

Page 1

SONY.
FMIAM Clock Radiol
Home Security Light
Control System
Operating Instructions
Mode d'emploi (arrière)
Manual de instrucciones (en el reverso)
3-862-234-11(1)
HOME SECURITY LIGHT CONTROL SYSTEM
DREAM MACHINE
Dream Machine is a trademark of Sony Corporation./Dream Machine est une marque de fabrique
de Sony Corporation./Dream Machine es marca comercial de Sony Corporation.
ICF-C900HS
Sony Corporation © 1998 Printed in Malaysia
Page 2
Page 3
Light Control Module
Light Control code
to a wall
outlet
Page 4

English
WARNING
To prevent fire or shock hazard, do not expose
the unit to rain or moisture.
To avoid electrical shock, do not open the
cabinet. Refer servicing to qualified personnel
only.
For the Customers in Canada
CAUTION:
TO PREVENT ELECTRIC SHOCK, MATCH
WIDE BLADE OF PLUG TO WIDE SLOT
FULLY INSERT.
Before You Begin
Thank you for choosing the Sony clock radio.
This will give you many hours of reliable serv ice
and listening pleasure.
Before operating the clock radio, please read
these instructions thoroughly and retain them for
future reference.
Features
• Home Security Light Control System added to
a Clock Radio.
• Home Security Light Control System which
you can program the ON/OFF time of your
lights or you can use the built-in program
which automatically operates the ON/OFF
time of your lights.
• Random Function—The preset ON/OFF time
will automatically shift. The ON/OFF time is
different everv'day, which improves the
security function.
• Date button to display the year, month and
date.
• D.S.T. (Daylight Saving Time)—Summer time
calculation (one-hour skip function).
• Dual alarm FM/AM clock radio.
• Radio and buzzer alarms with the snooze
function.
• Power backup of the clock, and preset time of
the Light Control and alarm (radio and buzzer)
during a power interruption, with a 6F22
battery (not supplied).
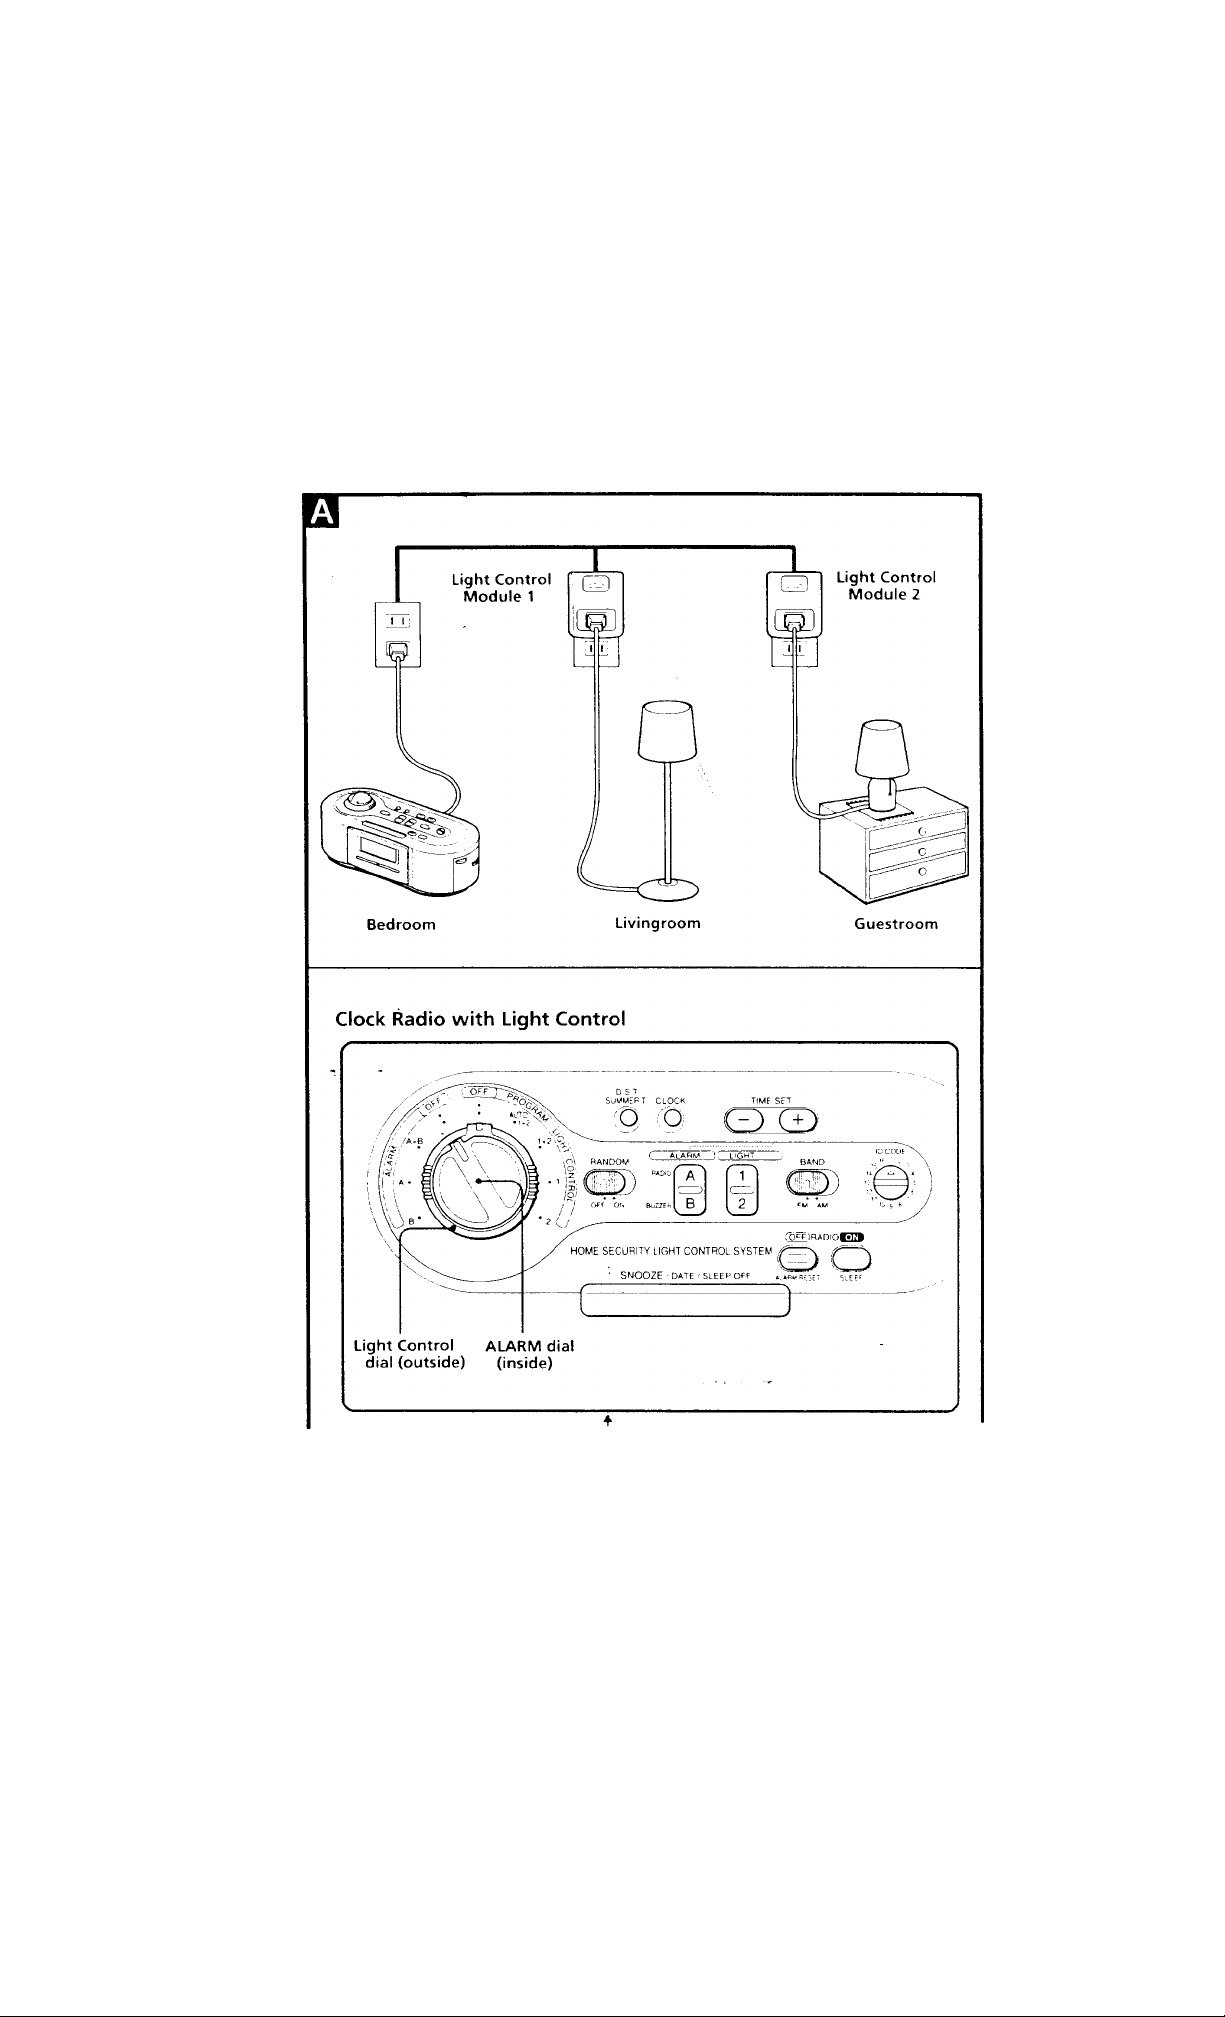
How the Home
Security Light
Control System
Works (see Fig. ES)
You can easily assemble the Home Security Light
Control System by using the main unit and the
supplied Light Control Modules (2 modules are
included in the package). The main unit sends
signals through your house wiring system to the
Light Control Modules and automatically turn
the connected lights on or off to give your home
a li\ ed-in look while you are away.
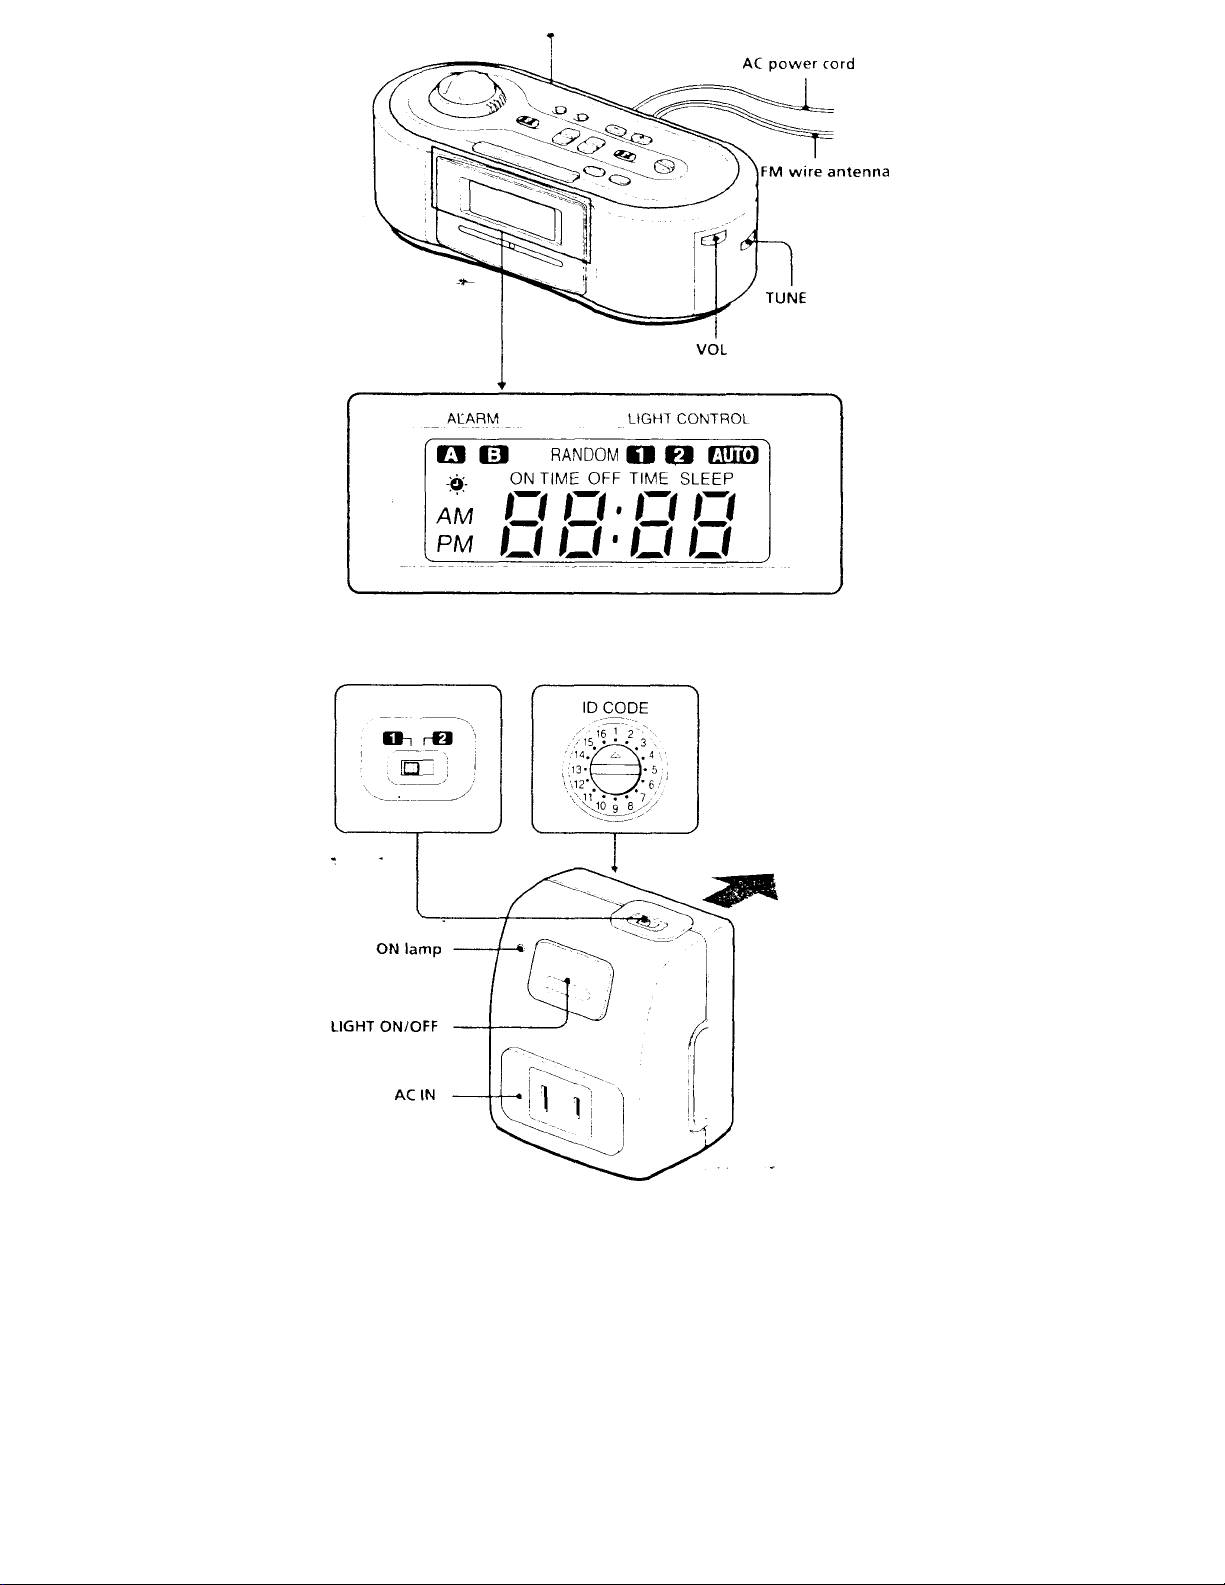
About the ID CODE
You can choose from 16 transmission codes to
prevent Signal interference from other similar
systems usc*d in the same household or
apartment complex, etc.
Installing the
Battery
To keep accurate time, your Dream Machine
requires one oF22 batten (not supplied), in
addition to the house current The battery' keeps
the cIcKk operating in the event of a power
interruption. Before setting the time and light
control on vour Dream Machine, open the lid at
the bottom of the unit, install the battery with
correct polarity and then close the lid.
Note
wt^n \'ou are not going to use the unit for a long
time, remove the battery to avoid damage from
battery leakage and corrosion.
To check when to replace the
battery
To check the remaining battery power, unplug
the jx>wer cord from the wall outlet and plug it
in again after a few minutes. If the displayed
time is incorrect or the display dtx?s not show at
all, replace the battery with a new one.
Installing the Home
Security Light
Control System
Complete this built-in ON/OFF control setup
before you proceed to the next .section. This will
enable the successful control of your lights from
your Dream Machine.
1 Turn ID CODE selector on the main
unit with a coin or a flat-blade
screwdriver to select the desired code.
2 Turn the ID CODE selector on the
module with a coin or a flat-blade
screwdriver to match the ccxJe on the
main unit.
3 Set the Light control mode switch to 1
or 2 on the modules.
1 is for LIGHT'1 and 2 is for LIGFIT*2
4 Insert the module to a desired wall
outlet in your house.
■ 5 Insert the plug of a desired light fixture
to the module and turn on the power
switch for the light.
Note
You may also turn the light on or off manually
using the UGHT»ON/OFF button on the mtxlule.
Cautions
• EXr not connect light fixtures that use over
300 W (MAX), 2A (MAX).
• The svstem should tmlv be used to control
lights. Do not connect a coffee maker, toaster,
or other heating appliances, as this may lead to
a fire hazard.
To check the control function
1
Turn LIGHT CONTROL tn the right side
from OFF to AUTO 1+2.
"AinO" Will appear in the display.
2 Confirm if the light i.s on.
If the light IS not lit, repeat steps 1 to 5 again
under "Installing the Home Security Light
Control S\ stem" L»r check that the switch on
the light stand is turned on.
Setting the Light
Control ON/OFF
times
You can preset the ON/OFF time of your lights.
Before setting the lights, be sure to set the remote
control function (See '"Installing the Home
Security Light Control System").
Example: To set the ON/OFF time for LIGHT*!.
1 To set the ON time, press LIGHT« 1 for
a few seconds.
A short beep sounds. The "ON TIME" and
"1" indications and the hour will flash in the
display.
2 Press either TIME SET + or - until the
desired hour appears in the display.
3 Press LIGHT»1 to set the minutes.
The minutes will flash in the display.
4 Press either TIME SET + or - until the
desired minutes appear in the display.
5 Press LIGHT«1 to set the OFF time.
A short beep sounds. The "OFF TIME" and
"1" indications and the hour will flash in the
display.
6 Press either TIME SET + or - until the
desired hour apf>ears in the display.
7 Press LIGHT«1 to set the minutes.
The minutes will flash in the display.
8 Press either TIME SET + or - until the
desired minutes appear in the display.
9 Press LIGHT-1.
Two short beeps sound to indicate successful
presetting.
Note
You can check the ON/OFF time setting by
pressing LIGHT*! or 2.
Turning the lights ON/OFF
Turn the light control dial to "AUTO 1+2" to turn
on the lights immediately.
Turn the light control dial to "OFF" to turn off
the lights immediately.
Note
The AUTO 1+2 function can be used as an instant
light control switch besides to control the ON/
OFF times of the lights (see Setting the Light
Control Mode - AUTO 1+2). However, this
setting will turn the lights on and off as
described in Setting the Light Control Mode.
About the Light Control Code
You can choose from Light control code 1 or 2 on
the Light Control Module Light control code 1
and 2 are linked to LIGHT*! and 2, respccf;Vely,
of the mam unit, and can be controlled
separatelv
Page 5

Setting the Light
Control Mode
If you adjust the Light Control dial to the
position shown in the table, the Light Control
Modules will operate as described below.
Light Control
Position
OFF
AUTO 1+2
1+2
1
2
Notes
• A beep will sound each time you reset the
UGHT CONTROL dial
• The ON/OFF time for AUTO is factor)' set.
• If you do not set the preset time for LIGHT* 1
and 2, the Light control mode will not operate
even when you set the LIGHT CONTROL dial to
1,2 and 1+2
The Light Control
Modules will
turn off.
turn on and off repeatedly
every' 2 hours for Module 1
and every 3.5 hours for
Module 2.
turn on/off. Module 1 at the
setting of LIGHT*1 and
Module 2 at the setting of
UGHT-2
turn on/off for Module 1
only, the ON/OFF time for
UGHT*1 will operate as
preset.
turn on/off for Module 2
only, the ON/OFF time for
UGHT*2 will operate as
preset.
To Use the Random Function
You can randomize the cm and off times to gi\'e
your home a Ii\’c?d-in look while you are away.
Set the RANDOM switch to ON.
The on and off times will operate as preset on the
first day, with a 24 minutes delay on the second
day, a 48 minutes delay on the third day, and a
36 minutes delay on the fourth day. The four day
cycle will then be repeated from the fifth day.
AUTO mode with or without the RANDOM
function:
WTien the RANEXDM function is not activated,
UGHT*1 will alterate ben\'een on and off every 2
hours and LIGHT*2 every 3.5 hours.
When the RANDOM function is activated, the
ON/OFF times will follow the cycles below:
UGHT»1
2 hours 4 hours 3 hours 5 hours
ON/OFF —^ O.WOFF -+ ON/OFF ON/OFF
t
_______________________
UGHT*2
3.5 hours 2 hours 5 hours 2.5 hours
ON/OFF —• ON/OFF —► ON/OFF —+ ON/OFF
t
_______________________
To cancel the RAN'CXTM function, set RANDOM
to OFF.
I
I
Setting the Clock
1 Plug in the clock radio.
The display will flash "AM 12:00".
2 Press CLOCK for a few seconds.
You will hear a beep and the year will start to
flash in the display.
3 Press TIME SET + o r- until the correct
year appears in the display.
4 Press CLOCK once.
5 Repeat steps 3 and 4 to set the month,
(iate, hour, and minutes.
After setting the minutes, press and release
CLOCK to acti\ ate the dock.
• To display the year and date, press SNOOZE/
DATE/SLEEP OFF once for the date and within
2 seconds press it again for the vear. The date
or \ ear will appc’ar in the display for a few
seconds and then the display returns to the
current time.
When SNOOZE/DATE/SLEEP OFF is pressed
while the SNCXDZE function is operating, the
vear and date will not appt'ar in the display.
•To set the current time rapidly, hold down the
+ or - button.
• To ‘ц.‘t the current time from zero seconds,
ix'lease CLOCK with the time signal at step 5.
To change the display to the
daylight saving time (summer time)
indication
I’ress D.S.T./SUMMER T.
' -Ti: ’ >s displayed and the time indication
change's to summer time.
To cancel the summer time indication, press
D.S.T./SUMMER T. again.
Operating the Radio
1 Press RADIO ON to turn on the radio.
2 Set BAND to FM or AM.
3 Use TUNE to tune into the desired
station.
4 Adjust volume using VOL.
• To turn off the radio, press RADIO OFF.
• To improve reception
FM: Extend the FM wire antenna fully to
increase FM reception sensitivity.
AM: Rotate the unit horizontally for optimum
reception. A ferrite bar is built in to the
unit.
Setting the Alarm
You can set the radio and buzzer alarms at the
preset time. Before setting the alarm, be sure to
set the clock (See "Setting the Clock").
1 Hold down ALARM*RADIO A or
ALARM*BUZZER B until a short beep
sounds.
The "A" or "B" indication and the hour will
flash in the display.
2 Press either TIME SET + or - until the
desired hour appears in the display.
3 Press ALARM*RADIO A or
ALARM*BUZZER B to set the minutes.
The minutes will flash in the display.
4 Press either TIME SET + or - until the
desired minutes appear in the display.
5 Press ALARM»RADIO A or
ALARM*BUZZER B.
Two short beeps sound to indicate successful
presetting. *.
6 Turn ALARM dial to the left side from
OFF to set the desired alarm mode.
At the preset alarm time, the radio or buzzer
sounds for 60 minutes or until turned off.
Note
A beep will sound each time you change the
ALARM dial setting.
To stop the alarm
Press ALARM RESET while the alarm is
activated.
The alarm w'ill come on at the same time the next
day.
To cancel the alarm
Turn ALARM dial to OFF so that neither
the "A" nor "B" indication is displayed.
Notes
• The alarm does not function, tmless you set the
clock, ALARM «RADIO A or
ALARM*BUZZER B function.
• If both the radio and buzzer alarm are set for
the same time, the radio alarm takes
precedence.
• You can check the alarm time setting by
pressing ALARM*RADfO A or
ALARM*BUZZER B.
Page 6

To doze for a few more minutes
1 Tress SNOOZE/DATE/SLEEP OFF.
1 ht' radio or buzzer will shut oif but will
auti>matically a>me on again after about
S minutes. You can repeat this process as
many times as vou like.
Setting the Sleep
Timer
You can enjoy falling asleep to the radio using
the built-in sleep timer that turns off the radio
automatically after a preset duration.
1 Tress SLEEP.
The radio turns on. It will go off after the
preset duration. You can set the sleep timer
to 90,60,30, or 15 minutes. When you press
SLEEP repeatedly, the display changes as
follows.
OFF (current time)
t-,5 -
The radio will play for the duration you set, and
then shut off.
• To turn off the radio before the preset time,
press SNOOZE/DATE/SLEEP OFF.
On —♦ 90(min)
«— 60 «-I
30
To Use Both Sleep Timer and Alarm
You can fall asleep to the radio so.und and be
awakened by the radio or buzzer alarm at the
preset time.
1 Set the alarm. (See "Setting the
Alarm".) -
2 Set the sleep timer. (See "Setting the
Sleep Timer".)
Troubleshooting
-Should any problem occur with the unit, make
the following simple checks to determine
whether or not ser\ icing is required.
If the problem persists, consult the nearest Sony
dealer.
The radio or buzzer alarm does not sound at
the preset alarm time.
• Has the desired radio and/or buzzer alarm
mode been activated with the ALARM dial
("A" and/or "B" indication shown in the
display)?
The module does not respond to the control
of the Dream Machine.
• Be sure the Dream Machine and module are set
to the same ID code.
• Be sure the power switch for the light is turned
on.
Lights turn on or off by themselves.
• Interference from a neighbor's HOME
SECURITY LIGHT CONTROL SYSTEM Dream
Machine. Change your system's ID code.
Precautions
• Operate the unit on tite power sources
specified in ‘'%>ecifications''.
• The nameplate indicating voltage, etc. are at
the rear on the main unit (Clock Radio with
Light Control) and at tihe bottom on the
module (Light Control Module).
• Disconnect the cord by grasping the plug.
Never pull it by the cord.
• Do not leave the unit in a location near a heat
source such as a radiator or airduct, or in a
place subject to direct sunlight, excessive dust,
mechanical vibration, or shock.
• Do not place the unit on surfaces (rugs,
blankets, etc.) or near materials (curtains,
draperies) that block the ventilation holes.
• Should any liquid or solid object fall into the
unit, unplug the unit and have it checked by
qualified personnel before operating it further.
• When the casing becomes soiled, clean it with a
soft cloth dampened with a mild detergent
solution. Never use abrasive cleaners or
chemical solvents, as they may mar the casing.
• The unit is not disconnected from the AC
power source (mains) as long as it is connected
to the wall outlet, even if the unit itself has
been turned off.
• Do not coimect the antenna lead to the external
antenna.
If you have any questions, please consult your
nearest Sony dealer.
Specifications
Clock Radio section
Frequency range
FM: 87.5-108 MHz
AM; 530-1605 kHz
Time display
12-hour system
Speaker
Approx. 6.6 cm (2 5/8 in) dia.
Power output
150 mW (at 10% harmonic distortion)
Power requirements
120 V AC, 60 Hz
For power backup: 9V DC, one 6F22 battery
Dimensions
Approx. 250 X 90 X 112 mm (w/h/d)
(9 7/8 X 3 5/8X 4 '/2 in) incl. projecHngparts
and controls
Mass
Approx. 830 g (11b 13 oz)
Light Control Module section
Power output
300 W (MAX), 2A (MAX)
Power requirements
120 V AC, 60 Hz
Dimensions
Approx. 68 X 80 X 47 mm (w/h/d)
(2 3/4 X 3'/t X 1 "/8 in) not incl. projecting
parts and controls
Mass
Approx. 120 g (4.2 oz)
Design and specifications are subject to change
without notice.
Page 7

Page 8

Module de commande/
Módulo de control de iluminación
Code de commande/
Código de control de
iluminación
a une prise
murale/a un
tomacorriente
de CA
Page 9

Français
AVERTISSEMENT
Pour éviter tout risque d'incendie ou
d electrocution, n'exposez pas l'appareil à la
pluie ni à l'humidité.
Afin d'écarter tout risque d'électrocution,
n'ouvrez pas le coffret. Confiez les réparations
exclusivement à un technicien qualifié.
Pour les utilisateurs au Canada
r ATTENTION:-----------------------------------------
POUR ÉVITER LES CHOCS ÉLECTRIQUES,
INTRODUIRE LA LAME LA PLUS LARGE
DE LA FICHE DANS LA BORNE
CORRESPONDANTE DE LA PRISE ET
POUSSER JUSQU’AU FOND.
Avant la mise en
service
Nous vous remercions d'avoir choisi ce radio
réveil Sony. Il vous procurera de nombreuses
heures de fonctionnement fiable et de plaisir
d'écoute.
Avant d'utiliser le radio-réveil, lisez
attentivement tout ce mode d'emploi et
conser\'ez-le pour pouvoir vous y reporter
ultérieurement.
Caractéristiques
• Radio-réveil avec système d'éclairage de
sécurité.
• Système d'éclairage de sécurité avec
programmation individuelle de l'heure
d'éclairage/extinction des lampes ou_
utilisation de la programmation usine.
• Fonction d'éclairage/extinction aléatoire des
lampes — L'heure d'éclairage/extinction sera,
automatiquement décalée et différente chaque
jour, ce qui rend la fonction de sécurité plus
efficace.
• Touche d'affichage de la date (année, mois,
jour).
• Affichage de l'heure d'été (D.S.T.) — Calcul du
décalage d'une heure en été.
• RacUtvréveil FM/AM à double alarme.
• Alarme par radio et par sonnerie, avec sonnerie
répétiti\e.
• Alimentation d'appoint du radio-ré\’eil, de
l'heure préréglée de la commande d'éclairage
et de l'alarme (radio et sonnerie) avec une pile
6F22 (non fournie) en cas de coupure de
courant.
Fonctionnement du
système d'éclairage
de sécurité
(voir Fig. ES)
Vous pouvez facilement installer le système
d'eclairage de sécurité en raccordant l'appareil
principal (radio-ré\’eil) et les modules de
conmiande fournis (l'emballage contient deux
miKiuk's). Le radio-ré\’eil en\ oie les signaux aux
nuKiules de commande par le réseau électrique
de la maison et éclaire ou éteint
automatiquement les lampes raccordées. La
maison semblera habitée meme en votre absence.
A propos du code ID
Wius avez le choix entre 16 codes de commande
pou? é\ iter les interferences lorsque d'autres
s\ '•ti-mes similaires sont utilisc's dans la même
tn.M'.on ou le même batiment.
A propos du code de commande
\'\»us pt^)uvez choisir un des codes de commande
1 ou 2 sur le module de commande. Les ccxics ^
et 2 sont reliés aux minuteries LIGHT«1 et 2 du
radio-réveil qui pc»uvent être ajustées
séparément.
lyiise en place de la
pile
Pour que \’Otre radio-réveil soit toujours à
I heure, une pile 6F22 (non fournie) est néces.saire
on plus du courant secteur. Elle permettra au
radio-révoil de fonctionner même en cas de
coupure de courant. Avant de mettre le radioré\ eil à l'heure et de régler la commande
d'eclairage, ou\ rez le couvercle sous l'appareil et
installez la pile en respectant la polarité.
Refermez ensuite le couvercle.
Remarque
Si \ ous n'avez pas l'intention d'utiliser le radio
réveil ptmdant longtemps, enlevez la pile pour
e\ iter une fuite de l'électroK te et la corrosion
qu'elle provxxpie.
Remplacement de la pile
Pour sax’oir si la pile doit être remplacée,
débranchez le cordon d'alimentation secteur de
la prise murale et rebranchez-le quelques
minutes plus tard. Si l'heure affichée n'est pas
ct'rrecte ou n'apparaît pas du tout, remplacez la
pile par une neuve.
Installation du
système d'éclairage
de sécurité
Réglez d'abord le système d'éclairage/extinction
avant de passer à l'étape suivante pour que le
radio-réveil contrôle correctement ïéclairage/
extinction des lampes.
1
Tournez le sélecteur ID CODE sur le
radio-réveil a\ ec une pièce de monnaie
ou un tournevis à tête plate pour
sélectionner le code souhaité.
2 Tournez le sélecteur ID CODE sur le
module de commande avec une pièce
de monnaie ou un tournevis pour
sélectionner le code correspondant à
celui du radio-réveil.
3 Réglez le commutateur de mode de
ct^mmande sur 1 ou 2 sur les modules.
1 correspond à LIGHT»! et 2 à LIGHT»2.
4 Branchez le m<xlule sur la prise murale
appropriée dans la maison.
5 Branchez la fiche de la lampe souhaitée
sur le module de commande et mettez
la lampe sous tension en appuyant sur
son interrupteur.
Remarque
X'ou'- p<»u\ e/ aui>si allumer et éteindre la lampe
m.imiellemenf en utilisant l'interrupteur
LIGHT»ON/OFF du mixiultL
Précautions
* \e racciirdez pas des lampes C(vnsommant plus
de "\0(t W (MAX), 2 A (MAX)
♦ I I svsteme doit être utilisa' pour l'éclairage des
l.unpes seulement Ne racu^rdez pas de
cai< liere electnque. gnlle-pam ni aucun
■ .ippareil de chauttac«.-, car ils risquent di-
prev oquiT un inct'ndu'
Pour vérifier la fonction de
commande
1 Tournez LIGHT CONTROL vers le côté
droit de OFF pour régler la molette sur
AUTO 1+2
"AUTO" apparaît sur l'afficheur.
2 Vérifiez si la lampe est allumée.
Si la lampe ne s'allume pas, répétez les
opérations 1 à 5 de "Installation du système
d'éclairage de sécurité" ou vérifiez si le
commutateur de la lampe est activé.
Réglage des heures
d'éclairage et
d'extinction
Vous pouvez prérégler les heures d'éclairage et
d'extinction des lampes. Auparavant, veillez à
régler le mode de commande (voir "Installation
du système d'éclairage de sécurité").
Exemple: Pour régler les heures d'éclairage et
d'extinction de LIGHT*!.
1 Pour régler l'heure d'éclairage, appuyez
sur LIGHT* 1 pendant quelques
secondes.
Un bref bip retentit et les indications "ON
TIME" et "1" clignotent en même temps que
l'heure sur l'afficheur.
2 Appuyez sur TIME SET + ou - jusqu'à
ce que l'heure souhaitée apparaisse sur
l'afficheur.
3 Appuyez sur LIGHT* 1 pour régler les
minutes. Les minutes clignotent sur
l'afficheur.
4 Appuyez sur TIME SET + ou - jusqu'à
ce que les minutes souhaitées
apparaissent sur l'afficheur.
5 Appuyez sur LIGHT*1 pour régler
l'heure d'extinction.
Un bref bip retentit et les indications "OFF
TIME" et "1" clignotent en même temps que
l'heure sur l'afficheur.
6 Appuyez sur TIME SET + ou - jusqu'à
ce que l'heure souhaitée apparaisse sur
l'afficheur.
7 Appuyez sur LIGHT*1 pour régler les
minutes.
Les minutes clignotent sur l'afficheur.
8 Appuyez sur TIME SET + ou - jusqu'à
ce que les minutes souhaitées
apparaissent sur l'afficheur.
9 Appuyez sur LIGHT*1.
Deux brefs bips retentissent pour indiquer
que le préréglage est terminé.
Remarque
Vous pouvez vérifier l'heure d'éclairage/
extinction préréglée en appuyant sur'LIGHT*! ou
2
Eclairage ou extinction immédiat des lampes
Tournez la molette d'éclairage \ ers "AUTO 1+2"
pour allumer immédiatement les lampes.
Tournez la molette d'éclairage vers "OFF" pour
éteindre immédiatement les lampes.
Remarque
\nus pouvez utiliser la fonction AUTO 1+2 non
seulement comme commande d'éclairage/
extinction automatique d<.*s lampes mais aussi
comme interrupteur instantané. (\ oir "Réglage
du mode de commande - AUTO 1+2").
Cependant, les lampes >'éclalrertmt et
s QU'indronf. tel qu'indique dans "Réglage du
mode de commande
Page 10

Réglage du mode de commande
Si vous réglez la molette sur la position indiquée
sur le tableau, les mt.>dules de commande
fonctionneront tel que décrit ci*dt‘ssous.
Position de la
molette de
commande
OFF Les deux modules sont mis
AUTO 1+2
1+2
1
2
Remarques
• Un bip retentit chaque fois que \ t>us changez le
réglage la molette de commande LIGHT
CONTROL.
• Les heures d'éclairage et d'extinction du
réglage AUTO ont été préréglées en usine.
• Si \ oui> ne préréglez pas d'heure pour LIGHT*1
et 2, le mtxle de commande ne fonctionnera
pas, même si vous réglez la molette LIGHT
CONTROL sur la position 1, 2 ou 1+2.
Mise en ou hors service
des modules
hors service.
Les deux modules sont mis
cn/hors sen icc toutes les 2
heures pour le module 1 et
toutes des 3,5 heures pour le
module 2.
Le mexduie 1 est mis en/hors
ser\'ice en fonction du réglage
de LI6HT«1 et le module 2 on
fonction du réglage de
LIGHT-2
Le module 1 seulement est
mis en/hors son ice. l'heure
d'éclairage/extinction de
LIGHT*1 sera telle que
préréglée.
Le module 2 seulement est
mis en/hors serx'ice, l'heure
d'éclairage/extinction de
LIGHT*2 sera telle que
préréglée.
Pour utiliser la fonction d'éclairage aléatoire
Les heures d'éclairage et d'extinction peu\ ent
changer de manière aléatoire p<.>ur donner
l'impression que la majson est habitw même en
V <»tre absence. *
Pour utiliser
simultanément le
temporisateur et
l'alarme
Vous pouvez vous endormir au son de la radio,
et être réveillé par la radio ou la sonnerie à
l'heure préréglée.
1 Réglez l'alarme. (Voir "Réglage de
l'alarme".)
2 Réglez le temporisateur. (Voir "Réglage
du temporisateur".)
Guide de dépannage
Si vous avez des problèmes avec l'appareil,
effectuez les vérifications simples ci-dessous
pour voir si l'appareil a besoin d'être réparé.
Si Je problème pereiste, consultez votre
revendeur Sony.
L'alarme par radio ou par sonnerie ne se
déclenche pas à l'heure préréglée.
• Avez-vous activé l'alarme voulue, radio et/ou
sonnerie, av'ec la molette ALARM (indicateur
"A" et/ou "B" affiché) ?
Le module ne répond pas à la commande du
radio-réveil.
• Assurez-vous que le radio-réveil et le module
sont réglés sur le meme code iD.
• Assurez-vous que l'interrupteur d'alimentation
de la lampe est activé.
Les lampes s'allument et s'éteignent d'ellesméme.
• Interférences avec un autre radio-réveil à
commande d'éclairage de sécurité.
Changez le code ID de votre système
d'éclairage de sécurité.
Pour toute question, consultez votre
revendeur Sony.
Spécifications
Section Radio-réveil
Plage de fréquences
FM: 87,5 -108 MHz
AM: 530 -1605 kHz
Affichage de l'heure
Cycle de 12 heures
Haut-parleur
Em. 6,6cm (2 V, po.) dedia.
Puissance de sortie
150 mW (à une distorsion harmonique de
lO-i,,)
Alimentation
120 V CA, 60 Hz
Alimentation de secours: CC 9 V, avec une
pile 6F22
Dimensions
Env. 250 X 90 X 112 mm (9 V, x 3 V,x4 V.)
(1/h/p), saillies et commandes comprises
Poids
Env. 830 g (1 )i. 13 on.)
Section Module de commande
Puissance de sortie
300 W (MAX), 2A (MAX)
Alimentation
120 V CA, 60 Hz
Dimensions
En\'. 68 X 80 X 47 mm (1/h/p)
(2 ’/j X 3 V, X 1 ^/,) saillies et commandes
non comprises
Poids
Env. 120 g (4,2 on.)
La conception et les spécifications sont sujettes à
modification sans préavis.
Réglez le commutateur RANDOM sur ON.
Les heures d'éclairage et d'extinction seront
telles que préréglées pour le premier jour mais
a\’ec un décalage de 24 minutes le second jour,
de 48 minutes le troisième jour et de 36 minutes
le quatrième jt>ur»Ce c\’cle de quatre jours se
répétera à partir du cinquième jour.
Mode AUTO avec ou sans fonction RANCX3M
(aléatoire);
Si la fonction RANDOM n'est pas activée,
LIGHT*1 sera activé/désacti\'é toutes les 2 heures
et UGHT*2 toutes les 3,5 heures.
Si la fonction RANDC>M est activée, les heures
d'éclairage et d'extinction suivront le cvcle
indiqué ci-dessiHis.
UGHT*1
2 hcoi t*>
LcbirnKo/
Extmcium
LI6HT»2
3,.^ lu'urt's
Fdairagf/
bxtinc(H*n
î
____
13>ur annule! le reglage aleatuire, regie/
RANDOM SUT OFF
4 hi'ures
► Lclairago/ ■
Lxtinctu'n
2 heures
♦ Tclairage/
1 vtinclum
3 hourt*>
► LclaiMjîc, -
Lvtinclmn
^ heures
* relaira^e/ •
LxtiiutKni
3 hi'urcs
* Kclairagc/
l xtinction
heure-s
I lairage/
vtinction
Précautions
• Alimentez l'appareil sur les sources
d'alimentation précisées dans les spécifications.
• La plaque signaléfique indiquant la tension, se
trouve à l'arrière de l'appareil principal (radio
réveil avec système d'éclairage de sécurité) et
sous les modules (modules de commande).
• Débranchez le cordon en le tenant par la fiche.
Ne tirez jamais sur le cordon proprement dit.
• Ne laissez pas l'appareil à proximité d'une
source de chaleur, par exemple un radiateur ou
une conduite d'air, ni dans un endroit situé en
plein soleil, excessivement poussiéreux, ou
soumis à des vibrations ou à des chocs.
• Ne pas poser l'appareil sur une surface
moelleuse (comme un tapis, une couverture,
etc.) ou près de tissus (comme un rideau ou,
une tenture) risquant de bloquer les orifices de
ventilation.
• Si un liquide ou un objet solide pénètre dans
l'appareil, débranchez l'appareil et faites-le
vérifier par un technicien qualifié avant de
Tutiliscr.
• Si le coffret est sale, nettoyez-le avec un chiffon
doux humecté d'une solution détergente
douce. N'ufiÎisez jamais de produits de
nettoyage abrasifs ni de solvants chimiques, car
ils pourraient endommager la finition du
coffret.
• L'appareil n'est pas isolé du secteur tant qu'il
est branché sur une prise secteur, même s'il est
hors tension.
• Ne pas raccorder l'antenne-fil à une antenne
extérieure.
Page 11

Español
ADVERTENCIA
Para e\-itar incendios o ei riesgo de electrocución,
no exponga la uiüdad a b lluvia ni a la
humedad.
Para evitar descargas ebctiicas, ito abra la
unidad. En caso de averia solicite sólo ios
servicios de personal cualificado.
Antes de comenzar
Muchas gracias por la adquisición de este
radiorreloj, Sony. Este radioneloj le
proporcionará muchas horas de servicio fiable y
de placer de escucha.
Antes de utilizar este radiorreloj, lea
detenidamente el manual de instrucckmes, y
consérvelo para futuras refeieiKias.
Características
• Sistema de control de iluminación para
seguridad del hogar con radio.
• Sistema de control de iluminación de
seguridad para el hogar, con el que usted
podrá programar la hora de eiKendido/
apagado dé sus lámparas, o utilizar el
programa incorporado que eiKenderá/apagará
automáticamente sus látnparas.
• Futrción aleatoria — Las horas de erKettdido/
apagado se desplazarán automáticamente.
Estas horas serán diferentes cada día, lo que
mejorará la función de seguridad.
• Tecla de fecha para visualizar el año, el rttes, y
el día.
• Hora de ahorro de luz diurna (D£.T.) - Cálculo
de la hora de verano (función de salto de una
hora).
• Radiorreloj con alarma doble de FM/AM.
• Alarmas con radio y zumbador con función de
repetición de alarma.
■ Alimentación de protección del reloj, las horas
de control de ilumitvación prograrmidas, y la
alarma (radio y zumbador) durante la
interrupción del suministro eléctrico con urrà
pila 6F22 (no suministrada).
Cómo funciona el
sistema de control
de iluminación de
seguridad para el
hogar
(Consulte la Fig. Q)
Usted podrá instalar fácilmente el sistema*de
control de iluminación de seguridad para el
hogar utilizando la unidad principal y los
m<>dulos de control de iluminación
suministrados (en el paquete se incluyen 2
m<'Klulos). La unidad principal transmite señales
a través del sistema eléctrico de su hogar a los
módulos de control de iluminación y encierKle/
apaga automáticamente las lámparas conectadas,
para ofrecer la sensación de que se eruruentrá en
su hogar cuando esté ausente.
Sobre el código de
identificación
Usted podrá elegir entre 16 cckligos de
transmisión para evitar la interferencia de
Simales de otros sistemas similares utilizados en
la vecindad.
Sobre el código de control de iluminación
l.Mivl podrá elegir v'ntrv el cvxhgo de control de
ilumimtCKVi 1 o 2 en el módulo de control de
ilumiivición. Los cvSdigos do control 1 y 2 están
vinculados con LIGHT• 1 y 2. respectivamente, de
la unidad principal, y usted podrá controlarlos
por separado.
Instalación de la pila
Para mantener la hora exacta, su Dream Machine
requiere una pila 6F22 (no suministrada),
además de la corriente de la red. La pila
manteiKlrá el rek^ en funcionamiento en caso de
que se interrumpa el suministro eléctrico. Antes
de ajustar la hora y el control de Uumirtación en
su Dream Machine, abra la tapa de la base de la
unidad, instale la pila con la polaridad correcta, y
cierre la tapa.
NoU
Cuando no vaya a utilizar la unidad durante
mucho tiempo, extráigale la pila para e\*itar el
daño que podría causar el electrólito de la misma
en caso de fugarse.
Para comprobar cuándo reemplazar
la pila
Гага comprobar la energía restante de la pila,
desenchufe el cable de alimentacivSn del
tomacorriente de CA y enchúfelo después de
algunos minutos. Si la hora visualizada es
incorrvv.'ta, o el visualizador no muestra nada,
reemplace la pila por otra nueva.
Instalación del
sistema de control
de iluminación de
seguridad para el
hogar
Antes de pasar a la sección siguiente, configure el
control de encendido/apagado incorporado.
Esto le permitirá controlar con éxito sus
lámparas desde unidad Dream Machine.
1 Oiré el selector ID CODE de la unidad
principal con una moneda o un
destornillador de cabeza plana para
seleccionar el código deseado.
2 Gire el selector ID CODE del módulo
con una moneda o un destornillador de
cabeza plana para seleccionar el código
deseado en la unidad principal.
3 Ponga el selector modo de control de
iluminación de los módulos en 1 o 2.
1 es para UGHT«1 y 2 es para UGHT*2.
4 Inserte el módulo en el tomacorriente
de CA deseado de su hogar.
5 Inserte el enchufe de la lámpara
dc*scada en el módulo y cierre el
interruptor de alimentación de la
lámpara.
Nota
L’sli’ii t.imbión podrá encender y apag.ir
ni.inudlmente la lámpara utilizando la tecla
UGHT«ON/OFF del modulo.
Precauciones
• No conecte lámparas con un consumo superior
a ÍIKIW (máx.). 2 A (má\.).
• lisie sistema solamente deberá utilizarse para
controlar l.imparas No conecte una cafetera,
una ((»stadora. ni electrodomóstici»s de
, aietacción, va qui* tst<» piHÍría conducir aun
nu end io.
Para comprobar la función de
control
1 Gire LIGHT CONTROL hacia la deretdu
desde OFF a hasta AUTO 1+2.
En el visualizador aparecerá "AUTO'.
2 Confirme que la lámpara esté
encendida.
Si no está encendida, repita los pasos 1 a S d<
"Instalación del sistema de control de
iluminación de seguridad para el hogar", o
compruebe si el interruptor de la lámpara
está cerrado (ON).
Ajuste de las horas
de control de
iluminación
Usted podrá ajustar las horas de encendido/
apagado (ON/OFF) de sus lámparas. Antes de
esto, cerciórese de ajustar la hmción de control
remoto (consulte "Instalación del sistema de
control de ilumituidón de seguridad para el
hogar").
Ejemplo: Para ajustar las horas de encendido/
apagado para UGHT«1.
1 Para ajustar la hora de encendido,
presione LIGHT»1 durante algunos
segundos.
Sonará un pitido corto. En el visualizador
aparecerán las indicaciones "ON TIME" y "I
con la hora parpadeando.
2 Presione TIME SET ♦ o—heista que en
el visualizador aparezca la hora
deseada.
3 Presione LIGHT*1 para ajustar los
minutos.
Los minutos parpadearán en el visualizador
4 Presione TIME SET + o - hasta que en
el vosualizador aparezcan los minutos
deseados.
5 Presione LIGHT*1 para ajustcir la hora
de apagado.
Sonará un pitido corto. En el vósualizador
aparecerán las indicaciones "OFF TIME" y
*1" con la hora parpadeando.
6 Presione TIME SET + o — hasta que en
el visualizador aparezca la hora
deseada.
7 Presione UGHT»1 para ajustar los
minutos.
Los minutos parpadearán en el visualizador
8 Presione TIME SET + o - hasta que en
el visualizador aparezcan los minutos
deseadds.
9 Presione LIGHT'I.
Sonarán dos pitidos cortos para indicar que I
programación ha tenido éxito.
Nota
Usted podrá comprobar el ajuste de la hora de
encendido/apagado presionando UGHT»1 o 2.
Encendido/apagado de lámparas
Gire el dial de control de iluminación hasta
"AUTO 1+2" para encender inmediatamente las
luces.
Gire el dial de control de iluminación hasta
"OFF" para apagar inmediatamente las luces.
Afora
Usted podrá utilizar ia función AUTO 1+2 como
interruptor de control instantáneo de las
lámparas, para controlar las horas de encendido
apagado de lámparas (consulte Programación
del modo de control de iluminación AUTO 1 +
2). Sin embargo, tenga en cuenta que las
lámparas se encenderán/apagarán como se
describe en la sección mencionada.
I
Page 12

Programación del modo
de control de
iluminación
Si a|usU d dial de control de iluminación a la
poción mostnda en la tabla, los módulos de
control de iluminación funcionarán como se
describe a continuación.
Posición de control
de iluminadófl
OFF
AUTO 1+2
14.2
1
2
Notas
• Cada vez que reponga d dial de LIGHT
CONTROL sonará un pitido.
• La hora de eivxivlido/apagado para AUTO ha
sido ajustada en fábrica.
• Si no ajusta la hora para UGHT'1 ni Z, d tirado
de control de iluminación no funckmará
induso aunque haya puesto d dial de LIGHT
CONTROL en 1,2y1+2.
Los módulos de control
de Huminadón se
desactivaráiL
activarán y desactivarán
repetidamente cada 2
horas para el módulo 1 y
cada 33 horas para el
módulo 2.
activará/desactivaiá, el
módulo con el ajuste de
UGHT*1, y el módtUo
con el ajuste de UGHT«2.
activaiá/desactivatá
solamente el módulo 1, y
las horas de eiraendido/
apagado para UGHT«1
fundonaián como se
hayan programado.
activará/desactivaiá
solamente d módulo 2, y
las horas de encendido/
apagado para UGHT*2
fundonaián como se
hayan programado.
Para utilizar la función
aleatoria
Usted podrá hacer que las horas de encendide y
apagado sean aleatorias para ofrecer la sensación
de que se encuentra en su hogar aunque esté
ausente.
Ponga RANDOM en ON. ^
Las horas de encendido y apagado serán las '
programadas para el primer día, con un retardo
de 24 minutos'd segundo día, 48 minutos el
tercero, y 36 el cuarto. El ciclo del cuarto día se
repetirá después del quinto.
Modo AUTO con o sin función RANDOM;
Cuando la fundón RANDOM no esté activada,
UGHT*1 se activará y desactivará cada 2 horas y
UGHT*2 cada 3,5 horas.
Cuando la función RANDOM esté activada, las
horas de erraendido/apagado seguirán los ciclos
mostrados a continuadón:
LIGHT« 1
2 horas 4 horas 3 horas 5 horas
Encendido/ Encendido/ Encendido/ Encendido/
apagado —♦ apagado —♦ apagado —^ apagado
I
_________________________
UGHT«2
3,5 horas 2 horas 5 horas 2,5 horas
ErKCTKlido/ ErKendido/ Encortdido/ Encendido/
apaf*ado ^ apagado “♦ apagado —apagado
t
__________________
I*«ira cancelar la función aleatoria (RANDOM),
ponea RANDOM <»л OFF
I
I
Puesta en hora del
reloj
1 Enchufe el radiorreloj.
En el visualizador aparecerá "AM 12Ю0",
2 Mantenga presionada CLOQC durante
algunos segundos.
Usted oirá un pitido y en el visualizador
comenzará a parpadear el año.
3 Presione TUNE/ПМЕ SET <«• o - hasta
que en el visualizador aparezca el año
correcto.
4 Presione una vez CLOCK.
5 Repita los pasos 3 y 4 para ajustar el
mes, el día, la hora, y los minutos.
Después de haber ajustado los minutos,
presione y suelte CLOCK para poner el relc^
en funcionamiento.
• Para hacer que se visualice el año y la fecha,
presione una vez SNOOZE/OATE/SLEEP OFF
una vez para la fecha y, antes de 2 segundos,
vuelva a presionarla para el año. La fecha o el
año aparecerán en el visualizador durante
algunos segundos y después volverá a
visualizarse la hora actual.
Cuando presione SNOOZE/DATE/SLEEP OFF
mientras esté activada la fundón de repetidón
de alarma, el año y la fecha no aparecerán en el
visualizador.
• Para ajustar rápidamente la hora actual,
mantenga presionado el botón + o
• Para ajustar la hora actual a cero segundos,
cuelte CLOCK al oír una señal horaria en el
paso 5.
Para cambiar la visualtzación a la de
indicación de la hora de ahorro de
luz diurna (hora de verano)
Presione D.S.T7SUMMER T.
Se visualizará ^ y la indicadón de la hora
cambiará a La de la hora de verano.
Para cancelar la indicadón de la hora de verano,
vuelva a presionar D.S.T^SUMMER T.
Radiorrecepción
1 Presione RADIO ON para conectar la
alimentación de la radio.
2 Ponga BAND en FM o AM.
3 Utilice TUNE para sintonizar la emisora
deseada.
4 Ajuste el volumen utilizando VOL.
• Para desconectar la alimentadón de la radio,
presione RADIO OFF. .
• Para mejorar la recepdón
FM: Extieruia completamente la antena
monofilar de FM a fin de aumentar la
sensibilidad de recepción de FM.
AM: Gire horizontalmente la unidad hasta la
posición que ofrezca la mejor recejxión
posible.
Programación de la
alarma
Usted podrá programar alarmas de radio y del
zumbador a la hora deseada. Antes de
programar la alarma, cerdórese de poner en hora
el reloj (consulte "Puc*sta en hora del reloj").
1 Manteniendo pulsada AI_ARM«RADIO
A o ALARM«BUZZER B hasta que
suene un pitido corto.
En el \ isualizador aparecerá la indicación
"A" o "U" y parpadeará la hora.
2 Presione TIME SET + o - hasta que en
el visualizador aparezca la hora
deseada.
3 Presione ALARM*RADIO A o
ALARM*BlfZZER B para ajustar los
minutos.
Los minutos parpadearán en el visualizador.
4 Presione TIME SET 4- o — hasta que en
el visualizador aparezcan los minutos
deseados.
5 Presione ALARM*RADIO A o
ALARM«BUZZER B.
Sanarán dos pitidos cortos para indicar que la
programación resultó satisfactoria.
6 Gire el dial ALARM hacia la izquierda
desde OFF para ajustar el modo de
alarma deseado.
Cuando llegue la hora de alarma, la radio o el
zumbador sonará durante 60 minutos o hasta
que desconecte la alimentación.
Nota
Cada vez que cambíe el ajuste del dial ALARM,
sonará un pitido.
Para silenciar la alarma
Presione ALARM RESET mientras esté
sonando la alarma.
La alarma sonará a la misma hora del día
siguiente.
Para cancelar la alarma
Gire el dial ALARM hasta OFF de forma
que no se visualice la indicación "A" ni
"B".
Notas
• La alarma no funcionará a morras que haya
puesto en hora el reloj y haya activado la
función ALARM«RAD10 A o
ALARM«BUZZER B.
• Si ha programado las alarmas de la radio y del
zumbador a la misma hora, la alarma de la
radio tendrá prioridad.
• Usted podrá comprobar ia hora de alarma
programada presionando ALARM«RADIO A o
ALARM«BUZZER B.
Para dormitar algunos minutos más
1 Presione SNOOZE/DATeSLEEP OFF.
La radio o el zumbador dejará de sonar, pero
volverá a hacerlo automáticamente después
de unos 8 segundos. Usted ¡x>drá rep>etir este
proceso las veces que desee.
Programación del
temporizador
cronodesconectador
Usted podrá dormirse escuchando la radio
utilizando el temporizador cronodesconectador,
que desconectará automáticamente la
alimentación de la radio después de la duración
programada.
1 Presione repetidamente SLEEP.
La alimentación de la radio se conectará. La
alimentación se desconectará cuando haya
transcurrido el tiempo programado. Usted
podrá programar el temporizador
cronodesconectador a 90,60,30, o 15
minutos.
OFF (desconexión) On
Hora actual (conexión) )
L
15
La radio se oirá durante el tiempo programado, y
después se desconectará.
• Para desconectar la radio antes del tiempo
programado, presione SNOOZE/DATE/SLEEP
OFF
30
60
Page 13

Para utilizar el
temporizador
cronodesconectador y la
alarma
Usted podrá dormirse escuchando la radío y
despertarse con el sonido de la radio o del
temporizador a la hora programada.
1 Progreime la alarma. (Cotisulte
"Programación de la alarma".)
2 Programe el temporizador
cronodesconectador. (Consulte
"Programación del temporizador
cronodesconectador".)
Solución de
problemas
Si la unidad presenta algún problema, realice las
comprobaciones sencillas siguiente para
determinar si necesita o no reparación.
Si el problema persiste, corrsulte a su proveedor
Sony.
La alarma de la radio o del zumbador no
suena a la hora de alarma programada.
• ¿Sintoirizó la emisora deseada y activó el modo
de alarma de la radio/zumbador con el dial
ALARM (indicación "A" y/o
"B" en el visualizador)?
£1 módulo no responde al control de la unidad
Dream Machine.
• Cerciórese de que la unidad Dream Madriire y
el módulo estén ajustado al mismo código de
identificación.
• Cerciórese de que el interruptor de
alimentación para la lámpara esté cerrado.
Las lámparas se enciende y apagan por sí
mismas.
• Hay interferencias de una unidad HOME
SECURITY UGHT CONTROL SYSTEM Dieam
Machine cercana. Cambie el có4igo de .
identificación.
Especificaciones
Sección del radiorreloj
Respuesta en frecuencia
FM; 873-109 MHz
AM: 530 - 1605 kHz
Visualización de la hora
Sistenra de 12 horas
Altavoz
Aprox. 63 cm de diá.
Salida de potencia
150 mW (con el 10% de distorsión armónica
total)
Alimentación
120 VCA,60Hz
Para alimentación de protección: 9 V CC,
una pila 6F22
Dimensiones
Aprox. 250 X 90 X 112 cm (an/al/prO,
incluyendo partes y controles salientes
Masa
Aprox. 830 g
Sección del módulo de control de
iluminación
Salida de potencia
300 W (máx.), 2 A (máx.)
Alimentación
120 V CA, 60 Hz
Dimensiones
Aprox. 68 X 80 X 47 mm (an/al/prf),
excluyendo partes y controles salientes
Masa
Aprox. 120 g
El diseño y las especificaciones están sujetos a
cambio sin previo aviso.
Precauciones
• Utilice la unidad solamente con las fuentes de
alimentación indicadas en "Especificaciones.''
La placa-de caracterfeticas en la que se indica la
tensión de alimentación, etc., se encuentra en la
parte posterior de la unidad principal
(Radiorrelq con control de iluminación) y en la
parte iideríor del módulo (Módulo de control
de iluminación).
• Para desconectar le cable de alimentación, tire
del enchufe, no del propio cable.
• No deje la unidad cerca de fuentes térmicas,
como un radiador o im conducto de
calefacción, ni sometida a la luz solar directa,
polvo excesivo, vibraciones, ni golpes.
• No coloque la unidad sobre superficies
(alfombras, mantas, etc.) ni cerca de materilaes
(cortinas, tapices, etc.) que puedan bloquear los
orificios de ventilación.
• Si dentro de la unidad cae algún objeto sólido o
un líquido, desconecte su cable de alimentación
de CA y haga que sea re\'isada por personal
cualiticado antes de volver a utilizarla.
• Para limpiar el exterior, utilice un paño suave
humedecido en una solución poco concentrada
de detergente. No use nunca limpiadores
abrasivos no disolventes químicos, ya que
podría dañar su acabado.
• La unidad no se desconectará déla fuente de
alimentación de CA (red) mientras permanezca
enchufada en una toma de dicha red, incluso
aunque haya descoenctado la alimentación de
la propia unidad.
• No conecte el conductor de a una antena
exterior.
Si tiene alguna pregunta o problema en
relación con la unidad, póngase en contacto
 Loading...