

Page 1

QUICK START GUIDE
HV-FX9000U
Welcome
Thank you for purchasing this AIWA product.
When you unpack your video cassette recorder
for the first time, follow the procedures 1 to
below for set up.
You will find these accessories in the package box.
Remote control (1)
5
Video cable (1)Antenna cable (1)
For Assistance And Inf ormation
Call Toll Free 1-800-BUY-AIWA
8A-JFC-902-01
000114ATO-YX
(United States and Puerto Rico)
AIWA CO., LTD
Printed in Korea
Audio cable (1)
Operating instructions (1)Batteries (2)
Please read the various informations on page 1 and 2 of Operating Instructions before installing or operating your
VCR.
1
Insert two R03 (size AAA) batteries (supplied) with the
correct polarity, as indicated inside the battery
compartment.
Installing Batteries in the Remote Control
1
Page 2
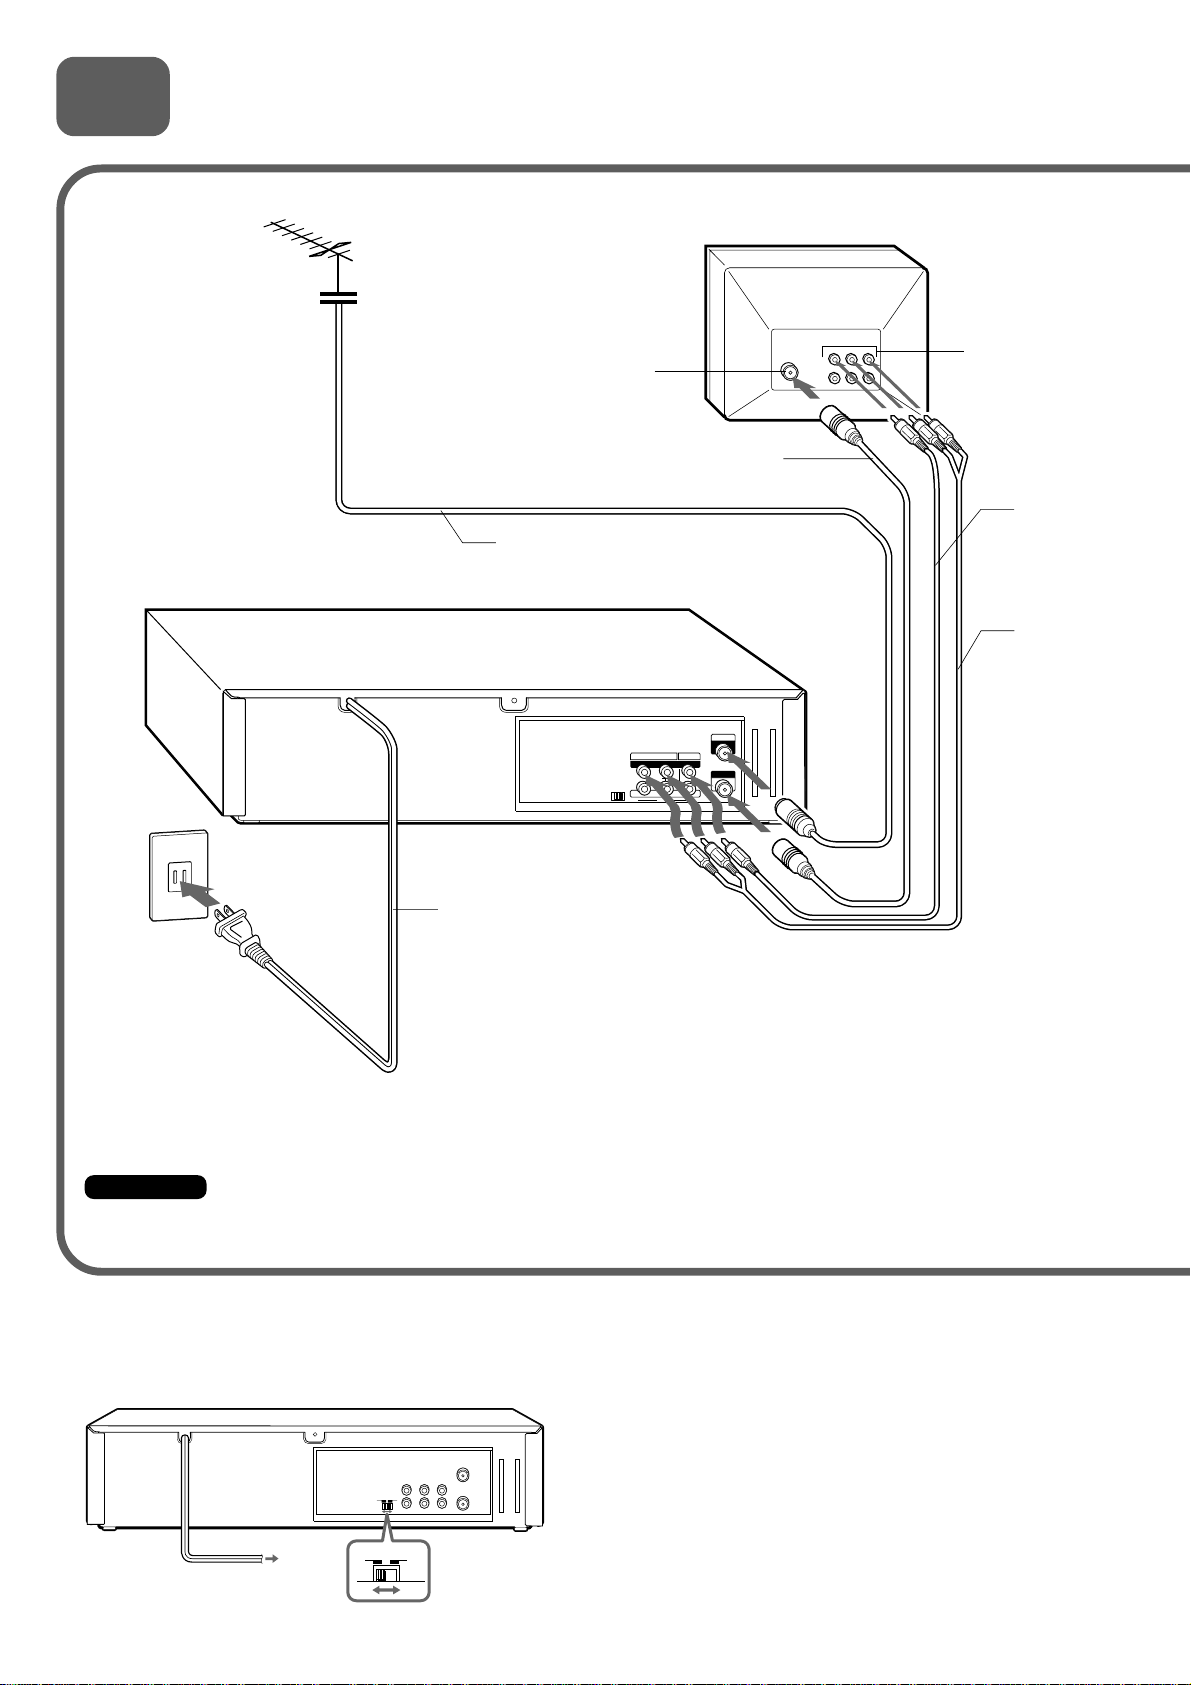
2
AERIAL
(VHF/UHF)
RF OUT
Connecting Antenna (or CATV)-VCR-TV
Basic connections
TV
2 Connect the VCR with the
supplied antenna cable to the
TV's antenna input connector.
1 Connect the TV
antenna cable (not
supplied) to the
VCR.
AC outlet
Antenna input
connector
TV antenna cable (not supplied)
AC cord
Antenna cable
(supplied)
R AUDIO L
VIDEO
OUT OUT
(MONO)
IN IN
LINE 1
AERIAL
(VHF/UHF)
RF OUT
Audio/video
input jacks
Video cable
(supplied)
Audio cable
(supplied)
3 If your TV has audio/video
input jacks, connect the VCR
and TV using the supplied
4 Connect the AC cord
of the VCR to the AC
outlet.
Important
Connect the AC cord to the AC outlet after all of the connections are complete.
When the TV is connected to OUT TO TV using only an antenna cable
Set the channel selector to 3CH or 4CH, not employed for broadcasts, and select the same channel on the TV.
To select a desired TV channel on the TV
Turn the TV and VCR on, and press TV/VCR to turn off
VCR in the display window, or turn off this VCR.
3CH
3CH 4CH
4CH
(VHF/UHF)
AERIAL
RF OUT
audio and video cables.
2
Page 3
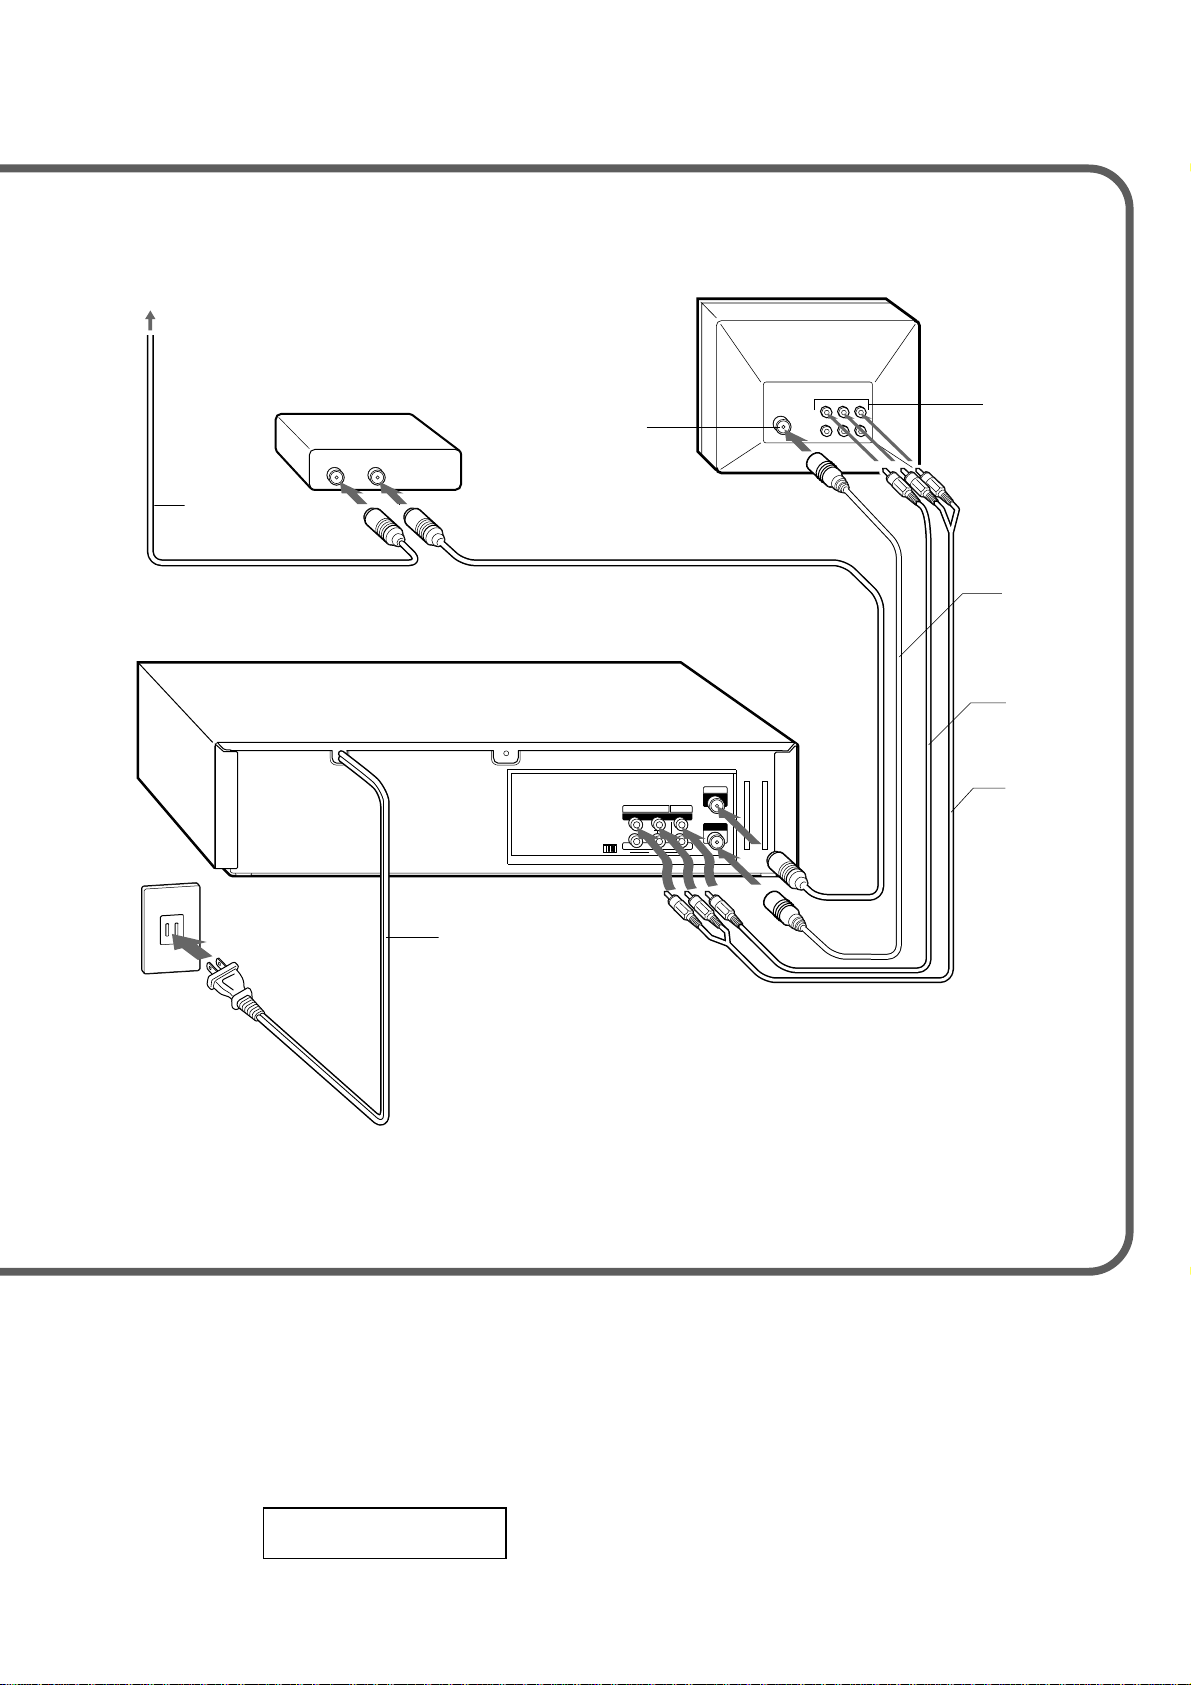
CATV connections
CATV System
CATV converter
(not supplied)
OUTIN
Antenna input
connector
3 Connect the VCR with the supplied
antenna cable to the TV's antenna input
connector.
TV
Audio/video
input jacks
CATV cable
(not supplied)
1 Connect the cable from the CATV system
to the input on the CATV converter.
AC outlet
AC cord
5 Connect the AC cord of
the VCR or the VCR to
the AC outlet.
2 Connect the output on the
converter to ANT IN on the VCR
with a coaxial cable (not supplied).
VIDEO
AERIAL
(VHF/UHF)
RF OUT
R AUDIO L
OUT OUT
(MONO)
IN IN
4 If your TV has audio/video input
jacks, connect the VCR and TV
using the supplied audio and
video cables.
Antenna cable
(supplied)
Video cable
(supplied)
Audio cable
(supplied)
To connect a CATV system without using a CATV converter
Connect the cable from the CATV system to ANT IN on the VCR in step 1 above.
To see a TV program or video program selected on the VCR
Turn the TV and VCR on, and press TV/VCR to display VCR in the display
window.
VCR
3
Page 4
3
FUNCTION OSD : ON
HI-FI
STEREO
STEREO
LANGUAGE SELECT : ENGLISHLANGUAGE SELECT : ENGLISH
AUDIO MODE :
BROADCAST TYPE :
AUDIO OUTPUT :
CHANNEL MAPPING
SELECT ADJUST
TO EXIT PRESS
MENU
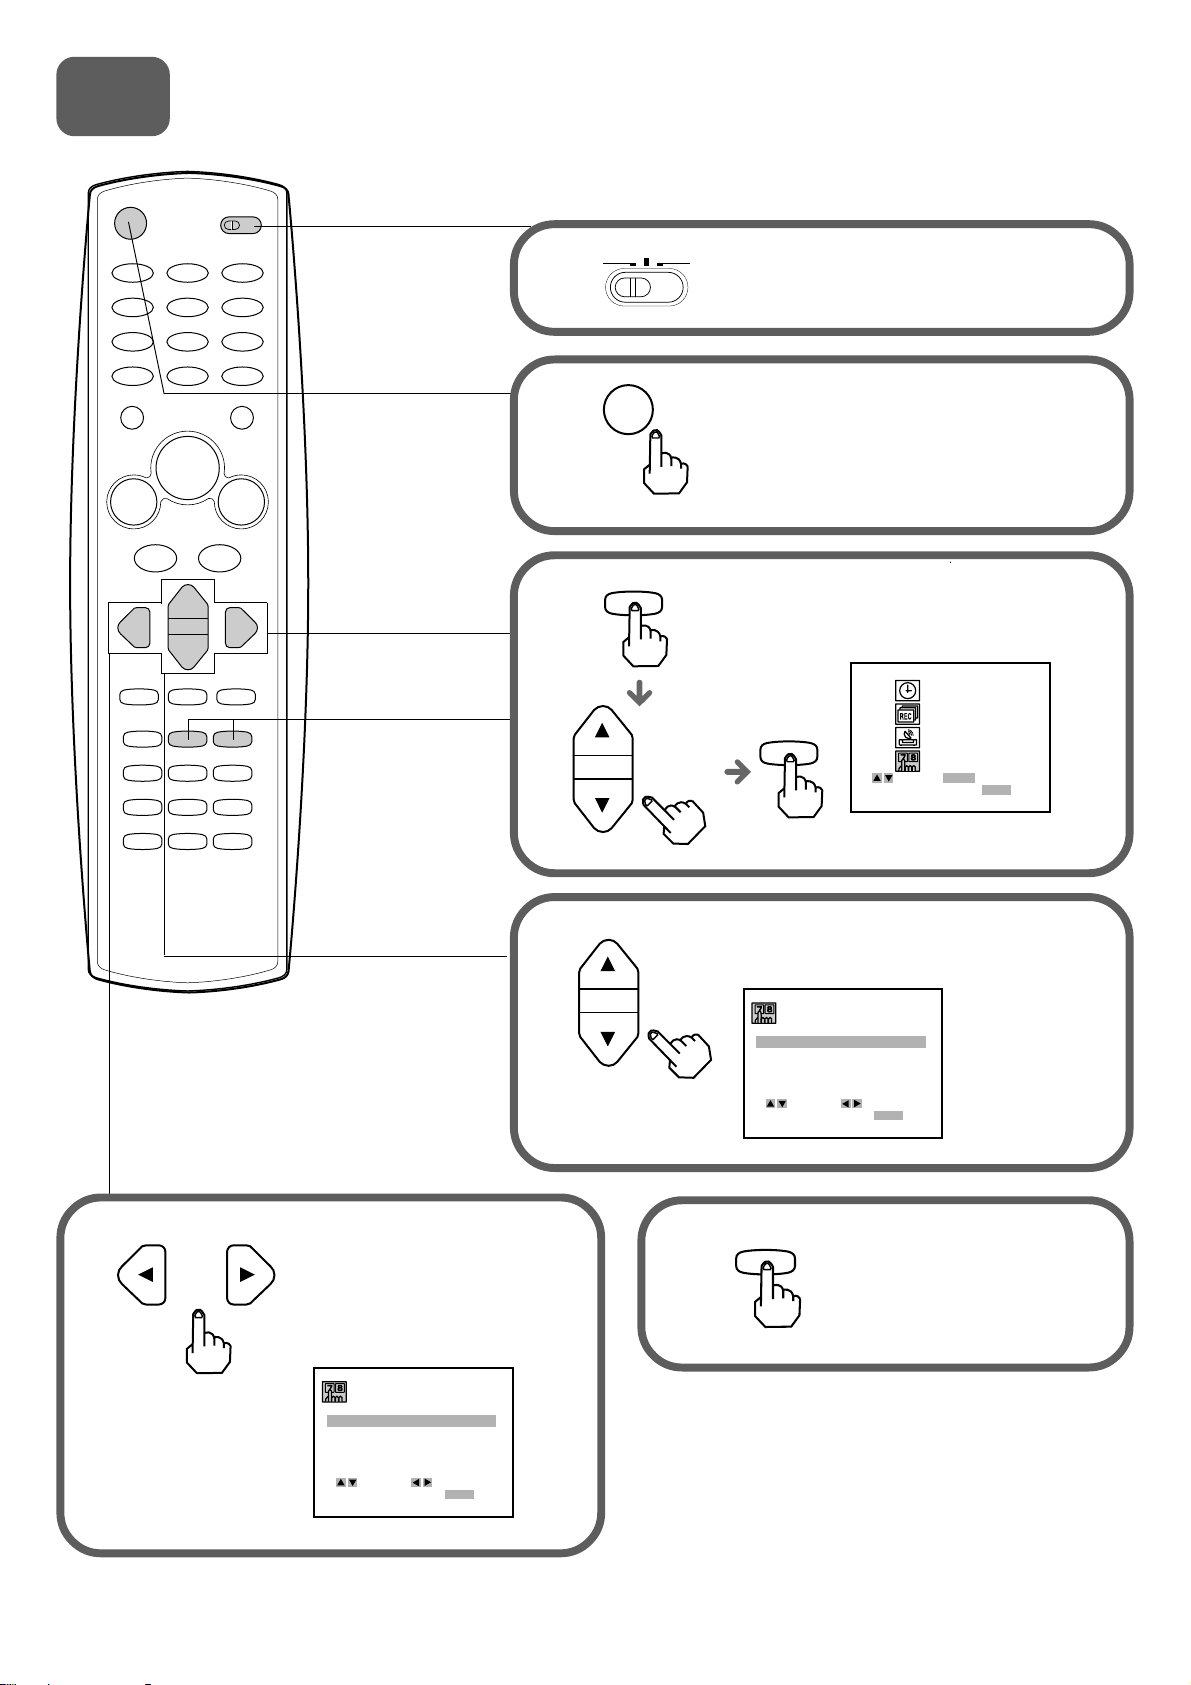
LANGUAGE SELECT : ENGLISH
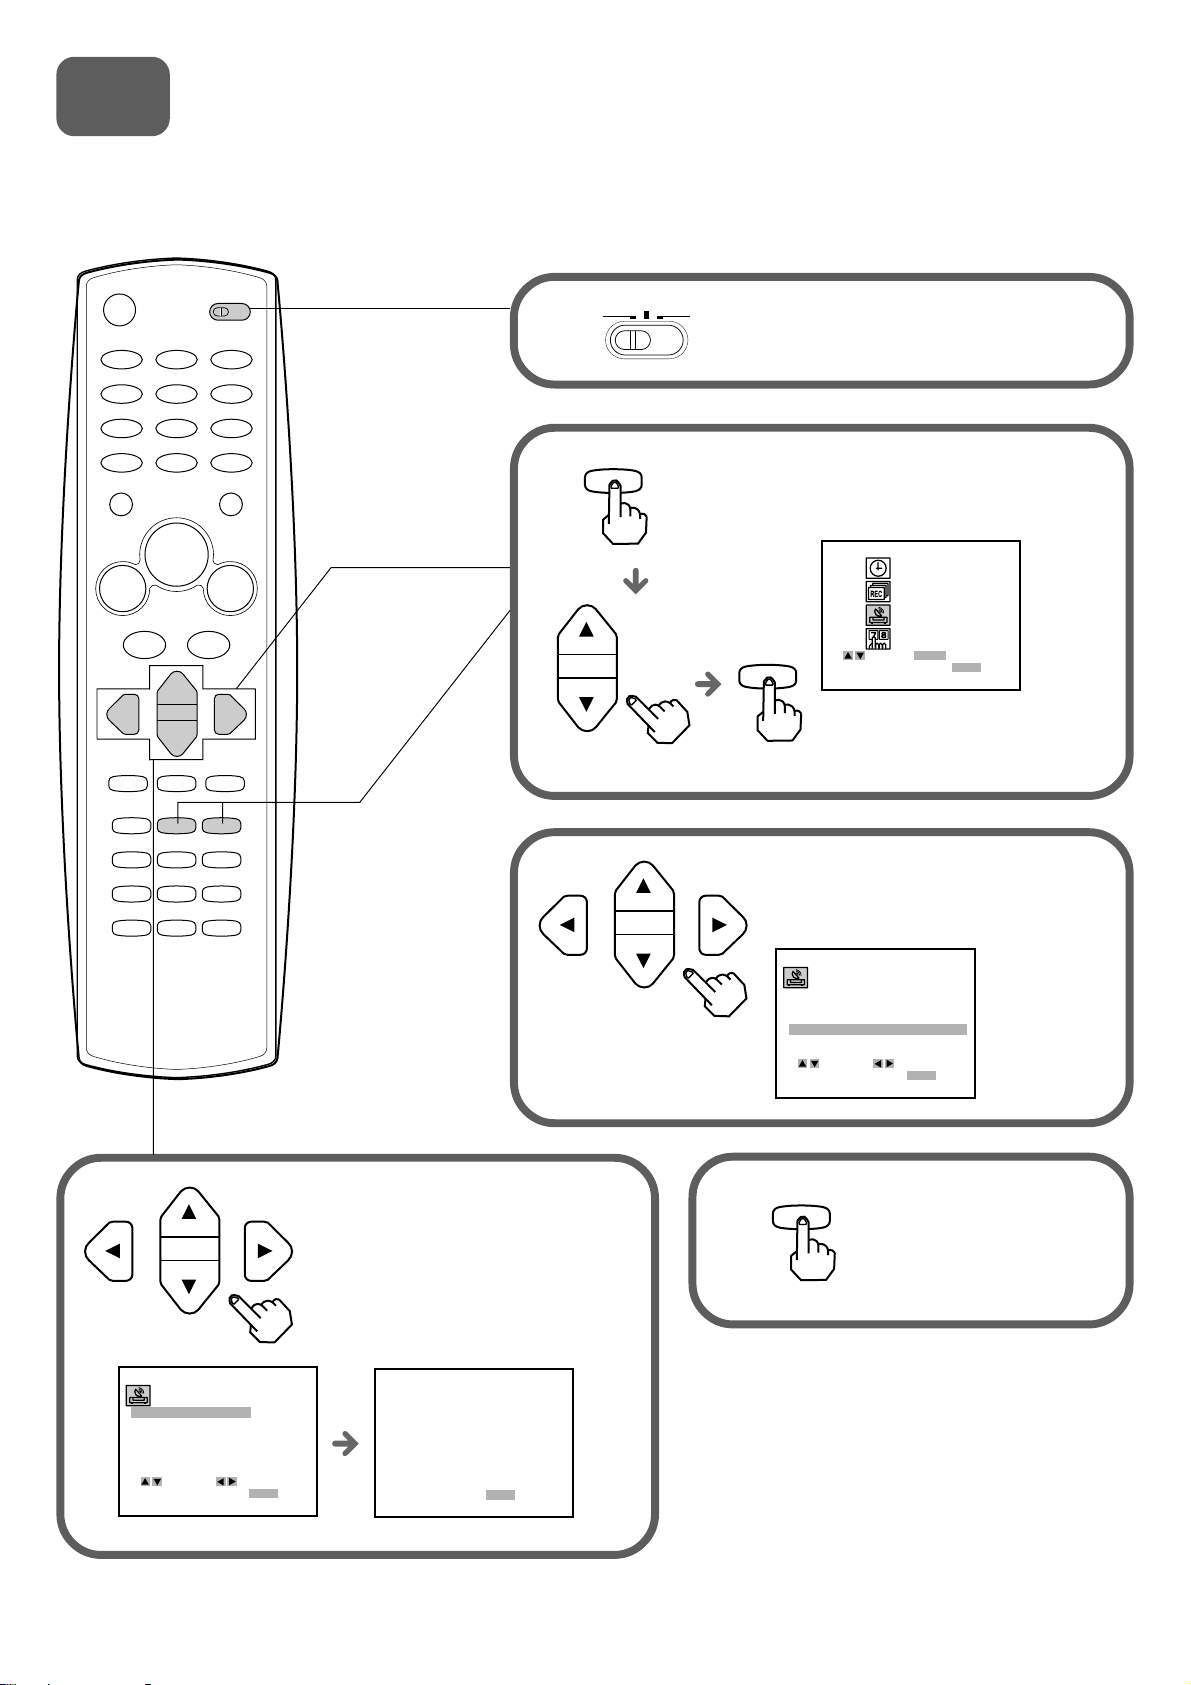
Setting the language
The on-screen menu can display any of three languages,
English, Spanish and French.
VCR TV
1
CATV/DBS
Set the VCR/CATV/DBS/TV
selector to VCR.
3
2
4
MENU
POWER
Press POWER to turn on the VCR.
Press MENU, and press
i or k to select SETUP,
then press ENTER/DISPLAY.
CLOCK
PROGRAM
ENTER
TUNING
SETUP
ENTER
SELECT ENTER
TO EXIT PRESS
MENU
Press i or k to select LANGUAGE
SELECT.
5
or
Press j or l to display the
desired language.
Each time the language
changes, the on-screen
display language changes.
FUNCTION OSD : ON
LANGUAGE SELECT : ENGLISH
AUDIO MODE :
BROADCAST TYPE :
AUDIO OUTPUT :
CHANNEL MAPPING
SELECT ADJUST
TO EXIT PRESS
STEREO
STEREO
MENU
HI-FI
4
6
MENU
Press MENU to return to
the normal screen.
Page 5
4
CLOCK
PROGRAM
TUNING
SETUP
SELECT ENTER
TO EXIT PRESS
ENTER
MENU
MONTH : MONTH : JUNEJUNE
DAY : 1 THU
YEAR : 2000
TIME
: 12 : 00 AM
AUTO CLOCK SET : OFF
SELECT ADJUST
TO EXIT PRESS
MENU
: 10 : 30 AM
MONTH : JUNE
DAY : 17 SAT
YEAR : 2000
TIME
: 10 : 30 AM
AUTO CLOCK SET : ONAUTO CLOCK SET : ON
SELECT ADJUST
TO EXIT PRESS
MENU
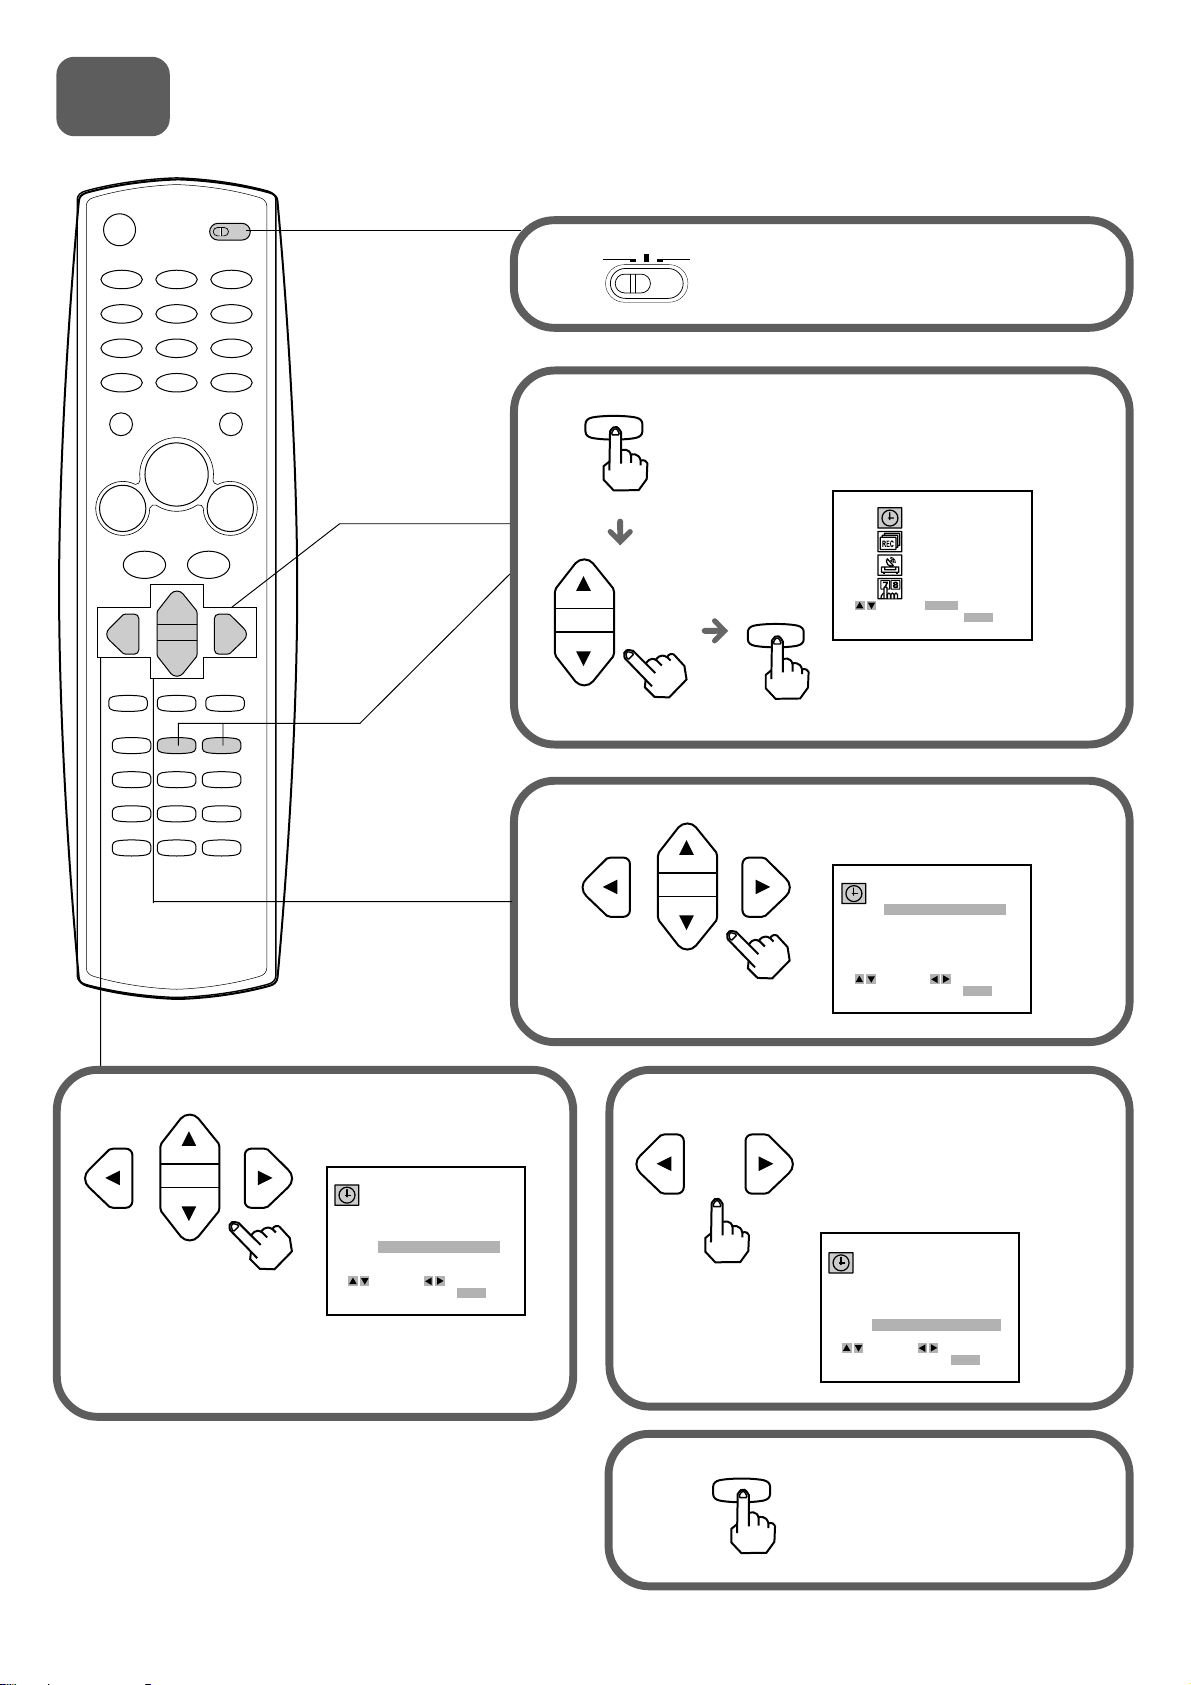
Setting the Clock
You must set the date and time for timer recordings.
CATV/DBS
VCR TV
1
Set the VCR/CATV/DBS/TV
selector to VCR.
2
3
MENU
Press MENU, and press i or
k to select CLOCK, then press
ENTER/DISPLAY.
ENTER
Press j or l to set MONTH,
then press k.
4
Press and hold j or l to
change the setting rapidly.
Set DAY, YEAR and
TIME as in step 3.
MONTH : JUNE
DAY : 17 SAT
YEAR : 2000
TIME
: 10 : 30 AM
AUTO CLOCK SET : OFF
SELECT ADJUST
TO EXIT PRESS
MENU
5
5
6
or
MENU
Press j or l to set AUTO
CLOCK SET to ON.
The VCR automatically corrects
the clock setting once you set
AUTO CLOCK SET to ON.
Press MENU to start the clock.
The normal screen returns.
Page 6
CLOCK
PROGRAM
TUNING
SETUP
SELECT ENTER
TO EXIT PRESS
ENTER
MENU
5
AUTO CHANNEL SET
TUNING BAND :
CH. ADD / DEL :
SOURCE SELECT : TUNERSOURCE SELECT : TUNER
SELECT ADJUST
TO EXIT PRESS
MENU
AUTO CHANNEL SETAUTO CHANNEL SET
TUNING BAND :
CH. ADD / DEL :
SOURCE SELECT :
SELECT ADJUST
TO EXIT PRESS
MENU
Setting the VCR channels
Before starting
Make sure the VCR channel is not selected "LINE 1" or "LINE 2."
CATV/DBS
VCR TV
1
Set the VCR/CATV/DBS/TV
selector to VCR.
2
3
MENU
Press MENU, press i or k to
select TUNING, then press
ENTER/DISPLAY.
ENTER
Press i or k to select SOURCE
SELECT, then press j or l to
display TUNER.
4
Press i or k to select AUTO
CHANNNEL SET, then press j or l.
All available channels are tuned.
After tuning, the previous screen
returns.
AUTO CHANNEL SET
PROCEEDING
CHANNEL 11
TO EXIT PRESS
MENU
6
5
MENU
Press MENU to return to
the normal screen.
Page 7

HV-FX9000U
SOMMAIRE DES OPÉRATIONS
Bienvenue
Merci pour l’achat de cet appareil AIWA.
Si vous déballez votre magnétoscope pour la
première fois, veuillez effectuer les opérations
à 5 ci-dessous pour l’installation.
Vous trouverez les accessoires suivants dans le carton d’emballage.
Télécommande (1)
1
En cas de problème et pour tout renseignement
Composez le numéro gratuit
1-800-BUY-AIWA
(Etats-Unis et Puerto Rico)
Câble audio (1)Câble vidéo (1)Câble d’antenne (1)
Mode d’emploi (1)Piles (2)
Veuillez lire attentivement les informations figurant page 1 et page 2 du mode d’emploi avant d’installer ou d’utiliser
votre magnétoscope.
1
Insérez les deux piles fournies R03 (format AAA) en
respectant la polarité indiquée dans le porte-piles.
Mise en place des piles dans la télécommande
1
Page 8

Raccordement de l’antenne (ou du réseau câblé), du
AERIAL
(VHF/UHF)
RF OUT
2
Raccordements de base
magnétoscope et du téléviseur
1 Raccordez le câble
d’antenne TV (non fourni)
au magnétoscope.
2 Raccordez le magnétoscope au
connecteur d’entrée de
l’antenne du téléviseur à l’aide
du câble d’antenne fourni.
Connecteur d’entrée de
l’antenne
Câble d’antenne
(fourni)
Câble d’antenne TV (non fourni)
Téléviseur
Prises d’entrée
audio/vidéo
Câble vidéo
(fourni)
Câble audio
(fourni)
AERIAL
VIDEO
(VHF/UHF)
RF OUT
LINE 1
Prise secteur
Cordon d’alimentation
R AUDIO L
OUT OUT
(MONO)
IN IN
3 Si votre téléviseur est muni de
4 Raccordez le cordon
d’alimentation secteur du
magnétoscope à la prise
secteur.
Importante
Raccordez le cordon d’alimentation secteur à la prise secteur quand toutes les autres connexions ont été faites.
Quand le téléviseur est raccordé à OUT TO TV avec seulement un câble d’antenne
Réglez le sélecteur de canal sur 3CH ou 4CH, le canal non utilisé pour la réception, et sélectionnez le même canal sur
le téléviseur.
prises d’entrée audio/vidéo,
raccordez le magnétoscope et le
téléviseur avec les câbles audio
et vidéo fournis.
3CH
3CH 4CH
4CH
(VHF/UHF)
Pour sélectionner le canal souhaité sur le
AERIAL
RF OUT
téléviseur
Allumez le téléviseur et le magnétoscope et appuyez sur
TV/VCR pour effacer VCR de l’afficheur ou mettez ce
magnétoscope hors tension.
2
Page 9

Raccordements avec le réseau câblé
Réseau câblé
3 Raccordez le magnétoscope au connecteur
d’entrée de l’antenne du téléviseur à l’aide
du câble d’antenne fourni.
Convertisseur
(non fourni)
OUTIN
Câblé
(non fourni)
1 Raccordez le câble du réseau câblé à
l’entrée du convertisseur.
Prise secteur
Connecteur
d’entrée de l’antenne
2 Raccordez la sortie du
convertisseur à ANT IN du
magnétoscope avec un câble coaxial
(non fourni).
VIDEO
AERIAL
(VHF/UHF)
RF OUT
R AUDIO L
OUT OUT
(MONO)
IN IN
Téléviseur
Prises
d’entrée
audio/vidéo
Câble d’antenne
(fourni)
Câble vidéo
(fourni)
Câble audio
(fourni)
Cordon d’alimentation
4 Si votre téléviseur est muni de
prises d’entrée audio/vidéo,
5 Raccordez le cordon
d’alimentation secteur
du magnétoscope à la
prise secteur.
Pour raccorder le magnétoscope au réseau câblé sans convertisseur
Raccordez le câble du réseau câblé à ANT IN du magnétoscope à l’étape 1 ci-dessus.
Pour regarder un programme TV ou vidéo sélectionné sur le
magnétoscope
Allumez le téléviseur et le magnétoscope, puis appuyez sur TV/VCR pour faire
apparaître VCR sur l’afficheur.
raccordez le magnétoscope et le
téléviseur à l’aide des câbles
audio et vidéo fournis.
VCR
3
Page 10

3
FUNCTION OSD :
LANGUAGE SELECT : ENGLISHLANGUAGE SELECT : ENGLISH
AUDIO MODE :
BROADCAST TYPE :
AUDIO OUTPUT :
CHANNEL MAPPING
SELECT ADJUST
TO EXIT PRESS
MENU
CHOIX LANGAGE : FRANÇAIS
Sélection de la langue
Le menu peut être affiché à l’écran dans une des trois
langues suivantes : Anglais, espagnol et français.
VCR TV
1
CATV/DBS
Réglez le sélecteur VCR/CATV/DBS/
TV sur VCR.
2
3
4
MENU
POWER
Appuyez sur POWER pour allumer
le magnétoscope.
Appuyez sur MENU, puis sur i ou k
pour sélectionner SETUP (installation),
puis appuyez sur ENTER/DISPLAY.
CLOCK
ENTER
PROGRAM
TUNING
SETUP
ENTER
SELECT ENTER
TO EXIT PRESS
MENU
Appuyez sur i ou k pour
sélectionner LANGUAGE SELECT
(choix langage).
56
or
Appuyez sur j ou l pour
afficher la langue souhaitée.
Chaque fois que la langue
change, la langue de
l’affichage sur écran change
elle aussi.
FONCTION OSD : MARCHE
CHOIX LANGAGE : FRANÇAIS
MODE AUDIO :
TYPE DE DIFFUSION :
SORTIE AUDIO :
CONFIGURATION CANAUX
CHOISIR AJUSTER
POUR SORTIR PRESSER
HI-FI
STEREO
STEREO
MENU
4
MENU
Appuyez sur MENU
pour revenir à l’écran
normal.
Page 11

4
HORLOGE
PROGRAMME
SYNTONISATION
INSTALLATION
CHOISIR CONFIRMER
POUR SORTIR PRESSER
ENTER
MENU
MOIS : JUIN
JOUR : 17 SAM
ANNÉE : 2000
HEURE
: 10 : 30 AM
RÉGLAGE AUTO : MARRÉGLAGE AUTO : MAR
CHOISIR AJUSTER
POUR SORTIR PRESSER
MENU
: 10 : 30 AM
MOIS : JUINMOIS : JUIN
JOUR : 1 JEU
ANNÉE : 2000
HEURE
: 12 : 00 AM
RÉGLAGE AUTO : ARR
CHOISIR AJUSTER
POUR SORTIR PRESSER
MENU
Réglage de l’horloge
Vous devez régler la date et l’heure pour les
enregistrements programmés.
VCR TV
1
CATV/DBS
Réglez le sélecteur VCR/CATV/DBS/
TV sur VCR.
2
3
MENU
Appuyez sur MENU, puis sur
i ou k pour sélectionner
HORLOGE, puis appuyez sur
ENTER/DISPLAY.
ENTER
Appuyez sur j ou l pour régler
MOIS, puis appuyez sur k.
45
Appuyez sur j ou l et
maintenez cette touche
enfoncée pour modifier
rapidement le réglage.
Réglez JOUR, ANNÉE
et HEURE comme à
l’étape 3.
MOIS : JUIN
JOUR : 17 SAM
ANNÉE : 2000
HEURE
: 10 : 30 AM
RÉGLAGE AUTO : ARR
CHOISIR AJUSTER
POUR SORTIR PRESSER
MENU
5
6
or
MENU
Appuyez sur j ou l pour régler
RÉGLAGE AUTO sur MAR.
Le magnétoscope corrige le
réglage de l’horloge
automatiquement une fois que
vous avez réglé RÉGLAGE AUTO
sur MAR.
Appuyez sur MENU pour
faire démarrer l’horloge.
L’écran normal réapparaît.
Page 12

5
SYNTONISATION AUTO.
BANDE SYNTONISATION :
CANAL AJOUT / EFF. :
SÉLECTION SOURCE : TUNERLECTION SOURCE : TUNER
CHOISIR AJUSTER
POUR SORTIR PRESSER
MENU
SYNTONISATION AUTO.SYNTONISATION AUTO.
BANDE SYNTONISATION :
CANAL AJOUT / EFF. :
SÉLECTION SOURCE :
CHOISIR AJUSTER
POUR SORTIR PRESSER
MENU
Préréglage des canaux
Préparatifs
Vérifiez que le canal de magnétoscope n’est pas sélectionnsur LINE1 ou LINE2.
CATV/DBS
VCR TV
1
Réglez le sélecteur VCR/CATV/DBS/
TV sur VCR.
2
3
MENU
Appuyez sur MENU, puis sur i
ou k pour sélectionner
SYNTONISATION. Appuyez
ensuite sur ENTER/DISPLAY.
HORLOGE
PROGRAMME
ENTER
POUR SORTIR PRESSER
SYNTONISATION
INSTALLATION
ENTER
CHOISIR CONFIRMER
MENU
Appuyez sur i ou k pour
sélectionner SÉLECTION SOURCE,
puis sur j ou l pour afficher
TUNER.
4
Appuyez sur i ou k pour
sélectionner SYNTONISATION
AUTO, puis appuyez sur j ou l.
Tous les canaux disponibles sont
balayés et mémorisés. Après la
syntonisation, l’écran précédent
apparaît.
DIRECTIVES POUR
SYNTONISATION AUTO.
CANAL 11
POUR SORTIR PRESSER
MENU
6
5
MENU
Appuyez sur MENU
pour revenir à l’écran
normal.
Page 13

HV-FX9000U
GUIA DE REFERENCIA RAPIDA
Bienvenido
Muchas gracias por haber adquirido este producto AIWA.
Cuando desembale su videograbadora por
primera vez, siga los procedimientos 1 a
siguientes para prepararla.
En el cartón de embalaje encontrará los siguientes accesorios.
Controlador remoto (1)
5
Para servicio e información,
Llame gratis al 1-800-BUY-AIWA
(Estados Unidos y Puerto Rico)
AIWA CO., LTD
8A-JFC-903-01
000115ATO-YX
Instrucciones de manejo (1)Pilas (2)
Printed in Korea
Cable de audio (1)Cable de vídeo (1)Cable de antena (1)
Lea la información de las páginas 1 y 2 del manual de instrucciones antes de instalar o utilizar la videograbadora.
1
Coloque dos pilas R03 (tamaño AAA) (suministradas) con
las polaridades correctamente alineadas, como se indica en
el compartimento de las pilas.
Instalación de las pilas en el controlador remoto
1
Page 14

Conexión de la antena (o sistema de cablevisión) -
AERIAL
(VHF/UHF)
RF OUT
2
Conexiones básicas
Videograbadora - Televisor
1 Conecte el cable de la
antena de televisión (no
suministrado) a la
videograbadora.
Tomacorriente de CA
2 Conecte la videograbadora
con el cable de antena
suministrado al conector de
entrada de antena del
televisor.
Conector de entrada
de antena
Cable de antena (suministrado)
Cable de antena de televisión
(no suministrado)
R AUDIO L
OUT OUT
(MONO)
IN IN
LINE 1
Televisor
AERIAL
VIDEO
(VHF/UHF)
RF OUT
Tomas de
entrada de
audio/vídeo
Cable de vídeo
(suministrado)
Cable de audio
(suministrado)
Cable de CA
3 Si su televisor tiene tomas de
4 Conecte el cable de
alimentación de CA de la
videograbadora a una
toma de la red.
Importante
Conecte el cable de alimentación de CA al tomacorriente de CA después de haber finalizado todas las
conexiones.
Cuando conecte el televisor a OUT TO TV utilizando un cable de antena
Ponga el selector de canales en 3CH o 4CH, el canal no utilizado para teledifusión, y seleccione el mismo canal en el
televisor.
Para seleccionar el canal deseado en el
televisor
Encienda el televisor y la videograbadora, y presione TV/
VCR para que VCR desaparezca del visualizador, o
apague esta videograbadora.
3CH
3CH 4CH
4CH
(VHF/UHF)
AERIAL
RF OUT
entrada de audio/vídeo, conecte
la videograbadora y el televisor
utilizando los cables de audio y
vídeo suministrados.
2
Page 15

Conexiones a un sistema de cablevisión
A sistema de cablevisión
Convertidor de cablevisión
(no suministrado)
Conector de
entrada de antena
OUTIN
3 Conecte la videograbadora con el cable de
antena suministrado al conector de
entrada de antena del televisor.
Televisor
Tomas de
entrada de
audio/vídeo
Cable de
cablevisión
(no suministrado)
2 Conecte la salida del convertidor a la
entrada ANT IN de la videograbadora
con un cable coaxial (no suministrado).
1 Conecte el cable proveniente del sistema de cablevisión
a la entrada del convertidor de cablevisión.
Tomacorriente
de CA
Cable de CA
5 Conecte el cable de
alimentación de CA de la
videograbadora a una
toma de la red.
VIDEO
AERIAL
(VHF/UHF)
RF OUT
R AUDIO L
OUT OUT
(MONO)
IN IN
4 Si el televisor dispone de tomas
de entrada de audio/vídeo,
conecte la videograbadora y el
televisor con los cables de audio
y vídeo suministrados.
Cable de antena
(suministrado)
Cable de vídeo
(suministrado)
Cable de audio
(suministrado)
Para conectar un sistema de cablevisión sin utilizar convertidor de cablevisión
Conecte el cable del sistema de cablevisión a la entrada ANT IN de la videograbadora en el anterior paso 1.
Para contemplar un programa de televisión o de vídeo
seleccionado en la videograbadora
Conecte la alimentación del televisor y de la videograbadora, y presione TV/
VCR para visualizar VCR en el visualizador.
VCR
3
Page 16

3
FUNCTION OSD : ON
HI-FI
STEREO
STEREO
LANGUAGE SELECT : ENGLISHLANGUAGE SELECT : ENGLISH
AUDIO MODE :
BROADCAST TYPE :
AUDIO OUTPUT :
CHANNEL MAPPING
SELECT ADJUST
TO EXIT PRESS
MENU
IDIOMA : ESPAÑOL
Selección de idioma
El menú en pantalla podrá visualizarse en uno de los tres
idiomas siguientes: inglés, español, y francés.
CATV/DBS
1
VCR TV
Ajuste el selector VCR/CATV/DBS/TV
en VCR.
2
3
4
MENU
or
POWER
Presione POWER para conectar la
alimentación de la videograbadora.
Presione MENU y después i o k para
seleccionar SETUP. A continuación,
presione ENTER/DISPLAY.
CLOCK
ENTER
PROGRAM
TUNING
SETUP
ENTER
SELECT ENTER
TO EXIT PRESS
MENU
Presione i o k para seleccionar
LANGUAGE SELECT (idioma).
56
or
Presione
j o l
para hacer
que se visualice el idioma
deseado.
Cada ves que cambie el
idioma, el idioma visualizado
en pantalla cambiará.
HI-FI
ESTEREO
ESTEREO
SI
FUNCION DESPLEGADA :
IDIOMA : ESPAÑOL
MODO DE AUDIO :
TIP / TRANS :
SALIDA DE AUDIO :
MAPA DE CANALES
SELEC. AJUSTAR
MENU
PULSE PARA SALIR.
4
MENU
Presione MENU para
volver a la pantalla
normal.
Page 17

4
RELOJ
PROGRAMA
SINTONIZAR
AJUSTAR
SELEC. EJECUTAR
PULSE PARA SALIR.
ENTER
MENU
MES : JUNIOMES : JUNIO
DIA : 1 LUN
AÑO : 2000
HORA
: 12 : 00 AM
AUTOM. AJUSTADO : NO
SELEC. AJUSTAR
PULSE PARA SALIR.
MENU
MES : JUNIO
DIA : 17 SAB
AÑO : 2000
HORA
: 10 : 30 AM
AUTOM. AJUSTADO : SI
SELEC. AJUSTAR
PULSE PARA SALIR.
MENU
: 10 : 30 AM
Ajuste del reloj
Para realizar grabaciones con el temporizador, tendrá que
ajustar la fecha y la hora.
CATV/DBS
VCR TV
1
Ajuste el selector VCR/CATV/DBS/TV
en VCR.
2
3
MENU
Presione MENU y después
i o k para seleccionar
RELOJ. A continuación,
presione ENTER/DISPLAY.
ENTER
Presione j o l para ajustar
MES, y después presione k.
45
Mantenga presionado j
o l para que el ajuste
cambie rápidamente.
Ajuste DIA, AÑO y HORA
como en el paso 3.
MES : JUNIO
DIA : 17 SAB
AÑO : 2000
HORA
: 10 : 30 AM
AUTOM. AJUSTADO : NO
SELEC. AJUSTAR
MENU
PULSE PARA SALIR.
5
6
or
MENU
Presione j o l para ajustar
AUTOM. AJUSTADO en SI.
La videograbadora corregirá
automáticamente el ajuste del reloj
después de que usted haya
ajustado AUTOM. AJUSTADO a
SI.
Presione MENU par poner en
funcionamiento el reloj.
Reaparecerá la pantalla normal.
Page 18

5
AUTO PROGRAMACION
BANDA SINTONIZADA :
MEM / BORRAR :
SELEC / FUENTE : SIN.SELEC / FUENTE : SIN.
SELEC. EJECUTAR
PULSE PARA SALIR.
ENTER
MENU
AUTO PROGRAMACIONAUTO PROGRAMACION
BANDA SINTONIZADA :
MEM / BORRAR :
SELEC / FUENTE :
SELEC. AJUSTAR
PULSE PARA SALIR.
MENU
Sintonización de los canales de la videograbadora
Antes de comenzar
Compruebe que no ha seleccionado el canal de la videograbadora en “LINE1” o “LINE2”.
CATV/DBS
VCR TV
1
Ajuste el selector VCR/CATV/DBS/TV
en VCR.
2
3
MENU
Presione MENU, presione i o k
para seleccionar SINTONIZAR, y
después presione ENTER/DISPLAY.
RELOJ
PROGRAMA
ENTER
PULSE PARA SALIR.
SINTONIZAR
AJUSTAR
ENTER
SELEC. EJECUTAR
MENU
Presione i o k para seleccionar
SELEC/FUENTE, y después presione
j o l para hacer que se visualice
SIN.
4
Presione i o k para seleccionar
AUTO PROGRAMACION, y
después presione j o l.
Se sintonizarán todos los canales
disponibles.
Tras la sintonización, vuelve a
aparecer la pantalla anterior.
MEMORIA AUTOMATICA
DE CANALES
PROCESANDO
CANAL 11
MENU
PULSE PARA SALIR.
6
5
MENU
Presione MENU para
volver a la pantalla
normal.
 Loading...