

HV-FX8100U
QUICK START GUIDE
Welcome
Thank you for purchasing this AIWA product.
When you unpack your unit for the first time,
follow the procedures 1 to 5 below for set up.
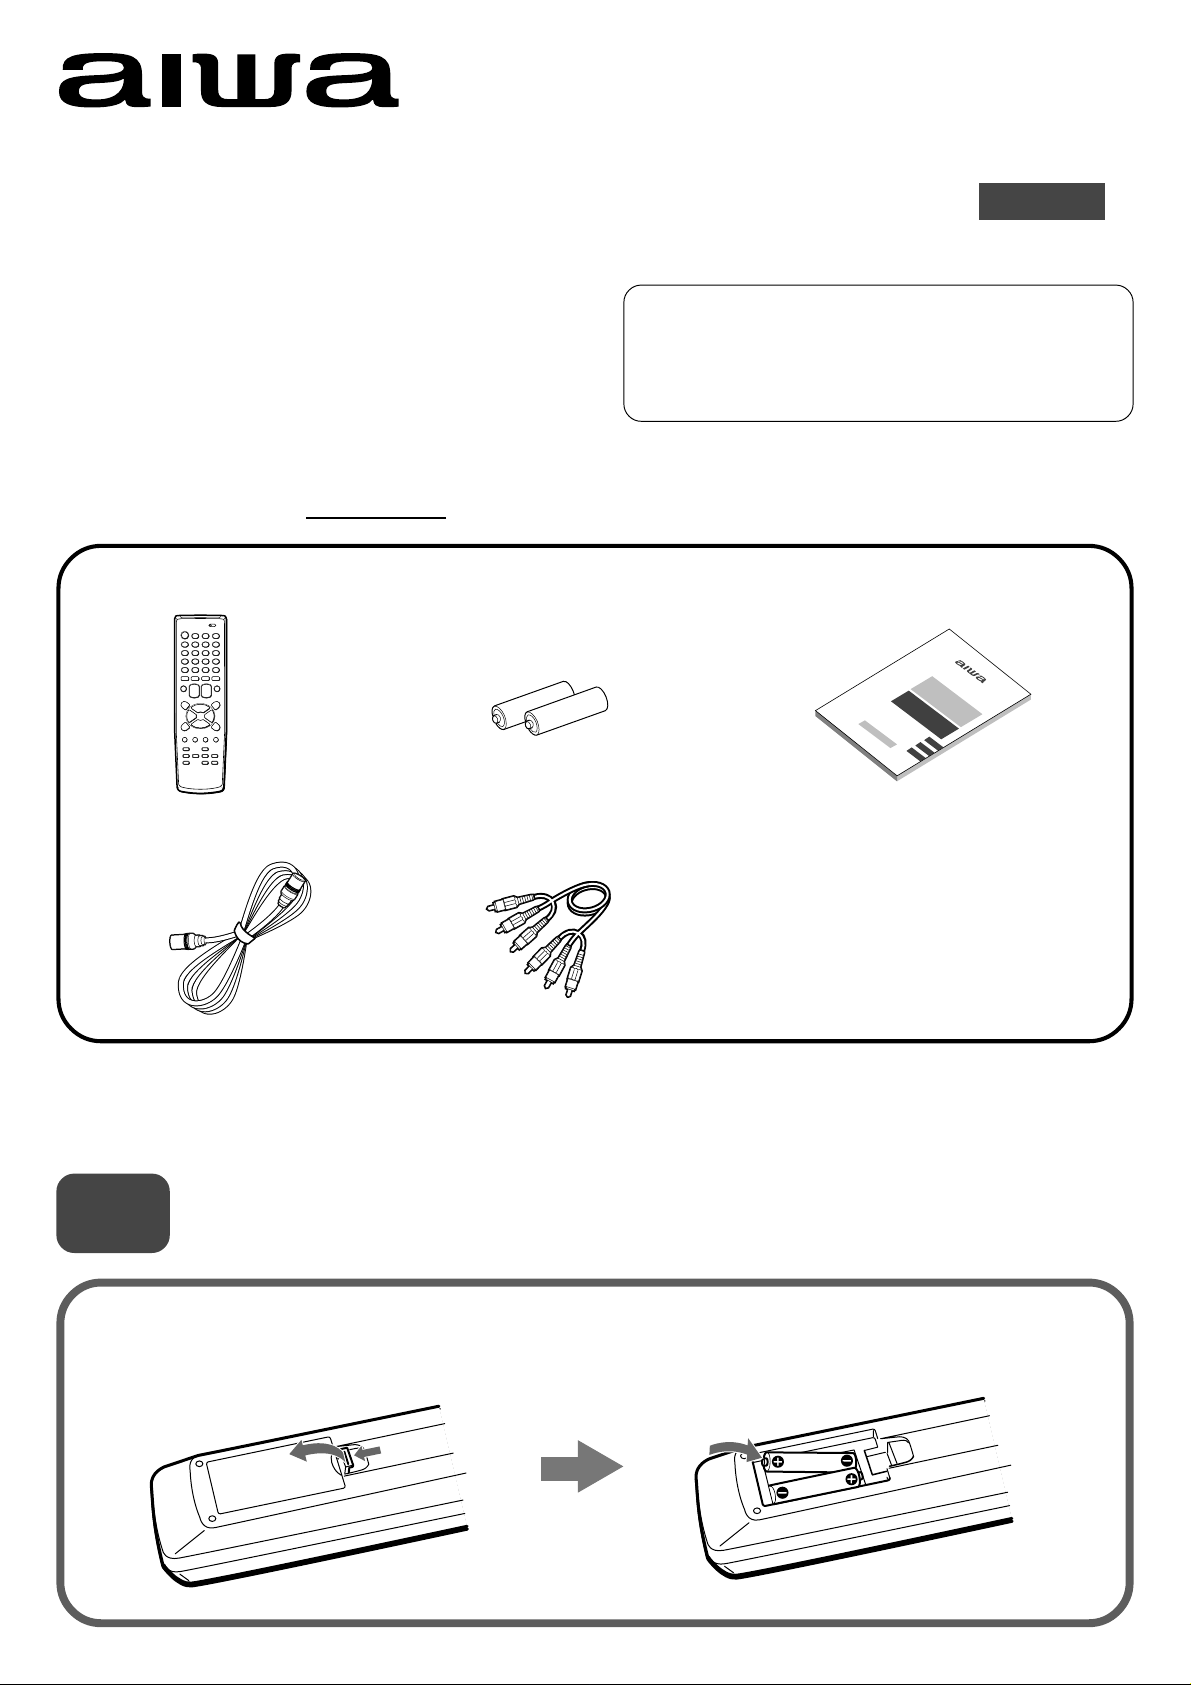
You will find these accessories in the package box.
Remote control (1) Batteries (2)
For Assistance And Inf ormation
Call Toll Free 1-800-BUY-AIWA
(United States and Puerto Rico)
ENGLISH
Operating Instructions (1)
Antenna cable (1)
Please read all of the information and warnings on page 1 and 2 of the operating instructions before installing or operating
your TV.
1
Insert two R03 (size AAA) batteries (supplied) with the correct
polarity, as indicated inside the battery compartment.
Installing Batteries in the Remote Control
Audio/video cable (1)
1
2
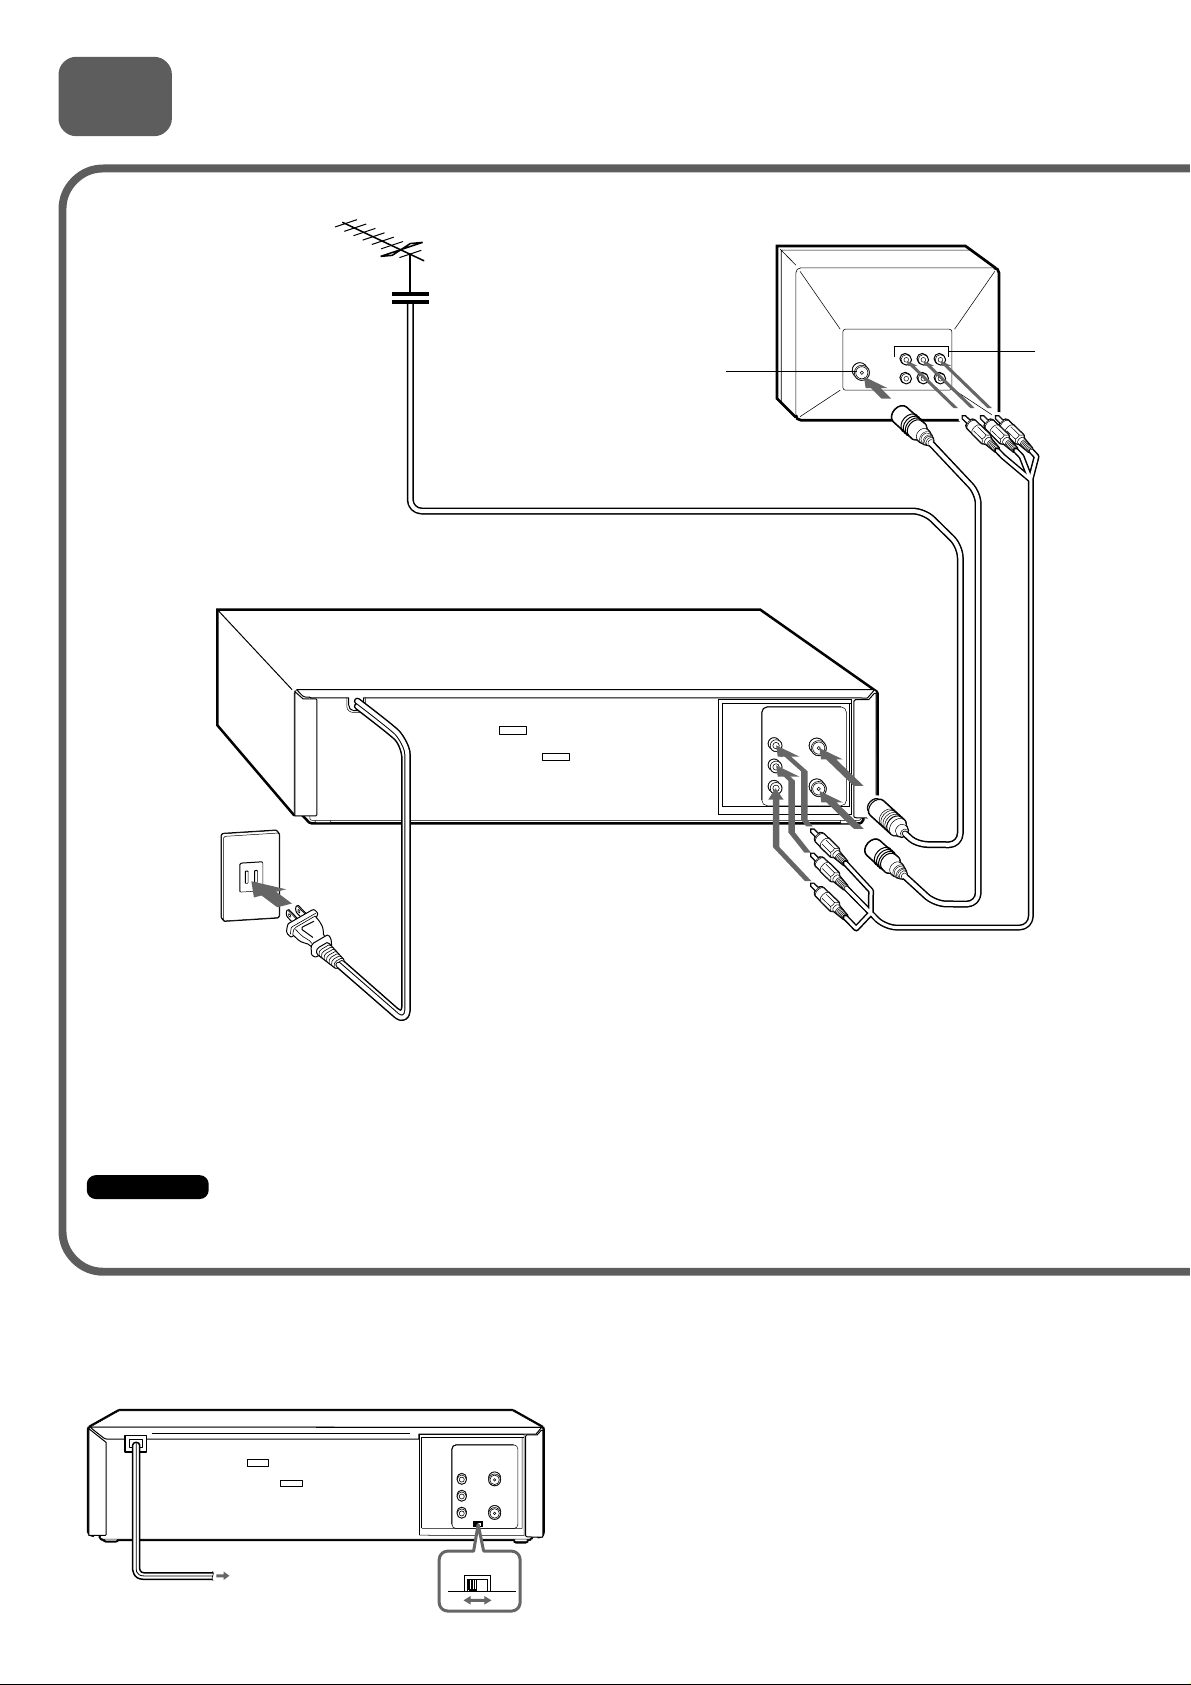
Connecting Antenna (or CATV)-VCR-TV
Basic connections
1 Connect the TV antenna
cable (not supplied) to the
VCR.
2 Connect the supplied antenna
cable to the UHF/VHF OUT TO
TV connector on the VCR and
the antenna connector on the
TV.
Antenna connector
TV
Audio/video
input jacks
UHF/VHF
IN (ANT)
OUT
VIDEO
L
OUT (TV)
AUDIO
R
AC outlet
3 If your TV has audio/video
4 Connect the AC cord to
the AC outlet.
Important
Connect the AC cord to the AC outlet after all of the connections are complete.
input jacks, connect the VCR
and TV using the supplied
audio/video cables.
When the TV is connected to the UHF/VHF OUT (TV) connector using an antenna cable
Set the channel selector to 3CH or 4CH, not employed for broadcasts, and select the same channel on the TV.
To select a desired TV channel on the TV
OUT
VIDEO
L
AUDIO
R
3CH
4CH
Turn the TV and VCR on, and press TV/VCR to turn off
VCR in the display window, or turn off this VCR.
2
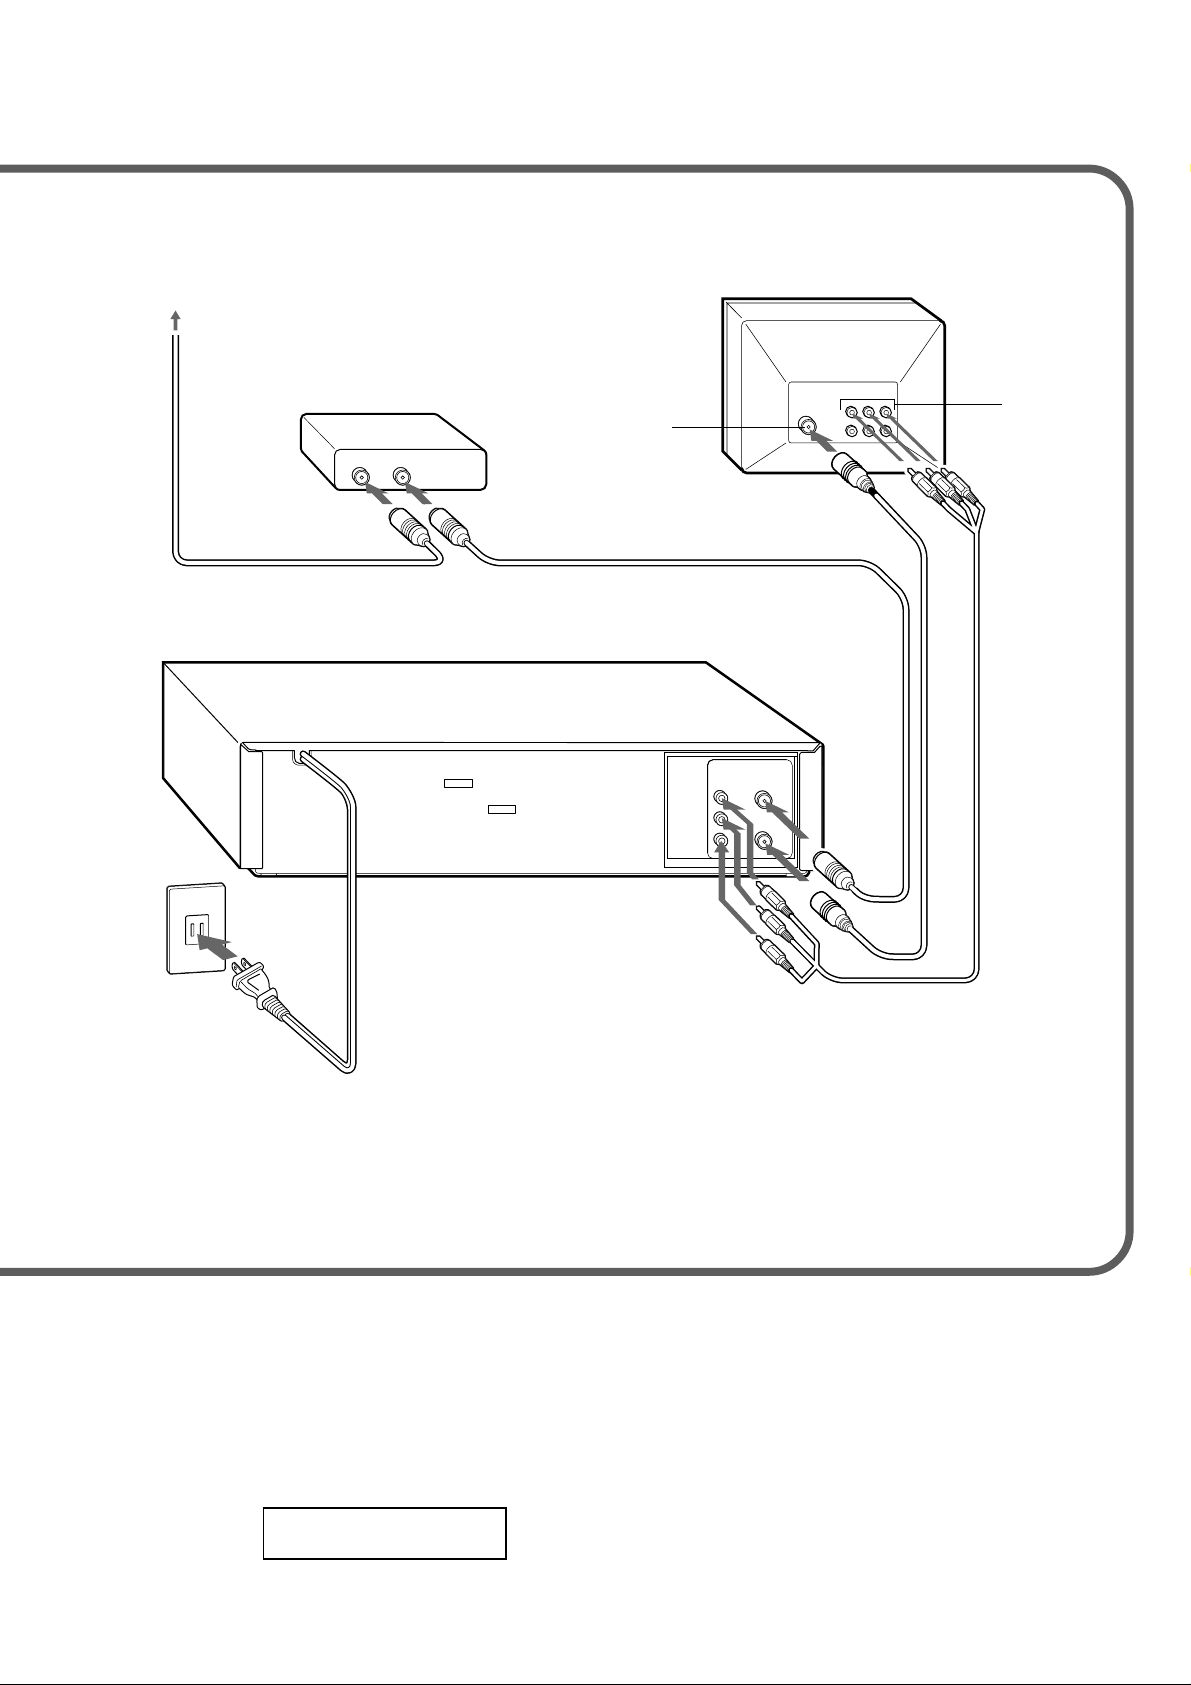
CATV connections
CATV System
CATV converter
(not supplied)
OUTIN
1 Connect the cable from the CATV system
to the input on the CATV converter.
3 Connect the VCR with the
supplied antenna cable to
the TV's antenna input.
Antenna connector
2 Connect the output
on the converter to the UHF/VHF IN
(ANT) connector on the VCR with a
coaxial cable (not supplied).
UHF/VHF
IN (ANT)
OUT
VIDEO
L
OUT (TV)
AUDIO
R
TV
Audio/video
input jacks
AC outlet
4 If your TV has audio/video input
jacks, connect the VCR and TV
5 Connect the AC cord to
the AC outlet.
To connect a CATV system without using a CATV converter
Connect the cable from the CATV system to the UHF/VHF IN (ANT) connector on the VCR in step 1 above.
To see a TV program or video program selected on the VCR
Turn the TV and VCR on, and press TV/VCR to display VCR in the display
window.
using the supplied audio and
video cables.
VCR
3
3
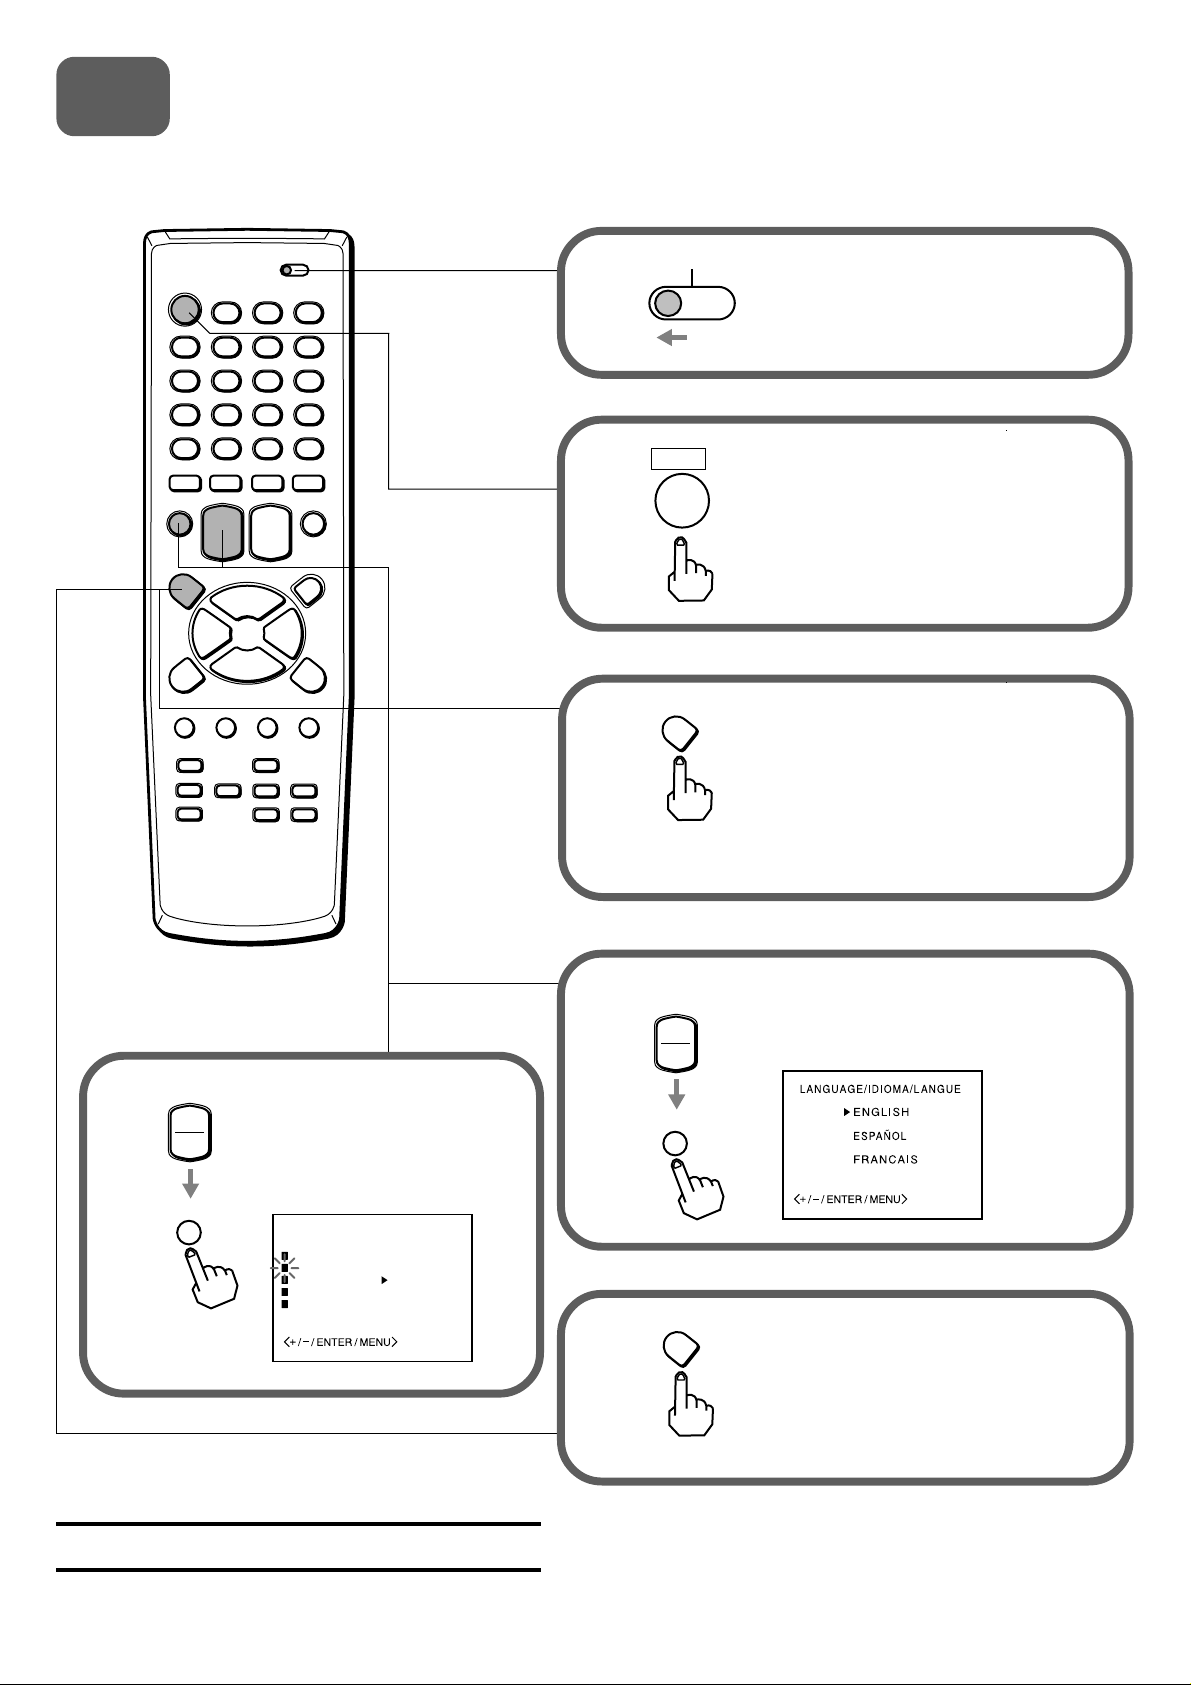
Setting the language
The on-screen menu can display three languages: English, Spanish and French.
1
2
3
CATV
VCR
POWER
MENU
TV
Set the VCR/CATV/TV selector to
VCR.
Press POWER to turn on the VCR.
Press MENU .
For the first setting, SYSTEM SET
UP menu appears. From the second
setting, MENU appears. See on
page 11 in the supplied operating
instructions.
SET/TRACKING
4
Press SET/TRACKING
+
+
–
ENTER
or
LANGUAGE/IDIOMA/
LANGUE, then press
ENTER.
SYSTEM SET UP
CLOCK SET
LANGUAGE/IDIOMA/LANGUE
AUTO CLOCK ON OFF
STANDARD TIME
DAYLIGHT SAVING TIME
AIWA CO., LTD
–
to select
5
6
SET/TRACKING
+
–
ENTER
MENU
Press SET/TRACKING
select the desired language, then
press ENTER.
Press MENU twice to return
to the normal screen.
+
or
–
to
8A-JFD-902-01
000225ATO-YX
Printed in Thailand
4
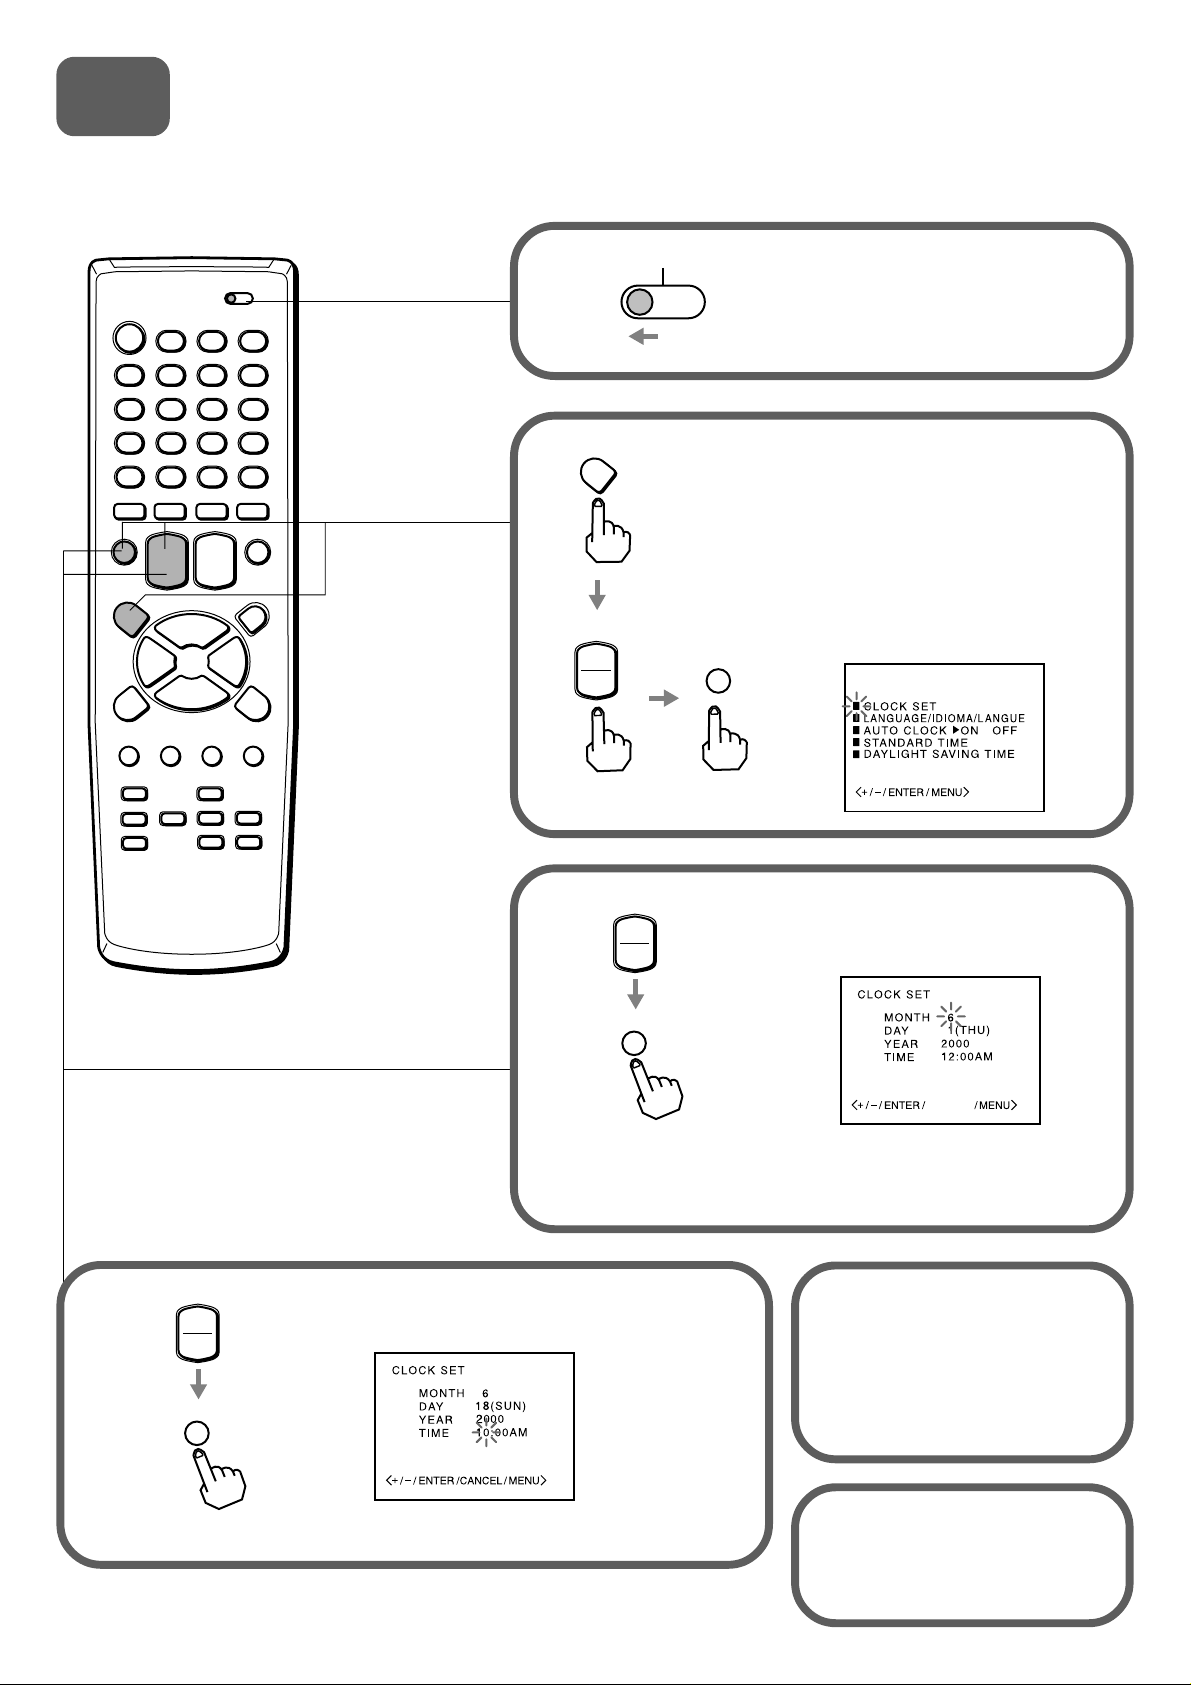
4
Setting the clock
You must set the date and time for timer recording.
1
MENU
2
SET/TRACKING
+
–
VCR
CATV
TV
ENTER
Set the VCR/CATV/TV selector to
VCR.
Press MENU. And press SET/
TRACKING + or – to select CLOCK
SET, then press ENTER.
For the first setting, SYSTEM SET
UP menu appears. From the second
setting, MENU appears. See on page
11 in the supplied operating
instructions.
SYSTEM SET UP
4
SET/TRACKING
+
–
ENTER
SET/TRACKING
3
+
–
ENTER
Set DAY, YEAR and hours in the same way
as in step 3.
Press SET/TRACKING + or – to
set MONTH, then press ENTER.
CANCEL
The day of the week will
automatically appears.
Press SET/TRACKING
5
+ or – to set minutes.
Press and hold SET/
TRACKING + or – to change
the setting in 10 minutes
intervals.
5
Press ENTER to start the
6
clock.
The normal screen returns
or the blue screen appears.
5
ENTER
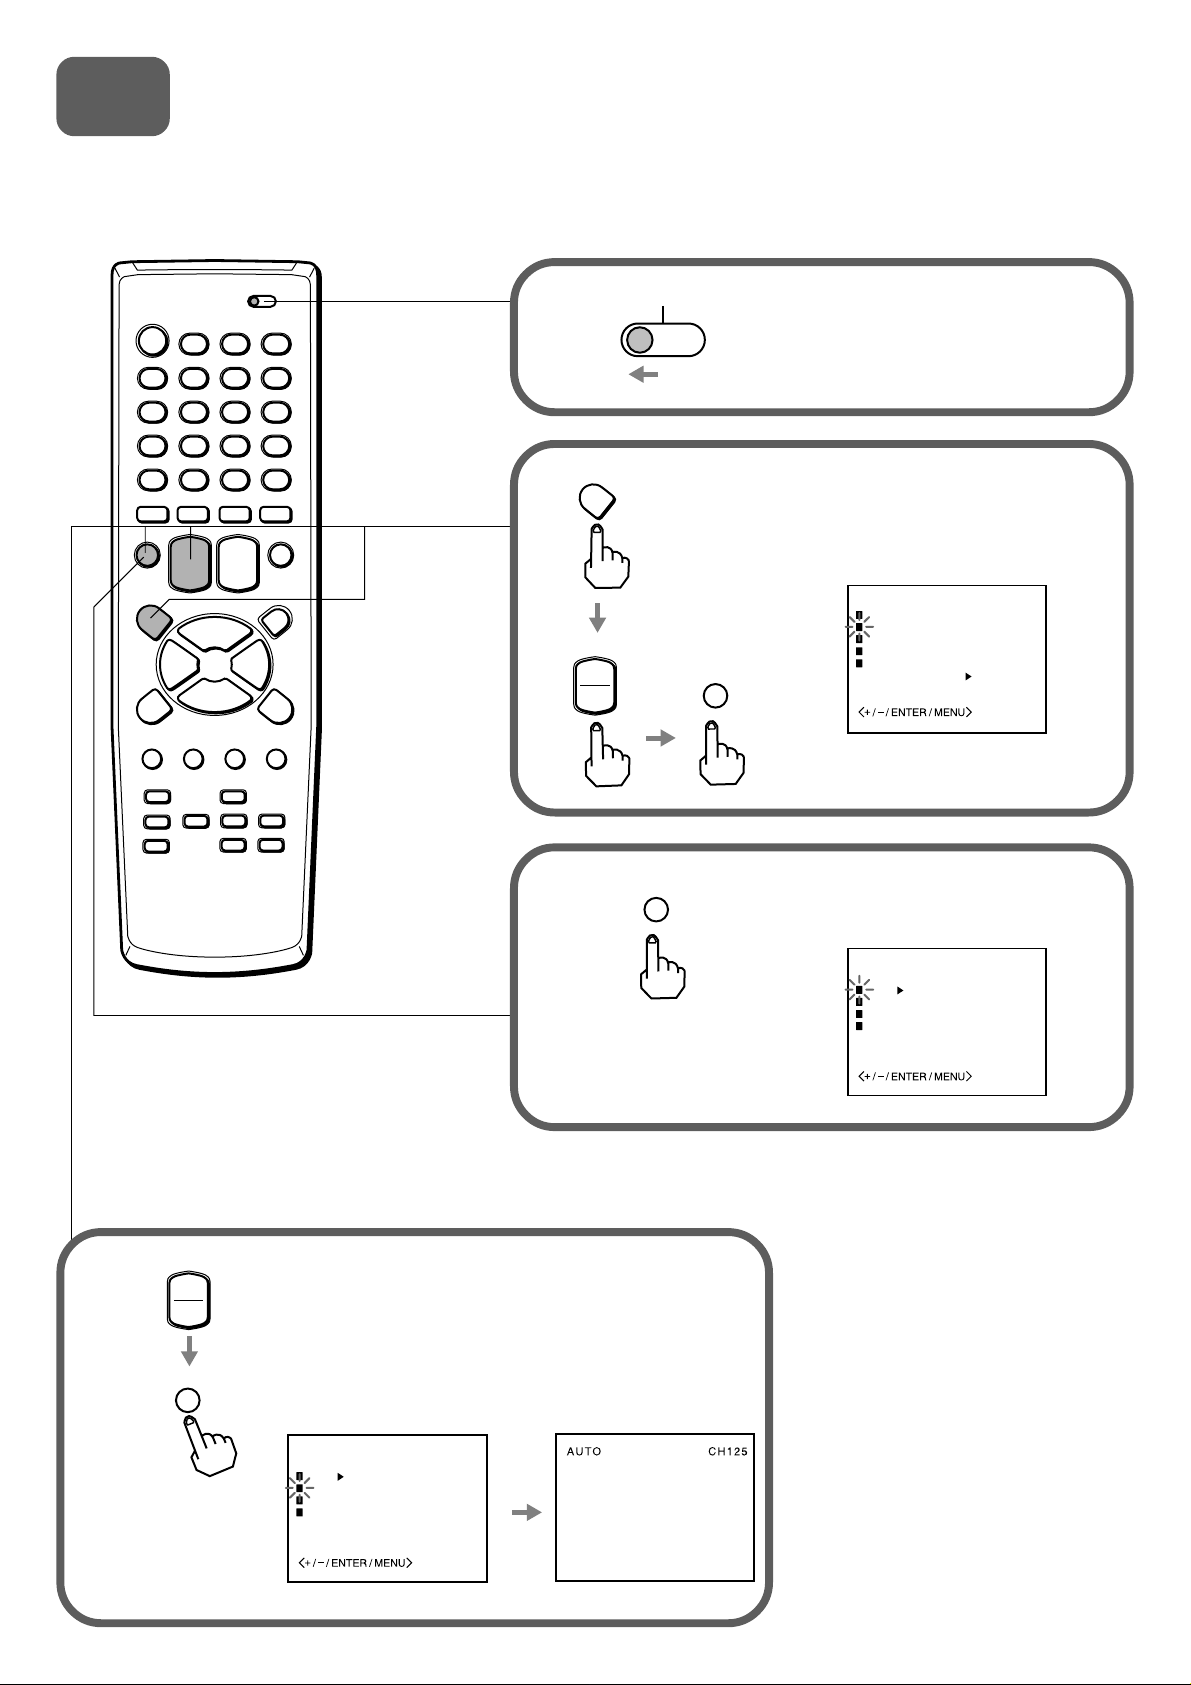
Setting the channels
Before starting
Make sure the VCR is in TV mode.
1
MENU
2
SET/TRACKING
+
–
VCR
CATV
TV
ENTER
Set the VCR/CATV/TV selector to
VCR.
Press MENU. And press SET/
TRACKING + or – to select CH
SET UP, then press ENTER.
MENU
TIMER REC SET
CH SET UP
VCR SET UP
SYSTEM SET UP
NO NOISE BACKGROUND
ON OFF
4
SET/TRACKING
+
–
ENTER
3
Press SET/TRACKING + or – to select
AUTO CH MEMORY, then press ENTER.
All available channels are tuned.
After tuning, CH SET UP menu appears on
the screen.
CH SET UP
TV CATV
AUTO CH MEMORY
ADD/DELETE
GUIDE CH SET
Press ENTER to select TV or
CATV.
CH SET UP
TV CATV
AUTO CH MEMORY
ADD/DELETE
GUIDE CH SET
6
 Loading...