

Sony HT-S500RF, HT-S700RF Operating Instructions Manual

Home Theatre System
Operating Instructions
HT-S500RF/S700RF
WARNING
Do not install the appliance in a
confined space, such as a bookcase or
built-in cabinet.
To reduce the risk of fire, do not cover
the ventilation opening of the appliance
with newspapers, tablecloths, curtains,
etc.
Do not expose the appliance to naked
flame sources (for example, lighted
candles).
To reduce the risk of fire or electric
shock, do not expose this appliance to
dripping or splashing, and do not place
objects filled with liquids, such as vases,
on the appliance.
The unit is not disconnected from the
mains as long as it is connected to the
AC outlet, even if the unit itself has been
turned off.
As the main plug is used to disconnect
the unit from the mains, connect the
unit to an easily accessible AC outlet.
Should you notice an abnormality in the
unit, disconnect the main plug from the
AC outlet immediately.
For the customers in India
Disposal of old
electrical &
electronic
equipment
(applicable in the
European Union
and other
countries with
separate
collection systems)
For the customers in UAE
TRA
REGISTERED No: ER58862/17
DEALER No: DA69600/17
Do not expose batteries or appliances
with battery-installed to excessive heat,
such as sunshine and fire.
Indoor use only.
Recommended cables
Properly shielded and grounded cables
and connectors must be used for
connection to host computers and/or
peripherals.
For the Bar Speaker
The nameplate is located on the bottom
of the Bar Speaker.
GB
2

Table of Contents
About These Operating
Instructions ..............................4
What’s in the Box ..........................5
What You Can Do with the
System .....................................6
Guide to Parts and Controls .......... 7
Connecting to a TV or Audio
Device
Connecting a TV
with an HDMI
Cable and/or
Optical Cable
Connecting an Audio Device with an
Analog Audio Cable ...............11
Preparing for Using the
System
Mounting the Bar Speaker and
Surround Speakers on a
Wall .........................................12
Operating the System Using the
Remote Control ..................... 15
When the TV Remote Control does
not Work ................................ 15
Listening to the Sound
Listening to a TV and Other
Devices .................................. 16
Listening to Music on a USB
Device .....................................17
Selecting the Sound Effect
Adjusting the Sound .................... 19
Adjusting the Volume of the
Subwoofer .............................20
Startup Guide
(separate
document)
Listening to Music/Sound
with the BLUETOOTH®
Function
Listening to Music from a Mobile
Device .................................... 21
Listening to Music on the Mobile
Device with Sony | Music
Center ....................................23
Using the Various Functions
Using the Setup Display ..............24
Using the Control for HDMI
Function .................................27
Notes on HDMI Connections .......28
Saving Power Consumption ........29
Troubleshooting
Troubleshooting ..........................30
Resetting the System ..................35
Additional Information
Specifications ...............................36
Playable Types of Files
(USB Input) .............................38
Supported Input Audio Formats
(HDMI OUT (TV (ARC)) or TV IN
(OPTICAL)) ..............................38
On BLUETOOTH
Communication .....................39
Precautions ..................................40
GB
3

About These Operating Instructions
•The instructions in these Operating
Instructions describe the controls on
the remote control.
•Some illustrations are presented as
conceptual drawings, and may be
different from the actual products.
•The default settings are underlined on
each feature description.
•The text enclosed in double quotation
mark (“--”) appears in the front panel
display.
GB
4

What’s in the Box
•Bar Speaker (1)
•Subwoofer (1)
• Surround speaker (HT-S500RF only) (2)
• R03 (size AAA) battery (2)
•HDMI cable (1)
• WALL MOUNT TEMPLATE (1) (Except
for some countries/regions)
• Surround speaker (2), speake r base (2),
and screw (8) (HT-S700RF only)
• Remote control (1)
•Startup Guide
• Operating Instructions
GB
5
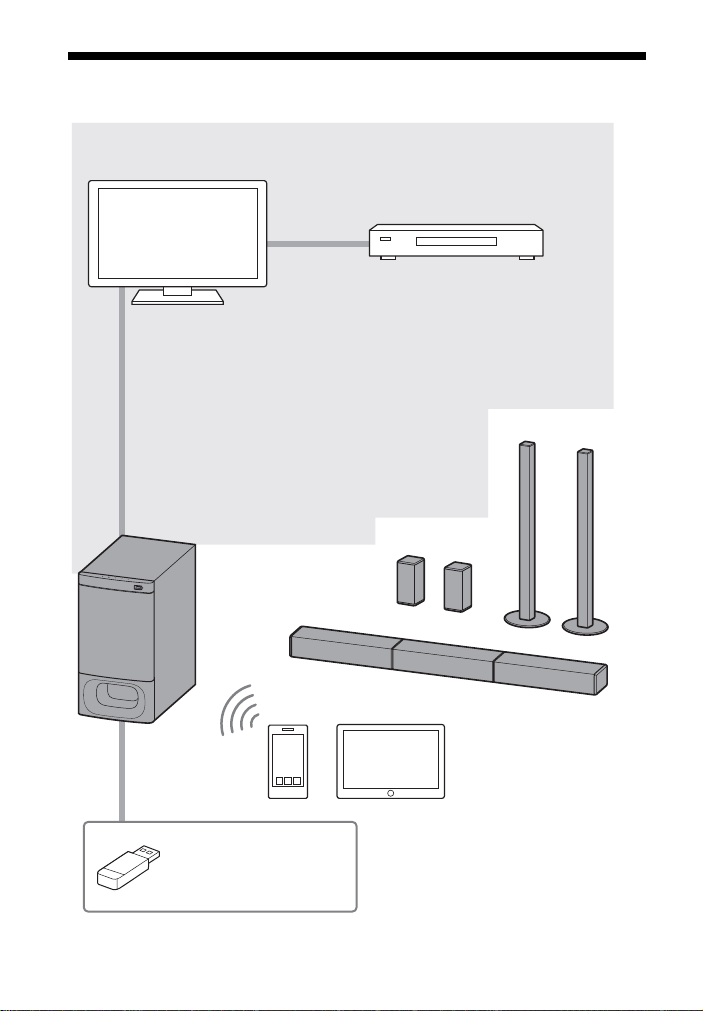
What You Can Do with the System
“Listening to a TV and Other Devices”
(page 16)
Blu-ray Disc™ player, cable
box, satellite box, etc.
Connecting the TV
(refer to “Startup Guide” (separate document) or
“Connecting an Audio Device with an Analog
Audio Cable” (page 11))
“Using the Control for HDMI Function”
(page 27)
“Listening to Music
on a USB Device”
(page 17)
“Listening to Music
from a Mobile Device”
(page 21)
“Listening to Music on
the Mobile Device
with Sony | Music
Center” (page 23)
HT-S500RF
HT-S700RF
GB
6
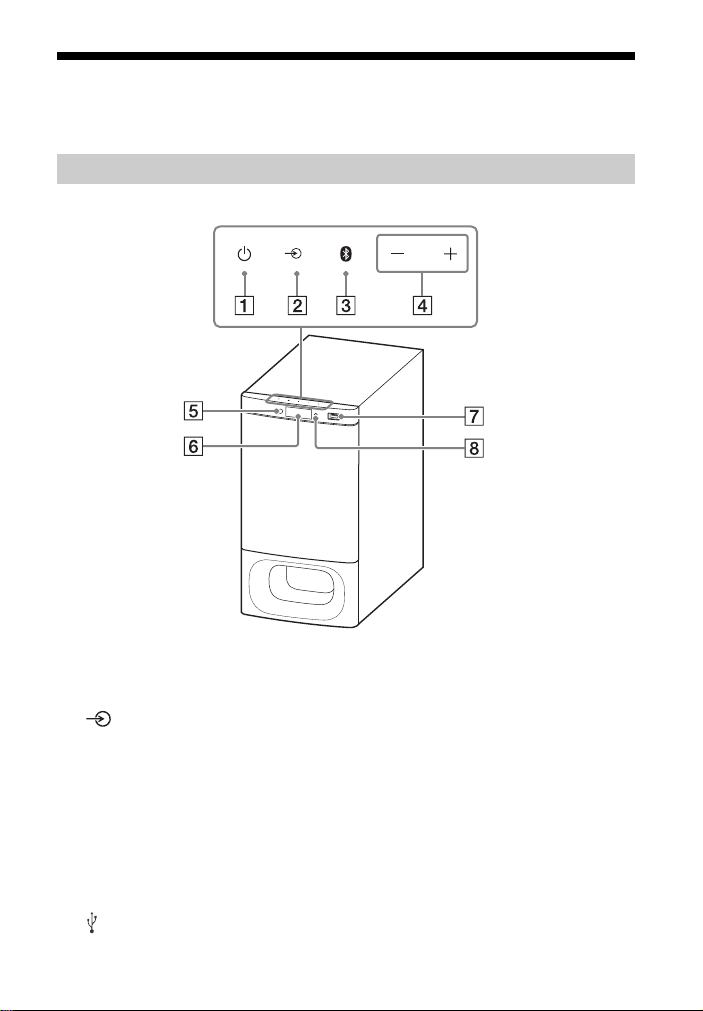
Guide to Parts and Controls
Details are omitted from the illustrations.
Subwoofer
Front
(power) button
Turns on the system or sets it to
standby mode.
(input select) button
(page 16)
BLUETOOTH button (page 21)
+/– (volume) buttons
Remote control sensor (page 15)
Point the remote control at the
remote control sensor to operate
the system.
Front panel display
(USB) port (page 17)
BLUETOOTH indicator
– Lights in blue: BLUETOOTH
connection is established (the
BLUETOOTH input is selected).
– Flashes quickly in blue: While
waiting for connection with a
device.
– Flashes in blue: While
reconnecting or performing
pairing.
GB
7
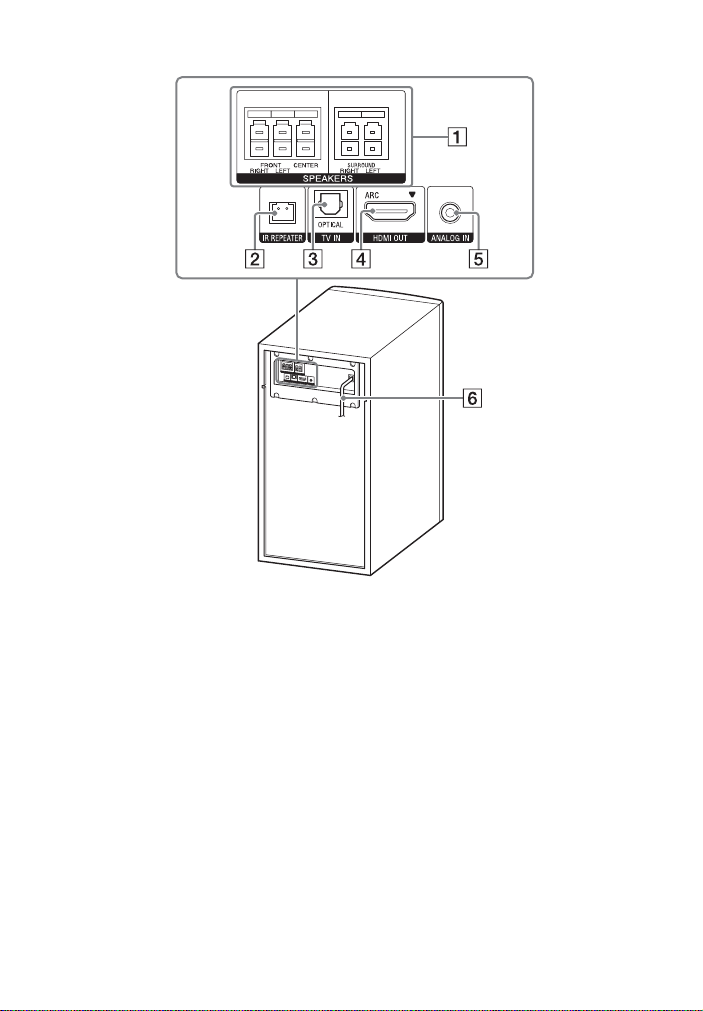
Rear
SPEAKERS jacks
IR REPEATER jack
TV IN (OPTICAL) jack
HDMI OUT (ARC) jack
Connect a TV that has an HDMI
input jack with an HDMI cable.
The system is compatible with
Audio Return Channel (ARC). ARC
is the function that sends TV
sou nd to an AV devi ce su ch as the
system from the TV’s HDMI jack.
GB
8
ANALOG IN jack (page 11)
AC power cord (mains lead)
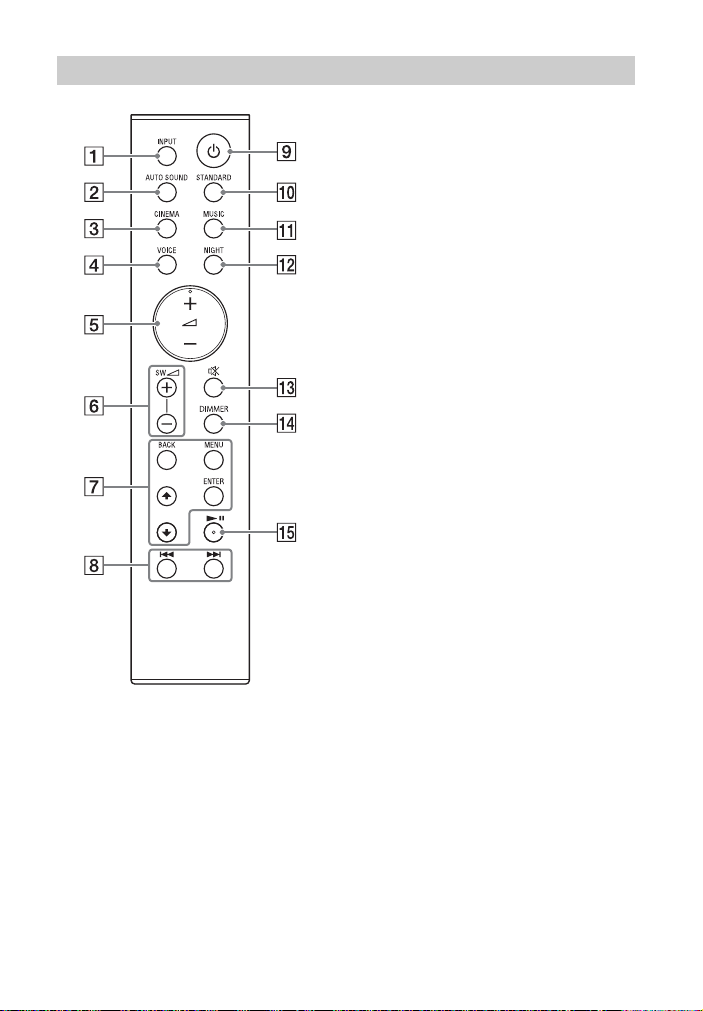
Remote Control
INPUT (page 16)
Selects the input source.
AUTO SOUND (page 19)
Selects AUTO SOUND for the sound
effect.
CINEMA (page 19)
Selects CINEMA for the sound
effect.
VOICE (page 19)
Turns on/off the voice mode.
(volume) +*/–
Adjusts the volume.
SW (subwoofer volume) +/–
Adjusts the subwoofer volume.
MENU (page 24)
Turns on/off the menu in the front
panel display.
/ (page 17, 24)
Selects the menu items.
Selects the content on the TV screen
for USB playback.
ENTER (page 17, 24)
Enters the selection.
Plays the content that is selected by
/ for USB playback.
BACK (page 17, 24)
Returns to the previous display.
Stops USB playback.
/ (previous/next)
(page 17, 21)
Press to select the previous/next
track or file.
Hold down to search backward or
forward.
(power)
Turns on the system or sets it to
standby mode.
STANDARD (page 19)
Selects STANDARD for the sound
effect.
MUSIC (page 19)
Selects MUSIC for the sound effect.
NIGHT (page 19)
Turns on/off the night mode.
GB
9

(muting)
Mutes the sound temporarily.
Pressing the button while muting
cancels muting.
DIMMER
Adjusts the brightness of the front
panel display.
“BRGHT” “DARK” “OFF”
• The front panel display is turned
off when “OFF” is selected. It turns
on automatically when you
operate the system, then turns off
again if you do not operate the
system for several seconds.
However, in some cases, the front
panel display may not turn off. In
this case, the brightness of the
front panel display is same as
“DARK.”
(play/pause)* (page 17, 21)
Plays, pauses, or resumes playback.
*The + and buttons have a tactile
dot. Use it as a guide during operation.
About the replacement of
batteries for the remote control
When the system does not respond by
operating with the remote control,
replace two batteries with new
batteries.
Use R03 (size AAA) manganese
batteries for replacement.
10
GB
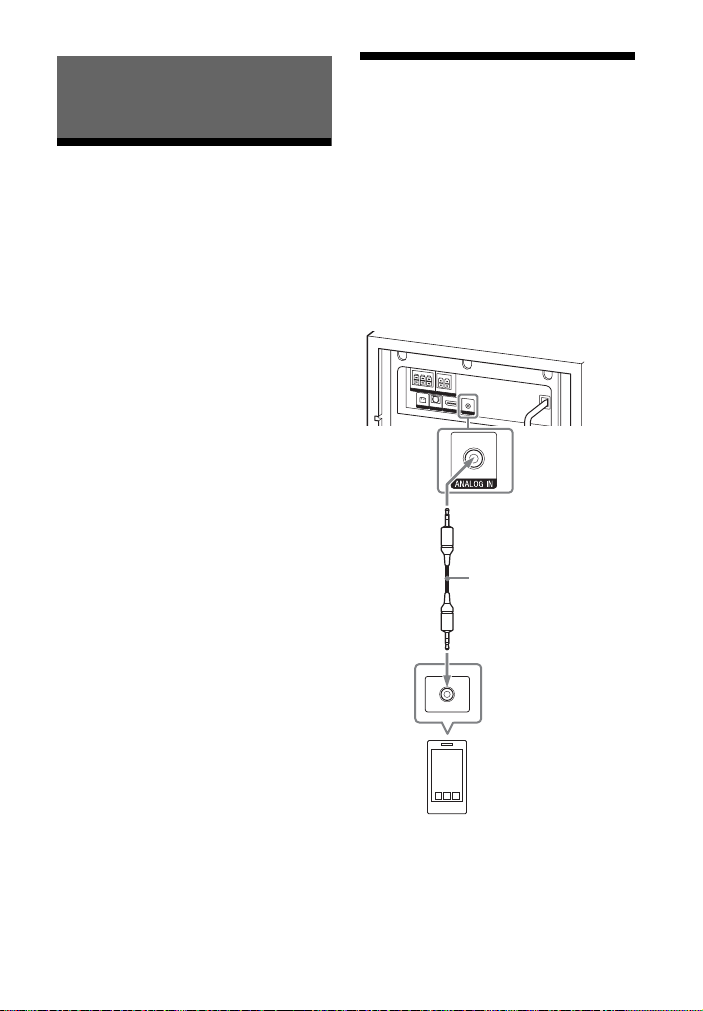
Connecting to a TV or Audio
Smartphone,
WALKMAN®, other
audio devices, etc.
Analog
audio out
Analog audio cable
(not supplied)
Device
Connecting a TV with an
HDMI Cable and/or
Optical Cable
Refer to Startup Guide (separate
document).
Connecting an Audio Device with an Analog Audio Cable
To connect portable audio devices such
as smartphones and WALKMAN® to the
system, connect them via the ANALOG
IN jack on the system.
For listening to the connected device,
see “Listening to a TV and Other
Devices” (page 16).
GB
11
Preparing for Using the System
Hole on the rear of the Bar Speaker
4mm
More than 30 mm
5 mm
10 mm
Center of the TV
WALL MOUNT
TEMPLATE
Adhesive tape,
etc.
installation, insufficient wall strength,
improper screw installation or natural
disaster, etc.
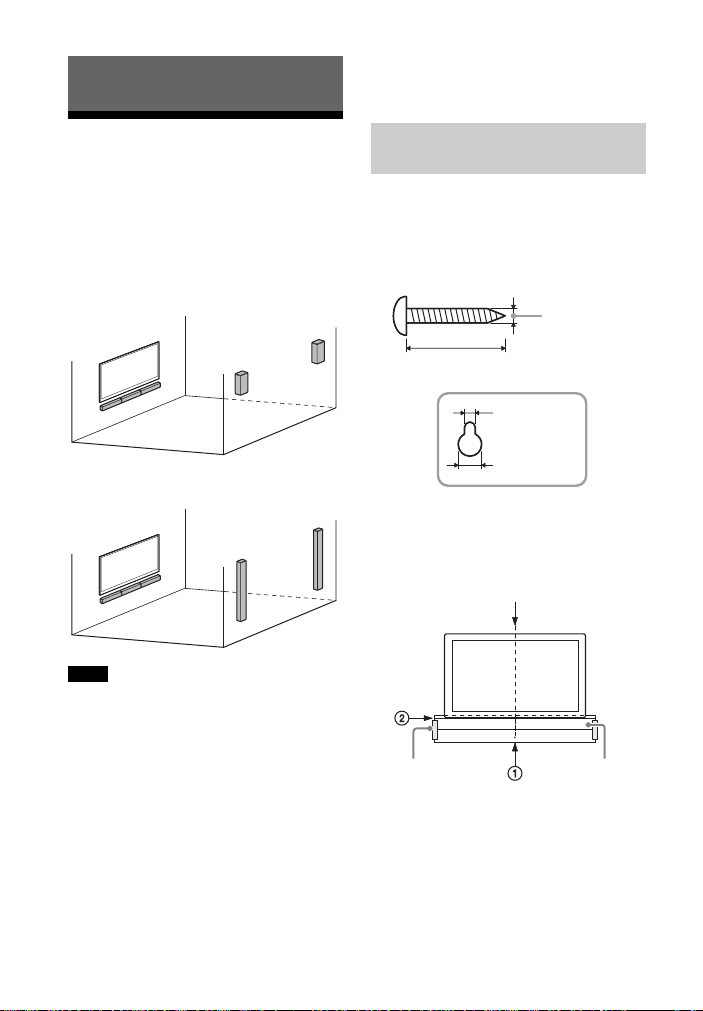
Mounting the Bar Speaker and Surround Speakers on a Wall
You can mount the Bar Speaker and
surround speakers on a wall.
HT-S500RF
HT-S700RF
Notes
• Prepare screws (not supplied) that are
suitable for the wall material and
strength. As a plasterboard wall is
especially fragile, attach the screws
securely in the wall beam. Install the
speakers horizontally, hung by screws in
studs in a continuous flat section of the
wall.
• Have the installation done by a Sony
dealer or licensed contractor and pay
special attention to safety during the
installation.
• Sony shall not be held responsible for
accidents or damage caused by improper
Mounting the Bar Speaker
on a Wall
1 Prepare two screws (not supplied)
that are suitable for the wall
mount holes on the rear of the Bar
Speaker.
2 Stick WALL MOUNT TEMPLATE
(supplied) on a wall.
1 Align TV CENTER LINE () of
WALL MOUNT TEMPLATE with the
center line of your TV.
2 Align TV BOTTOM LINE () of
WALL MOUNT TEMPLATE with the
bottom of your TV, then stick
GB
12
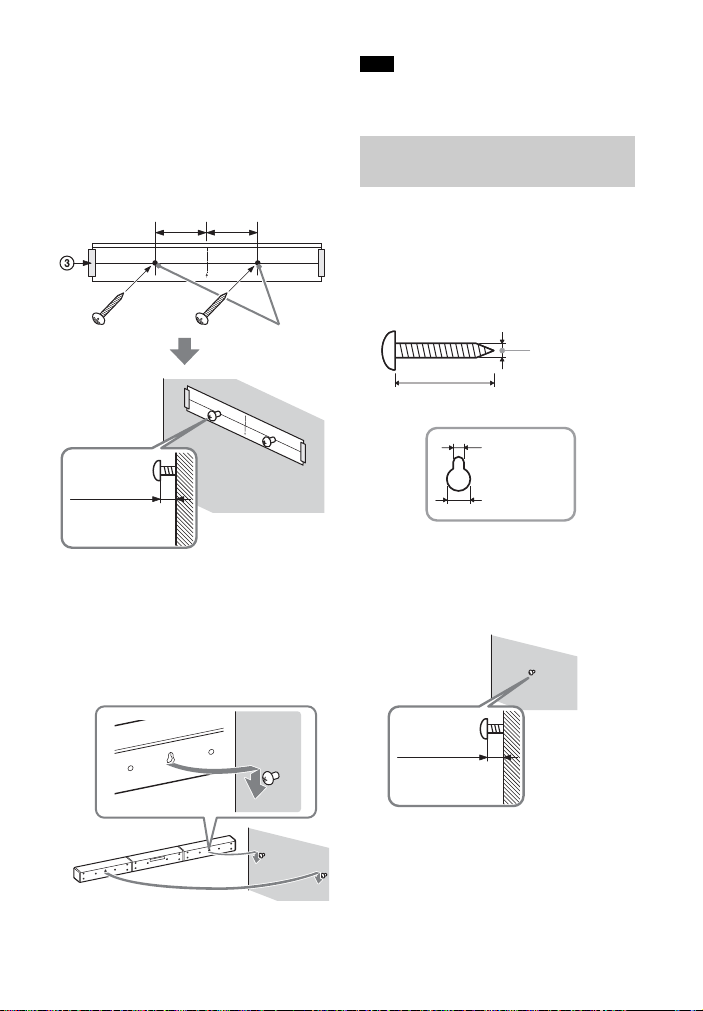
WALL MOUNT TEMPLATE on a
Screws
Marks
6 mm to
7mm
297.5 mm
297.5 mm
Hole on the rear of the surround speaker
4mm
More than 30 mm
5 mm
10 mm
8 mm to
9mm
wall by using a commercially
available adhesive tape, etc.
3 Fasten the screws into the marks
on SCREW LINE () of WALL
MOUNT TEMPLATE as the
illustration below.
Note
When sticking WALL MOUNT TEMPLATE,
smooth it out fully.
Mounting the Surround
Speakers on a Wall
For HT-S500RF
1 Prepare a screw (not supplied) for
each speaker that is suitable for
the wall mount hole on the rear of
the surround speaker.
4 Remove WALL MOUNT TEMPLATE.
5 Hang the Bar Speaker on the
screws.
Align the holes of the rear of the Bar
Speaker with the screws, then hang
the Bar Speaker on the two screws.
2 Fasten the screw in the wall.
The screw should protrude as
illustration.
13
GB
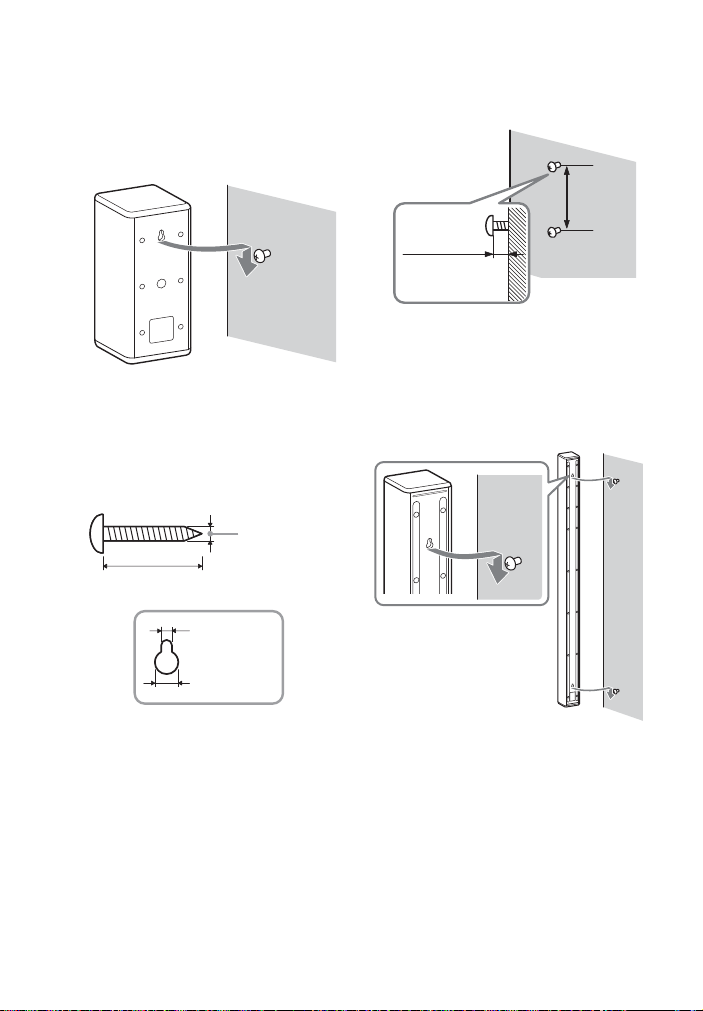
3 Hang the surround speaker on the
Hole on the rear of the surround speaker
4mm
More than 30 mm
5 mm
10 mm
1,000 mm
8 mm to
9mm
screw.
Align the hole of the rear of the
surround speaker with the screw,
then hang the surround speaker on
the screw.
For HT-S700RF
1 Prepare two screws (not supplied)
for each speaker that are suitable
for the wall mount holes on the
rear of the surround speaker.
2 Fasten the screws in the wall.
The screw should protrude as
illustration.
3 Hang the surround speaker on the
screws.
Align the holes of the rear of the
surround speaker with the screws,
then hang the surround speaker on
the screws.
14
GB
 Loading...