


Sound Bar
Operating Instructions US
http://www.sony.net/
Barre de son
Manuel d’instructions FR
Manual de instrucciones ES
Barra de sonido
©2019 Sony Corporation
Printed in Malaysia
Imprimé en Malaisie
4-748-757-11(2)
HT-S350

Owner’s Record
The model and serial numbers are
located on the bottom of the Bar
Speaker. Record the serial numbers in
the space provided below. Refer to
them whenever you call upon your Sony
dealer regarding the Sound Bar.
Model No. HT-S350
Serial No.
WARNING
To reduce the risk of fire or electric
shock, do not expose this Sound Bar
to rain or moisture.
The Sound Bar is not disconnected from
the mains as long as it is connected to
the AC outlet, even if the Sound Bar
itself has been turned off.
To reduce the risk of fire, do not cover
the ventilation opening of the Sound
Bar with newspapers, tablecloths,
curtains, etc.
Do not expose the Sound Bar to naked
flame sources (for example, lighted
candles).
To reduce the risk of fire or electric
shock, do not expose this Sound Bar to
dripping or splashing, and do not place
objects filled with liquids, such as vases,
on the Sound Bar.
As the main plug is used to disconnect
the Sound Bar from the mains, connect
the Sound Bar to an easily accessible AC
outlet. Should you notice an
abnormality in the Sound Bar,
disconnect the main plug from the AC
outlet immediately.
Do not install the Sound Bar in a
confined space, such as a bookcase or
built-in cabinet.
CAUTION
Risk of explosion if the battery is
replaced by an incorrect type.
Do not expose batteries or appliances
with battery-installed to excessive heat,
such as sunshine and fire.
Indoor use only.
For the Bar Speaker
The nameplate is located on the bottom
of the Bar Speaker.
For the customers in the U.S.A.
Important Safety Instructions
1) Read these instructions.
2) Keep these instructions.
3) Heed all warnings.
4) Follow all instructions.
5) Do not use this apparatus near
water.
6) Clean only with dry cloth.
7) Do not block any ventilation
openings. Install in accordance with
the manufacturer’s instructions.
8) Do not install near any heat sources
such as radiators, heat registers,
stoves, or other apparatus (including
amplifiers) that produce heat.
9) Do not defeat the safety purpose of
the polarized or grounding-type
plug. A polarized plug has two
blades with one wider than the
other. A grounding type plug has
two blades and a third grounding
prong. The wide blade or the third
prong are provided for your safety. If
the provided plug does not fit into
your outlet, consult an electrician for
replacement of the obsolete outlet.
10) Protect the power cord from being
walked on or pinched particularly at
plugs, convenience receptacles, and
the point where they exit from the
apparatus.
11) Only use attachments/accessories
specified by the manufacturer.
US
2

12) Use only with the cart, stand, tripod,
bracket, or table specified by the
manufacturer, or sold with the
apparatus. When a cart is used, use
caution when moving the cart/
apparatus combination to avoid
injury from tip-over.
13) Unplug this apparatus during
lightning storms or when unused for
long periods of time.
14) Refer all servicing to qualified service
personnel. Servicing is required
when the apparatus has been
damaged in any way, such as powersupply cord or plug is damaged,
liquid has been spilled or objects
have fallen into the apparatus, the
apparatus has been exposed to rain
or moisture, does not operate
normally, or has been dropped.
NOTE:
This Sound Bar has been tested and
found to comply with the limits for a
Class B digital device, pursuant to Part
15 of the FCC Rules. These limits are
designed to provide reasonable
protection against harmful interference
in a residential installation. This Sound
Bar generates, uses and can radiate
radio frequency energy and, if not
installed and used in accordance with
the instructions, may cause harmful
interference to radio communications.
However, there is no guarantee that
interference will not occur in a particular
installation. If this Sound Bar does cause
harmful interference to radio or
television reception, which can be
determined by turning the Sound Bar off
and on, the user is encouraged to try to
correct the interference by one or more
of the following measures:
– Reorient or relocate the receiving
antenna.
– Increase the separation between the
Sound Bar and receiver.
– Connect the Sound Bar into an outlet
on a circuit different from that to
which the receiver is connected.
– Consult the dealer or an experienced
radio/TV technician for help.
Properly shielded and grounded cables
and connectors must be used for
connection to host computers and/or
peripherals in order to meet FCC
emission limits.
If you have any questions about this
Sound Bar:
Visit: www.sony.com/support
Contact: Sony Customer Information
Service Center at 1-800-222-SONY
(7669)
Write: Sony Customer Information
Service Center 12451 Gateway Blvd., Fort
Myers, FL 33913
Supplier’s Declaration of Conformity
Trade Name: SONY
Model No.: HT-S350
Responsible Party: Sony Electronics Inc.
Address: 16535 Via Esprillo, San Diego,
CA 92127 USA
Telephone No.: 858-942-2230
This device complies with Part 15 of the
FCC Rules. Operation is subject to the
following two conditions: (1) This device
may not cause harmful interference,
and (2) this device must accept any
interference received, including
interference that may cause undesired
operation.
CAUTION
You are cautioned that any changes or
modifications not expressly approved in
this manual could void your authority to
operate this Sound Bar.
US
US
3

This Sound Bar must not be co-located
or operated in conjunction with any
other antenna or transmitter.
This Sound Bar complies with FCC
radiation exposure limits set forth for an
uncontrolled environment and meets
the FCC radio frequency (RF) Exposure
Guidelines. This Sound Bar should be
installed and operated keeping the
radiator at least 20cm or more away
from person’s body.
For the customers in Canada
Properly shielded and grounded cables
and connectors must be used for
connection to host computers and/or
peripherals.
This Sound Bar contains licence-exempt
transmitter(s)/receiver(s) that comply
with Innovation, Science and Economic
Development Canada’s license-exempt
RSS(s). Operation is subject to the
following two conditions:
(1) This Sound Bar may not cause
interference; and
(2) This Sound Bar must accept any
interference, including interference
that may cause undesired operation
of the Sound Bar.
This Sound Bar complies with ISED
radiation exposure limits set forth for an
uncontrolled environment and meets
RSS-102 of the ISED radio frequency (RF)
Exposure rules. This Sound Bar should
be installed and operated keeping the
radiator at least 20cm or more away
from person’s body.
US
4

Table of Contents
About These Operating
Instructions ..............................5
What’s in the Box ..........................6
What You Can Do with the Sound
Bar ............................................ 7
Guide to Parts and Controls ..........8
Connecting a TV
Connecting a TV
with an HDMI
Cable
Connecting Sony TV with the
BLUETOOTH Function
Wirelessly .............................. 15
Mounting the Bar Speaker on a
Wall .........................................17
When the TV Remote Control does
not Work ................................ 19
Listening to the Sound
Listening to a TV and Other
Devices ..................................20
Adjusting the Sound .....................21
Listening to Music/Sound
with the BLUETOOTH®
Function
Listening to Music from a Mobile
Device ....................................23
Turning the Sound Bar On by
Operating the BLUETOOTH
Device ....................................25
Turning the BLUETOOTH Function
Off ..........................................25
Using the Various Functions
Performing the Wireless Connection
of the Subwoofer
(SECURE LINK) ........................26
Using the Control for HDMI
Function .................................27
Startup Guide
(separate
document)
Using the “BRAVIA” Sync
Function .................................28
Notes on HDMI Connections .......29
Saving Power Consumption ........29
Troubleshooting
Troubleshooting ..........................30
Resetting the Sound Bar .............35
Additional Information
Specifications ...............................36
Supported Input Audio Formats
(TV Input) ............................... 37
On BLUETOOTH
Communication .....................38
Precautions ..................................39
About These Operating
Instructions
•The instructions in these Operating
Instructions describe the controls on
the remote control.
•Some illustrations are presented as
conceptual drawings, and may be
different from the actual products.
•The default settings are underlined on
each feature description.
Example: Control for HDMI function on
US
5

What’s in the Box
•Bar Speaker (1)
•Subwoofer (1)
• Remote control (1)
• R03 (size AAA) battery (2)
• WALL MOUNT TEMPLATE (1)
•Startup Guide
• Operating Instructions
• Optical digital cable (1)
US
6

What You Can Do with the Sound Bar
“Listening to a TV and Other
Devices” (page 20)
Blu-ray Disc™ player, cable
box, satellite box, etc.
Connecting the TV
(refer to “Startup Guide” (separate
document))
“Using the Control for HDMI
Function” (page 27)
“Using the “BRAVIA” Sync
Function” (page 28)
“Performing the Wireless
Connection of the Subwoofer
(SECURE LINK)” (page 26)
“Listening to Music from a
Mobile Device” (page 23)
“Connecting Sony TV
with the BLUETOOTH
Function Wirelessly”
(page 15)
US
7

Guide to Parts and Controls
Details are omitted from the illustrations.
Bar Speaker
Front
Remote control sensor
Point the remote control at the
remote control sensor to operate
the Sound Bar.
(power) button
Turns on the Sound Bar or sets it to
standby mode.
(TV) button (page 20)
BLUETOOTH button (page 23)
US
8
+/– (volume) buttons

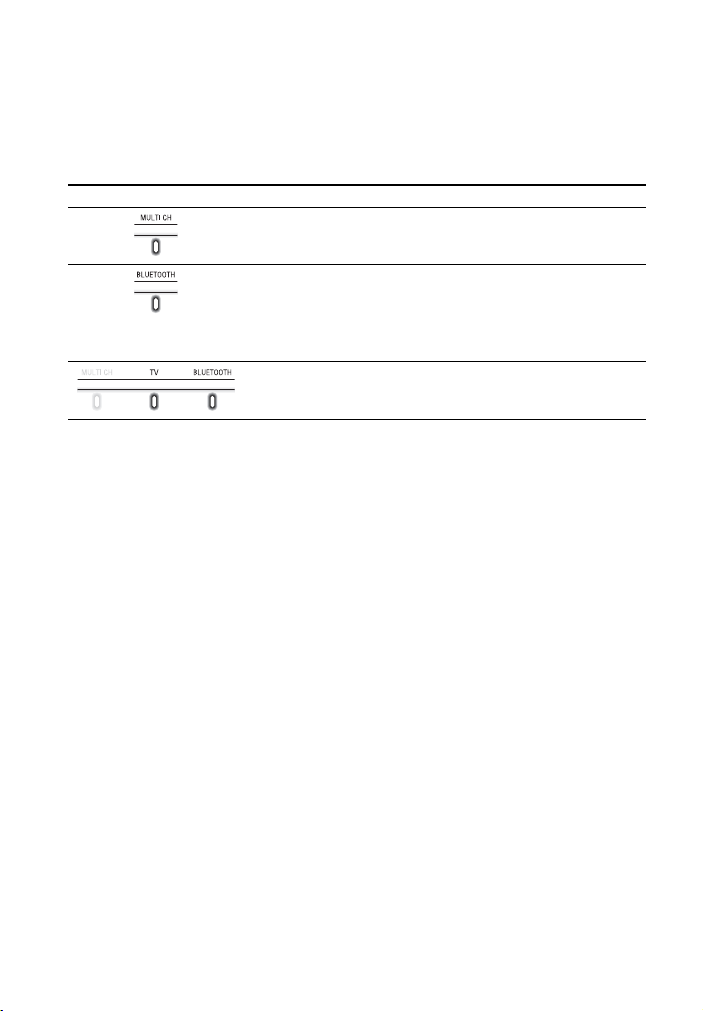
Indicators
A lighting or flashing of the indicators on the Bar Speaker indicates the following
state.
Currently selected input
Indicators Status
Lights while TV input is selected.
Lights while BLUETOOTH input is selected.
Light while the Sound Bar is connected to the TV with the
BLUETOOTH function (TV input is selected).
Sound format, surround effect
Indicators Status
• Lights while 5.1ch Multi-channel sound is input.
• Flashes once while the sound mode is selected (page 21).
Volume
Indicators Status
Flashes once when the volume level is set to low (1 - 20).
Flash once when the volume level is set to medium (21 - 40).
or
Flash once when the volume level is set to high (41 - 49).
• Flash repeatedly while the sound is muted.
• Flash twice when the volume level is set to maximum/minimum.
The current input indicator flashes once when adjusting the
subwoofer volume by pressing SW
Flash three times when the subwoofer volume level is set to
maximum/minimum.
+/–.
US
9
Setting value for each function
The on/off setting for each function is indicated by the number of times the following
indicator flashes.
• On: Flashes twice.
• Off: Flashes once.
For the indicator status when settings other than the on/off setting are changed, see
the description for each function.
Indicators Functions
•Night mode (page 22)
•Voice mode (page 22)
•Audio DRC (page22)
• Control for HDMI (page 27)
• BLUETOOTH standby (page 25)
• BLUETOOTH function (page 25)
• Auto standby (page 29)
• IR repeater (page 19)
Connecting a TV with the BLUETOOTH function (page 15).
10
US

Rear
HDMI OUT (TV (ARC)) jack
Connect a TV that has an HDMI
input jack with an HDMI cable (not
supplied).
The Sound Bar is compatible with
ARC (page 27). ARC is the function
that sends TV sound to an AV device
such as the Sound Bar from the TV’s
HDMI input jack.
TV IN (OPTICAL) jack
IR repeater (page 19)
Transmits the remote signal of the
TV remote control to the TV.
US
11
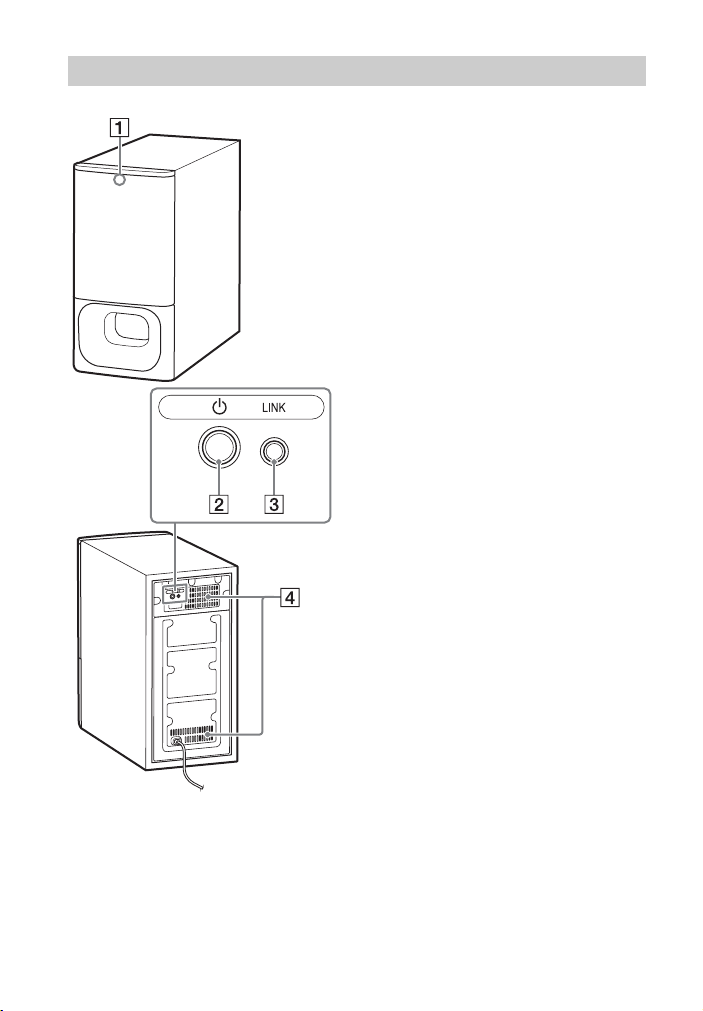
Subwoofer
Status indicator
Indicates the status of the
subwoofer power and Bar Speaker
connection.
– Lights in green: The connection
between the subwoofer and Bar
Speaker is established.
– Flashes in green: The connection
between the subwoofer and Bar
Speaker is in progress.
– Lights in orange: The connection
between the subwoofer and Bar
Speaker is established with the
Secure Link function.
– Flashes in orange: The connection
between the subwoofer and Bar
Speaker with the Secure Link
function is in progress.
– Lights in red: The subwoofer is in
standby mode.
– Lights off: The subwoofer is
turned off.
(power) button
Turns on/off the subwoofer.
LINK button (page 26)
Ventilation holes
For safety, do not block the
ventilation holes.
12
US
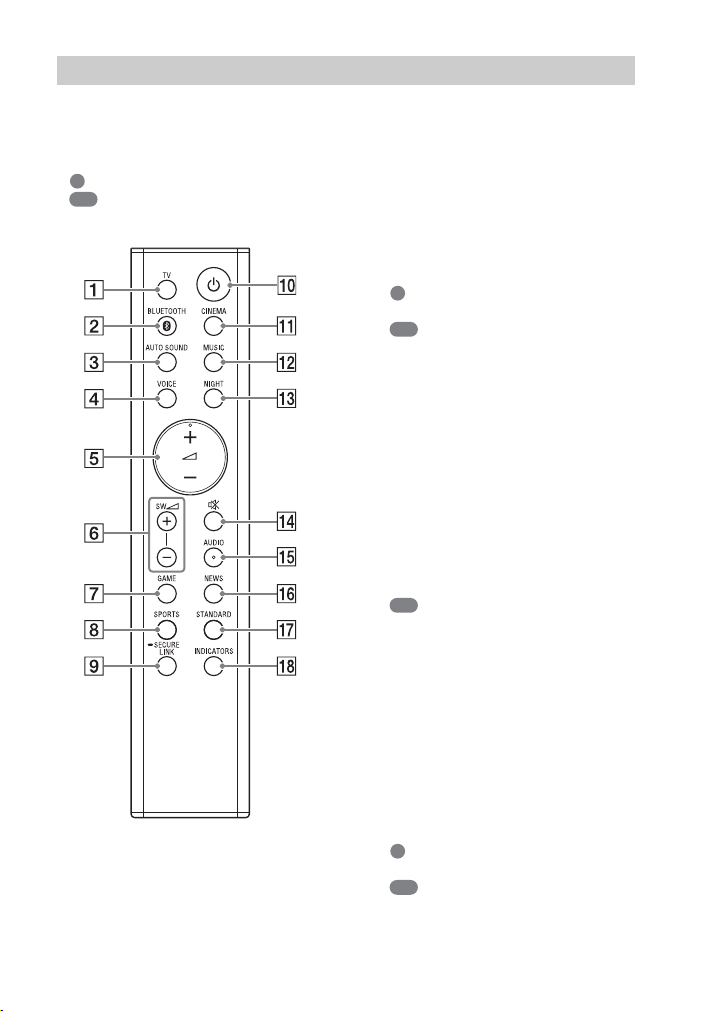
Remote Control
Some buttons function differently
depending on how long the button is
pressed. The icons below indicate how
long to press the button.
• : Press the button.
• : Press and hold the button for 5
seconds.
TV (page 20)
Selects the TV input.
BLUETOOTH (page 20, 24)
Selects the BLUETOOTH input.
AUTO SOUND (page 21)
Selects AUTO SOUND for the sound
effect.
VOICE
: Turns on/off the voice mode.
(page 22)
: Turns on/off the Control for
HDMI function. (page 27)
(volume) +*/–
Adjusts the volume.
SW (subwoofer volume) +/–
Adjusts the volume of the
subwoofer.
GAME (page 21)
Selects GAME for the sound effect.
SPORTS (page 21)
Selects SPORTS for the sound effect.
SECURE LINK (page 26)
: Starts the link setting for the
Secure Link function.
(power)
Turns on the Sound Bar or sets it to
standby mode.
CINEMA (page 21)
Selects CINEMA for the sound
effect.
MUSIC (page 21)
Selects MUSIC for the sound effect.
NIGHT
: Turns on/off the night mode.
(page 22)
: Turns on/off the BLUETOOTH
standby mode. (page 25)
13
US

(muting)
Turns off the sound temporarily or
turns on the sound.
AUDIO*
: Selects the audio channel for
Dolby Digital multiplex broadcast.
(page 22)
: Turns on/off the Audio DRC
function. (page 22)
NEWS (page 21)
Selects NEWS for the sound effect.
STANDARD
: Selects STANDARD for the
sound effect. (page 21)
: Turns on/off the IR repeater
function. (page 19)
INDICATORS
: Turns on/off the indicators on
the Bar Speaker.
: Turns on/off the auto standby
function. (page 29)
*The + and AUDIO buttons have a
tactile dot. Use it as a guide during
operation.
Tip
You can turn the indicators off by pressing
INDICATORS.
Even if the indicators are turned off by
pressing INDICATORS, when you operate
the Sound Bar, the indicators in relation to
the operation light or flash.
About the replacement of
batteries for the remote control
When the Sound Bar does not respond
by operating with the remote control,
replace two batteries with new
batteries.
Use R03 (size AAA) manganese
batteries for replacement.
US
14

Connecting a TV
Blu-ray Disc player,
cable box, satellite
box, etc.
TV
BLUETOOTH
button
Connecting a TV with an
HDMI Cable
Refer to Startup Guide (separate
document).
Connecting Sony TV with
the BLUETOOTH Function
Wirelessly
When using Sony TV* with the
BLUETOOTH function, you can listen to
sound of the TV or device that is
connected to the TV by connecting the
Sound Bar and TV wirelessly.
* The TV needs to be compatible with
A2DP (Advanced Audio Distribution
Profile).
Connecting the Sound Bar
and TV Wirelessly
To connect the Sound Bar and TV
wirelessly, you need to perform pairing
of the Sound Bar and TV by using the
BLUETOOTH function.
Pairing is the process required to
mutually register the information on
BLUETOOTH devices to be connected
wirelessly in advance.
1 Insert batteries (supplied) into the
remote control.
2 Turn on the TV.
3 Turn on the Bar Speaker and
subwoofer.
4 Point the remote control at the
remote control sensor on the Bar
Speaker, and press and hol d TV on
the remote control and the
BLUETOOTH button on the Bar
Speaker simultaneously for 5
seconds.
The TV and BLUETOOTH indicators
flash twice, the Sound Bar enters
the pairing mode, then the
BLUETOOTH indicator flashes
quickly.
15
US

5 On the TV, search the Sound Bar
BLUETOOTH
indicator
Remote control sensor
by performing the pairing
operation.
The list of the BLUETOOTH devices
that are searched appears on the TV
screen.
For the operation method to pair
the BLUETOOTH device to the TV,
refer to the operating instructions of
the TV.
6 Pair the Sound Bar and TV by
selecting “HT-S350” from the list
on the TV screen.
7 Make sure that the TV and
BLUETOOTH indicators on the Bar
Speaker light.
A connection between the Sound
Bar and TV has been established.
9 Adjust the volume of the Sound
Bar by using the TV remote
control.
When pressing the muting button
on the TV remote co ntrol, the sound
is muted temporarily.
Notes
• If the TV sound is not output from the
Sound Bar, press TV on the remote
control of the Sound Bar to select the TV
input and check the status of the
indicators on the Bar Speaker.
– The TV and BLUETOOTH indicators light:
The Sound Bar and TV are connected
and TV sound is output from the Sound
Bar.
– The BLUETOOTH indicator flashes
quickly: Perform pairing on the TV.
– The TV indicator lights: Perform the
connecting operation again from the
start.
• When you connect the Sound Bar and TV
with an HDMI cable (not supplied), the
BLUETOOTH connection is canceled. To
connect the Sound Bar and TV with the
BLUETOOTH function again, disconnect
the HDMI cable, then perform the
connecting operation from the start.
• To pair another TV after the first TV is
paired, turn off the paired TV, then pair
the new one by following the steps of
mobile device connection (page 23).
8 Select the program or input of the
TV by using the TV remote control.
The sound of the displayed image
on the TV screen is output from the
Sound Bar.
US
16
Listening to the Sound of the
TV or Device that is
Connected to the TV
You can turn the Sound Bar on/off,
adjust the volume, and mute the sound
by using the TV remote control when
connecting the TV to the Sound Bar
wirelessly.
1 Turn the TV on with the TV remote
control.
The Sound Bar is turned on by
interlocking with the TV power and

TV sound is output from the Sound
Bar.
2 Select the program or input of the
device by using the TV remote
control.
The sound of the image displayed
on the TV screen is output from the
Sound Bar.
3 Adjust the volume of the Sound
Bar by using the TV remote
control.
When pressing the mute button on
the TV remote control, the sound is
muted temporarily.
Tip
When the TV is turned off, the Sound Bar is
also turned off by interlocking with the TV
power.
Mounting the Bar
Speaker on a Wall
You can mount the Bar Speaker on a
wall.
Notes
•Prepare screws (not supplied) that are
suitable for the wall material and
strength. As a plasterboard wall is
especially fragile, attach the screws
securely in the wall beam. Install the
speakers horizontally, hung by screws in
studs in a continuous flat section of the
wall.
• Have the installation done by a Sony
dealer or licensed contractor and pay
special attention to safety during the
installation.
• Sony shall not be held responsible for
accidents or damage caused by improper
installation, insufficient wall strength,
improper screw installation or natural
disaster, etc.
US
17

1 Prepare two screws (not supplied)
Hole on the rear of the Bar Speaker
4mm (3/16 in)
More than 30 mm (1 3/16 in)
5 mm
(7/32 in)
10 mm
(13/32 in)
Center of the TV
WALL MOUNT
TEMPLATE
Adhesive tape,
etc.
Screws
Marks ()
10 mm to
11 mm
(approx.
7/16 in)
368.5 mm
(14 1/2 in)
368.5 mm
(14 1/2 in)
that are suitable for the wall
mount holes on the rear of the Bar
Speaker.
2 Stick WALL MOUNT TEMPLATE
(supplied) on a wall.
1 Align TV CENTER LINE () of
2 Align TV BOTTOM LINE () of
18
US
WALL MOUNT TEMPLATE with the
center line of your TV.
WALL MOUNT TEMPLATE with the
bottom of your TV, then stick
WALL MOUNT TEMPLATE on a
wall by using a commercially
available adhesive tape, etc.
3 Fasten the screws into the marks
() on SCREW LINE () of WALL
MOUNT TEMPLATE as in the
illustration below.
4 Remove WALL MOUNT TEMPLATE.
5 Hang the Bar Speaker on the
screws.
Align the holes of the rear of the Bar
Speaker with the screws, then hang
the Bar Speaker on the two screws.
Note
When sticking WALL MOUNT TEMPLATE,
smooth it out fully.

When the TV Remote
Control does not Work
When the Bar Speaker obstructs the
remote control sensor of the TV, the TV
remote control may not work. In that
case, enable the IR repeater function of
the Sound Bar.
You can control the TV with the TV
remote control by sending the remote
signal from the rear of the Bar Speaker.
Press and hold STANDARD for 5
seconds to set the function to on or
off.
IR repeater on
The BLUETOOTH indicator flashes twice.
IR repeater off
The BLUETOOTH indicator flashes once.
Notes
• Be sure to check that the TV remote
control cannot control the TV, and then
set the IR repeater function to on. If it is
set to on when the remote control can
control the TV, appropriate operation
may not be obtained because of the
interference between the direct
command from the remote control and
the command via the Bar Speaker.
• If the IR repeater function is set to on, this
function may not work depending on
your TV. Also, the remote controls of
other devices such as an air conditioner
may not work correctly. In this case,
change the installation position of the Bar
Speaker or TV.
19
US

Listening to the Sound
TV
+/–
SW +/–
BLUETOOTH
Listening to a TV and
Other Devices
1 Press TV or BLUETOOTH.
The indicator of the selected input
on the Bar Speaker lights.
TV input
• TV that is connected to the TV IN
(OPTICAL) jack on the Bar Speaker
• TV compatible with the ARC function
that is connected to the HDMI OUT (TV
(ARC)) jack on the Bar Speaker
When you connect the TV to both the
HDMI OUT (TV (ARC)) and TV IN
(OPTICAL) jacks, the jack for audio input
is selected depending on which audio
signal is input first.
BLUETOOTH input
BLUETOOTH device that supports A2DP
For details, see “Listening to Music from
a Mobile Device” (page 23).
2 Adjust the volume.
• Adjust the volume by pressing
+/– on the remote control.
• Adjust the subwoofer volume by
pressing SW +/– on the remote
control.
Tip
You can also select the input by pressing
(TV) or BLUETOOTH on the Bar Speaker.
Notes
• When the input source does not contain
much bass sound, such as in TV
programs, the bass sound from the
subwoofer may be difficult to hear.
•SW +/– does not work when the
subwoofer is not connected.
20
US

Adjusting the Sound
CINEMA
MUSIC
AUTO SOUND
NEWS
GAME
STANDARD
SPORTS
Enjoying the Sound Effect
that is Tailored to Sound
Sources (Sound Mode)
You can easily enjoy pre-programmed
sound effects that are tailored to
different kinds of sound sources.
CINEMA
Sounds are played back with surround
effects, and they are realistic and powerful,
making them suitable for movies.
MUSIC
Sound effects are optimized for listening to
music.
GAME
Sounds are powerful and realistic,
suitable for game play.
NEWS
Clear speech of newscasts is recreated.
SPORTS
You can experience an atmosphere as if
you were watching an event in a stadium.
However, narrations of commentators are
reproduced vividly.
STANDARD
Sound effects are optimized for each
individual source.
Press the sound mode selecting
button to select the sound mode.
When selecting the sound mode, the
MULTI CH indicator flashes once.
AUTO SOUND
You can enjoy the sound with Sonyrecommended sound mode. The sound
mode is automatically optimized according
to playback content and function.
21
US

Adjusting the Sound
You can adjust the sound with the buttons on the remote control.
Function
name
Night mode You can enjoy clear sound with low volume at midnight.
Voice mode You can make dialogs clearer.
Audio DRC
Multiplex
broadcast
sound
Tip
AUDIO does not work while the BLUETOOTH indicator is lit.
Button Function
• On: The MULTI CH indicator flashes twice.
•Off
Note
When you turn the Sound Bar off, the night mode is set to off
automatically.
• On: The MULTI CH indicator flashes twice.
•Off
You can compress the dynamic range of the audio signal
(range between the maximum and minimum volume) and
Press and
hold for 5
seconds
so un d wi th low vo lum e i s ea sy to h ea r. T hi s f unc ti on w or ks o nl y
when playing the Dolby Digital signal.
• On: The BLUETOOTH indicator flashes twice.
•Off
You can enjoy mul tiplex broadcast sounds when the Sound Bar
receives a Dolby Digital multiplex broadcast signal. The setting
changes cyclically in the order of Main
•Main
• Sub: The BLUETOOTH indicator flashes once.
• Main/Sub: Main sound is output from the left speaker and
sub sound is output from the right speaker.
The MULTI CH and BLUETOOTH indicators flash once.
: The MULTI CH indicator flashes once.
: The MULTI CH indicator flashes once.
: The BLUETOOTH indicator flashes once.
: The MULTI CH indicator flashes once.
Sub Main/Sub.
22
US

Listening to Music/Sound with the
BLUETOOTH
indicator
BLUETOOTH
button
BLUETOOTH® Function
Listening to Music from
a Mobile Device
You can listen to music stored on a
mobile device such as a smartphone or
tablet via a wireless connection by
connecting the Sound Bar and the
mobile device with the BLUETOOTH
function.
When connecting to the mobile device
with the BLUETOOTH function, you can
operate by simply using the supplied
remote control without turning the TV
on.
Listening to Music by Pairing
with a Mobile Device
To listen to music of the mobile device
with the BLUETOOTH function, you need
to perform pairing of the Sound Bar and
mobile device.
Pairing is the process required to
mutually register the information on
BLUETOOTH devices to be connected
wirelessly in advance.
1 Press and hold the BLUETOOTH
button on the Bar Speaker for 2
seconds.
The Sound Bar enters the pairing
mode and the BLUETOOTH indicator
flashes quickly.
If pairing is not performed for 5
minutes after the Sound Bar enters
the pairing mode, the pairing mode
is canceled. In this case, perform
pairing from the start.
2 On the mobile device, search the
Sound Bar by performing the
pairing operation.
The list of the BLUETOOTH devices
that are searched appears on the
screen of the mobile device.
For the operation method to pair
the BLUETOOTH device to the
mobile device, refer to the
operating instructions of the mobile
device.
3 Pair the Sound Bar and mobile
device by selecting “HT-S350”
from the list on the screen of the
mobile device.
If a Passkey is requested, enter
“0000.”
4 Make sure that the BLUETOOTH
indicator on the Bar Speaker lights
in blue.
A connection between the Sound
Bar and mobile device has been
established.
5 Start audio playback with the
music app on the connected
mobile device.
Sound is output from the Sound Bar.
23
US

6 Adjust the volume.
BLUETOOTH
+/–
SW +/–
• Adjust the volume by pressing
+/– on the remote control.
• Adjust the subwoofer volume by
pressing SW +/– on the remote
control.
To check the connection status of
the BLUETOOTH function
Status BLUETOOTH indicator
During pairing
standby status
Connection is
being
attempted
Connection has
been
established
Flashes quickly in blue
Flashes in blue
Lights in blue
Listening to Music from the
Paired Mobile Device
Notes
•You can pair the BLUETOOTH devices up
to the following number.
– Mobile devices: 9
– Sony TV with the BLUETOOTH function:
1
If a new device is paired after pairing the
above number of devices, the least recent
connected device will be replaced by the
new one.
• Perform pairing for the second and
subsequent mobile devices.
Tips
• You can check the connection status of
the BLUETOOTH function by checking the
BLUETOOTH indicator status.
• While the BLUETOOTH input is being
selected, the Sound Bar enters the pairing
mode by pressing the BLUETOOTH button
on the Bar Speaker shortly.
• While the BLUETOOTH input is not
selected, the Sound Bar automatically
reconnects to the BLUETOOTH device it
was most recently connected to by
pressing the BLUETOOTH button on the
Bar Speaker shortly.
US
24
1 Turn the BLUETOOTH function of
the mobile device on.
2 Press BLUETOOTH.
The BLUETOOTH indicator flashes
and the Bar Speaker automatically
reconnects to the BLUETOOTH
device it was most recently
connected to.
3 Make sure that the BLUETOOTH
indicator lights in blue.
A connection between the Sound
Bar and mobile device has been
established.
4 Start audio playback with the
music app on the connected
mobile device.
Sound is output from the Sound Bar.
5 Adjust the volume.
• Adjust the volume by pressing
+/– on the remote control.
• Adjust the subwoofer volume by
pressing SW +/– on the remote
control.

Turning the Sound Bar On
by Operating the
BLUETOOTH Device
When the Sound Bar has pairing
information, you can turn the Sound Bar
on and listen to music from a
BLUETOOTH device even when the
Sound Bar is in standby mode by setting
the BLUETOOTH standby mode to on.
Press and hold NIGHT for 5 seconds to
set the function to on or off.
BLUETOOTH standby mode on
The BLUETOOTH indicator flashes twice.
BLUETOOTH standby mode off
The BLUETOOTH indicator flashes once.
Note
While the BLUETOOTH standby mode is on,
standby power consumption increases.
Turning the BLUETOOTH
Function Off
You can turn the BLUETOOTH function off.
Press and hold , , and – on the Bar
Speaker for 10 seconds to set the
function to on or off.
BLUETOOTH function on
The BLUETOOTH indicator flashes twice.
BLUETOOTH function off
The BLUETOOTH indicator flashes once.
25
US

Using the Various Functions
LINK
Status indicator
SECURE LINK
Performing the Wireless
Connection of the
Subwoofer (SECURE LINK)
You can specify the wireless connection
to link the Bar Speaker to the subwoofer
using the Secure Link function. We
recommend to perform the Secure Link
function to prevent interference if you
use multiple same products or your
neighbors use same products.
1 Press LINK on the rear of the
subwoofer.
The status indicator of the
subwoofer flashes in orange.
Proceed to the next step within 2
minutes.
2 Press and hold SECURE LINK on
the remote control for 5 seconds.
The link setting starts.
The MULTI CH and TV indicators
flash twice, then the indicators flash
alternately.
3 Make sure that the MULTI CH and
TV indicators stop flashing and the
status indicator of the subwoofer
lights in orange.
A connection between the Bar
Speaker and subwoofer has been
established.
If it fails, the MULTI CH and TV
indicators light for 5 seconds. In this
case, perform the Secure Link
operation again.
To deactivate the Secure Link
function
Press and hold SECURE LINK for 5
seconds.
The MULTI CH indicator flashes twice.
26
US

Using the Control for
HDMI Function
Connecting a device such as a TV or Bluray Disc player compatible with the
Control for HDMI function* using an
HDMI cable enables you to easily
operate the device by using a TV or Bluray Disc player remote control.
Note
These functions may work with devices
other than those manufactured by Sony,
but operation is not guaranteed.
* Control for HDMI is a standard used by
CEC (Consumer Electronics Control) for
allowing HDMI (High-Definition
Multimedia Interface) devices to control
each other.
Preparing to Use the Control
for HDMI Function
Press and hold VOICE for 5 seconds to
set the function to on or off.
Control for HDMI function on
The BLUETOOTH indicator flashes twice.
Control for HDMI function off
The BLUETOOTH indicator flashes once.
Enable the Control for HDMI function
settings for the TV and other device
connected to the TV.
System Power Off Function
When you turn off the TV, the Sound Bar
will turn off automatically.
System Audio Control
Function
If you turn on the Sound Bar while you
are watching the TV, the TV sound will
be output from the speakers of the
Sound Bar. The volume of the Sound Bar
can be adjusted using the TV remote
control.
When you turn on the TV, the Sound Bar
is turned on automatically and the TV
sound is output from the speakers of
the Sound Bar.
Operations can also be made by the
TV’s menu. For details, refer to the
operating instructions of your TV.
Notes
•The number for the volume level of the
Sound Bar is displayed on the TV screen
depending on the TV.
•Depending on the settings of the TV, the
System Audio Control function may not
be available. For details, refer to the
operating instructions of your TV.
• Depending on the TV, if the TV sound was
output from the speakers of the TV the
previous time you watched the TV, the
Sound Bar may not turn on by interlocking
with the TV power even if the TV is turned
on.
ARC (Audio Return Channel)
If the Sound Bar is connected to a TV’s
HDMI IN jack compatible with ARC, you
can listen to TV sound from the speakers
of the Sound Bar without connecting an
optical digital cable.
Note
If the TV is not compatible with ARC, the
optical digital cable (supplied) needs to be
connected (refer to the supplied Startup
Guide).
27
US

One-Touch Play Function
When you play content on a device (Bluray Disc player, “PlayStation
connected to the TV, the Sound Bar and
TV are turned on automatically, the
input of the Sound Bar is switched to TV
input, and sound is output from the
speakers of the Sound Bar.
Notes
• If the TV sound was output from the
speakers of the TV the previous time you
watched the TV, the Sound Bar may not
turn on and t he sound and pictur e may be
output from the TV even if device content
is played.
• Depending on the TV, the beginning part
of content being played may not play
correctly.
4,” etc.)
®
Using the “BRAVIA” Sync
Function
In addition to the Control for HDMI
function, you can also use the “BRAVIA”
sync function such as the Sound mode/
Scene Select function.
Note
This function is proprietary function of
Sony. This function cannot operate with
products other than those manufactured
by Sony.
Sound mode/Scene Select
Function
The sound mode of the Sound Bar is
automatically switched according to the
setting of the TV’s Scene Select function
or sound mode. For details, refer to the
operating instructions of your TV.
Set the sound mode to AUTO SOUND
(page 21).
28
US

Notes on HDMI
Connections
Saving Power
Consumption
• Use an HDMI-authorized cable.
• We recommend using a Sony High
Speed HDMI Cable with Ethernet with
the Cable Type Logo.
• We do not recommend using an
HDMI-DVI conversion cable.
• Audio signals (sampling frequency, bit
length, etc.) transmitted from an HDMI
jack may be suppressed by the
connected device.
To use the Sound Bar while saving
power consumption, change the
following settings.
Turn the Sound Bar Off by
Detecting the Using State
When you set the auto standby function
to on, the Sound Bar enters standby
mode automatically when you do not
operate the Sound Bar for about 20
minutes and the Sound Bar is not
receiving an input signal.
Press and hold INDICATORS for 5
seconds to set the function to on or
off.
Auto standby on
The BLUETOOTH indicator flashes twice.
Auto standby off
The BLUETOOTH indicator flashes once.
Saving Power in Standby
Mode
To save power consumption during the
standby mode, set the BLUETOOTH
standby mode (page 25) and Control for
HDMI function (page 27) to off.
The default settings for them are on.
29
US

Troubleshooting
Troubleshooting
If you experience any of the following
difficulties while using the Sound Bar,
use this troubleshooting guide to help
remedy the problem before requesting
repairs. Should any problem persist,
consult your nearest Sony dealer.
Be sure to bring both your Bar Speaker
and subwoofer, even if it seems as
though only one has a problem, when
you request to repair.
Power
The Sound Bar does not power up.
Check that the AC power cord (mains
lead) is connected securely.
Disconnect the AC power cord (mains
lead) from the wall outlet (mains),
and then reconnect after several
minutes.
The Sound Bar is turned off
automatically.
The auto standby function is working.
Set the auto standby function to off
(page 29).
The Sound Bar does not turn on
even when the TV is turned on.
Set the Control for HDMI function to
on (page 27). The TV must support
the Control for HDMI function. For
details, refer to the operating
instructions of your TV.
Check the speaker settings of the TV.
The Sound Bar power syncs with the
speaker settings of the TV. Fo r details,
refer to the operating instructions of
your TV.
Depending on the TV, if the sound
was output from the speakers of the
TV the previous time, the Sound Bar
may not turn on by interlocking with
the TV power even when the TV is
turned on.
The Sound Bar turns off when the
TV is turned off.
Check the setting of the Control for
HDMI function (page 27). When the
Control for HDMI function is set to on
and the input of the Sound Bar is the
TV input, the Sound Bar turns off
automatically when you turn off the
TV.
The Sound Bar does not turn off
even when the TV is turned off.
Check the setting of the Control for
HDMI function (page 27). When you
turn off the TV, the Sound Bar turns
off automatically only if the input of
the Sound Bar is the TV input. The TV
must support the Control for HDMI
function. For details, refer to the
operating instructions of your TV.
Picture
There is no picture or the picture is
not output correctly.
When there is no picture while TV
input is selected, select the TV
channel that you want using the TV
remote control.
Sound
The Sound Bar cannot connect to a
TV with the BLUETOOTH function.
When you connect the Sound Bar and
TV wi th an HDMI cabl e (no t sup plied),
the BLUETOOTH connection is
canceled. Disconnect the HDMI cable,
then perform the connecting
operation from the start (page 15).
30
US

No TV sound is output from the
Sound Bar.
Check the type and connection of the
HDMI cable or optical digital cable
that is connected to the Sound Bar
and the TV (refer to the supplied
Startup Guide).
Disconnect the cables that are
connected between the TV and the
Sound Bar, then connect them firmly
again. Disconne ct the AC power cords
of the TV and the Sound Bar from the
AC outlets (mains), then connect
them again.
When the Sound Bar and TV are
connected with an HDMI cable only,
check the following.
– The HDMI jack of the connected TV
is labeled with “ARC.”
– The Control for HDMI function of the
TV is set to on.
– On the Sound Bar, the Control for
HDMI function is set to on (page 27).
If your TV is not compatible with ARC,
connect the optical digital cable
(supplied) (refer to the supplied
Startup Guide). If the TV is not
compatible with ARC, TV sound will
not be output from the Sound Bar
even if the Sound Bar is connected to
the TV’s HDMI IN jack.
Select the TV input by pressing TV
(page 20).
Increase the volume on the TV or
cancel muting.
Depending on the order in which you
connect the TV and the Sound Bar,
the Sound Bar may be muted. If this
happens, turn on the TV first, then the
Sound Bar.
Set the speakers setting of the TV
(BRAVIA) to Audio System. Refer to
the operating instructions of your TV
regarding how to set the TV.
Check the sound output of the TV.
Refer to the operating instructions of
the TV for the TV settings.
The Sound Bar supports the Dolby
Digital and PCM audio formats
(page 37). When you playback an
unsupported format, set the digital
audio out setting of the TV (BRAVIA)
to “PCM.” For details, refer to the
operating instructions of your TV.
The sound is output from both the
Sound Bar and the TV.
Change the audio output setting of
the TV so that the TV sound is output
from the external speaker.
Set the TV volume to minimum.
The output sound of the Sound Bar
is not the same level as that of the
TV even though the values of the
volume level on the Sound Bar and
TV are set to the same value.
If the Control for HDMI function is set
to on, the value of the volume level
on the Sound Bar may appear on your
TV as the TV volume. The output
sound levels of the Sound Bar and TV
differ even though the values of the
volume level on the Sound Bar and TV
are set to the same value. The output
sound levels of the Sound Bar and TV
differ depending on the sound
processing characteristics of each,
and it is not a malfunction.
The sound is interrupted while
watching a TV program or content
on a Blu-ray Disc, etc.
Check the sound mode setting
(page 21). If the sound mode is set to
AUTO SOUND, the sound may be
interrupted when the sound mode is
changed automatically according to
the information of the program th at is
being played. If you do not want to
change the sound mode
automatically, set the sound mode to
a setting other than AUTO SOUND.
31
US

No sound or only a very low-level
sound of the device connected to
the Sound Bar is heard from the
Sound Bar.
Press + and check the volume
level (page 13).
or + to cancel the muting
Press
function (page 13).
Make sure the input source is
selected correctly (page 20).
Check that all the cables and cords of
the Sound Bar and the connected
device are firmly inserted.
If the connected device supports up-
sampling feature, you need to turn it
off.
The surround effect cannot be
obtained.
Depending on the input signal and
the sound mode setting, surround
sound processing may not work
effectively. The surround effect may
be subtle, depending on the program
or disc.
To play multi channel audio, check
the digital audio output setting on
the device connected to the Sound
Bar. For details, refer to the operating
instructions supplied with the
connected device.
Subwoofer
No sound or only very low-level
sound is heard from the subwoofer.
Press SW + on the remote control
to increase the subwoofer volume.
Make sure that the status indicator on
the subwoofer is lit in green or
orange.
If the status indicator on the
subwoofer does not light, try the
following.
– Make sure the AC power cord
(mains lead) of the subwoofer is
connected properly.
–Press (power) of the subwoofer
to turn on the power.
If the status indicator on the
subwoofer lights in red, try the
following.
– Move the subwoofer to a location
near the Bar Speaker so that the
status indicator on the subwoofer
lights in green or orange.
– Follow the steps in “Performing the
Wireless Connection of the
Subwoofer (SECURE LINK)”
(page 26).
If the status indicator on the
subwoofer flashes in red, press
(power) of the subwoofer to turn off
the power and check whether the
ventilation holes of the subwoofer is
blocked or not.
If the input sources contain very little
bass sound components (i.e., a TV
broadcast), the sound from the
subwoofer may be difficult to hear.
Play the built-in demo nstration music
by following the steps below and
check that the sound is output from
the subwoofer.
Press and hold (TV) on the Bar
Speaker for 5 seconds.
The built-in demonstration music
is played.
Press (TV) again.
The built-in demonstration music
is canceled and the Sound Bar
returns to the previous status.
Set the night mode to off (page 22).
Mobile Device Connection
BLUETOOTH connection cannot be
completed.
Make sure that the BLUETOOTH
indicator on the Bar Speaker is lit
(page 8).
Make sure the BLUETOOTH device to
be connected is turned on and the
BLUETOOTH function is enabled.
32
US

Bring the BLUETOOTH device close to
the Bar Speaker.
Pair the Sound Bar and the
BLUETOOTH device again. You may
need to cancel the pairing with the
Sound Bar using your BLUETOOTH
device first.
If the BLUETOOTH function is set to
off, set it to on (page 25).
Pairing cannot be achieved.
Bring the BLUETOOTH device close to
the Bar Speaker.
Make sure the Sound Bar is not
receiving interference from a wireless
LAN device, other 2.4 GHz wireless
devices, or a microwave oven. If a
device that generates
electromagnetic radiation is nearby,
move the device away from the
Sound Bar.
Pairing may not be possible if other
BLUETOOTH devices are present
around the Sound Bar. In this case,
turn off the other BLUETOOTH
devices.
Sound of the connected
BLUETOOTH mobile device is not
output from the Sound Bar.
Make sure that the BLUETOOTH
indicator on the Bar Speaker is lit
(page 8).
Bring the BLUETOOTH device close to
the Bar Speaker.
If a device that generates
electromagnetic radiation, such as a
wireless LAN device, other
BLUETOOTH devices, or a microwave
oven is nearby, move the device away
from the Sound Bar.
Remove any obstacle between the
Bar Speaker and the BLUETOOTH
device or move the Bar Speaker away
from the obstacle.
If the Bar Speaker is installed under
the TV, move the Bar Speaker away
from the TV.
Reposition the connected
BLUETOOTH device.
Switch the wireless LAN frequency of
any nearby wireless LAN router or PC
to 5 GHz range.
Increase the volume on the
connected BLUETOOTH device.
The sound is not in sync with the
image.
When you are watching movies, you
may hear the sound with a slight
delay from the image.
Remote Control
The remote cont rol of the Sound Bar
does not function.
Point the remote control at the
remote control sensor on the Bar
Speaker (page 8).
Remove any obstacles in the path
between the remote control and the
Sound Bar.
Replace both batteries in the remote
control with new ones, if they are
weak.
Make sure you are pressing the
correct button on the remote control
(page 13).
The TV remote control does not
work.
Install the Bar Speaker so that it does
not obstruct the remote control
sensor of the TV.
This problem might be solved by
enabling the IR repeater function
(page 19).
Others
The Control for HDMI function does
not work properly.
Check the connection with the Sound
Bar (refer to the supplied Startup
Guide).
33
US

Enable the Control for HDMI function
on the TV. For details, refer to the
operating instructions of your TV.
Wait a while, and then try again. If
you unplug the Sound Bar, it will take
a while before operations can be
made. Wait for 15 seconds or longer,
and then try again.
Make sure the devices connected to
the Sound Bar support the Control for
HDMI function.
Enable the Control for HDMI function
of the devices connected to the
Sound Bar. For details, refer to the
operating instructions of your device.
The type and number of devices that
can be controlled by the Control for
HDMI function is restricted by the
HDMI CEC standard as follows:
– Recording devices (Blu-ray Disc
recorder, DVD recorder, etc.): up to
3 devices
– Playback devices (Blu-ray Disc
player, DVD player, etc.): up to 3
devices
– Tuner-related devices: up to 4
devices
– Audio system (receiver/
headphone): up to 1 device (used by
the Sound Bar)
All indicators on the Bar Speaker
flash for 10 seconds and the Sound
Bar is turned off.
The protection feature is activated.
Disconnect the AC power cord (mains
lead) and make sure that the
ventilations of the Bar Speaker are
not covered and turn on the Sound
Bar after a while.
Sensors of the TV do not work
properly.
The Bar Speaker may block some
sensors (such as the brightness
sensor), the remote control sensor of
your TV or the emitter for 3D glasses
(infrared transmission) of a 3D TV that
supports the infrared 3D glass
system, or wireless communication.
Move the Bar Speaker away from the
TV within a range that allows those
parts to operate properly. For the
locations of the sensors and remote
control receiver, refer to the
operating instructions supplied with
the TV.
The Sound Bar does not work
properly.
The Sound Bar may be in demo
mode. To cancel demo mode, reset
the Sound Bar. Press and hold –
(volume) and (power) on the Bar
Speaker for more than 5 seconds
(page 35).
The following message appears.
* This screen is an example for English.
Select the TV program by using the TV
remote control.
34
US

Resetting the Sound Bar
If the Sound Bar still does not operate
properly, reset the Sound Bar as
follows.
1 Press and hold – (volume) and
(power) on the Bar Speaker for
more than 5 seconds.
All indicators on the Bar Speaker
flash 3 times, and the settings
return to their initial status.
2 Disconnect the AC power cord
(mains lead).
3 Connect the AC power cord (mains
lead), then press to turn on the
Sound Bar.
Tip
The default settings are underlined on
each feature description.
35
US

Additional Information
Specifications
Bar Speaker (SA-S350)
Amplifier section
U.S. models:
POWER OUTPUT AND TOTAL HARMONIC
DISTORTION:
(FTC)
Front L + Front R:
With 4 ohms loads, both channels
driven, from 200 - 20,000 Hz; rated
18 W per channel minimum RMS
power, with no more than 1% total
harmonic distortion from 250 mW to
rated output.
POWER OUTPUT (reference)
Front L/Front R speaker: 85 W (per
channel at 4 ohms, 1 kHz)
Canadian models:
POWER OUTPUT (rated)
Front L + Front R: 45 W + 45 W (at
4 ohms, 1 kHz, 1% THD)
POWER OUTPUT (reference)
Front L/Front R speaker: 85 W (per
channel at 4 ohms, 1 kHz)
Inputs
TV IN (OPTICAL)
Outputs
HDMI OUT (TV (ARC))
BLUETOOTH section
Communication system
BLUETOOTH Specification version 5.0
Output
BLUETOOTH Specification Power
Class 1
Maximum communication range
Line of sight approx. 25 m
Frequency band
2.4 GHz band (2.4000 GHz -
2.4835 GHz)
1)
Modulation method
FHSS (Freq Hopping Spread Spectrum)
Compatible BLUETOOTH profiles
A2DP (Advanced Audio Distribution
Profile)
AVRCP (Audio Video Remote Control
Profile)
Supported Codec
SBC
Transmission range (A2DP)
20 Hz - 20,000 Hz (Sampling frequency
32 kHz, 44.1 kHz, 48 kHz)
1)
The actual range will vary depending on
factors such as obstacles between
devices, magnetic fields around a
microwave oven, static electricity,
cordless phone use, reception
sensitivity, the operating system,
software applications, etc.
2)
BLUETOOTH standard profiles indicate
the purpose of BLUETOOTH
communication between devices.
3)
Codec: Audio signal compression and
conversion format
4)
Abbreviation for Subband Codec
3)
4)
2)
Front L/Front R speaker block section
Speaker system
2 Speaker System
Speaker
Front L/Front R speaker: 52 mm ×
90mm (2 1/8in × 3 5/8in) cone type,
4Ω
General
Power requirements
120 V AC, 60 Hz
Power consumption
On: 30 W
Standby mode: 0.5 W or less (Power
Saving mode)
(When Control for HDMI function and
BLUETOOTH Standby mode are set to
off)
Standby mode: 2 W or less*
(When Control for HDMI function and
BLUETOOTH Standby mode are set to
on)
* The Sound Bar will automatically
enter Power saving mode when
36
US

there is no HDMI connection and no
BLUETOOTH pairing history.
Dimensions* (approx.) (w/h/d)
900 mm × 64 mm × 88 mm (35 1/2 in ×
2 5/8 in × 3 1/2 in)
* Not including projection portion
Mass (approx.)
2.4 kg (5 lb 4 7/10 oz)
Subwoofer (SA-WS350)
POWER OUTPUT (reference)
150 W (at 2.5 ohms, 100 Hz)
Speaker system
Subwoofer speaker system, Bass
reflex
Speaker
160 mm (6 1/2 in) cone type
Power requirements
120 V AC, 60 Hz
Power consumption
On: 25 W
Standby mode: 0.5 W or less
Dimensions* (approx.) (w/h/d)
190 mm × 382 mm × 390 mm (7 1/2 in ×
15 1/8 in × 15 3/8 in)
* Not including projection portion
Mass (approx.)
7.8 kg (17 lb 3 1/5 oz)
Supported Input Audio
Formats (TV Input)
Audio formats supported by the Sound
Bar are as follows.
•Dolby Digital
•Linear PCM 2ch
Wireless Transmitter/
Receiver Section
Frequency band
2.4 GHz (2.4000 GHz - 2.4835 GHz)
Modulation method
FHSS (Freq Hopping Spread Spectrum)
Design and specifications are subject to
change without notice.
37
US

On BLUETOOTH
Communication
• BLUETOOTH devices should be used
within approximately 10 meters
(33 feet) (unobstructed distance) of
each other. The effective
communication range may become
shorter under the following
conditions.
– When a person, metal object, wall or
other obstruction is between the
devices with a BLUETOOTH
connection
– Locations where a wireless LAN is
installed
– Around microwave ovens that are in
use
– Locations where other
electromagnetic waves occur
• BLUETOOTH devices and wireless LAN
(IEEE 802.11b/g/n) use the same
frequency band (2.4 G Hz). When using
your BLUETOOTH device near a device
with wireless LAN capability,
electromagnetic interference may
occur. This could result in lower data
transfer rates, noise, or inability to
connect. If this happens, try the
following remedies:
– Use this Sound Bar at least 10 meters
(33 feet) away from the wireless LAN
device.
– Turn off the power to the wireless
LAN device when using your
BLUETOOTH device within 10 meters
(33 feet).
– Install this Sound Bar and
BLUETOOTH device as closer to each
other as possible.
• The radio waves broadcast by this
Sound Bar may interfere with the
operation of some medical devices.
Since this interference may result in
malfunction, always turn off the po wer
on this Sound Bar and BLUETOOTH
device in the following locations:
– In hospital s, on trains, in airplanes, at
gas stations, and any place where
flammable gasses may be present
– Near automatic doors or fire alarms
• This Sound Bar supports security
functions that comply with the
BLUETOOTH specification to ensure
secure connection during
communication using BLUETOOTH
technology. However, this security
may be insufficient depending on the
setting contents and other factors, so
always be careful when performing
communication using BLUETOOTH
technology.
• Sony cannot be held liable in any way
for damages or other loss resulting
from information leaks during
communication using BLUETOOTH
technology.
• BLUETOOTH communication is not
necessarily guaranteed with all
BLUETOOTH devices that have the
same profile as this Sound Bar.
• BLUETOOTH devices connected with
this Sound Bar must comply with the
BLUETOOTH specification prescribed
by the Bluetooth SI G, Inc., and must be
certified to comply. However, even
when a device complies with the
BLUETOOTH specification, there may
be cases where the characteristics or
specifications of the BLUETOOTH
device make it impossible to connect,
or may result in different control
methods, display or operation.
• Noise may occur or the audio may cut
off depending on the BLUETOOTH
device connected with this Sound Bar,
the communications environment, or
surrounding conditions.
If you have any questions or problems
concerning your Sound Bar, please
consult your nearest Sony dealer.
38
US

Precautions
On safety
• Should any solid object or liquid fall into
the Sound Bar, unplug the Sound Bar and
have it checked by qualified personnel
before operating it any further.
• Do not climb on the Sound Bar, as you
may fall down and injure yourself, or
Sound Bar damage may result.
On power sources
• Before operating the Sound Bar, check
that the operating voltage is identical to
your local power supply. The operating
voltage is indicated on the nameplate on
the bottom of the Bar Speaker.
• If you are not going to use the Sound Bar
for a long time, be sure to disconnect the
Sound Bar from the wall outlet (mains). To
disconnect the AC power cord (mains
lead), grasp the plug itself; never pull the
cord.
• One blade of the plug is wider than the
other for the purpose of safety and will fit
into the wall outlet (mains) only one way.
If you are unable to insert the plug fully
into the outlet, contact your dealer.
• AC power cord (mains lead) must be
changed only at a qualified service shop.
On heat buildup
Although the Sound Bar heats up during
operation, this is not a malfunction.
If you continuously use this Sound Bar at
high volume, the Sound Bar temperature at
the rear and bottom rises considerably. To
avoid burning yourself, do not touch the
Sound Bar.
On placement
• Place the Sound Bar in a location with
adequate ventilation to prevent heat
buildup and prolong the life of the Sound
Bar.
• Do not place the Sound Bar near heat
sources or in a place subject to direct
sunlight, excessive dust, or mechanical
shock.
•Do not place anything on the top of the
Bar Speaker.
• If the Sound Bar is being used in
combination with a TV, VCR, or tape deck,
noise may result and picture quality may
suffer. In such a case, place the Sound Bar
away from the TV, VCR, or tape deck.
•Use caution when placing the Sound Bar
on a surface that has been specially
treated (with wax, oil, polish, etc.), as
staining or discoloration of the surface
may result.
• Take care to avoid any possible injury
from the corners of the Bar Speaker.
On operation
Before connecting other equipment, be
sure to turn off and unplug the Sound Bar.
If you encounter color irregularity
on a nearby TV screen
Color irregularities may be observed on
certain types of TV.
•If color irregularity is observed...
Turn off the TV, then turn it on again after
15 to 30 minutes.
•If color irregularity is observed again...
Place the Sound Bar further away from
the TV.
On cleaning
Clean the Sound Bar with a soft, dry cloth.
Do not use any type of abrasive pad,
scouring powder, or solvent such as
alcohol or benzine.
If you have any question or problem
concerning your Sound Bar, please consult
your nearest Sony dealer.
39
US

Copyrights and Trademarks
This Sound Bar incorporates Dolby* Digital.
* Manufactured under license from Dolby
Laboratories.
Dolby, Dolby Audio and the double-D
symbol are trademarks of Dolby
Laboratories.
The BLUETOOTH
registered trademarks owned by Bluetooth
SIG, Inc. and any use of such marks by Sony
Corporation is under license. Other
trademarks and trade names are those of
their respective owners.
The terms HDMI, HDMI High-Definition
Multimedia Interface, and the HDMI Logo
are trademarks or registered trademarks of
HDMI Licensing Administrator, Inc.
“BRAVIA” logo is a trademark of Sony
Corporation.
“PlayStation” is a registered trademark or
trademark of Sony Interactive
Entertainment Inc.
MPEG Layer-3 audio coding technology
and patents licensed from Fraunhofer IIS
and Thomson.
Windows Media is either a registered
trademark or trademark of Microsoft
Corporation in the United States and/or
other countries.
This product is protected by certain
intellectual property rights of Microsoft
Corporation. Use or distribution of such
technology outside of this product is
prohibited without a license from Microsoft
or an authorized Microsoft subsidiary.
®
word mark and logos are
All other trademarks are trademarks of
their respective owners.
US
40


Enregistrement du propriétaire
Les numéros de modèle et de série sont
situés sur la partie inférieure de la barre
de haut-parleurs. Notez les numéros
dans l’espace ci-dessous. Reportezvous à ces numéros lorsque vous
contactez votre détaillant Sony à propos
de cet appareil.
N° de modèle HT-S350
N° de série
N’installez pas la barre de son dans un
espace confiné, tel qu’une bibliothèque
ou un meuble encastré.
MISE EN GARDE
Risque d’explosion si la pile est
remplacée par un type de pile
inadéquat.
N’exposez pas les piles ou un appareil
contenant des piles à une chaleur
excessive, notamment aux rayons
directs du soleil ou à des flammes.
AVERTISSEMENT
Pour réduire les risques d’incendie ou
d’électrocution, gardez cette barre de
son à l’abri de la pluie et de l’humidité.
La barre de son n’est pas déconnectée
de la source d’alimentation tant qu’elle
reste branchée à la prise CA, même si la
barre de son a été éteinte.
Pour réduire le risque d’incendie,
n’obstruez pas l’orifice de ventilation de
la barre de son avec un journal, une
nappe, une tenture, etc.
N’exposez pas la barre de son à une
source de flamme nue (par exemple,
une bougie allumée).
Pour réduire le risque d’incendie ou
d’électrocution, n’exposez pas cette
barre de son à des éclab oussures ou des
gouttes d’eau et ne posez pas des
objets remplis de liquides, notamment
des vases, sur la barre de son.
Comme la fiche principale est utilisée
pour déconnecter la barre de son de la
prise électrique, connectez la barre de
son à une prise CA facilement
accessible. Si vous constatez que la
barre de son ne fonctionne pas
normalement, déconnectez
immédiatement la fiche principale de la
prise CA.
Utilisation à l’intérieur seulement.
Pour la barre de haut-parleurs
La plaque signalétique est située sur la
partie inférieure de la barre de hautparleurs.
Pour les clients aux États-Unis
Consignes de sécurité importantes
1) Lisez ces instructions.
2) Conservez ces instructions.
3) Respectez tous les avertissements.
4) Respectez toutes les instructions.
5) N’utilisez pas cet appareil à
proximité de l’eau.
6) Nettoyez-le uniquement avec un
chiffon sec.
7) N’obstruez pas les orifices de
ventilation. Installez l’appareil
conformément aux instructions du
fabricant.
8) N’installez pas l’appareil à proximité
des sources de chaleur telles que les
radiateurs, les registres de chaleur,
les poêles ou autres appareils (y
compris les amplificateurs)
produisant de la chaleur.
FR
2

9) N’altérez pas le dispositif de sécurité
de la fiche polarisée ou mise à la
terre. Une fiche polarisée compte
deux lames de largeur différente.
Une fiche de type mise à la terre
possède deux lames et une broche
de mise à la terre. La lame la plus
large ou la troisième broche assure
une fonction de sécurité. Si la fiche
fournie d’origine ne s’adapte pas à
votre prise, faites remplacer la prise
obsolète par un électricien.
10) Protégez le cordon d’alimentation
des lieux de passage ou des points
de pincement, en particulier au
niveau des fiches, des prises de
courant et de sa sortie de l’appareil.
11) Utilisez uniquement des accessoires
spécifiés par le fabricant.
12) Utilisez uniquement l’appareil avec
le chariot, socle, trépied, support ou
table spécifié par le fabricant ou
vendu avec l’appareil. Si vous utilisez
un chariot, soyez prudent lorsque
vous le déplacez avec l’appareil afin
d’éviter toute chute susceptible de
provoquer des blessures.
13) Débranchez cet appareil en cas
d’orage ou d’inutilisation prolongée.
14) Confiez toutes les réparations à du
personnel de service qualifié.
L’appareil doit être réparé en cas de
dommage quelconque, notamment
lorsque le cordon d’alimentation ou
sa fiche est endommagé, du liquide
ou un objet a pénétré à l’intérieur de
l’appareil, l’appareil a été exposé à la
pluie ou à l’humidité, l’appareil ne
fonctionne pas normalement ou est
tombé.
REMARQUE :
Cette barre de son a été testée et s’est
révélée conforme aux limites des
appareils numériques de Classe B,
conformément à l’alinéa 15 de la
réglementation FCC. Ces limites sont
conçues pour assurer une protection
raisonnable contre les interférences
nuisibles dans une installation
résidentielle. Cette barre de son génère,
utilise et peut rayonner de l’énergie de
fréquence radio qui, en cas
d’installation et d’utilisation non
conformes aux instructions, peut
engendrer des interférences nuisibles
avec les communications radio.
Il n’est toutefois pas garanti qu’aucune
interférence ne surviendra dans une
installation particulière. Si cette barre de
son altère effectivement la réception
radio ou télévisée, ce qui peut être
déterminé en mettant la barre de son
hors tension, puis à nouveau sous
tension, nous vous encourageons à
essayer de remédier à la situation en
prenant une ou plusieurs des mesures
ci-après :
– Réorientez ou repositionnez
l’antenne de réception.
– Augmentez la distance qui sépare la
barre de son du récepteur.
– Raccordez la barre de son à la prise
d’un circuit différent de celui auquel le
récepteur est raccordé.
– Sollicitez l’aide de votre revendeur ou
d’un technicien en radio/télévision
expérimenté.
Des câbles et conne cteurs correctement
blindés et mis à la terre doivent être
utilisés pour le raccordement à des
ordinateurs hôtes ou des périphériques
afin de satisfaire aux limites d’émission
du FCC.
Pour toute question au sujet de cette
barre de son :
Visitez : www.sony.com/support
FR
FR
3

Contactez : Sony Customer Information
Service Center au 1-800-222-SONY
(7669)
Écrivez : Sony Customer Information
Service Center 12451 Gateway Blvd., Fort
Myers, FL 33913
Déclaration de conformité du
fournisseur
Nom commercial : SONY
No de modèle : HT-S350
Responsable : Sony Electronics Inc.
Adresse : 16535 Via Esprillo, San Diego,
CA 92127 É.-U.
No de téléphone : 858-942-2230
Cet appareil est conforme à la Partie 15
de la réglementation de la FCC des
États-Unis. Son utilisation est sujette
aux deux conditions suivantes : (1) Cet
appareil ne doit pas générer
d’interférences nuisibles et (2) il doit
être en mesure d’accepter toute
interférence reçue, y compris les
interférences pouvant générer un
fonctionnement indésirable.
ATTENTION
Vous êtes prévenu que toute
modification ou tout changement non
expressément approuvé dans ce
manuel peut annuler votre autorisation
à utiliser cette barre de son.
Cette barre de son n e doit pas se trouver
à proximité d’un autre émetteur ou
d’une autre antenne, ou encore être
utilisée en même temps que ceux-ci.
Pour les clients au Canada
Il est impératif d’utiliser des câbles et
des connecteurs correctement blindés
et mis à la terre pour la connexion à des
ordinateurs hôtes et/ou aux
périphériques.
L’émetteur/récepteur exempt de
licence contenu dans la présente barre
de son est conforme aux CNR
d’Innovation, Sciences et
Développement économique Canada
applicables aux deux conditions
suivantes :
(1) la barre de son ne doit pas produire
de brouillage;
(2) l’utilisateur de la barre de son doit
accepter tout brouillage
radioélectrique subi, même si le
brouillage est susceptible de
compromettre le fonctionnement de
la barre de son.
Cette barre de son est conforme aux
limites d’exposition aux rayonnements
d’ISED énoncées pour un
environnement non contrôlé et
respecte les règles d’exposition aux
fréquences radioélectriques (RF) CNR102 d’ISED. Cette barre de son doit être
installée et utilisée en gardant une
distance de 20 cm ou plus entre le
radiateur et le corps humain.
Cette barre de son est conforme aux
limites d’exposition au rayonnement du
FCC déterminées pour un
environnement incontrôlé et rencontre
les recommandations d’exposition aux
radiofréquences (RF) du FCC. Ce tte barre
de son devrait être installée et utilisée
en gardant le radiateur à au moins
20 cm ou plus du corps d’une personne.
FR
4

Table des matières
À propos de ce Manuel
d’instructions ..........................5
Que contient la boîte? ...................6
Possibilités offertes par la barre de
son ...........................................7
Guide des pièces et commandes
..................................................8
Raccordement d’un téléviseur
Raccordement
d’un téléviseur
avec un câble
HDMI
Connexion sans fil d’un téléviseur
Sony avec la fonction
BLUETOOTH ........................... 15
Fixation de la barre de haut-parleurs
sur un mur ............................. 18
Lorsque la télécommande du
téléviseur ne fonctionne pas
................................................20
Écoute du son
Écoute d’un téléviseur et d’autres
appareils .................................21
Réglage du son ............................22
Écoute de la musique/du son
avec la fonction BLUETOOTH®
Écoute de la musique à partir d’un
appareil mobile .....................24
Mise en march e de la barre de son à
l’aide de l’appareil BLUETOOTH
................................................26
Désactivation de la fonction
BLUETOOTH ........................... 27
Manuel de
démarrage
(document
distinct)
Utilisation des diverses
fonctions
Établissement de la connexion sans
fil du caisson de graves (SECURE
LINK) ......................................28
Utilisation de la fonction Contrôle
pour HDMI .............................29
Utilisation de la fonction « BRAVIA »
Sync ....................................... 31
Remarques sur les raccordements
HDMI ...................................... 31
Réduction de la consommation
d’énergie ...............................32
Dépannage
Dépannage ..................................33
Réinitialisation de la barre de son
................................................39
Informations
complémentaires
Caractéristiques techniques ........40
Formats audio d’entrée pris en
charge (Entrée TV) .................42
À propos de la communication
BLUETOOTH ...........................42
Précautions ..................................44
À propos de ce Manuel
d’instructions
•Les instructions dans ce Manuel
d’instructions décrivent les
commandes de la télécommande.
•Certaines illustrations sont présentées
sous forme de dessins conceptuels et
peuvent différer des produits réels.
•Les réglages par défaut sont soulignés
dans chaque description de fonction.
Exemple : Fonction Contrôle pour
HDMI activée
FR
5

Que contient la boîte?
• Barre de haut-parleurs (1)
• Caisson de graves (1)
• Télécommande (1)
• Pile R03 (taille AAA) (2)
• CALIBRE DE MONTAGE MURAL (1)
• Manuel de démarrage
• Manuel d’instructions
• Câble numérique optique (1)
FR
6

Possibilités offertes par la barre de son
« Écoute d’un téléviseur et d’autres
appareils » (page 21)
Lecteur Blu-ray Disc™,
décodeur de câblodistribution,
récepteur satellite, etc.
Raccordement du téléviseur
(reportez-vous au « Manuel de
démarrage » (document distinct))
« Utilisation de la fonction
Contrôle pour HDMI » (page 29)
« Utilisation de la fonction
«BRAVIA» Sync» (page31)
« Établissement de la connexion
sans fil du caisson de graves
(SECURE LINK) » (page 28)
« Écoute de la musique à
partir d’un appareil mobile »
(page 24)
« Connexion sans fil
d’un téléviseur Sony
avec la fonction
BLUETOOTH »
(page 15)
FR
7

Guide des pièces et commandes
Les détails sont omis des illustrations.
Barre de haut-parleurs
Avant
Capteur de télécommande
Pointez la télécommande vers le
capteur de télécommande pour
faire fonctionner la barre de son.
Touche (alimentation)
A llu me la ba rr e d e s on ou la rè gl e e n
mode de veille.
Touche (TV) (page 21)
Touche BLUETOOTH (page 24)
Touches +/– (volume)
FR
8

Témoins
Les témoins de la barre de haut-parleurs s’allument ou clignotent pour indiquer
l’un des états suivants.
Entrée actuellement sélectionnée
Témoins État
S’allume lorsque l’entrée TV est sélectionnée.
S’allume lorsque l’entrée BLUETOOTH est sélectionnée.
S’allument lorsque la barre de son est connectée au téléviseur
avec la fonction BLUETOOTH (l’entrée TV est sélectionnée).
Format sonore, effet ambiophonique
Témoins État
• S’allume lorsqu’un son multicanal 5.1 canaux est reçu en entrée.
• Clignote une fois lorsque le mode sonore est sélectionné
(page 22).
Volume
Témoins État
Clignote une fois lorsque le niveau de volume est réglé à faible
(1 - 20).
Clignotent une fois lorsque le niveau de volume est réglé à moyen
(21 - 40).
ou
Clignotent une fois lorsque le niveau de volume est réglé à élevé
(41 - 49).
• Clignotent à plusieurs reprises lorsque le son est coupé.
• Clignotent deux fois lorsque le niveau de volume est réglé au
maximum/minimum.
Le témoin de l’entrée actuelle clignote une fois lors du réglage du
volume du caisson de graves en appuyant sur SW
Clignotent trois fois lorsque le niveau de volume du caisson de
graves est réglé au maximum/minimum.
+/–.
FR
9

Valeur de réglage pour chaque fonction
Le réglage activé/désactivé de chaque fonction est indiqué par le nombre de
clignotements du témoin suivant.
• Activé : Clignote deux fois.
• Désactivé : Clignote une fois.
Pour connaître l’état du témoin lors de la modification de réglages autres que le
réglage activé/désactivé, consultez la description de chaque fonction.
Témoins Fonctions
•Mode nuit (page23)
•Mode voix (page23)
•DRC Audio (page23)
• Contrôle pour HDMI (page 29)
• Veille BLUETOOTH (page 26)
• Fonction BLUETOOTH (page 27)
• Veille automatique (page 32)
• IR-Repeater (page 20)
Connexion d’un téléviseur avec la fonction BLUETOOTH (page 15).
10
FR

Arrière
Prise HDMI OUT (TV (ARC))
Raccordez un téléviseur muni d’une
prise d’entrée HDMI avec un câble
HDMI (non fourni).
La barre de son est compatible avec
ARC (page 30). ARC est la fonction
permettant d’envoyer le son du
téléviseur à un appareil AV, comme
la barre de son, à partir de la prise
d’entrée HDMI du téléviseur.
Prise TV IN (OPTICAL)
IR-Repeater (page 20)
Transmet le signal de la
télécommande du téléviseur au
téléviseur.
FR
11

Caisson de graves
Témoin d’état
Indique l’état de l’alimentation du
caisson de graves et de la
connexion avec la barre de hautparleurs.
– S’allume en vert : La connexion
entre le caisson de graves et la
barre de haut-parleurs est établie.
– Clignote en vert : La connexion
entre le caisson de graves et la
barre de haut-parleurs est en
cours.
– S’allume en oran ge : La connexion
entre le caisson de graves et la
barre de haut-parleurs est établie
avec la fonction Secure Link.
– Clignote en orange : La connexion
entre le caisson de graves et la
barre de haut-parleurs avec la
fonction Secure Link est en cours.
– S’allume en rouge : Caisson de
graves en mode de veille.
– S’éteint : Caisson de graves éteint.
Touche (alimentation)
Allume/éteint le caisson de graves.
Touche LINK (page 28)
Ouvertures d’aération
Pour des raisons de sécurité,
n’obstruez pas les ouvertures
d’aération.
12
FR

Télécommande
Certaines touches fonctionnent
différemment selon la durée pendant
laquelle vous appuyez sur la touche. Les
icônes ci-dessous indiquent la durée
pendant laquelle vous devez appuyer
sur la touche.
• : Appuyez sur la touche.
• : Maintenez enfoncée la touche
pendant 5 secondes.
TV (page 21)
Sélectionne l’entrée TV.
BLUETOOTH (page 21, 25)
Sélectionne l’entrée BLUETOOTH.
AUTO SOUND (page 22)
Sélectionne AUTO SOUND comme
effet sonore.
VOICE
: Active/désactive le mode voix.
(page 23)
: Active/désactive la fonction
Contrôle pour HDMI. (page 29)
(volume) +*/–
Règle le volume.
SW (volume du caisson de
graves) +/–
Règle le volume du caisson de
graves.
GAME (page 22)
Sélectionne GAME comme effet
sonore.
SPORTS (page 22)
Sélectionne SPORTS comme effet
sonore.
SECURE LINK (page 28)
: Démarre le réglage de liaison
pour la fonction Secure Link.
(alimentation)
A llu me la ba rr e d e s on ou la rè gl e e n
mode de veille.
CINEMA (page 22)
Sélectionne CINEMA comme effet
sonore.
MUSIC (page 22)
Sélectionne MUSIC comme effet
sonore.
13
FR

NIGHT
: Active/désactive le mode nuit.
(page 23)
: Active/désactive le mode de
veille BLUETOOTH. (page 26)
(coupure du son)
Désactive temporairement le son
ou active le son.
AUDIO*
: Sélectionne le canal audio pour
la diffusion en multiplex Dolby
Digital. (page 23)
: Active/désactive la fonction
DRC Audio. (page 23)
NEWS (page 22)
Sélectionne NEWS comme effet
sonore.
STANDARD
: Sélectionne STANDARD comme
effet sonore. (page 22)
: Active/désactive la fonction
IR-Repeater. (page 20)
INDICATORS
: Active/désactive les témoins de
la barre de haut-parleurs.
: Active/désactive la fonction
de veille automatique. (page 32)
* Les touches + et AUDIO comportent
un point tactile. Utilisez ce point comme
guide pendant l’utilisation.
Conseil
Vous pouvez désactiver les témoins en
appuyant sur INDICATORS.
Même après la désactivation des témoins
en appuyant sur INDICATORS, lorsque vous
utilisez la barre de son, les témoins reliés
au fonctionnement s’allument ou
clignotent.
À propos du remplacement des
piles de la télécommande
Lorsque la barre de son ne répond plus
à la télécommande, remplacez les deux
piles par des piles neuves.
Utilisez des piles au manganèse R03
(taille AAA) pour le remplacement.
14
FR

Raccordement d’un téléviseur
Lecteur Blu-ray Disc,
décodeur de
câblodistribution,
récepteur satellite, etc.
TV
Touche
BLUETOOTH
Raccordement d’un
téléviseur avec un câble
HDMI
Reportez-vous au Manuel de
démarrage (document distinct).
Connexion sans fil d’un
téléviseur Sony avec la
fonction BLUETOOTH
Lors de l’utilisation d’un téléviseur
Sony* avec la fonction BLUETOOTH,
vous pouvez écouter le son du
téléviseur ou de l’appareil raccordé au
téléviseur en établissant une connexion
sans fil entre la barre de son et le
téléviseur.
* Le téléviseur doit être compatible avec
A2DP (Advanced Audio Distribution
Profile).
Connexion sans fil entre la
barre de son et le téléviseur
Pour établir une connexion sans fil entre
la barre de son et le téléviseur, vous
devez effectuer le jumelage de la barre
de son et du téléviseur en utilisant la
fonction BLUETOOTH.
Le jumelage est le processus requis
pour l’enregistrement mutuel préalable
des informations sur les appareils
BLUETOOTH à connecter sans fil.
1 Insérez les piles (fournies) dans la
télécommande.
2 Allumez le téléviseur.
3 Allumez la barre de haut-parleurs
et le caisson de graves.
15
FR

4 Pointez la télécommande vers le
Témoin
BLUETOOTH
Capteur de télécommande
capteur de télécommande sur la
barre de haut-parleurs, puis
maintenez enfoncées les touches
TV de la télécommande et
BLUETOOTH de la barre de hautparleurs simultanément pendant
5secondes.
Les témoins TV et BLUETOOTH
clignotent deux fois, la barre de son
passe en mode de jumelage, puis le
témoin BLUETOOTH clignote
rapidement.
5 Sur le téléviseur, recherchez la
barre de son en effectuant
l’opération de jumelage.
La liste d’appareils BLUETOOTH
recherchés apparaît à l’écran du
téléviseur.
Pour la méthode de jumelage de
l’appareil BLUETOOTH au téléviseur,
reportez-vous au manuel
d’instructions du téléviseur.
6 Jumelez la barre de son et le
téléviseur en sélectionnant
« HT-S350 » dans la liste à l’écran
du téléviseur.
7 Assurez-vous que les témoins TV
et BLUETOOTH de la barre de
haut-parleurs s’allument.
Une connexion est établie entre la
barre de son et le téléviseur.
8 Sélectionnez l’émission ou
l’entrée du téléviseur en utilisant
la télécommande du téléviseur.
Le son de l’image affichée à l’écran
du téléviseur est émis par la barre
de son.
9 Réglez le volume de la barre de
son en utilisant la télécommande
du téléviseur.
Lorsque vous appuyez sur la touche
de coupure du son de la
télécommande du téléviseur, le son
est coupé temporairement.
Remarques
• Si le son du téléviseur n’est pas émis par
la barre de son, appuyez sur la touche TV
de la télécommande de la barre de son
pour sélectionner l’entrée TV et vérifiez
l’état des témoins de la barre de hautparleurs.
– Les témoins TV et BLUETOOTH
s’allument : La barre de son et le
téléviseur sont connectés et le son du
téléviseur est émis par la barre de son.
– Le témoin BLUETOOTH clignote
rapidement : Effectuez le jumelage sur
le téléviseur.
– Le témoin TV s’allume : Recommencez
la procédure de connexion depuis le
début.
FR
16

• Lorsque vous raccordez la barre de son et
le téléviseur avec un câble HDMI (non
fourni), la connexion BLUETOOTH est
annulée. Pour connecter de nouveau la
barre de son et le téléviseur avec la
fonction BLUETOOTH, déconnectez le
câble HDMI, puis effectuez la procédure
de connexion depuis le début.
• Pour jumeler un autre téléviseur après le
jumelage du premier téléviseur, éteignez
le téléviseur jumelé, puis jumelez le
nouveau téléviseur en suivant les étapes
pour la connexion d’un appareil mobile
(page 24).
Écoute du son du téléviseur
ou de l’appareil raccordé au
téléviseur
Vous pouvez allumer/éteindre la barre
de so n, ré gl er le vo lu me et co up er le so n
en utilisant la télécommande du
téléviseur lorsqu’une connexion sans fil
est établie entre le téléviseur et la barre
de son.
1 Allumez le téléviseur avec la
télécommande du téléviseur.
La barre de son est mise en marche
par interverrouillage avec
l’alimentation du téléviseur, puis le
son du téléviseur est émis par la
barre de son.
2 Sélectionnez l’émission ou
l’entrée de l’appareil en utilisant
la télécommande du téléviseur.
Le son de l’image affichée à l’écran
du téléviseur est émis par la barre
de son.
3 Réglez le volume de la barre de
son en utilisant la télécommande
du téléviseur.
Lorsque vous appuyez sur la touche
de coupure du son de la
télécommande du téléviseur, le son
est coupé temporairement.
Conseil
Lorsque le téléviseur est éteint, la barre de
son est également éteinte par
interverrouillage avec l’alimentation du
téléviseur.
FR
17

Fixation de la barre de
Trou à l’arrière de la barre de haut-parleurs
4mm (3/16po)
Plus de 30 mm (1 3/16 po)
5mm
(7/32 po)
10 mm
(13/32 po)
Centre du téléviseur
CALIBRE DE
MONTAGE MURAL
Ruban adhésif,
etc.
haut-parleurs sur un mur
Vous pouvez fixer la barre de hautparleurs sur un mur.
Remarques
• Préparez des vis (non fournies) adaptées
au matériau et à la résistance du mur.
Comme les plaques de plâtre sont
particulièrement fragiles, fixez
fermement les vis à une poutre du mur.
Installez les enceintes à l’horizontale en
les suspendant à des vis insérées dans
des montants, sur une partie plate et
continue du mur.
• Confiez l’installation à un détaillant Sony
ou à un installateur agréé et portez une
attention particulière aux consignes de
sécurité pendant l’installation.
• Sony ne peut être tenu responsable des
accidents ou dommages occasionnés par
une installation incorrecte, une résistance
insuffisante du mur, une installation
inappropriée des vis, une catastrophe
naturelle, etc.
1 Préparez deux vis (non fournies)
adaptées aux trous de fixation
murale situés à l’arrière de la
barre de haut-parleurs.
2 Collez le CALIBRE DE MONTAGE
MURAL (fourni) sur le mur.
1 Alignez la LIGNE CENTRALE DU
TÉLÉVISEUR () du CALIBRE DE
MONTAGE MURAL avec la ligne
centrale de votre téléviseur.
2 Alignez la LIGNE ARRIÈRE DU
TÉLÉVISEUR () du CALIBRE DE
MONTAGE MURAL avec le bas de
votre téléviseur, puis collez le
CALIBRE DE MONTAGE MURAL
sur le mur en utilisant un ruban
adhésif disponible sur le marché,
etc.
FR
18

3 Fixez les vis dans les marques ()
Vis
Marques ()
10 mm à
11 mm
(environ
7/16 po)
368,5 mm
(14 1/2 po)
368,5 mm
(14 1/2 po)
sur la LIGNE DE VIS () du
CALIBRE DE MONTAGE MURAL de
la manière indiquée dans
l’illustration ci-dessous.
4 Retirez le CALIBRE DE MONTAGE
MURAL.
5 Suspendez la barre de haut-
parleurs aux vis.
Alignez les trous à l’arrière de la
barre de haut-parleurs avec les vis,
puis suspendez la barre de hautparleurs aux deux vis.
Remarque
Au moment de coller le CALIBRE DE
MONTAGE MURAL, lissez-le
complètement.
19
FR

Lorsque la
télécommande du
téléviseur ne fonctionne
pas
Lorsque la barre de haut-parleurs
bloque le capteur de télécommande du
téléviseur, la télécommande du
téléviseur pourrait ne pas fonctionner.
Dans ce cas, activez la fonction IRRepeater de la barre de son.
Vous pouvez contrôler le téléviseur à
l’aide de la télécommande du téléviseur
en envoyant le signal de télécommande
depuis l’arrière de la barre de hautparleurs.
Maintenez enfoncée la touche
STANDARD pendant 5 secondes pour
activer ou désactiver la fonction.
Fonction IR-Repeater activée
Le témoin BLUETOOTH clignote deux fois.
Fonction IR-Repeater désactivée
Le témoin BLUETOOTH clignote une fois.
Remarques
• Assurez-vous que la télécommande du
téléviseur ne peut pas contrôler le
téléviseur, puis activez la fonction IRRepeater. Si la fonction est activée
pendant que la télécommande peut
contrôler le téléviseur, un problème de
fonctionnement peut survenir en raison
des interférences entre la commande
directe de la télécommande et la
commande via la barre de haut-parleurs.
• Si la fonction IR-Repeater est activée,
cette fonction pourrait ne pas
fonctionner, selon votre téléviseur. De
plus, les télécommandes des autres
appareils tels que les climatiseurs
pourraient ne pas fonctionner
correctement. Dans ce cas, changez la
position d’installation de la barre de haut parleurs ou du téléviseur.
20
FR

Écoute du son
TV
+/–
SW +/–
BLUETOOTH
Écoute d’un téléviseur et
d’autres appareils
1 Appuyez sur TV ou BLUETOOTH.
Le témoin de l’entrée sélectionnée
s’allume sur la barre de hautparleurs.
Entrée TV
• Téléviseur raccordé à la prise TV IN
(OPTICAL) de la barre de haut-parleurs
• Téléviseur compatible avec la fonction
ARC raccordé à la prise HDMI OUT (TV
(ARC)) de la barre de haut-parleurs
Lorsque vous raccordez le téléviseur aux
prises HDMI OUT (TV (ARC)) et TV IN
(OPTICAL), la prise pour l’entrée audio
est sélectionnée selon le signal audio
reçu en premier.
Entrée BLUETOOTH
Appareil BLUETOOTH prenant en charge
A2DP
Pour plus de détails, consultez « Écoute
de la musique à partir d’un appareil
mobile » (page 24).
2 Réglez le volume.
• Réglez le volume en appuyant sur
la touche +/– de la
télécommande.
• Réglez le volume du caisson de
graves en appuyant sur la touche
SW +/– de la télécommande.
Conseil
Vous pouvez également sélectionner
l’entrée en appuyant sur la touche (TV)
ou BLUETOOTH de la barre de hautparleurs.
Remarques
•Lorsque la source d’entrée ne contient
pas beaucoup de sons graves, comme les
émissions de télévision, les sons graves
émis par le caisson de graves peuvent
être difficiles à entendre.
•SW +/– ne fonctionne pas lorsque le
caisson de graves n’est pas connecté.
FR
21

Réglage du son
CINEMA
MUSIC
AUTO SOUND
NEWS
GAME
STANDARD
SPORTS
Apprécier l’effet sonore
adapté aux sources sonores
(Mode sonore)
Vous pouvez facilement profiter des
effets sonores préprogrammés adaptés
à différents types de sources sonores.
CINEMA
Les sonorités sont émises avec des effets
ambiophoniques, réalistes et puissants, afin
qu’elles soient adaptées aux films.
MUSIC
Les effets sonores sont optimisés pour
l’écoute de la musique.
GAME
Les sonorités sont puissantes et réalistes,
adaptées aux jeux vidéo.
NEWS
Les discours clairs des bulletins de nouvelles
sont recréés.
SPORTS
Vous pouvez profiter d’une atmosphère vous
donnant l’impression de regarder un
événement dans un stade. Cependant, les
voix des commentateurs sont reproduites
clairement.
STANDARD
Les effets sonores sont optimisés pour
chaque source individuelle.
Appuyez sur la touche de sélection de
mode sonore pour sélectionner le
mode sonore.
Lors de la sélection du mode sonore, le
témoin MULTI CH clignote une fois.
AUTO SOUND
Vous pouvez apprécier le son avec le mode
sonore recommandé par Sony. Le mode
sonore est automatiquement optimisé en
fonction du contenu en cour s de lecture et de
la fonction.
22
FR

Réglage du son
Vous pouvez régler le son à l’aide des touches de la télécommande.
Nom de
fonction
Mode nuit Vous pouvez apprécier un son clair avec un volume faible
Mode voix Vous pouvez améliorer la clarté des dialogues.
DRC Audio
Son diffusé en
multiplex
Conseil
AUDIO ne fonctionne pas pendant que le témoin BLUETOOTH est allumé.
Touche Fonction
pendant la nuit.
• Activé : Le témoin MULTI CH clignote deux fois.
•Désactivé
Remarque
Lorsque vous éteignez la barre de son, le mode nuit est
automatiquement désactivé.
• Activé : Le témoin MULTI CH clignote deux fois.
•Désactivé
Vous pouvez compresser la gamme dynamique du signal
audio (la différence entre les niveaux de volume minimum et
Maintenez
enfoncée la
touche
pendant
5secondes
maximum) afin que les sons à faible volume soient faciles à
entendre. Cette fonction fonctionne uniquement lors de la
lecture du signal Dolby Digital.
• Activé : Le témoin BLUETOOTH clignote deux fois.
•Désactivé
Vous pouvez apprécier les sons diffu sés en multiplex lorsque la
barre de son reçoit un signal diffusé en multiplex Dolby Digital.
Le réglage change de manière cyclique dans l’ordre Principal
Secondaire Principal/Secondaire.
•Principal
• Secondaire : Le témoin BLUETOOTH clignote une fois.
• Principal/Secondaire : Le son principal est émis par le hautparleur gauche et le son secondaire par le haut-parleur droit.
Les témoins MULTI CH et BLUETOOTH clignotent une fois.
: Le témoin MULTI CH clignote une fois.
: Le témoin MULTI CH clignote une fois.
: Le témoin BLUETOOTH clignote une fois.
: Le témoin MULTI CH clignote une fois.
23
FR

Écoute de la musique/du son avec
Témoin
BLUETOOTH
Touche
BLUETOOTH
la fonction BLUETOOTH®
Écoute de la musique à
partir d’un appareil
mobile
Vous pouvez écouter la musique
stockée sur un appareil mobile tel qu’un
téléphone intelligent ou une tablette via
une connexion sans fil en connectant la
barre de son et l’appareil mobile avec la
fonction BLUETOOTH.
Lors de la connexion de l’appareil
mobile avec la fonction BLUETOOTH,
vous pouvez contrôler le
fonctionnement en utilisant
simplement la télécommande fournie,
sans allumer le téléviseur.
Écoute de la musique en
jumelant un appareil mobile
Pour écouter la musique de l’appareil
mobile avec la fonction BLUETOOTH,
vous devez effectuer le jumelage de la
barre de son et de l’appareil mobile.
Le jumelage est le processus requis
pour l’enregistrement mutuel préalable
des informations sur les appareils
BLUETOOTH à connecter sans fil.
1 Maintenez enfoncée la touche
BLUETOOTH de la barre de hautparleurs pendant 2 secondes.
La barre de son passe en mode de
jumelage et le témoin BLUETOOTH
clignote rapidement.
Si le jumelage n’est pas effectué
dans les 5 minutes suivant le
passage de la barre de son en mode
de jumelage, le mode de jumelage
est annulé. En pareil cas, effectuez
le jumelage depuis le début.
2 Sur l’appareil mobile, recherchez
la barre de son en effectuant
l’opération de jumelage.
La liste d’appareils BLUETOOTH
recherchés apparaît à l’écran de
l’appareil mobile.
Pour la méthode de jumelage de
l’appareil BLUETOOTH à l’appareil
mobile, reportez-vous au manuel
d’instructions de l’appareil mobile.
3 Jumelez la barre de son et
l’appareil mobile en sélectionnant
« HT-S350 » dans la liste à l’écran
de l’appareil mobile.
Si un code est demandé, entrez
« 0000 ».
4 Assurez-vous que le témoin
BLUETOOTH de la barre de hautparleurs s’allume en bleu.
Une connexion est établie entre la
barre de son et l’appareil mobile.
24
FR

5 Démarrez la lecture audio avec
BLUETOOTH
+/–
SW +/–
l’application musicale sur
l’appareil mobile connecté.
Le son est émis par la barre de son.
6 Réglez le volume.
• Réglez le volume en appuyant sur
la touche +/– de la
télécommande.
• Réglez le volume du caisson de
graves en appuyant sur la touche
SW +/– de la télécommande.
Pour vérifier l’état de connexion
de la fonction BLUETOOTH
État Témoin BLUETOOTH
Pendant l’état
de veille de
jumelage
Tentative de
connexion en
cours
Connexion
établie
Remarques
• Vous pouvez jumeler le nombre suivant
d’appareils BLUETOOTH.
– Appareils mobiles : 9
– Téléviseur Sony avec la fonction
BLUETOOTH : 1
Si un nouvel appareil est jumelé après le
jumelage du nombre d’appareils cidessus, l’appareil connecté le moins
récemment est remplacé par le nouveau.
• Effectuez le jumelage pour le deuxième
appareil mobile et les suivants.
Conseils
• Vous pouvez vérifier l’état de connexion
de la fonction BLUETOOTH en vérifiant
l’état du témoin BLUETOOTH.
• Pendant que l’entrée BLUETOOTH est
sélectionnée, la barre de son passe en
mode de jumelage lorsque vous appuyez
brièvement sur la touche BLUETOOTH de
la barre de haut-parleurs.
Clignote rapidement en
bleu
Clignote en bleu
S’allume en bleu
•Pendant que l’entrée BLUETOOTH n’est
pas sélectionnée, la barre de son se
reconnecte automatiquement à l’appareil
BLUETOOTH auquel elle était connectée
le plus récemment lorsque vous appuyez
brièvement sur la touche BLUETOOTH de
la barre de haut-parleurs.
Écoute de la musique à partir
de l’appareil mobile jumelé
1 Activez la fonction BLUETOOTH de
l’appareil mobile.
2 Appuyez sur BLUETOOTH.
Le témoin BLUETOOTH clignote et la
barre de haut-parleurs se
reconnecte automatiquement à
l’appareil BLUETOOTH auquel elle
était connectée le plus récemment.
3 Assurez-vous que le témoin
BLUETOOTH s’allume en bleu.
Une connexion est établie entre la
barre de son et l’appareil mobile.
4 Démarrez la lecture audio avec
l’application musicale sur
l’appareil mobile connecté.
Le son est émis par la barre de son.
25
FR

5 Réglez le volume.
• Réglez le volume en appuyant sur
la touche +/– de la
télécommande.
• Réglez le volume du caisson de
graves en appuyant sur la touche
SW +/– de la télécommande.
Mise en marche de la
barre de son à l’aide de
l’appareil BLUETOOTH
Lorsque la barre de son contient des
informations de jumelage, vous pouvez
allumer la barre de son et écouter la
musique d’un appareil BLUETOOTH,
même si la barre de son est en mode de
veille, en activant le mode de veille
BLUETOOTH.
Maintenez enfoncée la touche NIGHT
pendant 5 secondes pour activer ou
désactiver la fonction.
Mode de veille BLUETOOTH activé
Le témoin BLUETOOTH clignote deux fois.
Mode de veille BLUETOOTH désactivé
Le témoin BLUETOOTH clignote une fois.
Remarque
Pendant que le mode de veille BLUETOOTH
est activé, la consommation d’énergie en
mode de veille augmente.
26
FR

Désactivation de la
fonction BLUETOOTH
Vous pouvez désactiver la fonction
BLUETOOTH.
Maintenez enfoncées les touches ,
et – de la barre de haut-parleurs
pendant 10 secondes pour activer ou
désactiver la fonction.
Fonction BLUETOOTH activée
Le témoin BLUETOOTH clignote deux fois.
Fonction BLUETOOTH désactivée
Le témoin BLUETOOTH clignote une fois.
27
FR

Utilisation des diverses fonctions
LINK
Témoin d’état
SECURE LINK
Établissement de la
connexion sans fil du
caisson de graves
(SECURE LINK)
Vous pouvez spécifi er la connexion sans
fil pour relier la barre de haut-parleurs et
le caisson de graves à l’aide de la
fonction Secure Link. Nous vous
recommandons d’exécuter la fonction
Secure Link pour prévenir les
interférences si vous utilisez plusieurs
produits identiques ou si vos voisins
utilisent des produits identiques.
1 Appuyez sur LINK à l’arrière du
caisson de graves.
Le témoin d’état du caisson de
graves clignote en orange.
Passez à l’étape suivante en
l’espace de 2 minutes.
2 Maintenez enfoncée la touche
SECURE LINK de la télécommande
pendant 5 secondes.
Le réglage de liaison démarre.
Les témoins MULTI CH et TV
clignotent deux fois, puis les
témoins clignotent successivement.
3 Assurez-vous que les témoins
MULTI CH et TV cessent de
clignoter et que le témoin d’état
du caisson de graves s’allume en
orange.
Une connexion est établie entre la
barre de haut-parleurs et le caisson
de graves.
28
En cas d’échec, les témoins MULTI
CH et TV s’allument pendant
5 secondes. En pareil cas,
recommencez la procédure Secure
Link.
FR

Pour désactiver la fonction
Secure Link
Maintenez enfoncée la touche SECURE
LINK pendant 5 secondes.
Le témoin MULTI CH clignote deux fois.
Utilisation de la fonction
Contrôle pour HDMI
Le raccordement d’un appareil tel qu’un
téléviseur ou lecteur Blu-ray Disc
compatible avec la fonction Contrôle
pour HDMI* à l’aide d’un câble HDMI
vous permet de contrôler facilement
l’appareil en utilisant une
télécommande de téléviseur ou lecteur
Blu-ray Disc.
Remarque
Ces fonctions pourraient fonctionner avec
des appareils autres que ceux fabriqués
par Sony, ma is le fonctionneme nt n’est pas
garanti.
* Contrôle pour HDMI est une norme
utilisée par CEC (Consumer Electronics
Control) pour permettre aux appareils
HDMI (High-Definition Multimedia
Interface) de se contrôler entre eux.
Préparation pour l’utilisation
de la fonction Contrôle pour
HDMI
Maintenez enfoncée la touche VOICE
pendant 5 secondes pour activer ou
désactiver la fonction.
Fonction Contrôle pour HDMI activée
Le témoin BLUETOOTH clignote deux fois.
Fonction Contrôle pour HDMI désactivée
Le témoin BLUETOOTH clignote une fois.
Activez les réglages de fonction
Contrôle pour HDMI pour le téléviseur et
l’autre appareil raccordé au téléviseur.
29
FR

Fonction de mise en arrêt du
système
Lorsque vous éteignez le téléviseur, la
barre de son s’éteint automatiquement.
Fonction de contrôle audio
du système
Si vous mettez la barre de son en
marche pendant que vous regardez le
téléviseur, le son du téléviseur sera émis
par les haut-parleurs de la barre de son.
Le volume de la barre de son peut être
réglé à l’aide de la télécommande du
téléviseur.
Lorsque vous mettez le téléviseur en
marche, la barre de son s’allume
automatiquement et le son du
téléviseur est émis par les haut-parleurs
de la barre de son.
Les opérations peuvent également être
effectuées à partir du menu du
téléviseur. Pour plus de détails,
reportez-vous au manuel d’instructions
du téléviseur.
Remarques
• Les chiffre s indiquant le nivea u de volume
de la barre de son s’affichent à l’écran du
téléviseur, selon le téléviseur.
• Selon les réglages du téléviseur, la
fonction de contrôle audio du système
pourrait ne pas être disponible. Pour plus
de détails, reportez-vous au manuel
d’instructions du téléviseur.
• Selon le téléviseur, si le son du téléviseur
était émis par les haut-parleurs du
téléviseur la dernière fois que vous l’avez
regardé, la barre de son pourrait ne pas
s’allumer par interverrouillage avec
l’alimentation du téléviseur lorsque vous
allumez le téléviseur.
ARC (Audio Return Channel)
Si la barre de son est raccordée à une
prise HDMI IN du téléviseur compatible
avec ARC, vous pouvez écouter le son
du téléviseur à l’aide des haut-parleurs
de la barre de son sans raccorder de
câble numérique optique.
Remarque
Si le téléviseur n’est pas compatible avec
ARC, le câble numérique optique (fourni)
doit être raccordé (reportez-vous au
Manuel de démarrage fourni).
Fonction de lecture à l’aide
d’une touche
Lors de la lecture d’un contenu sur un
appareil (lecteur Blu-ray Disc,
« PlayStation
téléviseur, la barre de son et le
téléviseur s’allument
automatiquement, l’entrée de la barre
de son passe à l’entrée TV et le son est
émis par les haut-parleurs de la barre de
son.
Remarques
• Si le son du téléviseur était émis par les
haut-parleurs du téléviseur la dernière
fois que vous l’avez regardé, la barre de
son pourrait ne pas s’allumer; le son et
l’image pourraient être émis par le
téléviseur, même si le contenu de
l’appareil est en cours de lecture.
• Selon le téléviseur, le début du contenu
en cours de lecture pourrait ne pas
s’afficher correctement.
4 », etc.) raccordé au
®
30
FR

Utilisation de la fonction
«BRAVIA» Sync
Remarques sur les
raccordements HDMI
En plus de la fonction Contrôle pour
HDMI, vous pouvez égalemen t utiliser la
fonction « BRAVIA » Sync, notamment le
mode sonore/la fonction de sélection
de scène.
Remarque
Cette fonction est une fonction exclusive
de Sony. Cette fonction ne peut
fonctionner qu’avec des produits fabriqués
par Sony.
Mode sonore/Fonction de
sélection de scène
Le mode sonore de la barre de son est
commuté automatiquement selon le
réglage de la fonction de sélection de
scène ou du mode sonore du téléviseur.
Pour plus de détails, reportez-vous au
manuel d’instructions du téléviseur.
Réglez le mode sonore à AUTO SOUND
(page 22).
• Utilisez un câble HDMI approuvé.
• Nous recommandons l’utilisation d’un
câble HDMI haute vitesse avec
Ethernet de Sony portant le logo du
type de câble.
• Nous vous déconseillons d’utiliser un
câble de conversion HDMI-DVI.
• Il est possible que les signaux audio
(fréquence d’échantillonnage,
longueur binaire, etc.) transmis par
une prise HDMI soient supprimés par
l’appareil raccordé.
FR
31

Réduction de la
consommation d’énergie
Pour utiliser la barre de son tout en
réduisant la consommation d’énergie,
modifiez les réglages suivants.
Éteindre la barre de son en
détectant l’état d’utilisation
Lorsque vous activez la fonction de
veille automatique, la barre de son
passe en mode de veille
automatiquement si vous n’utilisez pas
la barre de son pendant environ
20 minutes et que la barre de son ne
reçoit pas un signal d’entrée.
Maintenez enfoncée la touche
INDICATORS pendant 5 s econdes pour
activer ou désactiver la fonction.
Veille automatique activée
Le témoin BLUETOOTH clignote deux fois.
Veille automatique désactivée
Le témoin BLUETOOTH clignote une fois.
Économie d’énergie en
mode de veille
Pour réduire la consommation
d’énergie en mode de veille, désactivez
le mode de veille BLUETOOTH (page 26)
et la fonction Contrôle pour HDMI
(page 29).
Avec les réglages par défaut, ils sont
activés.
FR
32

Dépannage
Dépannage
Si vous rencontrez l’un des problèmes
suivants lors de l’utilisation de la barre
de son, consultez ce guide de
dépannage pour tenter de résoudre le
problème avant de demander une
réparation. Si le problème persiste,
consultez votre détaillant Sony le plus
proche.
Lorsque vous demandez une
réparation, apportez la barre de hautparleurs et le caisson de graves, même
si un seul élément semble présenter un
problème.
Alimentation
La barre de son ne s’allume pas.
Vérifiez que le cordon d’alimentation
CA est correctement connecté.
Déconnectez le cordon
d’alimentation CA de la prise murale,
puis reconnectez-le après quelques
minutes.
La barre de son s’éteint
automatiquement.
La fonction de veille automatique est
activée. Désactivez la fonction de
veille automatique (page 32).
La barre de son ne s’allume pas
lorsque vous allumez le téléviseur.
Activez la fonction Contrôle pour
HDMI (page 29). Le téléviseur doit
prendre en charge la fonction
Contrôle pour HDMI. Pour plus de
détails, reportez-vous au manuel
d’instructions du téléviseur.
Vérifiez les réglages de haut-parleur
du téléviseur. L’alimentation de la
barre de son est synchronisée avec
les réglages de haut-parleur du
téléviseur. Pour plus de détails,
reportez-vous au manuel
d’instructions du téléviseur.
Selon le téléviseur, si le son était émis
par les haut-parleurs du téléviseur
lors de la dernière utilisation, la barre
de son pourrait ne pas s’allumer par
interverrouillage avec l’alimentation
du téléviseur lorsque vous allumez le
téléviseur.
La barre de son s’éteint lorsque
vous éteignez le téléviseur.
Vérifiez le réglage de la fonction
Contrôle pour HDMI (page 29).
Lorsque la fonction Contrôle pour
HDMI est activée et que l’entrée de la
barre de son est l’entrée TV, la barre
de son s’éteint automatiquement
lorsque vous éteignez le téléviseur.
La barre de son ne s’éteint pas
lorsque vous éteignez le téléviseur.
Vérifiez le réglage de la fonction
Contrôle pour HDMI (page 29).
Lorsque vous éteignez le téléviseur,
la barre de son s’éteint
automatiquement uniquement si
l’entrée de la barr e de son est l’entrée
TV. Le téléviseur doit prendre en
charge la fonction Contrôle pour
HDMI. Pour plus de détails, reportezvous au manuel d’instructions du
téléviseur.
Image
Il n’y a pas d’image ou l’image n’est
pas émise correctement.
Lorsqu’il n’y a pas d’image pendant
que l’entrée TV est sélectionnée,
sélectionnez le canal de télévision
souhaité en utilisant la
télécommande du téléviseur.
33
FR

Son
La barre de son ne peut pas se
connecter à un téléviseur avec la
fonction BLUETOOTH.
Lorsque vous raccordez la barre de
son et le téléviseur avec un câble
HDMI (non fourni), la connexion
BLUETOOTH est annulée.
Déconnectez le câble HDMI, puis
effectuez la procédure de connexion
depuis le début (page 15).
Aucun son du téléviseur n’est émis
par la barre de son.
Vérifiez le type et le raccordement du
câble HDMI ou du câble numérique
optique raccordé à la barre de son et
au téléviseur (reportez-vous au
Manuel de démarrage fourni).
Déconnectez les câbles qui sont
connectés entre le téléviseur et la
barre de son, puis reconnectez-les
fermement. Déconnectez les cordons
d’alimentation CA du téléviseur et de
la barre de son des prises CA, puis
reconnectez-les.
Lorsque la barre de son et le
téléviseur sont raccor dés à l’aide d’un
câble HDMI uniquement, vérifiez les
points suivants.
– La prise HDMI du téléviseur
raccordé porte l’étiquette « ARC ».
– La fonction Contrôle pour HDMI du
téléviseur est activée.
– Sur la barre de son, la fonction
Contrôle pour HDMI est activée
(page 29).
Si votre téléviseur n’est pas
compatible avec ARC, raccordez le
câble numérique optique (fourni)
(reportez-vous au Manuel de
démarrage fourni). Si le téléviseur
n’est pas com patible avec ARC, le son
du téléviseur ne sera pas émis par la
barr e de s on, m ême si la ba rre d e son
est raccordée à la prise HDMI IN du
téléviseur.
Sélectionnez l’entrée TV en appuyant
sur TV (page 21).
Augmentez le volume du téléviseur
ou annulez la fonction de coupure du
son.
Selon l’ordre dans lequel vous
raccordez le téléviseur et la barre de
son, il est possible que le son de la
barre de son soit coupé. Si cela se
produit, allumez d’abord le
téléviseur, puis la barre de son.
Réglez le paramètre de haut-parleurs
du téléviseur (BRAVIA) à Système
audio. Reportez-vous au manuel
d’instructions de votre téléviseur
pour savoir comment configurer le
téléviseur.
Vérifiez le niveau de sortie sonore du
téléviseur. Reportez-vous au manuel
d’instructions du téléviseur pour plus
de détails sur les réglages du
téléviseur.
La barre de son prend en charge les
formats audio Dolby Digital et PCM
(page 42). Lors de la lecture d’un
format non pris en charge, réglez le
réglage de sortie audio numé rique du
téléviseur (BRAVIA) à « PCM ». Pour
plus de détails, reportez-vous au
manuel d’instructions du téléviseur.
Le son est émis par la barre de son
et le téléviseur.
Modifiez le réglage de sortie audio du
téléviseur afin que le son du
téléviseur soit émis au moyen d’une
enceinte externe.
Réglez le volume du téléviseur au
minimum.
34
FR

Le son émis par la barre de son n’est
pas au même niveau que celui du
téléviseur, même si les valeurs de
niveau de volume de la barre de
son et du téléviseur sont
identiques.
Si la fonction Contrôle pour HDMI est
activée, la valeur de niveau de
volume de la barre de son pourrait
apparaître sur votre téléviseur en tant
que valeur de volume du téléviseur.
Les niveaux sonores émis par la barre
de son et le téléviseur peuvent être
différents, même si les valeurs de
niveau de volume de la barre de son
et du téléviseur sont identiques. Les
niveaux sonores émis par la barre de
son et le téléviseur varient en
fonction de leurs caractéristiques de
traitement sonore; il ne s’agit pas
d’un problème de fonctionnement.
Le son est interrompu pendant le
visionnement d’une émission de
télévision ou d’un contenu sur un
disque Blu-ray, etc.
Vérifiez le réglage du mode sonore
(page 22). Si le mode sonore est réglé
à AUTO SOUND, le son pourrait être
interrompu lorsque le mode sonore
est modifié automatiquement en
fonction des informations de
l’émission en cours de visionnement.
Si vous ne souhaitez pas modifier le
mode sonore automatiquement,
réglez le mode sonore à un réglage
autre que AUTO SOUND.
Aucun son ou seulement un son
très faible de l’appareil raccordé à
la barre de son est émis par la barre
de son.
Appuyez sur + et véri fiez le nivea u
de volume (page 13).
Appuyez sur
la fonction de coupure du son
(page 13).
ou + pour annuler
Assurez-vous que la source d’entrée
est sélectionnée correctement
(page 21).
Vérifiez que tous les câbles et
cordons de la barre de son et de
l’appareil raccordé sont fermement
insérés.
Si l’appareil raccordé prend en charge
la fonction de suréchantillonnage,
vous devez la désactiver.
L’effet ambiophonique ne peut pas
être obtenu.
Selon le réglage de signal d’entrée et
de mode sonore, le traitement sonore
ambiophonique pourrait ne pas
fonctionner correctement. L’effet
ambiophonique peut être subtil,
selon le programme ou le disque.
Pour effectuer la lecture du son
multicanal, vérifiez le réglage de
sortie audio numérique sur l’appareil
raccordé à la barre de son. Pour plus
de détails, reportez-vous au manuel
d’instructions fourni avec l’appareil
raccordé.
Caisson de graves
Aucun son ou seulement un son
très faible est émis par le caisson de
graves.
Appuyez sur la touche SW + de la
télécommande pour augmenter le
volume du caisson de graves.
Assurez-vous que le témoin d’état du
caisson de graves est allumé en vert
ou orange.
Si le témoin d’état du caisson de
graves ne s’allume pas, essayez de
procéder comme suit.
– Assurez-vous que le cordon
d’alimentation CA du caisson de
graves est raccordé correctement.
– Appuyez sur la touche
(alimentation) du caisson de
graves pour le mettre en marche.
35
FR

Si le témoin d’état du caisson de
graves s’allume en rouge, essayez de
procéder comme suit.
– Rapprochez le caisson de graves de
la barre de haut-parleurs de
manière à ce que le témoin d’état
du caisson de graves s’allume en
vert ou orange.
– Suivez les étapes de la section
« Établissement de la connexion
sans fil du caisson de graves
(SECURE LINK) » (page 28).
Si le témoin d’état du caisson de
graves clignote en rouge, appuyez
sur la touche (alimentation) du
caisson de graves pour l’éteindre et
vérifiez si les ouvertures d’aération du
caisson de graves sont bloquées.
Si les sources d’entrée comportent
très peu de sons graves (par exemple,
une émission de télévision), le son
émis par le caisson de graves peut
être difficile à entendre. Démarrez la
lecture de la musique de
démonstration intégrée en suivant
les étapes ci-dessous et vérifiez que
le son est émis par le caisson de
graves.
Maintenez enfoncée la touche
(TV) de la barre de haut-
parleurs pendant 5 secondes.
La lecture de la musique de
démonstration intégrée démarre.
Appuyez de nouveau sur (TV).
La musique de démonstration
intégrée s’arrête et la barre de
son retourne à l’état précédent.
Désactivez le mode nuit (page 23).
Connexion d’un appareil
mobile
La connexion BLUETOOTH ne peut
pas être effectuée.
Assurez-vous que le témoin
BLUETOOTH de la barre de hautparleurs s’allume (page 8).
Assurez-vous que l’appareil
BLUETOOTH à connecter est allu mé et
que la fonction BLUETOOTH est
activée.
Rapprochez l’appareil BLUETOOTH de
la barre de haut-parleurs.
Jumelez de nouveau la barre de son
et l’appareil BLUETOOTH. Il pourrait
d’abord être nécessaire d’annuler le
jumelage avec la barre de son à l’aide
de votre appareil BLUETOOTH.
Si la fonction BLUETOOTH est
désactivée, activez-la (page 27).
Impossible d’effectuer le jumelage.
Rapprochez l’appareil BLUETOOTH de
la barre de haut-parleurs.
Assurez-vous que la barre de son ne
reçoit aucune interférence provenant
d’un appareil LAN sans fil, d’un autre
appareil sans fil 2,4 GHz ou d’un four
à micro-ondes. Si un appareil qui
génère un rayonnement
électromagnétique se trouve à
proximité, éloignez l’appareil de la
barre de son.
Le jumelage pourrait être impossible
si d’autres appareils B LUETOOTH sont
présents autour de la barre de son. En
pareil cas, éteignez les autres
appareils BLUETOOTH.
Le son de l’appareil mobile
BLUETOOTH connecté n’est pas
émis par la barre de son.
Assurez-vous que le témoin
BLUETOOTH de la barre de hautparleurs s’allume (page 8).
Rapprochez l’appareil BLUETOOTH de
la barre de haut-parleurs.
Si un appareil qui génère un
rayonnement électromagnétique se
trouve à proximité, par exemple un
appareil LAN sans fil, un autre
appareil BLUETOOTH ou un four à
micro-ondes, éloignez l’appareil de la
barre de son.
36
FR

Retirez tout obstacle se trouvant
entre la barre de haut-parleurs et
l’appareil BLUETOOTH ou éloignez la
barre de haut-parleurs de l’obstacle.
Si la barre de haut-parleurs est
installée sous le téléviseur, éloignez
la barre de haut-parleurs du
téléviseur.
Repositionnez l’appareil BLUETOOTH
connecté.
Faites passer la fréque nce LAN sans fil
de tout routeur LAN sans fil ou
ordinateur situé à proximité à la pl age
5GHz.
Augmentez le volume sur l’appareil
BLUETOOTH connecté.
Le son n’est pas synchronisé avec
l’image.
Lorsque vous regardez des films, le
son pourrait être légèrement décalé
par rapport à l’image.
Télécommande
La télécommande de la barre de
son ne fonctionne pas.
Pointez la télécommande vers le
capteur de télécommande sur la
barre de haut-parleurs (page 8).
Retirez tous les obstacles qui se
trouvent entre la télécommande et la
barre de son.
Remplacez les deux piles de la
télécommande par de nouvelles
piles, si elles sont faibles.
Assurez-vous d’appuyer sur la bonne
touche de la télécommande
(page 13).
La télécommande du téléviseur ne
fonctionne pas.
Installez la barre de haut-parleurs de
manière à ne pas bloquer le capteur
de télécommande du téléviseur.
Ce problème peut être résolu en
activant la fonction IR-Repeater
(page 20).
Autres
La fonction Contrôle pour HDMI ne
fonctionne pas correctement.
Vérifiez le raccordement avec la barre
de son (reportez-vous au Manuel de
démarrage fourni).
Activez la fonction Contrôle pour
HDMI sur le téléviseur. Pour plus de
détails, reportez-vous au manuel
d’instructions du téléviseur.
Attendez un instant, puis essayez de
nouveau. Si vous débranchez la barre
de son, vous devrez attendre
quelques instants avant d’effectuer
des opérations. Attendez au moins
15 secondes, puis essayez de
nouveau.
Assurez-vous que les appareils
raccordés à la barre de son prennent
en charge la fonction Contrôle pour
HDMI.
Activez la fonction Contrôle pour
HDMI des appareils raccordés à la
barre de son. Pour plus de détails,
reportez-vous au manuel
d’instructions de votre appareil.
Le type et le nombre d’appareils qui
peuvent être contrôlés par la fonction
Contrôle pour HDMI sont limités par la
norme HDMI CEC comme suit :
– Appareils d’enregistrement
(enregistreur Blu-ray Disc,
enregistreur DVD, etc.) : jusqu’à
3appareils
– Appareils de lecture (lecteur Blu-ray
Disc, lecteur DVD, etc.) : jusqu’à
3appareils
– Appareils de syntonisation : jusqu’à
4appareils
– Système audio (récepteur/casque
d’écoute) : jusqu’à 1 appareil (utilisé
par la barre de son)
37
FR

Tous les témoins de la barre de
haut-parleurs clignotent pendant
10 secondes et la barre de son
s’éteint.
La fonction de protection est activée.
Déconnectez le cordon
d’alimentation CA et assurez-vous
que les ouvertures d’aération de la
barre de haut-parleurs ne sont pas
recouvertes, puis allumez la barre de
son après quelques instants.
Les capteurs du téléviseur ne
fonctionnent pas correctement.
La barre de haut-parleurs peut
bloquer certains capteurs (comme le
capteur de luminosité), le capteur de
télécommande de votre téléviseur ou
l’émetteur de lunettes 3D
(transmission infrarouge) d’un
téléviseur 3D prenant en charge le
système de lunettes 3D infrarouge ou
la communication sans fil. Éloignez la
barre de haut-parleurs du téléviseur à
une distance suffisante pour
permettre à ces composants de
fonctionner correctement. Pour
connaître les emplacements des
capteurs et du récepteur de
télécommande, reportez-vous au
manuel d’instructions fourni avec le
téléviseur.
La barre de son ne fonctionne pas
correctement.
La barre de son pourrait être en mode
de démonstration. Pour annuler le
mode de démonstration, réinitialisez
la barre de son. Maintenez enfoncées
les touches – (volume) et
(alimentation) de la barre de hautparleurs pendant plus de 5 secondes
(page 39).
Le message suivant s’affiche.
* Cet écran présente un exemple pour la
langue Anglais.
Sélectionnez l’émission de télévision
en utilisant la télécommande du
téléviseur.
38
FR

Réinitialisation de la
barre de son
Si la barre de son ne fonctionne
toujours pas correctement,
réinitialisez la barre de son en
procédant comme suit.
1 Maintenez enfoncées les touches
– (volume) et (alimentation) de
la barre de haut-parleurs pendant
plus de 5 secondes.
Tous les témoins de la barre de
haut-parleurs clignotent 3 fois, puis
les réglages retournent à leur état
initial.
2 Déconnectez le cordon
d’alimentation CA.
3 Raccordez le cordon
d’alimentation CA, puis appuyez
sur pour allumer la barre de
son.
Conseil
Les réglages par défaut sont soulignés
dans chaque description de fonction.
39
FR

Informations complémentaires
Caractéristiques
techniques
Barre de haut-parleurs
(SA-S350)
Section amplificateur
Modèles américains :
PUISSANCE DE SORTIE ET DISTORSION
HARMONIQUE TOTALE :
(FTC)
Avant G + Avant D :
Avec des charges de 4 ohms, les deux
canaux étant alimentés, de 200 à
20 000 Hz; puissance efficace RMS
minimale de 18 W par canal, avec une
distorsion harmonique totale
inférieure ou égale à 1 %, de 250 mW à
la puissance de sortie nominale.
PUISSANCE DE SORTIE (référence)
Enceinte Avant G/Avant D : 85 W (par
canal à 4 ohms, 1 kHz)
Modèles canadiens :
PUISSANCE DE SORTIE (nominale)
Avant G + Avant D : 45 W + 45 W (à
4 ohms, 1 kHz, 1 % de DHT)
PUISSANCE DE SORTIE (référence)
Enceinte Avant G/Avant D : 85 W (par
canal à 4 ohms, 1 kHz)
Entrées
TV IN (OPTICAL)
Sorties
HDMI OUT (TV (ARC))
Section BLUETOOTH
Système de communication
Spécification BLUETOOTH version 5.0
Sortie
Spécification BLUETOOTH pour classe
de puissance 1
Portée de communication maximale
En ligne directe, environ 25 m
1)
Bande de fréquence
Bande 2,4 GHz (2,4000 GHz 2,4835 GHz)
Méthode de modulation
FHSS (Freq Hopping Spread Spectrum)
Profils BLUETOOTH compatibles
A2DP (Advanced Audio Distribution
Profile)
AVRCP (Audio Video Remote Control
Profile)
Codec pris en charge
4)
SBC
Plage de transmission (A2DP)
20 Hz - 20 000 Hz (Fréquence
d’échantillonnage 32 kHz, 44,1 kHz,
48 kHz)
1)
La plage réelle varie en fonction de
facteurs tels que la présence
d’obstacles entre les appareils, les
champs magnétiques autour des fours
à micro-ondes, l’électricité statique,
l’utilisation d’un téléphone sans fil, la
sensibilité de réception, le système
d’exploitation, les applications
logicielles, etc.
2)
Les profils BLUETOOTH standard
indiquent la fonction des
communications BLUETOOTH entre les
appareils.
3)
Codec : Format de conversion et
compression du signal audio
4)
Abréviation pour codec de sous-bande
3)
2)
Section bloc d’enceinte Avant G/
Avant D
Système d’enceinte
Système d’enceinte à 2 haut-parleurs
Haut-parleur
Enceinte Avant G/Avant D : Type
conique de 52 mm × 90 mm (2 1/8 po ×
35/8po), 4Ω
Généralités
Alimentation
120 V CA, 60 Hz
Consommation d’énergie
En marche : 30 W
Mode de veille : 0,5 W ou moins
(mode d’économie d’énergie)
(Lorsque la fonction Contrôle pour
HDMI et le mode de veille BLUETOOTH
sont désactivés)
40
FR

Mode de veille : 2 W ou moins*
(Lorsque la fonction Contrôle pour
HDMI et le mode de veille BLUETOOTH
sont activés)
* La barre de son passe
automatiquement en mode
d’économie d’énergie lorsqu’il n’y a
aucun raccordement HDMI ni aucun
historique de jumelage BLUETOOTH.
Dimensions* (environ) (l/h/p)
900 mm × 64 mm × 88 mm
(35 1/2 po × 2 5/8 po × 3 1/2 po)
* Excluant la partie saillante
Poids (environ)
2,4kg (5lb 47/10oz)
Caisson de graves
(SA-WS350)
PUISSANCE DE SORTIE (référence)
150 W (à 2,5 ohms, 100 Hz)
Système d’enceinte
Système de caisson de graves, Bass
Reflex
Haut-parleur
Type conique de 160 mm (6 1/2 po)
Alimentation
120 V CA, 60 Hz
Consommation d’énergie
En marche : 25 W
Mode de veille : 0,5 W ou moins
Dimensions* (environ) (l/h/p)
190 mm × 382 mm × 390 mm
(7 1/2 po × 15 1/8 po × 15 3/8 po)
* Excluant la partie saillante
Poids (environ)
7,8 kg (17 lb 3 1/5 oz)
Partie émetteur/récepteur
sans fil
Bande de fréquence
2,4 GHz (2,4000 GHz - 2,4835 GHz)
Méthode de modulation
FHSS (Freq Hopping Spread Spectrum)
La conception et les caractéristiques
techniques sont susceptibles d’être
modifiées sans préavis.
41
FR

Formats audio d’entrée
pris en charge (Entrée TV)
La barre de son prend en charge les
formats audio suivants.
•Dolby Digital
• PCM linéaire 2 canaux
À propos de la
communication
BLUETOOTH
• Les appareils B LUETOOTH doivent être
utilisés dans un rayon d’environ
10 mètres (33 pieds) (distance sans
obstacle) l’un de l’autre. La plage de
communication effective peut être
réduite dans les cas suivants.
– Si une personne, un objet
métallique, un mur ou au tre obstacle
est présent entre les appareils
connectés via BLUETOOTH
– Dans des endroits où un appareil
LAN sans fil est installé
– Autour de fours à micro-ondes en
cours d’utilisation
– Dans des endroits où d’autres ondes
électromagnétiques sont présentes
• Les appareils BLUETOOTH et LAN sans
fil (IEEE 802.11b/g/n) utilisent la même
bande de fréquence (2,4 GHz).
Lorsque vous utilisez votre appareil
BLUETOOTH à proximité d’un appareil
muni d’une fonctionnalité LAN sans fil,
des interférences électromagnétiques
peuvent survenir. Cela risque de
provoquer des taux de transfert de
données inférieurs, du bruit ou une
impossibilité de se connecter. Si cela
se produit, essayez les solutions
suivantes :
– Utilisez cette barre de son à une
distance minimum de 10 mètres
(33 pieds) de l’appareil LAN sans fil.
– Éteignez l’appareil LAN sans fil
lorsque vous utilisez votre appareil
BLUETOOTH dans un rayon de
10 mètres (33 pieds).
– Installez cette barre de son et
l’appareil BLUETOOTH aussi près que
possible l’un de l’autre.
42
FR

• Les ondes radio émises par cette barre
de son peuvent interférer avec le
fonctionnement de certains appareils
médicaux. Comme ces interférences
peuvent provoquer un problème de
fonctionnement, éteignez toujours
cette barre de son et l’appareil
BLUETOOTH dans les endroits suivants :
– Dans les hôpitaux, les trains, les
avions, les stations-service et tous
les endroits où pourraient se trouver
des gaz inflammables
– À proximité de portes automatiques
ou d’avertisseurs d’incendie
• Cette barre de son prend en charge
des fonctions de sécurité conformes à
la spécification BLUETOOTH afin de
garantir une connexion sécurisée lors
de la communication à l’aide de la
technologie BLUETOOTH. Toutefois,
comme cette sécurité peut s’avérer
insuffisante selon le réglage et
d’autres facteurs, faites toujours
attention lorsque vous communiquez
à l’aide de la technologie BLUETOOTH.
• Sony ne peut pas être tenu
responsable de tout dommage ou
toute perte résultant de fuites
d’informations lors de la
communication à l’aide de la
technologie BLUETOOTH.
• La communication BLUETOOTH n’est
pas forcément garantie avec tous les
appareils BLUETOOTH ayant le même
profil que cette barre de son.
• Les appareils BLUETOOTH connectés à
cette barre de son doivent être
conformes à la spécification
BLUETOOTH prescrite par Bluetooth
SIG, Inc., et être certifiés conformes.
Toutefois, même dans le cas d’un
appareil conforme à la spécification
BLUETOOTH, il est possible que
certaines caractéristiques ou
spécifications de l’appareil
BLUETOOTH rendent la connexion
impossible ou entraînent des
méthodes de contrôle, un affichage
ou un fonctionnement différents.
• Du bruit peut survenir ou le son peut
être interrompu en fonction de
l’appareil BLUETOOTH connecté à
cette barre de son, de
l’environnement de communication
ou des conditions environnantes.
Si vous avez des questions ou si vous
rencontrez des problèmes avec votre
barre de son, veuillez consulter votre
détaillant Sony le plus proche.
43
FR

Précautions
Sécurité
• Si un objet ou du liquide venait à pénétrer
à l’intérieur de la barre de son,
débranchez la barre de son et faites-la
vérifier par une personne qualifiée avant
de la remettre en marche.
• Ne montez pas sur la barre de son, car
cela pourrait entraîner une chute et des
blessures ou endommager la barre de
son.
Sources d’alimentation
• Avant de mettre en marche la barre de
son, vérifiez que la tension de
fonctionnement est identique à celle de
votre source d’alimentation locale. La
tension de fonctionnement est indiquée
sur la plaque signalétique située sur la
partie inférieure de la barre de hautparleurs.
• Déconnectez la barre de son de la prise
mu rale si vo us pr évoye z de n e pas util iser
la barre de son pendant une période
prolongée. Pour déconnecter le cordon
d’alimentation CA, saisissez la fiche; ne
tirez jamais sur le cordon.
• Pour des raisons de sécurité, l’une des
broches de la fiche est plus large que
l’autre et s’insère dans la prise murale
dans un seul sens. Si vous ne parvenez
pas à insérer la fiche complètement dans
la prise, contactez votre détaillant.
• Le cordon d’alimentation CA ne doit être
remplacé que dans un centre de service
agréé.
Accumulation de chaleur
Si la barre de son produit de la chaleur
pendant le fonctionnement, il ne s’agit pas
d’un problème de fonctionnement.
En cas d’utilisation continue de cette barre
de son à un volume élevé, la température
de la barre de son augmente
considérablement au niveau des parties
arrière et inférieure. Pour éviter de vous
brûler, ne touchez pas la barre de son.
Installation
• Installez la barre de son dans un endroit
suffisamment ventilé pour éviter
l’accumulation de chaleur et prolonger la
durée de vie de la barre de son.
• N’installez pas la barre de son à proximité
de sources de chaleur ou dans un endroit
exposé à la lumière directe du soleil, à
une poussière excessive ou à des chocs
mécaniques.
• Ne placez aucun objet sur le dessus de la
barre de haut-parleurs.
• Si la barre de son est utilisée
conjointement avec un téléviseur, un
magnétoscope ou un magnétophone,
des parasites peuvent se produire et la
qualité de l’image peut être réduite. En
pareil cas, éloignez la barre de son du
téléviseur, du magnétoscope ou du
magnétophone.
• Faites attention lorsque vous placez la
barre de son sur une surface
spécialement traitée (cirée, huilée, polie,
etc.), car des taches ou une décoloration
de la surface peuvent apparaître.
• Évitez de vous blesser sur les coins de la
barre de haut-parleurs.
Fonctionnement
Avant de raccorder d’autres équipements,
assurez-vous d’éteindre et de débrancher
la barre de son.
Si l’écran du téléviseur situé à
proximité présente des
irrégularités de couleurs
Des irrégularités de couleurs peuvent
apparaître sur certains types de téléviseur.
• En cas d’irrégularités de couleurs...
Éteignez le téléviseur, puis rallumez-le
après 15 à 30 minutes.
• En cas d’irrégularités de couleurs
persistantes...
Éloignez davantage la barre de son du
téléviseur.
44
FR

Nettoyage
Nettoyez la barre de son avec un chiffon
doux et sec. N’utilisez pas de tampons
abrasifs, de poudre à récurer ou de
solvants tels que de l’alcool ou du
benzène.
Si vous avez des questions ou si vous
rencontrez un problème avec votre barre
de son, veuillez consulter votre détaillant
Sony le plus proche.
Droits d’auteur et marques
de commerce
Cette barre de son intègre la technologie
Dolby* Digital.
* Fabriqué sous licence de Dolby
Laboratories.
Dolby, Dolby Audio et le symbole doubleD sont des marques déposées de Dolby
Laboratories.
Le terme et les logos BLUETOOTH
marques déposées appartenant à
Bluetooth SIG, Inc. et tout usage de ces
marques par Sony Corporation s’inscrit
dans le cadre d’une licence. Les autres
marques commerciales et noms de
marques appartiennent à leurs
propriétaires respectifs.
Les termes HDMI et HDMI High-Definition
Multimedia Interface, de même que le logo
HDMI sont des marques commerciales ou
des marques déposées de HDMI Licensing
Administrator, Inc. aux États-Unis et dans
d’autres pays.
Le logo « BRAVIA » est une marque
commerciale de Sony Corporation.
« PlayStation » est une marque déposée ou
une marque commerciale de Sony
Interactive Entertainment Inc.
Technologie de codage audio et brevets
MPEG Layer-3 sous licence Fraunhofer IIS
et Thomson.
®
sont des
Windows Media est une marque déposée
ou une marque commerciale de Microsoft
Corporation aux États-Unis et/ou dans
d’autres pays.
Ce produit est protégé par des droits de
propriété intellectuelle de Microsoft
Corporation. Il est interdit d’utiliser ou de
distribuer cette technologie hors de ce
produit sans disposer d’une licence
appropriée de Microsoft ou d’une filiale de
Microsoft autorisée.
45
FR

Toutes les autres marques commerciales
sont la propriété de leurs détenteurs
respectifs.
46
FR


Registro del propietario
Los números de modelo y serie están
ubicados en la parte inferior de la barra
parlante. Registre los números de serie
en el espacio proporcionado a
continuación. Indíquelos siempre que
llame a su distribuidor Sony con relación
a este producto.
N.° de modelo HT-S350
N.° de serie
No sitúe la barra de sonido en un
espacio cerrado, como una estantería o
un armario empotrado.
PRECAUCIÓN
Riesgo de explosión si la batería se
reemplaza por un tipo de batería
incorrecto.
No exponga las baterías ni los
dispositivos con batería a un calor
excesivo, como la luz directa del sol o
fuego.
ADVERTENCIA
Para reducir el riesgo de incendios o
electrocución, no exponga la barra de
sonido a la lluvia ni a la humedad.
La barra de sonido no estará
desconectada de la fuente de
alimentación de ca mientras esté
conectada a la toma de pared, aunque
se haya apagado la propia barra de
sonido.
Para reducir el riesgo de incendio, no
cubra la abertura de ventilación de la
barra de sonido con periódicos, paños,
cortinas, etc.
No exponga la barra de soni do a fuentes
de llamas vivas (velas encendidas, por
ejemplo).
Para reducir el riesgo de incendio o
descarga eléctrica, no exponga la barra
de sonido a goteos ni salpicaduras de
líquidos. No coloque objetos llenos de
líquido, como vasos, sobre la barra de
sonido.
Ya que el enchufe principal se utiliza para
desconectar la barra de sonido de la red
eléctrica, conecte la barra de sonido a
una salida de CA de fácil acceso. Si nota
alguna anomalía en la barra de sonido,
desconecte el enchufe principal de la
salida de CA de inmediato.
Solo para ser usado en interiores.
Para la barra parlante
La placa de identificación se encuentra
en la parte inferior de la barra parlante.
Para clientes de los EE. UU.
Instrucciones de seguridad
importantes
1) Lea estas instrucciones.
2) Conserve estas instrucciones.
3) Preste atención a las advertencias.
4) Siga las instrucciones.
5) No utilice este aparato cerca del
agua.
6) Límpielo sólo con un paño seco.
7) No bloquee los orificios de
ventilación. Instale el aparato según
las instrucciones del fabricante.
8) No instale el equipo cerca de fuentes
de calor, como radiadores, rejillas de
calefacción, estufas u otros aparatos
(incluidos amplificadores) que
producen calor.
9) No anule el propósito de seguridad
del enchufe polarizado o enchufe
con descarga a tierra. Un enchufe
polarizado dispone de dos hojas,
una más ancha que la otra. Un
enchufe de tipo conexión a tierra
tiene dos hojas y una tercera clavija
para la conexión a tierra. La hoja
ancha o la tercera clavija se
proporcionan por razones de
seguridad. Si el enchufe
ES
2

suministrado no entra en la toma,
contacte a un electricista para que
reemplace la toma obsoleta.
10) Evite pisar o perforar los cables de
alimentación, sobre todo en la parte
del enchufe, en los receptáculos y en
el punto en el que el cable sale del
equipo.
11) Use solamente los accesorios
indicados por el fabricante.
12) Use solamente con el carrito,
soporte, trípode, ménsula o mesa
indicados por el fabricante, o que se
venden con el equipo. Al utilizar el
carrito, tenga cuidad al desplazar el
carrito con el aparato, para evitar
lesiones y que se vuelque el equipo.
13) Desenchufe este equipo durante
tormentas eléctricas o cuando no se
vaya a utilizar por períodos
prolongados.
14) Consulte a personal de servicio
calificado para cualquier
mantenimiento. Se requiere servicio
de mantenimiento cuando se ha
dañado el equipo de algún modo, tal
como cuando se daña el cable o
enchufe de alimentación, se ha
derramado líquido sobre el equipo o
han caído objetos dentro de él, se ha
expuesto el equipo a lluvia o
humedad o cuando el equipo no
opera como de costumbre o se ha
dejado caer.
NOTA:
Esta barra de sonido ha sido sometida a
pruebas y se ha determinado que
cumple con los límites requeridos por
los aparatos digitales de la clase B, en
cumplimiento con la Sección 15 de las
regulaciones de la FCC. Estas
especificaciones han sido diseñadas
para proporcionar una protección
razonable contra interferencias
perjudiciales en una instalación
residencial. Esta barra de sonido
genera, utiliza y puede emitir energía de
radiofrecuencia y, de no ser instalado y
utilizado de acuerdo con las
instrucciones podría ocasionar
interferencias perjudiciales en las
comunicaciones de radio.
No obstante, no se garantiza que no
ocurra ninguna interferencia en una
instalación particular. Si la barra de
sonido causa interferencia en la
recepción de radio o televisión, que
puede determinarse al apagar y
encender la barra de sonido, se
recomienda que el usuario intente
corregir la interferencia mediante una o
más de las siguientes medidas:
– Cambie la orientación o ubicación de
la antena de recepción.
– Aumente la separación entre la barra
de sonido y el receptor.
– Conecte la barra de sonido en una
toma de circuito distinta a la que está
conectado el receptor.
– Consulte con su distribuidor o con un
técnico especializado en radio/
televisión para solicitar asistencia.
Es preciso utilizar cables y conectores
correctamente blindados y conectados
a tierra para la conexión a anfitriones y/
o periféricos con el fin de cumplir los
límites de emisiones de la FCC.
ES
Si tiene alguna pregunta sobre esta
barra de sonido:
Visite: www.sony.com/support
ES
3

Contacto: Sony Customer Information
Service Center al 1-800-222SONY (7669).
Escriba a: Sony Customer Information
Service
Center 12451 Gateway Blvd., Fort Myers,
FL 33913
Declaración de Conformidad del
proveedor
Marca comercial: SONY
N.° de modelo: HT-S350
División a cargo: Sony Electronics Inc.
Dirección: 16535 Via Esprillo, San Diego,
CA 92127 USA
N.° de teléfono: 858-942-2230
Este dispositivo cumple con las
disposiciones de la Sección 15 de la FCC.
Su funcionamiento está sujeto a las
siguientes condiciones: (1) este
dispositivo no debe ocasionar
interferencias; y (2) Este dispositivo
debe ser capaz de aceptar cualquier
tipo de interferencia, incluidas las
interferencias que puedan ocasionar un
funcionamiento no deseado del equipo.
PRECAUCIÓN
Queda notificado que ante cualquier
cambio o modificación que no haya sido
aprobado expresamente en este
manual se podrían invalidar sus
facultades para utilizar esta barra de
sonido.
Esta barra de sonido no debe colocarse
ni utilizarse junto con otras antenas o
transmisores.
Para los clientes en Canadá
Utilice conectores y cables
debidamente protegidos y con
conexión a tierra para conectar a
computadoras del host o dispositivos
periféricos.
Esta barra de sonido contiene
transmisores o receptores exentos de
licencia que cumplen con las
Especificaciones Estándar de Radio
(RSS, por sus siglas en inglés) del Centro
de Innovación, Ciencia y Desarrollo
Económico de Canadá. Su
funcionamiento está sujeto a las
siguientes condiciones:
(1) Esta barra de sonido no debe
ocasionar interferencias; y
(2) Esta barra de sonido debe ser capaz
de aceptar cualquier tipo de
interferencia, incluidas las
interferencias que puedan ocasionar
un funcionamiento no deseado de la
barra de sonido.
Esta barra de sonido cumple con los
límites de exposición a la radiación de
ISED definidos para un entorno no
controlado y cumple con la RSS-102 de
las normas de exposición a
radiofrecuencia (RF) del ISED. La barra
de sonido se debe instalar y operar
manteniendo el radiador a una distancia
de al menos 20cm o más del cuerpo de
la persona.
Esta barra de sonido cumple con los
límites de exposición a la radiación de la
FCC definidos para un ambiente no
controlado y cumple con los
lineamientos de exposición a
radiofrecuencia (RF) de la FCC. Esta
barra de sonido se debe instalar y
operar manteniendo el radiador a una
distancia de al menos 20cm del cuerpo
de la persona.
ES
4

Índice
Acerca de este Manual de
instrucciones ...........................5
¿Qué viene en la caja? ...................6
Qué puede hacer con la barra de
sonido ......................................7
Guía para partes y controles .........8
Conexión al TV
Cómo conectar
un TV con un
cable HDMI
Cómo conectar el TV Sony con la
función BLUETOOTH de forma
inalámbrica ............................ 15
Montaje de la barra parlante en una
pared ..................................... 18
Cuando el control remoto del TV no
funciona .................................20
Cómo escuchar el sonido
Cómo escuchar el TV u otros
dispositivos ............................21
Ajuste del sonido .........................22
Escuchar música/sonido con
la función BLUETOOTH®
Escuchar música desde un
dispositivo móvil ...................24
Encendido de la barra de sonido
mediante el dispositivo
BLUETOOTH ...........................26
Apagado de la función BLUETOOTH
................................................ 27
Guía de inicio
(documento
aparte)
Uso de las distintas funciones
Cómo realizar la conexión
inalámbrica del subwoofer
(SECURE LINK) ........................28
Uso de la función de control para
HDMI ......................................29
Cómo usar la función “BRAVIA” Sync
................................................30
Notas sobre conexiones HDMI .... 31
Ahorro de energía ....................... 31
Solución de problemas
Solución de problemas ...............32
Reconfiguración de la barra de
sonido ....................................38
Información adicional
Especificaciones ..........................39
Formatos de entrada de audio
compatibles (entrada de TV)
................................................40
Comunicación por BLUETOOTH
................................................ 41
Precauciones ...............................42
Acerca de este Manual de
instrucciones
•Las instrucciones incluidas en este
Manual de instrucciones describen las
funciones del control remoto.
•Algunas de las ilustraciones se
presentan a modo de esquemas
conceptuales, por lo que es posible
que presenten diferencias respecto de
los productos reales.
•Los ajustes predeterminados están
subrayados en la descripción de cada
función.
Ejemplo: Función de cont rol para HDMI
activada
ES
5

¿Qué viene en la caja?
• Barra parlante (1)
•Subwoofer (1)
• Control remoto (1)
• Batería R03 (tamaño AAA) (2)
• PLANTILLA PARA MONTAJE EN PARED
(1)
• Guía de inicio
• Manual de instrucciones
• Cable óptico digital (1)
ES
6

Qué puede hacer con la barra de sonido
“Cómo escuchar el TV u otros
dispositivos” (página 21)
Reproductor Blu-ray Disc™,
decodificador de cable,
decodificador satelital, etc.
Conexión del TV
(consulte la “Guía de inicio”
(documento aparte))
“Uso de la función de control para
HDMI” (página 29)
“Cómo usar la función “BRAVIA”
Sync” (página 30)
“Cómo realizar la conexión
inalámbrica del subwoofer
(SECURE LINK)” (página 28)
“Escuchar música desde un
dispositivo móvil” (página 24)
“Cómo conectar el TV
Sony con la función
BLUETOOTH de
forma inalámbrica”
(página 15)
ES
7

Guía para partes y controles
Los detalles se omiten de las ilustraciones.
Barra parlante
Parte frontal
Sensor del control remoto
Apunte el control remoto al sensor
de control remoto para operar la
barra de sonido.
Botón (alimentación)
Enciende la barra de sonido o la
ajusta en el modo de espera.
Botón (TV) (página 21)
Botón BLUETOOTH (página 24)
Botones +/– (volumen)
ES
8

Indicadores
El encendido o parpadeo de los indicadores en la barra parlante indican el
siguiente estado.
Entrada seleccionada en ese momento
Indicadores Estado
Se enciende mientras se selecciona la entrada de TV.
Se enciende mientras se selecciona la entrada de BLUETOOTH.
Se enciende mientras se conecta la barra de sonido al TV con la
función BLUETOOTH (con la entrada de TV seleccionada).
Formato de sonido, efecto envolvente
Indicadores Estado
• Se enciende mientras ingresa sonido multicanal de 5.1 canales.
• Parpadea una vez mientras se selecciona el modo de sonido
(página 22).
Volumen
Indicadores Estado
Parpadea una vez al bajar el volumen al mínimo (1-20).
Parpadea una vez al bajar el volumen al nivel medio (21-40).
Parpadea una vez al subir el volumen al máximo (41-49).
• Parpadea de forma intermitente al silenciar el sonido.
• Parpadea dos veces al configurar el volumen al máximo/
mínimo.
El indicador de la entrada actual parpadea una vez al ajustar el
o
volumen del subwoofer con los botones SW
Parpadea tres veces al configurar el volumen del subwoofer al
máximo/mínimo.
+/–.
ES
9

Configuración de valores de cada función
El ajuste de encendido/apagado para cada función se indica mediante la cantidad
de veces que parpadea el siguiente indicador.
• Encendido: parpadea dos veces.
• Apagado: parpadea una vez.
Consulte la descripción de cada función para ver qué sucede con el estado del
indicador en los casos en que las configuraciones modificadas sean otras que las de
encendido/apagado.
Indicadores Funciones
• Modo nocturno (página 23)
•Modo de voz (página23)
• Audio DRC (página 23)
• Control para HDMI (página 29)
• Modo de espera BLUETOOTH (página 26)
• Función BLUETOOTH (página 27)
• Modo de espera automático (página 31)
• IR repeater (página 20)
Cómo conectar un TV con la función BLUETOOTH (página 15).
10
ES

Parte trasera
Toma HDMI OUT (TV (ARC))
Conecte un TV que tenga una toma
de entrada HDMI con un cable HDMI
(no suministrado).
La barra de sonido es compatible
con ARC (página 30). ARC es la
función que envía el sonido del TV a
un dispositivo AV como la barra de
sonido desde la toma HDMI del TV.
Toma TV IN (OPTICAL)
IR repeater (página 20)
Transmite la señal remota del
control remoto del TV al TV.
ES
11

Subwoofer
Indicador de estado
Indica el estado de la alimentación
del subwoofer y la conexión de la
barra parlante.
– Se enciende en verde: se
establece la conexión entre el
subwoofer y la barra parlante.
– Parpadea en verde: la conexión
entre el subwoofer y la barra
parlante está en proceso.
– Se enciende en anaranjado: se
establece la conexión entre el
subwoofer y la barra parlante con
la función Secure Link.
– Parpadea en anaranjado: la
conexión entre el subwoofer y la
barra parlante con la función
Secure Link está en proceso.
– Se enciende en color rojo: el
subwoofer está en modo de
espera.
– Apagado: el subwoofer está
apagado.
Botón (alimentación)
Enciende o apaga el subwoofer.
Botón LINK (página 28)
Orificios de ventilación
Por seguridad, no bloquee los
orificios de ventilación.
12
ES

Control remoto
Algunos de los botones tienen distintas
funciones dependiendo del tiempo que
se los mantenga presionados. Los
íconos a continuación indican por
cuánto tiempo se debe presionar el
botón.
• : Presione el botón.
• : Presione el botón y manténgalo
presionado durante 5 segundos.
TV (página 21)
Seleccione la entrada de TV.
BLUETOOTH (página 21, 25)
Seleccione la entrada de
BLUETOOTH.
AUTO SOUND (página 22)
Selecciona AUTO SOUND para el
efecto de sonido.
VOICE
: Activa/desactiva el modo Voice.
(página 23)
: Activa/desactiva la función de
control para HDMI. (página 29)
(volumen) +*/–
Ajusta el volumen.
SW (volumen del subwoofer)
+/–
Ajusta el volumen del subwoofer.
GAME (página 22)
Selecciona GAME para el efecto de
sonido.
SPORTS (página 22)
Selecciona SPORTS para el efecto
de sonido.
SECURE LINK (página 28)
: Inicia el ajuste del enlace para
la función Secure Link.
(alimentación)
Enciende la barra de sonido o la
ajusta en el modo de espera.
CINEMA (página 22)
Selecciona CINEMA para el efecto
de sonido.
MUSIC (página 22)
Selecciona MUSIC para el efecto de
sonido.
13
ES

NIGHT
: Activa/desactiva el modo night.
(página 23)
: Activa/desactiva el modo en
espera BLUETOOTH. (página 26)
(silencio)
Apaga el sonido
momentáneamente o enciende el
sonido.
AUDIO*
: Selecciona el canal de audio
para una transmisión multiplex
Dolby Digital. (página 23)
: Activa/desactiva la función
Audio DRC. (página 23)
NEWS (página 22)
Selecciona NEWS para el efecto de
sonido.
STANDARD
: Selecciona STANDARD para el
efecto de sonido. (página 22)
: Activa/desactiva la función IR
repeater. (página 20)
INDICATORS
: Activa/desactiva los indicadores
de la barra parlante.
: Activa/desactiva la función de
espera automática. (página 31)
*Los botones + y AUDIO tienen un
punto táctil. Úselo como guía durante su
operación.
Consejo
Puede apagar los indicadores presionando
INDICATORS.
Incluso si los apaga presionando
INDICATORS, verá que los indicadores se
encienden o parpadean cuando opera la
barra de sonido.
Acerca del reemplazo de baterías
del control remoto
Cuando la barra de sonido no responda
al control remoto, reemplace con dos
nuevas baterías las baterías viejas.
Use baterías de manganeso R03
(tamaño AAA) como reemplazo.
14
ES
 Loading...