

Page 1
4-170-896-12(1)
Additional information on this product and
answers to frequently asked questions can be
found at our Customer Support Website.
Puede encontrar más información sobre este
producto y respuestas a las preguntas más
frecuentes en nuestro sitio Web de atención al
cliente.
http://www.sony.net/
Printed on 70% or more recycled paper.
Impreso en papel reciclado en un 70% o más.
Printed in China
US/ES
HDR-CX110/CX150/XR150
Digital HD Video Camera Recorder
Operating Guide
Guía de operaciones
2010 Sony Corporation
US
ES
Page 2
Owner’s Record
The model and serial numbers are located
on the bottom. Record the serial number
in the space provided below. Refer to these
numbers whenever you call upon your Sony
dealer regarding this product.
Model No. HDRSerial No.
Model No. ACSerial No.
WARNING
To reduce fire or shock hazard, do not
expose the unit to rain or moisture.
Do not expose the batteries to
excessive heat such as sunshine, fire or
the like.
This symbol is intended
to alert the user to the
presence of important
operating and maintenance
(servicing) instructions in
the literature accompanying
the appliance.
This symbol is intended
to alert the user to the
presence of uninsulated
“dangerous voltage” within
the product’s enclosure
that may be of sufficient
magnitude to constitute
a risk of electric shock to
persons.
US
2
Page 3

IMPORTANT SAFETY INSTRUCTIONS
SAVE THESE INSTRUCTIONS.
DANGER - TO REDUCE THE RISK OF FIRE
OR ELECTRIC SHOCK,
CAREFULLY FOLLOW THESE
INSTRUCTIONS.
Read these instructions.
Keep these instructions.
Heed all warnings.
Follow all instructions.
Do not use this apparatus near water.
Clean only with dry cloth.
Do not block any ventilation openings. Install in accordance with the manufacturer’s
instructions.
Do not install near any heat sources such as radiators, heat registers, stoves, or other
apparatus (including amplifiers) that produce heat.
Do not defeat the safety purpose of the polarized or grounding-type plug. A polarized plug
has two blades with one wider than the other. A grounding type plug has two blades and a
third grounding prong. The wide blade or the third prong are provided for your safety. If
the provided plug does not fit into your outlet, consult an electrician for replacement of the
obsolete outlet.
Protect the power cord from being walked on or pinched particularly at plugs, convenience
receptacles, and the point where they exit from the apparatus.
Only use attachments/accessories specified by the manufacturer.
Use only with the cart, stand, tripod, bracket, or table specified by the manufacturer, or
sold with the apparatus. When a cart is used, use caution when moving the cart/apparatus
combination to avoid injury from tip-over.
US
Unplug this apparatus during lightning storms or when unused for long periods of time.
Refer all servicing to qualified service personnel. Servicing is required when the apparatus
has been damaged in any way, such as power-supply cord or plug is damaged, liquid has
been spilled or objects have fallen into the apparatus, the apparatus has been exposed to
rain or moisture, does not operate normally, or has been dropped.
If the shape of the plug does not fit the power outlet, use an attachment plug adaptor of the
proper configuration for the power outlet.
US
3
Page 4

Representative plug of power supply cord of countries/regions around the world.
A Type
(American
Type)
B Type
(British Type)
BF Type
(British Type)
B3 Type
(British Type)
C Type
(CEE Type)
SE Type
(CEE Type)
(Ocean Type)
The representative supply voltage and plug type are described in this chart.
Depend on an area, Different type of plug and supply voltage are used.
Attention: Power cord meeting demands from each country shall be used.
For only the United States
Use a UL Listed, 1.5-3 m (5-10 ft.), Type SPT-2 or NISPT-2, AWG no. 18 power supply
cord, rated for 125 V 7 A, with a NEMA 1-15P plug rated for 125 V 15 A.”
Europe
Countries/regions Voltage Frequency (Hz) Plug type
Austria 230 50 C
Belgium 230 50 C
Czech 220 50 C
Denmark 230 50 C
Finland 230 50 C
France 230 50 C
Germany 230 50 C
Greece 220 50 C
Hungary 220 50 C
Iceland 230 50 C
Ireland 230 50 C/BF
Italy 220 50 C
Luxemburg 230 50 C
Netherlands 230 50 C
Norway 230 50 C
Poland 220 50 C
Portugal 230 50 C
Romania 220 50 C
Russia 220 50 C
Slovak 220 50 C
Spain 127/230 50 C
Sweden 230 50 C
Switzerland 230 50 C
UK 240 50 BF
Asia
Countries/regions Voltage Frequency (Hz) Plug type
China 220 50 A
Hong Kong 200/220 50 BF
India 230/240 50 C
Indonesia 127/230 50 C
Japan 100 50/60 A
Korea (rep) 220 60 C
Malaysia 240 50 BF
Philippines 220/230 60 A/C
Singapore 230 50 BF
Taiwan 110 60 A
Thailand 220 50 C/BF
US
4
O Type
Page 5

Countries/regions Voltage Frequency (Hz) Plug type
Vietnam 220 50 A/C
Oceania
Countries/regions Voltage Frequency (Hz) Plug type
Australia 240 50 O
New Zealand 230/240 50 O
North America
Countries/regions Voltage Frequency (Hz) Plug type
Canada 120 60 A
USA 120 60 A
Central America
Countries/regions Voltage Frequency (Hz) Plug type
Bahamas 120/240 60 A
Costa Rica 110 60 A
Cuba 110/220 60 A/C
Dominican (rep) 110 60 A
El Salvador 110 60 A
Guatemala 120 60 A
Honduras 110 60 A
Jamaica 110 50 A
Mexico 120/127 60 A
Nicaragua 120/240 60 A
Panama 110/220 60 A
South America
Countries/regions Voltage Frequency (Hz) Plug type
Argentina 220 50 C/BF/O
Brazil 127/220 60 A/C
Chile 220 50 C
Colombia 120 60 A
Peru 220 60 A/C
Venezuela 120 60 A
Middle East
Countries/regions Voltage Frequency (Hz) Plug type
Iran 220 50 C/BF
Iraq 220 50 C/BF
Israel 230 50 C
Saudi Arabia 127/220 50 A/C/BF
Turkey 220 50 C
UAE 240 50 C/BF
Africa
Countries/regions Voltage Frequency (Hz) Plug type
Algeria 127/220 50 C
Congo (dem) 220 50 C
Egypt 220 50 C
Ethiopia 220 50 C
Kenya 240 50 C/BF
Nigeria 230 50 C/BF
South Africa 220/230 50 C/BF
Tanzania 230 50 C/BF
Tunisia 220 50 C
US
5
Page 6

Read this first
Before operating the unit, please read this
manual thoroughly, and retain it for future
reference.
CAUTION
Battery pack
If the battery pack is mishandled, the
battery pack can burst, cause a fire or even
chemical burns. Observe the following
cautions.
Do not disassemble.
Do not crush and do not expose the battery
pack to any shock or force such as hammering,
dropping or stepping on it.
Do not short circuit and do not allow metal
objects to come into contact with the battery
terminals.
Do not expose to high temperature above 60°C
(140°F) such as in direct sunlight or in a car
parked in the sun.
Do not incinerate or dispose of in fire.
Do not handle damaged or leaking lithium ion
batteries.
Be sure to charge the battery pack using a
genuine Sony battery charger or a device that
can charge the battery pack.
Keep the battery pack out of the reach of small
children.
Keep the battery pack dry.
Replace only with the same or equivalent type
recommended by Sony.
Dispose of used battery packs promptly as
described in the instructions.
Replace the battery with the specified type
only. Otherwise, fire or injury may result.
AC Adaptor
Do not use the AC Adaptor placed in a
narrow space, such as between a wall and
furniture.
Use the nearby wall outlet (wall socket)
when using the AC Adaptor. Disconnect
the AC Adaptor from the wall outlet (wall
socket) immediately if any malfunction
occurs while using your camcorder.
Even if your camcorder is turned off, AC
power source (mains) is still supplied to
it while connected to the wall outlet (wall
socket) via the AC Adaptor.
For customers in the U.S.A. and CANADA
RECYCLING LITHIUM-ION BATTERIES
Lithium-Ion batteries are
recyclable.
You can help preserve our
environment by returning
your used rechargeable
batteries to the collection and
recycling location nearest you.
For more information
regarding recycling of
rechargeable batteries, call toll
free 1-800-822- 8837, or visit
http://www.rbrc.org/
Caution: Do not handle
damaged or leaking LithiumIon batteries.
Battery pack
This device complies with Part 15 of the
FCC Rules. Operation is subject to the
following two conditions: (1) This device
may not cause harmful interference, and
(2) this device must accept any interference
received, including interference that may
cause undesired operation.
This Class B digital apparatus complies
with Canadian ICES-003.
US
6
Page 7

For the customers in the U.S.A.
UL is an internationally recognized safety
organization.
The UL Mark on the product means it has
been UL Listed.
If you have any questions about this
product, you may call:
Sony Customer Information Center 1-800222-SONY (7669).
The number below is for the FCC related
matters only.
Regulatory Information
Declaration of Conformity
Trade Name: SONY
Model No.: HDR-CX110
Responsible Party: Sony Electronics Inc.
Address: 16530 Via Esprillo, San Diego,
CA 92127 U.S.A.
Telephone No.: 858-942-2230
This device complies with Part 15 of the
FCC Rules. Operation is subject to the
following two conditions: (1) This device
may not cause harmful interference,
and (2) this device must accept any
interference received, including
interference that may cause undesired
operation.
Declaration of Conformity
Trade Name: SONY
Model No.: HDR-CX150
Responsible Party: Sony Electronics Inc.
Address: 16530 Via Esprillo, San Diego,
CA 92127 U.S.A.
Telephone No.: 858-942-2230
This device complies with Part 15 of the
FCC Rules. Operation is subject to the
following two conditions: (1) This device
may not cause harmful interference,
and (2) this device must accept any
interference received, including
interference that may cause undesired
operation.
Declaration of Conformity
Trade Name: SONY
Model No.: HDR-XR150
Responsible Party: Sony Electronics Inc.
Address: 16530 Via Esprillo, San Diego,
CA 92127 U.S.A.
Telephone No.: 858-942-2230
This device complies with Part 15 of the
FCC Rules. Operation is subject to the
following two conditions: (1) This device
may not cause harmful interference,
and (2) this device must accept any
interference received, including
interference that may cause undesired
operation.
CAUTION
You are cautioned that any changes or
modifications not expressly approved in
this manual could void your authority to
operate this equipment.
Note
This equipment has been tested and found
to comply with the limits for a Class B
digital device, pursuant to Part 15 of the
FCC Rules.
These limits are designed to provide
reasonable protection against harmful
interference in a residential installation.
This equipment generates, uses, and
can radiate radio frequency energy and,
if not installed and used in accordance
with the instructions, may cause harmful
interference to radio communications.
However, there is no guarantee that
interference will not occur in a particular
installation. If this equipment does cause
harmful interference to radio or television
reception, which can be determined by
turning the equipment off and on, the
user is encouraged to try to correct the
interference by one or more of the following
measures:
Reorient or relocate the receiving antenna.
Increase the separation between the
US
7
Page 8
equipment and receiver.
Connect the equipment into an outlet on
a circuit different from that to which the
receiver is connected.
Consult the dealer or an experienced radio/
TV technician for help.
The supplied interface cable must be used
with the equipment in order to comply with
the limits for a digital device pursuant to
Subpart B of Part 15 of FCC Rules.
Supplied items
The numbers in ( ) are the supplied
quantity.
AC Adaptor (1)
Power cord (Mains lead) (1)
Component A/V cable (1)
A/V connecting cable (1)
USB cable (1)
Rechargeable battery pack NP-FV50 (1)
CD-ROM “Handycam” Application
Software (1) (p. 37)
“PMB” (software, including “PMB Help”)
“Handycam” Handbook (PDF)
“Operating Guide” (This manual) (1)
Battery pack
The camcorder is not dustproofed, dripproofed
or waterproofed. See “Precautions” (p. 66).
Menu items, LCD panel, and lens
A menu item that is grayed out is not available
under the current recording or playback
conditions.
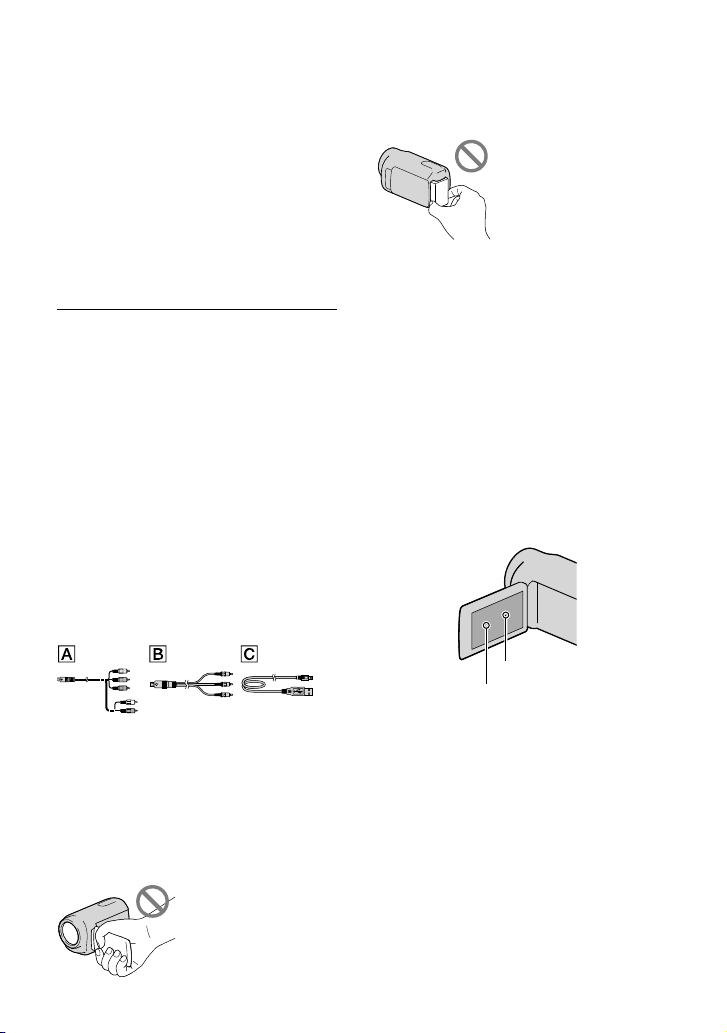
The LCD screen is manufactured using
extremely high-precision technology, so over
99.99% of the pixels are operational for effective
use. However, there may be some tiny black
points and/or bright points (white, red, blue,
or green in color) that appear constantly on the
LCD screen. These points are normal results of
the manufacturing process and do not affect the
recording in any way.
Black points
White, red, blue or green points
See page 21 for the memory card you can use
with this camcorder.
Using the camcorder
Do not hold the camcorder by the following
parts, and also do not hold the camcorder by
the jack covers.
LCD Screen
US
8
Exposing the LCD screen or the lens to direct
sunlight for long periods of time may cause
malfunctions.
Do not aim at the sun. Doing so might cause
your camcorder to malfunction. Take images
of the sun only in low light conditions, such as
at dusk.
About language setting
The on-screen displays in each local language
are used for illustrating the operating
procedures. Change the screen language before
sin
g the camcorder if necessary (p. 19).
u
Page 9

On recording
To ensure stable operation of the memory card,
it is recommended to initialize the memory
card with your camcorder before the first
use. Initializing the memory card will erase
all the data stored on it and the data will be
irrecoverable. Save your important data on your
PC etc.
Before starting to record, test the recording
function to make sure the image and sound are
recorded without any problems.
Compensation for the contents of recordings
cannot be provided, even if recording or
playback is not possible due to a malfunction of
the camcorder, recording media, etc.
TV color systems differ depending on the
country/region. To view your recordings on a
TV, you need a NTSC system-based TV.
Television programs, films, video tapes,
and other materials may be copyrighted.
Unauthorized recording of such materials may
be contrary to the copyright laws.
Notes on playing back
The camcorder is compatible with MPEG-4
AVC/H.264 High Profile for high definition
image quality (HD) recording. Therefore, you
cannot play back images recorded with high
definition image quality (HD) on the camcorder
with the following devices;
Other AVCHD format compatible devices
which are not compatible with High Profile
Devices which are not compatible with the
AVCHD format
You may not be able to play back normally
images recorded on your camcorder with other
devices. Also, you may not be able to play back
images recorded on other devices with your
camcorder.
Discs recorded with HD image quality
(high definition)
This camcorder captures high definition footage
in the AVCHD format. DVD media containing
AVCHD footage should not be used with DVD
based players or recorders, as the DVD player/
recorder may fail to eject the media and may
erase its contents without warning. DVD media
containing AVCHD footage may be played on
a compatible Blu-ray Disc
player/recorder or
other compatible device.
Save all your recorded image data
To prevent your image data from being lost,
save all your recorded images on external media
periodically. It is recommended that you save
the image data on a disc such as DVD-R, etc.
using your computer. Also, you can save your
image data using a VCR, or a DVD/HDD
corder (p. 49).
e
r
You cannot make a AVCHD disc from the
image data recorded with
[Show others]
[ REC MODE] (under
(MENU)
[SHOOTING SET] category) set to [HD
FX]. Save them on a Blu-ray Disc or using an
nal media (p. 45, 47).
exter
Notes on battery pack/AC Adaptor
Be sure to remove the battery pack or the AC
Adaptor after turning off the camcorder.
Disconnect the AC Adaptor from the
camcorder, holding both the camcorder and the
DC plug.
Note on the camcorder/battery pack
temperature
When the temperature of the camcorder
or battery pack becomes extremely high or
extremely low, you may not be able to record
or play back on the camcorder, due to the
protection features of the camcorder being
activated in such situations. In this case, an
indicator appears on the LCD screen.
When the camcoder is connected to a
computer or accessories
Do not try to format the recording media of the
camcorder using a computer. If you do so, your
US
9
Page 10
camcorder may not operate correctly.
When connecting the camcorder to another
device with communication cables, be sure to
insert the connector plug in the correct way.
Pushing the plug forcibly into the terminal
will damage the terminal and may result in a
malfunction of the camcorder.
If you cannot record/play back images,
perform [MEDIA FORMAT]
If you repeat recording/deleting images for
a long time, fragmentation of data occurs on
the recording media. Images cannot be saved
or recorded. In such a case, save your images
on some type of external media first, and then
perform [MEDIA FORMAT] by touching
(MENU) [Show others]
[MEDIA FORMAT] (under [MANAGE
MEDIA] category)
(HDR-CX150/XR150)
the desired medium
[YES] [YES]
.
Carl Zeiss lens
Your camcorder is equipped with a Carl Zeiss
lens, which was developed jointly by Carl
Zeiss, in Germany, and Sony Corporation, and
produces superior images. It adopts the MTF
measurement system for video cameras and
offers a quality typical of a Carl Zeiss lens.
MTF= Modulation Transfer Function. The
number value indicates the amount of light
from a subject coming into the lens.
Notes on optional accessories
We recommend using genuine Sony accessories.
Genuine Sony accessories may not be available
in some countries/regions.
indication are exaggerated or simplified for
understandability.
In this manual, the internal memory (HDRCX150) and the hard disk (HDR-XR150) of
the camcorder and the memory card are called
“recording media.”
In this manual, the DVD disc recorded with
high definition image quality (HD) is called
AVCHD disc.
Design and specifications of your camcorder
and accessories are subject to change without
notice.
Confirm the model name of your
camcorder
The model name is shown in this manual when
there is a difference in specification between
models. Confirm the model name on the
bottom of your camcorder.
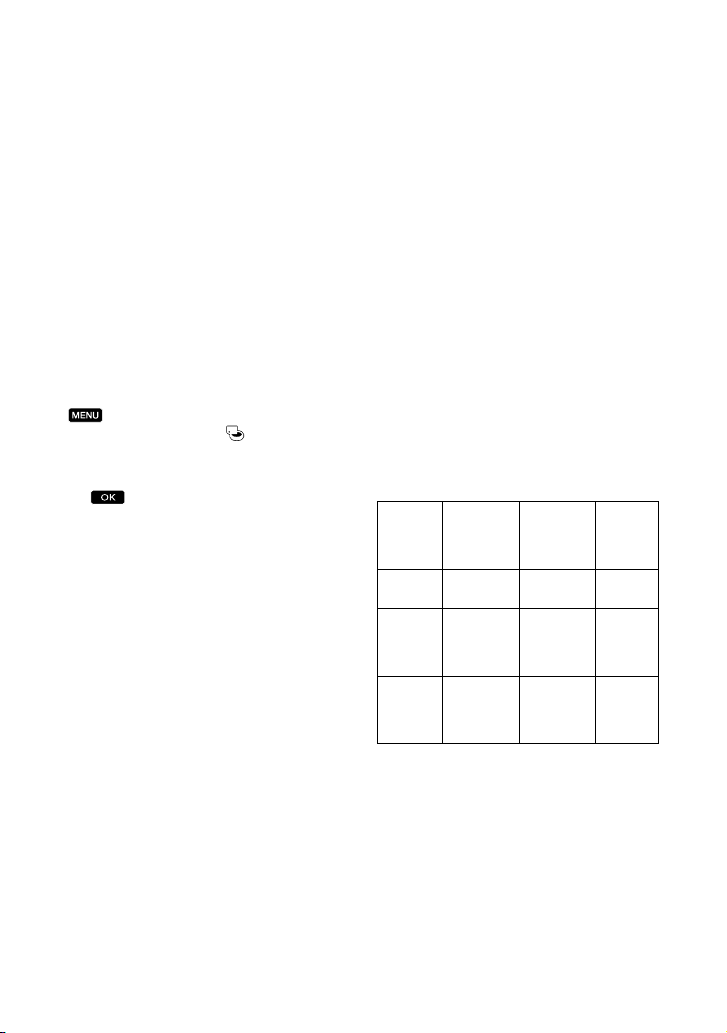
The main differences in specification of this
series are as follows.
HDRCX110
HDRCX150
HDRXR150
Recording
media
Memory
card
Internal
memory +
memory
card
Internal
hard disk
+ memory
card
Capacity
of internal
recording
media
- Input/
16GB Input/
120GB Input/
USB
jack
output
output
output
About this manual, illustrations and
on-screen displays
The example images used in this manual for
illustration purposes are captured using a
digital still camera, and therefore may appear
different from images and screen indicators that
actually appear on your camcorder. And, the
illustrations of your camcorder and its screen
US
10
Page 11

Notes on use
Do not do any of the following. Otherwise, the
recording media may be damaged, recorded
images may be impossible to play back or may
be lost, or other malfunctions could occur.
ejecting the memory card when the access
mp (p. 22) is lit or flashing
a
l
removing the battery pack or AC Adaptor
from the camcorder, or applying mechanical
shock or vibration to the camcorder when the
(Movie)/ (Photo) lamps (p. 24) or the
access lamp (p. 22) are lit or flashing
When using a shoulder belt (sold separately), do
not crash the camcorder against an object.
Do not use your camcorder in very loud areas.
On the drop sensor (HDR-XR150)
To protect the internal hard disk from shock
by dropping, the camcorder has a drop sensor
function. When a drop occurs, or under a nongravity condition, the block noise made when
this function is activated by the camcorder may
also be recorded. If the drop sensor catches a
drop repeatedly, recording/playback may be
stopped.
Note on using the camcorder at high
altitudes (HDR-XR150)
Do not turn on the camcorder in a low-pressure
area, where the altitude is more than 5,000
meters (16,000 feet). Doing so may damage the
internal hard disk drive of your camcorder.
US
11
Page 12
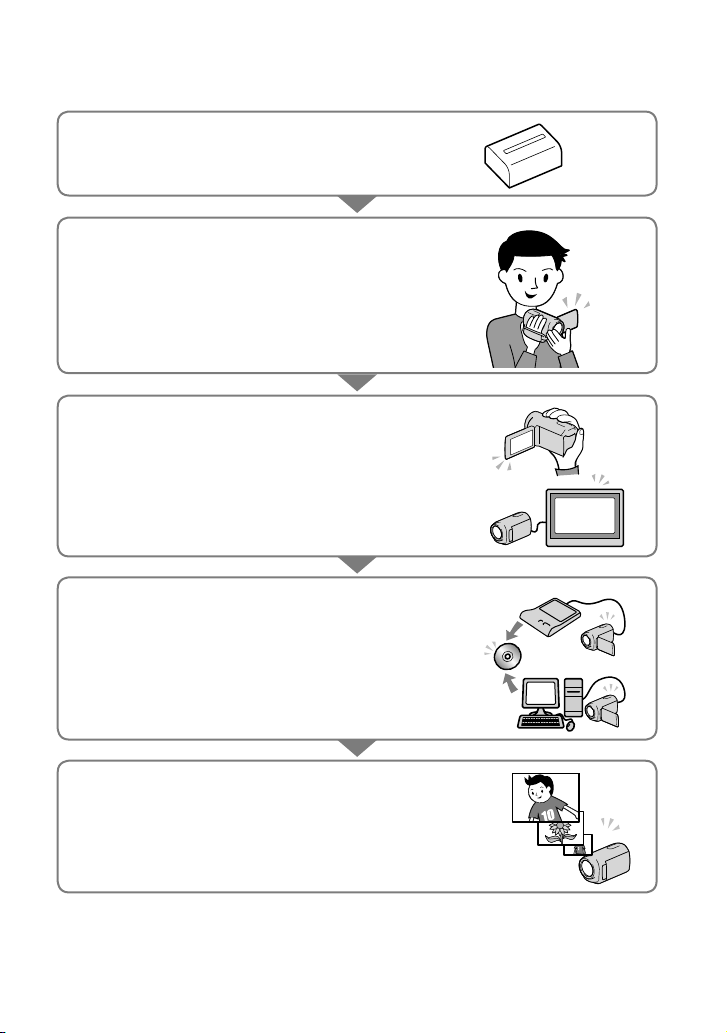
Operation flow
Getting started (p. 15)
Prepare the power source and memory card.
Recording movies and photos (p. 23)
Recording movies p. 25
Changing the recording mode
Expected recording time(MEDIA INFO)
Shooting photos p. 27
Playing movies and photos
Playback on the camcorder p. 28
Playing images on a TV p. 31
Saving images
Saving movies and photos with a computer p. 36
Saving movies and photos in external media p. 47
ving images with a DVD writer/recorder p. 49
Sa
Deleting movies and photos (p. 34)
If you delete the image data that has been saved on your
computer or a disc, you can record new images on the free
media space again.
US
12
Page 13

Table of contents
IMPORTANT SAFETY INSTRUCTIONS .. .. . .. .. . .. . .. .. . .. . .. .. . .. . .. . .. .. . .. .. . .. . .. .. . .. .. . .. . .. 3
Read this first . .
Operation flow . .
Getting started
Step 1: Charging the battery pack .. . .. .. . .. . .. .. . .. . .. .. . .. . .. .. . .. . .. . .. .. . .. .. . .. . .. .. . .. .. . 15
Step 2: Turning the power on, and setting the date and time . .
Step 3: Preparing the recording media .
Recording/Playback
Recording . .. .. . .. . .. .. . .. . .. . .. .. . .. .. . .. . .. .. . .. .. . .. . .. .. . .. .. . .. . .. .. . .. .. . .. . .. .. . .. .. . .. . .. .. . . 23
Playback on the camcorder ..
Playing images on a TV . .
Making good use of your camcorder
Deleting movies and photos . . .. .. . .. . .. .. . .. .. . .. . .. .. . .. . .. . .. .. . .. .. . .. . .. .. . .. .. . .. . .. .. . .. . 34
Saving movies and photos with a computer
Preparing a computer (Windows) . . .. . .. . .. .. . .. .. . .. . .. .. . .. . .. . .. .. . .. .. . .. . .. .. . .. .. . .. . .. . 36
Starting PMB (Picture Motion Browser) . .
Selecting the method for creating a disc (computer) . .
Creating a disc with one touch (One Touch Disc Burn) . .
Importing movies and photos to a computer . .
Creating an AVCHD disc . .
Creating a standard definition image quality (STD) disc that can be played on
ordinary DVD players . .
. .. . .. .. . .. . .. .. . .. . .. . .. .. . .. .. . .. . .. .. . .. .. . .. . .. .. . .. .. . .. . .. .. . .. .. . .. . .. .. . .. .. . .. 6
. .. . .. .. . .. . .. .. . .. . .. . .. .. . .. .. . .. . .. .. . .. .. . .. . .. .. . .. .. . .. . .. .. . .. .. . .. . .. .. . .. . 12
Charging the battery pack abroad . .
Changing the language setting . .
To check the recording media settings . .
Dubbing or copying movies and photos from the internal recording media
to memory card (HDR-CX150/XR150) . .
. .. . .. .. . .. . .. .. . .. . .. . .. .. . .. .. . .. . .. .. . .. .. . .. . .. .. . .. .. . .. . .. .. . 28
. .. . .. .. . .. . .. .. . .. . .. . .. .. . .. .. . .. . .. .. . .. .. . .. . .. .. . .. .. . .. . .. .. . .. .. . 31
When using a Macintosh . .
Playing an AVCHD disc on a computer . .
Creating a Blu-ray disc . .
. .. . .. .. . .. . .. .. . .. . .. . .. .. . .. .. . .. . .. .. . .. .. . .. . .. .. . .. .. . .. . .. .. . .. .. . .. . 45
Copying a disc . .
Editing movies . .
Capturing photos from a movie . .
. .. . .. .. . .. . .. .. . .. . .. . .. .. . .. .. . .. . .. .. . .. .. . .. . .. .. . .. .. . .. . .. .. . .. .. . .. . 46
. .. . .. .. . .. . .. .. . .. . .. . .. .. . .. .. . .. . .. .. . .. .. . .. . .. .. . .. .. . .. . .. .. . .. .. . .. 46
. .. . .. .. . .. . .. .. . .. . .. . .. .. . .. .. . .. . .. .. . .. .. . .. . .. .. . .. .. . .. . 37
. .. . .. .. . .. . .. .. . .. . .. . .. .. . .. .. . .. . .. .. . .. .. . .. . .. .. . .. .. . .. . .. .. . .. .. 44
. .. . .. .. . .. . .. .. . .. . .. . .. .. . .. .. . .. . .. .. . .. .. . .. . .. .. . .. .. . .. . .. . 45
. .. . .. .. . .. . .. .. . .. . .. . .. .. . .. .. . .. . .. .. . .. .. . .. . . 17
. .. . .. .. . .. . .. .. . .. . .. . .. 18
. .. . .. .. . .. . .. .. . .. . .. . .. .. . .. .. . .. . .. .. . .. .. . .. . .. .. . 19
. .. . .. .. . .. . .. .. . .. . .. . .. .. . .. .. . .. . .. .. . .. .. . .. . .. .. . 20
. .. . .. .. . .. . .. .. . .. . .. . .. .. . .. .. . .. . .. .. . .. .. 21
. .. . .. .. . .. . .. .. . .. . .. . .. .. . .. .. . .. . .. .. . .. .. . 22
. .. . .. .. . .. . .. .. . .. . .. . .. .. . .. .. . .. . .. .. . .. .. . .. . .. .. 39
. .. . .. .. . .. . .. .. . .. . .. . .. .. . .. .. . .. . 40
. .. . .. .. . .. . .. .. . .. . .. . .. .. . .. .. . . 42
. .. . .. .. . .. . .. .. . .. . .. . .. .. . .. .. . .. . .. .. . .. .. 43
. .. . .. .. . .. . .. .. . .. . .. . .. .. . .. .. . .. . .. .. . .. .. 44
. .. . .. .. . .. . .. .. . .. . .. . .. .. . .. .. . .. . .. .. . .. .. . .. . .. .. 46
Table of contents
US
13
Page 14

Saving images with an external device
Saving images in external media (DIRECT COPY) . .. .. . .. .. . .. .. . .. . .. .. . .. .. . .. . .. .. . .. .. . . 47
Creating a disc with a DVD writer, recorder . .
. .. . .. .. . .. . .. .. . .. . .. . .. .. . .. .. . .. . .. .. . .. .. . .. 49
Customizing your camcorder
Using menus .. .. . .. .. . .. .. . .. . .. . .. .. . .. .. . .. . .. .. . .. .. . .. . .. .. . .. .. . .. . .. .. . .. .. . .. . .. .. . .. .. . .. . . 56
Getting detailed information from the “Handycam” Handbook . .
. .. . .. .. . .. . .. .. . .. . .. . 63
Additional information
Troubleshooting . .. . .. . .. .. . .. .. . .. . .. .. . .. . .. .. . .. . .. . .. .. . .. .. . .. . .. .. . .. .. . .. . .. .. . .. .. . .. . . 64
Precautions . .
Specifications ..
. .. . .. .. . .. . .. .. . .. . .. . .. .. . .. .. . .. . .. .. . .. .. . .. . .. .. . .. .. . .. . .. .. . .. .. . .. . .. .. . .. .. . .. 66
. .. . .. .. . .. . .. .. . .. . .. . .. .. . .. .. . .. . .. .. . .. .. . .. . .. .. . .. .. . .. . .. .. . .. .. . .. . .. .. . .. .. 68
Quick reference
Screen indicators . . . .. .. . .. . .. .. . .. .. . .. . .. .. . .. . .. .. . .. . .. .. . .. . .. . .. .. . .. .. . .. . .. .. . .. .. . .. . .. .. . 73
Parts and controls . .
Index . .. .. . .. . .. .. . .. .. . .. . .. .. . .. . .. .. . .. . .. .. . .. . .. . .. .. . .. .. . .. . .. .. . .. .. . .. . .. .. . .. .. . .. . .. .. . .. .. 77
. .. . .. .. . .. . .. .. . .. . .. . .. .. . .. .. . .. . .. .. . .. .. . .. . .. .. . .. .. . .. . .. .. . .. .. . .. . .. .. 74
14
US
Page 15
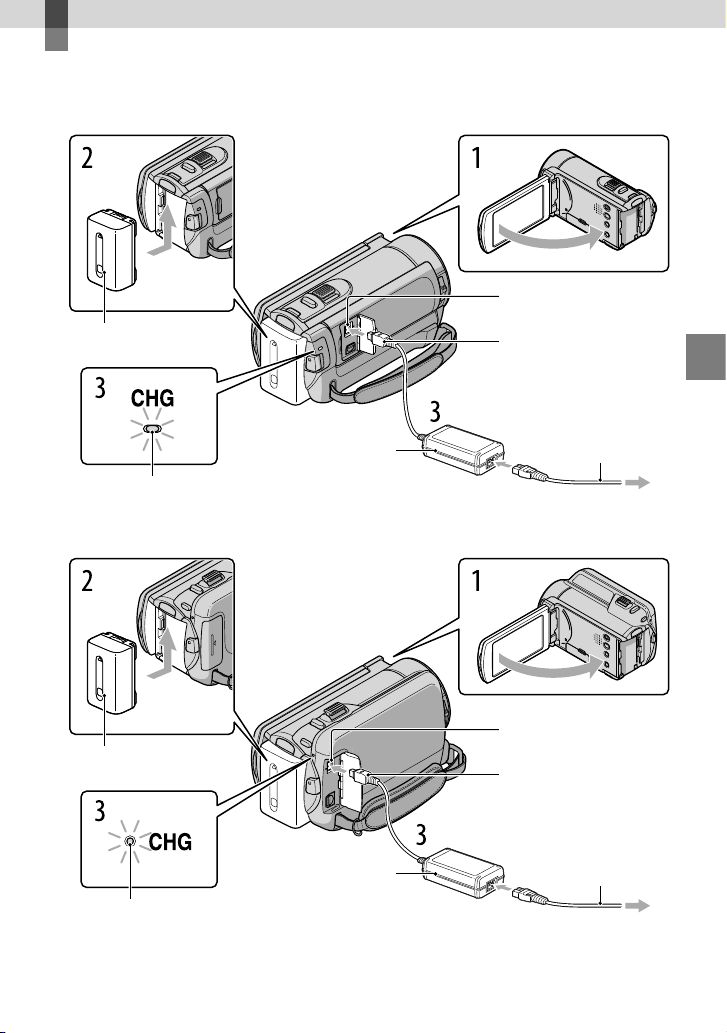
Getting started
Step 1: Charging the battery pack
HDR-CX110/CX150
DC IN jack
Battery pack
CHG (charge) lamp
HDR-XR150
Battery pack
CHG (charge) lamp
AC Adaptor
AC Adaptor
DC plug
Power cord (Mains lead)
To the wall outlet (wall
socket)
DC IN jack
DC plug
Power cord (Mains lead)
To the wall outlet (wall
socket)
Getting started
US
15
Page 16
16
US
You can charge the “InfoLITHIUM” battery pack (V series) after attaching it to your
camcorder.
Notes
You cannot attach any “InfoLITHIUM” battery pack other than the V series to your camcorder.
Turn off your camcorder by closing the LCD screen.
1
Attach the battery pack by sliding it in the direction of the arrow until it
2
clicks.
Connect the AC Adaptor and the power cord (mains lead) to your
3
camcorder and the wall outlet (wall socket).
Align the mark on the DC plug with that on the DC IN jack.
The CHG (charge) lamp lights up and charging starts. The CHG (charge) lamp turns off
when the battery pack is fully charged.
When the battery is charged, disconnect the AC Adaptor from the DC IN
4
jack of your camcorder.
Tips
See page 70 on recording and playing time.
When your camcorder is on, you can check the approximate amount of remaining battery power with the
remaining battery indicator at the upper left on the LCD screen.
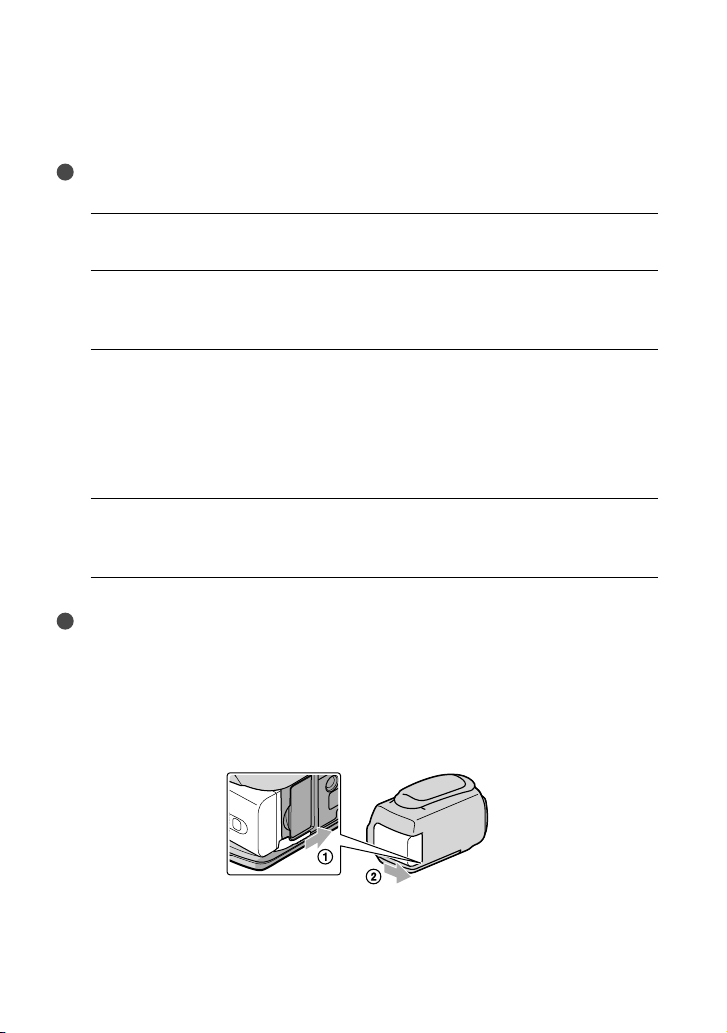
To remove the battery pack
Close the LCD screen. Slide the BATT (battery) release lever () and remove the battery
pack ().
Page 17

To use a wall outlet (wall socket) as a power source
Make the same connections as “Step 1: Charging the battery pack.” Even if the battery pack is
attached, the battery pack is not discharged.
Notes on the battery pack
When you remove the battery pack or disconnect the AC Adaptor, close the LCD screen and make sure
that the
The CHG (charge) lamp flashes during charging under the following conditions:
(Movie)/ (Photo) lamps (p. 24), the access lamp (p. 22) are turned off.
The battery pack is not attached correctly.
The battery pack is damaged.
The temperature of the battery pack is low.
Remove the battery pack from your camcorder and put it in a warm place.
The temperature of the battery pack is high.
Remove the battery pack from your camcorder and put it in a cool place.
We do not recommend using an NP-FV30, which only allows short recording and playback times, with
your camcorder.
In the default setting, the power turns off automatically if you leave your camcorder without any
operation for about 5 minutes, to save battery power ([A.SHUT OFF]).
Notes on the AC Adaptor
Use the nearby wall outlet (wall socket) when using the AC Adaptor. Disconnect the AC Adaptor from
the wall outlet (wall socket) immediately if any malfunction occurs while using your camcorder.
Do not use the AC Adaptor placed in a narrow space, such as between a wall and furniture.
Do not short-circuit the DC plug of the AC Adaptor or battery terminal with any metallic objects. This
may cause a malfunction.
Charging the battery pack abroad
You can charge the battery pack in any countries/regions using the AC Adaptor supplied with
your camcorder within the AC 100 V - 240 V, 50 Hz/60 Hz range.
Do not use an electronic voltage transformer.
Getting started
US
17
Page 18
18
US
Step 2: Turning the power on, and setting the
date and time
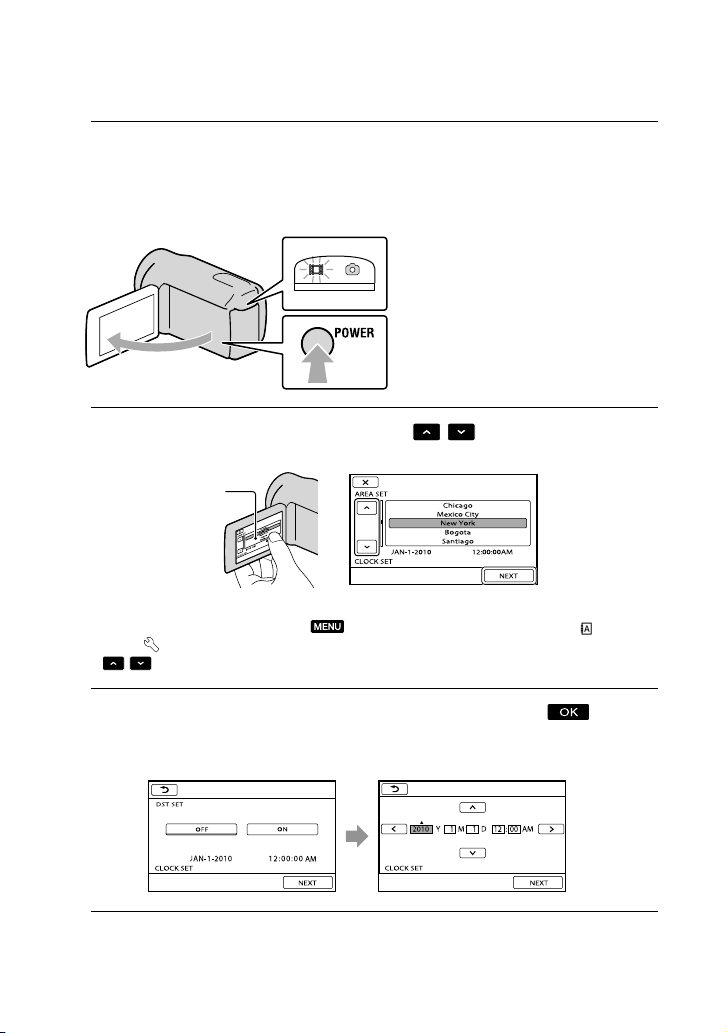
Open the LCD screen of your camcorder.
1
Your camcorder is turned on.
To turn on your camcorder when the LCD screen is open, press POWER.
MODE lamp
POWER button
Select the desired geographical area with
2
Touch the button on the
3
LCD screen
To set the date and time again, touch (MENU) [Show others] [CLOCK/ LANG]
[GENERAL SET] category) [CLOCK SET]. When an item is not on the screen, touch
(under
/ until the item appears.
Set [DST SET] or [SUMMERTIME], date and time, then touch
The clock starts.
If you set [DST SET] or [SUMMERTIME] to [ON], the clock advances 1 hour.
/ , then touch [NEXT].
.
Page 19
Notes
The date and time does not appear during recording, but they are automatically recorded on the
recording media, and can be displayed during playback. To display the date and time, touch
(MENU) [Show others] [PLAYBACK SET] (under
CODE] [DATE/TIME]
You can turn off the operation beeps by touching
SET] (under
If the button you touch does not react correctly, calibrate the touch panel.
[GENERAL SET] category) [BEEP] [OFF] .
.
[PLAYBACK] category) [DATA
(MENU) [Show others] [SOUND/DISP
To turn off the power
Close the LCD screen. The (Movie) lamp flashes for a few seconds and the power is turned
off.
Tips
You can turn off your camcorder also by pressing POWER.
When [POWER ON BY LCD] is set to [OFF], turn off your camcorder by pressing POWER.
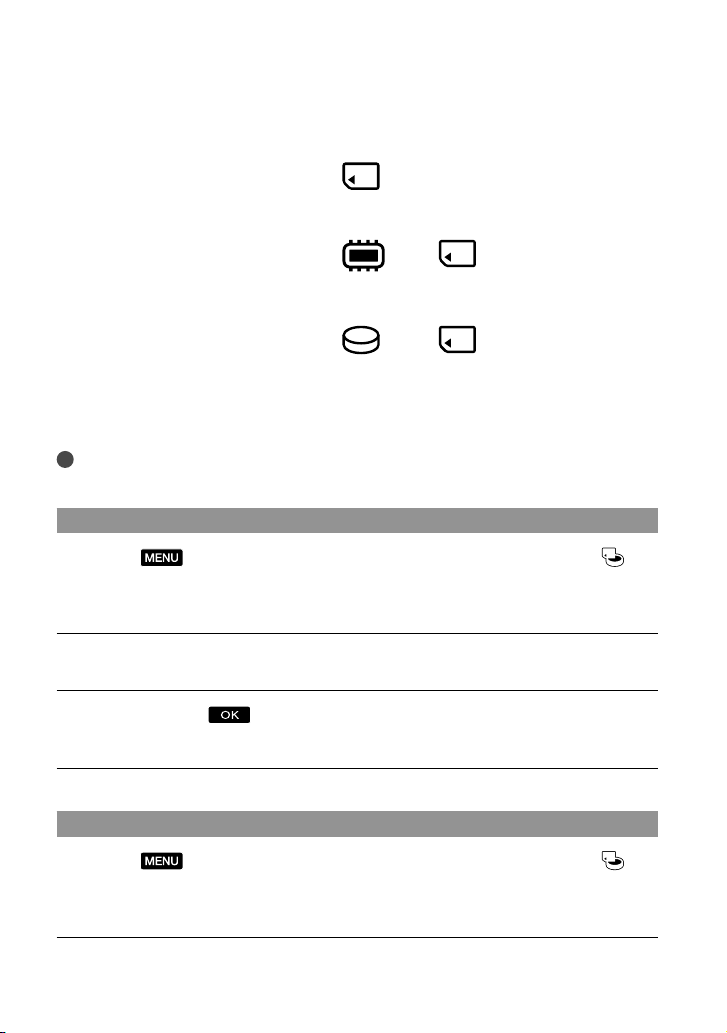
Changing the language setting
You can change the on-screen displays to show messages in a specified language.
Touch
category) [
(MENU) [Show others] [CLOCK/ LANG] (under [GENERAL SET]
LANGUAGE SET] a desired language .
Getting started
US
19
Page 20
20
US
Step 3: Preparing the recording media
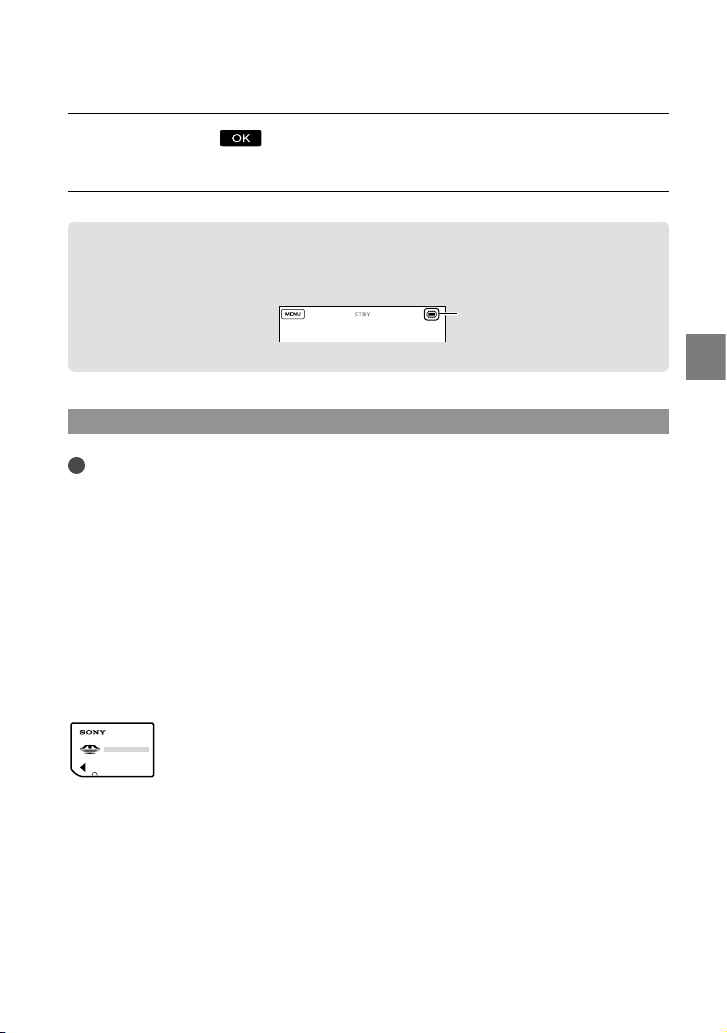
The recording media that can be used differs depending on your camcorder. The following
icons are displayed on the screen of your camcorder.
HDR-CX110
Memory
card
HDR-CX150
*
Internal
memory
HDR-XR150
Internal hard
disk
* In the default setting, both movies and photos are recorded on this recording media. You can perform
recording, playback and editing operations on the selected medium.
Tips
See page 70 for the recordable time of movies.
Selecting the recording media for movies (HDR-CX150/XR150)
Touch (MENU) [Show others] [MEDIA SETTINGS] (under
[MANAGE MEDIA] category) [MOVIE MEDIA SET].
The [MOVIE MEDIA SET] screen appears.
Touch the desired recording media.
Touch [YES] .
The recording medium is changed.
Memory
card
*
Memory
card
Selecting the recording media for photos (HDR-CX150/XR150)
Touch (MENU) [Show others] [MEDIA SETTINGS] (under
[MANAGE MEDIA] category) [PHOTO MEDIA SET].
The [PHOTO MEDIA SET] screen appears.
Touch the desired recording media.
Page 21
Touch [YES] .
The recording medium is changed.
To check the recording media settings
In either movie recording mode or photo recording mode, the media icon of the selected
recording media is displayed at the top right corner of the screen.
Recording media icon
The icon displayed may vary depending on your model.
Inserting a memory card
Notes
Set the recording medium to [MEMORY CARD] to record movies and/or photos on a memory card
(HDR-CX150/XR150).
Types of memory card you can use with your camcorder
Only “Memory Stick PRO Duo” (Mark2) media, “Memory Stick PRO-HG Duo” media, SD memory
cards (Class 4 or faster) and SDHC memory cards (Class 4 or faster) can be used with this camcorder. A
MultiMediaCard cannot be used with this camcorder.
In this manual, “Memory Stick PRO Duo” (Mark2) media and “Memory Stick PRO-HG Duo” media are
called “Memory Stick PRO Duo” media.
Memory cards of up to 32 GB have been verified to operate with your camcorder.
“Memory Stick PRO Duo” media/“Memory Stick PRO-HG Duo” media
(This size can be used with your camcorder.)
Getting started
“Memory Stick PRO Duo” media can be used only with “Memory Stick PRO” media compatible
equipment.
Do not attach a label or the like on “Memory Stick PRO Duo” media or “Memory Stick Duo” media
adaptor.
US
21
Page 22
Do not attach a label or the like on “Memory Stick PRO Duo” media or “Memory Stick Duo” media
adaptor.
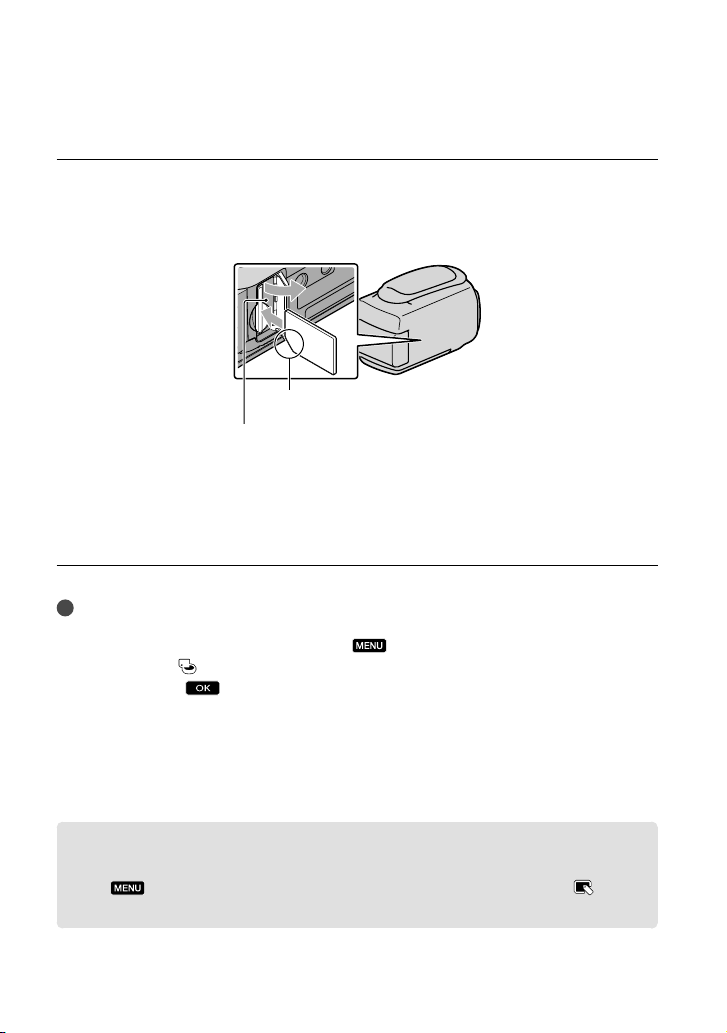
Open the cover, and insert the memory card with the nothched edge in the
direction as illustrated until it clicks.
Close the cover after inserting the memory card.
Note direction of notched corner.
Access lamp
The [Create a new Image Database File.] screen may appear if you insert a new memory
card. In that case, touch [YES]. If you record only photos on the memory card, touch
[NO].
Confirm the direction of the memory card. If you forcibly insert the memory card in the wrong
direction, the memory card, memory card slot, or image data may be damaged.
Notes
If [Failed to create a new Image Database File. It may be possible that there is not enough free space.]
is displayed, format the memory card by touching
FORMAT]
[YES]
(under [MANAGE MEDIA] category) [MEMORY CARD] (HDR-CX150/XR150)
[YES] .
(MENU) [Show others] [MEDIA
To eject the memory card
Open the cover and lightly push the memory card in once.
Do not open the cover during recording.
When inserting or ejecting the memory card, be careful so that the memory card does not pop out and
drop.
Dubbing or copying movies and photos from the internal recording media
to memory card (HDR-CX150/XR150)
Touch (MENU) [Show others] [MOVIE DUB]/[PHOTO COPY] (under [EDIT]
category), then follow the displays on the screen.
US
22
Page 23
Recording/Playback
Recording
In the default setting, movies are recorded with high definition image quality (HD) on the
following media.
HDR-CX110: Memory card
HDR-CX150: Internal memory
HDR-XR150: Internal hard disk
Tips
To change the recording media, see page 20 (HDR-CX150/XR150).
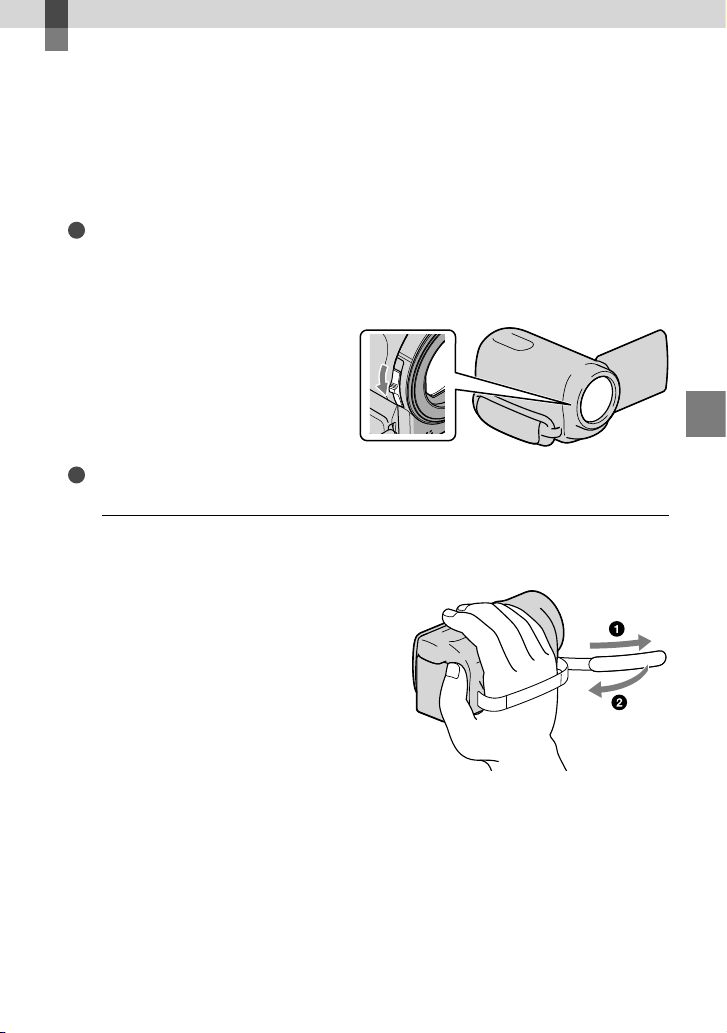
To open the lens cover
Slide the LENS COVER switch to open.
Tips
When you finish recording or when you play back images, close the lens cover.
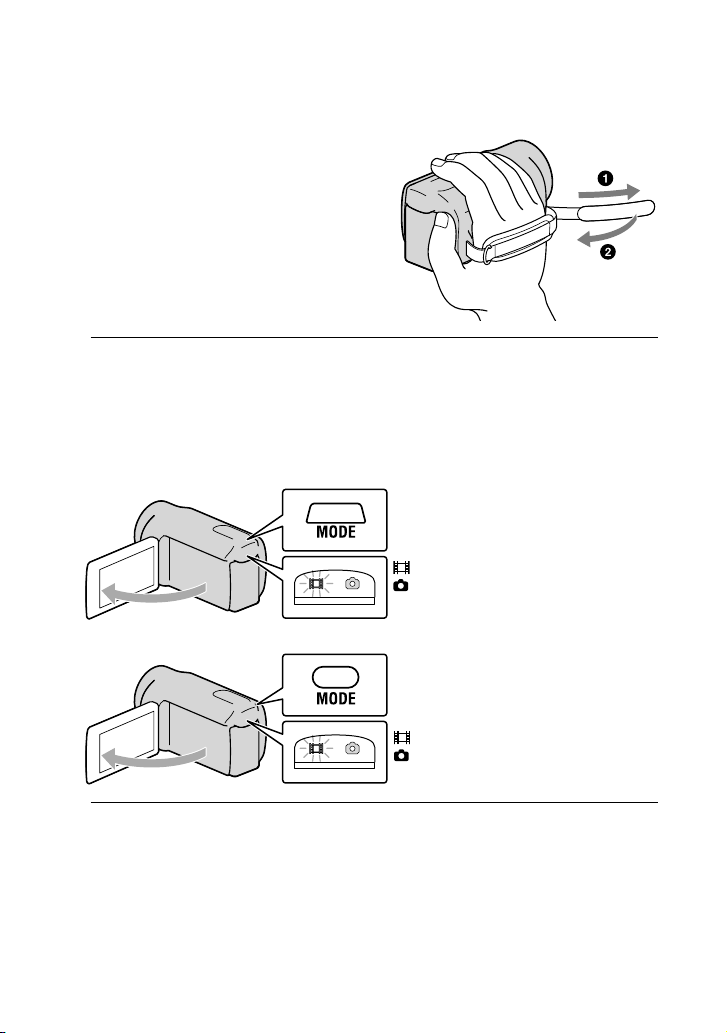
Fasten the grip belt.
1
HDR-CX110/CX150
Recording/Playback
US
23
Page 24
24
US
HDR-XR150
Open the LCD screen of your camcorder.
2
Your camcorder is turned on.
To turn on your camcorder when the LCD screen is already open, press POWER (p. 18).
You can switch recording modes by pressing MODE. Press MODE to light up the desired recording
mode lamp.
HDR-CX110/CX150
MODE button
(Movie): When recording a movie
(Photo): When recording a photo
HDR-XR150
MODE button
(Movie): When recording a movie
(Photo): When recording a photo
Page 25
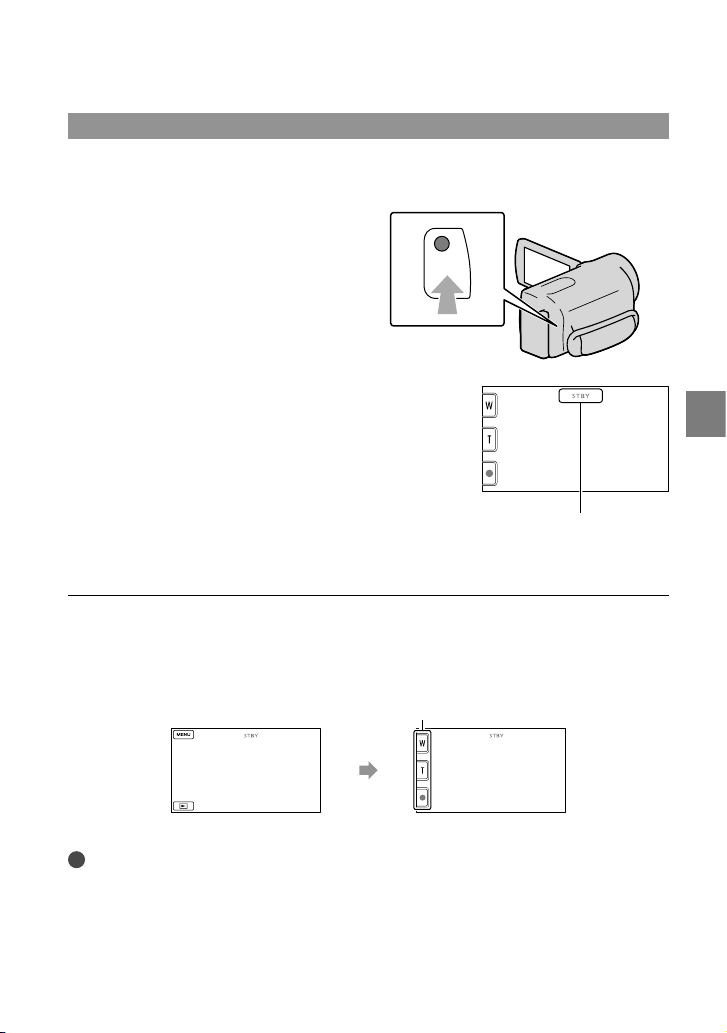
Recording movies
Press START/STOP to start recording.
You can start recording also by touching in the bottom left of LCD screen.
START/STOP button
[STBY] [REC]
To stop recording, press START/STOP again.
You can stop recording also by touching in the bottom left of LCD screen.
The icons and indicators on the LCD panel will be displayed for about 3 seconds, then disappear after
turning on your camcorder or switching the recording (movie/photo)/playback modes. To display the
icons and indicators again, touch anywhere on the screen except the rec & zoom buttons on the LCD.
Recording/Playback
Rec & zoom buttons on LCD
about 3sec
after
Notes
If you close the LCD screen while recording movies, the camcorder stops recording.
The maximum continuous recordable time of movies is about 13 hours.
When a movie file exceeds 2 GB, the next movie file is created automatically.
It will take several seconds until you can start recording after you turn on the camcorder. You cannot
operate your camcorder during this time.
US
25
Page 26
26
US
The following states will be indicated if data is still being written onto the recording media after recording
has finished. During this time, do not apply shock or vibration to the camcorder, or remove the battery or
AC Adaptor.
cces
s lamp (p. 22) is lit or flashing
A
The media icon in the upper right of the LCD screen is flashing
Tips
See page 70 on the recordable time of movies.
You can record photos during movie recording by pressing PHOTO fully (Dual Rec).
When a face is detected, a white frame appears and the image quality around the face is optimized
automatically ([FACE DETECTION]).
You can specify the priority face by touching it.
In the default setting, a photo is recorded automatically when the camcorder detects the smile of a
person during movie recording (Smile Shutter).
You can capture photos from recorded movies.
You can check the recordable time, estimated remaining capacity, etc., by touching
[Show others] [MEDIA INFO] (under
The LCD screen of your camcorder can display recording images across the entire screen (full pixel
[MANAGE MEDIA] category).
(MENU)
display). However, this may cause slight trimming of the top, bottom, right and left edges of images when
played back on a TV which is not compatible with full pixel display. In this case, set [GUIDEFRAME] to
[ON], and record images using the outer frame displayed on the screen as a guide.
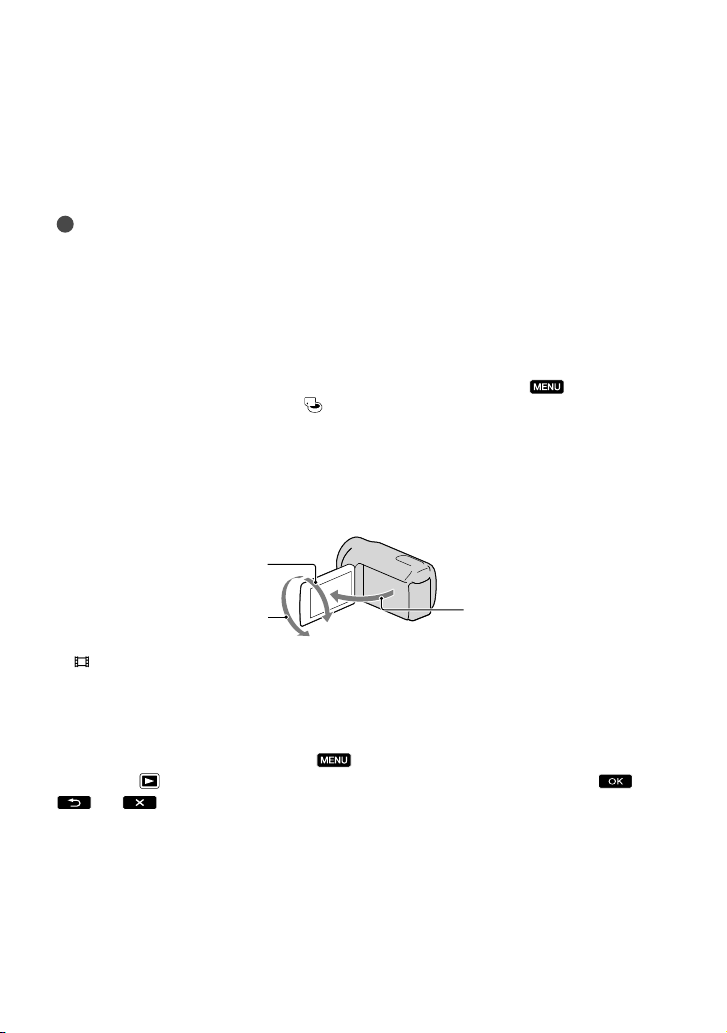
To adjust the angle of the LCD panel, first open the LCD panel 90 degrees to the camcorder (), and
then adjust the angle ().
90 degrees (max.)
180 degrees (max.)
[ STEADYSHOT] is set to [ACTIVE] in the default setting.
90 degrees to the
camcorder
Data code during recording
The recording date, time and condition are recorded automatically on the recording media.
They are not displayed during recording. However, you can check them as [DATA CODE]
during playback. To display them, touch
SET] (under
[PLAYBACK] category) [DATA CODE] a desired setting
(MENU) [Show others] [PLAYBACK
.
Page 27
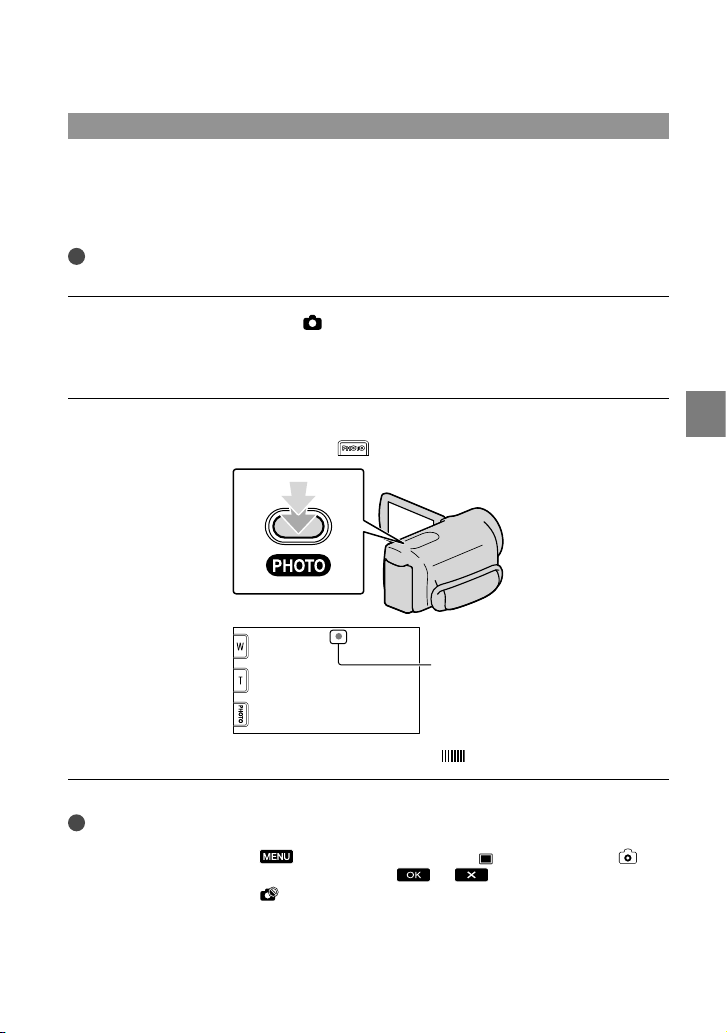
Shooting photos
In the default setting, photos are recorded on the following recording media.
HDR-CX110: Memory card
HDR-CX150: Internal memory
HDR-XR150: Internal hard disk
Tips
To change the recording media, see page 20 (HDR-CX150/XR150).
Press MODE to turn on the (Photo) lamp.
The LCD screen display switches for photo recording mode, and the screen aspect ratio
becomes 4:3.
Press PHOTO lightly to adjust the focus, then press it fully.
You can record photos also by touching on the LCD screen.
Flashes Lights up
Recording/Playback
When disappears, the photo is recorded.
Tips
You can check the recordable number of photos on the LCD (p. 73).
To change the image size, touch
[PHOTO SETTINGS] category) a desired setting
You cannot record photos while
(MENU) [Show others] [ IMAGE SIZE] (under
is displayed.
.
US
27
Page 28
28
US
Playback on the camcorder
In the default setting, movies and photos that are recorded on the following recording media
are played.
HDR-CX110: Memory card
HDR-CX150: Internal memory
HDR-XR150: Internal hard disk
Tips
To change the recording media, see page 20 (HDR-CX150/XR150).
Open the LCD screen of your camcorder.
1
Your camcorder is turned on.
To turn on your camcorder when the LCD screen is already open, press POWER (p.18).
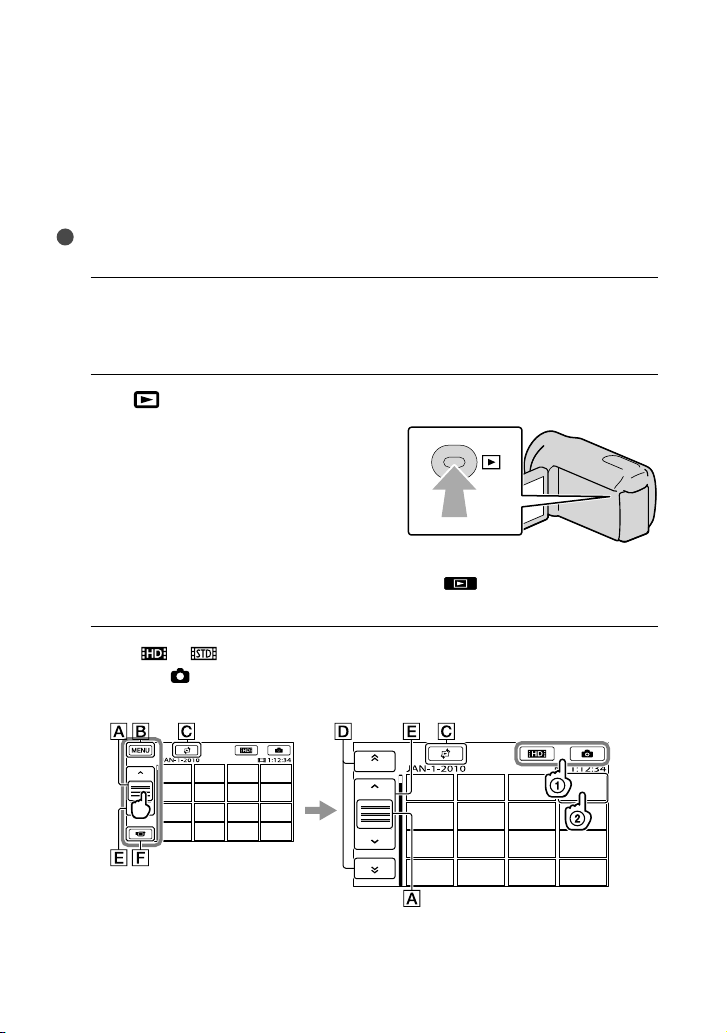
Press
2
The VISUAL INDEX screen appears after some seconds.
Touch
3
Touch the
Movies are displayed and sorted by recording date.
(VIEW IMAGES).
You can display the VISUAL INDEX screen also by touching (VIEW IMAGES) on the LCD
screen.
or () a desired movie () to playback a movie.
(Photo) () a desired photo () to view a photo.
Switches operating button display.
To MENU screen
Page 29
Displays the screen to select the index type ([DATE INDEX]/[
FACE]).
[
/ : Displays movies recorded on the previous/next date.*
/ : Displays the previous/next movie.
Returns to the recording screen.
* is displayed when is touched.
appears when the standard definition image quality (STD) movie is selected with [ /
SET].
You can scroll the display by touching and dragging or .
appears with the movie or photo that was most recently played or recorded. If you touch the
movie or photo with , you can continue playback from the previous time. ( appears on the
photo recorded on the memory card.)
FILM ROLL]/
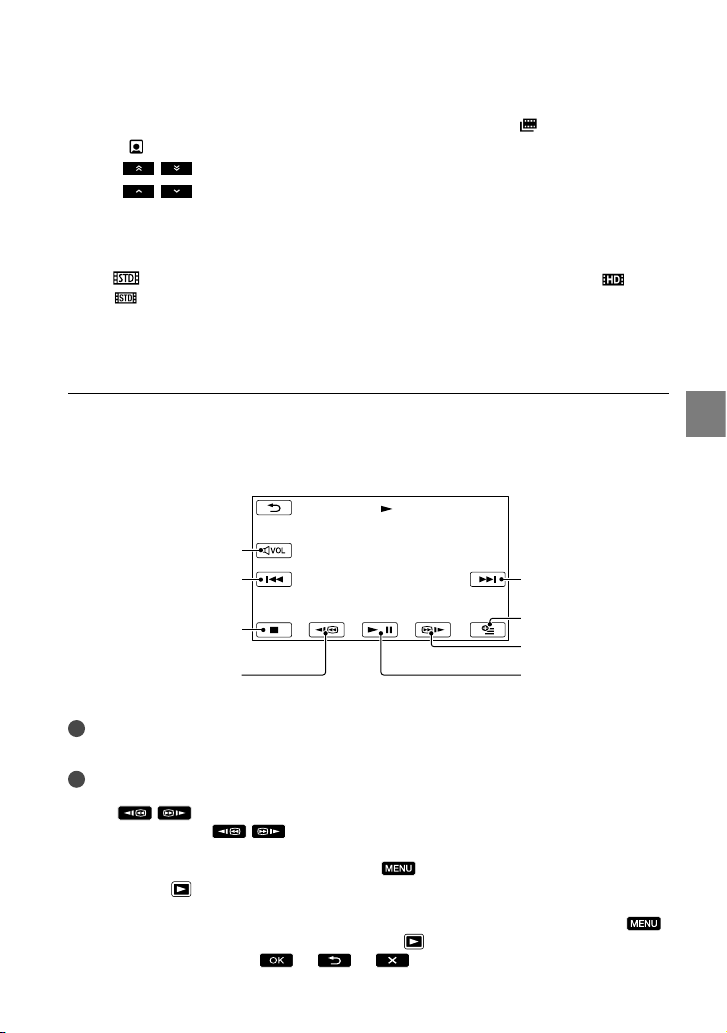
Playing movies
Your camcorder starts playing the selected movie.
Volume adjustment
Previous
To stop
Next
OPTION
To fast-forward
To fast-reverse
Notes
You may not be able to play back the images with other devices than camcorder.
Tips
When playback from the selected movie reaches the last movie, the screen returns to the INDEX screen.
Touch
As you repeat touching
about 10 times about 30 times about 60 times.
You can also display the VISUAL INDEX by touching
INDEX] (under
The recording date, time, and shooting conditions are recorded automatically during recording. This
information is not displayed during recording, but you can display it during playback by touching
(MENU) [Show others] [PLAYBACK SET] (under
CODE] a desired setting
/ during pause to play back movies slowly.
/ during playback, movies are played as fast as about 5 times
(MENU) [Show others] [VISUAL
[PLAYBACK] category).
[PLAYBACK] category) [DATA
.
To pause/play
Recording/Playback
US
29
Page 30
30
US
To adjust the sound volume of movies
While playing back movies, touch adjust with / .
You can also adjust the sound volume by using / in the OPTION MENU.
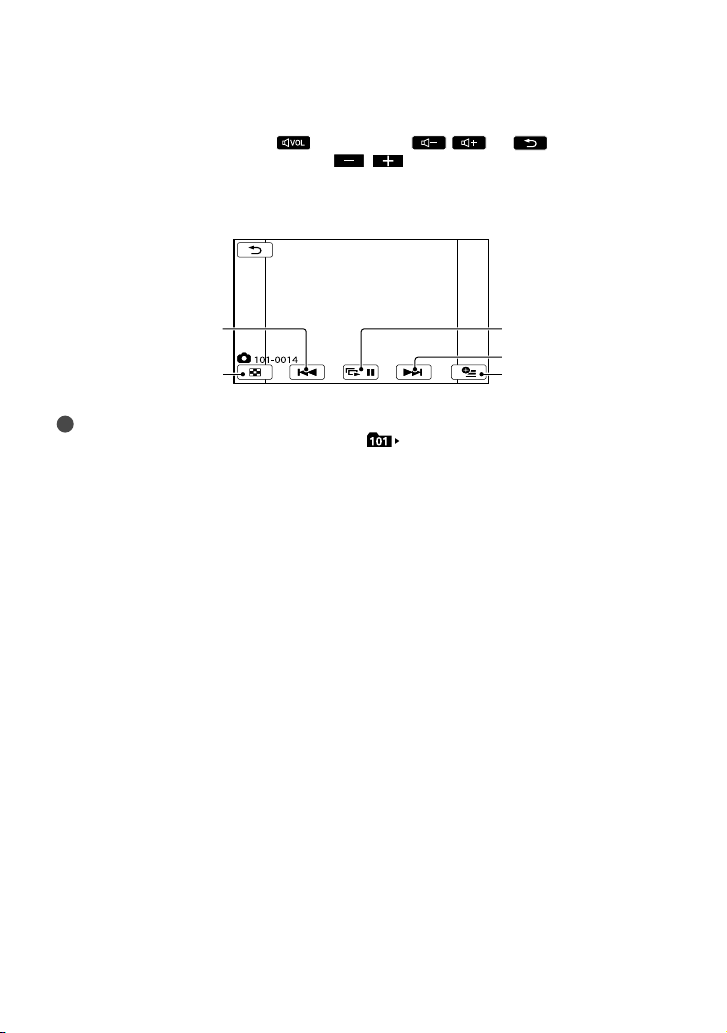
Viewing photos
Your camcorder displays the selected photo.
Previous
To the VISUAL INDEX
screen
Tips
When viewing photos recorded on the memory card,
To start/stop slide
show
Next
OPTION MENU
(playback folder) appears on the screen.
Page 31
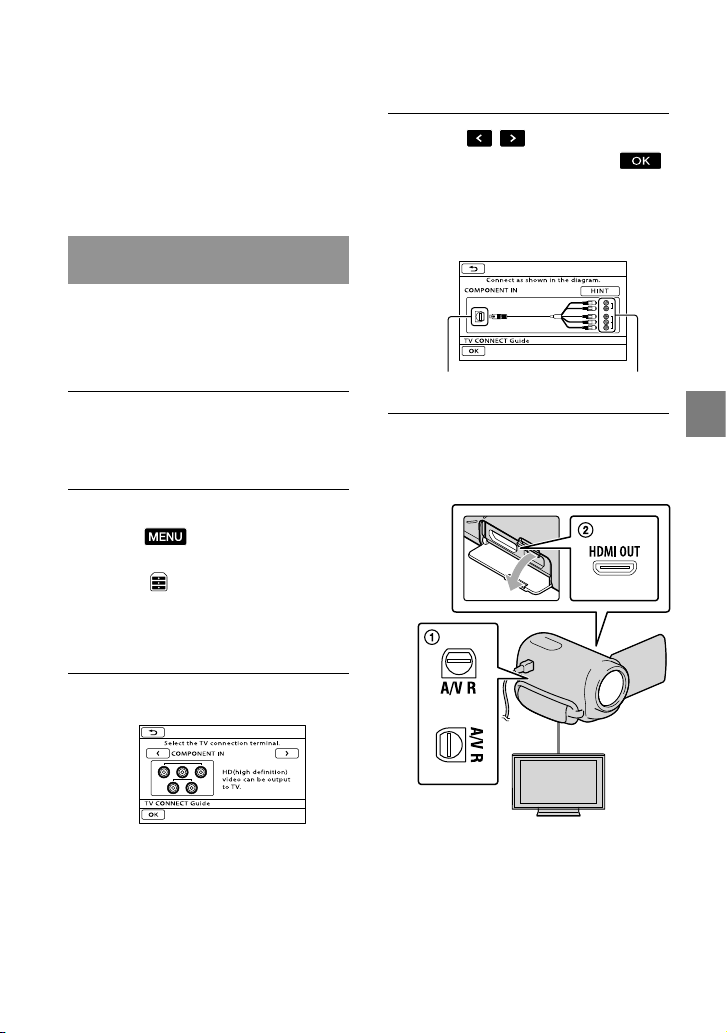
Playing images on a TV
Connection methods and the image
quality (high definition (HD) or standard
definition (STD)) viewed on the TV screen
differ depending on what type of TV is
connected, and the connectors used.
Connecting a TV using [TV
CONNECT Guide]
You can connect your camcorder to the TV
easily following the instructions displayed
on the LCD screen, [TV CONNECT
Guide].
Switch the input on the TV to the
connected jack.
Refer to the instruction manuals of the TV.
Turn on your camcorder, and
touch
(MENU) [Show
others] [TV CONNECT Guide]
(under [OTHERS] category) on
the LCD screen.
Use the supplied AC Adaptor as the power
source (p. 17).
Touch [High Definition TV].
Touch
/ to select the input
jack of your TV, then touch .
The connection medhod is displayed.
If you touch [HINT], you can see tips for
the connection or change the settings of
your camcorder.
Connectors on your
camcorder
Input connectors
on the TV
Connect your camcorder to the
TV.
HDMI OUT jack
*
**
Recording/Playback
A/V Remote
Connector
* HDR-CX110/CX150
** HDR-XR150
US
31
Page 32
32
US
Touch
When the A/V connecting cable is used
to output movies, movies are output with
standard definition image quality (STD).
[YES].
Play back movies and photos on
your camc
order (p. 28).
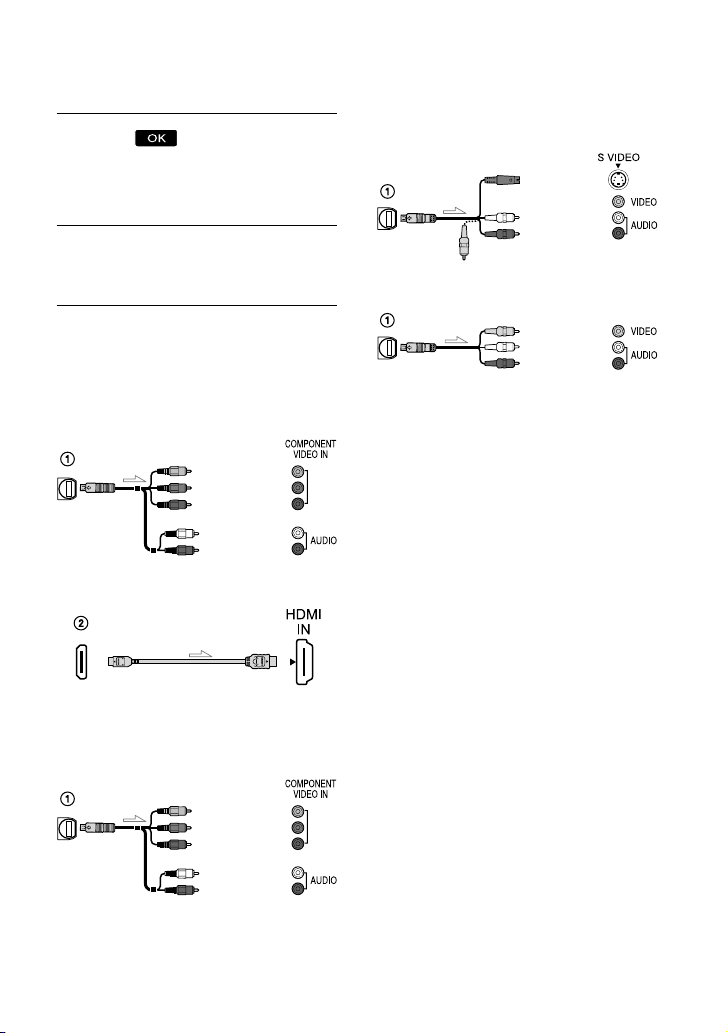
Types of connection cables between
your camcorder and TV
Connecting to a high definition TV
Component A/V Cable (supplied)
(Green) Y
(Blue)
PB/CB
(Red)
PR/CR
(White)
(Red)
HDMI Cable (sold separately)
Connecting to a non-high-definition 16:9 (wide) or 4:3
TV
Component A/V Cable (supplied)
(Green) Y
(Blue)
PB/CB
(Red)
PR/CR
(White)
(Red)
A/V connecting cable with S VIDEO (sold
separately)
(White)
(Red)
(Yellow)
A/V connecting cable (supplied)
(Yellow)
(White)
(Red)
When connecting to your TV via a VCR
Connect your camcorder to the LINE IN input
on the VCR using the A/V connecting cable. Set
the input selector on the VCR to LINE (VIDEO
1, VIDEO 2, etc.).
To set the aspect ratio according to the
connected TV (16:9/4:3)
Set [TV TYPE] to [16:9] or [4:3] according to
your TV.
When your TV is monaural (When your
TV has only one audio input jack)
Connect the yellow plug of the A/V connecting
cable to the video input jack and connect the
white (left channel) or red (right channel) plug
to the audio input jack of your TV or VCR.
When you connect with component
A/V cable
If you connect only component video plugs,
audio signals are not output. Connect the white
and red plugs to output audio signals.
Page 33

When you connect with HDMI cable
Use an HDMI cable with the HDMI logo.
Use an HDMI mini connector on one end
(for the camcorder), and a plug suitable for
connecting your TV on the other end.
Copyright-protected images are not output
from the HDMI OUT jack of your camcorder.
Some TVs may not function correctly (e.g., no
sound or image) with this connection.
Do not connect the camcorder HDMI OUT
jack to an external device HDMI OUT jack, as
malfunction may result.
When you connect with A/V
connecting cable with S VIDEO
When the S VIDEO plug (S VIDEO channel)
is connected, audio signals are not output. To
output audio signals, connect the white and red
plugs to the audio input jack of your TV.
This connection produces higher resolution
images compared with the A/V connecting
cable.
Notes
When you play back standard definition image
quality (STD) movies on a 4:3 TV that is not
compatible with the 16:9 signal, record movies
with 4:3 aspect ratio. Touch
[Show others] [OTHER REC SET]
(under
[
[SHOOTING SET] category)
WIDE SELECT] [4:3]
(p. 59).
Tips
If you connect your camcorder to the TV using
more than one type of cable to output images,
the order of priority of the TV input jacks is as
follows:
HDMI component S VIDEO video
HDMI (High Definition Multimedia Interface)
is an interface to send both video/audio signals.
The HDMI OUT jack outputs high quality
images and digital audio.
(MENU)
On “Photo TV HD”
This camcorder is compatible with the
“Photo TV HD” standard. “Photo TV
HD” allows for highly-detailed, photo-like
depiction of subtle textures and colors.
By connecting Sony’s Photo TV HDcompatible devices using an HDMI cable
or the component A/V cable
**, a whole
new world of photos can be enjoyed in
breathtaking full HD quality.
* The TV will automatically switch to the
appropriate mode when displaying photos.
** Setup of the TV will be necessary. Please refer
to the instructions of your Photo TV HDcompatible TV for details.
*
Recording/Playback
US
33
Page 34
Making good use of your camcorder
Deleting movies and
photos
You can free media space by deleting
movies and photos from recording media.
Notes
You cannot restore images once they are
deleted. Save important movies and photos in
advance.
Do not remove the battery pack or the AC
Adaptor from your camcorder while deleting
the images. It may damage the recording media.
Do not eject memory card while deleting
images from the memory card.
You cannot delete protected movies and photos.
Undo the protection of the movies and photos
to delete them, before you try to delete them.
If the deleted movie is included in the Playlist,
the movie added to the Playlist is deleted also
from the Playlist.
If the deleted movie is included in the saved
Highlight Playback scenario, the movie is also
deleted from the scenario.
Tips
You can delete an image on the playback screen
from
To delete all images recorded in the recording
media, and recover all the recordable space of
the media, format the media.
Reduced-size images which enable you to view
many images at the same time on an index
screen are called “thumbnails.”
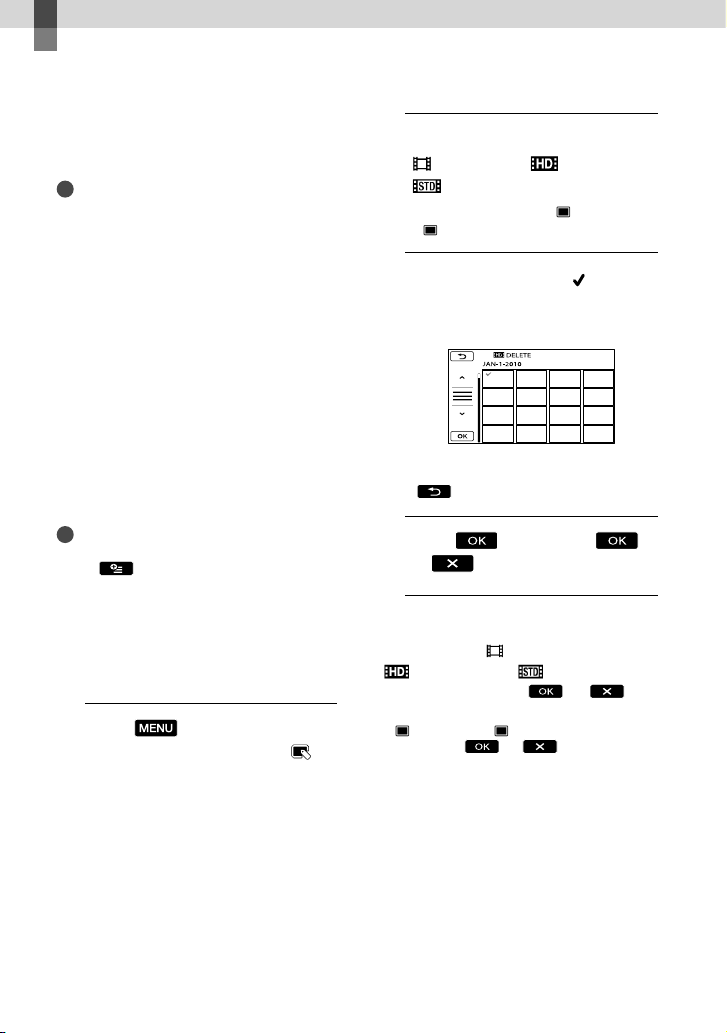
1
OPTION MENU.
Touch (MENU) [Show
others] [DELETE] (under
[EDIT] category).
2
To delete movies, touch
[ DELETE] [ DELETE] or
[ DELETE].
To delete photos, touch [ DELETE]
DELETE].
[
3
Touch and display the mark
on the movies or photos to be
deleted.
Press and hold the image down on the
LCD screen to confirm the image. Touch
to return to the previous screen.
4
Touch
[YES]
.
To delete all movies/photos at one time
In step 2, touch [ DELETE]
DELETE ALL]/[ DELETE ALL]
[
[YES] [YES]
To delete all photos at one time, touch
DELETE] [ DELETE ALL] [YES]
[
[YES]
.
.
34
US
Page 35
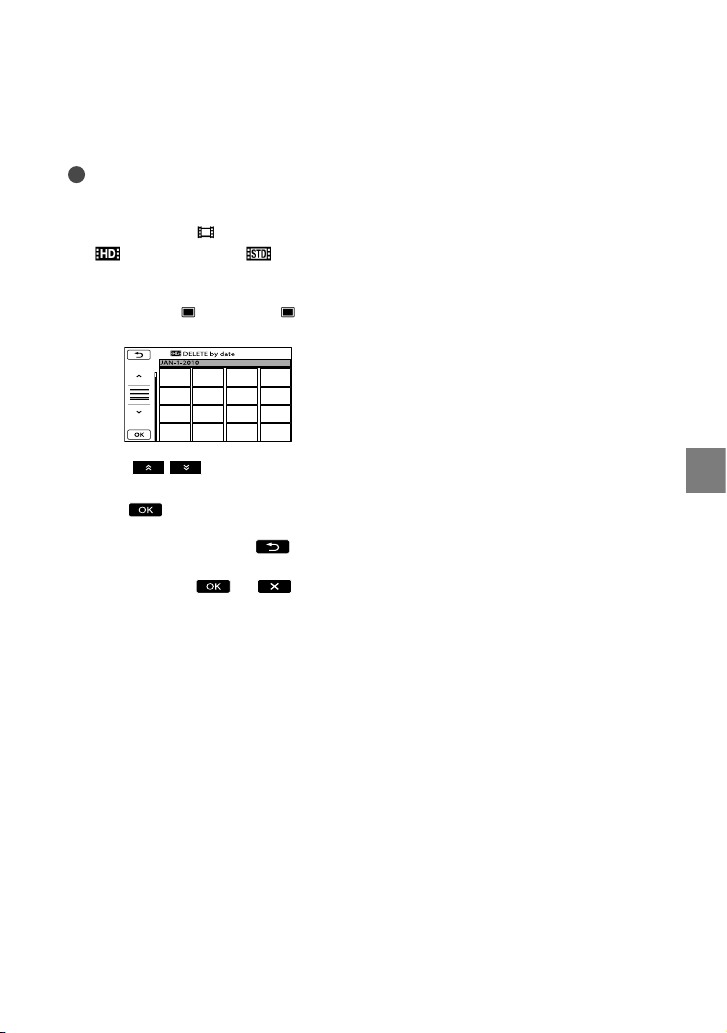
To delete all the movies/photos
recorded on the same day at one time
Notes
You cannot delete photos on memory card by
recording date.
In step 2, touch [ DELETE]
DELETE by date]/[ DELETE
[
by date].
To delete all photos on the same day at one
time, touch [
by date].
DELETE] [ DELETE
Touch / to select the recording
date of the desired movies/photos, then
touch
.
Touch the image on the LCD screen to
confirm the image. Touch
to the previous screen.
to return
Touch [YES] .
Making good use of your camcorder
US
35
Page 36
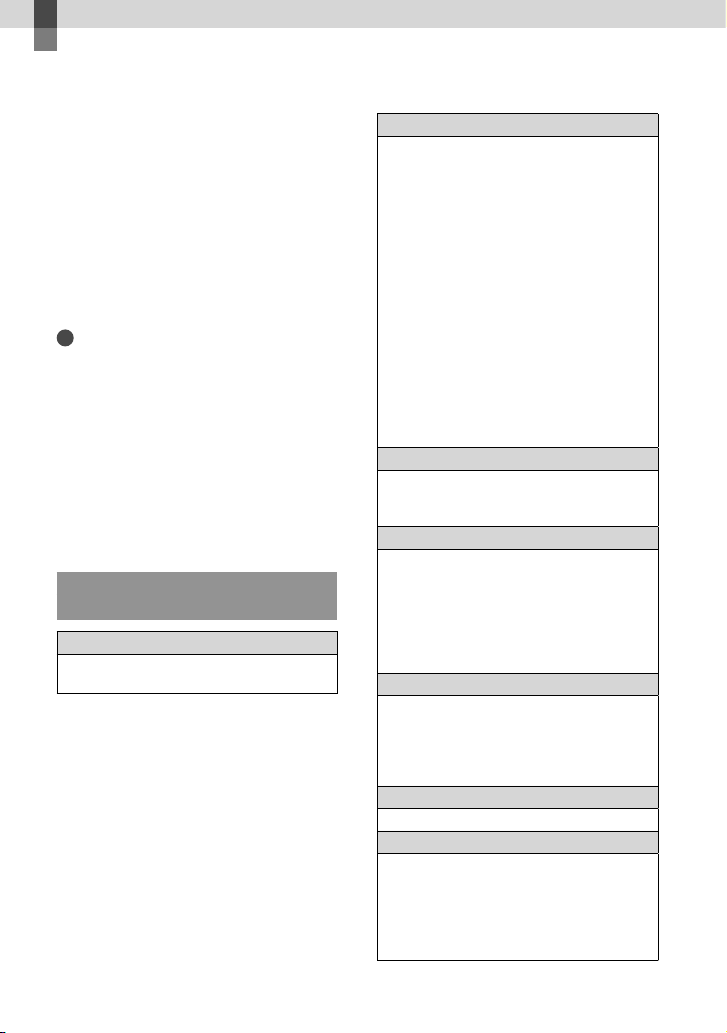
Saving movies and photos with a computer
Preparing a computer
(Windows)
You can perform following operations using
“PMB (Picture Motion Browser).”
Importing images to a computer
Viewing and editing imported images
Creating a disc
Uploading movies and photos to websites
To save movies and photos using a
computer, install “PMB” from the supplied
CD-ROM beforehand.
Notes
Do not format the media of your camcorder
from a computer. Your camcorder may not
operate correctly.
This camcorder captures high definition footage
in the AVCHD format. Using the enclosed
PC software, high definition footage can be
copied onto DVD media. However, DVD media
containing AVCHD footage should not be used
with DVD based players or recorders, as the
DVD player/recorder may fail to eject the media
and may erase its contents without warning.
Step 1 Checking the computer
system
1
OS*
Microsoft Windows XP SP3*2/Windows Vista
3
SP2
*
/Windows 7
US
36
4
CPU*
Intel Core Duo 1.66 GHz or faster, or Intel
Core 2 Duo 1.66 GHz or faster (Intel Core
2 Duo 2.26 GHz or faster is required when
processing HD FX/HD FH movies)
However, Intel Pentium III 1 GHz or faster is
sufficient for the following operations:
Importing the movies and photos to the
computer
One Touch Disc Burn
Creating a Blu-ray disc/AVCHD disc/DVD-
video (Intel Core Duo 1.66 GHz or faster
is required when creating a DVD video by
converting high definition image quality
(HD) to standard definition image quality
(STD).)
Copying a disc
Processing only the movies with standard
definition image quality (STD)
Application
DirectX 9.0c or later (This product is based
on DirectX technology. It is necessary to have
DirectX installed.)
Memory
For Windows XP: 512 MB or more (1 GB or
more is recommended.)
However, 256 MB or more is sufficient for
processing only the movies with standard
definition image quality (STD).
For Windows Vista/Windows 7: 1 GB or
more
Hard disk
Disk volume required for installation:
Approximately 500 MB (10 GB or more may
be necessary when creating AVCHD discs.
50 GB maximum may be necessary when
creating Blu-ray discs.)
Display
Minimum 1,024 × 768 dots
Others
USB port (this must be provided as standard,
Hi-Speed USB (USB 2.0 compatible)), Bluray disc/DVD burner (CD-ROM drive is
necessary for installation) Either NTFS or
exFAT file system is recommended as the
hard disk file system.
Page 37

1
*
Standard installation is required. Operation is
not assured if the OS has been upgraded or in a
multi-boot environment.
2
*
64-bit editions and Starter (Edition) are not
supported. Windows Image Mastering API
(IMAPI) Ver.2.0 or newer is required to use disc
creation function, etc.
3
*
Starter (Edition) is not supported.
4
*
Faster processor is recommended.
Notes
Operation with all computer environments is
not assured.
When using a Macintosh
The supplied software “PMB” is not
supported by Macintosh computers.
To process photos using a Macintosh
computer connected to your camcorder,
see the following website.
http://guide.d-imaging.sony.co.jp/mac/
ms/us/
Step 2 Installing the supplied
software “PMB”
Install “PMB” before connecting your
camcorder to a computer.
Notes
If a version of “PMB” under 5.0.00 has been
installed on your computer, you may be unable
to use some functions of those “PMB” when
installing the “PMB” from the supplied CDROM. Also, “PMB Launcher” is installed from
the supplied CD-ROM and you can start “PMB”
or other software by using the “PMB Launcher.”
Double-click the “PMB Launcher” short-cut
icon on the computer screen to start “PMB
Launcher.”
Confirm that your camcorder is
not connected to the computer.
Turn on the computer.
Log on as an Administrator for
installation.
Close all applications running on the
computer before installing the software.
Place the supplied CD-ROM in
the disc drive of your computer.
The installation screen appears.
If the screen does not appear, click
[Start] [Computer] (in Windows
XP, [My Computer]), then double-click
[SONYPMB (E:)] (CD-ROM)
* Drive names (such as (E:)) may vary
depending on the computer.
Click [Install].
Select the country or region.
Select the language for the
application to be installed, then
proceed to the next screen.
*.
Saving movies and photos with a computer
US
37
Page 38
Read the terms of the license
agreement carefully. If you agree
to the terms, change
then click [Next] [Install].
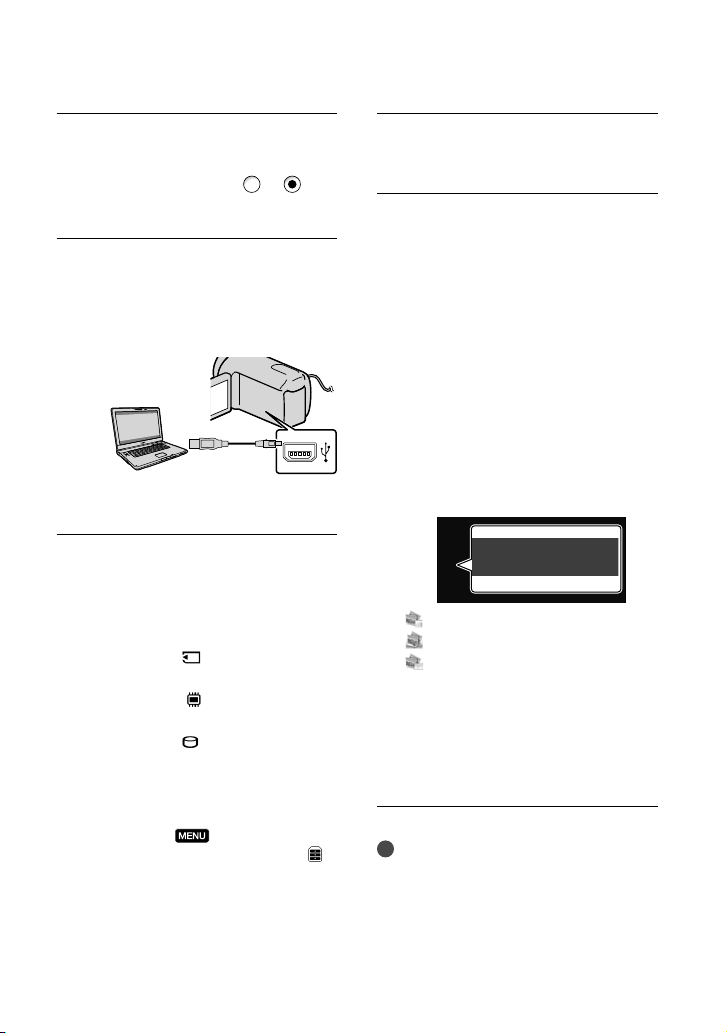
Turn on your camcorder, then
connect the camcorder to the
computer using the supplied USB
cable.
The [USB SELECT] screen appears on
the camcorder screen automatically.
Touch the one of the media types
displayed on the camcorder
screen to make the computer
recognize your camcorder.
HDR-CX110: [ USB CONNECT]
(memory card)
HDR-CX150 : [
USB CONNECT]
(internal memory)
HDR-XR150: [
USB CONNECT]
(internal hard disk)
The displayed recording media differ
depending on the model.
If the [USB SELECT] screen does not
appear, touch
others] [USB CONNECT] (under
[OTHERS] category).
US
(MENU) [Show
38
to , and
Click [Continue] on the computer
screen.
Follow the on-screen instructions
to install the software.
Connect the camcorder to the computer
during the installation of “PMB.”
Depending on the computer, you may
need to install third party software. If
the installation screen appears, follow
the instructions to install the required
software.
Restart the computer if required to
complete the installation.
When the installation is completed,
following icons will appear.
Remove the CD-ROM from your
computer.
: Starts “PMB.”
: Displays “PMB Help.”
: Displays “PMB Launcher.”
“PMB Launcher” enables you to start
“PMB” or other software, or to open
web sites.
Other icons may appear.
No icon may appear depending on the
installation procedure.
Notes
To create discs or use other functions on
Windows XP, Image Mastering API v2.0 for
Windows XP should be installed. If Image
Mastering API v2.0 for Windows XP has not
been installed yet, select it from required
programs on the installation screen and install
Page 39
Starting PMB (Picture
Motion Browser)
it following the procedures displayed. (The
computer must be connected to the internet
for the installation.) You may install Image
Mastering API v2.0 for Windows XP in
response to the message displayed when you try
to start those functions.
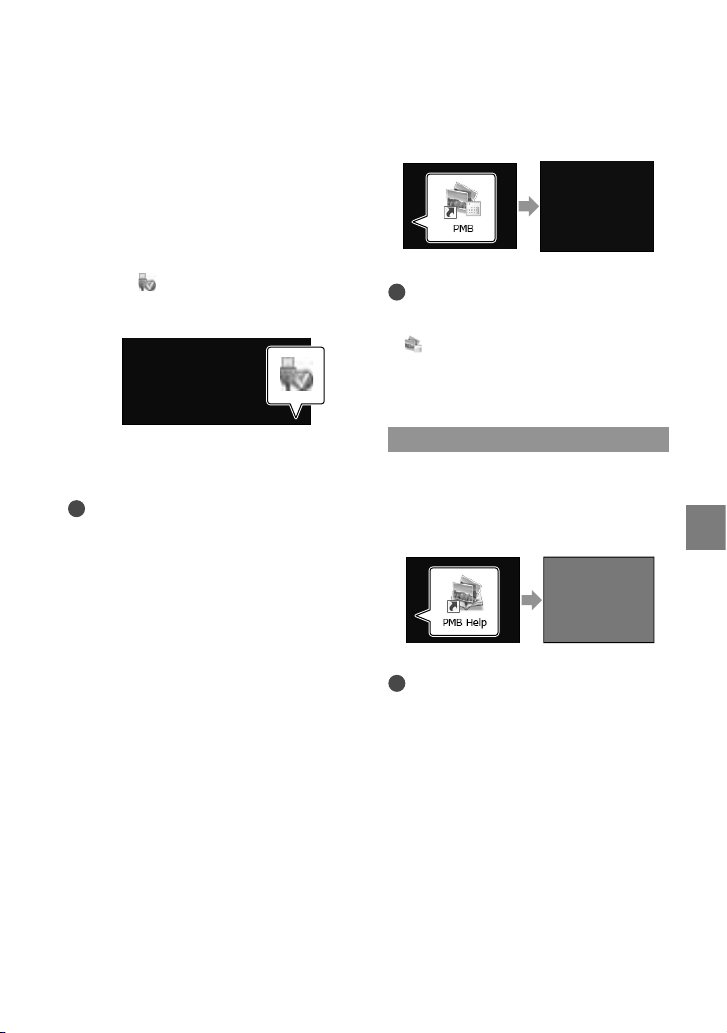
To disconnect your camcorder from the
computer
Click the icon at the bottom right of the
desktop of the computer [Safely remove
USB Mass Storage Device].
Touch [END] [YES] on the camcorder
screen.
Disconnect the USB cable.
Notes
Access from the computer using the supplied
software “PMB.” Do not modify the files or
folders on the camcorder from the computer.
The image files may be destroyed or may not be
played back.
Operation is not guaranteed, if you perform the
above operation.
When you delete image files, follow the steps
on page 34. Do not delete the image files on the
camcorder directly from the computer.
Do not copy the files on the recording
media from the computer. Operation is not
guaranteed.
You can create a Blu-ray disc by using a
computer with a Blu-ray disc burner. Install the
D A
dd-on Software for “PMB” (p. 45).
B
Double-click the “PMB” short-cut icon on
the computer screen.
Notes
If the icon is not displayed on the computer
screen, click [Start] [All Programs]
PMB] to start “PMB.”
[
You can view, edit, or create discs of movies
and photos using “PMB.”
Reading “PMB Help”
For details on how to use “PMB,” read the
“PMB Help.” Double-click the “PMB Help”
short-cut icon on the computer screen to
open the “PMB Help.”
Notes
If the icon is not displayed on the computer
screen, click [Start] [All Programs]
[PMB] [PMB Help]. You can also open the
“PMB Help” from [Help] of “PMB.”
Saving movies and photos with a computer
US
39
Page 40
Selecting the method for creating a disc
(computer)
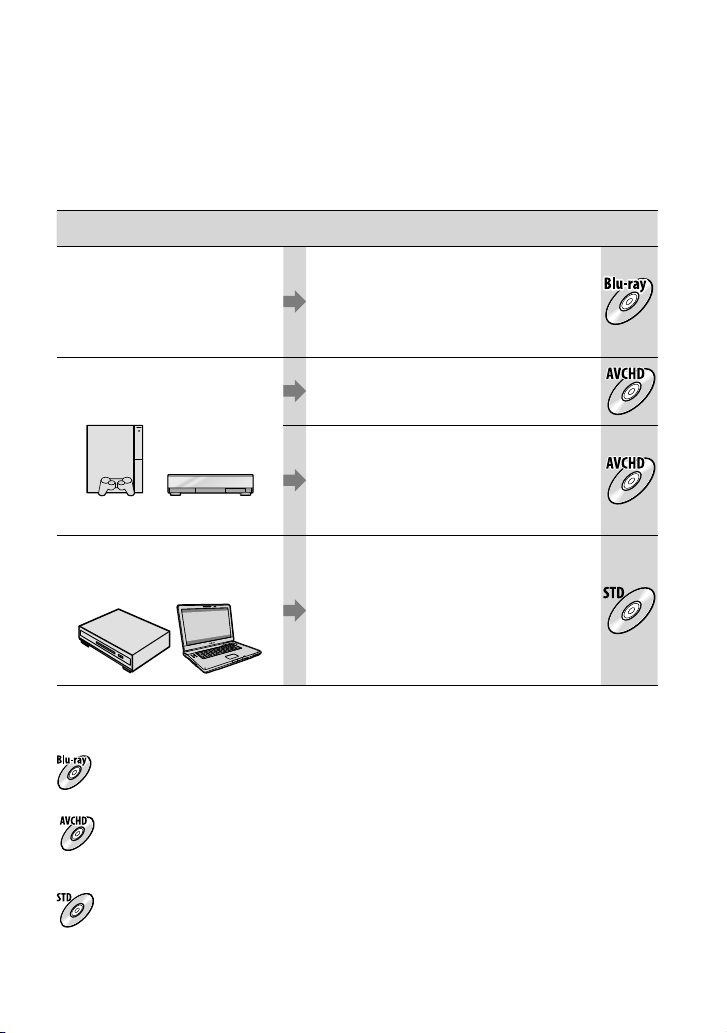
Several methods for creating a high definition image quality (HD) disc or a standard
definition image quality (STD) disc from high definition image quality (HD) movies or
photos recorded on your camcorder are described here. Select the method that suits your
disc player.
Player Choosing a method and disc type
Blu-ray disc playback
devices (a Blu-ray disc player,
PlayStation
3, etc.)
Importing movies and photos to a
computer (p. 43)
Creating a Blu-ray disc* with high
definition image quality (HD) (p. 45)
AVCHD format playback devices
(a Sony Blu-ray disc player,
PlayStation
3, etc.)
Creating a disc with one touch (One Touch
Disc Burn) (p. 42)
Importing movies and photos to a
computer (p. 43)
Creating a AVCHD format disc with high
definition image quality (HD) (p. 44)
Ordinary DVD playback devices
(a DVD player, a computer that
can play DVDs, etc.)
Importing movies and photos to a
computer (p. 43)
Creating a standard definition image
quality (STD) disc (p. 45)
* To create a Blu-ray disc, the BD Add-on Software for “PMB” must be installed (p. 45).
Characteristics of each type of disc
Using a Blu-ray disc enables you to record high definition image quality (HD) movies of a longer
duration than DVD discs.
High definition image quality (HD) movie can be recorded on DVD media, such as DVD-R discs,
and a high definition image quality (HD) disc is created.
You can play a high definition image quality (HD) disc on AVCHD format playback devices, such as
a Sony Blu-ray disc player and a PlayStation
Standard definition image quality (STD) movie converted from high definition image quality (HD)
movie can be recorded on DVD media, such as DVD-R discs, and a standard image quality (STD)
disc is created.
3. You cannot play the disc on ordinary DVD players.
40
US
Page 41

Discs you can use with “PMB”
You can use 12 cm discs of following type with “PMB.” For Blu-ray disc, see page 45.
Disc type Features
DVD-R/DVD+R/DVD+R DL Unrewritable
DVD-RW/DVD+RW Rewritable
Notes
Always maintain your PlayStation
The PlayStation
3 may not be available in some countries/regions.
3 to use the latest version of the PlayStation3 system software.
Saving movies and photos with a computer
US
41
Page 42
Creating a disc with
one touch
(One Touch Disc Burn)
Movies and photos recorded on your
camcorder that have not yet been saved
with One Touch Disc Burn function can
be saved on a disc automatically. Movies
and photos are saved on a disc with their
recorded image quality.
Notes
High definition image quality (HD) movies (the
default setting) will make an AVCHD disc.
You cannot create AVCHD discs from movies
recorded with [HD FX] mode of [
MODE].
Creating a Blu-ray disc is not available with One
Touch Disc Burn.
To create a standard definition image quality
(STD) disc from high definition image quality
(HD) movies, import movies to a computer first
.
43), and then create a standard definition
(p
ge quality (STD) disc (p. 45).
ima
stall “PMB” beforehand (p. 37), however, do
In
not start “PMB.”
Connect your camcorder to the wall outlet (wall
socket) using the AC Adaptor supplied for this
eration (p. 17).
p
o
With One Touch Disc Burn function on your
camcorder, you can save movies and photos
recorded on the internal recording media only
(HDR-CX150/XR150).
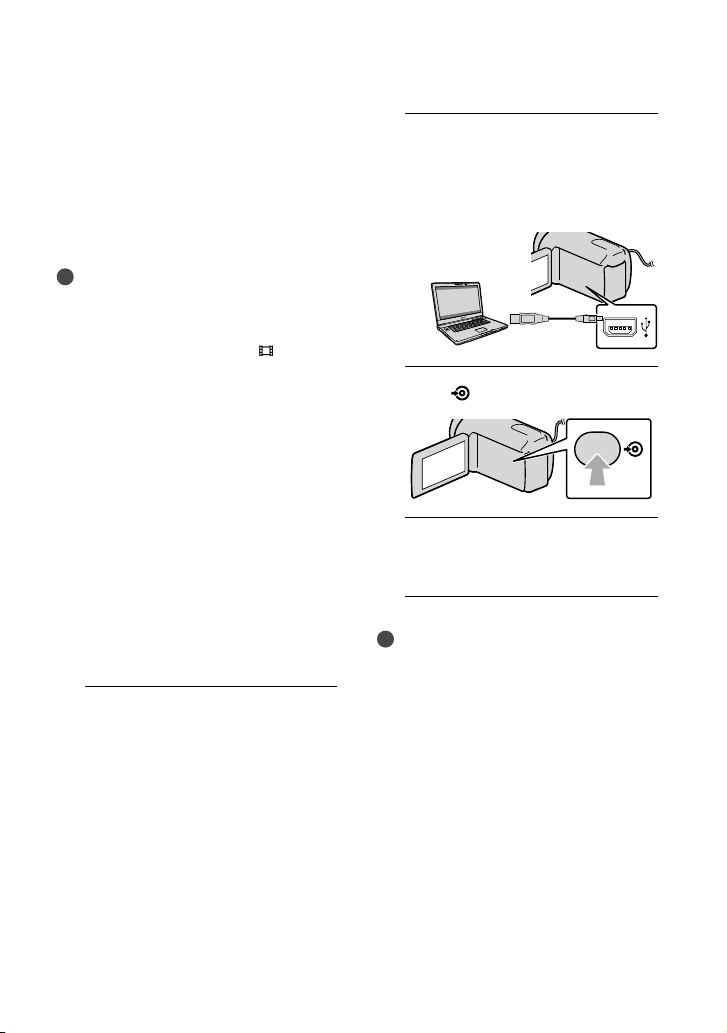
1
Turn on your computer, and place
an unused disc on the DVD drive.
See page 41 for the type of discs you can
use.
If any other software than “PMB” starts
automatically, shut it down.
REC
2
Turn on your camcorder, then
connect the camcorder to the
computer using the supplied USB
cable.
3
Press (DISC BURN).
4
Follow the instructions on the
computer screen.
Notes
Movies and photos are not saved on the
computer when you perform One Touch Disc
Burn.
42
US
Page 43
Importing movies and
photos to a computer
Movies and photos recorded on your
camcorder can be imported to a computer.
Turn on the computer beforehand.
Notes
Connect your camcorder to the wall outlet (wall
socket) using the supplied AC Adaptor for this
p
eration (p. 17).
o
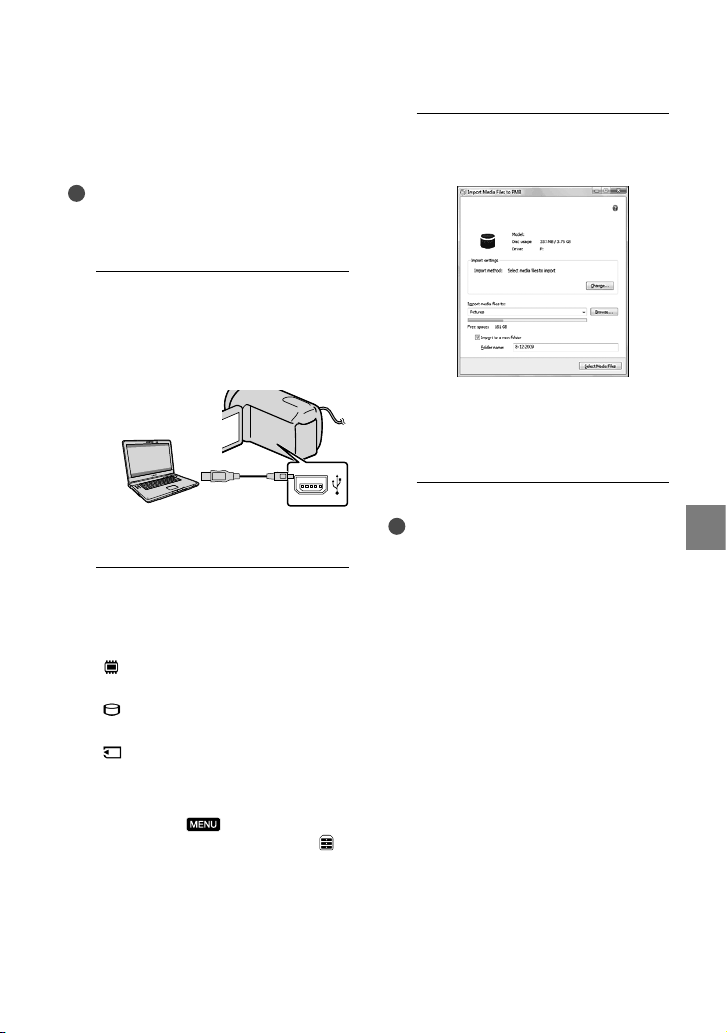
1
Turn on your camcorder, then
connect the camcorder to the
computer using the supplied USB
cable.
The [USB SELECT] screen appears on
the camcorder screen.
2
Touch the recording media that
contains the images you want to
save on the camcorder screen.
[ USB CONNECT]: Internal
memory
USB CONNECT]: Internal hard
[
disk
USB CONNECT]: Memory card
[
The displayed recording media differ
depending on the model.
If the [USB SELECT] screen does not
appear, touch
others] [USB CONNECT] (under
[OTHERS] category).
The window for import appears on the
computer screen.
(MENU) [Show
3
Click [Import].
Refer to “PMB Help” (p. 39) for details.
Movies and photos are imported to
your computer.
When the operation is completed, the
“PMB” screen appears.
Tips
You can export high definition image quality
(HD) movies from your computer to your
a
mcorder. See “PMB Help” (p. 39) for details.
c
Saving movies and photos with a computer
US
43
Page 44
Creating an AVCHD
disc
You can create an AVCHD disc by putting
together high definition image quality
(HD) movies previously imported to your
m
puter (p. 43).
co
In this section, the procedure for recording
a high definition image quality (HD) movie
on a DVD disc is explained.
1
Turn on your computer, and place
an unused disc on the DVD drive.
See page 40 for the type of discs you can
use.
If any other software than “PMB” starts
automatically, shut it down.
2
Start “PMB” (p. 39).
3
Click [Calendar] or [Index] on
the left side in the window, and
select the date or folder, then
select the high definition image
quality (HD) movies.
High definition image quality (HD)
movies are marked with
You cannot save photos on a disc.
To select plural movies, hold the Ctrl key
down and click thumbnails.
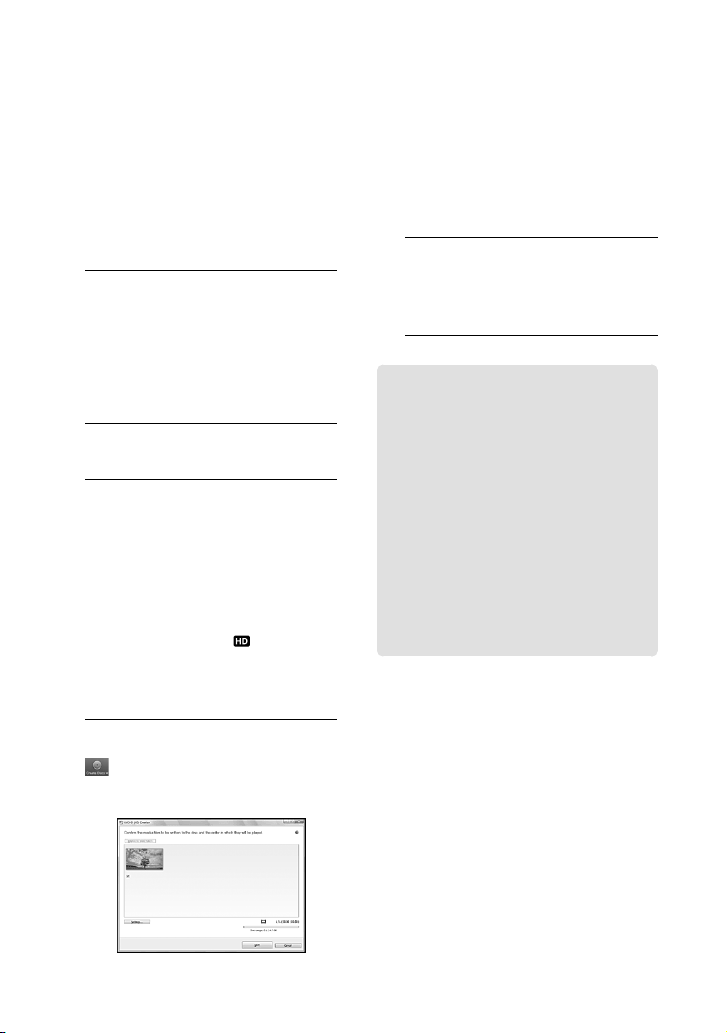
4
At the top of the window, click
[Create AVCHD Format
Discs (HD)].
.
The window used to select movies
appears.
To add movies to the previously selected
ones, select the movies in the main
window and drag and drop onto the
window for selecting movies.
5
Follow the instructions on the
screen to create a disc.
It may take a long time to create a disc.
Playing an AVCHD disc on a
computer
You can play back AVCHD discs using
“Player for AVCHD” that is installed
together with “PMB.”
To start “Player for AVCHD” Click
[Start] [All Programs] [PMB]
[PMB Launcher] [View] [Player
for AVCHD].
See the “Player for AVCHD” help on the
operation.
Movies may not be played smoothly
depending on the computer environment.
44
US
Page 45
Creating a Blu-ray disc
You can create a Blu-ray disc with a high
definition image quality (HD) movie
previously imported to a computer
.
43).
(p
To create a Blu-ray disc, the BD Add-on
Software for “PMB” must be installed.
Click [BD Add-on Software] on the
installation screen of “PMB,” and install
this plug-in according to the on-screen
instructions.
Connect your computer to the internet
when you install [BD Add-on Software].
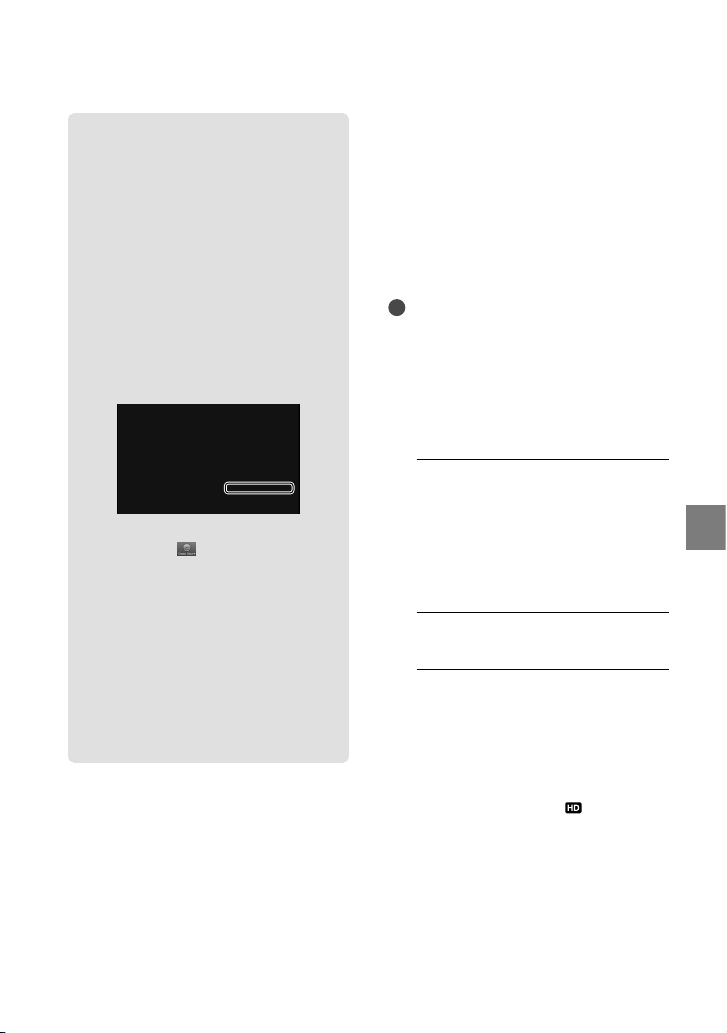
Place an unused Blu-ray disc in the disc
drive, and click
Disc (HD)] in step 4 of “Creating an
AVCHD disc” (p
a
re the same as that for creating an
AVCHD disc.
Your computer must support the creation of
Blu-ray discs.
BD-R (unrewritable) and BD-RE
(rewritable) media are available for creating
Blu-ray discs. You cannot add contents to
either type of disc after creating the disc.
[Create Blu-ray
. 44). Other procedures
Creating a standard
definition image
quality (STD) disc
that can be played on
ordinary DVD players
You can create a standard definition image
quality (STD) disc by selecting movies
previously imported to your computer
.
43).
(p
Notes
You may select high definition image quality
(HD) movies as sources. However, image
quality is converted from high definition (HD)
to standard definition (STD). It will take a
longer time for converting the image quality of
the movies than it took to actually record the
movies.
1
Turn on your computer, and place
an unused disc on the DVD drive.
See page 40 for the type of discs you can
use.
If any other software than “PMB” starts
automatically, shut it down.
2
Start “PMB” (p. 39).
3
Click [Calendar] or [Index] on
the left side in the window, and
select the date or folder, then
select the movies.
High definition image quality (HD)
movies are marked with
To select plural movies, hold the Ctrl key
down and click thumbnails.
.
Saving movies and photos with a computer
US
45
Page 46
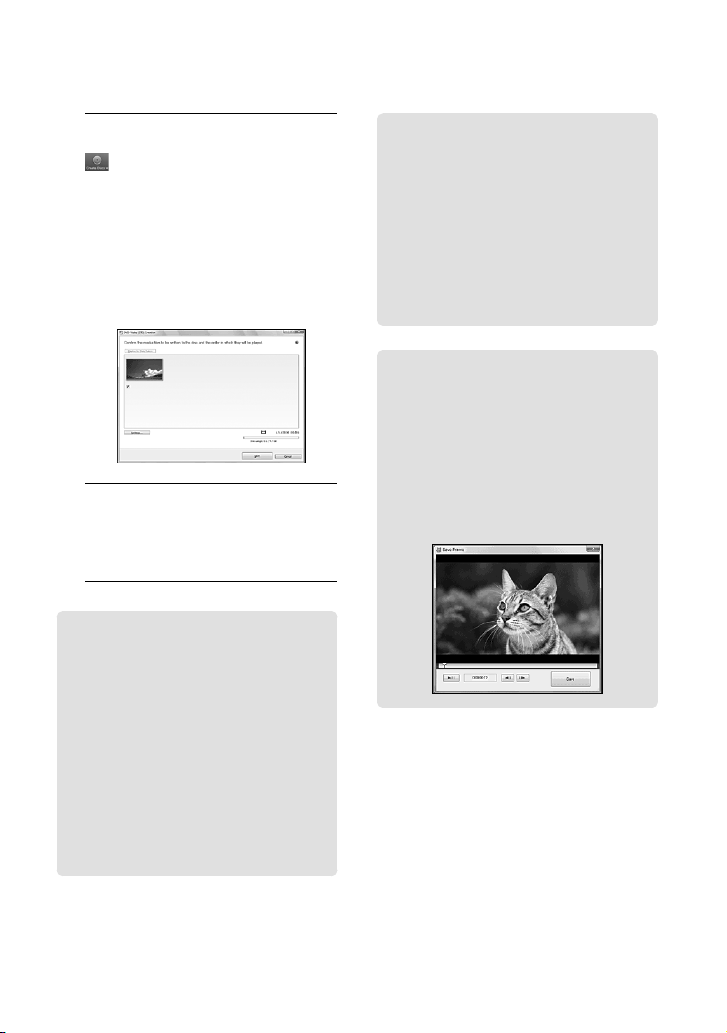
4
At the top of the window, click
[Create DVD-Video Format
Discs (STD)].
The window used to select movies
appears.
To add movies to the previously selected
ones, select the movies in the main
window and drag and drop onto the
window for selecting movies.
5
Follow the instructions on the
screen to create a disc.
It may take a long time to create a disc.
Copying a disc
You can copy a recorded disc to another
disc using “Video Disc Copier.”
Click [Start] [All Programs]
[PMB] [PMB Launcher] [Disc
Creation] [Video Disc Copier] to start
the software. See “Video Disc Copier”
help on the operation.
You cannot copy high definition image
quality (HD) movies by converting them to
standard definition image quality (STD).
You cannot copy to a Blu-ray disc.
Editing movies
You can cut out only necessary parts
from a movie and save it as another file.
Double-click the movie to be edited on
“PMB,” then click [Show Edit Palette]
on the right side of the screen [Trim
Video], or select the [Manipulate] menu
[Edit] [Trim Video]. See “PMB
lp” (p. 39) for details.
e
H
Capturing photos from a movie
You can save a frame of a movie as a
photo file.
Double-click the movie to be edited on
“PMB,” then click [Show Edit Palette]
on the right side of the screen [Save
ra
me]. See “PMB Help” (p. 39) for
F
details.
46
US
Page 47
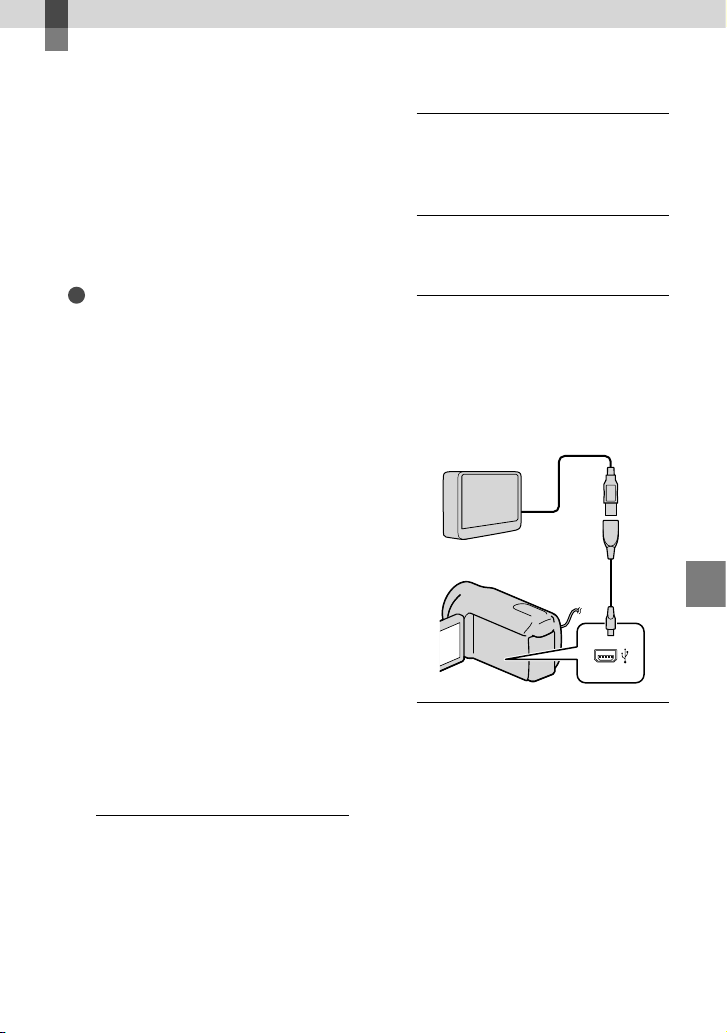
Saving images with an external device
Saving images in
external media
(DIRECT COPY)
You can save movies and photos on external
media (USB storage device), such as an
external hard disk drive. You can also play
back images on the camcorder or another
playback device.
Notes
For this operation, you need the USB Adaptor
Cable VMC-UAM1 (sold separately).
The USB Adaptor Cable VMC-UAM1 may not
be available in some countries/regions.
You cannot use the following devices as an
external media.
media with a capacity exceeding 2 TB
ordinary disc drive such as CD or DVD drive
media connected via USB hub
media with built-in USB hub
card reader
You may not be able to use external media with
a code function.
FAT file system is available for your camcorder.
If the external media was formatted to NTFS
file system, etc., format the external media on
your camcorder before use. The format screen
appears when the external media is connected
to your camcorder.
Operation is not assured with every device
satisfying requirements for operating.
Connect your camcorder to the wall outlet (wall
cket) using the supplied AC adaptor (p. 17).
o
s
Refer to the instruction manual supplied with
the external media.
For details on available external media, go to the
Sony support website in your country/region.
1
Connect the AC Adaptor and the
power cord (mains lead) to the
DC IN jack of your camcorder and
the wall outlet (wall socket).
2
If the external media has the AC
power cable, connect it to the
wall outlet (wall socket).
3
Connect the USB Adaptor Cable
to the external media.
4
Connect the USB Adaptor Cable
to the (USB) jack of your
camcorder.
When the [Create a new Image
Database File.] screen appears, touch
[YES].
USB Adaptor
Cable (sold
separately)
5
Touch [Copy.] on the camcorder
screen.
HDR-CX110:
Movies and photos that have not yet
been saved on to external media can
be saved.
HDR-CX150/XR150:
Movies and photos in the internal
recording media of the camcorder that
have not yet been saved on to external
media can be saved.
Saving images with an external device
US
47
Page 48
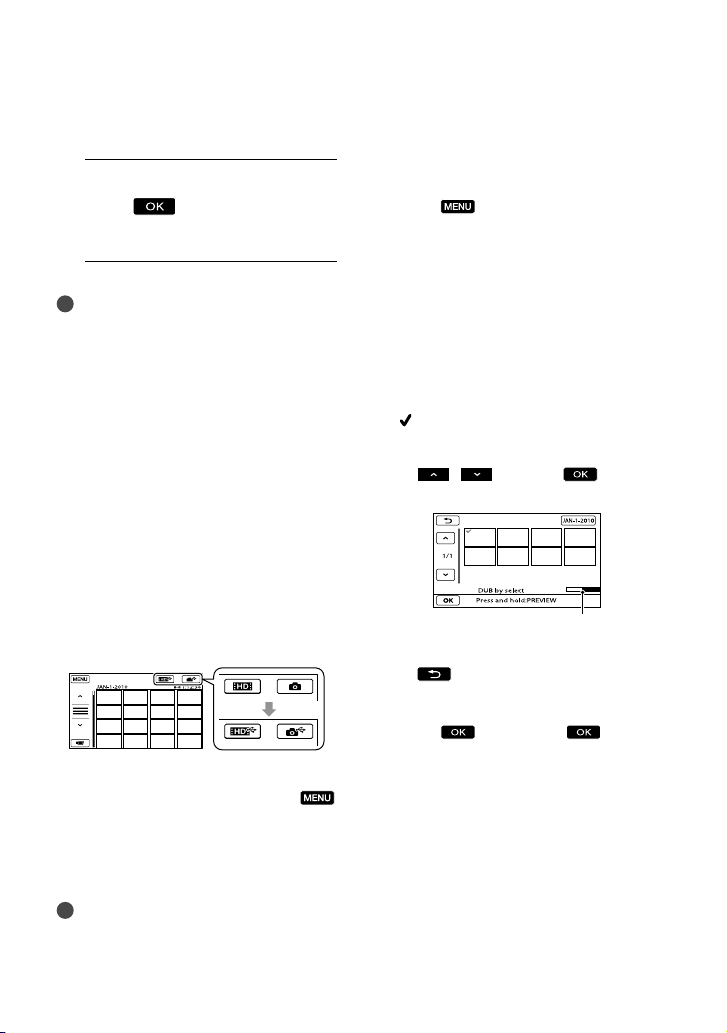
48
US
This screen will appear only when there
are newly recorded images.
6
After the operation is completed,
touch on the camcorder
screen.
Notes
The number of scenes you can save on the
external media are as follows. However, even if
the external media has free space, you cannot
save scenes exceeding the following number.
High definition image quality (HD) movies:
Max. 3,999
Standard definition image quality (STD)
movies: 9,999
Photos: 9,999 frames × 899 folders
The number of scenes may be smaller
depending on the type of images recorded.
When connecting an external media
The images saved in the external media
are displayed on the LCD screen. The
movie display and photo display buttons
on the VISUAL INDEX screen change as
illustrated below.
You can make menu settings of the external
media such as deleting images. Touch
(MENU) [Show others] on the VISUAL
INDEX screen.
To save desired movies and photos
Notes
You cannot copy or search photos by date which
are recorded on the memory card.
Touch [Play without copying.] in step 5
above.
The VISUAL INDEX screen of the
external media is displayed.
ouch (MENU) [Show others]
T
[MOVIE DUB] (when selecting
movies)/[PHOTO COPY] (when
selecting photos).
ollow the on-screen instructions to
F
select the recording media (HDRCX150/XR150) and image selection
methods.
hen you selected [DUB by select],
W
touch the image to be saved.
appears.
When you selected [DUB by date], select
the date of the images to be dubbed with
/ , then touch and go
to step .
Remaining external media capacity
Press and hold the image down on the
LCD screen to confirm the image. Touch
to return to the previous screen.
By touching date, you can search for
images by date.
Touch [YES] on the
camcorder screen.
To play back images in the external
media on the camcorder
Touch [Play without copying.] in step 5
above.
The VISUAL INDEX screen of the
external media is displayed.
Page 49
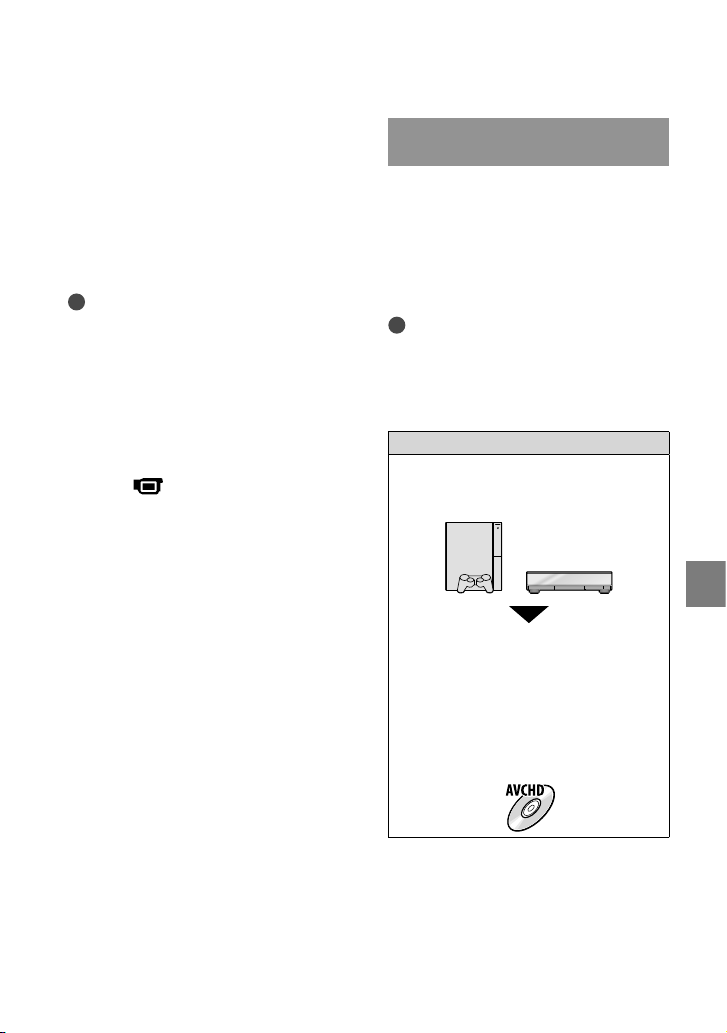
Creating a disc with a
DVD writer, recorder
Play back the image (p. 28).
You can also view images on a TV
connected to your camcorder (p. 31).
You can play back the high definition
image quality (HD) movies on your
computer using [Player for AVCHD]. Start
ayer for AVCHD] (p. 44), and select
l
[P
the drive where the external media is
connected with [Settings].
Notes
The Date Index of photos cannot be displayed.
If your camcorder does not recognize the
external media, try the following operations.
Reconnect the USB Adaptor Cable to your
camcorder
If the external media has the AC power cable,
connect it to the wall outlet (wall socket)
To finish the external media connection
Touch on the VISUAL INDEX
screen of the external media.
sconnect the USB Adaptor Cable.
Di
Selecting the method for creating
a disc
Several methods for creating an AVCHD
disc or a standard definition image quality
(STD) disc from high definition image
quality (HD) movies or photos recorded on
your camcorder are described here. Select
the method that suits your disc player.
Notes
Prepare a DVD disc such as a DVD-R, for
creating a disc.
See page 45 to create a Blu-ray disc.
See page 47 to save images in the external
media.
AVCHD format compatible device
Player
Sony Blu-ray disc player
PlayStation
Creating device
DVD writer, DVDirect Express (p. 50)
DVD writer, etc., other than DVDirect
Exp
Disc type
AVCHD disc (high definition image quality
(HD))
ress (p. 53)
3, etc.
Saving images with an external device
US
49
Page 50
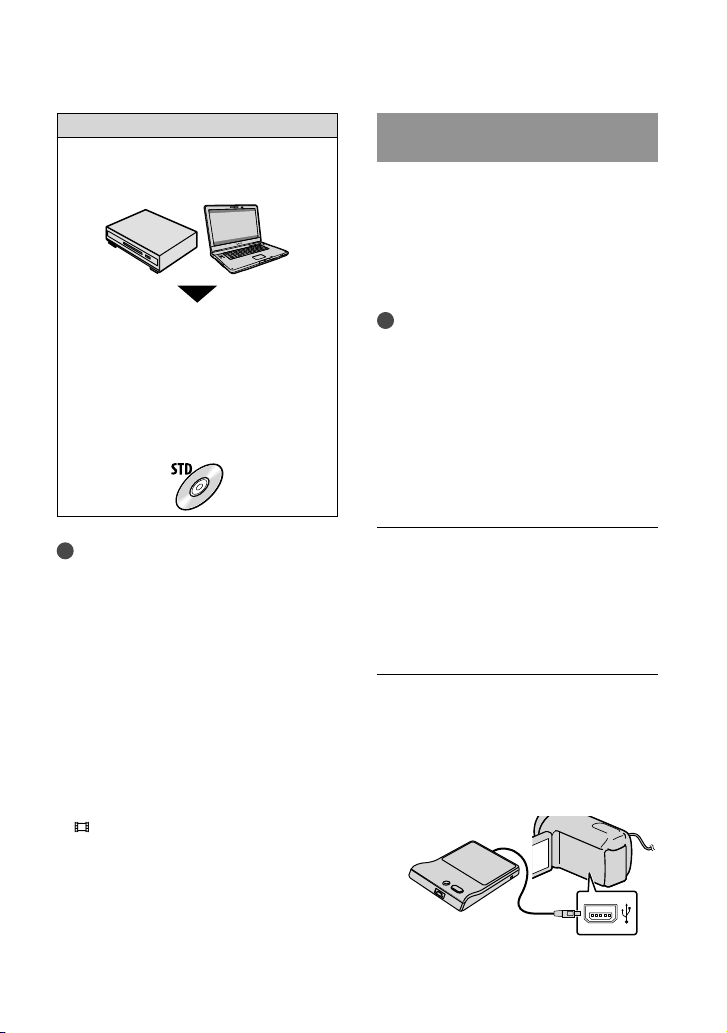
50
US
Ordinary DVD device
Player
DVD player
Computer that can play DVDs, etc.
Creating device
DVD writer, DVDirect Express (p. 50)
DVD writer, other than DVDirect Express
53)
(p.
c recorder, etc. (p. 54)
Dis
Disc type
Standard definition image quality (STD) disc
Notes
Always maintain your PlayStation
the latest version of the PlayStation
software.
The PlayStation
countries/regions.
The AVCHD disc can be played back only on
AVCHD format compatible devices.
The AVCHD disc should not be used in DVD
players/recorders. Because DVD players/
recorders are not compatible with the AVCHD
format, DVD players/recorders may fail to eject
the disc.
You cannot create an AVCHD disc from a
movie recorded with [HD FX] mode of
REC MODE]. Save a movie recorded with
[
[HD FX] mode onto Blu-ray discs or external
orage devices (p. 47).
st
3 may not be available in some
3 to use
3 system
Creating a disc with the dedicated
DVD writer, DVDirect Express
You can create a disc or play back the
images on a created disc by using the
dedicated DVD writer, DVDirect Express
(sold separately).
Refer also to the instruction manual
supplied with the DVD writer.
Notes
Connect your camcorder to the wall outlet (wall
socket) using the supplied AC Adaptor for this
p
eration (p. 17).
o
Only unused discs of the following types can
be used:
12cm DVD-R
12cm DVD+R
The device does not support two-layered discs.
DVDirect Express is referred to as “DVD
writer” in this section.
Connect the AC Adaptor and the
power cord (mains lead) to the
DC IN jack of your camcorder
and the wall outlet (wall socket)
(p.
17).
Turn on your camcorder, and
connect the DVD writer to the
(USB) jack of your camcorder
with the USB cable of the DVD
writer.
Page 51
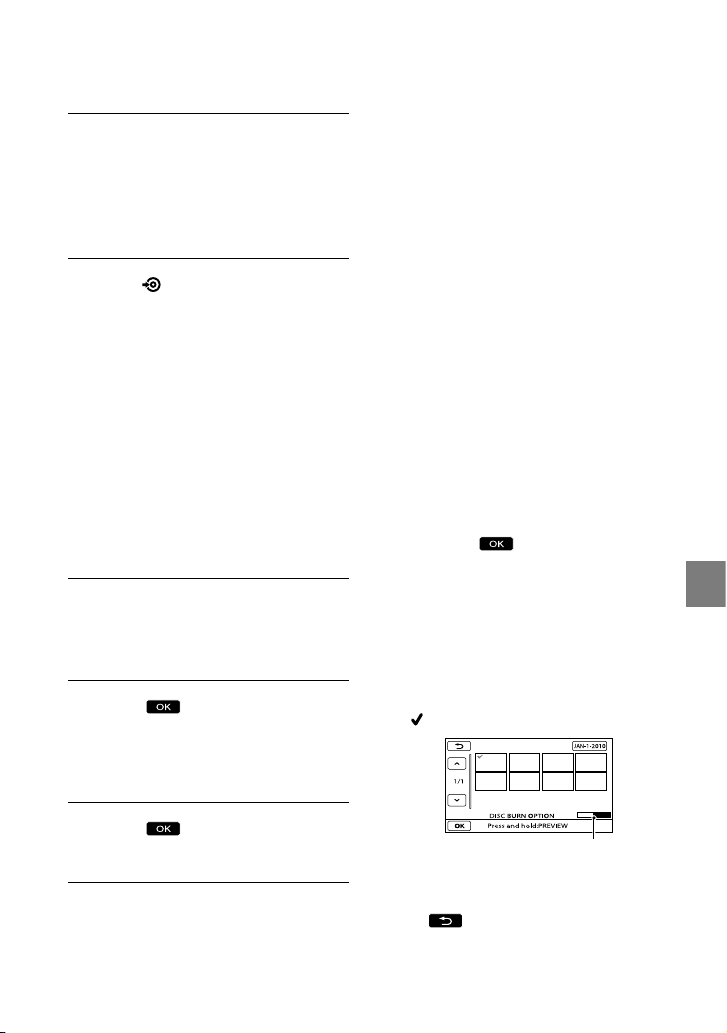
Insert an unused disc into the
DVD writer, and close the disc
tray.
The [DISC BURN] screen appears on
the camcorder screen.
Press
(DISC BURN) on the DVD
writer.
Movies that have not been saved on
any discs will be recorded onto the disc
(HDR-CX110).
Movies recorded on the internal
recording media that have not been
saved on any discs will be recorded
onto the disc (HDR-CX150/XR150).
When there are unsaved high definition
(HD) and standard definition (STD)
image quality movies, they will be saved
on individual discs according to the image
quality.
Repeat steps 3 and 4 when the
total memory size of movies to
be burnt exceeds that of the disc.
Touch
[END] [EJECT
DISC] on the camcorder screen.
Remove the disc after the operation is
completed.
Touch
, then disconnect the
USB cable.
To customize a disc with DISC BURN
OPTION
Perform this operation in the following
cases:
When dubbing a desired image
When creating multiple copies of the same
disc
When converting high definition (HD)
movies to standard definition (STD) movies,
and creating a disc
When dubbing images in the memory card
(HDR-CX150/XR150)
Touch [DISC BURN OPTION] in step 4.
Select the recording media containing
he movie(s) you want to save
t
CX150/XR150).
(HDR-
When you select movies with high
definition image quality (
HD), the
screen to select the image quality of the
disc to be created appears on the LCD
screen. Select the desired image quality,
and touch
The image quality of the disc depends on
the recording time of the selected movies
when you create a disc converting them
from high definition image quality (HD)
to standard definition image quality
(STD).
.
Touch the movie you want to burn on
the disc.
appears.
Remaining Disc capacity
Press and hold the image down on the
LCD screen to confirm the image. Touch
to return to the previous screen.
By touching date, you can search for
images by date.
Saving images with an external device
US
51
Page 52
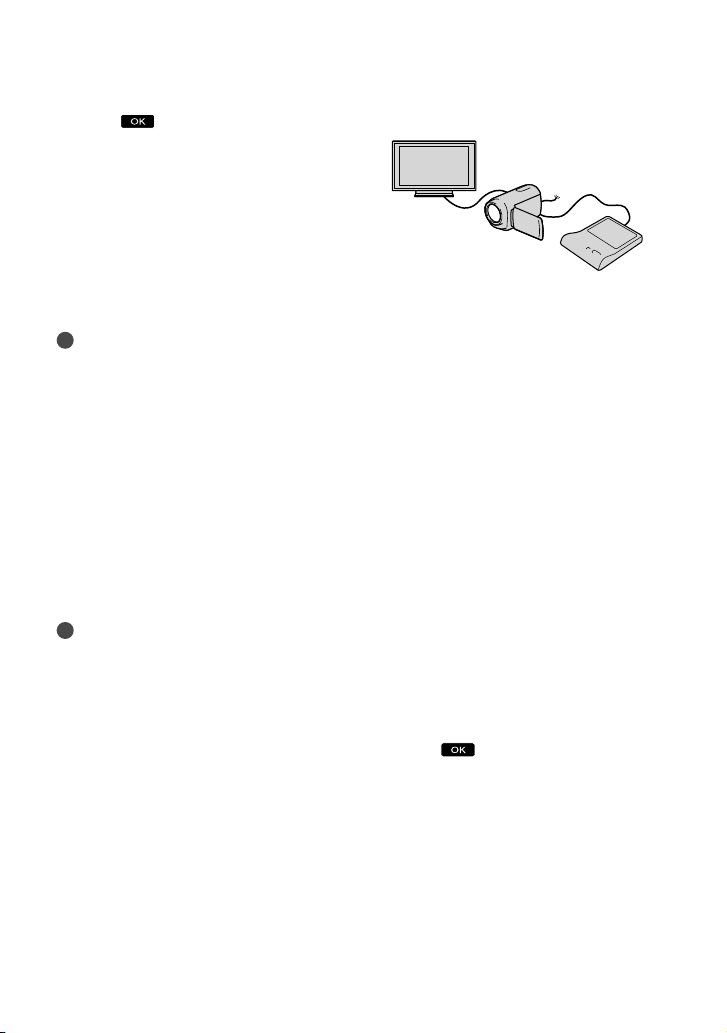
52
US
Touch [YES] on the camcorder
screen.
To create another disc of the same
contents, insert a new disc and touch
[CREATE SAME DISC].
After the operation is completed, touch
[END] on the camcorder
[EXIT]
screen.
sconnect the USB cable from your
Di
c
amcorder.
Notes
Do not do any of the following when creating
a disc.
Turn off the camcorder
Disconnect the USB cable or the AC adaptor
Subject the camcorder to mechanical shock
or vibration
Eject the memory card from the camcorder
Play the created disc to make sure dubbing was
performed correctly before deleting the movies
on your camcorder.
If [Failed.] or [DISC BURN failed.] appears on
the screen, insert another disc into the DVD
writer and perform the DISC BURN operation
again.
Tips
If the total memory size of movies to be burnt
by the DISC BURN operation exceeds that of
the disc, disc creation stops when the limit is
reached. The last movie on the disc may be
cut off.
Disc creation time to dub movies to the limit
of the disc is about 20 to 60 minutes. It may
take more time depending on the recording
mode or the number of scenes. Also, if high
definition image quality (HD) is converted to
standard definition image quality (STD), image
quality conversion takes longer than the actual
recording.
To play back a disc on the DVD writer
Connect the AC Adaptor and the power
cord (mains lead) to the DC IN jack of
your camcorder and the wall outlet (wall
cket) (p. 17).
so
urn on your camcorder, and connect
T
t
he DVD writer to the (USB) jack of
your camcorder with the USB cable of
the DVD writer.
You can play back movies on the TV
screen by connecting the camcorder to a
. 31).
TV (p
Insert a created disc into the DVD
writer.
The movies on the disc appear as
VISUAL INDEX on the camcorder
screen.
ress the play button on the DVD writer.
P
You can also operate by the camcorder
screen.
Touch [END] [EJECT DISC] on the
camcorder screen and remove the disc
after the operation is completed.
T
ouch
and disconnect the USB
cable.
To play back a disc on the ordinary DVD
player
Select the standard image quality (STD) on
the screen to select the image quality of the
disc to be created in step 2 of “To customize
a disc with DISC BURN OPTION.”
Page 53
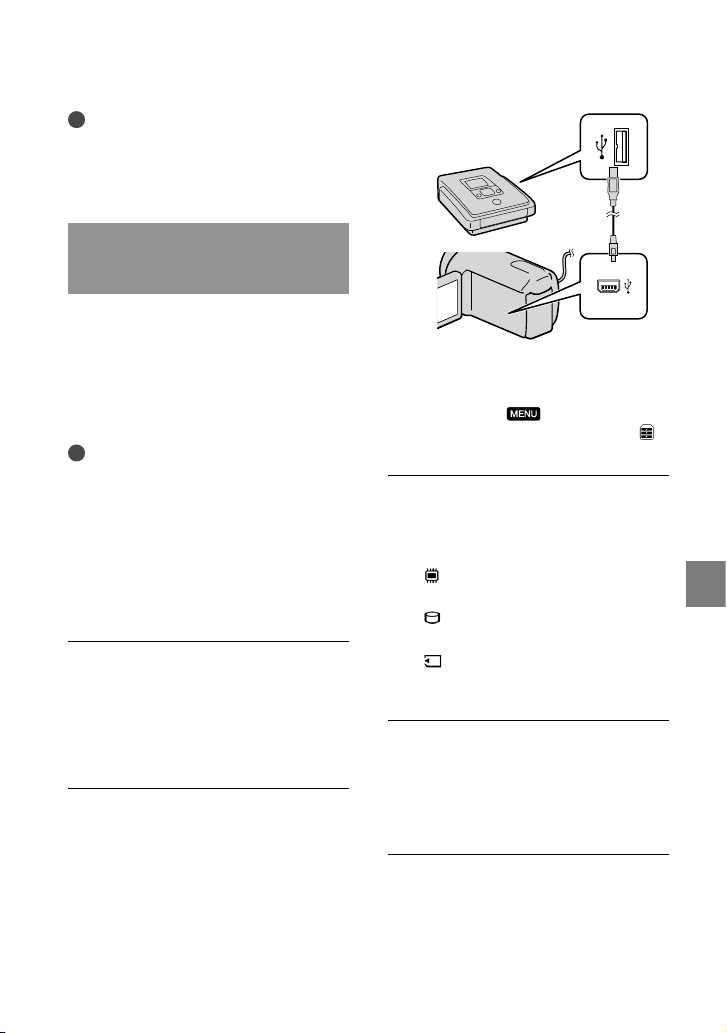
Tips
If you cannot play back created standard
definition (STD) image quality discs on any
DVD player, connect the camcorder to the
DVD writer, and then play back.
Creating a high definition image
quality (HD) disc with a DVD writer,
etc., other than DVDirect Express
Use USB cable to connect your camcorder
to a disc creation device, which is
compatible with high definition image
quality (HD) movies, such as a Sony DVD
writer. Refer also to the instruction manuals
supplied with the device to be connected.
Notes
Connect your camcorder to the wall outlet (wall
socket) using the supplied AC Adaptor for this
p
eration (p. 17).
o
Sony DVD writer may not be available in some
countries/regions.
Always maintain the firmware of the Sony
DVDirect (DVD writer) to its latest version.
For details, see the following website.
http://sony.storagesupport.com/
Connect the AC Adaptor and the
power cord (mains lead) to the
DC IN jack of your camcorder
and the wall outlet (wall socket)
(p.
17).
Turn on your camcorder, and
connect a DVD writer, etc. to the
(USB) jack of your camcorder
with the USB cable (supplied).
The [USB SELECT] screen appears on
the camcorder screen.
If the [USB SELECT] screen does not
appear, touch
others] [USB CONNECT] (under
[OTHERS] category).
(MENU) [Show
Touch the recording media that
contains the images on the
camcorder screen.
[ USB CONNECT]: Internal
memory
USB CONNECT]: Internal hard
[
disk
USB CONNECT]: Memory card
[
The displayed recording media differ
depending on the model.
Record movies on the connected
device.
For details, refer to the instruction
manuals supplied with the device to be
connected.
After the operation is completed,
touch [END] [YES] on the
camcorder screen.
Saving images with an external device
US
53
Page 54
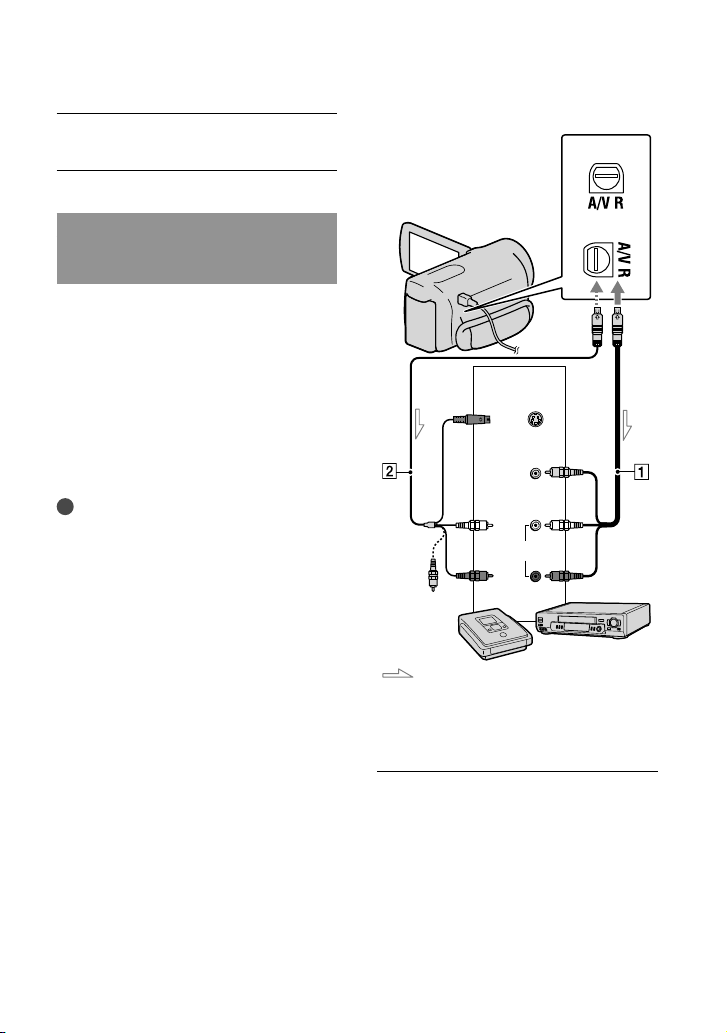
54
US
Disconnect the USB cable.
A/V Remote Connector
*
Creating a standard definition
image quality (STD) disc with a
recorder, etc.
You can dub images played back on your
camcorder on a disc or video cassette,
by connecting your camcorder to a disc
recorder, a Sony DVD writer, etc., other
than DVDirect Express, with the A/V
connecting cable. Connect the device in
either way of or . Refer also to the
instruction manuals supplied with the
devices to be connected.
Notes
Connect your camcorder to the wall outlet (wall
socket) using the supplied AC Adaptor for this
p
eration (p. 17).
o
Sony DVD writer may not be available in some
countries/regions.
High definition image quality (HD) movies
will be dubbed with standard definition image
quality (STD).
A/V connecting cable (supplied)
Connect the A/V connecting cable to the
input jack of another device.
A/V connecting cable with S VIDEO
(sold separately)
When connecting to another device
via the S VIDEO jack, by using an A/V
connecting cable with an S VIDEO cable
(sold separately), higher quality images can
be produced than with an A/V connecting
cable. Connect the white and red plug
(left/right audio) and the S VIDEO plug
(S VIDEO channel) of the A/V connecting
cable with an S VIDEO cable. If you
connect the S VIDEO plug only, you will
hear no sound. The yellow plug (video)
connection is not necessary.
**
Input
S VIDEO
VIDEO
(Yellow)
(White)
AUDIO
(Yellow)
(Red)
Signal flow
* HDR-CX110/CX150
** HDR-XR150
Insert the recording media in the
recording device.
If your recording device has an input
selector, set it to the input mode.
Page 55
Connect your camcorder to the
recording device (a disc recorder,
etc.) with the A/V connecting
cable (supplied) or an A/V
connecting cable with S VIDEO
(sold separately).
Connect your camcorder to the input jacks
of the recording device.
Start playback on your
camcorder, and record it on the
recording device.
Refer to the instruction manuals supplied
with your recording device for details.
When dubbing is finished, stop
the recording device, and then
your camcorder.
Notes
Since dubbing is performed via analog data
transfer, the image quality may deteriorate.
You cannot dub images to recorders connected
with an HDMI cable.
To hide the screen indicators (such as a counter,
etc.) on the screen of the monitor device
connected, touch
others] [OUTPUT SETTINGS] (under
[GENERAL SET] category) [DISP
OUTPUT] [LCD PANEL] (the default
setting)
To record the date/time or camera settings data,
touch
[PLAYBACK SET] (under
category) [DATA CODE] a desired
setting
addition, touch
others] [OUTPUT SETTINGS] (under
OUTPUT] [V-OUT/PANEL]
(MENU) [Show others]
[GENERAL SET] category) [DISP
(MENU) [Show
.
[PLAYBACK]
. In
(MENU) [Show
.
When the screen size of display devices (TV,
etc.) is 4:3, touch
others] [OUTPUT SETTINGS] (under
[GENERAL SET] category) [TV TYPE]
[4:3]
When you connect a monaural device, connect
the yellow plug of the A/V connecting cable
to the video input jack, and the white (left
channel) or the red (right channel) plug to the
audio input jack on the device.
(MENU) [Show
.
Saving images with an external device
US
55
Page 56
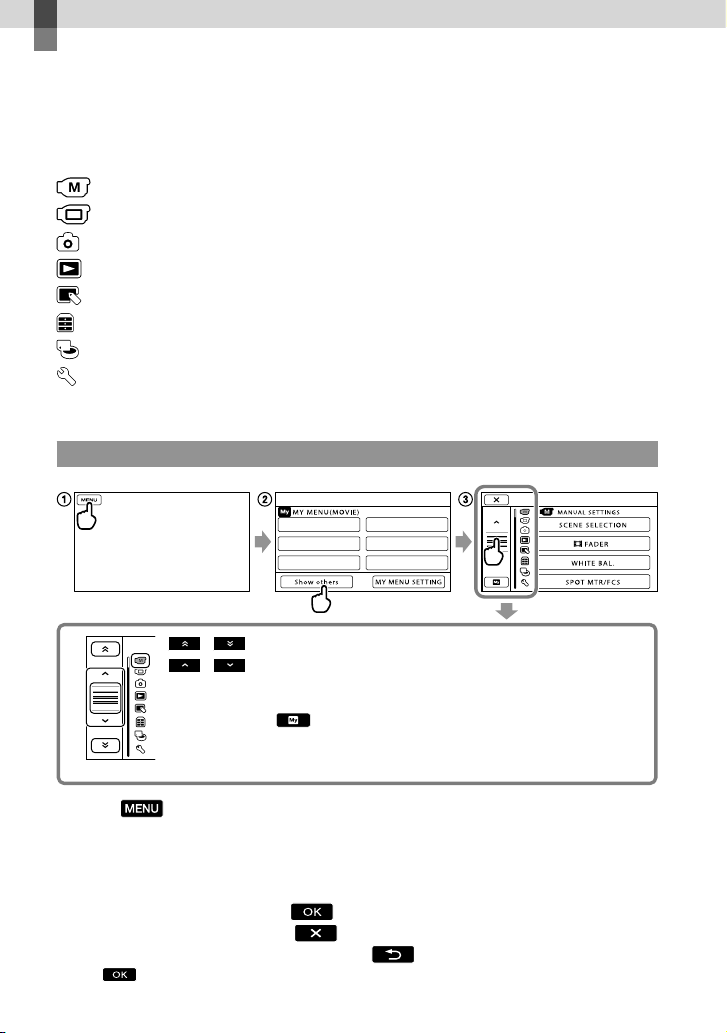
Customizing your camcorder
Using menus
Using the menus, you can perform useful functions and change various settings. If you make
good use of menu operations, you can enjoy using your camcorder.
The camcorder has various menu items under each of eight menu categories.
MANUAL SETTINGS (Items to adjust for scene condition) p. 59
SHOOTING SET (Items for customized shooting) p. 59
PHOTO SETTINGS (Items for recording photos) p. 60
PLAYBACK (Items for playback) p. 60
EDIT (Items for editing) p. 60
OTHERS (Items for other settings) p. 61
MANAGE MEDIA (Items for recording media) p. 61
GENERAL SET (Other setup items) p. 62
Menu items are described in more details in the “Handycam” Handbook.
Setting menus
/ : The menu list moves from category to category.
/ : The menu list moves through 4 items at once.
You can touch buttons and drag the screen to scroll the list of the menu.
The selected category icon is displayed in orange.
When you touch
, the screen returns to the MY MENU screen.
Touch (MENU).
Touch [Show others] on the MY MENU screen.
See the next page for details on MY MENU.
Touch the central part in the left side of screen to change the display.
Touch the menu item to be changed.
After changing the setting, touch
To finish setting the menu, touch
.
.
To return to the previous menu screen, touch
US
may not be displayed depending on the menu item.
56
Page 57
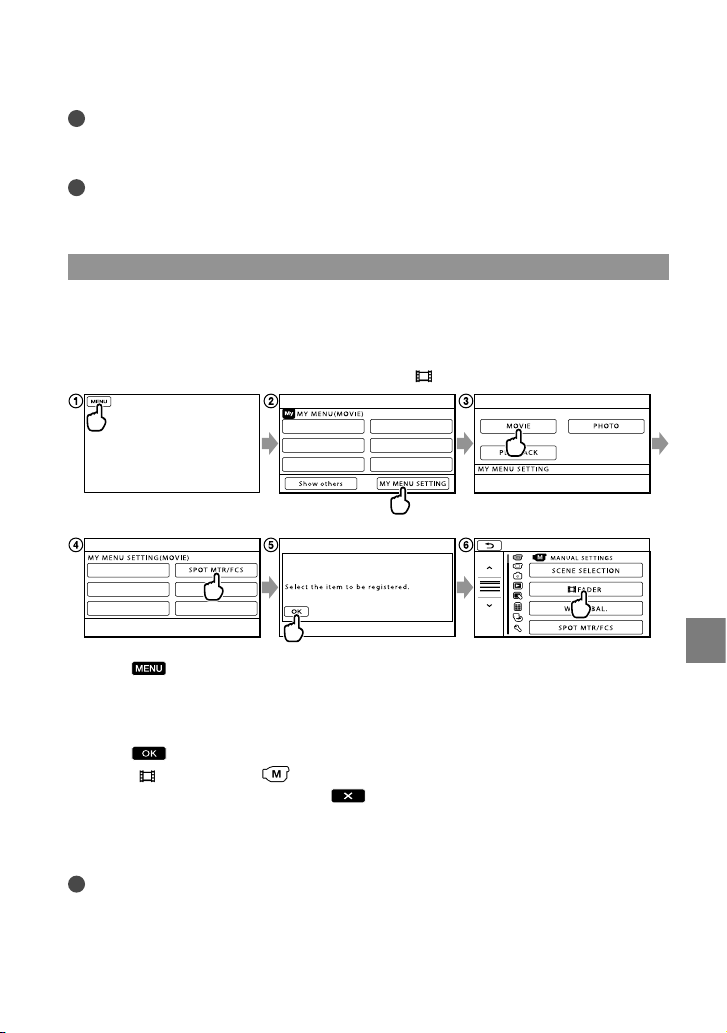
Notes
You may not be able to set some menu items, depending on the recording or playback conditions.
Grayed out menu items or settings are not available.
Tips
Depending on the menu items being changed, your camcorder switches between playback mode and
recording mode (movie/photo).
Using MY MENU
You can use the menu items more easily by registering the menu items you use most often on
MY MENU. You can register 6 menu items on each MY MENU of the MOVIE, PHOTO, and
PLAYBACK.
Example: deleting [SPOT MTR/FCS] and registering [
FADER]
Touch (MENU).
Touch [MY MENU SETTING].
Touch [MOVIE].
Touch [SPOT MTR/FCS].
Touch
Touch [
When MY MENU is displayed, touch
.
FADER] (under [MANUAL SETTINGS] category).
.
Repeat the same steps above to register menu items on MY MENU, and enjoy using your
“Handycam.”
Tips
When an external storage device is connected, the exclusive MY MENU appears.
Customizing your camcorder
US
57
Page 58
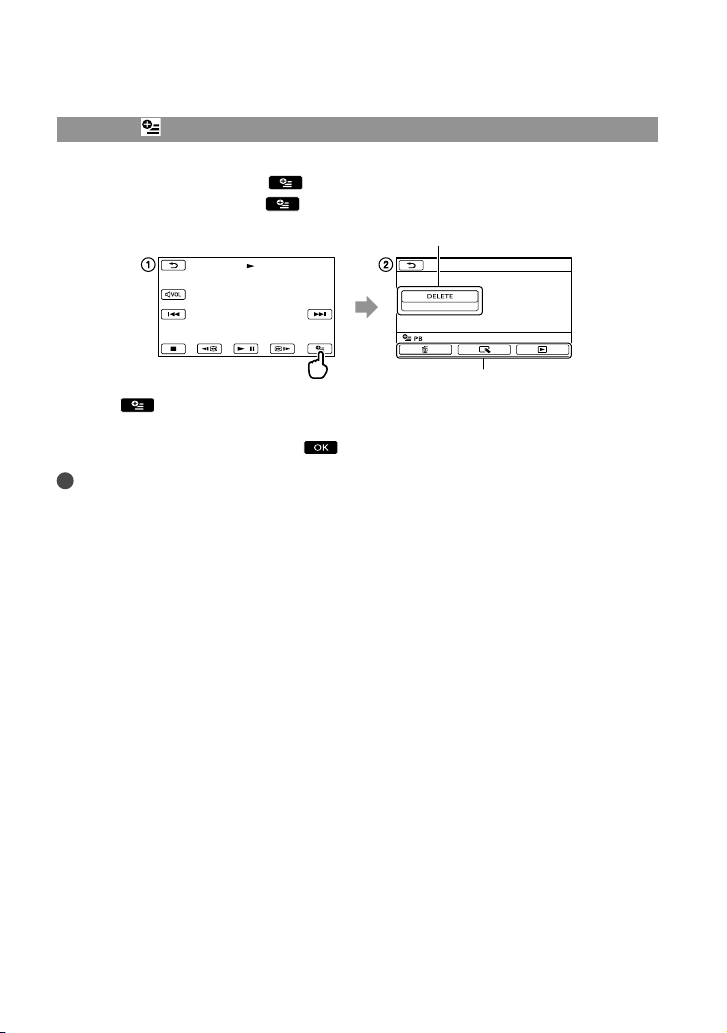
Using the OPTION MENU
The OPTION MENU appears just like the pop-up window that appears when you right-click
the mouse on a computer. When
the OPTION MENU. You touch
appear.
Touch (OPTION).
Touch the desired tab the item to change the setting.
After completing the setting, touch
Notes
Grayed out menu items or settings are not available.
When the item you want is not on the screen, touch another tab. (There may be no tab.)
The tabs and items that appear on the screen depend on the recording/playback status of your camcorder
at the time.
is displayed at bottom-right of the screen, you can use
, and the menu items you can change in the context
Menu item
Tab
.
58
US
Page 59
Menu lists
(MANUAL SETTINGS) category
SCENE SELECTION ..................Selects an appropriate recording setting according to the type of scene,
such as night view or beach.
FADER ....................................Fades scenes in or out.
WHITE BAL. ................................ Adjusts the color balance to the brightness of the recording environment.
SPOT MTR/FCS ......................... Adjusts the brightness and focus for the selected subject simultaneously.
SPOT METER .............................Adjusts the brightness of images to a subject you touch on the screen.
SPOT FOCUS ............................. Focuses on a subject you touch on the screen.
EXPOSURE .................................Adjusts the brightness of movies and photos.
FOCUS ......................................... Focuses manually.
TELE MACRO ............................. Shoots a subject in focus with, the background out of focus.
SMTH SLW REC .........................Records fast moving subjects in slow-motion.
(SHOOTING SET) category
/ SET ............................. Sets image quality for recording, playback, or editing movies.
REC MODE ...........................Sets the mode to record movies. When recording fast moving subject, a
high image quality is recommended.
GUIDEFRAME ............................ Displays the frame to make sure the subject is horizontal or vertical.
STEADYSHOT ......................Sets the SteadyShot function when recording movies.
CONVERSION LENS .................Sets the type of an attached conversion lens (sold separately). Optimizes
the SteadyShot function and focus according to the attached lens.
LOW LUX .................................... Records bright color images in the dim.
FACE DETECTION .................... Adjusts the image quality of the face(s) automatically.
PRIORITY SETTING ..................Select the subject that has priority for the face detection and the smile
shutter.
SMILE DETECTION ..................Automatically takes a shot whenever a smile is detected.
SMILE SENSITIVITY .................. Sets the smile detection sensitivity using the smile shutter function.
AUDIO REC SET
BLT-IN ZOOM MIC .......... Records movies with vivid sound appropriate to the zoom position.
MICREF LEVEL ................. Sets the microphone level.
OTHER REC SET
DIGITAL ZOOM .........Sets the maximum zoom level of the digital zoom that exceeds the zoom
level of the optical zoom.
AUTO BACK LIGHT.........Adjusts the exposure for backlit subjects automatically.
X.V.COLOR ..................Records wider range of colors.
WIDE SELECT ............. Sets the horizontal to vertical ratio when recording movies with standard
definition image quality (STD).
Customizing your camcorder
US
59
Page 60
(PHOTO SETTINGS) category
SELF-TIMER .......................... Sets the self-timer when your camcorder is in photo recording mode.
IMAGE SIZE .......................... Sets the photo size.
FILE NO. ...................................... Sets how to assign the file number.
(PLAYBACK) category
VISUAL INDEX ...........................Displays recording images as thumbnails (p. 28).
VIEW IMAGES
DATE INDEX .....................Enables searching for desired images by date.
FILM ROLL .................. Displays and plays the scenes by a certain interval.
FACE ..............................Displays and plays the face scenes.
PLAYLIST..................................... Displays and plays the playlist of movies.
HIGHLIGHT ........................... Selects a number of short scenes and plays them back together as a digest
of your movies with music and visual effects.
SCENARIO ............................. Plays the favorite scenario saved in Highlight Playback.
PLAYBACK SET
/ SET ................... Sets image quality for recording, playback, or editing movies.
DATA CODE ...................... Displays the detailed recording data during playback.
(EDIT) category
DELETE
DELETE ........................Deletes movies.
DELETE ........................Deletes photos.
SCENARIO ERASE
ERASE ................................Erases scenarios saved in Highlight Playback.
ERASE ALL ........................ Erases all scenarios saved in Highlight Playback.
PROTECT
PROTECT ..................... Protects movies to avoid deleting.
PROTECT ..................... Protects photos to avoid deleting.
DIVIDE ................................... Divides movies.
PHOTO CAPTURE .................... Captures photos from desired scenes of movies.
MOVIE DUB
1*2
*
DUB by select .................Selects movies and dub.
DUB by date .................... Dubs all movies of a specified date.
DUB ALL/
DUB ALL .................... Dubs all saved movies in a playlist.
2
PHOTO COPY
*1*
COPY by select ............... Selects photos and copy.
COPY by date .................. Copies all photos of a specified date.
PLAYLIST EDIT
ADD/ ADD ........Adds movies in a playlist.
ADD by date/
ADD by date ...........Adds movies recorded on a same day at one time in a playlist.
US
60
Page 61
ERASE/ ERASE ..Erases movies from a playlist.
ERASE ALL/
ERASE ALL ................ Erases all movies from a playlist.
MOVE/ MOVE ...Changes the order of movies in a playlist.
(OTHERS) category
USB CONNECT
USB CONNECT*1 ....... Connects the internal memory via USB.
USB CONNECT*2 ....... Connects the internal hard disk via USB.
USB CONNECT .......... Connects the memory card via USB.
DISC BURN .......................Allows you to save images onto discs by pressing the
TV CONNECT Guide ...............Introduces the connection method depending on the TV type connected
button (p. 42).
.
31).
(p
(DISC BURN)
MUSIC TOOL
EMPTY MUSIC ................. Deletes music files.
DOWNLOAD MUSIC .....Download music files that can be played with Highlight Playback.
BATTERY INFO .......................... Displays the battery information.
(MANAGE MEDIA) category
MEDIA SETTINGS
MOVIE MEDIA SET*
PHOTO MEDIA SET*
MEDIA INFO .............................. Displays information on the recording media, such as free space.
MEDIA FORMAT
INT. MEMORY*
2
................................ Deletes all data on the internal hard disk.
HDD*
MEMORY CARD*
REPAIR IMG.DB F.
INT. MEMORY*
2
................................ Repairs the image database file on the internal hard disk (p. 66).
HDD*
MEMORY CARD*
1*2
.. Sets the media for recording movies (p. 20).
1*2
. Sets the media for recording photos (p. 20).
1
............... Deletes all data on the internal memory.
1*2
....... Deletes all data on the memory card.
1
............... Repairs the image database file on the internal memory (p. 66).
1*2
....... Repairs the image database file on the memory card (p. 66).
Customizing your camcorder
US
61
Page 62

(GENERAL SET) category
SOUND/DISP SET
VOLUME ............................Ad
BEEP ...................................Sets whether the camcorder sounds operation beeps or not.
LCD BRIGHT ..................... Adjusts the brightness of the LCD screen.
LCD BL LEVEL .................. Adjusts the backlight of the LCD screen.
LCD COLOR ...................... Adjusts the color intensity of the LCD screen.
DISPLAY SET .................... Sets the duration that icons or indicators are displayed on the LCD screen.
OUTPUT SETTINGS
TV TYPE .............................C
COMPONENT .................. Select this option when you connect your camcorder to a TV with the
HDMI RESOLUTION ....... Selects the output image resolution when connecting your camcorder to a
DISP OUTPUT .................. Sets whether the on-screen displays appears on the TV screen or not.
LANG
CLOCK/
CLOCK SET .......................Sets t
AREA SET .......................... Ad
DST SET/SUMMERTIME
LANGUAGE SET ......... Sets the display language (p. 19).
POWER SETTINGS
A.SHUT OFF ..................... C
POWER ON BY LCD ....... Sets whether or not the camcorder is turned on and off when you open
OTHER SETTINGS
DEMO MODE...................Sets whether the demonstration appears or not.
CALIBRATION .................. Calibrates the touch panel.
CTRL FOR HDMI .............Sets whether or not the TV’s Remote Commander is to be used when
2
1
*
HDR-CX150
2
*
HDR-XR150
DROP SENSOR*
justs the volume of playback sound (p. 30).
nverts the signal depending on the TV connected (p. 31).
o
ponent input jack (p. 32).
com
TV with an HDMI cable.
he date and time (p. 18).
justs for a time difference without stopping the clock (p. 18).
.Sets the DST SET (p. 18).
h
anges the [A.SHUT OFF] setting (p. 16).
and close the LCD screen.
the camcorder is connected to a “BRAVIA” Sync compatible TV with the
HDMI cable (sold separately).
............. Activates or deactivates the drop sensor.
62
US
Page 63
Getting detailed
information from the
“Handycam” Handbook
The “Handycam” Handbook is a user guide
designed to be read on a computer screen.
The “Handycam” Handbook is intended to
be read when you want to know more about
operating your camcorder.
1
To install the “Handycam”
Handbook on a Windows
computer, place the supplied
CD-ROM in the disc drive of your
computer.
2
On the installation screen
displayed, click [Handycam
Handbook].
To view the “Handycam” Handbook,
double-click the short-cut icon on the
computer screen.
When using a Macintosh, open the [Handbook]
– [US] folder in the CD-ROM, then copy
[Handbook.pdf].
You need Adobe Reader to read “Handycam”
Handbook. If it is not installed on your
computer, you can download it from the Adobe
Systems web page:
http://www.adobe.com/
Refer to “PMB Help” for details on the supplied
ftware “PMB” (p. 39).
o
s
3
Select the desired language
and the model name of your
camcorder, then click [Handycam
Handbook (PDF)].
The model name of your camcorder is
printed on its bottom surface.
4
Click [Exit] [Exit], then remove
the CD-ROM from your computer.
Customizing your camcorder
US
63
Page 64
Additional information
Troubleshooting
If you run into any problems using your
camcorder, follow the steps below.
Check the list (p. 64 to 66), and
inspect your camcorder.
Remove the power source, attach
the power source again after about 1
minute, and turn the camcorder on.
Press RESET (p. 75) using a pointed
object, and turn the camcorder on.
If you press RESET, all settings,
including the clock setting, are reset.
Contact your Sony dealer or local
authorized Sony service facility.
Your camcorder may be required to initialize or
change the current internal recording media of
your camcorder, depending on the problem. In
the event of this, the data stored on the internal
recording media will be deleted. Be sure to
save the data on the internal recording media
on other media (backup) before sending your
camcorder for repair. We will not compensate
you for any loss of internal recording media
data.
During repair, we may check a minimum
amount of data stored on the internal recording
media in order to investigate the problem.
However, your Sony dealer will neither copy
nor retain your data.
ee the “Handycam” Handbook (p. 63) for
S
details on the symptoms of your camcorder,
n
d “PMB Help” (p. 39) on connecting your
a
camcorder to a computer.
The power does not turn on.
Attach a charged battery pack to the
camcorder (p. 15).
Connect the plug of the AC Adaptor to the
wa
l outlet (wall socket) (p. 17).
l
US
64
The camcorder does not operate even
when the power is set to on.
It takes a few seconds for your camcorder to
be ready to shoot after the power is turned on.
This is not a malfunction.
Disconnect the AC Adaptor from the wall
outlet (wall socket) or remove the battery
pack, then reconnect it after about 1 minute.
If your camcorder still does not work, press
RES
E
T (p. 75) using a pointed object. (If you
press RESET, all settings, including the clock
setting, are reset.)
The temperature of your camcorder is
extremely high. Turn off the camcorder and
leave it for a while in a cool place.
The temperature of your camcorder is
extremely low. Leave the camcorder with the
power turned on. If you still cannot operate
your camcorder, turn off the camcorder and
take it to a warm place. Leave the camcorder
there for a while, then turn on the camcorder.
Your camcorder gets warm.
Your camcorder may become warm during
operation. This is not a malfunction.
The power abruptly turns off.
Use the AC Adaptor (p. 17).
Turn on the power again.
Ch
arge the battery pack (p. 15).
Pressing START/STOP or PHOTO does not
record images.
Press MODE to turn on the (Movie) or
(Photo) lamp.
Your camcorder is recording the image you
have just shot on the recording media. You
cannot make any new recordings during this
period.
The recording media is full. Delete
unn
ecessary images (p. 34).
Total number of movie scenes or photos has
exceeded the recordable capacity of your
c
amcorder. Delete unnecessary images (p. 34).
Page 65
The recording stops.
The temperature of your camcorder is
extremely high/low. Turn off your camcorder
and leave it for a while in a cool/warm place.
”PMB” cannot be installed.
Check the computer environment or
installation procedure required to install
“PMB
” (p. 36).
”PMB” does not work correctly.
Quit “PMB” and restart your computer.
The camcorder is not recognized by the
computer.
Disconnect devices from the USB jack of the
computer other than the keyboard, mouse,
and your camcorder.
Disconnect the USB cable from the computer
and your camcorder, and restart the computer,
then connect the computer and your
camcorder again in an orderly manner.
Self-diagnosis display/Warning
indicators
If indicators appear on the LCD screen,
check the following.
If the problem persists even after you
have tried to fix a couple of times, contact
your Sony dealer or local authorized Sony
service facility. In this case, when you
contact them, give them all the numbers of
the error code beginning with C or E.
C:06:
The battery pack temperature is high. Change
the battery pack or place it in a cool place.
C:13: / C:32:
Remove the power source. Reconnect it and
operate your camcorder again.
E::
Follow the steps from to on page 64.
The internal hard disk of your camcorder is
full. Delete unnecessary images on the internal
ha
rd disk (p. 34).
An error may have occurred with the internal
hard disk of your camcorder.
Battery power is low.
The battery pack temperature is high. Change
the battery pack or place it in a cool place.
The temperature of your camcorder is getting
high. Turn off your camcorder and leave it in
a cool place.
The temperature of your camcorder is low.
Make the camcorder warm.
Additional information
C:04:
The battery pack is not an “InfoLITHIUM”
battery pack V series. Use an “InfoLITHIUM”
ba
ttery pack (V series) (p. 15).
Connect the DC plug of the AC Adaptor to
y
ur camcorder securely (p. 15).
o
No memory card is inserted (p. 21).
When the indicator flashes, there is not
enough free space for recording images. Delete
unn
cessary images (p. 34), or format the
e
memory card after storing the images on other
media.
US
65
Page 66
Precautions
The Image Database File is damaged. Check
the data base file by touching
[Show others] [REPAIR IMG.DB F.]
(under
[MANAGE MEDIA] category)
the recording medium (HDR-CX150/XR150).
The memory card is damaged. Format the
memory card with your camcorder (p. 61).
Incompatible memory card is inserted (p. 21).
Access to the memory card was restricted on
another device.
The camcorder is unsteady. Hold the camcorder
steady with both hands. However, note that
the camera-shake warning indicator does not
disappear.
The drop sensor function is activated. You
may not be able to record nor play back
images.
The recording media is full. Delete unnecessary
images (p. 34).
Photos cannot be recorded during processing.
Wait for a while, then record.
US
66
(MENU)
On use and care
Do not use or store the camcorder and
accessories in the following locations:
Anywhere extremely hot, cold or humid.
Never leave them exposed to temperatures
C (140 °F), such as under direct
b
ove 60
a
sunlight, near heaters or in a car parked in
the sun. They may malfunction or become
deformed.
Near strong magnetic fields or mechanical
vibration. The camcorder may malfunction.
Near strong radio waves or radiation. The
camcorder may not be able to record properly.
Near AM receivers and video equipment.
Noise may occur.
On a sandy beach or anywhere dusty. If
sand or dust gets in your camcorder, it may
malfunction. Sometimes this malfunction
cannot be repaired.
Near windows or outdoors, where the LCD
screen or the lens may be exposed to direct
sunlight. This damages the inside of the LCD
screen.
Operate your camcorder on DC 6.8 V/7.2 V
(battery pack) or DC 8.4 V (AC Adaptor).
For DC or AC operation, use the accessories
recommended in these operating instructions.
Do not let your camcorder get wet, for example,
from rain or sea water. If your camcorder
gets wet, it may malfunction. Sometimes this
malfunction cannot be repaired.
If any solid object or liquid gets inside the
casing, unplug your camcorder and have it
checked by a Sony dealer before operating it
any further.
Avoid rough handling, disassembling,
modifying, physical shock, or impact such
as hammering, dropping or stepping on the
product. Be particularly careful of the lens.
Keep the camcorder turning off when you are
not using your camcorder.
Do not wrap your camcorder with a towel, for
example, and operate it. Doing so might cause
heat to build up inside.
When disconnecting the power cord (mains
lead), pull it by the plug and not the cord (lead).
Do not damage the power cord (mains lead)
Page 67

such as by placing anything heavy on it.
Do not use a deformed or damaged battery
pack.
Keep metal contacts clean.
If the battery electrolytic liquid has leaked:
Consult your local authorized Sony service
facility.
Wash off any liquid that may have contacted
your skin.
If any liquid gets in your eyes, wash with
plenty of water and consult a doctor.
When not using your camcorder for a
long time
To keep your camcorder in optimum state for a
long time, turn it on and let it run by recording
and playing back images about once a month.
Use up the battery pack completely before
storing it.
LCD screen
Do not exert excessive pressure on the LCD
screen, as it may cause damage.
If your camcorder is used in a cold place, a
residual image may appear on the LCD screen.
This is not a malfunction.
While using your camcorder, the back of
e LCD screen may heat up. This is not a
h
t
malfunction.
To clean the LCD screen
If fingerprints or dust make the LCD screen
dirty, it is recommended that you use a soft
cloth to clean it. When you use the LCD
Cleaning Kit (sold separately), do not apply the
cleaning liquid directly to the LCD screen. Use
cleaning paper moistened with the liquid.
On handling the casing
If the casing is soiled, clean the camcorder body
with a soft cloth lightly moistened with water,
and then wipe the casing with a dry soft cloth.
Avoid the following to avoid damage to the
finish:
Using chemicals such as thinner, benzine,
alcohol, chemical cloths, repellent, insecticide
and sunscreen
Handling the camcorder with above
substances on your hands
Leaving the casing in contact with rubber or
vinyl objects for a long period of time
About care and storage of the lens
Wipe the surface of the lens clean with a soft
cloth in the following instances:
When there are fingerprints on the lens
surface
In hot or humid locations
When the lens is exposed to salty air such as
at the seaside
Store in a well-ventilated location subject to
little dirt or dust.
To prevent mold, periodically clean the lens as
described above.
On charging the pre-installed
rechargeable battery
Your camcorder has a pre-installed rechargeable
battery to retain the date, time, and other settings
even when the camcorder is turned off. The preinstalled rechargeable battery is always charged
while your camcorder is connected to the wall
outlet (wall socket) via the AC Adaptor or while
the battery pack is attached. The rechargeable
battery will be fully discharged in about 3 months
if you do not use your camcorder at all. Use
your camcorder after charging the pre-installed
rechargeable battery. However, even if the preinstalled rechargeable battery is not charged, the
camcorder operation will not be affected as long
as you are not recording the date.
Procedures
Connect your camcorder to a wall outlet (wall
socket) using the supplied AC Adaptor, and leave
it with the LCD screen closed for more than 24
hours.
Note on disposal/transfer of the
camcorder (HDR-CX150/XR150)
Even if you delete all movies and still images, or
perform [MEDIA FORMAT], data on the internal
recording media may not be completely erased.
When you transfer the camcorder, it is
recommended that you perform [EMPTY]
Additional information
US
67
Page 68

Specifications
(See “Getting detailed information from the
“Handycam” Handbook” on page 63.) to prevent
the recovery of your data. Also, when you dispose
of the camcorder, it is recommended that you
destroy the actual body of the camcorder.
Note on disposal/transfer of memory
card
Even if you delete data in the memory card or
format the memory card on your camcorder or
a computer, you may not delete data from the
memory card completely. When you give the
memory card to somebody, it is recommended
that you delete data completely using data
deletion software on a computer. Also, when you
dispose of the memory card, it is recommended
that you destroy the actual body of the memory
card.
US
68
System
Signal format: NTSC color, EIA standards
HDTV 1080/60i specification
Movie recording format:
HD: MPEG-4 AVC/H.264 AVCHD format
compatible
STD: MPEG-2 PS
Audio recording system:
Dolby Digital 2ch
Dolby Digital Stereo Creator
Photo recording format
: DCF Ver.2.0 Compatible
: Exif Ver.2.21 Compatible
: MPF Baseline Compatible
Recording media (Movie/Photo)
Internal memory
HDR-CX150: 16GB
Internal hard disk
HDR-XR150: 120GB
“Memory Stick PRO Duo” media
SD Memory card, SDHC Memory card (Class
4, 6, 10)
When measuring media capacity, 1 GB equals
1 billion bytes, a portion of which is used for
system management and/or application files.
The capacity that a user can use is below.
HDR-CX150:
approximately 15.5 GB
HDR-XR150:
approximately 119 GB
Image device: 4.5 mm (1/4 type) CMOS sensor
Recording pixels (photo, 4:3):
M
Gross: Approx. 4 200 000 pixels
Effective (movie, 16:9):
Ap
Effective (photo, 16:9):
Approx. 1 180 000 pixels
Effective (photo, 4:3):
Ap
Lens: Carl Zeiss Vario-Tessar
25
Filter diameter: 30 mm (1 3/16 in.)
F1.8 ~ 3.2
Focal length:
f=2.5 ~ 62.5 mm (1/8 ~ 2
When converted to a 35 mm still camera
For movies
in.) (16:9)
Fo
in.) (4:3)
ega (2 048
ax. 3.1 m
prox. 1 350 000 pixels
prox. 1 570 000 pixels
(Optical), 300 (Digital)
*2*
r photos: 36 ~ 900 mm (1 7/16 ~ 35 1/2
1 536) pixels*
2
*
1/2 in.)
3
: 37 ~ 1075 mm (1 1/2 ~ 42 3/8
1
Page 69

Color temperature: [AUTO], [ONE PUSH],
[INDOOR] (3 200 K), [OUTDOOR]
(5 800 K)
Minimum illumination
11 lx (lux) (in default setting, shutter speed 1/60
second)
3 lx (lux) (LOW LUX is set to [ON], shutter speed
1/30 second)
1
*
The unique pixel array of Sony’s ClearVid
and the image processing system
(BIONZ) allow still image resolution
equivalent to the sizes described.
2
*
[ STEADYSHOT] is set to
[STANDARD] or [OFF].
3
*
The focal length figures are actual figures
resulting from wide angle pixel read out.
Input/Output connectors
A/V Remote Connector: Component/video and
audio output jack
HDMI OUT jack: HDMI mini connector
USB jack: mini-AB
LCD screen
Picture: 6.7 cm (2.7 type, aspect ratio 16:9)
Total number of pixels: 230 400 (960
240)
General
Power requirements: DC 6.8 V/7.2 V (battery
pack) DC 8.4 V (AC Adaptor)
Average power consumption: During camera
recording, using LCD screen at normal
brightness:
HDR-CX110/CX150
HD: 3.0 W STD: 2.1 W
HDR-XR150
HD: 3.3 W STD: 2.4 W
Operating temperature: 0
104 °F)
Storage temperature: –20
+140 °F)
Dimensions (approx.):
HDR-CX110/CX150
56 106 mm (2 × 2 1/4 × 4 1/4 in.)
50
(w/h/d) including the projecting parts
56 114 mm (2 × 2 1/4 × 4 1/2 in.)
50
(w/h/d) including the projecting parts,
and the supplied rechargeable battery pack
attached
HDR-XR150
67 106 mm (2 1/4 × 2 3/4 × 4 1/4 in.)
57
(w/h/d) including the projecting parts
C to 40 C (32 °F to
C to + 60 C (-4 °F to
57 67 114 mm (2 1/4 × 2 3/4 × 4 1/2
in.) (w/h/d) including the projecting parts,
and the supplied rechargeable battery pack
attached
Mass (approx.)
HDR-CX110/CX150:
210 g (7 oz) main unit only
260 g (9 oz) including the supplied
rechargeable battery pack
HDR-XR150:
300 g (10 oz) main unit only
350 g (12 oz) including the supplied
rechargeable battery pack
AC Adaptor AC-L200C/AC-L200D
Power requirements: AC 100 V - 240 V,
50 Hz/60 Hz
Current consumption: 0.35 A - 0.18 A
Power consumption: 18 W
Output voltage: DC 8.4 V
*
Operating temperature: 0 C to 40 C (32 °F to
104 °F)
Storage temperature: –20
C to + 60 C (-4 °F to
+140 °F)
Dimensions (approx.): 48
1 3/16 3 1/4 in.) (w/h/d) excluding the
29 81 mm (1 15/16
projecting parts
Mass (approx.): 170 g (6.0 oz) excluding the
power cord (mains lead)
* See the label on the AC Adaptor for other
specifications.
Rechargeable battery pack NP-FV50
Maximum output voltage: DC 8.4 V
Output voltage: DC 6.8 V
Maximum charge voltage: DC 8.4 V
Maximum charge current: 2.1 A
Capacity
Typ
ical: 7.0 Wh (1 030 mAh)
Minimum: 6.6 Wh (980 mAh)
Type: Li-ion
Design and specifications of your camcorder and
accessories are subject to change without notice.
Manufactured under license from Dolby
Laboratories.
Additional information
US
69
Page 70
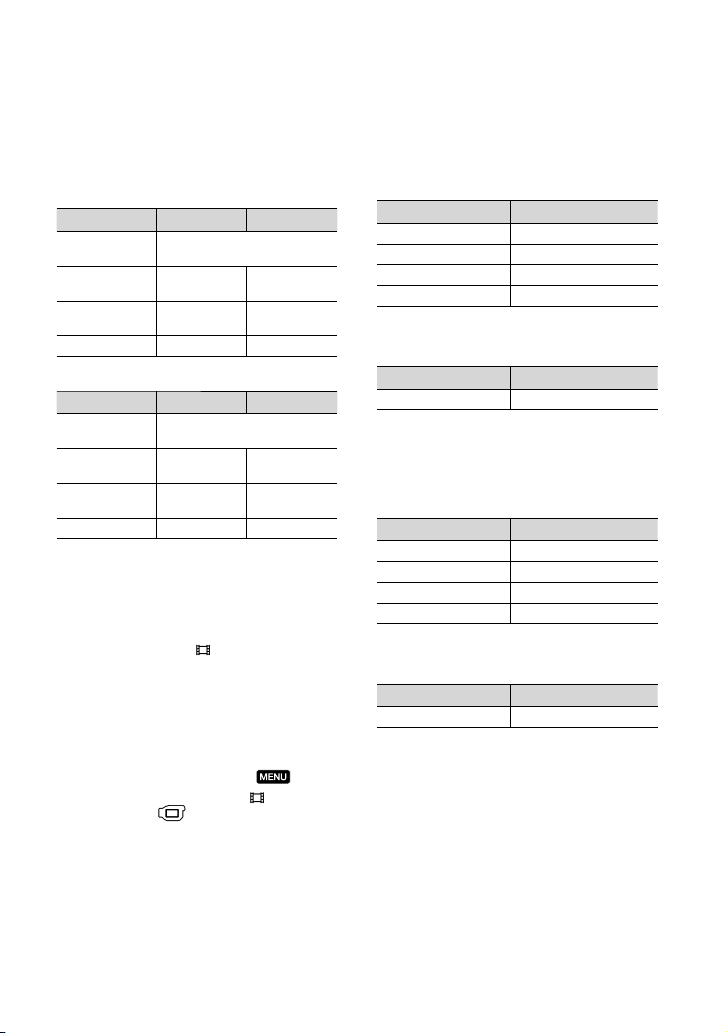
Expected charging and running time
for the supplied battery pack (in
minute)
HDR-CX110/CX150
Image quality HD STD
Charging time
(full charge)
Continuous
recording time
Typical recording
time
Playback time 190 280
155
125 180
60 90
HDR-XR150
Image quality HD STD
Charging time
(full charge)
Continuous
recording time
Typical recording
time
Playback time 170 225
Recording and playback time is approximate
time available using a fully charged battery
pack.
High definition image quality (HD)/Standard
definition image quality (STD)
Recording condition: [
to [HQ].
Typical recording time shows the time when
you repeat recording start/stop, turning the
power on/off and zooming.
155
110 155
55 75
REC MODE] is set
Expected recording time of movies
To set the recording mode, touch
(MENU) [Show others] [
MODE] (under
category). In the default setting, the recording
mode is [HD HQ].
[SHOOTING SET]
REC
Internal memory
HDR-CX150
High definition image quality (HD) in h (hour) and m
(minute)
Recording mode Recording time
[HD FX] 1 h 25 m
[HD FH] 1 h 55 m
[HD HQ] 3 h 50 m
[HD LP] 6 h 35 m
Standard definition image quality (STD) in h (hour) and
m (minute)
Recording mode Recording time
[STD HQ] 3 h 55 m
Internal hard disk
HDR-XR150
High definition image quality (HD) in h (hour) and m
(minute)
Recording mode Recording time
[HD FX] 11 h 20 m
[HD FH] 14 h 50 m
[HD HQ] 29 h 40 m
[HD LP] 50 h 30 m
Standard definition image quality (STD) in h (hour) and
m (minute)
Recording mode Recording time
[STD HQ] 30 h 30 m
70
US
Page 71
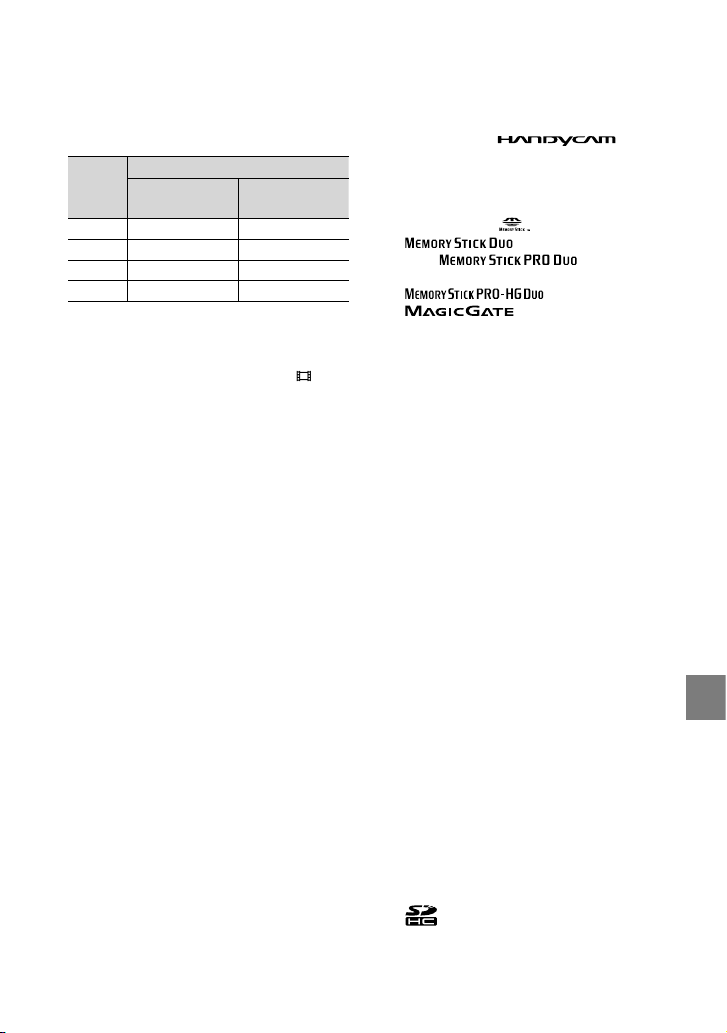
Example of expected recording time of
movies in a memory card (in minute)
Recording
mode
[FX] 20 (20) [FH] 25 (25) [HQ] 55 (40) 55 (50)
[LP] 95 (75) -
High definition (HD)
The number in ( ) is the minimum recordable
time.
The recordable time may vary depending on the
recording and subject conditions and [
MODE].
On charging/recording/playback time
e
asured when using the camcorder at 25
M
(77 °F) (10
recommended)
The recording and playback time will be
shorter in low temperatures, or depending
on the conditions under which you use your
camcorder.
For 4 GB capacity
Standard definition
(STD)
REC
C to 30 C (50 °F to 86 °F) is
C
On trademarks
“Handycam” and are
registered trademarks of Sony Corporation.
“AVCHD” and “AVCHD” logotype are
trademarks of Panasonic Corporation and Sony
Corporation.
“Memory Stick,” “
“
Duo,” “
Stick PRO-HG Duo,”
“
“
Stick” and “MagicGate Memory Stick Duo” are
trademarks or registered trademarks of Sony
Corporation.
“InfoLITHIUM” is a trademark of Sony
Corporation.
“x.v.Color” is a trademark of Sony Corporation.
“BIONZ” is a trademark of Sony Corporation.
“BRAVIA” is a trademark of Sony Corporation.
“DVDirect” is a trademark of Sony
Corporation.
“Blu-ray Disc” and the logo are trademarks.
Dolby and the double-D symbol are trademarks
of Dolby Laboratories.
HDMI, the HDMI logo and High-Definition
Multimedia Interface are trademarks or
registered trademarks of HDMI Licencing LLC.
Microsoft, Windows, Windows Vista, and
DirectX are either registered trademarks or
trademarks of Microsoft Corporation in the
United States and/or other countries.
Macintosh and Mac OS are registered
trademarks of Apple Inc. in the U.S. and other
countries.
Intel, Intel Core, and Pentium are trademarks
or registered trademarks of Intel Corporation
or its subsidiaries in the United States and other
countries.
“PlayStation” is a registered trademark of Sony
Computer Entertainment Inc..
Adobe, the Adobe logo, and Adobe Acrobat
are either registered trademarks or trademarks
of Adobe Systems Incorporated in the United
States and/or other countries.
SDHC logo is a trademark.
,” “Memory Stick Duo,”
,” “Memory Stick PRO
,” “Memory
,” “MagicGate,”
,” “MagicGate Memory
Additional information
MultiMediaCard is a trademark of
MultiMediaCard Association.
US
71
Page 72

All other product names mentioned herein may
be the trademarks or registered trademarks of
their respective companies. Furthermore,
are not mentioned in each case in this manual.
and
72
US
Page 73
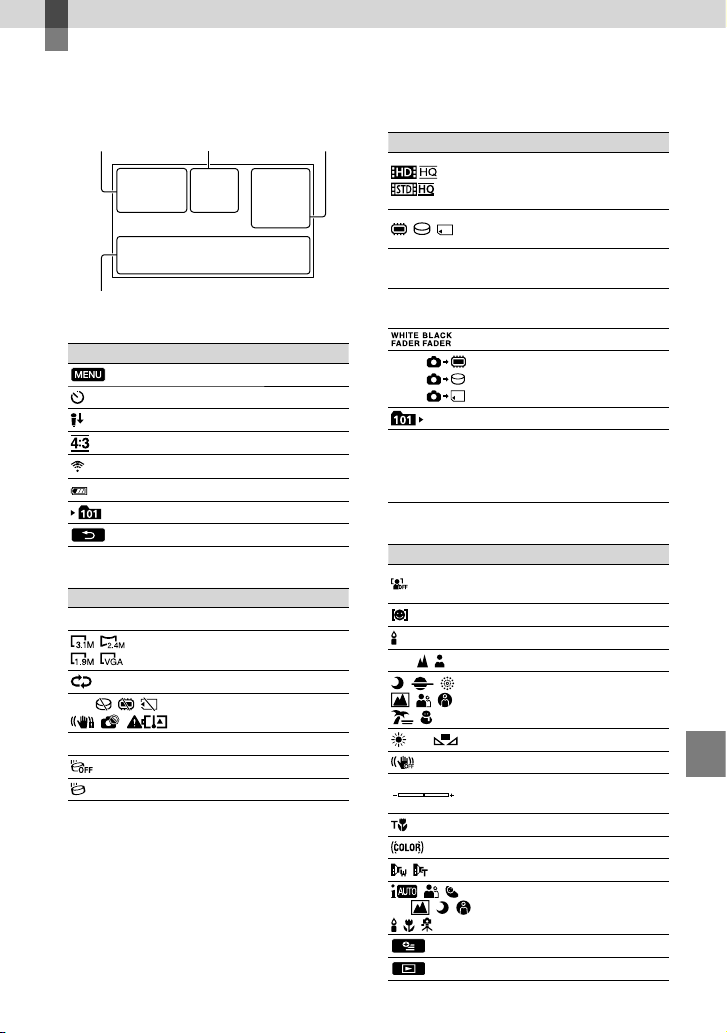
Quick reference
Screen indicators
Upper left Center Upper right
Bottom
Upper left
Indicator Meaning
MENU button
Self-timer recording
MICREF LEVEL low
WIDE SELECT
BLT-IN ZOOM MIC
60 min Remaining battery
Recording folder
Return button
Center
Indicator Meaning
[STBY]/[REC] Recording status
Photo size
Slide show set
Warning
Playback mode
Drop sensor off
Drop sensor activated
Upper right
Indicator Meaning
Recording image quality
(HD/STD) and recording
mode (FX/FH/HQ/LP)
0:00:00
[00min]
9999
9999
9999
100/112
Recording/playback/
editing media
Counter (hour:minute:
second)
Estimated recording
remaining time
FADER
Approximate number of
recordable photos and
recording media
Playback folder
Current playing movie or
photo/Number of total
recorded movies or photos
Bottom
Indicator Meaning
[FACE DETECTION] set
to [OFF]
SMILE DETECTION
LOW LUX
Manual focus
SCENE SELECTION
White balance
SteadyShot off
SPOT MTR/FCS / SPOT
METER / EXPOSURE
TELE MACRO
X.V.COLOR
CONVERSION LENS
INTELLIGENT AUTO
OPTION button
VIEW IMAGES button
Quick reference
US
73
Page 74
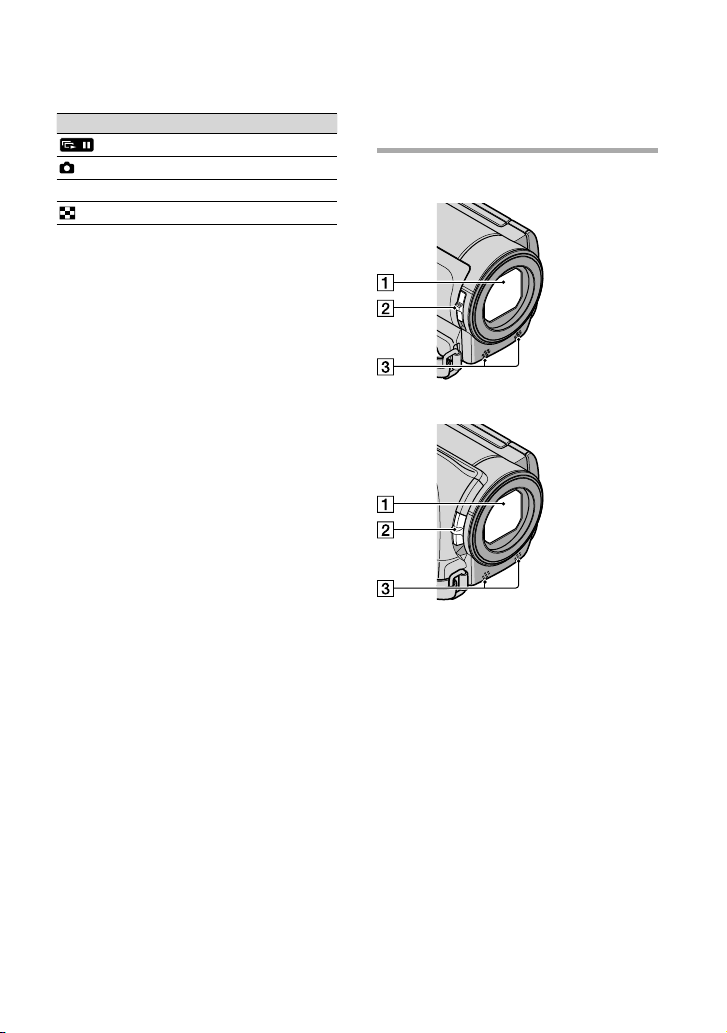
74
US
Parts and controls
Indicator Meaning
Slide show button
101-0005
Indicators and their positions are approximate
and may differ from what you actually see.
Some indicators may not appear, depending on
your camcorder model.
Data file name
Protected image
Index button
Figures in ( ) are reference pages.
HDR-CX110/CX150
HDR-XR150
Lens (Carl Zeiss lens)
LENS COVER switch (23)
Built-in microphone
Page 75
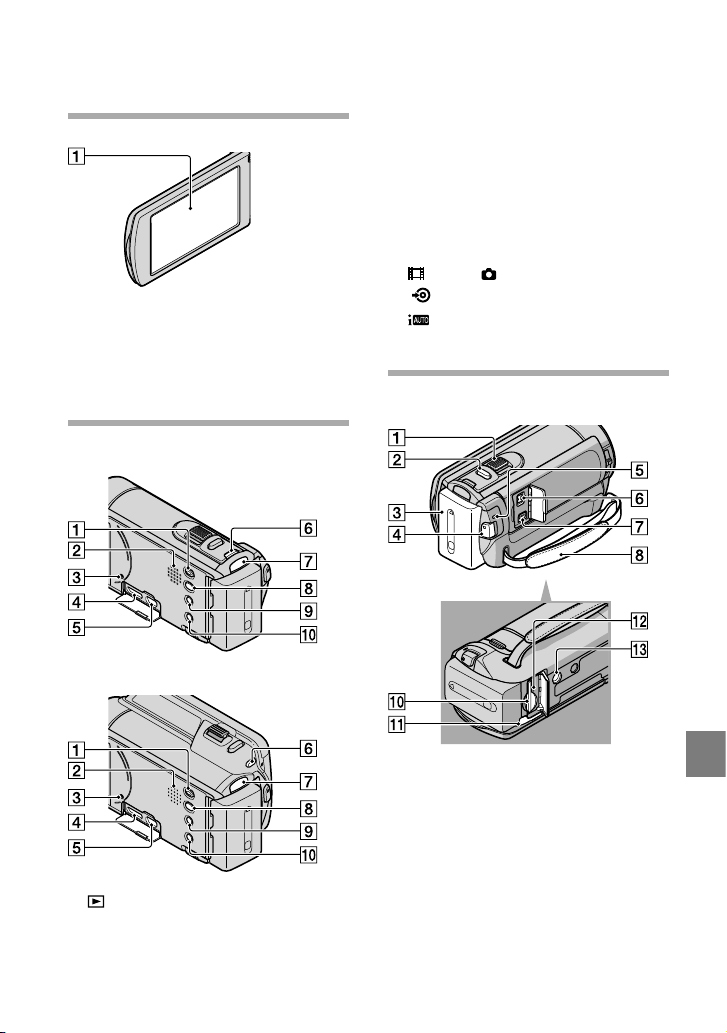
LCD screen/Touch panel
If you rotate the LCD panel 180 degrees, you
can close the LCD panel with the LCD screen
facing out. This is convenient during playback
operations.
HDR-CX110/CX150
HDR-XR150
RESET button
Press RESET using a pointed object.
Press RESET to initialize all the settings
including the clock setting.
HDMI OUT jack (31)
(USB) jack (38, 42, 43, 47, 50)
MODE button (24)
(movie)/ (Photo) lamps (24)
(DISC BURN) button (42)
(INTELLIGENT AUTO) button
POWER button (18)
HDR-CX110/CX150
(VIEW IMAGES) button (28)
Speaker
Quick reference
US
75
Page 76
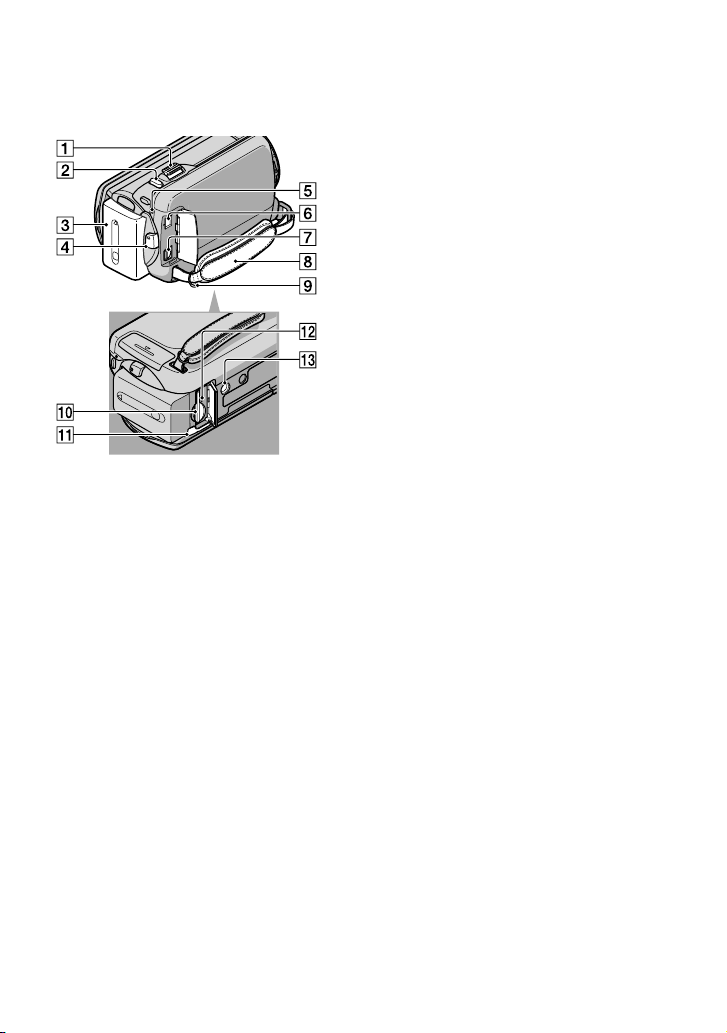
HDR-XR150
Power zoom lever
PHOTO button (27)
Battery pack (15)
START/STOP button (25)
CHG (charge) lamp (15)
DC IN jack (15)
A/V Remote Connector (31)
Grip belt (23)
Hook for a shoulder belt
Memory card slot (22)
BATT (battery) release lever (16)
Memory card Access lamp (22)
While the lamp is lit or flashing, the
camcorder is reading or writing data.
Tripod receptacle
Attach a tripod (sold separately) to the
tripod receptacle using a tripod screw (sold
separately: the length of the screw must be less
than 5.5 mm (7/32 in.)).
76
US
Page 77

Index
A
A/V connecting cable...........32, 54
AVCHD........................................40
B
Battery pack .................................15
Blu-ray disc ..................................45
C
Capturing photos from
a movie .........................................46
Care ..............................................66
Charging the battery abroad .....17
Charging the battery pack .........15
CLOCK SET ................................18
Computer.....................................36
Computer system ........................36
Copying a disc .............................46
Creating a disc ......................40, 49
Creating a standard definition
image quality (STD) disc ...........45
Creating AVCHD disc ...............44
D
DATA CODE ..............................19
DATE/TIME................................19
DELETE .......................................34
Disc recorder ...............................54
Dubbing .......................................22
DVDirect Express .......................50
DVD writer............................50, 53
E
Editing movies ............................46
External media ............................47
F
Fully charged ...............................15
H
“Handycam” Handbook .............63
I
Image quality ...............................59
Install ............................................37
L
LANGUAGE SET .......................19
M
Macintosh ....................................37
Maintenance ................................66
MANAGE MEDIA ..................... 20
MEDIA SETTINGS ....................20
Memory card ...............................21
“Memory Stick” media ...............21
“Memory Stick PRO-HG Duo”
media ............................................21
“Memory Stick PRO Duo”
media ............................................21
Menus .....................................56, 59
MOVIE MEDIA SET .................20
Movies ....................................25, 29
MY MENU ..................................56
MY MENU SETTING ...............56
O
One Touch Disc Burn ................42
Operation flow ............................12
OPTION MENU ........................58
P
Parts and controls .......................74
PHOTO MEDIA SET ................20
Photos ....................................27, 30
Playing..........................................28
Playing AVCHD disc..................44
PMB (Picture Motion
Browser) .................................36, 39
PMB Help ....................................39
Power on ......................................18
Precautions ..................................66
R
Recording ....................................23
Recording and playback time ...70
Recording media.........................20
Repair ...........................................64
RESET ..........................................75
S
Saving images in external
media ............................................47
Screen indicators ........................73
Self-diagnosis display .................65
Setting the date and time ...........18
Software .......................................37
Specifications ..............................68
Supplied items ...............................8
T
Thumbnail ...................................34
Tripod...........................................76
Troubleshooting ..........................64
Turning the power on ................18
TV .................................................31
TV CONNECT Guide ...............31
U
USB cable ...............................50, 53
USB CONNECT ...................43, 53
V
VISUAL INDEX .........................28
Volume .........................................30
W
Wall outlet (wall socket) ............15
Warning indicators .....................65
Windows ......................................36
You will find the menu lists
on pages 59 to 62.
Quick reference
US
77
 Loading...