

Page 1
HDD
HDD
Photo Storage
Photo Storage
Read Me First
2-639-394-12(1)
HDPS-M10
HDPS-M10
HDPS-M10
HDPS-M10
HDPS-M10
HDPS-M10
© 2005 Sony Corporation© 2005 Sony Corporation© 2005 Sony Corporation
© 2005 Sony Corporation
© 2005 Sony Corporation
© 2005 Sony Corporation
© 2005 Sony Corporation
© 2005 Sony Corporation
OPEN
Page 2

Safety regulations
WARNING
Keep away from children. If any part of the unit is swallowed, promptly see a
doctor.
To reduce the risk of fire or electric shock, do not expose this apparatus to rain
or moisture.
To avoid electrical shock, do not open the cabinet. Refer servicing to qualified
personnel only.
For use only with power supply SONY, Model HDAC-M1.
Disclaimer
Sony Corporation assumes no responsibility for the loss of information stored on the hard
disk of this unit, or information transferred to a “Memory Stick” and/or CompactFlash
card with your computer.
Caution
This equipment has been tested and found to comply with the limits for a Class B digital
device, pursuant to Part 15 of the FCC Rules. These limits are designed to provide
reasonable protection against harmful interference in a residential installation. This
equipment generates, uses, and can radiate radio frequency energy and, if not installed and
used in accordance with the instructions, may cause harmful interference to radio
communications. However, there is no guarantee that interference will not occur in a
particular installation. If this equipment does cause harmful interference to radio or
television reception, which can be determined by turning the equipment off and on, the
user is encouraged to try to correct the interference by one or more of the following
measures:
• Reorient or relocate the receiving antenna.
• Increase the separation between the equipment and receiver.
• Connect the equipment into an outlet on a circuit different from that to which the
receiver is connected.
• Consult the dealer or an experienced radio/TV technician for help.
You are cautioned that any changes or modifications not expressly approved in this
manual could void your authority to operate this equipment.
2
Page 3

Note
If you have any questions about this product, you may call the telephone number listed in
“Technical Support”. The telephone number below is not for customer service but only
for official purpose.
Declaration of Conformity
Trade Name: SONY
Model No.: HDPS-M10
Responsible Party: Sony Electronics Inc.
Address: 16530 Via Esprillo,
San Diego, CA
92127 U.S.A.
Telephone No.: 858-942-2230
This device complies with Part 15 of the FCC Rules. Operation is subject to the
following two conditions: (1) This device may not cause harmful interference, and
(2) this device must accept any interference received, including interference that may
cause undesired operation.
RECYCLING LITHIUM-ION BATTERIES
Lithium-Ion batteries are recyclable.
You can help preserve our environment by returning your used
rechargeable batteries to the collection and recycling location nearest you.
For more information regarding recycling of rechargeable batteries, call toll free
1-800-822-8837, or visit http://www.rbrc.org/
Caution: Do not handle damaged or leaking Lithium-Ion batteries.
3
Page 4
Table of contents
Safety regulations ...........................2
Introduction .................................... 5
Accessories ..................................... 5
What you can do with the HDD
Photo Storage .................................. 6
Opening/closing the covers ............ 7
Powering the unit ............................ 8
Copying data to the HDD Photo
Storage ............................................ 9
Viewing data on the internal hard
disk using a computer ................... 12
Preparing the HDD Photo Storage
and computer .............................. 12
Checking the remaining battery
charge and hard disk capacity ....... 16
“PhotoDiary” (the implemented
software for Windows only) ......... 17
Troubleshooting ............................18
Error Messages ........................... 18
Electric Specifications .................. 23
Technical Support ......................... 23
• The following are trademarks of Sony Corporation:
• “Memory Stick”, , “MagicGate Memory Stick”, “Memory Stick Duo”,
“ ”, “MagicGate Memory Stick Duo”, “Memory Stick PRO”,
“ ”, “Memory Stick PRO Duo”, “ ”, “MagicGate”, and
“”.
• Microsoft and Windows are registered trademarks of Microsoft Corporation in the United States
and/or other countries.
• Mac and Macintosh are trademarks of Apple Computer Inc., registered in the U.S. and/or other
countries.
• CompactFlash is a trademark of SanDisk Corporation and is licensed to the CompactFlash
Association.
• Microdrive is a registered trademark of Hitachi Global Storage Technologies.
• Other system and product names used herein are registered trademarks or trademarks of their
respective manufacturers, although the ™ and ® marks are not used in the text.
®
In this document, Microsoft
Edition are referred to as Windows XP.
In this document, Microsoft
In this document, Microsoft
Windows® XP Professional and Microsoft® Windows® XP Home
®
Windows® 2000 Professional is referred to as Windows 2000.
®
Windows® Millennium Edition is referred to as Windows Me.
4
Page 5
Introduction
Thank you for purchasing the HDD Photo Storage HDPS-M10. This document
explains how to prepare your unit for use. For details about how to use the unit,
refer to the operating instructions in PDF format on the hard disk of the unit.
To locate the operating instructions, refer to “ReadMe.html” on the internal
hard disk of the unit.
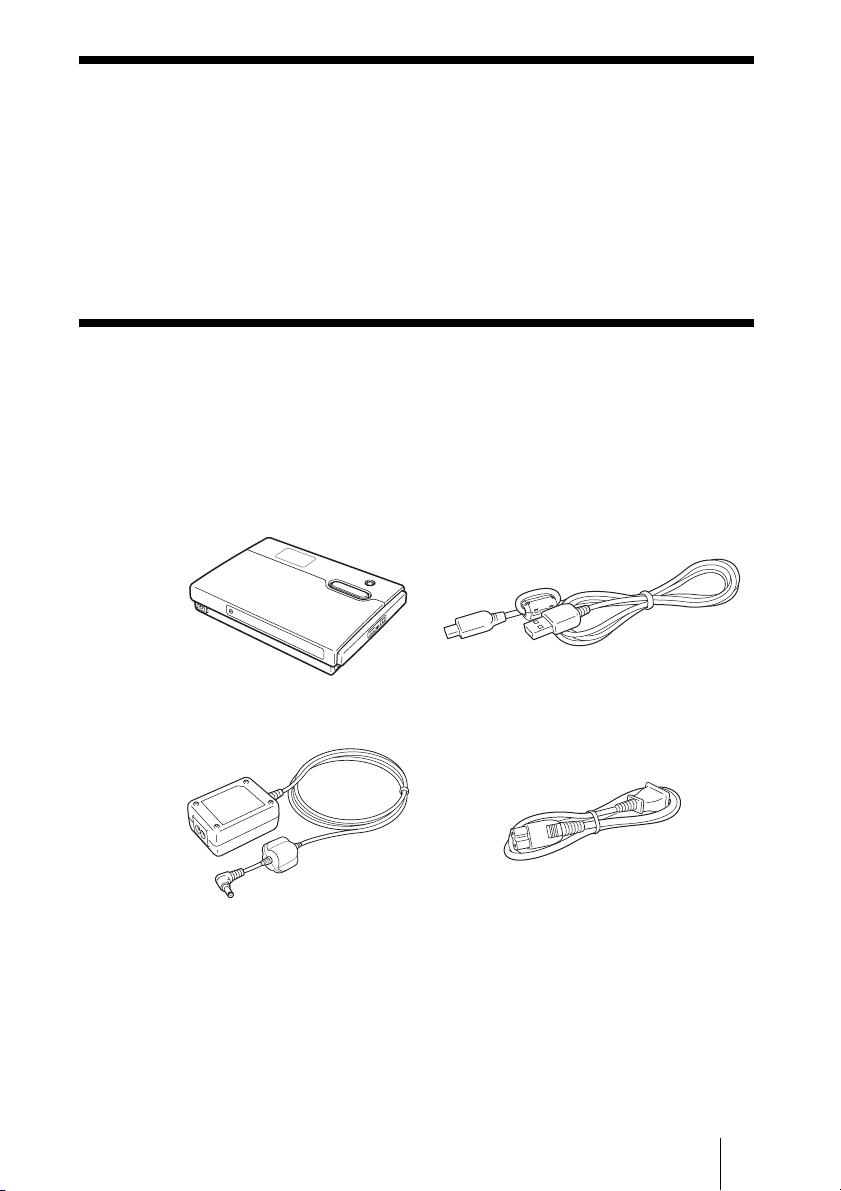
Accessories
When you unpack the unit, make sure that all the items listed below are
present. If anything is missing, contact your dealer or an authorized service
center in your area.
• HDD Photo Storage unit (1) • USB cable (1)
OPEN
• AC power adapter (1)
(SONY, Model HDAC-M1)
• Carrying case (1)
• Hand strap (1)
• Operating Instructions (on the hard disk)
• PhotoDiary software (on the hard disk)
• Read Me First (this document) (1)
• Warranty card (1)
• Power cord (1)
5
Page 6
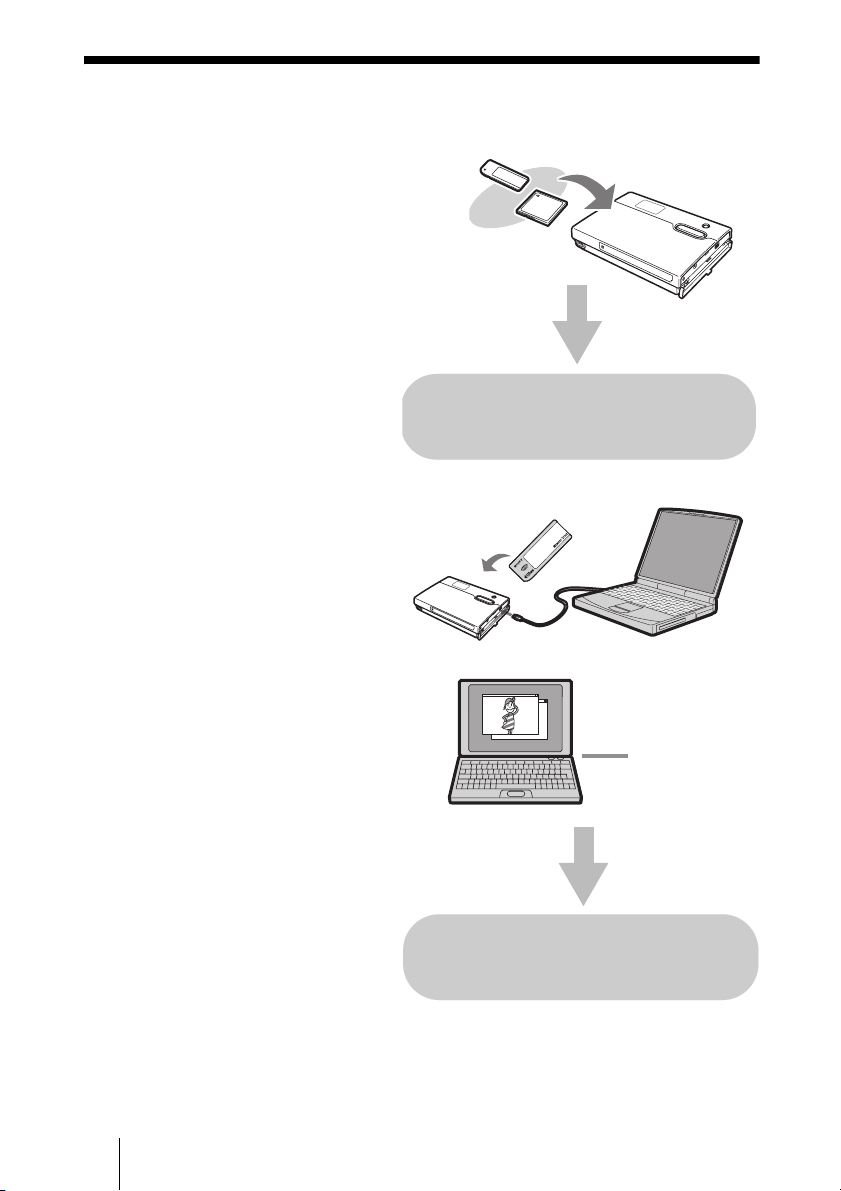
What you can do with the HDD Photo Storage
Store images from a digital camera!
Simply take pictures, and then insert the
media into the HDD Photo Storage to
copy the image data to the internal hard
disk. After copying, you can reuse the
media immediately. The 40 GB hard disk
of the HDD Photo Storage can store the
equivalent of about 620 units of 64 MB
media.
For details,
see “Copying data to the HDD Photo
Storage”(page 9).
Connect to a computer!
Using the supplied USB cable, you can
easily transfer data from an inserted media
or from the hard disk of the HDD Photo
Storage to a computer. It can function as a
USB2.0-compatible external hard disk, to
provide data storage capacity to a
computer. There is no need to install any
special software or perform a setup
procedure.
Copy!
HDD Photo Storage
Copy image files
to your computer.
View images on
your computer.
For details,
see “Viewing data on the internal hard
disk using a computer”(page 12).
6
Page 7
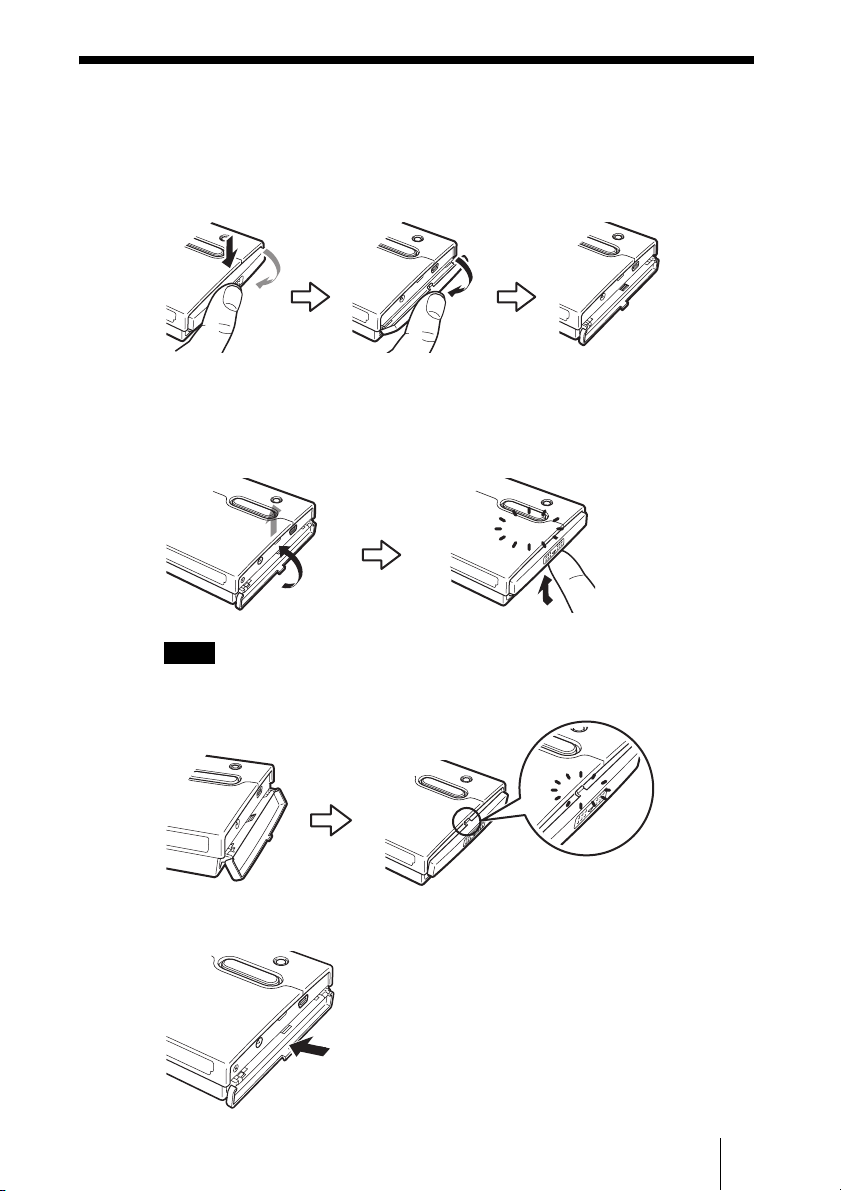
Opening/closing the covers
You can open/close the port and slot covers the same way.
To open the covers
Lightly push down the top part of the cover to open it, as illustrated.
To close the covers
Push the cover up from its fully open position, until the tab of the cover fits
into the notch of the body. Then, lightly push up the cover until you feel it click
into place. When it does, the cover is securely closed.
Click
Notes
• Close the covers when the unit is not in use.
• If the cover only opens as far as illustrated, you cannot close the cover.
To solve this problem, press the center of the cover as illustrated until it is in its fully open
position, and then try closing it again.
7
Page 8
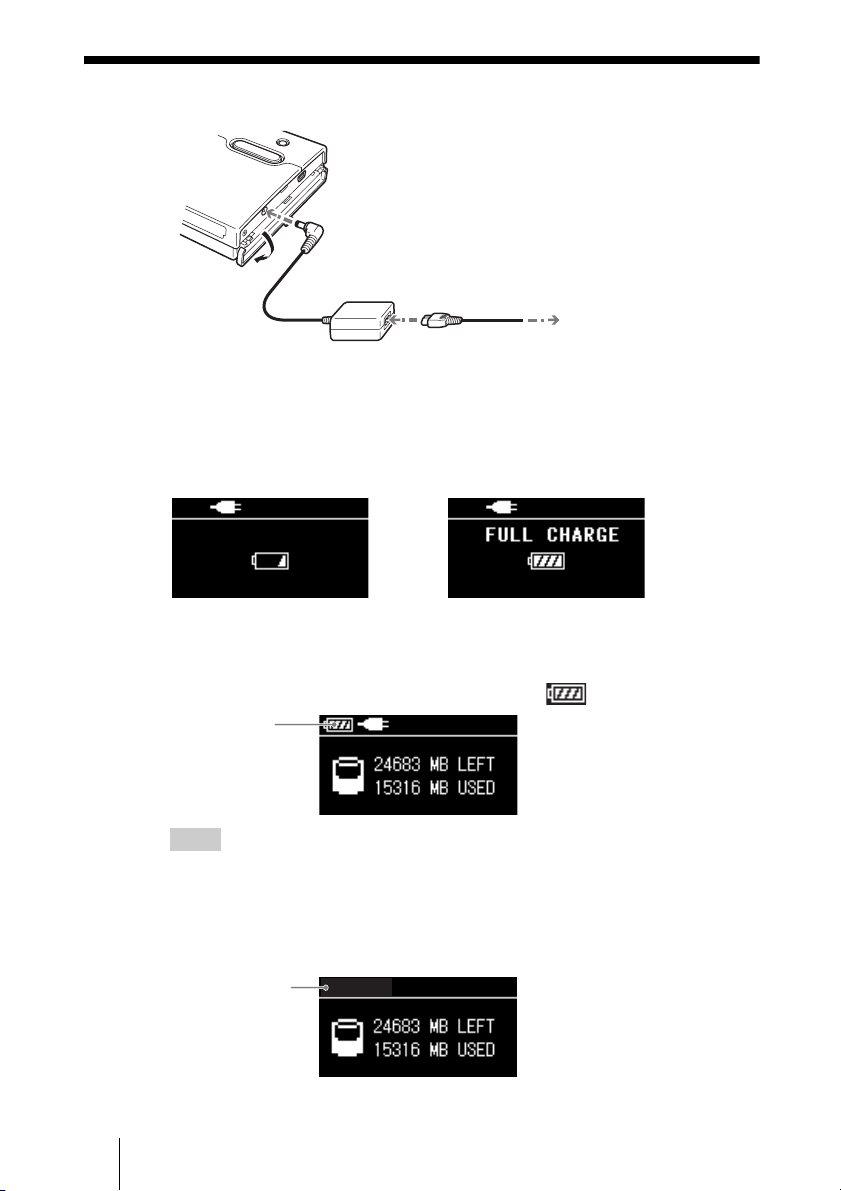
Powering the unit
To the ! (DC In) connector
Charging the battery
When the AC power adapter is connected to the unit, the internal battery starts
charging. A battery charge indicator appears on the display during charging.
When the battery is fully charged, the LCD display shows “FULL CHARGE”
before it turns off. The charging process takes about 4 hours at ambient
temperature.
Battery charging in progress Battery is fully charged
Confirming full battery charge
After the charging process is complete, turn on the unit while the AC power
adaptor is still connected, and make sure that the icon appears.
Battery icon
To the AC outlet
Hints
• The internal battery charges even when the unit is in use, as long as the AC power adapter
is connected. However, the charge time is considerably longer than when the internal
battery is charged as outlined above.
• If the unit has not been charged for some time, the internal battery level may be depleted.
When the unit is turned on, the low battery level may cause the battery icon at the top left
corner of the LCD display not to appear.
No battery icon
To recover, fully charge the battery using the supplied AC power adapter. Do not remove
the adapter while charging is in progress.
8
Page 9

Copying data to the HDD Photo Storage
1 Turn on the unit.
Press the ! (power) button.
The “Welcome to SONY HDPS” appears on the unit display.
!
! (power) button
Slide the HOLD switch in
the direction opposite to
that of the arrow.
Remaining internal hard disk capacity appears on the display when no
media is inserted in the drives of the unit.
Remaining internal hard
disk capacity
Locking the controls (HOLD)
You can lock the controls to prevent accidental button presses while carrying
the device.
Slide the HOLD switch in the direction of the arrow to lock the controls.
To unlock the controls
Slide the HOLD switch in the direction opposite to that of the arrow.
9
Page 10

2 Insert the “Memory Stick” or CompactFlash card into the unit.
“READY” (ready to copy) appears on the unit display.
The label should face up. Insert it in the
v direction until you hear a click.
Notes
• An error message appears on the display when an error has occurred. For details, see
“Error Messages” in the HDD Photo Storage Operating Instructions (PDF).
• When the unit is used stand-alone, it is not possible to insert both a “Memory Stick” and
CompactFlash card, and copy data from both at the same time. Insert one media at a time.
The label should face up. Insert it in the
v direction all the way into the slot.
3 Press COPY.
CANCEL
A folder is automatically created on the internal hard disk and the data is
copied to the folder. While copying is in progress, the copy progress bar
shows the copying status. When copying is done, “COMPLETED” (copy
completed) appears on the unit display.
10
Copy progress bar
Note
If the error message “HDD Disk Full” appears, the remaining space on the internal hard
disk is insufficient to finish copying. Connect the unit to a computer and use the
computer to delete unnecessary data on the internal hard disk of the unit. For details, see
“Deleting unnecessary files and folders” in the HDD Photo Storage Operating
Instructions (PDF).
Number of
folders copied
Number of
files copied
Number of folders
to be copied
Number of files
to be copied
Page 11
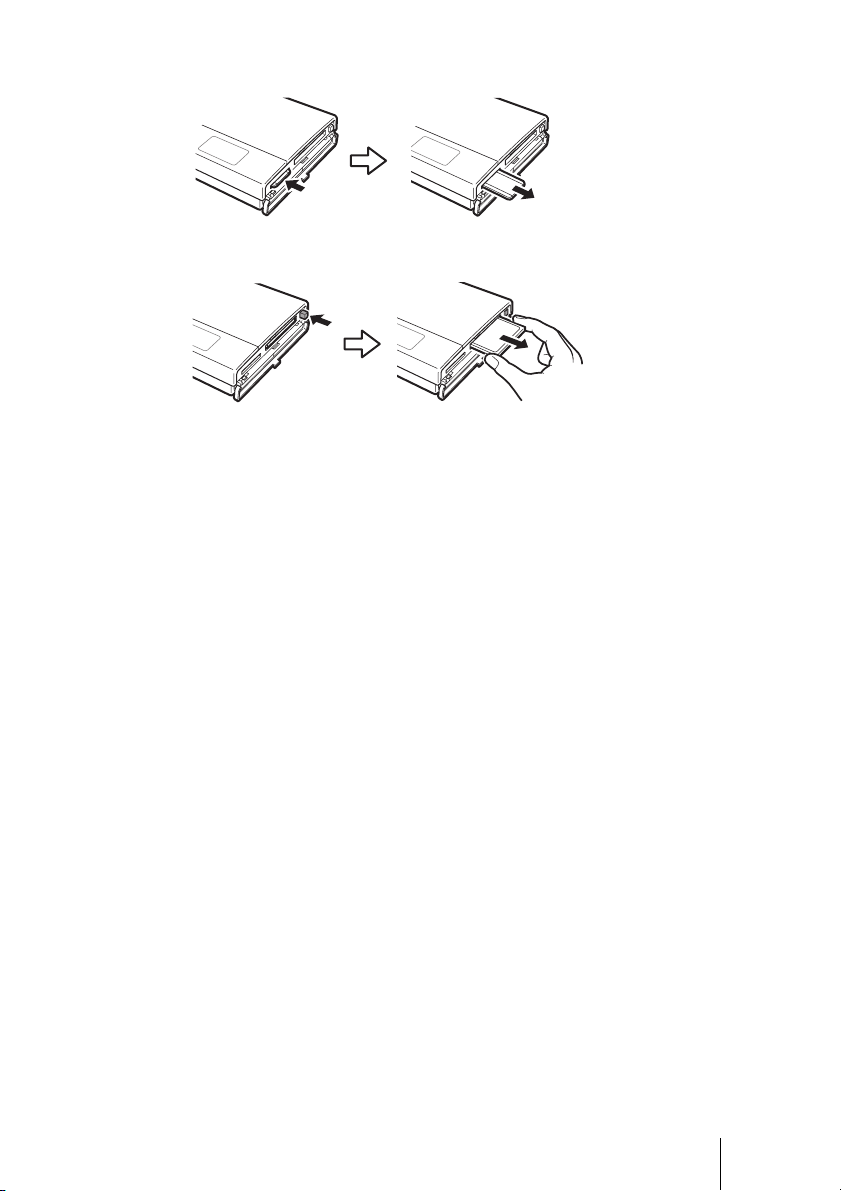
4 Remove the media.
Push in
Push in fully Pull out
Release briefly and pull out
11
Page 12

Viewing data on the internal hard disk
1
using a computer
Preparing the HDD Photo Storage and computer
This section describes how to connect the unit to a computer using the USB
cable to transfer data between the two devices.
Hints
• When the unit is connected to a computer, you can insert a “Memory Stick” and a
CompactFlash card at the same time and access data from both.
• When the unit is connected to a computer for the first time, the necessary programs are
installed automatically.
1 Turn on the computer.
2 Turn on the unit.
Press the ! (power) button
The “Welcome to SONY HDPS” appears on the unit display.
12
3 Open the port cover on the right side of the unit and connect the
supplied USB cable to the (USB) port. Connect the other
end of the cable to the USB port of your computer.
To the (USB) port
To the USB port of your computer
2
To the AC outlet
Note
Correct operation is not guaranteed when the unit is connected to a USB hub. Establish
a direct USB connection.
Page 13

4 Insert a “Memory Stick” and/or CompactFlash card into the unit
as necessary.
Hint
When you connect the unit to your computer, the internal battery automatically charges
whether the unit is on or off. However, to maintain battery performance, make sure that
you fully charge it periodically by connecting the AC power adapter.
5 Access the internal hard disk.
• When the operating system is Windows 2000 or Windows Me
Double-click [My Computer] on the desktop, and then double-click the
local disk icon that corresponds to the internal hard disk in the “My
Computer” window.
“Memory Stick”
CompactFlash card
Internal hard disk of the unit
13
Page 14

• When using Windows XP
Click [Start] - [My Computer], and then double-click the local disk icon
that corresponds to the internal hard disk in the “My Computer” window.
CompactFlash card
“Memory Stick”
Internal hard disk of the unit
• When using Macintosh
Double-click the internal hard disk icon on the desktop.
Internal hard disk of the unit
CompactFlash card
“Memory Stick”
The “STORE.IPS” folder, “HDPS” folder, and the “ReadMe.html” file are
displayed.
14
Page 15

Notes
• Do not format the internal hard disk of the unit with Windows or your Macintosh
computer. In particular, if formatted with Windows NTFS, you will no longer be able
to use the unit. If you partition the internal hard disk of the unit, make sure that the file
system of the first partition is FAT32.
• If the hard disk has been formatted using your computer or NTFS format, Error Code
F20 will be shown on the LCD display when it is turned on while not connected to a
computer. Reformat the internal hard disk. For details, see “If an HDD Format Error
(error code: F20) appears” (page 21).
Hints
• To delete files from the internal hard disk, see “Deleting unnecessary files and folders”
in the HDD Photo Storage Operating Instructions (PDF).
• Always disconnect the unit from the computer properly. For details, see
“Disconnecting the USB cable from the computer or removing media” in the HDD
Photo Storage Operating Instructions (PDF).
• When the drives of the HDD Photo Storage do not appear on the computer, uninstall
the device and turn it off. Power on the unit and wait for detection by the computer.
15
Page 16

Checking the remaining battery charge and hard disk capacity
To verify the remaining battery charge
The remaining battery charge is indicated on the display. As the number of
indicator bars decreases, less charge remains.
Indicator Remaining battery capacity Description
75% ~ 100%
50% ~ 75%
25% ~ 50%
10% ~ 25%
There is enough remaining battery
charge to use the unit without connecting
it to the AC power adapter.
The remaining battery charge is getting
low, but is still sufficient to copy several
more media.
0% ~ 10%
Connect the AC power adapter to charge
the internal battery.
To verify the remaining capacity of the internal hard disk
Remaining internal hard disk capacity appears on the display when no media
is inserted in the drives of the unit.
Remaining internal hard
disk capacity
The used capacity of the internal hard disk is displayed as follows:
Indicator Used capacity Indicator Used capacity
0 21-25GB
1-5GB 26-30GB
6-10GB 31-35GB
11-15GB 36-40GB
16
16-20GB
Page 17

“PhotoDiary” (the implemented software for Windows only)
“Photo Diary” is a useful software that allows you to view and manage images
stored in the unit using a computer. When the unit is connected to a computer, auto-
search starts and newly stored images can then be copied to the computer.
Images can be viewed by the month, week, or day. You can easily edit and print
images, as well as attach them to an e-mail.
Day
Week
Month
Hints
• For details on how to operate the software, see “PhotoDiary” help.
• For information on how to install “PhotoDiary”, refer to “Readme.html” on the internal
hard disk of the unit.
17
Page 18

Troubleshooting
In addition to this section, refer to the operating instructions of the unit and the
documentation of your computer.
Symptom Cause/remedy
The unit does not start. c The internal battery may be depleted. Connect
The unit turns off unexpectedly. c When the unit is used stand-alone, it turns off
With Windows 2000 or
Windows Me, the drive icon of
the unit does not appear in the
“My Computer” window.
When the unit is turned on,
there is no battery icon at the
top left corner of the LCD
display.
HDD Format Error
(error code:F20) is shown on
the LCD display.
The unit does not respond in
hang up state.
the AC power adapter and charge the battery.
automatically after remaining idle for five
minutes, whether operating on internal power or
through the AC power adapter. Restart the unit.
c Make sure that the “USB Mass Storage Device”
is not displayed as a in the “Device
Manager”. If it is, delete it, disconnect the USB
cable from your computer, and then reconnect it.
c Connect the AC power adapter and fully charge
the battery. For details, see “Charging the
battery” (page 8).
c Reformat the internal hard disk. For details, see
“If an HDD Format Error (error code: F20)
appears” (page 21).
c Wait for a few moments. If the drive status does
not change, press the ! (POWER) button while
holding down the COPY and CANCEL button.
This will reset the drive. If RESET was
performed during data copying, the data may
not be valid. Please recopy the data.
Error Messages
Follow the instructions below if an error message appears on the display.
Battery error
Error
code
—
18
Message Meaning Corrective action
The battery level is
almost completely
depleted.
Connect the AC
power adapter and
fully charge.
For details, see
“Charging the
battery” (page 8).
Page 19
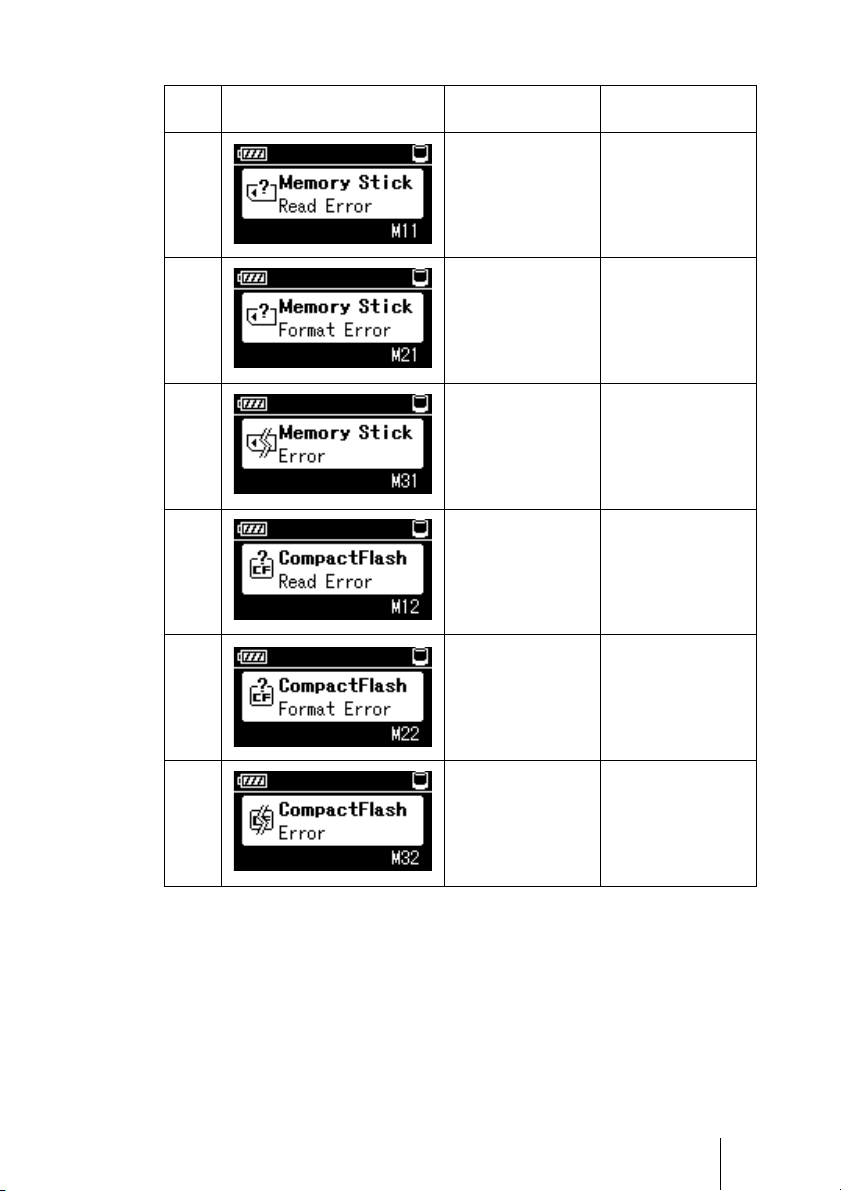
Media error
Error
Message Meaning Corrective action
code
M11
The “Memory Stick”
cannot be accessed
during copying.
Press the COPY
button again to
restart copying.
M21
M31
M12
M22
M32
“Memory Stick”
format error
“Memory Stick”
error
The CompactFlash
card cannot be
accessed during
copying.
CompactFlash card
format error
CompactFlash card
error
Format the “Memory
Stick”.
The “Memory Stick”
may be damaged.
Use a different
“Memory Stick”.
Press the COPY
button again to
restart copying.
Format the
CompactFlash card.
The CompactFlash
card may be
damaged. Use a
different card.
19
Page 20

Warning
Error
code
W10
Message Meaning Corrective action
Internal hard disk
full error
There is not enough
free space on the
internal hard disk.
Delete any
unnecessary data to
free space.
W11
W01
W02
Fatal error
Error
Message Meaning Corrective action
code
F10
The number of
folders with the
same name has
reached its
maximum (999).
Battery power alone
is insufficient to
perform copying.
“Memory Stick” and
CompactFlash card
double load error
The internal hard
disk on the unit
cannot be accessed.
Delete some folders
with the same name.
Connect the AC
power adapter.
Eject either the
“Memory Stick” or
CompactFlash card.
Contact your dealer
or an authorized
service center.
20
F20
Internal hard disk
format error
Reformat the internal
hard disk. For
details, see “If an
HDD Format Error
(error code: F20)
appears” (page 21).
If the unit still does
not operate properly,
contact your dealer
or an authorized
service center.
Page 21

Error
Message Meaning Corrective action
code
Contact your dealer
or an authorized
service center.
F30
The internal hard
disk cannot be
detected.
“Memory Stick”
copy error
F01
CompactFlash card
copy error
F02
Reinsert the
“Memory Stick”. If
the error persists, use
a different “Memory
Stick”.
Reinsert the
CompactFlash card.
If the error persists,
use a different
CompactFlash card.
If an HDD Format Error (error code: F20) appears
Perform the following steps to format the unit’s internal hard disk.
1 At first, connect the unit to a computer and backup your data.
Then safely disconnect the drive.
Error code F20 will be shown on the LCD display.
Warning
The following steps will erase all data on your hard disk.
2 Press the CANCEL button 5 times while holding the COPY
button.
The screen below will be displayed.
21
Page 22

3 Press COPY button.
The screen below will be displayed.
4 Press COPY button again to start the format.
The screen below will be displayed. The hard disk data will be erased.
The screen below will be displayed upon format completion.
5 Press COPY for the final time.
22
Contact an authorized service center to restore all the applications
originally supplied in the hard disk of the unit.
Page 23

Electric Specifications
Power supply
Lithium-ion rechargeable battery (internal)
100 - 240 V AC, 50/60 Hz
Power consumption
7.5 W maximum
Ambient conditions
Operating temperature: 5 °C to 40 °C (40 °F to 104 °F)
(temperature gradient less than 10 °C/hour (50 °F/hour))
Operating humidity: 20% to 80%
(non-condensing)
Technical Support
Sony Direct Response Center
12451 Gateway Blvd
Fort Meyers, FL 33913
(800) 222-SONY (7669)
www.sony.com/service
23
Page 24

Printed using VOC (Volatile Organic Compound)-free
vegetable oil based ink.
Printed in Malaysia
 Loading...