

Page 1
2-682-684-11(2)
Quick Guide ..................
to the Screens
Operating Instructions
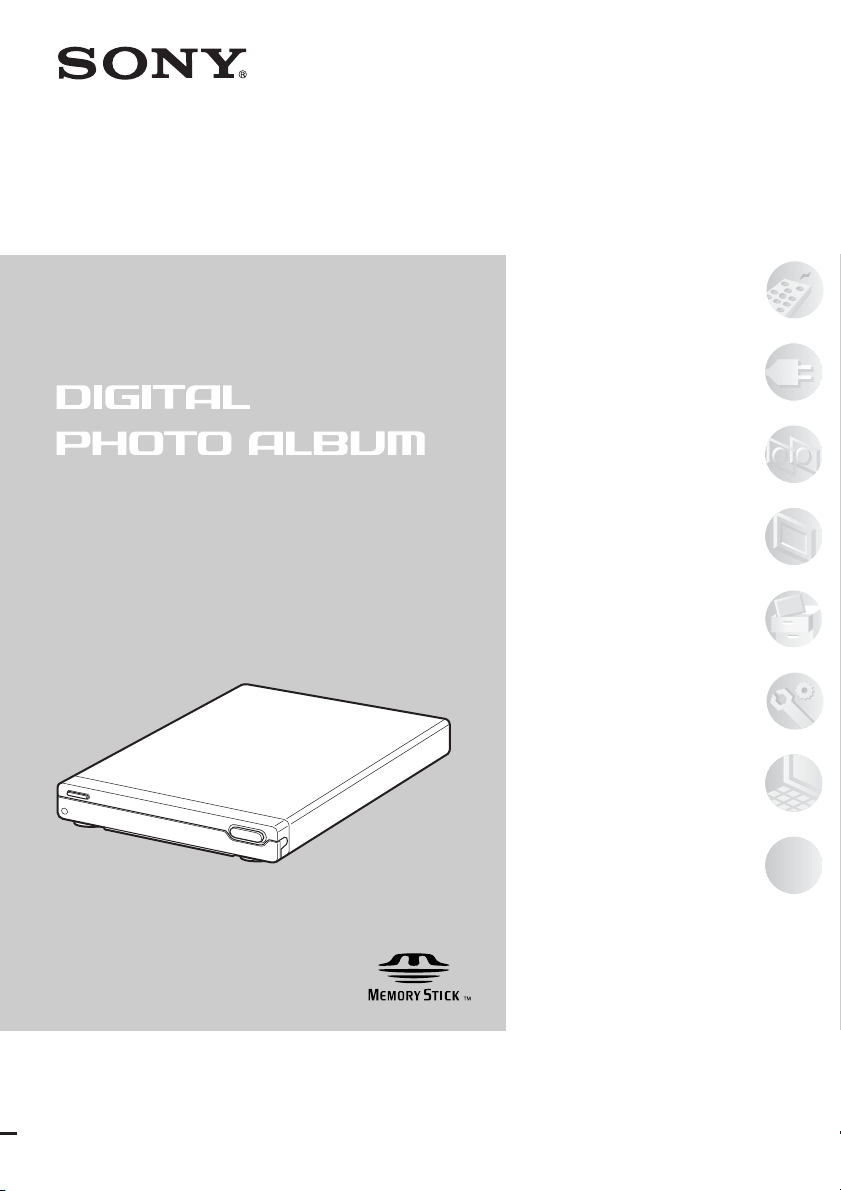
Thank you for purchasing the HDD Photo Storage
HDPS-L1.
This document explains how to prepare your unit
for use. Before operating the unit, please read this
document thoroughly, and retain it for future
reference.
C
O
P
Y
HDD Photo Storage
Preparations .................
Copying Images to........
the Unit
Viewing Images ............
Managing Images .........
Setting Up the Unit .......
Connecting to ...............
a Computer
Additional Information...
HDPS-L1
C 2006 Sony Corporation
Page 2

Owner’s Record
The model and serial number are
located on the rear panel of the drive
unit. Record the serial number in the
space provided below. Refer to these
numbers whenever you call upon your
Sony dealer regarding this product.
Model No. HDPS-L1
Serial No.
WARNING
Keep this unit away from children. If
any part of the unit is swallowed,
promptly see a doctor.
To reduce the risk of fire or electric
shock, do not expose this apparatus
to rain or moisture.
To avoid electrical shock, do not
open the cabinet. Refer servicing to
qualified personnel only.
NOTE
This equipment has been tested and found
to comply with the limits for a Class B
digital device, pursuant to Part 15 of the
FCC Rules. These limits are designed to
provide reasonable protection against
harmful interference in a residential
installation.
This equipment generates, uses, and can
radiate radio frequency energy and, if not
installed and used in accordance with the
instructions, may cause harmful
interference to radio communications.
However, there is no guarantee that
interference will not occur in a particular
installation. If this equipment does cause
harmful interference to radio or television
reception, which can be determined by
turning the equipment off and on, the user
is encouraged to try to correct the
interference by one or more of the
following measures:
• Reorient or relocate the receiving
antenna.
• Increase the separation between the
equipment and receiver.
• Connect the equipment into an outlet on
a circuit different from that to which the
receiver is connected.
• Consult the dealer or an experienced
radio/TV technician for help.
This symbol is intended to alert
the user to the presence of
uninsulated “dangerous voltage”
within the product's enclosure that
may be of sufficient magnitude to
constitute a risk of electric shock
to persons.
This symbol is intended to alert
the user to the presence of
important operating and
maintenance (servicing)
instructions in the literature
accompanying the appliance.
2
You are cautioned that any changes or
modifications not expressly approved in
this manual could void your authority to
operate this equipment.
PRECAUTIONS
The nameplate is located on the rear panel
of the unit.
Page 3
NOTE
If you have any questions about this
product, you may call the telephone
number listed in “Technical Support”.
The telephone number below is not for
customer service but only for official
purpose.
Declaration of Conformity
Trade Name: SONY
Model No.: HDPS-L1
Responsible Party:Sony Electronics
Inc.
Address: 16530 Via Esprillo,
San Diego, CA
92127 U.S.A.
Telephone No.: 858-942-2230
This device complies with Part 15 of the
FCC Rules. Operation is subject to the
following two conditions.: (1) This
device may not cause harmful
interference, and (2) this device must
accept any interference received,
including interference that may cause
undesired operation.
Disclaimer
Sony corporation assumes no
responsibility for the loss of information
stored on the hard disk of this unit, or
information transferred to a memory card
with your computer.
It is highly recommended to regularly
back up the contents of the hard disk.
Sony Corporation does not accept any
liability for damage caused by data loss.
Important Safety Instructions
1) Read these instructions.
2) Keep these instructions.
3) Heed all warnings.
4) Follow all instructions.
5) Do not use this apparatus near water.
6) Clean only with dry cloth.
7) Do not block any ventilation
openings. Install in accordance with
the manufacturer's instructions.
8) Do not install near any heat sources
such as radiators, heat registers,
stoves, or other apparatus (including
amplifiers) that produce heat.
9) Do not defeat the safety purpose of the
polarized or grounding-type plug. A
polarized plug has two blades with
one wider than the other. A grounding
type plug has two blades and a third
grounding prong. The wide blade or
the third prong are provided for your
safety. If the provided plug does not fit
into your outlet, consult an electrician
for replacement of the obsolete outlet.
10) Protect the power cord from being
walked on or pinched particularly at
plugs, convenience receptacles, and
the point where they exit from the
apparatus.
11) Only use attachments/accessories
specified by the manufacturer.
12) Use only with the cart, stand, tripod,
bracket, or table specified by the
manufacturer, or sold with the
apparatus. When a cart is used, use
caution when moving the cart/
apparatus combination to avoid injury
from tip-over.
S3125A
13) Unplug this apparatus during
lightning storms or when unused for
long periods of time.
14) Refer all servicing to qualified service
personnel. Servicing is required when
the apparatus has been damaged in any
way, such as power cord or plug is
damaged, liquid has been spilled or
objects have fallen into the apparatus,
the apparatus has been exposed to rain
or moisture, does not operate
normally, or has been dropped.
3
Page 4

Copyright
Copyright law prohibits unauthorized use
of any recorded audio/video for any other
purpose than personal enjoyment. Please
be warned that the “Memory Stick”
containing images and data protected by
copyright shall be strictly used within
copyright law.
Precautions
Usage and storage
• Only use the specified power cord.
• Never short-circuit any of the
connectors with a metallic object such
as a keyholder.
• Do not leave the unit in locations where
the temperature may rise above 60°C
(140°F), such as in direct sunlight.
• Protect the unit from water and
moisture.
• Use the unit on a flat level surface.
• Do not install this equipment in a
confined space such as a bookshelf or
similar unit.
• To prevent fire or shock hazard, do not
place objects filled with liquids, such as
vases, on the apparatus.
• Turn off the unit before carrying it.
• Do not touch the memory card while
copying.
Overheating
If the unit has become hotter than normal
during operation, turn off the unit,
disconnect the power cord, and then
contact a service center.
Condensation
If the unit is brought from a cold to a warm
location, or if the ambient temperature
suddenly rises, moisture may form on the
outer surface and on the interior of the
unit. Do not use the unit in such a
condition, as damage may occur. If
condensation has occurred, leave the unit
for about an hour before turning it on.
Hard disk
The hard disk has a high storage density,
and holds vast amount of images.
However, it can easily be damaged by
shock, vibration or dust, and should be
kept away from magnets. To avoid losing
4
Page 5

important data, observe the following
precautions.
• Do not apply a strong shock to the unit.
• Do not place the unit in a location
subject to mechanical vibrations or in an
unstable location.
• Do not place the unit on top of a hot
surface, such as a VCR or amplifier
(receiver).
• Do not use the unit in a place subject to
extreme changes in temperature
(temperature gradient less than 10°C/
hour).
• Do not move the unit with its power
cord connected.
• Do not disconnect the power cord while
the power is on.
• Do not move the unit for one minute
after you have unplugged the power
cord.
• Do not attempt to replace or upgrade the
hard disk by yourself, as this may result
in malfunction.
If the hard disk drive should malfunction,
you cannot recover lost data. The hard
disk drive is only a temporary storage
space.
It is highly recommended to regularly
back up the contents of the hard disk.
Sony Corporation does not accept any
liability for damage caused by data loss.
5
Page 6

Table of Contents
WARNING ........................................................................................................... 2
Precautions ........................................................................................................... 4
Ways to Enjoy Your HDD Photo Storage ............................................................ 8
Quick Guide to the Screens ................................................................ 10
Preparations
Unpacking ........................................................................................................... 12
Preparing the remote control ............................................................................ 13
Connecting to a TV ............................................................................................ 15
Turning on the Unit ............................................................................................ 17
Setting the Date and Time .................................................................................. 18
Copying Images to the Unit
Inserting and Removing a Memory Card ........................................................... 20
Inserting a “Memory Stick” or SD Memory Card (SD)/
MultiMediaCard (MMC)/xD-Picture Card (xD) ............................................. 20
Inserting a CompactFlash (CF)/Microdrive ..................................................... 21
Copying Images from Memory Card ................................................................. 22
Viewing Images
Selecting Images by Date ................................................................................... 24
Specifying a shooting date to display in the Calendar screen .......................... 26
Selecting Images by Folder ................................................................................ 28
Selecting the folder by setting the date ............................................................ 30
Zooming Images ................................................................................................. 32
Rotating Images .................................................................................................. 33
Playing a Slide Show .......................................................................................... 35
Selecting multiple images or folders ................................................................ 36
6
Page 7

Managing Images
Registering Images to a Group ........................................................................... 37
Viewing images registered in a group .............................................................. 40
Setting a group number to select the group ...................................................... 41
Deleting Images or Folders ................................................................................. 43
Displaying Image or Folder Information ............................................................ 44
Sorting Images by Shooting Date ....................................................................... 45
Duplicating a Folder ........................................................................................... 46
Exporting Images or a Folder to a Memory Card ............................................... 47
Setting Up the Unit
How to Set Up the Unit ...................................................................................... 49
Setting List .......................................................................................................... 50
Connecting to a Computer
Preparing the Unit and Computer ....................................................................... 52
Copying Data to a Computer .............................................................................. 53
Using with Windows ........................................................................................ 53
Using with Macintosh ...................................................................................... 55
Data Storage Locations ....................................................................................... 56
Additional Information
Troubleshooting .................................................................................................. 58
Supported Memory Card Types ......................................................................... 61
Cleaning the Cabinet .......................................................................................... 62
Specifications ...................................................................................................... 63
Identifying Parts ................................................................................................. 64
Technical Support ............................................................................................... 66
Index ................................................................................................................... 67
7
Page 8
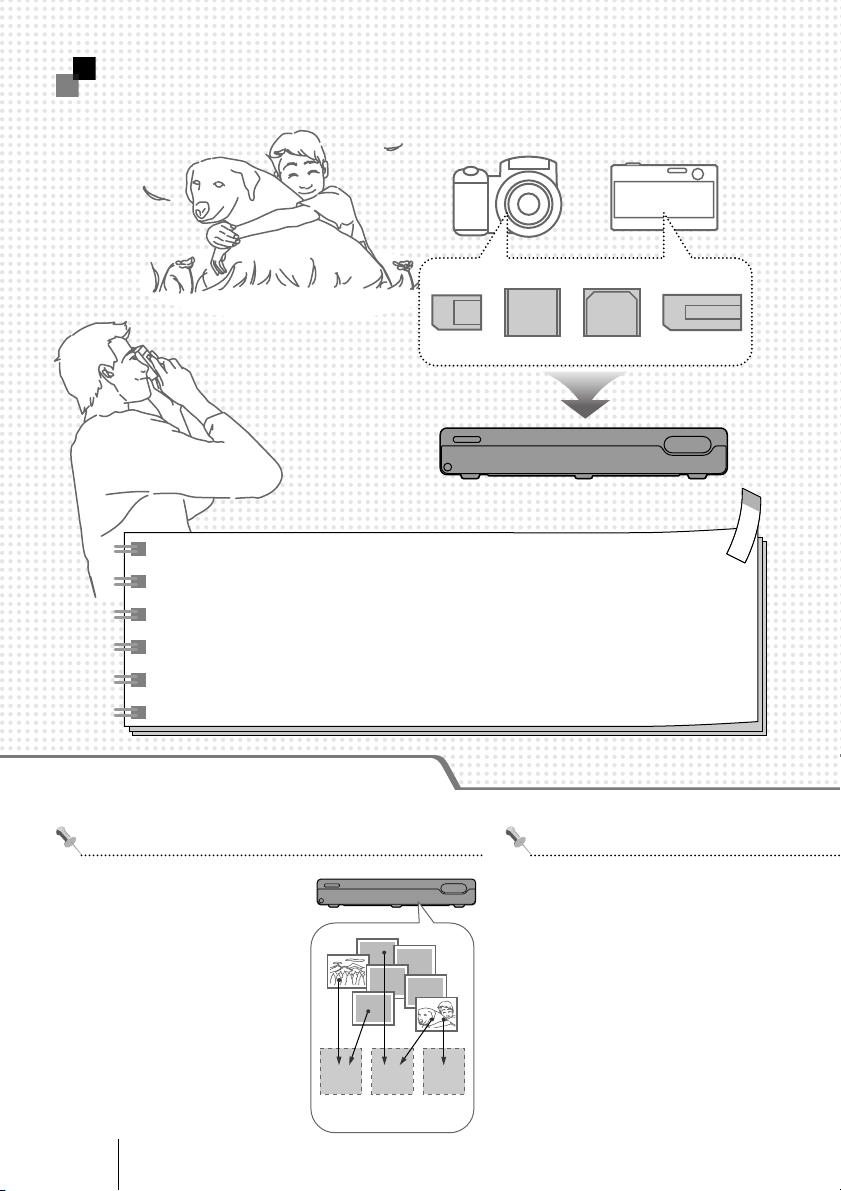
Ways to Enjoy Your HDD Photo Storage
Copy your images with a single press of a button
Several kinds of memory cards, such as "Memory Stick" or CF cards,
are available. For more information, see "Supported Memory Card
Types" (page 61).
☛"Copying Images to the Unit" (page 20)
Enjoying advanced features
Create your favorite image groups
You can group images by
theme, event, etc.
Even when removing images
from a group, original images
are not deleted.
☛"Registering Images to
a Group" (page 37)
GroupA GroupB GroupC
8
Export images
You can export images stored in the
unit to a memory card to carry with
your mobile phone or video game, or
share with friends.
☛"Exporting Images or a Folder to
a Memory Card" (page 47)
Page 9
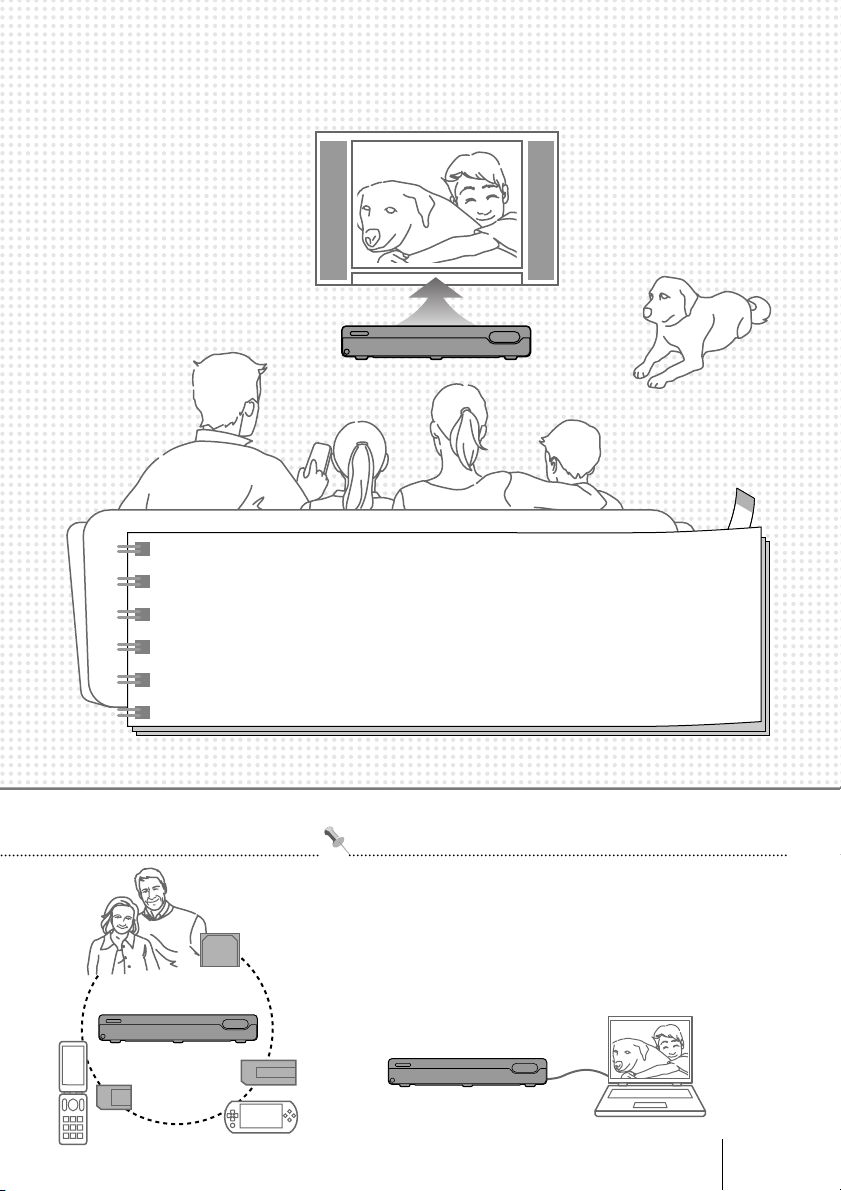
View images on your TV
If you have a TV (with component connection), high quality images
can be displayed. You can also enjoy images as a slide show.
☛"Viewing Images" (page 24)
☛"Playing a Slide Show" (page 35)
Connect to your computer
You can copy images to the computer for backup, printing,
etc. You can also copy images on your computer to the
unit to view on your TV.
☛"Connecting to a Computer" (page 52)
9
Page 10

Quick Guide to the Screens
Basic steps for using the screen
Select an image or item using
the buttons.
Screen types
Home
Thumbnail 1/2
Calendar
Folder
Group
Settings
To return to the previous screen, press .
Folder 1/2
20051012.001
20051224.001
20051224.002
20051224.003
20060214.001
20060214.002
10
Home
Calendar
Folder
Group
Settings
Home
Appears when power
is turned on
2005.10
S
M
T
W
T
2
3
4
5
3
3
3
2
9
10
10
10
10
9
16
17
17
17
17
16
23
24
24
24
24
23
30
31
31
31
31
30
6
4
5
6
4
5
6
4
5
6
11
13
121212
11
13
11
13
11
13
18
19
20
18
19
20
18
19
20
18
19
20
25
26
27
25
26
27
25
26
27
25
26
27
Calendar
Shows a monthly
calendar
F
S
1
1
7
8
7
7
7
8
14
15
14
14
14
15
21
22
21
21
21
22
28
29
28
28
28
29
Folder 1/2
20051012.001
20051224.001
20051224.002
20051224.003
20060214.001
20060214.002
Folder
Shows folders containing
copied images
Page 11

Press to confirm.
Home
Calendar
Folder
Group
Settings
S
2
2
9
9
16
16
23
23
30
30
2005.10
M
3
3
3
3
10
10
10
10
17
17
17
17
24
24
24
24
31
31
31
31
T
W
T
F
S
1
4
5
4
5
4
5
4
5
11
121212
11
11
11
18
19
18
19
18
19
18
19
25
26
25
26
25
26
25
26
1
6
7
8
6
7
6
7
6
7
8
13
14
15
13
14
13
14
13
14
15
20
21
22
20
21
20
21
20
21
22
27
28
29
27
28
27
28
27
28
29
When selecting [Calendar]
To use various features, press . To return to the Home menu, press .
The currently available menu items pop up.
Thumbnail 1/2 Thumbnail 1/2
MENU
Select
Group Add/Edit
Export
Slide Show
Delete
Information
HOME
To close the menu list, press again.
Home
Calendar
Folder
Group
Settings
Quick Guide to the Screens
Thumbnail 1/2
Thumbnail
Shows the reduced
images as a list
Full screen
Shows an image in full
size of the screen
Group
001
002
003
004
005
006
Group
Shows the registered
groups list
MENU
Select
Group Add/Edit
Export
Duplicate
Date Sort
Slide Show
Delete
Information
Find Date
HOME
Menu
Shows the menu list
11
Page 12
B
Preparations
Unpacking
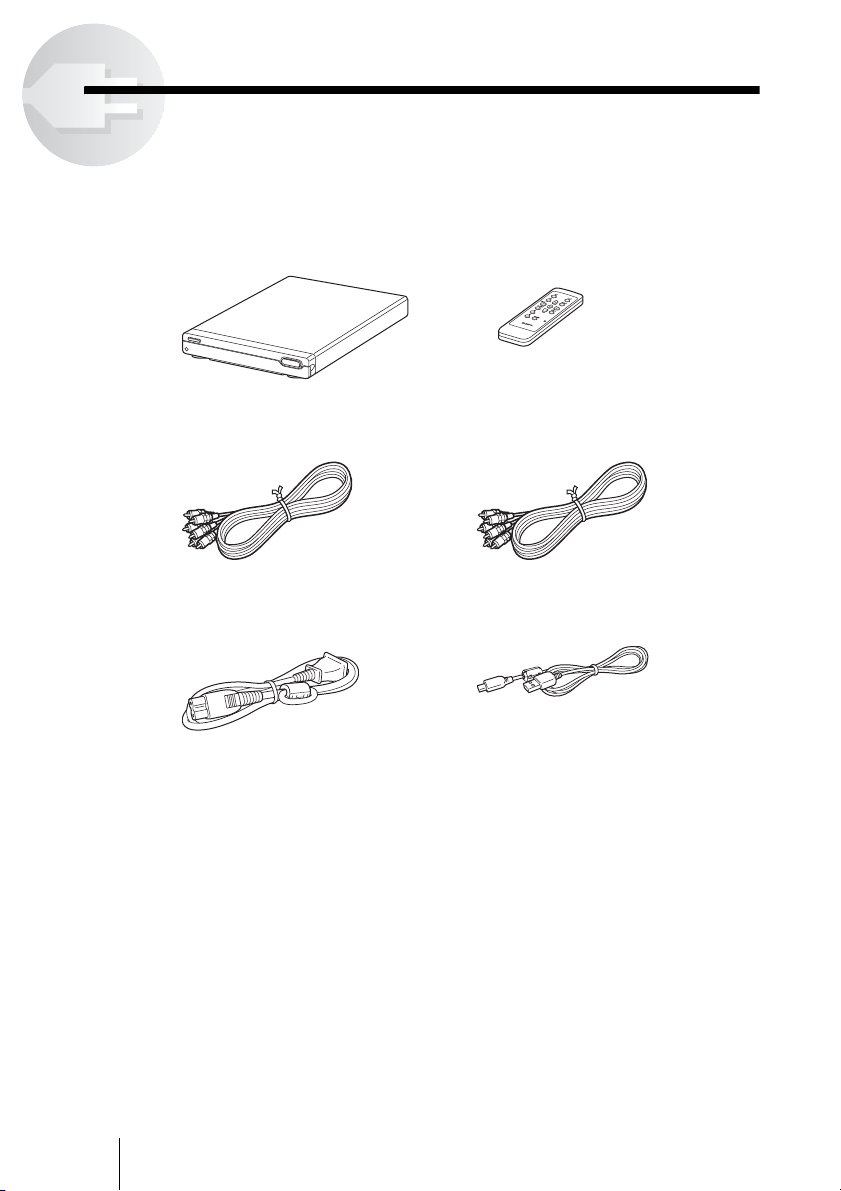
Check that you have the following items. Should anything be missing, contact
your dealer or service center in your area.
• HDD photo storage unit (1) • Remote control
• Audio/video cable (1) • Component video cable (1)
• Power cord (1) • USB cable (1)
(with CR2025 lithium battery) (1)
C
O
P
Y
12
• Operating Instructions (this document) (1)
• Warranty card (1)
Page 13

Preparing the remote control
Pull out the insulating sheet, as illustrated.
When using the remote control, point it at the remote sensor on the unit.
To replace the battery
If remote control performance deteriorates, replace the battery with a new one.
Use the CR2025 lithium battery for the remote control.
1 Open the cover and remove the battery.
2 Insert a new CR2025 lithium battery.
When inserting a battery, make sure e of the battery is facing up.
Insulating sheet
Pull out
Preparations
3 Close the cover.
13
Page 14

Notes
• Caution: There is a risk of explosion if the battery is replaced by an incorrect type.
• Caution: To preserve our environment, dispose of used battery according to your local laws
or regulations.
• Do not leave the remote control in an extremely hot or humid place.
• Do not drop any foreign object into the remote casing, particularly when replacing the
battery.
• Improper handling of battery may result in battery leakage or corrosion. Observe the
following:
– Do not attempt to charge the battery.
– If you do not intend to use the remote control for an extended period of time, remove the battery
to avoid possible damage from leakage and corrosion.
• Do not expose the remote sensor to direct light from the sun or any lighting apparatus.
Doing so may cause a malfunction.
14
Page 15

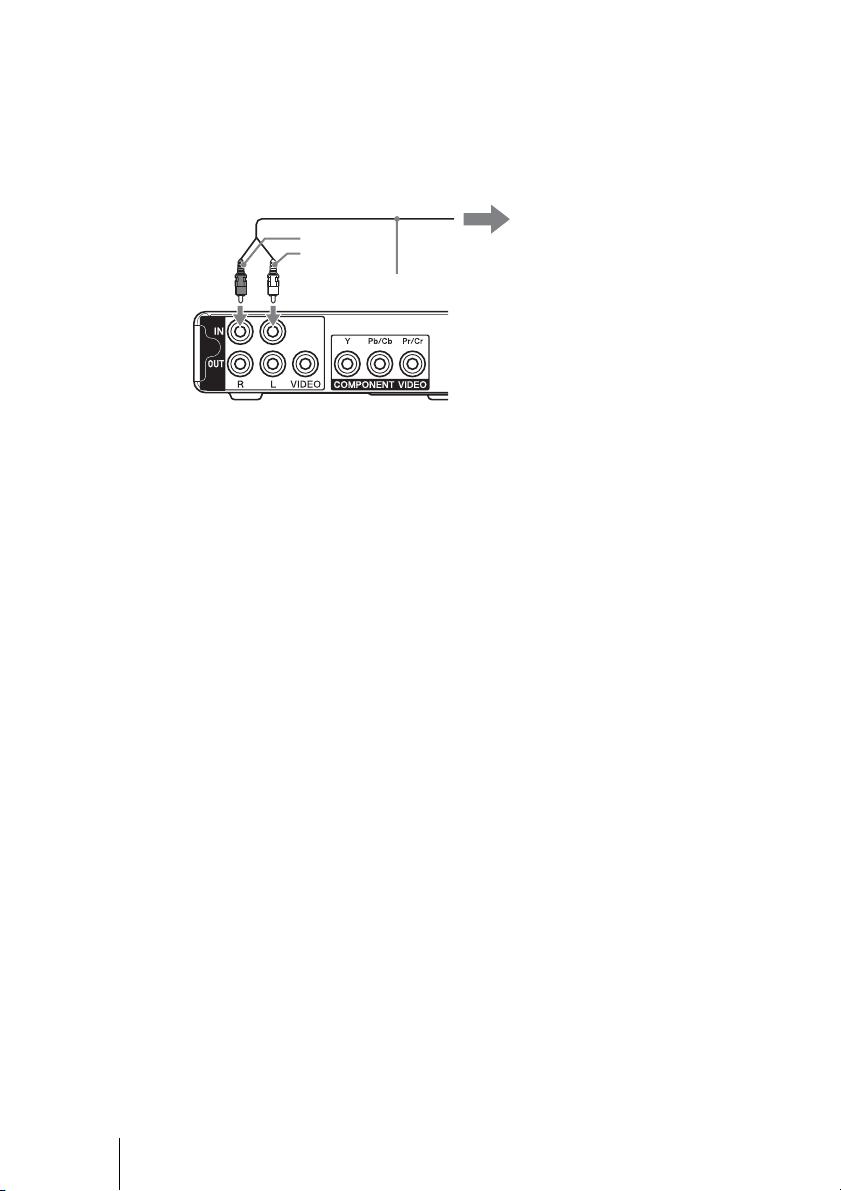
Connecting to a TV
t
You can view stored images on a TV. If you have a TV with a component
connection, you can enjoy clearer images by using the supplied component
video cable.
1 Connect the unit to a TV using the supplied cable as illustrated.
TV (without component connection) TV (with component connection)
Rear of the unit
Ye l l o w
White
Red
Audio/video cable
(supplied)
Rear of the unit
Audio/video
cable (supplied)
Pr/Cr
P
b/Cb
White
Red
Y
Componen
video cable
(supplied)
Preparations
IN
TV
R L VIDEO
AUDI O
IN
TV
R L VIDEO
AUDI O
YPb/CbPr/C
2 Connect the power cord.
Connect the power cord to the AC IN connector of the unit, then connect
the other end to a wall outlet.
AC IN
100-240V
Power cord
(supplied)
Note
Only use the supplied power cord; other power cords are not guaranteed.
To wall outlet
r
15
Page 16
To connect to an external audio device
If the unit is connected to an external audio device, you can listen to music
through the audio device during a slide show.
Connect the audio cable (not supplied) to the Audio IN of the unit, then
connect the other end to the LINE OUT of your audio device. See also the
instruction manual supplied with the device.
To LINE OUT
Red
White
Audio cable
(not supplied)
of your audio device
16
Page 17

Turning on the Unit
1 Switch the input selector of the TV.
2 Press the "/1 (power) switch of the unit or remote control.
The "/1 (power) switch of the unit lights up in green when the unit is
turned on.
When the unit turns on for the first time, the date and time setting display
will appear. To set the date and time, see step 3 (page 18) of “Setting the
Date and Time”.
COPY
To turn off the unit
Press the "/1 (power) switch of the unit or remote control.
If the menu on the screen does not work
See “To turn off the power by force” (page 59) of “Troubleshooting”.
Preparations
17
Page 18

Setting the Date and Time
1 Select [Settings] in the Home menu using the M/m buttons, then
press .
The setting menu appears.
Settings
Information
Slide Show
Video Out
Date and Time
2 Select [Date and Time] using the M/m buttons, then press .
The Date and Time setting screen appears.
Date and Time
2005.12.24 14:20
Date and Time
18
Date FormatY / M / D
OK
3 Select [Date and Time] using the M/m buttons, then press .
The setting screen to set [Year], [Month], [Day], [Hour], or [Minute]
appears.
Date and Time
Date and Time
Y M DY M D
2005 12 24 14 20
// :
OK
Page 19

4 Select [Year], [Month], [Day], [Hour], or [Minute] using the
</,/M/m buttons, then press .
The / appears below the selected item.
Date and Time
Date and Time
Y M DY M D
2005 12
// :
_
+
24 14 20
OK
5 Set [Year], [Month], [Day], [Hour], or [Minute] with / using
the </, and press buttons.
6 Press M.
The Selected item is fixed.
To move to the next or previous item, press </,.
7 Select [OK] using the M/m buttons, then press .
The top menu of date and time settings appears.
8 Select [OK] using the M/m buttons, then press .
After setting is completed, the setting menu appears.
To return to the previous screen
Press BACK.
When the HOME button is pressed, the Home menu appears.
Preparations
19
Page 20
B
o
o
Copying Images to the Unit
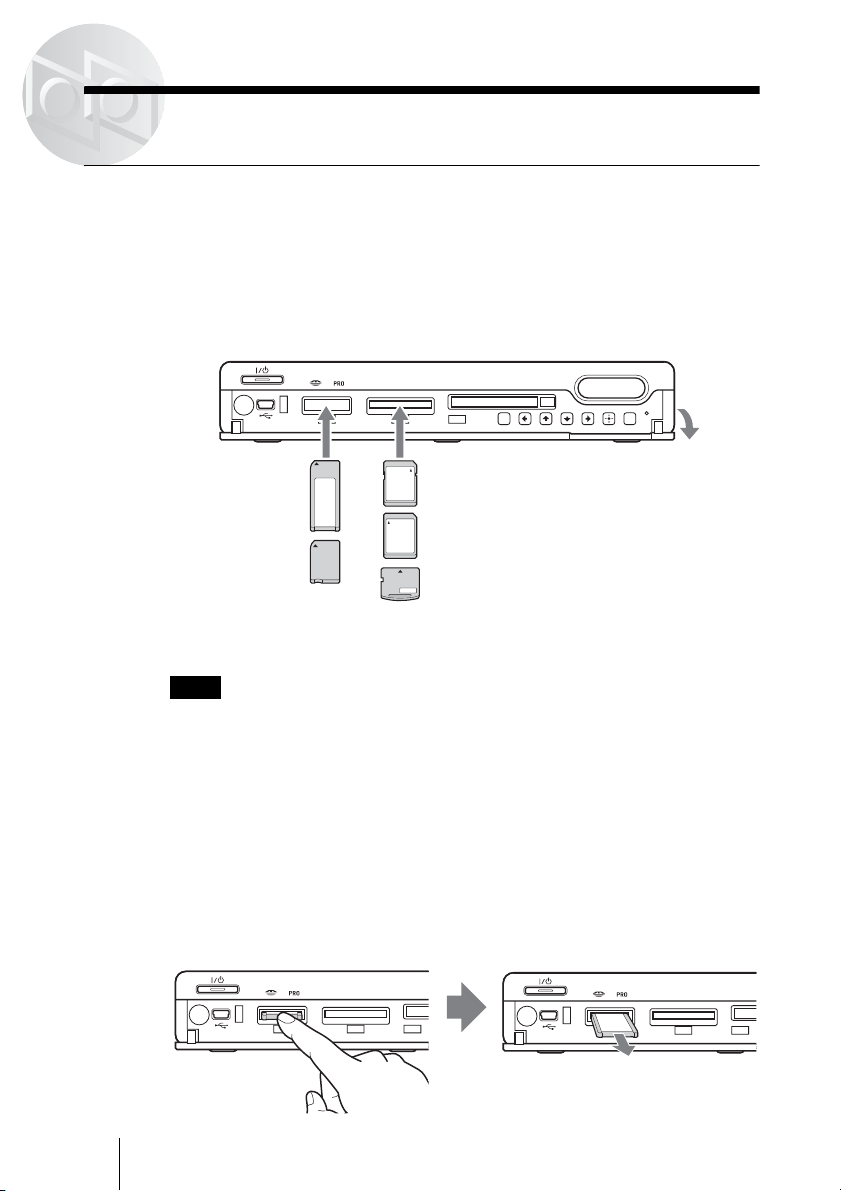
Inserting and Removing a Memory Card
Inserting a “Memory Stick” or SD Memory Card (SD)/MultiMediaCard (MMC)/xD-Picture Card (xD)
Open the front cover and insert the “Memory Stick” or SD/MMC/
xD as illustrated, until it clicks into place.
When using a “Memory Stick Micro” (“M2”) or miniSD with the unit, you
need to use the memory card with the M2 adaptor or SD adaptor
respectively (not supplied).
SD/MMC/
S
T
D
/D
U
O
ConpactFlash/Microdrive
X
D
SD Memory Card
COPY
M
E
N
U
B
A
C
K
Open the front
cover.
“Memory Stick”
MultiMediaCard
With the labeled side up,
insert the “Memory Stick”
“Memory Stick Duo”
xD-Picture Card
or SD/MMC/xD in the v
direction until it clicks.
The “Memory Stick” or SD/MMC/xD access lamp lights up when
“Memory Stick” or SD/MMC/xD is detected.
Note
The unit has a slot that can take both standard size and Duo size. All the products with such
a slot as this are equipped with a system which automatically measures the size of an inserted
memory card. That’s why both standard-size “Memory Stick” and smaller “Memory Stick
Duo” can be used on the unit without any Memory Stick Duo Adaptor.
To remove a “Memory Stick” or SD/MMC/xD
Push the “Memory Stick” or SD/MMC/xD all the way in, briefly
release it, and pull it out.
When you push the “Memory Stick” or SD/MMC/xD all the way in, it will
pop out slightly.
Push in Release briefly and pull out
20
SD/MMC/
X
S
T
D
/D
U
O
C
D
S
T
D
SD/MMC/
X
/D
U
O
C
D
Page 21

Inserting a CompactFlash (CF)/Microdrive
Open the front cover and insert the CF/Microdrive all the way
into the slot, as illustrated.
SD/MMC/
X
S
T
D
/D
U
O
ConpactFlash/Micr
D
odrive
M
E
N
U
COPY
B
A
C
K
Open the front
With the labeled side up, insert
the CF/Microdrive in the v
CompactFlash
cover.
direction all the way into the slot.
Microdrive
The CF/Microdrive access lamp lights up when the CF/Microdrive is
detected.
To remove a CF/Microdrive
Push the eject button all the way in, release it, and then pull the
CF/Microdrive out.
When you push the eject button in, the CF/Microdrive will pop out slightly.
Push the eject button
ConpactFlash/Micr
odrive
M
E
N
U
COPY
B
A
C
K
CF/Microdrive pops out
ConpactFlash/Micr
odrive
M
E
N
U
COPY
Copying Images to the Unit
B
A
C
K
Notes
• When multiple memory cards are inserted, the left side memory card has priority to be
recognized.
• Do not insert more than one memory card in each slot, as damage may occur.
• Before use, check that the memory card is inserted correctly.
• Do not remove the memory card while copying, as damage to data may occur.
• Do not close the slot cover when the eject button is out.
• If you attempt to insert “Memory Stick Micro” or miniSD without an M2 or SD adaptor
respectively, there is a possibility that it cannot be pulled out.
• Memory cards should be kept away from small children to prevent them from accidentally
swallowing it.
21
Page 22

Copying Images from Memory Card
You can copy images from memory cards to the HDD by a simple press of the
COPY button.
1 Press the "/1 (power) switch to turn on the unit.
2 Open the front cover and insert a memory card into the unit.
When a memory card is inserted, the memory card access lamp lights up.
3 Press COPY on the unit.
SD/MMC/
S
T
D
/D
U
O
ConpactFlash/Micr
X
D
odrive
M
E
N
U
COPY
B
A
C
K
Copying starts.
A folder is automatically created on the HDD and the images are copied to
the folder.
After copying is completed, the remaining capacity of the HDD is
displayed. Select [OK], then press .
4 Remove the memory card.
Hints
• You can also copy images from the computer. See “Connecting to a Computer” (page 52).
• When multiple memory cards are inserted, the left side memory card has priority to be
recognized.
• When you set [Auto Date Sort] (page 51) or [Memory Card Image Delete] (page 51) of
“Setting List”, each menu appears after copying is completed.
Notes
• The data read/write speed differs depending on the memory card and usage environment.
• Data of a memory card that has an access control attribute set on another device cannot be
read or copied on the HDD of the unit. To enable reading and copying of such data, you
must first disable access control on the other device.
• MagicGate-compatible data can be copied but not played back with the unit.
22
Page 23

To stop copying
Select [CANCEL], then press while copying.
To verify the remaining capacity of the HDD
See [Information] (page 50) of “Setting List”.
Folder name and image storage locations
When you copy images from a memory card to the HDD, all images are stored
in an automatically created folder. A folder name is automatically given
according to the most recent shooting date of the images (e.g.,
“20060401.001”). For multiple folders created on the same day, an extension
is added, which increases with subsequent folders (e.g., “20060401.002”,
“.003”). If an image file has no date, it is saved in a folder named
“19800000.xxx”.
Copying Images to the Unit
23
Page 24

B
2
16
23
30
10
17
24
31
11
18
25
19
26
13
20
27
14
21
28
15
22
29
10
17
24
31
11
18
25
19
26
13
20
27
14
21
28
Viewing Images
Selecting Images by Date
The Calendar screen allows you to search for images by a date.
1 Select [Calendar] in the Home menu using the M/m buttons, then
press .
The Calendar screen appears.
To display another month, press PAGE UP/DOWN.
2005.10
S
M
T
W
T
F
2
2
9
9
16
16
23
23
30
30
3
3
3
3
10
10
10
10
17
17
17
17
24
24
24
24
31
31
31
31
4
4
4
4
11
11
11
11
18
18
18
18
25
25
25
25
5
5
5
5
121212121212
19
19
19
19
26
26
26
26
2 Select a day using the </,/M/m buttons, then press .
The Folder screen appears.
6
6
6
6
13
13
13
13
20
20
20
20
27
27
27
27
7
7
7
7
14
14
14
14
21
21
21
21
28
28
28
28
1
1
8
8
15
15
22
22
29
29
S
24
Folder 1/2
20051012.001
20051224.001
20051224.002
20051224.003
20060214.001
20060214.002
Page 25

3 Select the folder to view using the M/m buttons, then press .
The Thumbnail screen appears.
Thumbnail 1/2
4 Select the image to view using the </,/M/m buttons, then
press .
The selected image appears as a full screen.
To display the next/previous image, press </,.
Viewing Images
Hint
If you set [Non-image Display], you can display files other than images (e.g., MPEG files)
on the Thumbnail screen. For details on how to set, see [Non-image Display] (page 50) of
“Setting List”.
To return to the previous screen
Press BACK.
When the HOME button is pressed, the Home menu appears.
25
Page 26

Specifying a shooting date to display in the Calendar screen
You can specify a shooting date of images in the Calendar screen by entering
a date. This is useful when you want to view images taken some years ago.
1 Display the Calendar screen, then press MENU.
The menu list appears.
MENU
Find Date
HOME
2 Select [Find Date] using the M/m buttons, then press .
The Find Date screen appears.
Find Date
Ye a r
Month
Day
2004
12
26
OKBACK
3 Set the desired year, month, and day using the </,/M/m and
the buttons.
26
Page 27

4 Select [OK] using the </,/M/m buttons, then press .
3
10
31
11
19
13
20
27
14
21
28
15
22
29
10
31
11
19
13
20
27
14
21
28
121212
1617171818
18
2324242525
25
30
The Calendar screen including the selected date appears.
2004.12
S M
5
5
5196
5196
1212
12
19
19
262626262626
To close the menu list
Press MENU.
6
6
13
13
13
13
20
20
20
20
27
27
27
27
7
7
7
7
14
14
14
14
21
21
21
21
28
28
28
28
T
W
T
F
1
1
8
8
15
15
22
22
29
29
292
9
16
23
30
30
3
4
3
4
3
4
3
4
10
11
10
11
10
11
10
11
171718
17 1817 1816
242425
24 2524 2523
31
31
31
31
S
Viewing Images
27
Page 28

Selecting Images by Folder
You can search for an image by selecting the folder from the Folder screen.
1 Select [Folder] in the Home menu using the M/m buttons, then
press .
The Folder screen appears.
To display the next or previous page, press PAGE UP/DOWN.
Folder 1/2
20051012.001
20051224.001
20051224.002
20051224.003
20060214.001
20060214.002
2 Select the folder to view using the M/m buttons, then press .
The Thumbnail screen appears.
Thumbnail 1/2
28
Page 29

3 Select the image to view using the </,/M/m buttons, then
press .
The selected image appears as a full screen.
To display the next/previous image, press </,.
Hint
If you set [Non-image Display], you can display files other than images (e.g., MPEG files)
on the Thumbnail screen. For details on how to set, see [Non-image Display] (page 50) of
“Setting List”.
To return to the previous screen
Press BACK.
When the HOME button is pressed, the Home menu appears.
Viewing Images
29
Page 30

Selecting the folder by setting the date
When there are many folders in the unit, you can move to the desired folder by
entering the folder name.
1 Display the Folder screen, then press MENU.
The menu list appears.
MENU
Select
Group Add/Edit
Export
Duplicate
Date Sort
HOME
Slide Show
Delete
Information
Find Date
2 Select [Find Date] using the M/m buttons, then press .
The Find Date screen appears.
Find Date
Ye a r
Month
Day
2004
12
26
OKBACK
3 Set desired year, month, and day using the </,/M/m and the
buttons.
30
Page 31

4 Select [OK] using the </,/M/m buttons, then press .
The Folder screen appears with the selected folder highlighted.
Folder 1/2
20001231.001
20001231.002
20030303.001
20030307.001
20041115.001
20041115.002
To close the menu list
Press MENU.
Viewing Images
31
Page 32

Zooming Images
You can zoom a displayed image in or out. For details on how to display an
image, see pages 24 and 28.
1 Display an image to zoom in full screen, then press .
The image zooms in.
While pressing the button, the zoom size is displayed on the screen.
To zoom out, press .
2 Press </,/M/m to adjust the location of the screen.
The zoomed image returns to the original size when you go back to the
Thumbnail screen.
Hint
You can also zoom in or out of the menu list.
1 Display an image to zoom in full screen, then press MENU.
2 Select [Zoom] using the </,/M/m buttons, then press .
3 Press , to zoom in or < to zoom out, then press .
4 Press </,/M/m to adjust the location of the screen.
When enlargement is 1.0, press </, to display the next/previous image.
32
To return to the previous screen
Press BACK.
When the HOME button is pressed, the Home menu appears.
Page 33

Rotating Images
You can rotate the displayed image. For details on how to display an image,
see pages 24 and 28.
1 Display an image to rotate in full screen, then press MENU.
The menu list appears.
MENU
Zoom
HOME
Rotate
2 Select [Rotate] using the </,/M/m buttons, then press .
/ appear on the image.
3 Press , to rotate clockwise, then press .
Each press rotates the image 90 degrees.
To rotate counterclockwise, press <.
Viewing Images
When the button is pressed, the rotated image will be fixed.
33
Page 34

Hints
• The information of the rotated image is retained even when you go back to the Thumbnail
screen.
• The unit automatically duplicates an image to rotate. The original image is saved by
changing the file extension to “ORG” when you rotate it. Original images with the “ORG”
extension are not recognized by the unit and are displayed with the “?” icon. To display the
original image after copying to your computer, you need to change the extension from
“ORG” to “JPG”. For details on the “?” icon, see [Non-image Display] (page 50) of
“Setting List”.
To return to the previous screen
Press BACK.
When the HOME button is pressed, the Home menu appears.
34
Page 35

Playing a Slide Show
You can enjoy viewing selected images as a slide show.
1 Select a folder to display as a slide show in the Folder screen,
then press .
The Slide Show screen appears.
Slide Show
ThemePhoto Diary
BGMDefault BGM
BACK
Play
2 Select [Play] using the M/m buttons, then press .
The slide show starts.
To pause the slide show, press
Note
It may take time to start a slide show, depending on the images.
Hints
• You can also display the Slide Show screen by selecting [Slide Show] from the menu list
of the Thumbnail or Folder screen.
• You can enjoy a slide show using multiple folders or multiple images in a folder (page 36).
To stop the slide show
Press BACK during the slide show.
To make slide show settings
You can select a special effect and music for a slide show. See [Slide Show]
(page 50) of “Setting List”.
. To continue, press .
Viewing Images
35
Page 36

Selecting multiple images or folders
When multiple images or folders have been set, you can operate without
selecting images or folders individually. This is useful when you want to delete
images or folders, or play a slide show, etc.
1 Display the Thumbnail or Folder screen, then press MENU.
The menu list appears.
MENU
Select
Group Add/Edit
Export
HOME
Slide Show
Delete
Information
2 Select [Select] using the </,/M/m buttons, then press .
3 Select an image or folder using the </,/M/m buttons, then
press .
To cancel the selection, press again.
Select the next image or folder using the </,/M/m buttons
continuously, then press .
4 When you finish selecting, press MENU.
The menu list appears.
For subsequent operations, see pages of each menu.
To cancel all selection
Press MENU, select [Deselect] using the </,/M/m buttons, then press .
36
Page 37

B
Managing Images
Registering Images to a Group
You can register images to a group to make searching for an image easier. You
can also play a slide show of a registered group.
1 Display the Thumbnail or Folder screen.
2 Select an image to register using the </,/M/m buttons, then
press MENU.
The menu list appears.
MENU
Select
Group Add/Edit
Export
Duplicate
Date Sort
HOME
Slide Show
Delete
Information
Find Date
3 Select [Group Add/Edit] using the </,/M/m buttons, then
press .
The Group Add/Edit screen appears.
Group Add/Edit
NEW
002
003
004
005
006
Managing Images
4 Select a group to add an image to using the M/m buttons, then
press .
To create a new group, select [NEW], then press .
A group name is created automatically.
The confirmation screen appears.
37
Page 38

5 Select [OK] using the </, buttons, then press .
The selected image is registered to the group.
Hints
• When you want to register multiple images to a group, the [Select] function may be useful.
To select multiple images, see page 36.
• You can also register the same image to another group.
• If you register a folder, all images in the folder will be registered to the group.
• The maximum number of groups you can create is 999.
To remove images from a group
1 Select [Group] in the Home menu using the M/m buttons, then
press .
The Group screen appears.
Group
001
002
003
004
005
006
38
2 Select the group containing the image(s) to be removed using
the M/m buttons, then press .
The Thumbnail screen appears.
Thumbnail 1/2
Page 39

3 Select an image to remove using the </,/M/m buttons, then
press MENU.
The menu list appears.
MENU
Select
Group Add/Edit
Export
HOME
Slide Show
Remove Image
Information
4 Select [Remove Image] using the </,/M/m buttons, then
press .
The confirmation screen appears.
5 Select [OK] using the </, buttons, then press .
The selected image is removed from the registered group.
After removing is completed, a message will be displayed. Select [OK],
then press .
Hint
When you remove all images from the group, the group will be deleted.
Managing Images
39
Page 40

Viewing images registered in a group
1 Select [Group] in the Home menu using the M/m buttons, then
press .
The Group screen appears.
Group
001
002
003
004
005
006
2 Select the group containing the image(s) to view using the M/m
buttons, then press .
The Thumbnail screen appears.
Thumbnail 1/2
40
3 Select an image to view using the </,/M/m buttons, then
press .
The selected image appears in the full screen.
To display the next/previous image, press </,.
To return to the previous screen
Press BACK.
When the HOME button is pressed, the Home menu appears.
Page 41

Setting a group number to select the group
You can find a group by its number.
1 Select [Group] in the Home menu using the M/m buttons, then
press .
The Group screen appears.
Group
001
002
003
004
005
006
2 Press MENU.
The menu list appears.
MENU
Find Group #
HOME
Slide Show
Managing Images
41
Page 42

3 Select [Find Group #] using the </,/M/m buttons, then press
.
The Find Group Number screen appears.
Find Group #
001
OKBACK
4 Set the group number using the </, and the buttons.
5 Select [OK] using the M/m buttons, then press .
After setting a group number, the group list is displayed.
42
Page 43

Deleting Images or Folders
1 Display the Thumbnail or Folder screen.
2 Select the image or folder to delete using the </,/M/m
buttons, then press MENU.
The menu list appears.
MENU
Select
Group Add/Edit
Export
HOME
Slide Show
Delete
Information
3 Select [Delete] using the </,/M/m buttons, then press .
The confirmation screen appears.
Delete
Image will be deleted.
OKBACK
4 Select [OK] using the </, buttons, then press .
The selected image or folder is deleted.
After deleting is completed, a message will be displayed. Select [OK], then
press .
Managing Images
43
Page 44

Displaying Image or Folder Information
You can display the file name, file size, shooting date, etc., of an image or
folder.
1 Display the Thumbnail or Folder screen.
2 Select the image or folder using the </,/M/m buttons, then
press MENU.
The menu list appears.
MENU
Select
Group Add/Edit
Export
HOME
Slide Show
Delete
Information
3 Select [Information] using the </,/M/m buttons, then press
.
Information screen of the selected image or folder appears.
Example: The information of an image
Information
File name :
File name :
File size :
File size :
Shooting date :
Shooting date :
Update :
Update :
Pixel data :
Pixel data :
Folder :
Folder :
DCIM/101MSDCF
DCIM/101MSDCF
DSC00157.JPG
DSC00157.JPG
602k
602k
2005.12.24
2005.12.24
2005.12.24
2005.12.24
1,280 x 960
1,280 x 960
STORE.IPS/20051224.001/
STORE.IPS/20051224.001/
OK
44
Select [OK] and press , then the Thumbnail or Folder screen appears.
Page 45

Sorting Images by Shooting Date
When you copy images from a memory card to the HDD, all the images are
stored in the automatically created folder named according to the most recent
shooting date of the images. Using the [Date Sort] function, you can sort
images into corresponding shooting date folders.
1 Display the Folder screen.
2 Select the folder to sort by shooting date using the M/m buttons,
then press MENU.
The menu list appears.
MENU
Select
Group Add/Edit
Export
Duplicate
Date Sort
HOME
Slide Show
Delete
Information
Find Date
3 Select [Date Sort] using the </,/M/m buttons, then press .
The confirmation screen appears.
4 Select [OK] using the </, buttons, then press .
The shooting date folders are created automatically.
The images are sorted into their corresponding folders by shooting date.
Hint
When copying images from a memory card to the HDD, you can also sort images by shooting
date automatically. For details on how to sort images automatically, see [Auto Date Sort]
(page 51) of “Setting List”.
Managing Images
45
Page 46

Duplicating a Folder
You can back up important images by duplicating a folder.
1 Display the Folder screen, then press MENU.
The menu list appears.
MENU
Select
Group Add/Edit
Export
Duplicate
Date Sort
HOME
Slide Show
Delete
Information
Find Date
2 Select [Duplicate] using the </,/M/m buttons, then press .
The confirmation screen appears.
Duplicate
Folder will be duplicated.
OKBACK
3 Select [OK] using the </, buttons, then press .
The selected folder is duplicated.
The duplicated folder name will have an extension number added to its
original folder name.
After duplicating is completed, a message will be displayed. Select [OK],
then press .
46
To stop duplicating
Select [CANCEL] in step 3 while duplicating, then press .
Page 47

Exporting Images or a Folder to a Memory Card
You can export the data in the HDD to a memory card.
1 Insert a memory card into the unit.
2 Display the Thumbnail or Folder screen.
3 Select the image or folder to export using the </,/M/m
buttons, then press MENU.
The menu list appears.
MENU
Select
Group Add/Edit
Export
HOME
Slide Show
Delete
Information
4 Select [Export] using the </,/M/m buttons, then press .
The confirmation screen appears.
Export
Image(s) will be exported to memory card.
OKBACK
5 Select [OK] using the </, buttons, then press .
Exporting starts.
After exporting is completed, a message will be displayed. Select [OK],
then press .
Managing Images
47
Page 48

Hints
• When you want to export multiple images, the [Select] function may be useful. To select
multiple images, see page 36. Multiple folders cannot be exported.
• When multiple memory cards are inserted, the left side memory card has priority to be
recognized.
• If the memory card is not blank, a folder cannot be exported to the memory card, however,
images can be exported.
• To view exported images through a mobile phone or video game, refer to each supplied
instruction manual.
• Exporting will be continued until completed even if you turn off the unit.
To stop exporting
Select [CANCEL] in step 5 while exporting, then press .
48
Page 49

B
Setting Up the Unit
How to Set Up the Unit
The section explains how to set up the unit on the [Settings] screen. For details
on settings options, see “Setting List” (page 50).
1 Select [Settings] in the Home menu using the M/m buttons, then
press .
The setting menu appears.
Settings
Information
Slide Show
Video Out
Date and Time
2 Select the menu to change using the M/m buttons, then press
.
Example: [Slide Show] settings
Slide Show
ThemePhoto Diary
BGMDefault BGM
BACK
Play
3 Set the options using the </,/M/m and the buttons.
4 Select [OK] using the M/m buttons, then press .
When you finish setting each option, the screen returns to the setting menu.
Setting Up the Unit
49
Page 50

Setting List
You can set up the following options.
Information
Display the total capacity, utilized capacity, and free capacity of the HDD.
Slide Show
You can set a special effect and music for a slide show.
For details on the slide show, see “Playing a Slide Show” (page 35).
[Theme]
[BGM]
Set a theme for the slide show. You can select a special effect
from the effect list.
Set background music for the slide show. You can select music
from default BGM, an external audio device, or copied music in
the “MUSIC” folder in the HDD*.
* To play music in the “MUSIC” folder, you must copy it from the computer
to the folder. The music file name should be less than 8 characters and its
extension should be “WAV”. For folder location, see “Data Storage
Locations” (page 56).
Video Output
[NTSC/PAL]
[Component]
Set the video output signal (color format) to [NTSC] or [PAL]
when connecting to a TV.
Set the component output signal to [720p (16:9)] or [480i (4:3)]
when connecting to a TV via the component video cable.
Date and Time
For the time setting procedure, see “Setting the Date and Time” (page 18).
Date and Time Set [Year], [Month], [Day], [Hour] and [Minute].
Date Format Set the order to display [Month], [Day] and [Year].
Language
Set the screen language.
Non-image Display
You can display thumbnails of all files included in the selected folder. Files
other than images (e.g., MPEG files) are displayed as the “?” icon on the
Thumbnail screen.
50
Page 51

Auto Date Sort
Set whether to sort images by shooting date automatically after copying from
a memory card to the HDD is completed.
To sort images manually, see “Sorting Images by Shooting Date” (page 45).
Import Image(s)
If you cannot view images copied from other than a memory card in the HDD,
you may be able to view the images by converting them to a file which is
compatible with the unit.
For the procedure to convert files, see “To convert images” (page 57).
Memory Card Image Delete
Set whether to delete all files on the memory card automatically after copying
from a memory card to the HDD is completed.
Note
In certain cases, after deleting files on a memory card with the HDD, it may not be able to
save images using your digital camera. In that case, format the memory card with your digital
camera.
Reset
Reset all settings to default. Images in the HDD are not deleted.
HDD format
Format the HDD of the unit. If the HDD is formatted, all stored images will be
deleted. Be careful when formatting the HDD.
To format the HDD, select [HDD format] in the setting menu. Select [OK],
then press . Formatting starts automatically. After formatting is completed,
press .
Even after formatting, the unit settings will remain unchanged. To reset, set
[Reset] in the setting menu.
Setting Up the Unit
Software Update
Update firmware in the unit.
Demo Mode
Set whether to start demo automatically after turning on the unit.
Pressing any buttons other than "/1 (power) switch cancels the demo, then the
Home menu appears.
51
Page 52

B
Connecting to a Computer
Preparing the Unit and Computer
Recommended Computer
Environment
The unit can be used with computers
that run the following preinstalled
operating systems and equipped with
USB ports.
Windows
• Windows XP Professional
(Service Pack 1 or later)
• Windows XP Home Edition
(Service Pack 1 or later)
• Windows 2000 Professional
(Service Pack 4 or later)
• Windows Me
Macintosh
• Mac OS X (10.1 or later)
Notes
• Even if the operating system is one of the
above, operation is not guaranteed in a
multi-boot environment or if the operating
system is an upgrade version.
• Operation is not guaranteed if you use USB
interface cards or USB CardBus cards
added later.
To connect to a computer
This section explains how to connect
the unit to a computer using the USB
cable.
1 Turn on the unit and the
computer.
2 Connect the supplied USB
cable to the USB port of the
unit. Connect the other end of
the cable to the USB port of
your computer.
SD/MMC/
X
D
S
T
D
/
D
U
O
A
USB cable
(Supplied)
Note
Operation is not guaranteed if the unit is
connected to a USB hub. Establish a direct
USB connection.
Hint
When the unit is connected to a computer for
the first time, the necessary programs are
installed automatically.
To the USB
port of your
computer
52
Page 53

Copying Data to a Computer
By connecting the unit to a computer,
data on the HDD of the unit can be
managed by the computer.
To illustrate, this section explains how
to copy data from the HDD of the unit
to the “My Documents” folder of a
computer running Windows XP.
Copying data from the computer to the
HDD of the unit also uses a similar
procedure.
When you use Windows 2000 or
Windows Me, displayed messages
may differ.
Note
When the unit is connected to a computer, the
COPY button on the unit and remote control
are disabled.
Using with Windows
1 Open [My Computer].
In “My Computer”, the HDD of
the unit appears as follows.
2 Double-click [Removable
Disk (E:)].
The HDD contents of the unit
appear.
3 Double-click [STORE.IPS].
Files and folders on the HDD of
the unit appear. For details on
folder names, see “Data Storage
Locations” (page 56).
4 Double-click the folder that
contains the files to copy to
the computer.
5 Right-click the file to copy,
then click [Copy] on the
shortcut menu.
HDD of the unit
Connecting to a Computer
53
Page 54

6 Open [My Documents].
7 Right-click anywhere in the
“My Documents” window,
then click [Paste] on the
shortcut menu.
To disconnect the USB cable
from the computer
1 Click on the windows
taskbar.
2 Click [Safely remove USB
mass storage device - drive
(E:)].
3 Make sure that the drive letter
is correct and click [OK].
4 Disconnect the USB cable.
If the drive of the HDD Photo
Storage does not appear on the
computer
The selected file is copied to “My
Documents”.
Hint
The drive letters (e.g., “E:”) differ depending
on the computer system.
If a file of the same name already
exists in the destination folder
A message prompting you to confirm
whether you want to overwrite the
existing file appears. If you overwrite
the existing file, it is irrevocably lost,
as it is replaced by the new file. To
copy the new file without overwriting
the existing file with the same name,
save the new file under a different
name.
1 Right-click [My Computer],
then click [Properties] on the
shortcut menu.
The “System Properties” dialog
box appears.
2 On the [Hardware] tab, click
[Device Manager].
The “Device Manager” appears.
54
Page 55

3 Verify that no other devices
are shown. If other devices
are shown, delete them.
1 Make sure that “USB Mass
Storage Device” is displayed
as a . If it is, right-click it
and click [Uninstall] on the
shortcut menu. Perform the
same operation for “Disk
drivers”.
The “Confirm Device
Removal” dialog box appears.
Using with Macintosh
When the unit is connected to a
Macintosh computer with the USB
cable, icons for the HDD of the unit
appear on the desktop.
1 Double-click one of the newly
added icons on the desktop.
The HDD contents of the unit
appear.
2 Double-click [STORE.IPS].
2 Click [OK].
The device is removed.
After the device is removed,
disconnect the USB cable, and
then reconnect it.
Files and folders on the HDD of
the unit appear. For details on
folder names, see “Data Storage
Locations” (page 56).
3 Double-click the folder that
contains the files to copy to
the computer.
4 Drag the file to the hard disk
icon.
The file is copied to the hard disk.
55
Connecting to a Computer
Page 56

To disconnect the USB cable
1 Drag the HDD icon to the
trash.
Data Storage Locations
2 Disconnect the USB cable
from your computer.
Data copied to the HDD of the unit is
stored according to the following
rules.
Internal HDD
STORE.IPS
Date folder
Data
Date folder
Data
MUSIC
IMPORT
Hints
• When copying the data from a computer to
the HDD of the unit, you must store the
data to date folder (e.g., “20060301.001”,
“20060401.002”, etc.) in “STORE.IPS”.
The unit recognizes only data in the date
folder.
• The music file for slide show must be
stored in the “MUSIC” folder.
56
Page 57

To convert images
If you cannot view images copied
from a computer in the unit, you may
view images by converting them into
data which is compatible with the unit.
1 Select [Settings] in the Home
menu using the M/m buttons,
then press .
The setting menu appears.
2 Select [Import Image(s)]
using the M/m buttons, then
press .
The file conversion screen
appears.
3 Select [NEXT], then press .
The confirmation screen appears.
Import Image(s)
All images in "IMPORT" folder
will be imported in Sony HDPS format.
OKBACK
4 Select [OK], then press .
Conversion starts.
After converting is completed, a
message will be displayed. Select
[OK], then press .
Hints
• Only JPEG or RAW* images based on
DCF (Design rule for Camera File system)
can be recognized by the unit.
* For RAW image that can be displayed
with the unit, see “Supported file formats”
(page 63) of “Specifications”.
• The images to convert must be stored in the
“IMPORT” folder.
Connecting to a Computer
57
Page 58

B
Additional Information
Troubleshooting
This section provides information
related to the most common problems
encountered by users of this product
and their solutions. Check the points
listed here before contacting your
dealer or a service center. Refer also to
the documentation of your computer.
Memory Card
The memory card access lamp
does not light up. The unit does
not recognize the inserted
memory card.
c Remove the memory card and insert
again.
When multiple memory cards are
inserted, the left side memory card has
priority to be recognized.
After copying, the files are deleted
from the memory card.
c Set [Memory Card Image Delete] in
[Settings] to OFF.
A copied image file is sorted by
the shooting date automatically.
c Set [Auto Date Sort] in [Settings] to
OFF.
A copied image file is saved in the
folder named “19800000.xxx”.
c If the copied image has no date, it is
saved in a folder named
“19800000.xxx”.
All folders do not appear.
c When selecting a folder from the
Calendar screen, only the selected
date folder appears.
To display all folders, Select [Folder]
in the Home menu.
The “?” icon appears on the
Thumbnail screen.
c The files other than images are
displayed as a “?” icon on the
Thumbnail screen.
It takes time to display an image, a
thumbnail, or a slide show.
c It may take time depending on the file
format.
TV
The picture does not appear on
your TV.
c Check the setting of [Video Output] in
[Settings]. After changing the setting
of [Video Output] in [Settings], turn
off the unit.
If the changed setting caused no
picture on your TV, turn off the unit.
With holding the M button, turn on the
unit.
- For using component output
Check the TV setting and the
connection using the component video
cable.
- For NTSC/PAL output
Check the connection using audio/
video cable. If the component video
cable is also connected, the component
video cable has the priority. In this
case, disconnect the component video
cable.
Images
The folder name is not displayed
as the same as the shooting date.
c The folder name is automatically
given according to the most recent
shooting date or last modified date of
the images. Refer to “Folder name and
image storage locations” (page 23),
and “Sorting Images by Shooting
Date” (page 45).
58
Slide show
The favorite music cannot be
selected for the slide show.
c Check that the “WAV” file is stored in
the “MUSIC” folder of the unit.
Page 59

The music file name is not
displayed correctly.
c Check that the music file name is less
than 8 characters and its extension
should be “WAV”.
Music cannot be played with the
slide show.
- If BGM is set to Favorite in slide
show
Check that the music file is not
damaged.
- If BGM is set to External Input in
slide show
Check the Output of the connected
external audio device.
The slide show stops.
c As you pressed the button, the
slide show is paused. To continue,
press .
If the problem is still unresolved,
perform a forced shut down, then turn
on again. For details, see “To turn off
the power by force” (page 59).
Files other than JPEG cannot be
displayed.
c Set [Non-image Display] to ON in
[Settings] to display the “?” icon.
Remote control
The remote does not work.
c Check the battery level or change the
battery.
Point the remote at the remote sensor
on the unit.
Do not place objects between the
remote and the remote sensor on the
unit.
Setting
You can reset the unit without
selecting [Reset] in [Settings].
c Turn off the unit. With holding the M
button, turn on the unit. Images in the
HDD are not deleted.
Computer connection
The image copied from the
computer cannot be displayed.
c The data stored must be under rules.
See “Data Storage Locations”
(page 56).
The image cannot be converted.
c Check the file is stored in “IMPORT”
folder of the unit.
Other files
Files other than JPEG are
displayed.
c Set [Non-image Display] to OFF in
[Settings] not to display the “?” icon.
The file with the extension of
“ORG” is created.
c After rotating images, the original file
extension is changed to “ORG” and
rotated file is created with its
extension of “JPG”.
To turn off the power by force
If the problem is still unresolved after
checking the troubleshooting guide,
turn off the power by force.
Press the FORCED SHUT DOWN
switch using a pointed object.
C
o
n
p
ac
tF
M
C
X
/
D
las
h
/M
ro
ic
d
rive
COPY
M
E
N
U
B
A
C
K
Additional Information
59
Page 60

If the recovery screen appears
If the unit is inadvertently turned off,
etc., the recovery screen may appear
when the unit is turned on again.
Recovery
Recovery process is necessary as
power was not turned off normally.
It may take several minutes.
OK CANCEL
In this case, select [OK] using the
</, buttons, then press .
After recovering is completed, a
message will be displayed. Select
[OK], then press .
To stop recovering, select [cancel],
then press . The recovery screen
will appear every time you turn on the
unit until you complete recovery.
60
Page 61

Supported Memory Card Types
The following memory cards can be
used with the unit
“Memory Stick” (w/o MagicGate)
“MagicGate Memory Stick”
“Memory Stick”
(with MagicGate)
“Memory Stick Duo”
(w/o MagicGate)
“MagicGate Memory Stick Duo”
“Memory Stick Duo”
(with MagicGate)
“Memory Stick Pro”
“Memory Stick Pro Duo”
“Memory Stick Micro” (“M2”)
SD Memory Card
miniSD™ Card
MultiMediaCard™
RS-MMC™
CompactFlash
Microdrive
xD-Picture Card™
*1 Not all memory cards are guaranteed to
work.
Operation is not assured if non-supported
memory cards are used.
*2 Recording or playback of MagicGate data
that uses MagicGate technology is not
supported.
*3 Parallel data transfer (high-speed data
transfer) is supported.
Actual read/write speed may vary based
on media.
*4 With adapter (not included)
*5 Recording or playback of data that uses
SD technology is not supported.
*4 *6
®
®
*1
*4 *5
.
*2 *3
*2 *3
*2 *3
*2 *3
*5
*6
*6 MMCplus™ and MMCmobile™ are
supported, but parallel data transfer is not
supported.
Notes
• There is no guarantee that the unit can use
all memory cards.
• The unit supports “Memory Stick” and
Microdrives of up to 4 GB. Operation with
“Memory Stick PRO” or Microdrives of
higher capacities is not guaranteed.
*2
• Do not insert any media or devices into the
unit, other than those listed above.
About the “Memory Stick”
“Memory Stick” is a compact-size IC
recording medium with a large
*2
capacity. It has been designed not only
for exchanging/sharing digital data
among “Memory Stick” compliant
products, but also for serving as an
insertable/removable external storage
medium that can save data.
*2 *4
What is MagicGate?
“MagicGate” is the general name of a
copyright protection technology
developed by Sony.
Notes on using “Memory Stick”
media
• If you set Write-Protect switch
“LOCK”, data cannot be recorded,
edited, or erased.
Terminal
Write-protect
switch
Label area
Additional Information
• Do not remove “Memory Stick”
while data is being read or written.
• Data may be damaged if:
– You remove “Memory Stick” or turn off the
power of the product while data is being
read or written.
61
Page 62

– You use “Memory Stick” in a place where it
is susceptible to static electricity or electric
noise.
• We recommend that you make a
backup copy of important data in
“Memory Stick”.
• Do not touch the terminal of
“Memory Stick” with anything
including your fingers or metallic
objects.
• Do not bend, drop, or put a big
impact on “Memory Stick”.
• Do not disassemble or modify
“Memory Stick”.
• Keep “Memory Stick” away from
water.
• Do not use or keep “Memory Stick”
under an unfavorable condition as
below:
– Extremely hot place (such as in a parked car
with windows closed in summer, a spot
under direct sunlight, or near an electrical
appliance that radiates heat)
– Humid place
– Place near corrosive substances
• If you format a medium in which
data has been already written, all the
data and software will be erased.
Please be cautious not to mistakenly
erase any important data.
• Use an object with a sharp tip to
move the Write-Protected switch.
• Do not press on the memo area
strongly when writing.
• Carry and keep “Memory Stick” in
the supplied case.
Cleaning the Cabinet
Wipe the outside of the unit with a
soft, dry cloth. To remove stubborn
stains, moisten the cloth with a mild,
neutral detergent. Do not use solvents,
cleaning alcohol, benzene, or other
substances that may damage the
finish.
Notes on using “Memory Stick
Duo”
• When you use “Memory Stick Duo”
without Write-Protected switch, be
careful not to edit or erase important
data by mistake.
• When you use “Memory Stick Duo”
with Write-Protected switch, data
cannot be recorded, edited, or erased
by “LOCK” the switch.
Terminal
Write-protect
switch
Memo area
62
Page 63

Specifications
HDPS-L1
Storage capacity
80 GB
(The capacity that can actually be used
is approximately 75GB due to the
system management area on HDD. It
will be displayed as 70GB on your PC
since it calculates 1GB as
1,073,741,824 bytes.)
Media slots
“Memory Stick” slot 1
SD Memory Card/MultiMediaCard/
xD-Picture Card slot 1
CompactFlash/Microdrive slot 1
Supported memory cards
See page 61.
Interface
USB 2.0 (Hi-Speed/Full-Speed)*
*Data transfer reverts to Full-speed USB
(12 Mbps) if computer does not support
USB 2.0.
Connector
USB (mini-B) × 1
IN (Audio In) × 1
OUT R/L/VIDEO
(Audio/Video Out) × 1
COMPONENT VIDEO × 1
Power supply
100 V - 240 V AC, 50/60 Hz
Power consumption
7.5 W maximum
Ambient conditions
Operating temperature: 5°C to 35°C
(41°F to 95°F) (temperature gradient
less than 10°C/hour (50°F/hour))
Operating humidity: 20% to 80%
(non-condensing)
Dimensions
Approx. 215 × 35 × 255 mm
1
/2 × 1 3/8 × 10 1/8 in.) (W × H × D)
(8
Mass
Approx. 1.8 kg (4 lbs.)
Supported file formats
Still image
JPEG: JPG
RAW*: SRF, SR2
Music: WAV
* Thumbnail of RAW files is
displayed as native.
Supplied accessories
Remote control
(with CR2025 lithium battery) (1)
Power cord (1)
Audio/video cable (1)
Component video cable (1)
USB cable (1)
Operating Instructions
(this document)
Warranty card (1)
• , “Memory Stick”, “Memory
Stick Duo”, “MagicGate Memory
Stick”, “MagicGate Memory Stick
Duo”, “Memory Stick PRO”, “Memory
Stick PRO Duo”, “Memory Stick
Micro” and “M2” are registered
trademarks or trademarks of Sony.
• Microsoft
Windows logo are registered trademarks
or trademarks of Microsoft Corporation
in the United States of America and/or
other countries.
•Macintosh
trademarks of Apple Computer, Inc. in
the United States of America and/or
other countries.
• Other system and product names used
herein are registered trademarks or
trademarks of their respective
manufacturers.
• The raster process of true type fonts is
based on the FreeType Team software.
®
, Windows®, and the
®
and Mac OS® are registered
Design and specifications are subject
to change without notice.
Screen displays in this manual may
not be the same as those of the
product.
Additional Information
63
Page 64

Identifying Parts
1234 567
Front panel of the unit
SD/MMC/
X
D
S
TD
/D
U
O
A "/1 (power) switch
(page 17)
B “Memory Stick” slot
(page 20)
C SD/MMC/xD slot (page 20)
D CompactFlash/Microdrive
slot (page 21)
E Eject button of
CompactFlash/Microdrive
(page 21)
F COPY button (page 22)
G FORCED SHUT DOWN
switch (page 59)
H BACK button (page 10)
ConpactFlash/Microdrive
M
E
N
U
COPY
M “Memory Stick” access
lamp (page 20)
N USB access lamp
O USB port (page 52)
P Remote sensor
B
AC
K
890qaqsqdqfqgqh
I </,/M/m/ (enter)
buttons (page 10)
J MENU button (page 11)
K CompactFlash/Microdrive
access lamp (page 21)
L SD/MMC/xD access lamp
(page 20)
64
Page 65

Rear panel of the unit
AC IN
100-240V
A IN (Audio In) (page 16)
B OUT R/L/VIDEO (Audio/
Video Out) (page 15)
Remote control
A (slide show) button
(page 35)
B PAGE UP button
1
2
3
4
5
6
C COMPONENT VIDEO
(page 15)
D AC IN (page 15)
7
8
9
0
F HOME button (page 11)
G "/1 (power) switch
(page 17)
Additional Information
C PAGE DOWN button
D (zoom in) button
(page 32)
E (zoom out) button
(page 32)
H MENU button (page 11)
I </,/M/m/ (enter)
buttons (page 10)
J BACK button (page 10)
65
Page 66

Technical Support
Sony Direct Response Center
12451 Gateway Blvd
Fort Myers, FL 33913
(800) 222-SONY (7669)
www.sony.com/service
66
Page 67

Index
A
Auto Date Sort 45, 51
B
Battery 13
BGM 50
C
Calendar screen 10, 24, 26
Cleaning 62
CompactFlash (CF) 21
Connecting
computer 52
TV 15
Convert 51, 57
Copy
images 22
to a Computer 53
D
Date and Time 18, 50
Delete 43
Demo Mode 51
Duplicate 46
E
Export 47
F
Find
Calendar 26
Folder 30
group number 41
Folder name 23
Folder screen 10, 24, 28, 30
FORCED SHUT DOWN
switch 59
G
Group
find 41
register 37
remove 38
view 40
H
HDD format 51
Home menu 10, 11
I
Identifying Parts 64, 65
Import Image(s) 51, 57
Information 44, 50
L
Language 50
M
MagicGate 61
Memory card
CompactFlash (CF) 21
Image Delete 51
insert and remove 20
“Memory Stick” 20, 61
Microdrive 21
MultiMediaCard (MMC) 20
SD Memory Card (SD) 20
supported types 61
xD-Picture Card (xD) 20
“Memory Stick” 20, 61
Microdrive 21
MultiMediaCard (MMC) 20
N
Non-image Display 50
R
Recovery 60
Remote control 65
Replace battery 13
Reset 51
Rotate 33
S
SD Memory Card (SD) 20
Set up 49
Setting list 50
Slide show 35
BGM 50
theme 50
Software Update 51
Sort 45, 51
Specifications 63
Storage locations 23, 56
T
Theme 50
Thumbnail screen 11, 25, 28
Troubleshooting 58
Turning on/off 17
V
Video Output 50
Viewing images
Calendar screen 24
Folder screen 28
Group 40
X
xD-Picture Card (xD) 20
Z
Zoom 32
Additional Information
67
Page 68

Printed in Malaysia
 Loading...