

Sony HAR-LH500 User Manual
4-249-904-11(1)
Hard Disc
Audio Recor der
Operating Instructions
HAR-LH500
© 2003 Sony Corporation

WARNING
To prevent fire or shock hazard, do not
expose the unit to rain or moisture.
To avoid electrical shock, do not open the cabinet.
Refer servicing to qualified personnel only.
This appliance is classified as
a CLASS 1 LASER product.
This marking is located on the
rear exterior.
To prevent fire, do not cover the ventilation of the
apparatus with news papers, table-cloths, curtains,
etc. And don’t place lighted candles on the apparatus.
To prevent fire or shock hazard, do not place objects
filled with liquids, such as vases, on the apparatus.
Don’t throw away the battery with
general house waste, dispose of it
correctly as chemical waste.
IN NO EVENT SHALL SELLER BE LIABLE
FOR ANY DIRECT, INCIDENTAL OR
CONSEQUENTIAL DAMAGES OF ANY
NATURE, OR LOSSES OR EXPENSES
RESULTING FROM ANY DEFECTIVE
PRODUCT OR THE USE OF ANY PRODUCT.
CAUTION
The use of optical instruments with this product will
increase eye hazard.
About HAR-LH500 manual
HAR-LH500 contains the following manuals.
Refer to them as required by the operation.
• HAR-LH500 Operating Instructions
(this manual)
This manual explains the connections and
operations of the recorder itself.
This manual mainly explains operations
using the remote, but the same operations
can also be performed using the buttons and
controls on the recorder having the same or
similar names.
• “M-crew for HAR-LH500” Help
This manual can be used after the “M-crew
for HAR-LH500” software is installed.
It explains the operations of the “M-crew for
HAR-LH500” software included on the same
CD-ROM.
• “M-crew for HAR-LH500” Install
manual
This manual is included on the supplied CDROM.
It explains how to install the supplied “Mcrew for HAR-LH500” software to your
computer.
2

Table of Contents
Overview
Playable discs................................................. 6
Getting Started
Inserting batteries into the remote ................. 6
Hooking up the system .................................. 7
Playing CDs
Loading a CD................................................. 8
Playing a CD
–– Normal Play/Shuffle Play/Repeat
Play ............................................................ 8
Using the CD display..................................... 9
Programming the CD tracks ........................ 10
Recording to HDD
Notes on recording....................................... 11
Recording a CD to the HDD
–– CD-HDD Synchro-Recording/
High-Speed CD-HDD Synchro-
Recording ................................................ 11
Using the HDD display................................ 13
Recording to the HDD ................................. 13
Recording the current CD track
–– REC-IT Function ............................... 14
Recording tips
–– Marking track numbers/Smart Space/
Adjusting the recording level .................. 15
Playing the HDD
Playing the HDD
–– Normal Play/Shuffle Play/Repeat
Play .......................................................... 18
Using the HDD display................................ 19
Playing a track in a play list
–– Play List Registration/Play List
Play .......................................................... 20
Locating a desired album or track
–– Keyword Search/Artist Play .............. 21
Playing a recently played album
–– History ............................................... 23
Editing Recorded HDD
Erasing recordings
–– Erase Function ...................................23
Dividing recorded tracks
–– Divide Function ................................. 25
Combining recorded tracks
–– Combine Function ............................. 26
Moving recorded tracks or albums
–– Move Function ................................... 27
Assigning a title or artist name to a track,
album or play list
–– Name Function................................... 28
Undoing the last edit
–– Undo Function ...................................31
Other Functions
Falling asleep to music
–– Sleep Timer ........................................ 32
Converting the format of recorded tracks .... 32
Using a Keyboard
Naming a track or an album using the
keyboard ............................................... 33
Operating the recorder using the
keyboard ............................................... 33
Additional Information
Precautions................................................... 34
Serial Copy Management System................ 35
Troubleshooting ...........................................36
Display Messages ........................................ 36
Setup menu table.......................................... 37
Specifications............................................... 38
List of button locations and reference
pages ..................................................... 39
3

Overview
This recorder, with its internal hard disc,
supports the following functions:
Recording
The recorder’s HDD can store up to 1,340
hours of data (in ATRAC3) or 125 hours of
data (in LINEAR PCM). Up to 999 albums can
be recorded on the HDD, with one album
containing up to 400 tracks. The maximum
number of tracks that can be recorded on the
HDD is 40,000. Like an MD deck, this
recorder supports Synchro-Recording and the
editing of recorded tracks.
Transferring MP3 format audio files
from your computer
MP3 format audio files stored in your computer
can be transferred to the recorder using the
supplied “M-crew for HAR-LH500” software.
Search
Specific tracks on the HDD can be easily
found.
• Keyword Search (page 21)
A keyword can be entered to find a desired
album or track. Keywords may be the name
of the album, track or artist.
• Artist Play (page 22)
The name of an artist can be used to find all
the songs by that artist (tracks labeled with
the artist’s name).
Automatic insertion of the albums,
tracks and artist’s names by CDDB
With the supplied “M-crew for HAR-LH500”
software, you can access Gracenote CDDB
server* from your computer to label albums,
tracks and artist’s names automatically.
*A database containing information about CDs on
the market
®
Play list
A play list is a receptacle for gathering together
only the tracks that you want. Besides the 999
albums that you can create on the HDD, you
can create up to 10 albums through play lists on
the HDD, with one play list containing up to
400 tracks. Tracks can be repeatedly added to
or deleted from play lists. Since track data are
originally recorded inside albums on the HDD,
the original data are not affected by the deletion
of tracks from a play list.
Notes
• The recorded music is limited to private use
only. Use of the music beyond this limit
requires permission of the copyright holders.
• Sony is not responsible for any loss that may
arise from lost data.
• Recording to the hard disc should be considered
as a temporary means of storing audio data. Be
sure to retain the original sound source as
backup.
• There is no service for the recovery of lost data.
• You may hear sounds as the recorder access the
hard disc when you turn on the recorder, play an
HDD track, record to the HDD, etc. These
sounds are natural to the HDD and are not
abnormal.
• The recorder may make sounds even when no
operation is being performed. These sounds are
produced by the recorder’s self-maintenance
functions and are not abnormal.
• You may also feel vibrations from the recorder,
but this is not a malfunction.
• The copying of digital data is restricted by the
Serial Copy Management System (page 35).
For this reason, digital data recorded from a CD
in the recorder’s CD player, digital data input
from an a CD player connected through the
DIGITAL OPTICAL IN connector, and MP3
files transferred from a computer cannot be
copied to an externally connected recording
device. Note that an MP3 format file that is
transferred from your computer to the HDD is
erased from the computer, and files transferred
to the HDD cannot be transferred back to the
computer.
M-crew is the registered trademark of Sony
Corporation.
IBM is the registered trademark of International
Business Machines Corporation.
4
Flow-Down License Terms
This product contains technology and data from
Gracenote, Inc. of Berkeley, California
(“Gracenote”). The technology from Gracenote (the
“Gracenote Embedded Software”) enables this
product to do disc identification and obtain musicrelated information, including name, artist, track, and
title information (“Gracenote Data”), which is
included on the Gracenote Database (the “Gracenote
Database”).
You agree that you will use Gracenote Data, the
Gracenote Database, and Embedded Software for
your own personal non-commercial use only. You
agree that you will access Gracenote Data only by
means of the standard end user functions and features
of this product. You agree not to assign, copy,
transfer or transmit the Embedded Software or any
Gracenote Data to any third party. YOU AGREE
NOT TO USE OR EXPLOIT GRACENOTE DATA,
THE GRACENOTE DATABASE, OR
GRACENOTE COMPONENT, EXCEPT AS
EXPRESSLY PERMITTED HEREIN.
You agree that your non-exclusive license to use the
Gracenote Data, the Gracenote Database, and
Embedded Software will terminate if you violate
these restrictions. If your license terminates, you
agree to cease any and all use of the Gracenote Data,
the Gracenote Database, and Gracenote Embedded
Software. Gracenote reserves all rights in the
Gracenote Data, Gracenote Database, and Gracenote
Embedded Software, including all ownership rights.
You agree that Gracenote may enforce its rights under
this Agreement against you directly in its own name.
The Embedded Software and each item of Gracenote
Data are licensed to you “AS IS.” Gracenote makes
no representations or warranties, express or implied,
regarding the accuracy of any Gracenote Data.
Gracenote reserves the right to delete data or to
change data categories in any Data updates and for
any cause that Gracenote deems sufficient. No
warranty is made that the Embedded Software is
error-free or that functioning of the Embedded
Software will be uninterrupted. Gracenote is not
obligated to provide you with any new enhanced or
additional data types or categories that Gracenote
may choose to provide in the future.
GRACENOTE DISCLAIMS ALL WARRANTIES
EXPRESS OR IMPLIED, INCLUDING, BUT NOT
LIMITED TO, IMPLIED WARRANTIES OF
MERCHANTABILITY, FITNESS FOR A
PARTICULAR PURPOSE, TITLE, AND NONINFRINGEMENT. GRACENOTE DOES NOT
WARRANT THE RESULTS THAT WILL BE
OBTAINED BY YOUR USE OF THE
GRACENOTE COMPONENT OR ANY
GRACENOTE SERVER. IN NO CASE WILL
GRACENOTE BE LIABLE FOR ANY
CONSEQUENTIAL OR INCIDENTAL DAMAGES
OR FOR ANY LOST PROFITS OR LOST
REVENUES.
Music recognition technology and related data are
provided by Gracenote and the Gracenote CDDB
Music Recognition ServiceSM. Gracenote is the
industry standard in music recognition technology
and related content delivery. For more information
visit www.gracenote.com.
CD and music-related data from Gracenote CDDB
Music Recognition ServiceSM 2000, 2001, 2002
Gracenote. Gracenote CDDB Client Software
2000, 2001, 2002 Gracenote. U.S. Patents Numbers
#5,987,525; #6,061,680; #6,154,773, and other
patents issued or pending.
CDDB is a registered trademark of Gracenote. The
Gracenote logo and logotype, the Gracenote CDDB
logo and logotype, and the “Powered by Gracenote
CDDB” logo are trademarks of Gracenote. Music
Recognition Service and MRS are service marks of
Gracenote.
Overview
5
Getting Started
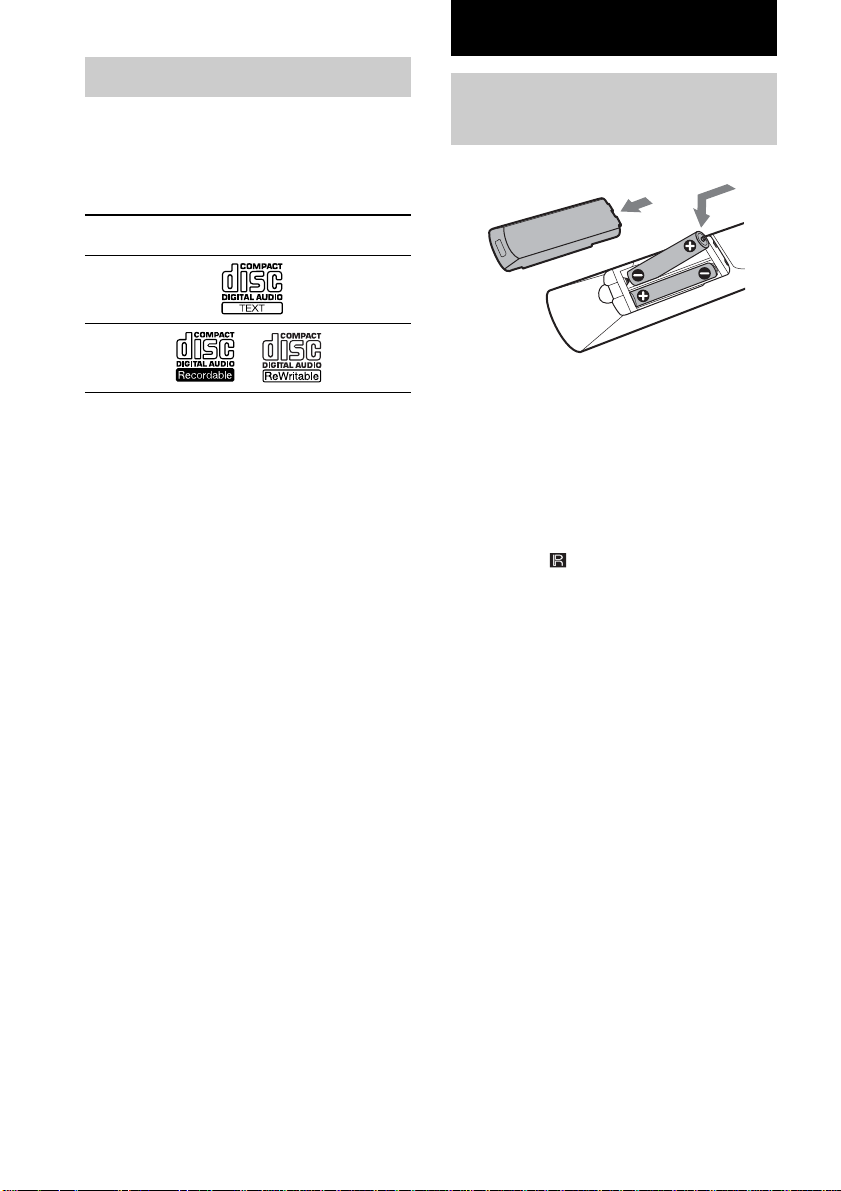
Playable discs
You can play back the following discs on this
recorder. Other discs cannot be played back.
List of playable discs
Format of
discs
Audio CDs Audio
CD-R/
CD-RW
Discs that this recorder
cannot play
• CD-ROMs (PHOTO CDs included)
• CD-Rs/CD-RWs other than those recorded
in the music CD format
Notes on CD-R and CD-RW
• This recorder can play CD-R/CD-RW discs
edited by the user. However, note that
playback of some discs may not be possible
depending on the recording device used for
recording or the disc condition.
• CD-R and CD-RW discs that have not been
finalized (processing to allow play by a
normal CD player) cannot be played.
• CD-R and CD-RW discs recorded in multisession mode are not supported.
Music discs encoded with copyright
protection technologies
This product is designed to playback discs that
conform to the Compact Disc (CD) standard.
Recently, various music discs encoded with
copyright protection technologies are marketed
by some record companies. Please be aware
that among those discs, there are some that do
not conform to the CD standard and may not be
playable by this product.
Disc logo Contents
Audio
Inserting batteries into the remote
You can control the recorder using the supplied
remote.
Insert two R6 (size AA) batteries by matching
the + and – on the batteries to the diagram
inside the battery compartment.
Insert the negative (–) end first, then push in
and down until the positive (+) end clicks into
position. When using the remote, point it at the
remote sensor
Notes
• Do not leave the remote near an extremely hot or
humid place.
• Do not drop any foreign object into the remote
casing, particularly when replacing the batteries.
• Do not expose the remote sensor to direct sunlight
or lighting apparatuses. Doing so may cause a
malfunction.
• If you do not use the remote for an extended period
of time, remove the batteries to avoid possible
damage from battery leakage and corrosion.
Tip
When the remote no longer operates the recorder,
replace both batteries with new ones.
on the recorder.
6
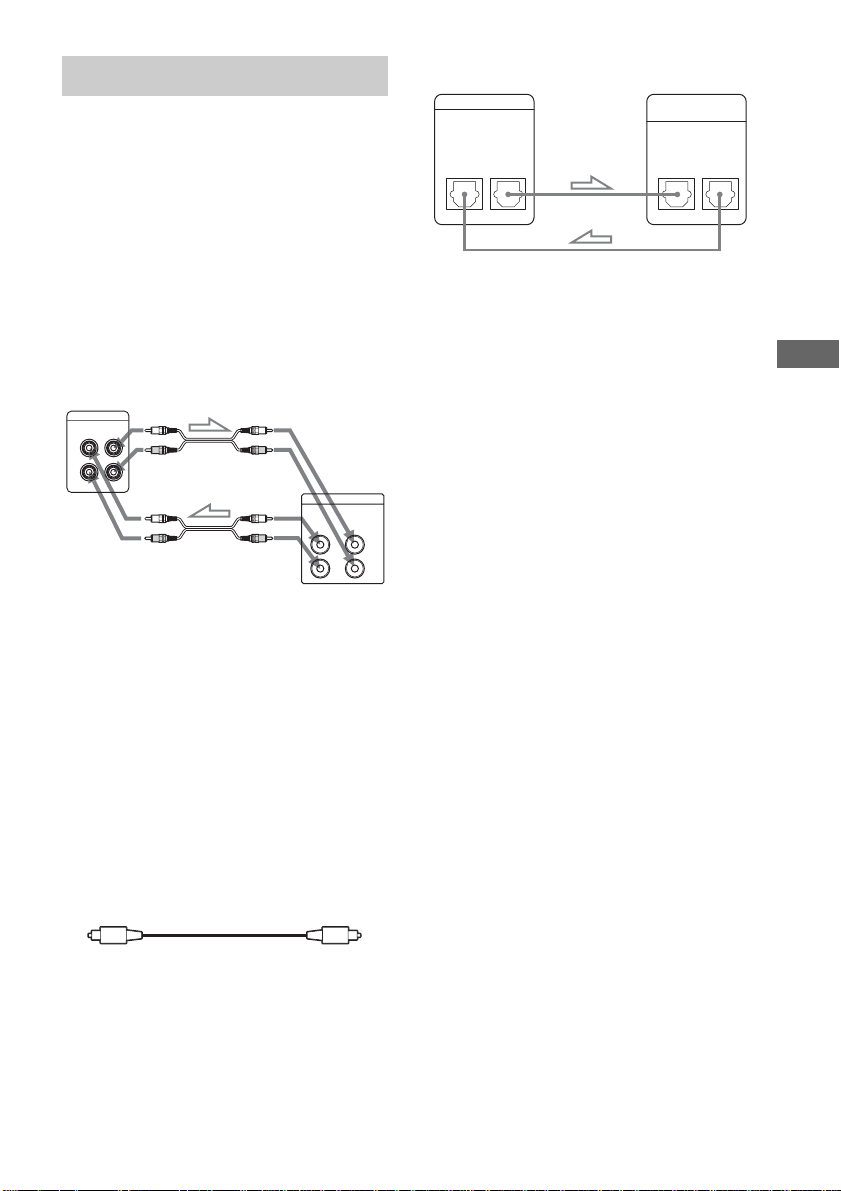
Hooking up the system
OG
OU
This section describes how to hook up the
HDD recorder to an external devices. Be sure
to turn off each component before making the
connections.
Analog hookups
Connect the amplifier via the ANALOG IN or
OUT jacks using the audio connecting cord
(supplied). Make sure to match the colorcoded cords to the appropriate jacks on the
components: red (right) to red and white (left)
to white.
HDD recorder
ANAL
T
Amplifier
ANALOG
INOUT
l : Signal flow
Digital hookups
If you have a digital component such as a
digital amplifier or D/A converter, connect the
component via the DIGITAL OPTICAL IN or
OUT connector using the digital optical cord
(supplied).
The DIGITAL OPTICAL OUT connector on
the recorder is provided for audio signal output
to an amplifier or receiver. For this reason,
non-audio data such as text and track number
information are not output from this connector.
Be sure not to bend or tie the digital optical
cord.
DIGITAL
OPTICAL
IN OUT
* One digital optical cord is supplied with this
recorder. To make connections to the DIGITAL
OPTICAL IN and OUT connectors, another
optional digital optical cord is necessary.
Notes
• When you connect via the DIGITAL OPTICAL IN
connector, noise may occur when you play CD
software other than music, such as a CD-ROM.
• Track numbers may not be recorded correctly
during recording to other components through the
DIGITAL OPTICAL OUT connector.
• If “Din Unlock” or “Cannot Copy” flashes in the
display, recording via the DIGITAL OPTICAL IN
connector is not possible. In this case, record the
L
R
sound source via the ANALOG IN jacks pressing
ANALOG button.
• Do not place heavy objects such as an amplifier,
deck, etc. on top of the recorder.
Tip
A built-in sampling rate converter automatically converts
the sampling frequency of various digital sources to the
44.1 kHz sampling rate of this recorder.
Connecting a computer
Use the supplied USB cable to connect a
computer to the recorder. By connecting the
recorder to a computer, you will be able to
select and play the tracks and do various HDD
editing operations from the computer.
Digital componentHDD recorder
DIGITAL
(OPTICAL)
IN OUT
Getting Started
Digital optical cord (supplied)*
7
Playing CDs
Loading a CD
1 Turn on the amplifier and set the
source selector to the position for this
recorder.
2 Press @/1 to turn on the recorder.
3 Press CD (or CD/HDD on the recorder
to light up the CD indicator).
“CD” appears in the display.
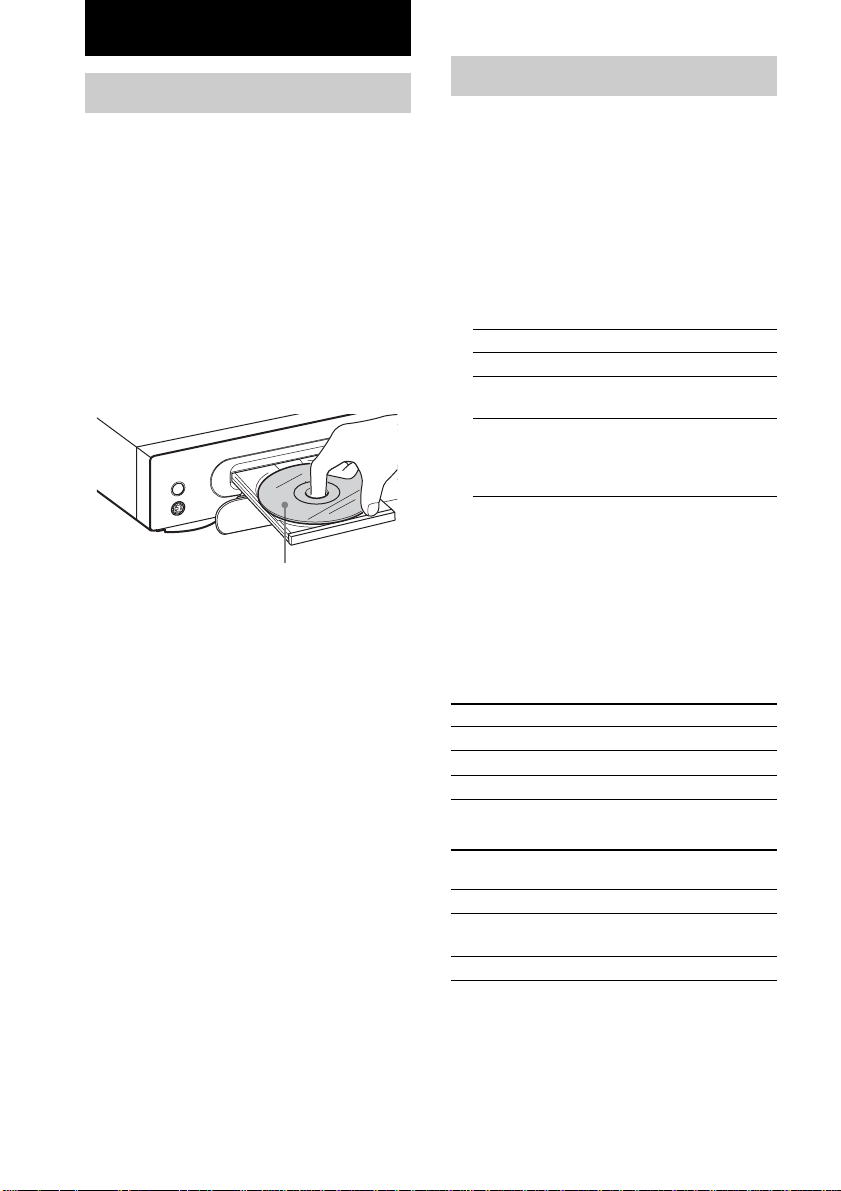
4 Press OPEN/CLOSE Z.
The disc tray slides out.
5 Load a disc on the disc tray with the
label side up.
?/1
KEYBOARD
When you play a CD single (8 cm CD),
load it on the inner circle of the tray.
6 Press OPEN/CLOSE Z again to close
the disc tray.
Playing a CD
––Normal Play/Shuffle Play/Repeat
Play
This recorder lets you play CDs in different
play modes.
Before the operation, press CD or press CD/HDD
on the recorder to light up the CD indicator.
1 While the recorder is stopped, press
PLAY MODE repeatedly to select the
play mode.
To play Select
The disc in original order No display
The tracks on the CD in
random order
The tracks on the CD in any
order that you want (see
“Programming the CD
tracks” on page 10)
2 Press H (or the PLAY/NEXT/PREV dial
(H) on the recorder).
Repeat Play Operations
You can play the CD tracks repeatedly in any
play modes.
Press REPEAT repeatedly until “REPEAT”
or “REPEAT 1” appears in the display.
To Select
Repeat all tracks REPEAT
Repeat only one track REPEAT 1
Cancel Repeat Play No display
SHUFFLE
PROGRAM
The recorder repeats the tracks as follows:
When the CD is
played in
Normal Play All the tracks
Shuffle Play All the tracks in random
Program Play (page 10) The same program
The recorder repeats
order
8
Other Operations
To Do this
Stop playback Press x.
Pause Press X. Press X again or H to
Select a track During playback or pause, press
Select a track
1
directly*
Find a point in a
track
Remove the CD Press OPEN/CLOSE Z.
*1When you directly locate a track numbered over
10, press >10 before entering a two-digit track
number. When you press the >10 button, two bars
appear if the CD contains 10 to 99 tracks. Press
0/10 for “0”.
Example:
To enter track number 30 for a CD containing
99 tracks
1Press >10.
“- -” appears in the display.
2Press 3 and 0/10.
*2If you press and hold down while the recorder is
paused, you can find a point viewing the time
information.
Notes
• If there is no CD in the recorder, “No Disc” appears
in the display.
• If “- Over -” appears in the display, the CD has
reached the end while you are pressing and holding
down the M button. Press and hold down the m
button to go back.
• CD playback on the recorder is disabled when the
function is set to external input (i.e., when “Optical
In” or “Analog In” is selected by pressing the
OPTICAL or ANALOG button).
Tips
• You can select the last track quickly by pressing
. (or turning the PLAY/NEXT/PREV dial
towards l on the recorder) while the total
number of tracks and total playing time are
displayed.
• You can pause at the beginning of a track by
pressing ./> (or turning the PLAY/NEXT/
PREV dial towards l/L on the recorder)
while the recorder is paused.
resume playback (or the PLAY/
NEXT/PREV dial (H) on the
recorder).
> repeatedly (to go forward)
or . repeatedly (to go
backward) (or turn the PLAY/
NEXT/PREV dial towards l/
L on the recorder).
Press the numeric button(s).
Press and hold down m/M
during playback, and release it at
the desired point.*
2
Using the CD display
You can check information about the CD using
the display.
Before the operation, press CD or press CD/HDD
on the recorder to light up the CD indicator.
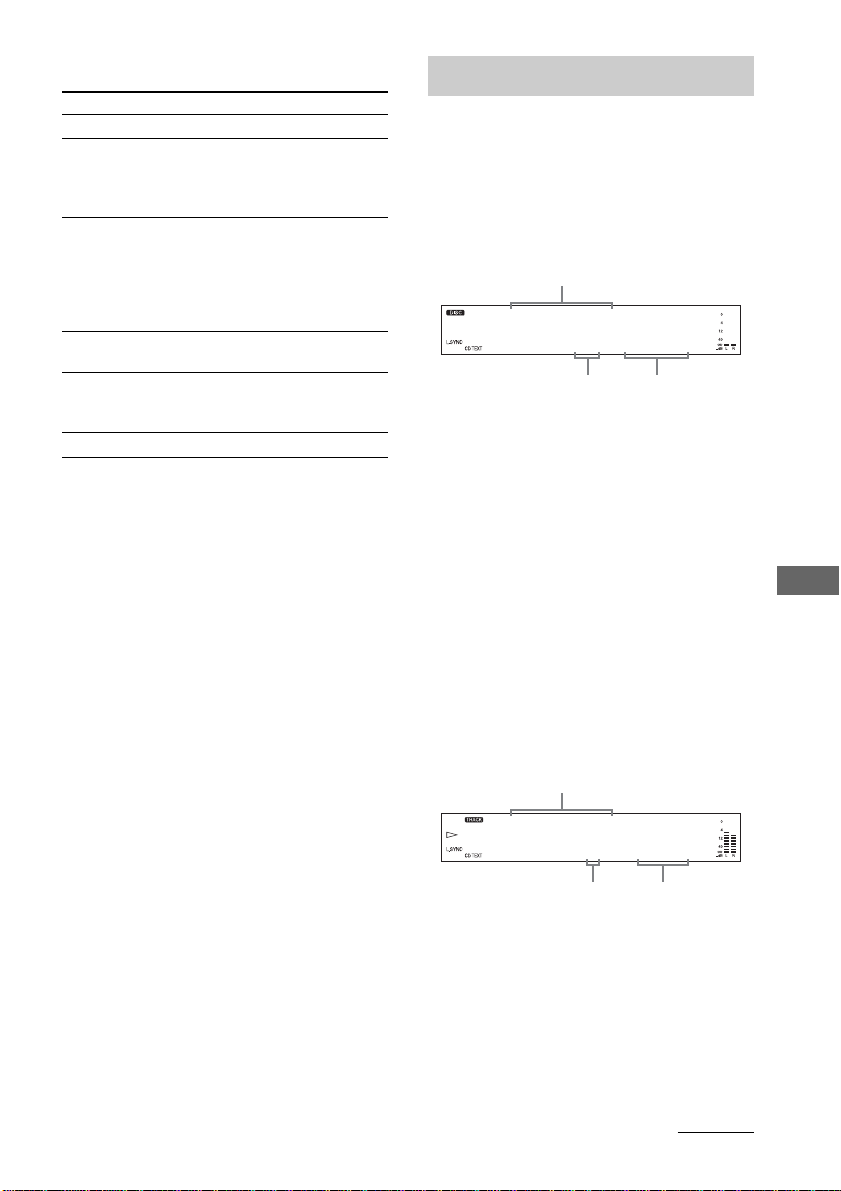
While in stop mode
Disc name/Track name/Artist name
CDFox Tail
13 62.23
Total playing timeTotal number of tracks
To display name information
Press DISPLAY (or DISPLAY/CHAR on the
recorder) repeatedly.
Each time you press the button, the display
changes as follows:
• When no track is selected
Disc name t Name of the disc’s artist
• When a track is selected
Track name t Name of track’s artist t
Disc name
When Program Play is selected, the program’s
total number of tracks and total playing time
are displayed.
While playing
Track name
CDBugbear
3 2.23
Elapsed timeCurrent track number
To display name information
Press DISPLAY (or DISPLAY/CHAR on the
recorder) repeatedly.
Each time you press the button, the display
changes as follows.
Track name t Name of track’s artist t
Disc name
continued
Playing CDs
9

Using the CD display (continued)
Tips
• When you load a CD containing CD TEXT data,
“CD TEXT” lights up in the display.
• If the CD has no text information, “No Name”
appears instead of the disc name or track name.
• You can scroll a title of 14 or more characters by
pressing the SCROLL button. Press the button
again to pause scrolling, and again to resume
scrolling.
To display time information
Press TIME repeatedly.
Each time you press the button, the display
changes as follows:
Elapsed time of the current track t
Remaining time of the current track t
Remaining time of the disc
Note
The remaining time of the disc does not appear in the
display when the “REPEAT 1,” “SHUFFLE,” or
“PROGRAM” play mode is selected.
Programming the CD tracks
You can specify the playback order of the
tracks on a CD and create your own programs
containing up to 25 tracks.
Before the operation, press CD or press CD/HDD
on the recorder to light up the CD indicator.
Note
You cannot mix CD and HDD tracks together in the
same program.
1 While the recorder is stopped, press
PLAY MODE repeatedly until
“PROGRAM” appears in the display.
2 Press ./> (or turn the PLAY/
NEXT/PREV dial towards l/L on
the recorder) repeatedly until the
desired track appears, then press
ENTER to program the track.
The last programmed track number appears,
followed by the total playing time of the
program.
Tip
You can select the track using the numeric
buttons. To select a track numbered over 10, use
>10 (see page 9).
3 To program additional tracks, repeat
step 2.
4 Press H (or the PLAY/NEXT/PREV dial
(H) on the recorder) to start Program
Play.
To cancel Program Play
While the recorder is stopped, press
PLAY MODE repeatedly until “PROGRAM”
disappears.
Notes
• The total playing time of the program does not
appear when it exceeds 1,000 minutes.
• “Step Full!” appears when you program over 25
tracks. Erase the unnecessary tracks to enter other
tracks.
• The program is erased when you take out the CD,
turn off the power, or disconnect the power cord.
Tip
The program remains even after the Program Play
ends. When you press H (or the PLAY/NEXT/
PREV dial (H) on the recorder), you can play the
same program again.
Changing the track order
You can change your program while the
recorder is stopped.
To You need to
Erase the last track in
the program
Add tracks to the end of
the program
Press CLEAR. Each time
you press the button, the
last programmed track is
cleared.
Follow step 2 of the
programming procedure.
10

Recording to HDD
Notes on recording
Before recording
• You cannot select a play list as the recording
destination.
• You cannot record over an existing track. If
you select an album with existing tracks as
the recording destination, the recorder
automatically starts recording from the end of
the existing tracks.
After recording
The HDD play mode automatically switches to
Normal Play.
Automatic conversion of digital
sampling rates
A built-in sampling rate converter
automatically converts the sampling frequency
of various digital sources to the 44.1 kHz
sampling rate of the recorder.
Maximum number of recordable
tracks
Total number of the tracks recorded on the
HDD cannot exceeds 40,000, not counting the
tracks in play lists.
If “Track Full!” appears in the display
when you select the recording
destination
The album already contains 400 tracks, the
maximum number of tracks that can be
recorded to a single album. Select another
album. When using the REC-IT function, the
recording will be cancelled automatically.
If “Drive Full!” appears in the display
while recording to the HDD
Further recording is impossible because there is
not enough recordable space on the HDD or the
maximum number of recordable tracks has
been attained on the HDD. To continue
recording to the HDD, compress the data by
converting tracks to the ATRAC3 format (page
32) or erase unnecessary tracks or albums.
Recording a CD to the HDD
––CD-HDD Synchro-Recording/
High-Speed CD-HDD SynchroRecording
Tips
• You can use the ALBUM dial on the recorder
instead of the <, ,, or ENTER button on the
remote to select and enter items in Edit Menu or
Setup Menu.
To select an item: Turn the ALBUM dial towards
+/–.
To enter a selection: Press the ALBUM dial.
• You can also use the ALBUM +/– buttons instead of
the </, buttons to select items in Edit Menu or
Setup Menu.
1 Turn on the amplifier and set the
source selector to the position for this
recorder.
2 Press @/1 to turn on the recorder.
3 Press CD (or CD/HDD on the recorder
to light up the CD indicator).
4 Load a CD on the disc tray.
5 Press MENU/NO.
“Setup Menu” appears in the display.
6 Press </, repeatedly until
“Sync Normal” (or “Sync High”)
appears in the display, then press
ENTER or YES.
7 Press </, repeatedly to select the
recording speed, then press ENTER or
YES.
To Select
Perform the normal-speed
Synchro-Recording
Perform the high-speed
Synchro-Recording
Sync Normal
Sync High (factory
setting)
continued
Playing CDs
Recording to HDD
Note on text information
Text data on CDs with CD TEXT content are not
recorded by the recorder when the CDs are recorded
through the DIGITAL OPTICAL IN connector.
11

Recording a CD to the HDD
(continued)
8 Press MENU/NO.
9 Press CD SYNC.
The HDD stands by for recording and the
CD stands by for playback.
To change the album position, press
ALBUM +/– repeatedly (or turn the
ALBUM dial on the recorder). To enter the
position directly, press ALBUM and the
numeric button(s) (see page 19).
10
Press H (or the PLAY/NEXT/PREV dial
(H) on the recorder) or X.
Recording starts.
The recorded sound is not audible during
High-Speed CD-HDD Synchro-Recording.
To stop recording
Press x.
To extend the recordable
time (Recording Mode)
By recording tracks in the ATRAC3 format, the
total recordable time on the HDD becomes
longer than that possible in normal recording
mode.
1 Press REC MODE so that “ATRAC3”
appears in the display.
2 Do steps 5 through 10 of “Recording a
CD to the HDD” on page 11.
Notes
• You cannot change the recording mode while
recording.
• You cannot change the recording mode to MP3
format.
To restore the factory setting
Press REC MODE again so that “ATRAC3”
disappears in the display.
To change the recording mode using
Setup Menu
You can also change the recording mode using
the Setup Menu.
1 While the recorder is stopped or recording
pause, press MENU/NO.
“Setup Menu” appears in the display.
2 Press </, repeatedly until “Rec Mode”
appears in the display, then press ENTER
or YES.
3 Press </, repeatedly until “ATRAC3”
appears in the display, then press ENTER
or YES.
4 Do steps 5 through 10 of “Recording a CD
to the HDD” on page 11.
To restore the factory setting
Select “LinearPCM” in step 3.
Notes
• If the HDD becomes full during recording,
recording ends automatically.
• You cannot pause recording during SynchroRecording.
• If the CD play mode is set to Repeat Play or Shuffle
Play, it automatically switches to Normal Play.
• The HDD play mode automatically switches to
Normal Play.
• CD TEXT may not be saved for short tracks.
Tips
• You can record 10 times faster than normal CDHDD Synchro-Recording by doing High-Speed
CD-HDD Synchro-Recording with the recording
mode set to “LinearPCM” (factory setting) (this
page). If the recording mode is set to “ATRAC3,”
High-Speed CD-HDD Synchro-Recording will still
be 2 times faster than normal CD-HDD SynchroRecording.
• You can select the recording mode before you start
recording (this page).
• You can use Program Play to specify only the CD
tracks you want to record. After loading a CD, do
the procedure of “Programming the CD tracks” on
page 10. Then do the Synchro-Recording
procedure afterwards.
• If an inserted CD supports CD TEXT, CD TEXT
(track name only) can be saved to the HDD
automatically.
• Synchro-Recording enables the assignment of
album and track names from the Gracenote CDDB
server. For details on the Gracenote CDDB server,
refer to the Help for “M-crew for HAR-LH500.”
12
 Loading...