

Page 1

4-236-703-12(4)
Hard Disc
Audio Recor der
Operating Instructions
Owner’s Record
The model and serial numbers are located on the rear of the unit. Record the serial number
in the space provided below. Refer to them whenever you call upon your Sony dealer
regarding this product.
Model No. HAR-D1000 Serial No. ___________
HAR-D1000
© 2001 Sony Corporation
Page 2
WARNING
To prevent fire or shock hazard, do not
expose the unit to rain or moisture.
To avoid electrical shock, do not open the cabinet. Refer
servicing to qualified personnel only.
To prevent fire, do not cover the ventilation of the
apparatus with news papers, table-cloths, curtains, etc.
And don’t place lighted candles on the apparatus.
To prevent fire or shock hazard, do not place objects
filled with liquids, such as vases, on the apparatus.
The following caution label is located inside of the unit.
IN NO EVENT SHALL SELLER BE LIABLE FOR
ANY DIRECT, INCIDENTAL OR
CONSEQUENTIAL DAMAGES OF ANY
NATURE, OR LOSSES OR EXPENSES
RESULTING FROM ANY DEFECTIVE PRODUCT
OR THE USE OF ANY PRODUCT.
CAUTION
The use of optical instruments with this product will
increase eye hazard.
For the customers in the U.S.A.
This appliance is classified as a
CLASS 1 LASER product. The
CLASS 1 LASER PRODUCT
MARKING is located on the
rear exterior.
Don’t throw a battery, dispose it
as the injurious wastes.
WARNING
This equipment has been tested and found to comply with the
limits for a Class B digital device, pursuant to Part 15 of the
FCC Rules. These limits are designed to provide reasonable
protection against harmful interference in a residential
installation. This equipment generates, uses, and can radiate
radio frequency energy and, if not installed and used in
accordance with the instructions, may cause harmful
interference to radio communications. However, there is no
guarantee that interference will not occur in a particular
installation. If this equipment does cause harmful interference
to radio or television reception, which can be determined by
turning the equipment off and on, the user is encouraged to try
to correct the interference by one or more of the following
measures:
• Reorient or relocate the receiving antenna.
• Increase the separation between the equipment and receiver.
• Connect the equipment into an outlet on a circuit different
from that to which the receiver is connected.
• Consult the dealer or an experienced radio/TV technician for
help.
The shielded interface cable recommended in this manual must
be used with this equipment in order to comply with The limits
for a digital device pursuant to Subpart B of Part 15 of FCC
Rules.
If you have any questions about this product, you may call;
Sony customer Information Center 1-800-488-7669. The
Number below is for the FCC related matters only.
Regulatory Information
Declaration of Conformity
Trade name: SONY
Model No.: HAR-D1000
Responsible Party: Sony Electronics Inc.
Address: 680 Kinderkamack Road, Oradell, NJ 07649 USA
Telephone No.: 201-930-6972
This device complies with Part 15 of the FCC Rules.
Operation is subject to the following two conditions:
(1)This device may not cause harmful interference, and
(2)this device must accept any interference received,
including interference that may cause undesired operation.
For the customers in Canada
This Class B digital apparatus complies With Canadian
ICES-003.
CAUTION
TO PREVENT ELECTRIC SHOCK, DO NOT USE
THIS POLARIZED AC PLUG WITH AN EXTENSION
CORD, RECEPTACLE OR OTHER OUTLET UNLESS
THE BLADES CAN BE FULLY INSERTED TO
PREVENT BLADE EXPOSURE.
This symbol is intended to alert the user to the
presence of uninsulated “dangerous voltage”
within the product’s enclosure that may be of
sufficient magnitude to constitute a risk of electric
shock to persons.
This symbol is intended to alert the user to the
presence of important operating and maintenance
(servicing) instructions in the literature
accompanying the appliance.
CAUTION
You are cautioned that any changes or modification not
expressly approved in this manual could void your
authority to operate this equipment.
2
About this manual
The instructions in this manual is for HAR-D1000.
Tip
Instructions in this manual describe the controls on the
recorder.
You can also use the controls on the remote if they have the
same or similar names as those on the recorder.
Page 3

Table of Contents
Parts Identification
Front Panel ............................................ 4
Rear Panel.............................................. 4
Remote Control .....................................5
Overview
Getting Started
Inserting batteries into the remote ......... 7
Hooking up the system .......................... 7
Playing CDs
Loading a CD ........................................9
Playing a CD
–– Normal Play/Shuffle Play/
Repeat Play ..................................... 9
Using the CD display .......................... 10
Programming the CD tracks ................ 11
Recording to HDD
Notes on recording ..............................12
Recording a CD to the HDD
–– CD-HDD Synchro-Recording/
High-Speed CD-HDD Synchro-
Recording ...................................... 12
Recording to the HDD......................... 13
Recording the current CD track
–– REC-IT Function...................... 14
Recording tips
Marking track numbers/Smart Space/
––
Adjusting the recording level .............
15
Playing the HDD
Playing the HDD
–– Normal Play/Shuffle Play/
Repeat Play ................................... 18
Using the HDD display .......................19
Playing a track in a play list
–– Play List Play ...........................20
Locating a desired album or track
–– Keyword Search/
Highlight Play ...............................21
Editing Recorded HDD
Erasing recordings
–– Erase Function.......................... 23
Dividing recorded tracks
–– Divide Function........................ 24
Combining recorded tracks
–– Combine Function .................... 25
Moving recorded tracks or albums
–– Move Function .........................26
Assigning a title or artist name to
a track, album or play list
–– Name Function ......................... 27
Undoing the last edit
–– Undo Function.......................... 29
Other Functions
Falling asleep to music
–– Sleep Timer .............................. 30
Recording from a CD changer............. 30
Additional Information
Precautions ..........................................32
Notes on CDs....................................... 32
Notes on handling the hard disc ..........33
Troubleshooting................................... 33
Display Messages ................................ 34
Setup menu table .................................35
Specifications ........................Back cover
3
Page 4

Parts Identification
The items are arranged in alphabetical order.
Refer to the pages indicated in parentheses ( ) for details.
Front Panel
12 3 456 87 9q; qaqs qd qfqg
STANDBY
?/1
ALBUM dial qk (12 - 18, 20 - 27,
29 - 31)
CD SYNC qf (13, 31)
CD H 4 (9, 11, 14)
CD X 5 (9)
CD x 6 (8, 9, 13, 14)
CD l/L 8 (9, 10. 11)
CLEAR qj (8, 16, 17, 28)
Disc tray wf (9)
DISPLAY w; (10, 19, 22)
Display wd (10, 19, 21)
Rear Panel
ANALOG
DIGITAL
CD CHANGER
USB
IN OUT OPTICAL
L
R
CONTROL
IN
OPEN/
AHXx HXxzlL lL
CD
CLOSE
HDD indicator 7 (33)
HDD H 9 (13, 14, 18, 21, 22,
31)
HDD X 0 (13, 14, 18, 31)
HDD x qa (13, 14, 18, 23, 31)
HDD l/L qd (18, 21, 22,
24, 27, 28, 31)
HDD z qs (14, 15)
INPUT qg (8, 13)
HDD
HDD
DISPLAY
OPEN/CLOSE A 3 (9, 10)
Remote sensor wa (7)
SEARCH/CHAR ql (21, 22, 27)
STANDBY indicator 2 (9, 12, 13,
18)
YES qh (12, 15 - 17, 20 - 31)
BUTTON DESCRIPTIONS
@/1 (power) 1 (9, 12, 13, 18)
MENU/NO ws (12, 13, 15 - 17, 21,
23 - 27, 29 - 31)
CDSYNC
MENU/NO
SEARCH/CHAR
ALBUM YES
PUSH ENTER
INPUT
CLEAR
qhqjqkqlw;wawswf wd
312 4 5 6
ANALOG IN L/R jacks 1 (8)
ANALOG OUT L/R jacks 2 (7,
30)
CD CHANGER CONTROL jack
4 (30 )
4
DIGITAL OPTICAL IN connector
3 (7, 30)
Power cord 6 (7)
USB connector 5 (8)
Page 5
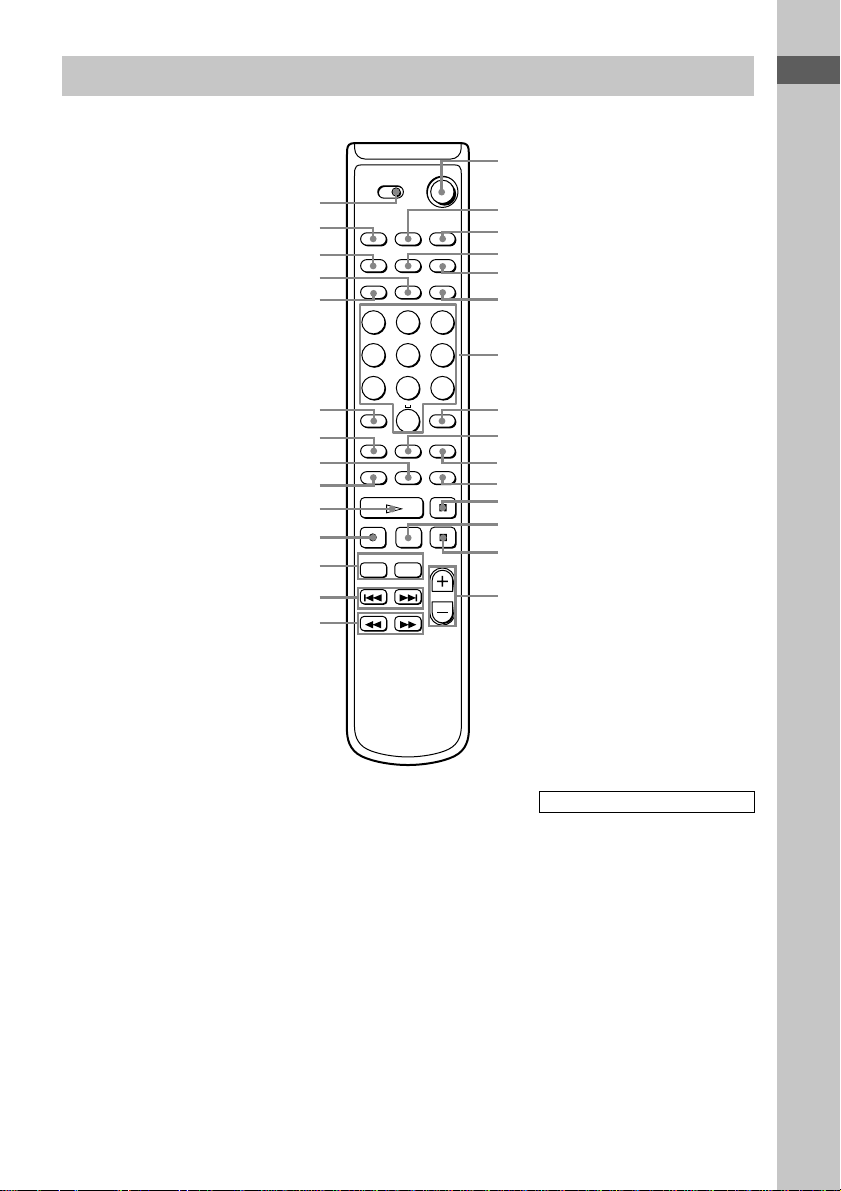
Remote Control
Parts Identification
wl
wk
wj
wh
wg
wf
wd
ws
wa
w;
ql
qk
qj
qh
1 / u
SELECT
HDDCD
INFO
PLAY MODE
REPEAT
DISPLAY SCROLL
MENU/NO
`-/,
123
GHI JKL MNO
456
PQRS TUV WXYZ
NAME EDIT
/ SELECT
ABC DEF
TIME
YES
789
SEARCH
PLAY LIST
CD SYNCHRO
><
ALBUM
CLEAR
HIGH-
LIGHT
REC
LEVEL
>10 10/0
INPUT
REC-IT
ALBUM - ALBUM +
1
2
3
4
5
6
7
8
9
q;
qa
qs
qd
qf
qg
ALBUM 8 (13, 14, 18, 19)
ALBUM +/– qk (12 - 18, 20 - 26,
28 - 31)
CD SYNCHRO qd (13, 31)
CLEAR 0 (11, 16, 17, 28)
DISPLAY wj (10, 19, 22)
HIGH-LIGHT qa (22)
INFO wk (20)
INPUT wd (8, 13)
Letter/Numeric buttons 7 (10, 11,
13, 14, 18, 19, 28)
MENU/NO wg (12, 13, 15 - 17, 21,
23 - 26, 29 - 31)
NAME EDIT/SELECT wh (28)
PLAY LIST ws (20, 22)
PLAY MODE 2 (9, 11, 18)
REC-IT wa (14)
REC LEVEL +/– qg (17)
REPEAT 3 (9, 18)
SCROLL 4 (10, 19)
SEARCH 9 (21, 22)
SELECT wl (9 - 13, 15, 18 - 21,
23 - 27, 29)
TIME 5 (10, 19, 20)
YES 6 (12, 15 - 17, 20 - 26,
28 - 31)
BUTTON DESCRIPTIONS
@/1 (power) 1 (9, 12, 13, 18)
H w; (9, 11, 13, 14, 18, 21, 22,
31)
X qs (9, 13, 14, 18, 31)
x qf (9, 13, 14, 18, 23, 31)
./> qj (9 - 11, 18, 21, 22,
24, 28, 31)
m/M qh (10, 18)
z ql (14, 15)
>10 wf (10, 11, 13, 14, 18, 19)
5
Page 6

Overview
This recorder, with its internal hard disc,
supports the following functions:
Recording
More than 600 hours of data can be recorded to
the recorder’s HDD. Up to 500 albums can be
created on the HDD with each album
containing up to 400 tracks for a total of 20,000
tracks. Like an MD deck, this recorder
supports Synchro-Recording and the editing of
recorded tracks.
Search
Specific tracks on the HDD can be easily
found.
• Keyword Search (page 21)
A keyword can be entered to find a desired
album or track. Keywords may be the name
of the album, track or artist.
With the supplied M-crew for HAR-D1000
software, you can access CDDB2* from your
computer to label albums and tracks
automatically.
* A database containing information about CDs on
the market
• Highlight Play (page 22)
This function allows you to listen to just a
part of a single track in each album in order to
find a specific album on the HDD.
Play list
You can create play lists containing only the
tracks you want. Besides the 500 albums that
you can create on the HDD, you can create up
to 10 albums through play lists on the HDD,
with each play list containing up to 400 tracks.
6
Notes
• The recorded music is limited to private use
only. Use of the music beyond this limit
requires permission of the copyright holders.
• Sony is not responsible for any loss that may
arise from lost data.
• Recording to the hard disc should be considered
as a temporary means of storing audio data. Be
sure to retain the original sound source as
backup.
• There is no service for the recovery of lost data.
• You may hear sounds as the recorder access the
hard disc when you turn on the recorder, play an
HDD track, record to the HDD, etc. These
sounds are natural to the HDD and are not
abnormal.
• The recorder may make sounds even when no
operation is being performed. These sounds are
produced by the recorder’s self-maintenance
functions and are not abnormal.
• You may also feel vibrations from the recorder,
but this is not a malfunction.
Music recognition technology and related data are
provided by Gracenote and the Gracenote CDDB
Music Recognition ServiceSM. Gracenote is the
industry standard in music recognition technology
and related content delivery. For more information
go to www.gracenote.com.
Gracenote is CDDB, Inc. d/b/a “Gracenote.” CD and
music related data from Gracenote CDDB Music
Recognition ServiceSM 2000, 2001 Gracenote.
Gracenote CDDB Client Software 2000, 2001
Gracenote. U.S. Patents Numbers #5,987,525;
#6,061,680; #6,154,773, and other patents issued or
pending.
CDDB is a registered trademark of Gracenote.
CDDB-Enabled, the Gracenote logo, the CDDB
Logo, and the “Powered by Gracenote CDDB” logo
are trademarks of Gracenote. Music Recognition
Service and MRS are service marks of Gracenote.
• Gracenote CDDB or Gracenote CDDB Music
Recognition Service
• Powered by Gracenote CDDB
SM
Page 7
Getting Started
Inserting batteries into the remote
You can control the recorder using the supplied
remote.
Insert two R6 (size AA) batteries by matching
the + and – on the batteries to the diagram
inside the battery compartment.
Insert the negative (–) end first, then push in
and down until the positive (+) end clicks into
position. When using the remote, point it at the
remote sensor
Tip
When the remote no longer operates the recorder,
replace both batteries with new ones.
Notes
• Do not leave the remote near an extremely hot or
humid place.
• Do not drop any foreign object into the remote
casing, particularly when replacing the batteries.
• Do not expose the remote sensor to direct sunlight
or lighting apparatuses. Doing so may cause a
malfunction.
• If you do not use the remote for an extended period
of time, remove the batteries to avoid possible
damage from battery leakage and corrosion.
on the recorder.
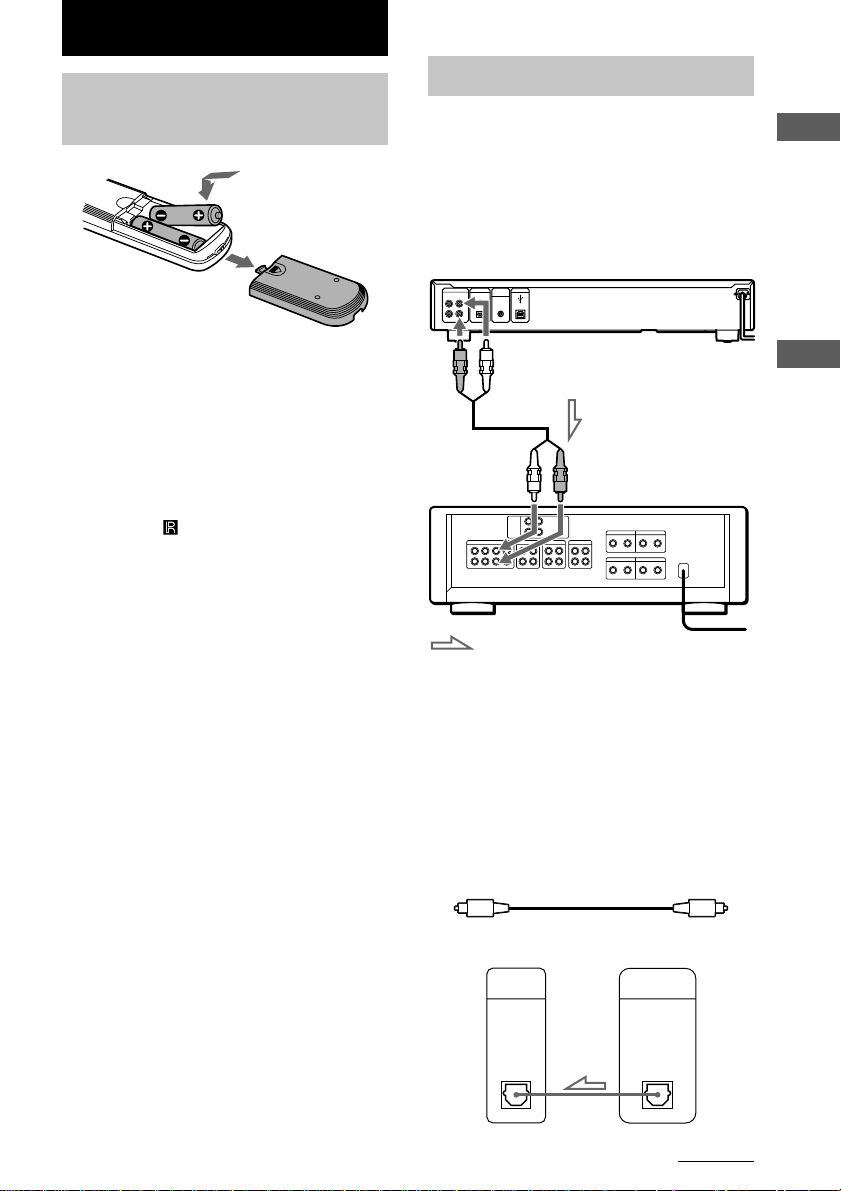
Hooking up the system
Hookups
This section describes how to hook up the
HDD recorder to an amplifier. Be sure to turn
off each component before making the
connections.
HDD recorder
ANALOG
DIGITAL
CD CHANGER
USB
CONTROL
IN OUT OPTICAL
IN
L
R
ANALOG
OUT
(White) (L)
ANALOG
OUT
(Red) (R)
Audio input
(White) (L)
: Signal flow
Audio input
(Red) (R)
Making digital hookups
If you have a digital component such as a
digital amplifier, D/A converter, DAT, or MD,
connect the component via the DIGITAL
OPTICAL IN connector using the optical cable
(not supplied). Take off the cap and plug in the
optical cable.
Be sure not to bend or tie the optical cable.
To a wall outlet
Amplifier
To a wall outlet
Overview
Getting Started
POC-15
Optical cable (not supplied)
Digital componentHDD recorder
DIGITAL
OPTICAL
IN
DIGITAL
OUTPUT
OPTICAL
continued
7
Page 8

Hooking up the system (continued)
Notes
• When you connect via the DIGITAL OPTICAL IN
connector, noise may occur when you play CD
software other than music, such as a CD-ROM.
• If “Din Unlock” or “Cannot Copy” flashes in the
display, recording via the DIGITAL OPTICAL IN
connector is not possible. In this case, record the
sound source via the ANALOG IN jacks with
“ANLG” selected by the INPUT button.
• Do not place heavy objects such as an amplifier,
deck, etc. on top of the recorder.
Connecting a computer
Use the supplied USB cable to connect a
computer to the recorder. By connecting the
recorder to a computer, you will be able to
select and play the tracks and do various HDD
editing operations from the computer. For
details, refer to the supplied “M-Crew for
HAR-D1000 Operating Instructions”.
Demonstration mode
When you turn on the recorder and there is no
CD in the recorder, demonstration mode is
activated automatically when the recorder is
stopped for about 10 minutes. To deactivate
the demonstration mode, press any button on
the recorder or on the remote.
Tip
By pressing the CD x and CLEAR buttons at the
same time, you can turn off the demonstration mode.
Demonstration mode is turned off until you
disconnect the power cord of the recorder and
reconnect it.
8
Page 9
Playing CDs
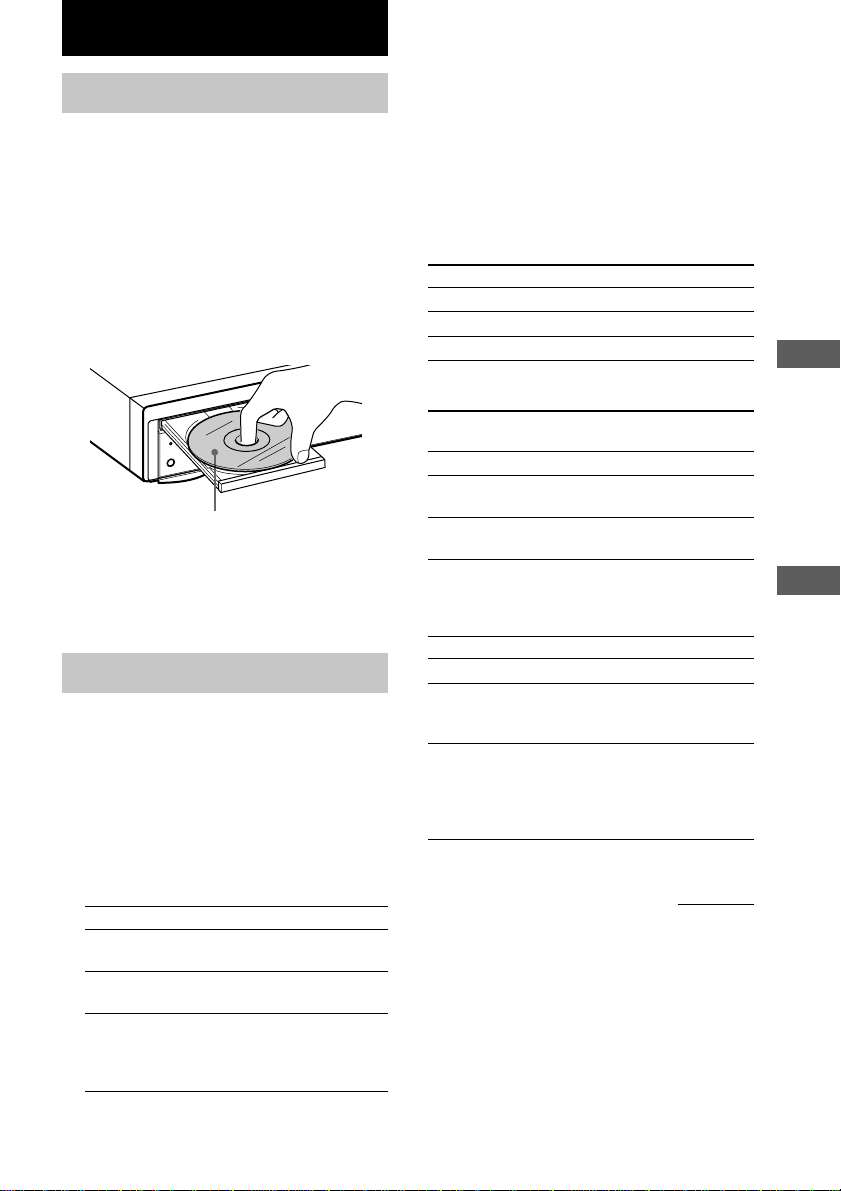
Loading a CD
1 Turn on the amplifier and set the
source selector to the position for this
recorder.
2 Press @/1 to turn on the recorder.
The STANDBY indicator turns off.
3 Press OPEN/CLOSE A.
The disc tray slides out.
4 Load a disc on the disc tray with the
label side up.
HX
D
C
/
A
N
E
P
O
E
S
O
L
C
B
D
N
A
T
S
1
?/
When you play a CD single (8
cm CD), load it on the inner
circle of the tray.
2 Press CD H.
Repeat Play Operations
You can play the CD tracks repeatedly in any
play modes.
To activate the Repeat Play function, press
REPEAT on the remote repeatedly until
“REPEAT’ or “REPEAT 1’ appears in the
display.
To
Repeat all tracks
Repeat only one track
Cancel Repeat Play
The recorder repeats the tracks as follows:
When the CD is
played in
Normal Play
Shuffle Play
Program Play (page
11)
Select
REPEAT.
REPEAT 1.
No display.
The recorder repeats
All the tracks.
All the tracks in random
order.
The same program.
Getting Started
5 Press OPEN/CLOSE A again to close
the disc tray.
Playing a CD
––Normal Play/Shuffle Play/Repeat
Play
This recorder lets you play CDs in different
play modes.
When using the remote, set SELECT to CD.
1 While the recorder is stopped, press
PLAY MODE on the remote repeatedly
to select the play mode.
To play
The disc in original
order
The tracks on the CD in
random order
The tracks on the CD in
any order that you want
(see “Programming the
CD tracks” on page 11)
Select
No display.
SHUFFLE.
PROGRAM.
Other Operations
To
Stop playback
Pause
Select a track
Do this
Press CD x.
Press CD X. Press CD X
again or CD H to resume
playback.
During playback or pause,
press CD L repeatedly
(to go forward) or CD l
repeatedly (to go
backward).
Playing CDs
continued
9
Page 10
Playing a CD (continued)
To
Select a track directly*
Find a point in a track
Remove the CD
* When you directly locate a track numbered over 10,
press >10 before entering a two-digit track number.
When you press the >10 button, two bars appear if
the CD contains 10 to 99 tracks. Press 10/0 for “0”.
Example: To enter track number 30 for a CD
containing 99 tracks
1Press >10.
2Press 3 and 10/0.
Tip
If there is no CD in the recorder, “No Disc” appears
in the display.
Note
If “- Over -” appears in the display, the CD has
reached the end while you are pressing and holding
down the M button on the remote. Press and hold
down m on the remote, or press CD l
repeatedly to go back.
Do this
Press the numeric button(s)
on the remote.
Press and hold down
m/M on the remote
during playback, and
release it at the desired
point.
Press OPEN/CLOSE A.
“- -” appears in the display.
Tips
• When you load a CD containing CD TEXT data,
“CD TEXT” lights up in the display.
• When the detailed display is selected, the disc name
appears while the recorder is stopped and the track
name appears while a track is playing.
If the CD has no text information, “No Name”
appears instead of the disc name or track name.
• When the detailed display for HDD recorder section
1 is selected, the album name appears while the
recorder is stopped and the track name appears
while a track is playing. When the detailed display
for HDD recorder section 2 is selected, the album
name appears at all times.
• You can scroll a title of 12 or more characters by
pressing the SCROLL button on the remote. Press
the button again to pause scrolling, and again to
resume scrolling.
Note
If you perform an HDD operation while the detailed
display for CD player section appears, the display
will change to the CD/HDD divided display.
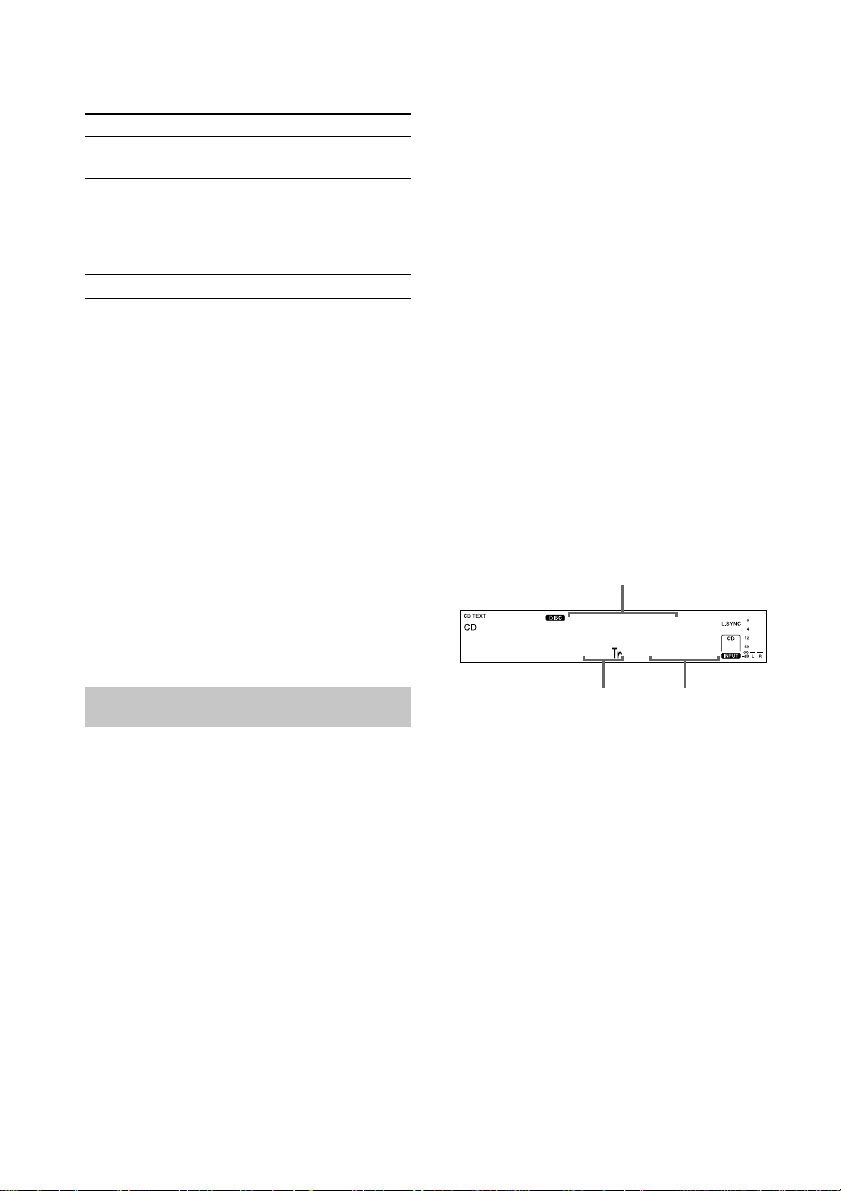
Detailed display for CD player
section
In the stop mode
Disc name
Fox Tail
13 62.23
Using the CD display
You can check information about the CD using
the display.
When using the remote, set SELECT to CD.
Changing the display
Press DISPLAY while the recorder is
stopped or playing.
Each time you press the button, the display
changes as follows:
CD/HDD divided display t Detailed display
for CD player section t Detailed display for
HDD recorder section 1 t Detailed display
for HDD recorder section 2
10
Total number of tracks
Total playing time
The information also appears when you press
the OPEN/CLOSE A button to close the disc
tray.
When Program Play is selected, the total
number of tracks in the program and the total
playing time of the program are displayed.
Tip
By pressing the TIME button on the remote when
Program Play is selected, you can check the last track
number in the program and the selection number.
During normal playback
Press TIME on the remote repeatedly.
Each time you press the button, the display
changes as follows:
Current track number and elapsed playing time
of the track t Current track number and
remaining time of the track t Remaining time
of the entire CD
Page 11

Programming the CD tracks
You can specify the playback order of the
tracks on a CD and create your own programs
containing up to 25 tracks.
When using the remote, set SELECT to CD.
1 While the recorder is stopped, press
PLAY MODE on the remote repeatedly
until “PROGRAM” appears in the
display.
2 Press CD l/L repeatedly until the
desired track appears and press
PLAY MODE on the remote to program
the track.
The last programmed track number appears,
followed by the total playing time of the
program.
Tip
You can select the track using the numeric buttons
on the remote. To select a track numbered over
10, use >10 (see page 10).
3 To program additional tracks, repeat
step 2.
4 Press CD H to start Program Play.
To cancel Program Play
While the recorder is stopped, press
PLAY MODE on the remote repeatedly until
“PROGRAM” disappears.
Tip
The program remains even after the Program Play
ends. When you press the CD H button, you can
play the same program again.
Notes
• The total playing time of the program does not
appear when it exceeds 100 minutes.
• “Step Full!” appears when you program over 25
tracks. Erase the unnecessary tracks to enter other
tracks.
• The program is erased when you disconnect the
power cord.
Changing the track order
You can change your program while the
recorder is stopped.
To
Erase the last track in
the program
Add tracks to the end
of the program
You need to
Press CLEAR on the
remote. Each time you
press the button, the last
programmed track is
cleared.
Follow step 2 of the
programming procedure.
Playing CDs
11
Page 12

Recording to HDD
Notes on recording
Before recording
• You cannot select a play list as the recording
destination.
• You cannot record over an existing track. If
you select an album with existing tracks as
the recording destination, the recorder
automatically starts recording from the end of
the existing tracks.
After recording
The HDD play mode automatically switches to
Normal Play.
Automatic conversion of digital
sampling rates
A built-in sampling rate converter
automatically converts the sampling frequency
of various digital sources to the 44.1 kHz
sampling rate of the recorder. This allows you
to monitor and record sources such as 32- or
48-kHz DAT tape or satellite broadcasts, as
well as the CDs and HDD.
Maximum number of recordable
tracks
Total number of the tracks recorded on the
HDD cannot exceeds 20,000, not counting the
tracks in play lists.
If “Track Full!” appears in the display
when you select the recording
destination
The album already contains 400 tracks, the
maximum number of tracks that can be
recorded to a single album. Select another
album. When using the REC-IT function, the
recording will be cancelled automatically.
If “Drive Full!” appears in the display
while recording to the HDD
Further recording is impossible because there is
not enough recordable space on the HDD or the
maximum number of recordable tracks has
been attained on the HDD. Erase any
unnecessary albums or tracks to continue
recording to the HDD.
Recording a CD to the
HDD
––CD-HDD Synchro-Recording/
High-Speed CD-HDD SynchroRecording
When using the remote, set SELECT to HDD.
1 Turn on the amplifier and set the
source selector to the position for this
recorder.
2 Press @/1 to turn on the recorder.
The STANDBY indicator turns off.
3 Load a CD on the disc tray.
4 Press MENU/NO.
“Edit Menu” appears in the display.
5 Turn ALBUM dial (or press ALBUM +/–
on the remote repeatedly) until
“Setup?” flashes in the display, then
press ALBUM dial or YES.
“Setup Menu” appears in the display.
6 Turn ALBUM dial (or press ALBUM +/–
on the remote repeatedly) until
“Sync Normal” (or “Sync High” or
“SyncChanger”) appears in the display,
then press ALBUM dial or YES.
7 Turn ALBUM dial (or press ALBUM +/–
on the remote repeatedly) to select the
recording speed, then press ALBUM
dial or YES.
To
Perform the normalspeed SynchroRecording
Perform the high-speed
Synchro-Recording
Select
Sync Normal. (factory
setting)
Sync High.
12
Page 13

8 Press MENU/NO.
9 Press CD SYNC.
When “Sync Normal” was selected,
“CD SYNCHRO – Normal –” appears in
the display.
When “Sync High” was selected,
“CD SYNCHRO – High –” appears in the
display.
The HDD stands by for recording and the
CD stands by for playback.
To change the album position, turn
ALBUM dial (or press ALBUM +/– on the
remote repeatedly). When using the remote,
press ALBUM and the numeric button(s) to
enter the position directly (see page 19).
10
After “CD SYNCHRO – Normal –” (or
“CD SYNCHRO – High –”) disappears,
press HDD H or HDD X.
Recording starts.
Track playback is not audible during high-
speed Synchro-Recording.
To stop recording
Press CD x or HDD x.
Tips
• You can use Program Play to specify only the CD
tracks you want to record. After loading a CD, do
the procedure of “Programming the CD tracks” on
page 11. Then do the Synchro-Recording
procedure afterwards.
• If you set “TxtSave” to “On” in the setup menu, CD
text (track name only) can be saved to the HDD
automatically.
• Synchro-Recording enables the assignment of
album and track names from the CDDB2. For
details on the CDDB2, refer to the Help for
“M-crew for HAR-D1000”.
Notes
• If the HDD becomes full during recording,
recording ends automatically.
• You cannot pause recording during SynchroRecording.
• If the CD play mode is set to Repeat Play or Shuffle
Play, it automatically switches to Normal Play.
• The HDD play mode automatically switches to
Normal Play.
• Sound input automatically switches to “CD” during
Synchro-Recording.
• The recording level changes to 0.0 dB
automatically during CD-HDD Synchro Recording
no matter what the setting in the setup menu is.
• CD text may not be saved for short tracks.
If “Retry” flashes in the display after
you press the CD SYNC button
A reading failure has occurred, and the recorder
is trying to read the data again.
• If the retry was successful, the recorder
continues with High-Speed CD-HDD
Synchro-Recording.
• If the condition of the loaded CD or the
system is poor, and retry fails, High-Speed
CD-HDD Synchro-Recording is disabled. In
this case, “×2” flashes in the display and the
recorder automatically starts recording in
normal CD-HDD Synchro-Recording. Note
that monitoring of the recorded signal is not
possible when this occurs.
Recording to the HDD
When using the remote, set SELECT to HDD.
1 Turn on the amplifier and set the
source selector to the position for this
recorder.
2 Press @/1 to turn on the recorder.
The STANDBY indicator turns off.
3 Press INPUT repeatedly to select the
sound source
Sound source
The CD in the recorder
The component
connected to the
DIGITAL OPTICAL
IN connector
The component
connected to the
ANALOG IN jacks
Select
CD.
OPT.
ANLG.
continued
Recording to HDD
13
Page 14

Recording to the HDD (continued)
4 Press HDD z.
“REC” appears in the display.
The HDD stands by for recording.
To change the album position, turn
ALBUM dial (or press ALBUM +/– on the
remote repeatedly). When using the remote,
press ALBUM and the numeric button(s) to
enter the position directly (see page 19).
5 If necessary, adjust the recording level
(see “Adjusting the recording level” on
page 17).
6 Press HDD H or HDD X.
Recording starts.
7 Start playing the sound source.
Other operations during recording
To
Stop recording
Pause recording
Resume recording
after recording pause*
Add a track number
* Track number increases by one.
Notes
• If you change to another sound source while
recording from the CD in the recorder, CD playback
stops.
• If you change the sound source during recording,
track number increases by one automatically. If the
track number cannot be incremented, recording
ends.
• Tracks longer than 120 minutes cannot be recorded.
If the recording time has reached 120 minutes, the
track number increases by one automatically. If the
track number cannot be incremented, recording
ends.
• If the selected album is one that contains 400 tracks
at the time you press the HDD z button, the sound
source is recorded to the album that is closest in
number with recording space.
• When recording a CD with “CD” selected as the
sound source, CD text will not be saved even if
“TxtSave” is set to “On”.
Press
HDD x.
HDD X.
HDD H or HDD X.
HDD z.
If “Din Unlock” flashes in the display
• The digital sound source is not connected as
you selected with the INPUT button.
Connect the sound source properly.
• The sound source is not turned on. Turn on
the sound source.
Recording the current CD
track
––REC-IT Function
You can record the currently playing CD track.
1 Press CD H.
2 Press REC-IT on the remote when the
desired track is being played.
Playback returns to the beginning of the
track and recording starts. Recording stops
at the end of the track, but CD playback
continues.
To stop recording
Press CD x or HDD x.
Tip
If you set “TxtSave” to “On” in the setup menu, CD
text (track name only) can be saved to the HDD
automatically.
Notes
• You cannot select an album that already contains
recorded tracks. The previously displayed album is
automatically selected.
• The HDD play mode automatically switches to
Normal Play.
• Sound input automatically switches to “CD” during
Synchro-Recording.
• The recording level changes to 0.0 dB
automatically during CD-HDD Synchro Recording
no matter what the setting in the setup menu is.
• CD text may not be saved for short tracks.
14
Page 15

Recording tips
––Marking track numbers/Smart
Space/Adjusting the recording
level
When using the remote, set SELECT to HDD.
Marking track numbers while
recording
You can marking track numbers either
manually or automatically while recording. By
marking track numbers at specific points, you
can quickly locate the points later or edit the
HDD easily.
Marking track numbers manually
(Track Mark)
During manual recording, press HDD z at
the point where you want to add a track
number.
Marking track numbers
automatically (Level Synchro
Recording)
When recording from a CD player or MD deck
connected to the DIGITAL OPTICAL IN
connector, the recorder automatically marks
track numbers in the same sequence as the
sound source. When recording from other
sound sources connected to the DIGITAL
OPTICAL IN connector or a sound source
connected to the ANALOG IN jacks, do the
procedure below to mark track numbers
automatically. However, you cannot mark
track numbers automatically if the sound
source you want to record is noisy (e.g., tapes
or radio programmes).
1 While the recorder is stopped or
recording pause, press MENU/NO.
“Edit Menu” appears in the display.
2 Turn ALBUM dial (or press ALBUM +/–
on the remote repeatedly) until
“Setup?” flashes in the display, then
press ALBUM dial or YES.
“Setup Menu” appears in the display.
3 Turn ALBUM dial (or press ALBUM +/–
on the remote repeatedly) until
“T.Mark Lsyn” (or “T.Mark Off”)
appears in the display, then press
ALBUM dial or YES.
4 Turn ALBUM dial (or press ALBUM +/–
on the remote) to select the setting,
then press ALBUM dial or YES.
To
Turn on the Level
Synchro Recording
function
Turn off the Level
Synchro Recording
function
Select
T.Mark Lsyn. (factory
setting)
T.Mark Off.
5 Press MENU/NO.
When you set Level Synchro Recording to
on, “L.SYNC” appears in the display.
The recorder marks a track number
whenever the input signal level drop to the
trigger level for Level Synchro Recording
or below for at least 1.5 seconds.
To change the trigger level for Level
Synchro Recording
Do the procedure below to change the signal
level that triggers Level Synchro Recording.
1 While the recorder is stopped or
recording pause, press MENU/NO.
“Edit Menu” appears in the display.
2 Turn ALBUM dial (or press ALBUM +/–
on the remote repeatedly) until
“Setup?” flashes in the display, then
press ALBUM dial or YES.
“Setup Menu” appears in the display.
continued
Recording to HDD
15
Page 16

Recording tips (continued)
3 Turn ALBUM dial (or press ALBUM +/–
on the remote repeatedly) until
“LS(T) –XXdB” appears in the display,
then press ALBUM dial or YES.
4 Turn ALBUM dial (or press ALBUM +/–
on the remote repeatedly) to select the
level, then press ALBUM dial or YES.
You can set the level at any value between
–72 dB and 0 dB, in 2 dB increments
(–50 dB is the factory setting).
5 Press MENU/NO.
Tips for Level Synchro Recording
• When recording from a CD player or an MD deck
connected to the DIGITAL OPTICAL IN
connector, the entire material might be recorded as
a single track in the following cases:
– When you consecutively record the same track
two or more times using single-track repeat play.
– When you consecutively record two or more
tracks with the same track number but from
different CDs or MDs.
– When you record tracks from certain CD or
multi-disc players.
• When recording from a component connected to the
ANALOG IN jacks with “T.Mark Off” selected or
when recording from a DAT deck or DBS tuner
connected to the DIGITAL OPTICAL IN
connector, the entire material may be recorded as a
single track.
Tips
• You can mark track numbers even after recording
has finished. (see “Dividing Recorded Tracks” on
page 24)
• To restore the factory setting, press CLEAR while
setting the trigger level in step 4.
Notes
• If this function is activated when the 400th track is
reached, recording stop.
• When recording from a CD, a track number might
not be marked for tracks less than 4 seconds in
length.
Erasing blank portions
automatically
(Smart Space/Auto Cut)
The Smart Space function lets you make the
blank spaces between tracks 3 second long
automatically. If the Smart Space function is
on and there is no sound input for about 3
seconds or more (but less than 30 seconds)
during recording, the recorder replaces this
silence with a blank of about 3 seconds and
continues recording:
No sound input for less than 30 seconds
Off
On
Replaced with a blank of 3 seconds and
recording continues
Auto Cut: When the Smart Space function is
on, if there is no sound input for 30 seconds or
more, the recorder replaces this silence with a
blank of about 3 seconds and enters recording
pause.
No sound input for 30 seconds or more
Off
On
Replaced with a blank of 3 seconds and
recording pauses
1 While the recorder is stopped or
recording pause, press MENU/NO.
“Edit Menu” appears in the display.
2 Turn ALBUM dial (or press ALBUM +/–
on the remote repeatedly) until
“Setup?” flashes in the display, then
press ALBUM dial or YES.
“Setup Menu” appears in the display.
16
Page 17

3 Turn ALBUM dial (or press ALBUM +/–
on the remote repeatedly) until
“S.Space On” (or “S.Space Off”)
appears in the display, then press
ALBUM dial or YES.
4 Turn ALBUM dial (or press ALBUM +/–
on the remote) to select the setting,
then press ALBUM dial or YES.
To
Turn on the Smart
Space and Auto Cut
functions
Turn off the Smart
Space and Auto Cut
functions
Select
S.Space On. (factory
setting)
S.Space Off.
5 Press MENU/NO.
Notes
• When you record from a CD, Smart Space does not
affect the order of the track numbers being
recorded, even if the blank space occurs in the
middle of a track.
• Auto Cut is automatically turned on or off in
tandem with Smart Space.
• If the recorder continues recording pause for about
10 minutes after Auto Cut activated, recording stops
automatically.
• If this function is activated when the 400th track is
reached, recording stop.
Adjusting the recording level
You can adjust the recording level for both
analog and digital recordings.
1 Do steps 1 through 4 of “Recording to
the HDD” on page 13.
2 Play the portion of the sound source
with the strongest output.
3 Press MENU/NO.
“Setup?” appears in the display.
4 Press ALBUM dial or YES.
“Setup Menu” appears in the display.
5 Turn ALBUM dial (or press ALBUM +/–
on the remote repeatedly) until
“CD X.XdB” (or “Opt X.XdB” or
“Anlg X.XdB”) appears in the display,
then press ALBUM dial or YES.
6 While monitoring the sound, turn
ALBUM dial (or press ALBUM +/– on
the remote repeatedly) to adjust the
recording level so that the OVER
indicator on the peak level meters does
not turn on.
Avoid turning on this indicator
CD +1.8dB
7 Press ALBUM dial or YES.
8 Press MENU/NO.
9 Stop playing the sound source.
10
Do steps 6 and 7 of “Recording to the
HDD” on page 13.
Tips
• You can adjust the recording level by pressing the
REC LEVEL +/– buttons on the remote repeatedly
during recording or recording pause.
• To restore the factory setting, press CLEAR while
adjusting the recording level in step 6.
Notes
• The recording level can only be increased up to
+12 dB (for analog recording) or +18 dB (for digital
recording) (0.0 dB is the factory setting).
Therefore, if the output level of the connected
components is low, it may not be possible to set the
recording level to maximum.
• The monitor sound is not affected when you adjust
the recording level during recording.
Recording to HDD
17
Page 18

Playing the HDD
Playing the HDD
––Normal Play/Shuffle Play/Repeat
Play
This recorder lets you play the HDD in
different play modes.
When using the remote, set SELECT to HDD.
1 Turn on the amplifier and set the
source selector to the position for this
recorder.
2 Press @/1 to turn on the recorder.
The STANDBY indicator turns off.
3 While the recorder is stopped, press
PLAY MODE on the remote repeatedly
to select the play mode.
When you select
ALL ALBUM
only
1ALBUM only
ALL ALBUM and
SHUFFLE
1ALBUM and
SHUFFLE
* Except for the play lists (see page 20)
4 Press HDD H.
Repeat Play Operations
You can play the HDD tracks repeatedly in any
play modes.
To activate the Repeat Play function, press
REPEAT on the remote repeatedly until
“REPEAT’ or “REPEAT 1’ appears in the
display.
Result
All the albums in the
recorder are played back
consecutively in the order
of album number.
Only the current album is
played back.
An album* is selected at
random and the tracks in
that album are played back
in random order. After all
the tracks have been played,
another album is selected in
the same manner. (Shuffle
Play continues until all the
tracks* in the recorder have
been played.)
All the tracks in the current
album are played back in
random order.
To
Repeat all tracks
Repeat only one track
Cancel Repeat Play
Select
REPEAT.
REPEAT 1.
No display.
The recorder repeats the tracks as follows:
When the HDD is
played in
Normal Play
(ALL ALBUM)
Normal Play
(1ALBUM)
Shuffle Play
(ALL ALBUM)
Shuffle Play
(1ALBUM)
The recorder repeats
All the tracks on the HDD.
All the tracks in the current
album.
All the tracks (except for
the play lists (see page 20))
on the HDD in random
order.
All the tracks in the current
album in random order.
Other Operations
To
Stop playback
Pause
Select a track
Select a track
1
directly*
Select an album*
Select an album
3
directly*
Find a point in a
4
track*
Do this
Press HDD x.
Press HDD X. Press
HDD X again or HDD H
to resume playback.
During playback or pause,
press HDD L repeatedly
(to go forward) or
HDD l repeatedly (to
go backward).
Press the numeric button(s)
on the remote.
2
During playback or pause,
turn ALBUM dial
clockwise (to go forward)
or counterclockwise (to go
backward) (or press
ALBUM + (to go forward)
or ALBUM – (to go
backward) on the remote
repeatedly).
Press ALBUM on the
remote first, then press the
numeric button(s) on the
remote.
Press and hold down
m/M on the remote
during playback, and
release it at the desired
point.
18
Page 19

*1When you directly locate a track numbered over
10, press >10 before entering a two-digit or threedigit track number. When you press the >10
button, two bars appear if the album contains 10 to
99 tracks or three bars appear if the album contains
100 or more tracks. Press 10/0 for “0”.
Example: To enter track number 30 in an
album containing 100 tracks
1Press >10.
“- - -” appears in the display.
2Press 10/0.
The flashing bar shifts to the right.
3Press 3 and 10/0.
*2The playback starts from the first track in the
specified album. You cannot select the album
containing no track.
*3Press 10/0 for “0”.
Example: To enter album number 30 when the
HDD contains albums numbered 100
or more
1Press ALBUM.
“- - -” appears in the display.
2Press 10/0.
The flashing bar shifts to the right.
3Press 3 and 10/0.
*4You can locate a point only within the current
album.
Using the HDD display
You can check information about the HDD
using the display.
When using the remote, set SELECT to HDD.
Tips
• When the detailed display for HDD recorder section
1 is selected, the album name appears while the
recorder is stopped and the track name appears
while a track is playing. When the detailed display
for HDD recorder section 2 is selected, the album
name appears at all times.
• You can scroll a title of 12 or more characters by
pressing the SCROLL button on the remote. Press
the button again to pause scrolling, and again to
resume scrolling.
Note
If you perform a CD operation while detailed display
for HDD recorder section appears, the display will
change to the CD/HDD divided display.
Detailed display for HDD
recorder section
In the stop mode
Press TIME on the remote.
Each time you press the button, the display
changes as follows:
Total number of tracks and total playing time
of the album t Percentage of the HDD area
used as a total recorded time
Album name
Best Select
19 77.45
Playing the HDD
Changing the display
Press DISPLAY while the recorder is
stopped or playing.
Each time you press the button, the display
changes as follows:
CD/HDD divided display t Detailed display
for CD player section t Detailed display for
HDD recorder section 1 t Detailed display
for HDD recorder section 2
Total playing timeTotal number of tracks
Note
The percentage of the HDD area used will never be
0% even when no tracks have been recorded to the
HDD. This is because the HDD contains information
other than music data; for example, track names and
information about the music, etc.
continued
19
Page 20

Using the HDD display (continued)
Playing a track in a play
During normal playback
Press TIME on the remote repeatedly.
Each time you press the button, the display
changes as follows:
Current track number and elapsed playing time
of the track t Current track number and
remaining time of the track t Remaining time
of the entire album (Normal Play only)
Tip
When you press the INFO button on the remote, the
display changes to the album number of the album
containing the current track. If you press the button
while the album number is displayed, the display
changes to the artist name for the current track.
Note
“- - - - . - -” appears when the remaining time of the
album exceeds 1,000 minutes.
During recording
Press TIME on the remote.
Each time you press the button, the display
changes as follows:
Track number and elapsed recording time of
the current track t Percentage of the HDD
area used as a total recorded time
Notes
• The total recorded time is first displayed as a
percentage. When the remaining recordable time
reaches “999 . 59” (999 minutes and 59 seconds),
the display changes to a time display.
• The percentage of the HDD area used will never be
0% even when no tracks have been recorded to the
HDD.
list
––Play List Play
By registering tracks on the HDD to a play list,
you can play back only the tracks you want to
listen to. Up to 10 play lists can be created and
each play list can contain up to 400 tracks. On
this recorder, album numbers 501 to 510
correspond to the play lists.
When using the remote, set SELECT to HDD.
1 During the playback or play pause of
the desired track, press PLAY LIST on
the remote.
2 Turn ALBUM dial (or press ALBUM +/–
on the remote repeatedly) until the
desired play list appears, then press
YES.
“Complete!” appears for a few seconds.
3 Do the procedure of “Playing the HDD”
on page 18 to play the play list.
Tip
When you press the PLAY LIST button on the remote
while the recorder is stopped, all the tracks in the
current album are registered to a play list.
Notes
• If you edit a track in an album that is registered to
one or more play lists, the track is erased from all
the play lists automatically. (except for the Name
function)
• During the playback of a track in a play list, you
cannot press the PLAY LIST button on the remote
to register the track to a play list.
20
Page 21

Locating a desired album
or track
––Keyword Search/Highlight Play
When using the remote, set SELECT to HDD.
Searching by keywords
(Keyword Search)
You can easily find desired albums or tracks on
the HDD if they have been named.
1 While the recorder is stopped, press
SEARCH/CHAR (or SEARCH on the
remote).
2 Turn ALBUM dial (or press ALBUM +/–
on the remote) to select the target level,
then press ALBUM dial or YES.
To
Search for an album
Search for a track
3 Turn ALBUM dial (or press ALBUM +/–
on the remote) to select the keyword
type, then press ALBUM dial or YES.
To
Search by an album or
track name
Search by an artist
name
“Keyword In” appears in the display.
4 Enter the keyword (see “Assigning a
title or artist name to a track, album or
play list” on page 27).
Up to 10 characters can be entered.
Select
For Album?.
For Track?.
Select
By Title?.
By Artist?.
5 Press YES.
When the corresponding item is found,
playback of the item starts.
If you selected
For Album?
For Track?
If there are multiple matches, turn ALBUM
dial (or press ALBUM +/– on the remote
repeatedly) to select the desired album or
track.
If there are no matches, “Not Found”
appears in the display.
To cancel Keyword Search
Press MENU/NO.
If you press the HDD H button during
Keyword Search, the search is cancelled and
the HDD play mode returns to Normal Play.
When an album match is made, playback starts
from the first track in the album. When a track
match is made, playback starts from the
beginning of the track.
To check information about the
matches
The total number of matches*
1/13[ 1]
Ceramic Art
The current item
*1Even if there are 21 or more matches, the display
shows “X/20”.
*2Each page contains up to 20 items.
To
Go ahead
Go back
The recorder plays
the Highlight positions
of all tracks in the
album.
the track repeatedly.
1
2
Page*
Press
HDD L.
HDD l.
Playing the HDD
continued
21
Page 22

Locating a desired album or track
(continued)
By pressing the DISPLAY button, you can
check more information about the current item.
Each time you press the button, the lower part
of the display changes as follows:
Album or track name t Album (and track)
number
Tips
• When you press the SEARCH/CHAR button (or the
SEARCH button on the remote) while the current
item is displayed, the display for entering a
keyword appears again. This allows you to do
another search with another keyword under the
same condition as the previous keyword.
• In step 4, you can register the track to a play list by
pressing the PLAY LIST button on the remote. (see
“Playing a track in a play list” on page 20).
Searching by playback
(Highlight Play)
This function allows you to easily locate an
album on the HDD by playing back a part of a
representative track in each album.
To register a representative track
for Highlight Play
1 While the recorder is playing or paused
in Normal Play, press HIGH-LIGHT on
the remote.
Rehearsal playback starts from the point
where you pressed the button.
2 While monitoring the sound, turn
ALBUM dial (or press ALBUM +/– on
the remote repeatedly) to adjust the
starting point of Highlight Play.
You can shift the starting point in 1-frame
(f) intervals (1 frame = 1/43 second).
The time indication (minute, second and
frame) of the current point is displayed
To find a point quickly
Specify the unit (minute, second or frame)
by pressing the HDD l/L buttons
repeatedly. The selected unit flashes in the
display.
3 Press ALBUM dial or YES.
“Complete!” appears in the display and the
Highlight position of the representative
track in the album is registered for
Highlight Play.
The Highlight position plays for 10 seconds.
Notes
• If the registration of the Highlight position has not
been performed, the beginning of the first track in
the album becomes the Highlight position of the
album.
• Only one track can be selected as the representative
track for each album.
The Highlight position can be registered for any of
the tracks. However, if you register more than two
Highlight positions in the same album, the last track
with the Highlight position registered becomes the
representative track for that album.
• During Highlight Play, you cannot:
– register a Highlight position
– register a track to a play list
• You cannot register a Highlight position to a play
list (album numbers 501 to 510).
To play an album found through
Highlight Play
1 While the recorder is stopped, press
HIGH-LIGHT on the remote.
Highlight Play starts and HDD’s H flashes
in the display.
2 While monitoring the sound, turn
ALBUM dial (or press ALBUM +/– on
the remote repeatedly) to locate the
desired album.
3 Press HDD H.
Playback starts from the first track in the
selected album.
Note
If you perform Highlight Play when Shuffle Play is
selected, the HDD play mode automatically switches
to Normal Play.
22
Page 23

Editing Recorded HDD
Before editing
You can edit an HDD track only when the
HDD play mode is Normal Play.
To cancel the last edit
Use Undo function to cancel the last edit and
restore the contents of the HDD to the
condition before the edit.
To quit while editing
Press MENU/NO or HDD x.
Erasing recordings
––Erase Function
The HDD recorder lets you erase unwanted
tracks quickly and easily.
The two options for erasing recordings are:
• Erasing a single track (Track Erase)
• Erasing all tracks in an album (Album Erase)
When using the remote, set SELECT to HDD.
Erasing a single track
(Track Erase)
You can erase a track simply by selecting its
track number. When you erase a track, the
total number of tracks in the album decreases
by one and all the tracks following the erased
one are renumbered.
Example: Erasing track 2
Track
number
Original
tracks
After
ERASE
123
ACD
123
AC D
Erase track 2
4
B
1 While the recorder is stopped, playing
or paused, press MENU/NO after
selecting the album you want to edit.
“Edit Menu” appears in the display.
2 Turn ALBUM dial (or press ALBUM +/–
on the remote repeatedly) until
“Tr Erase?” flashes in the display, then
press ALBUM dial or YES.
The display for erasing tracks appears and
playback of the displayed track starts.
3 Turn ALBUM dial (or press ALBUM +/–
on the remote repeatedly) until the
track number you want to erase
flashes.
4 Press ALBUM dial or YES.
“Complete!” appears for a few seconds.
The track following the erased track starts
playing. If you erase the last track in the
album, the track preceding the erased track
starts playing.
Notes
• If erasing a track causes an album or play list to
become empty, the album or the play list will be
also erased.
• If you erase a track that is registered to a play list,
the track is erased from the play list also.
Afterwards, the contents of the play list cannot be
restored to the condition before the edit even if you
use the Undo function.
• If you erase a track containing a registered
Highlight position (for Highlight Play), the track
following the erased one becomes the registered
track instead. After the erasure of such a track, the
Highlight Play registration cannot be restored to the
condition before the edit, evin if you use the Undo
function.
continued
Playing the HDD
Editing Recorded HDD
23
Page 24

Erasing recordings (continued)
Erasing all tracks in an album
(Album Erase)
Do the procedure below to erase all tracks,
track names, album name and artist name at
once.
1 While the recorder is stopped, playing
or paused, press MENU/NO after
selecting the album you want to edit.
“Edit Menu” appears in the display.
2 Turn ALBUM dial (or press ALBUM +/–
on the remote repeatedly) until
“Album Ers?” flashes in the display,
then press ALBUM dial or YES.
“Album Ers??” flashes in the display.
3 Press ALBUM dial or YES.
“Complete!” appears for a few seconds.
Notes
• Once an album is erased by the Album Erase
function, it cannot be restored, even if you use
Undo function.
• Do not turn off the recorder while “Erasing”
appears in the display.
Dividing recorded tracks
––Divide Function
You can use this function to mark numbers
after recording. The total number of tracks in
the album increases by one and all the tracks
following the divided one are renumbered.
When using the remote, set SELECT to HDD.
Example: Dividing track 2 into two tracks
Track
number
Original
tracks
After
DIVIDE
12 3
A
123 4
AB C D
CBD
Divide track 2 into
track B and C
1 While the recorder is stopped, playing
or paused, press MENU/NO after
selecting the album you want to edit.
“Edit Menu” appears in the display.
2 Turn ALBUM dial (or press ALBUM +/–
on the remote repeatedly) until
“Divide?” flashes in the display, then
press ALBUM dial or YES.
3 Turn ALBUM dial (or press ALBUM +/–
on the remote repeatedly) until the
track number you want to divide
flashes, then press ALBUM dial or YES
at the dividing point.
“– Rehearsal –” appears and the recorder
repeatedly plays several seconds of the track
from the point where you pressed the
ALBUM dial or the YES button.
4 While monitoring the sound, turn
ALBUM dial (or press ALBUM +/– on
the remote repeatedly) to locate the
dividing point.
You can shift the starting point in 1-frame
(f) intervals (1 frame = 1/43 second)
The time indication (minute, second and
frame) of the current point is displayed and
the recorder plays several seconds of the
track from that point repeatedly.
To find a point quickly
Specify the unit (minute, second or frame)
by pressing the HDD l/L buttons
repeatedly. The selected unit flashes in the
display.
5 Press ALBUM dial or YES.
“Complete!” appears for a few seconds.
The newly created track starts playing.
Note that new track has no name.
24
Page 25

Tips
• You can divide a track while recording. For details,
see “Marking track numbers while recording” on
page 15.
• If you divide a track with a Highlight position, the
track with the Highlight position becomes the
representative track. If you divide a track in the
middle of the Highlight position, the 10 seconds up
to the dividing point automatically become the new
Highlight position, and the track containing the
Highlight position becomes the new representative
track of the album.
Notes
• You cannot divide a track at its beginning or end.
• You cannot divide a track if the total number of
tracks in the album will exceed 400 after the
division.
• You cannot divide a track if the total number of
tracks on the HDD will exceed 20,000 after the
division.
• You cannot divide tracks in a play list.
Combining recorded
tracks
––Combine Function
You can use this function to combine 2 tracks
into a single track. The total number of tracks
in the album decreases by one and all the tracks
following the combined ones are renumbered.
You can also use this function to erase
unnecessary track numbers.
When using the remote, set SELECT to HDD.
Example: Combining track 3 to track 1
Track
number
Original
tracks
12
A
43
DCB
1 While the recorder is stopped, playing
or paused, press MENU/NO after
selecting the album you want to edit.
“Edit Menu” appears in the display.
2 Turn ALBUM dial (or press ALBUM +/–
on the remote repeatedly) until
“Combine?” flashes in the display, then
press ALBUM dial or YES.
3 Turn ALBUM dial (or press ALBUM +/–
on the remote repeatedly) until the
track number of the first track you want
to combine flashes, then press ALBUM
dial or YES.
The display for selecting a second track
appears and the recorder plays the portion
where joining will occur (the end of the first
track and the beginning of the second track
following it) repeatedly.
4 Turn ALBUM dial (or press ALBUM +/–
on the remote repeatedly) until the
track number of the second track you
want to combine flashes, then press
ALBUM dial or YES.
“Complete!” appears for a few seconds.
The combined track starts playing.
Notes
• If both of the combined tracks have track names,
the name of the second track is erased.
• If “Impossible” appears in the display, the tracks
cannot be combined because repeated editing has
been done to the track(s). This is a technical
limitation of the HDD system and is not a
mechanical error.
• You cannot combine tracks if the total playing time
of the tracks will exceed 120 minutes after the
combination.
• You cannot combine tracks in a play list.
Editing Recorded HDD
After
COMBINE
Example: Combining track 1 to track 4
Original
tracks
After
COMBINE
12
ACBD
12
A
12433
BC D A
3
5
DCB
4
25
Page 26

Moving recorded tracks
or albums
––Move Function
You can use this function to change the order
of any track or album on the HDD.
When using the remote, set SELECT to HDD.
Moving recorded tracks
When you move tracks, the tracks are
automatically renumbered.
Example: Moving track 3 to position 2
Track
number
Original
tracks
After
MOVE
1 While the recorder is stopped, playing
2 Turn ALBUM dial (or press ALBUM +/–
3 Turn ALBUM dial (or press ALBUM +/–
4 Turn ALBUM dial (or press ALBUM +/–
123
AB C D
23
1
CBDA
or paused, press MENU/NO after
selecting the album you want to edit.
“Edit Menu” appears in the display.
on the remote repeatedly) until
“Move?” flashes in the display, then
press ALBUM dial or YES.
on the remote repeatedly) until the
track number you want to move
flashes, then press ALBUM dial or YES.
on the remote repeatedly) until the new
track position flashes, then press
ALBUM dial or YES.
“Complete!” appears for a few seconds.
The moved track starts playing.
4
4
Moving recorded albums
You can change the order of album numbers 1
to 500. (album numbers 501 to 510 in the case
of play lists)
All tracks in an album can be simultaneously
moved to an album that contains no tracks.
1 While the recorder is stopped, playing
or paused, press MENU/NO after
selecting the album you want to edit.
“Edit Menu” appears in the display.
2 Turn ALBUM dial (or press ALBUM +/–
on the remote repeatedly) until
“Move?” flashes in the display, then
press ALBUM dial or YES.
3 Turn ALBUM dial (or press ALBUM +/–
on the remote repeatedly) until
“Album” flashes, then press ALBUM
dial or YES.
4 Turn ALBUM dial (or press ALBUM +/–
on the remote repeatedly) until the new
album position flashes, then press
ALBUM dial or YES.
“Complete!” appears for a few seconds.
The album after being moved becomes the
current album.
Notes
• You cannot move a track in an album to a play list,
or a track in a play list to an album.
• It is not possible to move an album numbered 1 to
500 to produce an album with a number of 501 to
510 (a play list number). It is not possible to move
an album numbered 501 to 510 to produce an album
with a number of 1 to 500.
• It is not possible to move an album (or play list)
when there is no album (or play list) that contains
no tracks.
• Moving an album does not affect the order of its
tracks.
26
Page 27

Assigning a title or artist
name to a track, album or
play list
––Name Function
You can enter a title or artist name for albums
and play lists as well as for individual tracks.
Name can consist of uppercase and lowercase
letters, numbers and symbols. Up to 127
characters can be entered for each name.
When using the remote, set SELECT to HDD.
Notes
• If you name a track while it is being recorded, be
sure to finish the naming operation before the track
ends. If the track ends before you have completed
the naming operation, the entered character data
will be discarded and track will remain unnamed.
• You cannot name an album during recording.
• You cannot name tracks in a play list. Track names
in a play list cannot be erased or changed.
Assigning a title or artist
name using the controls on
the recorder
1 While the recorder is stopped, playing
or paused, press MENU/NO after
selecting the album you want to edit.
“Edit Menu” appears in the display.
2 Turn ALBUM dial until “Name In?”
flashes in the display, then press
ALBUM dial or YES.
3 Turn ALBUM dial to select the item,
then press ALBUM dial or YES.
To
Assign a title to a track,
album or play list
Assign an artist name
to a track, album or
play list
While the recorder is recording, a flashing
cursor appears in the display and you can
enter a name of the track being recorded. In
this case, go to step 5.
Select
Nm Title?.
Nm Artist?.
4 Turn ALBUM dial to select the item,
then press ALBUM dial or YES.
To
Name a track
Name an album or play
list
A flashing cursor appears.
The recorder starts playing and you can
assign a title or artist name while
monitoring the sound. (for track only)
Select
A track number.
Album.
5 Press SEARCH/CHAR repeatedly to
select the character type.
Each time you press the button, the display
changes as follows:
(Blank space) t A (Upper cases) t a
(Lower cases) t 0 (Numbers) t ’
(Symbols)
To enter a space
Press HDD L while the cursor is
flashing.
6 Turn ALBUM dial to select the
character.
The selected character flashes.
To enter a symbol
You can use the following symbols in
names:
’ – / , . ( ) : ! ? & + < > _ = ” ; # $ % @ * `
To change a selected character
Repeat steps 5 and 6.
7 Press ALBUM dial.
The selected character is entered and lights
continuously. The cursor shifts to the right,
flashes and waits for the input of the next
character.
continued
Editing Recorded HDD
27
Page 28

Assigning a title or artist name to a
track, album or play list (continued)
8 Repeat steps 5 through 7 to enter the
rest of the name.
To change a character
Press HDD l/L repeatedly until the
character you want to change flashes, then
repeat steps 5 and 6.
To erase a character
Press HDD l/L repeatedly until the
character you want to erase flashes, then
press CLEAR.
9 Press YES.
“Complete!” appears for a few seconds.
Assigning a title using the
remote
1 After selecting the album you want to
edit, press NAME EDIT/SELECT
depending on what you want to name.
To name
A track
An album or
play list
A flashing cursor appears in the display.
Note
You cannot assign an artist name using the
remote.
Press while
The recorder is playing or
recording. (the track number is
displayed)
The recorder is stopped with the
total number of tracks displayed.
2 Press NAME EDIT/SELECT repeatedly
to select the character type.
Each time you press the button, the display
changes as follows:
“Selected AB” (Upper cases or symbols*)
t “Selected ab” (Lower cases or
symbols*) t “Selected 12” (Numbers)
* Only ’ – / , . ( ) : ! ? can be selected.
You can enter a space by pressing the 10/0
button.
3 Enter a character using letter/numeric
buttons.
If you have selected upper cases
or lower cases
1 Press corresponding letter/numeric button
repeatedly until the character you want to
enter flashes.
Or press ALBUM +/– repeatedly.
2 Press >.
The flashing character is entered and
lights continuously and the cursor shifts
to the right.
4 Repeat steps 2 and 3 to enter the rest
of the name.
To change a character
Press ./> repeatedly until the
character you want to change flashes, press
CLEAR to erase the character, then repeat
steps 2 and 3.
5 Press YES.
“Complete!” appears for a few seconds.
Renaming a track, album or
play list
1 Do steps 1 through 4 of “Assigning a
title or artist name using the controls
on the recorder” on page 27 or step 1
of “Assigning a title using the remote”
on this page.
A title or artist name appears in the display.
Note
You cannot reassign an artist name using the
remote.
2 Press and hold down CLEAR until the
selected name is erased completely.
3 Do steps 5 through 8 of “Assigning a
title or artist name using the controls
on the recorder” on page 27 or steps 2
through 4 of “Assigning a title using
the remote” on this page.
4 Press YES.
“Complete!” appears for a few seconds.
28
Page 29

Erasing a title or artist name
You can use this function to erase a title or
artist name.
1 While the recorder is stopped, playing
or paused, press MENU/NO after
selecting the album you want to edit.
“Edit Menu” appears in the display.
2 Turn ALBUM dial (or press ALBUM +/–
on the remote repeatedly) until
“Name Erase?” flashes in the display,
then press ALBUM dial or YES.
3 Turn ALBUM dial (or press ALBUM +/–
on the remote) to select the item, then
press ALBUM dial or YES.
To
Erase a title
Erase an artist name
While the recorder is recording,
“Complete!” appears for a few seconds and
the name of the track being recorded is
erased.
Select
Ers Title?.
Ers Artist?.
4 Turn ALBUM dial (or press ALBUM +/–
on the remote repeatedly) to select the
item, then press ALBUM dial or YES.
To
Erase a name of a track
Erase a name of an
album or play list
“Complete!” appears for a few seconds.
Select
A track number.
Album.
Undoing the last edit
––Undo Function
You can undo the last edit operation and restore
the contents of the HDD to the condition that
existed before the operation. Note, however,
that you cannot undo an edit operation if you
perform any of the following operation after
the edit:
• Do another edit.
• Start recording.
• Perform a play list or Highlight Play
registration.
• Turn off the recorder.
• Disconnect the power cord.
When using the remote, set SELECT to HDD.
1 While the recorder is stopped, playing
or paused, press MENU/NO.
“Edit Menu” appears in the display.
2 Turn ALBUM dial (or press ALBUM +/–
on the remote repeatedly) until
“Undo?” flashes in the display.
“Undo” does not appear if no editing has
been done.
3 Press ALBUM dial or YES.
One of the messages appears depending on
the last edit operation.
4 Press ALBUM dial or YES.
“Complete!” appears for a few seconds.
Editing Recorded HDD
29
Page 30

Other Functions
Falling asleep to music
––Sleep Timer
You can set the recorder so that it turns off
automatically after a specified duration.
1 Press MENU/NO.
“Edit Menu” appears in the display.
2 Turn ALBUM dial (or press ALBUM +/–
on the remote repeatedly) until
“Setup?” flashes in the display, then
press ALBUM dial or YES.
“Setup Menu” appears in the display.
3 Turn ALBUM dial (or press ALBUM +/–
on the remote repeatedly) until
“Sleep Off” (or “Sleep XXmin”) appears
in the display, then press ALBUM dial
or YES.
4 Turn ALBUM dial (or press ALBUM +/–
on the remote repeatedly) to select a
desired time (“Off”, “30min”, “60min”,
“90min”, “120min”), then press ALBUM
dial or YES.
“SLEEP” appears in the display.
5 Press MENU/NO.
Tip
You can check the remaining time.
Once you turn on Sleep Timer, the remaining time is
displayed when you select “Sleep” in Setup Menu.
Recording from a CD changer
If you have a Sony CD changer in which 200,
300 or 400 CDs can be inserted and which is
equipped with the CONTROL A1II (or
CONTROL A1) jack, after connecting the
changer and an amplifier, follow the procedure
below. For details on CD changer operations,
refer to the instructions included with the CD
changer.
This function is not supported by all Sony CD
changers. The following CD changers are
recommended:
CDP-CX235, CDP-CX335, CDP-CX400,
CDP-CX450, CDP-CX333ES, CDP-M333ES,
CDP-CX555ES, CDP-M555ES, CDP-CX230,
CDP-CX300, CDP-CX350
ANALOG
IN OUT OPTICAL
To
DIGITAL
OPTICAL
IN
To ANALOG OUT
DIGITAL
CD CHANGER
USB
CONTROL
IN
L
R
To CD
CHANGER
CONTROL
To
CONTROL
A1II
To digital
output
HAR-D1000
CD changer
30
To audio input
: Signal flow
Amplifier
Page 31

1 Connect components to the recorder.
(see also “Hooking up the system” on
page 7)
After turning on the CD changer, load the
desired CDs into the CD changer.
2 Press MENU/NO.
“Edit Menu” appears in the display.
3 Turn ALBUM dial (or press ALBUM +/–
on the remote repeatedly) until
“Setup?” flashes in the display, then
press ALBUM dial or YES.
“Setup Menu” appears in the display.
4 Turn ALBUM dial (or press ALBUM +/–
on the remote repeatedly) until
“Sync Normal” (or “Sync High” or
“SyncChanger”) appears in the display,
then press ALBUM dial or YES.
5 Turn ALBUM dial (or press ALBUM +/–
on the remote repeatedly) to select
“SyncChanger”, then press ALBUM dial
or YES.
6 Press MENU/NO.
7 Press CD SYNC.
“CD SYNCHRO – Changer –” appears in
the display.
8 When “Start Disc” appears in the
display, turn ALBUM dial (or press
ALBUM +/– on the remote repeatedly)
to select the starting disc among those
loaded in step 1.
9 Press ALBUM dial or YES.
“End Disc” appears in the display.
10
Turn ALBUM dial (or press ALBUM +/–
on the remote repeatedly) to select the
ending disc among those loaded in
step 1.
11
Press ALBUM dial or YES.
The HDD stands by for recording and the
CD changer stands by for playback.
In the albums containing no tracks, the one
with the smallest album number is
automatically set as the recording
destination. If you want to change an album
position, turn ALBUM dial (or press
ALBUM +/– on the remote repeatedly) to
select the desired position.
12
After “CD SYNCHRO – Changer –”
disappears, press HDD H or HDD X.
Recording starts.
To stop recording
Press HDD x.
Tips
• In steps 8 and 10, you can use the HDD l/L
buttons to select the disc number. In this case, only
disc numbers that are multiples of 10 can be
selected.
• In step 10, you can press the MENU/NO button to
return to the display for selecting the starting disc.
• If you set “TxtSave” to “On” in the setup menu, CD
text (track name only) can be saved to the HDD
automatically.
• When using a CD changer that holds 300 or more
CDs, set the CONTROL A1 setting on the CD
changer to “CONTROL A1II”.
• Synchro-Recording enables the assignment of
album and track names from the CDDB2. For
details on the CDDB2, refer to the Help for
“M-crew for HAR-D1000”.
Notes
• Do not turn off the CD changer during recording.
• Do not disconnect the optical cable and the
CONTROL A1 cable during recording.
• The time and text information on the current CD do
not appear in the recorder’s display.
• If the HDD becomes full during recording,
recording ends automatically.
• You cannot pause recording during SynchroRecording.
• Depending on the condition of the CD changer,
some CDs may not be recorded or recording may
have stopped in the middle of some CD. Check the
condition of the CD changer and record the CDs
again.
• Depending on the way your CD changer operates, a
short track with no sound may be recorded in some
cases.
• The CD changer’s play mode automatically
switches to Normal Play.
• The HDD play mode automatically switches to
Normal Play.
• Sound input automatically switches to “OPT”
during Synchro-Recording.
• The recording level changes to 0.0 dB
automatically during CD-HDD Synchro Recording
no matter what the setting in the setup menu is.
• While “Remote” appears in the CD changer’s
display, most of the controls and buttons for the CD
changer are inoperative.
• CD text may not be saved for short tracks.
• The supplied M-crew for HAR-D1000 does not
support Synchro-Recording from a CD changer.
Other Functions
31
Page 32

Additional Information
Precautions
On safety
• Caution — The use of optical instruments with this
product will increase eye hazard.
• Should any solid object or liquid fall into the
cabinet, unplug the recorder and have it checked by
qualified personnel before operating it any further.
• Discs with non-standard shapes (e.g., heart, square,
star) cannot be played on this unit. Attempting to
do so may damage the unit. Do not use such discs.
On power sources
• Before operating the recorder, check that the
operating voltage of the recorder is identical with
your local power supply. The operating voltage is
indicated on the nameplate at the rear of the
recorder.
• The unit is not disconnected from the AC power
source (mains) as long as it is connected to the wall
outlet, even if the unit itself has been turned off.
• Be sure to turn off the recorder before
disconnecting the power cord.
• If you are not going to use the recorder for a long
time, be sure to disconnect the recorder from the
wall outlet. To disconnect the AC power cord
(mains lead), grasp the plug itself; never pull the
cord.
• AC power cord must be changed only at the
qualified service shop.
On placement
• Place the recorder in a location with adequate
ventilation to prevent heat build-up in the recorder.
• Do not place the recorder on a soft surface such as a
rug that might block the ventilation holes on the
bottom.
• Do not place the recorder in a location near heat
sources, or in a place subject to direct sunlight,
excessive dust or mechanical shock.
• Do not place heavy objects such as an amplifier,
deck, etc. on top of the recorder.
On operation
• If the recorder is brought directly from a cold to a
warm location, or is placed in a very damp room,
moisture may condense on the lenses inside the
recorder. Should this occur, the recorder may not
operate properly. In this case, remove the CD and
leave the recorder turned on for about an hour until
the moisture evaporates.
On cleaning
• Clean the cabinet, panel and controls with a soft
cloth slightly moistened with a mild detergent
solution. Do not use any type of abrasive pad,
scouring powder, or solvent such as alcohol or
benzine.
If you have any questions or problems
concerning your recorder, please consult your
nearest Sony dealer.
Notes on CDs
On handling CDs
• To keep the CD clean, handle the CD by its edge.
Do not touch the surface.
• Do not stick paper or tape on the CD.
• Do not expose the CD to direct sunlight or heat
source such as hot air ducts, nor leave it in a car
parked in direct sunlight as there can be a
considerable rise in temperature inside the car.
• If there is glue or a similar substance on the CD,
remove it completely before using the CD.
• After playing, store the CD in its case.
On cleaning
• Fingerprint or dust on the CD may cause poor
sound reproduction or sound dropout.
• Before playing, clean the CD with a cleaning cloth.
Wipe the CD from the centre out.
• If the CD is still dirty after being wiped with a
cleaning cloth, wipe it again with a slightly
moistened cloth. Then wipe off the residual
moisture with a dry cloth.
• Do not use solvents such as benzine, thinner,
commercially available cleaners or anti-static spray
intended for vinyl LPs.
32
Page 33

On CD-R/CD-RW discs
• This recorder does not support the use of CD-R/
CD-RW discs.
Note on High-Speed CDHDD Synchro-Recording
Certain CD conditions may cause sound
dropout or noise in the recording results,
or even create unwanted tracks on the
HDD. If this happens, clean the CD as
instructed on “On cleaning” on page 32,
and record material to the HDD using
normal-speed CD-HDD SynchroRecording only.
Notes on handling the hard disc
The hard disc has a high storage density and reads or
writes data in a short time with compared to the
floppy disk. On the other hand, it may be easily
damaged by mechanical vibration, shock or dust.
Keep the hard disc away from magnets.
Although the hard disc has safety devices to prevent
losing data due to mechanical vibration, shock or
dust, you should be careful when handling the
recorder. Avoid damaging your data:
• Do not cause a shock or strong vibration to the
recorder.
• Do not place the recorder in a location subject to
mechanical vibration or in unstable location.
• Do not move the recorder while the power is on.
• Do not turn off the recorder while the HDD
indicator lights up blue.
• Do not use the recorder in a place subject to
extreme changes in temperature (temperature
gradient less than 18 °F (10 °C)/ hour).
• Keep any magnetic objects, including a TV set,
speaker, magnet, and magnetic bracelet, away from
the recorder.
If the hard disc is damaged, data cannot be restored or
recovered.
Troubleshooting
If you experience any of the following
difficulties while using the recorder, use this
troubleshooting guide to help you remedy the
problem. Should any problem persist, consult
your nearest Sony dealer.
General
There is no sound.
• Check that the recorder is connected securely.
• Make sure you have operated the amplifier
correctly.
The remote does not function.
• Remove the obstacles in the path of the remote
and the recorder.
• Point the remote at the remote sensor on the
recorder.
• Replace all the batteries in the remote with new
ones if they are weak.
The recorder functions incorrectly.
• The microcomputer chips may be operating
incorrectly. Turn the recorder off, then turn it
back on to reset the recorder.
CD
The CD does not play.
• There is no CD inside the recorder. “No Disc”
appears. Load a CD.
• Load the CD with the label side up on the disc
tray correctly.
• Clean the CD (see page 32).
• Moisture has condensed inside the recorder.
Remove the CD and leave the recorder turned on
for about an hour.
• Load the CD in the correct position on the disc
tray.
continued
Additional Information
33
Page 34

Troubleshooting (continued)
Display Messages
HDD
The HDD does not play.
• Moisture has condensed inside the recorder.
Leave the recorder turned on for about an hour.
• Press @/1 to turn the recorder on.
The HDD does not record.
• Make connections properly to the sound source.
• The sound source is not connected to the selected
input connector. Select the correct input
connector using the INPUT button.
• The recording level is not adjusted properly.
Adjust the recording level properly (see page
17).
• There has been a power failure or the power cord
has been disconnected during recording. Data
recorded to that point may be lost. Repair the
recording procedure.
• Recording to play lists (album numbers 501 to
510) is not possible. Make sure a play list is not
displayed.
The HDD does not edit.
• Press PLAY MODE on the remote repeatedly
until “SHUFFLE” disappears.
The sound has a lot of static.
• Strong magnetism from a television or similar
device is interfering with operations. Move the
recorder away from the source of strong
magnetism.
34
One of the following messages may appear or
flash in the display during operations. Also,
the recorder has a Self-Diagnosis Function.
Album Full!
There are no more albums containing no tracks on
the HDD. It is not possible to record tracks to
create a new album.
Auto Cut
The recorder is pausing the recording because
silence continued for 30 seconds or more during
digital recording.
Blank Disc
There is no track on the HDD.
Cannot Copy
You tried to play a CD with a format that the
recorder does not support, such as a CD-ROM.
The sound source is a copy of commercially
available music software.
Cannot Edit
You tried to edit in Shuffle Play, or you tried to
register a track to a play list that already contains
400 tracks.
Cannot Play
The recorder cannot play the track because of
damage to the audio data.
Cannot Rec
You tried to record a track while a play list was
displayed.
CD Error!
An operational error has occurred in the recorder.
Wait a few seconds, and then try the operation
again.
Changer Err
The CD changer malfunctioned. Check the power
of the CD changer or status of the disc.
Din Unlock
A moment’s lighting is due to the signals of the
digital program being recorded. This does not
affect the recorded material.
While recording from a digital component
connected through the DIGITAL OPTICAL IN
connector, the digital connecting cable was
unplugged or the digital component turned off.
Drive Error
Consult your nearest Sony dealer.
Drive Full!
Recording tracks is not possible because there is
not enough recordable space on the HDD or the
maximum number of recordable tracks has been
reached.
Page 35

Erasing
The recorder is erasing data from the HDD. Do
not disconnect the power cord.
Format Error
Consult your nearest Sony dealer.
Impossible
You tried to make an impossible editing or
recording operation.
Name Full!
The naming capacity of the HDD has reached its
limit (about 127 characters).
No Artist
You tried to show the name of a non-labeled artist.
No Disc
There is no CD on the disc tray.
No Name
You tried to show the title of a non-labeled CD,
album or track.
No Signal
The recorder has detected a silent portion during
recording.
Not Connect
During Synchro Recording from a CD changer, the
CD changer does not respond due to a bad cable
connection or another problem.
The CD changer does not respond because
Synchro Recording from the CD changer is not
supported by this recorder.
Reading
The recorder is reading data from the HDD.
Rec Error
Proper recording is not possible.
REMOTE
The recorder is being connected to your
computer.*
– Retry –
The recorder is retrying reading data from the CD
during the High-speed Synchro Recording.
Smart Space
The signal was input again after silence continued
for 3 or more but less than 30 seconds during
digital recording.
Step Full!
The program contains the maximum number of
tracks. You cannot set additional tracks.
TOC Reading
The recorder is reading the TOC information of the
CD.
Track Full!
Recording tracks is not possible because there are
400 tracks in the album. Select another album for
recording.
* If “REMOTE” appears under other circumstances, turn
off the recorder, then turn on it again.
Setup menu table
Menu item
T.Mark
LS(T)
S.Space
CD
Opt
Anlg
Sleep
TxtSave
Sync Normal
Sync High
SyncChanger
Reference page
15
15
16
17
17
17
30
13, 14, 31
12
12
30
Additional Information
35
Page 36

Specifications
CD player section
System Compact disc and digital
Laser Semiconductor laser
Frequency response 5 Hz – 20 kHz (±0.5 dB)
Signal-to-noise ratio More than 95 dB
Wow and flutter Below measurable limit
HDD section
Capacity 40 GB
Recording system ATRAC 3
Transfer rate 132 kbps
Maximum recording time About 600 h
Maximum number of albums
Maximum number of tracks
Maximum number of tracks per album
Maximum CD-HDD ripping speed
Input
Jack
type
ANALOG
IN
DIGITAL
OPTICAL
IN
Phono
jacks
Square
optical
connector
jack
audio system
(λ = 780 nm)
Emission duration:
continuous
500
20,000
400
Max. ×2
Input
impedance
47 kilohms
Optical
wave length:
660 nm
Rated
input
500 mVrms
—
Minimum
input
125 mVrms
—
Supplied accessories
Audio connecting cord (2)
Remote commander (remote) (1)
Sony R6 (size AA) battery (2)
USB cable (1)
“M-crew for HAR-D1000” CD-ROM (1)
“M-crew for HAR-D1000” operating instructions (1)
US and foreign patents licensed from Dolby
Laboratories.
Design and specifications are subject to change
without notice.
Output
ANALOG
OUT
Jack type
Phono
jacks
Rated
output
2 Vrms (at
50 kilohms)
General
Power requirements 120 V AC, 60 Hz
Power consumption 25 W
Dimensions (Approx.) (w/h/d)
Mass (Approx.) 3.9 kg
Sony Corporation Printed in Malaysia
36
Load
impedance
Over
10 kilohms
430 × 82.5 × 285 mm
incl. projecting parts and
controls
 Loading...