

Sony HAP-Z1ES Help Guide
HDD AUDIO PLAYER HAP-Z1ES
About the HDD AUDIO PLAYER
Features of the HDD AUDIO PLAYER [1]
Playable audio file formats [2]
How to make and enter selections [3]
How to input characters [4]
System requirements for computers connected to the HDD AUDIO PLAYER [5]
Required network environment [6]
Supplied accessories [7]
Supported applications
HAP Music Transfer [8]
HDD Audio Remote [9]
Help for HAP Music Transfer/HDD Audio Remote [10]
Preparations
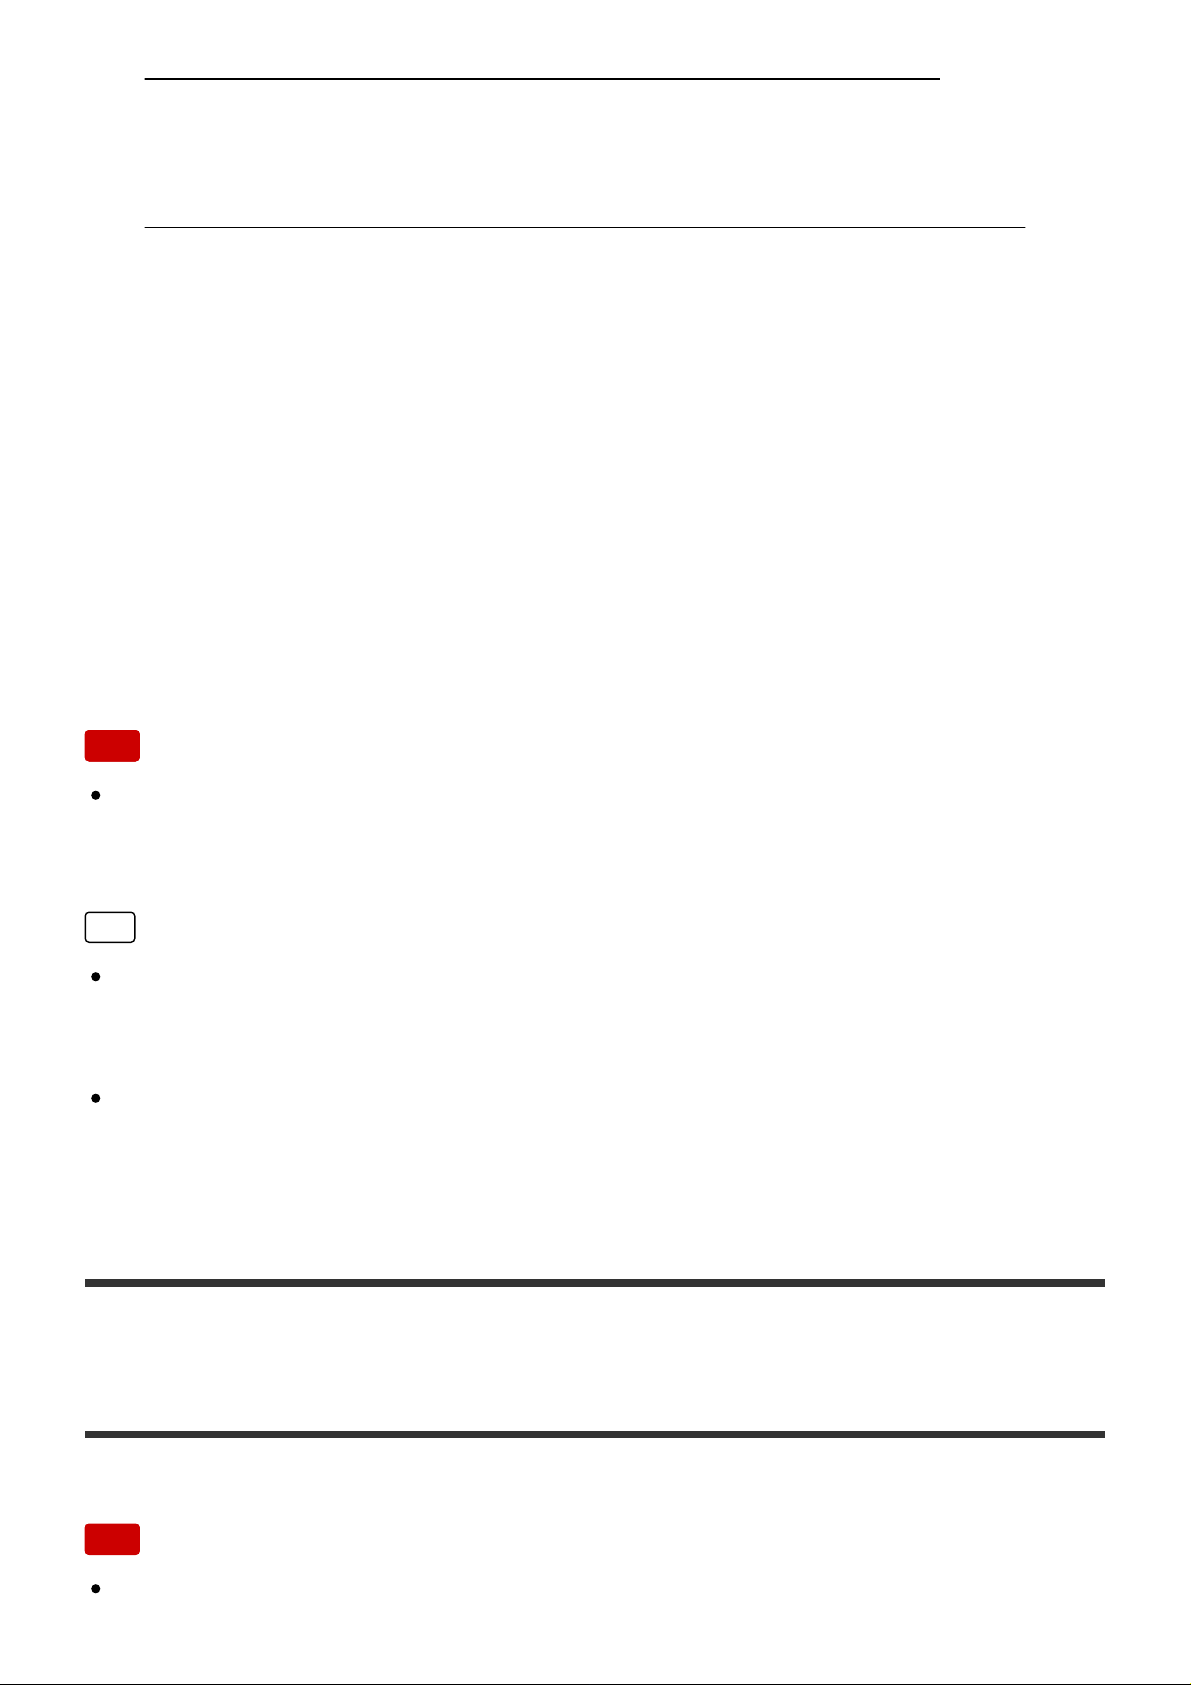
What you need to do before starting to use the HDD AUDIO PLAYER [11]
Prep 1. Connecting an amplifier [12]
Prep 2. Connecting to a network with a LAN cable (only when using a wired LAN)
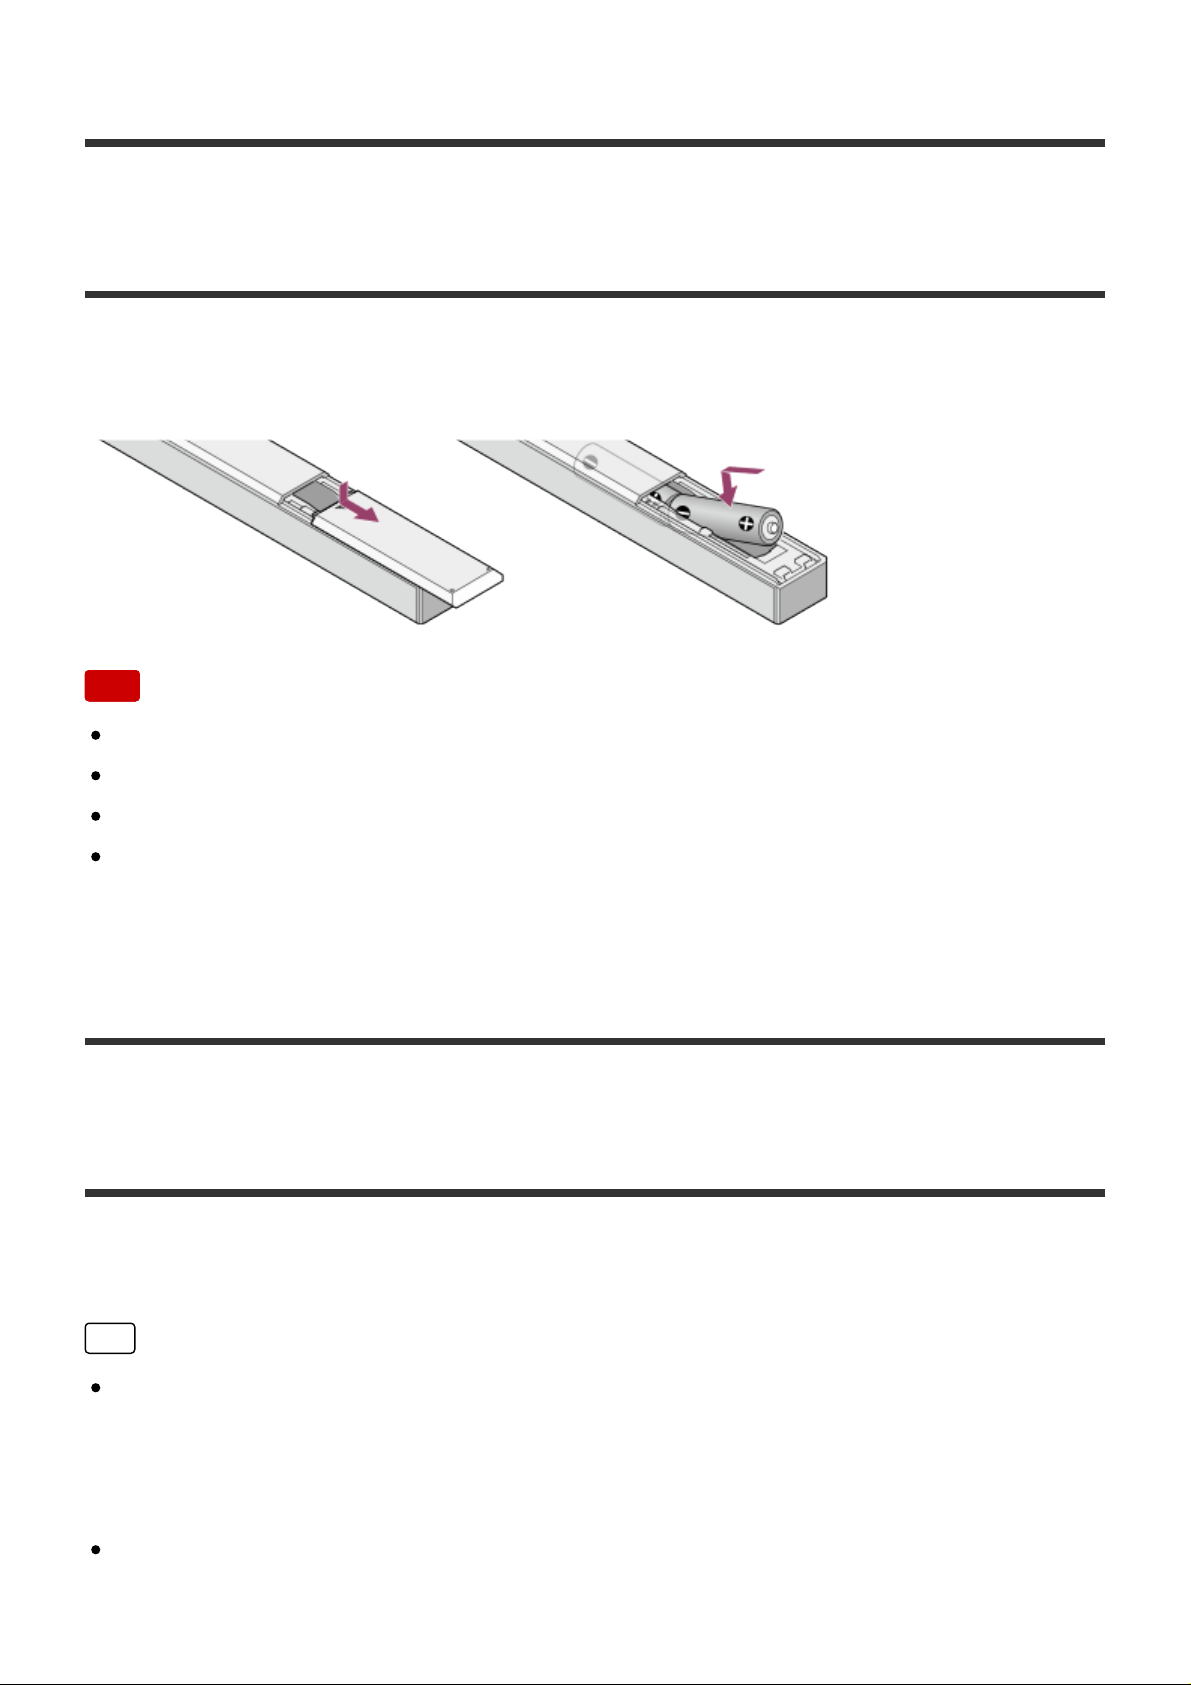
[13]
Prep 3. Turning on the HDD AUDIO PLAYER [14]
Prep 4. Configuring the initial settings of the HDD AUDIO PLAYER [15]
Prep 5. Configuring the settings of a computer to use HAP Music Transfer [16]
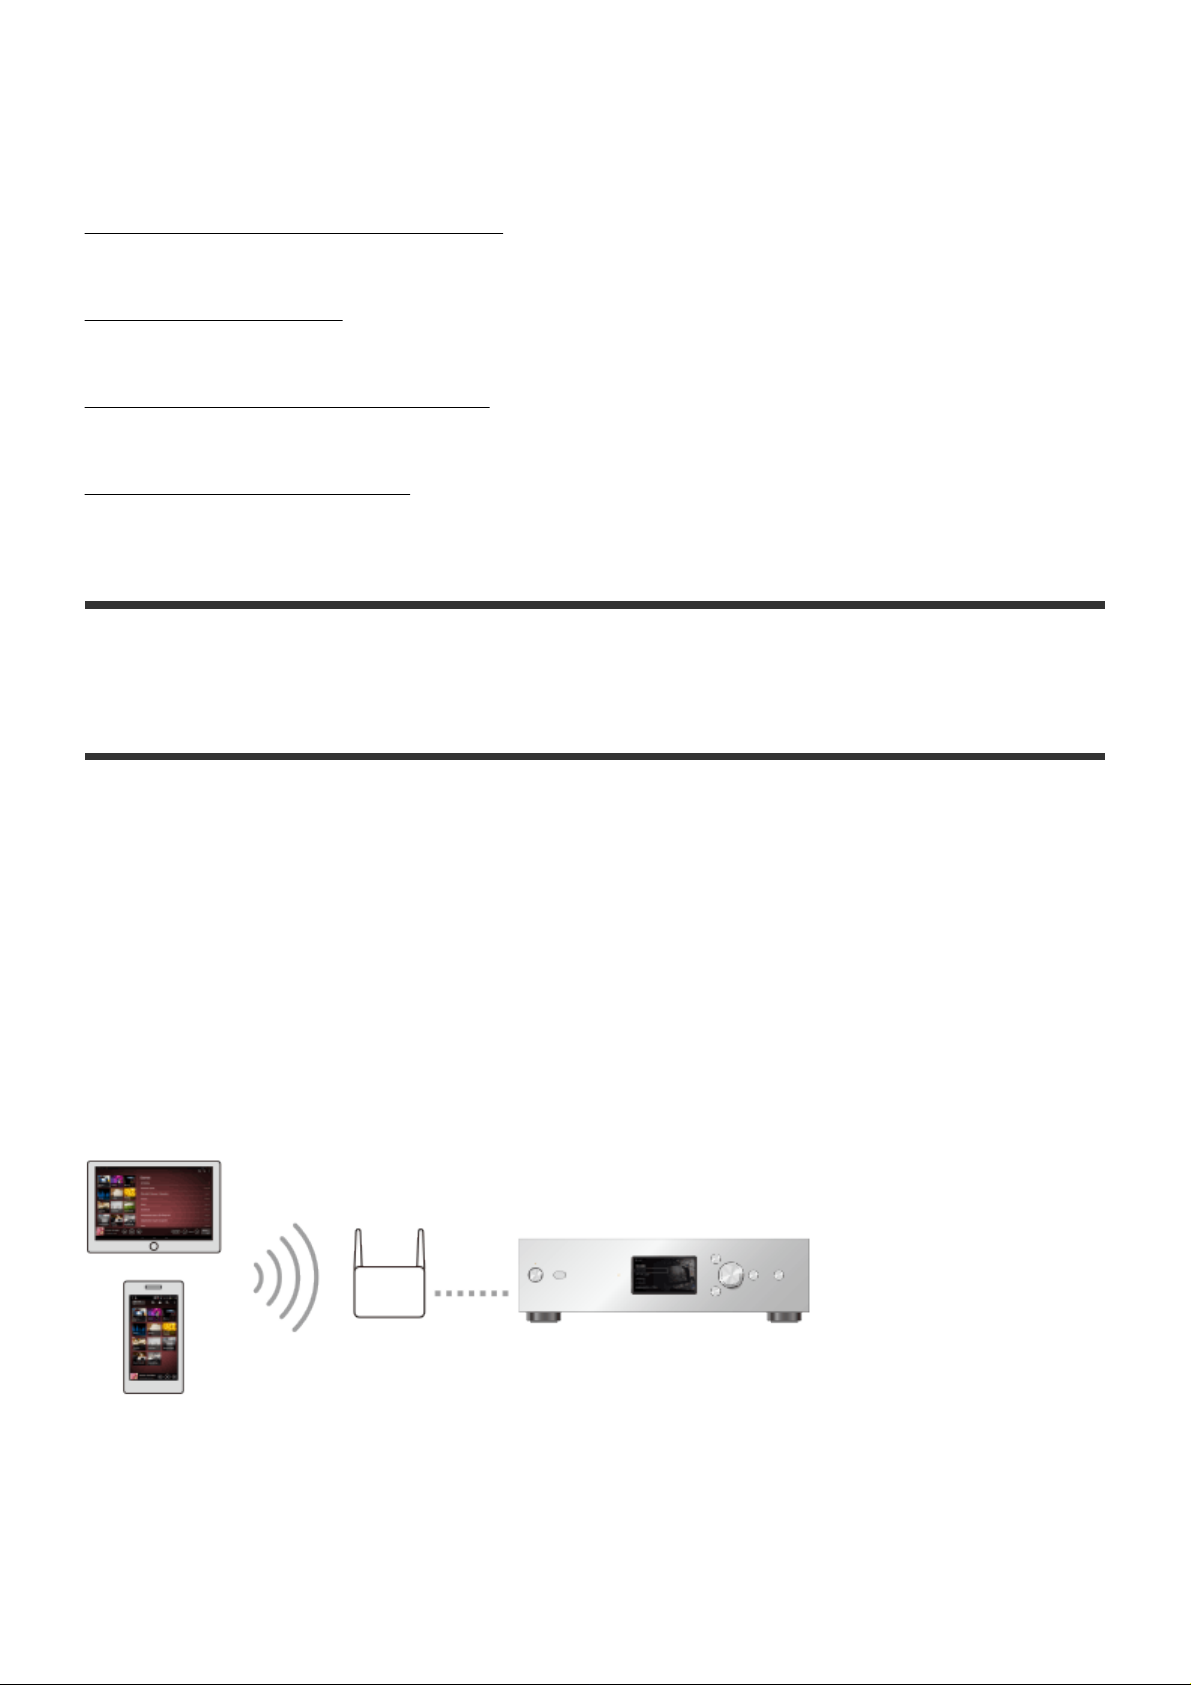
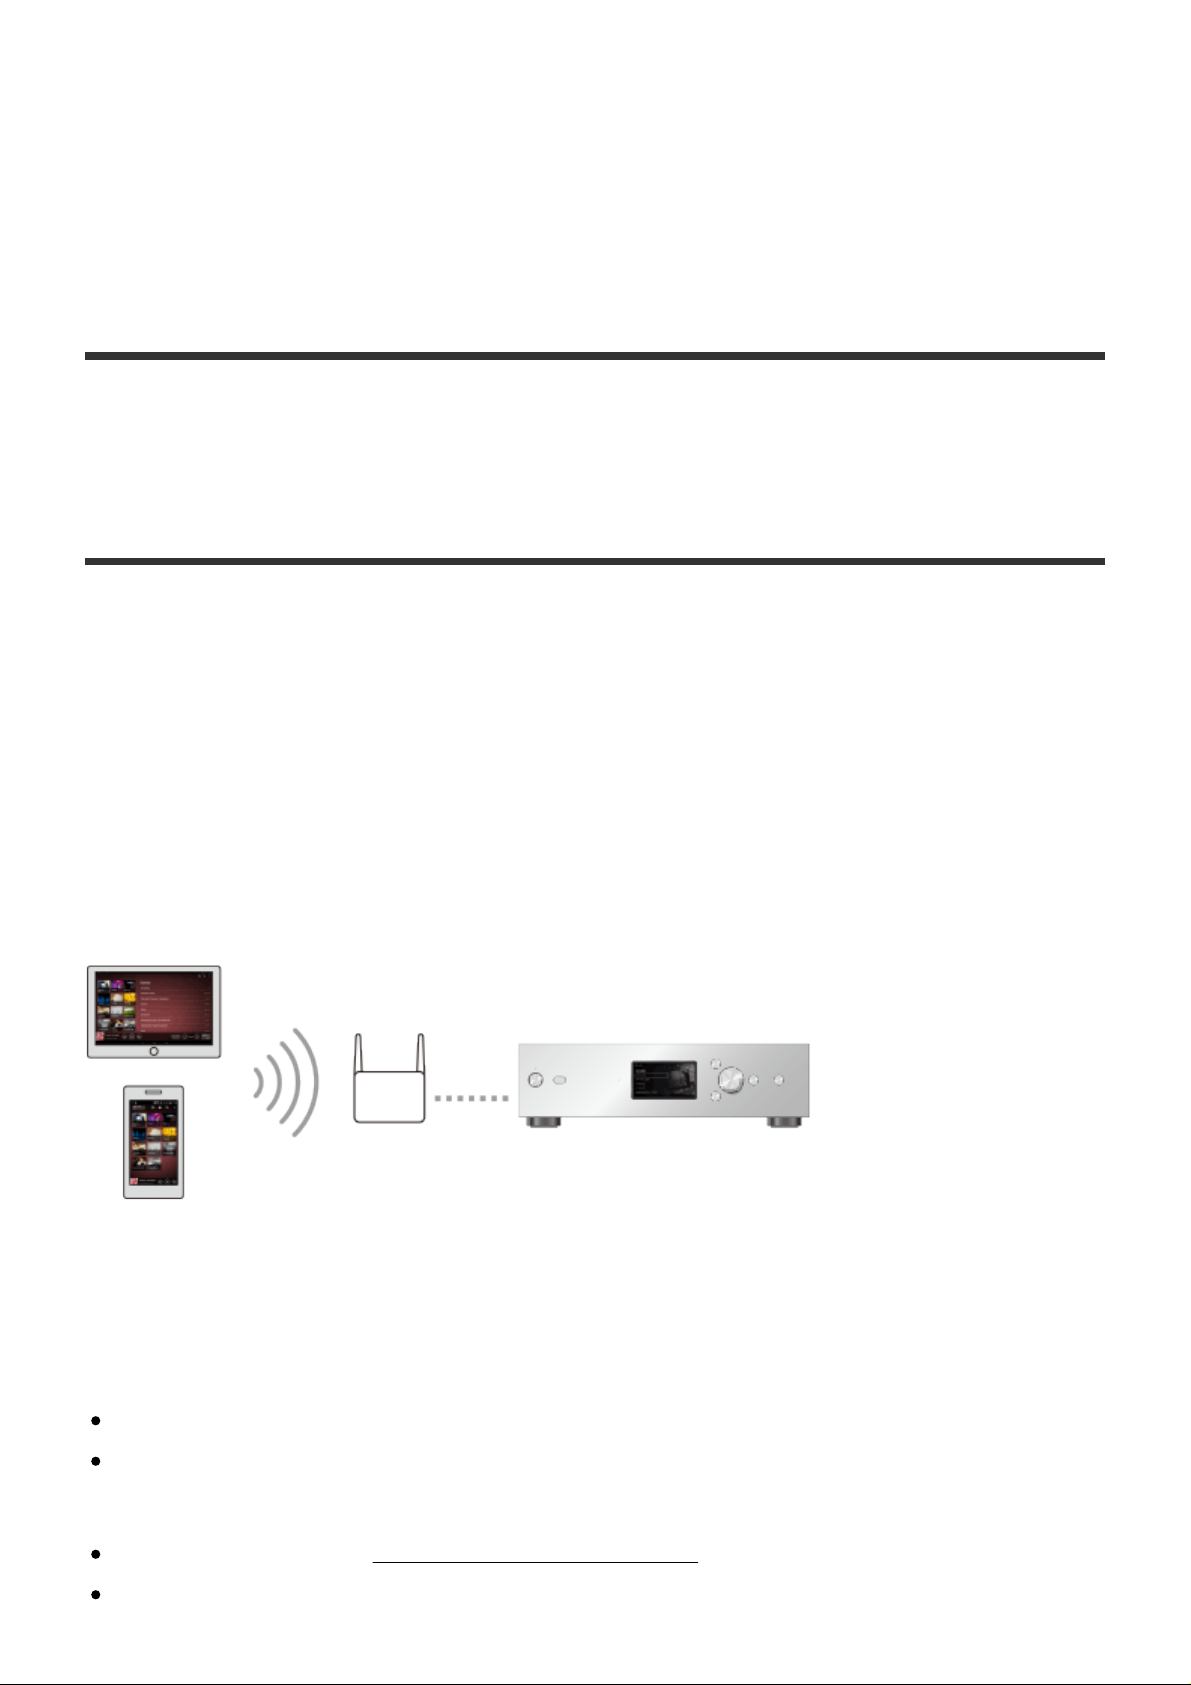
Operating the HDD AUDIO PLAYER from your smartphone or tablet (using HDD
Audio Remote) [17]
Preparing the remote control [18]
Transfer) [36]
Connections
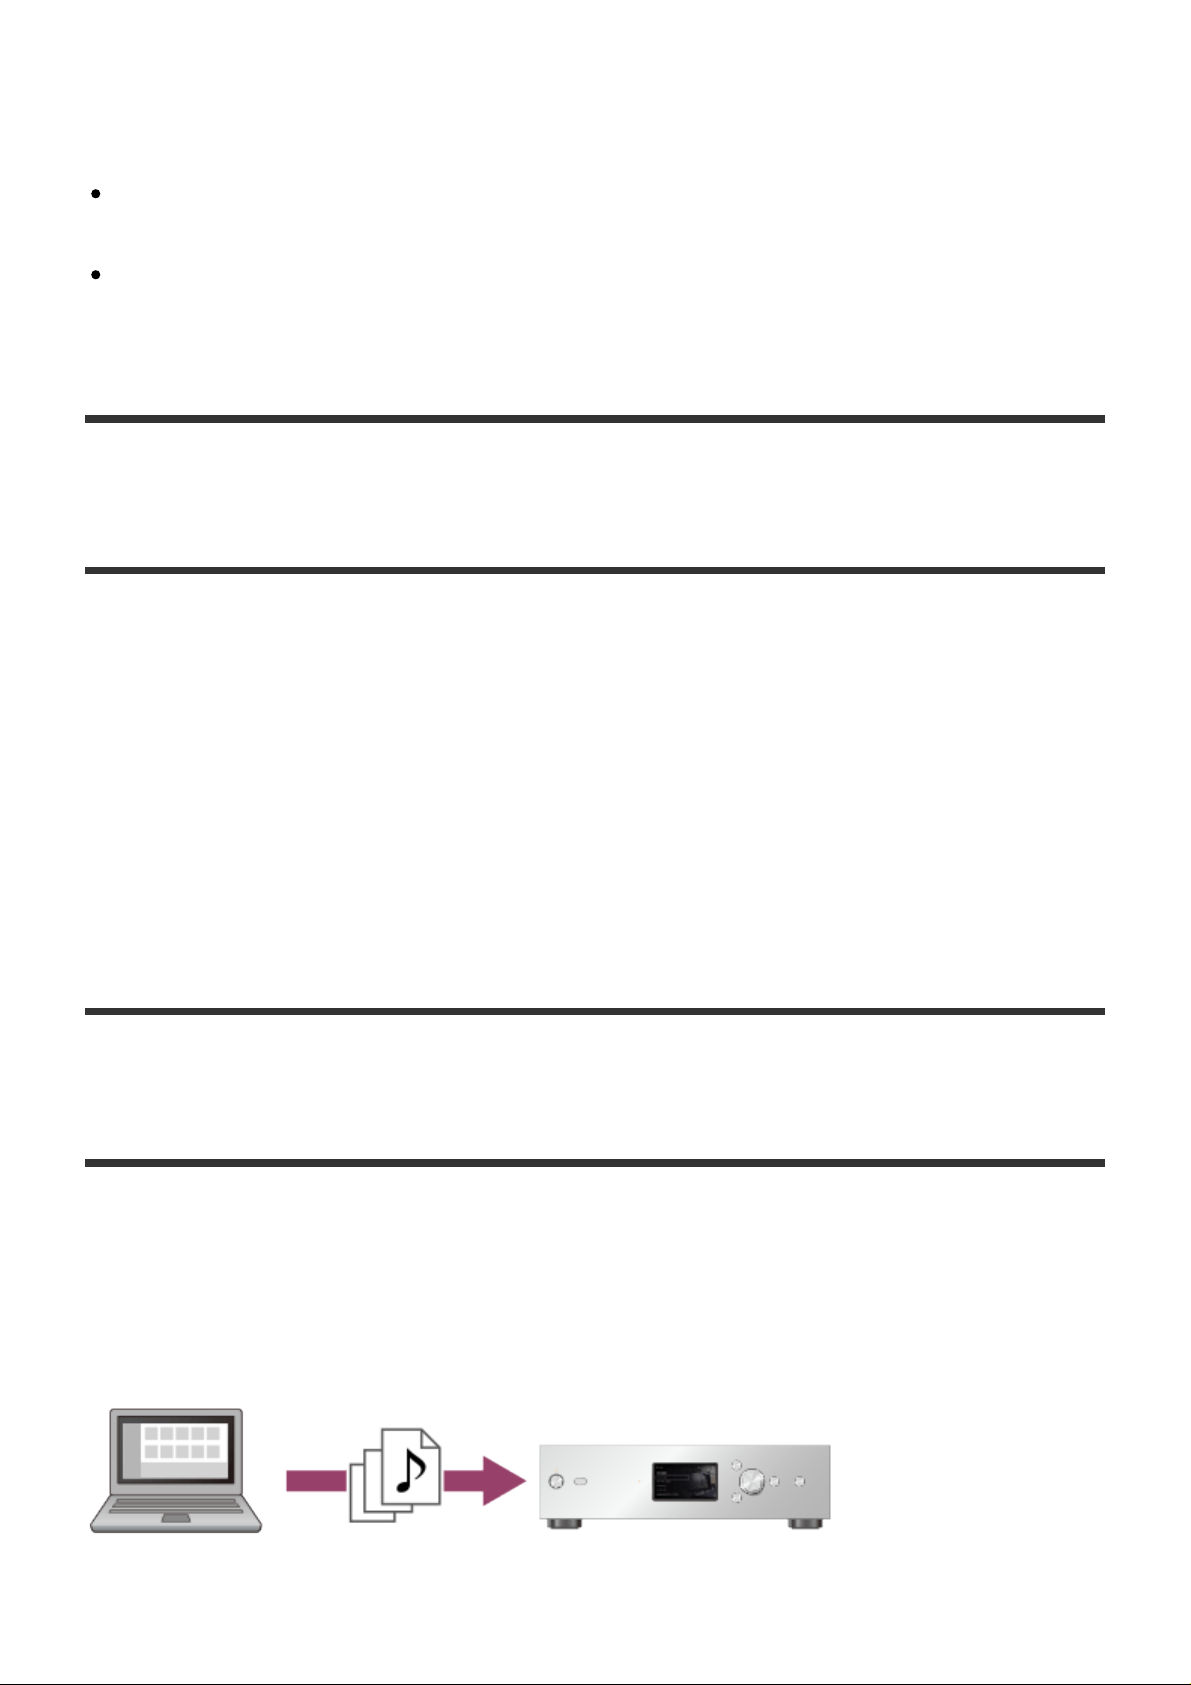
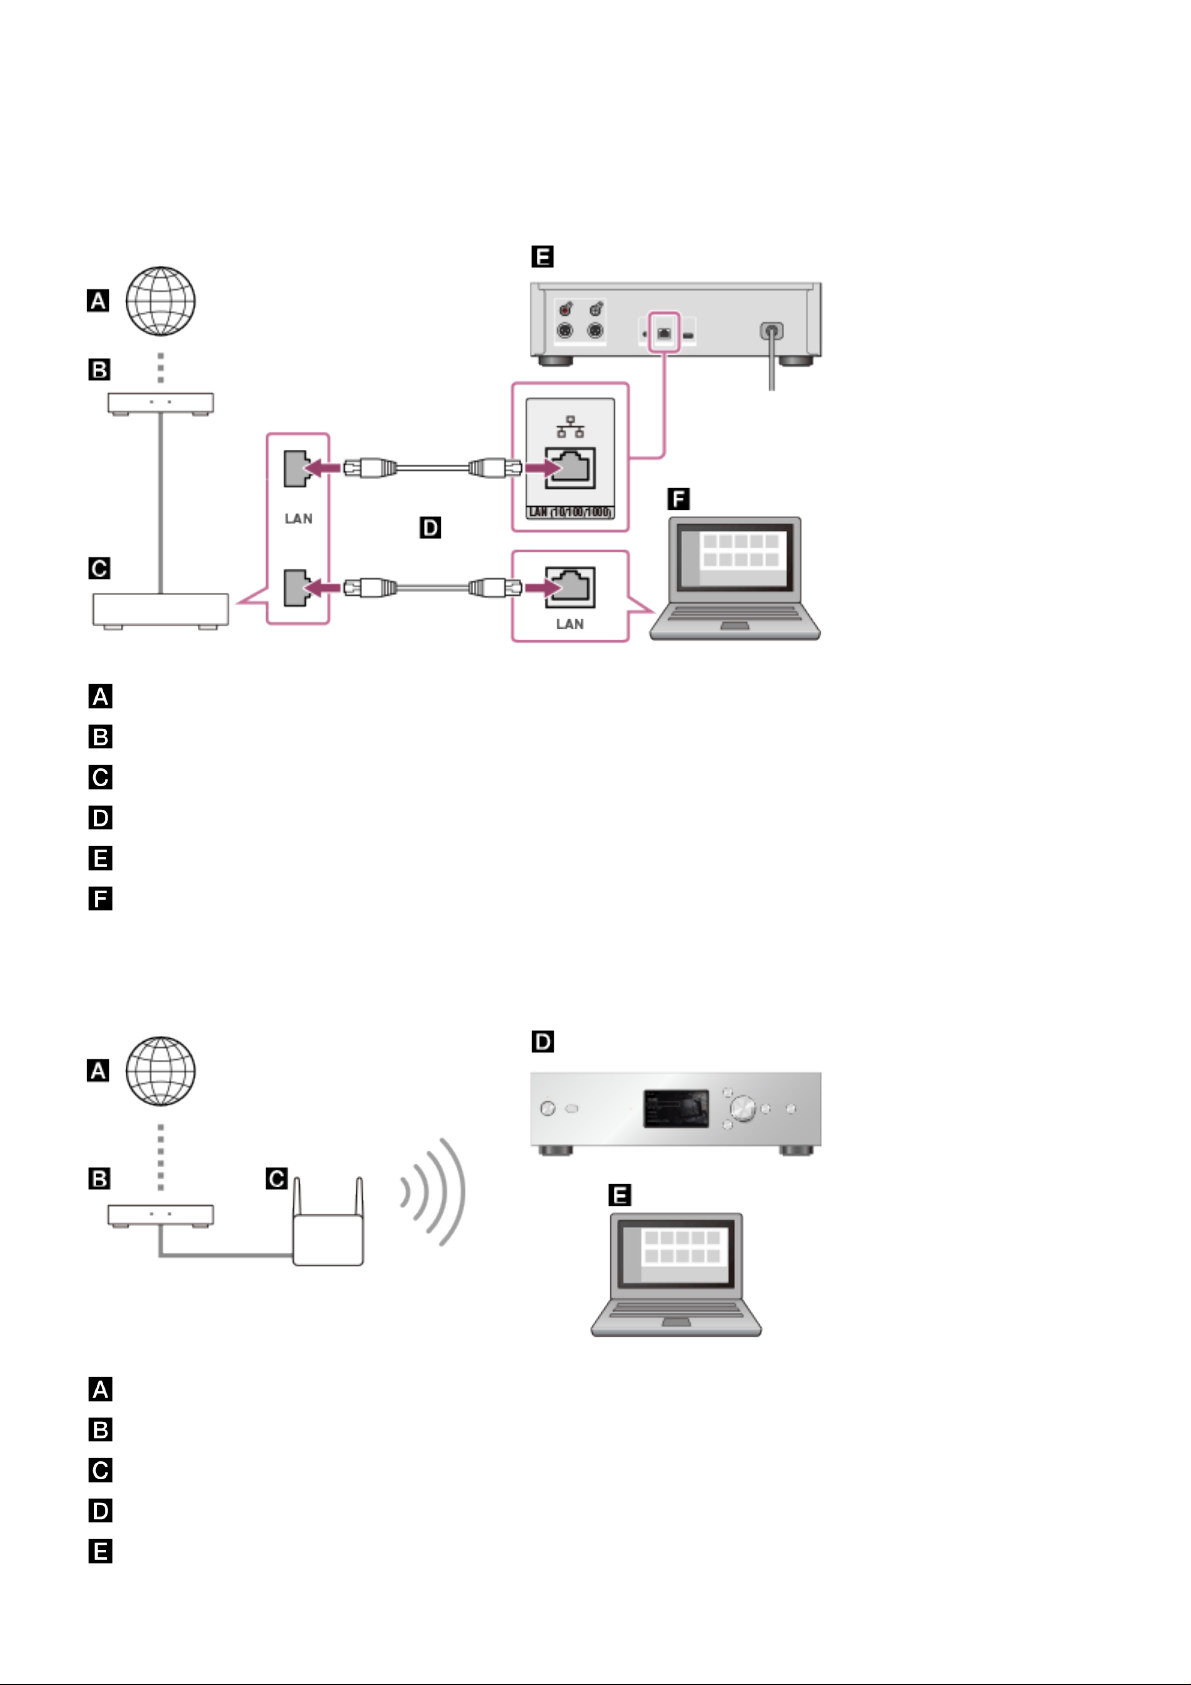
Connecting to a computer [19]
Connecting an amplifier [20]
Connecting an external hard disk drive [21]
Connecting an external CD drive [22]
Network connections (wired LAN)
Required network environment [23]
Connecting the HDD AUDIO PLAYER to a network automatically [24]
Connecting the HDD AUDIO PLAYER to a network manually [25]
Wi-Fi network connections (wireless LAN)
Required network environment [26]
Selecting a Wi-Fi (wireless LAN) connection method [27]
Method 1. Setting up a network connection using the WPS push button
configuration method [28]
Method 2. Setting up a network connection by selecting an access point [29]
Method 3. Setting up a network connection by adding a new access point [30]
Method 4. Setting up a network connection using the (WPS) PIN code
configuration method [31]
Playing music
Playable audio file formats [32]
Transferring music files from a computer to the HDD AUDIO PLAYER [33]
Playing music files [34]
Deleting music files from the HDD AUDIO PLAYER (when operating on the HDD
AUDIO PLAYER) [35]
Deleting music files from the HDD AUDIO PLAYER (when using the HAP Music
Playing tracks using SensMe™ channels [37]
Playing tracks in playlists [38]
Selecting playback methods [39]
Registered music file information [40]
Standby modes [41]
Connecting with network audio devices (Media Server function) [42]
Music Services
Listening to the Spotify music services [43]
Listening to the TuneIn music services [44]
Music copy from a CD
Copying music files from a CD [45]
Useful functions
Copying music files from a CD [46]
Deleting music files from the HDD AUDIO PLAYER (when operating on the HDD
AUDIO PLAYER) [47]
Deleting music files from the HDD AUDIO PLAYER (when using the HAP Music
Transfer) [48]
Using the DSEE function [49]
Adding tracks to “Favorites” [50]
Playing tracks in “Favorites” [51]
Operating an external amplifier using the remote control or the dedicated
application [52]
Registered music file information [53]
Parts and controls
Front panel [54]
Rear panel [55]

Remote control [56]
Home screen [57]
Playback screen [58]
Playback Options screen [59]
Play Queue screen [60]
Playback Seek screen [61]
Settings menus
Network Settings [62]
HDD Settings [63]
Audio Settings [64]
Amp Control Settings [65]
System Settings [66]
Network Update [67]
Backups
Backing up data [68]
Backing up music files in the HDD AUDIO PLAYER to your computer (for
Windows) [69]
Backing up music files in the HDD AUDIO PLAYER to your computer (for Mac)
[70]
Returning backup music files from your computer to the HDD AUDIO PLAYER (for
Windows) [71]
Returning backup music files from your computer to the HDD AUDIO PLAYER (for
Mac) [72]
Specifications/Notes
Playable audio file formats [73]
Design and specifications [74]
Software updates for the HDD AUDIO PLAYER [75]
When registering music files to the HDD AUDIO PLAYER [76]
Precautions on heat buildup [77]
Notes on the internal hard disk drive [78]
Precautions for use [79]
Disclaimer regarding services offered by third parties [80]
Trademarks [81]
Troubleshooting
General [82]
Sound/playback [83]
Connections [84]
Hard disk drive [85]
Help for HAP Music Transfer/HDD Audio Remote [86]
If the problem is not solved [87]
Dealing with problems/Inquiries
Standby modes [88]
Forced shutdown of the HDD AUDIO PLAYER [89]
Messages for protecting the HDD AUDIO PLAYER [90]
Other messages [91]
When a notification about a new version of the software appears on the display
[92]
Customer support websites [93]
[1] About the HDD AUDIO PLAYER
Features of the HDD AUDIO PLAYER
Thank you for purchasing this HDD AUDIO PLAYER.
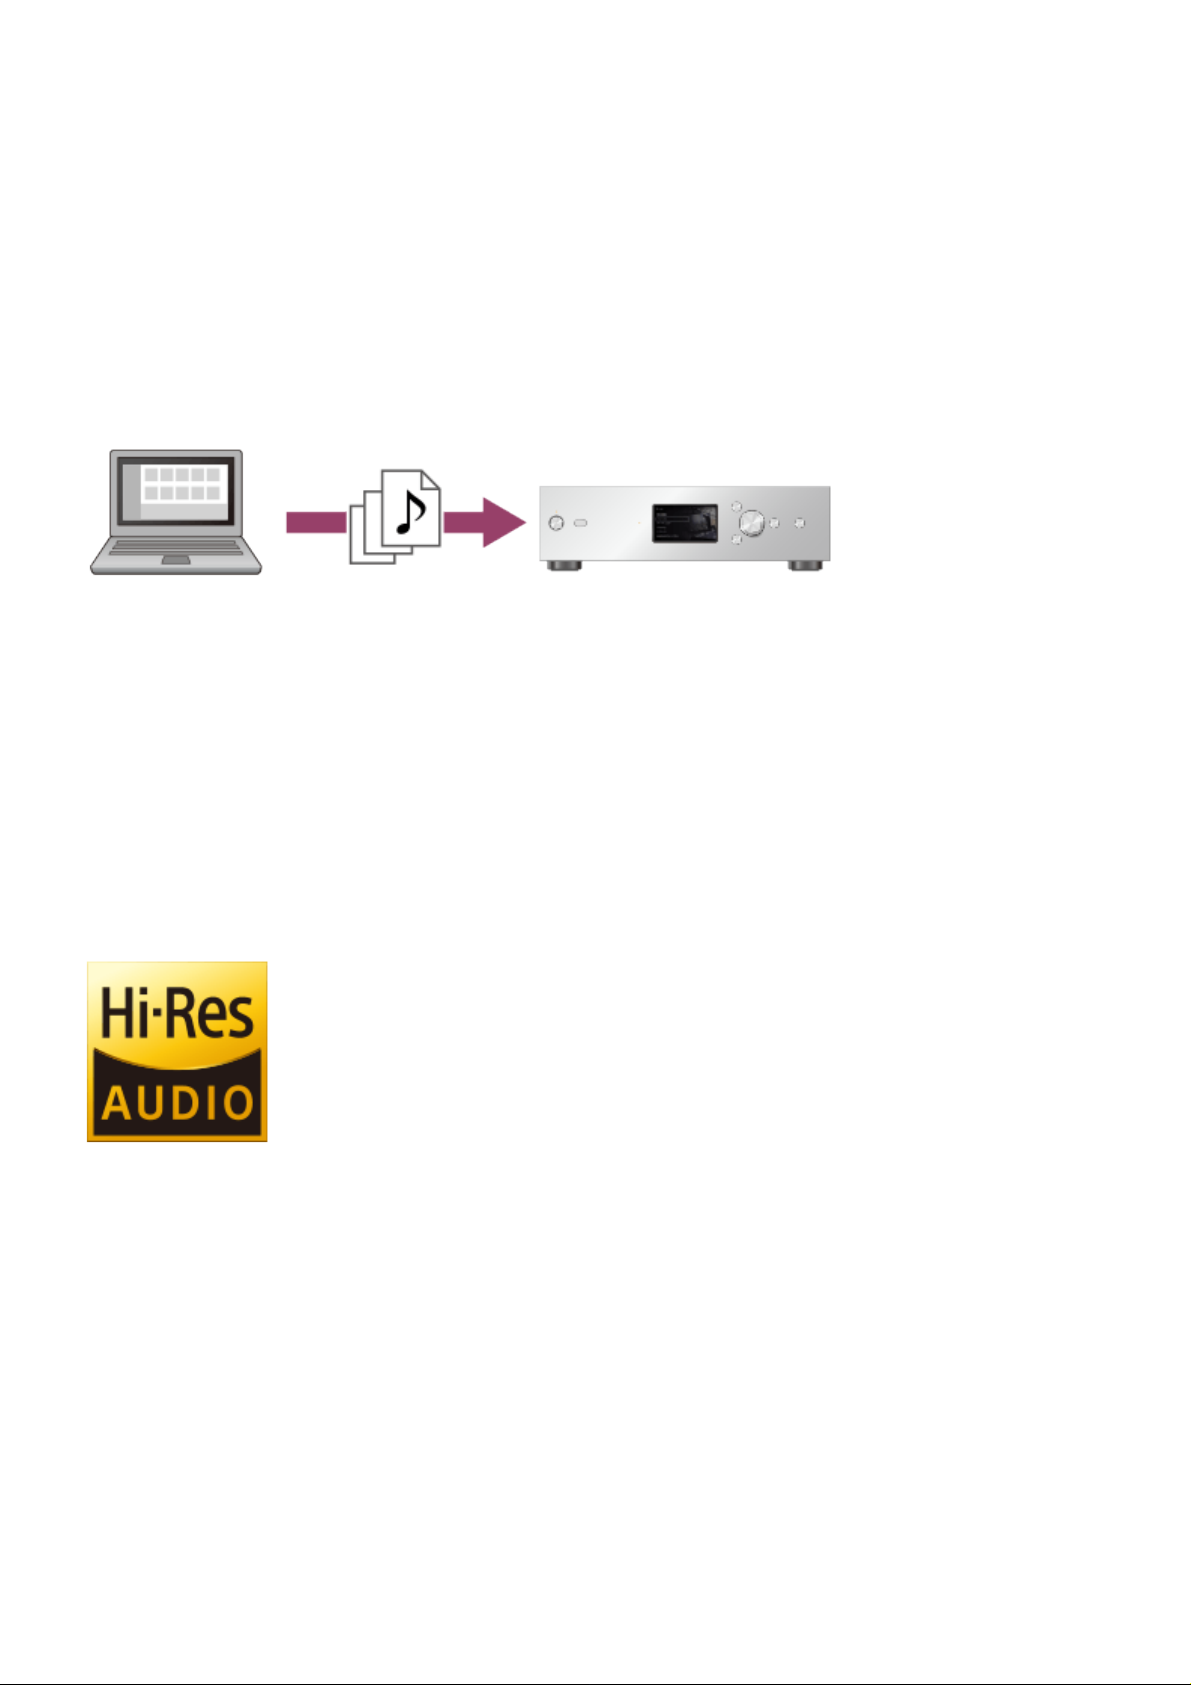
The HDD AUDIO PLAYER is a music player that allows you to transfer and store
High-Resolution Audio files, such as DSD, and various other formats of audio files,
such as MP3 and FLAC, from your computer and enjoy playback of high quality
audio sources.
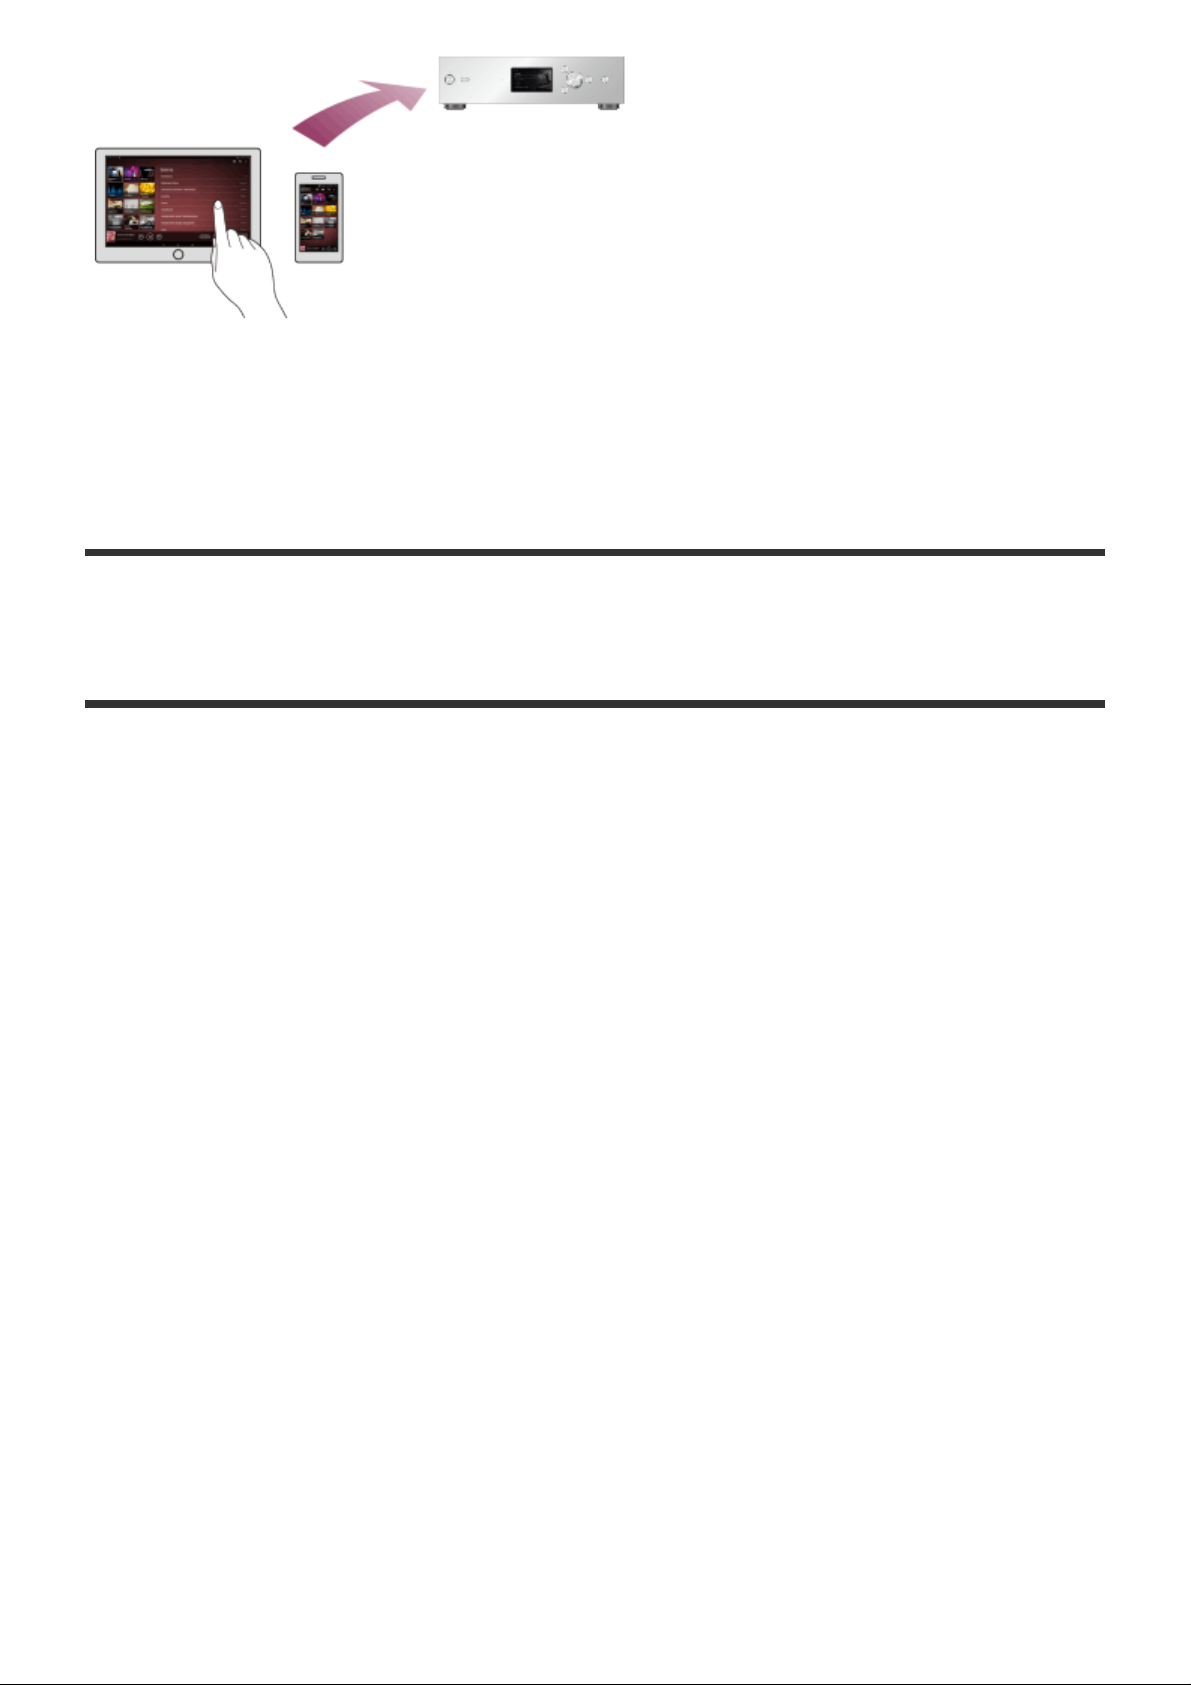
You can install a specially designed application on your smartphone or tablet and
operate the HDD AUDIO PLAYER remotely.
The HDD AUDIO PLAYER has the following features:
Transferring various audio files to the HDD AUDIO PLAYER
You can transfer various types of audio files to the hard disk drive of the HDD AUDIO
PLAYER from a computer connected to the same network (*).
Storing audio files in the HDD AUDIO PLAYER allows you to enjoy high quality
sound playback that is not affected by the network environment.
*
You can use HAP Music Transfer, an application designed for HDD AUDIO PLAYER, to
automatically transfer audio files from your computer to the HDD AUDIO PLAYER.
High quality audio playback
The HDD AUDIO PLAYER can play High-Resolution Audio files such as 192 kHz/24
bit, 96 kHz/24 bit, or DSD (Direct Stream Digital) audio files.
Furthermore, the HDD AUDIO PLAYER gives a more natural and expansive sound to
compressed audio files, such as MP3s, by restoring high-frequency sound and
almost imperceptible sound during fade-out, which are usually lost by compression.
Easy operation with your smartphone or tablet
MP3 (MPEG-1/2 Audio Layer-3)
The HDD Audio Remote application is available to for even easier operation of the
HDD AUDIO PLAYER.
You can install the application on your smartphone or tablet.
[2] About the HDD AUDIO PLAYER
Playable audio file formats
The following audio file formats can be played on the HDD AUDIO PLAYER.
DSD (DSF, DSDIFF)
Extensions: .dsf, .diff
Sampling frequency: 2.8224 MHz, 5.6448 MHz
LPCM (WAV, AIFF)
Extensions: .wav, .aif, .aiff
Sampling frequency: 44.1 kHz, 48 kHz, 88.2 kHz, 96 kHz, 176.4 kHz, 192 kHz
Quantization bits: 16 bits, 24 bits, 32 bits (*)
*
32-bit playback is only possible for files in WAV format.
FLAC
Extensions: .flac, .fla
Sampling frequency: 44.1 kHz, 48 kHz, 88.2 kHz, 96 kHz, 176.4 kHz, 192 kHz
Quantization bits: 16 bits, 24 bits
ALAC
Extensions: .m4a
Sampling frequency: 44.1 kHz, 48 kHz, 88.2 kHz, 96 kHz, 176.4 kHz, 192 kHz
Quantization bits: 16 bits, 24 bits

Extensions: .mp3
Bit rate: 64 kbps - 320 kbps
Sampling frequency: 44.1 kHz, 48 kHz
Quantization bits: 16 bits
AAC (MPEG-4 AAC-LC, HE-AAC)
Extensions: .m4a, .mp4, .3gp
Bit rate: 64 kbps - 320 kbps
Sampling frequency: 44.1 kHz, 48 kHz
Quantization bits: 16 bits
WMA (WMA, WMAPro, WMA Lossless)
Extensions: .wma, .asf
Bit rate: 32 kbps - 320 kbps (WMA, WMAPro)
Sampling frequency: 44.1 kHz, 48 kHz (WMA)
Sampling frequency: 44.1 kHz, 48 kHz, 88.2 kHz, 96 kHz (WMAPro, WMA Lossless)
Quantization bits: 16 bits (WMA, WMAPro)
Quantization bits: 16 bits, 24 bits (WMA Lossless)
ATRAC (ATRAC3, ATRAC3plus, ATRAC Advanced Lossless)
Extensions: .oma, .aa3
Bit rate: 48 kbps - 352 kbps (ATRAC3plus)
Bit rate: 132 kbps (ATRAC3)
Sampling frequency: 44.1 kHz
Quantization bits: 16 bits
Note
No copy protected files in any of the above formats can be played. If you transfer
copy protected files to the HDD AUDIO PLAYER, music information of the copy
protected files will appear in gray and you will not be able to select it.
Only 2ch files in the above formats are supported.
Playing formats other than those above may produce noise or even damage the
speakers if played at a high volume.
[3] About the HDD AUDIO PLAYER
How to make and enter selections

The basic operations of the HDD AUDIO PLAYER are as follows:
1. Turn the jog dial left or right to select an item.
2. Press ENTER to enter the selection.
Hint
To display the Home screen, press the HOME button.
To go back to the previous screen, press the BACK button.
[4] About the HDD AUDIO PLAYER
How to input characters
When the character input screen appears during operations, enter characters as
follows:
A: Character input area
B: Keyboard area
C: OK
1. Turn the jog dial left or right to select a character in the keyboard area, and then
press ENTER to enter the selection.
2. Repeat the operations in step 1 to enter a text string.
3. When the character input is done, turn the jog dial left or right to select [OK],
and then press ENTER.
Hint
To change the type of characters, use the character type selection button on the
bottom left of the keyboard area.
The character type changes in the order of [ABC] (capitals), [abc] (lower case) and
[@./] (symbols).
To move the cursor left and right in the character input area, use / .
To delete a character, move the cursor to the right of the character you want to
delete, and then use [BS] on the keyboard area.
[5] About the HDD AUDIO PLAYER
System requirements for computers connected to the HDD
AUDIO PLAYER
HAP Music Transfer, an application that copies audio files from your computer to the
HDD AUDIO PLAYER, can be used in the following system environment:
OS
Windows 10 Home
Windows 10 Pro
Windows 8.1
Windows 8
Windows 8 Pro
Windows 7 Starter Service Pack 1 or later
Windows 7 Home Basic Service Pack 1 or later
Windows 7 Home Premium Service Pack 1 or later
Windows 7 Professional Service Pack 1 or later
Windows 7 Ultimate Service Pack 1 or later
Windows Vista Home Basic Service Pack 2 or later
Windows Vista Home Premium Service Pack 2 or later
Windows Vista Business Service Pack 2 or later
Windows Vista Ultimate Service Pack 2 or later
Mac OS X 10.6, 10.7, 10.8, 10.9, 10.10, 10.11, 10.12 (*)
*
Intel CPU models, 64 bit (10.6, 10.7, 10.8, 10.9, 10.10, 10.11, 10.12) and 32 bit (10.6, 10.7) are
supported.
Screen resolution
1,024 x 768 pixels or higher
Note
One of the above operating systems should be installed by default. Upgraded
operating systems and multi-boot environments are not supported.
We do not guarantee operation for all computers even if they meet the above
system requirements. Furthermore, the following systems are not supported:
Personally constructed computers or operating systems
Upgraded operating systems
Multi-boot environments
Multi-monitor environments
[6] About the HDD AUDIO PLAYER
Required network environment
You can transfer audio files from your computer to the HDD AUDIO PLAYER by
connecting both to the same network, either by a wired or wireless connection.
Confirm the supported environment described below.
Note
You need to connect the HDD AUDIO PLAYER to a network that can access the
Internet if you want to play music services (*).
*
Some music services may not be available depending on your country or region.
Wired LAN (using a LAN cable)

LAN (10/100/1000) port:
1000BASE-T/100BASE-TX/10BASE-T
(The network speed may differ depending on the network environment.)
LAN cable:
We recommend using a LAN cable that is Cat5 or higher. A normal-type cable is
also recommended, as some flat-type LAN cables are easily affected by noise.
If the receiver is used in an environment with power supply noise from electronic
devices or in a noisy network environment, use a shielded-type LAN cable.
Wi-Fi (using a wireless LAN network)
Compatible standards:
IEEE 802.11 b/g/n
Security mode:
None
WEP
WPA/WPA2-PSK (AES)
WPA/WPA2-PSK (TKIP)
Radio frequency:
2.4 GHz
Note
Wi-Fi devices work on the 2.4 GHz band, which is used by a variety of devices.
Wi-Fi devices use technology to minimize radio interference from other devices
that use the same band. However, radio interference may still cause slower data
transfer rates, reduce the communication range, or cause communication failure.
The data transfer rate and communication range may vary depending on the
following conditions:
Distance between devices
Presence of obstacles between devices
Device configuration
Signal conditions
Surrounding environment (wall material, etc.)
Software in use
Communications may be cut off depending on signal conditions.
The HDD AUDIO PLAYER does not support 5 GHz band Wi-Fi.
The data transfer rate for IEEE 802.11g and IEEE 802.11n (2.4 GHz) devices may
be affected by interference when used with IEEE 802.11b products. Also, products
using IEEE 802.11g and IEEE 802.11n automatically lower the transfer rate to
maintain compatibility with IEEE 802.11b products. The normal transfer rate may
be regained by changing the channel settings of your access point.
When the data transfer rate is not as fast as expected, changing the wireless
channel on the access point may increase the rate.
If a communication failure occurs while transferring music files, updating the
firmware of your access point may improve the communication status.
[7] About the HDD AUDIO PLAYER
Supplied accessories
Main unit (1)
Remote control (1)
R03 (size-AAA) batteries (2)
AC power cord (mains lead) (1)
LAN cable (1)
Audio cord (1)
IR blaster (1)
Monaural mini-plug cable (1)
[8] Supported applications
HAP Music Transfer
What you can do using HAP Music Transfer
You can transfer audio files managed and stored on your computer to the HDD
AUDIO PLAYER using the dedicated HAP Music Transfer application.
Install the application to your (Windows or Mac) computer.
Downloading HAP Music Transfer
Download HAP Music Transfer from the following website:
Models for the USA and Canada:
http://esupport.sony.com/swu/8811
Models for Europe:
www.sony.eu/support
Models for Asia Pacific:
http://www.sony-asia.com/support
Models for China:
https://service.sony.com.cn
[9] Supported applications
HDD Audio Remote
What you can do using HDD Audio Remote
You can operate the HDD AUDIO PLAYER using your smartphone or tablet by
installing HDD Audio Remote, a dedicated application for smartphones and tablets.
HDD Audio Remote allows you to browse and play audio files stored in the HDD
AUDIO PLAYER from your smartphone or tablet.
You can also add tracks to playlists, edit information such as the genre, artist, album
and track title of music files, and more.
Install the application to your smartphone or tablet.
Downloading HDD Audio Remote
Download HDD Audio Remote from the following websites:
Models except for China:

For Android devices: Google Play
For iPhone/iPod touch/iPad: App Store
Models for China:
For Android devices: https://service.sony.com.cn
For iPhone/iPod touch/iPad: App Store
[10] Supported applications
Help for HAP Music Transfer/HDD Audio Remote
Help for HAP Music Transfer or HDD Audio Remote can be displayed from the
following website.
http://rd1.sony.net/help/ha/hap1/
[11] Preparations
What you need to do before starting to use the HDD
AUDIO PLAYER
After you purchase the HDD AUDIO PLAYER, you need to connect the external
equipment and configure settings before you can listen to music.
1. Prep 1. Connecting an amplifier.
2. Prep 2. Connecting to a network with a LAN cable (only when using a wired
LAN).
Make a wired connection between the HDD AUDIO PLAYER and a computer
with a LAN cable (supplied).
If you want to establish a wireless connection between the HDD AUDIO
PLAYER and computer, you can set it in step 4.
3. Prep 3. Turning on the HDD AUDIO PLAYER.
When all necessary connections are completed, AC power cord (mains lead) to
the wall outlet (mains) and then turn the power on.
4. Prep 4. Configuring the initial settings of the HDD AUDIO PLAYER.
When you use the HDD AUDIO PLAYER for the first time, configure the
language setting and network setting first.
5. Prep 5. Configuring the settings of a computer to use HAP Music Transfer.
Install HAP Music Transfer on your computer.
HAP Music Transfer is a dedicated application to transfer music files stored on
your computer to the HDD AUDIO PLAYER.
6. Launch HAP Music Transfer to transfer music files on your computer to the HDD
AUDIO PLAYER.
Refer to the HAP Music Transfer Help for details on operations.
7. Play music files transferred to the HDD AUDIO PLAYER.
Choose your desired method of playback from each topic under “Playing music
files” in this Help Guide.
Note
The HDD AUDIO PLAYER is equipped with a built-in antenna for wireless LAN.
Make sure to keep a distance between the HDD AUDIO PLAYER and speakers or
other devices to maintain good wireless communication.
Hint
We recommend using a wired LAN when you transfer a large number of music
files from your computer to the HDD AUDIO PLAYER, such as when you transfer
music files for the first time, to save transfer time.
It may take a while before the file registration is completed, as transferring,
analyzing and registering music files takes time when a large number of music
files are transferred to the HDD AUDIO PLAYER.
[12] Preparations
Prep 1. Connecting an amplifier
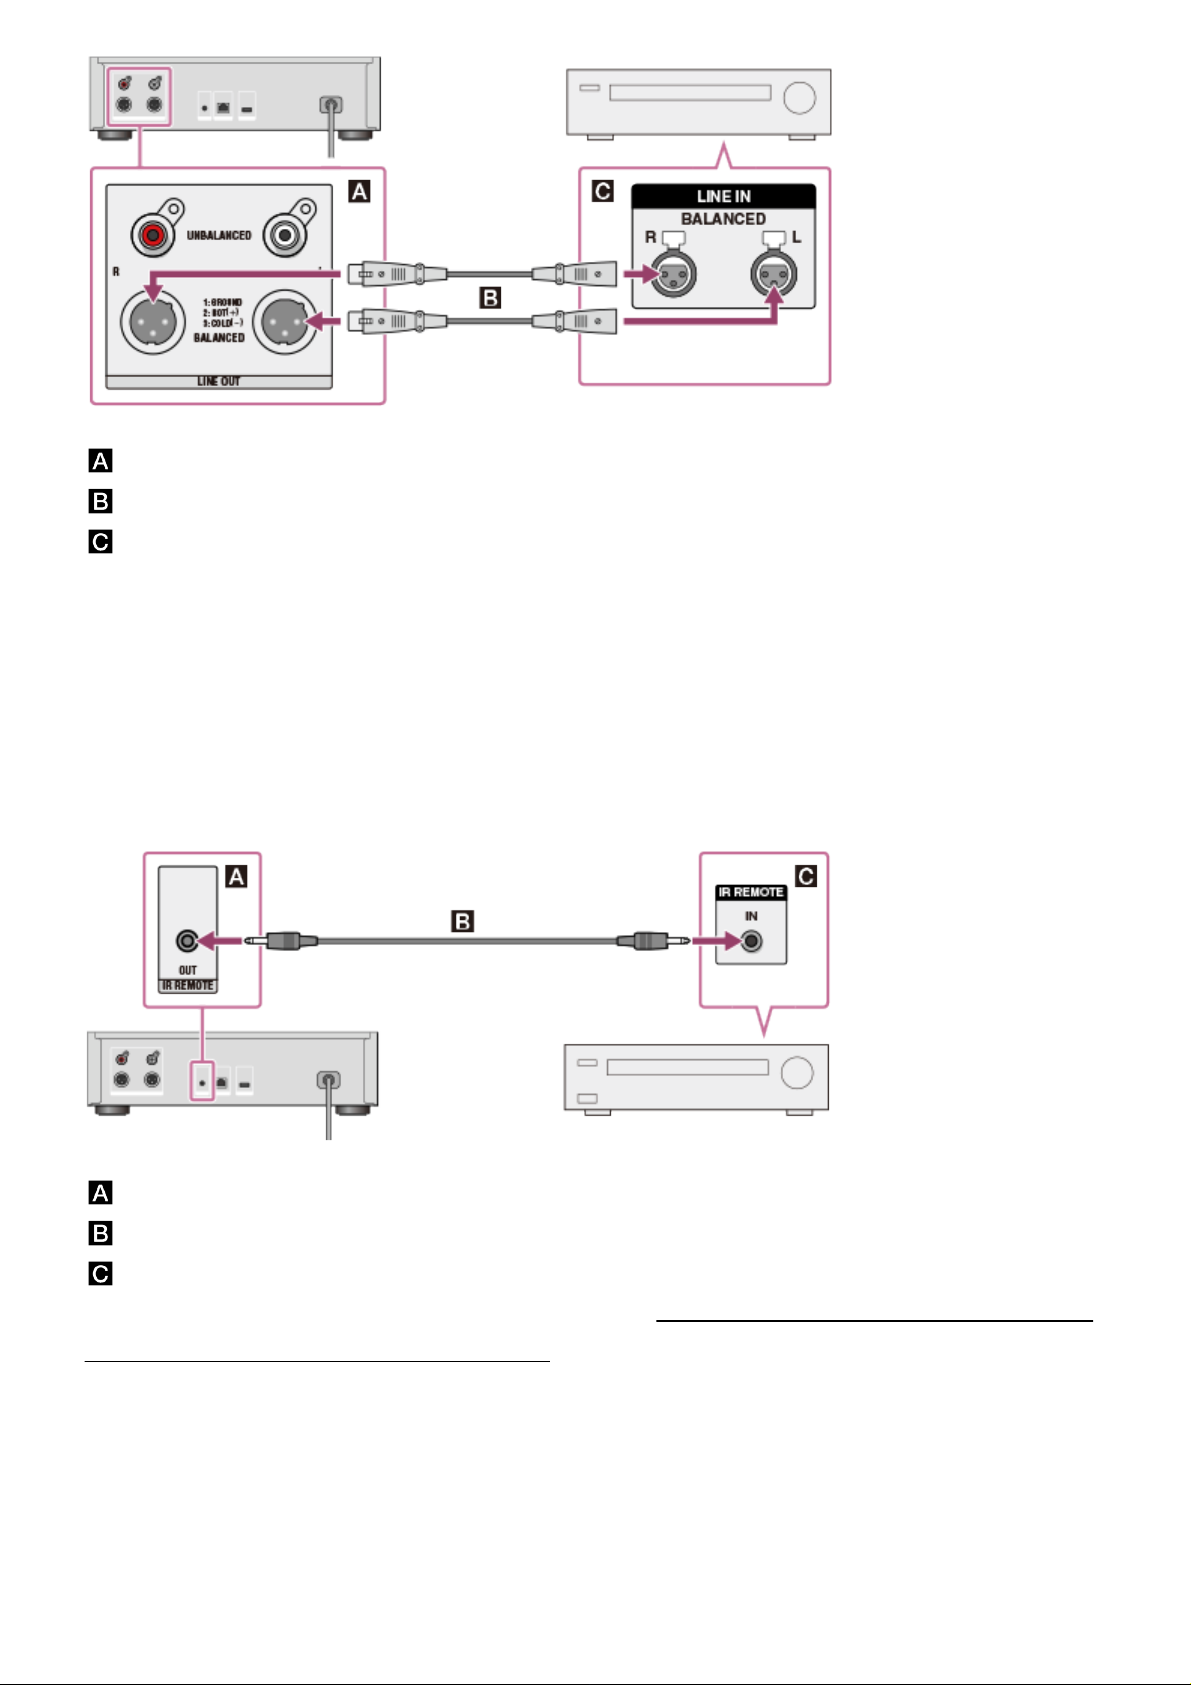
First, you need to connect an amplifier to the HDD AUDIO PLAYER.
Note
Make sure that the AC power cord (mains lead) of the HDD AUDIO PLAYER is
unplugged when connecting any other cord.
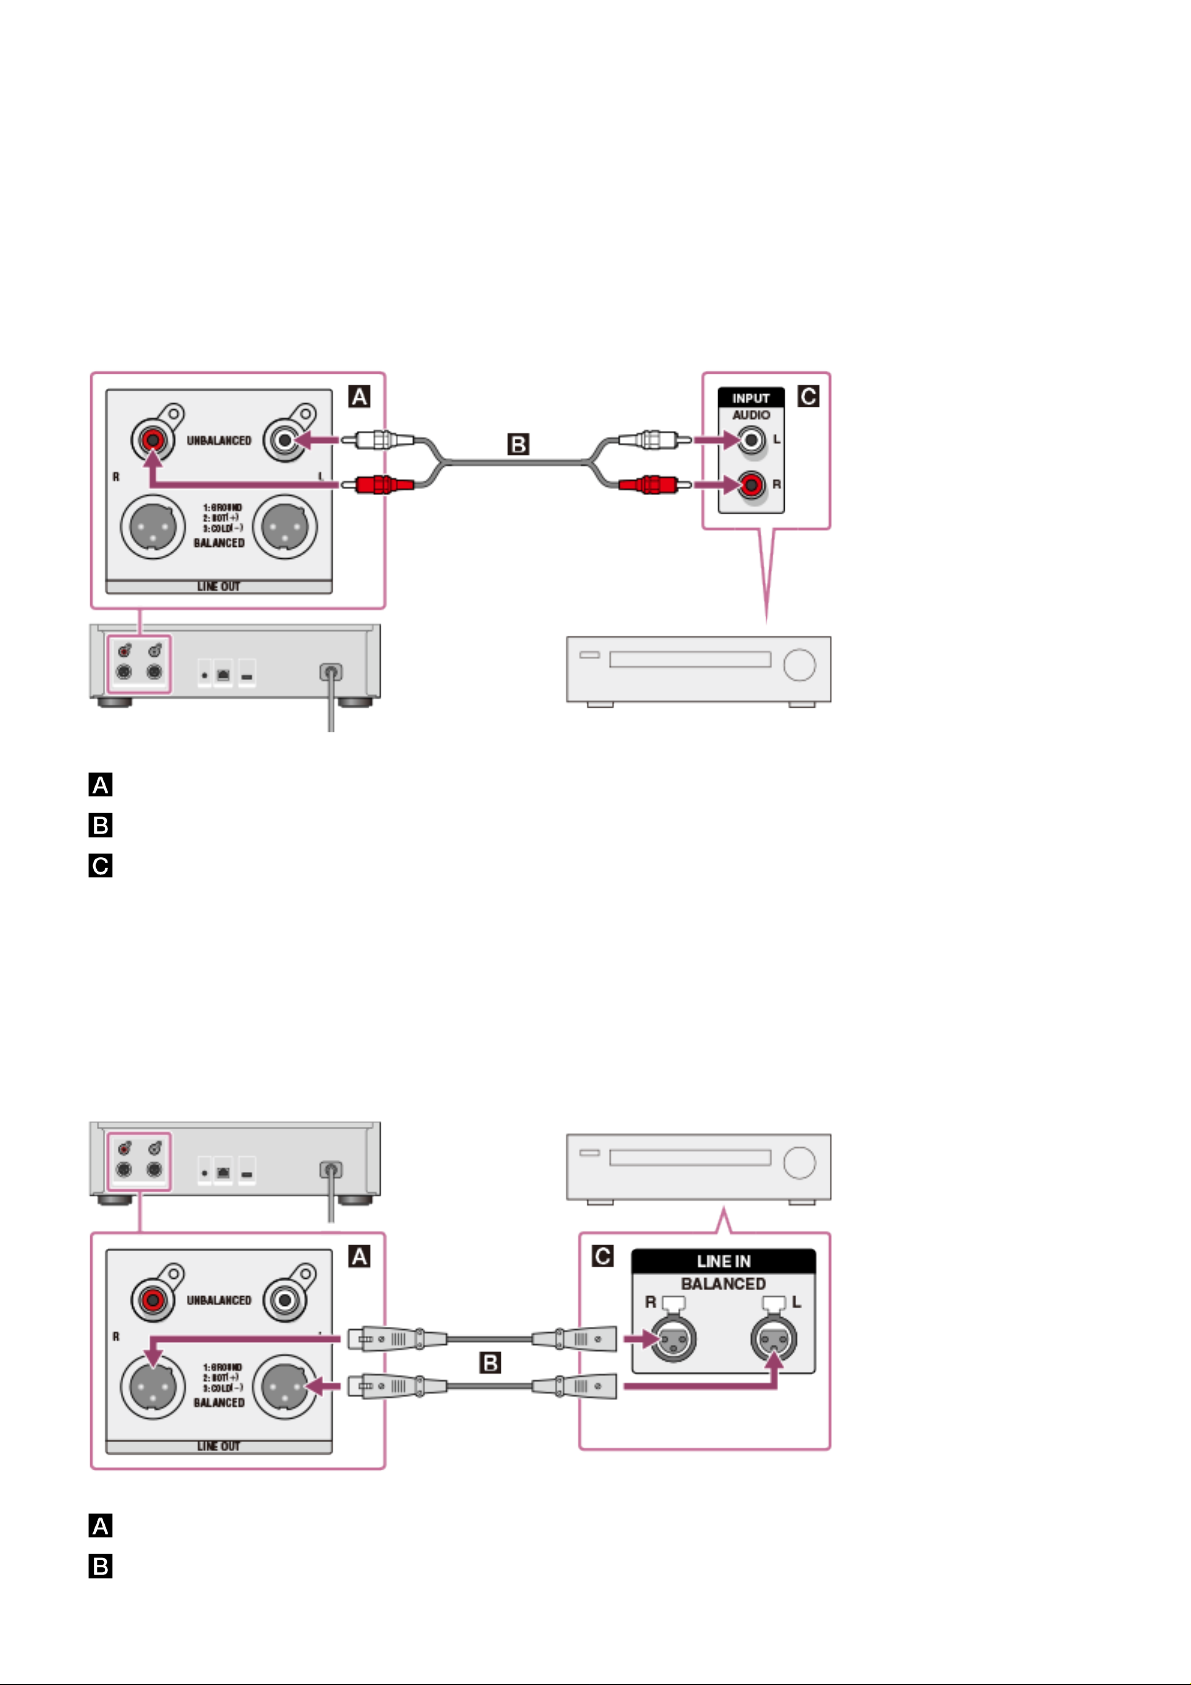
Connecting to the LINE OUT UNBALANCED jacks using an audio
cord
Connect an amplifier to the LINE OUT UNBALANCED jacks on the rear panel of the
HDD AUDIO PLAYER using an audio cord (supplied) as shown in the illustration
below.
: LINE OUT UNBALANCED L/R jacks of the HDD AUDIO PLAYER
: Audio cord (supplied)
: Analog input jack of an amplifier
Connecting to the LINE OUT BALANCED jacks using XLR balanced
cords
Connect an amplifier to the LINE OUT BALANCED jacks on the rear panel of the
HDD AUDIO PLAYER using XLR balanced cords (not supplied).
: LINE OUT UNBALANCED L/R jacks of the HDD AUDIO PLAYER
: XLR balanced cords (not supplied)
: Analog input jack of an amplifier
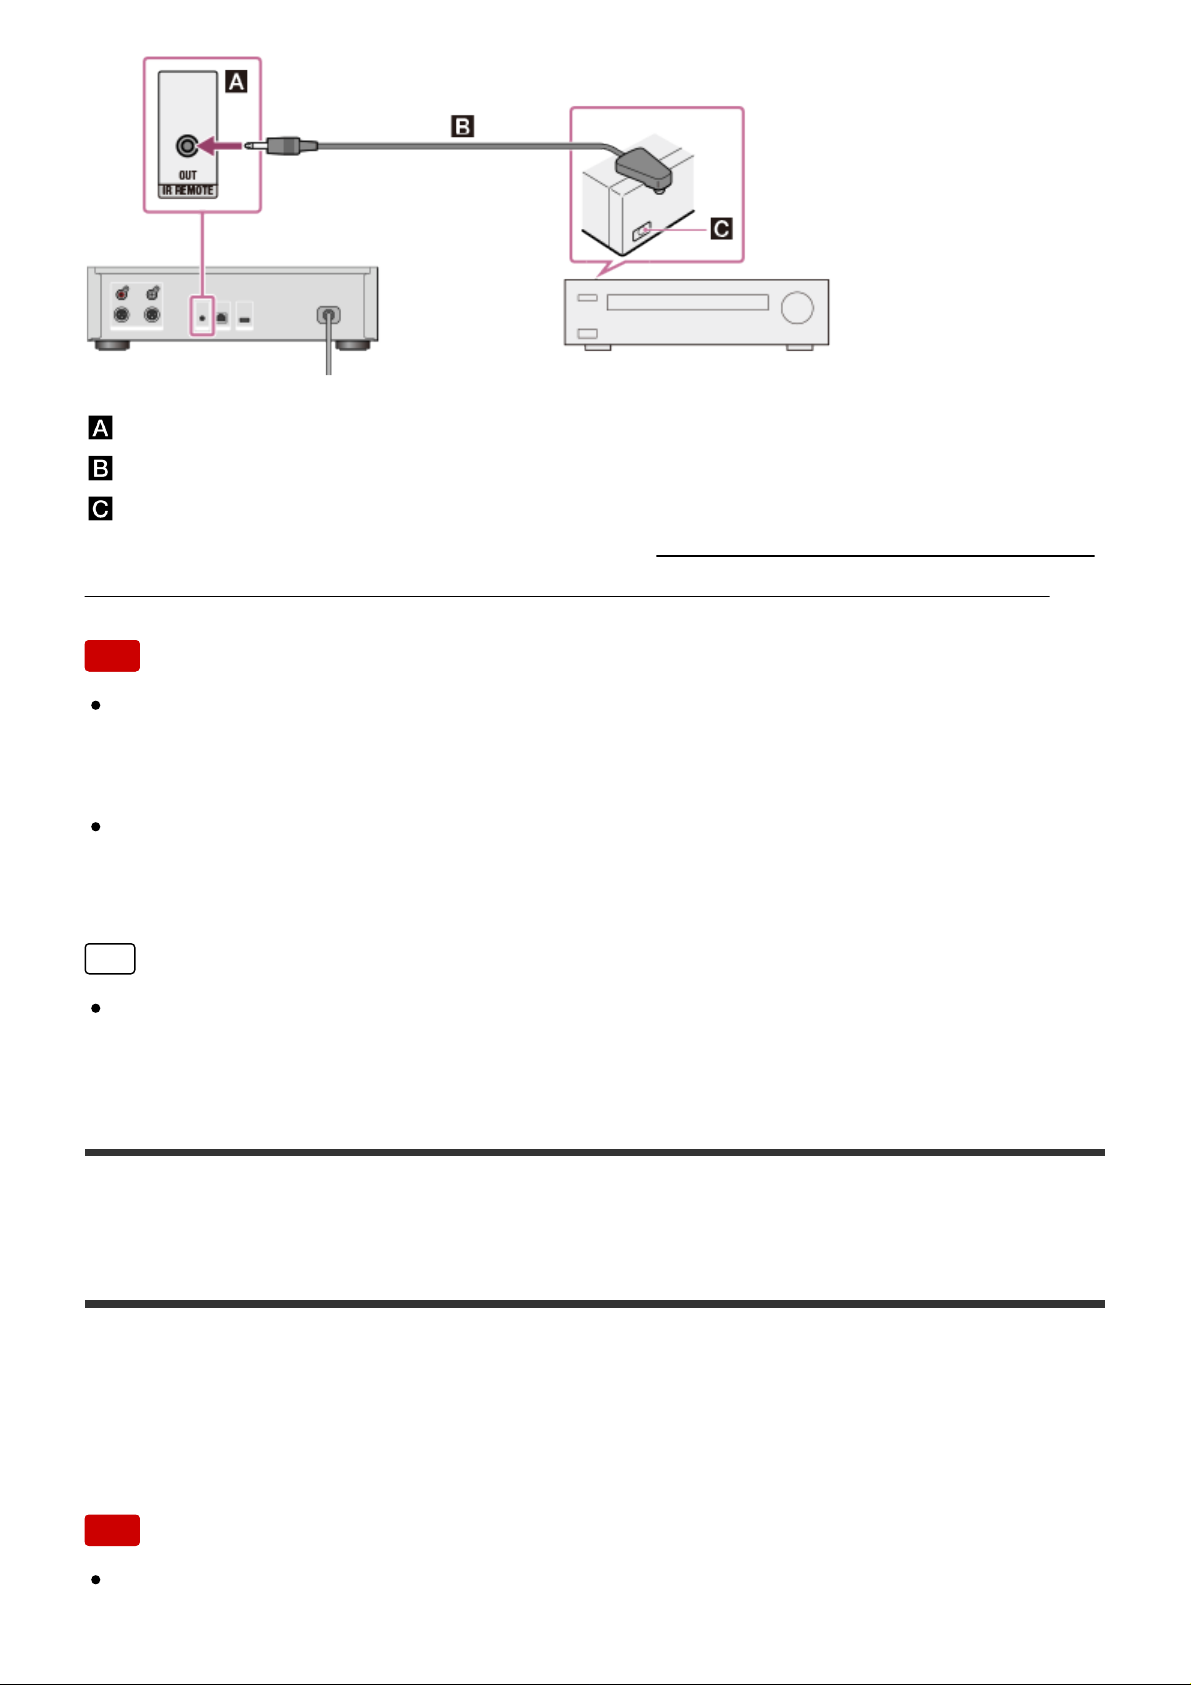
Operating a connected amplifier
You can operate a connected amplifier using the remote control supplied with the
HDD AUDIO PLAYER or the dedicated application if you connect the supplied
monaural mini-plug cable or IR blaster.
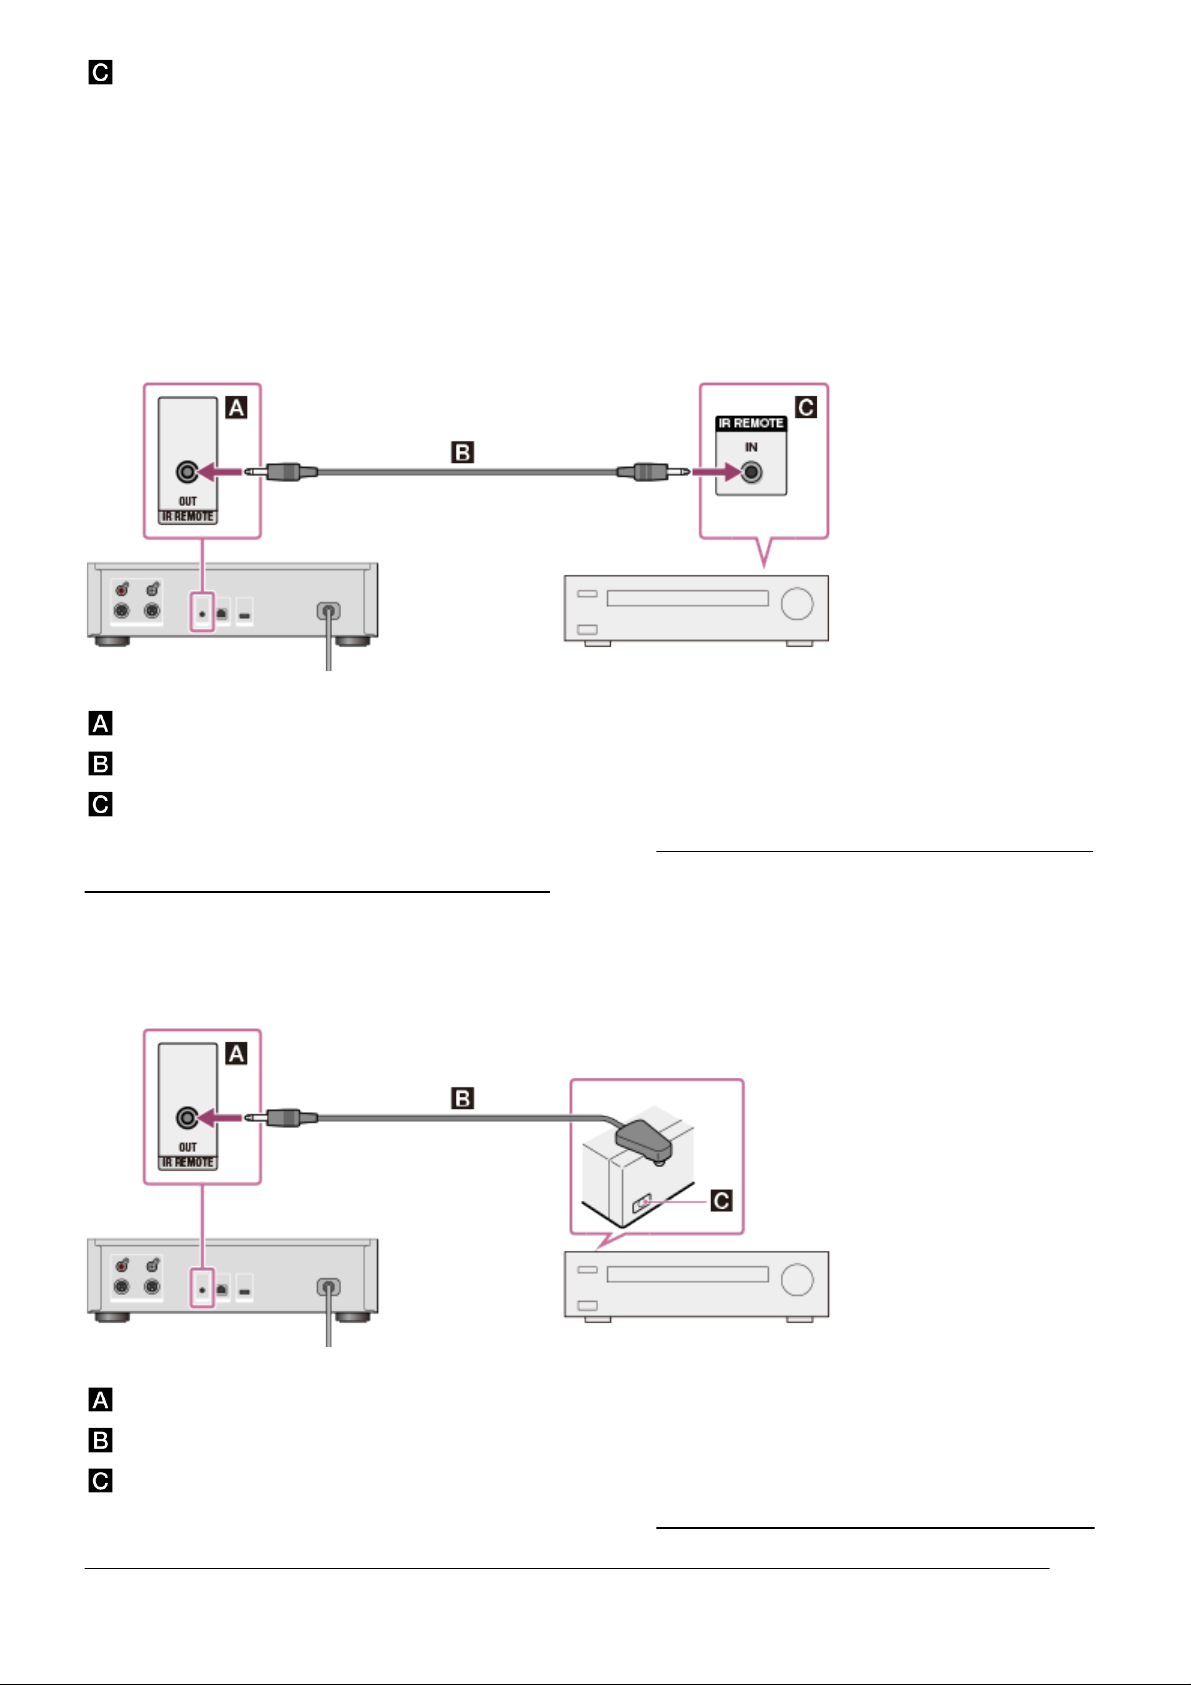
When you use a Sony amplifier equipped with an IR input jack.
: IR REMOTE OUT jack of the HDD AUDIO PLAYER
: Monaural mini-plug cable (supplied)
: IR input jack of an amplifier
For details on how to operate an amplifier, see “Operating a Sony amplifier using the
remote control or dedicated application.”
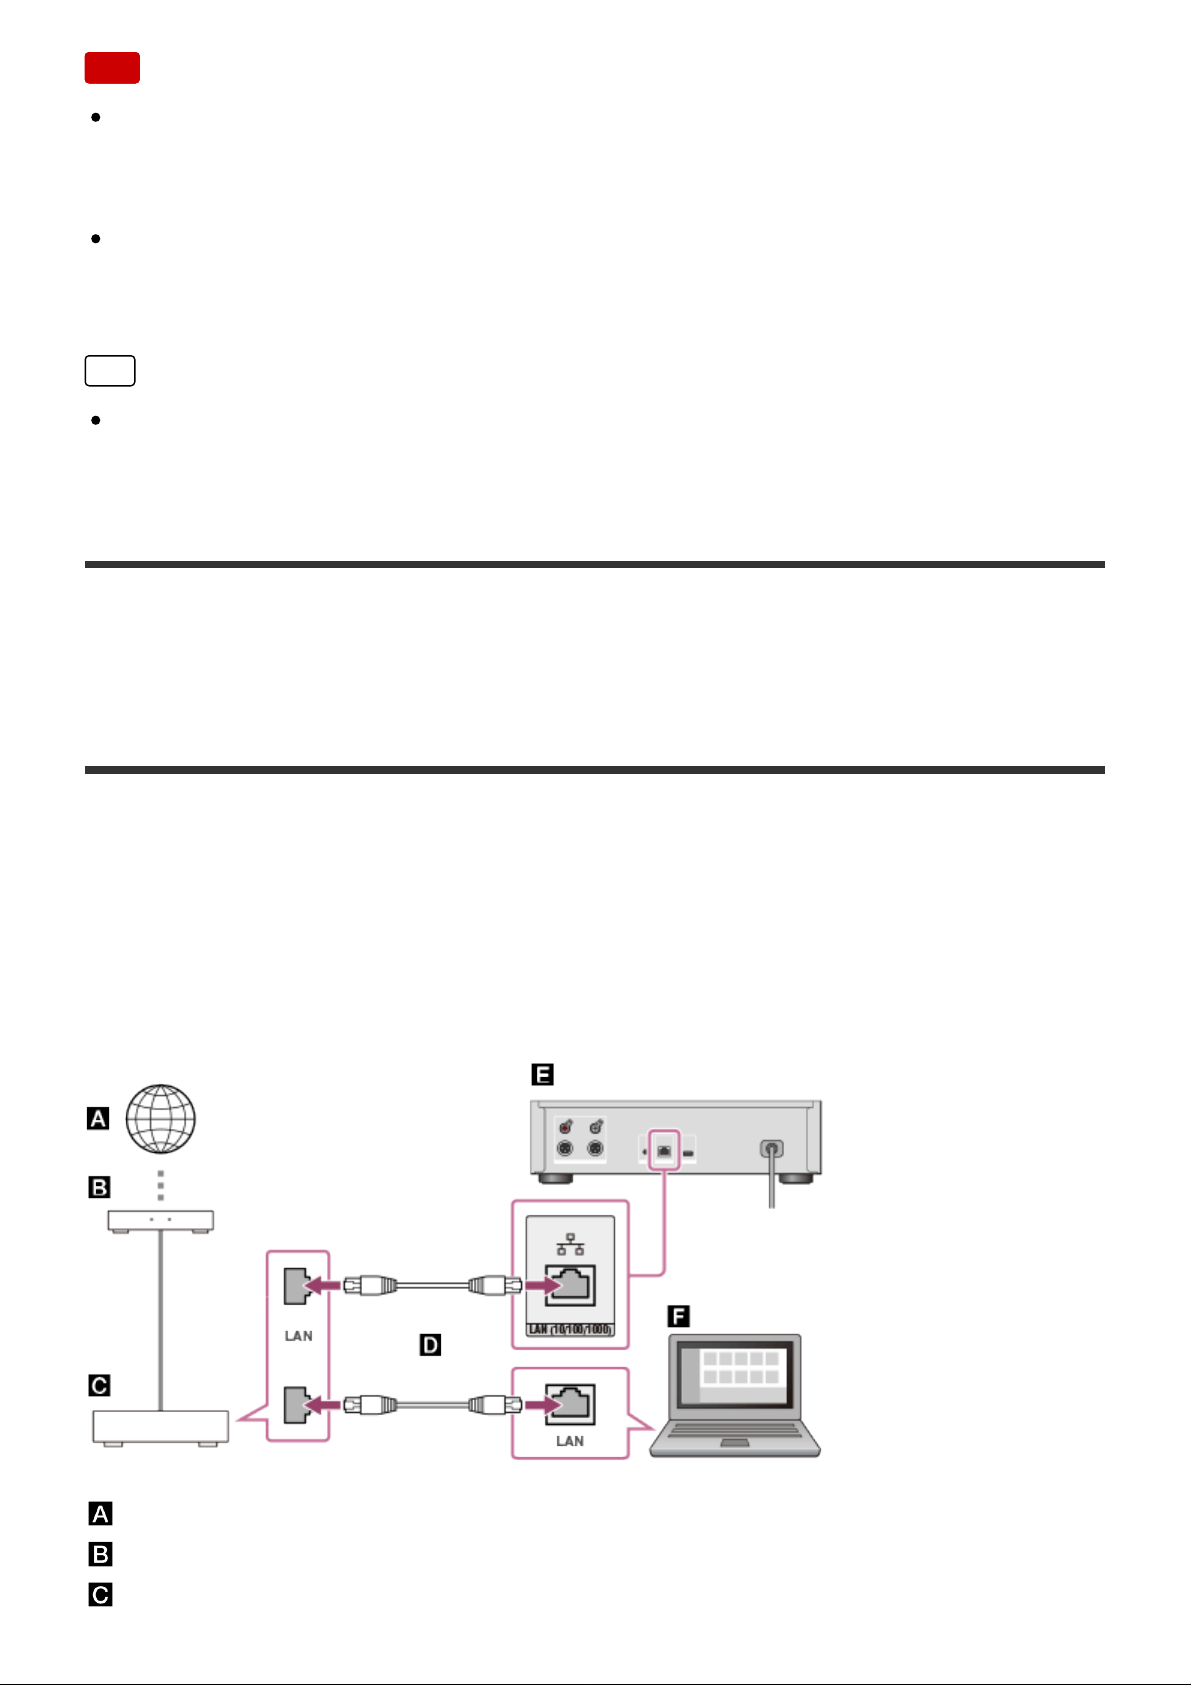
When you use a Sony amplifier not equipped with an IR input jack or an
amplifier from other manufacturers.
: IR REMOTE OUT jack of the HDD AUDIO PLAYER
: IR blaster (supplied)
: The remote sensor (receiver) of a connected amplifier
For details on how to operate an amplifier, see “Operating an amplifier manufactured
by another company using the supplied remote control or a dedicated application.”
Note
The XLR balanced cords are locked in place. Forcibly removing them may
damage the connected devices. Make sure to unlock and disconnect the XLR
balanced cord before moving the HDD AUDIO PLAYER.
The HDD AUDIO PLAYER is equipped with a built-in antenna for wireless LAN.
Make sure to keep a distance between the HDD AUDIO PLAYER and speakers or
other devices to maintain good wireless communication.
Hint
When you connect an amplifier to the HDD AUDIO PLAYER using the XLR
balanced cords, the output is less affected by surrounding noise sources.
[13] Preparations
Prep 2. Connecting to a network with a LAN cable (only
when using a wired LAN)
You need to connect the HDD AUDIO PLAYER to the same network as your
computer. We recommend using a wired LAN connection when you transfer music
files stored on your computer to the HDD AUDIO PLAYER for the first time.
Connect the LAN cable (only one cable is supplied) between the LAN (10/100/1000)
port on the rear panel of the HDD AUDIO PLAYER and a router.
: Internet
: Modem
: Router
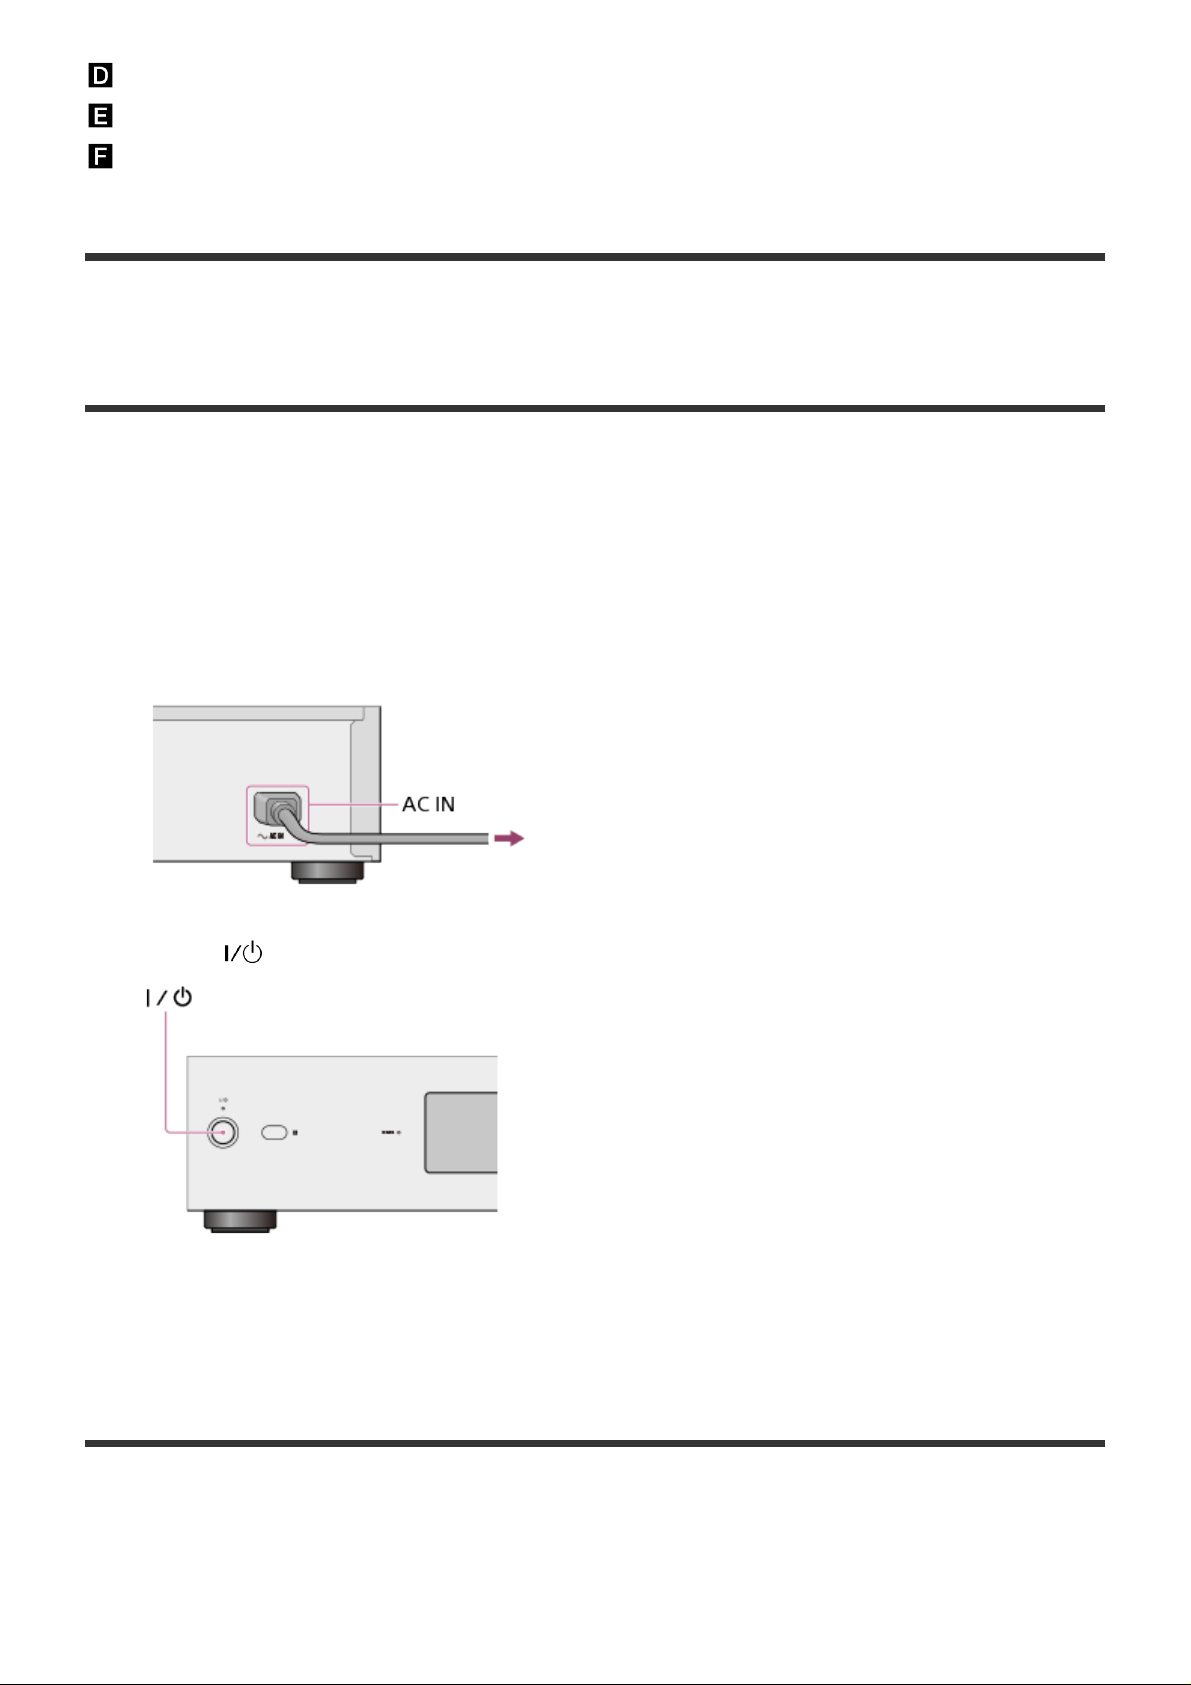
: LAN cables (only one cable is supplied)
: LAN (10/100/1000) port of the HDD AUDIO PLAYER
PLAYER
: Computer
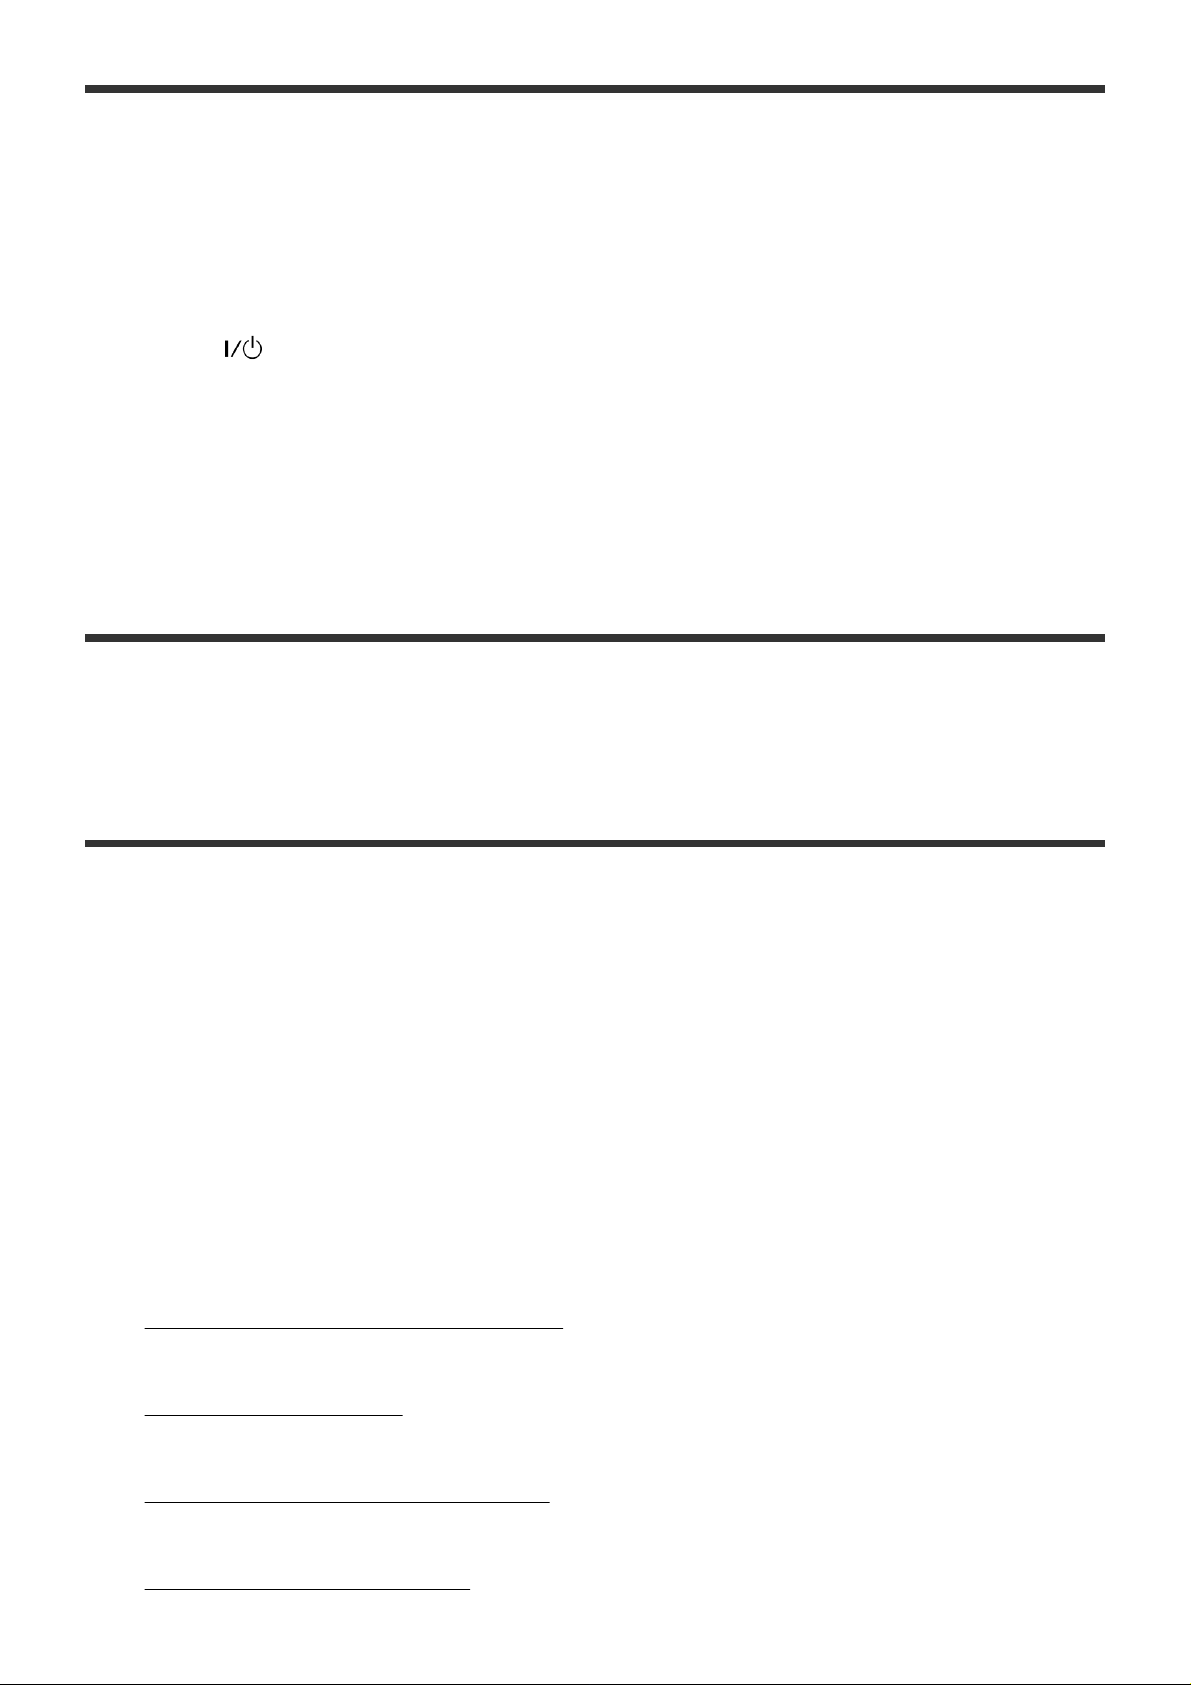
[14] Preparations
Prep 3. Turning on the HDD AUDIO PLAYER
When you have made all connections with the other devices, connect the supplied
AC power cord (mains lead), then turn on the HDD AUDIO PLAYER.
1. Firmly connect the supplied AC power cord (mains lead) to the AC IN jack on
the rear panel of the HDD AUDIO PLAYER, then connect the plug to a wall
outlet (mains).
2. Press to turn on the HDD AUDIO PLAYER.
The power lamp lights up in green.
[15] Preparations
Prep 4. Configuring the initial settings of the HDD AUDIO
When you turn on the HDD AUDIO PLAYER for the first time, it automatically enters
the initial settings mode. You can configure the initial settings of the HDD AUDIO
PLAYER easily by following the instructions on the screen.
Refer to each related topic for details on each item of the initial settings.
1. Press to turn on the HDD AUDIO PLAYER.
2. Configure the initial settings by following the instructions on the screen.
When a screen appears to indicate that the initial settings are completed, select
[Close].
[16] Preparations
Prep 5. Configuring the settings of a computer to use HAP
Music Transfer
You can transfer music files managed on your computer to the HDD AUDIO PLAYER
using HAP Music Transfer. The music files are saved in the hard disk drive of the
HDD AUDIO PLAYER, so you can enjoy playing tracks without worrying about the
status of the network connection, even if those tracks are large files with a high
sound quality.
For details on the operations of HAP Music Transfer, refer to the HAP Music Transfer
Help.
1. Download the HAP Music Transfer application from the following website:
Models for the USA and Canada:
http://esupport.sony.com/swu/8811
Models for Europe:
www.sony.eu/support
Models for Asia Pacific:
http://www.sony-asia.com/support
Models for China:
https://service.sony.com.cn
2. Install HAP Music Transfer.
For iPhone/iPod touch/iPad: App Store
Install the application by following the instructions on the screen.
3. Launch HAP Music Transfer to transfer music files to the HDD AUDIO PLAYER.
[17] Preparations
Operating the HDD AUDIO PLAYER from your
smartphone or tablet (using HDD Audio Remote)
What you can do using HDD Audio Remote
You can operate the HDD AUDIO PLAYER using your smartphone or tablet by
installing HDD Audio Remote, a dedicated application for smartphones and tablets.
HDD Audio Remote allows you to browse and play audio files stored in the HDD
AUDIO PLAYER from your smartphone or tablet.
You can also add tracks to playlists, edit information such as the genre, artist, album
and track title of music files, and more.
Install the application to your smartphone or tablet.
Downloading HDD Audio Remote
Download HDD Audio Remote from the following websites:
Models except for China:
For Android devices: Google Play
For iPhone/iPod touch/iPad: App Store
Models for China:
For Android devices: https://service.sony.com.cn
[18] Preparations
Preparing the remote control
Open the lid of the remote control and insert two R03 (size-AAA) batteries.
Place the batteries so that the + and – ends are in the correct position.
Note
Do not leave the remote control in an extremely hot or humid place.
Do not use a new battery and an old one together.
Do not mix different kinds of batteries.
If you do not intend to use the remote control for an extended period of time,
remove the batteries to avoid possible damage from battery leakage and
corrosion.
[19] Connections
Connecting to a computer
You need to connect the HDD AUDIO PLAYER to your computer through a wired
LAN or Wi-Fi (wireless LAN).
Hint
A wired LAN connection enables you to transfer music files more quickly.
Using a wired LAN is especially recommended when transferring large volumes of
data, such as when transferring music files stored on your computer to the HDD
AUDIO PLAYER for the first time.
The Wi-Fi (wireless LAN) function of the HDD AUDIO PLAYER turns off when you
select the wired LAN setting.
Using a wired LAN connection
Connect the LAN cable (only one cable is supplied) between the LAN (10/100/1000)
port on the rear panel of the HDD AUDIO PLAYER and a router.
: Internet
: Modem
: Router
: LAN cables (only one cable is supplied)
: LAN (10/100/1000) port of the HDD AUDIO PLAYER
: Computer
Using a Wi-Fi (wireless LAN) connection
: Internet
: Modem
: Router
: HDD AUDIO PLAYER
: Computer
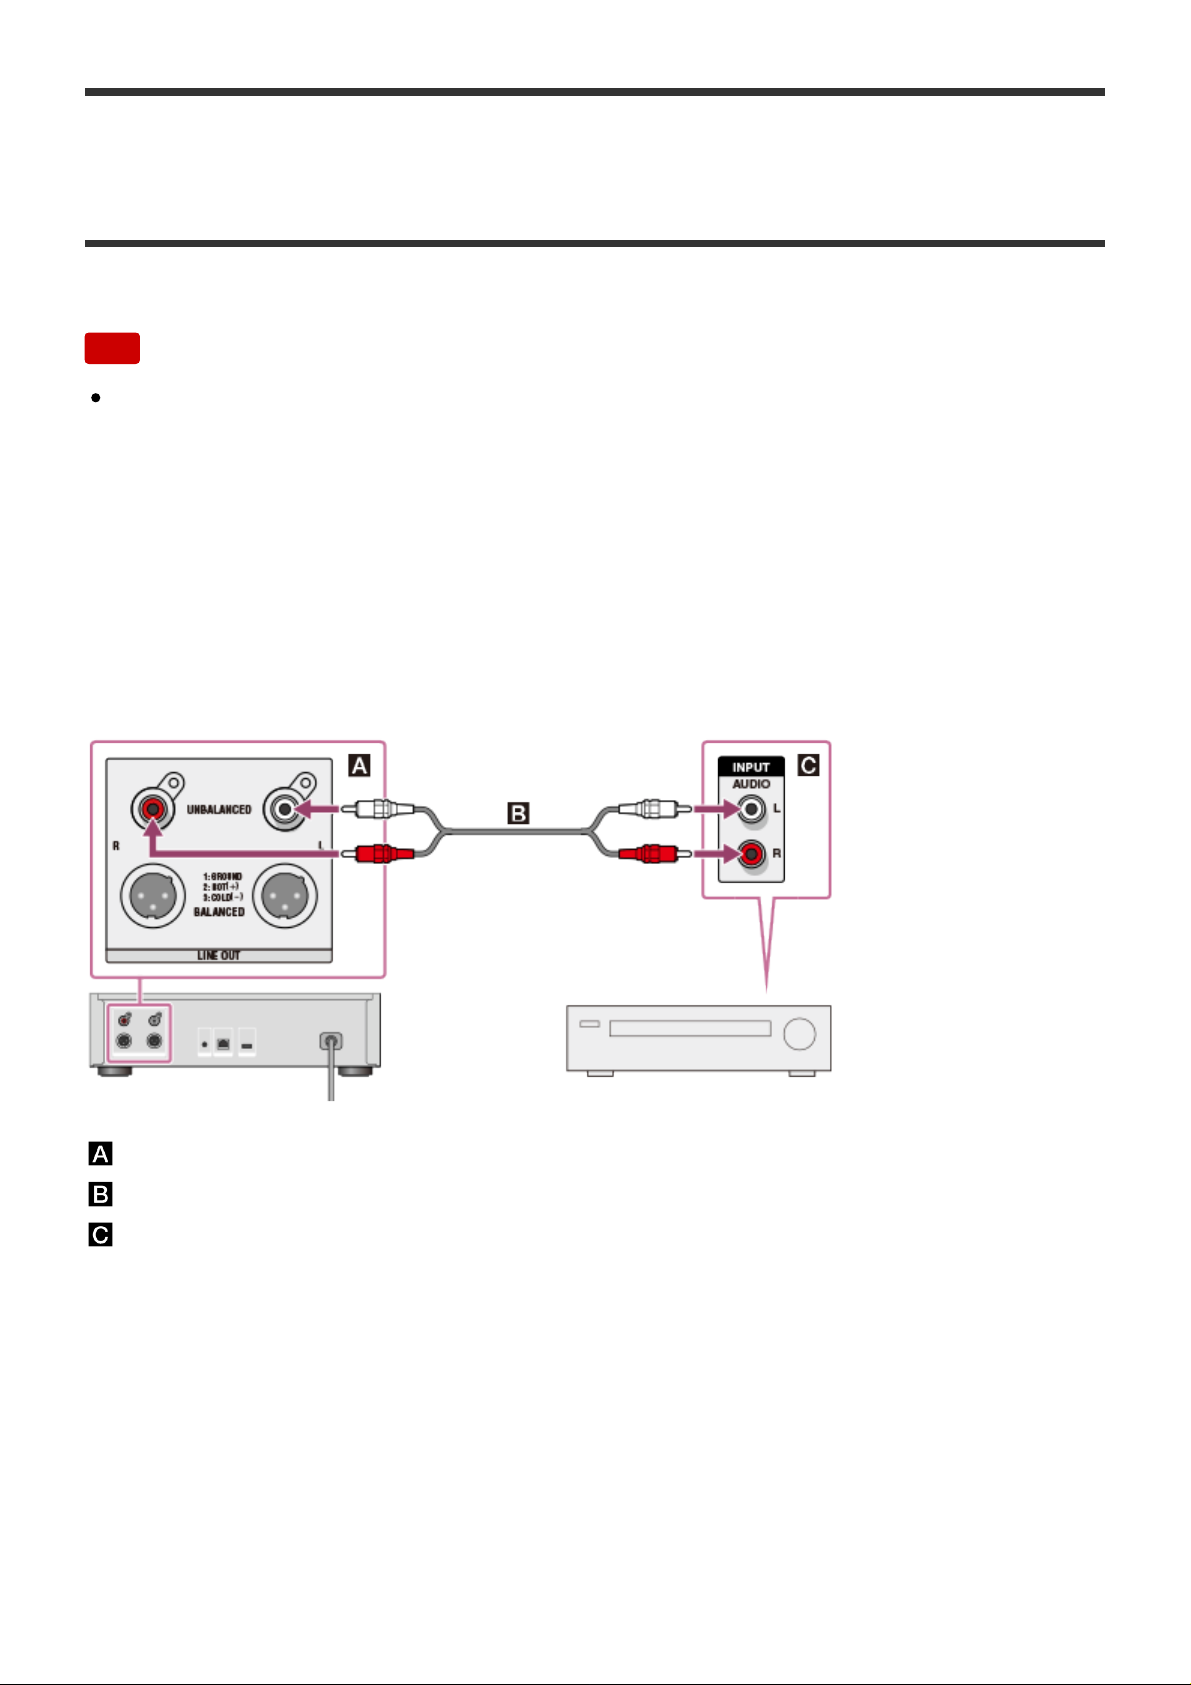
[20] Connections
Connecting an amplifier
You need to connect an amplifier to the HDD AUDIO PLAYER.
Note
Make sure that the AC power cord (mains lead) of the HDD AUDIO PLAYER is
unplugged when connecting any other cord.
Connecting to the LINE OUT UNBALANCED jacks using an audio
cord
Connect an amplifier to the LINE OUT UNBALANCED jacks on the rear panel of the
HDD AUDIO PLAYER using an audio cord (supplied) as shown in the illustration
below.
: LINE OUT UNBALANCED L/R jacks of the HDD AUDIO PLAYER
: Audio cord (supplied)
: Analog input jack of an amplifier
Connecting to the LINE OUT BALANCED jacks using XLR balanced
cords
Connect an amplifier to the LINE OUT BALANCED jacks on the rear panel of the
HDD AUDIO PLAYER using XLR balanced cords (not supplied).
: LINE OUT UNBALANCED L/R jacks of the HDD AUDIO PLAYER
: XLR balanced cords (not supplied)
: Analog input jack of an amplifier
Operating a connected amplifier
You can operate a connected amplifier using the remote control supplied with the
HDD AUDIO PLAYER or the dedicated application if you connect the supplied
monaural mini-plug cable or IR blaster.
When you use a Sony amplifier equipped with an IR input jack.
: IR REMOTE OUT jack of the HDD AUDIO PLAYER
: Monaural mini-plug cable (supplied)
: IR input jack of an amplifier
For details on how to operate an amplifier, see “Operating a Sony amplifier using the
remote control or dedicated application.”
When you use a Sony amplifier not equipped with an IR input jack or an
amplifier from other manufacturers.
: IR REMOTE OUT jack of the HDD AUDIO PLAYER
: IR blaster (supplied)
: The remote sensor (receiver) of a connected amplifier
For details on how to operate an amplifier, see “Operating an amplifier manufactured
by another company using the supplied remote control or a dedicated application.”
Note
The XLR balanced cords are locked in place. Forcibly removing them may
damage the connected devices. Make sure to unlock and disconnect the XLR
balanced cord before moving the HDD AUDIO PLAYER.
The HDD AUDIO PLAYER is equipped with a built-in antenna for wireless LAN.
Make sure to keep a distance between the HDD AUDIO PLAYER and speakers or
other devices to maintain good wireless communication.
Hint
When you connect an amplifier to the HDD AUDIO PLAYER using the XLR
balanced cords, the output is less affected by surrounding noise sources.
[21] Connections
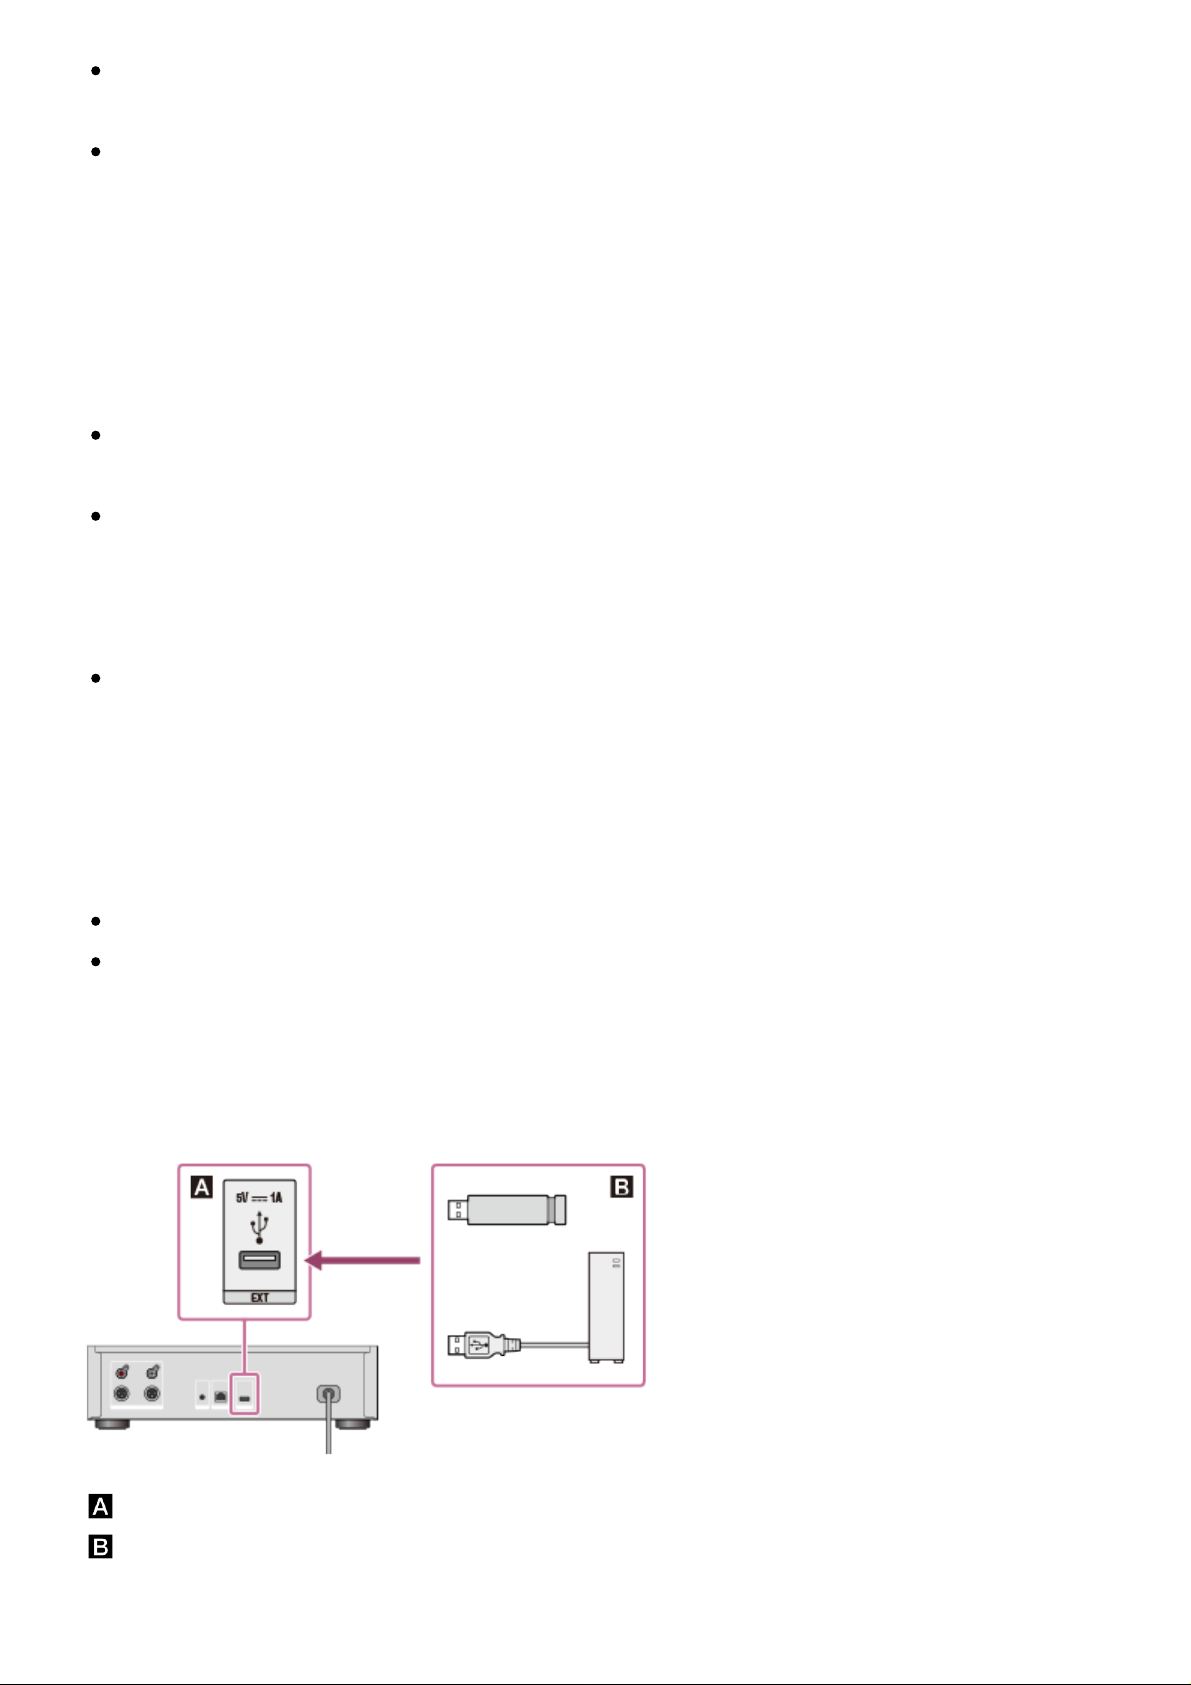
Connecting an external hard disk drive
You can connect an external hard disk drive (USB storage) to the EXT port on the
rear panel of the HDD AUDIO PLAYER. The music files transferred from your
computer to the external hard disk drive can be played in the same way as music
files stored in the internal hard disk drive of the HDD AUDIO PLAYER.
Note
Compatible with USB 2.0.
Be sure to connect or disconnect the external hard disk drive (USB storage) only
when the HDD AUDIO PLAYER is in the standby mode.
The HDD AUDIO PLAYER registers content stored in the external hard disk drive
to the database in the HDD AUDIO PLAYER. If there is insufficient database
capacity, you cannot transfer any more music file or scan the content of a newly
connected external hard disk drive. In this case, delete unnecessary music files
and perform the Rescan HDD function. If this does not solve the problem, perform
the Factory Reset function or the Clear Database function, connect an external
hard disk drive, and then rescan the external hard disk drive.
Only the external hard disk drive that is currently connected can be used at the
same time as the internal hard disk drive.
The HDD AUDIO PLAYER is compatible with the ext4 and FAT file systems.
External hard disk drives with other file systems need to be formatted by selecting
the formatting function from the menu of the HDD AUDIO PLAYER. Please note
that the content of the external hard disk drive is deleted when formatting.
You cannot use an external hard disk drive (USB storage) formatted by the HDD
AUDIO PLAYER with other devices such as a computer, because the external
hard disk drive is formatted only for the HDD AUDIO PLAYER. To use the external
hard disk drive with other devices format it using the device you want to use it
with. Please note that any music files on the external hard disk drive are deleted
when the hard disk drive is deleted.
If an external hard disk drive is connected during playback, the playback stops.
You cannot simultaneously use multiple external hard disks connected with a USB
hub.
Connect an external hard disk drive to the EXT port on the rear panel of the HDD
AUDIO PLAYER as shown below.
: EXT port of the HDD AUDIO PLAYER
: External hard disk drive (USB storage)
[22] Connections
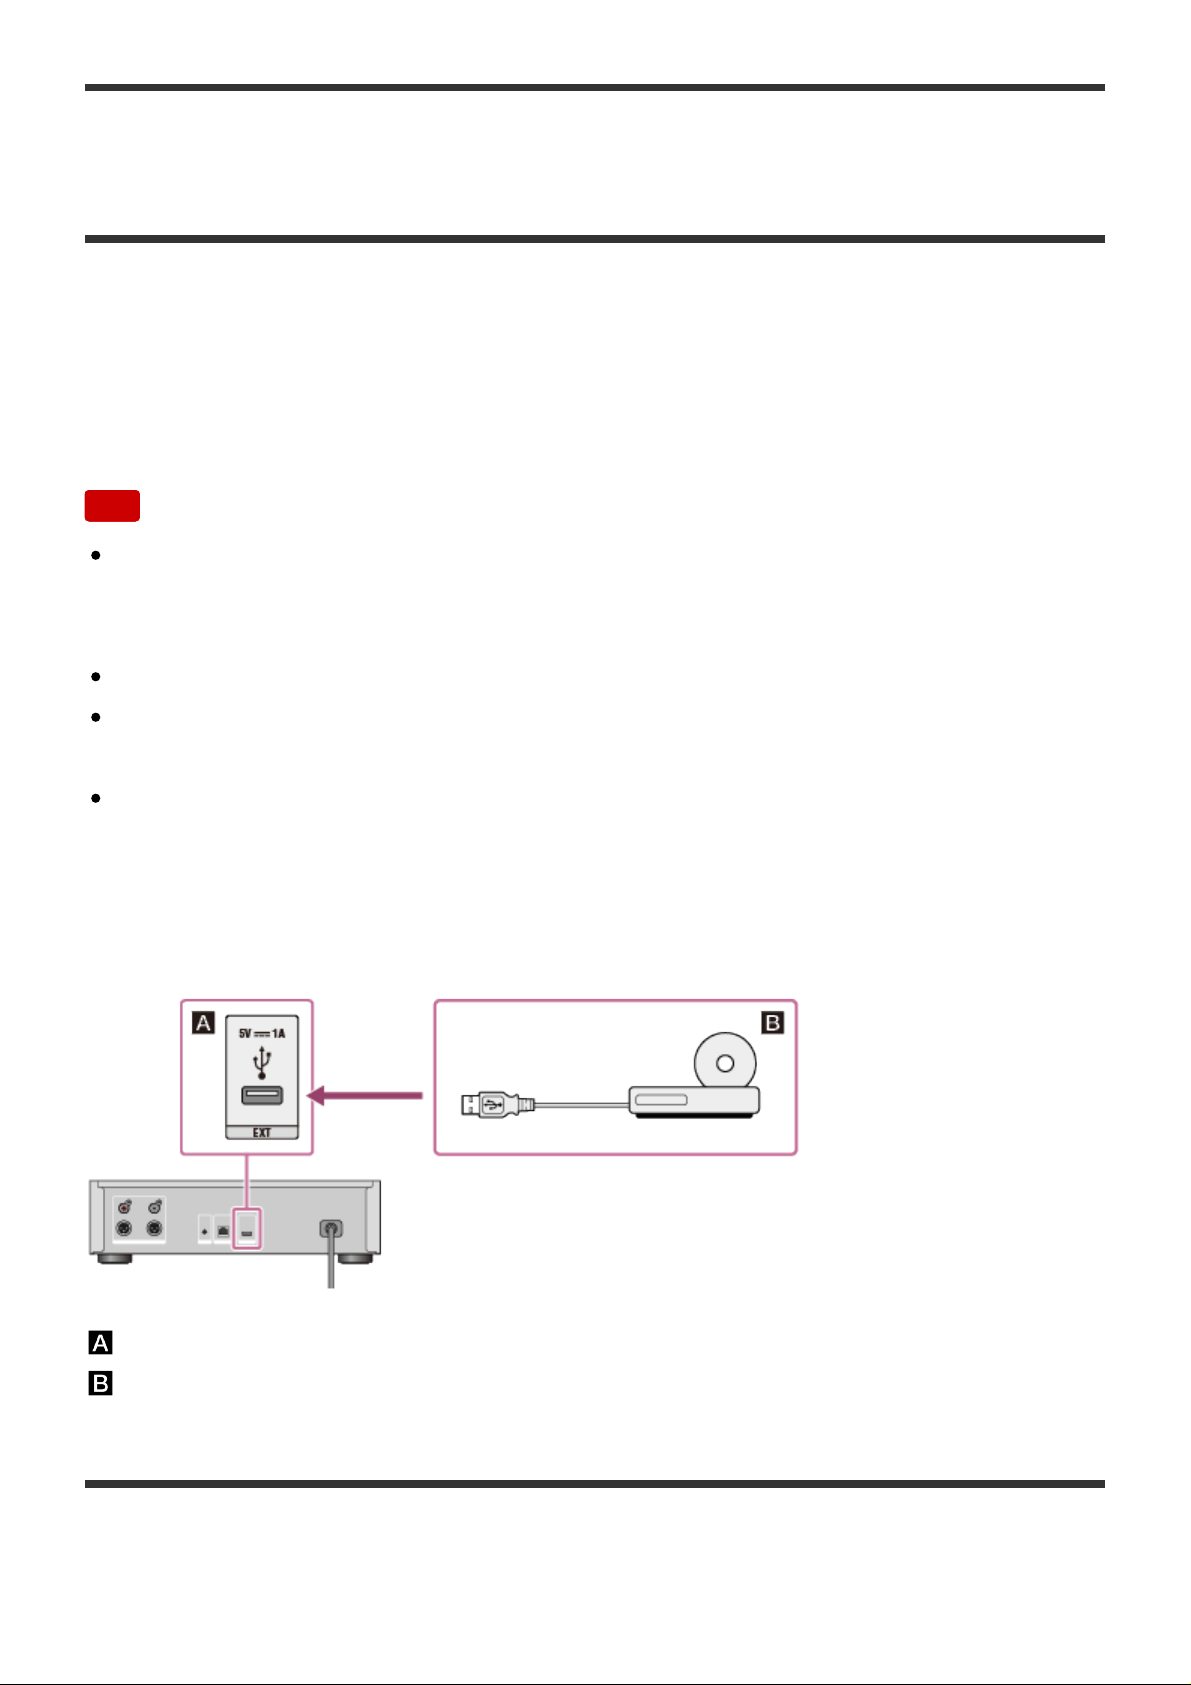
Connecting an external CD drive
You can connect an external CD drive to the EXT port on the rear panel of the HDD
AUDIO PLAYER and use the [Import CD] function to copy music files stored on a CD
directly to the internal hard disk drive of the HDD AUDIO PLAYER. The music files
copied from the CD can be played or viewed for music information on the screen in
the same way as music files transferred from your computer.
Note
Be sure to use an external CD drive that is powered through the AC adaptor and
connect it to a power outlet. Successful operations with power supply from the
HDD AUDIO PLAYER are not guaranteed.
Compatible with USB 2.0.
You cannot simultaneously use multiple external CD drives connected with a USB
hub.
During playback of a file, if you start preparing for the [Import CD] function, the
playback stops.
Connect an external CD drive to the EXT port on the rear panel of the HDD AUDIO
PLAYER as shown below.
: EXT port of the HDD AUDIO PLAYER
: External CD drive
[23] Network connections (wired LAN)
Required network environment

You can transfer audio files from your computer to the HDD AUDIO PLAYER by
connecting both to the same network, either by a wired or wireless connection.
Confirm the supported environment described below.
Note
You need to connect the HDD AUDIO PLAYER to a network that can access the
Internet if you want to play music services (*).
*
Some music services may not be available depending on your country or region.
Wired LAN (using a LAN cable)
LAN (10/100/1000) port:
1000BASE-T/100BASE-TX/10BASE-T
(The network speed may differ depending on the network environment.)
LAN cable:
We recommend using a LAN cable that is Cat5 or higher. A normal-type cable is
also recommended, as some flat-type LAN cables are easily affected by noise.
If the receiver is used in an environment with power supply noise from electronic
devices or in a noisy network environment, use a shielded-type LAN cable.
Wi-Fi (using a wireless LAN network)
Compatible standards:
IEEE 802.11 b/g/n
Security mode:
None
WEP
WPA/WPA2-PSK (AES)
WPA/WPA2-PSK (TKIP)
Radio frequency:
2.4 GHz
Note
Wi-Fi devices work on the 2.4 GHz band, which is used by a variety of devices.
Wi-Fi devices use technology to minimize radio interference from other devices
that use the same band. However, radio interference may still cause slower data
transfer rates, reduce the communication range, or cause communication failure.
 Loading...