

Page 1
Help Guide
1
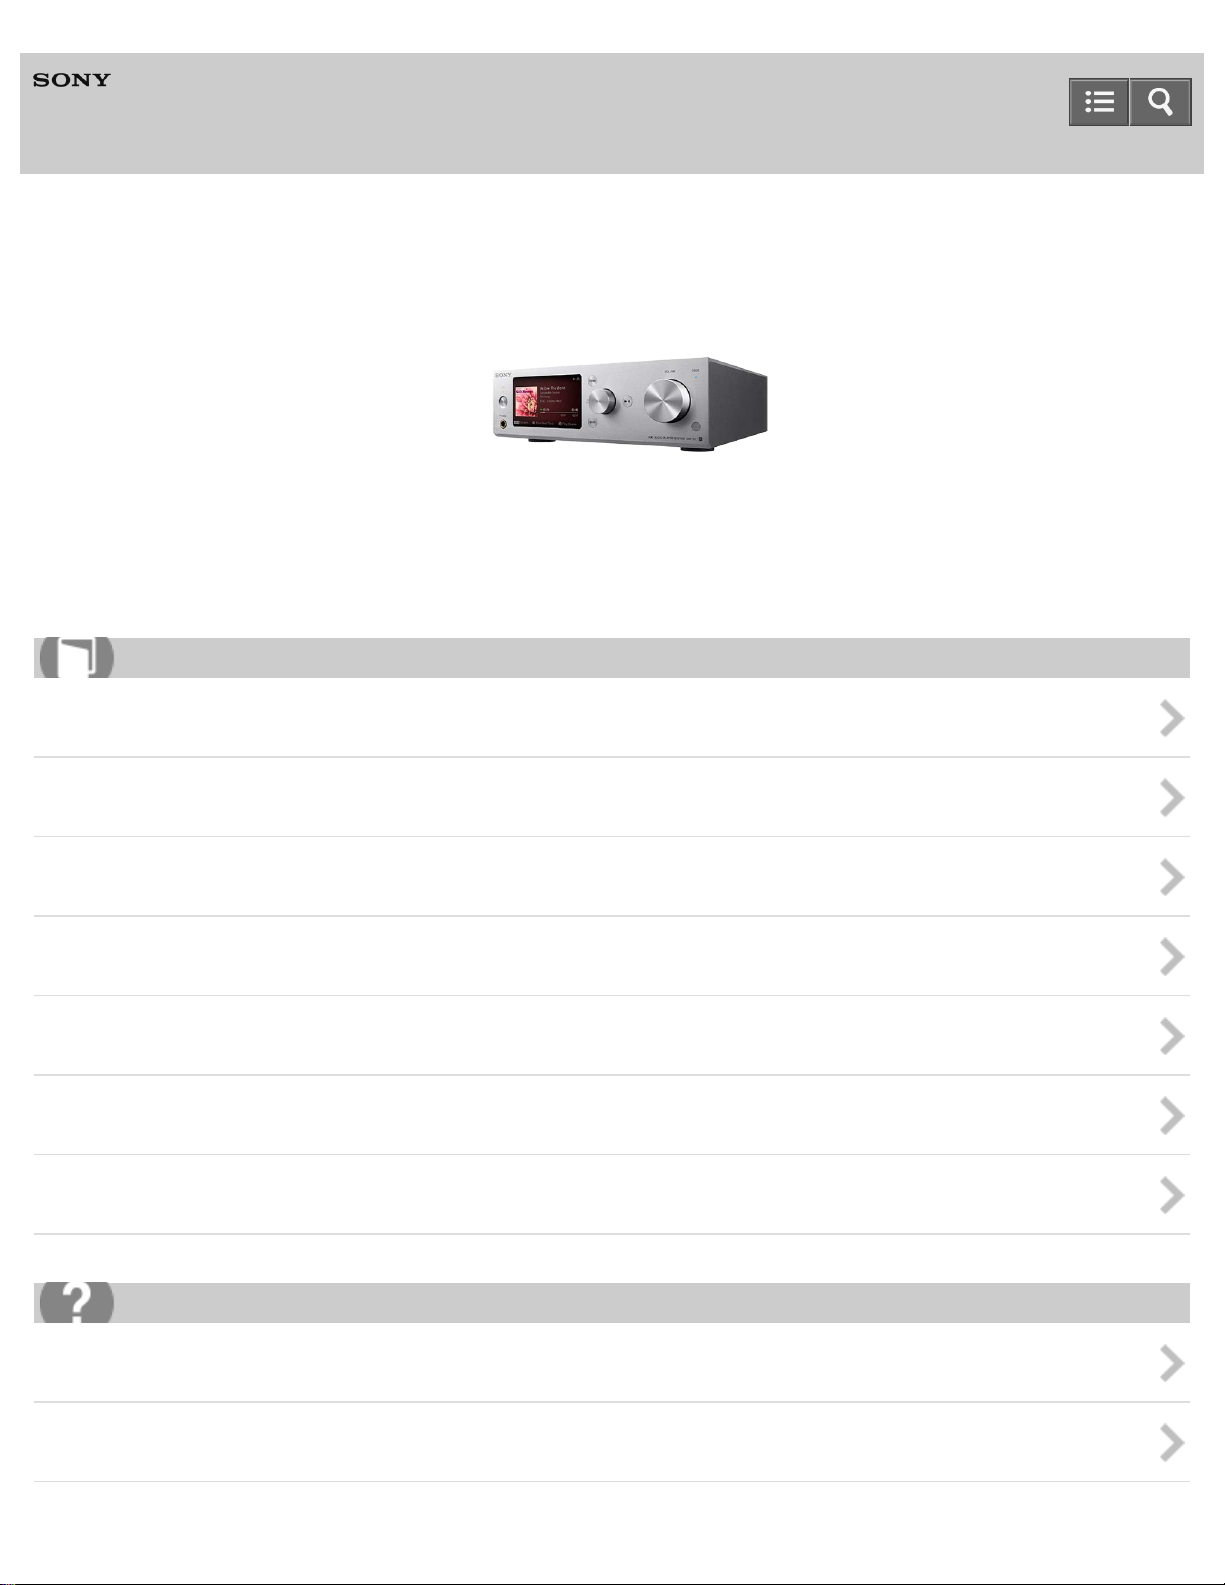
HDD AUDIO PLAYER
HAP-S1
Use this Help Guide when you have any questions on how to use your HDD AUDIO PLAYER.
How to Use
About the HDD AUDIO PLAYER SYSTEM
Preparations and Connections
Connecting the HDD AUDIO PLAYER to a network
Playing music files
Configuring settings (Settings menus)
Parts and controls
Announcements
Troubleshooting
Actions and screen notifications
Dealing with problems
Page 2

List of Topics
2
How to Use
Troubleshooting
Notes on use
4-472-853-11(1)
Copyright 2013 Sony Corporation
Page 3
Help Guide
3
How to Use
HDD AUDIO PLAYER
HAP-S1
About the HDD AUDIO PLAYER SYSTEM
Features of the HDD AUDIO PLAYER SYSTEM
Basic operations
Supported environment
Supported applications
Notes on use
4-472-853-11(1)
Copyright 2013 Sony Corporation
Page 4

Help Guide
4
How to Use
HDD AUDIO PLAYER
HAP-S1
Preparations and Connections
Preparations
Connections
Notes on use
4-472-853-11(1)
Copyright 2013 Sony Corporation
Page 5

Help Guide
5
How to Use
HDD AUDIO PLAYER
HAP-S1
Connecting the HDD AUDIO PLAYER to a network
Wired LAN
Wi-Fi (wireless LAN)
Notes on use
4-472-853-11(1)
Copyright 2013 Sony Corporation
Page 6

Help Guide
6
How to Use
HDD AUDIO PLAYER
HAP-S1
Playing music files
Playing music
Internet radio
Playback screens
Sound quality settings
Notes on use
4-472-853-11(1)
Copyright 2013 Sony Corporation
Page 7

Help Guide
7
How to Use
HDD AUDIO PLAYER
HAP-S1
Configuring settings (Settings menus)
Network Settings
HDD Settings
Audio Settings
System Settings
Network Update
Notes on use
4-472-853-11(1)
Copyright 2013 Sony Corporation
Page 8

Help Guide
8
How to Use
HDD AUDIO PLAYER
HAP-S1
Parts and controls
Main unit
Remote control
Screen
Notes on use
4-472-853-11(1)
Copyright 2013 Sony Corporation
Page 9
Help Guide
9
How to Use
HDD AUDIO PLAYER
HAP-S1
Announcements
Specifications
Notes
Backups
Trademarks
Inquiries
Notes on use
4-472-853-11(1)
Copyright 2013 Sony Corporation
Page 10
Help Guide
10
Troubleshooting
HDD AUDIO PLAYER
HAP-S1
Actions and screen notifications
Actions
Screen notifications
Notes on use
4-472-853-11(1)
Copyright 2013 Sony Corporation
Page 11

Help Guide
11
Troubleshooting
HDD AUDIO PLAYER
HAP-S1
Dealing with problems
General
Sound/playback
Connections
Hard disk drive
If the problem is not solved
Notes on use
4-472-853-11(1)
Copyright 2013 Sony Corporation
Page 12
Help Guide
12
List of Topics
HDD AUDIO PLAYER
HAP-S1
How to Use
About the HDD AUDIO PLAYER SYSTEM
Features of the HDD AUDIO PLAYER SYSTEM
Features of the HDD AUDIO PLAYER SYSTEM
Basic operations
How to make and enter selections
How to input characters
Supported environment
System requirements for computers connected to the HDD AUDIO PLAYER
Required network environment
Supported applications
HAP Music Transfer
HDD Audio Remote
Preparations and Connections
Preparations
What you need to do before starting to use the HDD AUDIO PLAYER
Prep 1. Connecting speakers
Prep 2. Connecting to a network with a LAN cable (only when using a wired LAN)
Prep 3. Turning on the HDD AUDIO PLAYER
Prep 4. Configuring the initial settings of the HDD AUDIO PLAYER
Prep 5. Configuring the settings of a computer to use HAP Music Transfer
Operating the HDD AUDIO PLAYER from your smartphone or tablet (using HDD Audio Remote)
System requirements for computers connected to the HDD AUDIO PLAYER
Supplied accessories
Preparing the remote control
Standby modes
Connections
Connecting to a computer
Connecting speakers
Connecting an amplifier
Connecting other playback equipment
Page 13

Connecting an external hard disk drive
Connecting headphones
13
Connecting the HDD AUDIO PLAYER to a network
Wired LAN
Required network environment
Connecting the HDD AUDIO PLAYER to a network automatically
Connecting the HDD AUDIO PLAYER to a network manually
Wi-Fi (wireless LAN)
Required network environment
Selecting a Wi -Fi (wireless LAN) connection method
Method 1. Setting up a network connection using the WPS push button configuration method
Method 2. Setting up a network connection by selecting an access point
Method 3. Setting up a network connection by adding a new access point
Method 4. Setting up a network connection using the (WPS) PIN code configuration method
Playing music files
Playing music
Playable audio file formats
Transferring music files from a computer to the HDD AUDIO PLAYER
Registered music file information
Playing music files
Playing tracks using SensMe™ channels
Playing tracks in playlists
Adding tracks to “Favorites”
Playing tracks in “Favorites”
Selecting playback methods
Listening to the sound from externally connected devices
Deleting music files from the HDD AUDIO PLAYER
Internet radio
Listening to the vTuner Internet radio programs
Playback screens
Playback screen
Playback Options screen
Play Queue screen
Sound quality settings
Using the DSEE function
Using the Tone Control Bypass function (Tone Control Bypass )
Using the Tone Control function (Tone Control)
Configuring settings (Settings menus)
Page 14

Network Settings
Connecting to a network (Internet Settings)
14
Viewing the network status (View Network Status)
HDD Settings
Viewing the hard disk drive status (View HDD Status)
Formatting a hard disk drive (Format HDD)
Rescanning a hard disk drive (Rescan HDD)
Audio Settings
Using the DSEE function
Using the Tone Control Bypass function (Tone Control Bypass )
Using the Tone Control function (Tone Control)
Using the Gapless Playback function (Gapless Playback )
Using the Volume Normalization function (Volume Normalization)
System Settings
Selecting the language to be displayed on the screen (Language)
Controlling the brightness (Brightness)
Setting the Network Standby function (Network Standby)
Setting the Auto Standby function (Auto Standby)
Setting the Sleep timer (Sleep)
Receiving notifications about software updates (Software Update Notification)
Displaying the current system information (System Information)
Displaying the software license (Software License )
Resetting to the factory default (Factory Reset )
Network Update
Updating the software ( Network Update )
Parts and controls
Main unit
Names and descriptions of parts of the front panel
Names and descriptions of parts of the rear panel
Remote control
Names and descriptions of parts of the remote control
Screen
Home screen
Playback screen
Playback Options screen
Play Queue screen
Announcements
Specifications
Playable audio file formats
Page 15

Design and specifications
Software updates for the HDD AUDIO PLAYER
15
Notes
Precautions on heat buildup
Precautions on short circuit of the speakers
Notes on the internal hard disk drive
Precautions for use
Backups
Backing up data
Backing up music files in the HDD AUDIO PLAYER to your computer (for Windows)
Backing up music files in the HDD AUDIO PLAYER to your computer (for Mac)
Returning backup music files from your computer to the HDD AUDIO PLAYER (for Windows)
Returning backup music files from your computer to the HDD AUDIO PLAYER (for Mac)
Trademarks
Trademarks
Inquiries
Customer support websites
Notes on use
4-472-853-11(1)
Copyright 2013 Sony Corporation
Page 16
Help Guide
16
List of Topics
HDD AUDIO PLAYER
HAP-S1
Troubleshooting
Actions and screen notifications
Actions
Standby modes
Forced shutdown of the HDD AUDIO PLAYER
Screen notifications
Messages for protecting the HDD AUDIO PLAYER
When a notification about a new version of the software appears on the display
When registering music files to the HDD AUDIO PLAYER
Dealing with problems
General
The power is automatically turned off.
The power is automatically turned on.
The remote control does not work.
Cannot transfer music files via HAP Music Transfer.
Cannot operate the HDD AUDIO PLAYER through HDD Audio Remote.
The HDD AUDIO PLAYER responds slowly to operations.
Sound/playback
No sound is output or sound is interrupted.
There is severe humming or noise.
Cannot play tracks.
Some tracks are not displayed.
Playback stopped.
Connections
Your computer cannot connect to the network after you press the WPS button.
You cannot connect to the network or the network connection is unstable.
The wireless router you want to connect to is not shown in the wireless network list.
It takes a long time to transfer and register music files to the HDD AUDIO PLAYER.
You want to turn off the Wi - Fi (wireless LAN) function but do not know how.
Hard disk drive
The external hard disk drive is not recognized.
Page 17

Some music files are not transferred.
An external hard disk drive that has been used with the HDD AUDIO PLAYER cannot be used with your
17
computer.
You want to delete music files but do not know how.
If the problem is not solved
Resetting to the factory default
Customer support websites
Notes on use
4-472-853-11(1)
Copyright 2013 Sony Corporation
Page 18

Help Guide
18
HDD AUDIO PLAYER
HAP-S1
Notes on use
Before use
To make full use of this content, please read the following notes thoroughly. Please note that they are subject to change
without prior notice.
June 2013
Recommended system environment
The following system environments are recommended for displaying this content. You may not be able to view the
content on other system environments.
For viewing on a computer
Recommended browser
With Microsoft Windows
Microsoft Internet Explorer 8 or later
Mozilla Firefox: latest version
Google Chrome™ : latest version
With Apple Mac OS
Apple Safari Ver. 5 or later
Mozilla Firefox: latest version
Google Chrome™ : latest version
For viewing on a smartphone or tablet
Basic operation has been confirmed on the standard browser for the noted devices running the following operating
systems.
Android 2.3 or later: Xperia series, Walkman running Android
iOS 4 or later: iPhone, iPod touch, iPad
JavaScript
JavaScript is used with this content for viewing convenience. If JavaScript is disabled in your web browser settings,
the content may not operate properly or it may not be displayed correctly.
Style Sheets
Cascading Style Sheets are used in designing this content. Page layout may not be as intended if you view the
content with style sheets disabled or on a web browser that is not compatible with style sheets. However, operation
will not be affected.
Cookies
This content uses cookies. To use services incorporating cookies, you need to set your browser to allow cookies.
Handling of personal information obtained from websites
Page 19

Sony may use cookies, web beacons or similar technologies to make statistical analysis of customers’ usage of this
content while preserving anonymity.
19
Notes on use
4-472-853-11(1)
Copyright 2013 Sony Corporation
Page 20

Help Guide
20
How to Use
HDD AUDIO PLAYER
HAP-S1
Features of the HDD AUDIO PLAYER SYSTEM
Features of the HDD AUDIO PLAYER SYSTEM
Introduces the features of the HDD AUDIO PLAYER SYSTEM.
Notes on use
4-472-853-11(1)
Copyright 2013 Sony Corporation
Page 21

Help Guide
21
How to Use
HDD AUDIO PLAYER
HAP-S1
Basic operations
How to make and enter selections
Explains the basic operations of the HDD AUDIO PLAYER.
How to input characters
Explains how to operate the character input screen.
Notes on use
4-472-853-11(1)
Copyright 2013 Sony Corporation
Page 22

Help Guide
22
How to Use
HDD AUDIO PLAYER
HAP-S1
Supported environment
System requirements for computers connected to the HDD AUDIO PLAYER
Explains the system environment required for computers to use HAP Music Transfer, an application that
transfers audio files from your computer to the HDD AUDIO PLAYER.
Required network environment
Explains the network environment required to connect the HDD AUDIO PLAYER to a network and provides
related notes.
Notes on use
4-472-853-11(1)
Copyright 2013 Sony Corporation
Page 23
Help Guide
23
How to Use
HDD AUDIO PLAYER
HAP-S1
Supported applications
HAP Music Transfer
HAP Music Transfer is a computer application that transfers music files stored on your computer to the HDD
AUDIO PLAYER. Install this application on the computer to which you want to connect the HDD AUDIO PLAYER.
This topic provides information on the download site.
HDD Audio Remote
HDD Audio Remote is an application that makes operating the HDD AUDIO PLAYER even easier by allowing you
to operate it using your smartphone or tablet. This topic provides information on the download site.
Notes on use
4-472-853-11(1)
Copyright 2013 Sony Corporation
Page 24

Help Guide
24
How to Use
HDD AUDIO PLAYER
HAP-S1
Preparations
What you need to do before starting to use the HDD AUDIO PLAYER
Explains what you need to do to listen to music after you purchase the HDD AUDIO PLAYER.
Prep 1. Connecting speakers
Explains how to connect speakers to the SPEAKERS terminals on the rear panel of the HDD AUDIO PLAYER.
Prep 2. Connecting to a network with a LAN cable (only when using a wired LAN)
Explains how to connect the HDD AUDIO PLAYER to the same network as your computer using a wired LAN.
Prep 3. Turning on the HDD AUDIO PLAYER
Explains the procedures for connecting the supplied AC power cord (mains lead) and then turning on the HDD
AUDIO PLAYER after making connections with all other devices.
Prep 4. Configuring the initial settings of the HDD AUDIO PLAYER
Explains the initial settings process. When the HDD AUDIO PLAYER is turned on for the first time, it
automatically enters the initial settings mode.
Prep 5. Configuring the settings of a computer to use HAP Music Transfer
Explains the process to save music files managed on your computer to the hard disk drive of the HDD AUDIO
PLAYER using HAP Music Transfer.
Operating the HDD AUDIO PLAYER from your smartphone or tablet (using HDD Audio Remote)
Install the HDD Audio Remote application to operate the HDD AUDIO PLAYER from your smartphone or tablet.
This topic provides information about the download site of the HDD Audio Remote.
System requirements for computers connected to the HDD AUDIO PLAYER
Explains the system environment required for computers to use HAP Music Transfer, an application that
transfers audio files from your computer to the HDD AUDIO PLAYER.
Supplied accessories
Provides a list of the accessories included with the HDD AUDIO PLAYER.
Page 25

Preparing the remote control
25
Explains how to insert the R03 (size -AAA) batteries.
Standby modes
Explains the two types of standby mode: normal standby mode and Network Standby mode.
Notes on use
4-472-853-11(1)
Copyright 2013 Sony Corporation
Page 26
Help Guide
26
How to Use
HDD AUDIO PLAYER
HAP-S1
Connections
Connecting to a computer
Explains how to connect the HDD AUDIO PLAYER to the same network as your computer through a wired LAN
or Wi -Fi (wireless LAN).
Connecting speakers
Explains how to connect speakers to the SPEAKERS terminals on the rear panel of the HDD AUDIO PLAYER.
Connecting an amplifier
Explains how to connect the HDD AUDIO PLAYER to an amplifier using an audio cord (not supplied).
Connecting other playback equipment
Explains how to connect other audio equipment to the input jacks of the HDD AUDIO PLAYER. You can enjoy
playback from other audio equipment through the speakers or headphones of the HDD AUDIO PLAYER.
Connecting an external hard disk drive
Explains how to connect an external hard disk drive (USB storage) to the EXT port on the rear panel of the
HDD AUDIO PLAYER. The connected external hard disk drive can be used in the same way as the internal hard
disk drive of the HDD AUDIO PLAYER.
Connecting headphones
Explains how to connect headphones to the PHONES jack on the front panel of the HDD AUDIO PLAYER.
Notes on use
4-472-853-11(1)
Copyright 2013 Sony Corporation
Page 27

Help Guide
27
How to Use
HDD AUDIO PLAYER
HAP-S1
Wired LAN
Required network environment
Explains the network environment required to connect the HDD AUDIO PLAYER to a network and provides
related notes.
Connecting the HDD AUDIO PLAYER to a network automatically
Explains how to connect the HDD AUDIO PLAYER to a wired network by obtaining an IP address automatically.
Connecting the HDD AUDIO PLAYER to a network manually
Explains how to connect the HDD AUDIO PLAYER to a wired network by entering setup information (such as
the IP address) manually.
Notes on use
4-472-853-11(1)
Copyright 2013 Sony Corporation
Page 28

Help Guide
28
How to Use
HDD AUDIO PLAYER
HAP-S1
Wi-Fi (wireless LAN)
Required network environment
Explains the network environment required to connect the HDD AUDIO PLAYER to a network and provides
related notes.
Selecting a Wi-Fi (wireless LAN) connection method
Explains how to select a Wi-Fi (wireless LAN) connection method. You can select the most suitable network
connection method for your network environment from 4 network connection methods.
Method 1. Setting up a network connection using the WPS push button configuration method
Explains how to set up a Wi-Fi (wireless LAN) network connection using the WPS push button configuration
method. This method requires a wireless LAN router/access point that supports the WPS push button
configuration method.
Method 2. Setting up a network connection by selecting an access point
Explains how to set up a Wi-Fi (wireless LAN) network connection by searching for an access point.
Method 3. Setting up a network connection by adding a new access point
Explains how to set up a Wi-Fi (wireless LAN) network connection by adding a new access point.
Method 4. Setting up a network connection using the (WPS) PIN code configuration method
Explains how to set up a Wi-Fi (wireless LAN) network connection using the (WPS) PIN code configuration
method. You can set up a connection by entering the (WPS) PIN code of the HDD AUDIO PLAYER into the
wireless LAN router/access point to authenticate the connection between the devices.
Notes on use
4-472-853-11(1)
Copyright 2013 Sony Corporation
Page 29
Help Guide
29
How to Use
HDD AUDIO PLAYER
HAP-S1
Playing music
Playable audio file formats
Explains the audio file formats that can be played on the HDD AUDIO PLAYER.
Transferring music files from a computer to the HDD AUDIO PLAYER
Explains how to transfer music files stored in a computer to the hard disk drive of the HDD AUDIO PLAYER
using the HAP Music Transfer application.
Registered music file information
Explains how the HDD AUDIO PLAYER obtains information of the transferred music files and registers it in the
hard disk drive. This topic also includes notes on obtaining music information.
Playing music files
Explains how to play music files stored in the hard disk drive.
Playing tracks using SensMe™ channels
Explains how to play tracks using SensMe™ channels. The SensMe™ channels function analyzes and
automatically categorizes music tracks transferred to the HDD AUDIO PLAYER according to their mood and
tempo.
Playing tracks in playlists
Explains how to play tracks in playlists. The HDD AUDIO PLAYER automatically creates playlists such as a list of
newly transferred tracks or a list of frequently played tracks. You can also play playlists you have created using
HDD Audio Remote.
Adding tracks to “Favorites”
Explains how to add tracks to “Favorites.”
Playing tracks in “Favorites”
Explains how to play tracks in “Favorites.”
Selecting playback methods
Explains how to play tracks with various playback methods, such as shuffle play and repeat play, using the
Page 30

Playback Options menu.
30
Listening to the sound from externally connected devices
Explains how to listen to the sound played on an external device that is connected to the input jack of the
HDD AUDIO PLAYER.
Deleting music files from the HDD AUDIO PLAYER
Explains how to delete music files from the HDD AUDIO PLAYER.
Notes on use
4-472-853-11(1)
Copyright 2013 Sony Corporation
Page 31

Help Guide
31
How to Use
HDD AUDIO PLAYER
HAP-S1
Internet radio
Listening to the vTuner Internet radio programs
Explains how to listen to the vTuner Internet radio programs.
Notes on use
4-472-853-11(1)
Copyright 2013 Sony Corporation
Page 32

Help Guide
32
How to Use
HDD AUDIO PLAYER
HAP-S1
Playback screens
Playback screen
Describes the items displayed on the playback screen.
Playback Options screen
Describes the items displayed on the Playback Options screen.
Play Queue screen
Describes the items displayed on the Play Queue screen.
Notes on use
4-472-853-11(1)
Copyright 2013 Sony Corporation
Page 33

Help Guide
33
How to Use
HDD AUDIO PLAYER
HAP-S1
Sound quality settings
Using the DSEE function
Explains how to set the DSEE (Digital Sound Enhancement Engine) function. This function offers natural and
expansive sound by restoring both high-frequency signals and fine fade-out sound that is likely to be lost by
compression in compressed audio sources, or restoring fine fade-out sound that is likely to be lost by
quantization in PCM audio sources with lossless compression.
Using the Tone Control Bypass function (Tone Control Bypass)
Explains how to set the Tone Control Bypass function. This function allows you to listen to the original sound
without using the Tone Control function.
Using the Tone Control function (Tone Control)
Explains how to set the Tone Control function. This function allows you to adjust bass and treble to your
desired tone.
Notes on use
4-472-853-11(1)
Copyright 2013 Sony Corporation
Page 34

Help Guide
34
How to Use
HDD AUDIO PLAYER
HAP-S1
Network Settings
Connecting to a network (Internet Settings)
Explains how to connect the HDD AUDIO PLAYER to the network you are using through a wired LAN or Wi - Fi
(wireless LAN).
Viewing the network status (View Network Status)
Explains how to view the current network status of the HDD AUDIO PLAYER.
Notes on use
4-472-853-11(1)
Copyright 2013 Sony Corporation
Page 35

Help Guide
35
How to Use
HDD AUDIO PLAYER
HAP-S1
HDD Settings
Viewing the hard disk drive status (View HDD Status)
Explains how to confirm the total capacity, used space and free space of the internal and external hard disk
drives.
Formatting a hard disk drive (Format HDD)
Explains how to format an external hard disk drive.
Rescanning a hard disk drive (Rescan HDD)
Explains how to forcibly match the content of a hard disk drive and the content displayed on the screen of the
HDD AUDIO PLAYER by rescanning the hard disk drive.
Notes on use
4-472-853-11(1)
Copyright 2013 Sony Corporation
Page 36

Help Guide
36
How to Use
HDD AUDIO PLAYER
HAP-S1
Audio Settings
Using the DSEE function
Explains how to set the DSEE (Digital Sound Enhancement Engine) function. This function offers natural and
expansive sound by restoring both high-frequency signals and fine fade-out sound that is likely to be lost by
compression in compressed audio sources, or restoring fine fade-out sound that is likely to be lost by
quantization in PCM audio sources with lossless compression.
Using the Tone Control Bypass function (Tone Control Bypass)
Explains how to set the Tone Control Bypass function. This function allows you to listen to the original sound
without using the Tone Control function.
Using the Tone Control function (Tone Control)
Explains how to set the Tone Control function. This function allows you to adjust bass and treble to your
desired tone.
Using the Gapless Playback function (Gapless Playback)
Explains how to configure the Gapless Playback function. This function allows you to play tracks without the
silent part between tracks. This is useful for playing albums of concerts or other live music.
Using the Volume Normalization function (Volume Normalization)
Explains how to configure the Volume Normalization function. This function allows you to analyze the recording
level of tracks or albums when transferring and registering music files to the HDD AUDIO PLAYER and
automatically adjust the volume level to minimize the difference in volume between each track or album during
playback. The volume level is kept constant even if you play multiple different tracks or albums consecutively.
Notes on use
4-472-853-11(1)
Copyright 2013 Sony Corporation
Page 37

Help Guide
37
How to Use
HDD AUDIO PLAYER
HAP-S1
System Settings
Selecting the language to be displayed on the screen (Language)
Explains how to configure the language to be displayed on the screen.
Controlling the brightness (Brightness)
Explains how to change the brightness of the screen. You can adjust the brightness of the screen to suit the
brightness of your surroundings by selecting from five levels.
Setting the Network Standby function (Network Standby)
Explains how to configure the setting to start the Network Standby function (allowing you to operate the HDD
AUDIO PLAYER via the network).
Setting the Auto Standby function (Auto Standby)
Explains how to configure the Auto Standby setting. If you do not operate the HDD AUDIO PLAYER for a
specific period of time, the unit is automatically turned off.
Setting the Sleep timer (Sleep)
Explains how to set the Sleep timer.
Receiving notifications about software updates (Software Update Notification)
Explains how to enable the software update notification function.
Displaying the current system information (System Information)
Explains how to display the current system information of the HDD AUDIO PLAYER.
Displaying the software license (Software License)
Explains how to display the software license of the HDD AUDIO PLAYER.
Resetting to the factory default (Factory Reset)
Explains how to reset the HDD AUDIO PLAYER to the factory default settings.
Page 38

Notes on use
38
4-472-853-11(1)
Copyright 2013 Sony Corporation
Page 39

Help Guide
39
How to Use
HDD AUDIO PLAYER
HAP-S1
Network Update
Updating the software (Network Update)
Explains how to update the software of the HDD AUDIO PLAYER.
Notes on use
4-472-853-11(1)
Copyright 2013 Sony Corporation
Page 40

Help Guide
40
How to Use
HDD AUDIO PLAYER
HAP-S1
Main unit
Names and descriptions of parts of the front panel
Provides names and descriptions of each part on the front panel of the HDD AUDIO PLAYER.
Names and descriptions of parts of the rear panel
Provides names and descriptions of each part on the rear panel of the HDD AUDIO PLAYER.
Notes on use
4-472-853-11(1)
Copyright 2013 Sony Corporation
Page 41

Help Guide
41
How to Use
HDD AUDIO PLAYER
HAP-S1
Remote control
Names and descriptions of parts of the remote control
Provides names and descriptions of each part on the remote control supplied with the HDD AUDIO PLAYER.
Notes on use
4-472-853-11(1)
Copyright 2013 Sony Corporation
Page 42

Help Guide
42
How to Use
HDD AUDIO PLAYER
HAP-S1
Screen
Home screen
Describes the items displayed on the Home screen.
Playback screen
Describes the items displayed on the playback screen.
Playback Options screen
Describes the items displayed on the Playback Options screen.
Play Queue screen
Describes the items displayed on the Play Queue screen.
Notes on use
4-472-853-11(1)
Copyright 2013 Sony Corporation
Page 43

Help Guide
43
How to Use
HDD AUDIO PLAYER
HAP-S1
Specifications
Playable audio file formats
Explains the audio file formats that can be played on the HDD AUDIO PLAYER.
Design and specifications
Provides specifications of the HDD AUDIO PLAYER.
Software updates for the HDD AUDIO PLAYER
Explains what to do when a software update notification appears on the screen. The HDD AUDIO PLAYER
functions can be updated.
Notes on use
4-472-853-11(1)
Copyright 2013 Sony Corporation
Page 44

Help Guide
44
How to Use
HDD AUDIO PLAYER
HAP-S1
Notes
Precautions on heat buildup
Provides information on rises in the temperature of the HDD AUDIO PLAYER.
Precautions on short circuit of the speakers
Provides the solution if a short circuit of the speakers occurs.
Notes on the internal hard disk drive
Provides the notes on the internal hard disk drive.
Precautions for use
Provides precautions for general use.
Notes on use
4-472-853-11(1)
Copyright 2013 Sony Corporation
Page 45

Help Guide
45
How to Use
HDD AUDIO PLAYER
HAP-S1
Backups
Backing up data
Provides information on having a backup.
Backing up music files in the HDD AUDIO PLAYER to your computer (for Windows)
Explains how to back up music files stored in the HDD AUDIO PLAYER to your computer.
Backing up music files in the HDD AUDIO PLAYER to your computer (for Mac)
Explains how to back up music files stored in the HDD AUDIO PLAYER to your computer.
Returning backup music files from your computer to the HDD AUDIO PLAYER (for Windows)
Explains how to return music files that have been copied to your computer as a backup to the HDD AUDIO
PLAYER.
Returning backup music files from your computer to the HDD AUDIO PLAYER (for Mac)
Explains how to return music files that have been copied to your computer as a backup to the HDD AUDIO
PLAYER.
Notes on use
4-472-853-11(1)
Copyright 2013 Sony Corporation
Page 46

Help Guide
46
How to Use
HDD AUDIO PLAYER
HAP-S1
Trademarks
Trademarks
Provides a list of trademarks/registered trademarks.
Copyright 2013 Sony Corporation
Notes on use
4-472-853-11(1)
Page 47

Help Guide
47
How to Use
HDD AUDIO PLAYER
HAP-S1
Inquiries
Customer support websites
Provides the URLs of our customer support websites.
Copyright 2013 Sony Corporation
Notes on use
4-472-853-11(1)
Page 48

Help Guide
48
Troubleshooting
HDD AUDIO PLAYER
HAP-S1
Actions
Standby modes
Explains the two types of standby mode: normal standby mode and Network Standby mode.
Forced shutdown of the HDD AUDIO PLAYER
In unusual situations, such as if the HDD AUDIO PLAYER does not respond to operations, you can forcibly turn
the power off.
Notes on use
4-472-853-11(1)
Copyright 2013 Sony Corporation
Page 49

Help Guide
49
Troubleshooting
HDD AUDIO PLAYER
HAP-S1
Screen notifications
Messages for protecting the HDD AUDIO PLAYER
When a notification about a new version of the software appears on the display
When registering music files to the HDD AUDIO PLAYER
Notes on use
4-472-853-11(1)
Copyright 2013 Sony Corporation
Page 50

Help Guide
50
Troubleshooting
HDD AUDIO PLAYER
HAP-S1
General
The power is automatically turned off.
The power is automatically turned on.
The remote control does not work.
Cannot transfer music files via HAP Music Transfer.
Cannot operate the HDD AUDIO PLAYER through HDD Audio Remote.
The HDD AUDIO PLAYER responds slowly to operations.
Notes on use
4-472-853-11(1)
Copyright 2013 Sony Corporation
Page 51

Help Guide
51
Troubleshooting
HDD AUDIO PLAYER
HAP-S1
Sound/playback
No sound is output or sound is interrupted.
There is severe humming or noise.
Cannot play tracks.
Some tracks are not displayed.
Playback stopped.
Notes on use
4-472-853-11(1)
Copyright 2013 Sony Corporation
Page 52

Help Guide
52
Troubleshooting
HDD AUDIO PLAYER
HAP-S1
Connections
Your computer cannot connect to the network after you press the WPS button.
You cannot connect to the network or the network connection is unstable.
The wireless router you want to connect to is not shown in the wireless network list.
It takes a long time to transfer and register music files to the HDD AUDIO PLAYER.
You want to turn off the Wi-Fi (wireless LAN) function but do not know how.
Notes on use
4-472-853-11(1)
Copyright 2013 Sony Corporation
Page 53

Help Guide
53
Troubleshooting
HDD AUDIO PLAYER
HAP-S1
Hard disk drive
The external hard disk drive is not recognized.
Some music files are not transferred.
An external hard disk drive that has been used with the HDD AUDIO PLAYER cannot be used with
your computer.
You want to delete music files but do not know how.
Notes on use
4-472-853-11(1)
Copyright 2013 Sony Corporation
Page 54

Help Guide
54
Troubleshooting
HDD AUDIO PLAYER
HAP-S1
If the problem is not solved
Resetting to the factory default
Customer support websites
Notes on use
4-472-853-11(1)
Copyright 2013 Sony Corporation
Page 55

Help Guide
55
How to Use
HDD AUDIO PLAYER
HAP-S1
Features of the HDD AUDIO PLAYER SYSTEM
Thank you for purchasing this HDD AUDIO PLAYER SYSTEM.
The HDD AUDIO PLAYER SYSTEM is a music player that allows you to transfer and store High-Resolution
Audio files, such as DSD, and various other formats of audio files, such as MP3 and FLAC, from your
computer and enjoy playback of high quality audio sources.
You can install a specially designed application on your smartphone or tablet and operate the HDD AUDIO
PLAYER SYSTEM remotely.
The HDD AUDIO PLAYER SYSTEM has the following features:
Transferring various audio files to the HDD AUDIO PLAYER SYSTEM
You can transfer various types of audio files to the hard disk drive of the HDD AUDIO PLAYER SYSTEM
from a computer connected to the same network (*).
Storing audio files in the HDD AUDIO PLAYER SYSTEM allows you to enjoy high quality sound playback
that is not affected by the network environment.
*
You can use HAP Music Transfer, an application designed for HDD AUDIO PLAYER SYSTEM, to automatically
transfer audio files from your computer to the HDD AUDIO PLAYER SYSTEM.
High quality audio playback
The HDD AUDIO PLAYER SYSTEM can play High-Resolution Audio files such as 192 kHz/24 bit, 96 kHz/24
bit, or DSD (Direct Stream Digital) audio files.
Furthermore, the HDD AUDIO PLAYER SYSTEM gives a more natural and expansive sound to compressed
audio files, such as MP3s, by restoring high-frequency sound and almost imperceptible sound during
fade-out, which are usually lost by compression.
Page 56

Easy operation with your smartphone or tablet
56
The HDD Audio Remote application is available to for even easier operation of the HDD AUDIO PLAYER
SYSTEM.
You can install the application on your smartphone or tablet.
Notes on use
4-472-853-11(1)
Copyright 2013 Sony Corporation
Page 57

Help Guide
57
How to Use
HDD AUDIO PLAYER
HAP-S1
How to make and enter selections
The basic operations of the HDD AUDIO PLAYER are as follows:
1. Turn the jog dial left or right to select an item.
2. Push the jog dial in to enter the selection.
Hint
To display the Home screen, press the HOME button.
To go back to the previous screen, press the BACK button.
Related Topic
How to input characters
Notes on use
4-472-853-11(1)
Copyright 2013 Sony Corporation
Page 58

Help Guide
58
How to Use
HDD AUDIO PLAYER
HAP-S1
How to input characters
When the character input screen appears during operations, enter characters as follows:
A: Character input area
B: Keyboard area
C: OK
1. Turn the jog dial left or right to select a character in the keyboard area, and then push the jog dial in
to enter the selection.
2. Repeat the operations in step 1 to enter a text string.
3. When the character input is done, turn the jog dial left or right to select [OK], and then push the jog
dial in to enter the text string.
Hint
To change the type of characters, use the character type selection button on the bottom left of the
keyboard area.
The character type changes in the order of [ABC] (capitals), [abc] (lower case) and [@./] (symbols).
To move the cursor left and right in the character input area, use / .
To delete a character, move the cursor to the right of the character you want to delete, and then use
[BS] on the keyboard area.
Related Topic
How to make and enter selections
Page 59

Notes on use
59
4-472-853-11(1)
Copyright 2013 Sony Corporation
Page 60

Help Guide
60
How to Use
HDD AUDIO PLAYER
HAP-S1
System requirements for computers connected to the HDD AUDIO PLAYER
HAP Music Transfer, an application that copies audio files from your computer to the HDD AUDIO PLAYER,
can be used in the following system environment:
OS
Windows 8
Windows 8 Pro
Windows 7 Starter Service Pack 1 or later
Windows 7 Home Basic Service Pack 1 or later
Windows 7 Home Premium Service Pack 1 or later
Windows 7 Professional Service Pack 1 or later
Windows 7 Ultimate Service Pack 1 or later
Windows Vista Home Basic Service Pack 2 or later
Windows Vista Home Premium Service Pack 2 or later
Windows Vista Business Service Pack 2 or later
Windows Vista Ultimate Service Pack 2 or later
Windows XP Home Edition Service Pack 3 or later (*1)
Windows XP Professional Service Pack 3 or later (*1)
Mac OS X 10.6, 10.7, 10.8 (*2)
*1
Only the 32 - bit version of Windows XP is supported.
*2
Intel CPU models, 64 bit (10.6, 10.7, 10.8) and 32 bit (10.6, 10.7) are supported.
Screen resolution
1,024 x 768 pixels or higher
Note
One of the above operating systems should be installed by default. Upgraded operating systems and
multi- boot environments are not supported.
We do not guarantee operation for all computers even if they meet the above system requirements.
Furthermore, the following systems are not supported:
Personally constructed computers or operating systems
Upgraded operating systems
Multi-boot environments
Multi-monitor environments
Page 61

Notes on use
61
4-472-853-11(1)
Copyright 2013 Sony Corporation
Page 62

Help Guide
62
How to Use
HDD AUDIO PLAYER
HAP-S1
Required network environment
You can transfer audio files from your computer to the HDD AUDIO PLAYER by connecting both to the
same network, either by a wired or wireless connection.
Confirm the supported environment described below.
Note
You need to connect the HDD AUDIO PLAYER to a network that can access the Internet if you want to
listen to Internet radio programs.
Wired LAN (using a LAN cable)
LAN (10/100/1000) port:
1000BASE-T/100BASE-TX/10BASE-T
(The network speed may differ depending on the network environment.)
LAN cable:
We recommend using a LAN cable that is Cat5 or higher. A normal-type cable is also recommended, as
some flat-type LAN cables are easily affected by noise.
If the receiver is used in an environment with power supply noise from electronic devices or in a noisy
network environment, use a shielded-type LAN cable.
Wi-Fi (using a wireless LAN network)
Compatible standards:
IEEE 802.11 b/g/n
Security mode:
None
WEP
WPA/WPA2-PSK (AES)
WPA/WPA2-PSK (TKIP)
Radio frequency:
2.4 GHz
Note
Wi- Fi devices work on the 2.4 GHz band, which is used by a variety of devices. Wi-Fi devices use
technology to minimize radio interference from other devices that use the same band. However, radio
interference may still cause slower data transfer rates, reduce the communication range, or cause
Page 63

communication failure.
The data transfer rate and communication range may vary depending on the following conditions:
63
Distance between devices
Presence of obstacles between devices
Device configuration
Signal conditions
Surrounding environment (wall material, etc.)
Software in use
Communications may be cut off depending on signal conditions.
The HDD AUDIO PLAYER does not support 5 GHz band Wi-Fi.
The data transfer rate for IEEE 802.11g and IEEE 802.11n (2.4 GHz) devices may be affected by
interference when used with IEEE 802.11b products. Also, products using IEEE 802.11g and IEEE
802.11n automatically lower the transfer rate to maintain compatibility with IEEE 802.11b products.
The normal transfer rate may be regained by changing the channel settings of your access point.
When the data transfer rate is not as fast as expected, changing the wireless channel on the access
point may increase the rate.
If a communication failure occurs while transferring music files, updating the firmware of your access
point may improve the communication status.
Notes on use
4-472-853-11(1)
Copyright 2013 Sony Corporation
Page 64

Help Guide
64
How to Use
HDD AUDIO PLAYER
HAP-S1
HAP Music Transfer
What you can do using HAP Music Transfer
You can transfer audio files managed and stored on your computer to the HDD AUDIO PLAYER using the
dedicated HAP Music Transfer application.
Install the application to your (Windows or Mac) computer.
Downloading HAP Music Transfer
Download HAP Music Transfer from the following website:
Models for the USA and Canada:
http://esupport.sony.com/swu/8812
Models for Europe:
http://support.sony-europe.com/
Related Topic
System requirements for computers connected to the HDD AUDIO PLAYER
Notes on use
4-472-853-11(1)
Copyright 2013 Sony Corporation
Page 65

Help Guide
65
How to Use
HDD AUDIO PLAYER
HAP-S1
HDD Audio Remote
What you can do using HDD Audio Remote
You can operate the HDD AUDIO PLAYER using your smartphone or tablet by installing HDD Audio
Remote, a dedicated application for smartphones and tablets.
HDD Audio Remote allows you to browse and play audio files stored in the HDD AUDIO PLAYER from
your smartphone or tablet.
You can also add tracks to playlists, edit information such as the genre, artist, album and track title of
music files, and more.
Install the application to your smartphone or tablet.
Downloading HDD Audio Remote
Download HDD Audio Remote from the following websites:
For Android devices: Google Play
For iPhone/iPod touch/iPad: App Store
Notes on use
4-472-853-11(1)
Copyright 2013 Sony Corporation
Page 66

Help Guide
66
How to Use
HDD AUDIO PLAYER
HAP-S1
What you need to do before starting to use the HDD AUDIO PLAYER
After you purchase the HDD AUDIO PLAYER, you need to connect the external equipment and configure
settings before you can listen to music.
1. Prep 1. Connecting speakers.
2. Prep 2. Connecting to a network with a LAN cable (only when using a wired LAN) .
Make a wired connection between the HDD AUDIO PLAYER and a computer with a LAN cable
(supplied).
If you want to establish a wireless connection between the HDD AUDIO PLAYER and computer, you
can set it in step 4.
3. Prep 3. Turning on the HDD AUDIO PLAYER.
When all necessary connections are completed, AC power cord (mains lead) to the wall outlet
(mains) and then turn the power on.
4. Prep 4. Configuring the initial settings of the HDD AUDIO PLAYER.
When you use the HDD AUDIO PLAYER for the first time, configure the language setting and network
setting first.
5. Prep 5. Configuring the settings of a computer to use HAP Music Transfer.
Install HAP Music Transfer on your computer.
HAP Music Transfer is a dedicated application to transfer music files stored on your computer to the
HDD AUDIO PLAYER.
6. Launch HAP Music Transfer to transfer music files on your computer to the HDD AUDIO PLAYER.
Refer to the HAP Music Transfer Help for details on operations.
7. Play music files transferred to the HDD AUDIO PLAYER.
Choose your desired method of playback from each topic under “Playing music files” in this Help
Guide.
Note
The HDD AUDIO PLAYER is equipped with a built-in antenna for wireless LAN. Make sure to keep a
distance between the HDD AUDIO PLAYER and speakers or other devices to maintain good wireless
communication.
Hint
Page 67

We recommend using a wired LAN when you transfer a large number of music files from your
67
computer to the HDD AUDIO PLAYER, such as when you transfer music files for the first time, to save
transfer time.
It may take a while before the file registration is completed, as transferring, analyzing and registering
music files takes time when a large number of music files are transferred to the HDD AUDIO PLAYER.
Related Topic
HAP Music Transfer
It takes a long time to transfer and register music files to the HDD AUDIO PLAYER.
Notes on use
4-472-853-11(1)
Copyright 2013 Sony Corporation
Page 68

Help Guide
68
How to Use
HDD AUDIO PLAYER
HAP-S1
Prep 1. Connecting speakers
First, you need to connect speakers to the HDD AUDIO PLAYER.
Note
Make sure that the AC power cord (mains lead) of the HDD AUDIO PLAYER is unplugged when
connecting any other cord.
Connect speakers to the SPEAKERS terminals on the rear panel of the HDD AUDIO PLAYER as shown in
the illustration below.
: SPEAKERS terminals of the HDD AUDIO PLAYER
: Speaker cords (not supplied)
: Speaker (R)
: Speaker (L)
Note
The HDD AUDIO PLAYER is equipped with a built-in antenna for wireless LAN. Make sure to keep a
distance between the HDD AUDIO PLAYER and speakers or other devices to maintain good wireless
communication.
Notes on use
4-472-853-11(1)
Copyright 2013 Sony Corporation
Page 69

69
Page 70

Help Guide
70
How to Use
HDD AUDIO PLAYER
HAP-S1
Prep 2. Connecting to a network with a LAN cable (only when using a wired LAN)
You need to connect the HDD AUDIO PLAYER to the same network as your computer. We recommend
using a wired LAN connection when you transfer music files stored on your computer to the HDD AUDIO
PLAYER for the first time.
Connect the LAN cable (only one cable is supplied) between the LAN (10/100/1000) port on the rear
panel of the HDD AUDIO PLAYER and a router.
: Internet
: Modem
: Router
: LAN cables (only one cable is supplied)
: LAN (10/100/1000) port of the HDD AUDIO PLAYER
: Computer
Notes on use
4-472-853-11(1)
Copyright 2013 Sony Corporation
Page 71

Help Guide
71
How to Use
HDD AUDIO PLAYER
HAP-S1
Prep 3. Turning on the HDD AUDIO PLAYER
When you have made all connections with the other devices, connect the supplied AC power cord (mains
lead), then turn on the HDD AUDIO PLAYER.
1. Firmly connect the supplied AC power cord (mains lead) to the AC IN jack on the rear panel of the
HDD AUDIO PLAYER, then connect the plug to a wall outlet (mains).
2. Press to turn on the HDD AUDIO PLAYER.
The power lamp lights up in green.
Notes on use
4-472-853-11(1)
Copyright 2013 Sony Corporation
Page 72

Help Guide
72
How to Use
HDD AUDIO PLAYER
HAP-S1
Prep 4. Configuring the initial settings of the HDD AUDIO PLAYER
When you turn on the HDD AUDIO PLAYER for the first time, it automatically enters the initial settings
mode. You can configure the initial settings of the HDD AUDIO PLAYER easily by following the instructions
on the screen.
Refer to each related topic for details on each item of the initial settings.
1. Press to turn on the HDD AUDIO PLAYER.
2. Configure the initial settings by following the instructions on the screen.
When a screen appears to indicate that the initial settings are completed, select [Close].
Related Topic
Connecting the HDD AUDIO PLAYER to a network automatically
Connecting the HDD AUDIO PLAYER to a network manually
Method 1. Setting up a network connection using the WPS push button configuration method
Method 2. Setting up a network connection by selecting an access point
Method 3. Setting up a network connection by adding a new access point
Method 4. Setting up a network connection using the (WPS) PIN code configuration method
Selecting the language to be displayed on the screen (Language)
Setting the Network Standby function (Network Standby)
Notes on use
4-472-853-11(1)
Copyright 2013 Sony Corporation
Page 73

Help Guide
73
How to Use
HDD AUDIO PLAYER
HAP-S1
Prep 5. Configuring the settings of a computer to use HAP Music Transfer
You can transfer music files managed on your computer to the HDD AUDIO PLAYER using HAP Music
Transfer. The music files are saved in the hard disk drive of the HDD AUDIO PLAYER, so you can enjoy
playing tracks without worrying about the status of the network connection, even if those tracks are large
files with a high sound quality.
For details on the operations of HAP Music Transfer, refer to the HAP Music Transfer Help.
1. Download the HAP Music Transfer application from the following website:
Models for the USA and Canada:
http://esupport.sony.com/swu/8812
Models for Europe:
http://support.sony-europe.com/
2. Install HAP Music Transfer.
Install the application by following the instructions on the screen.
3. Launch HAP Music Transfer to transfer music files to the HDD AUDIO PLAYER.
Related Topic
HAP Music Transfer
Notes on use
4-472-853-11(1)
Copyright 2013 Sony Corporation
Page 74

Help Guide
74
How to Use
HDD AUDIO PLAYER
HAP-S1
Operating the HDD AUDIO PLAYER from your smartphone or tablet (using HDD Audio Remote)
What you can do using HDD Audio Remote
You can operate the HDD AUDIO PLAYER using your smartphone or tablet by installing HDD Audio
Remote, a dedicated application for smartphones and tablets.
HDD Audio Remote allows you to browse and play audio files stored in the HDD AUDIO PLAYER from
your smartphone or tablet.
You can also add tracks to playlists, edit information such as the genre, artist, album and track title of
music files, and more.
Install the application to your smartphone or tablet.
Downloading HDD Audio Remote
Download HDD Audio Remote from the following websites:
For Android devices: Google Play
For iPhone/iPod touch/iPad: App Store
Notes on use
4-472-853-11(1)
Copyright 2013 Sony Corporation
Page 75

Help Guide
75
How to Use
HDD AUDIO PLAYER
HAP-S1
Supplied accessories
Main unit (1)
Remote control (1)
R03 (size-AAA) batteries (2)
AC power cord (mains lead) (1)
LAN cable (1)
Notes on use
4-472-853-11(1)
Copyright 2013 Sony Corporation
Page 76

Help Guide
76
How to Use
HDD AUDIO PLAYER
HAP-S1
Preparing the remote control
Open the lid of the remote control and insert two R03 (size-AAA) batteries.
Place the batteries so that the + and – ends are in the correct position.
Note
Do not leave the remote control in an extremely hot or humid place.
Do not use a new battery and an old one together.
Do not mix different kinds of batteries.
If you do not intend to use the remote control for an extended period of time, remove the batteries to
avoid possible damage from battery leakage and corrosion.
Notes on use
4-472-853-11(1)
Copyright 2013 Sony Corporation
Page 77

Help Guide
77
How to Use
HDD AUDIO PLAYER
HAP-S1
Standby modes
The HDD AUDIO PLAYER has two types of standby mode: normal standby mode and Network Standby
mode.
Standby mode
Press the button to switch to standby mode so that you can save power.
(The HDD AUDIO PLAYER enters this standby mode if the Network Standby mode is disabled. The HDD
AUDIO PLAYER cannot be operated through the network.)
Network Standby mode
In this mode, the network function is activated even when the HDD AUDIO PLAYER is in standby mode.
This function is useful in the following cases:
When music files are transferred to the HDD AUDIO PLAYER using the HAP Music Transfer application.
When you want to launch the HDD AUDIO PLAYER from the HDD Audio Remote application.
Select [Settings] - [System Settings] - [Network Standby] from the menu to set the Network Standby
mode.
Note
The HDD AUDIO PLAYER does not enter standby mode when music files are being transferred from
your computer or when the HDD AUDIO PLAYER is analyzing transferred music files, even if you press
the button to switch to standby mode. The HDD AUDIO PLAYER enters standby after all target
music files are transferred and analyzed.
Hint
The HDD AUDIO PLAYER enters the Network Standby mode after 20 minutes of no operations and no
playback if [Auto Standby ] is set to [On] (factory default setting). The HDD AUDIO PLAYER does not
enter the standby mode or the Network Standby mode when an external input is selected.
Related Topic
HAP Music Transfer
HDD Audio Remote
Setting the Network Standby function (Network Standby)
Setting the Auto Standby function (Auto Standby)
Page 78

Notes on use
78
4-472-853-11(1)
Copyright 2013 Sony Corporation
Page 79

Help Guide
79
How to Use
HDD AUDIO PLAYER
HAP-S1
Connecting to a computer
You need to connect the HDD AUDIO PLAYER to your computer through a wired LAN or Wi-Fi (wireless
LAN).
Hint
A wired LAN connection enables you to transfer music files more quickly.
Using a wired LAN is especially recommended when transferring large volumes of data, such as when
transferring music files stored on your computer to the HDD AUDIO PLAYER for the first time.
The Wi-Fi (wireless LAN) function of the HDD AUDIO PLAYER turns off when you select the wired LAN
setting.
Using a wired LAN connection
Connect the LAN cable (only one cable is supplied) between the LAN (10/100/1000) port on the rear
panel of the HDD AUDIO PLAYER and a router.
: Internet
: Modem
: Router
: LAN cables (only one cable is supplied)
: LAN (10/100/1000) port of the HDD AUDIO PLAYER
: Computer
Using a Wi-Fi (wireless LAN) connection
Page 80

: Internet
80
: Modem
: Router
: HDD AUDIO PLAYER
: Computer
Related Topic
Connecting the HDD AUDIO PLAYER to a network automatically
Connecting the HDD AUDIO PLAYER to a network manually
Method 1. Setting up a network connection using the WPS push button configuration method
Method 2. Setting up a network connection by selecting an access point
Method 3. Setting up a network connection by adding a new access point
Method 4. Setting up a network connection using the (WPS) PIN code configuration method
Notes on use
4-472-853-11(1)
Copyright 2013 Sony Corporation
Page 81

Help Guide
81
How to Use
HDD AUDIO PLAYER
HAP-S1
Connecting speakers
You need to connect speakers to the HDD AUDIO PLAYER.
Note
Make sure that the AC power cord (mains lead) of the HDD AUDIO PLAYER is unplugged when
connecting any other cord.
Connect speakers to the SPEAKERS terminals on the rear panel of the HDD AUDIO PLAYER as shown in
the illustration below.
: SPEAKERS terminals of the HDD AUDIO PLAYER
: Speaker cords (not supplied)
: Speaker (R)
: Speaker (L)
Note
The HDD AUDIO PLAYER is equipped with a built-in antenna for wireless LAN. Make sure to keep a
distance between the HDD AUDIO PLAYER and speakers or other devices to maintain good wireless
communication.
Notes on use
4-472-853-11(1)
Copyright 2013 Sony Corporation
Page 82

82
Page 83

Help Guide
83
How to Use
HDD AUDIO PLAYER
HAP-S1
Connecting an amplifier
The HDD AUDIO PLAYER has an internal amplifier, but you can connect an external amplifier as well.
Note
Make sure that the AC power cord (mains lead) of the HDD AUDIO PLAYER is unplugged when
connecting any other cord.
Connect an amplifier to the D/A DIRECT·LINE OUT jacks on the rear panel of the HDD AUDIO PLAYER
using an audio cord (not supplied) as shown in the illustration below.
: D/A DIRECT·LINE OUT jacks of the HDD AUDIO PLAYER
: Audio cord (not supplied)
: Analog input jack of an amplifier
Note
The HDD AUDIO PLAYER is equipped with a built-in antenna for wireless LAN. Make sure to keep a
distance between the HDD AUDIO PLAYER and speakers or other devices to maintain good wireless
communication.
Hint
The D/A DIRECT·LINE OUT jacks directly output analog signals through the D/A converter without using
any internal connectors or signal switchers. This eliminates as many elements that reduce the sound
quality as possible.
You can use the HDD AUDIO PLAYER as a D/A converter by connecting it to an external amplifier.
You can connect a digital audio device to the OPTICAL IN or COAXIAL IN jack of the HDD AUDIO
PLAYER and output the signal from these jacks through the D/A DIRECT ·LINE OUT jacks. (The D/A
DIRECT·LINE OUT jacks do not output analog signals input through the LINE IN jacks.)
Page 84

Notes on use
84
4-472-853-11(1)
Copyright 2013 Sony Corporation
Page 85

Help Guide
85
How to Use
HDD AUDIO PLAYER
HAP-S1
Connecting other playback equipment
You can connect other playback equipment such as the Super Audio CD player to the HDD AUDIO PLAYER
and enjoy playback from that equipment through the speakers or headphones of the HDD AUDIO PLAYER.
Note
Make sure that the AC power cord (mains lead) of the HDD AUDIO PLAYER is unplugged when
connecting any other cord.
Only the LPCM 2ch audio format can be played when the signal is input through the OPTICAL IN or
COAXIAL IN jack.
Playing other formats may produce noise or even damage the speakers if played at a high volume.
Connect another audio player to the OPTICAL IN jack, COAXIAL IN jack or LINE IN jacks on the rear
panel of the HDD AUDIO PLAYER.
When connecting through the OPTICAL IN jack
: OPTICAL IN jack of the HDD AUDIO PLAYER
Page 86

: Optical digital cable (not supplied)
: Optical digital output jack of other equipment
86
When connecting through the COAXIAL IN jack
: COAXIAL IN jack of the HDD AUDIO PLAYER
: Coaxial digital cable (not supplied)
: Coaxial digital output jack of other equipment
When connecting through LINE IN jacks
: LINE IN jacks of the HDD AUDIO PLAYER
: Audio cord (not supplied)
: Analog output jacks of other equipment
Related Topic
Listening to the sound from externally connected devices
Notes on use
4-472-853-11(1)
Copyright 2013 Sony Corporation
Page 87

Help Guide
87
How to Use
HDD AUDIO PLAYER
HAP-S1
Connecting an external hard disk drive
You can connect an external hard disk drive (USB storage) to the EXT port on the rear panel of the HDD
AUDIO PLAYER. The music files transferred from your computer to the external hard disk drive can be
played in the same way as music files stored in the internal hard disk drive of the HDD AUDIO PLAYER.
Note
Compatible with USB 2.0.
Be sure to connect or disconnect the external hard disk drive (USB storage) only when the HDD AUDIO
PLAYER is in the standby mode.
The HDD AUDIO PLAYER registers content stored in the external hard disk drive to the database in the
HDD AUDIO PLAYER. If there is insufficient database capacity, you cannot transfer any more music file
or scan the content of a newly connected external hard disk drive. In this case, delete unnecessary
music files and perform the Rescan HDD function. If this does not solve the problem, perform the
Factory Reset function, connect an external hard disk drive, and then rescan the external hard disk
drive.
Only the external hard disk drive that is currently connected can be used at the same time as the
internal hard disk drive.
The HDD AUDIO PLAYER is compatible with the ext4 file system. External hard disk drives with other
file systems need to be formatted by selecting the formatting function from the menu of the HDD
AUDIO PLAYER. Please note that the content of the external hard disk drive is deleted when formatting.
If an external hard disk drive is connected during playback, the playback stops.
USB hubs cannot be used.
Connect an external hard disk drive to the EXT port on the rear panel of the HDD AUDIO PLAYER as
shown below.
: EXT port of the HDD AUDIO PLAYER
: External hard disk drive (USB storage)
Page 88

Related Topic
88
Standby modes
Formatting a hard disk drive (Format HDD)
Rescanning a hard disk drive (Rescan HDD)
Notes on use
4-472-853-11(1)
Copyright 2013 Sony Corporation
Page 89

Help Guide
89
How to Use
HDD AUDIO PLAYER
HAP-S1
Connecting headphones
You can connect headphones to the PHONES jack on the front panel of the HDD AUDIO PLAYER.
Note
When headphones are connected, no sound is output from the speakers.
Connect headphones to the PHONES jack on the front panel of the HDD AUDIO PLAYER as shown below.
: PHONES jack of the HDD AUDIO PLAYER
: Headphones
Notes on use
4-472-853-11(1)
Copyright 2013 Sony Corporation
Page 90

Help Guide
90
How to Use
HDD AUDIO PLAYER
HAP-S1
Connecting the HDD AUDIO PLAYER to a network automatically
This topic explains how to connect the HDD AUDIO PLAYER to a wired network by obtaining an IP
address automatically.
As the HDD AUDIO PLAYER can obtain an IP address automatically, you do not have to make complicated
connection configurations. You can connect the HDD AUDIO PLAYER to a network simply by connecting
the LAN cable (supplied).
1. Select [Settings] - [Network Settings] - [Internet Settings] from the Home screen.
2. Select [Wired Setup].
A selection screen for the connection method appears.
3. Select [Auto].
A network setting configuration screen appears.
4. Select [Next].
A confirmation message for the LAN cable connection appears.
5. Select [Save & Connect].
The HDD AUDIO PLAYER starts connecting to the network.
6. When the network connection is completed, confirm the message about the wired LAN and Internet
access on the screen and then select [OK].
Notes on use
4-472-853-11(1)
Copyright 2013 Sony Corporation
Page 91

Help Guide
91
How to Use
HDD AUDIO PLAYER
HAP-S1
Connecting the HDD AUDIO PLAYER to a network manually
You can enter the IP address and other network information manually to connect the HDD AUDIO PLAYER
to a wired network. Make sure that you have information such as the IP address, subnet mask, default
gateway and primary/secondary DNS in advance.
1. Select [Settings] - [Network Settings] - [Internet Settings] from the Home screen.
2. Select [Wired Setup].
3. Select [Custom] on the IP address settings confirmation screen.
4. Select [Specify IP Address].
An input screen for information such as IP address, subnet mask and default gateway appears.
5. When the IP address is surrounded by a white box, push the jog dial in.
An input segment appears for the IP address.
6. Enter the IP address.
Turn the jog dial to select a value and push it in to enter the selection. When you push the jog dial
in, the input segment moves to the next number. When you push the jog dial in at the furthest right
segment, the IP address is confirmed and the whole IP address is surrounded by the white box
again.
7. If you also want to enter a subnet mask, default gateway or primary/secondary DNS, select the item
you want to enter.
Repeat the same operations as step 6.
When the input is completed, a screen showing the network settings information appears.
8. Select [Next].
A confirmation message for the LAN cable connection appears.
9. Select [Save & Connect].
The HDD AUDIO PLAYER starts connecting to the network.
10. When the network connection is completed, confirm the message about the wired LAN and Internet
access on the screen and then select [OK].
Page 92

Notes on use
92
4-472-853-11(1)
Copyright 2013 Sony Corporation
Page 93

Help Guide
93
How to Use
HDD AUDIO PLAYER
HAP-S1
Selecting a Wi-Fi (wireless LAN) connection method
You can select the most suitable network connection method for your network environment from 4
network connection methods. Confirm your network environment in advance.
If your wireless LAN router/access point supports the WPS (Wi-Fi Protected
Setup) push button configuration method
If your wireless LAN router/access point has a designated WPS button, you can connect to a Wi- Fi
(wireless LAN) network by a single press of a button. Refer to the following link for details.
Method 1. Setting up a network connection using the WPS push button configuration
method
If setting up a network connection by searching your access point
You can search for available access points that are already configured and select a network name (SSID)
from the search results.
Confirm the network name (SSID) and security key (WEP key or WPA key) of your wireless LAN
router/access point in advance, then refer to the following link for details.
Method 2. Setting up a network connection by selecting an access point
If connecting to a new access point
You can add and connect a new access point by entering a network name (SSID) and security key (WEP
key or WPA key) manually without using the WPS method.
Confirm the network name (SSID) and security key (WEP key or WPA key) of your wireless LAN
router/access point in advance, then refer to the following link for details.
Method 3. Setting up a network connection by adding a new access point
If your wireless LAN router/access point supports the (WPS) PIN code
configuration method
If an access point supports the (WPS) PIN (Personal Identification Number) code connection, you can set
up a wireless connection by entering the (WPS) PIN code of the HDD AUDIO PLAYER into the wireless
LAN router/access point.
Confirm the operations of your wireless LAN router/access point, then refer to the following link for
details.
Method 4. Setting up a network connection using the (WPS) PIN code configuration
method
Page 94

Notes on use
94
4-472-853-11(1)
Copyright 2013 Sony Corporation
Page 95

Help Guide
95
How to Use
HDD AUDIO PLAYER
HAP-S1
Method 1. Setting up a network connection using the WPS push button configuration method
If your wireless LAN router/access point has a WPS button, you can easily connect the HDD AUDIO
PLAYER to a Wi-Fi (wireless LAN) network.
If your wireless LAN router has an AOSS button or other easy setup button, it may support WPS. Check
the operation manual of your wireless LAN router/access point for details.
1. Select [Settings] - [Network Settings] - [Internet Settings].
2. Select [Wireless Setup].
3. Select [Wi-Fi Protected Setup (WPS)].
4. Select [Start] and then press the WPS button on your wireless LAN router/access point.
The HDD AUDIO PLAYER starts searching for the access point.
5. When the connection is made, confirm the registration completion message that appears on the
screen and then select [Next].
6. When the network setup is completed, select [OK] on the screen.
Note
If you cannot connect to a network correctly, the following reasons are possible. Try the connection
again or use another connection method.
You pressed the WPS button more than two minutes after selecting [Start] in step 4.
The WPS button may have to be pressed and held for about two minutes (depending on the router).
You cannot cancel the connection after the HDD AUDIO PLAYER has started connecting to the network.
Do not turn the power off while the HDD AUDIO PLAYER is connecting to the network.
Hint
For details on the name and position of the WPS button on your wireless LAN router/access point, refer
to the operating manual of the router/access point.
Notes on use
4-472-853-11(1)
Copyright 2013 Sony Corporation
Page 96

96
Page 97

Help Guide
97
How to Use
HDD AUDIO PLAYER
HAP-S1
Method 2. Setting up a network connection by selecting an access point
You can set up a Wi-Fi (wireless LAN) network connection by searching for an access point.
Note
This connection method requires information such as the network name (SSID) (*1) of the wireless
LAN router/access point and the security key (password) (*2) for the network.
*1
SSID (Service Set Identifier) is a name that identifies a particular access point.
*2
This information should be available from a label on your wireless LAN router/access point, from the operating
manual, from the person who set up your wireless network, or from the information provided by your Internet
service provider.
1. Select [Settings] - [Network Settings] - [Internet Settings].
2. Select [Wireless Setup].
3. Select [Select access point].
The HDD AUDIO PLAYER starts searching for available access points.
4. When the list of available network names (SSID) is displayed, select the access point you want to
connect to.
An input space for a security key (WEP/WPA) appears on the screen.
If you have selected an access point with no security key, proceed to step 8.
5. When the input space for the security key (WEP/WPA) is surrounded by a white box, push the jog
dial in.
An editing display and keyboard appear.
6. Enter the security key (WEP/WPA).
For details on how to use the keyboard, see “How to input characters.”
7. When you have finished entering the security key, select [Next].
8. When the setup is completed, select [OK].
Note
You can enter 5, 13 or 26 alphanumeric characters and/or symbols for a WEP key or 8 to 63
alphanumeric characters and/or symbols for a WPA key.
Hint
Page 98

If you cannot find the network name (SSID) you want to connect to in step 4, add a new access point.
98
Related Topic
How to input characters
Method 3. Setting up a network connection by adding a new access point
Notes on use
4-472-853-11(1)
Copyright 2013 Sony Corporation
Page 99

Help Guide
99
How to Use
HDD AUDIO PLAYER
HAP-S1
Method 3. Setting up a network connection by adding a new access point
You can set up a wireless LAN network connection by adding a new access point.
If you cannot find the desired network name (SSID) in the list of available networks, try this connection
method.
Note
This connection method requires information such as the network name (SSID) (*1) of the wireless
LAN router/access point and the security key (password) (*2) for the network.
*1
SSID (Service Set Identifier) is a name that identifies a particular access point.
*2
This information should be available from a label on your wireless LAN router/access point, from the operating
manual, from the person who set up your wireless network, or from the information provided by your Internet
service provider.
1. Select [Settings] - [Network Settings] - [Internet Settings].
2. Select [Wireless Setup].
3. Select [Select access point].
The HDD AUDIO PLAYER starts searching for available access points.
4. When the list of available network names (SSID) is displayed, select [Add a new access point].
5. Select [Manual registration].
An input space for the network name (SSID) appears on the screen.
6. When the input space for the network name (SSID) is surrounded by a white box, push the jog dial
in.
An editing display and keyboard appear.
7. Enter the network name (SSID).
For details on how to use the keyboard, see “How to input characters.”
8. When the network name (SSID) is entered, select [Next].
9. Select the security mode of your wireless LAN router/access point from [None], [WEP], [WPA/WPA2PSK] or [WPA2-PSK] on the security mode selection screen.
10. If you want to set up a security key, enter the security key (WEP/WPA) and then select [Next].
Perform the same operations as step 7 to enter the security key (WEP/WPA).
Page 100

11. Select either [ Auto] or [Custom] on the selection screen for the IP address setup method.
12. Follow the instructions that appear in the display to set up the connection.
100
Note
You can enter a maximum of 32 alphanumeric characters and/or symbols for a network name (SSID).
If the security mode of your wireless LAN router/access point is not included in the options in step 9,
change the security configuration of the router.
You can enter 5, 13 or 26 alphanumeric characters and/or symbols for a WEP key or 8 to 63
alphanumeric characters and/or symbols for a WPA key.
Related Topic
How to input characters
Method 2. Setting up a network connection by selecting an access point
Notes on use
4-472-853-11(1)
Copyright 2013 Sony Corporation
 Loading...