

Page 1
A specialized application for HDD AUDIO PLAYER HAP Music Transfer
About the HAP Music Transfer
Features of HAP Music Transfer [1]
Compatible HDD AUDIO PLAYER models [2]
Trademarks [3]
Preparations
System requirements [4]
Installing HAP Music Transfer [5]
Checking the connection status of your computer and the HDD AUDIO PLAYER
[6]
Transferring music files
Step 1. Starting HAP Music Transfer [7]
Step 2. Transferring music files stored on the computer to the HDD AUDIO
PLAYER [8]
Descriptions and functions of the Connection window [9]
Descriptions and functions of the Contents Settings window [10]
Descriptions and functions of the Transfer Settings window [11]
Deleting music files
Deleting music files from the HDD AUDIO PLAYER [12]
Using menus (Windows)
Using the system menu (Windows only) [13]
Using the context menu for the HAP Music Transfer task tray icon (Windows only)
Page 2
[14]
[1] About the HAP Music Transfer
Using menus (Mac)
Using menus from the menu bar (Mac only) [15]
Using the context menu for the HAP Music Transfer icon on the Dock (Mac only)
[16]
Backups
Backing up data [17]
Backing up music files in the HDD AUDIO PLAYER to your computer (for
Windows) [18]
Backing up music files in the HDD AUDIO PLAYER to your computer (for Mac)
[19]
Returning backup music files from your computer to the HDD AUDIO PLAYER (for
Windows) [20]
Returning backup music files from your computer to the HDD AUDIO PLAYER (for
Mac) [21]
Error messages
Error messages [22]
Dealing with problems
Cannot install HAP Music Transfer. [23]
HAP Music Transfer does not start. [24]
HAP Music Transfer window is not displayed correctly. [25]
The desired HDD AUDIO PLAYER is not displayed in the Connection window. [26]
You want to delete music files but do not know how. [27]
Music files cannot be transferred correctly. [28]
Page 3

Features of HAP Music Transfer
[3] About the HAP Music Transfer
HAP Music Transfer is an application that transfers music files stored in your
computer to the HDD AUDIO PLAYER.
The features of this application are as follows:
Selecting multiple folders and batch transfer
You can select multiple folders in which music files are saved on your computer, and
then transfer them in a batch to the HDD AUDIO PLAYER.
You can select up to 100 folders.
Supports the transfer of various types of file formats
In addition to widely used file formats (such as MP3), HAP Music Transfer allows you
to transfer non-compressed and High-Resolution Audio files such as 192 kHz/24 bit
and DSD (Direct Stream Digital) file formats.
Automatic transfer setting
You can set the automatic transfer function to [ON] to start transferring automatically.
If you set the automatic transfer function, it automatically starts transferring music
files to the HDD AUDIO PLAYER when new music files are added to the designated
folder on your computer.
You can also start transfer manually any time you choose.
[2] About the HAP Music Transfer
Compatible HDD AUDIO PLAYER models
HAP Music Transfer is compatible with the following HDD AUDIO PLAYER models.
Compatible models
HAP-Z1ES, HAP-S1
(as of Sept., 2013)
Page 4

Trademarks
Microsoft, Windows, Windows Vista and Windows Media are either trademarks or
registered trademarks of Microsoft Corporation in the United States and/or other
countries.
Mac and Mac OS are trademarks of Apple Inc., registered in the U.S. and other
countries.
All other trademarks and registered trademarks are trademarks or registered
trademarks of their respective holders. In this Help, TM and ® marks are not
specified.
[4] Preparations
System requirements
HAP Music Transfer can be used in the following system environment.
OS
Windows 10 Home
Windows 10 Pro
Windows 8.1
Windows 8
Windows 8 Pro
Windows 7 Starter Service Pack 1 or later
Windows 7 Home Basic Service Pack 1 or later
Windows 7 Home Premium Service Pack 1 or later
Windows 7 Professional Service Pack 1 or later
Windows 7 Ultimate Service Pack 1 or later
Windows Vista Home Basic Service Pack 2 or later
Windows Vista Home Premium Service Pack 2 or later
Windows Vista Business Service Pack 2 or later
Windows Vista Ultimate Service Pack 2 or later
Mac OS X 10.6, 10.7, 10.8, 10.9, 10.10, 10.11, 10.12 (*)
*
Intel CPU models, 64 bit (10.6, 10.7, 10.8, 10.9, 10.10, 10.11, 10.12) and 32 bit (10.6, 10.7) are
supported.
Page 5

Screen resolution
1,024 x 768 pixels or higher
Note
One of the above operating systems should be installed by default. Upgraded
operating systems and multi-boot environments are not supported.
We do not guarantee operation for all computers even if they meet the above
system requirements. Furthermore, the following systems are not supported:
Personally constructed computers or operating systems
Upgraded operating systems
Multi-boot environments
Multi-monitor environments
[5] Preparations
Installing HAP Music Transfer
First, you need to install HAP Music Transfer on a computer on which music files are
stored.
1. Download “HAP Music Transfer” from the following Sony service site.
When using HAP-Z1ES:
For the USA and Canada: http://esupport.sony.com/swu/8811
For Europe: www.sony.eu/support
For Asia Pacific: http://www.sony-asia.com/support
For China: https://service.sony.com.cn
When using HAP-S1:
For the USA and Canada: http://esupport.sony.com/swu/8812
For Europe: www.sony.eu/support
For Asia Pacific: http://www.sony-asia.com/support
For China: https://service.sony.com.cn
For details on how to install the application, refer to one of the websites listed
above.
Hint
Page 6
When you install HAP Music Transfer, the HAP Music Transfer icon appears on
the desktop and the start menu for Windows.
In this case, check the IP address again.
To uninstall the application from Windows, use “Programs and Features” (for
Windows Vista, Windows 7, or Windows 8) in the Control Panel.
[6] Preparations
Checking the connection status of your computer and the
HDD AUDIO PLAYER
Confirm whether your computer and the HDD AUDIO PLAYER are connected to the
same network as follows.
1. Start HAP Music Transfer and check that the name of the HDD AUDIO PLAYER
is shown on the top left of the display.
The icon of the currently connected HDD AUDIO PLAYER appears. The name
of the HDD AUDIO PLAYER appears above the icon and the IP address
appears below the icon.
Hint
If the HDD AUDIO PLAYER is not displayed in the Connection window, enter the
IP address of the HDD AUDIO PLAYER, and then click the [Select] button. To
check the IP address of the HDD AUDIO PLAYER, select [Settings] - [Network
Settings] - [View Network Status] on the Home screen.
Turning off your router may change the IP address of the HDD AUDIO PLAYER.
Page 7

[7] Transferring music files
Step 1. Starting HAP Music Transfer
1. Start HAP Music Transfer with (Windows) or (Mac) (the HAP Music
Transfer icon) on your computer desktop.
HAP Music Transfer starts.
When you start the HAP Music Transfer for the first time, the wizard starts (the
Connection window appears first).
When you subsequently start HAP Music Transfer, the Connection window
appears.
Note
If the computer is not connected to the HDD AUDIO PLAYER, such as when you
start HAP Music Transfer for the first time, you cannot select the Contents Settings
window or the Transfer Settings window.
Hint
You can quit HAP Music Transfer using the following operations.
Windows: Select [Menu] - [Exit] from the menu bar, or select [Exit] the context menu from
the task tray icon.
Mac: Select [HAP Music Transfer] - [Quit HAP Music Transfer] from the menu bar, or
select [Quit] in the context menu from the Dock.
If you turn off your computer while HAP Music Transfer is open, it automatically
starts the next time you turn on the computer.
[8] Transferring music files
Step 2. Transferring music files stored on the computer to
the HDD AUDIO PLAYER
When you first start HAP Music Transfer, a setup wizard starts. Follow the steps
below to transfer music files.
Page 8

When you start HAP Music Transfer subsequently, the steps below will differ since
the wizard does not appear. Set up the Connection window, Contents Settings
window and Transfer Settings window manually to transfer the file(s).
1. Start HAP Music Transfer.
The setup wizard starts and the Connection window appears.
2. Select the HDD AUDIO PLAYER you want to connect to, and then select [Next]
(Windows) or [Continue] (Mac).
The Contents Settings window appears.
3. Select [Add] to select the folder in which music files are stored, and then select
[OK] (Windows) or [Add folders] (Mac).
File formats that are supported by the connected HDD AUDIO PLAYER are
listed at the bottom of the Contents Settings window.
4. Check the check boxes of file formats you want to transfer, and then select
[Next] (Windows) or [Continue] (Mac).
The Transfer Settings window appears.
5. Select [Start] beside [Manual Transfer].
A progress bar appears and the file transfer starts.
When the file transfer is completed, select [Finish Wizard]. The window changes
back to the Connection window.
Music file management on the HDD AUDIO PLAYER
The HDD AUDIO PLAYER registers music information obtained from music files
when you transfer them to the HDD AUDIO PLAYER.
The HDD AUDIO PLAYER utilizes music information about the album name, album
artist name, album art image, track name, track artist name, track number and track
genre from each music file.
The method of embedding music information differs depending on the music file
management software or tag editing software.
Music information is classified on the list screen of the HDD AUDIO PLAYER as
follows.
Genres: Displays the track genre in [Genres].
Artists: Displays the track artist name in [Artists].
Albums: Displays information composed of the album name and album artist name
in [Albums].
Page 9

Tracks: Displays the track name in [Tracks].
Note
Some music file management software only manages the music information in the
database on your computer and does not embed any music information to the
music files. In other cases, some music file management software embeds part of
the music information to the music files.
The method of embedding music information differs depending on the music file
format in some music file management software.
Some music file management software uses a different method from the HDD
AUDIO PLAYER to construct an album from multiple tracks.
Hint
You can transfer music files automatically by setting [Auto Transfer] to [ON] in the
Transfer Settings window.
When transferring music files to the HDD AUDIO PLAYER for the first time, it is
recommended that you connect using a wired LAN connection, as doing so allows
a large number of files to be transferred at higher speed.
You can select whether to exit the wizard and start transferring or to exit the
wizard without transferring.
[9] Transferring music files
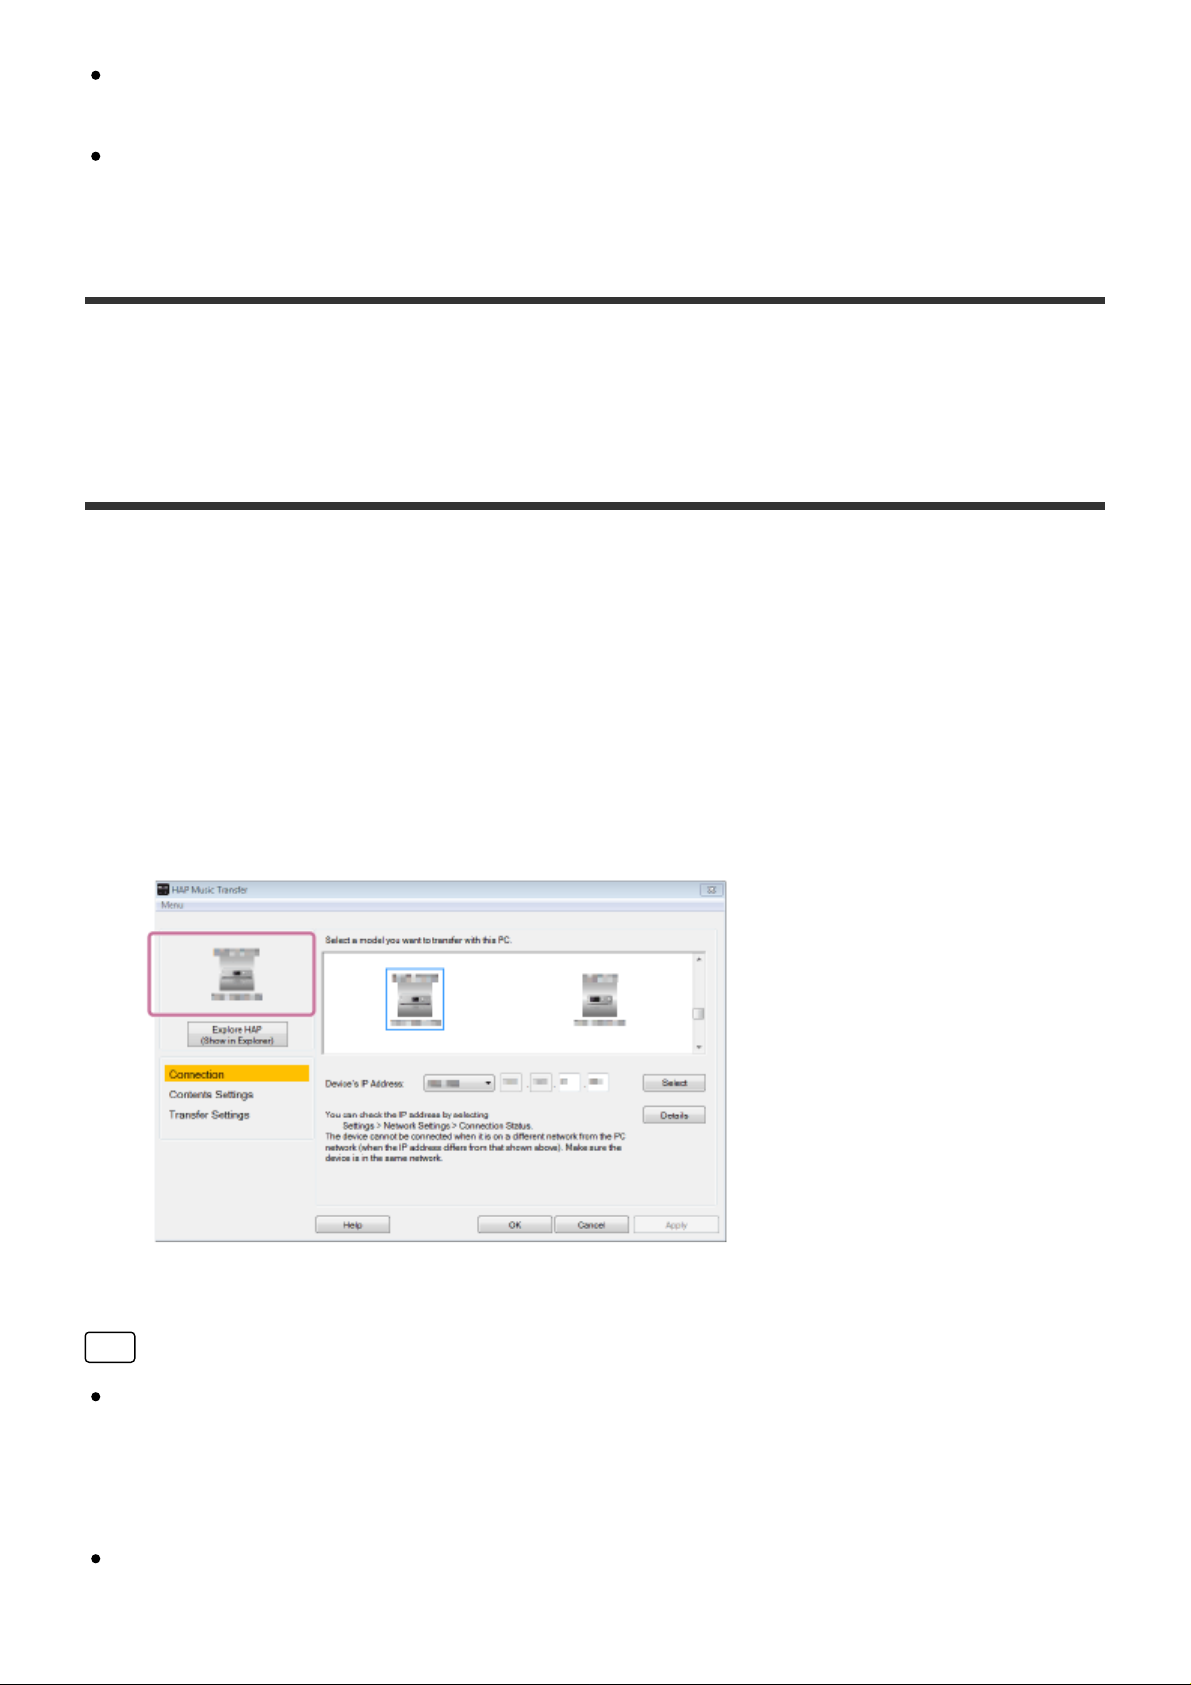
Descriptions and functions of the Connection window
Select the HDD AUDIO PLAYER that you want to connect to in the Connection
window.
Page 10
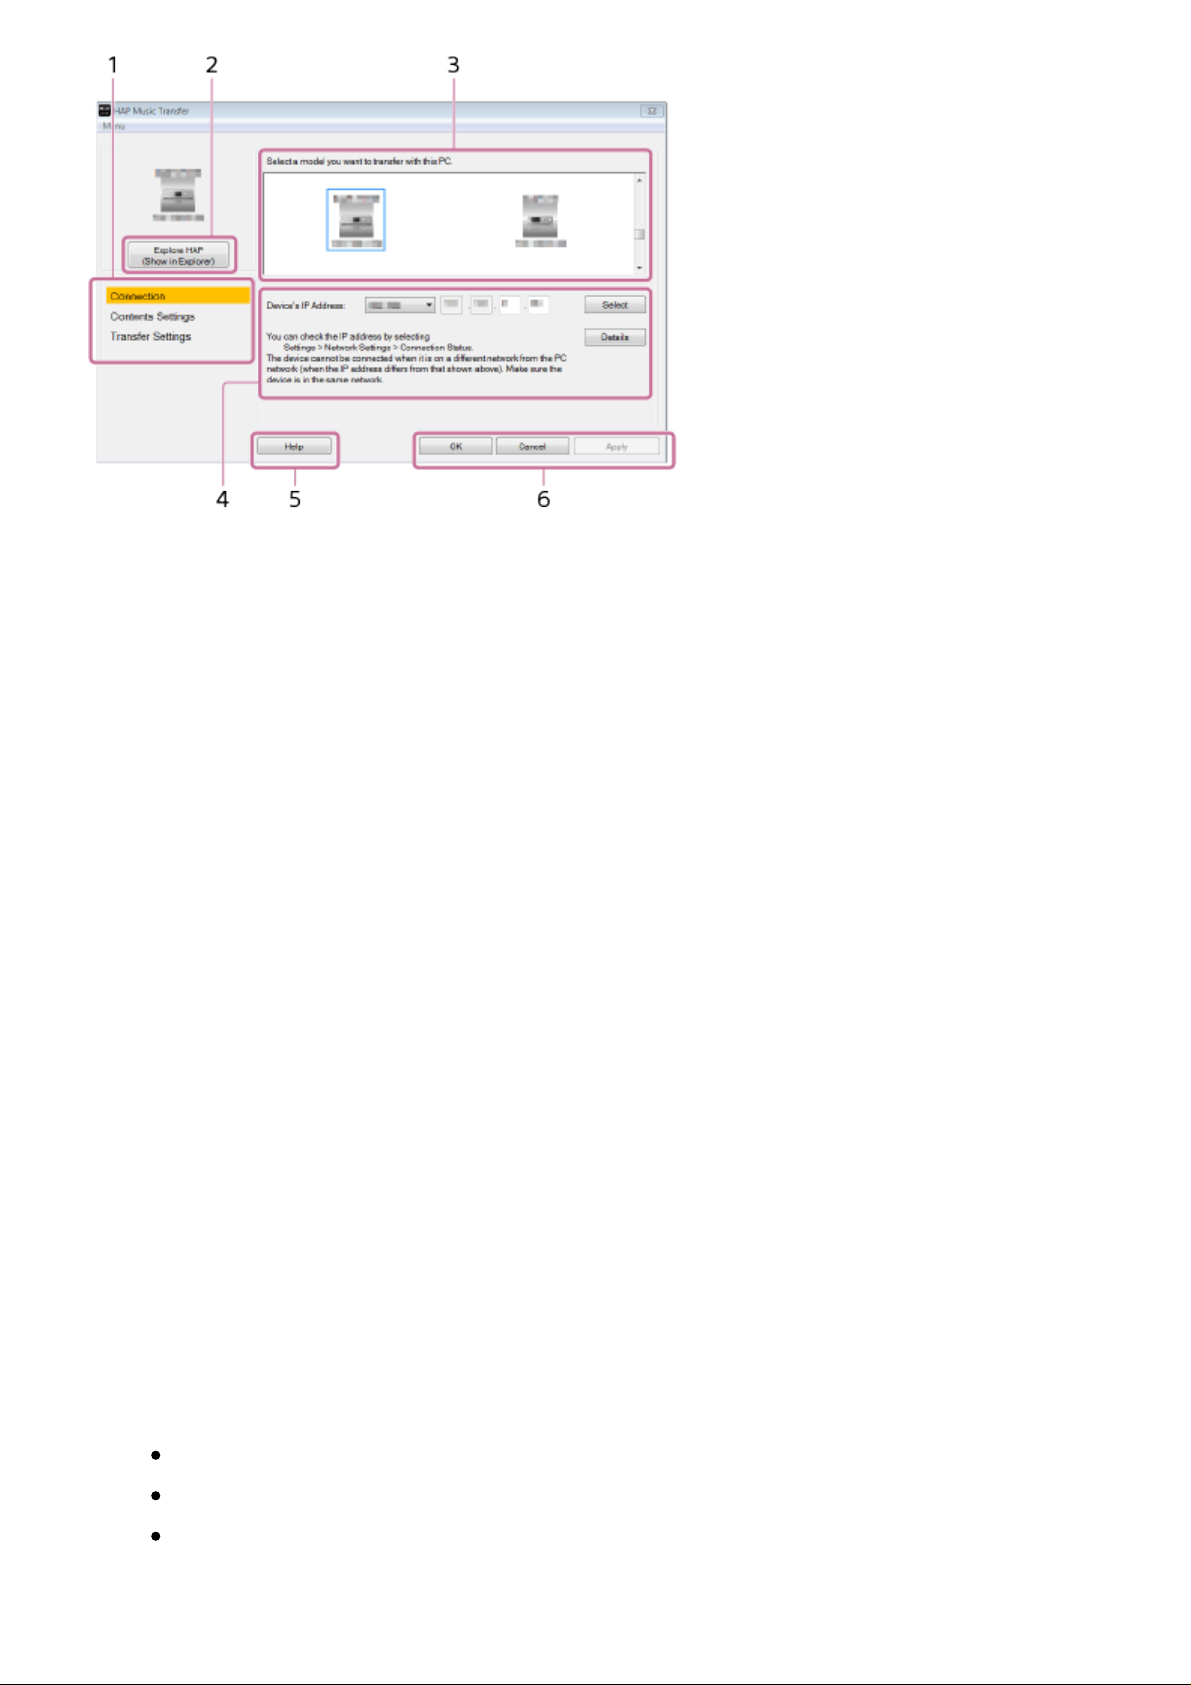
1. Menu window selection area
Select which window to display.
Menu items are highlighted according to the selected window.
2. Explore HAP
The Explorer window (for Windows) or the Finder (for Mac) opens and displays
the content stored in the hard disk drive of the HDD AUDIO PLAYER.
3. HDD AUDIO PLAYER selection area
The HDD AUDIO PLAYER models that are connected to the same network as
the computer appear in this area.
Select the HDD AUDIO PLAYER you want to connect to.
You can check the icons of the HDD AUDIO PLAYER models and their names
and IP addresses.
4. IP address verification area
You can check and directly enter the IP address of the HDD AUDIO PLAYER.
Directions on how to check the IP address of your HDD AUDIO PLAYER and
notes are shown in this area.
5. Help
Opens the web browser and displays the website which links to the HAP Music
Transfer Help. Select the HAP Music Transfer Help.
6. Operation buttons
Windows:
[OK]: Enters the settings and closes the window.
[Cancel]: Cancels the settings made on the screen and closes the window.
[Apply]: Enters the settings. The window remains open.
Mac:
Page 11
[Apply]: Enters the settings. The window remains open.
[Close]: Enters the settings and closes the window.
[Quit]: Enters the settings and quits HAP Music Transfer.
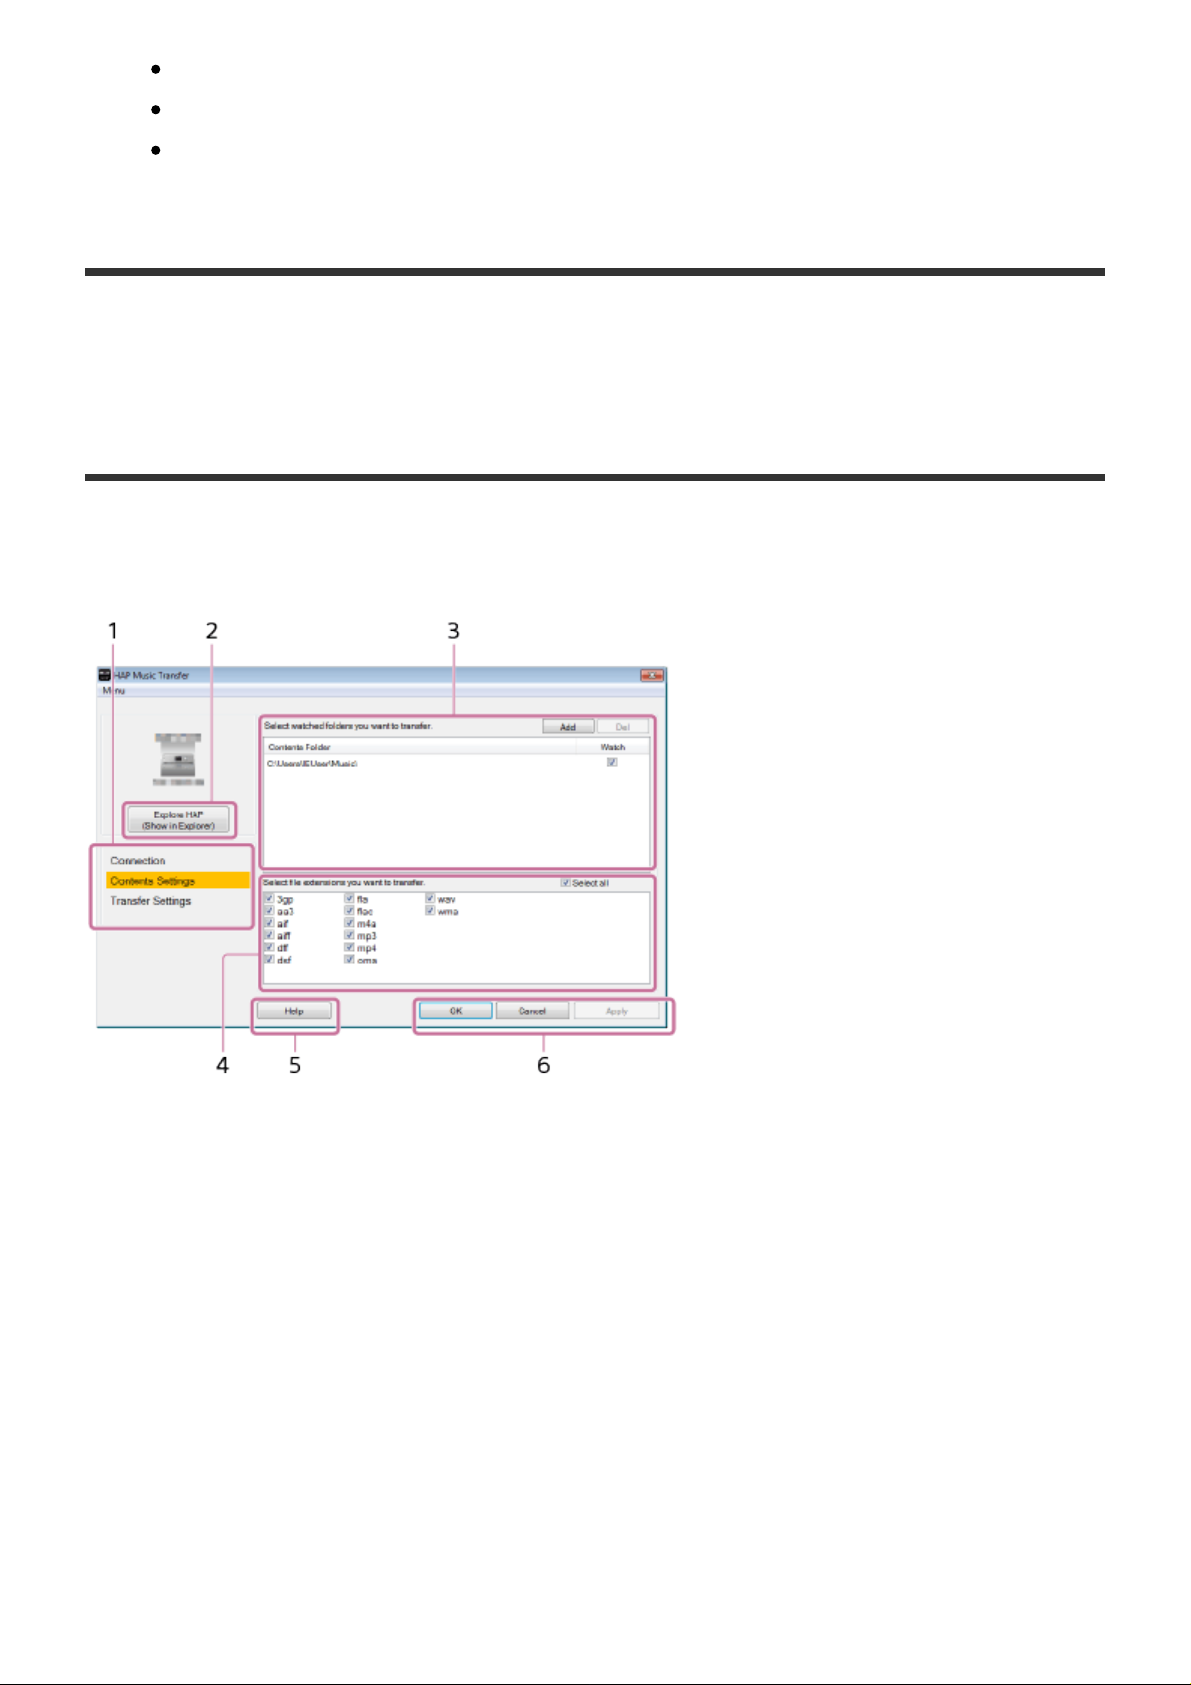
[10] Transferring music files
Descriptions and functions of the Contents Settings
window
You can select the folder in which music files are stored in your computer and the file
formats of the music files to be transferred in the Contents Settings window.
1. Menu window selection area
Select which window to display.
Menu items are highlighted according to the selected window.
2. Explore HAP
The Explorer window (for Windows) or the Finder (for Mac) opens and displays
the content stored in the hard disk drive of the HDD AUDIO PLAYER.
3. Folder selection area
Check the check boxes of folders on your computer in which music files that you
want to transfer are stored.
Select [Add] to add target folders in your computer.
Select [Del] to delete a folder from the screen so that it is removed from the
Page 12

transfer targets.
Check the [Watch] check boxes to set the folders as transfer target folders.
4. File format selection area
Check the check boxes of file format extensions that you want to transfer.
Unless you have reason not to, check the [Select all] check box and transfer
files of all file formats.
For details on the compatible file formats, refer to the HDD AUDIO PLAYER
Help Guide.
5. Help
Opens the web browser and displays the website which links to the HAP Music
Transfer Help. Select the HAP Music Transfer Help.
6. Operation buttons
Windows:
[OK]: Enters the settings and closes the window.
[Cancel]: Cancels the settings made on the screen and closes the window.
[Apply]: Enters the settings. The window remains open.
Mac:
[Apply]: Enters the settings. The window remains open.
[Close]: Enters the settings and closes the window.
[Quit]: Enters the settings and quits HAP Music Transfer.
[11] Transferring music files
Descriptions and functions of the Transfer Settings window
You can select the transfer method (manual/automatic), the hard disk drive on the
HDD AUDIO PLAYER for the music files to be transferred to and check the transfer
history in the Transfer Settings window.
Page 13

1. Menu window selection area
Select which window to display.
Menu items are highlighted according to the selected window.
2. Explore HAP
The Explorer window (for Windows) or the Finder (for Mac) opens and displays
the content stored in the hard disk drive of the HDD AUDIO PLAYER.
3. Manual transfer operation area
Set [Manual Transfer] to [Start] to immediately start transferring music files.
When the transfer starts, the progress bar, total number of files to be transferred
and number of transferred files appear on the screen.
4. Automatic transfer setup area
Set [Auto Transfer] to [ON] and set the desired time in the [Transfer Timer]
parameter.
If your computer is not operated for the amount of time set in [Transfer Timer],
HAP Music Transfer starts transferring music files to the HDD AUDIO PLAYER
automatically.
[Task Priority] sets the priority for the HAP Music Transfer process within the
software/hardware processes performed automatically by your computer. (This
function is available for Windows only.)
5. Hard disk drive selection area
Select [Destination] to select the hard disk drive on the HDD AUDIO PLAYER.
Select the destination from [Auto], [Internal HDD], or [External HDD].
If you select [Auto], the music files are transferred to the internal hard disk drive
first, and then are automatically transferred to the external hard disk drive when
the internal hard disk drive becomes full.
Page 14

6. Transfer history confirmation area
Select [Open] from [Transferred Files List] to check the transfer history of the
music files transferred to the currently selected HDD AUDIO PLAYER.
You can erase the history by selecting [Clear]. When the transfer history is
erased, all files that are included in the folders you select will be transferred to
the HDD AUDIO PLAYER the next time the application transfers music files.
Erase the transfer history when you want to transfer all music files again.
7. Help
Opens the web browser and displays the website which links to the HAP Music
Transfer Help. Select the HAP Music Transfer Help.
8. Operation buttons
Windows:
[OK]: Enters the settings and closes the window.
[Cancel]: Cancels the settings made on the screen and closes the window.
[Apply]: Enters the settings. The window remains open.
Mac:
[Apply]: Enters the settings. The window remains open.
[Close]: Enters the settings and closes the window.
[Quit]: Enters the settings and quits HAP Music Transfer.
[12] Deleting music files
Deleting music files from the HDD AUDIO PLAYER
You can delete music files from the HDD AUDIO PLAYER using the HAP Music
Transfer application.
1. Perform one of the following operations.
For Windows:
Select [Explore HAP] from
of your computer.
(the HAP Music Transfer icon) on the task tray
Page 15

For Mac:
Select [Explore HAP] from
(the HAP Music Transfer icon) on the Dock of
your computer.
The Explorer window (for Windows) or the Finder (for Mac) opens and icon(s) of
the available shared folder(s) appear. ([HAP_Internal] appears for the internal
hard disk drive and [HAP_External] appears for the external hard disk drive if
one is connected.)
2. Select [HAP_Internal] (to select the internal hard disk drive) or [HAP_External]
(to select the external hard disk drive), and then keep selecting folders until you
reach the folder that contains the music files you want to delete.
3. Delete the music files.
Note
You can delete sample files that are pre-installed in the HDD AUDIO PLAYER. If
you perform the Factory Reset function on the HDD AUDIO PLAYER, the sample
files will be restored.
Do not transfer music files using HAP Music Transfer on your computer while
deleting music files in Explorer (for Windows) or in the Finder (for Mac).
Do not transfer music files from your smartphone or tablet while deleting music
files using Explorer (for Windows) or the Finder (for Mac).
Page 16

[13] Using menus (Windows)
Using the system menu (Windows only)
You can use the system menu to access the HAP Music Transfer Help and find the
HAP Music Transfer software version. You can select the system menu from any of
the Connection, Contents Settings or Transfer Settings windows.
1. Select [Menu] in the Connection, Contents Settings or Transfer Settings
window.
The system menu appears.
2. Select the desired item.
Descriptions of displayed items
The following items can be selected.
Connection:
Displays the Connection window.
Contents Settings:
Displays the Contents Settings window.
Transfer Settings:
Displays the Transfer Settings window.
Help:
Opens the web browser and displays the website which links to the HAP Music
Transfer Help. Select the HAP Music Transfer Help.
Page 17

About:
Shows the current version and the copyright year of HAP Music Transfer.
Exit:
Quits HAP Music Transfer.
[14] Using menus (Windows)
Using the context menu for the HAP Music Transfer task
tray icon (Windows only)
You can use the context menu, which can be displayed from (the HAP Music
Transfer icon) in the task tray, to start file transfer, open the HAP Music Transfer
operation window, open the explorer and display the hard disk drive of the HDD
AUDIO PLAYER, and more.
1. Right-click (tap and hold on the touch panel) in the task tray.
The context menu appears.
2. Select the desired item.
Descriptions of the displayed item
The following items can be selected.
Manual Transfer/Stop Transferring:
Select [Manual Transfer] to start the transfer of music files immediately.
[Stop Transferring] appears during the transfer, and can be used to stop the transfer.
Setup Console:
Opens a HAP Music Transfer window.
Page 18

Explore HAP:
Opens the explorer and displays the content stored in the hard disk drive of the HDD
AUDIO PLAYER.
Help:
Opens the web browser and displays the website which links to the HAP Music
Transfer Help. Select the HAP Music Transfer Help.
About:
Shows the current version and the copyright year of HAP Music Transfer.
Exit:
Quits HAP Music Transfer.
Hint
The HAP Music Transfer icon differs depending on the status of HAP Music
Transfer.
: HAP Music Transfer is not transferring music files (stopped).
: HAP Music Transfer is standing by for automatic transfer (Transfer Timer has
started).
: HAP Music Transfer is transferring music files.
[15] Using menus (Mac)
Using menus from the menu bar (Mac only)
You can use the menu bar to find the HAP Music Transfer software version, access
the HAP Music Transfer Help, and more.
1. Select [HAP Music Transfer], [Settings] or [Help] in the menu bar.
The following menus appear.
Page 19

2. Select the desired item.
Descriptions of “HAP Music Transfer” menu
The following items can be selected.
About HAP Music Transfer:
Shows the current version and the copyright year of HAP Music Transfer.
Hide HAP Music Transfer:
Hides the HAP Music Transfer Window.
Hide Others:
Hides the windows of other applications currently running on the computer.
Show All:
Shows all windows of all applications currently running on the computer (including
HAP Music Transfer).
Quit HAP Music Transfer:
Quits HAP Music Transfer.
Descriptions of “Settings” menu
The following items can be selected.
Connection:
Displays the Connection window.
Contents Settings:
Displays the Contents Settings window.
Transfer Settings:
Displays the Transfer Settings window.
Descriptions of “Help” menu
The following item can be selected.
Page 20

HAP Music Transfer Help:
Opens the web browser and displays the website which links to the HAP Music
Transfer Help. Select the HAP Music Transfer Help.
[16] Using menus (Mac)
Using the context menu for the HAP Music Transfer icon
on the Dock (Mac only)
You can use the context menu, which can be displayed from (the HAP Music
Transfer icon) in the Dock, to start file transfer, open the HAP Music Transfer
operation window, open the Finder and display the hard disk drive of the HDD
AUDIO PLAYER, and more.
1. Click and hold on the Dock, or click while holding the Ctrl key on the
keyboard.
The context menu appears.
2. Select the desired item.
Descriptions of the displayed item
The following items can be selected.
Manual Transfer/Stop Transferring:
Select [Manual Transfer] to start the transfer of music files immediately.
[Stop Transferring] appears during the transfer, and can be used to stop the transfer.
Setup Console:
Page 21

Opens a HAP Music Transfer window.
Explore HAP:
Opens the Finder and displays the content stored in the hard disk drive of the HDD
AUDIO PLAYER.
Options:
Displays system menu of your Mac.
Show All Windows:
Displays all windows that are running on the computer, including the HAP Music
Transfer window.
Hide:
Hides the HAP Music Transfer window.
Quit:
Quits HAP Music Transfer.
Hint
The HAP Music Transfer icon differs depending on the status of HAP Music
Transfer.
: HAP Music Transfer is not transferring music files (stopped).
: HAP Music Transfer is standing by for automatic transfer (Transfer Timer has started).
: HAP Music Transfer is transferring music files.
[17] Backups
Backing up data
We recommend you arbitrarily have a backup of contents stored on the hard disk
drive of the HDD AUDIO PLAYER, which are copies of contents on your computer.
If you do not have the original data on your computer anymore, we recommend you
copy the contents in the hard disk drive of the HDD AUDIO PLAYER to your
computer to have a backup.
Make sure you have a back up before sending the HDD AUDIO PLAYER for repair.
For details on how to copy music files from the HDD AUDIO PLAYER to your
computer as a backup, check the topics listed as related topics below.
Page 22

[18] Backups
Backing up music files in the HDD AUDIO PLAYER to your
computer (for Windows)
It is recommended that you copy music files in the HDD AUDIO PLAYER to your
computer as a backup before you bring the HDD AUDIO PLAYER for repair or if you
do not have the original music files in your computer.
You need to use the HAP Music Transfer application installed in your computer for
the backup. Make sure that the HDD AUDIO PLAYER is turned on.
1. Open the context menu of HAP Music Transfer from (the HAP Music
Transfer icon) on the task tray of your computer and then select [Explore HAP].
The Explorer window opens and icon(s) of the available shared folder(s) appear.
([HAP_Internal] appears for the internal hard disk drive and [HAP_External]
appears for the external hard disk drive if one is connected.)
2. Select [HAP_Internal] (to select the internal hard disk drive) or [HAP_External]
(to select the external hard disk drive), and then keep selecting folders until you
reach the folder that contains the music files you want to back up.
3. Copy the music files from the HDD AUDIO PLAYER to the desired folder in your
computer by drag and drop.
Note
Do not transfer music files while backing up music files in Explorer using HAP
Music Transfer.
Do not transfer music files from your smartphone or tablet while backing up music
files in Explorer.
Set the [Auto Standby] function of the HDD AUDIO PLAYER to [Off] when you
make a backup.
Hint
If you want to back up all of the content in the internal or external hard disk drive,
copy all of the folders (or files) that are located directly under [HAP_Internal] or
[HAP_External] to your computer.
Page 23

[19] Backups
Backing up music files in the HDD AUDIO PLAYER to your
computer (for Mac)
It is recommended that you copy music files in the HDD AUDIO PLAYER to your
computer as a backup before you bring the HDD AUDIO PLAYER for repair or if you
do not have the original music files in your computer.
You need to use the HAP Music Transfer application installed in your computer for
the backup. Make sure that the HDD AUDIO PLAYER is turned on.
1. Open the context menu of HAP Music Transfer from (the HAP Music
Transfer icon) on the Dock of your computer and then select [Explore HAP].
The Finder opens and icon(s) of the available shared folder(s) appear.
([HAP_Internal] appears for the internal hard disk drive and [HAP_External]
appears for the external hard disk drive if one is connected.)
2. Select [HAP_Internal] (to select the internal hard disk drive) or [HAP_External]
(to select the external hard disk drive), and then keep selecting folders until you
reach the folder that contains the music files you want to back up.
3. Copy the music files from the HDD AUDIO PLAYER to the desired folder in your
computer by drag and drop.
Note
Do not transfer music files while backing up music files in the Finder using HAP
Music Transfer.
Do not transfer music files from your smartphone or tablet while backing up music
files in the Finder.
Set the [Auto Standby] function of the HDD AUDIO PLAYER to [Off] when you
make a backup.
Hint
If you want to back up all of the content in the internal or external hard disk drive,
copy all of the folders (or files) that are located directly under [HAP_Internal] or
[HAP_External] to your computer.
Page 24

[20] Backups
Returning backup music files from your computer to the
HDD AUDIO PLAYER (for Windows)
If you want to return music files you have copied to your computer as a backup to the
HDD AUDIO PLAYER, follow the steps below.
You need to use the HAP Music Transfer application installed in your computer for
returning backup files. Make sure that the HDD AUDIO PLAYER is turned on.
1. Open the context menu of HAP Music Transfer from (the HAP Music
Transfer icon) on the task tray of your computer and then select [Explore HAP].
The Explorer window opens and icon(s) of the available shared folder(s) appear.
([HAP_Internal] appears for the internal hard disk drive and [HAP_External]
appears for the external hard disk drive if one is connected.)
2. Select [HAP_Internal] (to select the internal hard disk drive) or [HAP_External]
(to select the external hard disk drive), and then keep selecting folders until you
reach the folder of the music files you want to restore.
3. Copy the music files from your computer to the HDD AUDIO PLAYER by drag
and drop.
Note
Do not transfer music files while returning backup files from your computer to the
HDD AUDIO PLAYER using HAP Music Transfer.
Do not transfer music files from your smartphone or tablet while returning backup
files from your computer to the HDD AUDIO PLAYER.
Do not return backup files from two or more computers at the same time.
Hint
If you want to return the backup files of all of the content in the internal or external
hard disk drive, select the backup folder and check “Watch” in the Contents
Settings window of HAP Music Transfer. Go to the Transfer Settings window and
select [Clear] for the [Transferred Files List] configuration to delete the transfer
history, and then automatically or manually transfer the files.
Page 25

[21] Backups
Returning backup music files from your computer to the
HDD AUDIO PLAYER (for Mac)
If you want to return music files you have copied to your computer as a backup to the
HDD AUDIO PLAYER, follow the steps below.
You need to use the HAP Music Transfer application installed in your computer for
returning backup files. Make sure that the HDD AUDIO PLAYER is turned on.
1. Open the context menu of HAP Music Transfer from (the HAP Music
Transfer icon) on the Dock of your computer and then select [Explore HAP].
The Finder opens and icon(s) of the available shared folder(s) appear.
([HAP_Internal] appears for the internal hard disk drive and [HAP_External]
appears for the external hard disk drive if one is connected.)
2. Select [HAP_Internal] (to select the internal hard disk drive) or [HAP_External]
(to select the external hard disk drive), and then keep selecting folders until you
reach the folder of the music files you want to restore.
3. Copy the music files from your computer to the HDD AUDIO PLAYER by drag
and drop.
Note
Do not transfer music files while returning backup files from your computer to the
HDD AUDIO PLAYER using HAP Music Transfer.
Do not transfer music files from your smartphone or tablet while returning backup
files from your computer to the HDD AUDIO PLAYER.
Do not return backup files from two or more computers at the same time.
Hint
If you want to return the backup files of all of the content in the internal or external
hard disk drive, select the backup folder and check “Watch” in the Contents
Settings window of HAP Music Transfer. Go to the Transfer Settings window and
select [Clear] for the [Transferred Files List] configuration to delete the transfer
history, and then automatically or manually transfer the files.
Page 26

[22] Error messages
Error messages
The selected device is now offline. Please confirm the power of
device and network connection.
The HDD AUDIO PLAYER that was previously selected or that is currently
selected is not turned on.
Turn the power on or set the HDD AUDIO PLAYER to the Network Standby mode.
The HDD AUDIO PLAYER that was previously selected or that is currently
selected is not connected to the network.
Check the network connection and connect the HDD AUDIO PLAYER to the same
network as your computer.
The watched folders you selected is over 100. Please confirm the
list of watched folders.
You cannot select more than 100 source folders. Select the folders you do not want
to transfer and select [Del] in the Contents Settings window.
There is not enough space on the device.
The HDD AUDIO PLAYER does not have enough space on its hard disk drive.
Remove the unnecessary files from the hard disk drive or add the external hard disk
drive to ensure there is enough space.
There is not enough space on the disk.
There is not enough free space on the computer to use HAP Music Transfer. Delete
unnecessary files from the hard disk drive of your computer.
The selected device is not connected. The files can't be copied.
Please confirm the power of device and network connection.
The selected HDD AUDIO PLAYER switched to standby mode or was turned off
while transferring music files.
Turn the power on or set the HDD AUDIO PLAYER to the Network Standby mode.
The network connection with the selected HDD AUDIO PLAYER was interrupted
Page 27

while transferring music files.
Check the network connection.
An error occurs when transferring. Please confirm the transferred
files list.
Unexpected error occurred during the transfer. Check the transfer history by
selecting [Transferred Files List] in the Transfer Settings window. Also check the
status of the connected HDD AUDIO PLAYER and the network connection.
[23] Dealing with problems
Cannot install HAP Music Transfer.
Make sure that HAP Music Transfer is compatible with your operating system.
Check the system requirements and install HAP Music Transfer on a computer
with a compatible operating system installed.
Make sure that there is enough free space on the hard disk drive of your
computer. If not, delete any unnecessary files from your computer.
[24] Dealing with problems
HAP Music Transfer does not start.
Your computer may not be functioning normally. Start other software to check if
your computer is functioning normally.
Your computer may not be functioning normally. Restart your computer.
HAP Music Transfer may not be installed correctly. Uninstall HAP Music Transfer,
and then install it again.
[25] Dealing with problems
HAP Music Transfer window is not displayed correctly.
Page 28

Your computer may not be functioning normally. Start other software to check if
using HAP Music Transfer.
your computer is functioning normally.
Your computer may not be functioning normally. Restart your computer.
HAP Music Transfer may not be installed correctly. Uninstall HAP Music Transfer,
and then install it again.
[26] Dealing with problems
The desired HDD AUDIO PLAYER is not displayed in the
Connection window.
Check the network connection.
Check that the HDD AUDIO PLAYER is connected to the same network as the
computer is connected.
Example of a good network connection
(The HDD AUDIO PLAYER ( ) and the computer ( ) are connected to one
router ( ), so they belong to the same network.)
In this situation, the computer is able to recognize the HDD AUDIO PLAYER using
HAP Music Transfer.
Example of a bad network connection
(The HDD AUDIO PLAYER ( ) and the computer ( ) are connected to different
routers ( ) or servers, so they belong to different networks.)
In this situation, the computer is not able to recognize the HDD AUDIO PLAYER
Page 29

: Internet
: Modem
: Router
: HDD AUDIO PLAYER (The illustrations in this topic use HAP-S1 as an
example.)
: Computer
Distribute the connection using a network hub or a Wi-Fi access point set to
infrastructure mode when it is difficult to connect the HDD AUDIO PLAYER and
the computer directly to one router (for example, when using HAP Music Transfer
on a computer placed in a different room from the HDD AUDIO PLAYER).
The HDD AUDIO PLAYER is not turned on. Turn the power on or set the HDD
AUDIO PLAYER to the Network Standby mode.
If you are using your computer’s firewall function or commercially available firewall
software on your computer, HAP Music Transfer may not work properly.
If you are using your computer’s firewall function, configure HAP Music Transfer as an
“exception.” Refer to your computer’s operating manuals, the operating system help or the
computer manufacturer's website for more information.
If you are using commercially available firewall software, disable the software or add HAP
Music Transfer to the list of allowed programs. Refer to the help of the firewall software or
operating manual for more information.
If the network connection is interrupted while HAP Music Transfer is active, quit
HAP Music Transfer once, and then restart it.
The SSDP port (UDP 1900) used by your computer to detect other devices may
be occupied by another application (such as a DLNA server). In this case, HAP
Music Transfer automatically detects applications that may be occupying the
SSDP port, and displays a warning screen. Quit the detected applications, and
Page 30

then restart HAP Music Transfer. For details on how to quit the applications, refer
to the operating manual of each application.
Some routers are equipped with a function (privacy separator) to prohibit
communications between Wi-Fi terminal devices (such as a computer). Check that
the function is disabled.
Check the network SSID of the HDD AUDIO PLAYER and the computer. When
network SSIDs are different from each other, the network separation function may
be enabled on your router. Reconnect the HDD AUDIO PLAYER and the
computer to the same SSID.
To check the network SSID of the HDD AUDIO PLAYER, select [Settings] - [Network
Settings] - [View Network Status] on the Home screen. The network SSID of the HDD
AUDIO PLAYER is displayed in [Network (SSID)].
To check the network SSID of a Windows computer, click the Wi-Fi connection icon ( )
on the task bar, and then check the item displayed as “Connected” ( ).
To check the network SSID of a Mac computer, click the Wi-Fi connection icon ( ) on the
menu bar, and then check the item on which a check mark is displayed ( ).
Page 31

The “MAC address filtering” function may be enabled on your router. Disable this
function.
[27] Dealing with problems
You want to delete music files but do not know how.
You can delete music files from the HDD AUDIO PLAYER using HAP Music
Transfer.
[28] Dealing with problems
Music files cannot be transferred correctly.
Transferred music files cannot be found on the HDD AUDIO PLAYER.
Music files cannot be transferred to the HDD AUDIO PLAYER.
The computer does not start transferring files even when the time set in the Transfer
Timer has elapsed.
Tracks belonging to the same album are registered to different albums.
Tracks belonging to different albums are registered to one album.
Page 32

The album art image displayed on the HDD AUDIO PLAYER is different from that
displayed in the music file management software on your computer or does not
display.
The track name or album name displayed on the HDD AUDIO PLAYER is different
from that displayed in the music file management software on your computer or does
not display.
Transferred music files cannot be found on the HDD
AUDIO PLAYER.
Check the transfer history by selecting [Open] for [Transferred Files List] in the
Transfer Settings window, and confirm that the desired music files have been
transferred.
The HDD AUDIO PLAYER may not have finished analyzing the music files. Wait
for a while and check again, or turn the power of the HDD AUDIO PLAYER off and
then on again.
Music files cannot be transferred to the HDD AUDIO
PLAYER.
The hard disk drive of the HDD AUDIO PLAYER may be full. Delete any
unnecessary music files or add a new external hard disk drive to ensure there is
sufficient free space for new files.
The network connection may be malfunctioning. The network connection may be
interrupted for some reason if a Wi-Fi (wireless LAN) connection is used. Check
the network connection, select the destination HDD AUDIO PLAYER in the
Connection window, and then transfer the music files again.
The audio format of the music files may not be supported by the HDD AUDIO
PLAYER. Check the supported audio formats in the Contents Settings window.
You may not be able to transfer files from HAP Music Transfer if your router is set
Page 33

to low power consumption mode. In this case, disable the low power consumption
mode of your router. For details, refer to the operating manual of your router.
Make sure not to transfer music files from your smartphone or tablet and HAP
Music Transfer at the same time.
The computer does not start transferring files even when
the time set in the Transfer Timer has elapsed.
If the [Task Priority] in the Transfer Settings window is set to [Low], the priority of
file transfer may be lower than all other processes performed on your computer.
Your computer will start the file transfer when other processes are finished
(Windows only).
The Transfer Timer does not work while you are operating the computer. Your
computer only starts transferring files when the time set for the Transfer Timer
elapses without any operation being performed on your computer.
Tracks belonging to the same album are registered to
different albums.
The album name or album artist name embedded in the music files are different.
Select the target albums with HDD Audio Remote, and then edit the album name and
album artist name of the tracks so they are the same. (For details on how to edit the
information, refer to the Help of HDD Audio Remote.)
Edit the album name and album artist name of all music files you want to include together
in same album so they are the same using music file management software on your
computer, and then transfer (*) those music files to the HDD AUDIO PLAYER.
Edit the album name and album artist name of all music files you want to include together
in same album so they are the same using tag editing software on your computer, and
then transfer (*) those music files to the HDD AUDIO PLAYER. However, problems may
occur in the music file management software if you are using that on your computer to
edit.
You can merge different albums into one album using the HDD AUDIO PLAYER
Page 34

or HDD Audio Remote. Albums belonging to the same folder are displayed as
possible albums. For details, refer to the Help Guide for the HDD AUDIO PLAYER
or the Help for HDD Audio Remote.
Perform [Get music info] from the Folder list screen on the HDD AUDIO PLAYER
or HDD Audio Remote and select the information you want to obtain from the
options displayed. Music files with the same album information will be recognized
as tracks in the same album. For details, refer to the Help Guide for the HDD
AUDIO PLAYER or the Help for HDD Audio Remote.
*
When you transfer music files the next time, the HAP Music Transfer transfers the changed files to
the HDD AUDIO PLAYER again if it detects changes to the files in the folder you have selected.
Tracks belonging to different albums are registered to one
album.
The album name and album artist name embedded in the music files are same on
multiple albums.
Select the target album with HDD Audio Remote, and then edit the album name or album
artist name of all music files you want to separate into different albums. (For details on
how to edit the information, refer to the Help of HDD Audio Remote.)
Edit the album name or album artist name of all music files you want to separate into
different albums using music file management software on your computer, and then
transfer (*) those music files to the HDD AUDIO PLAYER.
Edit the album name or album artist name of all music files you want to separate into
different albums using tag editing software on your computer, and then transfer (*) those
music files to the HDD AUDIO PLAYER. However, problems may occur in the music file
management software if you are using that on your computer.
*
When you transfer music files the next time, the HAP Music Transfer transfers the changed files to
the HDD AUDIO PLAYER again if it detects changes to the files in the folder you have selected.
The album art image displayed on the HDD AUDIO
PLAYER is different from that displayed in the music file
management software on your computer or does not
Page 35

display.
Some music file management software may not embed album art images to music
files. In this case, the album art image may be different from that displayed in the
music file management software on your computer because the HDD AUDIO
PLAYER obtains the album art image from the Gracenote database using tag
information of the music file.
Select the target album with HDD Audio Remote, and then edit the album art image. (For
details on how to edit the information, refer to the Help of HDD Audio Remote.)
Edit the album art images of all music files for which you want to change the album art
image using tag editing software on your computer, and then transfer (*) those music files
to the HDD AUDIO PLAYER. However, problems may occur in the music file
management software if you are using that on your computer.
*
When you transfer music files the next time, the HAP Music Transfer transfers the changed files to
the HDD AUDIO PLAYER again if it detects changes to the files in the folder you have selected.
The track name or album name displayed on the HDD
AUDIO PLAYER is different from that displayed in the
music file management software on your computer or does
not display.
Some music file management software may not embed music information with
some kinds of file formats such as WAV. In this case, the track name or album
name may be different from that displayed in the music file management software
on your computer because the HDD AUDIO PLAYER obtains the track name or
album name from the Gracenote database using information of the music file other
than the tag information.
Select the target track or album with HDD Audio Remote, and then edit the track name or
album name. (For details on how to edit the information, refer to the Help of HDD Audio
Remote.)
Edit the track name or album name of all music files for which you want to change the
track name or album name using tag editing software on your computer, and then transfer
(*) those music files to the HDD AUDIO PLAYER. However, problems may occur in the
music file management software if you are using that on your computer.
Page 36

*
When you transfer music files the next time, the HAP Music Transfer transfers the changed files to
the HDD AUDIO PLAYER again if it detects changes to the files in the folder you have selected.
Text encoding information may be dropped out while the music file management
software is embedding music information. In despite of automatic detection of the
text encoding type attempted by the HDD AUDIO PLAYER, the music information
may not be correctly displayed. In such a case, check the music file management
software settings, or change the text encoding type by selecting [Settings] [System Settings] - [Text encoding] and copy the file again.
 Loading...