

Sony Handycam NEX-VG20, Handycam NEX-VG20H Operating Manual
]
Interchangeable Lens Digital
HD Video Camera Recorder/
Cam_scope num_rique HD &
objectif interchangeable
Operating Guide US
]_])))))))))))))_i
Moded'emp,o,FR_!_!_!ii!!
Additional infbrmation on this product and
answers to frequently asked questions can be
found at our Customer Support Website.
De plus amples renseignements 'apropos de ce
produit et des r@onses amx questions fr&luemment
pos6es sont disponibles sur le site\Veb de
l__ssistance'ala client{,le.
htt p://www.so ny.net/
© 2011 Sony Corporation
Printed in Japan
IIIIIIIIIIII
4291370210
C
-11
::13
AVCHE)
Progressive
.................................. M_o_VSTI[I{ M
CI)_,,rourH_u_

Owner'sRecord
The model and serial numbers are located
on the bottom. Record the serial number
in the space provided below. Refbr to these
numbers whenew, r you call upon your Sony
dealer regarding this product.
Model No. NEX-
Serial No.
Model No. AC-
Serial No.
This symbol is intended
to alert the user to the
presence of important
operating and maintenance
(servicing) instructions in
the literature accompanying
the appliance.
To reduce fire or shock hazard, do not
expose the unit to rain or moisture.
Do not expose the batteries to
excessive heat such as sunshine, fire or
the like.
CAUHON:10 REDUC£_H_ RISKOFE CTRICSNOOK,
Do NOr REMOVECOVER(O_ BACK)¸
NO USE_-SERVlCEAIJLEPARRSINSIDE
rtEFERSErtVlClNGTOQUALIFIEDSERVICEPERSONNEL.
This symbol is intended
to alert the user to the
presence of uninsulated
"dangerous wfltage" within
the product's enclosure
that may be of sufficient
magnitude to constitute
a risk of electric shock to
persons.

SAVE THESE INSTRUCTIONS.
DANGER - TO REDUCE THE RISK OF FIRE
OR ELECTRIC SHOCK,
CAREFULLY FOLLOW THESE
INSTRUCTIONS.
• Read these instructions.
• Keep these instructions.
• Heed all warnings.
• Follow all instructions.
• Do not use this apparatus near water.
• Clean only with dry cloth.
• Do not block aW w.ntilation openings. Install in accordance with the manufhcturer's
instructions.
• Do not install near aW heat sources such as radiators, heat registers, stoves, or other
apparatus (including amplifiers) that produce heat.
• Do not detbat the satbty purpose of the polarized or grounding-type plug. A polarized plug
has two blades with one wider than the other. A grounding type plug has two blades and a
third grounding prong. The wide blade or the third prong are provided for your safet}: If
the provided plug does not fit into your outlet, consult an electrician for replacement of the
obsolete outlet.
• Protect the power cord from being walked on or pinched particularly at plugs, conw.nience
receptacles, and the point where they exit from the apparatus.
• Only use attachments/accessories specified by the manufacturer.
• Use only with the cart, stand, tripod, bracket, or table specified by the manufacturer, or
sold with the apparatus. When a cart is used, use caution when moving the cart/apparatus
combination to awfid injury from tip-ow.r.
• Unplug this apparatus during lightning storms or when unused for long periods of time.
• Refer all servicing to qualified service personnel. Servicing is required when the apparatus
has been damaged in any wa}; such as power-supply cord or plug is damaged, liquid has
been spilled or objects haw. fallen into the apparatus, the apparatus has been exposed to
rain or moisture, does not operate normall}; or has been dropped.
• Ifthe shape of the plug does not fit the power outlet, use an attachment plug adaptor of the
proper configuration fbr the power outlet.
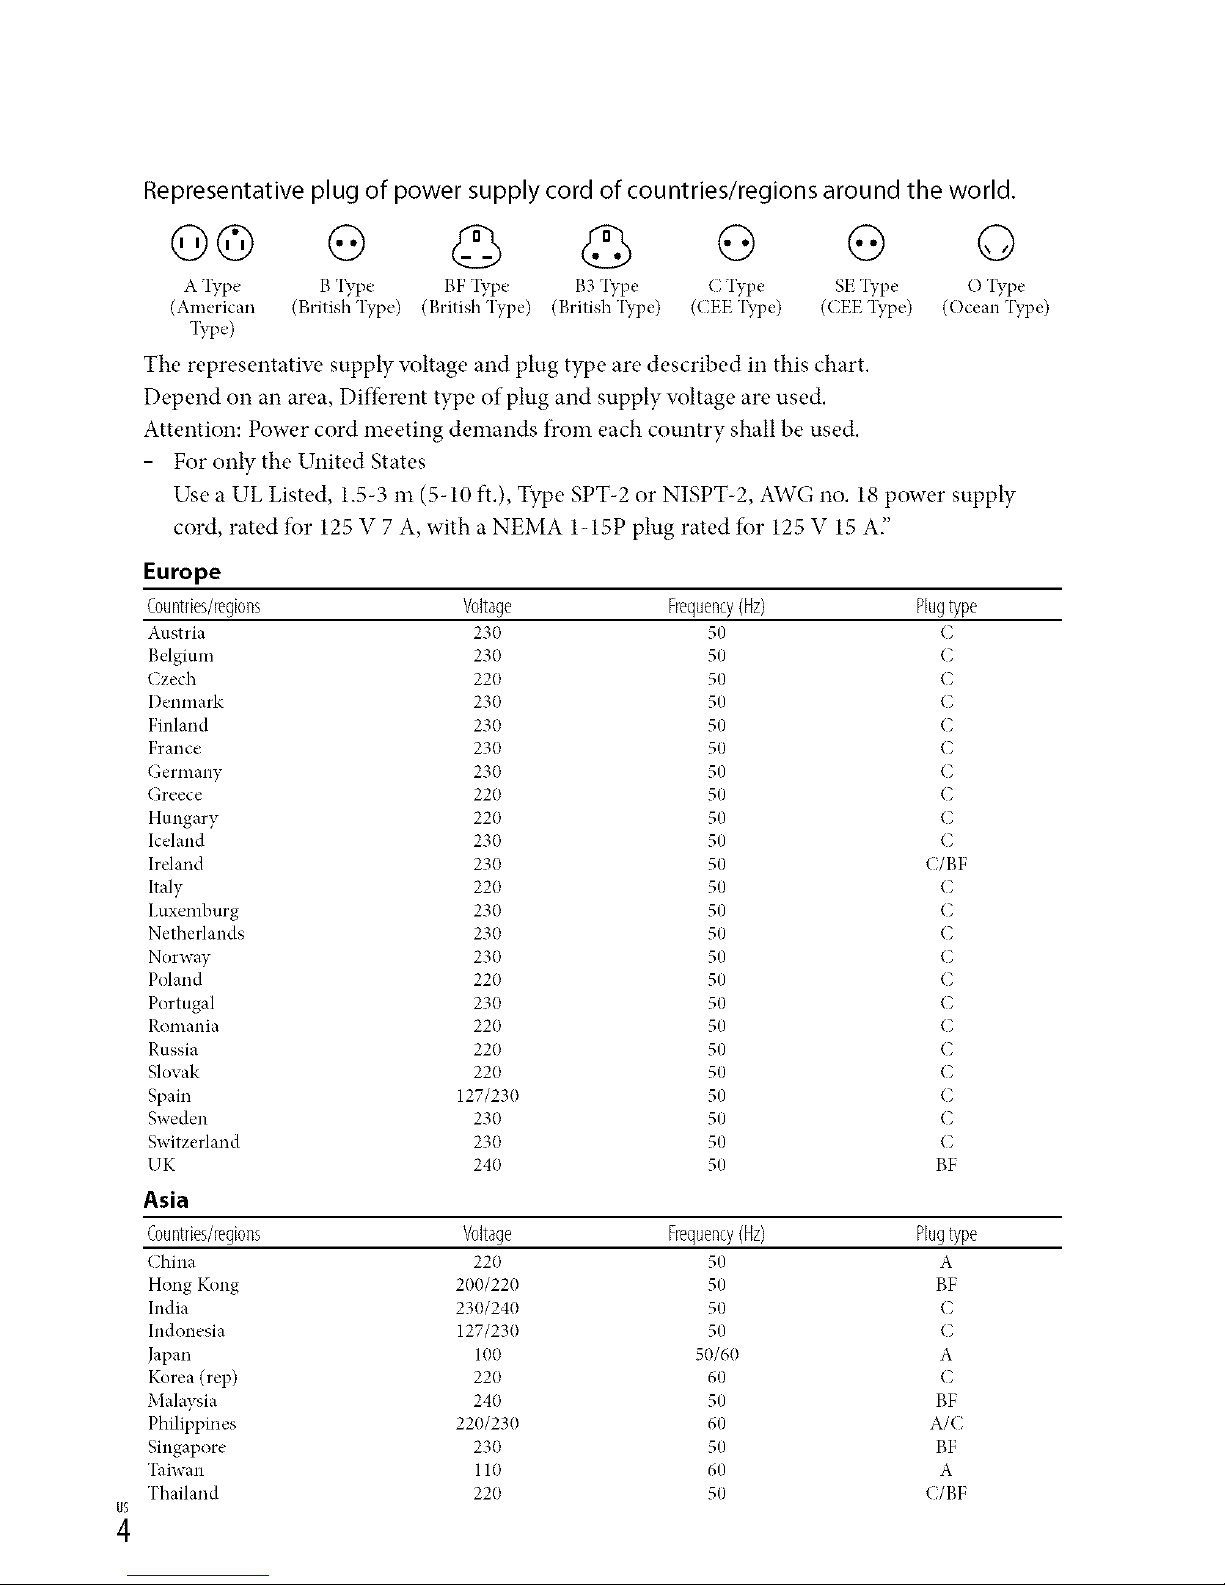
Representative plug of power supply cord of countries/regions around the world.
Go o o G o
A l_T,e B 'I_T,e BF l_T,e B3 'I?q_e C Type SE "I?q_e O "I_T,e
(American (British Type) (British Type) (British'I?_pe) ((EE'I_,pe) (CEE'I_pe) (Ocean 'I_,pe)
133,e)
The representatiw, supply voltage and plug type are described in this chart.
Depend on an area, Diffbrent type of plug and supply voltage are used.
Attention: Power cord meeting demands from each country shall be used.
- For only the United States
Use a UL Listed, 1.5-3 m (5-10 ft.), Type SPT-2 or NISPT-2, AWG no. 18 power supply
cord, rated for 125 V 7 A, with a NEMA 1-15P plug rated for 125 V 15 A"
Europe
Countries/regions Voltage Frequency(Hz) Plugtype
Austria 230 50 C
Belgium 230 50 C
Czech 220 50 C
I)enmark 230 50 C
Finland 230 50 C
France 230 50 C
Germany 230 50 C
Greece 220 50 C
Hungary 220 50 C
Iceland 230 50 C
Ireland 230 50 C/BF
Italy 220 50 C
I,uxemburg 230 50 C
Netherlands 230 50 C
Norway 230 50 C
Poland 220 50 C
Portugal 230 50 C
Romania 220 50 C
Russia 220 50 C
Slovak 220 50 C
Spain 127/230 50 C
Sweden 230 50 C
Switzerland 230 50 C
UK 240 50 BF
Asia
Countries/regions Voltage Frequency(Hz) Plugtype
China 220 50 A
Hong Kong 200/220 50 BF
India 230/240 50 C
Indonesia 127/230 50 C
Japan 100 50/60 A
Korea (rep) 220 60 C
Malaysia 240 50 BF
Philippines 220/230 60 A/C
Singapore 230 50 BF
Taiwan 110 60 A
Thailand 220 50 (/BF
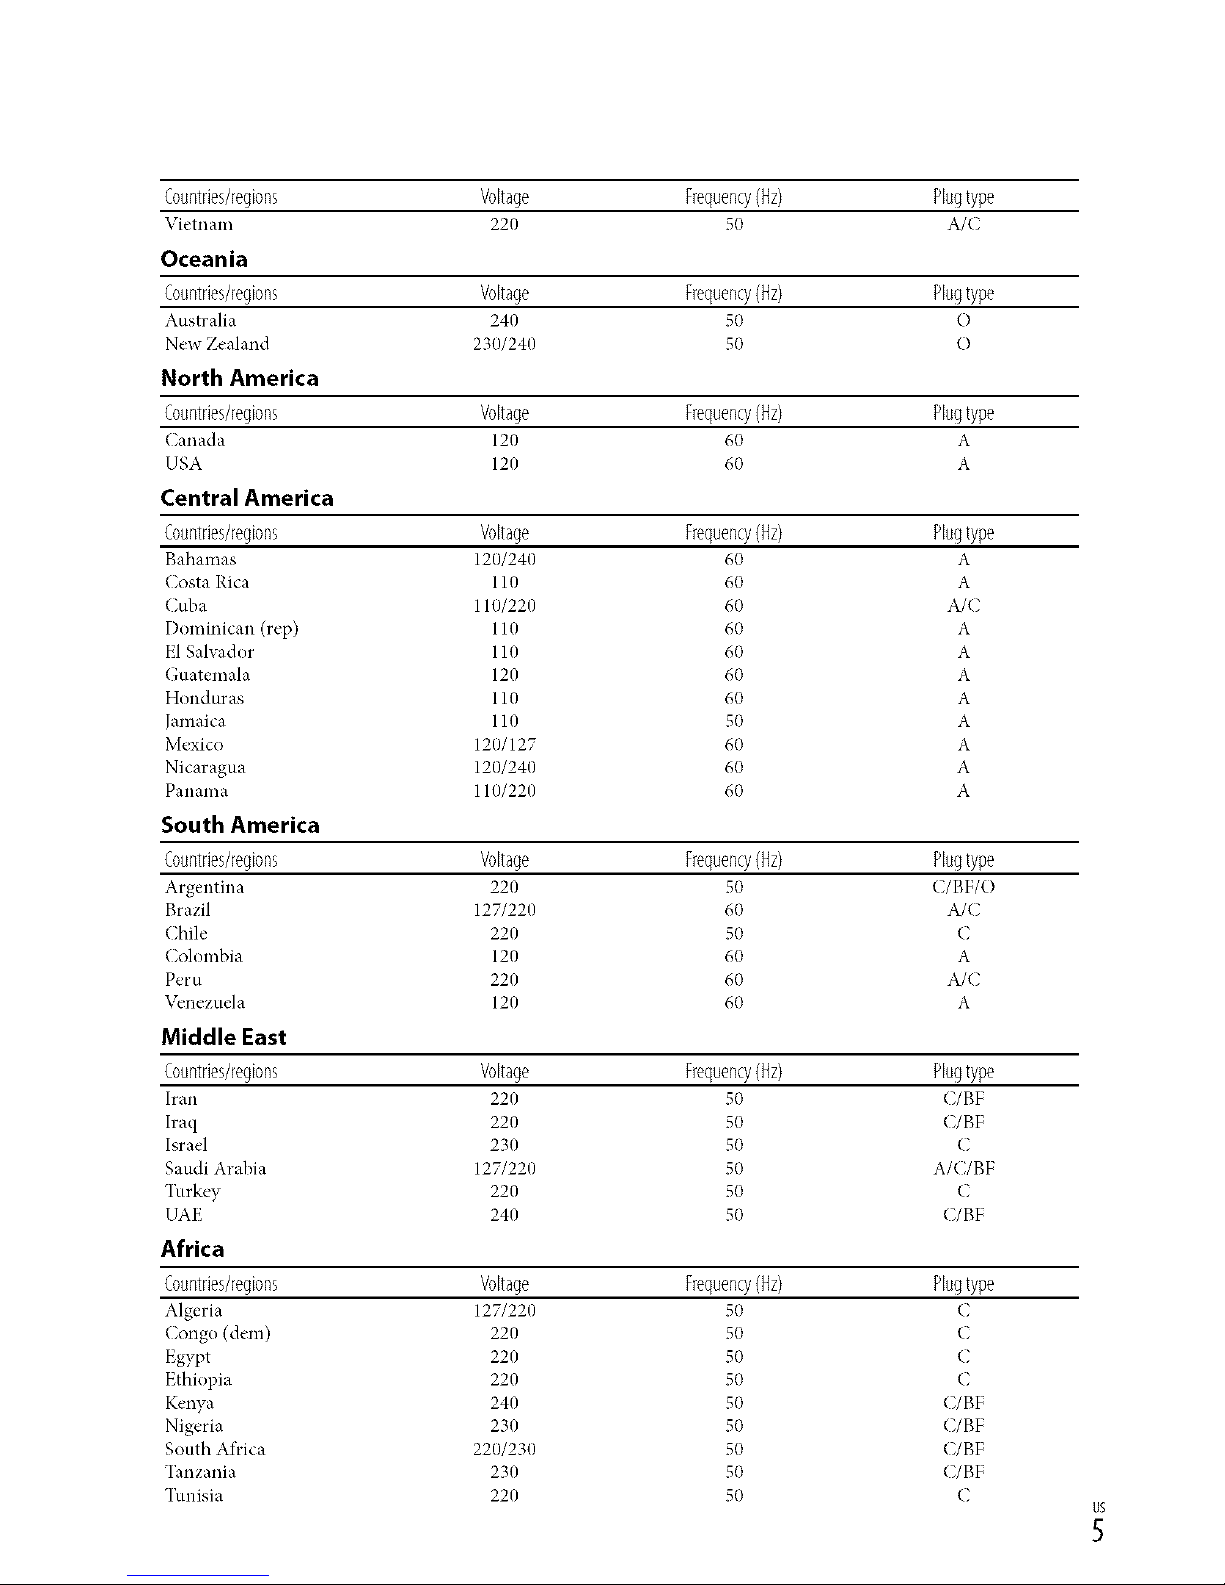
Countries/regions Voltage Frequency(Hz) Plugtype
VietllalIl 220 50 A/(
Oceania
Countries/regions Voltage Frequency(Hz) Plugtype
Australia 240 50 O
New Zealand 230/240 50 O
North America
Countries/regions Voltage Frequency(Hz) Plugtype
Canada 120 60 A
USA 120 60 A
Central America
Countries/regions Voltage Frequency(Hz) Plugtype
Bahamas 120/240 60 A
Costa Rica 110 60 A
Cuba 110/220 60 A/C
Dominican (rep) 110 60 A
El Salvador 110 60 A
Guatemala 120 60 A
Honduras 110 60 A
Jamaica 110 50 A
Mexico 120/127 60 A
Nicaragua 120/240 60 A
Panama 110/220 60 A
South America
Countries/regions Voltage Frequency(Hz) Plugtype
Argentina 220 50 (/BF/O
Brazil 127/220 60 A/C
Chile 220 50 C
Colombia 120 60 A
Peru 220 60 A/C
\_,nezuela 120 60 A
Middle East
Countries/regions Voltage Frequency(Hz) Plugtype
h'an 220 50 C/BF
Iraq 220 50 C/BF
Israel 230 50 C
Saudi Arabia 127/220 50 A/C/BF
Turkey 220 50 C
UAE 240 50 C/BF
Africa
Countries/regions Voltage Frequency(Hz) Plugtype
Algeria 127/220 50 (
Congo (dem) 220 50 C
Egypt 220 50 C
Ethiopia 220 50 C
Kenya 240 50 C/BF
Nigeria 230 50 C/BF
South Africa 220/230 50 C/BF
Tanzania 230 50 C/BF
Tunisia 220 50 C
Read this first
Betbre operating the unit, please read this
manual thoroughl?; and retain it for future
reference.
Battery pack
If the battery pack is mishandled, the
battery pack can burst, cause a fire or ew, n
chemical burns. Obserw, the fbllowing
cautions.
• Do not disassemble.
• Do not crush and do not expose the battery
pack to any shock or lbrce such as hammering,
dropping or stepping on it.
• Do not short circuit and do not allow metal
objects to come into contact with the battery
terminals.
• Do not expose to high temperature above 60°C
(140°F) such as in direct sunlight or in a car
parked in the sun.
• Do not incinerate or dispose of in fire.
• Do not handle damaged or leaking lithium ion
batteries.
• Be sure to charge the battery pack using a
genuine Sony battery charger or a device that
can charge the battery pack.
• Keep the battery pack out of the reach of small
children.
• Keep the battery pack dr3c
• Replace onlywith the same or equNalent tTpe
recommended by Son3_
• Dispose of used battery packs promptly as
described in the instructions.
Replace the battery with the specified type
onb: Otherwise, fire or injury may result.
ACAdaptor
Do not use the AC Adaptor placed in a
narrow space, such as between a wall and
furniture.
Use the nearby wall outlet (wall socket)
when using the AC Adaptor. Disconnect
the AC Adaptor from the wall outlet (wall
socket) immediately if aW malfunction
occurs while using your camcorder.
Note onthe powercord(mainslead)
The power cord (mains lead) is designed
specifically for use with this camcorder
only, and should not be used with other
electrical equipment.
Ew,n if your camcorder is turned off., AC
power source (mains) is still supplied to
it while connected to the wall outlet (wall
socket) via the AC Adaptor.
Excessiw, sound pressure from earphones
and headphones can cause hearing loss.
RECYCLINGLITHIUM-IONBATTERIES
Lithium-Ion batteries are
recyclable.
You can help preserw, our
environment by returning
your used rechargeable
batteries to the collection and
recycling location nearest you.
For more infbnnation
regarding recycling of
rechargeable batteries, call toll
free 1-800-822- 8837, or visit
http://www.rbrc.org/
Caution: Do not handle
damaged or leaking Lithium-
Ion batteries.
Battery pack and lens
This device complies with Part 15 of the
FCC Rules. Operation is subject to the
following two conditions: (1) This device
may not cause harmful interference, and
(2) this device must accept any interference
receiw, d, including interference that may
cause undesired operation.
This Class B digital apparatus complies
with Canadian ICES-003.
UL is an internationally recognized safety
organization.
The UL Mark on the product means it has
been UL Listed.
If you haw. aW questions about this
product, you may call:
SoW Customer Information Center 1-800-
222-SONY (7669).
The number below is for the FCC related
matters onl):
RegulatoryInformation
Declaration ofConformity
Trade Name: SONY
Model No.: NEX-VG20
Responsible Party: Sony Electronics Inc.
Address: 16530 Via Esprillo, San Diego,
CA 92127 U.S.A.
Telephone No.: 858-942-2230
This device complies with Part 15 of the
FCC Rules. Operation is subject to the
fbllowing two conditions: (1) This device
may not cause harmful interference,
and (2) this device must accept any
interfbrence receiw.d, including
interfbrence that may cause undesired
operation.
CAUTION
You are cautioned that any changes or
modifications not expressly approw, d in
this manual could void your authority to
operate this equipment.
Note
This equipment has been tested and tbund
to comply with the limits for a Class B
digital device, pursuant to Part 15 of the
FCC Rules.
These limits are designed to provide
reasonable protection against harmful
interference in a residential installation.
This equipment generates, uses, and
can radiate radio frequency energy and,
if not installed and used in accordance
with the instructions, may cause harmful
interfk, rence to radio comnmnications.
Howew, r, there is no guarantee that
interfk, rence will not occur in a particular
installation. If this equipment does cause
harmful interfk, rence to radio or television
reception, which can be determined by
turning the equipment offand on, the
user is encouraged to try to correct the
interference by one or more of the following
measures:
- Reorient or relocate the receiving antenna.
- Increase the separation between the
equipment and receiver.
- Connect the equipment into an outlet on
a circuit different ficomthat to which the
receiver is connected.
- Consult the dealer or an experienced radio
TV technician *br help.
The supplied interface cable nmst be used
with the equipment in order to comply with
the limits for a digital device pursuant to
Subpart B of Part 15 of FCC Rules.
FortheStateof California, USAonly
Perchlorate Material - special handling may
appl};
See
www.dtsc.ca.gov/hazardouswaste/
perchlorate
Perchlorate Material: Lithium battery
contains perchlorate.
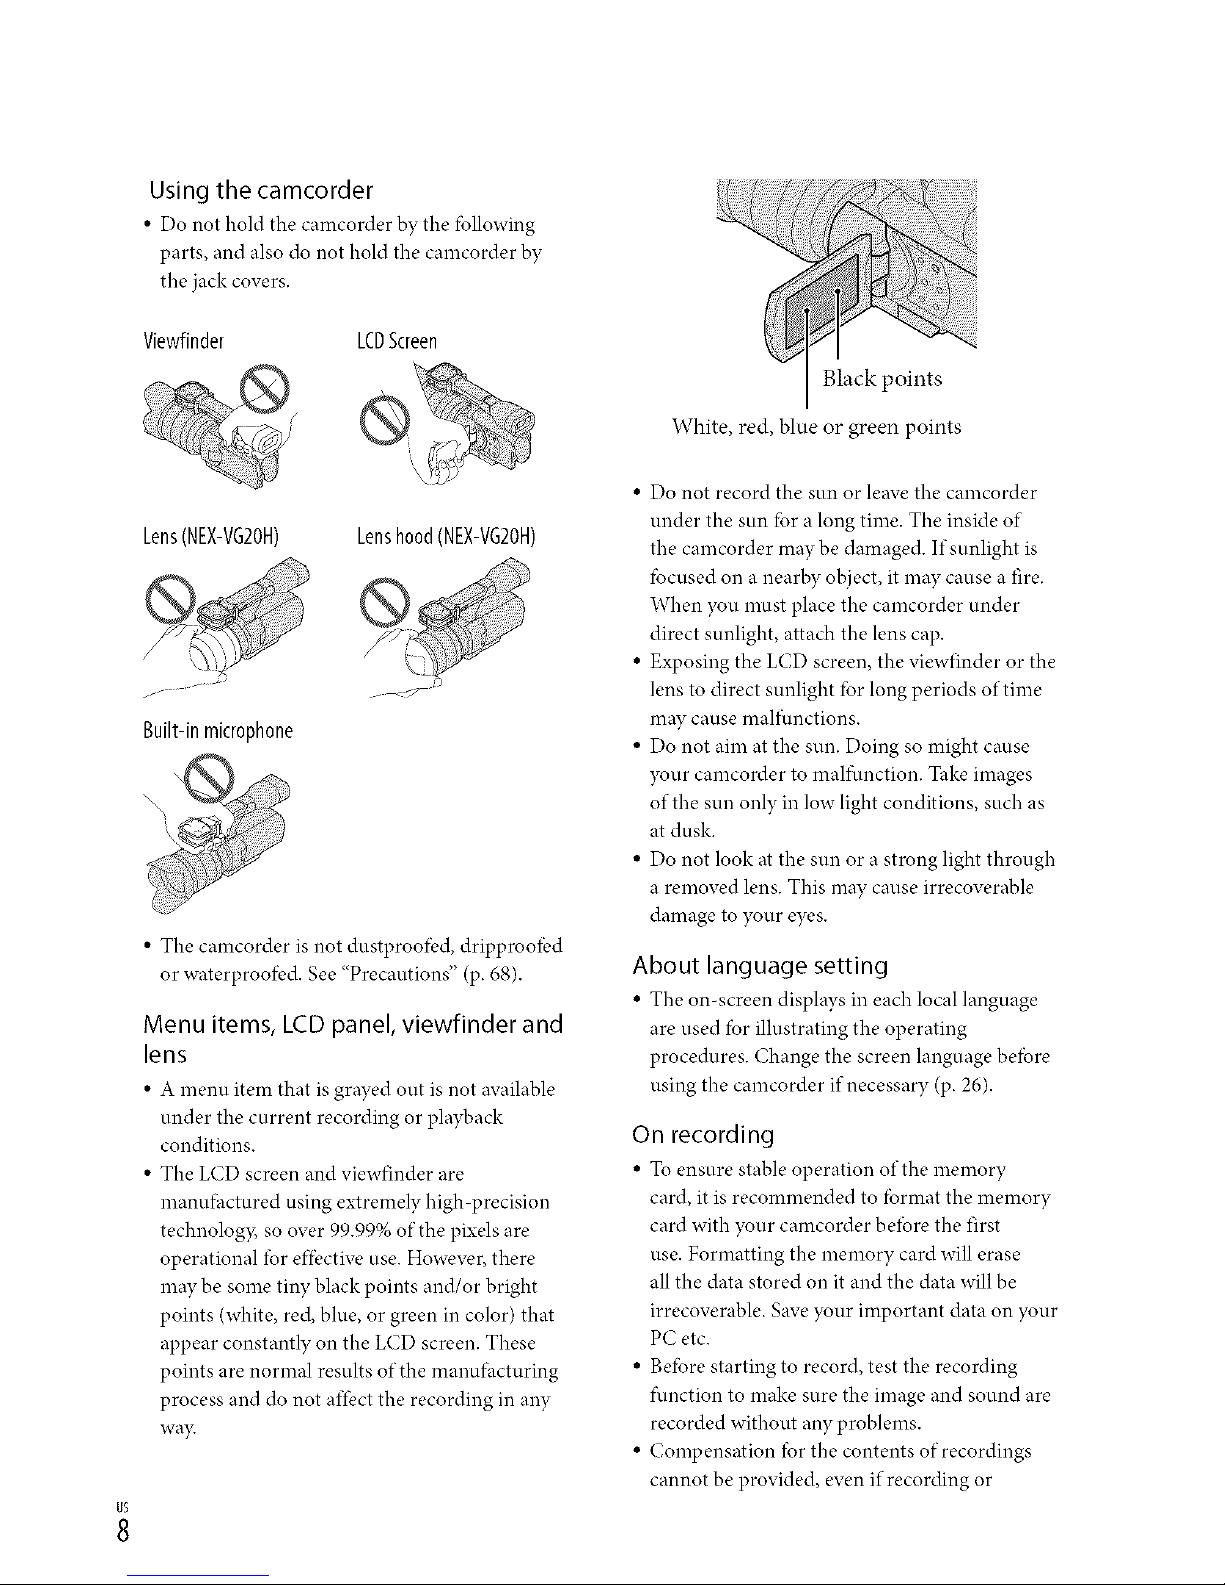
Using the camcorder
• Do not hold the camcorder by the fbllowing
parts, and also do not hold the camcorder by
the jack covers.
Viewfinder LCDScreen
Lens(NEX-VG2OH) Lenshood(NEX-VG2OH)
Built-in microphone
• The camcorder is not dustproofi:d, dripproo/bd
or waterproofi:d. See "Precautions" (p. 68).
Menu items, LCD panel, viewfinder and
lens
• A menu item that isgrayed out is not available
under the current recording or playback
conditions.
• The LCD screen and viewfinder are
manufhctured using extremely high precision
technology, so over 99.99% of the pixels are
operational fur effbctive use. However, there
may be some tiny black points and/or bright
points (white, red, blue, or green in color) that
appear constantly on the LCD screen. These
points are normal results of the manufhcturing
process and do not affect the recording in any
way.
Black points
White, red, blue or green points
• Do not record the sun or leave the camcorder
under the sun fbr a long time. The inside of
the camcorder may be damaged. If sunlight is
fbcused on a nearby object, it may cause a fire.
When you must place the camcorder under
direct sunlight, attach the lens cap.
• Exposing the LCD screen, the viewfinder or the
lens to direct sunlight fbr long periods of time
may cause malf_.mctions.
• Do not aim at the sun. Doing so might cause
your camcorder to malfimction. Take images
of the sun only in low light conditions, such as
at dusk.
• Do not look at the sun or a strong light through
a removed lens. This may cause irrecoverable
damage to your eyes.
About language setting
• The omscreen displays in each local language
are used fbr illustrating the operating
procedures. Change the screen language befbre
using the camcorder if necessary (p. 26).
On recording
• Tu ensure stable operation of the memory
card, it is recommended to fbrmat the memory
card with },our camcorder bdbre the first
use. Formatting the memory card will erase
all the data stored on it and the data will be
irrecoverable. Save },our important data on },our
PC etc.
• Befbre starting to record, test the recording
function to make sure the image and sound are
recorded without any problems.
• Compensation fur the contents of recordings
cannot be provided, even if recording or
playbackisnotpossibleduetoamalfunctionof
thecamcorder,memorycard,etc.
•TVcolorsystemsdifferdependingonthe
country/region.Toviewyourrecordingsona
TV,youneedaNTSCsystem-basedTV.
•Televisionprograms,films,videotapes,
andothermaterialsmaybecopyrighted.
Unauthorizedrecordingofsuchmaterialsmay
becontrarytothecopyrightlaws.
•Usethecamcorderinaccordancewithlocal
regulations.
Notes on playing back
• You may not be able to play back normally
images recorded on your camcorder with other
devices. Also, you may not be able to play back
images recorded on other devices with your
camcorder.
• Standard (STD) image quality movies recorded
on SD memory cards cannot be played on AV
equipment of other manufhcturers.
DVD media recorded with HD image
quality (high definition)
• DVD media recorded with high definition
image quality (HD) can be played back with
devices that are compatible with the AVCHD
standard. You cannot play discs recorded with
high definition image quality (HD) with DVD
players/recorders as they are not compatible
with the AVCHD format. If you insert a disc
recorded with the AVCHD tbrmat (high
definition image quality (HD)) into a DVD
player/recorder, you may not be able to eject
the disc.
Save all your recorded image data
• To prevent your image data from being lost,
save all your recorded images on external media
periodically. To save images on your computer,
see page 45, and to save images on external
devices, see page 53.
• The type of discs or media on which the images
can be saved depend on the [_REC Mode]
selected when the images were recorded.
Movies recorded in [60p Quality _] or
[Highest Quality _ ] can be saved on external
media or on Blu-ray discs (p. 53).
Notes on battery pack/AC Adaptor
" Be sure to remove the battery pack or the AC
Adaptor after turning off the camcorder.
" Disconnect the AC Adaptor from the
camcorder, holding both the camcorder and the
DC plug.
Note on the camcorder!battery pack
temperature
" When the temperature of the camcorder
or battery pack becomes extremely high or
extremely lo'_v,you may not be able to record
or play back on the camcorder, due to the
protection features of the camcorder being
activated in such situations. In this case, an
indicator appears on the LCD screen or on the
viewfinder.
When the camcorder is connected to a
computer or accessories
" Do not try to format the memory card of the
camcorder using a computer. If you do so, your
camcorder may not operate correctly.
" When connecting the camcorder to another
device with communication cables, be sure to
insert the connector plug in the correct way.
Pushing the plug forcibly into the terminal
will damage the terminal and may result in a
malfunction of the camcorder.
If you cannot record!play back images,
perform [Format]
" Ifyou repeat recording/deleting images for
a long time, fragmentation of data occurs on
the memory card. hnages cannot be saved or
recorded. In such a case, save your images on
some type of external media first, and then
perform [Format] by touching _ (MENU)
-_ [Setup] -_ [_ (_Media Settings)] -_
[Format] -_ _ -_ _.
Notes on optional accessories
" We recommend using genuine Sony accessories.
" Genuine Sony accessories may not be available
in some countries/regions.
About this manual, illustrations and
on-screen displays
• The example images used in this manual for
illustration purposes are captured using a
digital still camera, and therefore may appear
diflbrent *)cornimages and screen indicators that
actually appear on },our camcorder. And, the
illustrations of your camcorder and its screen
indication are exaggerated or simplified for
understandabilit3c
• In this manual, the DVD disc recorded with
high definition image quality (HD) is called
AVCHD recording disc.
• Design and specifications of your camcorder
and accessories are subject to change without
notice.
• Do not do any of the fbllowing. Otherwise,
the memory card may be damaged, recorded
images may be impossible to play back or may
be lost, or other malfimctions could occur.
- ejecting the memory card when the access
lamp (p. 30) is lit or flashing
- removing the battery pack or AC Adaptor
fi'om the camcorder, or applying mechanical
shock or vibration to the camcorder when the
(Movie)/l_ (Photo) lamps (p. 33) or the
access lamp (p. 30) are lit or flashing
• When using a shoulder belt (sold separately), do
not crash the camcorder against an object.
1;
Table of contents
IMPORTANT SAFETY INSTRUCTIONS ........................................................... 3
Read this first ....................................................................................... 6
Getting Star'ted
Step 1: Checking supplied items .............................................................. 13
Step 2: Attaching the supplied accessories ................................................. 15
Step 3: Charging the battery pack ............................................................ 16
Charging the battery pack abroad .................................................. 18
Step 4: Attaching the lens ...................................................................... 19
Step 5: Turning the power on, and setting the date and time .......................... 24
Changing the language setting ...................................................... 26
Step 6: Making setting adjustments before recording ................................... 27
Step 7: Inserting a memory card .............................................................. 30
Recording!Playback
Recording .......................................................................................... 32
Selecting the recording mode ....................................................... 35
Adjusting for shooting conditions ............................................................ 36
Playback on the camcorder .................................................................... 37
Playing images on a TV ......................................................................... 41
ASva nce(_ ope_atioi_ s
Deleting movies and photos ................................................................... 44
Savinc_ movies an8 photos with a compute_ _
Useful functions available if you connect the camcorder to a computer ............. 45
Preparing a computer ........................................................................... 46
When using a Macintosh .............................................................. 46
Starting PMB (Picture Motion Browser) ...................................................... 49
Using "Image Data Converter". ................................................................ 50
Z
fD
o
8
Saving images with an exte_'nal device
Selecting a method for saving images with an external device ........................ 51
Saving images on an external media device ............................................... $3
Creating a high definition image quality (HD) disc with such as a Sony DVD writer,
etc ................................................................................................... $6
Creating a standard definition image quality (STD) disc with a recorder, etc ........ 57
Customizing your camco_delL"
Using menus ...................................................................................... 59
Getting detailed information from the"Handycam" Handbook ........................ 63
Additional information
_ Troubleshooting .............................................................................. 64
Recording time of movies/number of recordable photos ............................... 66
Precautions ........................................................................................ 68
Specifications ..................................................................................... 70
Quick iL'efe_'ence
Screen indicators ................................................................................. 73
Parts and controls ................................................................................ 75
Index ................................................................................................ 78
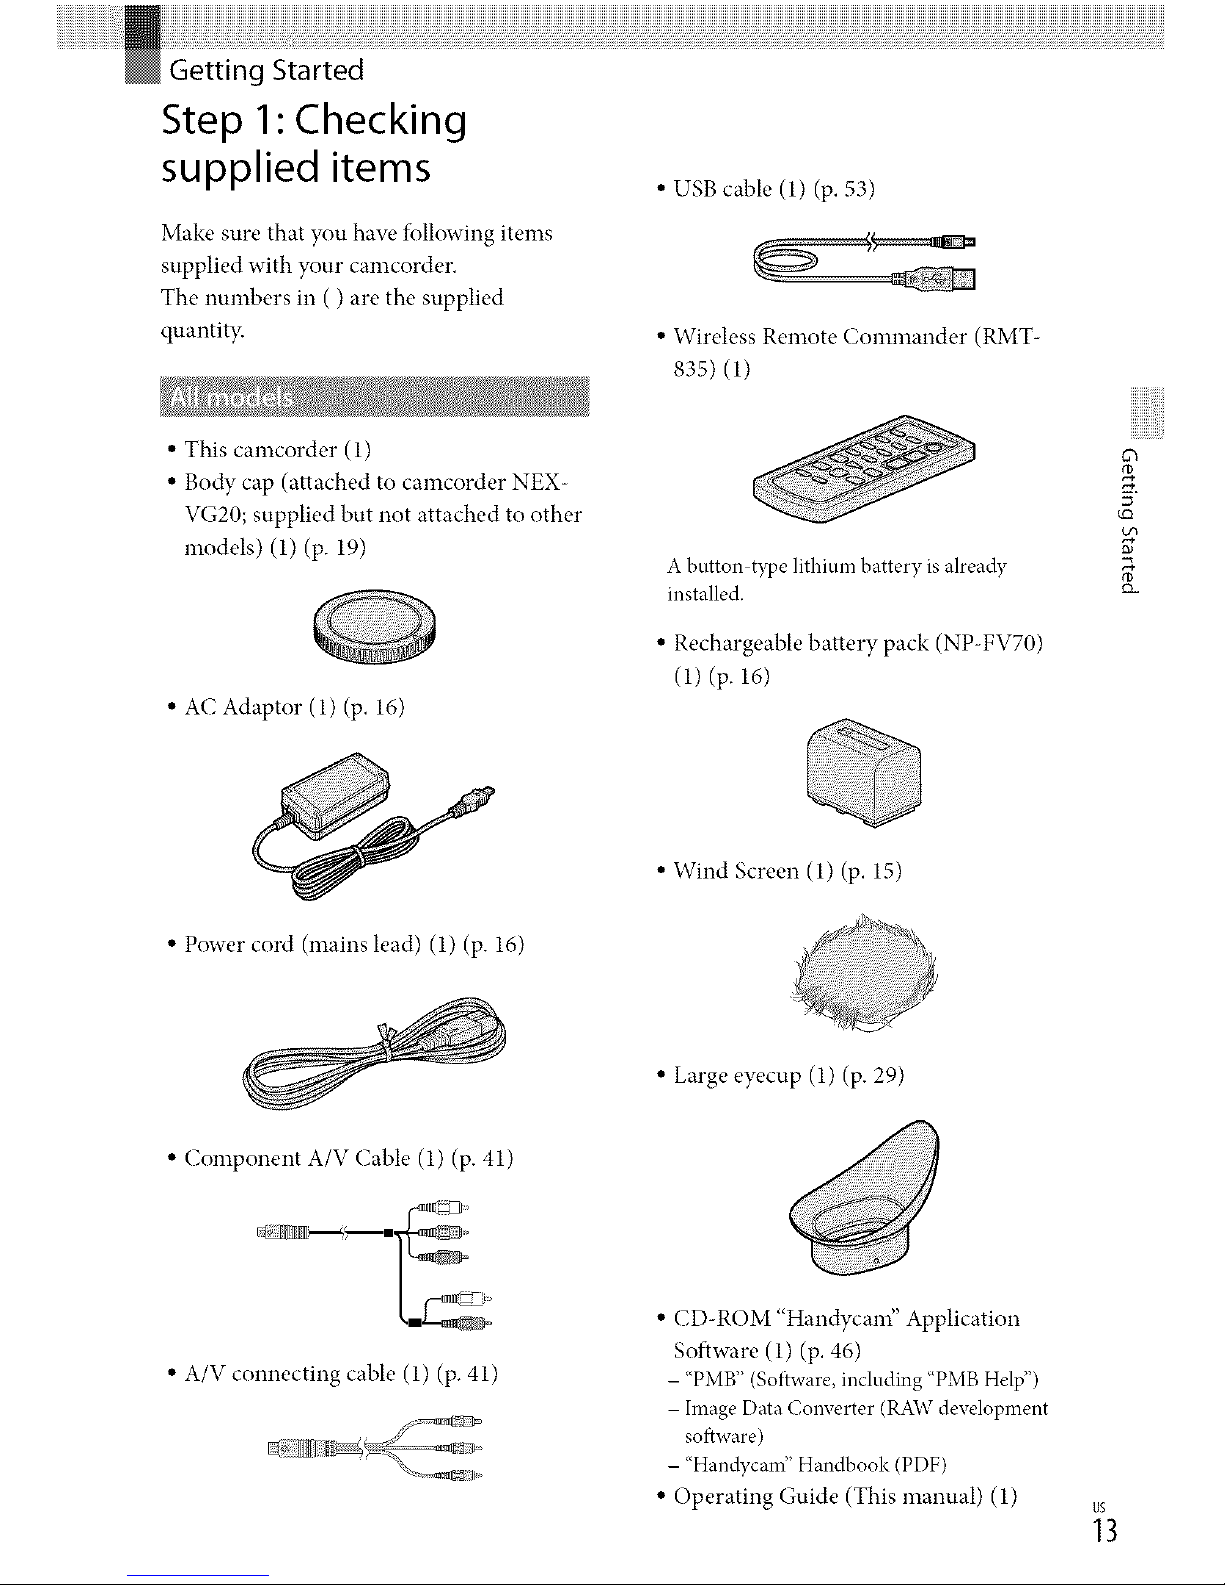
Step 1" Checking
supplied items
Make sure that you haw' following items
supplied with your camcorder,
The numbers in ( ) are the supplied
quantity.
• USB cable (1) (p. 53)
• Wireless Remote Commander (RMT-
835) (1)
• This camcorder (1)
• Body cap (attached to camcorder NEX-
VG20; supplied but not attached to other
models) (1) (p. 19)
• AC Adaptor (1) (p. 16)
A button-type litbiunl battery is already
installed.
• Rechargeable battery pack (NP-FV70)
(1) (p. 16)
5 ¸
• Power cord (mains lead) (1) (p. 16)
• Wind Screen (1) (p. 15)
• Component A/V (;able (1) (p. 41)
• A/V connecting cable (1) (p. 41)
• Large eyecup (1) (p. 29)
• CD-ROM "Handycam" Application
Software (1) (p. 46)
- "PMB" (So*_ware,including "PMBHelp")
- Image Data Converter (RAWdevelopment
software)
- "Handycam" Handbook (PDF)
• Operating Guide (This manual) (1)
_3
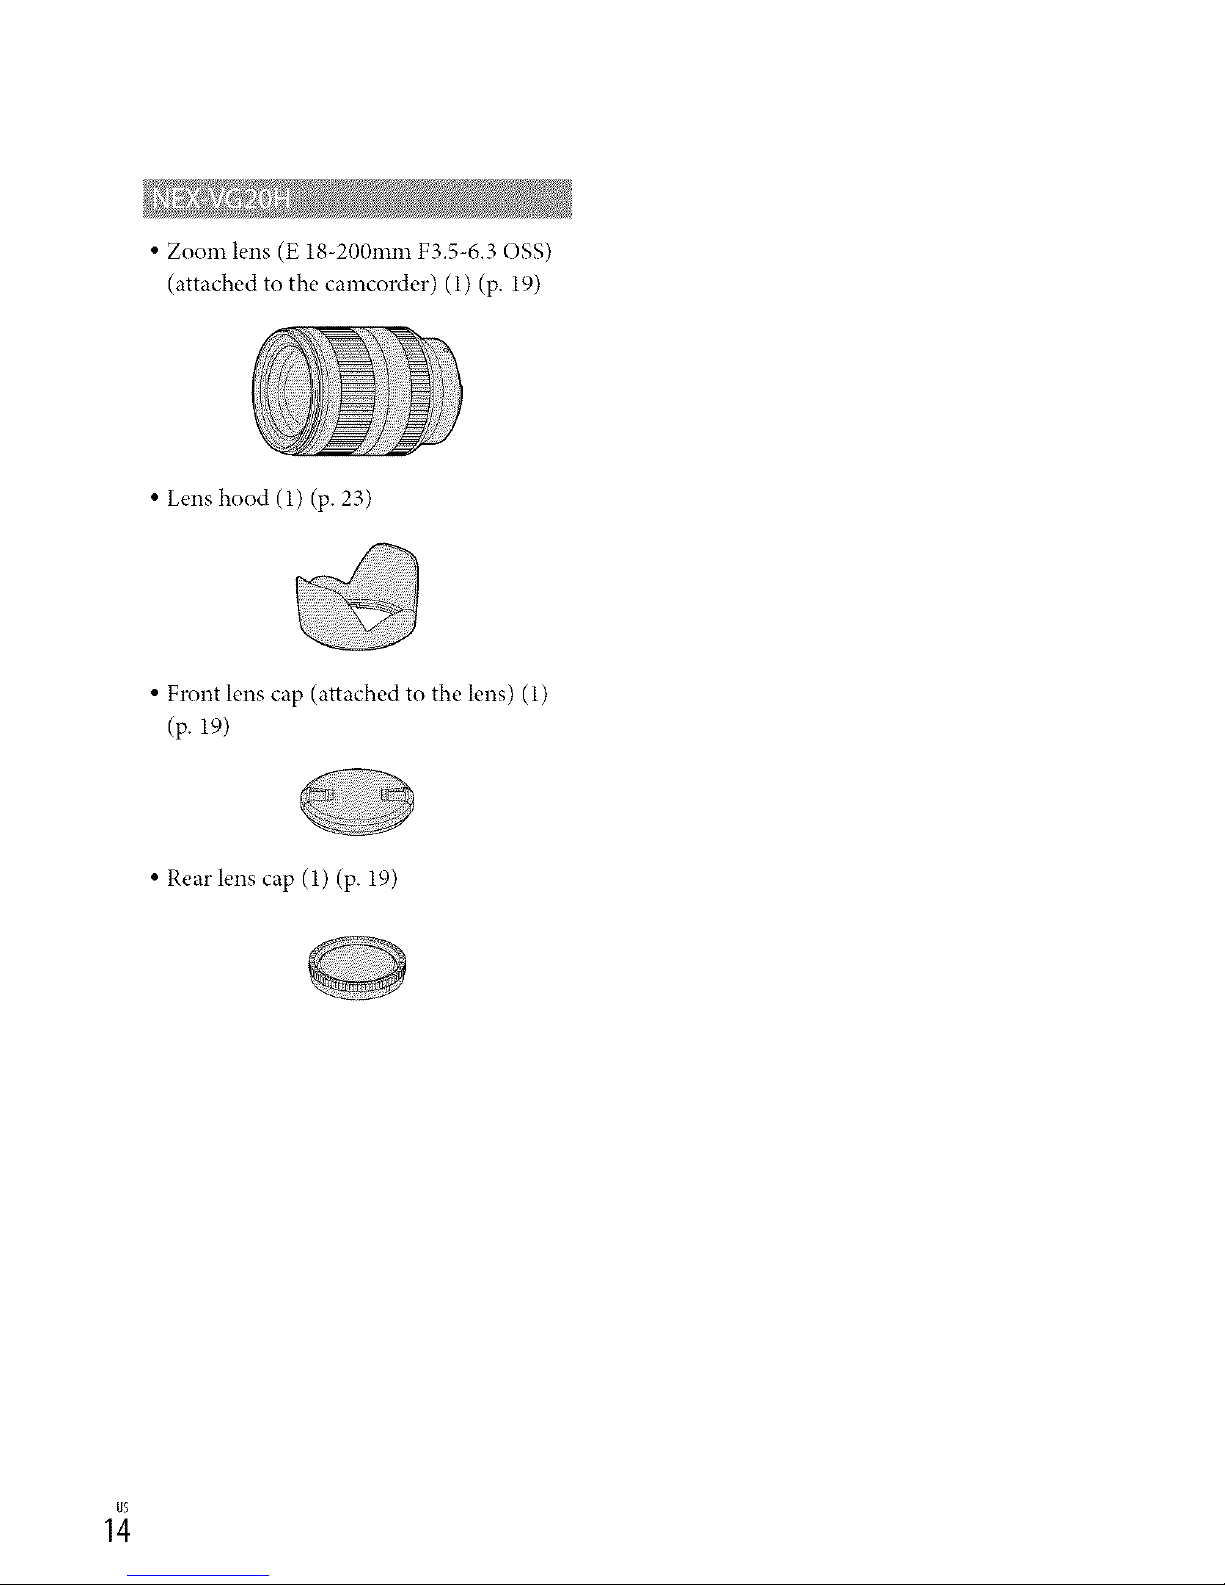
• Zoom lens (E 18-200ram F3.5-6.30SS)
(attached to the camcorder) (1) (p. 19)
• Lens hood (1) (p. 23)
• Front lens cap (attached to the lens) (1)
(p. 19)
• Rear lens cap (1) (p. 19)

Step 2: Attaching the
supplied accessories
See page 19fbr information on attaching
the lens. The NEX-VG20 does not come
with the E 18-200ram F3.5-6.3 OSS
lens. Please use appropriate lenses (sold
separately).
For NEX-VG20H models, the lens is
attached to the camcorder at the time of
purchase.
Use the Wind Screen when you want to
reduce the wind noise recorded by the
microphone. Attach the "Wind Screen with
the Sony logo facing down.
5 ¸
_5
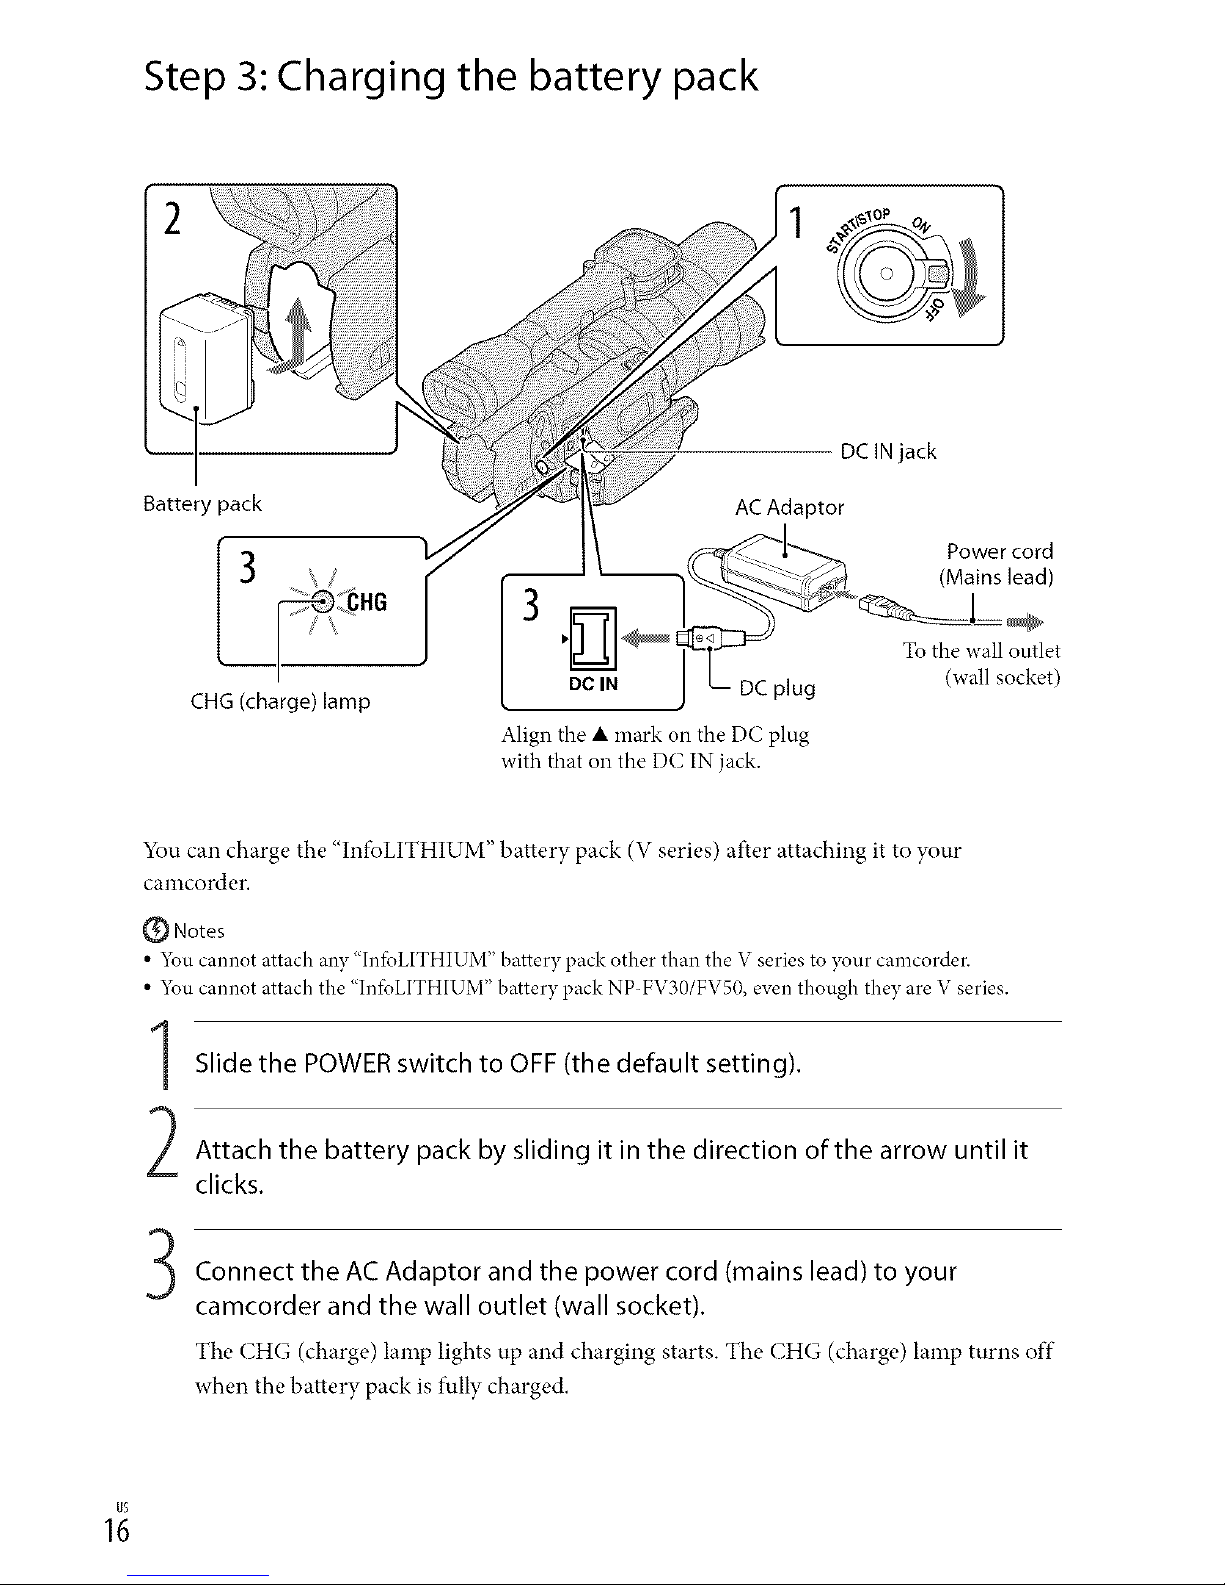
Step 3: Charging the battery pack
Battery pack
3
_
CHG(charge) lamp
Align the • mark on the DC plug
with that on the DC IN jack.
You can charge the "Inti_LITHIUM" battery pack (V series) after attaching it to your
camcorder.
Notes
• 5_u cannot attach any "Ini(_LITHIUM" battery pack other than the V series to your camcorder.
• 5_ucannot attach the "Inik_LITHIUM"battery pack NP-FV30/FVS0,eventhough they are Vseries.
Slide the POWER switch to OFF (the default setting).
Attach the battery pack by sliding it in the direction of the arrow until it
clicks.
Connect the AC Adaptor and the power cord (mains lead) to your
camcorder and the wall outlet (wall socket).
The CHG (charge) lamp lights up and charging starts. The CHG (charge) lamp turns off
when the battery pack is fully charged.
1;

When the battery is charged, disconnect the AC Adaptor from the DC IN
jack of your camcorder.
Charging time
Approximate time (rain.) required when you fully charge a fully discharged battery pack.
NP-FV70 (supplied) 195
NP-FV100 390
• The cbarging times shown in the table above are measured when charging the camcorder at a
temperature of 2._ C (//°F). It is recommended tbat you cbarge the battery in a temperature range of
10 °C to 30 °C (50 °F to 86 °F).
OTips
• See page 66 on recoMing and playing time.
• When your camcorder is on, you can check the approximate amount of remaining battery power with the
remaining battery indicator at the upper right on the LCD screen.
To remove the battery pack
Slide the POWER switch to OFF. Slide the BATT (battery) release lever ((!)) and remove the
battery pack (@).
5 ¸
BATT (battery) release lever
To use a wall outlet (wall socket) as a power source
Make the same connections as "Step 3: Charging the battery pack" (p. 16). Even if the battery
pack is attached, the battery pack is not discharged.
_7
Notes on the battery pack
• When you remove the battery pack or disconnect the A(" Adaptor, turn the camcorder off and make sure
that the 11_ (Movie)/l_ (Photo) lamps (p. 33), the access lamp (p. 30) are turned ofi-i
• The CHG (charge) lamp flashes during charging under the fbllowing conditions:
- The battery pack is not attached correctl?_
- The battery pack is damaged.
- The temperature of the battery pack islow.
Remove the battery pack f)_om your camcorder and put it in a warm place.
- The temperature of the battery pack ishigh.
Remove the battery pack f)_om your camcorder and put it in a cool place.
• In the default setting, the power turns offautomatically if you leave your camcorder without any
operation fbr about 5 minutes, to save battery power ([A. Shut Off]).
Notes on the AC Adaptor
• Use the nearby wall outlet (wall socket) when using the A(" Adaptor. Disconnect the A(" Adaptor f)_om
the wall outlet (wall socket) immediately if any malftmction occurs while using your camcorder.
• Do not use the AC Adaptor placed in a narrow space, such as between a wall and furniture.
• Do not short circuit the DC plug of the AC Adaptor or battery terminal with any metallic objects. This
may cause a malf_.mction.
Note on the power cord (Mains lead)
The power cord (Mains lead) is designed specifically for use with this camcorder only, and should not be
used with other electrical equipment.
You can charge the battery pack in any countries/regi0ns using the AC Adaptor SUpplied with
y0ur Camc0rder within the AC !00 V : 240 V, 50 Hzi60 Hz range.
,,Do notuse an electronicvo!tage transformer.
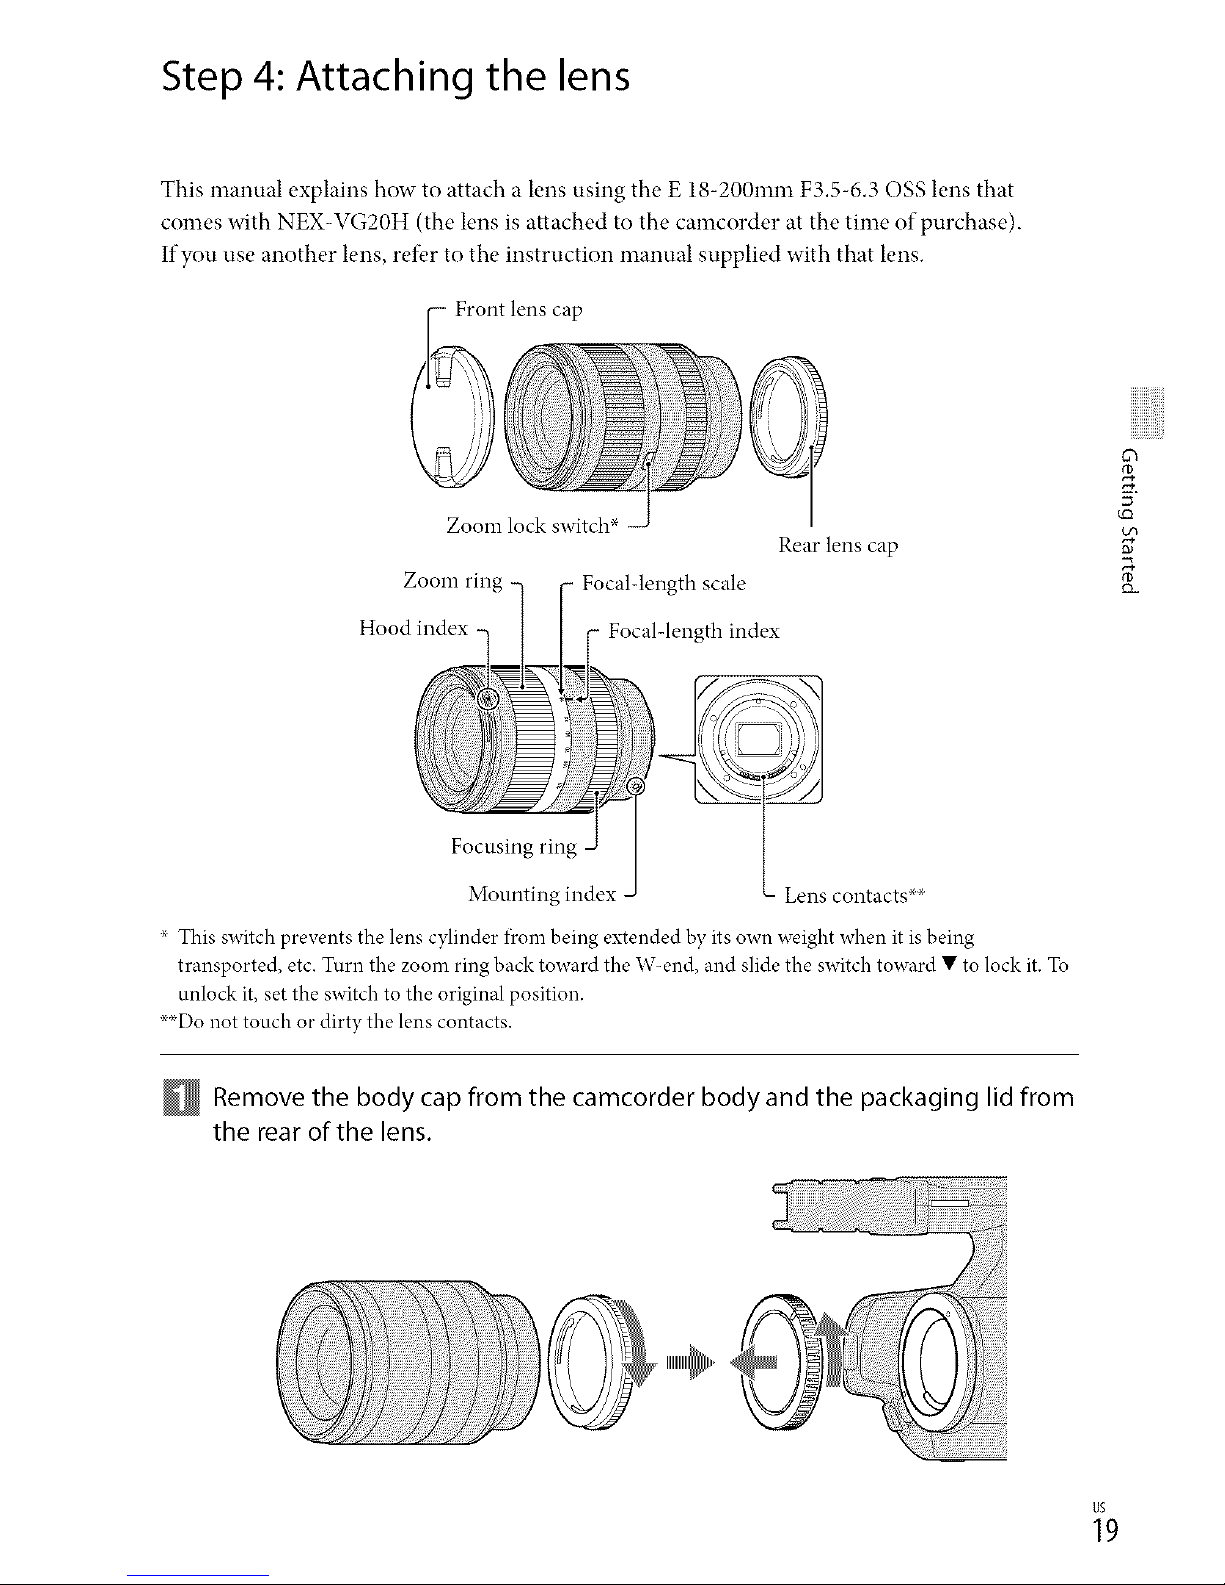
Step 4: Attaching the lens
This manual explains how to attach a lens using the E 18-200ram F3.5-6.3 OSS lens that
comes with NEX-VG20H (the lens is attached to the camcorder at the time of purchase).
If you use another lens, ref_,rto the instruction manual supplied with that lens.
Zoom lock switch*
Rear lens cap
Zoom ring Focal-length scale
Focal-length index
o_
5 ¸
Focusing ring
Mounting index Lens contacts `×`×
x This switch prevents the lens cylinder fi'om being extended by its own weight when it is being
transported, etc. Turn the zoom ring back toward the W<nd, and slide the switch toward • to lock it. Tu
unlock it, set the switch to the original position.
>×Do not touch or dirty the lens contacts.
Remove the body cap from the camcorder body and the packaging lid from
the rear of the lens.
_9
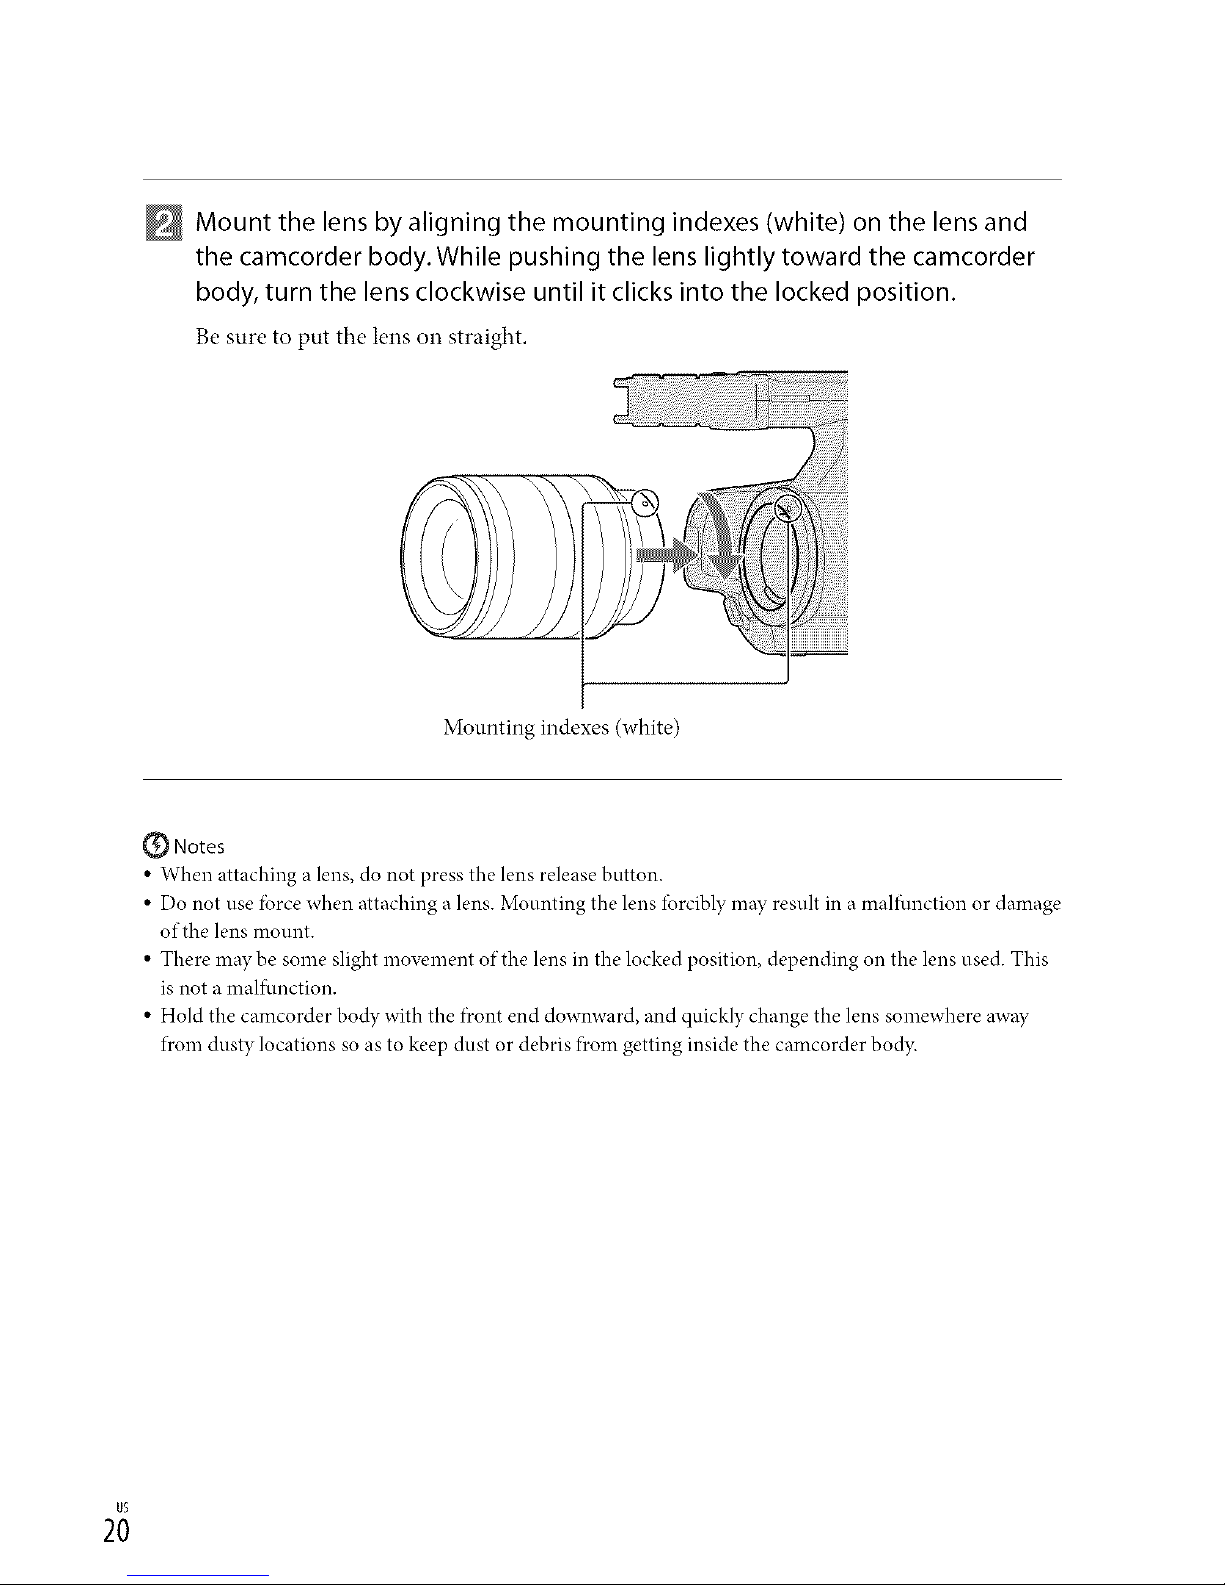
Mount the lens by aligning the mounting indexes (white) on the lens and
the camcorder body. While pushing the lens lightly toward the camcorder
body, turn the lens clockwise until it clicks into the locked position.
Be sure to put the lens on straight.
Mounting indexes (white)
@ Notes
• When attaching a lens, do not press the lens release button.
• Do not use fbrce when attaching a lens. Mounting the lens lbrcibly may result in a maliunction or damage
of the lens mount.
• There maybe some slight movement of the lens in the locked position, depending on the lens used. This
is not amalf_.mction.
• Hold the camcorder bo@ with the f)contend downward, and quickly change the lens somewhere away
fl'om dusty locations so as to keep dust or debris f?comgetting inside the camcorder body.
2;
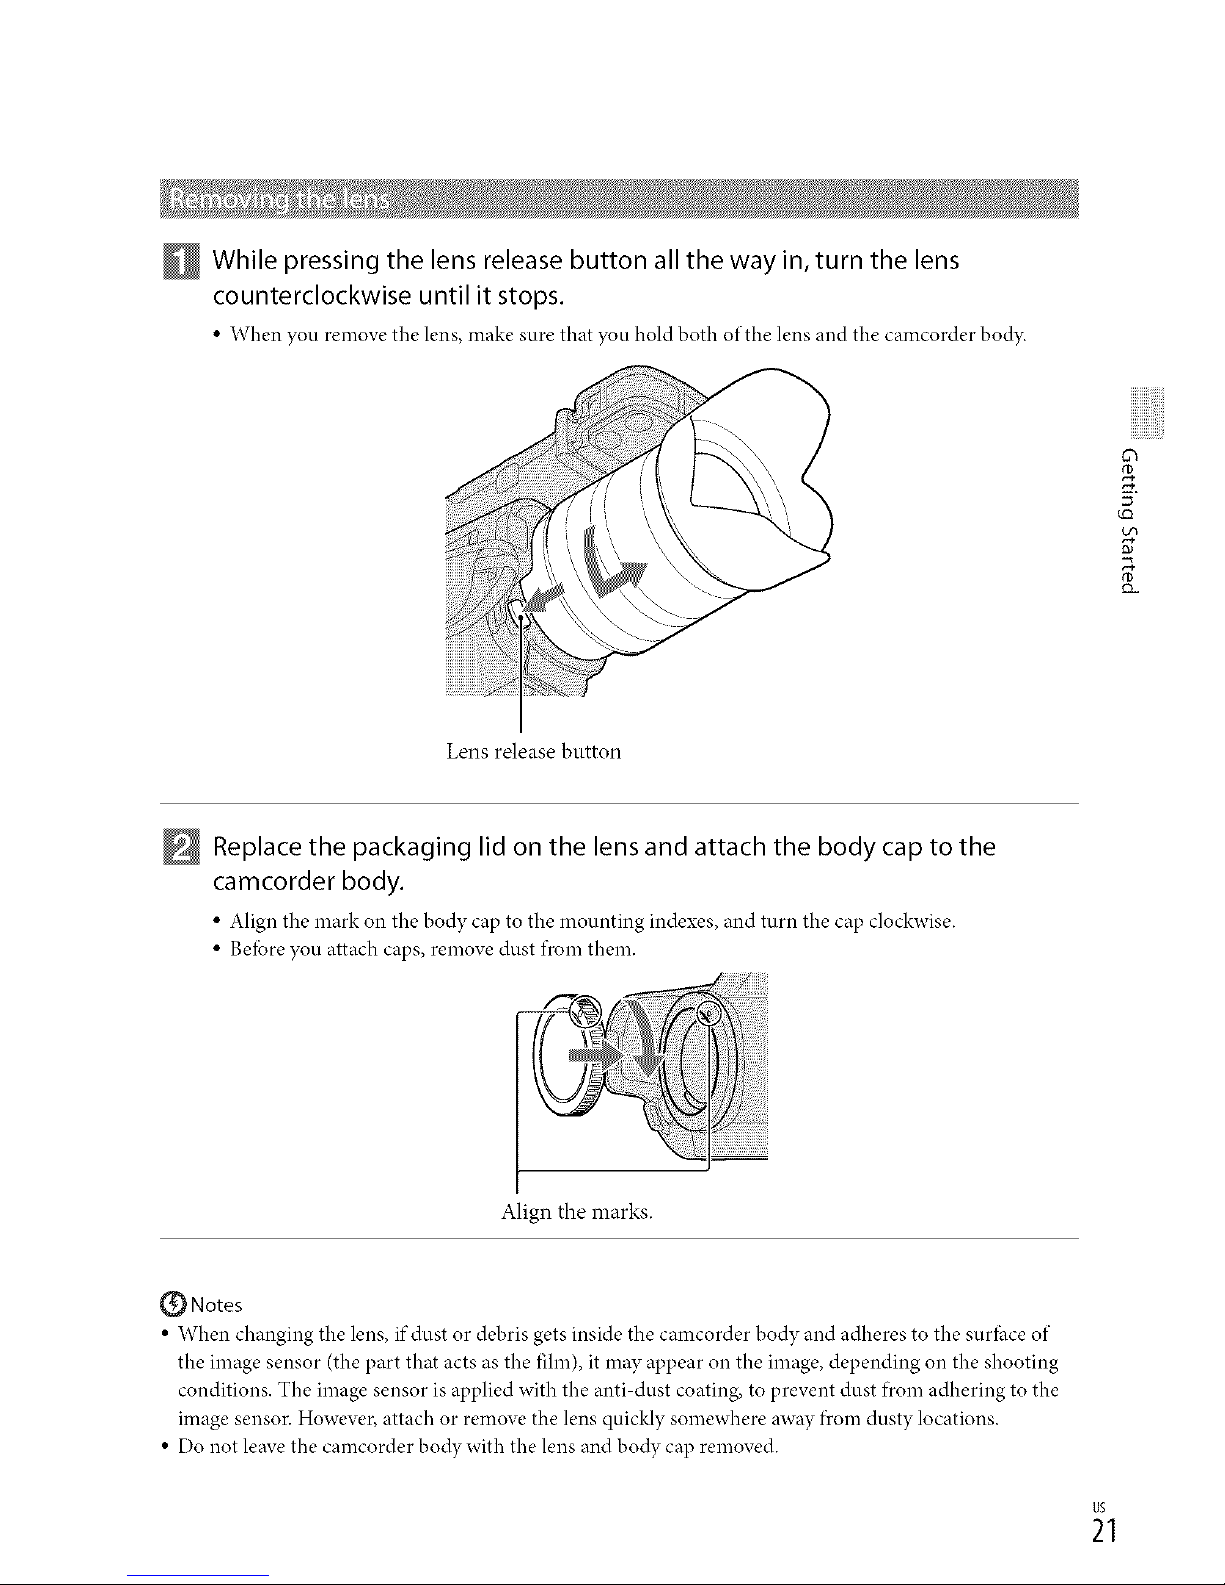
While pressing the lens release button all the way in, turn the lens
counterclockwise until it stops.
• When you removethe lens,make sure that you holdboth of thelens and the camcorder body.
v0
5 ¸
tm
Lens release button
N Replace the packaging lid on the lens and attach the body cap to the
camcorder body.
• Align the mark o,1the body cap to the mounting indexes,and turn thecap clockwise.
• Beforeyouattach caps,remove dust fl'om them.
!i!i!!i i ii iiiiiiiiiiiii!iii ii!'!i ilii ii ii ii !ii! ii!iiS!i
Align the marks.
{_ Notes
• When changing the lens, if dust or debris gets inside the camcorder body and adheres to the surihce of
the image sensor (the part that acts as the fihn), it may appear on the image, depending on the shooting
conditions. The image sensor is applied with the anti dust coating, to prevent dust ficom adhering to the
image sensor. However, attach or remove the lens quicldy somewhere away fl'om dusty locations.
• Do not leave the camcorder bo@ with the lens and bo@ cap removed.
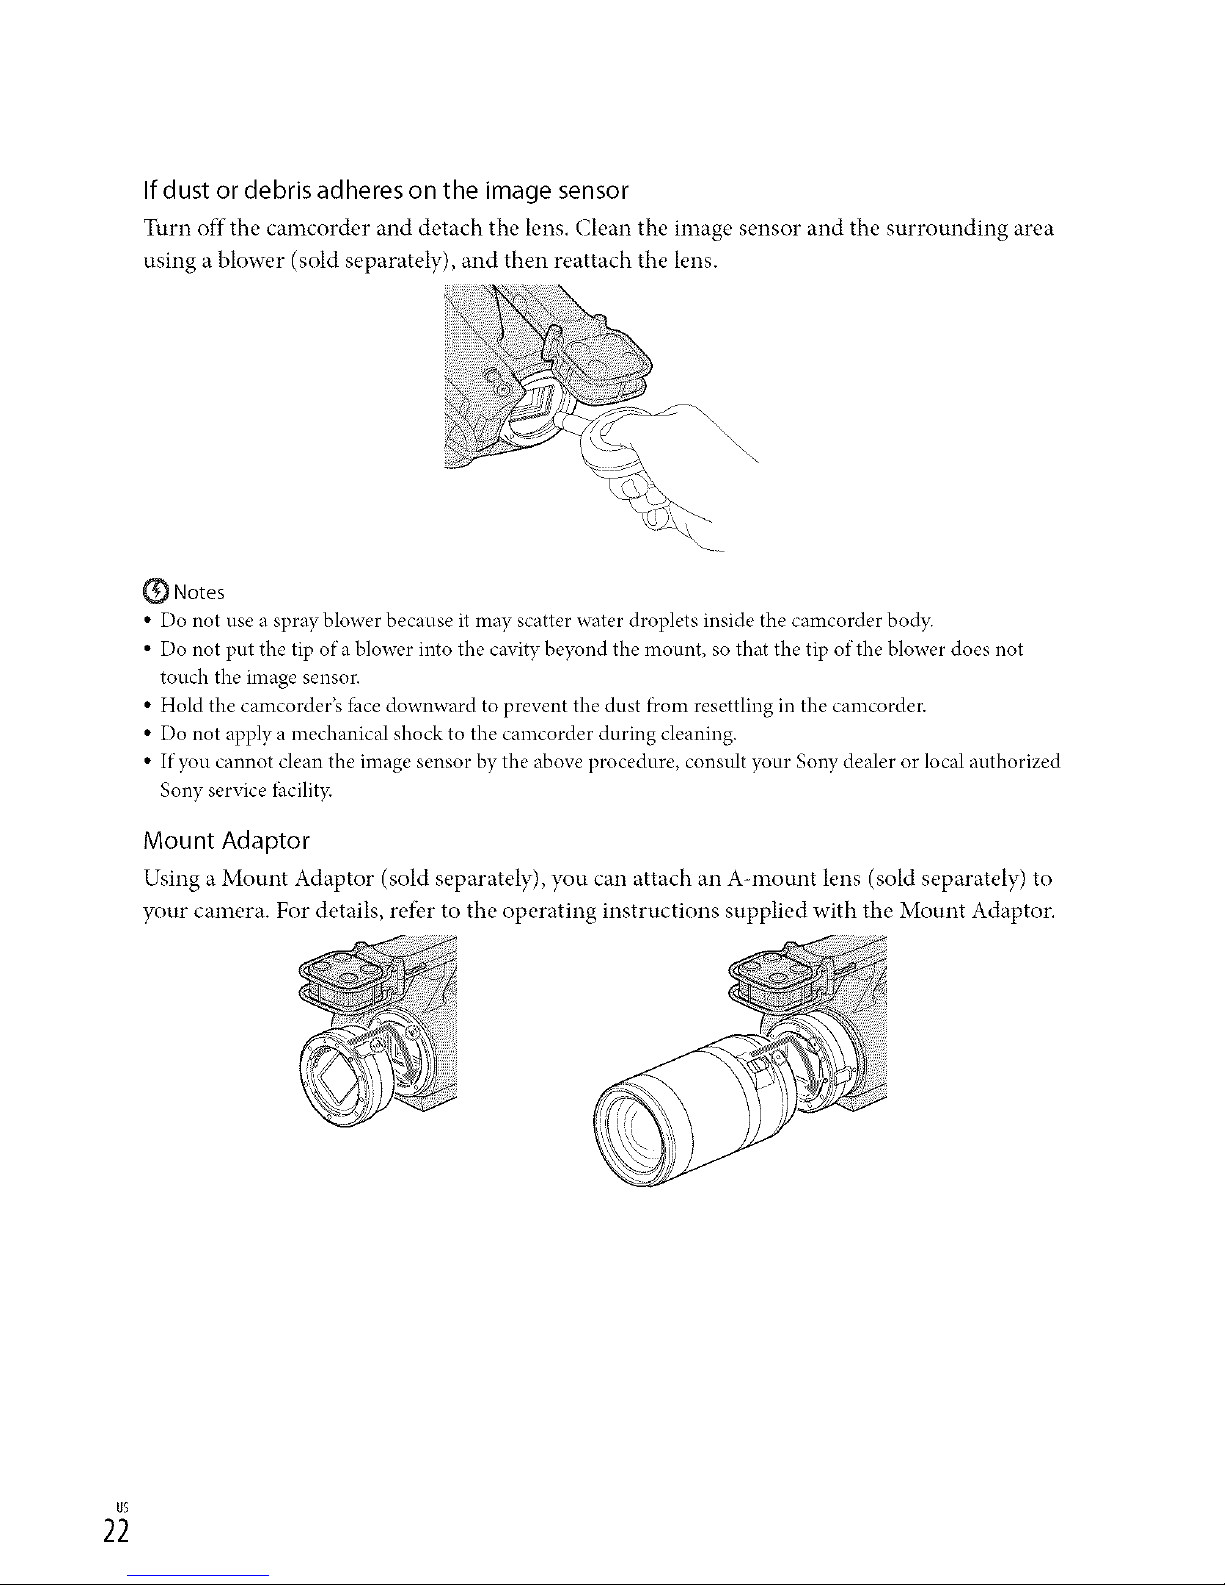
If dust or debris adheres on the image sensor
Turn off the camcorder and detach the lens. Clean the image sensor and the surrounding area
using a blower (sold separately), and then reattach the lens.
Q Notes
• Do not use a spray blower because it may scatter water droplets inside the camcorder body.
• Do not put the tip of a blower into the cavity beyond the mount, so that the tip of the blower does not
touch the image sensor.
• Hold the camcorder's lhce downward to prevent the dust f)comresettling in the camcorder.
• Do not apply a mechanical shock to the camcorder during cleaning.
• If you cannot clean the image sensor by the above procedure, consult your Sony dealer or local authorized
Sony service lhcilit3c
Mount Adaptor
Using a Mount Adaptor (sold separately), you can attach an A-mount lens (sold separately) to
your camera. For details, refer to the operating instructions supplied with the Mount Adaptor.
The available functions differ depending on the Mount Adaptor type.
Autofoeus Available with SAM/ Available
SSM lens only _
AF system Contrast AF Phase-detection AF
AF/MF Select Switchable on the lens SAM/SSM lenses: switchable on the lens
Other lenses: switchable on the FOCUS
button
Autofocus Mode (Only Single Single/Continuous
photo mode)
With LA-EA1, autofocus s reed with an Ammunt lens attached will be slower compared to an E-mount
lens. (When an Ammunt lens is attached, the autofocus speed will be about 2seconds to 7 seconds, when
shooting under SoW measurement condition. The speed may vary depending on the subject, ambient
light, etc.)
Q Notes
• Some lenses may not be usable or may have limited functionality. Check the dedicated support web site or
consult your local authorized Son?, service facility on compatible lenses.
• The sound of the lens and the camera in operation maybe recorded during movie recording. You can
avoid this by setting Audio Rec Level to minimum. Touch _ (MENU) --_ [Camera/Mic] --_
[Q%,( ®%,Microphone)] --+ [Audio Rec Level].
• It may take a long time or may be difficult tbr the camera to focus, depending on the lens used or the
subject.
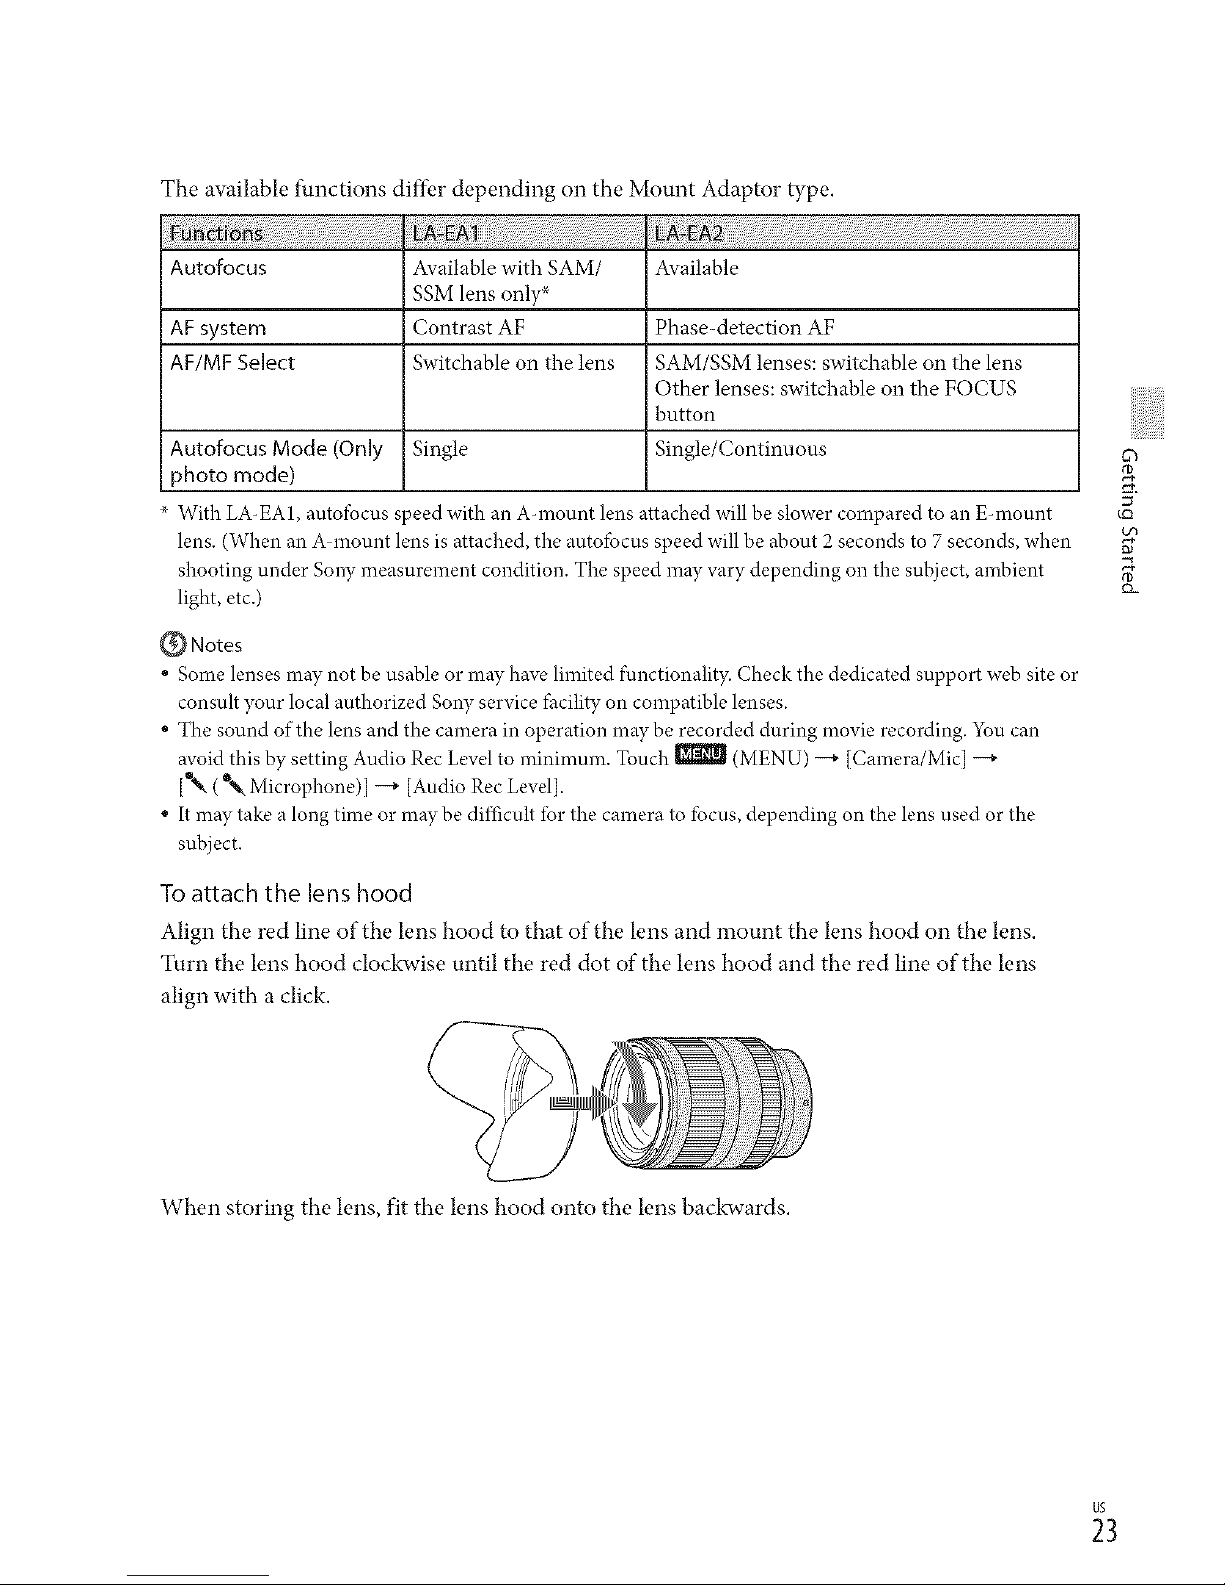
To attach the lens hood
Align the red line of the lens hood to that of the lens and mount the lens hood on the lens,
Turn the lens hood clockwise until the red dot of the lens hood and the red line of the lens
align with a click,
tO
g_
When storing the lens, fit the lens hood onto the lens backwards.
_3
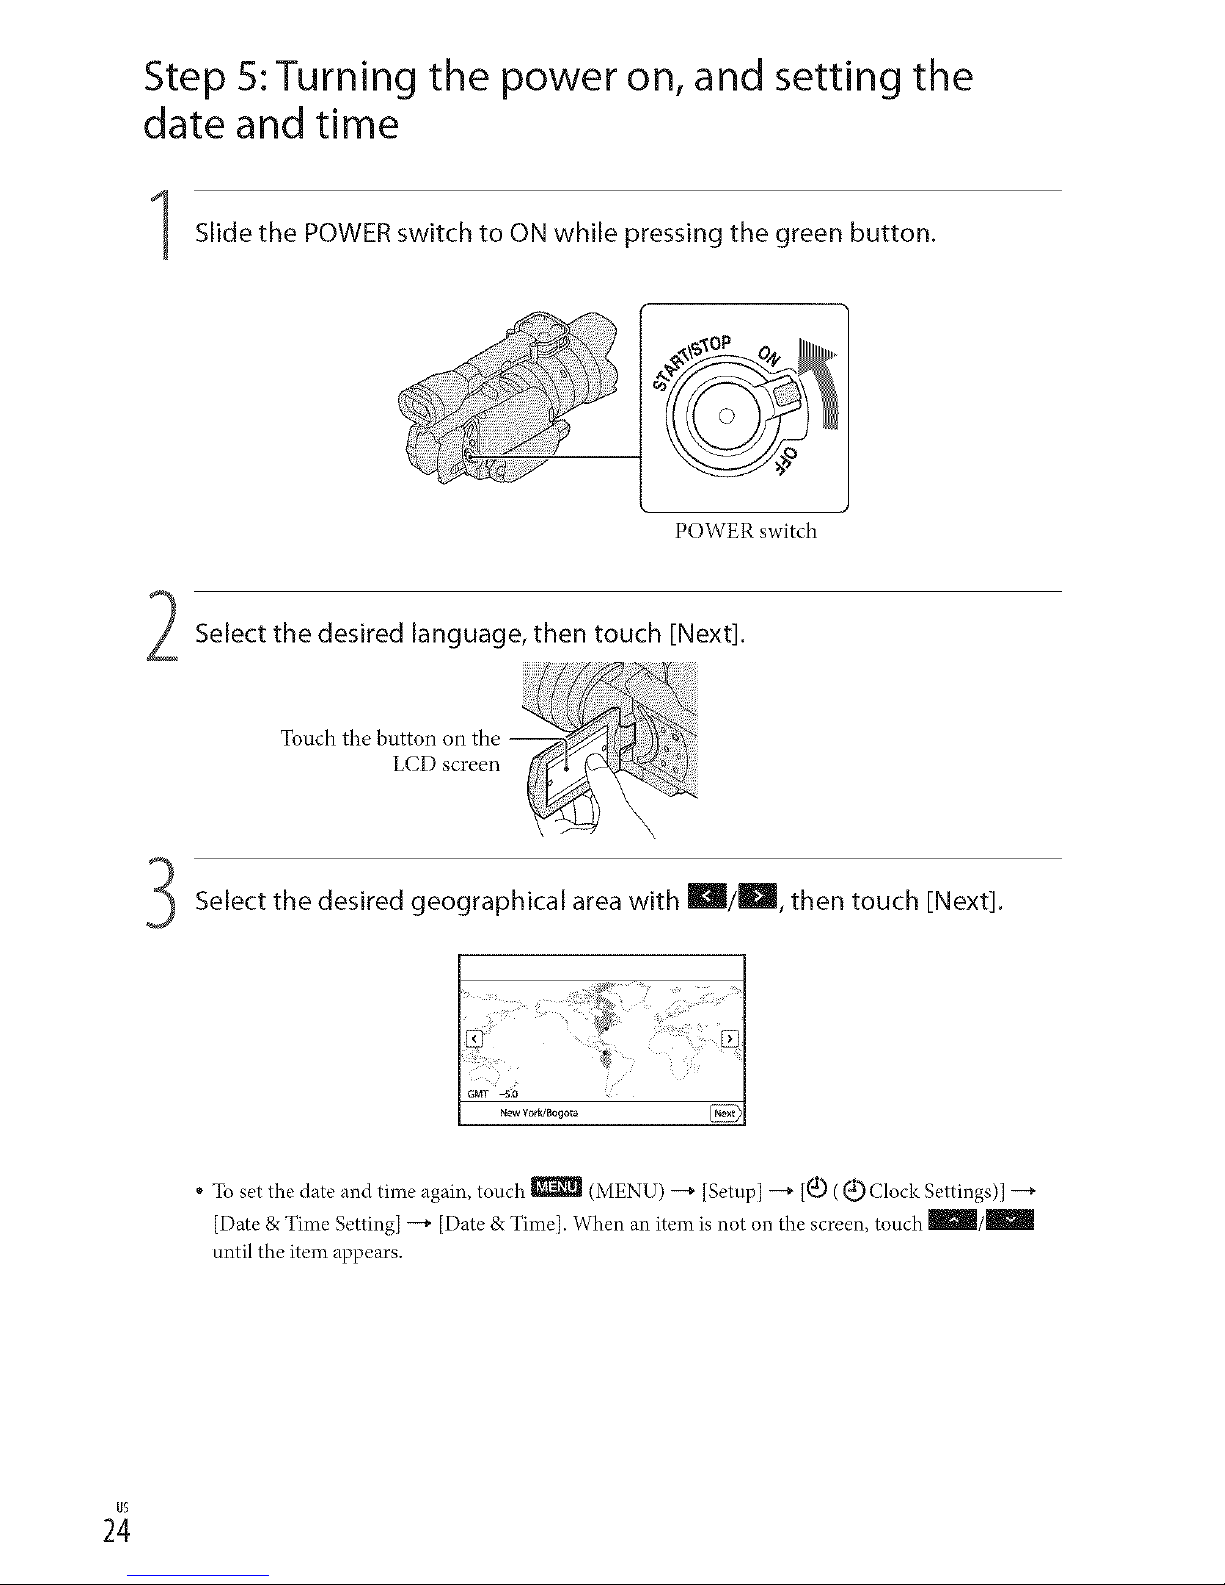
Step 5: Turning the power on, and setting the
date and time
Slide the POWER switch to ON while pressing the green button.
POWER switch
Select the desired language, then touch [Next].
Touch the button on the
LCD screen
Select the desired geographical area with Ik_l/l_, then touch ENext].
" To set the date and time again, touch _ (MENU) --+ [Setup] --+ [_(_.)((d_)Clock Settings)] --+
[Date & Time getting] --+ [Date & Time]. When an item is not on the screen, touch mmil/IBIm
until the item appears.
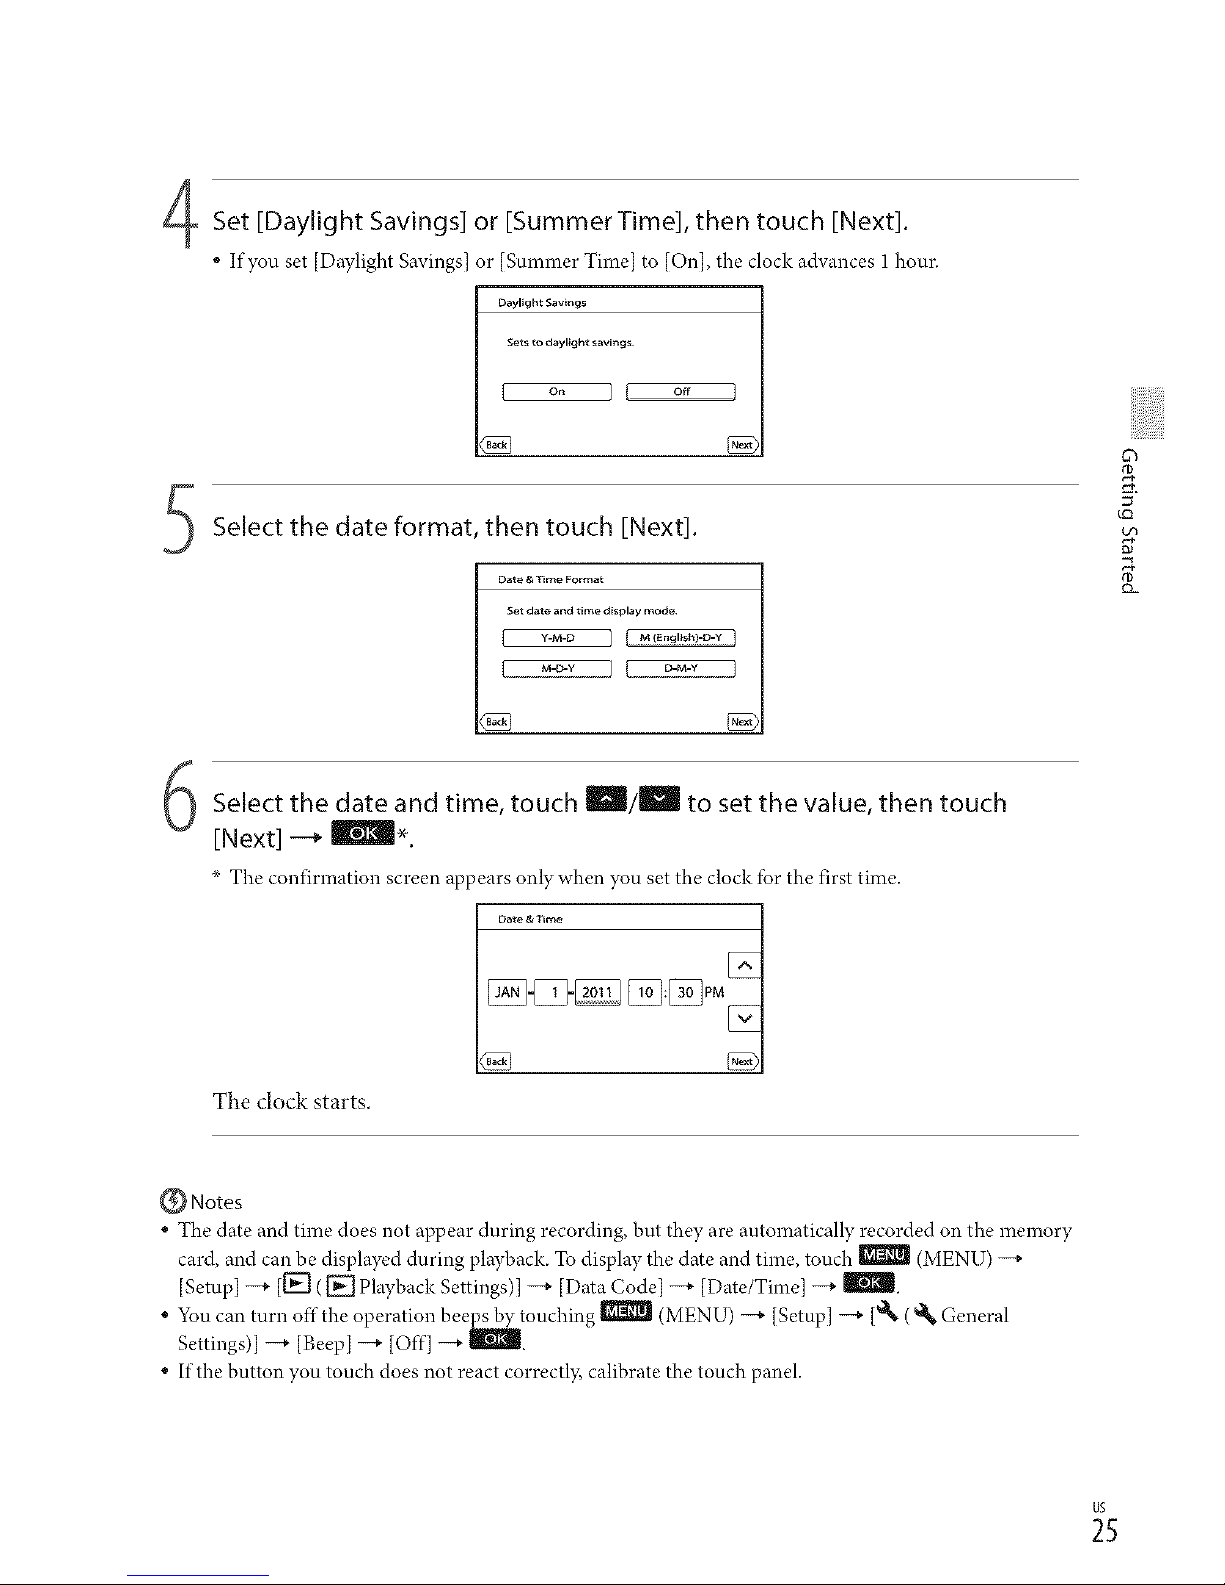
Set [Daylight Savings] or [SummerTime], then touch [Next].
* If you set [Daylight Savings] or [Summer Time[ to [On], the clock advances 1hour.
Daylight Sa_i,_9_
_ts to daylight s_vmg_
Select the date format, then touch [Next].
I Date &Time Format
Set data and time display mode
Select the date and time, touch _/_ to set the value, then touch
[Next] -_ _.
_ The confirmation screen appears only when you set the clock for the first time.
Da_e&Time
The clock starts.
Notes
• The date and time does not appear during recording, but they are automatically recorded on the memory
card, and can be displayed during playback. To display the date and time, touch _ (MENU) --_
[Setup] -+ [[_(_ Playback Settings)] --_ [Data Code] --+ [Date/Time] --_ _.
• You can turn off the operation beeps by touching _ (MENU) --+ [Setup] --+ [_ ( _t_ General
Settings)] -+ [Beep] -+ [Off] --+ _.
• Ifthe button you touch does not react correctly, calibrate the touch panel.
_5
To turn offthe power
Slide the POWER switch to OFE
The 11_ (Movie) lamp flashes for a few seconds and the cmncorder is turned off.
You Canchange the omscreen displays to show messages in a specified language.
Touch _ (MENU) _ [Setup] _[*_k ( _ General Settings)] _ [Language Setting] _a
desired language _ _ _ _ _ _.
2;
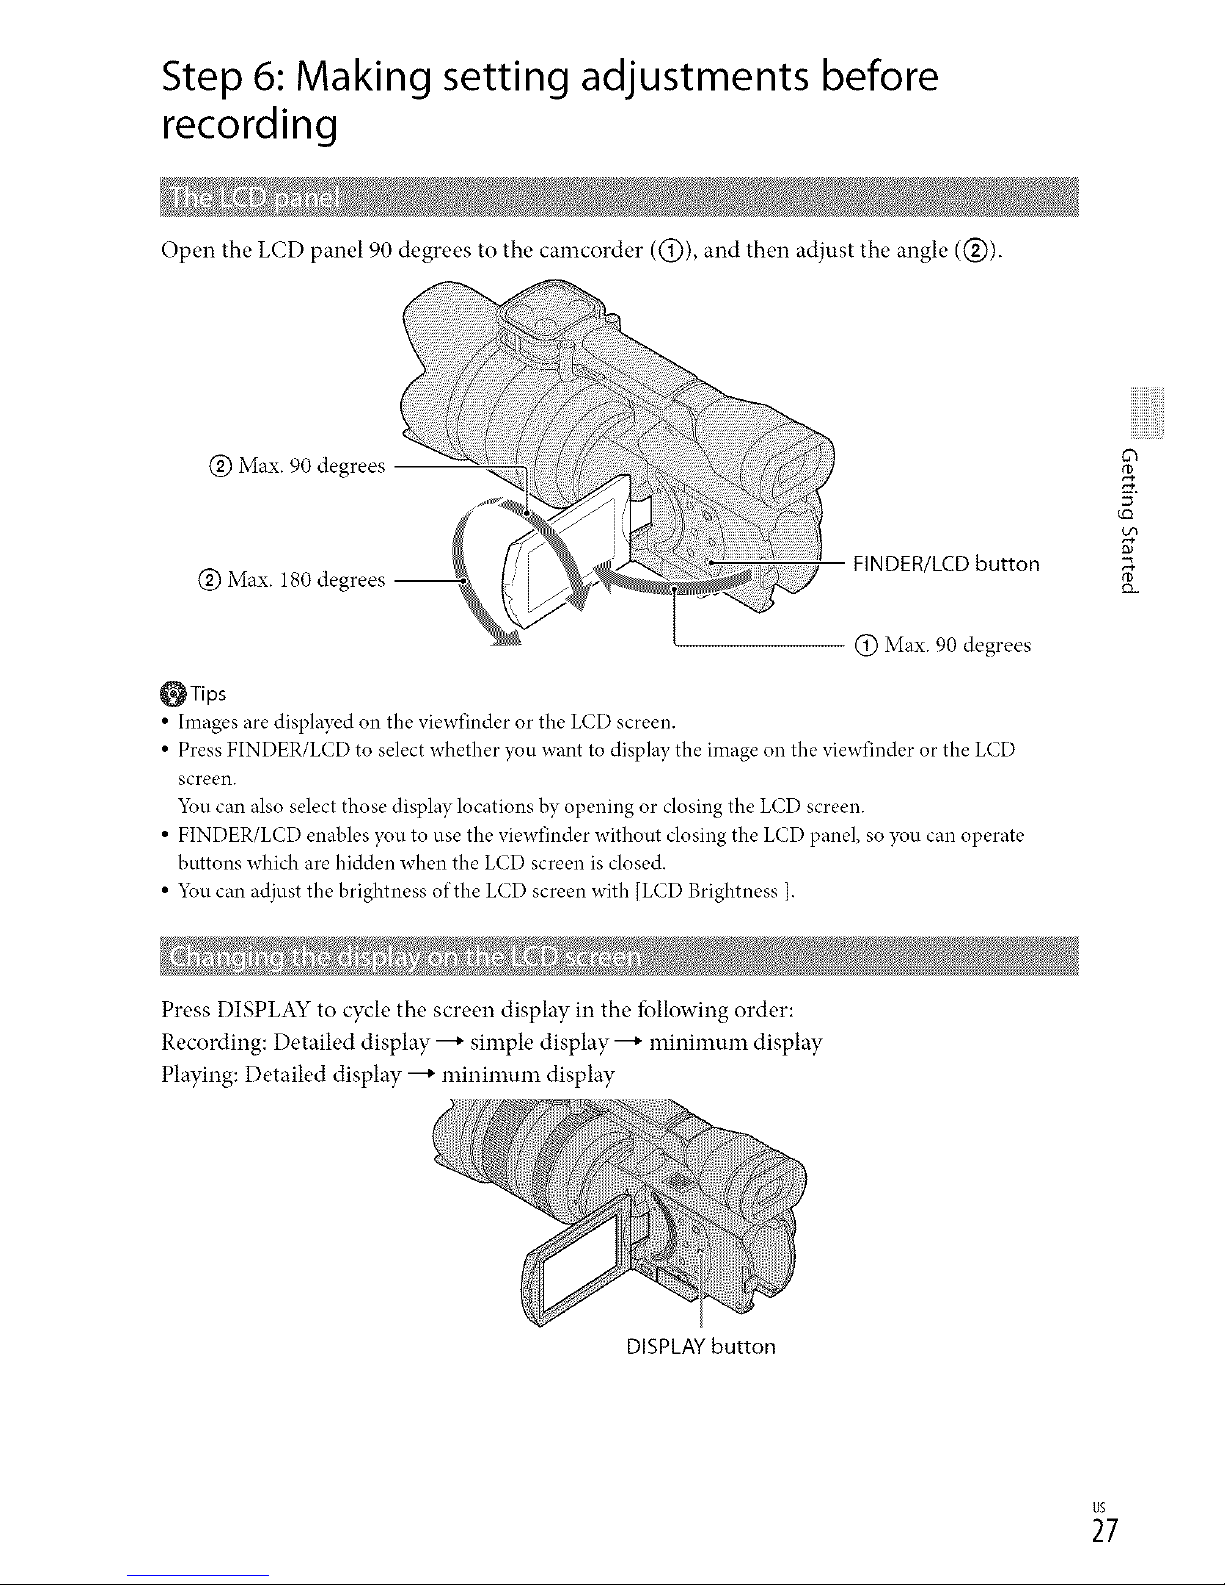
Step 6: Making setting adjustments before
recording
Open the LCD panel 90 degrees to the camcorder ((_)), and then adjust the angle (@).
@Max. 90 degrees
@Max. 180 degrees --
-..4
FINDER/LCD button
@Max. 90 degrees
_Tips
• Images are displayed on the viewfinder or the LCD screen.
• Press FINDER/LCD to select whether you want to display the image on the viewfinder or the LCD
screen.
5_u can also select those display locations by opening or closing the LCD screen.
• FINDER/LCD enables you to use the viewfinder without closing the LCD panel, so you can operate
buttons which are hidden when the LCD screen is closed.
• 5_u can adjust the brightness of the LCD screen with [LCD Brightness ].
0_
5 ¸
tm
Press DISPLAY to cycle the screen display in the fbllowing order:
Recording: Detailed display ---+simple display ---+minimum display
Playing: Detailed display ---+minimum display
DISPLAY button
_7
_Tips
• In the defhult setting, the screen display changes to the simple display after about 4 seconds ([Display
Setting]). The display changes to the detailed display when you touch anywhere on the screen except the
buttons on the LCD screen so that you can use items.
I
about 4sec I÷:
[N after
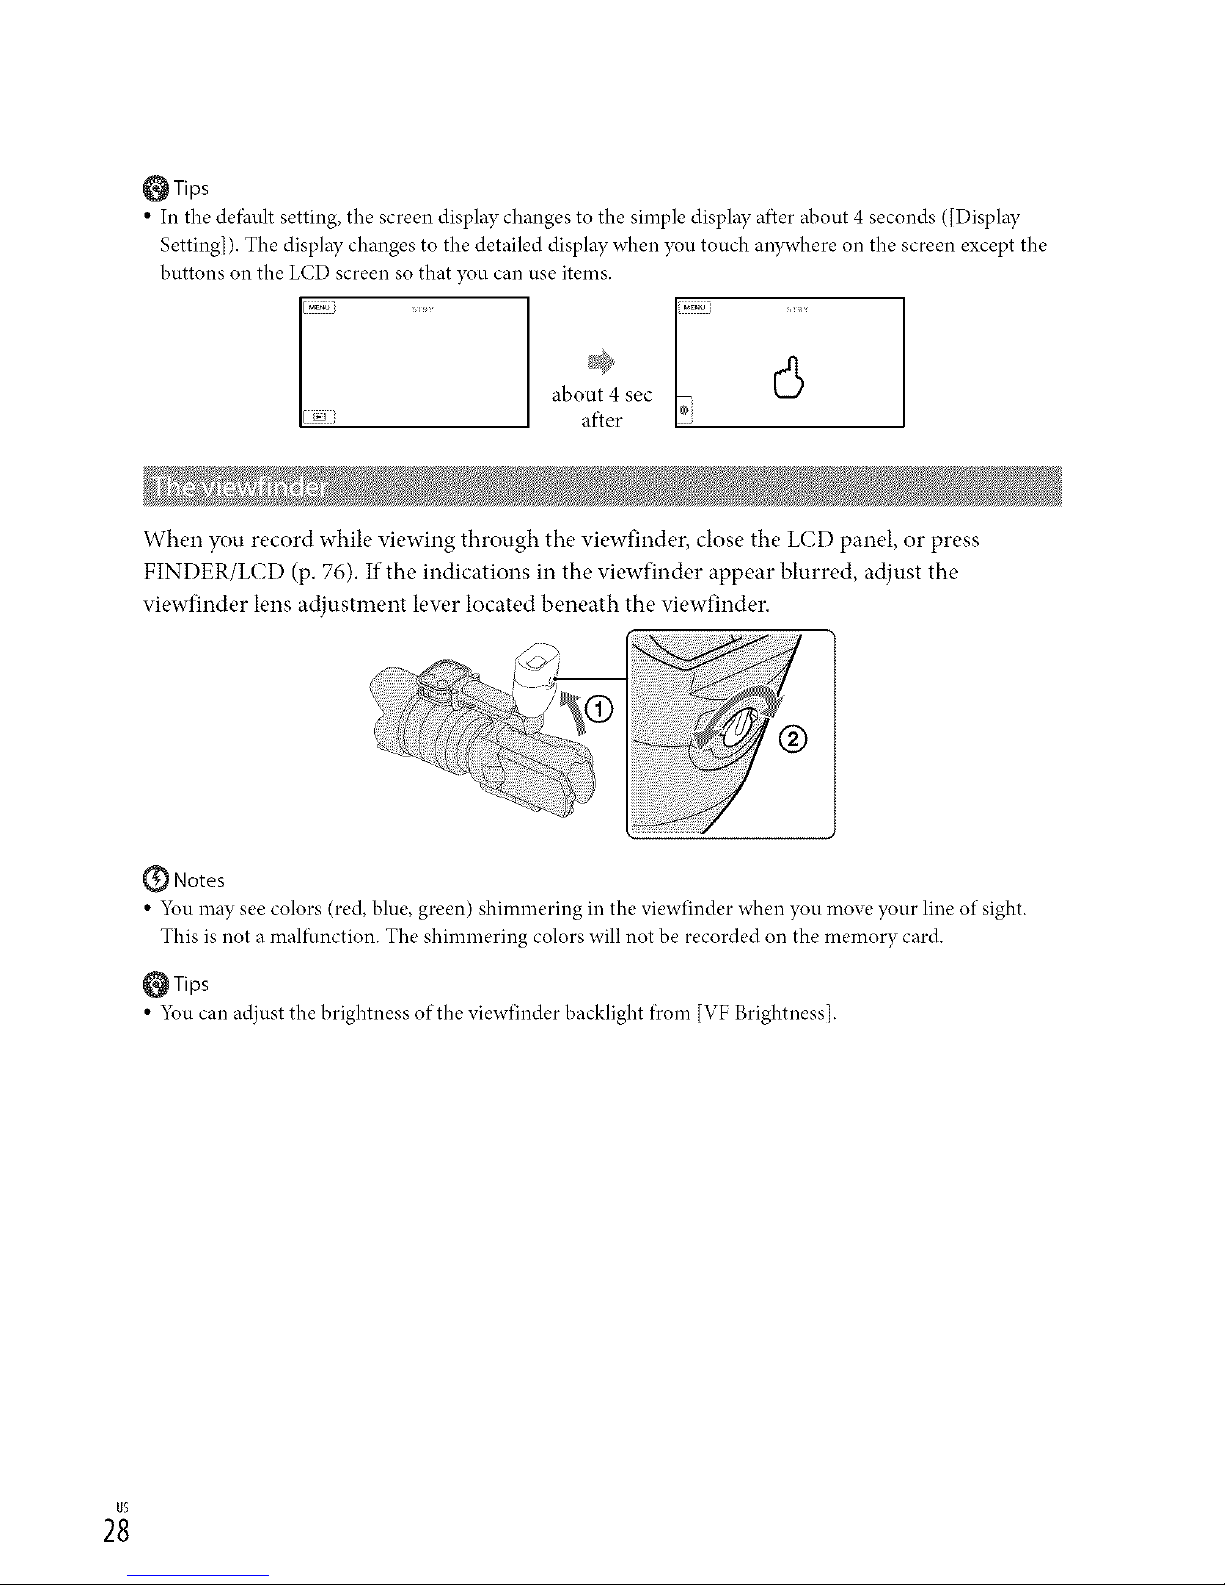
When you record while viewing through the viewfinder, close the LCD panel, or press
FINDER/LCD (p. 76). If the indications in the viewfinder appear blurred, adjust the
viewfinder lens adjustment lew,r located beneath the viewfinder.
@ Notes
• 5_u may see colors (red, blue, green) shimmering in the viewfinder when you move },our line of sight.
This is not a malfunction. The shimmering colors will not be recorded on the memory card.
_Tips
• 5_u can adjust the brightness of the viewfinder backlight from [VF Brightness].

If the image is not clear in the viewfinder
If you cannot see the picture in the viewfinder clearly under bright circumstances, use the
supplied large eyecup. To attach the large eyecup, stretch it slightly and align it with the
eyecup groow, in the viewfinder. You can attach the large eyecup facing either the right or left
side.
Large eyecup (supplied)
Attach the projection to be
straight.
5 ¸
{_ Notes
• Do not remove the pre-attached eyecup.
_9
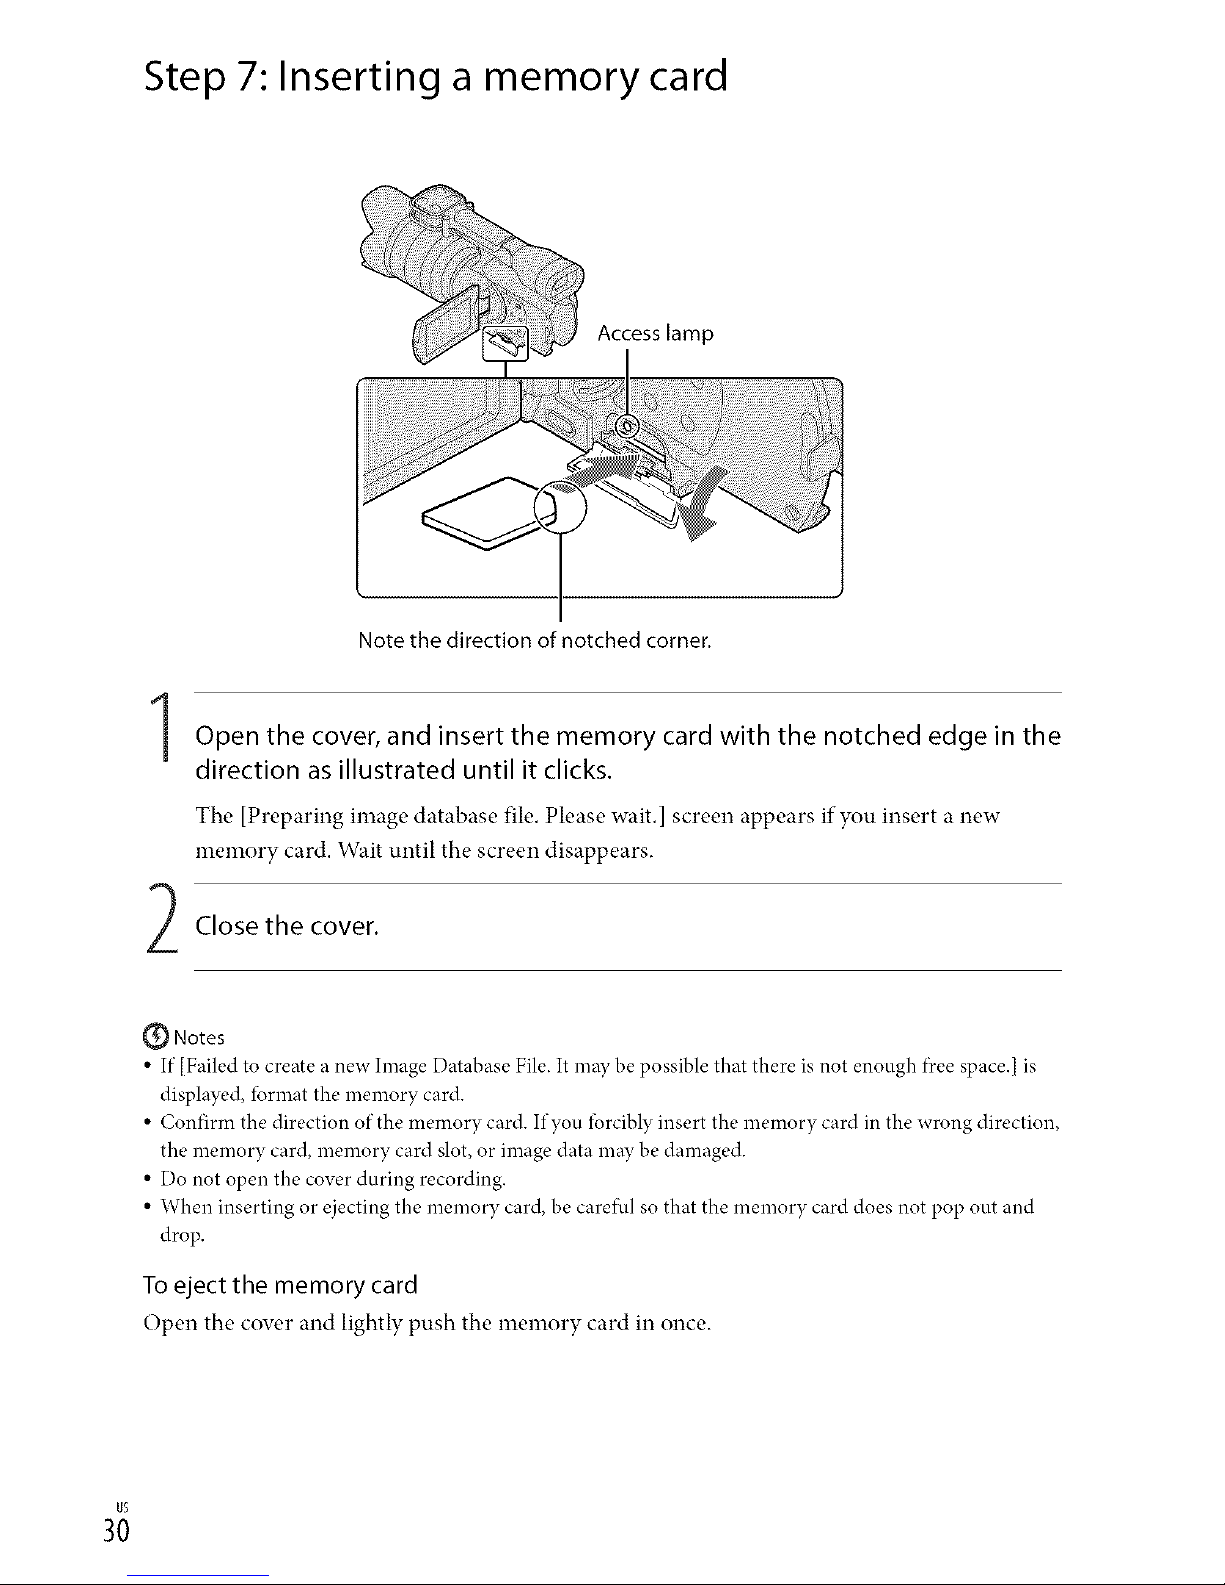
Step 7: Inserting a memory card
I
Note the direction of notched corner.
Open the cover, and insert the memory card with the notched edge in the
direction as illustrated until it clicks.
The [Preparing image database file. Please wait.] screen appears if you insert a new
memory card. Wait until the screen disappears.
Close the cover.
(_ Notes
• If [Failed to create a new hnage Database File. It may be possible that there is not enough f)ceespace.[ is
displayed, lbrmat the memory card.
• Confirm the direction of the memory card. If you forcibly insert the memory card in the wrong direction,
the memory card, memory card slot, or image data may be damaged.
• Do not open the cover during recording.
• When inserting or ejecting the memory card, be caret_d so that the memory card does not pop out and
drop.
To eject the memory card
Open the cover and lightly push the memory card in once.
 Loading...