

Sony Handycam MPK-TRV2 Operating Instructions Manual

Sony MPK-TRV2 (EN,F) 3-859-264-1X
3-859-264-11 (1)
Operating Instructions
Mode d’emploi
1997 by Sony Corporation
MPK-TRV2
Marine Pack
EN
F

2
Sony MPK-TRV2 (EN,F) 3-859-264-1X
T
W
Zoom indicator
in the viewfinder
We recommend you use a wide-conversion lens (not
supplied) when using the marine pack.
Features ........................................................................................ 2
Supplied accessories................................................................... 3
Precautions .................................................................................. 4
Labeling the parts and controls ................................................ 5
Position of the adaptor and the remote control cable ........... 6
Notes on the O-ring .................................................................... 8
Attaching the video camera recorder to the marine pack .... 9
Recording................................................................................... 13
When the LEAK lamp flashes................................................. 14
Removing the video camera recorder ................................... 15
Underwater recording ............................................................. 16
Specifications............................................................................. 17
Prerecording checklist.............................................................. 17
Table of contents
Features
English
This mark indicates that this
product is a genuine accessory for
Sony video products. When
purchasing Sony video products,
Sony recommends that you
purchase accessories with this
“GENUINE VIDEO
ACCESSORIES” mark.
The MPK-TRV2 marine pack allows the following
8 mm video camera recorders to be used underwater.
CCD-TR44
CCD-TR54
CCD-TR64
CCD-TR66
CCD-TR74
CCD-TR78
CCD-TR84
CCD-TR86
CCD-TR88
CCD-TR94
CCD-TR96
CCD-TR98
CCD-TR99
CCD-TR200
CCD-TR300
CCD-TR500
CCD-TR514
CCD-TR555
CCD-TR614
CCD-TR710*
CCD-TR714
CCD-TR814
CCD-TR910*
CCD-TR916
CCD-TR930
CCD-TR2300*
CCD-TR3000*
CCD-TR3300*
CCD-TR3400
• Recording at a depth of 246 feet (75 meters) is
possible.
• The following operations can be performed
underwater.
Power on/off
Auto focusing on/off (Only models marked with *)
Recording start/stop
Power zooming
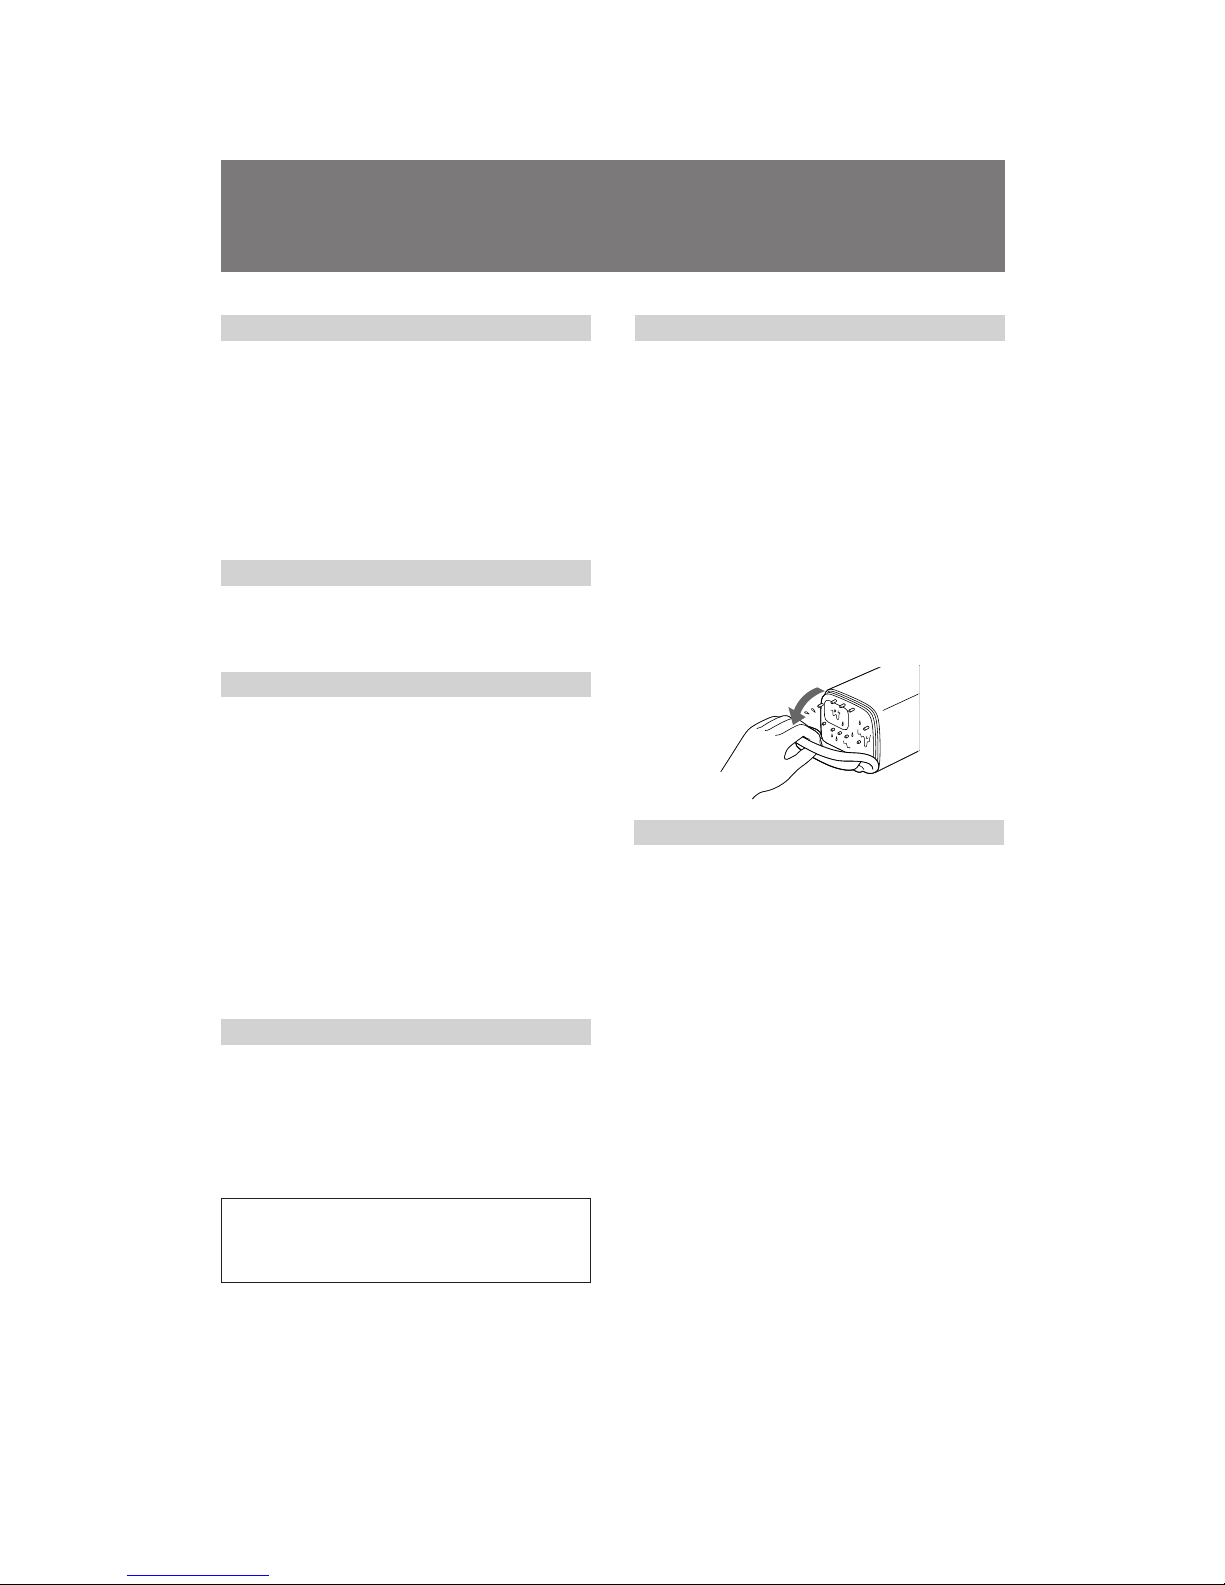
If there are specks or dust in focus on the front glass of
the marine pack, move the power zoom lever towards
the T (telephoto) side slightly so that the zoom indicator
inside the viewfinder moves towards T. (See the
illustration below.)
WARNING
This equipment has been tested and found to comply with
the limits for a Class B digital device, pursuant to Part 15 of
the FCC Rules. These limits are designed to provide
reasonable protection against harmful interference in a
residential installation. This equipment generates, uses, and
can radiate radio frequency energy and, if not installed and
used in accordance with the instructions, may cause
harmful interference to radio communications. However,
there is no guarantee that interference will not occur in a
particular installation. If this equipment does cause harmful
interference to radio or television reception, which can be
determined by turning the equipment off and on, the user is
encouraged to try to correct the interference by one or more
of the following measures:
–Reorient or relocate the receiving antenna.
–Increase the separation between the equipment and
receiver.
–Connect the equipment into an outlet on a circuit
different from that to which the receiver is
connected.
–Consult the dealer or an experienced radio/TV
technician for help.
You are cautioned that any changes or modifications not
expressly approved in this manual could void your
authority to operate this equipment.
CCD-TRV11
CCD-TRV12
CCD-TRV21
CCD-TRV22
CCD-TRV30
CCD-TRV32
CCD-TRV33
CCD-TRV40
CCD-TRV41*
CCD-TRV52
CCD-TRV53
CCD-TRV62
CCD-TRV70
CCD-TRV72
CCD-TRV81*
CCD-TRV82
CCD-TRV101
CCD-TRV112
CCD-TRV212
CCD-TRV312
CCD-TRV512

3
Sony MPK-TRV2 (EN,F) 3-859-264-1X
Supplied accessories
EN
F
E
Adaptor A (1)
Adaptor B (1)
Adaptor C (1)
Mounting screw plate (1)
O-rings (2)
Grease (1)
Accessory belt (1)
Viewfinder adaptor (1)
4
Sony MPK-TRV2 (EN,F) 3-859-264-1X
Precautions
On the video camera recorder
Take care not to expose the equipment to salty air. Do not
drip water on the equipment.
• Do not open the marine pack while at sea or at the
seaside. Preparations such as installing and checking the
equipment should be made in a place with low humidity
and no salty air.
• When a video camera recorder is to be used near the sea
for a long time, we recommend that it be checked
periodically by a Sony dealer.
• If the equipment becomes wet, take it immediately to the
nearest Sony dealer for preventive maintenance.
On the video camera recorder power source
We recommend you use battery packs with a large capacity.
However, in some cases battery packs NP-99/4500/F930
cannot be attached to the video camera recorder.
On the marine pack
• If you open and join the front and rear shells in a place
with high temperature and high humidity, moisture
condensation may occur when you put the marine pack in
the water, causing the front glass to fog.
• The waterproof integrity of the marine pack is maintained
by the O-ring, and the groove and surface where it
touches. Be especially careful not to damage or deform
that area.
• Do not leave the marine pack under direct sunlight for a
long period of time, otherwise the temperature in the
marine pack may rise and the equipment inside may be
damaged.
• If you cannot avoid leaving the marine pack under direct
sunlight, be sure to cover the marine pack with a towel or
other protection.
• Do not throw the marine pack into the water. Lower it
gently into the water.
On recording underwater
• Check that the equipment operates correctly and that
there is no water leak at a depth of about 3 feet (one
meter) before you dive deeper.
• Be sure to follow the safety rules for diving, such as
diving period and depth.
• Remove the bubbles from the outside of the front glass.
Sony does not accept liability for damage to the video
camera recorder, battery, etc. in the marine pack or for
the loss of prerecorded material if water leak caused by
incorrect operation occurs.
On maintenance
After recording in the sea, submerge the marine pack with
the buckles tightly fastened in fresh water for a while to
remove the sea water. Then rinse it with fresh water and dry
it with a soft cloth.
• Every time you use the marine pack and the video camera
recorder underwater, clean the video camera recorder and
the inside of the marine pack with a dry soft cloth. Do not
use any type of solvent, such as alcohol or benzine for
cleaning, as this may damage the finish.
• When you store the marine pack, grease the O-ring and
put it in the groove correctly. Join the front and rear shells
then put in a cool place without fastening the buckles.
Avoid storing the marine pack in a hot or very cold place,
in a place subject to direct sunlight or excessive dust, or
together with naphthalene or camphor as. This will
damage the marine pack.
• If water comes between the rear shell and the rubber part,
remove the rubber and clean it with a dry soft cloth.
On transportation
• When transporting the marine pack, be sure to remove
the video camera recorder from the marine pack.
• When transporting the marine pack by air or by car, use a
marine pack carrying case (not supplied).
5
Sony MPK-TRV2 (EN,F) 3-859-264-1X
F
O
C
U
S
A
U
T
O
O
N
/
O
F
F
REC LEAK
S
T
A
N
D
B
Y
L
O
C
K
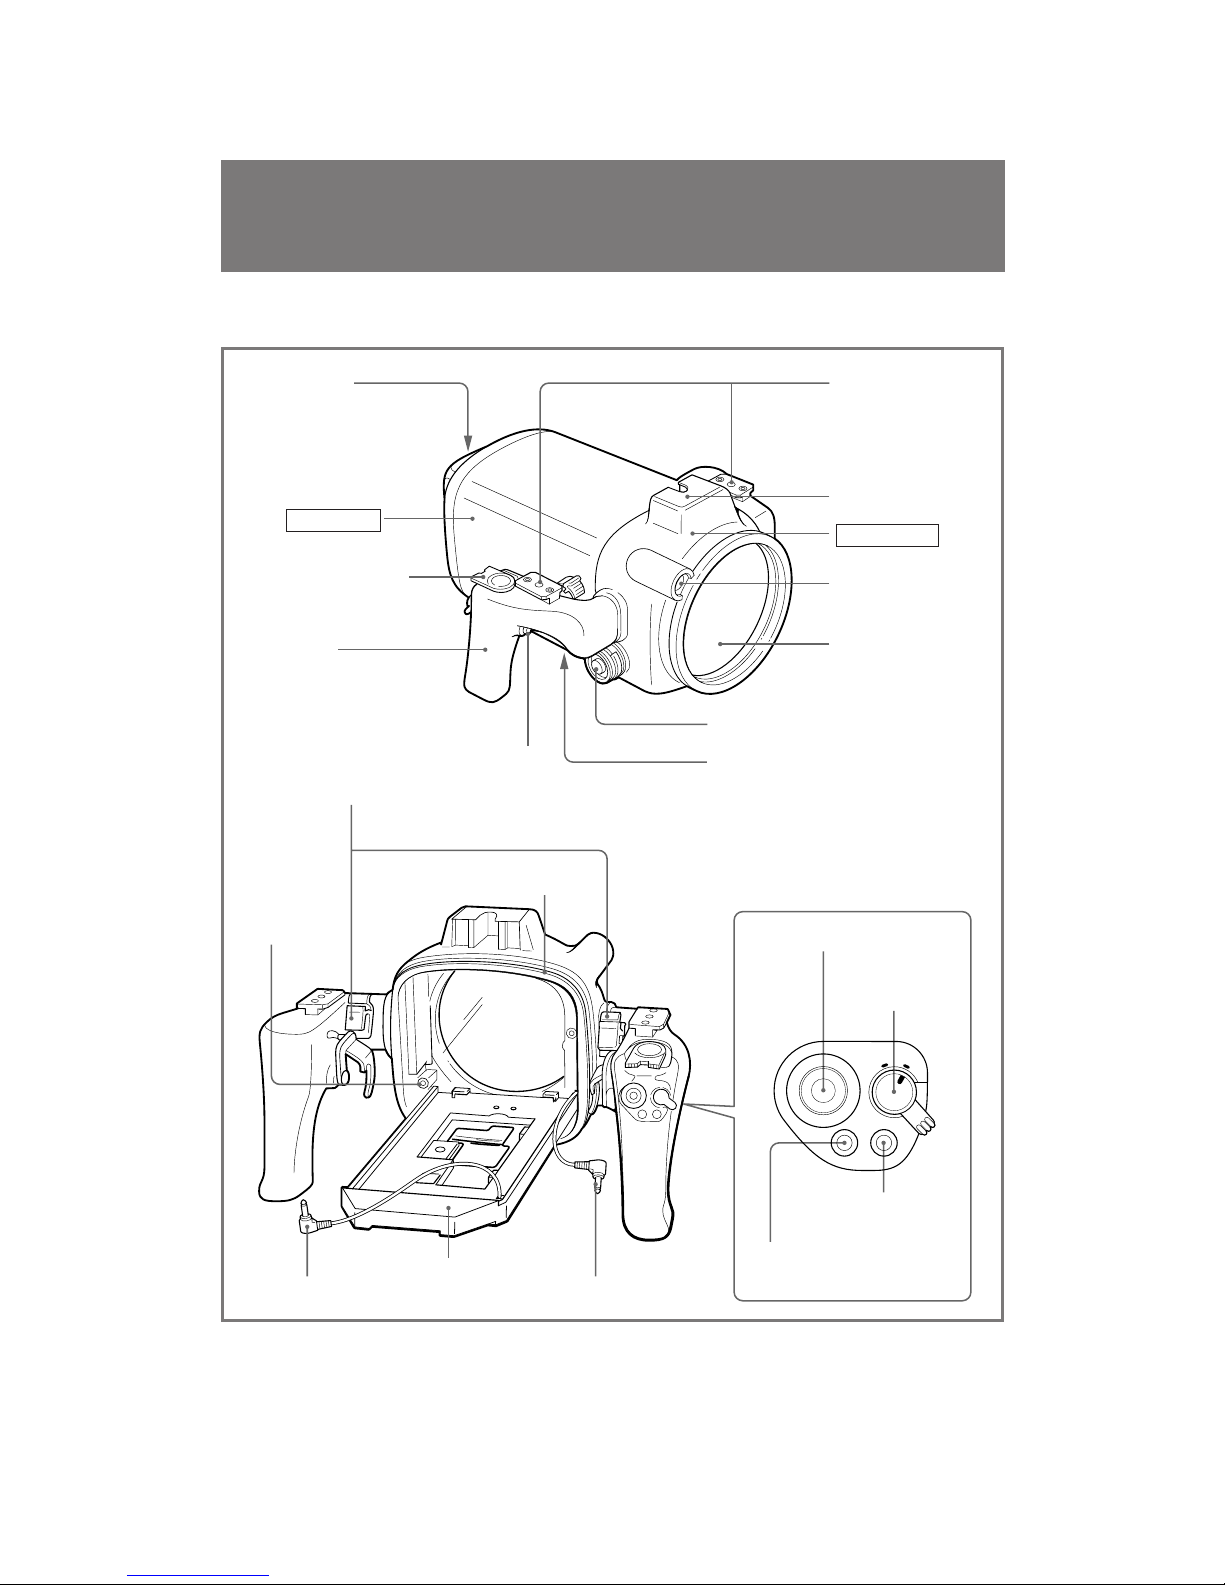
Labeling the parts and controls
• For the use of each part or control, see the pages indicated in parenthesis.
O-ring (8)
AUTO FOCUS ON/OFF button
(13)
Remote control cable (10)
Microphone cable (10)
Camera mount (10)
Eyecup
Power zoom lever T/W (13)
Accessory shoes
for underwater video
lights (16)
Accessory shoe
Front shell
Underwater microphone
(monaural)
Front glass
Video cable connector (14)
Grip
Rear shell
START/STOP button (13)
Video output jack
Buckles (11, 12)
STANDBY/
LOCK switch (13)
LEAK lamp
(yellow) (14)
REC (recording)
lamp (red) (13)
Lead weight
6
Sony MPK-TRV2 (EN,F) 3-859-264-1X
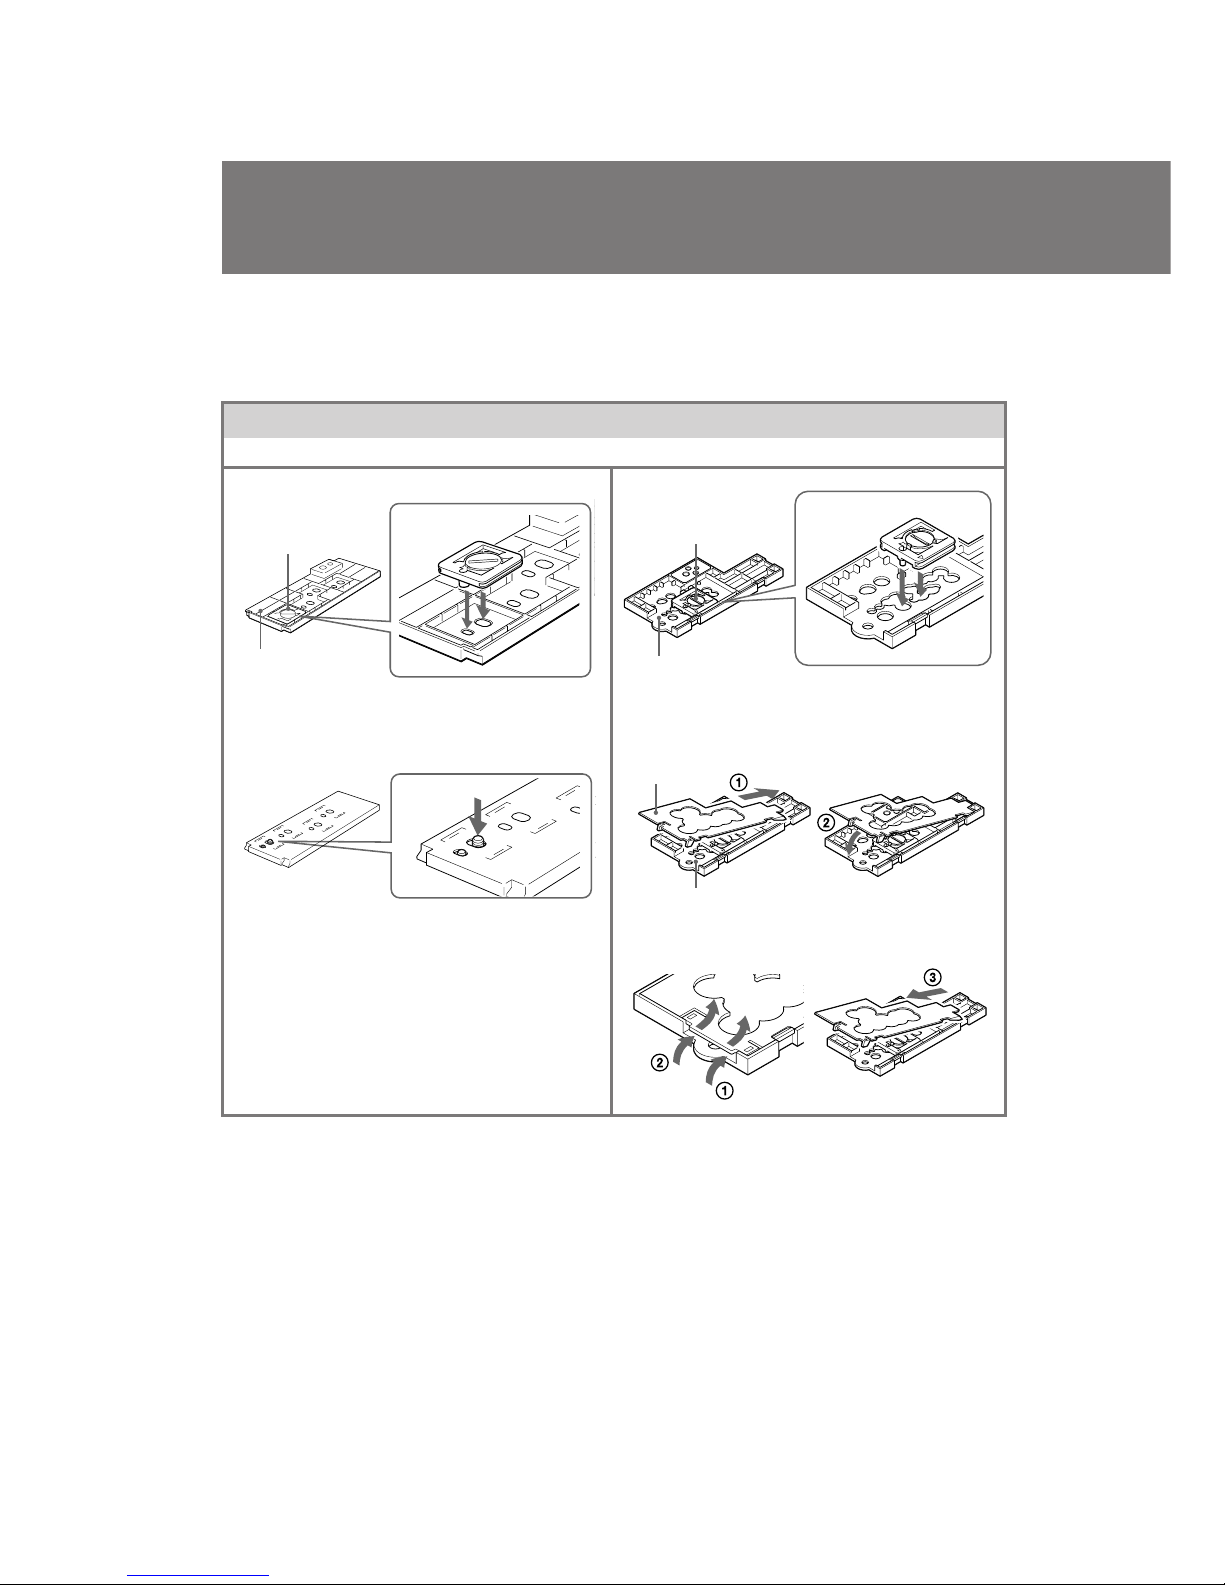
Put the mounting screw plate on the number of the adaptor depending upon the model of video camera recorder.
The position of the adaptor and the mounting screwplace
depend on the video camera model. See the following page
when adjusting the adaptor and mounting screwplace
position.
Check the position for the video camera recorder you use.
Mounting instructions are explained in “Attaching the
video camera recorder to the marine pack” on page 9.
Mounting screw plate
adaptor A
adaptor B
Attach adaptor C to adaptor B.
To detach adaptor C from adaptor B.
Adaptor B
Position of the mounting screw plate on the adaptor
Position of the adaptor and the remote control cable
Mounting screw plate
Adaptor B
Adaptor A
Adaptor C
To disassemble after using.

7
Sony MPK-TRV2 (EN,F) 3-859-264-1X
Position of the mounting
screw plate on the adaptor
Without a wideconversion lens
With a wideconversion lens
A1 A2
B1
Position of the mounting
screw plate on the adaptor
B3 B6
B3
B2 B5
Without a wideconversion lens
With a wideconversion lens
Video camera recorder
CCD-
TRV30/TRV40/TRV70
TR44/TR54/TR64/TR66/
TR74/TR78/TR84/TR88/
TR94/TR98/TR99/TR514/
TR614/TR714/TR814
B3
B7B3
B6B4
B7B4
A, B adaptor to be used.
1, 2, 3... corresponding number on the adaptor.
Notes
• The CCD-TRV101 video camera recorder cannot be fitted with a wide conversion lens.
• When you attach a wide conversion lens to the CCD-TRV11/TRV12/TRV21/TRV22/TRV33/TRV41/TRV81/TRV112/
TRV212 video camera recorders, you cannot attach the viewfinder adaptor.
• When you attach a wide conversion lens to the CCD-TRV11/TRV12/TRV21/TRV22/TRV33/TRV112/TRV212 video
camera recorders, you cannot attach Sony battery NP-99/4500.
• When you attach a wide conversion lens to the CCD-TR2300/TR3300/TR3400 video camera recorders, you cannot attach
Sony battery NP-F930.
A3
B2 B9
Video camera recorder
CCD-
TR200/TR300/TR500
TR86/TR96/TR916/
TRV11/TRV12/TRV21/
TRV22/TRV32/TRV33/
TRV52/TRV53/TRV112/
TRV212/TRV312/TRV512
TRV62/TRV72/TRV82
TR3000
TR555
TRV101
TR710/TR910
TR2300/TR3300/TR3400/
TRV41/TRV81
TR930
B8B5
8
Sony MPK-TRV2 (EN,F) 3-859-264-1X
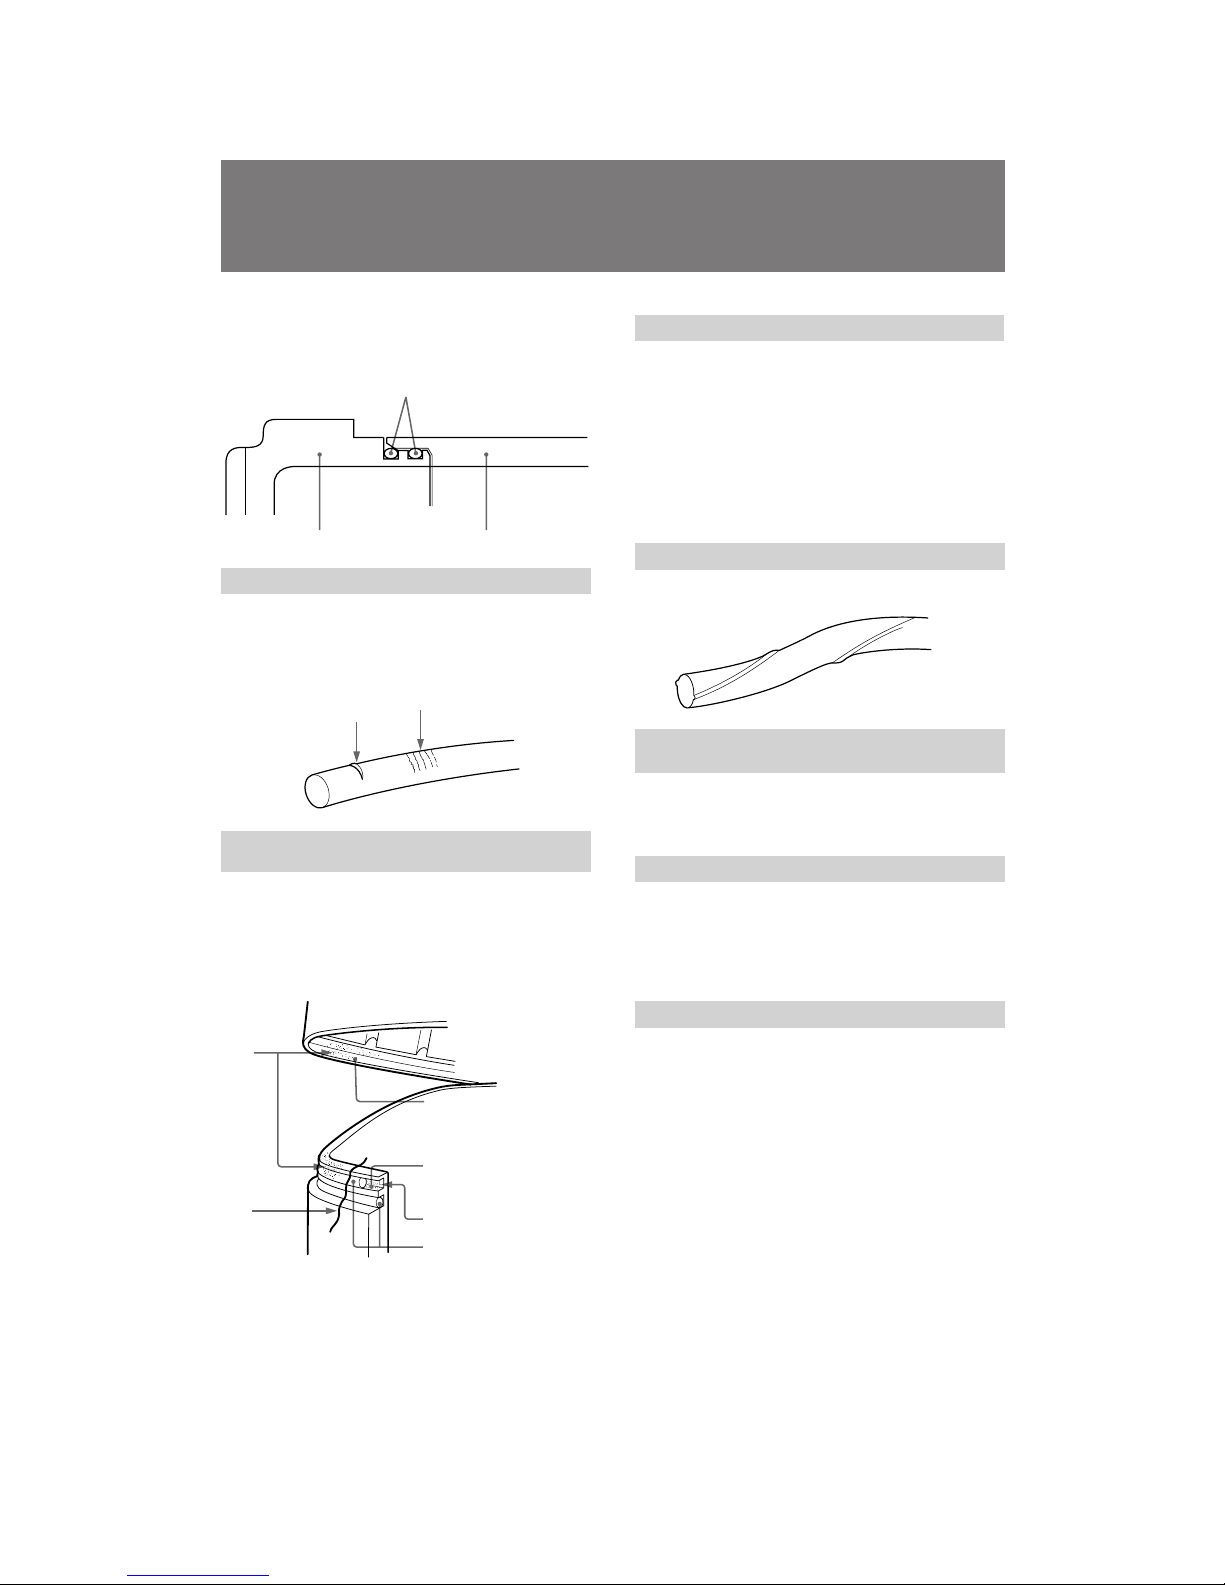
The O-ring assures the waterproof function of the marine
pack. To maintain waterproof integrity, use it correctly.
Incorrect handling may cause water to leak in.
O-ring
Check that there are no scratches or cracks.
Scratches or cracks on the O-ring may cause water to leak in.
If the O-ring is damaged in this way, replace it with a new
one. Do not remove the O-ring from the groove with a metal
tool or a tool with a sharp point.
Scratches
Not this way
Grease the O-ring
The grease protects the O-ring from wear.
Check that there are no cracks or dust on the O-ring, then
grease it using your finger. While greasing, double check
that there are no cracks or dust.
Never use cloth or paper to apply grease because the fibers
may cling.
Do not use any type of grease other then the supplied one,
or it may damage the O-ring.
If you run out of silicone grease (2-115-921-01) you can
purchase it from your nearest Sony Service Center.
Do not twist the O-ring.
Put the O-ring in the groove evenly. Never twist it.
Do not pinch the O-ring with the marine
pack.
When joining the front and rear shells, take care not to pinch
the O-ring between them. If this happens, not only will the
O-ring be damaged, but water may leak in.
Storage
Put the supplied spare O-rings in the original carton and
store it in a cool place.
• Do not expose the O-ring to direct sunlight.
• Do not place a heavy object on the O-ring.
• Do not fold the O-ring.
Useful life of the O-ring.
Depending upon maintenance and the length of use, we
recommend changing the O-ring every one or two years.
The O-ring (3-952-928-01) can be replaced at your nearest
Sony Service Center.
Remove any dust, sand or hair from the
O-ring.
Make sure there is no dust, sand or hair on the O-ring, in the
groove, or on the surface of the marine pack where
the O-ring touches. If there is, clean them completely, or the
O-ring and the surface of the marine pack may be damaged
and water may leak in.
Notes on the O-ring
Dust
Hair
Surface of the marine pack
where the O-ring touches
O-ring groove
O-ring
Sand
Crack
Front shell Rear shell
9
Sony MPK-TRV2 (EN,F) 3-859-264-1X
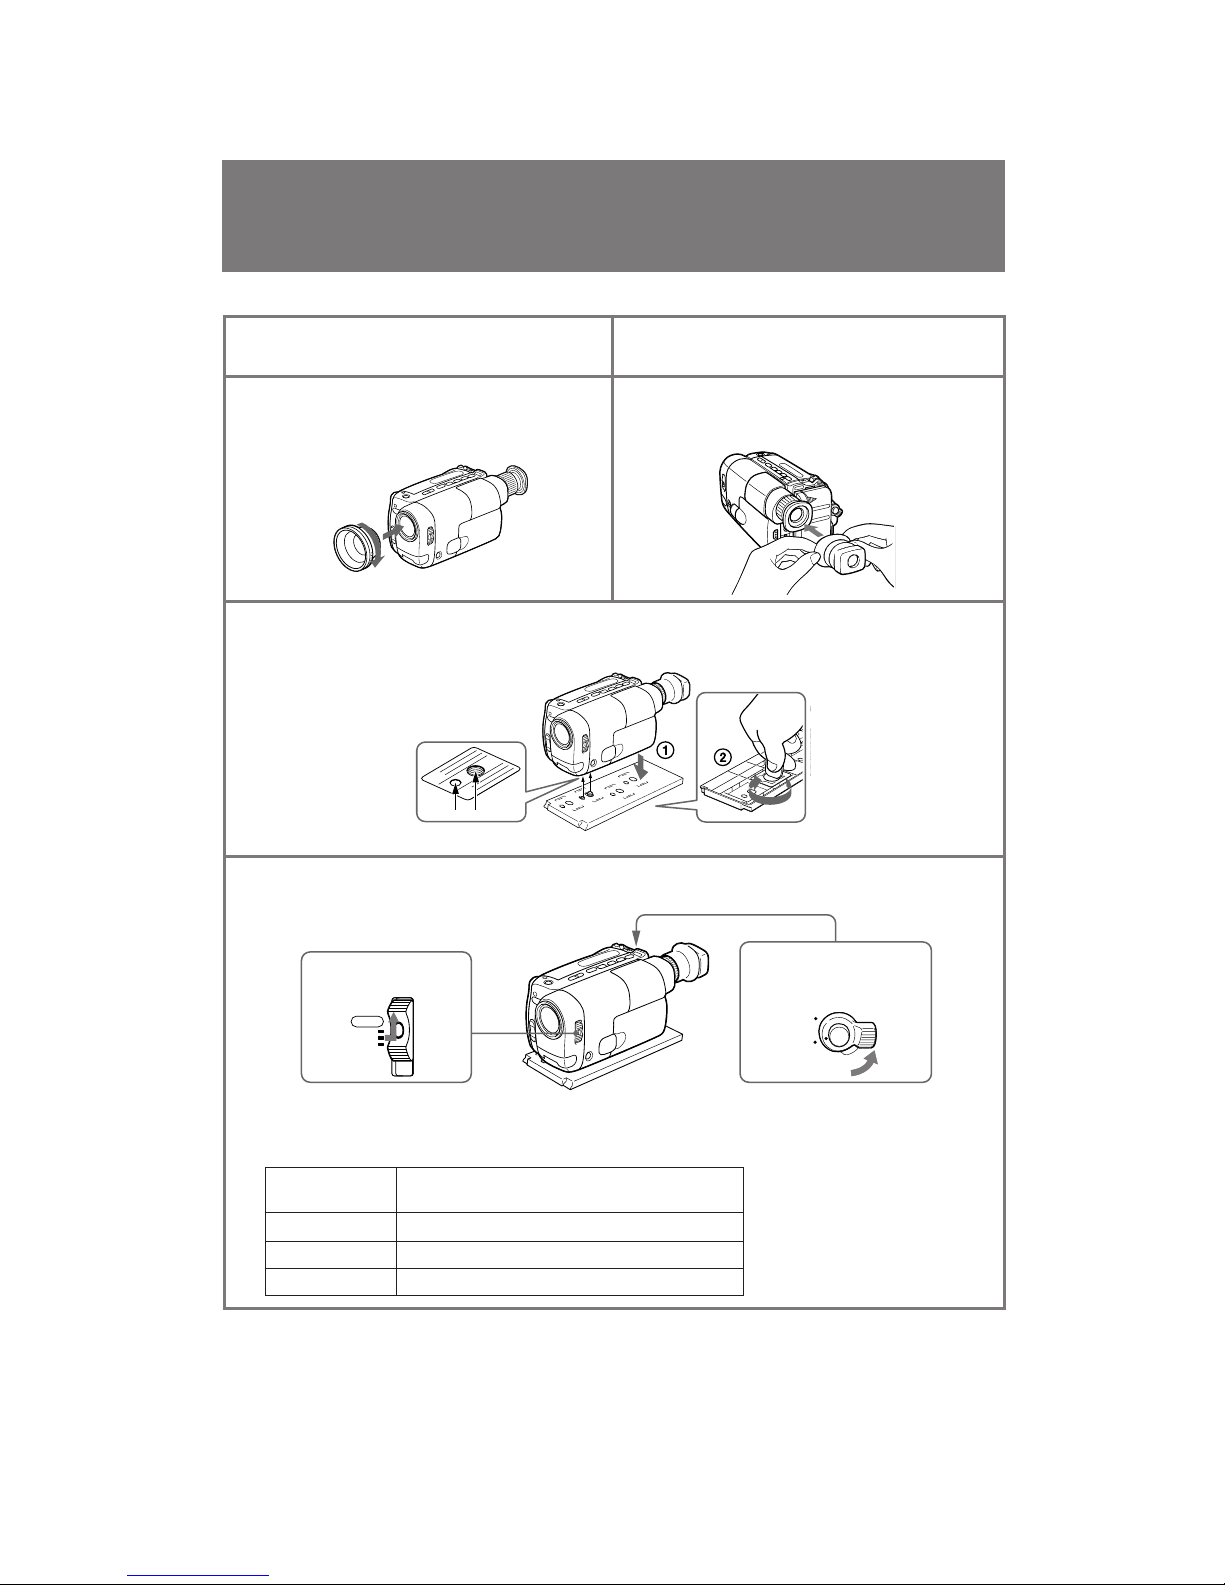
1
Remove the lens cap, shoulder strap, filter, etc.,
from the video camera recorder.
2
Attach a charged battery pack and insert a video
cassette.
Attaching the video camera recorder to the marine pack
3
Attach the wide conversion lens (not supplied).
By attaching the wide conversion lens, the shooting
coverage becomes wider, and the subject size
becomes smaller.
5
When using adaptor A, attach it to the video
camera recorder.
Check that the position of the mounting screw plate
is correct. (See pages 6 and 7.)
When using adaptor B, skip this step.
White balance
Shutter speed
Program AE
Brightness
6
Adjust the video camera recorder.
Refer to the operation manual of your video camera recorder.
Normally set to w (outdoor).
Set to e (indoor) for night diving.
Set where no indicator appears.
Set where no indicator appears.
Turn off the indicator.
The following adjustments are needed when your video camera
recorder has the corresponding function.
Refer to the operation manual of the video camera recorder for details.
1
Set the POWER
switch to CAMERA.
2
Set the STANDBY
switch to STANDBY.
4
Attach the Viewfinder adaptor.
If the viewfinder adaptor is loose when it is attached,
bend the eyecup of the camcorder and attach it again.
On some video camera recorder
models, you cannot adjust the focus
with the button on the marine pack.
Set the focus to auto focus mode (see
page 2).
(continued)
CAMERA
L
S
T
A
N
D
B
Y
O
C
K
10
Sony MPK-TRV2 (EN,F) 3-859-264-1X
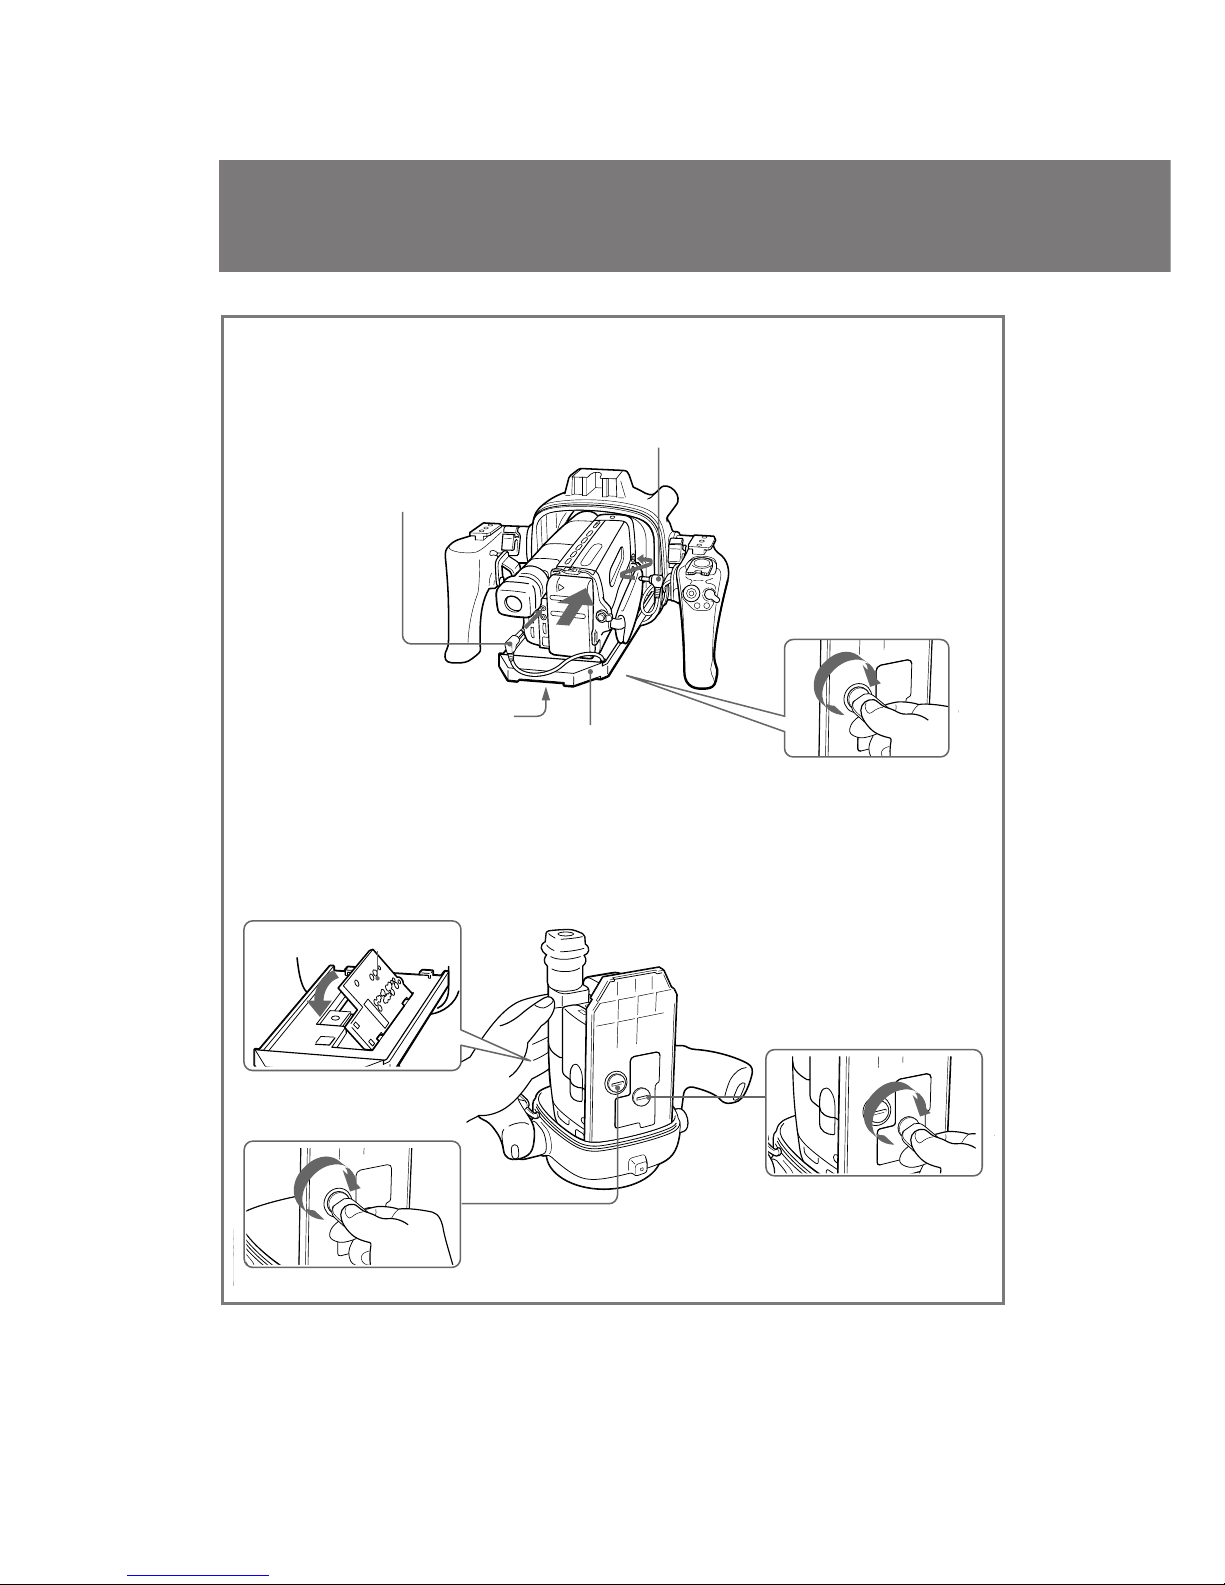
7
Attach the video camera recorder to the marine pack.
Check the position of the adaptor. (See pages 6 and 7.)
Attaching the video camera recorder to the marine pack
Connect the remote control cable to
l REMOTE.
3
4
Fasten the screw.
1
Connect the microphone cable to MIC.
(The sound is recorded in monaural.)
Slide the video camera
recorder into the marine
pack until the hooks of
the camera mount catch
the adaptor.
2
Attach the video camera recorder
to the adaptor.
4
2
Fasten the screw.
Align the right side of the
adaptor with the hooks of the
camera mount, then push
down the adaptor.
1
Connect the remote control cable to the
l REMOTE jack of the video camera
recorder.
5
When using adaptor A
When using adaptor B
3
Connect the microphone cable to MIC
jack of the video camera recorder.
(The sound is recorded in monaural.)
Screwdriver
Camera mount
Adaptor B
11
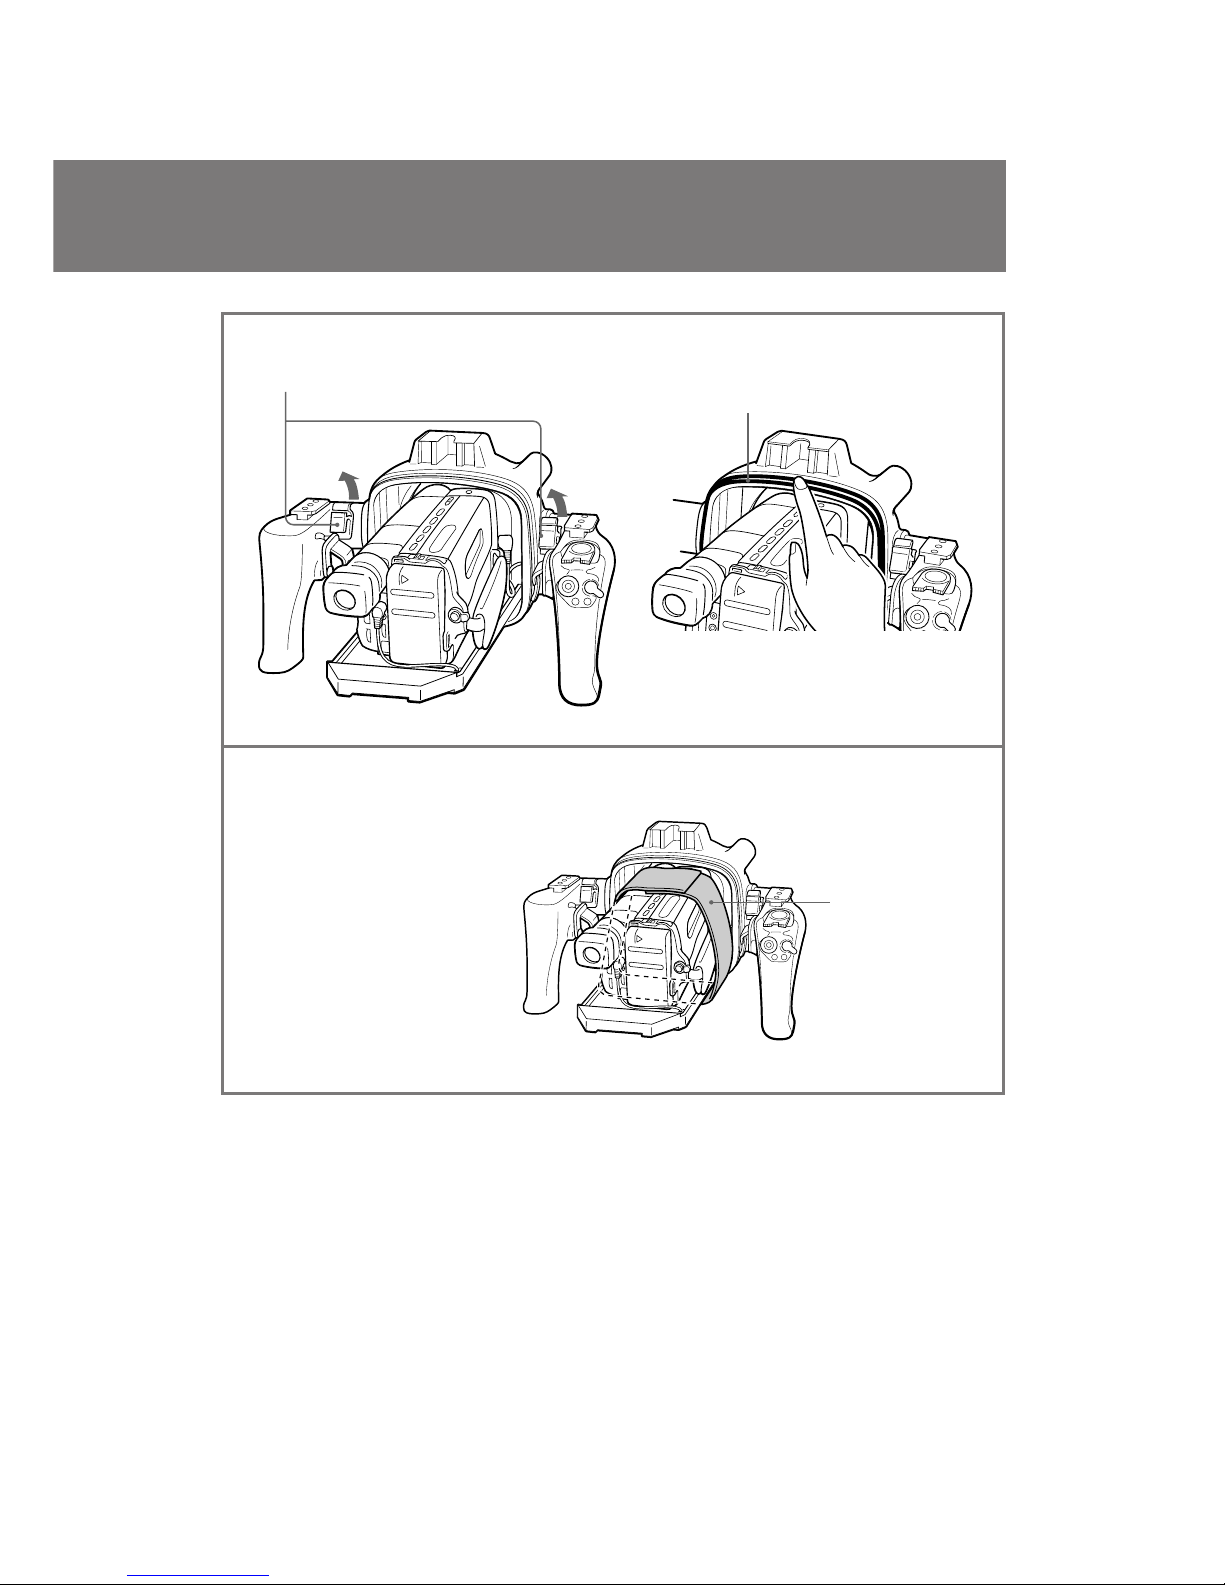
Sony MPK-TRV2 (EN,F) 3-859-264-1X
Raise the buckles until they stop.
8
Buckles
9
Fasten the video camera recorder with the
accessory belt.
When you fasten the video camera recorder with
accessory belt, take care not to touch the zoom
button.
O-ring
Check the O-ring and grease it slightly.
Accessory belt
(continued)
 Loading...