

Sony Handycam HDR-FX7 Operating Manual
2887514110
0
Z
SON_
2-887-514-11(1)
Addilional inl'ormation on this producl and answers
to t'requendy asked questions can be l'ound at our
Customer Support Website.
http://www.sony.net/
Printed on 70% or more recycled paper
using VOC (Volatile Organic Compound)
-free vegetable oil based ink.
Printed in Japan
!
C
t_
Digital HD Video Camera Recorder
Operating Guide
HDR-FX7
Getting Started
Using the Menu
Dubbing/Editing
Using a Computer
Troubleshooting
Additional Information
Quick Reference
IF|i_V Mi0i,..,+,0.,a._.:.. el Ham,Video _ _ IrffoLITHIUM
_U_ Cassette MEMaRYSTI[K_+
HDV 1080i
© 2006 Sony Corporation
....
To reduce fire or shock hazard, do
not expose the unit to rain or
moisture.
CAUTION: TO REDUCE THE RISK OF ELECTRIC SNOCK,
DO NOT REMOVE COVER (OR BACK}.
NO USER-SERVICEA6LE PARTS INSIDE,
REFER SERVICING TO QUAUFIED SERVICE PERSONNEL,
This symbol is intended to alert
the user to the presence of
uninsulated "dangerous
voltage" within the product's
enclosure that may be of
sufficient magnitude to
constitute a risk of electric
shock to persons.
This symbol is intended to alert
the user to the presence of
important operating and
maintenance (servicing)
instructions in the literature
accompanying the appliance.
IMPORTANTSAFEGUARDS
For your protection, please read these safety
instructions completely before operating
the appliance, and keep this manual for
future reference.
Carefully observe all warnings, precautions
and instructions on the appliance, or the one
described ill the operating instructions and
adhere to them.
i!iiUNi ....
PowerSources
This set should be operated only from the type of
power source indicated on the marking label. If
you are not sure of the type of electrical power
supplied to your home. consult your dealer or
local power company. For those sets designed to
operate li'orn battery power, or other sources, relier
to the operating instructions.
Polarization
This set rn_y be equipped with a poh_rized ac
power cord plug (a plug having one blade wider
than the other).
This plug will fit into the power outlet only one
way. This is a sali_ty feature, lfyou are unable to
insert the plug flflly into the outlet, try reversing
the plug. If the plug should still fail to fit, contact
your electrician to have a suitable outlet installed.
Do not defi_at the satiety purpose of the polarized
plug by lk)rcing it in.
Overloading
Do not overload wMl outlets, extension cords or
convenience receptacles beyond their capacity,
since this can result in fire or electric shock.
ObjectandLiquidEntry
Never push ohjects of m_y kind into the set
through openings as they may touch dangerous
voltage points or short out parts that could result
in a fire or electric shock. Never spill liquid of any
kind on the set.
Attachments
Do not use attachments not recor'tnnended hy the
manulhcturer, as they may cause hazards.
Cleaning
Unplug the set from the w:dl outlet bef_>re
cleaning or polishing it. Do not use liquid cleaners
or aerosol cleaners. Use a cloth lightly dampened
with water lot cleaning the exterior of the set.
WaterandMoisture
Do not use power-line operated sets near water -
li)r example, near a bathtub, washbowl, kitchen
sink, or laundry rob, in a wet basement, or near a
swimming pool, etc.
Power-CordProtection
Route the power cord so th:_t it is not likely to be
walked on or pinched by items placed upon or
against them, paying particular attention to the
plugs, receptacles, and the point where the cord
exits from the appliance.
Accessories
Do not ph_ce the set on ml unstable cart, stand,
tripod, bracket, or table. The set may f:dl, causing
serious injury to a child or an adult, and serious
damage to the set. Use only a cart, stand, tripod,
bracket, or table recommended by the
mauufiicturer.
Ventilation
The slots and openings in the c_d_inet are provided
li)r necessary ventilation. To ensure reliable
operation of the set, and to protect it from
overheating, these slots and openings must never
be blocked or covered.
Never cover the slots and openings with a cloth
or other materials.
Never block the slots and openings by placing
the set on a bed, sofm rug, or other similar
surf:ice.
Never place the set in a confined space, such as
a bookcase, or built-in cabinet, unless proper
ventilation is provided.
Do not place the set near or over a radiator or
heat register, or where it is exposed to direct
sunlight.
Continued,_ 3
INPORTANTSAFEGUARDS{Continued/
Lightning
For added proteclinn lor this set dnrir'lg a ]ightnir'lg
slorm, or when it is left unallended and unused 121r
long periods ol thne, unplug il lrnm file wall
nutlel and discolmect file antenna or cable syslem.
This will prevent damage to tile sel due tn
lighlning and pnwerqine surges.
i!il !i!!!iiiiiiiiii:ii!!!ilii!iiiiliiliiiii!!i!!i li
DamageRequiringService
Unplug tile set from tile wall outlet and reflzr
servicing tn qualilied service persnnnel under file
following conditions:
When tile power cord or plug is damaged or
flayed.
If liquid has been spilled nr objecls have fallen
into file set.
lllhe set has been exposed tn rain or water.
lithe set has been subjecl lo excessive shock by
being dropped, nr lhe cabinet has been
damaged.
lllhe set does not nperate normally when
follnwing tile operating inslructions. Adjust
nnly lhnse controls lhat are specified in file
nperaling instruclions. Improper adjuslment of
hiller controls may result in dmnage and will
often require extensive work by a qualified
technician to reslore file sel tn normal operation.
When file set exhibits a distincl change in
performance this indicales a need fk_rservice.
Servicing
Dn not allempt :n service file set ynurself as
npellillg nr removing covers may expose yntl I0
dangerous voltage or other hazards.
Refer all servicing lo qualilied service personnel.
Replacementparts
When replacement parts are required, be sure tile
service technician has used replacement parts
specified by the manufacturer that have the same
characteristics as tile original parts.
Unauthorized substitutions may result in fire,
electric shock, or other hazards.
SafetyCheck
Upon completion of any service or repairs to tile
set, ask tile service technician 1o perlornl routine
safety checks (as specilied by file manul_tclurer)
tn delermine lhat file sel is in safe nperaling
cnnditinn.
Readthis first
Before operating the unit, please read this
manual thoroughly, and retain it for future
reference.
i!iii !!!!!....
Replace the battery with the
specified type only. Otherwise, fire
or injury may result.
RECYCLINGLITHIUM-IONBATTERIES
Lithium-Ion batteries are ,.'l"_
O
recyclable. You can help preserve
our environment by relurning
your used rechargeable batteries
to the colleclkm and recycling
location nearest you.
Fur more inlormatiun regarding recycling of
rechargeable batteries, call toll free 1=800=822=
8837, or visit http://www.rbrc.urg/
Caution: Do not handle damaged or leaking
Lithiumqon batteries.
Owner'sRecord
The model and serial numbers are located un the
bottom. Record the serial number in the space
provided below. Reler to these numbers whenever
you call upon your Sony dealer regarding this
product.
Model No. HDR-FX7
Serial No.
Model No. AC-
No.
If you have any questions about this
product, you may call:
Sony Customer Information Center 1-800-
222-SONY (7669).
The number below is for the FCC related
matters only.
RegulatoryInformation
Declaration of Conformity
Trade Name: SONY
Model No.: HDR-FX7
Responsible Party: Sony Electronics Inc.
Address: 16530 Via Esprillo, San Diego, CA
92127 U.S.A.
Telephone Number: 858-942-2230
This device complies with Part 15 of the FCC
Rules.
Operation is subject to the following two
conditions:
(1) This device may not cause harmful
interference, and (2) this device must accept any
interference received, including interference
that may cause undesired operation.
CAUTION
You are cautioned that any changes or
modifications not expressly approved in this
manual could void your authority to operate this
equipment.
Note
This equipment has been tested and lound to
comply with the limits for a Class B digital
device, pursuant to Part 15 of the FCC Rules.
These limits are designed to provide reasonable
protection against harmful interli_rence in a
residential installation. This equipment generates,
uses, and can radiate radio fi'equency energy and,
if not installed and used in accordance with the
instructions, may cause harmflfl interference to
radio commullications.
However, there is no guarantee that interference
will not occur in a particular installation. If this
equipment does cause harmRi1 interference to
radio or television reception, which can be
determined by turning the equipment off and on,
Continued,_ 5
Readthis first {Continued/
the user is encouraged to try to correct the
inteHi_rence by one or more of the following
nleHsl.lres:
Reorient or relocate the receiving antenna.
Increase the separation between the equipment
and receiver.
Connect the equipment into an outlet on a
circuit diffizrent fi'om that to which the receiver
is connected.
Consult the dealer or an experienced radio/TV
technician [i_r help.
The supplied interface cable must be used with the
equipment in order to comply with the limits for a
digital device pursuant to Subpart B of Part 15 of
FCC Rules.
Typesofcassetteyoucanuseinyour
camcorder
You can use mini DV cassettes marked
with m_ni][_v.Mini DV cassettes with
Cassette Memory are incompatible (p. 105).
Typesof"MemoryStick"youcanuse
inyourcamcorder
There are two sizes of "Memory Stick."
You can use "Memory Stick Duo" marked
with MEMOrYSTleKBuB or
Memory Stick PRB DUB (p. 106).
"Memory Stick Duo"
(This size can be used with your
camcorder.)
7...........................................................
"Memory Stick"
(You cannot use it in your camcorder.)
• "Memory Stick PRO" and "Memory Stick
PRO Duo" can be used only with
"Memory Stick PRO" compatible
equipment.
• Do not attach a label or the like on a
"Memory Stick Duo" or a Memory Stick
Duo Adaptor.
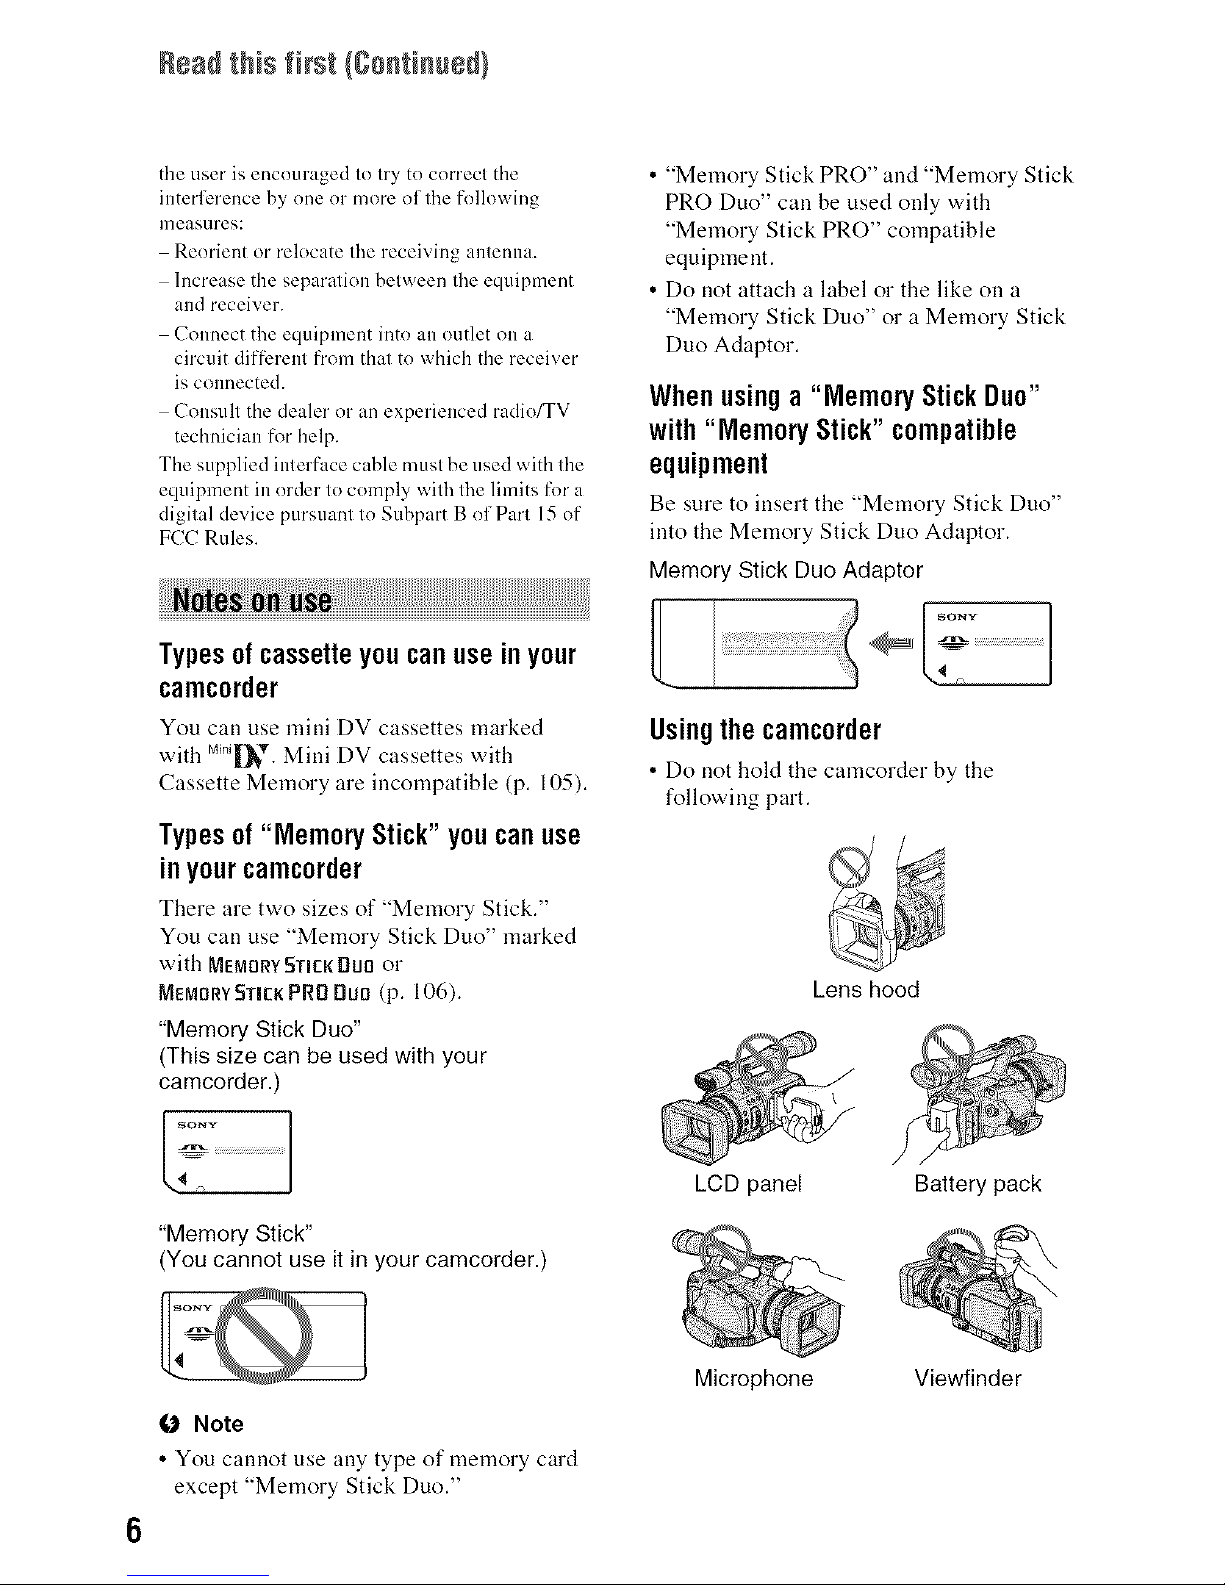
Whenusinga "MemoryStickDuo"
with"MemoryStick"compatible
equipment
Be sure to insert the "Memory Stick Duo"
into the Memory Stick Duo Adaptor.
Memory Stick Duo Adaptor
/. l
Usingthecamcorder
• Do not hold the camcorder by the
following part.
Lens hood
LCD panel
Microphone
Battery pack
O Note
• You cannot use any type of memory card
except "Memory Stick Duo."
Viewfinder
(J Note
• The carncorder is not dustproof, dripproof
or waterproof.
See "Maintenance and precautions"
(p. 111).
• Before connecting your camcorder to
another device with all HDMI cable,
component video cable, USB or i.LINK
cable, be sure to insert the connector plug
the correct way, and not forcibly to avoid
dmnaging the terminal, or cause a
malfunction of your camcorder.
Aboutmenuitems,LCDpanel,
viewfinder,andlens
• A menu item that is grayed out is not
available under the current recording or
playback conditions.
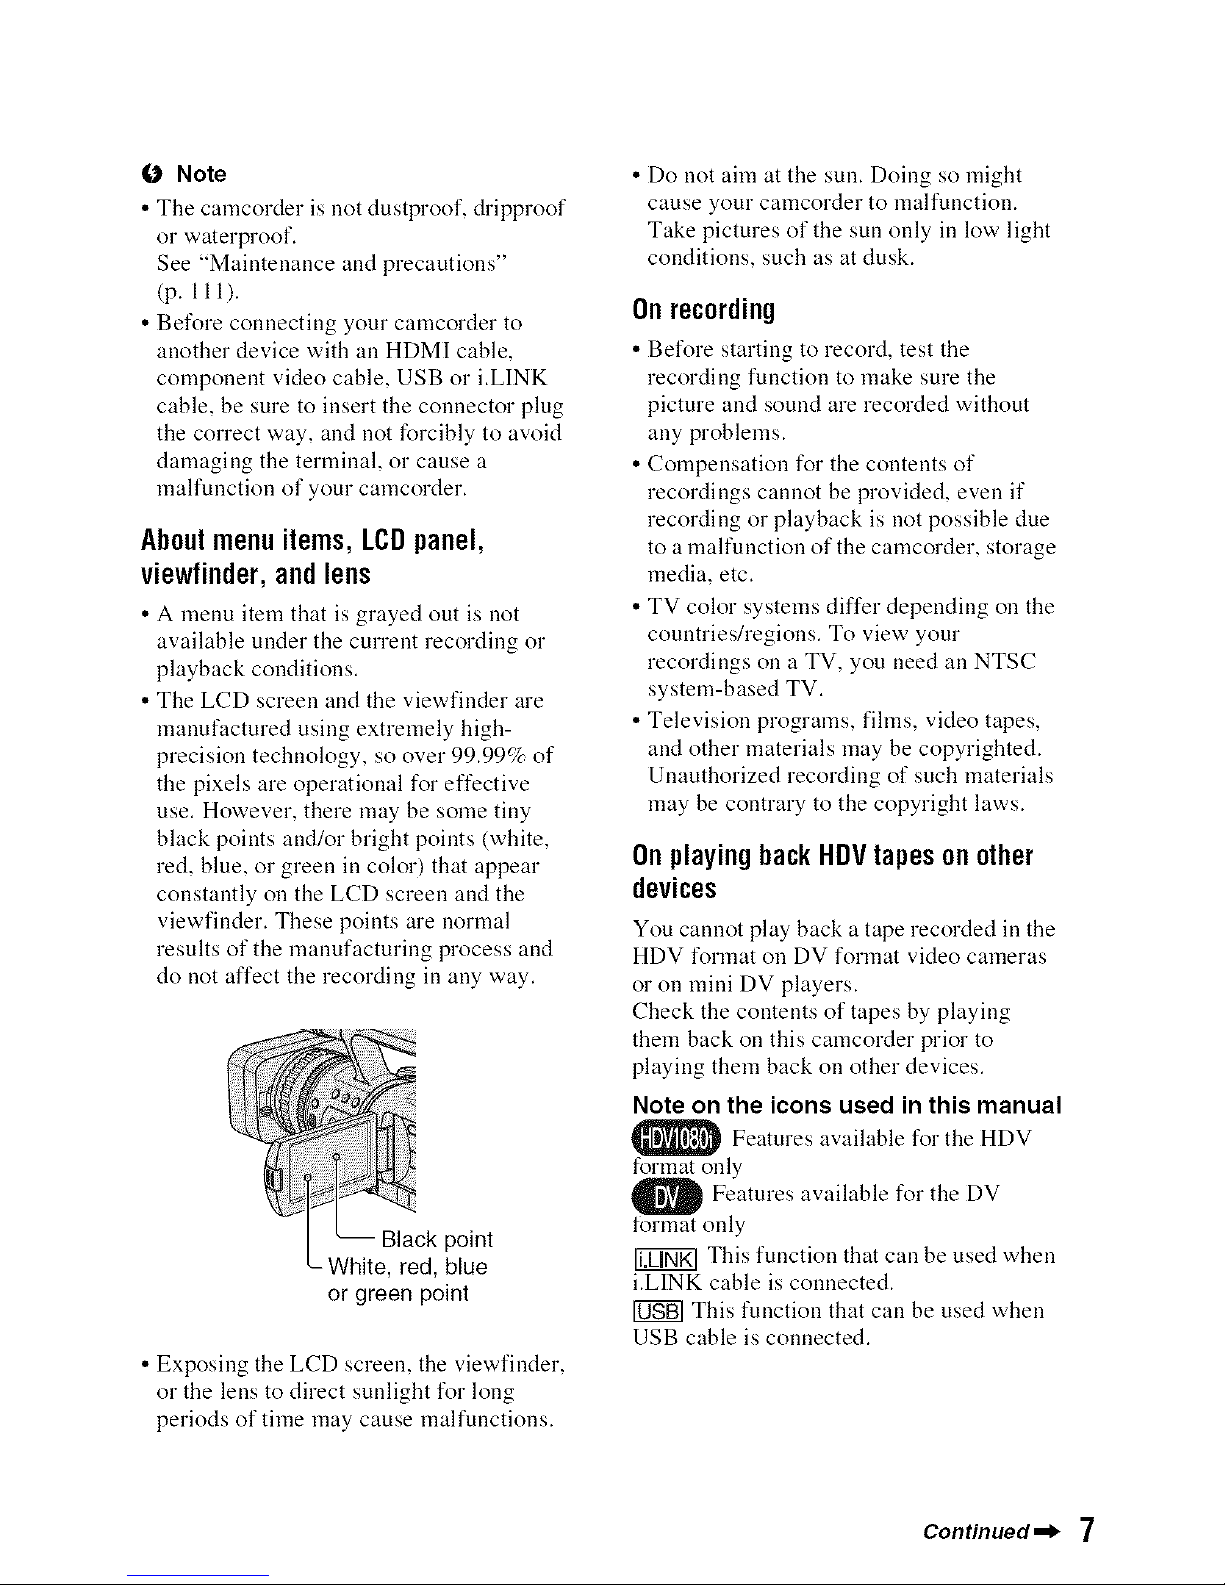
• The LCD screen and the viewfinder are
manufactured using extremely high-
precision technology, so over 99.99% of
the pixels are operational for effective
use. However, there may be some tiny
black points and/or bright points (white,
red, blue, or green in color) that appear
constantly on the LCD screen and the
viewfinder. These points are normal
results of the manufacturing process and
do not affect the recording in any way.
point
-White, red, blue
or green point
• Exposing the LCD screen, the viewfinder,
or the lens to direct sunlight for long
periods of time may cause malfunctions.
• Do not aim at the sun. Doing so might
cause your camcorder to malfunction.
Take pictures of the sun only in low light
conditions, such as at dusk.
Onrecording
• Before starting to record, test the
recording function to make sure the
picture and sound are recorded without
any problems.
• Compensation for the contents of
recordings cannot be provided, even if
recording or playback is not possible due
to a malfunction of the camcorder, storage
media, etc.
• TV color systems differ depending on the
countries/regions. To view your
recordings on a TV, you need an NTSC
system-based TV.
• Television programs, fihns, video tapes,
and other materials may he copyrighted.
Unauthorized recording of such materials
may he contrary to the copyright laws.
OnplayingbackHDVtapesonother
devices
You cannot play back a tape recorded in the
HDV format on DV format video cameras
or on mini DV players.
Check the contents of tapes by playing
them back on this camcorder prior to
playing them back on other devices.
Note on the icons used in this manual
_ Features available for the HDV
format only
O Features available for the DV
tormat only
This function that can be used when
i.LINK cable is connected.
[0NB]This function that can be used when
USB cable is connected.
Continued,_ 7
Readthis first {Continued/
Aboutthismanual
• The images of the LCD screen and the
viewfinder used in this manual for
illustration purposes are captured using a
digital still camera, and therefore may
appear different.
• The on-screen displays in each local
language are used for illustrating the
operating procedures. Change the screen
language before using your carncorder if
necessary (p. 74).
• Design and specifications of recording
media and other accessories are subject to
change without notice.
AbouttheCarlZeisslens
Your camcorder is equipped with a Carl
Zeiss lens, which was developed jointly by
Carl Zeiss, in Germany, and Sony
Corporation, and produces superior images.
It adopts the MTF measurement system for
video cameras and offers a quality typical
of a Carl Zeiss lens. Also, the lens for your
camcorder is T*-coated to suppress
unwanted reflections and faithfully
reproduce colors.
MTF= Modulation Transfer Function. The
number value indicates the amount of light
from a subject coming into the lens.

Tableof Contents
IMPORTANT SAFEGUARDS .................................................................. 3
Read this first ........................................................................................... 5
Trying out the new HDV format! ............................................................. 12
Features of this camcorder ..................................................................... 13
Handy Functions for Recording .............................................................. 14
Viewing video recorded in the HDV format! ........................................... 15
Step 1: Checking supplied items ............................................................ 16
Step 2: Attaching the lens hood with lens cover ..................................... 17
Step 3: Charging the battery pack .......................................................... 18
Step 4:Turning the power on and holding your camcorder properly ...... 21
Step 5: Adjusting the LCD panel and viewfinder .................................... 22
Step 6: Setting the date and time ........................................................... 24
Step 7: Inserting a tape or a "Memory Stick Duo" .................................. 26
Recording ............................................................................................... 28
Playback ................................................................................................. 31
Changing the settings of your camcorder recordings ............................. 33
Adjusting the zoom ............................................................................. 33
Adjusting the focus manually .............................................................. 34
Adjusting the EXPOSURE/IRIS ............................................................ 35
Adjusting to Natural Color (White balance) ......................................... 38
Customizing the picture quality (Picture profile) ................................. 39
Assigning the functions to the ASSIGN buttons ..................................... 42
Focusing on a distant subject (Focus infinity) .................................... 43
Recording an index signal .................................................................. 44
Reviewing the most recently recorded scenes (Rec review) .............. 44
Searching for the last scene of the most recent recording
(End search) ....................................................................................... 44
Using the Shot transition .................................................................... 45
Changing/checking the settings in your camcorder ................................ 47
Changing the screen .......................................................................... 47
Continued,_ 9
Displaying the settings in your camcorder (Status check) ................. 47
Checking the remaining battery (Battery Info) .................................... 48
Locating a scene on a tape .................................................................... 49
Searching quickly for a desired scene (Zero set memory) ................. 49
Searching for a scene by date of recording (Date search) ................ 49
Searching for a recording start point (Index search) .......................... 50
Playing the picture on a TV .................................................................... 51
Using the menu items ........................................................... 56
Menu items ............................................................................................ 57
(CAMERA SET) menu .................................................................... 59
Settings to adjust your camcorder to the recording conditions (EXPOSURE/
IRIS/STEADYSHOT/BACK LIGHT, etc.)
,_ (AUDIO SET) menu ....................................................................... 64
Settings for the audio recording (AUDIO REC LV/DV AU. MODE, etc.)
D (DISPLAY SET) menu ..................................................................... 65
Display settings of the display and the viewfinder (MARKER/VF B.LIGHT/
DATA CODE, etc.)
_, (IN/OUT REC) menu ....................................................................... 69
Recording settings, input and output settings (VCR HDV/DV/DV REC MODF/
DV WIDE REC/TV TYPE, etc.)
_(MEMORY SET) menu ..................................................................... 71
Settings for the "Memory Stick Duo" (QUALITY/ALL ERASE, etc.)
_ (OTHERS) menu ............................................................................. 73
Settings while recording on a tape or other basic settings (USB SELECT/
QUICK REC/BEEP, etc.)
Dubbing to VCR, DVD/HDD device, etc ................................................ 76
Recording pictures from a VCR .............................................................. 79
Copying movies from tape to "Memory Stick Duo" as still images ......... 82
Deleting recorded pictures from the "Memory Stick Duo" ...................... 82
Printing recorded images (PictBridge compliant printer) ........................ 83
Connecting to a computer ...................................................................... 86
Copying still images to a computer ........................................................ 86
Copying movies on a tape to a computer .............................................. 89
10
Troubleshooting ...................................................................................... 92
Warning indicators and messages ....................................................... 101
Using your camcorder abroad .............................................................. 104
HDV format and recording/playback .................................................... 105
About the "Memory Stick". .................................................................... 106
About the "InfoLITHIUM" battery pack .................................................. 108
About i.LINK ......................................................................................... 110
Maintenance and precautions .............................................................. 111
Specifications ....................................................................................... 115
Identifying parts and controls ............................................................... 119
Indicators for the LCD screen and viewfinder ...................................... 124
Index ..................................................................................................... 127
11
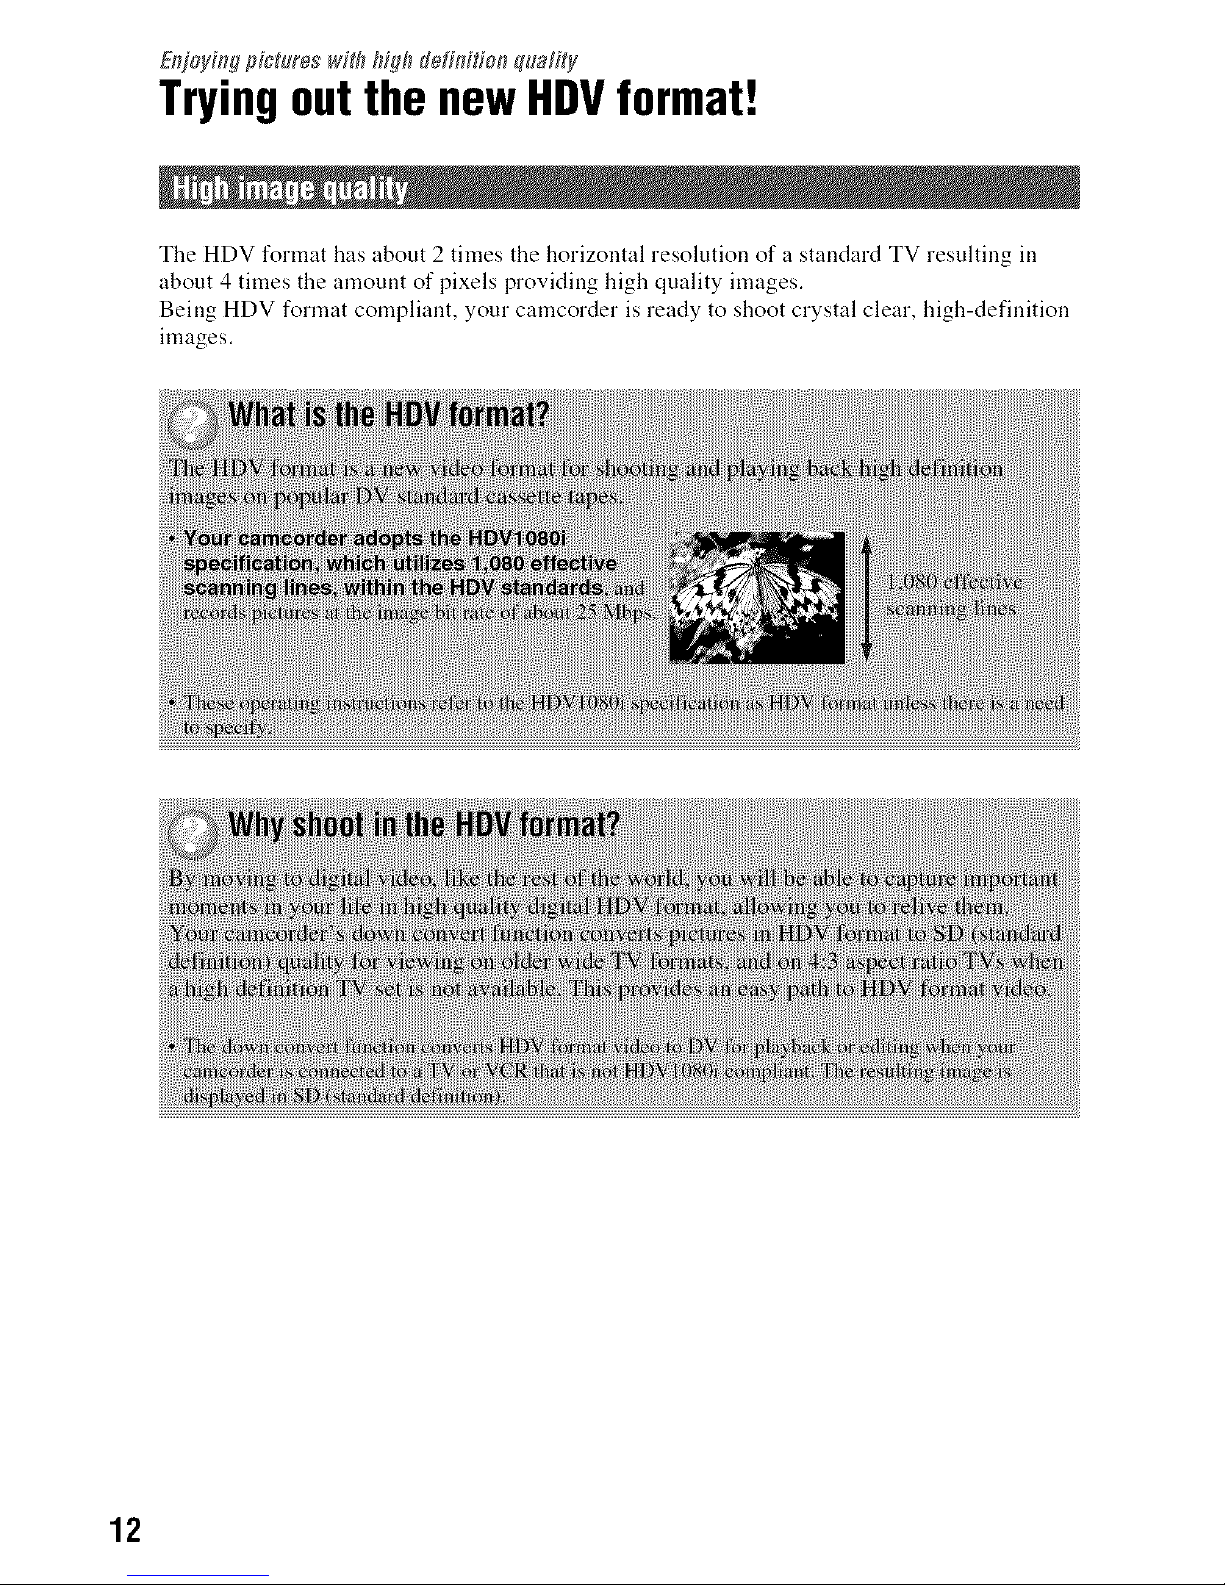
ER_ioy#Pgpictures _##hhigh flefit_itio_ quaf#y
Tryingeut the new HDVfermat!
The HDV format has about 2 times the horizontal resolution of a standard TV resulting ill
about 4 times the amount of pixels providing high quality images.
Being HDV format compliant, your camcorder is ready to shoot crystal clear, high-definition
images.
12
Featuresofthis camcorder
The HDV1080i specification digital HD video camera recorder has the following features to
enable you to record beautiful scenery while traveling, etc., ill high definition quality.
[] 3-ClearVidCIVIOSsensorsysteminstalled
This camcorder is fitted with the 3-ClearVid CMOS sensor system. Superb spectroscopic
characteristics and high definition are achieved by the use of three ClearVid CMOS sensors
developed by Sony for high definition, enabling reproduction of digital high definition with
excellent sensitivity and color reproducibility.
[] CarlZeissVario-SonnarT* 20Xopticalzoomlensinstalled
The Carl Zeiss Vario-Sonnar T* 20× optical zoom lens lets you zoom in on distant objects
and record in high definition quality.
[] Realisticsoundrecordingwithbuilt-inhighperformancemicrophone
The high performance stereo microphone built into this camcorder enables bighly realistic
sound recording.
[] Detailedmanualsettingsforseriousfilming
Extensive manual setting functions allow you to shoot high definition videos with customized
settings.
- The zoom ring, focus ring and EXPOSURE/IRIS dial provide full manual control.
- You can manually fine-adjust the shutter speed, white balance and gain.
[] Connectingtootherdevices
Superb external connectability is provided by a "Memory Stick Duo" slot, USB port, HDMI
OUT jack, and headphone jack on the left side of your camcorder and an i.LINK (HDV/DV)
jack, COMPONENT OUT jack, A/V OUT jack, and DC IN jack on the right side.
=_
m.
m.
_g
_g
13
HandyFunctionsfor Recording
You call record 1.2M still images on the "Memory Stick Duo" during recording movie.
Moving subjects call be shot ill smooth moving slow-motion.
Two settings profiles, including brightness, color, etc., call be saved ill your camcorder. This
enables you to use saved settings data to quickly reproduce suitable shooting settings.
You call adjust the brightness using the EXPOSURE/IRIS dial. The EXPOSURE/IRIS dial
call be used to adjust [EXPOSURE], [IRIS] or [AE SHIFT].
14
Viewingvideorecordedinthe HDVformat!
Pictures recorded ill the HDV format call be played back as crisp HD (high definition)
picture on a high definition TV.
• For details on HDVI080i specification compliant TVs, see page 53.
Your camcorder call down convert video recorded ill the HDV format to SD (standard
definition) quality for playback on a conventional TV.
I ConnectingtoanHDVI080ispecification
An optional i.LINK cableallows you to copy pictures inHD (high definition) quality.
I Connectingto HDV1080i non-compliantspecification
Use your camcorder to convert HDV format video to SD (standard definition) quality to
enable copying.
I Copying"Memory StickDuo" still imagesto a computer.
=_
CD
m.
_g
I Copyingmovie from tape to a computer
You can copy movie to a computer, and save to DVD from copying movie.
The computer will need to be set up differently depending on whether HDV or DV format
video is to be copied. See page 89 for details.
15
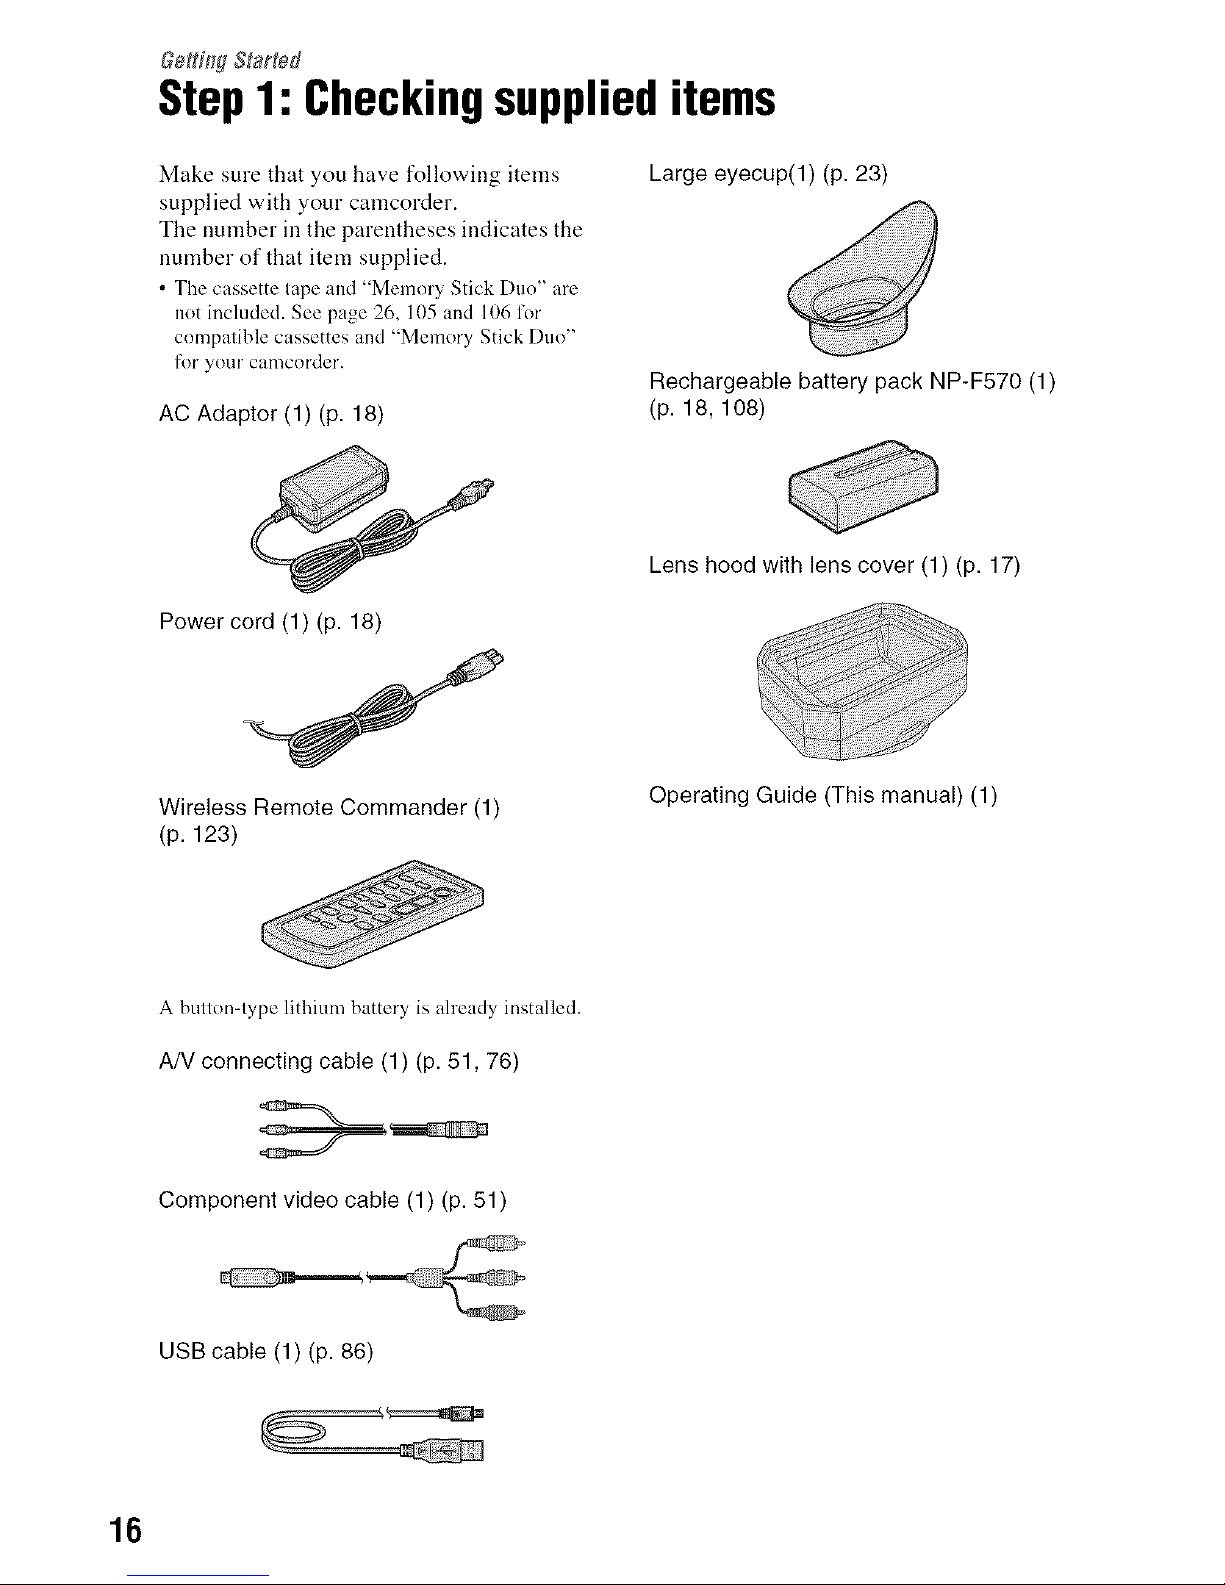
Step1: Checkingsupplieditems
Make sure that you have following items
supplied with your carncorder.
The number ill the parentheses indicates the
number of that item supplied.
• The cassette tape and "Memory Stick Duo" are
not included. See page 26, 105 and 106 for
compatible cassettes and "Memory Stick Duo"
for your camcorder.
AC Adaptor (1) (p. 18)
Large eyecup(I) (p. 23)
Rechargeable battery pack NP-F570 (1)
(p. 18, 108)
Power cord (1) (p. 18)
Wireless Remote Commander (1)
(p. 123)
Lens hood with lens cover (1) (p. 17)
ii!:ii ! !i
Operating Guide (This manual) (1)
A button-type lithium battery is already installed.
AN connecting cable (1) (p. 51,76)
Component video cable (1) (p. 51)
USB cable (1) (p. 86)
16
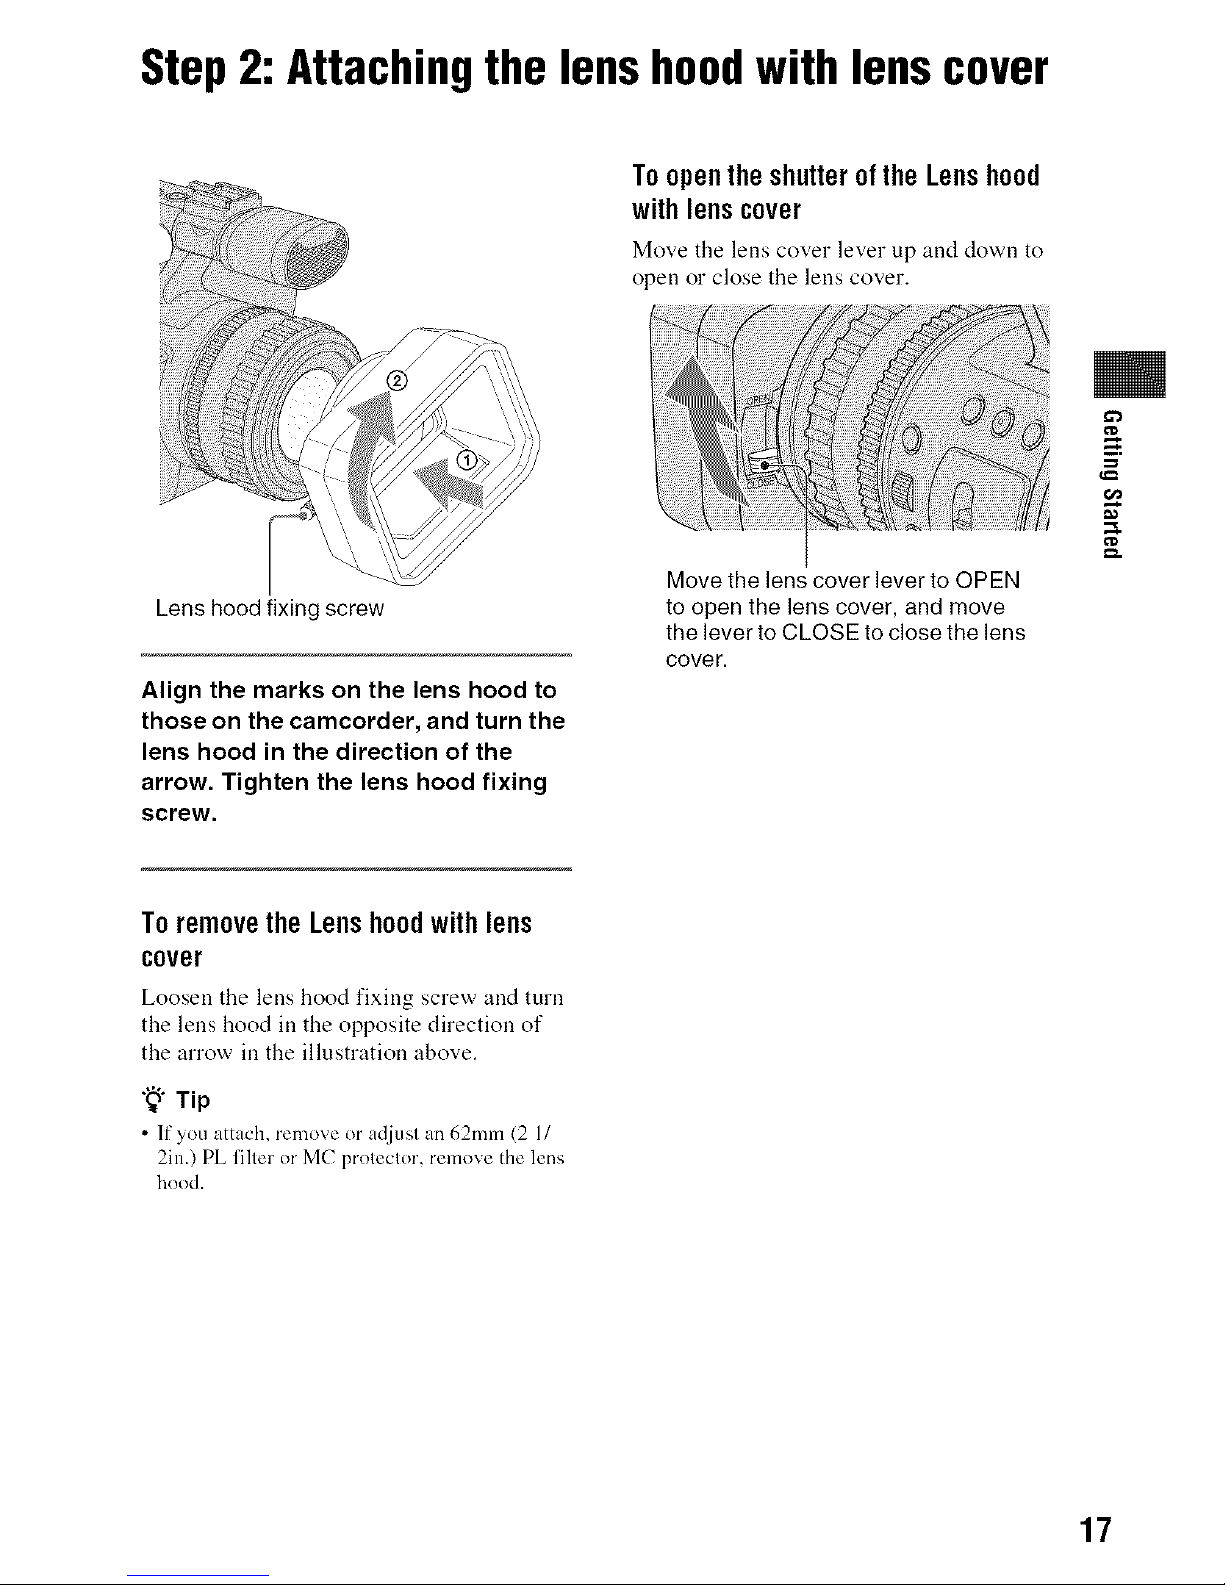
Step2: Attachingthe lenshoodwith lenscover
ToopentheshutteroftheLenshood
withlenscover
Move the lens cover lever up and down to
open o1"close the lens cover.
Lens hood fixing screw
Align the marks on the lens hood to
those on the camcorder, and turn the
lens hood in the direction of the
arrow. Tighten the lens hood fixing
screw.
Move the lens cover lever to OPEN
to open the lens cover, and move
the lever to CLOSE to close the lens
cover.
G3
ToremovetheLenshoodwithlens
cover
Loosen the lens hood fixing screw and turn
the lens hood in the opposite direction of
the arrow in the illustration above.
"8" Tip
• If you attach, remove or adjusl an 62mm (2 1/
2in.) PL liller or MC proleclor, remove the lens
hood.
17
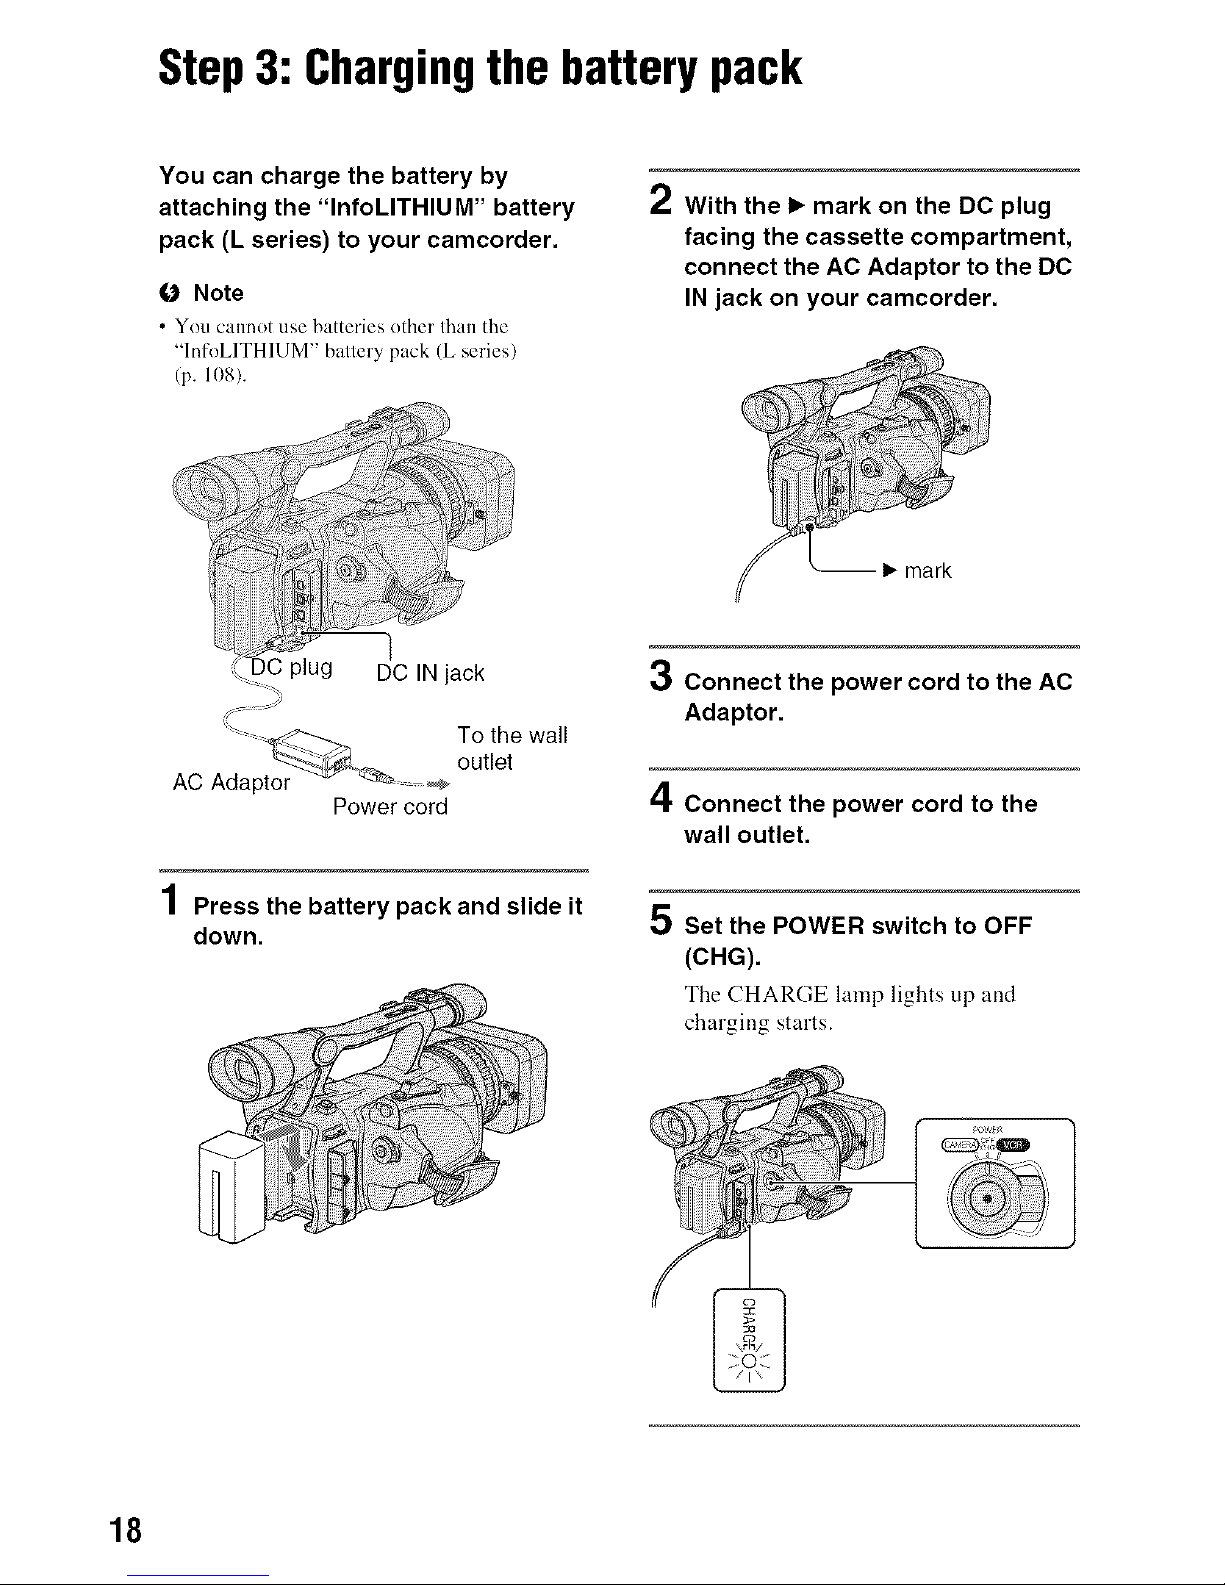
Step3: Chargingthe batterypack
You can charge the battery by
attaching the "InfoLITHIUM" battery
pack (L series) to your camcorder.
O Note
• You cannot use batteries other than the
"lnfoLITHIUM" battery pack (L series)
(p. 108).
2 With the I_ mark on the DC plug
facing the cassette compartment,
connect the AC Adaptor to the DC
IN jack on your camcorder.
Power cord
4
| Press the battery pack and slide it
down.
3 Connect the power cord to the AC
Adaptor.
/I
=.1,Connect the power cord to the
wall outlet.
5 Set the POWER switch to OFF
(CHG).
The CHARGE lamp lights up and
charging starts.
18
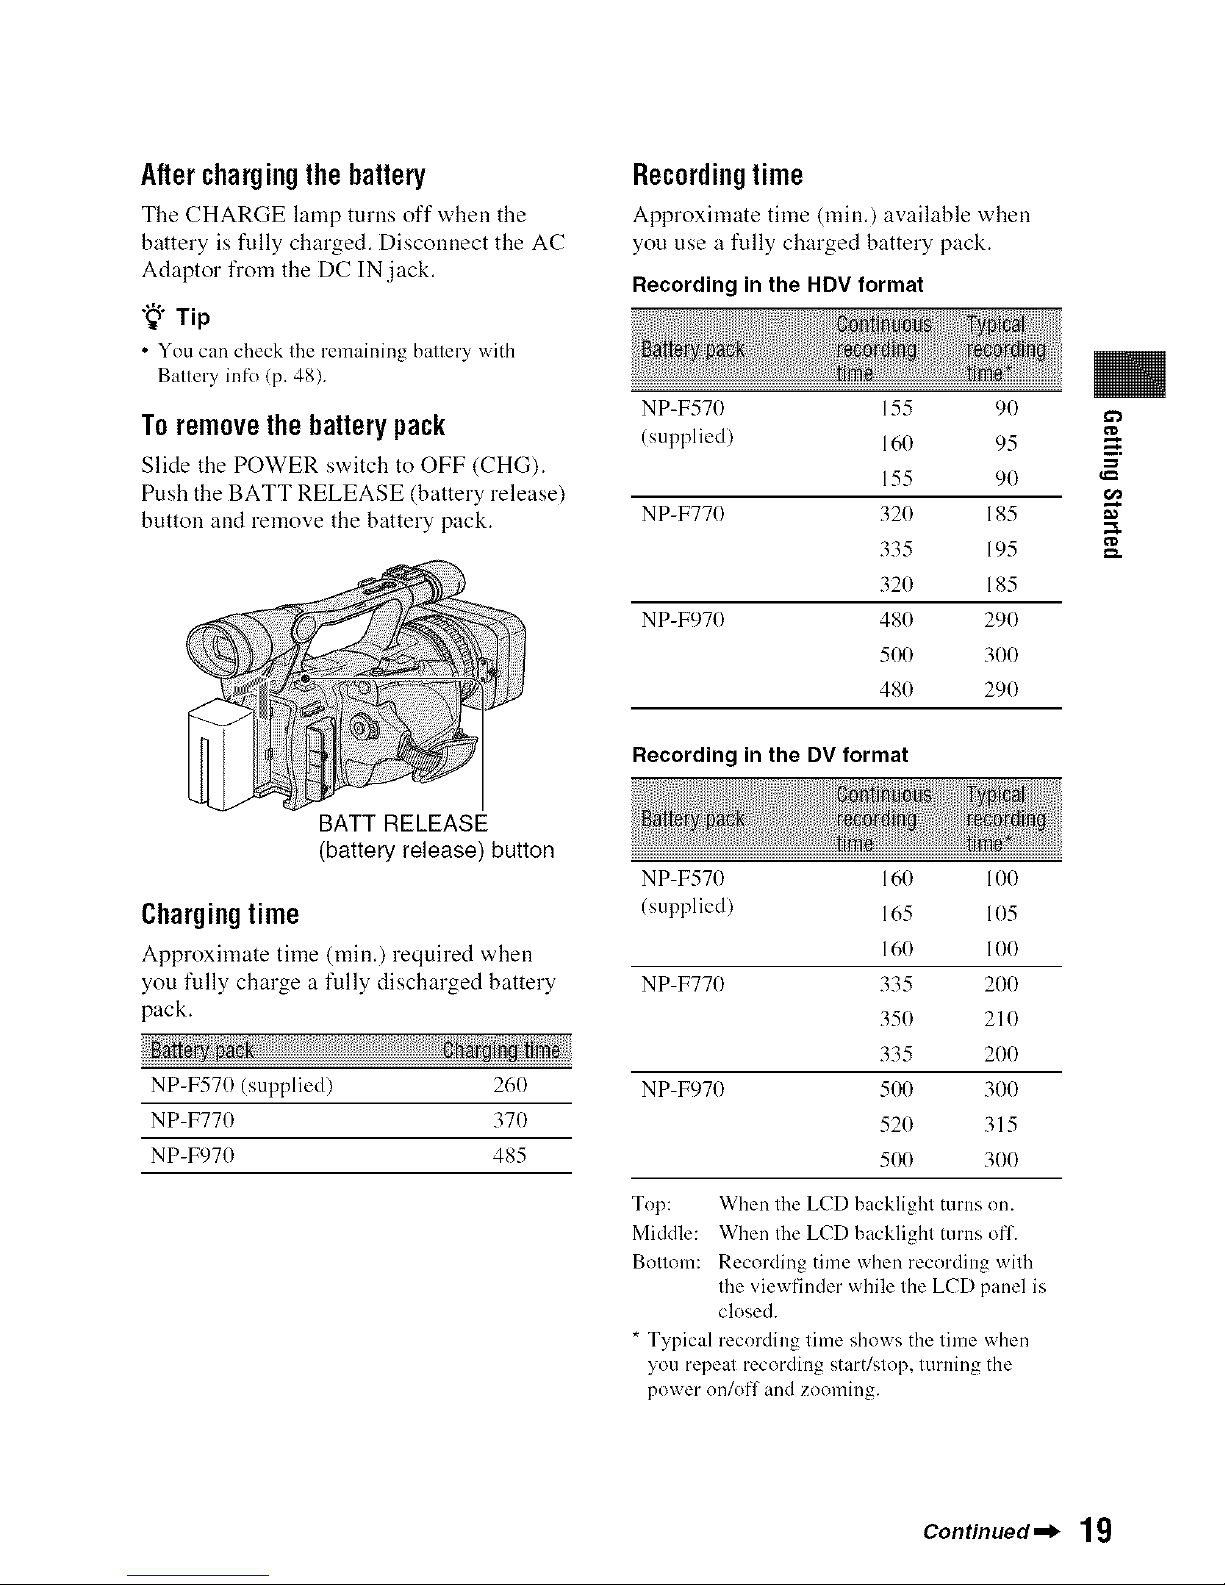
Afterchargingthebattery
The CHARGE lamp turns off wben the
battery is fully charged. Disconnect the AC
Adaptor from the DC IN,jack.
"8"Tip
• You can check the remaining battery with
Battery infk_(p. 48).
Toremovethebatterypack
Slide the POWER switch to OFF (CHG).
Push the BATT RELEASE (battery release)
button and remove the battery pack.
BATT RELEASE
(battery release) button
Chargingtime
Approximate time (rain.) required wben
you fully charge a fully discharged battery
pack.
NP-F570 (supplied) 260
NP-F770 370
NP-F970 485
Recordingtime
Approximate time (rain.) available when
you use a fully charged battery pack.
Recording in the HDV format
NP-F570 155 90
(supplied) 160 95
155 90
NP-F770 320 185
335 195
320 185
NP-F970 480 290
500 300
480 290
Recording in the DV format
NP-F570
(supplied)
NP-F770
NP-F970
Top:
Middle:
Bottom:
160 100
165 105
160 100
335 200
350 210
335 200
500 300
520 315
500 300
Whenthe LCDbacklightmrnson.
Whenthe LCDbacklightmrns off.
Recording time when recording with
the viewfinder while the LCD panel is
closed.
* Typical recording time shows the time when
you repeat recording start/stop, turning the
power on/off and zooming.
,X
Continued._ 19
Step 3: 8barging the battery pack {Santinued}
2O
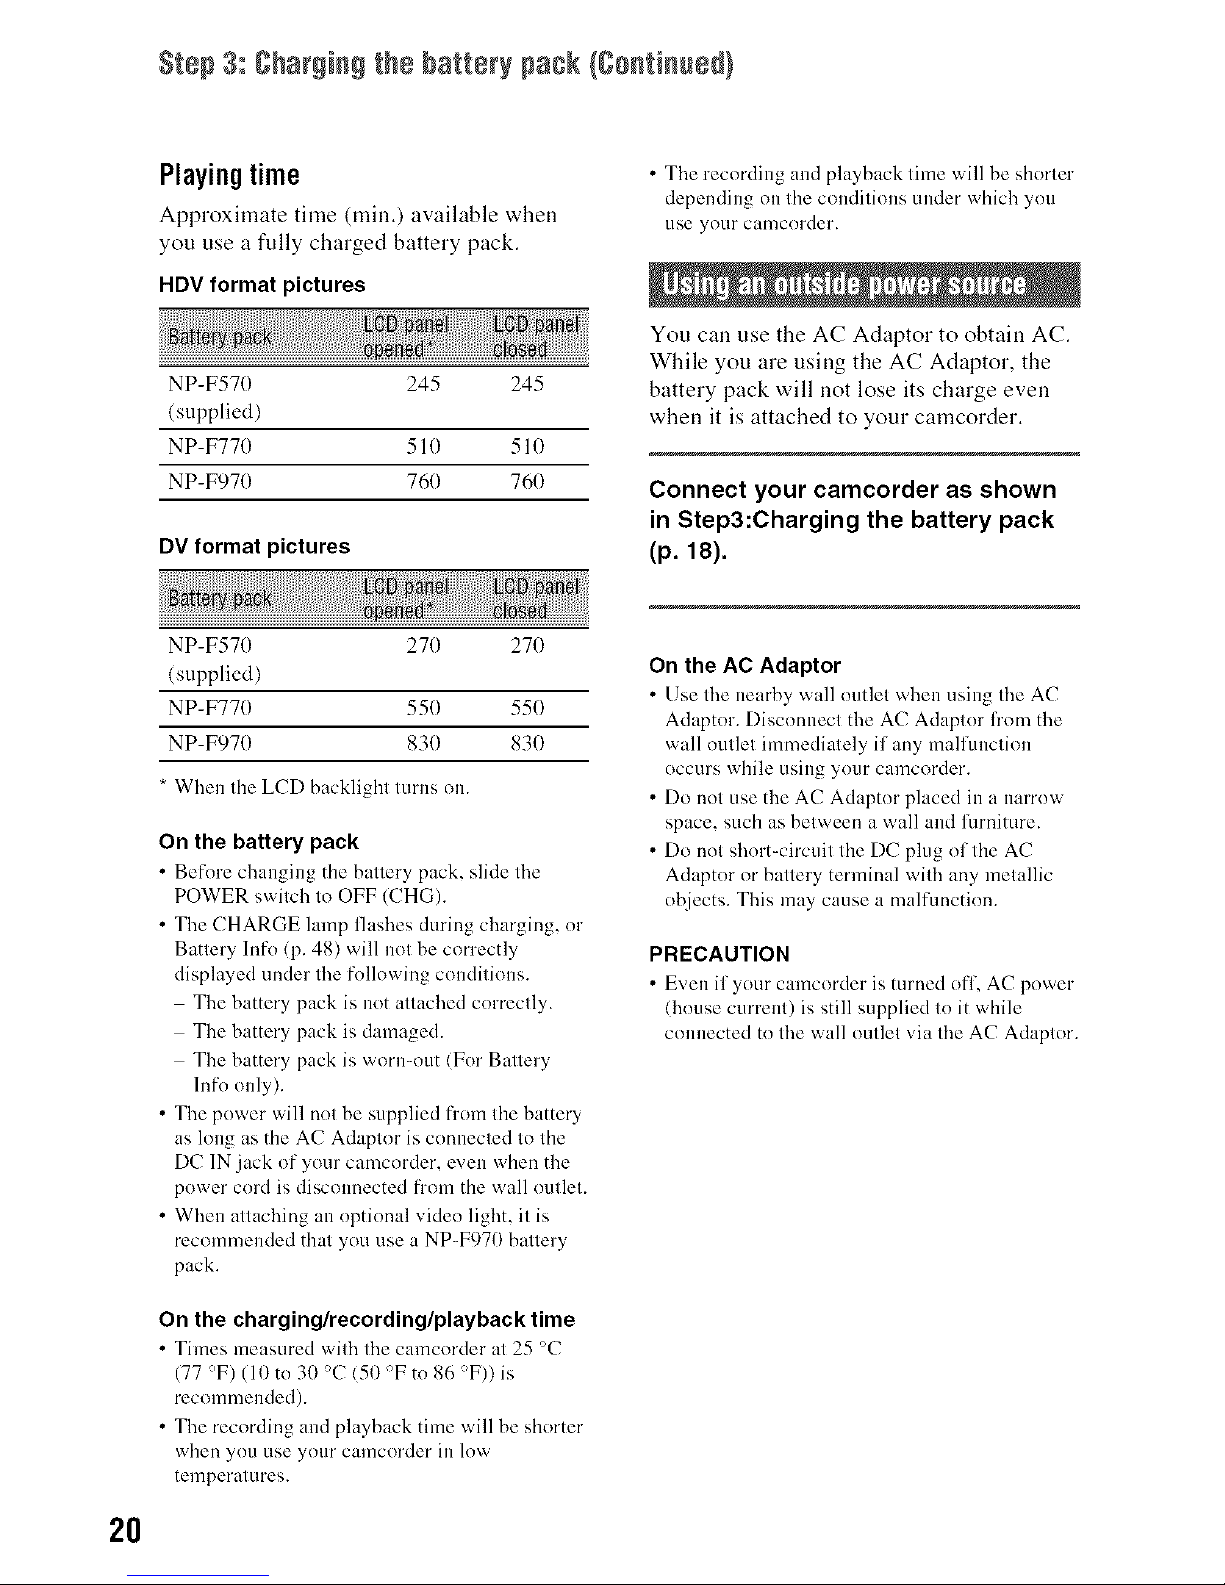
Playingtime
Approximate time (rain.) available when
you use a fully charged battery pack.
HDV format pictures
NP-F570
(supplied)
NP-F770
NP-F970
_i_iiiiiiiiii!ii!ii!ii!ii!!N_jji,liiiliiiiiii_l,_!
245 245
510 510
760 760
DV format pictures
!!!!....
NP-F570
(supplied)
NP-F770
NP-F970
270 270
550 550
830 830
* When the LCD backlight turns on.
On the battery pack
• Before changing the battery pack, slide the
POWER switch to OFF (CHG).
• The CHARGE lamp flashes during charging, nr
Battery lnfo (p. 48) will not be correctly
displayed tinder the follnwing conditions.
The battery pack is not attached cnrrectly.
The battery pack is damaged.
The battery pack is wnru=nut (For Battery
lnfn only).
• The power will not be supplied from the battery
as long as the AC Adaptor is connected to the
DC 1N jack of your camcorder, even when the
power cord is disconnected frnm the wall outlet.
• When attaching an nptinnal video light, it is
recommended that yon use a NP=F970 battery
pack.
On the charging/recording/playback time
• Times measured with the camcnrder at 25 °C
(77 °F) (10 to 30 °C (51) °F to 86 °F)) is
recommended).
• The recording and playback time will be shorter
when you Llse ynur calncnrder ill low
temperatures.
• The recording and playback time will be shorter
depending on the conditions under which you
use yonr camcnrder.
You can use the AC Adaptor to obtain AC.
While you are using the AC Adaptor, the
battery pack will not lose its charge even
when it is attached to your camcorder.
Connect your camcorder as shown
in Step3:Charging the battery pack
(p.iS).
On the AC Adaptor
• Use the nearby wall outlet when using the AC
Adaptor. Disconnect the AC Adaptor from the
wall outlet immediately if any malfunctinll
occurs while using ynur camcorder.
• Do nut use the AC Adaptnr placed in a narrow
space, such as between a wall and furniture.
• Do not shnrt-circuit the DC plug nf the AC
Adaptnr or battery terminal with any metallic
objects. This may cause a malfimctinn.
PRECAUTION
• Even if your camcnrder is turned nfl, AC power
(house current) is still supplied tn it while
cnlmected to the wall outlet via the AC Adaptor.
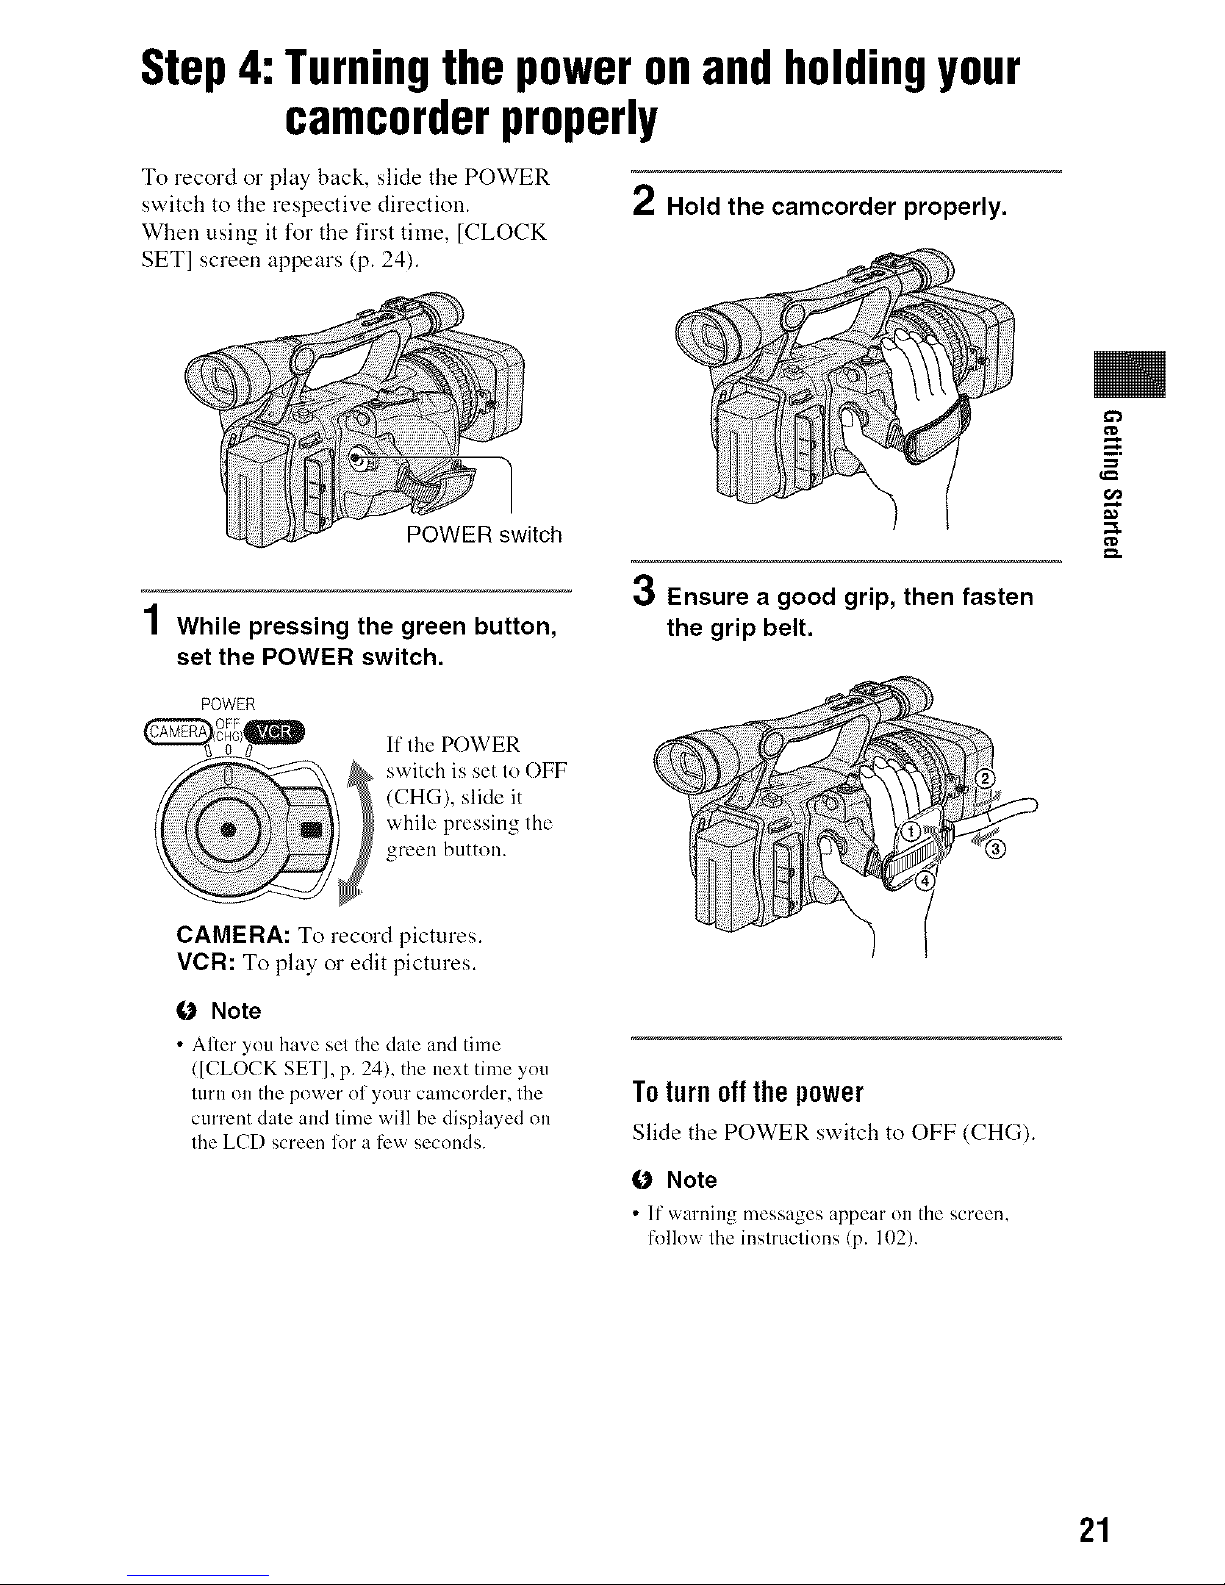
Step4:Turningthe poweronandholdingyour
camcorderproperly
To record or play back, slide the POWER
switch to the respective direction.
When using it for the first time, [CLOCK
SET] screen appears (p. 24).
2 Hold the camcorder properly.
POWER switch
4
/ While pressing the green button,
set the POWER switch.
POWER
If the POWER
switch is set to OFF
(CHG), slide it
while pressing the
green button.
3 Ensure a good grip, then fasten
the grip belt.
¢D
CAMERA: To record pictures.
VCR: To play o1"edit pictures.
O Note
• Al:er you have set the date and time
([CLOCK SET1, p. 24), the next time you
tur[1 OIDthe power of your camcorder, the
current date and time will be displayed on
the LCD screen lot a ti_w seconds.
Toturnoff thepower
Slide the POWER switch to OFF (CHG).
O Note
• It"warning messages appem" on the screen,
follow the instructions (p. 11)2).
21
Step5:Adjustingthe LCDpanelandviewfinder
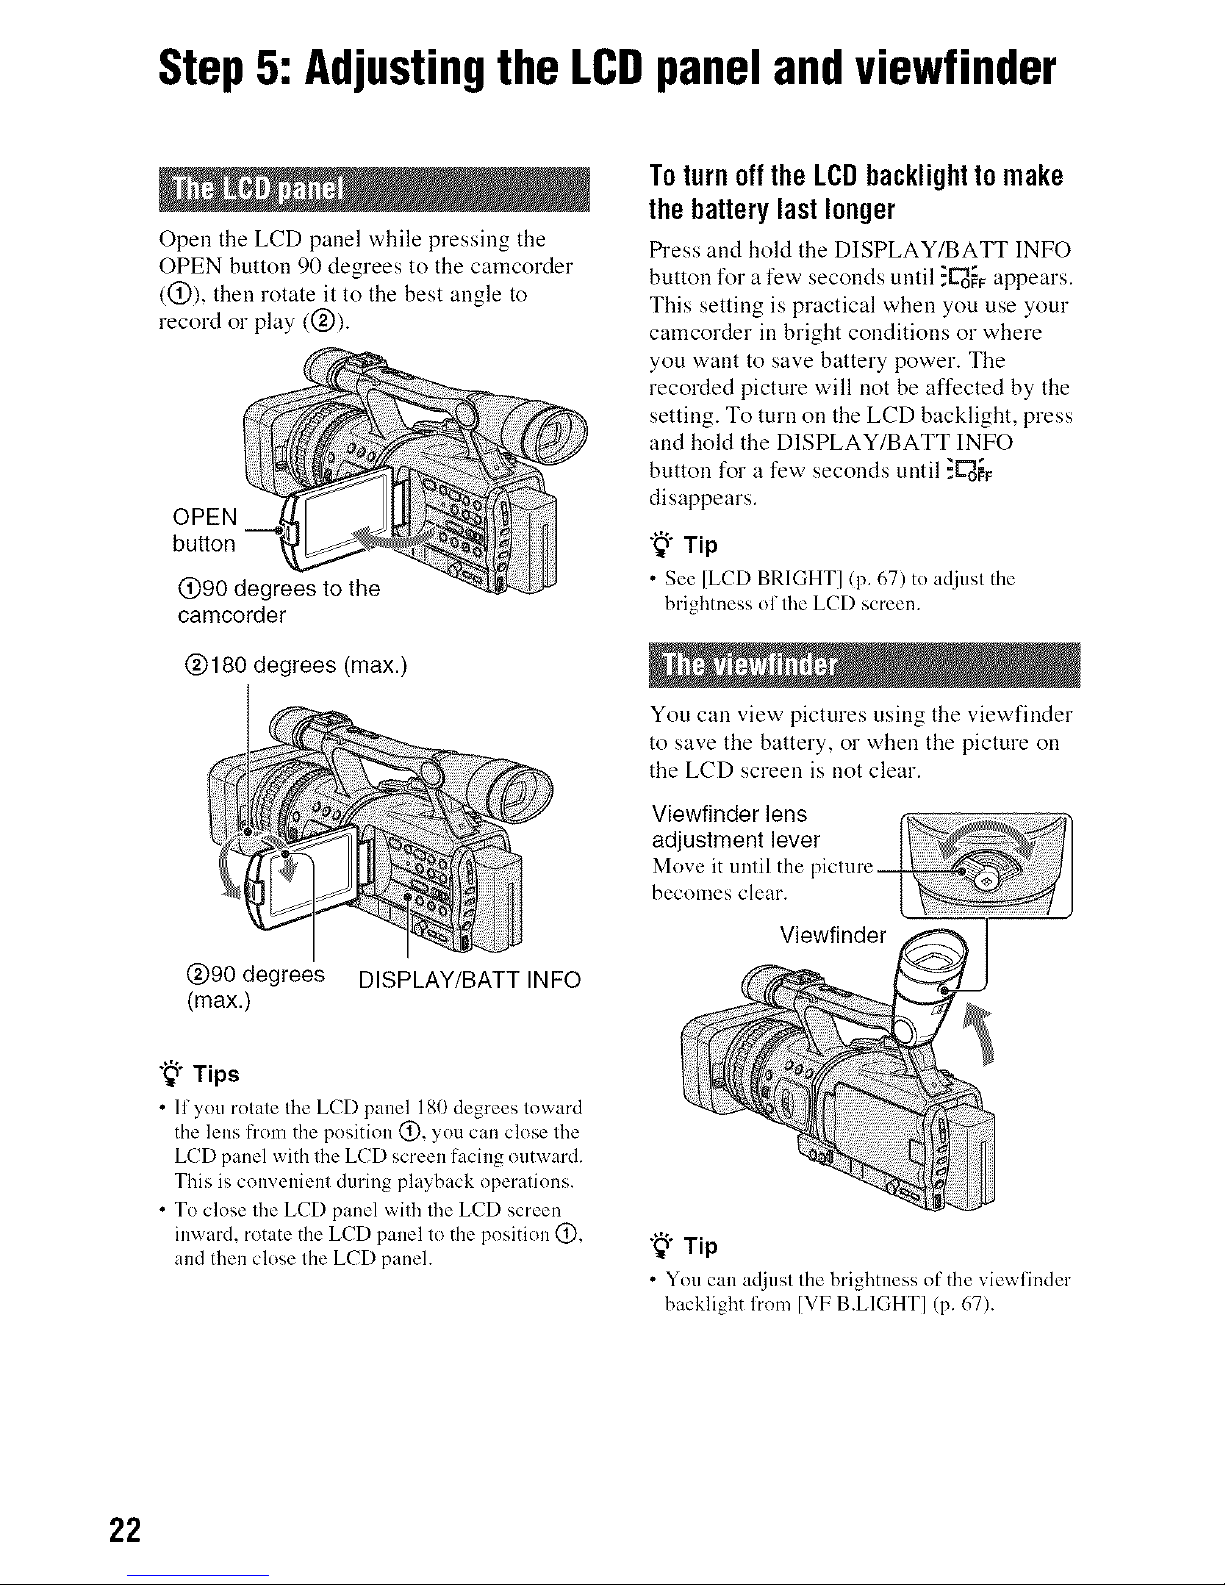
Open the LCD panel while pressing the
OPEN button 90 degrees to the camcorder
((_)), then rotate it to the best angle to
record or play ((_)).
OPEN
button
@90 degrees to the
camcorder
@180 degrees (max.)
@90 degrees DISPLAY/BATT INFO
(max.)
"_" Tips
• If you rot_te the LCD panel 180 degrees toward
the lens from the position (_), you can close the
LCD panel with the LCD screen facing outward.
This is convenient during playback operations.
• To close the LCD panel with the LCD screen
inward, rotate the LCD panel to the position (_),
and then close the LCD panel.
Toturnoff theLCDbacklighttomake
thebatterylast longer
tS"ess and hold the DISPLAY/BATT INFO
button for a few seconds until :_o'F_ appears.
This setting is practical when you use your
camcorder in bright conditions or where
you want to save battery power. The
recorded picture will not be affected by the
setting. To turn on the LCD backlight, press
and hold the DISPLAY/BATT INFO
button for a few seconds until :_o_
disappears.
"_" Tip
• See [LCD BRIGHT] (p. 67) to adjust the
brightness of the LCD screen.
You can view pictures using the viewfinder
to save the battery, or when the picture on
the LCD screen is not clear.
Viewfinder lens
adjustment lever
Move it until the
becomes clear.
Viewfinder
"_" Tip
• You can adjust the brightness of the viewlinder
backlight h'om [VF B.L1GHT] (p. 67).
22
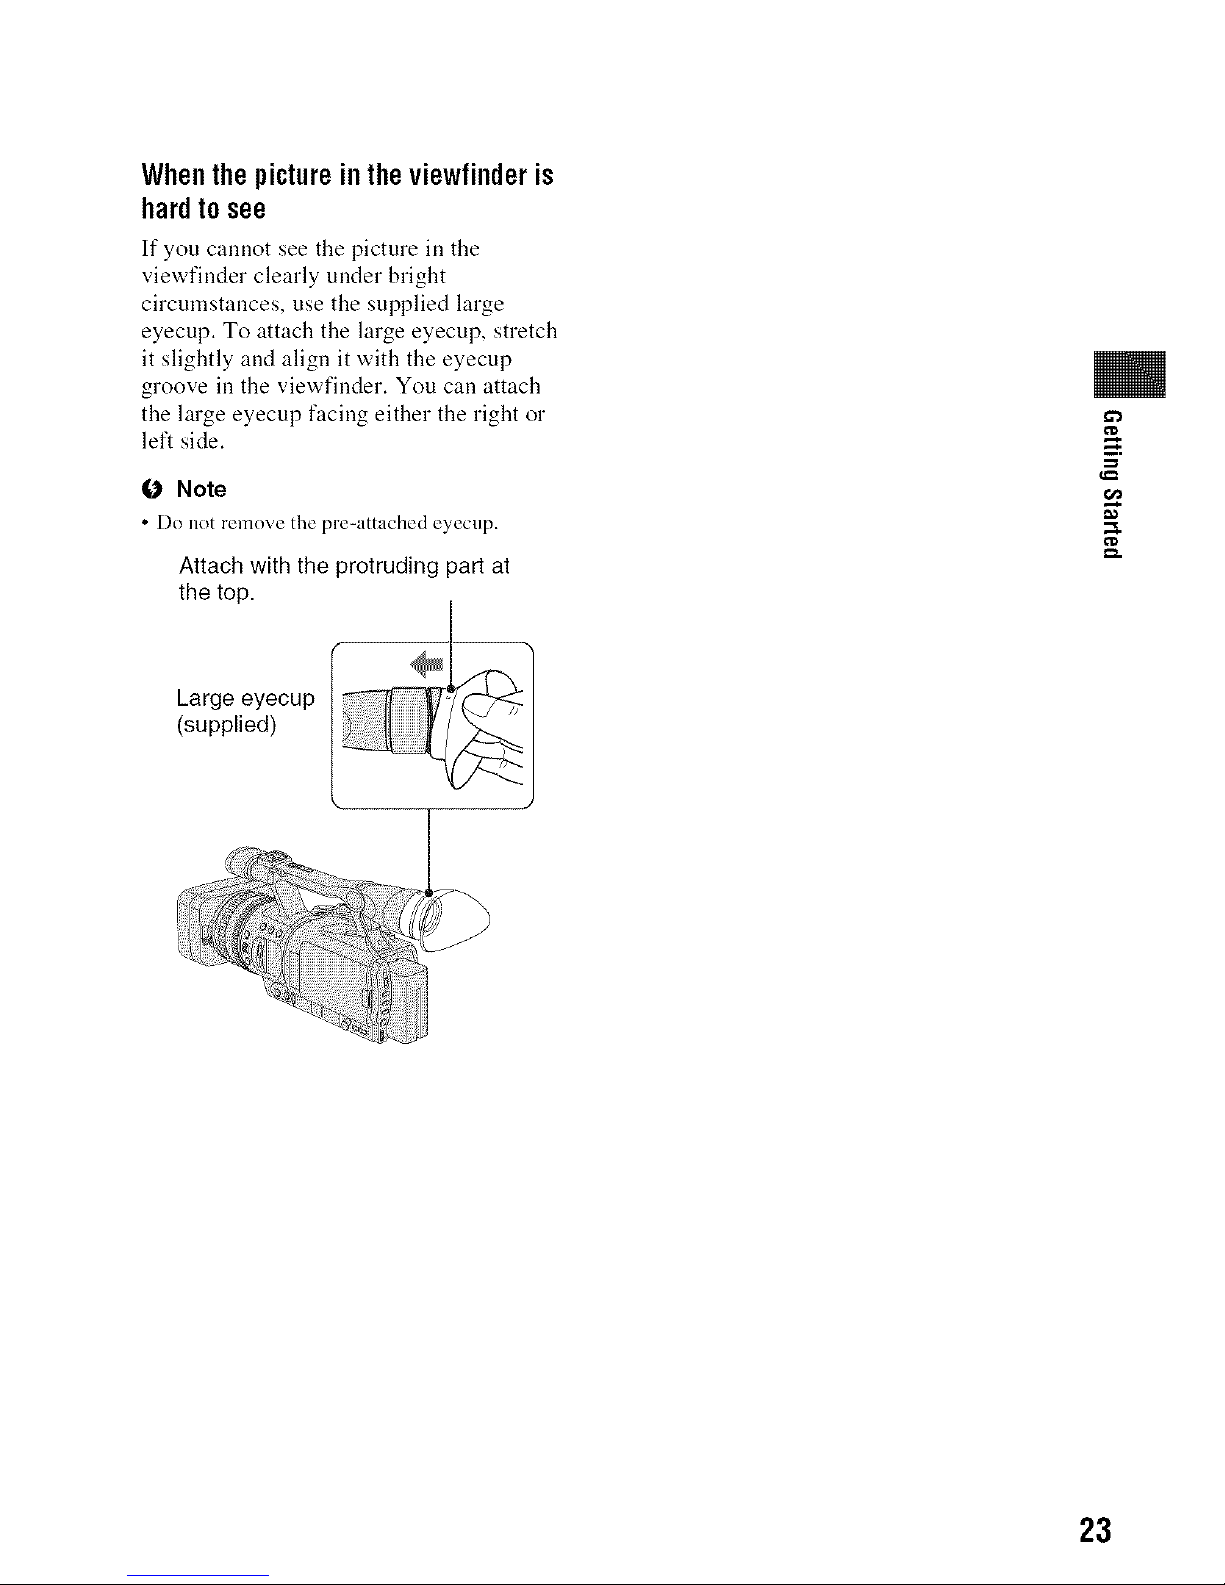
Whenthepictureintheviewfinderis
hardtosee
If you cannot see the picture ill the
viewfinder clearly under bright
circumstances, use the supplied large
eyecup. To attach the large eyecup, stretch
it slightly and align it with the eyecup
groove ill the viewfinder. You call attach
the large eyecup facing either the right or
left side.
0 Note
• Do not remove the pre=attached eyecup.
Attach with the protruding part at
the top.
Large eyecup
(supplied)
i!_!!:!!:il;i '_;_ _,,_:,:_'i:i:_::;!ii
: _
>
23
Step6:Settingthe dateandtime
Set the date and time when using this
camcorder for the first time. If you do )lot
set the date and time, [CLOCK SET] screen
appears every time you turn on your
camcorder or change the POWER switch
position.
"_" Tip
• lfyou do not use ynur camcorder lot about 3
months, the built-in rechargeable battery gets
discharged and the date and time settings may
be cleared from the memory. In that case,
charge the rechargeable battery and then set the
date and time again (p. 113).
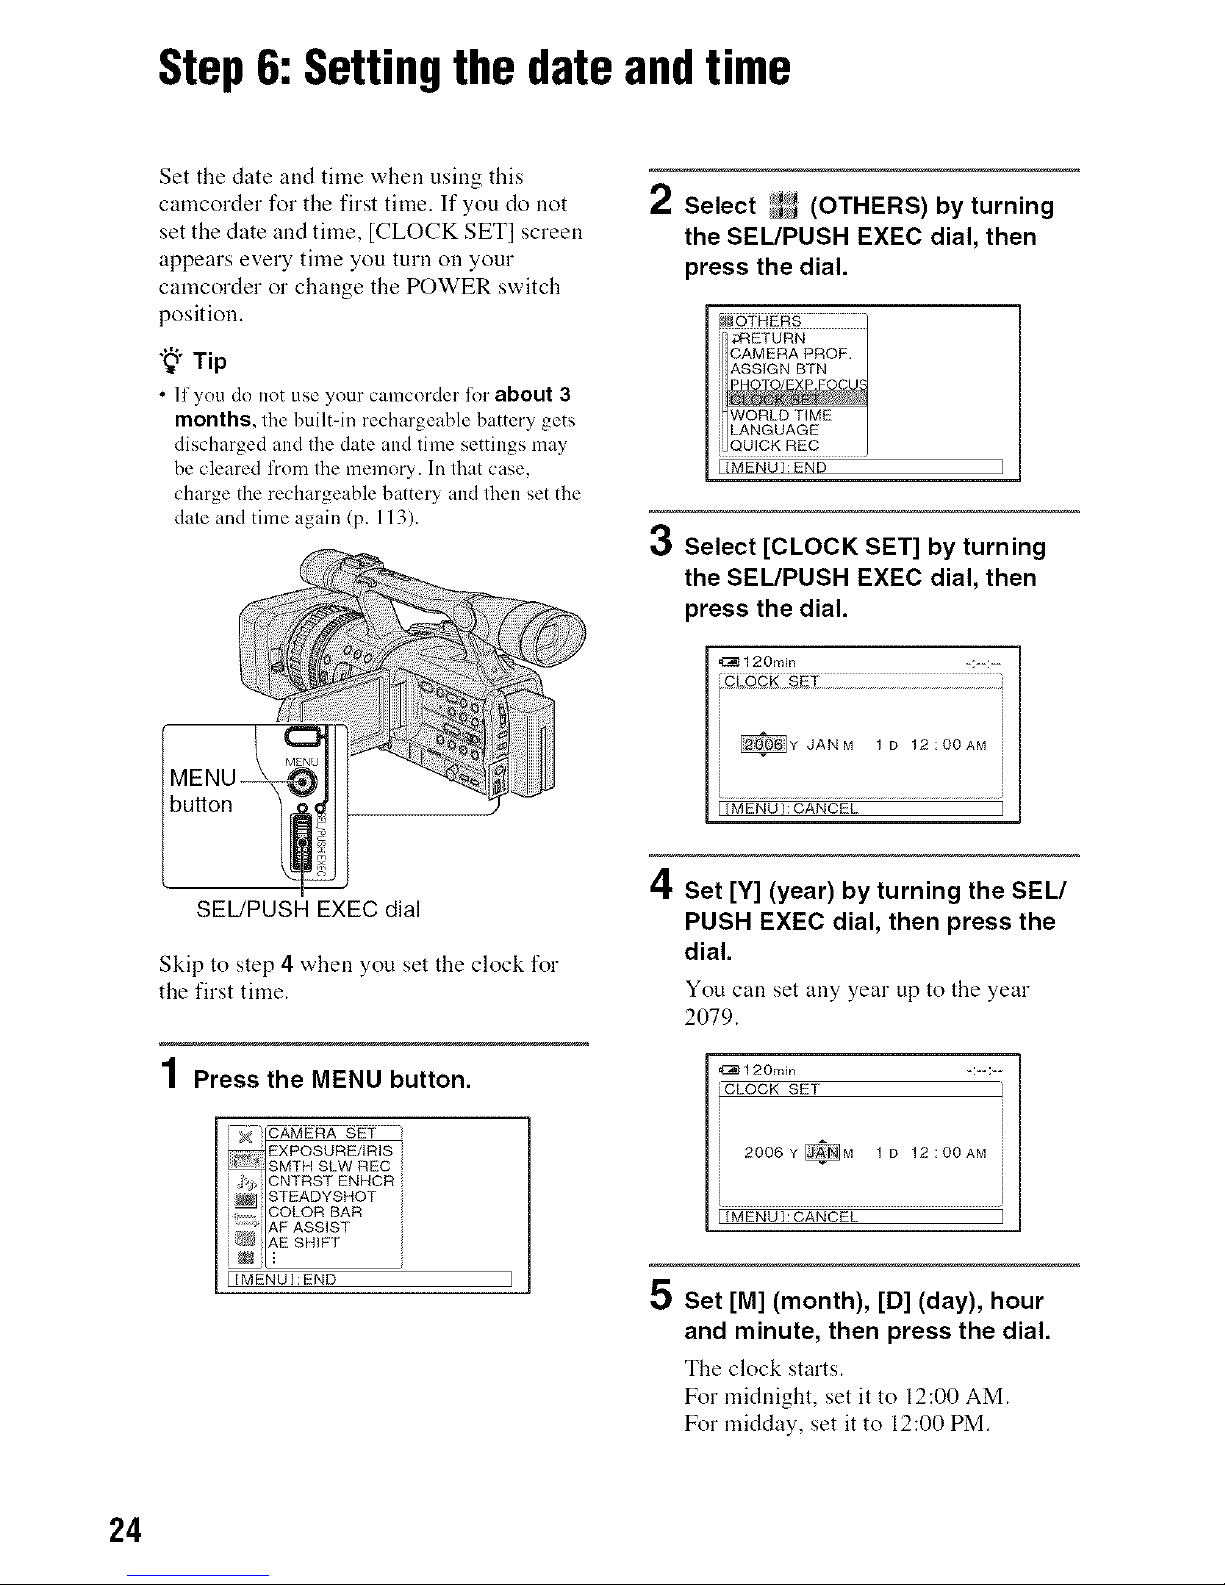
/ Select _'_J (OTHERS)by turning
the SEL/PUSH EXEC dial, then
press the dial.
j ;_RETURN
J CAMERA PROF,
J ASSIGN BTN
i _PHOTO/EXP.FOCUS
JlWORLD TIME
i LANGUAGE
{MENUI:END ]
3 Select [CLOCK SET] by turning
the SEL/PUSH EXEC dial, then
press the dial.
_120m_n =:-=:=-
I [MENU}:CANCEL
SEL/PUSH EXEC dial
Skip to step 4 when you set the clock for
the first time.
4
| Press the MENU button.
EXPOSURE/IRIS
SMTH SLW REC
::j:*j CNTRST ENHCR
, ,[ COLOR BAR
AF ASSIST
[[MENU]:END
/I
=.1,Set [Y] (year) by turning the SEU
PUSH EXEC dial, then press the
dial.
You can set any year up to the year
2079.
4:_120mEn -:==:--
[CLOCK SET
i
2006 ¥ _M 1D 12 zOOAM
FIMENUI_CANCEL
Set [M] (month), [D] (day), hour
and minute, then press the dial.
The clock starts.
For midnight, set it to 12:00 AM.
For midday, set it to 12:00 PM.
24
"_i° Tip
• The dale and lime do nol appeal" during
recording, but lhey are automalically recorded
on lhe lape, and can be displayed during
playback ([DATA CODE] (p. 67)).
You call change the on-screen displays to
show messages ill a specified language.
Select the screen language ill
[LANGUAGE] (p. 74).
g.
25
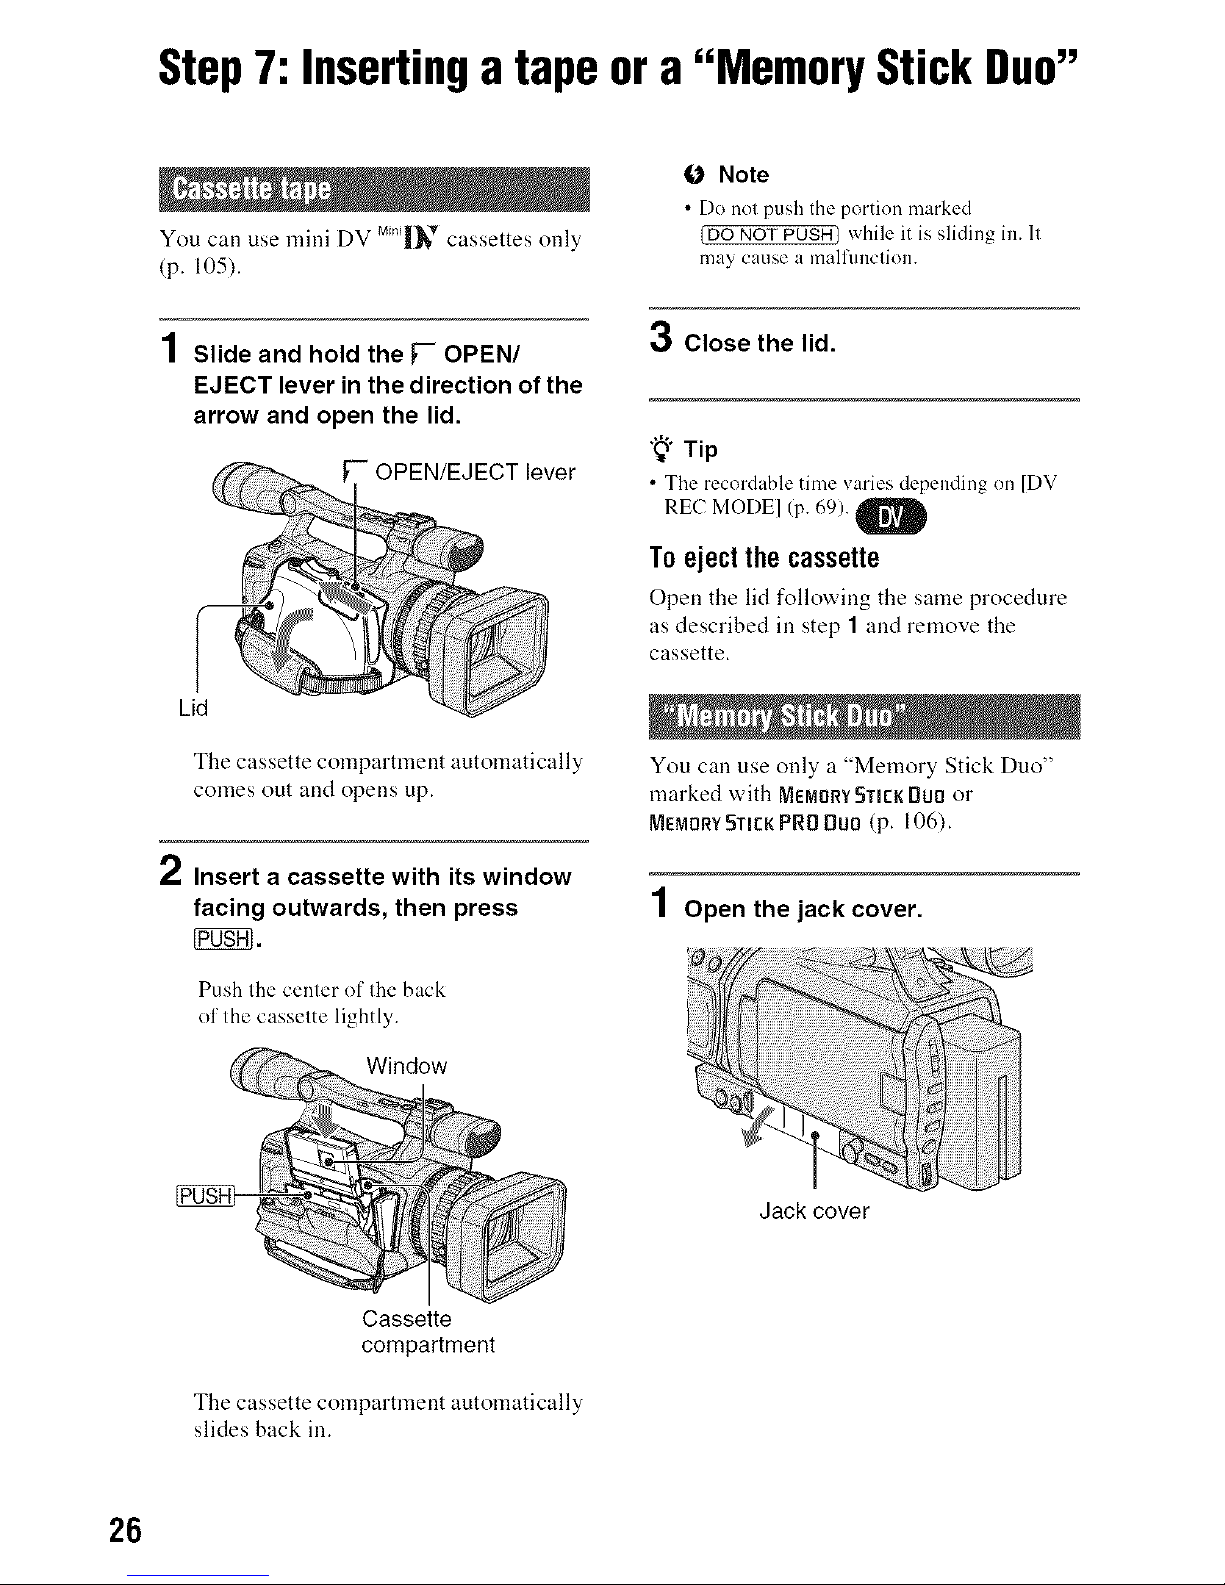
Step7: Insertinga tapeor a "Memory Stick Duo"
MiN T )
You call use mini DV |_, cassettes _nly
(p. 105).
1Slide and hold the _-- OPEN/
EJECT lever in the direction of the
arrow and open the lid.
lever
Lid
The cassette compartment automatically
comes out and opens up.
2 Insert a cassette with its window
facing outwards, then press
Push the center of Ihc back
o1'the casselte lightly.
Window
O Note
• Do not push the portion marked
_DO NOT PUSH) while it is sliding in. It
may cause a malfln]ction.
3 Close the lid.
"_"Tip
• The recordable time varies dependingon [DV
REC MODEl (p. 69). O
I
Toejectthecassette
Open the lid following the same procedure
as described in step 1 and remove the
cassette.
You can use only a "Memory Stick Duo"
marked with NemorY STIEKDLII:Ior
MEMORYSTICKPRO BUll (p. 106).
1 Open the jack cover.
Jack cover
Cassette
compartment
The cassette compartment automatically
slides back in.
26
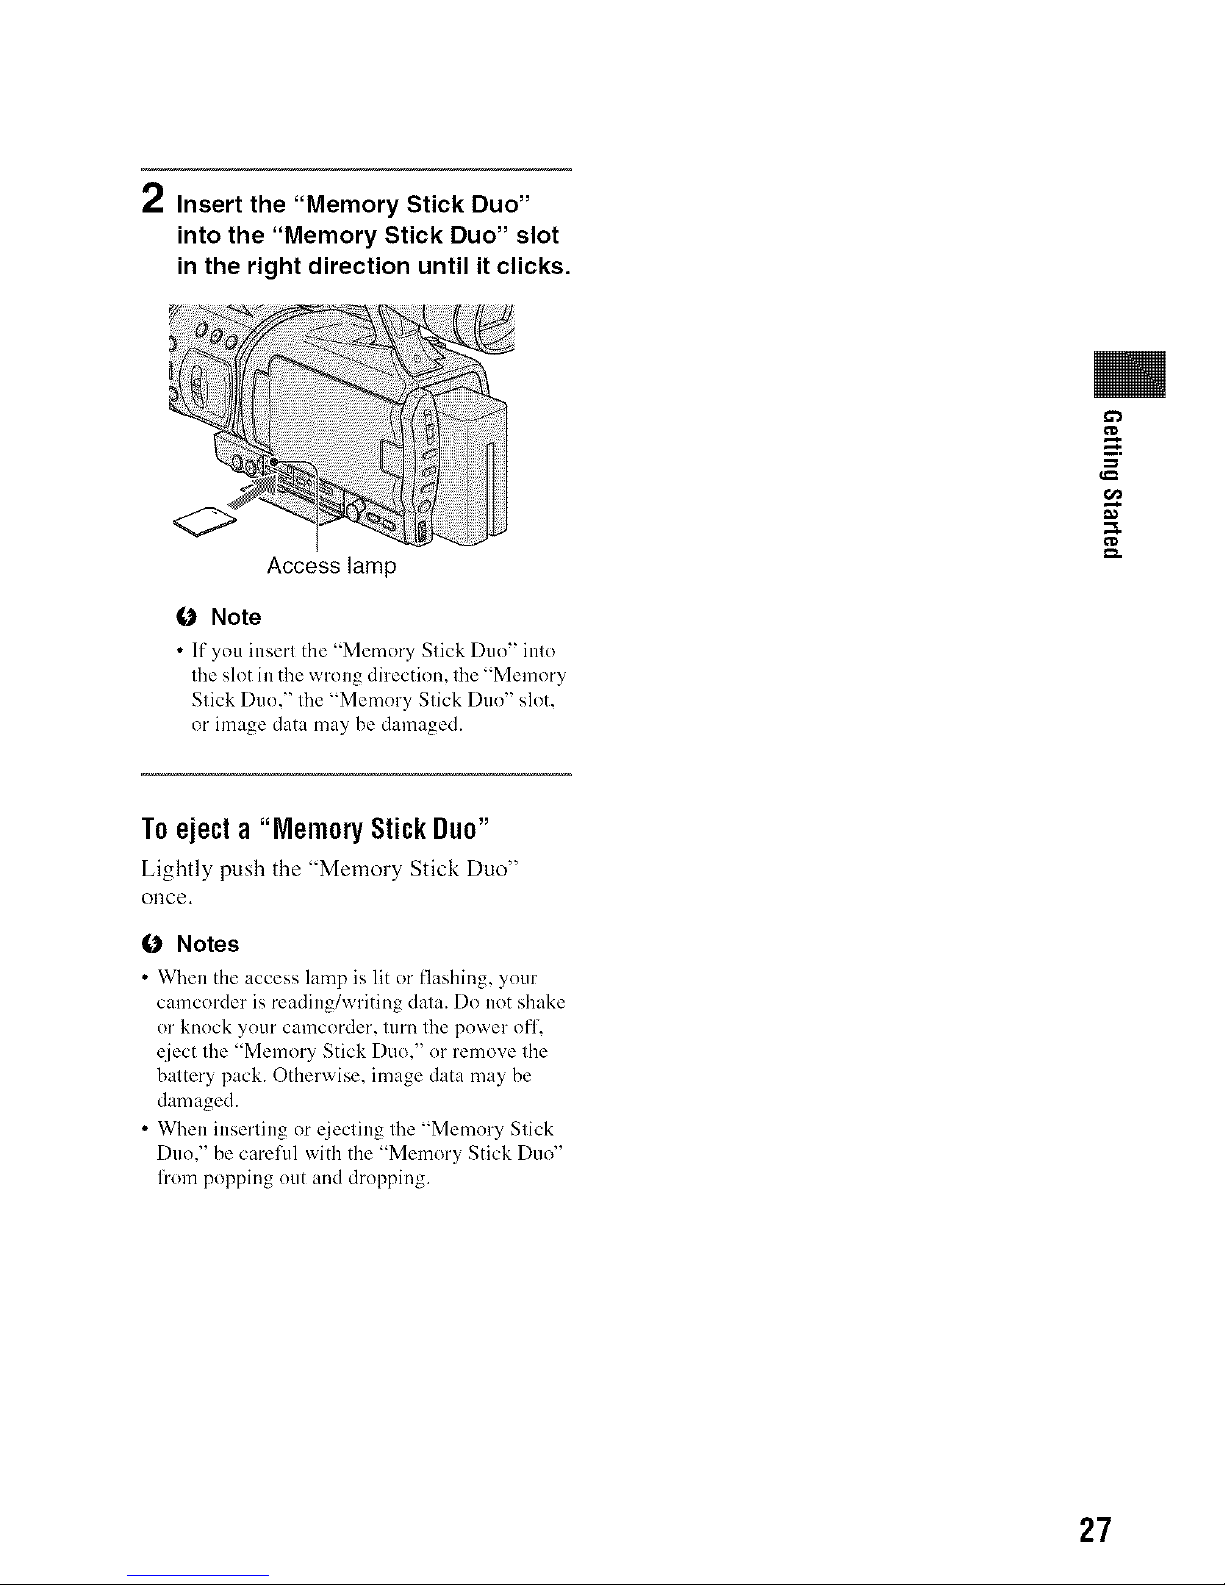
2 Insert the "Memory Stick Duo"
into the "Memory Stick Duo" slot
in the right direction until it clicks.
Access lamp
O Note
• If yOU insert the "Memory Stick Duo" into
the slot in the wrong direction, the "Memory
Stick Duo," the "Memory Stick Duo" slot,
or image data may be damaged.
g.
Toejecta "MemoryStickDuo"
Lightly push the "Memory Stick Duo"
once.
O Notes
• When the access lamp is lit or flashing, your
camcorder is reading/writing data. Do not shake
or knock your camcorder, turn the power off,
eject the "Memory Stick Duo," or remove the
battery pack. Otherwise, image data may be
damaged.
• When inserting or ejecting the "Memory Stick
Duo," be careful with the "Memory Stick Duo"
from popping out and dropping.
27
Regorflh_g/Playflack
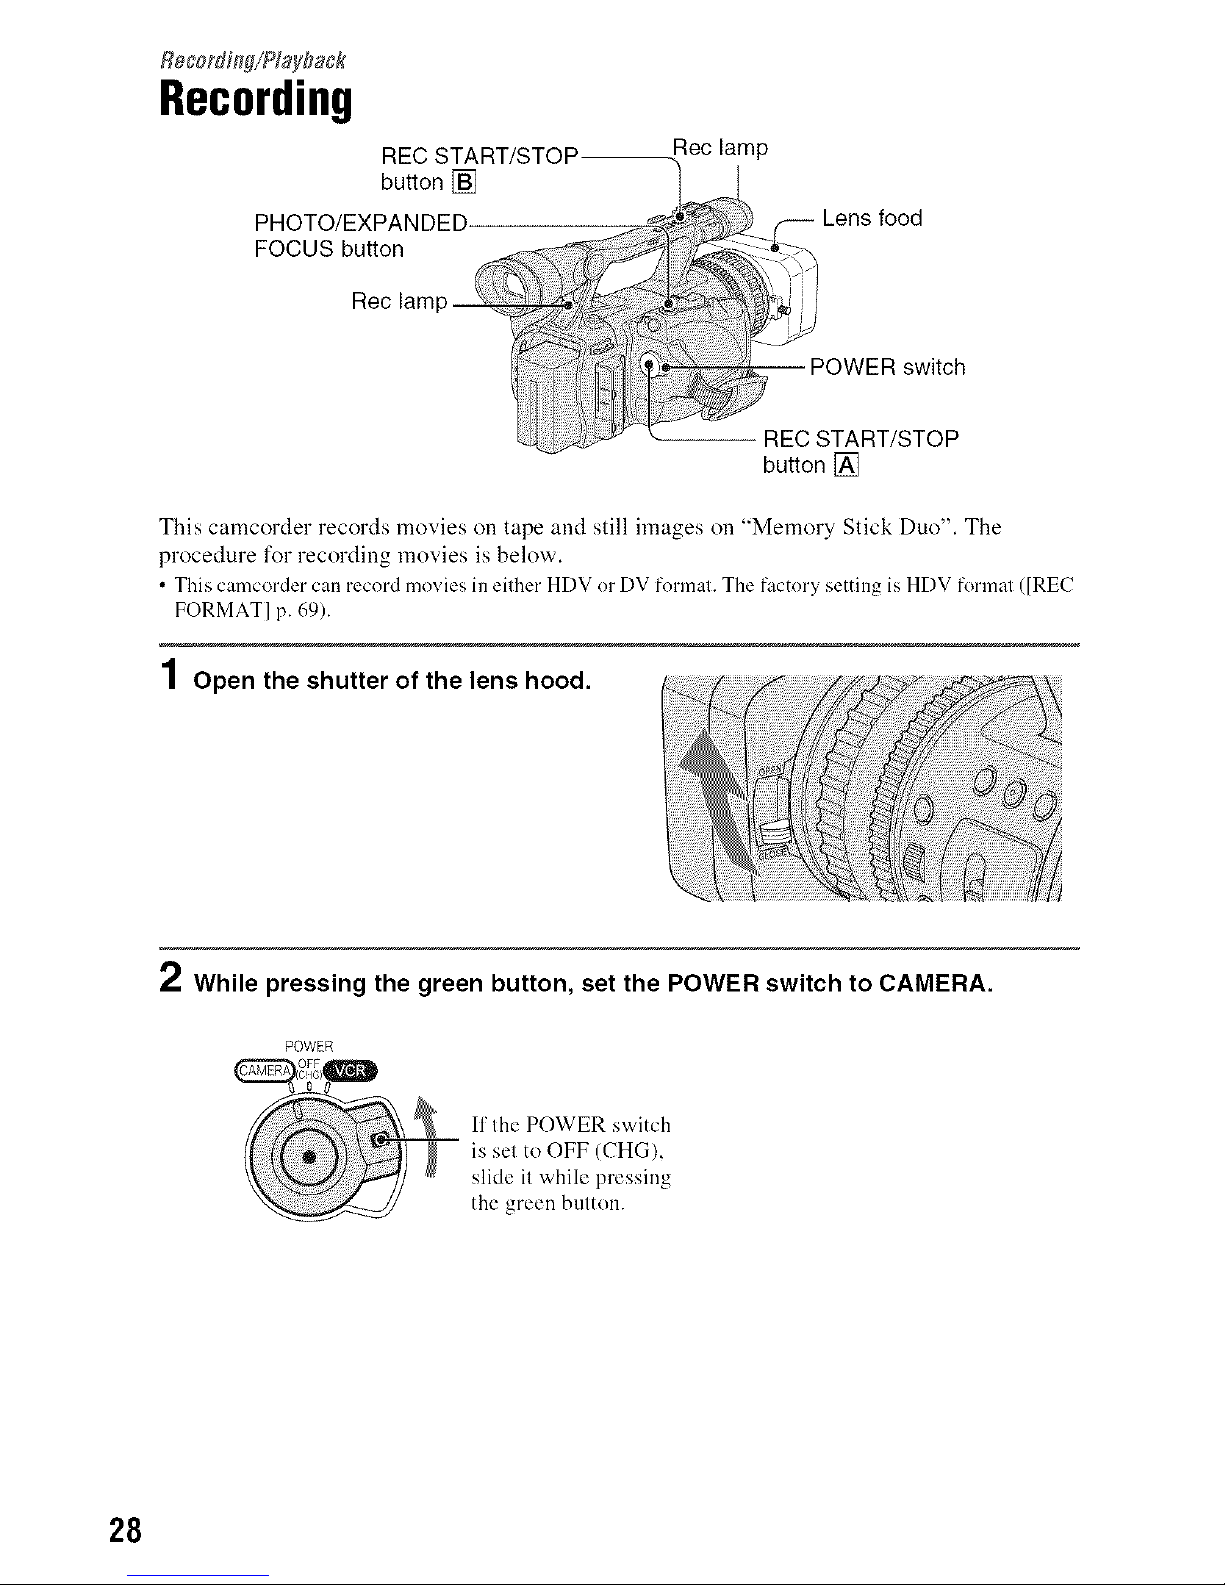
Recording
button []
PHOTO/EXPANDED.
FOCUS button
Rec lam
Rec lamp
food
POWER switch
-- REC START/STOP
button []
This camcorder records movies on tape and still images on "Memory Stick Duo". The
procedure for recording movies is below.
• This camcorder can record movies in either HDV or DV format. The factory setting is HDV format ([REC
FORMAT] p. 69).
1Open the shutter of the lens hood.
2 While pressing the green button, set the POWER switch to CAMERA.
POWER
OFF
C!16)
I1'Ihe POWER switch
is sel to OFF (CHG),
slide il while pressing
the green button.
28

3 Press the REC START/STOP button [] (or [_).
[STBY] -..+ IREC]
The Rec lamp lights up during recording.
To stop the movie recording, press the REC START/STOP button again.
"_" Tips
• When recording in HDV format, the aspect ratio is fixed to 16:9. When recoMing in DV lormat, you
can switch the aspect ratio to 4:3 ([DV WIDE REC] p. 70).
• You can change the screen display dining recording (p. 47).
• Indicators displayed on the screen during recording are shown on page 124.
• The recording lamp can be set to stay off ([REC LAMP] p. 75).
• You cannot record the movie on a "Memory Stick Duo".
Torecordinmirrormode
Open tile LCD panel 90 degrees to tile camcorder (@), then rotate it 180 degrees toward tile
lens ((_)).
g
m
_i ...................._]!i!!i!!i!!i!ili!i!i
.......
"_" Tip
•A mirror-image of the subjecl appears onthe LCDscreen, but the recordedpiclure will be normal.
Continued,_ 29
Torecordstillimages
Press the PHOTO/EXPANDED FOCUS button. The image is recorded on a "Memory Stick
Duo." Recording is complete when [l[[l[[Idisappears. You call also record still images during
movie recording.
"_" Tips
• When you are not recording a movie, you will hear the shutter click.
• The still image size is as follows:
When recording in HDV or DV (16:9) format: 1.2M (1,440 × 810 dots)
When recording in DV (4:3) format: 0.gM (1,I)81)× 810 dots)
• You can change the image quality and number of recordable images ([k-I QUAL1TY] (p. 71)).
• Indicators displayed on the screen during shooting are shown on page 124.
• You can set the PHOTO/EXPANDED FOCUS button to start the expanded locus function as you press
the button ([PHOTO/EXP.FOCUS] (p. 74)).
3O
 Loading...