

Sony Handycam HDR-CX100 Operation Manual
SONY:
4-129-506-11
(1)
HDR-CX100
Digital HDVideoCamera Recorder
_O_p_e_ra_ti_n_9_G_u_id_e
G_u_la_d_e_o--:..-p_e_ra_c_i_o_n_e_s
_
I::\VCHD
HOrn.
~
MEMORY STICK
rl)/nfoLiTHIU~
n.
GJ
SER'ES
_
_
®
© 2009 Sony Corporation
Owner's
Record
The model and serial numbers are located
on
the bottom. Record the serial number
in the space provided below. Refer to these
numbers whenever you call upon your Sony
dealer regarding this product.
Model No. HDR-CXlOO
Serial No.
Model No. ACSerial No.
WARNING
To
reduce fireorshock hazard,donot
expose
Do
excessive
the
not
like.
the
unittorainormoisture.
expose
the
batteries
heat
suchassunshine, fire
to
or
This symbolisintended
to alert the user to the
of
presence
important
operating and maintenance
(servicing) instructions in
the literature accompanying
the appliance.
CAUTION: TO REDUCE THE RISK OF ELECTRIC SHOCK.
DO NOT REMOVE COVER (OR BACK).
NO USER·SERVICEABLE PARTS INSIDE.
TO
REFER SERVICING
QUALIFIED SERVICE PERSONNEL
This symbolisintended
to alert the user to the
of
presence
uninsulated
"dangerous voltage" within
the product's enclosure
of
that may be
sufficient
magnitude to constitute
of
a risk
electric shock to
persons.
us
2
IMPORTANT
SAFETY
INSTRUCTIONS
SAVE
DANGER OR
CAREFULLY
THESE
INSTRUCTIONS.
TO
ELECTRIC
FOLLOW
REDUCE
SHOCK,
INSTRUCTIONS.
• Read these instructions.
• Keep these instructions.
• Heed all warnings.
• Follow all instructions.
• Do not use this apparatus near water.
• Clean only with
•
Do
not block any ventilation openings. Install in accordance with the manufacturer's
instructions.
Do
not install near any heat sources such as radiators, heat registers, stoves,orother
•
apparatus (including amplifiers) that produce heat.
•
Do
not defeat the safety purposeofthe polarizedorgrounding-type plug. A polarized plug
has two blades with one wider
third
grounding prong.
the provided plug does
dry
cloth.
The
not
than
the other. A grounding type plug has two blades and a
wide bladeorthe third prong are provided for your safety.
fit into your outlet, consult an electrician for replacementofthe
THE
THESE
RISK
OF
FIRE
If
obsolete outlet. •
• Protect the power cord from being walked
receptacles, and the point where they exit from the apparatus.
• Only use attachments/accessories specified by the manufacturer.
• Use only with the cart, stand, tripod, bracket, or table specified by the manufacturer,
sold with the apparatus.
combination to avoid injury from tip-over.
• Unplug this apparatus during lightning storms
• Refer all servicing to qualified service personnel. Servicing
has been damaged in any
been spilled
rain
or
•
If
the shapeofthe plug does
proper configuration for the power outlet.
or
objects have fallen into the apparatus, the apparatus has been exposed to
moisture, does
When
not
a cartisused, use caution when moving the cart/apparatus
way,
such as power-supply cordorplugisdamaged, liquid has
operate normally,orhas been dropped.
not
fit
the
onorpinched particularly at plugs, convenience
or
or
when unused for long periodsoftime.
is
required when the apparatus
power outlet, use an attachment plug adaptorofthe
us
3
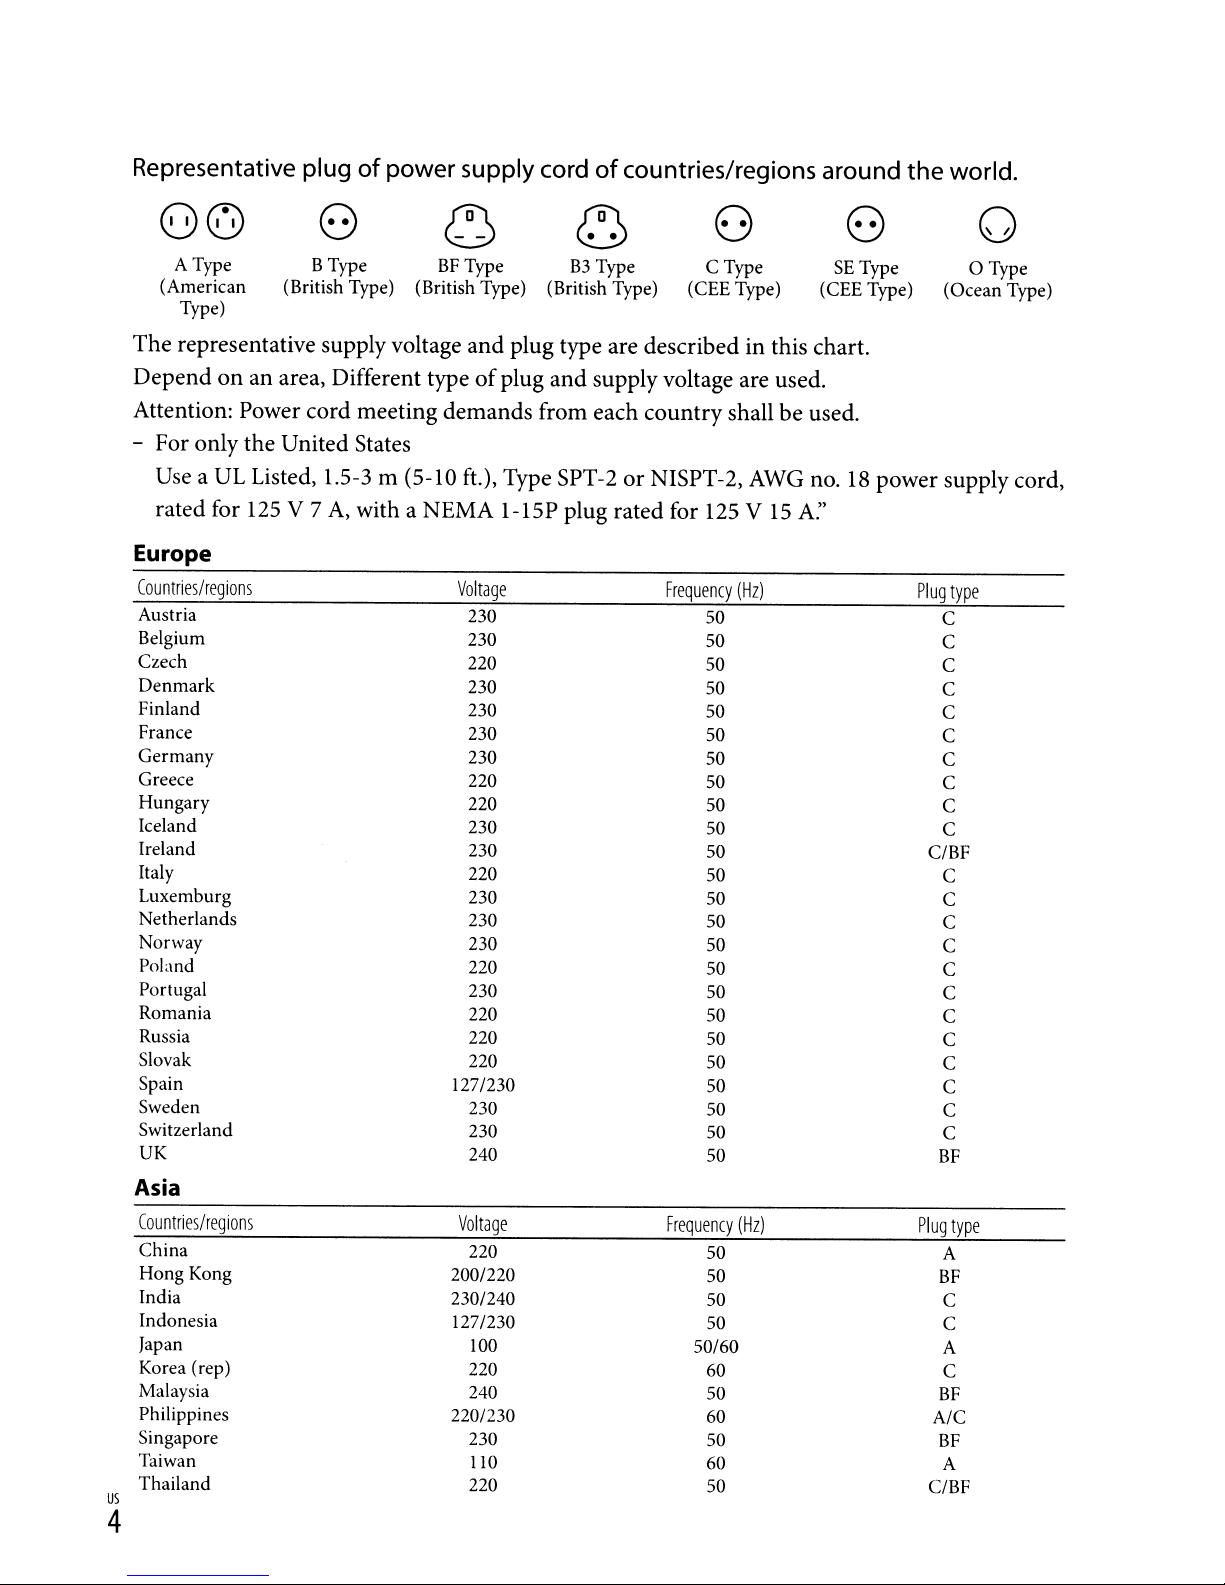
Representative plugofpower supply cordofcountries/regions around the world.
8@
A Type BType
(American (British Type) (British Type) (British Type) (CEE Type)
Type)
(0
~ ~
BF
Type
B3
8
Type C Type
(0
SE
(CEE Type)
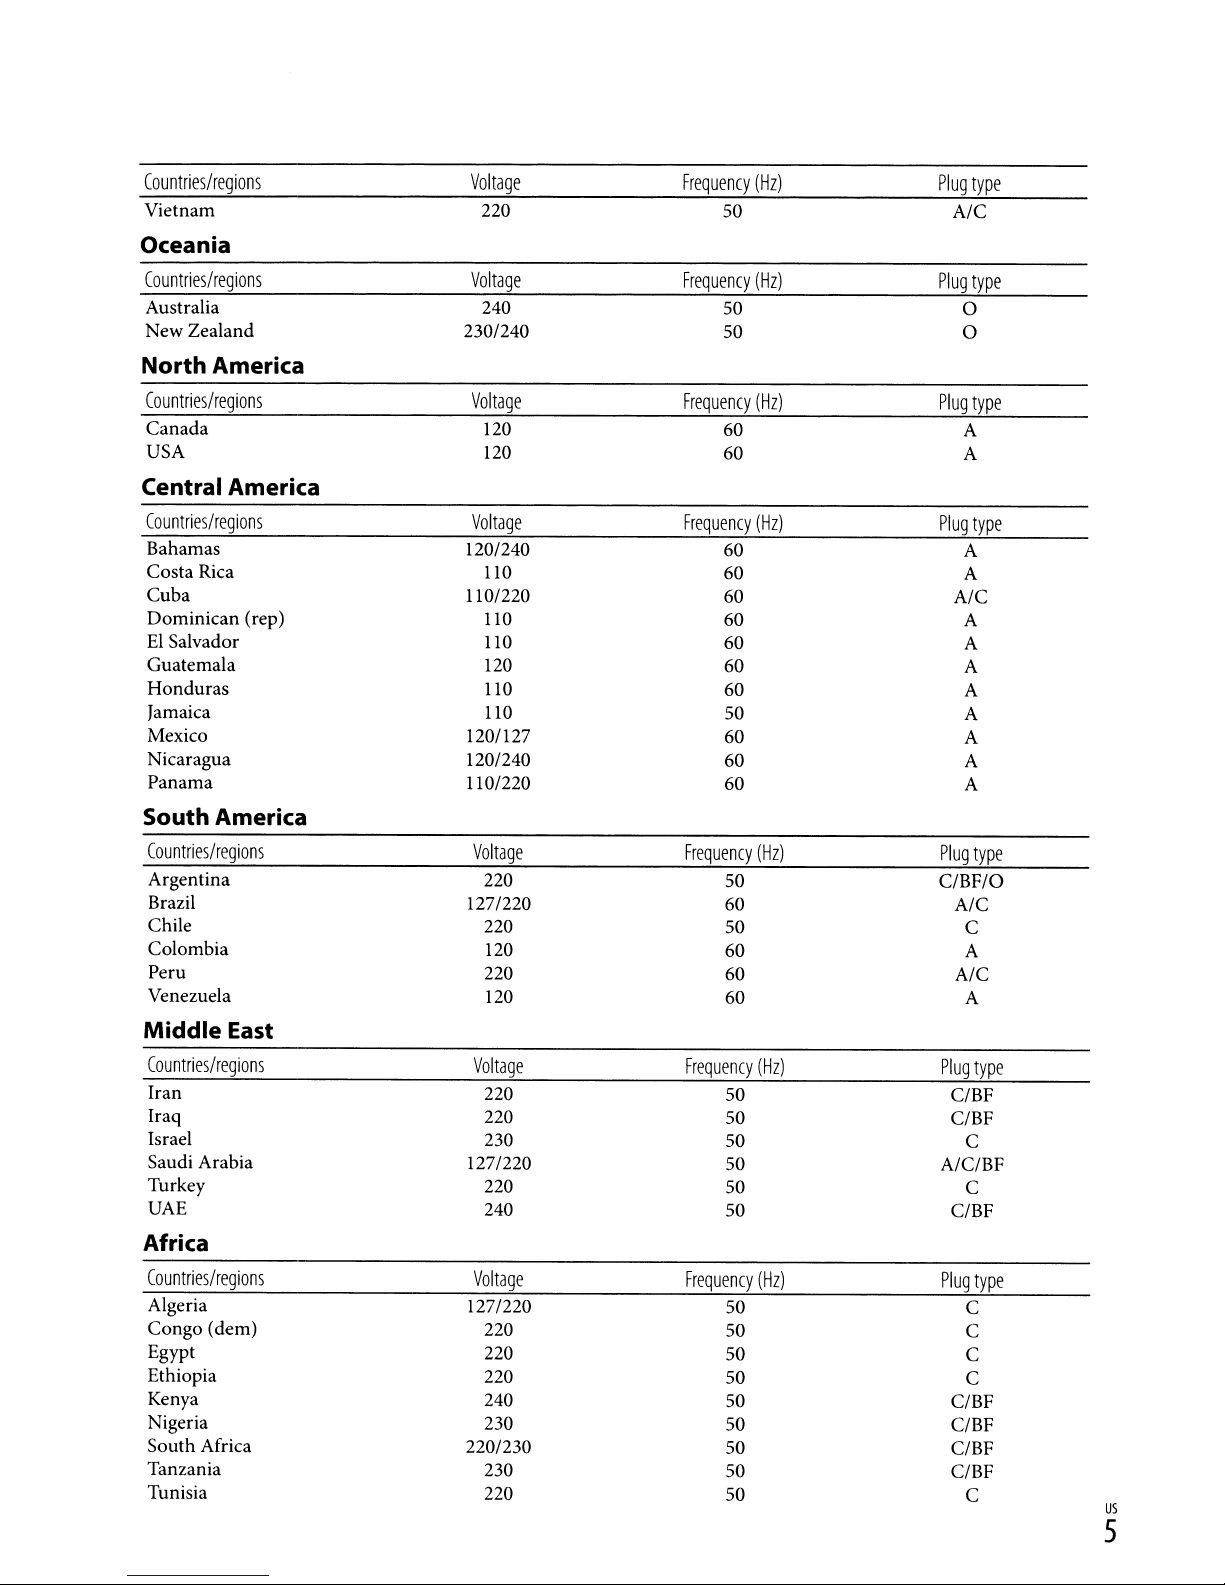
The representative supply voltage and plug type are described in this chart.
Depend
on
an area, Different typeofplug
and
supply voltage are used.
Attention: Power cord meeting demands from each countryshall be used.
- For only the United States
Use a
UL
Listed, 1.5-3 m (5-10 ft.), Type SPT-2 or NISPT-2,
rated for
Europe
Countries/regions
Austria
Belgium 230
Czech 220
Denmark
Finland
France
Germany 230
Greece
Hungary
Iceland 230
Ireland
Italy 220
Luxemburg 230
Netherlands
Norway
Poland
Portugal 230
Romania
Russia 220
Slovak 220
Spain
Sweden 230
Switzerland 230
UK
125
V 7A,with a NEMA 1-15P plug rated for 125 V15A:'
Voltage
230 50
230 50
230
230 50
220
220
230 50 C/BF
230 50
230
220
220 50 C
127/230
240 50
Frequency
AWG
(Hz)
50
50 C
50 C
50 C
50 C
50 C
50 C
50 C
50 C
50 C
50 C
50
50 C
50 C
50
50 C
50 C
no.18power supply cord,
Type
0
oType
(Ocean Type)
Plug
type
C
C
C
C
C
C
C
BF
Asia
Countries/regions
China
Hong Kong 200/220
India 230/240
Indonesia
Japan
Korea (rep)
Malaysia
Philippines 220/230 60 A/C
Singapore 230
Taiwan
Thailand
us
4
Voltage
220 50 A
127/230 50
100
220 60 C
240 50
110 60
220 50 C/BF
Frequency
(Hz)
50
50 C
50/60 A
50
Plug
type
BF
C
BF
BF
A
Countrieslregions
Vietnam
Oceania
Countries/regions
Australia
New Zealand
North America
Voltage
220
Voltage
240
230/240
Frequency
(Hz)
50
Frequency
(Hz)
50
50
Plug
A/C
Plug
type
type
0
0
Countries/regions
Canada
USA
Voltage
120
120
Central America
Countries/regions
Bahamas 120/240
Costa Rica
Cuba
Dominican
El
Salvador
Guatemala
Honduras
Jamaica
Mexico
Nicaragua
Panama
(rep)
Voltage
110
110/220
110
110
120
110
110
120/127
120/240
110/220
South America
Countries/regions
Argentina
Brazil
Chile
Colombia
Peru
Venezuela
Voltage
220
127/220
220
120
220
120
Frequency
(Hz)
60
60
Frequency
(Hz)
60
60
60
60
60
60
60
50
60 A
60 A
60
Frequency
(Hz)
50
60
50
60
60
60
Plug
type
A
A
Plug
type
A
A
A/C
A
A
A
A
A
A
Plug
type
C/BF/O
A/C
C
A
A/C
A
Middle
East
Countries/regions
Iran
Iraq
Israel
Saudi Arabia
Turkey
UAE
Africa
Countries/regions
Algeria
Congo (dem)
Egypt
Ethiopia
Kenya
Nigeria
South Africa
Tanzania
Tunisia
Voltage
220
220
230
127/220
220
240
Voltage
127/220
220
220
220
240
230
220/230
230
220
Frequency
(Hz)
50
50 C/BF
50
50
50
50
Frequency
(Hz)
50
50
50
50
50
50
50
50
50
Plug
type
C/BF
C
A/C/BF
C
C/BF
Plug
type
C
C
C
C
C/BF
C/BF
C/BF
C/BF
C
us
5
Read
this
first
Before operating the unit, please read this
manual thoroughly, and retain it for future
reference.
CAUTION~
Battery
pack
Ifthe battery packismishandled, the
or
battery pack can burst, cause a fire
even
chemical burns. Observe the following
cautions.
• Do not disassemble.
• Do not crush and do not expose the battery
pack to any shock or force such
dropping or stepping on
• Do not short circuit and do not allow metal
objects to come into contact with the battery
terminals.
to
• Do not expose
(140°F) such
parked in the sun.
• Do not incinerate
• Do not handle damaged
batteries.
•
Be
sure to charge the battery pack using a
genuine Sony battery charger or a device that
can charge the battery pack.
• Keep the battery pack out
children.
•
Keep
the battery pack dry.
• Replace only with the same or equivalent type
recommended by
• Disposeofused batterypacks promptly
described in the instructions.
high temperature above 60°C
as
in direct sunlightorin a car
it.
or
disposeofin fire.
or
Sony.
as
hammering,
leaking lithium ion
of
the reachofsmall
as
Replace the battery with the specified type
only. Otherwise, fire or injury may result.
if
socket) immediately
any malfunction
occurs while using your camcorder.
Even
if
your camcorderisturned
power source (mains)
is
still supplied to
off, AC
it while connected to the wall outlet (wall
socket) via the
For
customers
.
RECYCLING
AC
Adaptor.
in
···.t,
the
,"
LITHIUM-ION
U.S.A.
andCANADk
.
BATTERIES
Lithium-Ion batteries are
recyclable.
You
can help preserve
our
environment by returning
your used rechargeable
batteries to the collection and
recycling location nearest you.
For more information
regarding recycling
of
rechargeable batteries, call toll
free 1-800-822- 8837,
or
visit
http://www.rbrc.org/
Caution: Do
not
handle
damaged orleaking Lithium-
Ion batteries.
Battery
This device complies with Part15of
FCC Rules. Operation
following two conditions:
pack
is
subject to the
(1) This device
the
may not cause harmful interference, and
(2) this device must accept any interference
received, including interference that may
cause undesired operation.
ACAdaptor
Do not use the
narrow space, such as between a wall and
furniture.
Use
the nearby wall outlet (wall socket)
when using the
the
AC
us
Adaptor from the wall outlet (wall
AC
Adaptor placed in a
AC
Adaptor. Disconnect
6
This Class B digital apparatus complies
with Canadian ICES-003.
For
the
customersinthe
U.S.A.
ULisan internationally recognized safety
organization.
UL
This product has received
Listing.
Ifyou have any questions about this
product, you may call:
Sony Customer Information
222-S0NY (7669).
The
number
matters only.
Regulatory
DeclarationofConformity
Trade Name: SONY
Model No.: HDR-CXI00
Responsible Party: Sony Electronics Inc.
Address: 16530 Via Esprillo, San Diego,
CA 92127 U.S.A.
Telephone No.: 858-942-2230
This device complies with Part
FCC Rules. Operation is subject to the
following two conditions: (1) This device
may
not
and
(2) this device
interference received, including
interference that may cause undesired
operation.
below is for the FCC related
Information
cause harmful interference,
must
Center
15ofthe
accept any
1-800-
CAUTION
You
are cautioned that any changes
modifications
this manual could void
operate this equipment.
not
expressly approved
your
authority to
or
in
Note
This equipment has been tested
to comply with the limits for a Class B
digital device,
FCC Rules.
These limits are designed to provide
reasonable protection against harmful
interference in a residential installation.
This equipment generates, uses,
can radiate radio frequency energy and,
if
not
installed
with the instructions, may cause harmful
interference to radio communications.
However, there is
interference will
installation.
pursuant
and
not
If
this equipment does cause
to Part15of
used in accordance
no
guarantee that
occur
and
found
the
and
in a particular
harmful
reception, which can be determined by
turning
user
interference by one
measures:
- Reorientorrelocate the receiving antenna.
- Increase the separation between the
- Connect the equipment into an outlet
- Consult the dealer or
The
with the equipment in order to comply with
the limits for a digital device pursuant to
Subpart B
The
quantity.
interference to radioortelevision
the equipment off
is
encouraged to
or
equipment and receiver.
a circuit different from that to which the
is
receiver
TV
supplied interface cable mustbeused
numbers in ( ) are the supplied
connected.
technician for help.
of
Part15of
and
on, the
try
to correct the
moreofthe following
on
an
experienced radioI
FCC Rules.
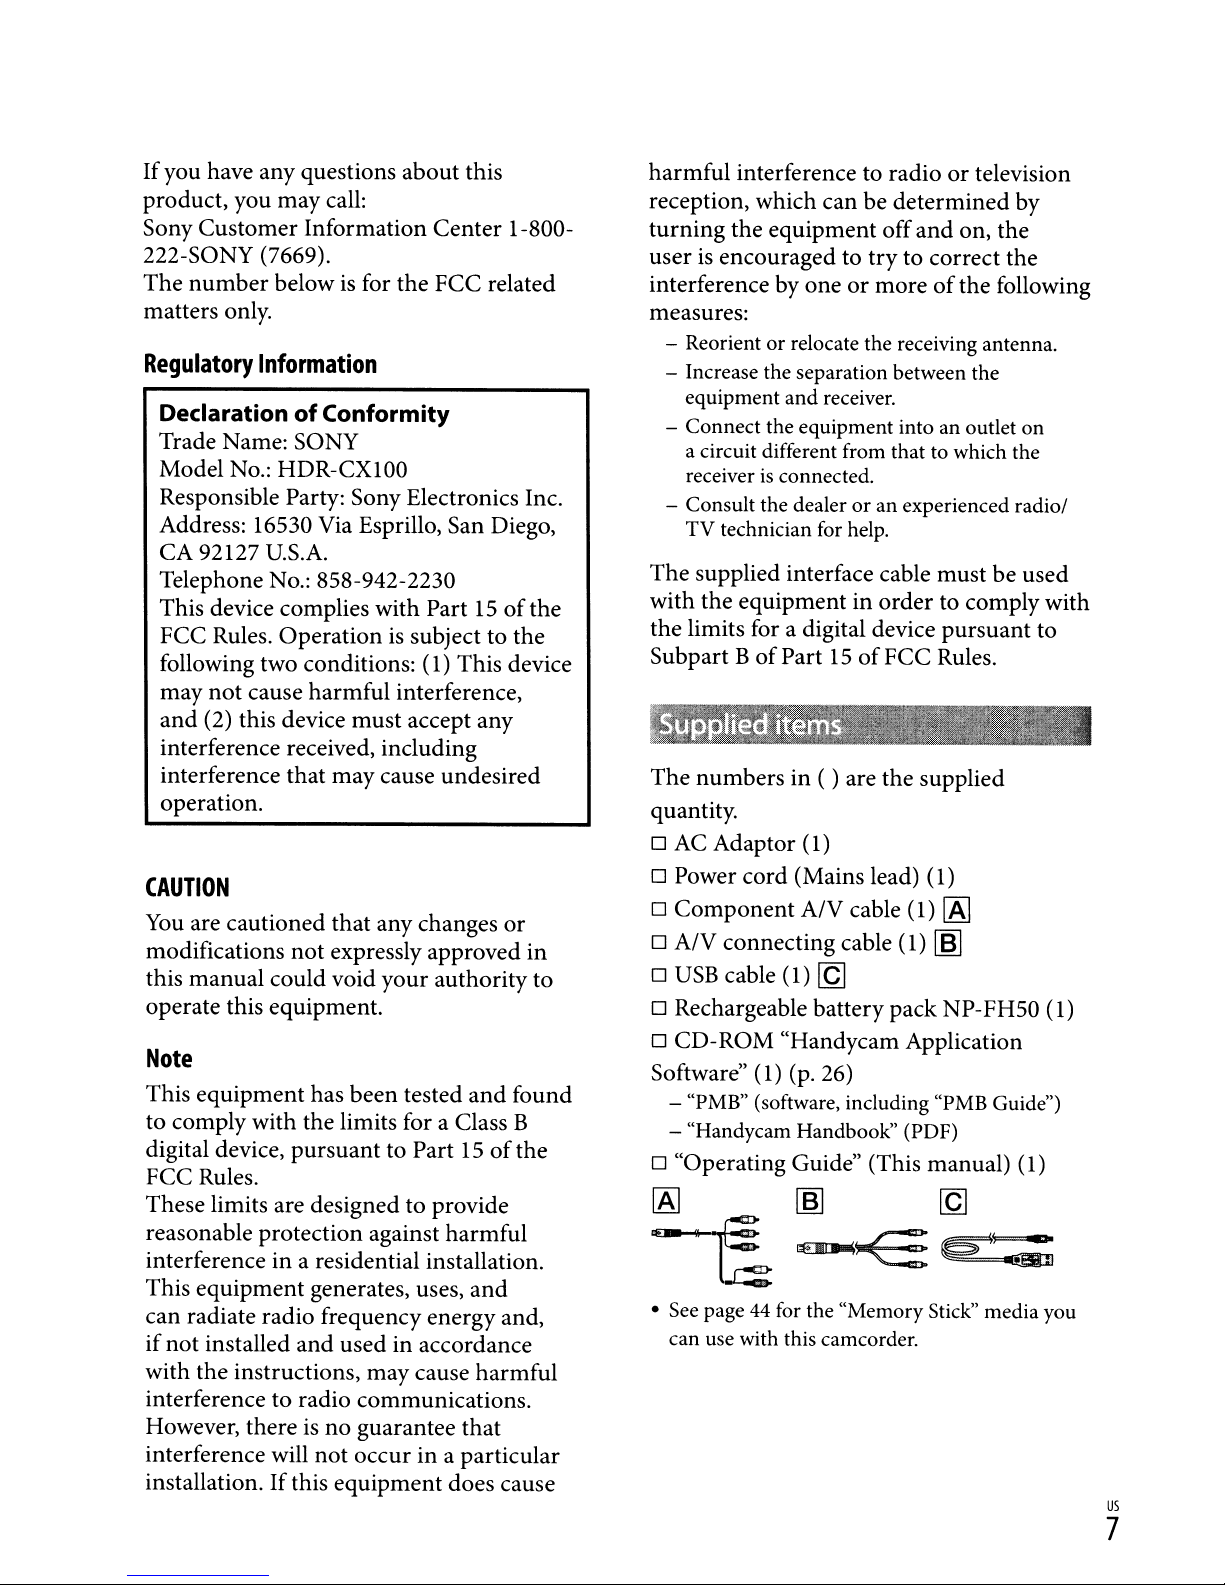
o AC Adaptor (1)
o Power cord (Mains lead) (1)
o
Component
o A/V connecting cable (1)
o
USB
cable (1)
A/V cable (1)
[g
lAl
~
o Rechargeable battery packNP-FH50 (1)
o CD-ROM "Handycam Application
Software"
- "PMB" (software, including "PMB Guide")
- "Handycam Handbook" (PDF)
(1) (p. 26)
o "Operating Guide" (This manual) (1)
lAl
~
• See page 44 for the "Memory Stick" media you
can use with this camcorder.
~
..-..€
[g
e¥
--;;;;
us
7
Using the camcorder
• The camcorderisnot dustproofed, dripproofed
See
or waterproofed.
• Do not do any
(Movie)/O
lamp
recording media may be damaged, recorded
images may be lost
occur.
- ejecting the "Memory Stick PRO Duo" media
- removing the battery pack or
from the camcorder
• Do not apply shock
camcorder. The camcorder may not be able to
record or play movies and photos.
• Do not use the camcorder in very loud areas.
The camcorder may not be able
play movies and photos.
When
•
device with communication cables, be sure to
insert the connector plug in the correct
Pushing the plug forcibly into the terminal
will damage the terminal and may result in a
malfunction
•
If
you repeat recording/deleting images for
a long time, fragmentation
tne recording media. Images cannot be saved
or recorded. In such a case, save your images
on some type
perform [MEDIA FORMAT]
• The
extremely high-precision technology, so over
99.99%
use. However, there may be some tiny black
points and/or bright points (white, red, blue,
or green in color) that appear constantly on the
LCD
the manufacturing process and do not affect the
recording in any
(Photo) lamps
(p.
44)
are litorflashing. Otherwise, the
connecting the camcorder to another
of
LCD
screenismanufactured using
of
the pixels are operational for effective
screen. These points are normal results
"Precautions"
of
the following when theIt:I
(p.
or
other malfunctions could
or
vibration to the
the camcorder.
of
of
external media first, and then
way.
(p.
54).
15)orthe access
AC
Adaptor
to
record or
way.
data occurs on
(p.
42).
of
cannot be provided, even ifrecording or
is
playback
the camcorder, recording media, etc.
• TV color systems differ depending on the
country/region.
TV,
you need an NTSC system-based
• Television programs, films, video tapes,
and other materials may be copyrighted.
Unauthorized recordingofsuch materials may
be contrary to the copyright laws.
To
prevent your image data from being lost,
•
save all your recorded images on external media
periodically. It
the image data
your computer. Also, you can save your image
data using a VCR,
not possible due to a malfunction
To
view your recordings on a
TV.
is
recommended that you save
on
a disc suchasDVD-R using
or
a DVD/HDD recorder.
Playing back recorded images on other
devices
• The camcorderiscompatible with MPEG-4
AVC/H.264 High Profile for high definition
image quality (HD) recording. Therefore, you
cannot play back images recorded with high
on
definition image quality (HD)
with the following devices;
- Other AVCHD format compatible devices
which are not compatible with High Profile
- Devices which are not compatible with the
AVCHD format
Discs
recorded with
HD
the camcorder
image quality
(high definition)
• This camcorder captures high definition footage
in the AVCHD format. DVD media containing
AVCHD footage should not be used with DVD
as
based players or recorders,
fail
recorder may
erase its contents without warning. DVD media
containing AVCHD footage may be played on
a compatible Blu-ray Disc
other compatible device.
to eject the media and may
the DVD player/
™ player/recorder
of
or
On
recording
• Before starting to record, test the recording
function to make sure the image and sound are
recorded without any problems.
us
• Compensation for the contents
8
of
recordings
About language setting
• The on-screen displays in each local language
are used for illustrating the operating
procedures. Change the screen language before
(p.
using the camcorder ifnecessary
16).
About this manual
• The imagesofthe LCD screen used in this
manual for illustration purposes are captured
using a digital still camera, and therefore may
of
appear different from the actual images
LCD screen.
• In this Operating Guide, the internal memory
of
the camcorder and "Memory Stick PRO Duo"
media are called "recording media:'
• In this Operating Guide, both "Memory Stick
PRO Duo" media and "Memory Stick PRO-HG
as
Duo" media are referred
Duo" media.
You
will find the "Handycam Handbook" (PDF)
•
on the supplied CD-ROM (p. 51).
• The screenshots are from Windows Vista. The
scenes may vary depending on the operating
of
system
the computer.
"MemoryStick PRO
the
us
9

Operation flow
Recording
• In the default settings, movies and photos are recorded with high
definition image quality (HD)
•
You
can change the recording media selected,
quality
of
Playing
Playing movies and photosonyour
Playing movies and photos
movies
movies (p. 43, 48).
movies
and
and
photos
on
the internal memory.
photos
on
a connected
(p.
and
(p.
21)
camcorder
TV
17)
the image
(p.
21)
(p.
24)
Saving
Saving movies and photos
•
You
(HD) or standard definition image quality (SD) from high
definition image quality (HD) movies imported to the computer.
See page
Creating a disc
Deleting
•
You
that you have saved
media.
movies
can create a disc with either high definition image quality
29onthe characteristicsofeach typeofdisc.
with
movies
can free recording space by deleting movies and photos
and
a DVD
on
photos
withacomputer
writerora recorder
and
other media, from the your camcorder's
photos
onadisc
(p.
26)
(p.
(p.
42)
38)
~"~
~'&l
.~
~
~.'.'
.."
.:0.
~
-.'
•.............' .
,<
'::'-'
••.
"
,
~'j
us
10
Table
of
contents
IMPORTANT
Read
this first. , 6
Operation flow.......................... ..................... .... ................................
SAFETY
I Getting started
Step1:Charging
Charging
Step
2:
I
Recording
Recording
I
Playback
Playbackon
Playing images on a
Turning
Changing
Recording and playing movies and photoseasily
operation)
the
the
INSTRUCTIONS
the
battery
the
battery pack abroad , 14
power
the
language setting 16
camcorder
TV
pack
on, and setting
the
date and
time
(Easy
Handycam
3
..
10
13
15
17
20
21
24
Saving
Preparing a
Selecting
Creating a disc
Importing
Starting
Creating a
Creating a standard
ordinary
movies
When using a Macintosh 27
the
movies and photostoa
Changing
PMB
high
Playing a
Creating a Blu-ray disc
OVO
Copying a disc 36
Editing movies
Capturing photos
and
computer
method
with
one touch (OneTouch Disc Burn)
the
(Picture
definition
high
definition
players
photos
(Windows) 26
for
creating a disc (computer) 29
destination driveorfolder for movies and photos
Motion
image
definition
from
with acomputer
computer
Browser) ,
quality
image
image
a movie
quality
quality
(Easy
(HO)
disc. 34
(HO)
(SO)
disc
PC
Back-up)
disc on a
that
computer
can be played on
31
32
32
33
34
35
36
37
37
us
11
I Saving images
withaDVD
writer, recorder
Selecting the method for creating adisc
Creating a high definition image quality
(USB
cable connection)
Creating a standard definition image quality
(AN
connecting cable connection) 40
I Making good use
Deleting movies and photos 42
Changing the recording media
To
check the recording media settings
Dubbing or copying movies and photos from the internal memory
"Memory Stick
Customizing your camcorder
Using the
Getting detailed information from the"Handycam Handbook"
HELP
of
your camcorder
PRO
Duo"media 44
function
I Additional information
i1Troubleshooting
with
menus
(DVD
writer/recorder)
(HD)
disc
(SO)
withaDVD
disc
with
38
writer, etc.
39
a recorder, etc.
43
43
to
45
45
51
52
Precautions 54
Specifications
Screen indicators
Parts
and controls 60
Index
56
59
62
us
12

Getti
ng
sta
rted
Step
1
2
Battery pack
1:
Charging
the battery
pack
3
" I
/'G,"
Power cord
(Mains lead)
/'
!-,-+-
CHG
lamp
To
(wall
(charge)
the
wall
socket)
outlet
You
can charge the "InfoLITHIUM" battery pack(Hseries) after attaching it to your
camcorder.
•
You
cannot attach any "InfoLITHIUM" battery pack other than the H series to your camcorder.
Turn
off
your
camcorder
by
closing
the
LCD
screen.
1
Attach
battery
pack
by
slidingitin
the
directionofthe
the
2
clicks.
the
AC
Connect
Adaptor
and
the
power
cord (mains lead)toyour
3
camcorder and
•Besure that
The
CHG
when the battery pack
4When
the
(charge) lamp lights up and charging starts. The
batteryischarged, disconnect
the
wall
outlet
the.
markonthe DC plugisfacing right.
is
fully charged.
(wall socket).
the
AC
Adaptor
CHG
(charge) lamp turns off
arrow
from
the
until
DC
it
IN
jackofyour
camcorder.
us
13
• See page57on charging, recording and playing time.
is
• When your camcorder
remaining battery indicator at the upper left on the
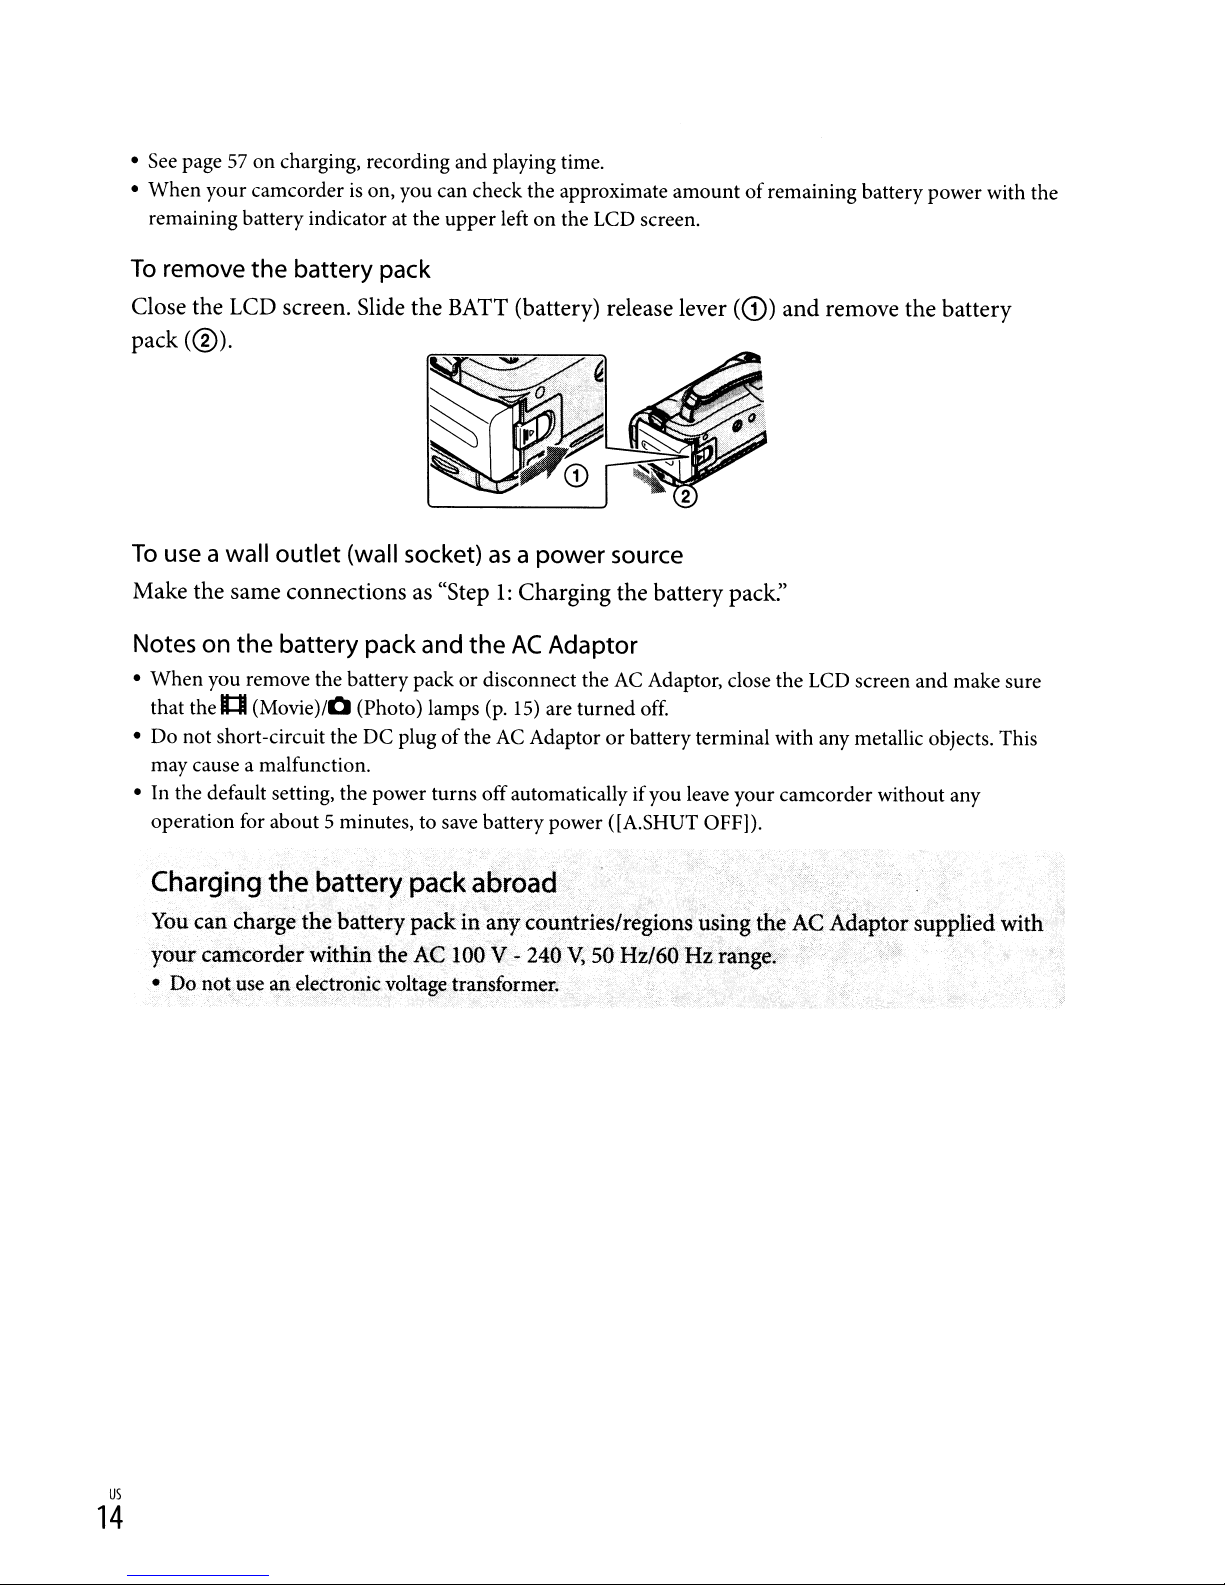
To
remove
the
battery pack
on, you can check the approximate amountofremaining battery power with the
LCD
screen.
Close the LCD screen. Slide the BATT (battery) release lever
(0).
pack
To
use a wall
Make
the
Notes on
•
When
you remove the battery pack or disconnect theACAdaptor, close the
that the
• Do not short-circuit the DC plug
may cause a malfunction.
• In the default setting, the power turns off automatically ifyou leave your camcorder without any
operation for about 5 minutes, to save battery power ([A.SHUT
Charging
outlet
(wall socket)asa
power
source
same connections as "Step1:Charging the battery pack:'
the
battery pack and
1:1
(Movie)/O
the
battery packaoroad
(Photo) lamps
the
AC
Adaptor
(p.
15)
are turned off.
of
theACAdaptororbattery terminal with any metallic objects. This
~
(CD)
OFF)).
and
remove
LCD
the
screen and make sure
battery
us
14
You
can charge the battery
cf1n1'corder
your
•
Do
notiuse
an
ele~trOI?icyoltagetransformer;
pack
in
within the ACJOO
iny
countries/regions u.sing the'AC Adaptor supplied with
V-
240V;50
Hz/60 Hztange."
..

Step
2:
Turning
date and time
the
power on, and setting the
1Open
Your
camcorderisturned
•Toturn
2Select
Touch
LCD
the
LCD
screenofyour
on.
on your camcorder when the LCD screenisopen, press POWER.
the
the
buttononthe
screen.
POWER
desired geographical area
button
/
/
camcorder.
11:I
(Movie): To
o (Photo): To
with
record
record
DID,
photos
then
movies
touch [NEXT].
•Toset the date and time again, touch ~ (HOME)
[CLOCK SET].
3Set
• The date and time does not appear during recording, but they are automatically recorded on the
recording media, and can be displayed during playback.
--
--
•
You
SET]--
[DST
The
clock
• Ifyou set [DST
i:i
(SETTINGS)--[VIEW IMAGES
00.
can
turn
offthe operation beeps by touching~(HOME)
[BEEP]--
When
SET]or[SUMMERTIME], date and time, then touch
starts.
SET]or[SUMMERTIME] to [ON], the clock advances 1 hour.
[OFF]--
--
i:i
an itemisnot on the screen, touch
To
display the date and time, touch~(HOME)
[QKJ
--1+=>1-- 00.
SET]--[DATA
CODE]
(SETTINGS)--[CLOCK/~LANG]
DID
--
until the item appears.
--
[DATE/TIME]
i:i
(SETTINGS)
IQRI.
--
[QKJ
--
[SOUND/DISP
--I
+=>
--
I
us
15
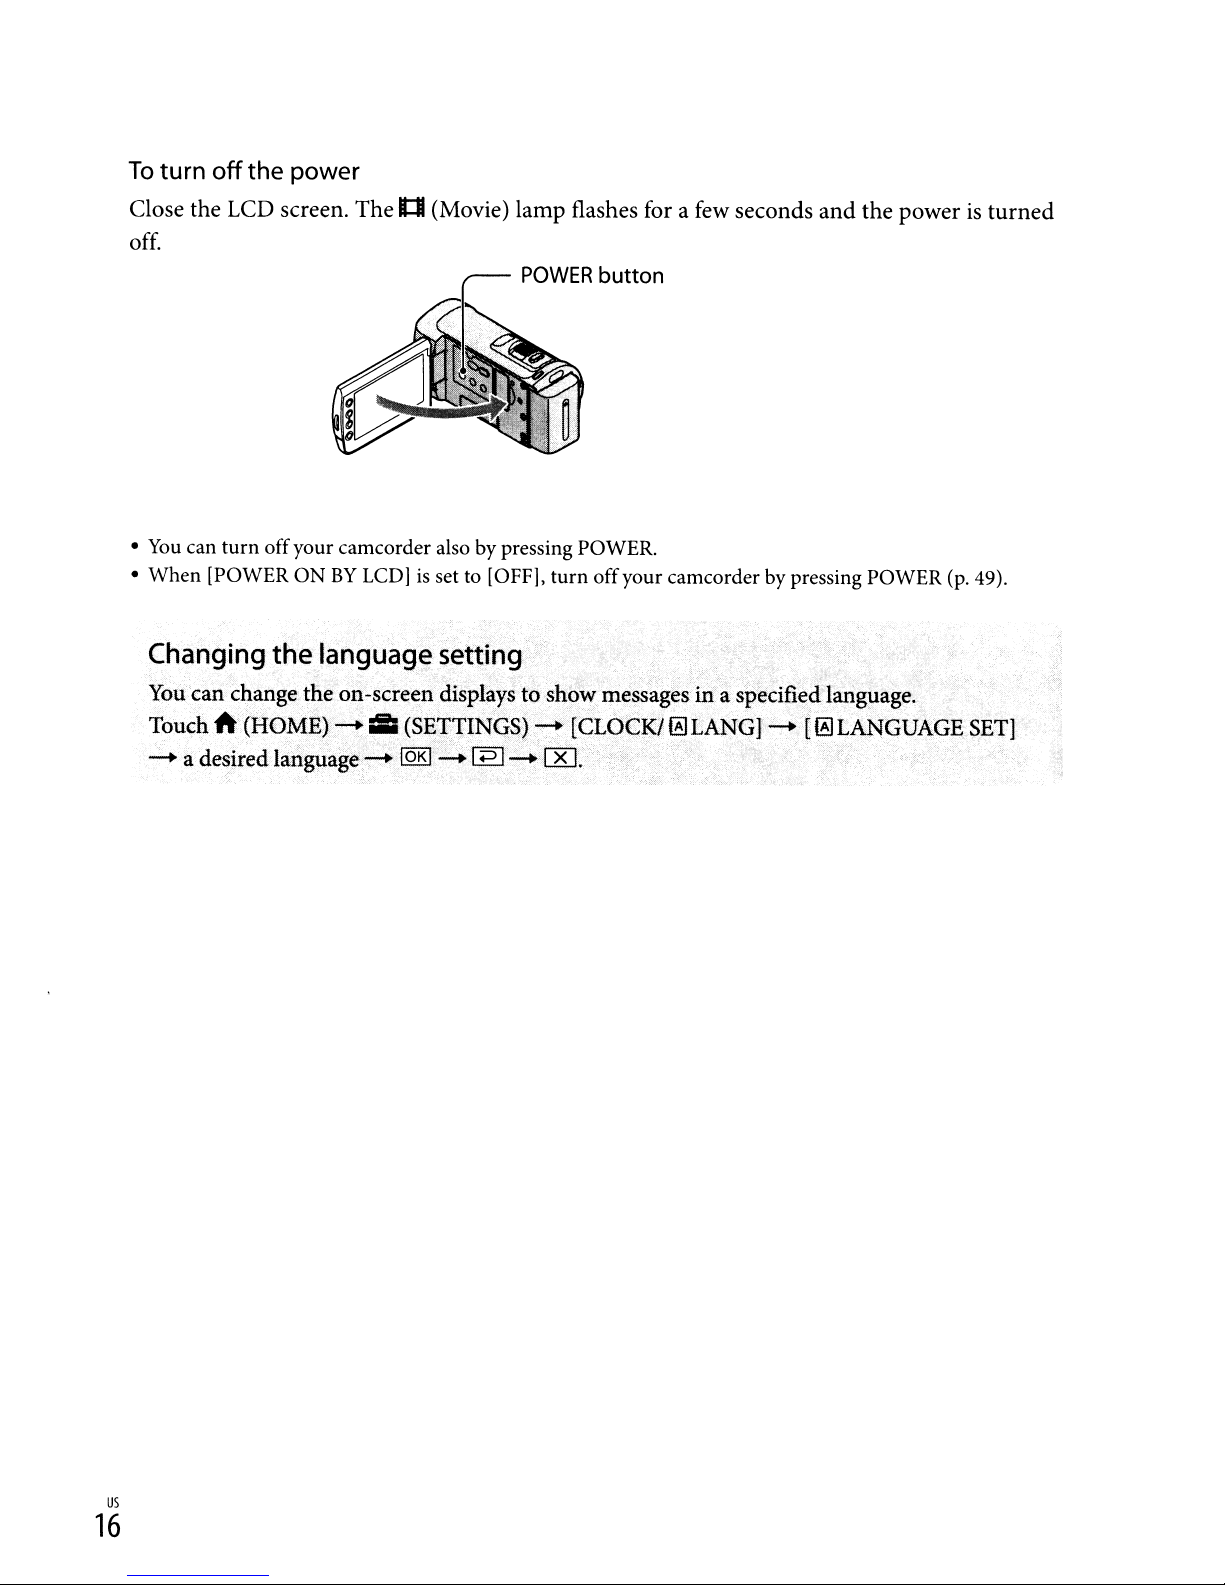
To
turn
off
the power
Close the
LCD
screen. The
ItI
(Movie) lamp flashes for a
off.
•
You
can
turn
offyour camcorder also by pressing POWER.
•
When
[POWER
ONBYLCD)isset to [OFF),
Changing the language setting
You
can change
Touch
-+
a desired
A(H0!-AE)-Ji~(S~TJINGS)~"
theo~-screen
language;"
displ~ys
(@
~I~
POWER
to shbw
1-+
[~T;
few
seconds and the poweristurned
button
turn
offyour camcorder by pressing POWER (p. 49).
essagesina specifiedlarig!Jage.
Il1
[C~2CI<I~LANG]
..".. . ; " .
~[~LANGUAGE~ETl
us
16
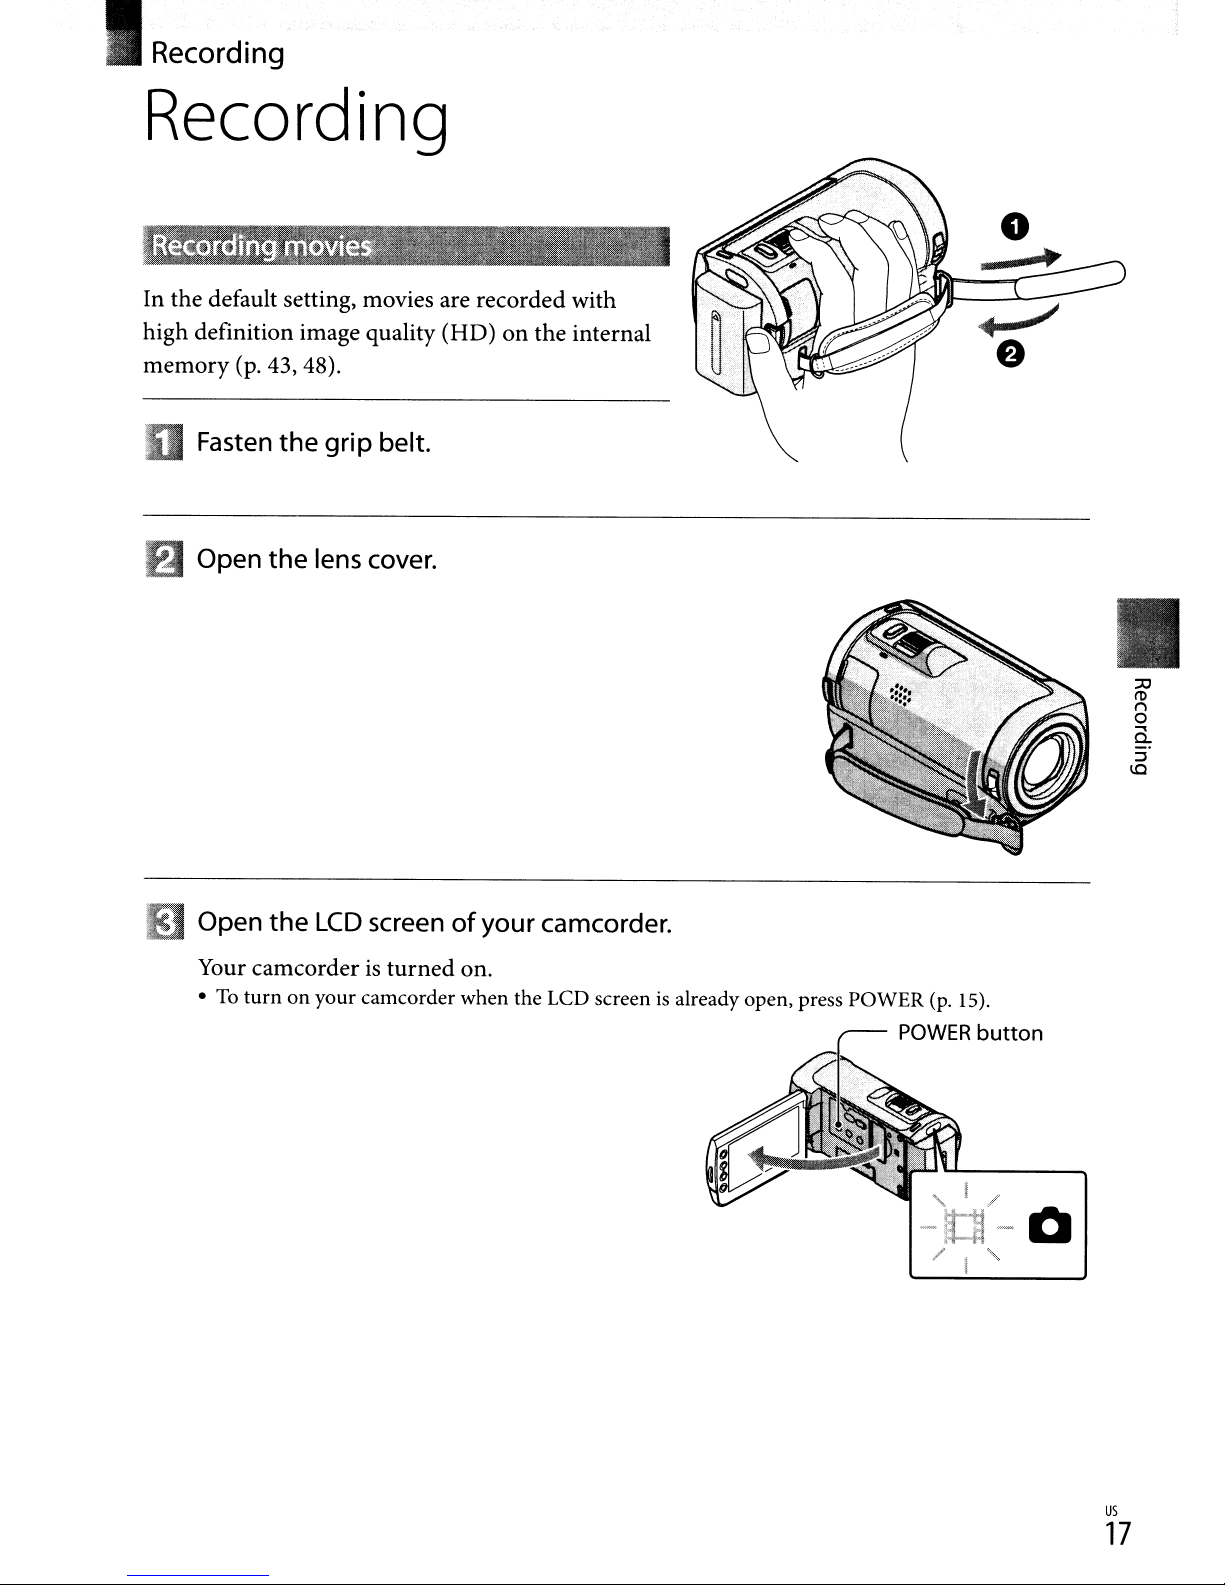
I Recording
Recording
In
the
default setting, movies are recorded with
high
definition image quality
memory
(p. 43, 48).
(HD)onthe internal
Fasten
Openthelenscove~
Open the
Your
•Toturnonyour camcorder when the LCD screenisalready open, press POWER
the grip belt.
LCD
screen
camcorderisturned
of your
on.
camcorder.
POWER
(p.
II
15).
button
/"
/"
"
us
17
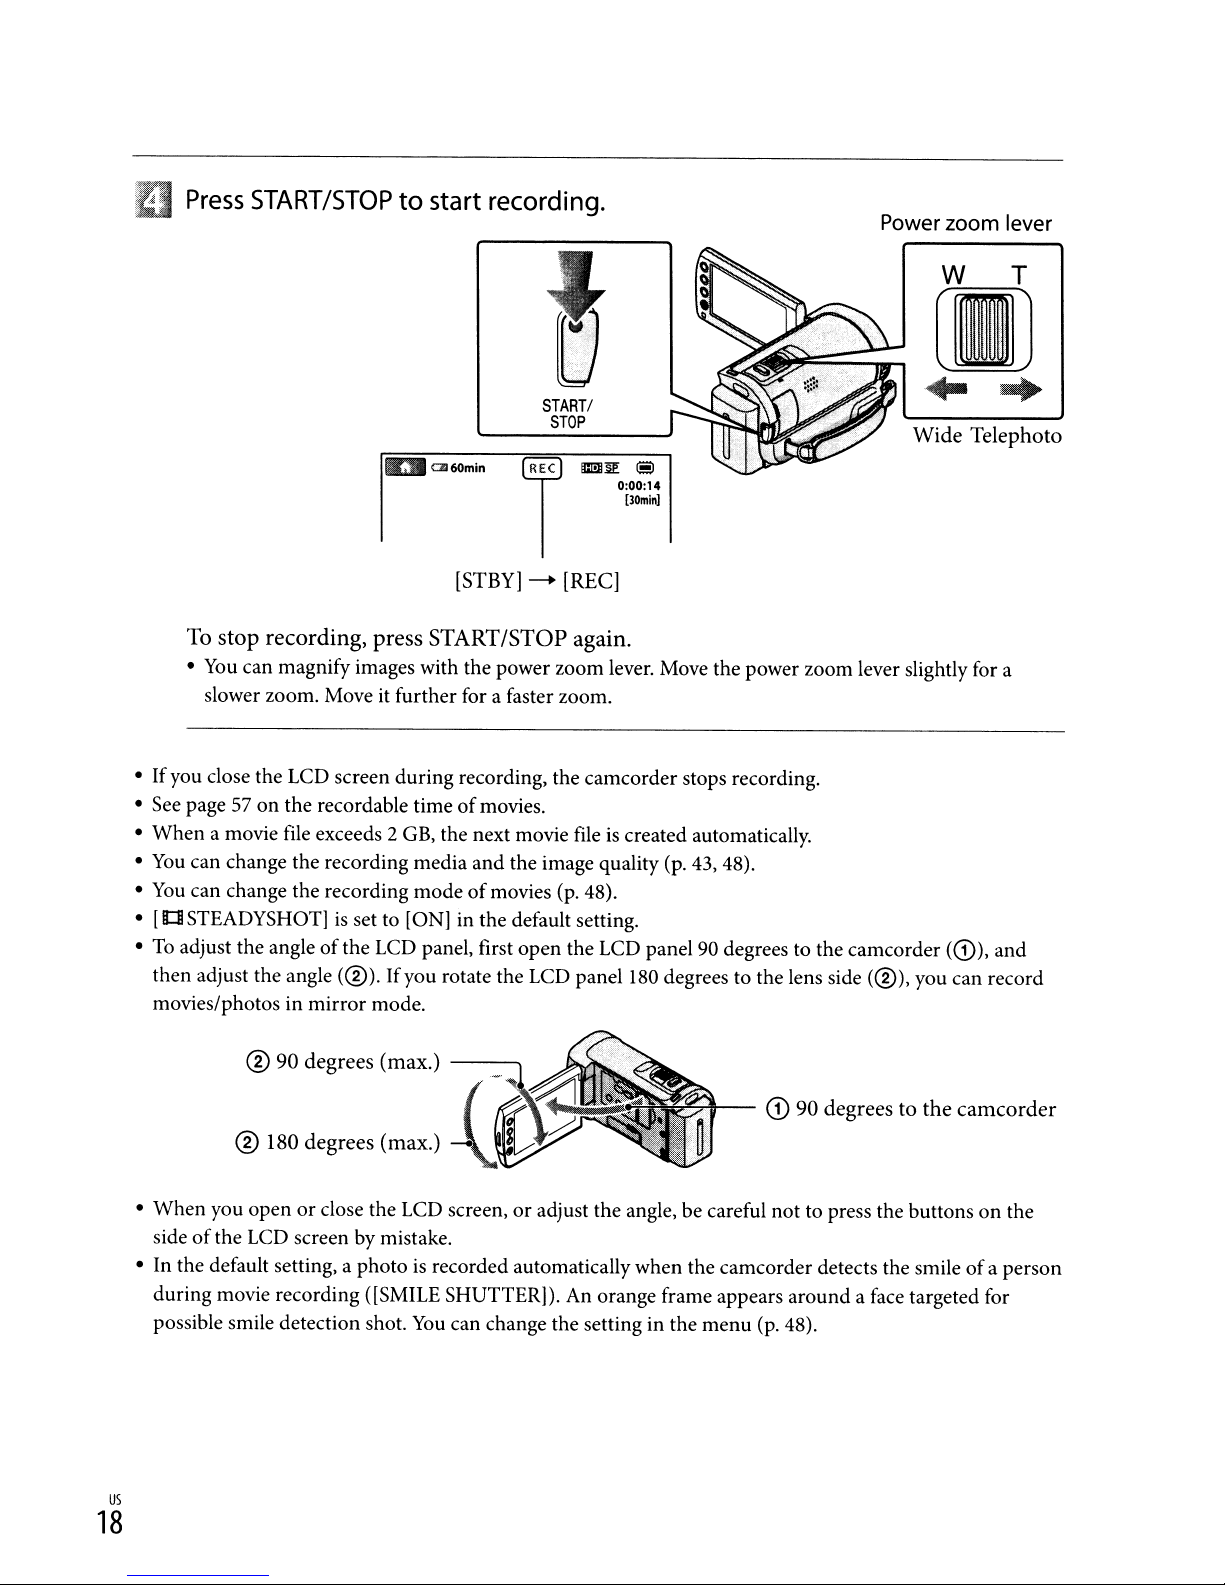
Press
START/STOP
ItBClI60min
to start recording.
START/
STOP
Ee
lIlI1JI~
S
0:00:14
[lOmin]
Power zoom lever
....
Wide
T
[STBYj
To
stop recording, press START/STOP again.
•
You
can magnify images with the power zoom lever. Move the power zoom lever slightly for a
slower zoom. Move it further for a faster zoom.
• If you close the LCD screen during recording, the camcorder stops recording.
• See page57on
• When a movie file exceeds 2
You
can change the recording media and the image quality
•
•
You
can change the recording modeofmovies
•
[lCll
STEADYSHOT]isset to [ON] in the default setting.
•
To
adjust the angleofthe LCD panel, first open the LCD panel 90 degrees to the camcorder (CD), and
then adjust the angle
movies/photos in
the recordable timeofmovies.
GB,
the next movie fileiscreated automatically.
(®).
If
you rotate the LCD panel 180 degrees to the lens side
mirror
mode.
--
[REC]
(p.
48).
(p.
43, 48).
(®),
you can record
W T
ITIJ
Telephoto
•
When
you openorclose the LCD screen,oradjust the angle, be careful not to press the buttonsonthe
of
side
• In the default setting, a photo
during movie recording ([SMILE SHUTTER]). An orange frame appears around a face targeted for
us
the LCD screen by mistake.
possible smile detection shot.
18
~,.......-
is
recorded automaticallywhen the camcorder detects the smileofa person
You
can change the setting in the menu (p. 48).
CD
90 degreestothe
camcorder
•
You
can increase the zooming level by using the digital zoom. Set the zooming level by touching h
(HOME)
--+
•
When
h (HOME)
--+
the
--+
iii;
(SETTINGS)
[QE]
--+
I
~
1--+ 00.
viewing moviesonan x.v.Color-compliant
--+
~
(SETTINGS)
00.Some settings may be required
TV.
--+
[MOVIE SETTINGS]
--+
[MOVIE SETTINGS]
onaTV
--+
[DIGITAL ZOOM]
TV,
record movies with the x.v.Color function. Touch
--+
[X.V:COLOR]
to view the movies. Refer to the instruction manuals
--+
--+
[ON]
the desired setting
--+
[@
--+
1~I
of
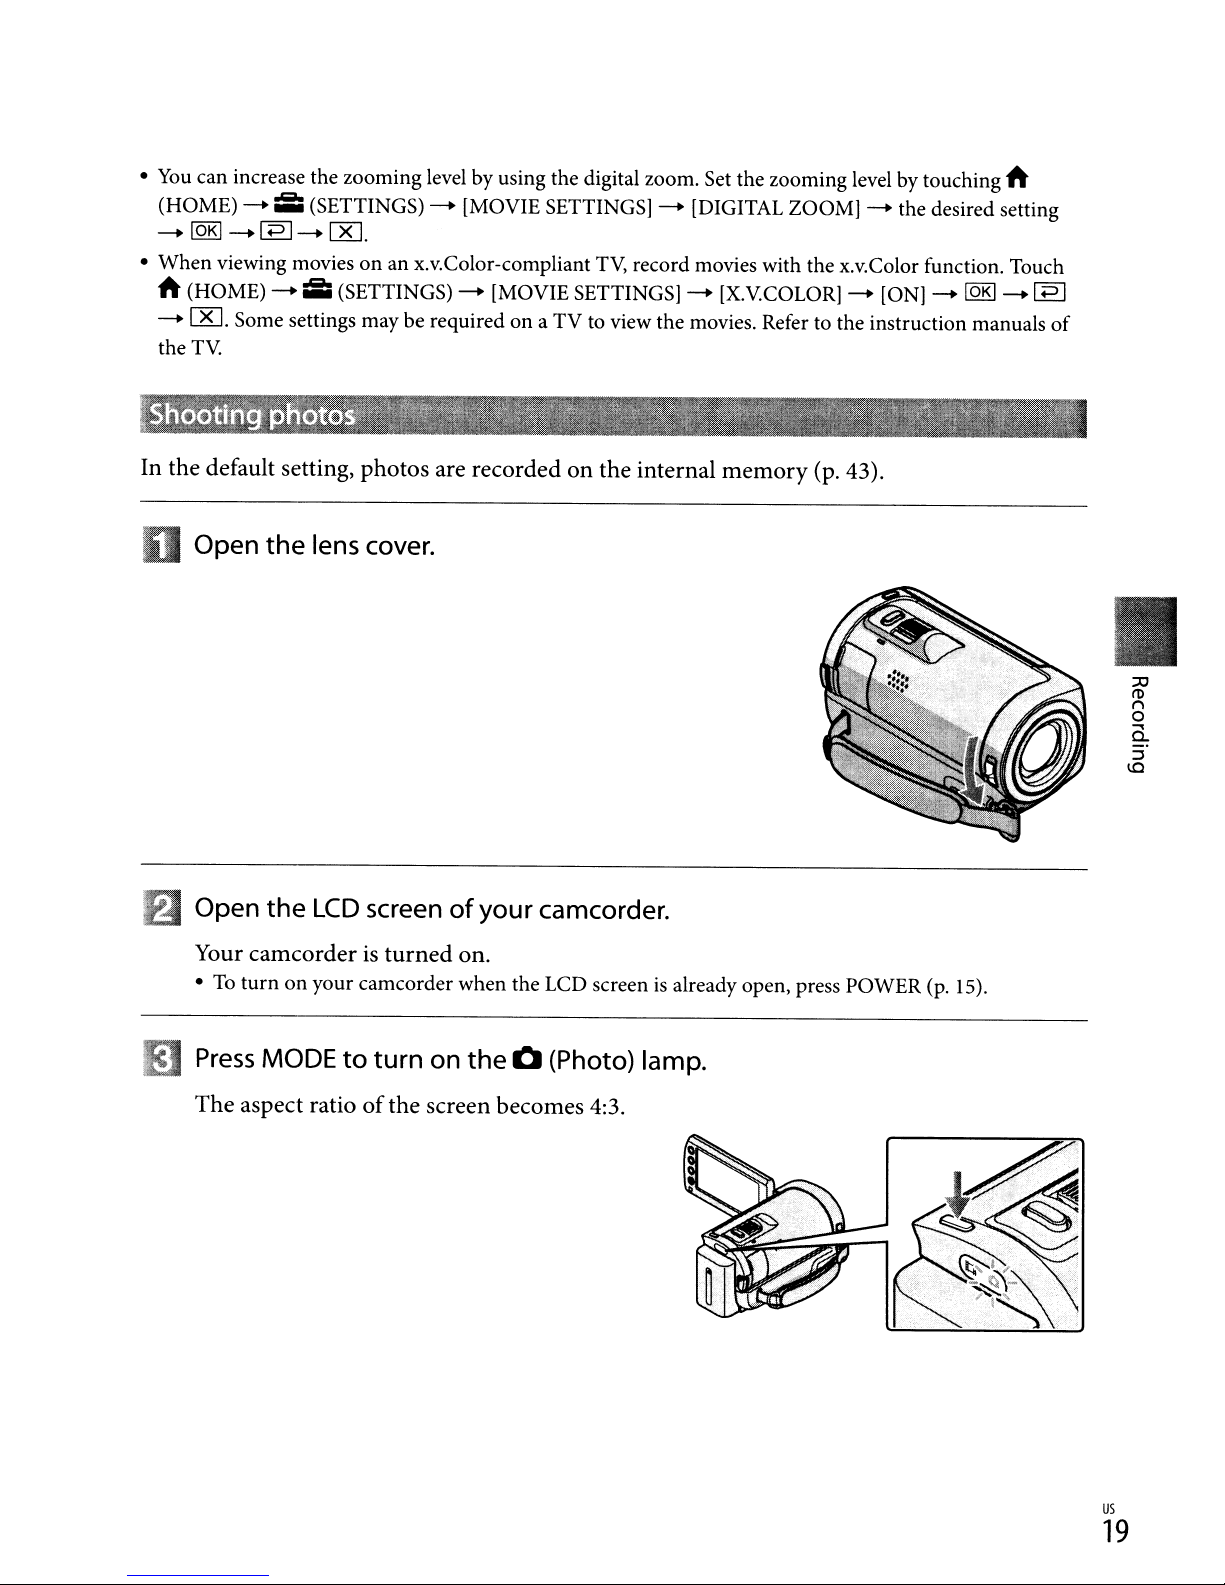
In the default setting, photos are recordedonthe internal
Openthelenscove~
Open
Your camcorder is
•Toturnonyour camcorder when the LCD screenisalready open, press POWER (p. 15).
the
LCD
screenofyour camcorder.
turned
on.
memory
(p. 43).
Press
The
MODEtoturn
aspect ratioofthe screen becomes 4:3.
on
the
0 (Photo) lamp.
us
19
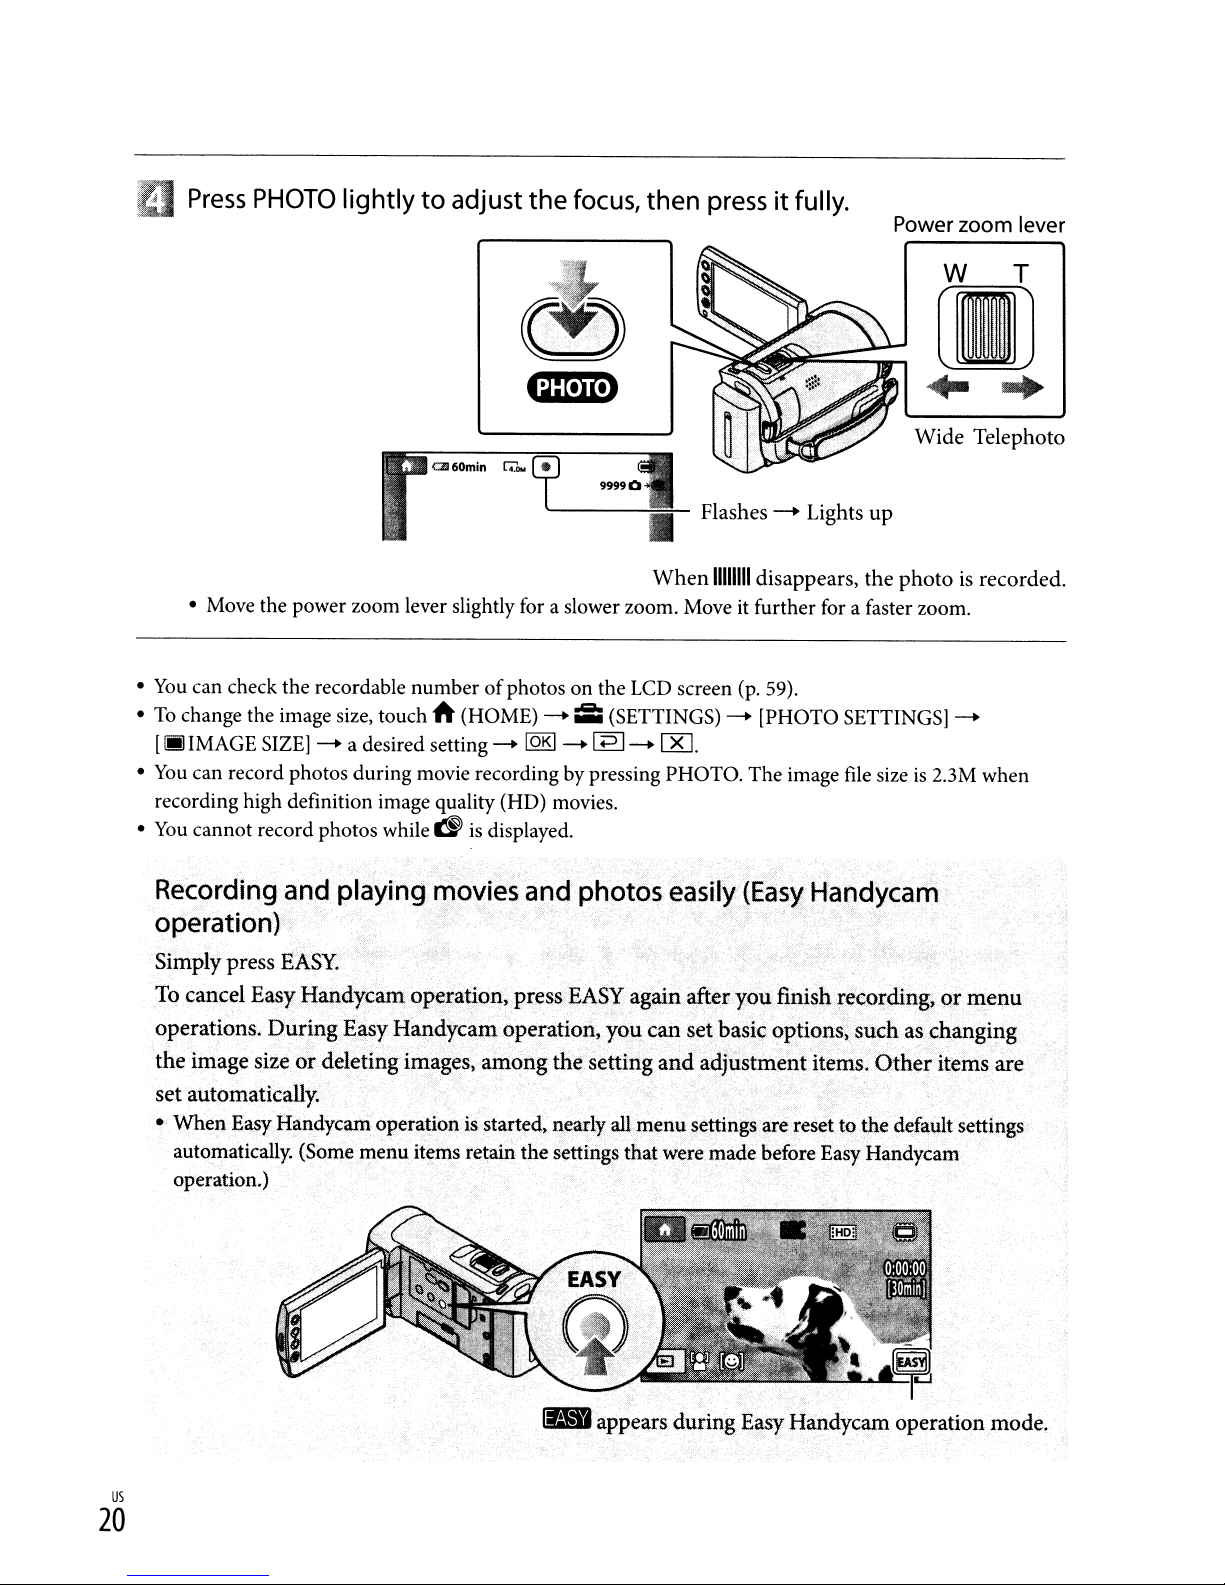
Press
PHOTO
lightlytoadjust
the
focus,
then
pressitfully.
Power zoom lever
W T
(!)
Gmm)
aJ60min
• Move the power zoom lever slightly
•
You
can check the recordable number ofphotos on the
To
change the image size, touch h (HOME)
•
[(jj)
IMAGE
•
You
can record photos during movie recording by pressing PHOTO. The image
recording high definition image quality (HD) movies.
•
You
cannot record photos while
Recording
SIZE)
--+ a desired setting --+
and
playing
~
movies
operation) . .
[4,'
...
is
displayed.
Cf'-
for
a slower zoom. Moveitfurther for a faster zoom.
--+:
[QR]
--+
and
-"
Flashes
When
LCD
(SETTINGS) --+ [PHOTO SETTINGS)--+
lEJ
--+ 00.
photos
11I1111I
screen
easily
disappears, the
(p.
(Easy
--+
Lights
59).
Handycam
[IJ
.....
Wide
up
photoisrecorded.
file
sizeis203M
Telephoto
when
Simply
To
operations.
the
set
• When Easy Handycam operation
us
press
EASY.
cancel
image
automatically.
automatically. (Some menu items retain the settings that were made before Easy Handycam
operation.)
Easy
Handycam
During
sizeordeleting
20
Ea.sy
operatioIl~press
Handycam
images,
operation,
among
is
started, nearly
EASY
the
lJBappears
again
you
setting
all
after
can
set
and
adjustment
menu settings are
during
you
finishp~cording;
basic
options,
Easy
re~et
Handycam
such
items.
Other
to the default settings
or
n;enu
as .changiIlg
items
operation
are
mode.
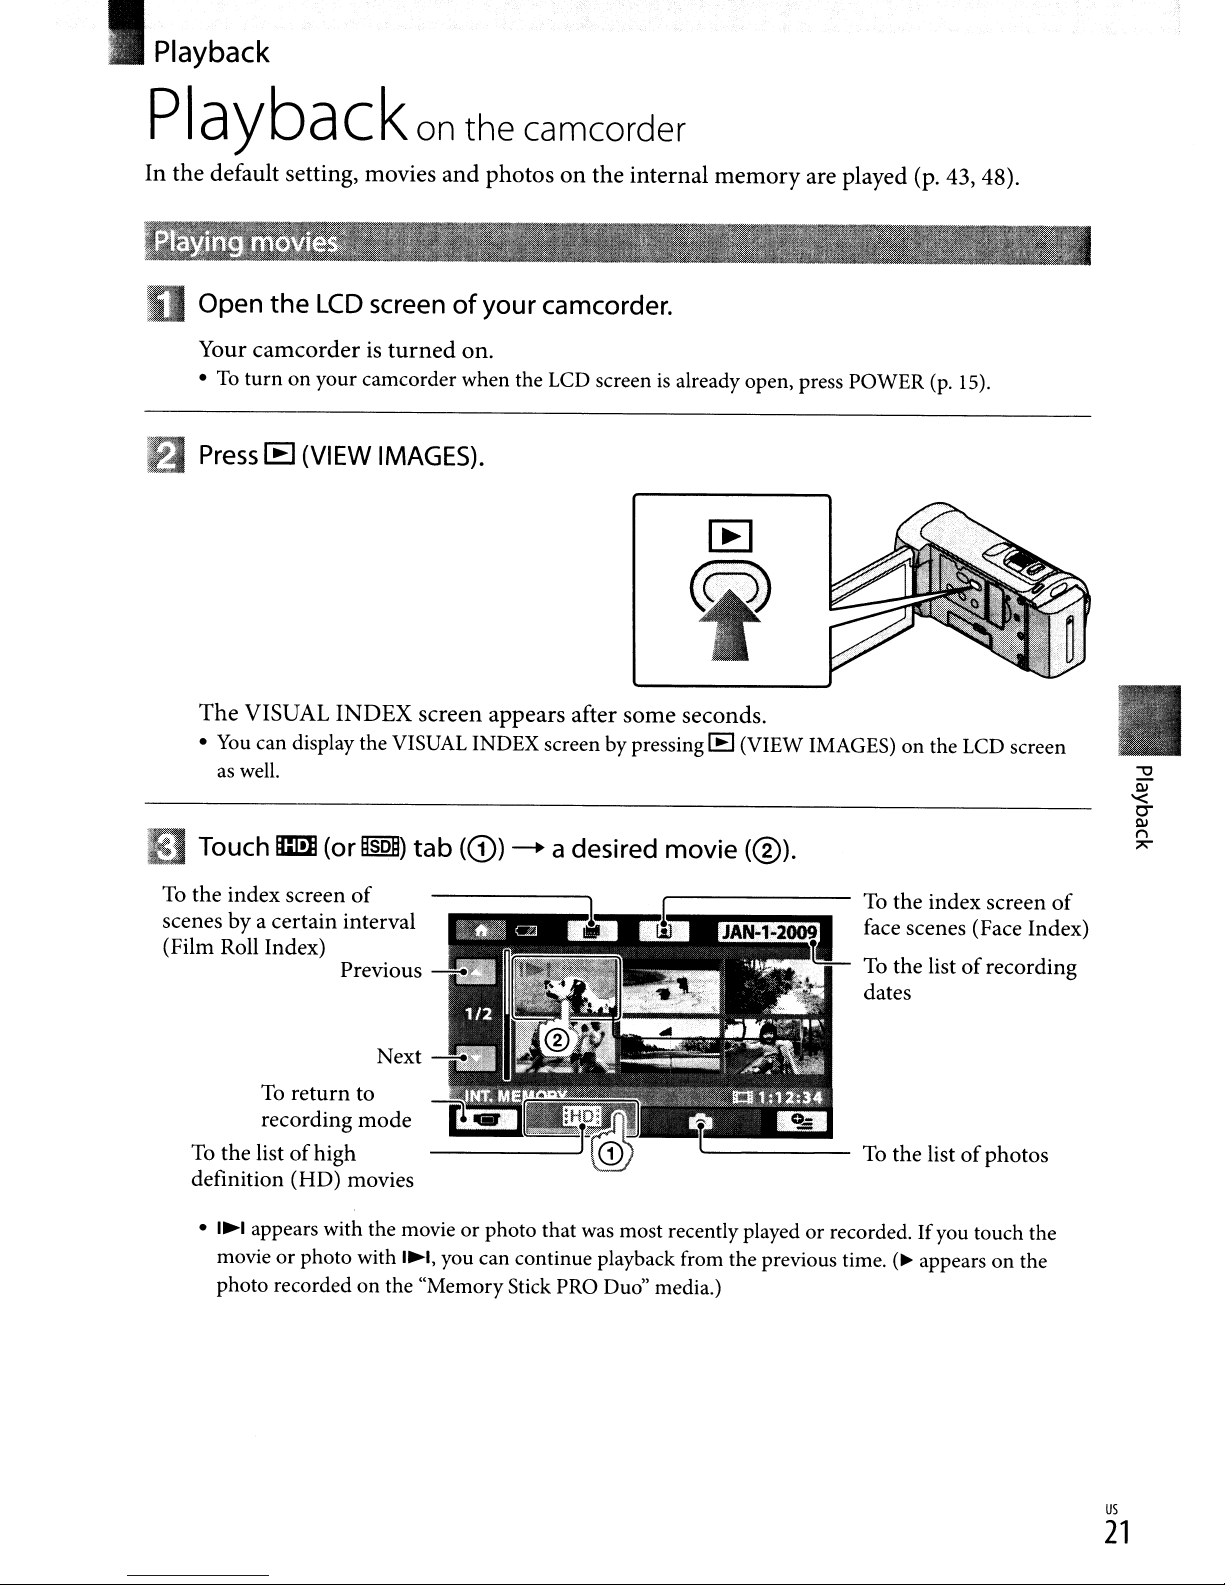
Playback
Playbackon
In the default setting, movies
Open
the
LCD
screenofyour
Your camcorderisturned
•Toturn
Press
on your camcorder when the LCD screenisalready open, press POWER
IE (VIEW IMAGES).
and
on.
the camcorder
photos
on
the internal
camcorder.
memory
are played (p. 43, 48).
(p.
15).
The
VISUAL INDEX screen appears after some seconds.
•
You
can display the VISUAL INDEX screen by pressing
as
well.
Touch
To
the
scenes by a
(Film Roll Index)
To
definition
•
lImE
index
screen
certain
To
return
recording
the
listofhigh
(HD)
I~I
appears with the movie or photo that
movie or photo with
photo recorded
(or
MsoM)
of
interval
to
mode
movies
on
I:B
(VIEW IMAGES) on the LCD screen
tab
(CD)
---+ a desired
was
I~I,
you can continue playback from the previous time.(~appears on the
the "MemoryStick PRO Duo" media.)
movie
most recently played or recorded. Ifyou touch the
(®).
To
the
listofphotos
us
21
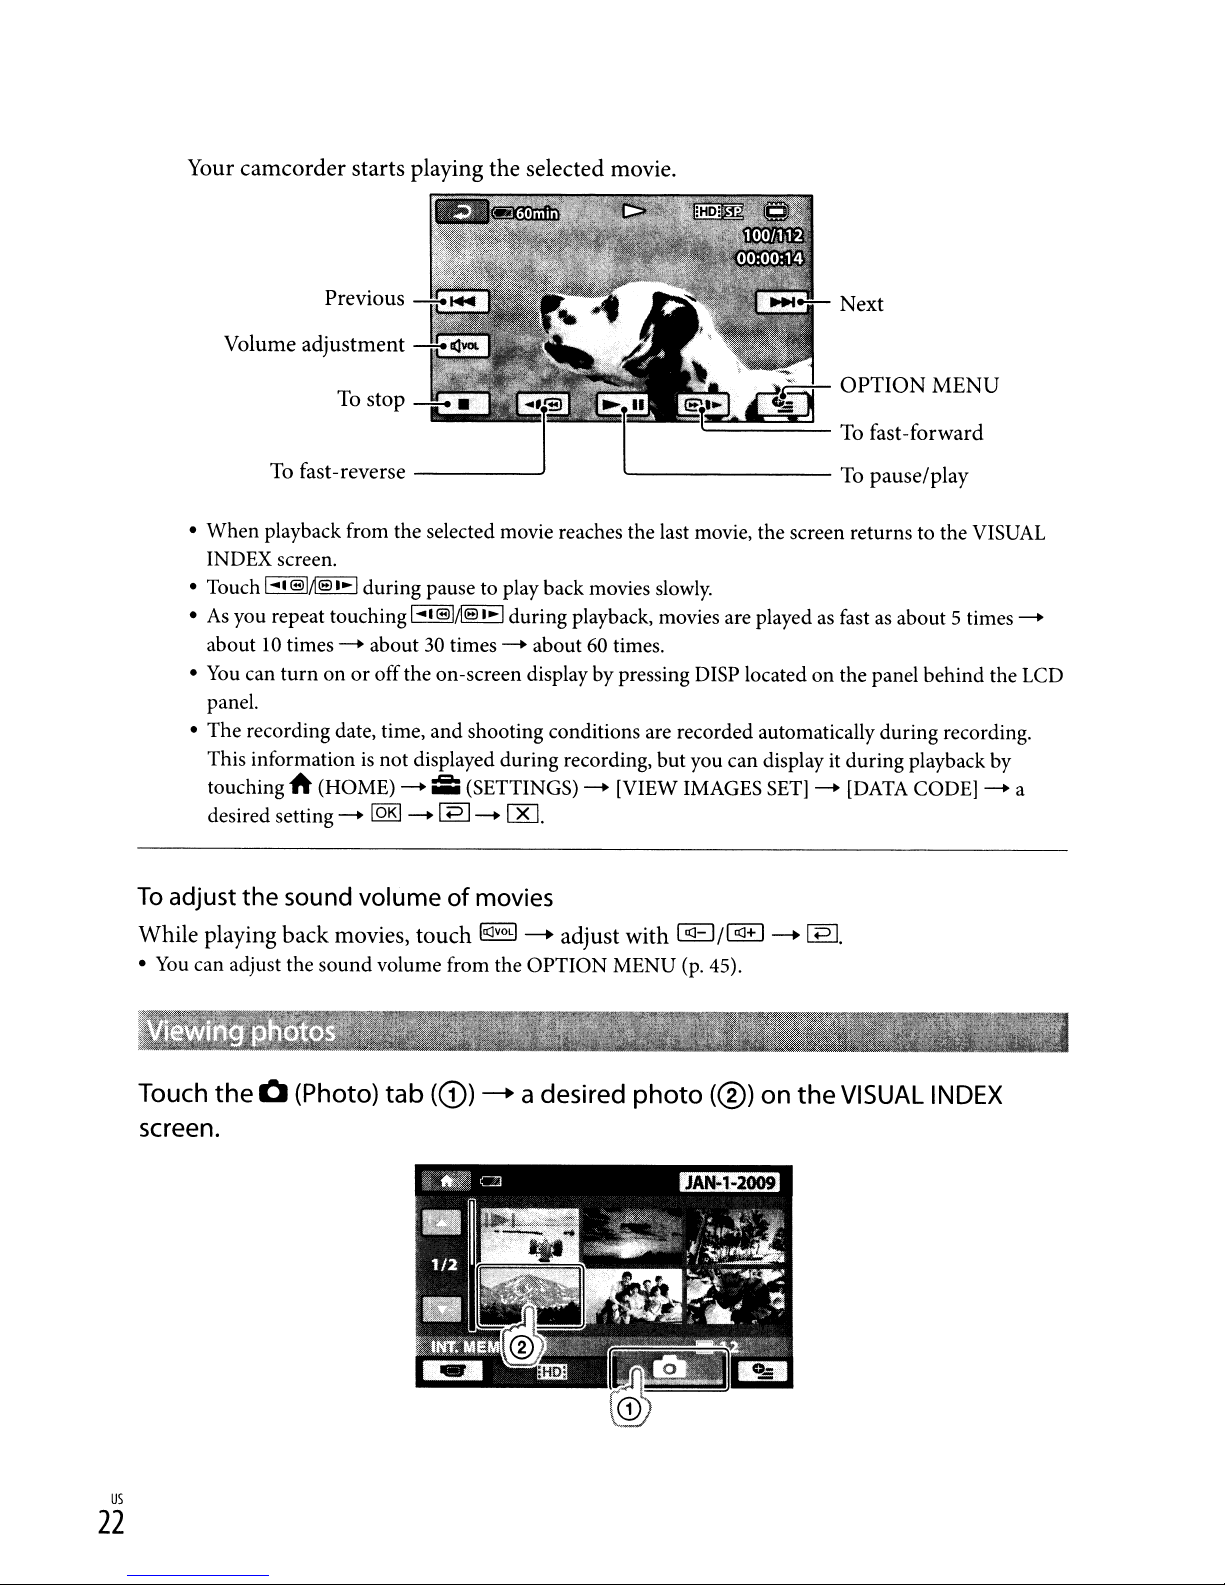
Your
camcorder
starts playing the selected movie.
Previous
Next
Volume adjustment
To
fast-reverse
• When playback from the selected movie reaches the last movie, the screen returns to the VISUAL
INDEX screen.
• Touch I
•Asyou repeat touching
about10times-.about30times-.about60times.
You
•
panel.
• The recording date, time, and shooting conditions are recorded automatically during recording.
This information
touching
desired setting
....
®W~)
can
turnonor
A (HOME)
'·1 during pause to play back movies
-.
-------'
1""®IM3,·1
offthe on-screen display by pressing DISP located on the panel behind the LCD
is
not displayed during recording, but you can display it during playback by
-.:
[QBJ
-.
[PJ
during playback, movies are playedasfastasabout 5
(SETTINGS)-.[VIEW IMAGES
-.
00.
'---------
slowly.
SET]
To
-.
pause/play
[DATA
times-'
CODE]-.a
To
adjust
While playing
•
You
Touch
the
sound volumeofmovies
back
movies, touch
can adjust the sound volume from the OPTION MENU
the
0 (Photo)
tab
(CD)
IItJVOLI
-+
~
a desired
screen.
adjust with I
photo
1tJ-1/1
(p.
45).
(®)
1tJ+
1-+
on
[2].
the
VISUAL
INDEX
us
22
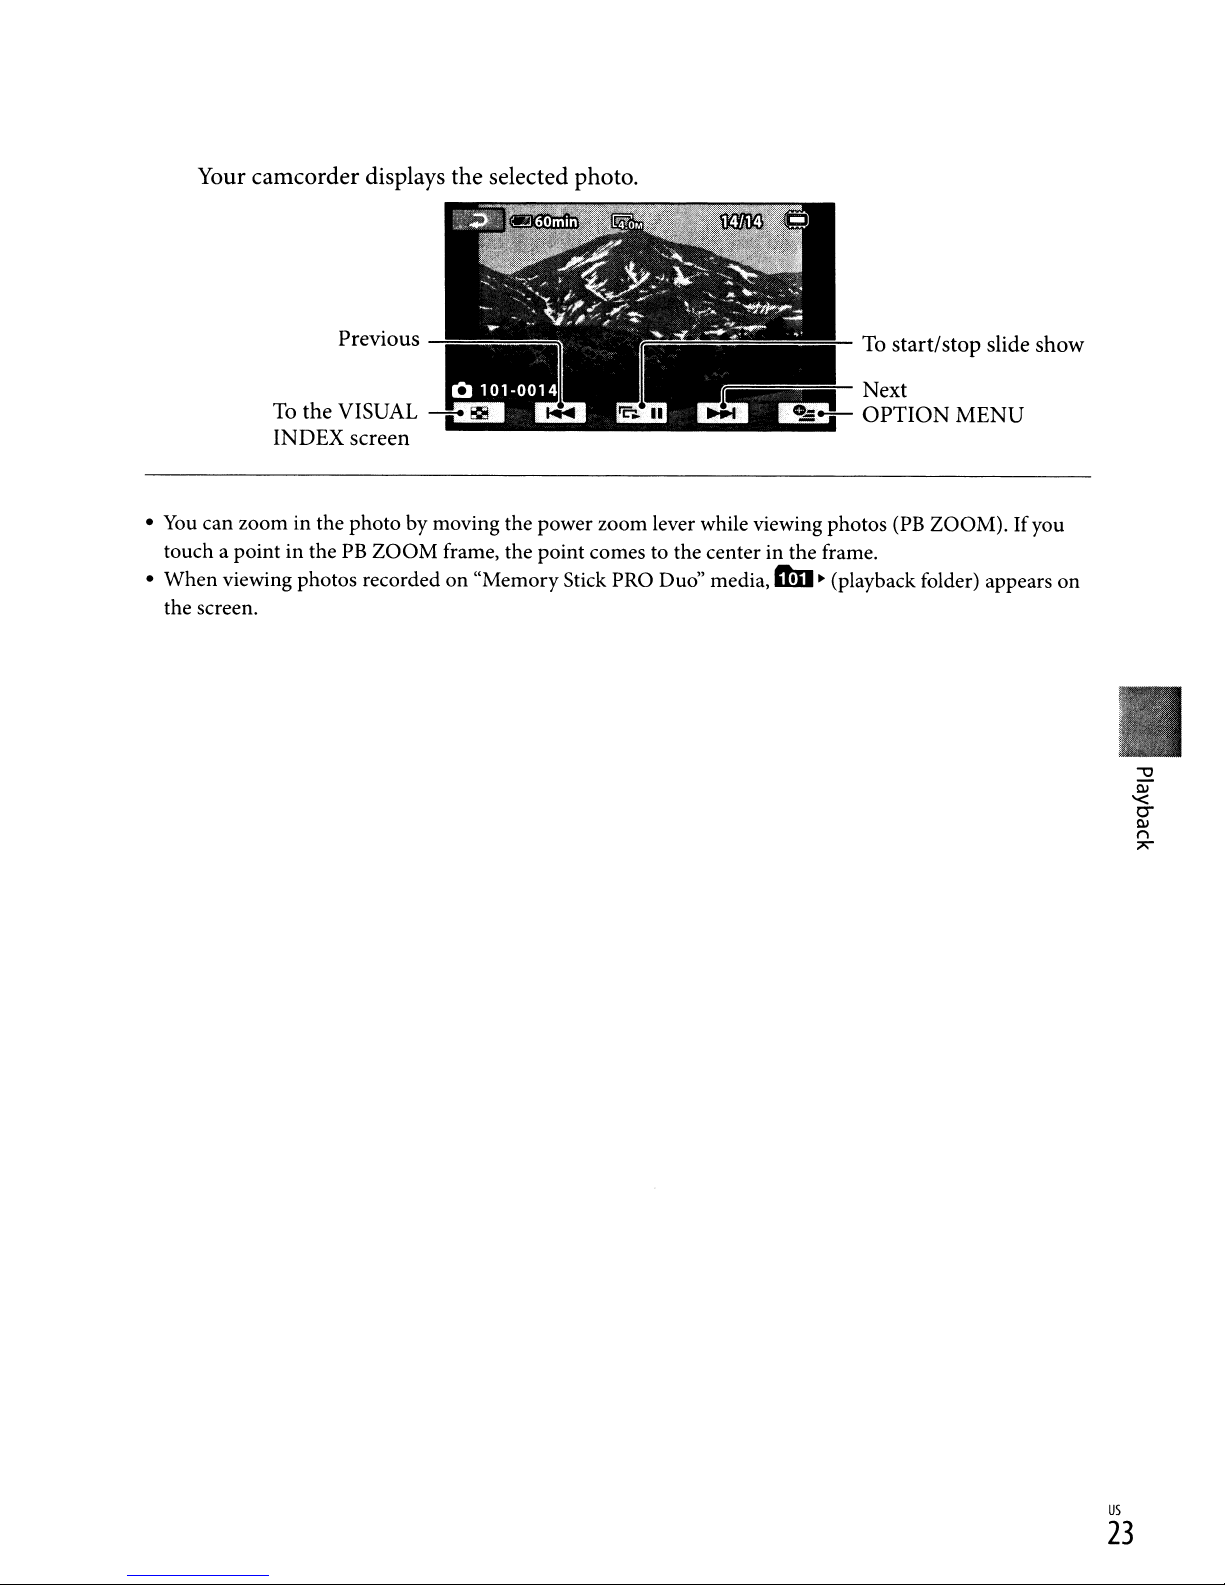
Your
camcorder
displays
the
selected
photo.
Previous
•
You
can zoom in the photo by moving the power zoom lever while viewing photos
touch a point in the
• When viewing photos recorded on "Memory Stick PRO Duo" media,
the screen.
PB
ZOOM frame, the point comes to the center in the frame.
To
start/stop
(PB
ZOOM).Ifyou
ft!D
~
(playback folder) appears on
slide
show
us
23

Playing
images
onaTV
Connection
(SD))
viewed
connectors
of
[TV
D Switch
• Refer to the instruction manuals ofthe
Turn
CONNECT Guide]
• When an itemisnot on the screen, touch
•
Connect
methods
on
used.
CONNECT
the
on
your
Use
the suppliedACAdaptorasthe power source (p. 14).
and
the
image
the
TV
screen
You
can
connect
Guide].
input
on
theTVto
camcorder, and
on
the
your
camcorder andTV referring
differ
your
LCD
quality
depending
(high
camcordertothe
the
connected jack.
TV.
touch
~
screen.
aID
definition
on
what
(HOME) ---+
until the item appears.
(HD)orstandard
typeofTVisconnected,
TV
easily
Ei3
to
[TV CONNECT Guide].
following
(OTHERS)
definition
and
the
instructions
---+ [TV
the
Select the
TV
type.
I High DefInitionTV1 . 16:9
HDMIOUT
(=)
• When the A/V connecting cableisused to output movies, movies are output with standard
definition image quality
Play back movies and
(SD).
photos
on
your
or
4:31V,
:1
A/V Remote
Connector
~J
camcorder (p. 21).
Input connectors
the
TV
on
• Make the required output settings on your camcorder.
To
connect a high definition TV via component video jacks:
h
(HOME)
--+[QB]--+(]5]--+[X]
us
--+
iii
(SETTINGS) --+
24
[OUTPUT
SETTINGS)--+
[COMPONENT)--+
[1080il480i)
To
connect a non-high-definition TV via component video jacks:
~
(HOME) -
iiii
(SETTINGS) - [OUTPUT
SETTINGSj-
-1+=>1-00
To
connect a
~
(HOME) -
4:3
TV:
iiii
(SETTINGS) - [OUTPUT
SETTINGSj-
-00
To
activate
~ (HOME) -
setting) -
"BRA
[QR]
VIA"
Sync:
iiii
(SETTINGS) - [GENERAL
_I
+=>1-00
On "PhotoTV HD"
SETj-
[COMPONENTj-
[TV
TYPEj-
[CTRL FOR
HDMIj-
[480ij-
[4:3j-
[QR]
[ONj (the default
-I
[QR]
+=>
I
This camcorderiscompatible with the "Photo
highly-detailed, photo-like depiction
TV
HD-compatible devices using an
new world
* The TV will automatically switch to the appropriate mode when displaying photos.
**Setup
compatible
of
of
photos can be enjoyed in breathtaking full
the
TV
will be necessary. Please refer to the instruction manualofyour Photo TV HD-
TV
for details.
of
subtle textures
HDMI
TV
HD" standard. "Photo
and
colors.
By
connecting Sony's Photo
cable*orthe component A/V cable**, a whole
HD
quality.
TV
HD" allows for
us
25
I Saving movies and photos
Preparingacomputer
with
acomputer
(Windows)
You
can
perform
"PMB
To save
computer,
CD-ROM
(Picture
-
Importing
-
Viewing
-
Creatingadisc
-
Uploading
movies
install
beforehand.
• Do not format the internal memory ofyour
camcorder from a computer.
may not operate correctly.
• This camcorder captures high definition footage
in the
AVCHD
PC
software, high definition footage can
copied onto
containing
with DVD based players or recorders,
DVD
player/recorder may
and may erase
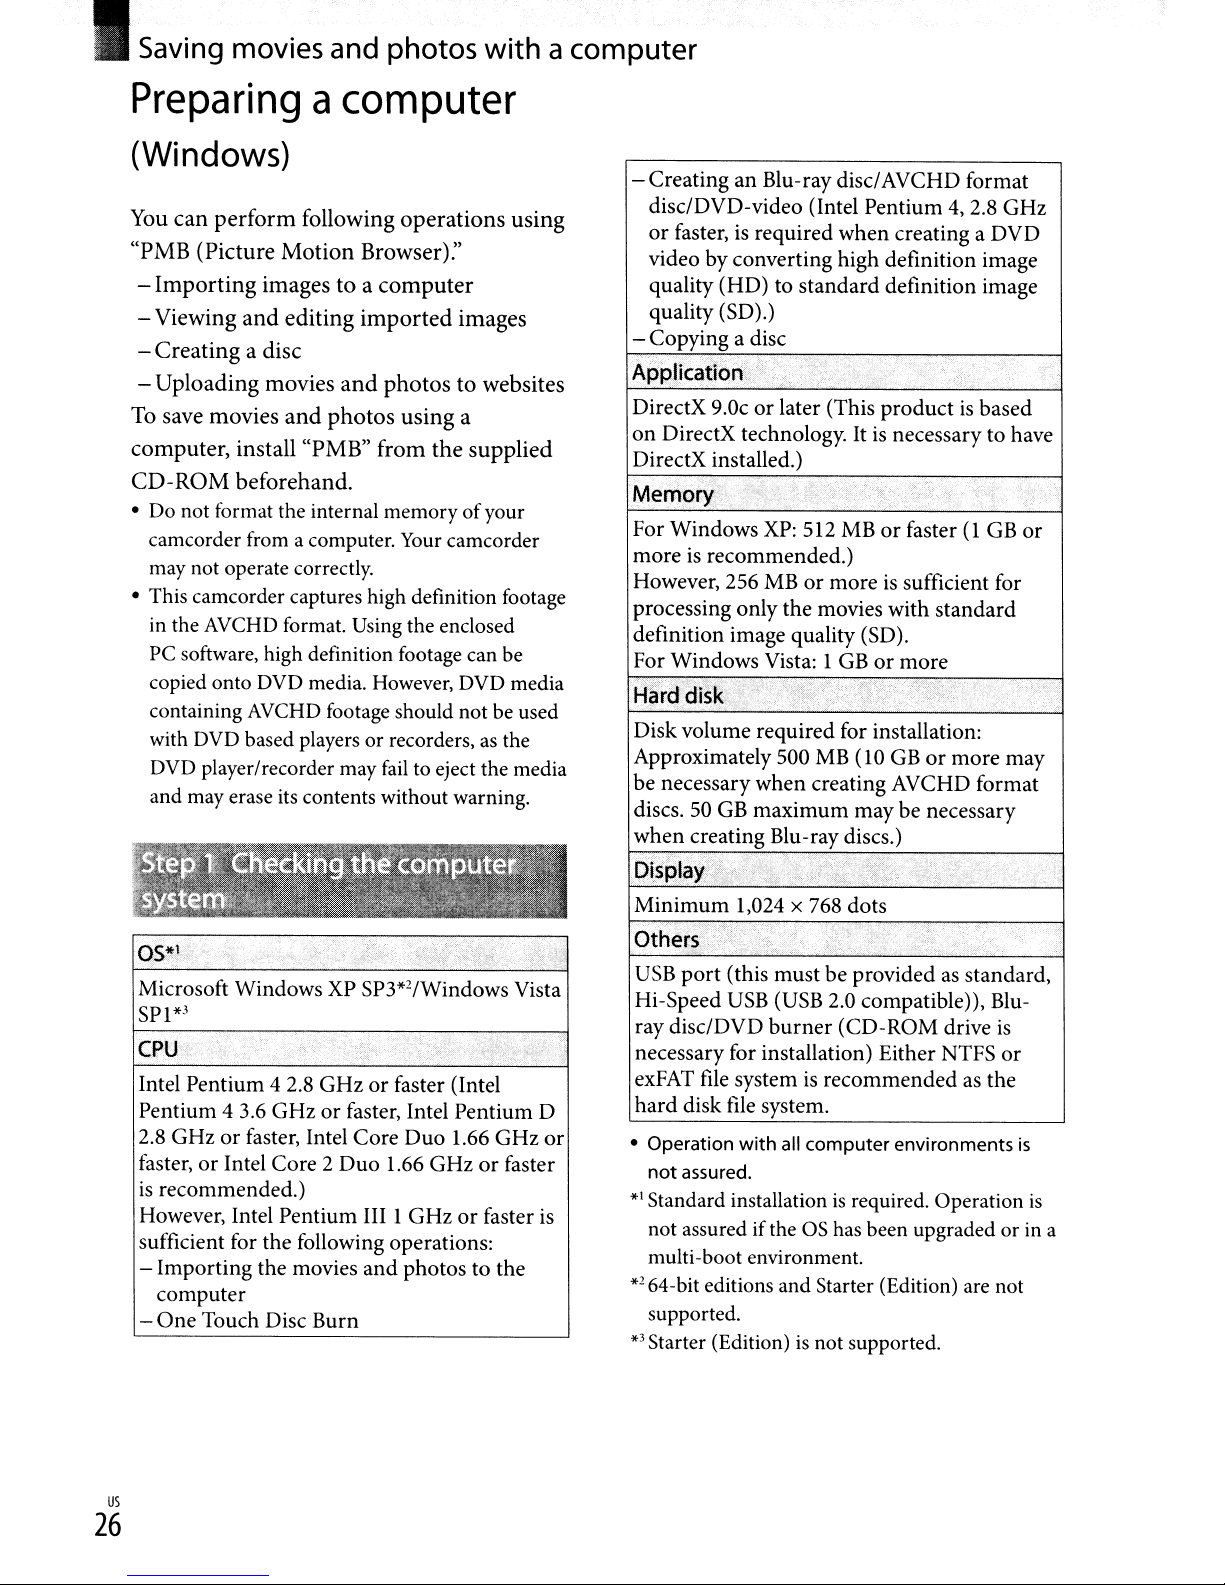
Microsoft Windows XP SP3*2/Windows Vista
SPl*.J
CPU, "
Intel Pentium 4 2.8
Pentium 4 3.6
GHzorfaster, Intel Core
2.8
faster,orIntel Core 2
is
recommended.)
However, Intel Pentium III 1
sufficient for the following operations:
- Importing the movies
computer
-
One
Touch Disc
following
Motion
imagestoa
and
editing
movies
and
"PMB"
and
photos
operations
Browser):'
computer
imported
images
photostowebsites
using
a
from
the
supplied
Your
camcorder
format. Using the enclosed
DVD
media. However, DVD media
AVCHD
footage should not be used
fail
to eject the media
its
contents without warning.
GHzorfaster (Intel
GHzorfaster, Intel Pentium D
Duo
1.66
Duo
1.66
GHzorfaster
GHzorfaster is
and
photos to the
Burn
as
using
be
the
GHz
or
-Creating
disc/DVD-video (Intel Pentium
or
an
Blu-ray disc/AVCHD format
faster,isrequired
when
4,
creating a
2.8
GHz
DVD
video byconverting high definition image
quality
(HD)tostandard
definition image
quality (SD).)
- Copying a disc
Application.
DirectX 9.0corlater (This
on
DirectX technology.Itis
.""
productisbased
necessary to have
DirectX installed.)
..
....
;"
'."j;
.;~%,
.i,
/
"
For Windows XP: 512 MBorfaster(lGB
moreisrecommended.)
or
However, 256 MB
processing only the movies with
moreissufficient for
standard
definition image quality (SD).
or
For Windows Vista: 1 GB
Hard
"
disk,)'
,,"
..
.
i,,";;,
more
it'
"
Disk volume required for installation:
Approximately 500 MB (10 GB
or
more may
be necessary when creating AVCHD format
discs. 50 GB
when
creating Blu-ray discs.)
Display
Minimum
Others
USB
port
Hi-Speed
ray disc/DVD
maximum
','
1,024 x 768 dots
';
,.'
(this must be providedasstandard,
USB
(USB 2.0 compatible)), Blu-
burner
necessary for installation) Either NTFS
exFAT file systemisrecommended
hard
disk file system.
• Operation
not
*1
Standard installationisrequired. Operation
assured.
with
all computer environments
maybenecessary
i'
',"i"
\Jh
,••>L,
(CD-ROM drive
.
".'
is
as the
or
not assured iftheOShas been upgraded or in a
multi-boot environment.
*2
64-bit editions and Starter (Edition) are not
supported.
*3
Starter (Edition)isnot supported.
"
or
.
is
is
us
26
When using a Macintosh
The supplied software
supported by Macintosh computers.
To
process photos using a Macintosh
computer connectedto your camcorder.
see the following website.
http://guide.d-imaging.sony.co.jp/mac/
ms!us!
"PMB»isnot
~
Place
the
The
•Ifthe screen does not appear, click
EJ
Click [Install].
the
supplied
disc driveofyour computer.
installation screen appears.
[Start]--+ [Computer] (in Windows
XP,
[My Computer]), then double-click
[SONYPICTUTIL (E:)] (CD-ROM).
90NY
Handycam Application Software
CD-ROM
in
Install "PMB" before connecting your
camcorder to a computer.
•
If
a versionof"PMB" supplied with another
device has already been installed
computer, check the version. (The version
is
number
PMB].) Compare theversion
supplied CD-ROM with that
installed "PMB:' check to ensure that the
versions have been installed in order, from the
lower to the higher.
the previously installed "PMB"ishigher than
that
"PMB" from the computer
it in order, from lower to higher. Ifyou install a
higher version
may not work correctly.
• See page
iii
Confirm
not
displayed by clicking [Help] - [About
If
the version
of
the "PMB"ofyour camcorder, uninstall
of
"PMB" first, some functions
51onthe "Handycam Handbook':
that
your camcorder
connectedtothe computer.
on
the
numberofthe
of
the previously
number
and
then re-install
a Turn on the computer.
of
is
1.,-
I.'
~
Select the language for the
to
application
be installed, then
click [Next].
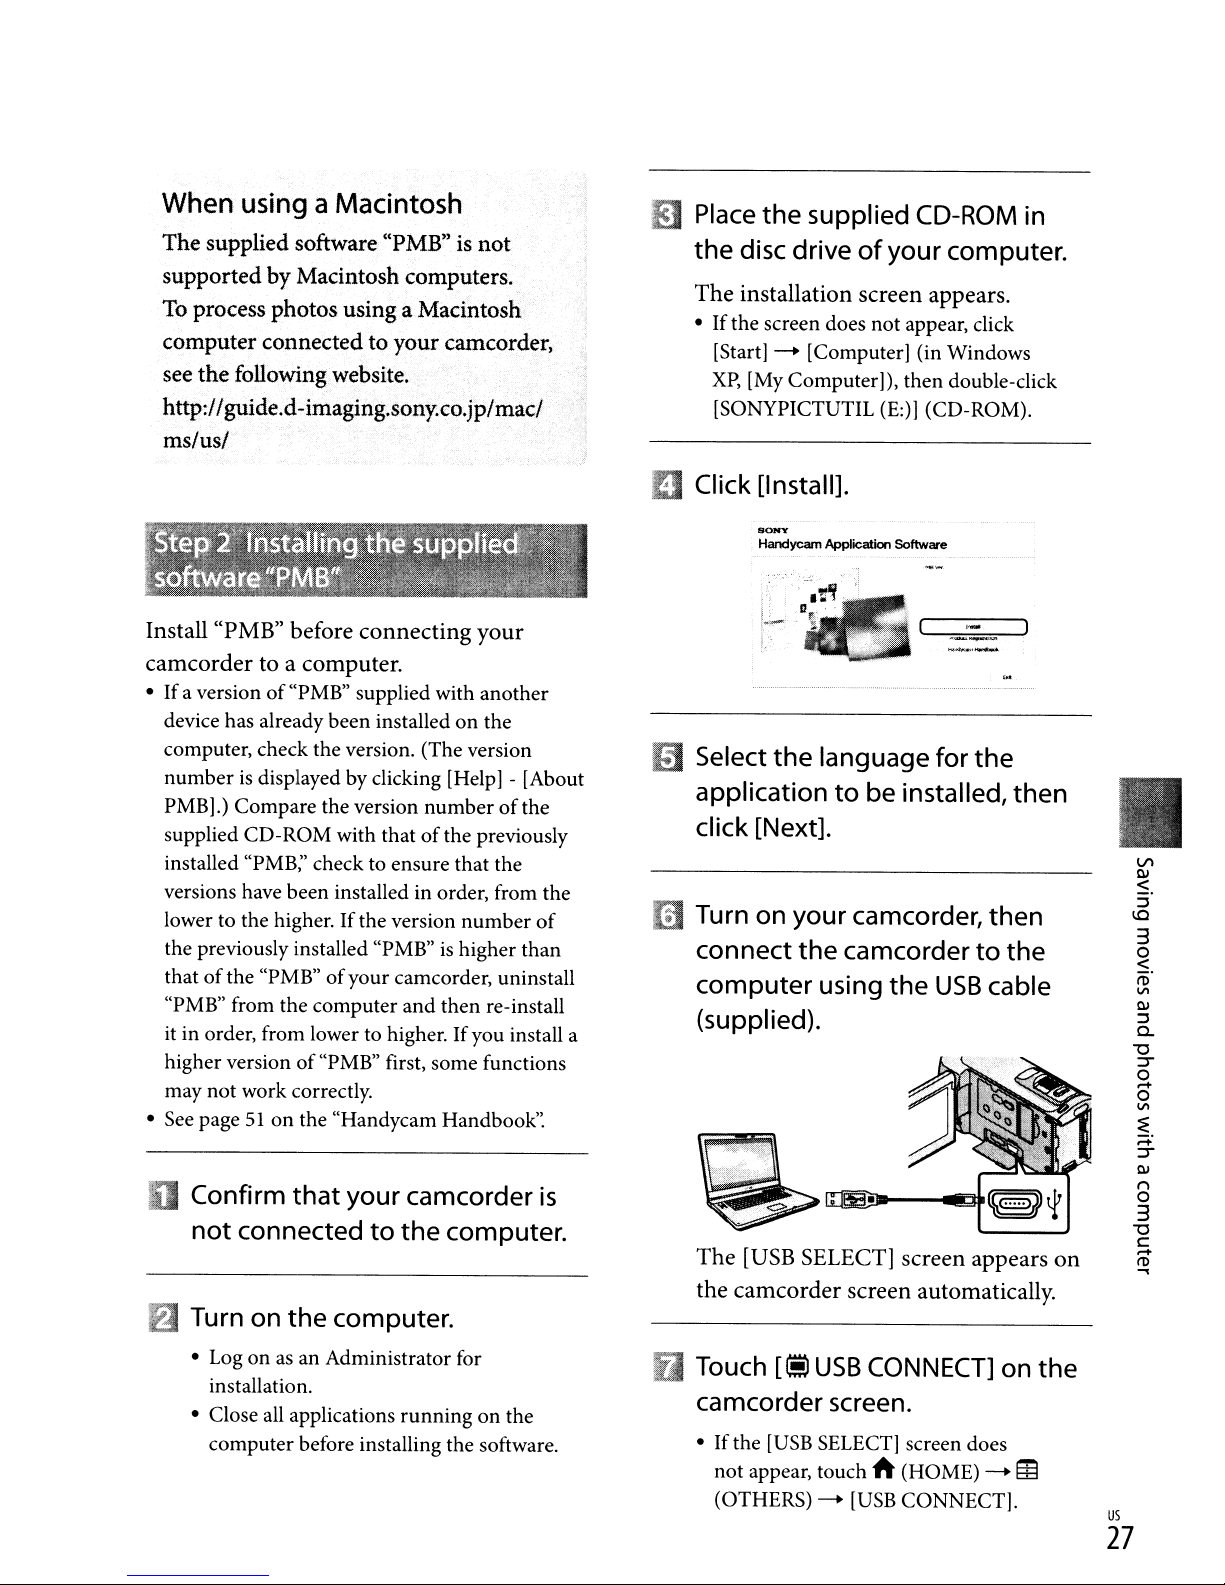
mTurn on your camcorder, then
connect the camcordertothe
computer
(supplied).
The
[USB
the camcorder screen automatically.
using the
USB
cable
SELECT] screen appears
on
VI
Ql
~.
::l
lO
3
o
<
(D'
VI
Ql
::l
0-
"0
:r
o
......
o
VI
~
;=1:
:r
Ql
f"l
o
3
"0
c
......
(l)
...,
• Logonas
installation.
• Close all applications running on the
computer before installing the software.
an Administrator for
D Touch [Ii)
camcorder screen.
• If the
[USB
not appear, touch
(OTHERS) --+
USB
CONNECT]
SELECT] screen does
f\
(HOME) --+ ~
[USB
CONNECT].
on the
us
27
To
disconnect your camcorder from the
computer
(;]
Click [Continue] on
the
computer
screen.
(;]
Read
the
termsofthe
license
agreement carefully. Ifyou agree
to
the
terms, change 0
then
ml
to
click [Next]
--.
Follow the on-screen instructions
install
• Depending on the computer, you may
need to install third party software. If
the installation screen appears, follow
the instructions to install the required
software.
• Restart the computer if required to
complete the installation.
When
following icons will appear.
Remove the CD-ROM from your
computer.
the
software.
the installationiscompleted,
to
[Install].
@, and
o Click
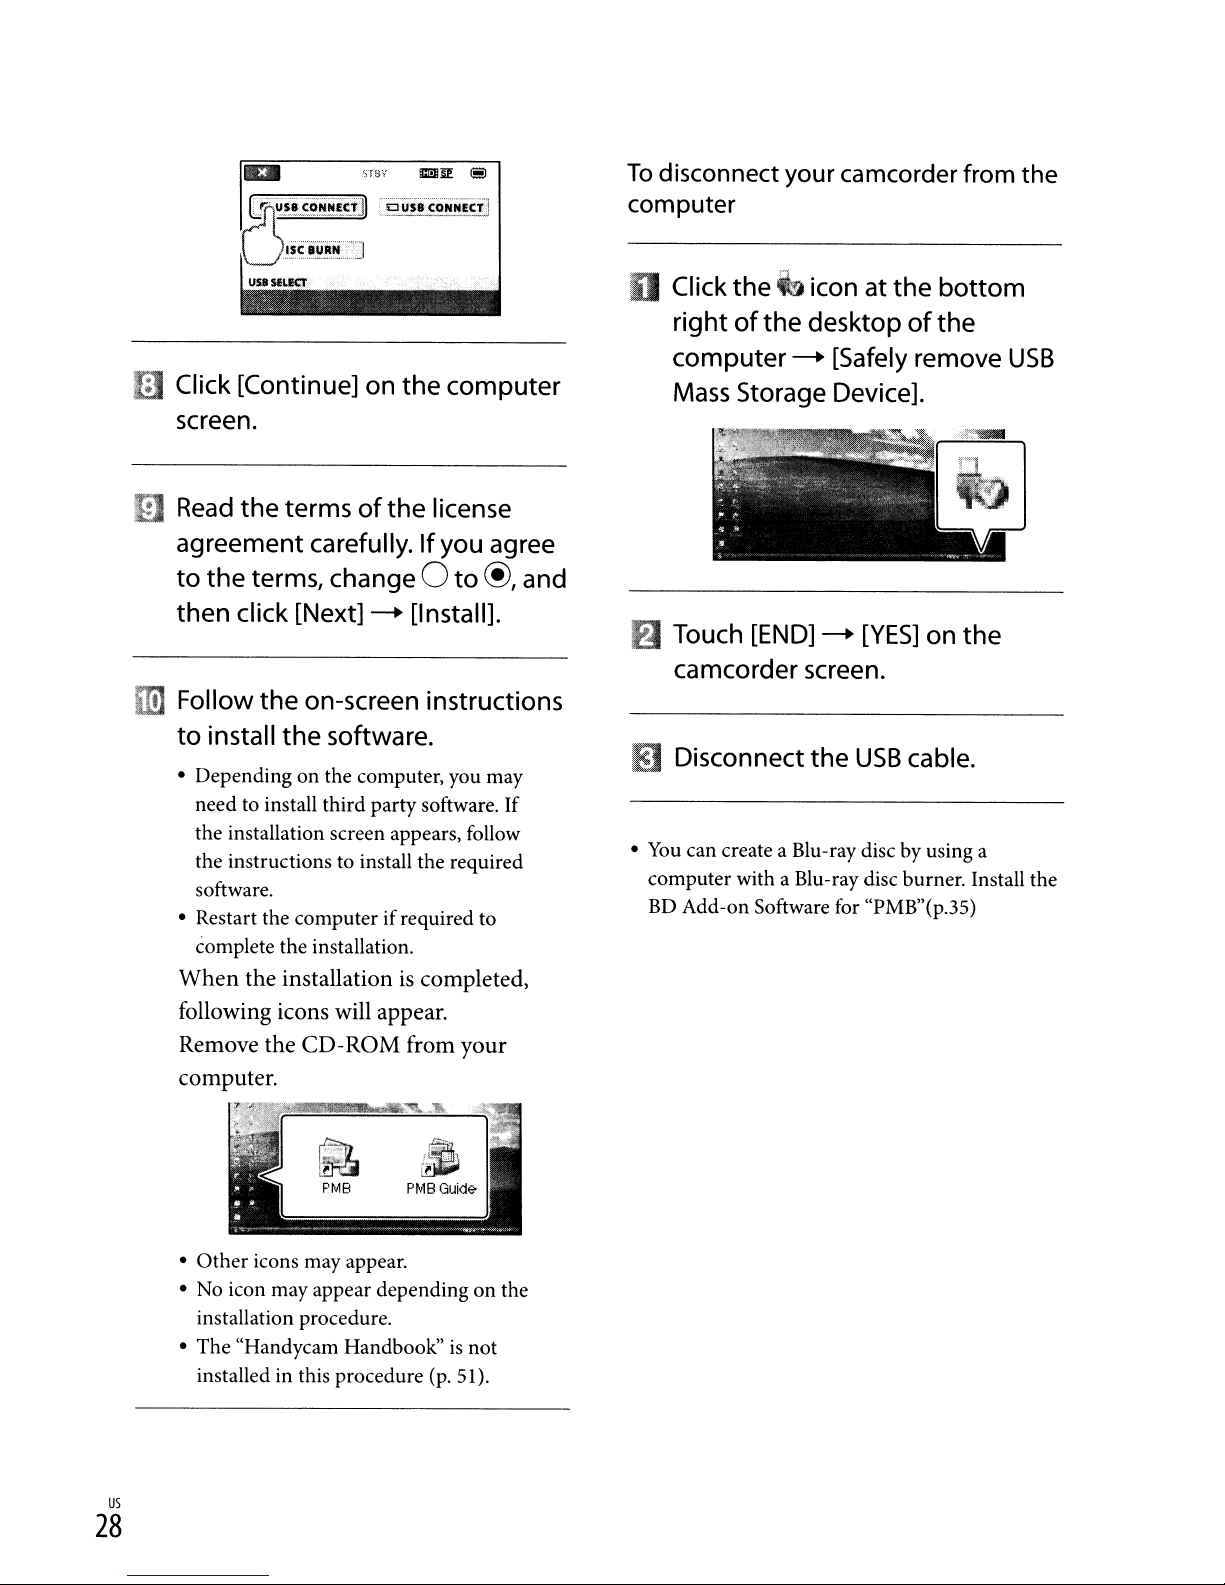
6 Touch
the~icon at
rightofthe
computer
Mass
Storage Device].
[END]
the
desktopofthe
--.
[Safely remove
--.
[YES]
on
bottom
the
camcorder screen.
If§]
Disconnect
•
You
can create a Blu-ray disc by using a
computer with a Blu-ray disc burner. Install the
BD
Add-on Software for "PMB"(p.35)
the
USB
cable.
USB
PMB
• Other icons may appear.
•
No
icon may appear depending on the
installation procedure.
• The "Handycam Handbook"
installed in this procedure
us
28
(p.
is
51).
not
 Loading...