

Sony Handycam DCR-SR45, Handycam DCR-SR46, Handycam DCR-SR65, Handycam DCR-SR85 Operating Manual
SONY:
3-286-667-11(1)
Digital
I--I.I'n
Video
Camera
Recorder
I:n/CIVT1~
_O_p_er_a_ti_"_9_G_u_id_e
Guia de operacio"es
---------
DCR-SR45/SR46/SR65/SR85
_
..
~
(l)
MEIIORY
STICK
no
For detailsonthe advanced operations, please refer to
"Handycam Handbook" (PDF).
Para obtener mas informacion acerca de las funciones
avanzadas, consulte la "Guia practica de Handycam" (PDF).
© 2008 Sony Corporation
InfoLiTHIU~
m
SERIES

IMPORTANT
SAFEGUARDS
WARNING,
To
reduce
the
Do
not
heat
fireorshock
unittorainormoisture.
expose
the
batteriestoexcessive
suchassunshine,
CAUTION:TOREDUCE
DO
NO
REFER
SERVICINGTOQUALIFIED
This symbol is intended to
alert the user to the presence
of
voltage" within the product's
enclosure that may be
sufficient magnitude to
constitute a risk
shock to persons.
This symbol
alert the user to the presence
of
maintenance (servicing)
instructions in the literature
accompanying the appliance.
THE
NOT
REMOVE
USER-SERVICEABlE
uninsulated "dangerous
important operating and
hazard,donot
fireorthe
RISKOFELECTRIC
COVER
(OR
PARTS
SERVICE
is
like.
SHOCK,
BACK),
INSIDE,
PERSONNEL
of
of
electric
intended to
expose
For your protection, please read these
safety instructions completely before
and
operating the appliance,
keep this
manual for future reference.
Carefully observe all warnings, precautions
and
instructions on the appliance,orthe
one described in the operating instructions
and
adhere to them.
Power
This set should be operated only from the type
of
If
supplied to your home, consult your dealer
local power company. For those sets deSigned
to operate from battery power,
refer to the operating instructions.
Sources
power source indicatedonthe marking label.
you are
not
sureofthe typeofelectrical power
or
other
or
sources,
Polarization
This set may be equipped with a polarized
power cord plug (a plug haVing one blade wider
than the other).
This plug will
way. This
insert the plug fully into the outlet, try reversing
the plug.
your electrician to have a suitable outlet installed.
Do
not
plug by forcing it in.
fit
into the power outlet only one
is
a safety feature.Ifyou are unable to
If
the plug should still fail to
defeat the safety purposeofthe polarized
fit,
ac
contact
Overloading
Do not overload wall outlets, extension cords
convenience receptacles beyond their capacity,
since this can result in fire
or
electric shock.
or
us
2
Object
Never push objectsofany kind into the set
through openings as they may touch dangerous
voltage pointsorshort
in a fire
kind
and
Liquid
or
electric shock. Never spill liquidofany
on
the set.
Entry
out
parts that could result
Attachments
Do
not
use attachments
manufacturer,
as
not
recommended by the
they may cause hazards.
Cleaning
Unplug the set from the wall outlet before
cleaning
or
polishing it. Do
not
use liquid

cleanersoraerosol cleaners. Use a cloth lightly
dampened with water for cleaning the exterior
of
the set.
due to lightning and power-line surges.
Service
Installation
Water
Do
- for example, near a bathtub, washbowl, kitchen
sink,
swimming pool, etc.
Power-Cord
Route the power cord so that itisnot likely to be
walked
against them, paying particular attention to the
plugs, receptacles,
exits from the appliance.
Accessories
Do not place the setonan unstable cart, stand,
tripod, bracket,ortable. The set may
causing serious injury to a childoran adult,
serious damage to the set. Use only a cart, stand,
tripod, bracket,
manufacturer.
Ventilation
The slots and openings in the cabinet are
overheating, these slots
and
Moisture
not
use power-line operated sets near water
or
laundry tub, in a wet basement, or near a
Protection
onorpinched by items placed upon
and
the point where the cord
fall,
or
table recommended by the
provided for necessary ventilation. To ensure
reliable operation
be blocked
- Never cover the slots and openings with a cloth
or other materials.
- Never block the slots and openings by placing
the set
surface.
- Never place the set in a confined space, such
a bookcase,orbuilt-in cabinet, unless proper
ventilation
- Do not place the set near
heat register,orwhere itisexposed to direct
sunlight.
or
on
of
the set, and to protectitfrom
and
openings must never
covered.
a bed, sofa, rug,orother similar
is
provided.
or
over a radiator
or
and
or
Lightning
For added protection for this set during a
is
lightning storm, or when it
unused for long periods
the wall outlet and disconnect the antenna or
cable system. This will prevent damage to the set
left unattended and
of
time, unplug it from
as
Damage
Unplug the set from the wall outlet and refer
servicing to qualified service personnel under the
following conditions:
- When the power cord or plug
frayed.
-
If
into the set.
-
If
-
If
by being dropped,
damaged.
-
If
following the operating instructions. Adjust
only those controls that are specified in the
operating instructions. Improper adjustment
of
will often require extensive work
technician to restore the set to normal
operation.
- When the set exhibits a distinct change in
Requiring
liquid has been spilled or objects have fallen
the set has been exposed to rain or water.
the set has been subject to excessive shock
the set does not operate normally when
other controls may result in damage and
performance - this indicates a need for service.
Service
is
damaged
or
the cabinet has been
by
or
a qualified
Servicing
Do not attempt to service the set yourself
openingorremoving covers may expose you to
or
dangerous voltage
Refer
all
servicing to qualified service personnel.
Replacement
When replacement parts are required, be sure
the service technician has used replacement parts
specified by the manufacturer that have the same
characteristics
Unauthorized substitutions may result in fire,
electric shock,
Safety
Upon completionofany serviceorrepairs to the
set, ask the service technician to perform routine
safety checks (as specified by the manufacturer)
to determine that the set
condition.
Check
other hazards.
parts
as
the original parts.
or
other hazards.
is
in safe operating
as
us
3
Read
Before operating the unit, please read this
manual thoroughly,
reference.
CAUTION····
Replace
type only. Otherwise, fire
result.
For
CANADA
RECYCLING
Lithium-Ion batteries are
recyclable.
You can help preserve
environment by returning
your used rechargeable
batteries to the collection
and recycling location
nearest you.
For more information
regarding recycling
rechargeable batteries, call
toll free 1-800-822- 8837,
visit http://www.rbrc.org/
Caution: Do
leaking Lithium-Ion batteries.
Owner's
The model and serial numbers are located
on
in the space provided below. Refer to these
numbers whenever you call your Sony
dealer regarding this product.
Model No. DCRSerial No.
this
the
first
and
retain it for future
/·'.:
..•
c
.'-'}
batterywith
the
or
custom·
....
··
LITHIUM-ION
not
Record
the bottom. Record the serial
BATTERIES
our
of
or
handle damaged
specified
injury may
or
number
If
you have any questions about this
product, you may call:
Sony Customer Information Center 1-800222-S0NY (7669).
is
The number below
matters only.
Regulatory
DeclarationofConformity
Trade Name: SONY
Model No.: DCR-SR45, DCR-SR46
Responsible Party: Sony Electronics Inc.
Address: 16530 Via Esprillo, San Diego,
CA 92127 U.S.A.
Telephone number: 858-942-2230
This device complies with Part
FCC Rules. Operation
following two conditions: (1) This device
may
and
interference received, including
interference that may cause undesired
operation.
DeclarationofConformity
Trade Name: SONY
Model No.: DCR-SR65, DCR-SR85
Responsible Party: Sony Electronics Inc.
Address: 16530 Via Esprillo, San Diego,
CA 92127 U.S.A.
Telephone number: 858-942-2230
This device complies with Part
FCC Rules. Operation
following two conditions: (1) This device
may not cause harmful interference,
and (2) this device must accept any
interference received, including
interference that may cause undesired
operation.
Information
not
cause harmful interference,
(2) this device must accept any
for the FCC related
15ofthe
is
subject to the
15ofthe
is
subject to the
Model No. ACSerial No.
us
4
" Note
• DCR-SR65/SR85isto be used with the
Handycam Station Model DCRA-C200
Adaptor Model AC-L200/L200B.
and
AC
CAUTION
You are cautioned that any changes
modifications not expressly approved in
this manual could void your authority to
operate this equipment.
or
For
customers
CANADA
Battery
pack
iii
the
U.S.A.
and
Note
This equipment has been tested and found
to complywith the limits for a Class B
digital device, pursuant to Part
FCC Rules.
These limits are designed to provide
reasonable protection against harmful
interference in a residential installation.
This equipment generates, uses, and
can radiate radio frequency energy and,
if
not installed and used in accordance
with the instructions, may cause harmful
interference to radio communications.
However, there is
no
guarantee that
interference will not occur in a particular
installation.
If
this equipment does cause
harmful interference to radio
reception, which can be determined
by turning the equipment off and on,
the user
is
encouraged to try to correct
the interference by one or more
follOWing
- Reorientorrelocate the receiving antenna.
- Increase the separation between the
equipment and receiver.
- Connect the equipment into an outlet on
a circuit different from that to which the
receiver
- Consult the dealer
TV technician for help.
measures:
is
connected.
or
an experienced radiol
The supplied interface cable must be used
with the equipment in order to comply
with thelimits for a digital device pursuant
of
to Subpart B
For
the
StateofCalifornia,
Part15of
Perchlorate Material - special handling may
apply,
See
www.dtsc.ca.gov/hazardouswaste/
perchlorate
Perchlorate Material: Lithium battery
contains perchlorate.
15ofthe
or
television
of
the
FCC Rules.
USA
only
This device complies with Part15of
the IIP.!!IIII
FCC Rules. Operation is subject to the
following two conditions:(l) This device
may not cause harmful interference, and
(2)
this device must accept any interference
received, including interference that may
cause undesired operation.
This Class Bdigital apparatus complies
with Canadian ICES-003.
Notesonuse
Supplied items
The numbers in ( ) are the supplied
quantity.
• AC Adaptor (1)
• Power cord (Mains lead) (1)
• Handycam Station
•
AN
connecting cable (1)
•
USB
cable (1)
• Wireless Remote Commander (1) (DCR-SR651
SR85)
A button-type lithium battery
installed.
• Rechargeable battery pack NP-FH40
• CD-ROM "Handycam Application Software"
(1) (p. 26)
- Picture Motion Browser (Software)
- PMB Guide
- Handycam Handbook (PDF)
• "Operating Guide" (This manual) (1)
[AJ
[Q
~
:::>
(1)
[AJ
(DCR-SR65/SR85)
~
is
already
[g
.,.
e -:;;
(1)
~
Using
the
camcorder
• The camcorderisnot dustproofed, dripproofed
or
waterproofed.
• Do not do anyofthe following when the
Il:1
(movie)/O
ACCESS lamps (p.
Otherwise the media may be damaged, recorded
See
"Precautions" (p. 32).
(still image) lamps (p.
14,
19)
is litorflashing.
12)
or
~
us
5
images may be lostorother malfunctions could
occur.
- Remove the "Memory Stick PRO Duo."
- Remove the battery pack
the camcorder.
- Apply mechanical shock
camcorder.
• When connecting your camcorder to another
device with a cable, be sure to insert the
connector plug in the correct way. Pushing the
plug forcibly into the terminal will damage the
and
terminal
your camcorder.
not
• Do
camcorder. The hard disk
not be recognized,
may not be possible.
• Do
not
The hard disk
recognized,
• To protect the internal hard disk from shock
by dropping, the camcorder has drop sensor
function"'.
gravity condition, the block noise made when
this function
also be recorded.
drop repeatedly, recording/play back may be
stopped.
• When the temperature
becomes extremely high
not
may
camcorder, due to the protection features
camcorder being activated in suchsituations.
In this case, an indicator appears on the LCD
screen (p. 30).
• Do not turn
area, where the altitude
meters (9,800 feet). Doing so may damage the
hard disk driveofyour camcorder.
• If you repeat recording/deleting images for a
long time, fragmentation
media. Images cannot be saved
such a case, save your images on some type
external media first,
FORMAT]"'.
• Fasten the grip belt
correctly while recording.
may result in a malfunction
apply shockorvibration to your
or
use your camcorder in very loud areas.
of
the camcorder may
or
recording may
Whenadrop
is
activated by the camcorder may
If
the
be able to recordorplay back on the
on
the camcorder in a low-pressure
and
or
AC Adaptor from
or
vibration to the
of
the camcorder may
recordingorplayback
not
not
be possible.
occurs,orunder a non-
drop
sensor catches a
of
the camcorder
or
extremely low, you
is
more than 3,000
of
data occurs on the
or
recorded. In
and
then perform [MEDIA
hold your camcorder
us
6
be
of
of
of
the
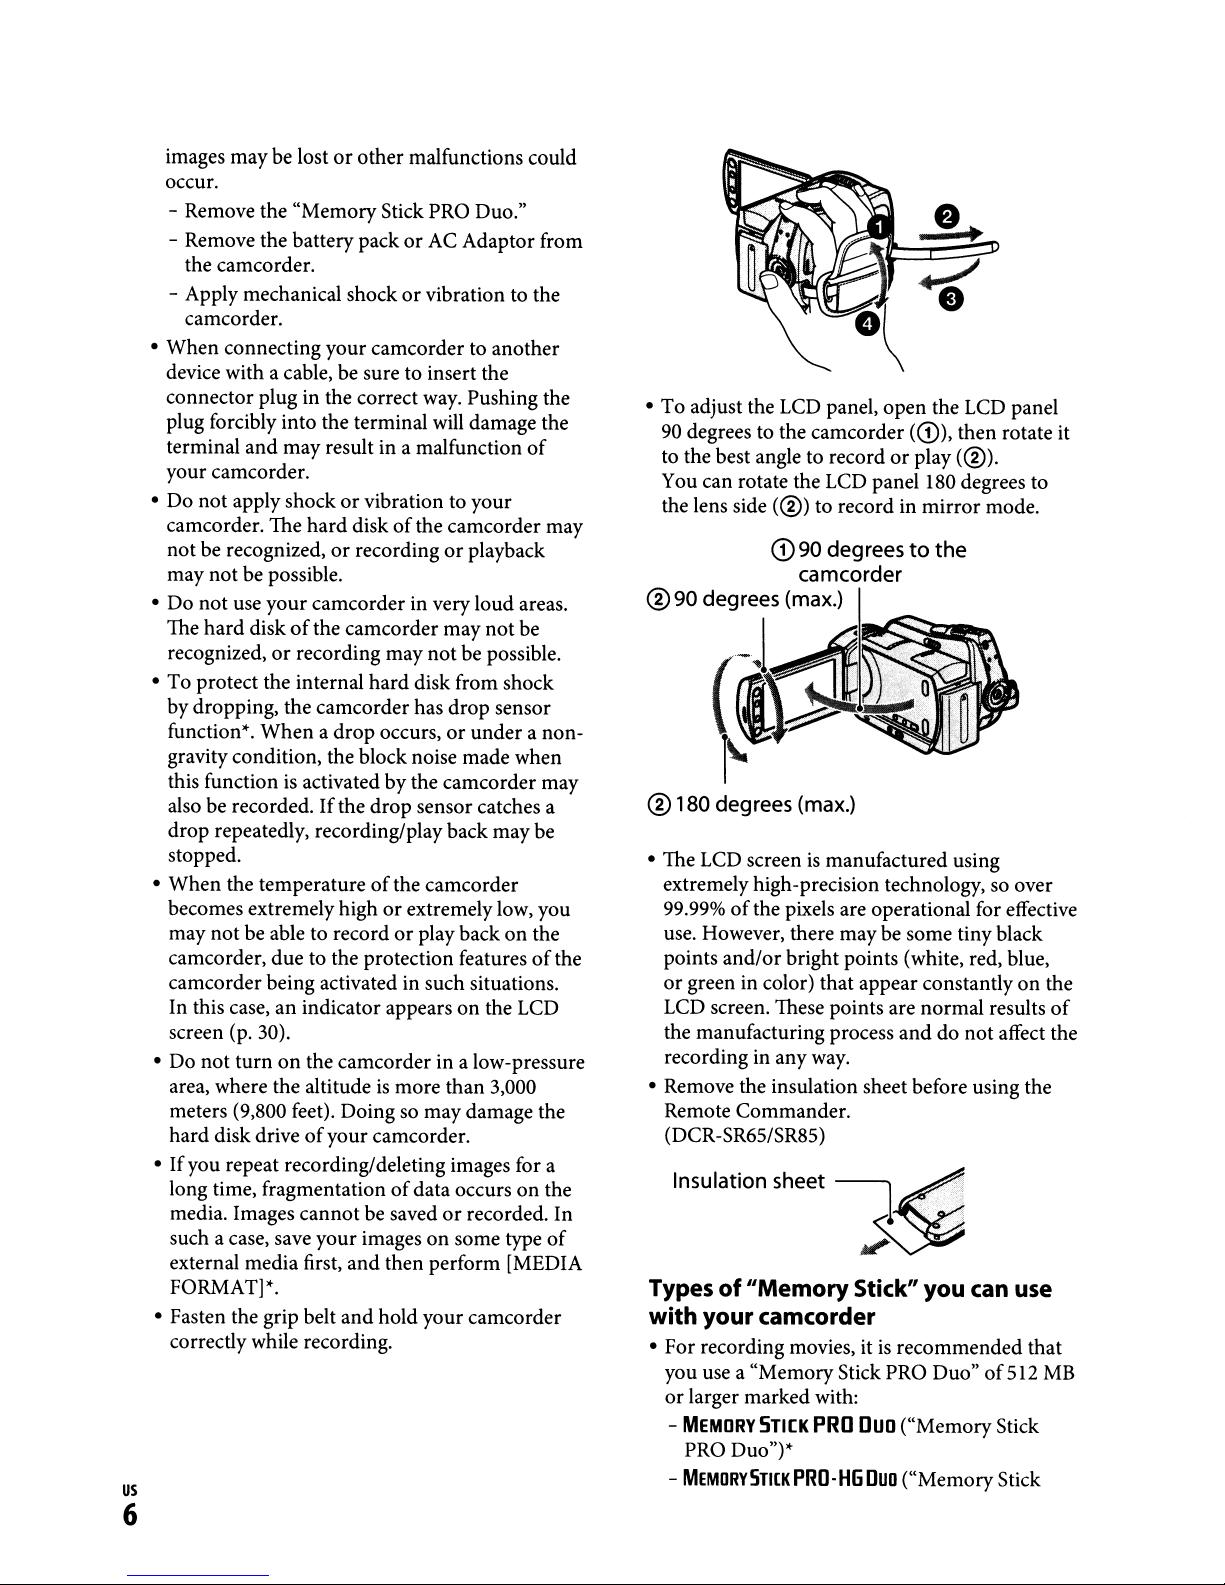
• To adjust the LCD panel, open the LCD panel
90
degrees to the camcorder
to the best angle to recordorplay
You can rotate the LCD panel 180 degrees to
the lens side
(@)
to record in
(CD),
mirror
then rotate
(@).
mode.
®180 degrees (max.)
• The LCD screenismanufactured using
extremely high-precision technology, so over
of
99.99%
use. However, there may be some tiny black
points
or
green in color) that appear constantly on the
LCD screen. These points are normal results
the manufacturing process
recording in any way.
• Remove the insulation sheet before using the
Remote Commander.
(DCR-SR65/SR85)
Insulation sheet
Types
with your camcorder
• For recording movies, itisrecommended that
you use a "Memory Stick PRO Duo"
or
larger marked with:
-
MEMORY
PRO Duo")'"
-
MEMDRV5TIlK
the pixels are operational for effective
and/or
bright points (white, red, blue,
anddonot
~
of"Memory
STICK
PRD-HG
PRO
Stick"
Duo
you
("Memory Stick
Duo
("MemoryStick
can
of
affect the
use
512
it
of
MB
PRO-HG
* Marked with Mark2
"Memory
• A
been confirmed to operate correctly with this
camcorder.
•
See
page13for the recordable timeofa
"Memory
• "MemoryStick PRO Duo"
PRO-HG
Stick PRO Duo" in this manual.
On
recording
• Before starting to record, test the recording
function to make sure the image
recorded without any problems.
• Compensation for failure
cannot
playbackisnot
the camcorder, recording media, etc.
•
TV
color systems differ dependingonthe
country/region. To view
TV, you need an NTSC system-based TV.
• Television programs, films, video tapes,
and
other
Unauthorized recording
be contrary to the copyright laws.
Duo")
or
not
are available.
Stick PRO Duo"ofup to 8GBhas
Stick PRO Duo."
and
"Memory
Duo" are
be provided, even if recording
materials may be copyrighted.
both
possible
called as
or
due
your
of
"Memory
and
lossofrecording
to a malfunction
recordingsona
such materials may
sound
or
Stick
are
of
About
• The on-screen displays in each local language
About
• The LCD screens
• In this Operating Guide, the
• Unless otherwise specifically indicated,
• The screenshots are from Windows Vista,
* Refer also to "Handycam Handbook" (PDF)
language
are used for illustrating the operating
procedures. Change the screen language before
using
your
this
manual were taken with a digital still camera,
and
maylook different from what you actually
see.
"MemoryStick PRO Duo" are called "media."
illustrations in this manual are based
SR85.
may vary dependingonthe operating system
the computer.
and
"PMB Guide."
setting
camcorderifnecessary (p. 12).
manual
and
indicators shown in this
hard
disk
on
and
DCR-
and
of
Save
all
your
recorded
•Toprevent
save all your recorded images
periodically.
the image data
your
data using a VCR,
When
your
It
is
on
computer*. Also, you can save
the
camcorderisconnededtoa
image
image data from being lost,
recommended that you save
a disc such as a
oraDVD/HDD
data
on
external media
DVD-R
your
recorder*.
using
image
computer
•
Do
not
try to format the
camcorder using a computer.
camcorder
may
not
hard
diskofthe
If
youdoso,
operate correctly.
your
Noteondisposal/transfer
•Ifyou perform [MEDIA FORMAT]*to format
the
hard
diskofthe camcorder, data may
hard
completely deleted from the
you transfer the camcorder, itisrecommended
that you perform
recovery
In addition to the above, when you dispose
the camcorder, itisrecommended
destroy the actual
of
[e
EMPTY]* to prevent the
your data.
bodyofthe camcorder.
disk.
that
not
When
of
you
be
us
7

Tableofcontents
IMPORTANT
Read
this first 4
Getting
Step1:Charging
2:
Step
setting
Changing
Step3:Selecting
SAFEGUARDS
Started
Turning
the
date and
the
the
battery pack
the
power
language setting
the
on, and
time
media
.........
Recording/Playback
Recording
Playback
Playing
Other parts and functionsofthe
camcorder
Indicators displayed during recording/
playback
Performing various functions -
"AHOME" and
the
image on a
TV
"0..::
OPTION" 22
2
9
12
12
13
15
16
17
18
20
Saving images 24
Deleting images
Enjoying
Performing
Handbook/softwaretobe installed
Installing "Picture Motion Browser" 26
~
Troubleshooting
Troubleshooting 29
Self-diagnosis displaylWarning
"
Additional
..
Precautions
Specifications 34
withacomputer
withacomputer
indicators 30
Information
25
26
26
32
us
8

Getting
Started
Step1:Charging
DCR-SR65/SR85
CHG
lamp
Battery
pack
the
battery
pack
You can charge
battery
ittoyour camcorder.
pack (H series)
U Notes
• Your camcorder operates only with an
"InfoLITHIUM" battery pack (H series).
1 Turn
the
directionofthe
(the default setting).
2 Attach
in
the
directionofthe
clicks.
the
IlnfoLiTHIUM"
after
POWER switch in
arrowtoOFF (CHG)
the
battery
pack by sliding
attaching
arrow
the
until
•
it
it
AC
Adaptor
DCR-SR45/SR46
DC
plug
With
the'"
mark on the right
AC
Adaptor
-H.-!i=---=~f--
-~-4
DCINjack
Power
(Mains lead)
cord
..L
To the
(wall socket)
wall
..
outlet
3 For DCR-SR6S/SR8S:
Connect
IN jackon the Handycam Station.
For DCR-SR4S/SR46:
Connect
IN jack on your camcorder.
Open the jackcover and connect the
DC plug
IN jack.
the
AC
Adaptortothe
the
AC
Adaptortothe
of
the AC Adaptor to the DC
4 For DCR-SR6S/SR8S:
Connect
lead)
wall
the
Station securely, all
bottom.
• When setting the camcorder onto the
Handycam Station, close the DC IN jack
cover.
For DCR-SR4S/SR46:
Connect the power cord (mains
lead)
outlet
The CHG (charge) lamp lights up and
charging starts.
the
power cord (mains
to
the
AC
Adaptorand
outlet
camcorder into
to
(wall socket). Insert
the
AC
Adaptor and
(wall socket).
the
Handycam
the
waytothe
the
the
DC
DC
wall
us
9
The CHG (charge) lamp turns offwhen
is
the battery
fully charged.
Disconnect the AC Adaptor from the
DC
DC IN jackholding both the
and
the Handycam Station (DCR-SR65/
plug
SR85)oryour camcorder (DCR-SR45/
SR46).
Charging
Recording
Continuous
recording
time
time
time
DCR-
SR45ISR46
125 125
100
110
(Unitmin.)
DCR-SR6S/SRSS
90
105
.~.
Tips
• For DCR-SR65/SR85:
Same as DCR-SR45/SR46, you can charge the
battery pack
your camcorder.
To
remove
Turn
the POWER switch to OFF (CHG).
Slide the BATT (battery) release lever
by
connecting the AC Adaptor to
the
battery
pack
and
remove the battery pack.
SAIT(battery)
release lever
o
'0
AVfiilablerunning
tirnlefolrth4!i'i
,supp'i,d'batterypack'"
Charging time:
Approximate time (min.) required to fully
charge a completely exhausted battery
pack.
Recording/Playback time:
Approximate time (min.) available when
you use a fully charged battery pack.
Typical
recording
time
Playback
Top:
Bottom: When the media
Stick PRO Duo"
U
•
All
settings:
- Recording mode:
- The LCD backlight turns: [ON]
• Typical recording time shows the time when
you repeat recording start/stop, turning the
power on/offand zooming.
On the battery pack
• Before changing the battery packorremoving
the AC Adaptor from the camcorder, turn
the POWER switch to OFF (CHG)
sure that the
(p. 12)/ACCESS lamps (p.
• The power will not be supplied from the
battery
to the DC IN jack
the Handycam Station (DCR-SR65/SR85),
even when the power cord (mains lead)
disconnected from the wall outlet (wall socket).
On the charging/recording/playbacktime
• Times measured when using the camcorder at
25°C (77
recommended).
• The available recording
be shorter when you use your camcorder in low
temperatures.
• The available recording
be shorter depending
which you use your camcorder.
time
When
the mediaisset to the
Notes
times measured under the following
1:1
as
longasthe AC Adaptorisconnected
OF)
(lOOC
50 45
50 50
120
140 140
is
set to the "Memory
[SP]
(Movie) lamp/ 0 (Still) lamp
14,
19)isturned off.
of
your camcorder
to 30°C (50OFto 86
and
playback time will
and
playback time will
on
the conditions under
hard
and
120
disk
make
or
is
OF)
is
us
10
On
theACAdaptor
• Use the nearby wall outlet (wall socket) when
using the AC Adaptor. Disconnect the AC
Adaptor from the wall outlet (wall socket)
immediately ifany malfunction occurs while
using your camcorder.
Do
not use the AC Adaptor placed in a narrow
•
as
space, such
•
Do
not short-circuit the DC plugofthe AC
Adaptor
objects. This maycause a malfunction.
• Even if your camcorder
source (mains)
connected to the wall outlet (wall socket) via the
AC Adaptor.
between a wall and furniture.
or
battery terminal with any metallic
is
turned off, AC power
is
still supplied to it while
•
us
11
Step2:Turning
time
ft
(HOME)
(p.
22)
Touch the button on
the
LCD
screen.
the
power
on,
and
1
setting
the
date
and
1 While pressing
turn
the
POWER
the
in
the
It:lI
Q (Still): To record still images
Go to step 3 when you
camcorder for the first time.
• When you turnonthe Q (Still) lamp,
directionofthe
respective
(Movie): To record movies
the screen aspect ratio
automatically.
2 Touch A(HOME)
--+
[CLOCKI~LANG]
SET].
The [CLOCK
the
green button,
switch repeatedly
arrow until
lamp
SET]
lights up.
turnonyour
is
changed to
--+
iI;
--+
screen appears.
2
4:3
(SETTINGS)
[CLOCK
JF-i:....--+-
The clock starts.
.~.
Tips
• The date and time do not appear during
but
recording,
on the media, and can be displayed during
playback.
• You can turn off the operation beeps by
touching
[SOUND/DISP SET]--+ [BEEP]--+ [OFF].
Ch~ngjpg>
they are automatically recorded
ft
(HOME)
the
POWER
When using the
camcorder for the first
time, the [CLOCK
screen appearsonthe
LCD screen.
--+;:;
language
(SETTINGS) --+
setti~g
switch
SET]
3 Select the desired geographical
IE!
I
0,
area with
4 Set lOST
(year), [M] (month),
and minute, then touch
us
SET]
12
then touch [NEXT].
or [SUMMERTIME],
[0]
(day), hour
lOKI.
[V]
You can change the on-screen displays to
show messages in a specified language.
Touch
[CLOCK/~LANG]
SET], then select the desired language.
ft
(HOME)
--+;:;
--+
(SETTINGS)
[~LANGUAGE
--+
Step
3:
Selecting
the
media
You can select the hard diskor"Memory
Stick PRO Duo"asthe recording/playback!
editing mediaonyour camcorder. Select
the media for movies and still images
separately.
The default settingishard
and still images.
Hard disk
disk for movies
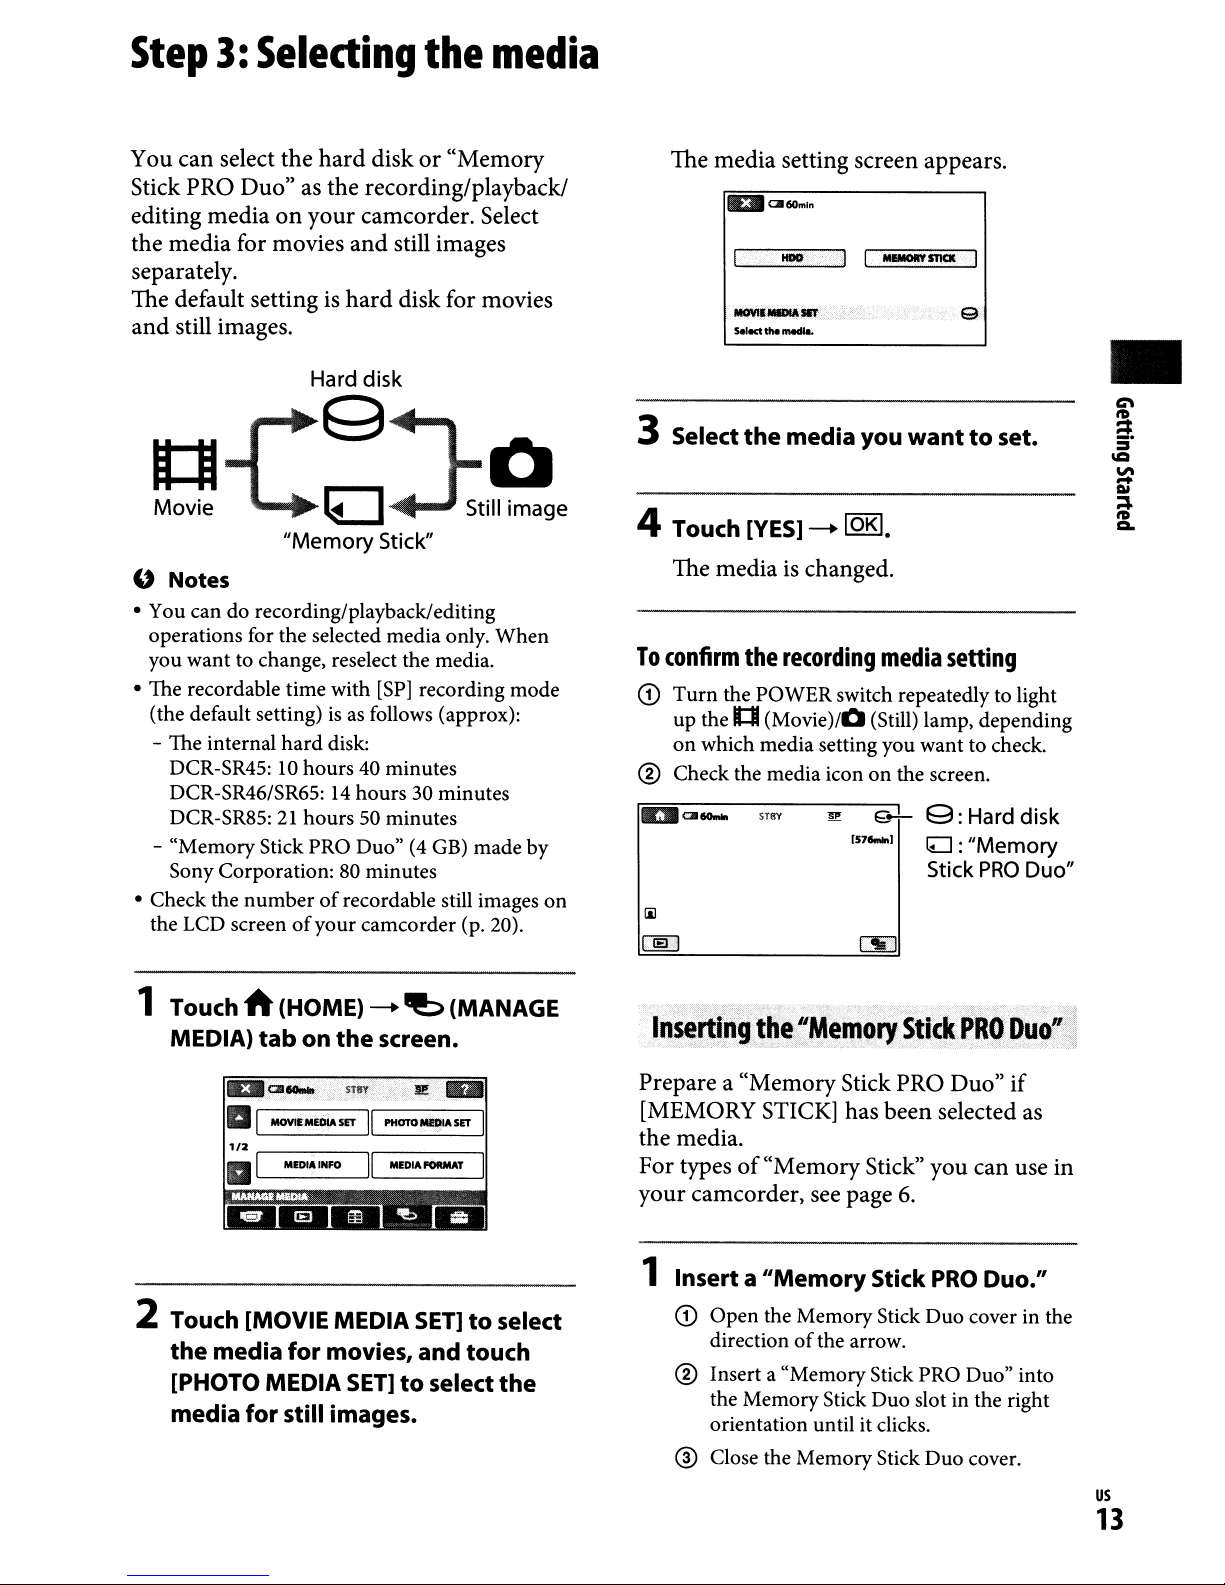
The media setting screen appears.
IEIIC360mln
_
·.·1
_1__
5eIocttlle_
_STICII
.
e
•
3 Select
e-C~J:iee
"Memory
" Notes
• You can do recording/playback/editing
operations for the selected media only. When
you want to change, reselect the media.
• The recordable time with
(the default setting)
- The internal hard disk:
DCR-SR45:
DCR-SR46/SR65:
DCR-SR85:
- "Memory Stick PRO Duo"
Sony Corporation:
• Check the number
the LCD screenofyour camcorder (p. 20).
10
hours 40 minutes
21
hours50minutes
of
Stick"
[SP]
recording mode
isasfollows (approx):
14
hours 30 minutes
(4
GB)
made by
80
minutes
recordable still images
on
4 Touch
The mediaischanged.
To
confirm
CD
Turn
up the
on
® Check the media icon
~CII_
iii
~
the
media you
[YES]
the
the POWER switch repeatedly to light
It::Jl
which media setting you want to check.
-+
recording
(Movie)/O
ST8Y
I!
lOKI.
wanttoset.
media
(Still) lamp, depending
on
Q-;-
157_1
setting
the screen.
g:
Hard disk
lLJ :
"Memory
Stick
PRO
Duo"
1 Touch A (HOME)
MEDIA)
tab
on
the
-+
"b
screen.
lElIa...... STIlY
aI
MOYlE
MEOlA
SETIIPHOTOMEDtA
1'2
III
r----------,
MEDIIIINFO
,----------,1
II
_DIII_T
2 Touch [MOVIE MEDIA
the
media for movies, and touch
[PHOTO MEDIA
media for still images.
SET]toselect
(MANAGE
~
..
SET
I
I
SET]toselect
the
Inserth1g~he"Memory
Prepare a "Memory Stick PRO Duo" if
[MEMORY STICK] has been selected
the media.
For typesof"Memory Stick" you can use in
your camcorder, see page
1 Inserta
CD
"Memory
Open the MemoryStick Duo cover in the
direction
of
the arrow.
Stick
6.
Stick
PRO
PRO
DUO":.j
as
Duo."
® Insert a "MemoryStick PRO Duo" into
the Memory Stick Duo slot in the right
orientation until it clicks.
® Close the Memory Stick Duo cover.
us
13
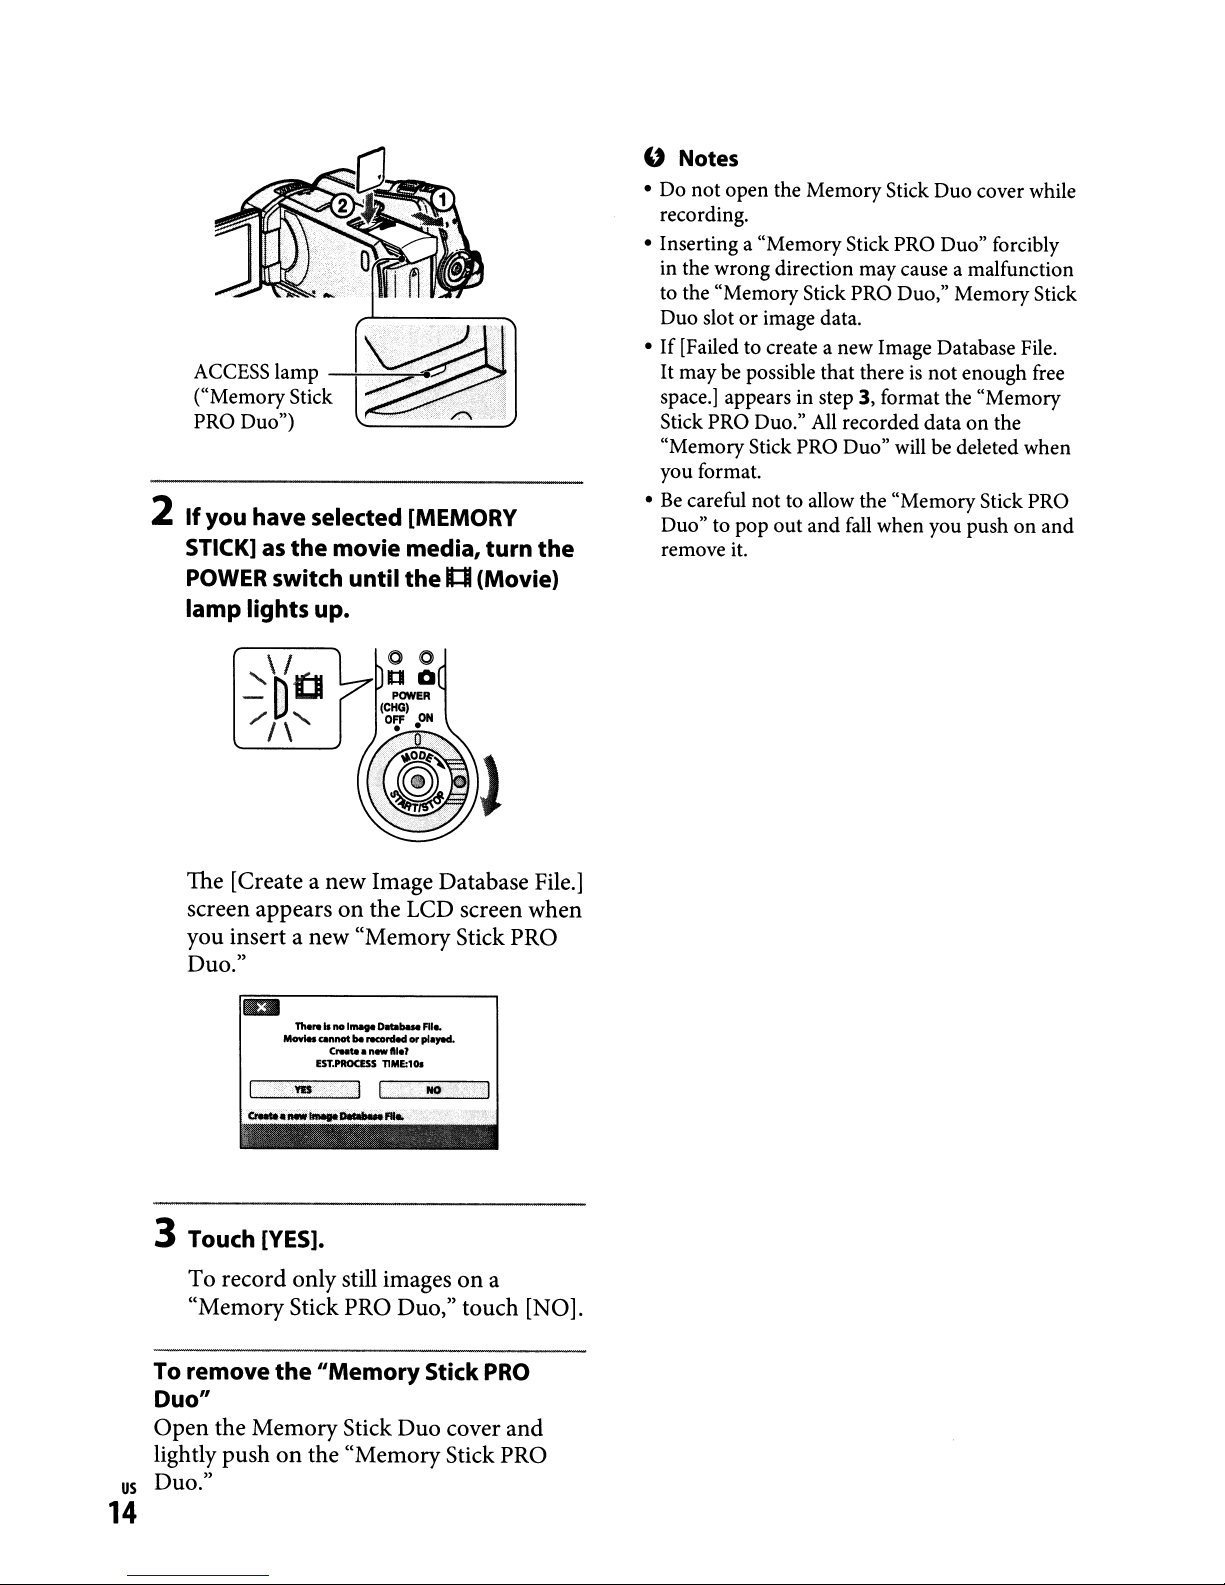
ACCESS lamp
("Memory Stick
PRO Duo")
2
If
you
have
selected [MEMORY
STICK]
as
the
POWER switch until
lamp
lights
---l~~~-<
movie media,
the01(Movie)
up.
turn
the
" Notes
•
Do
not
open the Memory Stick Duo cover while
recording.
• Inserting a "Memory Stick PRO Duo" forcibly
in the wrong direction may cause a malfunction
to the "Memory Stick PRO Duo," MemoryStick
Duo slot
If
•
It
space.] appears in step 3, format the "Memory
Stick PRO Duo."
"MemoryStick PRO Duo" will be deleted when
you format.
•
Be
Duo" to pop
remove it.
or
image data.
[Failed to create a new Image Database File.
may be possible that thereisnot
All
recorded dataonthe
careful not to allow the "Memory Stick PRO
out
and
fall
when you pushonand
enough free
The [Create a new Image Database File.]
on
screen appears
the LCD screen when
you insert a new "Memory Stick PRO
Duo."
-..
....'.....D...
__..MOt
CrHte
EST.PROCESS
be.-nled
a new
bueFlI
t".'
nME:101
..
o<plOJOd.
3 Touch [YES].
To record only still imagesona
"Memory Stick PRO Duo," touch [NO].
To remove
Duo"
Open the MemoryStick Duo cover and
lightly push
Duo."
us
14
the
"Memory
on
the "Memory Stick PRO
Stick
PRO
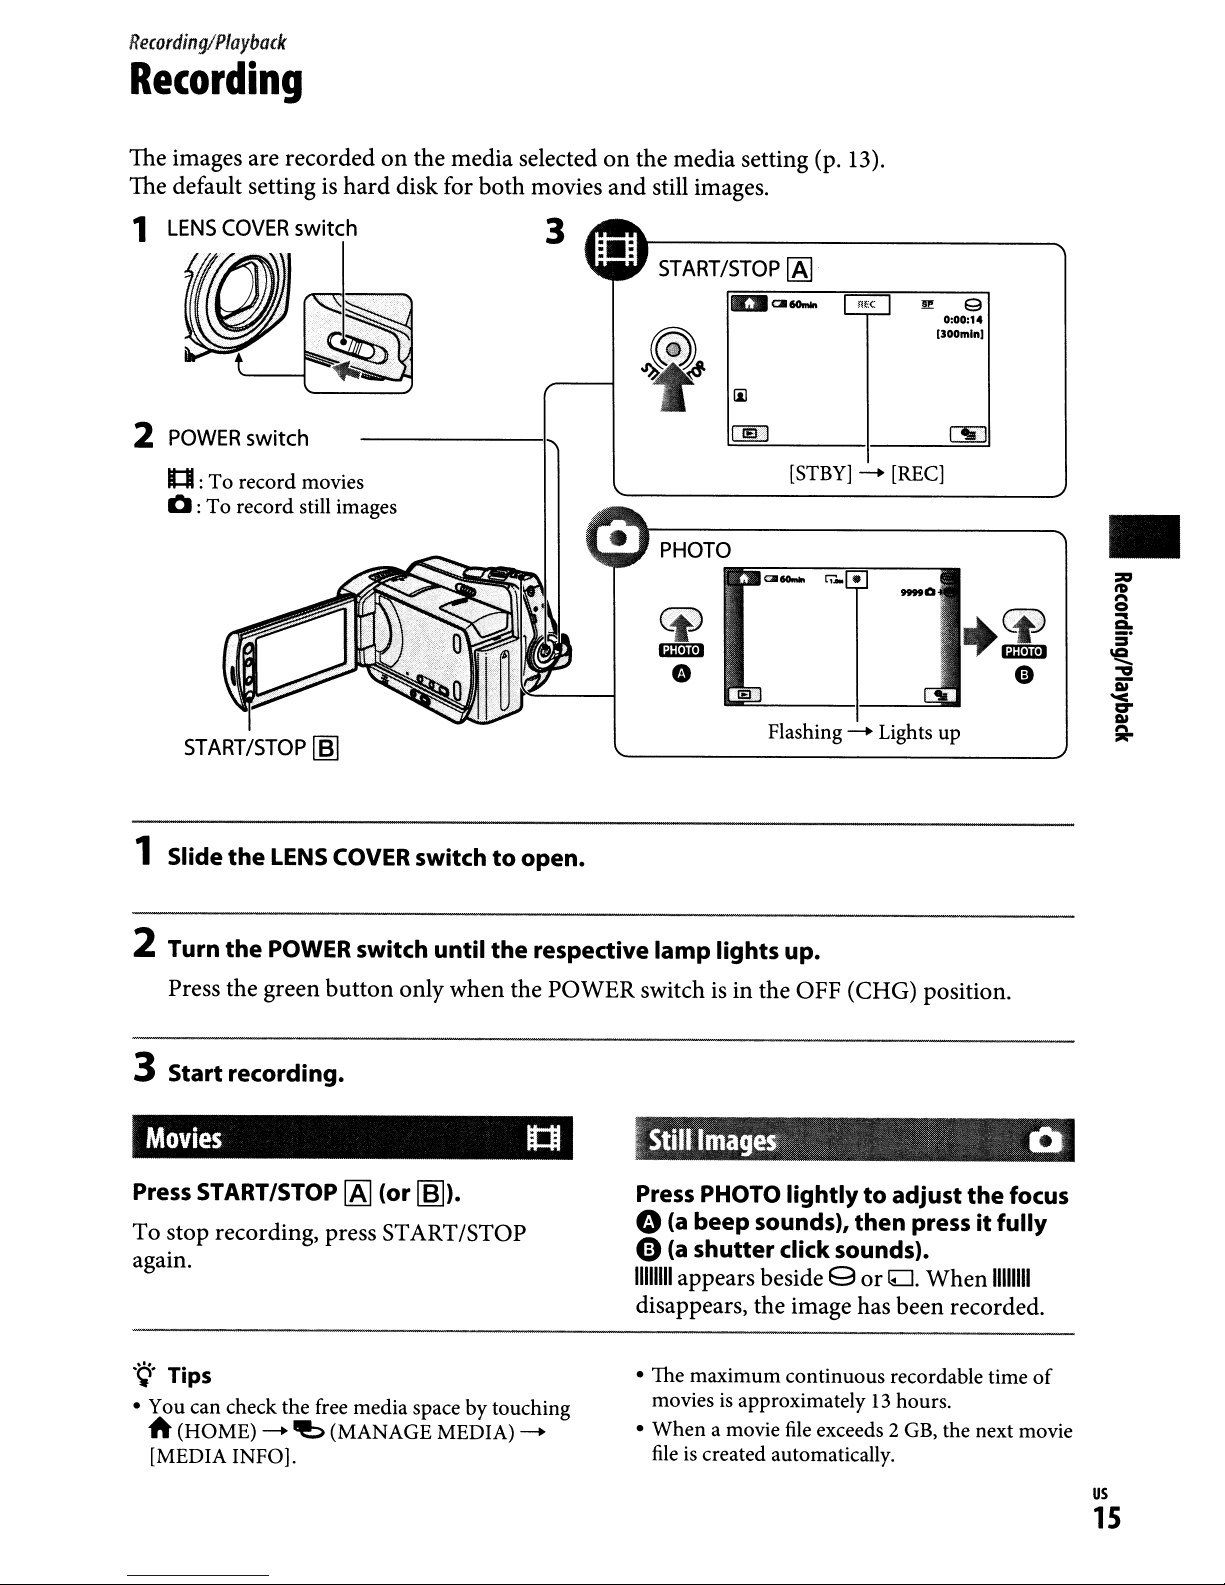
Recording/Playback
Recording
The images are
The default setting is
1
LENS
COVER
2
POWER
1tI:
To
0:
To
START/STOP
recordedonthe
switch
switch
record
record still images
movies
~
hard
media
disk for
selectedonthe media setting (p. 13).
both
movies
and
still images.
3
START/STOP
PHOTO
~
mmL!J
IIDI
IAJ
CII_
e
Flashing-.Lights up
[STBY]
C!..~
-.
II!
[REC]
_0
9
0:00:14
(JOOmln)
+~
e
:=
•
tD
1'\
0
...
CI.
5°
\CI
."
-
Di"
'<
c:r
Ql
A-
1 Slide
2 Turn
3
Press
Start
the
LENS
the
POWER
the
green
recording.
button
Movies
Press
To
again.
.~.Tips
• You can check the free
START/STOP
stop
recording, press START/STOP
A
(HOME)
[MEDIA INFO].
-.
~
COVER
[AJ
media
(MANAGE MEDIA)
switchtoopen.
switch until
only
when
(or
[6]).
spacebytouching
the
respective
the
POWER
ttl
-.
lamp
switch isinthe
~
Still
Press
" (a
e (a
11111111
disappears, the image has been recorded.
• The
movies is approximately13hours.
•
When
file
lights up.
OFF (CHG) position.
Images
PHOTO
beep
shutter
appears beside 9
maximum
a movie file exceeds 2 GB, the next movie
is created automatically.
lightlytoadjust
sounds),
then
click sounds).
or
continuous
the
press
ILJ.
recordable time
it fully
When
focus
11111111
0
of
us
15
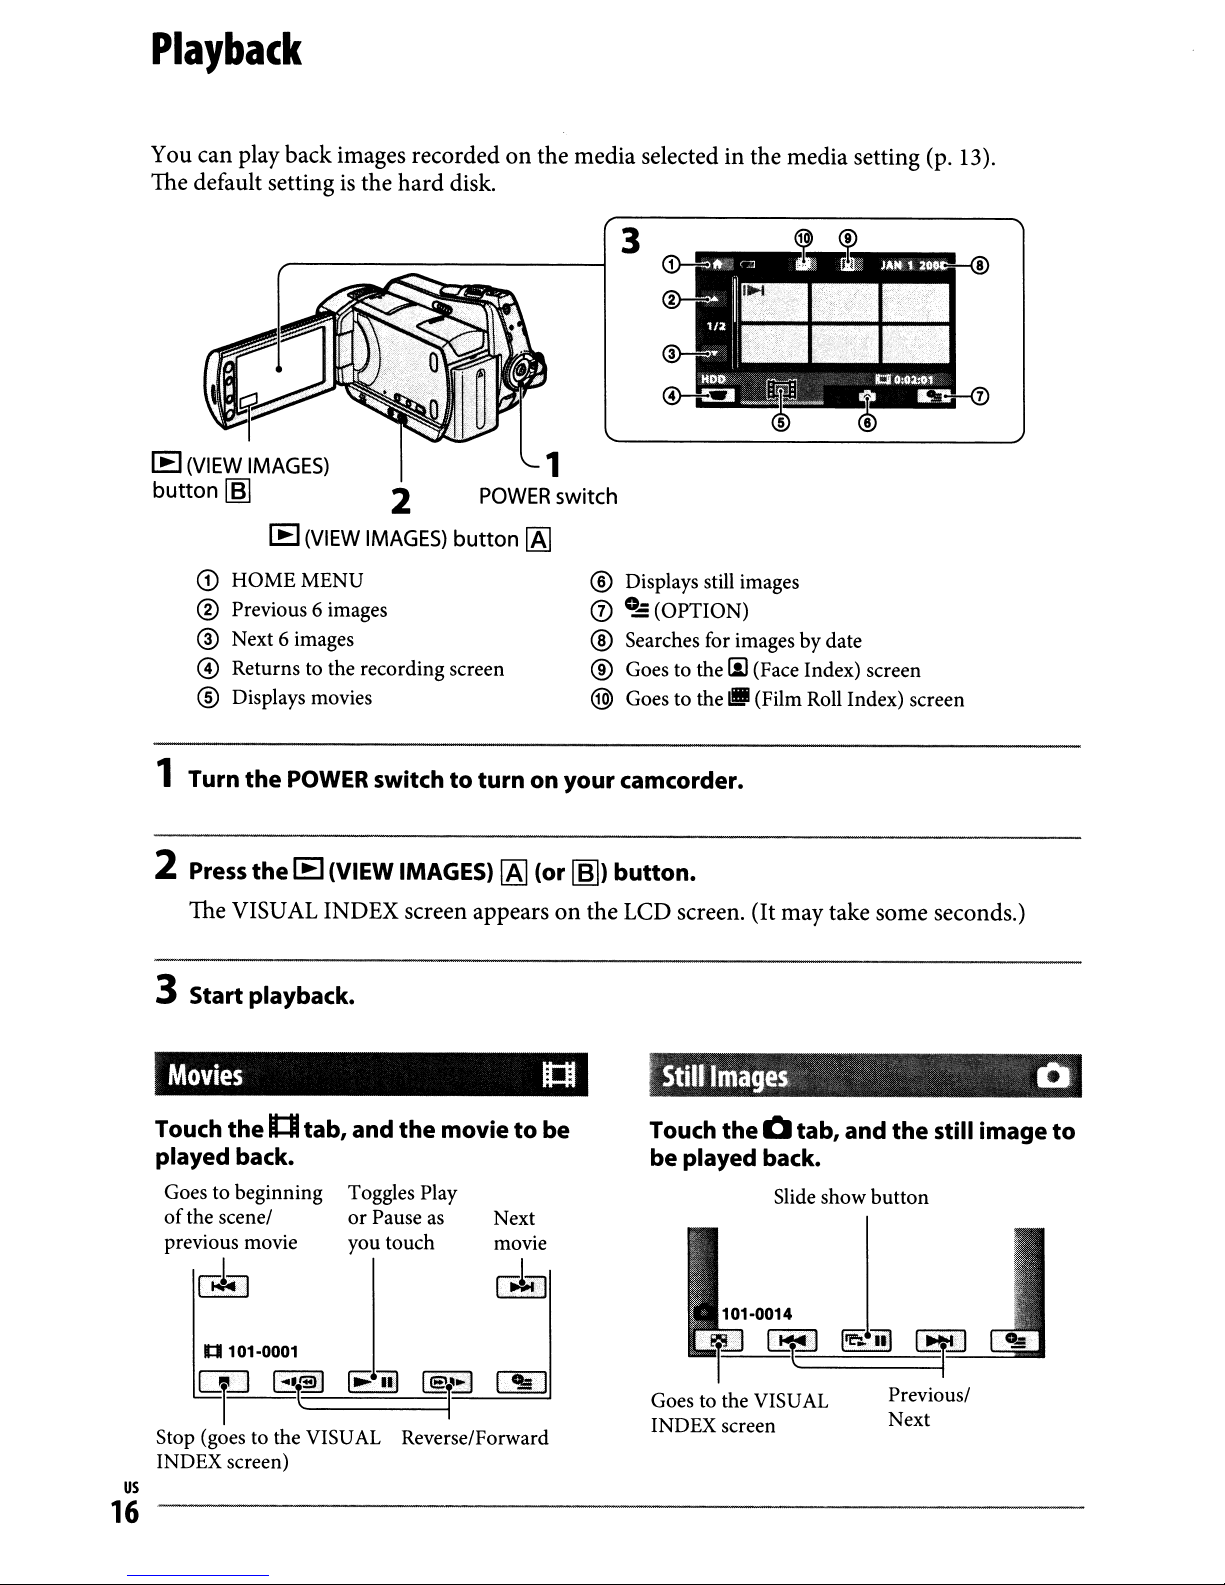
Playback
You can play back images recordedonthe media selected in the media setting (p. 13).
The default setting
[EJ
(VIEW
button
IMAGES)
[6J
[EJ
CD
HOMEMENU
® Previous 6 images
® Next 6 images
o Returns to the recording screen
® Displays movies
is
the hard disk.
(VIEW
2
IMAGES)
button
[AJ
3
® Displays still images
CD
0..: (OPTION)
® Searches for images by date
® Goes to the
@ Goes to the
iii
(Face Index) screen
11II
(Film Roll Index) screen
1 Turn
2
the
POWER
Press
The VISUAL INDEX screen appearsonthe LCD screen. (It may take some seconds.)
the
[EJ
switchtoturn on your camcorder.
(VIEW IMAGES)
[AJ
(or
~)
button.
3 Start playback.
Movies
Touch
played back.
Goes to beginning
of
previous movie
the
the scene/
It:I
c.1""l
lJ
101-0001
tab, and
Toggles Play
or
Pause as
you touch
the
movietobe
rt:I
Next
movie
@,""]
Still
Images
Touch
be played back.
the
Q tab, and
Slide show
~
the
still image
button
~3=·.'·=---....:==-_
0
to
eli]
Stop (goes to the VISUAL Reverse/Forward
INDEX screen)
us
G!~
~
16
[!gl~
~
Goes to the VISUAL
INDEX screen
Previous/
Next
To
adjust
When
(OPTION)
adjust
.~.
•
I~I/~
tab that was lastly played back/recorded. When
you touch image marked with
play it back from the point you have stopped
previously.
the
volumeofmovies
playing
the
Tips
appears with the image on eachofthe
back
--+
lEI
volume
a movie,
tab
--+
with
c:=::J/[±].
touch
[VOLUME],
I~I/~,
0..,:
you can
then
Playing
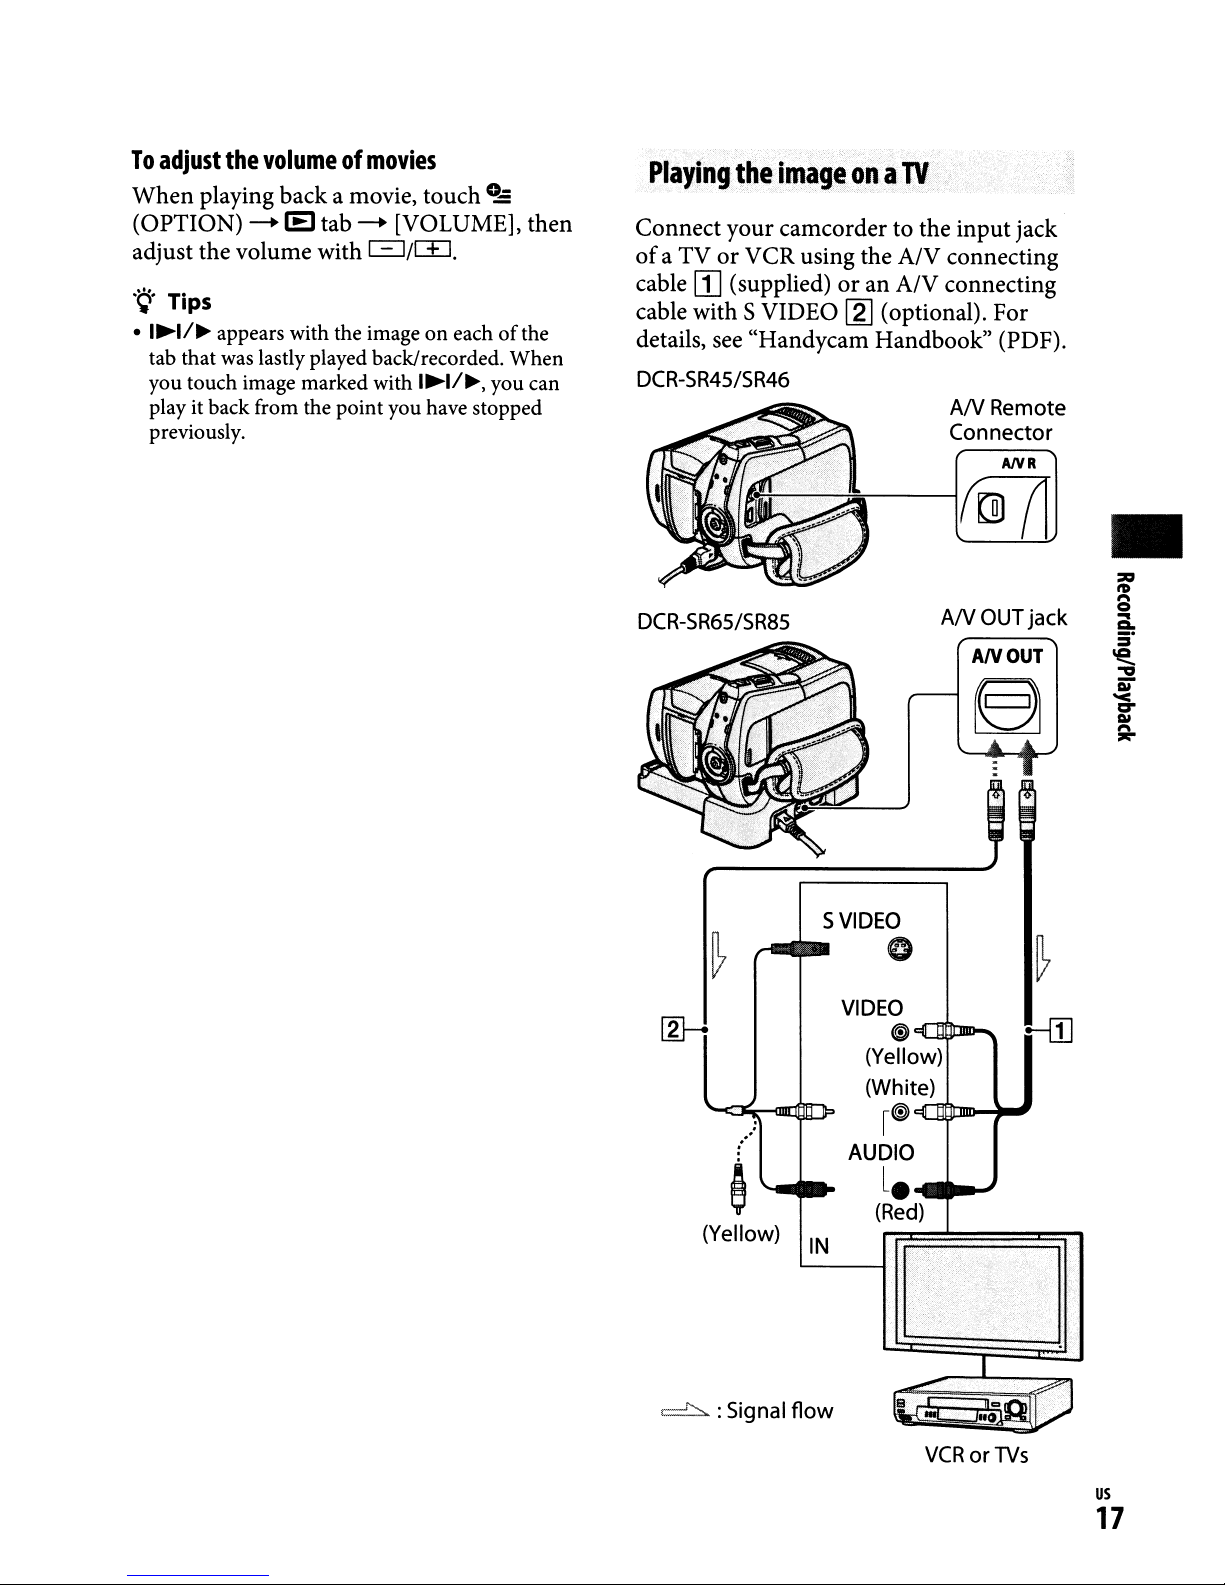
Connect
ofaTVorVCR
cable
cable
details, see
DCR-SR45/SR46
DCR-SR65/SR85
the
your
[I]
(supplied)oran
withSVIDEO
"Handycam
imageona
camcordertothe
using
TV
the
A/V
A/V
~
(optional).
Handbook"
input
jack
connecting
connecting
For
(PDF).
AN
Remote
Connector
ANR
rrID7l
AN
OUT
jack
AN
OUT
•
[2]--1
(Yellow)
~
~
.'
&
:Signal flow
SVIDEO
VIDEO
AUDIO
IN
0
~
(Yellow)
(White)
I~
l.
(Red)
VCR
~
!-ill
orTVs
us
17
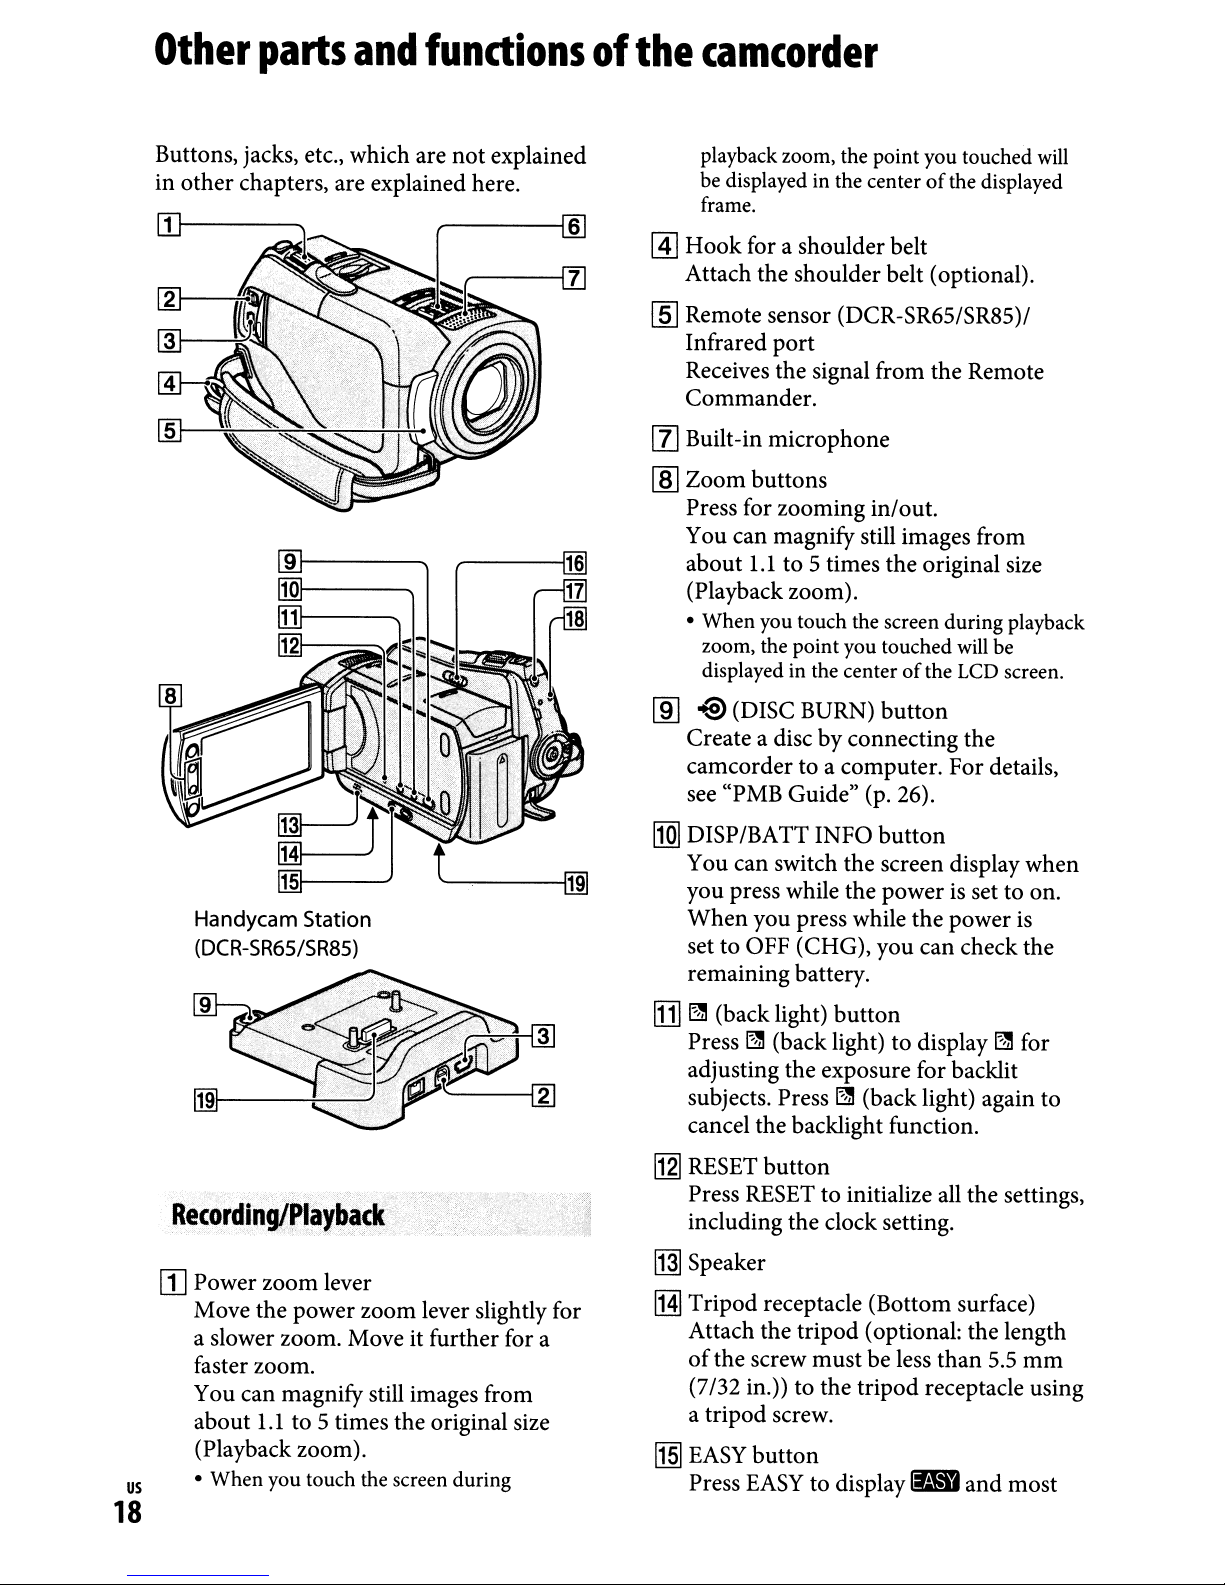
Other
parts
and
functionsofthe
camcorder
Buttons, jacks, etc., which are not explained
in other chapters, are explained here.
[1]1----
playback zoom, the point you touched
be displayed in the centerofthe displayed
frame.
@]
Hook for a shoulderbelt
Attach the shoulder belt (optional).
[ID
Remote sensor (DCR-SR65/SR85)/
Infrared port
Receives the signal from the Remote
Commander.
[l] Built-in microphone
lID
Zoom buttons
Press for zooming in/out.
You can magnify still images from
1.1
about
(Playback zoom).
• When you touch the screen during playback
zoom, the point you touched
displayed in the center
[ID
-@
Create a disc by connecting the
camcorder to a computer. For details,
see "PMB Guide" (p. 26).
to 5 times the original size
of
the
(DISC BURN)
button
will
LCD
be
will
screen.
Handycam Station
(DCR-SR65/SR85)
[j]]1----+-=-+--
[I] Power zoom lever
Move the power zoom lever slightly for
a slower zoom. Move it further for a
faster zoom.
You can magnify still images from
1.1
us
about
(Playback zoom).
• When you touch the screen during
18
'-----[g]
to 5 times the original size
[1ID
DISP/BATT INFO
You can switch the screen display when
you press while the power
When
set to OFF (CHG), you can check the
remaining battery.
[j]
~
Press~(back light) to display~for
adjusting the exposure for backlit
subjects. Press
cancel the backlight function.
I12l
RESET
Press
including the clock setting.
you press while the power
(back light)
button
RESET
button
is
button
~
(back light) again to
to initialize
all
set to on.
the settings,
[j]] Speaker
IHI
Tripod receptacle (Bottom surface)
Attach the tripod (optional: the length
of
the screw must be less than 5.5
(7/32
in.»
to the tripod receptacle using
a tripod screw.
[j§]
EASY
Press
button
EASY
to display
~
and most
is
mm
of
the settings are set automatically for
easy recording/playback. To cancel,
press
EASY
~
NIGHTSHOT
Set the NIGHTS
to
ON
places.
[11J
QUICK
The QUICK
camcorder goes to power saving mode
(sleep mode). Press QUICK ON again
to start recording next time. Your
camcorder returns to recording standby
in approximately 1 second.
With [QUICK ON
the time when the camcorder turns off
in sleep mode.
~
ACCESS lamp (Hard disk)
When
flashing, yourcamcorder is writing/
reading data.
again.
PLUS
(l!!l
appears) to record in dark
ON
button
ON
the ACCESS lampislit or
switch
HOT
PLUS
lamp flashes and your
STBY],
switch
you can set
•
(onneetingto;
•
.--.•: -, , >
[2J
A/V Remote Connector / A/V OUT
jack
Connect with the A/V connecting cable.
@]
'1'
(USB) jack
Connect with the
1m
Active Interface Shoe
SR65/SR85)
The Active Interface Shoe supplies
power to optional accessories such as
a video light, a flash,
The accessory can be turned
you operate the POWER switch
camcorder.
~
Interface connector
Connect your camcorder and the
Handycam Station.
(DCR-SR65/SR85)
the
devices
USB
;,
~'.<:
cable.
1.i~'Shoe
or
a microphone.
(DCR-
onoroffas
on
your
us
19
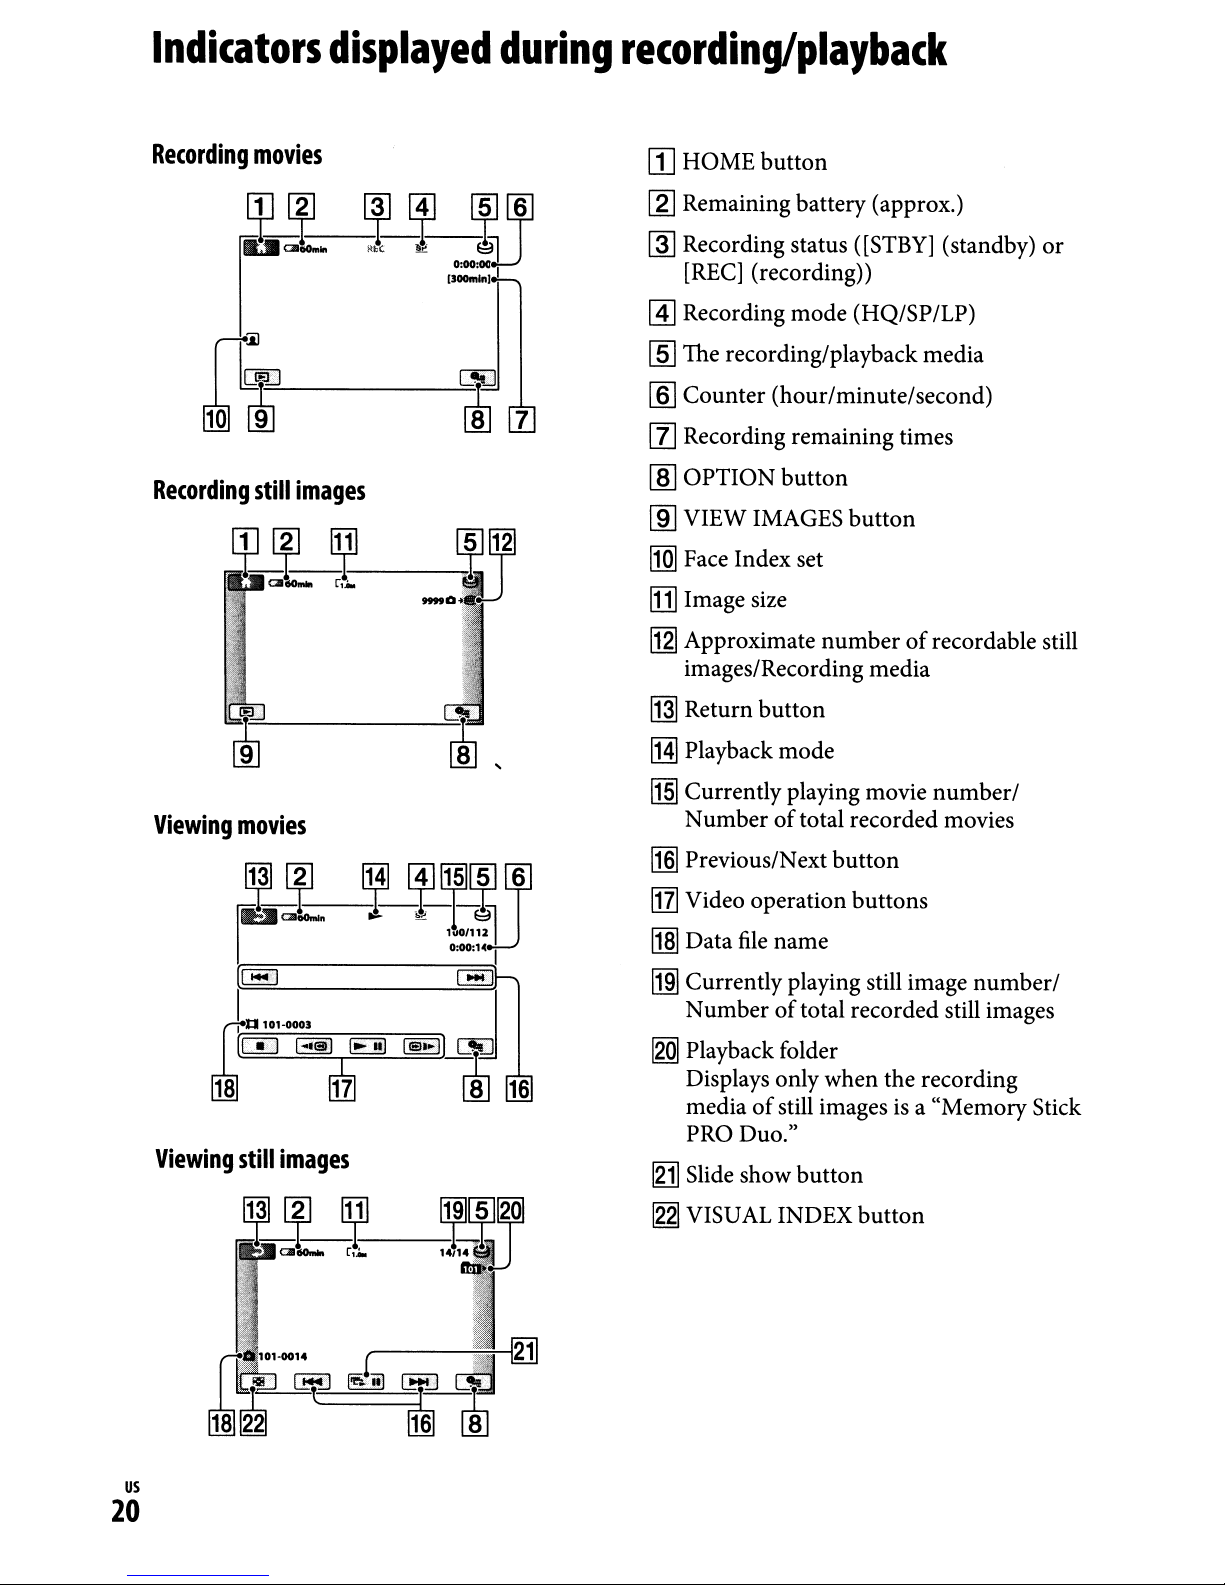
Indicators
displayed
during
recording/playback
Recording
Recording
movies
still
~~
images
8 7
[1]
HOME button
[gJ
Remaining battery (approx.)
~
Recording status
[REC]
@]
Recording mode (HQ/SP/LP)
[§]
The recording/playback media
[ID
Counter (hour/minute/second)
(recording))
([STBY]
(standby)
[l] Recording remaining times
[ID
OPTION button
lID
VIEW IMAGES button
l1Q]
Face Index set
I11l
Image size
I12l
Approximate numberofrecordable still
images/Recording media
~
Return button
or
Viewing
~
iIBI
Viewing
movies
..
,_.
~
f3jfJ17
still
images
BJ
IHl
Playback mode
~
Currently playing movie number/
of
Number
lI§I
Previous/Next button
l11l
Video operation buttons
11§1
Data
file
~
Currently playing still image number/
Number
~
Playback folder
Displays only when the recording
media
PRO Duo."
[gj]
Slide show button
12.21
VISUAL INDEX button
total recorded movies
name
of
total recorded still images
of
still images is a "Memory Stick
us
20
Indicators
when
you
made
changes
Center
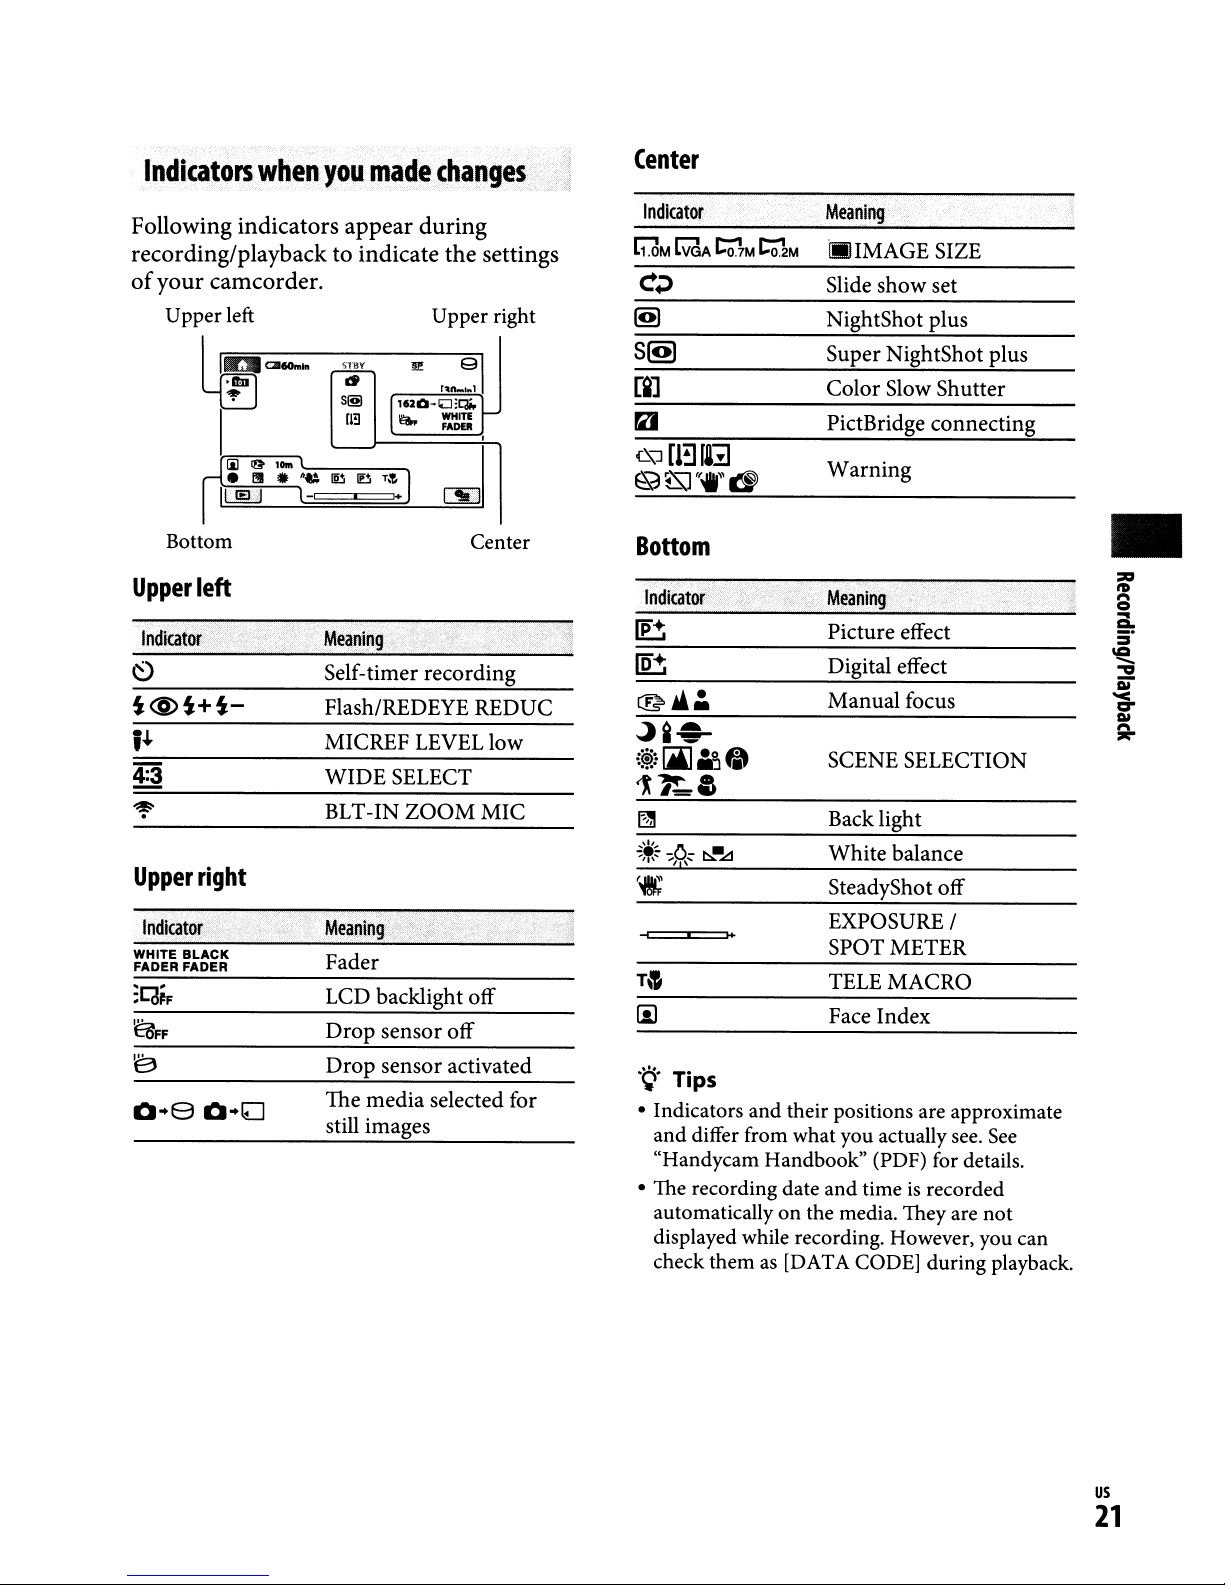
Following indicators appear during
recording/playback to indicate the settings
of
your camcorder.
Upper left Upper right
Bottom
Upper
.
Indicator
1+
4:3
W~r-
I
left
.:
:
lIE)
L-~====i~
Center
.
Meaning
Self-timer recording
Flash/REDEYE REDUC
MICREF LEVEL low
WIDE
SELECT
Indicator
S(!!)
raJ
Bottom
Indicator'
Meaning
illJIMAGESIZE
Slide
show
set
NightShot plus
Super NightShot plus
Color
PictBridge connecting
Warning
Meanin.g
Slow Shutter
Picture effect
Digital effect
Manual
SCENE SELECTION
focus
•
Upper
WHITE
FADER FADER
~FF
right
Indicator·
BLACK
•.
BLT-IN
LCD backlight off
Drop
Drop
The
still images
ZOOM
sensor off
sensor activated
media
MIC
selected for
~:::
'"i"
Backlight
White
SteadyShot off
.~
;"';
--=:::'::::=:::J+I+
.~.
Tips
• Indicators and their positions are approximate
and differ from what you actually
"Handycam Handbook" (PDF) for details.
• The recording date and time
automatically on the media. They are not
displayed while recording. However, you can
check them
as
EXPOSURE/
SPOT METER
TELEMACRO
Face Index
[DATA CODE] during playback.
balance
is
recorded
see.
See
us
21
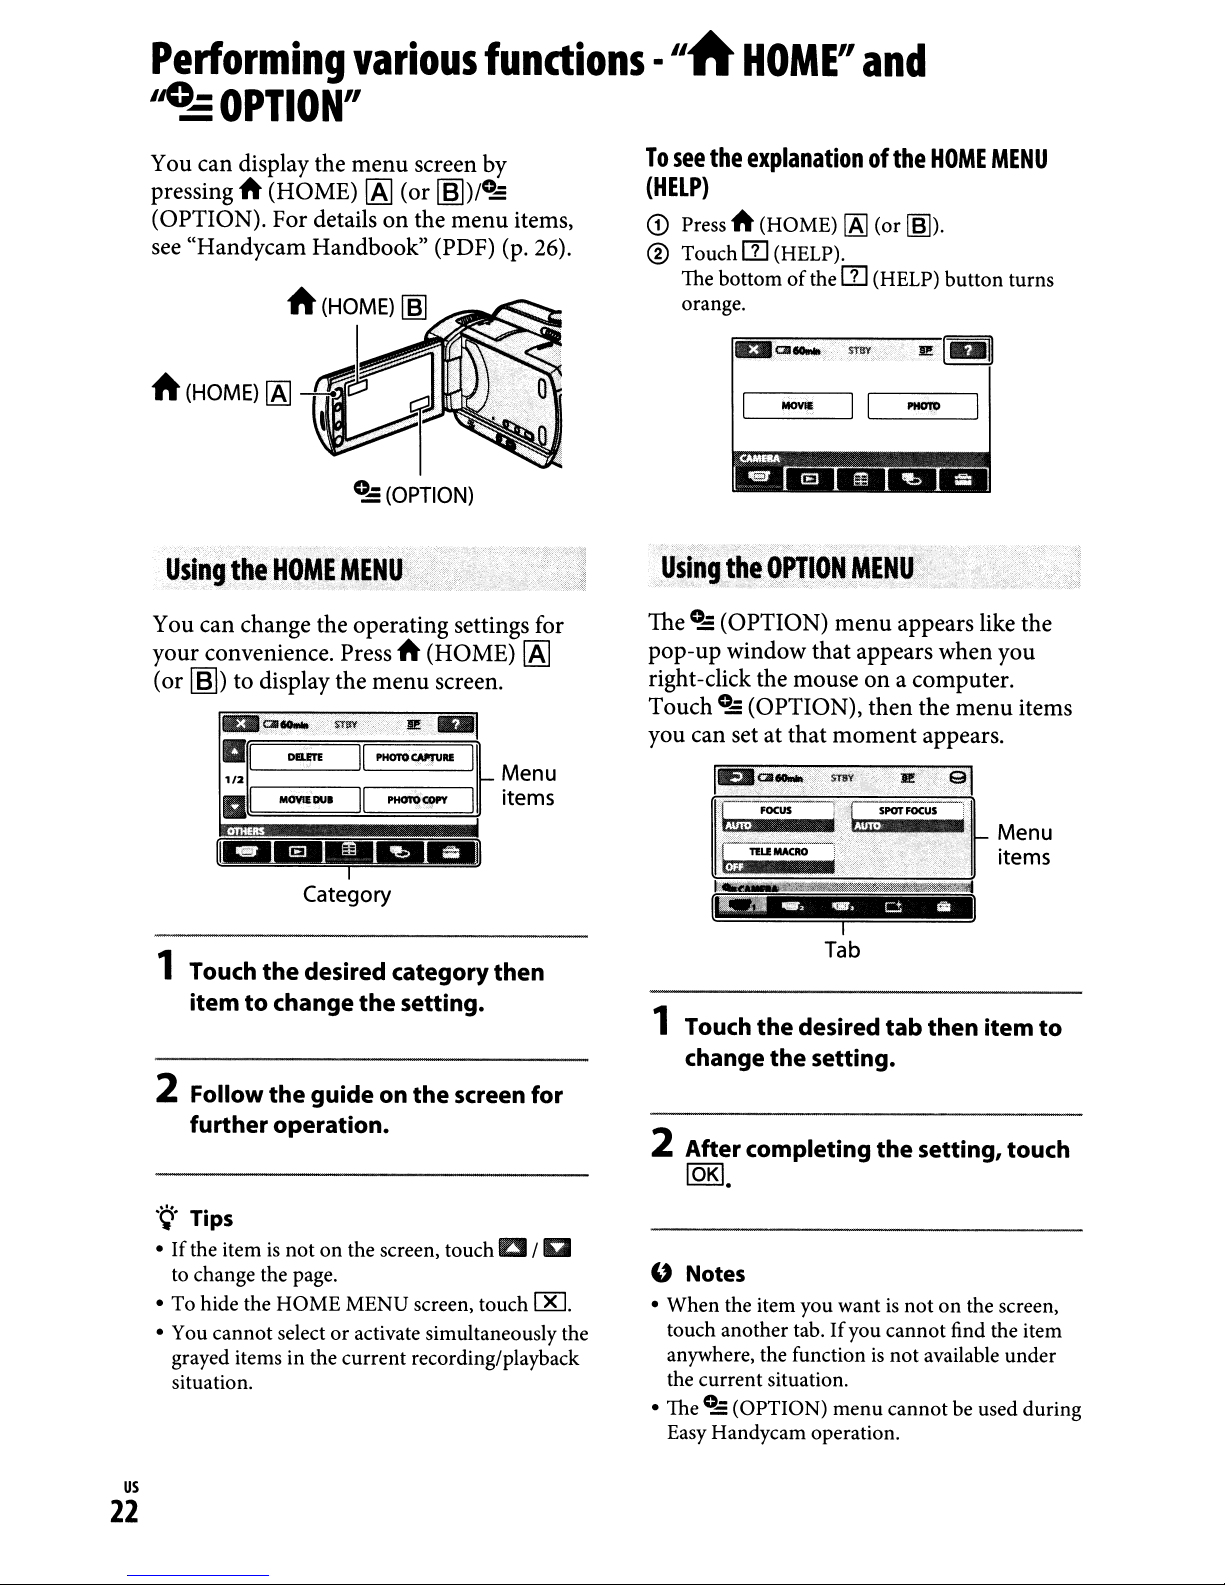
Performing
various
'~OPTION"
You can display
pressing A (HOME)
(OPTION).
see
"Handycam
the
For
detailsonthe
Handbook"
A
(HOME)
menu
[A]
screen
(or
~)/O~
menu
(PDF) (p. 26).
~
...-a~
fundions
by
items,
·
"A
To
see
(HELP)
CD
Press A (HOME)
® Touch
The bottom
orange.
HOME"
the
rn
and
explanationofthe
[AJ
(or
~).
(HELP).
of
thern(HELP) button turns
HOME
MENU
ft
You
your
(or
(HOME)
can
~)
1Al-tr
0..,:
(OPTION)
change the operating settings for
convenience. Press A (HOME)
to display
",01"'-
a,
1/2
l
a
:
......
Dam
MOVIlDUI
the
STay
menu
PHOI'O
II
II
PHOI'OCI!"
~FI".ElEI~
Category
1 Touch
itemtochange
the
desired category
the
screen.
iI!
..
CAl'JVIlI!
setting.
I
f-
I
[A]
Menu
items
then
DOI...-
MOV.
Usi,ngi~~
The
O~
pop-up
right-click the
Touch
you
can setatthat
••
9PTI~N
(OPTION)
window
O~
(OPTION),
1~,ClI"'"
ll~
t:.tliiWiU.l~
$TBY
II
MEN~:;/:,·i.
menu
that
mouseona computer.
moment
mY
appears like the
appears
then
,~
b:~~J
...
[
I
Tab
1 Touch
change
the
the
desired
setting.
tab
2~
PHOI'O
when
the
appears.
••
··el
~
then
I
you
menu
items
~:~~
item
to
2 Follow
further operation.
.~.Tips
•Ifthe item
to change the page.
• To hide the HOME MENU screen, touch
• You cannot selectoractivate simultaneously the
grayed items in the current recording/playback
situation.
us
the
guide on
is
not on the screen, touch a /a
22
the
screen for
IXl
2 After completing
lOKI
.
" Notes
• When the item you wantisnot on the screen,
touch another tab.
anywhere, the function
the current situation.
• TheO~(OPTION) menu cannot be used during
Easy Handycam operation.
the
setting, touch
If
you cannot find the item
is
not available under
Itemsofthe
...
(CAMERA)
PHOTO*l
IEJCVIEW
VISUAL
INDEX*l
lI!JI
INDEX*l
IiJINDEX*l
PLAYLIST
DELETE*l [IOIDELETE], [fllJDELETE]
PHOTO
CAPTURE
MOVIE
PHOTO
COpy
EDIT
PLAYLIST
EDIT
PRINT
USB
CONNECT
HOME
category
IMAGES)
DUB
[DUB
date],
[COpy
by
[
[fIIDELETE], [DIVIDE]
[IOIADD],
date],
[~ERASE
[~MOVE]
[SUSB
[L]USB
[DISC BURN]
MENU
category
date]
101
DELETE],
..
by select], [DUB by
[~DUB
by select],
[101
[~ERASE],
ALL],
CONNECT],
CONNECT],
ALL]
[COpy
ADD
by
i:icsmINGS)
MOVIE
SETTINGS
PHOTO
SETTINGS NO.],
VIEW
IMAGES SET
SOUND/
DISP
SET*3
OUTPUT
SETTINGS
CLOCK/
~LANG
GENERAL
SET
category
[REC MODE],
[NIGHTSHOT
[WIDE SELECT],
[DIGITAL
[STEADYSHOT],
[AUTO
[GUIDEFRAME],
[IOIREMAINING SET],
[IiJINDEX SET]*l
[fllJIMAGE SIZE]*\ [FILE
LIGHT], [GUIDEFRAME],
[FLASH MODE]*1*2,
[FLASH LEVEL]
[REDEYE REDUC]*2
[DATA CODE],
[~DISPLAY]
[VOLUME]*l, [BEEP]*l,
[LCD BRIGHT], [LCD
LEVEL], [LCD COLOR]
[TV TYPE], [DISP
OUTPUT]
[CLOCK SET]*l, [AREA
SET], [DST SET]/
[SUMMERTIME],
[~LANGUAGE
[DEMO MODE],
[CALIBRATION],
[A.SHUT OFF], [QUICK
ON
CTRL]*2, [DROP SENSOR]
LIGHT],
ZOOM],
SL
W SHUTTR],
[NIGHTSHOT
*2,
SET]*l
STBY], [REMOTE
•
BL
MOVIE
MEDIA
SET*l
PHOTO
MEDIA
SET*l
MEDIA
INFO
MEDIA
FORMAT*l
REPAIR
IMG.DBF.
[HDD], [MEMORY STICK]
[HDD], [MEMORY STICK]
[HDD], [MEMORY STICK]
[HDD], [MEMORY STICK]
*1
You can set the item during Easy Handycam
operation.
*2
DCR-SR65/SR85
*3
The menu nameischanged to [SOUND
SETTINGS] during Easy Handycam operation.
us
23
Saving
images
Itemsofthe
Items you can set onlyonthe OPTION
MENU will be described below.
[FOCUS], [SPOT FOCUS], [TELE
MACRO], [EXPOSURE], [SPOT METER],
[SCENE SELECTION], [WHITE BAL.],
[COLOR SLOW SHTR],
PLS]
[FADER], [D.EFFECT], [PICT.EFFECT]
&tab
[BLT-IN
[SELF-TIMER]
~
(A
tabdependson
[SLIDE SHOW], [SLIDE
[COPIES], [DATE/TIME], [SIZE]
f
);',"
ZOOM
OPTION
MENU'
[So
NIGHTSHOT
.......•.•..•..•
MIC], [MICREF LEVEL],
the
situatioriiNotab)
SHOW
SET],
Due to the limited capacityofthe media,
make sure that you save the image data
of
to some type
DVD- R
You can save the images recorded
camcorderasdescribed below.
or
external media suchasa
a computer.
on
the
Usingacomp~ter
By
using "Picture Motion Browser"onthe
supplied CD-ROM, you can save images
on
recorded
see "PMB Guide"
ROM.
CreatingaDVD
Disc
Burn)
You can save images recordedonthe
diskofthe camcorder directly to a DVD
with ease by pressing
button.
your camcorder. Fordetails,
on
the supplied CD-
with
One
Touch
o@
(One
Touch
hard
(DISC BURN)
Saving
imagesona
computer
(Easy
PC
Back-up)
You can save images recordedonthe
camcorderonthe hard diskofa computer.
CreatingaDVD
You can save images imported to your
computer
those images.
with
selected
on
a DVD. You can also edit
images
Conne~ingyourcamcordert~other
devicesf:··
~.
:,:;-
For details, see "Handycam Handbook"
(PDF).
Connecting
You can dub to VCRs, DVD/HDD
recorders.
/ .
~-
,
with
theANconnecting
cable
us
24
Connecting
You can dub to movie dubbing compatible
DVD writers, etc.
with
the
USB
cable
Deleting
images
·~.
Tips
• You can dub movies
hard
the
Touchit(HOME)
[MOVIE DUB]/[PHOTO COPY].
disk to a "Memory Stick PRO Duo."
or
copy still images from
-.
IE
(OTHERS)
-.
Select the media which contains the images
you want to delete before the operation
(p. 13).
Deleting
1 Touch A (HOME)
-.
2 Touch
3 Touch
4 Touch
movies'
[DELETE].
[ltl
DELETE].
[ltl
DELETE].
the
movietobe
-.133
deleted.
(OTHERS)
•
The selected movie is marked
5 Touch IOKI-.[YES] -.IOKI.
To
delete
In step 3, touch [ltlDELETE
[YES]
To
delete
CD
® Touch
® Touch
.~.Tips
• To delete
®,
[YES]
all
moviesatone
-.
[YES]
the
In step 2, touch
[.DELETE],
image to be deleted.
The selected still image
[QR)
all
touch
-
-.
[QR).
still
images
[.DELETE].
-
[YES]
still images on the media, in step
[.DELETE
[QR).
time
ALL]
then touch the still
is
marked with
-
[QR)
.
ALL]
-
[YES]-
with./.
-.
./.
us
2S
Enjoying
withacomputer
Performing
Handbook/software
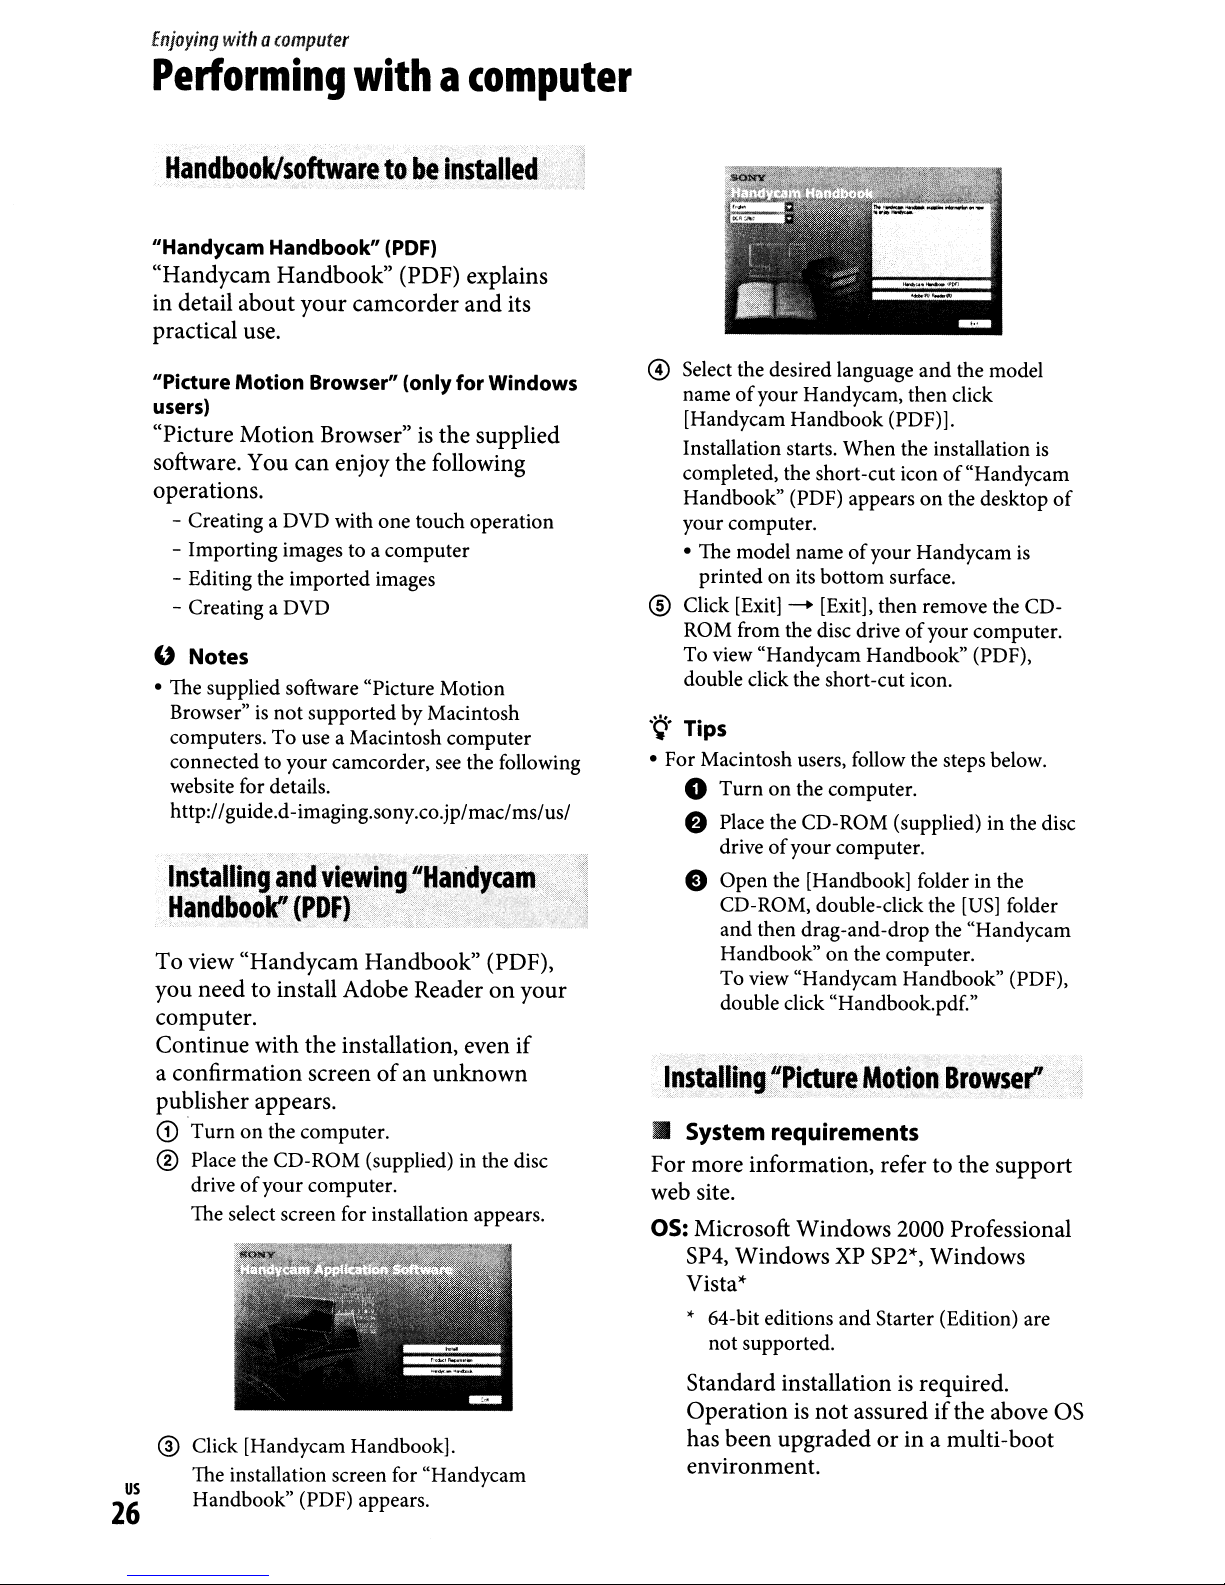
"Handycam Handbook" (PDF)
"Handycam Handbook" (PDF) explains
in detail about your camcorder and its
practical use.
"Picture Motion Browser" (only for Windows
users)
"Picture Motion Browser"isthe supplied
software. You can enjoy the following
operations.
- Creating a DVD with one touch operation
- Importing images to a computer
- Editing the imported images
- Creating a DVD
"
Notes
• The supplied software "Picture Motion
is
Browser"
computers.
connected to your camcorder, see the following
website for details.
http://guide.d-imaging.sony.co.jp/mac/ms/us/
Installing
Handboo~'
To view "Handycam Handbook" (PDF),
you need to install Adobe Readeronyour
computer.
Continue with the installation, even if
a confirmation screen
publisher appears.
CD
Turnonthe computer.
not supported by Macintosh
To
:.-
and
i(PDF).'
withacomputer
to
b~
installed
use a Macintosh computer
,.
viewing
"Handy,~m"
of
an unknown
....
...
® Place the CD-ROM (supplied) in the disc
driveofyour computer.
The select screen for installation appears.
. 4
j
"'~;
o Select the desired language and the model
of
name
[Handycam Handbook (PDF)].
Installation starts. When the installation
completed, the short-cut iconof"Handycam
Handbook" (PDF) appearsonthe desktop
your computer.
• The model name
@)
Click [Exit] - [Exit], then remove the CORaM
To view "Handycam Handbook" (PDF),
double click the short-cut icon.
.~.
Tips
• For Macintosh users, follow the steps below.
o
your Handycam, then click
of
your Handycam
printed on its bottom surface.
from the disc driveofyour computer.
Turnonthe computer.
is
is
e Place the CD-ROM (supplied) in the disc
of
drive
e Open the [Handbook] folder in the
CD-ROM, double-click the
and then drag-and-drop the "Handycam
Handbook"
To view "Handycam Handbook" (PDF),
double click "Handbook.pdf."
InstallingjPirture
• System requirements
For more information, refer to the support
web site.
OS: Microsoft Windows 2000 Professional
SP4, Windows
Vista*
,.
64-bit editions and Starter (Edition) are
not supported.
your computer.
on
the computer.
ft,totion
XP
SP2*,
[US]
folder
Browser"
Windows
of
® Click [Handycam Handbook].
us
The installation screen for "Handycam
Handbook" (PDF) appears.
26
Standard installationisrequired.
Operationisnot
has been upgradedorin a multi-boot
environment.
assuredifthe above
OS
CPU:
Intel Pentium III 1 GHzorfaster
Memory:
Hard disk: Disk volume required for
installation: Approximately 500
(5
256
MBormore
MB
GBormore may be necessarywhen
creating DVD-Videos.)
Display: Minimum 1,024 x 768 dots
Others: r
as
compatible)
burner (CD-ROM drive
USB
port (this must be provided
standard, Hi-Speed
is
recommended), DVD
USB
(USB
is
necessary for
2.0
installation)
• Installing software
You need to install the software to your
Windows computer
your camcordertothe
before connecting
computer. The
installation is required only for the first
time.
Contents to be installed and procedures
may differ depending
CD
Confirm that your camcorderisnot
connected to the computer.
®
Turnonthe computer.
" Notes
• Logonas
• Close
computer before installing the software.
@)
Place the supplied CD-ROM in the disc drive
of
your
The installation screen appears.
an Administrator for installation.
all
applications runningonthe
computer.
on
your as.
@ Click [Install]
computer.
on
the installation screenofthe
® Select the language for the application to be
installed, then click [Next].
®
As
the screen to confirm the connection
appears, connect your camcorder to the
computer following the steps below.
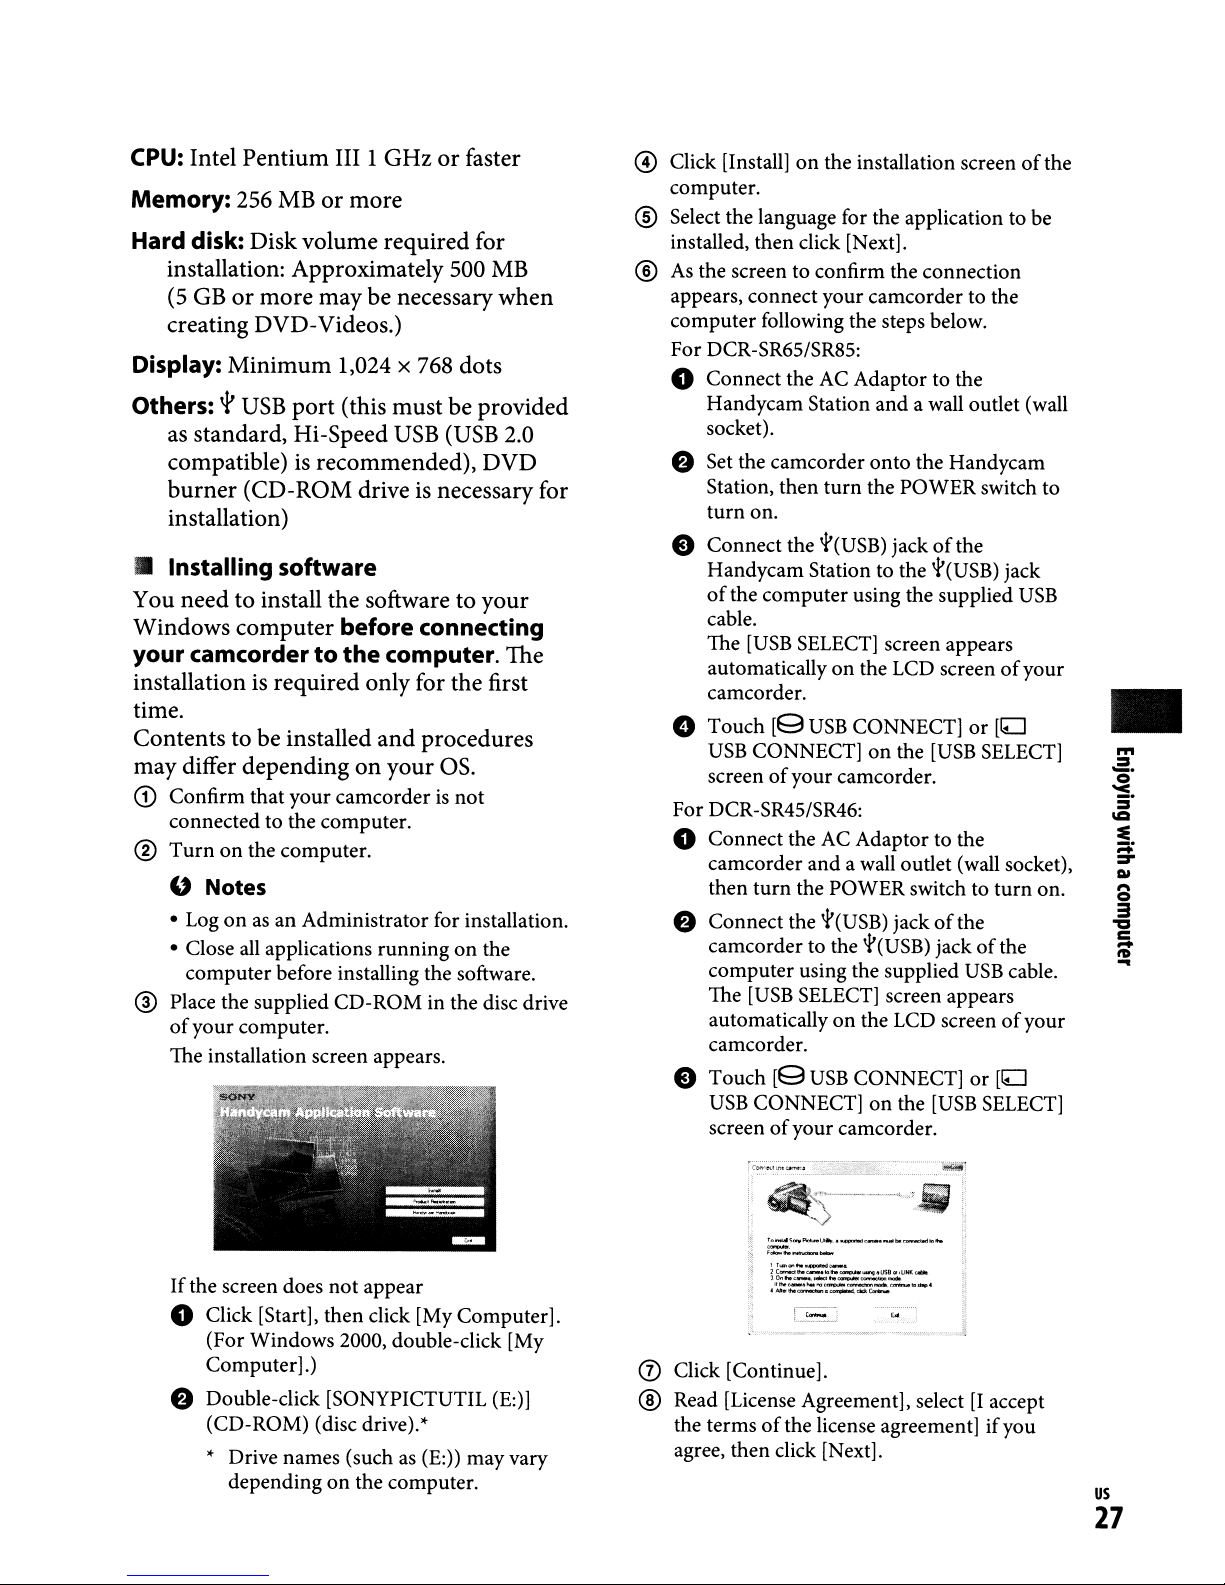
For DCR-SR65/SR85:
o Connect the AC Adaptor to the
Handycam Station and a wall outlet (wall
socket).
e Set the camcorder
Station, then
turn
on.
e Connect the
Handycam Station to the
of
the computer using the supplied
cable.
[USB
The
automaticallyonthe LCD screenofyour
camcorder.
o Touch
USB
screenofyour camcorder.
For DCR-SR45/SR46:
SELECT] screen appears
[9
USB
CONNECT]onthe
onto
the Handycam
turn
the POWER switch to
'1'(USB)
jackofthe
'1'(USB)
CONNECT]
[USB
jack
USB
or
[ILJ
SELECT]
o Connect the AC Adaptor to the
camcorder and a wall outlet (wall socket),
turn
then
e Connect the
camcorder to the
computer using the supplied
The
automatically
camcorder.
e Touch
USB
screenofyour camcorder.
the POWER switch to
'1'(USB)
'1'(USB)
[USB
SELECT] screen appears
on
the LCD screenofyour
[9
USB
CONNECT]
CONNECT]onthe
jackofthe
[USB
turn
jackofthe
USB
cable.
or
[ILJ
SELECT]
on.
_.
•
"'
=
o
'<
S'
IC
~
;::;:
::r
C»
8
a
'a
c
It»
-
..
If
the screen does
not
appear
o Click [Start], then click [My Computer].
(For Windows 2000, double-click [My
Computer].)
e Double-click [SONYPICTUTIL (E:)]
(CD-ROM) (disc drive)."
..
Drive names (suchas(E:)) mayvary
dependingonthe computer.
=~==._---_
11
..__.
1e-
_ _
30....-.
Who_
~_
..
_ .................
.....~..
__
,.,_~
e.-
....
,fJ&.~
......
__
".......
.......
o Click [Continue].
® Read [License Agreement], select [I accept
the termsofthe license agreement] ifyou
agree, then click [Next].
us
27
® Confirm the installation settings, then click
[Install].
" Notes
• Evenifa screen prompting you to restart
your computer appears, you do
restart it at this time. Restart your computer
after completing the installation.
•
It
may take some time for the
authentication.
@ Follow the on-screen instructions to install
the software.
• Depending on the computer, you may
need to install third party software.
installation screen appears, follow the
instructions to install the required software.
@ Restart the computer
the installation.
if
required to complete
@ Remove the CD-ROM from the disc drive
your computer.
To
disconnect
<D
Click the _ icon - [Safely remove
Mass Storage Device] - [OK] (Windows
2000 only)
rightofthe desktopofyour computer.
® Touch [END] -
camcorder.
@)
Disconnect the
the
USB
["j
on
cable
the task trayonthe
[YES]onthe screenofyour
USB
cable.
not
need to
If
USB
bottom
the
of
• Operating "Picture Motion Browser"
To
start "Picture Motion Browser," click
[Start]
Picture Utility]
~
[All Programs]
~
~
[Sony
[PMB - Picture Motion
Browser].
of
For the basic operation
"Picture Motion
Browser," see "PMB Guide."
To
display "PMB Guide," click [Start]
[All Programs]
~
[Help]
~
~
[PMB Guide].
[Sony Picture Utility]
.~.Tips
•Ifthe
[USB
ft
touch
CONNECT].
(HOME) - ffi(OTHERS) -
SELECT] screen does
not
us
28
~
appear,
[USB
Troubleshooting
Troubleshooting
If
you
run
into
any
problems
camcorder,
troubleshoot
persists,
contact
Notes
use
disconnect
your
before
the
following
the
problem.Ifthe
the
Sony
dealer.
sending
your
repair
• Your camcorder may require initializing or
change the current hard disk ofthe camcorder,
depending on the problem. In the event
this, the data stored on the hard disk
deleted.Besure to
hard disk
on other media (backup) before sending your
camcorder for repair.
you for any loss ofhard disk data.
• During repair,
amount
to investigate the problem. However, your Sony
dealer
• For the symptoms
"Handycam Handbook" (PDF) and for
connecting to the computer,
The
• Attach a charged battery
camcorder (p. 9).
•
Connect
wall outlet (wall socket) (p. 9).
(see
of
will
power
data stored on the harddisk in order
neither copy nor retain your data.
the plugofthe AC
save
the data on the internal
"Handycam Handbook" (PDF))
We
we
may check a minimum
of
your camcorder,
does
not
turn on.
using
table
power
source
camcorder
will
not compensate
see
"PMB
pack
to the
Adaptor
your
to
problem
and
for
of
will
be
see
Guide."
to the
and
take it to a warm place. Leave the
It:::Jl
button
then
(Movie)
(p. 19).
this period.
of
camcorder there for a while,
the camcorder.
Your camcorder gets warm.
• Thisisbecause the power has been
turnedonfor a long time. Thisisnot
malfunction.
The power abruptlyturns off.
• Use the AC Adaptor.
•
Turnonthe power again.
• Charge the battery pack (p. 9).
Pressing
not
• Set the POWER switch to
(Still) (p. 12).
• You
Press the QUICK
• Your camcorder
have just shot
make new recording
• The media
unnecessary images (p. 25).
• Total
exceeds the recordable capacity
media. Delete unnecessary images (p. 25).
START
record images.
cannot
numberofmoviesorstill images
ISTOPorPHOTO does
record images in sleep mode.
ON
is
recording the image you
on
the media. You
during
of
the camcorderisfull. Delete
turn
on
a
or
cannot
the
0
•
The camcorder does
when
the
powerissettoon.
•
It
takes a few seconds for
to be ready to shootafter the power
turned
• Disconnect the AC Adaptor from the wall
outlet (wall socket)
pack,
minute.Ifthe functions stilldonot
press the RESET
sharp-pointed object.
RESET button, all settings, including the
clock setting, are reset.)
• The temperature
extremely high.
and
• The temperature
extremely low.
on. Thisisnot
then
reconnect it after about 1
leave it for a while in a cool place.
not
operate even
your
a malfunction.
or
remove the battery
button
of
Turn
of
Turn
(p. 18) using a
(If
you press the
your
camcorder
off
your
your
camcorder
offthe camcorder
camcorder
is
work,
is
camcorder
is
The recording stops.
• The temperatureofyour
is
extremely high/low.
camcorder
cool/warm place.
You cannot install"Picture
Browser."
• Check the
to install "Picture
• Install "Picture
orderly
and
computer
manner
leave it for a while in a
Motion
Motion
(p. 26).
camcorder
Turn
environment required
Browser."
Browser" in
off
your
Motion
an
us
29
"Picture
work
• Quit"Picture Motion Browser"
your computer.
Your camcorderisnot
the
• Disconnect devices from the
the computer other than the keyboard,
mouse,
• Disconnect the
computer and the Handycam Station, and
restart the computer, then connect the
computer
orderly manner.
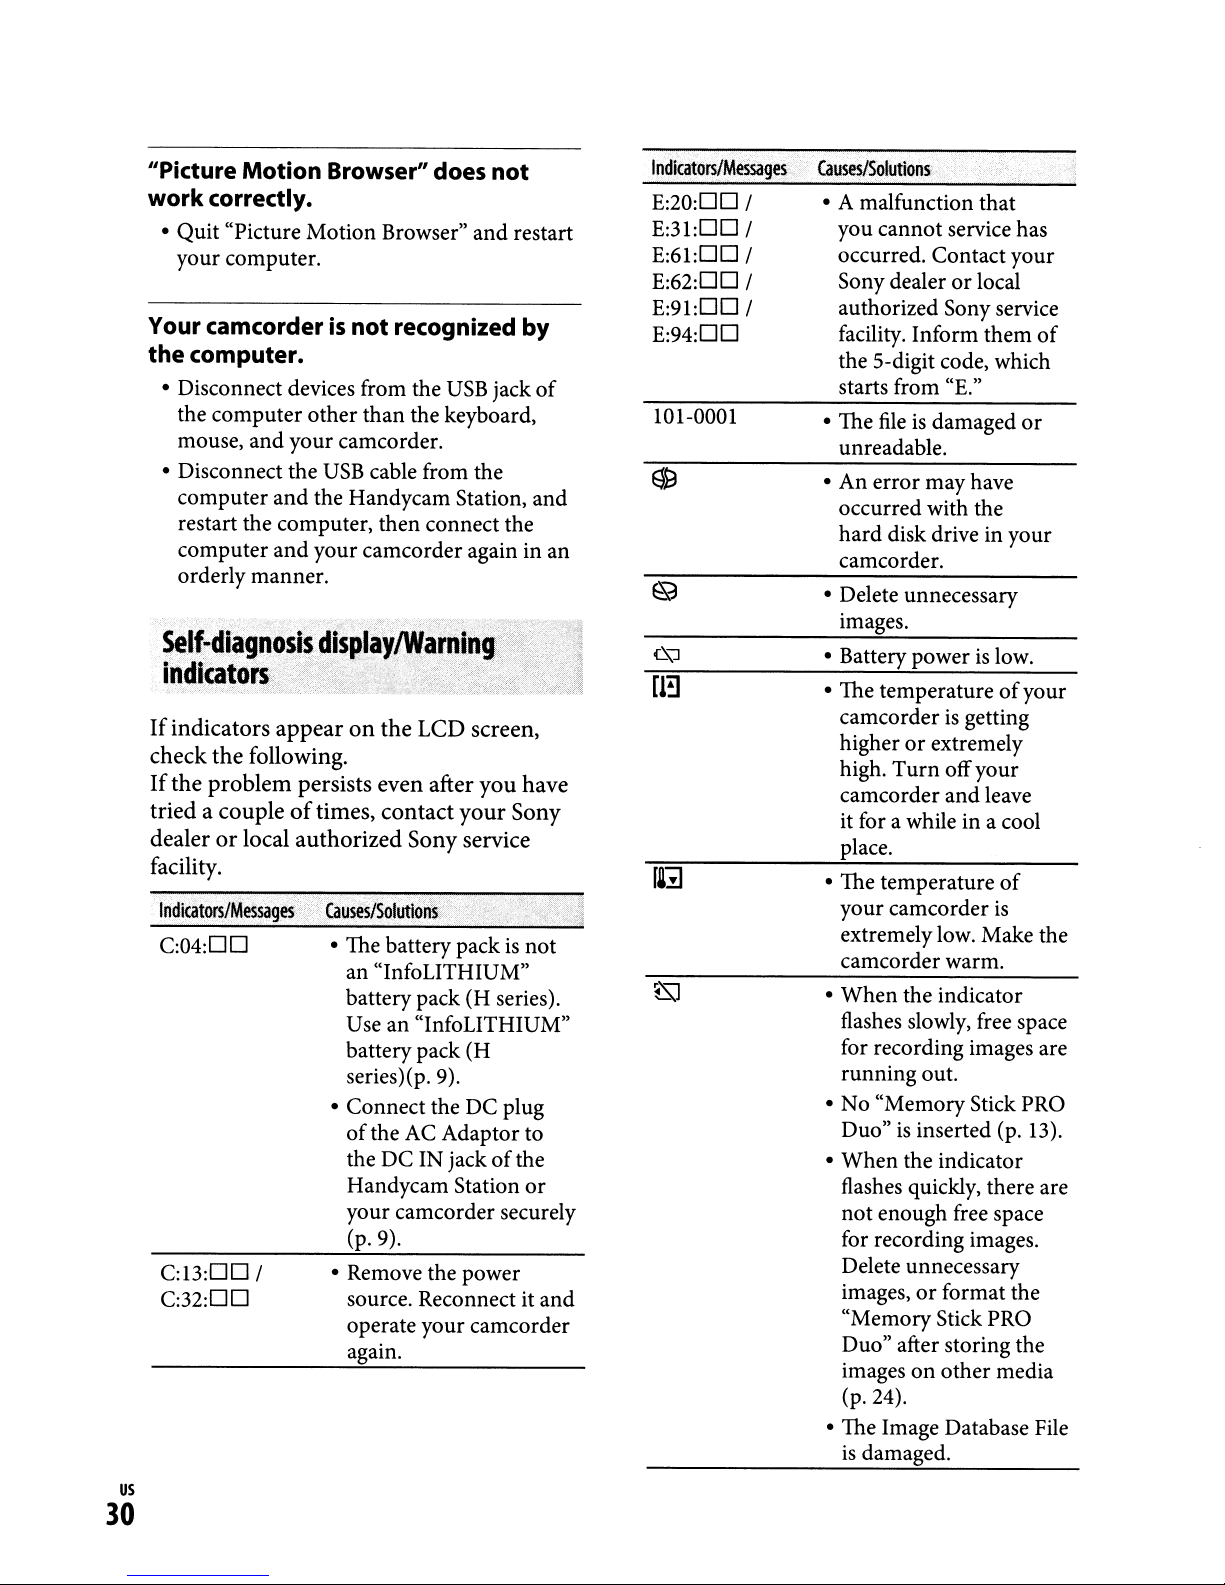
Self-diagnosis
indlcatoii
If
indicators
check
If
the
triedacoupleoftimes,
dealerorlocal
facility.
Indicators/Messages
C:04:DD
C:13:DD
C:32:DD
Motion
correctly.
computer.
and
and
appearonthe
the
following.
problem
/
Browser" does
and
recognized
USB
your camcorder.
USB
cable from the
your camcorder again in an
displaYlWarning'/
'
LCD
screen,
persists even after
contact
authorized
..
Causes/Solutions
• The battery pack
an "InfoLITHIUM"
battery pack (H series).
Use an "InfoLITHIUM"
battery pack (H
series)(p.9).
• Connect the DC plug
of
the DC IN jack
Handycam Station
your camcorder securely
• Remove the power
Sony service
the
AC
(p.9).
source. Reconnect it and
operate your camcorder
again.
you
your
Adaptor to
not
restart
jack
Sony
is
of
by
of
have
not
the
or
Indicators/Messages
E:20:DD
E:31:DD /
E:61:DD /
E:62:DD /
E:91:DO
E:94:DO
101-0001
/
/
[!!]
Causes/Solutions
• A malfunction that
you cannot service has
occurred. Contact your
or
Sony dealer
authorized Sony service
facility. Inform them
the 5-digit code, which
starts from "E."
fileisdamaged
• The
unreadable.
• An error may have
occurred with the
hard
disk drive in your
camcorder.
• Delete unnecessary
images.
• Battery powerislow.
• The temperature
camcorder
higher
high.
camcorder and leave
it for awhile in a cool
place.
• The temperature
your camcorder
extremelylow. Make the
camcorder warm.
•
When
flashes slowly, free space
for recording images are
running out.
• No "Memory Stick PRO
Duo"
•
When
flashes quickly, there are
not enough free space
for recording images.
Delete unnecessary
images,
"Memory Stick PRO
• The Image Database File
or
Turn
the indicator
is
the indicator
Duo" after storing the
images
(p.24).
is
on
damaged.
local
or
of
your
is
getting
extremely
offyour
of
is
inserted (p. 13).
or
format the
other media
of
us
30
 Loading...