

Sony Handycam DCR-PC5 Operating Instructions Manual
SONY 30021!4,1_1,
Digital
Video Camera
Recorder
Operating Instructions
Before operating the unit, please read this mallual thoroughly,
and retain it for flltt,re reference.
Owner's Record
The model and serial nturlbers are located on the bottom. Record the
serial number in tile space provided helow. Refer to these numbers
whenever you call upon your Sony dealer regarding this product.
Model No. DCR-PC5 Model No. AC,
Serial No. Serial No.
_i®i_mHHandgcam
C'_"'oL'T"uMQ
SERI_S
_lll e °
I'1 CassetteMemory
MEMORY _TIEK rM
DCR-PC5
m
@2000 Sony Corporation
Welcome!
Congratulations on your purchase of this Sony Digital Handycam camcorder. With your
Digital Handycam, you can capture li%'s precious moments with superior picture and sound
quality. Your Digital Handycam is loaded with advanced features, but at the same time it is
vel T easy to use. You will soon be producing home video that you can enjoy %r years to
collie.
To prevent fire or shock hazard, do
not expose the unit to rain or
moisture.
CAUTION: TO REDUCE THE RISK OF ELECTRIC SHOCK,
DO NOT REMOVE COVER (OR BACK),
NO USER-SERVICEABLE PARTS INSIDE,
REFER SERVICING TO QUALIFIKD SERVICE PERSONNEL,
DISPOSAL OF LITHIUM ION BATTERY.
LITHIUM ION BATTERY.
DISPOSE OF PROPERLY.
You ran return your unwanted lithium ion batteries
to your nearest Sony Self'ice Center or Factoly
Service Center,
Note: In some areas tile disposal of lithiunl ion
batteries in household or business trash may
be prohibited,
For the Sony Service Center nearest you call
1 800 222 SONY (United States only)
For the Sony Factory Service Center nearest you call
416 499 SONY (Canada only)
Caution: Do not handle damaged or leaking lithium
ion batte W.
This symbol is intended to alert
the user to the presence of
uninsulated 'dangerous voltage"
within tile product's enclosure
that may be of sufl?cient
magnitude to constitute a risk of
electric shock to persons.
This symbol is intended to alert
the user to the presence of
important operating and
maintenance (sel_icing)
instructions in tile literature
accompanying tile appliance.
Never expose the battery pack to tenlperatures
above 140°F (60°C) such as in a car parked in
the sun or under dilect sunlight.
If you have ally questions about this product, you
may call:
Sony Customer Infiormation Center 1 800 222 SONY
(7669) or
white to: Sony Customer Information Center 1 Sony
Drive, Mail Drop #TI 11,Park Ridge, NJ 07656
CAUTION
You are cautioned that arly changes or nlodifirations
not expressly approved ill this manual could voKt
our authority to operate this equipment.
Declaration of Conforlnity
Trade Name: SONY
Model No.: DCR PC5
Responsible Party: Sony Electronics Inc.
Address: 1 Sony Drive, Park Ridge,
NJ, 07656 USA
Telephone No.: 201 930 6{t72
This device complies with Partl5 of tile FCC
Rules. Operation is subject to the following two
conditions.: (1) This device may not cause
harmflfl inter%fence, and (2) this device nmst
accept any inter%rence received, including
inter%rence that may cause undesired operation.
2
Not_:
This equipment has been tested and %und to comply
with the limits for a Class B digital device, pursuant
to Part 15 of the FCC Rules. These limits are designed
to provide reasonable protection against harmfkfl
interference in a residential installation. This
equipment generates, uses, and can radiate radio
flequency energy anti, if not installed and used in
accordance with the instructions, may cause harmflfl
interference to radio corlllllunJcations, However,
there is no guarantee that interference will not occur
in a particular installation, If this equipment does
cause harmflfl interference to radio or television
reception, which can be determined by turning the
equipment off and on, the user is encouraged to try to
correct the interference by one or more of the
following measures:
Reorient or relocate the receiving antenna.
Increase the separation between the equipment
and receiver.
Connect the equipment into an outlet on a circuit
dif{erent florn that to which the receiver is
connected.
Consult the dealer or an experienced radio/TV
technician for help,
"Memory Stick"
This devke complies with Par tl5 of the FCC Rules.
Operation is subject to the following two conditions,:
(1) This device may not cause harmflfl interference,
and (2) this device must accept any interference
received, including interference that may cause
undesired operation.
iiiiiiiiiiiii ii i! i! i! i i ! i
CAUTION
TO PREVENT ELECTRIC SHOCK, MATCH
WIDE BLADE OF PLUG TO WIDE SLOT,
FULLY INSERT.
"Memory Stick"
This Class B digital apparatus complies with
Canadian ICES 003,
Table of contents
4
Checking supplied accessories ....................... 5
Quick Start Guide .................................6
Getting started
Using this manual ............................................ 8
Step 1 Preparing the power snpply ............ 10
Charging the hattery pack ..................... 10
Installing the hattery pack ..................... 12
Connecting to a wall outlet ................... 14
Step 2 Inserting a cassette ............................ 15
Step 3 Using a tonch panel .......................... 16
Recording - Basics
Recording a pictnre ........................................ 18
Shooting hacklit snhjects
(BACK LIGHT) ................................ 23
Shooting in the clark
(NightShot/Snper Nightshot) ....... 24
Sel_timer recording ............................... 25
END SEARCH ........................................ 26
Playback - Basics
Playing back a tape ........................................ 27
Viewing the recording on TV ....................... 31
Advanced Recording Operations
Recording astill image on atape
Tape Photo recording ......................... 32
Adjusting the white halance manually ....... 35
Using the wide mode .................................... 36
Using the fader flmction ............................... 37
Using special ef%cts Picture effect ........... 40
Using special effects Digital effect ............ 41
Using the PROGRAM AE flmction ............. 44
Adjusting the exposure manually ............... 46
Using the spot light metering mode
Flexible Spot Meter. ............................. 47
Focusing manually ......................................... 48
Advanced Playback Operations
Playing back a tape with picture effects ..... 49
Playing back a tape with digital effects ...... S0
Enlarging recorded images PB ZOOM .... 51
Quickly locating a scene using the zero set
memory function .................................... 52
Searching the botmdaries of recorded
tape by title Title search ...................... 53
Searching a recording hy date
Date search ........................................... 54
Searching %r a photo
Photo search/Photo scan .................... 56
Editing
Duhbing a tape ............................................... 58
Dubbing only desired scenes
Digital program editing ...................... 60
Using with analog video unit and personal
computer Signal convert flmction..... 71
Recording video or TV programs ................ 72
Inserting a scene fl'om a VCR ....................... 76
Audio dnhbing ............................................... 78
Superin-)i)osing a title .................................... 81
Making your own titles ................................. 85
Laheling a cassette ......................................... 87
Customizing Your Camcorder
Changing the menn settings ......................... 89
Resetting the date and time .......................... 95
"Memory Stick" operations
Using a "Memory Stick" introduction ....... 96
Recording still images on "Memory Stick"
Memory Photo recording ................. 103
Superimposing a still picture in the "Memory
Stick" on a moving picture
MEMORY MIX ................................... 107
Recording an image fl'om a mii'd DV tape
as a still image ....................................... 110
Copying still images fl'om a mini DV tape
Photo save ........................................... 112
Viewing a still picture
Memory photo playback .................. 114
Enlarging still images recorded on "Memory
Stick"s Memory PB ZOOM .............. 117
Playing back images continuously
SLIDE SHOW ..................................... 118
Preventing accidental erasure
Image protection ................................ 119
Deleting images ............................................ 120
_Vl"itii'Jga print mark PRINT MARK ...... 123
Additional Information
Using the viewfinder. .................................. 124
Usable cassettes ............................................ 125
About i.LINK ................................................ 127
Troubleshooting ........................................... 129
Sel_diagnosis display .................................. 135
Warning indicators and messages ............. 136
Using your camcorder ahroad ................... 138
Maintenance information and
precautions ............................................ 139
Specifications ................................................ 144
Quick Reference
Identifying the parts and controls ............. 145
Quick Function Guide ................................. 153
Index .............................................................. 154
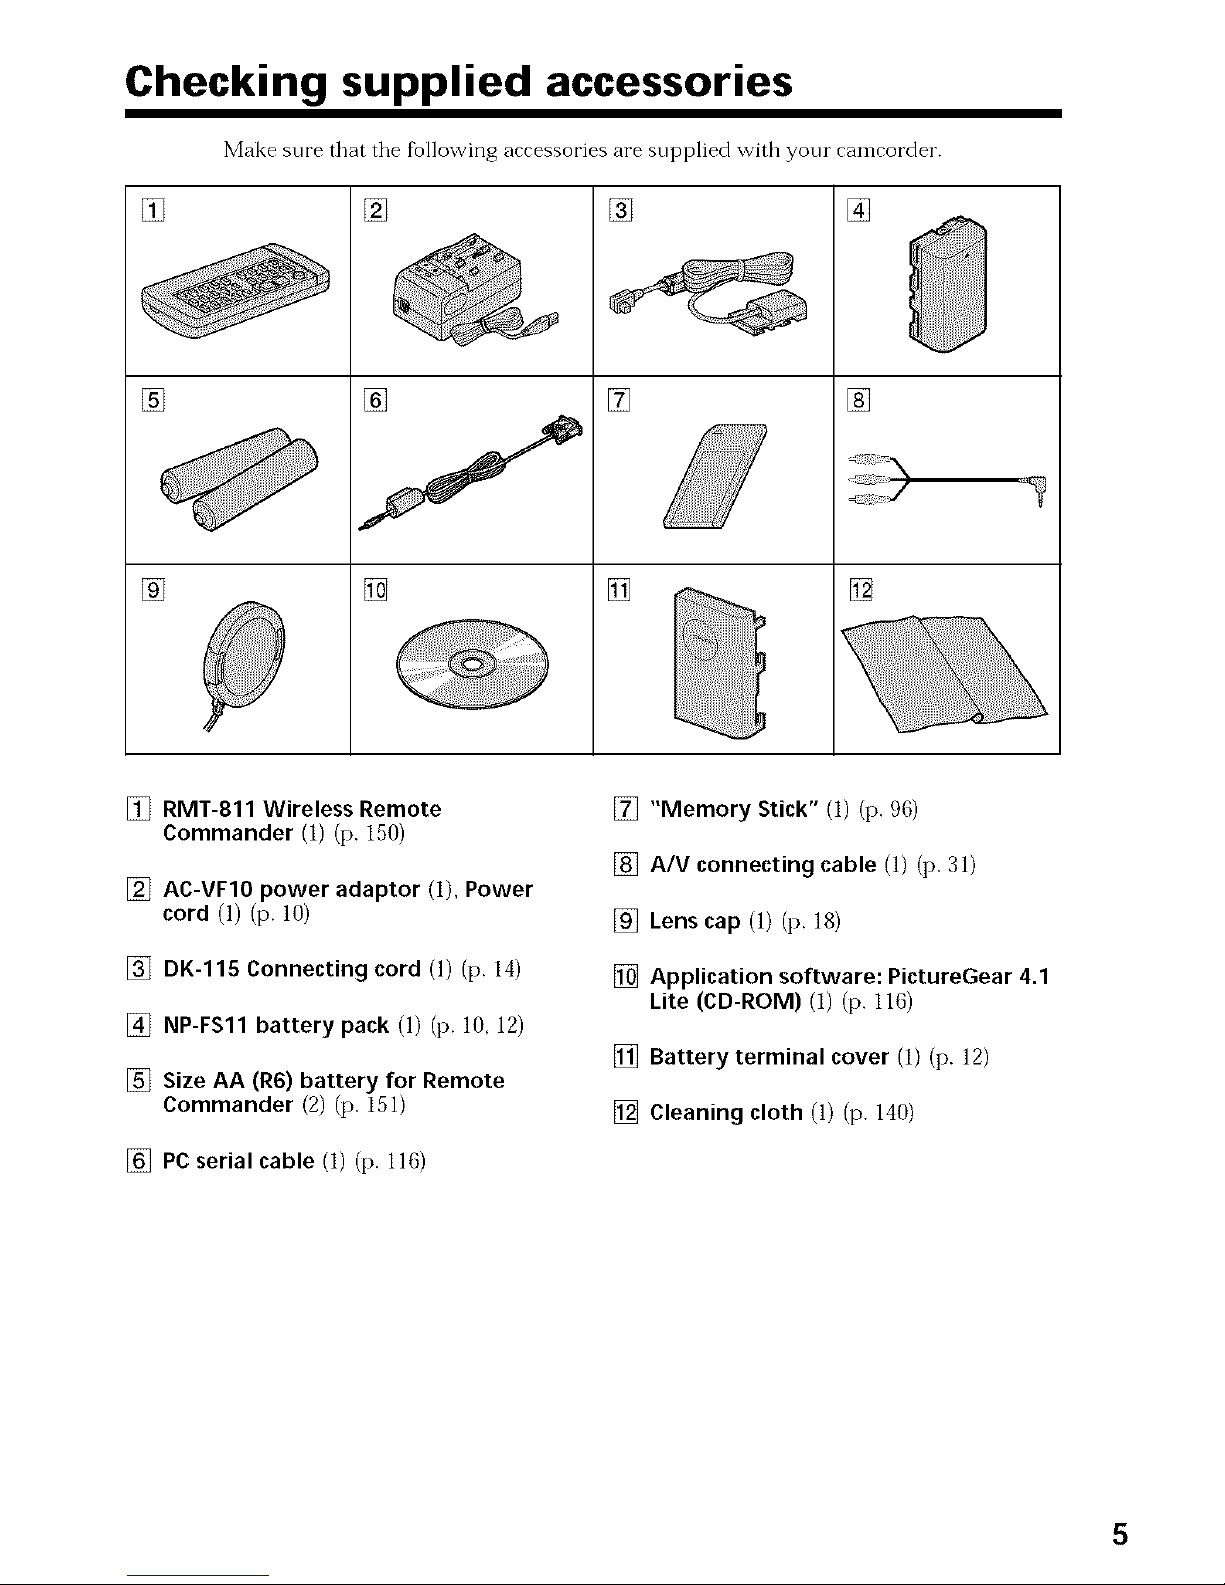
Checking supplied accessories
Make sure that tile fbllowing accessories are supplied with your canlcorcter.
[] [] []
[]
[]
[]
70
[]
[] []
[]
[]
[] RMT-811 Wireless Remote
Commander (1) (p. 150)
[] AC-VF10 power adaptor (I), Power
cord (1) (p. 10)
[] DK-115 Connecting cord (1) (p. 14)
[] NP-FS11 battery pack (1) (p. 10, 12)
[] Size AA (R6) battery for Remote
Commander (2) (p. 15])
[] PC serial cable (I) (p. 116)
[] "Memory Stick" (I) (p. 96)
[] A/V connecting cable (1) (p. 31)
[] Lens cap (1) (p. 18)
[] Application software: PictureGear 4.1
Lite (CD-ROM) (1) (p. 116)
[] Battery terminal cover (1) (p. 12)
[] Cleaning cloth (1) (p. 140)
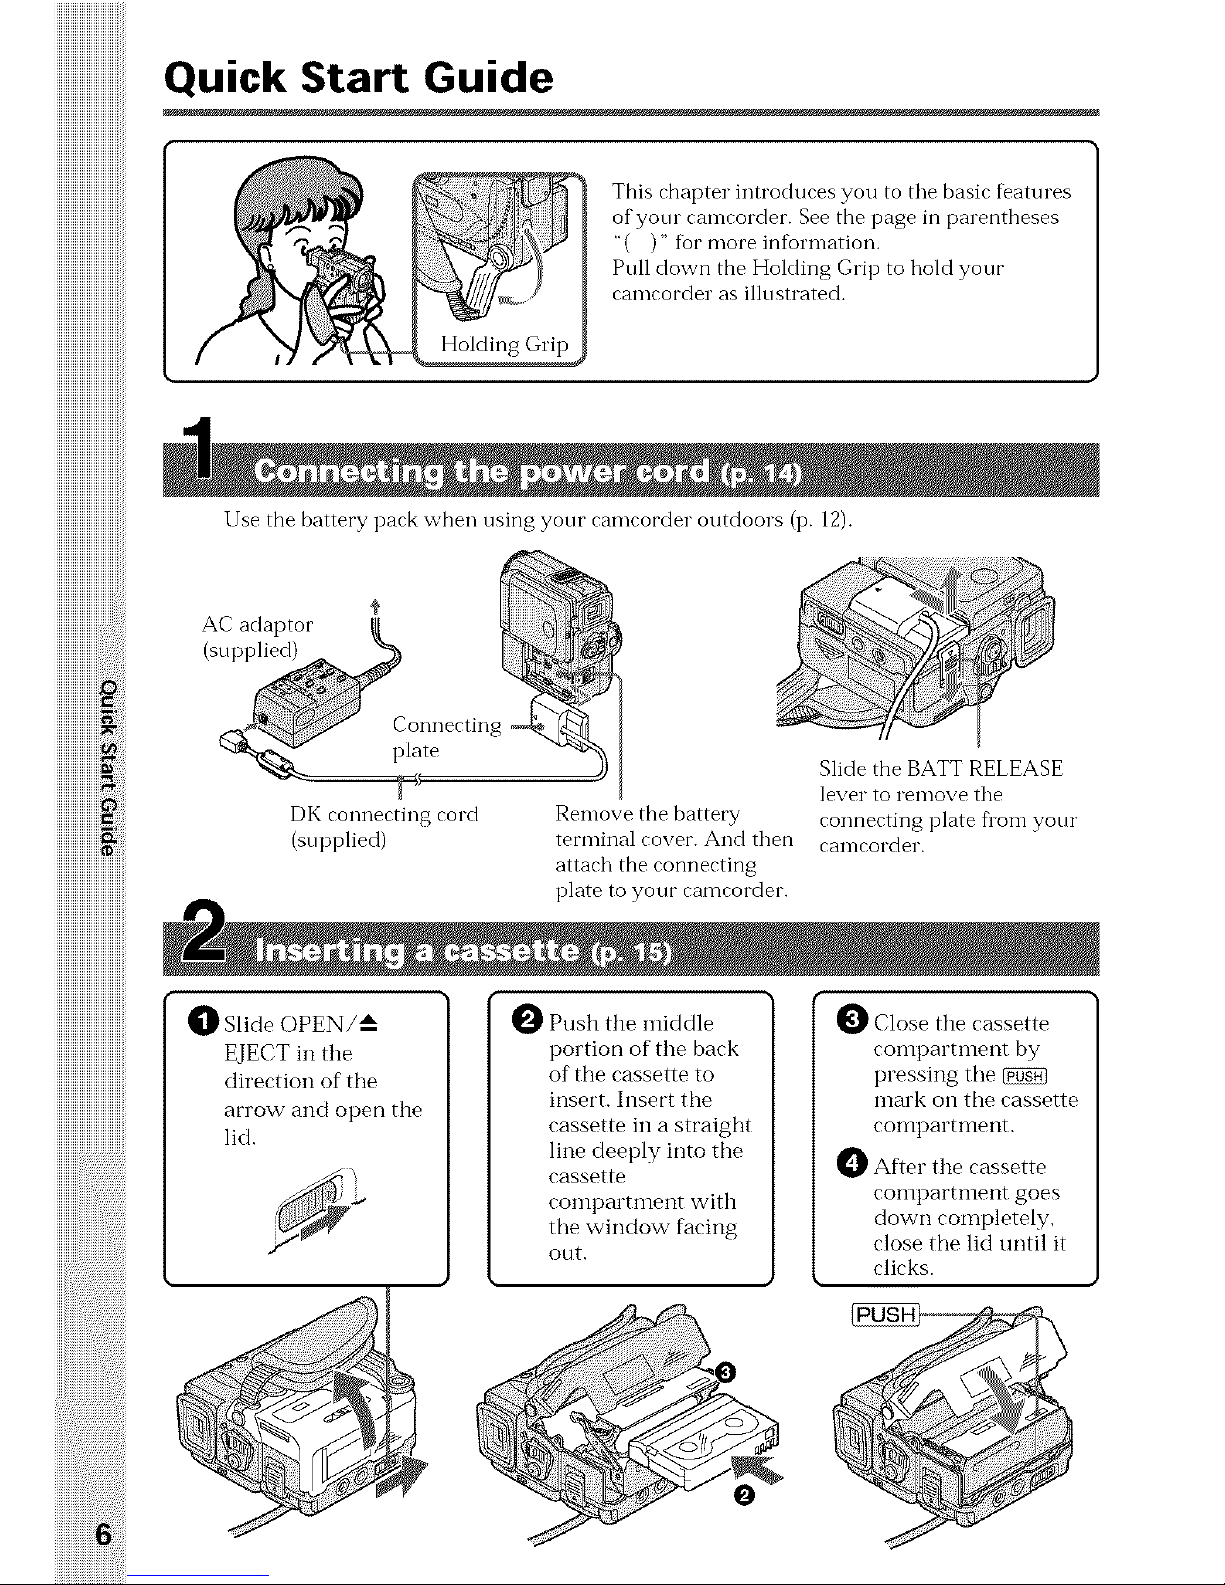
Quick Start Guide
This chapter introduces you to tile basic features
of your camcorder. See the page in parentheses
"( )" %r more information.
Pull down the Holding Grip to hold your
camcorder as illustrated.
Use the battery pack when using your camcorder outdoors (p. 12).
DK connecting cord
(supplied)
_]_ Slide OPEN/_
EJECT in the
direction of the
arrow and open the
lid.
Slide the BATT RELEASE
lever to remove the
Remove the battery connecting plate flora your
terminalcover. And then camcorder.
attach the connecting
plate to your camcorder.
A
Push the iniddle
portion of the back
of the cassette to
insert. Insert the
cassette in a straight
line deeply into the
cassette
compartment with
the window facing
out.
0 Close the cassette
coinpartment by
pressing the
mark on the cassette
compartment.
O After the cassette
compartment goes
dowtl completely,
close the lid until it
clicks.
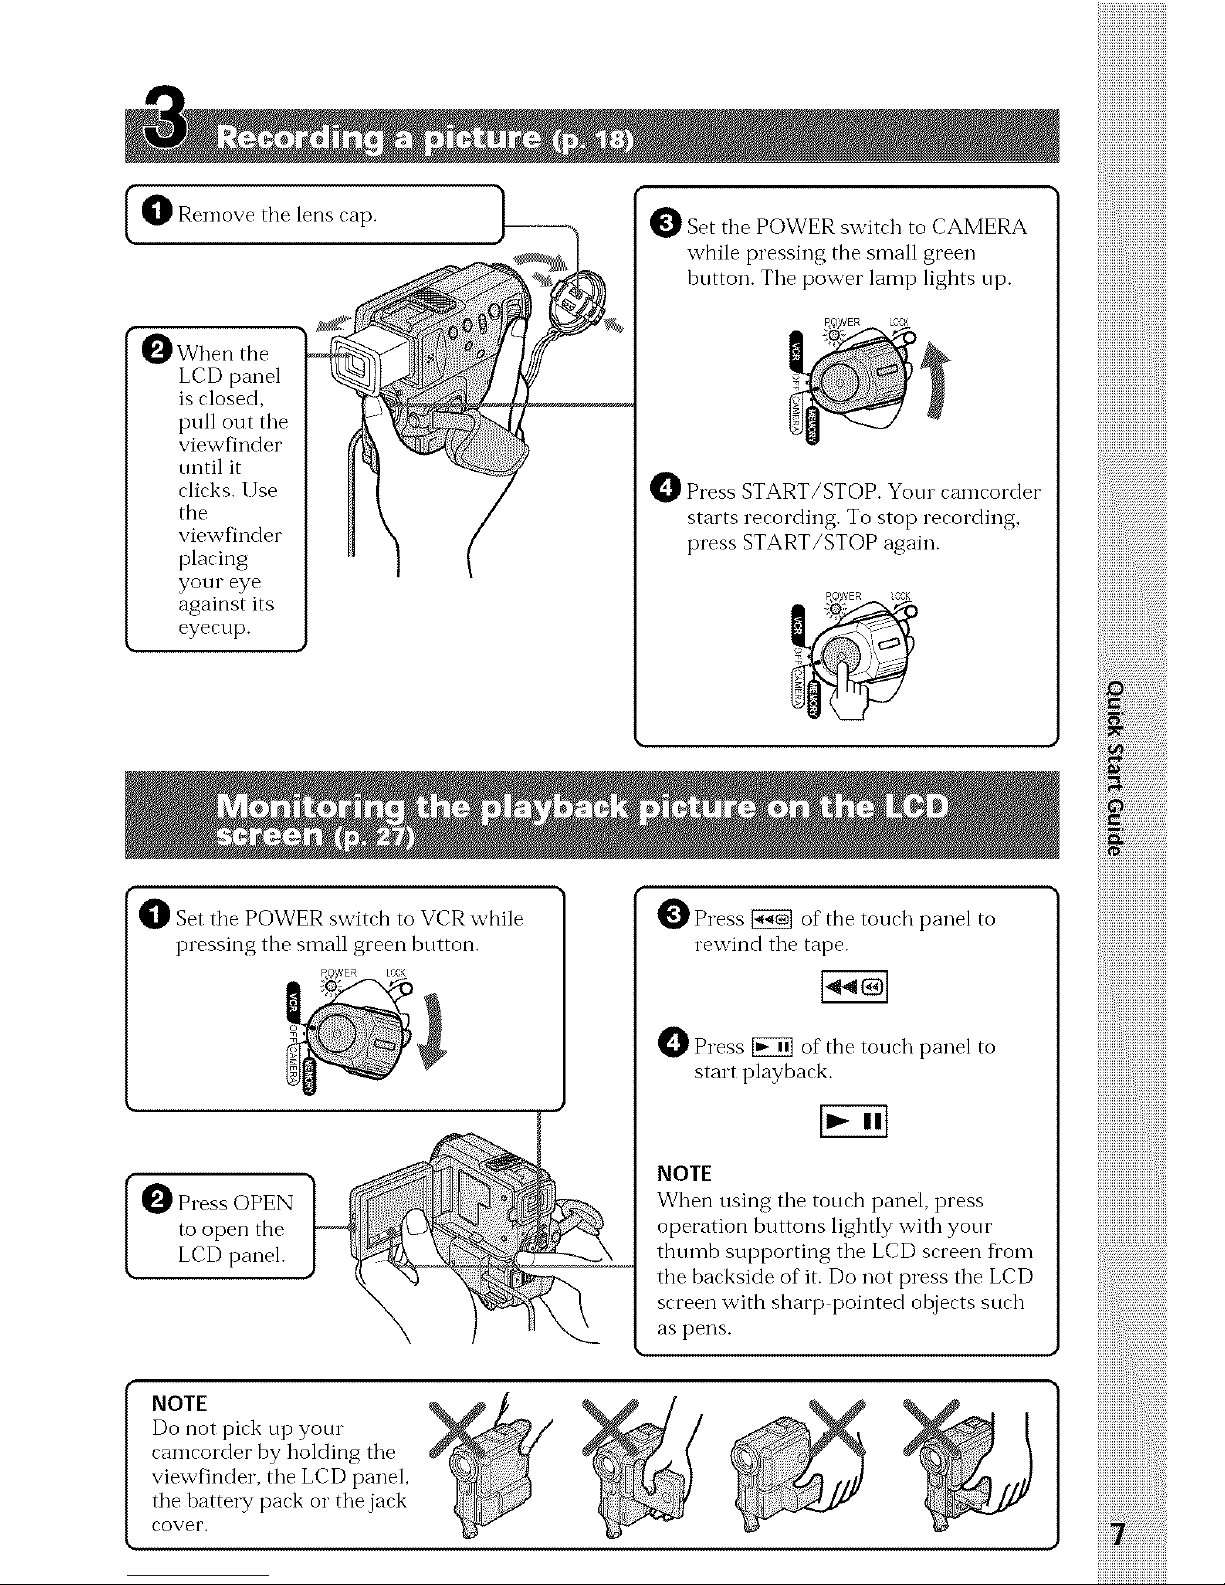
I ORemove the lens cap. ) _
0 Whentile
LCD panel
is closed,
pull out tile
viewfinder
tmtil it
clicks. Use
the
viewfinder
placing
your eye
against its
eyecup.
_]_ Set tile POWER switch to VCR while
pressing the small green bntton.
O ress OPEN
to open the
LCD panel.
O Set the POWER switch to CAMERA
while pressing the small green
button. Tile power lamp lights up.
Press START/STOP. Yore camcorder
starts recording. To stop recording,
press START/STOP again.
0 Press _ of the touch panel to
rewind tile tape.
_ Press _ of the touch panel to
start playback.
NOTE
When using tile touch panel, press
operation buttons lightly with your
thumb supporting tile LCD screen from
the backside of it. Do not press tile LCD
screen with sharp pointed objects such
as pens.
iiiiiiiiiiiiiiiiiiiiiiiiiiiiii
iiiiiiiii :ii:ii:ii:ii:ii:ii:ii:ii:ii:ii:ii:ii:ii:ii:ii:ii:ii:ii
iiiiiiiiiiiiiiiiiiiiiiiiiiiiii
NOTE
Do not pick up your
camcorder by holding tile
viewfinder, tile LCD panel,
tile battery pack or tile jack
cover.
-- Getting started --
Using this manual
As you read through this manual, buttons and settings oil your camcorder are shown in
capital letters.
e.g. Set the POWER switch to CAMERA.
When you carry out an operation, you can hear a beep sound to indicate that the
operation is being carried out.
Your camcorder is based on the DV format. You can only use mini DV cassettes with
your camcorder. We recommend that you use a tape with cassette memory (|q.
The flmctions which reqtfire different operations depending on whether the tape has
tile cassette IlleIllory or Mot are:
• End search (p. 26, 30)
• Searching a recording by date Date search (p. 54)
• Photo search (p. 56).
The functions you can operate only witb tile cassette memo W are:
• Semching the botmdaries of recorded tape by title Title search (p. 53)
• Stq)erimposing a title (p. 81)
• Making yore own titles (p. 85)
• Labeling a cassette (p. 87).
For details, see page 125.
You see this mark in the introduction of the features that operate only with
cassette memory.
Tapes with cassette memmy are marked by CIq (Cassette Memolyj.
TV color systems differ fl'om count W to counn T. To view your recordings on a TV,you
need an NTSC system based TV.
Television programs, films, video tapes, and other materials may be copyrighted.
l Jnauthorized recording of such materials may be contrary to tile provision of tile
copyright laws.
8

Using this manual
• The LCD screen and the viewfinder are manufactured using high-precision
technology. However, there may be some tiny black points and/or bright points
(red, blue, green, or white) that constantly appear on the LCD screen and in the
viewfinder. These points occur normally in the manufacturing process and do not
affect the recorded picture in any way. Effective ratio of pixels and/or screen are _'
99.99% or more.
• Do not let your camcorder get wet. Keep your camcorder away fl'om rain and sea
water. Letting your camcorder get wet may cause your camcorder to malflmction. _-
Sometimes this malflmction cannot be repaired [a]
• Never leave your camcorder exposed to temperatures above 140°F (60°C), such as in a
car parked in the sun or under direct sunlight [b]
• Do not place your camcorder so as to point the viewfinder or the LCD screen toward
the sun. The inside of the viewfinder or LCD screen may be damaged [¢].
[a] [b] [c]
Contents of the recording cannot be compensated if recording or playback is not
made due to a malfnnction of the camcorder, video tape, etc.
Step 1 Preparing the power supply
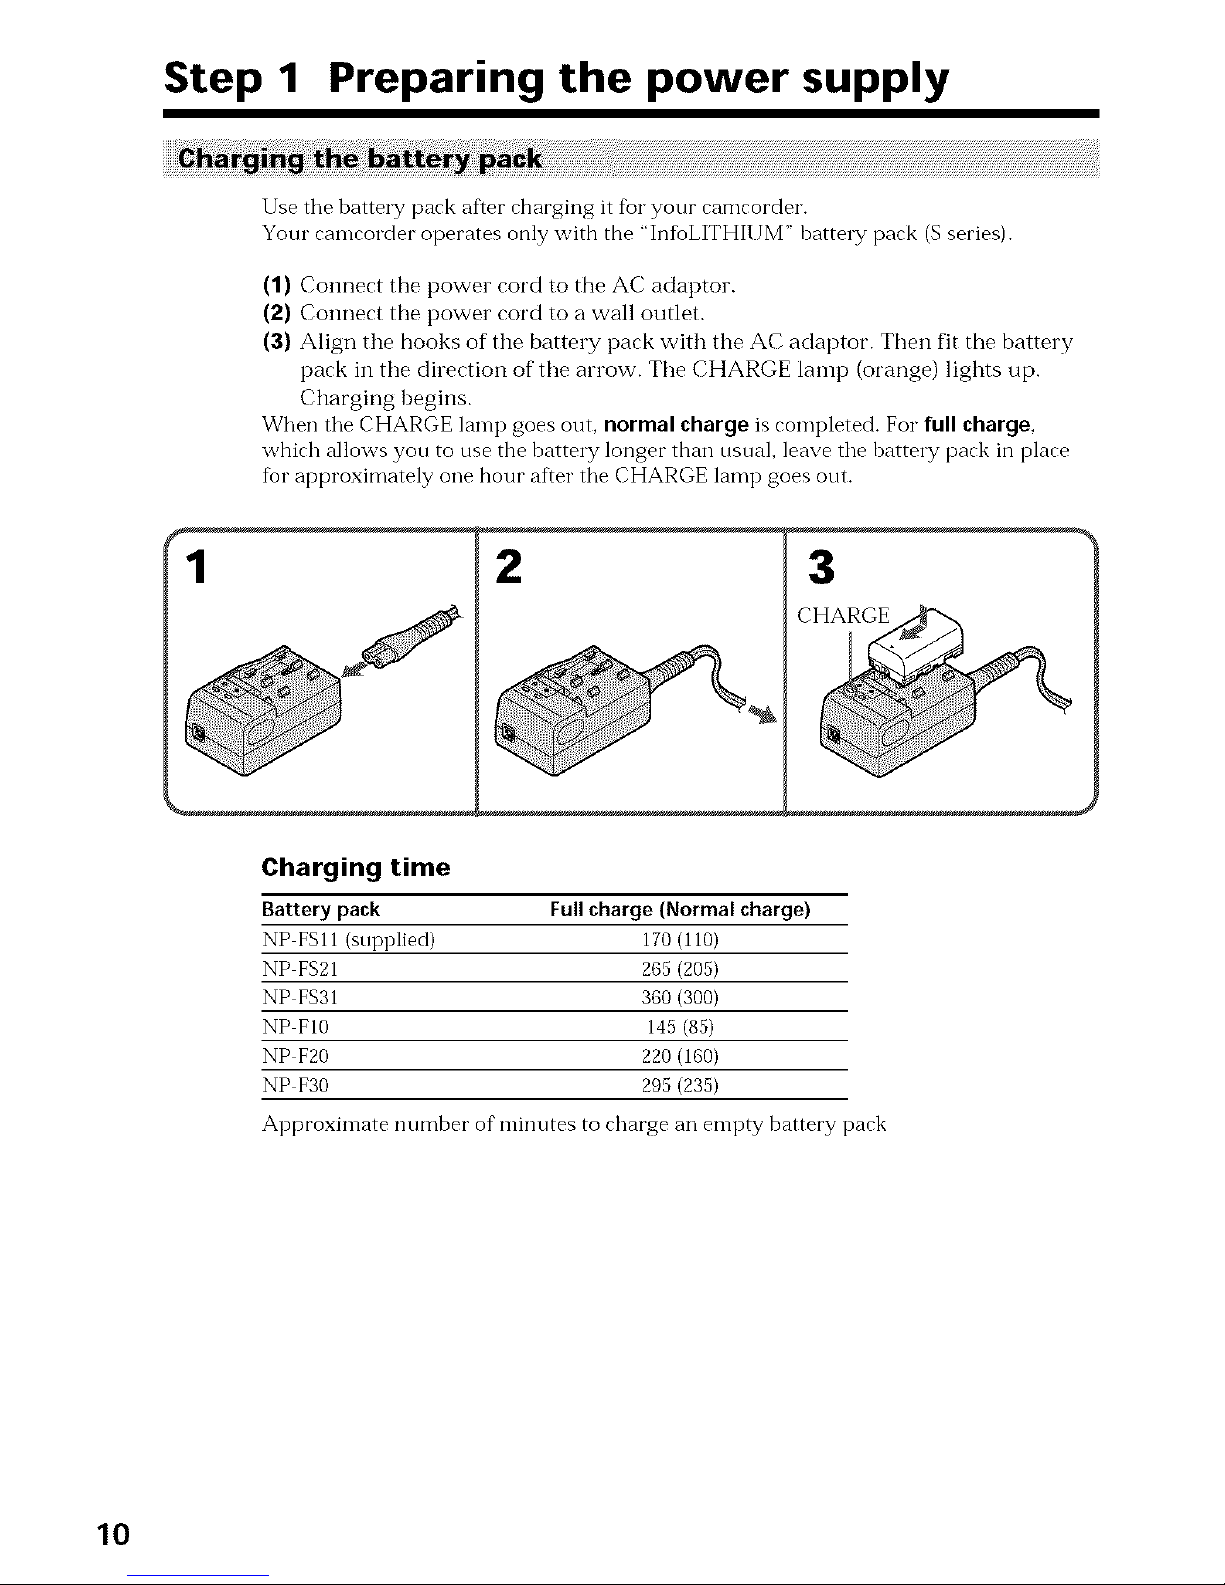
(1) Connect the power cord to the AC adaptor.
(2) Connect the power cord to a wall outlet.
(3) Align the books of the battery pack with the AC adaptor. Tben fit the battery
pack in tbe direction of tile arrow. Tile CHARGE lamp (orange) lights up.
Chargirlg begins.
When tile CHARGE lamp goes out, normal charge is completed. For full charge,
which allows you to use the battery longer than usual, leave tile battery pack in place
for approximately one hour after tile CHARGE lamp goes out.
2
3
CHARGE
Charging time
Battery pack Full charge (Normal charge)
NP FSII (supplied) 170 (110)
NP FS21 265 (205)
NE FS31 360 (300)
NP FI0 145 (85)
NP F20 220 (160)
NP F30 295 (235)
Approximate number of minutes to charge an empty battery pack
10

Step 1 Preparing the power supply
Recording time
Recording with Recording with
Battery pack the viewfinder the LCDscreen
Continuous* Typical** Continuous* Typical**
NP FSll
(supplied) 80 (70) 40 (35) 60 (50) 30 (25) _,'t
NP FS21 170 (155) 85 (75) 130 (115) 65 (55) _a
NP FS31 260 (235) 130 (115) 200 (180) 100 (90)
NP FIO 60 (55) 30 (25) 50 (45) 25 (20) _.
NP F20 135 (120) 65 (60) 100 (90) 50 (45)
NP F30 195 (175) 95 (85) 150 (135) 75 (65)
Approximate number of minutes when you use a fl/lly charged battery
Numbers in parentheses "( )" indicate the time when using a normally charged
batte_Ty.
* Approximate continuous recording time at 77°F (25°C).The battery life will be
shorter if you use your camcorder in a cold environment.
** Approximate number of minutes when recording while you repeat recording start/
stop, zooming and turning the power on/off The actual battery life may be shorter.
Playing time
Battery pack Playing time Playing time
on LCDscreen with LeD closed
NP FSll (supplied) 60 (55) 85 (75)
NP FS21 135 (125) 185 (165)
NP FS31 210 (190) 280 (250)
NP FIO 50 (45) 65 (60)
NP F20 110 (95) 145 (130)
NP F30 160 (145) 215 (190)
Approximate number of minutes when you use a fhlly charged battery
Numbers in parentheses "( )" indicate the time when t/sing a normally charged
batte_Ty.
The battery life will be shorter if you use your camcorder in a cold environment.
Notes on the AC adaptor
• Attach the battery pack firmly.
• Charge the battery pack on a fiat surfhce without vibration.
• Remove the supplied connecting cord (DK 115) flora this trait. If not removed,
charging is not possible.
• The charging time may differ depending on tbe condition of the battery pack or the
temperature of the environment.
• When a fhlly charged battery pack is installed, the CHARGE lamp will once light,
then go out.
• If the CHARGE lamp does not light or flash, check that the battery pack is correctly
attached to the AC adaptor. If it is not attached, it will not be charged.
• Prevent metallic objects from coming into contact with the metal parts of the
connecting cord of the AC adaptor. This may cause a short circuit, damaging the AC
adaptor.
• Keep the battery pack dry.
• When the battery pack is not to be used for a long time, charge tbe battery pack once
flflly, and then use it tmtil it flflly discharges again. Keep the battery pack in a cool
place.
11
Step 1 Preparing the power supply
Charging temperature
The temperature range for charging is 32 °F to 104 °F (0 °C to 40 °C).
However, to provide maximum battery efficiency, tile recommended temperature range
when charging is 50 °F to 86 °F (10 °C to 30 °C).
If the power may go off although the battery remaining indicator indicates that
the battery pack has enough power to operate
Chmge the battery park fully again so that tbe indication oil the battery remaining
indicator is correct.
After charging the battery pack
Remove the battery pack fl'on-i the AC adaptor.
Note on NP-F10/FS11
The battery 1i% will be shorter when you carry out recording in a cold place or with the
LCD panel opened. We recommend that you use the NP FS21/FS31 large capacity
battery pack (not supplied).
Plug the power cord deeply
Be sure to plug the power cord deeply into the terminal of AC power adaptor so that it
is firmly locked. If there is a gap between the plug of power cord and the terminal of
AC power adaptor, it does not affect the efficiency of the AC power adaptor.
What is "lnfoLITHIUM"?
The "InfbLITHIUM" is a lithium ion battery park wbirh ran exchange data such as
battery consumption with compatible electronic equipment. This unit is compatible
with the "InfoLITHIUM" battery pack (S series). Your camcorder operates only with the
"InfbLITHIUM" battery.
"InfbLITHIUM" S series battery packs have the C'j)_._our._u_Q mark.
InfbLITHIUM" is a trademark of Sony Corporation.
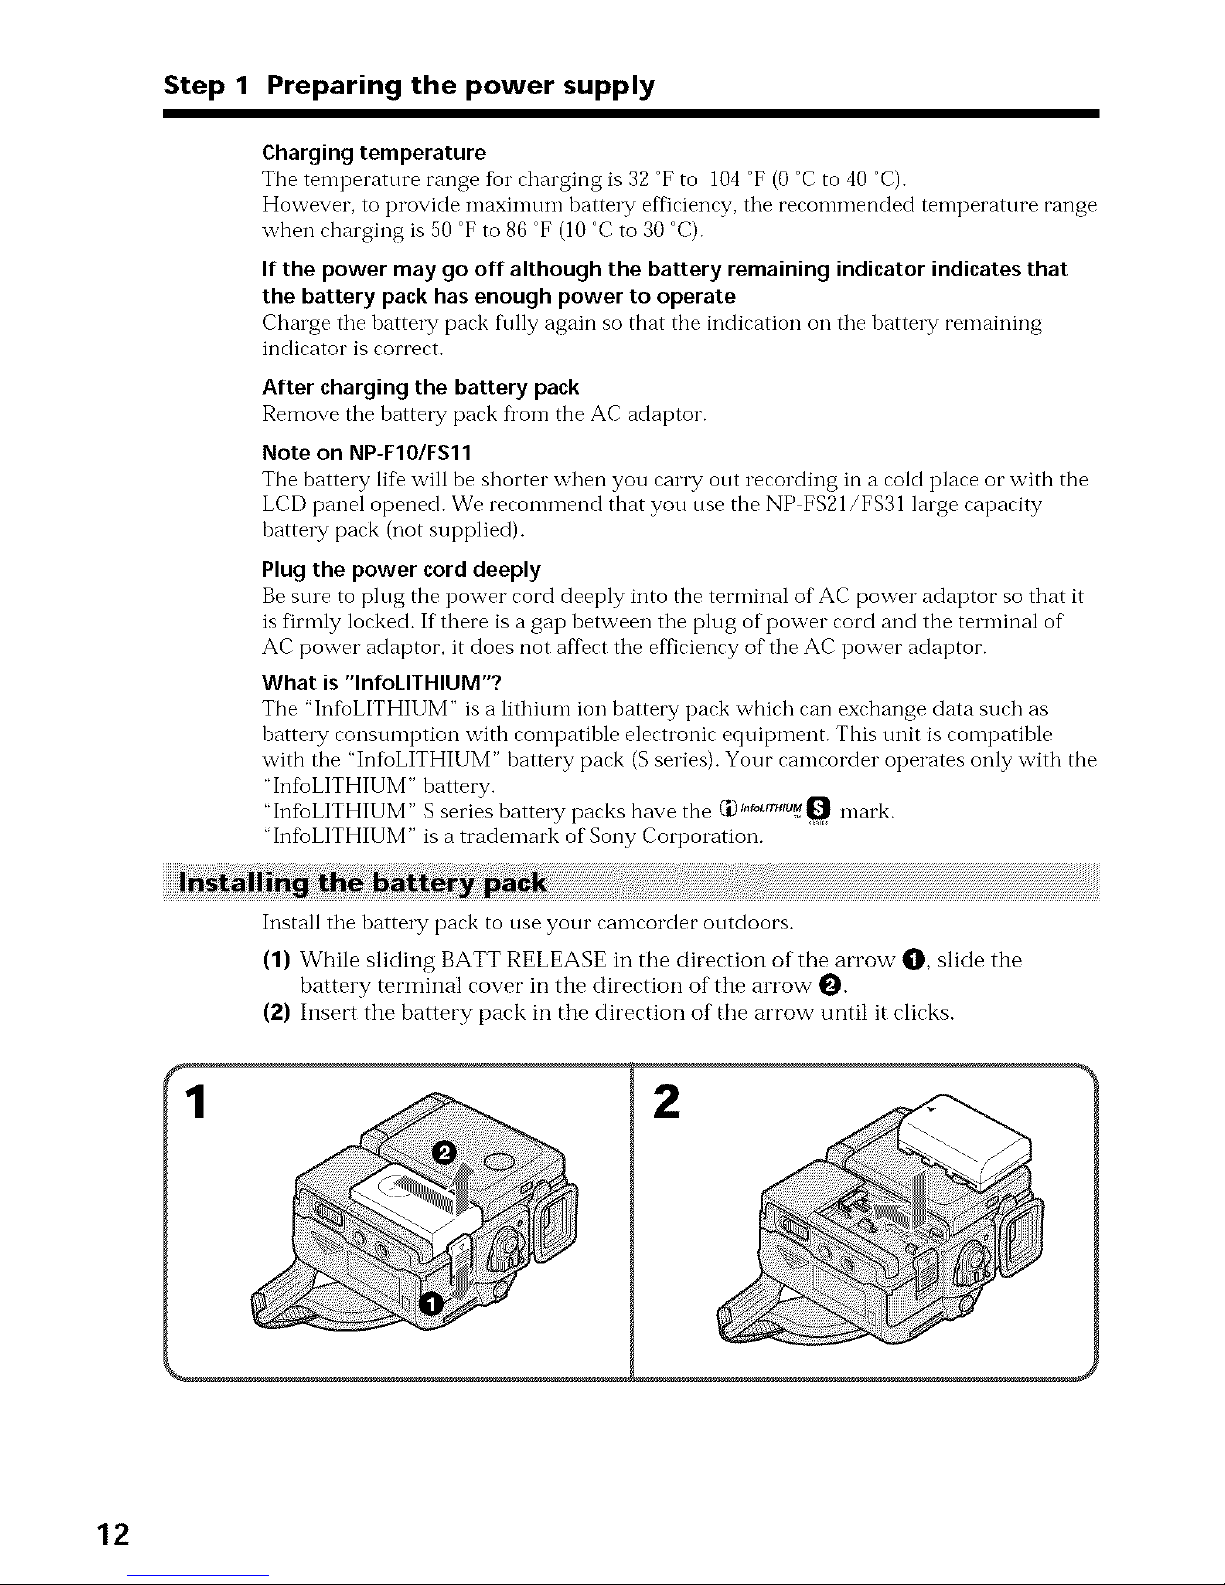
Install the battery pack to use your camcorder outdoors.
(1) While sliding BATT RELEASE in the direction of the arrow O, slide the
battery terminal covet" in the direction of the arrow _.
(2) Insert the battery pack in the direction of the arrow until it clicks.
2
12
Step 1 Preparing the power supply
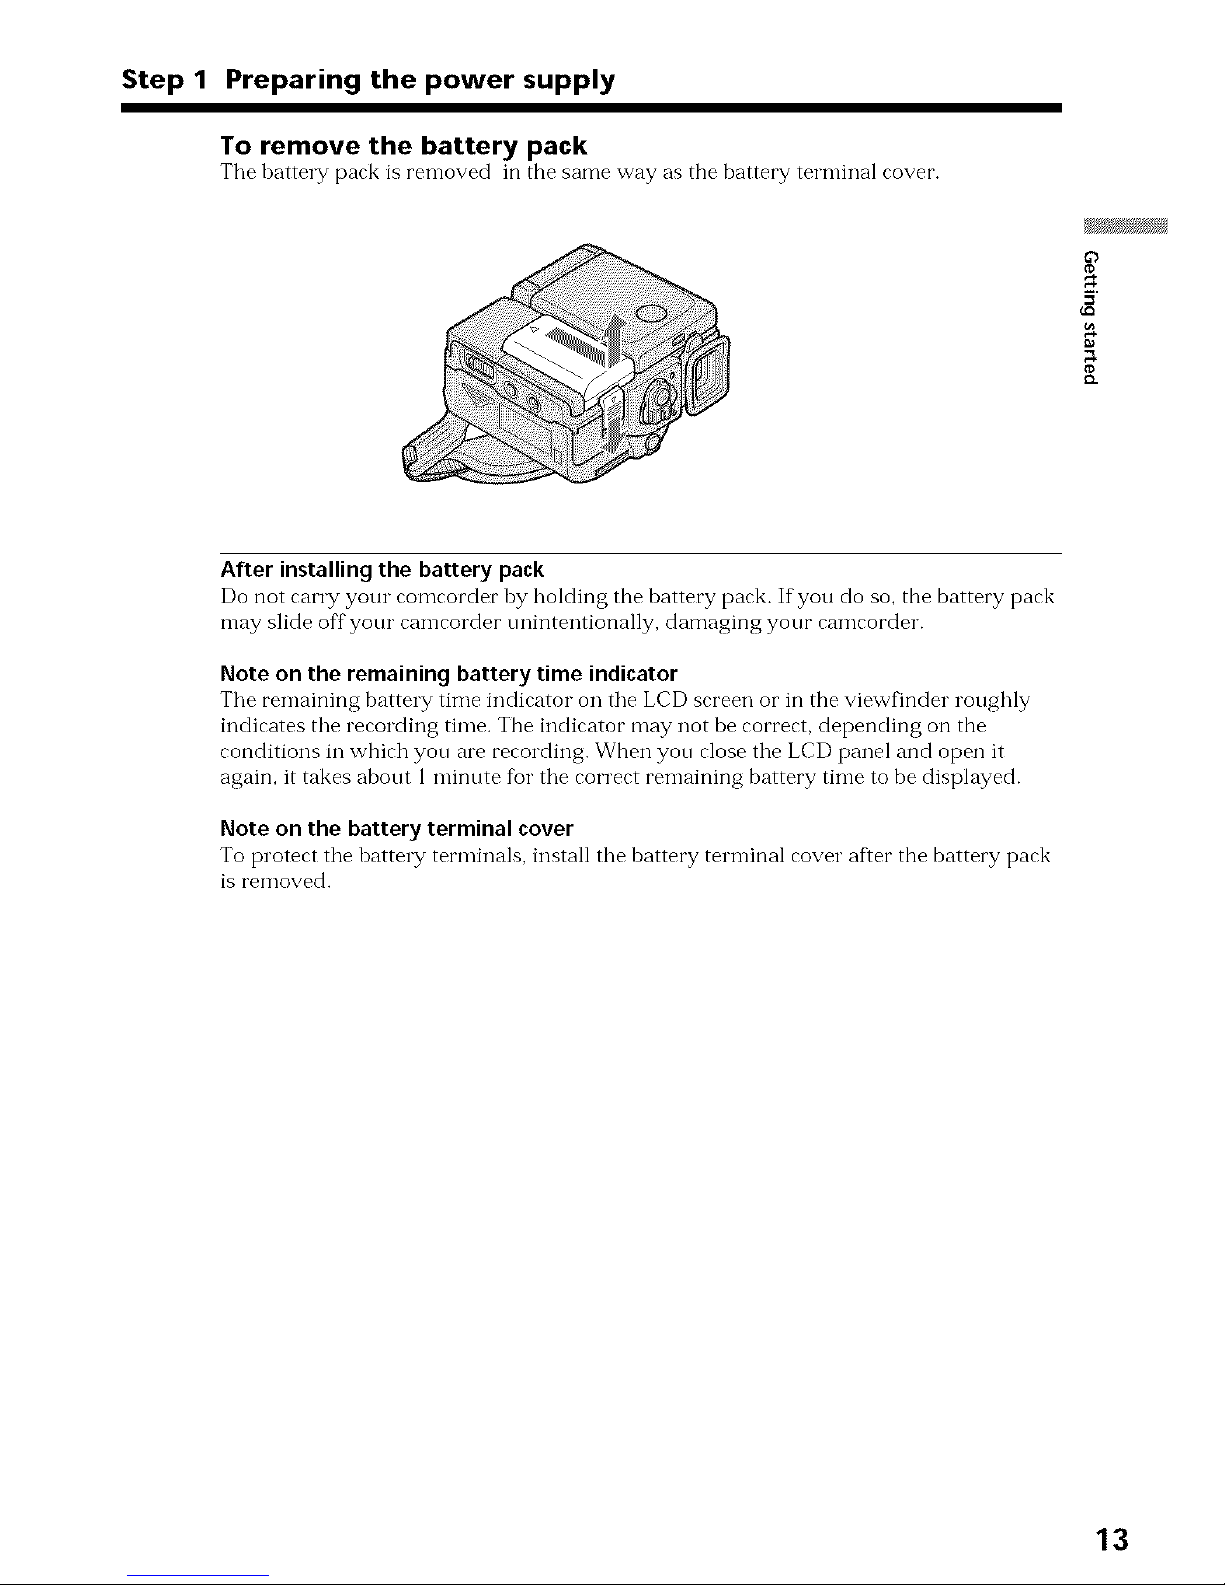
To remove the battery pack
Tile battery pack is removed in the same way as the battery terminal cover.
After installing the battery pack
Do not carry your comcorder by holding the battery pack. If you do so, the battery pack
may slide off your camcorder nnintentionally, damaging your camcorder.
Note on the remaining battery time indicator
The remaining battery time indicator on the LCD screen or in the viewfinder roughly
indicates the recording time. The indicator may not be correct, depending on the
conditions in which you are recording. When you close the LCD panel and open it
again, it takes about 1 minute fbr the correct remaining battery time to be displayed.
Note on the battery terminal cover
To protect the battery terminals, install the battery terminal cover after the battery pack
iS l'eIlloved.
13
Step 1 Preparing the power supply
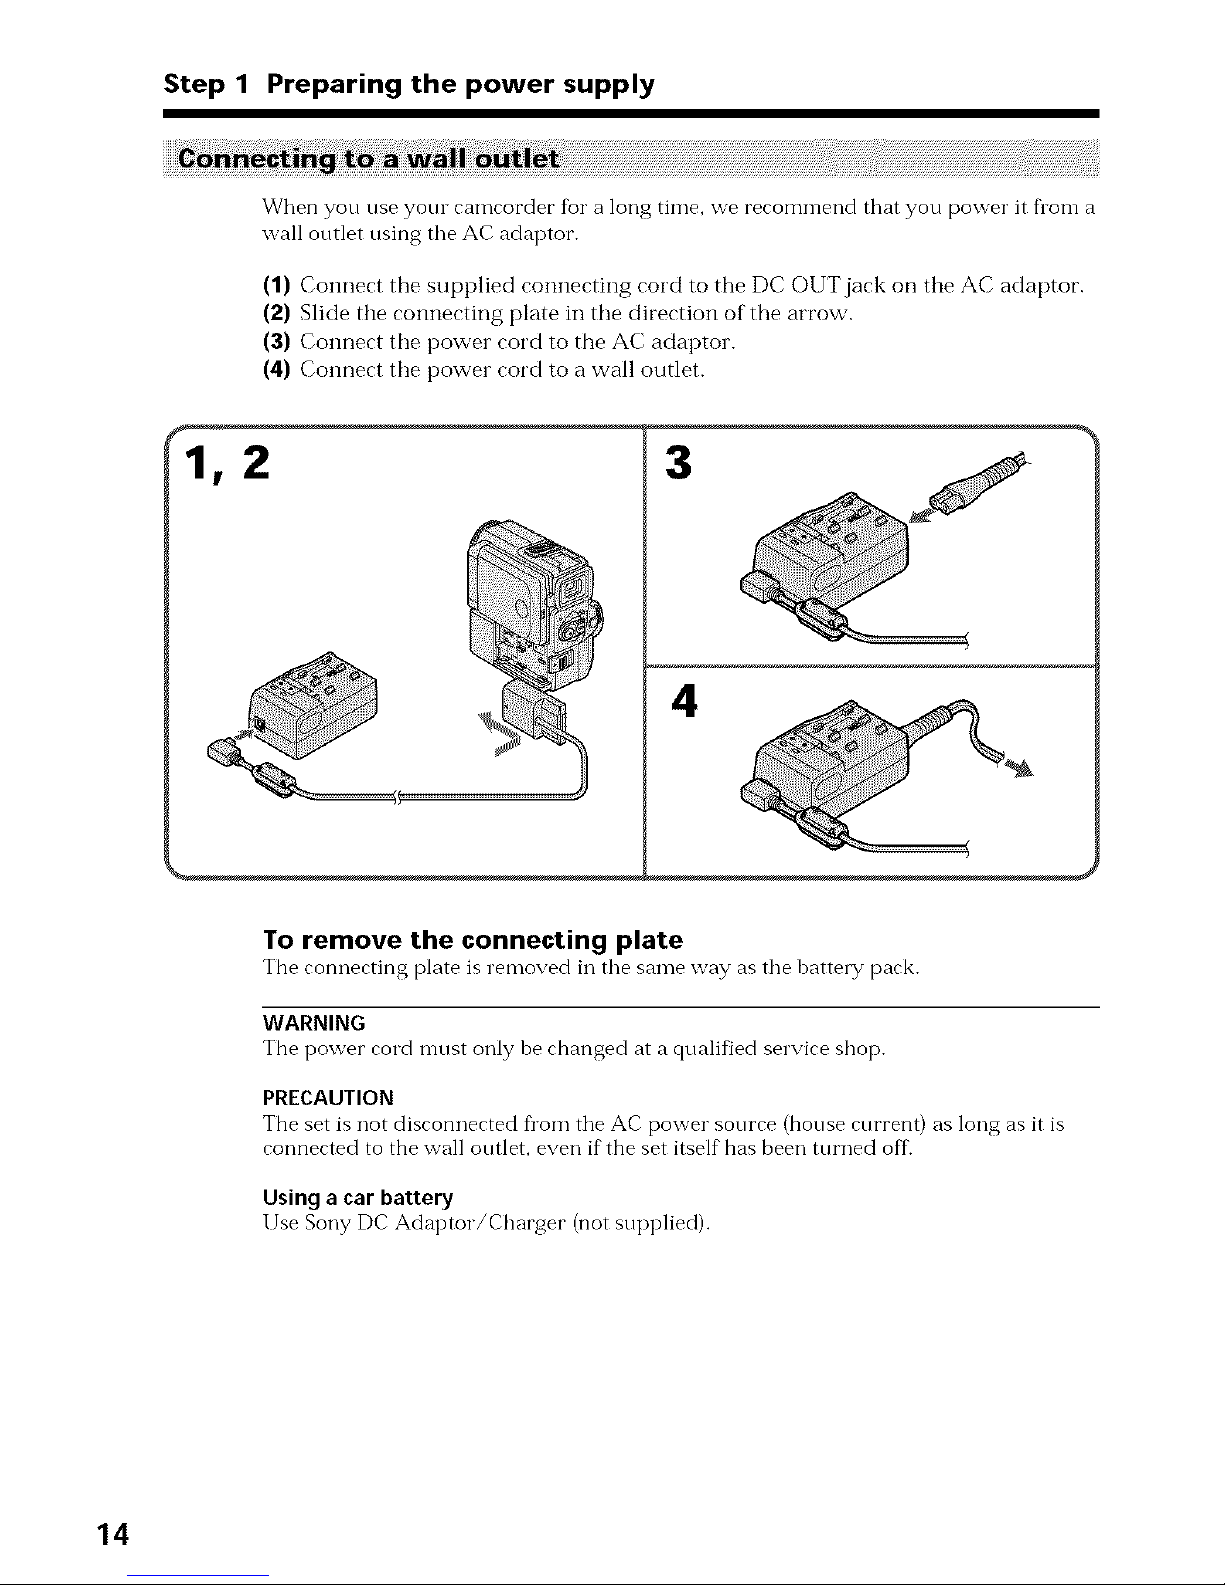
When you use yore camcorder for a long time, we reconm-lend that you power it flora a
wall outlet using tile AC adaptor.
(1) Connect the supplied connecting cord to the DC OUT jack on the AC adaptor.
(2) Slide the connecting plate ill tile direction of the arrow.
(3) Connect the power cord to the AC adaptor.
(4) Connect tile power cord to a wall outlet.
3
4
To remove the connecting plate
The connecting plate is removed in tile same way as tile battery pack.
WARNING
The power cord n-lust only he changed at a qualified service shop.
PRECAUTION
The set is not disconnected from tile AC power source (house current) as long as it is
connected to the wall outlet, even if the set itself has been turned off.
Using a car battery
Use Sony DC Adaptor/Charger (not supplied).
14
Step 2 Inserting a cassette
You can use mini DV cassette with MI_" logo* only.
*M_[_-,is a trade mark.
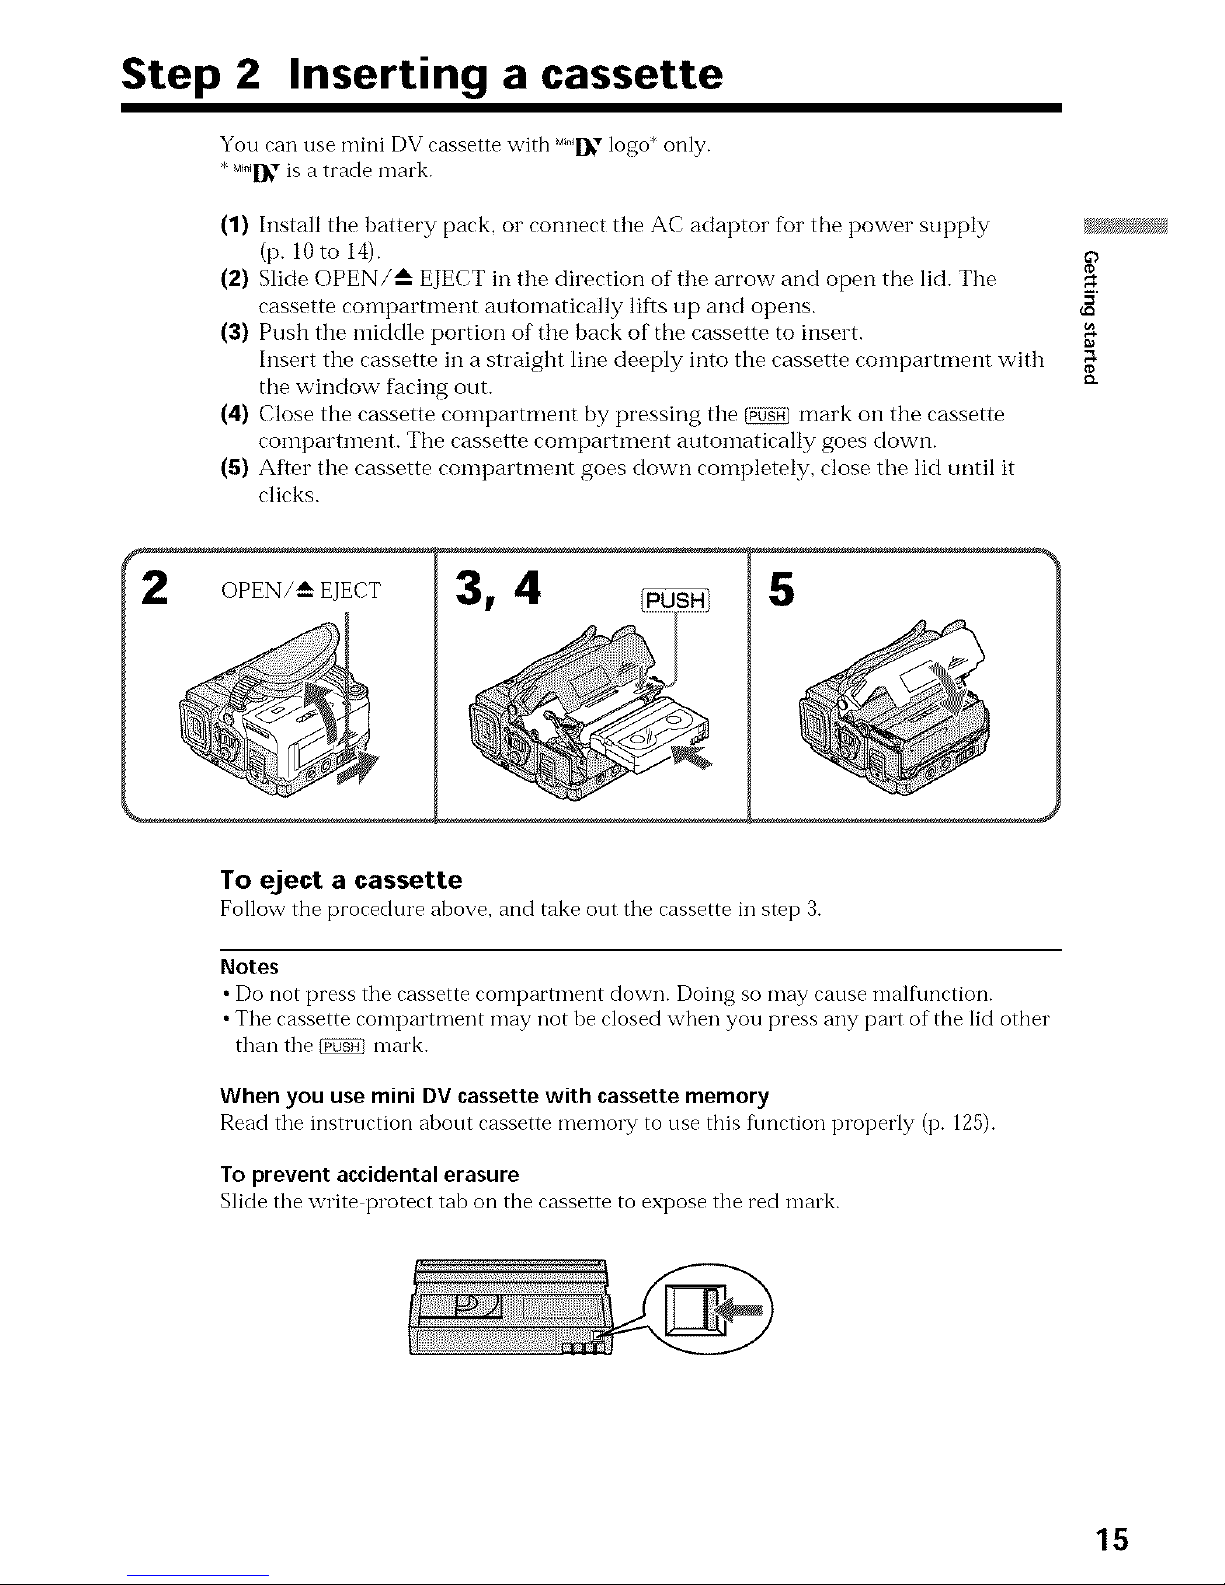
(1) Install tile battery pack, or connect tile AC adaptor for the power supply
(p. 10 to 14). ¢_
(2) Slide OPEN/_ EJECT in tile direction of tile arrow and open the lid. Tile
cassette compartment automatically lifts up and opens.
(3) Push tile middle portion of tile back of the cassette to insert.
Insert tile cassette in a straight line deeply into tile cassette comparmmnt with oa
the window facing out.
{D.
(4) Close tile cassette comparmmnt by pressing tile _ mark on the cassette
coinpartinent. The cassette compamnent autoinatically goes down.
(5) After the cassette compartment goes down completely, close the lid tmtil it
clicks.
OPEN/_-- EJECT
5
To eject a cassette
Follow the procedure above, and take out the cassette in step 3.
Notes
• Do not press the cassette compartment down. Doing so may cause mall\ruction.
• The cassette compartment may not be closed when you press any part of the lid other
than the _ mark.
When you use mini DV cassette with cassette memory
Read the instruction about cassette memory to use this function properly (p. 125).
To prevent accidental erasure
Slide the write protect tab on the cassette to expose the red mink.
15
Step 3 Using a touch panel
Your camcorder has operation huttons oil tile LCD screen. Tonch tile LCD panel
directly to operate each flmction.
In CAMERANCR mode
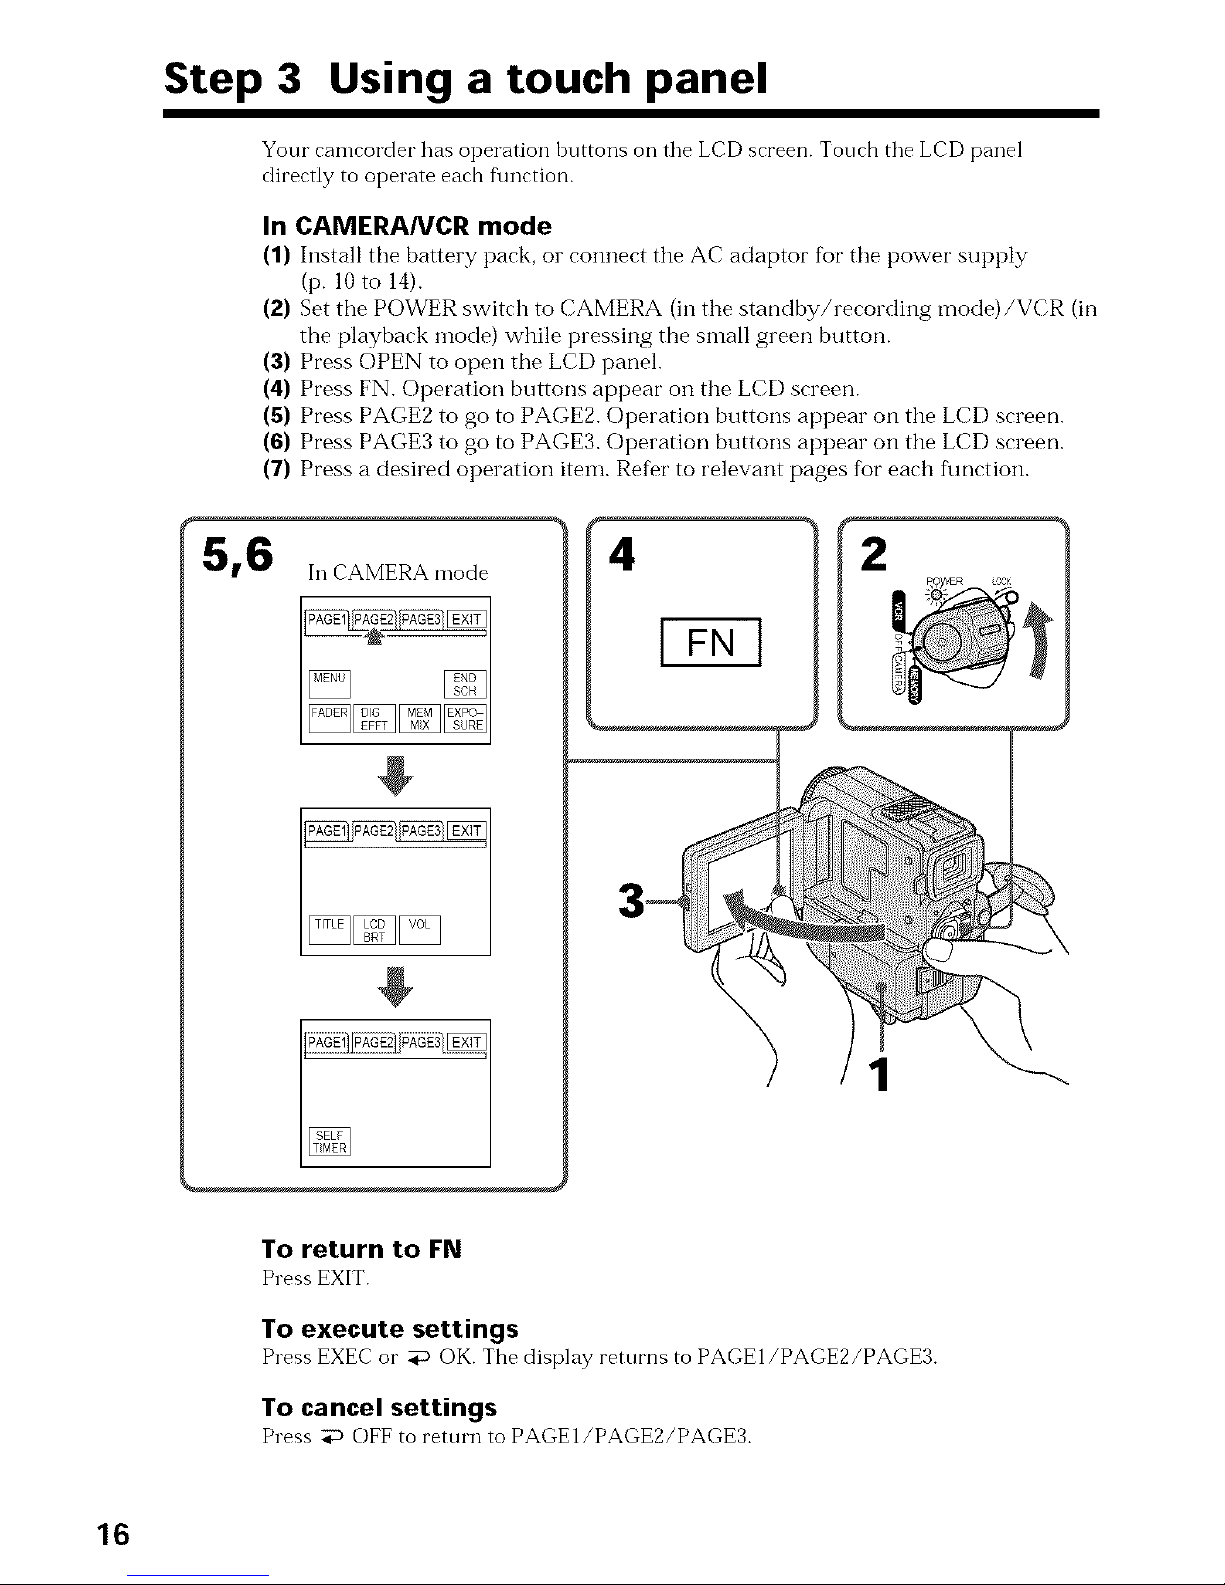
(1) Install the battery pack, or connect the AC adaptor for tile power supply
(p. 10 to 14).
(2) Set the POWER switch to CAMERA (in the standby/recording mode)/VCR (in
the playback mode) while pressing the small green button.
(3) Press OPEN to open the LCD panel.
(4) Press FN. Operation buttons appear on the LCD screen.
(5) Press PAGE2 to go to PAGE2. Operation buttons appear on the LCD screen.
(6) Press PAGE3 to go to PAGE3. Operation buttons appear on the LCD screen.
(7) Press a desired operation item. Relier to relevant pages for each function.
5,6
In CAMERA mode
@
¢--
4 2
1
To return to FN
Press EXIT.
To execute settings
Press EXECor _ OK. The display returns to PAGEI/PAGE2/PAGE3.
To cancel settings
Press :iD OFF to return to PAGEI/PAGE2/PAGE3.
16

Step 3 Using a touch panel
Notes
•When nsing the tonch panel, press operation buttons with your thnmb supporting tile
LCD screen from the back side of it o1"press those buttons lightly with yore index
finger. Do not press them with sharp pointed olojectssnch as pens.
• Do not press the LCD screen too hard. ¢_
• Do not touch the LCD screen with wet hands.
•If FN is not on the LCD screen, touch the LCD screen lightly to make it appear. Yon
can control the display with DISPLAY/TOUCH PANEL on your camcorder.
•When operation bnttons do not work even ifyon press them, an adjtlstment is
required (CALIBRATION) (p. 141). _"
•When the LCD screen gets dirty, use the supplied cleanig cloth.
When executing each item
The green bar appears above the item.
If the items are not available
The color of the items changes to gray.
Touch panel
Yon can operate with the touch panel using the viewfinder (p. 124).
Press FN to display the following buttons:
In CAMERA mode
PAGE1 MENU, END SEARCH, FADER, DIGITAL EFFECT, MEMORY MIX,
EXPOSURE
PAGE2 TITLE, LCD BRIGHT, VOLUME
PAGE3 SELFTIMER
In VCR mode
PAGE1 MENU, LCD BRIGHT, VOLUME, END SEARCH
PAGE2 TITLE, DIGITAL EFFECT, PBZOOM
PAGE3 DATA CODE, REC CONTROL
See p. 99 for MEMORY mode.
17

-- Recording - Basics--
Recording a picture
Your camcorder auton-latically %cuses %1"yon.
(1) Remove the lens cap and pull the lens cap string to fix it.
(2) Install tile power source and insert a cassette. See "Step 1" and "Step 2" for
more inflormation (p. I0 to 15).
(3) Pull out the viewfinder until it clicks.
(4) Pull down the Holding Grip.
Hold your camcorder firmly as illustrated.
(5) Set the POWER switch to CAMERA while pressing the small green button.
Your camcorder is set to the standby mode.
(6) Press START/STOP. Your caincorder starts recording. The "REC" indicator
appears. The camera recording lamp located on the fi'ont of your camcorder
lights up. To stop recording, press START/STOP again.
LOCK
Microphone
,g
lamp
18
After recording
(1) Set the POWER switch to OFF.
(2) Set the Holding Grip and the viewfinder back to the previous position.
(3) Eject the cassette.
(4) Remove the battery pack.
Notes
• Fasten the grip strap filmly. Do not touch the built in microphone dul'ii]g recording.
• When the viewfinder is not pulled out tmtil it clicks, the picture does not appear in the
viewfinder even if the LCD panel is closed.
Recording a picture
Note on Recording mode
Your camcorder records and plays back in the SP (standard play) mode and in the LP
(long play) mode. Select SP or LP in the menu settings (p. 89). In the LP mode. you can
record 1.5 times as long as in the 8P mode.
When you record a tape in the LP mode on your camcorder, we recommend playing tile
tape on your camcorder.
Note on the LOCK
When you slide the LOCK to the left, the POWER switch can no longer be set to
MEMORY accidentally. Tile LOCK is set to the right as a default setting.
To enable smooth transition
Transition between tile last scene you recorded and the next scene is smooth as long as
you do not eject tbe cassette even if you turn offyour camcorder.
However, check the fbllowing:
• Do not mix recordings in tile SP mode and ones in tile LP mode on one tape.
• When you change the battery pack. set the POWER switch to OFF.
• When you use a tape with cassette memory, however, you can make tile transition
smooth even after ejecting the cassette if you use the end search flmction (p. 26).
If you leave your camcorder in the standby mode for 5 minutes while the cassette
is inserted
Your ramrorder automatirally turns off This is to save battery power and to prevent
batte W and tape wear. To resume the standby mode, set the POWER switch to OFF, and
to CAMERA again.
However, your camcorder does not turn offautomatically while the cassette is not
inserted.
When you record in the SP and LP modes on one tape or you record in the LP
mode
• Tile transition between srenes is not smootb.
• Tile playback picture may be distorted or the time code may not be written properly
between scenes.
0
E
E
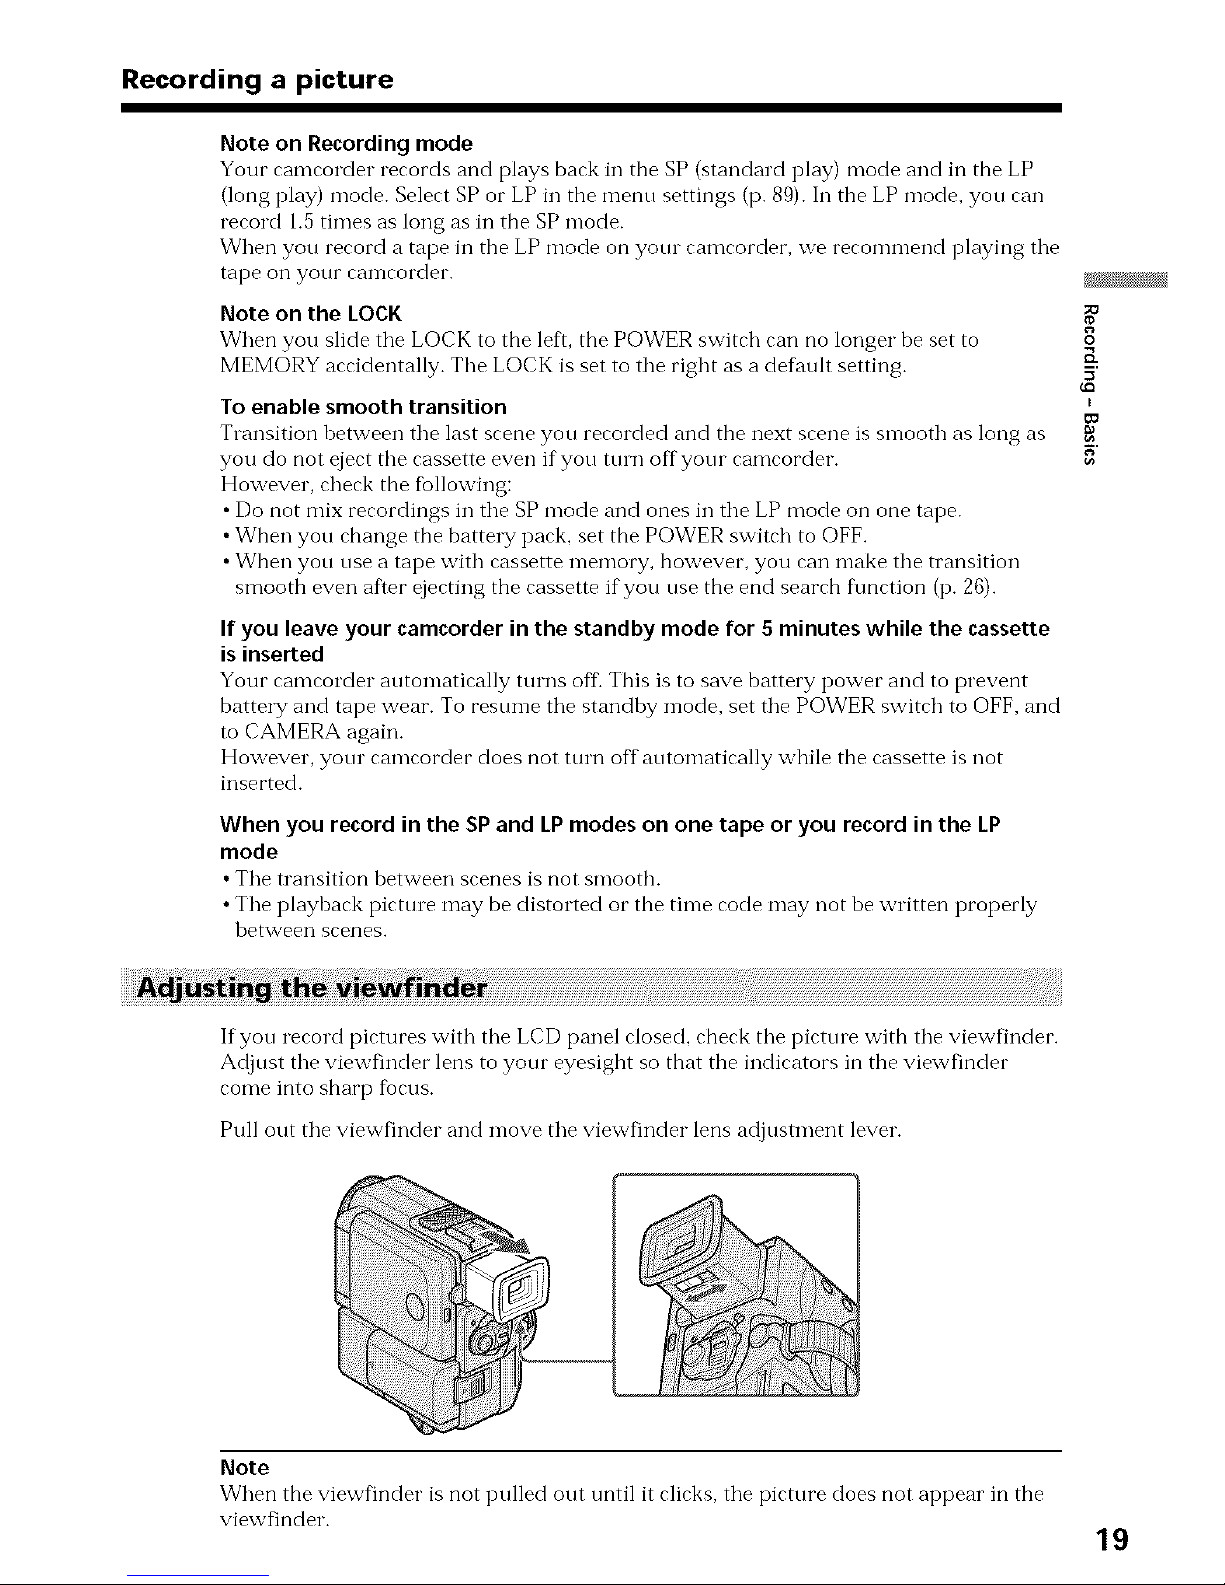
If yon record pictures with tile LCD panel closed, check tile pictme with tile viewfinder.
Adjust the viewfinder lens to your eyesight so that the indicators in the viewfinder
come into sharp fiocus.
Pull out tile viewfinder and move tile viewfinder lens adjustment lever.
•..............
Note
When tile viewfinder is not pulled out until it clicks, the picture does not appear in tile
viewfinder.
19
Recording a picture
Press OPEN to open tile LCD panel.
The LCD panel moves about 90 degrees to the viewfinder side and about 180 degrees to
the lens side.
If you tmn tile LCD panel over so that it faces tbe other way, tile @ indicator appears
in the viewfinder and on the LCD screen (Mirrormode).
When closing the LCD panel, set it vertically until it clicks, and swing it into the
camcorder body.
Notes
• Shooting with the LCD screen makes battery life shorter than using the viewfinder.
• When using the LCD screen except in the rein'or mode, the viewfinder automatically
turns off
When you use the LCD screen outdoors in direct sunlight
Tbe LCD screen n-lay be diffkult to see. If"this happens, we recomn'Jei'<l tbat you use tim
viewfinder.
When you adjust angles of the LCD panel
Make sure if the LCD panel is opened up to 90 degrees.
Picture in the mirror mode
The picture on the LCD is a mirror image. However, the picture will be normal when
recorded.
Duringrecording inthe mirror mode
ZERO SET MEMORY on the Remote Commander does not work.
Indicators in the mirror mode
The STBY indicator appears as 110 and REC as O. Some of the other indicators appear
rein'or reversed and others are not displayed.
When you press FN
Tbe @ does not appear on the LCD screen oi"in tbe viewfinder.
FN in the mirror mode
FN appears mirror reversed in the viewfinder.
20
Recording a picture
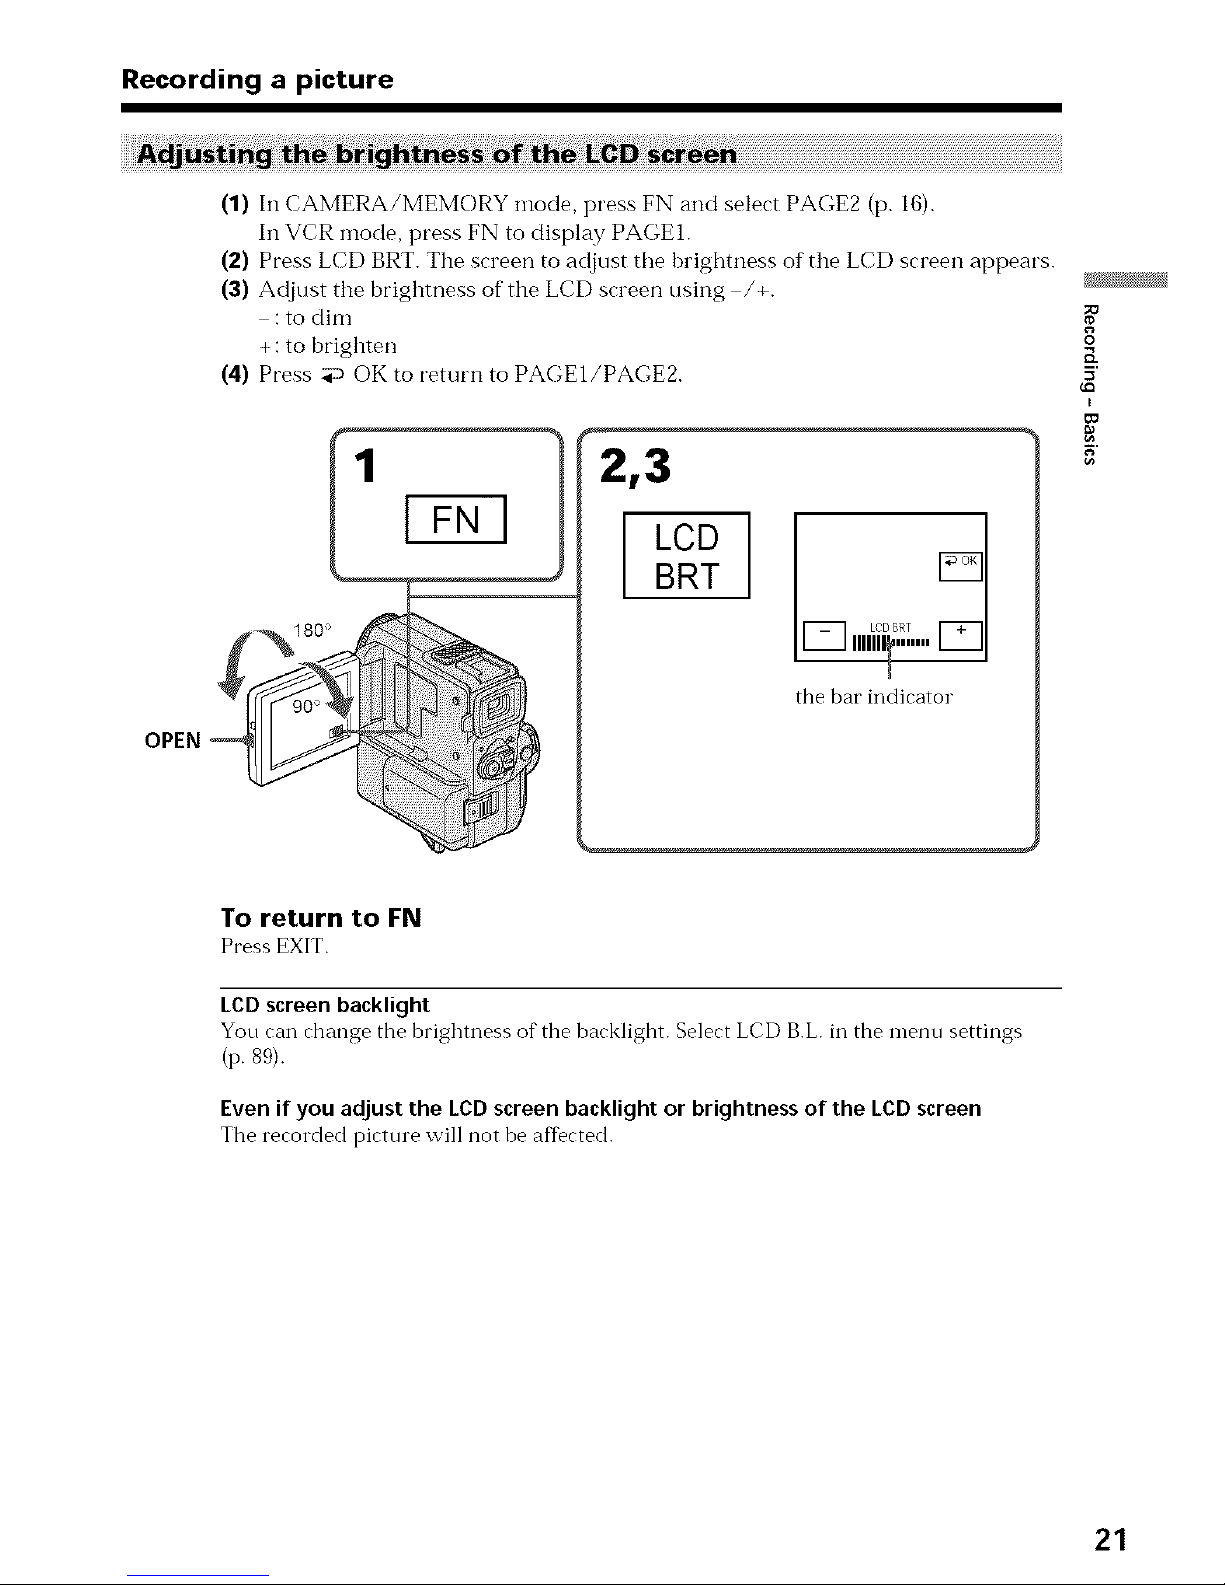
(1) In CAMERA/MEMORY mode, press FN and select PAGE2 (p. IB).
In VCR mode, press FN to display PAGE1.
(2) Press LCD BRT. The screen to adjust tile brightness of the LCD screen appears.
(3) Adjust the brightness of the LCD screen using /+.
: to dim
+ : to brighten
(4) Press aP OK to return to PAGE1/PAGEZ
1
2,3
LCD
BRT
the bar indicator
0
K
I
¢o
To return to FN
Press EXIT.
LCD screen backlight
You can change the brighmess of the backlight. Select LCD B.L. in the menu settings
(p. 89).
Even if you adjust the LCD screen backlight or brightness of the LCD screen
The recorded picture will not be affected.
21
Recording a picture
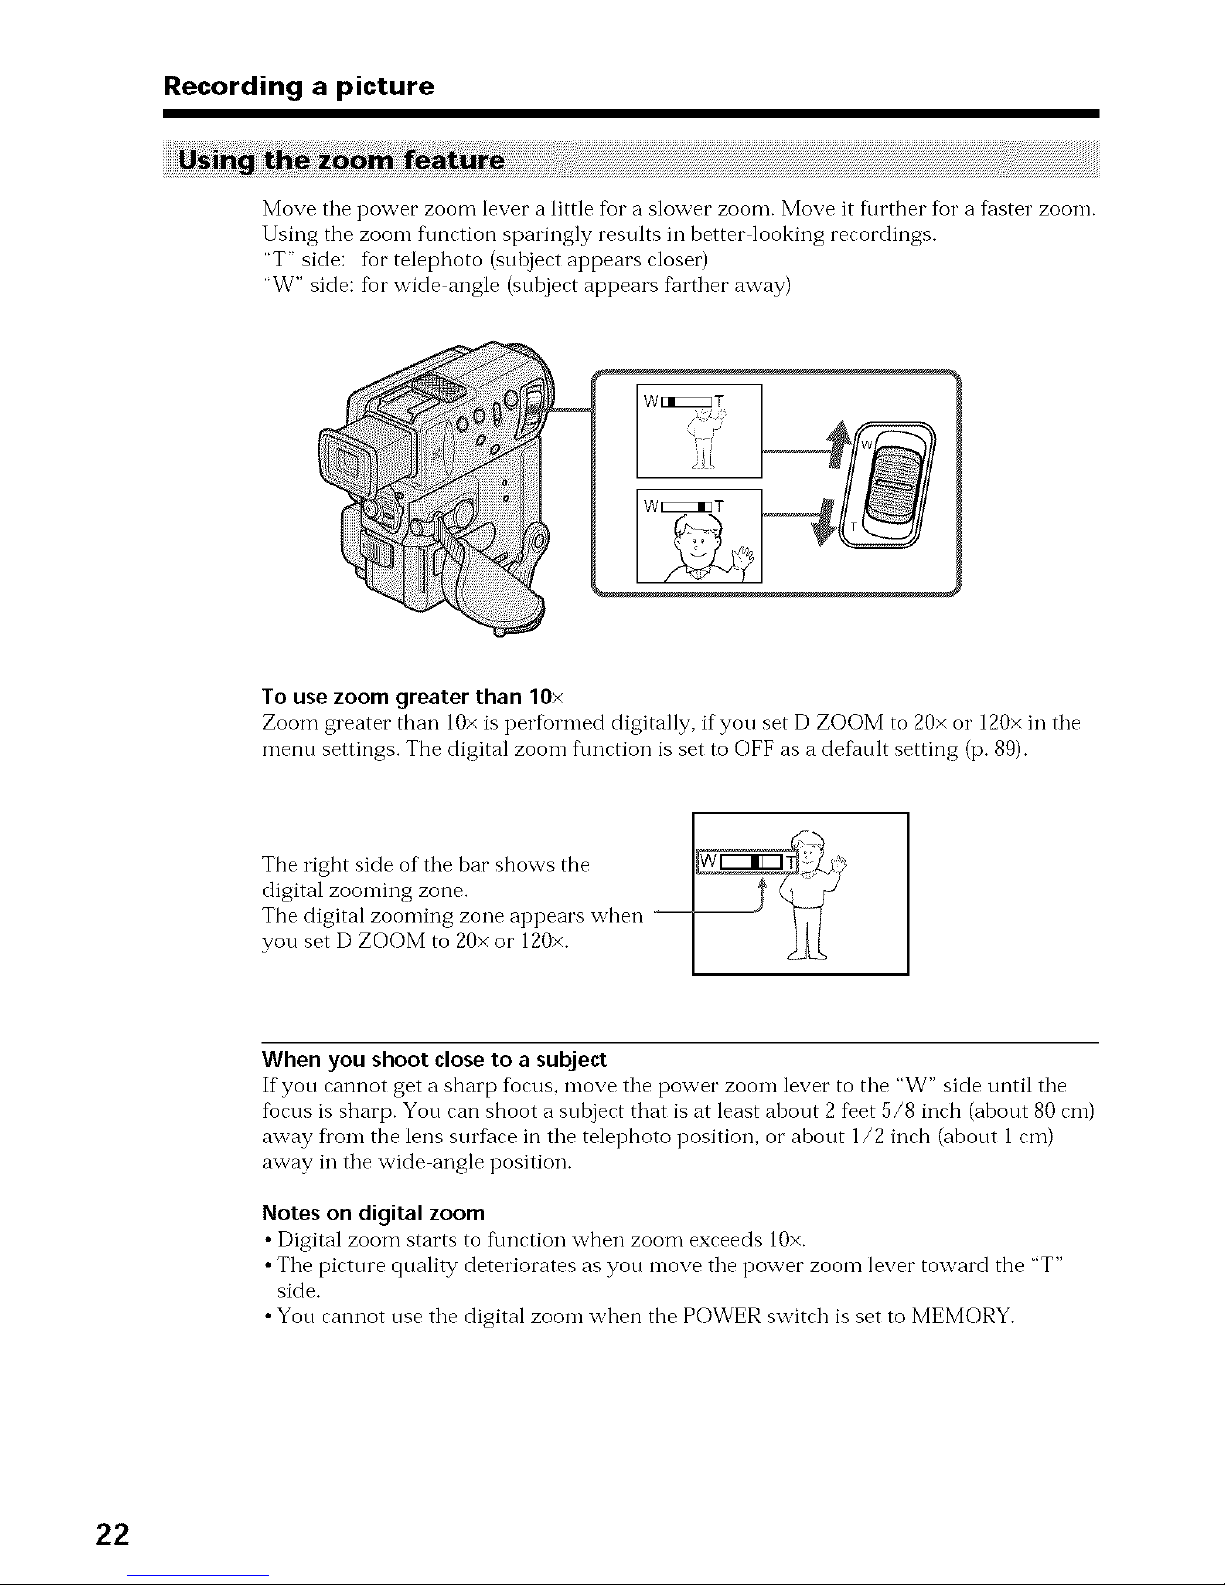
Move tile power zoom lever a little for a slower zoom. Move it further for a f_ster zoom.
Using the zoom flmction sparingly results in better looking recordings.
"T" side: for telephoto (snhject appears closet')
"W" side: for wide angle (snbject appears fiirther away)
w [IEEEZ3T
To use zoom greater than 10×
Zoom greater than 10× is performed digitally, if you set D ZOOM to 20× o1" 120× in the
menn settings. The digital zoom f\mction is set to OFF as a defanlt setting (p. 89).
The right side of the bar shows the ]_-!,_Q
digital zooming zone.
The digital zooming zone appears when
you set D ZOOM to 20x or 120×.
When you shoot close to a subject
If yon cannot get a sharp focus, move the power zoom lever to the "W" side until the
focus is sharp. Yon can shoot a snbject that is at least about 2 feet 5/8 inch (about 80 cm)
away flora the lens surface in the telephoto position, or about 1/2 inch (abont 1 cm)
away in the wide angle position.
Notes on digital zoom
• Digital zoom starts to flmction when zoom exceeds 10×.
• The pictnre quality deteriorates as yon move the power zoom lever toward the "T"
side.
• Yon cannot nse the digital zoom when the POWER switch is set to MEMORY.
22
Recording a picture
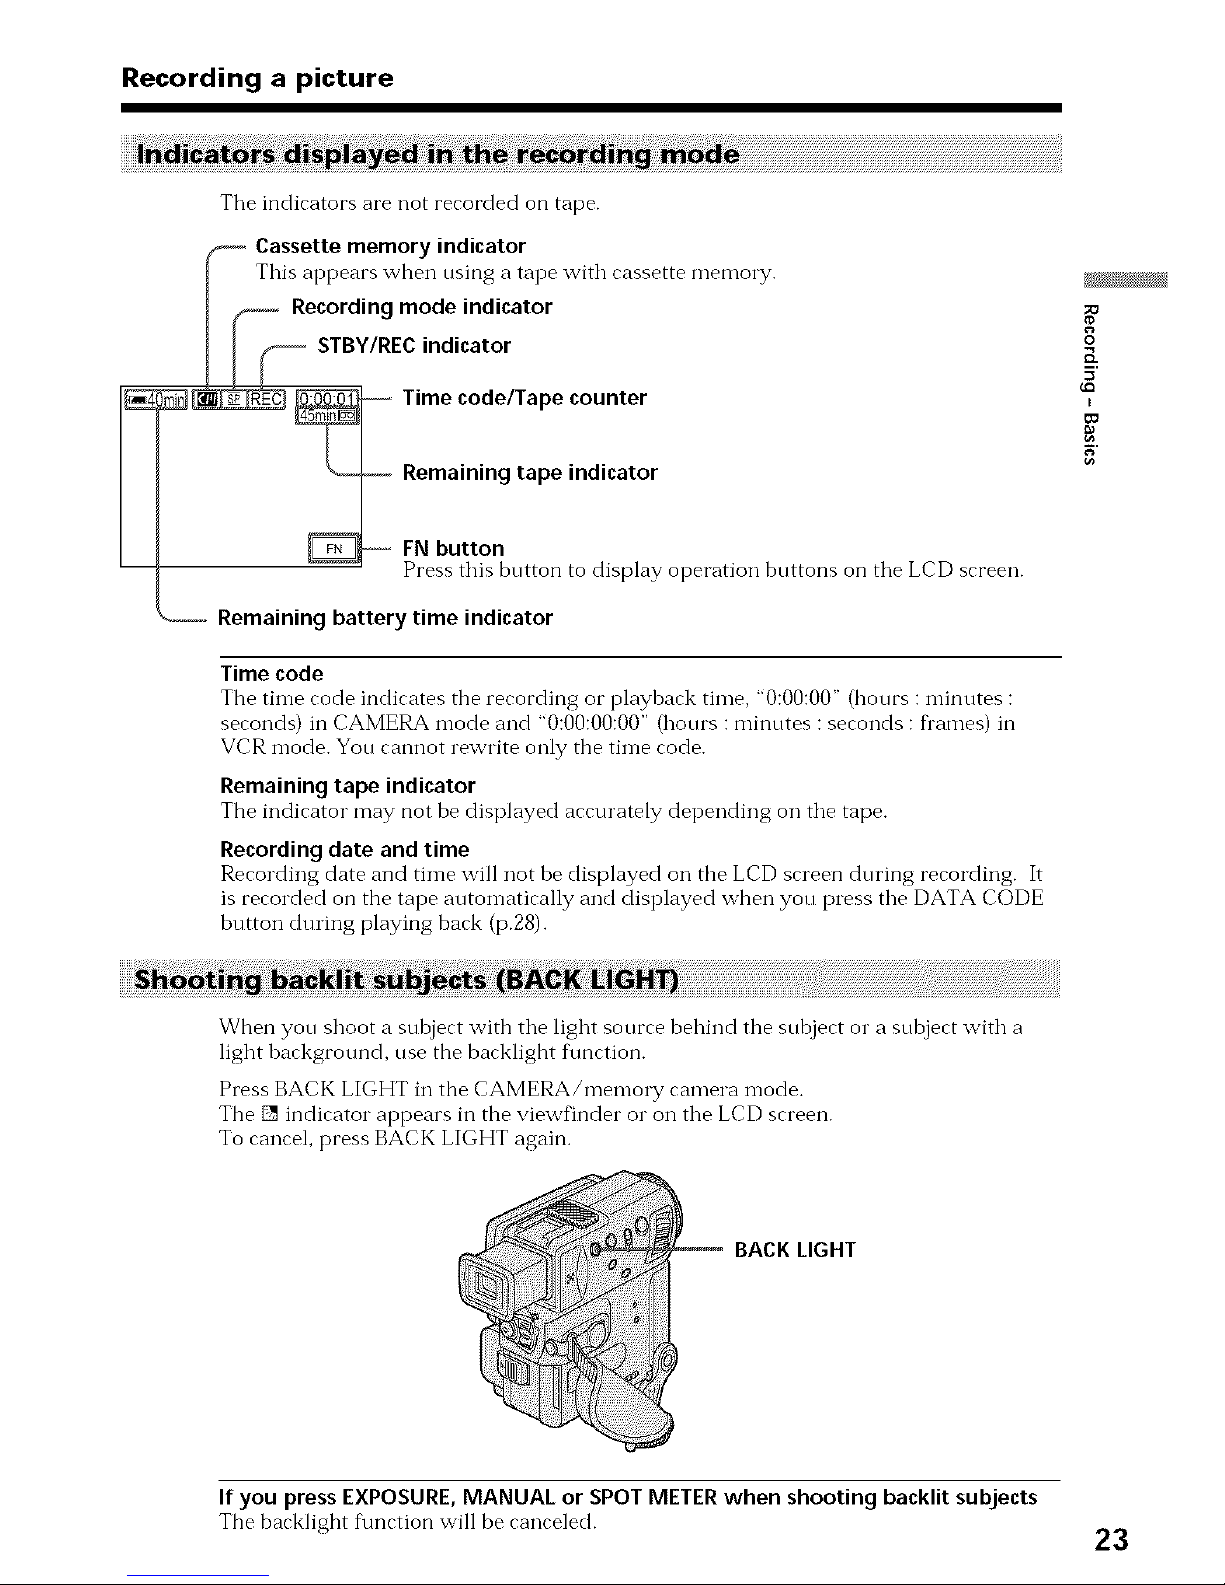
The indicators are not recorded on tape.
Cassette memory indicator
This appears when using a tape with cassette memory.
Recording mode indicator
STBY/REC indicator
Time code/Tape counter
Remaining tape indicator
_O
O
E
5
FN button
Press this bntton to display operation bnttons on the LCD screen.
Remaining battery time indicator
Time code
The time code indicates the recording or playback time, "0:00:00" (hours :minutes :
seconds) in CAMERA mode and "0:00:00:00" (hours :minutes : seconds : Dames) in
VCR mode. You cannot rewrite only the time code.
Remaining tape indicator
The indicator may not be displayed accurately depending on the tape.
Recording date and time
Recording date and time will not be displayed on tbe LCD screen during recording. It
is recorded on the tape automatically and displayed when you press the DATA CODE
button during playing back (p.28).
When you shoot a subject with the light source behind the subject or a subject with a
light background, use the backlight f\mction.
Press BACK LIGHT in the CAMERA/memory camera *node.
The [] indicator appears in the viewfinder or on the LCD screen.
To cancel, press BACK LIGHT again.
i
BACK LIGHT
If you press EXPOSURE, MANUAL or SPOT METER when shooting backlit subjects
Tbe toarkligbt t\mrtion will be ranreled. 23
Recording a picture
The NightShot flmction enables you to shoot a subject in a dark place. For example, you
can satisfactorily record the envilonment of nocturnal animals fur observation when
you use this flmction.
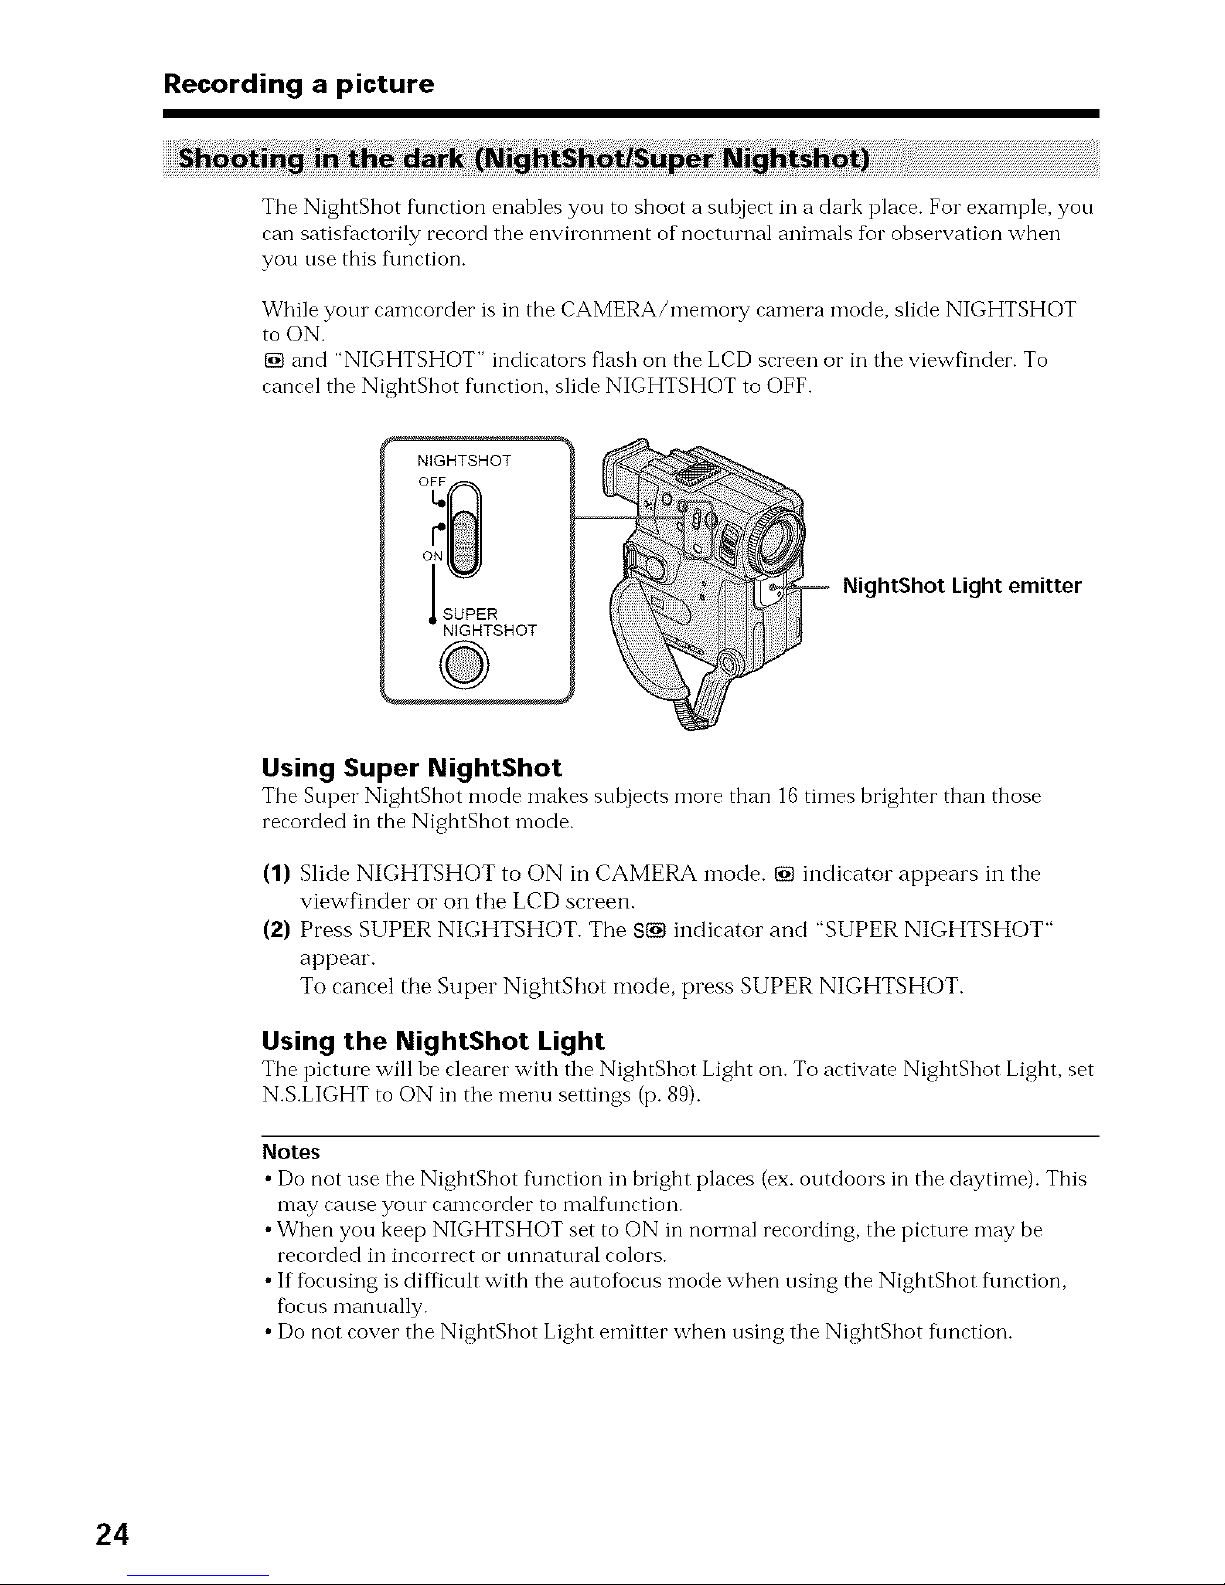
While your camcorder is in the CAMERA/memo W camera mode, slide NIGHTSHOT
to ON.
[] and "NIGHTSHOT" indicators flash on the LCD screen or in the viewfinder. To
cancel the NightShot f\mction, slide NIGHTSHOT to OFF.
NIGHTSHOT
SUPER
NIGHTSHOT
NightShot Light emitter
Using Super NightShot
The Super NightShot mode n-lakes subjerts more than 16times brighter than those
recorded in the NightShot mode.
(1) Slide NIGHTSHOT to ON in CAMERA mode. [] indicator appears in the
viewfinder oi" on the LCD screen.
(2) Press SUPER NIGHTSHOT. The $[] indicator and "SUPER NIGHTSHOT"
appear.
To cancel the Super NightShot mode, press SUPER NIGHTSHOT.
Using the NightShot Light
The pirture will be rlearer with the NightShot Light on. To artivate NightShot Light, set
N.S.LIGHT to ON in the menu settings (p. 89).
Notes
• Do not use the NightShot flmction in bright plares (ex. outdoors in the daytime). This
may cause yotn camcorder to mall\ruction.
•When you keep NIGHTSHOT set to ON in normal recording, the picttne may be
recorded in incorrect or tmnattnal colors.
• If focusing is difficult with the autofocus mode when using the NightShot flmction,
fbcus manually.
• Do not cover the NightShot Light emitter when using the NightShot flmction.
24
Recording a picture
While using the NightShot function, you cannot usethe following functions:
Exposure
PROGRAM AE
White balance
Shutter speed in the SuperNighShotmode
The shutter speed will be automatically changed depending oi1the brightness of the
hackgrotmd. The motion of tile picttue will be slow.
While using the Super NightShot function, you cannot use the following
functions:
Exposure
PROGRAM AE
Fader
Digital effect
White halance
In MEMORY mode
Super NightShot does not work.
NightShot Light
NightShot Light rays are infraled and so are invisible. Tile maxin-lum shooting distance
using the NightShot Light is about 10feet (3m).
When recording in the mirror mode using NP-F10/FS11 battery
NightShot Light does not work.
O
I
5
You can make a recording with the self timer. This mode is useful when you want to
record yourself
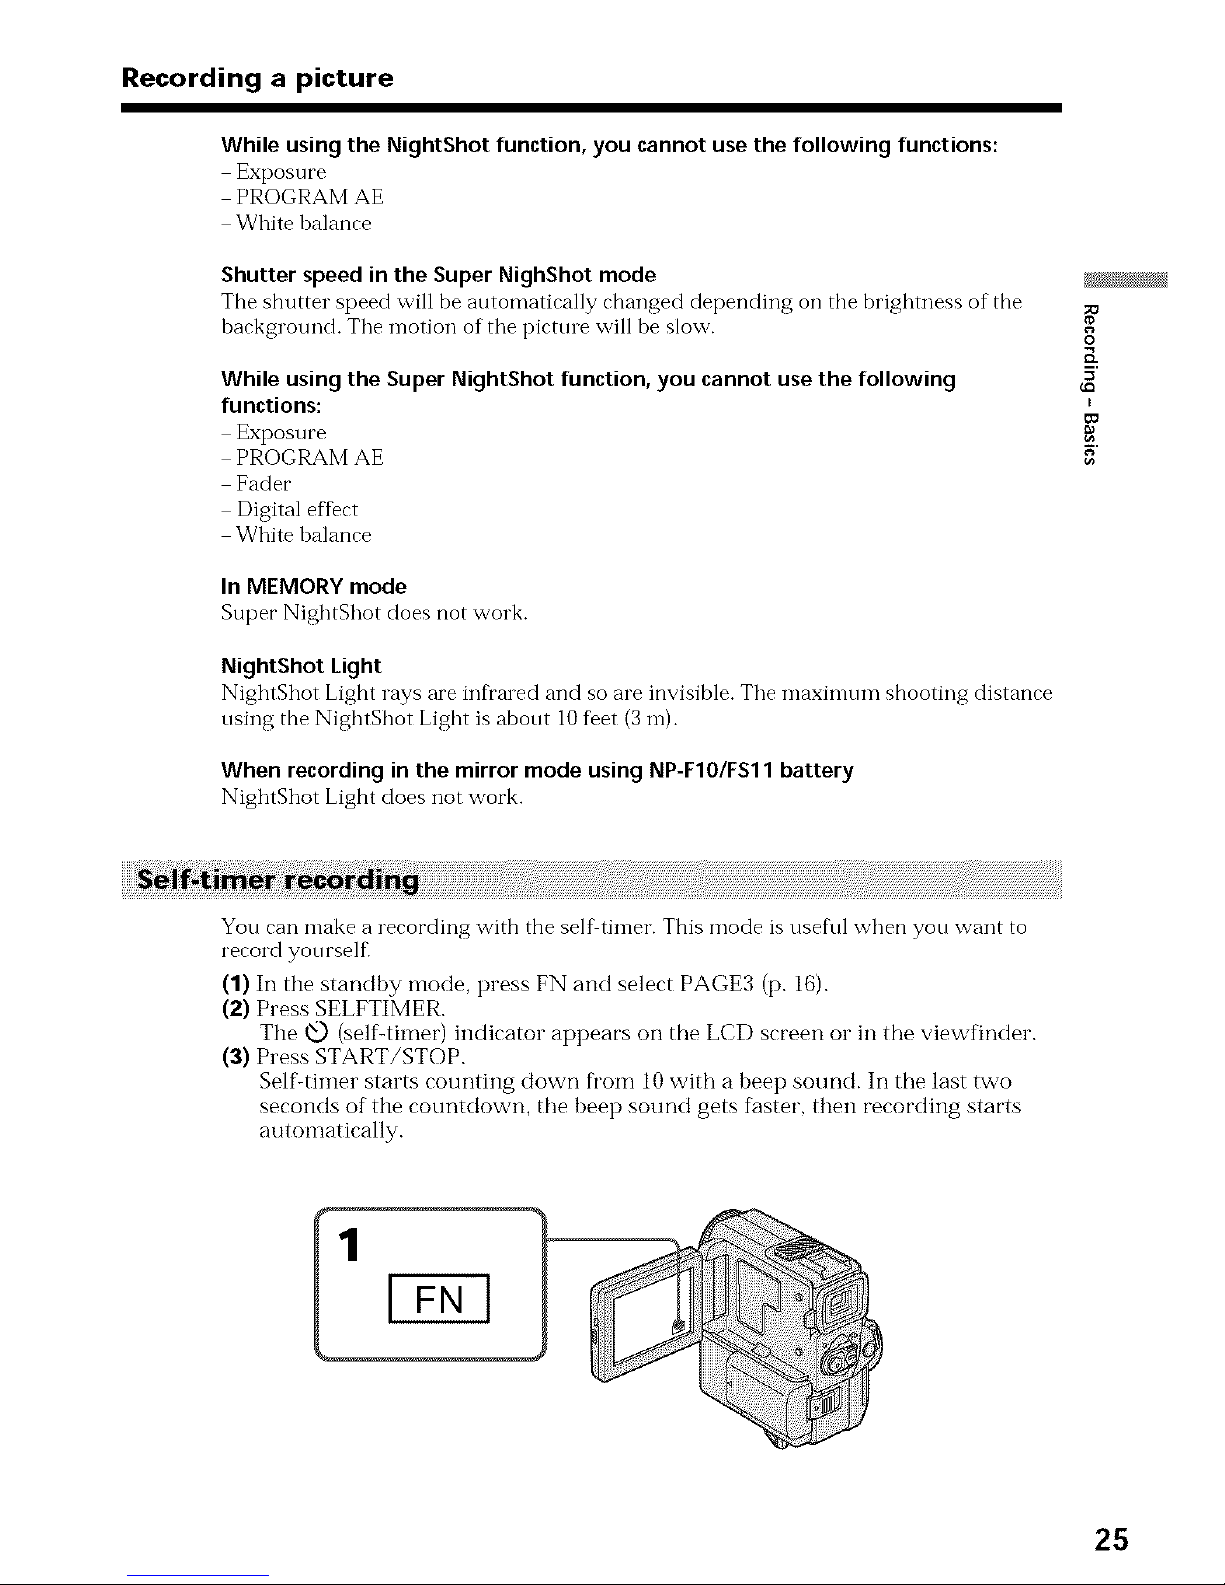
(1) In the standby mode, press FN and select PAGE3 (p. 16).
(2) Press SELFTIMER.
The xt_) (selfLtimer) indicator appears on the LCD screen or in the viewfinder.
(3) Press START/STOP.
Self:timer starts counting down from 10 with a beep sound. In the last two
seconds of the countdown, the beep sound gets faster, then recording starts
automatically.
25
Recording a picture
To stop the self-timer during recording
Press START/STOP.
IIse tile Remote Commander for convenience.
To cancel the self-timer recording
Press SELFTIMER so that tile <e..)indicator disappears fl'om tile LCD screen or the
viewfinder whi]e your camcorder is in the standby mode.
To record still pictures on a tape using the self-timer
Press PHOTO in step 3 (p. 33).
Note
The self timer recording mode is automatically cancelled when:
The selftimer recording is finished.
The POWER switch is set to OFF or VCR.
You can go to tile end of tile recorded section after you record.
(1) In the standby mode, press FN to display PAGE 1 (p. 16).
(2) Press END SCH.
The last 5 seconds of the recorded section are played back and the playback
stops. You can monitor the sound fi'om the speaker or headphones.
To return to FN
Press EXIT.
To stop searching
Press ENDSCHagain.
Note
If there is a blank portion in tile recorded portion, the end search f\metion may not
work correctly (p. 125).
Endsearchfunction
When you use a tape without cassette memory, the end search f\mction does not work
once you eject tile cassette afler you have recorded on tile tape. If you use a tape with
cassette memory, tile end search fimction works even once you eject the cassette.
26
-- Playback - Basics--
Playing back a tape
You can monitor the playback picture on the LCD screen. If you close tile LCD panel,
you can n-lonitor the playback picture in tile viewfinder. You can also control playback
osing tile Remote Commander supplied with your camcorder.
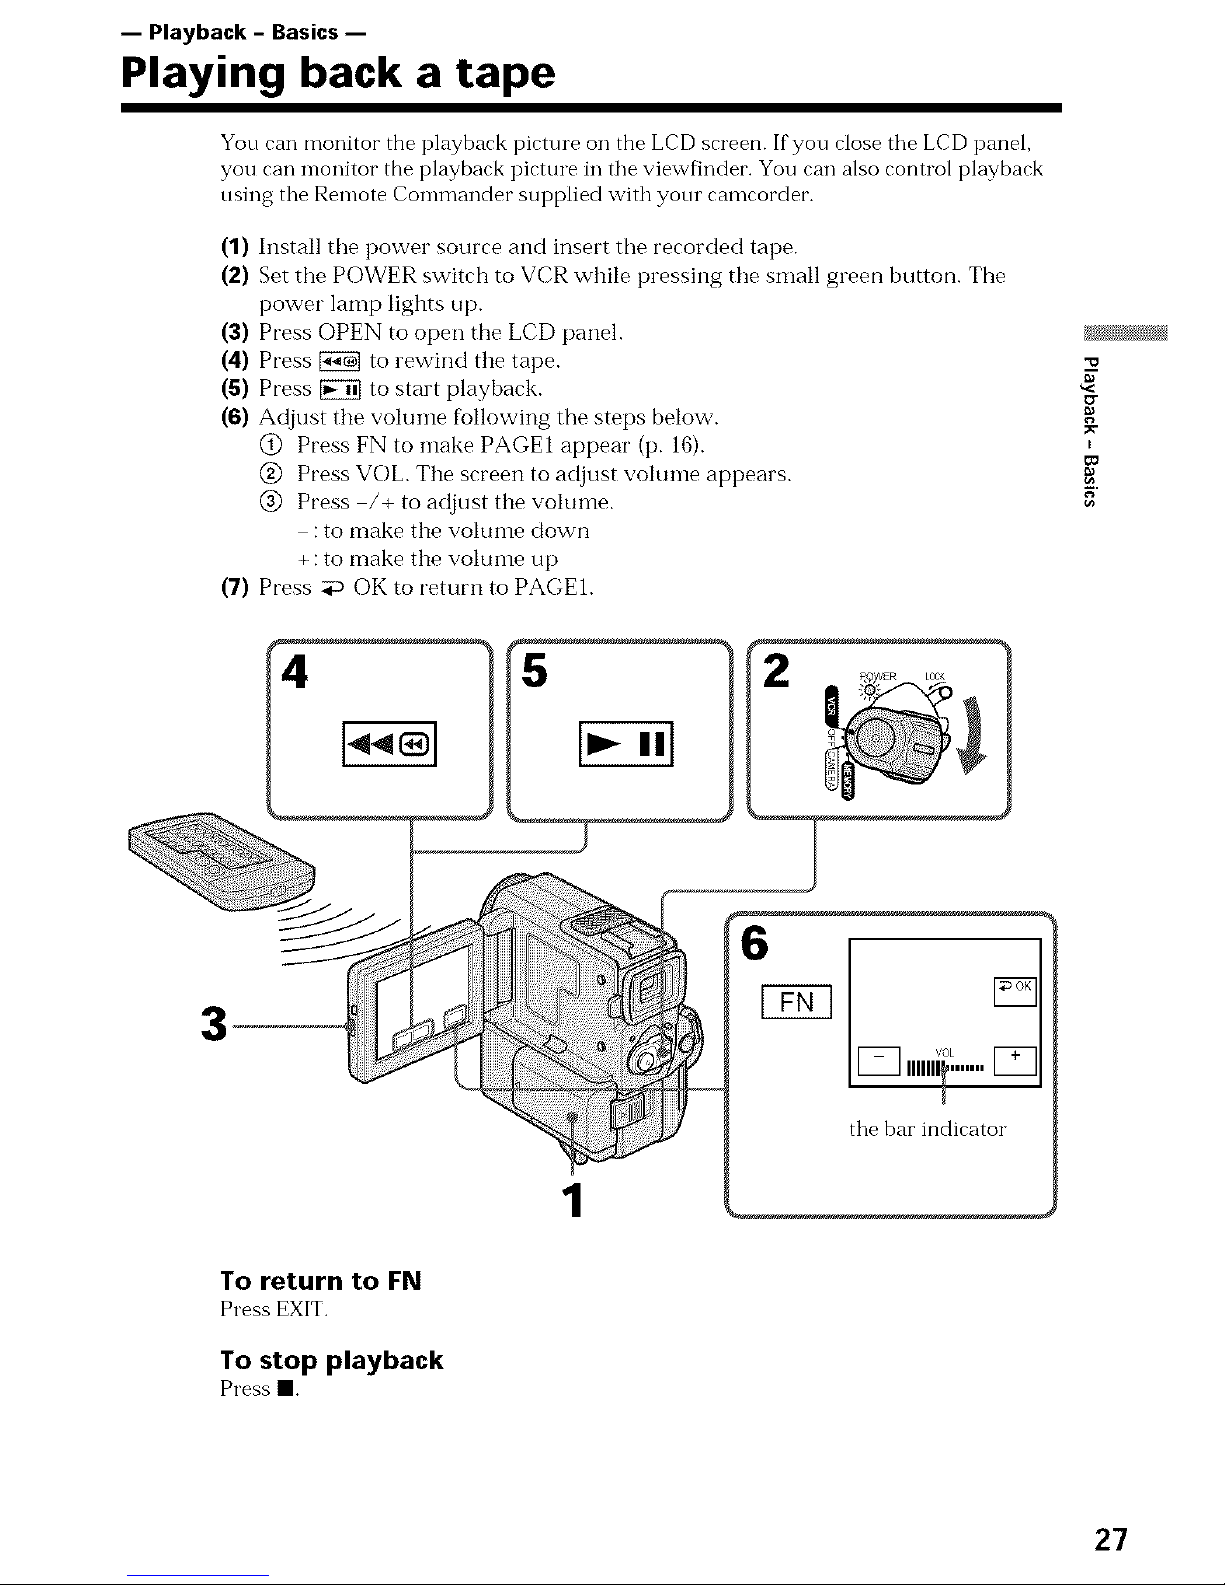
(1) Install tile power source and insert the recorded tape.
(2) Set the POWER switch to VCR while pressing the small green button. The
power lamp lights up.
(3) Press OPEN to open the LCD panel.
(4) Press _ to rewind the tape.
(5) Press _ to start playback.
(6) Adjust the voluine fi_llowing the steps below.
@ Press FN to make PAGE1 appear (p. 16).
@ Press VOL. The screen to adjust volume appears.
@ Press /+ to adjust the volume.
:to make the volume down
+: to make the voluine up
(7) Press _ OK to return to PAGE1.
g
E
1
....0L
U_ ,,,_.......
tile bar indicator
To return to FN
Press EXIT.
To stop playback
Press am.
27
Playing back a tape
When monitoring on the LCD screen
You can turn tile LCD panel over and move it hack to the camcorder hody with tile LCD
screen facing out.
If you leave the power on for a long time
Your camcorder gets warm. This is not a malfunction.
When you open/close the LCD panel
Open/close tile LCD panel vertically.
When monitoring in the viewfinder
Turn the LCD panel over and move it hack to the camcorder body with the LCD screen
liming out, and pull out the viewfinder tmtil it clicks. In this case, the picture is not
displayed on the LCD screen.
28
Press DISPLAY/TOUCH PANEL on your camcorder or DISPLAY on the Remote
Commander supplied with your camcorder.
The indicators disappear on the LCD screen.
To make the indicators appear, press DISPLAY/TOUCH PANEL again.
Using the data code function
Your rameorder automatically records not only images on the tape hut also the
recording data (date/time or various settings when recorded) (Data code).
Follow the steps helow to display the data code using the touch panel or the Remote
Commander.
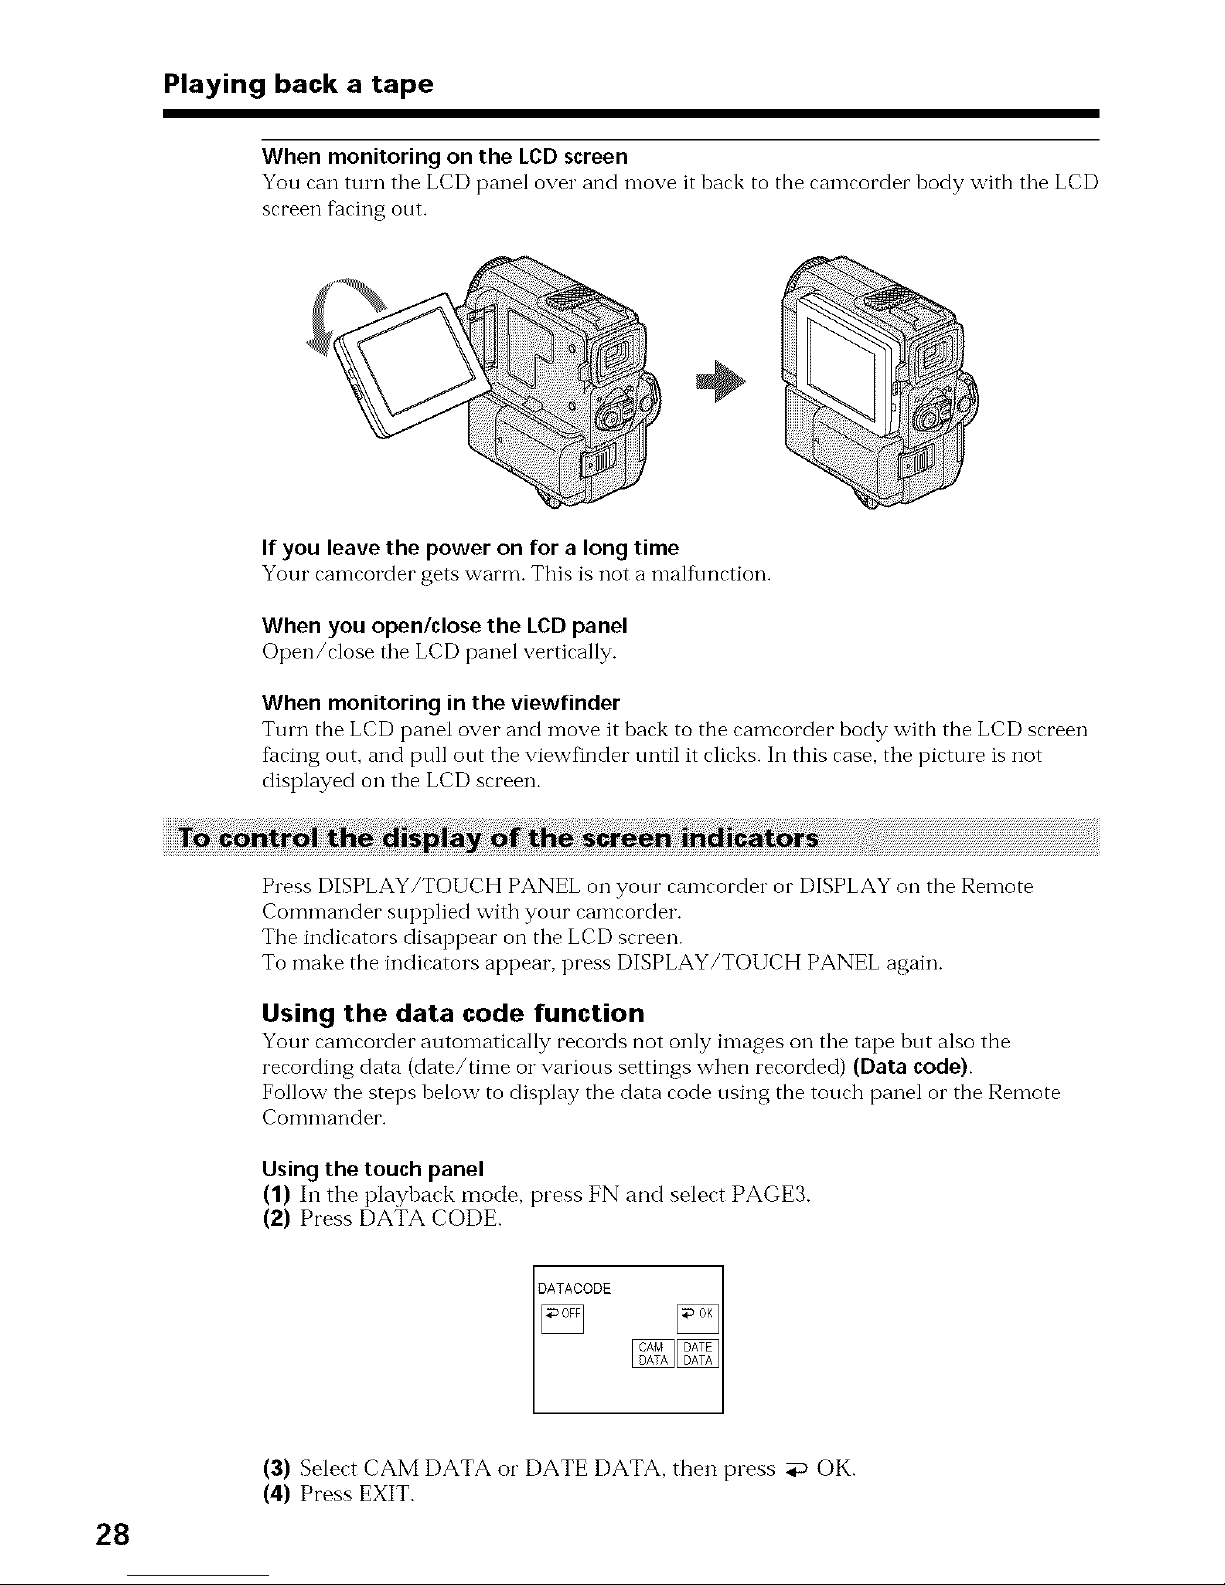
Using the touch panel
(1) In the playback mode. press FN and select PAGE3.
(2) Press DATA CODE.
(3) Select CAM DATA or DATE DATA. then press _ OK.
(4) Press EXIT.
Playing back a tape
Usingthe Remote Commander
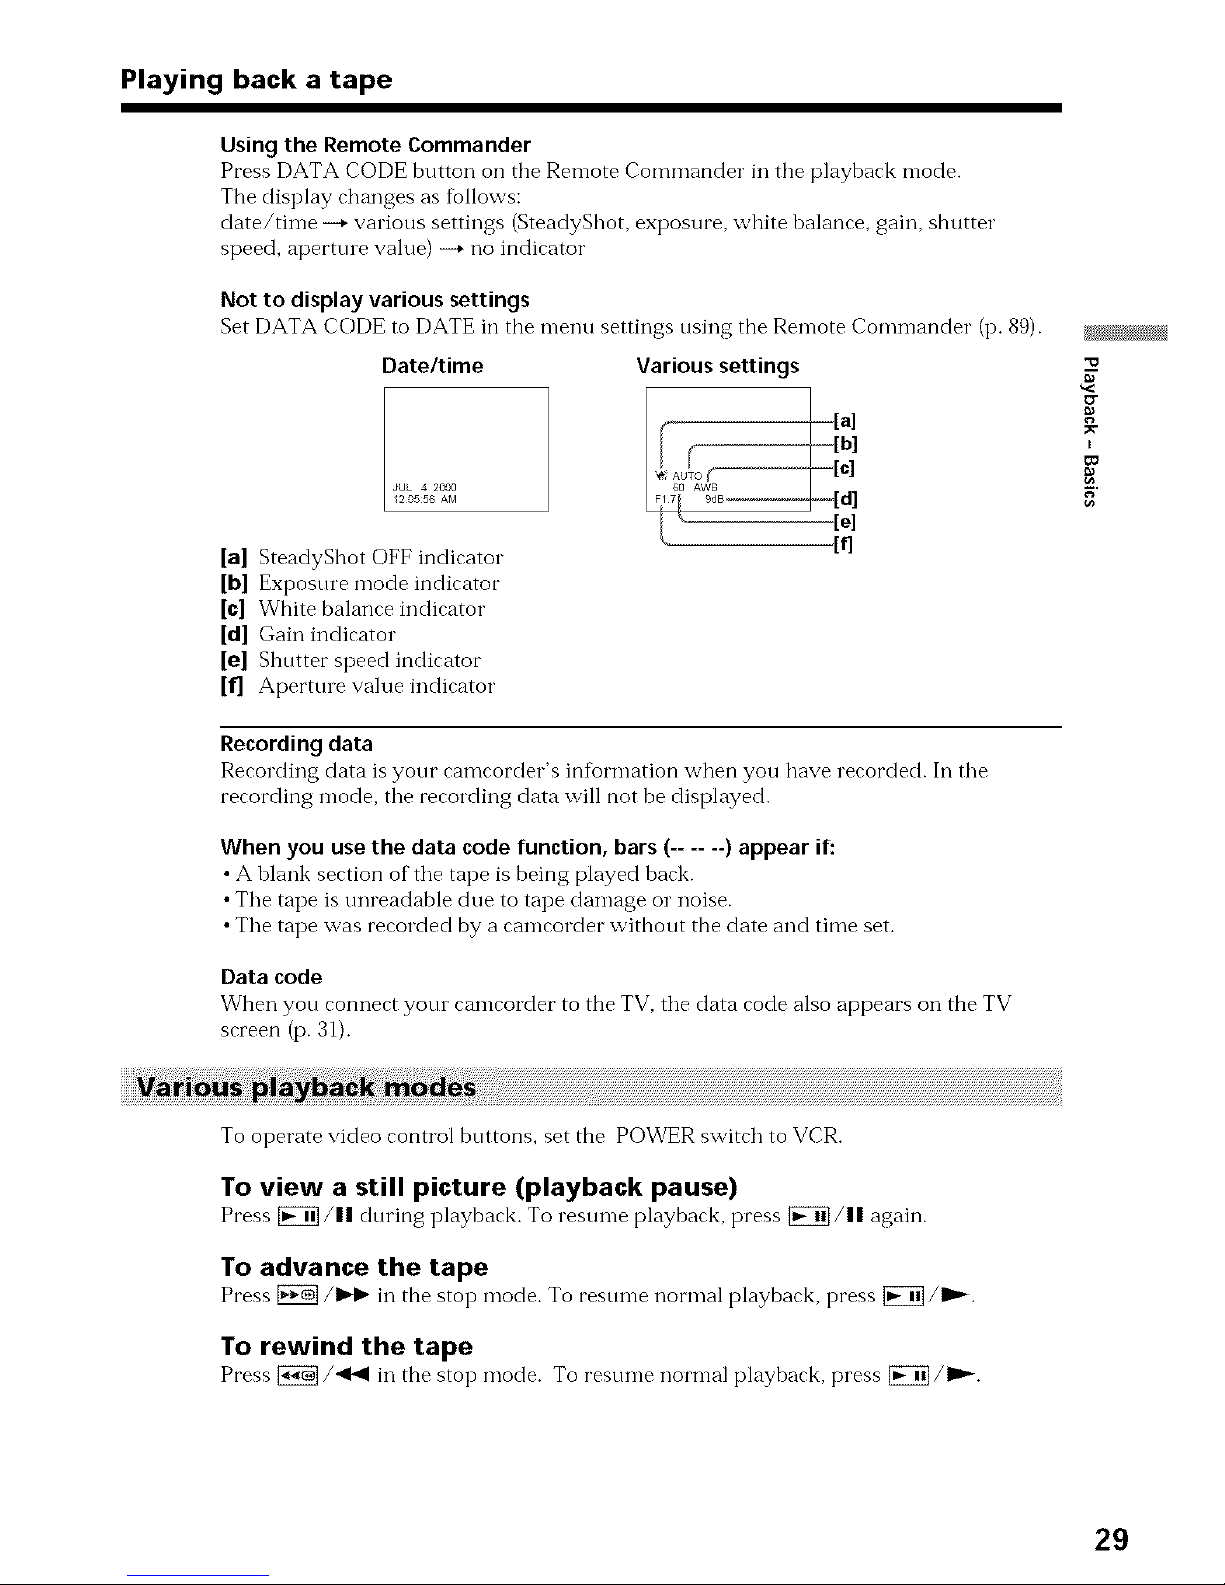
Press DATA CODE button on tbe Remote Commander in tbe playback mode.
The display changes as follows:
date/time -+ various settings (SteadyShot, exposure, white balance, gain, shutter
speed, aperttne value) -+ no indicator
Not to display various settings
Set DATA CODE to DATE in tbe menu settings using tbe Remote Commander (p. 89).
Date/time
[a] SteadyShot OFF indicator
[b] Exposure mode indicator
[o] White balance indicator
[d] Gain indicator
[el Shutter speed indicator
[f] Aperttne value indicator
Various settings
I J
/'
Recording data
Recording data is your camcorder's in%rmation when you have recorded. In the
recording mode, the recording data will not be displayed.
When you use the data code function, bars (...... ) appear if:
• A blank sertion of the tape is being played bark.
• The tape is tmreadable due to tape damage or noise.
• The tape was recorded by a camcorder without the date and time set.
Data code
Wben you ronnert yotn camrorder to the TV, the data rode also appears on the TV
screen (p. 31).
"o
g
I
To operate video control buttons, set the POWER switch to VCR.
To view a still picture (playback pause)
Press _/11 during play/oark. To resume playback, press _/11 again.
To advance the tape
Press [_K_]/_ in tbe stop mode. To resume normal playback, press _/raP--.
To rewind the tape
Press {_/'<_ in tbe stop mocie. To resume norn-lal playbark, press [_]/_'-.
29

Playing back a tape
To change the playback direction
Press < on tile Ren-lote Con-llllaI'<ter dtning playbark to reverse the playbark dilertion.
To resume normal playback, press I_.
To locate a scene monitoring the picture (picture search)
Keep pressing [_/'<<1 o1"[_]/IH_ dmhlg playbark. To resume normal playbark,
release the button.
To monitor the high-speed picture while advancing or
rewinding the tape (skip scan)
Keep pressing _/'<<I while rewinding o1"_/IH_ while advanring the tape. To
resume rewinding or advancing, release the button.
To view the picture at slow speed (slow playback)
Press t_ on the Remote Commander dining playbark. For slow playback in the reverse
direction, press <, then press I_ on the Remote Commander. To resume normal
playback, press IP--.
To view the picture at double speed
Press×2on the RemoteCommander during playbark. For double speedplaybark in the
reverse dirertion, press <, then press x2 on the Remote Commander. To resume
normal playback, press I_-.
To view the picture frame-by-frame
Press lib,-on the Remote Cowanai'<ler in the playbark pause mode. For fi'ame by fl'ame
playback in the reverse direction, press <111.To resume normal playback, press _/
I_.
To search the last scene recorded (END SEARCH)
Press END SEARCH in the stop mode. The last 5seronds of the rerorded sertion plays
back and stops.
Video control buttons
Marks on your camcorder are different fl'om those on the Remote Commander supplied
with yore camcorder.
Your camcorder : [_, [_,
Remote Commander : I1_ II, .<14,
In the various playback modes
• Sound is muted.
• The previous picture may remain as a mosaic image during playback.
When the playback pausemode lastsfor 5 minutes
Your camcorder automatically enters the stop mode. To resume playback, press _/
I_.
Slow playback
The slow playback can be performed smoothly on your camcorder; however, this
flmction does not work for an output signal fl'om the _,DV IN/OI JT jack.
3O
When you play back a tape in reverse
Horizontal noise appears at the center o1"top and bottom of the screen. This is not a
malflmction.
 Loading...