

Sony Handycam DCR-PC330 Operation Manual
3-084-863-11(1)
© 2003 Sony Corporation
Camera
Operations Guide
Read this first
Digital Video Camera Recorder
DCR-PC330
SERIES
TM
Downloaded From VideoCamera-Manual.com Manuals

2
Read this first
Before operating the unit, please read this
manual thor oughly, and retain i t f or future
reference.
WARNING
To prevent fire or shock ha za rd, do no t
expos e the un it to rain o r moisture.
This symbol is intended to alert the
user to the presenc e of uni nsulat ed
“dangerous voltage” within the
product’s enclosure that may be of
sufficient magnitude to c onst itut e
a risk of electric shock to persons.
This symbol is inten ded to alert the
user to the pre s ence of important
operating and maintenanc e
(servicing) instructions in the
literature accompanyi ng the
appliance.
CAUTION
The use of optical instru men ts with this product
will incre ase eye haza rd. As the la ser be am use d in
this Handycam is harmful to eyes, do not attempt to
disassemble the cabine t.
Refer servicing to qua li fi ed personnel only.
b Notice
If static electricity or electromagnetic interference
causes d ata transf er to disco n tinue mid way (fail ) ,
restart the appli c ation or disconnect and connect
the USB cable again.
For customers in the U.S.A. and
CANADA
CAUTION
TO PREVENT ELECTRIC SHOCK, MATCH
WIDE BLADE OF PLUG TO WIDE SLOT,
FULLY INSERT.
RECYCLING LI THIUM-ION BATTERIES
Lithium-Ion batteries are
recyclable.
You can help preserv e ou r
environment by returning your
used rechargeable batteries to th e
collection and recycling location nearest you.
For more information regarding recyclin g of
rechargeable ba tt e rie s, c al l toll free 1-800-8228837, or visit http://w ww .r brc.org/
Caution: Do not handle damaged or leaking
Lithium-Ion ba tt eries.
“Memory Stick”
This device complies with Pa r t 1 5 of the FCC
Rules. Operation is subject to th e f ollowing two
conditions: (1) This device may not cause harmful
interfer en c e, and (2) this dev ice must accept an y
interferenc e received, including interference that
may cause undesired operation.
This Class B digit al apparatus compli es wi th
Canadian ICES-003.
Downloaded From VideoCamera-Manual.com Manuals

3
For customers in the U.S.A.
If you have any questions about this product, you
may call:
Sony Customer Inform ation Center 1-800-222SONY (7669)
The number below i s f or F CC rel ated matt er s only .
Regulatory Inform a tion
Owner’s Record
The model and serial numbers are lo ca te d on the
bottom. Record the serial number in the space
provided b elow . Ref e r to thes e nu mber s w hen ever
you call upon your Sony dealer regarding this
product.
Model No. DCR-PC330
Serial No.
Model No.AC-
Serial No.
CAUTION
You are cautioned that any chan ges or
modifications not expressly approved in this
manual could void your authority to ope rate this
equipment.
b Note:
This equipment has been te sted and found to
comply with the limit s for a Cla ss B digit al device ,
pursuant to Part 15 of the FCC Rules.
These limit s are designed to provide reasonable
protection aga inst harmful interferenc e in a
residential installation . Thi s equi pm e nt ge ne ra te s,
uses, and can radiate radio frequency energy and, if
not install ed and used in ac cordance with the
instructions, may cause harmful interference to
radio communi ca ti ons. H ow e ver, there is no
guarantee that interference will not occur in a
particula r installa tion. If thi s equipment d oes cause
harmful inter ference to radio or tel ev ision
reception, which ca n be dete rmin ed by tu rning the
equipment off and on , the u ser i s enc ouraged to tr y
to correct the interference by one or more of th e
following measures:
– Reorient or relocate the receiving antenna.
– Increase the separation between the equipment and
receiver.
– Connect the equipment to an outlet on a circ uit
different from that to which the receiver is
connected.
– Consult a Sony dealer or an experienced radio/TV
technician for help.
The interface ca ble suppl ied must be us ed with the
equipment in ord er to comply with the lim its for a
digital device pursuant to Sub part B of Part 15 of
FCC Rules.
Notes on use
Note on Cassette M em ory
Your camcorder is based on the DV format. You can
use only mini DV cassettes in your camcorder. Use of
mini DV cassettes with Cassette Memory is
recommended as you can use Title search (p. 54), Date
search (p. 55), [ TITLE] (p. 74), [ TAPE
TITLE] (p. 76).
Cassettes with Cassette Memory are marked
with .
Notes on recording
• Before starting to record, test the recording function
to make sure the picture and sound are recorded
without any problems.
• Compensation for the contents of recordings cannot
be provided, even if recording or pla yba c k is not
possible due to a malfunc tion of the camcorder,
storag e media, etc.
• TV color systems differ depend ing on the country/
regions. To view your recordings on a TV, you need
an NTSC system-based TV.
• Television programs, films, video tapes, and other
materials may be copyrighted. Unauthorized
recording of such mate r ia ls m ay be contrary to the
copyright laws.
Notes on the LCD panel, viewfinder, and
lens
• The LCD screen and the viewfinder are
manufactured using extr e me ly hi gh- pr e cision
technology, so over 99.99% of th e pixel s are
operational for e ffective use.
However, ther e ma y be some tiny black points and/
or bright points (white, red, blue, or green in color)
that appear constantl y on the LCD scr een a nd the
Declaration of Conformity
Trade Name: SONY
Model No.: DCR-PC330
Responsible Party: S ony Ele c tronics Inc.
Address: 680 Kinderkamack Road, Oradell ,
NJ 07649 U.S.A.
Telephone No.: 201-930-6972
This device compli es with Part 15 of the FCC Rules.
Operation is subject to the following two conditions:
(1) This device may not c ause h armful in terfe rence,
and (2) this device must a cc e pt a ny interference
received, including interference that may cause
undesired operation.
,continued
Downloaded From VideoCamera-Manual.com Manuals
4
viewfinder.
These points are normal results of the manufacturing
process and do not affect the record ing in any way.
• Exposing the LCD screen, the viewfinder, or the lens
to direct sunlight for long periods of time may cause
malfunctions. Be careful when placing the camera
near a window or outdoors.
• Do not aim at the sun. Doing so might c au se your
camcorder to malfunction. Take pictures of the sun
only in low light conditions, suc h as at dusk.
Note on connecting other de vice
Before connecting your camcorder to other device
such as a VCR or a computer with a USB or i.LINK
cable, be s u re to inser t the connec to r plug in th e
proper direct io n. If you insert the connector plug
forcib ly in the wron g direction, the termin al may
be damaged, or this may cause a malfunction of
your camcorder.
Note on using this manual
The images of the LCD screen and the viewfinder
used on this manual are capt ured using a di g ital
still camera, and th us ma y appear different from
what you se e.
Notes on using the cam corder
• Hold your camcorder correc tl y .
• To ensure a good grip, lower the finge r rest a nd
fasten the grip belt as shown in the following
illustration.
• When you are using the touch panel, place your hand
on the back side of the LCD panel to support it.
Then, touch the buttons displayed on the screen.
• You can change the language to be used fo r screen
display on your camcorder (p. 22).
• Do not hold the camcorder by the following parts.
Touch the button on the LCD screen.
Viewfinder
LCD panel
Battery pack
Flash
Downloaded From VideoCamera-Manual.com Manuals

5
Read this first ............................................................................................. 2
Quick Start Guide
Recording movies on a tape ...................................................................... 8
Recording still images on a “Memory Stick”............................................. 10
Getting started
Step 1: Checking supplied items.............................................................. 12
Step 2: Charging the battery pack............................................................ 13
Using an outside power sou rce ............... .......... ........... ................... .......... ........... ..... 16
Step 3: Turning the power on................................................................... 16
Step 4: Adjusting the LCD panel and viewfinder...................................... 17
Adjusting the LCD panel ............................................................ ....... .. .... .. .... ....... .... .17
Adjusting the viewfinder ............................................................................................17
Step 5: Setting the date and time............................................................. 18
Step 6: Inserting the recording media...................................................... 20
Inserting a cassette tape ...........................................................................................20
Inserting a “Memory Stick” ........................................................................................ 21
Step 7: Setting the screen language........................................................ 22
Recording
Recording movies .................................................................................... 23
Recording for a longer time .......................................................................................25
Using zoom .................................... ........... ...................................... .......... ................25
Recording in mirror mode ......................................................................................... 26
Using the self-time r .............. ................................................................... ..................26
Recording movies fit for breaking into still images
– Progressive recording mode ............................................................................ 27
Recording still images – Memory photo recording............................. 28
Selecting image quality or size ............. .......... .............................. ............................29
Using the flash .................................................. ........... ...................................... .......30
Using the self-time r .............. ................................................................... ..................31
Recording a still image on a “Memory Stick” while recording movies on a tape ....... 32
Adjusting the exposure............................................................................. 32
Adjusting the exposure for backlit sub je cts .............. .................. ........... .......... ..........32
Fixing the exposure for the selected subject – Flexible spot meter .......................... 33
Adjusting the expos u re manually .................. ........... .......... .......................................33
: Features available for tape only.
: Features available for “Memory Stick”
only.
Table of Contents
,continued
Downloaded From VideoCamera-Manual.com Manuals

6
Recording in dark places – NightShot, etc............................................... 34
Adjusting the focus................................................................................... 35
Adjusting the foc u s for an off-center subje ct – SPOT FOCUS ............................ ......35
Adjusting the focus manually .....................................................................................36
Using supplementary light to focus on a still image – HOLOGRAM AF .............37
Adjusting the frame and focus when recording a still image in darkness
– NightFraming ....................................................................................................38
Recording a picture using various effects................................................ 38
Fading in and out of a scene – FADER ....................................... .... .. .. ....... .... .. ..38
Using special effects – Digital effect ...................................................................40
Overlaying still images on movies on a tape – MEMORY MIX ..................................41
Searching for the starting point .......................................................... 43
Searching for the last scene of the most recent recording – END SEARCH .............43
Searching manually – EDIT SEARCH ....................... ............................... .................44
Reviewing the most recently recorded scenes – Rec review ....................................44
Playback
Viewing movies recorded on a tape ................................................... 45
Playing back in various modes ..................................................................................46
Viewing recordings with added effects – Digital effect ..............................................47
Viewing recordings on a “Memory Stick” ........................................... 48
Playing back in various modes from a “Memory Stick” ..............................................49
Various playback functions ...................................................................... 50
Magnifying pictures – Tape playback zoom/Memory playback zoom .......................50
Displaying the screen indicators . ...............................................................................51
Displaying the date/time and camera settings data – Data code ..............................51
Playing the picture on a TV...................................................................... 53
Locating a scene on a tape for playback ........................................... 54
Searching quickly for a desired scene – Zero set memory ........................................54
Searching for a scene using Cassette Memory – Title search ..................................54
Searching for a scene by date of recording – Date search .......................................55
Downloaded From VideoCamera-Manual.com Manuals

7
Advanced operations
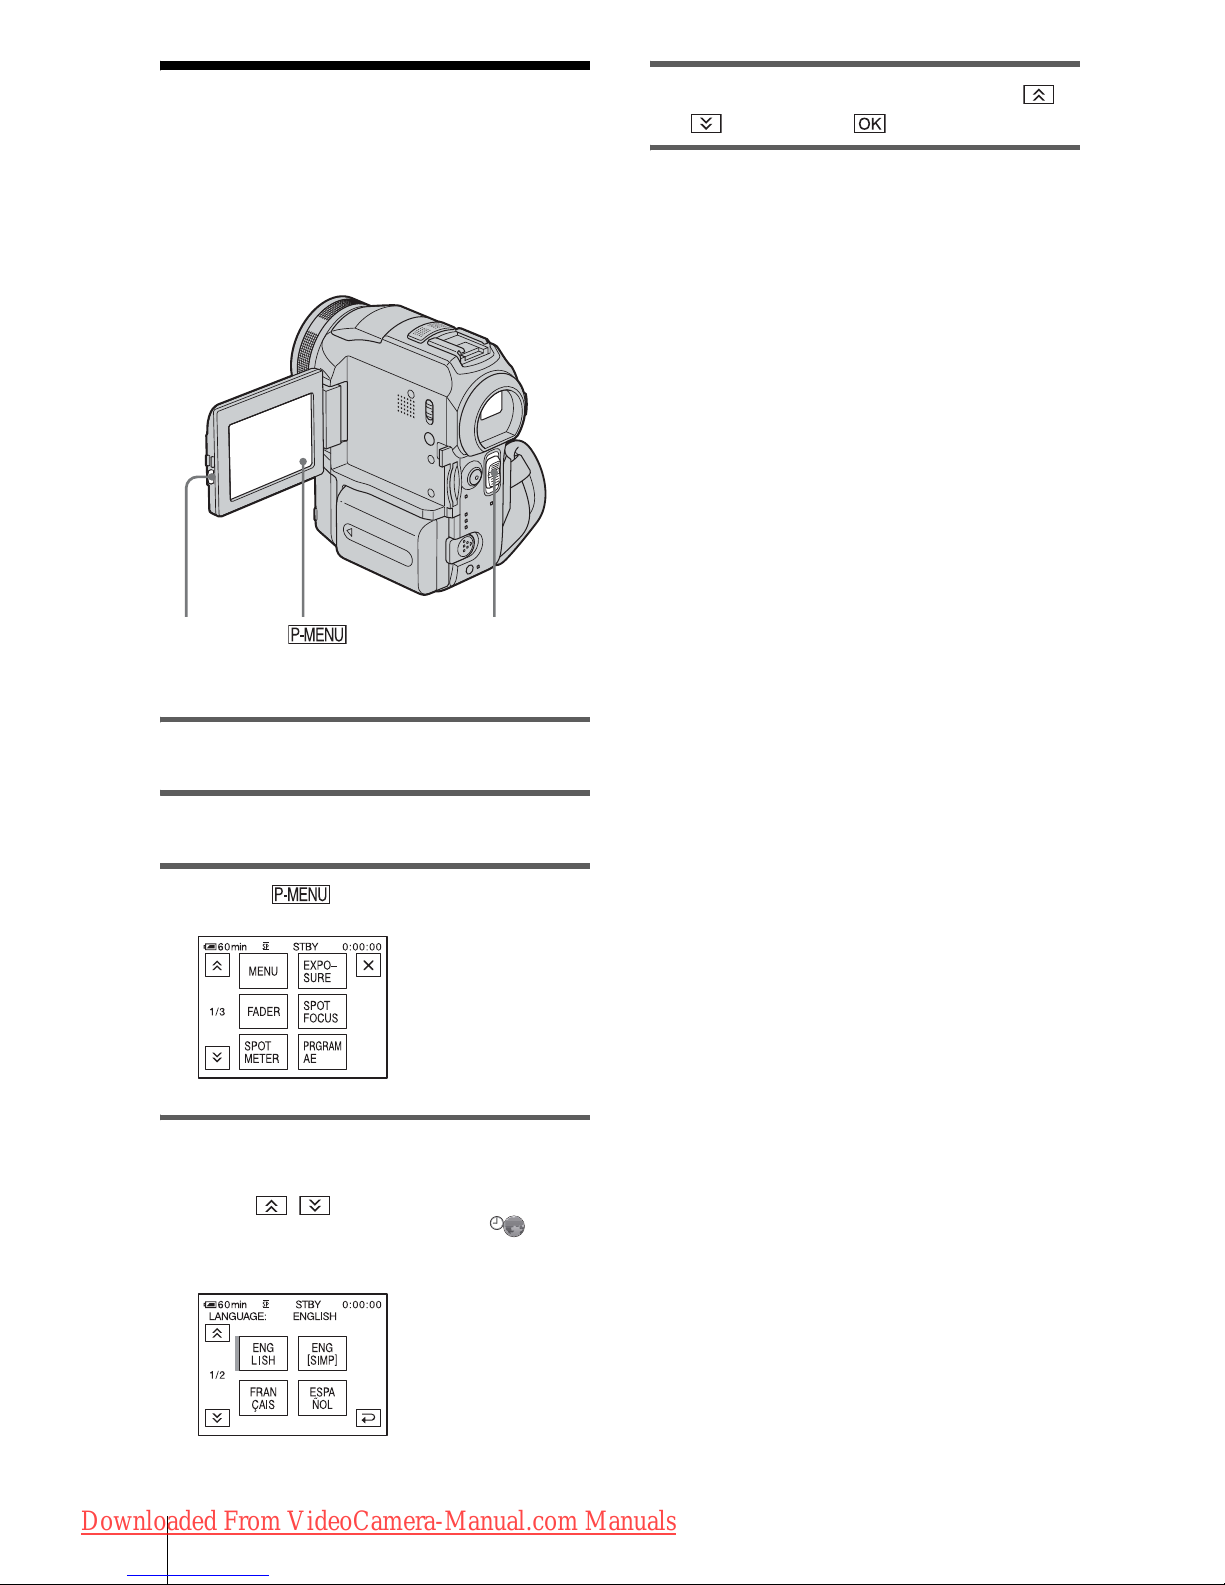
Using the Menu
Selecting menu items .........................56
Using the (CAMERA SET) menu
– PROGRAM AE/WHITE BAL./16:9
WIDE, etc. ....................................58
Using the (MEMORY SET) menu
– BURST/QUALITY/IMAGE SIZE/
ALL ERASE/NEW FOLDER, etc. .64
Using the (PICT. APPLI.) menu
– PICT. EFFECT/SLIDE SHOW/
FRAME REC/SMTH INT. REC,
etc. ...............................................68
Using the (EDIT/PLAY) menu
– TITLE/TAPE TITLE/SEARCH,
etc. ...............................................73
Using the (STANDARD SET) menu
– REC MODE/MULTI-SOUND/
AUDIO MIX/USB-CAMERA, etc. ..77
Using the (TIME/LANGU.) menu
– CLOCK SET/WORLD TIME,
etc. ................................................82
Customizing Personal Menu ..............83
Dubbing/Editing
Connecting to a VCR or TV ...............86
Dubbing to another tape ..............87
Recording pictures from a VCR or TV 87
Dubbing pictures from a t ape to a
“Memory Stick” .............................89
Dubbing still images from a “Memory
Stick” to a tape .............................90
Dubbing selected scenes from a tape
– Digital program editing ..............91
Dubbing sound to a recorded tape
......................................................97
Deleting recorded pictures ...........99
Changing the image size
– Resize .....................................100
Marking recorded images with specific
information – Image protection/
Print mark ...................................101
Troubleshooting
Troubleshooting ...............................103
Warning indicato rs and me ss ages ...111
Additional Info rmation
Using your camcorder abroad ..........115
Usable cassette tapes ......................116
About the “Memory Stick” .................117
About the “InfoLITHIUM” battery
pack ............................................119
About i.LINK .....................................121
Maintenance and precauti ons ..........122
Specification .....................................125
Quick Referenc e
Identifying parts and controls ...........127
Index ................................................134
Refer also to other operating instructions
supplied with your ca m co rder:
• Editing images with your computer
cComputer Applications Guide
Downloaded From VideoCamera-Manual.com Manuals
Quick Start Guide
8
Quick Start Guide
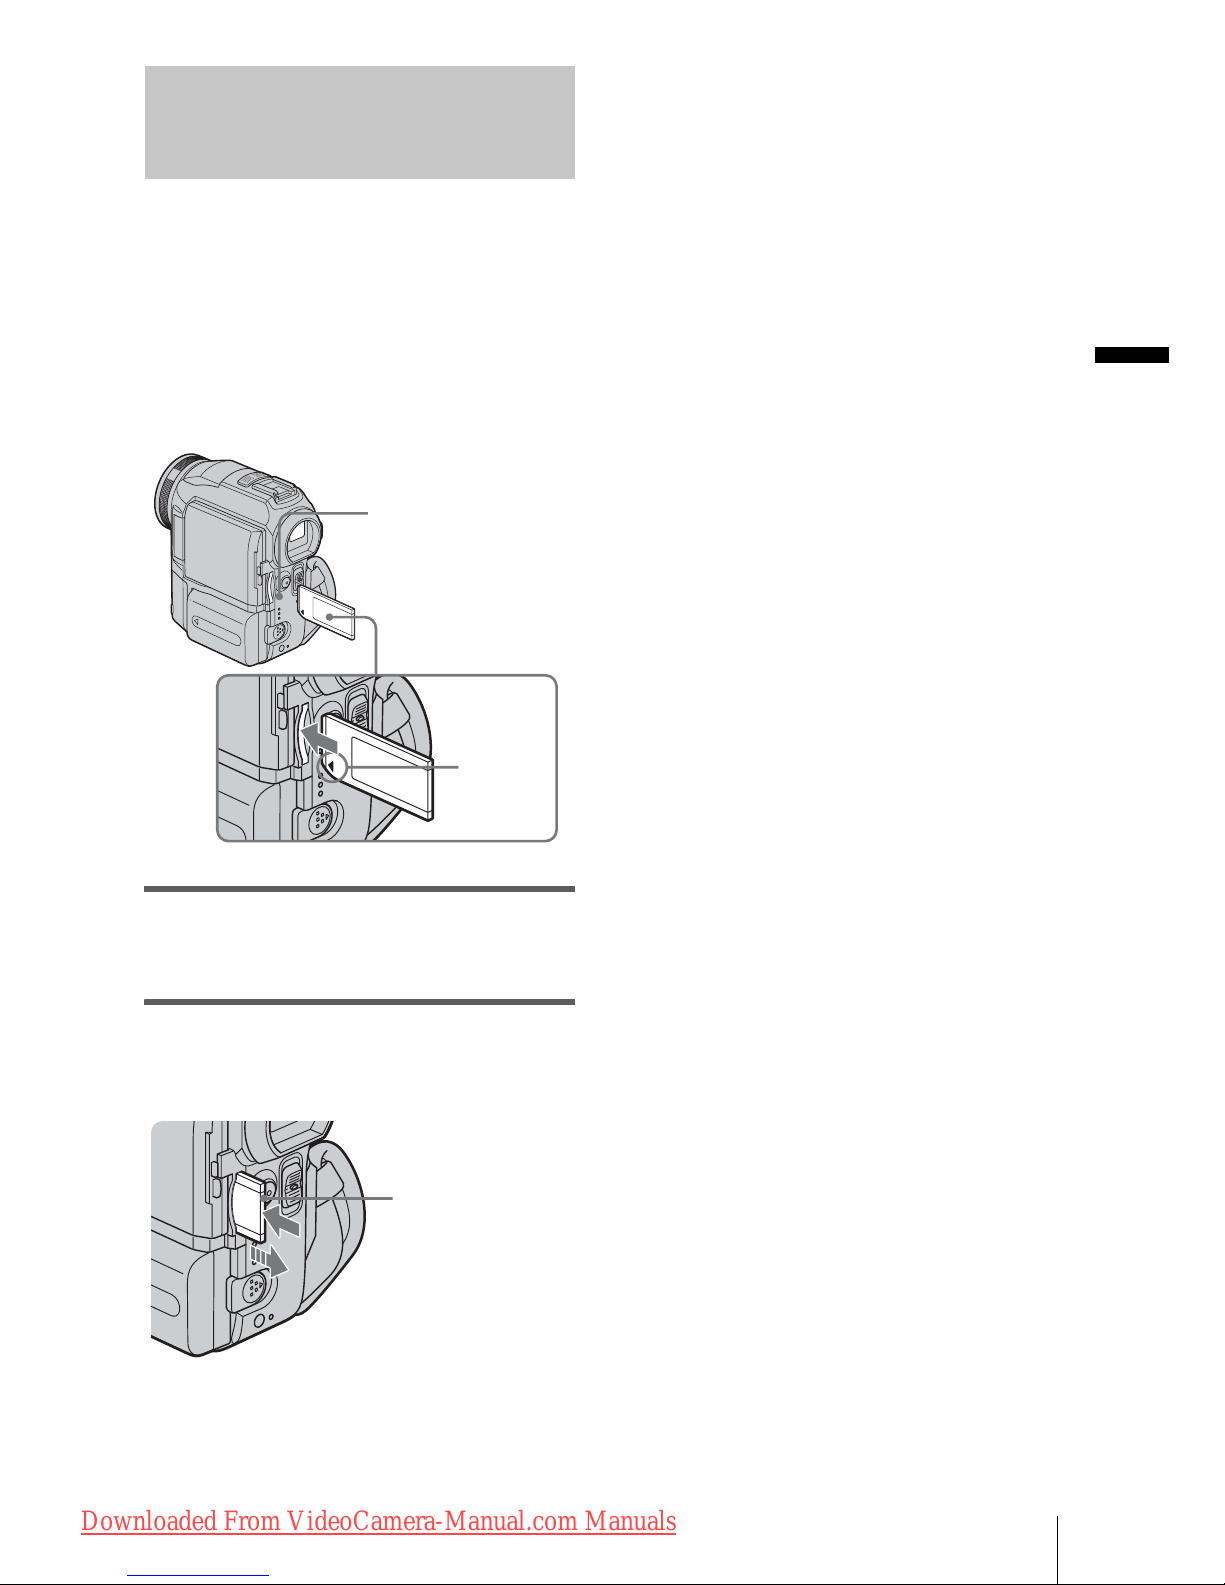
Recording movies on a tape
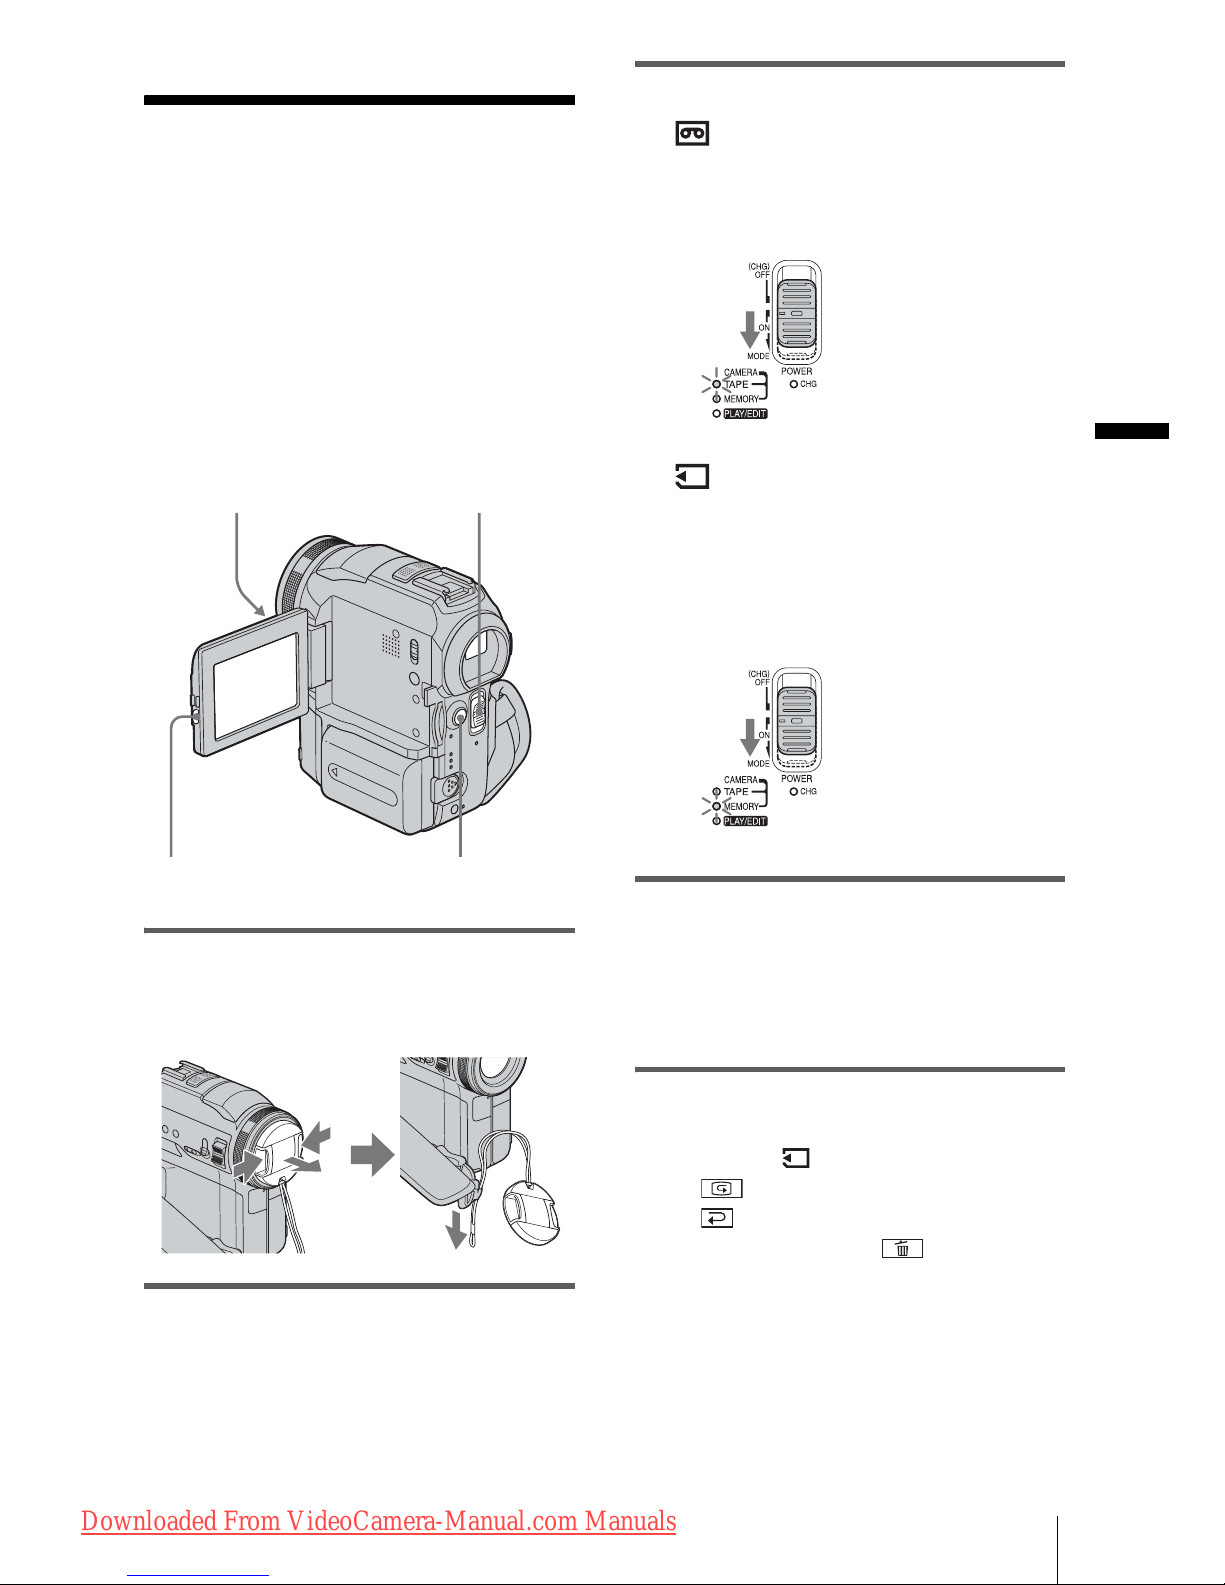
1 Attach the charged battery pack to the camcorder.
To charge the battery, see page 13.
2 Insert a cassette into the camcorder.
a Slide the battery release lever and
remove the battery terminal cover.
b Slide the battery pack in the direction
of the arrow until it clicks.
a Slide the OPEN/
ZEJECT lever in
the direction of the
arrow to open the lid.
The cassette compartment
comes out automatically.
b Insert the cassette with
its window-side facing
up, then push the center
of the back of the
cassette.
c Press .
Close the cassette lid after
the cassette compartment
slides back in by itself.
OPEN/ZEJECT lever
Window-side
Battery release lever
Downloaded From VideoCamera-Manual.com Manuals

Quick Start Guide
Quick Start Guide
9
3 Start recording while checking the subject on the LCD screen.
The date and time is not set up in the default setting. To set the date and time, see page 18.
4 View the recorded picture on the LCD screen.
a Rem ove the lens cap.
b Press OPEN and
open the LCD panel.
c While pressing the
green button, slide
the POWER switch
down to light up the
CAMERA-TAPE lamp.
The power turns on.
d Press START/STOP.
Recording starts. To
change to stan dby mode,
press START/STOP again.
a Slide the POWER
switch repeatedly
until the PLAY/EDIT
lamp lights up.
b Touch (rewind).
c Touch (play) to
start the playback.
To stop, press .
To turn off the power, slide the
POWER switch up to (CHG)
OFF.
Downloaded From VideoCamera-Manual.com Manuals
Quick Start Guide
10
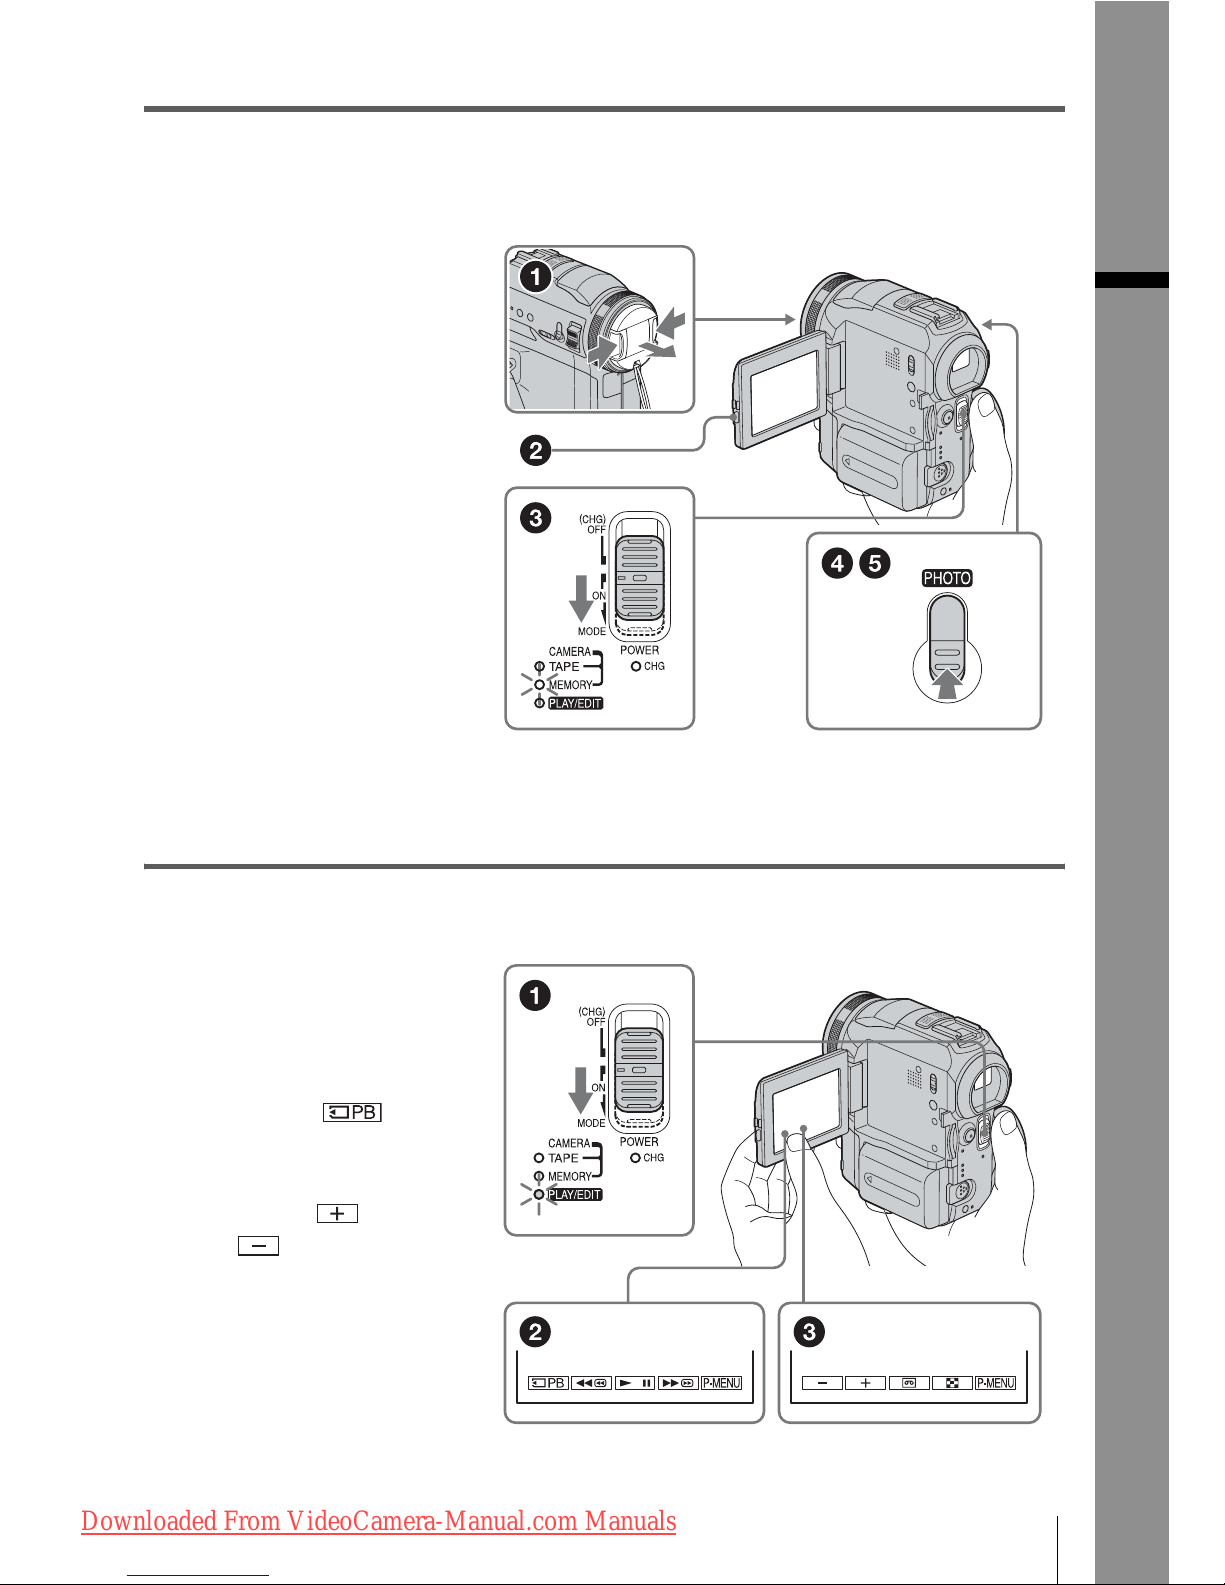
Recording still images on a “Memory
Stick”
1 Attach the charged battery pack to the camcorder .
To charge the battery, see page 13.
2 Insert a “Memory Stick” into the camcorder.
a Slide the battery release lever and
remove the battery terminal cover.
b Slide the battery pack in the direction
of the arrow until it clicks.
Insert it so that the b mark
is at the bottom left corner.
Push in until it clicks.
Battery release lever
b mark
Downloaded From VideoCamera-Manual.com Manuals
Quick Start Guide
Quick Start Guide
11
3 Start recording while checking the subject on the LCD screen.
The date and time is not set up in the default setting. To set the date and time, see page 18.
4 View the recorded picture on the LCD screen.
a Rem ove the lens cap.
b Press OPEN and
open the LCD panel.
c While pressing the
green button, slide
the POWER switch
repeatedly until the
CAMERA-MEMORY
lamp lights up.
The power turns on.
d Press PHOTO lightly.
A short beep sound is heard
when the focus is adjusted.
e Press PHOTO fully.
A shutter sound is heard
and the still image is
recorded.
a Slide the POWER
switch repeatedly
until the PLAY/EDIT
lamp lights up.
b Touch .
The most recently recorded
image is displa y ed.
c Touch (next) or
(previous) to
view images in
sequence.
To turn off the power, slide the
POWER switch up to (CHG)
OFF.
Downloaded From VideoCamera-Manual.com Manuals
Getting started
12
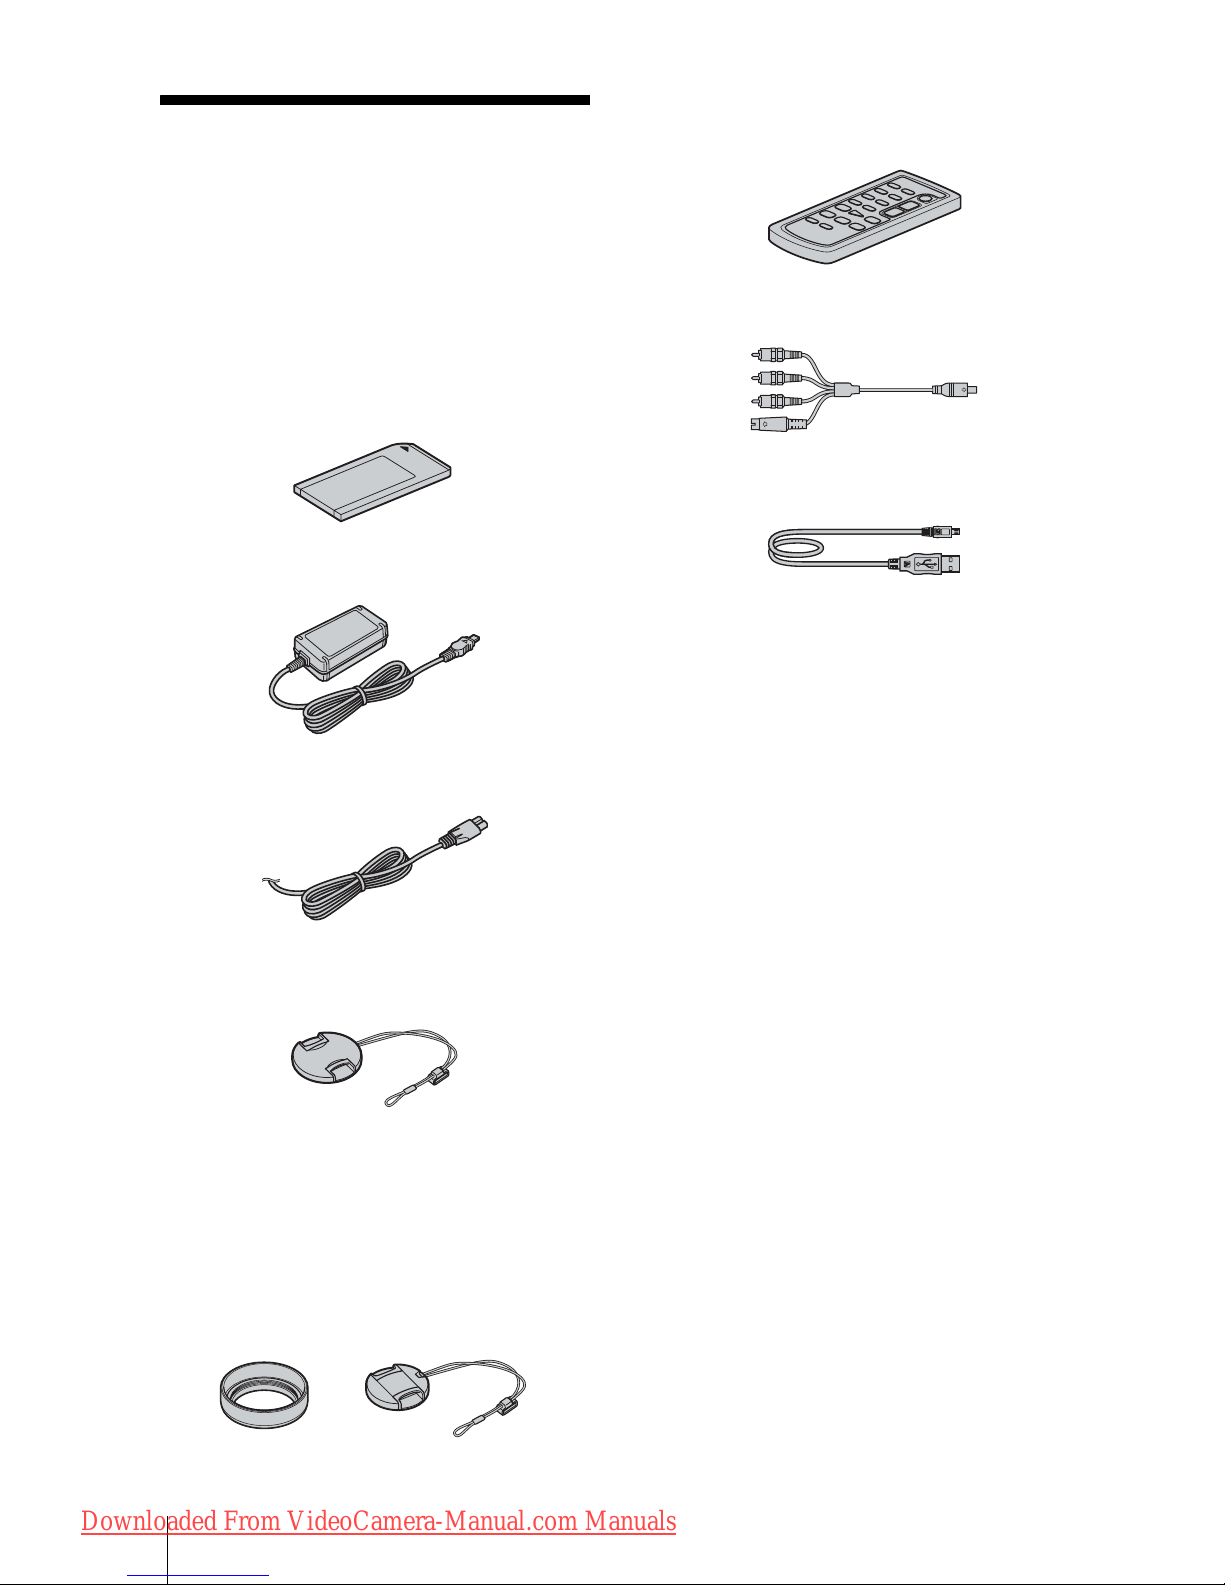
Getting started
Step 1: Checking
supplied items
Make sure you have fo llowing items supplied
with your cam c or der.
The number in parentheses in dicates the nu mber
of that item supplied.
“Memory Stick” 16MB (1)
AC Adaptor (1 )
Power cord (1)
Lens cap (Large, 1)
Attached to the camcorder.
Lens hood (1) and Lens cap (Sm all, 1)
Use the lens hood to record under strong light, such as
under the sun. When you use the le ns hood, use the
small lens cap. See page 127 on how to replace the
lens cap. Note when you use a filt er ( opti onal), the
shadow of the lens hood may appear on the screen.
Also, if you force the lens hood on, you may not be
able to remove it again.
Wireless Remote Commander (1)
A button-type lithium battery is already
installed.
A/V connecting cable ( 1)
USB cable (1)
Rechargeable battery pack NP-FM30 (1 )
Battery term i nal cover (1)
CD-ROM “SPVD-010 USB Driver” (1)
Cleaning cloth (1)
Camera Operations Guide (This manual)
(1)
Computer Applications Guide (1)
Downloaded From VideoCamera-Manual.com Manuals
Getting started
Getting started
13
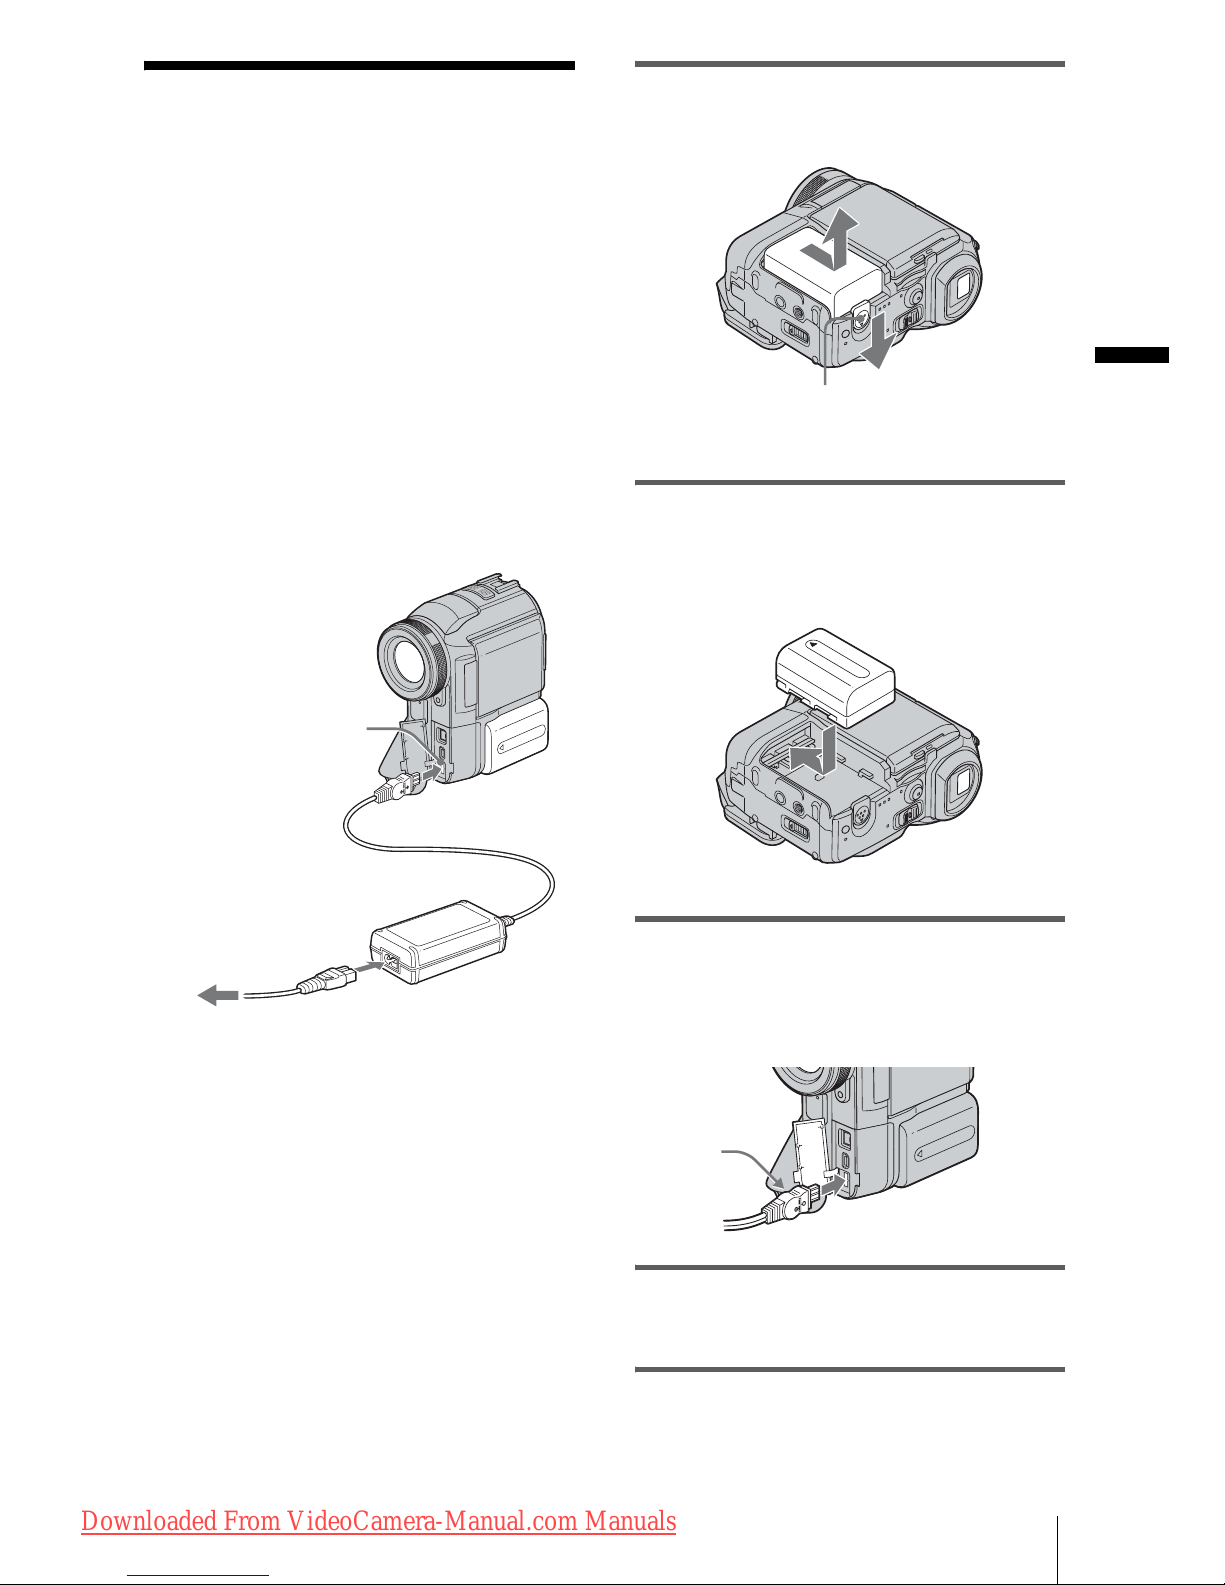
Step 2: Charging the
battery pack
You can charge the b attery by attaching t he
“InfoLITHIUM” battery pack (M series)
to your camcorder.
b Notes
• You cannot use bat te r ie s othe r tha n the
“InfoLITHIUM” battery pack (M seri es) (p. 11 9) .
• Do not short-circuit the DC plug of the AC Adaptor
with any metal lic obje cts. This may cause a
malfunction.
• Use a nearby wall outle t whe n using the AC
Adaptor. Disconnect th e AC Adaptor fro m th e wal l
outlet immedia te ly if a ny malfunction occurs.
1 Slide the battery release lever and
remove the battery terminal cover.
2 Attach the battery pack by slidin g it in
the direction of the arrow until it
clicks.
3 With the b mark on the DC plug
facing the jack cover, connect th e AC
Adaptor to the DC IN jack on your
camcorder.
4 Connect the power cord to the AC
Adaptor.
5 Connect the power cord to the wall
outlet.
To the wall outlet
DC plug
DC IN jack
Power cord
AC Adaptor
Battery
Battey release lever
b mark
,continued
Downloaded From VideoCamera-Manual.com Manuals
Getting started
14
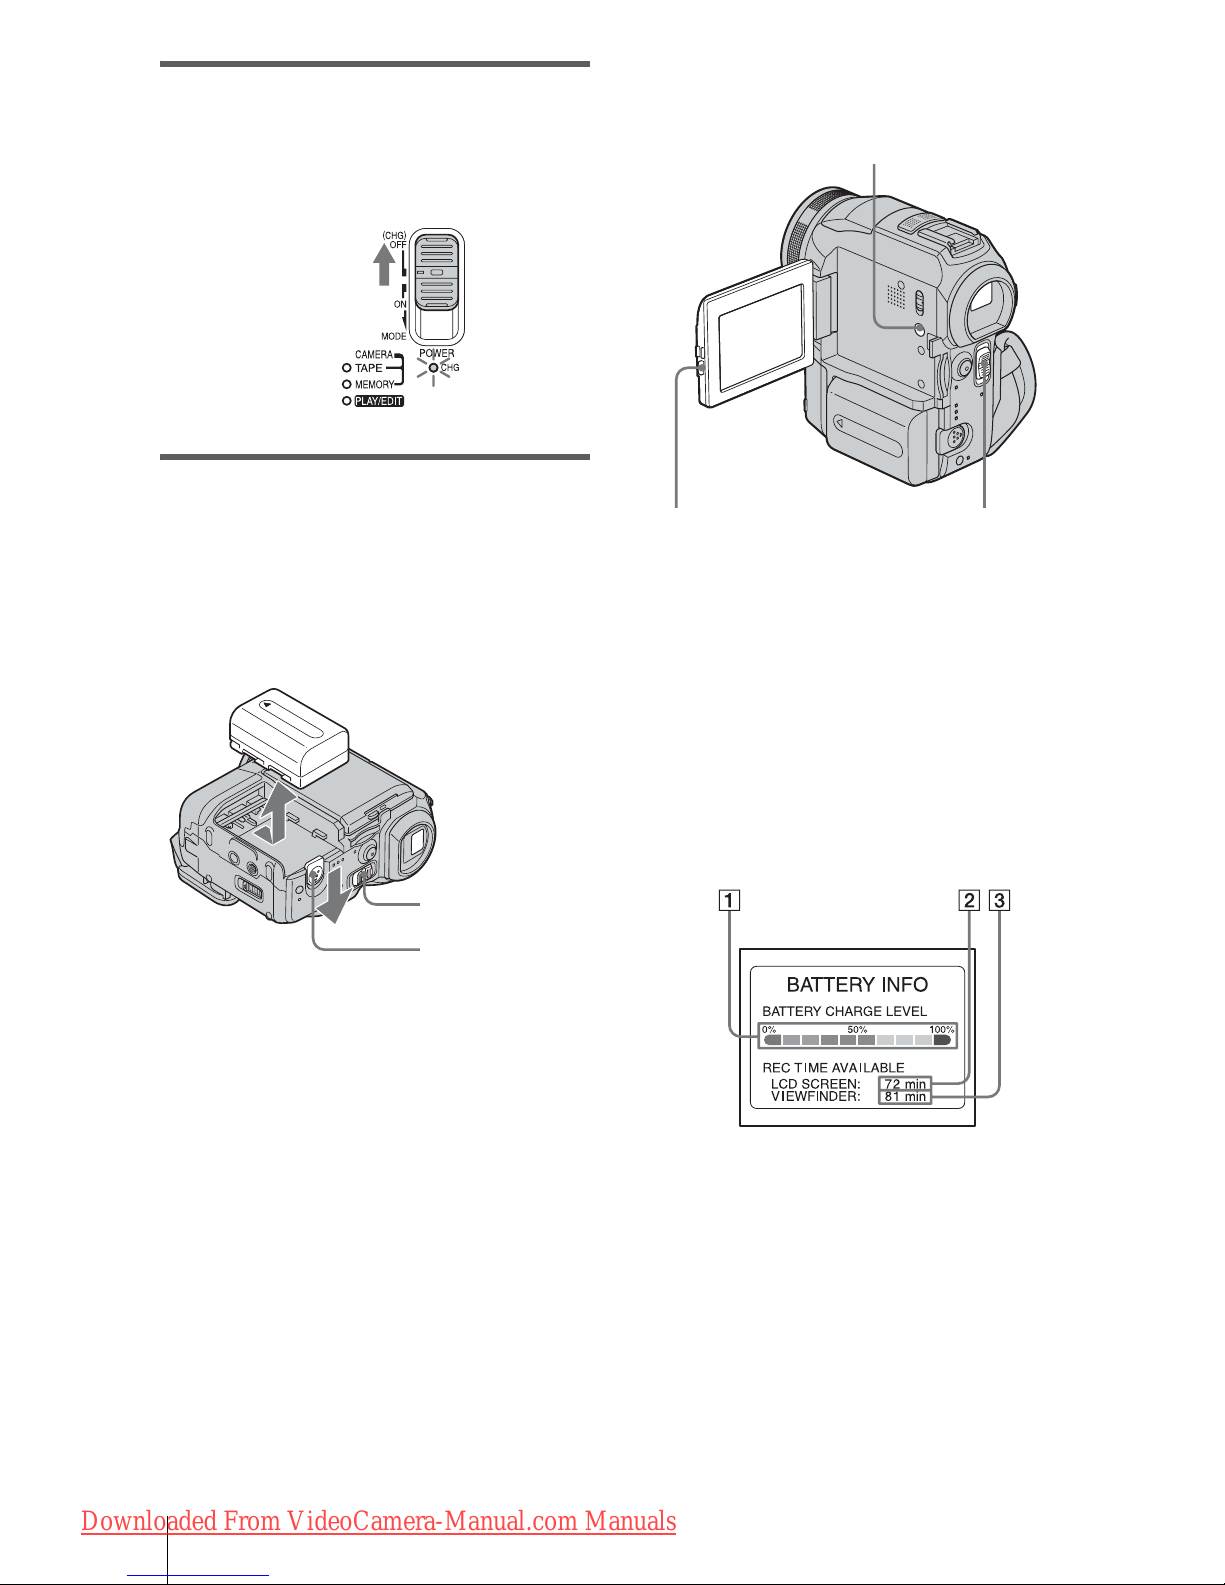
6 Slide the POWER switch up to (CHG)
OFF.
The CHG (cha rge) lamp light s up and
charging starts.
After charging the battery
The CHG (charge) lamp turns off when the
battery is fully charged. Disconnect the AC
Adaptor from the DC IN jack.
To remove the battery pack
1
Set the POWER switch to (CHG) OFF.
2 Slide the battery release lever and slide
the batter y p ack out.
b After removing the battery pack
• Always attach the terminal cover to protect the
battery terminal. If you do not use the ba tte r y pa ck
for a long time, use up the battery pack completely
before storing it. See page 120 about storage of the
battery pack.
To check the remain ing battery – Battery
Info
You can check the battery ’s current cha rge level
and its current remaining re cording time both
during charging or when the power is turned off.
1 Set the POWER switch to OFF (CHG).
2 Press OPEN and open the LCD panel.
3 Press DISPLAY/BATT INFO.
The battery i nformatio n appears for ab out 7
seconds.
Keep the bu tton pr essed to view it for about
20 seconds.
A Battery charge level : D i s p l ays
approximate remaining amo unt of
power left in the bat tery pack.
B Possible recording time using the LCD
panel.
C Possible recording time using the
viewfinder.
Battery release
lever
POWER
switch
POWER switch
OPEN
DISPLAY/BATT INFO
Downloaded From VideoCamera-Manual.com Manuals

Getting started
Getting started
15
Charging time
Approximate number of minutes required when
you fully charge a fully discharged battery pack
at 25°C (77°F). (10 – 30°C (50 – 86°F)
recommended.)
Recording time when recording with the
LCD screen on
Approxima t e number of minutes available
when you use a fully charg ed battery pa ck at
25°C (77°F).
With the LCD BACKLIGHT switch set to
ON
With the LCD BACKLIGHT switch set to
OFF
Recording time wh en recording with the
viewfinder
Approximate number of minutes available
when you use a fully charged batt ery pack at
25°C (77°F).
* Approximate number of minutes when recording
while you repeatedly record, start/stop, slide the
POWER switch to change the power mode, and
zoom. Th e ac tual batt e ry life ma y be shorter.
Playing time
Approximate number of minutes available
when you use a fully charged batt ery pack at
25°C (77°F).
* With the LCD BACKLIGHT sw itc h se t to O N .
b Notes
• The power will not be supplied from the battery pack
when the AC Adaptor is connected to the DC IN jack
of your camcorder, even if its power c or d is
disconnected from the w all outl et .
• The recording and playback tim e wil l be shorte r
when you use your camcorder in low tempe r a ture .
• The CHG (charge) lamp flashes during charging, or
the battery information will not be c or r ec tly
displayed in followin g con d it ions.
Battery pack
NP-FM30 (supplied) 145
NP-FM50 150
NP-FM70 240
NP-QM71/QM71D 260
NP-FM91/QM91/
QM91D
360
Battery pack Continuous
recording
time
Typical*
recording
time
NP-FM30
(supplied)
80 45
NP-FM50 130 75
NP-FM70 270 155
NP-QM71/
QM71D
315 180
NP-FM91/
QM91/QM91D
475 270
Battery pack Continuous
recording
time
Typical*
recording
time
NP-FM30
(supplied)
90 50
NP-FM50 150 85
NP-FM70 310 175
NP-QM71/
QM71D
365 210
NP-FM91/
QM91/QM91D
550 315
Battery pack Continuous
recording
time
Typical*
recording
time
NP-FM30
(supplied)
90 50
NP-FM50 150 85
NP-FM70 310 175
NP-QM71/
QM71D
365 210
NP-FM91/
QM91/QM91D
550 315
Battery pack LCD panel
opened*
LCD panel
closed
NP-FM30
(supplied)
120 150
NP-FM50 195 240
NP-FM70 400 495
NP-QM71/
QM71D
465 580
NP-FM91/
QM91/QM91D
695 865
,continued
Downloaded From VideoCamera-Manual.com Manuals
Getting started
16
– The battery pack is not attach e d cor r ectly.
– The battery pack is dama ge d.
– The battery pack is fully discharged. (For Battery
information only.)
Using an outside power source
You can use the AC Adapto r as the power
source when you do not want the battery to
run out. While you are using the AC Adaptor,
the battery pack will no t lo se i ts c harge ev en
when it is attached to your camcorder.
PRECAUTION
Even if your camcorder is turned off, AC power
(house current) is still supplied to it while
connecte d to the wa ll out let vi a the AC Ada ptor.
Connect your camcorder as shown in
“Charging the battery pack” (p. 13).
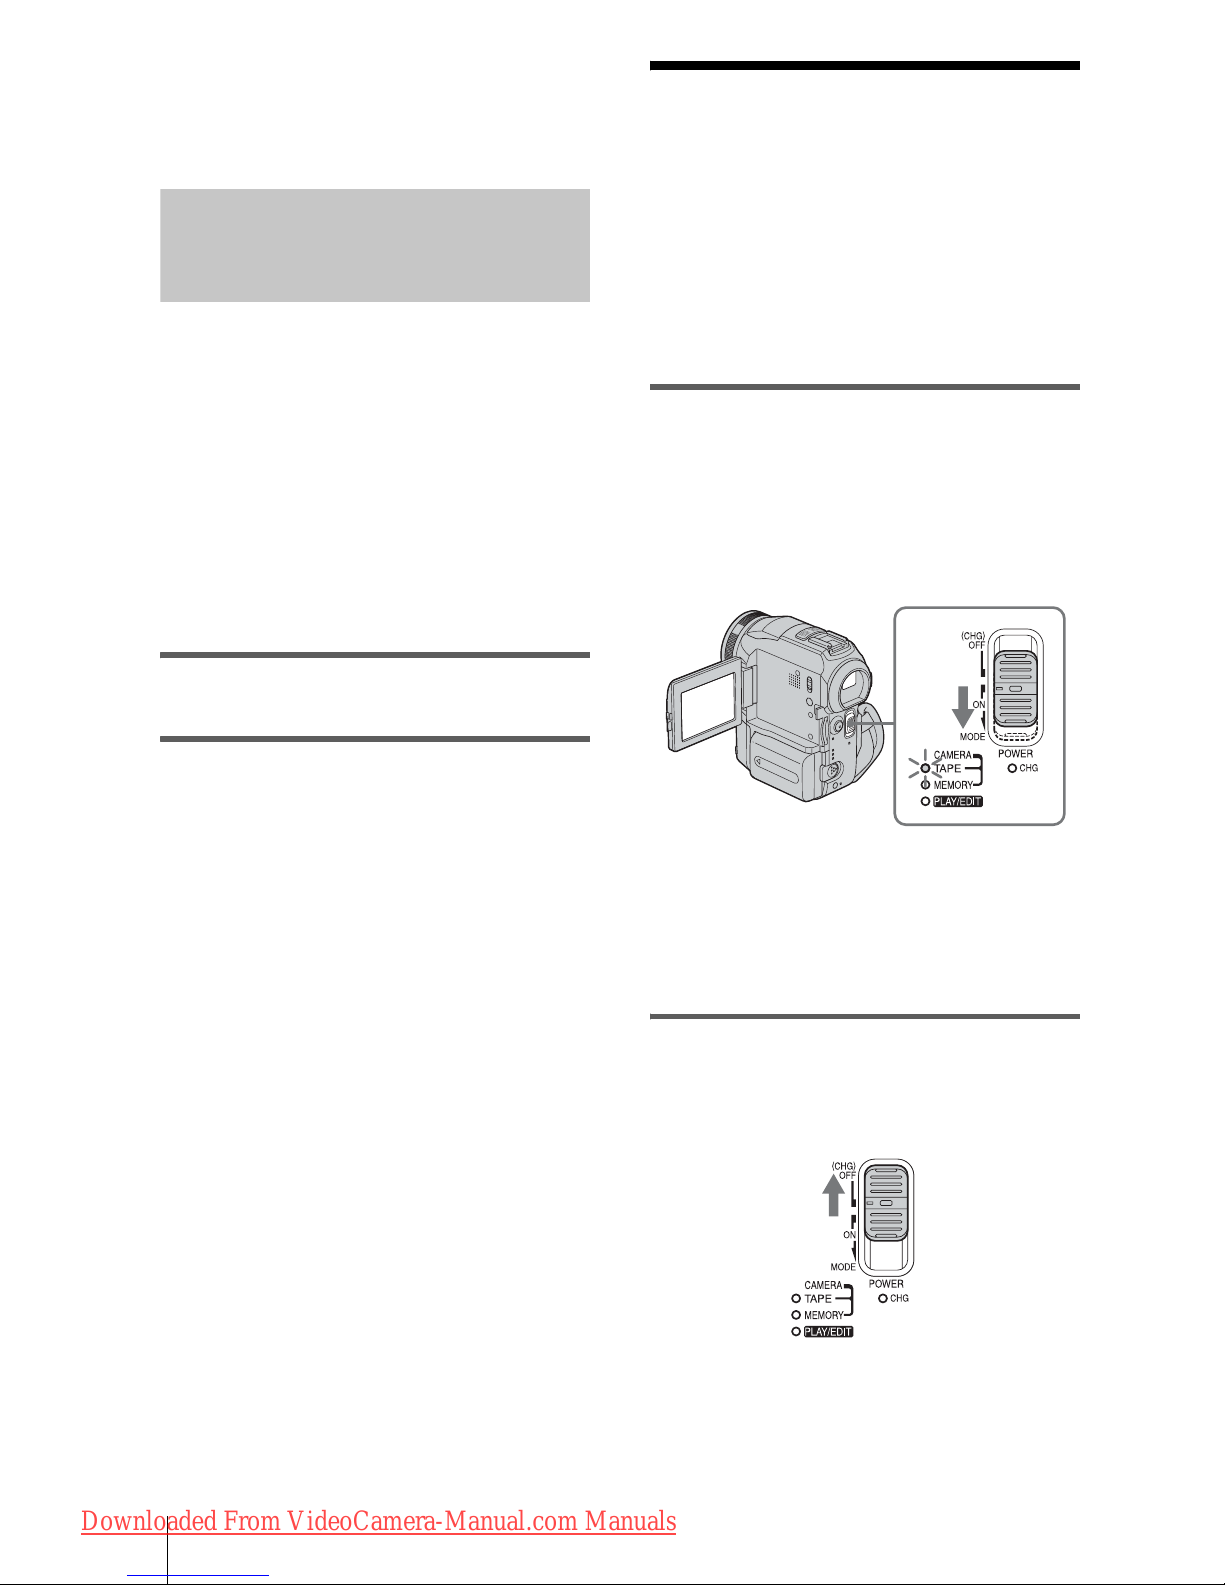
Step 3: Turning the
power on
You need to slide the POWER switch
repeatedly to select the desired power mode
to record or play
When using this camcorder for the first time,
the [CLOCK SET] screen appears (p. 18).
While pressing the green button, slide the
POWER switch down.
The power turns on.
To enter the recording or playin g mode, slide
the switch repeatedly until the respective lamp
for the desire d power mode ligh ts up.
• CAMERA-TAPE mode: To record on a tape.
• CAMERA-MEMORY mode: To record on a
“Memory St ic k.”
• PLAY/EDIT mode: To play or edit pictures on
a tape or “Mem or y St ick.”
To turn off the power
Slide the POWER switch up to (CHG) OFF.
Downloaded From VideoCamera-Manual.com Manuals
Getting started
Getting started
17
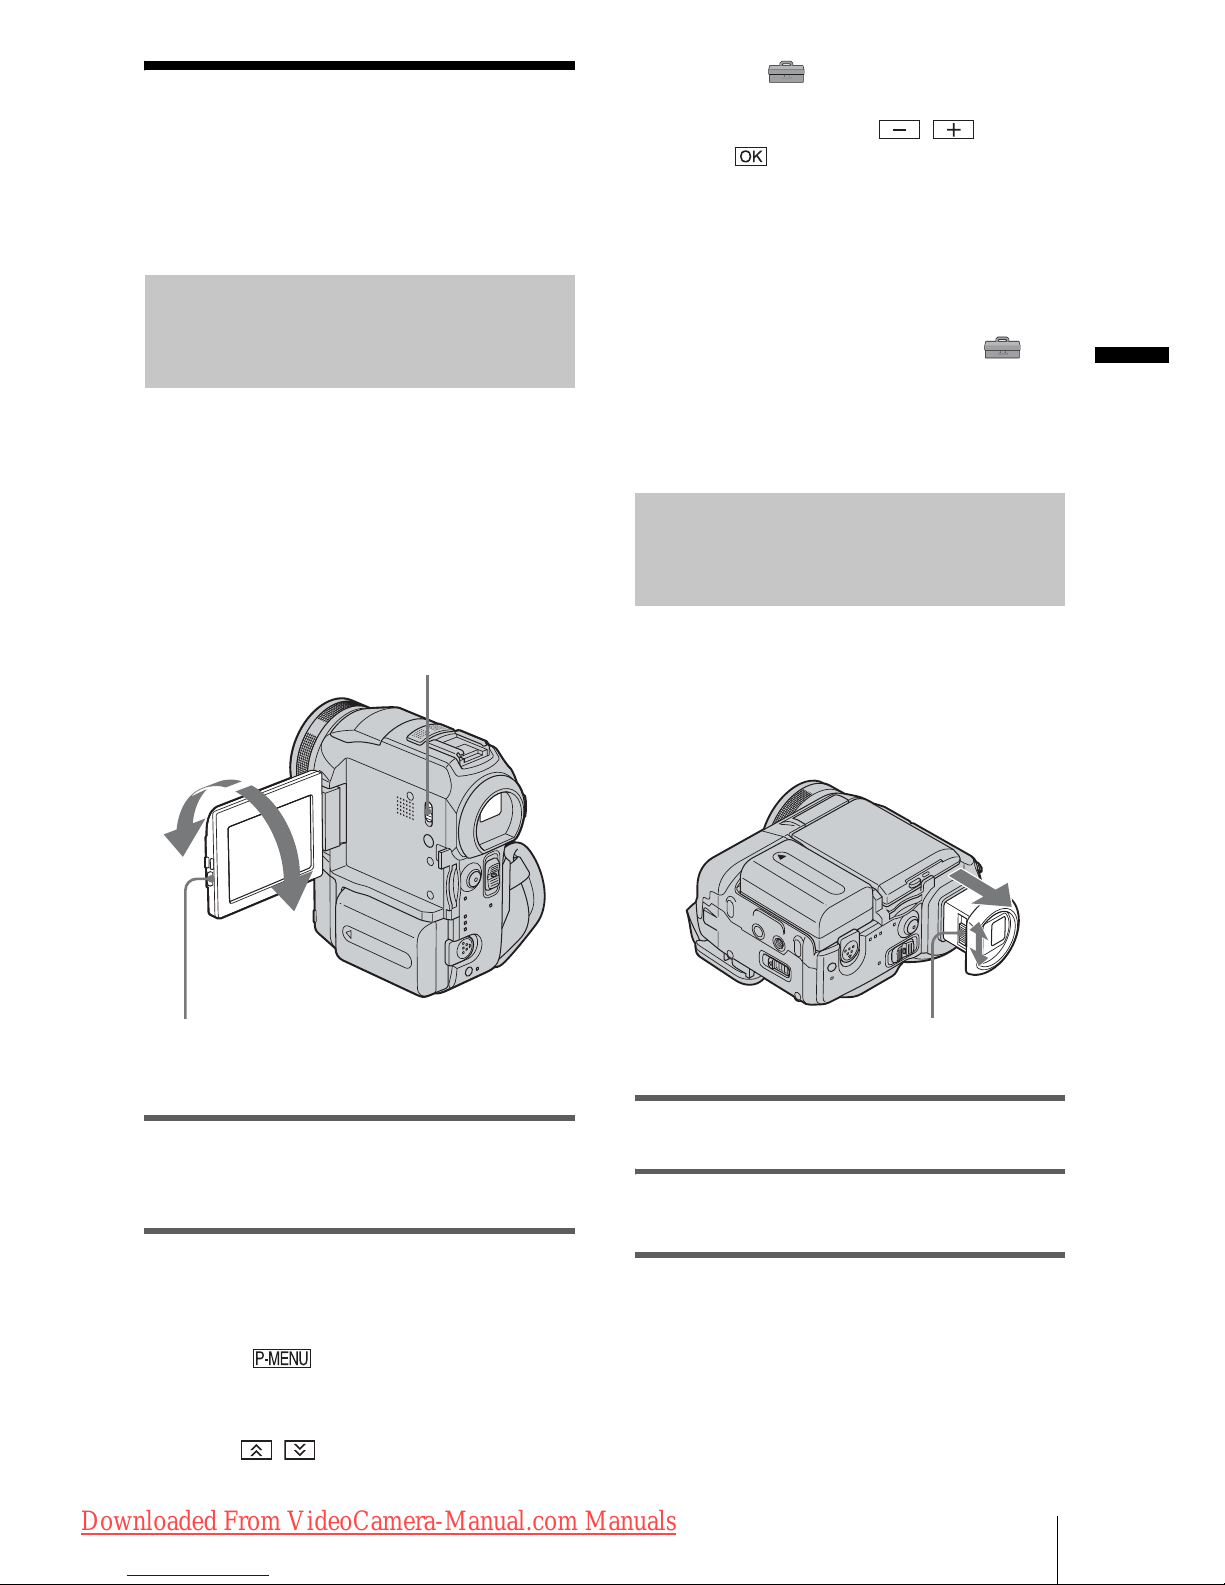
Step 4: Adjusting the
LCD panel and
viewfinder
Adjusting the LCD panel
You can adjust the angle and brightness of
the LCD panel to meet various recording
situations.
Even when there are obstructions between you
and the subj ect, you can ch eck the subjec t on the
LCD screen during recording by adjustin g t h e
angle of th e LC D panel.
Open the LCD panel 90 degrees to the
camcorder, then rotate it to the desired
position.
To adjust the brightness of the LCD
screen
1
Touch .
2 Touch [LCD BRIGHT].
If the item is not displayed on the screen,
touch / . If you c ann ot fin d it , to uch
[MENU], (STANDARD SET) menu,
then touch [LC D / V F SET] (p. 78) .
3 Adjust the item with / , then
touch .
z Tips
• If you rotate the LCD panel 180 degrees to the lens
side, you can close the LCD panel with the LCD
screen facing out.
• If you are using the battery pack for power sour c e ,
you can adjust the brightness by selecting [LCD BL
LEVEL] from the [LCD/VF SET] on the
(STANDARD SET) menu
(p. 78).
• When you use your camcorder in bright conditions
using the battery pack, set the LCD BACKLIGHT
switch to OFF. This position save s ba tte r y powe r .
Adjusting the viewfinder
You can view images using the viewfinder
when you close the LC D panel. Use the
viewfinde r when the ba ttery is runnin g out, or
when the screen is hard to see.
1 Extend the viewfinder.
2 Adjust the viewfinder lens adjustment
lever until the picture is clear.
To use the viewfinder during operation
When you are recording on a tape or a “Memory
Stick,” you can adjust the exposure (p. 32) and
fader (p. 38) while checking the image on the
viewfinder . Have the LCD panel rotated 180
degrees and cl os ed with the scree n facing out.
Press OPEN and open the LCD panel.
Maximum
180 degrees
Maximum
90 degrees
LCD BACKLIGHT switch
Viewfinder lens adju stment lever
,continued
Downloaded From VideoCamera-Manual.com Manuals

Getting started
18
1 Se t the po wer mo de to CAME RA-TAPE
or CAMERA-MEMORY (p. 16).
2 Extend the viewfind er, and close the
LCD panel with the screen facing out.
appears on the screen.
3 Touch .
4 Touch [YES].
The LCD screen is turned off.
5 Touch the LCD screen whil e checking
the display i n the viewfind er.
[EXPOSURE], etc. are displayed.
6 Touch the button you want to set.
• [EXPOSURE]: Adjust with /
and touch .
• [FADER]: Touch it repeatedly to select a
desired effect ( onl y in the CAMERATAPE mode).
• : The LCD screen lights up.
To hide the buttons on the LCD screen,
touch .
z Tip
• To adjust the brightness of the viewfinder backlight,
select (STANDARD SET) menu, [LCD/VF
SET], then [VF B.LIGHT] (when you are using the
battery pack, p. 78).
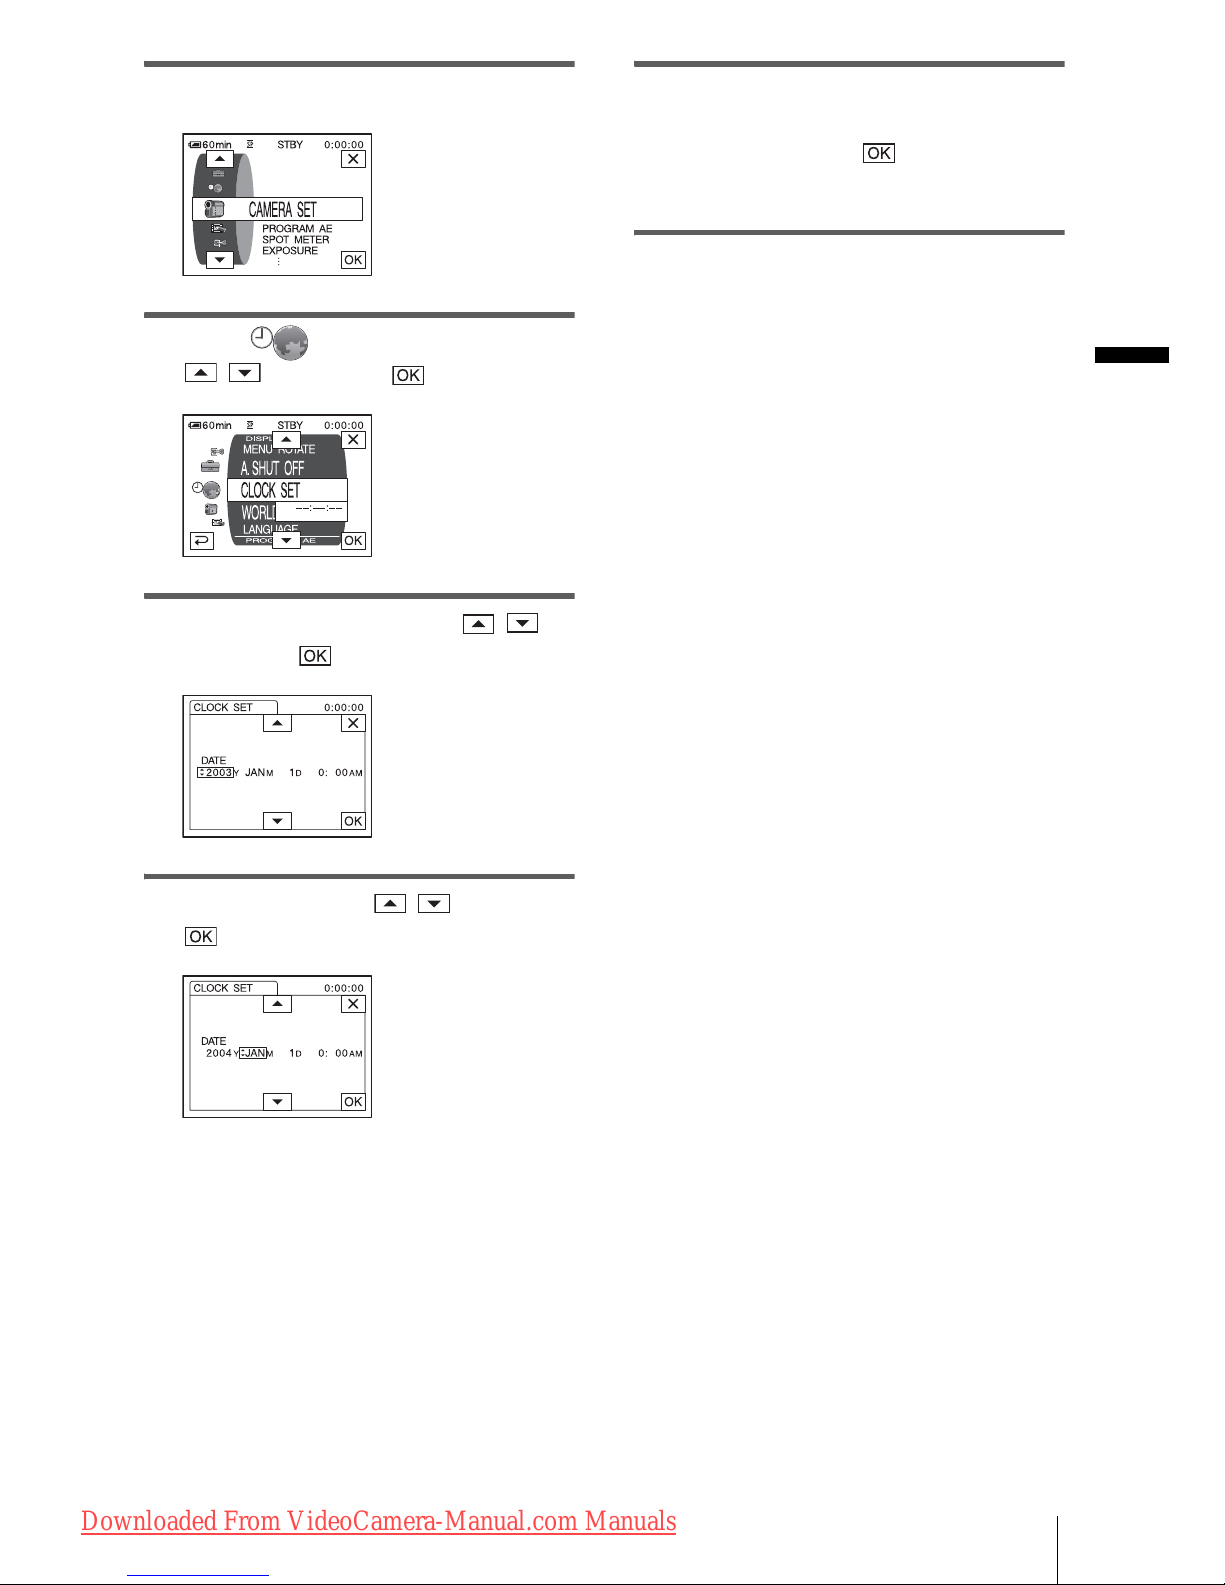
Step 5: Setting the
date and time
Set the date and time when using this
camcorder for the first time. If you do not set
the date and time, the [CLOCK SET] screen
appears ev e r y t im e yo u tur n on your
camcorder.
b Note
• If you do not use your camcorder for about 3
months, the built-in rechargeable bu tton-type
battery gets discharged and the date and time
settings may be cl eared from the memo ry . I n tha t
case, charge the rechargeable button-type battery
(p. 124) and then set th e d a te and time again.
1 Turn on your camcorder (p. 16).
2 Press OPEN and open the LCD panel.
Proceed to step 7 when you set the clock for
the first time.
3 Touch .
OPEN
POWER switch
Downloaded From VideoCamera-Manual.com Manuals
Getting started
Getting started
19
4 Touch [MENU].
5 Select (TIME/LANGU.) with
/ , then touch .
6 Select [CLOCK SET] with / ,
then touch .
7 Set [Y] (year) with / , then touch
.
You can set any year up to the year 2079.
8 Set [M] (month), [D] (day), hour and
minute in the same way as was do ne in
step 7, then couch .
For midnight, set it to 12:00AM.
For midday, set it to 12:00PM.
Downloaded From VideoCamera-Manual.com Manuals
Getting started
20
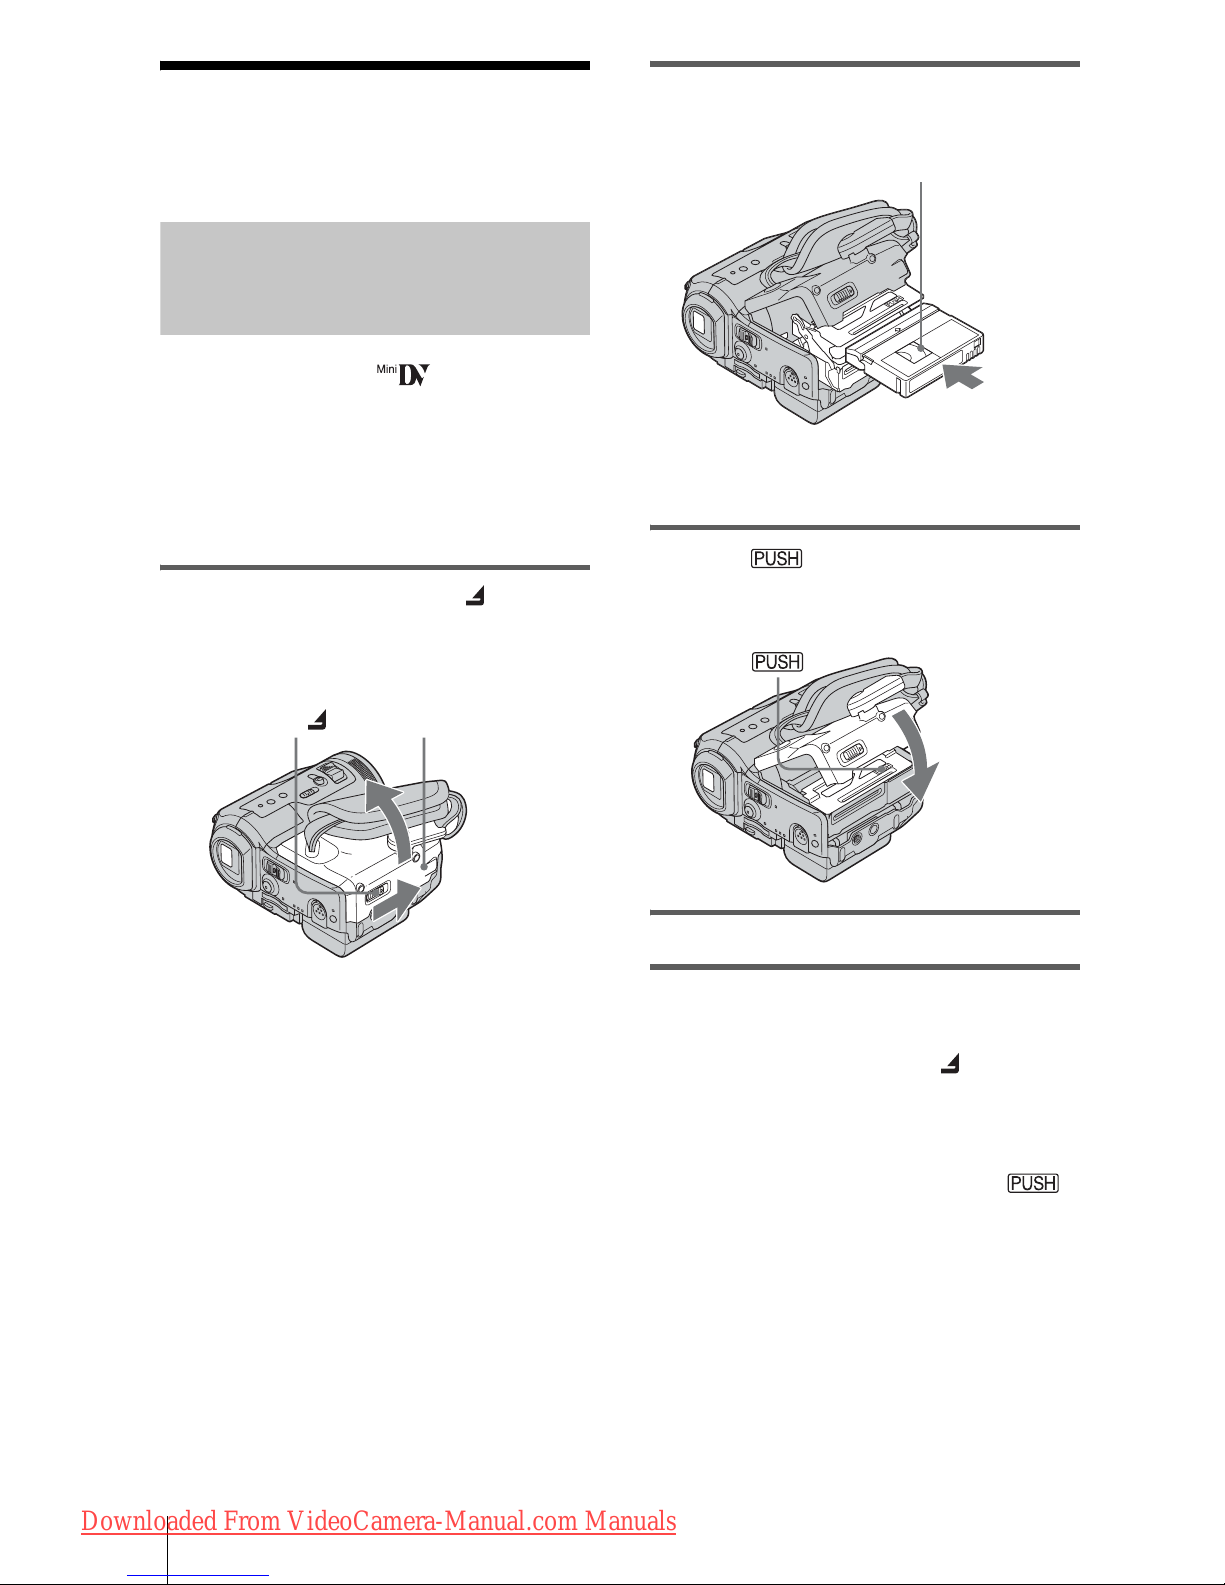
Step 6: Inserting the
recording media
Inserting a cassette tape
You can use mini DV cassettes only.
For details on these cassettes (such as writeprotection), see page 116.
b Note
• Do not force the casse tte into the comp artment. This
may cause a malfunction of your camcorder.
1 Slide the OPEN/ZEJECT lever in
the direction of the arrow and open the
lid.
The cassette compartment automatically
comes out an d opens up.
2 Insert a cassette with its window-side
facing up.
3 Press .
The cassette compartment automatically
slides back in.
4 Close the lid.
To eject the cassette
1
Slide the OPEN/ZEJECT lever in the
direction o f t he arrow and open the lid.
The cassette compartment automatically
comes out.
2 Take out the cassette, then press .
The cassette compartment automatically
slides back in.
3 Close the lid.
Lid
OPEN/ZEJECT lever
Window-side
Push the center of the
back of the cassette
lightly.
Downloaded From VideoCamera-Manual.com Manuals
Getting started
Getting started
21
Inserting a “Memory Stick”
For details on the “Memory Stick” (such as
write-protection), see page 117.
b Note
• When using the half-sized “Memory Stick,” the
“Memory Stick Duo,” ma ke sure you a tta c h the
Memory Stick Duo adaptor. Your camcorder may
malfunction wh e n it is inserted without a n ada ptor
(p. 118).
Insert the “Memory Stick” with the b
mark at the bottom left corner until it
clicks.
To eject a “Memory Stick”
Lightly push t he “Memory Stic k” i n once.
b Notes
• If you force the “Memory Sti ck ” in to the “Memory
Stick” slot in the wro ng dir e ction, the “Memory
Stick” slot may be damag ed.
• Do not insert anything other than a “Memory Stick”
into the “Memory Stick” slot. Doing so may cause a
malfunction of your camcorder.
• When the access lamp is lit or fl a shing, your
camcorder is reading /wr iti ng da ta from/to the
“Memory Stick.” Do not shake or knoc k your
camcorder, turn the power off, eject the “Memory
Stick,” or remove the ba tte r y pa ck . Othe rw ise,
image data may be dama ge d.
b mark
Access lamp
Lightly push in
once.
Downloaded From VideoCamera-Manual.com Manuals
Getting started
22
Step 7: Setting the
screen language
You can select the language to be used on the
LCD screen.
1 Turn on your camcorder.
2 Press OPEN to open the LCD panel.
3 Touch .
4 Touch [LANGUAGE].
If the item is not displayed on the screen,
touch / . If you cannot find it, touch
[MENU], and select it from the
(TIME/LANGU.) menu (p. 82).
5 Select the desired language with /
, then touch .
z Tip
• Your camcorder offers [ENG [SIMP]] (simpl ified
English) for when you cannot find your nat ive
tongue among the options.
POWER switch
OPEN
Downloaded From VideoCamera-Manual.com Manuals
Recording
Recording
23
Recording
Recording movies
You can record movies on a tape or a
“Memory Stick.”
Before recording, follow steps 1 to 7 in
“Getting started” (p. 12 - p. 22).
When you are recording on a tape, movies
will be recorded along with stereo sound.
When you are recording on a “Memory
Stick,” the movie will be recorded with
monaural sound.
1 Remove the lens cap. Pull the lens cap
string down and attach it to the grip
belt.
2 Press OPEN and open the LCD panel.
3 Select the recording mod e.
To record on a tape
Slide the POWER switch until the
CAMERA-TAPE lamp lights up, and your
camcorder is set to the standby mode.
To record on a “Memory Stick” –
MPEG MOVIE EX
Slide the POWER switch repeatedly until
the CAMERA-MEMORY lamp lights up,
and the currently selecte d re cording folder
appears on the screen.
4 Press START/STOP.
Recording st arts. [REC] appears on the
LCD screen and t he Camera record ing lamp
lights up.
Press START/STOP again to stop
recording.
To check the most recently recorded
MPEG movie – Review
Touch . Playback starts automatically.
Touch again to return to standby.
To delete the movie, to uch after playback
is finished, then [YES].
To cancel deleting, touch [NO].
To turn the power off
Slide the POWER switch up to (CHG) OFF.
OPEN
POWER switch
START/STOP
Camera re cording l amp
Slide the POWER
switch while
pressing the green
button.
Slide the POWER
switch while
pressing the green
button.
,continued
Downloaded From VideoCamera-Manual.com Manuals
Recording
24
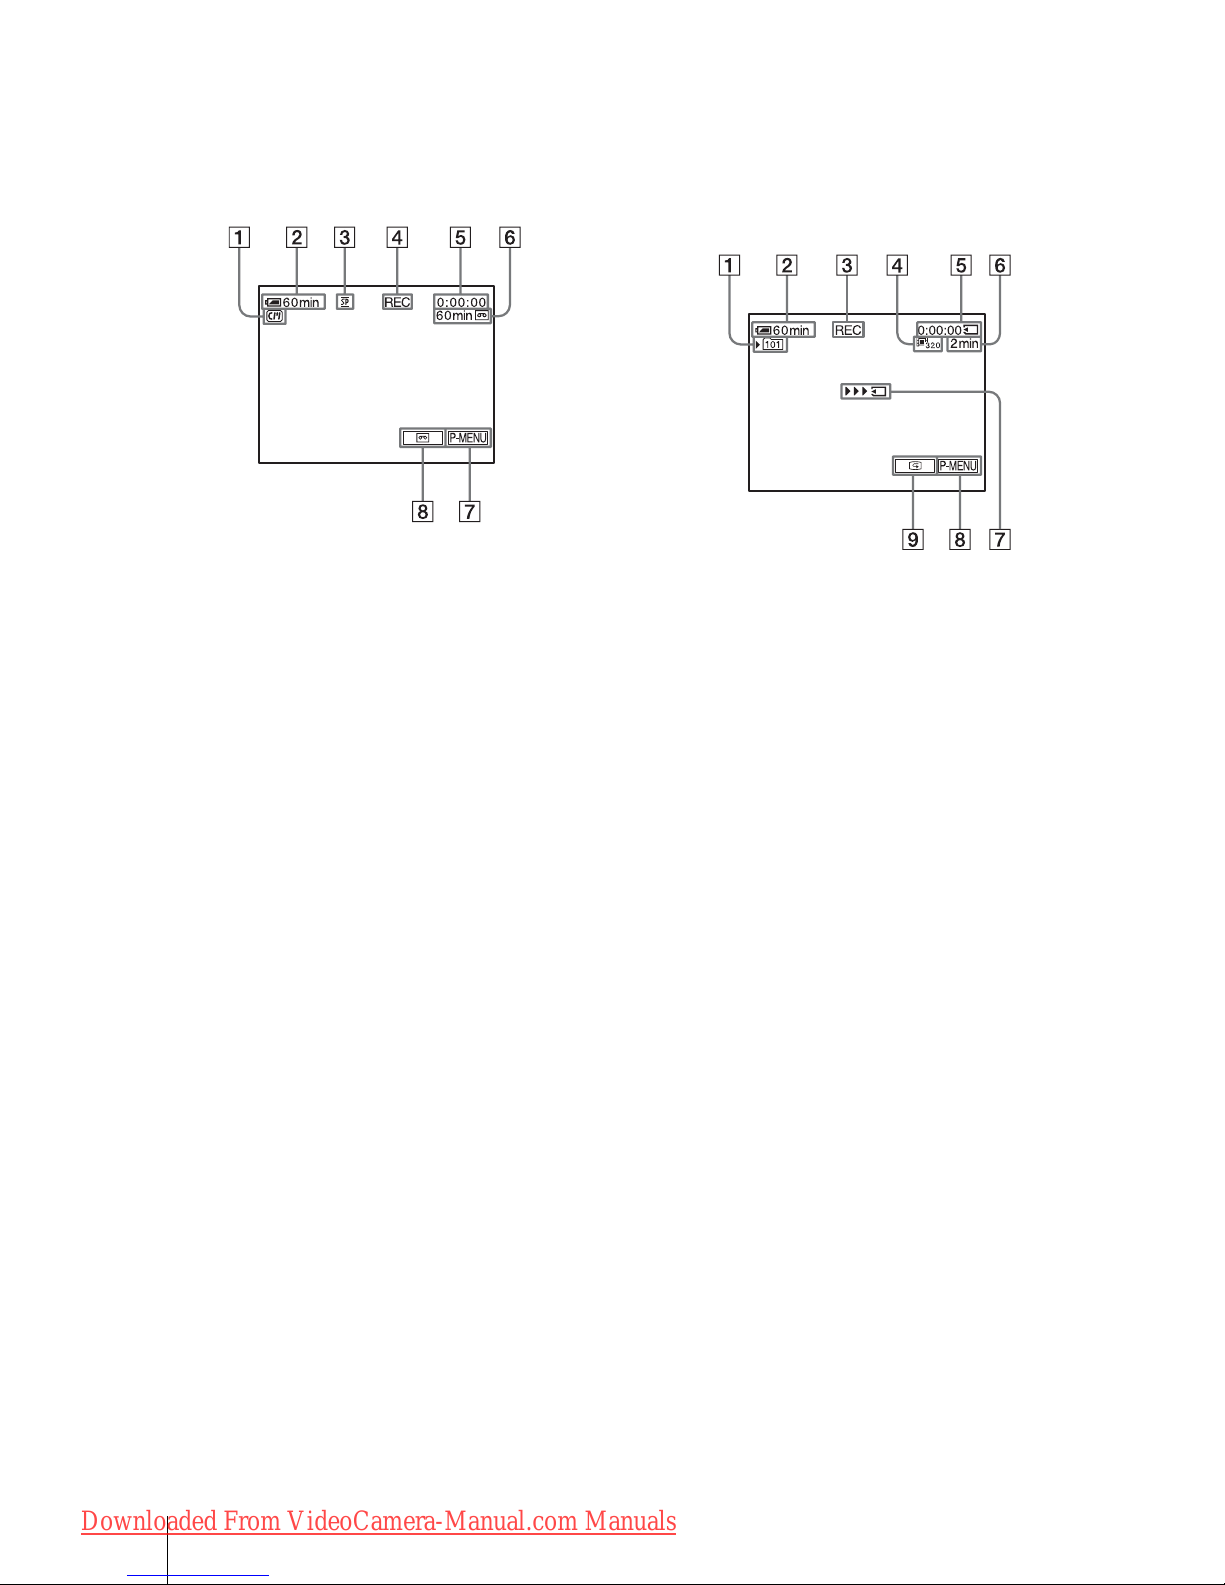
Indicators displayed during recording
on a tape
The indicators will not be recorded on the tape.
Date/time and the camera settings data (p. 51)
will not be displayed during recording.
A Indic ators fo r Cassett e Memory ca ssettes
B Remainin g b attery
The indicated time may not be correct
depending on the environment of use.
When you open ed or clos ed the LCD pan el,
it takes about on e m inute to displa y th e
correct remaining battery time.
C Recording mode (SP or LP)
D Recording status ([STBY] (standby) or
[REC] (recording))
E Time code (hour: minute: second: frame)
or tape counter (hour: minute: se cond)
F Recording capacity of the tape
Displayed after you run the tape for a while.
G Personal Menu button (p. 56)
H END SEARCH/EDIT SEARCH/Rec
review display s w itch button (p. 43)
Indicators displayed during recording
on a “Memory Stick”
The indicator s w i ll not be recorded on the
“Memory Stick.”
Date/time (p. 51) will not be displayed during
recording.
A Recording fold er
B Remaining batter y
The indicated time may not be correct
depending on the environme nt of use.
When you opened or closed the LCD panel,
it takes about one minute to display the
correct remaining battery t ime.
C Recording status ([STBY] (standby) or
[REC] (recording))
D Movie size
E Recorded time (hour: minute: second)
F Recording capac it y of the “Memory
Stick”
G “Memory Stick” recording start
indicator (appears for ab out 5 seconds)
H Personal Menu butto n (p. 56)
I Review button (p. 23)
b Notes
• Before changin g the batt ery pack, slide the POWER
switch up to (CHG) OFF.
• In the default setting, w hen y ou do not ope rate the
camcorder for more than about 5 minutes, the power
will automatically turn off to prevent battery loss
([A.SHUT OFF], p. 81). To restart recording, slide
the POWER switc h do w n to select CAMERA TAPE or CAMERA-MEMORY, and then press
START/STOP.
• When you are recording on a “Memory Stick” using
an external flash (optional), turn off the power of the
external flash to prevent charg ing noise fro m getting
recorded.
Downloaded From VideoCamera-Manual.com Manuals
Recording
Recording
25
z Tips
• To ensure smoot h tr ansition on a tape from the last
recorded scene to the next, note the following.
– Do not remove the cassette. (The picture w ill be
recorded continuously without a break even when
you turn the power off).
– Do not record pictures in SP mode and LP mode on
the same tape.
– Avoid stopping then recording a movie in the LP
mode.
• See “To record for a longer time on a “Memory
Stick”” (p. 25) for the approximate length of time it
is possible to record on a “Me mor y S tic k” of
different capacities.
• The recording time, date, and the camera settings
data (for tape only) are recorded automatically on
the recording media without being displayed on the
screen. You can view this informat io n duri ng
playback by pressing [DATA CODE] on the screen
(p. 51).
Recording for a longer time
To record for a longer time on a tape
In the (STANDARD SET) menu, select
[ REC MODE], then [LP] (p. 77).
In the LP mode, you can record 1.5 times longer
than you can w hen recording i n t he SP mode.
A tape recorded in the LP mode should be
played back only on this camcorder.
To record for a longer time on a
“Memory Stick”
In the (MEMORY SET) menu, select
[MOVIE SET], [ IMAGE SIZE], then [160 ×
112] (p. 65).
The numbe r o f pi ct ures you can re cord on a
“Memory Stick” varies depending on the image
size and the recording environment.
Refer to the following list for approximate
length of ti m e you can record movi es on a
“Memory Stick” formatted on your camcor der.
Image size and tim e
(hour: minute: second)
Using zoom
When the CAMERA-TAPE mode is
selected, you can choose zoom to
magnification levels greater than 10 times,
and from that poin t ac tiv ate th e dig ital z o om
([DIGITAL ZOOM], p. 62).
Occasional use of the zoom is effective, but
use it sparingly for best results.
320 × 240 160 × 112
8MB 00:01:20 00:05:20
16MB
(supplied)
00:02:40 00:10:40
32MB 00:05:20 00:21:20
64MB 00:10:40 00:42:40
128MB 00:21:20 01:25:20
256MB
(MSX-256)
00:42:40 02:50:40
512MB
(MSX-512)
01:25:20 05:41:20
1GB
(MSX-1G)
02:50:40 11:22:40
320 × 240 160 × 112
1 cm (approx. 1/2 inch)*
80 cm (approx. 2 5/8 feet)*
* The minimum dista nc e required between your
camcorder and the subject to get a sharp focus in
that position of the leve r.
,continued
Downloaded From VideoCamera-Manual.com Manuals
Recording
26
Move the power zoom lever sl ightly for a
slower zoom. Move it further for a faster
zoom.
To record wider range of view
Move the pow er zoom lever to w ards W.
The subject appears farther away (Wide
angle).
To record closer vie w
Move the power zoom lever to w ards T.
The subject ap pears closer (T el ephoto).
Recording in mirror mode
You can turn the LCD panel towards the
subject so that you and your subject can share
the image being recorded. You can also
utilize this function when recordin g yourself,
to keep the attention of small children
attracted to the camcorder while you record
them.
Open the LCD panel 90 degrees to the
camcorder, then rotate it 180 degrees
towards the subject.
A mirror-image of the subject appears on the
LCD screen, but the picture will be normal
when recorded.
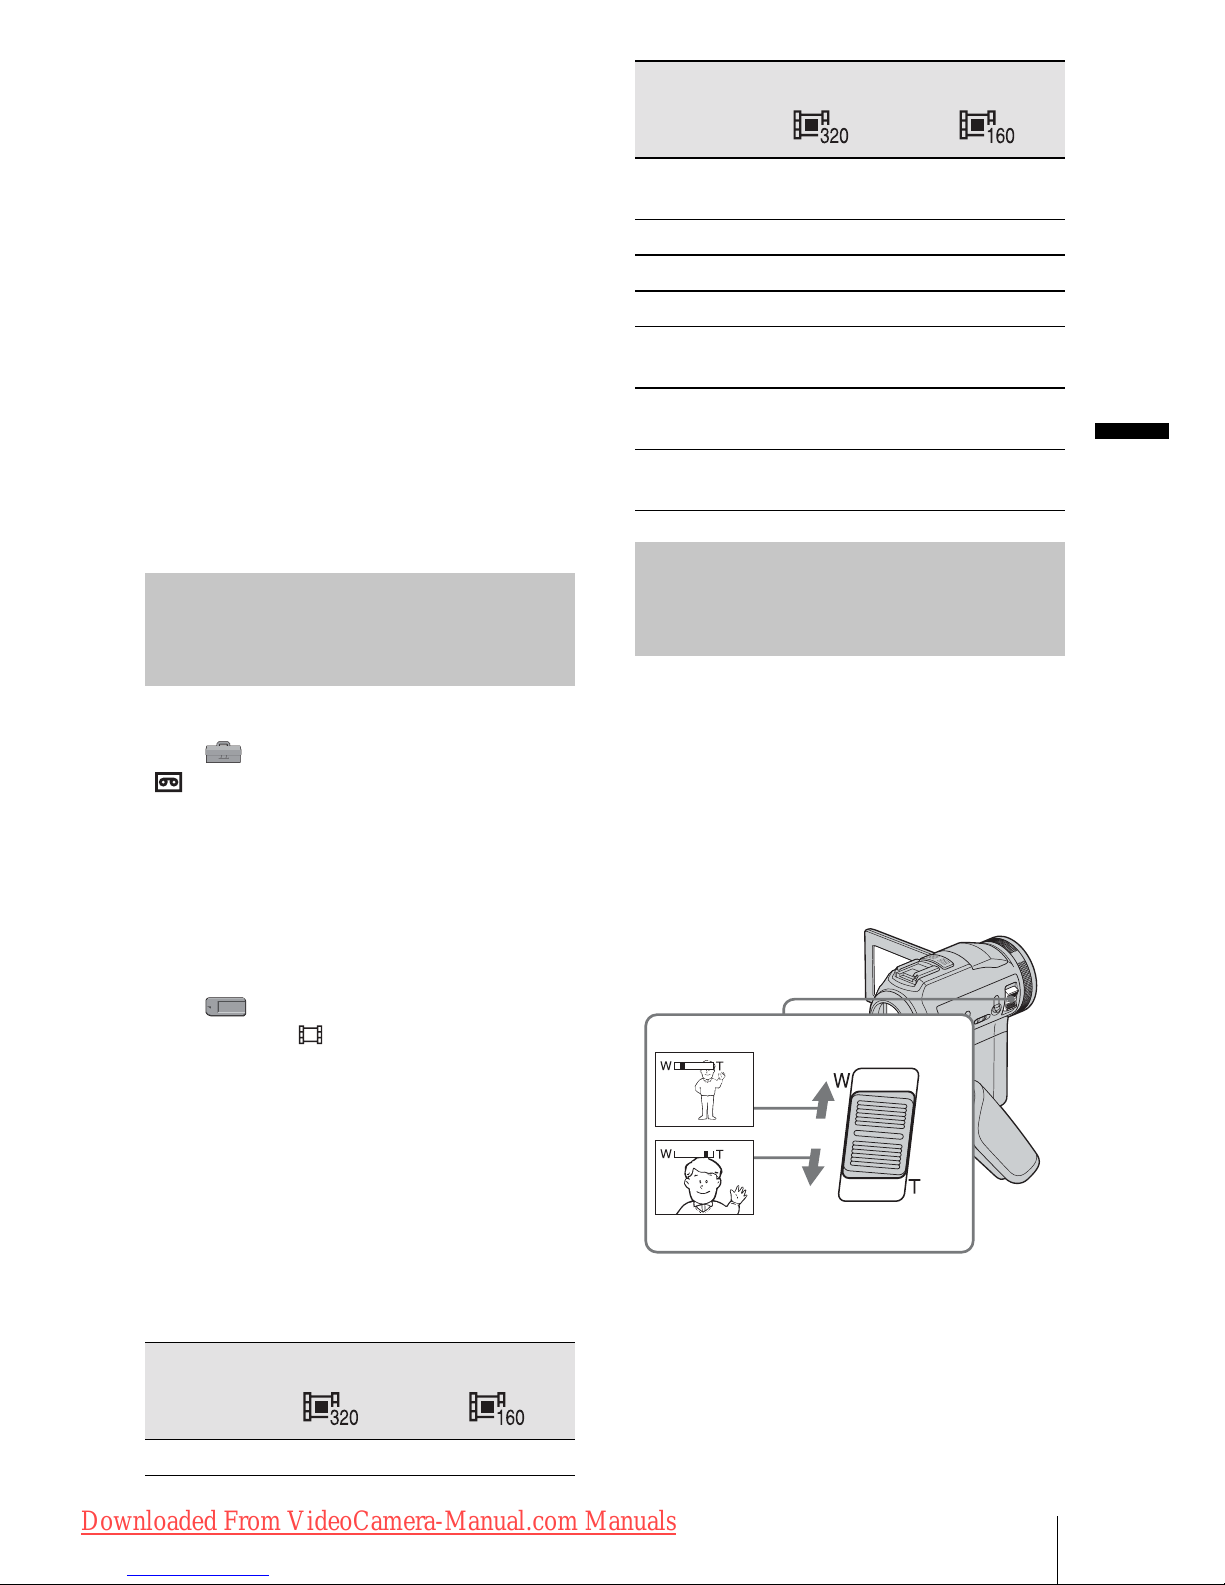
Using th e self-timer
With the self-timer, you can start recording
after a delay of about 10 seconds.
1 Touch .
2 Touch [SELF-TIMER].
If the item is not displayed on the screen,
touch / . If you cannot find it, touch
[MENU], and select it from the
(CAMERA SET) menu.
3 Touch [ON], then .
appears.
4 Press START/STOP.
Extend the viewfinder.
START/STOP
START/STOP
Downloaded From VideoCamera-Manual.com Manuals
Recording
Recording
27
You will hear a beep sound counting down
for about 10 seconds (The count down
indicat i on begins fr om 8).
The recording starts.
To stop recor di ng, press START/ STO P.
To cancel the count down
Touch [RESET] or press START/STOP.
To cancel the self-timer
Follow st eps 1 and 2, the n select [OFF] in step
3.
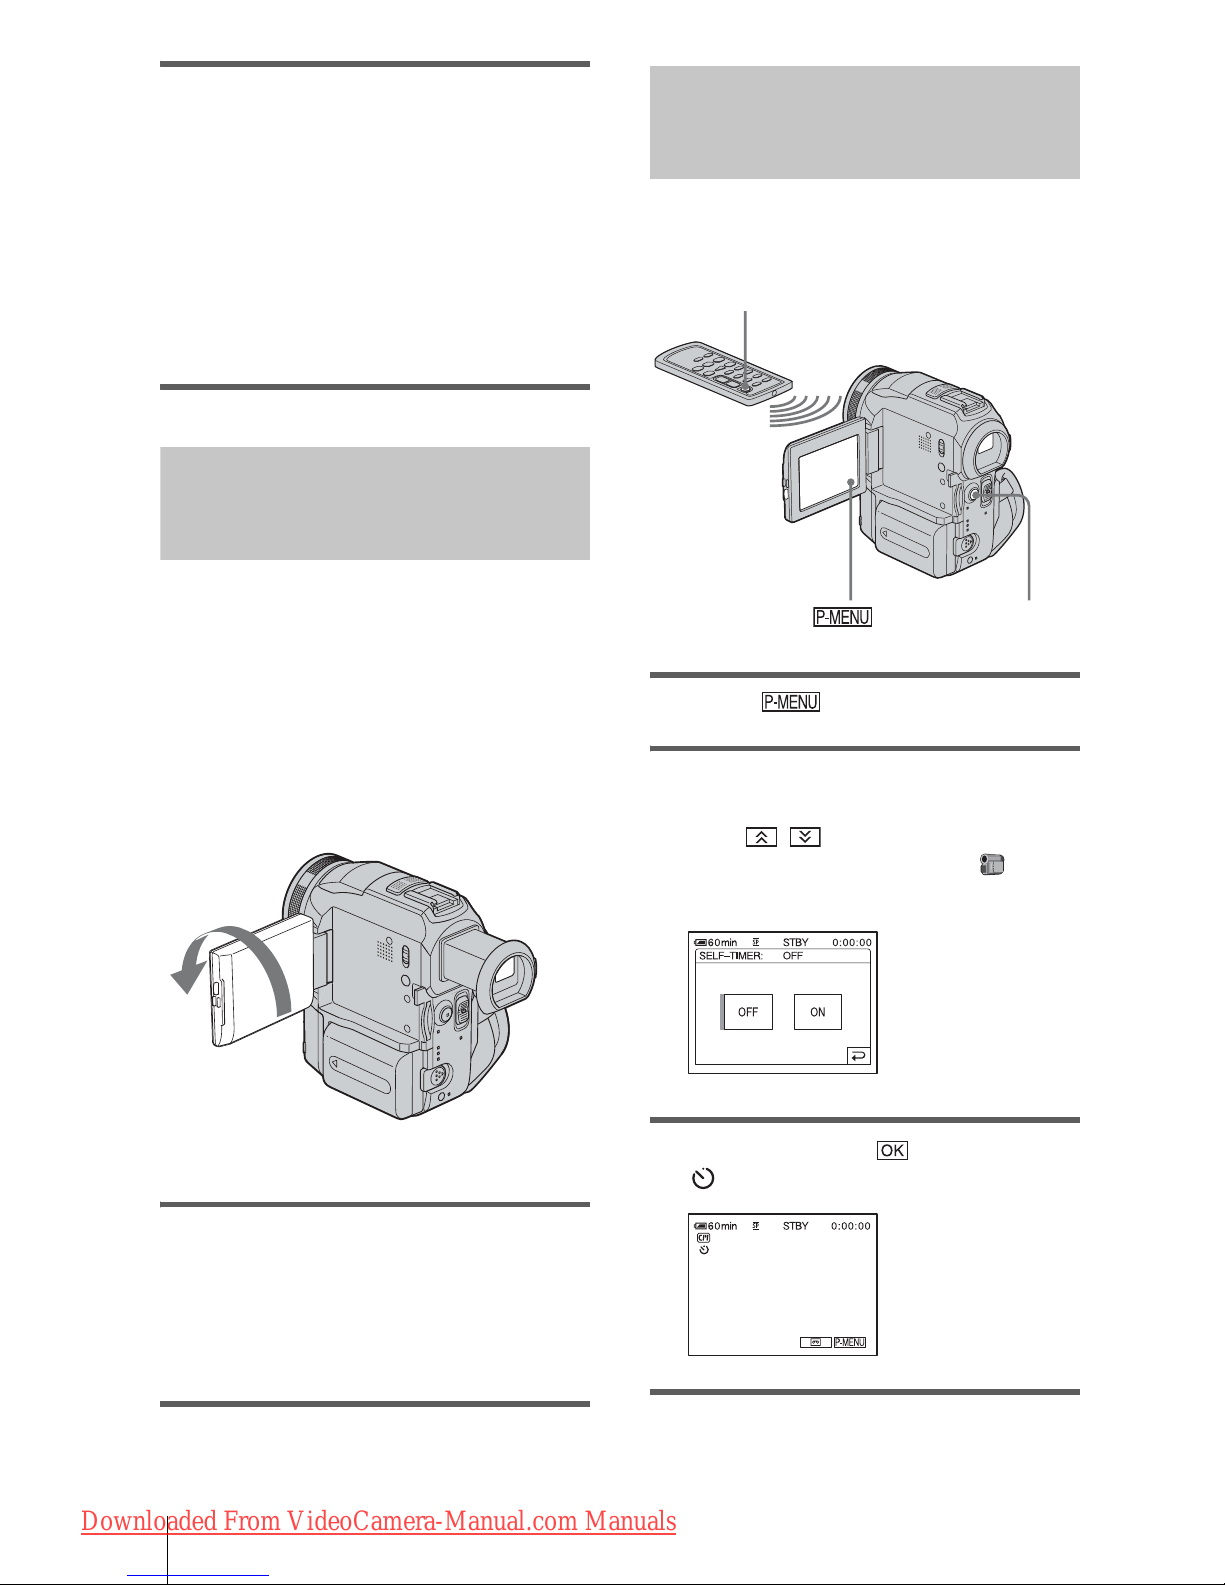
Recording movies fit for breaki ng
into still images – Progressive
recording mode
This feature is use f ul for mo v i es yo u inte n d
to import to your computer to produce still
images.
You can record pi ctures with less blurring
than recording in the no rmal mode,
producing pi ctures suitable for analyzing
high-speed action such as sports. To enjoy as
a movie, it is better to record the picture in the
normal mode, since the i mage is recorded
only every 1/30 of a sec ond in the prog ressive
recording mode.
1 Touch .
2 Touch [PROGRE REC].
If the item is not displayed on the screen,
touch / . If you cannot find it, touch
[MENU], and select [PROGRES. REC]
from the (CAMERA SET) menu.
3 Touch [ON], then .
appears.
4 Press START/STOP.
Press it again to stop recording.
To cancel the progressive recording
mode
Follow steps 1 and 2, then select [ O FF] in step
3.
Note on the progressive recording mode
In a normal TV broadcast, the sc reen is d ivide d into 2
finer fields and these are displayed in turn, every 1/60
of a second. Thus, the actual pictur e displa yed in an
instant covers only half of the apparent picture area. In
progressive recording, the pic tur e is fu ll y displayed
with all the pixels. A picture recorded in this mo d e
appears clearer, but a moving subject may appear
awkward.
b Notes
• When recording in the progr e ssi ve re co rd ing mode
under fluorescent lig ht or a li ght bulb, the screen
may flicker. Th is is not a malfunct ion.
• You cannot use the Progres sive recording mode
with:
– [16:9 WIDE] mode
START/STOP
Downloaded From VideoCamera-Manual.com Manuals
Recording
28
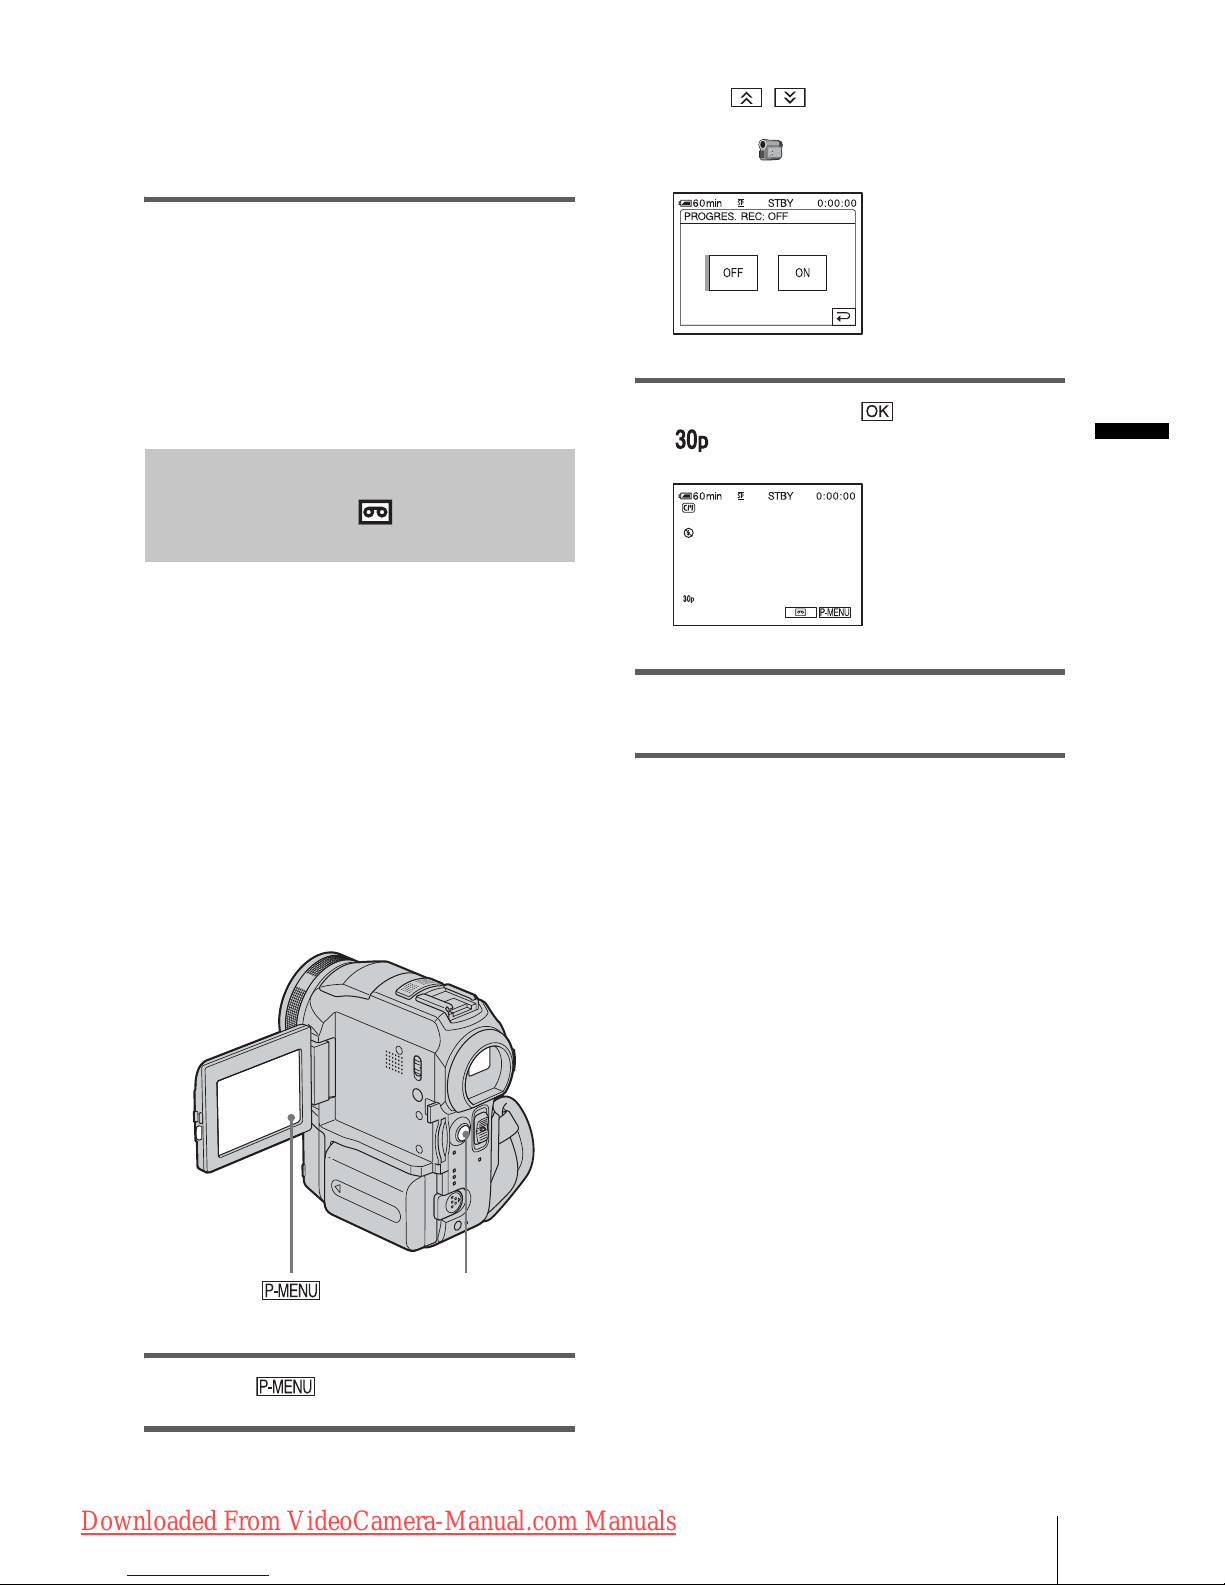
Recording still
images
– Memory photo recording
You can record still images on a “Memory
Stick.” Before recording, follow steps 1 to 7
in “Getting started” (p. 12 - p. 22).
1 Remove the lens cap. Pull the lens cap
string down and attach it to the grip
belt.
2 Press OPEN and open the LCD panel.
3 Slide the POWER switch repeatedly
until the CAMERA-MEMORY lamp
lights up.
The selecte d recording fo l d er is displayed.
4 Press and hold PHOTO lightly.
You will hear a light beeping soun d wh e n
the focus and brightness settings are
adjusted. Recording does not start at this
point.
*The number of images that can be rec orde d
varies depending on the im ag e si ze se tting and
the recording environment.
5 Press PHOTO fully.
A shutter sound is heard. When bars of
disappears, the image is recorded
on the “Memor y St ick.”
To check the most recently recorded
image – Review
Touch .
Touch again to return to standby.
To delete the image, touch , then [YES].
To cancel delet in g, to uch [NO].
To turn the power off
Slide the POWER switch up to (CHG) OFF.
OPEN
POWER switch
PHOTO
Slide the POWER
switch while pressing
the green button.
The indicator
stops flashing.
The number of images
that can be recorded.*
Downloaded From VideoCamera-Manual.com Manuals

Recording
Recording
29
To record still images continuously –
Burst
Select the (MEMORY SET) menu,
[STILL SET], then [ BURST] (p. 64).
You can record 3 to 32 images continuously in
a time interval of about 0.5 to 0.07 seconds.
Indicators displayed during recording
A Recording fol der
B Image size
(2016 × 1512) or (640 × 480)
C Quality
([FINE]) or ([STANDARD])
D Personal Menu button (p. 56)
E Review button (p. 28)
z Tips
• When you press PHOTO on your Remote
Commander, the imag e di s pl ay e d on th e screen at
that timing is recorded.
• The recording time, date, and the camera settings
data are recorded automatically on the recording
media without being displayed on the screen. You
can view this inform ation dur ing playback by
pressing [DATA CODE] on the screen (p. 51).
• The recording angle is wider than that of the
CAMERA-TAPE mode.
Selecting image quality or size
Select the (MEMORY SET) menu,
[STILL SET], then [ QUALITY] or
[ IMAGE SIZE] (p. 64).
The number of p ictures you can reco rd on a
“Memory Stick” varies depending on the
quality/size of the image and the recording
environment.
Refer to the following list for the appr o ximate
number of pictures that can be recorded on a
“Memory Sti ck” formatted on your camcorder.
When the Image quality is [FINE]
(number of images)
The image size of 2016 × 1512 is 1540KB, that
of 640 × 480 is 150KB.
When the Image quality is [STANDARD]
(number of images)
The image size of 2016 × 1512 is 640KB, that
of 640 × 480 is 60KB .
2016 × 1512
640 × 480
8MB 5 50
16MB (supplied) 10 96
32MB 20 190
64MB 40 390
128MB 82 780
256MB
(MSX-256)
145 1400
512MB
(MSX-512)
300 2850
1GB (MSX-1G) 610 5900
2016 × 1512
640 × 480
8MB 12 120
16MB (supplied) 24 240
32MB 48 485
64MB 98 980
128MB 195 1970
256MB
(MSX-256)
355 3550
512MB
(MSX-512)
720 7200
1GB (MSX-1G) 1450 14500
,continued
Downloaded From VideoCamera-Manual.com Manuals
Recording
30
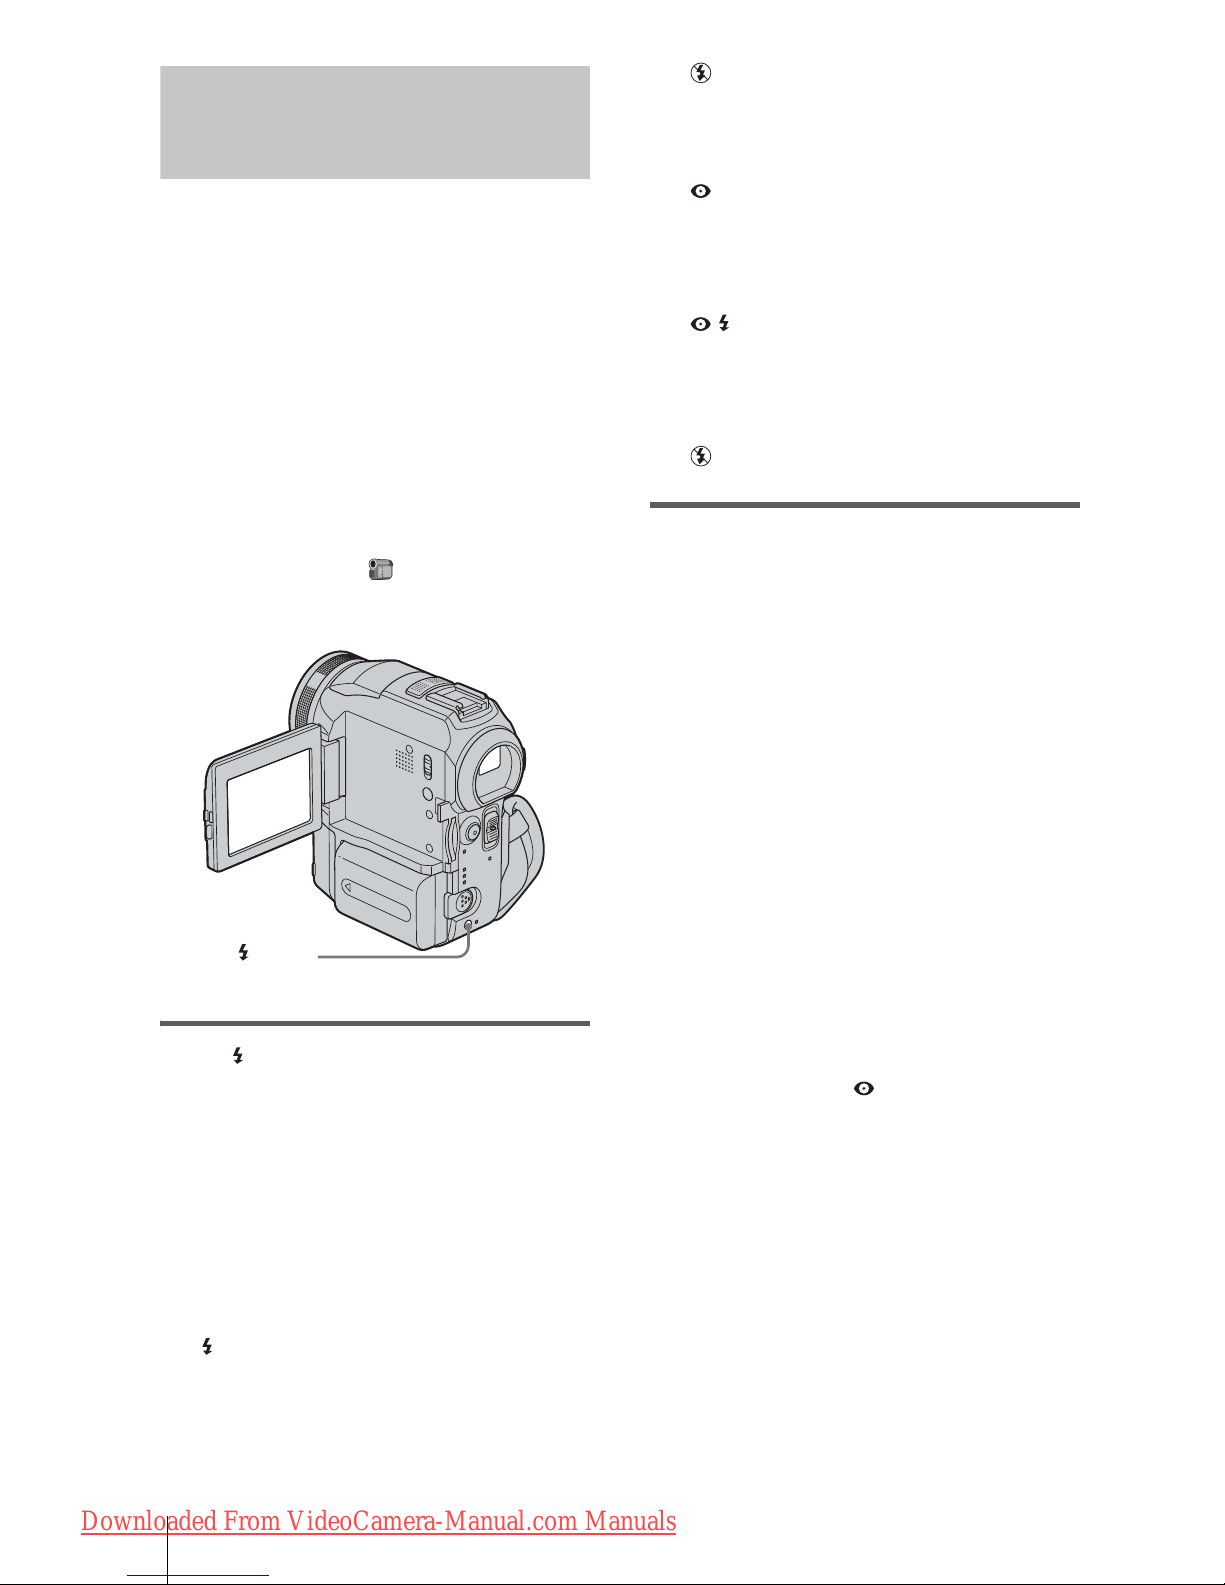
Using the flash
The recommended dist ance to the subject
when using the built-in flash is 0.3 to 2.5 m (1
to 8 feet).
Your camcor der is set to auto flashing by
default, so according to the lighting
conditions, the flash may be automatically
activated when you press PHOTO.
Follow the steps below when you always
want to use th e flash, or when yo u do not
want to use the flash at all.
The available settings vary according to what
you selected in [REDEYE REDUC] of
[FLASH SET] in the (CAMERA SET)
menu (p. 61).
Press (flash) repeatedly to select a
setting.
The settings are displayed cyclically in the
following order.
When the red eye re duction feature
is turned off
No indicator displayed: Automatic ally
flashes when there is not enough
surrounding li ght.
m
(Forced flash): Always uses the flash
regardless of the surrounding brightness.
m
(No flash): A lways records without
using the flash.
When the red eye reduction feature
is turned on
(Auto red-eye reduction): Pre-flashes to
reduce red-eye before the flash
automatically flashes when there is not
enough surrounding light.
m
(Forced red-eye reducti on): Always
uses the flash and the red-eye reducing preflash rega rd l ess of the surrounding
brightness.
m
(No flash): A lways records without
using the flash.
b Notes
• Remove the dust from the surface of the flash lamp
before using it. You may not get a sufficient amount
of flash if the dust discolors or sticks to the lamp due
to the heat from flashing .
• The red-eye red uction may not produce the desired
effect due to individual dif f e renc e s an d othe r
conditions.
• The flash charge indicator fl ic ke rs while charging,
and remains lit when the ba ttery charg e is comple te.
(In the CAME RA-TAPE mode, it takes a while to
fully charge t he flash lam p since it ch arges its batt ery
with the flash la mp open.)
• The flash will not work during the fo llowing
operations:
– Super Nigh tS hot f unc ti on
– Color Slow Shutter function
– Digit al effect
– Progressive recording mode
–Burst
– During tape rec o rd ing
– [16:9 WIDE] mode
• Even if auto f lashi ng or (Auto re d-eye r educti on)
is selected, the flash will n ot w o r k dur ing the
following operations:
– NightSh ot f unc tion
– [SPOTLIGHT], [SUNSET&MOON], and
[LANDSCAPE] of [PROGRAM AE]
– Manual exposure
– Flexible spot meter
• If you use the flash in bright places such as when
shooting a backlit sub je ct , the f la sh ma y not b e
effective.
• Attaching the lens hood (supplied) or a conversion
lens (optional) may cause its shadow to appear.
• You cannot use an external flash (optional) and the
built-in flash at the same time.
(flash)
Downloaded From VideoCamera-Manual.com Manuals
 Loading...