

Sony Handycam DCR-HC1000E Camera Operations Manual
2-067-391-11(1)
Camera Operations Guide [GB]
Camera
Operations Guide
Read this first
Digital Video Camera Recorder
© 2004 Sony Corporation
DCR-HC1000E
Read this first
FOR CUSTOMERS IN EUROPE
Before operating the unit, please read this
manual thoroughl y, and retain it for future
reference.
WARNING
To prevent fire or shock hazard, do no t
expose t h e u nit to rain o r moisture.
To avoid electrical sho ck, do not open
the cabinet. Refer servicing to qualified
personnel only.
“Memory Stick”
N50
FOR CUSTOMERS IN THE UNITED
KINGDOM
NOTICE ON THE SUPPLIED AC
ADAPTOR
A moulded plug complying with BS1363 is fitted to
this equipment for your safe ty an d convenience.
Should the fuse in the plug supplied need to be
replaced, a fuse of the same rating as the supplied one
and approved by ASTA or BSI to BS1362 (i.e.,
marked with or mark) must be used.
If the plug supplied with this equipment has a
detachable fuse cover , be sure to at ta ch the fus e cov er
after you change the fuse. Never use the plug without
the fuse cover. If you should lose the fuse cover, please
contact your nearest Sony service station.
ATTENTION
The electromagnetic fields at the specific frequencies
may influence the picture and sound of this camcorder.
This product has been tested and found compliant with
the limits set out in the EMC Directive for using
connection cables shorter than 3 meters
(9.8 feet).
b
Notice
If static elec tr icity or electr o magnetic inte rference
causes data transfer to discontinue midway (fail),
restart the application or disconne c t a nd co nne ct the
USB cable again.
Notes on use
Note on Cassette Memory
Your camcorder is based on the DV format. You can
use only mini DV cassettes in your camcorder. Use of
mini DV cassettes with Cassette Memory is
recommended as you can use Title search (p. 52), Date
search (p. 53), [ TITLE] (p. 73), [ TAPE
TITLE] (p. 75).
Cassettes with Cassette Memory are marked
with .
Note on the type of “Memory Stick” you
can use in your camcorder
You can use only a “Memory Stick Duo,” which is
about half the size of a standard “Memor y S tic k, ” in
your camcorder (p. 121).
The mark is indicated on the
“Memory Stick Duo.”
Notes on recording
• Before starting to record, t est the recor ding function
to make sure the picture and sound are reco rd ed
without any problems.
• Compensation for the contents of recordings cannot
be provided, even if recording or playbac k is not
possible due to a malfunction of the camcorder,
storage media, etc.
• TV color systems differ depending on the countries/
regions. To view your recordings on a TV, you need
a PAL system-based TV.
• Television programs, films, video tapes, and other
materials may be copyright ed . Unau thorized
recording of such materials may be contrary to the
copyright laws.
2
Notes on the LCD panel, viewfinder, and
lens
• The LCD screen and the viewfinder are
manufactured using extremely high-precision
technology, so over 99.99% of the pixels are
operational for effective use.
However, there may be some tiny blac k points and/
or bright points (white, red , blu e, or gree n in co lor )
that appe ar constantly on the LCD screen an d the
viewfinder.
These points are normal results of the manufacturing
process and do not affect the recording in any way.
• Exposing the LCD screen, the viewfinder, or the lens
to direct sunlight for long periods of time may cause
malfunctions. Be careful when placing the camera
near a window or outdoors.
• Do not aim at the sun. Do ing so might cause your
camcorder to malf unction. Take picture s o f th e sun
only in low light co nditions, such as at dusk.
Note on connecting other device
Before connecting your camcord er to ot he r devi ce
such as a VCR or a computer with a USB or i.LINK
cable, be sure to insert the connector plug in the proper
direction. If you insert the connecto r plu g fo rcibly in
the wrong direction, the terminal may be damaged, or
this may cause a malfunction of your camcorder.
Notes on using this manual
• The images of the LCD screen and the viewfinder
used on this manual are captured using a digital still
camera, and thus may appear different from what
you see.
• The on-screen displays in each local language are
used in illustrating the operating procedures. Change
the screen language before using your camcorder if
necessary (p. 2 1 ).
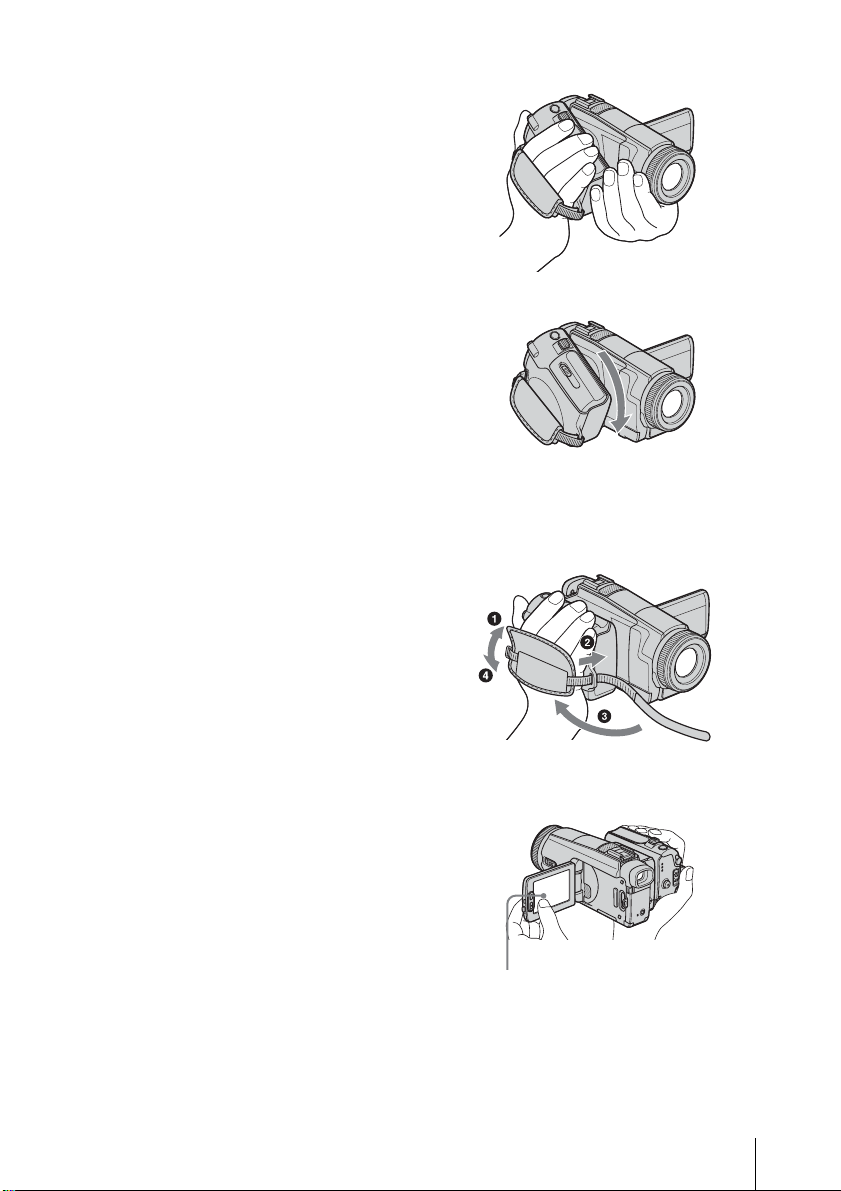
Notes on using the camcorder
• Hold your camcorder correc tly.
• Rotate the Multi-Angle Grip to the angle you prefer.
• Do not rotate the Multi- A ngle Gr ip f or cef ull y or
subject it to shock, as distorted images or sound may
result.
• Fasten the Gri p Be lt as shown in the following
illustration.
• When you are using the touch panel, place your hand
on the back side of the LCD panel to support it.
Then, touch the buttons displayed on the screen.
Touch the button on the LCD screen.
• Be careful not to press butt ons on the LC D fra me
accidentally when you open or close the LCD panel,
or when you adjust the angle of the LCD panel.
,continued
3

• Do not hold the camcorder by the following parts.
Flash LCD panel
Battery compartment lid
4

Table of Contents
: Features available for tape only.
: Features ava ilable for “Me mory Stick Duo”
only.
Read this first ............................................................................................. 2
Quick Start Guide
Recording movies ...................................................................................... 8
Recording still images.............................................................................. 10
Getting started
Step 1: Checking supplied items.............................................................. 12
Step 2: Charging the battery pack............................................................ 13
Using an outside power sourc e ......................... ............................ .............. ..............15
Step 3: Turning the power on................................................................... 16
Step 4: Adjusting the LCD panel and viewfinder...................................... 16
Adjusting the LCD panel ...................................................... .... .. ....... .... .... .. .... ....... ...16
Adjusting the viewfinder . .. .... .... .... .... ......... .... .... .... ......... .... .. .... ......... .... .... .... ......... ...17
Step 5: Setting the date and time............................................................. 18
Step 6: Inserting the recording media ...................................................... 19
Inserting a cassette tape ........................................................................................... 19
Inserting a “Memory Stick Duo” ................................................................................20
Step 7: Setting the screen language........................................................ 21
Recording
Recording movies .................................................................................... 22
Recording for a longer time ....................................................................................... 24
Using zoom ................. ....................................................... ............... ........................24
Recording in mirror mode ......................................................................................... 25
Using the self-timer ............................. ...................................................................... 26
Enhanced sound recording – 4CH MIC REC ........................... ...... ... 27
Recording still images – Memory photo recording............................. 29
Selecting image quality or siz e .... .......................................... ................................... 30
Using the flash ......................... ............... ........................... ............... ........................31
Using the self-timer ............................. ...................................................................... 32
Recording a still image on a “Memory Stick Duo” while recording movies
on a tape .............................. ........................... ....................................................33
,continued
5

Adjusting the exposure............................................................................. 33
Adjusting the exposure for b ack lit subjects ................................ .............. .................33
Fixing the exposure for the selected subject – Flexible spot meter ...........................34
Adjusting the exposure manually ...............................................................................34
Adjusting the focus................................................................................... 35
Adjusting the focus for an off-center subject – SPOT FOCUS ..................................35
Adjusting the focus manually .....................................................................................36
Recording a picture using various effects ................................................ 37
Fading in and out of a scene – FADER ............................................................ ..37
Using special effects – Digital effect ...................................................................38
Overlaying still images on movies on a tape – MEMORY MIX ..................................40
Searching for the starting point .......................................................... 42
Searching for the last scene of the most recent recording – END SEARCH .............42
Searching manually – EDIT SEARCH .............. .........................................................42
Reviewing the most recently recorded scenes – Rec review .................................... 43
Playback
Viewing movies recorded on a tape ................................................... 44
Playing back in various modes ..................................................................................45
Viewing recordings with added effects – Digital effect ..............................................45
Viewing recordings on a “Memory Stick Duo” .................................... 46
Playing back in various modes from a “Memory Stick Duo” ......................................48
Various playback functions ...................................................................... 49
Magnifying pictures – Tape playback zoom/Memory playback zoom .......................49
Displaying the screen indicators ................................................................................50
Displaying the date/time and camera settings data – Data code ..............................50
Playing the picture on a TV...................................................................... 51
Locating a scene on a tape for playback ........................................... 52
Searching quickly for a desired scene – Zero set memory ........................................52
Searching for a scene using Cassette Memory – Title search ..................................52
Searching for a scene by date of recording – Date search .......................................53
6

Advanced operations
Using the Menu
Selecting menu items .........................54
Using the AUTO LOCK switch ...........55
Using the (CAMERA SET) menu
– PROGRAM AE/WHITE BAL./
SHUTTR SPEED/ZEBRA/16:9
WIDE, etc. ....................................56
Using the (M EMORY SET) menu
– BURST/QUALITY/IMAGE SIZE/
ALL ERASE/NEW FOLDER,
etc. ...............................................63
Using the (PICT. APPLI.) menu
– PICT. EFFECT/SLIDE SHOW/
FRAME REC/INTERVAL REC/INT.
REC–STL, etc. .............................67
Using the (EDIT/PLAY) menu
– TITLE/ TAPE TITLE,
etc. ...............................................72
Using the (STANDARD SET) menu
– REC MODE/MULTI-SOUND/
AUDIO MIX/MIC LEVEL/USB-
CAMERA, etc. ..............................76
Using the (TIME/LANGU.) menu
– CLOCK SET/WORLD TIME,
etc. ...............................................82
Customizing Personal Menu ..............83
Dubbing selected scenes from a tape
– Digital program editing ..............91
Dubbing sound to a recorded
tape ........................................98
Deleting recorded pictures .........100
Marking recorded images with specific
information – Image protection/
Print mark ...................................101
Printing recorded images (PictBridge
compliant printer) .................103
Troubleshooting
Troubleshooting ...............................106
Warning indicators and
messages ...................................114
Additional Information
Using your camcorder abroad ..........119
Usable cassette tapes ......................119
About the “Memory Stick” .................121
About the “InfoLITHIUM”
battery pack ................................123
About i.LINK .....................................124
Maintenance and precauti ons ..........125
Specification .....................................128
Dubbing/Editing
Connecting to a VCR or TV ...............86
Dubbing to another tape ..............87
Recording pictures from a VCR or
TV .................................................88
Dubbing pictures from a tape to a
“Memory Stick Duo” .....................89
Dubbing still images from a “Memory
Stick Duo” to a tape ...................... 90
Quick Reference
Identifying parts and controls ...........131
Index ................................................138
Refer also to other operating instructions
supplied with your camcorder:
• Editing images with your co mputer
cCompute r Appli c at ions Guide
7
Quick Start Guide
Recording movies
1 Insert the charged battery pack into the camcorder.
To charge the battery, see page 13.
a Push the catch on the
battery compartment
lid in the direction of
the arrow 1 to open
the lid.
b Insert the battery pack in
the direction of the arrow
until it clicks.
c Close the battery
compartment lid.
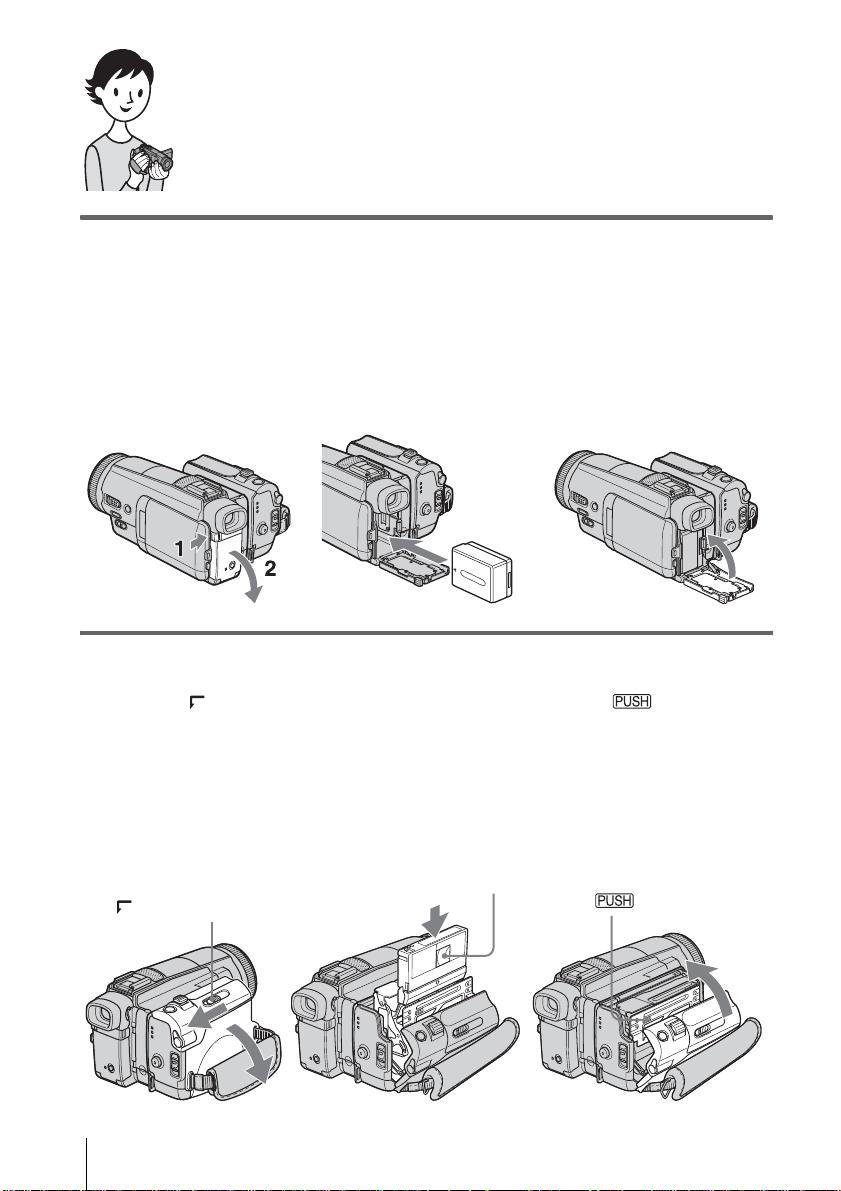
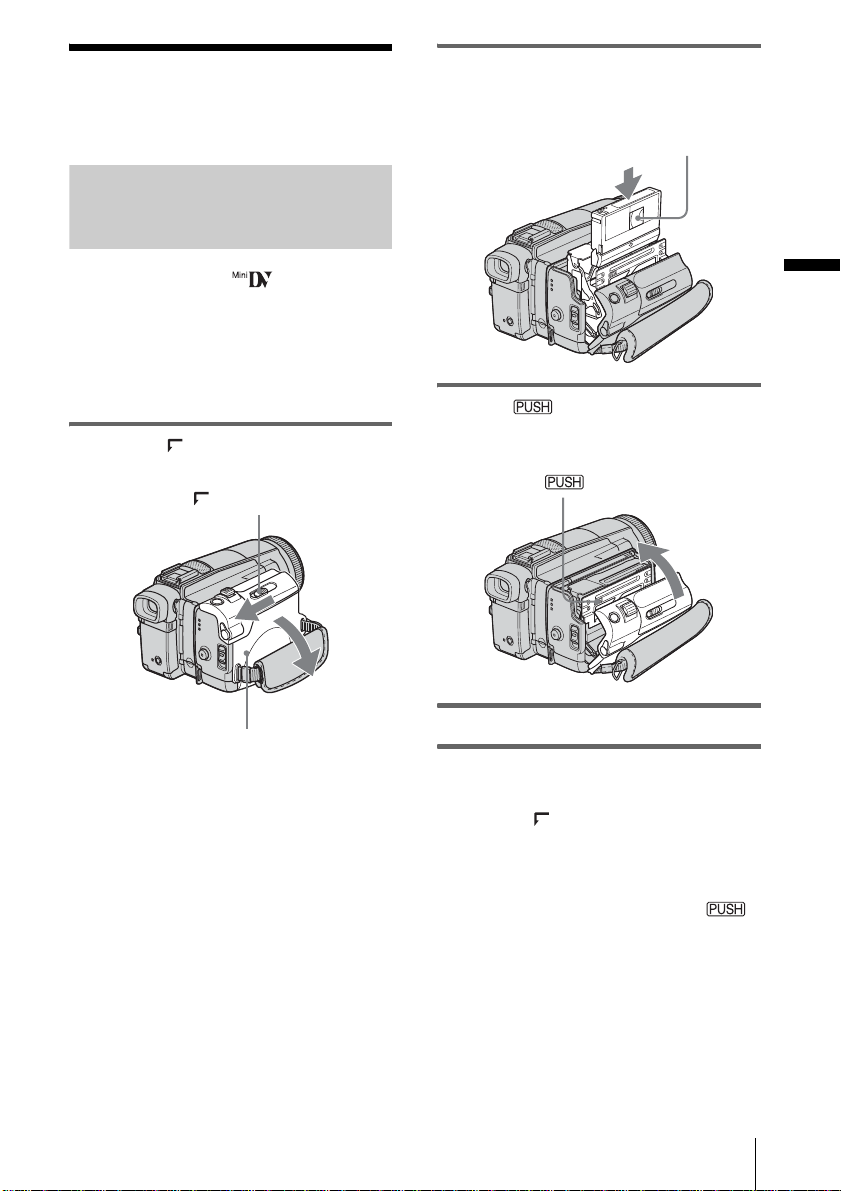
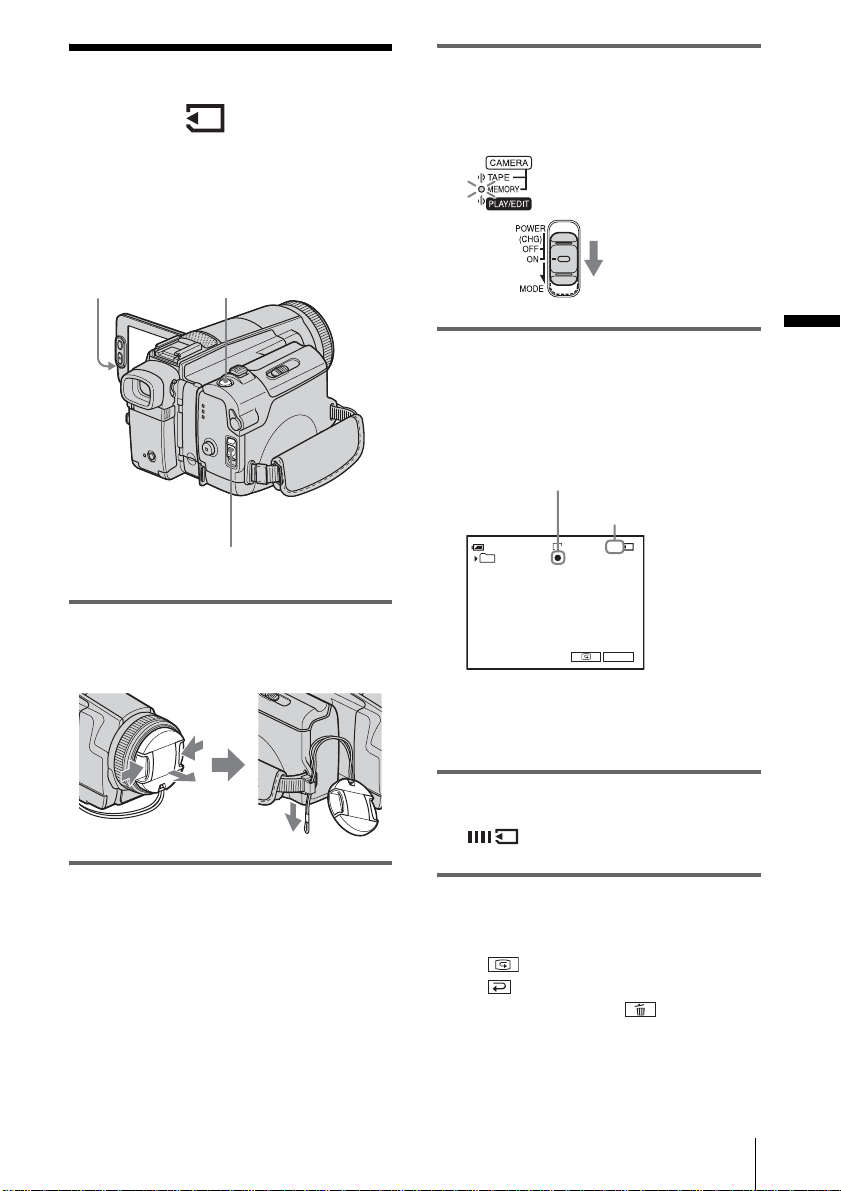
2 Insert a cassette into the camcorder.
a Slide the OPEN/
EJECT lever in the
direction of the
arrow to open the
lid.
The cassette
compartment comes out
automatically.
OPEN/EJECT lever
Quick Start Guide
8
b Insert the cassette with
its window-side facing
out, then push the
center of the back of the
cassette.
Window-side
c Press .
Close the cass ette lid aft er the
cassette compartment slides
back in by itself.
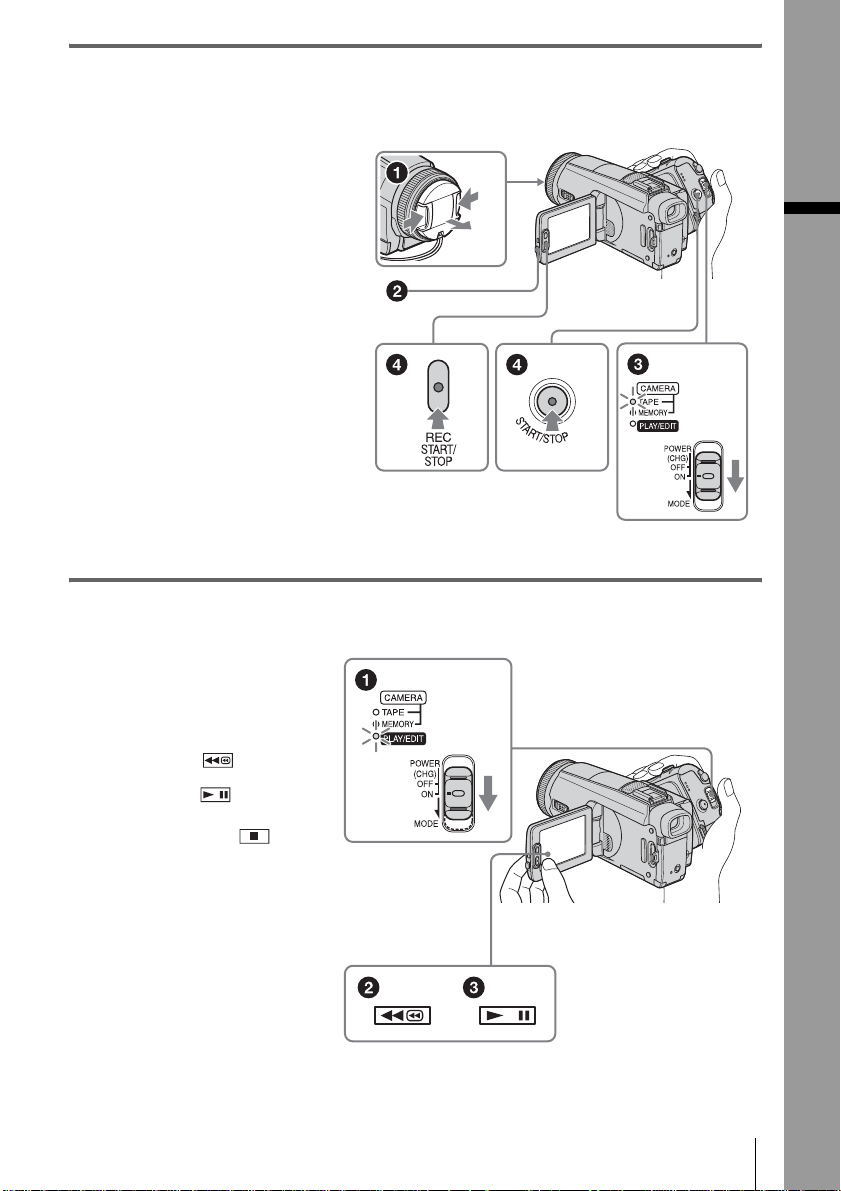
3 Start recording while checking the subject on the LCD screen.
The date and time is not set up in the default setting. To set the date and time, see page 18.
a Remove the lens cap.
b Press OPEN and
open the LCD panel.
c While pressing the
green button, slide
the POWER switch
down to light up the
CAMERA-TAPE lamp.
The power turns on.
d Press REC START/
STOP.
Recording starts. To
change to standb y m ode,
press REC START/STOP
again.
You can also use REC
START/STOP of the LCD
panel.
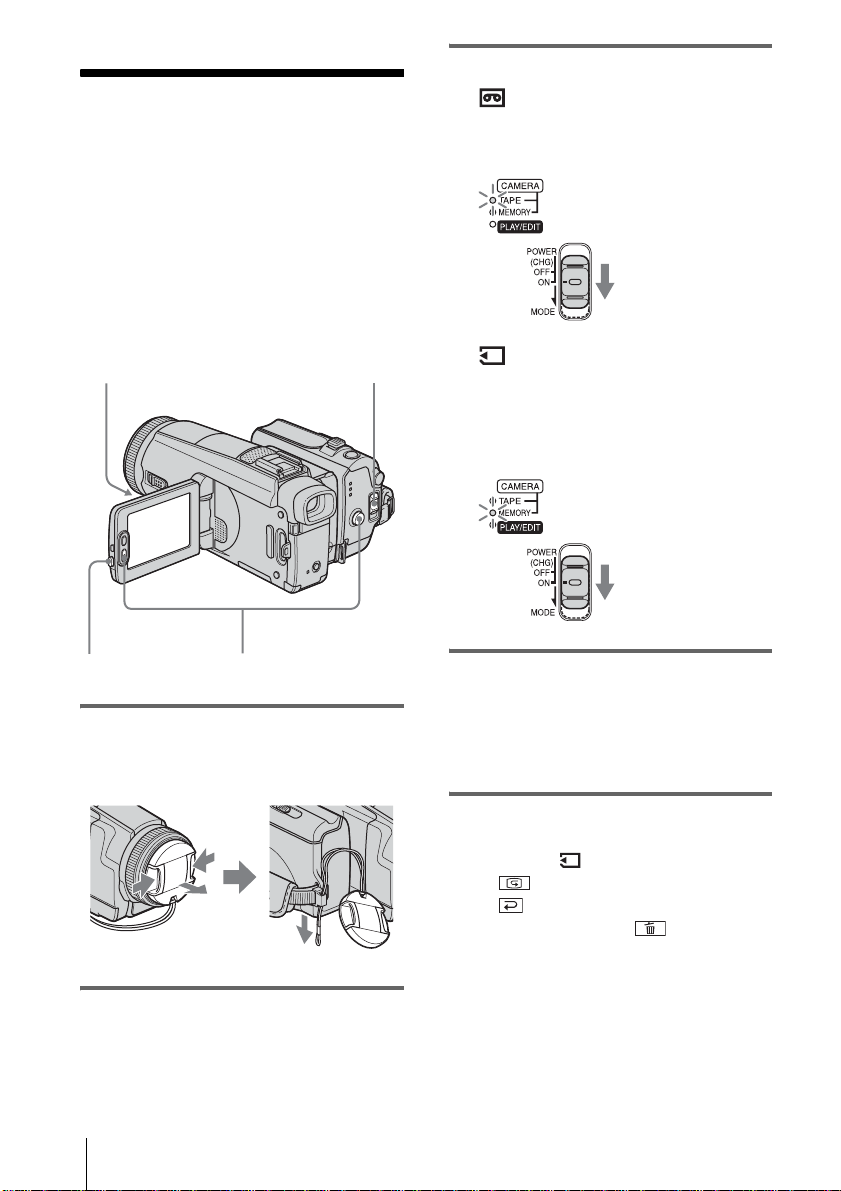
4 View the recorded picture on the LCD screen.
Quick Start Guide
a Slide the POWER
switch rep eatedly
until the PLAY/EDIT
lamp lights up.
b Touch (rewind).
c Touch (play) to
start the playback.
To stop, press .
To turn off the power, slide the
POWER switch up to (CHG)
OFF.
Quick Start Guide
9

Recording still images
1 Insert the charged battery pack into the camcorder.
To charge the battery, see page 13.
a Push the catch on the
battery compartment
lid in the direction of
the arrow 1 to open
the lid.
b Insert the battery pack in
the direction of the arrow
until it clicks.
c Close the battery
compartment lid.
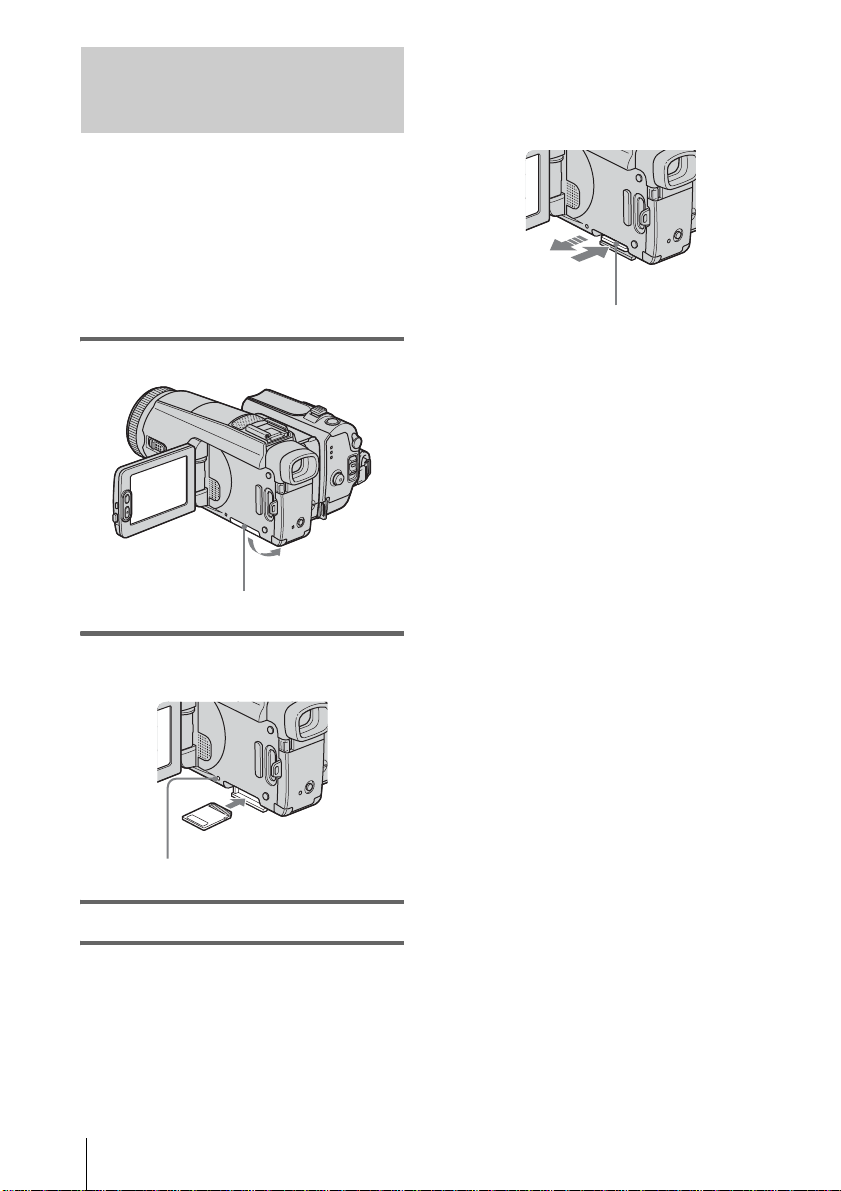
2 Insert a “Memory Stick Duo” into the camcorder.
a Open the
“Memory Stick
Duo” cover.
b Insert a “Memory
Stick Duo” with
its terminal
facing up until it
clicks.
c Close the
“Memory Stick
Duo” cover.
Quick Start Guide
10
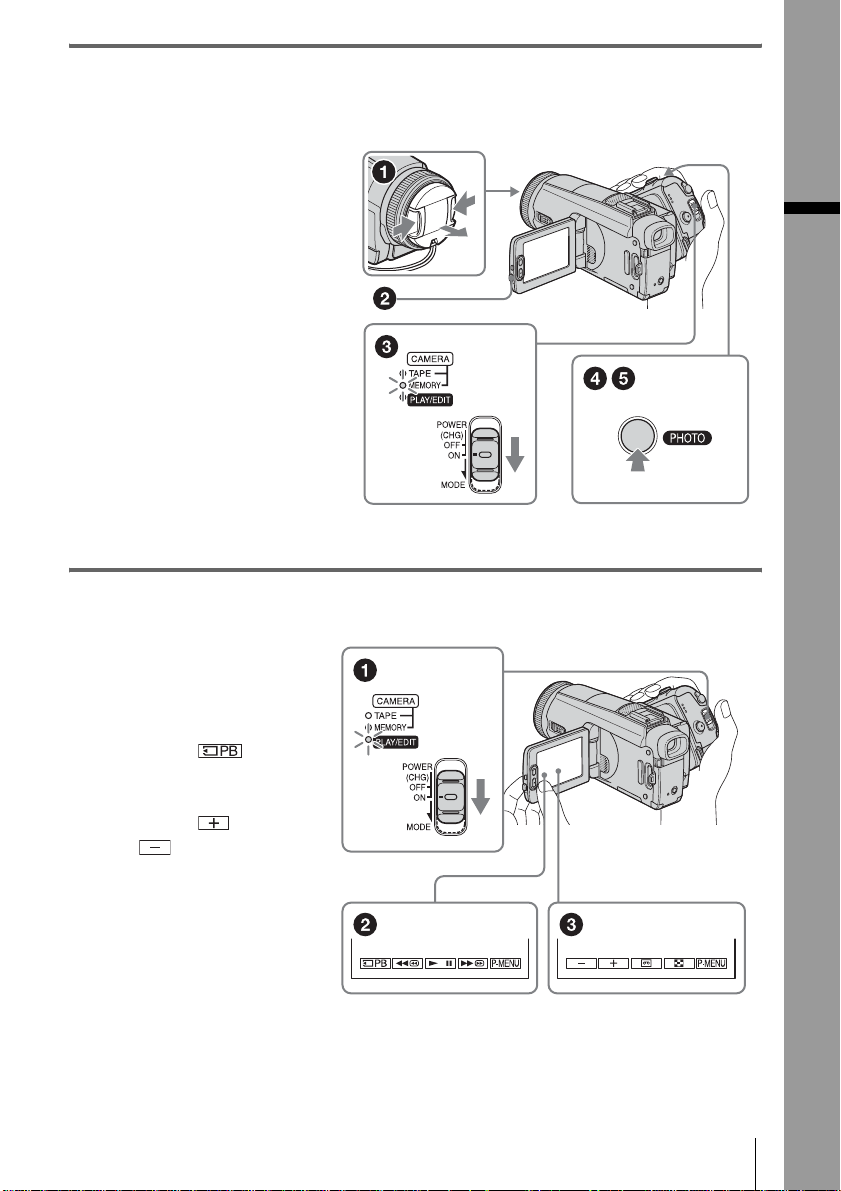
3 Start recording while checking the subject on the LCD screen.
The date and time is not set up in the default setting. To set the date and time, see page 18.
a Remove the lens cap.
b Press OPEN and
open the LCD panel.
c While pressing the
green button, slide
the POWER switch
repeatedly until the
CAMERA-MEMORY
lamp lights up.
The power turns on.
d Press PHOTO lightly.
A short beep sound is heard
when the focus is adjusted.
e Press PHOTO fully.
A shutter sound is heard
and the still image is
recorded.
4 View the recorded picture on the LCD screen.
a Slide the POWER
switch rep eatedly
until the PLAY/EDIT
lamp lights up.
b Touch .
The most recently recorded
image is d isplayed.
c Touch (next) or
(previous) to
view images in
sequence.
To turn off the power, slide the
POWER switch up to (CHG)
OFF.
Quick Start Guide
Quick Start Guide
11
Getting started
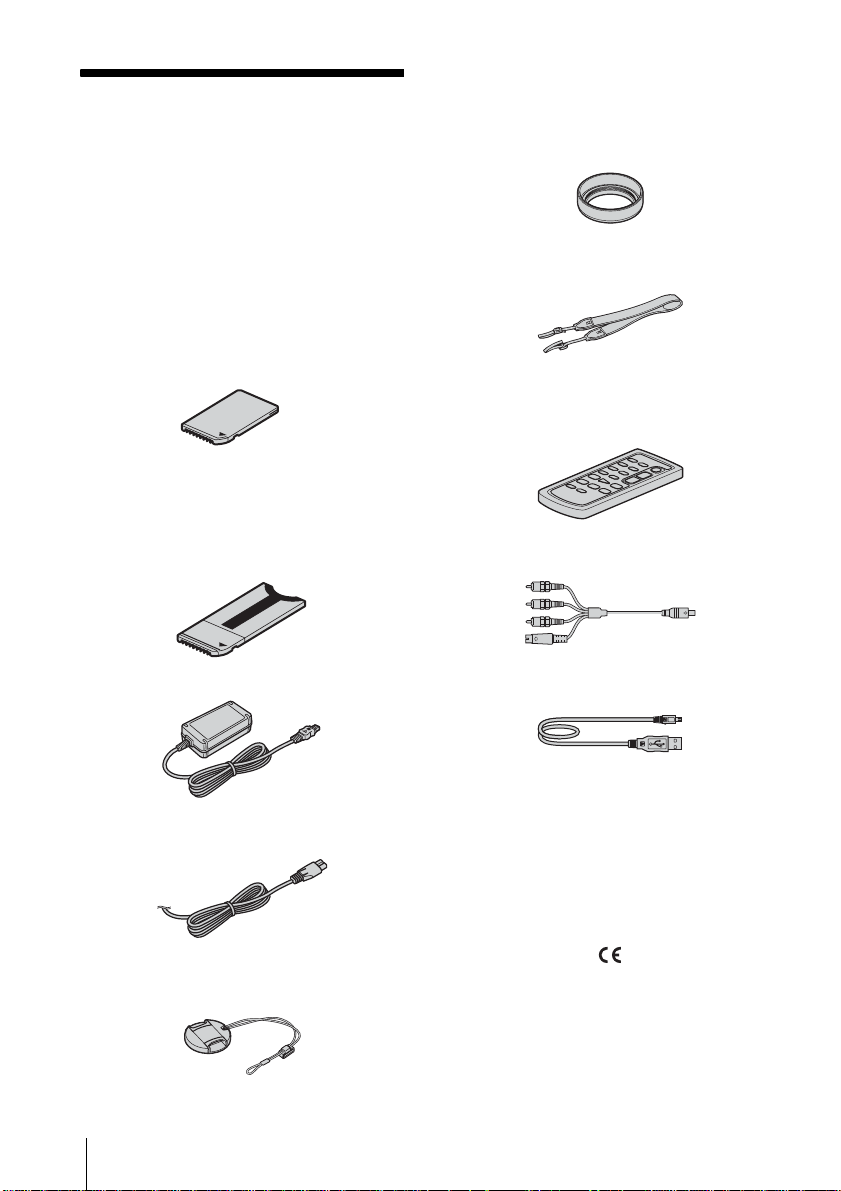
Step 1: Checking supplied items
Make sure you have followi ng items supplied
with your camc order.
The number in pa rentheses indi cates the numbe r
of that item supplied.
“Memory Stick Duo” 8M B ( 1)
You can use only a “Memory Stick Duo ,” w hic h is
about half the size of a standard “Memory Stick,” in
your camcorder. See page 121 for details.
Memory Stick Duo adaptor (1)
If you attach a Memory Stick Duo ad ap tor to a
“Memory Stick Duo,” you can use a “Memo r y Stick
Duo” with any of the devices compatible with a
standard “Memory Stick.”
Lens hood (1)
Use the lens hood to record under strong light, such as
under the sun. Note when you use a filter (opti ona l) ,
the shadow of the lens hood may appear on the screen.
Also, if you force the lens hood on, you may not be
able to remove it again.
Shoulder strap (1)
Wireless Remote Commander (1)
A button-type lithium battery is already installed.
A/V connecting cable (1)
AC Adapt or (1)
Mains lead (1)
Lens cap (1)
Attached to the camcorder.
Getting started
12
USB cable (1)
Rechargeable battery pa ck NP - FF71 (1)
CD-ROM “SPVD-012 USB Driver” (1)
Cleaning cloth (1)
21-pin adaptor (1)
For the models with the mark printed on their
bottom surfaces only.
Camera Operations Guide (This manual)
(1)
Computer Applications Guide (1)
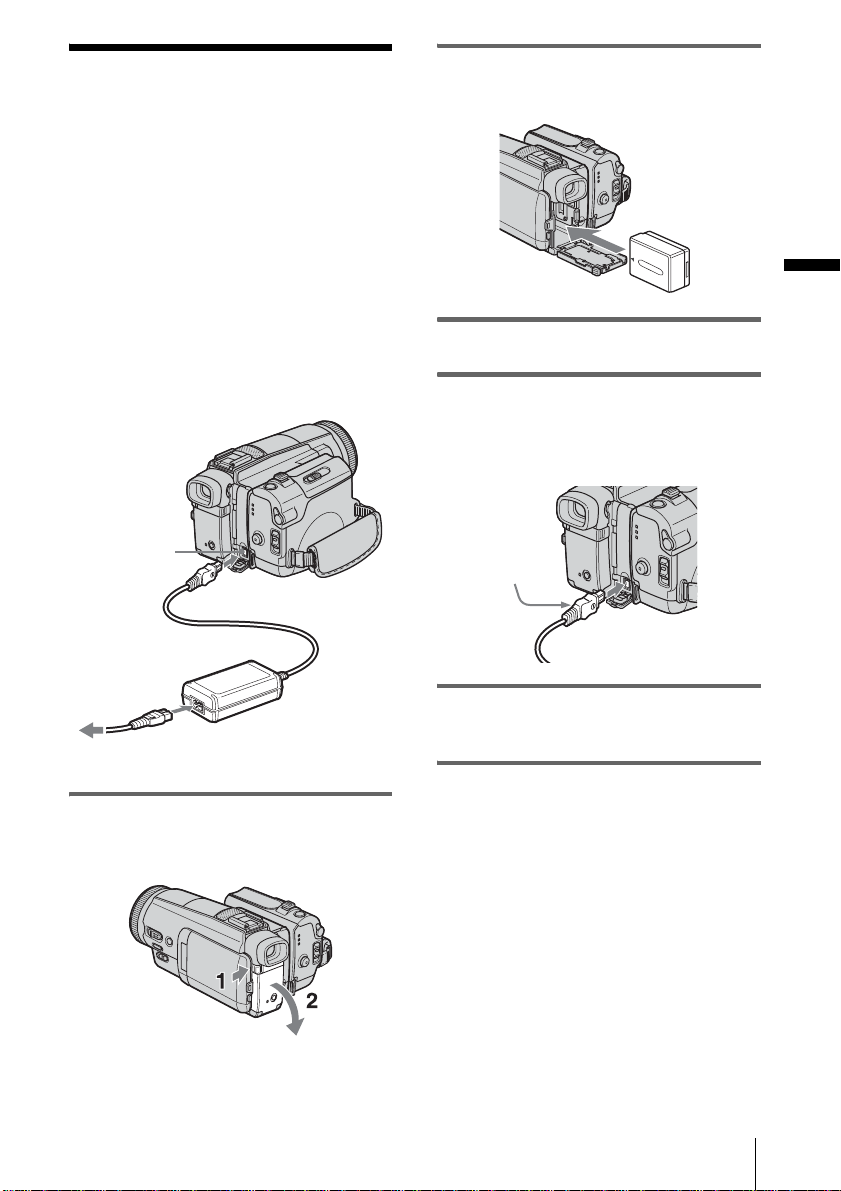
Step 2: Charging the battery pack
You can charge the battery by attaching the
“InfoLITHI UM” battery pack (F ser ies) to
your camcorde r .
b Note
• Only the “InfoLITHIUM” battery pack (NP -FF 70/
FF71) can be used (p. 123).
• Do not short-circuit the DC plug of the AC Adaptor
or battery termina ls w ith any metallic object s. This
may cause a malfunction.
• Use a nearby wall socket when using the AC
Adaptor. Disconnect the AC Adaptor from the wall
socket immediately if any malfunction occurs.
DC IN jack
DC plug
2 Insert the battery pack in the direction
of the arrow until it clicks.
Getting started
3 Close the battery compartment lid.
4 With the v mark on the DC plug facing
the battery compartment lid side,
connect the AC Adaptor to the DC IN
jack on your camcorder.
v mark
Mains lead
AC Adaptor
To the wall socket
1 Push the catch on the battery
compartment lid i n t he direction of th e
arrow 1 to open the lid.
5 Connect the mains lead to the AC
Adaptor.
6 Connect the mains lead to the wall
socket.
,continued
Getting started
13
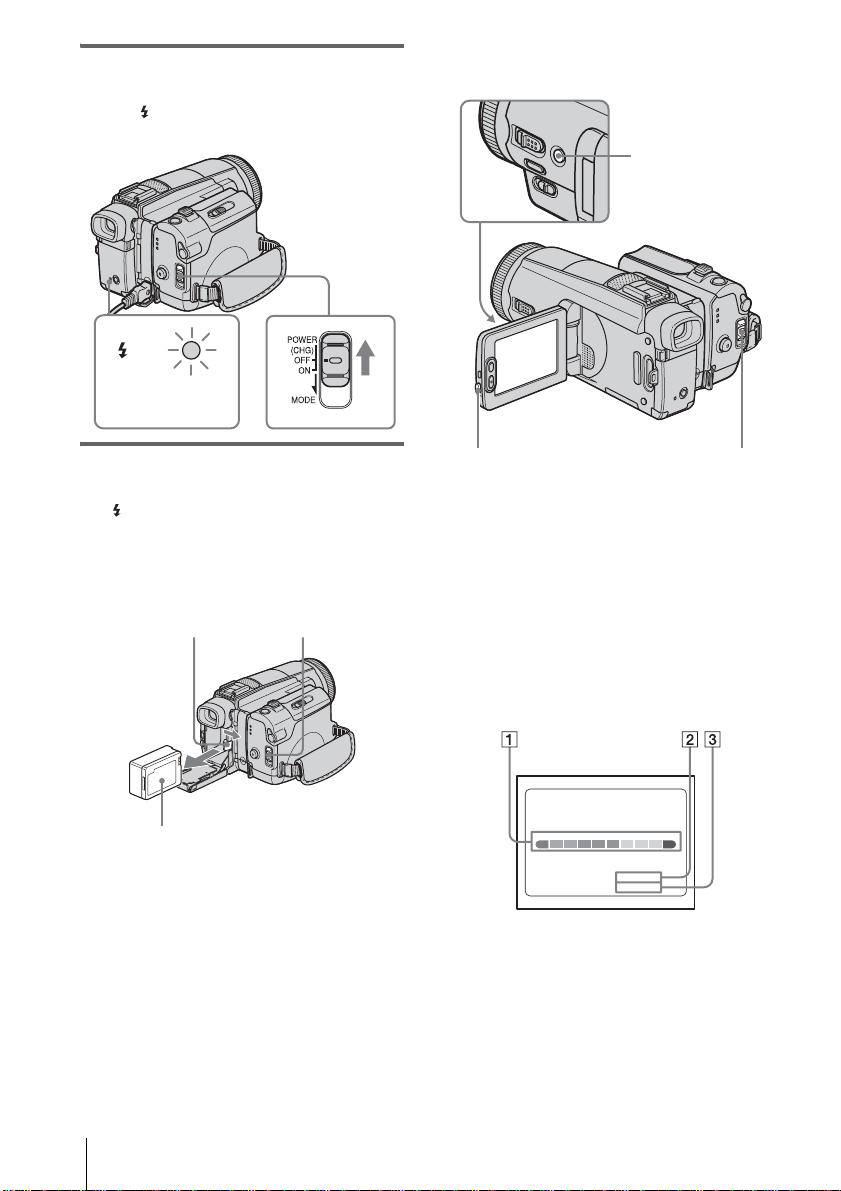
7 Slide the POWER switch up to (CHG)
OFF.
The (flash)/CHG (charg e) lamp lights u p
and charging starts .
/CHG
Flash/char ge lamp
To check the remaining b attery – Battery
Info
DISPLAY/
BATT INFO
After charging the battery
The (flash)/CHG (charge) lamp turns off
when the battery is fully charged. Disconnect
the AC Adaptor from the DC IN jack.
To remove the battery pack
POWER switchBattery release tab
Battery pack
Set the POWER switch to (CHG) OFF.
1
2 Open the battery compartment lid.
3 Un l a tch the battery release tab in the
direction of the arrow and remove the
battery pack.
b Note
• If you do not use the battery pack for a long time, use
up the battery pack completely before storing it. See
page 123 about storage of the battery pack.
OPEN
POWER switch
You can check the battery’s curr ent charge l evel
and its current remaining recording time both
during charging or when the power is turned off.
1 Set the POWER switch to (CHG) OFF.
2 Press OPEN and open the LCD pa nel.
3 Press DISPLAY/BATT INFO.
The battery info rmation appe ars for about 7
seconds.
Keep the butt on pres sed to vi ew it for a bout
20 seconds.
BATTERY INFO
BATTERY CHARGE LEVEL
REC TIME AVAILABLE
A Battery charge level: Displays
approximate remaining amount of
power left in the batt ery pack.
B Approximate possib l e recording time
using the LCD panel.
C Approximate possib l e recording time
using the viewfinder.
LCD SCREEN
VIEWFINDER::
50%0% 100%
117 min
135 min
Getting started
14

Charging time
Approximate number of minutes required when
you fully charge a fully discharged battery pack
at 25°C (77°F). (10 – 30° C (50 – 86°F)
recommended.)
Battery pack
NP-FF71 (supplied) 170
NP-FF70 150
Recording time when recording with the
LCD screen on
Approximate nu m ber of minutes availabl e
when you use a full y charged battery pack at
25°C (77°F).
With LCD BACKLIGHT set to ON
Battery pack Continuous
NP-FF71
(supplied)
NP-FF70 120 65
recording
time
130 70
Typical*
recording
time
With LCD BACKLIGHT set to OFF
Battery pack Continuous
NP-FF71
(supplied)
NP-FF70 130 70
recording
time
140 75
Typical*
recording
time
Recording time when recording with the
viewfinder
Approximate nu m ber of minutes availabl e
when you use a full y charged battery pack at
25°C (77°F).
Battery pack Continuous
NP-FF71
(supplied)
NP-FF70 135 75
recording
time
150 85
Typical*
recording
time
Playing time
Approximate number of minutes available
when you use a fully charged battery pack at
25°C (77°F).
Battery pack LCD panel
NP-FF71
(supplied)
NP-FF70 185 220
* With LCD BACKLIGHT set to ON.
b Note
• The power will not be supplied from the battery pack
when the AC Adaptor is conn ected to the DC IN ja ck
of your camcorder, even if its mai ns le ad is
disconnected from the wall socket.
• The recording and playba ck tim e wil l be shor te r
when you use your camcorder in low temperatur e .
• The (flash)/CHG (charge) lamp flashes during
charging, or the battery information will not be
correctly displayed in following conditions.
– The battery pack is not attached correctly.
– The batt ery pa c k is da ma ge d.
– The batt ery pa c k is fully discharged. (For Battery
information only)
opened*
205 240
LCD panel
closed
Using an outside power source
You can use the AC Adaptor as the power
source when you do not wan t the battery to
run out. While you ar e using the AC Adaptor,
the battery pack will not lose it s char ge e ven
when it is attached to your camcorder.
PRECAUTION
Even if your camcorder is turned off , AC power
(mains) is still suppli ed to it whi le conne cted to
the wall socket via th e AC Adaptor .
Connect your camcorder as s hown in
“Charging the battery pack” (p. 13).
Getting started
* Approximate number of minutes when recordi ng
while you repeatedly rec or d, sta r t/stop, slide the
POWER switch to change the power mode, an d
zoom. The actual battery li fe ma y be shor te r .
Getting started
15
Step 3: Turning the
Step 4: Adjusting the
power on
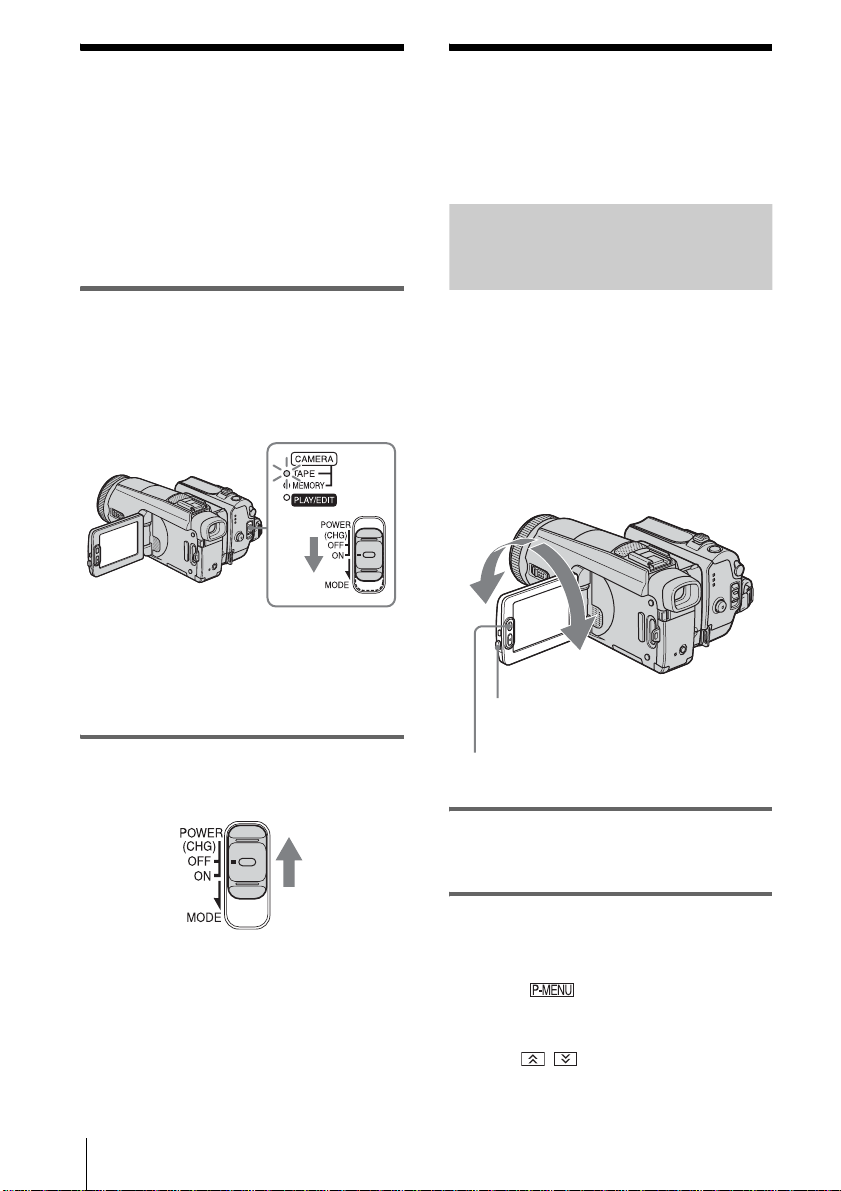
You need to slide the POWER switch
repeatedly to select the desired power mode
to record or play.
When using this camcorder for the first time,
the [CLOCK SET] screen appears (p. 18).
While pressing the green button, slide the
POWER switch down.
The power turns on .
To enter the recording or playing mode, slide
the switch repeatedly until the respective lamp
for the desired power mode lights up.
• CAMERA-TAPE mode: To record on a tape .
• CAMERA-MEMORY mode: To record on a
“Memory Stick Duo. ”
• PLAY/EDIT mode: To play or edit pictures on
a tape or “Memory Stick Duo.”
LCD panel and
viewfinder
Adjusting the LCD panel
You can adjust the angle an d brightness of
the LCD panel to meet various recording
situations.
Even when there ar e obstructions betw een you
and the subject, you can check the subject on the
LCD screen during recording by adjustin g th e
angle of the LCD panel .
Maximum
180 degrees
Maximum
90 degrees
OPEN
To turn off the power
Slide the POWER switch up to (CHG) OFF.
Getting started
16
LCD BACKLIGHT
Open the LCD panel 90 degrees to the
camcorder, then rotate it to the desired
position.
To adjust the brightness of the LCD
screen
1
Touch .
2 Touch [LCD BRIGHT].
If the item is not displayed on the screen,
touch / . If you cannot find it, touch
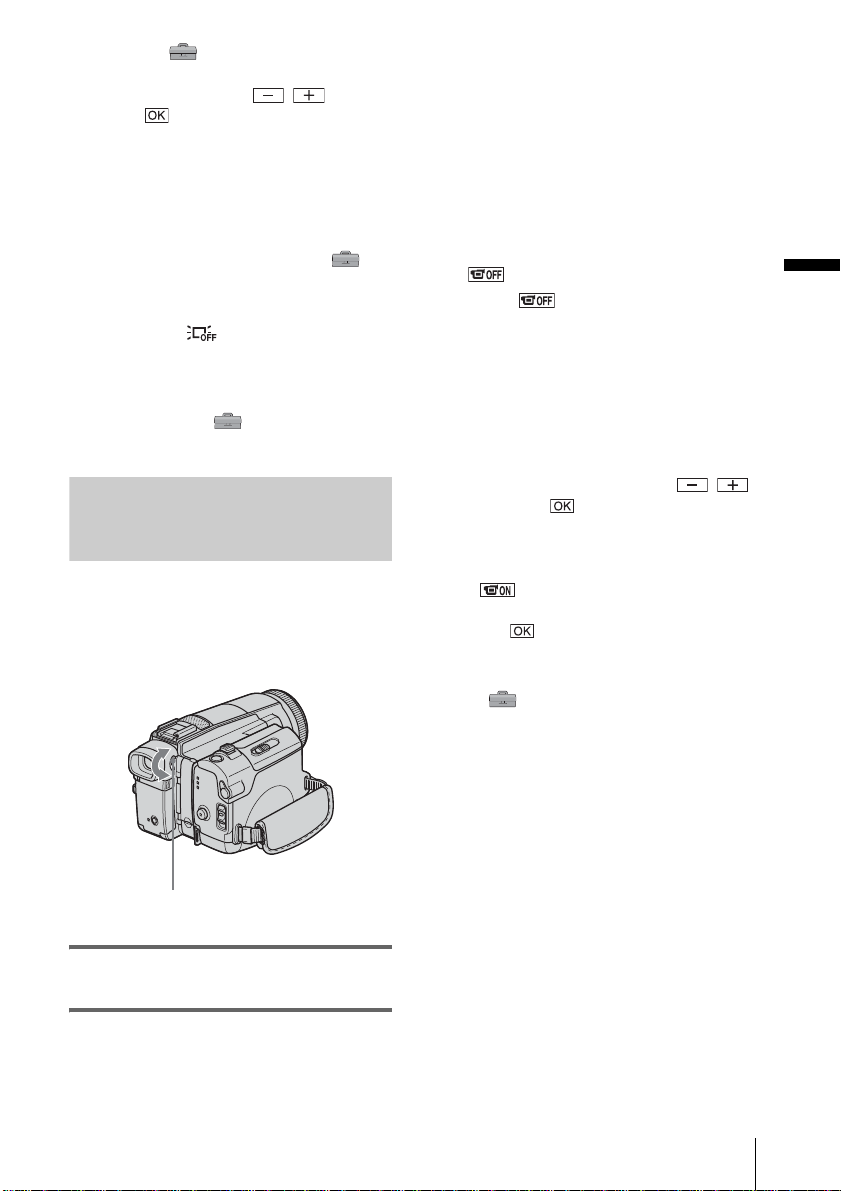
[MENU], (STANDARD SET) menu,
then touch [LCD/VF SET] (p. 77).
3 Adjust the item wit h / , then
touch .
z Tip
• If you rotate the LCD panel 180 degre e s to the lens
side, you can close the LCD panel with the LCD
screen facing out.
• If you are using the battery pack for powe r sour ce,
you can adjust the brightness by selecting [LCD BL
LEVEL] from the [LCD/VF SET] on the
(STANDARD SET) menu
• When you use your camcorder in bright conditions,
press LCD BACKLIGHT to switch off the LCD
screen backlight ( appears on the screen.). This
setting saves battery power.
• Even if you adjust the LCD screen backlight, the
recorded picture will not be affected.
• You can turn off the operation confirmation beep by
setting [BEEP] in the (STANDARD SET)
menu to [OFF] (p. 80).
(p. 77).
Adjusting the viewfinder
You can view images using the v ie w fin der
when you close the LCD panel. Use the
viewfinder when the battery is running out, or
when the screen is hard to see.
To use the viewfinder during operation
When you are recording on a tape or a “Memory
Stick Duo,” you can adjust the exposure (p. 34)
and fader (p. 37) w hile checking the image on
the viewfinder. Have the LCD panel rotated 180
degrees and closed with the screen facing out.
1 Set th e power mode to CAMERA-TAPE
or CAMERA-MEMORY (p.16).
2 Close the LCD panel with th e screen
facing out.
appears on the screen.
3 Touch .
[Set LCD off?] appears on the screen.
4 Touch [YES].
The LCD screen is turned off.
5 Touch the LCD screen while checking
the display in the viewfinder.
[EXPOSURE], etc. are displayed.
6 Touch the button you want to set.
• [EXPOSURE]: Adjust with /
and touch .
• [FADER]: Touch it repe ated ly to select a
desired effect (o nly in the CAMERATAPE mode).
• : The LCD screen lights up.
To hide the buttons on the LCD screen,
touch .
z Tip
• To adjust the brightness of the viewfinder backlight,
select (STANDARD SET) menu, [LCD/VF
SET], then [VF B.LIGHT] (when you are using the
battery pack, p. 78).
Getting started
Viewfinder lens adjustment lever
Adjust the viewfinder lens adjustment
lever until the picture is clear.
Getting started
17
Step 5: Setting the date and time
Set the date and time when using this
camcorder for the first time. If you do not set
the date and time, the [CLOCK SET] screen
appears every time yo u turn on your
camcorder.
b Note
• If you do not use your camcorder for about 3
months, the built-in rechargeable button-type
battery gets discharged and the date and time
settings may be cleared from the memory. In that
case, charge the recharg eab le button-type battery
(p. 127) and the n set the date and time again.
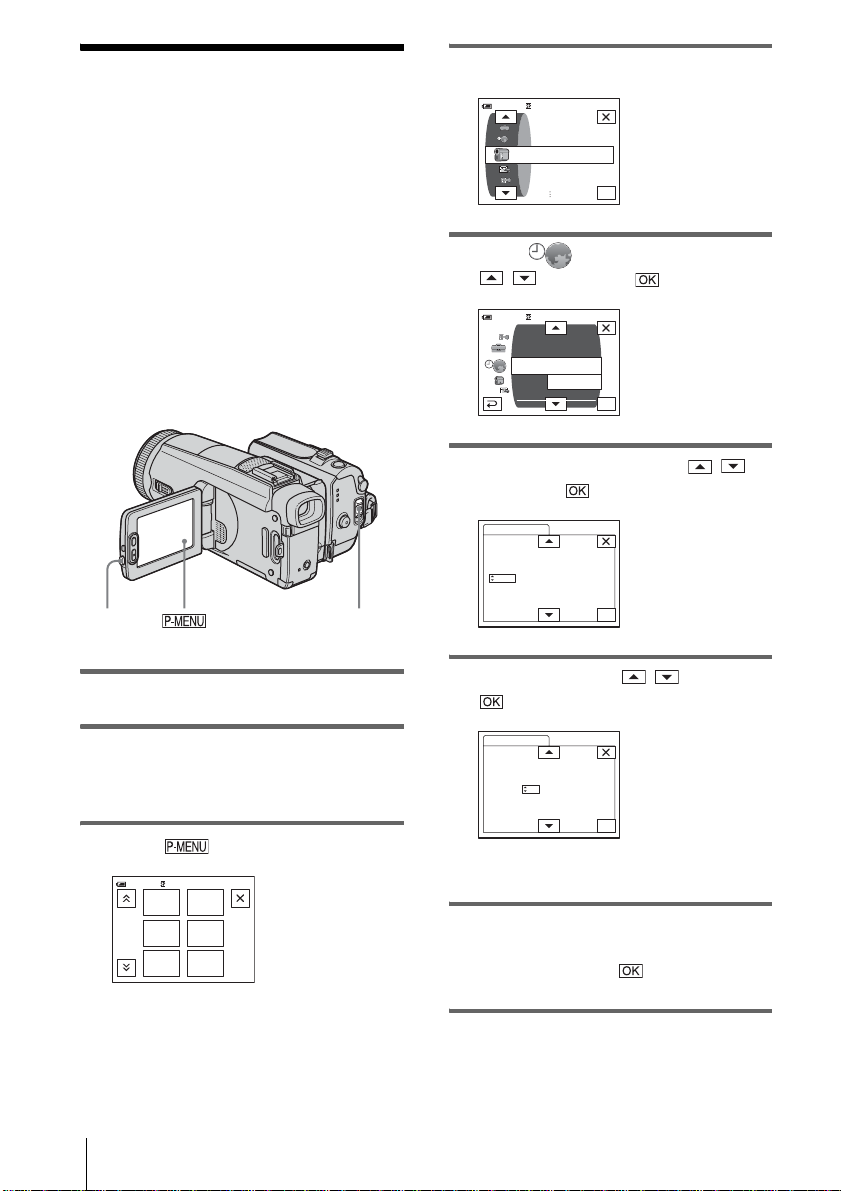
4 Touch [MENU].
60min
–:––:––
CAMERA SET
PROGRAM AE
SPOT METER
EXPOSURE
OK
5 Select (TIME/LANGU.) with
/ , then touch .
DISPLAY
MENU ROT ATE
LANGUAGE
PROGRAM AE
–:––:––
––:––:––
OK
60min
A. SHUT OFF
CLOCK SET
WORLD
6 Select [CLOCK SET] with / ,
then touch .
OPEN
POWER switch
1 Turn on your camcorder (p. 16).
2 Press OPEN and open the LCD panel.
Proceed to st ep 7 when you set t he clock for
the first time.
3 Touch .
60min
MENU
SPOT
1/3
METER
WHITE
BAL.
EXPO–
SURE
PRGRAM
AE
SHUTTR
SPEED
–:––:––
CLOCK SET
DATE
Y 1M 1D 0: 00
2004
–:––:––
OK
7 Set [Y] (year) with / , then touch
.
CLOCK SET
DATE
Y 1M 1D 0: 00
2004
–:––:––
OK
You can set any year up to the year 2079.
8 Set [M] (month), [D] (day), hour and
minute in the same way as was don e in
step 7, then touch .
The clock starts.
Getting started
18
Step 6: Inserting the recording media
Inserting a cassette tape
2 Insert a cassette with its window-side
facing out.
Push the center of
the back of the
cassette lightly.
Window-side
You can use mini DV cassettes only.
For details on these cassettes (such as writeprotection), see page 119.
b Note
• Do not force the cassette into the compartment. This
may cause a malfunction of your camc or de r.
1 Slide the OPEN/EJECT lever in the
direction of the arrow and open the lid.
OPEN/EJECT lever
Lid
The cassette compartment automatically
comes out and open s up.
3 Press .
The cassette compartment automatically
slides back in.
4 Close the lid.
To eject the cassette
1
Slide the OPEN/EJECT lever and
open the lid.
The cassette compartment automatically
comes out and opens up.
2 Take out the cassette, then press .
The cassette compartment automatically
slides back in.
3 C l ose the lid.
Getting started
Getting started
19
Inserting a “Memory Stick Duo”
For details on the “Memory Stick Duo” (such
as write-protection), see page 12 1.
b Note
• You can use only a “Memory Stick Duo,” which is
about half the size of a standard “Memory Stick,” in
your camcorder (p. 121). Do not try to force any
other type of “Memory Stick” into the “Memory
Stick Duo” slot.
To eject a “Memory Stick Duo”
1
Open the “Memory Stick Duo” cover.
2 Lightly push the “Memory Stick Duo” in
once.
Lightly push in once.
1 Open the “Memory Stick Duo” cover.
“Memory Stick Duo” cover
2 Insert a “Memory Stick Duo” with its
terminal facing up until it clicks.
Access lamp
3 Close the “Memory Stick Duo” cov er.
3 Cl ose the “Memory Stick D uo” cover.
b Note
• If you force the “Memory Stick Duo” int o the
“Memory Stick Duo” slot in the wrong direction, the
“Memory Stick Duo” slot may be damaged. Ima ge
files in the “Memory Stick Duo” may al so be
damaged.
• Do not insert anything othe r than a “M emor y St ic k
Duo” into the “Memory Stick Duo” slot. Doing so
may cause a malfunction of your camc or de r.
• When the access lamp is lit or flashing, your
camcorder is reading/writing data from/to the
“Memory Stick Duo.” Do not shake or knock your
camcorder, turn the power off, eject the “Memory
Stick Duo,” or remove the battery pack. Otherwise,
image data may be damaged.
Getting started
20
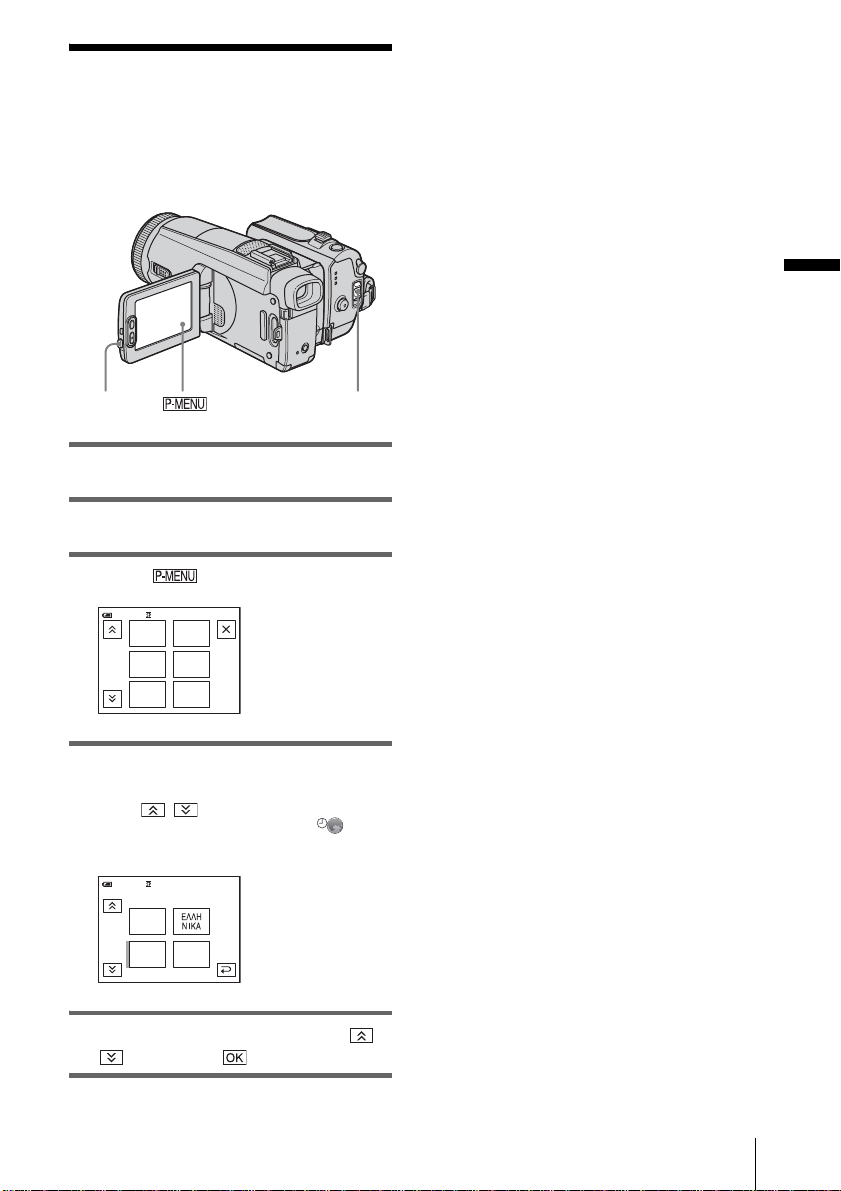
Step 7: Setting the screen language
You can select the language to be used on the
LCD screen.
z Tip
• Your camcorder offers [ENG [SIMP]] (simplified
English) for when you cannot find your nati ve
tongue among the options.
Getting started
OPEN
POWER switch
1 Turn on your camcorder.
2 Press OPEN and open the LCD panel.
3 Touch .
60 min STBY
MENU
SPOT
1/3
METER
WHITE
BAL.
EXPO–
SURE
PRGRAM
AE
SHUTTR
SPEED
0:00:00
4 Touch [LANGUAGE].
If the item is not displayed on the screen,
touch / . If you cannot find i t , to uc h
[MENU], and select it from the
(TIME/LANGU.) menu (p. 82).
STBY
ENG
[
SIMP
0:00:00
]
60min
LANGUAGE: ENGLISH
DEU
TSCH
1/4
ENG
LISH
5 Select the desired language with /
, then touch .
Getting started
21
Recording
Recording movies
You can record movi es on a tape or a
“Memory Stick Duo.”
Before recording, follow steps 1 to 7 in
“Getting started” (p. 12 to p. 21).
When you are recor ding on a tape, movies
will be recorded alon g with stereo sound.
When you are recording on a “Memory Stick
Duo,” the movie will be recorded with
monaural sound.
Camera recording lamp
POWER switch
3 Select the recording mode.
To record on a tape
Slide the POWER switch until the
CAMERA-TAPE lamp lights up, and your
camcorder is set t o t he standby mode.
Slide the POWER
switch while
pressing the green
button.
To record on a “Memo ry Stick
Duo” – MPEG MOVIE EX
Slide the POWER switch repeatedly until
the CAMERA-MEMORY lamp lights up,
and the currently selected recordi ng folder
appears on the sc reen.
Slide the POWER
switch while
pressing the green
button.
OPEN
REC START/STOP
1 Remove the lens cap. Pull the lens cap
string down and attach it to the grip
belt.
2 Press OPEN and open the LCD panel.
Recording
22
4 Press REC START/STOP.
Recording starts. [REC] appears on the
LCD screen and the Camera recording lamp
lights up.
Press REC START/STOP again to stop
recording.
To check the most recently recorded
MPEG movie – Review
Touch . Playback starts au to m at i cal l y.
Touch again to return to standby.
To delete the movie, touch after playback
is finished, then [YES].
To cancel deleting, to uch [NO].
To turn the power off
Slide the POWER switch up to the (CHG) OFF
position.

Indicators displayed during recording
on a tape
The indicators will not be recorded on the tape.
Date/time and the camera settings data (p. 50)
will not be displayed during recording.
Date/time (p. 50) will not be displayed during
recording.
60min REC
101
0:00:00
320
2min
60min
0:00:00REC
60min
P-MENU
A Indicato rs for Cass ette Memo ry casset tes
B Remaining battery
The indicated time may not be correct
depending on the environment of use.
When you opened or closed the LCD panel,
it takes about 1 minute to display the cor rect
remaining battery time.
C Recording mode (SP or LP)
D Recording status ([STB Y ] ( st andby) or
[REC] (recording))
E Time code or tape counter (hour:
minute: s e cond)
F Recording capacity of the tape (p. 80)
G Personal Menu button (p. 5 4)
H END SEARCH/EDIT SEARCH/Rec
review display switch button (p. 42)
Indicators displayed during recording
on a “Memory Stick Duo”
The indicators will not be recorded on the
“Memory Stick Du o.”
P-MENU
Recording
A Recordi n g folder
B Remaining battery
The indicated time may not be correct
depending on the env ir onment of use.
When you opened or closed the LCD panel,
it takes about 1 minute to display the correc t
remaining battery time.
C Recording status ([REC] (recording))
D Movie siz e
E Recorded time (hour: minute: second)
F Recording capacity of the “Memory
Stick Duo”
G “Memory Stick Duo” re cording start
indicator (appears for about 5 seconds)
H Personal Menu button (p. 54 )
I Review button (p. 22)
b Note
• Before changing the batt ery pac k, slid e the POWER
switch up to (CHG) OFF.
• In the default setting, when you do not operate the
camcorder for more than about 5 minutes, the power
will automatica lly turn off to prevent batter y loss
([A.SHUT OFF], p. 81). To restart recording, slide
the POWER switch down to select CAMERATAPE or CAMERA-MEMORY, and then press
REC START/STOP.
• While recording movies on a “Memor y Stic k Duo,”
the only menu items available will be those with
short cuts on the Personal Menu. In order to use
other menu items, add them to the Pe rs ona l Me nu.
• When you are recording on a “Memory Stic k Duo”
with an external flash (optional) connected to the
accessory shoe, turn off the power of the external
flash to prevent charging noise being recorded.
,continued
Recording
23
z Tip
• If you do not use your camcorder for a long time ,
remove the cassette and store it.
• You can also use REC START/STOP of the LCD
panel to record moving pictures. It is useful when
you record from a low-angle or record yourself in the
mirror mode.
• To press REC START/STOP on LCD frame,
support the LCD panel with your hand.
• To ensure smooth transition on a tape from the last
recorded sc ene to the next, no te the following.
– Do not remove the cassette. (The picture will be
recorded continuously without a break even when
you turn the power off).
– Do not record pictures in SP mode and LP mode on
the same tape.
– Avoid stopping then recording a movie in the LP
mode.
• See “To record for a longe r time on a “Memory S tick
Duo”” (p. 24) for the approximate length of time it is
possible to record on a “Memory Stick Duo” of
different capacities .
• The recording time, date, and the camera settings
data (for tape only) are recorded au to matically on
the recording media without being displayed on the
screen. You can view this information duri ng
playback by selecting [DATA CODE] in the me nu
setting (p. 50).
Recording for a longer time
To record for a longer time on a tape
In the (STANDARD SET) menu, select
[ REC MODE], then [LP] (p. 76).
In the LP mode, you can record 1.5 times longer
than you can when recording in the SP mode.
A tape recorded in the LP mode should be
played back only on this camcorder.
Image size and time
(hour: minute: second)
320 × 240 160 × 112
8MB
(supplied)
16MB 00:02:40 00:10:40
32MB 00:05:20 00:21:20
64MB 00:10:40 00:42:40
128MB 00:21:20 01:25:20
256MB
(MSX-M2 5 6)
512MB
(MSX-M5 1 2)
00:01:20 00:05:20
00:42:40 02:50:40
01:25:20 05:41:20
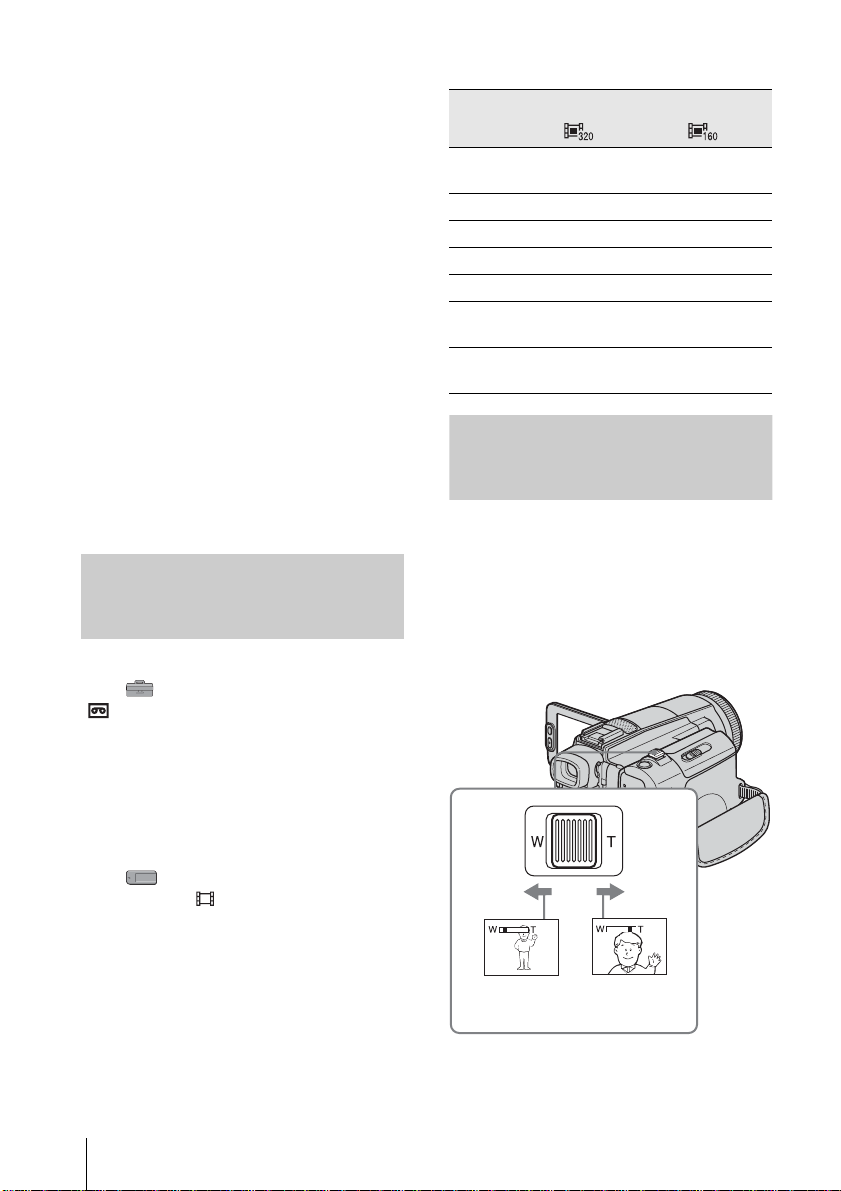
Using zoom
When the CAMERA-TAPE mode is
selected, you can choose zoom to
magnification levels greater than 12 times,
and from that point activate th e dig ita l zoo m
([DIGITAL ZOOM], p. 61).
Occasional use of the zoom is effective, but
use it sparingly for best results.
To record for a longer time on a
“Memory Stick Duo”
In the (MEMORY SET) menu, select
[MOVIE SET], [ IMAGE SIZE], then [160 ×
112] (p. 64).
The length of ti m e you can record on a
“Memory Stick D uo” varies depending on t he
image size and the recording environment.
Refer to the following list for approximate length
of time you can record movies on a “Memory
Stick Duo” formatted on your c am cord er.
Recording
24
1 cm (approx.
1/2 inch)*
* The minimum distance required betwee n your
camcorder and the subject to get a shar p focus in
that position of the lever.
80 cm (approx .
2 5/8 feet)*

Move the power zoom lever slightly for a
slower zoom. Move it further for a faster
zoom.
To record wider ran g e of vi ew
Move the power zoom lever towards W.
The subject appears farther away (Wide
angle).
To record closer vie w
Move the power zoom lever towards T.
The subject appears closer (Telephot o ) .
Recording in mirror mode
You can turn the LCD panel towards the
subject so that you and your subject can share
the image being recorded. You can also
utilize this function wh en recording yo urself,
to keep the attention of small children
attracted to the camcorder while you record
them.
To use the zoom ring
Zoom in/out can be achieved at the desired
speed with the zoom ring. You can also finetune zooming.
Zoom ring
1 Set the FOCUS/ZOOM switch to
ZOOM.
appears on the sc reen.
2 Turn the zoom ring at t he desired speed.
b Note
• If you turn the zoom ring too fast, the zoom function
might not follow the speed.
Recording
Open the LCD panel 90 degrees to the
camcorder, then rotate it 180 degrees
towards the subject.
A mirror-image of the subject appears on the
LCD screen, but the picture will be normal
when record ed.
Recording
25
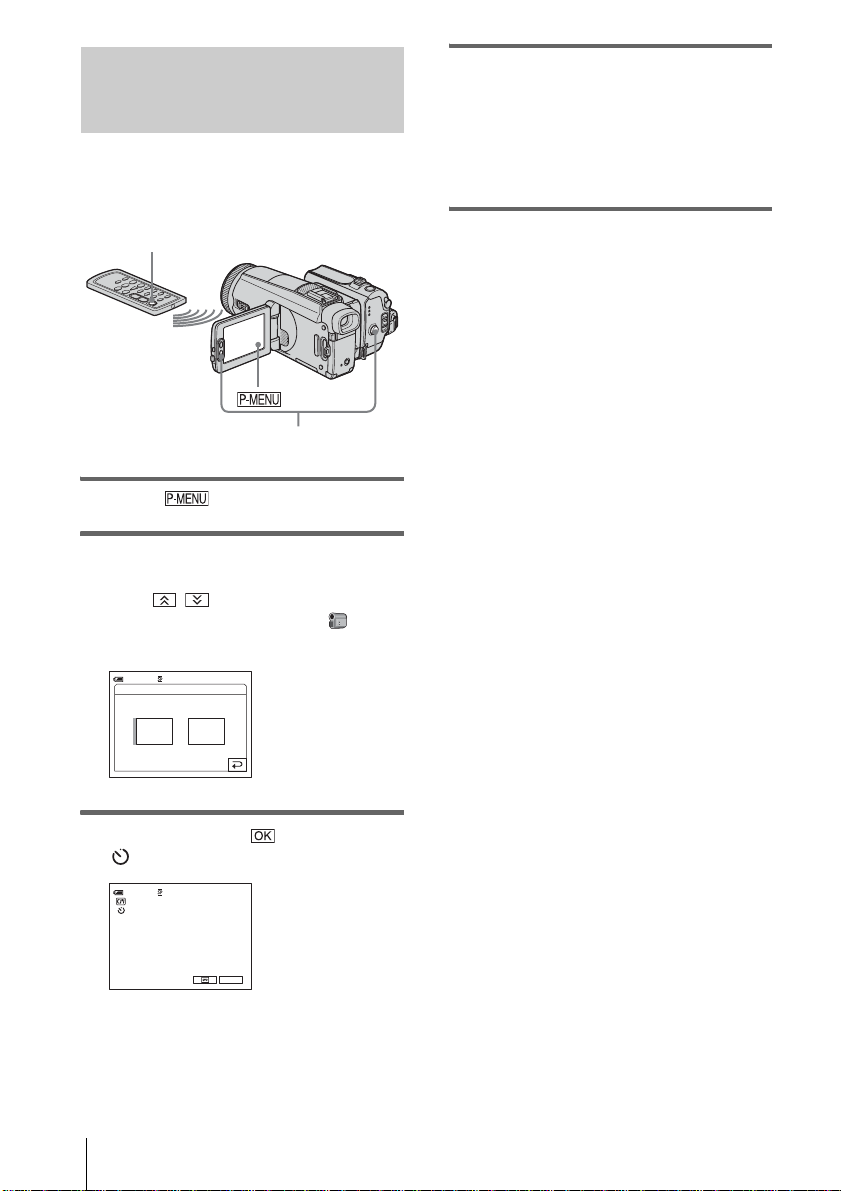
Using the self-timer
With the self-timer, you can start recording
after a delay of abou t 10 s ec o nd s .
4 Press REC START/STOP.
You will hear a beep sound counting down
for about 10 seconds (The count down
indication begins from 8).
The recording sta rt s .
To stop recording, press REC START/
STOP.
REC START/STOP
REC START/STOP
1 Touch .
2 Touch [SELF-TIMER].
If the item is not displayed on the screen,
touch / . If you cannot find it, touch
[MENU], and select it from the
(CAMERA SET) menu ( p. 56) .
SELF–TIMER: OFF
0:00:0060 min STBY
ONOFF
To cancel the count down
Touch [RESET] or pr es s REC START/STOP.
To cancel the self-timer
Follow steps 1 and 2, then select [OFF] in s te p
3.
3 Touch [ON], then .
appears.
0:00:00STBY
P-MENU
26
60min
Recording
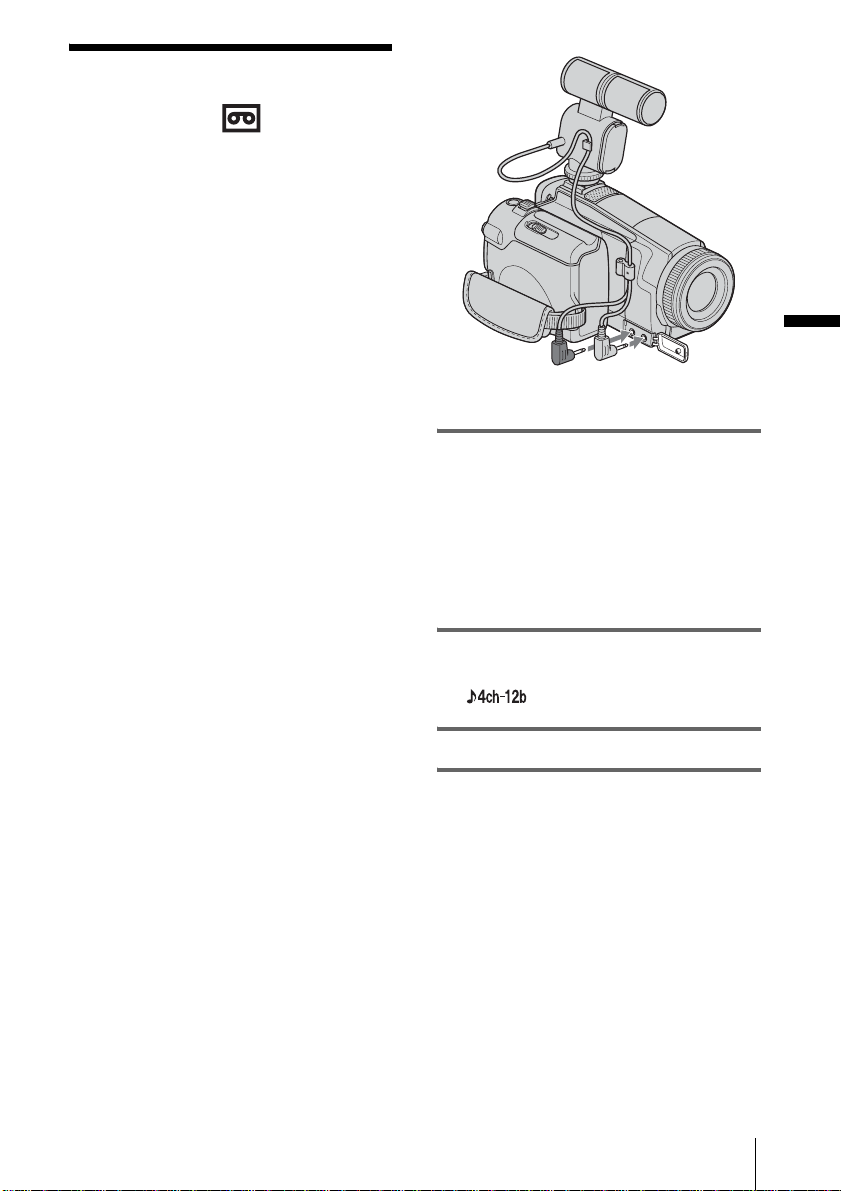
Enhanced sound
recording
– 4CH MIC REC
You can enjoy 5.1ch surround sound
playback by following the procedure below
using an optiona l mic r op ho ne and a Sony
VAIO series personal computer.
Recording
Attach the optional ECM-CQP1
microphone to your camcorder and make a
recording. 4ch sound (front-left, front-right,
rear-left, and rear-right) will be recorded
simultaneously.
m
Creating a DVD
Create a DVD with 5.1ch surround sound
on a Sony VAIO s er ie s personal computer
using “Click to DVD” (Ver.2.0 or later).
m
Playback
Play back the created DVD on your home
theater system with 5.1ch play back system.
To the REAR
(black) jack
To the FRONT
(red) jack
1 Connect the microphone to your
camcorder.
Fully insert the front microphone plug (red)
into the FRONT (r ed) jack, and the rear
microphone plug (black) into the REAR
(black) jack.
For details, refer to the operating
instructions of the microphone.
Recording
z Tip
• These operating instructions explain the Recording
procedure.
• An optional microphone (ECM-CQP1) is required
for this function.
• The application software “Click to DVD” (Ver.2.0
or later) bundled with Sony VAIO series personal
computers is required for creating a DVD in 5.1ch
surround sound format.
• For details on Creating a DVD, refer to the supplied
“Computer applications Guide.”
b Note
• Your camcorder does not output audio in the 5.1ch
audio format.
• Sound is recorded in 12-bit mode. If the [AUDIO
MODE] has been set to [16B I T ], it automatically
switches to [12BIT].
• Do not disconnect/connect the microphone cable
during recording.
• Some application software bundled with VAIO does
not allow for 4CH MIC REC recording.
2 Slide the POWER switch repeatedly to
select the CAMERA-TAPE mode.
appears on the sc reen.
3 Press REC START/STOP.
Recording
27
To monitor the sound during recording
– 4CH Audio Check
You can listen to either the front input sound or
the rear input so und. Using headphon es is
recommended (p.131).
1 Touch .
2 Tou ch [M ENU] .
3 Select (STANDARD SET) menu,
then [4CH AUD CHECK] by touching
/ , and then touch .
4 Select [FRONT ] or [REAR], then touch
.
When [FRONT] is selec te d:
The front input sound is he ar d.
When [REAR] is selected:
The rear input sound is heard.
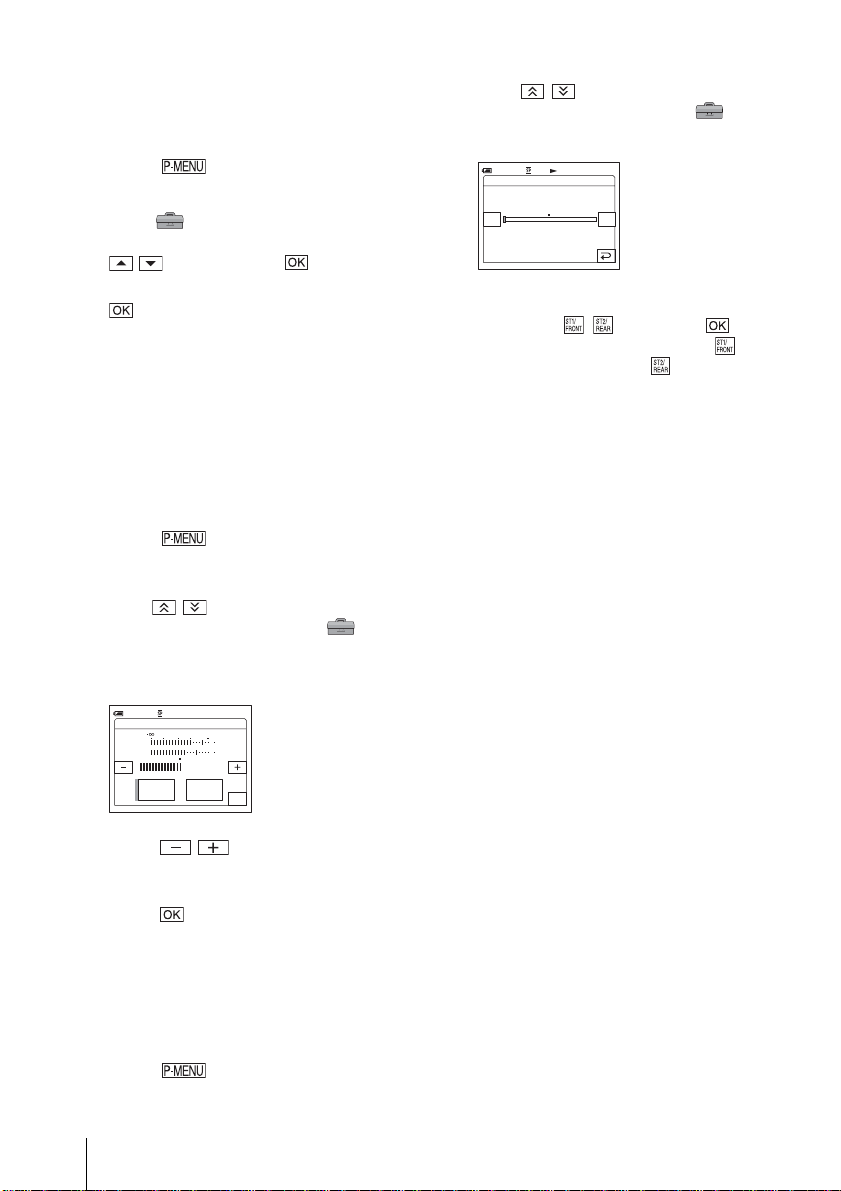
To adjust the volume of recording sound
You can adjust the volume of the front and rear
input sound. Using headphones is
recommended (p.131).
1 Touch .
2 Tou ch [MIC LEVEL].
If the item is not displayed on the screen,
touch / . If you cannot find it, t ouc h
[MENU], and select it from the
(STANDARD SET) menu.
3 Touch [MANUAL].
3 To uch [AUDIO MIX].
If the item is not displayed on the screen,
touch / . If you cannot find it, touc h
[MENU], and select it from the
(STANDARD SET) menu.
AUDIO MIX
ST1/
FRONT
0:00:00:0060min
ST2/
REAR
4 Adjust the balance of the front and rear
sound with / , then touch .
The front sound can be heard at the end,
and the rear sound at t he end.
Your camcorder cannot output 4ch audio
simultaneously as it only supports 2ch
audio output. When you set the audio
balance bar to the center, the front and rear
sounds are output at equal level.
The adjusted audi o balance returns to the
default setting in about 5 minutes after the
battery pack or other power sources ha ve
been disconnec te d.
To end 4CH MIC REC
Disconnect the microphone cable after finishing
recording and a ft er turning the power off.
MANUAL
30 20 12 0
MANUALAUTO
0:00:00
dB
OK
60 min STBY
MIC LEVEL:
FRONT
REAR
4 To uch / to adjust the volume.
The front an d rear so und volu mes cannot be
adjusted separately.
5 Touch .
To check the recorded sound
You can check the recorded front and rear sound
after recording.
1 Sl id e the POWER switch re peatedly to
select the PLAY/EDIT mode.
2 Touch .
Recording
28
Recording still
images
– Memory photo recording
You can record still images on a “Memory
Stick Duo.” Before recording, follow steps 1
to 7 in “Getting started” (p. 12 to p. 21).
PHOTOOPEN
3 Slide the POWER switch repeatedly
until the CAMERA-MEMORY lamp
lights up.
The selected recording folder is displayed.
Slide the POWER
switch while
pressing the green
button.
POWER switch
1 Remove the lens cap. Pull the lens cap
string down and attach it to the grip
belt.
2 Press OPEN and open the LCD panel.
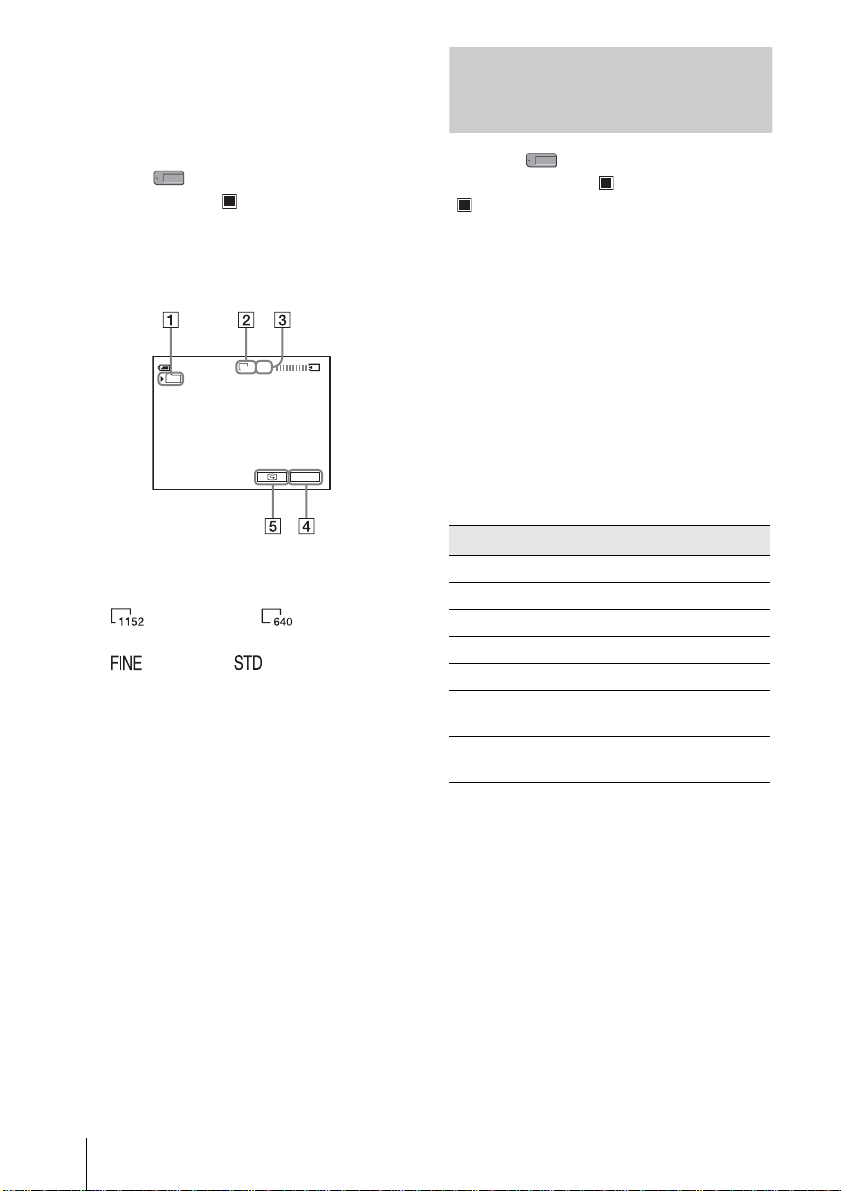
4 Press and hold PHOTO lightly.
You will hear a light beeping sound when
the focus and brightness settings are
adjusted. Reco rding does not start at thi s
point.
The indicator
stops flashing.
The number of images
that can be recorded.*
60min
101
* The number of images that can be recorded
varies depending on the image quality setting
and the recording environment.
30
FINE
1152
P-MENU
5 Press PHOTO fully.
A shutter sound is heard. When bars of
disappear, the i mage is recorded on
the “Memory Stick D uo. ”
Recording
To check the most recently recorded
image – Review
Touch .
Touch to return to standby.
To delete the image, touch , then [YES].
To cancel deleting, touch [NO].
Recording
29
To turn the power off
Slide the POWER switch up to the (CHG) OFF
position.
To record still images continuously –
Burst
Select the (MEMORY SET) menu,
[STILL SET], then [ BURST] (p.63).
You can record 4 to 13 images continuously in
a time interval of about 0.5 seconds.
Indicators displayed during recording
60min
101
A Recording folder
B Image size
(1152 × 864) or (640 × 480)
C Quality
([FINE]) or ([STANDARD])
D Personal Menu button (p.54)
E Review button (p. 29)
z Tip
• When you press PHOTO on your Remote
Commander, the image dis pla ye d on the screen at
that timing is recorded.
• The recording time, date, and the camera settings
data are recorded automatically on the recording
media without being displayed on the sc ree n. You
can view this information during pla yback by
selecting [DATA CODE] on the screen (p. 50).
• The recording angle is wider than that of the
CAMERA-TAPE mode.
FINE
1152
P-MENU
Selecting image quality or size
Select the (MEMORY SET) menu,
[STILL SET], then [ QUALITY] or
[ IMAGE SIZE] (p. 64).
The number of pictures you can record on a
“Memory Stick Duo” varies depending on
the quality/size of the image and the
recording environment.
Refer to the following list for the approximate
number of pictures th at can be recorded on a
“Memory Stick D uo” formatted on your
camcorder.
When the image quality is [FINE]
(number of images)
The image si ze of 1152 × 864 is 500kB, that of
640 × 480 is 150kB.
1152 × 864 640 × 480
8MB (supplied) 15 50
16MB 30 96
32MB 61 190
64MB 120 390
128MB 245 780
256MB
(MSX-M256)
512MB
(MSX-M512)
445 1400
900 2850
30
Recording
 Loading...