

Handycam CCD-TRV21E,CCD-TRV119,Handycam CCD-TRV11E,CCD-TRV21,Handycam CCD-TRV21PK,Handycam CCD-TRV119,Handycam CCD-TRV21,RMT-713
Sony Handycam CCD-TRV21E,CCD-TRV119,Handycam CCD-TRV11E,CCD-TRV21,Handycam CCD-TRV21PK,Handycam CCD-TRV119,Handycam CCD-TRV21,RMT-713 Service Manual

CC,-T,V,]E,
T,V2 ,V2E ,V2,P,
RMT-713
SERVICEMANUAL
Video8
Handgcam
I B MECHANISM I
PHOTO : CCD-TRV11 E
• CCD-TRV21PK is model that cartingbag are added in
CCD-TRV21.
• CCD-TRV21PK is different from CCD-TRV21
only in the accessory and packing materials.
US Model
Canadian Model
CCD-TRV11/TRV21
AEP Model
UK Model
CCD-TRV11E/TRV21E
E Model
CCD-TRV11/TRV11E/TRV21/
TRV21E/TRV21PK
Australian Model
CCD-TRVl 1E
Hong Kong Model
CCD-TRV11/'I'RV1 IE
Tourist Model
CCD-TRV21/TRV21E
I For MECHANISM ADJUSTMENT, refer to the I
8mm Video MECHANICAL ADJUSTMENT
MANUAL W" (9-973-801-11).
SPECIFICATIONS
Video camera recorder
system
V'Kleo recording system
Two rotary heads, Helical
scanning,_ system
Audio recording system
Rotary heads, FIVIsystem
Usable cassette
8 nun video format cassette
(standard 8 ram)
Image device
CCD (Charge Coupled Device)
Viewflnder
Electronic viewfinder
Black and white
Lens
12x, Combined power zoom
lens, FI.8--2.7
Filter diameter 37 mm (1 _
incb_s)
Color temperature
Auto
Recommended illumination
More than 100Ix
* Mizdmum illundnation
expresses the light level a
camcorder requires to
produce a picture. Visible
minimum low lightexpresses
the light level to produce a
visible signal
LCD screen
Picture
2.5 inches measured
diagomJ]y
50.3x 37.4mm
(2x1½ inches)
dina.y
TN LCD/TFT activematrix
method
Total dot number
61_a80(279x22o)
Input and Output connectors
Vldeo output
Phono jacL 1 Vp-p, 75 Q,
unbalance!
Audio output
Monaural Phono jack, 327
mY, (at load _pedance 47
k.q), impedance less than 2.2
100
RFU IX: OUT
Specialminijack,iX: SV
Earphone lack
Mb'ff.jack
LANC control jack
Stereo mL,d-mi.-diack (e 2-5
_)
mmmmml
lid
MICROFLM
* Refer to the table on page 2 for the differences
of specifications between the respective models.
MR: jack
Minijack,0.388 mV, low
impedance with 2.5 to 3 V DC
output,impedance 6.8 k.q (e
3.5 men)
Speaker
Dy.a_c_
General
Power requirements
7.5 V (AC power adaptor)
Operatlng temperature
0°C to 40°C (32°F to 104°F)
Storage temperature
-20°C to +60°C (--4OFto
+14001:)
Dimensions (Approx.)
113 x 106 x 210 mm
(41/_x4 V4x83/8inches)(w/h/
d)
Microphone
Electret condenser microphone,
monauraltype
AC power adaptor
Power requirements
110 - 240 V AC, 50/60Hz
Power consumption
AC-V15:18 W
AC-V16:20 W
AC-V16A_ 22 W
outputvoltage
DC OUT in operation mode
AC-V15:7.5 V, 1.6 A
AC-V16/V16A: 7.5 V, 1.8 A
Bat_z7 charge _mLnal
10 V, 1.1 A. m charge mode
App,_
Sony battery packs NP-55
(supplied),NP-55H,NP-C65,
NP-67, NP-77H, NP-77I-ID, NP-
98, NP-98D
Operating temperature
O°C to 40°C (32OFto 104°_
Storage temperature
-20°C to +60°C (--4°F to +140°F)
Dimensions (Approx.)
166 x 43 x 75 mm (6 s/a x 1 11A6x
3 inches) (w/h/d)
including projecting parts and
controls
Mass (Approx.)
AC-V15/V16:420 g (15 oz)
AC-VI6A: 450 g (16 oz)
VIDEOCAMERARECORDER
Preparativos
o
rl
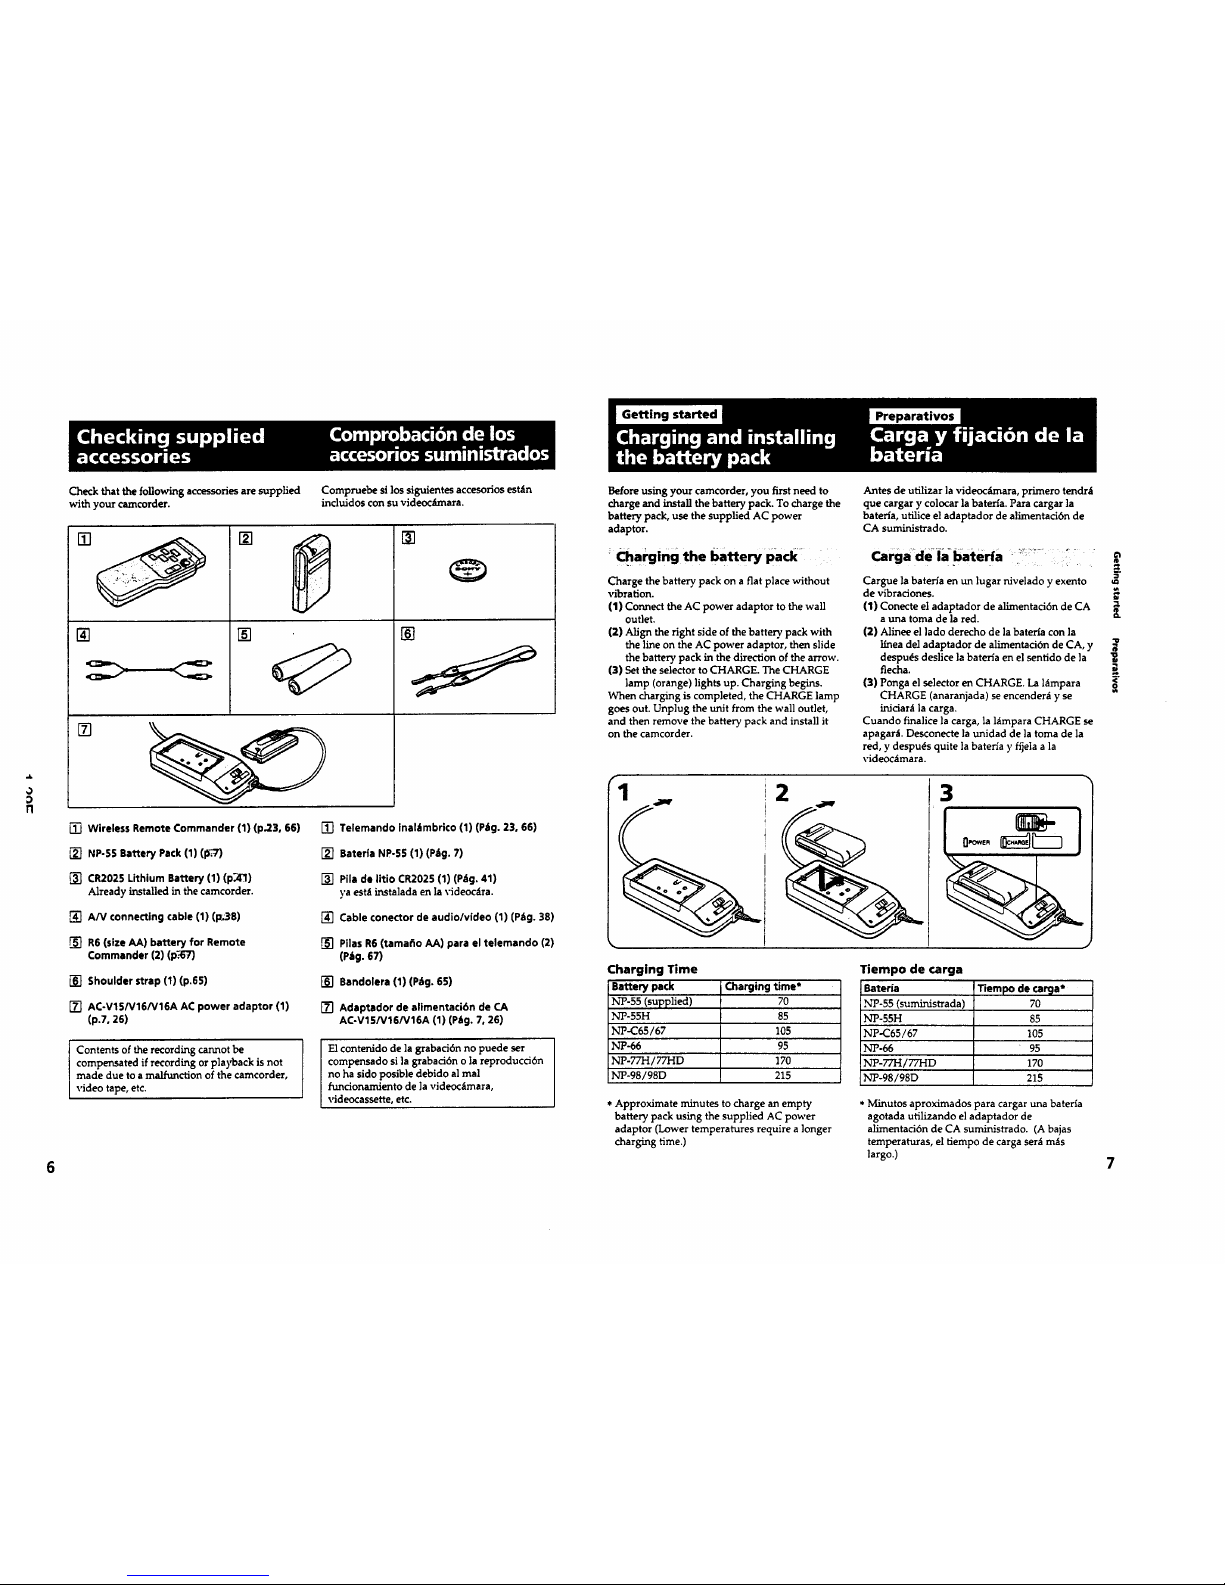
Check that the following accessories are supplied Compruebe si los siguientes accesorios est_tn
with your camcorder, incluidos con su videoc_nara.
[]
[]
[]
I
[]
[]
[]
• i
[]
[] Wireless Remote Commander (1) (p23, 66)
[] NP-S5 Battery Pack (1) (p;-'])
[] CR2025 Lithium Battery (1) (p_l)
Already installed in the camcorder.
[] A/V connecting cable (1) (p_8)
[] R6 (size AA) battery for Remote
Commander (2) (p.'_'7)
[] Shoulder strap (1) (p.65)
[] AC-VlS/V16/V16A AC power adaptor (1)
(p.7, 26)
[] Telemando InalJimbrico (1) (Pig. 23, 66)
[] Bateria NP-55 (1) (Pig. 7)
[] Pila de Ittio CR2025 (1) (p=ig. 41)
ya est'; insta]ada en la videoc_ira.
[] Cable conector de audio/video (1) (P_tg. 38)
[] Pilas R6 (tamafio AA) para el telemando (2)
(Pig. 67)
[] Bandolera (1) (Pitg. 65)
[] Adaptador de alimentaci6n de CA
AC-V15/V16/V16A (1) (Pig. 7, 26)
Contents of the recording cannot be
compensated if recording or playback is not
made due to a maJfunction of the camcorder,
video tape, etc.
E1contenido de la grabacidn no puede set
compensedo si la grabad6n o la reproducddn
no ha sido posible debido al mal
funcionamiento de ]a videoc_fmara,
videocassette, etc.
6
Before using your camcorder, you first need to
charge and install the battery pack. To charge the
battery pack, use the supplied AC power
adaptor.
: _,rging the Battery pack
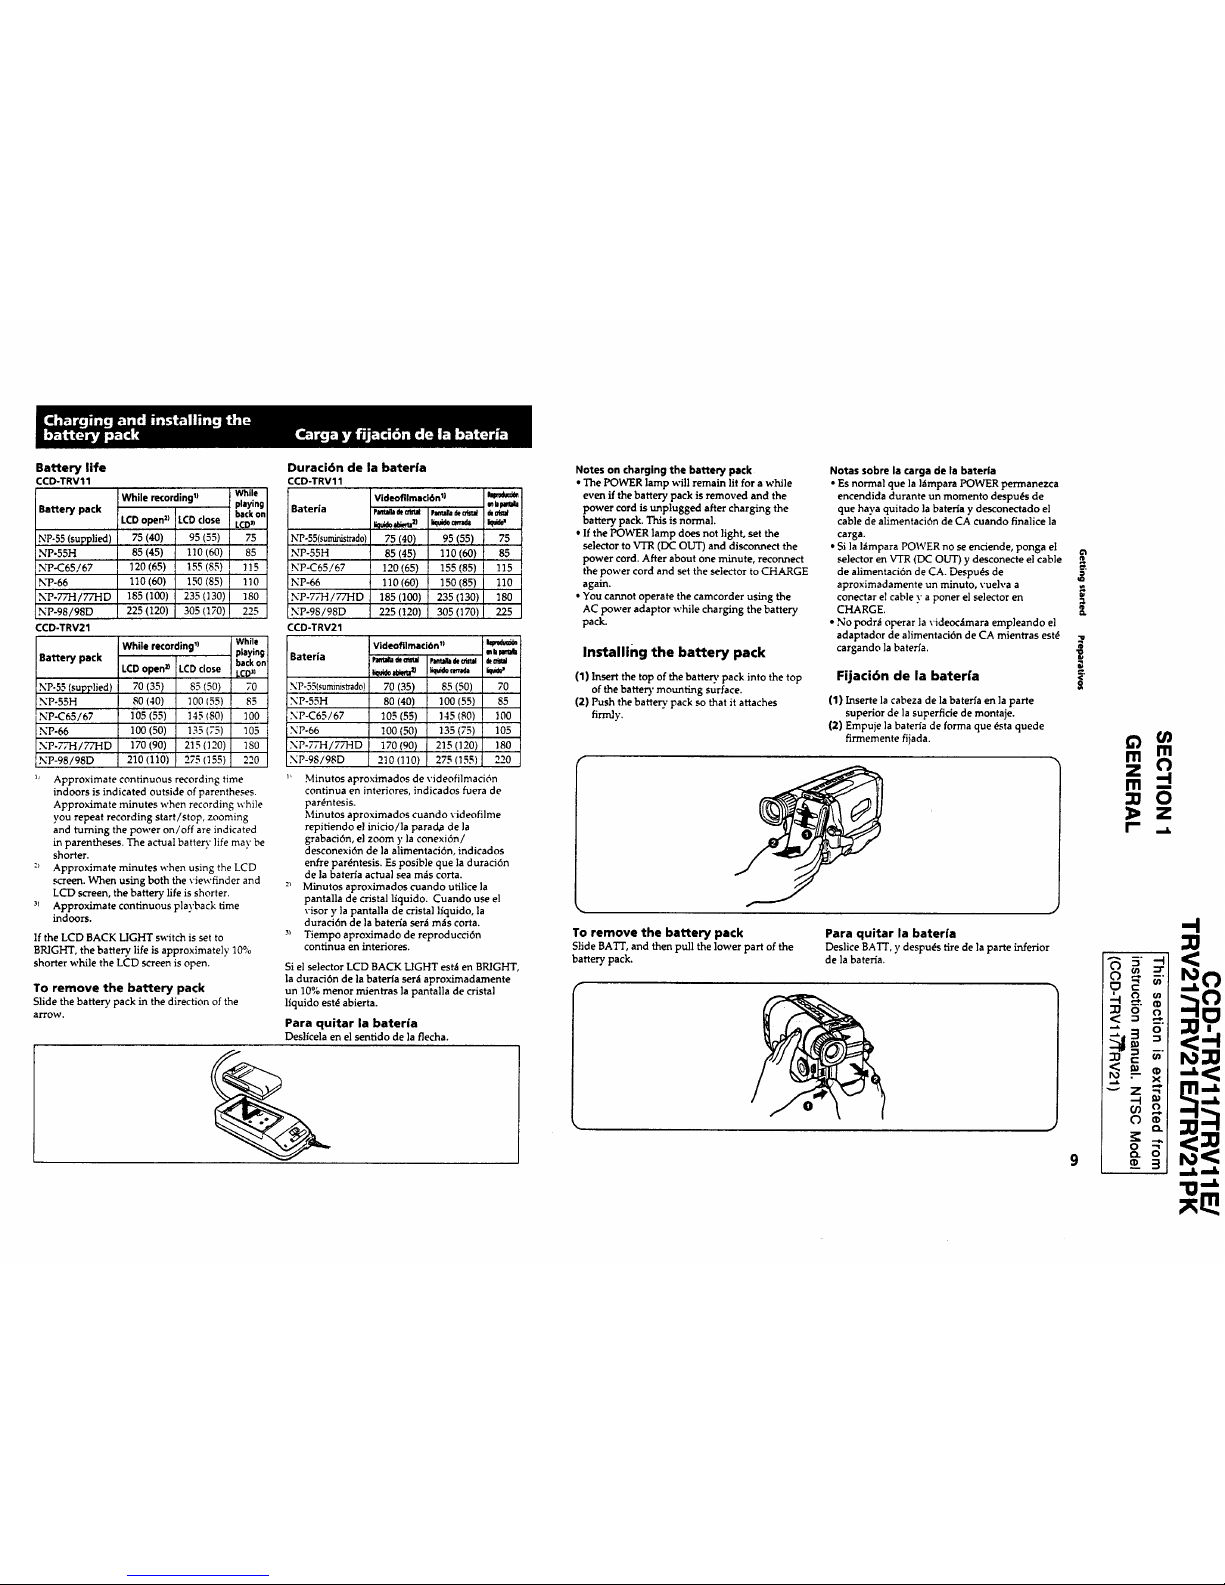
Charge the battery pack on a fiat place without
vibration.
(1) Connect the AC power adaptor to the wall
outlet.
(2) Align the right side of the battery pack with
the line on the AC power adaptor, then slide
the battery pack in the direction of the arrow.
(3) Set the selector to CHARGE. The CHARGE
lamp (orange) lights up. Charging begins.
When charging is completed, the CHARGE lamp
goes out. Unplug the unit from the wall outlet,
and then remove the battery pack and install it
on the camcorder.
;2
/f'_ i
i
f
Antes de utilizar la videocLmara, primero tendril
que cargar y colocar la baterfa. Para cargar la
hateria, utilice el adaptador de alimentaci6n de
CA suministrado.
Cargue la bateria en un lugar nivelado y exento
de vibradones.
(1) Conecte el adaptador de alimentaci6n de CA
a uLna toma de la red.
(2) Alinee el ]ado derecho de la baterta con la
ltnea de] adaptador de alimentaci6n de CA, y
despu_s deslice la bateria en el sentido de ]a
flecha.
(3) Ponga el selector en CHARGE. La htmpara
CHARGE (anaranjada) se encender_t y se
inidar_t la carga.
Cuando finalice la carga, la l_mpara CHARGE se
apagar_t. Desconecte la unidad de la toma de la
red, y despu_s quite la bateria y fijela a la
\,ideoc_mara.
I
3
Charging Time
Battery pack Charging time*
NP-55 (supplied) 70
,x,rP-55H 85
NP-C65/67 105
NP-66 95
NP-77H/77HD 170
N-P-98/98D 215
Tiempo de carga
Bateria
NP-55 (suministrada)
NP-55H
NP-C65/67
NP-66
NP-77H/77HD
NP-98/98D
Tiempo de tara*
70
85
105
95
170
215
* Approximate minutes to charge an empty
battery pack using the supplied AC power
adaptor (Lower temperatures require a longer
charging time.)
* Minutos aproximados para cargar una bateHa
agotada utilizando el adaptador de
alimentad6n de CA suministrado. (A bajas
temperaturas, el tiempo de carga sera m_s
largo.)
a_
D
Battery life
CCD-TRV11
• 1) While
While recording
playing
Battery pack backon
LCDopen2) LCDclose LCD"
NP-55 (supplied) 75 (40) 95 (55) 75
NP-55H 85 (45) 110 (60) 85
N_P-C65/67 120(65) 155(85) 1!5
NP-66 110 (60) 150 (85) 110
NP-77H/77HD 185 (100) 235 (130) 180
NP-98/98D 225 (120) 305 (170) 225
CCD-TRV21
While recording') While
Battery pack playing
backon
LCDopen_ LCD close _CDJ_
NP-55 (supplied) 70 (35) 85 (50) 70
NP-55H 80 (40) 100 (55) 85
NP-C65/67 105 (55) 145 (80) 100
NP-66 100 (50) 135 (75) 105
NP-7,7-I/77HD 170 (90) 215 (120) 180
NP-98/98D 210 (110) 275 (155) 220
_' Approximate continuous recording time
indoors is indicated outside of parentheses.
Approximate minutes when recording while
you repeat recording start/stop, zooming
and turning the power on/off are indicated
in parentheses. The actual batte_" life may be
shorter.
:_ Approximate minutes when using the LCD
screen. When using both the viewfinder and
LCD screen, the battery life is shorter.
-_> Approximate continuous playback time
indoors.
DuraciGn de la bateria
CCD-TRV11
Vide°fllmaci6nl) J,.b_m_
Baterla PJeu_dt_ _ _
NP-55(suministrado 75 (40) 95 (55) 75
NP-55H 85 (45) 110 (60) 85
NP-C65/67 120 (65) !55 (85) 115
NP-66 110 (60) 150 (85) 110
NP-77H/77HD 185 (100) 235 (130) 180
NP-98/98D 225 (120) 305 (170) 225
CCD-TRV21
Videofllmacibn_)
mbMmla
Bateria _ e_a_o_a _a_a
NP-55(suminisrrad0) 70 (35) 85 (50) 70
NP-55H 80 (40) 100 (55) 85
NP-C65/67 105 (55) 145 (80) 100
NP-66 100 (50) 135 (75) 105
NP-77H/77HD 170 (90) 215 (120) 180
NP-98/98D 2t0 (110) 275 (155) 220
If the LCD BACK LIGHT switch is set to
BRIGHT, the battery life is approximately 10%
shorter while the LCD screen is open.
To remove the battery pack
Slide the battery pack in the direction of the
arrow.
Minutos aproximados de videofilmaci6n
continua en interiores, indicados fuera de
par6ntesis.
Minutos aproximados cuando videofilme
repitiendo el inicio/la parad,a de ]a
grabaci6n, el zoom y la conexi6n/
desconexi6n de la alimentaci6n, indicados
enfre par4ntesis. Es posible que la duraci6n
de la baterla actual sea m_s corta.
Minutos aproximados cuando utilice la
pantalla de cristal liquido. Cuando use el
visor y ]a pantalla de crista] liquido, la
duraci6n de la bater_a ser_ m_s corta.
Tiempo aproximado de reproducci6n
continua en interiores.
Si el selector LCD BACK LIGHT est_ en BRIGHT,
la duraci6n de la baterta ser_l aproximadamente
un 10% menor mientras la pantalla de crista]
liquido est_ abierta.
Para quitar la bateria
Desllcela en el sentido de la flecha.
Notes on charging the battery pack
• The POWER lamp will remain lit for a while
even if the battery pack is removed and the
power cord is unplugged after charging the
battery pack. This is normal.
• If the POWER lamp does not light, set the
selector to VTR (DC OUT) and disconnect the
power cord. After about one minute, reconnect
the power cord and set the selector to CHARGE
again.
• You cannot operate the camcorder using the
AC power adaptor while charging the battery
pack.
Installing the battery pack
(1) Insertthe top of the battery pack into the top
of thebatter), mounting surface.
(2) Push the battery"packso that it attaches
firmly.
Notas sobre la carga de la baterla
• Es normal que la l_mpara POWER permanezca
encendida durante un momento despu_s de
que haya quitado la bateria y desconectado el
cable de alimentaci6n de CA cuando finalice la
carga.
• Si ]a I_mpara POWER no se enciende, ponga el
selector en VTR (DC OUT) y desconecte el cable
de alimentaci6n de CA. Despu_s de
aproximadamente un minuto, vuelva a
conectar el cable y a poner el selector en
CHARGE.
• No podr_ operar ]a videoc_mara emp]eando el
adaptador de alimentaci6n de CA mientras est_
cargando ]a bateria.
Fijaci6n de la baterra
(1) Inserte la cabeza de la bateria en ]a parte
superior de la superficie de montaje.
(2) Empuje ]a bateria de forma que dsta quede
firmemente fijada.
To remove the battery pack
Slide BATT, and then pull the lower part of the
battery pack.
Para quitar la bateria
Deslice BA'I'T, y despu(._s tire de la parte inferior
de la baterla.
o
t
_1 tar_
m m
z O
F _.a.
:_ o" o
_'_
-I
-..L ---_

Make sure thata power sourceisinstalled.
(I)While pressingthesmallbluebutton,slide
EJECT in the direction of the arrow. The
cassette compartment automatically opens.
(2)Inserta cassette(not supplied) with the
window facing out.
(3) Press the PUSH mark on the casse,e
compartment to dose it. The cassette
compartment automatically closes.
Aseg_rese de que haya una fuente de
alimentad6n conectada a la videoc_mara.
(1) Manteniendo presionado el pequeflo bot6n
azul, deslice EJECT en el senfido de ]a flecha.
El compartimlento del videocassette se abrir_t
automaficamente.
(2) Inserte un videncassette (no suministrado)
con ]a ventanllla hacia afuera.
(3) Presione la marca PUSH del compartimiento
del videocassette para cerrar}o. El
compartlm,iento se cerrar_ automdticamente.
1
EJECT
2 3
To eject the cassette Para expulsar el videocassette
While pressing the small blue button, slide EJECT Mantenlendo presionado el pequefio bot6n azul,
in the direction of the arrow, deslice EJECT en el sentido de la flecha.
To prevent accidental erasure
Slide the tab on the cassette to expose the red
mark.
If you insert the cassette with thered mark
exposed and close the cassette compartment, the
beeps sound for a while. If you try to record with
the red mark exposed, the _ and _ indicators
flash in the viewfinder, and you cannot record,
To re-record on this tape, slide the tab back out
covering the red mark.
Para prevenir el borrado accidental
Deslice ]a ]eng_eta del videocassette de forma
que la marca roja quede al descubierto.
Si inserta un videocassette con ]a marca roja a]
descubierto y cierra el compartimiento del
videocassette, sonar_i un pitido durante un
momento. Si intenta grabar con la marca roja al
descubierto, en el visor parpadear_n los
indicadores _ y A., y no podnl grabar. Para
volver a grabar en esta cinta, deslice la lengfieta
de forrna que se cubra ]a marca roja.
Make sure that a power source and a cassette is
inserted end that the START/STOP MODE
switch inside theLCD panelissetto ._.
When you use the camcorder for thefirst time,
power on it and reset the date and time to your
time (p. 43) before you start recording. The date
is automatically recorded for 10 seconds after
you start recording (AUTO DATE feature). This
feature works only once a day.
Before you record one-time events, you may
went to make a trial recording to make sure that
you are using the camcorder correctly.
(1) While pressing the small green button on the
POWER switch, set it to CAMERA.
(2) Turn STANDBY up. The "STBY" indicator
appears in the viewfinder.
{3) Press START/STOP. The camcorder starts
recording and the "STBY" indicator changes
to the "REC" indicator.
You can also select Recording mode, SP
(standard play) mode or LP (long play) mode. Set
REC MODE (P. 37) according to the length of
your planned recording before you start.
Asebn£rese de que haya una fuente de
alimentaci6n conectada, un videocassette
insertado, y de que el selector START[STOP
MODE de] interior de ]a pantalla de crista!
]fquido est& en ,_..
Cuando uidlice ]a vldeoc_imara por primera vez,
conecte is alimentaci6n y reajuste ]a fecha y la
hora actual (p_g. 43). Cuendo las reajuste, la
fecha se grabar,_l automfiticamente durante 10
segundos a partir de] inlclo de la videofilmaci6n
[funci6n AUTO DATE (grabacidn autom_tica de _"
la fecha)]. Esta funci6n s6lo rrabajar_ tma vez a]
dia.
Antes de realizar videofilmadones irrepetibles,
se recomienda realizar una filmacidn de prueba a
fin de comprobar si la videoolmara funciona
correctamente, o
(1) Manteniendo presionado el pequefio botdn
verde del selector POWER, deslfcelo hasta
CAMERA. _'
(2)Gire STANDBY hacia arriba. En el visor
aparecer_ el indicador "STBY".
{3) Presione START/STOP. La videooimara
comenzara a grabar y el indicador "STBy"
cambiar_ a "REC".
Usted tambi(_n podr_t selecoonar el modo de
grabad6n, modo SP (reproducddn est_lndar) o
LP (reproducci6n ]arga). Ajuste REC MODE
(p_g. 37) de acuerdo con la durad6n de ]a
filmacidn planeada antes de comenzar.
'2
10 11
To stop recording momentarily [a]
Press START/STOP again. The "REC"indicator
in the viewfinder changes to the "STBY"
indicator (Standby mode).
To finish recording [b]
PressSTART/STOP. Turn STANDBY down, and
setthePOWER switchtoOFF.
Then,ejectthecassetteand remove thebattery
pack.
Para detaner moment_tnearnente la
grabad6n [a]
Presioneo_'avez START/STOP. Elindicador
"REC" cambiar_ al indicador "STBY" (Modo de
espera).
Para finalizar la grabaci6n [b]
Presione START/STOP, gireSTANDBY hacia
abajoy ponga elselectorPOWER en OFF,
Despu_s extraigaelvideocassettey quitela
baterJa.
[a]
Note on standby mode
Ifyou leavethecamcorder for5minutes ormore
witha cassetteinsertedinStandby mode, the
camcordergoes offautomatically."I'hisprevents
wearingdown thebatteryand wearing outthe
tape.To resume Standby mode, turnSTANDBY
down onceand turnitup again.To start
recording,pressSTART/STOP.
Notes on the recordingmode
* Thiscamcorder recordsand playsback inSP
(standardplay)mode and inLP (longplay)
mode.
The playbackqualityin LP mode, however,
willnotbe asgood asthatinSP mode.
. When a taperecordedon thiscameorder in LP
mode isplayed backon othertypesof8 mm
camcordersorVCRs, theplaybackqualitymay
notbe as good asthaton thiscamcorder.
Note sobre elmodo de espera
Sidejalavideoc_mara en elmodo de espera
durante 5 minutos o m_ts con el \'ideocassette
insertado, la videoc_mara se apagar_
autom_ficamente. Esto evitar_ que ]a bateHa y el
videocassette se desgasten. Para restablecer el
modo de espera, gire una vez STANDBY hacia
abajo y despu_s otTa vez hacia arriba. Para
comenzar a grabar, preslone START/STOP.
Notes sobre el modo de grabacl6n
• Esta videocdmara graba y repoduce en los
modos SP (reproducci6n estdndar) y LP
(reproducci6n larga). Sin embargo, ]a calidad
de ]as im_fgenes reproducidas en el modo LP
no ser_; tan buena como en el modo SP.
• Cuando reproduzca una cinta grabada en esta
videocdmara en el modo LP en uLna
_'ideoc_mara de 8 mm de otto tipo o una
videograbadora, es poslble que la calidad de
reproducci6n no sea tan buena como ]a
reproducida en esta \_deoc_imara.
To focus the vlewfinder lens
If the viewfinder is not in focus at all or when
you use the camcorder after someone else has
used it, focus the viewfinder lens. Turn the
viewfinder lens adjustment ring so that the
indicators in the viewfinder come into sharp
focus.
Para enfocar la lente del visor
Cuando el visor no est_ enfocado en absoluto, o
cuando vaya a utilizer la vide_ara despu_s
de haberla empleado otra persona, enfoque ]a
lente del visor. Gire el anillo de ajuste de la ]ente
del visor de forma que los indicadores del visor
queden nitidamente enfocados.
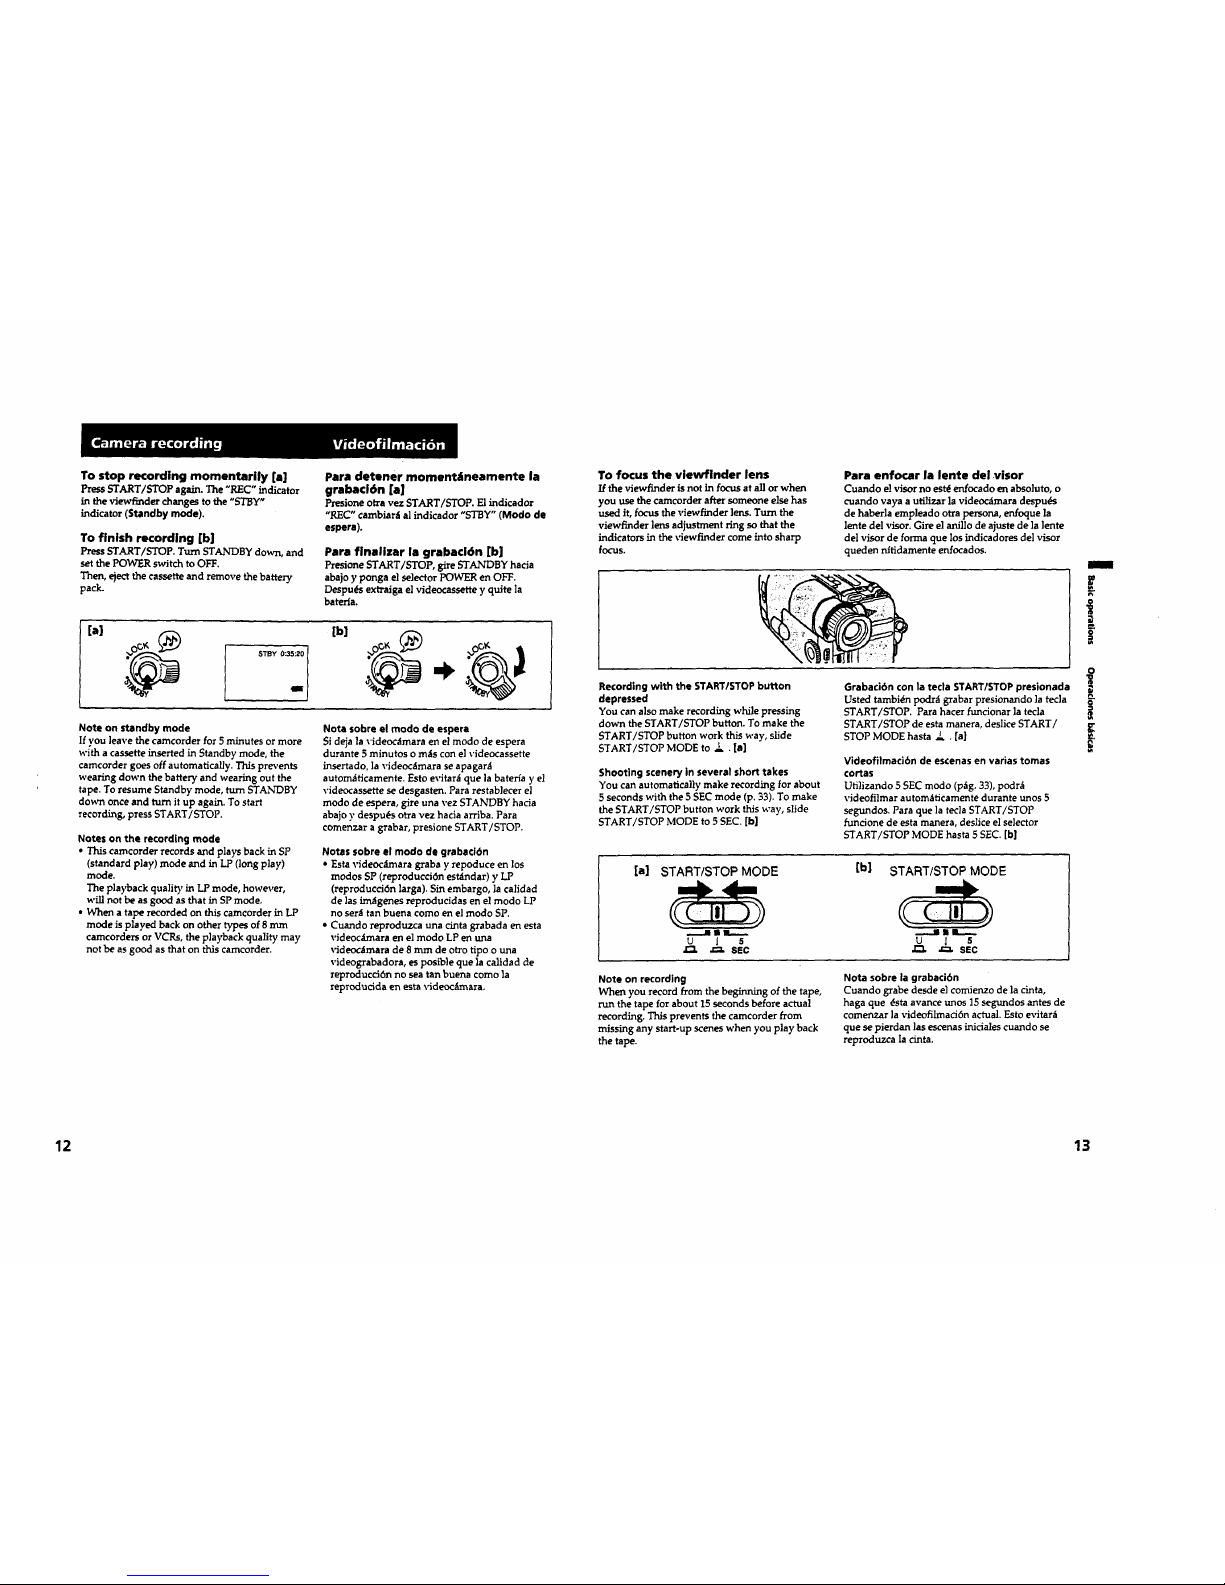
Recording with the STARTISTOP button
depressed
You can also make recording while pressing
down the START/STOP button. To make the
START/STOP button work this way, slide
START/STOP MODE to ! . [el
Shooting sceneryin severalshorttakes
You can automaticallymake recordingforabout
5 secondswith the5 SEC mode (p.33).To make
theSTART/STOP button work thisway, slide
START/STOP MODE to 5 SEC. [b]
Grabacibn con la tecla START/STOP presionada
Usted tambidn podrd grabar presionando ]atecla
START/STOP. Para hater funcionar ]a tecla
START/STOP de esta manera, deslice START/
STOP MODE hasta Z . [a]
Vldeofilmaci6n de escenas en varias tomas
€ortas
Utilizando 5 SEC modo (p_g. 33), podr_
videofilmar autom_ticamente durante unos 5
segundos. Para que la tecla START/STOP
funcione de esta manera, deslice el selector
START/STOP MODE haste 5 SEC. [b]
[a] START/STOP MODE
[b] START/STOP MODE
u i s u l s
J_ ._, SEC
Note on recording
When you record from the beginning of the tape,
run the tape for about 15 seconds before actual
recording. This prevents the camcorder from
missing any start-up scenes when you play back
the tape.
Note sobre la grabaci6n
Cuando grebe desde el comJenzode la cinta,
haga que _sta avance unos 15segundos antes de
comenzar la videofilmaci6n actual. Esto evitar_t
que se pierdan las escenas iniciales cuando se
reproduzca la cinta.
m
E
o
12 13
Notes on the tape counter
• The t_l:_ co_mter indicates the recording or
playback time. Use it as a guide. There will be a
time lag of several seconds from the actual
time. To setthe counter to zero,press
COUNTER RESET.
• I/the tape is recorded in SP and LP modes
mixed, the tape counter shows incorrect
recording time. When you intend to edit the
tape using the tape counter, record in same (SP
or LP)mode.
Noteon beep sound
As indicatedwith)intheillustrations,abeep
sounds when you turnthe power on or when
you start recording and two beeps sound when
you stop recording,confirming the operation.
Several beeps also sound as a warning of any
unusual condition of the camcorder. Note that
the beep Sound is not recorded on the tape. If you
do not want to hear the beep sound, change the
BEEPsetting to OFF.
Note on the AUTO DATE feature
The clockisse_atthefactorytoTokyo time for
themodels soidinJapan,and to New York or
Panama time forothermodels.You can resetthe
clock.
The AUTO DATE feature shows the date
automatically once a day. However, the date may
automatically appear more than once a day
when:
- you reset the date and time.
- you eject and insert the tape again.
- you stop recordingwithin10seconds.
When moving from indoors to outdoors (or
vice versa)
Turn STANDBY up and point the camcorder at a
white object for about 15 seconds so that the
white balanceisproperlyadjusted.
Notas sobre el €ontador de la cJnta
* E1contador de la cinta indicar_ el tiempo de
grabaci6n o de reproducci6n. Empl_elo como
una guia. Es posible que exista una diferencia
de varios segundos de] tiempo real. Para
ajustar el contador a cero, presione COUNTER
RESET.
* Si la cinta se ha grabado en los modos SPy LP
mezclados, el contador de la cinta indicant un
tiempo de videofilmacidn incorrecto. Cuando
intente editar la cinta utilizando el contador de
]a cinta, grabe en el mismo modo (SP o LP).
Nota sobre el pitido
Como se indica con la marca ._en las
ilustraciones, cuando conecte la alimentad6n o
cuando comience la videofilmaci6n, sonar_iun
pitido, y cuando pare }avideofilmaci6n sonar_n
dos pttidos para confirmarla operaci6n.
Tambidnsonaran varios pitidos como
advertencia de una condici6n anorma] de ]a
videocAmara. Tenga en cuenta que los pitidos no
se grabantn en la cinta. Si no desea oir los
pitidos, cambie el aiuste de BEEPa OFF,
Nora sobre la funcibn AUTO DATE
El reloj est_t ajustado en htbrica a la hora de
Tokio en el modelo para Jap6n y a la de Nueva
York o Panam;i en otros modelos. E1 relo_ puede
reajustarse.
La funci6n AUTO DATE se activar_ una vez al
dia, Sin embargo, la fecha eparecer_t
autom_ficamente m_ts de una vez a] d_a cuando:
- reajuste la fecha y ]a hora.
- extraiga y vuelva a insertar el rideocassette.
- pare la grabaci6n antes de 10 segundos.
¢uandosemueva del interioral exterior (o
viceversa)
Cite STANDBY hacla arribay apuntecon la
videoc_lmara hacia un objetoblanco durante
unos 15segundos de forrna que el equilibrio del
blanco se ajuste apropiadamente.
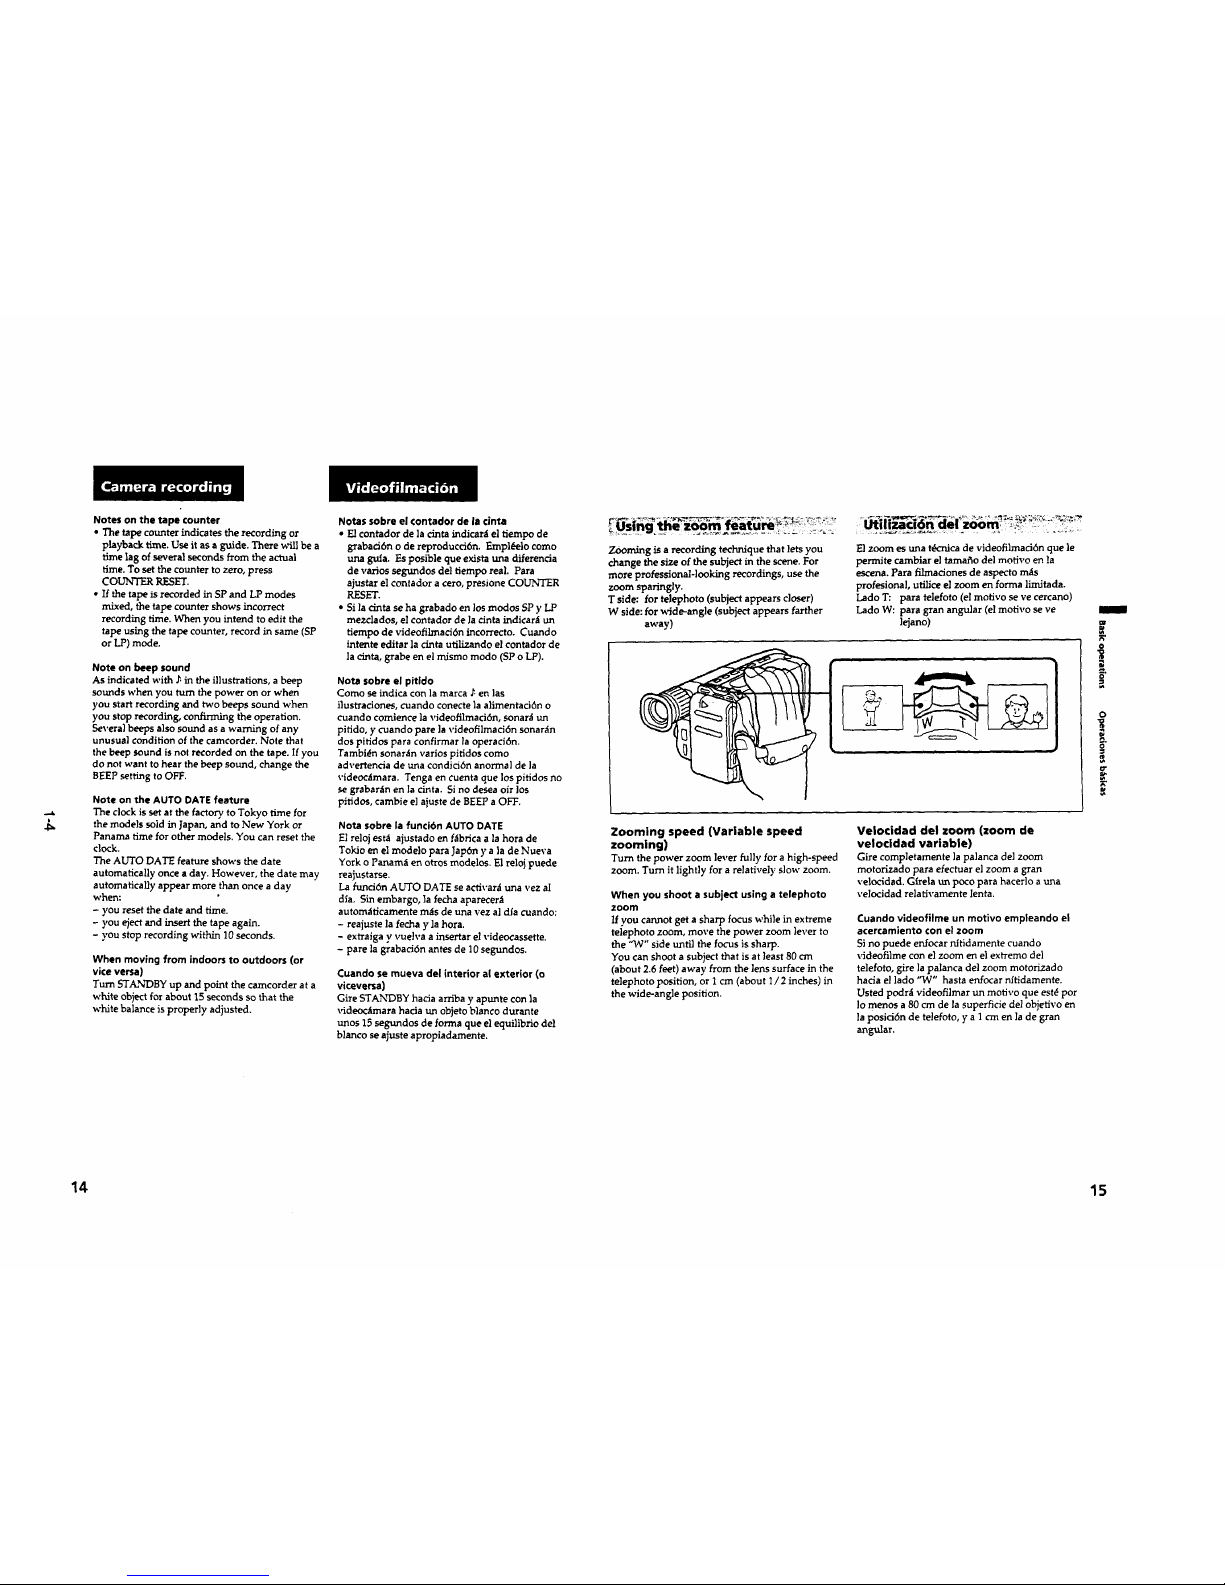
Zooming is a recording technique that lets you
change the size of the subject in the scene. For
more professional-looking recordings, use the
zoom sparingly.
T side: for telephoto (subject appears closer)
W side: for wide-angle (subject appears farther
away)
El zoom es una t4crtica de videofilmaci6n que le
permite cambiar el tamafio de] motivo en la
escena. Para filmaciones de aspecto m_ts
profesional, utilice el zoom en forma limitada.
Lado T: para telefoto (el motivo seve cercano)
Lado W: para g-ran angular (el motivo se ve
l_ano)
Zooming speed (Variable speed
zooming)
Turn the power zoom lever fully fora high-speed
zoom. Turn it lightly forarelatively slow zoom.
When you shoot a subject using a telephoto
zoom
If you cannot get a sharp focus while in extreme
telephoto zoom, move the power zoom lever to
the "W" side until the focus is sharp.
You can shoot a subject that is at least 80 cm
(about 2.6 feet) away from the lens surface in the
telephoto position, or 1 cm (about l/2 inches) in
the wide-angle position.
Velocidad del zoom (zoom de
velocidad variable)
Cite comp]etamente ]a palanca de] zoom
motorizado para efectuar el zoom a gran
velocidad. Glrela un poco para hacerlo a una
velocidad relativamente lenta.
Cuando videofilme un motivo empleando el
acercamiento con el zoom
Si no puede erffocar rfltidamente cuando
videofilme con el zoom erael extremo del
telefoto, gire la palanca de] zoom motorizado
hacia el lado "W" hasta enfocar nftidamente.
Usted podr_l videofilmar un molSvo clue est(_ por
1o menos a 80 cm de la superficie del objetivo en
la posici6n de telefoto, y a 1 cmen la de gran
angular.
N
;v
o
?,
o
o
_r
g-
14 15
71
16
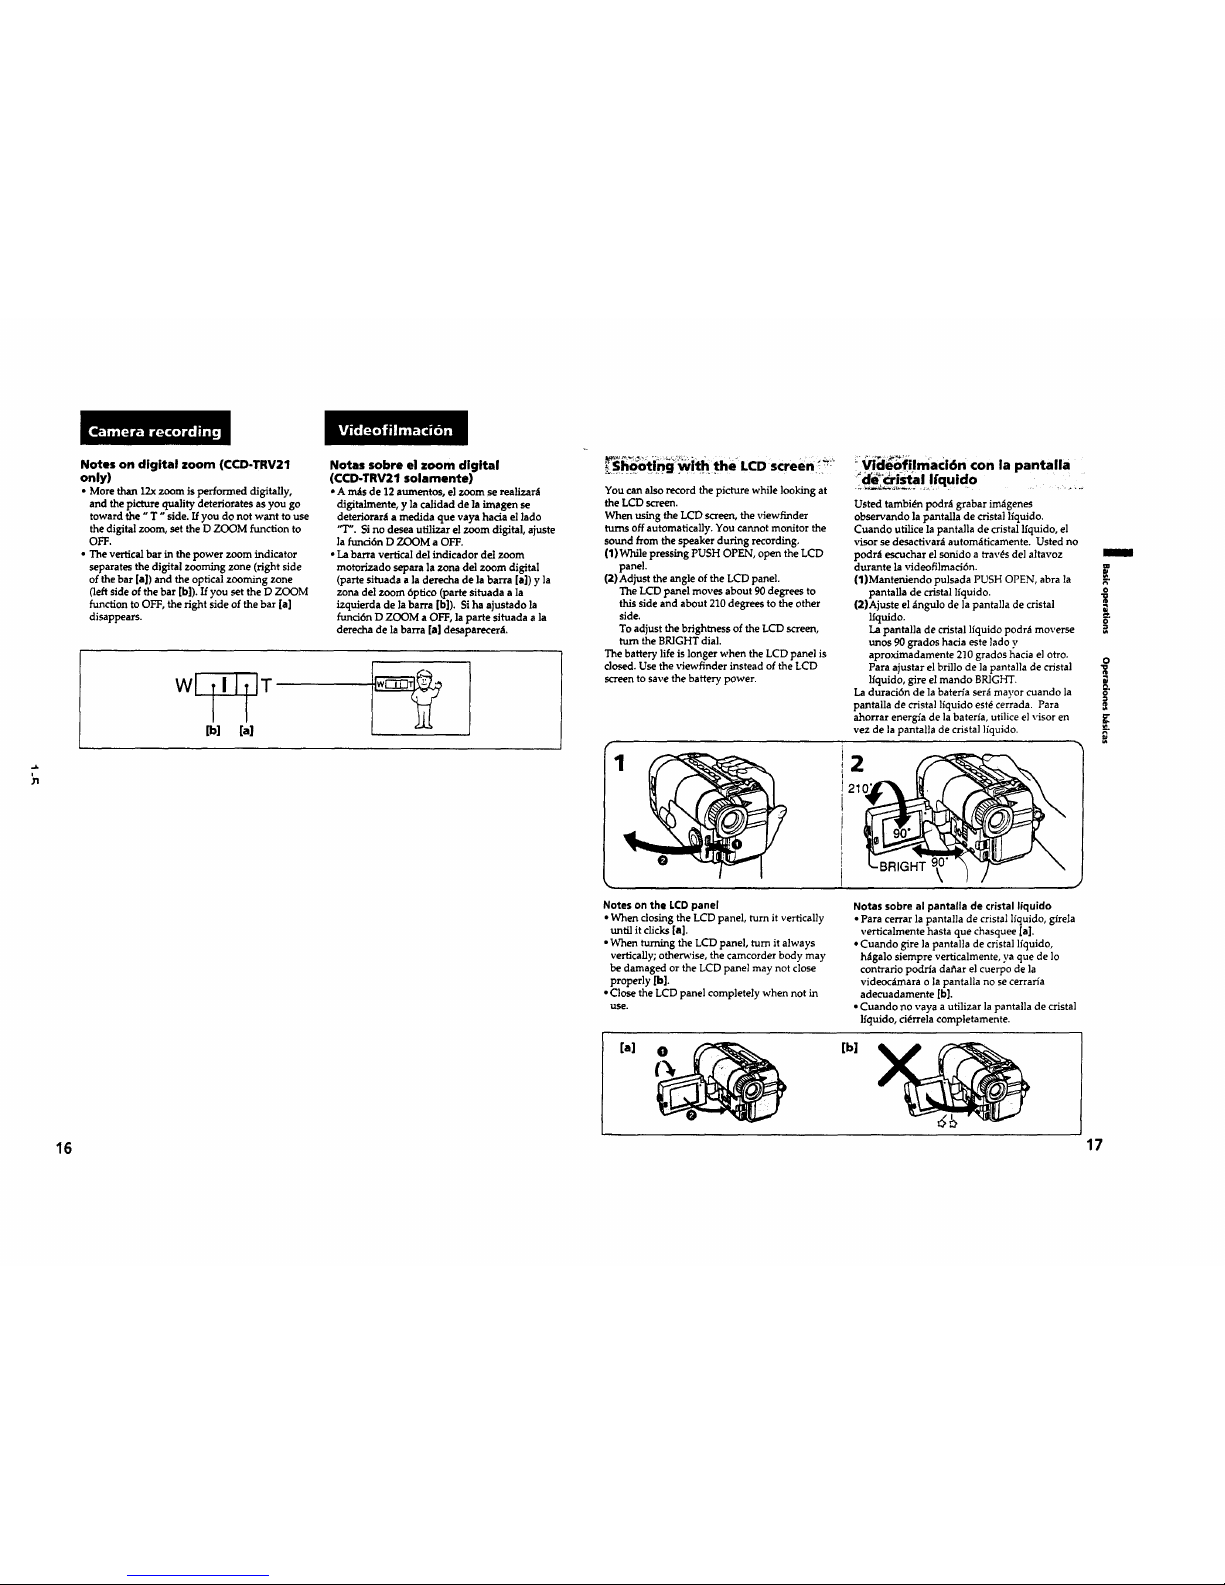
Notes on digital zoom (CCD-TRV21
only)
• More than 12x zoom is performed digitally,
and the picture quality deteriorates as you go
toward the "T" side. If you do not want to use
the digital zoom, set the D ZOOM function to
OFF.
• The vertical bar in the power zoom indicator
separates the digital zooming zone (right side
of the bar [a]) and the optical zooming zone
(left side of the bar [b]). If you set the D ZOOM
function to OFF, the fight side of the bar [a]
disappears.
Notas sobre el zoom digital
(CCD-TRV21 solamente)
• Amas de 12 aumentos, el zoom se realizant
digitalmente, y la calidad de ]a imagen se
deteriorara a medida que vaya hacia el lado
"T'. Si no desea utllizar el zoom digital, ajuste
la funci6n D ZOOM a OFF.
• La barra vertical del indicador del zoom
motorizado separa la zona del zoom digital
(parte situada ala derecha de la barra [el) y ]a
zona del zoom 6ptico (parte situada ala
izquierda de la barra [b]). Si ha ajustado la
funci6n D ZOOM a OFF, la parte situada ala
derecha de la barra [el desaparecera.
wl TIITIT
I I
[b] [a]
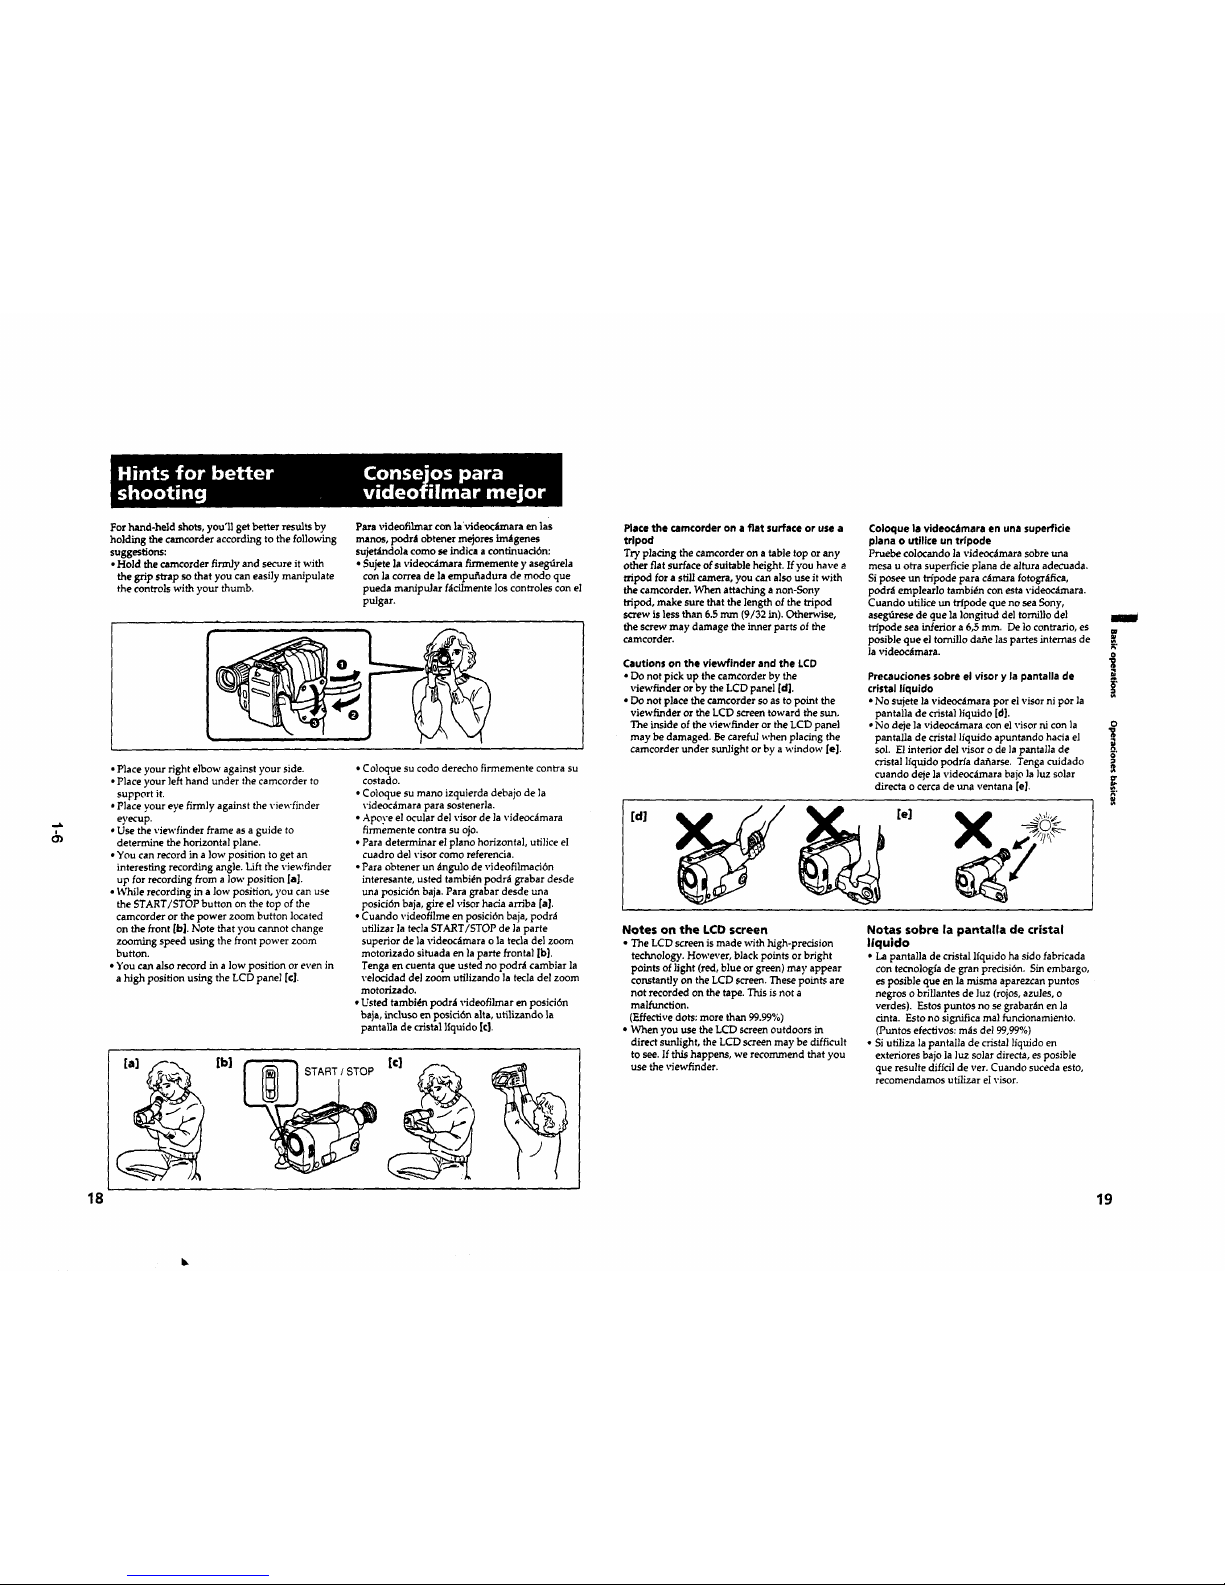
_S_ti_g_ it h the' LCD screen: _!_
You can also record the picture while looking at
the LCD screen.
When using the LCD screen, the viewfinder
turns off automatically. You cannot monitor the
sound from the speaker during recording.
(1) While pressing PUSH OPEN, open the LCD
panel•
(2) Adjust the angle of the LCD panel.
The LCD panel moves about 90 degrees to
this side and about 210 degrees to the other
side.
To adjust the brightness of the LCD screen,
turn the BRIGHT dial.
The battery life is longer when the LCD panel is
closed. Use the viewfinder instead of the LCD
screen to save the battery power.
Videofilmaci6n con la pantalla
Usted tambi6n pc(ira grabar im_genes
observando la pantalla de cristal llquido.
Cuando utilice la pantalla de cristal lfquido, el
visor se desactivara autom_tticamente. Usted no
podr_t escuchar el sonido a tray,s de] altavoz
durante la videofilmaci6n.
(1)Manteniendo pulsada PUSH OPEN, abra la
pantana de cristal lfquido.
(2)Ajuste el angulo de la pantalla de cristal
lfquido.
La pantal]a de cristal ltquido podra moverse
unos 90 grados hacia este lado y
aproximadamente 210 grados hacia el otro.
Para ajustar el brilio de ]a pantalla de cristal
lfquido, gire el mando BRIGHT.
La duraci6n de la baten'a ser_ mayor cuando la
pantalla de crlstal liquido est(_ cerrada. Para
ahorrar energla de la bateria, utilice el visor en
vez de la pantalla de crista] ]iquido.
2
Notes on the LCD panel
• When closing the LCD panel, turn it vertically
until it clicks [a].
• When turning the LCD panel, turn it always
vertically; othen_'ise, the camcorder body may
be damaged or the LCD panel may not close
properly [b].
• Close the LCD panel completely when not in
uSe.
[el
Notes sobre al pantafla de cristal liquido
•Para cerrar la pantal]a de cristal l_quido, girela
verticalmente hasta que chasquee [a].
• Cuando gire ]a pantalla de cristal lfquido,
hagalo siempre verticalmente, ya que de lo
contrario podrta dafiar el cuerpo de ]a
videoc_ara o la pantalla no se cerraria
adecuadamente [b].
• Cuando no vaya a utilizer la pantalla de crista!
lfquido, ci_rrela completamente.
[b]
m
o
g
17
Forhand-held shots, you'll get better results by
holding the earn_orderaccording to the following
suggestions:
• Hold the camcorder firmly and secure it with
the grip strap so that you caneasily manipulate
the controls with your thumb.
Para videofilmar con lavideoclmara en las
manos, podrl obtener mejores im_tgenes
sujet_lndola como se indica a continuaci6n:
• Sujete la videoc_mara firmemente y asegtlrela
con la correa de la empu_adura de modo que
pueda manipular fltcilmente los controles con el
pulgar.
18
• Place your right elbow against your side.
• Place your left hand under the camcorder to
support it.
• Place your eye firmly against the viewfinder
eyecup.
• Use the viewfinder frame as a guide to
determine the horizontal plane.
• You can record in a low position to get an
interesting recording angle. Lift the viewfinder
up for recording from a low position [a].
• While recording in a low position, you can use
the START/STOP button on the top of the
camcorder or the power zoom button located
on the front [b]. Note that you cannot change
zooming speed using the front power zoom
button.
• You can also record in a low position or even in
a high position using the LCD panel [€].
• Coloque su codo derecho firmemente contra su
costado.
• Coloque su mano izquierda debajo de la
videoc_tmara para sostenerla.
• Apoye el ocular del visor de ]a \,ideocltmara
firmemente contra su ojo.
• Para determinar el piano horizontal, utillce el
cuadro del visor como referencia.
• Para obtener un _tngu]o de videofilmaci6n
interesante, usted tambi_n podrlt grabar desde
una posici6n baja. Para grabar desde una
posici6n baja, gire el visor hacia arriba [a].
• Cuando videofilme en posici6n baja, podr_t
utilizar la tecla START/STOP de ]a parte
superior de la videocltmara o la tecla de] zoom
motorizado situada en la parte frontal [b].
Tenga en cuenta que usted no podr_i cambiar la
velocidad del zoom utilizando ]a tecla del zoom
motorizado.
• Usted tambi_n podr_t videofilmar en posici6n
baja, incluso en posid6n alta, utilizando la
pantalla de cristal liquido [€}.
[b]
START / STOP
Place the camcorder on a fiat surface or use a
tripod
Try placing the camcorder on a table top or any
other fiat surface of suitable height. If you have o
tripod for a still camera, you can also use it with
the camcorder. When attaching a non-Sony
tripod, make sure that the langth of the tripod
screw is less than 6.5 mm (9/32 in). Otherwise,
the screw may damage the inner parts ot the
camcorder.
Cautions on the viewfinder and the LCD
• Do not pick up the camcorder by the
viewfinder or by the LCD panel [d].
• Do not place the camcorder so as to point the
viewfinder or the LCD screen toward the sun.
The inside of the viewfinder or the LCD panel
may be damaged. Be careful when placing the
camcorder under sunlight or by a window [el.
Coloquela videoc_tmaraen unasuperficie
plana o utilice un trlpode
Pruebe eo]ocando la videoc_lmarasobre una
mesa u otra superficie plana de altura adecuada.
Siposee un tripode para c_mara fotogr_tfica,
podr_ emplearlo tambi_n con estavideoc_lmara.
Cuando utilice un trlpode clueno sea Sony,
asegfirese de que la longitud del tomilio del
tHpode sea in_eriora 6,5 ram. De locontrario, es
posible que el tornillo dafie las partes intemas de
la videoc_lmara.
Precauciones sobre el visor y la pantalla de
cristal liquido
• No sujete la videoc_tmara por el visor ni por ]a
pantalla de cristal ]iquido [d].
•No deje la videoc_tmara con el visor ni con la
pantalla de cristal lfquido apuntando hacia el
sol. El interior del visor o de ]a pantalla de
[d]
cristal lfquido podrfa da_arse. Tenga cuidado
cuando deje la videocltmara bajo la ]uz solar
directa o cerca de una ventana [el.
m
i
o
Notes on the LCO screen
• The LCDscreen is made with high-precision
technology. However, black points orbright
points of light (red, blue or green) may appear
constantly on theLCDscreen. These points are
not recorded on the tape. This is not a
malfunction.
(Effective dots: more than 99.99%)
• When you use the LCD screen outdoors in
direct sunlight, the LCD screen may be difficult
to see. If this happens, we recommend that you
use the viewfinder.
Notas sobre la pantalla de cristal
liquido
• Lapantalla de cristal lfquido ha sido fabricada
con tecnologfa de gran precisi6n. Sinembargo,
es posible clue en la misma aparezcan puntos
negros o brillantes de luz (rojos, azules0o
verdes). Estos puntos no se grabar_tnen la
cinta. Estono significa mal funcionamiento.
(Puntos efectivos: m_tsdel 99,99%)
• SiutiLizala pantalla de crista] liquido en
exteriores bajo la ]uz solar directa,es posible
que resu/te diflcil de ver. Cuando suceda esto,
recomendamos utilizarel visor.
19

Using EDITSEARCH, you can review the last
recorded r_"eneor check the recorded picture in
the viewfinder, You can also review the picture
on theLCD screen.
(I)While pressingthesmallgreen buttonon the
POWER switch,setittoCAMERA.
(2)TurnSTANDBY up.
(3)Pressthe-(_1)sideofEDITSEARCH
momentarily; the last few seconds of the
recorded portion plays back (Rec Review).
You can alsomonitorthesound from the
speakeror by usingan earphone (not
supplied).
Hold clown the- sideof]_DITSEARCH until
thecamcorder goes back tothe sceneyou
want.The lastrecordedportionisplayed
back.To go forward,hold down the+ side
(Edit Search).
Ufilizando EDITSEARCH, usted podr_t revisar la
_ltima escena grabada o comprobar la imagen
grabada en el visor.
(1) Manteniendo presionado el pequefio bot6n
verde del selector POWER, ponga hasta
CAMERA.
(2) Gire STAIXrDBY hacia arribe.
(3) Presione EDITSEARCH. Presione
momentaneamente el lado - (_). Se
reproducir_Inlostiltimossegl.mdosde la
parte filmada (Revisibn de la grabacibn).
Mantenga presionado el lado - de
EDITSEARCH basra que la cinta retroceda
hasta la escena deseada. La 61tima parte
filmada se reproducir_. Para avanzar la cinta,
mantenga presionado el ]ado + (Bt_squeda
para la edicibn).
I
3
To stop playback
ReleaseEDITSEARCH.
To go back to the last recorded point
after edit search
PressEND SEARCH. The lastrecordedpointis
played back for about 5 seconds if the tape was
recorded in SP mode, or 10 seconds if the tape
was recorded in LP mode, and stops.
Note that this function does not work once you
eject the cassette after you recorded in the tape.
To begin re-recording
PressSTART/STOP. Re-recordingbeginsfrom
thelastrecordedpointorthepointyou released
EDITSEARCH. Provided you do notejectthe
tape, the transition between the last scene you
recorded and the next scene you record will be
smooth.
Para parar la reproduccidn
SuelteEDITSEARCH.
Para volver al Gltimo punto grabado
despu_s de la bGsqueda para edici6n
Presione ErsrDSEARCH. E1tiltimo punto
grabado se reproducir_i durante unos 5 segundos
si la cinta fue grabada en el modo SP, o 10
segundos si rue grabada en el modo LP, y
despu_s separar_L _.
Tenga en cuentaque estafunci6nno trabajar_i
cuando haya extraldoelvideocassettedespuds de
w
haber grabado lacinta. --.
Para reanudar la grabaci6n
PresioneSTART/STOP. La grabaci6nseinidar_
desde elpunto en elque solt6ED/TSEARCH.
Mientrasno extraigaelvideocassette,la
rransici6nentrela_ltimaescenagrabaday la
siguiente ser_t uniforme.
O
?,
21
20
 Loading...