

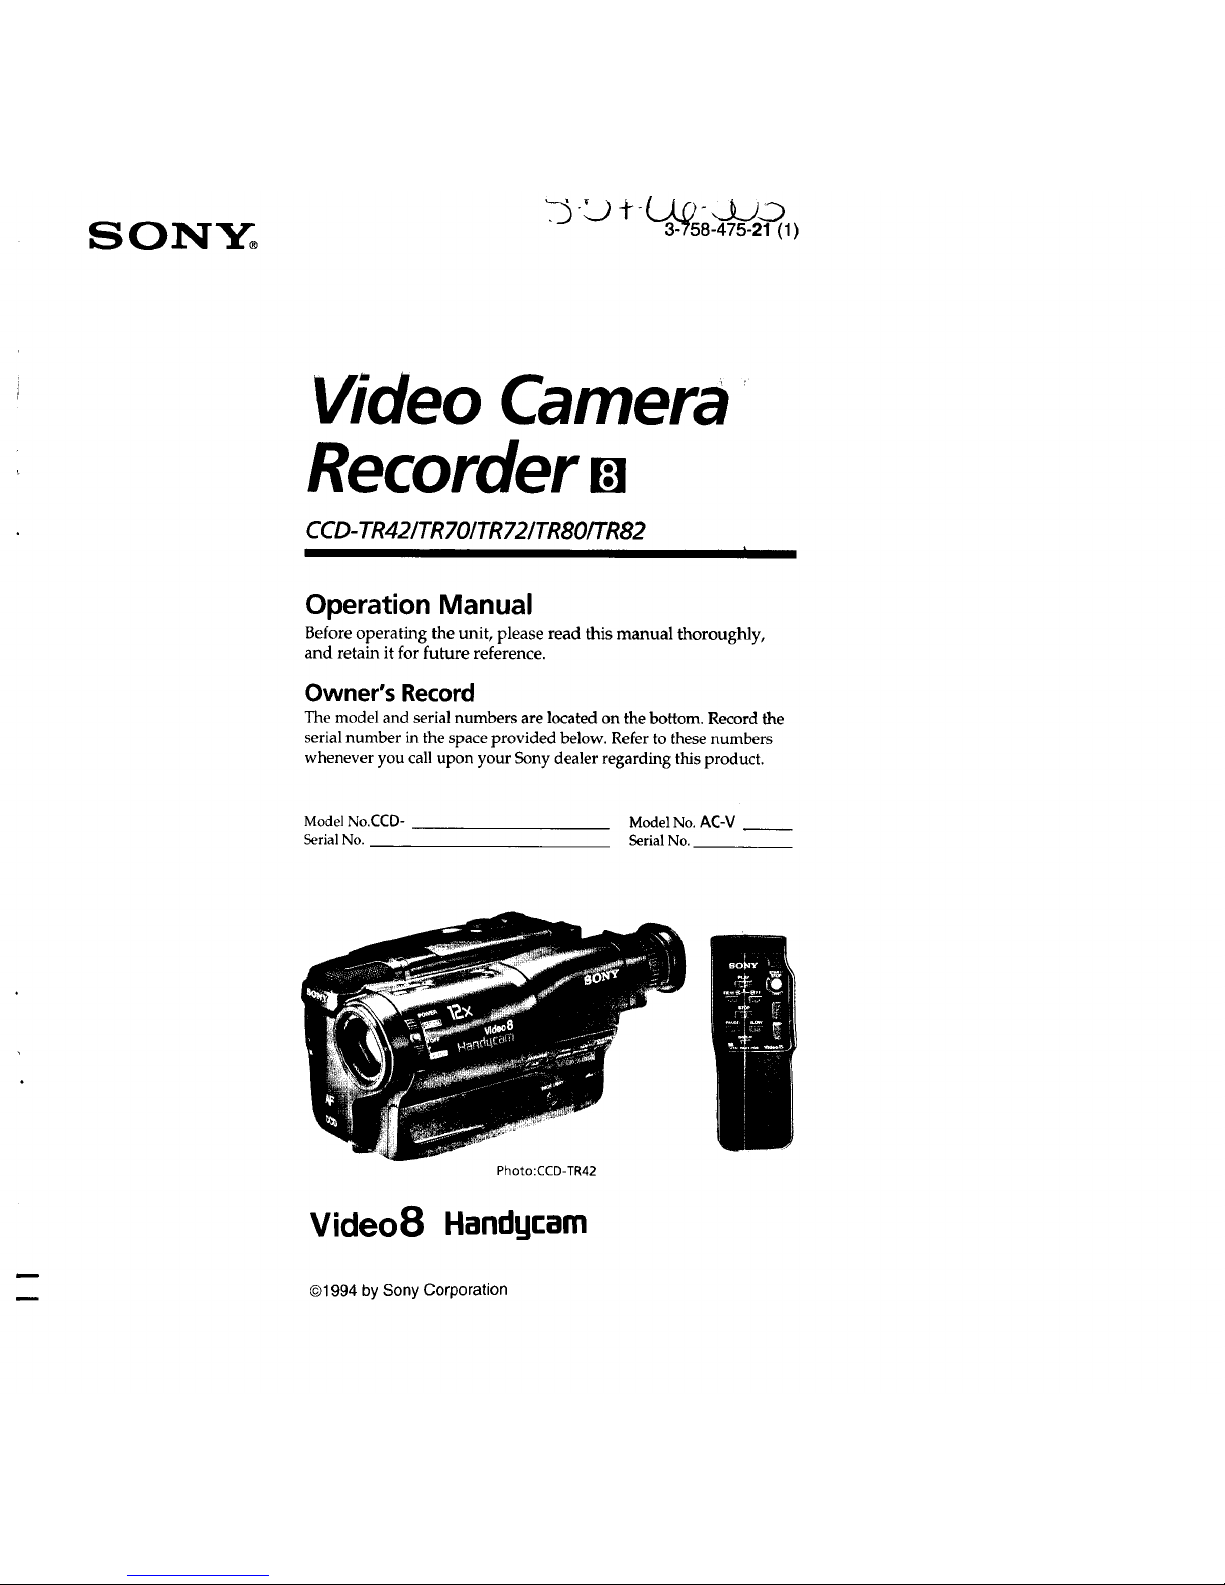
Sony Handycam CCD-TR42, Handycam CCD-TR70, Handycam CCD-TR72, Handycam CCD-TR80 Operation Manual
SONY°
2) t(_._ _.9._2_
3-758-475-21 (1)
Video Camera
Recorder m
CCD-TR42/TR701TR72/TR80/TR82
Operation Manual
Before operating the unit, please read this manual thoroughly,
and retain it for future reference.
Owner's Record
The model and serial numbers are located on the bottom. Record the
serial number in the space provided below. Refer to these numbers
whenever you call upon your Sony dealer regarding this product.
Model No.CCD- Model No. AC-V
Serial No. Serial No.
Photo:CCD-TR42
Video8 Handgcarn
©1994 by Sony Corporation

Welcome to Video 8
Congratulations on your purchase of this Sony Handycam" camcorder. With your Handycam, you can
capture life's precious moments with superior picture and sound quality. Your Handycam is loaded
with advanced features, but at the same time it is very easy to use. You will soon be producing home
video that you can enjoy for years to come.
To prevent fire or shock hazard,
do not expose the unit to rain or
moisture.
For the Sony Service Center nearest you call
1-800-222-SONY (United States only)
For the Factory Service Center nearest you call
416-499-SONY (Canada only)
Caution: Do not handle damaged or leaking
nickel-cadmium batteries.
CAUTION: 10 F_EDUL_E IHE RISK Oh LLLGTRIC SHOCK,
DO NOT REMOVE COVER (OR BACK).
NO USER-SERVICEABLE PARTS INSIDE.
REFER SERVICING TO QUALIFIED SERVICE PERSONNEL.
I his _) mbol is intended t_,,llL'rtthe
user to the presence of uninsulated
"dangerous voltage" within the
product's enclosure that may be of
sufficient magnitude to constitute a
risk of electric shock to persons.
This symbol is intended to alert the
user to the presence of important
operating and maintenance (servicing)
instructions in the literature
accompanying the appliance.
RECYCLING NICKEL-CADMIUM
BArFERIES
©
Ni-Cd
NICKEL-CADMIUM RATI'ERY.
MUST BE DISPOSED OF PROPERLY.
Nickel-Cadmium batteries are Kocyclable.
You can help preserve our environment by
returning your unwanted batteries to your
nearest Sony Service Center or Factory
Service Center for collection, recycling or
proper disposal.
] _WJllKe3_
Note: In some areas the disposal of nickel-cadmium
batteries in household or business trash may be
prohibited.
WARNING
This equipment has been tested and found to comply
with the limits for a Class B digital device, pursuant to
Part 15 of the FCC Rules. These limits are designed to
provide reasonable protection against harmful
interference in a residential installation. This equipment
generates, uses, and can radiate radio frequency energy
and, if not installed and used in accordance with the
instructions, may cause harmful interference to radio
communications. However, there is no guarantee that
interference will not occur in a particular installation. If
this equipment does cause harmful interference to radio
or television reception, which can be determined by
turning the equipment off and on, the user is
encouraged to try to correct the interference by one or
more of the following measures:
- Reorient or relocate the receiving antenna.
- Increase the separation between the equipment and
receiver.
- Connect the equipment into an outlet on a circuit
different from that to which the receiver is cormected.
- Consult the dealer or an experienced radio/TV
technician for help.
You are cautioned that any changes or modifications not
expressly approved in this manual could void your
authority to operate this equipment.
This apparatus complies with the Class B limits for radio
noise emissions set out in Radio Interference
Regulations.
TO PREVENT ELECTRIC SHOCK, DO NOT USE THIS
POLARIZED AC PLUG WITH AN EXTENSION CORD,
RECEPTACLE OR OTHER OUTLET UNLESS THE
BLADES CAN BE FULLY INSERTED TO PREVENT
BLADE EXPOSURE.
2
Before You Begin
Checking Your Model Number 4
Checking Supplied Accessories 5
Getting Started
Charging and Installing the Battery Pack 0
Inserting a Cassette 9
Adjusting the Viewfinder Lens 10
Basic Operations
Camera Recording 11
Using the Zoom Feature 13
Hints for Better Shooting 14
Checking the Recorded Picture 15
Connections for Playback 16
Connecting to a TV without Video/Audio Input Jack_ 1_
Connecting to a TV with Video/Audio Input Jacks or VCR 10
Playing Back a Tape 17
Advanced Operations
Using Alternate Power Sources 19
Using House Current 19
Recording with the Date or Time 20
Shooting with Backlighting 21
Using the PROGRAM AE Function 22
Fade-in and Fade-out 23
Releasing the Steady Shot Function (CCD-TR82 only) 24
Changing the Mode Settings 25
Using the World Clock 27
Editing onto Another Tape 29
Additional Information
Changing the Lithium Battery in the Camcorder 30
Resetting the Date and Time 31
Playback Modes 33
Tips for Using the Battery Pack 33
Maintenance Information and Precautions 36
Using Your Camcorder Abroad 39
Trouble Check 40
Specifications 43
Identifying the Parts 45
Warning Indicators 51
Index (Back cover)
3

Before You Beq
lhe instructions in this manual arc lot five models listed below. Belorc you sta_'t reading and operating,
check your model number by looking at the bottom of your camcorder. The CCD-TR42 is the model used
for illustration purposes. Otherwise, the model name is indicated in the illustrations. Any differences in
operation are clearly indicated in the text, for example, "CCD-TR82".
As you read through this manual, buttons and settings on the camcorder are shown in capital letters.
e.g. Set the POWER switch to CAMERA.
Types of Differences
Model Number
CCD-TR42
CCD-TR70
CCD-TR72
CCD-TR80
CCD-TR82
Audio
Monaural
0
o
©
Stereo
©
O
Viewfinder
B/W Color
O
O
O
O
O
Steady Shot
O
Zoom
(x)
12
10
12
12
12
_te 6n l"VColor Systems
TV color systems differ from country to country.
To view your recordings on a TV, you need an NTSC system based TV. When you want to use a PAL-M
system based TV, you will need a NTSC/PAL-M transcoder (as this is an NTSC system based
camcorder). Please check the list on page 39 to see the TV color system of your country.
eOn_e _ _ _Su hedRFUada _r _
PP P ...... .... .....
You can use the supplied RFU adaptor only in the country where you bought this camcorder. Since each
country has its own electricity and TV color system, you may not be able to use the RFU adaptor when
you use the camcorder abroad.
Television programs, films, video tapes, and other materials may be copyrighted. Unauthorized
recording of such materials may be contrary to the provision of the copyright laws.
4
• Do no let sand get into the camcorder. When you use the camcorder on a sandy beach or dusty
place, protect it from the sand or dust. Sand or dust may cause the unit to malfunction and
sometimes the malfunction cannot be repaired. [a]
• Do not let the camcorder get wet. Keep the camcorder from rain or sea water. It may cause a
malfunction and sometimes the malfunction cannot be repaired. [b]
• Never leave the camcorder under temperatures above 140°F (60°C), such as in a car parked in the sun
or under direct sunlight. [el
[b]
[cJ
Check that the following a_'cessorie_ are _upplied with your camcorder.
5/
[]
[]
or
[]
RFU-90UC RFU-95UC
[]
[] Wireless remote commander (1) (p.17, 48)
[] NP-5S Battery pack (1) (p.6, 33)
[] AC-V25/V25A/V25B AC power adaptor (1) (p.6, 19)
[] RFU-90UC/95UC RFU adaptor (1) (p.16)
[] Shoulder strap (1) (pA6)
[] CR2025 Lithium Battery (1) (p.30)
Already installed in the camcorder.
[] Size AA (R16) Battery for Remote Commander (2) (p.48)
[] A/V connecting cable (1) (p.16)
For CCD-TR72/TR80 only
[]
[]
(CCD-TR72/TR80)
oq
o
z
t_
o_
>
2_
5

Getting Started
6
Before using your camcorder, you first need to charge and install tile battery pack. 1o charge the batter 3
pack, use the supplied AC-V25/V25A/V25B AC power adaptor.
Charging the Batte_ Pack
Charge the battery pack on a flat place without vibration.
(1) Connect the AC power adaptor to a wall outlet. (2) Align the right side of the battery pack with the
line on the AC power adaptor, then slide the battery pack in the direction of the arrow. (3) Set the
selector to CHARGE. The POWER lamp (green) and the CHARGE lamp (orange) light up. Charging
begins.
When charging is completed, the CHARGE lamp goes out. Set the selector to the center position and
unplug the unit from the wall outlet. Then remove the battery pack and install it on the camcorder. To
stop charging, set the selector to the center position.
Charging Time
NP-55
Battery pack (supplied)
Charging time* 70
2
NP-80
NP-80D
180
NP-77H
160
3
NP-66H NP-60D
120 90
NP-55H
80
* Approximate minutes to charge an empty pack using the AC-V25/V25A/V25B (Lower temperatures
require a longer charging time.)
Battery Life
CCD-TR42/TR72
Battery Pack NP-55 NP-80/
80D
Typical recording time** 35 95
Continuous recording time*** 65 180
CCD-TRg0FFR80
Battery pack NP-55 NP-80/
80D
Typical recording time** 30 90
Continuous recording time*** 60 170
|
NP-77H NP-66H NP-60D I NP-55H
I
85 65 45 40
160 120 85 75
NP-77H
80
150
NP-66H NP-60D NP-55H
60 40 35
110 80 70
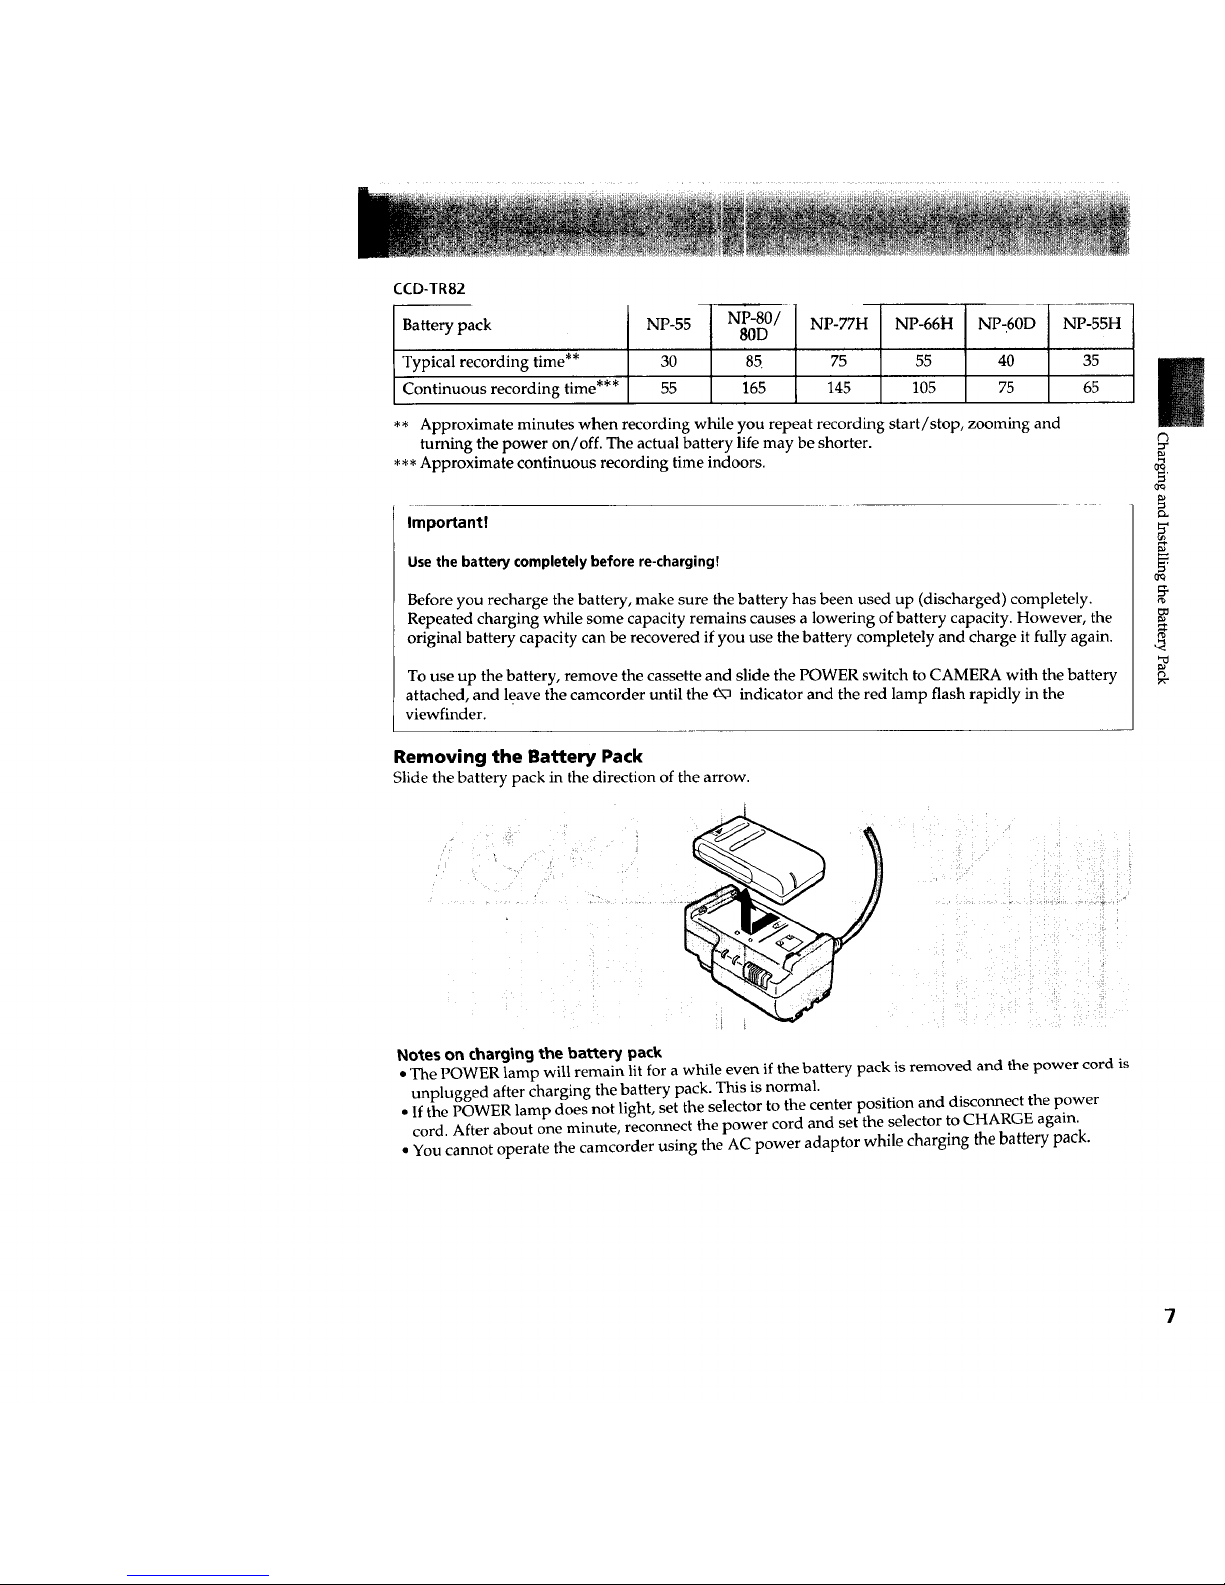
CCD-TR82
Battery pack
Typical recording time**
Continuous recording time***
NP-55 NP-80/ NP-77H NP-66H NP-60D [ NP-55H
80D
I
30 85 75 55 40 35
55 165 145 105 75 65
** Approximate minutes when recording while you repeat recording start/stop, zooming and
turning the power on/off. The actual battery life may be shorter.
*** Approximate continuous recording time indoors.
Important!
Use the battery completely before re-chargingT
Before you recharge the battery, make sure the battery has been used up (discharged) completely.
Repeated charging while some capacity remains causes a lowering of battery capacity. However, the
original battery capacity can be recovered if you use the battery completely and charge it fully again.
To use up the battery, remove the cassette and slide the POWER switch to CAMERA with the battery
attached, and leave the camcorder until the __\-3indicator and the red lamp flash rapidly in the
viewfinder.
Removing the Battery Pack
Slide the battery pack in the direction of the arrow.
(3
¢tq
Notes on charging the battery pack
=The POWER lamp will remain lit for a while even if the battery pack is removed and the power cord is
unplugged after charging the battery pack. This is normal.
• If the POWER lamp does not light, set the selector to the center position and disconnect the power
cord. After about one minute, reconnect the power cord and set the selector to CHARGE again.
• You cannot operate the camcorder using the AC power adaptor while charging the battery pack.
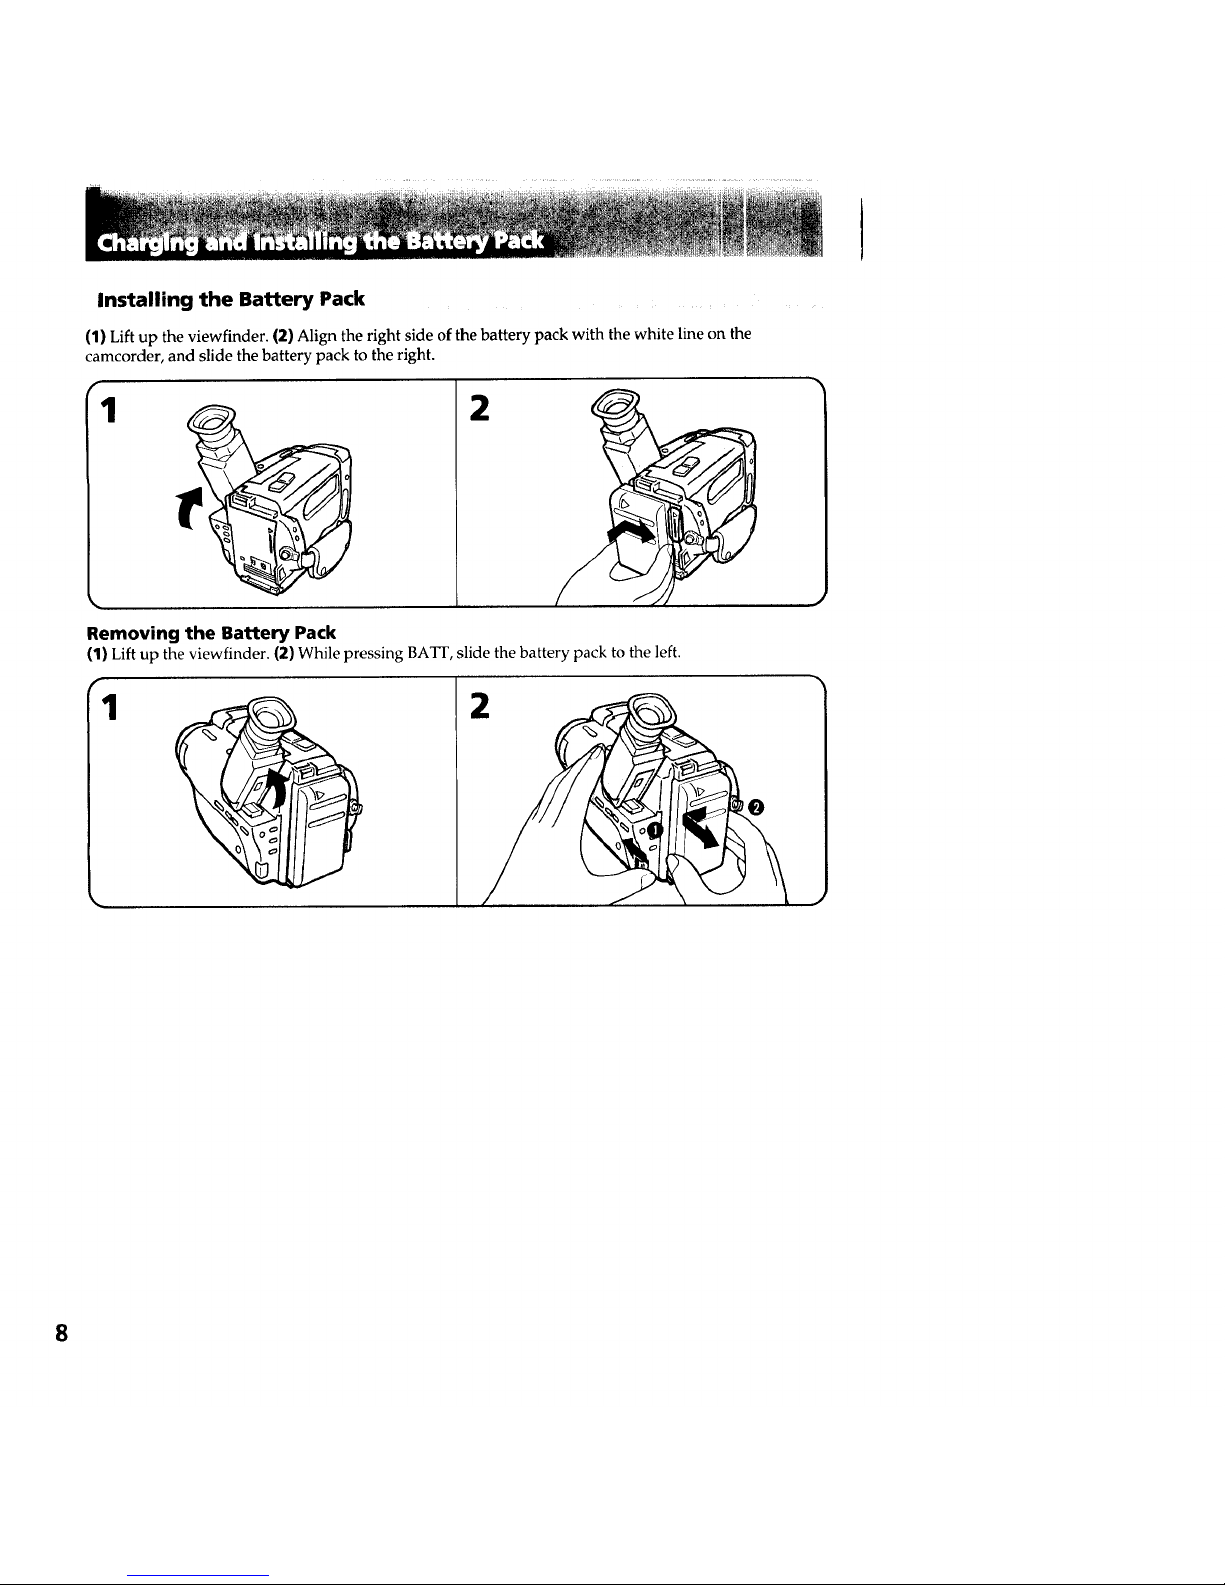
Installing the Battery Pack
(1) Lift up the viewfinder. (2) Align the right side of the battery pack with the white line on the
camcorder, and slide the battery pack to the right.
2
Removing the Battery Pack
(1) Liftup the viewfinder. (2) While pressing BATF, slide the battery pack to the left.
1
2
8
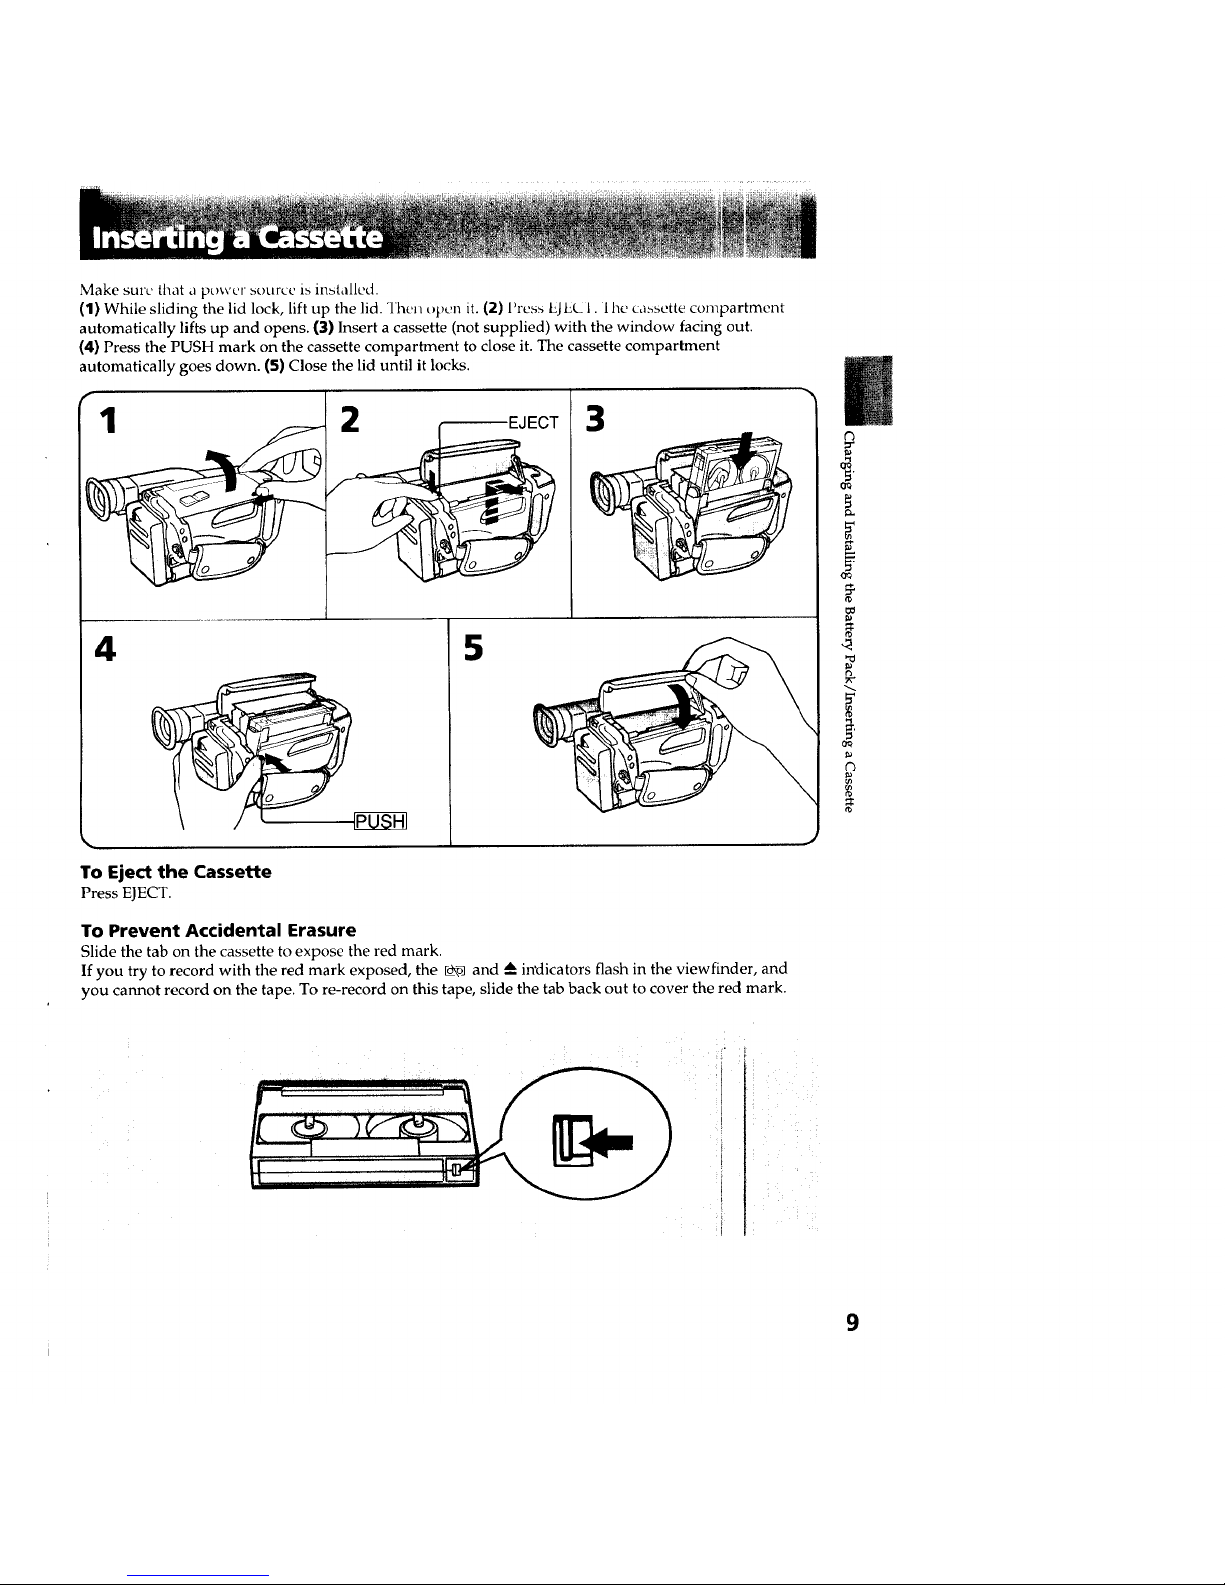
Make sure that a power s(_urcc is installed.
(1) While sliding the lid lock, lift up the lid. "lhel/t)pen it. (2) Press EJEC 1. I he ca,_sette compartment
automatically lifts up and opens. {3) Insert a cassette (not supplied) with the window facing out.
(4) Press the PUSH mark on the cassette compartment to close it. The cassette compartment
automatically goes down. (5) Close the lid until it locks.
3
4 5
To Eject the Cassette
Press EJECT.
To Prevent Accidental Erasure
Slide the tab on the cassette to expose the red mark.
If you try to record with the red mark exposed, the ,,,L_and --_indicators flash in the viewfinder, and
you cannot record on the tape. To re-record on this tape, slide the tab back out to cover the red mark.
k
_0
r'3
9
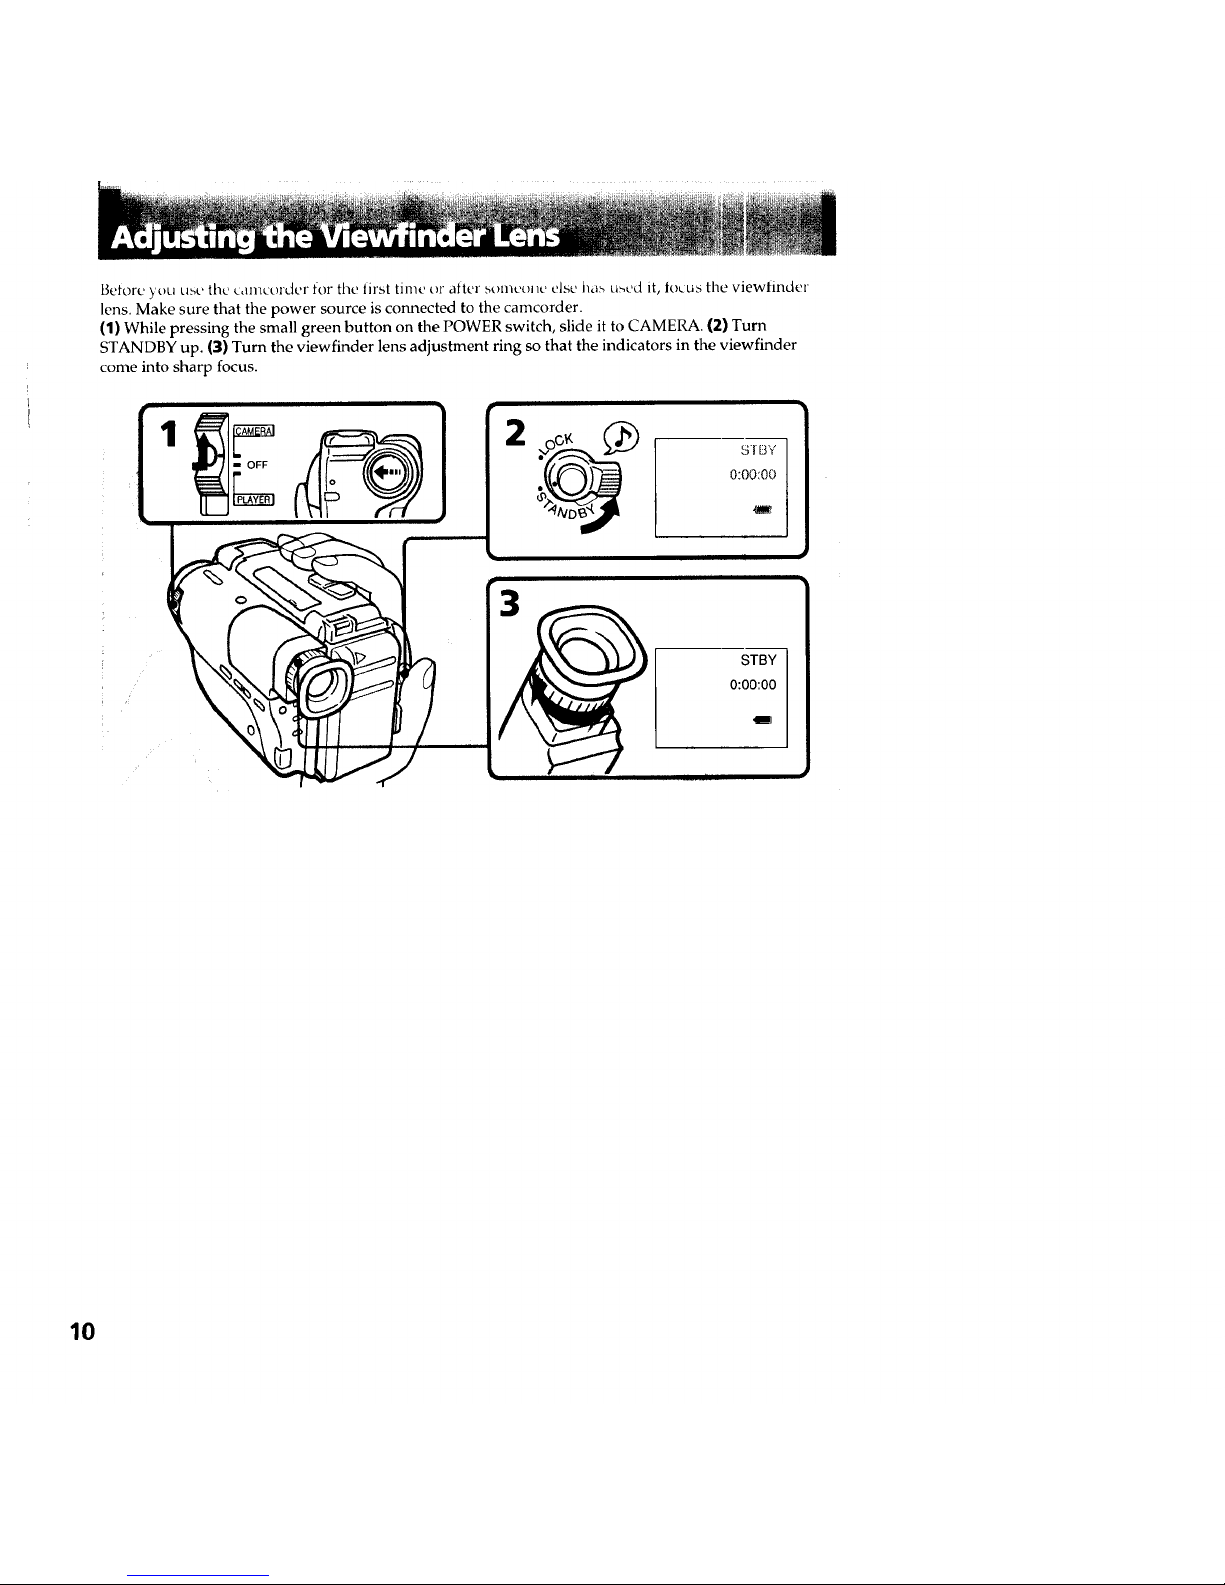
Before you use the camcorder for file In'st time or atter someone else l_as u_ed it, loLus tile viewtinder
lens. Make sure that the power source is coru'tected to the camcorder.
(1) While pressing the small green button on the POWER switch, slide it to CAMERA. (2) Turn
STANDBY up. (3) Turn the viewfinder lens adjustment ring so that the indicators in the viewfinder
come into sharp focus.
SIBY
0:00:00
10
Basic Operations
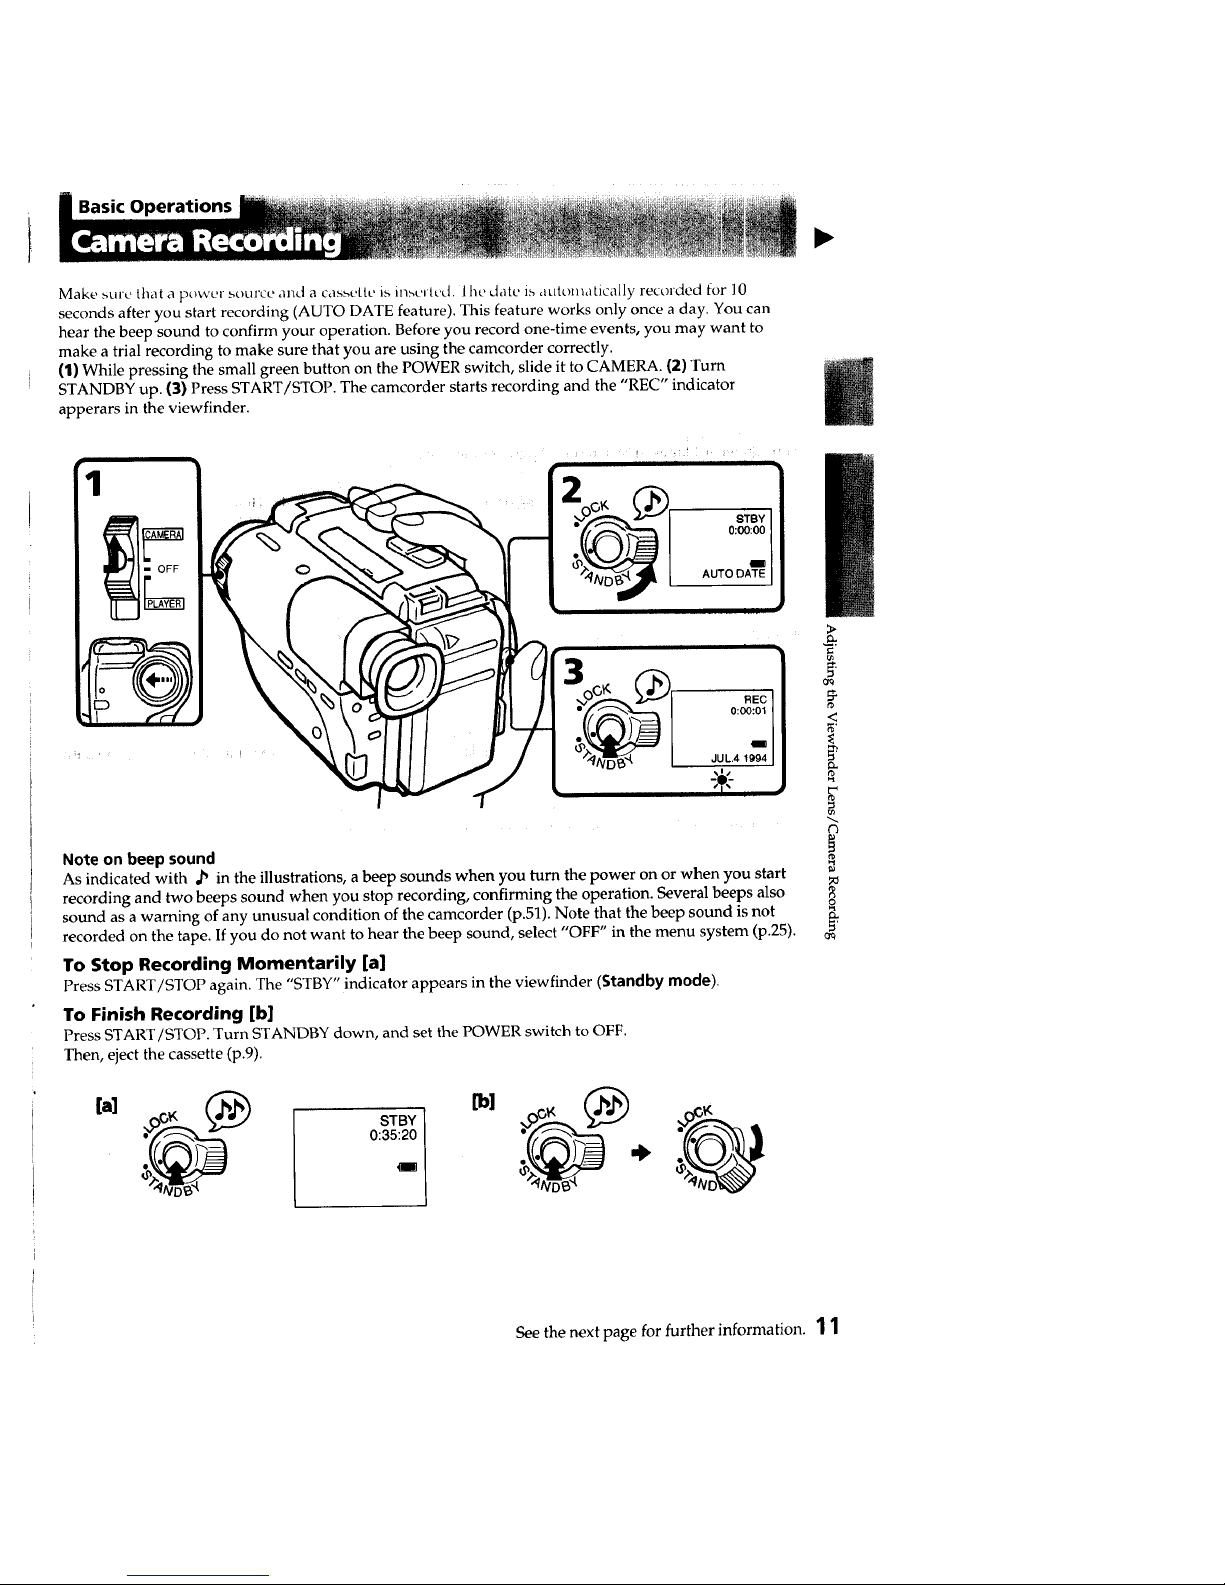
Make sure that a power aource and a cassette is into, ted. I he date is auton_atically recorded for l0
seconds after you start recording (AUTO DATE feature). This feature works only once a day. You can
hear the beep sound to confirm your operation. Before you record one-time events, you may want to
make a trial recording to make sure that you are using the camcorder correctly.
(1) While pressing the small green button on the POWER switch, slide it to CAMERA. (2) Turn
STANDBY up. (3) Press START/STOP. The camcorder starts recording and the "REC" indicator
apperars in the viewfinder.
Note on beep sound
As indicated with ,_' in the illustrations, a beep sounds when you turn the power on or when you start
recording and two beeps sound when you stop recording, confirming the operation. Several beeps also
sound as a waming of any unusual condition of the camcorder (p.51). Note that the beep sound is not
recorded on the tape. If you do not want to hear the beep sound, select "OFF" in the menu system (p.25).
To Stop Recording Momentarily [a]
Press START/STOP again. The "STBY" indicator appears in the viewfinder (Standby mode).
To Finish Recording [b]
Press START/STOP. Turn STANDBY down, and set the POWER switch to OFF.
Then, eject the cassette (p.9).
[al _1
STBY
0:35:20
I
>
<
('3
¢tq
See the next page for further information. 'i 1
Note on Standby mode
If you leave the camcorder for 5 minutes or more with a cassette inserted in Standby mode, the
camcorder goes off automatically. This prevents wearing down the battery and wearing out the tape. 1'o
resume Standby mode, turn STANDBY down once and turn it up again. To start recording, press
START/STOP.
Note on recording
When you record from the beginning of the tape, run the tape for about 15 seconds before actual
recording. This prevents the camcorder from missing any start-up scenes when you play back the tape.
You can record tapes in SP (standard play) mode only.
Note on the tape counter
The tape counter indicates the recording or playback time. Use it as a guide. There will be a time lag of
several seconds from the actual time. To set the counter to zero, press COUNTER RESET located below
the viewfinder. You can know the approximate remaining tape by the remaining tape indicator (p.50).
Note on the AUTO DATE feature
The clock is set to the East Coast Standard Time at the factory. You can reset the clock (p.31).
You can change the AUTO DATE setting by selecting ON or OFF in the menu system (p.25).
• The AUTO DATE feature works once a day. However, the date may automatically appear more than
once a day when:
- you reset the date and time.
- you eject and insert the tape again.
- you stop recording within 10 seconds.
- you set AUTO DATE to OFF once and set to ON in the menu system.
• Once the AUTO DATE feature turns off the date display 10 seconds after the start of recording, the date
and time are displayed as follows:
- if the date display setting has been made, the date is displayed.
- if the time display setting has been made, the time is displayed.
- if neither display setting has been made, nothing is displayed.
When moving from indoors to outdoors (or vice versa)
Turn STANDBY up and point the camcorder at a white object for about 15 seconds so that the white
balance is properly adjusted.
12
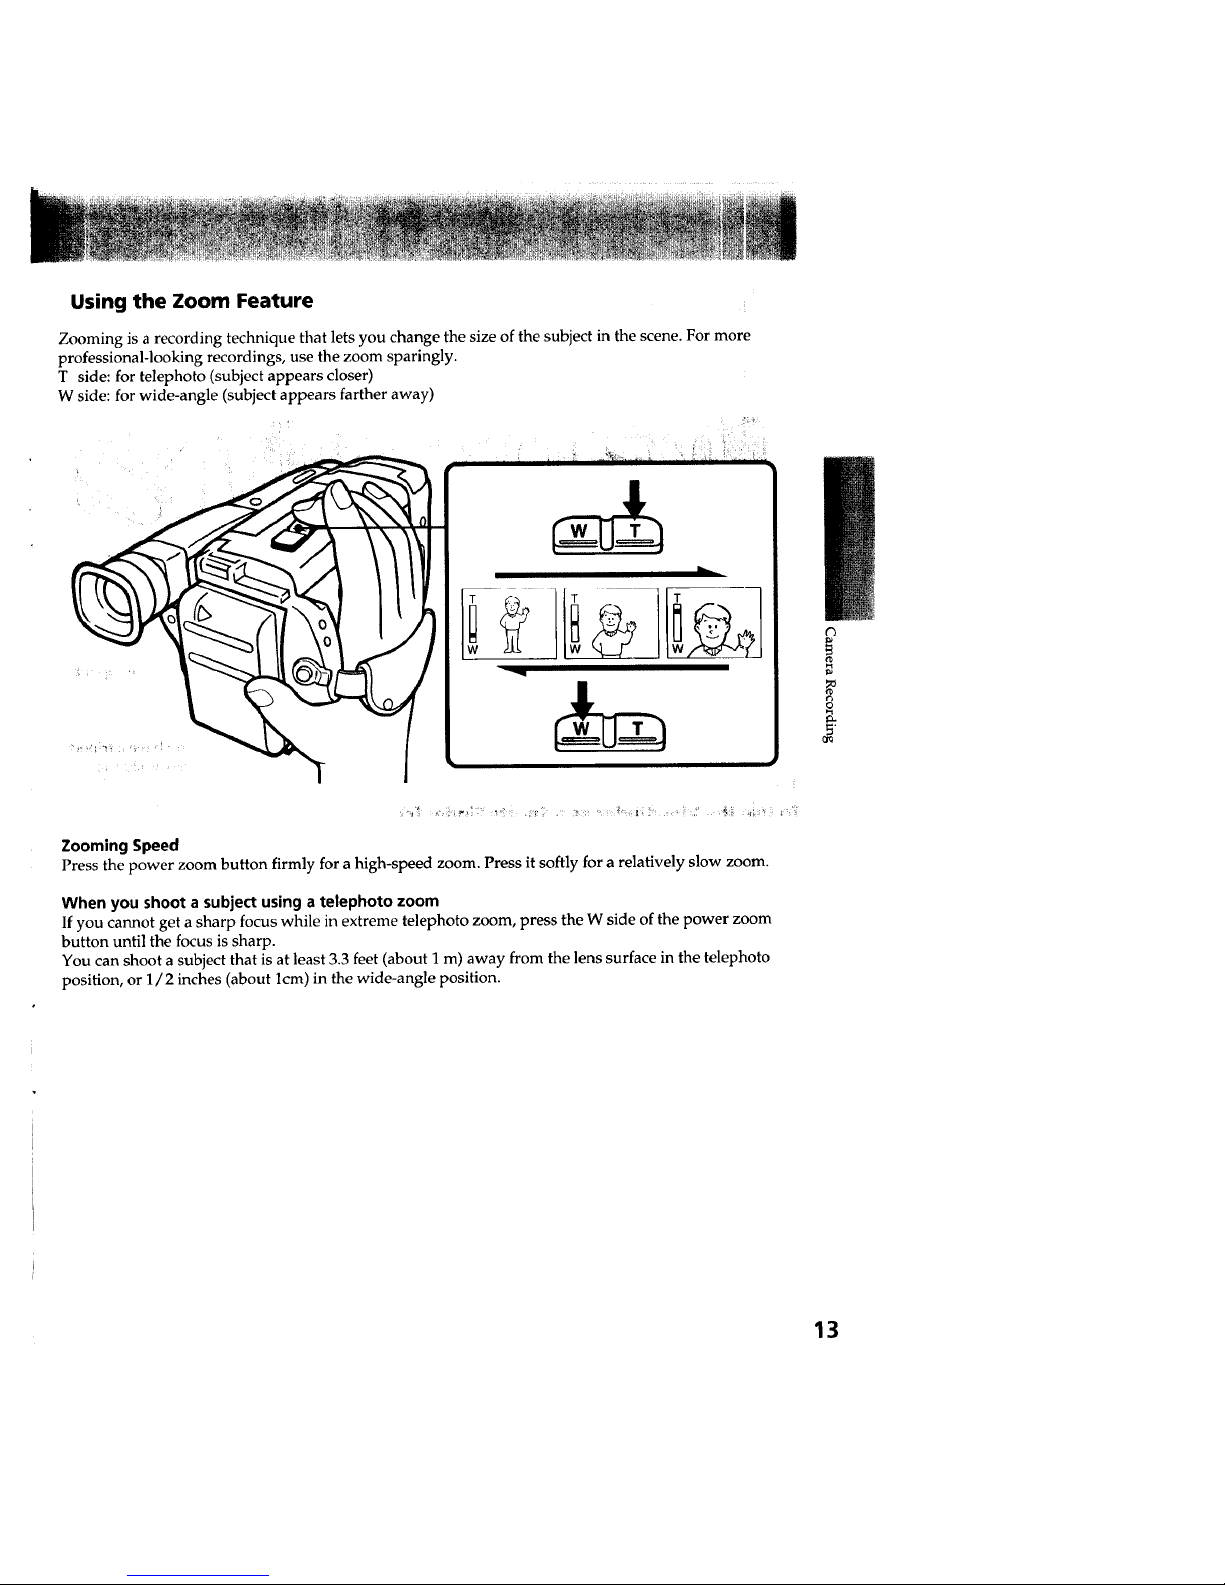
Using the Zoom Feature
Zooming is a recording technique that lets you change the size of the subject in the scene. For more
professional-looking recordings, use the zoom sparingly.
T side: for telephoto (subject appears closer)
W side: for wide-angle (subject appears farther away)
ZoomingSpeed
Press the power zoom button firmly for a high-speed zoom. Press it softly for a relatively slow zoom.
When you shoot a subject using a telephoto zoom
If you cannot get a sharp focus while in extreme telephoto zoom, press the W side of the power zoom
button until the focus is sharp.
You can shoot a subject that is at least 3.3 feet (about I m) away from the lens surface in the telephoto
position, or 1/2 inches (about lcm) in the wide-angle position.
¢3
p_
r_
13
For hand-held shots, you'll get better results holding the camcorder according to the tollowing suggestions:
[al
i
• Hold the camcorder firmly and secure it with the grip strap so that you can easily manipulate the
controls with your thumb. [a]
• Place your right elbow against your side.
• Place your left hand under the camcorder to support it.
• Place your eye firmly against the viewfinder eyecup.
• Use the viewfinder frame as a guide to determine the horizontal plane.
• You can also record in a low position to get an interesting recording angle. Turn the viewfinder up for
recording from a low position. [b]
Place the camcorder on a flat surface or use a tripod.
Try placing the camcorder on a table top or any other flat surface of suitable height. If you have a tripod
for a still camera, you can also use it with the camcorder (p.46). Make sure the tripod screw is shorter
than 9/32 in (6.5ram).
To Use the Viewfinder as a Sports Finder [c]
With the sports finder, you can monitor the picture while your eye is at a distance from the eyecup.
The sports finder is convenient when moving around to shoot scenes.
While sliding the viewfinder release knob to the left, flip open the viewfinder.
Note on the color viewfinder (for CCD-TR70/TRS0)
You may find it difficult to use the color viewfinder as the sports finder for recording in light location.
Cautions on the viewfinder
• Do not pick up the camcorder by the viewfinder. [d]
• Do not place the camcorder so as to point the viewfinder toward the sun. The inside of the viewfinder
may be deformed. Be careful in placing the camcorder under sunlight or at the window. [e]
14
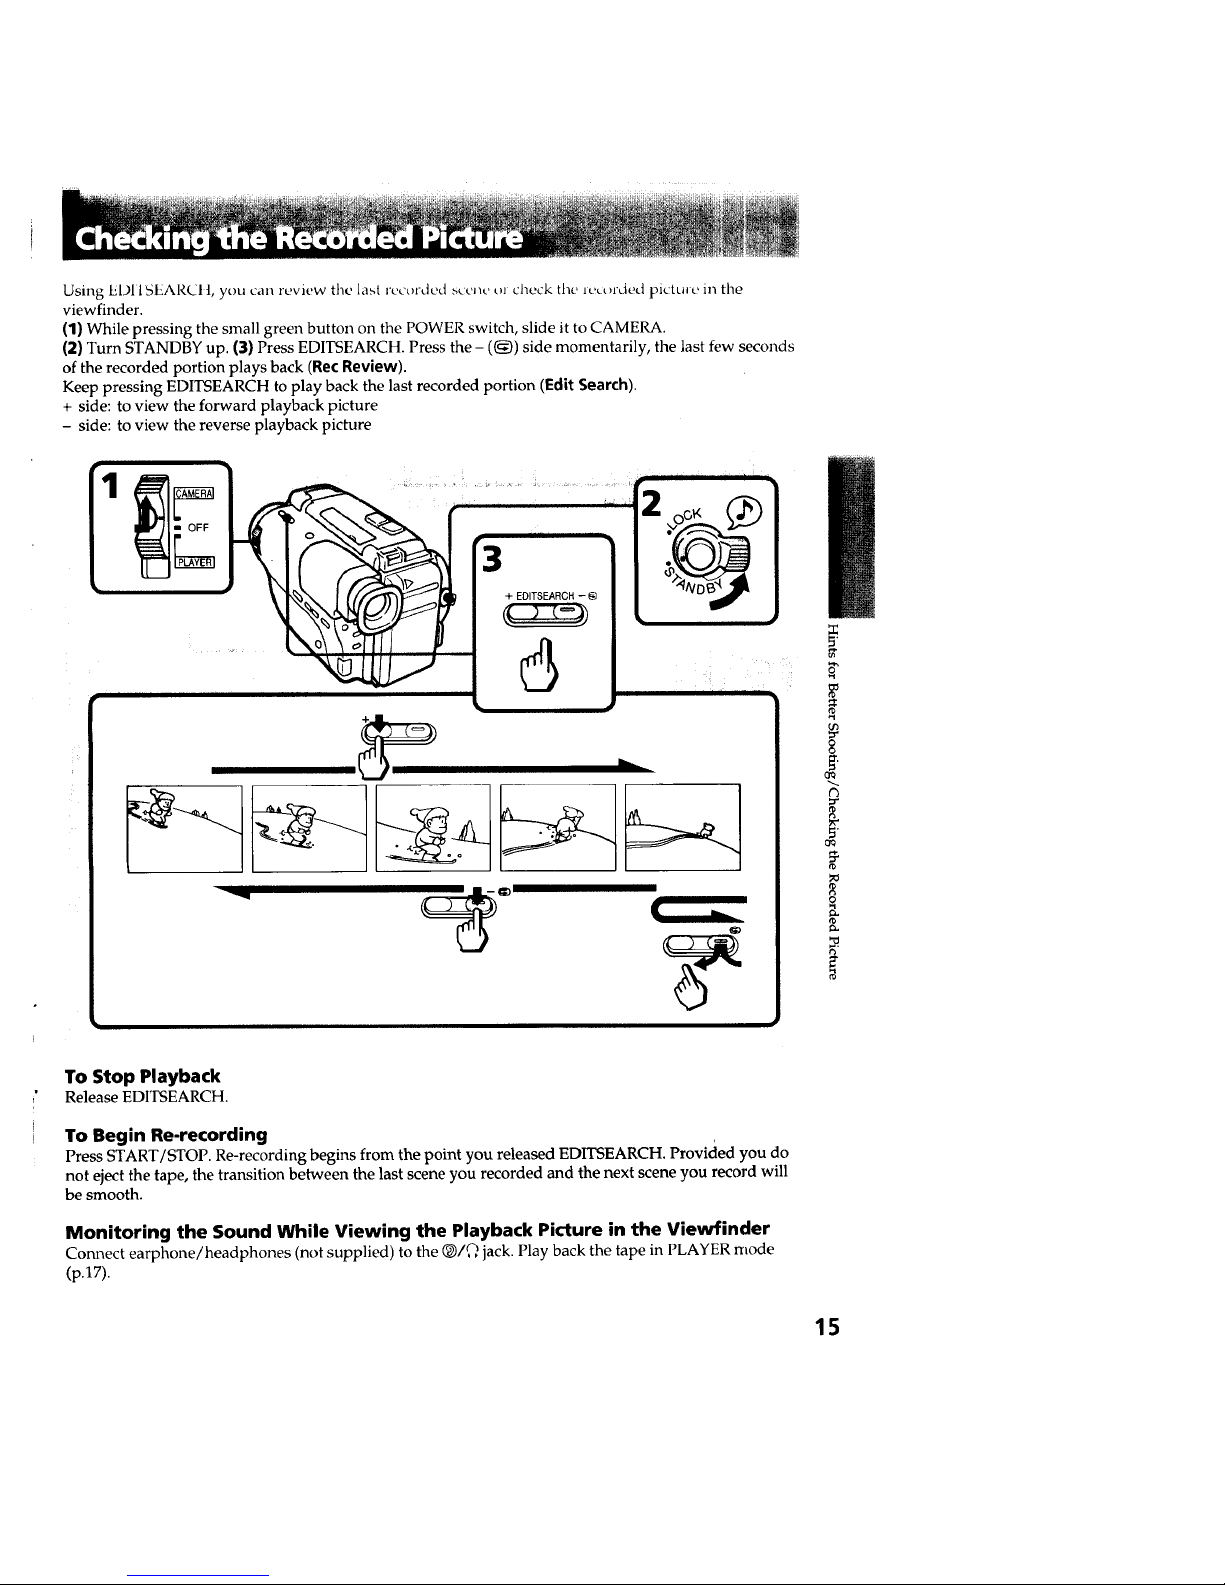
Using EDI ISEARCIt, you call review tile last recorded scene t)l check tile leLorded pictule in the
viewfinder.
(1) While pressing the small green button on the POWER switch, slide it to CAMERA.
(2) Turn STANDBY up. (3) Press EDITSEARCH. Press the - ((_)) side momentarily, the last few seconds
of the recorded portion plays back (Rec Review).
Keep pressing EDITSEARCH to play back the last recorded portion (Edit Search).
+ side: to view the forward playback picture
- side: to view the reverse playback picture
I'VE ..................iii i, i
+ EDITSEARCH - @
....
i ii ii
To Stop Playback
Release EDITSEARCH.
To Begin Re-recording
Press START/STOP. Re-recording begins from the point you released EDITSEARCH. Provided you do
not eject the tape, the transition between the last scene you recorded and the next scene you record will
be smooth.
Monitoring the Sound While Viewing the Playback Picture in the Viewfinder
Connect earphone/headphones (not supplied) to the Q/Q jack. Play back the tape in PLAYER mode
(p.17).
_r
g,
¢3
g
t_
15
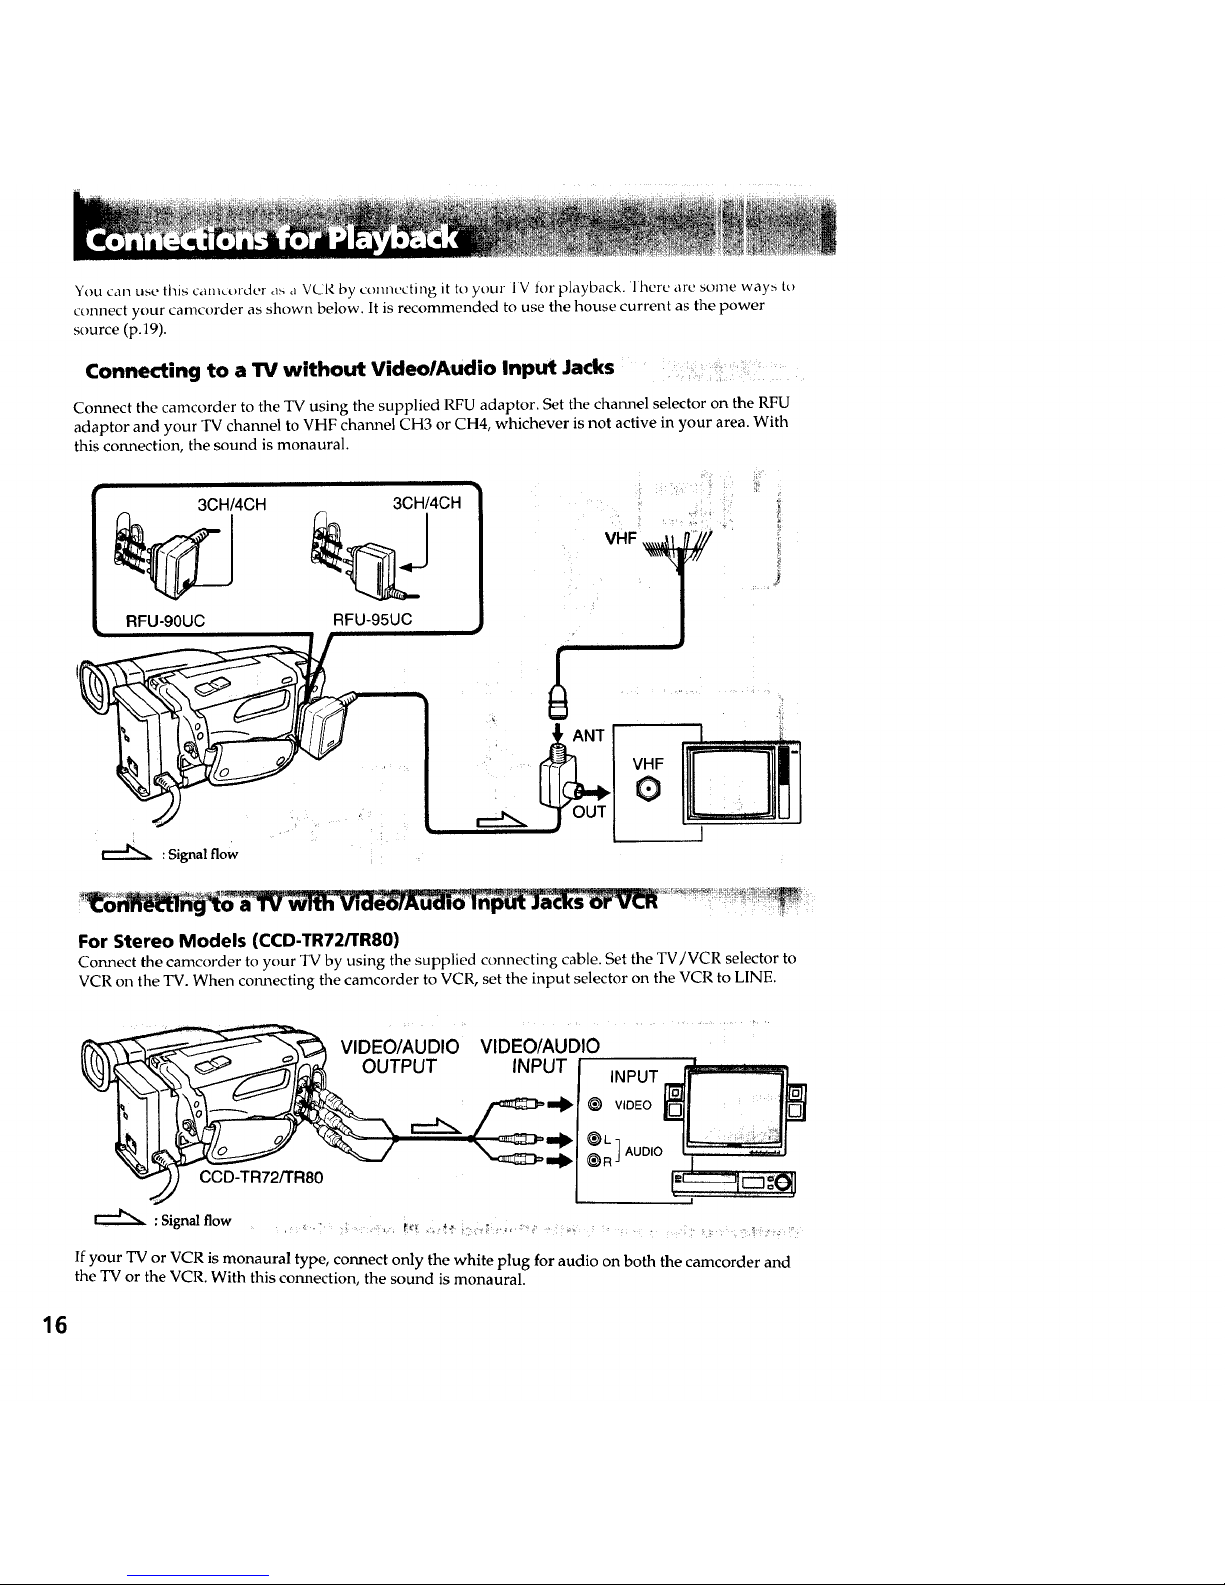
You can use this cam,order as ,_ VkJR by connecting it to your IV for playback, lherc are some way_ t_
connect your camcorder as shown below. It is recommended to use the house current as the power
source (p.19).
Connecting to a TV without Video/Audio Input Jacks i
Connect the camcorder to the TV using the supplied RFU adaptor. Set the channel selector on the RFU
adaptor and your TV channel to VHF channel CH3 or CH4, whichever is not active in your area. With
this connection, the sound is monaural.
3CH/4CH
RFU-90UC RFU-95UC
3CH/4CH
J
VHF
: Signal flow
For Stereo Models (CCD-TR72/TR80)
Connect the camcorder to your TV by using the supplied connecting cable. Set the TV/VCR selector to
VCR on the TV. When connecting the camcorder to VCR, set the input selector on the VCR to LINE.
VIDEO/AUDIO
CCD-TR72/TR80
VIDEO/AUDIO
INPUT
INPUT
VIDEO
:Signal flow B'_ _,,, : :,
If your TV or VCR is monaural type, connect only the white plug for audio on both the camcorder and
the TV or the VCR. With this connection, the sound is monaural.
16
 Loading...