

Sony Handycam CCD-TR33, Handycam CCD-TR23, Handycam CCD-380, Handycam CCD-TR380PK, Handycam CCD-TR460 Service Manual
...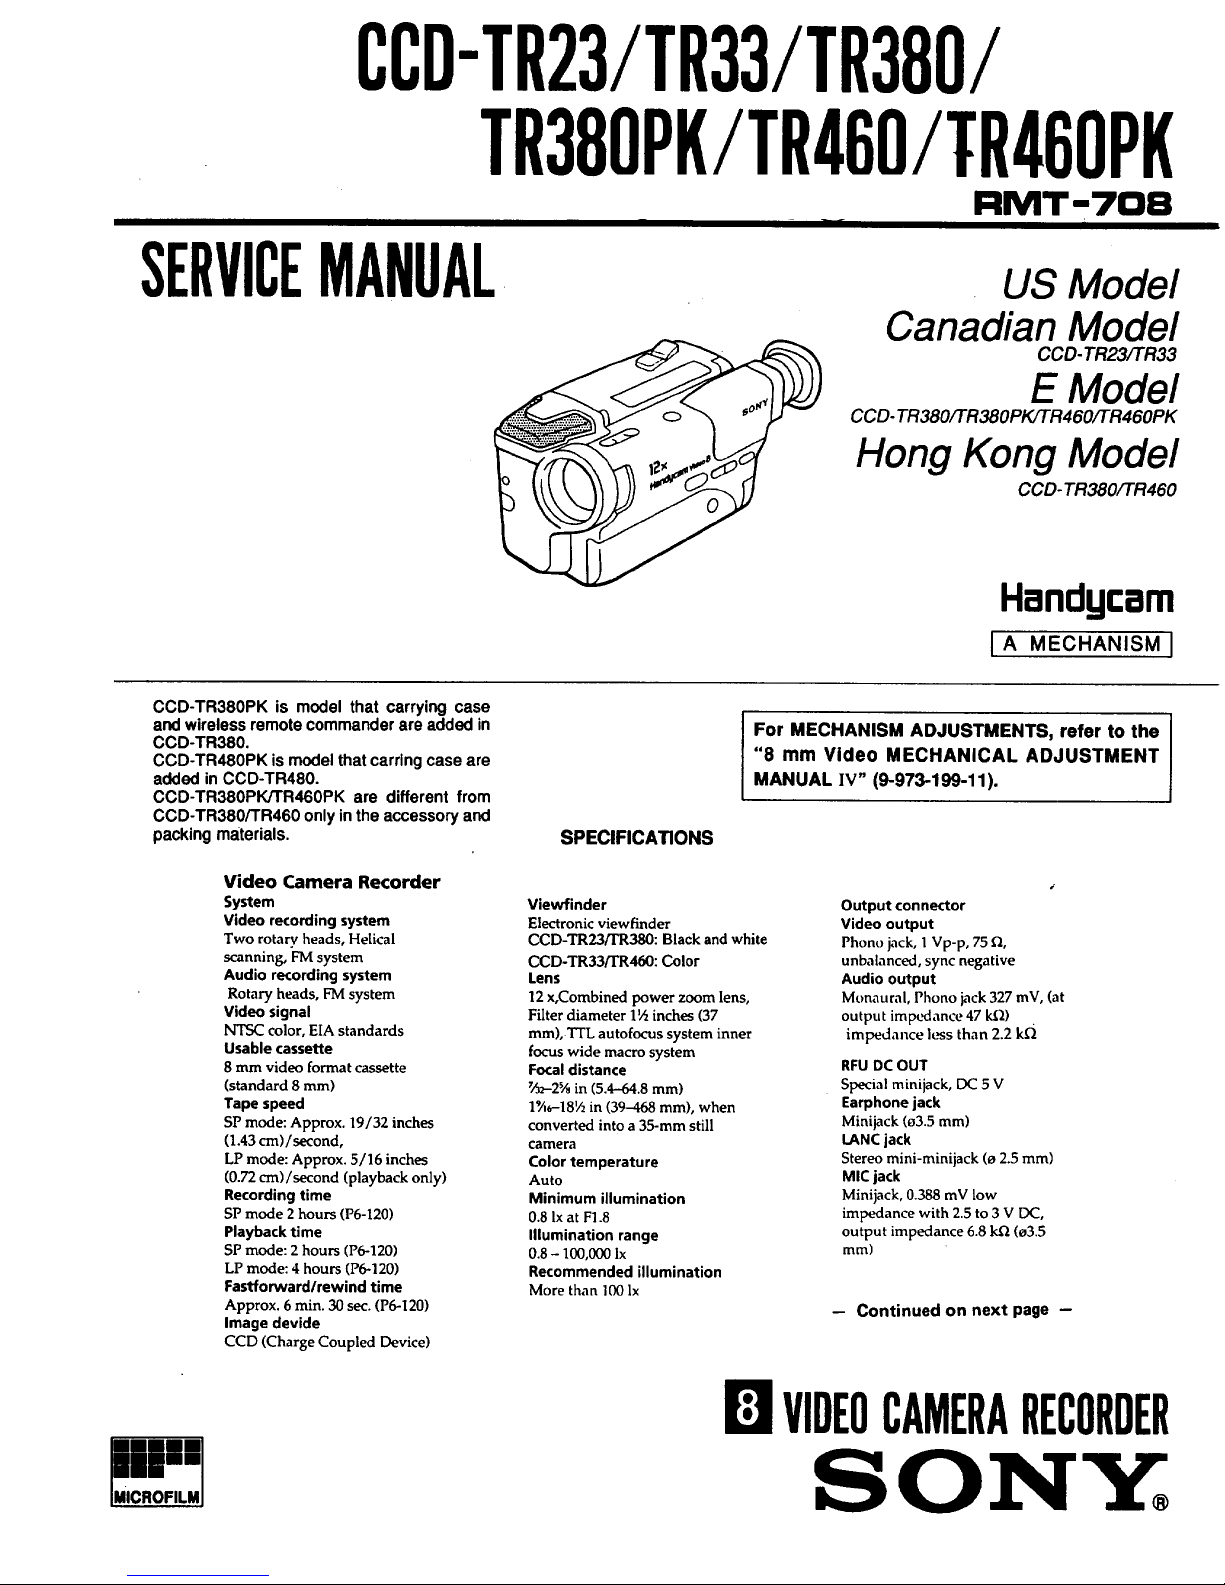
CCD-TR23/TR33/TR380/
TR380PK/TR460/TR460PK
• ii _
I=IMT-70B
SERVICEMANUAL usM
Canadian Model
CCD- TR23/'FR33
E Modol
CCD- TR380/'I'R380PK/TR460/TR460PK
Hong Kong Modol
CCD- TR380/TR460
Handy,-arn
I A MECHANISM I
CCD-TR380PK is model that carrying case
and wireless remote commander are added in
CCD-TR380.
CCD-TR480PK is model that carting case are
added in CCD-TR480.
CCD-TR380PK/TR460PK are different from
CCD-TR380/TR460 only in the accessory and
packing materials.
Video Camera Recorder
System
Video recording system
Two rotary heads, HeLical
scanning, FM system
Audio recording system
Rotary heads, FM system
Video signal
NTSC color, EIA standards
Usable cassette
8 mm video format cassette
(standard 8 mm)
Tape speed
SP mode: Approx. 19/32 inches
(1.43 cm)/second,
LP mode: Approx. 5/16 inches
(0.72 cm)/second (playback only)
Recording time
SP mode 2 hours (P6-120)
Playback time
SP mode: 2 hours (P6-120)
LP mode: 4 hours (P6-120)
Fastforward/rewind time
Approx. 6 min. 30 sec. (P6-120)
Image devide
CCD (Charge Coupled Device)
ili"i
LlalCFIOFILMJ
For MECHANISM ADJUSTMENTS, refer to the
"8 mm Video MECHANICAL ADJUSTMENT
MANUAL IV" (9-973-199-11).
SPECIFICATIONS
Viewfinder
Electronic viewfinder
CCD-TR23/I'R380: Black andwhite
CCD-TR33/I'R460: Color
Lens
12 x,Combined power zoom lens,
Filter diameter 1',_inches (37
mm), "FFL autofocus system inner
focus wide macro system
Focal distance
7Ar-2%in (5.4--/o4.8ram)
1%_-181/2in (39-468 mm), when
converted into a 35-ram still
camera
Color temperature
Auto
Minimum illumination
0.8 Ixat F1.8
Illumination range
0.8 - 100,000 Ix
Recommended illumination
More than 100 lx
i
Output connector
Video output
Phono jack,IVp-p,75Q,
unbalanced, sync negative
Audio output
Monaural, Phono jack 327 mV, (at
output irnpedance 47 k.Q)
impedance less than 2.2 k.Q
RFU DC OUT
Special minijack, DC 5 V
Earphone jack
Minijack (03.5 mm)
LANC jack
Stereo mini-minijack (o 2.5 mm)
MIC jack
Minijack, 0.388 mV low
impedance with 2.5 to 3 V DC,
output impedance 6.8 kfl (03.5
mm)
-- Continued on next page --
VIDEOCAMERARECORDER
The instructions in this manual are for two models listed below. Before you start reading and operating,
check your model number by looking at the bottom of your camcorder. The CCD-TR33 is the model used
for illustration purposes. Otherwise, the model name is indicated in the illustrations. Any differences in
operation are clearly indicated in the text, for example, "CCD-TR33".
As you read through thismanual,buttonsand settingson the camcorder are shown incapitalletters.
e.g.Setthe POWER switchto CAMERA.
Types of Differences
od.,number_
cco-Tx_ I ./w I
c_ I color I
"IV color systems differ from country to country.
To view your recordings on a "IV, you need an NTSC system based "IV. When you want to use a PAL-M
system based 'IV, you will need a NTSC/PAI.,-M transcoder (as this is an N'rSC system based
camcorder). Please check the list on page 35 to see the TV color system of your country.
Television programs, films, video tapes, and other materials may be copyrighted. Unauthorized
recordingof such materialsmay be contraryto the provisionofthecopyrightlaws.
* Do no let sand got into the camcorder. When you use the camcorder on a sandy beach or dusty
place, protect it from the sand or dust. Sand Or dust may cause the unit to maffunction and
sometimes the malfunction cannot be repaired. [a]
• Do not let the camcorder get wet. Keep the camcorder from rain or sea water. It may cause a
malfunction and sometimes the malfunction cannot be repaired. [b]
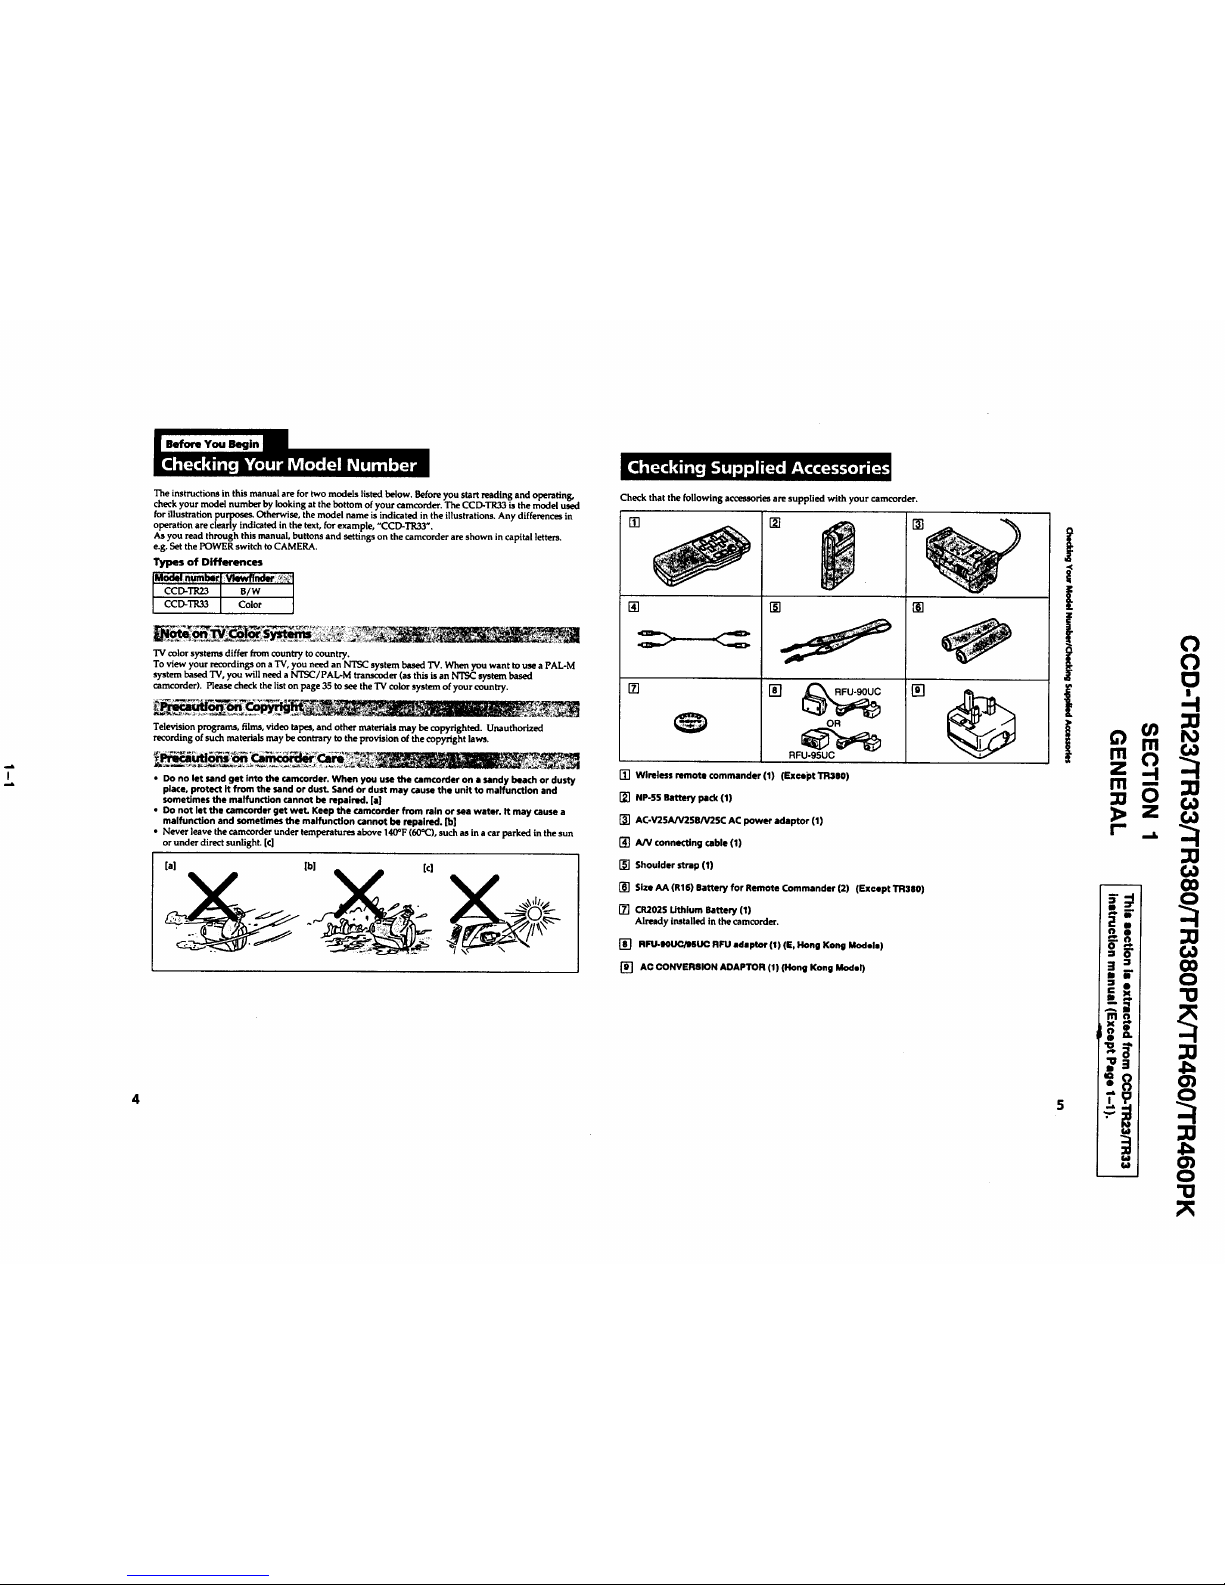
Check thatthe followingacceseoHesare supplied with your camcorder.
[]
[]
[]
[]
[]
OR
[]
RFU-95UC
[] Wireless remote commander(I) (F,xceptTR3e0)
[] NP-55 Battery pack (1)
[] AC-V25A/V2SB/V25C AC power adaptor (1)
[]
l
I
i 0
0
0
• Never leave the camcorder under temperatures above 140°F (60°C), such as in a car parked in the sun r "m _..x "_
or under directsunlight.[C] 1_ AN connecting cable (1)
[] RFU.QOUC_SUC RFU adaptor (|) (1: Hong Kong Models) 0
[] ACCONVERSIONADAPTOR(1)(HongKongldodal) :_ =1 CO
,,E"
5
O
m t,_
!£ ._,
., w
a
v me
m
- ::O
ka
-- O
Before using your camcorder, you first need to charge and install the battery pack. To charge the battery
pack, use the supplied AC-V25A/V25B/V25C AC power adaptor.
Charging the httery Pack
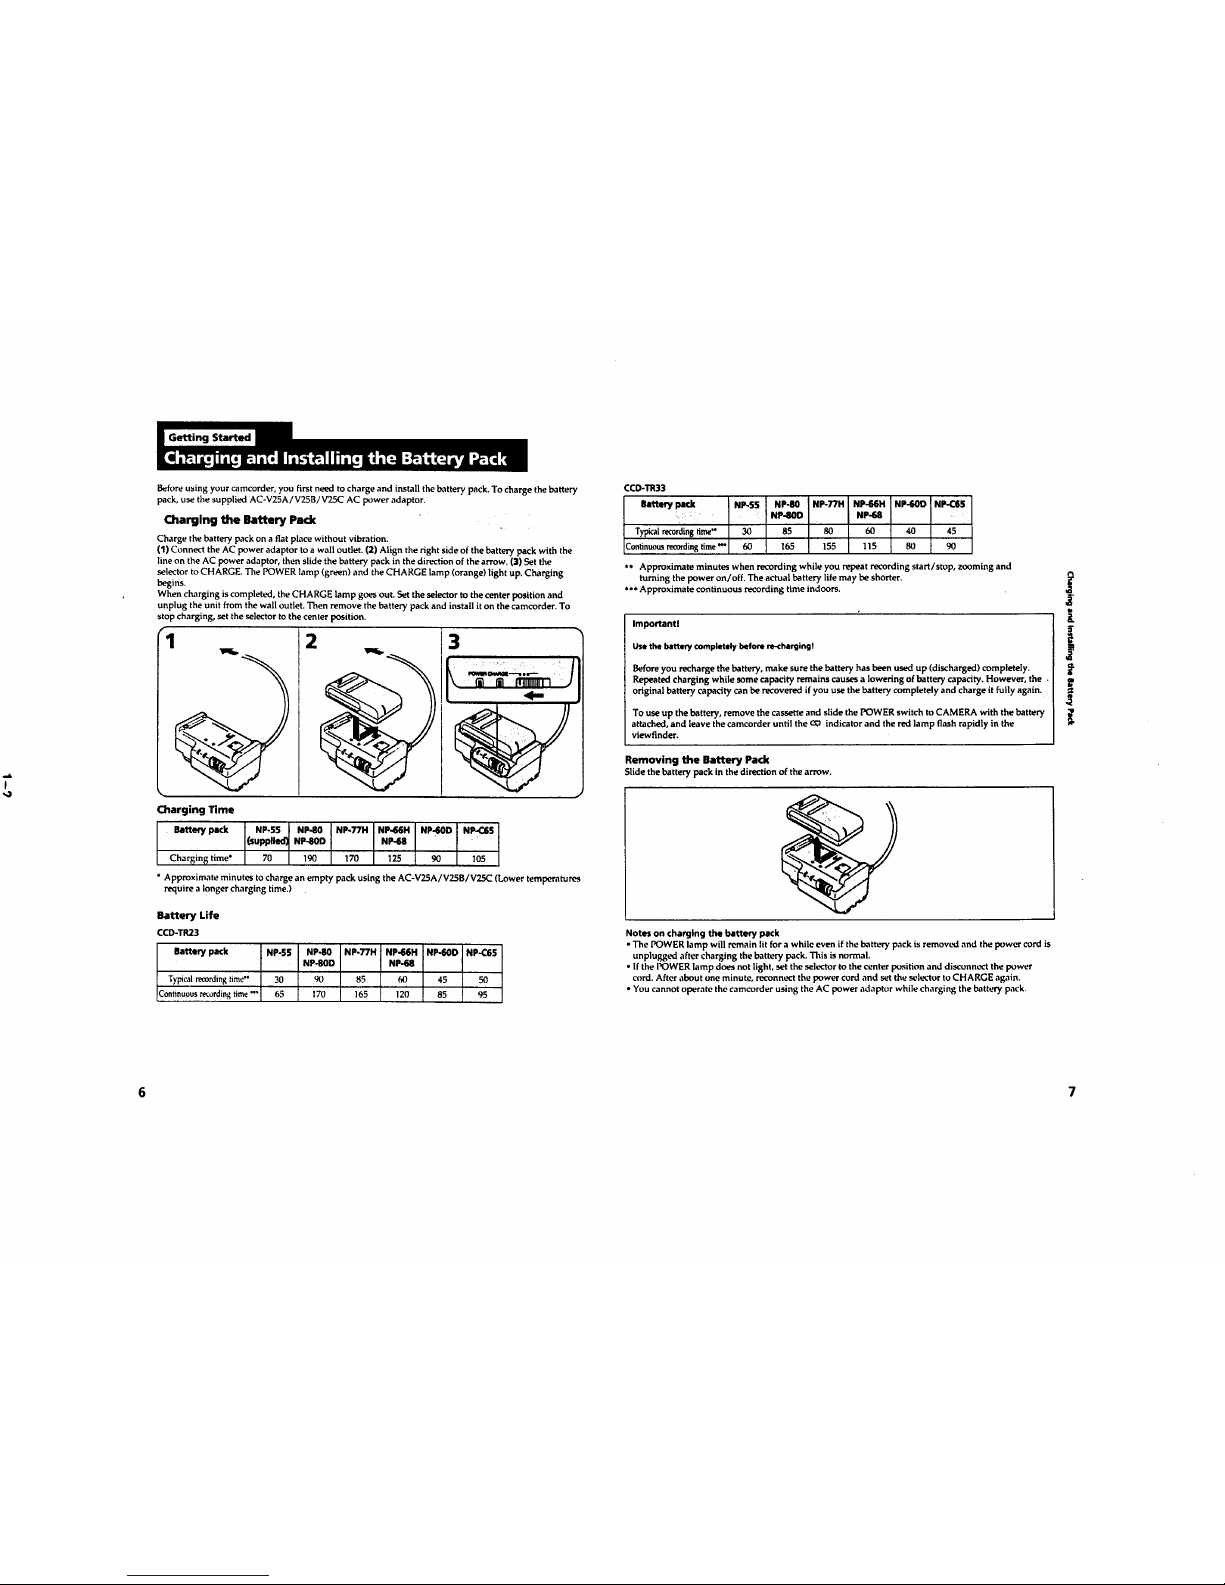
Charge the battery pack on a flat place without vib_tion.
(1) Connect the AC power adaptor to a wall outlet. (2) Align the right side of the battery pack with the
line on the AC power adaptor, then slide the battery pack in the direction of the arrow. (3) Set the
selector to CHARGE. The POWER lamp (green) and the CHARGE lamp (orange) light up. Charging
begins.
When charging is completed, the CHARGE lamp goes out. Set the selector to the center position and
unplug the unit from the wall outlet. Then remove the battery pack and install it on the camcorder. To
stop charging, set the se]ector to the center position.
2
3
Charging Time
Battery pack NP-55 I NP-80 NP.77H NP-66H NP-60D NP-CES
(suppllea_ NP-BOD I NP-68 ! "_ I
Charging time* 70 / 19_ 170 125 90 105
• Approximate minutes to charge an empty pack using the AC-V25A/V25B/V25C (Lower temperatures
require a longer charging time.)
Battery Life
CCD-TR23
Batterylack NP-55 NP-80 NP-77H NP.6GH NP-60D NP-C65
NP-BOD NP-68
Typicalrecordingtime'* 30 90 85 60 45 50
Continuous re_ordlng time" 65 170 165 120 85 95
CCD-TR33
Batte_ lack NP-S5 NP-80 NP-77H NP-66H NP-60D NP-C65
• NP-80D NP-68
Typicalrecordin8 time" 30 85 80 60 40 45
Continuous recording time _ 60 165 155 115 80 90
** Approximate minutes when recording while you repeat recording start/stop, zooming and
turning the power on/off. The actual battery life may be shorter.
*** Approximate continuous recording time indoors.
Importantl
Use the battery completely before re-chargingl
Before you recharge the battery, make sure the battery has been used up (discharged) completely.
Repeated charging while some capacity remains causes a lowering of battery capacity. However, the •
original battery capacity can be recovered if you use the battery completely and charge it fully again.
To use up the battery, remove the cassette and slide the POWER switch to CAMERA with the battery
attached, and leave the camcorder until the (20 indicator and the red lamp flash rapidly in the
viewfinder.
Removing the Battery Pack
Slide the battery pack in the direction of the arrow.
Notes on charging the battery pack
• The POWER lamp will remain lit for a while even if the battery pack is removed and the power cord is
unplugged after charging the battery pack. This is normal.
• If the I_OWER lamp d('_'s not light, set the selector to the center position and disconm.,ct the p_wer
cord. After about one minute, reconm.,ct the power cord and set the sele_or to CHARGE again.
* You cannot operate the camcorder using the AC power adaptor while charging the battery pack.
i
_L
t
6 7
II _,,_-"[_ hi._I n[_ _ ie(';_. T,.'[,._ _ ( "-ll
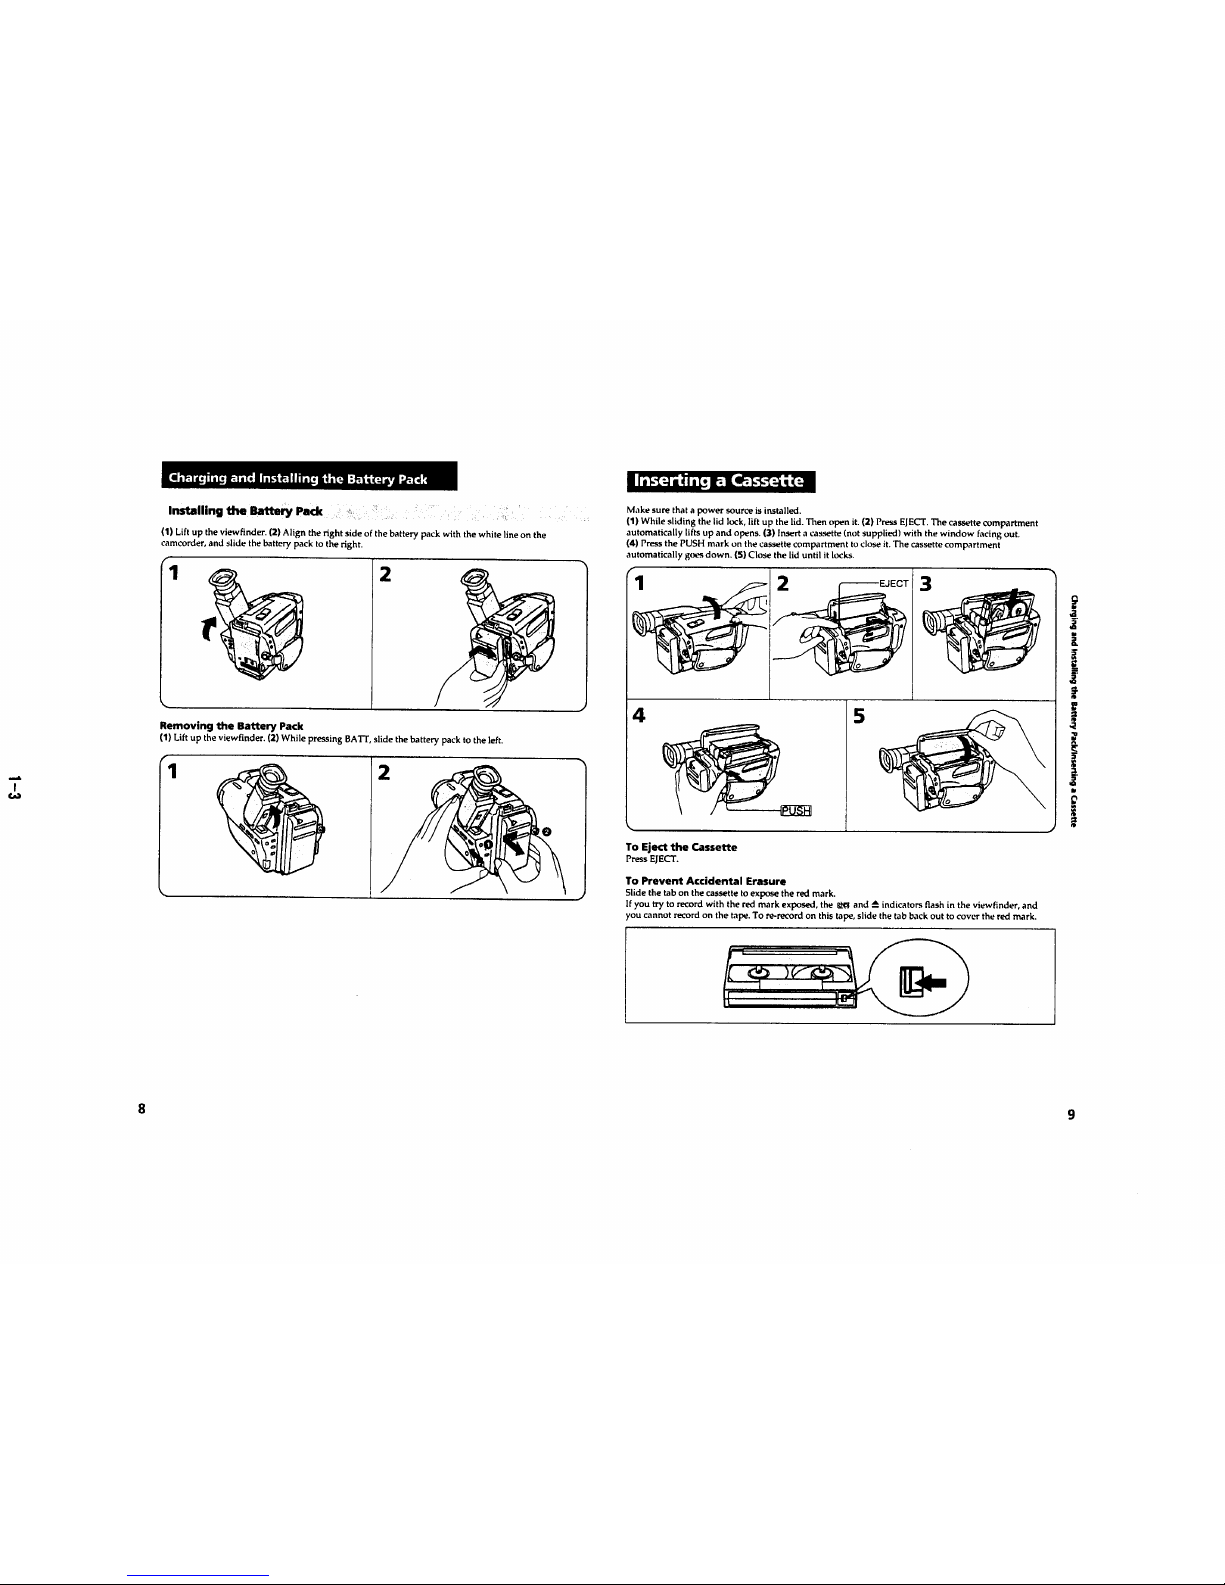
Installing the Batte_ Pack"
(1) Lift up the viewfinder. (2) Align the right side of the battery pack with the white line on the
camcorder, and slide the battery pack to the right.
2
Removing the Battery Pack
(1) Lift up the viewfinder. (2) While pressing BA'I-I',slide thebattery pack to the left.
f
1
2
Make sure that a power source is installed.
(1) While sliding the lid lock, lift up the lid. Then open it. (2) Press EJECT. The cassette compartment
automatica[ly lifts up and opens. (3) Insert a cassette (not supplied) with the window facing out.
(4) Press the PUSH mark on the cassette compartment to close it. The cassette compartment
automatically goes down. (S) Close the [id until it locks.
2 --EJECT 3
4
To Eject the Cassette
Press ELECT.
To Prevent Accidental Erasure
Slide the tab on the cassette toexpose the red mark.
If you try to record with the red mark exposed, the _1 and _ indicators flash in the viewfinder, and
ou cannot record on the tape. To re-record on this tape, slide the tab back out to cover the red mark.
,,3
i
3
(
i
im
8 9
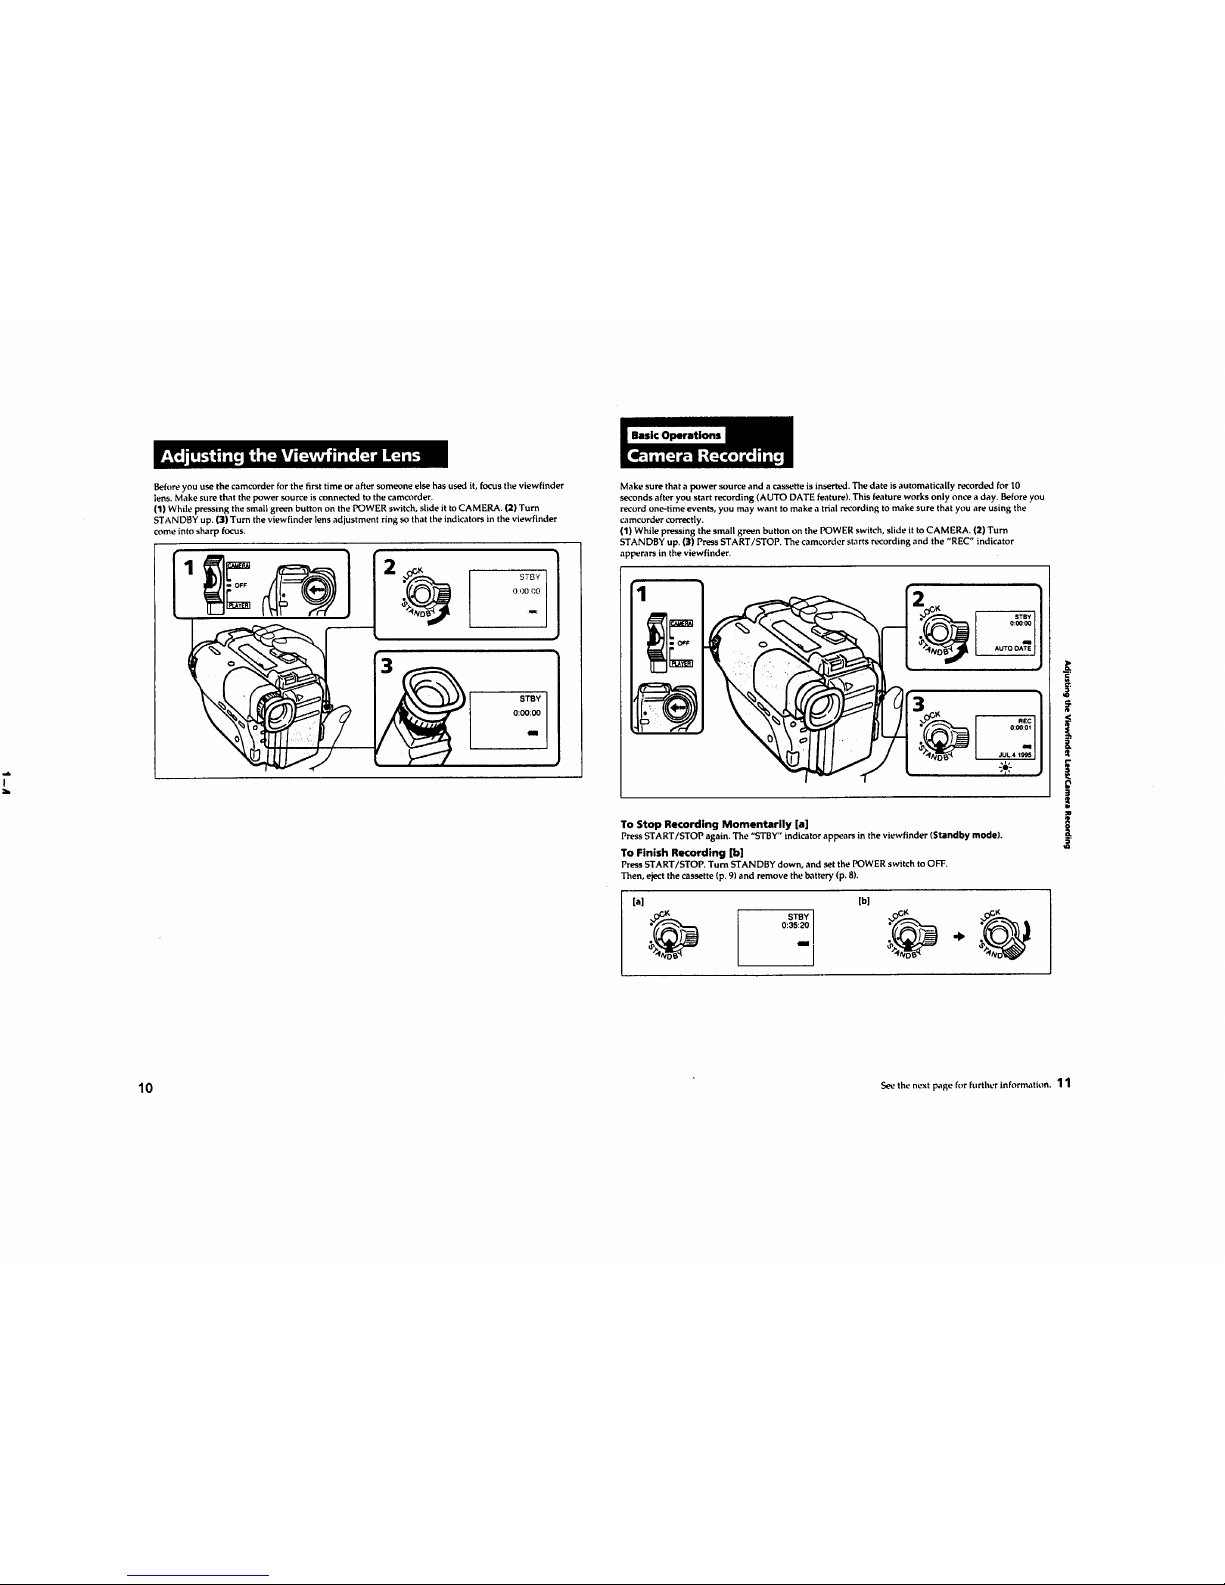
Before you use the camcorder for the first time or after someone else has used it, focus the viewfinder
lens. Make sure that the power source is connected to the camcorder.
(1) While pressing the small green button on the POWER switch, slide it to CAMERA. (2) Turn
STANDBY up. (_11)Turn the viewfinder lens adjustment ring so that the indicators in the viewfinder
come into sharp focus.
0 c)0 (,_0
STBY
0:_:_
Make sure that a power source and a cassette is inserted. The date is automatically recorded for 10
seconds after you start recording (AUTO DATE feature). This feature works only once a day. Before you
record one-time events, you may want to make a trial recording to make sure that you are using the
camcorder correctly.
(1) While pressing the small green button on the POWER switch, slide it to CAMERA. (2) Turn
STANDBY up. (3) Press START/STOP. The camcorder starts recording and the "REC" indicator
apperars in the viewfinder.
To Stop Recording Momentarily [a]
Press START/STOP again. The "STBY" indicator appears in the viewfinder (Standby mode).
To Finish Recording [b]
Press START/STOP. Turn STANDBY down, and set the POWER switch to OFF.
Then, eject the cassette (p. 9) and remove the battery (p. 8).
[a] [b]
_fK I STBY
'_D_ 0:35:20
ill
j.
<
[
3
[
10 s_ the next page for further information. 11
Note on Standby mode
if you leave the camcorder for 5 minutes or more with a cassette inserted inStandby mode, the
camcorder goes off automatically. This prevents wearing down the battery and wearing out the tape. To
resume Standby mode, turn STANDBY down once and turn it up again. To start recording, press
START/STOP.
Note on recording
When you record from the beginning of the tape, run the tape for about 15 seconds before ach_al
recording. This prevents the camcorder from missing any start-up scenes when you play back the tape.
You can record tapes in SP (standard play] mode only.
Note on the tape counter
The tape counter indicates the recording or playback time. Use it as a guide. There will bea time lag of
several seconds from the actual time. To set the counter to zero, pus COUNTER RESET located below
the viewfinder. You can know the approximate remaining tape by the remaining tape indicator (p. 45).
Note on the AUTO DATE feature
The clock is set tothe East Coast Standard Time at the factory. You canreset the clock (p. 28).
You can change the AUTO DATE setting by selecting ON or OFF in the menu system (p. 25).
• The AUTO DATE feature works once a day. However, the date may automatically appear more than
once a day when;
- you reset the date and time.
- you eject and insert the tape again.
- you stop recording within 10 seconds.
- you set AUTO DATE to OFF once and set to ON in the menu system.
• Once the AUTO DATE feature turns off the date display 10 seconds after thestart ofrecording, the date
and time are displayed as follows:
- if the date display setting has been made, the date isdisplayed.
- if the time display setting has been made, the time is displayed.
- if neither display setting has been made, nothing is displayed.
When moving from indoors to outdoors (or vice versa)
Turn STANDBY up and point the camcorder at awhite object for about 15 seconds so that the white
balance isproperly adjusted.
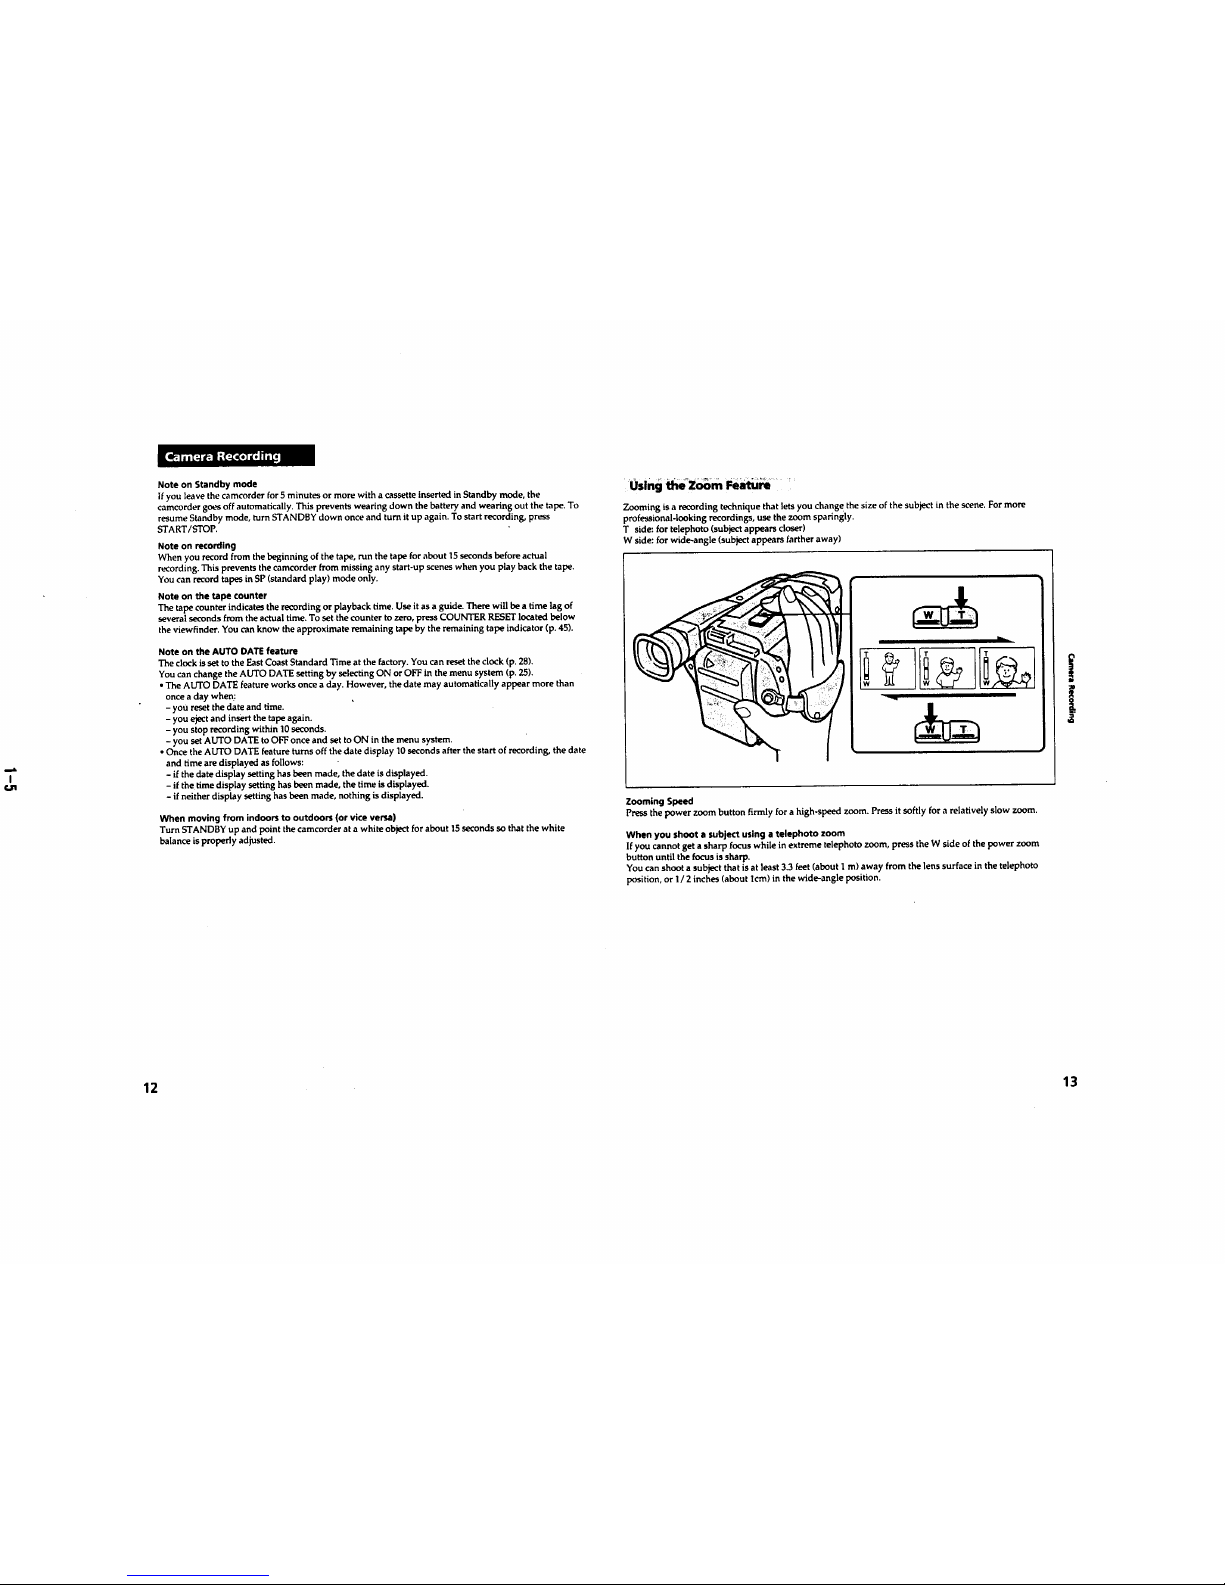
Using the_°Zoom Featu_rQ.....
Zooming is a recording technique that lets you chang e the size of the subject in the scene. For more
professional-looking recordings, use the zoom sparingly.
T side: for telephoto (subject appears closer)
W side: for wide-angle (subject appears farther away]
Zooming Speed
Press the power zoom button firmly for a high-speed zoom. Press it softly for a relatively slow zoom.
When you shoot a subject using a telephoto zoom
If you cannot get asharp focus while in extreme telephoto zoom, press the W side of the power zoom
button until the focus is sharp.
You can shoot a subject that isat ]east 3.3 feet (about 1 m) away from the lens surface in the telephoto
position, or 1/2 inches (about lcm) in the wide-angle position.
12 13
 Loading...