

Sony Handycam CCD-F302 Operating Instructions Manual
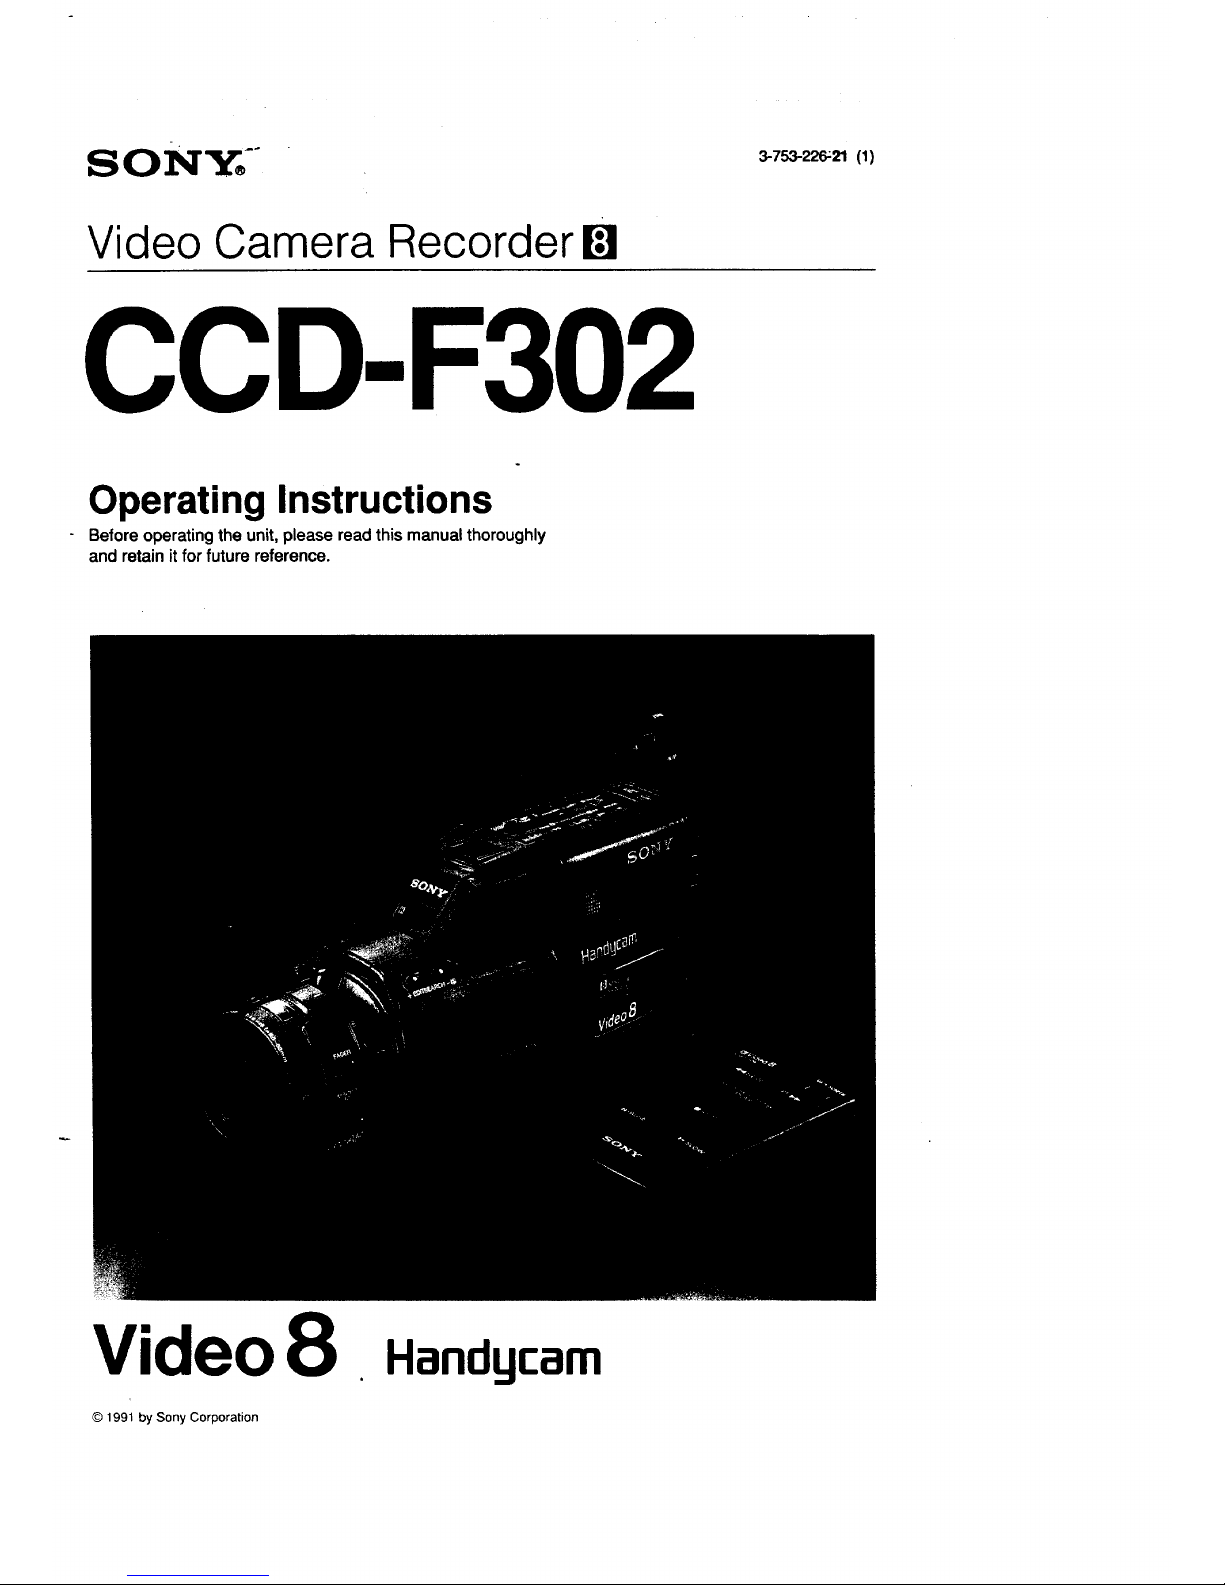
Video Camera Recorder[:]
CCD-F302
Operating Instructions
Beforeoperatingtheunit,pleasereadthismanualthoroughly
andretainitfor future reference.
Video8
Handgcam
© 1991 by Sony Corporation
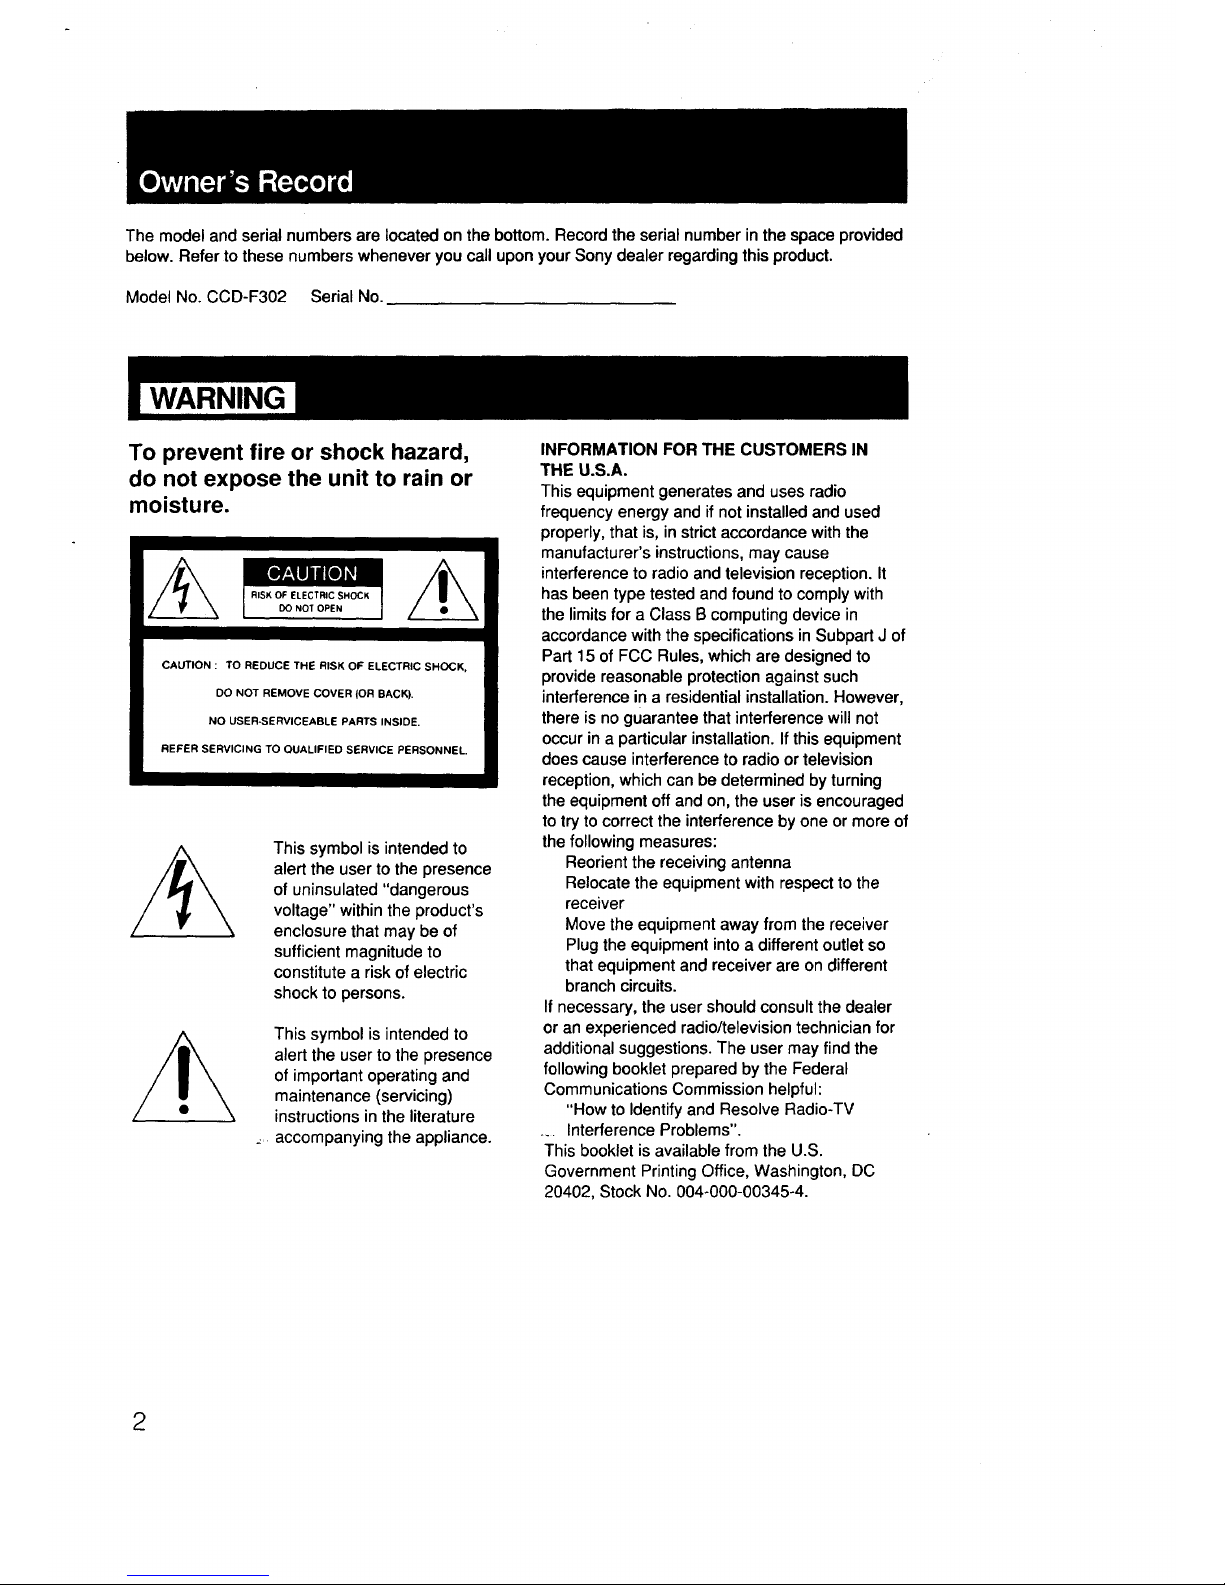
The model and serial numbers are located on the bottom. Record the serial number in the space provided
below. Refer to these numbers whenever you call upon your Sony dealer regarding this product.
Model No. CCD-F302 Serial No.
wARNINGi
WARNING
To prevent fire or shock hazard,
do not expose the unit to rain or
moisture.
This symbol is intended to
alert the user to the presence
of uninsulated "dangerous
voltage" within the product's
enclosure that may be of
sufficient magnitude to
constitute a risk of electric
shock to persons.
This symbol is intended to
alert the user to the presence
of important operating and
maintenance (servicing)
instructions in the literature
accompanying the appliance.
INFORMATION FOR THE CUSTOMERS IN
THE U.S.A.
This equipment generates and uses radio
frequency energy and if not installed and used
properly, that is, in strictaccordance with the
manufacturer's instructions, may cause
interference to radio and television reception. It
has been type tested and found to comply with
the limits for a Class Bcomputing device in
accordance with the specifications in Subpart J of
Part 15 of FCC Rules, which are designed to
provide reasonable protection against such
interference in a residential installation. However,
there is no guarantee that interference will not
occur in a particular installation. Ifthis equipment
does cause interference to radio or television
reception, which can be determined by turning
the equipment off and on, the user is encouraged
to try to correct the interference by one or more of
the following measures:
Reorient the receiving antenna
Relocate the equipment with respect to the
receiver
Move the equipment away from the receiver
Plug the equipment intoa different outlet so
that equipment and receiver are on different
branch circuits.
If necessary, the user should consult the dealer
or an experienced radio/television technician for
additional suggestions. The user may find the
following booklet prepared by the Federal
Communications Commission helpful:
"How to Identify and Resolve Radio-TV
°.. Interference Problems".
This booklet is available from the U.S.
Government Printing Office, Washington, DC
20402, Stock No. 004-000-00345-4.
2
Introduction........................................................ 4
Identifying the parts .......................................... 5
Preparing your camcorder .............................. 11
Connecting the power sources ........................ 12
Setting the date and time ................................ 18
Inserting tapes ................................................ 20
Adjusting the viewfinder lens .......................... 21
Recording a picture using automatic
adjustments ........................................................ 22
To record the date and time ............................ 24
Playing back the picture instantly .................... 27
Recording a picture using manual
adjustments
Selecting the automatic/manual adjustment .... 28
Manual focusing .............................................. 29
Adjusting the white balance ............................ 31
Setting shutter speed ...................................... 33
Shooting with backlighting .............................. 34
Zooming .......................................................... 35
Close-ups (Auto-focusing in macro) ................ 36
Fade-in and fade-out ...................................... 38
Recording the age of your child ...................... 39
Connections for playback ................................ 43
Playing back a tape ........................................ 45
Editing onto another VCR ................................ 48
Recording from another VCR or a TV ............ 49
Insert recording .............................................. 50
Using the tape counter .................................... 51
Hints for better shooting .................................. 52
Notes and precautions .................................... 54
Using your camcorder abroad .......................... 56
Specifications .................................................. 57
Trouble check .................................................. 58
Indications inside the viewfinder ........ back cover
List of beeps ...................................... back cover
3
The first section of the manual explains the
preliminary steps necessary to prepare for
shooting and playing back.
Other sections include shooting procedures that
show how to use the features and functions of
your camcorder. If you are a beginner, start with
"Recording a picture using automatic
adjustments". If you are very familiar with
camcorders, try to shoot your picture with manual
adjustments as well as automatic adjustment.
If you want to record right away, see pages 11,
22, and 28.
The manual also includes how to play back a
picture on a TV, how to edit your original 8mm
tape onto another video tape, and how to record
a picture from another video tape or TV.
If you have any problems during operation, see
the "Trouble check" section.
Use the information below to help you follow the
instructions in this manual.
• Controls and settings on the camcorder are
shown in capital letters:
ex. Set POWER to CAMERA.
• The letter in an illustration corresponds to the
letter in the text:
ex. (A-l) or (B)
• The step number in an illustrationcorresponds
tothe step number in the text.
• Notes and cautions are enclosed with lines:
ex.
Noteon battery life
Batterywillnotlastas longincoldplaces.
The camcorder is packed together with the
following accessories. Check to see that
everything is contained in the package.
• Remote Commander RMT-506 (1)
• Size AA (R6) battery for Remote
Commander (2)
• Battery pack NP-66H (1)
• AC power adaptor AC-V60N60A (1)
• Lithium battery CR2025 (1)
• RFU adaptor RFU-90UC (1)
• Lens cap (1)*
• Shoulder strap (1)
*Attached to the camcorder
4

(A-l)
For details on the use of each part, refer to the
pages indicated in the circle.
(A-l)
I-_ Eyecup
r-_ viewfinder lens adjustment ring •
% Viewfinder (back cover)
The picture being recorded or played back
can be monitored in black and white here.
Also, indicators which shows caution and
function mode appear here,
I-_ Power zoom button
_-I Accessory shoe
Attach a video light, external microphone,
etc. (notsupplied).
®
Ffl
%
Zoom lever
DATA SCREEN button
BEEP switch Q O
Normally set to "ON" to activate the
recording start/stop and warning beep.
To deactivate the beep, set the switch to
"OFF".
[_] EDIT switch _)
[]
POWER switch
CAMERA: for camera recording
VTR: for playing back or editing tapes
OFF: power off
% Tape transport buttons _
>/11 I_FRAME (forward direction/frame-by-
frame in forward direction)
ID-SLOW
[] (stop)
REW (rewind)
_(playback)
FF (fast forward)
II PAUSE
I-_ • REC switch _)
[_ DATE (+) and TIME (NEXT) buttons O
[_ AGE/EVENT button _)
[-_ ZERO MEM (zero memory) button _) •
I-_ COUNTER RESET button _) _) 5
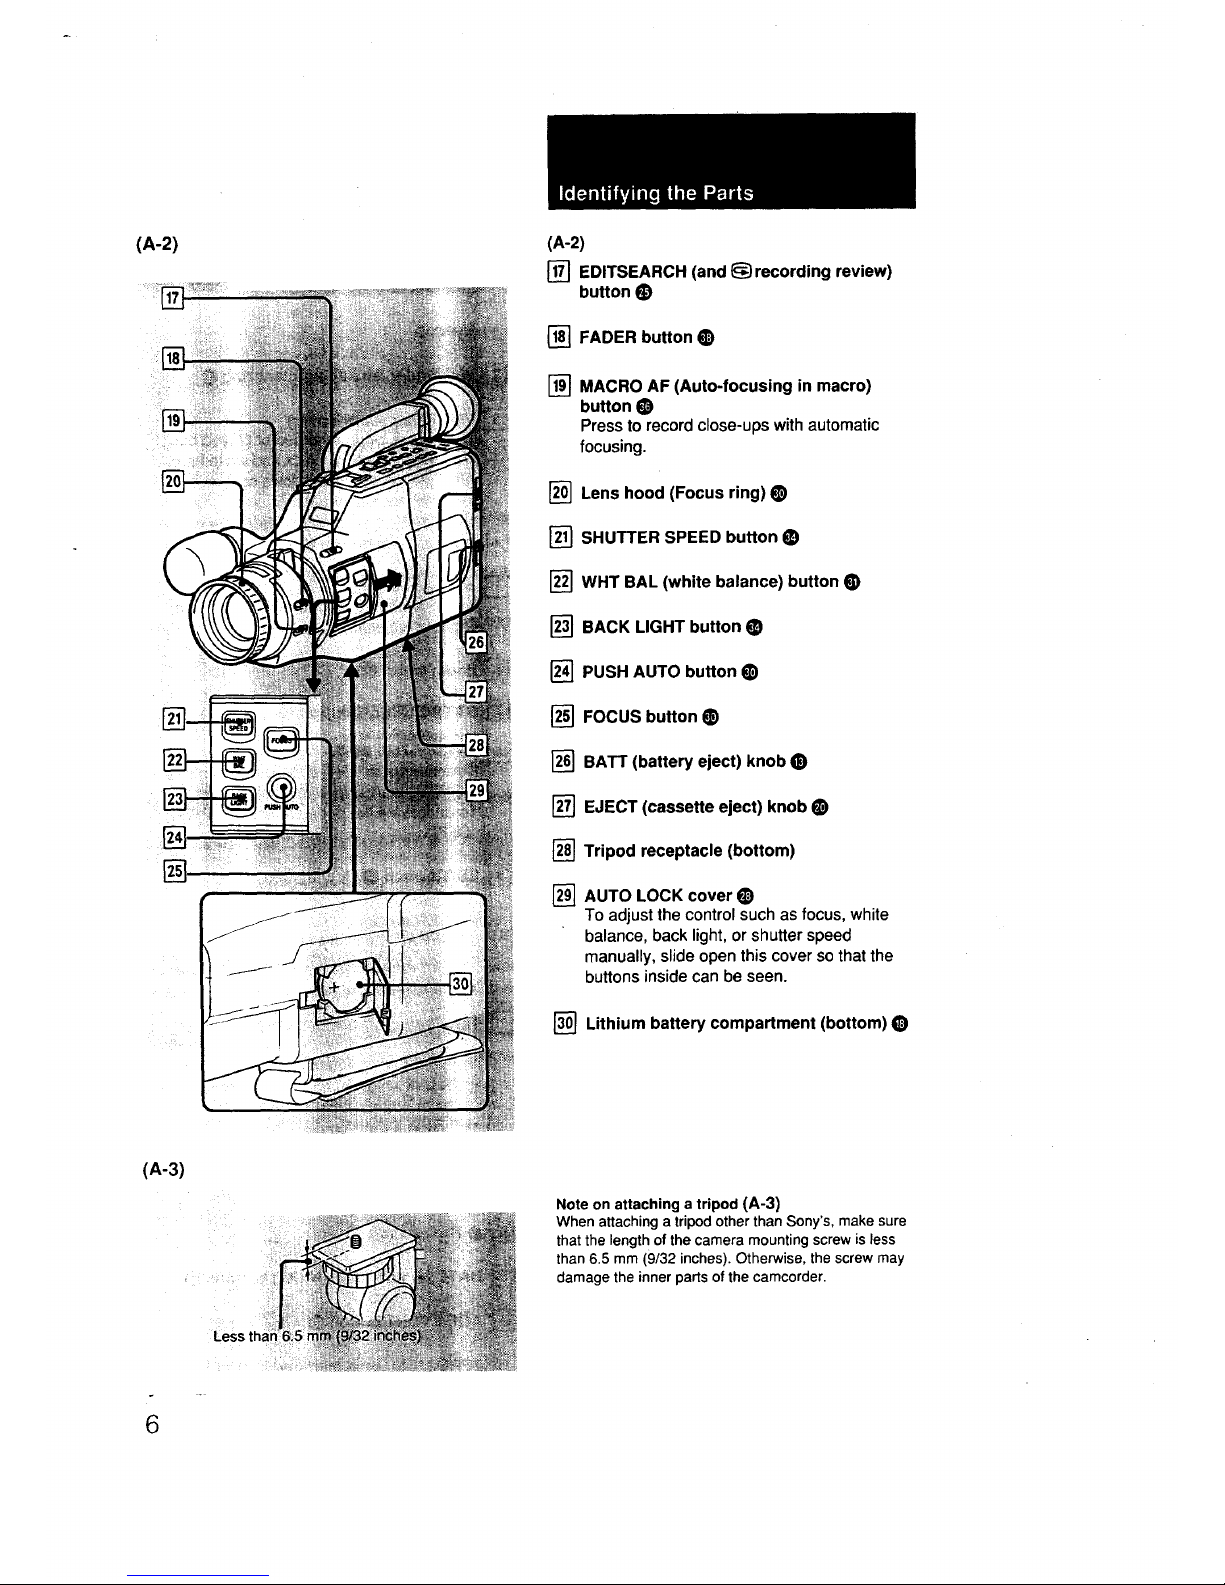
(A-2)
(
(A-2)
[] EDITSEARCH (and _ recording review)
button •
{_] FADER button •
r_ MACRO AF (Auto-focusing in macro)
button •
Press to record close-ups with automatic
focusing.
[20] Lens hood (Focus ring) •
[_] SHUTTER SPEED button
r_l WriT BAL (white balance) button •
I_ BACK LIGHT button
r_ PUSH AUTO button •
[_ FOCUS button •
[_ BATT (battery eject) knob
r_ EJECT (cassette eject) knob
[] Tripod receptacle (bottom)
AUTO LOCK cover
To adjust the control such as focus, white
balance, back light, or shutter speed
manually, slide open this cover so that the
buttons inside can be seen.
r_ Lithium battery compartment (bottom)
(A-3)
Note on attaching a tripod (A-3)
When attaching a tripod other than Sony's, make sure
that the length of the camera mounting screw is less
than 6.5 mm (9/32 inches). Otherwise, the screw may
damage the inner parts of the camcorder.
6
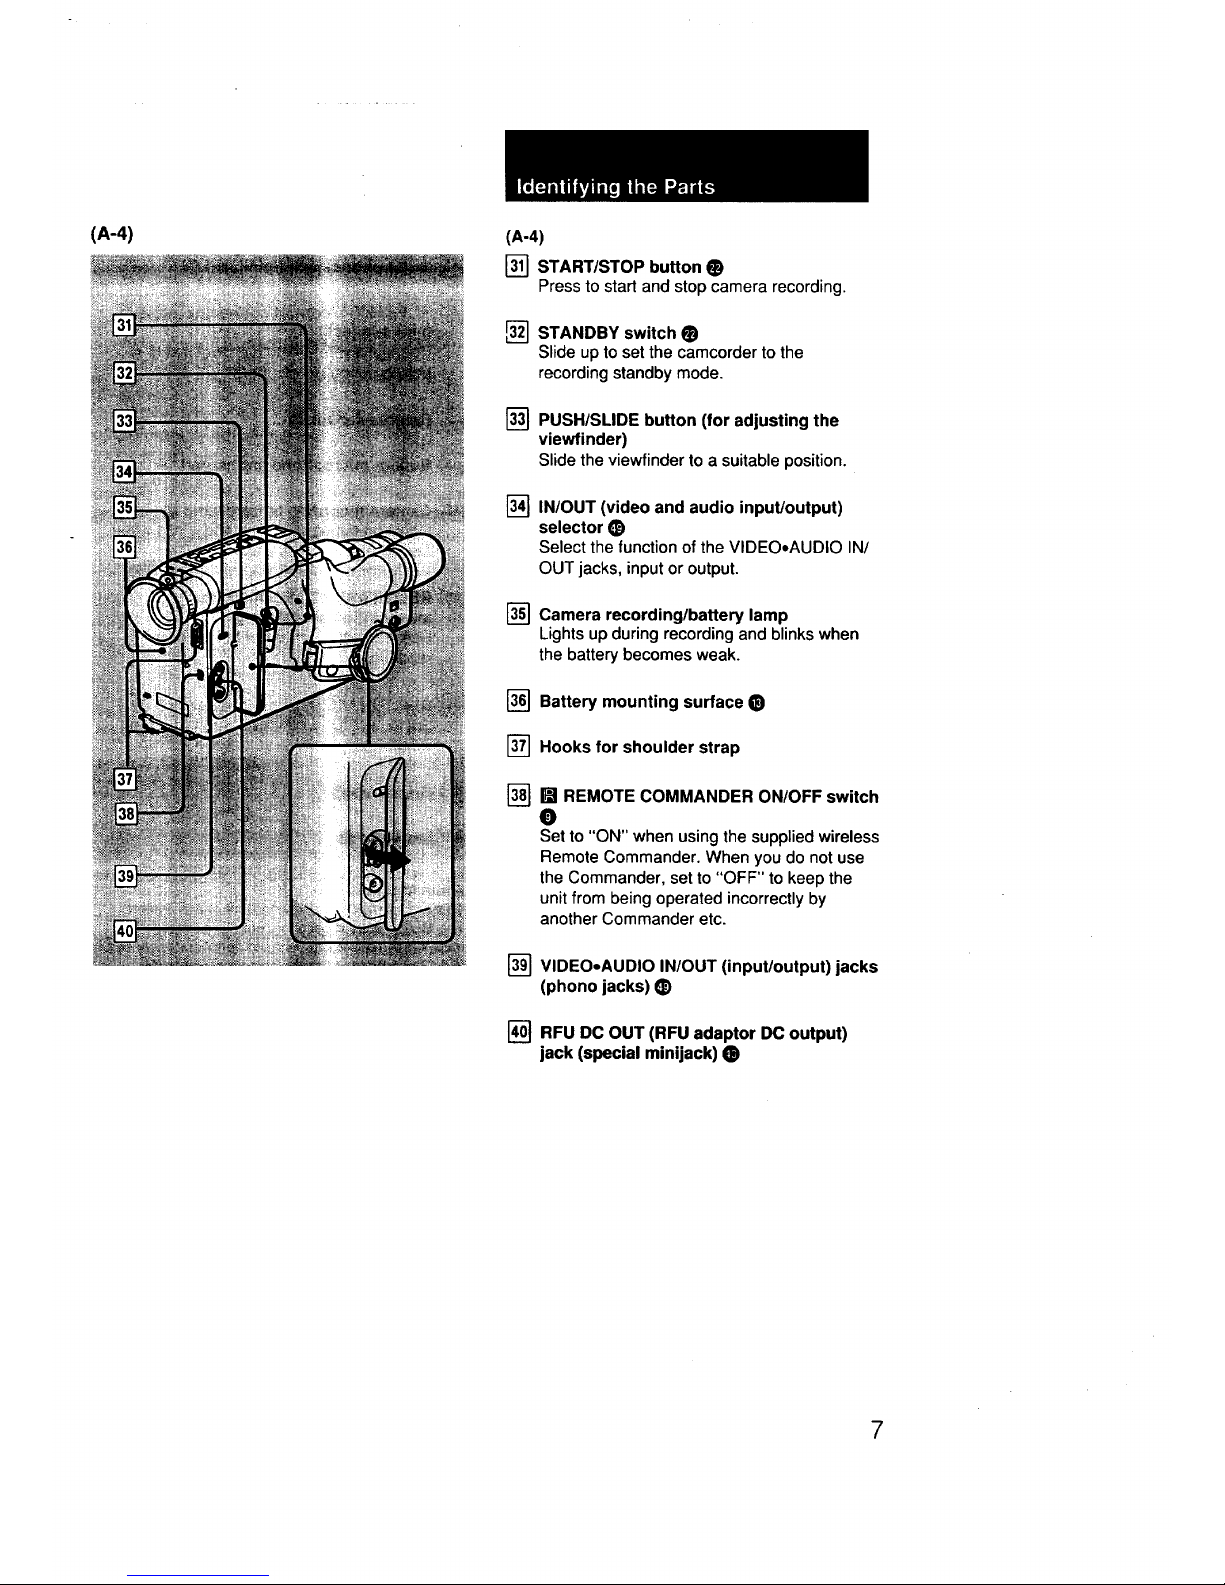
(A-4)
(A-4)
[_] START/STOP button •
Press to start and stop camera recording.
I_ STANDBY switch •
Slide up to set the camcorder tothe
recording standby mode.
@
[]
@
PUSH/SLIDE button (for adjusting the
viewfinder)
Slide the viewfinder to a suitable position.
IN/OUT (video and audio input/output)
selector •
Select the function of the VIDEO.AUDIO IN/
OUT jacks, input or output.
Camera recording/battery lamp
Lights up during recording and blinks when
the battery becomes weak.
@ Battery mounting surface •
I-_ Hooks for shoulder strap
@
[] REMOTE COMMANDER ON/OFF switch
O
Set to "ON" when using the supplied wireless
Remote Commander. When you do not use
the Commander, set to "OFF" to keep the
unit from being operated incorrectly by
another Commander etc.
@VIDEO-AUDIO IN/OUT (input/output) jacks
(phono jacks) _)
I-_ RFU DC OUT (RFU adaptor DC output)
jack (special minijack) •
7
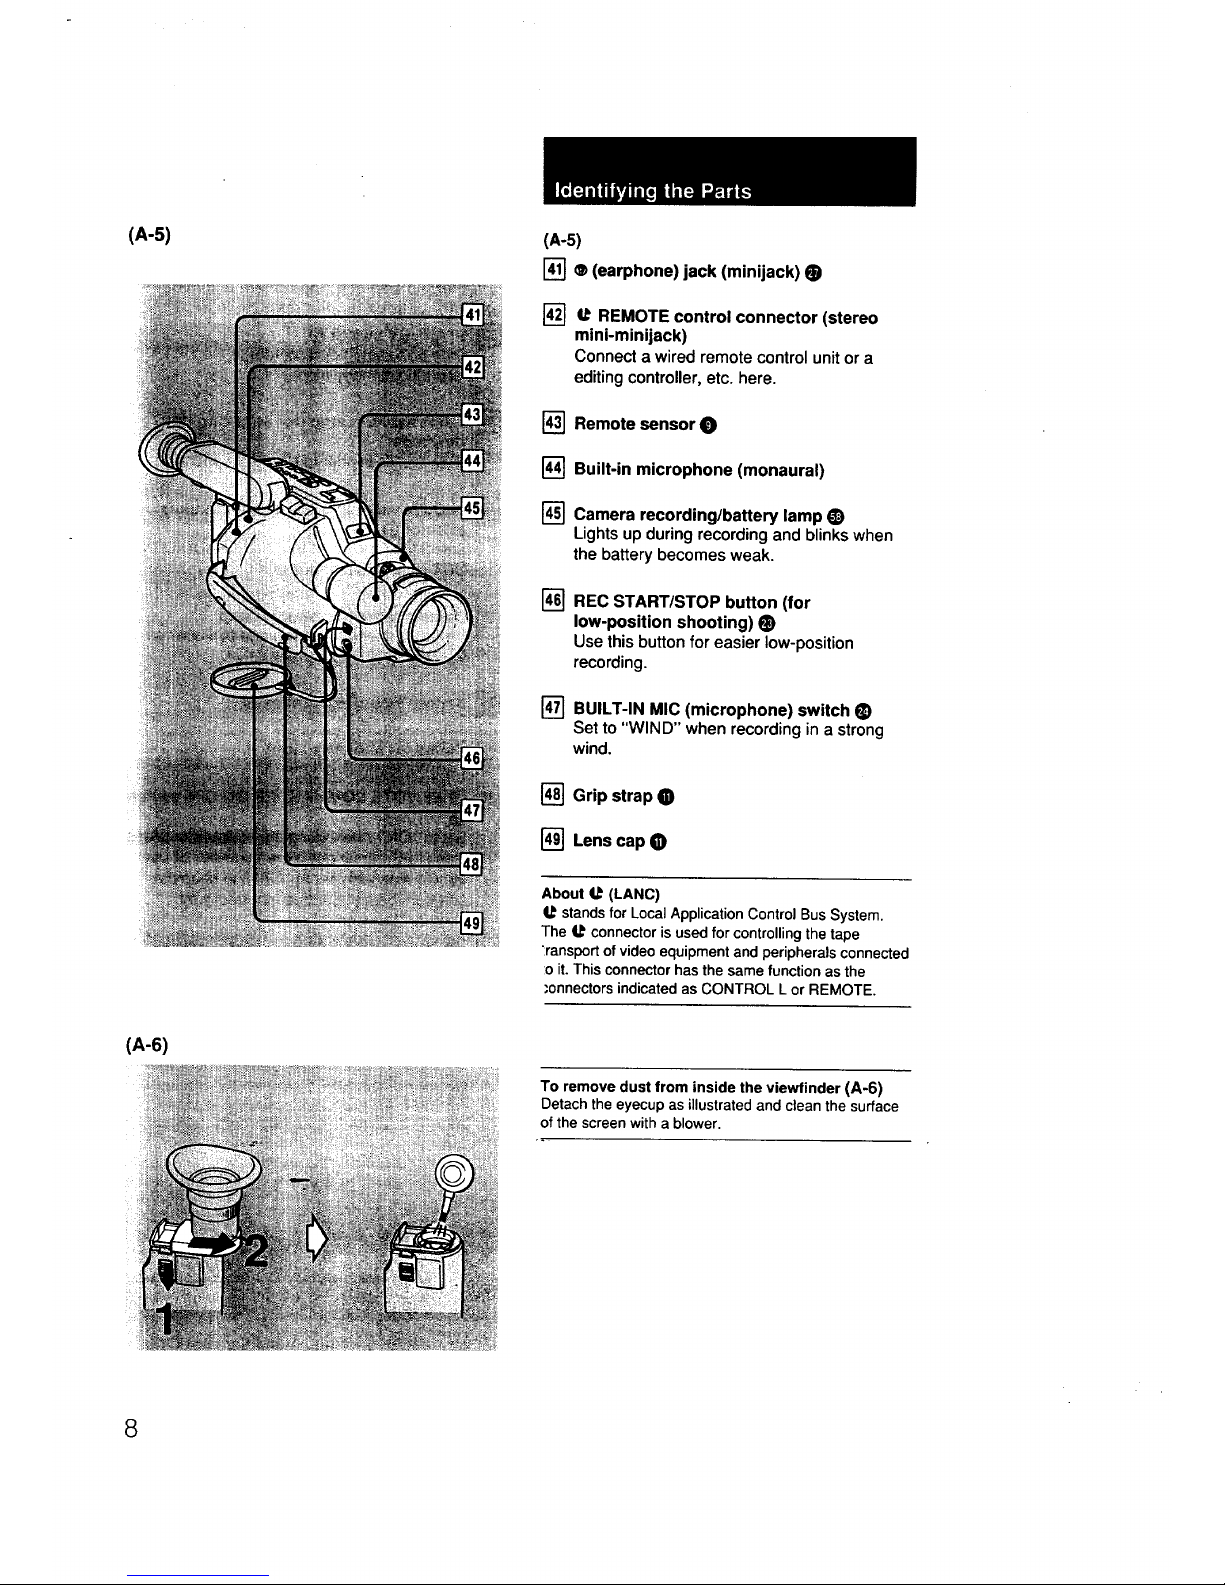
(A-5)
(A-5)
I-_ O (earphone) jack (minijack) •
[]
REMOTE control connector (stereo
mini-mini jack)
Connect a wired remote control unitor a
editing controller, etc. here.
_-_ Remote sensor O
@
@
@
@
Built-in microphone (monaural)
Camera recording/battery lamp •
Lights up during recording and blinks when
the battery becomes weak.
REC START/STOP button (for
low-position shooting) •
Use thisbutton for easier low-position
recording.
BUILT-IN MIC (microphone) switch •
Set to "WIND" when recording in a strong
wind.
@ Grip strap
@ Lens cap •
About _ (LANC)
stands for Local Application Control Bus System.
The @ connector is used for controlling the tape
":ransportof video equipment and peripherals connected
:o it. This connector has the same function as the
:onnectors indicated as CONTROL L or REMOTE.
(A-6)
To remove dust from inside the viewfinder (A-6)
Detach the eyecup as illustrated and clean the surface
of the screen with a blower.
8
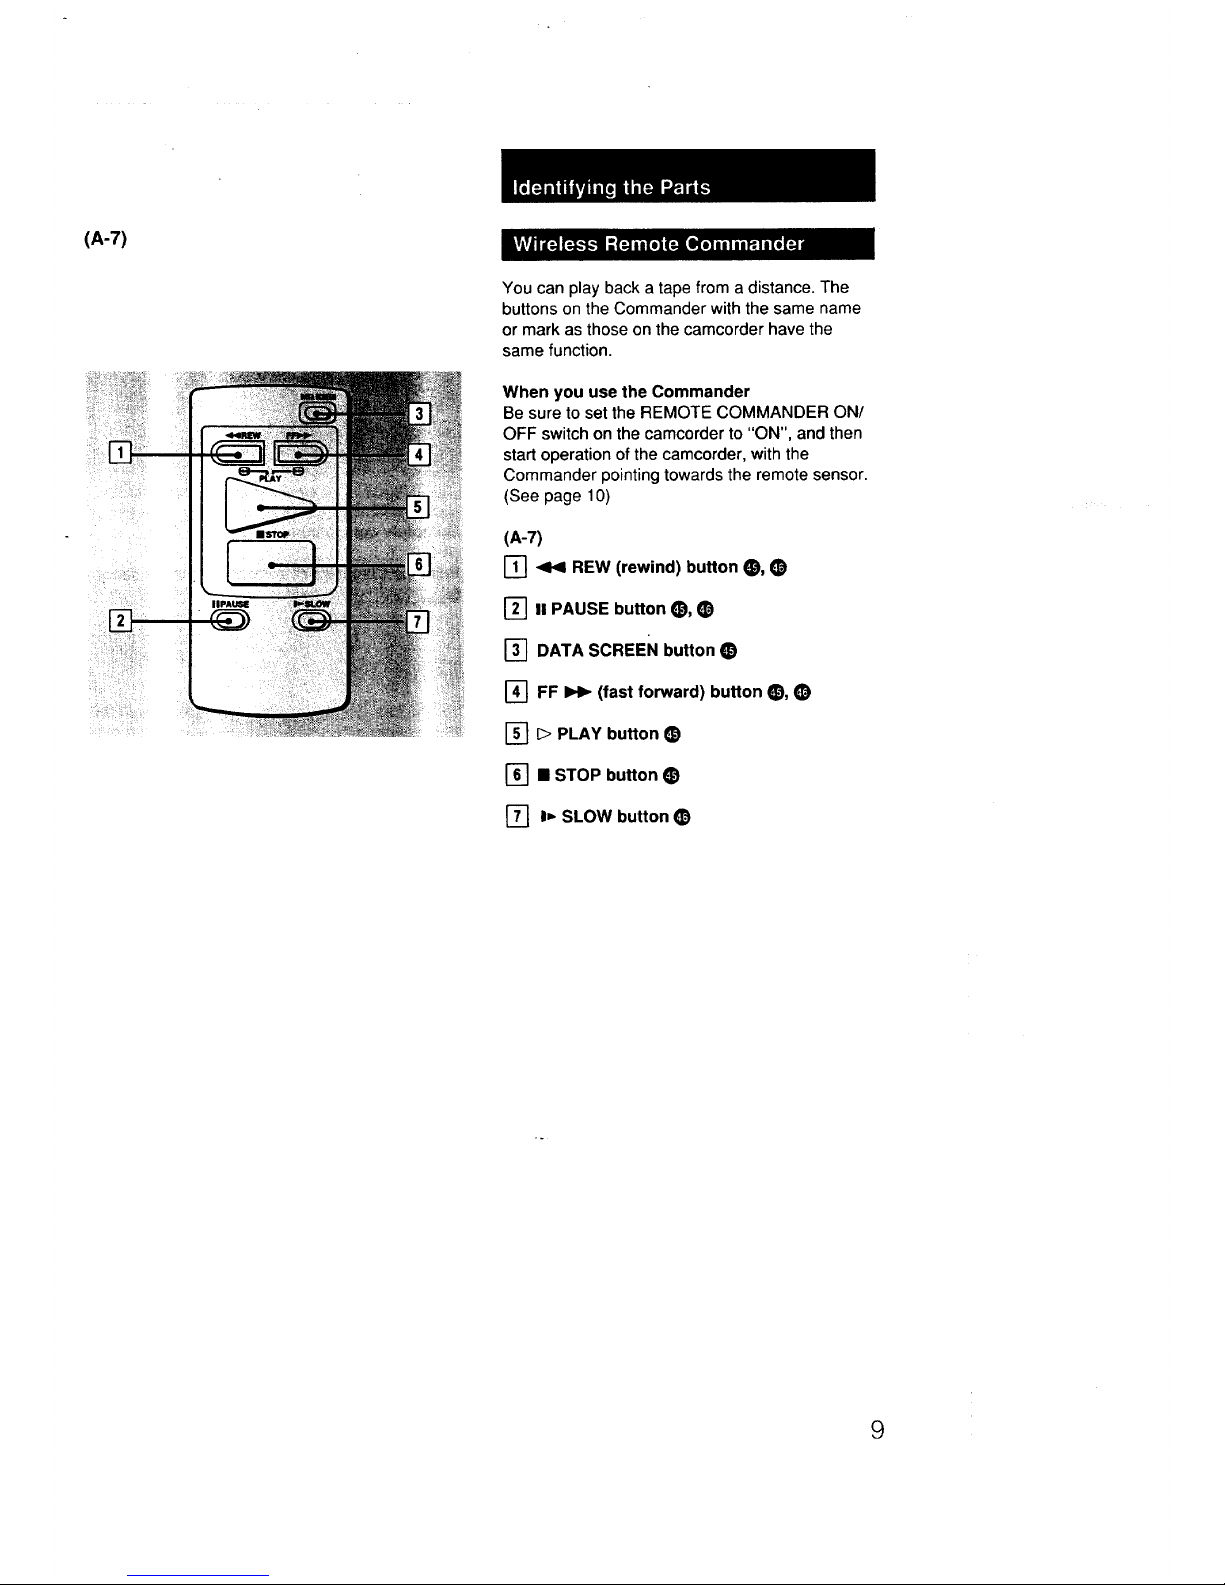
(A-7)
You can play back a tape from a distance. The
buttons on the Commander with the same name
or mark as those on the camcorder have the
same function.
When you use the Commander
Be sure to set the REMOTE COMMANDER ON/
OFF switch on the camcorder to "ON", and then
start operation of the camcorder, with the
Commander pointing towards the remote sensor.
(See page 10)
(A-7)
[] _ REW (rewind) button O, •
[] II PAUSE button 0, •
[_] DATA SCREEN button •
I-_ FF _ (fast forward) button 0, •
[-_ D PLAY button •
_-] • STOP button
O
[_ I=- SLOW button •
9
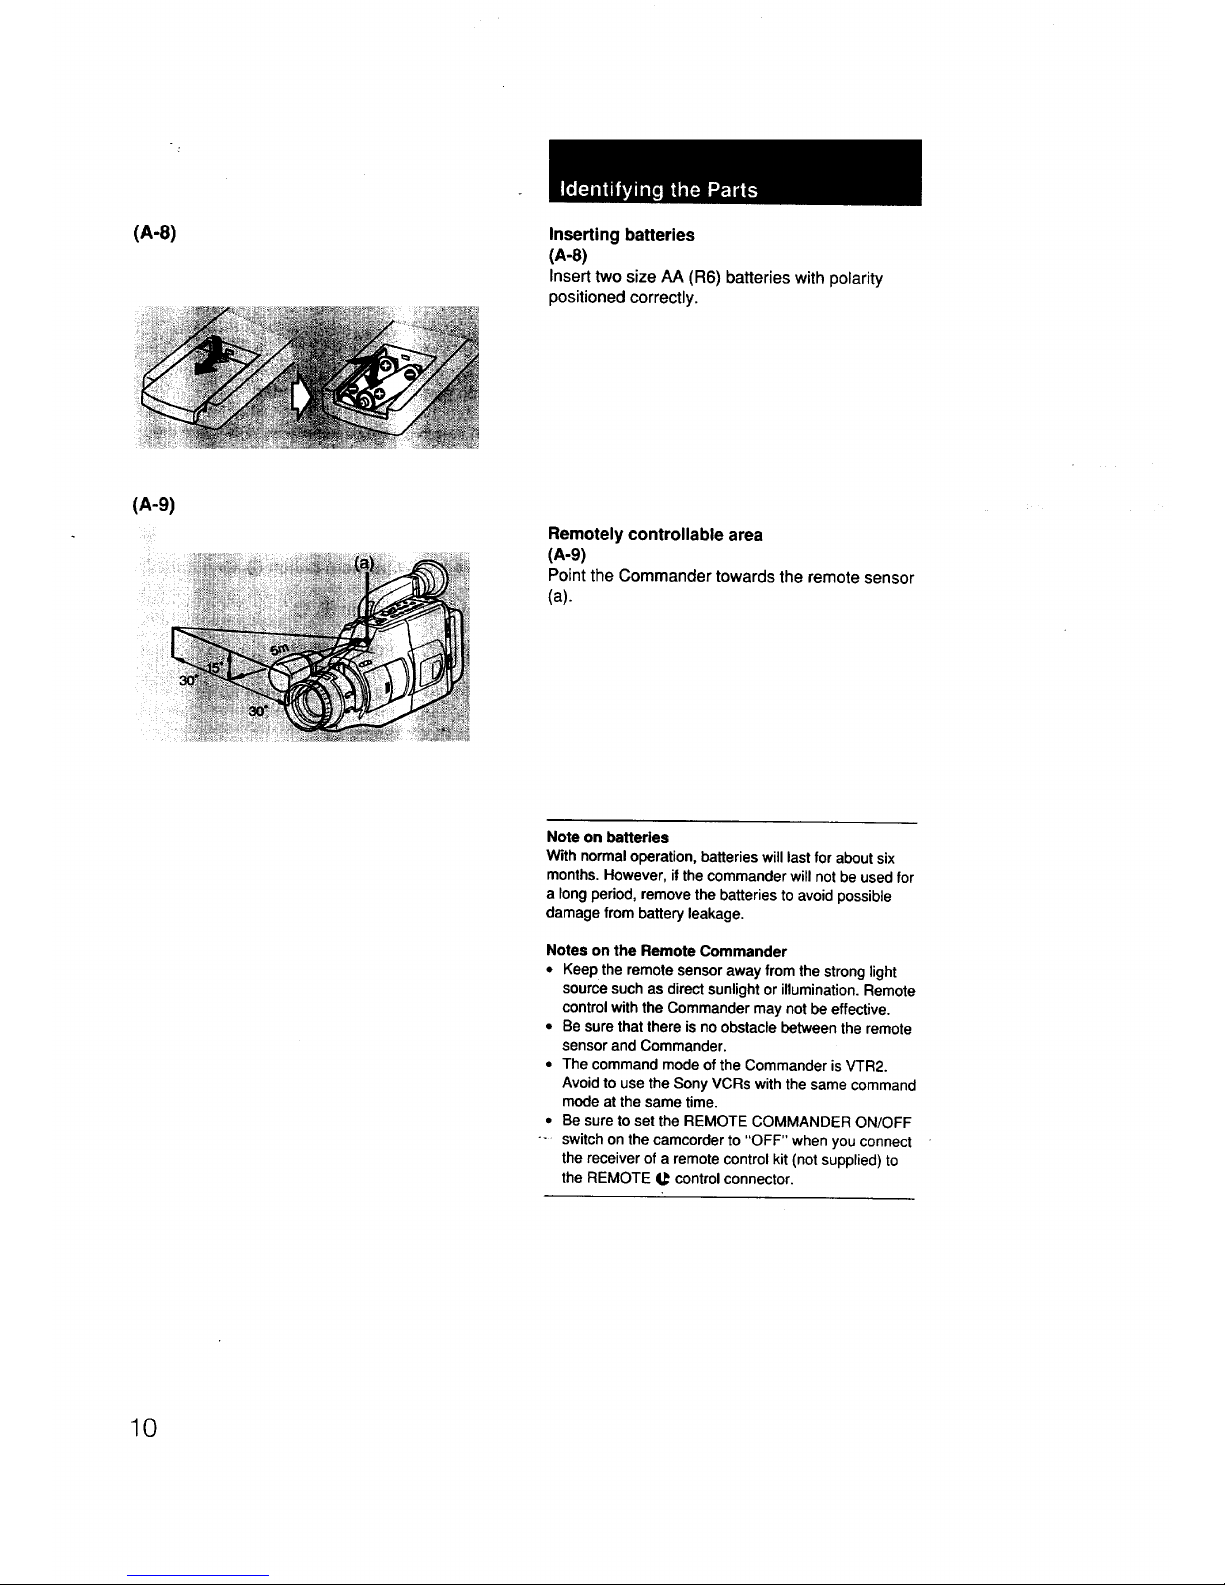
(A-8)
Inserting batteries
(A-e)
Insert two size AA (R6) batteries with polarity
positioned correctly.
(A-9)
il !!
Remotely controllable area
(A-S)
Point the Commander towards the remote sensor
(a).
Note on batteries
With normal operation, batteries will last for about six
months. However, if the commander will not be used for
a long period, remove the batteries to avoid possible
damage from battery leakage.
Notes on the Remote Commander
• Keep the remote sensor away from the strong light
source such as direct sunlight or illumination. Remote
control with the Commander may notbe effective.
• Be sure that there is no obstacle between the remote
sensor and Commander.
• The command mode of the Commander isVTR2.
Avoid to use the Sony VCRs with the same command
mode at the same time.
Be sure to set the REMOTE COMMANDER ON/OFF
switch on the camcorder to "OFF" when you connect
the receiver of a remote control kit (not supplied) to
the REMOTE U control connector.
10
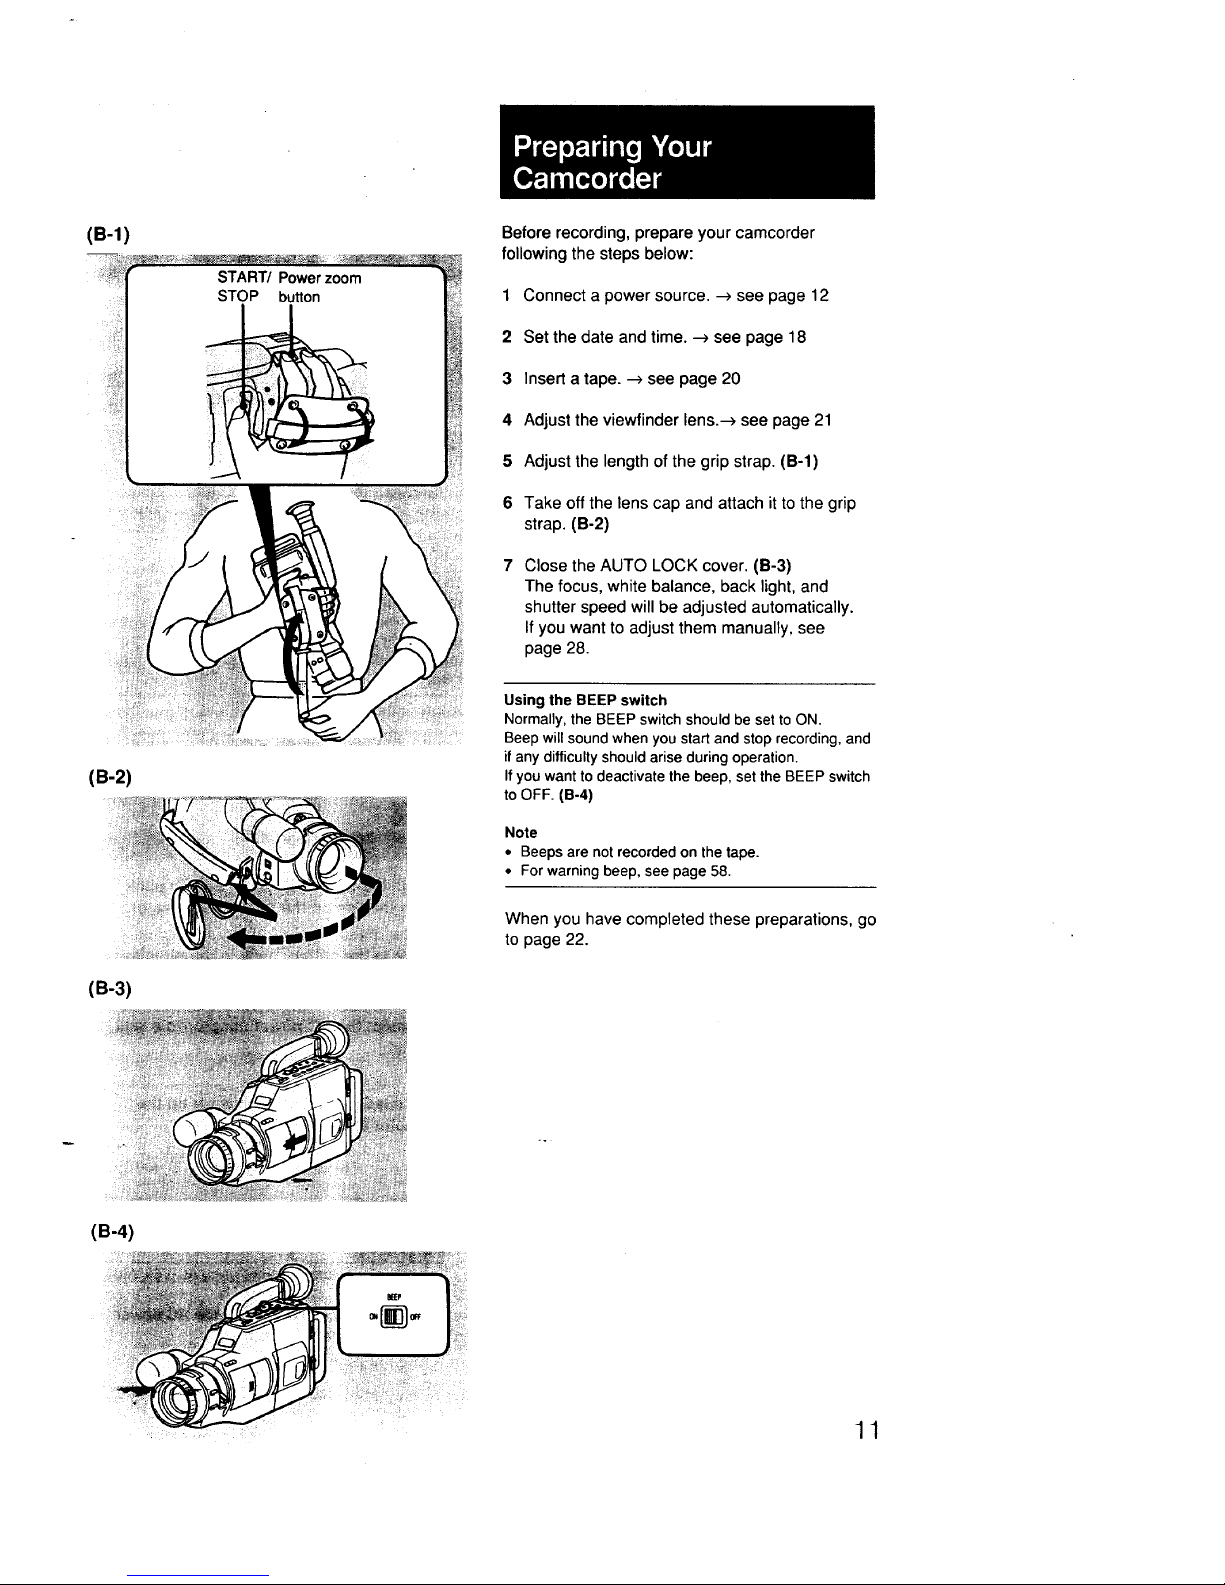
(B-l)
(B-3)
Before recording, prepare your camcorder
following the steps below:
1 Connect a power source. --) see page 12
2 Set the date and time. --) see page 18
3 Insert a tape. --) see page 20
4 Adjust the viewfinder lens.--) see page 21
5 Adjust the length of the grip strap. (B-l)
6 Take off the lens cap and attach it to the grip
strap. (B-2)
7 Close the AUTO LOCK cover. (B-3)
The focus, white balance, back light, and
shutter speed will be adjusted automatically.
If you want to adjust them manually, see
page 28.
Using the BEEP switch
Normally, the BEEP switch should be set to ON.
Beep will sound when you start and stop recording, and
if any difficulty should arise during operation.
If you want to deactivate the beep, set the BEEP switch
to OFF. (B-4)
Note
• Beeps are not recorded on the tape.
° For warning beep, see page 58.
When you have completed these preparations, go
to page 22.
(B-4)
i ¸ 11
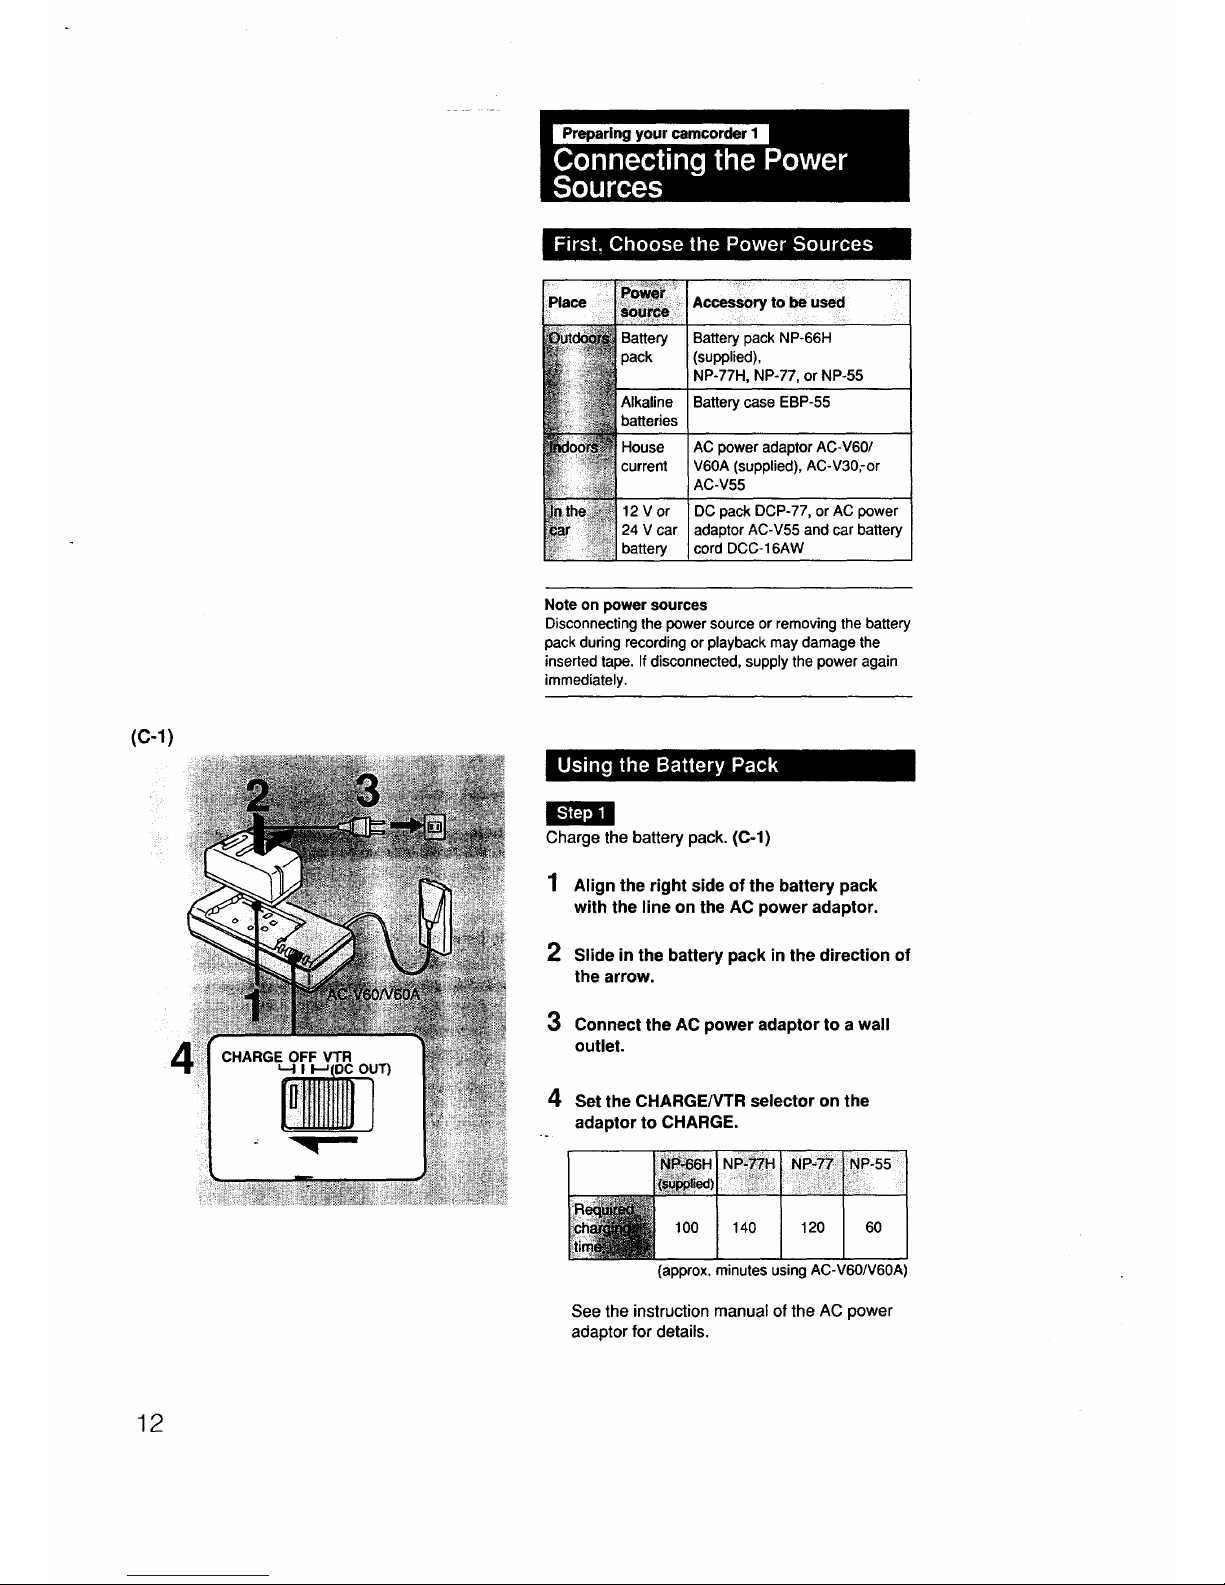
pow_ Ac_o,_to _ ._
P r
ace
NP-77H, NP-77, or NP-55
Alkaline BatterycaseEBP-55
batteries
House ACpower adaptorAC-V60/
current V60A(supplied), AC-V30ror
AC-V55
12 V or DC pack DCP-77,or AC power
24 V car adaptor AC-V55 and car battery
battery cord DCC-16AW
Note on power sources
Disconnecting the power source or removing the battery
pack during recording or playback may damage the
inserted tape. If disconnected, supplythe power again
immediately.
(0-1)
Charge the battery pack. (C-1)
1 Align the right side of the battery pack
with the line on the AC power adaptor.
2 Slide in the battery pack in the direction of
the arrow.
3 Connect the AC power adaptor to a wall
outlet.
4 Set the CHARGE/VTR selector on the
adaptor to CHARGE.
I, H
_(__ _ _)
iti_ 100 140 120 60
(approx. minutes using AC-V60/V60A)
See the instruction manual of the AC power
adaptor for details.
12
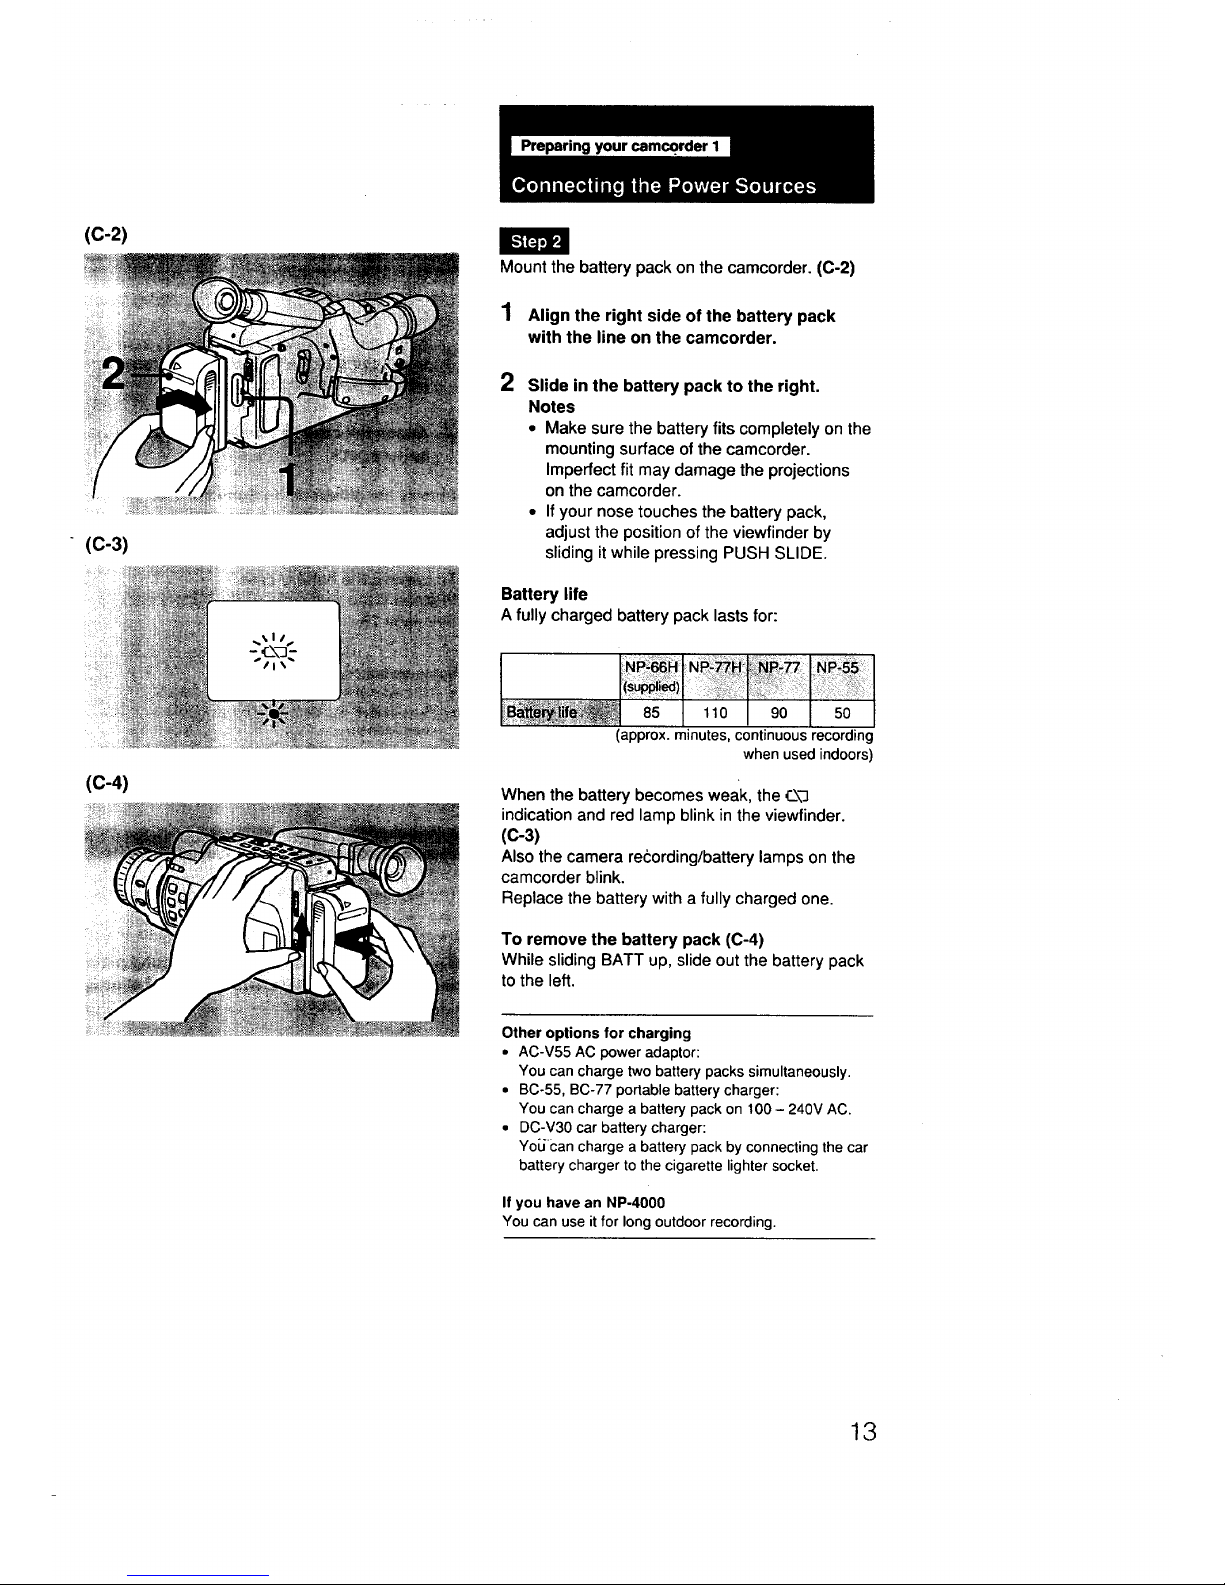
Preparing
(C-2)
(C-4)
Mount the battery pack on the camcorder. (0-2)
1 Align the right side of the battery pack
with the line on the camcorder.
2
Slide in the battery pack to the right.
Notes
• Make sure the battery fits completely on the
mounting surface of the camcorder.
Imperfect fit may damage the projections
on the camcorder.
• Ifyour nose touches the battery pack,
adjust the position of the viewfinder by
sliding it while pressing PUSH SLIDE.
Battery life
A fully charged battery pack lasts for:
_B ' _ ! 85 110 90 50
(approx. minutes, continuous recording
whenused indoors)
When the battery becomes weak, the _\3
indication and red lamp blink in the viewfinder.
(0-3)
Also the camera recording/battery lamps on the
camcorder blink.
Replace the battery with a fully charged one.
To remove the battery pack (0-4)
While sliding BATT up, slide out the battery pack
tothe left.
Other options for charging
• AC-V55 AC power adaptor:
You can charge two battery packs simultaneously.
° BC-55, BC-77 portable battery charger:
You can charge a battery pack on 100 - 240V AC.
° DC-V30 car battery charger:
Yo_J"c:ancharge a battery pack by connecting the car
battery charger to the cigarette lighter socket.
If you have an NP-4000
You can use it for long outdoor recording.
13
(c-5)
::
4;
_Sr+,,
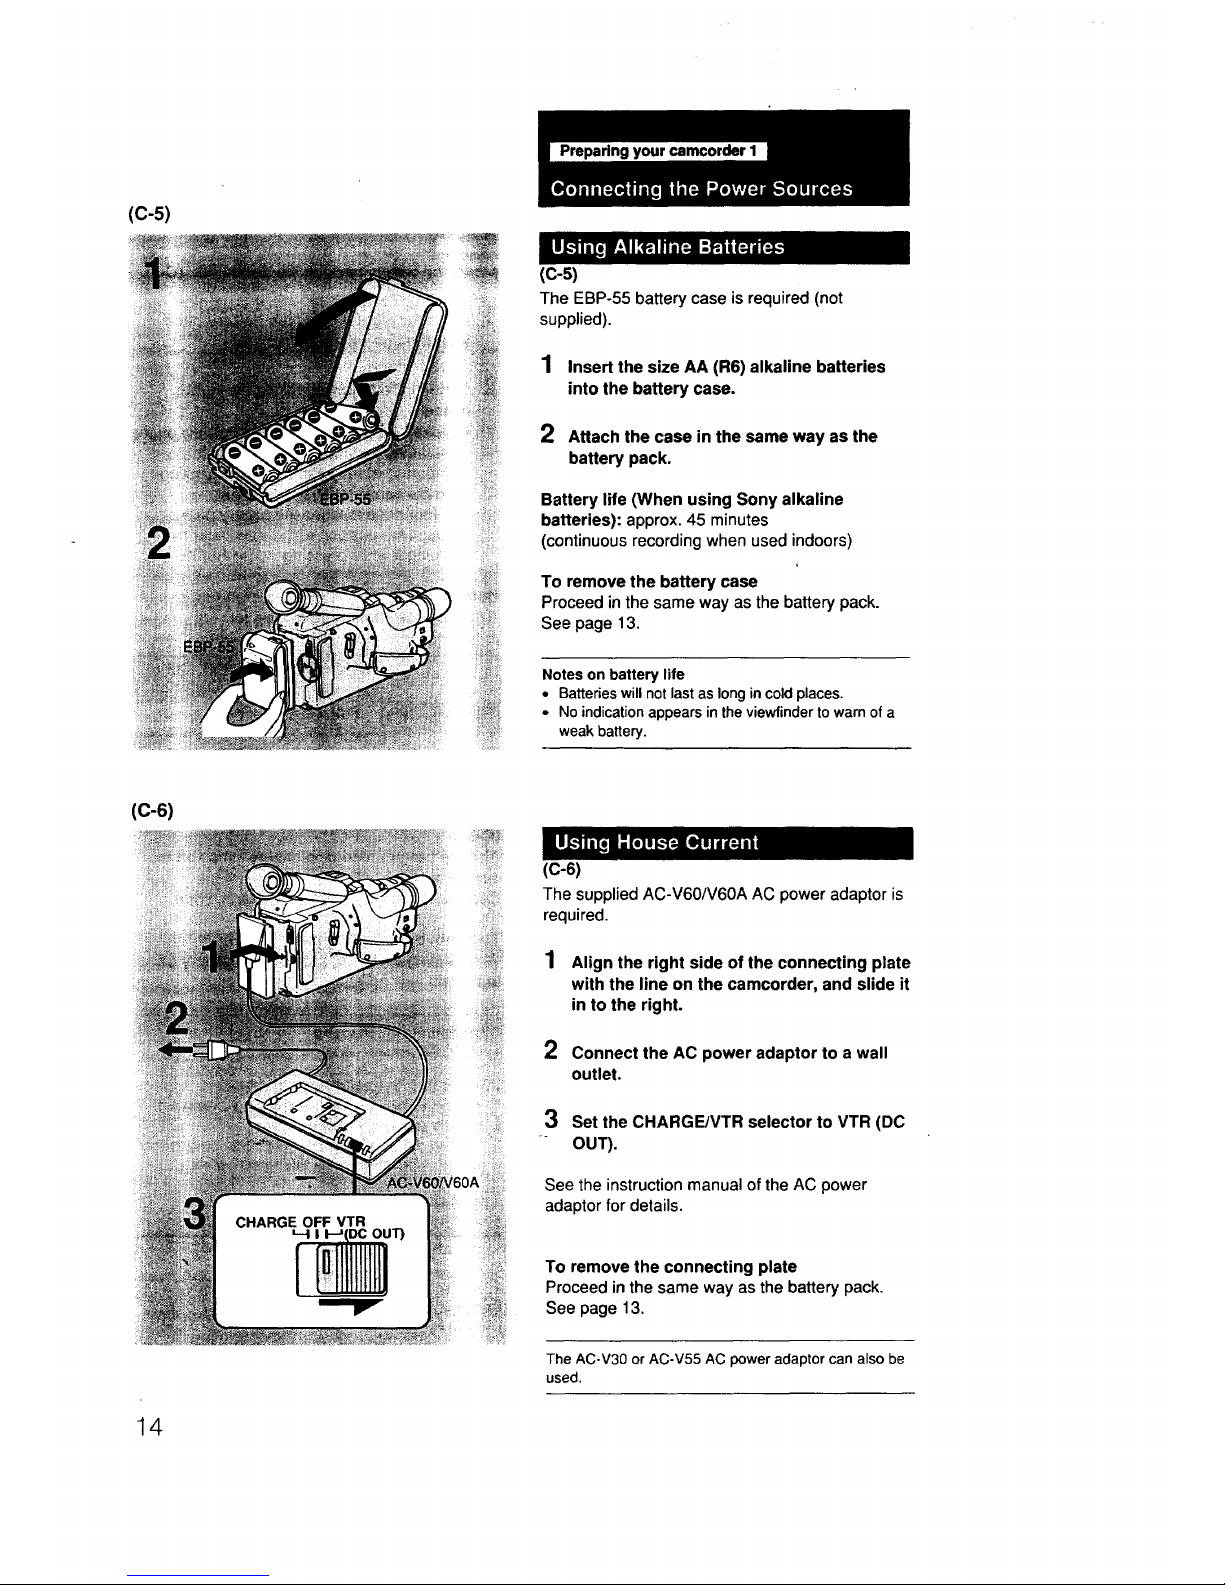
(c-s)
The EBP-55 battery case isrequired (not
supplied).
1 Insert the size AA (R6) alkaline batteries
into the battery case.
2 Attach the case in the same way as the
battery pack.
Battery life (When using Sony alkaline
batteries): approx. 45 minutes
(continuous recording when used indoors)
To remove the battery case
Proceed in the same way as the battery pack.
See page 13.
Notes on battery life
• Batteries will not last as long in cold places.
• No indication appears in the viewfinder to warn of a
weak battery.
(C-6)
(C-6)
The supplied AC-V60/V60A AC power adaptor is
required.
1 Align the right side of the connecting plate
with the line on the camcorder, and slide it
in to the right.
2 Connect the AC power adaptor to a wall
outlet.
3 Set the CHARGE/VTR selector to VTR (DC
° OUT).
See the instruction manual of the AC power
adaptor for details.
To remove the connecting plate
Proceed in the same way as the battery pack.
See page 13.
The AC-V30 or AC-V55 AC power adaptor can also be
used.
14

(C-7)
(C-7)
The DCP-77 DC pack is required (not supplied).
1 Align the right side of the DC pack with
the line on the camcorder, and slide it in to
the right.
2 Connect the cord to the cigarette lighter
socke:t of a car (12 V or 24 V).
To remove the DC pack
While pressing the BATT knob on the camcorder,
slide the DC pack to the left and pull out.
Other options
• The AC-V55 AC power adaptor and the DCC-16AW
car battery cord can also be used to operate this
camcorder on a 12 V or 24 V car battery.
• The DCP-55 DC pack can also be used to operate
this camcorder on a 12 V or 24 V car battery.
15
Preparing Your camcorder I
Have a sufficient battery pack power to
perform 2 or 3 times as much recording
than you have planned.
"Battery life" as indicated in the instruction
manual or catalogue ofthe camcorder is
measured by the continuous recording time of
the camcorder, placed at a room temperature
using a full-chargea battery.
Turn the STANDBY switch of the
camcorder off when not recording to save
battery power.
A smooth recording can be made even if
recording is stopped and started again.
While positioning the subject, selecting an
angle, or lookingthrough the viewfinder, the
lens moves automatically and the battery is
used. The battery is also used when a tape is
inserted or removed.
Battery life is shorter in a cold climate.
Battery efficiency is decreased and the
battery will be used up more quickly.
When the __\3mark in the viewfinder
changes from slow blinking to rapid
blinking while you are recording,
Turn offthe power switch of the camcorder
and replace the battery pack. Leave the tape
in the camcorder in order to obtain a smooth
recording after the b_ttery pack is replaced.
Beforeusingthebatterypack,chargeit
sufficiently.Abrand-newbatterypackisnot
charged.
Recharge the battery pack when it is
exhausted.
• If recording is completed before the _\-J
mark appears in the viewfinder, it is
recommended that you remove the tape,
set POWER to CAMERA, slide up
STANDBY, and leave the camcorder until
the __\-_mark blinks rapidly.
• Repeated charging while some capacity
remains causes a lowering of battery
capacity. However, the original battery
capacity can be recovered if you fully
discharge and fully charge the battery
again.
Recharge the battery pack before using.
If the battery pack is charged fully but not
used for a long time (about 1 year), it
becomes discharged.
Charge it again but in this case the battery
life will be shorter than normal. After several
charging and discharging cycles, the battery
life will recover its original capacity.
If the terminals (metal parts on the back)
are not clean, the battel2_Lduration will be
shortened.
When the terminals are not clean or when
the battery pack has not been used for a
long time, install and remove the battery
pack from time to time. This will improve the
contact condition. Also wipe the + and -
terminals with a soft cloth or paper.
Why the battery pack heats up
During charging or recording, the battery
pack heats up. This means energy has been
generated and a chemical change has
occurred inside the battery pack, but this is
not dangerous.
How to care for the battery pack
• Remove the battery pack from the
camcorder after using it, and keep it in a
cool place.
When the battery pack is attached to the
camcorder, a small amount of current flows
to the camcorder even if the POWER
switch is turned off. Itcauses
overdischarging and will shorten battery
life.
• The battery pack is always discharging
even when it is not in use after charging.
Thus, it is recommended you charge the
battery before using.
How to use the switch on the battery pack
This switch is provided so that you can
remember the charging condition. Set the
switch to the "no mark" position when
charging iscompleted. Set the switch to the
"red mark" position when the battery is used
up.
How many times can the battery pack be
recharged
It can be fully charged and discharged about
500 times under normal temperatures.
If t_he _\_ mark blinks rapidly just after turning
on the camcorder with a fully charged battery
pack, the battery pack should be replaced
with a new fully charged one.
Temperature during charging
Lower temperature require a longer charging
time. Charging under temperatures ranging
from 10°C to 30°C is recommended.
17
(D-l)
:
2
(D-2)
',D-3)
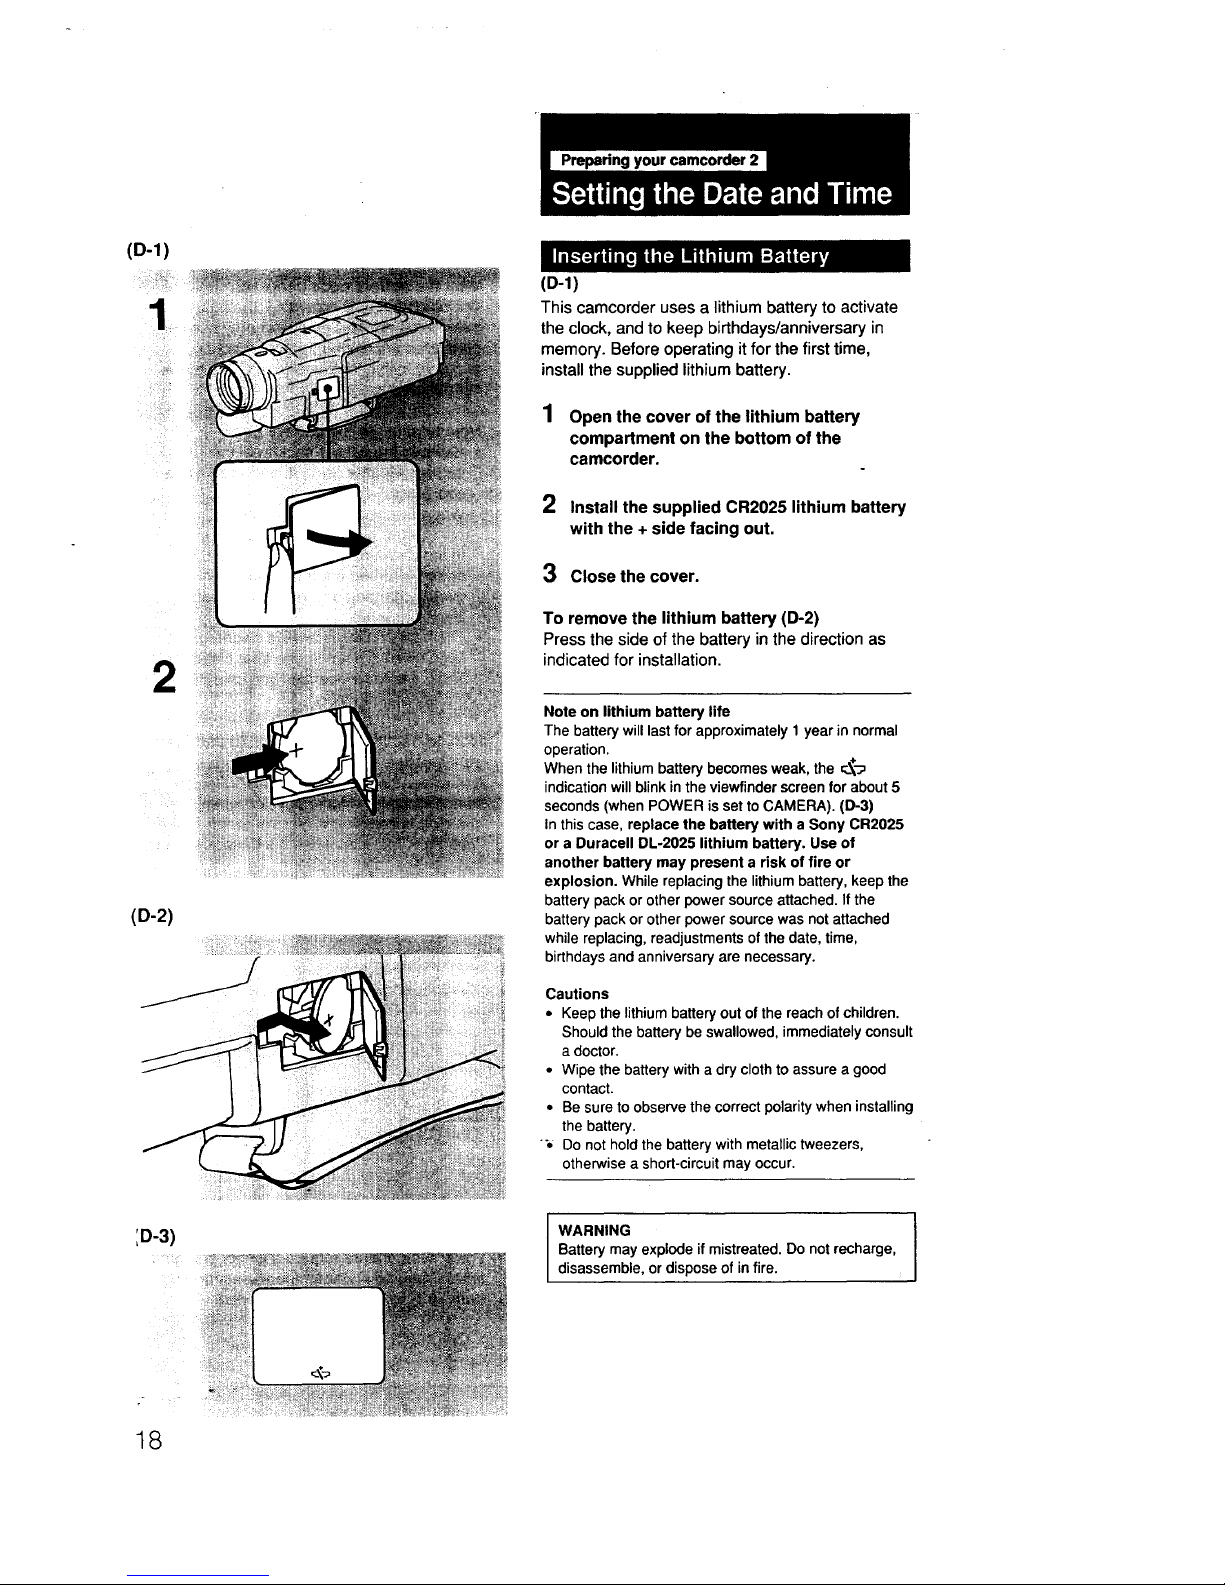
(D-l)
This camcorder uses a lithiumbattery to activate
the clock, and to keep birthdays/anniversary in
memory. Before operating itfor the first time,
install the supplied lithium battery.
1 Open the cover of the lithium battery
compartment on the bottom of the
camcorder.
2 Install the supplied CR2025 lithium battery
with the + side facing out.
3 CIosethe cover.
To remove the lithium battery (D-2)
Press the side of the battery in the direction as
indicated for installation.
Note on lithium battery life
The battery will last for approximately 1 year in normal
operation.
When the lithium battery becomes weak, the ___'_
indication will blink in the viewfinder screen for about 5
seconds (when POWER is set to CAMERA). (D-3)
In this case, replace the battery with a Sony CR2025
or a Duracell DL-2025 lithium battery. Use of
another battery may present a risk of fire or
explosion. While replacing the lithium battery, keep the
battery pack or other power source attached. If the
battery pack or other power source was not attached
while replacing, readjustments of the date, time,
birthdays and anniversary are necessary.
Cautions
• Keep the lithium battery out ofthe reach of children.
Should the battery be swallowed, immediately consult
a doctor.
• Wipe the battery with a dry cloth to assure a good
contact.
• Be sure to observe the correct polarity when installing
the battery.
'. Do not hold the battery with metallic tweezers,
otherwise a short-circuit may occur.
WARNING I
Battery may explode if mistreated. Do not recharge,
disassemble, or dispose of in fire.
18
 Loading...