

Page 1

About the software on
your Sony notebook
PCG-GRX516SP
N
Page 2

Read this first
nN
1
Read this first
Notice
This pr oduct c ont ains s of twar e own ed by Sony and l icense d by thir d partie s . Us e of su c h s of t ware is s ubject t o t he t er ms and conditions
of lice nce agreements enclosed w ith this p ro duct. Software specificati ons ar e subjec t to change witho ut no tic e and may n ot necessarily
be identical to current retail versions. Updates and additions to software may require an additional charge. Subscriptions to online
service providers may require a fee and credit card information. Financial services may require prior arrangements with participating
finan c ial institutions.
© 2002 Sony Corporation. All rights reserv ed.
Reproduction in whole or in part without perm ission is prohibited.
End user software licence agreement
About the software on your Sony notebook
This End User Software Licence Agreement (the EULA) is a legal agreement bet ween you and Sony Corporation (hereinafter referred
to as Sony), a cor por a t io n or ganized under J apa nese Law, t he m anufacturer of y our Sony com put er s ystem (the SONY HARD WAR E).
Please read this EULA carefully before installing or using the software distributed together with this EULA (the SONY SOFTWARE). By
insta ll ing or usin g the SO NY SO FTWARE, you agre e to be bound by th e term s of th is EULA. You may use th e SONY SOFTWARE only in
connect ion with the use of the SONY HARDWARE. SONY SOFTWARE is licensed; not sold.
Notwithstanding the foregoing, software distributed together with separate End User Software Licence Agreement (the Third Party
EULA), including but not l imited to Windows® operatin g system provided by Micr osoft Corporat ion, shall be covered by the Third Pa rty
EULA.
If you do not agree to the terms of this EULA, please return the SONY SOFTWARE together with the SONY HARDWARE to the place
where y ou obt ained it.
1. Licence. This SONY SOFTWARE and the related documentation are licensed to you by Sony. This EULA allows you to us e the SONY
SOF TW AR E f or your p erson al use for a single SON Y HARD WARE outside a netwo rk and only to m ake one copy of the SONY SOFTWARE
in machin e-re ad a ble form for back- up purp o ses o nly.
Page 3

Read this first
About the software on your Sony notebook
nN
2
2. Restrictions. The SONY SOFTWARE cont ains copyrighted material and othe r propr i e t ary mat e r ial . In order to prot e ct them , and
except as permit ted by applicable law, you may not decompil e, reverse engineer or disassembl e the SONY SOFTWARE in whole or in
part. Except for the transfer of the SONY SOFTWARE together with the SONY HARDWARE and prior agreement of the recipient to be
bound by th e terms and conditions of this EULA, you may not sell or rent the SONY SOFTWARE and its copy to any third party.
3. Limited Warranty. Sony warrants the media on which the SONY SOFTWARE is recorded to be free from physical defects for a period
of ninet y (90) days from th e da t e of pu rchase as ev id e nce d by a co py of the rec ei pt . During the applicab le w ar ran ty per i od, Sony will
replace free of charge such media prov ed to be defective, provid ed they are returned pr operly packag ed to the place where you
obtained it , together with your name, address, and proof of date of purchase. Sony will have no resp o nsib il ity to repl ace med ia
damaged by accident, abuse, or misapplication. The above limit ed warranty replaces all other representati ons, conditions and
warra nt ies , whet her ex pr es s or impl ied, by stat ut e or otherw is e and Sony express ly disclaims all other warranties and all conditions
inclu ding, but not limited to, the implied warrantie s and/or condition s of sa tis fa ctor y quality and fitne ss for a par t icul ar purpo se. The
term s o f th is limited warranty do not a f fe ct or prejudice y our statutory r ights as an u lt i mate c onsumer, neither do t hey l imit or ex c l ude
any liabi l it y for deat h or pe rsonal in ju ry caus e d by th e ne glige nce of Sony.
4. Termination. This EULA is effective until terminated. You may terminate this EULA at any time by destroying the SONY SOFTWARE,
related document at ion, and all copies thereof. This EULA will terminat e immedi at ely withou t notice from Sony, if you fail to comply
with any provision of this EULA. Upon termination you must destroy the SONY SOFTWARE, related documentation, and all copies
thereof.
5. Governing Law . This EULA shall be governed by and construed in accordance with the laws of Japan.
Should you have any questions concerning this E U L A or t his limited wa r r ant y, please refe r t o t he Customer Service Guide on how to
contact V AI O-Lin k.
Page 4

Read this first
nN
3
About the software on your Sony notebook
ENERGY STAR
As an ENERGY STAR® Partner, Sony has determ ine d that th is produ ct me ets th e ENERGY STAR® guidelines for energy ef ficien c y. The
Internat ional ENERGY STAR® Office Eq uipment Program is an international program that promotes energy saving through the use
of comput e r s and their office eq uip m ent . The pr ogr a m bac ks the devel opm e nt and di ssem ination of produ cts wi t h fun cti ons th at
effec t ively re duc e ener gy co ns um pt io n. It is an ope n s ystem in w hich busines s pro pr iet or s can parti c ipat e voluntarily . The targeted
prod ucts a r e of fic e equipment such as comput e r s, displays, printers, facsim i les and c opi er s. Their s tandards and logos are uni form
among participating nations.
ENERGY STAR is a U.S. registered m ark.
®
Page 5

Read this first
About the software on your Sony notebook
nN
4
Trademarks
Sony, Digita lPri nt, DVDit, Drag’n Drop CD/DV D, DVgate, HotKey Utili ty, i.LINK, Jog Dial Navigato r, MovieShaker, Simple DVD Mak er,
Smart Cap tu re , Soni c Stage, Sony Notebook Set up, UI Design S elector , V AI O Edi t Comp onent s , Memory Sti ck , the Me mo ry St ick logo,
VAI O and the V AI O l ogo ar e tradem ar ks of Sony Corporation. T he Windows and Windows XP Profe s s io nal l ogo ar e regis t e re d
tradema rks o f Micro so ft Corpo ra ti o n.
WinDVD is a trademark of InterVideo, Inc.
i.LINK is a trademark of Sony used to designate that a product contains an IEEE1394-connection.
Adobe, Adobe Acro bat Re ader, Adob e Phot os hop Elements and Adobe Pr em iere ar e tradem a r ks of Adobe Sy s tems Incor porated.
QuickTime and the QuickTime logo are tradem ar ks used under lic enc e. Q uickTime is register e d in the U.S . and othe r countr ies.
RealPlayer is a registered tradem ark of RealNetwor ks , Inc. in the U.S. and other countries.
PowerPanel is a trademark of Phoenix Tec hnologies Ltd.
Symantec Norton An tiVir us is a trademar k of Symantec Corporat ion .
All other names of systems, products and services are trademarks of their respective owners. In the manual, the ™ or ® marks are not
specified.
Speci f icat i ons are s ubj ec t to change w it hout noti c e.
All other trademar ks are trademarks of their respecti ve owners.
Page 6

Registering your VAIO
Registering your VAIO
It only takes a few momen ts to regis te r your S ony VAI O computer .
By register in g yo ur comput er , you can take adva ntage of So ny’s c om mit m ent to quality c us to mer suppor t
and receive the following be nefits:
❑ Club VA IO – Online support, tutorials, tips and tricks, news, news forums, c ompetitions, free downloads
and software updates.
❑ VAIO-Link – If you are experiencing any problems with your computer, you can check the VAIO-Link
website fo r a possibl e solution: http://www.vaio-link.com.
❑ Guarantee – Protect your investment. See the Guarantee sheet fo r th e te rms and condi tion s an d refe r
to your Troubleshooting Guide for mor e inform at ion .
To register your Sony VAIO comp ut er , proceed as follow s:
1 Connect your phone line and set up a modem connection (see Configuring your modem (page 75)).
About the software on your Sony notebook
2 Double-cl ick t he VA IO O nline Regis tration icon on th e deskto p .
3 Select your language and click Next.
4 Select the Register Now option button and click Next.
This brings you to the website https://registration.sonystyle-europe.com/vai o/registration.asp.
5 Fill in your first and last name, the serial number of your computer and the place where you live.
6 Click Submit.
Your VAIO is registered.
✍ You can only register if you have administrator rights on your computer.
nN
5
Page 7
About the software on your computer
About the software on your computer
Your Sony computer is ready to help you work, play, learn, and communicate as soon as you turn it on. This
section gi ves you an overvi ew of wha t you can do wit h the sof tware installed on your comput er .
Sony software
DigitalPrint
Sony Electronics
DigitalPrint is easy-to-use software designed to help you get the most enjoyment out of your photographs
taken with a digit al cam era or taken from a CD, floppy disk or Memor y Sti ck™ . With Di gi ta lPrint, you can
easily load photos into your computer, create photo albums, labels and make prints.
nN
6
About the software on your Sony notebook
DVgate
Sony Electronics
DVgate is a kit of 3 complementary applications: DVgate Motion, DVgate Still, and DVgate Assemble. This
collectio n make s it easy to select and edit digital video clips, then bring th em together in to a professionallooking hom e video. Use i. LIN K™ to connect your digit a l vide o camera, and the computer opera t es as an
editing desk that can captur e, preview, cut and assemble your sel ecti on and sa ve the sequences in AV I and
MPEG 1 & 2 formats. DVgate Still displays digital video images sent from a digital videocassette recorder or
a digital video c am era recorder (on ly pos s ible if y ou have DV In /Out on your cam er a), and sa v es them as
graphic files on your hard drive.
Page 8

About the software on your computer
ISP Selector
Sony Electronics
With the ISP Selec tor you can eas il y inst all the Int ern et Servi ce Provi der you want to use. Just choos e y our
country and y our langu age in the dr op- dow n li sts and th e ava ila bl e provider s appear . Click the Install
button next to the ISP and the installation begi ns.
✍ Once you have selected your country, you can only set up ISPs for that country.
Jog Dial Navigator
Sony Electronics
In this application, you can select Sony applications, or others, that you want the Jog Dial™ to pilot; you can
also configur e th e Jog Dial Navig ato r to start any appli cat ion , estab li s h a dial-up conn ection, or read an email, simpl y by turning and pr es sing t he Jo g Dia l™.
About the software on your Sony notebook
MovieShaker
Sony Electronics
MovieShaker® creates personal movies - complete with transitions, specia l effects , background music, and
text. All you do is import your clips, pick the tune you want and MovieShaker® does the rest. Yo u can also
choose to take contr ol and produce your very own movie. You choos e the exact clips or der , special effec t s,
and transitions. You can also import your own music and MovieShaker® will auto matically ma tch the length
of the song to the length of your movie.
nN
7
Page 9

About the software on your computer
PowerPanel
Sony Electronics
The PowerPanel util ity control s the power mana geme nt of your com put er and prov ide s key inform at io n
about syste m ac tivi ty a nd bat te ry li fe . Automa ti c pow er manag eme n t selects the mo st ap pr opri a te profi le ,
dependi ng on the appli c at ion you are working w ith and t he co ndi tions of use.
Simple DVD Maker
Sony Corporat ion
Make the most of the VAIO (Video Aud io In te gr ate d Operation) leading tech nol ogy wit h Simple DVD
Maker. As the name suggests, Simple DVD Maker makes it easy to create your own DVDs. You can use images
recorded with movie files (MPEG files or DV codec AVI files) created with MovieShaker or DVgate, or images
loaded from a DV device to make DVDs. Files can then be written to a DVD-R/RW disc or CD-R/CD-RW disc in
About the software on your Sony notebook
DVD-Vide o f o rma t .
Smart Capture
Sony Electronics
Connect a digital camera to your computer to shoot still images and video clips, which you can view or send
by e-mail. The Smart Capture Finder displays images from the camera and allows you to adjust the settings
or create effects. Smart Captu re enables y ou to capture images via i.LINK™ compatib le devi c es or create a
panora ma pic tu re using th e panor am a assi st fu nct ion.
nN
8
Page 10

About the software on your computer
SonicStage
Sony Electronics
SonicStage is software using the OpenMG technology, a copyright protection technology developed by Sony
Corpo rati on and des ig ned t o all ow recor di ng a nd playb a ck of di gital musi c data on a perso nal computer .
Once the data is encrypted an d recorded onto the hard disk, SonicStage technology allows it to be played
back on the PC b ut prevents unauthorised distribution. T he purpose of SonicStage technology is to create
an environment in which larger quan tities of high-quality music can be distributed without subsequent
unaut hori se d dis tri buti o n of the music fil es.
The SonicSt age soft w ar e encrypts and ma nages mu sic files either dow nloaded to a personal com put er by
using the EMD services or adopt ed (or c re ate d) fro m your ow n CD or the Internet.
To use the CD-R functions, you will need to install the CD-R module from the supplied Application CD-ROM.
Sony Notebook Setup
nN
9
About the software on your Sony notebook
Sony Electronics
Use Sony Noteboo k Setup to consult system information, specify preferences for system behaviour, and se t
up a power-on passw ord for your S ony co mp ut er.
UI Design Selector
Sony Electronics
You can chang e the wind ow desi gn of the Sony s of twar e comp at ibl e with UI Desi gn Select or .
Page 11
About the software on your computer
VAIO Edit Components
Designed as a plug-in for Adobe® Premiere®, VAIO Edit Components includes special features to support
your i.LINK™-DV devices, so you can produce superior quality home movies even after editing. Now you can
control th e DV device from your co mp ut er, impo rt and e dit the movie , and then expo rt it back to the DV
device.
Product Recovery CD- RO Ms
Sony Corporat ion
The P roduct Recovery CD -ROMs allow you to rein stall the system, the softwar e ship ped with your compu te r
and the bundled device drivers if they are corrupted or accidentally erased. Reinstalling an individual device
driver may correct a probl em you ar e expe rien ci ng wi th your co mp uter , wi thout yo u having to recove r the
entire system.
About the software on your Sony notebook
! You can only use the Recovery CD-ROMs on the Sony computer you purchased, and not on any other Sony PC or other manufacturer's PC.
nN
10
Page 12

About the software on your computer
Operating syst em and other pre-installed software
Windows® XP Professional
Microsoft Corporation
Built on the pro ven Windows® 2000 operating system, Windows® XP Professional delivers a reliable
foundation you can count on to keep your computer up and running when you need it most. Not only is the
operati ng system more reliable, i t also offers features that ma ke it much faster and easier to recover from
system probl em s.
From it s fresh , new look to its more intu it ive , task -ba sed desi g n, W ind ow s® XP Professional will make your
computing experience easier than i t’s ever been. With support for the latest security standards an d
enhanced Firewall protection, Windows® XP Professional also keeps your data secure and maintains your
privacy.
For questions and technical assi st a nce, go onl i ne to:
About the software on your Sony notebook
http://support.microsoft.com/directory
Inte r n et Ex plo r e r 6. 0
Microsoft Corporation
Internet Explorer is the Microsoft Internet browser allowing you to surf the World Wide Web. The Setup
Wizard configures your computer to connect automatically to your service provider. A full e-mail package
enables you to send and receive mail - including attached files - across the Internet. NetMeeting, Outlook
Express and Mic ro soft Chat are just some of the component s bundled with Internet Ex pl or er 6.0. Inte rn et
Explorer 6.0 also includes 128-bit encrypt io n, the hig hes t possi ble lev el of prote cti on f or all your Internet
communications, including credit card use and financial transactions. A complete online tutorial helps new
users be come comfort a ble using th e Interne t.
For questions and technical assi st a nce, go onl i ne to:
http://support.microsoft.com/directory
nN
11
Page 13

About the software on your computer
Adobe® Acrobat® Reade r 5.0
Adobe Systems Incorporated
Acrobat® Reader software allows you to view, navigate, and print electronic documents in Adobe Portable
Docum ent Format (P D F), an open fil e format that is inte nd e d to preserve the confo rmi ty of doc um ents
created on all maj or computer platfo rms. Once Ac robat® Reader is installed, you can open and view PDF files
from withi n your Web brows er by clicking a PDF file embedded in an HTML file. You quickly see the first
page while the rest of the document is being downloaded.
For questions and technical assi st a nce, go onl i ne to:
http://www.adobe.com
Adobe® Photoshop® Elements
Adobe Systems Incorporated
About the software on your Sony notebook
Adobe® Photoshop® Elements software introduces the next generation of image editing with powerful new
features that offer something for every user. Delivering the broadest and most productive toolset available,
Photoshop® Elements helps you explore your creativity, work at peak efficiency, and achieve the highest
quality results a cross all image media.
For questions and technical assi st a nce, go onl i ne to:
http://www.adobe.com
nN
12
Page 14

About the software on your computer
Adobe® Premie re® 6.0 LE
Adobe Systems Incorporated
Complem ent ar y with DV gat e Moti on, Adobe® Premiere® lets you capture, reco rd, create and edit movie s
with vide o, sound, animat ions, photo gr aphs , drawings, text and other ma teri al.
This stunningly simple and powerful professional video-editing tool comfortably closes the DV to Web gap.
Different tools, including various effects and transitions, help you to prepare your images for editing on tape
or CD-ROM.
Adobe® Pr emie r e® combines professional video editing capabilities and high quality output in a product
that's easy to use and versati le.
For questions and technica l and tec hni c al assis t anc e, go online to:
http://www.adobe.com
Drag'n Drop CD/DVD
About the software on your Sony notebook
DigiOn / Easy Systems Japan
Drag'n Drop CD/DVD is designed to be the most simple software to make your own DVDs or CDs. Users can
create their own audio CDs or DVDs that can be read in most PCs. You ca n also bur n your own CD s with it.
The operation is simple: select the files that you wish to write, and drag and drop them into an appropriate
box that corresponds to the CD or DVD format. After dropping them, simply press the DVD Create button.
For questions and technical assi st a nce, go onl i ne to:
http://www.easy.co.jp/dde/sony
nN
13
Page 15

About the software on your computer
DVDit!™
Sonic Solutions
DVDit!™ enables you to create interactive Video content on your PC and publish it on DVD. You start by
importing your edited MPEG-1 and MPEG-2 video and audio files (WAV and MPEG-1 layer 2 files only), image
files, and other multimedia. Then you can import backgrounds and buttons, text and effects, to create your
own DVD menus. Link your video and audio content to create interactive presentations, training
applica tions or virtually any other interac t ive video content. When you're finish ed, DV Di t!™ aut om at ically
converts you r video so urces into the correct formats, and records your content directly to DVD- R or CD-R .
For questions and technical assi st a nce, go onl i ne to:
http://dvdit.com/Support/index.html
QuickTime 5.0
nN
14
About the software on your Sony notebook
Apple
QuickTime is the Apple technology that makes video, sound, music, 3D and virtual reality come alive for your
Internet browser and Windows.
For furth er in fo rmation, see the website at:
http://www.apple.com/quicktime
RealPlayer
RealNetworks - RealPlayer
RealPlayer is the RealNetworks video and audio player, which lets you access 2,500 radio stations featuring
music, news and sp or ts.
For furth er in fo rmation, see the website at:
http://www.real.com
Page 16

About the software on your computer
Symantec Norton AntiVirus (as setup on the hard drive)
Symantec
This software package includes a 90-day free subsc r ipti on t o virus defini tion updates.
With Norto n AntiV irus, you ca n scan fil es , folde rs, or ent ire drive s fo r viruse s, and quara ntin e in fecte d fil es
for subm ission to the Sy man tec AntiVirus R e sea rch C e n tre (SARC). Fil es su b mit te d to SARC are analyze d and
the resu lts are reported auto maticall y within seve n days. When you conf igure Norton AntiVirus ad equately,
your com puter is safe. Norto n AntiV i ru s can aut omat ical ly check boot re cord s fo r viru ses a t syste m startup,
check p rograms for vir u se s at the time you use them, scan a l l lo cal hard dri ve s for vi ru se s once per week, an d
monit or yo u r comp u ter for any activity that might indi cate th e work of a v irus in action . I t can al so scan files
you downl oad fro m the Inter net and c heck floppy di s ks for boot virus es when you use the m.
You must launch t he Nort on An ti Vi r us installation, and you wi ll th en be pro mp ted to update the v irus
definitions. This is normal as new viruses have come out since your VAIO left the factory.
For more informati on, see the online help files and the websit e at:
About the software on your Sony notebook
http://www.symantec.com/techsupp
VAIO Web Phone
CallServe Com m uni c at ions Ltd.
Once you have purchased the USB telephone, this Internet Telephone enables you to make telephone calls
from your PC via the Internet to any other phone. You can make internati onal calls at significant ly lo wer
prices and make phone calls and surf the web at the same time - on just one phone line.
For more informati on, see the online help files and the websit e at:
http://www.callserve.com/EN/help/index.asp
nN
15
Page 17

About the software on your computer
WinDVD
Inte rV ideo, Inc.
InterVideo Inc.'s WinDVD is a simple-to-use DVD player. WinDVD combines all the features you would expect
to find on a standard consumer DVD player, in addition to some very advanced functionalities, full precision
video decoding, a choice of user interfaces, and video display options. You can play DVD movies, interactive
DVD titles, MPEG video content, video and audio CDs. WinDVD automatically determines the type of disc in
the DVD dri ve and uses the correct pla yback metho d.
For questions and technical assi st a nce, go onl i ne to:
http://www.intervideo.com
About the software on your Sony notebook
nN
16
Page 18

Using Video software
Using Video software
The followin g video s of t ware appl icat i ons are insta ll ed on your VAIO:
❑ Usi ng DVgat e (page 18)
❑ Using MovieSh aker (page 34)
❑ Using Sma rt Captur e (page 40)
About the software on your Sony notebook
nN
17
Page 19

Using Video software
Using DVgate
DVgate is a software application that enables you to capture and then edit images taken with digital video
devices (DV devices), such as digital video camera recorders, on your personal computer. It also gives you the
ability to output the edited material for recording on a DV device.
With DVgate, you can easil y per fo rm image edi t ing with your c omput er and a DV device.
DVgate consists of 3 applications:
❑ DVgate Motion;
❑ DVgate Still;
❑ DVgate Assemble.
✍ Depending on the computer settings, frames may be lost during video capture and frame duplication when recording edited video. Please make sure
you configure your computer according to the recommended settings to prevent this from happening. To configure your computer to use DVgate, refer
to th e O nline hel p of DVgat e.
About the software on your Sony notebook
nN
18
Page 20

Using Video software
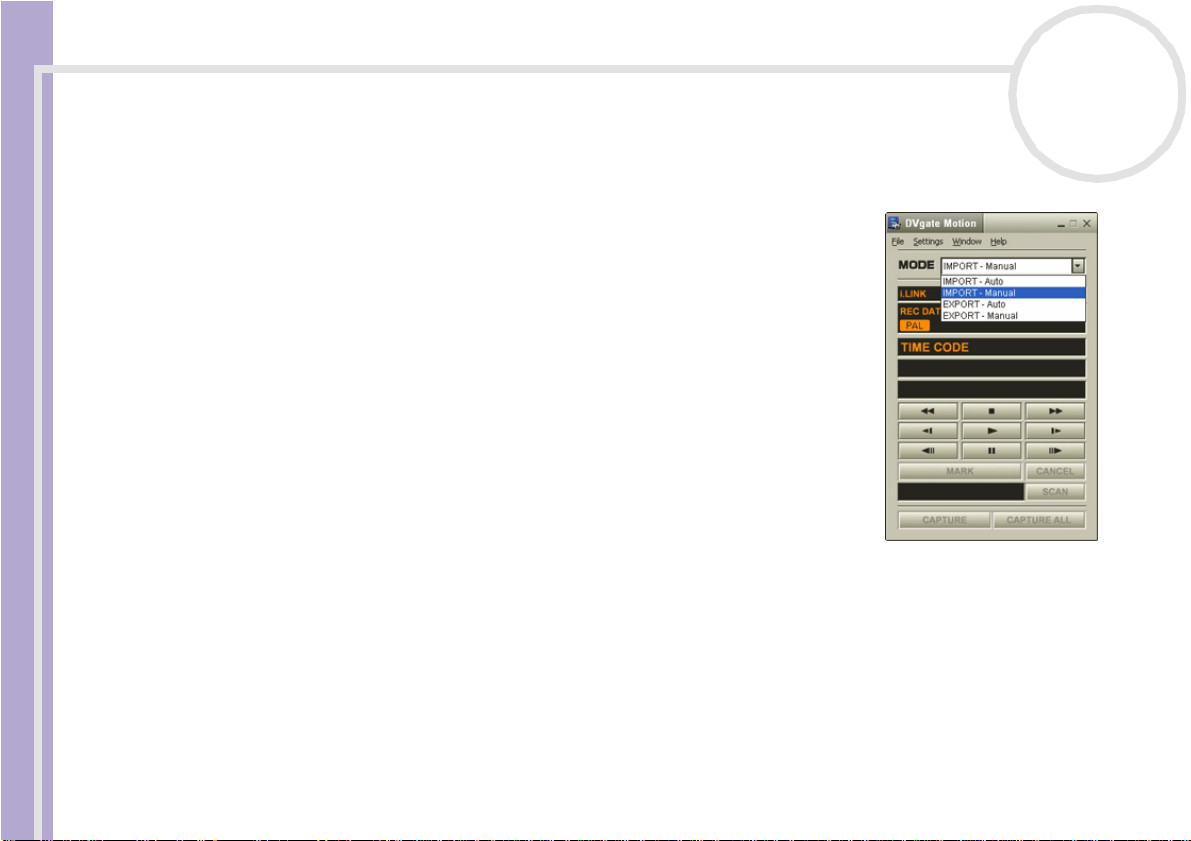
Using DVgate Motion
With DVgate Mo tion y ou can c apt ur e video and r ec ord edited videos on a DV device.
❑ Capturing video:
You can automatically or manually capture any scene or portion of the images recorded on a DV
device, such as a digi tal video camera recorder. What is more, you can specify the exact scenes tha t you
want to captur e while wa tch ing the tape playback on the monitor. You can then choose t o save the
selected scenes as separate files or as one file.
❑ Recording edited video on a DV device
You can recor d the edited v id eo on tape using a DV devi ce , such as a digital vi deo ca mera re cor der *,
conne cted to the compu ter. With DVg ate , you ar e not limited to recording single clips, but you can
record a series of clips on the D V device at one time.
To launch DVga te Motio n, proc eed as follows:
1 Connect the camera to th e computer with the i .LINK™ cable and turn on the camera.
About the software on your Sony notebook
2 Click Start, All Programs, DVgate, DVgate Motion.
DVgate Motion and t he Monitor windows appear.
* The digital video camera recorder must have a DV-IN connector.
nN
19
Page 21
Using Video software
Capturing videos
You can automat ically or manual ly import videos onto your com put er .
To automatically import vid eos onto you r comput er , proceed as follows:
1 Launch DVgate Motion.
2 Click the down arrow and select Import-Auto from the Mode drop-
down list.
Us e the D V g ate camera controls butt o ns to p lay, re win d or fast fo rward
the tape to the select ed tim e co de to begin capt ur ing.
3 Press Play to start the video .
The video begi ns to play in the Monitor window.
4 Click Mark to mark th e begin ni ng of the firs t segmen t.
The first frame of the segment to be captured, is displayed in the In/Out
list window.
About the software on your Sony notebook
Click Mark again to mark the end of the segment to capture.
The last frame of the segment to be captured, is displayed in the In/Out
list window.
Continue t o mark as many s egm ent s as you want.
5 Click Capture to import the sel ected video segment or cli ck Captu re Al l to import them all at once.
The Save as a file window appears.
6 Select the location to save the file.
7 Click the Save butt on.
DVgate captures the segments.
The Capturing complete message appears.
8 Click OK in the DVgate Motion windo w to fin ish.
Information about the capturing process is displayed in the Report window.
9 Click OK.
nN
20
Page 22

Using Video software
10 Exit DVgate Mo tion.
The Dvmotion2 window appear s on th e screen.
You can then save the In/Out list, which al lows you to capt ure th e same v ideo seque nc es later on, or
change the In/Out se tti ngs.
✍ Make sure that the camera is in Video Tape Recorder mode (VTR) when capturing or playing back video from or to a tape.
If you want to manually import video onto your computer, ref er to the DVgate online help file.
Recor ding edited videos on a DV device
To record edited videos on a DV device, proceed as follows:
1 Adjust th e record ing cor re ction valu es .
2 Add fi les to the Record List.
3 Record rem ot ely or manu all y the video on th e DV devi ce .
Adjusting the recording corre ction valu es
About the software on your Sony notebook
To ensure accuracy in the recording, you can specify recording correction values. Adjustment of the
recordin g corre ct ion values is especially i mp or tan t when per for ming s pli ce reco rding. You can choose to
specify the values yourself or to have them automatically adjusted by using the automatic calibration
feature. The values generated by the automatic calibration feature are usually correct.
To automatically adjust the recordi ng co rrection valu es, p roce ed as follo ws :
1 Launch DVgate Motion.
2 Click the down arrow and select Export - Auto from the Mode drop-dow n li st.
3 Select Adjust on Recording… from the Settings menu.
The Adjust on Recording dialog box appears.
4 Click the AutoAdjust but t on.
DVgate Mot ion activ ate s th e connect ed DV device and auto ma tical ly fin ds th e adjustme n t va lue s.
5 Click OK.
✍ To manually adjust the recording correction v alues, ref er to the DVgate online help file.
nN
21
Page 23

Using Video software
Adding files to the Record List
To add files to the Record List, proceed as follows:
1 Launch DVgate Motion.
2 Click Add in the DVgate M otion – A VI file l ist.
The Add dialog box appears.
3 Select a file and click Open.
The specifie d fil e is added and th e seri al number, first and last images , time code, file le ngt h and fil e
name are displ ayed.
★ DVgate Motion adds all serial numbered files with the same name if you select Ad d all div ided files s ave d w it h t he same n a me. Serial numbered
files are creat ed whe n yo u sp ecify to save files as multip le files in DVgate Motion an d DVgate Assemble.
✍ All newly added files are appended to the end of the list.
You can drag multip le fi les a t one tim e; howe ver, the order in whic h the y ar e adde d is unp red ic ta bl e.
About the software on your Sony notebook
You can record AVI files with different sound modes on a DV device, but about one second of no sound (depending on the DV device) may oc cur at
the point where the sound modes change.
You can only add AVI files using DV Codec as video compression; MPEG files are not supported.
When recording a video sequ ence, make sure that all images are saved in the same mode . Recording in different m odes might cause sound or im age
distortions during playback. After adding the files you want to the Record List, you can still change the order of the files, add or delete files.
After adding the fil es to the Record List, you can still change the order of the files, add or delete files.
To change the order of the files in the Record List , proceed as follows:
1 Click the file you w ant to move while holding down the mou se butt on.
2 Drag the file to the appropriate position and then release the mouse button.
To remove a file from the Record List, pro ceed as fol lows :
1 Click the file you want to remove.
nN
22
Page 24

Using Video software
2 Click Delete.
The removed file is filled by the subsequent file and the files are renu mbered.
Click Delete All when to remove all fi les.
✍ You can select multiple AVI or still picture files from the Record List by clicking them while holding down the <Shift> or <Ctrl> key.
When you move multiple files, they are all moved together.
You can undo chan ge s by choosing Undo from the Edit menu immediately after inserting, moving or deleting (a) file(s).
You can save a Record List for future use. Record List files can only be used in DVgate Motion.
To preview a clip, proc eed as follo ws:
1 Selec t t h e file you wan t to pr e v iew in the DVgate Motion – AVI file list window.
2 Click Preview.
The Monitor window and the Preview window appear.
The Monitor window shows the first frame of the file.
Click on the Pre vious File button or on the Next File butt on to sel ect the file you want to preview.
About the software on your Sony notebook
Click Preview All to previe w all th e files shown in th e list.
✍ Previous File and Nex t Fi le are buttons for moving the preview from one selected file to another. They are not for designed for navigation purposes
wit hin th e list. Consequently , you cannot click on them when only on e file is selected. When you se lect only one file, Previous File an d Next File
do not function.
nN
23
Page 25

Using Video software
Recording on t he DV devi c e
You can automat ical l y or manual ly expor t video s fro m your com put er to a DV device.
To automatically export videos from you r computer to a DV device, proceed as follows:
1 Connect the camera to th e computer with the i .LINK™ cable and turn on the camera.
2 Launch DVgate Motion.
3 Click the down arrow and select Export-Auto from th e Mode drop-down list.
4 Click the Add button in the DVgate Motion - AVI file list window and select the video file you want
to export.
5 Click Record or Record All.
The Output dialog box appears.
6 Select the Add blank image option butt on.
❑ You can add blank frame(s) during recording if you select the Append option button in the Output
About the software on your Sony notebook
❑ You can specify the length of a blank image by entering the number of frames in the Length box in
7 Click OK.
The Output dialog box closes and recording starts.
Video sequences are recorded on t he DV devic e in the orde r in which they are arranged in the Record
List.
★ Clicking Record All will send all the video files shown in the Record List to the connected device. Clicking Record will send only th e video files
selected from the Record List to the connected device.
nN
24
di a log bo x.
Blank frame(s ) can be placed in the following locations:
Head: A blank image is plac ed bef ore the sta rt of the vid eo seq uence dur ing recording.
Tail: A blank image is placed afte r the end of the video se quenc e dur i ng recording.
Both: Blank images are placed bef ore the start and aft er the end of the vid eo seq uence dur i ng
recordin g.
the Output dialog box.
Page 26

Using Video software
✍ Even if you specify not to add blank frames, several blank frames are always placed at the end of the recorded segment regardless of the settings.
This is to prevent image noise from being recorded when recording stops.
Do not quit or log off from Windows
Disable the screen saver in Windows
Do not start other applications or move any active window while recording.
Recording from the very beginning of the tape may not be successful if you record by controlling the video device through DVgate Mo t i o n.
Do not turn the power switch on the digital video camera re corder to Camera or turn it off while DVgate Motion is recording. Never switch the input
sources when recording on a digital videocassette recorder as this might prevent recording.
If you want to export manually videos from your computer to a DV device, refer to the DVgate online help file.
Using DVgate Still
DVgate S til l is an applicati o n tha t disp lays dig ital video imag es sent fro m DV devi ce s such as a digital
videocas s ette rec or der or a digital vi deo c ame ra rec order and th at captur es them as still pi ctu re s.
About the software on your Sony notebook
The followin g fun cti ons are featured:
❑ Control the connected DV device and display a video image on the screen of your VAIO.
❑ Capture 30 frames of still pictures in total with respectivel y 15 frames in the forward and backward
directions.
❑ Capture onl y one frame of a still pictur e.
❑ Save a captur ed still pict ure in BMP, JPEG, GIF or DVF format .
✍ The sound recorded with the image, is not played.
®
while rec ording. Otherwise, rec ording will fail.
®
.
nN
25
Page 27

Using Video software
Capturing pictur es
There are two capt ure modes in DVgate Still: the Co ntin uous Capture mode and the Single Frame
Capture mode.
❑ Continuous Capture mode:
If you captur e pict ur es during Play mode, you can capture 30 frames of still pictures in total with
respectively 15 frames in the forwa rd and backward directions. All still pictures already captured, are
lost. If you capture during Pause mode, you can capture only one frame of a still pictur e.
✍ Immediately after you capture during Play mode in Continuous Capture mode, the DV device pauses.
❑
Single Frame Capture mode:
You can captur e one frame of a still pictur e. The capt ur ed resul t is the same even if you captu re during
Play or Pause mode.
✍ Capturing 30 frames in Continuous Capture mode repla ces all 30 frames. Ca pturing only one frame overwrites the first frame of the still picture,
capturing the next frame overwrites the second frame, and so on.
About the software on your Sony notebook
To toggle bet ween Continuous Capture mode and Single Frame Capture mode, proceed as follows:
1 Click Settings in the DVgate Still window.
2 Choose Capture…
The Capture Settings window appear s.
3 Select the Capt u re frame s continu ous ly opti on but t on to captur e in Continuous Capture mode.
Clear the Capture frames continuously option butt on t o captu re i n Si ngle Frame Capt ure mode.
nN
26
Page 28

Using Video software
To capture pict ur es , proceed as follo ws:
1 Connect the DV device to your computer .
2 Launch DV gate Still (Start/All Programs/DVgate/DVgate Still).
The DVgate Still window appears.
About the software on your Sony notebook
3 Set the DV device to the Play or Pause mode.
The video image appe ars in the Monitor window.
4 Click the Capture button.
The video image in the Monitor window is bei ng ca pt ur ed.
✍ Dragging the slider in the Capture window to the left or right lets you display the still picture before or after the current one.
! If you exit DVgate Still wit hout saving t he captured still picture, it is clear ed.
! Even if you attempt to capture continuous pictures, you may not be able to capture some frames. In this case, exit all applications other than DVgate
Still and then retry to capture them.
nN
27
Page 29

Using Video software
Sav in g t he capt ured pi ctures
You can save the still pictures disp layed in the DVg ate Still - Still window in eith er one of the follo wi ng
formats: BMP, JPG, GIF or DVF.
To save the captured pictures, proceed as follows:
1 Launch DV gate Still and captur e images .
2 In the DVgate Still - Still window, select a still picture you want to save.
About the software on your Sony notebook
nN
28
3 Click the Save butt on.
The Save As dialog box appears.
Use the Location to Save drop-down list to sel ect a folde r.
Select a file format fro m the File Format dr op-down list.
4 Click Save.
The captured picture is saved.
Page 30

Using Video software
Using DVgate Assemble
DVgate Ass em ble enab les you to edit video files an d still image fil e s captured wit h DVga te Moti on and
DVgate Still. Afterwards you can splice them together to form on e single file. You can save the resulting
spliced vid eo seq uences as AVI, MPEG1, or MP EG2* for ma t files .
To launch DVgate Assemble, proceed as follows:
1 Click Start.
2 Point to All Programs, DVgate and then to DVgate Assemble.
The DVgate Assemble main window appears.
* Depending on your model.
Creating an Assemble List
You can create an Assemble List with files you want to spl ice together. Afterward s you can always edit the
About the software on your Sony notebook
Assembl e List by changi ng t he ord er of the files and adding or deleting fi l es.
To add files to an Assemble List, proceed as fo llows:
1 Launch DVgate Assemble.
2 Click the Add button.
The Add dialog box appears.
3 Choose AVI file in the Files of type drop-down bo x .
If y ou selec t Add all divided files saved with the same name,
DVgate Assemble will add all seria l numbered fil es with the same name
to the list. Serial numbered files are files that are created when DVgate
Motion saves files that are split and applies consecutive numbers to
them. The n u mbe rs o f the sp li t fi les h a ve 4 d igits and increase one u n it
at a time starting wi th 0001.
nN
29
Page 31

Using Video software
4 Select a file and click Open.
The AVI file is added to the list.
✍ Imported files are added at the end of the Assemble List.
You can only a dd video fi les in AVI (D V CODEC) fo r mat, and still image files in BMP, JP E G, and GIF fo r mats. Please see th e help files for informat ion
on converting non-compatible AVI files.
When you add a still image file (BMP, JPEG, or GIF), the number of frames, converted size , and size conversion mode are shown.
You can save an Assemble List for future use. Assemble List files can only be used in DVgate Assemble.
Editing AVI files
You can edit the AVI files in the Assemble List for the exact scenes you want to use. For example, there is no
need to recapt ur e files even if yo u only want to use one partic ul ar scene from a long er video sequenc e
originally captured with DVgate Motion. Note that the process of removing the exact scene is only enabled
when one AVI file is selected from the Assemble List . Howe ve r, this comm a nd is disab led when more than
About the software on your Sony notebook
one file are selected.
To edi t the AVI files in the Assemble List for the exact scenes you want to use , proceed as follows:
1 Launch DVgate Assemble.
2 Sele ct the AVI f ile y o u wa n t t o ed it f ro m th e Assemble List.
3 Choose Edit a clip... from the Edit menu.
The DVgate Assemble - Clip dial og box appear s .
4 Click the Preview button.
The video sequenc e of the sele cted file is played back.
You can move the playback position to the Begin point or the End point by clicking the Begin or End
point of the image.
Click the Begin button when you see the scene to be used as the Begin point.
nN
30
Page 32

Using Video software
The Begin point image and the time code appear in the lower par t of the dialog box.
Click the End button when you see the scene to be used as the End point.
The End poin t imag e and the time code appear in the lower par t of the dialog box.
5 Click OK.
The A VI file is edit e d .
Combining st ill ima ges wit h video images
To combine still images with video images, proceed as follows:
1 Launch DVgate Assemble.
2 Click the Add button.
The Add dialog box appears.
3 Select the image file type from the Files of type drop-down list.
4 Select your image file and click Open.
About the software on your Sony notebook
The image is added to the Assemble List.
5 Choose Edit a clip... from the Edit menu in the main w ind ow.
The DVgate Assemble - Clip dial og box appear s .
6 Enter the inser tion t ime in sec onds or fram es .
7 T urn th e Wide TV mode on or of f.
8 Select the screen size.
9 Adjust the height and width of still images when they are output:
❑ Full size: Enlarges the screen size to the ful l monitor size. The aspect ratio may chan ge with this
❑ Original Size: Retain s the original size of the image, witho ut reduction or enlargement.
❑ Full size using aspect ratio as saved: Enlarges the screen size to the maximum without changing
nN
31
selection.
the aspect ratio.
Page 33

Using Video software
10 Click the Settings button.
The Settings window appears.
11 Select the final fo rmat of the combi ne d file, ch oosi ng from A V I, MPEG1 or MPEG 2 (if avai lable ) *.
12 Click OK.
The Assemble List appears.
13 Click OK.
The still and vide o images are combi ned.
* Choosing MPEG1 as the format will reduce the size of the fi le consi derably.
About the software on your Sony notebook
nN
32
Page 34

Using Video software
Saving the edited video
To save an edited video sequence, proceed as follows:
1 Click the Output or th e Output All butt on.
The Save As dialog box appears.
Information on the output file and the amount of free disk space is shown in the lower part of the Save
As dialog box.
2 Select the location where you want to sa ve the fi le a nd typ e the n ame of the fil e in the File name text
box.
3 Click Save.
4 The Outputting as an AVI file d ial og box appears and splic in g begin s.
5 The DVassemble window appears and displays the Exporting/Save to an AVI file complete message.
The set time and the size that the file is spl it into are displayed when outputting an AVI file.
About the software on your Sony notebook
6 Click OK.
The edited video is saved.
✍ When you click t he Output button, only the files on the Assemble List that have been selected, are connected and output as a file . Clicking Output
All means that all the files on the Assemble List are connected and output.
The file name is the name that was entered in the Save As dialog box. A 4-digit serial number is attached to the file name, e.g., test001-0001.avi,
then test001-0002.avi, test001-0003.avi.
nN
33
Page 35

Using Video software
Using MovieShaker
MovieShaker can be used to create fun and innovative movies without any knowledge of film editing. In a
few steps, motion pictures can be combined with special effects, still images (pictures), and music files and
th en s ave d i n a fo rmat most compu ters ca n play .
To open MovieShaker, proceed as follows:
1 Click the Start but t on on t he Windows® tas kb ar.
2 Point to All Programs and then MovieShaker.
3 Click MovieShaker.
About the software on your Sony notebook
nN
34
Page 36

Using Video software
1. Menu bar Shows Movi eShaker men us.
2. Mo nitor pa nel Contains t he Shake, Capture, and Edit tray. Select a tray by clicking the Shake, Capture, or
3. Tool panel In t he Too l panel, you will find t he Effect, Text, Transition, Narration and Index tray.
About the software on your Sony notebook
4. Clip tray The Clip tray is provided for plac i ng c li ps to be proce s se d with Movi eS haker.
5. Produc t tray The Product tray is where you arrange clips to make a movie. In the Produ ct tray, you will
nN
35
Edit tab.
The Shake tray is f or creati ng a scen e of approx imatel y 30 seconds l ong includ ing back ground
musi c , using clip s on the Cli p tray at random.
The Capture tra y is pr ovided for captur ing images direc t ly f r om the DV devi c e or M ICROMV
device connected to your com puter, and importing them into the Clip tray. The monito r
displays the images recorded on the video tapes of the DV device or MICROMV device.
The Edit tray is for processing scene s. Click a scene on the Product tray, then it is displayed
on t he Edit tray. You can add an effe ct to the scene by dr agging th e ef fect from t he Effect
tray and/or the Text t ray a nd dr oppi ng it on t he Edi t tray.
Select a tray by clicking the Effect, Text, Transition, or Narration button. Only when a
MICRO M V dev i ce has been connected to your com put er and MICROMV Device has been
selected from the Device menu, the Index tray appears while t he Capture tray is display e d
on the monitor pane l .
The Effect tray contains various effects to be applied to a scene.
The Text tray provides a tool for creating a text effect to be applied to a scene.
The Transition tray c ont ai ns vari ous trans ition effects to be ins er t ed be t we en scenes.
The Narration tray provides a tool for recording narration to be inserted into a movie.
The Index tray pr ovides a tool for capturing images from a MICROMV device and impor ts
them into the Clip tray.
It can cont ai n a movie file, still image and/ or sou nd fi l es.
find th e Storyboard Display and the Timeline Display.
On the Storyboard, you can easily arrange scenes and transitions.
On the Timeline, you can ar r ange s ce nes , tr ans it i ons , back gr ound musi c, and na r r at io n, and
make fine adjustments to the starti n g/e ndi ng poi nt s and dura ti on of scen es, tran sitions,
bac kgr ound musi c, a nd nar r ation.
Page 37

Using Video software
Importing imag es and soun d clips
Before you can creat e a movie, you need to import t he images and so und c lips yo u want to use in your
movie.
To import images and s ound c lips , proceed as follows:
1 Click the File import button .
The Import dialog box appears.
2 Select the file you want to add.
3 Click Open.
The file is added to the Clip tray.
✍ Importing files over 75 seconds in length may cause MovieShaker to stop responding.
To remove a clip from the Clip tray, drag it from the Clip tray and drop it on the trash icon . This only removes the clip from the tray, the original
file is not delet ed.
nN
36
About the software on your Sony notebook
Creating a movie
After addi ng cli p( s) to the Clip tray, you can create a short movie using th e Shaker feature. Shaker
randomly selects clips from the Clip tray t o create a 30-second scene.
To create a movie, proc eed as fol lows :
1 Click the Shake tab .
2 Select a mood by clicki ng a face in the Shaker tray .
3 Click the Shake button .
A thirty-sec ond sce ne is auto ma tical ly gene ra ted .
To preview the created m ovie , proc eed as follo ws:
Press Play .
Page 38

Using Video software
✍ Scenes create d with Shaker begin with a black frame. After proce ss ing, they are placed i n the first ava ilable slot on the Product tray.
Limit the number of scenes in the Product tray to 5 or less.
MovieShaker may stop responding if ther e a r e t oo many scenes in the Product tray.
About the software on your Sony notebook
nN
37
Page 39

Using Video software
Editing clips and sc enes
You can edit you r movie by adding ef f ec ts and tex t , adjusti ng t he co lou r and contr a s t, and mo difyi ng t he
length of the clip.
About the software on your Sony notebook
nN
38
1. Shake tab
2. Captur e ta b
3. Edit tab
4. Speed control slider
5. Volume cont ro l slider
6. Effect palette
7. Fade-in, fade- out
8. Tr as h
9. Full-screen preview button
10. Play trimming range
11. Repeat-play
12. Play control buttons
13. Tri mmi ng range
14. Save as still image button
15. T ime a dju stme nt
16. Monitor
Page 40

Using Video software
To edit clips and scen es, pr oceed as follow s:
1 Double-click the clip in the Clip tray to move it to the Monitor Panel.
2 Select the Effect tab from the Too l Panel.
3 Drag and drop the effect you want to add from the Effect tra y to th e Edit tray monitor.
✍ To preview an eff ect , click the effect in the Effect tray in the Working Panel monitor.
For instructions on adjusting effect duration and replaying clips or scenes, consult the online Help-files.
Saving a movie
You can save or expo rt your final movie pro duc t s. You can pr ev iew and c heck the m befor e sa ving them.
Your final movie products ca n be saved as files, exported to a DV device/MICROMV device*.
To save your movi e, proceed as follo ws:
1 Click the Export button .
About the software on your Sony notebook
The Export dialog box appea rs.
2 Select the fo rmat in which y ou w ant the document t o be saved.
3 Click Next.
4 Select the folder in which you want to save the file.
5 Name the file.
6 Click Save.
Your movie is saved .
✍ Exporting movies may take a long time to complete. Saving movies with DV (Digital Video) will provide better quality than Quick-Save, but will take
longer.
MovieShaker can play AVI files up to 65 MB in size.
For DV playback and smooth video playback, the following resolution/refresh rates are recommended: 1024x768/75 Hz or lower.
* Depending on your model.
nN
39
Page 41

Using Video software
Using Smart Capture
You can use Smart Capt ur e to shoo t stil l images and re cor d video cli ps from a digi t al cam er a conn ecte d to
your comput er .
Capturing stil l images
Yo u ca n cap tu r e st il l im a g e s f ro m i.LINK™ co mp atible devices.
To capture sti ll images , proc eed as follo ws:
1 Connect an i.LINK™ c om pat ible dev i ce to your co mpute r.
2 Launch Smart Capture from t he Start menu, in All Programs / Smart
Capt ure / Smar t Capt ure.
The Finder window appears, displaying the image of the subject.
3 Adjust th e focus on th e subjec t.
4 Click the Capture button in the Smart Capture window.
About the software on your Sony notebook
The Still Viewer window appear s .
The image you have captured, is displayed in the Still Image Displa y
area.
5 To end Smart Capture click the button in the to p r igh t corn e r of th e
window.
✍ Make sure a camera is plugged to the i.LINK™ connector.
nN
40
Page 42

Using Video software
Displaying captured images in Still Viewer
To display capt ur ed images in Still Viewer, proceed as follows:
From the Start menu, select All Programs / Sma rt Capture and click Still Viewer. You can displ ay, save
or delete your images or send them by e-mai l.
To end Still Viewer, c lick the button.
✍ Y ou c a n capture still images in the following sizes: 640 x 480, 320 x 240 , 160 x 120 a nd 80 x 60 pixels.
When capturing a sma ll r esolutio n im a ge (i.e. , 80 x 60 pixels), the di sp la yed image o n the Finder window may appear blurred.
A gap may appear when a rapid-moving object is displayed. This is not a malfunction.
If you start Smart Capture while no camera is plugged, the Smart Capture Finder screen will appear blue.
You can capture still images and video clips from a digital video camera using Smart Capture.
Sendi ng still images via e-mail
About the software on your Sony notebook
To send still images via e-mai l , proc eed as follow s:
1 Launch Still Viewer.
2 Select the still image you want to send via e-mail, u sing or .
3 Click Mail.
Your e-mail window appears with the selected file attached to your message.
4 Send the e-mail.
✍ You need to set up MAPI (Messaging Application Program Interface) when using the e-mail software. MAPI is a Microsoft
interface that enables you to send e-mails from within a Windows application and to attach the document you are working on to the e-mail note.
nN
41
®
Windows program
Page 43

Using Video software
Shooting video clips
With a video camera connected to your computer you can use Smart Capture to capture video clips, as well
as play them or send them via e-mail.
To capture video clips, proceed as follows:
1 Launch Smart Capture.
2 Select Net Movie using the Switch Capture Mode button.
The image appears in the Finder.
3 Tu rn th e camera to ward s th e subject.
4 Adjust th e image .
5 Click the Capture button to shoot a video clip (you can shoot up to 120 seconds, according to the settings
you chose in the Recording options section).
6 Click the Capture button wh en fi ni sh ed.
About the software on your Sony notebook
The Movie Player wi ndow appear s , it cont ai ns the capt ured v ideo clip.
7 Click to playbac k the images . Cl ick to paus e, to stop playback.
8 To end Smart Capture, click .
✍ Make sure a camera is plugged to the i.LINK™ connector and turned on.
You can shoot video cl i ps in the foll ow in g formats:
Non-compressed:
- Vi deo 160 x 120, 24 bits, max . 10 frames/sec.
- Aud io PC M, 11.025 kHz , 16 bits, mono ph onic
Compressed:
- Vi deo MPEG1 16 0 x 112, maximum of 30 fr ames/sec.).
- Audio MPE G1, 44.1 kHz (eff ec ti v e maxi mum equi va lent to 11. 02 5 kHz), monophoni c .
A gap may appear when a rapi d-moving o bject i s display e d. Howe ver, this is not a ma lfunctio n.
nN
42
Page 44

Using Video software
Sending video clips via e-mail
If you sho ot a video cli p in a low res olu tion fo rma t, its si ze will b e sma ll al lowing yo u to sen d the vi deo cli p
by e-mail.
To send video clips v ia e-m ail , proceed as follows:
1 Launch Smart Capture.
2 Click Movie Player.
3 Click Mail.
The Compression Settings window appears.
4 Choose the compression rate by moving th e slider.
5 Click Start Compression.
When compression is compl eted, you will be asked to attach the file to your e-mail.
6 Accept and send th e e-mail.
About the software on your Sony notebook
nN
43
Page 45

Managing audio files with SonicStage
Managing audio files with SonicStage
SonicStage lets you play and record audio CDs and import digital audio files while maintaining the copyright
information of the contents. When you record an audio CD with SonicStage, it is encoded in ATRAC3 format
onto you comput er ’s har d dr ive. The impor t ed dat a can be play ed on your co mpu te r or transf er r ed to
external devices or media. SonicStage converts your existing MP3, WMA and WAV format audio files into
ATRAC3 format.
To open SonicStage, proceed as follows:
1 Click the Start but t on on t he Windows® tas kb ar.
2 Point to All Programs, Son icStage and then click SonicStage.
3 The Please c onfir m setup dialog box appears.
You can set SonicS t age as the default appli cat ion for playing audio CD s by select in g the app ropr iate
check box.
4 Click Ye s.
About the software on your Sony notebook
The SonicStage main window appears.
nN
44
Page 46

Managing audio files with SonicStage
About the software on your Sony notebook
1 Feature tabs Changes the screen view according to the selected feature.
2 Player contr ol but t ons Cont r ols playback f uncti ons , s uc h as play, pause , stop, fast-f or ward and rev er se .
3 Playlist dr op-d own lis t Displays availab le p layli sts a n d audi o files of the curr ent feature tab.
4 Fil e tree view Displays the folders availab le on your computer.
5 Internet addr es s drop -
dow n li s t
6 File list view Displays th e conten ts of the folder sel ecte d in the file tree view.
7 Tutor ial tab Opens and closes t he Tutorial fea tu re.
nN
45
Displays Internet addresses, if available. You can cli ck the Go to URL link
button to immediately connect to web sites.
✍ The CDDB
®
(Compact Disc Database) Music Recognition Service registrati on wizard enables you to regi ster with CDDB . You need Internet access on
your computer to register and use this service. For more information regarding CDDB registration, click the Help button.
Page 47

Managing audio files with SonicStage
Recording a CD
You can record song s from aud io CD s and imp or t them to play lis ts in Soni c St age.
To record a CD, proceed as follows :
1 Inse rt an audi o CD into your sy stem’s optical d isc drive.
2 Click the CD ta b.
3 Use th e drop-d ow n lists to select th e file for ma t.
4 You can select specific tracks on your CD by deselecting the check boxes from the tracks you do not want
to record . You can clear all select ed tracks b y sel ecting the empt y Select All check box, and then
selecting the tracks you want to record.
5 Click the Rec to Jukebox button to begin recordin g. When the re cording is finished, the new
playli st appears in the File tree view of the Playlist window. Yo u can move to this feature view by
clic kin g the Playlist tab.
About the software on your Sony notebook
✍ When you record from an audio CD on your optical disc drive for the first time, the CD Drive Optimization dialog box appears.
Click Start to verify your optical disc drive. Once the verification is performed, recording begins.
You can display the name of the CD and its songs by clicking the CD Info button and after registering with CDDB.
nN
46
Page 48

Managing audio files with SonicStage
Transferring songs (check in/out)
You can trans fe r songs between the playlist s on your SonicStage software and e xternal d e vi ces o r media
(for example, Memory Stick™ Walkman, Network Walkman, C D-RW). For more informatio n on using your
external devices or media, see the documentation that came wi th the product.
These instructions are for using the check in/out 1-step method. For information on using the 2-step method,
read the SonicStage online He lp -files .
Checking out songs
Checking out songs mean s tra ns fe rring audio files from a comput er to an external devi c e (for example, a
portable player).
To check out songs, proc eed as follows :
1 Connect the exter nal devic e or inse rt the media (for ex am ple , a MagicGate Mem or y Sti ck™) into your
computer.
About the software on your Sony notebook
2 Click the Transfer tab to display the Transfer window.
Your computer automatically recogni ses the connected external device or media an d lists the content
information in a new panel on the right side of the Transfer windo w.
3 Select the playl i st cont aining the song to check out.
The songs in the play list ar e shown in the Playl is t view panel located in the centre of the Transfer
window.
4 From the Playlist view panel, select the song to be checked out. To check out more than one song at a
time, hold down t he <Ctrl> key and select addi tional so ngs .
5 Click Check Out or drag the song to the appro pr iate pos i tion in the song list of the external dev ice or
media.
The checking out begin s.
✍ SonicStage does not work with the blue Memory Sticks™. For more information, read the OpenMG manual.
To cance l Check Out, click Stop, or click Cancel in the processing dialog box that is displayed during the Check Out process.
nN
47
Page 49

Managing audio files with SonicStage
Checking in songs
After che ck ing out audi o files, you can transf er those fil es back to an external device or to the hard drive.
This is what we call checking in.
The songs that you trans fe r like this can only be chec ked i n to the hard driv e of the same computer from
which the songs were ch ecked out .
To check in songs, proceed as follow s:
1 Connect the external device or insert the Mag icGate Memory Stick™ in to your computer.
2 Click the Transfer tab to display the Transfer window.
Your computer automatically recogni ses the connected external device or media an d lists the content
information in a new panel on the right side of the Transfer windo w.
3 Select the song to be checked in from the song list of the external device or media. To check in more than
one song at a time, hold down the <Ctrl> key and click the additional song s.
About the software on your Sony notebook
4 Click Check In, or drag the song(s) to the Playlist view panel. If you want to check in all the songs in
the external devi c e or media , click In All.
Check In begins.
✍ To cance l Check In, click Stop, or click Cancel in the Processing dialog box that is displayed during the Check In process.
nN
48
Page 50

Managing audio files with SonicStage
Additional features
❑ SonicStag e Tutorial – The features of SonicStage are described in the Tutorial. The user-friend ly
interface guides you directly t hr ough t he SonicStage features.
❑ SonicStage Backup Tool – You can back up and restore all the music, graphics and information data
managed by SonicStage. You must be connected to the Internet to use the SonicStage Backup Tool.
❑ Import audio files in various for mats – You can i mp o rt a ud io files with v ario us fo rmats, such a s MP 3
or WAV st andards. You can also impor t audio f il es that comply wit h th e Microsof t® Windows Media™
Technologies (WMT) st andar d, identified by ASF or WMA extensi ons . Ma nage your audio files through
the Playlist feature of SonicStage.
❑ Manage imported songs on the Playlist – Additional features are available when you register your
imported songs through the Playlist featur e of SonicStage. You can m anage your musi c by cre ati ng
your own list of songs categorized by genre or artist, displaying your song list in the Playlist fea ture ,
and arranging your songs in a customised order using the Playlist fo lders. Edit yo ur mu si c b y combining
About the software on your Sony notebook
multipl es songs in to a single one, or div ide one song into two, by usi ng th e Combine and Div ide
features.
❑ Simple mode – The main SonicStage window in Simple mode is a smaller, compact ve rsion of the
Full m ode view. This can be useful when you want to listen to songs with SonicStage while using other
software, or whenever you feel th at Full mode vie w is in t ru sive. The d es ig n of th e ma in SonicStage
window in simp le mode c an be cha nged by se lect ing a new “skin”, which enhan ce s the appear ance of
the window. The Simple mode feature enable s you to perform playback operations only.
nN
49
Page 51

Using DigitalPrint
Using DigitalPrint
DigitalPrint is designed to help you get the most enjoyment out of your photographs taken with a digital
camera.
With Digit alPr i nt , you ca n easily load photos onto your co mp ut er, create photo albums, decor at e y our
photos, print the m and even make lab els fo r your fa vour ite s to rag e media.
DigitalPrint includes the following five tools. All these tools can be launched from the DigitalPrint Launcher.
❑ PhotoCapture: Load photos from a digit al cam er a or a Memory St ick™ ont o your computer.
❑ PhotoCollection: Vi ew and print phot os that you have loaded onto your compu ter.
❑ PhotoDecor: Draw on and add pictures and stamps to photos that you have loaded into your computer.
❑ PhotoAlbum: Create photo albums using the photos that you have loaded into your computer.
❑ LabelMaker: Create labels for CDs, MDs, videotapes, etc.
About the software on your Sony notebook
nN
50
Page 52

Using DigitalPrint
To launch Digit al Pr int, proceed as follow s :
1 In the Start menu , selec t All Programs , DigitalPrint, and then DigitalPrint.
About the software on your Sony notebook
nN
51
DigitalPrint Launcher appears.
2 Click Import to launch PhotoCa pt ur e
or click Photo to launch Phot oCollect io n
or click Edit to launch PhotoDecor
or click Alb um to launch PhotoA lbu m
or click Label to launch LabelMaker.
Page 53

Using DigitalPrint
Importing photos
Use PhotoC apt ur e to load images th at are stored on a dig it al camera or a Memory Stick™ ont o your
computer.
Photo Captu re ca n auto ma tical ly reco gni se the digital camera o r Memory Sti ck ™ that is connected to the
computer.
Once photos are loaded into y our com put er , they can be used to create or ig inal works (photo albu ms and
labels) wi th PhotoAl bum and L abelMaker. You can also prin t pho to s with Phot oCollection.
PhotoC apt ure can load photos f ro m the fo llowi ng di gi tal ca meras and s to rag e dev ices :
❑ USB storag e class-compatible digital cameras
❑ TWAIN- compatible digital cameras
❑ Memory Stic k™ .
To import photos , proceed as follow s:
About the software on your Sony notebook
1 Connect a digi ta l camera or a Memory Sti ck ™ that conta ins the imag es yo u want to transfe r to your
2 Open DigitalPrint Launcher an d simply click the Import icon.
nN
52
computer.
Y ou can also launch PhotoCapture from the Start menu by clicking All Programs, DigitalPrint, Tool,
PhotoCapture.
The PhotoCapture window appears.
Page 54

Using DigitalPrint
nN
53
About the software on your Sony notebook
3 Depending on the device connected to your computer , you can click a Photo folder icon or a camera icon.
4 In either case, click t he icon to load all the photos of the devices.
Enter a name for your photo fold er in the Enter Photo Name dialog box and click OK.
The images are loaded into your computer and appear in the Im ported Photos w indow. You can now
use the pictures for editing, printing, creating CD labels, etc.
Page 55

Using DigitalPrint
Printing photos
With PhotoCollection, printing photos at home is just as easy as asking your local photo shop to develop your
photos or make reprints.
Photos stored in a folder can be printed as a group. Since you can also specify the number of prints to be
made of each photo, you only need to run one printing job (instead of printing each photo separately, one
at a time), even if you want to give copies to a lot of people.
To print pho tos, pro ce ed as foll ow s :
1 Click the Photo icon in the DigitalPri nt La uncher.
About the software on your Sony notebook
nN
54
PhotoCollection can also be launched directly from the Start menu by selecting All Programs,
DigitalPrint, Tool, PhotoCollection.
The PhotoCollection window appears.
Page 56

Using DigitalPrint
2 Click Register Folder to register a photo fo lde r (load the photos into the comput er ) and fol low th e
3 To pr int pho to s from th e folde r, simply cli ck the PhotoPrint bu t ton.
✍ For more information about the functionalities of PhotoCollection, refer to the online help files.
About the software on your Sony notebook
nN
55
onscreen in str uct ion s or selec t a folder in which phot os are stor ed and c lic k the OK but ton.
You can speci fy the num ber of prin ts and select th e paper.
Page 57

Using DigitalPrint
Decorating photos
PhotoDecor allows you to decorate digital photos by adding lines, graphics, text, and stamps to digital
photos.
You can use stamps and a variety of pen patterns to decorate digital photos and create colourful and original
works of art through s impl e operat ion s.
To decorate phot os , proc eed as follows:
1 Open PhotoD ec or from the DigitalPrint Launcher by clicking the Edit icon.
About the software on your Sony notebook
nN
56
You can also launch PhotoDecor directly from the Start menu by selecting All Programs, DigitalPrint,
Tool, PhotoDecor .
The PhotoDecor window appear s .
Page 58

Using DigitalPrint
2 Select a photo folder that contains the images you wish to decorate and select one photo.
3 Use the Pen, Auto Shape, Text, Clip Art or Stamp Tool Palette to edit your image.
4 Print or save your edited picture by clicking the Print or Save icon.
✍ For more information on the use of PhotoDecor, refer to the online help.
About the software on your Sony notebook
nN
57
Page 59

Using DigitalPrint
Creating a photo album
With Photo Al bum , you can creat e and pr i nt albums of photos t aken wit h a digi ta l came ra or phot os you
have loaded on your comp ut er .
PhotoA lbum is very simple to use. It incl udes many useful design templates. Use the se templa tes to ea sily
create an attracti ve album even if you have little design experience.
You can also print your album to creat e wond er ful phot o c ollec t io ns , addi ng a whole new dimens io n of
enjoyment to digit al camer a phot ography.
To create an album, proc eed as foll ows:
1 Open PhotoA lbum fro m the DigitalPrint Launcher by clicking the Album icon.
About the software on your Sony notebook
nN
58
Y ou can also launch PhotoAlbum directly from the Start menu by selecti ng Al l Program s, DigitalPrint,
Tool, and PhotoAlbum.
The PhotoAlbum Initial window appears.
Page 60

Using DigitalPrint
2 Click the Create N ew Album button and register a photo folder or select an existing one.
3 T o se le c t yo u r im a g e s, c lick the List button in the photo fo lder and se lect the image s in the Photo List
4 Select a design from the Select Design window by clicking it.
5 Select a photo layout by clicking it.
6 Use the album menu to decorate the existing a lbums or to print them.
✍ For more information on the use of PhotoAlbum, refer to the online help.
About the software on your Sony notebook
nN
59
You can sele ct all or only some of the phot os in the album.
dialog box. Then click the Create the album with the selected photo(s) button.
The Select Design w ind ow appears.
The Select Layout window appears.
The album is created and t he album menu appears.
You can eith er previ ew the album or change the layout, or design.
Page 61

Using DigitalPrint
Creating labels
LabelMaker is an easy-to-use label-making software.
Use the design templ ate s to make beautifully designed labels.
To create labels, proceed as follows:
1 Open Labe lM aker fro m th e DigitalPrint Launcher by clicking the Label icon.
About the software on your Sony notebook
nN
60
It is also possible to laun ch Labe lMaker direc t l y from the Start menu by sele cting All Programs,
DigitalPrint, Tool, LabelMaker.
The LabelMaker window appear s .
Page 62

Using DigitalPrint
2 In the list on the side of the screen, click th e medium fo r which you w ant to create a label or edit an
3 Click the paper you wish to use.
4 Click the desig n you wish to use .
5 In the Edit window, edit the label by using the Pen, Auto Shape, Text, Clip Art or Image To ol Palette.
6 Save or print your label by clicking the Save or Print button.
✍ For m ore information on the use of LabelMaker, refer to th e online help.
About the software on your Sony notebook
nN
61
existing label (CDs, MDs, VHS cassettes, etc.).
The Select Paper window appear s .
The Select Design w ind ow appears.
The Song List (if you selected a music medium like CD or MD ) or the Edit window appears.
Edit the al bum and track names in th e Song List window.
Create a track name list when you are creat ing a label for a music medium , such as a CD. Then click the
Input to the label button.
LabelMaker can be launched and used in conjunction with other Sony applications such as SonicStage.
Page 63

Customizing your computer
Customizing your computer
The following sections briefly describe how to change the main settings of your computer. Among other
things, you will learn how to prepare your modem for use, how to use and customise the look of your Sony
software and utilities, etc.
❑ Setting up your language (page 63)
❑ Setting up your notebook with Sony Notebook Setup (page 65)
❑ Managing power with PowerPanel (page 67)
❑ Selec ting di sp lay m odes (page 74)
❑ Configur i ng y our mod em (page 75)
❑ Changing your windows design with the UI Design Selector program (page 77)
About the software on your Sony notebook
❑ Setting a Sony wall paper (page 78)
❑ Selecting a screen s av er (page 79)
nN
62
Page 64

Customizing your computer
Setting up your language
It is important th at you sele ct t he correct k eyboar d s etti ngs dur ing the Win dow s Setup.
To select the correct keyboard settings during Windows Setup, proceed as follows:
1 At fir st boot, cl i ck 2 x Next in the Windows XP Setup Wizard window.
The Select Y o ur System Settings dialog box appears.
2 Fill in thes e three questions:
❑ I live the closest to this region.
❑ I type mostly in this language.
❑ I use this type of keyboa rd .
3 In the End User Licence Agreement, accept the Licence Agreement and click Next.
4 Continue your W ind ow s set up unt il it is finis hed.
You can also change the country and language settings into your language as soon as Windows® has been
About the software on your Sony notebook
rest arte d or use the Language Selector.
To change the country and language settings, proceed as follows:
1 Click Start and then Control Panel.
2 In the Control Panel windo w, double-click t he Regional and Language Options ico n.
If you do not see this i con, cli c k Switch to Classic View on the left side.
3 In the Regional Options tab of the Regional and Lan guage Options window, select your language
from the Standards and formats drop- dow n men u.
4 To change the language of the menus and dialog boxes, select the Languages tab of the Re gi on a l a n d
Language Options windo w.
5 Select your language from the drop- dow n li st.
nN
63
Page 65

Customizing your computer
6 Click Apply to apply the changes.
You are prompt ed to log off and log on again . Only then, the c hanges to the new lang uage wil l take
effect.
7 Click Start, and select Log Off.
8 Click Log Off in the Log Off Windows window.
If necessary, enter your p assword to log on again.
All the menus, hel p file s and ico ns are then displa yed in you r sele cted language. However, some parts
may remain in Eng li sh.
About the software on your Sony notebook
nN
64
Page 66

Customizing your computer
Setting up your notebook with Sony Notebook Setup
The Sony Notebook Setup utili ty a l lows you to co nsu lt sy stem informat ion , spe ci fy pre fe ren ce s fo r system
behaviour, and set up password pr ot ect ion for your VAIO notebook.
To use Sony Notebook Setup, proceed as follows:
1 Click the Start but t on on t he Windows® tas kb ar.
2 In All Programs, se le ct Sony Notebook Setup and t hen c lic k Sony Note book Setu p.
The Sony Notebook Setup window appear s.
About the software on your Sony notebook
nN
65
Page 67

Customizing your computer
Tab Description
About T his Com put er Dis plays system informat io n, i nc lud ing memor y ca pac ity, serial num ber, and BIOS v er sion.
Printer Selects printer port mode settings.
Initi al Set t ing Selec ts th e driv e and dev i ce order y ou w ish to use for loading the operatin g syst em . You can
Touchpad When yo u c onnec t an optional mouse t o y our computer, you can disa ble your touchpad. You can
Power On Password Sets the password to secure your computer.
Enable Ports Disables port to release resources to the system. To change the port settings, click Advanced on
About the software on your Sony notebook
Basic /A dv anc ed Toggles between Ad v anc ed m ode (additional sc r ee ns wit h adv anc ed s et t ings) and Basic mo de of
3 Select the tab for the item you want to change.
4 Once finished, click OK.
The item has been changed.
✍ For more information about each option, click Help on the Notebook Setup screen to display the help file.
nN
66
specify the hard drive as well as other drives inserted into your computer. You can change the
volum e of the so unds while the ope rat i ng s y stem is loading.
also customise your mouse settings by means of the mouse utility in this tab.
If you use this option, remem ber the passw ord at all time s. If you forge t the password, you cannot
chan ge this setting anymo re, and you will not be able to start yo ur compute r.
the Basic/Advanced tab.
display. Advanced mode includes Serial and View Resources tab.
Page 68

Customizing your computer
Managing power with PowerPanel
The PowerPanel utility controls the power management of your notebook and provides key information
about syste m activ it y and battery li fe . The automa t ic power manag e ment sele cts th e most advanta g eo us
profiles , or lets you cust om ise t he pr of iles you choo se, ac co rding to your own needs, with the goal of
extended battery life.
PowerPanel has the followin g features :
❑ Automati c Profile Selection (APS) ba sed on the current ly ac tive application;
❑ Ability to select specific Power Profi l es manually from the menu;
❑ Ability to edit and create new profiles;
❑ Abili ty to display de tail ed bat te ry in forma ti on;
❑ CPU perform anc e m onitor i ng t ool;
❑ It works in ha rmony with your Wind ows s etti ngs .
nN
67
About the software on your Sony notebook
Act iv ating Power P an el
When you start the computer, the PowerPanel icon appears in the system tray by d efault.
If the comput er is runni ng on AC power , you see Pow erP anel ’s Performance icon: .
If the comput er is runni ng on bat t er y power, the Battery Life icon is di s p la ye d: .
To see the CPU state and the current power profile, simply point to the icon. The CPU state and current
pow e r pr ofile will be displaye d in a to o ltip.
To change profiles, proceed as follows:
1 Right-click the PowerPanel ico n in the taskba r a nd select Profiles.
2 In the Profiles menu, select a profile.
The appropriat e power settings are activ at ed.
Page 69

Customizing your computer
✍ When you use the battery pack as power source, your system selects the Maximum Batt ery Life power management profile by default. If you select
a different power management profile while using battery power, the same profile will automatically be selected the next time you use the battery
pack to power your computer.
Activating power management profiles
PowerPanel provides several predefined power management profiles. Each p ro fi le co n si sts of a group of
power man agem ent settings that are designed to meet speci fic power m anagem ent goal s , ranging from
maximum pow er manag eme nt to no power manag eme nt .
Mai n p reset prof il es
Icon Description
Maximum Battery Life – Provides power saving features to give you maximum
batter y l ife and good pe r fo rmance . It reduces t he brightnes s of t he display an d puts
About the software on your Sony notebook
the system into Standby mode af ter a spec ified time period.
Ultimate Battery Life – Provides power saving features to give you maximum
batter y life and good per fo rmanc e.
Maximum Performance – Pro vid es th e best system performan ce while stil l
conser ving power.
AC Power – The power man agement state when AC po wer is in us e. PowerPanel
automatically loads the AC profile unless you disable this feature.
Power Management Off – Turns off all power management features such as
Standby and Hibernate mo d es.
nN
68
Page 70

Customizing your computer
Other preset profiles
Icon Description
Word Processing – Optimize s power man a gem ent wi t h long er
timeou ts on the hard disk a nd di s play s c r ee n. You can al s o es t abli s h
settings for LCD (Video) Standby , Hard Di sk Standby , and Stan dby to
optimize power management for your system.
Spreadsheet – Reduces the LCD brig ht nes s to 'medi um ', as your
software does not require higher performance.
Pres entati on – Keeps the display on at all times while it conserves
power. This opti on is ideal fo r sli des how pr e se nt at ions. You can
establish settings for LCD (Video) Standby, Hard Disk Standby,
and Standby to optimize power man a gem ent fo r your syste m.
Communications – Extends bat tery life by initia ting a quic k display
time-out . You c an also establis h s etti ngs f or LCD (Video) Standby,
About the software on your Sony notebook
Hard Disk Sta ndby, a nd Standby to optimize po wer manage ment
for your syst em .
Games – Disables the display and the Hard Disk timer.
DVD – Optimizes pe rforma n ce and power re q uire men ts fo r DVD
usage.
nN
69
Camera – Optimizes performance and power requirements for
camera u sage.
Automatic Profile Selection - Analyses the performance of each
appli ca tion y ou choose and matches the prof iles to its needs.
Page 71

Customizing your computer
Selecting automati c profi les
A pow er pr of il e is a se t o f ti me r valu es fo r a va ri e ty o f syste m devices. PowerPan el au to matically selects the
profile associated with the application you are using and changes profiles as you switch between
applications.
Power management lets your system enter energy saving modes by levelling some energy-consuming
parameters, such as LCD brightness, or hard disk activity.
To select automatic profiles, proceed as follows:
1 Right-click the PowerPanel ico n in the taskb ar.
2 Select Profiles.
3 Select Automatic Profile Selection.
About the software on your Sony notebook
nN
70
Page 72

Customizing your computer
Displaying detail ed ba t tery in fo rmation
You can display detailed information of your computer's battery.
To displa y batte ry info rmation, proceed as follo ws:
1 Double-cl ick t he PowerPanel icon in th e ta skb ar.
The Battery Information windo w appea rs.
2 Select the Battery tab .
This tab conta ins info rmation such as the estimat ed bat tery life re main i ng and ch argi ng ti me.
Battery icon Battery status
nN
71
dischargi ng: th e icon is blue
About the software on your Sony notebook
fully charged: the i con is completely blue with an AC power plug
charging: the icon is blue with a red clip attached to the terminal
no battery: th e icon is blue with a yell ow cros s ove r it
Page 73

Customizing your computer
Displaying CPU information
You can also view the level of perform anc e of your notebook with the CPU Controls.
To do so, you just have to move your c ur so r over the CPU icon in you r tas kbar .
Icon Description
Performance:
Battery Life:
nN
72
This control helps to maximize the CPU clock speed. The
computer can then be used at its maximum performance. This
will be the de fau lt icon wh en the com puter is conne cted to the
mains supply.
This contr ol he lps to redu ce the notebook’s pow er
consumpti on by decr easing the CPU cloc k speed and the
power voltage. This will be the default icon when the
computer is disconnected from the mai ns supply, using the
battery.
About the software on your Sony notebook
✍ For more detailed information on what you can do with PowerP anel, refer to the Help files of P owerPa nel.
Editing a power profile
To edit the power manag e me nt settings of a power profile, proceed as follows:
1 Right- cli ck the CPU icon in the taskbar and select Edit/Create Profiles from the menu.
The Profi le Editor window appears.
2 Click the profile you want to edit on the left of the screen.
3 Double-click the power profile property (CPU Control, Hibernate, Standby…) you want to modify on the
right of the screen.
An option lis t or a dialog box will appear. Add or define the setting you want to select .
4 Click the File menu and then click Save.
Page 74

Customizing your computer
Creating a power prof ile
To create a power profi le, proceed as follows:
1 Right- cli ck the CPU icon in the taskbar and select Edit/Create Profiles from the menu.
The Profi le Editor window appears.
2 Select New from the File menu.
3 Double-click the power manage men t set ting y ou w ant to select to display the Power Management
Setting menu on the right of the window.
4 Select the new power man agem ent setting you would like for the devic e.
5 Click the File menu and then click Save.
About the software on your Sony notebook
nN
73
Page 75

Customizing your computer
Selecting display modes
This noteb ook us es the Mobili t y Radeon 7500 v id eo co nt roll er. You c an se lect whic h displ ay is used when
the notebook is connected to an external display. When you connect an external display, you can switch the
display betw een y our notebook's LCD and the external monitor .
Before you can select a display, you need to shut down your notebook, connect the external display (TV,
panel or monitor) to your notebook, and restart.
To select a displ ay, proc eed as follo ws:
1 Click the Start but t on, and then click Control Panel.
The Control Panel appears.
2 Double-click Appearance and Themes, and then select Display.
The Display Properties dialog box appears.
3 Click the Settings tab .
About the software on your Sony notebook
4 Click the Advanced button.
The Sony Notebook LCD and Mobility Radeon 7500 Properties dialog box appears.
5 Click the Displays ta b.
Select the Monitor, Panel or TV icon.
6 Click Apply and then OK.
✍ You cannot have a display on TV and on another display at the same time.
Yo u m ay no t b e able to disp lay the n otebook LC D s creen and an external display or a projector at the same ti me, d epend ing on the types of computer
displays and projectors you are using.
If the display resolution of your notebook is more than 800 x 600 dots, a part of the image cannot be displayed on your TV displa y. You can see the
hidden area on your TV display by moving the cursor on your computer. If you want to display the full image, you need to change the display resolution
of yo ur notebook to 6 40 x 480 dots.
Before turning on the computer, turn off the peripheral devices.
If you want more information on the ATI video controller, click the ATI icon in the taskbar and click Help.
nN
74
Page 76

Customizing your computer
Configuring your modem
Before you can start using your internal modem, or each time you use your modem while travelling, make
sure tha t the country of the active locati on define d in the Phone and Modem Options dialog box matches
the country you are dialing from. You may notice a Country Selector tab under your current modem driver
options . As the Country Selector tab is not a constant feature, do not use this tab to change the country
settings. Only the following procedure is reliable.
To change your modem country settings, proceed as follows:
1 Click Start and then Control Panel.
2 Double-click Phone and Modem Options.
The Phone and Modem Options dialog box appears.
If you do not see the Phone and Modem Options dialog box, click Switch to Classic View on t he lef t
side.
About the software on your Sony notebook
3 Select your locat i on on th e Dialing Rul es tab.
4 Click the Edit bu tton to change the current configuration .
The Edit Location dialog box appears.
Or
Click the New button to configure your mod em.
The New Location dialog box appear s .
5 Check the count ry /regi on s et tings , and make sur e it matches th e place you are dialing from.
6 If you modi fied your locat ion settings , clic k Apply, and then OK.
The Phone and Modem Options dial og box appear s .
7 Check that your modem is lis ted in the Modems tab.
If your modem is not list ed, cli ck Add and foll ow the wizard.
8 Click Apply/OK. Your modem is con figur ed.
✍ Before applying new country settings, please make sure your phone line is disconnected from your VAIO computer.
nN
75
Page 77

Customizing your computer
Updating the modem dri v er
If you need to update th e modem dri v er for any reason, pr oc eed as fol lows :
1 Click the Start but t on and open Control Panel.
The Control Panel windo w appears .
2 Click the P r inters an d Oth er Ha r dwar e icon.
The Printers and Other Hardware window appears.
3 Click the Phone and Modem Options icon.
The Phone and Modem Options dial og box appear s .
4 Click the Modems tab and then click Properties to view the pr oper t ies of you r modem.
The Modem Properties dialog box appears.
5 On the Driver tab, click Updat e driver.
The Hardware Update Wizard window appears.
About the software on your Sony notebook
Follow the instructions that appear on your screen. Y ou can perform a Windows search for the driver, or
point to the driver ' s loc ation y our s el f.
nN
76
Page 78

Customizing your computer
Changing your windows design wit h the UI Desig n Sel ector program
You can change the wind ow design of Sony software com patible with the UI Design Selector pr ogr am .
To change the windo w desig n using UI Desig n Selec t or , proc eed as follows:
1 Click Start, and then Control Panel.
If you do not see UI Design Selector, click Switch to Classic View on the left side.
OR
If you do not see UI Design Selector, click Other C ontrol Panel Options on the right side.
2 Double-click UI Design Selector .
The UI Design Selector dialog box appears.
3 Click << or >> and select the desi gn you li ke.
4 Click Apply .
About the software on your Sony notebook
The UI Design Selector window design changes, to give you a preview of the design you chose for the
Sony software.
5 To try another design, click << or >>.
6 Click OK once you are satisfied with your ch oice.
The UI Design Selector dialog box disappears and changes the window design of Sony software as you
selected.
nN
77
Page 79

Customizing your computer
Settin g a Sony wallpaper
Your Sony VAIO compu te r off er s you, amo ng man y other feat ur es, a cho ice of wal lpap ers.
You can change the wallpaper, the background of your desktop, as many times as you like. There are several
VAIO-specific wallpaper s to choose f ro m.
To set another VAIO wallpaper, proceed as follo ws:
1 Go to Control Panel and select the Switch to Classic View option.
Double-cl ick t he Display icon.
The Display Properties dialog box appears.
2 Click the Desktop tab.
A list of Windows and VAI O wallp aper s is dis pla y ed.
3 Select a wallpaper in the Background list.
You can see a preview of this wallpaper in the monitor above t he Background list.
About the software on your Sony notebook
4 Adjust th e pos iti on of the wall p aper wi th the Position drop-down li st.
5 Click Apply when you have found the appropriate wallpaper.
6 Click OK to clo se the Display Properties dialog box.
The wallpaper is applied to your comput er.
✍ A higher screen resolution reduces the size of items on your screen and increases the relative space on your desktop.
Yo u may not be able to increase the screen resolution above a certain level. Your monitor and video adapters, for example, determine to which extend
you can ch ange the res ol ut i on.
nN
78
Page 80

Customizing your computer
Selecting a screen saver
A screen saver is an anim at ed image th at is activated on a computer display when no user activity has been
sensed for a certai n time . The orig inal pur pos e of a screen saver was to prevent bur n- in (the bur nin g of an
image into the phos phor insi de th e cathod e ray tube af ter hour s of the sa me image being rescanned). In
fact, today 's CRT di sp lay t ec hnol ogy makes burn -i n unl ikel y ex ce pt under extre me conditions.
Your computer comes with built-in screen savers that you can select.
To change the built-in screen saver, proceed as follows:
1 Right- cli ck on the deskt op.
2 Select Properties.
The Display Properties dialog box appears.
3 Select the Screen Saver tab.
4 In the Screen saver drop- dow n men u, select a screen s a ver.
About the software on your Sony notebook
When you want to see how the screen saver look s like, click Preview.
5 Click Apply and OK.
nN
79
Page 81

Installing and updating applications
Installing and updating applications
This section explains how to install, run or uninstall a software.
Furthermore, you will learn how to downl oad the latest updates from our websi te.
❑ Installing s oft ware (page 81)
❑ Changi ng or removi ng so ftware (page 82)
❑ Uninstalling software (page 83)
❑ Download ing sof tware (page 85)
About the software on your Sony notebook
nN
80
Page 82

Installing and updating applications
Installing software
Before installing the appl icat io ns :
❑ Install and connec t a hardware device, if necessary (see the Managing drivers (page 86) section);
❑ Close all open applications.
To install an applicat i on f rom t he suppli ed CD -RO M, proc eed as foll ows:
1 Click Start and then Control Panel.
2 Open Add or Remove Programs in Control Panel.
The Add or Remove Programs dial og box appear s .
3 Click Add New Programs, and then click CD or Floppy.
The Install Program From Floppy Disk or CD-ROM window appears.
4 Insert the first inst al lation floppy disk or CD-ROM and click Next.
The Run Installation Program appears.
About the software on your Sony notebook
5 Click Browse… t o find the inst al lati o n pro gra m.
The Browse windo w appea rs.
6 Select the installation progr am and click Open.
The path of the install ation pr ogr am appear s in Open: text box.
7 Click Finish.
A Li cence Agreeme nt dialog box might appear.
8 Read the agreement and cli ck Yes to accept.
You are asked to define t he location where you want to install the so ftw ar e.
9 Click Browse to select the folder and click Next.
If necessary, select the typ e of installation you wish and cl i ck Next.
The software installation begins.
Make sure to select Yes, I want to restart my computer now if you are asked to.
10 Click Finish.
Instal lation is complete and your computer restarts.
✍ When usi ng Add or Remove Programs, you can only install programs that were written for Windows
®
operating systems.
nN
81
Page 83

Installing and updating applications
Changi ng or remo ving software
You can at all times remove or change a software application.
To change or remove a software, proceed as follows:
1 Click Start, click Control Panel, and then c lic k Add or Remove Progr ams.
2 Select the software you wan t to change or remove.
❑ To change a program, click Change/Remove or Change.
❑ To rem ove a pr ogr am , clic k Change/Remove or Remove.
! When you click Change or Remove, some programs may be removed without any further warning.
✍ You can sort prog ram s by sele c tin g dif f ere nt opti ons in Sort by.
Add or Remove Programs will only remove programs that were written for Windows
documentation to see if other files (such as .ini files) should be removed.
About the software on your Sony notebook
nN
®
operating systems. For other programs , check the
82
Page 84

Installing and updating applications
Uninstalling software
Before proc eeding, close the app lica tion y ou w ant to unins t all .
To uninsta ll soft wa re, pr oc eed as follows :
1 From the Start menu, click Control Panel.
The Control Panel window appear s .
2 Dou ble-click the Add/Remove Programs icon.
The Add/Remove Programs dialog box appear s .
3 Select the softwar e you wish to uninstal l from the list of currently inst alled progra ms, the n click Change/
Remove.
4 Select Remove, and then click Next.
The Confirm File Deletion dialog box appear s.
5 Click OK.
About the software on your Sony notebook
If the Locked file detected dialog box appears, click Reboot. Th e computer restarts once un installati on
is completed and all previ ous ly used f il es are delet ed.
If t h e Shared file detected dialog box app ears, it is recomm ended that you click No to keep shared
files.
6 Click Close.
The sof tw a re is un insta lled.
nN
83
Page 85

Installing and updating applications
Caution
Windows® File protection
Instal ling a program might overwrite shared system files such as dynamic-link libraries (D L L files)* and
execu tab le files (EXE files). When system files are overw ritten, system p er fo rman ce b ecom es u npre dictable,
programs behave erratically, and the operating system can fail .
Never delete files with the following extension s: SYS, DLL, OCX, TTF, or FO N.
In Windows® XP, Windows File Protection prevents the replacement of protected system files such as SYS,
DLL, OCX, TTF, FON, and EXE files. Windows File Protection runs in the back gro und and pr ot ect s all files
installed by the Windows Setup program.
Windows File Protection detects at te mpts b y other p rog ra ms to rep lace o r mov e a pro tec ted syste m fi le .
It also checks the file's digi ta l signature.
About the software on your Sony notebook
* This is an operating system feature that allows executabl e rou tines (g enerally servi ng a specific funct io n or set of functions) to be
stored s eparately as files wit h DLL extens ions. These routines are loaded only when needed by the program that calls them.
File Signature verification
When you install a new applic at ion on your comput er , you mig ht overwr ite syst em files and dev i c e driver
files with unsigned or incompatible versi ons , w hich pr ovokes system insta bi li t y.
The system files and device driver files provided with Windows® XP have a Microsoft digital signature, which
indicates that the files are original , unal t ered syst em files or that they have been appr oved by M icros of t®
for use with Windows®.
nN
84
Page 86

Installing and updating applications
Downloading software
Please note it is possible to download the latest upgrades of software for your computer on our website.
Just click th e follow ing link to access i t: www.vaio-link.com
To download th e lates t upg ra des , proc eed as follo ws:
1 Go to www.vaio-link.com and choose your language.
2 Click the VAIO User butt on.
3 Fill in the two codes an d ente r the sit e.
4 Select Downloads and follow th e proc e dure.
A list of available dow nloads appears.
5 Choos e the approp riat e upgr ade and f ol low the onli ne instructions to download it.
✍ To in stall your application, see the Installing software (page 81) sec tion .
About the software on your Sony notebook
nN
85
Page 87

Managing drivers
About the software on your Sony notebook
nN
86
Managing drivers
A driver is a software enabling you to use hardware devices. For example, in order for you to be able to use
a printer, yo u must fir st insta l l its drive r. Many dr ivers, such as the mo use driver, come wi th the opera ti ng
system.
This section explains how to install, check, update or uninstall a driver.
The Windows® XP Rollback featur e is also expl ain ed.
Finall y, you will learn ho w to download the latest drivers from our site.
❑ In st a llin g a d r iver (page 87)
❑ Checking t he driver ' s ins tallation (page 88)
❑ Updating a driver (page 89)
❑ Uninstalling a d river (page 90)
❑ Restoring a driver (page 91)
❑ Download ing drivers (page 93)
Page 88

Managing drivers
About the software on your Sony notebook
nN
87
Installing a driver
Please procee d as follow s to instal l the driver , if it does not come with a speci f ic installation procedur e:
1 Insert the application CD-ROM into the CD-ROM drive (or the disk or the CD-ROM accompanying the
device you want to configure).
2 Connect the device that needs a driv er, to your computer.
The Found New Hardware Wizard screen appears.
3 Select Specify a locati on, then click Next.
4 When install ing a driver from the provided CD- ROM (o r disk ) by using a CD-ROM (or disk) driv e
connected to the computer, select the Drivers folder on the CD -ROM (or di sk) dr ive .
5 When installing a driver after having copied the contents of the provided CD-ROM (or disk) to your hard
disk, browse to the appropriate subdirectory containing the driver. The subdirectory should be found in
the folder you copied from the CD-ROM (or disk ).
6 Click OK to begin the search proc edur e.
7 Click Next to install the driver.
A new window appears when the driver has been installed.
8 Click Finish.
You may be asked to restart your machine.
9 Click Ye s.
The d river is insta lled.
✍ To install your device driver, you must be logged on to your computer with an administrator account.
Page 89

Managing drivers
About the software on your Sony notebook
nN
88
Checking the driver's installation
When the computer re starts, verify that the device is work ing prope rl y .
To verify the driver ’s inst allation, proceed as follows:
1 From the Start menu, click Control Panel.
The Control Panel windo w appears .
2 Double-cl ick t he System icon.
The System dialog box appears.
If you do not see the System icon, click Switch to Classic View on the left side.
3 Click the Hardware tab, then click Device Manager.
4 Double-cl ick t he opt ion corres ponding to the device you in stal led , then double-clic k your device.
The Properties dialog box appears.
5 Make sure that the This device is working properly message is displayed under Device status.
6 Click OK.
Close all the open ed wi ndow s , your dev ice i s ready fo r use.
The d e v ice is not w o r k in g properly in the follo wing case s:
❑ Your dev ic e is shown in Device Manager with a yellow question or exclamation mark.
Right-click your device and click Uninstall. Then repeat from step 2 in Installing a driver (page 87).
❑ Double-clicking the category of your device in the device manager list does not display your device.
You have to remove your de vice. Plea se refe r to Uninstalling a driver (page 90) to remove it. The n
repeat from step 2 in Ins t alling a driver (page 87).
❑ Double-clicking Other devices displays your device.
You have to right-click your device, then click Uninstall. Repeat fro m step 2 in Insta lling a driver
(page 87).
❑ If t h e This device is working properly message is not displayed, the device is not working properly.
Click OK to clo se the Pr operties dia log box, then re install th e dri ver as follow s:
Page 90

Managing drivers
About the software on your Sony notebook
nN
89
❑ Right-click Uninstall.
❑ When the Confirm Device Removal dialog box appears, click OK.
❑ Click Ye s and resta rt the comp ute r.
❑ When the computer restarts, repeat fro m step 2 in Ins talling a driver (page 87).
❑ If your device i s not displ ay ed in the Properties dialog box , the device is not working properl y.
Repeat steps 1 through 4 in the previous sections to verify the driver’ s installation. Click your device, then
click Uninstall to remove the driver. Cl ick Yes to resta rt the computer. When th e computer restarts,
repeat from step 2 in Ins t alling a driver (page 87).
Up dating a driver
To update the driver , proceed as follows:
1 Click Start on the taskbar.
2 Click Control Panel.
3 Click the P r inters an d Oth er Ha r dwar e icon.
And then click the device you want to revert.
4 On the Hardware tab, click Properties.
5 On the Driver tab, click Updat e driver.
6 Follow the instructions that appear on your screen. You can have Windows search for the driver, or point
to the driver's location yourself.
Or:
1 Click Start on the taskbar.
2 Click My computer from the menu.
3 Click View system information on the left of the window.
4 Click the Hardware tab, then click Device Manager.
Page 91

Managing drivers
About the software on your Sony notebook
nN
90
5 Double-cl ick t he opt ion corres ponding to the device you in stal led , then double-clic k your device.
The Properties dialog box appears.
6 Click the Driver tab.
7 Click Update driver.
The driver is updated.
✍ To update your device driver, you must be logged on to your computer with an administrator account.
Uninstalling a driver
Leave the device connect ed t o your compu te r while unin stal li ng t he driver .
To uninst all the dri v er, pr oceed as fol lows :
1 Click Start on the taskbar.
2 Click Control Panel.
3 Click the P r inters an d Oth er Ha r dwar e icon.
And then click the device you want to revert.
4 On the Hardware tab, click Properties.
5 On the Driver tab, click Uninstall.
6 If you are prompted to restart your computer, click Ye s.
The Uninstall button is unava i lab le if r emo ving the driver wo uld make your device unusa ble.
Or:
1 Click Start on the taskbar.
2 Click My computer from the menu.
3 Click View system information on the left of the window.
4 Click the Hardware tab, then click Device Manager.
Page 92

Managing drivers
About the software on your Sony notebook
nN
91
5 Double-cl ick t he opt ion corres ponding to the device you in stal led , then double-clic k your device.
The Properties dialog box appears.
6 Click the Driver tab.
7 Click Uninstall.
The driver is uni nst a lled.
✍ To uninstall your device driver, you must be logged on to your computer with an owner account.
Restoring a driver
System Restore is a feature of Microsoft® Windows® XP that restores your computer to a previous state, if a
proble m occu rs, wi th out losi n g your person a l data file s.
Syst em R esto re mo nitor s cha n ges to th e system, and i t au to ma ti call y crea tes e a si ly identified resto re po ints.
These restore points allow you t o revert the system to a previous time. They are created daily and at the time
of signifi ca nt sy stem e vents (suc h as when an appl ication or dri ve r is install e d).
To revert to your previous driver, proceed as follows:
1 Open the device that is not working correctly in Control Panel.
To open the device:
❑ Click Start on the taskbar.
❑ Click Control Panel.
The Control Panel windo w appears
❑ Click the Printers and Other Hardware icon.
❑ And then click the device you want to revert.
2 On the Hardware tab, click Properties.
3 Click the Driver tab.
4 On the Driver tab, click Roll Back Driver.
Page 93

Managing drivers
About the software on your Sony notebook
nN
Or:
1 Click Start on the taskbar.
2 Click My computer from the menu.
3 Click View system information on the left of the window.
4 Click the Hardware tab, then click Device Manager.
5 Double-cl ick t he opt ion corres ponding to the device you in stal led , then double-clic k your device.
The Properties dialog box appears.
6 Click the Driver tab.
7 On the Driver tab, click Roll Back Driver.
Yo u h ave yo ur pre v i ous drive r back.
✍ You must be logged on to your computer with an owner account in order to complete this procedure.
Restoring your computer does not affect or change your personal data files.
®
For more information about System Restore, see Windows
Help.
92
Page 94

Managing drivers
About the software on your Sony notebook
nN
93
Downloading drivers
Please note it is possib le to download the latest versions of driver s for your comput er on our website.
Just click th e follow ing link to access i t: www.vaio-link.com
To download th e lates t dri v ers, pro ce ed as follow s :
1 Go to www.vaio-link.com and choose your language.
2 Click the VAIO User button.
3 Fill in the two codes an d ente r the sit e.
4 Select Downloads and follow the procedure.
A list of available dow nloads appears.
5 Choos e the approp riat e driv er and fo llow the online instructions to downl oad it.
T o in stall your drive r, follo w the inst ru ction s y ou dow nlo aded with th e driver.
Page 95

Using the product recovery CD-ROMs
Using the product recovery CD-ROMs
The Product Rec over y CD- RO Ms supplied with your com put er allow you to perfor m a full system re co ve ry,
and help you reinst all individual applic at io ns and device dr iver s manu ally .
❑ Perform an Application Recovery to:
❑ Reinst all an indi vidual driver if a device is not fu ncti oni ng pr operly.
❑ Reinst all an indi vidual application if you have problem s runni ng i t.
❑ Perform a System Recovery in the f o llowing case s:
❑ In the event of a serious system c rash.
❑ If you want to modify the size of the hard drive partitions.
! You can only use these product recovery CD-ROMs on the Sony computer they came with and not on any other Sony PC or other manufacturer's PC .
❑
Performing an application recovery (page 95)
About the software on your Sony notebook
❑ Performing a system recovery (page 97)
❑ Aborti ng the system recovery process (page 103)
nN
94
Page 96

Using the product recovery CD-ROMs
Performing an application recovery
The final CD in the set of product recovery CD-ROMs contains most of the applications that were preinstalled
on your computer and some that are not yet installed. Reinstalling a program from this application CD can
fix the proble ms encount er ed if it does not run correct ly anym or e, or if Windows® is having a problem
running a device.
To perform an application recovery, proceed as fol lows:
1 Turn on your computer (usi ng AC pow er only) and wait until Windows® has booted up.
2 Inse rt the final product recove ry CD -ROM into th e disc driv e.
3 Open the drive through My Computer and open the Apps folder.
4 Open the folder of the appl ication you want to reinst all.
5 Double-cl ick t he Setup file.
6 Follow the instructions in the Installer.
About the software on your Sony notebook
✍ You must run the final product recovery CD-ROM from Windows
The applic a tio n rec ove r y does not run from DOS.
When performing an application recovery, you do not lose any data on your hard disk.
In most cases, you are advised to uninstall an application before reinstalling it.
nN
95
®
.
Page 97

Using the product recovery CD-ROMs
Reinstalling a device dr iver from the appli ca t io n CD
Some applicat i ons or perip her als r equi re specific drivers which are not found on t he Windows® operating
system.
The final CD in the set of produc t recovery CD-ROMs contains the driv er s you need for the prei ns ta ll ed
hardware devices. Reinstalling a driver from this CD can fix the problems encountered if Windows® is having
a problem runni ng a device. For more details on managi ng driv er s, ple ase see the online Software Gu ide.
To reinstal l/update a device driv er, pr oceed as follow s:
1 Turn on your computer (usi ng AC pow er only) and wait until Windows® has booted up.
2 Inse rt the final product recove ry CD -ROM into th e disc driv e.
3 Open the drive through My Computer and open the Drivers folder.
4 Check that the driver y ou require appea rs in the fo lde r.
5 Click Start on the taskbar.
About the software on your Sony notebook
6 Click Control Panel, Performance and Maintenance, t h e n System.
7 On the Hardware tab, select Devi ce Manager and double-click the device you want to update.
8 On the Driver tab click Up date Dri ver.
❑ Follow the instructions that appear on your screen. You can have Windows
point to the driver ' s loc at ion your s el f.
nN
96
®
search for the driver, or
Page 98

Using the product recovery CD-ROMs
Performing a system recovery
The system recovery process al lows you to:
1 Reinstall an image of the hard disk as it was before you started using your computer.
In the even t that your system is seri ously dam aged, for ex ample, i f Windows® does not work as it should,
or your PC behaves a bnormally , the syste m recovery wi ll complete l y rein stall the orig ina lly confi gured
system on your C: drive.
2 Change the sizes of the two available hard drive partitions, or delete the partitions altogether .
If you decide to modify the size of your partitions, the existing data on both C: drive and D: drive will be
deleted (see Using partitioned drives (pag e 98)).
Notes on performing a sys tem recovery
❑ The recover y pro ce ss can las t up to sixty minut es , and i n this ti me you wil l be prom pt ed to chang e CDs .
About the software on your Sony notebook
❑ Y ou can recover only the software bundled to your computer . It does not work for the software you have
installe d sub seq uent l y or the data you have cr eat ed.
❑ This procedure recovers the entire system, which means you cannot choose to only recover Windows
❑ Make sure that your compu ter is connec t ed t o the AC power suppl y (not to the batt er y) befor e you
attemp t a system recovery.
❑ When the re cov ery i s p erformed, you are rec omme nded to r e mo ve th e re cov ery C D -ROM from the drive
before restarting the computer.
nN
97
®
.
Page 99

Using the product recovery CD-ROMs
Using partiti oned dri ves
In My Computer you may have noticed the availability of two drive partitions (C: and D:). Your hard disk
driv e com es fro m th e factory with 2 lo gica l partitions. Th is do es n o t mea n th at yo ur com puter contains two
physical hard disks.
When you start us ing your com puter , your C: partition ( also r efe rred to as C: drive) contai ns all the files
required by Windows® and other pre-installed software, while the D: drive is empty. The D: drive is the ideal
storage spa ce for all your documents and files , especial l y larger ones like digital motion pictures c apt ur ed
by DVgat e.
✍ Although you can perform a s ystem recovery an d ch ange the partition settings in o rder to have o ne C: d rive only , th is option is not recommended for
using video editing applications like DVgate.
To optimise data storage, use the C: drive to install new applications , and save all your documents and files to the D: drive. Moreover, do ing so will
prevent the loss of your data in case you need to perform a system recovery.
Do not try to add, delete, or resize partitions unless you really need to. Changing partition settings might delete all your files on the hard disk.
About the software on your Sony notebook
If you need to perform a system recovery, but do not want to lose all the data stored on your hard disk, copy all the files you want to keep on the
D: drive. During the system recovery process, choose to keep the current partition informa tion. Doing so will keep your D: drive unchanged af ter the
recovery process.
If you do need to change the size of your partitions, you can do so by choosing Option Recovery in the system recovery set-up process. In this c ase,
it is important to be aware that all data on your hard disk will be deleted. If you need to keep existing files, make sure you back them up before
performing the system recovery.
nN
98
Page 100

Using the product recovery CD-ROMs
Starting the system recovery procedure
To start the system recovery, proceed as follows:
1 Tu rn o n your comp u ter (u si ng A C po wer o nly) a nd in sert th e first system recovery CD -ROM i nt o the d isc
drive.
2 If you are still able to access Windows®, shut down your computer (Start/Turn Off Computer/Turn
off)*.
3 Wait 10 seco nds the n turn the compu ter back on.
4 The system starts to read th e CD automati cally and you are asked to wai t.
5 Click Next in the window that appears.
6 Read the introd uc tion and c lic k Next.
You can now choos e th e natu re of th e recover y.
* If your system is severely damaged and you can no longer access Windows®, you will have to turn off the computer by pressing the
About the software on your Sony notebook
power but t on f or longer t han fo ur seconds. Wa i t for ten sec onds bef or e pr essi ng t he but to n a gain to tur n the powe r on.
Recoverin g the s ystem without changing partitio n sizes
To completely restore the ori ginal software, drivers and settings on your computer without chan ging the
parti tion sizes, choose the fir st o ptio n and apply a Def aul t S yste m D rive R ec over y . Per forming this recover y
means that you wil l lose al l the data stor ed on your C: drive, but data on your D: driv e will remai n.
You should al low one hour fo r the reco ver y process .
To perform the Default System Drive Recovery, proceed as foll ows:
1 Select the but t on next to Default System Drive Recovery (Recommended).
2 Click Next.
You are asked if you are sure you want to recover the system.
3 To sta rt th e proce du re , click Next.
nN
99
 Loading...