

Page 1
LCD Display
Reference Guide
EN
Read this manual before using this product /
Lisez ce manuel avant d’utiliser le produit /
Lea este manual antes de usar el producto
FW-85EZ20L / 75EZ20L / 65EZ20L / 55EZ20L / 50EZ20L / 43EZ20L
Page 2
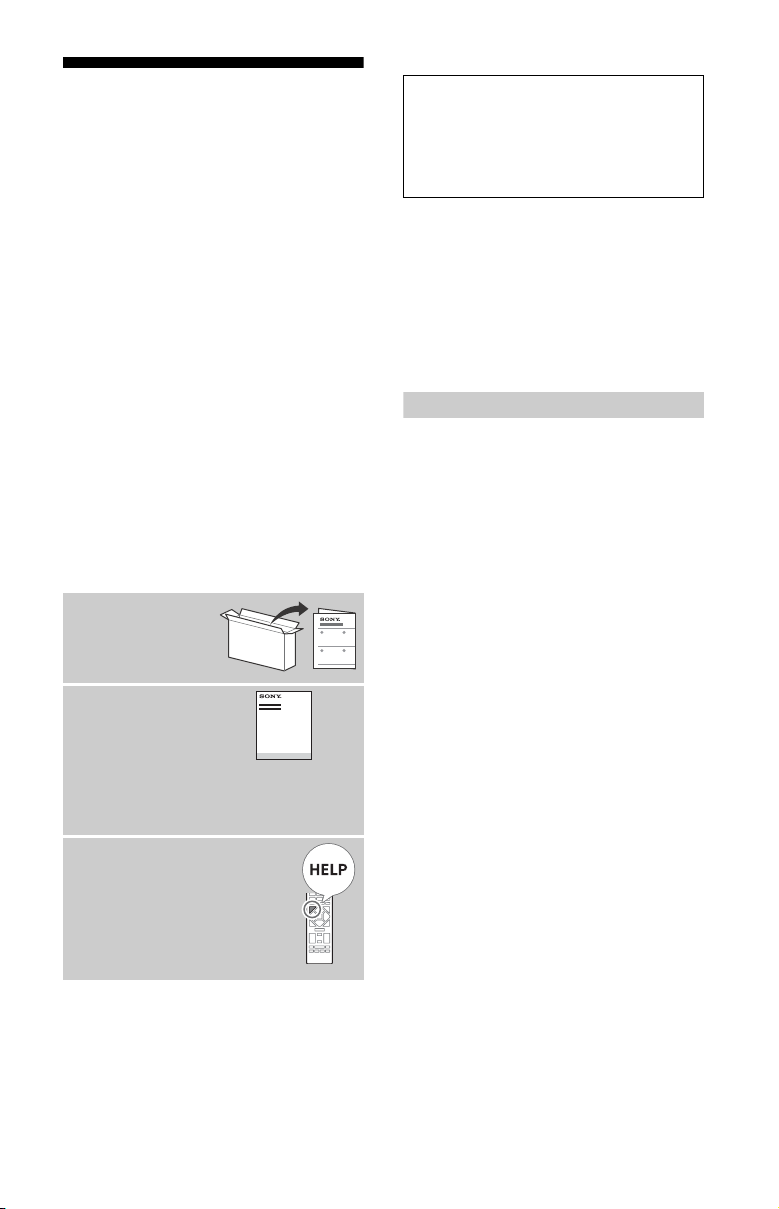
Table of Contents
IMPORTANT NOTICE . . . . . . . . . . . . . . . . 2
Safety Information . . . . . . . . . . . . . . . . . 3
Connection Diagram . . . . . . . . . . . . . .6
Remote Control and LCD Display . . . .8
Pro settings. . . . . . . . . . . . . . . . . . . . . .9
BRAVIA Signage Free . . . . . . . . . . . . .10
Control functions . . . . . . . . . . . . . . . . 12
RS-232C . . . . . . . . . . . . . . . . . . . . . . . . . 12
IP control . . . . . . . . . . . . . . . . . . . . . . . . 13
Installing the LCD Display to
the Wall. . . . . . . . . . . . . . . . . . . . . . . .14
Troubleshooting . . . . . . . . . . . . . . . . . 15
Specifications . . . . . . . . . . . . . . . . . . .16
About Manuals
This LCD Display comes with the following
manuals. Please retain the manuals for
future reference.
Setup Guide
• LCD Display
installation and
setup.
Reference Guide (this
manual) / Safety and
Regulatory Booklet
• Safety information,
remote control, troubleshooting,
wall-mount installation, specification,
etc.
Help
Find more troubleshooting and
other useful information
directly from your LCD Display.
Press HELP on the remote
control to display a list of
topics.
Setting menus are subject to change without notice.
IMPORTANT - Read the End User Software License
Agreement before using your Sony product. Using your
product indicates your acceptance of the End User
Software License Agreement. The software license
agreement between you and Sony is available online at
Sony website (https://www.sony.net/
tv-software-licenses/) or on your product screen. Go to
[Settings] t [System] t [About] t [Legal information]
t [End user license agreement].
Note
• Images and illustrations used in the Setup Guide and this
manual are for reference only and may differ from the
actual product.
• This LCD Display displays all video input signals in a
resolution of 3840 dots × 2160 lines.
Location of the identification label
Labels for the LCD Display Model No. and Power Supply
rating are located on the rear of the LCD Display.
IMPORTANT NOTICE
IMPORTANT NOTICE FOR MEXICO
Operation of this equipment is subject to the following two
conditions: (1) it is possible that this equipment or device
may not cause harmful interference and (2) this equipment
or device must accept any interference, including
interference that may cause undesired operation.
For information related to the certificate number, refer to
the package label and / or product.
Note:
This product uses the following module for wireless
functionalities:
Model: WBUR56
Brand: FOXCONN
WLAN:
2.4 GHz (2.4000 GHz – 2.4835 GHz)
5 GHz (5.150 GHz – 5.850 GHz)
Bluetooth®:
2.4 GHz (2.4000 GHz – 2.4835 GHz)
For models with supplied plug adapter:
This plug adapter is not for the use in Argentina, Chile,
Paraguay and Uruguay. Please use this plug adapter in the
countries where it is necessary.
CAUTION
To prevent electric shock and blade exposure, do not use
this AC plug with an extension cord, receptacle or other
outlet unless the blades can be fully inserted.
• Operate the LCD Display only on 110 V - 240 V AC (U.S.A./
Canada 120 V AC).
EN
2
Page 3
GBEN
Safety Information
Notice for customers in the United States
of America
Supplier’s Declaration of Conformity
Trad e Nam e: SO NY
Model: FW-85EZ20L / FW-75EZ20L / FW-65EZ20L /
FW-55EZ20L / FW-50EZ20L / FW-43EZ20L
Responsible Party: Sony Electronics Inc.
Address: 16535 Via Esprillo, San Diego, CA 92127 U.S.A.
Telephone Number: 858-942-2230
FCC Related Information
This equipment has been tested and found to comply with
the limits for a Class B digital device, pursuant to Part 15 of
the FCC Rules. These limits are designed to provide
reasonable protection against harmful interference in a
residential installation. This equipment generates, uses and
can radiate radio frequency energy and, if not installed and
used in accordance with the instructions, may cause
harmful interference to radio communications. However,
there is no guarantee that interference will not occur in a
particular installation. If this equipment does cause harmful
interference to radio or LCD Display reception, which can be
determined by turning the equipment off and on, the user
is encouraged to try to correct the interference by one or
more of the following measures:
• Reorient or relocate the receiving antenna.
• Increase the separation between the equipment and
receiver.
• Connect the equipment into an outlet on a circuit
different from that to which the receiver is connected.
• Consult the dealer or an experienced radio/LCD Display
technician for help.
Pursuant to FCC regulations, you are cautioned that any
changes or modifications not expressly approved in this
manual could void your authority to operate this
equipment.
Safety and Regulatory
FCC regulations restrict operation of this device to indoor
use only.
Warning
This device complies with Part 15 of the FCC Rules.
Operation is subject to the following two conditions:
(1) This device may not cause harmful interference, and
(2) this device must accept any interference received,
including interference that may cause undesired operation.
Notice for customers in Canada
This device contains licence-exempt transmitter(s)/
receiver(s) that comply with Innovation, Science and
Economic Development Canada’s licence-exempt RSS(s).
Operation is subject to the following two conditions:
(1) This device may not cause interference.
(2) This device must accept any interference, including
interference that may cause undesired operation of the
device.
To prevent radio interference to the licensed service, this
device is intended to be operated indoors and away from
windows to provide maximum shielding. Equipment (or its
transmit antenna) that is installed outdoors is subject to
licensing.
High-power radars are allocated as primary users (i.e.
priority users) of the bands 5250-5350 MHz and
5650-5850 MHz and that these radars could cause
interference and/or damage to LE-LAN devices.
Notice for customers in the United States
of America and Canada
This equipment complies with FCC/IC radiation exposure
limits set forth for an uncontrolled environment and meets
the FCC radio frequency (RF) Exposure Guidelines and
RSS-102 of the IC radio frequency (RF) Exposure rules. This
equipment should be installed and operated keeping the
radiator at least 20 cm or more away from person’s body
(excluding extremities: hands, wrists, feet and ankles).
This device and its antenna(s) must not be co-located or
operating with any other antenna or transmitter except
Grant condition.
Compatible Wall-Mount Bracket
Information
Use the following Sony Wall-Mount Bracket with your LCD
Display model.
Sony LCD Display Model No.
FW-75EZ20L / 65EZ20L /
55EZ20L
Sony Wall-Mount
Bracket Model No.
Use with other Wall-Mount Brackets*
and could result in property damage or injury.
*1 Only for limited region/country/model.
*2 For instructions on using the Wall-Mount bracket with
your LCD Display please go to https://www.sony.com/
am/support for your LCD Display model and download
“Wall-Mount Bracket”.
1
SU-WL855*
2
may cause instability
Compatible Table-Top Stand Information
Use the following Table-Top Stand accessory with your LCD
Display model.
Sony LCD Display Model No.
FW-65EZ20L /
55EZ20L
Tab le -Top
Stand
Model No.
FW-43EZ20L
FWA-ST1L
FW-50EZ20L
FWA-ST2L FWA-ST3L
To C ustomers
Sufficient expertise is required for LCD Display installations.
Be sure to subcontract the installation to a Sony dealer or
licensed contractor and pay adequate attention to safety
during the installation.
Before setting up your LCD Display
Some LCD Display models are packaged with a detached
Table-Top Stand so you can mount your LCD Display to a
wall right away. See “Installing the LCD Display to the Wall”
if you want to mount the LCD Display to a wall. If you are
not mounting the LCD Display to a wall, you will need to
attach the Table-Top Stand (refer to the Setup Guide).
(Models with Table-Top Stand only)
Be sure to consider the following while setting up your LCD
Display:
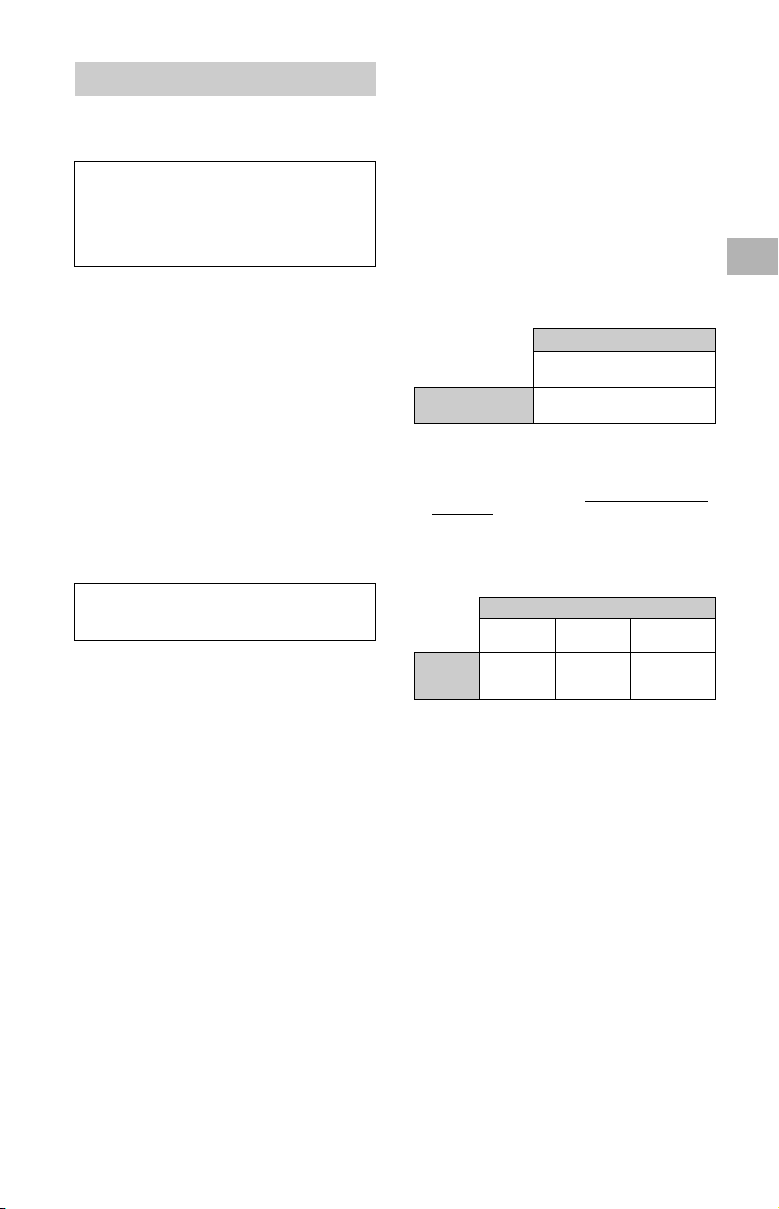
• Disconnect all cables when carrying the LCD Display.
• Two or more persons (three or more persons for 214.8 cm
(85 inches) and above LCD Display) are needed to
transport a large Display.
• Correct hand placement while carrying the LCD Display is
very important for safety and to avoid damage.
EN
3
Page 4
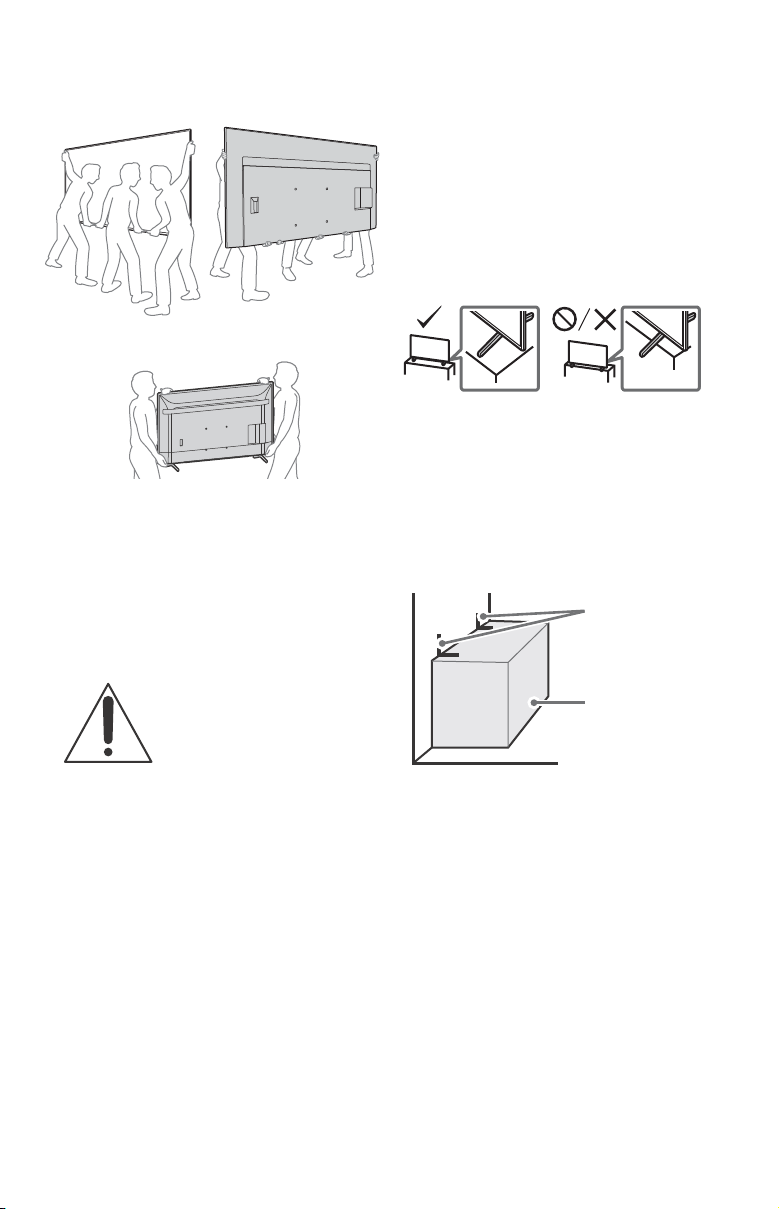
• When handling or mounting the LCD Display set, do not
Angle brace
(not supplied)
Stand
lay down the LCD Display (for applicable LCD Display
model only).
FW-85EZ20L
FW-75EZ20L / 65EZ20L / 55EZ20L / 50EZ20L / 43EZ20L
• Ensure your LCD Display has adequate ventilation, refer to
the safety documentation.
• For best picture quality, do not expose the screen to direct
illumination or sunlight.
• Avoid installing the LCD Display in a room with reflective
wall and floor materials.
• Avoid moving the LCD Display from a cold area to a warm
area. Sudden room temperature changes may cause
moisture condensation. This may cause the LCD Display
to show poor picture and/or poor color. Should this occur,
allow moisture to evaporate completely before powering
the LCD Display on.
Securing the LCD Display
Sony strongly recommends taking
measures to prevent the LCD Display
from toppling over.
Unsecured LCD Display may topple and
result in property damage, serious
bodily injury or even death.
Preventing the LCD Display from Toppling
• Secure the LCD Display to a wall and/or Stand (models
with Table-Top Stand only).
• Do not allow children to play or climb on furniture and
LCD Display.
• Avoid placing or hanging items on the LCD Display.
• Never install the LCD Display on:
slippery, unstable and/or uneven surfaces.
furniture that can easily be used as steps, such as a
chest of drawers.
• Install the LCD Display where it cannot be pulled, pushed,
or knocked over.
• Install the LCD Display so that the LCD Display’s Table-Top
Stand does not protrude out from the Stand (not
supplied). If the Table-Top Stand protrudes out from the
Stand, it may cause LCD Display to topple over, fall down,
and cause personal injury or damage to the LCD Display.
(Models with Table-Top Stand only)
• Route all AC power cords and connecting cables so that
they are not accessible to curious children.
Recommended Measures to Secure the LCD
Display (models with Table-Top Stand only)
Consider the following measures when securing your LCD
Display to a Stand (not supplied).
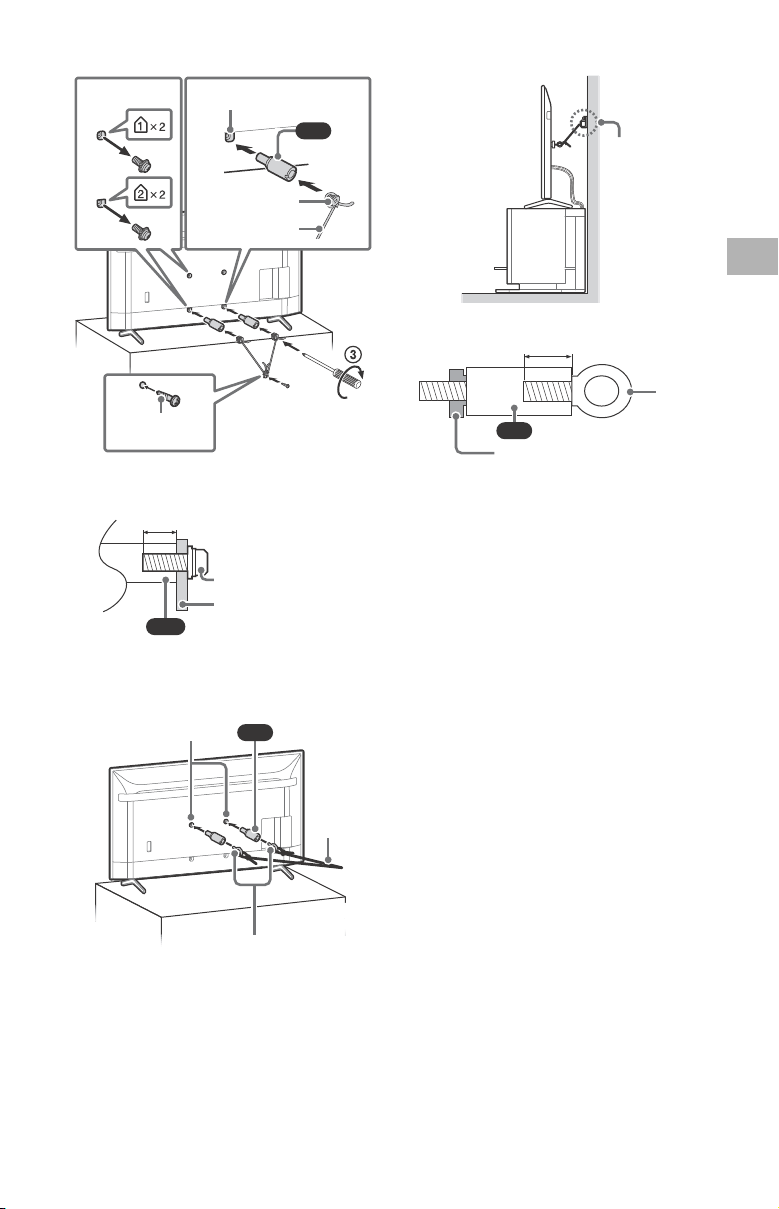
1 Secure the Stand for the LCD Display.
Make sure the Stand can adequately support the weight
of the LCD Display. Use two angle braces (not supplied)
to secure the Stand. For each angle brace use the
appropriate hardware to:
• Attach one side of the angle brace to the wall stud.
• Attach the other side to the Stand.
2 Secure the LCD Display to the Stand.
Use the optional hardware listed as follows (not
supplied):
• M6 machine screws (screwed into the LCD Display’s
rear cover).
• A screw or similar (attach it to the Stand).
• Rope or chain (strong enough to support the weight of
the LCD Display). Make sure that there is no excess
slack in the rope or chain.
EN
4
Page 5
GBEN
FW-65EZ20L / 55EZ20L / 50EZ20L / 43EZ20L
12
4
VS
1.5 N·m
{15 kgf·cm}
M6 machine screw
(not supplied)
Rope or chain (not
supplied)
Screw (not supplied)
Screw hol e on the rear cove r
(supplied)
VS
10 – 12 (mm)
Screw (M6)
Rope or chain
VS
Wall-mount holes
Rope or
chain (not
supplied)
M6 eye bolts (not supplied)
(supplied)
Wall-anchor
(not supplied)
VS
10 – 12 (mm)
LCD Display’s rear cover
M6 eye
bolt
The length of the M6 machine screw differs depending
on the rope or chain diameter. Please refer to below
illustration.
Please refer to below illustration for M6 eye bolt length.
Note
• Your LCD Display is shipped with screws attached to the
rear of the LCD Display depending on the LCD Display
model. (They are fastened in the screw holes for wall
mounting.) Be sure to remove the upper two screws prior
to anchoring the LCD Display to a wall.
• Securing the LCD Display to the Stand without securing
the LCD Display and the Stand to the wall provides
minimum protection against the LCD Display toppling
over. For further protection, be sure to follow the three
measures recommended.
3 Anchor the LCD Display to the wall by using bolts, wall
anchor and chain (or rope).
FW-65EZ20L / 55EZ20L / 50EZ20L / 43EZ20L
EN
5
Page 6
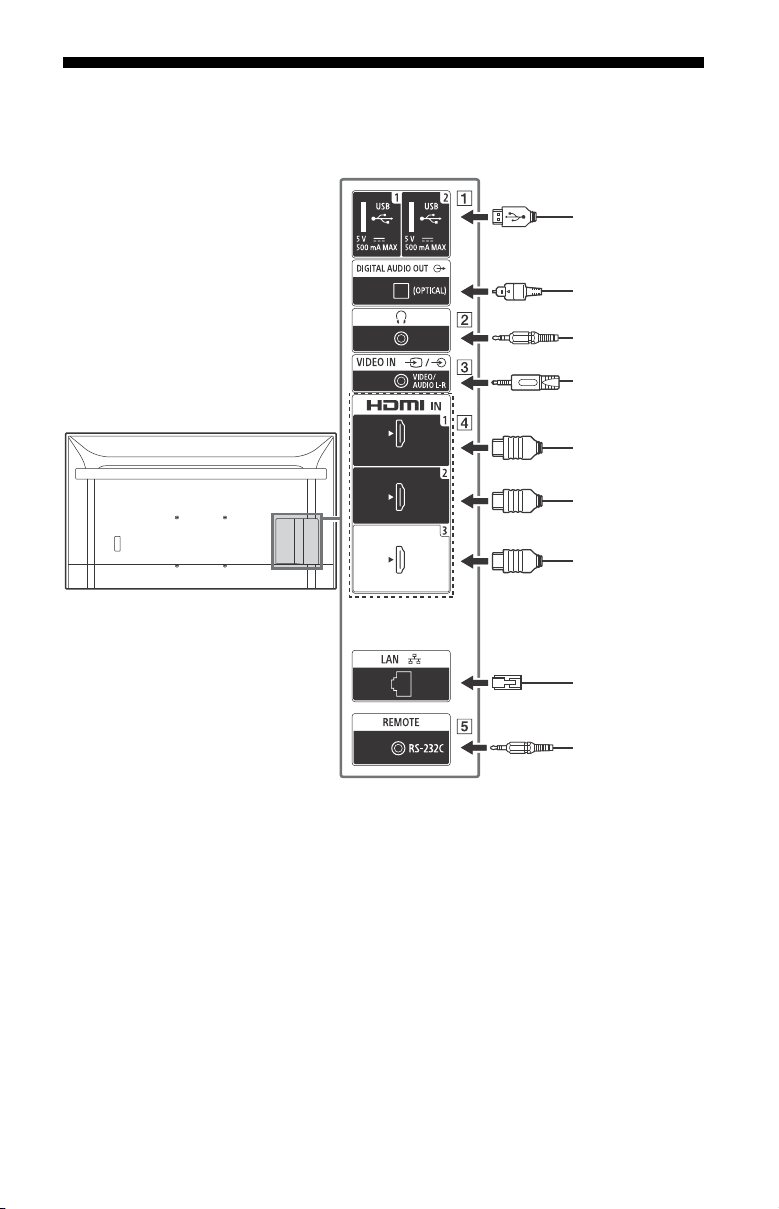
Connection Diagram
(eARC/ARC)
USB storage media
etc.
VCR/Video game
equipment/DVD
player/Camcorder
Headphone
HDMI Device/PC
Audio System
with eARC/ARC/
HDMI Device
Router
Home Controller
HDMI Device/PC
Audio System
with Optical
Audio Input
Note
• Terminals and labels may vary depending on region/country/LCD Display model.
EN
6
Page 7
GBEN
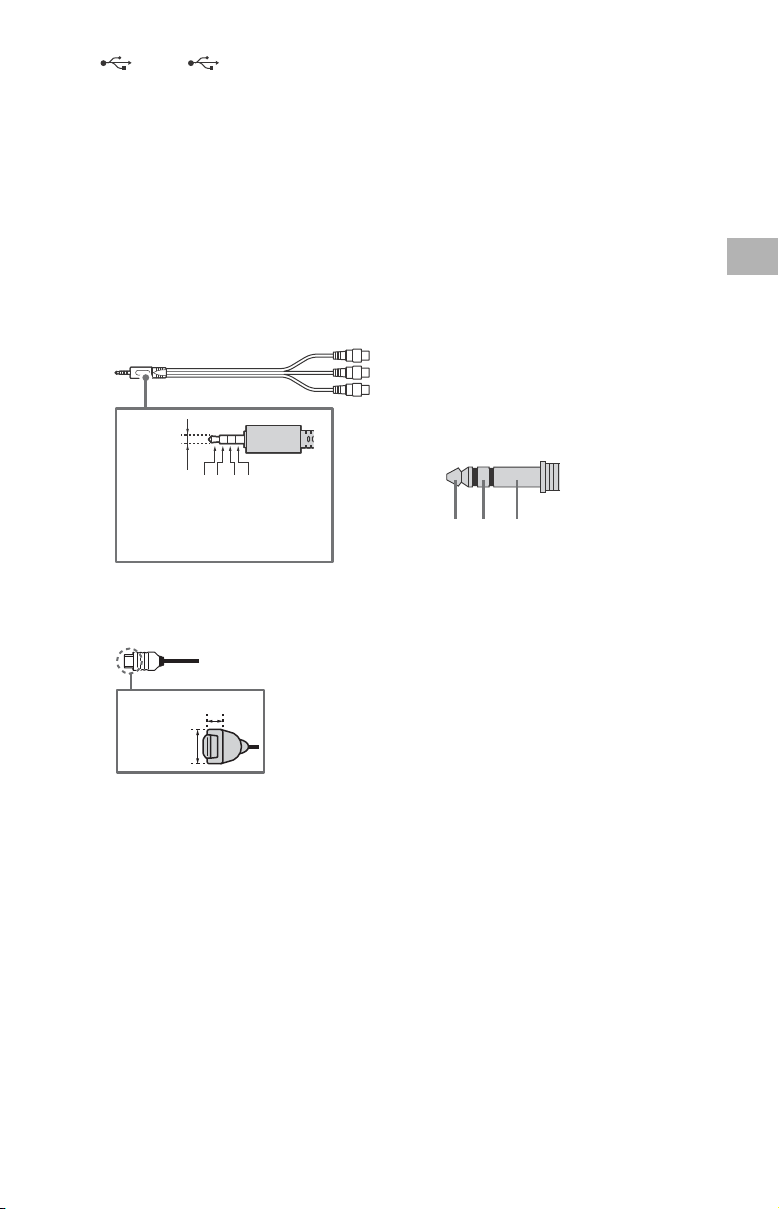
USB 1, USB 2
3214
3.5 mm
1: L
2: Video
3: Ground
4: R
<
<
12 mm
21 mm
RX TX GND
• Connecting a large USB device may
interfere with other connected
devices beside it.
(Headphone)
• Supports 3-pole stereo mini jack only.
• You cannot output sound from both
the headphone and the LCD Display
speakers at the same time.
/ VIDEO IN
• For a composite connection, use an
Analog Extension Cable (not
supplied).
•
HDMI IN 1/2/3
• HDMI interface can transfer the digital
video and audio on a single cable.
•
• HDMI IN 3 eARC/ARC (Enhanced
Audio Return Channel/Audio
Return Channel)
Connect your audio system to the
HDMI IN 3 to route LCD Display audio
to your audio system. An audio
system that supports HDMI eARC/
ARC can send video to the LCD
Display, and receive audio from the
LCD Display via the same HDMI cable.
If your audio system does not support
HDMI eARC/ARC, an additional
connection with DIGITAL AUDIO OUT
(OPTICAL) is necessary.
• Use the HDMI cable with Ethernet to
connect audio system with eARC.
REMOTE RS-232C
• Terminal for serial communication.
For details, see “Control functions”.
EN
7
Page 8
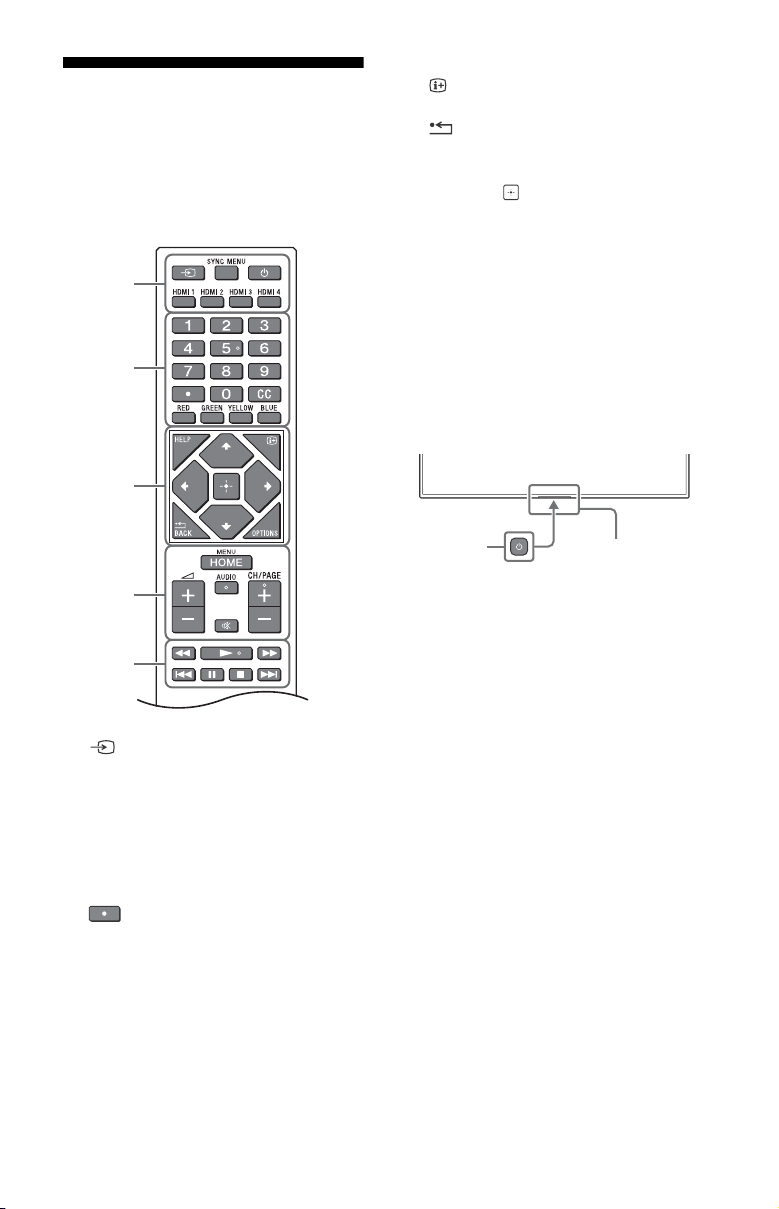
Remote Control and LCD
Ȫ
ȩ
ȫ
Ȭ
ȭ
Ȯ
Display
The remote control shape, layout,
availability and function of remote
control buttons may vary depending on
your region/country/LCD Display model/
LCD Display settings.
HELP: Display the Help menu.
(Screen display): Display
information.
/BACK
OPTIONS:
that can be used at that time.
//// (Navigation D-Pad): On
screen menu navigation and selection.
HOME/MENU
+/– (Volume)
AUDIO*:
multilingual source or dual sound
(depend on program source).
(Mute)
CH/PAGE +/–
///.///>
(Power)
Remote Control sensor / LED
* Accessibility shortcut is available by pressing
and holding AUDIO.
Displays a list of functions
Select the sound of
(Input select): Display and select
the input source, etc.
SYNC MENU: Display the BRAVIA Sync
Menu.
(Power)
HDMI 1/2/3/4
Number buttons
(dot)
CC
Color buttons
EN
8
Page 9

GBEN
Pro settings
In [Pro settings], you can use various
convenient functions for professional use.
How to use Pro settings
1 Press the HOME/MENU button on the
remote control.
2 Go to [Settings] t [Pro settings], then
select the desired settings.
For each setting, refer to the following.
Initialize Pro settings
All changes will be discarded, and default
settings will be restored.
Install APK
Install the APK file for the Android TV app to
the LCD Display using a USB storage media.
1 Select [Pro settings] t [Install APK].
2 Select an APK.
Note
• This menu is displayed only when the .apk file
exists in the USB storage media.
PC input optimization
Show the typical PC format in full screen by
keeping the aspect ratio.
1 Select [Pro settings] t [PC input
optimization].
2 Change the settings.
The default setting is Off.
Wake-up on signal
a) Automatically turn on the LCD Display
and switch input when an HDMI input is
connected.
b) Automatically turn off the LCD Display
when the HDMI input is disconnected.
1 Select [Pro settings] t [Wake-up on
signal].
2 Select the option.
[Disable] (Default): The function is
disabled.
[Always enabled]: Both function a) and b)
are enabled.
[Input change only]: Only function a) is
enabled.
[Specified hours]: You can specify the
start/end time during which the function
is enabled.
Lock settings
You can protect the settings of [Pro
settings] by using a PIN.
1 Select [Pro settings] t [Lock settings].
2 Set the PIN by following the instruction
on the screen.
Initial input source
Set the input that is displayed when the
LCD Display is turned on.
1 Select [Pro settings] t [Initial input
source].
2 Select a primary input source.
Power Scheduling
Set the times for the LCD Display to turn on
and off automatically, including a schedule
to run periodically (daily or weekly).
1 Select [Pro settings] t [Power
Scheduling].
2 Select the time / the day of week to turn
on and off.
Periodic restart
Restart the LCD Display at a set time. This
can schedule periodic restarts (daily or
weekly). You can select whether a restart
should be executed or not while the LCD
Display is on. It is recommended to
schedule a periodic restart of the LCD
Display to maintain system stability.
1 Select [Pro settings] t [Periodic restart].
2 Turn on [Periodic restart] function.
3 Set the time, the day of week to restart
the LCD Display.
4 Select whether a restart should be
executed or not while the LCD Display is
on.
Display/Remote controls
Enable or disable the buttons on the LCD
Display or the remote control.
1 Select [Pro settings] t [Display/Remote
controls].
2 Select an option.
[Display control]: Enable or disable the
buttons on the LCD Display.
[IR remote control]: Enable or disable the
buttons on the IR remote control.
EN
9
Page 10

External inputs
Define which input sources are available.
1 Select [Pro settings] t [External inputs].
2 Select an input.
3 Select an option.
[Use with labels]: The input info label
appears on the screen.
[Use without labels]: The input info label
does not appear on the screen.
[Not use]: The input is disabled in Pro
mode.
BRAVIA Signage Free
Allows you to playback movies and still
images that are stored on a USB storage
media, insert the USB device into a USB
port on the LCD Display.
Supported files and formats
Video format*1*
MP4 AVC, MP4 AVC/HEVC (.mp4)
MPEG TS AVC/MPEG2 (.m2ts)
*1 Maximum supported resolution is 3840 × 2160
for a 4K model and 1920 × 1080 for a 2K model.
*2 Frame rate is 30 fps.
Photo format
JPEG*1 (.jpg, .jpeg)
BMP*2 (.bmp)
PNG*2 (.png)
GIF*2 (.gif)
*1 Maximum supported resolution is 3840 × 2160
for a 4K model.
*2 Maximum supported resolution is 1920 × 1080
for a 2K model.
Audio format
MP3 (.mp3) (44.1 kHz, 48 kHz) (2 channels)
AAC (.m4a) (44.1 kHz, 48 kHz) (2 channels)
What to prepare
Format the USB storage media file system
using NTFS or FAT32 option.
Start BRAVIA Signage Free
Select [BRAVIA Signage Free] on the [Home]
screen of the LCD Display.
The first time you open [BRAVIA Signage
Free], the [Basic settings] screen is
displayed.
Next time, the registered contents are
displayed.
2
You can display the [Basic settings] screen
when you press and hold the 1 button on
the remote control for more than 3
seconds.
If you enable [Lock settings], to view
[BRAVIA Signage Free], enter the PIN code.
Basic settings screen settings
[Landscape/Portrait], [Transition effect],
and [Text].
If you enable the [Presentation mode], you
can manually select the previous or next
content with the left/right button on the
remote control.
Slideshow playback
Slideshow playback will playback content
alphabetically that is stored on the USB
storage media.
1 Create a “media” folder in the root folder
of the USB storage media and copy the
contents.
2 Insert the USB storage media to a USB
port on the LCD Display.
3 Go to [Home] t [BRAVIA Signage Free],
to display the [Basic settings] screen.
To show the [Basic settings] screen, press
and hold the 1 button on the remote
control for more than 3 seconds.
4 Set the [Play mode] to [Slideshow].
5 Select [Start].
Create playlist and play
A playlist can be created that specifies the
order of playback for the contents stored
on the USB storage media.
1 Create a “media” folder in the root folder
of the USB storage media and copy the
contents.
2 Insert the USB storage media to a USB
port on the LCD Display.
3 Go to [Home] t [BRAVIA Signage Free],
to display the [Basic settings] screen.
To show the [Basic settings] screen, press
and hold the 1 button on the remote
control for more than 3 seconds.
4 Press the RED button on the remote
control to create the playlist and display
the [Playlist settings] screen. You can
check the colour button function at the
bottom of the screen.
5 Enter the playlist name via on-screen
keyboard.
10
EN
Page 11
GBEN
6 Select the content. You can add the
content by choosing [+].
7 Select [OK]. The Playlist is saved, and the
[Basic settings] screen is displayed.
8 On [Basic settings] screen, set the [Play
mode] to [Playlist] and select the playlist
name to playback, then select [Start].
Playlist schedule playback
You can set the playback schedule for the
playlist.
1 Go to [Home] t [BRAVIA Signage Free],
to display the [Basic settings] screen.
To show the [Basic settings] screen, press
and hold the 1 button on the remote
control for more than 3 seconds.
2 On the [Basic settings] screen, press the
GREEN button on the remote control.
The [Schedule settings] screen is
displayed.
3 On the [Schedule settings], press the
RED button on the remote control, and
create the new schedule.
4 Select [OK]. The Schedule is saved, and
the [Basic settings] screen is displayed.
5 On the [Basic settings] screen, set the
[Play mode] to [Scheduled], then select
[Start].
Note
• The time/date settings of the LCD Display must
be correct.
Copy the contents to the LCD Display’s
internal storage
You can copy the contents from the USB
storage media to the LCD Display’s internal
storage.
You can playback the contents from the
LCD Display’s internal storage by changing
the [Storage] setting to [Internal storage] on
the [Basic settings] screen.
1 On the [Basic settings] screen, press the
YELLOW button on the remote control.
The [Content management] screen is
displayed.
2 Press the GREEN button on the remote
control to import content.
Press the RED button on the remote
control to delete content.
Press the YELLOW button on the remote
control for multiple selections.
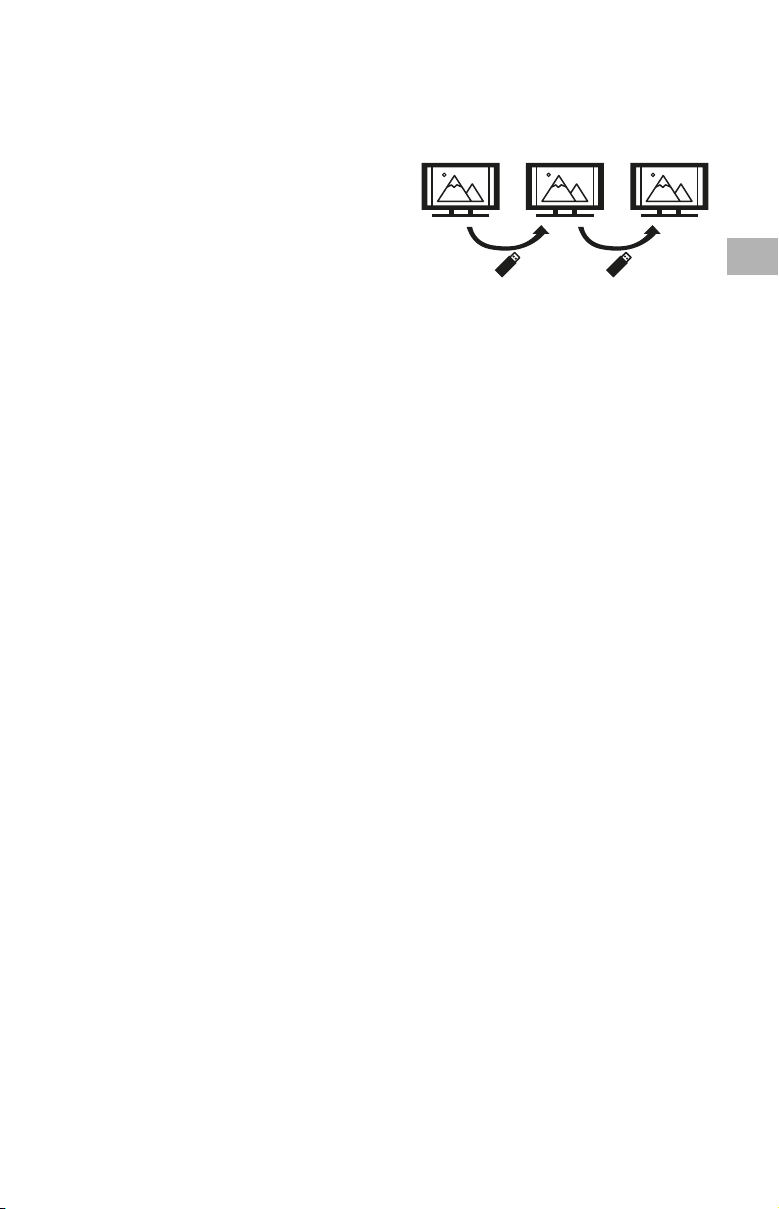
Bulk import / Bulk export
You can copy the settings and content from
one LCD Display to another using the
[BRAVIA Signage Free] software.
1 Connect the USB storage media to the
LCD Display.
2 Go to the [Basic settings] screen, select
[Bulk import] or [Bulk export].
[Bulk import]: Import the settings and
content from the USB storage media
[Bulk export]: Export the settings and
content to the USB storage media
3 Select [OK] to perform Bulk import / Bulk
export.
Auto start playback
1 Copy “autorun.txt” file to “sony” folder
and contents to “media” folder of the
USB storage media.
2 Connect the USB storage media to the
LCD Display after turned on.
3 Signage playback starts when AC power
cord is plugged in again.
EN
11
Page 12
Control functions
1 2 3 4
6 7 8 9
5
GND
TXD
RXD
TIP: LCD Display t Controller
RING: Controller
t
LCD Display
TIP
RING
SLEEVE
RS-232C
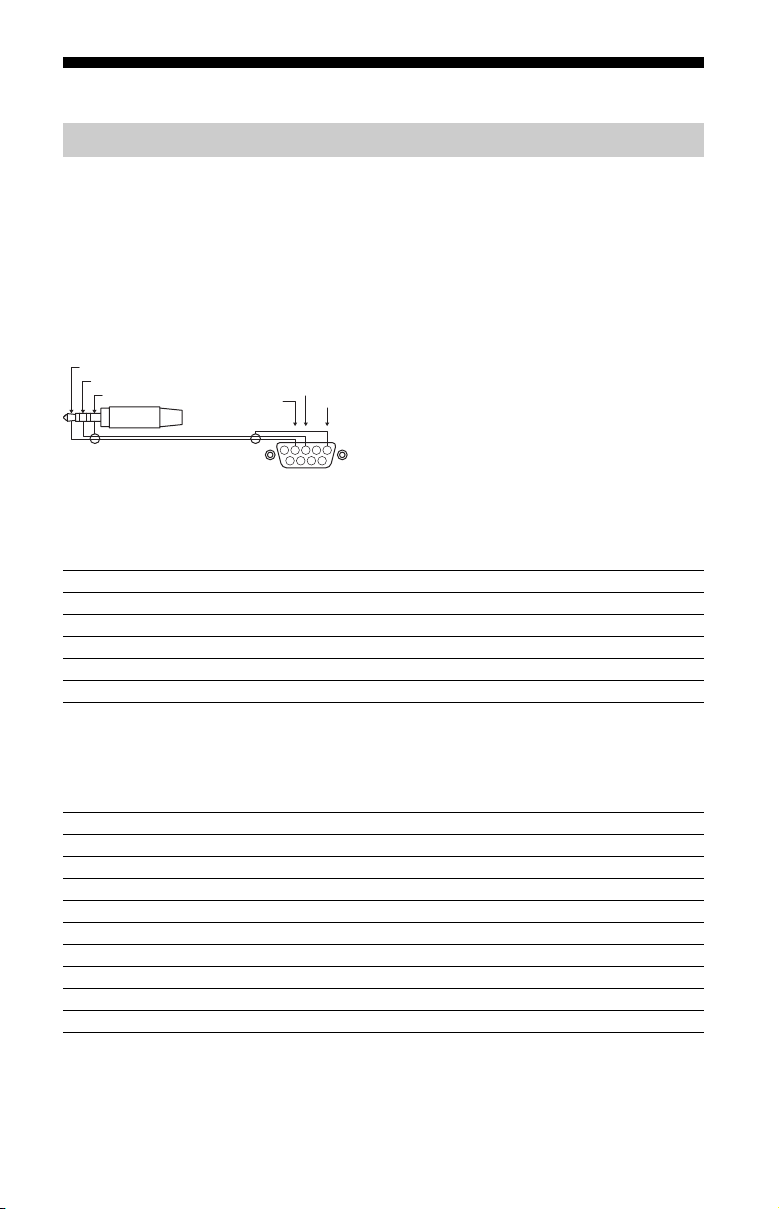
You can control the LCD Display from an external service via RS-232C. The RS-232C connection
is briefly explained in this page.
Interface
Establish the RS-232C connection to the LCD Display by using a 3.5 mm stereo mini plug
(supplied).
3.5 mm Stereo mini plug
Connection settings
When establishing the RS-232C connection, make connection settings as below.
Baud rate 9600 bps
Data 8 bit
Pari ty None
Start bit 1 bit
Stop bit 1 bit
Flow control None
Data format
We introduce the data format for the RS-232C communication below.
(a) Requests from the controller to the LCD Display
No. Item Value
1Header 0x8C: Control
2Category 0x00 (fixed)
3Function 0xXX
4Length 0xXX (=Data X+1 byte)
5Data 1 0xXX
:: 0xXX
:: 0xXX
X+4 Data X 0xXX
X+5 Check Sum 0xXX
EN
12
Page 13
GBEN
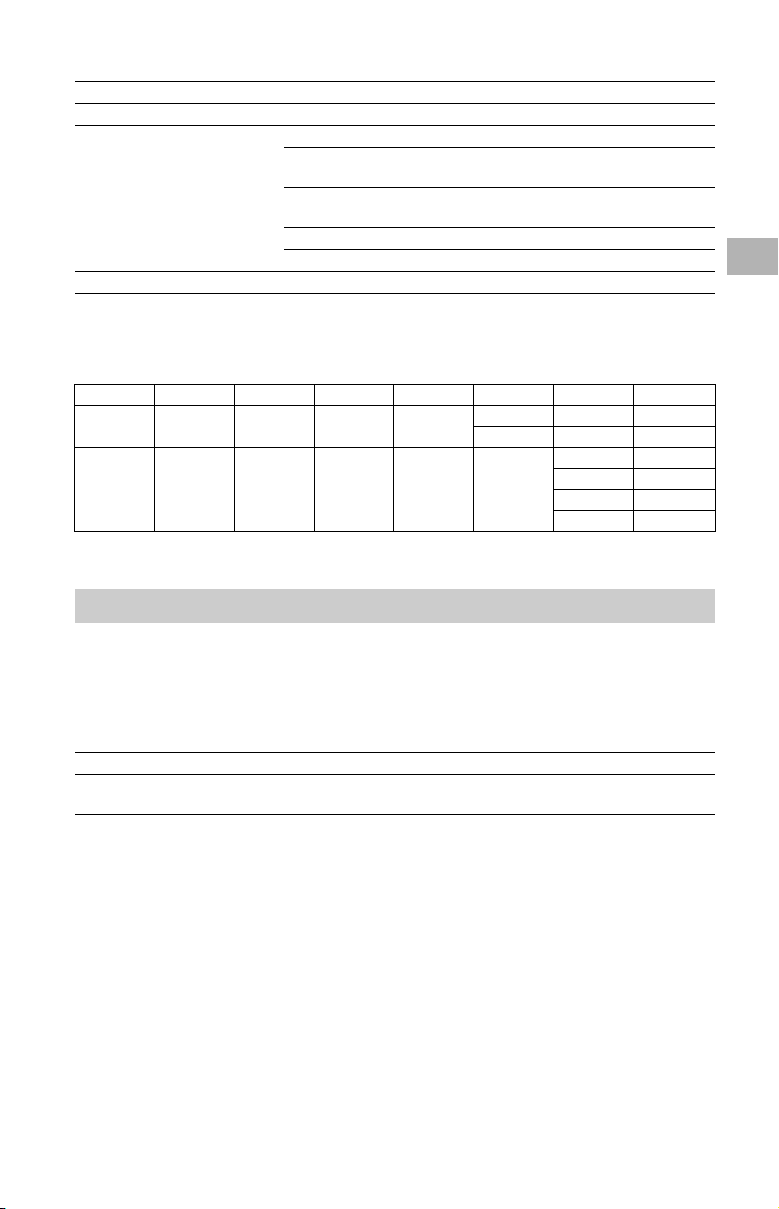
(b) Responses from the LCD Display to the controller
No. Item Value
1Header 0x70 Answer
2 Answer 0x00 Completed (Normal End)
0x01 : Limit Over
0x02 : Limit Over
0x03 : Command Canceled (Abnormal end)
0x04 : Parse Error (Data Format Error)
3Check Sum0xXX
(Abnormal End-Exceed maximum value)
(Abnormal End-Exceed minimum value)
Command example
Examples of RS-232C communication command are explained below.
Control Head Category Function Length Data 1 Data X Checksum
Power
on/off
HDMI
input
selection
0x8C 0x00 0x00 0x02
0x8C 0x00 0x02 0x03
0x00 (off) - 0x8E
0x01 (on) - 0x8F
0x01 (#1) 0x96
0x04
(HDMI)
0x02 (#2) 0x97
0x03 (#3) 0x98
0x04 (#4) 0x99
For more details on RS-232C, please contact your sales representative.
IP control
You can control the LCD Display via IP from an HTML5/Android application on the external
device. You can manage and monitor information of input/power, control the LCD Display
such as input source and volume.
Supported IP protocol
Protocol name Layer Format Authentication Explanation
Simple IP
control
TCP Byte stream N/A Only typical functions are
supported.
LCD Display settings
When using [IP control], set the LCD Display as follows first.
Go to [Settings] t [Network & Internet] t [IP control].
For Simple IP control,
• Enable [Simple IP control].
For more details on [IP control], please contact your sales representative.
EN
13
Page 14
Installing the LCD Display to
VS
10 – 12 (mm)
Screw (M6)
Wall-Mount Bracket
VS
10 – 12 (mm)
Screw (M6)
Wall-Mount Bracket
the Wall
Using the optional Wall-Mount Bracket
(SU-WL855 only)* (not supplied)
To Customers:
For product protection and safety reasons,
Sony strongly recommends that installation
of your LCD Display be performed by Sony
dealers or licensed contractors. Do not
attempt to install it yourself.
To Sony Dealers and Contractors:
Provide full attention to safety during the
installation, periodic maintenance and
examination of this product.
Wall-Mount Bracket Installation
Information
For instructions on Wall-Mount Bracket
installation, see the Installation Information
(Wall-Mount Bracket) on the Sony Customer
Support website for your LCD Display
model at the following address.
https://www.sony.com/am/support
• Follow the instruction guide provided
with the Wall-Mount Bracket for your
model. Sufficient expertise is required in
installing this LCD Display, especially to
determine the strength of the wall for
withstanding the LCD Display’s weight.
• Sony is not liable for any damage or injury
caused by mishandling or improper
installation.
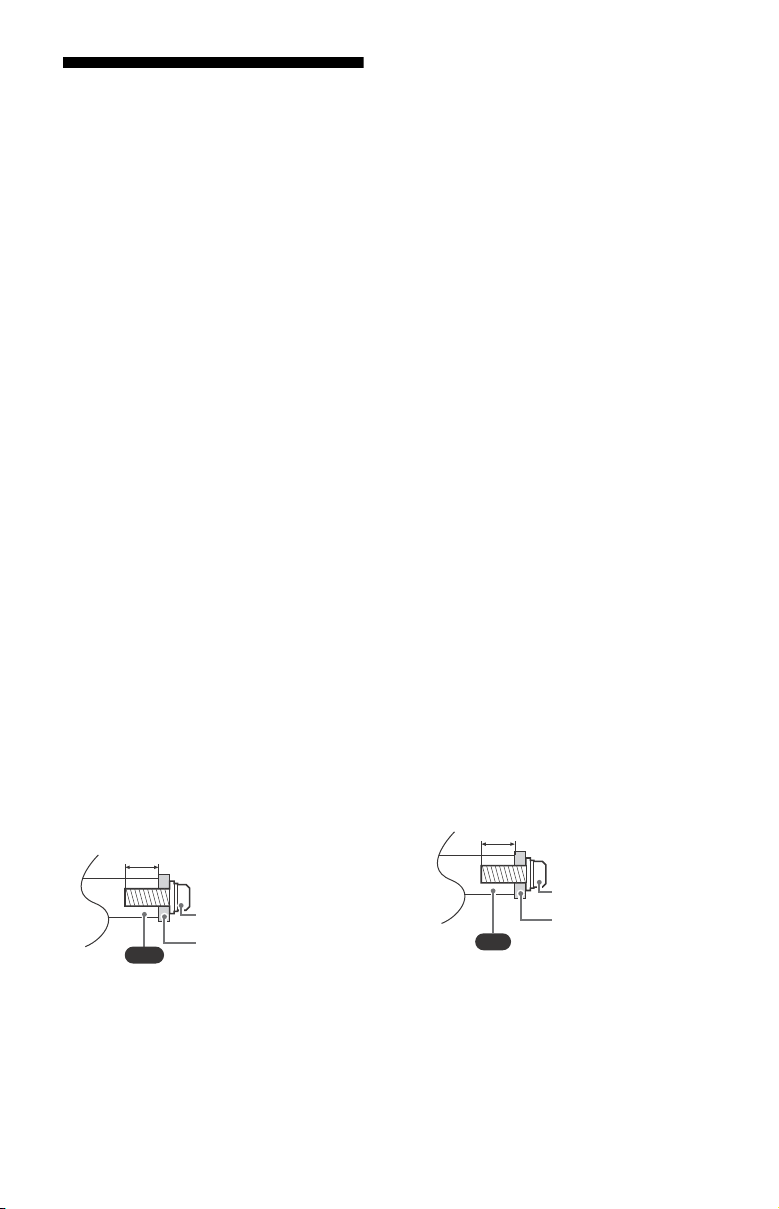
• The length of the screw for Wall-Mount
Bracket differs depending on the
Wall-Mount Bracket thickness. Please
refer to below illustration.
Note
• Read the supplied safety documentation for
additional safety information.
* Only for limited region/country/model.
Using the optional Wall-Mount Bracket
(except SU-WL855) (not supplied)
This LCD Display’s instruction manual only
provides the steps to prepare the LCD
Display for Wall-Mount installation before it
is installed on the wall.
Your LCD Display can be mounted to a wall
using a suitable Wall-Mount Bracket (not
supplied). If the Table-Top Stand is attached
to the LCD Display, the LCD Display may
require detaching the Table-Top Stand
(models with Table-Top Stand only).
Prepare the LCD Display for the Wall-Mount
Bracket before making cable connections.
For product protection and safety
reasons, Sony strongly recommends that
installation of your LCD Display on the
wall be performed by qualified
professionals. Do not attempt to install it
yourself.
• Follow the instruction guide provided
with the Wall-Mount Bracket for your
model. Sufficient expertise is required in
installing this LCD Display, especially to
determine the strength of the wall for
withstanding the LCD Display’s weight.
• The screws for installing the Wall-Mount
Bracket to the LCD Display are not
supplied.
• The length of the screw for Wall-Mount
Bracket differs depending on the
Wall-Mount Bracket thickness. Please
refer to below illustration.
• Be sure to store the unused screws and
Table-Top Stand in a safe place until you
are ready to attach the Table-Top Stand
(models with Table-Top Stand only). Keep
the screws away from small children.
EN
14
Page 15
GBEN
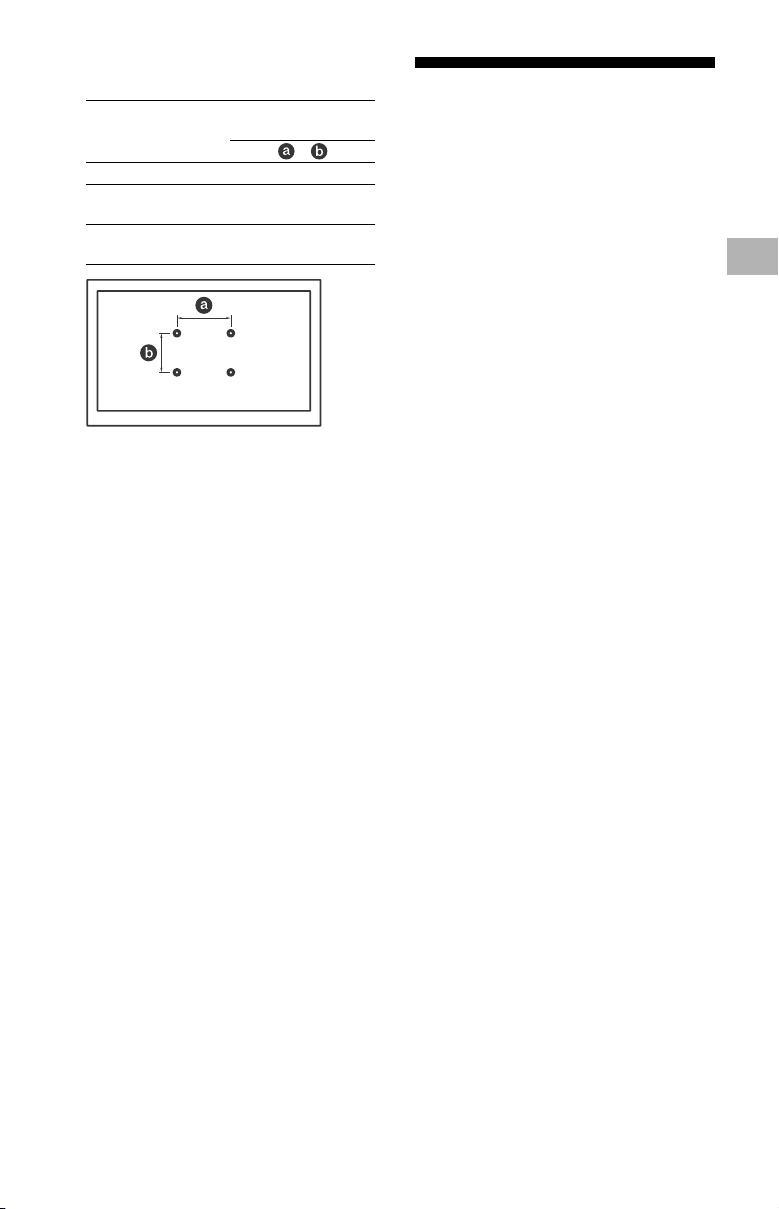
• Refer to the following table for
wall-mount hole pattern.
Wall-mount hole
Model Name
FW-85EZ20L 400 × 400 mm
FW-75EZ20L /
65EZ20L / 55EZ20L
FW-50EZ20L /
43EZ20L
• Be sure to store the unused screws and
Table-Top Stand in a safe place until you
are ready to attach the Table-Top Stand
(models with Table-Top Stand only). Keep
the screws away from small children.
Note
• Read the supplied safety documentation for
additional safety information.
• For more detailed information, visit Sony
Customer Support website.*
* Only for limited region/country/model.
pattern
×
300 × 300 mm
200 × 200 mm
Troubleshooting
General troubleshooting for issues like:
black screen, no sound, frozen picture, LCD
Display does not respond, or network is
lost, do the following steps.
1 Restart your LCD Display by pressing the
power button on the remote control for
about five seconds and select [Restart].
The LCD Display will restart. If the LCD
Display does not recover, try unplugging
the AC power cord then press the power
button on the LCD Display and release it.
Wait for two minutes, and plug in the AC
power cord.
Or, press the power button on the LCD
Display for about 40 seconds until the
LCD Display turns off.
2 Refer to the Help menu by pressing HELP
on the remote control.
3 Connect your LCD Display to the Internet
and perform a software update. Sony
recommends you to keep your LCD
Display software updated. Software
updates provide new features and
performance improvements.
4 Perform the factory data reset.
When you plug in the LCD Display, the
LCD Display may not be able to turn on
for a while even if you press the power
button on the remote control or the LCD
Display.
It takes time to initialize the system. Wait
for about one minute, then operate it
again.
How to reset the LCD Display to factory
settings
WARNING: The reset will clear all of your
customized settings including the parental
lock setting.
• You can reset the LCD Display to factory
settings by selecting [Factory data reset].
• To force factory data reset, unplug the AC
power cord. Press and hold button on
the LCD Display, then plug in the AC
power cord.
EN
15
Page 16
• For security purposes, be sure to remove
all personal and account information
before discarding, selling or passing your
LCD Display to someone else by:
unlinking/unregistering, signing out of
and deactivating all network services as
well as factory reset the LCD Display.
The remote control does not function.
• Replace the batteries.
The restricted profile password has been
forgotten.
• Perform the force factory data reset.
Specifications
System
Panel system
LCD (Liquid Crystal Display) Panel,
LED Backlight
Speaker output (W)
10 + 10
Wireless technology
Protocol IEEE 802.11a/b/g/n/ac
Bluetooth® Version 5.0
Input/Output jacks
/ VIDEO IN
Video/Audio input (mini jack)
HDMI IN 1/2/3 (HDCP 2.3-compatible)
Video:
4096 × 2160p (50, 60 Hz)*1,
4096 × 2160p (24 Hz), 3840 × 2160p
(50, 60 Hz)*
30 Hz), 1080p (30, 50, 60 Hz), 1080/24p,
1080i (50, 60 Hz), 720p (30, 50, 60 Hz),
720/24p, 576p, 576i 480p, 480i, PC
Formats
Audio:
In eARC (Enhanced Audio Return
Channel) mode
7.1 channel linear PCM: 32/44.1/48 kHz
16 bits, Dolby Digital, Dolby Digital
Plus, Dolby TrueHD, Dolby Atmos
Except eARC mode
Two channel linear PCM:
32/44.1/48 kHz 16/20/24 bits, Dolby
Audio
1
, 3840 × 2160p (24, 25,
eARC/ARC (Enhanced Audio Return
Channel/Audio Return Channel) (HDMI IN 3
2
only)*
In eARC mode
7.1 channel linear PCM: 32/44.1/48 kHz
16 bits, Dolby Digital, Dolby Digital Plus,
Dolby TrueHD, Dolby Atmos
In ARC mode
Two channel linear PCM: 48 kHz 16 bits,
Dolby Audio, Dolby Atmos
DIGITAL AUDIO OUT (OPTICAL)
Digital optical jack (Two channel linear
PCM: 48 kHz 16 bits, Dolby Audio)
(Stereo mini jack)
Headphone
1, 2
USB port 1 and 2 support High Speed USB
(USB 2.0)
LAN
10BASE-T/100BASE-TX connector
(Depending on the operating
environment of the network, connection
speed may differ. The communication
rate and quality are not guaranteed.)
REMOTE
RS-232C mini jack
This jack is for receiving the external
control signal.
Power and others
Power requirements
110V – 240V AC, 50/60Hz (U.S.A./
Canada 120 V AC, 60 Hz)
Power consumption
In use (W)
FW-85EZ20L: 342
FW-75EZ20L: 315
FW-65EZ20L: 226
FW-55EZ20L: 191
FW-50EZ20L: 146
FW-43EZ20L: 125
In standby*3*
Less than 0.5 W with 120 V AC and less
than 0.5 W with 240 V AC
Screen size (measured diagonally) (Approx.)
(cm/inches)
FW-85EZ20L: 214.8 / 84.6 (85" class)
FW-75EZ20L: 189.3 / 74.5 (75" class)
FW-65EZ20L: 163.9 / 64.5 (65" class)
FW-55EZ20L: 138.8 / 54.6 (55" class)
FW-50EZ20L: 125.7 / 49.5 (50" class)
FW-43EZ20L: 108.0 / 42.5 (43" class)
4
EN
16
Page 17

GBEN
Display resolution (horizontal × vertical)
(pixels)
3840 × 2160
Output rating
500 mA (for USB 1/2)
Dimensions (Approx.) (w × h × d) (mm) /
(inches)
FW-85EZ20L: 1901 × 1090 × 73 / 74 7/8 ×
43 × 2 7/
8
FW-75EZ20L: 1686 × 969 × 72 / 66 1/2 ×
38 1/4 × 2 7/
FW-65EZ20L: 1462 × 842 × 71 / 57 5/8 ×
33 1/4 × 2 7/
FW-55EZ20L: 1243 × 721 × 71 / 49 × 28 1/2 ×
2 7/
FW-50EZ20L: 1126 × 653 × 70 / 44 3/8 ×
25 3/4 × 2 7/
FW-43EZ20L: 972 × 567 × 70 / 38 3/8 ×
22 3/8 × 2 7/
8
8
8
8
8
wall-mount hole pattern
FW-85EZ20L: 400 × 400 mm
FW-75EZ20L / 65EZ20L / 55EZ20L:
300 × 300 mm
FW-50EZ20L / 43EZ20L: 200 × 200 mm
wall-mount screw size (mm)
M6 (length: see “Installing the LCD
Display to the Wall”.)
Mass (Approx.) (kg) / (lb.)
FW-85EZ20L: 44.7 / 98.5
FW-75EZ20L: 30.4 / 67
FW-65EZ20L: 20.4 / 45
FW-55EZ20L: 15.3 / 33.8
FW-50EZ20L: 12.1 / 26.7
FW-43EZ20L: 9.3 / 20.5
Others
Optional accessories
Wall-Mount Bracket: SU-WL855
(FW-75EZ20L / 65EZ20L / 55EZ20L only)
Table-Top Stand: FWA-ST1L (FW-43EZ20L),
FWA-ST2L (FW-50EZ20L), FWA-ST3L
(FW-65EZ20L / 55EZ20L)
Operating temperature: 0 ºC – 40 ºC /
32 ºF – 104 ºF
*1 Refer to the on screen menu to set [HDMI
signal format].
*2 Connect your audio system to the HDMI IN 3 to
route LCD Display audio to your audio system.
*3 Specified standby power is reached after the
LCD Display finishes necessary internal
processes.
*4 Standby power consumption will increase
when your LCD Display is connected to the
network.
Note
• Optional accessories availability depends on
countries/region/LCD Display model/stock.
• Design and specifications are subject to change
without notice.
• Some of the on-screen instructions may not
apply to your LCD Display model.
Licensing Information
• The terms HDMI, HDMI High-Definition
Multimedia Interface, HDMI Trade dress
and the HDMI Logos are trademarks or
registered trademarks of HDMI Licensing
Administrator, Inc.
• Manufactured under license from Dolby
Laboratories. Dolby, Dolby Audio, and the
double-D symbol are trademarks of Dolby
Laboratories Licensing Corporation.
• Vewd® Core. Copyright 1995-2023 Vewd
Software AS. All rights reserved.
• Google, YouTube and Android TV are
trademarks of Google LLC.
• Wi-Fi®, Wi-Fi Alliance® and Wi-Fi Direct®
are registered trademarks of Wi-Fi
Alliance.
• Wi-Fi CERTIFIED™ and Wi-Fi CERTIFIED 6™
logos are certification marks of Wi-Fi
Alliance.
• The Bluetooth® word mark and logos are
registered trademarks owned by
Bluetooth SIG, Inc. and any use of such
marks by Sony Group Corporation and its
subsidiaries is under license.
• Apple, Apple Home, AirPlay and HomeKit
are trademarks of Apple Inc., registered in
the U.S. and other countries and regions.
To use AirPlay and Apple HomeKit with
this TV, the latest version of iOS, iPadOS,
or macOS is recommended.
• Covered by one or more claims of the
HEVC patents listed at
patentlist.accessadvance.com.
• All other trademarks are the property of
their respective owners.
EN
17
 Loading...