


Help Guide
Future Lab Program N
FL-N01
The following explains how to use FL-N01. Select a topic from the navigation pane.
About the Future Lab Program N application
Use the app to setup FL-N01.
Click here for more information about installing the app on your smartphone.
What is FL-N01?
Concept
Flow of operations to begin FL-N01
Parts and Controls
Packaged contents
Getting Started
Charge
Charging
Checking the battery level
Power on/Power off

Initial Setup
Installing the “Future Lab Program N” app
Items of Initial Setup (Android)
Items of Initial Setup (iPhone)
How to wear
Wearing FL-N01
Using Open-ear earphones
Voice Control
What is voice control?
How to control FL - N01
Music
Listening to music
What you can do with device mode and streaming mode
Personalized Radio service
What is Personalized Radio service ?
Receiving Personalized Radio service automatically
Acquiring Personalized Radio service
About segments on Personalized Radio service
Camera
Taking a still image
Taking photos at intervals
Taking continuous photos
Taking a video
Taking photos at intervals automatically (Life Snap)
Phone Calls
Receiving a call
Making a call
Notice for Phone Call

Working with apps
We Run
Settings
Using the dedicated smartphone app “Future Lab Program N”
Changing the settings of FL-N01 on the “Future Lab Program N” app
PC connection
Connecting to a computer
Connecting to a computer
Transferring music using a computer
Transferring music using Explorer/Finder
Deleting music using Explorer/Finder
Checking photos stored on the built-in memory
Checking photos/videos/activity logs stored on the built-in memory of FL-N01
Information
Specifications
About the indicators
Specifications
Folder hierarchy recognized by FL-N01
Voice command/Natural speech list
General voice command
Voice command on music
Voice command on camera
Voice command/Natural speech on Personalized Radio service
Voice command on working with apps
Disclaimer regarding services offered by third parties
Notes on recognition technologies
Notes on recognition technologies
Precautions

Precautions
Updating FL-N01
Updating FL-N01
Copyrights and trademarks
Copyrights and trademarks
Troubleshooting
What you can do to solve a problem
What you can do to solve a problem
Power
FL-N01 is not turned on.
It takes time to power on FL-N01.
FL-N01 cannot be operated even though it is turned on.
FL-N01 turned off unexpectedly.
Charging
Charging cannot be done.
FL-N01 cannot be recognized by a computer.
The rechargeable battery life is short.
Sound
No sound
Low sound level
Distorted sound from FL-N01
Sound skips frequently during playback.
Volume changes on its own.
Bluetooth
Pairing cannot be done.
How can I delete the pairing information?
Unable to connect FL-N01 to a smartphone with one-touch connection (NFC)
Voice control
The wake-up phrase "Listen up Nigel" cannot be recognized by FL-N01.

The voice command function does not work well.
FL-N01 does not react correctly even though you have sent a voice command.
Music
You cannot play the music files transferred to FL-N01.
Music files on your smartphone cannot be played back.
Personalized Radio Service
FL-N01 does not deliver information / FL-N01 does not respond to the voice command.
FL-N01 delivers inappropriate information.
The route on the activity log is not correct.
FL-N01 does not deliver information based on the current location.
FL-N01 does not read out the latest SMS even though telling FL-N01 “Start SMS.”
When using Activity Log, Live Segments does not start.
Information that FL-N01 announces is inaccurate when using Activity Logs with Live Segments.
FL-N01 announces/the “Future Lab Program N” app shows that there is no space left on the internal storage of FL-N01.
Camera
Photos and videos taken by FL-N01 cannot be played back on a smartphone.
Video shooting stopped in the middle.
How can I disable the shutter sound of FL-N01?
FL-N01 is unable to take a photo/video.
How can I adjust the camera angle?
Phone call
The other party’s voice cannot be heard / Phone call cannot be made.
Computer
The computer does not recognize FL-N01.
The music files cannot be transferred to FL-N01 from a computer.
The latest system software cannot be installed on FL-N01.
Others
A drink (water, coffee, etc.) was spilled on FL-N01 / FL-N01 was washed in the washing machine.

FL-N01 becomes hot.
I lost FL-N01.
I lost both FL-N01 and the smartphone.
4-593-988-11(5) Copyright 2016 Sony Corporation

Table Of Contents
TOC-1
Help Guide FL-N01 i..........................................................................................................................
About the “Future Lab Program N” app 1.........................................................................................
What is FL-N01? i..............................................................................................................................
Concept 2..........................................................................................................................................
Flow of operations to begin FL-N01 3...............................................................................................
Parts and Controls 4..........................................................................................................................
Packaged contents 6.........................................................................................................................
Getting Started i.................................................................................................................................
Charge i.............................................................................................................................................
Charging 7...................................................................................................................................
Checking the battery level 9........................................................................................................
Power on/Power off 12................................................................................................................
Initial Setup ii.....................................................................................................................................
Installing the “Future Lab Program N” app 1..............................................................................
Items of Initial Setup (Android) 13...............................................................................................
Items of Initial Setup (iPhone) 17................................................................................................
How to wear ii....................................................................................................................................
Wearing FL-N01 20.....................................................................................................................
Using Open-ear earphones 21....................................................................................................
Voice Control ii..................................................................................................................................
What is voice control? 24..................................................................................................................
How to control FL-N01 25..................................................................................................................
Music ii...............................................................................................................................................
Listening to music 29.........................................................................................................................
What you can do with device mode and streaming mode 32............................................................
Personalized Radio service ii............................................................................................................
What is Personalized Radio service? 35...........................................................................................
Receiving Personalized Radio service automatically 37...................................................................
Acquiring Personalized Radio service 40..........................................................................................
About segments on Personalized Radio service 44..........................................................................
Camera ii...........................................................................................................................................
Taking a still image 47.......................................................................................................................
Taking photos at intervals 50.............................................................................................................
Taking continuous photos 53.............................................................................................................
Taking a video 56..............................................................................................................................
Taking photos at intervals automatically (Life Snap) 59....................................................................
Phone Calls ii.....................................................................................................................................
Receiving a call 61............................................................................................................................

Making a call 63.................................................................................................................................
TOC-2
Notice for Phone Call 65....................................................................................................................
Working with apps iii..........................................................................................................................
We Run 66.........................................................................................................................................
Settings iii..........................................................................................................................................
Using the dedicated smartphone app “Future Lab Program N” 69...................................................
Changing the settings of FL-N01 on the “Future Lab Program N” app 72........................................
PC connection iii................................................................................................................................
Connecting to a computer iii..............................................................................................................
Connecting to a computer 78......................................................................................................
Transferring music using a computer iii.............................................................................................
Transferring music using Explorer/Finder 80...............................................................................
Deleting music using Explorer/Finder 82.....................................................................................
Checking photos stored on the built-in memory iii.............................................................................
Checking photos/videos/activity logs stored on the built-in memory of FL-N01 83.....................
Information iii.....................................................................................................................................
Specifications iii.................................................................................................................................
About the indicators 84................................................................................................................
Specifications 87.........................................................................................................................
Folder hierarchy recognized by FL-N01 90.................................................................................
Voice command/Natural speech list iii...............................................................................................
General voice command 91.........................................................................................................
Voice command on music 93......................................................................................................
Voice command on camera 94....................................................................................................
Voice command/Natural speech on Personalized Radio service 95...........................................
Voice command on working with apps 99...................................................................................
Disclaimer regarding services offered by third parties 100..........................................................
Notes on recognition technologies iii.................................................................................................
Notes on recognition technologies 101.......................................................................................
Precautions 102.................................................................................................................................
Updating FL-N01 106........................................................................................................................
Copyrights and trademarks 108........................................................................................................
Troubleshooting iv.............................................................................................................................
What you can do to solve a problem iv..............................................................................................
What you can do to solve a problem 109....................................................................................
Power iv.............................................................................................................................................
FL-N01 is not turned on. 110.......................................................................................................
It takes time to power on FL-N01. 111........................................................................................
FL-N01 cannot be operated even though it is turned on. 112.....................................................
FL-N01 turned off unexpectedly. 113..........................................................................................

Charging iv........................................................................................................................................
TOC-3
Charging cannot be done. 114....................................................................................................
FL-N01 cannot be recognized by a computer. 115.....................................................................
The rechargeable battery life is short. 116..................................................................................
Sound iv.............................................................................................................................................
No sound 117..............................................................................................................................
Low sound level 118....................................................................................................................
Distorted sound from FL-N01 119...............................................................................................
Sound skips frequently during playback. 120..............................................................................
Volume changes on its own. 121.................................................................................................
Bluetooth iv........................................................................................................................................
Pairing cannot be done. 122........................................................................................................
How can I delete the pairing information? 123............................................................................
Unable to connect FL-N01 to a smartphone with one-touch connection (NFC) 124...................
Voice control iv..................................................................................................................................
The wake-up phrase "Listen up Nigel" cannot be recognized by FL-N01. 125...........................
The voice command function does not work well. 126................................................................
FL-N01 does not react correctly even though you have sent a voice
command. 127.............................................................................................................................
Music v..............................................................................................................................................
You cannot play the music files transferred to FL-N01. 128........................................................
Music files on your smartphone cannot be played back. 129......................................................
Personalized Radio Service v............................................................................................................
FL-N01 does not deliver information / FL-N01 does not respond to the voice
command. 130.............................................................................................................................
FL-N01 delivers inappropriate information. 131..........................................................................
The route on the activity log is not correct. 132...........................................................................
FL-N01 does not deliver information based on the current location. 133....................................
FL-N01 does not read out the latest SMS even though telling FL-N01 “Start
SMS.” 134...................................................................................................................................
When using Activity Log, Live Segments does not start. 135......................................................
Information that FL-N01 announces is inaccurate when using Activity Logs
with Live Segments. 136.............................................................................................................
FL-N01 announces/the “Future Lab Program N” app shows that there is no
space left on the internal storage of FL-N01. 137.......................................................................
Camera v...........................................................................................................................................
Photos and videos taken by FL-N01 cannot be played back on a smartphone. 138..................
Video shooting stopped in the middle. 139..................................................................................
How can I disable the shutter sound of FL-N01? 140.................................................................
FL-N01 is unable to take a photo/video. 141...............................................................................

How can I adjust the camera angle? 142....................................................................................
TOC-4
Phone call v.......................................................................................................................................
The other party’s voice cannot be heard / Phone call cannot be made. 143..............................
Computer v........................................................................................................................................
The computer does not recognize FL-N01. 144..........................................................................
The music files cannot be transferred to FL-N01 from a computer. 145.....................................
The latest system software cannot be installed on FL-N01. 146.................................................
Others v.............................................................................................................................................
A drink (water, coffee, etc.) was spilled on FL-N01 / FL-N01 was washed in
the washing machine. 147...........................................................................................................
FL-N01 becomes hot. 148...........................................................................................................
I lost FL-N01. 149........................................................................................................................
I lost both FL-N01 and the smartphone. 150...............................................................................

Help Guide
1
Future Lab Program N
FL-N01
Installing the “Future Lab Program N” app
Settings of FL -N01 can be made on the "Future Lab Program N" app.
Access Google Play™ or App Store to download and install the “Future Lab Program N” app on your
1
smartphone.
Launch the app.
2
Follow the on-screen instructions for initial setup.
3
Related Topic
Items of Initial Setup (Android)
Items of Initial Setup (iPhone)
4-593-988-11(5) Copyright 2016 Sony Corporation

Help Guide
2
Future Lab Program N
FL-N01
Concept
N is a Concept Prototype featuring a voice interaction system.
With ears open, hands free, and eyes no longer distracted by mobile displays, you can enjoy music and get up- to - the-minute
information on demand, promoting a more agreeable active lifestyle.
4-593-988-11(5) Copyright 2016 Sony Corporation

Help Guide
3
Future Lab Program N
FL-N01
Flow of operations to begin FL - N01
This is a simple explanation of the steps between purchasing and using FL-N01.
Charge FL-N01.
1
Power on FL-N01.
2
Install the “Future Lab Program N” app.
3
Download the “Future Lab Program N” app, a dedicated app for FL-N01, from App Store or Google Play onto your
smartphone, and then install.
Start and setup the “Future Lab Program N” app.
4
Follow the on- screen instructions for initial setup.
Wear FL-N01.
5
Related Topic
Charging
Power on/Power off
Installing the “Future Lab Program N” app
Items of Initial Setup (Android)
Items of Initial Setup (iPhone)
Wearing FL-N01
4-593-988-11(5) Copyright 2016 Sony Corporation

Help Guide
4
Future Lab Program N
FL-N01
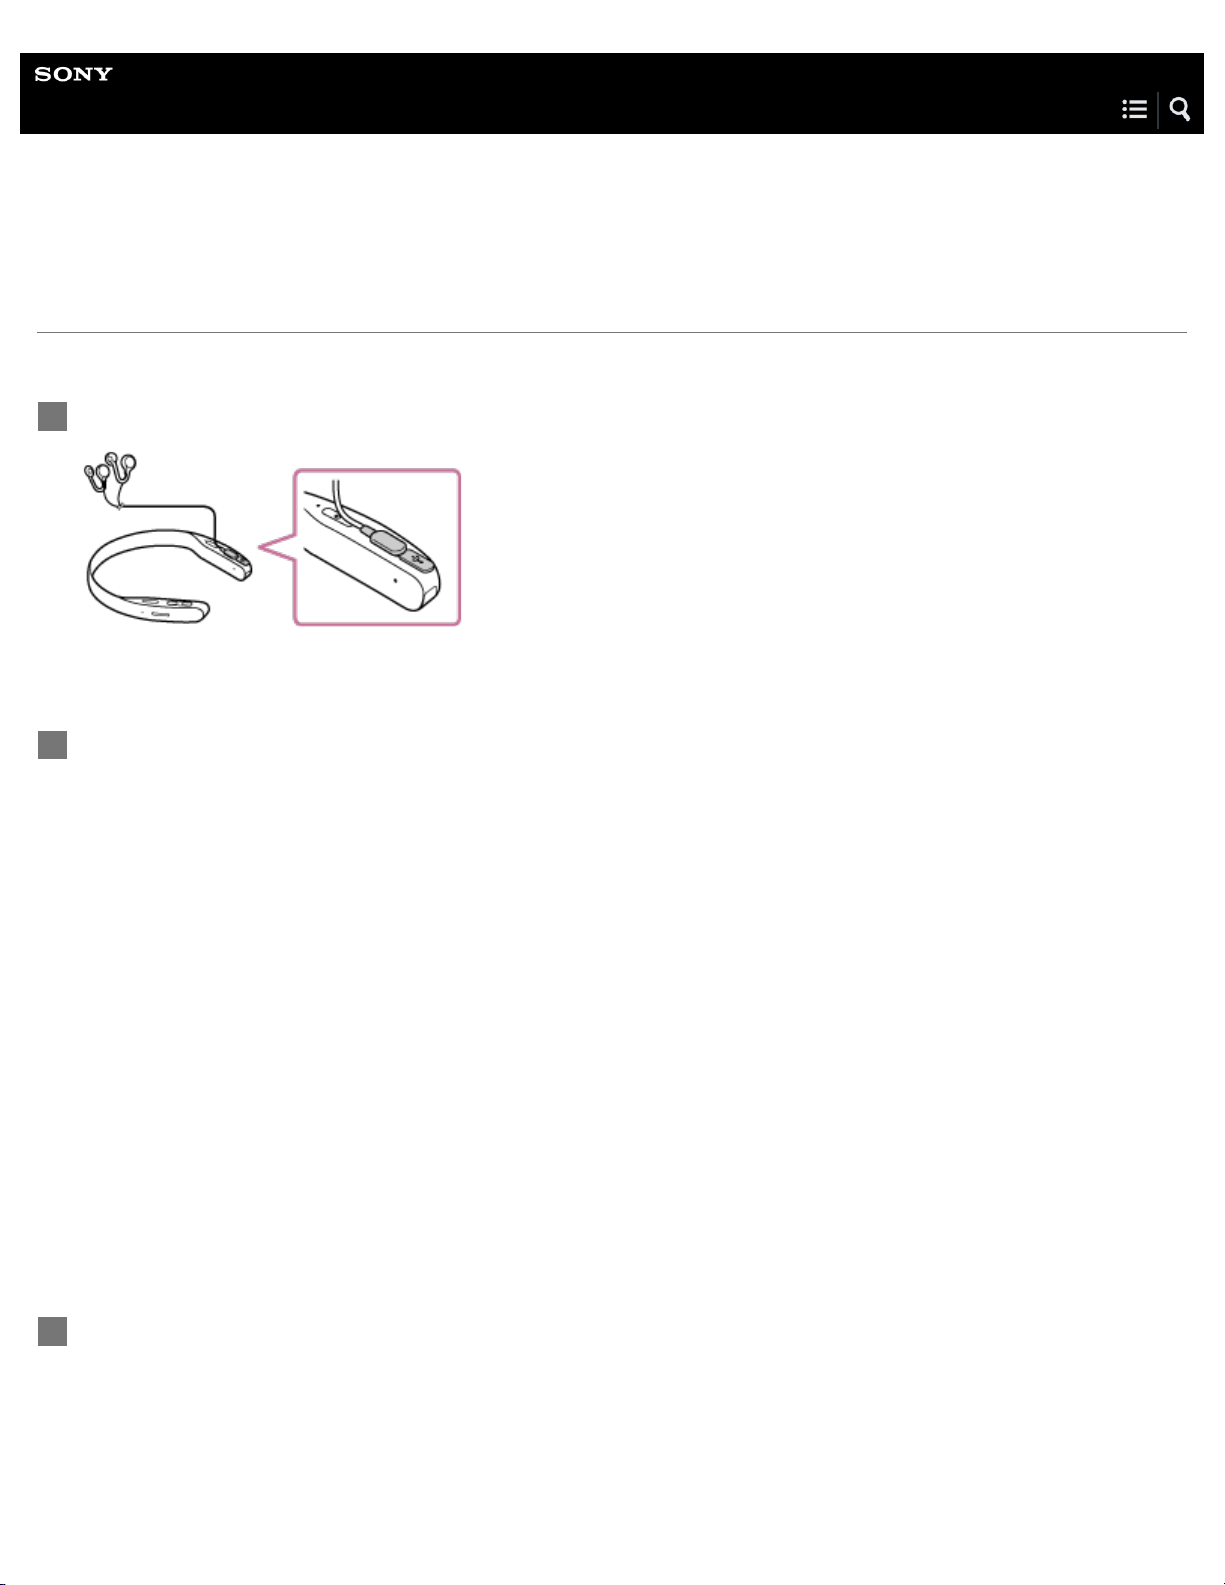
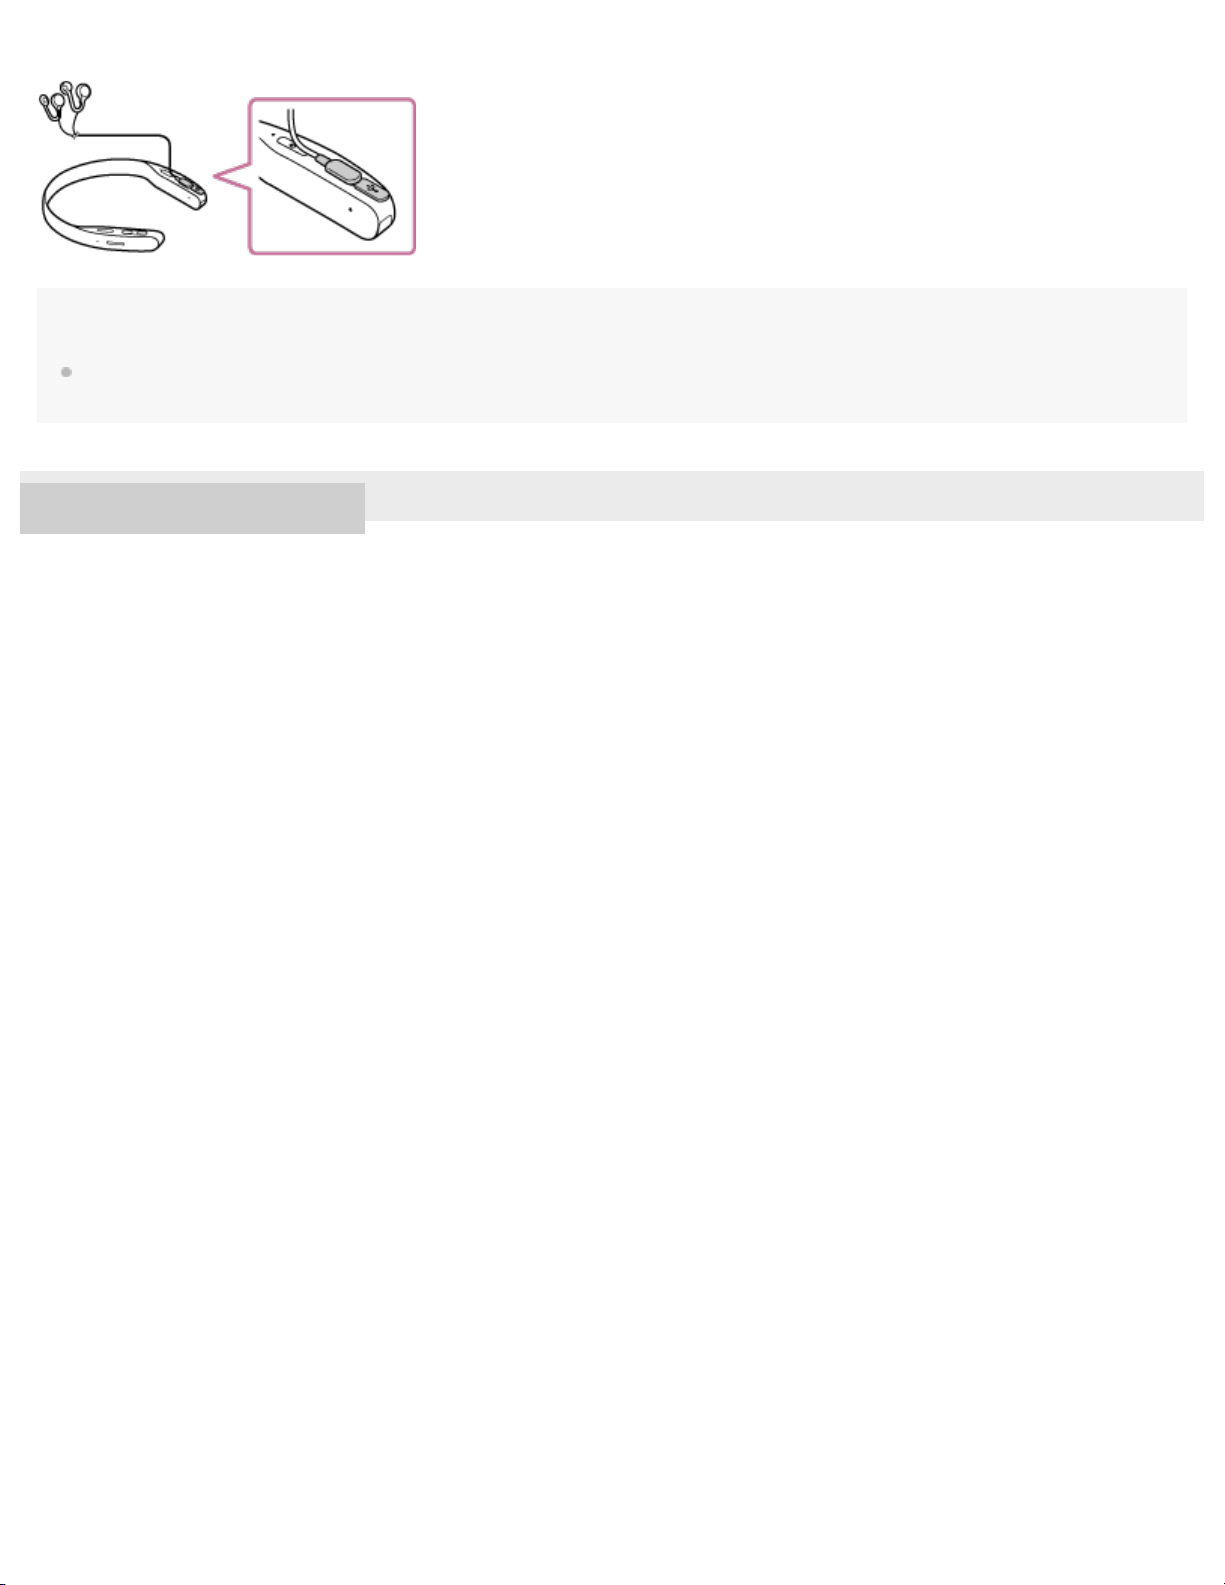
Parts and Controls
FL-N01
Custom button
1.
Volume +/- button
2.
The volume + button has a tactile dot.
Voice input button
3.
Indicator light
4.
(power) button
5.
Micro- USB port
6.
Charge light
7.
Tally light (Camera indicator)
8.
Camera
9.
10
(N-mark)
.
Open-ear earphones

Guide rings
5
1.
Micro- USB connector
2.
4-593-988-11(5) Copyright 2016 Sony Corporation

Help Guide
6
Future Lab Program N
FL-N01
Packaged contents
After opening the package, check that all items in the list are included. If any items are missing, consult Sony Customer
Experience Center. Numbers in ( ) indicate the item amount.
FL-N01 (1)
Open-ear earphones (1)
Micro- USB cable (approx. 50 cm (19 3/4 in.)) (1)
Printed documents
4-593-988-11(5) Copyright 2016 Sony Corporation

Help Guide
7
Future Lab Program N
FL-N01
Charging
FL-N01 contains a lithium ion rechargeable battery. Charge FL -N01 using the supplied micro-USB cable.
Connect the supplied micro-USB cable to FL-N01, and then connect the other end to a booted
1
computer.
Make sure that the charge light lights up.
Charging is completed in about 2.5 hours
*1
Time required for charging the empty battery to its full capacity.
*1
and the charge light goes off automatically.
Battery life (when using the Bluetooth connection)
About 3.0 to 5.5 hours when playing back music files with the speakers on FL-N01
About 6.5 hours when playing back music files with the supplied Open-ear earphones
Recommended computer environment
Windows® 10, Windows® 8.1, Windows® 7 SP1, Mac OS® X v10.11, Mac OS® X v10.10, Mac OS® X v10.9
*2
There is no guarantee that all computers with the environment above work with FL-N01.
*3
A home-built computer is not supported.
Note
To protect the battery from high/low-temperature environments, charging may stop. Charging may also stop if it takes a long time. In this case, FLN01 tells you that the internal temperature of FL-N01 becomes hot, the indicator light flashes twice quickly, then FL-N01 will turn off. This is not a
malfunction. Change locations to where the ambient temperature is between 5 °C and 35 °C (41 °F and 95 °F). Then disconnect and reconnect
the supplied micro-USB cable, and charge FL-N01 again.
*2*3
Even if you do not intend to use FL-N01 for a long time, charge the battery to its full capacity once every six months to maintain its performance.
Never use a device other than a computer to charge FL-N01, including commercially available AC adaptors, etc.

Related Topic
8
Connecting to a computer
4-593-988-11(5) Copyright 2016 Sony Corporation

Help Guide
9
Future Lab Program N
FL-N01
Checking the battery level
You can check the battery level by talking to FL-N01.
Set FL-N01 to ready for operation.
1
Select one of the following methods to set FL-N01 to ready for operation.
*1
Tell FL-N01 “Listen up Nigel
*1
Hear the sound (Playback may require the latest browser.)
.”
Press the voice input button on FL-N01.

You will hear a sound*2 from FL-N01 which reminds you that FL -N01 is ready for operation.
10
*2
Hear the sound (Playback may require the latest browser.)
Within a few seconds after hearing the sound, tell FL-N01 "Check battery."
2
You will hear a sound*3 from FL-N01 which reminds you that FL -N01 has received your voice input.
When you hear the error sound
Check for the sound
*2
*4
and "Failed to recognize. Try one more time." from FL-N01
that indicates FL-N01 is ready for operation.
Tell FL-N01 "Check battery" again.
You do not need to go back to step
When you hear the error sound
Go back to step
*2
Hear the sound (Playback may require the latest browser.)
*3
Hear the sound (Playback may require the latest browser.)
*4
Hear the error sound (Playback may require the latest browser.)
FL-N01 tells you the battery level.
3
and try the procedures again.
*4
.
and "Failed to recognize." from FL -N01
To cancel inputting voice command
After step , press the voice input button on FL-N01.

If you cannnot control FL-N01 well
See "How to control FL-N01" for details.
11
Hint
You can also check the battery level on the status screen of the “Future Lab Program N” app.
Related Topic
Installing the “Future Lab Program N” app
Using the dedicated smartphone app “Future Lab Program N”
How to control FL - N01
4-593-988-11(5) Copyright 2016 Sony Corporation

Help Guide
12
Future Lab Program N
FL-N01
Power on/Power off
Press and hold the (power) button for 4 seconds until FL-N01 vibrates.
1
A: Indicator light
(power) button
B:
After about 70 seconds, FL - N01 will power on and you will hear the announcement that FL-N01 is ready for operation.
To activate sleep mode
Press the (power) button.
To release from sleep mode, press the
(power) button again.
To power off
Press and hold the (power) button for more than 4 seconds.
Note
It takes about one and a half minutes longer to boot-up FL-N01 than usual when 2,000 music files are stored on the built-in memory of FL-N01.
Related Topic
About the indicators
4-593-988-11(5) Copyright 2016 Sony Corporation

Help Guide
13
Future Lab Program N
FL-N01
Items of Initial Setup (Android)
Bluetooth connection by One-Touch (NFC)
NFC
NFC (Near Field Communication) is a technology enabling short-range wireless communication between various devices, such as
smartphones and IC tags. Thanks to the NFC function, data communication - for example, Bluetooth pairing - can be achieved
easily by simply touching NFC- compatible devices together (i.e., at the N- Mark symbol or location designated on each device).
1. Unlock the screen of the smartphone if it is locked.
2. Set the NFC function of the smartphone to on.
3. Touch FL-N01 with the smartphone.
Touch the smartphone on the N- Mark of FL-N01. Keep touching FL-N01 with the smartphone until the smartphone vibrates.
Refer to the operating instructions supplied with the smartphone for the designated location to be touched on the smartphone.
Follow the on- screen instructions to complete pairing and connection.

If you do not setup Bluetooth settings
You can enjoy the limited functions of FL -N01 such as:
14
Some of the functions in device mode (when playing back music files)
Some of the functions for taking photos
Hint
If you cannot connect FL-N01, try the following.
Unlock the screen of the smartphone if it is locked and move the smartphone slowly over the N-Mark of FL-N01.
If the smartphone is in a case, remove the case.
Manual Bluetooth pairing
Follow the on- screen instructions of the app to pair and connect with a smartphone.
1. Press and hold the custom button of FL-N01 for at least 3 seconds.
2. Open the Bluetooth setting screen of the smartphone.
3. Set the Bluetooth function of the smartphone to on.
4. Select [FL-N01] from the detected devices.
If you do not setup Bluetooth settings
You can enjoy the limited functions of FL -N01 such as:
Some of the functions in device mode (when playing back music files)
Some of the functions for taking photos
Bluetooth tethering

To enjoy the full -functions of FL-N01, perform a Bluetooth tethering setting on your smartphone. An initial contract with a mobile
15
provider may be required to use this function. For details about a Bluetooth tethering contract, contact your mobile provider.
1. Follow the on-screen instructions for initial setup, then connect FL-N01 and your smartphone via
Bluetooth.
2. Open the Bluetooth tethering setting on your smartphone.
3. Set your smartphone's Bluetooth tethering setting to on.
If you do not setup Bluetooth tethering settings
You can enjoy the limited functions of FL -N01 such as:
Some of the functions in Personalized Radio service
Some of the voice commands
Signing in to Personalized Radio service

A Facebook account is required to use the Personalized Radio service.
16
If you do not have a Facebook account, create a new one on the Facebook site.
By signing in to a Facebook account, you can enjoy the Personalized Radio service such as Mail, Social Feeds, and other
segments.
If you do not sign with Facebook
You can only enjoy the limited Personalized Radio service.
Life Snap
FL-N01 detects when you are in activity (cycling, running or walking), which you have selected on the “Future Lab Program N”
app, and automatically takes photos at intervals. Since photos are automatically taken, you can enjoy unexpected scenes.
Related Topic
Installing the “Future Lab Program N” app
Taking photos at intervals automatically (Life Snap)
4-593-988-11(5) Copyright 2016 Sony Corporation

Help Guide
17
Future Lab Program N
FL-N01
Items of Initial Setup (iPhone)
Bluetooth pairing
Follow the on- screen instructions of the app to pair and connect with an iPhone.
1. Press and hold the custom button of FL-N01 for at least 3 seconds.
2. Open the Bluetooth setting screen of the iPhone.
3. Set the Bluetooth function of the iPhone to on.
4. Select [FL-N01] from the detected devices.
5. When Bluetooth pairing is complete, return to this app and tap [Next].
6. Tap [Connect].
7. If the dialog box appears, tap [Pair].
Hint
A Bluetooth connection has been completed when [FL-N01] and [FL-N01_BLE] appear on the Bluetooth connection screen of your iPhone. Do not
delete these model names from the Bluetooth connection screen of your iPhone.

If you do not setup Bluetooth settings
18
You can enjoy the limited functions of FL -N01 such as:
Some of the functions in device mode (when playing back music files)
Some of the functions for taking photos
Personal Hotspot
To enjoy the full -functions of FL-N01, perform a Personal Hotspot setting on your iPhone. An initial contract with a mobile
provider may be required to use this function. For details about a Personal Hotspot contract, contact your mobile provider.
1. Follow the on-screen instructions for initial setup, then connect FL-N01 and your iPhone via Bluetooth.
2. Open the Personal Hotspot setting on your iPhone.
3. Set the Personal Hotspot setting of your iPhone to on.
If you do not setup Personal Hotspot settings
You can enjoy the limited functions of FL -N01 such as:
Some of the functions in Personalized Radio service
Some of the voice commands
Signing in to Personalized Radio service

A Facebook account is required to use the Personalized Radio service.
19
If you do not have a Facebook account, create a new one on the Facebook site.
By signing in to a Facebook account, you can enjoy the Personalized Radio service such as Mail, Social Feeds, and other
segments.
If you do not sign with Facebook
You can only enjoy the limited Personalized Radio service.
Life Snap
FL-N01 detects when you are in activity (cycling, running or walking), which you have selected on the “Future Lab Program N”
app, and automatically takes photos at intervals. Since photos are automatically taken, you can enjoy unexpected scenes.
Related Topic
Installing the “Future Lab Program N” app
Taking photos at intervals automatically (Life Snap)
4-593-988-11(5) Copyright 2016 Sony Corporation

Help Guide
20
Future Lab Program N
FL-N01
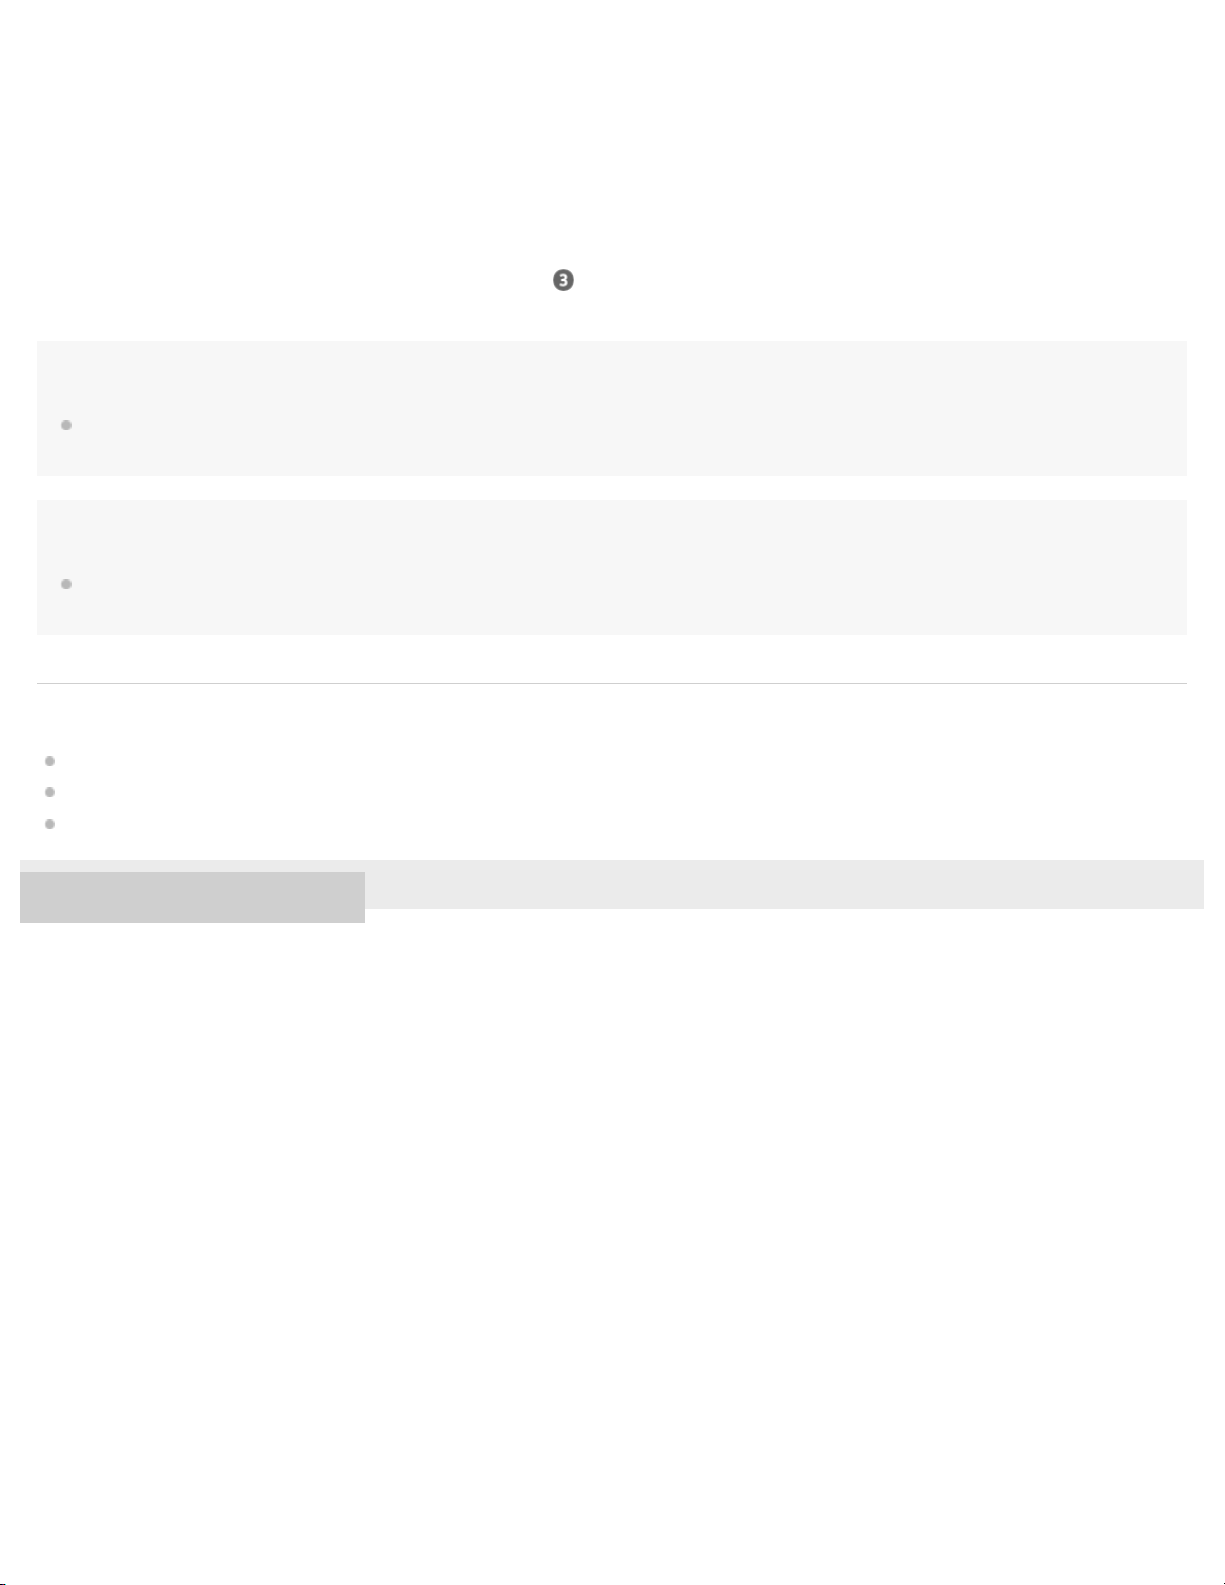
Wearing FL- N01
Wear FL-N01 on your neck so that the camera is on your right-hand side.
1
Note
Do not cover FL-N01 with cloth such as a collar, etc. to maximize the functions of FL-N01.
4-593-988-11(5) Copyright 2016 Sony Corporation
Help Guide
21
Future Lab Program N
FL-N01
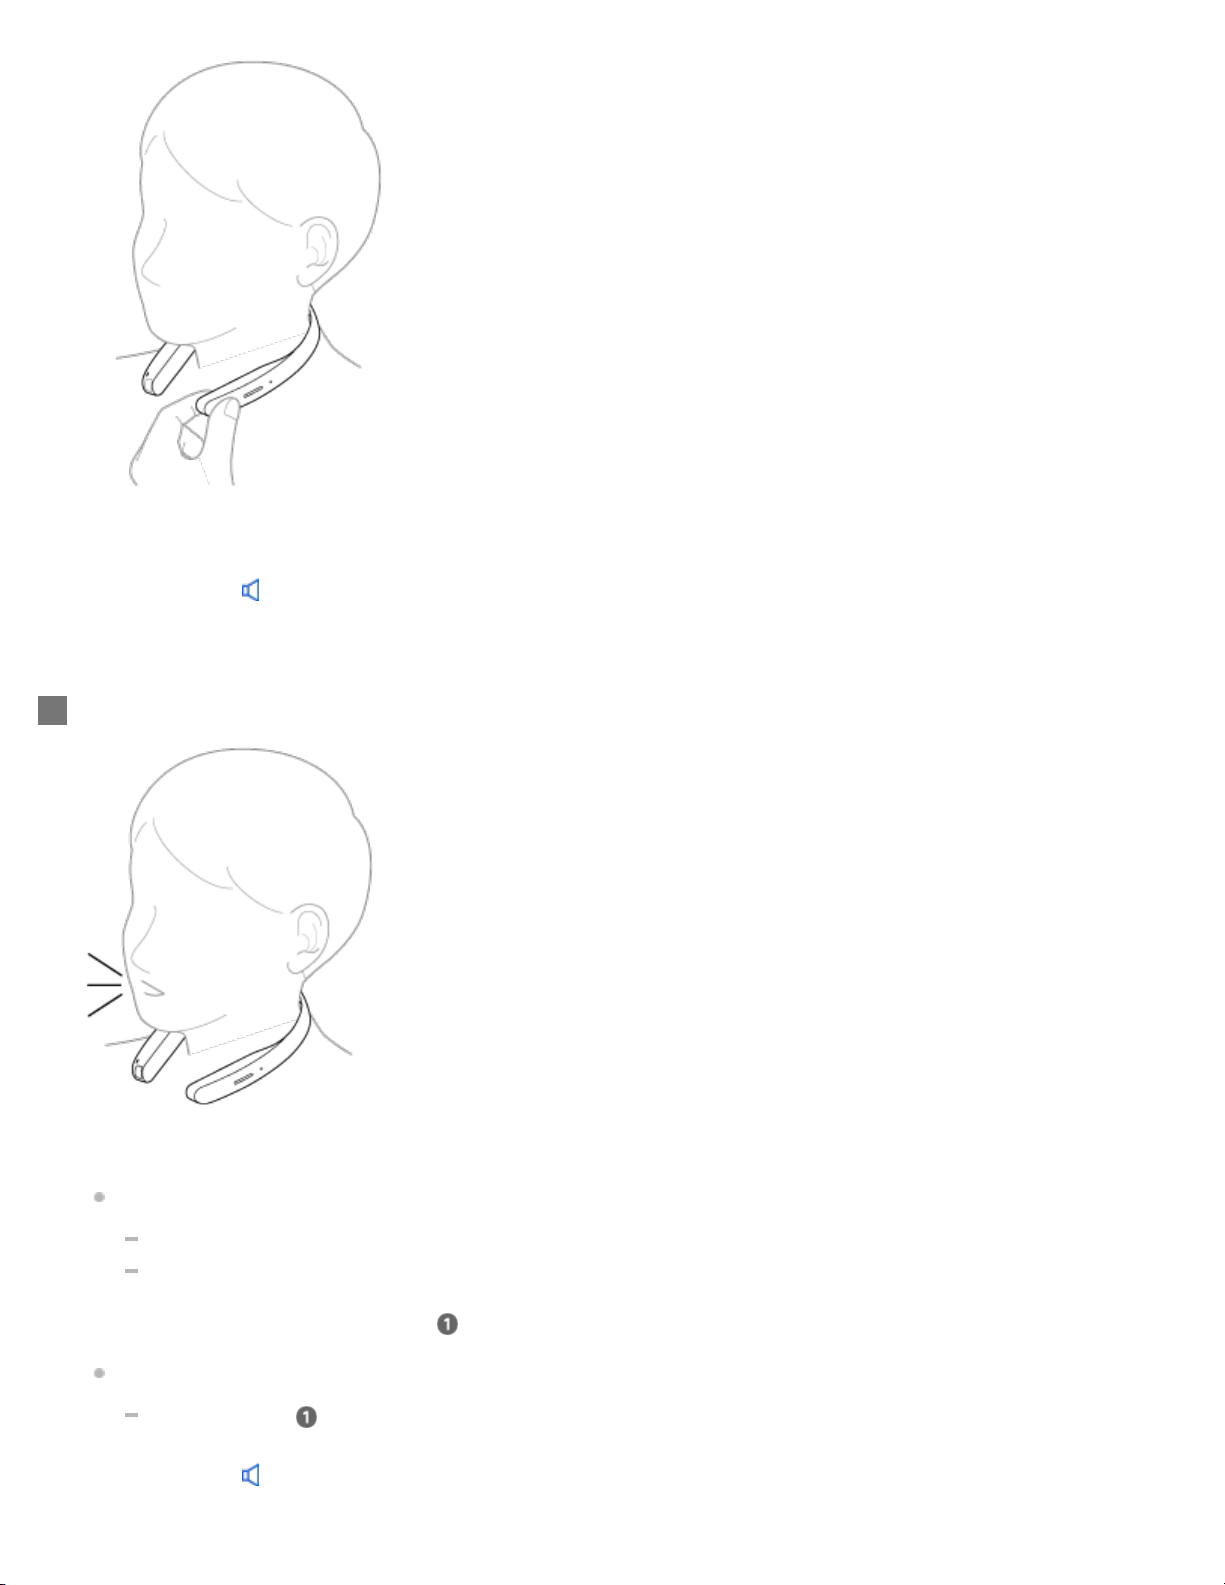
Using Open - ear earphones
Use the supplied Open - ear earphones when you are aware of sound leakage.
Connect FL-N01 and the Open-ear earphones.
1
Wear FL-N01 on your neck so that the camera is on your right-hand side.
2
Place the cable of the left earphone behind your neck.
3

Fit the earphone into your ear.
22
4
Slide up the earphone from under your ear along your jaw then place it into your ear.
1.
Pull the earphone down then fit it into your ear.
2.
To disconnect the Open-ear earphones from FL-N01
Pull out the connector of the Open- ear earphones, not the cable.
Note
23
The supplied Open-ear earphones are exclusively designed for FL-N01. Do not connect the supplied Open-ear earphones to a device other than
FL-N01.
4-593-988-11(5) Copyright 2016 Sony Corporation

Help Guide
24
Future Lab Program N
FL-N01
What is voice control?
FL-N01 can be operated by voice commands and natural speech. For details, see “Voice command/Natural speech list.”
Voice command
FL-N01 is operated by fixed phrases such as;
Start - -- (e.g. Start Weather)
Next
Previous
Bookmark
More detail
Stop
Natural speech
FL-N01 can take your utterances as commands if FL-N01 is connected to a network.
Example: What is the weather like in San Francisco ?
Related Topic
General voice command
Voice command on music
Voice command on camera
Voice command/Natural speech on Personalized Radio service
Using the dedicated smartphone app “Future Lab Program N”
Changing the settings of FL-N01 on the “Future Lab Program N” app
The voice command function does not work well.
4-593-988-11(5) Copyright 2016 Sony Corporation

Help Guide
25
Future Lab Program N
FL-N01
How to control FL-N01
You can operate FL- N01 with your voice.
This section shows you how to use FL-N01 following an example to check the time.
Set FL-N01 to ready for operation.
1
Select one of the following methods to set FL-N01 to ready for operation.
*1
Tell FL-N01 “Listen up Nigel
*1
Hear the sound (Playback may require the latest browser.)
.”
Press the voice input button on FL-N01.

You will hear a sound*2 from FL-N01 which reminds you that FL -N01 is ready for operation.
26
*2
Hear the sound (Playback may require the latest browser.)
Within a few seconds after hearing the sound, tell FL-N01 "What time is it?."
2
You will hear a sound*3 from FL-N01 which reminds you that FL -N01 has received your voice input.
When you hear the error sound
Check for the sound
*2
*4
and "Failed to recognize. Try one more time." from FL-N01
that indicates FL-N01 is ready for operation.
Tell FL-N01 "What time is it ?" again.
You do not need to go back to step
When you hear the error sound
Go back to step
*2
Hear the sound (Playback may require the latest browser.)
*3
Hear the sound (Playback may require the latest browser.)
*4
Hear the error sound (Playback may require the latest browser.)
FL-N01 tells you the time.
3
and try the procedures again.
*4
.
and "Failed to recognize." from FL -N01

To cancel inputting voice command
27
After step , press the voice input button on FL-N01.
If you cannot control FL-N01 well
FL-N01 may not work correctly depending on the ambient noise.
Make sure that FL-N01 is not covered with cloth such as a collar, etc.
Depending on the voice commands, a network connection is required. For details, see "Voice command/Natural speech list."
If FL-N01 hardly accepts your voice command, try the following.
Avoid places where loud noise, strong wind, or the echo effect occurs.
Try again from step
Try saying another phrase if you intend to control FL-N01 with your speech.
Note
It may take as long as 10 seconds for FL-N01 to tell you information after it has received your voice input.
FL-N01 is released from the ready for operation status when no voice input is sent within 4 seconds after you hear a sound from FL-N01 which
reminds you that FL-N01 is ready for operation (step
.
). In this case, go back to step .
Related Topic
Items of Initial Setup (Android)
Items of Initial Setup (iPhone)
Listening to music
Taking a still image
Taking photos at intervals
Taking continuous photos
Taking a video
Taking photos at intervals automatically (Life Snap)
Receiving Personalized Radio service automatically
Acquiring Personalized Radio service
Notes on recognition technologies
General voice command

Voice command on music
Voice command on camera
28
Voice command/Natural speech on Personalized Radio service
4-593-988-11(5) Copyright 2016 Sony Corporation

Help Guide
29
Future Lab Program N
FL-N01
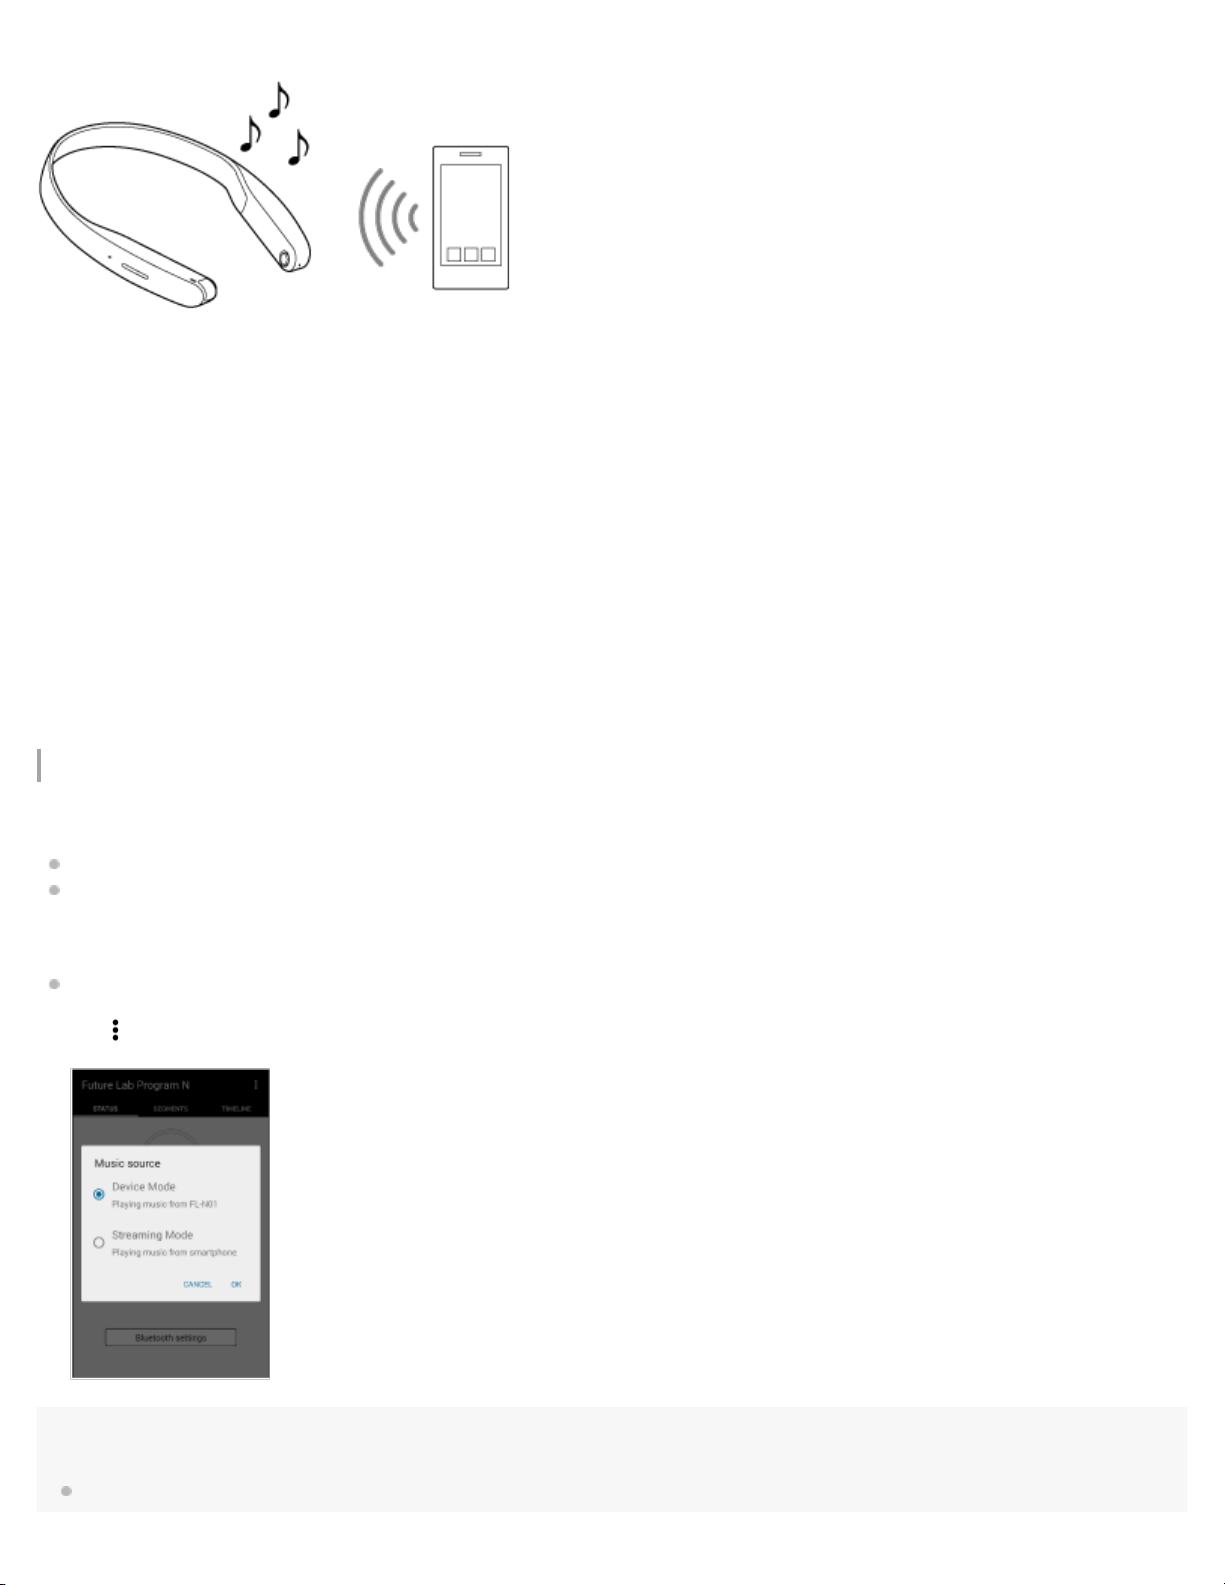
Listening to music
FL-N01 plays back music files in two different modes: device mode and streaming mode.
Device mode
Playing back music stored on FL -N01. Sample music files are stored on FL- N01 as a default.
You can also transfer desired music files to FL-N01 by connecting to a computer.
Streaming mode
Playing back music stored on a smartphone that is connected to FL-N01 via Bluetooth.
Set FL-N01 to ready for operation.
1
Select one of the following methods to set FL-N01 to ready for operation.
*1
Tell FL-N01 “Listen up Nigel
*1
Hear the sound (Playback may require the latest browser.)
Press the voice input button on FL-N01.
.”

You will hear a sound*2 from FL-N01 which reminds you that FL -N01 is ready for operation.
30
*2
Hear the sound (Playback may require the latest browser.)
Within a few seconds after hearing the sound, tell FL-N01 "Start Music."
2
You will hear a sound*3 from FL-N01 which reminds you that FL -N01 has received your voice input.
When you hear the error sound
Check for the sound
*2
*4
and "Failed to recognize. Try one more time." from FL-N01
that indicates FL-N01 is ready for operation.
Tell FL-N01 "Start Music" again.
You do not need to go back to step
When you hear the error sound
Go back to step
*2
Hear the sound (Playback may require the latest browser.)
and try the procedures again.
*4
.
and "Failed to recognize." from FL -N01

*3
31
Hear the sound (Playback may require the latest browser.)
*4
Hear the error sound (Playback may require the latest browser.)
FL-N01 starts to playback music.
3
Once a whole playlist has been played back, FL-N01 will go back to the first music file on the playlist (repeat all).
To cancel inputting voice command
After step , press the voice input button on FL-N01.
If you cannot control FL-N01 well
See "How to control FL-N01" for details.
How to switch between device mode and streaming mode
See "How to switch the modes" in "What you can do with device mode and streaming mode" for details.
To stop playback
Talk to FL-N01. (See “Voice command/Natural speech list”.)
You can also stop playback by pressing and holding the voice input button on FL-N01.
Related Topic
What you can do with device mode and streaming mode
How to control FL - N01
General voice command
Voice command on music
4-593-988-11(5) Copyright 2016 Sony Corporation

Help Guide
32
Future Lab Program N
FL-N01
What you can do with device mode and streaming mode
What is device mode?
Preconfigure
Connect FL-N01 to a computer, then transfer the desired music files to FL-N01 from the computer.
Playable music files
Music files stored in FL-N01
Sample music files are stored on FL- N01 as a default.
You can also transfer desired music files to FL-N01 by connecting to a computer.
Selectable playback modes
Normal play (default), Shuffle play
Once a whole playlist has been played back, FL-N01 will go back to the first music file on the playlist (repeat all) even though
either playback mode is selected.
Available functions
See "Voice command/Natural speech list."
What is streaming mode?
Preconfigure
33
Connect FL-N01 and a smartphone via Bluetooth.
Playable music files
Music files stored in a smartphone that is connected to FL-N01 via Bluetooth.
Selectable playback mode
You cannot select a playback mode with voice commands.
Available functions
See "Voice command/Natural speech list."
How to switch the modes
There are 3 ways of switching the modes.
Press the custom button on FL-N01 repeatedly.
Use voice commands.
Tell FL-N01 “Listen up Nigel” to make it ready for operation, then tell FL - N01 “Change music source.”
Change the setting on the “Future Lab Program N” app.
Tap - [Music source] to display the screen.
Hint
The custom button on FL-N01 is assigned to switch between device mode and streaming mode as a default. The function of the custom button
can be changed with the “Future Lab Program N” app.
34
Related Topic
Listening to music
Using the dedicated smartphone app “Future Lab Program N”
Changing the settings of FL-N01 on the “Future Lab Program N” app
General voice command
Voice command on music
4-593-988-11(5) Copyright 2016 Sony Corporation

Help Guide
35
Future Lab Program N
FL-N01
What is Personalized Radio service?
Personalized Radio service is a new feature that FL-N01 offers.
FL-N01 reads out and lets you know information such as weather, restaurants, news, events, calendar, mails, social feeds, activity
logs, SMS, smartphone notifications, etc.
You can select both when and how you receive information.
Receiving information automatically according to where you are, what time it is, or what you are doing.
Acquiring information when you want by using the voice control function.
Receiving Personalized Radio service automatically
FL-N01 analyzes where you are, what time it is, and what you are doing, then delivers you useful information automatically.
Note
"Audio AR Games" does not support this function.
While playing "Audio AR Games," FL-N01 does not deliver you any information automatically via segments on Personalized Radio service.
Acquiring Personalized Radio service
FL-N01 delivers you information whenever you want by using the voice commands.

Hint
36
The Bluetooth tethering/Personal Hotspot setting is required to use the Personalized Radio service.
Information (segments) that Personalized Radio service can provide may be updated automatically (except for "Audio AR Games").
4-593-988-11(5) Copyright 2016 Sony Corporation

Help Guide
37
Future Lab Program N
FL-N01
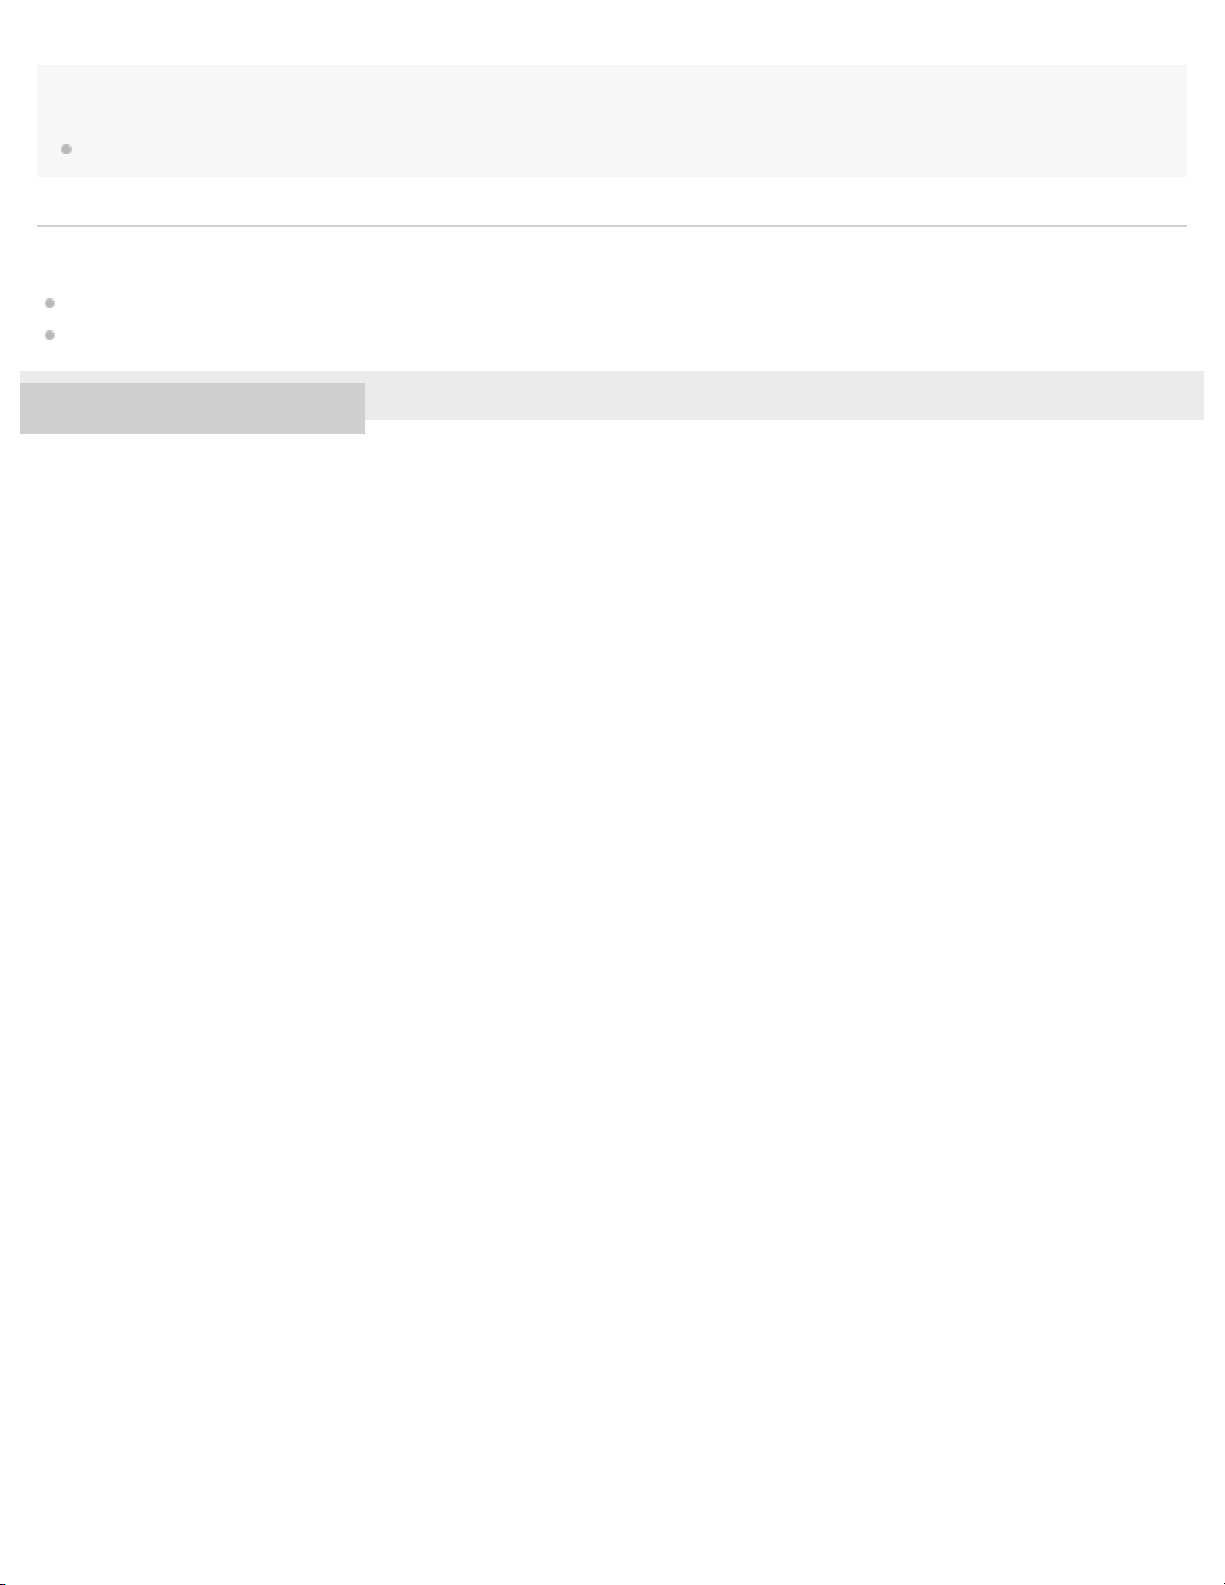
Receiving Personalized Radio service automatically
FL-N01 analyzes where you are, what time it is, and what you are doing, then delivers you useful information automatically.
The screen images used in this topic are those used in Android™ smartphones.
Note
"Audio AR Games" does not support this function.
While playing "Audio AR Games," FL-N01 does not deliver you any information automatically via segments on Personalized Radio service.
Perform initial setup on the “Future Lab Program N” app.
1
Select the segments you want to receive information from via the Personalized Radio service on the
2
“Future Lab Program N” app.
Wear FL-N01 and enjoy the Personalized Radio service.
38
3
FL-N01 reads out information automatically.
Hint
You can control/assort information you are receiving by using the voice commands.
1. Press the voice input button or tell FL- N01 “Listen up Nigel” to set FL-N01 ready for operation.
2. Within a few seconds after hearing the sound from FL - N01 which reminds you that FL- N01 is ready for operation,
tell FL- N01 "Next," "Previous," "Bookmark," "More detail," "Repeat item," or "Stop."
To stop receiving Personalized Radio service automatically
Set [Personalized Radio] to off on the segment screen of the “Future Lab Program N” app.
Hint
The Bluetooth tethering/Personal Hotspot setting is required to use the Personalized Radio service.
Personalized Radio service can be used without a network connection depending on services.

You can also stop receiving Personalized Radio service automatically by pressing and holding the voice input button on FL-N01.
39
Related Topic
What is voice control?
Using the dedicated smartphone app “Future Lab Program N”
General voice command
Voice command/Natural speech on Personalized Radio service
4-593-988-11(5) Copyright 2016 Sony Corporation

Help Guide
40
Future Lab Program N
FL-N01
Acquiring Personalized Radio service
FL-N01 delivers you information whenever you want by using the voice commands.
Perform initial setup on the “Future Lab Program N” app.
1
Select the segments you want to receive information from via the Personalized Radio service on the
2
“Future Lab Program N” app.
The image below is the screen of Android devices.

Set FL-N01 to ready for operation.
41
3
Select one of the following methods to set FL-N01 to ready for operation.
*1
Tell FL-N01 “Listen up Nigel
*1
Hear the sound (Playback may require the latest browser.)
.”
Press the voice input button on FL-N01.
You will hear a sound*2 from FL-N01 which reminds you that FL -N01 is ready for operation.
*2
Hear the sound (Playback may require the latest browser.)
Within a few seconds after hearing the sound, tell FL-N01 "Start Weather."
4

You will hear a sound*3 from FL-N01 which reminds you that FL -N01 has received your voice input.
42
When you hear the error sound
Check for the sound
*2
*4
and "Failed to recognize. Try one more time." from FL-N01
that indicates FL-N01 is ready for operation.
Tell FL-N01 "Start Weather" again.
You do not need to go back to step
When you hear the error sound
Go back to step
*2
Hear the sound (Playback may require the latest browser.)
*3
Hear the sound (Playback may require the latest browser.)
*4
Hear the error sound (Playback may require the latest browser.)
FL-N01 reads out weather information.
5
and try the procedures again.
*4
.
and "Failed to recognize." from FL -N01
To cancel inputting voice command
After step , press the voice input button on FL-N01.
If you cannot control FL-N01 well
See "How to control FL-N01" for details.
Hint
You can control/assort information you are receiving by using the voice commands.
1. Press the voice input button or tell FL- N01 “Listen up Nigel” to set FL-N01 ready for operation.

2. Within a few seconds after hearing the sound from FL - N01 which reminds you that FL- N01 is ready for operation,
tell FL- N01 "Next," "Previous," "Bookmark," "More detail," "Repeat item," or "Stop."
43
You can stop FL-N01 from reading out information by pressing and holding the voice input button on FL-N01.
Related Topic
What is voice control?
How to control FL - N01
General voice command
Voice command/Natural speech on Personalized Radio service
4-593-988-11(5) Copyright 2016 Sony Corporation
Help Guide
44
Future Lab Program N
FL-N01
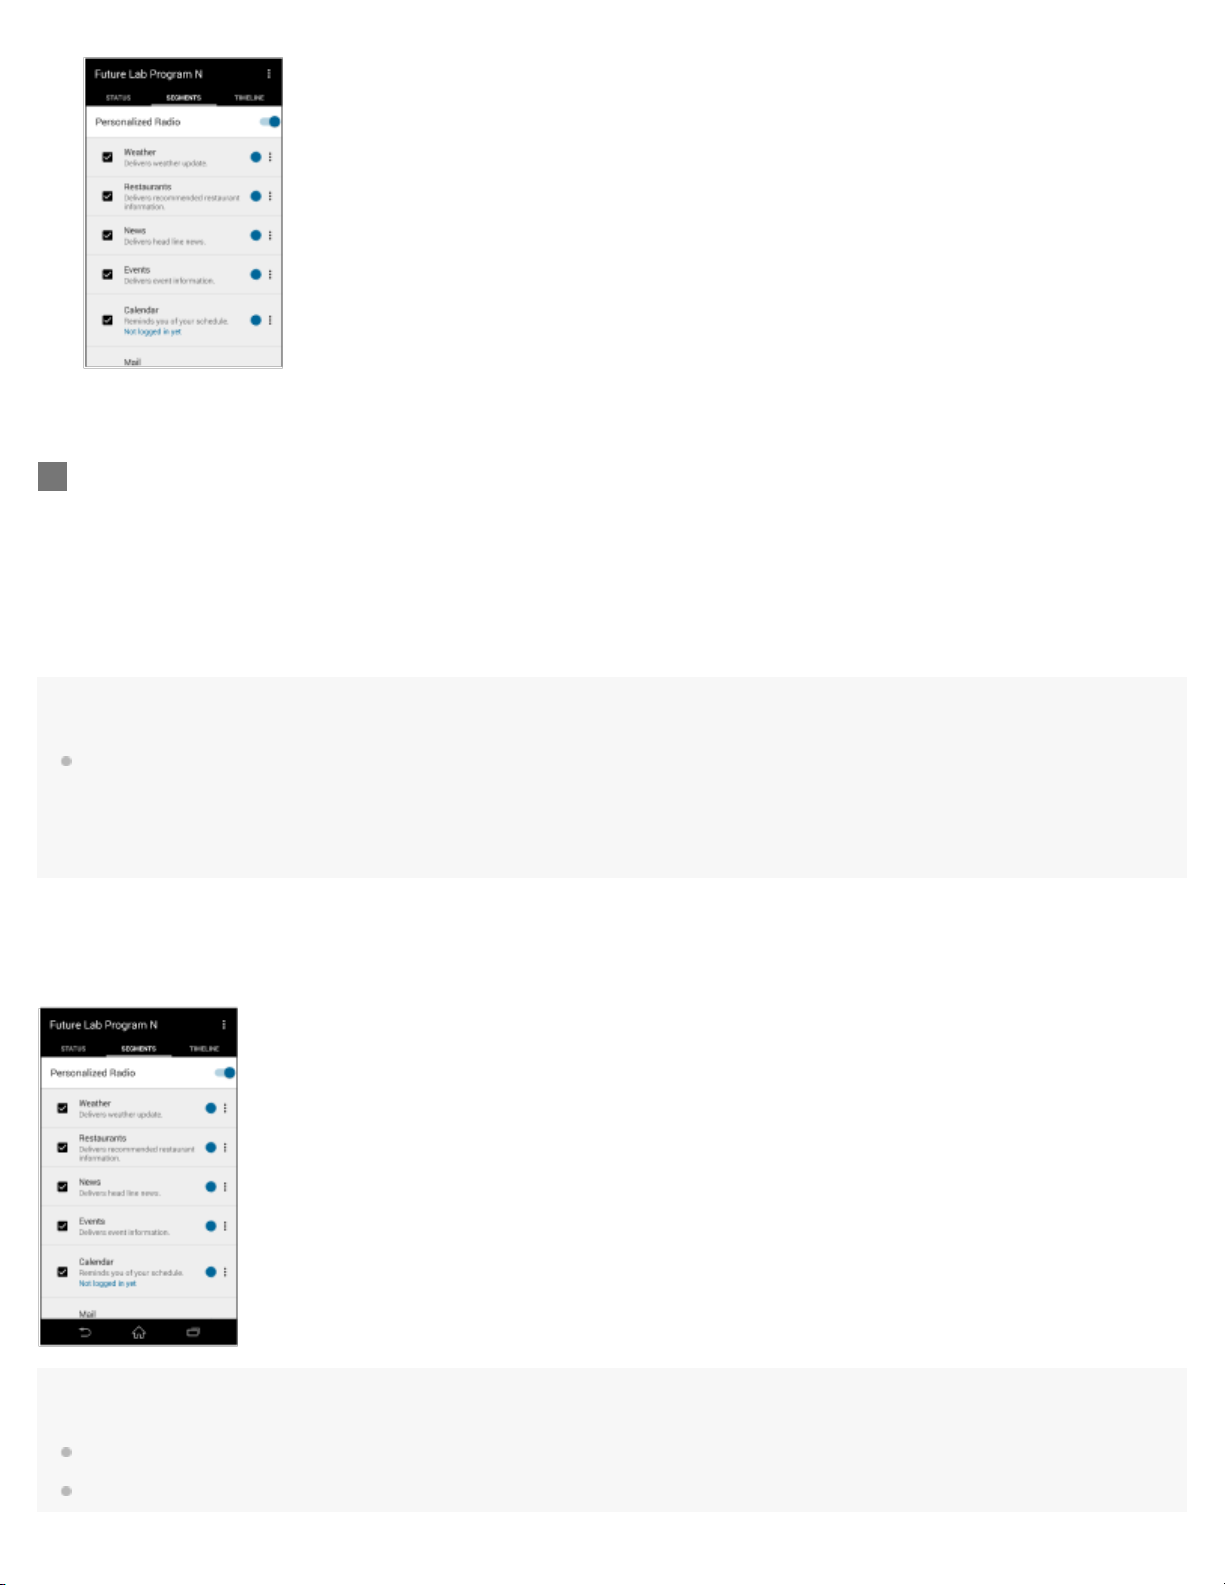
About segments on Personalized Radio service
Select the segments you want to receive information via Personalized Radio service on the “Future Lab Program N” app.
The available voice commands vary depending on the segments.
Weather
FL-N01 delivers weather updates according to your routine behavior. You can specify the time and place, and select categories
such as weather, temperature, chance - of -rain, weekly forecast, etc. FL-N01 can also let you know when it starts or stops raining.
Restaurants
FL-N01 delivers recommended restaurant information nearby.
The history of received restaurant information can be checked on the timeline screen of the "Future Lab Program N" app.
News
FL-N01 delivers news headlines. FL-N01 learns your preference and will deliver more suitable news for you. By selecting a
category on the “Future Lab Program N” app, you can specify what types of news you will receive.
The history of received news can be checked on the timeline screen of the "Future Lab Program N" app.
Events
FL-N01 delivers event information within a 100 miles radius from the center of the San Francisco bay area. You can specify what
kind of event information you will receive by selecting a category on the “Future Lab Program N” app. You can also specify event
information within a half mile radius from where you are by the time and place.
The history of received event information can be checked on the timeline screen of the "Future Lab Program N" app.
Calendar
FL-N01 reminds you of your schedule. An account for Google Calendar™ is required. In the morning, FL- N01 lets you know the
day’s schedule. In the afternoon, FL-N01 lets you know the rest of the day and tomorrow’s schedule. You can also check the
schedule on a specific day and time. The time for reminders can be adjusted as you like.
Mail
FL-N01 notifies you of received mail. An account for Gmail™ is required. FL-N01 reads out the sender and title of the mail. You
can select when to check emails, what items to be read out, etc. on the “Future Lab Program N” app.
Social Feeds
FL-N01 delivers the latest social feeds by reading out a timeline of tweets. Logging in to Twitter is required. When you made a list
of “N” by using the list function of Twitter, FL-N01 only reads out tweets from users in the “N” list. Direct messages and mentions
which are sent to you are also read out.
The history of the received social feeds can be checked on the timeline screen of the "Future Lab Program N" app.
Navigation

FL-N01 provides turn-by-turn voice guided directions for biking and walking, allowing you to get to your destination safely and
45
efficiently.
You need to connect FL-N01 to your smartphone via Bluetooth and launch the "Future Lab Program N" app on your smartphone
to use this function.
Navigation has the following functions:
Start Navigation to home:
Before using Navigation, set your home location in your "Future Lab Program N" app.
To start Navigation to home, tell FL -N01 "Start navigation to home." or "Take me home."
Start Navigation to your destination:
To start Navigation to your destination, tell FL-N01 "Start Navigation."
When FL-N01 asks for your destination, tell FL-N01 your destination.
Stop Navigation:
To stop navigation, tell FL-N01 "Stop Navigation."
Audio AR Games
FL-N01 offers you gaming entertainment that you can play only with audio.
"Lost Dog" is a pre-installed content. To start playing, tell FL-N01 "Start Lost Dog." To quit the content, tell FL-N01 "Stop Lost
Dog."
You need to play "Audio AR Games" outside since the contents use GPS on FL -N01. While playing "Audio AR Games," FL- N01
does not deliver you any information automatically via segments on Personalized Radio service.
Activity Log
You need to connect FL-N01 to your smartphone via Bluetooth and launch the "Future Lab Program N" app on your smartphone
to use this function.
Activity log has the following 2 logging modes:
Auto logging:Automatically logs your activity such as cycling and/or running based on your activity status.
Voice command logging:Logs your activity such as cycling or running which you set on the "Future Lab Program N." Logs are
started by voice command.
All the settings such as when to start taking logs, your weight, when to announce your lap time, or what to announce (distance,
time record, average speed, burned up calories) are made on the "Future Lab Program N" app. Logs are stored in FL-N01. You
can update logs by logging in to Strava.
If you are a premium member of Strava and have set the Personal Hotspot/Bluetooth tethering setting of your smartphone to on,
activity logs can be linked up with Live Segments.
For details on recognition technologies, see "Notes on recognition technologies."
SMS
FL-N01 notifies you of SMS which you receive on your smartphone while FL-N01 and the smartphone are connected via
Bluetooth, and FL-N01 will read out the sender and message. (If there is no Bluetooth connection between FL- N01 and your
smartphone, FL-N01 will not read out SMS even though you receive SMS on your smartphone.) You can change the setting on
the “Future Lab Program N” app to not have them read out. You can also recheck SMS that have been read out so far by telling
FL-N01 "Start SMS." The Personal Hotspot/Bluetooth tethering setting is not required.
Smartphone Notification
FL-N01 reads out notifications of the selected apps on your smartphone automatically. The Personal Hotspot/Bluetooth tethering
setting is not required. You cannot use a voice command to receive a smartphone notification.
Note
46
The services that the third parties provide may be revised, stopped, and discontinued without a notice. Sony bears no responsibility for this.
Related Topic
Notes on recognition technologies
FL-N01 announces/the “Future Lab Program N” app shows that there is no space left on the internal storage of FL-N01.
4-593-988-11(5) Copyright 2016 Sony Corporation

Help Guide
47
Future Lab Program N
FL-N01
Taking a still image
You can take a still image with FL- N01 by using the built-in camera.
Perform initial setup and camera settings on the “Future Lab Program N” app.
1
Set FL-N01 to ready for operation.
2
Select one of the following methods to set FL-N01 to ready for operation.
*1
Tell FL-N01 “Listen up Nigel
*1
Hear the sound (Playback may require the latest browser.)
.”
Press the voice input button on FL-N01.

You hear a sound*2 from FL-N01 which reminds you that FL -N01 is ready for operation.
48
*2
Hear the sound (Playback may require the latest browser.)
Within a few seconds after hearing the sound, tell FL-N01 "Take a picture."
3
You will hear a sound*3 from FL-N01 which reminds you that FL -N01 has received your voice input.
When you hear the error sound
Check for the sound
*2
*4
and "Failed to recognize. Try one more time." from FL-N01
that indicates FL-N01 is ready for operation.
Tell FL-N01 "Take a picture" again.
You do not need to go back to step
When you hear the error sound
Go back to step
*2
Hear the sound (Playback may require the latest browser.)
and try the procedures again.
*4
.
and "Failed to recognize." from FL -N01
*3
49
Hear the sound (Playback may require the latest browser.)
*4
Hear the error sound (Playback may require the latest browser.)
FL-N01 takes a picture.
4
Picture data will be stored in FL-N01. You can see them by connecting FL-N01 to a computer.
To cancel inputting voice command
After step , press the voice input button on FL-N01.
If you cannot control FL-N01 well
See "How to control FL-N01" for details.
Hint
The camera will be adjusted automatically to maintain the horizontal position while you are walking or cycling.
Related Topic
Items of Initial Setup (Android)
Items of Initial Setup (iPhone)
How to control FL - N01
General voice command
Voice command on camera
Connecting to a computer
Checking photos/videos/activity logs stored on the built-in memory of FL-N01
Using the dedicated smartphone app “Future Lab Program N”
Changing the settings of FL-N01 on the “Future Lab Program N” app
4-593-988-11(5) Copyright 2016 Sony Corporation

Help Guide
50
Future Lab Program N
FL-N01
Taking photos at intervals
You can take photos at intervals with FL-N01 by using the built-in camera.
Perform initial setup and camera settings on the “Future Lab Program N” app.
1
Set FL-N01 to ready for operation.
2
Select one of the following methods to set FL-N01 to ready for operation.
*1
Tell FL-N01 “Listen up Nigel
*1
Hear the sound (Playback may require the latest browser.)
.”
Press the voice input button on FL-N01.

You hear a sound*2 from FL-N01 which reminds you that FL -N01 is ready for operation.
51
*2
Hear the sound (Playback may require the latest browser.)
Within a few seconds after hearing the sound, tell FL-N01 "Start interval photo shooting."
3
You will hear a sound*3 from FL-N01 which reminds you that FL -N01 has received your voice input.
When you hear the error sound
Check for the sound
*2
*4
and "Failed to recognize. Try one more time." from FL-N01
that indicates FL-N01 is ready for operation.
Tell FL-N01 "Start interval photo shooting" again.
You do not need to go back to step
When you hear the error sound
Go back to step
*2
Hear the sound (Playback may require the latest browser.)
and try the procedures again.
*4
.
and "Failed to recognize." from FL -N01

*3
52
Hear the sound (Playback may require the latest browser.)
*4
Hear the error sound (Playback may require the latest browser.)
FL-N01 takes photos at intervals.
4
Photo data will be stored in FL-N01. You can see them by connecting FL -N01 to a computer.
To cancel inputting voice command
After step , press the voice input button on FL-N01.
If you cannot control FL-N01 well
See "How to control FL-N01" for details.
To stop taking photos at intervals
1. Set FL-N01 ready for operation by telling FL-N01 “Listen up Nigel” or pressing the voice input button on
FL-N01.
2. Within a few seconds after hearing the sound from FL-N01 which reminds you that FL-N01 is ready for
operation, tell FL-N01 "Stop interval photo."
Hint
The camera will be adjusted automatically to maintain the horizontal position while you are walking or cycling.
Related Topic
Items of Initial Setup (Android)
Items of Initial Setup (iPhone)
How to control FL - N01
General voice command
Voice command on camera
Connecting to a computer
Checking photos/videos/activity logs stored on the built-in memory of FL-N01
Using the dedicated smartphone app “Future Lab Program N”
Changing the settings of FL-N01 on the “Future Lab Program N” app
4-593-988-11(5) Copyright 2016 Sony Corporation

Help Guide
53
Future Lab Program N
FL-N01
Taking continuous photos
You can take continuous photos with FL-N01 by using the built-in camera.
Perform initial setup and camera settings on the “Future Lab Program N” app.
1
Set FL-N01 to ready for operation.
2
Select one of the following methods to set FL-N01 to ready for operation.
*1
Tell FL-N01 “Listen up Nigel
*1
Hear the sound (Playback may require the latest browser.)
.”
Press the voice input button on FL-N01.

You will hear a sound*2 from FL-N01 which reminds you that FL -N01 is ready for operation.
54
*2
Hear the sound (Playback may require the latest browser.)
Within a few seconds after hearing the sound, tell FL-N01 "Start continuous photo shooting."
3
You will hear a sound*3 from FL-N01 which reminds you that FL -N01 has received your voice input.
When you hear the error sound
Check for the sound
*2
*4
and "Failed to recognize. Try one more time." from FL-N01
that indicates FL-N01 is ready for operation.
Tell FL-N01 "Start continuous photo shooting" again.
You do not need to go back to step
When you hear the error sound
Go back to step
*2
Hear the sound (Playback may require the latest browser.)
and try the procedures again.
*4
.
and "Failed to recognize." from FL -N01

*3
55
Hear the sound (Playback may require the latest browser.)
*4
Hear the error sound (Playback may require the latest browser.)
FL-N01 takes continuous photos.
4
Photo data will be stored in FL-N01. You can see them by connecting FL -N01 to a computer.
To cancel inputting voice command
After step , press the voice input button on FL-N01.
If you cannot control FL-N01 well
See "How to control FL-N01" for details.
Hint
The camera will be adjusted automatically to maintain the horizontal position while you are walking or cycling.
The angle of the camera is fixed to when the continuous photo shooting starts.
Related Topic
Items of Initial Setup (Android)
Items of Initial Setup (iPhone)
How to control FL - N01
General voice command
Voice command on camera
Connecting to a computer
Checking photos/videos/activity logs stored on the built-in memory of FL-N01
Using the dedicated smartphone app “Future Lab Program N”
Changing the settings of FL-N01 on the “Future Lab Program N” app
4-593-988-11(5) Copyright 2016 Sony Corporation

Help Guide
56
Future Lab Program N
FL-N01
Taking a video
You can take a video (maximum to 1 minute long) with FL-N01 by using the built- in camera.
Perform initial setup and camera settings on the “Future Lab Program N” app.
1
Set FL-N01 to ready for operation.
2
Select one of the following methods to set FL-N01 to ready for operation.
*1
Tell FL-N01 “Listen up Nigel
*1
Hear the sound (Playback may require the latest browser.)
.”
Press the voice input button on FL-N01.

You will hear a sound*2 from FL-N01 which reminds you that FL -N01 is ready for operation.
57
*2
Hear the sound (Playback may require the latest browser.)
Within a few seconds after hearing the sound, tell FL-N01 "Start video shooting."
3
You will hear a sound*3 from FL-N01 which reminds you that FL -N01 has received your voice input.
When you hear the error sound
Check for the sound
*2
*4
and "Failed to recognize. Try one more time." from FL-N01
that indicates FL-N01 is ready for operation.
Tell FL-N01 "Start video shooting" again.
You do not need to go back to step
When you hear the error sound
Go back to step
*2
Hear the sound (Playback may require the latest browser.)
and try the procedures again.
*4
.
and "Failed to recognize." from FL -N01

*3
58
Hear the sound (Playback may require the latest browser.)
*4
Hear the error sound (Playback may require the latest browser.)
FL-N1 starts recording video.
4
Recorded data will be stored in FL-N01. You can see them by connecting FL-N01 to a computer.
To cancel inputting voice command
After step , press the voice input button on FL-N01.
If you cannot control FL-N01 well
See "How to control FL-N01" for details.
To stop taking a video
1. Press the voice input button on FL-N01.
Hint
The camera will be adjusted automatically to maintain the horizontal position while you are walking or cycling.
The angle of the camera is fixed to when the video shooting starts.
The function of the custom button on FL-N01 can be changed to take a video with the “Future Lab Program N” app.
Note
The recording time may be shorter depending on the recording conditions. When FL-N01 overheats, it may be automatically turned off or recording
may malfunction. To use the camera again, leave it in a cool place for a while to cool down.
Related Topic
Items of Initial Setup (Android)
Items of Initial Setup (iPhone)
How to control FL - N01
General voice command
Voice command on camera
Connecting to a computer
Checking photos/videos/activity logs stored on the built-in memory of FL-N01
Using the dedicated smartphone app “Future Lab Program N”
Changing the settings of FL-N01 on the “Future Lab Program N” app

Help Guide
59
Future Lab Program N
FL-N01
Taking photos at intervals automatically (Life Snap)
FL-N01 detects when you are in activity (cycling, running, or walking), which you have selected on the “Future Lab Program N”
app, and automatically takes photos at intervals with its built-in camera. Since photos are automatically taken, you can enjoy
unexpected scenes.
Perform initial setup on the "Future Lab Program N" app.
1
Select an activity of the Life Snap function (cycling, running, or walking) on the "Future Lab Program
2
N" app.
Wear FL-N01, then perform the activity you set on the app.
3
FL-N01 starts taking photos at intervals automatically.
Photo data will be stored in FL-N01. You can see them by connecting FL -N01 to a computer.
Hint
The camera will be adjusted automatically to maintain the horizontal position while you are walking or cycling.

You can adjust the maximum number of photos that are stored on FL-N01 on the "Future Lab Program N" app. (The default setting is 1,000.) Tap
60
- [Settings] - [Applications] - [Camera] - [Life Snap] - [Number of Photos in a loop]. When the amount of photos stored on FL-N01 reaches the
limit, the oldest photo will be deleted.
Related Topic
Items of Initial Setup (Android)
Items of Initial Setup (iPhone)
Connecting to a computer
Checking photos/videos/activity logs stored on the built-in memory of FL-N01
Using the dedicated smartphone app “Future Lab Program N”
Changing the settings of FL-N01 on the “Future Lab Program N” app
Notes on recognition technologies
4-593-988-11(5) Copyright 2016 Sony Corporation

Help Guide
61
Future Lab Program N
FL-N01
Receiving a call
Perform initial setup and phone call settings on the "Future Lab Program N" app.
1
Make sure that [Use call function] is set to on.
When you changed the [Use call function] setting from off to on, you need to restart FL -N01.
When you hear the name of the caller, press the voice input button once on FL-N01.
2
Talk over the phone via FL-N01.
3
To adjust the volume of the other party
Press the volume +/ - button on FL-N01.
To end a call
Press the voice input button on FL-N01.
To reject an incoming call
Press and hold the voice input button on FL-N01 when you hear the name of the caller.
62
If you do not hear the name of the caller
Change the setting on the “Future Lab Program N” app.
When you do not hear the sound from FL-N01
After you start talking over the phone via FL-N01 on step , change the setting of the speaker output on your smartphone or
mobile phone.
Note
Operations may vary depending on the smartphone or mobile phone. Refer to the operating instructions supplied with your smartphone or mobile
phone.
Hint
The volume during a call and volume during music playback can be adjusted independently. Changing the call volume does not change the
volume of music playback and vice versa.
Related Topic
Items of Initial Setup (Android)
Items of Initial Setup (iPhone)
Changing the settings of FL-N01 on the “Future Lab Program N” app
4-593-988-11(5) Copyright 2016 Sony Corporation

Help Guide
63
Future Lab Program N
FL-N01
Making a call
Perform initial setup and phone call settings on the "Future Lab Program N" app.
1
Make sure that [Use call function] is set to on.
When you changed the [Use call function] setting from off to on, you need to restart FL -N01.
Make a call by using your smartphone or mobile phone.
2
You will hear the sound from FL-N01.
Talk over the phone via FL-N01.
3
To adjust the volume of the other party
Press the volume +/ - button on FL-N01.
To end a call
Press the voice input button on FL-N01.
When you do not hear sound from FL-N01
After you start talking over the phone via FL-N01 on step , change the setting of the speaker output on your smartphone or
mobile phone.
Note
Operations may vary depending on the smartphone or mobile phone. Refer to the operating instructions supplied with your smartphone or mobile
phone.
Hint
The volume during a call and volume during music playback can be adjusted independently. Changing the call volume does not change the
volume of music playback and vice versa.

Related Topic
64
Items of Initial Setup (Android)
Items of Initial Setup (iPhone)
Changing the settings of FL-N01 on the “Future Lab Program N” app
4-593-988-11(5) Copyright 2016 Sony Corporation

Help Guide
65
Future Lab Program N
FL-N01
Notice for Phone Call
Android
We are releasing this Phone Call function in response to our Future Lab Participants feedback. During the term of this program,
we cannot fully develop the solution. If you choose to use the Phone Function, please know that it is not perfect and you may
experience some issues.
Issues and Workaround
Issue 1. When receiving a call, you may not be able to hear the voice of the caller loudly but the caller can
hear your voice.
Workaround for issue 1
1.If you cannot hear, hang up the phone and then make a call again.
When you put your phone in silent mode, we recommend having vibrate turned on so you can notice when a call is being
received.
iPhone
We are releasing this Phone Call function in response to our Future Lab Participants feedback. During the term of this program,
we cannot fully develop the solution. If you choose to use the Phone Function, please know that it is not perfect and you may
experience some issues.
Issues and Workaround
Issue 1. When listening to music from iPhone with iOS10 via Bluetooth, If you make a call using an iPhone,
the Bluetooth connection between N and the iPhone may disconnect if your ringer is not set to silent.
Workaround for issue 1
1. Stop the music on your iPhone.
2. Turn your ringer to silent mode.
3. Make a call from your iPhone.
Issue 2. When receiving a call, you may not be able to hear the voice of the caller loudly but the caller can hear your voice.
Workaround for issue 2
1. If you cannot hear, hang up the phone and then make a call again.
When you put your phone in silent mode, we recommend having vibrate turned on so you are still able to know when a call is
being received.
4-593-988-11(5) Copyright 2016 Sony Corporation

Help Guide
66
Future Lab Program N
FL-N01
We Run
You can enjoy the We Run application with FL-N01.
What is We Run?
Visit the following website about We Run and download it onto your smartphone, and then install.:
http://werun.sony.eu/
Perform initial setup on the "Future Lab Program N" app.
1
Connect FL-N01 to your smartphone via Bluetooth and launch the “We Run” app on your smartphone.
2
Set FL-N01 to ready for operation.
3
Select one of the following methods to set FL-N01 to ready for operation.
*1
Tell FL-N01 “Listen up Nigel
*1
Hear the sound (Playback may require the latest browser.)
.”
Press the voice input button on FL-N01.
You will hear a sound*2 from FL-N01 which reminds you that FL -N01 is ready for operation.
67
*2
Hear the sound (Playback may require the latest browser.)
Within a few seconds after hearing the sound, tell FL-N01 "Start We Run."
4
You will hear a sound*3 from FL-N01 which reminds you that FL -N01 has received your voice input.
When you hear the error sound
Check for the sound
*2
*4
and "Failed to recognize. Try one more time." from FL-N01
that indicates FL-N01 is ready for operation.
Tell FL-N01 "Start We Run" again.
You do not need to go back to step
When you hear the error sound
Go back to step
*2
Hear the sound (Playback may require the latest browser.)
and try the procedures again.
*4
.
and "Failed to recognize." from FL -N01

*3
68
Hear the sound (Playback may require the latest browser.)
*4
Hear the error sound (Playback may require the latest browser.)
Enjoy the We Run app with FL-N01.
5
To cancel inputting voice command
After step , press the voice input button on FL-N01.
If you cannnot control FL-N01 well
See "How to control FL-N01" for details.
To stop We Run
1. Set FL-N01 ready for operation by telling FL-N01 "Listen up Nigel" or pressing the voice input button on FL -N01.
2. Within a few seconds after hearing the sound from FL-N01 which reminds you that FL -N01 is ready for operation, tell FL -N01
"Stop We Run."
4-593-988-11(5) Copyright 2016 Sony Corporation

Help Guide
69
Future Lab Program N
FL-N01
Using the dedicated smartphone app “Future Lab Program N”
Launch the “Future Lab Program N” app on your smartphone and follow the on -screen instructions for initial setup, then make a
Bluetooth connection or a Personal Hotspot (Bluetooth tethering) setting between FL- N01 and the smartphone.
Status screen
You can see the current condition of FL-N01.
A: Tap to show the following menus.
Item Description
[Settings]
[Music
Source]
[Tutorial] The basic operation of FL-N01 is shown.
[Initial
Setup]
[Help
Guide]
B: Tap one of these tabs to switch the screen.
C: Shows the conditions of FL-N01’s connections and settings.
D: Shows the current status of FL-N01.
The application settings for camera function and the sound setting are available. You can also check information
about the latest software update, the versions of FL-N01, and the “Future Lab Program N” app.
Device mode and streaming mode can be switched.
The initial setup is restarted from the beginning.
You can access the Help Guide (web manual).
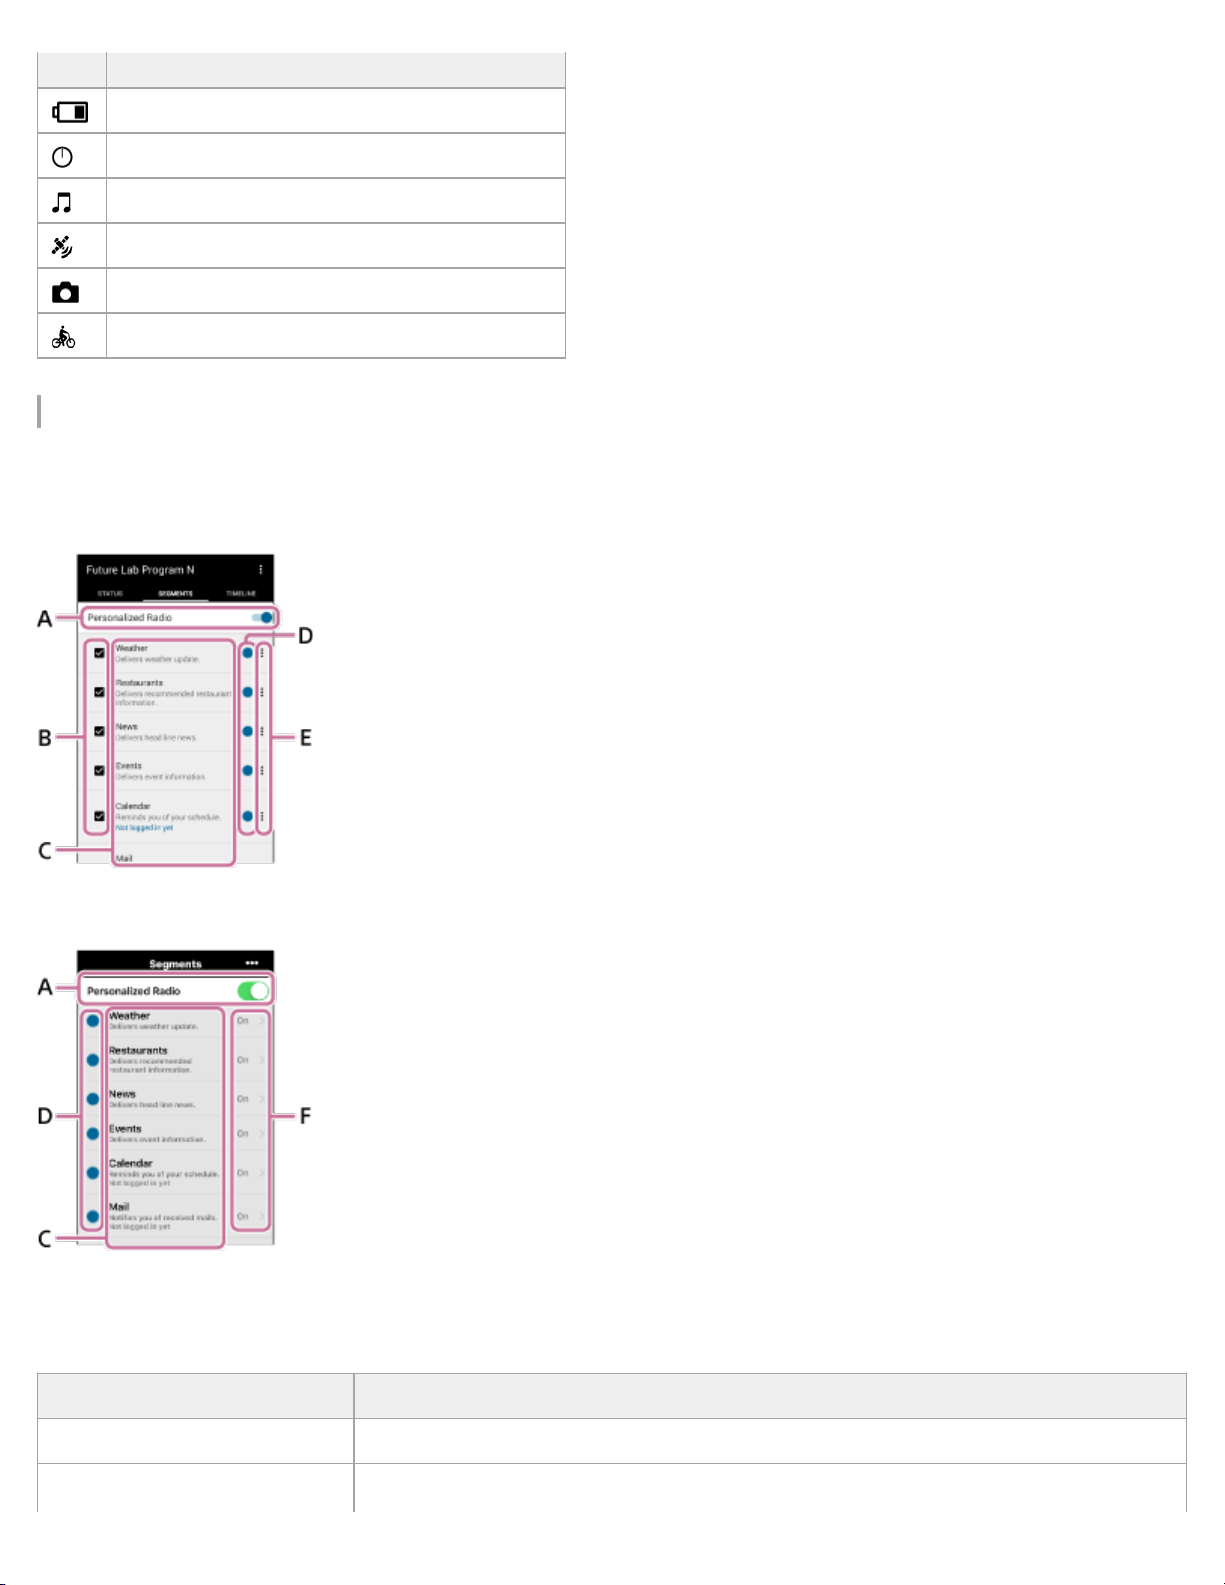
Item Description
The remaining battery level of FL-N01
70
The remaining space of FL -N01’s built-in memory
The selected music source
The status of FL-N01’s GPS signal
The status of FL-N01’s camera function
The status of activity logs
Segment screen
You can see the list of segments on the Personalized Radio service.
Android
iPhone
A: The setting whether you receive the Personalized Radio service automatically can be made (on/off).
B: Select the segments that you want to receive.
C: Shows the segment name and explains briefly what you can enjoy with the segment. Also shows the following messages:
Item Description
Logged in already You have already logged in to the segment correctly.
Not logged in yet
You have not logged in to the segment yet. Tap the message area to move to the next

screen and log in to the segment.
Segment terminated on
71
"Month""Day", "Year"
The segment will be terminated on the shown date.
D: Indicates the new segment.
E: Indicates that you can make advanced settings. Depending on the segment, an account setting can also be made.
F: You can select the segments that you want to receive. Depending on the segment, advanced settings or account setting is also
available.
Timeline screen
You can check information that you have received so far via the Personalized Radio service.
A: Tap one of these tabs to switch the screen.
Item Description
[Past 24
hours]
Shows segments that you have received in the last 24 hours via the Personalized Radio service. Tap the
information to open the website where the information came from. Tap the bookmark icon to bookmark the
segment. The segments will disappear from the list after 24 hours.
Shows the bookmarked segment. You can bookmark a segment by tapping the bookmark icon on the [Past 24
[Bookmarks]
hours] screen or by using a voice command while receiving the Personalized Radio service. Bookmarked
segments will not be deleted even after 24 hours.
4-593-988-11(5) Copyright 2016 Sony Corporation

Help Guide
72
Future Lab Program N
FL-N01
Changing the settings of FL-N01 on the “Future Lab Program N” app
Launch the “Future Lab Program N” app on your smartphone and follow the on -screen instructions for initial setup, then make a
Bluetooth connection or a Personal Hotspot (Bluetooth tethering) setting between FL- N01 and the smartphone.
Setting for the voice control function
You can select whether FL- N01 is activated by the wake-up phrase.
Tap - [Settings] - [Customize] - [Wake-up phrase].
Setting for the custom button on FL-N01
You can change the function of the custom button on FL-N01.
Tap - [Settings] - [Customize] - [Custom button].
Settings for Notification
You can select how FL-N01 reminds you of notifications.
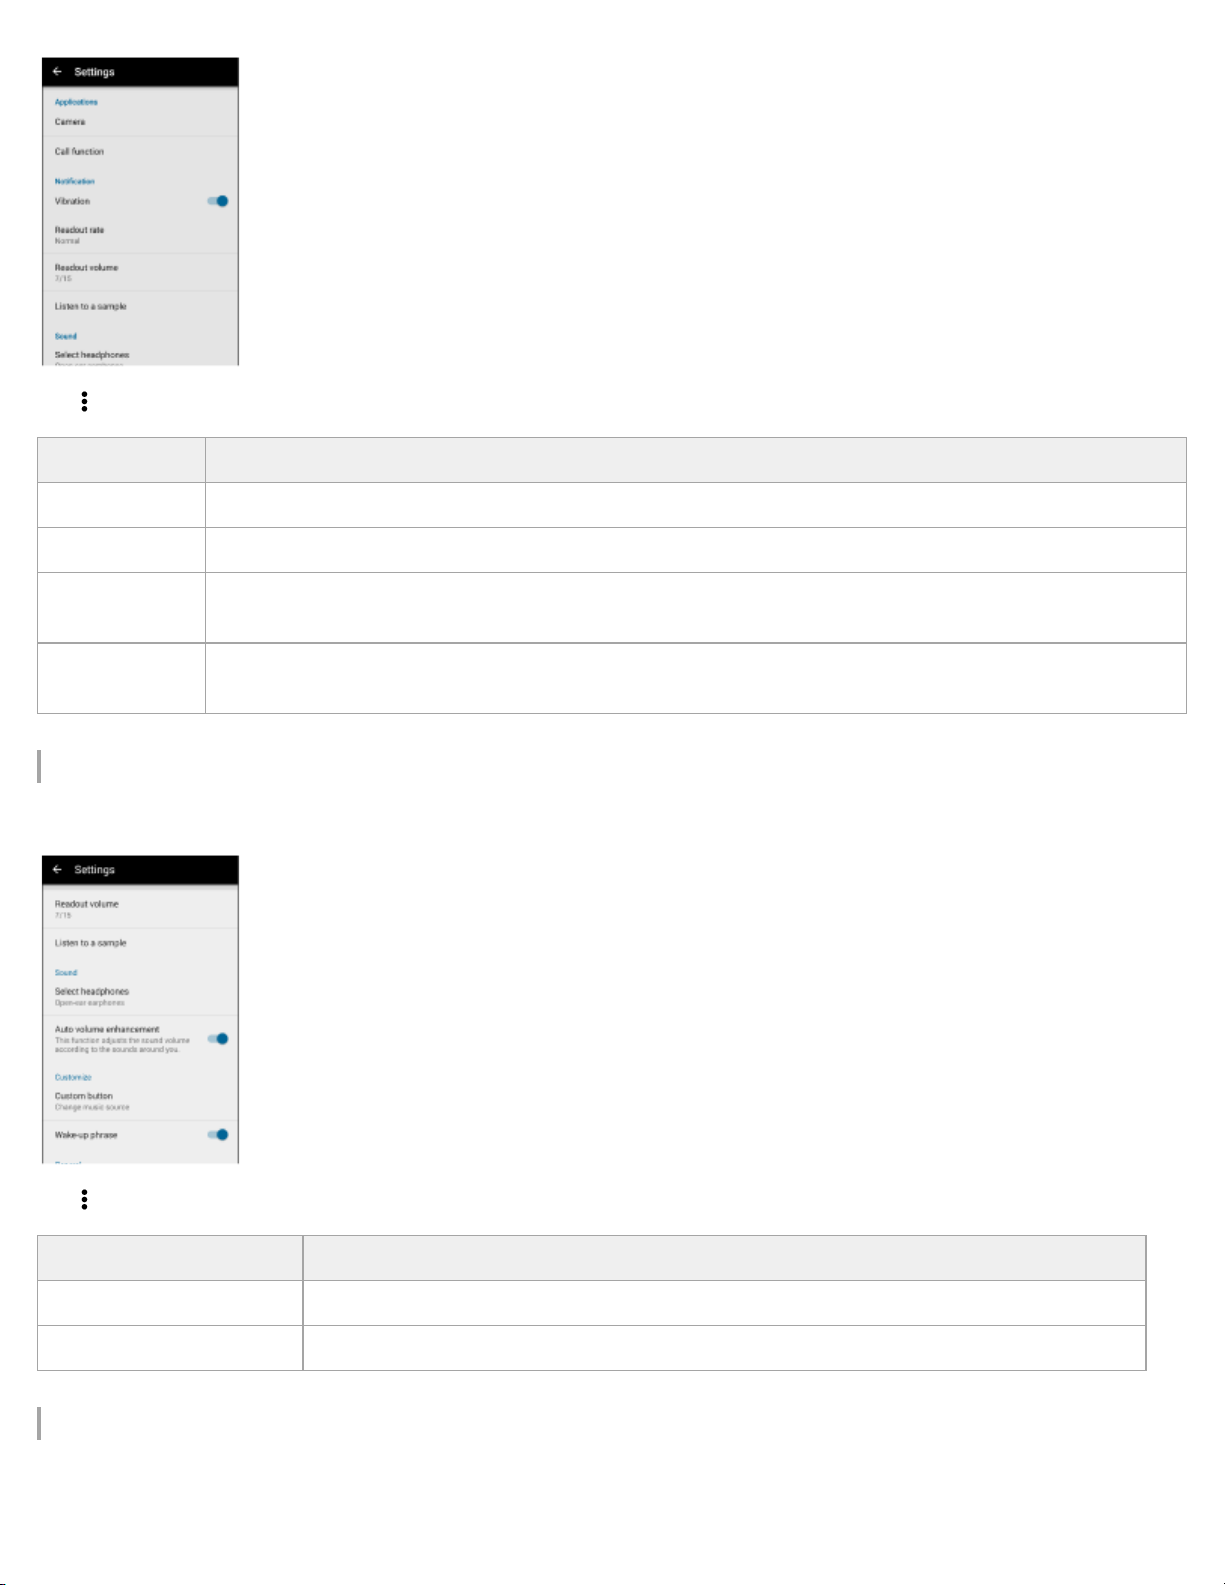
Tap - [Settings] - [Notification].
73
Item Description
[Vibration] Selects whether FL-N01 vibrates when you receive notifications.
[Readout rate] Adjusts the speed that FL-N01 reads out information.
[Readout
volume]
[Listen to a
sample]
Adjusts the volume that FL-N01 reads out information.
FL-N01 plays back the sound and you can check if the speed and volume that FL-N01 reads out information
are appropriate.
Settings for the sound adjustment
You can change the sound setting of FL-N01.
Tap - [Settings] - [Sound].
Item Description
[Select headphones] Selects the type of headphones connected to FL-N01.
[Auto volume enhancement] Selects on to adjust the volume level of FL -N01 automatically according to the ambient noise.
Setting for the music source
You can switch the music source between device mode and streaming mode.

Tap - [Music source].
74
Setting for the Personalized Radio service
You can check/delete or sign in/out from the accounts that you are using for the Personalized Radio service.
Tap - [Settings] - [General] - [Personalized Radio account].
Hint
For details on how to select segments on the Personalized Radio service, see “Segment screen” of “Using the dedicated smartphone app “Future
Lab Program N”.”
Settings for the camera function
You can make various settings for the camera function.

Tap - [Settings] - [Applications] - [Camera].
75
Item Description
[Photo
shooting]
[Continuous
photo
shooting]
[Life Snap]
[Photo
resolution]
[Photo
resolution]
[Number of
photos]
[Use Life Snap]
Selects definition for a still image.
Selects definition for continuous pictures.
Selects how many pictures are taken at one continuous photo shooting.
Selects whether FL-N01 starts taking photos at intervals automatically when you are in a
specific activity.
[Activity] Selects the activity that FL -N01 starts taking photos at intervals automatically.
[Photo
resolution]
[Shooting
interval]
[Number of
photos in a
loop]
[Photo
resolution]
Selects definition for pictures.
Selects the interval of taking photos.
Selects the maximum number of pictures that are stored on FL-N01. When the amount of
pictures stored on FL -N01 reaches the limit, the oldest picture will be deleted.
Selects definition for pictures.
[Interval photo
shooting]
[Video
shooting]
[Shooting
interval]
[Number of
maximum
photos]
Selects the interval of taking photos.
Selects the maximum number of pictures that FL-N01 takes. When the amount of pictures
that FL -N01 took reaches the limit, FL -N01 stops taking photos at intervals.
[SteadyShot] Selects whether to use the SteadyShot function.
[Geotagging] Selects whether to add Geotag on a picture that FL-N01 takes.
[General]
[Shut the
camera in]
Selects when to close the FL- N01’s lens after taking photos.
Settings for the phone call
You can change the phone call settings of FL-N01.

Tap - [Settings] - [Call function].
76
Item Description
[Use call function]
[Readout a caller
name]
Selects whether to use the phone call function. After changing this setting, you need to restart FL N01.
Selects whether FL-N01 reads out a name of the caller when you receive a phone call.
Setting for time readout
You can select whether FL- N01 reads time announcement while playing music.
Tap - [Settings] - [Time Readout].
Software information
You can check information on FL- N01’s software.

Tap - [Settings] - [General].
77
Item Description
[FL-N01 software update] Shows whether there is software update.
[FL-N01 information] Shows the software version or license information on FL-N01.
[App information] Show the software version or license information of the “Future Lab Program N” app.
4-593-988-11(5) Copyright 2016 Sony Corporation

Help Guide
78
Future Lab Program N
FL-N01
Connecting to a computer
Connect FL-N01 to a computer to charge or transfer data.
Press and hold the (power) button on FL-N01 for 4 seconds until FL-N01 vibrates to power on.
1
Connect the supplied micro-USB cable to FL-N01, and then connect the other end to a booted
2
computer.
Hint
If you are prompted to make a Windows operation, click [Cancel] or [x].
When disconnecting FL-N01 from a computer, do it correctly according to the instruction manual supplied with the computer.
Note
FL-N01 cannot be operated when it is connected to a computer.
Do not disconnect FL-N01 from your computer when transferring data between them. Doing so may result in loss of the data being transferred and
data on FL-N01.
Do not turn on, restart, wake up from sleep mode, or shut down the computer while FL-N01 is still connected to the computer. Otherwise, FL-N01
may malfunction. Disconnect FL-N01 from the computer before doing these operations.
Related Topic

Charging
79
4-593-988-11(5) Copyright 2016 Sony Corporation

Help Guide
80
Future Lab Program N
FL-N01
Transferring music using Explorer/Finder
Music files/folders can be directly transferred to FL-N01 by drag -and-drop using Explorer/Finder.
Press and hold the (power) button on FL-N01 for 4 seconds until FL-N01 vibrates to power on.
1
Connect the supplied micro-USB cable to FL-N01, and then connect the other end to a booted
2
computer.
Open the [FL-N01] folder.
3
Open the [MUSIC] folder.
4
Drag-and-drop the music files or folders you want to transfer (
5
) under the [FL-N01] folder.
(
Hint
) to the corresponding [MUSIC] folder
The music files can be played back even if they are placed in a location other than the [MUSIC] folder.

Note
Some songs may not be played back due to copyright protection.
81
Do not remove the micro-USB cable while transferring music files/folders.
It may take time if you transfer large amount of data to a folder at a time.
Playing back music files with device mode will not be available for as long as 5 minutes
Up to 2,000 music files can be transferred at a time. The number of files that can be transferred to FL-N01 at a time vary depending on the size of
files and number of tracks that each file contains. 2,000 is a rough standard when there is no other data files stored on the built-in memory of FLN01.
*
When 2,000 music files are stored on FL -N01. Inoperable time of FL -N01 varies depending on how many music files are stored on FL -N01.
Related Topic
Connecting to a computer
Listening to music
Folder hierarchy recognized by FL-N01
4-593-988-11(5) Copyright 2016 Sony Corporation
*
when you transfer/delete music files on FL-N01.

Help Guide
82
Future Lab Program N
FL-N01
Deleting music using Explorer/Finder
Use Explorer/Finder to delete music files/folders stored on FL- N01.
Connect the supplied micro-USB cable to FL-N01, and then connect the other end to a booted
1
computer.
Open the [FL-N01] folder.
2
Open the [MUSIC] folder.
3
Select the music files or folders, and delete.
4
Related Topic
Connecting to a computer
4-593-988-11(5) Copyright 2016 Sony Corporation
Help Guide
83
Future Lab Program N
FL-N01
Checking photos/videos/activity logs stored on the built-in memory of FL - N01
Connect the supplied micro-USB cable to FL-N01, and then connect the other end to a booted
1
computer.
Open the [FL-N01] folder.
2
Open the [DCIM] or [LOG] folder.
3
Hint
There are no [DCIM] and [LOG] folders when you purchase FL-N01. The [DCIM] folder will be created automatically when you take photos/videos
with FL-N01. The [LOG] folder will be created automatically when you use the Personalized Radio service and the activity logs are recorded.
Related Topic
Connecting to a computer
Folder hierarchy recognized by FL-N01
4-593-988-11(5) Copyright 2016 Sony Corporation

Help Guide
84
Future Lab Program N
FL-N01
About the indicators
A: Indicator light
B: Charge light
C: Tally light (Camera indicator)
Power on
The indicator light (A) shows the status of FL-N01.
Indicator light Status of FL-N01
White Flashes FL-N01 is in power- up.
White Flashes twice quickly FL-N01 is turned on.
Red Flashes 4 times slowly FL-N01 cannot be turned on.
Power off
The indicator light (A) shows the status of FL-N01.
Indicator light Status of FL-N01
White Flashes FL-N01 is in shut- down.

- Turns off FL-N01 is turned off.
85
Charging
The charge light (B) shows the status of FL-N01.
Charge light Status of FL-N01
Amber Lights up FL-N01 is being charged.
- Turns off FL-N01 is fully charged.
Amber Flashes on an irregular base FL-N01 has malfunctions.
Bluetooth connection
The indicator light (A) shows the status of FL-N01.
Indicator light Status of FL-N01
Blue Flashes twice quickly repeatedly FL- N01 is in the pairing mode.
Blue Flashes 3 times FL -N01 failed in pairing.
Blue Turns off gradually FL-N01 is connected to a smartphone.
Blue Flashes continuously FL-N01 is processing a Bluetooth connection.
Blue Flashes slowly FL-N01 has no Bluetooth connection with any smartphones.
Computer connection
The indicator light (A) shows the status of FL-N01.
Indicator light Status of FL-N01
Amber Lights up FL-N01 is processing a computer connection.
Sleep mode
The indicator light (A) shows the status of FL-N01.
Indicator light Status of FL-N01
Dark white Flashes slowly FL-N01 is in sleep mode.
White Flashes twice quickly FL-N01 is released from sleep mode.
Camera
The tally light (camera indicator) (C) shows the status of FL-N01.
Tally light Status of FL-N01

Red Lights up FL- N01 is taking a movie.
86
Red Flashes FL- N01 is about to take a still image, photos at intervals, or continuous pictures.
Software Update
The indicator light (A) shows the status of FL-N01.
Indicator light Status of FL-N01
White
Red
Green
Blue
Flashes
twice
Flashes
FL-N01 starts updating its software.
FL-N01 is processing software update. The interval of flashing indicates its
progress.
Factory reset
The indicator light (A) shows the status of FL-N01.
Indicator light Status of FL-N01
White Flashes twice FL-N01 starts initializing.
White Flashes slowly FL -N01 is erasing the settings.
White Flashes 3 times FL-N01 is back to the initial settings.
Error
The indicator light (A) shows the status of FL-N01.
Indicator light Status of FL-N01
FL-N01 is in one of the following situations;
The Bluetooth connection has failed.
Amber
Red
4-593-988-11(5) Copyright 2016 Sony Corporation
Flashes twice
quickly
Flashes 3 times
quickly
Software update has failed.
FL-N01 becomes extremely hot.
An unexpected error occurs.
Shortage of the built-in memory occurs.
FL-N01 cannot receive a GPS signal.
FL-N01 failed to update activity logs.
FL-N01 is about to shut -down due to a spent battery, increasing internal temperature of FL-N01,
or malfunction of hardware.

Help Guide
87
Future Lab Program N
FL-N01
Specifications
Unit
Audio DSP & Sensor Hub:
“Low Power Wearable SoC” made by Sony
Storage:
8 GB of user area
Sensor:
Accelerometer/Gyro/GNSS (GPS + GLONASS)
Communication System:
Bluetooth 4.1
NFC Tag
*1
Notifications:
Indicator light, charge light, tally light (camera indicator), vibration
Interface*2:
Micro- USB Type B used for a PC connection (USB 2.0), charging, and the supplied Open - ear earphones connection
Power Source:
Built-in lithium -ion rechargeable battery (760 mAh)
Power Consumption:
Playback at A2DP: 1.7 W
Camera shooting: 2.4 W
Charging: 2.5 W
Power Charge:
Micro- USB port
Speaker:
Stereo speaker

600 mW × 2 (maximum output)
Microphone:
88
Mic × 4
Supported Audio File*3:
MP3, AAC
Camera:
Still image: 8 megapixels
Movie image size: 720p30
Recording Video File:
MP4 (MPEG-4 AVC/H.264)
Recording Still Image File:
JPEG
Battery Charging Time:
About 2.5 hours
Battery Life:
Standby time (when FL- N01 is connected to a smartphone, and Personalized Radio setting is off.): About 20 hours
Playback (when using the speakers on FL-N01): About 3.0 hours to 5.5 hours (depending on the volume of playback)
Playback (when using the supplied Open -ear earphones): About 6.5 hours (depending on the volume of playback)
Recommended Computer Environment:
Windows 10, Windows 8.1, Windows 7 SP1, Mac OS X v10.11, Mac OS X v10.10, Mac OS X v10.9
Smartphone Models Tested to Work with FL-N01*4:
Sony:
Xperia Z5 (Android 6.0.1, Android 5.1.1)
Samsung:
Galaxy S6 edge (Android 6.0.1, Android 5.1.1)
Galaxy S6 (Android 6.0.1)
LG:
G5 (Android 6.0.1)
Apple:
iPhone SE, iPhone 6s, iPhone 6s Plus, iPhone 6, iPhone 5s (iOS 9.3.5)
Operating temperature*5:
5 °C to 35 °C (41 °F to 95 °F)
Dimensions (w/h/d):
S: Approx. 140 mm × 150 mm × 18 mm (5 5/8 in × 6 in × 23/32 in)

M: Approx. 155 mm × 160 mm × 18 mm (6 1/8 in × 6 3/8 in × 23/32 in)
L: Approx. 170 mm × 165 mm × 18 mm (6 3/4 in × 6 1/2 in × 23/32 in)
89
Mass:
S: Approx. 77 g (2.8 oz)
M: Approx. 79 g (2.8 oz)
L: Approx. 81 g (2.9 oz)
*1
NFC tag is used by the Bluetooth pairing function for Android devices.
*2
Battery charging except charging with a PC cannot be used with FL-N01.
*3
Audio files transferred by Media Go ver.3.0 and iTunes ver.12.4.2 are guaranteed for playback.
*4
Smartphone with Android 5.0 or higher, or iPhone 5s or higher with iOS 9 or higher are required. Also, the Bluetooth Tethering/Personal Hotspot
function needs to be equipped with your device. Refer to the Sony eSupport site for more information about the smartphone models that were tested
using the newest system software of FL-N01.
http://www.sony.com/support/futurelab
*5
If FL-N01 is outside of the operating temperature, FL-N01 cannot be charged and the charging light of FL-N01 does not light up.
Open-ear earphones
Type:
Open-ear*6, dynamic
Cable:
Approx. 0.6 m (23.62 in)
Connector:
Micro- USB type B
*7
Mass:
Approx. 12 g (0.423 oz) with cable
*6
This is a unique mechanism using a sound duct, developed by Sony.
*7
This micro-USB cable can be used only for FL-N01S/FL-N01M/FL-N01L.
Design and specifications are subject to change without notice.
4-593-988-11(5) Copyright 2016 Sony Corporation

Help Guide
90
Future Lab Program N
FL-N01
Folder hierarchy recognized by FL-N01
You can check data stored on FL-N01 such as music files, photos, and activity logs with a computer.
The folder hierarchy below can be recognized by FL-N01. Please transfer content properly.
Music: Stored in the [MUSIC] folder. Plays through “Level 8” in the following illustration.
Photo: Stored in the [DCIM] folder.
Activity log: Stored in the [LOG] folder.
Hint
The music files can be played back even if they are placed in a location other than the [MUSIC] folder.
There are no [DCIM] and [LOG] folders when you purchase FL-N01. The [DCIM] folder will be created automatically when you take photos with
FL-N01. The [LOG] folder will be created automatically when you use the Personalized Radio service and the activity logs are recorded.
Note
Some songs may not be played back due to copyright protection.
4-593-988-11(5) Copyright 2016 Sony Corporation
 Loading...