

Sony FAB1021011 User Manual

P900
User Guide
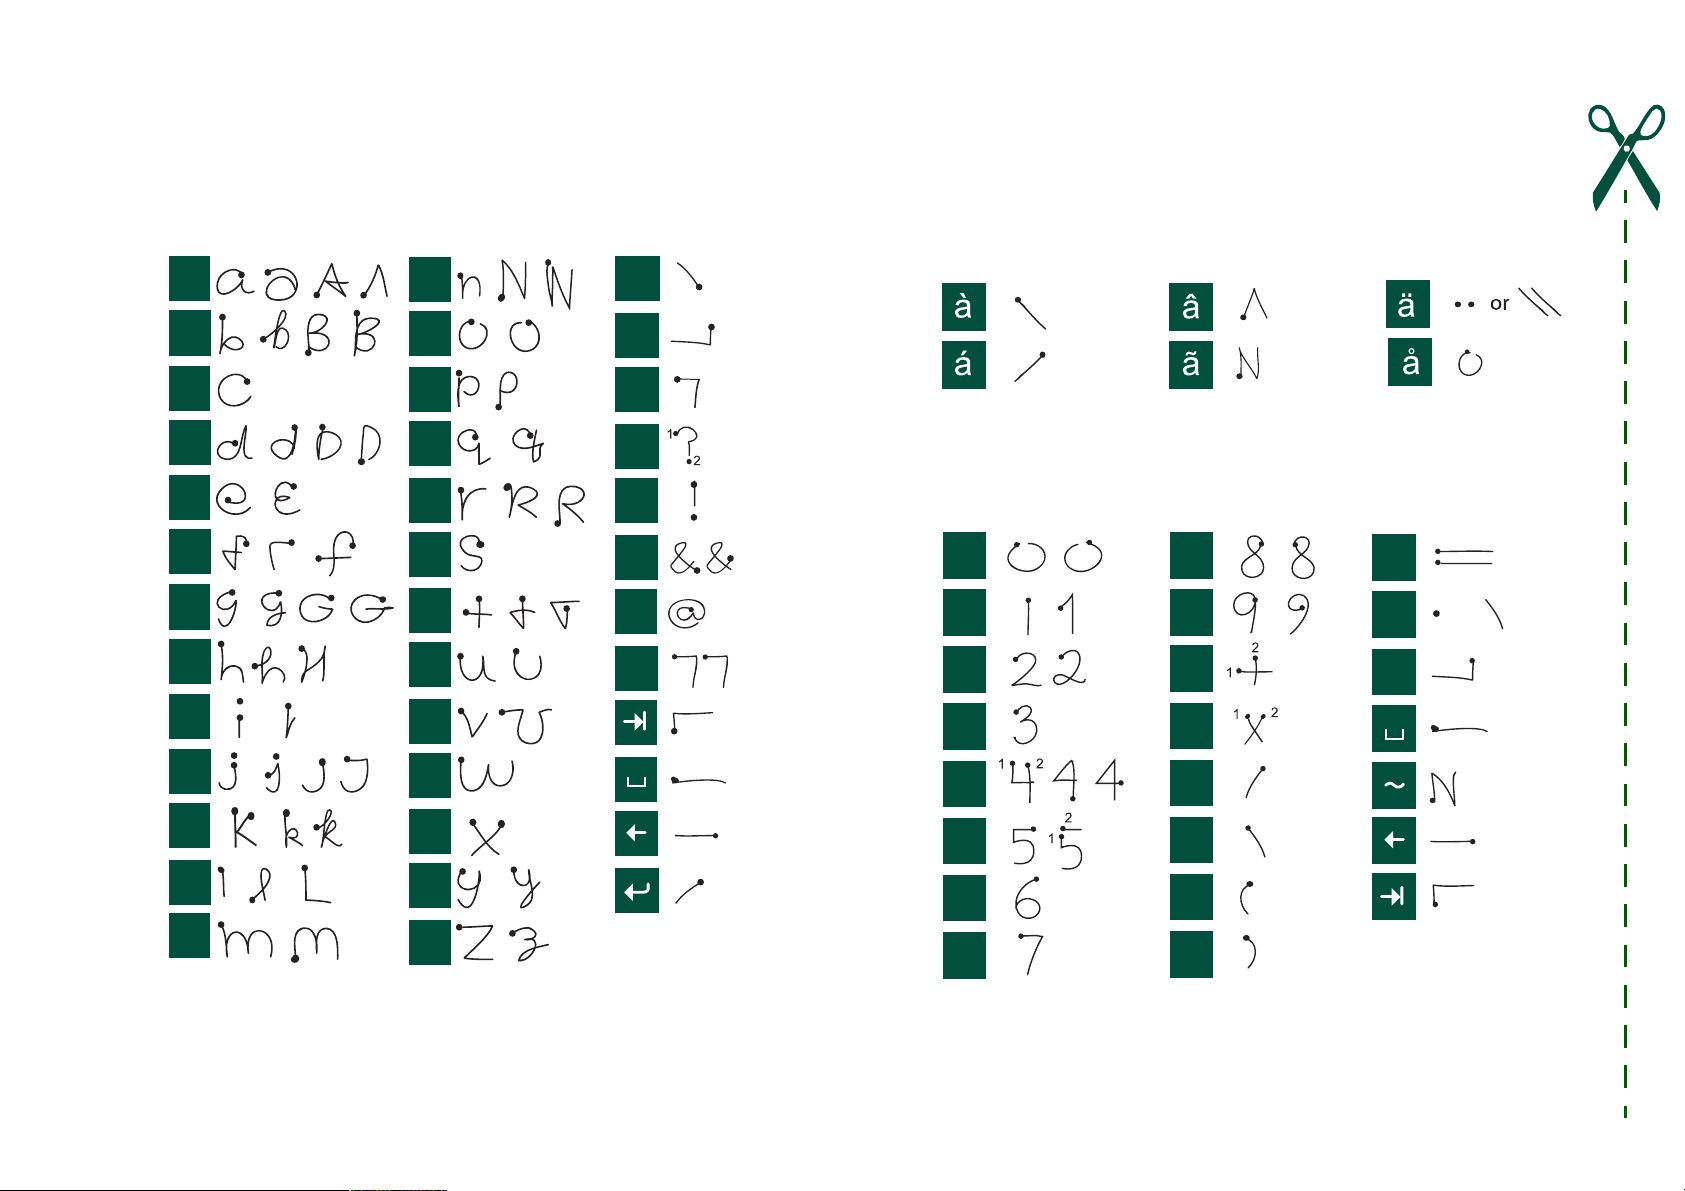
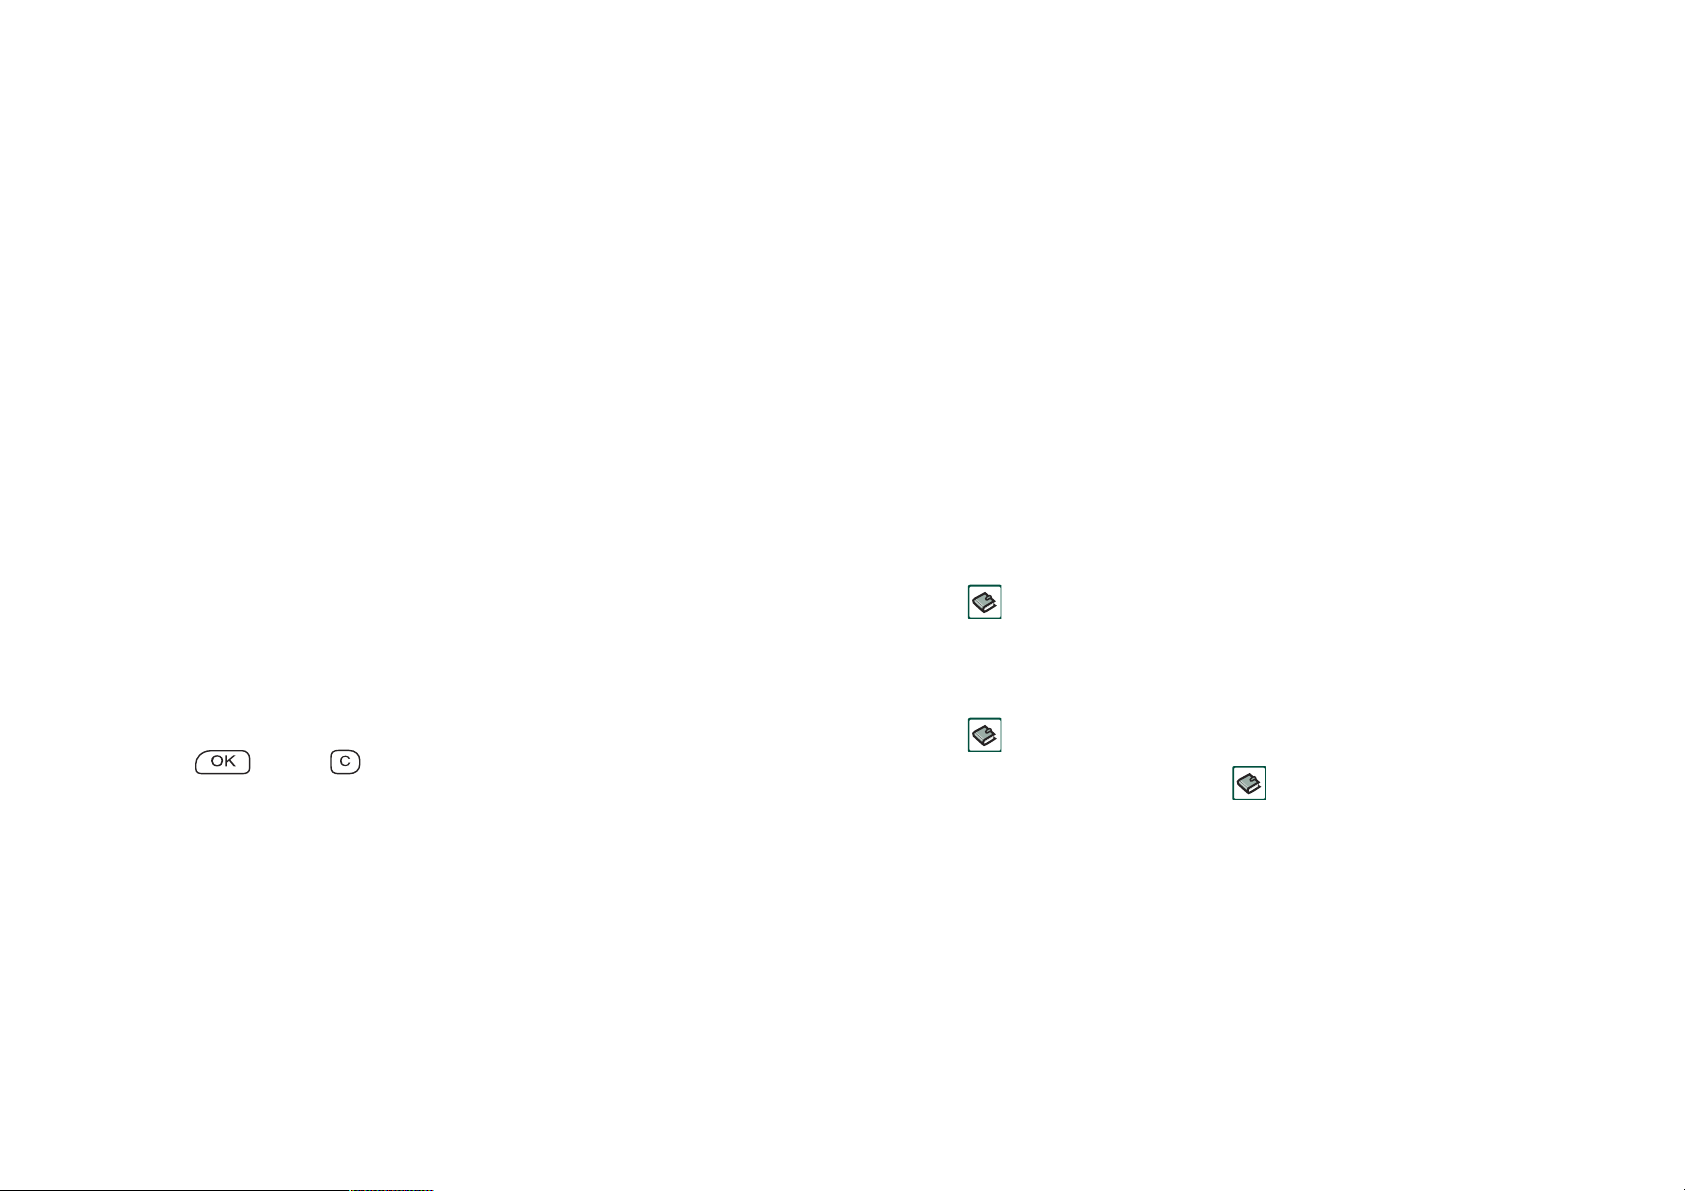
Letters
Lowercase letters are written below the arrow and uppercase
letters in line with the arrow.
?
&
@
"
.
,
«
1
!
2
a
b
c
d
e
f
g
h
k
n
o
p
q
r
2
1
s
t
1
2
u
2
1
i
2
1
j
1
2
1
2
v
w
x
1
2
Accented letters
Write the character as described above, then write the accent
above the arrow. Other such characters, for example, ö and ü,
follow the same principle.
Note Start each stroke at the dotted end.
Numbers
Numbers are written above the arrow.
0
1
2
3
4
5
8
9
+
*
/
\
=
.
or
,
*
l
m
Note Start each stroke at the dotted end.
y
z
6
7
Note Start each stroke at the dotted end.
(
)

Contents
OVERVIEW
Introduction ................................................................. 8
Getting to know your P900......................................... 9
P900 package...................................................................... 9
P900 overview .................................................................. 10
SIM card ........................................................................... 11
Battery .............................................................................. 11
Care instructions ............................................................... 12
First time start-up.............................................................. 13
Turning your P900 on and off .......................................... 13
Importing phone book entries........................................... 13
Operational modes ............................................................ 14
Flip closed mode .............................................................. 15
Flip open mode ................................................................. 16
Flip removed..................................................................... 16
Screen areas ...................................................................... 17
Jog Dial ............................................................................ 18
Keypad functions ............................................................. 19
Indicators and status bar icons.......................................... 20
Memory Stick® Duo™ .................................................... 21
Connecting the accessories ............................................... 23
Services............................................................................. 24
Applications - overview.................................................... 24
General functions.............................................................. 27
Entering text..................................................................... 31
P900 locks........................................................................ 35
Phone.......................................................................... 38
Call handling with the Flip closed ................................... 38
Call handling with the Flip open...................................... 41
Handling two or more calls.............................................. 44
Call list and call log ......................................................... 45
Hints and smart functions ................................................ 46
Preferences....................................................................... 50
MEDIA
CommuniCorder....................................................... 56
Recording video clips ...................................................... 56
Taking pictures ................................................................ 58
Camera settings................................................................ 59
Pictures and Image editor........................................ 60
Pictures ............................................................................ 60
Image editor ..................................................................... 62
Video player .............................................................. 64
Video clips ....................................................................... 64
Streaming ......................................................................... 66
Preferences....................................................................... 67
Music player .............................................................. 68
3

Playing sound files............................................................ 68
Managing sound files........................................................ 69
Internet....................................................................... 72
Using the browser view .................................................... 73
Using the bookmark view................................................. 76
Preferences........................................................................ 78
Games ......................................................................... 80
Chess................................................................................. 80
Solitaire............................................................................. 80
BUSINESS
Messaging................................................................... 82
Folders in Messaging ........................................................ 83
The accounts in Messaging............................................... 84
Handling text messages .................................................... 84
Handling multimedia messages ........................................ 85
Handling e-mails............................................................... 88
More about messaging...................................................... 91
Contacts...................................................................... 94
Using Contacts with the Flip closed ................................. 94
Using Contacts with the Flip open.................................... 96
Creating and editing contacts............................................ 97
Managing contacts ............................................................ 99
Making an owner card .................................................... 100
Preferences...................................................................... 100
Calendar................................................................... 101
Creating calendar entries................................................ 101
Managing calendar entries ............................................. 102
Sending and receiving calendar entries.......................... 103
Preferences ..................................................................... 103
Tasks ........................................................................ 104
Creating task entries....................................................... 104
Managing task entries .................................................... 105
Moving task entries........................................................ 105
Sending and receiving task entries................................. 106
Preferences ..................................................................... 106
Jotter ........................................................................ 107
Creating and editing notes ............................................. 107
Drawing pictures ............................................................ 108
Managing notes .............................................................. 108
Sending and receiving notes .......................................... 108
TOOLS
Sound recorder........................................................ 109
Making sound recordings............................................... 109
Using sound recordings as ring signals.......................... 110
Sending sound recordings .............................................. 110
Calculator ................................................................ 111
Time.......................................................................... 112
Setting time and date...................................................... 112
Specifying workdays...................................................... 113
Setting locations............................................................. 113
4

Setting number formats .................................................. 113
Setting alarms ................................................................. 114
Viewer....................................................................... 115
Common viewer functions.............................................. 115
Viewing Word documents .............................................. 116
Viewing Excel spreadsheets ........................................... 116
Viewing PowerPoint presentations and PDFs ................ 117
File manager ............................................................ 118
Online services......................................................... 120
A
DVANCED FUNCTIONS
PC Suite and multimedia for P900 ........................ 121
PC Suite for P900 ........................................................... 121
Multimedia for P900....................................................... 122
Installing applications............................................. 123
Installing applications on your P900 .............................. 123
Removing applications from your P900......................... 125
Connecting to other devices.................................... 126
Connection via SyncStation............................................ 126
Connection via Infrared port........................................... 127
Connection via Bluetooth wireless technology .............. 128
Restoring data ................................................................ 134
SETTINGS
Personalizing your P900......................................... 135
Themes........................................................................... 135
Changing your application shortcuts ............................. 135
Setting a wallpaper picture ............................................ 135
Setting a screen saver..................................................... 135
Adding images to your Contacts.................................... 136
Ring signals.................................................................... 136
Alarm tones and sound notification ............................... 137
Control panel........................................................... 138
The Device tab
Application shortcuts ..................................................... 138
Display ........................................................................... 138
Flight mode .................................................................... 139
International ................................................................... 140
Locks.............................................................................. 140
Sounds and alerts ........................................................... 140
Text input ....................................................................... 142
Themes........................................................................... 142
Time & date ................................................................... 142
User greeting.................................................................. 143
Synchronization and backup.................................. 131
Local synchronization..................................................... 131
Remote synchronization ................................................. 132
Backing up data .............................................................. 133
The Connections tab
Bluetooth........................................................................ 144
Cable .............................................................................. 145
GSM Networks .............................................................. 145
5

Infrared ........................................................................... 145
Internet accounts ............................................................. 146
Messaging accounts ........................................................ 150
WAP accounts ................................................................ 155
The Other tab
Certificate manager......................................................... 156
Flip removed ................................................................... 157
Format disk ..................................................................... 157
IP security manager ........................................................ 158
Language selection ......................................................... 158
Master reset..................................................................... 158
Secure tokens .................................................................. 159
Storage manager ............................................................. 159
WIM PIN settings ........................................................... 160
Getting started with Internet and Messaging....... 162
Introduction..................................................................... 162
Automatically set up service provider and messaging ... 163
Manually set up service provider.................................... 163
Manually set up Messaging ............................................ 164
Setting up WAP accounts ............................................... 165
Using your P900 as a modem ......................................... 165
GPRS - connection information...................................... 167
Limited warranty............................................................ 175
FCC Statement ............................................................... 176
Environmental information ............................................ 176
Declaration of Conformity............................................. 176
Terms and definitions............................................. 177
Technical data ......................................................... 185
Index......................................................................... 188
REFERENCE
Troubleshooting....................................................... 169
Guidelines for safe and efficient use ...................... 173
6

Sony Ericsson P900
User Guide
First edition (August 2003)
This User Guide is published by Sony Ericsson Mobile Communications AB,
without any warranty. Improvements and changes to this User Guide necessitated
by typographical errors, inaccuracies of current information, or improvements to
programs and/or equipment, may be made by Sony Ericsson Mobile Communications AB at any time and without notice. Such changes will, however, be incorporated into new editions of this User Guide.
Sony Ericsson Mobile Communications AB, 2002. All rights reserved.
Publication number: EN/LZT 108 6633 R1A
The Bluetooth word mark and logos are owned by the Bluetooth SIG, Inc. and any
use of such marks by Sony Ericsson is under license.
This product contain QuickView Plus and Outside In which are © 1992-2002 Stellent Chicago Inc. All rights reserved.
QuickView Plus and Outside In are trademarks or registered trademarks of Stellent
Chicago Inc.
Symbian and all Symbian-based marks and logos are trademarks of Symbian Limited.
Memory Stick
Beatnik is a trademark of Beatnik, Inc.
Java and all Java-based trademarks and logos are trademarks or registered trademarks of Sun Microsystems, Inc. in the U.S. and other countries.
Other product and company names mentioned herein may be the trademarks of
their respective owners.
Copyright SyncML initiative Ltd. (1999-2002). All rights reserved.
Portions of software © PacketVideo Corporation (USA) 1999, 2002. PacketVideo,
pvPlayer and the PacketVideo logo are trademarks of PacketVideo Corporation.
All rights reserved.
This product contains software copyright Beatnik, Inc.
1996-2002.
End-user license agreement for Sun Java J2ME:
1. Restrictions: Software is confidential copyrighted information of Sun and title to
all copies is retained by Sun and/or its licensors. Customer shall not modify,
decompile, disassemble, decrypt, extract, or otherwise reverse engineer Software.
Software may not be leased, assigned, or sublicensed, in whole or in part.
®
Duo is a trademark of Sony, its parent and/or its affiliates.
2. Export Regulations: Software, including technical data, is subject to U.S. export
control laws, including the U.S. Export Administration Act and its associated regulations, and may be subject to export or import regulations in other countries. The
Customer agrees to comply strictly with all such regulations and acknowledges
that it has the responsibility to obtain licenses to export, re-export, or import Software. Software may not be downloaded, or otherwise exported or re-exported (i)
into, or to a national or resident of, Cuba, Iraq, Iran, North Korea, Libya, Sudan,
Syria (as such listing may be revised from time to time) or any country to which
the U.S. has embargoed goods; or (ii) to anyone on the U.S. Treasury Department's
list of Specially Designated Nations or the U.S. Commerce Department's Table of
Denial Orders.
3. Restricted Rights: Use, duplication or disclosure by the United States government is subject to the restrictions as set forth in the Rights in Technical Data and
Computer Software Clauses in DFARS 252.227-7013(c) (1) (ii) and FAR 52.22719(c) (2) as applicable.
Any rights not expressly granted herein are reserved.
Note Some of the services in this User Guide are not supported by all networks.
This also applies to the GSM International Emergency Number 112. Please contact
your network operator or service provider if you are in doubt whether you can use
a particular service or not.
Important
Your mobile phone has the capability to load, store and forward additional content,
e.g. ring tone melodies. The use of such content may be restricted or prohibited by
rights of third parties, including but not limited to restriction under applicable
copyright laws. You, and not Sony Ericsson, are entirely responsible for additional
content that you download to or forward from your mobile phone. Prior to your use
of any additional content, please verify that your intended use is properly licensed
or is otherwise authorised. Sony Ericsson does not guarantee the accuracy, integrity or quality of any additional content or any other third-party content. Under no
circumstances will Sony Ericsson be liable in any way for your improper use of
additional content or other third party content.
7

OVERVIEW
Introduction
For ease of reference the ‘Getting to know your P900’ chapter
gives a quick overview of the main functions of the phone,
shortcuts and general information.
Your P900 combines advanced business and entertainment
features in one intuitive device.
Its integrated camera lets you take pictures and record video
wherever you are and use them in a wide range of applications.
The pictures can be used in the Picture Phone Book, where they
can be used to identify callers.
MMS (Multimedia Messaging Service) allows you to send and
receive messages that include pictures, sound, text and voice
notes.
The P900 features advanced entertainment functionality that
offers high quality MP3 music and widescreen format video
clips and 3D games. New content can be downloaded quickly
and easily from Internet sites or transferred to the phone via
Bluetooth Wireless Technology, an infrared port or a cable.
Extra memory is available through Memory Stick
which also serves as a convenient way to exchange content and
applications such as Java games.
®
Duo,
The P900 can be used as a corporate phone with Ericsson
®
MD110
The P900 also contains an organizer,
which includes contacts, a calendar,
notes and e-mail, all of which can be
quickly and efficiently synchronized
with a PC. The e-mail application
supports attachments. Viewers let you
read documents in various formats
such as Microsoft® Word, Excel and
PowerPoint.
The complete P900 documentation
consists of the following parts:
• Quick Guide
•User Guide
• Instruction for removing the Flip
• Help texts in the P900
• Complementary information on the Internet, refer to
www.SonyEricsson.com
• Information on the
and Business Phone® exchanges.
PC Suite for P900
CD
8 Introduction
Getting to know your P900
P
900
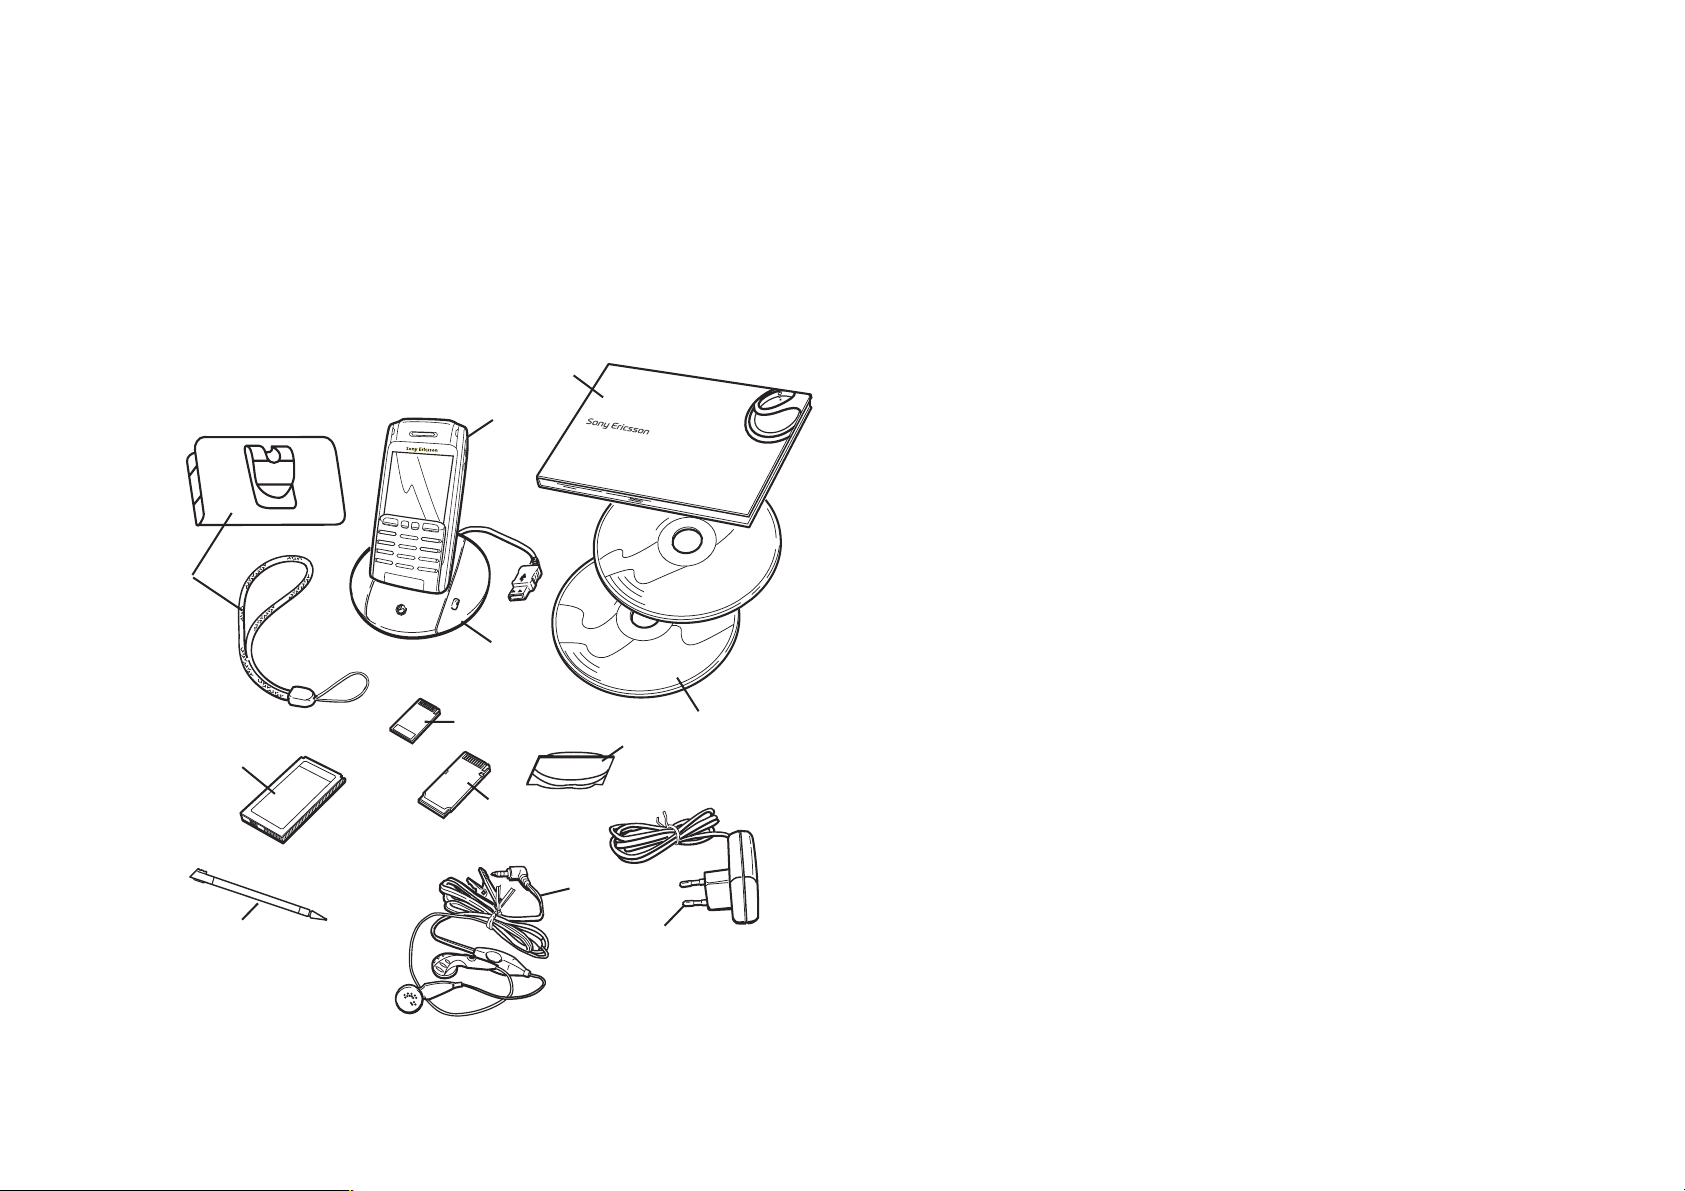
P900 package
L
A
F
D
B
J
H
M
A P900 with stylus
B Battery
C Travel charger
D SyncStation
E Stereo headset
F Protective bag and strap
G Extra stylus
H Cover and tool set - Flip replacement
J Memory Stick Duo
K Memory Stick Duo adapter
L User documentation package
M 2 CDs, PC Suite for P900 and Multimedia for P900
Note The design of the charger will differ depending on the
market.
K
Note If your package does not include all the listed items above,
please contact your retailer.
E
G
Getting to know your P900 9
C
Note Before you can use your P900 you need to insert the SIM
card, and insert and charge the battery. Always detach the
charger before you insert or remove the SIM card.

P900 overview
A
B
C
A Indicator light for Bluetooth wireless technology (blue)
B Screen
C Flip (in open position)
D Indicator light for network and battery (green/red)
E CommuniCorder activation and shutter release
F Internet button for activation of the browser
G Slot for Sony Memory Stick Duo
D
A
B
E
F
G
A Stylus
B External antenna connector
C CommuniCorder
D Battery compartment
E Connector for accessories and charger
F Connector for stereo headset
G Jog Dial
H Infrared port
C
D
E
F
G
H
I
I On/Off button
10 Getting to know your P900
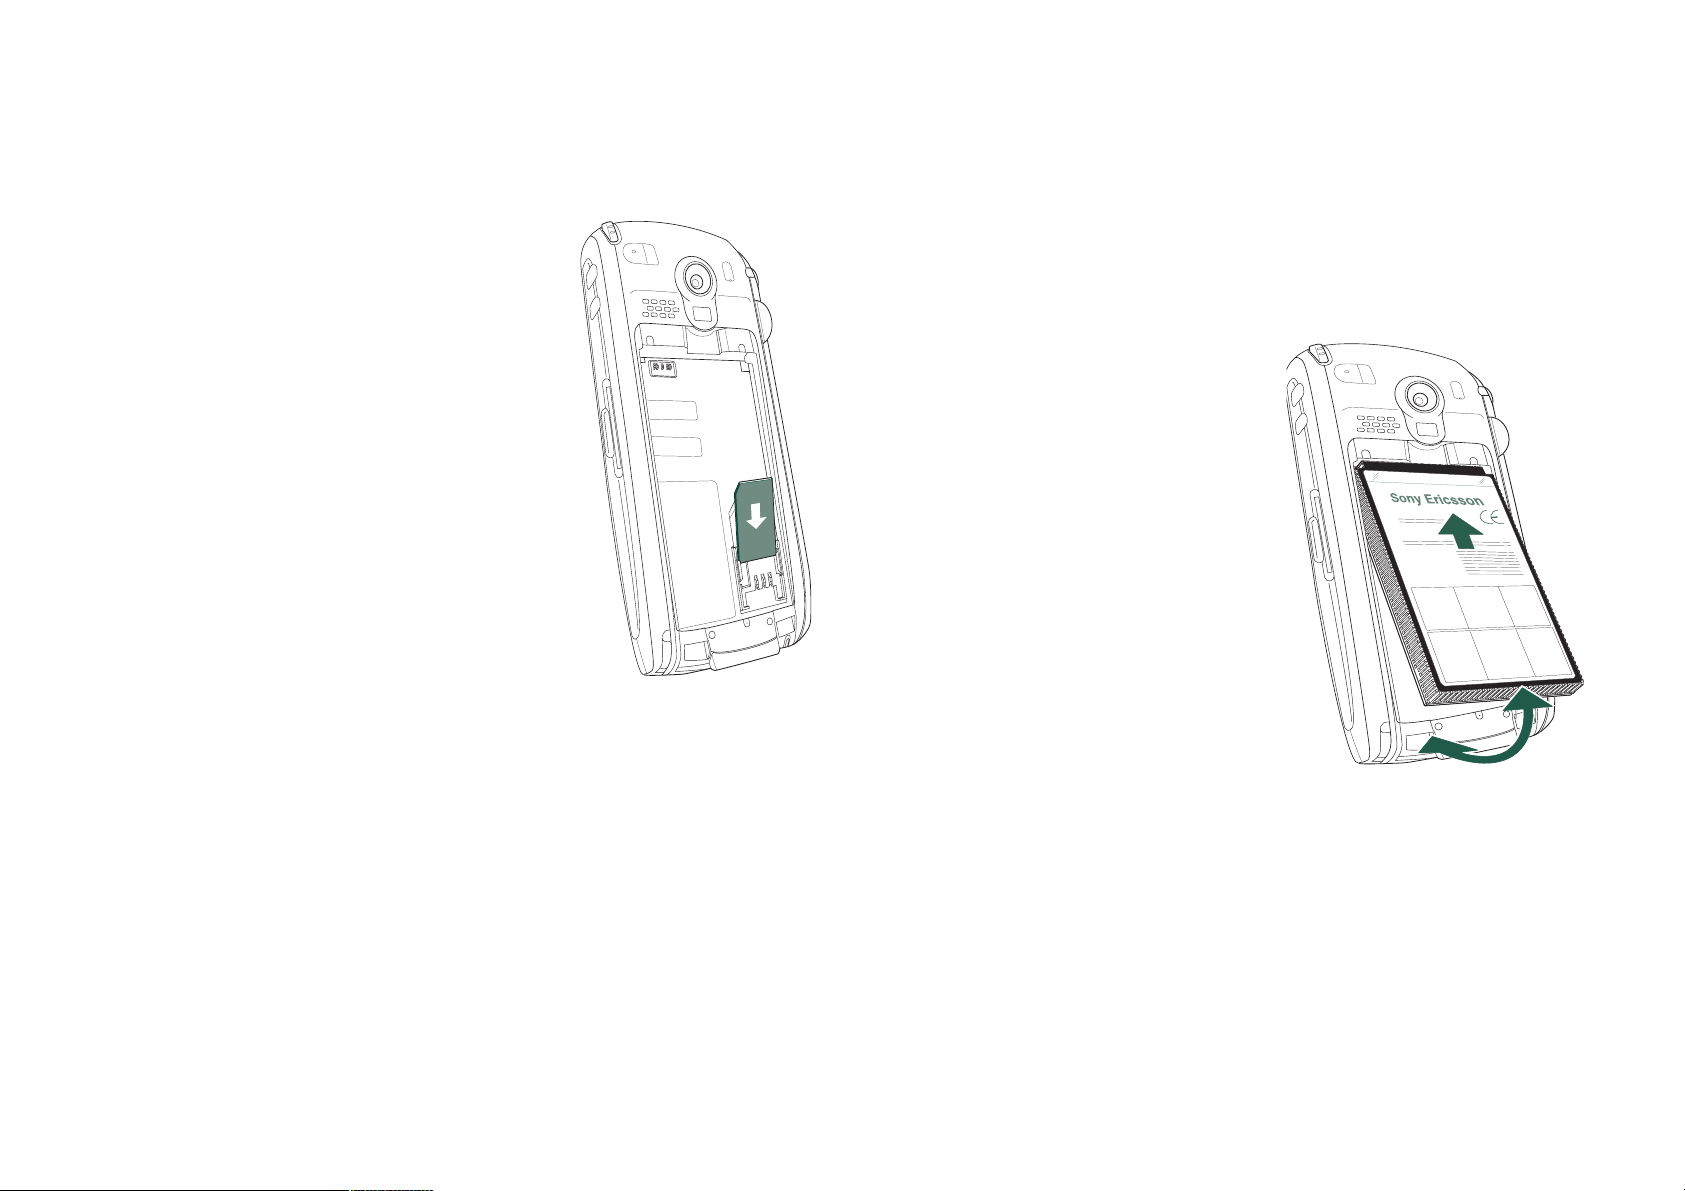
SIM card
When you register as a subscriber
with a network operator, you receive a
SIM (Subscriber Identity Module)
card. The SIM card contains a
computer chip that keeps track of your
phone number, the services included
in your subscription and your phone
book information, among other things.
A PIN (Personal Identity Number)
code is supplied with the SIM card
from your operator and must be
entered when switching on your P900.
Open the battery cover and insert the
SIM card as shown in the picture.
Some subscriptions are limited to call
only predefined numbers, so-called Fixed Dialling Numbers
(FDN). To avoid problems when travelling abroad, these
predefined numbers should be defined as international numbers
starting with +, for example +4613244500. In order to speed up
calling while at home, the same numbers can also be added in
the national number format, for example 013244500.
For more information. see ‘Copying contacts to and from the
SIM card’ on page 99.
Battery
Before you use your P900 for the first time, charge the battery
provided for at least 4 hours. Use the supplied charger. See
‘Charging the battery’ on page 12.
Insertion and removal
To insert the battery
1. Ensure that the Flip is closed.
2. Remove the battery cover by
sliding it downwards.
3. Place the battery in the
battery compartment and
close the cover.
To remove the battery
1. Ensure that your P900 is
turned off.
Note It is important that you always turn off your P900 before
removing the battery. Failure to do so can result in loss of
information.
2. Remove the battery cover by sliding it downwards.
3. Use your fingernail at the lower left-hand edge of the battery
to gently lift the lower edge of the battery outwards.
4. Take out the battery.
Getting to know your P900 11
Charging the battery
• When the battery needs to be charged, a beep is heard. The
indicator light (on the top of your P900) flashes red and a
battery low message appears on the screen.
• The battery can be charged whenever you want. The P900
performance is not affected. However, using your P900 while
charging increases the charging time.
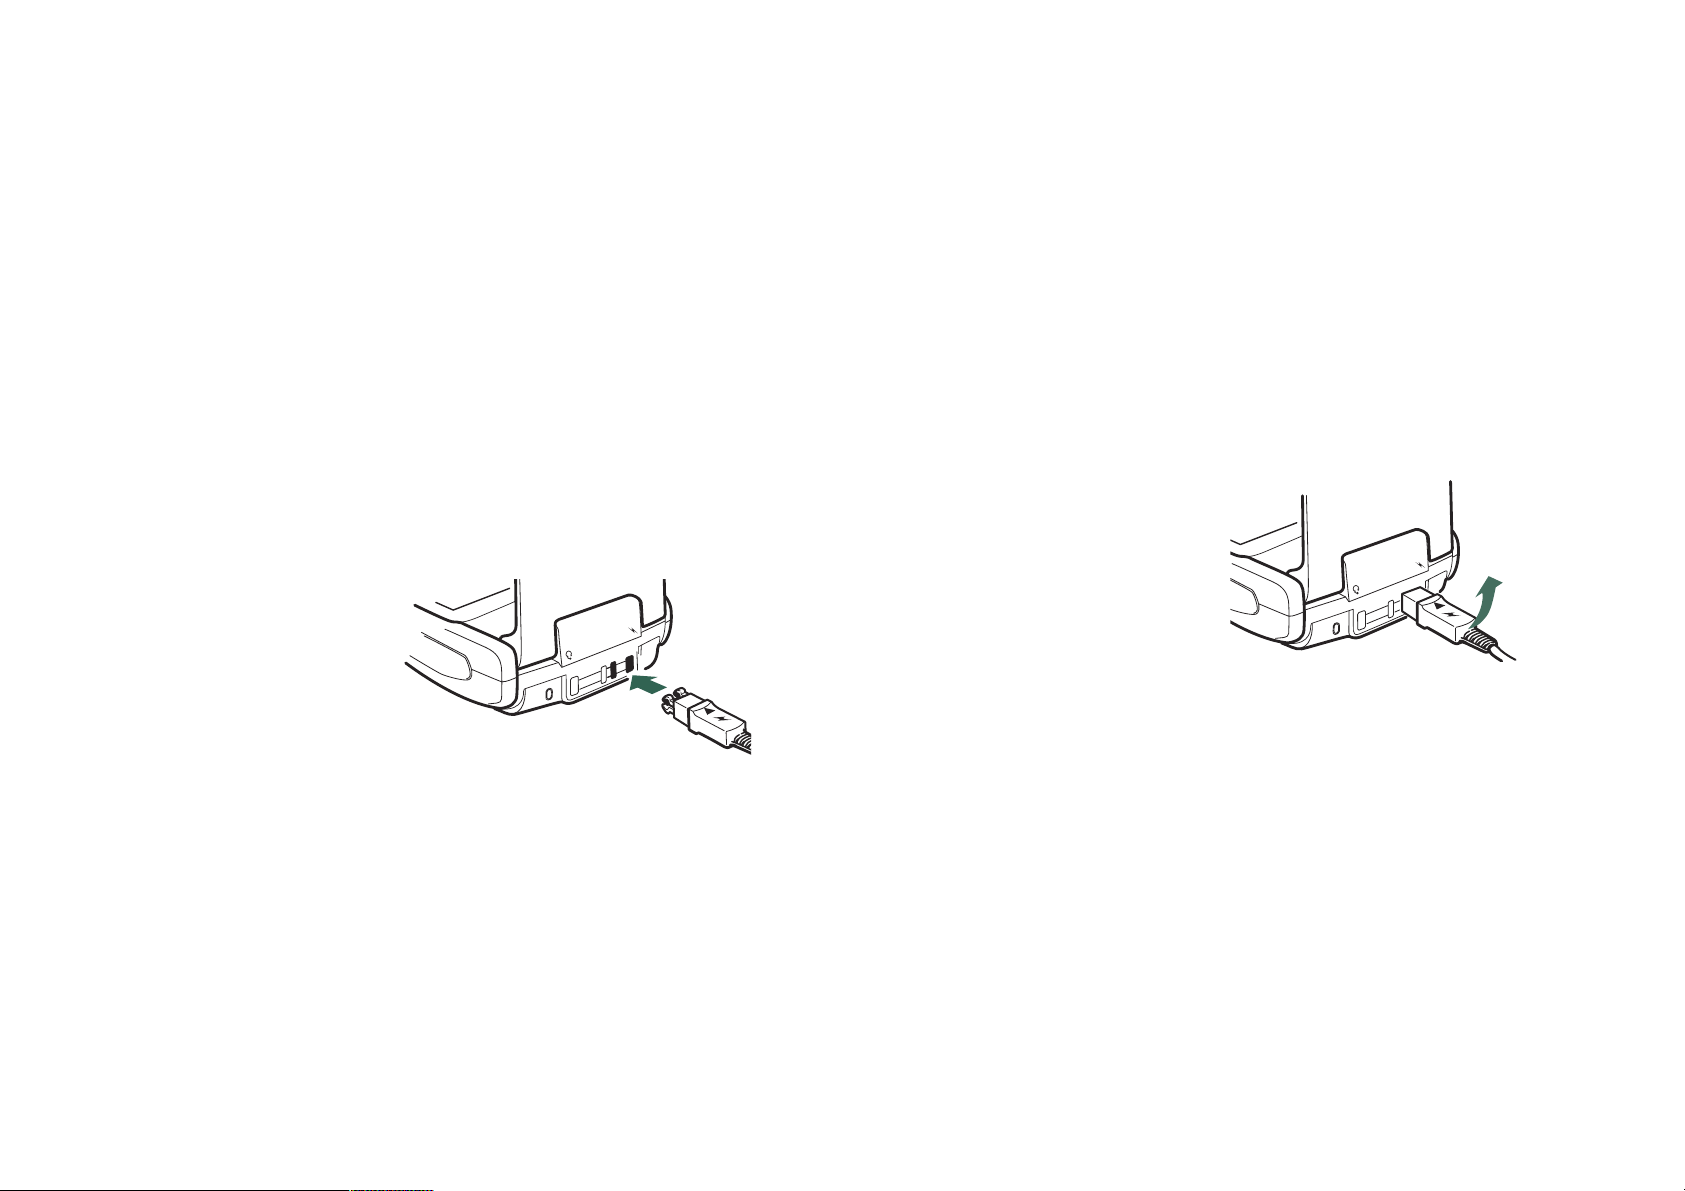
To charge the battery
The P900 can be charged either when it is switched on or off.
1. Make sure the battery is inserted in your P900 and the cover
is closed.
2. Connect the charger to
the P900 at the base of
the phone by the flash
symbol. The charger
plug flash symbol must
face upwards.
3. Connect the charger to
the mains.
Charging is indicated by the battery meter on the screen pulsing
continuously, and the indicator at the top of the P900 showing a
steady red light (or green, if the P900 is switched on).
See also ‘Battery Use and Care’ on page 174.
Tip You can also use other battery chargers that have been
supplied with other Sony Ericsson mobile phones using the same
connector plug, for example, T68i or T300.
Note When the battery is completely discharged, or new, it may
take up to 30 minutes before the battery charging icon appears
on the screen.
4. Wait approximately 4 hours or until the battery meter on the
screen is full and the indicator on the top of the P900 shows a
steady green light.
5. Remove the charger by tilting
the plug upwards.
Care instructions
Your P900 is a highly sophisticated electronic device. To get the
most out of it, please make sure that you follow this advice:
• Keep the P900 in its protective bag when not using it.
• Use a commercial glass screen cleaner sprayed on a cloth,
when you clean the screen.
• Use only the stylus provided to tap the screen.
12 Getting to know your P900
First time start-up
Please read ‘Guidelines for safe and efficient use’ on page 173
before you start using your P900.
When you start your P900 for the first time
1. Press the
closed. The language selection dialogue opens.
2. Select one of the languages from the list. Read more about
selecting a language in ‘Language selection’ on page 158.
3. When you have selected a language, the phone turns off.
4. Open the Flip. Press the
starts automatically and guides you through the essential
settings. These include time and date settings, and
information on the Jog Dial, text entry, and status bar. Follow
the instructions on the screen.
5. The
6. Enter your PIN when the dialogue box appears and press
On/Off
Power menu
. Press to delete a digit.
button to turn on your P900, keeping the Flip
On/Off
opens. Select
button again. The
Phone on.
Setup Wizard
Turning your P900 on and off
By default the
operation or
These settings can be turned off. See ‘To use the Power menu’
on page 47.
Power menu
Flight mode
prompts you to choose normal
each time you press the On/
Off
button.
Flight mode
In
off, but you can still use the other functions. Set your P900 in
Flight mode
can also use
do not want incoming calls.
the phone and Bluetooth functions are switched
where the use of mobile phones is not allowed. You
Flight mode
if you want to use the other functions but
Importing phone book entries
You may want to import existing contact information from
another mobile phone to your P900. You can do this in several
ways:
• Beam the phone book entries from the other phone by
infrared or Bluetooth wireless technology and save the set to
Contacts
• Synchronize the SIM and the internal memory on the other
phone with one of the PC PIM applications supported by
your P900. Then you can synchronize this information with
Contacts
Note When you synchronize
application, the SIM information will not be synchronized. You
might get two versions of the same contact. See
‘Synchronization and backup’ on page 131.
. See ‘Creating and editing contacts’ on page 97.
.
Contacts
with your PC PIM
Getting to know your P900 13

• Phone book entries stored on your SIM card are accessible
through
right in the menu bar to see the list of entries in your SIM
phone book. These entries can be imported to
See ‘Copying contacts to and from the SIM card’ on page 99.
Contacts
. Select
SIM
in the folders menu to the
Contacts
.
Operational modes
The P900 works in different operational modes:
Flip closed
With the keypad Flip closed, the P900 can be used like a
conventional mobile phone using the keypad to dial and the Jog
Dial to navigate. For more information please see ‘Jog Dial’ on
page 18 and ‘Keypad functions’ on page 19.
You can open the Flip at any time to continue working. Many
more functions are available when the Flip is open.
The Jog Dial provides further navigation and selection
capability. Closing the Flip generally ends an activity and saves
the data. Multimedia phone calls and data sessions will,
however, continue.
Flip removed
The Flip can also be removed, which makes the organizer
applications easier to access. When the Flip is removed, the
P900 works in Flip open operational mode.
Note Turn off the P900 before you remove the flip to avoid to
damage your phone.
Flip open
When the Flip is opened, the large touch-screen is revealed. You
use the stylus to tap the screen to navigate and enter data. There
is also a handwriting recognition feature, so that you can use the
stylus to write on the screen.
14 Getting to know your P900
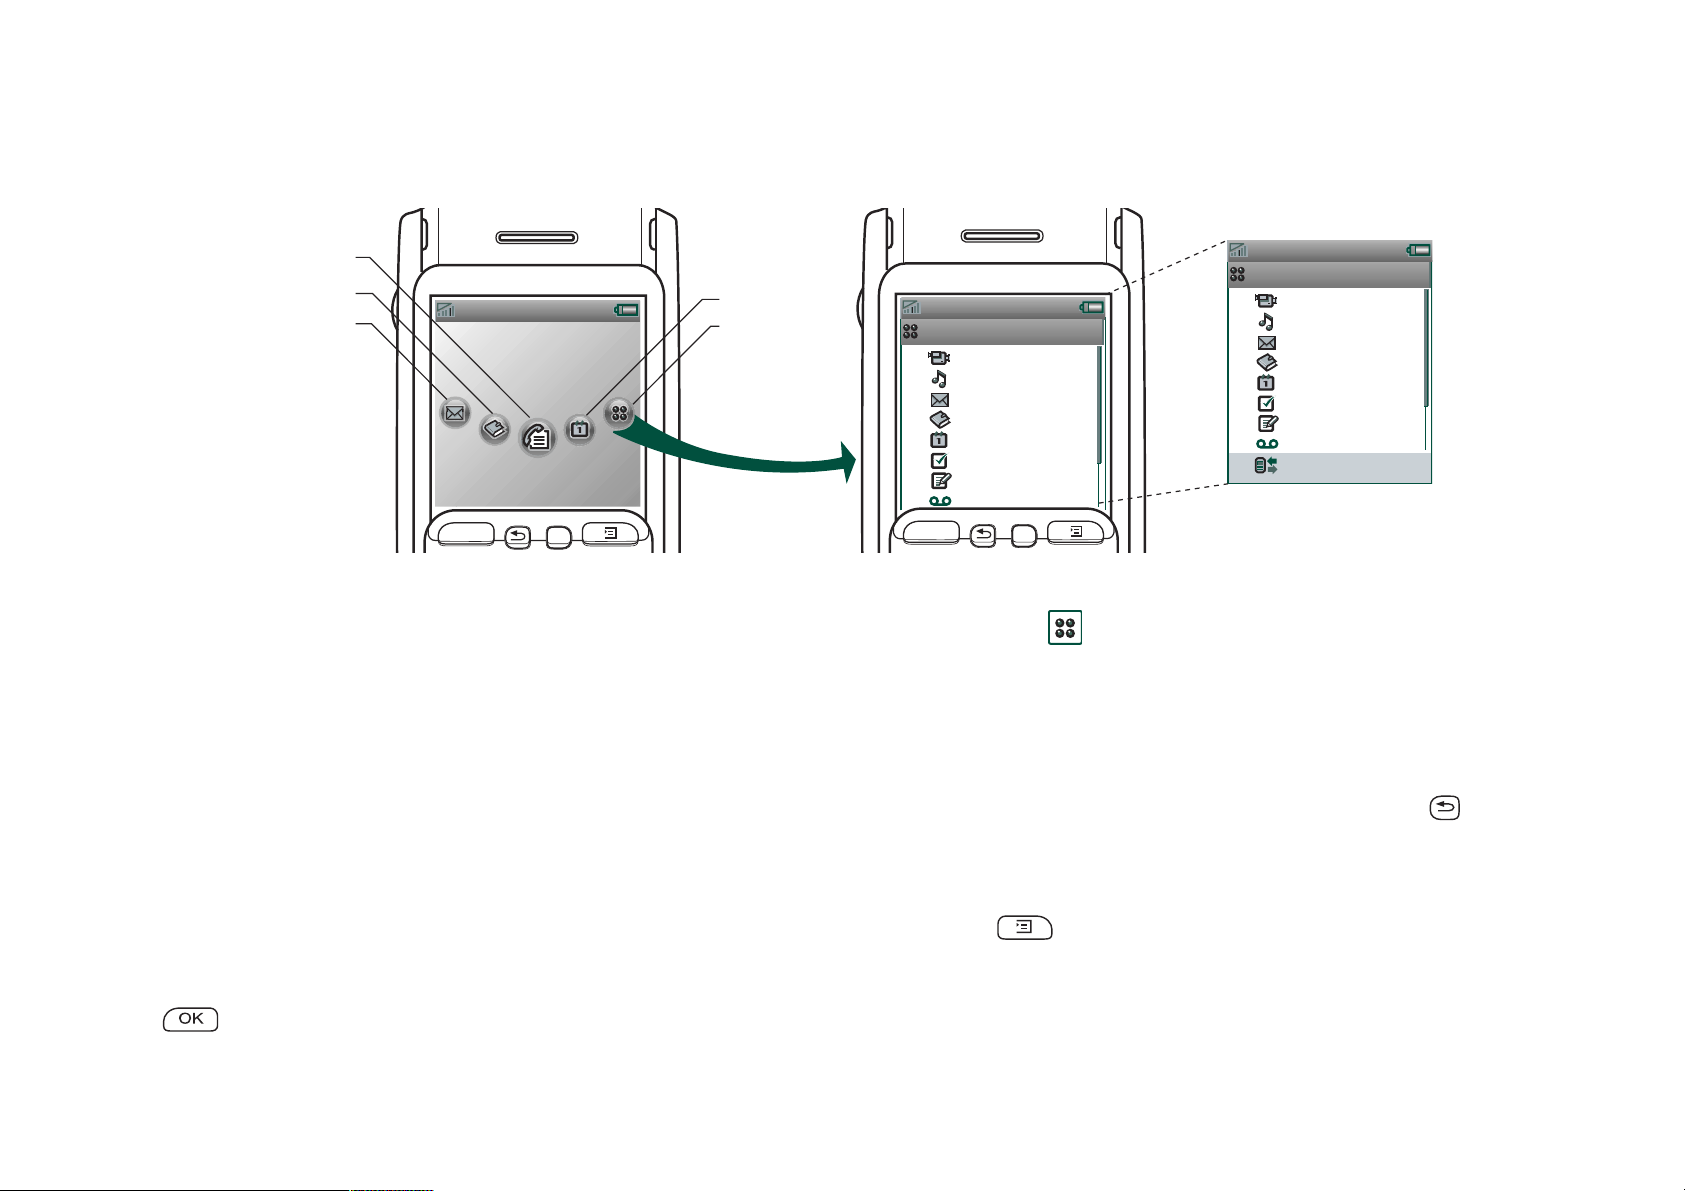
Flip closed mode
11:20am 21/06/2004
C
B
A
Sony Ericsson
11:20am 21/06/2004
Call list
OK
C
D
E
A Shortcut to the Messaging application
B Shortcut to the Contacts application
C Shortcut to the Call list application
D Shortcut to the Calendar application
E Shows all applications available in Flip closed mode
Standby view
The standby view shows shortcuts to the most commonly used
applications. Choose which shortcuts you want to use in
standby. See ‘Personalizing your P900’ on page 135.
Selecting and starting applications
Rotate the Jog Dial to select an application. Press the Jog Dial or
to start the application.
Applications
1
CommuniCorder
2
Applications
1
CommuniCorder
2
Music player
Messaging
3
Contacts
4
Calendar
5
Tas ks
6
Jotter
7
Sound recorder
8
OK
C
3
4
5
6
7
8
9
Music player
Messages
Contacts
Calendar
Tas ks
Jotter
Sound recorder
Connections
Tip When view is selected, it is also possible to start an
application by pressing its specific number.
Closing applications
The current application automatically closes and the data is
saved when you return to the standby view or switch to another
application. To return to standby, press and hold or press the
Jog Dial backwards.
Options menu
Press
or press the Jog Dial forwards to open the standby
options menu to get access to keylock, battery status, missed
calls and more.
Getting to know your P900 15
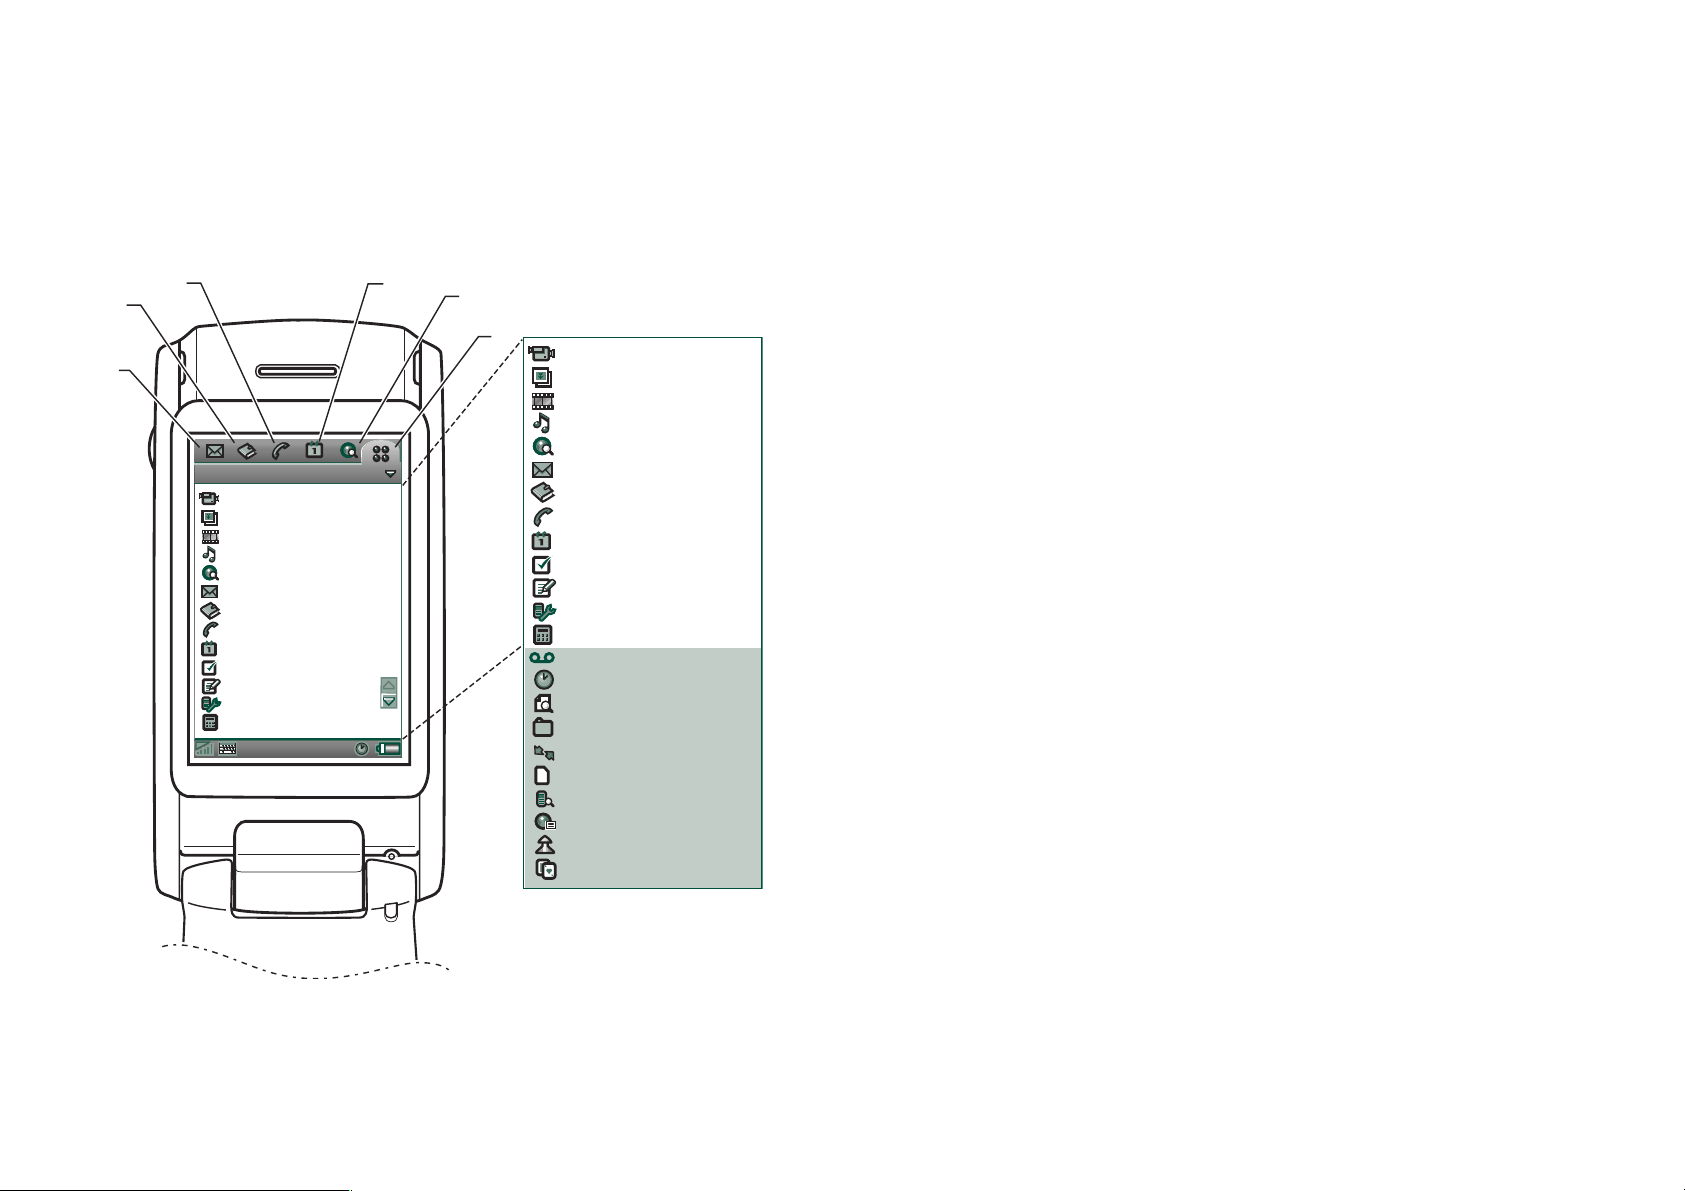
Flip open mode
A
A Shortcut to the Messaging application
B Shortcut to the Contacts application
C
B
Applications View All
CommuniCorder
Pictures
Video
Music player
Internet
Messages
Contacts
Phone
Calendar
Tasks
Jotter
Control panel
Calculator
D
E
F
CommuniCorder
Pictures
Video
Music player
Internet
Messages
Contacts
Phone
Calendar
Tas ks
Jotter
Control panel
Calculator
Sound recorder
Time
Viewer
File manager
Remote Sync
Online services
i
Demo
GPRS data log
Chess
Solitaire
C Shortcut to the Phone application
D Shortcut to the Calendar application
E Shortcut to the Internet application
F Shows all applications available in Flip open mode
You can change the shortcuts A-E. See ‘Changing your
application shortcuts’ on page 135.
Navigation
When the Flip is open, the application shortcut icons shown in
the Flip closed mode move to the top row in the Flip open
screen. You navigate by using the stylus and tapping selected
items and by using the Jog Dial, see ‘Jog Dial’ on page 18.
Flip removed
You can use your P900 without the physical Flip. When the Flip
is removed, the P900 works in Flip open mode.
To remove and attach the Flip, refer to the separate instructions.
Note Please note that Sony Ericsson does not accept any
liability for lost parts or product defects resulting from any
disassembly or modification of the product.
16 Getting to know your P900
Virtual flip
When the virtual flip is enabled, is shown on the status bar
when the virtual flip is open. Select to ‘close’ the virtual
flip.
When the virtual flip is closed, the virtual flip keypad is shown.
Select to ‘open’ the virtual flip.
You must activate the virtual flip, when you have removed the
Flip keypad, by tapping the
Control Panel > Device > Flip removed.
Enable virtual flip
checkbox in
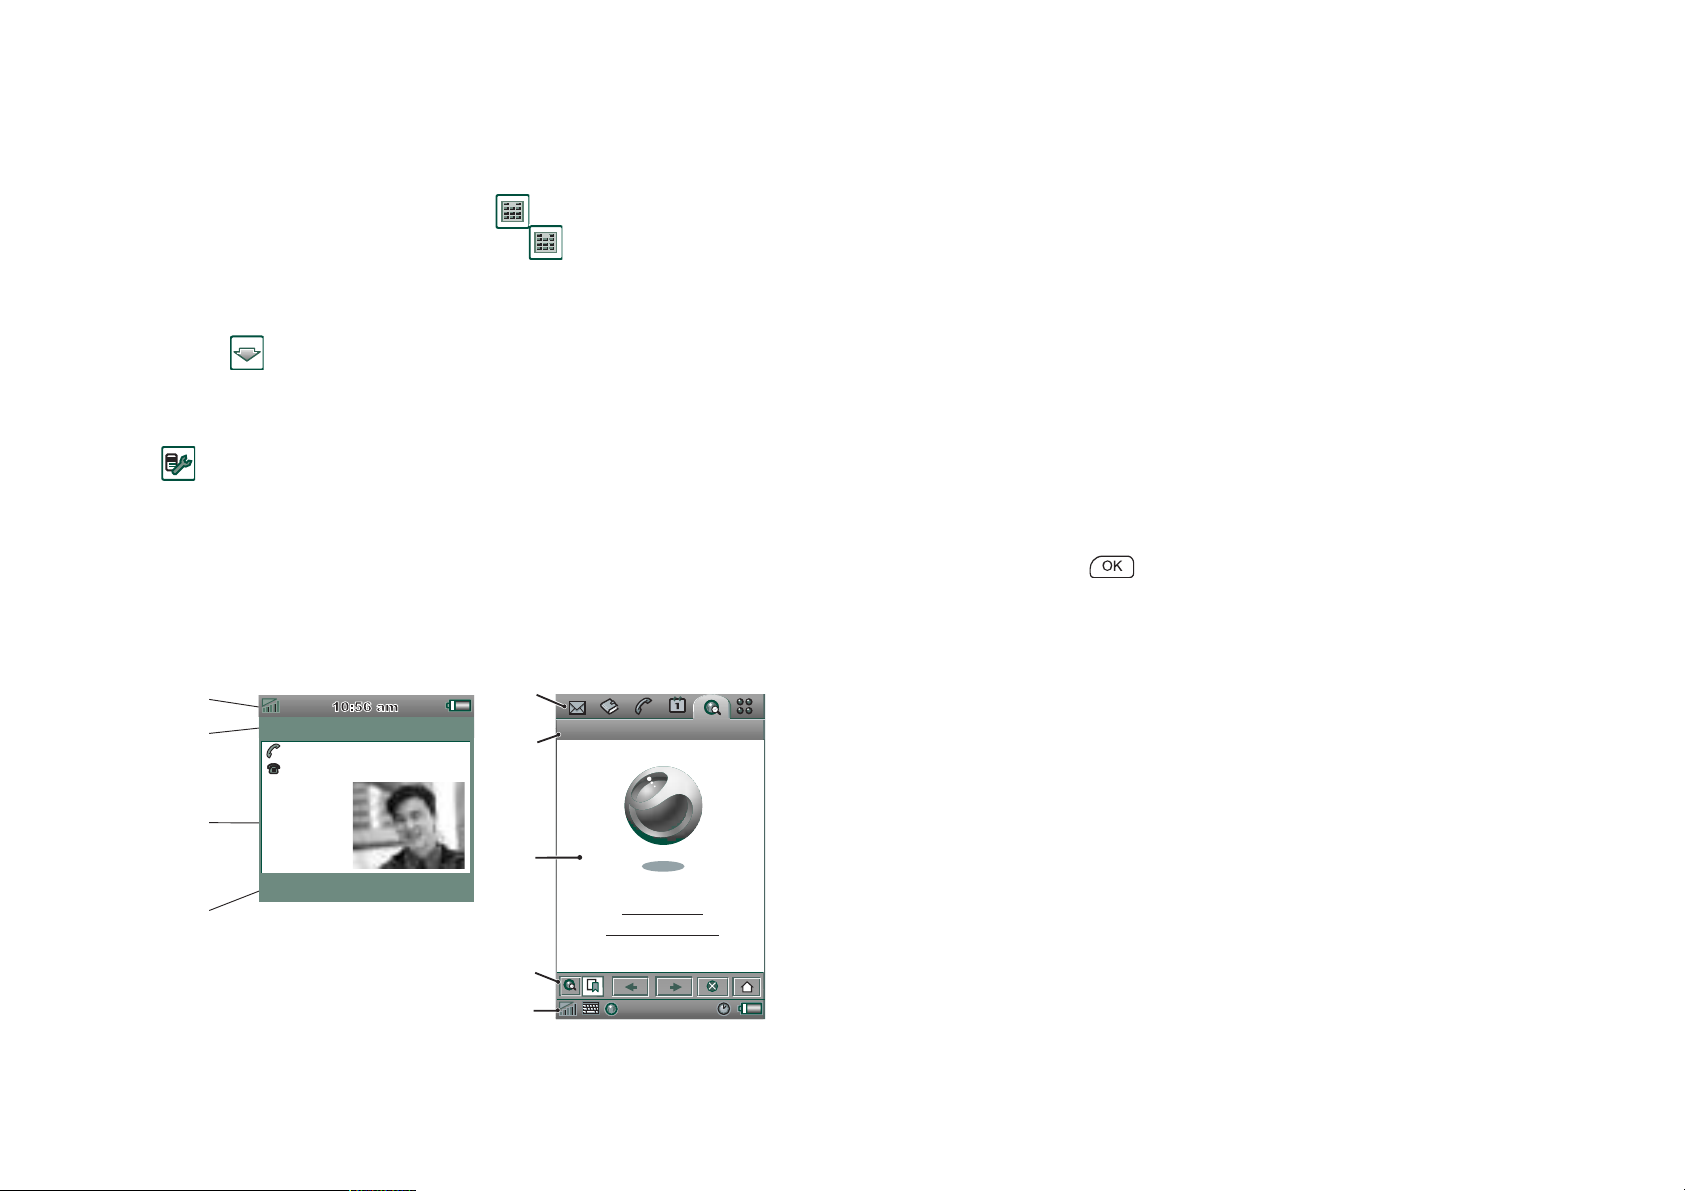
Screen areas
When the Flip is closed, you use the keyboard and the Jog Dial.
When the Flip is open the screen is touch-sensitive. The screen
is divided into a number of areas: see the figure and table below.
E
F
John Smith
+4613244500 (h)
11:03
A
B
I
nternet
E
Chat Edit
di
t
Item Description
A Application
picker
Displays six icons for quick and easy access to the
most common applications. These can be customized.
B Menu bar Usually contains two menus on the left, and a folder
menu on the right. The two left-hand menus contain:
•the application menu, whose name is always the
same as the application. It contains the system
services used by most applications, such as
Send as
, and
Delete
.
•the edit menus contain editing items such as
Copy
,
Paste, Zoom, Preferences
and
Help.
Find
Cut,
,
In Flip open, the menu bar shows the function of the
key.
C Application
area
Applications use this central area of the screen to
display the essential information.
Many of the built-in applications are based on two
standard view layouts: a list view and a detail view.
D Button bar An application view displays a button bar that
contains useful controls and shortcuts. Not all
application views require a button bar.
C
C
End call
B
D
E
Getting to know your P900 17
Sony Ericsson
Sony Ericsson P900
E Status bar Displays device status information such as: signal
strength, battery and device information, settings for
sounds and time, on-screen keyboard, as well as
temporary indicators such as missed calls and unread
messages.
F Title bar Displays the name of the active application.

Jog Dial
Action Function
Rotate the Jog Dial (up) Scrolls items in a list up / to the left,
increases volume during a call, moves
back a page when playing a
multimedia message.
Rotate the Jog Dial (down) Scrolls items in a list down / to the
right, decreases volume during a call,
moves forward a page when playing a
multimedia message.
Press the Jog Dial (inwards) Selects a highlighted item, dials
selected phone numbers. Generally the
same action as in Flip closed.
Press the Jog Dial
(backwards)
Press the Jog Dial (forwards) Flip closed: brings up the Options
Goes back to the previous screen,
dismisses dialogues, and sends a busy
signal to the calling party when you
receive a call. It will not end a call.
Always the same action as in Flip
closed and in Flip open.
menu. Press and hold takes you to the
Applications list.
Up
Down
Inward
ForwardBackward
Flip open: toggles the Application,
Edit and Category menus. Press and
hold takes you to the Application
launcher.
18 Getting to know your P900
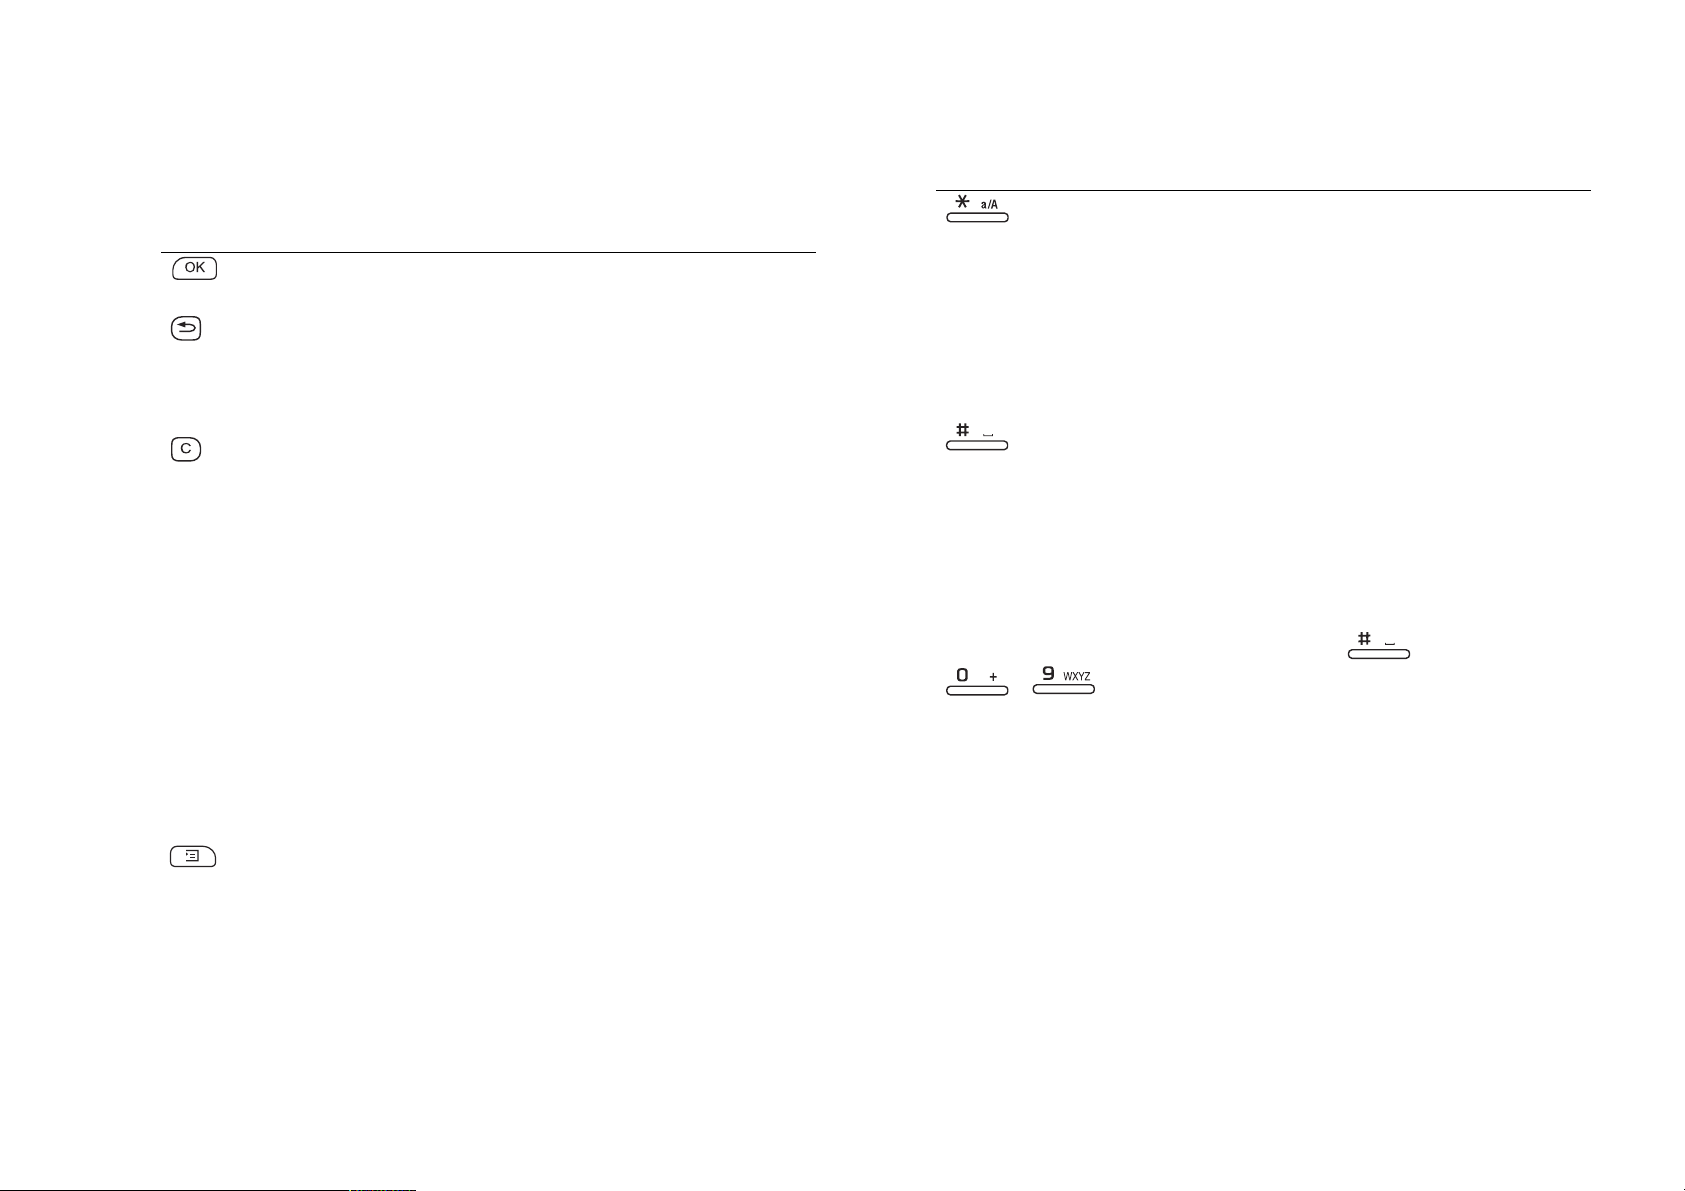
Keypad functions
Key Function
OK Enter selected function, indicated on the
display above the key.
B
ACK
• Return to previous menu.
• Reject an incoming call.
• Press and hold to return to Standby.
C
LEAR
• Delete entered characters/digits from the screen
one by one.
• Press and hold to delete an entire row of entered
characters/digits.
• Delete an entry from Contacts, Calendar, Tasks,
Sound Recorder, and Messaging.
• Press and hold to disconnect the microphone
(mute function) when a call is in progress.
• Mute the ring signal during an incoming call.
• Pause/play the medody when the Music player is
open.
• Press and hold to put the P900 into silent mode,
when in the standby view.
Key Function
STAR
• Enter the character *.
• Press and hold to enter a
• Press to switch between different input modes
(Abc, 123 ... ). This is useful when writing SMS
or similar texts.
• Press and hold to change between T9 and
multitap.
H
ASH
• Enter the character #.
• Press and hold to see a list with special
characters.
• Terminate the input of PIN and security codes.
• Retrieve a phone number from the SIM card
phone book. Enter the number of the memory
position and then press .
- N
UMERIC KEYS
• Enter the digits 0 to 9.
• Enter associated characters or perform associated
functions. See ‘Shortcuts’ on page 40.
• Press and hold digits 1 to 9 to open Contacts.
p
(pause) character.
O
PTIONS
• Open the menu with different options for
different applications.
• Press and hold to open Applications.
Getting to know your P900 19
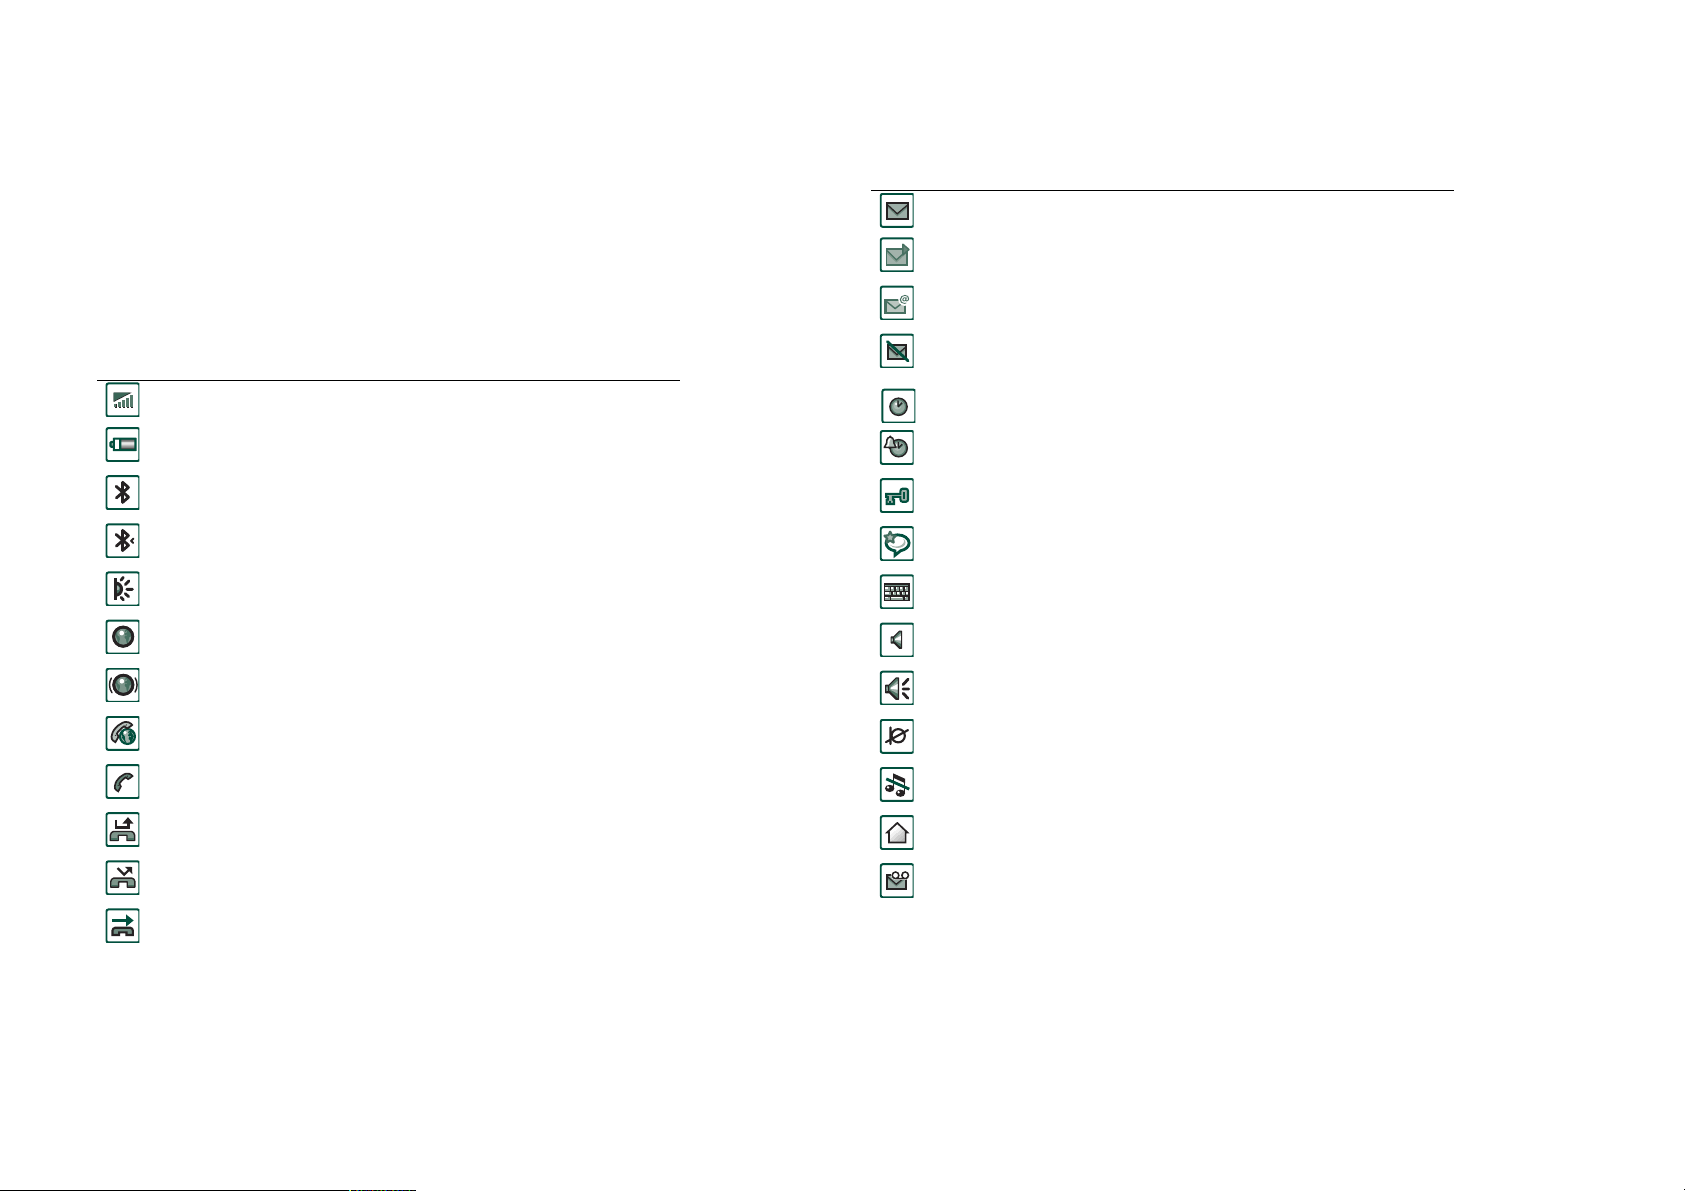
Indicators and status bar icons
These icons appear in the Flip closed standby screen or in the
status bar when the Flip is open. When the Flip is open, you can
often tap the icons to get more detailed information or start an
application.
Icon Function
Signal strength, GPRS status
Battery strength
Bluetooth on
Bluetooth discoverable
Infrared on
GPRS active
GPRS data transfer in progress
Ongoing data call
Icon Function
SMS notification
MMS notification
E-mail notification
SMS overflow
Time
Time, alarm set
Key lock
Magic word
Keyboard
Multimedia volume
Speakerphone
Muted microphone
Ongoing call
Missed call
Divert all calls notification
Calls screened
20 Getting to know your P900
Silent mode
Home network
Voicemail notification
Memory Stick® Duo™
The Memory Stick Duo provides a convenient way of increasing
the storage space in your P900. You can save still images, video
clips, music, and voice recordings as well as computer data and
applications on a Memory Stick Duo and use it to store or
transfer the contents for many different purposes. These include:
• Storing backup copies of important files.
• Storing media for personalizing your P900.
• Storing media for use when composing MMS messages.
• Storing installation files for new applications.
• Transferring data between the P900 and a PC or Mac.
• Providing storage for third-party applications.
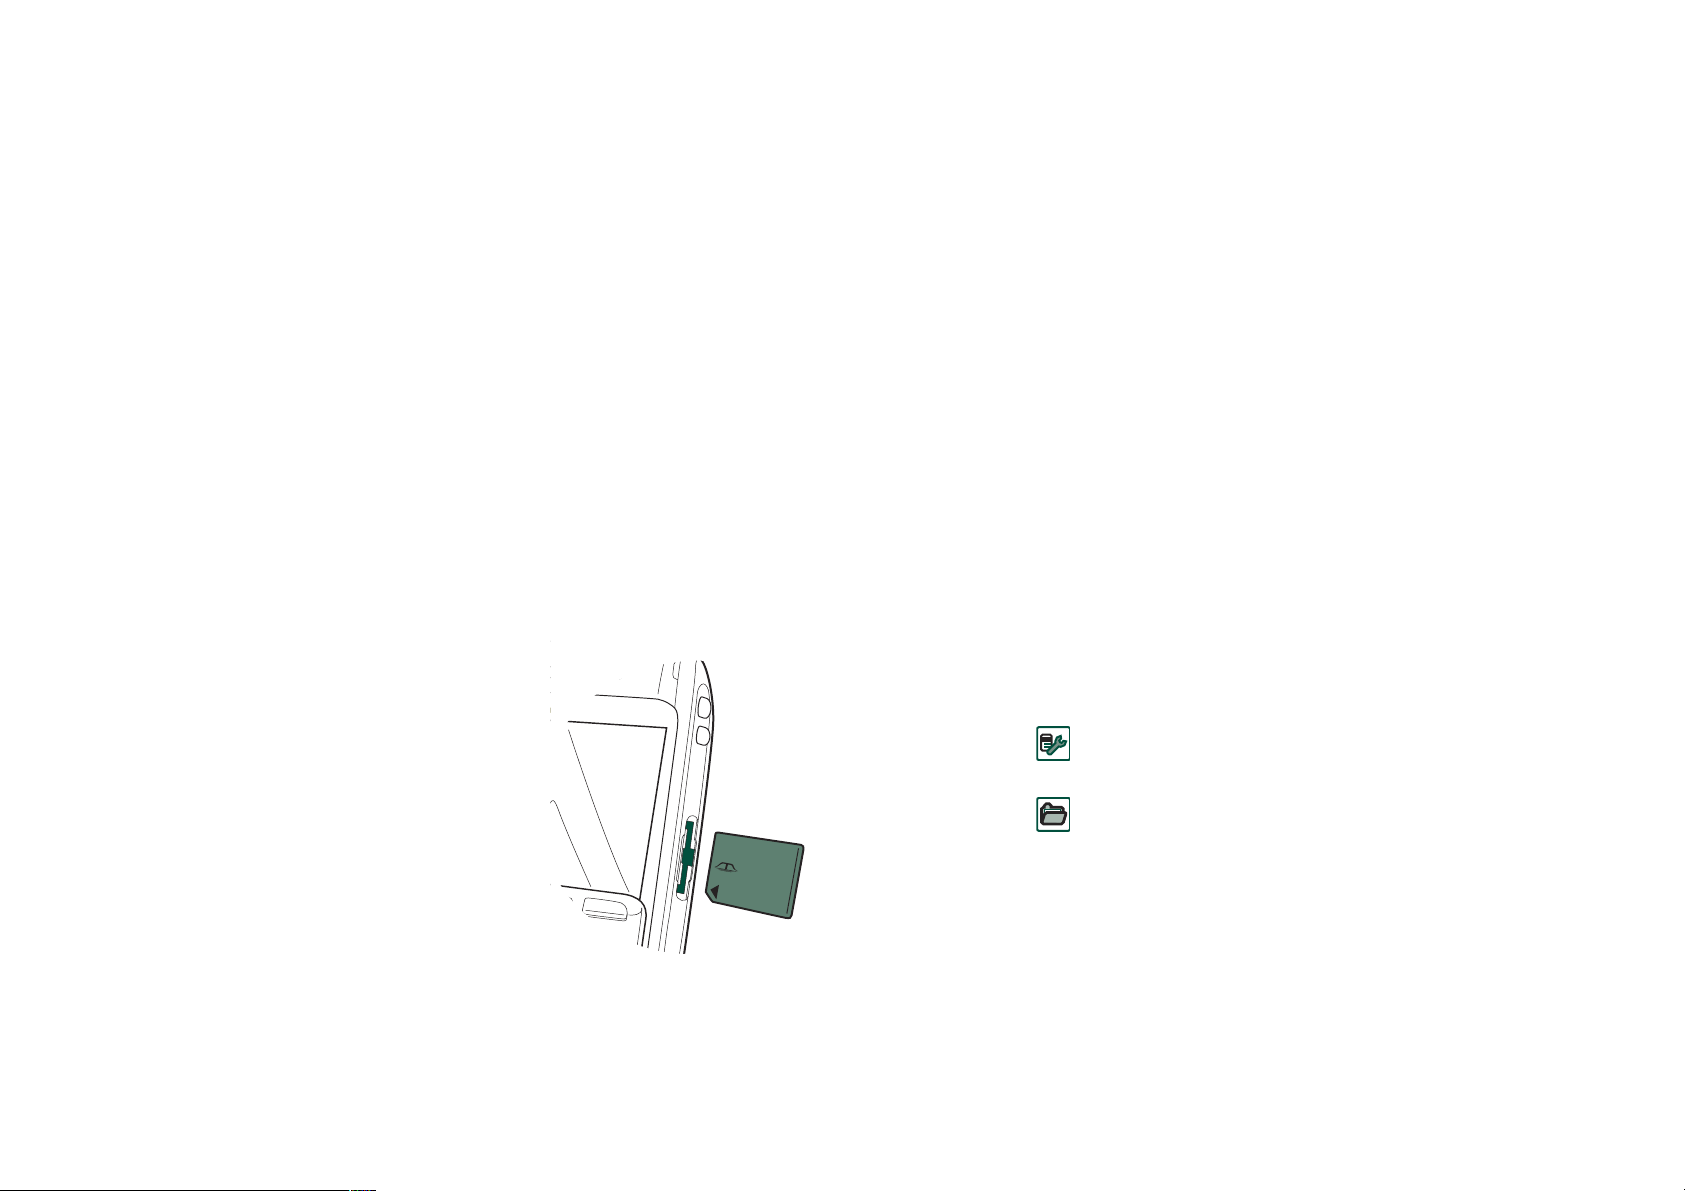
To insert the Memory Stick Duo
1. Open the cover for the Memory
Stick Duo slot.
2. Insert the Memory Stick Duo in
the slot, with the connector side
towards the back (see picture).
Make sure it is securely inserted.
A click should be heard.
S
O
N
Y
M
e
m
o
ry Stic
k
Du
8
o
MB
The Memory Stick Duo supplied with the P900 may or may not
be a version that contains the lock function. Remember, you can
overwrite existing files without the lock function.
To remove the Memory Stick Duo
Press the edge of the Memory Stick Duo using your fingernail or
the stylus to release it. You hear a click as it jumps out of the
slot.
Note Be careful when removing the Memory Stick Duo to avoid
dropping it.
Renaming a Memory Stick Duo
You can rename a Memory Stick Duo to give it a name that is
meaningful to you. The name you set will be shown in the
divider between internal and external storage in the folder menu.
See ‘Folders’ on page 27. There are two ways to rename a
Memory Stick Duo:
• Select
See ‘Format disk’ on page 157.
• Select
Renaming will not erase any data.
Control Panel > Other > Format disk
File manager > File > Format disk
and tap
and tap
Rename
Rename
.
.
Note Insert the Memory Stick Duo
correctly to avoid damage to your
P900 or the Memory Stick Duo.
Getting to know your P900 21
Copying and moving data
For information on how to copy and move data to and from the
Memory Stick Duo, refer to ‘Folders’ on page 27.

Formatting a Memory Stick Duo
If you need to reformat a Memory Stick Duo, select
Panel > Other > Format disk
disk
. When you format a disk, you delete all the information on
, or select
File manager > File > Format
it, including any applications that you may have installed.
Control
Sharing data with other devices
Your P900 uses the shorter memory stick variant, Memory Stick
Duo.
Memory Stick Duo Adapter
Use the Memory Stick Duo adapter when using your Memory
Stick Duo in a device equipped with a regular sized Memory
Stick, for example a personal computer. Insert your Memory
Stick Duo according to the picture on the adapter.
Warning! Do not insert a Memory Stick Duo adapter without a
Memory Stick Duo into a Memory Stick slot. This may damage
the product. Always insert the adapter in the slot with the
connector end (marked with a triangle) first.
Other devices must access the same folder structure to interact
with the P900 files. If you are using a PC, this is easily done by
browsing to the required folder on the Memory Stick.
Memory Stick enabled devices which do not allow you to
browse and manage a folder structure may not be able to share
data directly with the applications in your P900 (for example,
Memory Stick enabled digital cameras). However, the File
Manager can access these files and move them into the correct
folders for use by the applications. When your P900 is
connected to your PC, you also have access to the P900 folder
structure as well as other Memory Stick Duo content in
My P900
Personal computer support
Both PCs and Apple computers may be enabled for Memory
Stick use via built-in Memory Stick slots, Floppy Disk adapters,
PC card adapters, and Memory Stick enabled mouses. (Memory
Stick Duo Adapter required.)
For more information about Sony Memory Stick, visit
www.memorystick.com
.
.
Compatibility
The P900 defines its own folder structure on a Memory Stick.
Each application has its own set of folders. A folder created in
one application is not visible in another.
22 Getting to know your P900
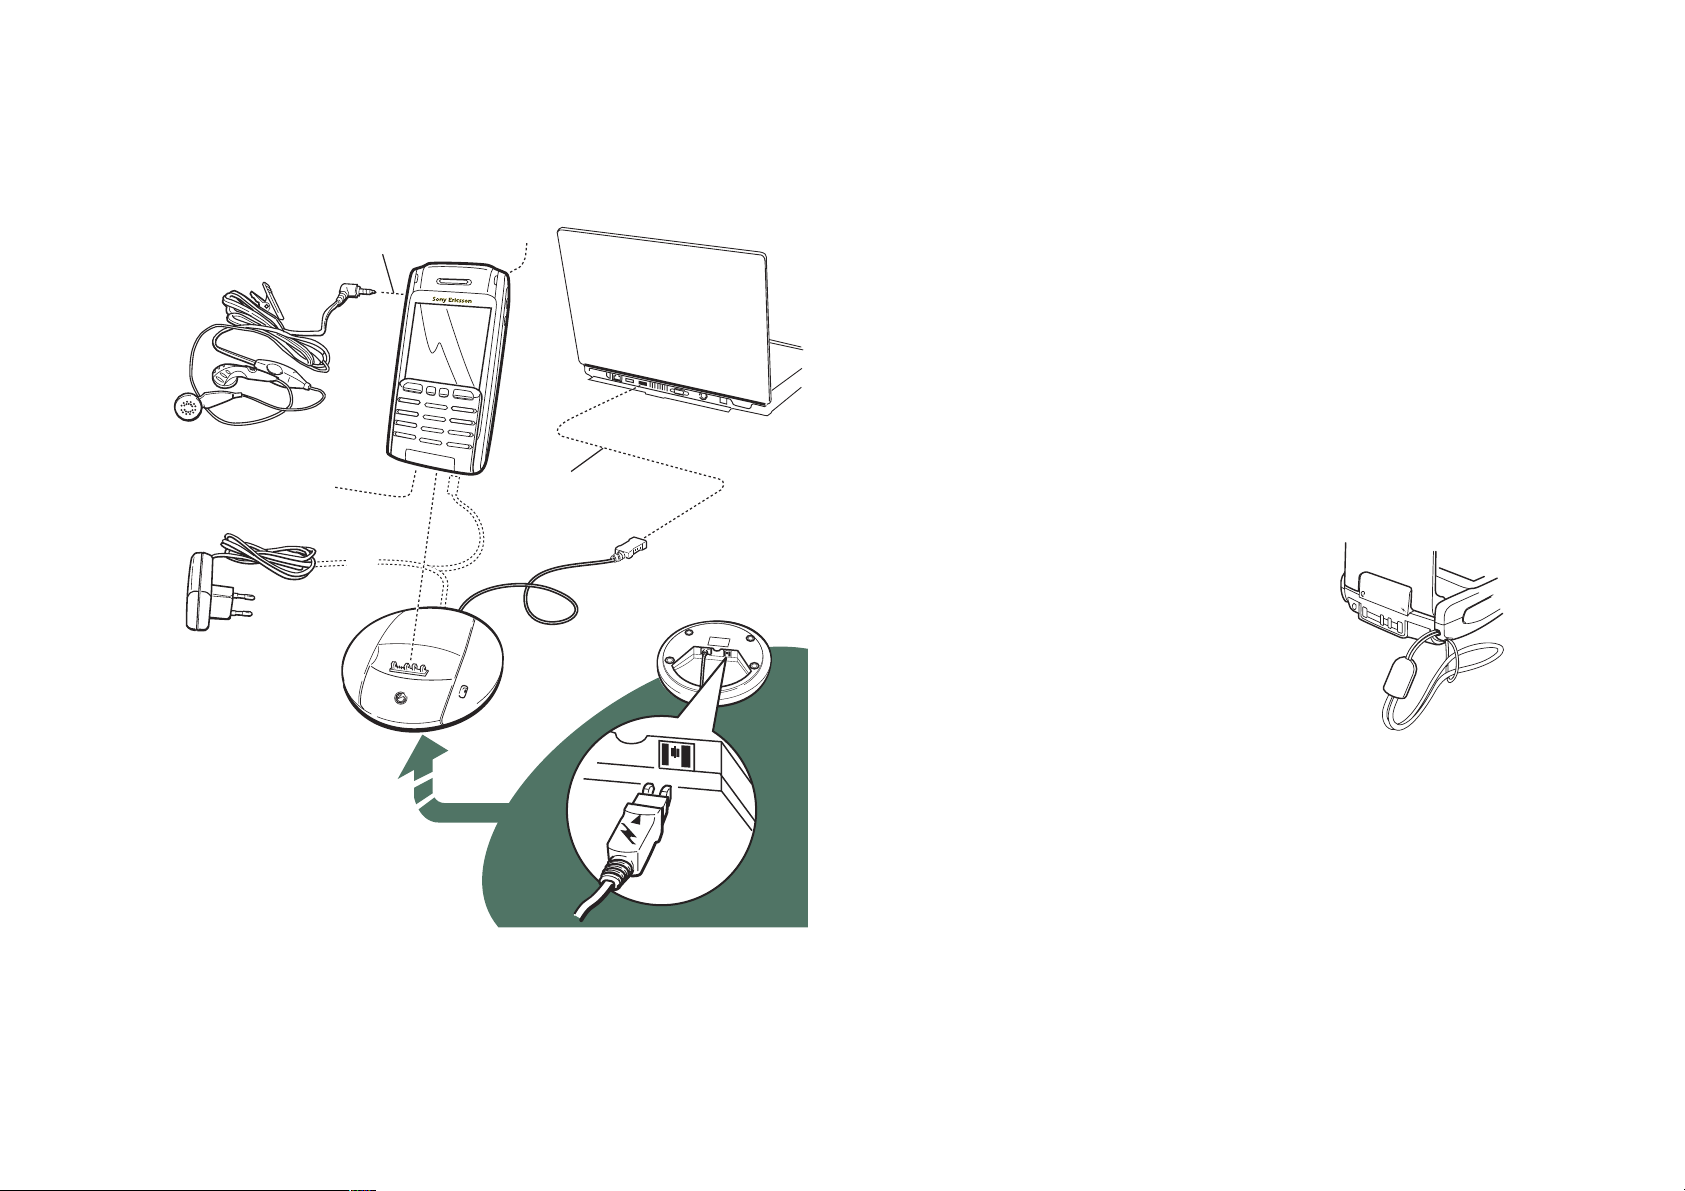
Connecting the accessories
D
A
C
E
B
A The travel charger is connected to the desk stand or to the P900.
Note The design of the charger will differ depending on the
market.
B The USB connector from the desk stand is connected to a PC.
C The headset is connected to the P900.
D Other accessories can be connected to the connector at the base of
the P900.
E A car holder can be connected to the antenna connector at the rear.
Note Remove the plastic plug before connecting the P900 to the
car holder.
The wrist strap is threaded
through the holes next to the
connector at the bottom of the
P900.
Getting to know your P900 23
Services
You need the following services to use the P900 functions:
To use... You need...
phone services GSM subscription
text messaging (SMS) GSM subscription
multimedia messaging (MMS) MMS account, GSM data subscription
e-mail e-mail account, GSM data subscription
Internet Internet account, WAP account (only
for WAP 1.x services), GSM data
subscription
data communication GSM data subscription
Please consult your network operator and Internet service
provider for more information about the services that are
available to you.
Applications - overview
You can start applications in different ways. Select icons in the
standby view (Flip closed) and in the application picker (Flip
open) to start the most important ones. Select to list all
applications.
You can uninstall the demo application and also reinstall it from
Multimedia for P900
the
your P900’ on page 125 for how to uninstall the demo
application and ‘Installing applications on your P900’ on
page 123 for how to reinstall it.
To start the demo
1. Select the Applications icon .
2. Select the Demo icon .
The demo starts.
To stop the demo
Tap the screen or rotate the Jog Dial to stop the demo.
The demo also stops when any other dialogue is opened.
Note When the Flip is open, an incoming text or MMS message
will not stop the demo.
The Demo application can be launched also when the P900 is
started without a SIM card inserted. When the P900 asks you to
insert the SIM card, just press OK. If the Flip is closed, open it.
Phone
This is the mobile phone application. When the Flip is opened,
select to start it.
CD. See ‘Removing applications from
Demo application
The Demo application shows some of the most common
functions in your P900.
24 Getting to know your P900
Call list
The call list displays the most recent calls, either outgoing,
incoming or missed. In Flip closed, press the Jog Dial or
to call the selected entry. To view the call list when the Flip is
open, open
icon.
CommuniCorder
For taking video clips and still pictures. In CommuniCorder
view, the screen becomes a viewfinder. Press the
CommuniCorder button or the Jog Dial to start recording or take
a photo. Alternatively tap the red button at the bottom of the
screen.
Pictures (Flip open only)
Manages your pictures. You can take pictures with
CommuniCorder, or receive them via e-mail, Bluetooth wireless
technology and infrared communication. Download via the
Internet browser, or transfer them from your PC. With the image
editor you can also edit your pictures.
Video (Flip open only)
Plays video clips. You can record video with CommuniCorder,
download them from Internet or transfer them from your PC.
You can stream video and audio from the Internet.
Phone
and select the call list view by tapping the
Music player
Plays music tracks and other audio files. You can download
these from the Internet or transfer them from your PC. The
player supports the most common sound formats. You can save
music tracks on the Memory Stick Duo.
Internet (Flip open only)
The Internet browser can access both Web and WAP pages. It
can also download images, video clips, audio files, and Java
applications.
Messaging
You can read, create, send and delete text (SMS), multimedia
(MMS) and e-mail messages in this view.
Contacts
Displays a list of your contacts. Select a contact to view
associated contact data.
Calendar
The Calendar view displays entries for the current day. Use the
Jog Dial to get more information about a selected entry or to
change days.
Tasks
Keeps track of your tasks. Set due date, alarm, priority, and so
on, for all your tasks and let your P900 remind you in time.
Getting to know your P900 25
Jotter
Displays a list of stored entries. In detailed view, the complete
entry is displayed.
Control panel (Flip open only)
Contains all settings that are system-wide and affect more than
one application. This is the main view to use when initially
setting up your P900.
Note Settings for Flight mode and P900 locks are located under
Control panel > Device
Calculator (Flip open only)
A standard 10-digit calculator. You can add, subtract, multiply,
divide, calculate square roots and percentages.
Sound recorder
You can use your P900 as a sound recorder.
File manager (Flip open only)
You can handle the content and organisation of media, both in
the P900 and on the Memory Stick Duo
Remote Sync (Flip open only)
Performs synchronization over the air. Using GPRS, the P900
can be continuously connected to the remote synchronization
server. Remote Sync works equally well over CSD or HSCSD.
Online services
i
Your service provider may offer different services, for example,
weather forecasts, financial information or newsletters. Contact
your service provider for more information.
GPRS data log (Flip open only)
A list of GPRS Internet accounts. Open an account to view your
logged GPRS traffic, including your costs. The P900 creates a
new data log when a connection to an account is created.
Time (Flip open only)
Shows time and date. You can set your current location and
another. You can also set different alarms.
Connections (Flip closed only)
Set the way you communicate with your PC or other devices.
Select between infrared, Bluetooth wireless technology and
cable. In the cable menu, you can also select whether the P900
Viewer (Flip open only)
synchronizes with a PC or acts as a wireless modem.
Use it to view various types of documents: for example
Microsoft® Word, Excel, Power Point, Adobe® Acrobat®
(PDF files).
26 Getting to know your P900

General functions
Application launcher views
In Flip open, the P900 can present the applications in two ways:
• List view (small icons appear in one column)
• Icon view (large icons appear in two columns)
Folders
Folders are used to organize information, for example contacts,
jotter entries, or task lists. You might want to organize your
contacts in business and personal folders.
Folders are also used when managing files of different types on
your P900 and Memory Stick Duo. You might want to move or
copy sound files into a sound track folder to store on a Memory
Stick Duo.
As you may notice, if you connect your P900 to a PC and view
the contents of your P900 in
overview of a folder and file structure on a large screen than on
a handheld device. If you make it a habit to set up specific
folders to suit your needs and use them to categorise all your
information, working with it becomes easy.
Each application has its own set of folders. A folder created in
one application is not visible in another.
My P900
, it is easier to get an
For each application there is a default
is no way of seeing on your P900, whether a file in an
folder is located on your P900 or on a Memory Stick, we
recommend that you move files to your own folders as soon as
possible.
Every item created in an application is always assigned to a
single folder, by default the same folder as displayed in the list
view.
In list view, the folder menu is used to organise your entries. In
detail view, the folder menu allows you to change the folder of
the current item.
Using the folder menu
In the applications that use folders you can see the folder menu
to the right in the menu bar.
When a Memory Stick Duo is available in the P900, the folders
on it are shown in the folder menu under the divider. If you
rename the disk (see ‘Renaming a Memory Stick Duo’ on
page 21) the divider will show the new name.
In list view, there is a super-folder called
selected, displays items from all folders (in
folder does not display the entries in the SIM phone book).
the default value in list views and when an application is first
launched.
Unfiled
folder. Since there
Unfiled
All,
which, when
Contacts
, the
All
All
is
Getting to know your P900 27

Use the
Edit Folders
menu item to:
• Rename a folder, or move a folder to or from Memory Stick
Duo. Select the folder you want to move or rename, tap
type the name of the new folder, and choose a
the list. Tap
•To
•To
Add
Location
a
Delete
Delete
. A folder can only be deleted if it is empty. Not all
Done
.
a new folder. Tap
from the list. Tap
Add
, enter a folder
Done
.
a folder. Select the folder you want to delete and tap
Location
Name
and choose
Edit
from
folders can be deleted.
To copy all the files in a folder to another folder
1. Open the folder in list view, and select
application menu; for example
2. Select the destination
Folder
Audio
from the list and select
Copy to
or
Image
in the main
.
Copy.
To move a file from one folder to another
Open the file in detail view. In the folder menu, select the
destination folder.
Tip To delete multiple files in an application you can use
Storage manager. See ‘Deleting or copying general files’ on
page 160.
,
Managing your files
Using the File Manager, you can handle the content and
organisation of media, both in the P900 and on the Memory
Stick Duo. See ‘File manager’ on page 118.
You can also use the Storage Manager in the Control Panel. See
‘Storage manager’ on page 159.
Zooming
You can change the size of the screen fonts. Choose between
Small, Medium or Large. From the menu bar, tap
Edit > Zoom.
Automatic saving
When you work in an application and leave it, your work is
automatically saved.
To copy a file to another folder
Find
1. Open the file in detail view. In the folder menu, select the
The Find function searches through all the items stored in an
application. The standard
edit box with two buttons,
the search, while
Cancel
Find
dialogue contains a single text
Find
and
closes the
Cancel
Find
dialogue.
. Selecting
Find
starts
Audio
Folder
Copy to
or
destination folder. Select
menu; for example
2. Select the destination
28 Getting to know your P900
in the main application
Image
.
from the list and tap
Copy.

In some applications, for example Messaging, Find may be
more complicated:
• The size of each message is so large that you may want to
restrict the search to the current message only.
• Folders are potentially more significant, so you may want to
restrict the search to the current folder only.
Sorting your files
You can sort the files you have stored in your P900. By sorting
your files, you choose in which order you want the files to be
displayed on the screen. You can choose between sorting by, for
example type, size, date, or name.
Note Sort is not included in all applications.
Sending and receiving items
From many applications it is possible to exchange items like
appointments, contacts and images.
To send an item using Send as
1. Enter the
Send as
menu in the specific application.
• Text message (using SMS): P900 will create a new text
message. Add the mobile number of the recipient and tap
Send
.
• E-mail: the P900 will create a new message with the item
included as an attachment. Complete with address and
subject, and tap
Send
.
• Multimedia message (using MMS): the P900 will create a
new message with the item included as an attachment.
Complete the message and tap
Send
.
• Infrared: align the infrared port of the P900 with the infrared
port of the other device. Select
Send.
Progress messages on
screen will tell you when the information has been
transferred.
• Bluetooth wireless technology: the P900 will search the local
area for paired devices. These will be presented in a list.
Select a device to which the item is to be sent and select
Send
. Progress messages will tell you when the information
has been transferred.
Tip The other devices must have Bluetooth wireless technology
enabled. You can select
Refresh
to perform a new search if, for
example, a destination device was not enabled at first.
2. Depending on the application and item, you can choose
To handle items received in e-mail and multimedia messages
between the following transfer methods:
1. Tap the notification icon
open
Messaging
and select MMS or an e-mail inbox.
, or
2. Open the message.
Getting to know your P900 29

3. Select the attachments tab.
4. Select the required attachment. The attachment or a summary
of the attachment will be displayed.
5. Select
Save
to save the item. You may optionally display the
received item within the related application.
See ‘Messaging’ on page 82 for more information.
To receive beamed items
1. Ensure that infrared or Bluetooth wireless technology is
activated.
2. For infrared, ensure that the infrared ports are aligned.
3. The received item will be notified by a dialogue box listing
the item(s) received.
4. Select
application. Select
automatically saved for you in the
View
to view and save the item to the related
Done
and any unsaved items will be
Beamed
inbox in
Messaging.
Methods for storing data
Your P900 can store data in different ways:
• Several other expansion-memory alternatives on the market.
• Pictures on Sony Image Station on the Web:
– For Europe: http://www.sonystyle-imaging.com
– For Japan: http://www.imagestation.jp
– For USA: http://www.imagestation.com
• SIM card, for phone numbers and associated names. See
‘Copying contacts to and from the SIM card’ on page 99.
Getting help
From the menu bar tap
The help system uses two views:
• The Topics view shows all available topics, for example both
specific application topics and general topics.
• The Detail view presents the title and text of a single topic.
The Topics view allows you to select a topic, which opens the
detail view/text view and displays the selected topic. You can
also set the zoom level and exit the Help system.
In many dialogue boxes you can select the Help icon in the
upper right corner.
Edit > Help
to get to the P900 help system.
• Internal memory. Up to 16 MB of capacity for storing
pictures, messages, music, applications, and so on,
depending on applications in use.
• Memory Stick Duo (expansion memory).
30 Getting to know your P900
 Loading...