

Page 1

CDMA PCS
Telephone
Operating Instructions
3-864-802-11
Draft Tuesday, February 09, 1999
CM-ZS300
1
Page 2

2 ▼
Page 3

Contents
Getting Started
Features ......................................................................................................................7
Unpacking Your Phone............................................................................................ 8
Phone Overview........................................................................................................9
Charging the Battery ..............................................................................................13
Turning On the Phone............................................................................................16
Activating th e Phone................ ..............................................................................1 7
Using Basic Functions
Making Calls..... .... ...................................................................................................19
Receiving Calls........................................................................................................20
Saving Names and Numbers
Saving a Phone Number........................................................................................21
Editing a Saved Name... .... .... .................................................................................24
Changing the Phone Book Location of a Saved Name......................................24
Viewing a Saved Number......................................................................................25
Restricting All Phone Numb ers Assig ned to a Saved Name............................25
Restricting One Phone Number Assigned to a Saved Name ...........................26
Unrestricting All Phone Numbers Assigned to a Saved Name.......................26
Unrestricting One Phone Number Assigned to a Saved Name.......................27
Erasing a Saved Name............................................................................................27
Creating a Voice Label to a Saved Name ............................................................28
Changing the Type of a Saved Number ..............................................................28
Setting a Saved Number as the Main Phone Book Number.............................29
Editing a Saved Phon e Number.. .... ......................................................................29
Erasing a Saved Phone Number ...........................................................................30
Calling a Saved Number
Calling a Saved Number........................................................................................31
Finding a Saved Phon e Number................ ... .... ....................................................32
Speed Dialing............... ............................................................................................33
Touch Dialing......................... ... ..............................................................................3 3
Adding a Prefix to a Saved Phone Num ber....... .................................................34
Sending Tones.........................................................................................................34
Using Fast 4 Dialing................................................................................................35
iii
Page 4

iv ▼
Contents
Checking Your Call History
Call History ..............................................................................................................38
Viewing Detailed Information of Calls List Entries...........................................38
Changing the Phone Settings
Settings Options......................... .............................................................................3 9
Displaying the Settings Menu...............................................................................40
Sounds .............................................................................................................................41
Display.............................................................................................................................42
Security............................................................................................................................43
Timers............................... .............. ............... ............... ............................. .............. ........44
Network............................ .............. ............... ............................. ............... .............. ........44
Misc..................................................................................................................................45
Hands Free Kit................................................................................................................45
Speakerphone.................................................................................................................46
Headset ............................................................................................................................46
Customizing Your Phone
Date/Time................................................................................................................47
Using the Scratchpad..............................................................................................48
Using Short Messaging Services
Receiving Messages................................................................................................49
Checking Message Storage Capacity ..................................................................49
Accessing Messages................................................................................................50
Reading Voice Mail Message Notifications......................................................... 50
Reading New Text Messages.................................................................................51
Reading Old Text Messages ..................................................................................51
Erasing Old Text Messages [F14]..........................................................................53
Additional Information
Troubleshooting......................................................................................................55
Accessories...............................................................................................................57
Specifications...........................................................................................................59
Rules and Regulations............................................................................................60
Safety Precautions...................................................................................................61
FCC/Battery/Legal Statement..............................................................................65
[back cover]
800 Numbers/Web Address .........................................................................66
Page 5

Getting Started
Features
Your Sony D-WAVE Zuma™ phone has many s pecial featur es to make mobile
calling easy and fun. Here are just a few of the features available:
❑ Phone Book: You can store up to 199 names and up to 400 phone
numbers. Use the Jog Dial navigator to easily locate and call your most
frequent contacts. See page xx fo r more information.
❑ Voice Label: You can recor d a short messa ge with up to 20 of your phone
book entrie s. You can locate your favorite cont ac ts by hearing a me ssa ge
you've recorded. U si ng the Jog Dial navigator you can recall a phone
number and make a call without ever having to look at the phone. See
page xx for more informat ion.
❑ Vibration Ringer: This convenient feature won't disturb those around
you when you're receiving a call. See page xx for more information.
❑ Ringer Options and Melodies: Choose from a variety of ringer sounds
and melodies. You won't confuse someone else's ringing phone with
your own w hen you select a unique ringer. See page xx for more
information.
❑ One Touch Ringer Mute: To instantly mute the ringer as you are
receiving a call, just turn the Jog Dial navigator down. See page xx for
more information.
❑ Automatic On and Off: You can have your phone turn on and off at a
certain time everyday. This feature allows your phone to “wake up” or
“go to sleep” when you want it to. See page xx for more information.
❑ Keypad Lock: To avoid any acciden tal operations while you ar e carrying
your phone around, press and hold the Jog Dial navigator to lock the
keypad. See page xx for more information.
❑ Phone Lock: If you have to leave your phone unattended, you can lock it
with a security code. See page xx for more information.
❑ Language Selection: Your phone speaks more than one language. See
page xx for more informat ion.
❑ Banner: Create your own text to display on your phone. See page xx for
more information.
❑ Accessories: Sony Authorized Accessories are available to carry, charge
and communicate with your phone. See page xx for more information.
❑ Service Provider Features: Your service provider may be able to
“activate” other special features in your Sony phone. Caller ID and
Short Message Services are examples of features provided by many
service providers.
7
Page 6

8 ▼
Getting Started
Unpacking Your Phone
Your phone package includes the following items. If anything is missing,
contact your nearest Sony dealer.
CM-ZS300 Telephone (1) QN-029BPL Li-Ion Battery (1)
QN-001AC AC Adapter
Additional access ories and differen t AC adap te rs ma y be supplied wit h
phones outside North America. See “Accessories” on page 57 for more
information about accessories.
Page 7
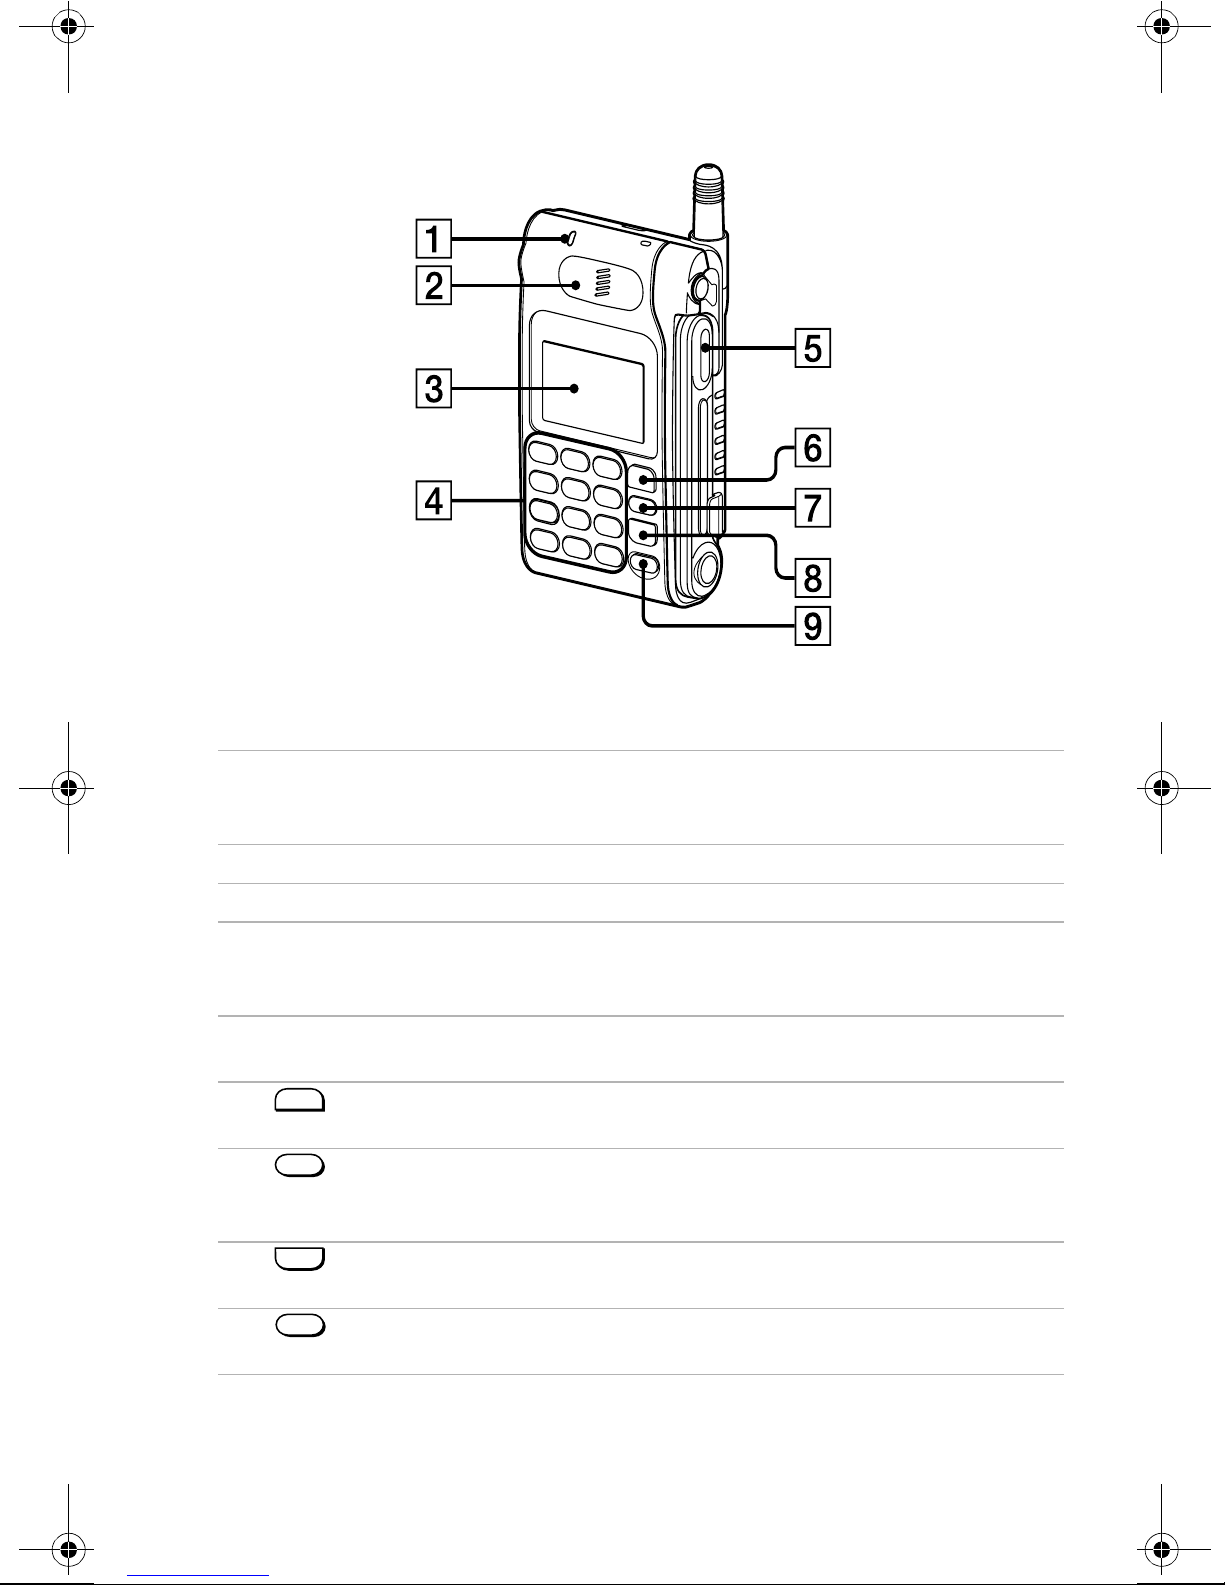
Phone Overview
Getting Started
▼
9
Telephone (Front)
1
LED
Lights when there is an incoming call; lights green when charging; lights red
when charging is complete.
2
Earpiece
3
Display
4
Keypad
Use the keypad to enter numbers. Press and hold a number button for touch
dialing.
5
Folding microphone arm
Open to make/receive a call. Close to end a call.
6
7
8
SEND
Press to make an d r e ceive calls when the micr op hone arm is open.
CLR
(Clear)
Press to clear the last digit on the display, or to exit the current menu. Press and
hold to clear all digits on the display.
END
Press to end calls or cancel an operation.
9
PWR
(Power)
Press and to turn the phone on or off.
Page 8
10 ▼
Getting Started
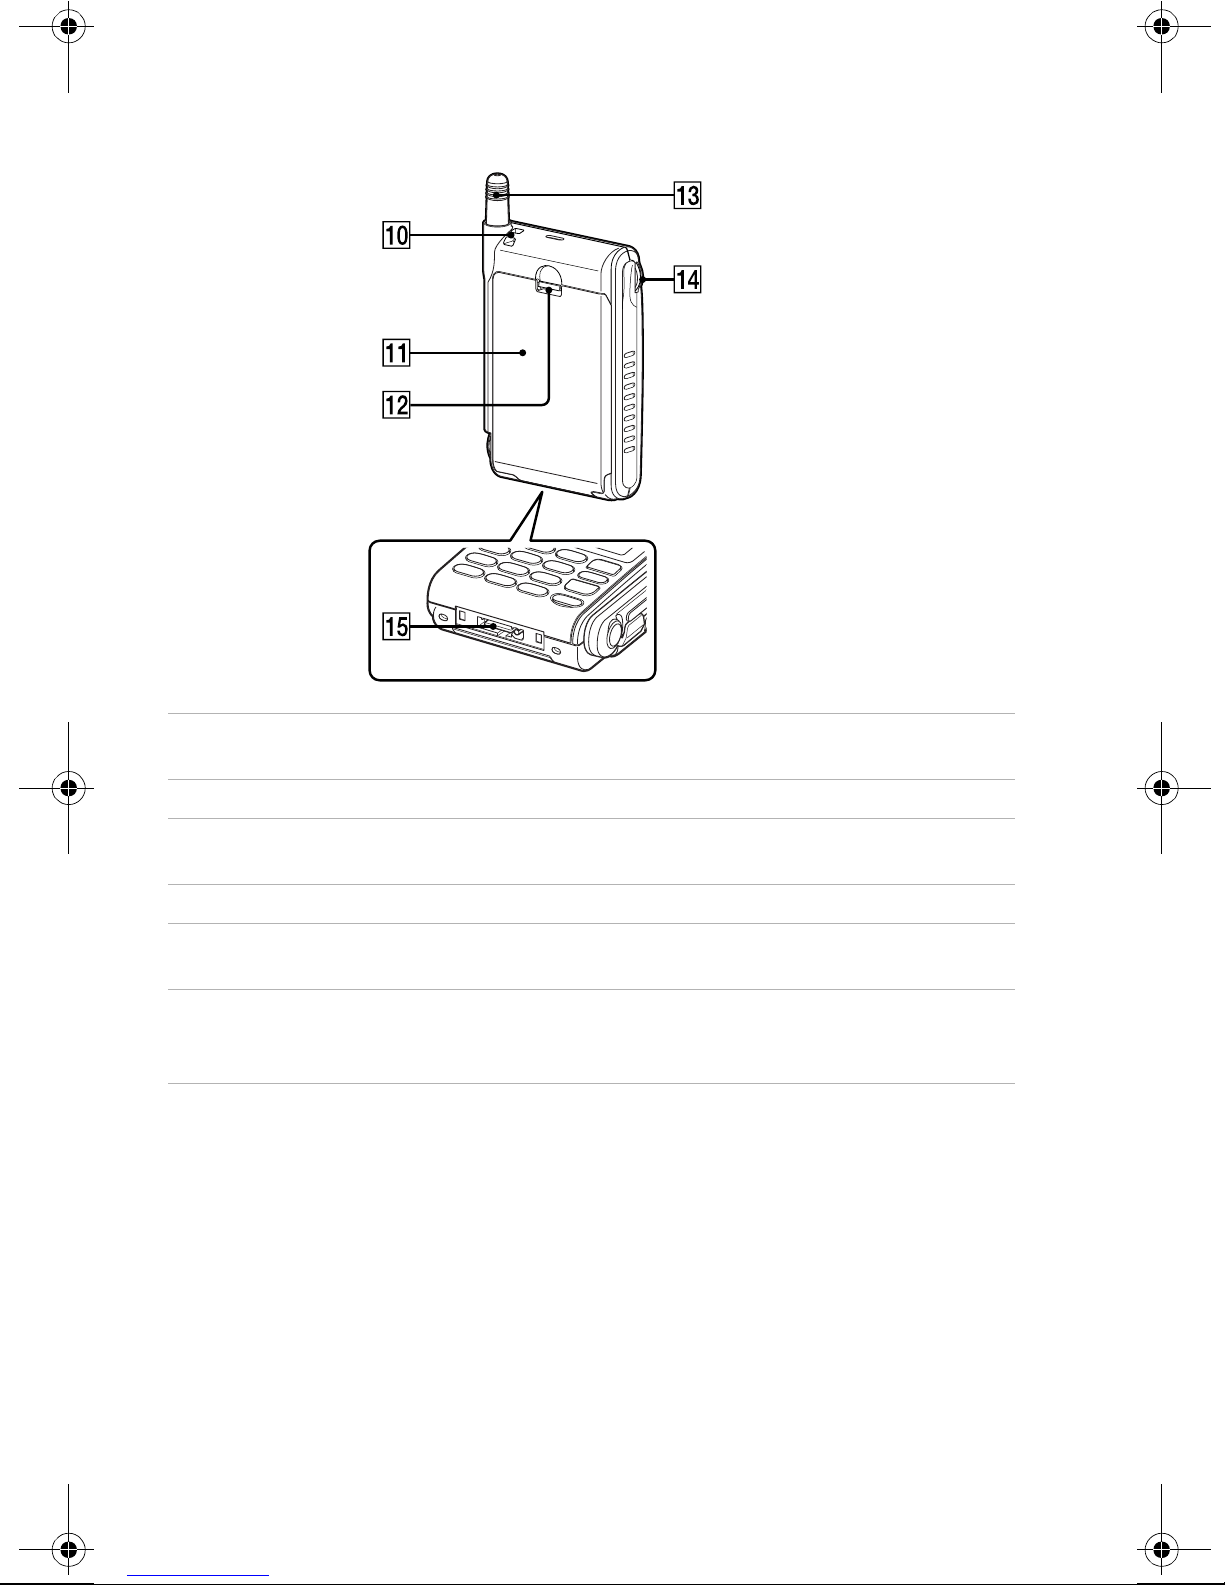
Telephone (Back and Sides)
0
Ringer speaker
Allows ringer sounds to be heard.
qa
Battery
qs
Battery release tab
Push up to remove the battery.
qd
Antenna
qf
Jog Dial™ navigator
Push and turn to navigate menus and to change settings.
qg
Connector
Use to connect the phone to either the AC adapter or to one of the other
accessories availab l e for your pho ne.
Page 9
Getting Started
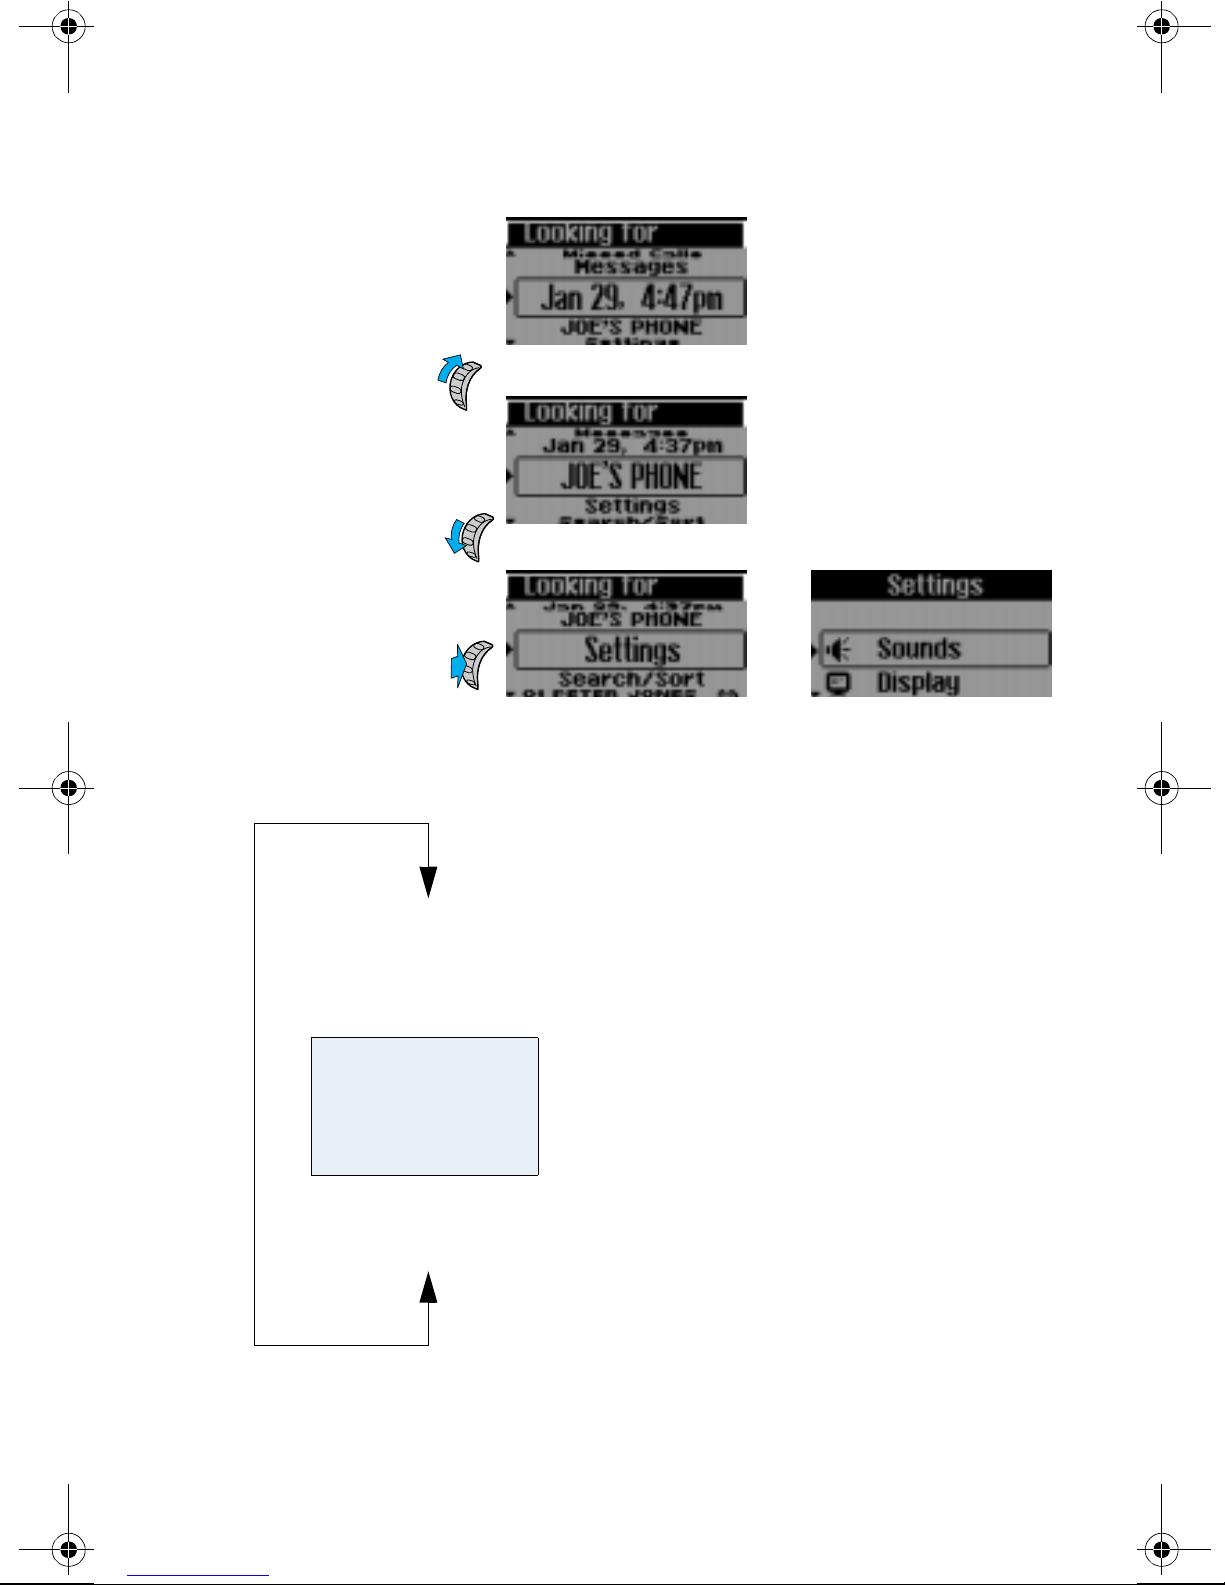
Using the Jog Dial
Use the Jog Dial to navigate through the displays, as shown below.
▼
11
To scroll up to an option,
turn the Jog Dial up
To scroll down to an
option, turn the
Jog Dial down
To select an option, push
in the Jog Dial
+
–
Navigating through the Displays
199 Name 199
Scratch Pad
Calls Made
Received Calls
Missed Calls
Messages
Date and Time
Sony
Settings
Search/Sort Sounds
01 Name 1 Display
02 Name 2
03 Name 3
,
m
The standby screen (left),
is the first screen you see
when you turn on the
phone.
m
,
Settings
Page 10
12 ▼
Getting Started
Display
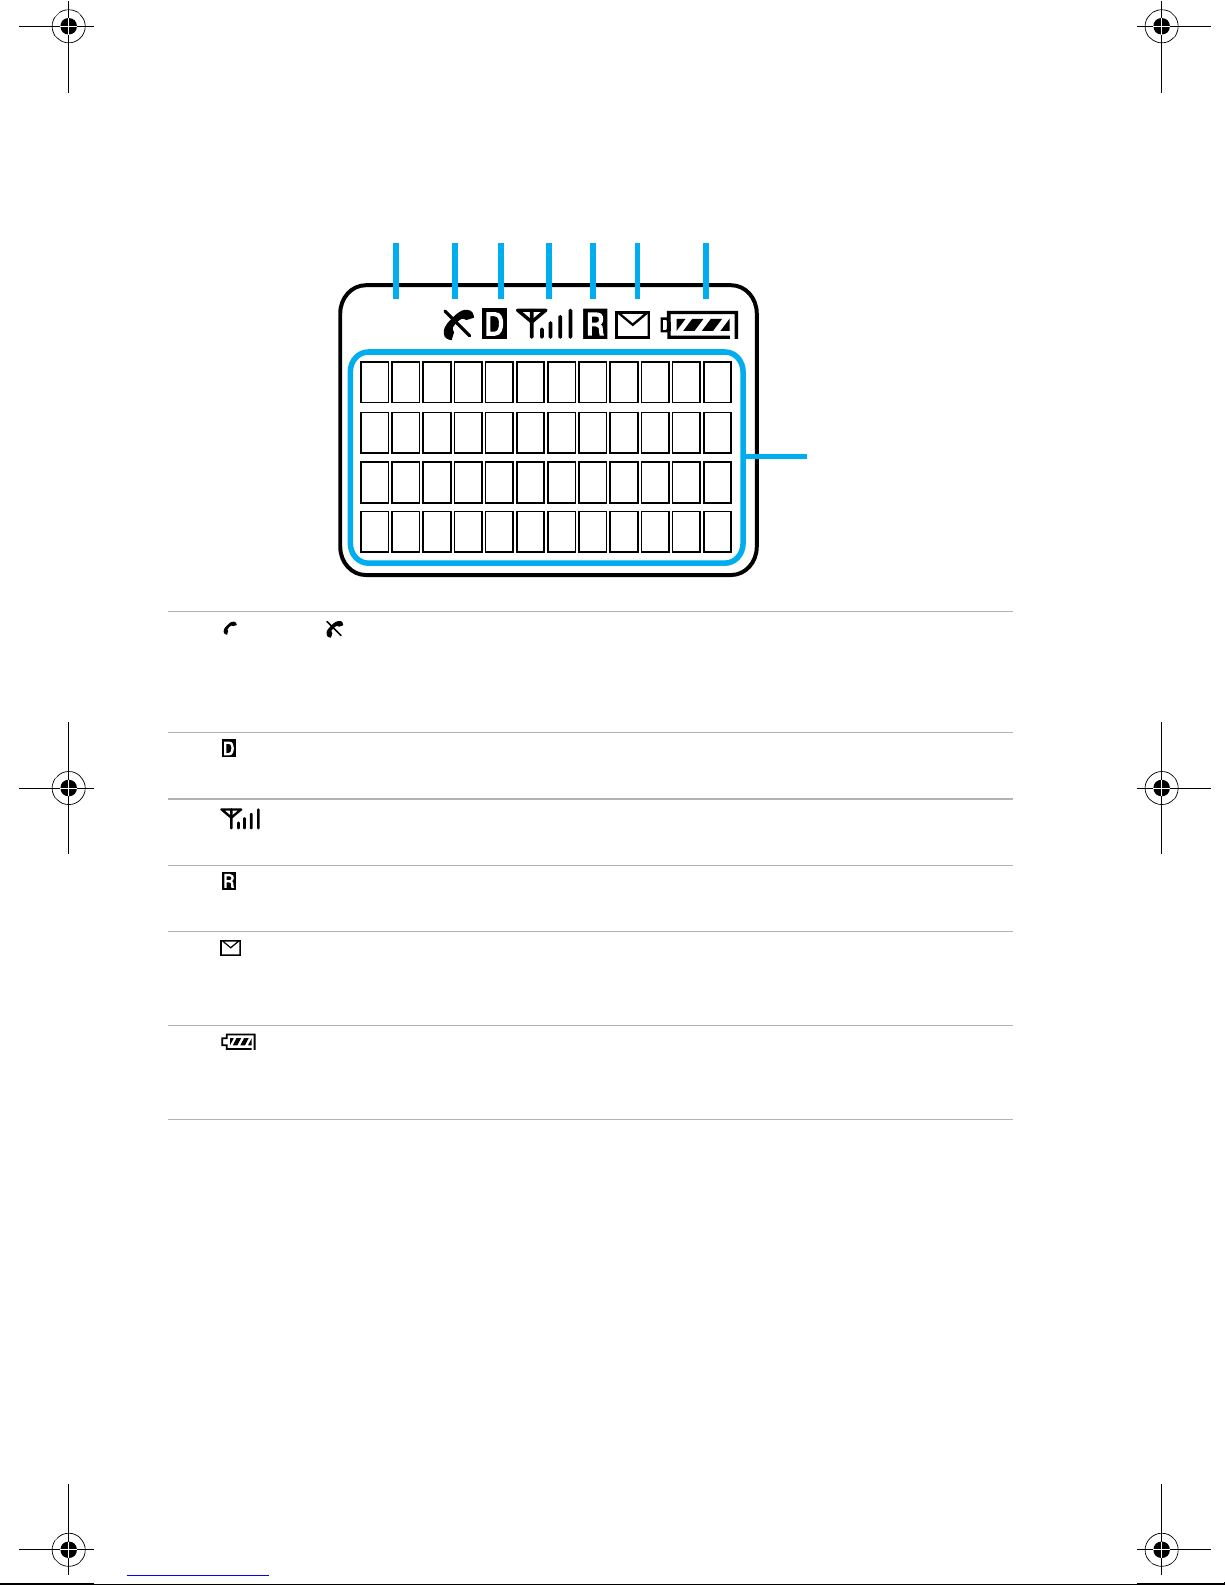
Icons and text appear on the display to show the status of the phone.
1 2 3 4 5 6 7
888
8
2
3
4
5
6
7
(in-use)/ (out-of-service)
The in-us e icon appear s du ring a call. A sl ash throug h the in-use icon appears
when no signal is received. You cannot make or receive calls when the out-ofservice icon is visible.
(digital)
Appears when your phone is receiving a digital signal.
(signal strength)
Tells you the approximate strength of th e si gn al b e in g receiv ed.
(roam)
Appears when you are roaming outside your home service area.
(message)
Appears when you have new text or voice mail messages pending. The icon
flashes if the new message is urgent.
(battery)
Shows the approximate amount of charge power remaining in the battery.
Recharge the battery before it is fully discharged.
Page 11
Getting Started
Charging the Battery
Charge the battery before using the phone. A new battery is not fully
charged. To charge the battery, attach it to the phone, then connect the
supplied AC adapter.
▼
13
NOTE
You can also use the accessories listed on page 57 to charge the battery.
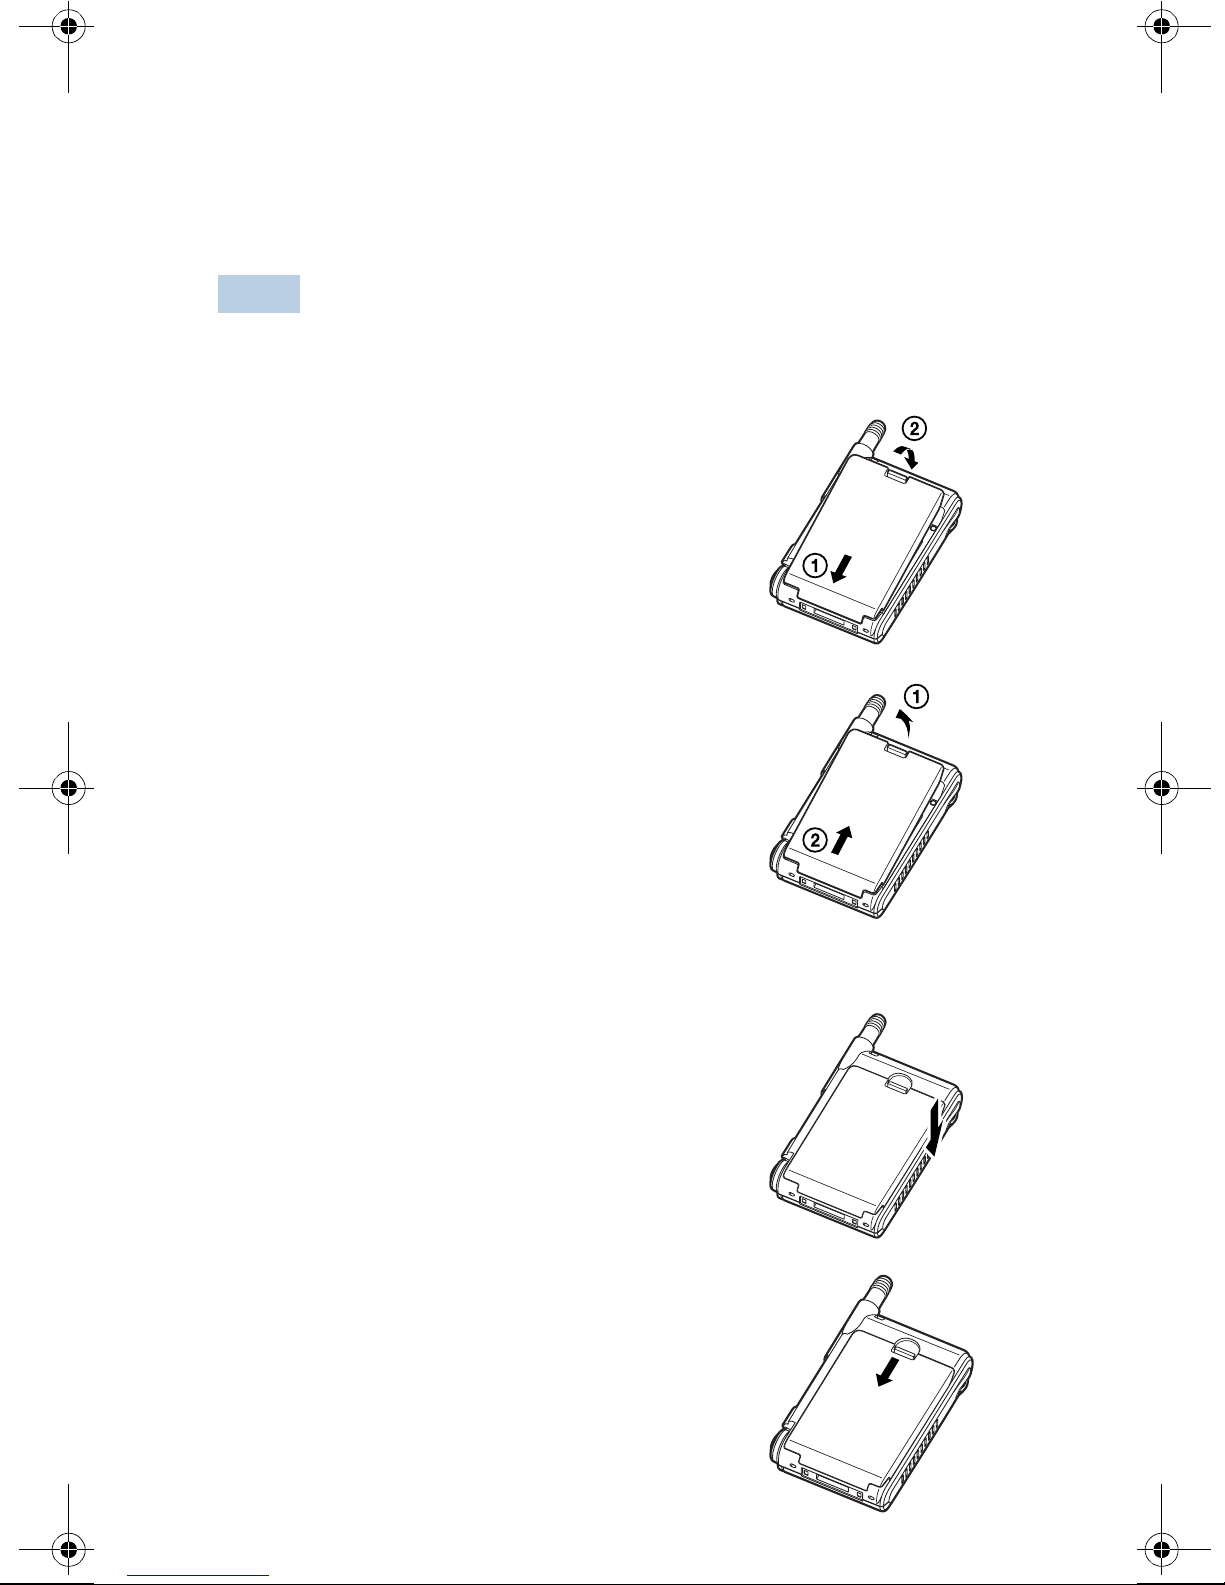
Attaching the Battery
Hook the battery onto the bottom of the
1
phone 1, and lower the battery down 2.
Snap the battery in place.
2
To remove the battery
Push the batter y release tab down.
1
Lift up the top of the battery 1, and pull it
2
out 2.
Page 12
14 ▼
Getting Started
Charging the Battery
You can charge the battery using the AC adapter that is supplied with some
phones. You can also use one of the accessories listed on page XX to charge
your battery.
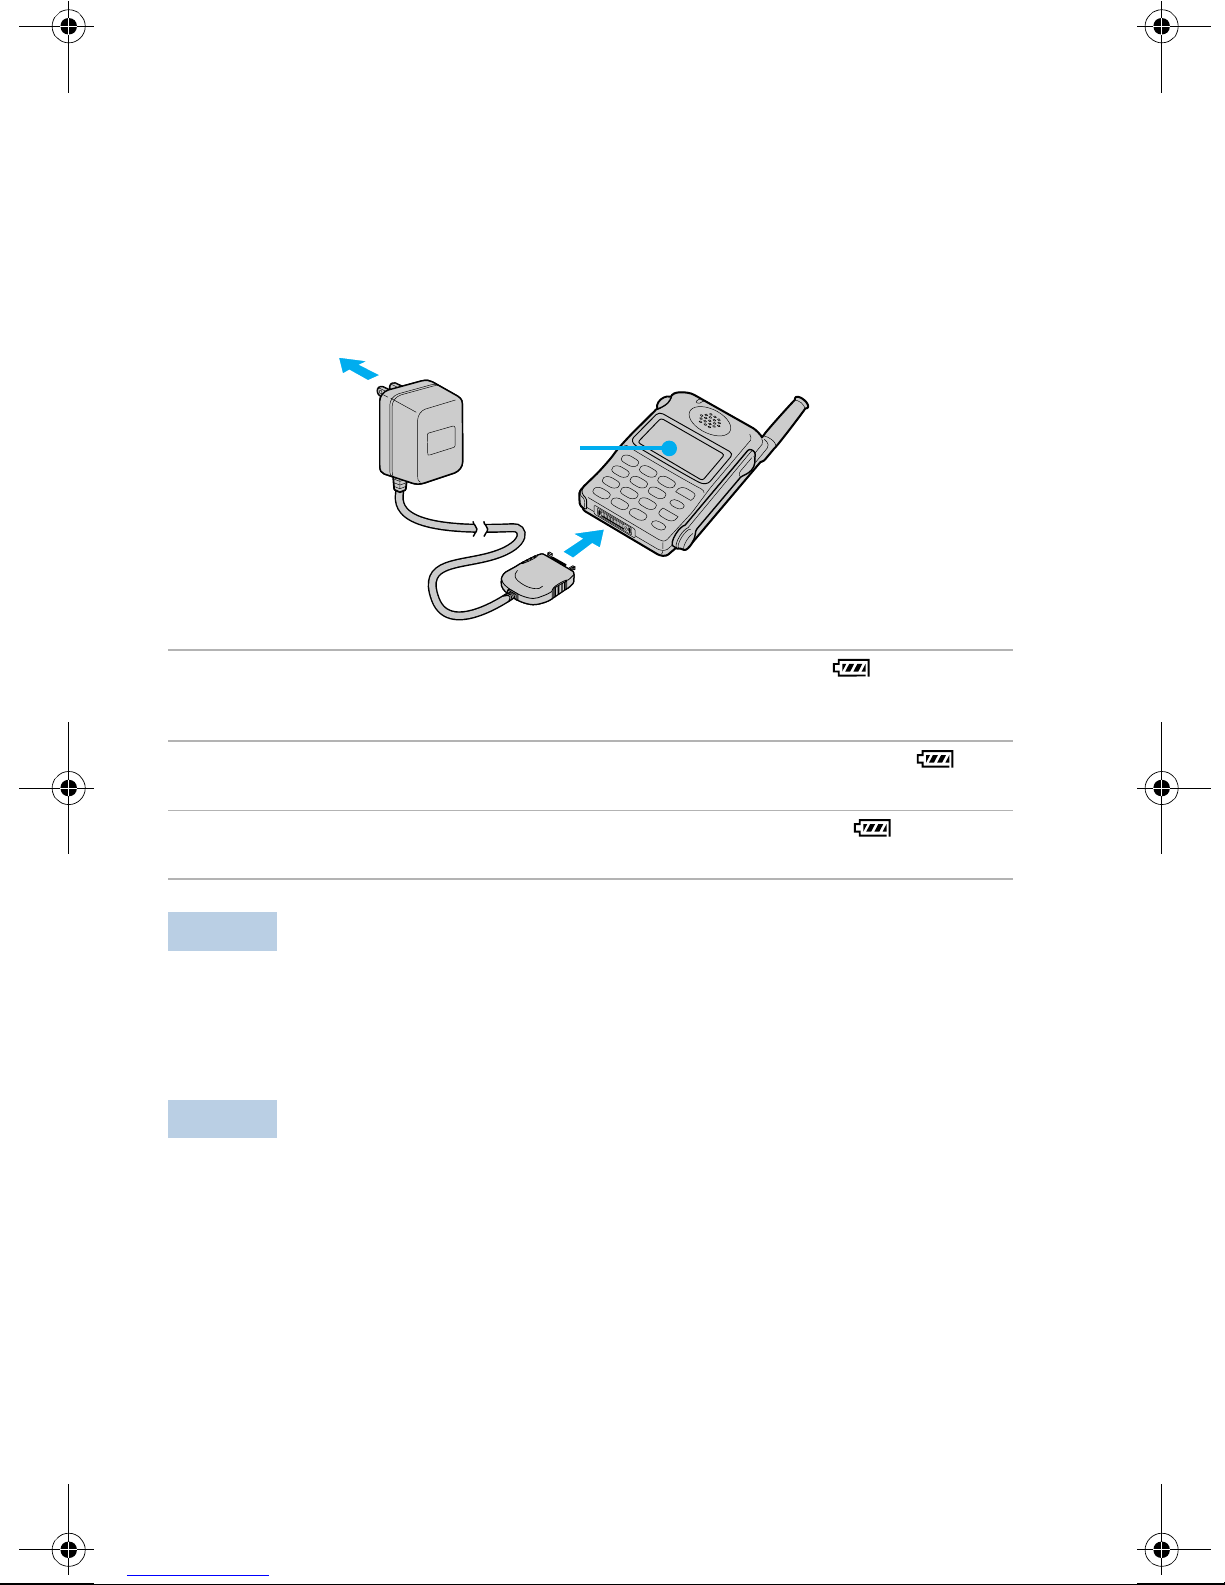
Connect the AC adapter to the phone and the other end to a standard AC
outlet as illustrated below.
To an AC outlet
Display
To the connector on the phone
When the power
is turned on
When the power
is turned off
When the battery is
fully charged
NOTE
CAUTION
• If you make or receive a call when the battery is not charged sufficiently, the call will be
cut off. In that case, you will hear an alert, indicating that the battery is lo w.
• You can turn on the phone without the battery, but you cannot make or receive a call,
even if you connect the AC adapter to an AC ou tlet.
• It is normal for the battery to become warm during charging or after use.
• Avoid charging for long periods of time, since this reduces battery life.
• Avoid charging in temperatures below 32
• Avoid charging the battery in direct sunlight or in places with high humidity (such as a
bathroom).
• Do not use any battery other than the one specified in these instructions.
• Do not expose the battery to temperatures above 140
leave the battery in the sun on the dashboard of a vehicle.
• Do not dispose of the batter y in a fir e or s hort -ci rc uit it. Doing so may caus e th e bat tery
to leak or get hot, which could cause personal injury.
• Do not try to disassemble the battery.
• Do not remove the battery while the phone is turned on.
As the battery charges, the battery icon ( ) pulses and
the LED remains green to indicate that the phone is
charging.
The message
pulses, and the LED remains green.
The LED turns from green to red and
pulsing.
Battery is Charging
°
F (0?C) or over 104°F (40°C).
°
F (60°C). For example, do not
is displayed,
stops
Page 13
Getting Started
▼
15
Checking the Battery
Battery life
A new, fully charged battery lasts appr oxi m at ely as long as descri be d below
before it needs to be recharged. Battery life may vary depending on
conditions of use.
Standby time 80 hours
Talk time 3.5 hours
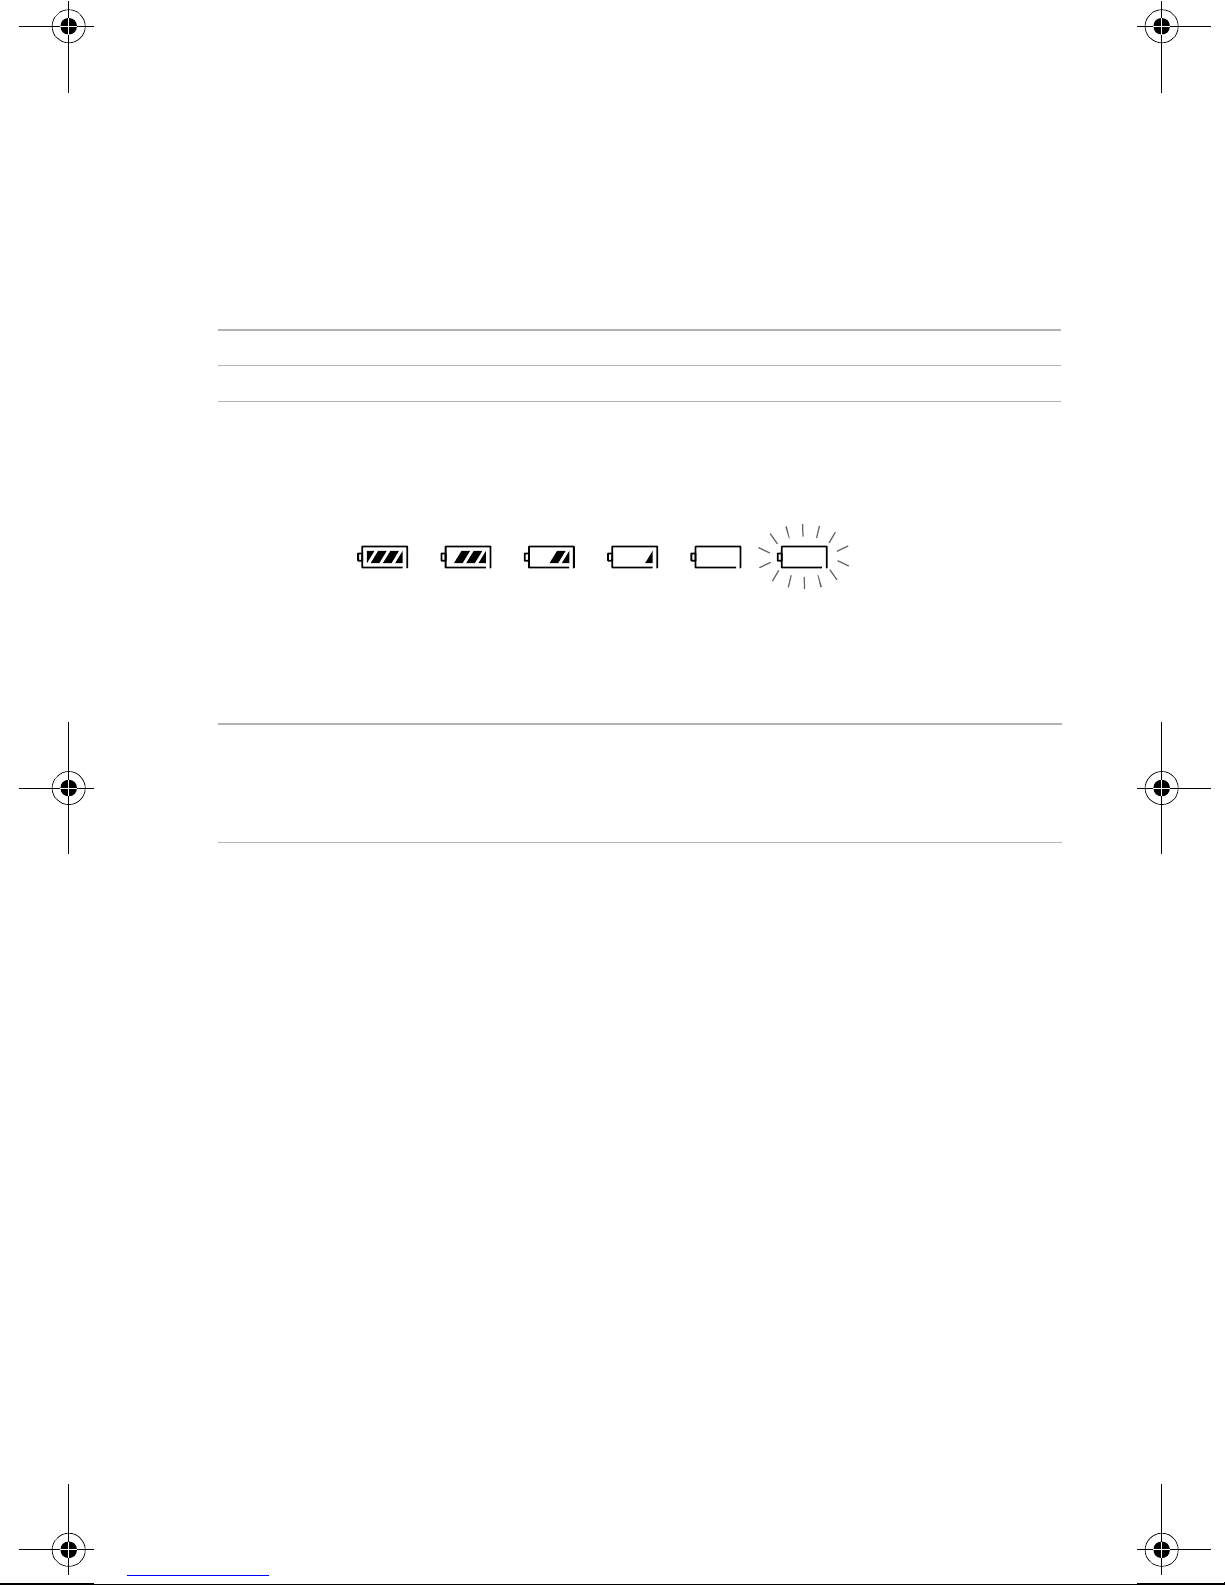
Battery status
The battery icon in dicates th e batte ry level a s follows (when the pow er is on ):
Full
t t t
t t
Empty
Note that the battery icon displays the approxima te charge level and that the
consumption may vary depending on conditions of use, such as ambient
temperature, network coverag e, and usage patterns.
When the battery is empty
The batt e r y icon flashes, a message is disp la y e d, the LED
blinks red, and a beep sounds to indicate the battery is
near empty. Shortl y thereafter, the phone turns off. To
start using your phone sgain, recharge the batt ery.
Page 14
16 ▼
Getting Started
Turning On the Phone
To use your phone, the power must be turned on. It is preferable to extend
the antenna, since t his maximizes signal str ength and m inimizes inte r f erence.
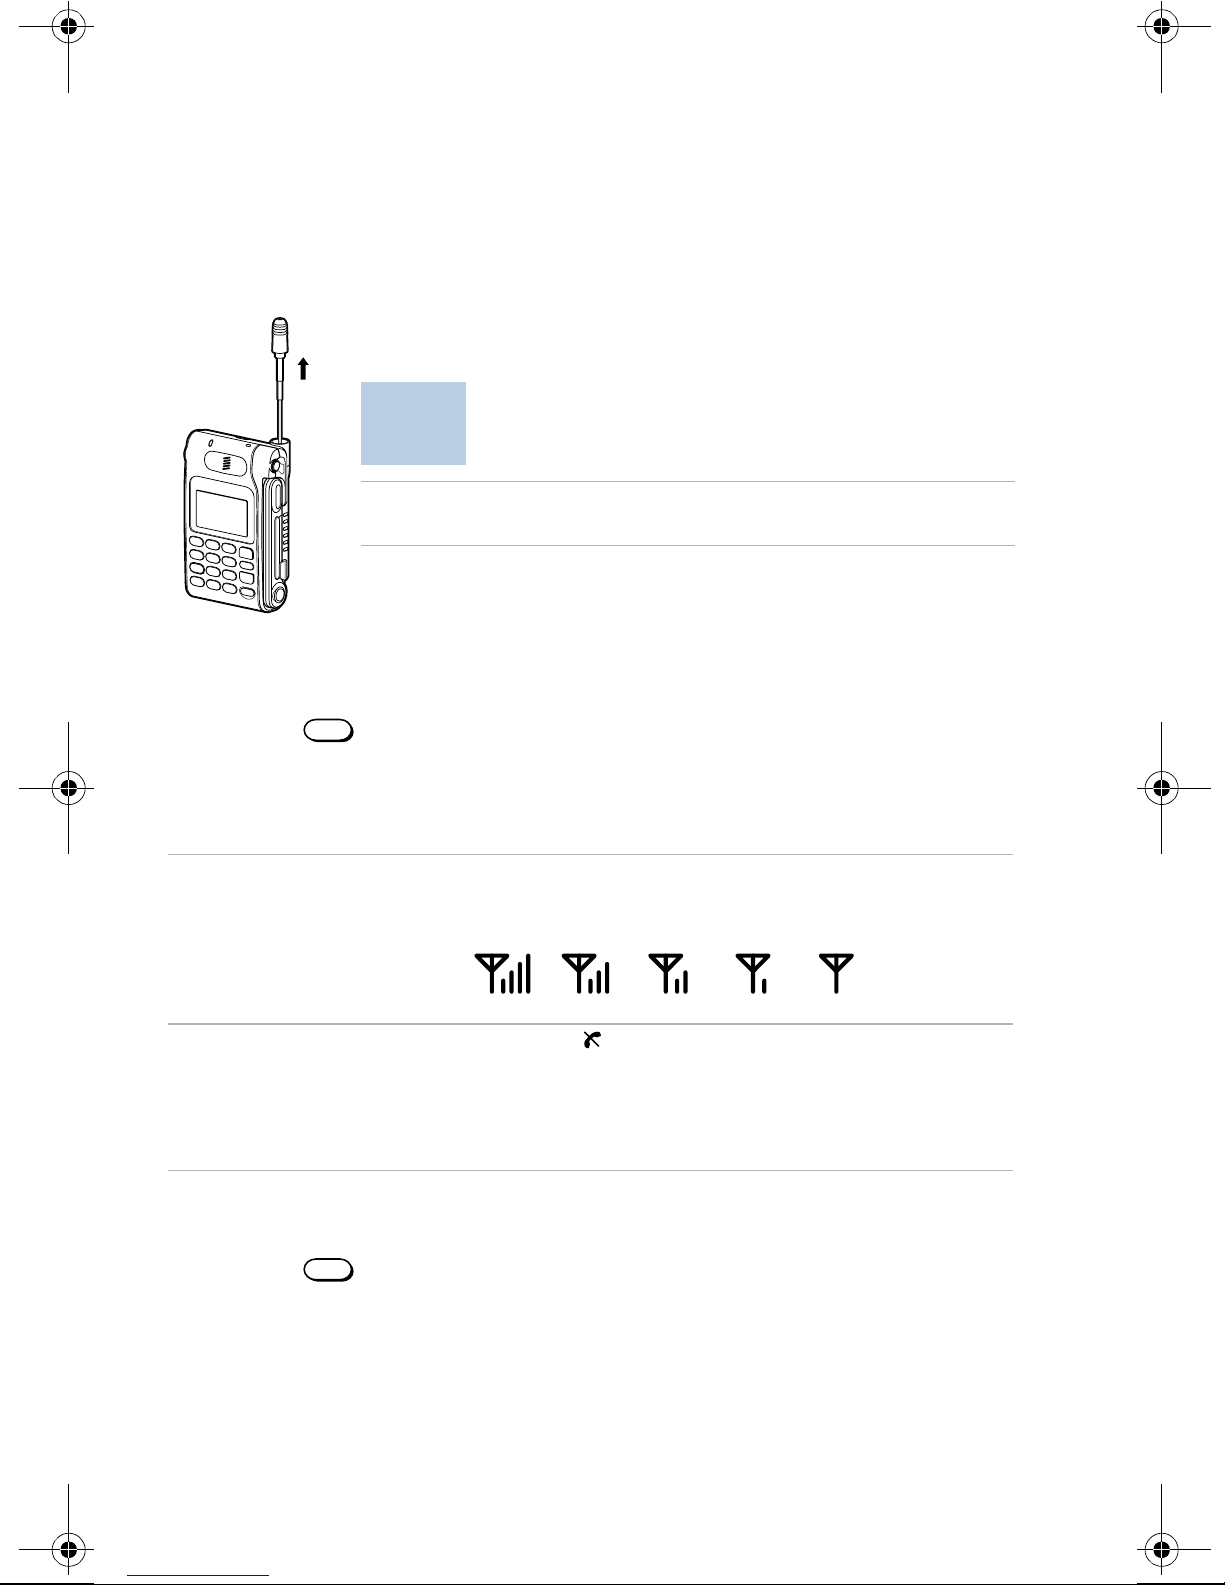
Extending the Antenna
Hold the end of the antenna and pull up until fully
extended.
For improved improved perfomance, the phone’s antenna extends
NOTE
at a slight backward angle. Do not attempt to straighten the
antenna by bending it.
To retract the antenna
Push the antenna down until it
is fully retracted.
Turning On the Power
Hold down until the phone displays
and then off, a beep sounds, and the phone starts searching for a signal.
When the phone has found a service signal, the standby display appears.
Now the phone is ready for use.
To check the
signal strength
If you are out
of the service area
PWR
POWERING ON
The signal strength ic on in dicates various levels of signa l
strength. It is best to make calls when the signal is strong,
although calls can be made when the signal strength is we ak.
Strong Weak
The out-of-servi ce ( ) icon appears and the ph on e se arches
for a service signal. If a signal cannot be found, the phone will
not be able to make or receive a call. If it cannot find a signal
after some time, the phone e nters a power savin g mode. It will
"wake up" periodically to search for a service signal.
. The LED turns on
Turning Off the Power
Hold down until the phone displays
PWR
POWERING OFF
.
Page 15

Getting Started
▼
17
Activating the Phone
Before you can begin making and receiving calls, you need to obtian service
from from a service provider. For information about service providers, check
with the dealer from which you purchased the phone.
Page 16

18 ▼
Getting Started
Page 17
Using Basic Functions
SEND
+
Making Calls
You can call any number up to 32 digits from within your service area.
Use the number buttons to enter the number.
1
CLR
END
.
.
CLR
.
If you enter a wrong number Press
To clear all entered digits Pres s
To retu rn to the standby dis p l ay Hold down
If the microphone arm is closed, open it to dial.
2
If the microphone arm is open, press to dial the number.
To end the call when you are finished, press or close the
3
END
microphone arm.
TIP
Y ou ca n also make calls from the lis t of saved name s and number s (see page31) and from the
call history lists (see page 38).
Related Functions
To adjust the earpiece volume During a call, turn
volume or
To mute/unmute the microphone During a call, push and hold
To redial the last number aut omatically After a call. on the sta nd b y di splay, press
SEND
when the microphone arm is open.
down to decrease vo lu me
–
up to increase
.
19
Page 18
20 ▼
+
Using Basic Functions
Receiving Calls
You can receive calls as long as the out-of-service ( ) icon is not displayed.
When you receive a call, the ringer sounds or the phone vibrates.
flashes, and the LED blinks.
Call
NOTE
1
If the ringer is turned off, you will not hear the rin ger. Ringer Off is displayed. See
“Sounds” on page41 for details.
If the microphone arm is closed, open it to answer the call. If the
microphone arm is open, press any button (except ) to answer the
PWR
Incoming
call.
To end the call, press or close the microphone arm.
2
END
Related Functions
To adjust the earpiece volume During a call, turn up to increase
volume or down to decre as e vol ume.
To mute/unmute the microphone During a call, push and hold
To mute the ri ng e r while it is ringing Turn down.
If caller ID is available The caller’s phone number appears.
If you missed a call The message
appears. T o return to the standby display ,
press , , or . If caller ID was
available, the caller’s phone number is
stored in the Missed Calls list. (For
details, se e “Che ck in g Your Call Histor y”
on page 37.)
SEND
–
.
You have missed XX Calls
END
Page 19

Saving Names and Numbers
Your phone can store up to 199 name entries with up to 400 phone numbers.
Name entries can include one or more phone numbers. Each phone number
can contain up to 32 digits.
Saving a Phone Number
On the standby display, use the keypad to enter the phone number you
1
want to save.
Push .
2
Turn to select
3
When
save, as follows:
Type Icon Type Icon
Home Voice Mail
Work Fax
Pager Modem
Cell Misc None
Turn to select the number type, and then push .
4
When
To save the number to a new na m e Push to sele ct
To save the number to a name you
already created
Number Type?
Under what Name
Save Number
appears, select the type of number that you want to
, and then push .
appears:
follow the procedures under “Saving a
New Name” on page 23.
T urn to select the name fr om the list
and then push .
New Name
and then
NOTE
You can also .... default number shown in the phone list .. how to change then number or
name or which number to show in the display
21
Page 20

22 ▼
Saving Names and Numbers
Entering hyphens and pauses
In addition to digits, you can insert hyphens, time pauses, and hard pauses
into phone numbers. (See “To release a pause or link during a call” on
page 31 for information on releasing a pause or link during a call.)
Hyphens When you enter a hyphen manually (for example, when you want to
store a number that do e s not follow the US/Canada standard),
autohyphenatio n is turne d off for that num b e r.
Pauses A time pause (T) automat ically sends additional digits about t wo
seconds after a call is connected. A hard pause (H) allows you to
send addit ional digits after a cal l is connected. Fo r e xample, you ma y
want to enter a phone num b e r in your phone book as foll ows: 1-800555-1212H123 . The hard pause character in the phone number
allows you to dial the exten si on 123 after you have reached 1-800555-1212.
While entering the digits of a phone number, push .
1
To select one of the following, turn and then push .
2
To Enter Select The Display Shows
A hard pause
A time pause
A hyphen
Insert Hard Pause H
Insert Time Pause T
Insert Hyphen
–
After inserting a hyphen or pause, th e di spla y returns to n umber en tr y mo de.
Page 21
Saving a New Name
Saving Names and Numbers
▼
23
If you selected
New Name
in step 4 of “Saving a Phone Number” on page 21,
use the following steps to create a new name.
Use the Jog Dial navigator to enter the name, as follows:
1
To select a lette r Turn up an d down. For a list of availa ble
characters, see “A lph a n umeric characters” on
page 23.
To save the selected
letter
To erase a character you
entered
When you are finished, push to store the phone number and name.
2
Push to store the new number in the first available memory location.
3
Push .
Press ?
If you want to store it in another lo cation, tu rn to select the location or
enter the location number, then push .
Alphanumeric characters
The following charact ers m ay be av ailable:
Button Available Characters Additional Characters
NOTE
- . , & ( ) : 1 to come
A B C a b c 2
D E F d e f 3
G H I g h i 4
J K L j k l 5
M N O m n o 6
P Q R S p q r s 7
T U V t u v 8
W X Y Z w x y z 9
0
Not all characters may be available in eac h la nguag e. F or e xam ple, Spanish ch aracters may not
be available if the display is set for English.
Page 22

24 ▼
Saving Names and Numbers
Editing a Saved Name
You can edit a name you have saved to the phone book.
On the standby display, turn to select the phone book name that you
1
want to edit.
Push .
2
The contents of the selected name are displayed.
Turn to select the name.
3
Push .
4
Turn to select
5
Edit the name, using the same method you used to create the original
6
name. See “Saving a New Name” on page 23).
The old information is overwritten.
Edit Name
, and then push .
Changing the Phone Book Location of a Saved Name
You can move a saved name to a different location in the phone book.
On the standby display, turn to select the phone book entry that
1
contains the information you want to edit or erase.
Push .
2
The contents of the selected name are displayed.
Turn to select the name.
3
Push .
4
Turn to select
5
FEATURE NOT YET IMPLEMENTED ...
6
Edit Location
, and then push .
Page 23

Saving Names and Numbers
Viewing a Saved Number
If a saved phone number is too long to be seen completely on the standby
display, you can use the
On the standby display, turn to select the name that contains the
1
phone number that you want to view.
Push .
2
The contents of the selected name are displayed.
Turn to select the phone number you want to view.
3
Push .
4
View Number
feature to see the complete number.
▼
25
Turn to select
5
Push when you are finished viewing the number.
6
View Number
, and then push .
Restricting All Phone Numbers Assigned to a Saved Name
You can restrict all phone numbers that are assigned to a saved name.
Restricting numbers can be dialed from the phone book only after entering
the security code? See “XX” for details about setting a security code.
To restrict a single number assigned to a saved name, see ...
On the standby display, turn to select the phone book name that you
1
want to restrict.
Push .
2
The contents of the selected name are displayed.
Turn to select the name.
3
Push .
4
Turn to select
5
Restrict All
, and then push .
When the message
6
Or to cancel the operation, turn to select
A confirmation screen appears, indicating the numbers are now restricted.
NOTES
• The phone number of a restricted entry is displayed only after you enter the lock code.
• Restricted entries are not listed when you search for phone book entries by phone number.
• Cross reference the Security menu?
Restrict all #s
appears, push to select
and then push .
No
Yes
.
Page 24

26 ▼
Saving Names and Numbers
Restricting One Phone Number Assigned to a Saved Name
You can restrict a phone number that is assigned to a saved name. Restricting
numbers can be dialed from the phone book only after entering the security
code? See “XX” for details about setting a security code.
On the standby display, turn to select the phone book name that is
1
assigned the phone number you want to restrict.
Push .
2
The contents of the selected name are displayed.
Turn to select the phone number.
3
Push .
4
Turn to select
5
When the message
6
Or to cancel the operation, turn to select
A confirmation screen appears, indicating the number is now restricted.
• The phone number of a restricted entry is displayed only after you enter the lock code.
NOTES
• Restricted entries are not listed when you search for phone book entries by phone number.
• Cross reference the Security menu?
Restrict Number
Restrict Number
, and then push .
appears, push to select
and then push .
No
Yes
.
Unrestricting All Phone Numbers Assigned
to a Saved Name
You can unrestrict phone numbers that you have restricted. See “Viewing a
Saved Number” on pag e 25.
On the standby display, turn to select the name that contains the
1
restricted numbers that you want to unrestrict.
Push .
2
The contents of the selected name are displayed.
Turn to select the name.
3
Turn to select
4
When the message
5
Or to cancel the operation, turn to select
A confirmation screen appears, indicating the numbers are now unrestricted.
Unrtestrict All
, and then push .
Unrestrict all #s
appears, push to select
and then push .
No
Yes
.
Page 25

Saving Names and Numbers
▼
27
Unrestricting One Phone Number Assigned
to a Saved Name
You can unrestrict a phone number that you have restricted. See “Restricting
One Phone Number Assigned to a Saved Name” on page 26.
On the standby display, turn to select the name that contains the
1
restricted number that you want to unrestrict.
Push .
2
The contents of the selected name are displayed.
Turn to select the
3
Push .
4
CRASH
5
Now the selected entry is unrestricted.
TIP
You can also use the Security menu to restrict/unrestrict names and phone numbers (see
“Security” on page43).
Restricted
number that you want to unrestri ct.
Erasing a Saved Name
You can erase a saved name, including all the phone numbers that are
assigned to that name.
On the standby display, turn to select the phone book name whose
1
numbers you want to erase.
Push .
2
The contents of the selected name are displayed.
Turn to select the name.
3
Push .
4
Turn to select
5
When the message
6
Or to cancel the operation, turn to select
A confirmation screen appears, indicating the numbers are now erased.
Erase All
Erase all numbers
, and then push .
appears, push to select
and then push .
No
Yes
.
Page 26

28 ▼
Saving Names and Numbers
Creating a Voice Label to a Saved Name
You can cr eate a voice label, a short (how long ?) recor ding that you can a ssign
to a saved name. This is useful for ....?
On the standby display, turn to select the name that contains the
1
restricted numbers that you want to unrestrict.
Push .
2
The contents of the selected name are displayed.
Turn to select the name.
3
Turn to select
4
Record your voice label by speaking into the mic. How do I know when
5
it’s done ...?
CRASH.
6
To erase a voice label, select Erase in step 4. (Or should this be separate?)
Record
, and then push .
Changing the Type of a Saved Number
You can change the type of a number you have saved to the phone book. For
a list of the phone number types y ou can save, s ee “Saving a Phone Number”
on page 21.
On the standby display, turn to select the name that contains the
1
phone number whose type you want to change.
Push .
2
The contents of the selected name are displayed.
Turn to select the phone number whose type you want to change.
3
Push .
4
Turn to select
5
FEATURE NOT YET IMPLEMENTED, but we co uld pr ob ab ly cross-
6
reference “Saving a Phone Number” on page 21 for details.
Change Type
, and then push .
Page 27

Saving Names and Numbers
▼
29
Setting a Saved Number as the Main Phone Book Number
If you have multiple phone numbers assigned to a saved name, one number
is designated the “main” number. The main number appears first under the
phone book name ... what are the other advantages to being the main?
On the standby display, turn to select the name that contains the
1
phone number that you want to set as the main phone book number for
that name.
Push .
2
The contents of the selected name are displayed.
Turn to select the phone number you want to set as the main phone
3
book number.
Push .
4
Turn to select
5
FEATURE NOT YET IMPLEMENTED, .. what happens?
6
Set as Main
, and then push .
Editing a Saved Phone Number
You can edit a phone number you have saved to the phone book.
On the standby display, turn to select the name that contains the
1
phone number that you want to edit.
Push .
2
The contents of the selected name are displayed.
Turn to select the phone number you want to edit.
3
Push .
4
Turn to select
5
FEATURE NOT YET IMPLEMENTED, but we could probably cross-
6
reference “Saving a Phone Number” on page 21 for details.
Edit Number
, and then push .
Page 28

30 ▼
Saving Names and Numbers
Erasing a Saved Phone Number
You can erase a phone number you have saved to the phone book.
On the standby display, turn to select the name that contains the
1
phone number that you want to erase.
Push .
2
The contents of the selected name are displayed.
Turn to select the phone number you want to erase.
3
Push .
4
Turn to select
5
When the message
6
Or to cancel the operation, turn to select
TIP
• You can also use the the Security menu to erase individual phone book entries or all phone
book entries at once (see “Security” on page 43).
Erase Number
Erase
, and then push .
appears, push to select
.
Yes
and then push .
No
Page 29
Calling a Saved Number
You can quickly locate the names and phone numbers that you have saved.
For information on saving names and phone numbers, see “Saving Names
and Numbers” on page 21.
Calling a Saved Number
You can use the Jog Dial navigator to easily call phone numbers you saved in
the phone book.
On the standby display, turn to select the phone book name that you
1
want to call.
Push .
2
The contents of the selected name are displayed.
Turn to select the number you want to call.
3
Push .
4
Turn to select
5
What happens if the mic is closed? If it’s open is the call dialed
6
automatically?
The phone dials the number stored in the selected phone book entry.
TIPS
To release a
pause or link
during a call
• You can search for a phone number by name or phone book location (see pages XX).
• Whenever the phone n umber i s displaye d, you can call it by pushi ng or SEND or by opening
the microphone arm.
• If the phone number of a se lected p hone book entr y is too long t o fit on the s creen, yo u ca n
still view the overflow digits. See “XX”.
If a phone book entry contains a hard pause, only the digits up to the
first hard pause are dialed. To dial the rest of the selected entry (and
release the pause), push . For a time pause, wait two seconds. The
phone dials the rest of the entry automatic al ly. (See page XX for
additional information on pauses.)
Send Number
, and then push .
31
Page 30

32 ▼
+
+
Calling a Saved Number
Finding a Saved Phone Number
Searching by Phone Book Location
You can find saved phone numbers by entering its phone book location
number.
On the standby display, enter the phone book location number (a
1
maximum of three? digits).
Push .
2
Turn up to select
3
The phone number that is sa ve d in the ph one book location n umber you
entered is displayed. If the entered location is empty, this is indicated on
the display.
To dial the number, ...
4
Recall Entry
, then push .
Using a Three-Number Search
You can find saved phone numbers by entering just three numbers of the
complete phone number.
On the standby display, enter at least three numbers of the phone
1
number you want to find.
Push .
2
Turn up to select
3
The phone displays all saved phone numbers that match the numbers
you entered.
Turn to view a list of entries that contain the numbers you entered.
4
If a matching phone book entry is not found, this is indicated on the
display.
Find Number
, then push .
To dial the number, ...
5
Page 31

Calling a Saved Number
▼
33
Speed Dialing
HOW IS THIS DIFFERENT FROM FINDING THE NUMBERS AS IN “Using
a Three-Number Search” on page 3 2. SIMULATOR DOESN’T DO THIS.
To dial quickly, you can enter the phone book location numbers. The phone
calls the number stored in the corresponding location.
Use the number buttons to enter the memory location number.
1
To dial the number, open the microphone arm. If the microphone arm is
2
already open, press SEND .
The phone dials the main phone number that is saved to the phone book
location you entered.
Touch Dialing
SIMULATOR DOESN’T DO THIS??? You can dial a saved phone number
without pressing SEND. Before using this feature, make sure that Touch Dial
on the Misc menu is set to on (see “Touch Dial” on page 45).
Open the microphone arm.
1
Enter the phone book location number using the keypad.
2
Hold down the last digit of the phone book location number for about
3
one second.
The phone dials the main phone number that is saved to the phone book
location you entered.
Page 32
34 ▼
Calling a Saved Number
Adding a Prefix to a Saved Phone Number
You can use the
before dialing. For example, you can add an area code prefix to a phone
number you saved as a local phone number.
On the standby display, turn to select the phone book name that you
1
want to call.
Push .
2
The contents of the selected name are displayed.
Turn to select the number you want to call.
3
Push .
4
Turn to select
5
Use the number buttons to enter the prefix number you want to add to
6
the phone number .
Push to make the call.
7
Prefix Number
Prefix Number
feature to add a prefix to a phone number
, and then push .
Sending Tones
SIM CRASH
Page 33

Calling a Saved Number
▼
35
Using Fast 4 Dialing
The Fast 4 Dialing feature enables you to quickly call a saved phone number
by entering only the last four numbers of the number. For example, to Fast 4
dial the saved phone number 215-555-1212, just enter 1212 on the keypad and
then press SEND.
NOTE
1
2
NOTE
Before you can use Fast 4 Dialing the first time, you must first set Fast 4 Dialing to On. For
details, see “Fast 4 Dialing” on page 45.
On the standby display, use the keypad to enter the la st four numbe rs of
the saved phone number that you want to call.
Press SEND.
The complete number is dialed automatically.
If the phone finds more than one phone number with the same last four numbers, or if the
phone finds no phone numbers with these last four numbers, a message is displayed.
Page 34

36 ▼
Calling a Saved Number
Page 35

Checking Your Call History
Your phone includes a phone book, in which you can store up to 199 (01–99)
phone numbers with names. Each phone n umber ca n cont ain up to 32 di git s,
and each name up t o 12 cha racter s. This s ection shows h ow to st or e, e dit, and
erase phone book numbers. You can dial stored numbers quickly by recalling
them from the phone book (see page 4.9).
37
Page 36

38 ▼
Checking Your Call History
Call History
Calling from the Calls List
Information on the ten most re cent outgoing calls, incomin g calls, sc ratch pad
entries, and missed calls are stored in the phone's Calls List. If you call the
same number twice in a row, only the most recent call is stored in the Calls
List.
On the standby display, to select one of the following and then push
1
push .
To See a List of Select
Calls you made
Calls you received
Calls you missed
Information on the most recent call appears.
Turn to select th e entry y ou want.
2
The contents of the selected entry are displayed.
Open the microphone arm if it is closed. If the microphone arm is open,
3
push twice or press SEND .
The phone dials the selected Calls List entry. The icon appears.
If the selected e ntry co ntains a paus e or a lin k, on ly the digit s up to the pause or link are dia led.
TIP
To release pauses and links, see page 4.6.
Calls Made
Received Calls
Missed Calls
Viewing Detailed Information of Calls List Entries
In addition, you can view the digits of a phone number that do not fit on the
screen, the duration of the call, or the time and date of the call by using the
Options menu in step 4 above.
To view Select
Digits that do not fit on the screen
The duration of th e call
The time and date of the call
View Number
Duration
Time/Date
Page 37
Changing the Phone Settings
The Settings menus ... description to come
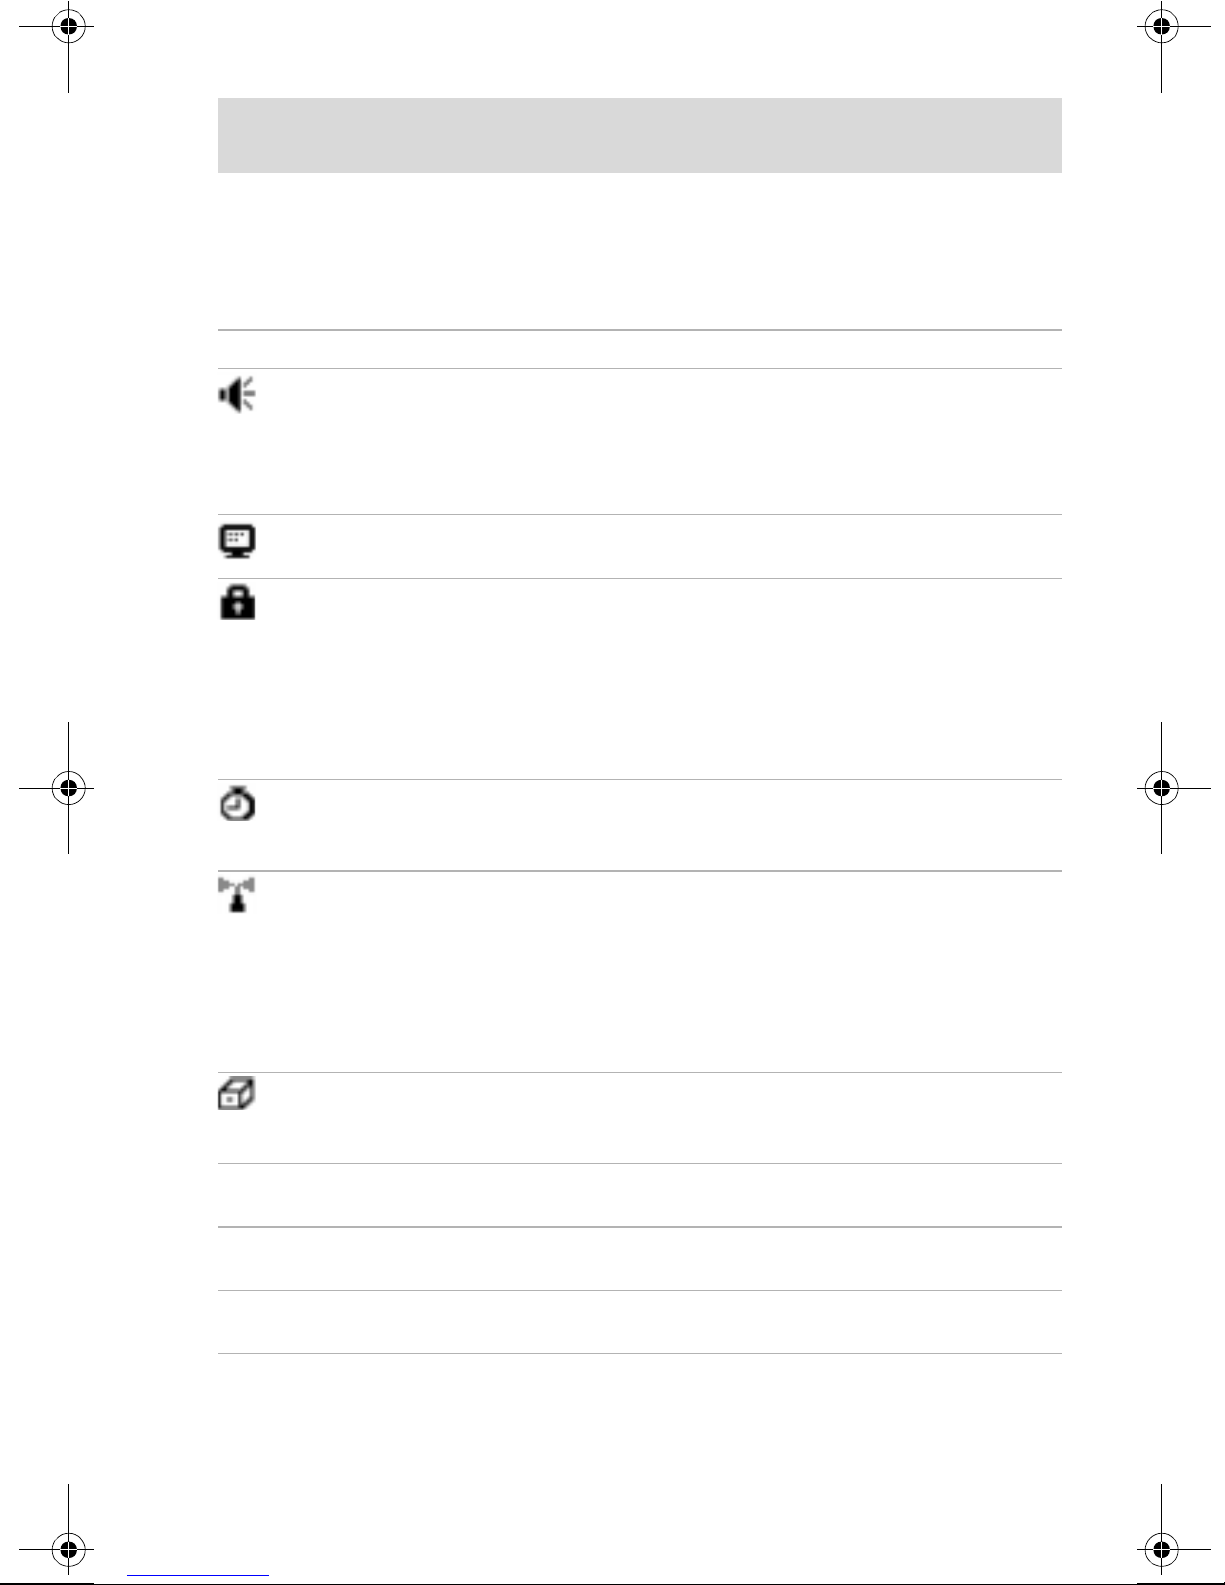
Settings Options
Option Description
Sounds
(page 41)
Display
(page 42)
Security
(page 43)
Timers
(page 44)
Network
(page 44)
Enables you to adjust the volume of the ringer,
keybeep, and earpiece. You can also select the type of
sounds heard when the phone rings and when you
press buttons. You can select to have vibratio n al e rt
instead of a ringi ng sound.
Enables you to change the appearance of the onscreen
display.
Enables you to restrict unauthorized access to your
phone and the information it holds. You can also reset
menu settings to default an d store emergency
numbers. Accessing the Security menu requires a lock
code when you select it from the menu . A typical
default lock code is either the last four digits of your
phone number or 0000.
Enables you to check call durations. In addition, you
can set the phone to alert you every minute of a call,
and make the phone turn itself off automatically
Enables you to set how your phone interacts with the
cellular network. You can set the phone to alert you
when the r o aming status changes, when a call is
dropped, or when e nhanced vo ic e pr iv acy i s gained or
lost. You can also set how NAM ' s (Num b e r
Assignment Modules) are switched, or set system
priorities.
Miscellaneous
(page 45)
Hands Free Kit
(page 45)
Speakerphone
(page 46)
Headset
(page 46)
Allows you to set the phone to enable touch dialing
and to redial automatical ly. You can al so lock the
keypad.
Allows you to TBD.
Allows you to TBD.
Allows you to TBD.
39
Page 38

40 ▼
+
Changing the Phone Settings
Displaying the Settings Menu
To access the Settings menu
[This page would be step-by-step instructions on how to access the Settings
menu -- maybe a menu map ...]
Turn up to select
1
Select one of the following ...
2
3
Settings
, then push .
Page 39

Changing the Phone Settings
▼
41
Sounds
You can use the Sounds menu to adjust the volume of the ringer, keybeep,
and earpiece. You can select the type of sounds heard when the phone rings
and when you press buttons. You can also select to have vibration alert
instead of a ringing sound.
Sound Option Description Settings
Ringer Vol
Keybeep Vol
Ringer Type
KeyBeep Type
KeyBeep Length
Sets the ringer volume
level you hear for
incoming calls .
Sets the beep volume level
you hear when you press
keys.
Sets the ringer sound you
hear for incoming calls.
Sets the beep type you
hear when you press keys.
Sets the time you can hear
the keybeep or touchtone
sound.
Escalate
High
Medium
Low
Vibration
Off
High
Medium
Low
Off
Several ringer options and
melodies are availab l e
Tones
Clicks
Standard
(approx. 0.1s ec)
Long
(from approx. 0.1 to 15
seconds, dependin g on
how long the key is
pressed)
SMS Ringer
EarpieceVol
Short Messaging Service
Ringer
Sets the volume level (1-7)
for the earp ie c e.
Off
On
(three beeps when a new
message is received)
+Reminder
(three beeps once every
three minutes until any
key is pressed)
1-7
Page 40
42 ▼
Changing the Phone Settings
Display
You can use the Display menu to change the appearance of the onscreen
display.
Display Option Description Settings
Backlight
Auto-Hyphen
Length of time the backl igh t remains
while the phone remains untouched.
When set to On, ent e red numbers are
hyphenated according to the US/Canada
standard (eleven d igit s which include a
long distanc e identifier, an area code, a
three-digit community code, and a fourdigit location cod e, for e xam ple, 1-800555-1212).
for 30 secs
for 15 sec
for 7 sec
Off
Always On
(available when
the phone is
attached to a
charging
accessory)
Off
On
Language
Need description.
Not all languages are avail ab le in all
areas.
English
Spanish
French
Portugese
Page 41
Changing the Phone Settings
▼
43
Security
You can use the Security menu to restrict unauthorized access to your phone
and the information it contains. You can reset menu settings to default and
store emergency numbers.
Unlike other items on the Settings menu, accessing the Security menu
requires a lock code when you select it from the menu. A typical default lock
code is either the last four digits of your phone number or 0000.
Security Option Description Settings
Lock Phone
Restrict #
Restrict Book
Erase Book
Enables you to set when the phone
will be locked. When the phone is
locked, carrying out most
operations requir es entering the l ock
code; you can still answer incoming
calls and dial 911 or othe r stored
emergency numbers.
Enables you to restrict acce ss to
individual Ph one Book entries. For
information about using the Restrict
# feature of the Security menu, see
“Restricting One Phone Number
Assigned to a Saved Name” on
page 26.
Enables you to restrict acce ss to all
Phone Book entries. All operations
that involve Phone Book entries
require the four-digi t lock code (see
page 5.16).
Enables you to erase all Phone Book
entries at once.
On power-up
On
Off
Off
On
Erase Calls
Emergency #s
New Code
Master Reset
Enables you to erase all Call List
entries at once.
Enables you to store up to three
emergency numbers other than 911
(which you cannot erase). You can
call these numbers even when the
phone is locked.
The lock code must be enter ed every
time you want to unlock the phone,
and also when you want to access
restricted numbers.
Resets all settings.
Calls Made
Received Calls
Page 42
44 ▼
Changing the Phone Settings
Timers
You can use the Timers menu to check call durations. In addition, you can set
the phone to alert you every minute of a call.
Timer Option Description Settings
Total Calls
Recent Calls
Roam Calls
Minute Alert
Network
You can view the total duration of all
calls. This information cannot be rese t .
Enables you to view the total duration of
the most recent calls. This information
can be reset.
You can view the total time of calls made
while roaming. This information can be
reset.
Enables you to set the phone to alert you
ten seconds before every full minute
during a call.
Off
On
You can use the Network to set how your phone interacts with the cellular
network. You can set the phone to alert you when the roaming status
changes, when a call is dropped, or when enhanced voice privacy is gained
or lost. You can also set how NAM's (Number Assignment Modules) are
switched or set system priorities.
Network Option Description Settings
Roam Alert
Drop Alert
Privacy Alert
Your phone is roaming when you use it
outside of the home area. Roaming access to a
differ ent ca r ri er and the types of calls you can
make varies with the ag reement between your
“home” carrie r an d the currently serving
carrier. Check with your service provider for
details about roamin g in a spe ci fic area.
If the signal fades, your phone m ay drop the
ongoing call. You can choose to be alerted by
an audible alarm when a call is d ropped.
Some networks and service providers of fer the
feature of enhanced voice privacy. This feature
encrypts transmission s to an d from yo ur
phone for added privacy. A display appears to
indicate if enhanced voice privacy is lost or
gained dur ing a call. You can choose to have
an audible alarm accompany this display.
Off
On
Off
On
Off
On
Page 43
Changing the Phone Settings
▼
Misc
On the Miscellaneous menu, you can set the phone to enable touch dialing,
and to redial automatically. Also, you can use this menu to lock the keypad.
Option Description Settings
45
Key Guard
Touch Dial
Auto-Retry
Fast 4 Dialing
Disables the keypad.
When set to On, enables you to ho ld
number keys to dial Memor y lo ca tions.
When set to On, the phone automatically
attempts to redial a call every three
seconds (for up to five at tem p t s) if the
initial call was unsuccessful.
Where does this appear in menu?
Off
On
On
Off
On
Off
Hands Free Kit
Description to come.
Option Description Settings
Ringer Vol
Keybeep Vol
TBD
TBD
High
Medium
Low
Off
High
Medium
Low
Off
Speaker Vol
Backlight
Auto Answer
TBD
TBD
TBD
1-7
Always On
for 30 secs
for 15 sec
for 7 sec
Off
On
Off
Page 44

46 ▼
Changing the Phone Settings
Speakerphone
Description to come.
Option Description Settings
Ringer Vol
Keybeep Vol
Speaker Vol
Backlight
Headset
TBD
TBD
TBD
TBD
High
Medium
Low
Off
High
Medium
Low
Off
1-7
Always On
for 30 secs
for 15 sec
for 7 sec
Off
Description to come.
Option Description Settings
Earpiece Vol
Keybeep Vol
TBD
TBD
1-7
High
Medium
Low
Off
Page 45

Customizing Your Phone
Date/Time
Using the Clock
Setting the Alarm Clock
Setting the Banner
You can change what the banner reads.
Push to select Banner from the standby screen.
1
The Banner display appears. The current banner text is displayed.
Push again to start editing.
2
A message appears, asking you to enter a new banner.
Use the number buttons and / or to enter the new banner text.
3
The banner can be up to 12 characters long. For details on character
entry, see the “Alphanumeric table” on page 4.2.
Push to save the new banner.
4
Your new banner is displayed.
47
Page 46

48 ▼
Customizing Your Phone
Using the Scratchpad
Y our phone has a scratchpad featur e, which is useful for writing down phone
numbers temporarily. The phone doesn't send DTMF tones when you enter
digits to the scratchpad.
Turn to select Scratch Pad, then push .
1
Use the keypad to enter the digits.
2
Push .
3
Turn to select
4
The information is stored as a scratchpad entry.
Store&Exit
, then push .
Page 47
Using Short Messaging Services
This section contains informatio n on the Short Messaging Serv ice (SMS). This
feature may allo w you to recei ve voice or t ext mess ages. Contact y our service
provider to see if this service is available in your area.
Receiving Messages
To receiv e messages, the pho ne must be turned on. The phone supports thr ee
types of messages:
only digits;
VOICE MAIL
MESSAGE
indicates a text message;
is a voice mail notification, and indicates the number
of new voice mail messages stored in your voice mailbox.
typically contains
PAGE
When you
receive a
message
TIPS
The message icon ( ) appears on the display and the call alert indicator
flashes, accompanied by audible alerts. The first line indicat e s
message type and priority. If the message is urgent, the message type
is surrounded by asteri sks (*) an d foll owed by an exclamation mark
(!). If you press any key, this display disappears. The mess age icon ( )
remains displayed as long as there are unread messages.
• If you receive duplicate messages, the phone deletes the older one and stores the new one
with the indication DUPLICATE .
• If the ringer volume is set to vibration , the phone emits a vibration instead of an audible
ring when you receive a message.
Checking Message Storage Capacity .
Voice mail
messages
Text
messages and
pages
Voice mail messages are store d remotely b y your service provider.
Your phone will simply notify you if you have any voice mail
messages. Check with your service provider to find out the maximum
number and length of voice mail messages that can be stored.
A text message mu st con t ai n at le ast one character, and can be up to
200 characters lon g. Th e num b e r of m e ssages that can be stored
depends on the siz e of the me ssages. You c an sto re approximat e ly 12
large messages or 45 small messages.
NOTE
If the memory
becomes full
When you receive a new message and your phone does not have enough
memory to store it, the phone erases old messages that are not locked
The phone issues a warning when the memory is almost full. At this
point, you should erase expendable messages (see page 5.6). If the
memory becomes completely full or your phone does not have
enough memory to receive an incom i ng m e ssa ge , ne w m essage s are
rejected.
49
Page 48

50 ▼
Using Short Messaging Services
Accessing Messages
Push twice from the standby display.
❑
The Message menu appears, indicating the number of the following
types of messages, respectively:
Voice mail messages (see below).
❑
Unread text messages and pages (see page 5.4).
❑
Text messages and pages that you have already read but are still
❑
stored in memory (see page 5.4).
Reading Voice Mail Message Notifications
Contact your service provider to find out how to listen to your voice mail
messages, if this service is available. You may be able to view information
about any voice mail messages you have received, such as the caller's phone
number.
Push to select voice from the Message menu.
1
The Voice display appears, indicating the number of voice messages
stored in your voice ma ilbox. Pr ess CLR to go back to th e Message me nu.
Turn to scroll through the voice mail message notification.
2
To dial a callback number
If a voice mail message notification contains a callback number, you can
quickly return that call.
After reading a voice mail message notification, open the microphone
1
arm if it is closed. If the micr ophon e arm is open, push to see t he Options
menu.
Push again to dial the callback phone number.
2
The phone dials the callback phone number which is attached to the
message.
TIP
In addition, you can dial the callback number by pressing SEND from the Messages display or
when read ing a voice mail notification message if the microphone arm is o pen.
To erase a voice mail message notification
After reading a voice mail message notification, push .
1
The Options menu appears.
Turn to select
2
The voice mail notification message is erased. The Message menu
reappears, indicating that there are currently no voice mail notification
messages stored in memory.
Erase Msg
, then push .
Page 49

Using Short Messaging Services
▼
Reading New Text Messages
You may be able to read text messages received by your phone. Check with
your service provider to see if this service is available. Urgent messages are
listed above non-urgent ones, with the most recent entries first. After you
view a new text message, it is saved as an old text message. You can protect
or erase messages using the Old Text Messages menu.
Turn to select New Text from the Message menu, then push .
1
The first message is displayed. An asterisk (*) indicates an urgent
message. If there are no new messages, this is indicated on the display.
Push to return to the Message menu.
Turn to scroll through the message.
2
If you do not scroll, the display automatically scrolls down.
While viewing a message, push to go to the next text message.
3
The Options menu appears. To return to the standby display, press END.
51
Turn to select Next Msg, then push .
4
The next message is displayed. If there are no more messages, the
Message menu reappears.
NOTE
When you have finished viewing a new text message, it is stored as an old text message.
Reading Old Text Messages
The most recent messages are listed first.
Turn to select Old Text from the Message menu, then push .
1
A list of old messages is displayed. A dot () indicates the beginning of
each message. A lock icon ( ) indicates that the message is locked (see
page 5.5). If a number is too long to fit, an ellipsis (...) is used.
Turn to scroll through the list of old messages.
2
To read the selected message, push .
3
The selected message is displayed.
Turn to scroll through the message.
4
If you do not scroll, the display automatically scrolls down to the end of
the message.
When you have read the message, press CLR to return to the list of old
5
messages.
To read the next message, push to go to the Options menu, then select
Next Msg . To read the previous message, push to go to the Options
menu, then select Prev Msg .
Page 50
52 ▼
Using Short Messaging Services
To protect a text message
You can lock a message to protect it from being erased.
After reading a message, push .
1
The Options menu appears.
Turn to select
2
A message indicates that the message is now locked.
NOTE
The phone does not erase locked messages automatically. When there is not enough memory
for incoming messages, you must erase the locked messages manually.
Lock Msg
, then push .
To respond to a text message
After reading a text message, open the microphone arm if it is closed.
1
If the microphone arm is open, push to see the Options menu. Turn to
2
select Send , then push .
The phone dials the callback phone number which is attached to the
message. If a callback number is not attached to the message, no call is
made and a message indicates that a callback number is not available.
TIP
In addition, when viewing a te xt mes sage or the li st of old mes sages , you ca n dial the callba ck
phone number simply by opening the microphone arm, or pressing SEND when the
microphone arm is already open.
To save the callback number
After reading a message, push .
1
The Options menu appears.
Turn to select
2
A message appears, prompting you for a name to accompany the
number.
Use the number buttons to enter the name.
3
See the "Alphanumeric table" on pa ge XX for info rmation about ent ering
characters.
Push to store the phone number and name.
4
A confirmation message appears.
Push to store the new number in the first available memory location.
5
If you want to store it in another location, turn to select the desired
location, then push .
Save Number
, then push .
Page 51

Using Short Messaging Services
To erase a text mes sage
After reading a text message, push .
1
The Options menu appears.
Turn to select Erase Msg , then push .
2
The message is erased.
Erasing Old Text Messages [F14]
Turn - down to select Erase Old from the Message menu, then push .
1
The Erase Old menu appears.
Press 1 to erase old messages.
2
All unlocked old messages are erased. To go back to the Message menu
without erasin g the messa ges, push . If you er ase a ll old m essag es, it wil l
be indicated on the Message menu.
▼
53
TIP
To erase a locked message, select Erase Msg from the Options menu of that message.
Page 52

54 ▼
Using Short Messaging Services
Page 53
Additional Information
Troubleshooting
Problem Cause/Remedy Page
Nothing appears on the
display.
The out-of-ser vi ce icon
( ) appears.
Nothing happens when
you press the buttons.
The call does not go
through.
You can hear the other
party, but the other
party cannot hear you.
You hear the other
party only faintly.
The call is cut off
("dropped").
• The phone is off. Turn the phone on.
• Battery is fully discharged. Recharge the
battery.
• The phone is outside the service area, or the
signal is too weak. Extend the antenna fully.
• The buttons may be locked.
• The phone may be locked. Enter the lock code
to unlock the phone.
• Check the sign al st rengt h.
• If the icon is displayed, there is no service. See
above.
• Check the number.
• Press SEND.
• Listen for a b usy sign al.
• The microphone may be muted. Unmute the
microphone.
• Adju s t the earpiece volum e . If possible, also
reduce the noise around you.
• You could be outside the coverage area. Redial
the number. If the problem continues, contact
your carrier. Also see "The out-of-service icon (
) appears" above.
You hear an alternate
high/ low tone.
You forgot the lock
code.
You hear a fast busy
tone.
• Y ou ar e attempt ing to use the phone in an area
without service.
• Extend the antenna fully.
• Let the icon disappear, then try to dial.
• Try 0000 or the last four digits of your own
number.
• See your service provider or au thori zed dealer.
• This can result from any one of the following: The phone is improperly programmed.
• The ph one is out of range.
• All cha n ne l s are bu sy.
• The antenna is broken or damaged.
55
Page 54

56 ▼
Additional Information
Problem Cause/Remedy Page
You cannot place or
receive call s.
• Make sure that the phone is turned on, and
that the out-of-service icon is not displayed.
• Check the system se ttin gs. If you are roaming,
consult your service provider concerning
roaming agreements.
Page 55

Additional Information
Accessories
Supplied Accessories
Additional accessories and diffe r ent AC adapters may be su p plied wit h
phones outside North America.
to come
International Accessories
to come
▼
57
Page 56
58 ▼
Additional Information
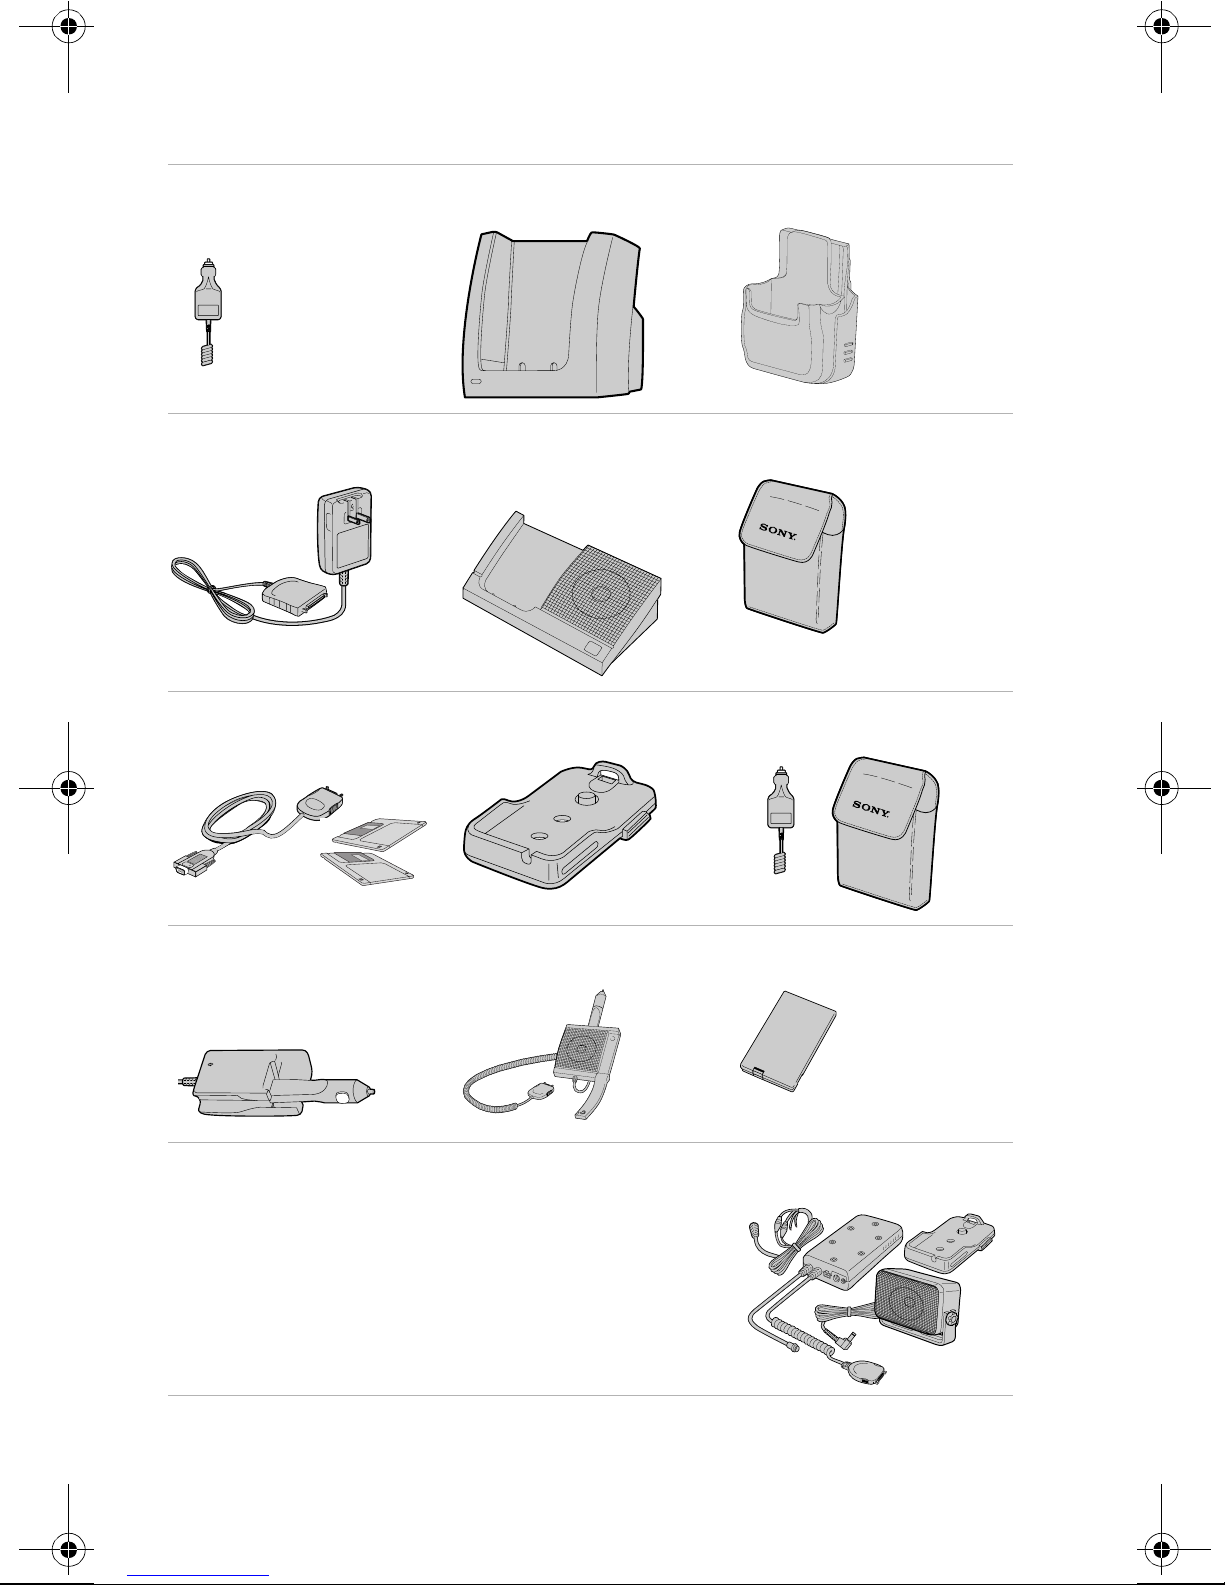
Optional Accessories
Rapid Charging Cigarette
Lighter Adapter
(QN-008CLA)
Travel Adapter
(QN-009TA)
Fonebook PLUS S oftware
with Interface Cable
(QN-012DAS)
Dual Slot Battery Charger
(QN-021BCD)
Deskt op Charger
Speakerphone
(QN-023DCS)
Auto Travel Holder
(QN-024HC)
Phone Holster
(QN-026HS)
Carrying Case
(QN-027LC)
Starter Kit
(QN-028SKT)
Combination Travel
Adapter/Cigarette Light er
Adapter
(QN-020TCL)
Portable Hands-Free Car
Kit (QN-025PHK)
How to Purchase Accessories
Call 1-800-488-SONY (7669) to order additional
accessories (USA only).All accessories may not be
available at press time. Some accessories may not
be available outside the United States.
Li-Ion Battery Pack
(QN-029BPL)
Hands-F ree Car Ki t
(QN-030HFK)
Page 57

Specifications
Additional Information
▼
59
Frequency Range Transmit
Receive
Dimensions
Mass (Weight)
Operational
Temperatures
3.9 x 2.5 x .8 inches (h /w/d) (95 x 63 x 21 mm)
(not including antenna)
4.8 oz. (136 g)
Phone
Battery
1851.25 to 1908.75 MH z
1931.25 to 1988.75 MH z
(including battery)
-22°F to 140°F (-30°C to 60° C)
-4°F to 140°F (-20°C to 60°C)
(operating
temperature)
Battery
32°F to 104°F (0°C to 40°C)
(charging
temperature)
Design and specifications are subject to change without notice.
Page 58

60 ▼
Additional Information
Rules and Regulations
The U.S. Federal Communications Commission and the Industry Canada
regulate cellular telephone service in their respective countries. It is
important for you, the cellular telephone user, to observe the applicable
regulations when operati ng your cellula r teleph one in eith er countr y. In
addition to these U.S. and Canadian federal regulations, you may be bound
also by cert ain stat e, pr ovincial, terr ito ria l, a nd loca l r u les an d regulations, a s
well as by your cellular carrier's tariff (the rates, terms, and conditions of its
service). If you wish to use your cellular telephone in both the U.S. and
Canada, please consult with your System Operator.
Furthermore, you should remember that your cellular telephone is a
radiotelephone, - i.e., it combines both wireline technology, as used in your
home or office telephone syste m, and radio technology - and that the scope of
regulations and pr ecautions is t herefo re br oader than the scope of regulation s
and precautions relating to wireline-only telephone usage.
Some of the major points of consideration are set out below. Please note,
however, that these “Rules and Regulations” and “Safety Precautions”
sections do not constitute legal advice, and are intended merely for general
information purposes. If you have specific questions, please contact your
cellular carrier (System Operator).
License - If your home system is in the U.S., you do not require a separate
license to operate your cellular telephone; obtaini ng a cellular telephon e
access number is sufficient to register you as a user. If your home system is in
Canada, a separate license is required; your carrier will assist you in the
licensing process. If you wish to use your cellular telephone on both sides of
the border, please contact your cellular carrier (System Operator).
Equipment modifications - The U.S. Federal Communications Commission
has type-approved the model of cellular telephone which you have
purchased, and has allocated a specific frequency range for cellular service.
No changes or adjustments are to be made to your cellular telephone.
The radio equipment shall be made available for inspection upon request by
representatives of the FCC or licensees.
Denial of service - A cellular carrier may deny service temporarily or
terminate service for violation of any government regulations or violation of
its tariff .
Privacy - As a telephone user, you have come to assume a certain standard of
privacy when y ou place or receive a telephone call via the trad itional wir elin e
systems. However, because cellular telephones utilize radio transmissions to
effect calls, the same standard cannot always be assured.
Page 59

Additional Information
While it is unlawful for any unauthorized person to divulge or use any
information obtained from intercepting or “listening in on” conversations
intended for others, you should not assume that your conversation is
completely secure.
Interference - No person shall interfere with, or cause interference to, any
radio communication or signal.
▼
61
Safety Precautions
IMPORTANT
For safe and efficient operation of your phone, observe these guidelines.
Your CDMA PCS telephone is a radio transmitter and
receiver. When the phone is ON, it receives and sends out radio frequency
(RF) energy. The phone operates in the frequency range of 1851 MHz to 1988
MHz. When you use your phone, the cellular system handling your call
controls the power level at whcih your phone transmis.
Exposure to Radio Frequency Energy
Research on health effects from RF energy has focused for many y ears on F M
radio technology. That research and studies regarding newer radio
technologies, such as CDMA, have found no credible scientific evidence that
adverse health effects result from the use of cellular telephones.
The Institute of Electrical and Electronics Engineers (IEEE) in 1991, and The
American National Standards Institute (ANSI) in 1992, updated the 1982
ANSI Standard for saf ety lev e ls with respe c t to hum an ex po sure to R F
energy. Over 120 scientists, engineers, and physicians from universities,
government health agencies, and industry, reviewed the available research
and developed this updated Standard. In March 1993, the U.S.
Federal Communications Commission (FCC) proposed the adoption of this
updated Standard.
The design of your phone complies with this updated Standard. Of course, if
you want to limit RF exposure even further t han the updated ANSI Standard,
you may choose to control the duration of your calls and opera te your phon e
in the most power efficient manner.
Efficient Phone Operation
Page 60

62 ▼
For your phone to operate at the lowest power level consistent with
satisfactory call quality, please observe the following guidelines: Your phone
has an extendable antenna; extend it fully whenever possible for maximum
efficiency.
Hold the phone as you would any other telephone. While speaking directly
into the mouthpiece, position the antenna up and over your shoulder.
Do not hold the antenna when the phone is in use. Holding the antenna
affects call quality and may cause the phone to operate at a higher power
level than needed.
Additional Information
Antenna Care and Replacement
Do not use the phone with a damaged antenna. If a damaged antenna comes
into contact with the skin, a minor burn may result. Replace a damaged
antenna immediately. Take your phone to an authorized service center for
repair .
Use only the supplied or approved antenna. Unauthorized antennas,
modifications, or attachments could impair call quality, damage the phone,
and violate FCC regulations.
Driving
Check the laws and regulations on the use of cellular telephones in the areas
where you drive. Always obey them. Also, when using your phone while
driving, please:
Pay full attention to drivin g
❑
Use hands-free operation, if available
❑
Pull off the road and park before making or answering a call, if driving
❑
conditions so require
Page 61

Additional Information
▼
63
Electronic Devices
Most modern electronic equipment is shielded from RF energy. However, RF
energy from cellular telephones may affect some electronic equipment.
RF energy may affect improperly installed or inadequately shielded
electronic operating and entertainment systems in motor vehicles. Check
with the manufacturer or its representative to determine if these systems are
adequately shielded fr o m ext ern al RF energy. You should also check wit h the
manufacturer of any equipment that has been added to your vehicle.
Medical Devices
Consult the manufacturer of any personal medical devices (such as
pacemakers, hearing aids, etc.) to determine if they are adequately shielded
from external RF energy. Your physician may be able to assist you in
obtaining this informat ion .
Turn your phone OFF in health care facilities when regulations posted in the
areas instruct you to do so. Hospitals or health care facilities may be using
equipment that could be sensitiv e to ext e rn al R F ene rgy.
Aircraft
Turn your phone OFF before boarding any aircraft.
❑
Use it on the ground only with crew permission.
❑
Do not use in the air.
❑
To prevent possible interference with aircraft systems, U.S. Federal Aviation
Administration (FAA) regulations require you to have permission from a
crew member to use your phone whi le the plane is on th e gr ound. To prevent
interference with aircraft communication systems, FCC regulations prohibit
using your phone while the plane is in the air.
Children
Do not allow chil dren to play with your ph one. It is not a toy. Children could
hurt themselves or others (by poking themselves or othe rs in the eye with the
antenna, for example). Children also could damage the phone or make calls
that increase your telephone bill.
Blasting Areas
To avoid interfering with blasting operati ons, turn your unit OFF when in a
“blasting area” or in areas posted: “Turn off two-way radio.” Construction
crews often use remote control RF devices to set off explosives.
Page 62

64 ▼
Additional Information
Potentially Explosive Atmospheres
Turn your phone OFF when in any area with a potentially explosive
atmosphere. It is rare, but your phone or its accessories could generate
sparks. Sparks in such areas could cause an explosion or fire resulting in
bodily injury or even death.
Areas with a potentially explosive atmosphere are often, but not always,
clearly marked. They include fueling areas such as gas stations; below deck
on boats; fuel or chemical transfer or storage facilities; areas where the air
contains chemicals or particles, such as grain, dust, or metal powders; and
any other area where you would normally be advised to turn off your
vehicle's engine.
Do not transport or store flammable gas, liquid, or explosives in the
compartment of your vehicle which contains your phone or accessories.
In the United States, v ehi cle s using liquefied petroleum gas (s uch as propane
or butane) must comply with the National Fire Protection Standard (NFPA-
58). For a copy of this standard, contact the National Fire Protection
Association, One Batterymarch Park, Quincy, MA 02269, Attn: Publication
Sales Division.
In Canada, vehicles using liquefied petroleum gas (such as propane or
butane) must comply with the Canadian Gas Association (CAN/CGSB149.2).
For a copy of this standard, contact the Canadian Standards Association, 178
Rexdale Blvd., Etobicoke, ON M9W 1R3, Attn.: Standard Sales Department.
Heat and Sunlight Exposure
Avoid leaving your phone exposed to direct sunlight or extreme heat.
Extended exposure to hea t and/or sunligh t may damage your phon e.
Page 63

Battery/Legal Statement
Page 64

66 ▼
Additional Information
[back cover]
800 Numbers/Web Address
Page 65

▼ 67
 Loading...