

Page 1
3-862-097-23 (1)
CD/DVD Player
Operating Instructions
Manual de instrucciones
EN
ES
C2
C2
DVP-S500D
1998 by Sony Corporation
Page 2
WARNING
To prevent fire or shock hazard, do not
expose the unit to rain or moisture.
To avoid electrical shock, do not open the
cabinet. Refer servicing to qualified personnel
only.
CAUTION
The use of optical instruments with this product will
increase eye hazard. As the laser beam used in this
CD/DVD Player is harmful to eyes, do not attempt to
disassemble the cabinet.
Refer servicing to qualified personnel only.
This label is located on the Laser protective housing
inside the enclosure.
Precautions
Safety
• This unit operates on 110 - 240 V AC, 50/60 Hz.
Check that the unit's operating voltage is identical
with your local power supply.
• If anything falls into the cabinet, unplug the unit and
have it checked by qualified personnel before
operating it any further.
• The unit is not disconnected from the mains as long
as it is connected to the mains outlet, even if the unit
itself has been turned off.
• Unplug the unit from the wall outlet if you do not
intend to use it for an extended period of time. To
disconnect the cord, pull it out by the plug, never by
the cord.
Installing
• Allow adequate air circulation to prevent internal
heat buildup.
• Do not place the unit on surfaces (rugs, blankets, etc.)
or near materials (curtains, draperies) that may block
the ventilation slots.
• Do not install the unit near heat sources such as
radiators or air dusts, or in a place subject to direct
sunlight, excessive dust, mechanical vibration or
shock.
• Do not install the unit in an inclined position. It is
designed to be operated in a horizontal position
only.
• Keep the unit and discs away from equipment with
strong magnets, such as microwave ovens or large
loudspeakers.
• Do not place heavy objects on the unit.
• If the unit is brought directly from a cold to a warm
location, moisture may condense inside the CD/
DVD player and cause damage to the lenses. When
you first install the unit, or when you move it from a
cold to a warm location, wait for about one hour
before operating the unit.
For the model supplied with the AC plug
adaptor
If the AC plug of your unit does not fit into the wall
outlet, attach the supplied AC plug adaptor.
Welcome!
Thank you for purchasing the Sony CD/DVD Player. Before
operating the unit, please read this manual thoroughly and
retain it for future reference.
EN
2
Page 3

TABLE OF CONTENTS
This Player Can Play the Following Discs................................................................4
Getting Started
Unpacking.............................................................................................................................6
Hooking Up the System......................................................................................................6
Necessary Setup Before Using the Player ........................................................................9
Selecting the Language for On-screen Display ...............................................................9
Basic Operations
Playing a DVD....................................................................................................................... 10
Playing a CD/VIDEO CD................................................................................................... 14
Playing Discs in Various Modes
Using the On-Screen Display .......................................................................................... 18
Using the Front Panel Display ........................................................................................ 20
Playing Repeatedly (Repeat Play) .................................................................................. 22
Playing in Random Order (Shuffle Play) ...................................................................... 23
Creating Your Own Program (Program Play).............................................................. 24
Resuming Playback from the Point Where You Stopped a Disc (Resume Play)..... 25
Changing the Sounds ....................................................................................................... 26
Displaying the Subtitles ................................................................................................... 26
Changing the Angles ........................................................................................................ 27
Limiting Playback by Children (Parental Control)...................................................... 28
Controlling the TV or the AV receiver with the Supplied Remote ........................... 30
EN
Settings and Adjustments
Using the Setup display ................................................................................................... 32
Setting the Language for Display and Sound (LANGUAGE SETUP) ...................... 33
Settings for Display (INITIAL SETUP 1) ....................................................................... 34
Settings for Sound (INITIAL SETUP 2) ......................................................................... 35
Dolby* Digital Surround
What is Dolby Digital Surround? ................................................................................... 36
Speaker System Hookups ................................................................................................ 36
Speaker Setup .................................................................................................................... 38
Setting for Dolby Digital Surround................................................................................ 40
Additional Information
Precautions ........................................................................................................................ 42
Notes on Discs ................................................................................................................... 42
Troubleshooting ................................................................................................................ 43
Self-diagnosis function..................................................................................................... 45
Specifications ..................................................................................................................... 46
Glossary.............................................................................................................................. 46
Index to Parts and Controls............................................................................................. 48
Setup Display Item List.................................................................................................... 51
Language Code List.......................................................................................................... 52
Index.......................................................................................................................................... 53
* Manufactured under license from Dolby Laboratories.
“Dolby”, “Pro Logic” and the double-D symbol a are trademarks of Dolby Laboratories.
Confidential Unpublished Works. ©1992-1997 Dolby Laboratories, Inc. All rights reserved.
EN
3
Page 4
Getting Started
About This Manual
The instructions in this manual are for model DVP-S500D.
Icon Meaning
Conventions
• Instructions in this manual describe the controls on the
player.
You can also use the controls on the remote if they have
the same or similar names as those on the player.
• The icons on the right are used in this manual:
Z
z
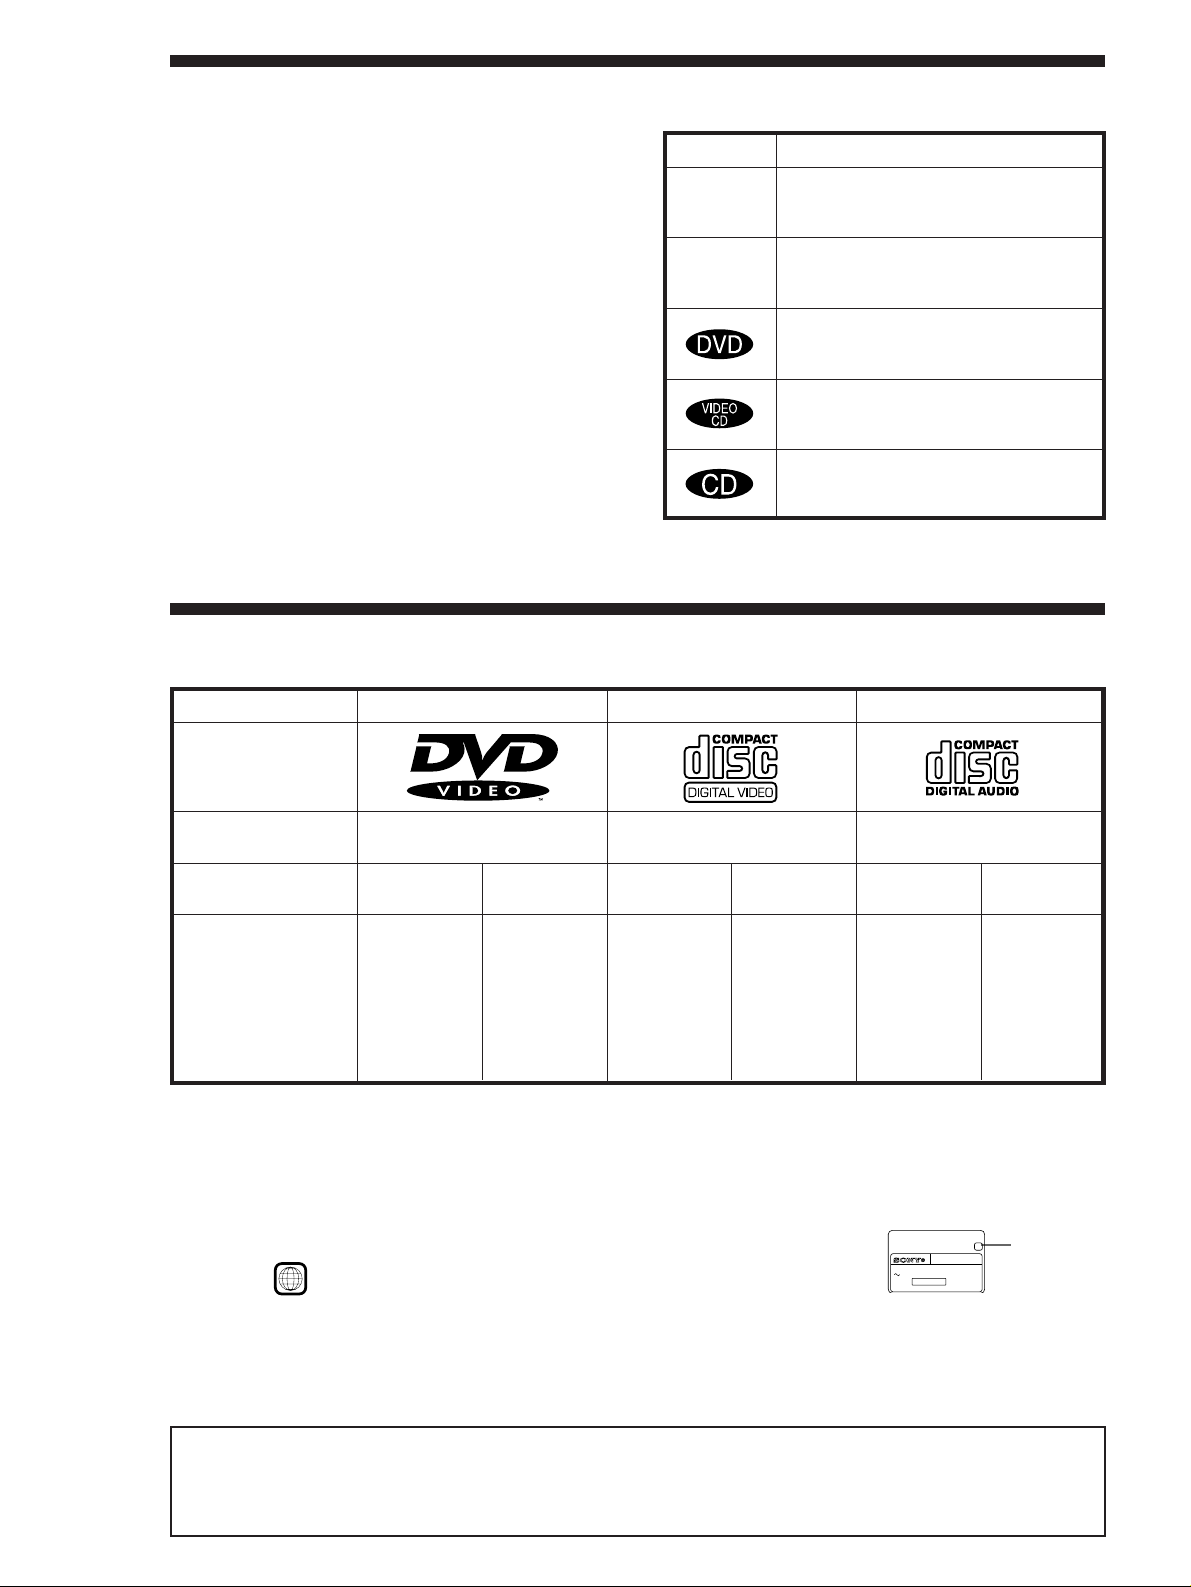
This Player Can Play the Following Discs
DVD VIDEOs
Disc logo
VIDEO CDs
Indicates that you can use only the remote
to do the task.
Indicates tips and hints for making the task
easier.
Indicates the functions for DVD VIDEOs.
Indicates the functions for VIDEO CDs.
Indicates the functions for Audio CDs.
Audio CDs
Contents
Disc size
Play time
This player conforms to the NTSC color system. You cannot play discs recorded in other color systems such as PAL or SECAM.
About 4 h (for
single-sided
DVD)/
about 8 h (for
double-sided
DVD)
Audio + Video
12 cm
8 cm
About 80 min.
(for
single-sided
DVD)/
about 160 min.
(for
double-sided
DVD)
Audio + Video
12 cm
74 min.
8 cm
20 min.
Audio
12 cm
74 min.
“DVD VIDEO” logo is a trademark.
8 cm
(CD single)
20 min.
Region code of DVDs you can play on this unit
Your DVD player has a region code printed on the back of the unit and will only play DVDs
that are labeled with identical region codes.
DVDs labeled
If you try to play any other DVD, the message “Playing this disc prohibited by area limits.” will
appear on the TV screen.
Depending on the DVD, no region code indication may be labeled even though playing the DVD is prohibited by the area limits.
ALL
will also play on this unit.
CD/DVD PLAYER
AC 110V 60Hz
NO.
22W
SONY CORPORATION
MODEL NO.
DVP–8306
MADE IN JAPAN 3-444-464-01
X
Region code
Note on playback operations of DVDs and VIDEO CDs
Some playback operations of DVDs and VIDEO CDs may be intentionally fixed by software producers. Since this player plays
DVDs and VIDEO CDs according to the disc contents the software producers designed, some playback features may not be
EN
4
available. Also refer to the instructions supplied with the DVDs or VIDEO CDs.
Page 5

Terms for discs
• Title
The longest sections of a picture or a music piece on a DVD;
a movie, etc, for a picture piece on a video software; or an
album, etc, for a music piece on an audio software. Each
title is assigned a title number enabling you to locate the
title you want.
• Chapter
Sections of a picture or a music piece that are smaller than
titles. A title is composed of several chapters. Each chapter
is assigned a chapter number enabling you to locate the
chapter you want. Depending on the disc, no chapters may
be recorded.
• Track
Sections of a picture or a music piece on a VIDEO CD or a
CD. Each track is assigned a track number enabling you to
locate the track you want.
Playing CDsGetting Started
Getting Started
DVD
structure
VIDEO CD
or CD
structure
Title
Chapter
Track
Index
Disc
Disc
• Index (CD) / Video Index (VIDEO CD)
A number that divides a track some sections to easily locate
the point you want on a VIDEO CD or a CD. Depending
on the disc, no indexes may be recorded.
• Scene
On a VIDEO CD with PBC functions, the menu screens,
moving pictures and still pictures are divided into sections
called “scenes.” Each scene is assigned a scene number
enabling you to locate the scene you want.
Note on PBC (Playback Control) (VIDEO CDs)
This player conforms to Ver. 1.1 and Ver. 2.0 of VIDEO CD
standards. You can enjoy two kinds of playback according to
the disc type.
Disc type
VIDEO CDs
without PBC
functions
(Ver. 1.1 discs)
VIDEO CDs
with PBC
functions
(Ver. 2.0 discs)
Discs that the player cannot play
The player cannot play discs other than the ones listed in the
table on page 4. CD-ROMs including PHOTO CDs, data
sections in CD-EXTRAs and DVD-ROMs etc. can not be
played.
You can
Enjoy video playback (moving
pictures) as well as music.
Play interactive software using menu
screens displayed on the TV screen
(PBC Playback), in addition to the
video playback functions of Ver 1.1
discs. Moreover, you can play highresolution still pictures, if they are
included on the disc.
This product incorporates copyright protection technology
that is protected by method claims of certain U.S. patents and
other intellectual property rights owned by Macrovision
Corporation and other rights owners. Use of this copyright
protection technology must be authorized by Macrovision
Corporation, and is intended for home and other limited
viewing uses only unless otherwise authorized by
Macrovision Corporation. Reverse engineering or
disassembly is prohibited.
EN
5
Page 6

Getting Started
Getting Started
Unpacking
Check that you have the following items:
• Audio/video connecting cord (1)
• S video cable (1)
• Remote commander (remote) RMT-D102A (1)
• Size AA (R6) batteries (2)
Inserting batteries into the remote
You can control the player using the supplied remote.
Insert two R6 (size AA) batteries by matching the + and
– on the batteries. When using the remote, point it at
the remote sensor g on the player.
z You can control TVs and Sony AV receivers using the
supplied remote
See page 30.
Hooking Up the System
Overview
This section describes how to hook up the CD/DVD
player to a TV (with audio/video input jacks) and/or
an amplifier. You cannot connect this player to a TV
without a video input connector. Be sure to turn off
the power of each component before making the
connections.
pTo listen to the sound through TV speakers (2ch – L,R)
CD/DVD player
R–AUDIO 1–L VIDEO 1
COMPONENT VIDEO OUT
Y B–Y
R–Y
To AUDIO
OUT
: Signal flow
CENTER
L
R
R–AUDIO 2–L
FRONT
REAR
WOOFER
LINE OUT
5.1 OUTPUT
1
2
VIDEO 2
S VIDEO OUT
To VIDEO
OUT
To video
input
To audio
input
OPTICAL COAXIAL
PCM/
DOLBY DIGITAL (AC-3)
DIGITAL OUT
To an AC outlet
TV
To an AC outlet
Notes
• Do not leave the remote in an extremely hot or humid
place.
• Do not drop any foreign object into the remote casing,
particularly when replacing the batteries.
• Do not expose the remote sensor to direct sunlight or
lighting apparatuses. Doing so may cause a malfunction.
• If you will not use the remote for an extended period of
time, remove the batteries to avoid possible damage from
battery leakage and corrosion.
pTo listen to the sound through speakers connected to
an amplifier (receiver) (2ch – L,R)
Amplifier
(Receiver)
CD/DVD player
COMPONENT VIDEO OUT
Y B–Y
R–Y
To audio
input
: Signal flow
FRONT
To
AUDIO
OUT
L
R
5.1 OUTPUT
CENTER
R–AUDIO 1–L VIDEO 1
WOOFER
R–AUDIO 2–L
REAR
LINE OUT
OPTICAL COAXIAL
1
2
PCM/
VIDEO 2
DOLBY DIGITAL (AC-3)
DIGITAL OUT
S VIDEO OUT
To
VIDEO
OUT
To an AC outlet
TV
To video input
To an AC outlet
To an AC outlet
pTo enjoy Dolby Digital surround sound by connecting
the player to an amplifier with 5.1 channel inputs
See page 36.
EN
6
Page 7
Getting Started
Playing CDsGetting Started
Getting Started
Getting Started
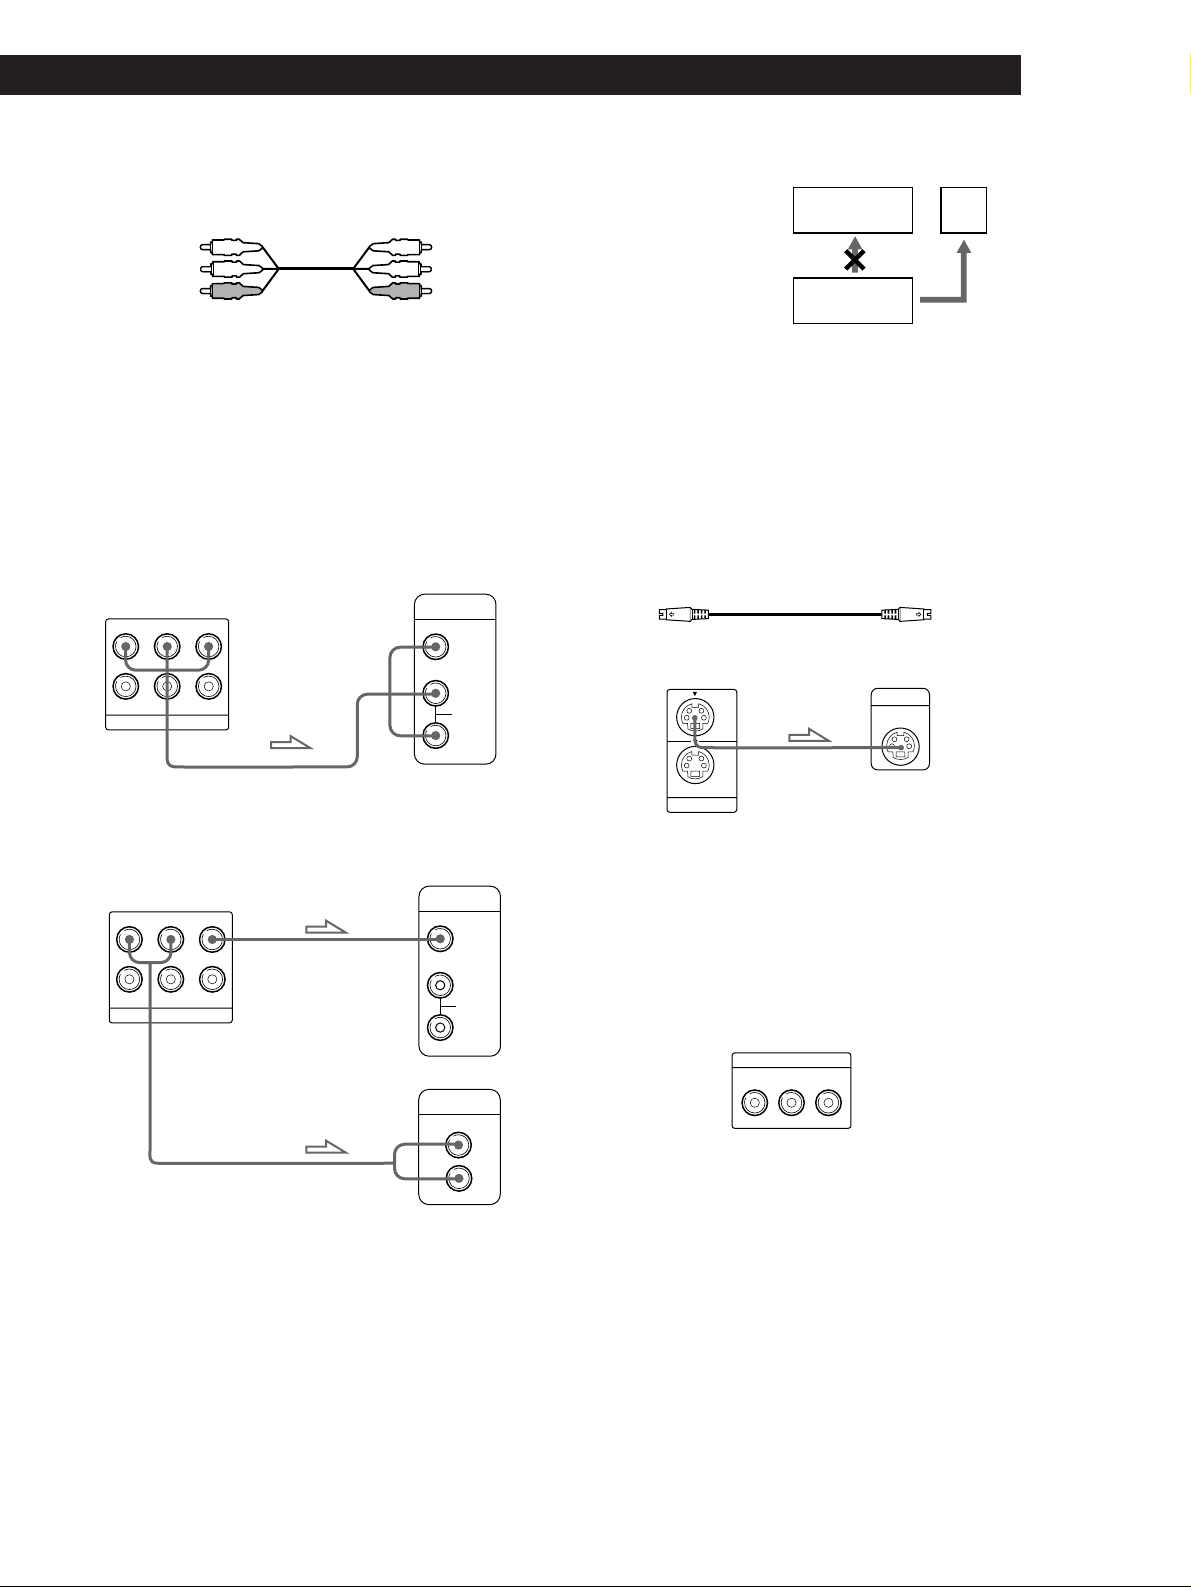
What cords will I need?
Audio/video connecting cord (supplied) (1)
Yellow
White (L)
Red (R)
Yellow
White (L)
Red (R)
Hookups
When connecting the cords, be sure to match the colorcoded cord to the appropriate jacks on the components:
Yellow (video) to Yellow, Red (right) to Red and White
(left) to White. Be sure to make connections firmly to
avoid hum and noise.
pTo listen to the sound through TV speakers
TV
CD/DVD player
R–AUDIO 1–L VIDEO 1
R–AUDIO 2–L
VIDEO 2
LINE OUT
INPUT
VIDEO
L
AUDIO
R
Notes
• Do not connect this
player to a video deck.
VCR
TV
If you view the pictures
on your TV after
making the connections
shown on the right, a
picture noise may
CD/DVD
Player
Connect
directly
appear.
• Depending on the TV or amplifier, sound distortion may
occur because the audio output level is high. In this case,
set “AUDIO ATT” in “INITIAL SETUP 2” to “ON” in the
setup display. For details, see page 35.
z If your TV has an S video input connector
Connect the component via the S VIDEO OUT connector
using the S video cable (supplied) instead of the video
connecting cord. You will get a better picture.
S video cable (supplied)
CD/DVD player
1
2
TV
S VIDEO IN
pTo listen to the sound through speakers connected to
an amplifier
TV
CD/DVD player
R–AUDIO 1–L VIDEO 1
R–AUDIO 2–L
VIDEO 2
LINE OUT
INPUT
VIDEO
L
AUDIO
R
Amplifier
CD
L
R
S VIDEO OUT
z If you connect the player to a monitor or projector
with component video input connectors that conform
to output signals from the COMPONENT VIDEO OUT
(Y, C
B/B-Y, CR/R-Y) connectors on the player
Connect the component via the COMPONENT VIDEO
OUT connectors using three video connecting cords (not
supplied) of the same kind. You will get a better picture.
COMPONENT VIDEO OUT
B
/
C
C
R
B-Y
R-Y
/
(Continued)
Y
Note
Refer to the instructions supplied with the component to be
connected.
EN
7
Page 8
Getting Started
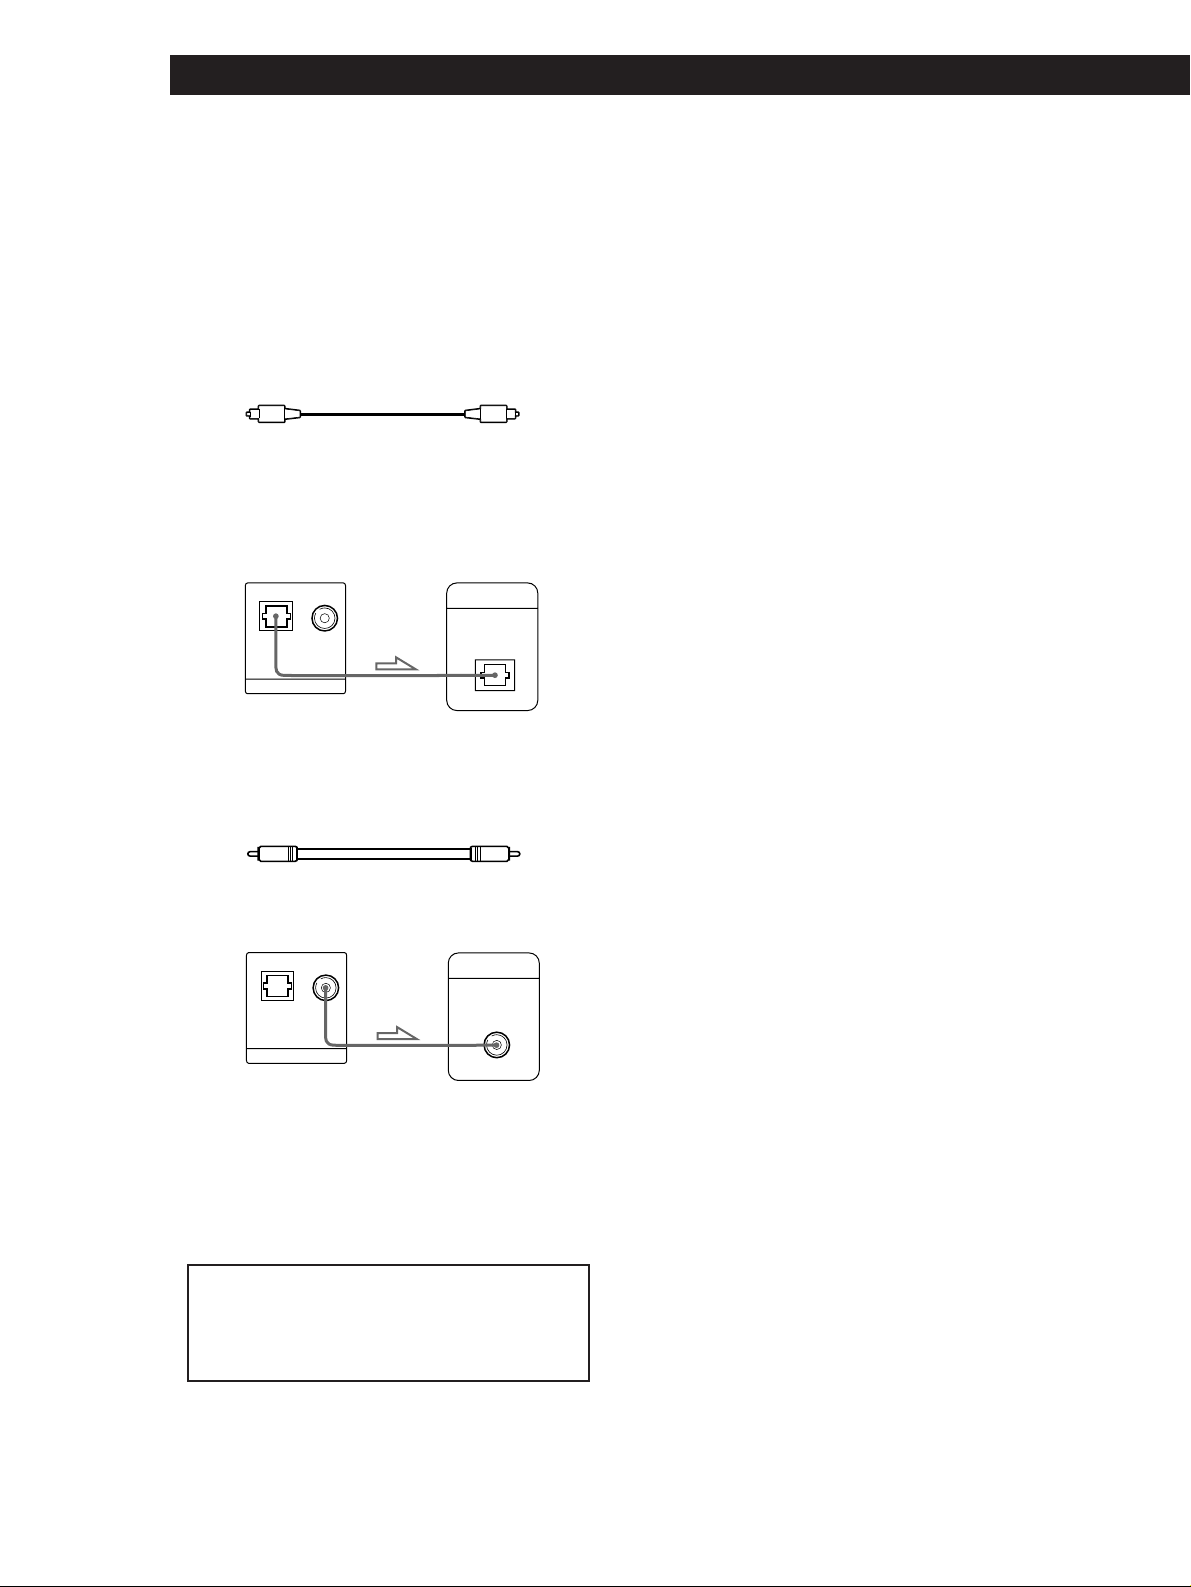
z If you have a digital component such as an amplifier
with a digital connector, DAT or MD
Connect the component via the DIGITAL OUT OPTICAL
or COAXIAL connector using an optical or coaxial digital
connecting cord (not supplied).
When you play a DVD, set “DIGITAL OUT” in “INITIAL
SETUP 2” to “PCM” in the setup display. (page 35)
p When using an optical digital connecting cord
Optical digital connecting cord
(not supplied)
Take off the cap and plug in the optical digital connecting
cord.
CD/DVD player
OPTICAL COAXIAL
Amplifier with a
digital connector, MD
deck, DAT deck, etc.
DIGITAL IN
PCM/
DOLBY DIGITAL (AC-3)
DIGITAL OUT
OPTICAL
p When using a coaxial digital connecting cord
Coaxial digital connecting cord
CD/DVD player
OPTICAL COAXIAL
DOLBY DIGITAL (AC-3)
DIGITAL OUT
(not supplied)
Amplifier with a
digital connector, MD
deck, DAT deck, etc.
DIGITAL IN
COAXIAL
PCM/
Notes
• Refer to the instructions supplied with the component
to be connected.
• You cannot make digital audio recordings of discs
recorded in Dolby Digital (AC-3) format directly using
an MD deck or DAT deck.
When you make the connections above, do not set
“DIGITAL OUT” in “INITIAL SETUP 2” to “DOLBY
DIGITAL/PCM.” If you do, a loud noise will
suddenly come out from the speakers, affecting
your ears or causing the speakers to be damaged.
EN
8
Page 9
Getting Started
Playing CDsGetting Started
Getting Started
Getting Started
Necessary Setup Before Using
the Player
Some setups are necessary for the player depending on
the TV or other components to be connected.
For details on using the setup display, see page 32.
For details on each setup display item, see pages 33 to
35.
For details to enjoy Dolby Digital Surround, see pages
36 to 41.
pTo connect the player to a wide-screen TV
In the setup display, set “TV TYPE” in “INITIAL SETUP
1” to “16:9.”
pTo connect the player to a normal TV
In the setup display, set “TV TYPE” in “INITIAL SETUP
1” to “4:3 LETTER BOX” (default setting) or “4:3 PAN
SCAN.” For details, see page 34.
pTo listen to the sound through speakers connected to
an amplifier with a digital connector or to output the
sound to a digital component such as a DAT or MD deck
When you play a DVD, set “DIGITAL OUT” in “INITIAL
SETUP 2” to “PCM” in the setup display. This is default
setting.
pTo enjoy Dolby Digital surround sound by connecting
the player to an amplifier with 5.1 ch inputs
In the setup display, set “MODE” in “5.1 OUTPUT
SETUP 2” to “OFF.” This is default setting. See page 36
to hookup the speaker system and page 38 to set each
speaker position or distance etc.
pTo connect the player to an audio component with a
built-in Dolby Digital decoder
In the setup display, set “DIGITAL OUT” in “INITIAL
SETUP 2” to “DOLBY DIGITAL/PCM.”
Use the setup display to change the various settings for
the picture and sound.
For details, see page 32.
To enjoy surround sound with front speakers only,
set “MODE” in “5.1 OUTPUT SETUP 2” to “VES
A” or “VES B.” You can enjoy surround sound
through both the LINE OUT (AUDIO 1, 2) and
FRONT (L/R) of the 5.1 OUTPUT connectors. See
page 40 for details.
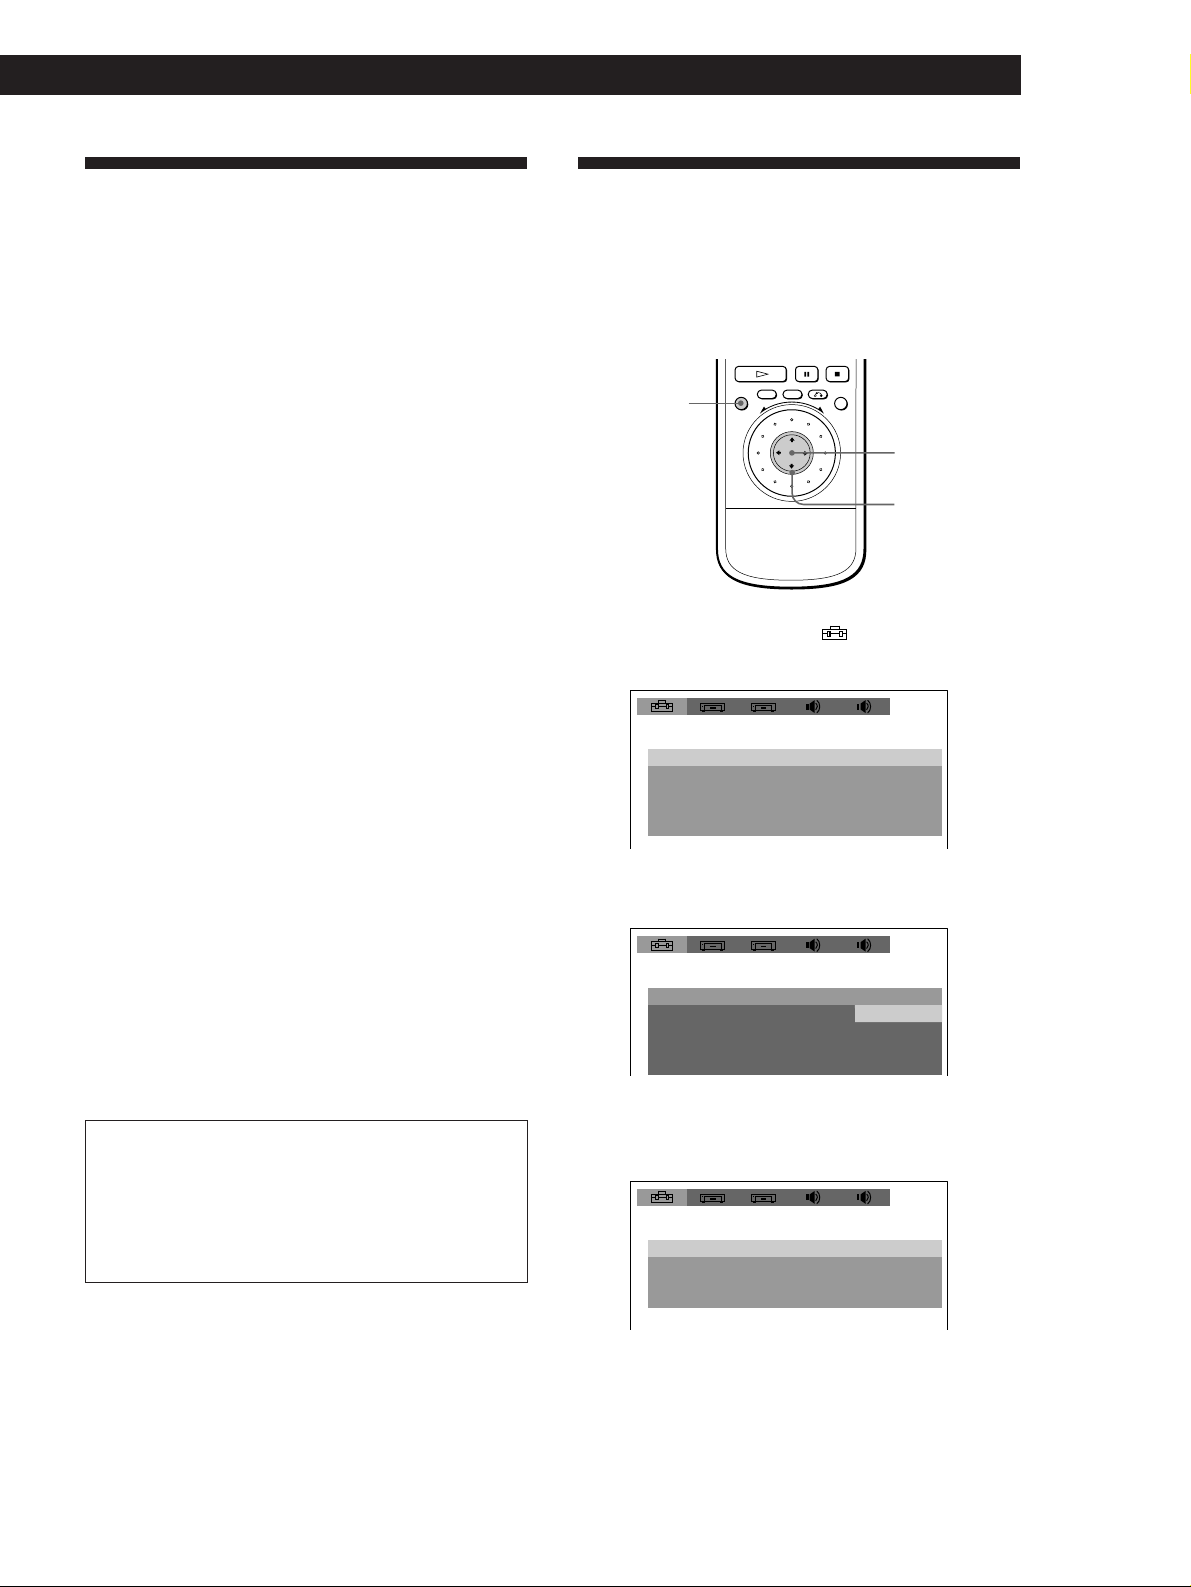
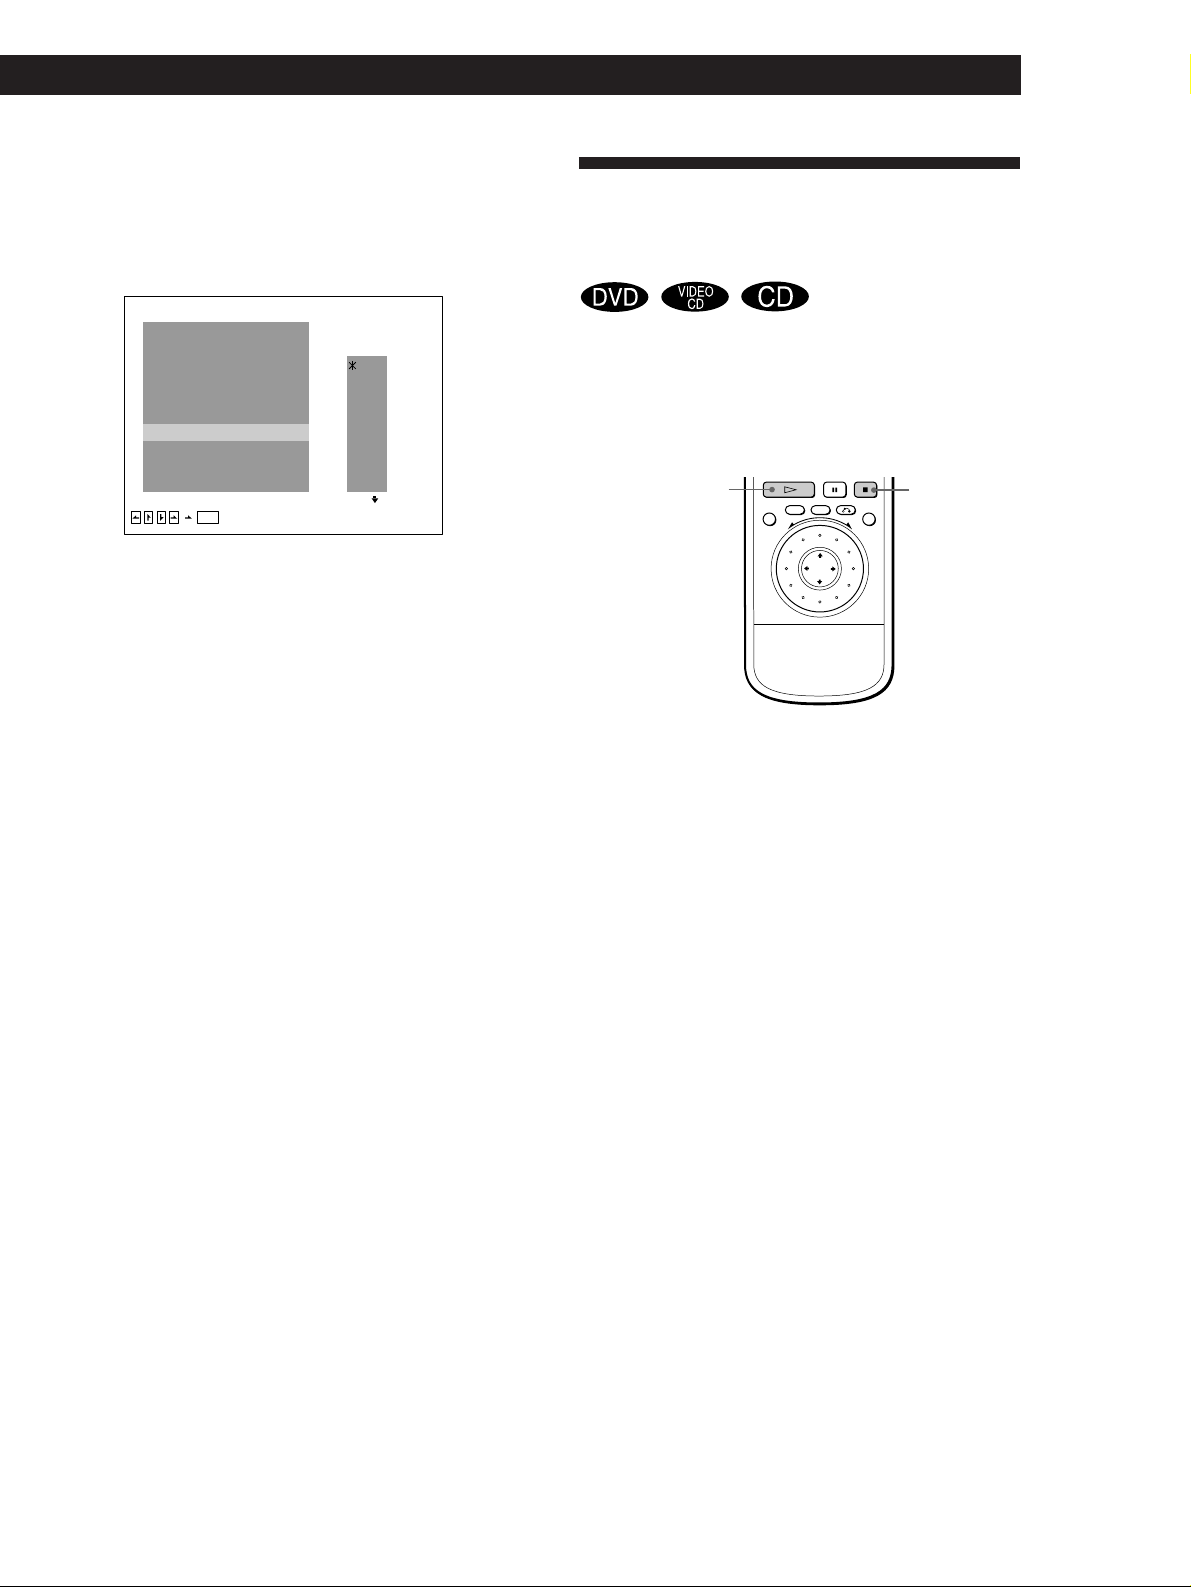
Selecting the Language for
On-screen Display
You can select the language for the setup display or the
messages displayed on the screen. Default setting is
“ESPAÑOL” (“SPANISH”.)
SET UP
ENTER
?/>/.//
1 Press SET UP and select “ ” using ?//, and
then press ENTER.
AJUSTE DE IDIOMA
MENU PANTALLA: ESPAÑOL
AUDIO:
SUBTITULO:
2 Select “MENU PANTALLA” using >/., then
press / or ENTER.
AJUSTE DE IDIOMA
MENU PANTALLA:
MENU DVD:
AUDIO:
SUBTITULO:
3 Select “INGLES” (ENGLISH) using >/., then
press ENTER.
LANGUAGE SETUP
OSD: ENGLISH
AUDIO:
SUBTITLE:
1 212
ESPAÑOLMENU DVD:
ORIGINAL
SEGUIR EL AUDIO
1 212
ESPAÑOL
INGLES
ORIGINAL
SEGUIR EL AUDIO
1 212
SPANISHDVD MENU:
ORIGINAL
AUDIO FOLLOW
To cancel using the setup display on the way
Press SET UP.
Note
The languages you can select are the ones displayed in step 2.
For details, see page 33.
EN
9
Page 10
Basic Operations
Basic Operations
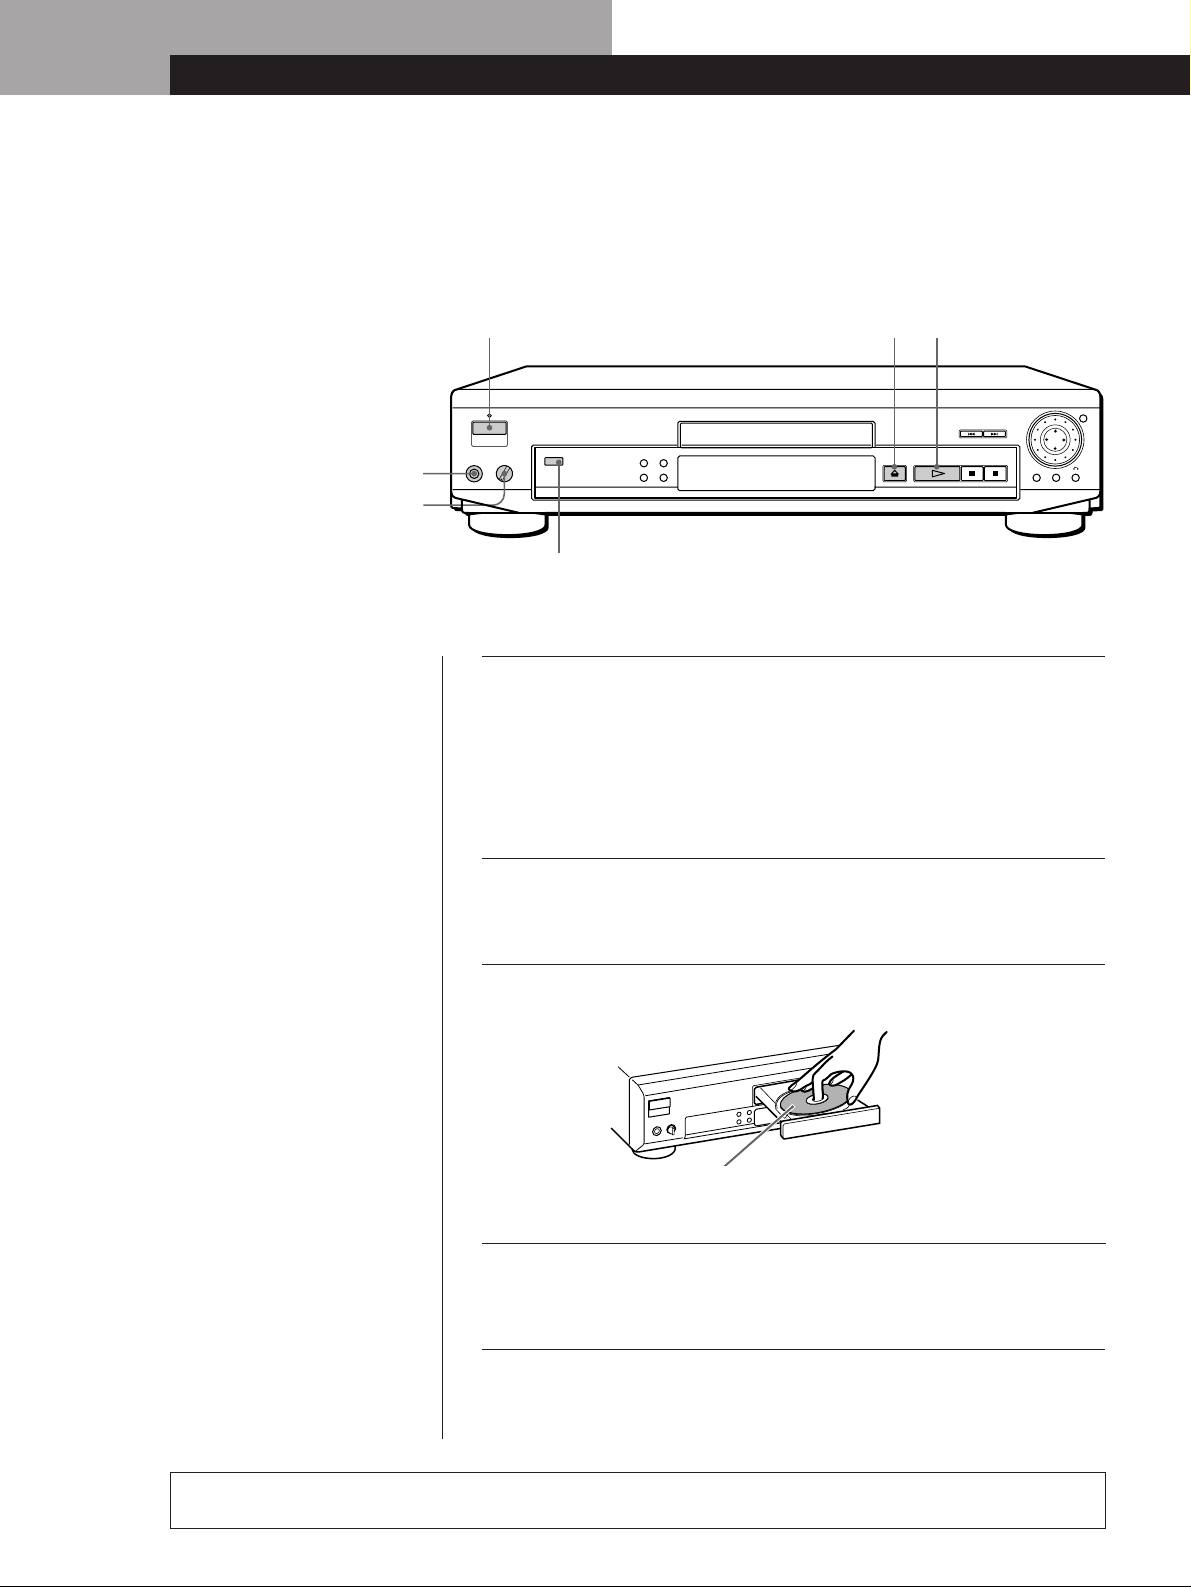
Playing a DVD
243
Connect headphones.
Adjust the headphone volume.
DOLBY DIGITAL Indicator*
• The operating procedure of CDs
or VIDEO CDs is different from
that of DVDs.
For details, see pages 14 to 17.
z You can turn on the player
using the remote
Press POWER when the
indicator above the POWER
button on the front panel is
lit in red.
* The DOLBY DIGITAL
indicator lights up except for
the case as follows:
– you insert a CD or a
VIDEO CD.
– the current audio format is
PCM or MPEG Audio.
Note
If you leave the player or the
remote in pause or stop mode for
15 minutes, the screen saver
image appears automatically. To
disappear the screen saver, press
·. (If you want to set the screen
saver function to off, see page 34.)
Make settings on your TV.
1
Turn on the TV and select the video input so that you can view
the pictures from this player.
When using an amplifier
Turn on the amplifier and select the appropriate position so that
you can listen to the sound from this player.
Press POWER to turn on the player.
2
The indicator (red) above the POWER button changes to green
and the front panel display lights up.
Press §, and place the disc on the disc tray.
3
With the playback
side facing down
Press ·.
4
The disc tray closes, and the player starts playback (Continuous
Play). Adjust the volume on the TV or the amplifier.
10
After following Step 4
A DVD menu or title menu may appear on the TV screen (see page 13).
Depending on the DVD, some operations may be different or restricted. Refer to the instructions supplied with
your disc.
EN
Page 11
z When “RESUME” appears on
123
456
789
0
the front panel display
You can resume playback
from the point where you
stopped the DVD. For
details on playing from the
beginning of the disc, see
page 25.
=/+
Basic Operations
Basic Operations
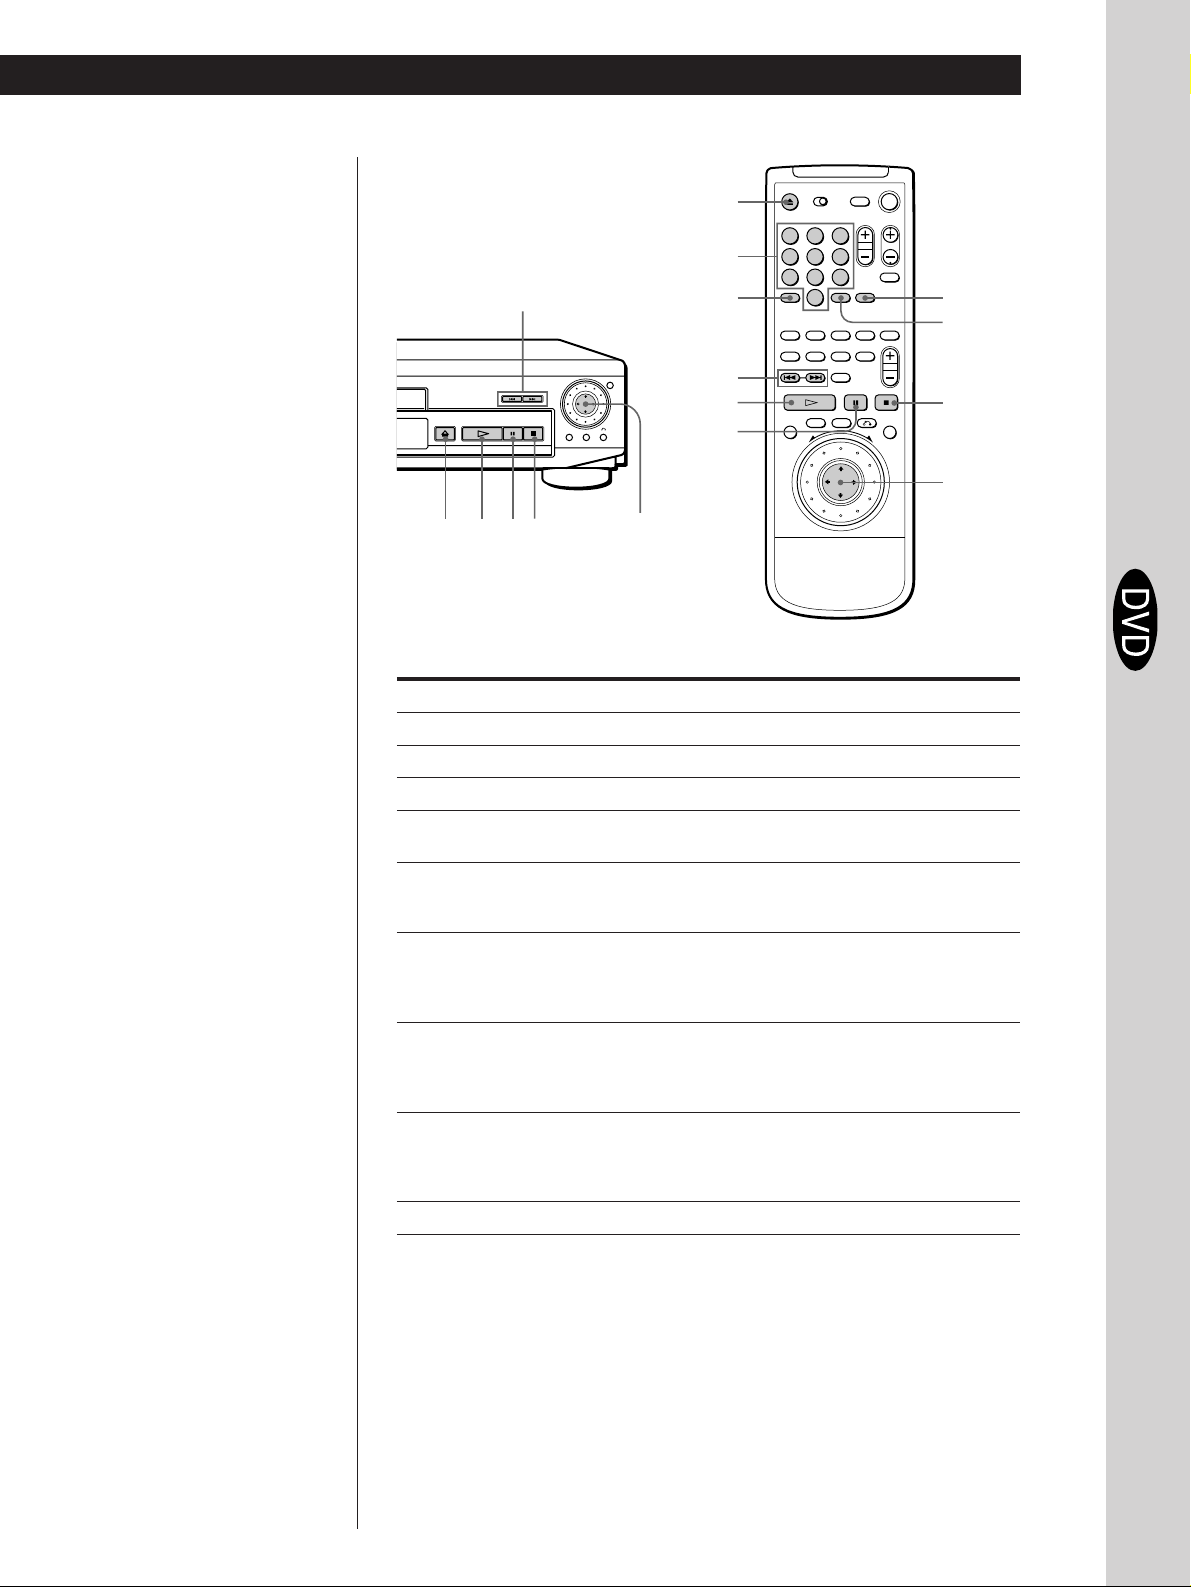
6
Number buttons
SEARCH MODE CLEAR
ENTER
Note
You may not be able to do
Resume Play depending on the
DVD.
z What are chapter and title?
See page 5.
Notes
Depending on the DVD, you may
not be able to do some of the
operations described on the right.
z Each time you press SEARCH
MODE
“CHAPTER SEARCH,”
“TITLE SEARCH” and
“TIME SEARCH” appear on
the TV screen.
=/+
·
P
§
·
pP
To
Stop
Pause
Resume play after pause
Go to the next chapter in
Continuous Play mode
Go back to the preceding
chapter in Continuous Play
mode
Select the chapter
Select the title
Locate a point using the time code
Stop play and remove the disc
ENTER
Press
p
P
P or ·
+
=
1 SEARCH MODE repeatedly until “CHAPTER
SEARCH” appears on the TV screen.
2 Number buttons to select the chapter number,
then ENTER or ·.
1 SEARCH MODE repeatedly until “TITLE
SEARCH” appears on the TV screen.
2 Number buttons to select the title number, then
ENTER or ·.
1 SEARCH MODE repeatedly until “TIME
SEARCH” appears on the TV screen.
2 Number buttons to enter a time code, then
ENTER or ·.
6
If you have made a mistake when you press the number button.
Press CLEAR, then the correct number button.
p
ENTER
Basic Operations
11
EN
Page 12
Basic Operations
Notes
• Depending on the DVD, you
may not be able to do some of
the operations described on the
right.
• When you play back a DVD at
twice the normal speed in
either direction, the sounds of
the picture will come out from
the LINE OUT (AUDIO 1, 2)
connectors. The sounds are
lower than the ones at normal
speed. In this case, no sounds
come out from the DIGITAL
OUT OPTICAL and COAXIAL
connectors. But there is no
sound when you set “MODE”
in “5.1 OUTPUT SETUP” to
“VES A” or “VES B” (page 40).
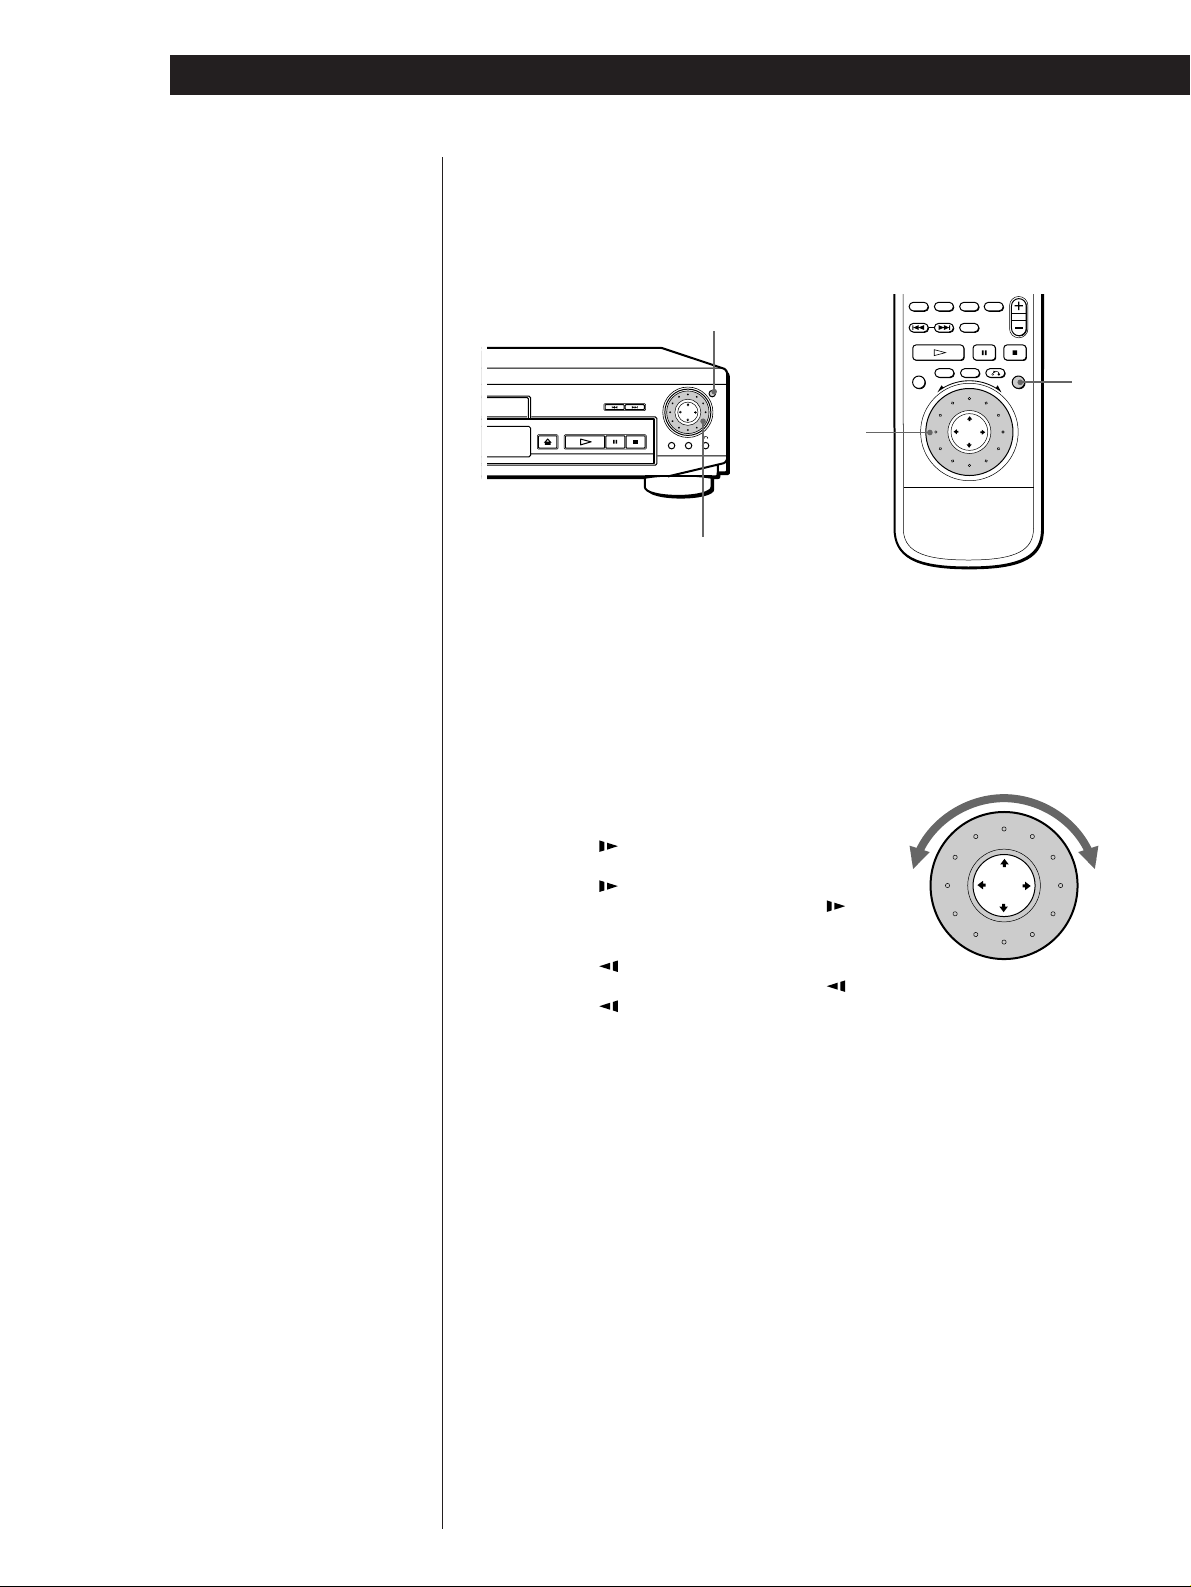
To play at various speeds/frame-by-frame
Using the click shuttle and the JOG button/indicator, you can
playback a DVD with various speed or frame-by-frame. Each time
you press JOG, it changes between shuttle mode and jog mode.
JOG
Click shuttle
Click shuttle
pTo change the playback speed (Shuttle mode)
Turn the click shuttle. The playback speed changes depending on the turning
direction and angle as follows:
FF2) (about 30 times the normal speed)
<
FF1) (about 10 times the normal speed)
<
×2” (about twice the normal speed)
<
PLAY( (Normal speed)
<
SLOW1
SLOW2
PAUSEP
SLOW2
SLOW1
×2“ (about twice the normal speed : opposite direction)
FR10 (about 10 times the normal speed)
FR20 (about 30 times the normal speed)
(playback direction)
<
(playback direction
< – slower than “SLOW1
<
(opposite direction
< – slower than “SLOW1
(opposite direction)
<
<
<
”)
”)
JOG
12
EN
Notes
• The JOG indicator shows the
mode of the click shuttle close
to the indicator only. When the
indicator on the remote does
not light up, it keeps shuttle
mode on the remote even if the
indicator on the player lights
up.
• If you don‘t operate the click
shuttle for about 20 seconds
after pressing JOG, it returns to
shuttle mode on the remote.
On the player, it keeps jog
mode.
If you turn the click shuttle quickly, the playback speed goes to FF2)/FR20
at once.
pTo play the DVDs frame-by-frame changing the playback speed (Jog mode)
1 Press JOG.
JOG lights up during jog mode. When you press JOG on the player, it
becomes pause.
2 Turn the click shuttle.
Depending on the turning speed, the playback goes to frame-by-frame toward
the turning direction of the click shuttle. If you turn the click shuttle with
constant speed for a while, the playback speed goes to slow or normal.
pTo return to Continuous Play
Press ·.
Page 13

Basic Operations
Basic Operations
Notes
• Depending on the DVD, you
may not be able to select the
title.
• Depending on the DVD, a “title
menu” may simply be called a
“menu” or “title ” in the
instructions supplied with the
disc. “Press ENTER.” may also
be expressed as “Press
SELECT.”
Using the Title Menu
A DVD is divided into long sections of a picture or a music piece
called “titles.” When you play the DVD which contains several titles,
you can select the title you want using the title menu.
?/>/.//
DVD MENU
TITLE
ENTER
?/>/.//
TITLE
DVD MENU
Press TITLE.
1
The title menu appears on the TV screen. The contents of the
menu varies from disc to disc.
ENTER
Basic Operations
z If you want to select the
language for the DVD menu
Change the setting using
“LANGUAGE SETUP” in
the setup display (see page
33).
Note
Depending on the DVD, a “DVD
menu” may simply be called a
“menu” in the instructions
supplied with the disc.
Press ?/>/.// to select the title you want to play.
Depending on the disc, you can use the number buttons to
2
select the title.
Press ENTER.
The player starts playing the selected title.
3
Using the DVD menu
Some DVDs allow you to select the disc contents using the menu.
When you play these DVDs, you can select the language for the
subtitles, the language for the sound, etc., using the DVD menu.
Press DVD MENU.
1
The DVD menu appears on the TV screen. The contents of the
menu vary from disc to disc.
Press ?/>/.// to select the item you want to change.
2
Depending on the disc, you can use the number buttons to
select the item.
To change other items, repeat Step 2.
3
Press ENTER.
4
13
EN
Page 14

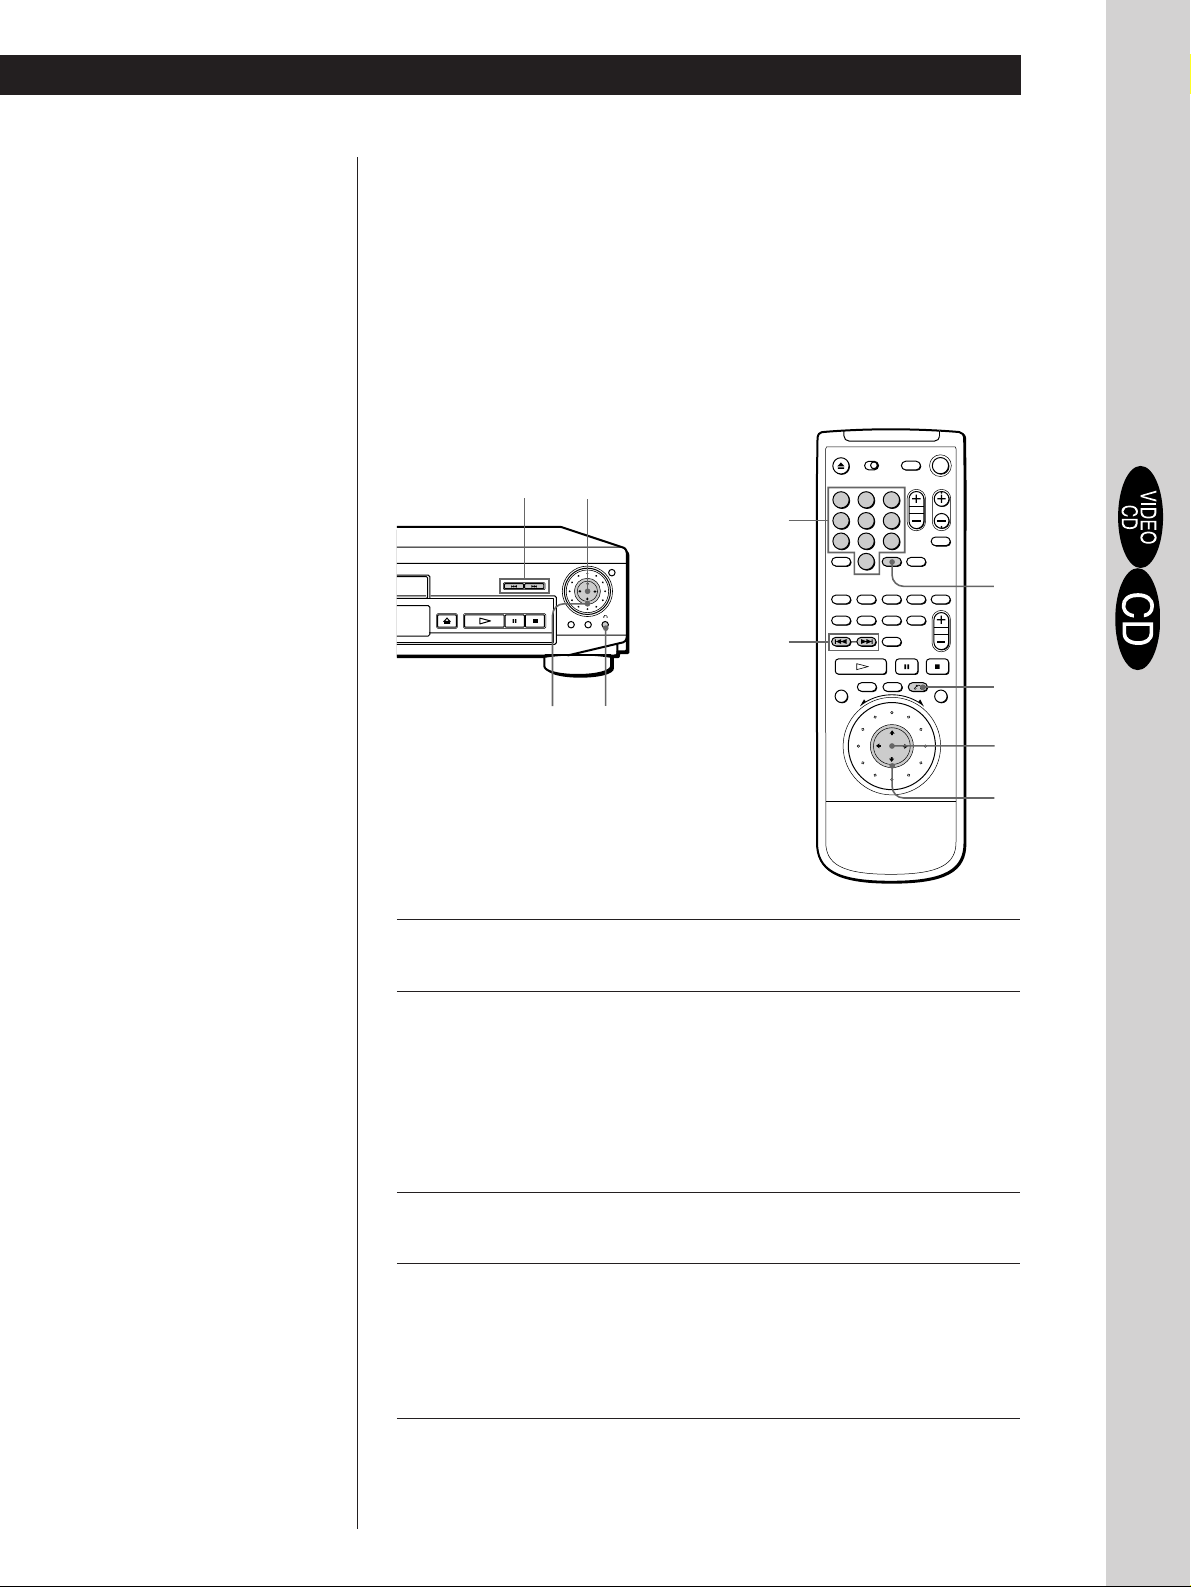
Basic Operations
Basic Operations
Playing a CD/VIDEO CD
243
Connect headphones.
Adjust the headphone volume.
• The operating procedure of DVDs
is different from that of CDs or
VIDEO CDs.
For details, see pages 10 to 13.
z You can turn on the player
using the remote
Press POWER when the
indicator above the POWER
button on the front panel is
lit in red.
z After following Step 4
The menu screen may
appear on the TV screen
depending on the VIDEO
CD. You can play the disc
interactively, following the
instructions on the menu
screen. (PBC Playback, see
page 17.)
Note
If you leave the player or the
remote in pause or stop mode for
15 minutes, the screen saver
image appears automatically. To
disappear the screen saver, press
·. (If you want to set the screen
saver function to off, see page 34.)
Make settings on your TV.
1
Turn on the TV and select the video input so that you can view
the pictures from this player.
When using an amplifier
Turn on the amplifier and select the appropriate position so that
you can listen to the sound from this player.
Press POWER to turn on the player.
2
The indicator (red) above the POWER button changes to green
and the front panel display lights up.
Press §, and place the disc on the disc tray.
3
With the label side
facing up
Press ·.
4
The disc tray closes and the player starts playback (Continuous
Play). Adjust the volume on the TV or the amplifier.
14
Depending on the VIDEO CD, some operations may be different or restricted. Refer to the instructions supplied
with your disc.
EN
Page 15

z When “RESUME” appears on
123
456
789
0
the front panel display
You can resume playback
from the point where you
stopped the CD/VIDEO CD.
For details on playing from
the beginning of the disc, see
page 25.
=/+
6
Number buttons
SEARCH MODE
=/+
·
P
Basic Operations
Basic Operations
CLEAR
ENTER
p
z What is a track?
See page 5.
z What is an index?
See page 5.
z What is a scene?
See page 5.
z If you want to change the
search mode
Press SEARCH MODE. Each
time you press in case of a
VIDEO CD, “SCENE
SEARCH,” “TRACK
SEARCH” and “V. (VIDEO)
INDEX SEARCH” appear on
the TV screen. In case of a
CD, only “TRACK
SEARCH” appears.
Note
Some discs do not allow you to
start playing from a particular
scene. In this case, if you do
Scene Search before you start
playing, the player starts playing
from scene 1. If you do Scene
Search while playing a disc, the
player starts playing from the
current scene.
P
·
p
§
To
Stop
Pause
Resume play after pause
Go to the next track in
Continuous Play mode
Go back to the preceding
track in Continuous Play
mode
Select the track
Select the scene before you start
playing a VIDEO CD with PBC
functions and during PBC playback
(Scene Search)
Stop play and remove the disc
ENTER
Press
p
P
P or ·
+
=
1 SEARCH MODE repeatedly until “TRACK
SEARCH” appears on the TV screen.
2 Number buttons to select the track number,
then ENTER or ·.
1 SEARCH MODE repeatedly until “SCENE
SEARCH” appears on the TV screen.
2 Number buttons to select the scene number,
then ENTER or ·. (To check the current scene
number, press DISPLAY. The scene number
appears at the left top of the TV screen.)
6
If you have made a mistake when you press the number button.
Press CLEAR, then the correct number button.
ENTER
Basic Operations
15
EN
Page 16
Basic Operations
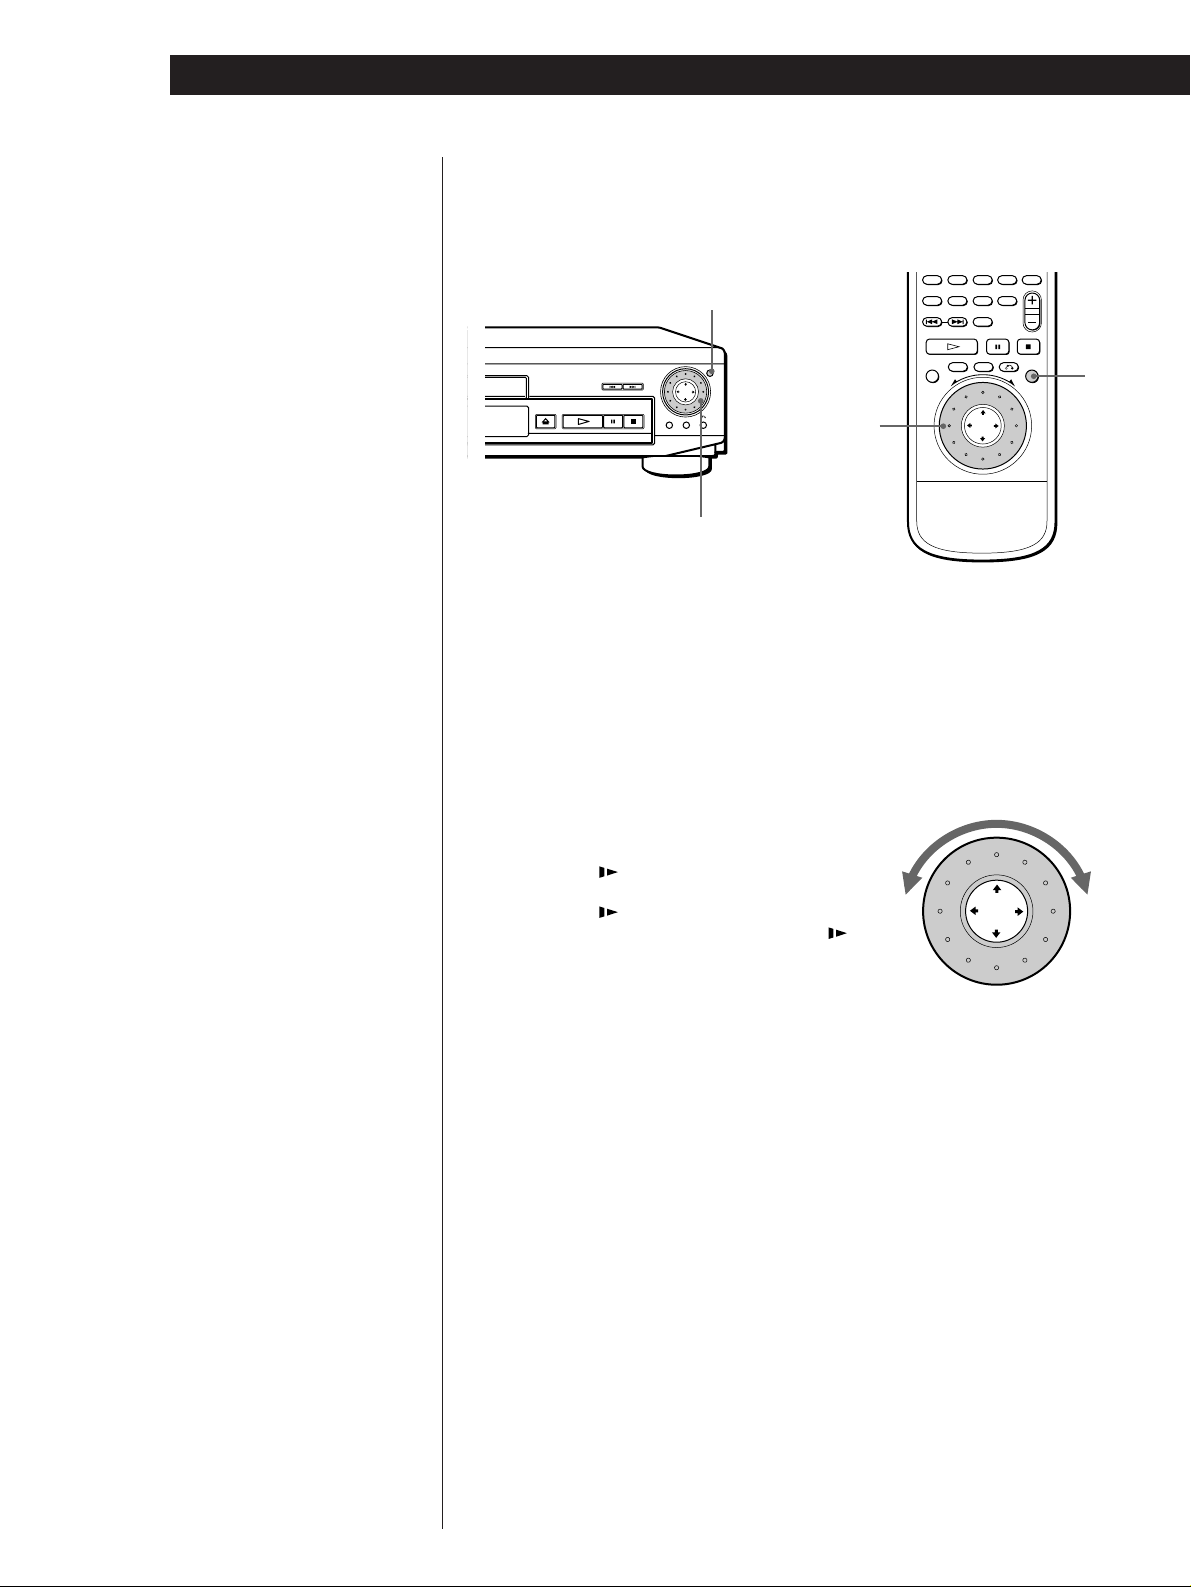
To play at various speeds / frame-by-frame
Using the click shuttle and the JOG button/indicator, you can
playback a CD/VIDEO CD with various speed or frame-by-frame.
Each time you press JOG, it changes between shuttle mode and jog
mode.
JOG
JOG
Click shuttle
Click shuttle
Notes
• Depending on the VIDEO CD,
you may not do some of the
operations described on the
right.
•When you play a VIDEO CD,
there is no sound except for the
playback at normal speed.
pTo change the playback speed (Shuttle mode)
Turn the click shuttle. The playback speed changes depending on the turning
direction and angle as follows:
FF2) (Faster than “FF1)”)
<
FF1)
<
×2” (about twice the normal speed)
<
PLAY( (Normal speed)
<
SLOW1
SLOW2
PAUSEP
FR10
FR20 (Faster than “FR10”)
If you turn the click shuttle quickly, the playback speed goes to FF2)/FR20
at once.
pTo play the VIDEO CDs frame-by-frame changing the playback speed (Jog mode –
VIDEO CD Only)
(playback direction)
< – VIDEO CD Only –
(playback direction
– Slower than “SLOW1
< – VIDEO CD Only –
<
<
”)
16
EN
Notes
• The JOG indicator shows the
mode of the click shuttle close
to the indicator only. When the
indicator on the remote does
not light up, it keeps shuttle
mode on the remote even if the
indicator on the player lights
up.
• If you don‘t operate the click
shuttle for about 20 seconds
after pressing JOG, it returns to
shuttle mode on the remote.
On the player, it keeps jog
mode.
1 Press JOG.
JOG lights up during jog mode. When you press JOG on the player, it
becomes pause.
2 Turn the click shuttle.
Depending on the turning speed, the playback goes to frame-by-frame toward
the playback direction only. If you turn the click shuttle with constant speed for
a while, the playback speed goes to slow or normal.
pTo return to Continuous Play
Press ·.
Page 17
Basic Operations
123
456
789
0
Basic Operations
z When playing VIDEO CDs with
PBC functions
PBC playback starts
automatically.
z To cancel PBC playback of a
VIDEO CD with PBC functions
and play the disc in
Continuous Play mode
There are two ways.
•Before you start playing,
select the track you want
using =or +, then
press ENTER or ·.
•Before you start playing,
select the track number
using the number buttons
on the remote, then press
ENTER or ·.
“Play without PBC”
appears on the TV screen
and the player starts
Continuous Play. You
cannot play still pictures
such as a menu screen.
To return to PBC playback,
press p twice then press
·.
Playing VIDEO CDs with PBC Functions (PBC Playback –
VIDEO CD Only)
When playing VIDEO CDs with PBC functions (Ver. 2.0 discs), you
can enjoy simple interactive operations, operations with search
functions, etc.
PBC Playback allows you to play VIDEO CDs interactively, following
the menu screen on the TV screen.
On this player, you can use the number buttons, ENTER, =, +,
>/. and ˆ(RETURN) during PBC Playback.
=/+
ENTER
>/.
Number buttons
=/+
ˆ(RETURN)
ˆ(RETURN)
ENTER
Basic Operations
ENTER
Note
Depending on the VIDEO CD,
“Press ENTER” in Step 3 may be
expressed as “Press SELECT” in
the instructions supplied with the
disc.
Start playing a VIDEO CD with PBC functions, following Steps
1
1 to 4 in “Playing a VIDEO CD” on page 14.
Select the item number you want.
2
On the player
Press >/. to select the item number.
On the remote
Press the number button of the item you want.
Press ENTER.
3
Follow the instructions on the menu screen for interactive
operations.
4
Refer to the instructions supplied with the disc, as the operating
procedure may differ according to the VIDEO CD.
>/.
Going back to the menu screen
Press ˆ, =, or +.
17
EN
Page 18

Playing Discs in Various Modes
Playing Discs in Various Modes
Using the On-Screen Display
Z
You can check the operating status of the player and
the information about the disc using the on-screen
display on the TV screen.
123
456
789
0
DISPLAY
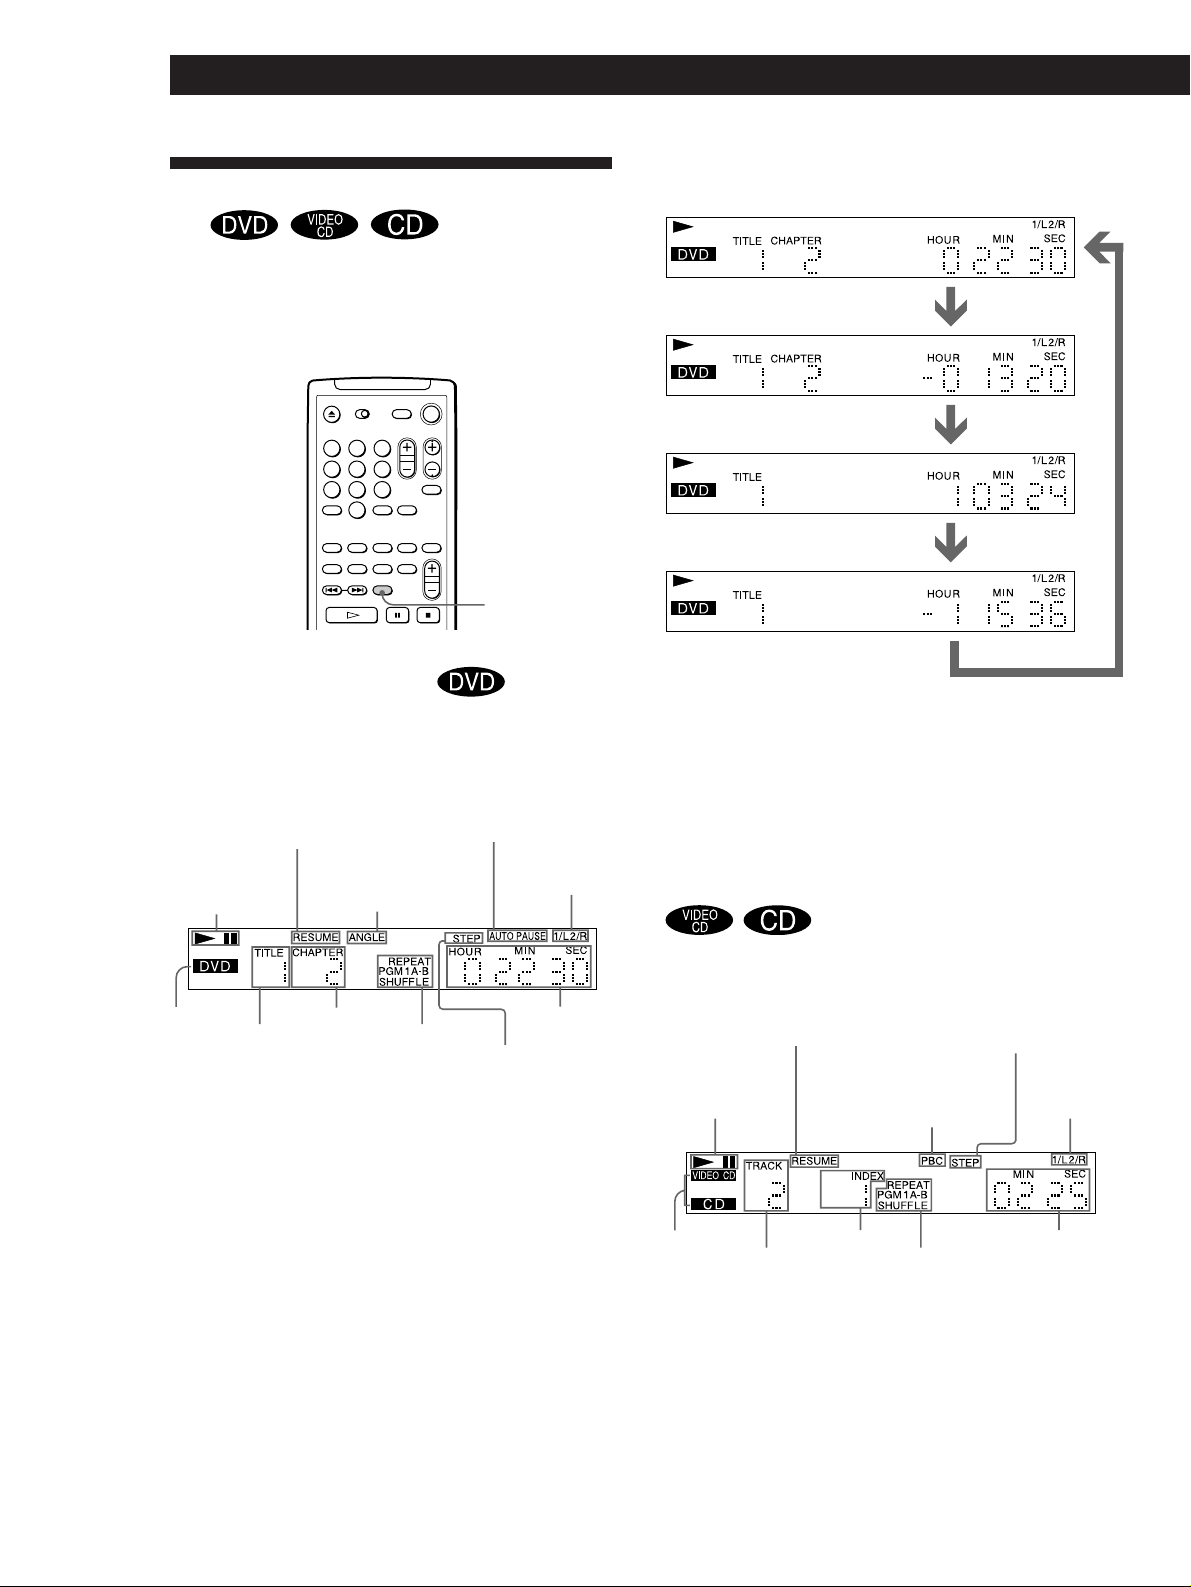
pDisplay information of the on-screen display 2 mode
Current title
number (total
number of titles)
Disc type
DVD
DVD
TITLE:
TITLE:
CHAPTER:
CHAPTER:
SUBTITLE:
SUBTITLE:
AUDIO:
AUDIO:
ANGLE:
ANGLE:
Playing time
of the current
chapter *
1 : 32 : 55
1 : 32 : 55
<
CHAPTER
<
CHAPTER
32 ( 50 )
32 ( 50 )
30 ( 50 )
30 ( 50 )
ENGLISH ( 32 )
ENGLISH ( 32 )
ENGLISH ( 8 )
ENGLISH ( 8 )
DOLBY DIGITAL
DOLBY DIGITAL
1 ( 9 )
1 ( 9 )
3 / 2. 1
3 / 2. 1
L
L
LFE
LS RS
LFE
LS RS
Playing
status
PLAY
PLAY
Current chapter
number (total
number of
chapters in the
current title)
>
>
C R
C R
Current
language for
the sound
(total number
of languages
for the sound)
TIME
When playing back or stopping a DVD
Press DISPLAY.
Each time you press the button, the on-screen display
changes as follows:
On-screen display 1
.
On-screen display 2
.
On-screen display 3
.
On-screen display off
pDisplay information of the on-screen display 1 mode
Current title
number
TITLE 32 PLAY
CHAPTER 30
Current chapter
number
<
Playing status
1 : 32 : 55
CHAPTER
>
Current language
for the subtitles
(total number of
languages for
subtitles)
Selected angle
(total number of
angles)
Current playing
channel**
Note
Some information may not be displayed depending on a
DVD.
* In display 1 or 2 mode, each time you press TIME the
information changes as shown below.
Playing time of the current chapter
.
Remaining time of
the current chapter
.
Playing time of the current title
.
Remaining time of
the current title
**See page 41 for details.
pDisplay information of the on-screen display 3 mode
While playing a disc, the approximate bit rate of the
playback picture is always displayed by Mbps (Mega bit
per second).
Current
audio
format **
18
Current
play mode
EN
ALL
REPEAT
Playing time
of the
current
chapter *
BIT RATE
0510
Bit rate of the playback
picture
z What is bit rate?
Bit rate refers to the amount of video data per second in a
disc. The higher the bit rate is, the larger the amount of
data. However, this does not always mean that you can
get higher quality pictures.
Page 19

Playing CDs in Various Modes
Playing Discs in Various Modes
pDisplay information of the on-screen display off mode
No information is displayed. (Messages, etc., will be
displayed.)
When playing back or stopping a CD/VIDEO
CD
Press DISPLAY.
Each time you press the button, the on-screen display
changes as follows:
On-screen display 1
.
On-screen display 2
.
On-screen display off
pDisplay information of the on-screen display 1 mode
Current
index
number
Current
play mode
Current track
number
TRACK 11
INDEX 8
TRACK
REPEAT
Playing status
PLAY
12 : 07
<
TRACK
>
Playing
time of the
current
track *
pDisplay information of the on-screen display 2 mode
PBC Status
(VIDEO CD
Disc type
VIDEO CD
PBC OFF
TRACK:
V.INDEX:
Current index
number
• During PBC playback (VIDEO CD Only)
Disc type
VIDEO CD
PBC ON
SCENE:
Only)
11 ( 50 )
8
PBC Status
122 ( 159 )
Playing status
PLAY
12 : 07
<
TRACK
Playing status
PLAY
12 : 07
Playing
time of the
current
track *
>
Current track
number (total
track number)
Playing
time
Current scene
number (total
scene number)
Current
play mode
• During PBC playback (VIDEO CD Only)
Current scene
number
SCENE 122
TRACK
REPEAT
Playing status
PLAY
05 : 27
Playing
time
* In display 1 or 2 mode, each time you press TIME, the
information changes as shown below.
Playing time of the current track
.
Remaining time of
the current track
.
Playing time of
the disc
.
Remaining time of
the disc
While you are doing Shuffle Play, Program Play, or
PBC Playback, the playing time of the disc and the
remaining time of the disc are not displayed.
pDisplay information of the on-screen display off mode
No information is displayed. (Messages, etc., will be
displayed.)
19
EN
Page 20
Playing Discs in Various Modes
Using the Front Panel Display
Z
You can check information about the disc, such as the
total number of the titles or the tracks or remaining
time, using the front panel display.
123
456
789
0
TIME
When playing back a DVD
pDisplay information while playing the disc
Lights up while
Lights up when you
can do Resume Play
Playing status
Lights up when
you can switch the
angles
playing the sections
with the auto pause
signal
Current
sound status
Playing time and number of
the current chapter
Remaining time of
the current chapter
Playing time and number of
the current title
Remaining time of
the current title
Press TIME
Press TIME
Press TIME
Press TIME
Notes
• Depending on the DVD, the chapter number or time may
not appear.
• While you are doing Shuffle Play or Program Play, the
playing time of the disc and the remaining time of the disc
are not displayed.
When playing back a CD/VIDEO CD
20
EN
Disc type
Current title
number
Current
chapter
number
Current
play mode
Lights up when
you are setting
a program
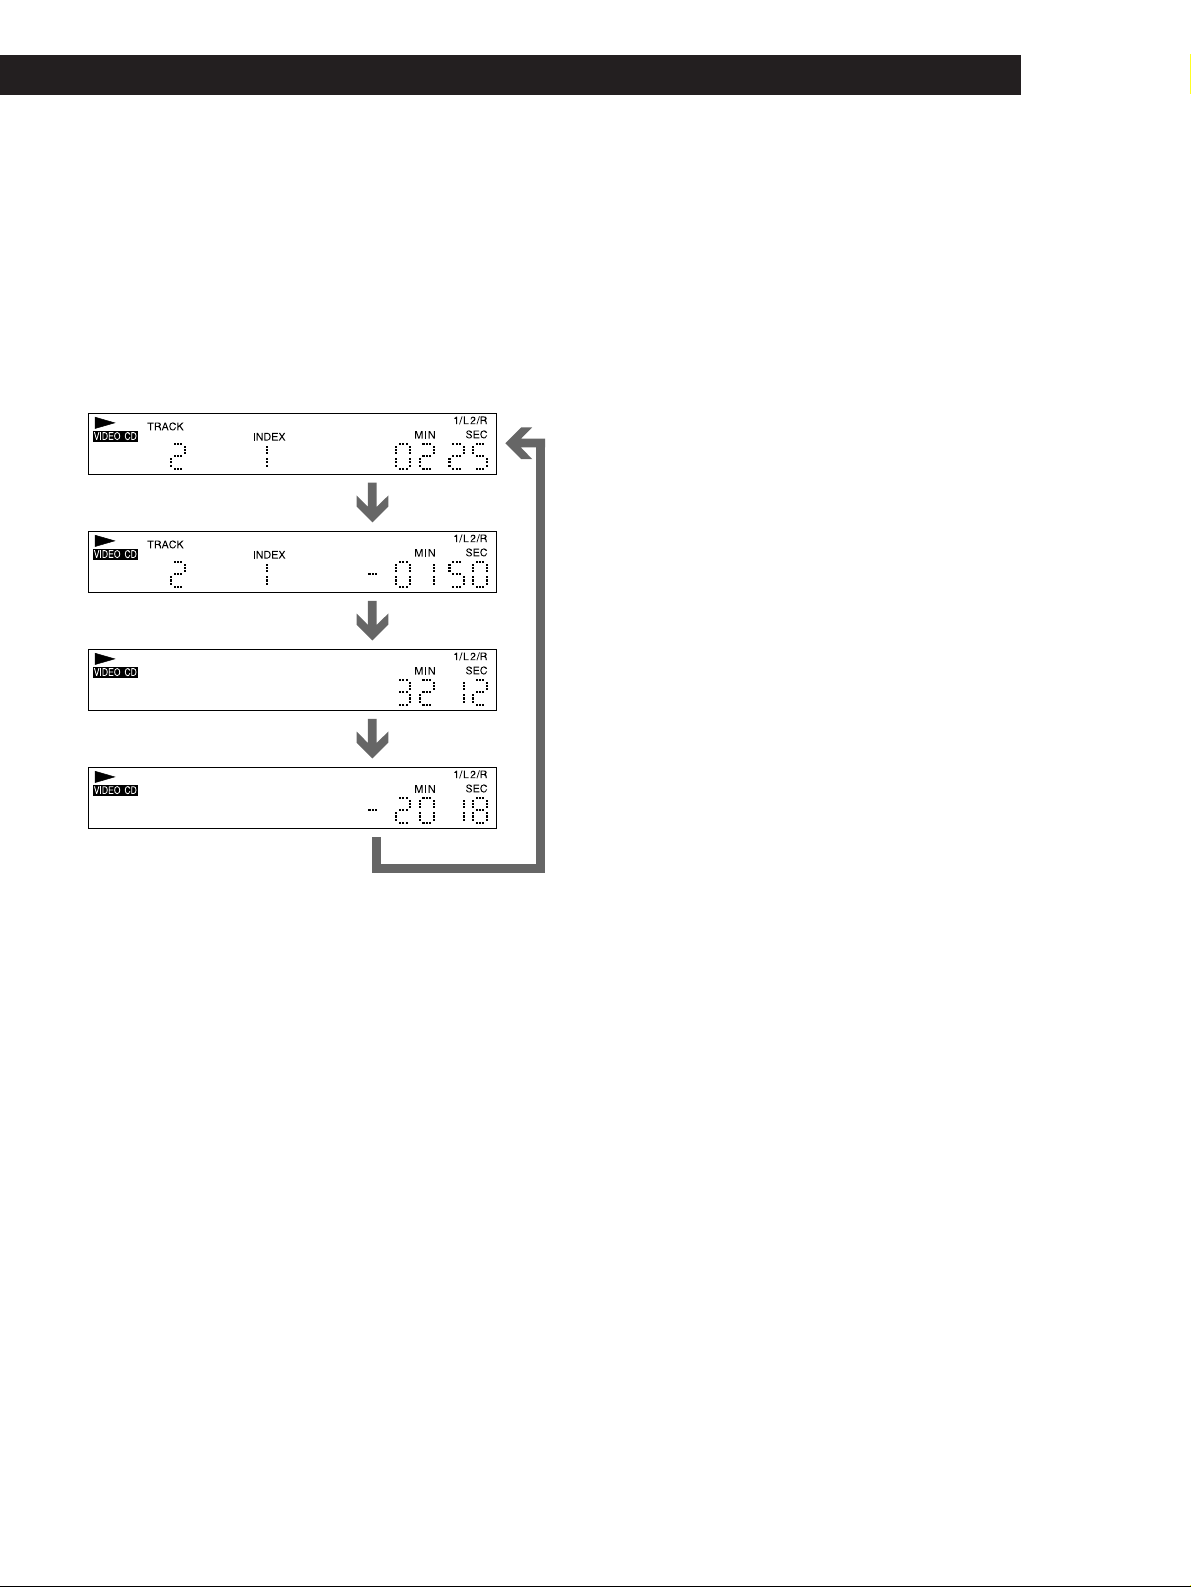
pChecking the remaining time
Press TIME.
Each time you press TIME while playing the disc, the
display changes as shown in the following chart. The time
information in the on-screen display 1 or 2 mode also
changes each time you press TIME.
Playing time
pDisplay information while playing a disc
Playing
status
Disc type
Lights up when
you can do
Resume Play
Current
track
number
Current
index
number
Lights up while
PBC playback
(VIDEO CD Only)
Lights up when
you are setting
a program
Current
play
mode
z When playing VIDEO CDs with PBC functions
The current scene number is displayed instead of the
current track number and the current index number. In
this case, the front panel display does not change when
you press TIME.
Current
sound
status
Playing time
Page 21
pChecking the remaining time
Press TIME.
Each time you press TIME while playing a disc, the display
changes as shown in the following chart. The time
information in the on-screen display 1 and 2 mode also
changes each time you press TIME.
Playing time and number of
the current track
Playing CDs in Various Modes
Playing Discs in Various Modes
Remaining time of the current
track
Playing time of the disc
Remaining time of the disc
Press TIME
Press TIME
Press TIME
Press TIME
Note
While you are doing Shuffle Play, Program Play, or PBC
playback, the playing time of the disc and the remaining time
of the disc are not displayed.
21
EN
Page 22
Playing Discs in Various Modes
789
Playing Repeatedly
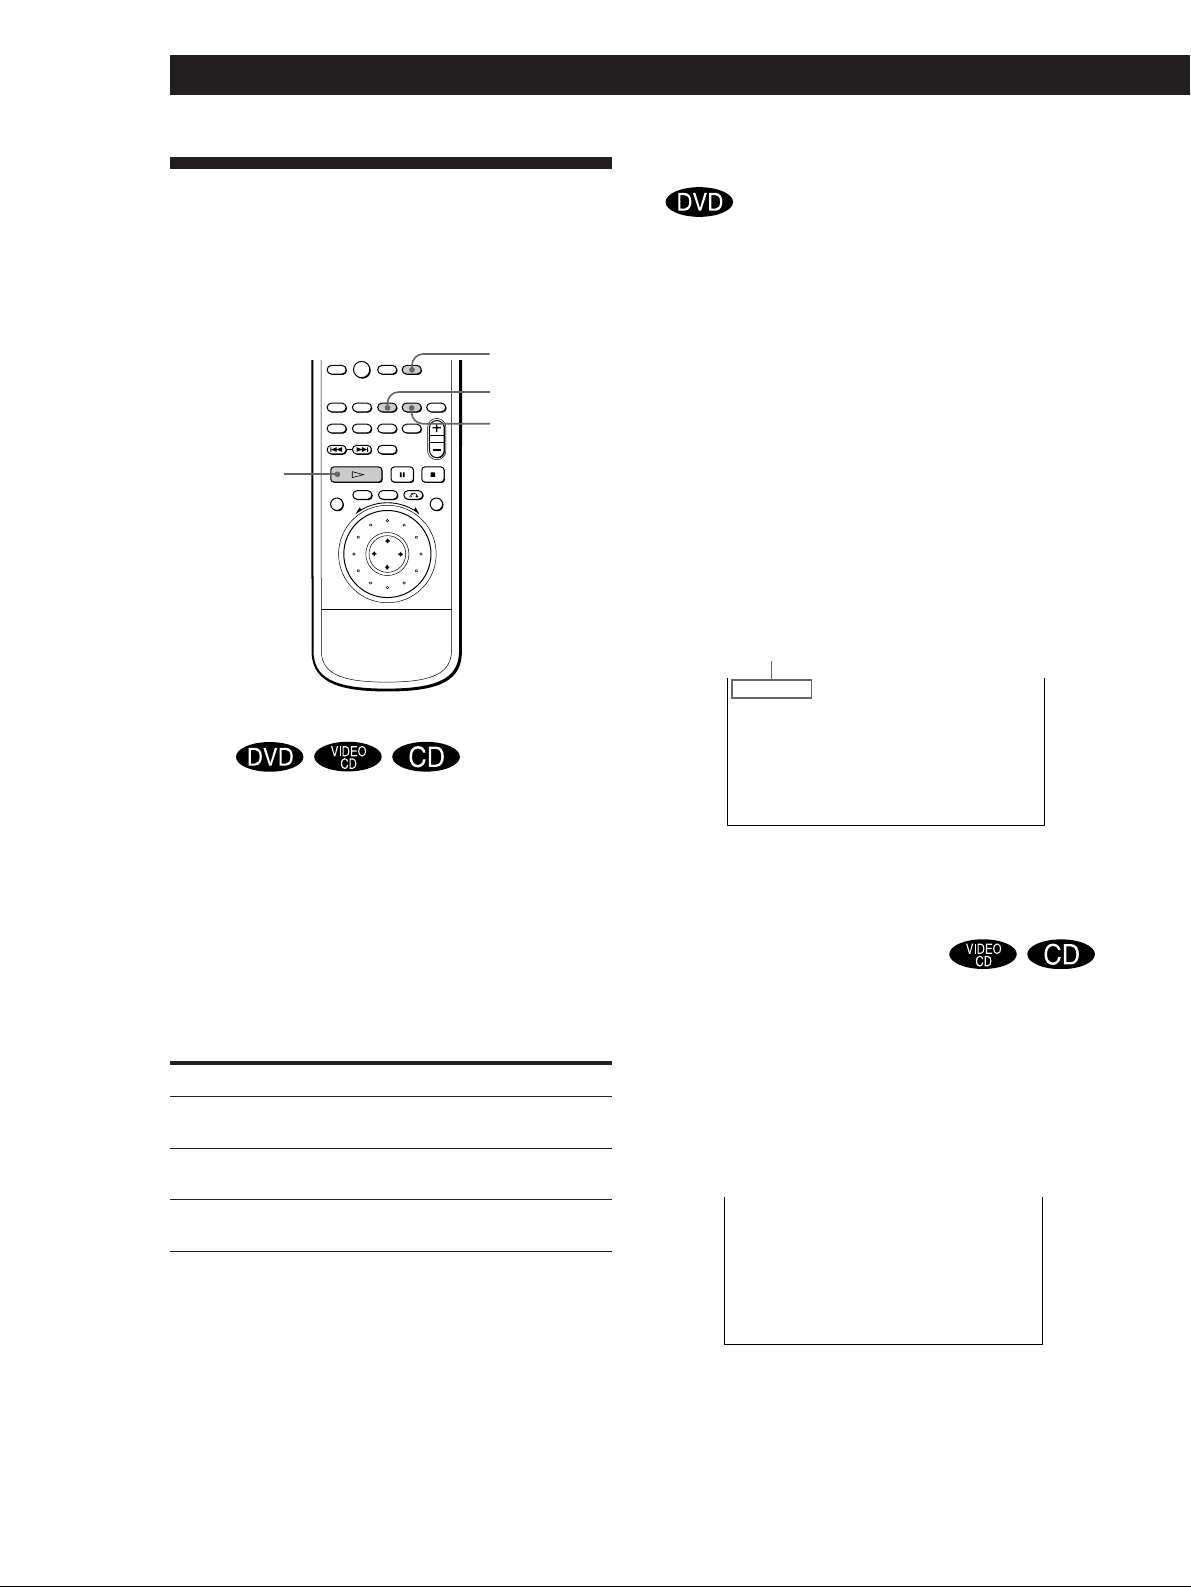
Repeating the current title or chapter
(Repeat Play)
You can play the all the titles/tracks on a disc, a single
title/chapter/track or a specific portion repeatedly.
0
·
Repeating all the titles or all the tracks on
a disc
In Shuffle or Program Play mode, the player repeats
the titles or tracks in the shuffled or programmed
order.
You cannot do Repeat Play during PBC playback of
VIDEO CDs (page 17). You may not be able to do
Repeat Play depending on the DVD.
CLEAR
REPEAT
A˜B
You can repeat only the current title or chapter in
Continuous Play mode. You may not be able to do
Repeat Play depending on the DVD.
pRepeating the current title
While the title you want is being played, press REPEAT
repeatedly until “TITLE REPEAT ” appears on the TV
screen.
The player repeats the current title.
pRepeating the current chapter
While the chapter you want is being played, press REPEAT
repeatedly until “CHAPTER REPEAT ” appears on the TV
screen.
The player repeats the current chapter.
“REPEAT 1” appears on the front panel display.
“CHAPTER” is displayed when you
select the current chapter
T
TLEI
REPEAT
To cancel repeating the current title or chapter
Press CLEAR.
EN
22
Press REPEAT during playback.
“ALL REPEAT” appears on the screen and “REPEAT”
appears on the front panel display. The player repeats
the titles/chapters/tracks as follows:
When the disc is played in
Continuous Play
(page 10 or 14)
Shuffle Play
(page 23)
Program Play (page 24)
The player repeats
All the titles/all the tracks
All the titles or tracks in
random order
Programmed titles /chapters
/tracks
To cancel repeating all the titles or all the tracks on a disc
Press CLEAR.
Repeating the current track
You can repeat only the current track in Continuous
Play mode.
While the track you want is being played, press
REPEAT until “TRACK REPEAT ” appears on the TV
screen.
“REPEAT 1” appears on the front panel display and
the player repeats the current track.
TRACK
REPEAT
To cancel repeating the current track
Press CLEAR.
Note
Repeat play is canceled when you turn the power off.
Page 23
Repeating a specific portion
(A˜B Repeat) Z
You can play a specific portion of a title, chapter, track
repeatedly. This is useful when you want to memorize
lyrics.
During PBC Playback of VIDEO CDs (page 17), this
function is available only while playing moving
pictures.
You may not be able to do Repeat Play depending on
the DVD.
Playing CDs in Various Modes
Playing Discs in Various Modes
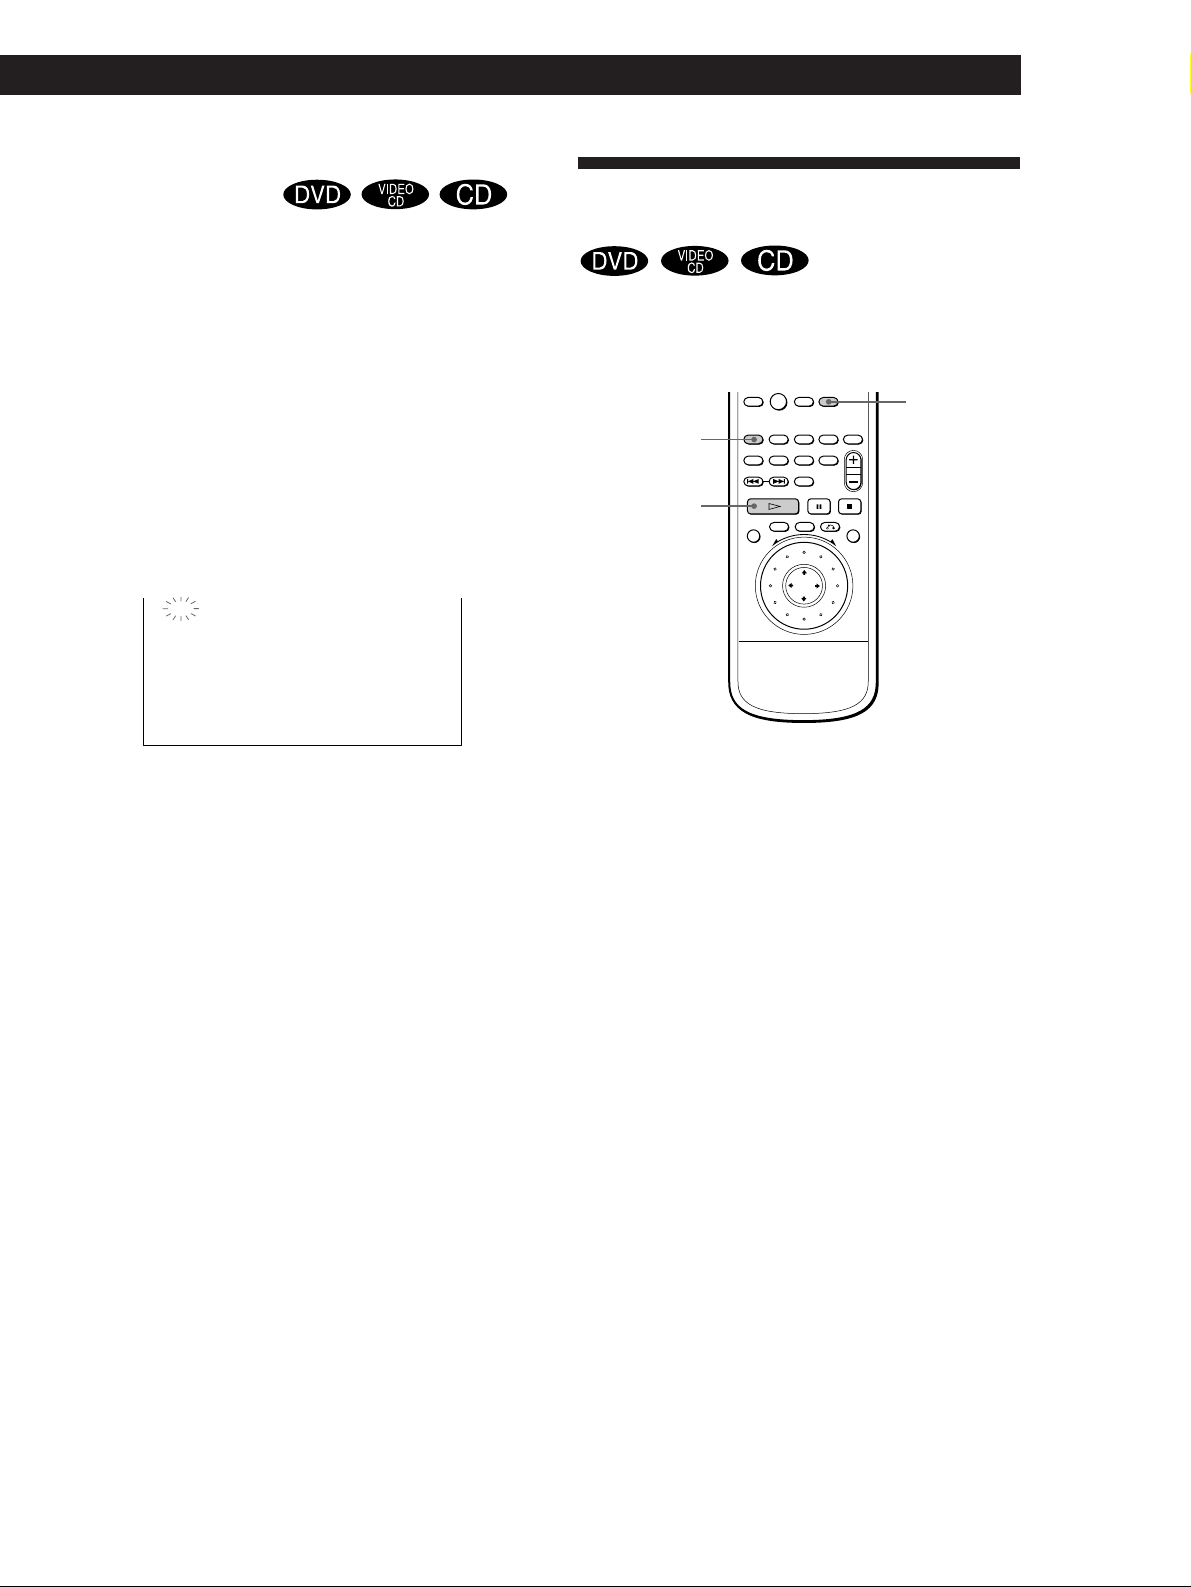
Playing in Random Order
(Shuffle Play)
You can have the player “shuffle” titles or tracks and
play them in a random order.
0
CLEAR
1 During playback, when you find the starting point
(point A) of the portion to be played repeatedly,
press A˜B.
The starting point (point A) is set. “A-B REPEAT”
is appears on the TV screen and “B” flashes.
A
B-
REPEAT
“REPEAT A-” also appears on the front panel
display and “B” flashes.
2 When you reach the ending point (point B), press
A˜B again.
“A-B REPEAT” on the TV screen disappears and
the player starts repeating this specific portion.
“REPEAT A-B” appears on the front panel display
during A˜B repeat play.
To cancel A˜B Repeat
Press CLEAR.
SHUFFLE
·
1 Press SHUFFLE.
2 Press ·.
(During playback, the player starts Shuffle Play
when you follow the step 1.)
To cancel Shuffle Play
Press CLEAR.
Notes
• The Shuffle Play is canceled when:
– you open or close the disc tray
– you turn the power off
• You may not be able to do Shuffle Play depending on the
DVD.
• When you play a DVD, you can do Shuffle Play only by
titles.
To cancel setting halfway
Press CLEAR.
Notes
•A˜B Repeat is canceled when:
– you open or close the disc tray
– you turn the power off
• When you set A˜B Repeat, the settings for Shuffle Play
and Program Play are canceled.
• You may not be able to set A˜B Repeat, depending on the
scene of a DVD or a VIDEO CD.
23
EN
Page 24
Playing Discs in Various Modes
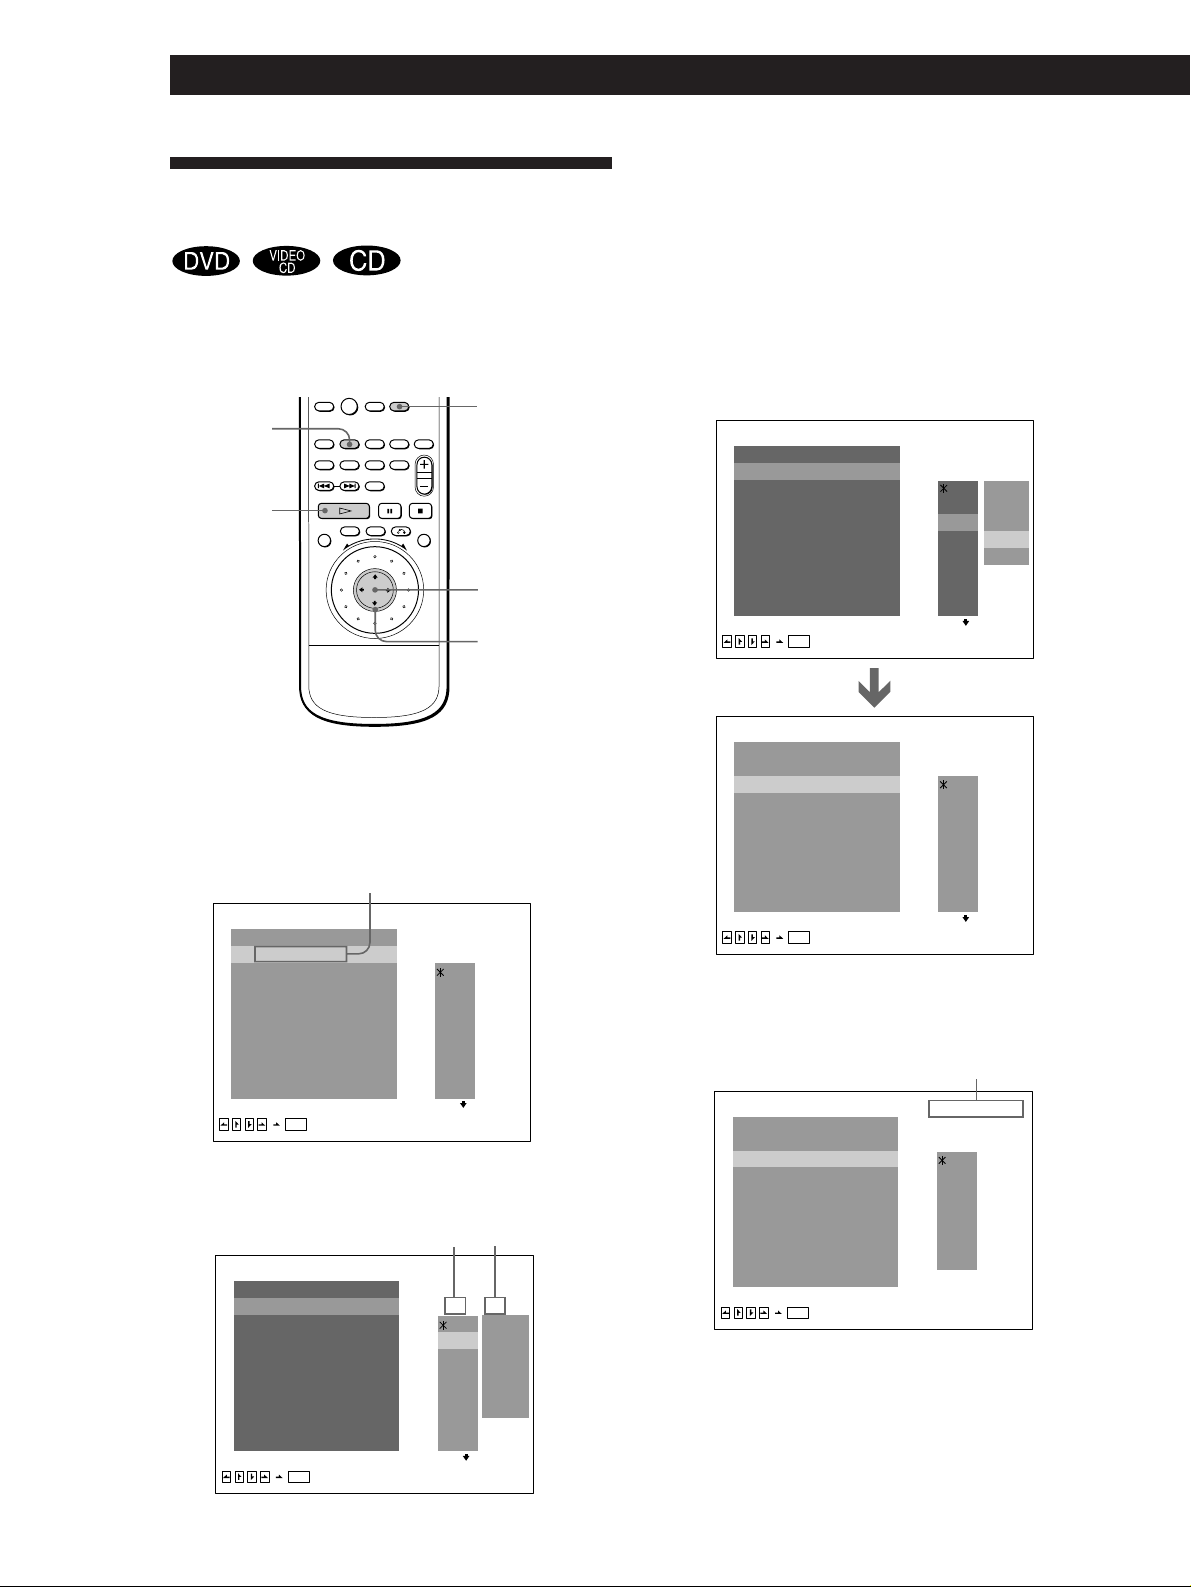
Creating Your Own Program
(Program Play)
You can arrange the order of the titles, chapters or
tracks on the disc and create your own program. The
program can contain up to 99 titles, chapters and
tracks.
0
PROGRAM
·
CLEAR
ENTER
?/>/.//
3 Select the title, chapter or track you want to
program using >/., then press ENTER.
For example, select title or track 2.
(You can also use the number buttons and ENTER
button to select. In this case, the selected number
is displayed on the screen.)
pWhen playing a DVD
When both titles and chapters are recorded on the disc,
select the title, then the chapter.
PROGRAM
ALL CLEAR
1 . T TLE02I
2 . T TLE––I
3 . T TLE––I
4 . T TLE––I
5 . T TLE––I
6 . T TLE––I
7 . T TLE––I
8 . T TLE––I
9 . T TLE––I
ENTER
[PLAY]
[PROGRAM]
CT
––
ALL
01
01
02 02
03 03
04 04
05
06
07
1 Press PROGRAM.
The programming display appears.
“TRACK_ _” is displayed when
you play a VIDEO CD or a CD.
PROGRAM
ALL CLEAR
1 . T TLE––I
2 . T TLE––I
3 . T TLE––I
4 . T TLE––I
5 . T TLE––I
6 . T TLE––I
7 . T TLE––I
8 . T TLE––I
9 . T TLE––I
ENTER
[PLAY]
2 Press /.
“01” is highlighted.
PROGRAM
ALL CLEAR
1 . T TLE––I
2 . T TLE––I
3 . T TLE––I
4 . T TLE––I
5 . T TLE––I
6 . T TLE––I
7 . T TLE––I
8 . T TLE––I
9 . T TLE––I
ENTER
[PLAY]
T
––
01
02
03
04
05
06
07
[PROGRAM]
Chapter
Title
CT
ALL
––
01
01
02 02
03 03
04 04
05 05
06
07
[PROGRAM]
PROGRAM
ALL CLEAR
1 . T TLE02–03I
2 . T TLE––I
3 . T TLE––I
4 . T TLE––I
5 . T TLE––I
6 . T TLE––I
7 . T TLE––I
8 . T TLE––I
9 . T TLE––I
ENTER
[PLAY]
[PROGRAM]
p When playing a VIDEO CD or CD
Select the track you want to program.
Total time of the
programmed tracks
PROGRAM
ALL CLEAR
1 . TRACK02
2 . TRACK––
3 . TRACK––
4 . TRACK––
5 . TRACK––
6 . TRACK––
7 . TRACK––
8 . TRACK––
9 . TRACK––
ENTER
[PLAY]
0 15 30::
[PROGRAM]
T
––
01
02
03
04
05
06
07
T
––
01
02
03
04
05
06
24
EN
Page 25
4 To program other titles, chapters or tracks, repeat
Step 3.
The programmed titles, chapters or tracks are
displayed from 02 in order.
Playing CDs in Various Modes
Playing Discs in Various Modes
Resuming Playback from the
Point Where You Stopped a
Disc (Resume Play)
PROGRAM
ALL CLEAR
1 . T TLE02–02I
2 . T TLE15I
3 . T TLE03I
4 . T TLE05I
5 . T TLE07–14I
6 . T TLE––I
7 . T TLE––I
8 . T TLE––I
9 . T TLE––I
ENTER
[PLAY]
T
––
01
02
03
04
05
06
07
[PROGRAM]
5 Press · to start Program Play.
To cancel Program Play
Press CLEAR.
To cancel programming
Press PROGRAM.
To change programming
1 In Step 2, select the program number of the title, chapter or
track you want to change using >/..
2 Follow Step 3 for new programming.
The player stores the point where you stopped a disc if
“RESUME” appears on the front panel display. In this
case, you can resume playback from that point.
As long as you do not open the disc tray, Resume Play
is available even if you turn the power off.
·
1 While playing a disc, press p to stop playback.
“RESUME” appears in the front panel display and
“When playing next time, disc restarts from point
you stopped.” appears on the TV screen.
If “RESUME” does not appear, Resume Play is not
available.
p
To cancel the programmed order
To cancel all the titles, chapters or tracks in the programmed
order, select “ALL CLEAR” in Step 2.
To cancel the selected program, select the program using >/
. in Step 2 then press CLEAR, or select “- -” in Step 3 then
press ENTER.
z The program remains even after the Program Play
ends
When you press ·, you can play the same program
again.
z You can do Repeat Play or Shuffle Play of the
programmed titles, chapters or tracks
During Program Play, press REPEAT or SHUFFLE.
Notes
• The number of titles, chapters or tracks displayed are that
of the titles, chapters or tracks recorded on a disc.
• The program is canceled when:
– you open or close the disc tray
– you turn the power off
• You may not be able to do Program Play depending on the
DVD.
• While you are doing PBC playback, you cannot set a
program unless you stop playback once.
2 Press ·.
The player starts playback from the point you
stopped the disc in Step 1.
z To play from the beginning of the disc
When “RESUME” appears on the front panel display
before you start playing, press p to turn off “RESUME,”
then press ·.
Notes
• You may not do Resume Play depending on the DVD.
• Resume Play is not available in Shuffle or Program Play
mode.
• Depending on where you stopped the disc, the player may
resume playback from a different point.
• The point where you stopped playing is cleared when:
– you open or close the disc tray
– you disconnect the AC power cord
– you change the play mode
– you start playback after selecting a title, chapter or track
– you change the settings of “DVD MENU”, “AUDIO” or
“SUBTITLE” in “LANGUAGE SETUP” in the setup display
– you change the settings of “TV TYPE”, “PARENTAL
CONTROL” in ”INITIAL SETUP 1” in the setup display
25
EN
Page 26
Playing Discs in Various Modes
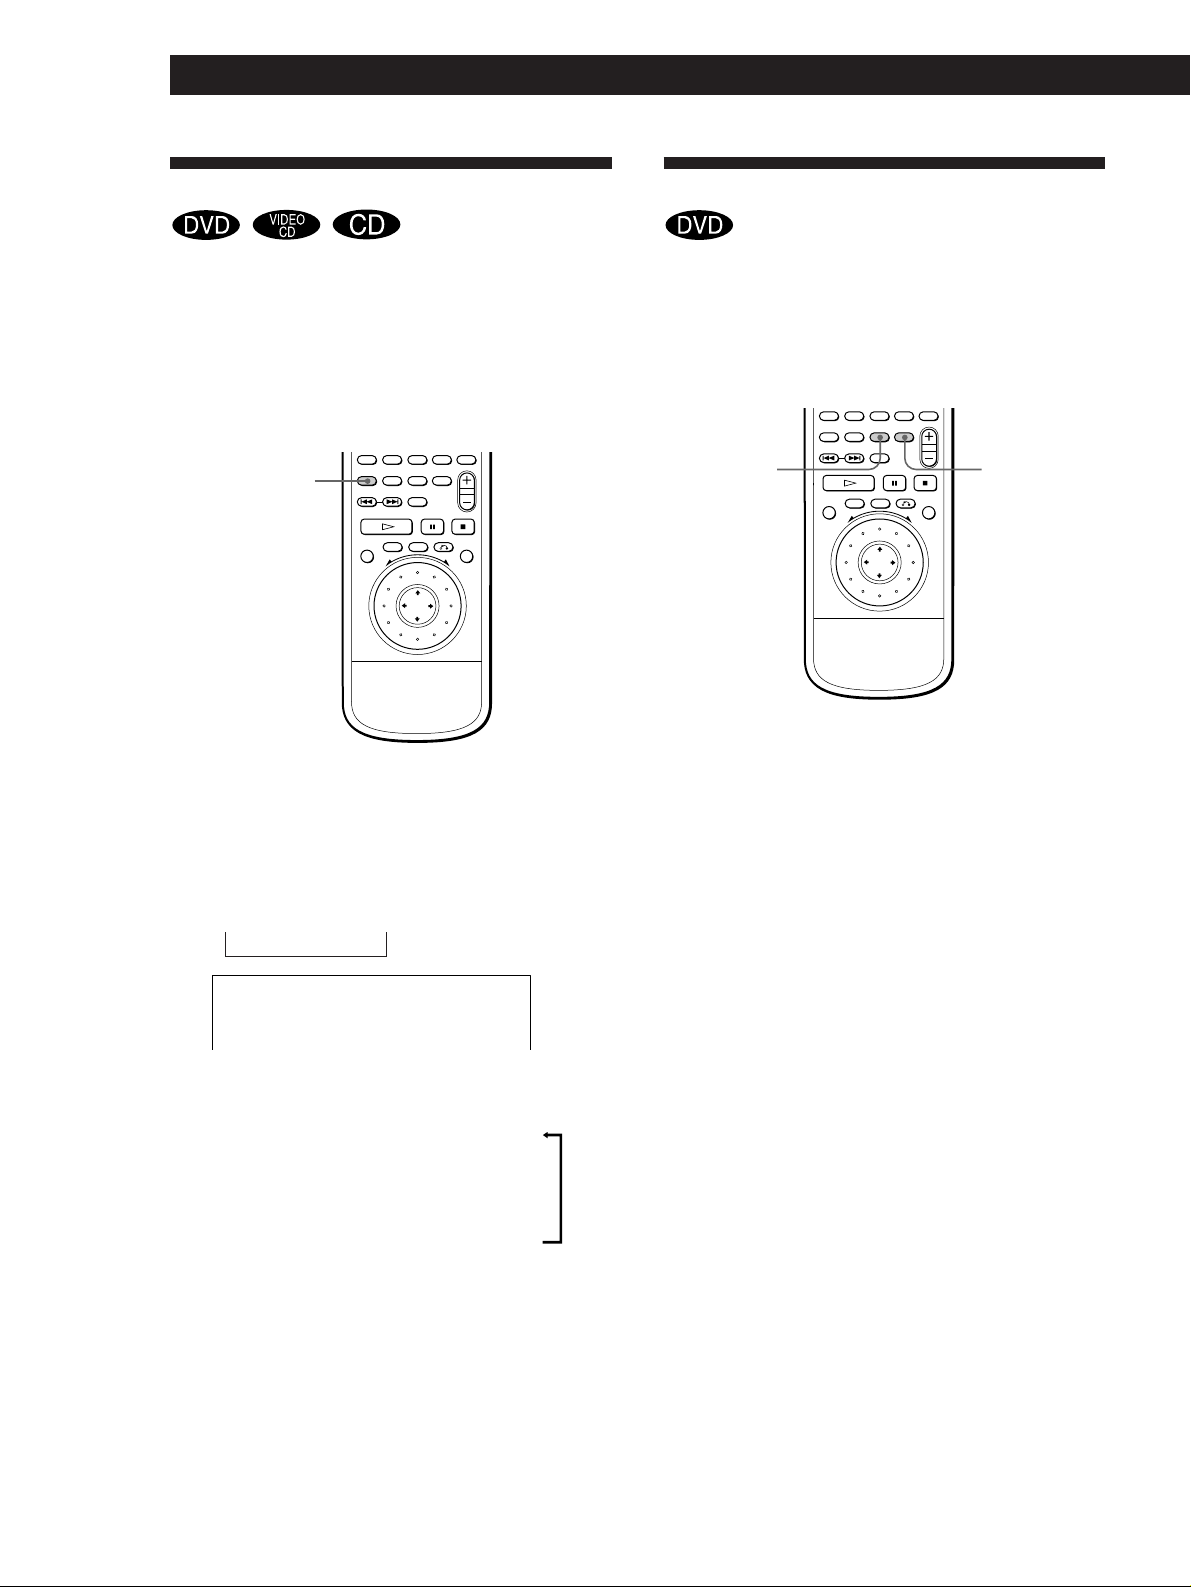
Changing the Sounds Z
With DVDs on which multilingual sounds are
recorded, you can select the language you want while
playing the DVD.
With multiplex VIDEO CDs, you can select the sound
from the right or left channel and listen to the sound of
the selected channel through both the right and left
speakers. In this case, the sound loses the stereo effect.
AUDIO
CHANGE
Press AUDIO CHANGE while playing a disc.
Each time you press the button, the indication and the
language/sound from the speakers change as follows:
Displaying the SubtitlesZ
With DVDs on which subtitles are recorded, you can
turn the subtitles on and off whenever you want while
playing the DVD. With DVDs on which multilingual
subtitles are recorded, you can change the subtitle
language whenever you want while playing the DVD.
SUBTITLE
CHANGE
Turning the Subtitles On and Off
Press SUBTITLE ON/OFF while playing a DVD.
Subtitles appear on the TV screen.
SUBTITLE
ON/OFF
26
EN
pWhen playing a DVD
AUDIO 1 n AUDIO 2 n .....
n
AUDIO
3:PORTUGUESE
pWhen playing a VIDEO CD or a CD
1/L : The sound of the left channel
.
2/R : The sound of the right channel
.
STEREO (1/L 2/R) : The standard stereo sound
Notes
• Depending on the DVD, you may not be able to change the
languages even if multilingual sounds are recorded on the
DVD.
• While playing the CD/VIDEO CD, the standard stereo
playback will be resumed when:
– you open or close the disc tray
– you turn the power off
• While playing the DVD, the sound may be changed when:
– you open or close the disc tray
– you change the title
• If the language is displayed as 4 digits number, refer to the
language code list in page 52.
To turn off the subtitles
Press SUBTITLE ON/OFF again.
Notes
• When playing the DVD on which no subtitles are recorded,
no subtitles appear even if you press SUBTITLE ON/OFF.
• Depending on the DVD, you may not be able to turn the
subtitles on even if they are recorded on the DVD.
• Depending on the DVD, you may not be able to turn the
subtitles off.
• If the language is displayed as 4 digits number, refer to the
language code list in page 52.
Changing the Subtitle Language
When subtitles are turned off, press SUBTITLE ON/
OFF to turn on the subtitles.
While playing a DVD, press SUBTITLE CHANGE
repeatedly until the subtitles you want appear on the
TV screen.
Page 27

Playing CDs in Various Modes
Playing Discs in Various Modes
SUBTITLE 1 n SUBTITLE 2 n ...
n
SUBTITLE
1:ENGLISH
Notes
• The type and number of languages for subtitles vary from
disc to disc.
• Depending on the DVD, you may not be able to change the
subtitles even if multilingual subtitles are recorded on the
DVD.
• While playing the DVD, the subtitle may be changed when:
– you open or close the disc tray
– you change the title
Changing the Angles Z
With DVDs on which various angles (multi-angles) for
a scene are recorded, you can change the angles
whenever you want while playing the DVD.
ANGLE
CHANGE
When “ANGLE” appears on the front panel display
while playing a DVD, press ANGLE CHANGE
repeatedly until you get the angle you want.
ANGLE 1 n ANGLE 2 n ...
n
ANGLE
1
z You can specify the angle beforehand
Specify the angle when “ANGLE” is not displayed on the
front panel display. When a scene on which multi-angles
are recorded comes, the angle is automatically selected.
Notes
• The number of angles varies from disc to disc or from scene
to scene. The number of angles that can be changed on a
scene is that of angles recorded for that scene.
• Depending on the DVD, you may not be able to change the
angles even if multi-angles are recorded on the DVD.
27
EN
Page 28

Playing Discs in Various Modes
Limiting Playback by Children
2 Select “INITIAL SETUP 1” using ?//, then
press . or ENTER.
(Parental Control) Z
Playing some DVDs can be limited depending on the
age of users. The “Parental Control” function allows
you to set a playback limitation level.
Number
buttons
SET UP
123
456
789
0
ENTER
?/>/.//
2
4:3
QUIT
12
OFFAUTO PLAY:
BRIGHT
BLUE
SETUP
INITIAL SETUP 1
1
TV TYPE: LETTER BOX
DIMMER:
BACKGROUND:
SCREEN SAVER: ON
PARENTAL CONTROL
ENTER
3 Select “PARENTAL CONTROL” using >/., then
press ENTER.
pWhen you have not entered a password yet
The display for entering a password appears.
INITIAL SETUP 1
PARENTAL CONTROL
Entry password. Enter
a number in 4 figures,
then press .
1 2
ENTER
12
1 Press SET UP to display the setup display on the
TV screen before playing.
2
INITIAL SETUP 1
TV TYPE: LETTER BOX
DIMMER:
BACKGROUND:
SCREEN SAVER: ON
PARENTAL CONTROL
1
4:3
ENTER
12
BRIGHT
SETUP
QUIT
OFFAUTO PLAY:
BLUE
pWhen you have already entered a password
The display for confirming the password appears.
Skip Step 4.
INITIAL SETUP 1
PARENTAL CONTROL
Enter password, then
press .
1 2
ENTER
12
28
EN
(Continued)
Page 29

Playing CDs in Various Modes
Playing Discs in Various Modes
4 Enter a password in 4 figures using the number
buttons, then press ENTER.
The figures change to asterisks (
), and the
display for confirming the password appears.
INITIAL SETUP 1
PARENTAL CONTROL
To confirm, enter
password again, then
press .
1 2
ENTER
12
5 To confirm your password, enter it using the
number buttons, then press ENTER.
The display for setting the playback limitation
level and changing the password appears.
INITIAL SETUP 1
1 2
PARENTAL CONTROL
STANDARD:
CHANGE PASSWORD
12
OFFLEVEL:
USA
7 Select an area as the standard for playback
limitation level using >/., then press /.
When you select “OTHERS”, select and enter the
standard code in the table below using number
buttons.
INITIAL SETUP 1
PARENTAL CONTROL
STANDARD:
CHANGE PASSWORD
1 212
OFFLEVEL:
USA
ENTER
QUIT
SETUP
8 Select “LEVEL” using >/., then press /.
INITIAL SETUP 1
PARENTAL CONTROL
STANDARD:
CHANGE PASSWORD NC17
1 212
OFFLEVEL:
8.
7.
6.
R
5.
4.
PG13
3.
PG
ENTER
QUIT
2.
SETUP
ENTER
QUIT
SETUP
6 Select “STANDARD” using >/., then press /.
INITIAL SETUP 1
1 2
PARENTAL CONTROL
STANDARD:
CHANGE PASSWORD
ENTER
12
OTHERS
SETUP
QUIT
OFFLEVEL:
USA
9 Select the level you want using >/., then press
ENTER.
INITIAL SETUP 1
PARENTAL CONTROL
LEVEL:
STANDARD:
CHANGE PASSWORD
The lower the value is, the more strict the
limitation.
To return to the normal screen
Press SET UP.
To turn off the Parental Control function and play the DVD
after entering your password
Set “LEVEL” to “OFF” in Step 9, then press ·.
1 212
PG134.
USA
ENTER
QUIT
SETUP
(Continued)
29
EN
Page 30

Playing Discs in Various Modes
123
456
789
0
To change the password
1 In Step 5, select “CHANGE PASSWORD” using >/., then
press / or ENTER.
The display for changing the password appears.
2 Follow Steps 4 and 5 to enter a new password.
z If you have forgot your password
Enter 6 digits number “199703” in Step 4 to clear the
current password. To enter a new password, follow the
procedure from Step 4 again.
Notes
• When you play DVDs which do not have the Parental
Control function, playback cannot be limited on this player.
• When you do not set a password, you cannot change the
settings for playback limitation.
• Depending on the DVD, you may be asked to change the
parental control level while playing the disc. In this case,
enter the password, then change the level.
When you stop playing the DVD, the level returns to the
original level.
Standard Code number
Austria 2046
Belgium 2057
Canada 2079
China 2092
Denmark 2115
Finland 2165
France 2174
Germany 2109
Hong Kong 2219
Indonesia 2238
Italy 2254
Japan 2276
Malaysia 2363
Netherlands 2376
Norway 2379
Philippines 2424
Singapore 2501
Spain 2149
Sweden 2499
Switzerland 2086
Taiwan 2543
Thailand 2528
United Kingdom 2184
Controlling the TV or the AV
receiver with the Supplied
Remote Z
If you adjust the remote signal, you can control your
TVs with the supplied remote. Default setting is to
control Sony TVs with the g mark.
When you connect the player to a Sony AV receiver,
you can also set the input of the receiver to this player
with the supplied remote .
TV/DVD
switch
Number
buttons
Controlling TVs with the remote
1 Slide TV/DVD switch to TV.
2 Hold down POWER, and enter your TV’s
manufacturer’s code in the table below using the
number buttons. Then release POWER.
Code numbers of controllable TVs
If more than one code number is listed, try entering
them one at a time until you find the one that works
with your TV.
Notes
• If you enter a new code number, the code number
previously entered will be erased.
• When you replace the batteries of the remote commander,
the code number automatically resets to 01 (Sony). Reset the
appropriate code number.
POWER
30
EN
Page 31

Playing CDs in Various Modes
Playing Discs in Various Modes
Manufacturer
Sony (default)
Akai
AOC
Centurion
Coronado
Curis-Mathes
Daytron
Emerson
Fisher
General Electric
Gold Star
Hitachi
J.C.Penny
JVC
KMC
Magnavox
Marantz
MGA/Mitsubishi
NEC
Code
number
01
04
04
12
03
12
12
03,04,14
11
06,10
03,04,17
02,03
04,12
09
03
03,08,12
04,13
04,12,13,17
04,12
Manufacturer
Panasonic
Philco
Philips
Pioneer
Portland
Quasar
Radio Shack
RCA
Sampo
Sanyo
Scott
Sears
Sharp
Sylvania
Teknika
Toshiba
Wards
Yorx
Zenith
Code
number
06,19
03,04
08
16
03
06,18
05,14
04,10
12
11
12
07,10,11
03,05,18
08,12
03,08,14
07
03,04,12
12
15
Controlling a Sony AV receiver with the
remote
1 Slide TV/DVD switch to DVD.
2 Hold down POWER, and enter your AV receiver’s
input connector code (see the table below) using
the number buttons.* Then release POWER.
AV receiver connector
VIDEO 1
VIDEO 2
VIDEO 3
AUX 1
LD/DVD (default setting)
AC-3
TV
* If you connect the player to the SONY Mini Hi-Fi
Component system, enter “98”.
When you press AV RECVR on the supplied remote,
you can set the input of AV receiver to the player.**
You can also change the volume of the sound using AV
VOL.
Code number
91
92
93
94
95
96
97
When you set the TV/DVD switch to TV, you can
control your TV using the keys below.
TV/DVD
switch
Number
buttons
By pressing
POWER
TV/VIDEO
VOL
CH
Number buttons
and ENTER
123
456
789
0
You can
Turn on or off the TV
Select the input source for the TV
Adjust the volume of the TV
Change the channel of the TV
Select the channel of the TV
POWER
VOL
CH
TV/VIDEO
ENTER
123
456
789
0
AV RECVR
(Receiver)
AV VOL
**If you connect the player to the SONY Mini Hi-Fi
Component system, press AV RECVR repeatedly to
change the input of the system.
Note
Depending on the AV receiver, you may not be able to control
your AV receiver.
Note
Depending on the TV, you may not be able to control your TV
or to use some buttons above.
31
EN
Page 32

Settings and Adjustments
Settings and Adjustments
Using the Setup display Z
Using the setup display, you can do the initial setup,
adjusting the picture and sound quality, setting the
various outputs, etc. You can also set a language for
the subtitles and the setup display, limit playback by
children, etc.
For details on each setup display item, see pages 33 to
35. If you want to change the settings for 5.1 channel,
see pages 36 to 41.
The setup display items are listed in page 51.
SET UP
ENTER
?/>/.//
3 Select the item you want using >/., then press /
or ENTER.
INITIAL SETUP 1
TV TYPE: LETTER BOX
DIMMER:
BACKGROUND:
SCREEN SAVER:
PARENTAL CONTROL
1 212
ENTER
4:3
QUIT
OFFAUTO PLAY:
BRIGHT
BLUE
ON
OFF
SETUP
4 Select the setting you want using >/., then press
ENTER.
INITIAL SETUP 1
TV TYPE: LETTER BOX
DIMMER:
BACKGROUND:
SCREEN SAVER: OFF
PARENTAL CONTROL
1 212
4:3
OFFAUTO PLAY:
BRIGHT
BLUE
1 Press SET UP to display the setup display on the
TV screen.
INITIAL SETUP 1
TV TYPE: LETTER BOX
DIMMER:
BACKGROUND:
SCREEN SAVER: ON
PARENTAL CONTROL
1 212
ENTER
4:3
QUIT
OFFAUTO PLAY:
BRIGHT
BLUE
SETUP
2 Select the main item you want using ?//, and
then press ENTER.
The selected main item is highlighted.
Main item
INITIAL SETUP 1
TV TYPE: LETTER BOX
DIMMER:
BACKGROUND:
SCREEN SAVER: ON
PARENTAL CONTROL
1 212
4:3
OFFAUTO PLAY:
BRIGHT
BLUE
ENTER
QUIT
SETUP
To cancel using the setup display on the way
Press SET UP.
Note
Some setup display items require operations other than
selecting the setting. For details on these items, see the
relevant pages.
32
EN
ENTER
QUIT
SETUP
Page 33

Setting the Language for
Display and Sound
(LANGUAGE SETUP)
Select “ ” after pressing SET UP.
“LANGUAGE SETUP” allows you to set various
languages for on-screen display or sound.
Default settings are underlined.
Note
When you select a language that is not recorded on the DVD,
one of the recorded languages is automatically selected except
for “OSD”.
Locating a Scene or Track You Want
Locating a Scene or Track You Want
Locating a Scene or Track You Want
Settings and Adjustments
Settings and Adjustments
pAUDIO
Switches the language for the sounds.
• ORIGINAL : the language given the priority in the disc
• SPANISH
• ENGLISH
• FRENCH
• ITALIAN
• GERMAN
• DUTCH
• PORTUGUESE
• CHINESE
• JAPANESE
• OTHERS/
When you select “OTHERS,” select and enter the
language code from the list using the number buttons
(page 52).
LANGUAGE SETUP
OSD: ENGLISH
AUDIO:
SUBTITLE:
1 212
ENGLISHDVD MENU:
ORIGINAL
AUDIO FOLLOW
ENTER
QUIT
SETUP
pOSD (On-Screen Display)
Switches the language for the on-screen display.
• SPANISH
• ENGLISH
pDVD MENU
Switches the language for the DVD menu.
• SPANISH
• ENGLISH
• FRENCH
• ITALIAN
• GERMAN
• DUTCH
• PORTUGUESE
• CHINESE
• JAPANESE
• OTHERS/
When you select “OTHERS,” select and enter the
language code from the list using the number buttons
(page 52).
pSUBTITLE
Switches the language for the subtitles.
• AUDIO FOLLOW*
• SPANISH
• ENGLISH
• FRENCH
• ITALIAN
• GERMAN
• DUTCH
• PORTUGUESE
• CHINESE
• JAPANESE
• OTHERS/
When you select “OTHERS,” select and enter the
language code from the list using the number buttons
(page 52).
* When you select “AUDIO FOLLOW,” the language for the
subtitles change according to the language for the sound.
33
EN
Page 34

Settings and Adjustments
Settings for Display (INITIAL
SETUP 1)
Select “
“INITIAL SETUP 1” allows you to set the display
according to the playback conditions.
Default settings are underlined.
pTV TYPE
Selects the aspect ratio of the TV to be connected.
• 4:3 LETTER BOX: when you connect a normal TV to the
player. Displays the wide picture with bands displayed on
the upper and lower portions of the screen.
• 4:3 PAN SCAN : when you connect a normal TV to the
player. Displays the wide picture on the whole screen with
a portion automatically cut off.
• 16:9: when you connect a wide-screen TV to the player.
1
” after pressing SET UP.
INITIAL SETUP 1
TV TYPE: LETTER BOX
DIMMER:
BACKGROUND:
SCREEN SAVER: ON
PARENTAL CONTROL
1 212
ENTER
4:3
QUIT
OFFAUTO PLAY:
BRIGHT
BLUE
SETUP
pAUTO PLAY
Selects the setting of Auto Play when you connect the AC
power cord to the AC outlet.
• OFF: does not use “TIMER”, “DEMO1“ or “DEMO2” to
start playing.
• TIMER: starts playing a disc automatically when you
connect the AC power cord to the AC outlet. By connecting
a timer (not supplied), you can start playing at any time
you want.
• DEMO1: starts playing the demonstration 1 automatically.
• DEMO2: starts playing the demonstration 2 automatically.
pDIMMER
Adjusts the lighting of the front panel display.
• BRIGHT: makes the front panel display bright.
• DARK: makes the front panel display dark.
• OFF: turns off the lighting of the front panel display.
pBACKGROUND
Selects the background color of the TV screen in stop mode.
• BLUE: The background color is blue.
• BLACK: The background color is black.
pSCREEN SAVER
Turns on and off the screen saver. If you turn on the screen
saver, the screen saver image appears when you leave the
player or the remote in pause or stop mode for 15 minutes.
The screen saver is useful to prevent your display from
damage.
• ON: turns on the screen saver.
• OFF: turns off the screen saver.
4:3 LETTER BOX
4:3 PAN SCAN
16:9
Note
Depending on the DVD, “4.3 LETTER BOX“ may be selected
automatically instead of “4.3 PAN SCAN” and vice versa.
pPARENTAL CONTROL
Sets a password and playback limitation level when you play
DVDs with playback limitation for children.
For details, see page 28.
34
EN
Page 35

Settings for Sound (INITIAL
SETUP 2)
Select “
“INITIAL SETUP 2” allows you to set the sound
according to the playback conditions.
Default settings are underlined.
pTRACK SELECTION
Gives the Dolby Digital (AC-3) format priority when you play
a DVD on which multiple audio formats are recorded. If
multiple audio channels are recorded in Dolby Digital (AC-3)
format, the higher-numbered channel audio recorded in
Dolby Digital (AC-3) format is played.
• OFF: No priority given.
• AUTO: Priority given.
Notes
• When you set this item to “ON”, the language may change
depending on the “AUDIO” settings in “LANGUAGE
SETUP.” The “TRACK SELECTION” setting has higher
priority than that of “AUDIO” settings in “LANGUAGE
SETUP” (page 33).
• Depending on the DVD, the audio with priority may be
predetermined. In this case, you cannot give priority to the
Dolby Digital (AC-3) format by selecting “AUTO.”
pSURROUND*
Switches the mixing down methods when you play a DVD on
which the sound in Dolby Digital (AC-3) format is recorded.
• ON: when the player is connected to an audio component
that conforms to Dolby surround, Dolby Pro Logic
surround, etc.
• OFF : when the player is connected to a normal audio
component.
2
” after pressing SET UP.
INITIAL SETUP 2
TRACK SELECTION:
SURROUND: ON
DIGITAL OUT:
AUDIO DRC:
AUDIO FILTER:
1 212
OFF
PCM
OFF
OFFAUDIO ATT:
SHARP
ENTER SETUP
QUIT
Locating a Scene or Track You Want
Locating a Scene or Track You Want
Locating a Scene or Track You Want
Settings and Adjustments
Settings and Adjustments
pDIGITAL OUT
Switches the methods of outputting audio signals from the
DIGITAL OUT OPTICAL and COAXIAL connectors on the
rear panel of the player.
• PCM: when the player is connected to an audio component
without a built-in Dolby Digital (AC-3) decoder
If you play the Dolby Digital (AC-3) sound track, the player
outputs no sound.
• DOLBY DIGITAL/PCM: when the player is connected to
audio component with a built-in Dolby Digital (AC-3)
decoder
• D-PCM (Downmix PCM): when you play the Dolby Digital
(AC-3) sound tracks, the output audio signals are mixed
down to 2 channels. By the settings of the item
“SURROUND,” you can select whether the signals contain
the surround component or not. The output audio signals
from the 5.1 OUTPUT connectors are also mixed down in
the same way. To enjoy the original Dolby Digital (AC-3)
sound through the 5.1 OUTPUT connectors, do not set this
item to “D-PCM.”
Note
Select the setting correctly. Otherwise, no sound or
strange sound will come out from the speakers,
affecting your ears or causing the speakers to be
damaged.
pAUDIO DRC (Dynamic Range Control)
Makes the sound clear with the volume turned down at night,
etc. when you play a DVD. This affects the output from the
DIGITAL OUT connectors only when “DIGITAL OUT” in
”INITIAL SETUP 2” is set to “PCM,” the output from the
LINE OUT (AUDIO 1,2), and 5.1 OUTPUT connectors.
• OFF: Normally select this position.
• ON: makes the sound clear even if you turned the volume
down.
Note
When you play DVDs without the AUDIO DRC function,
there may be no effect on the sound.
pAUDIO ATT (attenuation)
Selects the setting of the output from the LINE OUT (AUDIO
1, 2) and 5.1 OUTPUT connectors according to audio
equipment to be connected.
• OFF: turns off the audio attenuation.
• ON: reduces the audio output level so that no sound
distortion occurs.
Note
The setting does not affect the output from the DIGITAL OUT
OPTICAL and COAXIAL connectors.
* The setting affects the connectors as follows:
–LINE OUT (AUDIO 1, 2) connectors
–DIGITAL OUT (OPTICAL, COAXIAL) connectors.
pAUDIO FILTER
Selects the type of digital filter to reduce the noise higher
frequency than 22.05kHz (fs 44.1kHz), 24kHz (fs 48kHz) or
48kHz (fs 96kHz).
• SHARP: makes the sound clear and provides smooth sound
reproduction. Normally set this position.
• SLOW: makes the sound warm and deep.
Note
Depending on the disc, there may be no effect on the sound.
35
EN
Page 36

Dolby Digital Surround
Dolby Digital Surround
What is Dolby Digital
Surround?
Some DVDs have up to 5.1 channel soundtrack
recorded in Dolby Digital (AC-3) format. Using an
amplifier with 5.1 channel inputs and the 5 (+1*)
speakers, you can enjoy more real audio presence in
the comfort of your own home.
Even if you have fewer than 5 (+1*) speakers, the
player distributes the output signal to the speakers
appropriately.
You can also enjoy the VES (Virtual Enhanced
Surround) system using the DCS (Digital Cinema
Sound) method that Sony developed. The VES system
realize surround sound only with front speakers.
* Subwoofer
Speaker System Hookups
Hookups
Connect an amplifier with 5.1 channel inputs to the
player and to the speakers. See the figure on the next
page.
Notes on connection
• Do not connect the power cord to an AC outlet or press the
POWER switch before completing all connections.
• The cable connectors should be fully inserted into the jacks.
Loose connection may cause hum and noise.
• Jacks and plugs of the connecting cords are color-coded as
follows:
Red jacks and plugs: Right audio channel
White jacks and plugs: Left audio channel
You can use either red or white cables to connect the center
speaker and sub woofer.
Rear speaker (L)
Front speaker (L)
AV Amplifier with
5.1ch inputs
Center speaker
TV
CD/DVD Player
Subwoofer
Front speaker (R)
36
Rear speaker (R)
EN
Page 37

TV
CD/DVD Player
COMPONENT VIDEO OUT
Y B–Y
Additional Information
Dolby Digital Surround
VIDEO 3
MONITOR
INPUT
1
2
S VIDEO OUT
OUTPUT
OPTICAL COAXIAL
PCM/
DOLBY DIGITAL (AC-3)
DIGITAL OUT
S VIDEO IN
L
CENTER
R–AUDIO 1–L VIDEO 1
R–Y
R–AUDIO 2–L VIDEO 2
FRONT REARRWOOFER
5.1 OUTPUT LINE OUT
VIDEOINVIDEO
AUDIO
IN
CD
OUT
AUDIO
OUT
RECOUTINININ
TAPE / MD
MONITORVIDEO 1VIDEO 2
OUTINOUT
VIDEO
VIDEOINVIDEO
OUT
AUDIO
IN
L
R
IN
L
R
SURROUND SPEAKERS
REAR
R
L
CENTER
R
L
FRONT SPEAKERS
IMPEDANCE USE 6–16 Ω
––
––
+
–
A
L
B
+
WOOFER
AUDIO
–
OUT
IMPEDANCE USE 6–16 Ω
++
A
R
++
B
AV Amplifier with
5.1ch inputs
FRONT
L
R
CENTER
5.1 INPUT
REAR
WOOFER
TV / LD
VIDEOINVIDEO
OUT
IN
AUDIO
AUDIO
OUT
IN
SIGNAL
GND
y
PHONO
TUNER
}]
}]}]
Center
INPUT
}]}]
Front (R)
Subwoofer
Rear (R)
Speakers
Front (L)
Rear (L)
37
EN
Page 38

Dolby Digital Surround
Speaker Placement
For the best possible surround sound, we recommend
the following conditions.
• Use higher performance speakers.
• Use rear and center speakers that match your front
speakers in size and performance.
• All speakers should be the same distance from the
listening position.
• Place the subwoofer between the front (L, R)
speakers if possible.
Note
Do not place the center or rear speakers farther away from the
listening position than the front speakers.
Speaker Set Up
To obtain the best possible surround sound, first
specify the type of speakers you have connected and
their distance from your listening position. Then use
the test tone to adjust the speaker volumes to the same
level.
SET UP
ENTER
?/>/.//
Specifying the speaker type
1 Press SET UP and select “
2 Select the speaker you want to adjust in
“SPEAKER SETUP” and press ENTER.
3 Select the appropriate symbol for the speaker, then
press ENTER.
”, then press ENTER.
1
pFront speaker, Center speaker, or Rear speaker
Normally select this symbol. This is default
setting.
When the sound cracks or the effects of the
surround is difficult to hear, select this symbol.
This activates the Dolby Digital (AC-3) bass
redirection circuitry and outputs the bass
frequencies of the speaker from some other
speakers .
If you will not connect the speaker, select this
symbol. You cannot select this symbol for the
front speakers.
p Sub woofer
If you connect a sub woofer, select this symbol
to output the LFE (low frequency effects)
channel from the sub woofer. This is default
setting.
If you do not connect a sub woofer, select this
symbol. This activates the Dolby Digital (AC-3)
bass redirection circuitry and outputs the LFE
signals from other speakers.
Notes
• The cut off frequency for the subwoofer is fixed at 100Hz.
• Set the subwoofer‘s cut off frequency as high as possible.
• Depending on the settings of other speakers, the subwoofer
may output excessive sound.
• The bass management options provided by the bass
redirection circuitry in this player will optimize system setup based on total system configuration selected. In some
instances, independent speaker selections might be changed
to reflect the most optimum multi-channel sound
experience.
• If your speakers are too small to reproduce low bass
frequencies, please set all speaker settings to “ (small)”
and utilize a subwoofer for low frequency sound.
38
EN
5. 1 OUTPUT SETUP 1
SPEAKER SETUP
FRONT
CENTER
REAR
SUBWOOFER
DISTANCE
FRONT
CENTER
REAR
1 212
3. 6m
3. 6m
ENTER
QUIT
SETUP
3. 0m
Symbol
Note
When you select a symbol, the sound cuts off for a moment.
Page 39

Additional Information
Dolby Digital Surround
Specifying the speaker distance
1 Press SET UP and select “
2 Select the speaker you want to adjust in
“DISTANCE” and press ENTER.
3 Adjust the value using >/., then press ENTER.
Note
When you set the distance, the sound cuts off for a moment.
You can vary the distance of each speaker as follows.
Default adjustments are in the brackets.
pFront speaker (3.6 m)
• Front speaker distance can be set in 0.2 meter steps
from 1 to 15 meters.
• If both speakers are not placed an equal distance
from your listening position, set the distance of the
closest speaker.
pCenter speaker (3.6 m)
Center speaker distance can be set in 0.2 meter steps
from a distance equal to the front speaker distance to a
distance 1 meter closer to your listening position.
Note
Do not place the center speaker farther away from your
listening position than the front speakers.
pRear speaker (3.0 m)
• Rear speaker distance can be set in 0.2 meter steps
from a distance equal to the front speaker distance to
a distance 5 meters closer to your listening position.
• If both speakers are not placed an equal distance
from your listening position, set the distance of the
closest speaker.
Note
Do not place the rear speaker farther away from your
listening position than the front speakers.
”, then press ENTER.
1
Adjusting the speaker volume
1 While you stop playback, press SET UP and select
“2”, then press ENTER.
2 Set “TEST TONE” to “ON.”
You will hear the test tone from each speaker in
sequence.
3 From your listening position, adjust the value of
“BALANCE” and “LEVEL” using >/. and
ENTER.
During this adjustment, the test tone is emitted
from both speakers simultaneously.
4 Set “TEST TONE” to “OFF” to turn off the test
tone.
5. 1 OUTPUT SETUP 2
MODE: OFF
TEST TONE:
BALANCE
FRONT
REAR
LEVEL
CENTER
REAR
SUBWOOFER
Note
While you are playing a disc, you cannot here the test tone.
You can vary the balance and the level of each speaker
as follows. Default adjustments are in the brackets.
pFront speaker balance (0dB)
Adjust the balance between the front left and right
speakers (-8dB [L] ~+8dB [R], 0.5dB steps).
pRear speaker balance (0dB)
Adjust the balance between the rear left and right
speakers (-8dB [L] ~+8dB [R], 0.5dB steps).
pCenter speaker level (0dB)
Adjust the level of the center speaker (-20dB ~+6dB,
0.5dB steps).
pRear speaker level (0dB)
Adjust the level of the rear speakers (-20dB ~+6dB,
0.5dB steps).
pSub woofer level (0dB)
Adjust the level of the sub woofer (-10dB ~+6dB, 0.5dB
steps). The test tone does not be output from the
subwoofer.
To adjust the volume of all the speakers at one time
Use the amplifier‘s volume control.
To return to the default setting
Select the sybol or the item, then press CLEAR.
1 212
OFF
0. 0
dB
0. 0
dB
0. 0
dB
0. 0
dB
0. 0
ENTER
QUIT
dB
SETUP
39
EN
Page 40

Dolby Digital Surround
LR
Setting for Dolby Digital
Surround
To enjoy Dolby Digital Surround sound, set the output
signal from the 5.1 channel output connectors.
Note
To enjoy the original Dolby Digital (AC-3) sound through the
5.1 OUTPUT connectors, do not set “DIGITAL OUT” to
“D-PCM” under “INITIAL SETUP 2” in the setup display. For
details, see page 35.
SET UP
ENTER
?/>/.//
* These settings also affect the output from the LINE OUT
(AUDIO 1, 2) connectors.
Notes
• When you select an item, the sound cuts off for a moment.
• When you select “PRO LOGIC”, the sound may only come
from the center speaker depending on the disc.
• When the playing signal does not contain the surround
component, the effects may be difficult to hear even if you
select “PRO LOGIC”, “VES A” or ”VES B.”
• If the sound distortion occurs when you select “PRO
LOGIC”, “VES A” or ”VES B,” set this item to “OFF”.
• If you connect the front speakers only, there is no surround
effects even if you select “PRO LOGIC.”
• When you select “VES A” or ”VES B,” you cannot adjust
the level or the balance of the speakers except for the front
speakers.
• If both the front speakers are not placed an equal distance
from your listening position, the effects may be difficult to
hear even though you select “VES A” or “VES B.”
• The setting “PRO LOGIC” affects only when:
– you play a CD/VIDEO CD
– you play the PCM sound track on a DVD
– you play the “DOLBY DIGITAL 2/0“ sound track
on a DVD.
1 Press SET UP and select “
2 Set “MODE” to the desired item.
5. 1 OUTPUT SETUP 2
MODE: OFF
TEST TONE:
BALANCE
FRONT
REAR
LEVEL
CENTER
REAR
SUBWOOFER
Default setting is “OFF.”
pMODE
• OFF : outputs all channel signals recorded on the DVD.
When you connect fewer than 5 (+1) speakers, the player
distributes the output signal for the missing speaker to
other speakers appropriately.
When you play a CD or a VIDEO CD, outputs the stereo
signal to the front speakers.
• PRO LOGIC : outputs the Pro Logic processed signals when
the input signals are stereo.
• VES A* : uses 3D sound imaging to create virtual rear
speakers from the sound of the front speakers (L, R)
without using actual rear speakers. The virtual speakers
are reproduced as shown in Ill. 1.
• VES B* : uses 3D sound imaging to create virtual rear
speakers from the sound of the front speakers (L, R)
without using actual rear speakers. The virtual speakers
are reproduced as shown in Ill. 2.
”, then press ENTER.
2
12
ENTER
12
0. 0
dB
dB
0. 0
0. 0
dB
0. 0
dB
0. 0
dB
SETUP
QUIT
OFF
Ill.1 VES (Virtual Enhanced Surround) A
Ill.2 VES (Virtual Enhanced Surround) B
LR
40
EN
Page 41

Additional Information
()
()
Dolby Digital Surround
To display the playing channels
You can display the playing channels on the screen.
In Dolby Digital (AC-3) format, the signals from
monaural to 5.1 channel can be recorded on a DVD.
Depending on the DVD the numbers of the recorded
channels are different.
<
CHAPTER
3 / 2. 1
LFE
LS RS
DISPLAY
PLAY
1 : 32 : 55
L
C R
LFE component 1
>
Current
audio
format*
Current
playing
channel**
123
456
789
0
Press DISPLAY repeatedly until the channel display
appears.
DVD
TITLE:
CHAPTER:
SUBTITLE:
AUDIO:
ANGLE:
32 ( 50 )
30 ( 50 )
ENGLISH ( 32 )
ENGLISH ( 8 )
DOLBY DIGITAL
1 ( 9 )
* “PCM“ , “MPEG” or “DOLBY DIGITAL“ is
displayed. In “DOLBY DIGITAL” case, the
channels in the playing track are displayed by
number as follows:
The case of Dolby Digital (AC-3) 5.1 ch:
Rear component 2
Front component 2
+ Center component 1
S: Rear (monaural) – the rear component of
the Pro Logic processed stereo signal.
LFE: – displayed only when the LFE (Low
Frequency Effects) signal is playing
If “S” is displayed in gray, you can enjoy the surround
effect when you set “MODE” under ”5.1 OUTPUT
SETUP 2” to “PRO LOGIC,” “VES A” or ”VES B” in
the setup display. This affects only when the current
audio format is “DOLBY DIGITAL 2/0.”
The display examples are as follows:
•PCM (stereo)
AUDIO:
ANGLE:
ENGLISH ( 8 )
PCM
1 ( 9 )
L
R
•PRO LOGIC (PCM)
AUDIO:
ANGLE:
ENGLISH ( 8 )
PCM
1 ( 9 )
L C R
PRO LOGIC
S
•Dolby Digital (AC-3) 5.1ch
AUDIO:
ANGLE:
ENGLISH ( 8 )
DOLBY DIGITAL
1 ( 9 )
3 / 2. 1
LFE
LS RS
L
C R
z You can find Dolby Surround-encoded software by
looking at the packaging
Use discs with the logo. In order to enjoy Dolby
Digital (AC-3) playback you must use discs bearing this
logo.
Note
The DOLBY DIGITAL indicator turns off when:
– you insert a CD or a VIDEO CD.
– the current audio format is PCM or MPEG Audio.
** The playing channel shows the signals from 5.1
OUTPUT connectors whether the speakers exist or
not. The letters in the channel display mean the
following:
L: Front (L)
R: Front (R)
C: Center (monaural)
LS: Rear (L)
RS: Rear (R)
41
EN
Page 42

Additional Information
Additional Information
Precautions
On safety
• Caution – The use of optical instruments with this product
will increase eye hazard.
• Should any solid object or liquid fall into the cabinet,
unplug the player and have it checked by qualified
personnel before operating it any further.
On power sources
• The player is not disconnected from the AC power source
(mains) as long as it is connected to the wall outlet, even if
the player itself has been turned off.
• If you are not going to use the player for a long time, be
sure to disconnect the player from the wall outlet. To
disconnect the AC power cord (mains lead), grasp the plug
itself; never pull the cord.
• Should the AC power cord (mains lead) need to be
changed, have it done at a qualified service shop only.
On placement
• Place the player in a location with adequate ventilation to
prevent heat build-up in the player.
• Do not place the player on a soft surface such as a rug that
might block the ventilation holes on the bottom.
• Do not place the player in a location near heat sources, or in
a place subject to direct sunlight, excessive dust or
mechanical shock.
On operation
• If the player is brought directly from a cold to a warm
location, or is placed in a very damp room, moisture may
condense on the lenses inside the player. Should this occur,
the player may not operate properly. In this case, remove
the disc and leave the player turned on for about half an
hour until the moisture evaporates.
On adjusting volume
• Do not turn up the volume while listening to a portion with
very low level inputs or no audio signals. If you do, the
speakers may be damaged when a peak level portion is
played.
On cleaning
• Clean the cabinet, panel and controls with a soft cloth
slightly moistened with a mild detergent solution. Do not
use any type of abrasive pad, scouring powder or solvent
such as alcohol or benzine.
Notes on Discs
On handling discs
• To keep the disc clean, handle the disc by its edge. Do not
touch the surface.
• Do not stick paper or tape on the disc.
If there is glue (or a similar substance) on the disc, remove
the glue completely before using the disc.
Not this way
• Do not expose the disc to direct sunlight or heat sources
such as hot air ducts, or leave it in a car parked in direct
sunlight as there can be considerable rise in temperature
inside the car.
• After playing, store the disc in its case.
On cleaning
• Before playing, clean the disc with a cleaning cloth. Wipe
the disc from the center out.
• Do not use solvents such as benzine, thinner, commercially
available cleaners or anti-static spray intended for vinyl
LPs.
42
If you have any questions or problems concerning your
player, please consult your nearest Sony dealer.
IMPORTANT NOTICE
Caution: The enclosed DVD Player is capable of holding
a still video image or Setup display image on your
television screen indefinitely. If you leave the still video
image or Setup display image displayed on your TV for
an extended period of time you risk permanent damage
to your television screen. Projection televisions are very
susceptible.
EN
Page 43

Troubleshooting
If you experience any of the following difficulties while
using the player, use this troubleshooting guide to help
you remedy the problem. Should any problem persist,
consult your nearest Sony dealer.
The power is not turned on.
/If the indicator above the POWER button is not
lit, check that the AC power cord is connected
securely.
There is no picture.
/Check that the player is connected securely.
/The video connecting cord is damaged. Replace
it with a new one.
/Make sure you connect the player to the video
input connector on the TV. (page 6)
/Make sure you turn on the TV.
/Make sure you select the video input on the TV
so that you can view the pictures from the
player.
There is no sound.
/Check that the player is connected securely.
/The audio connecting cord is damaged. Replace
it with a new one.
/Make sure you connect the player to the audio
input connectors on the amplifier. (page 6)
/Make sure you turn on the TV and the
amplifier.
/Make sure you select the appropriate position
on the amplifier so that you can listen to the
sound from the player.
/The player is in pause mode or in Slow-motion
Play mode. Press · to return to normal play
mode.
/Fast forward (FF1 or FF2) or fast reverse (FR1 or
FR2) is performed. Press · to return to
normal play mode.
/Check the speaker connections and settings.
(page 37) Refer to the operating manual of your
amplifier.
/When you play the Dolby Digital (AC-3) sound
tracks and attempt to output from the DIGITAL
OUT connectors, set “DIGITAL OUT” to ”DPCM” under “INITIAL SETUP 2” in the setup
display. Otherwise no sound will come out
from the DIGITAL OUT connectors. (page 35)
The remote does not function.
/Remove any obstacles between the remote and
the player.
/Use the remote near the player.
/Point the remote at the remote sensor g on the
player.
/Replace all the batteries in the remote with new
ones if they are weak.
Additional Information
Additional Information
Additional Information
The picture noise appears.
/Clean the disc.
/If video from your DVD player has to go
through your VCR to get to your TV, the copyprotection applied to some DVD programs
could affect picture quality. If you still
experience problems after checking your
connections, please try connecting your DVD
player directly to your TV's S-input, if your TV
is equipped with these input. (page 7)
The sound noise is heard.
/Clean the disc.
The sound distortion occurs.
/In the setup display, set “AUDIO ATT” in
”INITIAL SETUP 2” to “ON.”
The disc does not play.
/There is no disc inside (“INSERT DISC” appears
on the TV screen).
Insert a disc.
/Insert the disc with the playback side facing
down on the disc tray correctly.
/Place the disc on the disc tray correctly.
/Clean the disc.
/The player cannot play CD-ROMs, etc. (page 5)
Insert a DVD, a VIDEO CD, or CD.
/Check the region code of the DVD. (page 4)
/Moisture has condensed inside the player.
Remove the disc and leave the player turned on
for about half an hour. (page 42)
The player does not play from the beginning when playing
a disc.
/Repeat Play, Shuffle Play or Program Play has
been selected. Press CLEAR. (page 22 to 24)
/Resume Play has been selected.
Press p on the front panel or on the remote
before you start playing. (page 25)
/A title menu or a DVD menu automatically
appears on the TV screen when you play your
DVD, or a setup display automatically appears
on the TV screen when you play your VIDEO
CD with PBC functions.
The DVD does not play when you select a title.
/The Parental Control functions. (page 28)
The player starts playing the DVD automatically.
/The DVD features the auto playback function.
Playback stops automatically.
/Depending on the disc, the auto pause signal is
recorded. While playing such a disc, the player
stops playback at the signal.
43
EN
Page 44

Additional Information
Stopping playback, Search, Slow-motion Play, Repeat
Play, Shuffle Play or Program Play, etc., cannot be done.
/Depending on the disc, you may not do some of
the operations above.
Messages do not appear on the TV screen in the language
you want.
/In the setup display, select the language for the
on-screen display in “OSD” under
“LANGUAGE SETUP.” (page 33)
The language for the sound cannot be changed when you
play a DVD.
/Multilingual sound is not recorded on the DVD.
/Changing the language for the sound is
prohibited on the DVD.
The language for the sound changes automatically.
/When you set the “TRACK SELECTION” in
“INITIAL SETUP 2” to ”ON” in the setup
display, the language may change depending
on the “AUDIO” settings in “LANGUAGE
SETUP.” The “TRACK SELECTION” setting
has higher priority than that of ”AUDIO”
settings. (page 33)
The language for the subtitles cannot be changed when
you play a DVD.
/Multilingual subtitles are not recorded on the
DVD.
/Changing the language for the subtitles is
prohibited on the DVD.
The subtitles cannot be turned off when you play a DVD.
/Depending on the DVD, you may not be able to
turn the subtitles off.
The angles cannot be changed when you play a DVD.
/Multi-angles are not recorded on the DVD.
/Change the angles when “ANGLE” appears on
the front panel display. (page 27)
/Changing the angles is prohibited on the DVD.
The aspect ratio of the screen cannot be changed even
though you set “TV TYPE” in “INITIAL SETUP 1” in the
setup display when you play a wide picture.
/The aspect ratio is fixed on your DVD.
/If you connect the player with the S video cable,
connect directly to the TV. Otherwise, you may
not change the aspect ratio.
/Depending on the TV, you may not change the
aspect ratio.
The menu screen does not appear when you play a VIDEO
CD.
/The VIDEO CD does not feature PBC functions.
/Follow the correct operating procedure. (Also
refer to the instructions supplied with the disc.)
The sound loses stereo effect when you play a VIDEO CD
or a CD.
/“1/L” or “2/R” appears on the front panel
display.
On the remote, press AUDIO CHANGE
repeatedly until “1/L 2/R ” appears. (page 26)
/Make sure you connect the player
appropriately. (page 10, 11)
The surround effect is difficult to hear when you are
playing a Dolby Digital (AC-3) sound track.
/Check the speaker connections and settings.
(page 37) Refer to the operating manual of your
amplifier.
/Set “MODE“ in “5.1 OUTPUT SETUP 2” to
“OFF” in setup display. (page 40)
/Depending on the DVD, the output signal may
not be the entire 5.1 channel but monaural or
stereo even if the sound track is recorded in
Dolby Digital (AC-3) format.
The sound comes from the center speaker only.
/Set “MODE“ in “5.1 OUTPUT SETUP 2” to
“OFF” in setup display. (page 40)
/Depending on the disc, the sound may come
from the center speaker only.
The player does not operate properly.
/Static electricity, etc., may affect the player's
operation.
Disconnect the AC power cord once, then
connect it again.
The numbers or letters of 5 characters are displayed on
the screen.
/Self diagnosis function was activated.
table in page 45 and treat the player
appropriately.
See the
44
EN
Page 45

Self-diagnosis function
C:13:00
The self-diagnosis function works to prevent the player from
malfunctioning, a five-digit service number (combination of a letter and
figures) flashes on the screen. In this case, check the following table.
Additional Information
Additional Information
Additional Information
First three digits
C13
C31
Exx (xx is any number)
Cause and/or Corrective Action
• The disc is dirty.
/ Clean the disc with a cleaning cloth. (page 42)
• The disc is not inserted correctly.
/ Open the disc tray and insert the disc correctly.
• To prevent the player from operating malfunctioning, the self-diagnosis function has
worked.
/ When you contact your Sony dealer or local authorized Sony service facility, inform
the service number with five digits. (example: E:61:10)
45
EN
Page 46

Additional Information
Specifications
CD/DVD player
Laser Semiconductor laser
Signal format system NTSC
Audio characteristics
Frequency response DVD (PCM 96 kHz): 2 Hz to 44 kHz
Signal-to-noise ratio More than 115 dB (LINE OUT (AUDIO
Harmonic distortion Less than 0.0028%
Dynamic range More than 100 dB (DVD)
Wow and flutter Less than detected value
Outputs and inputs
Jack
type
LINE OUT
(AUDIO 1, 2)
DIGITAL OUT
(OPTICAL)
DIGITAL OUT
(COAXIAL)
Phono
jacks
Optical
output
connector
Phono
jack
(±0.5 dB)*
DVD (PCM 48 kHz): 2 Hz to 22 kHz
(±0.5 dB)
CD: 2 Hz to 20 kHz (±0.5 dB)
1, 2) connectors only)
More than 97 dB (CD)
(±0.001% W PEAK)
Output
level
2 Vrms
(at 50 kilohms)
–18 dBm
0.5 Vp-p
Load impedance
Over 10 kilohms
Wave length: 660 nm
75 ohms terminated
General
Power requirements 110–240V AC, 50/60 Hz
Power consumption 22 W
Dimensions (approx.) 430 × 95 × 325 mm (17 × 3 3/4 × 12 3/4
in.) (w/h/d)
incl. projecting parts
Mass (approx.) 4.0 kg (8 lb 13 oz)
Operating temperature 41 ˚F to 95 ˚F (5 ˚C to 35 ˚C)
Operating humidity 5% to 90%
Supplied accessories
See page 6.
* The signals from LINE OUT (AUDIO 1, 2 ) connectors are
measured. When you play the PCM sound tracks with 96 kHz
sampling frequency, the output signals from the DIGITAL OUT
(OPTICAL, COAXIAL) and 5.1 OUTPUT connectors are
converted to 48 kHz (sampling frequency)/16 bits (quantization
bits).
Design and specifications are subject to change without notice.
Glossary
Bit rate (page 18)
Value indicating the amount of video data compressed
in a DVD per second. The unit is Mbps (Mega bit per
second). 1 Mbps indicates that the data per second is
1,000,000 bits. The higher the bit rate is, the larger the
amount of data. However, this does not always mean
that you can get higher quality pictures.
LINE OUT
(VIDEO 1, 2)
S VIDEO OUT
(1, 2)
COMPONENT
VIDEO OUT
(Y, CB/B-Y,
CR/R-Y)
PHONES
5.1 OUTPUT
Phono
jacks
4-pin mini
DIN
Phono
jacks
Phone
jack
Phono
jacks
1.0 Vp-p
Y: 1.0 Vp-p
C: 0.286 Vp-p
Y: 1.0 Vp-p
CB/B-Y,
CR/R-Y:
0.7 Vp-p
12 mW
1.6 Vrms
(at 50 kilohms)
75 ohms,
sync negative
75 ohms,
sync negative
75 ohms terminated
75 ohms,
sync negative
75 ohms
32 ohms
Over 10 kilohms
Chapter (page 5)
Sections of a picture or a music piece on a DVD that are
smaller than titles. A title is composed of several
chapters. Each chapter is assigned a chapter number
enabling you to locate the chapter you want.
Digital Cinema Sound (DCS) (page 40)
The general name of technology that Sony developed
to enjoy the surround sound in a home. To enjoy the
surround sound of the movie theater in the comfort of
your own home, it simulates the sound not in a
concert hall as usual but in a movie editing studio.
This player adopts VES (Virtual Enhanced Surround)
system from various DCS programs. The VES system
can create the sound image of virtual rear speakers
from the sound of the front speakers (L, R) without
using actual rear speakers.
46
EN
Page 47

Additional Information
Additional Information
Additional Information
Dolby Digital (AC-3) (page 36)
Digital audio compression technology that the Dolby
Laboratories Corporation developed. This technology
conforms to 5.1-channel surround. The rear channel is
stereo and there is discrete subwoofer channel in this
format. The good channel separation is realized
because the all channel data is recorded discrete and
processed in digital.
Dolby Pro Logic (page 40)
Audio signal processing technology that Dolby
Laboratories Corporation developed for surround
sound. When the input signal has the surround
component, the Pro Logic process outputs the front,
center and rear signals. The rear channel is monaural.
DVD (page 4)
A disc that contains up to 8 hours of moving pictures
even though its diameter is the same as a CD.
The data capacity of a single-layer and single-sided
DVD, at 4.7 GB (Giga Byte), is 7 times that of a CD.
Furthermore, the data capacity of a dual-layer and
single-sided DVD is 8.5 GB, a single-layer and doublesided DVD 9.4 GB, and a dual-layer and double-sided
DVD 17 GB.
The picture data uses the MPEG 2 format, one of the
worldwide standards of digital compression
technology. The picture data is compressed to about
1/40 of its original size. The DVD also uses the variable
rate coding technology that changes the data to be
allocated according to the status of the picture.
The audio data is recorded in Dolby Digital (AC-3) as
well as in PCM, allowing you to enjoy more real audio
presence.
Furthermore, various advanced functions such as the
multi-angle, multilingual, and Parental Control
functions are provided with the DVD.
Multi-angle function (page 27)
Various angles, or viewpoints of the video camera, for
a scene are recorded on some DVDs.
Multilingual function (page 26)
Several languages for the sound or sub-titles in a
picture are recorded on some DVDs.
Playback Control (PBC) (page 17)
Signals encoded on VIDEO CDs (Version 2.0) to control
playback.
By using menu screens recorded on VIDEO CDs with
PBC functions, you can enjoy playing simple
interactive programs, programs with search functions,
and so on.
Title (page 5)
The longest sections of a picture or a music piece on a
DVD; a movie, etc., for a picture piece on video
software; or an album, etc., for a music piece on an
audio software. Each title is assigned a title number
enabling you to locate the title you want.
Track (page 5)
Sections of a picture or a music piece on a CD or
VIDEO CD. Each track is assigned a track number
enabling you to locate the track you want.
VES (Virtual Enhanced Surround) (page 40)
See DCS (Digital Cinema Sound).
VIDEO CD (page 4)
A compact disc that contains moving pictures.
The picture data uses the MPEG 1 format, one of the
worldwide standards of digital compression
technology. The picture data is compressed to about
1/140 of its original size. Consequently, a 12 cm
VIDEO CD can contain up to 74 minutes of moving
pictures.
VIDEO CDs also contain compact audio data. Sounds
outside the range of human hearing are compressed
while the sounds we can hear are not compressed.
VIDEO CDs can hold 6 times the audio information of
conventional audio CDs.
There are 2 versions of VIDEO CDs.
• Version 1.1: You can play only moving pictures and
sounds.
• Version 2.0: You can play high-resolution still
pictures and enjoy PBC functions.
This player conforms to both versions.
Parental Control (page 28)
A function of the DVD to limit playback of the disc by
the age of the users according to the limitation level in
each country. The limitation varies from disc to disc;
when it is activated, playback is completely prohibited,
violent scenes are skipped or replaced with other
scenes and so on.
47
EN
Page 48

Additional Information
Index to Parts and Controls
Refer to the pages indicated in parentheses for details.
Front Panel
1 g (remote sensor) (6)
Accepts the remote control signals.
2 POWER switch and indicator (10, 14)
Turns on and off the power of the player.
3 DOLBY DIGITAL indicator (10, 41)
Indicates Dolby Digital (AC-3) sound tracks.
4 SHUFFLE button (23)
Press to execute the shuffle play.
5 REPEAT button (22)
Press to execute the repeat play.
6 Disc tray (10, 14)
Place a disc on the tray.
7 = PREV button (11, 15)
Press to go back to the preceding chapter or track.
8 + NEXT button (11, 15)
Press to go to the next chapter or track.
9 Click shuttle (12, 16)
Changes the playback speed.
!º ?/>/.// / ENTER button
Selects and executes the items or settings.
!¡ JOG button / indicator (12, 16)
Press to play a disc frame by frame.
!™ PHONES connector (10, 14)
Connect the headphones to this connector.
!£ PHONE LEVEL control (10, 14)
Adjusts the headphone volume.
!¢ PROGRAM button (24)
Press to execute the program play.
!∞ CLEAR button (11, 15, 22, 23, 24)
Press to return to the continuous play etc.
!§ Front Panel Display (20)
Indicates the playing time, etc.
!¶ §OPEN/CLOSE button (10, 14)
Opens or closes the disc tray.
!• ·PLAY button (10, 14)
Plays a disc.
!ª PPAUSE button (11, 15)
Pauses playing a disc.
@º pSTOP button (11, 15, 25)
Stops playing a disc.
@¡ TITLE button (13)
Displays the title menu on the TV screen.
@™ DVD MENU button (13)
Displays the DVD menu on the TV screen.
@£ ˆ RETURN button (17)
Press to return to the preceding selection screen, etc.
48
EN
Page 49

Rear Panel
1 COMPONENT VIDEO OUT connectors (7)
Connects to the monitor or projector with component
video input connectors (Y, CB/B-Y, CR/R-Y) that conform
to output signals from the player.
Additional Information
Additional Information
Additional Information
2 5.1 OUTPUT connectors (37)
Connects to the amplifier with 5.1 channel input
connectors.
3 LINE OUT (AUDIO 1, 2) connectors (7)
Connects to the audio input connector on the TV or
amplifier.
4 LINE OUT (VIDEO 1, 2) connectors (7)
Connects to the video input connector on the TV or
monitor.
5 S VIDEO OUT (1, 2) connectors (7)
Connects to the S video input connector on the TV or
VCR.
6 DIGITAL OUT (OPTICAL) connector (8)
Connects to an audio component using the optical digital
connecting cord.
7 DIGITAL OUT (COAXIAL) connector (8)
Connects to an audio component using the coaxial digital
connecting cord.
49
EN
Page 50

Additional Information
Remote
123
456
789
0
!º SUBTITLE CHANGE button (26)
Changes the subtitles when playing a DVD.
!¡ =/+PREV/NEXT buttons (11, 15)
Press to go to the next chapter or track or to go back to the
preceding chapter or track.
!™ ·PLAY button (10, 14)
Plays a disc.
!£ TIME button (18, 20)
Displays the playing time of the disc, etc., on the front
panel display.
!¢ SET UP button (32)
Displays the setup display on the TV screen to set or
adjust the items.
!∞ TITLE button (13)
Displays the title menu on the TV screen.
!§ DVD MENU button (13)
Displays the DVD menu on the TV screen.
!¶ Click shuttle (12, 16)
Changes the playback speed.
!• ?/>/.// / ENTER button
Selects and executes the items or settings.
1 TV/DVD switch (30)
Selects to control the player or the TV with the remote.
2 6OPEN/CLOSE button (11, 15)
Opens or closes the disc tray.
3 Number buttons (12, 16)
Selects the items or settings.
4 SEARCH MODE button (12, 16)
Press to select the unit for search (track, index, etc.)
5 REPEAT button (22)
Press to execute the repeat play.
6 PROGRAM button (24)
Press to execute the program play.
7 SHUFFLE button (23)
Press to execute the shuffle play.
8 ANGLE CHANGE button (27)
Changes the angles when playing a DVD.
!ª DISPLAY button (18, 41)
Displays the current playing status on the TV screen.
@º POWER button (14, 30)
Turns on and off the power of the player.
@¡ TV operation buttons (30)
Controls TVs.
@™ CLEAR button (22, 23, 24)
Press to return to the continuous play etc.
@£ ENTER button
Executes the items or settings.
@¢ A˜B button (22)
Press to execute the A˜B repeat play.
@∞ Receiver operation buttons (31)
Controls Sony AV receivers.
@§ SUBTITLE ON/OFF button (26)
Turns the subtitles on and off when playing a DVD.
@¶ pSTOP button (11, 15, 25)
Stops playing a disc.
@• JOG button / indicator (12, 16)
Press to play a disc frame by frame.
@ª ˆRETURN button (17)
Press to return to the preceding selection screen, etc.
#º PPAUSE button (11, 15)
Pauses playing a disc.
50
9 AUDIO CHANGE button (26)
Changes the sound while playing a DVD or VIDEO CD.
EN
Page 51

Setup Display Item List
Default settings are underlined.
Additional Information
Additional Information
Additional Information
LANGUAGE SETUP (page 33)
OSD
DVD MENU
AUDIO ORIGINAL
SUBTITLE
SPANISH
ENGLISH
SPANISH
ENGLISH
FRENCH
ITALIAN
GERMAN
DUTCH
PORTUGUESE
CHINESE
JAPANESE
OTHERS /
(same as DVD MENU)
AUDIO FOLLOW
(same as DVD MENU)
INITIAL SETUP 1 (page 34)
1
TV TYPE 4:3 LETTER BOX
4:3 PAN SCAN
16:9
AUTO PLAY OFF
TIMER
DEMO1
DEMO2
DIMMER BRIGHT
DARK
OFF
BACKGROUND BLUE
BLACK
SCREEN SAVER
PARENTAL CONTROL (page 28)
INITIAL SETUP 2 (page 35)
2
ON
OFF
TRACK SELECTION
OFF
AUTO
SURROUND ON
OFF
DIGITAL OUT
AUDIO DRC OFF
AUDIO ATT OFF
AUDIO FILTER
PCM
DOLBY DIGITAL / PCM
D-PCM
ON
ON
SHARP
SLOW
51
EN
Page 52

Additional Information
Language Code List
For details, see page 33.
The language spellings conform to the ISO 639: 1988 (E/F) standard.
Code Language Code Language Code Language Code Language
1027 Afar
1028 Abkhazian
1032 Afrikaans
1039 Amharic
1044 Arabic
1045 Assamese
1051 Aymara
1052 Azerbaijani
1053 Bashkir
1057 Byelorussian
1059 Bulgarian
1060 Bihari
1061 Bislama
1066 Bengali; Bangla
1067 Tibetan
1070 Breton
1079 Catalan
1093 Corsican
1097 Czech
1103 Welsh
1105 Danish
1109 German
1130 Bhutani
1142 Greek
1144 English
1145 Esperanto
1149 Spanish
1150 Estonian
1151 Basque
1157 Persian
1165 Finnish
1166 Fiji
1171 Faroese
1174 French
1181 Frisian
1183 Irish
1186 Scots Gaelic
1194 Galician
1196 Guarani
1203 Gujarati
1209 Hausa
1217 Hindi
1226 Croatian
1229 Hungarian
1233 Armenian
1235 Interlingua
1239 Interlingue
1245 Inupiak
1248 Indonesian
1253 Icelandic
1254 Italian
1257 Hebrew
1261 Japanese
1269 Yiddish
1283 Javanese
1287 Georgian
1297 Kazakh
1298 Greenlandic
1299 Cambodian
1300 Kannada
1301 Korean
1305 Kashmiri
1307 Kurdish
1311 Kirghiz
1313 Latin
1326 Lingala
1327 Laothian
1332 Lithuanian
1334 Latvian; Lettish
1345 Malagasy
1347 Maori
1349 Macedonian
1350 Malayalam
1352 Mongolian
1353 Moldavian
1356 Marathi
1357 Malay
1358 Maltese
1363 Burmese
1365 Nauru
1369 Nepali
1376 Dutch
1379 Norwegian
1393 Occitan
1403 (Afan) Oromo
1408 Oriya
1417 Punjabi
1428 Polish
1435 Pashto; Pushto
1436 Portuguese
1463 Quechua
1481 Rhaeto-Romance
1482 Kirundi
1483 Romanian
1489 Russian
1491 Kinyarwanda
1495 Sanskrit
1498 Sindhi
1501 Sangho
1502 Serbo-Croatian
1503 Singhalese
1505 Slovak
1506 Slovenian
1507 Samoan
1508 Shona
1509 Somali
1511 Albanian
1512 Serbian
1513 Siswati
1514 Sesotho
1515 Sundanese
1516 Swedish
1517 Swahili
1521 Tamil
1525 Telugu
1527 Tajik
1528 Thai
1529 Tigrinya
1531 Turkmen
1532 Tagalog
1534 Setswana
1535 Tonga
1538 Turkish
1539 Tsonga
1540 Tatar
1543 Twi
1557 Ukrainian
1564 Urdu
1572 Uzbek
1581 Vietnamese
1587 Volapük
1613 Wolof
1632 Xhosa
1665 Yoruba
1684 Chinese
1697 Zulu
1703 Not specified
52
EN
Page 53

Index
Additional Information
Additional Information
Index
Numerics
4:3 LETTER BOX 34
4:3 PAN SCAN 34
5.1 OUTPUT SETUP 1 38
5.1 OUTPUT SETUP 2 39, 40
A
A˜B Repeat 22
Adjusting
volume 10, 14
Angle 27
AUDIO ATT 35
AUDIO DRC 35
AUDIO FILTER 35
AUTO PLAY 34
Auto pause 20
B
Batteries 6
C
CD 14
Changing
angles 27
sound 26
subtitles 26
Chapter 5, 46
Connecting 6
Continuous play
CD/VIDEO CD 14
DVD 10
D, E
DCS 46
Display
front panel display 20
on-screen display 18
setup display 32
Digital output 8, 35
Dolby Digital (AC-3) 8, 36
DVD 10
DVD menu
language 33
usage 13
H
Handling discs 42
Hi-speed search 11, 15
Hooking up 6
I, J, K
INITIAL SETUP 1 34
INITIAL SETUP 2 35
L
LANGUAGE SETUP 33
Locating
a specific point 11, 15
by observing the TV
screen 12, 16
M, N, O
On-screen display
usage 18
language 9, 33
P, Q
Parental control 28
PBC functions 17
PBC Playback 17, 47
Playback
at various speeds 12, 16
Continuous Play 10, 14
frame by frame 12, 16
Program Play 24
Repeat Play 22
Shuffle Play 23
PRO LOGIC 40
Program Play 24
R
Remote 6, 30
Repeating
a specific portion 23
current title, chapter or
track 22
disc 22
Resume Play 25
S
Scene 5
Screen saver 34
Setup display
5.1 OUTPUT SETUP 1 38
5.1 OUTPUT SETUP 2 39, 40
INITIAL SETUP 1 34
INITIAL SETUP 2 35
item list 51
LANGUAGE SETUP 33
usage 32
Searching. See Locating.
Shuffle Play 23
Slow-motion Play 12, 16
Speakers
adjusting 39
hookup 36
set up 38
S video output 7
Subtitles
changing 26
turning on and off 26
T
Test tone 39
Title 5, 47
Title menu 13
Track 5, 47
Troubleshooting 43
U
Usable discs 4
V, W, X, Y, Z
VES 40, 47
VIDEO CD 14
F, G
Fast Forward 12, 16
Fast Reverse 12, 16
Front panel display 20
53
EN
Page 54

ADVERTENCIA
Para evitar el riesgo de incendios o descargas
eléctricas, no exponga la unidad a la lluvia ni a
la humedad.
Para evitar el riesgo de electrocución, no abra
el aparato. Solicite asistencia técnica sólo a
personal especializado.
PRECAUCIÓN
El uso de instrumentos ópticos con este producto
aumenta el peligro para los ojos. Puesto que el haz
láser empleado en este reproductor de CD/DVD es
perjudicial para los ojos, no intente desmontar la
unidad.
Solicite asistencia técnica sólo a personal especializado.
Esta etiqueta está situada en el alojamiento de
protección de láser dentro del aparato.
PRECAUCIÓN
PARA EVITAR DESCARGAS ELÉCTRICAS, LA
CLAVIJA DEL ENCHUFE DEBE COINCIDIR CON
LA RANURA ANCHA E INSERTARSE POR
COMPLETO.
Precauciones
Seguridad
• Esta unidad funciona con 110 - 240 V CA, 50/60 Hz.
Compruebe que la tensión de funcionamiento de la
unidad coincide con la del suministro eléctrico local.
• Si se introduce algún objeto en el reproductor,
desenchúfelo y haga que sea revisado por personal
especializado antes de volver a utilizarlo.
• El reproductor no estará desconectado de la fuente
de alimentación mientras esté conectado a la toma de
corriente, aunque lo haya apagado.
• Si no va a utilizar la unidad durante mucho tiempo,
desenchúfela de la toma mural. Para desconectar el
cable, tire del enchufe, nunca del propio cable.
Instalación
• Con el fin de evitar el recalentamiento interno,
permita que la unidad reciba una circulación de aire
adecuada.
• No coloque la unidad sobre superficies (mantas,
alfombras, etc.) ni cerca de materiales (cortinas,
tapices) que puedan bloquear las ranuras de
ventilación.
• No instale la unidad cerca de fuentes de calor, como
radiadores o conductos de aire caliente, ni en lugares
expuestos a la luz solar directa, polvo excesivo,
vibraciones o golpes mecánicos.
• No instale la unidad en posición inclinada. Está
diseñada para emplearse únicamente en posición
horizontal.
• Mantenga la unidad y los discos alejados de equipos
con imanes potentes, como hornos microondas o
altavoces grandes.
• No coloque objetos pesados sobre la unidad.
• Si traslada la unidad directamente de un lugar frío a
otro cálido, es posible que se condense humedad en
el interior del reproductor de CD/DVD y causar
daños en las lentes. Al instalar la unidad por primera
vez, o si la traslada de un lugar frío a otro cálido,
espere una hora aproximadamente antes de
emplearla.
Para el modelo suministrado con el
adaptador de enchufe de CA
Si el enchufe de CA de la unidad no encaja en la toma
mural, fíjele el adaptador de enchufe de CA
suministrado.
¡Bienvenido!
Gracias por la adquisición del reproductor de CD/DVD de
ES
2
Sony. Antes de utilizar la unidad, lea este manual atentamente
y consérvelo para realizar consultas en el futuro.
Page 55

INDICE
Discos que pueden reproducirse en este reproductor.................................... 4
Procedimientos iniciales
Desembalaje .......................................................................................................................... 6
Conexión del sistema ..........................................................................................................6
Ajustes necesarios previos al empleo del reproductor................................................... 9
Selección del idioma de las indicaciones en pantalla ..................................................... 9
Operaciones básicas
Reproducción de discos DVD ...................................................................................... 10
Reproducción de un CD/VIDEO CD........................................................................... 14
Reproducción de discos en varios modos
Uso de la indicación en pantalla..................................................................................... 18
Uso del visor del panel frontal........................................................................................ 20
Reproducción repetida..................................................................................................... 22
Reproducción en orden aleatorio (reproducción aleatoria) ....................................... 23
Creación de su propio programa (reproducción de programa) ................................ 24
Reanudación de la reproducción desde el punto donde detuvo el disco
(reanudación de reproducción) ...................................................................................... 25
Cambio del sonido ............................................................................................................ 26
Visualización de los subtítulos ....................................................................................... 26
Cambio de los ángulos ..................................................................................................... 27
Limitación de la reproducción para niños (control de limitación) ............................ 28
Control del TV o del receptor de AV con el control remoto suministrado .............. 30
ES
EN
ES
C2
C2
Ajustes
Uso de la pantalla de ajustes ........................................................................................... 32
Ajuste del idioma de las indicaciones y el sonido (AJUSTE DE IDIOMA) .............. 33
Ajustes de las indicaciones (AJUSTE INICIAL 1) ........................................................ 34
Ajustes del sonido (AJUSTE INICIAL 2)....................................................................... 35
Dolby* Digital Surround
Descripción del sistema Dolby Digital Surround ........................................................ 36
Conexiones del sistema de altavoces ............................................................................. 36
Ajustes de los altavoces ................................................................................................... 38
Ajustes del sistema Dolby Digital Surround ................................................................ 40
Información complementaria
Precauciones ...................................................................................................................... 42
Notas sobre los discos ...................................................................................................... 42
Solución de problemas ..................................................................................................... 43
Función de autodiagnóstico ............................................................................................ 45
Especificaciones ................................................................................................................ 46
Glosario .............................................................................................................................. 46
Indice de componentes y controles ................................................................................ 48
Lista de elementos del visor de configuración ............................................................. 51
Lista de códigos de idiomas ............................................................................................ 52
Indice alfabético................................................................................................................. 53
* Fabricado bajo licencia de los Laboratorios Dolby. “Dolby”, “Pro Logic” y el símbolo de doble D
a son marcas registradas de los Laboratorios Dolby. Trabajos Confidenciales No Publicados.
©1992-1997 Dolby Laboratories, Inc. Todos los derechos están reservados.
ES
3
Page 56

Procedimientos iniciales
Acerca de este manual
Las instrucciones de este manual son para el modelo DVP-S500D.
Convenciones
• Las instrucciones de este manual describen los controles
del reproductor.
También es posible utilizar los controles del control
remoto si tienen los mismos nombres o similares a los del
reproductor.
• En este manual se utilizan los iconos de la derecha:
Icono Significado
Indica que sólo es posible utilizar el
Z
z
control remoto para realizar la tarea.
Indica consejos y sugerencias para facilitar
la tarea.
Indica las funciones para los discos DVD
VIDEO.
Indica las funciones para los discos VIDEO
CD.
Indica las funciones para los discos
compactos de audio.
Discos que pueden reproducirse en este reproductor
Discos DVD VIDEO
Logotipo del disco
Discos VIDEO CD
Discos compactos de audio
Contenido
Tamaño del disco
Tiempo de
reproducción
Este reproductor está conforme con el sistema de color NTSC. No es posible reproducir discos grabados en otros sistemas de color,
como PAL o SECAM.
Aproximadamente
4 horas (discos
DVD de una
sola cara)/
aproximadamente
8 horas (discos
DVD de dos
caras)
Audio + Vídeo
12 cm
8 cm
Aproximadamente
80 minutos
(discos DVD de
una sola cara)/
aproximadamente
160 minutos
(discos DVD de
dos caras)
Audio + Vídeo
12 cm
74 minutos
Audio
8 cm
20 minutos
El logotipo “DVD VIDEO” es una marca comercial.
12 cm
74 minutos
(CD single)
20 minutos
8 cm
Código de región de los discos DVD que pueden reproducirse en esta unidad
El reproductor DVD tiene un código de región impreso en la parte trasera de la unidad y sólo
reproducirá discos DVD etiquetados con códigos de región idénticos.
Los discos DVD que presenten la etiqueta
Si intenta reproducir otro tipo de discos DVD, el mensaje “Reproducción de este disco prohibida
por limitacion de zona.” aparecerá en la pantalla del TV.
En función del disco DVD, es posible que no aparezca etiquetada ninguna indicación de código de región aunque la reproducción
del disco DVD esté prohibida por límites de zona.
ALL
también se reproducirán en esta unidad.
CD/DVD PLAYER
AC 110V 60Hz
NO.
22W
SONY CORPORATION
MODEL NO.
DVP–8306
MADE IN JAPAN 3-444-464-01
X
Código de región
Nota sobre las operaciones de reproducción de discos DVD y VIDEO CD
Ciertas operaciones de reproducción de discos DVD y VIDEO CD pueden estar intencionadamente fijadas por los productores
de software. Puesto que este reproductor reproduce discos DVD y VIDEO CD en función del contenido del disco diseñado por
los productores de software, es posible que no pueda disponerse de determinadas funciones de reproducción. Consulte también
ES
4
las instrucciones suministradas con los discos DVD o VIDEO CD.
Page 57

Términos de los discos
• Título
Las secciones más extensas de una imagen o de una pieza
musical de un disco DVD; una película, etc., de una parte de
una imagen de un software de vídeo; o un álbum, etc., de una
pieza musical de un software de audio. A cada título se le
asigna un número que permite localizar el título que se desee.
• Capítulo
Secciones de una imagen o de una pieza musical que son
menores que los títulos. Un título se compone de varios
capítulos. A cada capítulo se le asigna un número que
permite localizar el capítulo que se desee. En función del
disco, es posible que no haya capítulos registrados.
• Pista
Secciones de una imagen o de una pieza musical de un
VIDEO CD o de un CD. A cada pista se le asigna un
número que permite localizar la pista que se desee.
Procedimientos iniciales
Playing CDsGetting Started
Estructura
de los
discos
DVD
Estructura
de los
discos
VIDEO CD
o CD
Título
Capítulo
Pista
Indice
Disco
Disco
• Indice (CD) / Indice de vídeo (VIDEO CD)
Número que divide una pista en varias secciones para localizar
fácilmente el punto que se desee en un VIDEO CD o CD. En
función del disco, es posible que no haya índices registrados.
• Escena
En los discos VIDEO CD con funciones PBC, las pantallas
de menú, las imágenes en movimiento y las imágenes fijas
se dividen en secciones denominadas “escenas”. A cada
escena se le asigna un número que permite localizar la
escena que se desee.
Nota sobre la función PBC (control de reproducción)
(discos VIDEO CD)
Este reproductor cumple con las versiones 1.1 y 2.0 de las
normas sobre discos VIDEO CD. Es posible disfrutar de dos
tipos de reproducción en función del tipo de disco.
Tipo de disco
Discos VIDEO CD sin
funciones PBC (discos
de versión 1.1)
Discos VIDEO CD
con funciones PBC
(discos de versión
2.0)
Discos que el reproductor no puede reproducir
El reproductor no puede reproducir los discos que no
aparezcan enumerados en la tabla de la página 4. Los CDROM, incluyendo PHOTO CD, secciones de datos en CDEXTRA y DVD-ROM no pueden reproducirse.
Es posible
Realizar reproducciones de vídeo
(imágenes en movimiento) y de
música.
Reproducir software interactivo
utilizando pantallas de menú
mostradas en la pantalla del TV
(reproducción PBC), además de
las funciones de reproducción de
vídeo de los discos de versión 1.1.
Igualmente, es posible reproducir
imágenes fijas de alta resolución,
si están incluidas en el disco.
Este producto incorpora tecnología de protección del
copyright protegida por métodos establecidos en
determinadas patentes de EE.UU. y otros derechos de
propiedad intelectual de Macrovision Corporation y otros
propietarios de derechos. El uso de esta tecnología de
protección del copyright debe contar con la autorización de
Macrovision Corporation, y está únicamente destinada a uso
doméstico y otros de visualización limitada, a menos que lo
autorice Macrovision Corporation. Está prohibido el
desmontaje y la ingeniería inversa.
ES
5
Page 58

Procedimientos iniciales
Procedimientos iniciales
Desembalaje
Compruebe que ha recibido los siguientes artículos:
• Cable de conexión de audio/vídeo (1)
• Cable de vídeo S (1)
• Control remoto RMT-D102A (1)
• Pilas tamaño AA (R6) (2)
Inserción de las pilas en el control remoto
Es posible controlar el reproductor con el control
remoto suministrado. Inserte dos pilas R6 (tamaño AA)
de forma que coincidan las polaridades + y – de las
mismas. Cuando utilice el control remoto, oriéntelo
hacia el sensor remoto g del reproductor.
z Es posible controlar televisores y receptores de AV
Sony con el control remoto suministrado
Consulte la página 30.
Conexión del sistema
Descripción general
En esta sección se describe cómo conectar el
reproductor de CD/DVD a un TV (con tomas de
entrada de audio/vídeo) y/o a un amplificador. No es
posible conectar este reproductor a un TV sin conector
de entrada de vídeo. Asegúrese de apagar cada
componente antes de realizar las conexiones.
pPara escuchar el sonido mediante los altavoces de un
TV (2 canales – izquierdo, derecho)
Reproductor de CD/DVD
R–AUDIO 1–L VIDEO 1
CENTER
COMPONENT VIDEO OUT
Y B–Y
R–Y
L
R
FRONT
REAR
WOOFER
5.1 OUTPUT
A AUDIO
OUT
: Flujo de señales
R–AUDIO 2–L
LINE OUT
OPTICAL COAXIAL
1
2
PCM/
VIDEO 2
DOLBY DIGITAL (AC-3)
DIGITAL OUT
S VIDEO OUT
A VIDEO
OUT
A entrada
de vídeo
A entrada
de audio
A una toma de CA
TV
A una toma de CA
Notas
• No deje el control remoto en lugares extremadamente
cálidos o húmedos.
• No deje caer objetos extraños sobre el control remoto,
especialmente cuando sustituya las pilas.
• No exponga el sensor remoto a la luz solar directa ni a
dispositivos de iluminación, ya que pueden producirse
fallos de funcionamiento.
• Si no va a utilizar el control remoto durante mucho tiempo,
extraiga las pilas para evitar posibles daños producidos por
fugas de las mismas y corrosión.
pPara escuchar el sonido mediante altavoces conectados
a un amplificador (receptor) (2 canales – izquierdo,
derecho)
Reproductor de CD/DVD
COMPONENT VIDEO OUT
Y B–Y
R–Y
A AUDIO
OUT
Amplificador
(receptor)
A entrada
de audio
: Flujo de señales
L
CENTER
R–AUDIO 1–L VIDEO 1
R
WOOFER
R–AUDIO 2–L
FRONT
REAR
LINE OUT
5.1 OUTPUT
OPTICAL COAXIAL
1
2
PCM/
DOLBY DIGITAL (AC-3)
VIDEO 2
DIGITAL OUT
S VIDEO OUT
A VIDEO
OUT
TV
A entrada de vídeo
A una toma de CA
A una toma de CA
A una toma
de CA
pPara disfrutar de sonido envolvente Dolby Digital
mediante la conexión del reproductor a un amplificador
con entradas de canal 5.1
ES
6
Consulte la página 36.
Page 59

Getting Started
Playing CDsGetting Started
Procedimientos iniciales
Getting Started
Cables necesarios
Cable de conexión de audio/vídeo (suministrado) (1)
Amarillo
Blanco (izquierdo)
Rojo (derecho)
Amarillo
Blanco (izquierdo)
Rojo (derecho)
Conexiones
Al conectar los cables, asegúrese de hacer coincidir los
cables codificados con colores con las tomas adecuadas
de los componentes: amarillo (vídeo) a amarillo, rojo
(derecha) a rojo y blanco (izquierda) a blanco.
Asegúrese de realizar las conexiones firmemente con el
fin de evitar zumbidos y ruido.
pPara escuchar el sonido mediante los altavoces de un
TV
Reproductor de CD/DVD
R–AUDIO 1–L VIDEO 1
R–AUDIO 2–L
VIDEO 2
LINE OUT
TV
INPUT
VIDEO
L
AUDIO
R
Notas
• No conecte este
reproductor a una
platina de vídeo. Si
visualiza las imágenes
en el TV después de
realizar las conexiones
mostradas a la derecha,
es posible que se
produzca ruido de
imagen.
• En función del TV o del amplificador, es posible que el
sonido se distorsione debido a que el nivel de salida de
audio sea alto. En este caso, ajuste “ATENUACION
AUDIO” de “AJUSTE INICIAL 2” en “SI” en la pantalla de
ajustes. Para más información, consulte la página 35.
Platina de
vídeo
Reproductor
de CD/DVD
TV
Realice la
conexión
directamente
z Si el TV dispone de conector de entrada de vídeo S
Conecte el componente mediante el conector S VIDEO
OUT con el cable de vídeo S (suministrado) en lugar del
cable de conexión de vídeo. Obtendrá una imagen de
mayor calidad.
Cable de vídeo S (suministrado)
Reproductor de
CD/DVD
1
TV
S VIDEO IN
pPara escuchar el sonido mediante altavoces conectados
a un amplificador
TV
Reproductor de CD/DVD
R–AUDIO 1–L VIDEO 1
R–AUDIO 2–L
VIDEO 2
LINE OUT
INPUT
VIDEO
L
AUDIO
R
Amplificador
CD
L
R
2
S VIDEO OUT
z Si conecta el reproductor a un monitor o proyector
con conectores de entrada de vídeo de componentes
que admitan las señales de salida de los conectores
COMPONENT VIDEO OUT (Y, C
reproductor
Conecte el componente mediante los conectores
COMPONENT VIDEO OUT con los tres cables de
conexión de vídeo (no suministrados) del mismo tipo.
Obtendrá una imagen de mayor calidad.
COMPONENT VIDEO OUT
Y
Nota
Consulte las instrucciones suministradas con el componente
que vaya a conectar.
B/B-Y, CR/R-Y) del
B
/
C
C
R
/
B-Y
R-Y
(Continúa)
ES
7
Page 60

Procedimientos iniciales
z Si dispone de un componente digital, como un
amplificador con conector digital, platina DAT o de
MD
Conecte el componente mediante el conector DIGITAL
OUT OPTICAL o COAXIAL con un cable de conexión
digital coaxial u óptico (no suministrado).
Al reproducir un disco DVD, ajuste “SALIDA DIGITAL”
de “AJUSTE INICIAL 2” en “PCM” en la pantalla de
ajustes (página 35).
p Si utiliza un cable de conexión digital óptico
Cable de conexión digital óptico
(no suministrado)
Retire la tapa y enchufe el cable de conexión digital
óptico.
Amplificador con
Reproductor
de CD/DVD
OPTICAL COAXIAL
conector digital, platina
de MD, platina DAT, etc.
DIGITAL IN
PCM/
DOLBY DIGITAL (AC-3)
DIGITAL OUT
OPTICAL
p Si emplea un cable de conexión digital coaxial
Cable de conexión digital
coaxial (no suministrado)
Amplificador con
Reproductor
de CD/DVD
OPTICAL COAXIAL
PCM/
DOLBY DIGITAL (AC-3)
DIGITAL OUT
conector digital, platina
de MD, platina DAT, etc.
DIGITAL IN
COAXIAL
Notas
• Consulte las instrucciones suministradas con el
componente que vaya a conectar.
• No es posible realizar grabaciones de audio digitales de
discos grabados en el formato Dolby Digital (AC-3)
directamente mediante una platina de MD o DAT.
Si realiza las conexiones anteriores, no ajuste
“SALIDA DIGITAL” de “AJUSTE INICIAL 2” en
“DOLBY DIGITAL/PCM”. Si lo hace, los altavoces
emitirán repentinamente un ruido intenso,
afectando a sus oídos o causando daños a dichos
altavoces.
ES
8
Page 61

Getting Started
Playing CDsGetting Started
Procedimientos iniciales
Getting Started
Ajustes necesarios previos al
empleo del reproductor
Es necesario realizar ciertos ajustes para el reproductor
en función del TV u otros componentes que vaya a
conectar.
Para obtener información detallada sobre el empleo de
la pantalla de ajustes, consulte la página 32.
Para obtener información detallada sobre cada
elemento de la pantalla de ajustes, consulte las páginas
33 a 35.
Para más información sobre cómo disfrutar del sonido
envolvente Dolby Digital, consulte las páginas 36 a 41.
pPara conectar el reproductor a un TV de pantalla
panorámica
En la pantalla de ajustes, defina “TIPO TV” de “AJUSTE
INICIAL 1” en “16:9”.
pPara conectar el reproductor a un TV normal
En la pantalla de ajustes, defina “TIPO TV” de “AJUSTE
INICIAL 1” en “4:3 LETTER BOX” (ajuste de fábrica) o en
“4:3 PAN SCAN”. Para más información, consulte la
página 34.
pPara escuchar el sonido mediante altavoces conectados
a un amplificador con conector digital o para enviar el
sonido a un componente digital, como una platina DAT
o de MD
Al reproducir un disco DVD, ajuste “SALIDA DIGITAL”
de “AJUSTE INICIAL 2” en “PCM” en la pantalla de
ajustes. Este es el ajuste de fábrica.
pPara disfrutar de sonido envolvente Dolby Digital
mediante la conexión del reproductor a un amplificador
con entradas de canal 5.1
En la pantalla de ajustes, defina “MODO” de “AJUSTE
SALIDA 5.1CH 2” en “NO”. Este es el ajuste de fábrica.
Consulte la página 36 para conectar el sistema de
altavoces y la página 38 para ajustar la posición o
distancia de cada altavoz, etc.
pPara conectar el reproductor a un componente de audio
con decodificador Dolby Digital incorporado
En la pantalla de ajustes, defina “SALIDA DIGITAL” de
“AJUSTE INICIAL 2” en “DOLBY DIGITAL/PCM”.
Emplee la pantalla de ajustes para cambiar los distintos
ajustes de la imagen y el sonido.
Para más información, consulte la página 32.
Para disfrutar de sonido envolvente con altavoces
frontales solamente, ajuste “MODO” de “AJUSTE
SALIDA 5.1CH 2” en “VES A” o “VES B”. Es
posible disfrutar de sonido envolvente mediante
las salidas LINE OUT (AUDIO 1, 2) y FRONT (L/
R) de los conectores 5.1 OUTPUT. Consulte la
página 40 para más información.
Selección del idioma de las
indicaciones en pantalla
Es posible seleccionar el idioma de la pantalla de
ajustes o de los mensajes mostrados en pantalla. El
ajuste de fábrica es “ESPAÑOL”.
SET UP
ENTER
?/>/.//
1 Presione SET UP y seleccione “ ” con ?//; a
continuación, presione ENTER.
AJUSTE DE IDIOMA
MENU PANTALLA: ESPAÑOL
AUDIO:
SUBTITULO:
2 Seleccione “MENU PANTALLA” con >/. y, a
continuación, presione / o ENTER.
AJUSTE DE IDIOMA
MENU PANTALLA:
MENU DVD:
AUDIO:
SUBTITULO:
3 Seleccione el idioma que desee con >/. y, a
continuación, presione ENTER.
LANGUAGE SETUP
OSD: ENGLISH
AUDIO:
SUBTITLE:
Para cancelar mediante la pantalla de ajustes durante el
proceso
Presione SET UP.
Nota
Los idiomas que pueden seleccionarse son los mostrados en el
paso 2. Para más información, consulte la página 33.
1 212
ESPAÑOLMENU DVD:
ORIGINAL
SEGUIR EL AUDIO
1 212
ESPAÑOL
INGLES
ORIGINAL
SEGUIR EL AUDIO
1 212
SPANISHDVD MENU:
ORIGINAL
AUDIO FOLLOW
ES
9
Page 62

Operaciones básicas
Operaciones básicas
Reproducción de discos DVD
243
Conecte auriculares.
Ajuste el volumen de los
auriculares.
Indicador DOLBY DIGITAL*
• El procedimiento de
funcionamiento de discos CD o
VIDEO CD es diferente al de los
discos DVD.
Para más información, consulte
las páginas 14 a 17.
z Es posible encender el
reproductor con el control
remoto
Presione POWER si el
indicador situado sobre el
botón POWER del panel
frontal está iluminado en
rojo.
* El indicador DOLBY DIGITAL
se ilumina, excepto en los
siguientes casos:
– al insertar un CD o un
VIDEO CD.
– si el formato de audio
actual es PCM o MPEG
Audio.
Nota
Si deja el reproductor o el control
remoto en el modo de pausa o en
el de parada durante 15 minutos,
la imagen de protección de
pantalla aparecerá
automáticamente. Para que
desaparezca el protector de
pantalla, presione ·. (Si desea
desactivar la función de
protección de pantalla, consulte
la página 34.)
Realice los ajustes en el TV.
1
Encienda el TV y seleccione la entrada de vídeo para poder ver
las imágenes de este reproductor.
Si utiliza un amplificador
Encienda el amplificador y seleccione la posición adecuada para
poder escuchar el sonido de este reproductor.
Presione POWER para encender el reproductor.
2
El indicador (rojo) situado sobre el botón POWER cambia a
verde y el visor del panel frontal se ilumina.
Presione § y coloque el disco en la bandeja.
3
Con la cara de reproducción
hacia abajo
Presione ·.
4
La bandeja de discos se cierra y el reproductor inicia la
reproducción (reproducción continua). Ajuste el volumen en el
TV o en el amplificador.
Una vez realizado el paso 4
Es posible que aparezca un menú DVD o de títulos en la pantalla del TV (consulte
la página 13).
10
En función del disco DVD, es posible que algunas operaciones sean
diferentes o que estén restringidas. Consulte las instrucciones
suministradas con el disco.
ES
Page 63

z Si “RESUME” aparece en el
123
456
789
0
visor del panel frontal
Es posible reanudar la
reproducción desde el punto
donde detuvo el disco DVD.
Para obtener información
detallada sobre la
realización de la
reproducción desde el
principio del disco, consulte
la página 25.
Nota
Es posible que no pueda realizar
la reanudación de reproducción
en función del disco DVD.
§
=/+
·
Botones numéricos
pP
Basic Operations
Operaciones básicas
6
SEARCH MODE CLEAR
ENTER
=/+
·
P
ENTER
p
ENTER
z ¿Qué son el capítulo y título?
Consulte la página 5.
Notas
Según el DVD, es posible que no
pueda realizar algunas de las
operaciones que se describen a la
derecha.
z Cada vez que se presiona
SEARCH MODE
Aparecen en la pantalla del
televisor “BUSQUEDA
CAPITULO”, “BUSQUEDA
POR TITULO” y
“BISQUEDA POR TIEMPO”.
Para
Detener la reproducción
Realizar una pausa
Reanudar la reproducción
después de una pausa
Pasar al capítulo siguiente en el
modo de reproducción continua
Retroceder al capítulo anterior
en el modo de reproducción
continua
Seleccionar el capítulo
Seleccionar el título
Localizar un punto mediante el
código de tiempos
Detener la reproducción y
extraer el disco
Presione
p
P
P o ·
+
=
1 SEARCH MODE varias veces hasta que
“BUSQUEDA CAPITULO” aparezca en la
pantalla del TV.
2 Los botones numéricos para seleccionar el
número del capítulo y, a continuación, presione
ENTER o ·.
1 SEARCH MODE varias veces hasta que
“BUSQUEDA POR TITULO” aparezca en la
pantalla del TV.
2 Los botones numéricos para seleccionar el
número del título y, a continuación, presione
ENTER o ·.
1 SEARCH MODE varias veces hasta que
“BISQUEDA POR TIEMPO” aparezca en la
pantalla del TV.
2 Los botones numéricos para introducir el
código de tiempos y, a continuación, presione
ENTER o ·.
6
Operaciones básicas
Si comete un error al presionar el botón numérico
Presione CLEAR y, a continuación, el botón numérico correcto.
11
ES
Page 64

12
Operaciones básicas
Para reproducir a distintas velocidades/fotograma a fotograma
Utilizando el conmutador lanzadera y el botón/indicador JOG, es
posible reproducir un DVD a varias velocidades o bien fotograma a
fotograma. Cada vez que presiona JOG, cambia entre el modo de
lanzadera y el modo de avance.
JOG
JOG
Conmutador
lanzadera
Conmutador
lanzadera
pPara cambiar la velocidad de reproducción (modo de lanzadera)
Notas
• En función del disco DVD, es
posible que no pueda realizar
alguna de las operaciones
descritas en la derecha.
• Al reproducir un DVD a dos
veces la velocidad normal en
cualquier dirección, los sonidos
de la imagen se reciben
mediante los conectores LINE
OUT (AUDIO 1,2). Los sonidos
serán más bajos que a la
velocidad normal. En este caso,
no se reciben sonidos a través
de los conectores DIGITAL
OUT OPTICAL y COAXIAL.
Sin embargo, no habrá ningún
sonido si ajusta “MODO”
dentro de “AJUSTE SALIDA
5.1CH 2” en “VES A” o “VES
B.” (página 40)
Notas
• El indicador JOG sólo muestra
el modo del conmutador
lanzadera próximo al
indicador. Cuando no se
ilumina el indicador del mando
a distancia, se mantiene el
modo de dicho conmutador en
el mando aunque se ilumine el
indicador en el reproductor.
• Si no utiliza el conmutador
lanzadera durante unos 20
segundos después de presionar
JOG, se recuperará el modo de
lanzadera en el control remoto.
En el reproductor, se
conservará el modo de avance.
ES
Gire el conmutador lanzadera. La velocidad de reproducción cambiará en
función del sentido del giro y del ángulo de la siguiente forma:
FF2) (aproximadamente 30 veces la velocidad normal)
<
FF1) (aproximadamente 10 veces la velocidad normal)
<
×2” Aproximadamente dos veces la velocidad normal
<
REPRODUCIR( Velocidad normal
<
LENTO1
LENTO2
PAUSAP
LENTO2
LENTO1
×2“ (Aproximadamente dos veces la velocidad normal: sentido contrario)
FR10 (aproximadamente 10 veces la velocidad normal)
FR20 (aproximadamente 30 veces la velocidad normal)
Si gira rápidamente el conmutador lanzadera, la velocidad de reproducción
pasará inmediatamente a FF2)/FR20.
pPara reproducir los discos DVD fotograma a fotograma cambiando la velocidad de
reproducción (modo de avance)
(sentido de reproducción)
<
(sentido de reproducción
– más lento que “LENTO1
<
<
(sentido opuesto
– más lento que “LENTO1
<
(sentido opuesto)
<
<
<
”)
”)
1 Presione JOG.
JOG se ilumina durante el modo de avance. Al presionar JOG en el
reproductor, se interrumpe la reproducción.
2 Gire el conmutador lanzadera.
En función de la velocidad del giro, la reproducción pasa a ser fotograma a
fotograma según el sentido del giro del conmutador lanzadera. Si gira éste con
velocidad constante durante unos instantes, la velocidad de reproducción será a
cámara lenta o normal.
pPara volver a la reproducción continua
Presione ·.
Page 65

Basic Operations
Operaciones básicas
Notas
• En función del disco DVD,
puede no ser posible
seleccionar el título.
• En función del disco DVD, es
posible que un “menú de
títulos” se denomine
simplemente “menú” o “título”
en las instrucciones
suministradas con el disco.
También es posible que
“Oprima ENTER.” se exprese
como “Oprima SELECT”.
Uso del menú de títulos
Un disco DVD se divide en largas secciones de una imagen o de una
pieza musical denominadas “títulos”. Al reproducir un disco DVD
que contenga varios títulos, podrá seleccionar el que desee mediante
el menú de títulos.
?/>/.//
DVD MENU
TITLE
ENTER
?/>/.//
TITLE
DVD MENU
Presione TITLE.
1
El menú de títulos aparece en la pantalla del TV. El contenido
del menú varía según el disco.
ENTER
Operaciones básicas
z Si desea seleccionar el idioma
del menú DVD
Cambie el ajuste con
“AJUSTE DE IDIOMA” en la
pantalla de ajustes (consulte
la página 33).
Nota
En función del disco DVD, es
posible que un “menú DVD” se
denomine simplemente “menú”
en las instrucciones
suministradas con el disco.
Presione ?/>/.// para seleccionar el título que desee
2
reproducir.
En función del disco, podrá utilizar los botones numéricos para
seleccionar el título.
Presione ENTER.
3
El reproductor inicia la reproducción del título seleccionado.
Uso del menú DVD
Ciertos discos DVD permiten seleccionar el contenido del disco
mediante el menú. Al reproducir dichos discos, podrá seleccionar el
idioma de los subtítulos, el del sonido, etc., mediante el menú DVD.
Presione DVD MENU.
1
El menú DVD aparece en la pantalla del TV. El contenido del
menú varía según el disco.
Presione ?/>/.// para seleccionar el elemento que desee
2
cambiar.
En función del disco, podrá utilizar los botones numéricos para
seleccionar el elemento.
Para cambiar otros elementos, repita el paso 2.
3
Presione ENTER.
4
13
ES
Page 66

Operaciones básicas
Operaciones básicas
Reproducción de un CD/VIDEO
CD
243
Conecte auriculares.
Ajuste el volumen de los
auriculares.
• El procedimiento de
funcionamiento de los discos
DVD es diferente al de los discos
CD o VIDEO CD.
Para más información, consulte
las páginas 10 a 13.
z Es posible encender el
reproductor con el control
remoto
Presione POWER si el
indicador situado sobre el
botón POWER del panel
frontal está iluminado en
rojo.
z Una vez realizado el paso 4
Es posible que la pantalla de
menú aparezca en la del TV
en función del VIDEO CD.
Es posible reproducir el
disco interactivamente; para
ello, siga las instrucciones de
la pantalla de menú.
(Reproducción PBC, consulte
la página 17.)
Nota
Si deja el reproductor o el control
remoto en el modo de pausa o en
el de parada durante 15 minutos,
la imagen de protección de
pantalla aparecerá
automáticamente. Para que
desaparezca el protector de
pantalla, presione ·.(Si desea
desactivar la función de
protección de pantalla, consulte
la página 34.)
Realice ajustes en el TV.
1
Encienda el TV y seleccione la entrada de vídeo para poder ver
las imágenes de este reproductor.
Si utiliza un amplificador
Encienda el amplificador y seleccione la posición adecuada para
poder escuchar el sonido de este reproductor.
Presione POWER para encender el reproductor.
2
El indicador (rojo) situado sobre el botón POWER cambia a
verde y el visor del panel frontal se ilumina.
Presione § y coloque el disco en la bandeja.
3
Con el lado de la
etiqueta hacia arriba
Presione ·.
4
La bandeja se cierra y el reproductor inicia la reproducción
(reproducción continua). Ajuste el volumen en el TV o en el
amplificador.
14
En función del VIDEO CD, es posible que algunas operaciones sean
diferentes o que estén restringidas. Consulte las instrucciones
suministradas con el disco.
ES
Page 67

z Si “RESUME” aparece en el
123
456
789
0
visor del panel frontal
Es posible reanudar la
reproducción desde el punto
donde detuvo el CD/VIDEO
CD. Para obtener
información detallada sobre
la realización de la
reproducción desde el
principio del disco, consulte
la página 25.
=/+
Botones numéricos
SEARCH MODE
=/+
·
P
Basic Operations
Operaciones básicas
6
CLEAR
ENTER
p
z ¿Qué es una pista?
Consulte la página 5.
z ¿Qué es un índice?
Consulte la página 5.
z ¿Qué es una escena?
Consulte la página 5.
z Si desea cambiar el modo de
búsqueda
Presione SEARCH MODE.
Cada vez que lo presione en
el caso de un VIDEO CD, la
pantalla del TV mostrará
“BUSQUEDA ESCENA”,
“BUSQUEDA PISTA” y
“BUSQUEDA INDICE
VIDEO”. En el caso de un
CD, sólo aparecerá
“BUSQUEDA PISTA”.
Nota
Determinados discos no permiten
iniciar la reproducción desde
ciertas escenas. En este caso, si
realiza la búsqueda de escenas
antes de iniciar la reproducción,
el reproductor comenzará la
reproducción desde la escena 1.
Si realiza dicha búsqueda
mientras se reproduce un disco,
el reproductor comenzará la
reproducción a partir de la escena
actual.
P
·
p
§
Para
Detener la reproducción
Realizar una pausa
Reanudar la reproducción
después de la pausa
Pasar a la pista siguiente en el
modo de reproducción
continua
Retroceder a la pista anterior en
el modo de reproducción
continua
Seleccionar la pista
Seleccionar la escena antes de
iniciar la reproducción de un
VIDEO CD con funciones PBC
y durante la reproducción PBC
(búsqueda de escenas)
Detener la reproducción y
extraer el disco
ENTER
Presione
p
P
P o ·
+
=
1 SEARCH MODE varias veces hasta que
“BUSQUEDA PISTA” aparezca en la pantalla del
TV.
2 Los botones numéricos para seleccionar el
número de la pista y, a continuación, presione
ENTER o ·.
1 SEARCH MODE varias veces hasta que
“BUSQUEDA ESCENA” aparezca en la pantalla
del TV.
2 Los botones numéricos para seleccionar el
número de la escena y, a continuación, presione
ENTER o ·. (Para comprobar el número de la
escena actual, presione DISPLAY. El número
aparecerá en la parte superior izquierda de la
pantalla del TV.)
6
Si comete un error al presionar el botón numérico.
Presione CLEAR y, a continuación, el botón numérico correcto.
ENTER
Operaciones básicas
15
ES
Page 68

Operaciones básicas
Notas
• En función del VIDEO CD, es
posible que no pueda realizar
alguna de las operaciones
descritas en la derecha.
• Al reproducir un disco VIDEO
CD, no habrá sonido salvo la
reproducción a la velocidad
normal.
Para reproducir a distintas velocidades / fotograma a
fotograma
Con el conmutador lanzadera y el botón/indicador JOG, puede
reproducir un CD/VIDEO CD a varias velocidades o fotograma a
fotograma. Cada vez que presione JOG, cambiará entre el modo de
lanzadera y el modo de avance.
JOG
Conmutador
lanzadera
Conmutador
lanzadera
pPara cambiar la velocidad de reproducción (modo de lanzadera)
Gire el conmutador lanzadera. La velocidad de reproducción cambiará según el
sentido del giro y del ángulo de la siguiente forma:
FF2) (Más rápido que “FF1)”)
<
FF1)
<
×2” (Aproximadamente dos veces la velocidad normal)
<
REPRODUCIR( (Velocidad normal)
<
LENTO1
< – Sólo VIDEO CD –
(sentido de reproducción)
JOG
16
LENTO2
< – Sólo VIDEO CD –
PAUSAP
<
FR10
<
FR20 (Más rápido que “FR10”)
Notas
• El indicador JOG sólo muestra
el modo del conmutador
lanzadera próximo al
indicador. Cuando no se
ilumina el indicador del mando
a distancia, se mantiene el
modo de dicho conmutador en
el mando aunque se ilumine el
indicador en el reproductor.
• Si no emplea el conmutador
lanzadera durante
aproximadamente 20 segundos
después de presionar JOG, se
recuperará el modo de
lanzadera en el control remoto.
En el reproductor, se
conservará el modo de avance.
ES
Si gira rápidamente el conmutador lanzadera, la velocidad de reproducción
pasará inmediatamente a ser FF2)/FR20.
pPara reproducir discos VIDEO CD fotograma a fotograma cambiando la velocidad de
reproducción (modo de avance – sólo VIDEO CD)
1 Presione JOG.
JOG se ilumina durante el modo de avance. Al presionar JOG en el
reproductor, se interrumpe la reproducción.
2 Gire el conmutador lanzadera.
Dependiendo de la velocidad del giro, la reproducción será fotograma a
fotograma según el sentido de reproducción solamente. Si gira el conmutador
lanzadera con velocidad constante durante unos instantes, la velocidad de
reproducción será a cámara lenta o normal.
pPara volver a la reproducción continua
Presione ·.
(sentido de reproducción
– Más lento que “LENTO1
”)
Page 69

Basic Operations
123
456
789
0
Operaciones básicas
z Si reproduce discos VIDEO CD
con funciones PBC
La reproducción PBC se
inicia automáticamente.
z Para cancelar la reproducción
PBC de un VIDEO CD con
funciones PBC y reproducir el
disco en el modo de
reproducción continua
Existen dos formas.
•Antes de iniciar la
reproducción, seleccione la
pista que desee con =o
+ y, a continuación,
presione ENTER o ·.
•Antes de iniciar la
reproducción, seleccione el
número de la pista con los
botones numéricos del
control remoto y, a
continuación, presione
ENTER o ·.
Aparece “Reproducción sin
PBC” en la pantalla del TV
y el reproductor inicia la
reproducción continua. No
es posible reproducir
imágenes fijas, como una
pantalla de menú. Para
volver a la reproducción
PBC, presione p dos veces
y, a continuación, presione
·.
Reproducción de discos VIDEO CD con funciones PBC
(reproducción PBC – sólo VIDEO CD)
Al reproducir discos VIDEO CD con funciones PBC (discos de versión
2.0), podrá disfrutar de sencillas operaciones interactivas, operaciones
con funciones de búsqueda, etc.
La reproducción PBC permite reproducir discos VIDEO CD interactivamente,
siguiendo las instrucciones del menú de la pantalla del TV.
En este reproductor, es posible utilizar los botones numéricos, ENTER,
=, +, >/. y ˆ(RETURN) durante la reproducción PBC.
=/+
ENTER
>/.
Botones numéricos
ENTER
=/+
ˆ(RETURN)
ˆ(RETURN)
ENTER
>/.
Operaciones básicas
Nota
En función del VIDEO CD,
“Oprima ENTER” en el paso 3
puede aparecer expresado como
“Oprima SELECT” en las
instrucciones suministradas con
el disco.
Inicie la reproducción de un VIDEO CD con funciones PBC;
1
para ello, realice los pasos 1 a 4 de “Reproducción de un CD/
VIDEO CD” en la página 14.
Seleccione el número del elemento que desee.
2
En el reproductor
Presione >/. para seleccionar el número del elemento.
En el control remoto
Presione el botón numérico del elemento que desee.
Presione ENTER.
3
Siga las instrucciones de la pantalla de menú para realizar
4
operaciones interactivas.
Consulte las instrucciones suministradas con el disco, ya que el
procedimiento de funcionamiento puede ser diferente según el
VIDEO CD.
Recuperación de la pantalla de menú
Presione ˆ, = o +.
17
ES
Page 70

Reproducción de discos en varios modos
Reproducción de discos en varios modos
Uso de la indicación en pantalla
Z
Es posible comprobar el estado de funcionamiento del
reproductor y la información sobre el disco mediante
las indicaciones que muestra la pantalla del TV.
DISPLAY
123
456
789
0
Número del título
actual (número
total de títulos)
pInformación del modo de indicación en pantalla 2
Tipo de disco
DVD
TITULO:
CAPITULO:
SUBTITULO:
AUDIO:
ANGULO:
Tiempo de
reproducción del
capítulo actual *
Estado de
reproducción
REPRODUCIR
1 : 32 : 55
<
CAPITULO
32 ( 50 )
30 ( 50 )
ESPAÑOL ( 32 )
ESPAÑOL ( 8 )
DOLBY DIGITAL
1 ( 9 )
3 / 2. 1
LFE
LS RS
L
Número del
capítulo actual
(número total de
capítulos del
título actual)
>
Idioma actual
del sonido
(número total
de idiomas
del sonido)
C R
TIME
Al reproducir o detener un disco DVD
Presione DISPLAY.
Cada vez que presione el botón, la indicación en
pantalla cambia de la siguiente forma:
Indicación en pantalla 1
.
Indicación en pantalla 2
.
Indicación en pantalla 3
.
Indicación en pantalla
desactivada
pInformación del modo de indicación en pantalla 1
Número del
título actual
Número del
capítulo actual
Estado de
reproducción
Idioma actual de
los subtítulos
(número total de
idiomas de los
subtítulos)
Angulo seleccionado
(número total de
ángulos)
Canal actual de
reproducción **
Nota
Es posible que cierta información no aparezca en función del
disco DVD.
* En el modo de indicación 1 o 2, cada vez que presione TIME
la información cambia como se muestra a continuación.
Tiempo de reproducción del capítulo actual
.
Tiempo restante del capítulo actual
.
Tiempo de reproducción del
título actual
.
Tiempo restante del título actual
**Consulte la página 41 para más información.
pInformación del modo de indicación en pantalla 3
Mientras se reproduce un disco, el índice de bits
aproximado de la imagen de reproducción siempre se
muestra en Mbps (megabits por segundo).
Formato
actual de
audio **
Modo de
reproducción
actual
ES
18
TITULO 32 REPRODUCIR
CAPITULO 30
TODO
REPETICION
1 : 32 : 55
<
CAPITULO
>
Tiempo de
reproducción
del capítulo
actual *
VELOCIDAD BITS
0510
Indice de bits de la imagen
de reproducción
z ¿Qué es índice de bits?
El índice de bits se refiere a la cantidad de datos de vídeo
por segundo de un disco. Cuanto mayor sea el índice,
mayor será la cantidad de datos. No obstante, esto no
siempre significa que puedan obtenerse imágenes de
mayor calidad.
Page 71

Reproducción de discos en varios modos
Playing CDs in Various Modes
pInformación del modo de indicación en pantalla
desactivada
No aparece ninguna información. (Aparecerán mensajes,
etc.)
Al reproducir o detener un CD/VIDEO CD
Presione DISPLAY.
Cada vez que presione el botón, la indicación en
pantalla cambia de la siguiente forma:
Indicación en pantalla 1
.
Indicación en pantalla 2
.
Indicación en pantalla
desactivada
pInformación del modo de indicación en pantalla 1
Número de la
pista actual
Número
de índice
actual
Modo de
reproducción
actual
PISTA 11
INDICE 8
PISTA
REPETICION
REPRODUCIR
Estado de
reproducción
<
PISTA
12 : 07
Tiempo de
reproducción
>
de la pista
actual *
pInformación del modo de indicación en pantalla 2
Estado PBC
Tipo de disco
VIDEO CD
PBC DESACTIV
PISTA:
INDICE V.
Número de
índice actual
• Durante la reproducción PBC (sólo VIDEO CD)
Tipo de disco
VIDEO CD
PBC ACTIV
ESCENA:
*
En el modo de indicación 1 o 2, cada vez que presione TIME,
la información cambia como se muestra a continuación.
(sólo VIDEO
CD)
REPRODUCIR
11 ( 50 )
8
Estado
de PBC
REPRODUCIR
122 ( 159 )
Estado de
reproducción
12 : 07
<
Estado de
reproducción
PISTA
12 : 07
>
Tiempo de
reproducción
de la pista
actual *
Número de la
pista actual
(número total
de pistas)
Tiempo de
reproducción
Número de la
escena actual
(número total
de escenas)
• Durante la reproducción PBC (sólo VIDEO CD)
Modo de
reproducción
actual
Número de la
escena actual
ESCENA 122
PISTA
REPETICION
Estado de
reproducción
REPRODUCIR
05 : 27
Tiempo de
reproducción
Tiempo de reproducción
de la pista actual
.
Tiempo restante de la
pista actual
.
Tiempo de reproducción
del disco
.
Tiempo restante del disco
Durante los modos de reproducción aleatoria, de
programa o PBC, el tiempo de reproducción y el
restante del disco no aparecen.
pInformación del modo de indicación en pantalla
desactivada
No aparece ninguna información. (Aparecerán mensajes,
etc.)
19
ES
Page 72

Reproducción de discos en varios modos
Uso del visor del panel frontal
Z
Es posible comprobar información sobre el disco, como
el número total de títulos o de pistas o el tiempo
restante, mediante el visor del panel frontal.
123
456
789
0
TIME
Al reproducir un disco DVD
pInformación mostrada durante la reproducción del disco
Se ilumina cuando es
posible realizar la
reanudación de la
reproducción
Estado de
reproducción
Se ilumina cuando
es posible cambiar
los ángulos
Se ilumina durante la
reproducción de
secciones con la señal
de pausa automática
Estado actual
del sonido
Tiempo de reproducción y
número del capítulo actual
Tiempo restante del
capítulo actual
Tiempo de reproducción y
número del título actual
Tiempo restante
del título actual
Presione TIME
Presione TIME
Presione TIME
Presione TIME
Notas
• En función del disco DVD, es posible que el tiempo o
número del capítulo no aparezca.
• Durante la reproducción aleatoria o de programa, el tiempo
de reproducción y el restante del disco no aparecen.
Al reproducir un CD/VIDEO CD
Tipo de
disco
del título
actual
Número
del
capítulo
actual
Modo actual de
reproducción
Se ilumina
al definir un
programa
pComprobación del tiempo restante
Presione TIME.
Cada vez que presione TIME mientras reproduce el disco,
el visor cambiará tal como se muestra a continuación. La
información de tiempo en el modo de indicación en
pantalla 1 o 2 también cambia cada vez que presione TIME.
Tiempo de
reproducciónNúmero
pInformación mostrada durante la reproducción del disco
Se ilumina
al definir un
programa
Estado
actual del
sonido
Tiempo de
reproducción
Estado de
reproducción
Tipo de
disco
Número
de la pista
actual
Se ilumina cuando es posible
realizar la reanudación de
reproducción
Se ilumina durante la
reproducción PBC
(sólo VIDEO CD)
Número
de
índice
actual
Modo
actual de
reproducción
z Al reproducir discos VIDEO CD con funciones PBC
Aparece el número de la escena actual en lugar del
número de la pista y del índice actuales. En este caso, el
visor del panel frontal no cambia al presionar TIME.
20
ES
Page 73

pComprobación del tiempo restante
Presione TIME.
Cada vez que presione TIME mientras reproduce el disco,
el visor cambiará tal como se muestra a continuación. La
información de tiempo en el modo de indicación en
pantalla 1 y 2 también cambia cada vez que presione TIME.
Tiempo de reproducción y
número de la pista actual
Reproducción de discos en varios modos
Playing CDs in Various Modes
Tiempo restante de
la pista actual
Tiempo de reproducción
del disco
Tiempo restante del disco
Presione TIME
Presione TIME
Presione TIME
Presione TIME
Nota
Durante la reproducción aleatoria, de programa o PBC, el
tiempo de reproducción y el restante del disco no aparecen.
21
ES
Page 74

Reproducción de discos en varios modos
789
Reproducción repetida
Repetición del título o capítulo actual
Es posible reproducir de forma repetida todos los
títulos/pistas de un disco, un solo título/capítulo/
pista o una parte específica.
0
·
CLEAR
REPEAT
A˜B
Repetición de todos los títulos o de todas las
pistas de un disco
En el modo de reproducción aleatoria o de programa,
el reproductor repite los títulos o las pistas en el orden
programado o en el aleatorio.
No es posible realizar la reproducción repetida durante
la reproducción PBC de discos VIDEO CD (consulte la
página 17). Es posible que no pueda realizar la
reproducción repetida en función del disco DVD.
Presione REPEAT durante la reproducción.
Aparece "TODO REPETICION" en la pantalla y
"REPEAT" en el visor del panel frontal. El reproductor
repite los títulos/capítulos/pistas de la siguiente
forma:
Si reproduce el disco en el
modo de
Reproducción continua
(página 10 o 14)
Reproducción aleatoria
(página 23)
Reproducción de programa
(página 24)
El reproductor repite
Todos los títulos/todas las
pistas
Todos los títulos o pistas en
orden aleatorio
Títulos/capítulos/pistas
programados
Es posible repetir sólo el título o capítulo actual en el
modo de reproducción continua. Es posible que no
pueda realizar la reproducción repetida en función del
disco DVD.
pRepetición del título actual
Mientras se reproduce el título que desea, presione
REPEAT varias veces hasta que “TITULO REPETICION“
aparezca en la pantalla del TV.
El reproductor repite el título actual.
pRepetición del capítulo actual
Mientras se reproduce el capítulo que desea, presione
REPEAT varias veces hasta que “CAPITULO
REPETICION” aparezca en la pantalla del TV.
El reproductor repite el capítulo actual.
Aparece “REPEAT 1” en el visor del panel frontal.
Aparece “CAPITULO” cuando
seleccione el capítulo actual
TITULO
REPETICION
Para cancelar la repetición del título o capítulo actual
Presione CLEAR.
Repetición de la pista actual
Es posible repetir sólo la pista actual en el modo de
reproducción continua.
Mientras se reproduce la pista que desea, presione
REPEAT hasta que “PISTA REPETICION“ aparezca en
la pantalla del TV.
“REPEAT 1” aparece en el visor del panel frontal y el
reproductor repite la pista actual.
PISTA
REPETICION
22
Para cancelar la repetición de todos los títulos o de todas
las pistas de un disco
Presione CLEAR.
Para cancelar la repetición de la pista actual
Presione CLEAR.
Nota
La reproducción repetida se cancela al apagar la unidad.
ES
Page 75

Reproducción de discos en varios modos
0
Repetición de una parte específica
(Repetición A˜B) Z
Es posible reproducir de forma repetida una parte
específica de un título, capítulo o pista. Esto resulta útil
si desea memorizar las letras de las canciones.
Durante la reproducción PBC de discos VIDEO CD
(página 17), esta función sólo se encuentra disponible
durante la reproducción de imágenes en movimiento.
Es posible que no pueda realizar la reproducción
repetida en función del disco DVD.
Playing CDs in Various Modes
Reproducción en orden
aleatorio (reproducción
aleatoria)
El reproductor puede establecer el orden aleatorio de
los títulos o pistas y reproducirlos en dicho orden.
CLEAR
1 Durante la reproducción, cuando encuentre el
punto de inicio (punto A) de la parte que desee
reproducir de forma repetida, presione A˜B.
Se ajusta el punto de inicio (punto A), “A-B
REPETICION” aparece en la pantalla del TV y “B”
parpadea.
A BREPETICION
También aparece “REPEAT A-” en el visor del
panel frontal y “B” parpadea.
2 Cuando llegue al punto final (punto B), vuelva a
presionar A˜B.
“A-B REPETICION” desaparece de la pantalla del
TV y el reproductor comienza a repetir esta parte
específica.
“REPEAT A-B” aparece en el visor del panel frontal
durante la reproducción de la repetición A˜B.
Para cancelar la repetición A˜B
Presione CLEAR.
SHUFFLE
·
1 Presione SHUFFLE.
2 Presione ·.
(Durante la reproducción, el reproductor inicia la
reproducción aleatoria al realizar el paso 1.)
Para cancelar la reproducción aleatoria
Presione CLEAR.
Notas
• La reproducción aleatoria se cancelará si:
– abre o cierra la bandeja de discos
– desactiva la alimentación
• Es posible que no pueda realizar la reproducción aleatoria
en función del disco DVD.
• Al reproducir un disco DVD, podrá realizar la
reproducción aleatoria sólo por títulos.
Para cancelar el ajuste durante el proceso
Presione CLEAR.
Notas
• La repetición A˜B se cancelará si:
– abre o cierra la bandeja de discos
– desactiva la alimentación
• Si ajusta la repetición A˜B, los ajustes para la
reproducción aleatoria y de programa se cancelarán.
• Es posible que no pueda ajustar la repetición A˜B, en
función de la escena del disco DVD o VIDEO CD.
23
ES
Page 76

Reproducción de discos en varios modos
Creación de su propio programa
(reproducción de programa)
Es posible establecer el orden de los títulos, capítulos o
pistas del disco y crear su propio programa. Éste puede
contener un máximo de 99 títulos, capítulos y pistas.
0
PROGRAM
·
CLEAR
ENTER
?/>/.//
3 Seleccione el título, capítulo o pista que desee
programar; para ello, utilice >/. y, a
continuación, presione ENTER.
Por ejemplo, seleccione el título o pista 2.
(También puede utilizar los botones numéricos y el
botón ENTER para realizar la selección. En este
caso, el número seleccionado aparece en pantalla.)
pAl reproducir un disco DVD
Si hay títulos y capítulos grabados en el disco,
seleccione el título y, a continuación, el capítulo. “++”
significa “todo”.
PROGRAMA
BORRAR TODO
1 . T TULO0 2I
2 . T TULO– –I
3 . T TULO– –I
4 . T TULO– –I
5 . T TULO– –I
6 . T TULO– –I
7 . T TULO– –I
8 . T TULO– –I
9 . T TULO– –I
ENTER
[PLAY]
[PROGRAM]
CT
++
––
01 01
02 02
03 03
04 04
05
06
07
1 Presione PROGRAM.
Aparece la indicación de programación.
Aparece “PISTA_ _” al reproducir
un VIDEO CD o un CD.
PROGRAMA
BORRAR TODO
1 . T TULO––I
2 . T TULO––I
3 . T TULO––I
4 . T TULO––I
5 . T TULO––I
6 . T TULO––I
7 . T TULO––I
8 . T TULO––I
9 . T TULO––I
ENTER
[PLAY]
[PROGRAM]
2 Presione /.
“01” aparece resaltado.
Título
PROGRAMA
BORRAR TODO
1. I
T TULO––
2. I
T TULO––
3. I
T TULO––
4. I
T TULO––
5. I
T TULO––
6. I
T TULO––
7. I
T TULO––
8. I
T TULO––
9. I
T TULO––
ENTER
[PLAY]
[PROGRAM]
T
––
01
02
03
04
05
06
07
Capítulo
CT
––
01++01
02 02
03 03
04 04
05 05
06
07
PROGRAMA
BORRAR TODO
1 . T TULO02–03I
2 . T TULO– –I
3 . T TULO– –I
4 . T TULO– –I
5 . T TULO– –I
6 . T TULO– –I
7 . T TULO– –I
8 . T TULO– –I
9 . T TULO– –I
ENTER
[PLAY]
T
––
01
02
03
04
05
06
07
[PROGRAM]
p Al reproducir un VIDEO CD o un CD
Seleccione la pista que desee programar.
Tiempo total de las
pistas programadas
PROGRAMA
BORRAR TODO
1 . PISTA0 2
2 . PISTA– –
3 . PISTA– –
4 . PISTA– –
5 . PISTA– –
6 . PISTA– –
7 . PISTA– –
8 . PISTA– –
9 . PISTA– –
ENTER
[PLAY]
0 15 30::
P
––
01
02
03
04
05
06
[PROGRAM]
24
ES
Page 77

4 Para programar otros títulos, capítulos o pistas,
repita el paso 3.
Los títulos, capítulos o pistas programados
aparecen en orden a partir del 02.
PROGRAMA
BORRAR TODO
1 . T TULO02–02I
2 . T TULO1 5I
3 . T TULO0 3I
4 . T TULO0 5I
5 . T TULO07–14I
6 . T TULO– –I
7 . T TULO– –I
8 . T TULO– –I
9 . T TULO– –I
ENTER
[PLAY]
T
––
01
02
03
04
05
06
07
[PROGRAM]
Reproducción de discos en varios modos
Playing CDs in Various Modes
Reanudación de la
reproducción desde el punto
donde detuvo el disco
(reanudación de reproducción)
El reproductor almacenará el punto donde detuvo el
disco si “RESUME” aparece en el visor del panel
frontal. En este caso, podrá reanudar la reproducción
desde ese punto.
Mientras no extraiga el disco, la reanudación de
reproducción podrá realizarse aunque desactive la
alimentación.
5 Presione · para iniciar la reproducción de
programa.
Para cancelar la reproducción de programa
Presione CLEAR.
Para cancelar la programación
Presione PROGRAM.
Para cambiar la programación
1 En el paso 2, seleccione el número de programa del título,
capítulo o pista que desee cambiar; para ello, utilice >/..
2 Realice el paso 3 para definir una nueva programación.
Para cancelar el orden programado
Para cancelar todos los títulos, capítulos o pistas en el orden
programado, seleccione “BORRAR TODO” en el paso 2.
Para cancelar el programa seleccionado, seleccione el
programa con >/. en el paso 2 y, a continuación, presione
CLEAR, o bien seleccione “- -” en el paso 3 y presione ENTER.
z El programa se conserva incluso después de finalizar
la reproducción de programa
Si presiona ·, podrá volver a reproducir el mismo
programa.
·
p
1 Mientras se reproduce el disco, presione p para
detener la reproducción.
Aparece “RESUME” en el visor del panel frontal y
el mensaje “Al reproducir la próxima vez, el disco
se reanudará desde el punto donde se detuvo.”
aparece en la pantalla del TV.
Si “RESUME” no aparece, no podrá realizarse la
reanudación de reproducción.
2 Presione ·.
El reproductor inicia la reproducción desde el
punto donde detuvo el disco en el paso 1.
z Para reproducir desde el principio del disco
Si la indicación “RESUME” aparece en el visor del panel
frontal antes de iniciar la reproducción, presione p para
desactivarla y, a continuación, presione ·.
z
Es posible realizar la reproducción repetida o la
aleatoria de los títulos, capítulos o pistas programadas
Durante la reproducción de programa, presione REPEAT
o SHUFFLE.
Notas
•
El número de títulos, capítulos o pistas mostrado corresponde
a los títulos, capítulos o pistas grabados en el disco.
• El programa se cancelará si:
– abre o cierra la bandeja de discos
– desactiva la alimentación
• Es posible que no pueda realizar la reproducción de
programa en función del disco DVD.
• Durante la reproducción PBC, no es posible definir un
programa a menos que interrumpa la reproducción una
vez.
Notas
• Es posible que no pueda realizar la reanudación de
reproducción en función del disco DVD.
• No puede disponerse de la reanudación de reproducción en
el modo de reproducción aleatoria o de programa.
• Dependiendo del punto donde detenga el disco, es posible
que el reproductor reanude la reproducción desde un
punto diferente.
• El punto donde detenga la reproducción se borrará si:
– abre o cierra la bandeja de discos
– desconecta el cable de alimentación de CA
– cambia el modo de reproducción
– inicia la reproducción después de seleccionar un título,
capítulo o pista
– cambia los ajustes de “MENU DVD”, “AUDIO” o
“SUBTITULO” en “AJUSTE DE IDIOMA” en la pantalla
de ajustes
– cambia los ajustes de “TIPO TV”, “CONTROL DE
BLOQUEO” en “AJUSTE INICIAL 1” en la pantalla de
ajustes
25
ES
Page 78

Reproducción de discos en varios modos
Cambio del sonido Z
Con discos DVD en los que haya sonido multilingüe
grabado, podrá seleccionar el idioma que desee
durante la reproducción del disco DVD.
Con discos VIDEO CD multiplex, podrá seleccionar el
sonido del canal derecho o izquierdo y escuchar el
sonido del canal seleccionado mediante los altavoces
derecho e izquierdo. En este caso, el sonido pierde el
efecto estéreo.
AUDIO
CHANGE
Presione AUDIO CHANGE mientras se reproduce el
disco.
Cada vez que presione el botón, la indicación y el idioma/
sonido de los altavoces cambian de la siguiente forma:
pAl reproducir un disco DVD
AUDIO 1 n AUDIO 2 n .....
n
Visualización de los subtítulos
Z
Con discos DVD en los que haya subtítulos grabados,
podrá activar y desactivar dichos subtítulos cuando
desee mientras se reproduce el disco. Con discos DVD
en los que haya grabados subtítulos multilingües,
podrá cambiar el idioma del subtítulo cuando desee
mientras se reproduce el disco.
SUBTITLE
CHANGE
Activación y desactivación de los subtítulos
Presione SUBTITLE ON/OFF mientras se reproduce el
disco DVD.
Los subtítulos aparecen en la pantalla del TV.
Para desactivar los subtítulos
Vuelva a presionar SUBTITLE ON/OFF.
SUBTITLE
ON/OFF
26
AUDIO
3:PORTUGUES
pAl reproducir un VIDEO CD o un CD
1/IZQ.(1/L) : El sonido del canal izquierdo
.
2/DER.(2/R) : El sonido del canal derecho
.
ESTEREO(1/L 2/R) : El sonido estéreo estándar
Notas
• En función del disco DVD, es posible que no pueda cambiar
los idiomas aunque haya sonido multilingüe grabado en el
disco DVD.
• Mientras reproduce el CD/VIDEO CD, se reanudará la
reproducción estéreo estándar al:
- abrir o cerrar la bandeja de discos
- apagar la unidad
• Mientras reproduce el DVD, el sonido puede cambiar al:
- abrir o cerrar la bandeja de discos
- cambiar el título
• Si el idioma aparece como un número de 4 dígitos, consulte
la lista de códigos de idioma de la página 52.
ES
Notas
• Al reproducir un disco DVD en el que no haya subtítulos
grabados, no aparecerá ningún subtítulo aunque presione
SUBTITLE ON/OFF.
• En función del disco DVD, es posible que no pueda activar
los subtítulos aunque estén grabados en el disco.
• En función del disco DVD, es posible que no pueda
desactivar los subtítulos.
• Si el idioma aparece como un número de 4 dígitos, consulte
la lista de códigos de idioma de la página 52.
Cambio del idioma de los subtítulos
Si los subtítulos están desactivados, presione
SUBTITLE ON/OFF para activarlos.
Mientras se reproduce un disco DVD, presione
SUBTITLE CHANGE varias veces hasta que los
subtítulos que desee aparezcan en la pantalla del TV.
Page 79

Reproducción de discos en varios modos
Playing CDs in Various Modes
SUBTITULO 1 n SUBTITULO 2 n...
n
SUBTITULO
1:INGLES
Notas
• El tipo y número de idiomas de los subtítulos varía según el
disco.
• En función del disco DVD, es posible que no pueda cambiar
los subtítulos aunque haya subtítulos multilingües
grabados en el disco.
• Mientras reproduce el DVD, el subtítulo puede cambiar al:
- abrir o cerrar la bandeja de discos
- cambiar el título
Cambio de los ángulos
Z
Con discos DVD en los que haya grabados distintos
ángulos (múltiples ángulos) para una escena, podrá
cambiar los ángulos cuando desee mientras se
reproduce el disco.
ANGLE
CHANGE
Cuando “ANGLE” aparezca en el visor del panel
frontal mientras se reproduce un disco DVD, presione
ANGLE CHANGE varias veces hasta que obtenga el
ángulo deseado.
ANGULO 1 n ANGULO 2 n ...
n
ANGULO
1
z Es posible especificar el ángulo previamente
Especifique el ángulo si “ANGLE” no aparece en el visor
del panel frontal. Al llegar a una escena en la que haya
múltiples ángulos grabados, el ángulo se selecciona
automáticamente.
Notas
• El número de ángulos varía según el disco o la escena. El
número de ángulos que pueden cambiarse en una escena
corresponde al de ángulos grabados para esa escena.
• En función del disco DVD, es posible que no pueda cambiar
los ángulos aunque el disco tenga múltiples ángulos
grabados.
27
ES
Page 80

Reproducción de discos en varios modos
Limitación de la reproducción
para niños (control de
limitación) Z
La reproducción de ciertos discos DVD puede limitarse
en función de la edad de los usuarios. La función de
“control de limitación” permite establecer el nivel de
limitación de reproducción.
2 Seleccione "AJUSTE INICIAL 1" con ?// y
presione . o ENTER.
2
AJUSTE INICIAL 1
TIPO TV:
REPRODUCCION AUTO:
ATENUADOR:
FONDO: AZUL
PROTECTOR PANTALLA:
CONTROL DE BLOQUEO
121
LETTER BOX4:3
NO
BRILLO
SI
Botones
numéricos
SET UP
123
456
789
0
ENTER
?/>/.//
1 Presione SET UP para que la pantalla de ajustes
aparezca en la del TV antes de la reproducción.
ENTER
SALIR
SETUP
3 Seleccione “CONTROL DE BLOQUEO” con >/.
y, a continuación, presione ENTER.
pSi aún no ha introducido una contraseña
Aparecerá la pantalla de introducción de contraseñas.
AJUSTE INICIAL 1
CONTROL DE BLOQUEO
Ingreso de la
contraseña. Introduzca
un número de 4 cifras
y oprima .
1 2
ENTER
pSi ya ha introducido una contraseña
Aparecerá la pantalla de confirmación de la
contraseña. Omita el paso 4.
12
28
2
AJUSTE INICIAL 1
1
TIPO TV:
REPRODUCCION AUTO:
ATENUADOR:
FONDO:
PROTECTOR PANTALLA: SI
CONTROL DE BLOQUEO
ENTER
ES
12
LETTER BOX4:3
BRILLO
SALIR
SETUP
NO
AZUL
AJUSTE INICIAL 1
CONTROL DE BLOQUEO
Ingrese contraseña
y oprima .
1 2
ENTER
12
Page 81

Reproducción de discos en varios modos
Playing CDs in Various Modes
4 Introduzca una contraseña compuesta por 4 cifras
con los botones numéricos y, a continuación,
presione ENTER.
Las cifras cambian a asteriscos (
) y aparece la
pantalla de confirmación de la contraseña.
AJUSTE INICIAL 1
CONTROL DE BLOQUEO
Para confirmar, ingrese
contraseña nuevamente
y oprima .
1 2
ENTER
12
5 Para confirmar la contraseña, introdúzcala con los
botones numéricos y, a continuación, presione
ENTER.
Aparece la pantalla de ajustes del nivel de
limitación de reproducción y de cambio de la
contraseña.
AJUSTE INICIAL 1
1 2
CONTROL DE BLOQUEO
ESTANDAR:
CAMBIAR CONTRASEÑA
12
NONIVEL:
EE.UU.
7 Seleccione un área como estándar de nivel de
limitación de reproducción mediante >/. y, a
continuación, presione /.
Si selecciona “OTROS”, elija e introduzca el código
de estándar de la tabla que aparece a continuación;
para ello, utilice los botones numéricos.
AJUSTE INICIAL 1
CONTROL DE BLOQUEO
ESTANDAR:
CAMBIAR CONTRASEÑA
1 212
NONIVEL:
EE.UU.
ENTER
SALIR
SETUP
8 Seleccione “NIVEL” con >/. y, a continuación,
presione /.
AJUSTE INICIAL 1
CONTROL DE BLOQUEO
ESTANDAR:
CAMBIAR CONTRASEÑA
1 212
NONIVEL:
8.
7.
NC17
6.
5.
4.
PG13
3.
PG
ENTER
SALIR
2.
SETUP
R
ENTER
SALIR
SETUP
6 Seleccione “ESTANDAR” con >/. y, a
continuación, presione /.
AJUSTE INICIAL 1
1 2
CONTROL DE BLOQUEO
ESTANDAR:
CAMBIAR CONTRASEÑA
ENTER
12
EE.UU.
OTROS
SALIR
SETUP
9 Seleccione el nivel que desee con >/. y, a
continuación, presione ENTER.
AJUSTE INICIAL 1
CONTROL DE BLOQUEO
NIVEL:
ESTANDAR:
CAMBIAR CONTRASEÑA
NONIVEL:
Cuanto menor sea el valor, más estricta será la
limitación.
Para recuperar la pantalla normal
Presione SET UP.
Para desactivar la función de control de limitación y
reproducir el disco DVD después de introducir la contraseña
Ajuste “NIVEL” en “NO” en el paso 9 y, a continuación,
presione ·.
1 212
PG134.
EE.UU.
ENTER
SALIR
SETUP
(Continúa)
29
ES
Page 82

Reproducción de discos en varios modos
123
456
789
0
Para cambiar la contraseña
1 En el paso 5, seleccione “CAMBIAR CONTRASEÑA” con
>/. y, a continuación, presione / o ENTER.
Aparece la pantalla de cambio de contraseña.
2
Realice los pasos 4 y 5 para introducir una contraseña nueva.
Control del TV o del receptor
de AV con el control remoto
suministrado Z
z Si olvida la contraseña
Introduzca el número de 6 dígitos “199703” en el paso 4
para borrar la contraseña actual. Para introducir una
nueva, vuelva a realizar el procedimiento desde el paso 1.
Notas
• Si reproduce discos DVD que no dispongan de la función
de control de limitación, no será posible limitar la
reproducción en este reproductor.
• Si no establece ninguna contraseña, no será posible cambiar
los ajustes de limitación de reproducción.
• En función del disco DVD, es posible que se le solicite
cambiar el nivel de control de limitación mientras se
reproduce el disco. En este caso, introduzca la contraseña y,
a continuación, cambie el nivel.
Al detener la reproducción del disco DVD, se recuperará el
nivel original.
Estándar Código
Alemania 2109
Austria 2046
Bélgica 2057
Canadá 2079
China 2092
Dinamarca 2115
España 2149
Filipinas 2424
Finlandia 2165
Francia 2174
Holanda 2376
Hong Kong 2219
Indonesia 2238
Italia 2254
Japón 2276
Malasia 2363
Noruega 2379
Singapur 2501
Suecia 2499
Suiza 2086
Tailandia 2528
Taiwan 2543
Reino Unido 2184
Si ajusta la señal remota, podrá controlar el TV con el
control remoto suministrado. El ajuste de fábrica es
para controlar televisores Sony con la marca g.
Si conecta el reproductor a un receptor de AV Sony,
también podrá ajustar la entrada de dicho receptor a
este reproductor con el control remoto suministrado.
Interruptor
TV/DVD
Botones
numéricos
POWER
Control de televisores con el control
remoto
1 Deslice el interruptor TV/DVD hasta TV.
2 Mantenga POWER presionado e introduzca el
código del fabricante del TV mostrado en la tabla
que aparece más adelante; para ello, utilice los
botones numéricos. A continuación, deje de
presionar POWER.
Códigos de televisores que pueden controlarse
Si aparece enumerado más de un código, introdúzcalos
uno por uno hasta que encuentre el que funciona con el
TV.
Notas
• Si introduce un código nuevo, el anteriormente introducido
se borrará.
• Al sustituir las pilas del control remoto, el código se ajusta
automáticamente en 01 (Sony). Vuelva a ajustar el código
apropiado.
30
ES
Page 83

Reproducción de discos en varios modos
Playing CDs in Various Modes
Fabricante
Sony (ajuste
de fábrica)
Akai
AOC
Centurion
Coronado
Curis-Mathes
Daytron
Emerson
Fisher
General Electric
Gold Star
Hitachi
J.C.Penny
JVC
KMC
Magnavox
Marantz
MGA/Mitsubishi
NEC
Código
01
04
04
12
03
12
12
03,04,14
11
06,10
03,04,17
02,03
04,12
09
03
03,08,12
04,13
04,12,13,17
04,12
Fabricante
Panasonic
Philco
Philips
Pioneer
Portland
Quasar
Radio Shack
RCA
Sampo
Sanyo
Scott
Sears
Sharp
Sylvania
Teknika
Toshiba
Wards
Yorx
Zenith
Código
06,19
03,04
08
16
03
06,18
05,14
04,10
12
11
12
07,10,11
03,05,18
08,12
03,08,14
07
03,04,12
12
15
Si ajusta el interruptor TV/DVD en TV, podrá
controlar el TV con las teclas siguientes.
Control de un receptor de AV Sony con el
control remoto
1 Deslice el interruptor TV/DVD hasta DVD.
2 Mantenga POWER presionado e introduzca el
código del conector de entrada del receptor de AV
(consulte la siguiente tabla) mediante los botones
numéricos.* A continuación, deje de presionar
POWER.
Conector del receptor de AV
VIDEO 1
VIDEO 2
VIDEO 3
AUX 1
LD/DVD (ajuste de fábrica)
AC-3
TV
* Si conecta el reproductor a un minisistema de
componentes hi-fi de SONY, introduzca “98”.
Si presiona AV RECVR en el control remoto
suministrado, podrá ajustar la entrada del receptor de
AV al reproductor.** También podrá cambiar el
volumen del sonido mediante AV VOL.
Código
91
92
93
94
95
96
97
Interruptor
TV/DVD
Botones
numéricos
Presionando
POWER
TV/VIDEO
VOL
CH
Botones
numéricos y
ENTER
123
456
789
0
Podrá
Encender o apagar el TV
Seleccionar la fuente de entrada del TV
Ajustar el volumen del TV
Cambiar el canal del TV
Seleccionar el canal del TV
POWER
VOL
CH
TV/VIDEO
ENTER
Nota
En función del TV, es posible que no pueda controlarlo o
emplear algunos de los botones mencionados.
123
456
789
0
AV RECVR
AV VOL
**Si conecta el reproductor un minisistema de
componentes hi-fi de SONY, presione AV RECVR
varias veces para cambiar la entrada del sistema.
Nota
Según el receptor AV, es posible que no pueda controlar el
receptor AV.
31
ES
Page 84

Ajustes
Ajustes
Uso de la pantalla de ajustes
Z
3 Seleccione el elemento que desee mediante >/. y
presione / o ENTER.
Mediante esta pantalla, es posible realizar el ajuste
inicial, ajustes de la calidad de imagen y sonido, ajustes
de las distintas salidas, etc. También es posible definir
un idioma para los subtítulos y la pantalla de ajustes,
limitar la reproducción para niños, etc.
Para obtener información detallada sobre cada
elemento de la pantalla de ajustes, consulte las páginas
33 a 35. Si desea cambiar los ajustes del canal 5.1,
consulte las páginas 36 a 41.
Los elementos del visor de configuración aparecen en
la página 51.
SET UP
ENTER
?/>/.//
1 Presione SET UP para que la pantalla del TV
muestre la pantalla de ajustes.
AJUSTE INICIAL 1
TIPO TV:
REPRODUCCION AUTO:
ATENUADOR:
FONDO: AZUL
PROTECTOR PANTALLA:
CONTROL DE BLOQUEO
1 212
LETTER BOX4:3
NO
BRILLO
SI
NO
ENTER
SALIR
SETUP
4 Seleccione el ajuste que desee mediante >/. y
presione ENTER.
AJUSTE INICIAL 1
TIPO TV:
REPRODUCCION AUTO:
ATENUADOR:
FONDO: AZUL
PROTECTOR PANTALLA:
CONTROL DE BLOQUEO
1 212
LETTER BOX4:3
NO
BRILLO
NO
ENTER
SALIR
SETUP
AJUSTE INICIAL 1
TIPO TV:
REPRODUCCION AUTO:
ATENUADOR:
FONDO: AZUL
PROTECTOR PANTALLA:
CONTROL DE BLOQUEO
1 212
LETTER BOX4:3
NO
BRILLO
SI
ENTER
SALIR
SETUP
2 Seleccione el elemento principal que desee
mediante
?//
y, a continuación, presione
ENTER.
El elemento principal seleccionado aparece
resaltado.
Elemento principal
AJUSTE INICIAL 1
TIPO TV:
REPRODUCCION AUTO:
ATENUADOR:
FONDO: AZUL
PROTECTOR PANTALLA:
CONTROL DE BLOQUEO
1 212
LETTER BOX4:3
NO
BRILLO
SI
Para cancelar mediante la pantalla de ajustes durante el
proceso
Presione SET UP.
Nota
Ciertos elementos de la pantalla de ajustes requieren
operaciones diferentes a la selección del ajuste. Para más
información sobre estos elementos, consulte las páginas
correspondientes.
32
ENTER
ES
SALIR
SETUP
Page 85

Ajuste del idioma de las
indicaciones y el sonido
(AJUSTE DE IDIOMA)
Seleccione “ ” después de presionar SET UP.
“AJUSTE DE IDIOMA” permite ajustar diversos
idiomas para las indicaciones en pantalla o el sonido.
Los ajustes de fábrica aparecen subrayados.
Nota
Si selecciona un idioma que no esté registrado en el disco
DVD, se seleccionará automáticamente uno de los idiomas
registrados, excepto para las indicaciones en pantalla
(“MENU PANTALLA”).
AJUSTE DE IDIOMA
MENU PANTALLA: ESPAÑOL
MENU DVD:
AUDIO:
SUBTITULO:
pMENU PANTALLA (indicación en pantalla)
Cambia el idioma de la indicación en pantalla.
• ESPAÑOL
• INGLES
pMENU DVD
Cambia el idioma del menú DVD.
• ESPAÑOL
• INGLES
• FRANCES
• ITALIANO
• ALEMAN
• HOLANDES
• PORTUGUES
• CHINO
• JAPONES
• OTROS/
Si selecciona “OTROS”, elija e introduzca el código del
idioma de la lista mediante los botones numéricos
(página 52).
1 212
ESPAÑOL
ORIGINAL
SEGUIR EL AUDIO
ENTER
SALIR
SETUP
Locating a Scene or Track You Want
Locating a Scene or Track You Want
Locating a Scene or Track You Want
Settings and Adjustments
Ajustes
pAUDIO
Cambia el idioma de los sonidos.
• ORIGINAL : idioma de prioridad en el disco
• ESPAÑOL
• INGLES
• FRANCES
• ITALIANO
• ALEMAN
• HOLANDES
• PORTUGUES
• CHINO
• JAPONES
• OTROS/
Si selecciona “OTROS”, elija e introduzca el código del
idioma de la lista mediante los botones numéricos
(página 52).
pSUBTITULO
Cambia el idioma de los subtítulos.
• SEGUIR EL AUDIO*
• ESPAÑOL
• INGLES
• FRANCES
• ITALIANO
• ALEMAN
• HOLANDES
• PORTUGUES
• CHINO
• JAPONES
• OTROS/
Si selecciona “OTROS”, elija e introduzca el código del
idioma de la lista mediante los botones numéricos
(página 52).
* Al seleccionar "SEGUIR EL AUDIO", el idioma de los
subtítulos cambia de acuerdo con el idioma del sonido.
33
ES
Page 86

Ajustes
Ajustes de las indicaciones
(AJUSTE INICIAL 1)
Seleccione “
“AJUSTE INICIAL 1” permite ajustar la indicación en
función de las condiciones de reproducción.
Los ajustes de fábrica aparecen subrayados.
pTIPO TV
Selecciona la relación de aspecto del TV que vaya a conectar.
• 4:3 LETTER BOX: si conecta un TV normal al reproductor.
Muestra la imagen panorámica con bandas en las partes
superior e inferior de la pantalla.
• 4:3 PAN SCAN : si conecta un TV normal al reproductor.
Muestra la imagen panorámica en toda la pantalla con una
parte cortada automáticamente.
• 16:9: si conecta un TV de pantalla panorámica al
reproductor.
4:3 LETTER BOX
1
” después de presionar SET UP.
AJUSTE INICIAL 1
TIPO TV:
REPRODUCCION AUTO:
ATENUADOR:
FONDO: AZUL
PROTECTOR PANTALLA:
CONTROL DE BLOQUEO
1 212
LETTER BOX4:3
BRILLO
ENTER
SALIR
SETUP
NO
SI
pREPROCUCCION AUTO
Selecciona el ajuste de reproducción automática al conectar el
cable de alimentación de CA a la toma de corriente.
• NO: no utiliza “TEMPORIZADOR”, “DEMO1” ni
“DEMO2” para iniciar la reproducción.
• TEMPORIZADOR: la reproducción del disco se inicia
automáticamente al conectar el cable de alimentación de
CA a la toma de corriente. Si conecta un temporizador (no
suministrado), podrá iniciar la reproducción a la hora que
desee.
• DEMO1: la demostración 1 comienza a reproducirse
automáticamente.
• DEMO2: la demostración 2 comienza a reproducirse
automáticamente.
pATENUADOR
Ajusta la iluminación del visor del panel frontal.
• BRILLO: el visor del panel frontal se muestra con brillo.
• OSCURO: el visor del panel frontal se muestra oscuro.
• NO: desactiva la iluminación del visor del panel frontal.
pFONDO
Selecciona el color de fondo de la pantalla del TV en el modo
de parada.
• AZUL: El color de fondo es azul.
• NEGRO: El color de fondo es negro.
pPROTECTOR PANTALLA
Si activa la protección de pantalla, la imagen de protección de
pantalla aparecerá cuando deje el reproductor o el control
remoto en el modo de pausa o en el de parada durante 15
minutos. La protección de pantalla resulta útil para evitar que
ésta se dañe.
• SI: activa la protección de pantalla.
• NO: desactiva la protección de pantalla.
34
pCONTROL DE BLOQUEO
Define una contraseña y el nivel de limitación de
reproducción al reproducir discos DVD con dicha limitación
para niños.
4:3 PAN SCAN
16:9
Para más información, consulte la página 28.
Nota
En función del disco DVD, es posible que “4.3 LETTER BOX”
se seleccione automáticamente en lugar de “4.3 PAN SCAN” y
viceversa.
ES
Page 87

Ajustes del sonido (AJUSTE
INICIAL 2)
Seleccione “
“AJUSTE INICIAL 2” permite ajustar el sonido en
función de las condiciones de reproducción.
Los ajustes de fábrica aparecen subrayados.
AJUSTE INICIAL 2
SELECCION PISTA:
SURROUND: SI
SALIDA DIGITAL:
AUDIO DRC:
FILTRO DE AUDIO:
2
” después de presionar SET UP.
1 212
NO
PCM
NO
NOATENUACION AUDIO:
SETUP
ENTER
ABRUPTO
SALIR
Locating a Scene or Track You Want
Locating a Scene or Track You Want
Locating a Scene or Track You Want
• PCM: si el reproductor está conectado a un componente de
audio sin decodificador Dolby Digital (AC-3) incorporado
Si reproduce la pista de sonido Dolby Digital (AC-3), el
reproductor no emitirá ningún sonido.
• DOLBY DIGITAL/PCM: si el reproductor está conectado a
un componente de audio con decodificador Dolby Digital
(AC-3) incorporado
• D-PCM (Downmix PCM): al reproducir las pistas de sonido
Dolby Digital (AC-3), las señales de salida de audio se
mezclan en 2 canales. Con los ajustes del elemento
“SURROUND”, puede especificar si las señales deben
contener o no el componente de sonido envolvente. Las
señales de salida de audio de los conectores 5.1 OUTPUT
también se mezclan de la misma manera. Para disfrutar del
sonido Dolby Digital (AC-3) original mediante los
conectores 5.1 OUTPUT, no ajuste este elemento en “DPCM”.
Settings and Adjustments
Ajustes
Nota
Seleccione el ajuste correctamente. En caso contrario,
los altavoces no emitirán ningún sonido o éste será
anormal, afectando a sus oídos o causando daños en
dichos altavoces.
pSELECCION PISTA
Da prioridad al formato Dolby Digital (AC-3) al reproducir
discos DVD en los que hay registrados múltiples formatos de
audio. Si se graban varios canales de audio con el formato
Dolby Digital (AC-3), se reproduce el canal con el número
más alto.
• NO: No se da prioridad.
• AUTO: Se da prioridad.
Notas
• Si ajusta este elemento en “SI”, el idioma puede cambiar en
función de los ajustes de “AUDIO” en “AJUSTE DE
IDIOMA”. El ajuste “SELECCION PISTA” tiene mayor
prioridad que los ajustes de “AUDIO” en “AJUSTE DE
IDIOMA” (página 33).
• En función del disco DVD, el audio con prioridad puede
estar predeterminado. En este caso, no es posible dar
prioridad al formato Dolby Digital (AC-3) mediante la
selección de “AUTO”.
pSURROUND*
Cambia los métodos de mezcla al reproducir discos DVD en
los que está registrado el sonido en formato Dolby Digital
(AC-3).
• SI: si el reproductor está conectado a un componente de
audio que admita el sistema de sonido envolvente Dolby,
Dolby Pro Logic, etc.
• NO : si el reproductor está conectado a un componente de
audio normal.
* El ajuste afecta a los siguientes conectores:
- Conectores LINE OUT (AUDIO 1,2)
- Conectores DIGITAL OUT (OPTICAL, COAXIAL)
pSALIDA DIGITAL
Cambia los métodos de emisión de las señales de audio de los
conectores DIGITAL OUT OPTICAL y COAXIAL del panel
posterior del reproductor.
pAUDIO DRC (control de rango dinámico)
Produce un sonido más nítido con el volumen más bajo por la
noche, etc. al reproducir un DVD. Ello afecta a la salida de los
conectores DIGITAL OUT sólo cuando “SALIDA DIGITAL”
dentro de “AJUSTE INICIAL 2” se ajusta en "PCM", y la
salida de los conectores LINE OUT (AUDIO 1,2) y 5.1
OUTPUT.
• NO: normalmente seleccione esta posición.
• SI: produce un sonido nítido incluso tras bajar el volumen.
Nota
Si reproduce discos DVD sin la función AUDIO DRC, es
posible que el sonido no presente ningún efecto.
pATENUACION AUDIO (atenuación)
Selecciona el ajuste de la salida de los conectores LINE OUT
(AUDIO 1, 2) y 5.1 OUTPUT en función del equipo de audio
que vaya a conectar.
• NO: desactiva la atenuación de audio.
• SI: reduce el nivel de salida de audio de forma que no se
produzcan distorsiones de sonido.
Nota
El ajuste no afecta a la salida de los conectores DIGITAL OUT
OPTICAL y COAXIAL.
pFILTRO DE AUDIO
Selecciona el tipo de filtro digital para reducir el ruido de
frecuencia superior a 22,05kHz (fs 44,1kHz), 24kHz (fs 48kHz)
o 48kHz (fs 96kHz).
• ABRUPTO: se obtiene un sonido nítido y proporciona una
reproducción uniforme de sonido. Normalmente ajuste esta
posición.
• SUAVE: se obtiene un sonido cálido y profundo.
Nota
En función del disco, es posible que el sonido no presente
ningún efecto.
35
ES
Page 88

Dolby Digital Surround
Dolby* Digital Surround
Descripción del sistema Dolby
Digital Surround
Determinados discos DVD disponen de pistas de
sonido de canal 5.1 grabadas en formato Dolby Digital
(AC-3). Mediante el uso de un amplificador con
entradas de canal 5.1 y los 5 (+1*) altavoces, podrá
disfrutar de una presencia de audio más real en su
propia casa.
Incluso si dispone de menos de 5 (+1*) altavoces, el
reproductor distribuirá apropiadamente la señal de
salida a dichos altavoces.
También es posible disfrutar del sistema VES (sonido
envolvente virtual potenciado) mediante el método
DCS (sonido digital de cine) desarrollado por Sony. El
sistema VES emite el sonido envolvente sólo por los
altavoces frontales.
* Altavoz potenciador de graves
Conexiones del sistema de
altavoces
Conexiones
Conecte un amplificador con entradas de canal 5.1 al
reproductor y a los altavoces. Consulte la ilustración de
la página siguiente.
Notas sobre la conexión
• No conecte el cable de alimentación a una toma de CA ni
presione el interruptor POWER antes de haber finalizado
todas las conexiones.
• Los conectores de los cables deben insertarse por completo
en las tomas. Una conexión floja puede producir zumbidos
y ruido.
• Las tomas y los enchufes de los cables de conexión están
codificados con colores de la siguiente forma:
Tomas y enchufes rojos: canal derecho de audio
Tomas y enchufes blancos: canal izquierdo de audio
Es posible utilizar los cables rojos o los blancos para
conectar el altavoz central y el de potenciación de graves.
36
Altavoz frontal
(izquierdo)
Amplificador de
AV con entradas
de canal 5.1
Reproductor
de CD/DVD
Altavoz posterior
(izquierdo)
Altavoz posterior
(derecho)
ES
Altavoz central
TV
Altavoz
potenciador
de graves
Altavoz frontal
(derecho)
Page 89

TV
Reproductor de CD/DVD
COMPONENT VIDEO OUT
Y B–Y
R–Y
L
CENTER
R–AUDIO 1–L VIDEO 1
R–AUDIO 2–L VIDEO 2
FRONT REARRWOOFER
5.1 OUTPUT LINE OUT
S VIDEO IN
VIDEO 3
INPUT
1
2
S VIDEO OUT
MONITOR
OUTPUT
OPTICAL COAXIAL
PCM/
DOLBY DIGITAL (AC-3)
DIGITAL OUT
Additional Information
Dolby Digital Surround
VIDEOINVIDEO
AUDIO
IN
CD
OUT
AUDIO
OUT
RECOUTINININ
TAPE / MD
MONITORVIDEO 1VIDEO 2
OUTINOUT
VIDEO
VIDEOINVIDEO
OUT
AUDIO
IN
L
R
IN
L
R
SURROUND SPEAKERS
REAR
R
L
CENTER
R
L
FRONT SPEAKERS
IMPEDANCE USE 6–16 Ω
––
––
+
–
A
L
B
+
WOOFER
AUDIO
–
OUT
IMPEDANCE USE 6–16 Ω
++
A
R
++
B
Amplificador de
AV con entradas
FRONT
L
R
CENTER
5.1 INPUT
REAR
WOOFER
TV / LD
VIDEOINVIDEO
OUT
IN
AUDIO
AUDIO
OUT
IN
SIGNAL
GND
y
PHONO
TUNER
de canal 5.1
}]
}]}]
Central
INPUT
}]}]
Frontal (derecho)
Altavoz
potenciador
Posterior (derecho)
de graves
Altavoces
Frontal (izquierdo)
Posterior (izquierdo)
37
ES
Page 90

Dolby Digital Surround
Ubicación de los altavoces
Para obtener el mejor sonido envolvente posible, se
recomienda lo siguiente:
• Emplee altavoces de alto rendimiento.
• Utilice altavoces posteriores y central que coincidan
con los frontales en tamaño y rendimiento.
• Todos los altavoces deben encontrarse a la misma
distancia de la posición de escucha.
• Coloque el altavoz potenciador de graves entre los
altavoces frontales (izquierdo, derecho) si es posible.
Nota
No coloque los altavoces central o posteriores más alejados de
la posición de escucha que los altavoces frontales.
Ajustes de los altavoces
Para obtener el mejor sonido envolvente posible,
especifique en primer lugar el tipo de altavoces que haya
conectado y la distancia de éstos con respecto a la posición
de escucha. A continuación, utilice el tono de prueba para
ajustar el volumen de los altavoces en el mismo nivel.
pAltavoz frontal, altavoz central o altavoz posterior
Normalmente, seleccione este símbolo. Este es el
ajuste de fábrica.
Si el sonido no es uniforme o si el efecto de sonido
envolvente es difícil de escuchar, seleccione este
símbolo. De esta forma se activa la circuitería de
redirección de graves Dolby Digital (AC-3) y se
emiten las frecuencias de graves del altavoz de
algunos de los otros altavoces.
Si no conecta el altavoz, seleccione este símbolo.
No es posible seleccionarlo para los altavoces
frontales.
p Altavoz potenciador de graves
Si conecta un altavoz potenciador de graves,
seleccione este símbolo para emitir el canal LFE
(efectos de baja frecuencia) del altavoz potenciador
de graves. Este es el ajuste de fábrica.
Si no conecta un altavoz potenciador de graves,
seleccione este símbolo. De esta forma se activa
la circuitería de redirección de graves Dolby
Digital (AC-3) y se emiten las señales LFE de
otros altavoces.
SET UP
ENTER
?/>/.//
Especificación del tipo de altavoces
1 Presione SET UP y seleccione “
continuación, presione ENTER.
2 Seleccione el altavoz que desee ajustar en “AJUSTE
ALTAVOZ” y presione ENTER.
3 Seleccione el símbolo apropiado al altavoz y
presione ENTER.
AJUSTE SALIDA 5.1CH 1
AJUSTE ALTAVOZ
FRONTAL
CENTRAL
POSTERIOR
SUBWOOFER
DISTANCIA
FRONTAL
CENTRAL
POSTERIOR
1 212
ENTER
SALIR
SETUP
”. A
1
3. 6m
3. 6m
3. 0m
Símbolo
Notas
• La frecuencia de corte del altavoz potenciador de graves se
ha fijado en 100Hz.
• Ajuste la frecuencia de corte del altavoz potenciador de
graves en el valor más alto posible.
•
En función de los ajustes de los otros altavoces, es posible que
el altavoz potenciador de graves emita un sonido excesivo.
• Las opciones de gestión de graves que proporciona la
circuitería de redirección de graves de este reproductor
optimiza los ajustes de sistema basada en la configuración de
sistema total seleccionada. En ciertos casos, las selecciones de
altavoces por separado podrían cambiarse para reflejar los
efectos de sonido óptimos de canales múltiples.
• Si los altavoces son demasiado pequeños para reproducir las
frecuencias bajas de graves, defina todos los ajustes de altavoz
en “ (pequeño)” y utilice un altavoz potenciador de graves
para el sonido de frecuencias bajas.
38
Nota
ES
Al seleccionar un símbolo, el sonido se desactiva durante unos
instantes.
Page 91

Additional Information
Dolby Digital Surround
Especificación de la distancia de los altavoces
1 Presione SET UP y seleccione “
continuación, presione ENTER.
2 Seleccione el altavoz que desee ajustar en
“DISTANCIA” y presione ENTER.
3 Ajuste el valor con >/. y presione ENTER.
Nota
Al ajustar la distancia, el sonido se desactiva durante unos
instantes.
Es posible variar la distancia de cada altavoz de la
siguiente forma. Los ajustes de fábrica aparecen entre
paréntesis.
pAltavoz frontal (3,6 m)
• La distancia del altavoz frontal puede ajustarse en
intervalos de 0,2 metros de 1 a 15 metros.
• Si los dos altavoces no se encuentran a la misma
distancia con respecto a la posición de escucha,
ajuste la distancia del altavoz más próximo.
pAltavoz central (3,6 m)
La distancia del altavoz central puede ajustarse en
intervalos de 0,2 metros desde una distancia igual a la
del altavoz frontal hasta una distancia de 1 metro más
cerca de la posición de escucha.
Nota
No coloque el altavoz central más alejado de la posición de
escucha que los altavoces frontales.
pAltavoz posterior (3,0 m)
• La distancia del altavoz posterior puede ajustarse en
intervalos de 0,2 metros desde una distancia igual a
la del altavoz frontal hasta una distancia de 5 metros
más cerca de la posición de escucha.
• Si los dos altavoces no se encuentran a la misma
distancia con respecto a la posición de escucha,
ajuste la distancia del altavoz más próximo.
Nota
No coloque el altavoz posterior más alejado de la posición de
escucha que los altavoces frontales.
1
”. A
Ajuste del volumen de los altavoces
1 Interrumpa la reproducción, presione SET UP,
seleccione “2” y presione ENTER.
2 Ajuste “TONO PRUEBA” en “SI”.
Escuchará el tono de prueba de cada altavoz
secuencialmente.
3 Desde su posición de escucha, ajuste el valor de
“BALANCE” y de “NIVEL” con >/. y ENTER.
Durante este ajuste, los dos altavoces emitirán el
tono de prueba simultáneamente.
4 Ajuste “TONO PRUEBA” en “NO” para desactivar
el tono de prueba.
AJUSTE SALIDA 5.1CH 2
MODO: NO
TONO PRUEBA:
BALANCE
FRONTAL
POSTERIOR
NIVEL
CENTRAL
POSTERIOR
SUBWOOFER
Nota
No se oye el tono de prueba durante la reproducción de un
disco.
Puede variar el balance y el nivel de cada altavoz de la
siguiente forma. Los ajustes de fábrica aparecen entre
paréntesis.
pBalance del altavoz frontal (0dB)
Ajuste el balance entre los altavoces frontales izquierdo
y derecho (intervalos de -8dB [L] ~+8dB [R], 0,5dB).
pBalance del altavoz posterior (0dB)
Ajuste el balance entre los altavoces posteriores
izquierdo y derecho (intervalos de -8dB [L] ~+8dB [R],
0,5dB).
pNivel del altavoz central (0dB)
Ajuste el nivel del altavoz central (intervalos de -20dB
~+6dB, 0,5dB).
pNivel del altavoz posterior (0dB)
Ajuste el nivel de los altavoces posteriores (intervalos
de -20dB ~+6dB, 0,5dB).
pNivel del altavoz potenciador de graves (0dB)
Ajuste el nivel del altavoz potenciador de graves
(intervalos de -10dB ~+6dB, 0,5dB). El tono de prueba
no se emitirá por este altavoz.
Para ajustar el volumen de todos los altavoces de forma
simultánea
Utilice el control de volumen del amplificador.
Para volver al ajuste por omisión
Seleccione el símbolo o elemento y presione CLEAR.
1 212
NO
0. 0
dB
0. 0
dB
0. 0
dB
0. 0
dB
0. 0
ENTER
SALIR
dB
SETUP
39
ES
Page 92

Dolby Digital Surround
LR
Ajustes del sistema Dolby
Digital Surround
Para disfrutar del sonido Dolby Digital Surround,
ajuste la señal de salida de los conectores de salida del
canal 5.1.
Nota
Para disfrutar del sonido Dolby Digital (AC-3) original
mediante los conectores 5.1 OUTPUT, no ajuste “SALIDA
DIGITAL” en “D-PCM” en “AJUSTE INICIAL 2” de la
pantalla de ajustes. Para más información, consulte la página
35.
SET UP
ENTER
?/>/.//
1 Presione SET UP y seleccione “
continuación, presione ENTER.
2 Ajuste “MODO” en el elemento que desee.
2
”. A
* Estos ajustes también afectan a la salida de los conectores
LINE OUT (AUDIO 1, 2).
Notas
• Al seleccionar un elemento, el sonido se interrumpe de
forma momentánea.
• Si selecciona “PRO LOGIC”, es posible que el sonido sólo se
emita desde el altavoz central en función del disco.
• Si la señal en reproducción no contiene el componente de
sonido envolvente, es posible que los efectos se oigan con
dificultad aunque seleccione “PRO LOGIC”, “VES A” o
“VES B”.
• Si se produce distorsión del sonido al seleccionar “PRO
LOGIC”, “VES A” o “VES B”, ajuste este elemento en
“NO”.
• Si sólo conecta los altavoces frontales, no habrá efectos de
sonido envolvente aunque seleccione “PRO LOGIC”.
• Si selecciona “VES A” o “VES B”, no será posible ajustar el
nivel o el balance de los altavoces, excepto para los
frontales.
• Si los dos altavoces frontales no se encuentran a una misma
distancia de la posición de escucha, es posible que los
efectos se oigan con dificultad aunque seleccione “VES A” o
“VES B”.
• El ajuste de “PRO LOGIC" resulta efectivo solamente si:
– reproduce un CD/VIDEO CD
– reproduce la pista de sonido PCM de un disco DVD
– reproduce la pista de sonido “DOLBY DIGITAL 2/0"
de un disco DVD.
AJUSTE SALIDA 5.1CH 2
MODO: NO
TONO PRUEBA:
BALANCE
FRONTAL
POSTERIOR
NIVEL
CENTRAL
POSTERIOR
SUBWOOFER
El ajuste de fábrica es “NO”.
pMODO
• NO : se envían las señales de todos los canales registrados
en el disco DVD. Si conecta menos de 5 (+1) altavoces, el
reproductor distribuirá apropiadamente la señal de salida
del altavoz ausente a otros altavoces.
Al reproducir un CD o un VIDEO CD, se enviará la señal
estéreo a los altavoces frontales.
• PRO LOGIC : se envían las señales procesadas como Pro
Logic cuando las señales de entrada son estéreo.
• VES A* : se emplea la imagen de sonido 3D para crear
ES
40
altavoces posteriores virtuales del sonido de los altavoces
frontales (izquierdo, derecho) sin utilizar los altavoces
posteriores reales. Los altavoces virtuales se reproducen
como se muestra en la ilustración 1.
• VES B* : se emplea la imagen de sonido 3D para crear
altavoces posteriores virtuales del sonido de los altavoces
frontales (izquierdo, derecho) sin emplear los altavoces
posteriores reales. Los altavoces virtuales se reproducen
como se muestra en la ilustración 2.
12
ENTER
12
0. 0
dB
0. 0
dB
0. 0
dB
0. 0
dB
0. 0
dB
SALIR
SETUP
NO
Ilustración 1 VES (Sonido envolvente virtual potenciado) A
Ilustración 2 VES (Sonido envolvente virtual potenciado) B
LR
Page 93

Additional Information
()
()
Dolby Digital Surround
Para visualizar los canales en reproducción
Es posible presentar en pantalla los canales en
reproducción.
En el formato Dolby Digital (AC-3), las señales de
sonido monofónico en el canal 5.1 pueden estar
grabadas en los discos DVD. El número de canales
grabados variará en función del disco DVD.
1 : 32 : 55
<
CAPITULO
3 / 2. 1
L
LFE
LS RS
DISPLAY
C R
>
Formato
actual de
audio*
Canal
actual en
reproducción**
123
456
789
0
Presione DISPLAY varias veces hasta que aparezca la
indicación del canal.
DVD
TITULO:
CAPITULO:
SUBTITULO:
AUDIO:
ANGULO:
REPRODUCIR
32 ( 50 )
30 ( 50 )
ESPAÑOL ( 32 )
ESPAÑOL ( 8 )
DOLBY DIGITAL
1 ( 9 )
* Aparecerá “PCM” , “MPEG“ o “DOLBY DIGITAL”.
En el caso de “DOLBY DIGITAL”, los canales de la
pista en reproducción aparecen por número de la
siguiente forma:
S: Posterior (monofónico): el componente
posterior de la señal estéreo procesada
con Pro Logic.
LFE: – Aparece sólo cuando se reproduce la
señal LFE (efectos de baja frecuencia).
Si aparece “S” en color gris, puede disfrutar del
efecto de sonido envolvente si ajusta “MODO”
de “AJUSTE SALIDA 5.1CH 2” en “PRO
LOGIC”, “VES A” o “VES B” en la pantalla de
ajustes. Esta opción sólo tiene efecto si el
formato de audio actual es “DOLBY DIGITAL
2/0”.
A continuación, se muestran ejemplos de
indicación:
•PCM (estéreo)
AUDIO:
ANGULO: 1 ( 9 )
ESPAÑOL ( 8 )
PCM
L
R
•PRO LOGIC (PCM)
AUDIO:
ANGULO: 1 ( 9 )
ESPAÑOL ( 8 )
PCM
PRO LOGIC
L C R
S
•Canal 5.1 Dolby Digital (AC-3)
AUDIO:
ANGULO: 1 ( 9 )
ESPAÑOL ( 8 )
DOLBY DIGITAL
3 / 2. 1
LFE
LS RS
L
C R
En el caso del canal 5.1 Dolby Digital (AC-3):
Componente posterior 2
Componente frontal 2
+ Componente central 1
Componente LFE 1
** El canal en reproducción muestra las señales de los
conectores 5.1 OUTPUT tanto si los altavoces
existen como si no. Las letras de la indicación del
canal significan lo siguiente:
L: Frontal (izquierdo)
R: Frontal (derecho)
C: Central (monofónico)
LS: Posterior (izquierdo)
RS: Posterior (derecho)
z Es posible saber si el software está codificado con el
sistema Dolby Surround observando el paquete
Utilice discos con el logotipo . Con el fin de
disfrutar de reproducciones Dolby Digital (AC-3), es
preciso emplear discos que presenten este logotipo.
Nota
El indicador DOLBY DIGITAL se desactivará si:
– inserta un CD o un VIDEO CD.
– el formato actual de audio es PCM o MPEG Audio.
41
ES
Page 94

Información complementaria
Información complementaria
Precauciones
Seguridad
• Precaución: El uso de instrumentos ópticos con este
producto aumenta el peligro para los ojos.
•
Si se introduce algún objeto sólido o se derrama líquido
dentro del reproductor, desenchúfelo y haga que sea revisado
por personal especializado antes de volver a utilizarlo.
Fuentes de alimentación
• El reproductor no estará desconectado de la fuente de
alimentación de CA (toma de corriente) mientras esté
conectado a la toma mural, aunque lo haya apagado.
• Si no va a utilizar el reproductor durante mucho tiempo,
asegúrese de desconectarlo de la toma mural. Para
desconectar el cable de alimentación de CA (cable de
corriente), tire del enchufe, nunca del propio cable.
• Si es preciso cambiar el cable de alimentación de CA (cable
de corriente), hágalo únicamente en un centro de servicio
técnico especializado.
Ubicación
• Coloque el reproductor en un lugar donde reciba una
ventilación adecuada con el fin de evitar su recalentamiento
interno.
• No coloque el reproductor sobre superficies mullidas, como
una alfombra, que puedan bloquear los orificios de
ventilación de la base.
• No coloque el reproductor en lugares próximos a fuentes de
calor, ni sujetos a la luz solar directa, polvo excesivo o
golpes mecánicos.
Funcionamiento
• Si traslada el reproductor directamente de un lugar frío a
otro cálido, o si lo coloca en una sala muy húmeda, es
posible que se condense humedad en las lentes del interior
del reproductor. Si esto ocurre, es posible que éste no
funcione correctamente. En este caso, extraiga el disco y
deje el reproductor encendido durante una media hora
hasta que la humedad se evapore.
Ajuste del volumen
• No aumente el volumen mientras escucha una parte con
entradas de nivel muy bajo o sin señales de audio. Si lo
hace, los altavoces pueden dañarse al reproducirse una
parte de nivel pico.
Limpieza
•
Limpie el exterior, el panel y los controles con un paño suave
ligeramente humedecido con una solución detergente poco
concentrada. No utilice ningún tipo de estropajo abrasivo,
detergente en polvo ni disolventes, como alcohol o bencina.
Notas sobre los discos
Manejo de los discos
• Para mantener limpio el disco, agárrelo por los bordes. No
toque la superficie.
• No pegue papel ni cinta adhesiva en el disco.
Si hay pegamento (o sustancia similar) en el disco, elimínelo
por completo antes de utilizar dicho disco.
No de esta forma
• No exponga el disco a la luz solar directa ni a fuentes de
calor, como conductos de aire caliente, ni lo deje en un
automóvil aparcado bajo la luz solar directa, ya que puede
producirse un considerable aumento de temperatura en el
interior del mismo.
• Después de la reproducción, guarde el disco en su caja.
Limpieza
• Antes de la reproducción, limpie el disco con un paño de
limpieza desde el centro hacia los bordes.
• No utilice disolventes, como bencina, diluyentes, productos
de limpieza disponibles en el mercado ni aerosoles
antiestáticos destinados a discos de vinilo.
42
Si desea realizar alguna consulta o solucionar algún
problema referentes al reproductor, póngase en
contacto con el proveedor Sony más próximo.
AVISO IMPORTANTE
Precaución: El reproductor DVD es capaz de mantener
imágenes fijas de vídeo o la imagen de la pantalla de
ajustes en la pantalla del TV indefinidamente. Si deja
dichas imágenes mostradas en la pantalla del TV durante
mucho tiempo, pueden producirse daños permanentes en
ésta. Los televisores de proyección son muy susceptibles.
ES
Page 95

Solución de problemas
Si le surge alguno de los siguientes problemas mientras
emplea el reproductor, utilice esta guía de solución de
problemas para solucionarlo. Si no se soluciona,
póngase en contacto con el proveedor Sony más
próximo.
La alimentación no se activa.
/Si el indicador situado sobre el botón POWER no está
iluminado, compruebe que el cable de alimentación
de CA está firmemente conectado.
Ausencia de imagen.
/Compruebe que ha conectado el reproductor
firmemente.
/El cable de conexión de vídeo está dañado. Sustitúyalo
por otro nuevo.
/Compruebe que conecta el reproductor al conector de
entrada de vídeo del TV (página 6).
/Compruebe que enciende el TV.
/Asegúrese de seleccionar la entrada de vídeo en el TV
de forma que sea posible ver las imágenes del
reproductor.
Ausencia de sonido.
/Compruebe que el reproductor está conectado
firmemente.
/El cable de conexión de audio está dañado. Sustitúyalo
por otro nuevo.
/Compruebe que conecta el reproductor a los
conectores de entrada de audio del amplificador
(página 6).
/Asegúrese de encender el TV y el amplificador.
/Compruebe que selecciona la posición apropiada en el
amplificador de forma que sea posible escuchar el
sonido del reproductor.
/El reproductor se encuentra en el modo de pausa o en
el de reproducción a cámara lenta. Presione · para
recuperar el modo de reproducción normal.
/Está realizando el avance (FF1 o FF2) o el retroceso
(FR1 o FR2) rápido. Presione · para recuperar el
modo de reproducción normal.
/Compruebe las conexiones y los ajustes de los
altavoces (página 37). Consulte el manual de
instrucciones del amplificador.
/Si reproduce las pistas de sonido Dolby Digital (AC-3)
e intenta enviarlas desde los conectores DIGITAL
OUT, ajuste “SALIDA DIGITAL” en “D-PCM” en
“AJUSTE INICIAL 2” de la pantalla de ajustes. En
caso contrario, los conectores no emitirán ningún
sonido (página 35).
El control remoto no funciona.
/Elimine los obstáculos entre el control remoto y el
reproductor.
/Emplee el control remoto cerca del reproductor.
/Oriente el control remoto hacia el sensor remoto g del
reproductor.
/Sustituya todas las pilas del control remoto por otras
nuevas si disponen de poca energía.
Información complementaria
Additional Information
Additional Information
Aparece ruido de imagen.
/Limpie el disco.
/Si las señales de vídeo procedentes del reproductor de
DVD tienen que pasar por la videograbadora para
llegar al televisor, la protección contra copia que se
aplica a algunos programas de DVD podría afectar a
la calidad de la imagen. Si los problemas continúan
después de comprobar las conexiones, intente
conectar el reproductor de DVD directamente a la
toma S-input del televisor, si la tiene.(página 7).
Se oye ruido de imagen.
/Limpie el disco.
Se produce distorsión del sonido.
/Desde el visor de configuración, ajuste
“ATENUACION AUDIO” dentro de “AJUSTE
INICIAL 2” en “ON”.
El disco no se reproduce.
/No ha insertado ningún disco (aparece “Inserte disco”
en la pantalla del TV).
Inserte un disco.
/Inserte correctamente el disco con la cara de
reproducción hacia abajo en la bandeja de discos.
/Coloque el disco correctamente en la bandeja.
/Limpie el disco.
/El reproductor no puede reproducir discos CD-ROM,
etc. (página 5).
Inserte un disco DVD, VIDEO CD o CD.
/Compruebe el código de región del disco DVD
(página 4).
/Se ha condensado humedad en el interior del
reproductor. Extraiga el disco y deje el reproductor
encendido durante una media hora (página 42).
El reproductor no realiza la reproducción desde el
principio al reproducir un disco.
/Ha seleccionado la reproducción repetida, aleatoria o
de programa. Presione CLEAR (página 22 a 24).
/Ha seleccionado la reanudación de reproducción.
Presione p en el panel frontal o en el control remoto
antes de iniciar la reproducción (página 25).
/Aparece un menú de títulos o de DVD
automáticamente en la pantalla del TV al reproducir
un disco DVD, o aparece una indicación de ajustes
automáticamente en la pantalla del TV al reproducir
un VIDEO CD con funciones PBC.
El disco DVD no se reproduce al seleccionar un título.
/La función de control de limitación está activada
(página 28).
El reproductor inicia la reproducción del disco DVD
automáticamente.
/El disco DVD dispone de la función de reproducción
automática.
43
ES
Page 96

Información complementaria
La reproducción se detiene automáticamente.
/En función del disco, éste puede disponer de la señal
de pausa automática. Al reproducir dicho disco, el
reproductor detendrá la reproducción mediante la
señal.
No es posible realizar la detención de la reproducción,
búsqueda, reproducción a cámara lenta, repetida,
aleatoria o de programa, etc.
/En función del disco, es posible que no pueda realizar
alguna de las operaciones enumeradas anteriormente.
Los mensajes no aparecen en la pantalla del TV en el
idioma deseado.
/En la pantalla de ajustes, seleccione el idioma para las
indicaciones en pantalla en “MENU PANTALLA” en
“AJUSTE DE IDIOMA” (página 33).
No es posible cambiar el idioma para el sonido al
reproducir un disco DVD.
/El disco no dispone de sonido multilingüe.
/El cambio del idioma del sonido está prohibido en el
disco DVD.
El idioma del sonido cambia automáticamente.
/Al ajustar “SELECCION PISTA” de “AJUSTE
INICIAL 2” en “SI” en la pantalla de ajustes, es
posible que el idioma cambie en función de los ajustes
de “AUDIO” en “AJUSTE DE IDIOMA”. El ajuste de
“SELECCION PISTA” tiene mayor prioridad que los
ajustes de “AUDIO” (página 33).
No es posible cambiar el idioma de los subtítulos al
reproducir un disco DVD.
/No hay subtítulos multilingües registrados en el disco
DVD.
/Está prohibido el cambio del idioma de los subtítulos
en los discos DVD.
No es posible desactivar los subtítulos al reproducir un
disco DVD.
/En función del disco DVD, es posible que no pueda
desactivar los subtítulos.
No es posible cambiar los ángulos al reproducir un disco
DVD.
/No hay múltiples ángulos registrados en el disco
DVD.
/Cambie los ángulos cuando “ANGLE” aparezca en el
visor del panel frontal (página 27).
/Está prohibido cambiar los ángulos en el disco DVD.
No es posible cambiar la relación de aspecto de la
pantalla aunque ajuste “TIPO TV” de “AJUSTE INICIAL 1”
en la pantalla de ajustes al reproducir una imagen
panorámica.
/La relación de aspecto es fija en el disco DVD.
/Si conecta el reproductor con el cable de vídeo S,
conéctelo directamente al televisor. En caso contrario,
es posible que no pueda cambiar la relación de
aspecto.
/Según el televisor, es posible que no pueda cambiar la
relación de aspecto.
La pantalla de menú no aparece al reproducir un VIDEO
CD.
/El VIDEO CD no dispone de funciones PBC.
/Realice el procedimiento correcto de operación.
(Consulte también las instrucciones suministradas con
el disco.)
El sonido pierde el efecto estéreo al reproducir un VIDEO
CD o un CD.
/Aparece “1/L” o “2/R” en el visor del panel frontal.
En el control remoto, presione AUDIO CHANGE
varias veces hasta que aparezca “1/L 2/R “ (página
26).
/Compruebe que conecta el reproductor
apropiadamente (página 10, 11).
El efecto de sonido envolvente es difícil de oír al
reproducirse una pista de sonido Dolby Digital (AC-3).
/Compruebe los ajustes y conexiones de los altavoces
(página 37). Consulte el manual de instrucciones del
amplificador.
/Ajuste “MODO” de “AJUSTE SALIDA 5.1CH 2” en
“NO” en la pantalla de ajustes (página 40).
/En función del disco DVD, es posible que la señal de
salida no sea todo el canal 5.1, sino monofónico o
estéreo, aunque la pista de sonido esté grabada en
formato Dolby Digital (AC-3).
El sonido sólo se emite por el altavoz central.
/Ajuste “MODO” de “AJUSTE SALIDA 5.1CH 2” en
“NO” en la pantalla de ajustes (página 40).
/En función del disco, es posible que el sonido se emita
solamente por el altavoz central.
El reproductor no funciona correctamente.
/Es posible que el funcionamiento del reproductor se
vea afectado por electricidad estática, etc.
Desconecte una vez el cable de alimentación de CA y,
a continuación, vuelva a conectarlo.
Aparecen en pantalla números o letras de 5 caracteres.
/Se ha activado la función de autodiagnóstico. Consulte
la tabla de la página 45 y emplee el reproductor
adecuadamente.
44
ES
Page 97

Información complementaria
C:13:00
Función de autodiagnóstico
La función de autodiagnóstico, se activa para evitar un funcionamiento
defectuoso del reproductor. Un número de servicio de cinco dígitos
(combinación de una letra y cifras) parpadeará en la pantalla. En este caso,
consulte la siguiente tabla.
Additional Information
Additional Information
Primeros tres dígitos
C13
C31
Exx (xx corresponde a
cualquier número)
Causa y/o acción correctiva
• El disco está sucio.
/ Límpielo con un paño de limpieza (página 42).
• El disco no está insertado correctamente.
/ Abra la bandeja de discos e inserte el disco correctamente.
• Para evitar fallos de funcionamiento del reproductor, se ha activado la función de
autodiagnóstico.
/ Cuando se ponga en contacto con el proveedor Sony o con el centro de servicio
técnico local autorizado Sony, comuníquele el número de servicio de cinco dígitos
(ejemplo: E:61:10).
45
ES
Page 98

Información complementaria
Especificaciones
Reproductor de CD/DVD
Láser Semiconductor
Sistema de formato de señales
NTSC
Accesorios suministrados
Consulte la página 6.
* Las señales de los conectores LINE OUT (AUDIO 1, 2 ) se
miden. Al reproducir las pistas de sonido PCM con frecuencia
de muestreo de 96 kHz, las señales de salida de los conectores
DIGITAL OUT (OPTICAL, COAXIAL) y 5.1 OUTPUT se
convierten a 48 kHz (frecuencia de muestreo)/16 bits (bits de
cuantización).
Características de audio
Respuesta de frecuencia DVD (PCM 96kHz): de 2 Hz a 44 kHz
Relación señal-ruido Superior a 115 dB (sólo conectores
Distorsión armónica Inferior a 0,0028%
Rango dinámico Superior a 100 dB (DVD)
Fluctuación y trémolo Inferior al valor detectado
(±0,5 dB)*
DVD (PCM 48kHz): de 2 Hz a 22 kHz
(±0,5 dB)
CD: 2 Hz a 20 kHz (±0,5 dB)
LINE OUT (AUDIO 1, 2))
Superior a 97 dB (CD)
(±0,001% W PEAK)
Salidas y entradas
Impedancia de carga
Superior a 10
kiloohmios
Longitud de onda: 660
nm
Terminación de 75
ohmios
75 ohmios,
sincronización negativa
75 ohmios,
sincronización negativa
Terminación de 75 ohmios
75 ohmios,
sincronización negativa
75 ohmios
32 ohmios
Superior a 10
kiloohmios
LINE OUT
(AUDIO 1, 2)
DIGITAL OUT
(OPTICAL)
DIGITAL OUT
(COAXIAL)
LINE OUT
(VIDEO 1, 2)
S VIDEO OUT
(1, 2)
COMPONENT
VIDEO OUT
(Y, CB/B-Y,
CR/R-Y)
PHONES
5.1 OUTPUT
Tipo de
toma
Tomas
fonográficas
Conector
de salida
óptica
Toma
fonográfica
Tomas
fonográficas
Mini DIN
de 4 pines
Tomas
fonográficas
Toma de
entrada de
línea
Tomas
fonográficas
Nivel de
salida
2 Vrms (a 50
kiloohmios)
–18 dBm
0,5 Vp-p
1,0 Vp-p
Y: 1,0 Vp-p
C: 0,286 Vp-p
Y: 1,0 Vp-p
CB/B-Y,
CR/R-Y:
0,7 Vp-p
12 mW
1,6 Vrms (a 50
kiloohmios)
Diseño y especificaciones sujetos a cambios sin previo aviso.
Glosario
Indice de bits (página 18)
Valor que indica la cantidad de datos de vídeo
comprimidos en un disco DVD por segundo. La
unidad es Mbps (megabits por segundo). 1 Mbps
indica que los datos por segundo son de 1.000.000 de
bits. Cuanto mayor sea el índice de bits, mayor será la
cantidad de datos. No obstante, esto no siempre
significa que puedan obtenerse imágenes de calidad
superior.
Capítulo (página 5)
Secciones de una imagen o de una pieza musical de un
disco DVD más pequeñas que los títulos. Un título se
compone de varios capítulos. A cada uno de éstos se le
asigna un número que permite localizar el capítulo que
se desee.
DCS (Sonido digital de cine) (página 40)
Nombre genérico de una tecnología desarrollada por
Sony para disfrutar en casa de sonido envolvente. Para
disfrutar del sonido envolvente de un cine en su propia
casa, se simula no el sonido de una sala de conciertos
como es habitual, sino el de estudio de edición de
películas. Este reproductor incorpora el sistema VES
(sonido envolvente virtual potenciado) de diversos
programas DCS. El sistema VES puede crear la imagen
de sonido de altavoces posteriores virtuales a partir del
sonido de los altavoces frontales (izquierdo, derecho)
sin utilizar altavoces posteriores reales.
46
Generales
Requisitos de alimentación
Consumo de energía 22 W
Dimensiones (aprox.) 430 × 95 × 325 mm (17 × 3 3/4 × 12 3/4
Peso (aprox.) 4,0 kg
Temperatura de funcionamiento 5 °C a 35 °C (41 °F a 95 °F)
Humedad de funcionamiento 5% a 90%
110–240 V CA, 50/60 Hz
pulgadas) (an/al/prf)
partes salientes incluidas
Dolby Digital (AC-3) (página 36)
Tecnología de compresión de audio digital
desarrollada por Dolby Laboratories Corporation. Esta
tecnología admite el sonido envolvente de canal 5.1. El
canal posterior es estéreo y existe un canal de
potenciación de graves independiente en este formato.
Se obtiene una óptima separación de canales debido a
que los datos de todos los canales se registran por
separado y se procesan digitalmente.
ES
Page 99

Información complementaria
Additional Information
Additional Information
Dolby Pro Logic (página 40)
Tecnología de procesamiento de señales de audio
desarrollado por Dolby Laboratories Corporation para
el sonido envolvente. Si la señal de entrada dispone del
componente de sonido envolvente, el proceso Pro
Logic envía las señales frontales, centrales y
posteriores. El canal posterior es monofónico.
DVD (página 4)
Disco que contiene hasta 8 horas de imágenes en
movimiento aunque su diámetro es el mismo que el de
un CD.
La capacidad de datos de un disco DVD de una sola
capa y una sola cara, a 4,7 GB (Giga Byte), es 7 veces la
de un CD. Además, la capacidad de datos de un disco
DVD de dos capas y una sola cara es de 8,5 GB, el de
uno de una sola capa y dos caras de 9,4 GB, y el de uno
de dos capas y dos caras de 17 GB.
Los datos de imagen emplean el formato MPEG 2, uno
de los estándar a nivel mundial de tecnología de
compresión digital. Dichos datos se comprimen hasta
aproximadamente 1/40 de su tamaño original. El disco
DVD también utiliza tecnología de codificación de
índice variable que cambia los datos para asignarlos en
función del estado de la imagen.
Los datos de audio se graban en Dolby Digital (AC-3) y
en PCM, para disfrutar de una presencia de audio más
real.
Además, los discos DVD disponen de diversas
funciones avanzadas, como la de ángulos múltiples, la
multilingüe y la de control de limitación.
Función de ángulos múltiples (página 27)
Ciertos discos DVD disponen de diversos ángulos o
puntos de visualización de la videocámara para una
escena.
Función multilingüe (página 28)
Control de reproducción (PBC) (página 17)
Señales codificadas en discos VIDEO CD (versión 2.0)
para controlar la reproducción.
Mediante el uso de pantallas de menú grabadas en
discos VIDEO CD con funciones PBC, es posible
disfrutar de la reproducción de programas sencillos
interactivos, programas con funciones de búsqueda,
etc.
Título (página 5)
Las secciones más extensas de una imagen o de una
pieza musical de un disco DVD; una película, etc., para
una parte de una imagen de un software de vídeo; o un
álbum, etc., para una pieza musical de un software de
audio. A cada título se le asigna un número que
permite localizar el título que se desee.
Pista (página 5)
Secciones de una imagen o de una pieza musical de un
CD o VIDEO CD. A cada pista se le asigna un número
que permite localizar la pista que se desee.
VES (sonido envolvente virtual potenciado)
(página 40)
Consulte DCS (sonido digital de cine).
VIDEO CD (página 4)
Disco compacto que contiene imágenes en movimiento.
Los datos de imagen emplean el formato MPEG 1, uno
de los estándar a nivel mundial de tecnología de
compresión digital. Dichos datos se comprimen en
aproximadamente 1/140 de su tamaño original.
Consecuentemente, un VIDEO CD de 12 cm puede
contener hasta 74 minutos de imágenes en movimiento.
Los discos VIDEO CD también contienen datos de
audio compactos. Los sonidos que el oído humano no
Ciertos discos DVD disponen de varios idiomas para el
sonido o los subtítulos de una imagen.
Control de limitación (página 28)
Función del disco DVD para limitar su reproducción
según la edad de los usuarios en función del nivel de
limitación de cada país. Ésta varía en función del disco.
Al activarse, la reproducción estará completamente
prohibida; las escenas violentas se omiten o se
sustituyen por otras, etc.
47
ES
Page 100

Información complementaria
Indice de componentes y controles
Para más información, consulte las páginas indicadas entre paréntesis.
Panel frontal
1 g (sensor remoto) (6)
Admite las señales de control remoto.
2 Interruptor e indicador POWER (10, 14)
Enciende y apaga el reproductor.
3 Indicador DOLBY DIGITAL (10, 41)
Indica pistas de sonido Dolby Digital (AC-3).
4 Botón SHUFFLE (23)
Presiónelo para realizar la reproducción aleatoria.
5 Botón REPEAT (22)
Presiónelo para realizar la reproducción repetida.
6 Bandeja de discos (10, 14)
Coloque un disco en la bandeja.
7 Botón = PREV (11, 15)
Presiónelo para retroceder al capítulo o pista anterior.
8 Botón + NEXT (11, 15)
Presiónelo para acceder al capítulo o pista siguiente.
9 Conmutador lanzadera (12, 16)
Cambia la velocidad de reproducción.
0 Botón ?/>/.// / ENTER
Selecciona y ejecuta los elementos o los ajustes.
!¡ Botón / indicador JOG (12, 16)
Presiónelo para reproducir un disco fotograma a
fotograma.
!™ Conector PHONES (10, 14)
Conecte aquí los auriculares.
!£ Control PHONE LEVEL (10, 14)
Ajusta el volumen de los auriculares.
!¢ Botón PROGRAM (24)
Presiónelo para realizar la reproducción de programa.
!∞ Botón CLEAR (22, 23, 24)
Presiónelo para recuperar la reproducción continua, etc.
!§ Visor del panel frontal (20)
Indica el tiempo de reproducción, etc.
!¶ Botón §OPEN/CLOSE (10, 14)
Abre o cierra la bandeja de discos.
!• Botón ·PLAY (10, 14)
Reproduce un disco.
!ª Botón PPAUSE (11, 15)
Introduce pausas durante la reproducción de un disco.
@º Botón pSTOP (11, 15, 25)
Detiene la reproducción de un disco.
@¡ Botón TITLE (13)
Muestra el menú de títulos en la pantalla del TV.
@™ Botón DVD MENU (13)
Muestra el menú DVD en la pantalla del TV.
@£ Botón ˆ RETURN (17)
Presiónelo para volver a la pantalla de selección anterior,
etc.
48
ES
 Loading...