

Sony DVP-S5000 Operating Instructions Manual
3-862-097-11 (2)
CD/D VD Player
I I I I II I I II I II II III
Operating Instructions
Mode d'emploi
DVP-S5OOD
© 1998 bySonyCorporation
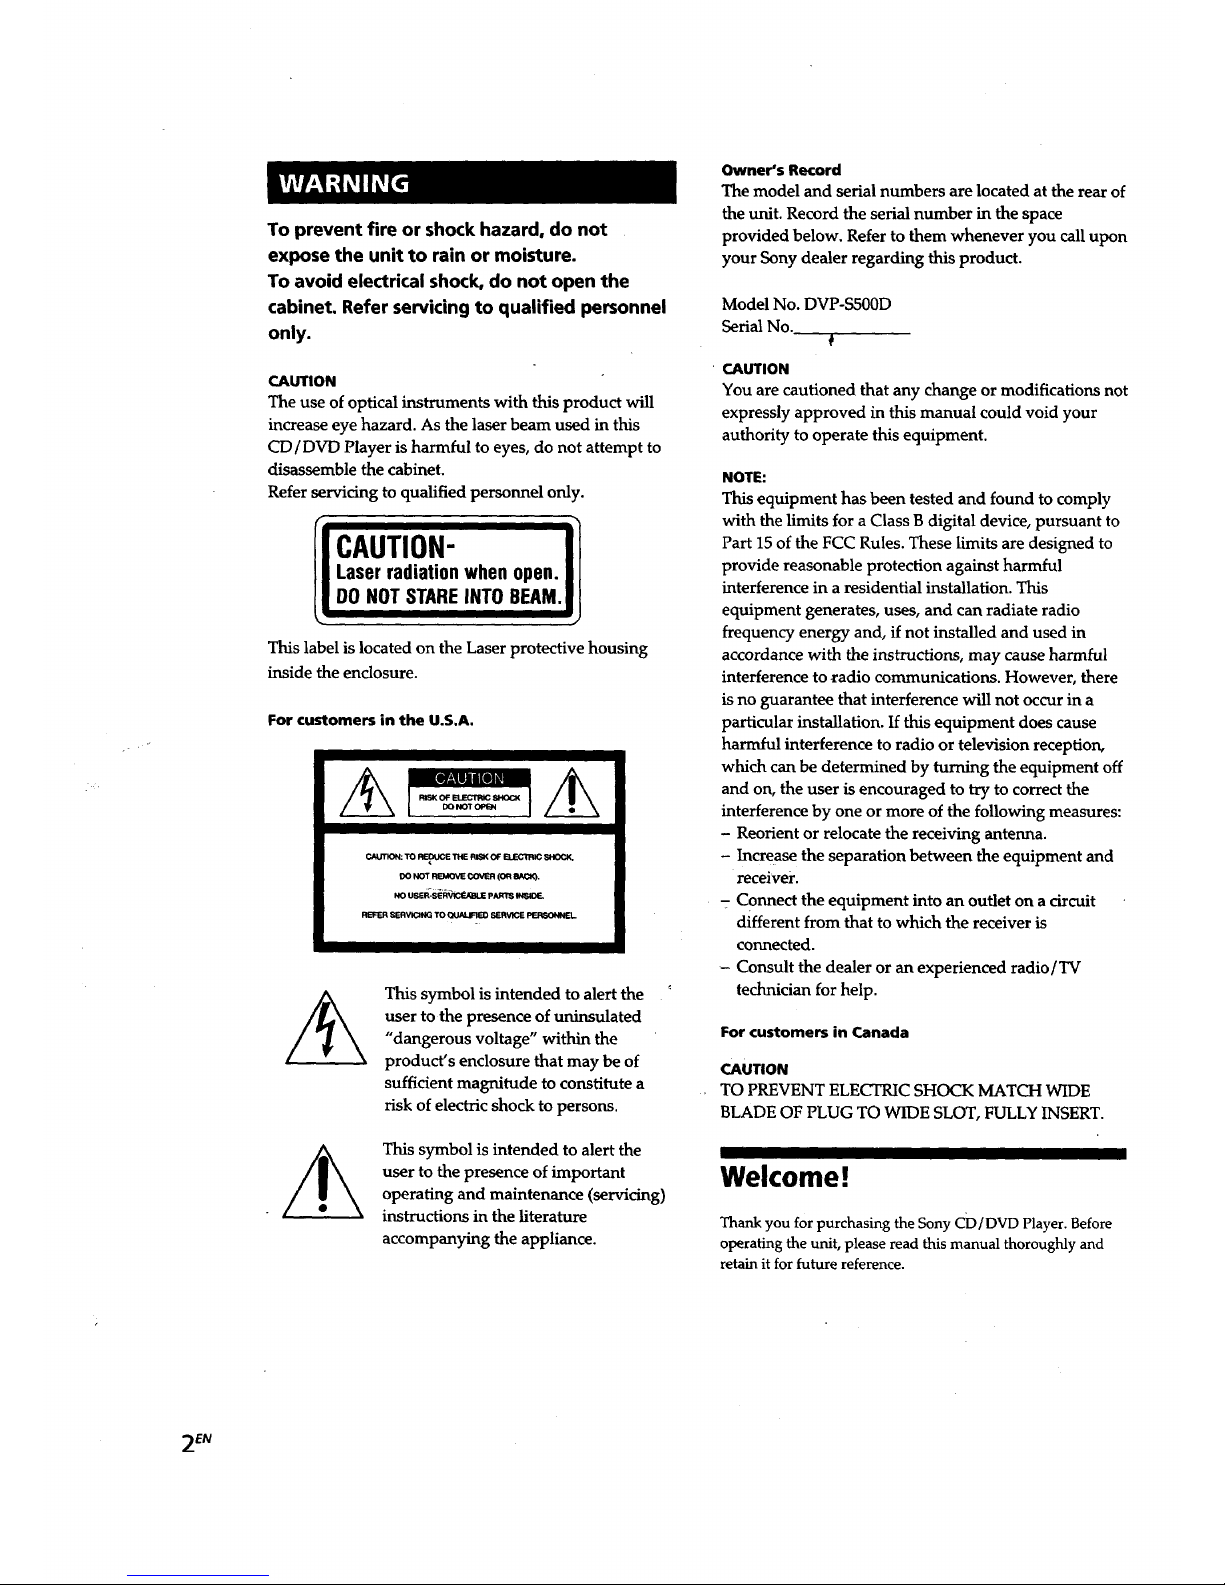
To prevent fire or shock hazard, do not
expose the unit to rain or moisture.
To avoid electrical shock, do not open the
cabinet. Refer servicing to qualified personnel
only.
CAUTION
The use of optical instruments with this product will
increase eye hazard. As the laser beam used in this
CD/DVD Player is harmful to eyes, do not attempt to
disassemble the cabinet.
Refer servicing to qualified personnel onl r.
i I
CAUTION-
Laser radiation when open.
DO NOT STAREINTO BEAM.
This label is located on the Laser protective housing
inside the enclosure.
For customers in the U.S,A.
This symbol is intended to alert the
user to the presence of uninsulated
"dangerous voltage" within the
product's enclosure that may be of
sufficient magnitude to constitute a
risk of electric shock to persons.
This symbol is intended to alert the
user to the presence of important
operating and maintenance (servicing)
instructions in the literature
accompanying the appliance.
Owner's Record
The model and serial numbers are located at the rear of
the unit. Record the serial number in the space
provided below. Refer to them whenever you call upon
your Sony dealer regarding this product.
Model No. DVP-SS00D
Serial No.
CAUTION
You are cautioned that any change or modifications not
expressly approved in this manual could void your
authority to operate this equipment.
NOTE:
This equipment has been tested and found to comply
with the limits for a Class B digital device, pursuant to
Part 15 of the FCC Rules. These limits are designed to
provide reasonable protection against harmful
interference in a residential installation. This
equipment generates, uses, and can radiate radio
frequency energy and, if not installed and used in
accordance with the instructions, may cause harmful
interference to radio communications. However, there
is no guarantee that interference will not occur in a
particular installation. If this equipment does cause
harmful interference to radio or television reception,
which can be determined by turning the equipment off
and on, the user is encouraged to try to correct the
interference by one or more of the following measures:
- Reorient or relocate the receiving antenna.
- Increase the separation between the equipment and
receiver.
- Connect the equipment into an outlet on a circuit
different from that to which the receiver is
connected.
- Consult the dealer or an experienced radio/TV
technician for help.
For customers in Canada
CAUTION
TO PREVENT ELECTRIC SHOCK MATCH WIDE
BLADE OF PLUG TO WIDE SLOT, FULLY INSERT.
II I
Welcome!
Thank you for purchasing the Sony CD/DVD Player. Before
operating the unit, please read this manual thoroughly and
retain it for future reference.
2 EN
TABLE OF CONTENTS
This Player Can Play the Following Discs................................................................4
Getting Started
Unpacking ............................................................................ :................................................ 6
Hooking Up the System ........ _............................................................................................. 6
Necessary Setup Before Using the Player ........................................................................ 9
Selecting the Language for On-screen Display ............................................................... 9
BasicOperations
Playing a DVD ......................................................................................................................: lO
Playing a CDNIDEO CD ...................................................................................................14
Playing Discs in Various Modes
Using the On-Screen Display .......................................................................................... 18
Using the Front Panel Display ........................................................................................ 20
Playing Repeatedly (Repeat Play) .................................................................................. 22
Playing in Random Order (Shuffle Play) ...................................................................... 23
Creating Your Own Program (Program Play) .....................:..............;.......:................. 24
Resuming Playback from the Point Where You Stopped aDisc (Resume Play) ..... 25
Changing the Sounds ....................................................................................................... 26
Displaying the Subtitles ................................................................................................... 26
Changing the Angles ........................................................................................................ 27
Limiting Playback by Children (Parental Control) ...................................................... 28
Controlling the TV or the AV receiver with the Supplied Remote ........................... 30
Settings and Adjustments
Using the Setup display ................................................................................................... 32
Setting the Language for Display and Sound (LANGUAGE SETUP) ...................... 33
Settings for Display (INITIAL SETUP 1) ....................................................................... 34
Settings for Sound (INITIAL SETUP 2) ......................................................................... 35
Dolby* Digital Surround
What is Dolby Digital Surround? ................................................................................... 36
Speaker System Hookups ................................................................................................ 36
Speaker Setup .................................................................................................................... 38
Setting for Dolby Digital Surround ................................................................................ 40
Additional Information
Precautions ........................................................................................................................ 42
Notes on Discs ................................................................................................................... 42
Troubleshooting ................................................................................................................ 43
Self-diagnosis function ..................................................................................................... 45
Specifications ..................................................................................................................... 46
Glossary .............................................................................................................................. 46
Index to Parts and Controls ........................................................................................ :.... 48
Setup Display Item List .............................................................. ....................................... 51
Language Code List .......................................................................................................... 52
Index ..........................................................................................................................................53
* Manufactured under license from Dolby Laboratories Licensing Corporation. "Dolby', the
double-D symbol IX], "Pro Logic" and "Dolby Digital (AC-3)" are trademarks of Dolby
Laboratories Licensing Corporation.
3 EN
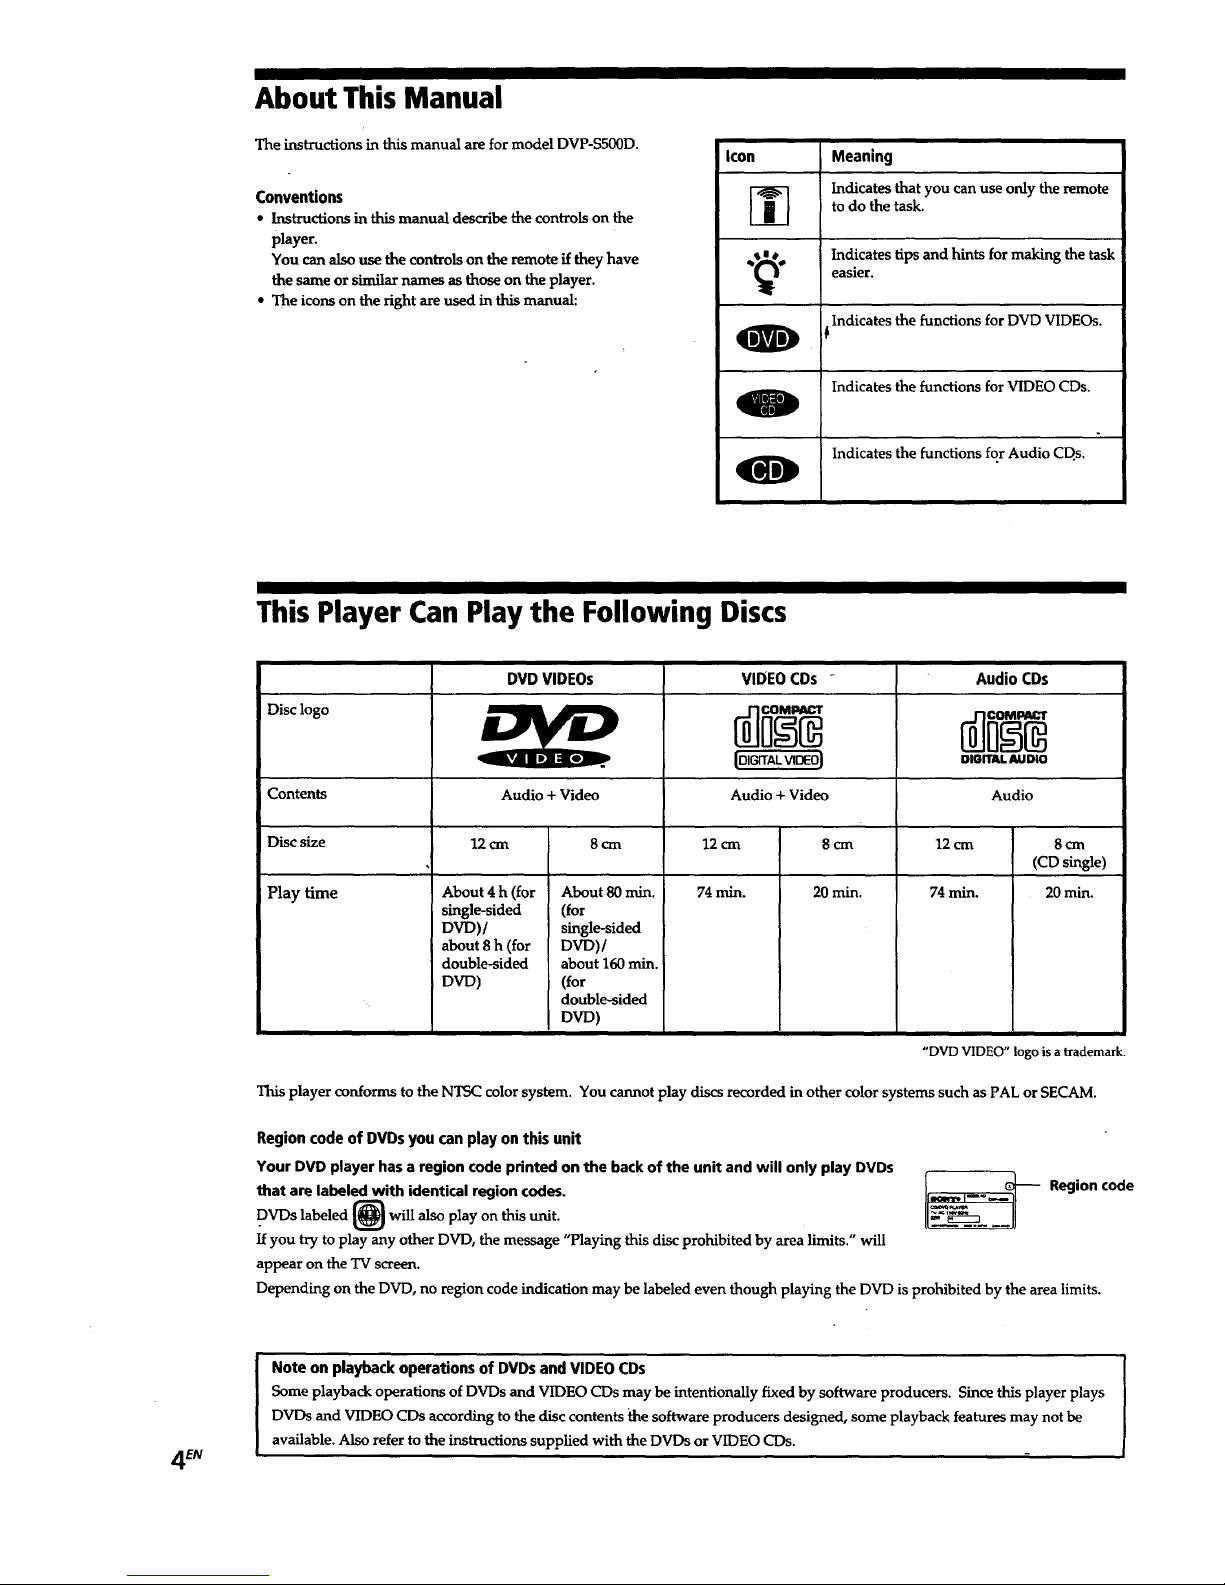
About This Manual
The instructions in this manual are for model DVP-SSOOD.
Conventions
• Instructions in this manual describe the controls on the
player.
You can also use the controls on the remote if they have
the same or similar names as those on the player.
• The icons on the right are used in this manual:
icon
Meaning
Lndicatesthat you can use only the remote
to do the task.
Indicates tips and hints for making the task
easier.
IndicatesthefunctionsforDVDVIDEOs.
$
Indicates the functions for VIDEO CDs.
Indicates the functions for Audio CD.s,
This Player Can Play the Following Discs
Disc logo
DVDVIDEOs VIDEO CDs -
tDIGITALVIDEOI
Audio CDs
DIGITAL AUDIO
AudioContents Audio + Video Audio + Video
Disc size 12 cm 8 cm 12 cm 8 cm 12 cm 8 cm
(CD single)
Play time 74 rain. 20 rain. 74 min. 20 min.
"DVD VIDEO" logo is a trademark.
About 4 h (for
single-sided
DVD)/
about 8h (for
double-sided
DVD)
About 80 rain.
(for
single-sided
DVD)/
about 160 min.
(for
double-sided
DVD)
This player conforms to the NTSC color system. You cannot play discs recorded in other color systems such as PAL or SECAM.
Region code of DVDs you can play on this unit
Your DVD player has a region code printed on the back of the unit and will only play DVDs
that are labeled with identical region codes.
_mmmb
DVDs labeled [@] will also play on this unit.
If you try to play any other DVD, the message "Playing this disc prohibited by area limits." will
appear on the TV screen.
Depending on the DVD, no region code indication may be labeled even though playing the DVD is prohibited by the area limits.
4 EN
Note on playback operations of DVDs and VIDEO CDs
Some playback operations of DVDs and VIDEO CDs may be intentionally fixed by software producers. Since this player plays
DVDs and VIDEO CDs according to the disc contents the software producers designed, some playback features may not be
available. Also refer to the instructions supplied with the DVDs or VIDEO CDs.
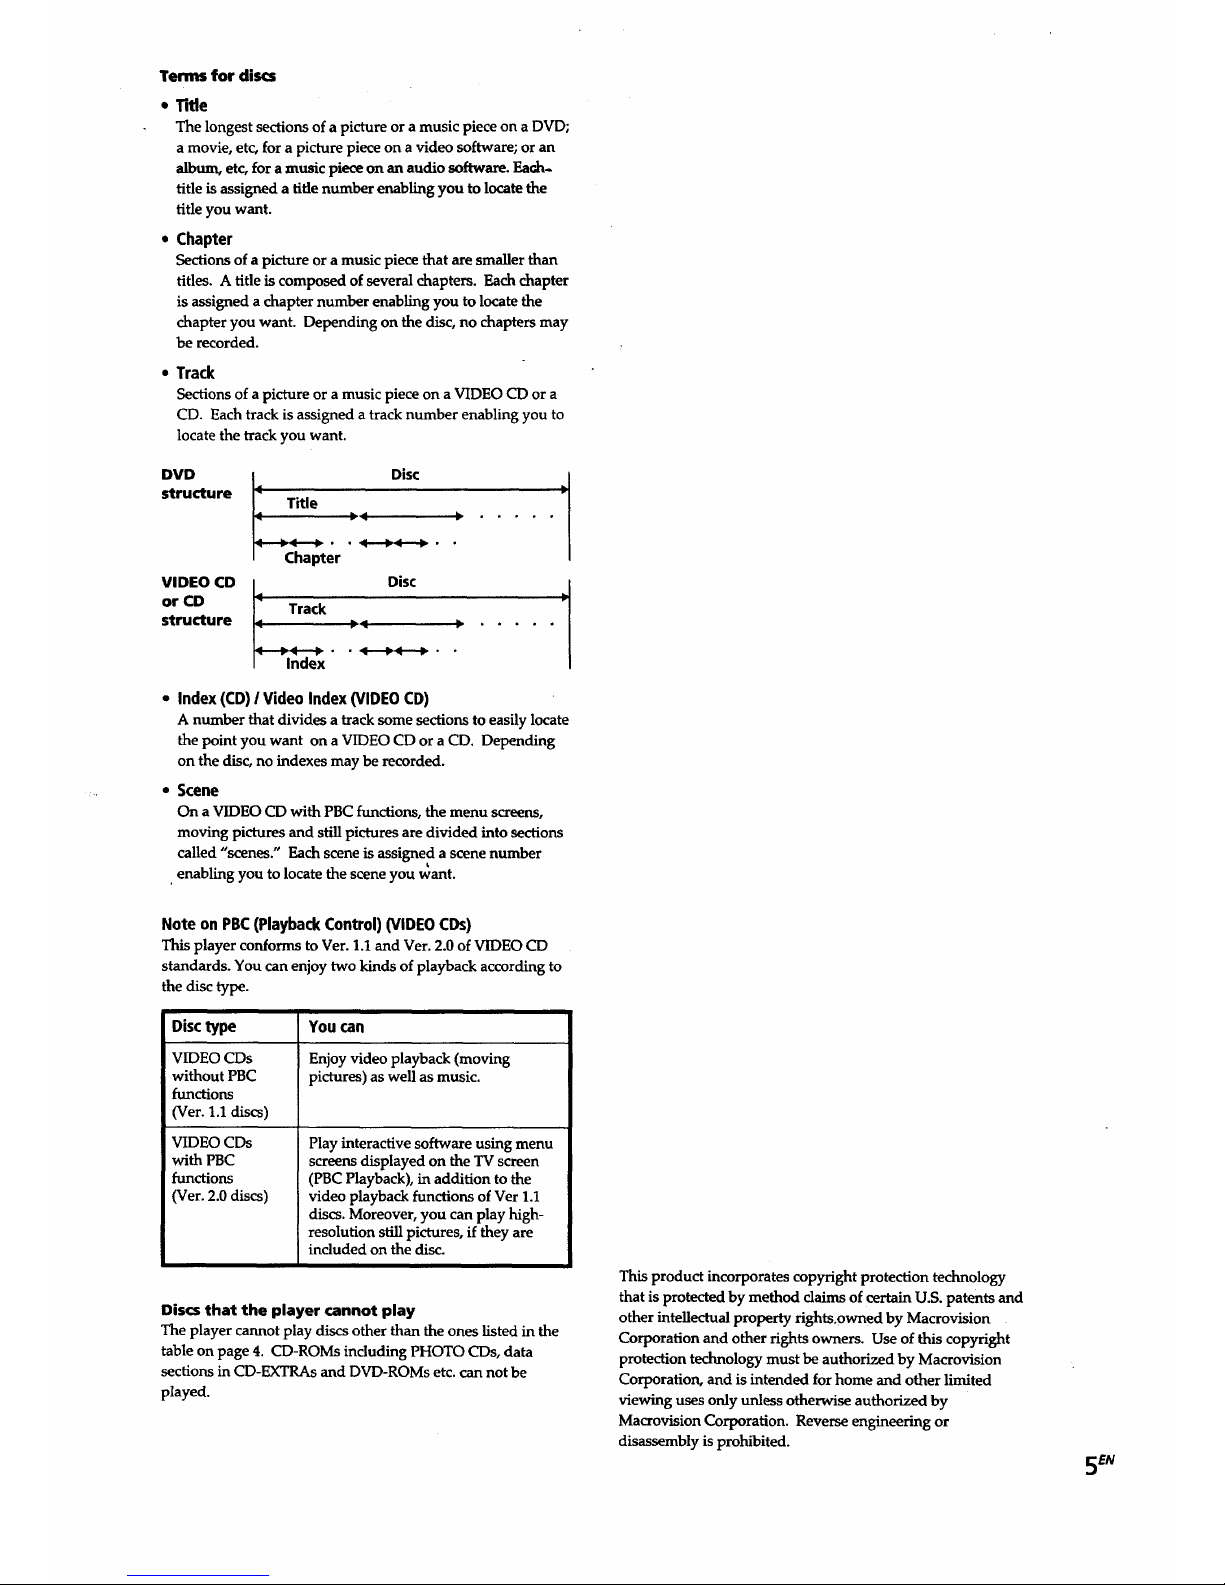
Terms for dim
• Tide
The longest sections of a picture or a music piece on a DVD;
a movie, etc, for a picture piece on a video software; or an
album, etc, for a music piece on an audio software. Each.
title is assigned a title number enabling you to locate the
title you want.
• Chapter
Sections of a picture or a music piece that are smaller than
titles. A title is composed of several chapters. Each chapter
is assigned a chapter number enabling you to locate the
chapter you want. Depending on the disc, no chapters may
be recorded.
Track
Sections of a picture or a music piece on a VIDEO CD or a
CD. Each track is assigned a track number enabling you to
locate the track you want.
DVD [ Disc )J
structure 4 Title
VIDEO CD I_ Disc I
or CD < Track
structure _ _ _
>< _- • • 4---1,<--_ • •
Index
Index (CD) / Video Index (VIDEO CD)
A number that divides a track some sections to easily locate
the point you want on a VIDEO CD or a CD. Depending
on the disc, no indexes may be recorded.
Scene
On a VIDEO CD with PBC functions, the menu screens,
moving pictures and still pictures are divided into sections
called "scenes." Each scene is assigned a scene number
• enabling you to locate the scene you want.
Note on PBC (Playback Control) (VIDEO CDs)
This player conforms to Ver. 1.1 and Ver. 2.0 of VIDEO CD
standards. You can enjoy two kinds of playback according to
the disc type.
Disctype
VIDEO CDs
without PBC
functions
(Vet. 1.1 discs)
VIDEO CDs
with PBC
functions
(Ver. 2.0 discs)
You can
Enjoy video playback (moving
pictures) as well as music.
Play interactive software using menu
screens displayed on the TV screen
(PBC Playback), in addition to the
video playback functions of Ver 1.1
discs. Moreover, you can play high-
resolution still pictures, if they are
included on the disc.
Discs that the player cannot play
The player cannot play discs other than the ones listed in the
table on page 4. CD-ROMs including PHOTO CDs, data
sections in CD-EXTRAs and DVD-ROMs etc. can not be
played.
This product incorporates copyright protection technology
that is protected by method claims of certain U.S. patents and
other intellectual property fights.owned by Macrovision
Corporation and other rights owners. Use of this copyright
protection technology must be authorized by Macrovision
Corporation, and is intended for home and other limited
viewing uses only unless otherwise authorized by
Macrovision Corporation. Reverse engineering or
disassembly is prohibited.
S EN
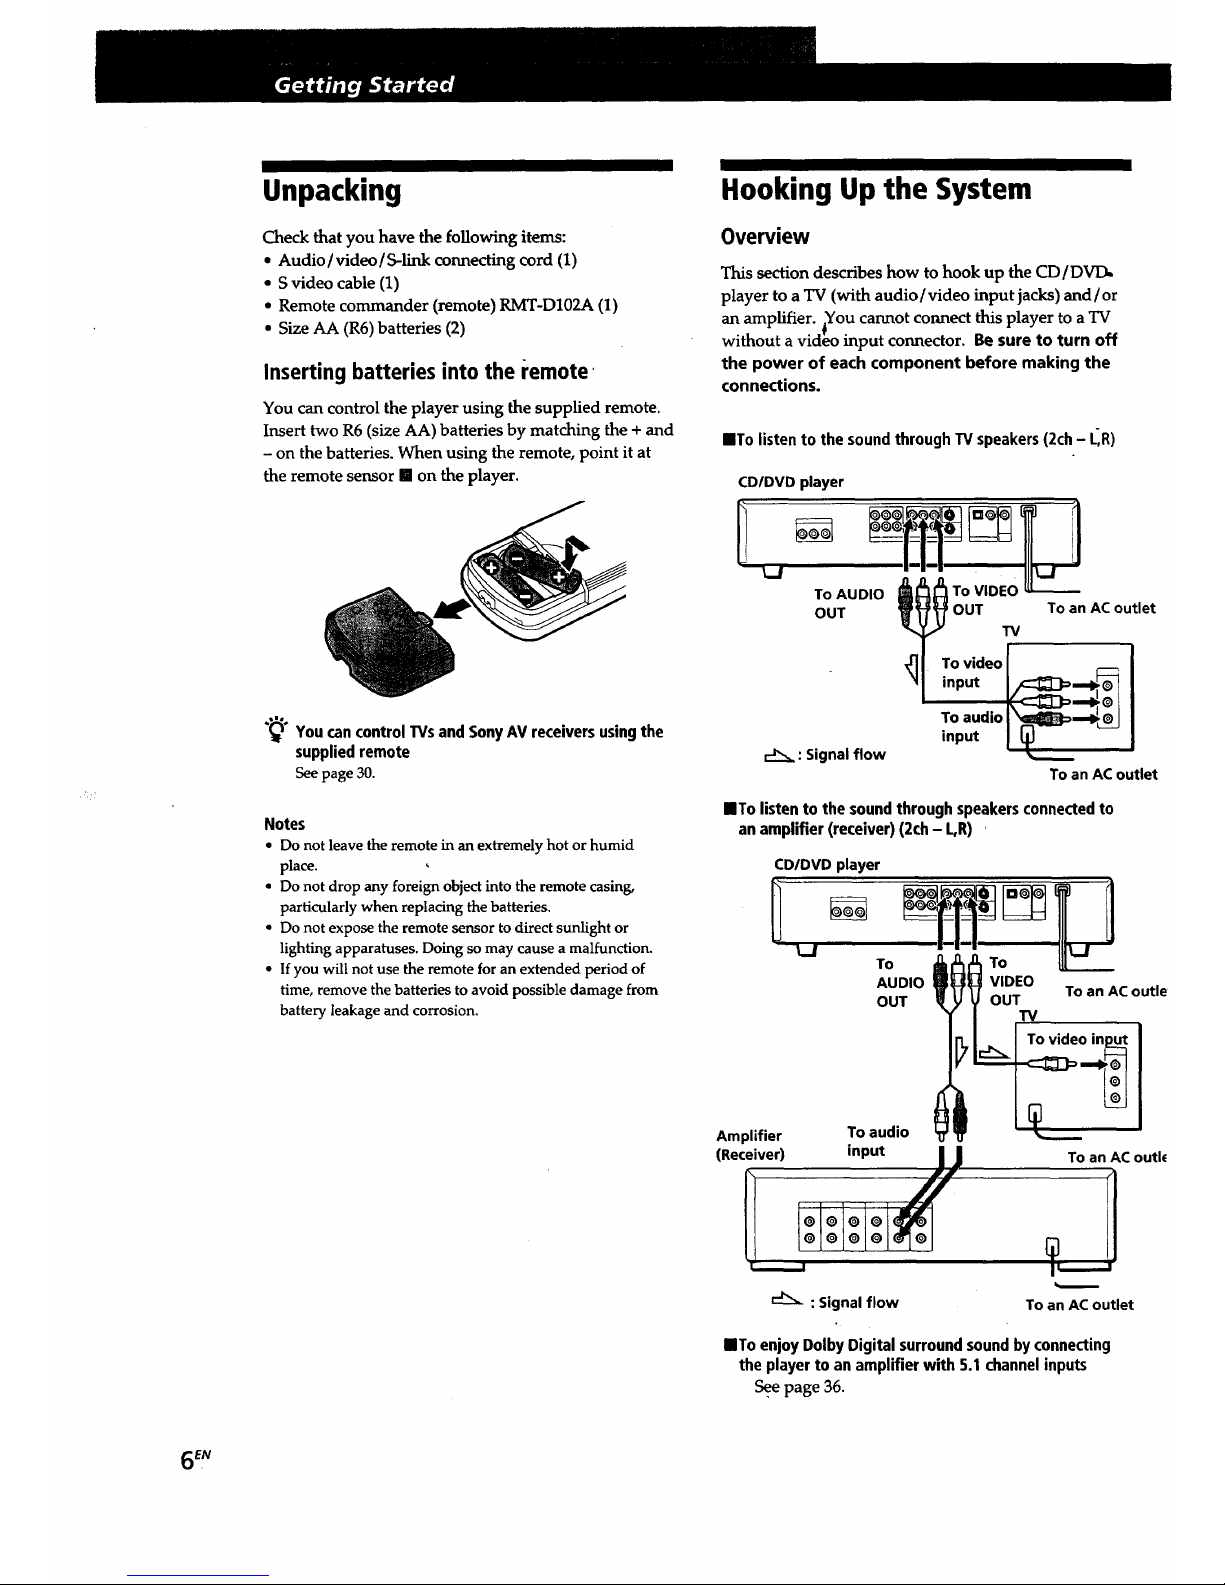
Unpacking
Check that you have the following items:
• Audio/video/S-link connecting cord (1)
• S video cable (1)
• Remote commander (remote) RMT-D102A (1)
• Size AA (R6) batteries (2)
Inserting batteries into the remote
You can control the player using the supplied remote.
Insert two R6 (size AA) batteries by matching the + and
- on the batteries. When using the remote, point it at
the remote sensor [] on the player.
"_° You can control Ws and SonyAV receiversusingthe
suppliedremote
See page 30.
Notes
• Do not leave the remote in an extremely hot or humid
place.
• Do not drop any foreign object into the remote casing,
particularly when replacing the batteries.
• Do not expose the remote sensor to direct sunlight or
lighting apparatuses. Doing so may cause a malfunction.
• If you will not use the remote for an extended period of
time, remove the batteries to avoid possible damage from
battery leakage and corrosion.
Hooking Up the System
Overview
This section describes how to hook up the CD/DVD=
player to aTV (with audio/video input jacks) and/or
an amplifier. _ou cannot connect this player to a TV
without a video input connector. Be sure to turn off
the power of each component before making the
connections.
[]To listen to the soundthrough TVspeakers(2ch - L_R)
CD/DVD player
TOAUDIO TOVIDEO
OUT OUT TOan ACoutlet
TV
I
To video I
Toa.dioI
c:_=: Signalflow input I _._
Toan ACoutlet
nTo listen to the soundthrough speakersconnectedto
an amplifier (receiver) (2ch - L,R)
CD/DVD player
TO To
AUDIO VIDEO
To an ACoutle
OUT OUT
TV
To video in
Amplifier Toaudio
(Receiver) input |J To an AC outh
: Signalflow To an AC outlet
==Toenjoy Dolby Digital surroundsoundbyconnecting
the player to an amplifier with 5.1 channelinputs
See page 36.
6EN
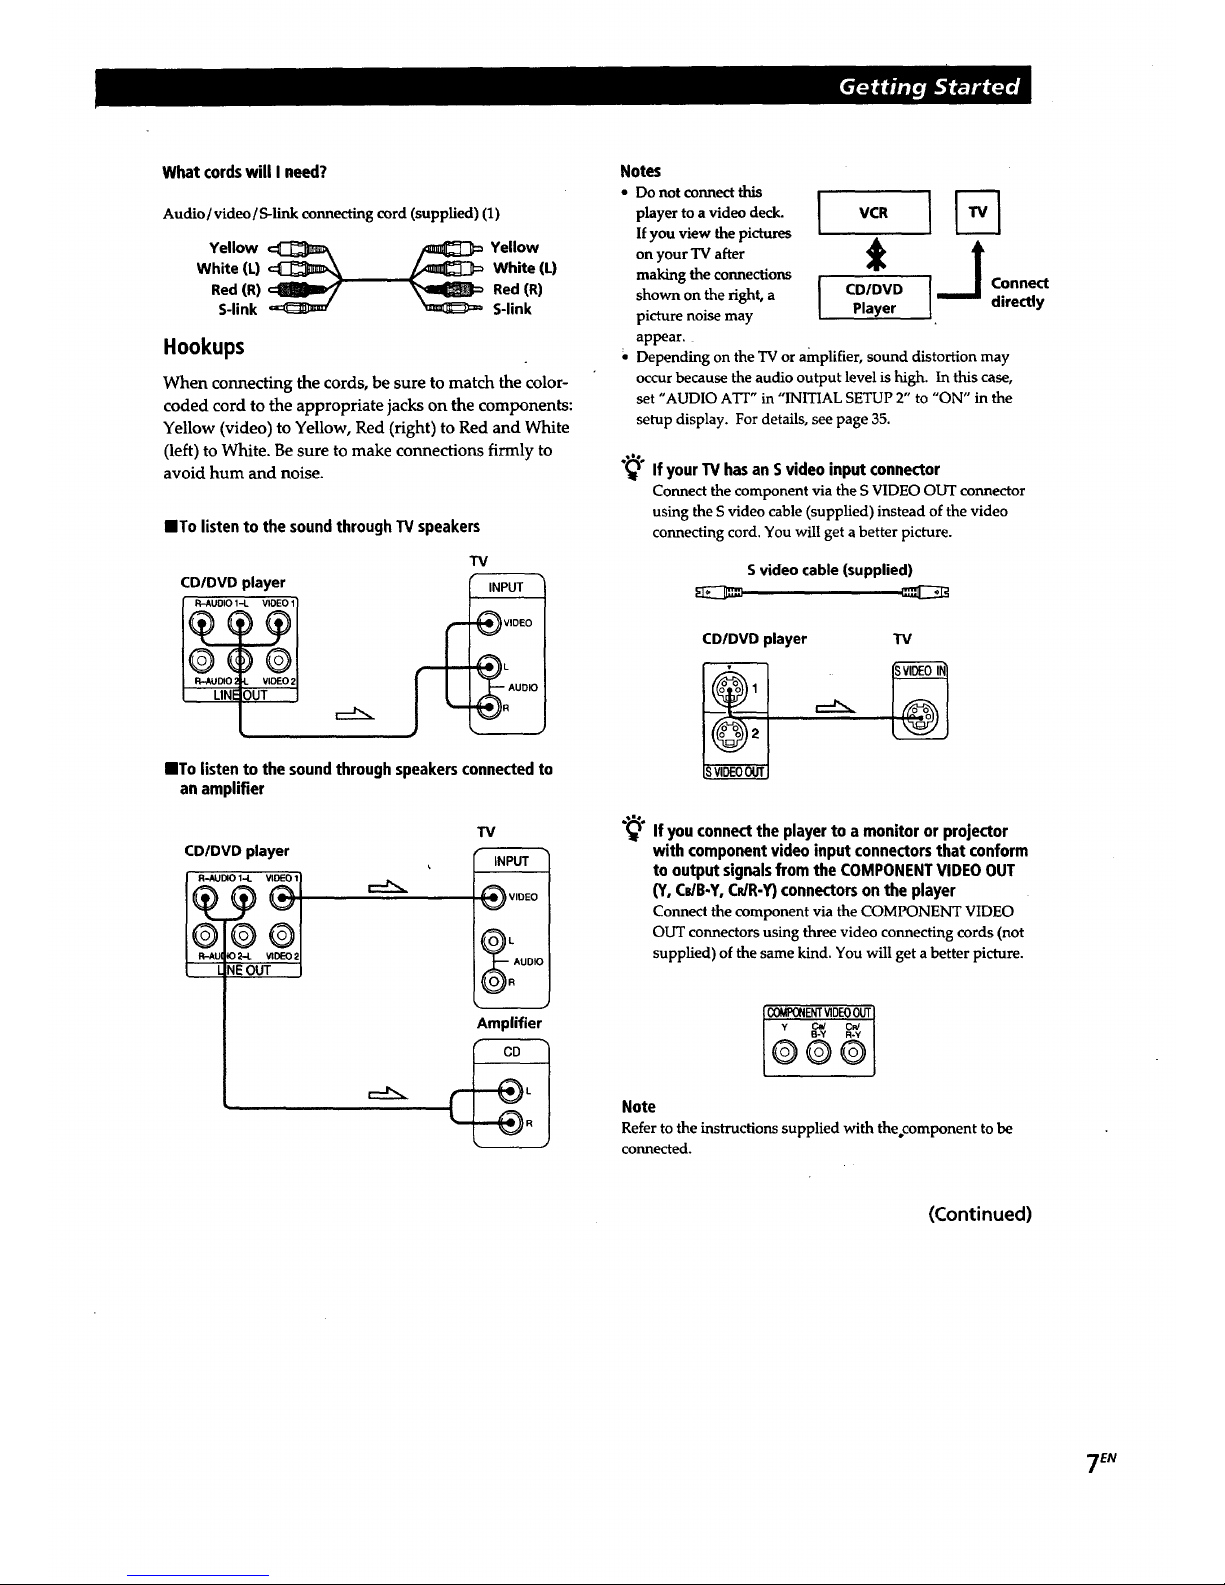
What cordswill I need?
Audio/video/S-link connecting cord (supplied) (1)
Yellow _ _ Yellow
White (L) White (L)
Red (R) Red (R)
S-link S-link
Hookups
When connecting the cords, be sure to match the color-
coded cord to the appropriate jacks on the components:
Yellow (video) to Yellow, Red (right) to Red and White
(left) to White. Be sure to make connections firmly to
avoid hum and noise.
IITo listen to the soundthrough TV speakers
TV
CD/DVD player
iNPUT
_'- AUDIO
IITo listen to the soundthrough speakersconnectedto
an amplifier
CD/DVD player
I R-AUDIO 1-.L VIDEO 11
®®®1
t:14tU IOlb.L ill)E021
L NEOUT I
,_.x,,.
"IV
INPUT
_ VIDEO
lOlL
t'_ AUDIO
((O_IR
Amplifier
Notes
• Do not connect this
player to a video deck.
If you view the pictures
on your TV after
making the connections
shown on the right, a
picture noise may
appear.
I VCR
I CD/DVD [ Connect
Player directly
Depending on the TV or amplifier, sound distortion may
occur because the audio output level is high. In this case,
set "AUDIO ATr" in "INITIAL SETUP 2" to "ON" in the
setup display. For details, see page 35.
"_° If your TV has an S video input connector
Connect the component via the S VIDEO OUT connector
using the S video cable (supplied) instead of the video
connecting cord. You will get a better picture.
Svideo cable (supplied)
CD/DVD player TV
"_°lf you connectthe playerto a monitor or projector
with componentvideo input connectorsthat conform
to output signalsfrom the COMPONENTVIDEO OUT
(Y, CriB-Y,CdR-Y)connectorson the player
Connect the component via the COMPONENT VIDEO
OUT connectors using three video connecting cords (not
supplied) of the same kind. You will get a better picture.
Note
Refer to the instructions supplied with the,component to be
connected.
(Continued)
7 EN
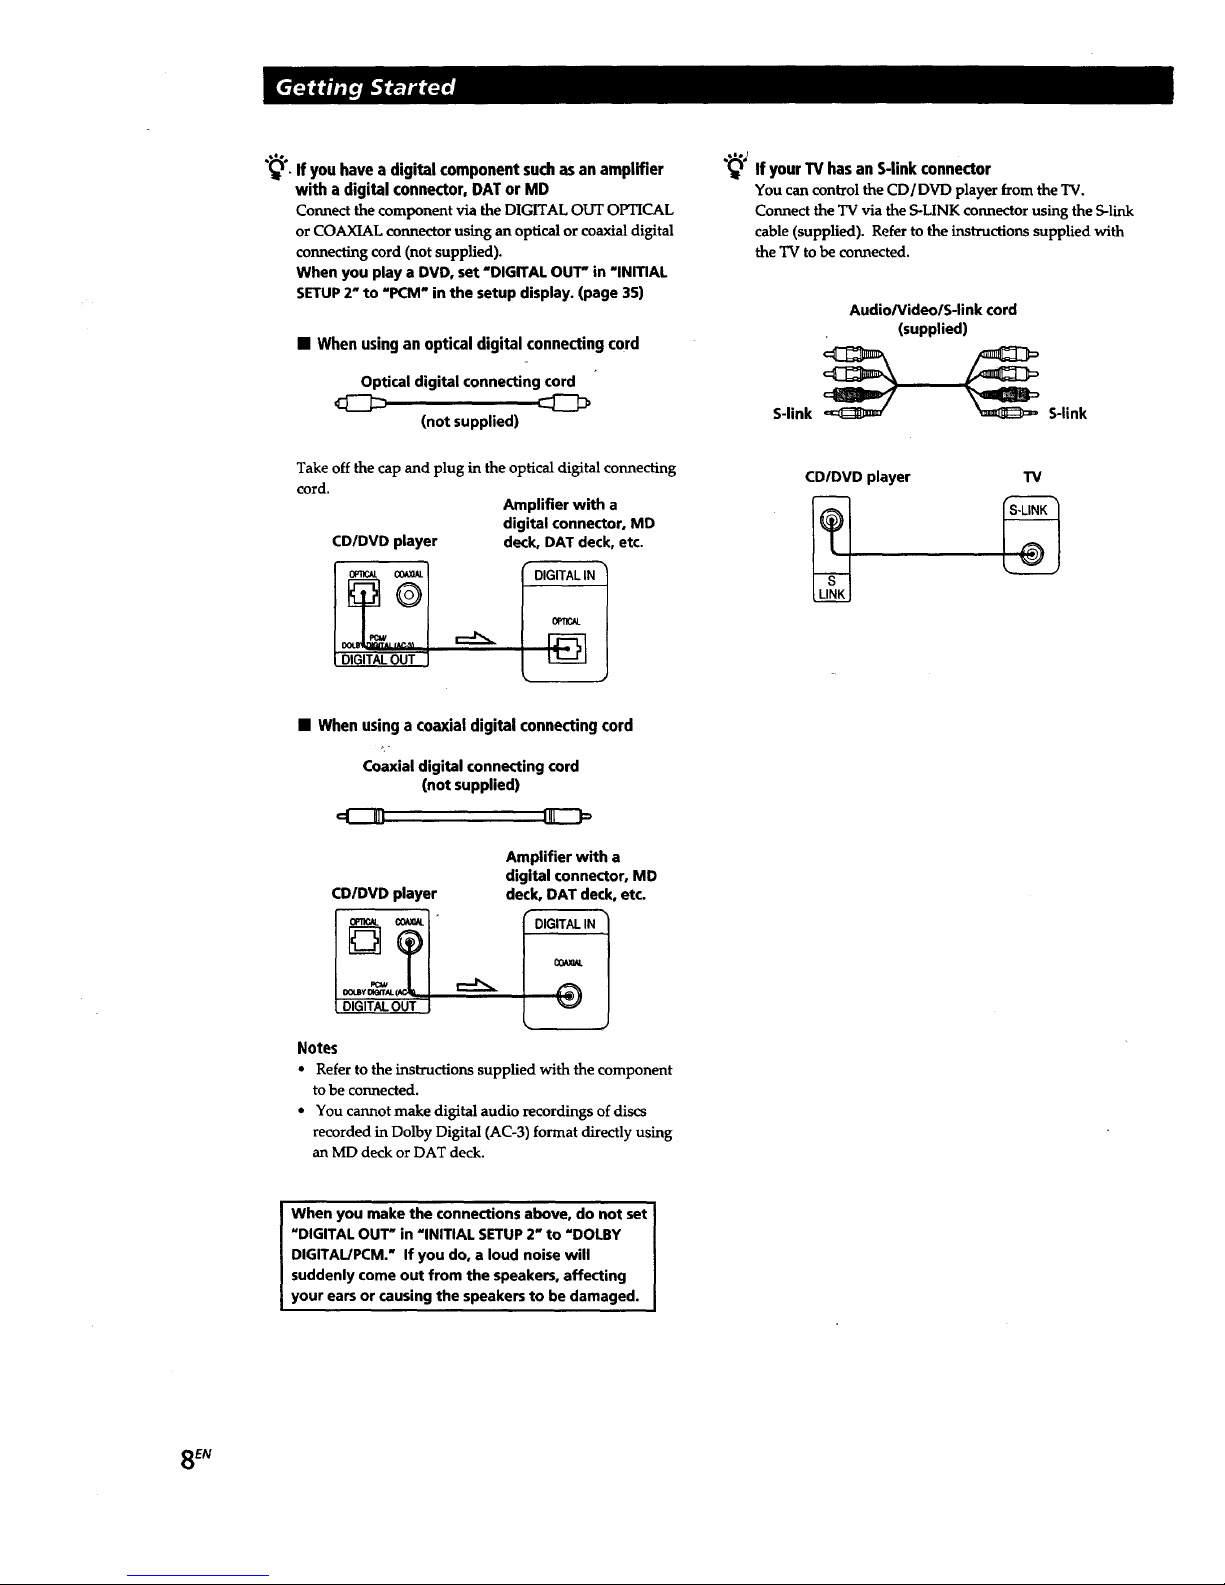
"_°. If you have a digital component such as an amplifier
with a digital connector, DAT or MD
Connect the component via the DIGITAL OUT OPTICAL
or COAXIAL connector using an optical or coaxial digital
connecting cord (not supplied).
When you play a DVD, set "DIGITAL OUT" in "INITIAL
SETUP 2" to "PCM" in the setup display. (page 35)
• When using an optical digital connecting cord
Optical digital connecting cord
(not supplied)
Take off the cap and plug in the optical digital connecting
cord.
Amplifier with a
digital connector, MD
CD/DVD player deck, DAT deck, etc.
DIGITALIN
0PT_L
"_;If your TV has an S-link connector
You can control the CD/DVD player from the TV.
Connect the TV via the S-LINK connector using the S-link
cable (supplied). Refer to the instructions supplied with
the TV to be connected.
Audio/Video/S-link cord
(supplied)
S-link _ S-link
CD/DVD player TV
• When usinga coaxial digital connecting cord
Coaxial digital connecting cord
(not supplied)
CD/DVD player
DIGITALOUT J
Notes
Amplifier with a
digital connector, MD
deck, DAT deck, etc.
• Refer to the instructions supplied with the component
to be connected.
* You cannot make digital audio recordings of discs
recorded in Dolby Digital (AC-3) format directly using
an MD deck or DAT deck.
When you make the connections above, do not set
"DIGITAL OUT" in "INITIAL SETUP 2" to =DOLBY
DIGITAL/PCM." If you do, a loud noise will
suddenly come out from the speakers, affecting
your ears or causing the speakers to be damaged.
S EN
Necessary Setup Before Using
the Player
Some setups are necessary for the player depending on
the TV or other components to be connected.
For details on using the setup display, see page 32.
For details on each setup display item, see pages 33 to
35.
For details to enjoy Dolby Digital Surround, see pages
36 to 41.
IITo connect the player to a wide-screen TV
In the setup display, set "TV TYPE" in "INITIAL SETUP
1" to "16:9."
IITo connect the player to a normal TV
In the setup display, set "TV TYPE" in "INITIAL SETUP
1" to "4:3 LE'I'rER BOX" (default setting) or "4:3 PAN
SCAN." For details, see page 34.
IITo listen to the sound through speakers connected to
an amplifier with a digital connector or to output the
sound to a digital component such as a DAT or MD deck
When you play aDVD, set "DIGITAL OUT" in "INITIAL
SETUP 2" to "PCM" in the setup display. This is default
setting.
IITo enjoy Dolby Digital surround sound by connecting
the player to an amplifier with 5.1 ch inputs
In the setup display, set "MODE" in "5.1 OUTPUT
SETUP 2" to "OFF." This is default setting. See page 36
to hookup the speaker system and page 38 to set each
speaker position or distance etc. ,
Use the setup display to change the various settings for
the picture and sound.
For details, see page 32.
To enjoy surround sound with front speakers only,
set "MODE" in "5.1 OUTPUT SETUP 2" to "VES
A" or "VES B." You can enjoy surround sound
through both the LINE OUT (AUDIO 1, 2) and
FRONT (L/R) of the 5.1 OUTPUT connectors. See
page 40 for details.
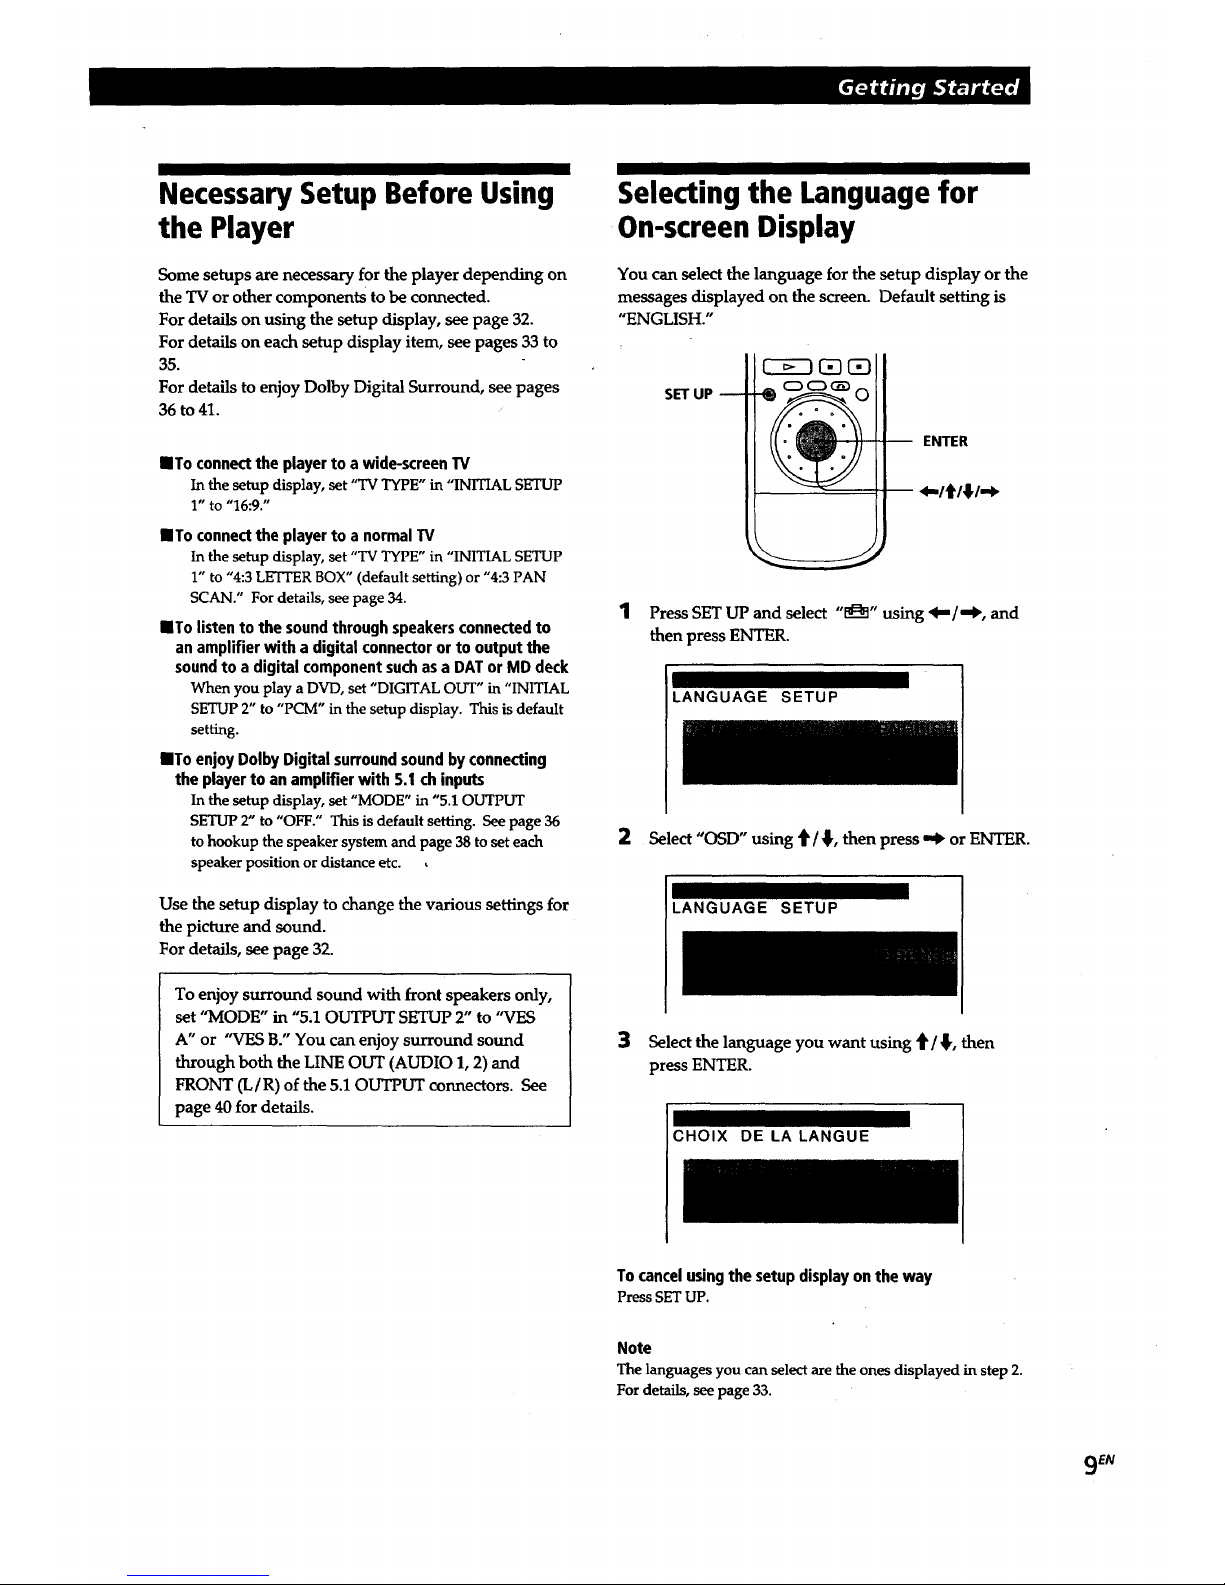
Selecting the Language for
On-screen Display
You can select the language for the setup display or the
messages displayed on the screen. Default setting is
"ENGLISH."
SETUP m
-- ENTER
1
Press SET UP and select "1_" using _,,-/,,,#, and
then press ENTER.
LANGUAGE SETUP
2 Select "OSD" using _/,I,, then press ,,,b or ENTER.
LANGUAGE SETUP
3 Select the language you want using 4' / _,, then
press ENTER.
CHOIX DE LA LANGUE
To cancelusingthe setup displayon the way
Press SETUP.
Note
The languages you can select are the ones displayed in step 2.
For details, see page 33.
9 EN
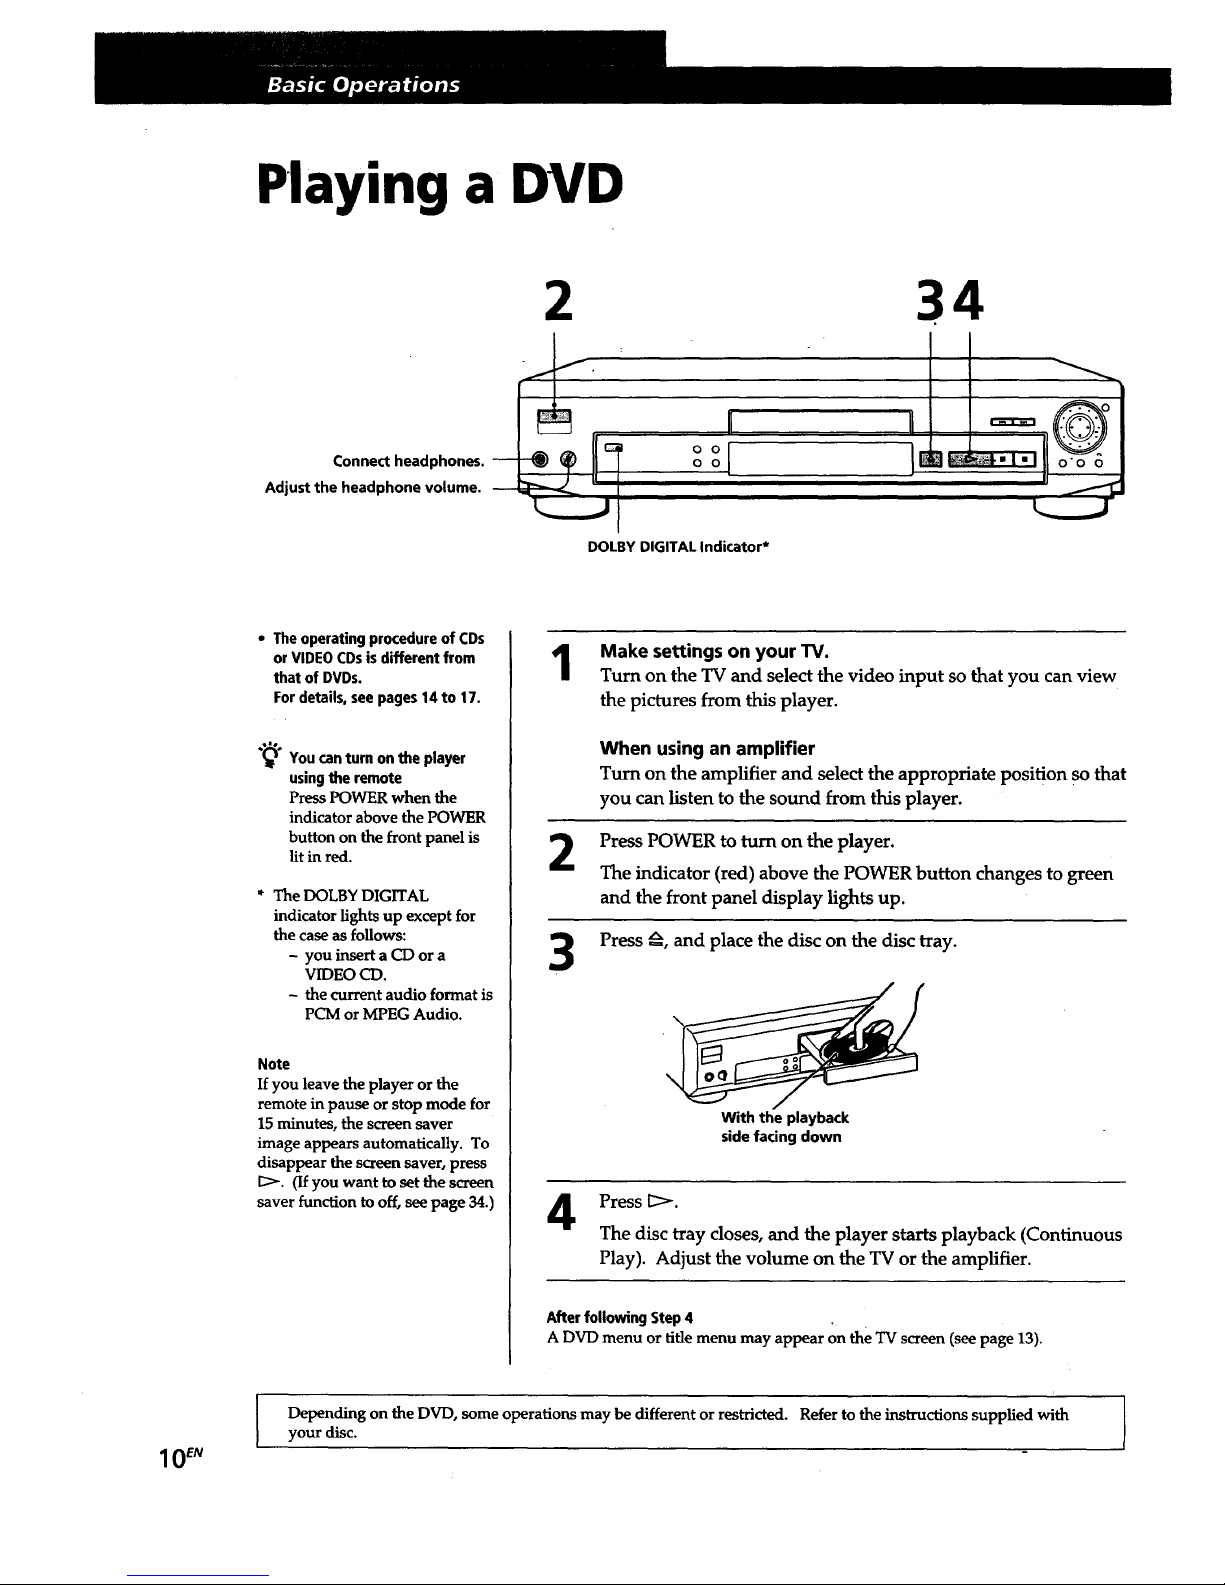
Playing a DVD
2 34
Connect headphones.
Adjust the headphone volume.
°°
-_@ oo
DOLBYDIGITALIndicator*
===Q
o.o
• Theoperatingprocedureof CDs
orVIDEOCDsisdifferentfrom
that of DVDs.
Fordetails,see pages14to 17.
"_° Youcanturn onthe player
usingthe remote
Press]_WF_ when the
indicator above the POWER
button on the front panel is
lit in red.
* The DOLBY DIGITAL
indicator lights up except for
the case as follows:
- you insert a CD or a
VIDEO CD.
- the current audio format is
PCM or MPEG Audio.
Note
If you leave the player or the
remote in pause or stop mode for
15 minutes, the screen saver
image appears automatically. To
disappear the screen saver, press
E:>-. (If you want to set thescreen
saver function to off, see page 34.)
Make settings on your TV.
Turn on the TV and select the video input so that you can view
the pictures from this player.
2
3
When using an amplifier
Turn on the amplifier and select the appropriate position S° that
you can listen to the sound from this player.
Press POWER to turn on the player.
The indicator (red) above the POWER button changes to green
and the front panel display lights up.
Press _, and place the disc on the disc tray.
With the playback
side facing down
4
PressI:_.
The disc tray closes, and the player starts playback (Continuous
Play). Adjust the volume on the TV or the amplifier.
AfterfollowingStep4
A DVD menu or title menu may appear on the TV screen (see page 13).
10 EN
Depending on the DVD, some operations may be different or restricted. Refer to the instructions supplied with
your disc.
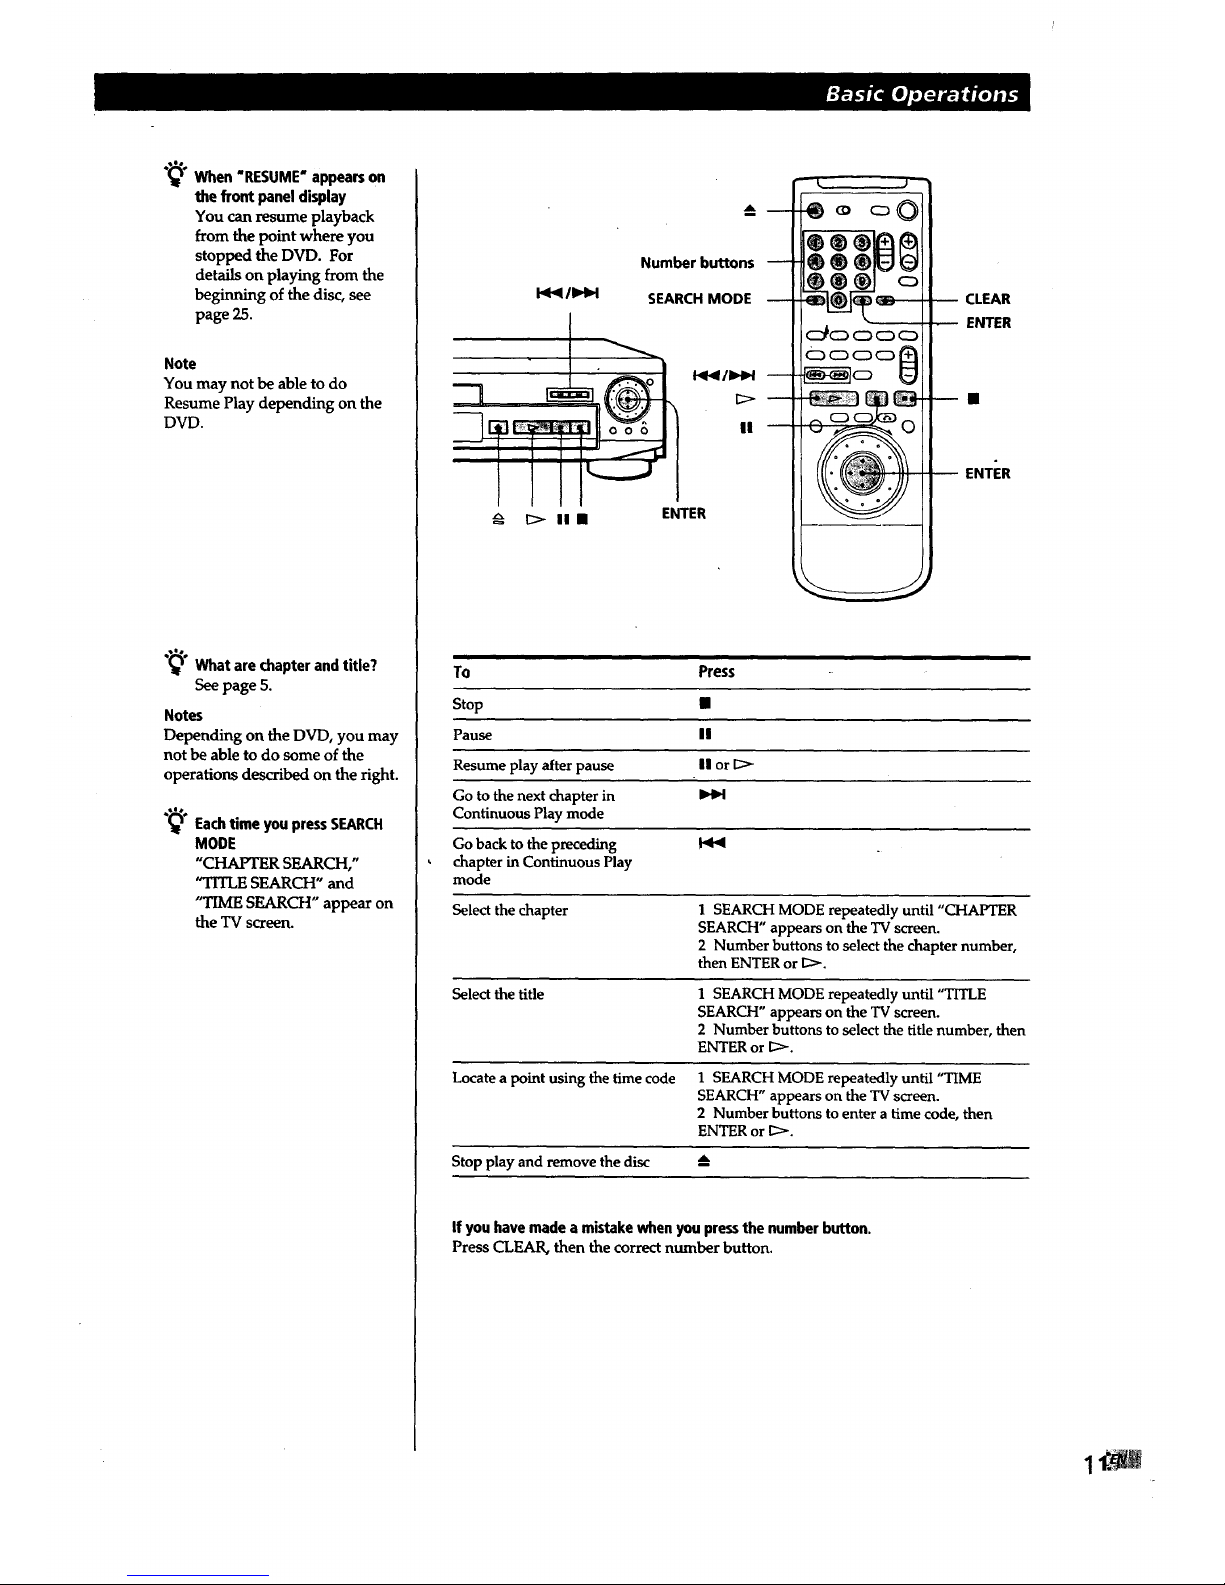
"_" When"RESUME"appearson
the front paneldisplay
You canresume playback
from the point where you
stopped the DVD. For
details on playing from the
beginning of the disc, see
page 25.
Note
You may not be able to do
Resume Play depending on the
DVD.
"_° What are chapter andtitle?
Seepage 5.
Notes
Depending on the DVD, you may
not be able to do some of the
operations described on the right.
"_* Eachtime you pressSEARCH
MODE
"CHAPTER SEARCH,"
"TITLE SEARCH" and
"TIME SEARCH" appear on
the TV screen.
Number buttons
1111
I;> II • ENTER
SEARCH MODE
14141/It_q
II
--L J--
c Oi
®1 cD
NNN
_,_ r.__
CLEAR
ENTER
ENTER
To Press
Stop •
Pause II
Resume play after pause II or 1_
Go to the next chapter in
Continuous Play mode
Go back to the preceding
chapter in Continuous Play
mode
Select the chapter 1 SEARCH MODE repeatedly until "CHAFFER
SEARCH" appears on the TV screen.
2 Number buttons to select the chapter number,
then ENTER or [_.
Select the title 1 SEARCH MODE repeatedly until "TITLE
SEARCH" appears on the TV screen.
2 Number buttons to select the title number, then
ENTER or I_.
Locate a point using the time code 1 SEARCH MODE repeatedly until "TIME
SEARCH" appears on the TV screen.
2 Number buttons to enter a time code, then
ENTER or [_.
Stop play and remove the disc --_
If youhavemadeamistakewhenyoupressthenumberbutton.
PressCLEAR, then the correctnumberbutton.
Notes
Notes
Depending on the DVD, you
may not be able to do some of
the operations described on the
nght.
When you play back a DVD at
twice the normal speed in
either direction, the sounds of
the picture will come out from
the LINE OUT (AUDIO 1, 2)
connectors. The sounds are
lower than the ones at normal
speed. In this case, no sounds
come out from the DIGITAL
OUT OPTICAL and COAXIAL
connectors. But there is no
sound when you set "MODE"
in "5.1 OUTPUT SETUP" to
"VESA" or "VES B" (page 40).
The JOG indicator shows the
mode of the click shuttle close
to the indicator only. Whenthe
indicator on the remote does
not light up, it keeps shuttle
mode on the remote even if the
indicator on the player lights
up.
Ifyou don't operate the click
shuttle for about 20 seconds
after pressing JOG, it returns to
shuttle mode on the remote.
On the player, it keeps jog
mode.
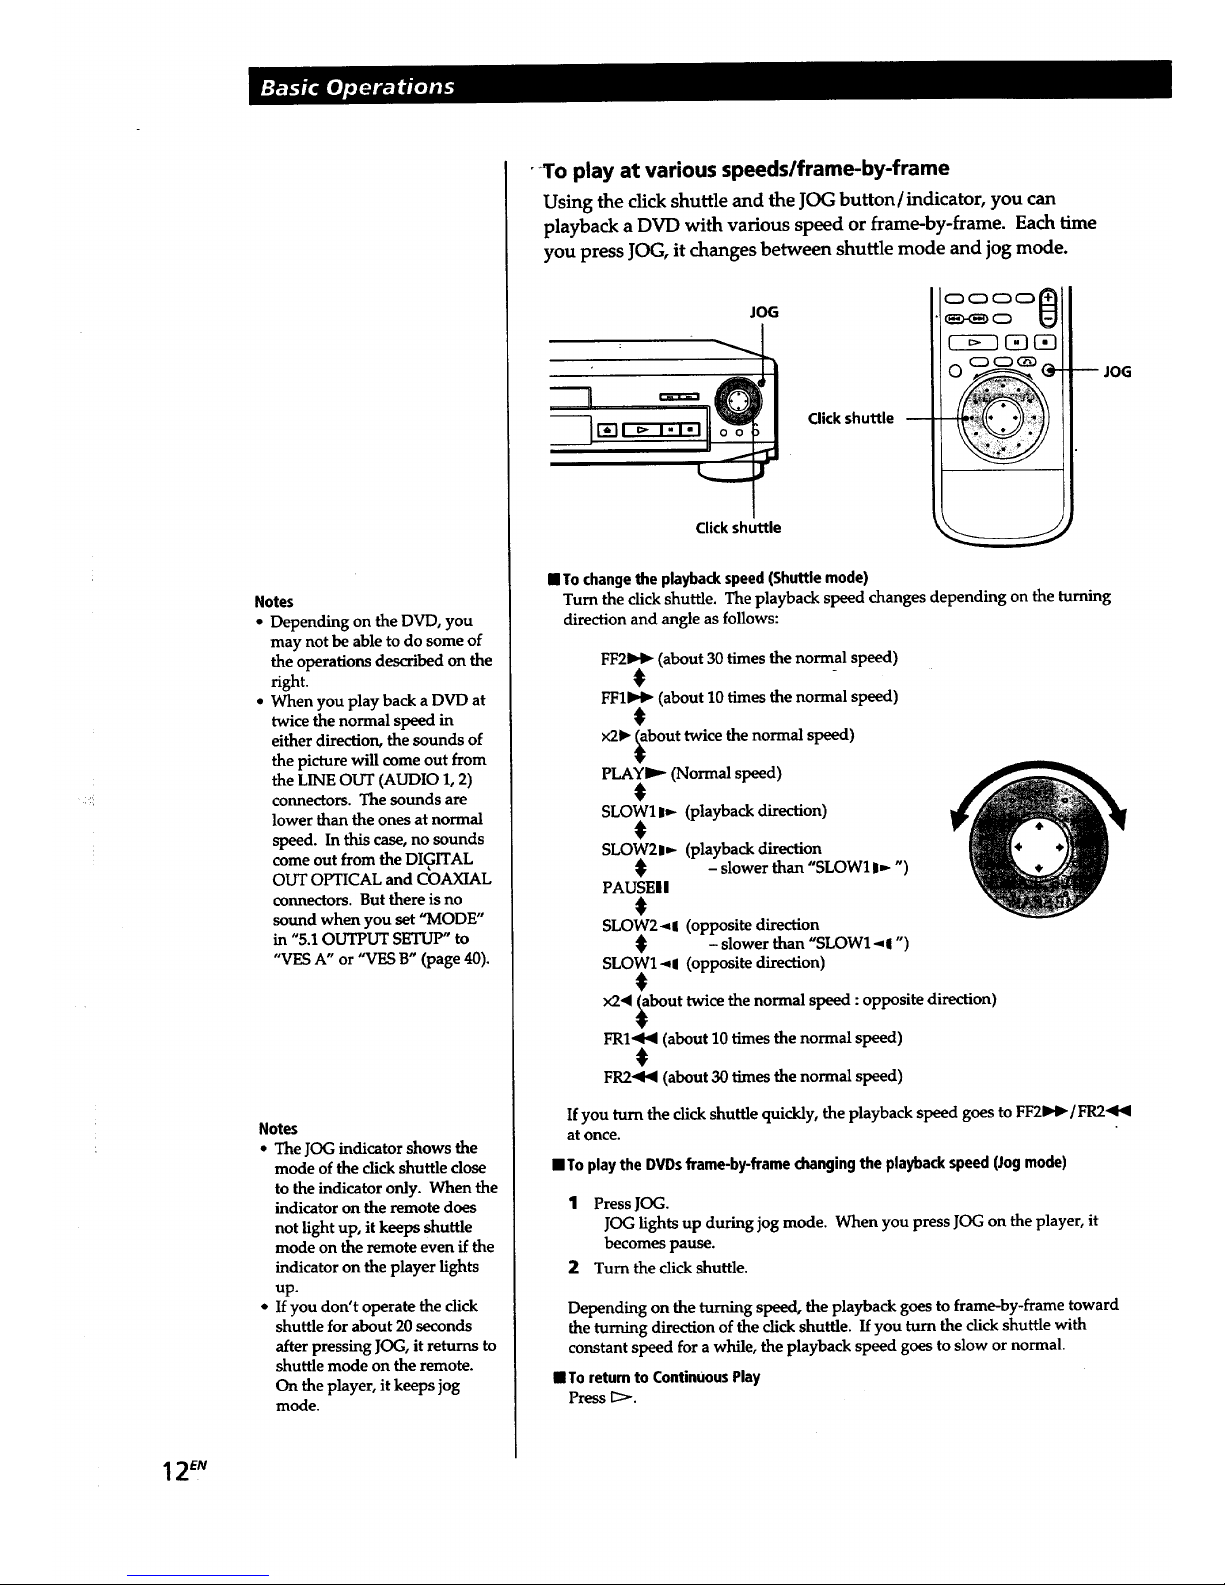
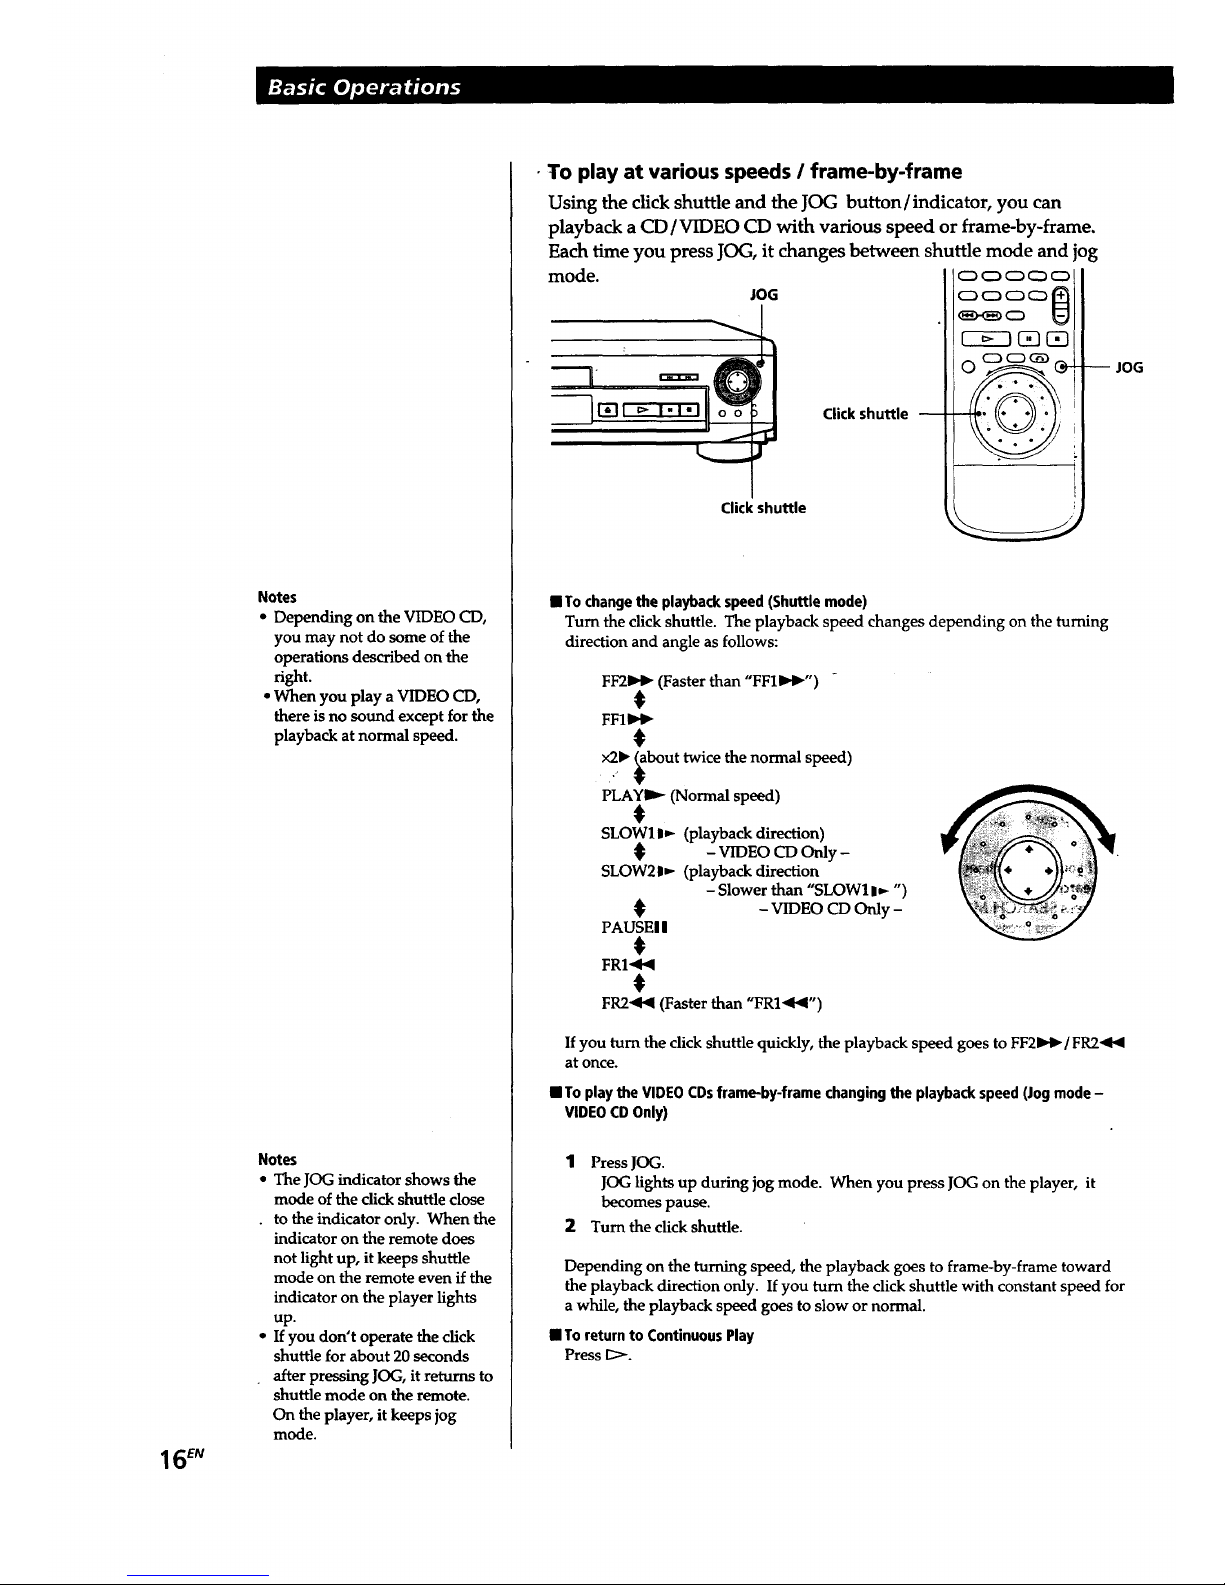
•To play at various speedslframe-by-frame
Using the clickshuttle and the JOG button/indicator, you can
playback a DV-D with various speedor frame-by-frame. Each time
you press JOG, it changes between shuttle mode and jog mode.
JOG
Click shuttle
Click shuttle --
JOG
• To change the playback speed (Shuttle mode)
Turn the click shuttle. The playback speed changes depending on the turning
direction and angle as follows:
FF2_ (about 30 times the normal speed)
,
FFI_ (about 10 times the normal speed)
#
x2_ _bout twice the normal speed)
PLAYIng.-(Normal speed)
SLOWII_ (playback direction)
SLOW2mP- (playback direction
- slower than "SLOWI_D- ")
PAUSE! I
SLOW2-4! (opposite direction
- slower than "SLOWI-q! ")
SLOWI-_| (opposite direction)
$
x2"q _bout twice thenormal speed :opposite direction)
'v
FRI._ (about 10times the normal speed)
t
FR2-qI_(about 30 timesthe normal speed)
If you turn the click shuttle quickly, the playback speed goes to FF2_/FR2"qb9
at once.
llTo playthe DVDsframe-by-framechangingthe playbackspeed(Jogmode)
1 Press JOG.
JOG lights up during jog mode. When you press JOG on the player, it
becomes pause.
2 Tum the click shuttle.
Depending on the turning speed, the playback goes to frame-by-frame toward
the turning direction of the click shuttle. If you turn the click shuttle with
constant speed for a while, the playback speed goes to slow or normal.
• Toreturn to ContinUousPlay
Press 1:>-.
12
Notes
• Depending on the DVD, you
may not be able to select the
title.
• Depending on the DVD, a "title
menu" may simply be called a
"menu" or "title" in the
instructions supplied with the
disc. "Press ENTER•" may also
be expressed as "Press
SELECT."
"_*lf youwant to selectthe
languageforthe DVDmenu
Change the setting using
"LANGUAGE SETUP" in
the setup display (see page
33)•
Note
Depending on the DVD, a "DVD
menu" may simply be called a
"menu" in the instructions
supplied with the disc.
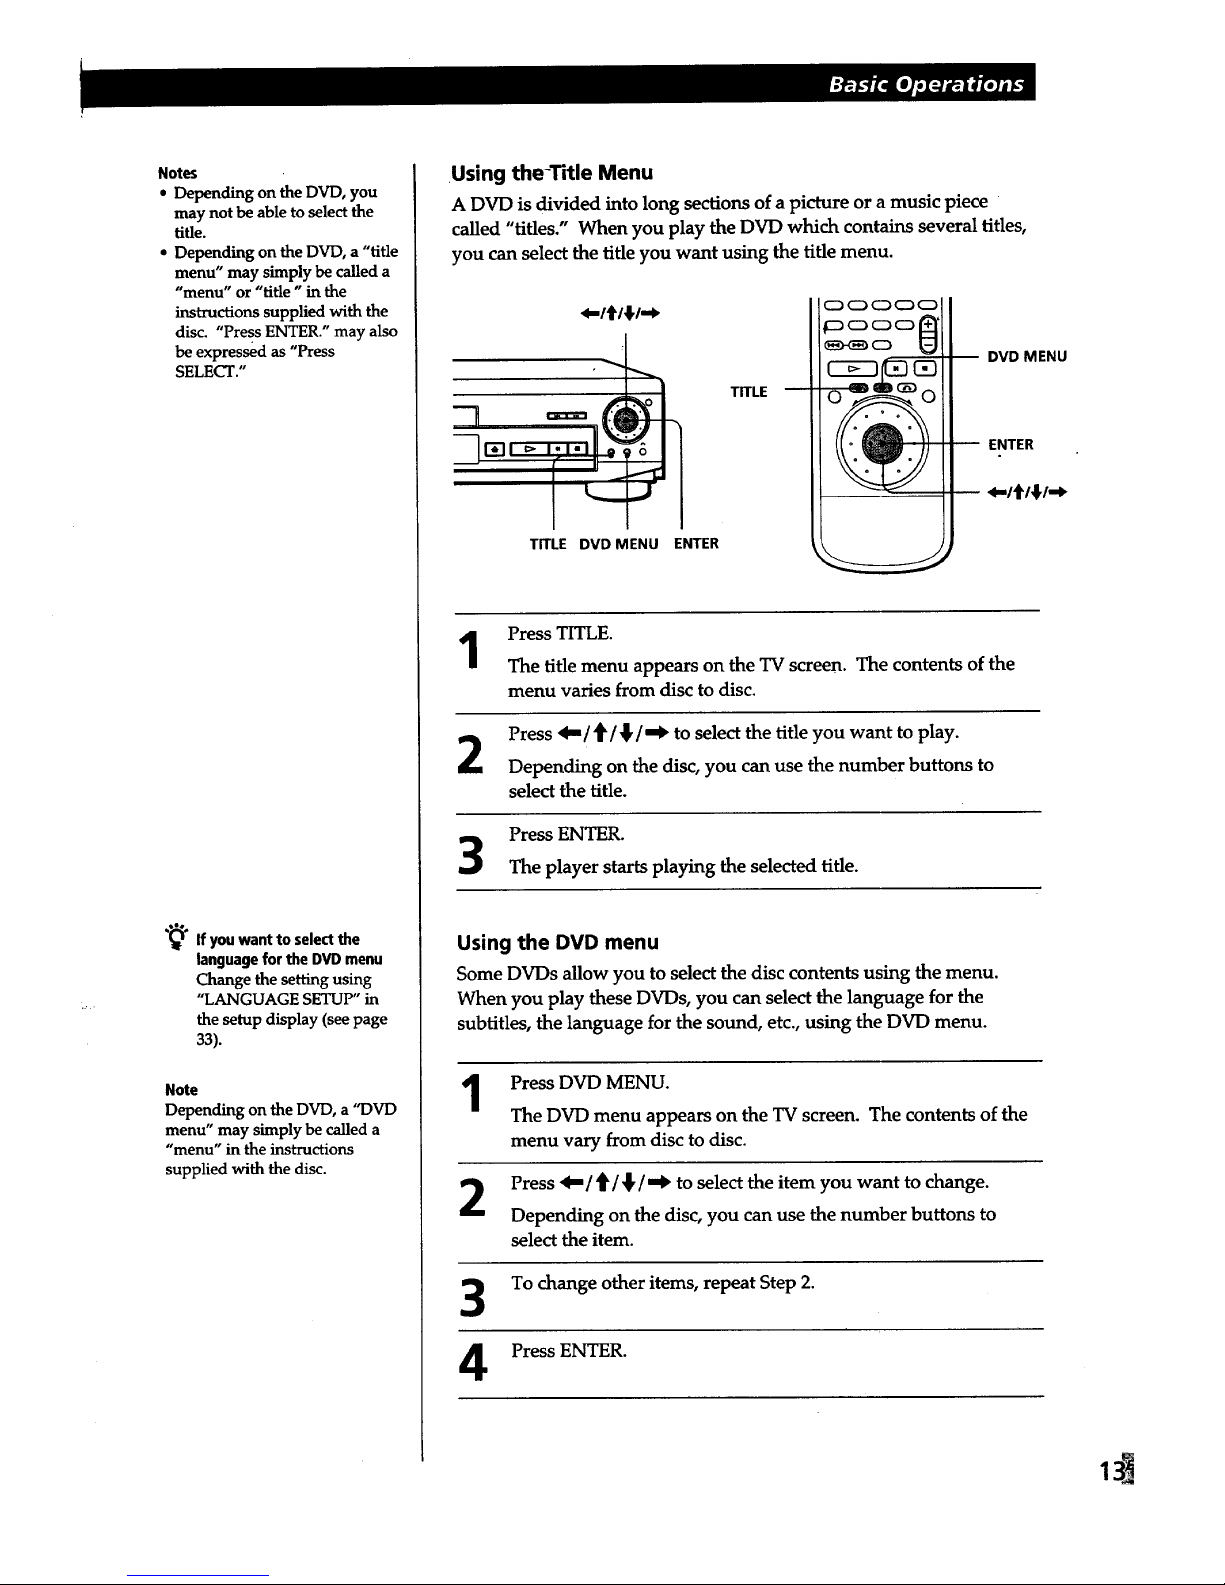
Using the-Title Menu
A DVD is divided into long sections of a picture or a music piece
called "titles." When you play the DVD which contains several titles,
you can select the title you want using the title menu.
_-/t/¢/-*
TRLE DVD MENU ENTER
TITLE
C_ C_CDC_O
poc_c:_
DVD MENU
Press TITLE.
The title menu appears on the TV screen. The contents of the
menu varies from disc to disc.
Press 4-/e/,_/_l_ to select the title you want to play.
Depending on the disc, you can use the number buttons to
select the title.
Press ENTER.
The player starts playing the selected title.
Using the DVD menu
Some DVDs allow you to select the disc contents using the menu.
When you play these DVDs, you can select the language for the
subtitles, the language for the sound, etc., using the DVD menu.
1
Press DVD MENU.
The DVD menu appears on the TV screen. The contents of the
menu vary from disc to disc.
Press _/_ / _ / _ to select the item you want to change.
Depending on the disc, you can use the number buttons to
select the item.
3
To change other items, repeat Step 2.
Press ENTER.

Playing a CD/VlDEO CD
Connect headphones.
Adjust the headphone volume.
2 34
• The operating procedure of DVDs
is different from that of CDs or
VIDEO CDs.
For details, see pages 10 to 13.
You can tum on the player
using the remote
Press POWER when the
indicator above the POWER
button on the front panel is
lit in red.
After following Step 4
The menu screen may
appear on the TV screen
depending on the VIDEO
CD. You can play the disc
interactively, following the
instructions on the menu
screen. (PBC Playback, see
page 17.)
Note
If you leave the player or the
remote in pause or stop mode for
15 minutes, the screen saver
image appears automatically. To
disappear the screen saver, press
I_. (If you want to set the screen
saver function to off, see page 34.)
Make settings on your TV.
Turn on the TV and select the video input so that you can view
the pictures from this player.
2
3
4
When using an amplifier
Turn on the amplifier and selectthe appropriate position so that
you canlisten to the sound from this player,
Press POWER to turn on the player.
The indicator (red) above the POWER button changes to green
and the front panel display lights up.
Press _, and place the disc on the disc tray.
With the label side
facing up
Press t>-.
The disc tray closes and the player starts playback (Continuous
Play). Adjust the volume on the TV or the amplifier.
14 EN
Depending on the VIDEO CD, some operations may be different or restricted. Refer to the instructions supplied
with your disc.

"_° When "RESUME"appearson
thefront paneldisplay
You can resume playback
from the point where you
stopped the CD/VIDEO CD.
For details on playing from
the beginning of the disc, see
page 25.
"_1 What is a track?
See page 5.
e_° What isan index?
See page 5.
"*_" Whatisa scene?
See page 5.
If youwant to changethe
searchmode
Press SEARCH MODE. Each
time you press in case of a
VIDEO CD, "SCENE
SEARCH," "TRACK
SEARCH" and "V. (VIDEO)
INDEX SEARCH" appear on
the TV screen. In case of a
CD, only "TRACK
SEARCH" appears.
Note
Some discs do not allow you to
start playing from a particular
scene. In this case, if you do
Scene Search before you start
playing, the player starts playing
from scene 1. If you do Scene
Search while playing a disc, the"
player starts playing from the
current scene.
AlL m
_" 1_> II • ENTER
Number buttons
SEARCH MODE
t,,,114tI1_1_'1
--
II
C_ C_ C_C_ 0
CLEAR
ENTER
ENTER
To Press
Stop •
Pause II
Resume play after pause I I or I=>
Go to the next track in
Continuous Play mode
Go back to the preceding
track in Continuous Play
mode
Select the track 1 SEARCH MODE repeatedly until "TRACK
SEARCH" appears on the TV screen.
2 Number buttons to select the track number,
then ENTER or [::>.
Select the scene before you start
playing a VIDEO CD with PBC
functions and during PBC playback
(Scene Search)
1 SEARCH MODE repeatedly until "SCENE
SEARCH" appears on the TV screen.
2 Number buttons to select the scene number,
then ENTER or I:>-. (To check the current scene
number, press DISPLAY. The scene number
appears at the left top of the TV screen.)
Stop play and remove the disc __
If youhavemadea mistakewhenyoupressthe numberbutton.
Press CLEAR, then the correct number button.
16 EN
Notes
• Depending on the VIDEO CD,
you may not do some of the
operations described on the
right.
• When you play a VIDEO CD,
there is no sound except for the
playback at normal speed.
Notes
• The JOGindicator shows the
mode of the click shuttle close
• to the indicator only. When the
indicator on the remote does
not light up, it keeps shuttle
mode on the remote even if the
indicator on the player lights
up.
• If you don't operate the click
shuttle for about 20 seconds
after pressing JOG, it returns to
shuttle mode on the remote.
On the player, it keeps jog
mode.
•To play at various speeds / frame-by-frame
Using the click shuttle and the JOG button/indicator, you can
playback a CD/VIDEO CD with various speed or frame-by-frame.
Each time you press JOG, it changes between shuttle mode and jog
mode.
JOG
Click shuttle
Click shuttle --
00000
-- JOG
• To change the playback speed (Shuttle mode)
Turn the click shuttle. The playback speed changes depending on the turning
direction and angle as follows:
FF21H_ (Faster than "FFIlHW')
#
FFI_-
PLAYI_- (Normal speed)
#
SLOWltD- (playback direction)
- VIDEO CD Only -
SLOW2 !*- (playback direction
- Slower than "SLOWII*- ")
- VIDEO CD Only -
PAUSEI I
#
FRI<b4
#
FR2<I_ (Faster than "FRI<I4")
If you turn the click shuttle quickly, the playback speed goes to FF21H_/FR2,91<
at once.
1To play the VIDEO CDsframe-by-frame changing the playback speed (Jog mode -
VIDEO CD Only)
1 Press JOG.
JOG lights up during jog mode. When you press JOG on the player, it
becomes pause.
2 Turn the click shuttle.
Depending on the turning speed, the playback goes to frame-by-frame toward
the playback direction only. If you turn the click shuttle with constant speed for
a while, the playback speed goes to slow or normal.
• To return to Continuous Play
Press I_.
"_- WhenplayingVIDEOCDswith
PBCfunctions
PBCplayback starts
automatically.
"_°To cancel PBC playback of a
VIDEO CD with PBCfunctions
and play the disc in
Continuous Play mode
There are two ways.
• Before you start playing,
select the track you want
using t_b( or _1, then
press ENTER or D.
• Before you start playing,
select the track number
using the number buttons
on the remote, then press
ENTER or E:>.
"Play without PBC"
appears on the TV screen
and the player starts
Continuous Play. You
cannot play still pictures
such as a menu screen.
To return to PBC playback,
press • twice then press
D.
Note
Depending on the VIDEO CD,
"Press ENTER" in Step 3 may be
expressed as "Press SELECT" in
the instructions supplied with the
disc.
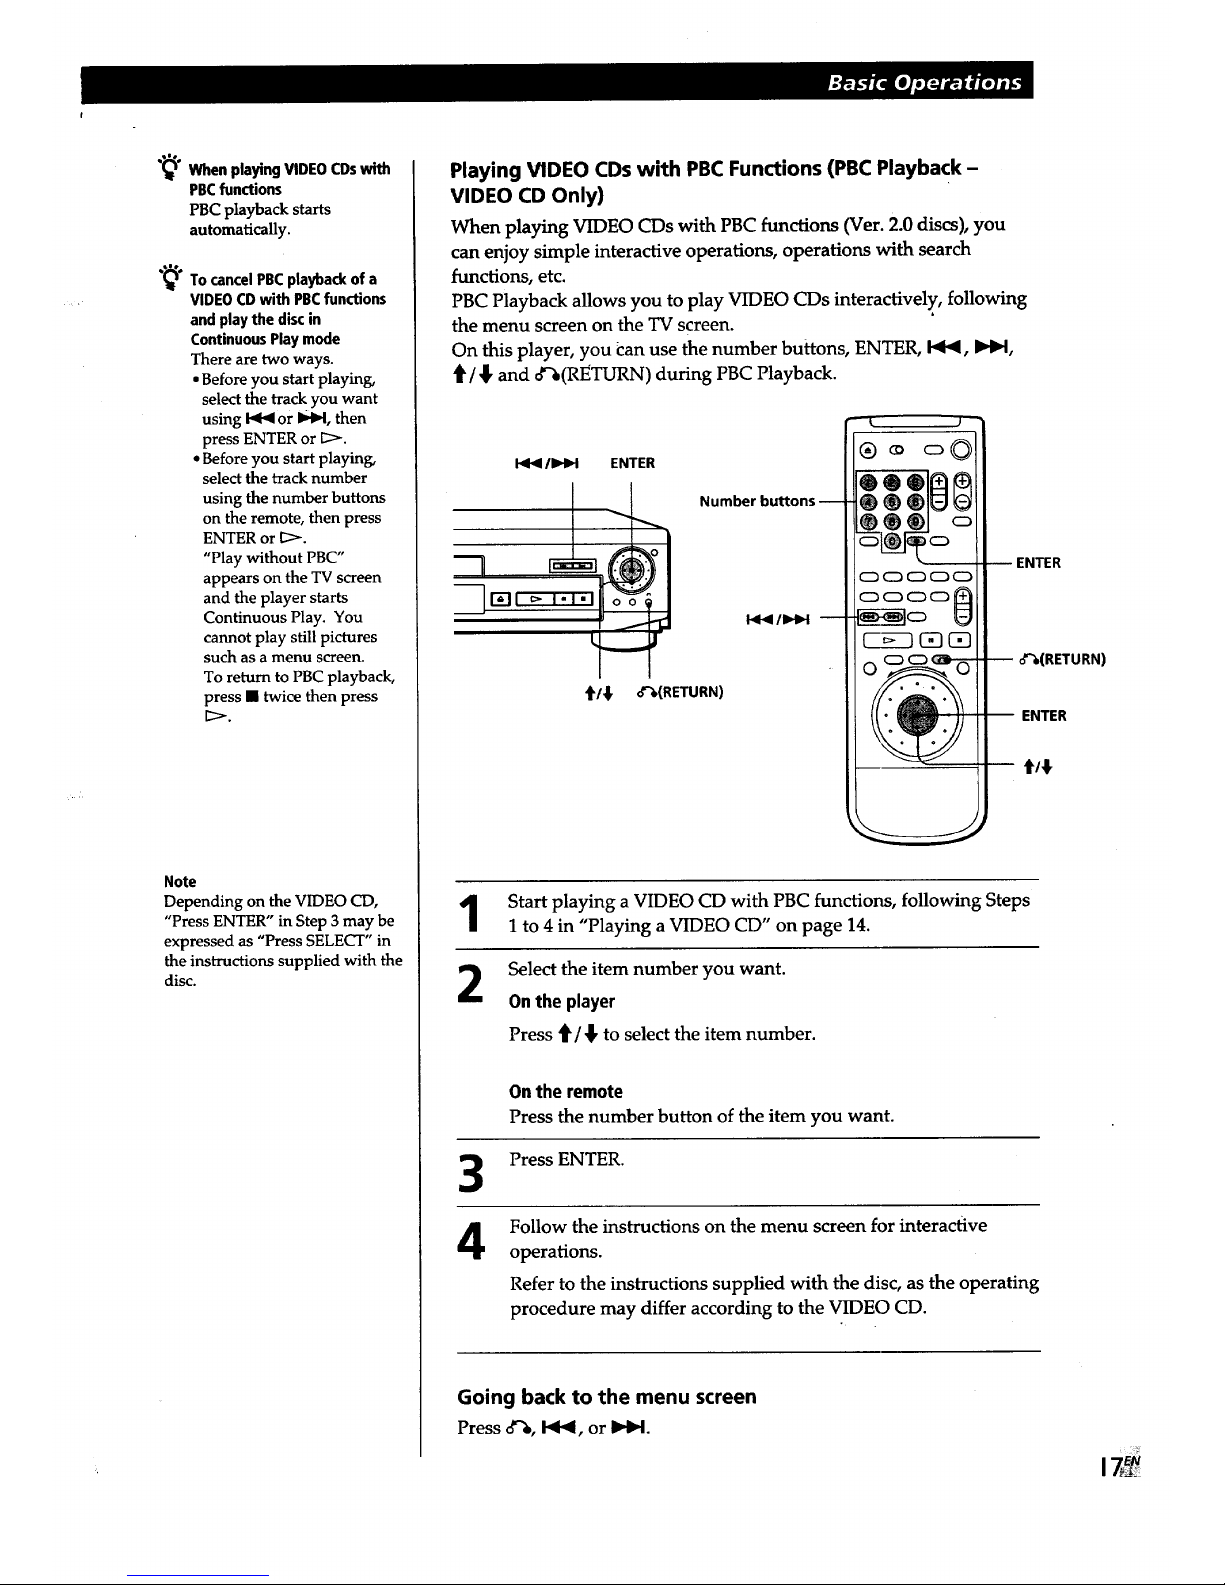
Playing VIDEO CDs with PBC Functions (PBC Playback -
VIDEO CD Only)
When playing VIDEO CDs with PBC functions (Vet. 2.0 discs), you
can enjoy simple interactive operations, operations with search
functions, etc.
PBC Playback allows you to play VIDEO CDs interactively, following
the menu screen on the TV screen.
On this player, you Can use the number buttons, ENTER, bqt_, _,
_/_, and o_(RETURN) during PBC Playback.
/1_1_1 ENTER
P'
t/_, o"_(RETURN)
Number buttons
o_I(RETURN)
-- ENTER
t/;
1
2
Start playing a VIDEO CD with PBC functions, following Steps
I to 4 in "Playing a VIDEO CD" on page 14.
Select the item number you want.
Onthe player
Press _ / {, to select the item number.
3
4
On the remote
Press the number button of the item you want.
Press ENTER.
Follow the instructions on the menu screen for interactive
operations.
Refer to the instructions supplied with the disc, as the operating
procedure may differ according to the VIDEO CD.
Going back to the menu screen
Press o_, bgt_, or _4.
 Loading...