

SONY:
CD/DVD Player
| Operating Instructions | EN |
|---|---|
| Mode d'emploi | F |

DVP-53000
© 1997 by Sony Corporation
WARNING
To prevent fire or shock hazard, do not expose the unit to rain or moisture. To avoid electrical shock, do not open the cabinet. Refer servicing to qualified personnel only.
CAUTION
The use of optical instruments with this product will increase eye hazard. As the laser beam used in this CD/DVD Player is harmful to eyes, do not attempt disassemble the cabinet.
Refer servicing to qualified personnel only.

This label is located on the Laser protective housing inside the enclosure.
For customers in the U.S.A.


This symbol is intended to alert the user to the presence of uninsulated "dangerous voltage" within the product's enclosure that may be of sufficient magnitude to constitute a risk of electric shock to persons.

This symbol is intended to alert the user to the presence of important operating and maintenance (servicing) instructions in the literature accompanying the appliance.
Owner's Record
The model and serial numbers are located at the rear of the unit. Record the serial number in the space provided below. Refer to them whenever you call upon your Sony dealer regarding this product.
Model No. DVP-S3000 Serial No.____
CAUTION
You are cautioned that any change or modifications not expressly approved in this manual could void your authority to operate this equipment.
NOTE:
This equipment has been tested and found to comply with the limits for a Class B digital device, pursuant to Part 15 of the FCC Rules. These limits are designed to provide reasonable protection against harmful interference in a residential installation. This equipment generates, uses, and can radiate radio frequency energy and, if not installed and used in accordance with the instructions, may cause harmful interference to radio communications. However, there is no guarantee that interference will not occur in a particular installation. If this equipment does cause harmful interference to radio or television reception, which can be determined by turning the equipment off and on, the user is encouraged to try to correct the interference by one or more of the following measures:
- Reorient or relocate the receiving antenna.
- Increase the separation between the equipment and receiver.
- Connect the equipment into an outlet on a circuit different from that to which the receiver is connected.
- Consult the dealer or an experienced radio/TV technician for help.
For customers in Canada
CAUTION
TO PREVENT ELECTRIC SHOCK, DO NOT USE THIS POLARIZED AC PLUG WITH AN EXTENSION CORD, RECEPTACLE OR OTHER OUTLET UNLESS THE BLADES CAN BE FULLY INSERTED TO PREVENT BLADE EXPOSURE.
Welcome!
Thank you for purchasing the Sony CD/DVD Player. Before operating the unit, please read this manual thoroughly and retain it for future reference.
TABLE OF CONTENTS
|
This Player Can Play the Following Discs |
|---|
| Getting Started |
|
Unpacking |
|
Hooking Up the System |
|
Necessary Setup Before Using the Player |
|
Necessary Setup Before Using the Player |
|
Necessary Setup Before Using the Player Basic Operations Playing a DVD |
|
Necessary Setup Before Using the Player Basic Operations Playing a DVD Playing a VIDEO CD |
Playing Discs in Various Modes
| Playing Repeatedly (Repeat Play) | 32 |
|---|---|
| Playing in Random Order (Shuffle Play) | 34 |
| Creating Your Own Program (Program Play) | 34 |
| Resuming Playback from the Point Where You Stopped a Disc (Resume Play) | 36 |
| Changing the Sounds | 37 |
| Turning the Sub-titles On and Off | 37 |
| Changing the Sub-titles | 38 |
| Changing the Angles | 38 |
| Limiting Playback by Children (Parental Control) | 39 |
| Controlling the TV with the Supplied Remote | 41 |
Settings and Adjustments
| 42 |
|---|
| 43 |
| 43 |
| 44 |
| • |
Additional Information
| Precautions |
۔
|
|---|---|
| Notes on Discs | •••• |
| Troubleshooting | |
| Specifications | |
| Glossary | • |
| Index to Parts and Controls | |
| Language Code List |
About This Manual
The instructions in this manual are for model DVP-S3000.
Conventions
- Instructions in this manual describe the controls on the player.
- You can also use the controls on the remote if they have the same or similar names as those on the player.
- The icons on the right are used in this manual:
| lcon | Meaning |
|---|---|
| Indicates that you can use only the remote to do the task. | |
| Ϋ́ | Indicates tips and hints for making the task easier. |
| OVD | Indicates the functions for DVD VIDEOs. |
|
VIDEO
CD |
Indicates the functions for VIDEO CDs. |
| CD | Indicates the functions for AUDIO CDs. |
This Player Can Play the Following Discs
| DVD VIDEOs | VIDEO CDs | AUDIO CDs | ||||
|---|---|---|---|---|---|---|
| Disc logo | ||||||
| Contents | Audio + Video | Audio + Video Audio + Video | Audio | |||
| Disc size | 12 cm | 8 cm | 12 cm | 8 cm | 12 cm |
8 cm
(CD single) |
| Play time |
About 4 h (for
single-sided DVD)/ about 8 h (for double-sided DVD) |
About 80 min.
(for single-sided DVD)/ about 160 min. (for double-sided DVD) |
74 min. | 20 min. | 74 min. | 20 min. |
| Reference pages for basic operations | Pages | 10 to 17 | Pages 1 | .8 to 25 | Pages | 26 to 31 |
"DVD VIDEO" logo is a trademark.
This player conforms to the NTSC color system. You cannot play discs recorded in other color systems such as PAL and SECAM.
Region code of DVDs you can play
Region code indications such as are labeled on some DVDs to indicate which type of player can play the discs. Unless "1" is included in the indications or is labeled on the DVDs, you cannot play the discs on this player. If you try to play these DVDs, the message "PLAYING THIS DISC PROHIBITED BY AREA LIMITS" will appear on the TV screen. Depending on the DVD, no region code indication may be labeled even though playing the DVD is prohibited by the area limits.
Note on playback operations of DVDs and VIDEO CDs
Some playback operations of DVDs and VIDEO CDs may be intentionally fixed by software producers. Since this player plays DVDs and VIDEO CDs according to the disc contents the software producers designed, some playback features may not be available. Also refer to the instructions supplied with the DVDs or VIDEO CDs.
ΔΕΝ
Terms for discs
• Title
The longest sections of a picture or a music piece on a DVD; a movie, etc. for a picture piece on a video software or an album, etc. for a music piece on an audio software. Each title is assigned a title number enabling you to locate the title you want.
• Chapter
Sections of a picture or a music piece that are smaller than titles. A title is composed of several chapters. Each chapter is assigned a chapter number enabling you to locate the chapter you want. Depending on the disc, no chapter may be recorded.
• Track
Sections of a picture or a music piece on a VIDEO CD or a CD. Each track is assigned a track number enabling you to locate the track you want.

• Index
A number that divides a track into some sections to easily locate the point you want on a VIDEO CD or a CD. Depending on the disc, no index may be recorded.
• Scene
On a VIDEO CD with PBC functions, the menu screens, moving pictures and still pictures are divided into sections called "scenes." Each scene is assigned a scene number enabling you to locate the scene you want.
Note on PBC (Playback Control) (VIDEO CDs)
This player conforms to Ver. 1.1 and Ver. 2.0 of VIDEO CD standards. You can enjoy two kinds of playback according to the disc type.
| Disc type | You can |
|---|---|
|
VIDEO CDs
without PBC functions (Ver. 1.1 discs) |
Enjoy video playback (moving pictures) as well as music. |
|
VIDEO CDs
with PBC functions (Ver. 2.0 discs) |
Play interactive software using menu
screens displayed on the TV screen (PBC Playback), in addition to the video playback functions of Ver 1.1 discs. Moreover, you can play high- resolution still pictures, if they are included on the disc. |
Discs that the player cannot play
The player cannot play discs other than the ones listed in the table on page 4 such as CD-ROMs including PHOTO CDs, data sections in CD-EXTRAs and DVD-ROMs.
Some of the DVD software include special encoding to trigger copy protection signal from the NTSC output of this player. If you find noise on playback picture of a certain DVD software, there is a possibility that it is caused by the incompatibility between your display and the copy protection signals triggered by such encoding in the DVD software.
This product incorporates copyright protection technology that is protected by method claims of certain U.S. patents and other intellectual property rights owned by Macrovision Corporation and other rights owners. Use of this copyright protection technology must be authorized by Macrovision Corporation, and is intended for home and other limited viewing uses only unless otherwise authorized by Macrovision Corporation. Reverse engineering of disassembly is prohibited.
What cords will I need?
Audio/video/S-link connecting cord (supplied) (1)

Hookups
When connecting the cord, be sure to match the colorcoded cord to the appropriate jacks on the components: Yellow (video) to Yellow, Red (right) to Red and White (left) to White. Be sure to make connections firmly to avoid hum and noise.
■To listen to the sound through TV speakers
Connect the TV using the audio/video/S-link connecting cord (supplied).

To listen to the sound through speakers connected to an amplifier
Connect the TV using a video connecting cord (not supplied), and the amplifier using an audio connecting cable (not supplied).

Make the same connections when your amplifier conforms to "Pro Logic."
Notes
• Do not connect this player to a video deck. If you view the pictures on your TV after making connections shown on the right, a picture noise may appear.

• Depending on the TV or amplifier, the sound distortion may occur because the audio output level is high. In this case, set "AUDIO ATT" in "CUSTOM SETUP" to "ON" in the menu. For details, see page 44.
ϔ If your TV has an S video input connector
Connect the component via the S VIDEO OUT connector using the S video cable (supplied) instead of the video connecting cord. You will get a better picture.

(Continued)
Manufactured under license from Dolby Laboratories Licensing Corporation. "Dolby", the double-D symbol III, "Pro Logic" and "AC-3" are trademarks of Dolby Laboratories Licensing Corporation.
Unpacking
Check that you have the following items:
- Audio/video/S-link connecting cord (1)
- S video cable (1)
- Remote commander (remote) RMT-D100U (1)
- Sony R6 (size AA) batteries (2)
Inserting batteries into the remote
You can control the player using the supplied remote. Insert two R6 (size AA) batteries by matching the + and - on the batteries. When using the remote, point it at the remote sensor B on the player.

You can control Sony TVs with the B mark using the supplied remote See page 42.
When to replace batteries
With normal use, the batteries should last for about six months. When the remote no longer operates the player, replace all the batteries with new ones.
· Notes
- Do not leave the remote in an extremely hot or humid place.
- Do not drop any foreign object into the remote casing, particularly when replacing the batteries.
- Do not expose the remote sensor to direct sunlight or lighting apparatuses. Doing so may cause a malfunction.
- If you will not use the remote for an extended period of time, remove the batteries to avoid possible damage from battery leakage and corrosion.
Hooking Up the System
Overview
This section describes how to hook up the CD/DVD player to a TV (with audio/video input jacks) and/or an amplifier. You cannot connect this player to a TV without a video input connector. Be sure to turn off the power of each component before making the connections.
■To listen to the sound through TV speakers

■ To listen to the sound through speakers connected to an amplifier

If you have a digital component such as an amplifier with a digital input connector, DAT or MD
Connect the component via the DIGITAL OUT OPTICAL or COAXIAL connector using an optical or coaxial cable (not supplied).
When you play a DVD, set "DVD DIGITAL OUT" in "INITIAL SETUP" to "PCM" in the menu. (page 45) When you play a VIDEO CD, set "VIDEO CD DIGITAL OUT" in "INITIAL SETUP" to "ON" in the menu. (page 45)
When using an optical digital connecting cord
Optical digital connecting cord
Take off the cap and plug in the optical cable.

When using a coaxial digital connecting cord
Coaxial digital connecting cord
Amplifier with a digital connector, MD deck, DAT deck, etc.


Notes
- Refer to the instructions supplied with the component to be connected.
- You cannot make digital audio recordings of discs recorded in Dolby Digital (AC-3) format directly using an MD deck or DAT deck.
When you make the connections above, do not set "DVD DIGITAL OUT" in "INITIAL SETUP" to "AC-3 Digital." If you do, a loud noise will suddenly come out from the speakers, affecting your ears or causing the speakers to be damaged.
G If you have a digital component with a built-in Dolby Digital decoder
Connect the component via the DIGITAL OUT OPTICAL or COAXIAL connector using an optical or coaxial cable (not supplied). When the component with a built-in Dolby Digital decoder is connected, the player plays DVDs with sound recorded in Dolby Digital (AC-3) format while producing the effect of being in a movie theater or a concert hall.
In the menu, set "DVD DIGITAL OUT" in "INITIAL SETUP" to "AC-3 Digital." (page 45)
When using an optical digital connecting cord

Take off the cap and plug in the optical cable.

When using a coaxial digital connecting cord

(not supplied)
Component with a built-in Dolby Digital decoder

Note
Refer to the instructions supplied with the component to be connected.
😧 If your TV has an S-link connector
You can control the CD/DVD player from the TV. Connect the TV via the S-LINK connector using the S-link cable (supplied). Refer to the instructions supplied with the TV to be connected.
Audio/video/S-link connecting cord


Necessary Setup Before Using the Player
Some setups are necessary for the player depending on the TV or other components to be connected. For details on using the menu, see page 42. For details on each menu item, see pages 43 to 45.
■ To connect the player to a wide-screen TV
In the menu, set "TV TYPE" in "INITIAL SETUP" to "16:9."
- To connect the player to a normal TV In the menu, set "TV TYPE" in "INITIAL SETUP" to "4:3."
- To listen to the stereo sound through speakers connected to a normal amplifier or through TV speakers In the menu, set "DOWNMIX" in "INITIAL SETUP" to "NORMAL."
- To listen to the sound through speakers connected to an amplifier (or a TV) that conforms to Dolby Pro Logic surround
In the menu, set "DOWNMIX" in "INITIAL SETUP" to "SURROUND."
To listen to the sound through speakers connected to an amplifier with a digital connector or to output the sound to a digital component such as a DAT or MD deck
When you play a DVD, set "DVD DIGITAL OUT" in "INITIAL SETUP" to "PCM" in the menu. When you play a VIDEO CD, set "VIDEO CD DIGITAL OUT" in "INITIAL SETUP" to "ON" in the menu.
■To connect the player to a digital component with a built-in Dolby Digital decoder
In the menu, set "DVD DIGITAL OUT" in "INITIAL SETUP" to "AC-3 Digital."
"INITIAL SETUP" also includes other items such as "VIDEO ASPECT RATIO" and "OSD LANGUAGE." For details, see page 45.
Playing a DVD

• The operating procedure of VIDEO CDs or CDs is different from that of DVDs. For details on playing a VIDEO CD, see pages 18 to 25. For details on playing a CD, see pages 26 to 31.
You can turn on the player using the remote Press POWER when the
Press POWER when the ON/STANDBY indicator on the front panel is lit in red.

may appear on the TV screen (see page 13 or 14).
Note
If you don't operate the player or the remote for more than 30 minutes when a disc is not being played, the power is automatically turned off (Auto Power Off function).
Refer to the instructions supplied with your disc.
Make settings on your TV.
Turn on the TV and select the video input so that you can view the pictures from this player.
When using an amplifier
Turn on the amplifier and select the appropriate position so that you can listen to the sound from this player.

Press POWER to turn on the player.
The ON/STANDBY indicator (red) changes to green and the front panel display lights up.

Press ≙, and place the disc on the disc tray.

With the playback side facing down
Press ⊳.
The disc tray closes, and the player starts playback (Continuous Play). Adjust the volume on the TV or the amplifier.
10EN
When "RESUME" appears on the front panel display
You can resume playback from the point where you stopped the DVD. For details on playing from the beginning of the disc, see page 36.
Note
You may not be able to do Resume Play depending on the DVD.
َلُا الله والله الله الله ال
SLOW 1
• Depending on the DVD, you may not do some of the
operations described on the
When you play back a DVD at twice the normal speed in any direction, the sounds of the picture will come out from the LINE OUT (AUDIO 1, 2) connectors. The sounds are lower than the ones at normal speed. In this case, no sounds come out from the DIGITAL OUT OPTICAL and COAXIAL
motion play
follows:
Notes
right.
connectors.
playback speed during Slow-
Two speeds are available: SLOW 1 (about 1/15th the normal speed) and SLOW 2 (about 1/30th). Each time you press ◄ or ▶, the indication changes as
To stop playback


During playback
| То | Press | |
|---|---|---|
| Pause | ll | |
| Resume play after pause | II or ⊳ | |
| Play frame by frame | ⊲ II or II► | |
| Play in slow motion | <[ or ]► | |
| Play at twice the normal speed | < or > | |
| Stop play and remove the disc |
To return to Continuous Play mode
Press ⊳.

Locating a title, chapter or point you want
What are title and chapter? See page 5.
If you want to change the search speed
Two speeds are available: FF1 or FR1 (about 10 times the normal speed) and FF2 or FR2 (about 30 times). Each time you press ⊕ or ⊕, the indication changes as follows: FF1 (FR1) ↔ FF2 (FR2)
If you have made a mistake Press CLEAR, then the correct number button.
Carlow Time you press SEARCH MODE "TITLE SEARCH,"
"CHAPTER SEARCH" and "TIME SEARCH" appear on the TV screen.
Note
Ϋ́
Depending on the DVD, you may not do some of the operations described on the right.
| То | Press |
|---|---|
|
Go to the next chapter in
Continuous Play mode |
|
|
Go back to the preceding
chapter in Continuous Play mode |
₩ |
| Select the chapter | Number buttons to select the chapter number, then ENTER or ▷. |
| Select the title |
|
| Locate a point using the time code |
|
| Locate a point while monitoring the picture (Search) | ♥/♥. You will not hear the sound during this operation. When you find the point you want, press ▷ to return to the normal speed. |
Notes
- Depending on the DVD, you may not select the title.
- Depending on the DVD, a "title menu" may be simply called a "menu" or "title " in the instructions supplied with the disc. "Press ENTER." in Step 3 may also be expressed as "Press SELECT."
Using the Title Menu
A DVD is divided into long sections of a picture or a music piece called "title." When you play the DVD which contains several titles, you can select the title you want using the title menu.

Press TITLE.
The title menu appears on the TV screen. The contents of the menu varies from disc to disc.
| 1 | TITLE 1 | |
|---|---|---|
| 2 - | TITLE 2 | |
| 3 | TITLE 3 | |
| 4 | TITLE 4 | |
2
Press ← / ↑ / ↓ / → to select the title you want to play.
Depending on the disc, you can use the number buttons to select the title.
3 Press ENTER.
The player starts playing the selected title.
Basic Operations
V If you want to select the language for the DVD menu Change the setting using
"INITIAL SETUP" in the normal menu (see page 45).
Note
Depending on the DVD, a "DVD menu" may be simply called a "menu" in the instructions supplied with the disc. "Press ENTER." in Step 4 may also be expressed as "Press SELECT."
Using the DVD menu
Some DVDs allows you to select the disc contents using the menu. When you play these DVDs, you can select the language for the subtitles, the language for the sound, etc., using the DVD menu.

Press DVD MENU.
The DVD menu appears on the TV screen. The contents of the menu vary from disc to disc.
| · | ITEM 1 | ||
|---|---|---|---|
| ITEM 2 | |||
| ITEM 3 | |||
| · | ITEM 4 | ||
2
Press ← / ↑ / ↓ / → to select the item you want to change.
Depending on the disc, you can use the number buttons to select the item.
To change other items, repeat Step 2.
Press ENTER.
Using the On-Screen Display
You can check the operating status of the player and the information about the disc using the on-screen display on the TV screen.

Press DISPLAY.
Each time you press the button, the on-screen display changes as follows:

Display information of the on-screen display 1 mode
While playing a disc, the current title number, current chapter number and playing time are always displayed.

Display information of the on-screen display 2 mode
Current title number/ total number of titles Current play mode Playing status Current chapter number/total TILE REPEAT number of chapters in the current title Playing time of the current chapter * Current language for the sub-titles/total number of languages Current for sub-titles language for Current audio the sound/total format number of languages for the sound Selected angle/total number of angles
What is play mode?
What are title and chapter?
ϔ What is language for the
What is language for the
Depending on the DVD, some
information may not appear on
* Each time you press TIME, the
Playing time of the current chapter
1,
∔
current title
Remaining time of
the current chapter
Playing time of the
Remaining time of the current title
information changes as shown
See page 43.
What is angle?
See page 38.
See page 5.
sound? See page 37
sub-titles?
the TV screen.
below.
Note
See page 37.
Basic Operation:
🗳 What is bit rate?
Bit rate refers to the amount of video data per second in a disc. The higher the bit rate is, the larger the amount of data. However, this does not always mean that you can get higher quality pictures.
Display information of the on-screen display 3 mode
While playing a disc, the approximate bit rate of the playback picture is always displayed.

■ Display information of the on-screen display off mode No information is displayed. (Messages, etc., will be displayed.)
Using the Front Panel Display
You can check the information about the disc, such as the total number of the titles or remaining time, using the front panel display.

Display information while playing the disc

Checking the remaining time
Each time you press TIME while playing the disc, the display changes as shown in the chart below. The time information in the on-screen display 1 or 2 mode also changes each time you press TIME.
Playing time and number of the current chapter TITLE OVD CHAPTER Remaining time of the current chapter TITLE OVD Plaving time and number of Press TIME the current title OVD Remaining time of Press TIME the curent title TITLE OVD ЧШ. Press TIME
Note
Depending on the DVD, the chapter number or time may not appear.
Basic Operations
Playing a VIDEO CD

• The operating procedure of DVDs or CDs is different from that of VIDEO CDs. For details on playing a DVD, see pages 10 to 17. For details on playing a CD, see pages 26 to 31.
You can turn on the player using the remote Press POWER when the ON/STANDBY indicator on the front panel is lit in red.
After following Step 4
The menu screen may appear on the TV screen depending on the VIDEO CD. You can play the disc interactively, following the instructions on the menu screen. (PBC Playback, see page 21.)
Note
• If you don't operate the player or the remote for more than 30 minutes when a disc is not being played, the power is automatically turned off (Auto Power Off function).
Refer to the instructions supplied with your disc.
Make settings on your TV.
Turn on the TV and select the video input so that you can view the pictures from this player.
When using an amplifier
Turn on the amplifier and select the appropriate position so that you can listen to the sound from this player.

Press POWER to turn on the player.
The ON/STANDBY indicator (red) changes to green and the front panel display lights up.

Press ≜, and place the disc on the disc tray.

facing up

Press ⊳.
The disc tray closes and the player starts playback (Continuous Play). Adjust the volume on the TV or the amplifier.
18EN
When "RESUME" appears on the front panel display You can resume playback from the point where you stopped the VIDEO CD. For details on playing from the beginning of the disc, see page 36.
`C If you want to change the
motion play
follows:
playback speed during Slow-
Two speeds are available: SLOW 1 and SLOW 2. Each time you press ▶►, the indication changes as
SLOW 1
To stop playback
Press 🗖


During playback
| То | Press | |
|---|---|---|
| Pause | 11 | |
| Resume play after pause | II or ⊳ | |
| Play frame by frame | ||
| Play in slow motion | 1> | |
| Stop play and remove the disc |
To return to Continuous Play mode
Press ⊳.

Locating a track or point you want
| То | Press |
|---|---|
|
Go to the next track in
Continuous Play mode |
|
|
Go back to the preceding
track in Continuous Play mode |
|
| Select the track | Number buttons to select the track number, then ENTER or ▷. |
|
Select the index in Continuous Play
mode |
|
|
Select the scene before you start
playing a VIDEO CD with PBC functions and during PBC playback (Scene Search) |
|
| Locate a point while monitoring the picture (Search) | ④/ ●. You will not hear the sound during this operation. When you find the point you want, press ▷ to return to the normal speed. |
What is a track? See page 5.
What is an index? See page 5.
What is a scene? See page 5.
Y If you want to change the search speed
Two speeds are available: FF1 or FR1 and FF2 or FR2. Each time you press ⊕ or ⊕, the indication changes as follows: FF1 (FR1) ↔ FF2 (FR2)
If you have made a mistake Press CLEAR, then the correct number button.
``Ç` Each time you press SEARCH MODE
"TRACK SEARCH," "SCENE SEARCH" and "VIDEO INDEX SEARCH" appear on the TV screen,
Note
20EN
*Some discs do not allow you to start playing from a particular scene. In this case, if you do Scene Search before you start playing, the player starts playing from scene 1. If you do Scene Search while playing a disc, the player starts playing from the current scene.
When playing VIDEO CDs with PBC functions PBC playback starts automatically.
To cancel PBC playback of a VIDEO CD with PBC functions and play the disc in Continuous Play mode There are two ways. •Before you start playing, select the track you want using I or I , then press ENTER or > •Before you start playing, select the track number using the number buttons on the remote, then press ENTER or > "PLAY WITHOUT PBC" appears on the TV screen and the player starts Continuous Play. You cannot play still pictures such as a menu screen.
Playing VIDEO CDs with PBC Functions (PBC Playback)
When plaving VIDEO CDs with PBC functions (Ver. 2.0 discs), you can enjoy simple interactive operations, operations with search functions, etc.
PBC Playback allows you to play VIDEO CDs interactively, following the menu screen on the TV screen.
On this player, you can use the number buttons, ENTER, H , H , ↑/↓ and ふ (RETURN) during PBC Playback.

Start playing a VIDEO CD with PBC functions, following Steps 1 to 4 in "Playing a VIDEO CD" on page 18.
2 Select On the player Select the item number you want.
Press ▲ / ▼ to select the item number.
On the remote
Press the number button of the item you want.
(Continued)
Basic Operations
Note
Depending on the VIDEO CD, "Press ENTER." in Step 3 may be expressed as "Press SELECT." in the instructions supplied with the disc.
Press ENTER.

3
Follow the instructions on the menu screen for interactive operations.
Refer to the instructions supplied with the disc, as the operating procedure may differ according to the VIDEO CD.
| When | Do the following | |
|---|---|---|
| Selecting the item | On the player, press ▲/▼ to select the item number, then press ENTER. | |
| On the remote, press the number button of the item you want, then press ENTER. | ||
| Going back to the menu screen | Press ♂ (RETURN), ◄◄, or ►►. | |
Using the On-Screen Display
You can check the operating status of the player and the information about the disc using the on-screen display on the TV screen.


Press DISPLAY.
Each time you press the button, the on-screen display changes as follows:

22EN

CD Basic Operations
of the disc are not displayed.
Basic Operations
- What is play mode? See page 43.
- * Each time you press TIME, the information changes as shown below.
Playing time of the ← current track
Remaining time of the current track
Playing time of the disk
Remaining time of – the disk
While you are doing Shuffle Play or Program Play, the playing time of the disc and the remaining time of the disc are not displayed.

Current scene number appears instead of track and index numbers. The display does not change even if you press the TIME button at this time.


Display information of the on-screen display off mode
No information is displayed. (Messages, etc., will be displayed.)
Using the Front Panel Display
You can check information about the disc, such as the total number of the tracks or remaining time, using the front panel display.

Display information while playing a disc

Note
While you are doing Shuffle Play or Program Play, the playing time of the disc and the remainig time of the disc are not displayed.
Checking the remaining time (in Continuous Play mode)
Each time you press TIME while playing a disc, the display changes as shown in the chart below. The time information in the on-screen display 1 or 2 mode also changes each time you press TIME.

Playing a CD

The operating procedure of DVDs or VIDEO CDs is different from that of CDs. For details on playing a DVD, see pages 10 to 17. For details on playing a VIDEO CD, see pages 18 to 25.
You can turn on the player using the remote Press POWER when the
ON/STANDBY indicator on the front panel is lit in red.
Make settings on your TV.
Turn on the TV and select the video input so that you can view the pictures from this player.
When using an amplifier
Turn on the amplifier and select the appropriate position so that you can listen to the sound from this player.
2
Press POWER to turn on the player.
The ON/STANDBY indicator (red) changes to green and the front panel display lights up.
2
Press ≜, and place the disc on the disc tray.

With the label side facing up

Press ⊳.
The disc tray closes and the player starts playback (Continuous Play). Adjust the volume on the TV or the amplifier.
Note
If you don't operate the player or the remote for more than 30 minutes when a disc is not being played, the power is automatically turned off (Auto Power Off function).
When "RESUME" appears in the front panel display You can resume playback from the point where you stopped the CD. For details on playing from the beginning of the disc, see page 36.
To stop playback


During playback
| То | Press | |
|---|---|---|
| Pause | II | |
| Resume play after pause | II or ⊳ | |
| Stop play and remove the disc | £ | · |


What is a track? See page 5.
What is an index? See page 5.
`` If you want to change the search speed
Two speeds are available: FF1 or FR1 and FF2 or FR2. Each time you press ⊕ or ⊕, the indication changes as follows: FF1 (FR1) ↔ FF2 (FR2)-
' If you have made a mistake Press CLEAR, then the correct number button.
| То | Press |
|---|---|
|
Go to the next track in
Continuous Play mode |
|
|
Go back to the preceding
track in Continuous Play mode |
|
| Select the track |
Number buttons to select the track number, then
ENTER or ▷. |
|
Select the index in Continuous Play
mode |
|
|
Locate a point while monitoring
the sound (Search) |
|
Using the On-Screen Display
You can check the operating status of the player and the information about the disc using the on-screen display on the TV screen.

Press DISPLAY.
Each time you press the button, the on-screen display changes as follows:

Display information of the on-screen display 1 mode
While playing a disc, the current track number, playing time and index number are always displayed.

Display information of the on-screen display 2 mode

Display information of the on-screen display off mode No information is displayed. (Messages, etc., will be displayed.)
* Each time you press TIME, the information changes as shown below.

Shuffle Play or Program Play, the playing time of the disc and the remaining time of the disc are not displayed.
Basic Oper
Using the Front Panel Display
You can check information about the disc, such as the total number of the tracks, remaining number of tracks or remaining time, using the front panel display.

Display information while playing a disc

Note
While you are doing Shuffle Play or Program Play, the playing time of the disc and the remainig time of the disc are not displayed.
Checking the remaining time
Each time you press TIME while playing a disc, the display changes as shown in the chart below. The time information in the on-screen display 1 or 2 mode also changes each time you press TIME.

Sasic Operation
Playing Discs in Various Modes
Playing Repeatedly (Repeat Play)
You can play the all the titles/all the tracks on a disc, a single title/chapter/track or a specific portion repeatedly. To set the Repeat Play, use the menu. For details on using the menu, see page 42.

Repeating all the titles or all the tracks on a disc DVD VIDEO
In Shuffle or Program Play mode, the player repeats the titles or tracks in the shuffled or programmed order.
You cannot do Repeat Play during PBC playback of VIDEO CDs (page 21). You may not be able to do Repeat Play depending on the DVD.
Press MENU to display the menu on the TV screen. Then set "REPEAT" in "PLAY MODE" to "DISC."

"REPEAT" appears on the front panel display. The player repeats the titles/chapters/tracks as follows:
| When the disc is played in | The player repeats |
|---|---|
|
Continuous Play
(page 10, 18 or 26) |
All the titles/all the tracks |
|
Shuffle Play
(page 34) |
All the titles or tracks in random order |
| Program Play (page 34) |
Programmed titles/
chapters/tracks |
To cancel repeating all the titles or all the tracks on a disc
Press MENU to display the menu on the TV screen. Then set "REPEAT" in "PLAY MODE" to "OFF" (page 43).
Repeating the current title or chapter
You can repeat only the current title or chapter in Continuous Play mode. You may not be able to do Repeat Play depending on the DVD.
Repeating the current title
While the title you want is being played, press MENU to display the menu on the TV screen. Then set "REPEAT" in "PLAY MODE" to "TITLE."
"REPEAT 1" appears on the front panel display and the player repeats the current title.

Repeating the current chapter
While the chapter you want is being played, press MENU to display the menu on the TV screen. Then set "REPEAT" in "PLAY MODE" to "CHAPTER."
"REPEAT 1" appears on the front panel display and the player repeats the current chapter.
To cancel repeating the current title or chapter
Press MENU to display the menu on the TV screen. Then set "REPEAT" in "PLAY MODE" to "OFF" (page 43).
Playing Discs in Various Modes
Repeating the current track
You can repeat only the current track in Continuous Play mode.
While the track you want is being played, press MENU to display the menu on the TV screen. Then set "REPEAT" in "PLAY MODE" to "TRACK."

"REPEAT 1" appears on the front panel display and the player repeats the current track.
To cancel repeating the current track
Press MENU to display the menu on the TV screen. Then set "REPEAT" in "PLAY MODE" to "OFF" (page 43).
Repeating a specific portion (A↔B Repeat) DVD V IDEO CD
You can play a specific portion of a title/chapter/track repeatedly. This is useful when you want to memorize lyrics.
During PBC Playback of VIDEO CDs (page 21), this function is available only while playing moving pictures.
You may not be able to do Repeat Play depending on the DVD.
While playing a disc, press MENU to display the menu on the TV screen. Then select "A-B REPEAT" in "PLAY MODE." "A-B REPEAT" is highlighted.

2 Select "SET" using ↑/↓ and press ENTER. The on-screen display for setting the point A appears indicating the current chapter or track number and playing time.
|
Set point A withENTER.
To quit, press MENU. |
||
|---|---|---|
|
CHAPTER TIME
2 - 00 : 02 : 23 |
||
| J |
3 When you find the starting point (point A) of the portion to be played repeatedly, press ENTER. The display for setting the point B appears. "REPEAT A –" also appears on the front panel display.

4 When you reach the ending point (point B), press ENTER.
"REPEAT A–B" appears on the front panel display. The player starts repeating this specific portion.
To cancel A↔B Repeat
Press MENU to display the menu on the TV screen. Then set "A-B REPEAT" in "PLAY MODE" to "OFF" (page 43).
To cancel setting halfway
Press MENU.
The setting for A↔B Repeat remains after it is canceled
When you select "ON" using ↑ / ↓ in Step 2 and press ENTER, you can play the same portion again.
Notes
- When you open or close the disc tray, the setting for A↔B Repeat is canceled.
- When you turn the power off, the setting for A↔B Repeat is canceled.
- When you set the A++B Repeat, the settings for Shuffle-Play and Program Play are canceled.
- Some scenes in the DVD and VIDEO CD do not allow you to do A+→B Repeat playback.
Playing in Random Order (Shuffle Play)
You can have the player "shuffle" titles, chapters or tracks and play them in a random order. To set the Shuffle Play, use the menu. For details on using the menu, see page 42.

Press MENU to display the menu on the TV screen. Then set "SHUFFLE" in "PLAY MODE" to "ON."

2 Press ⊳.
(During playback, the player starts Shuffle Play when you follow the step 1.)
To cancel Shuffle Play
Press MENU to display the menu on the TV screen. Then set "SHUFFLE" in "PLAY MODE" to "OFF."
Notes
- When you disconnect the AC power cord from the AC outlet, Shuffle Play is canceled.
- You may not be able to do Shuffle Play depending on the DVD.
Creating Your Own Program (Program Play)
You can arrange the order of the titles, chapters or tracks on the disc and create your own program. The program can contain up to 99 titles, chapters and tracks.

1 Press MENU to display the menu on the TV screen.
|
REPEAT : OFF
SHUFFLE : OFF PROGRAM : OFF A-B REPEAT : OFF ALL OFF |
|
|---|---|
|
NTN.
Setup |
|
| | ·. | |
|
To set, press HEND, then ENTER.
To quit, press HEND. |
2 Select "PLAY MODE" using ↑/↓, then press → "PLAY MODE" is highlighted.

Playing Discs in Various Modes
Select "PROGRAM" using ↑/↓, then press →. "PROGRAM" is highlighted.

4 Select "SET" using ↑/↓, then press ENTER. The programming display appears.

5 Press →.
"01" is highlighted.

6 Select the title, chapter or track you want to program using ↑/↓, then press ENTER. (You can also use the number buttons and ENTER button to select. The selected number appears at the top right of the screen.)
■When playing a DVD
When both titles and chapters are recorded on the disc, select the title, then the chapter.


When playing a VIDEO CD or CD
Select the track you want to program.

7 To program other titles, chapters or tracks, repeat Step 6.
The programmed titles, chapters or tracks are displayed from 02 in order.

Playing Discs in Various Modes
8 Press ▷ to start Program Play.
To cancel Program Play
Press MENU to display the menu on the TV screen. Then set "PROGRAM" in "PLAY MODE" to "OFF."
To cancel programming
Press MENU
To change programming
In Step 5, select the program number of the title, chapter or track you want to change using ↑/↓.
2 Follow Step 6 for new programming.
To cancel the programmed order
To cancel all the titles, chapters or tracks in the programmed order, select "ALL CLEAR" in Step 5. To cancel a title, chapter or track programmed, select the title, chapter or track you want to clear in Step 5, then select "CLEAR" in Step 6.
Y The program remains even after the Program Play ends
When you press ▷, you can play the same program again.
You can do Repeat Play or Shuffle Play of the programmed titles, chapters or tracks After programming, set "REPEAT" to "DISC" or
"SHUFFLE" to "ON" in the menu.
Notes
- The number of titles, chapters or tracks displayed are that of the titles, chapters or tracks recorded on a disc.
-
The program is canceled when:
- you open or close the disc tray
- you turn the power off
- You may not be able to do Program Play depending on the DVD.
Resuming Playback from the Point Where You Stopped a Disc (Resume Play)
The player stores the point where you stopped a disc if "RESUME" appears on the front panel display. In this case, you can resume playback from that point. As long as you do not remove the disc, Resume Play is available even if you turn the power off.

While playing a disc, press ■ to stop playback. "RESUME" appears in the front panel display and "WHEN PLAYING NEXT TIME, DISC RESTARTS FROM POINT YOU STOPPED." appears on the TV screen.
If "RESUME" does not appear, Resume Play is not available.
2 Press ▷. The player starts playback from the point you stopped the disc in Step 1.
Q To play from the beginning of the disc
When "RESUME" appears on the front panel display before you start playing, press ■ to turn off "RESUME," then press ▷.
Notes
- You may not do Resume Play depending on the DVD.
- Resume Play is not available in Shuffle or Program Play mode.
- Depending on where you stopped the disc, the player may resume playback from a different point.
-
The point where you stopped playing is cleared when:
you open or close the disc tray
- you disconnect the AC power cord
- you change the play mode
- you start playback after selecting a title, chapter or track
- you change the setting of "VIDEO ASPECT RATIO,"
"DVD MENU LANGUAGE" or "PARENTAL CONTROL" in "INITIAL SETUP" in the menu
Changing the Sounds
With DVDs on which multilingual sounds are recorded, you can select the language you want while playing the DVD.
With multiplex VIDEO CDs, you can select the sound from the right or left channel and listen to the sound of the selected channel through both the right and left speakers. In this case, the sound loses the stereo effect.

Press AUDIO CHANGE while playing a disc. Each time you press the button, the indication and the language/sound from the speakers change as follows:
When playing a DVD

| Press | Indication | You will hear |
|---|---|---|
| Once | 1/L | The sound of the left channel |
| Twice | 2/R | The sound of the right channel |
| Three times | 1/L2/R | The standard stereo sound |
When playing a VIDEO CD or a CD
You can also use the menu to switch the sound for the VIDEO CD or the CD
Press MENU to display the menu. Then select "L/R/ STEREO" in "CUSTOM SETUP" to change the sound (page 44).
Notes
- Depending on the DVD, you may not be able to change the languages even if multilingual sounds are recorded on the
-
If "DOLBY DIGITAL MODE" is set to "2" (page 44), the Dolby Digital (AC-3) format audio is played when: - you open or close the disc tray
- you release Resume Play
Turning the Sub-titles On and
With DVDs on which sub-titles are recorded, you can turn the sub-titles on and off whenever you want while playing the DVD.

Press SUB-TITLE ON/OFF while playing a DVD. Sub-titles appear on the TV screen.
To turn off the sub-titles
Press SUB-TITLE ON/OFF again
Notos
- When playing the DVD on which no sub-titles are recorded, no sub-titles appear even if you press SUB-TITLE ON / OFF
- Depending on the DVD, you may not be able to turn the sub-titles on even if they are recorded on the DVD.
- Depending on the DVD, you may not be able to turn the sub-titles off
Changing the Sub-titles
With DVDs on which multilingual sub-titles are recorded, you can change the sub-titles whenever you want while playing the DVD.
When sub-titles are turned off, press SUB-TITLE ON/ OFF to turn on the sub-titles.

While playing a DVD, press SUB-TITLE CHANGE repeatedly until the sub-titles you want appear on the TV screen.
SUB-TITLE 1 → SUB-TITLE 2 → ... → AUDIO FOLLOW *
* When you select "AUDIO FOLLOW," the language for the sub-titles change according to the language for the sound.
Notes
- The type and number of languages for sub-titles vary from disc to disc.
- Depending on the DVD, you may not be able to change the sub-titles even if multilingual subtitles are recorded on the DVD.
- Depending on the DVD, you may not change the sub-titles following the language for the sound, even if "AUDIO FOLLOW" is displayed.
Changing the Angles 👔 🖤
With DVDs on which various angles (multi-angles) for a scene are recorded, you can change the angles whenever you want while playing the DVD.

When "ANGLE" appears on the front panel display while playing a DVD, press ANGLE CHANGE repeatedly until you get the angle you want.

Specify the angle when "ANGLE" is not displayed on the front panel display. When a scene on which multi-angles are recorded comes, the angle is automatically selected.
Notes
- The number of angles varies from disc to disc or from scene to scene. The number of angles that can be changed on a scene is that of angles recorded for that scene.
- Depending on the DVD, you may not be able to change the angles even if multi-angles are recorded on the DVD.
Limiting Playback by Children (Parental Control)
Playing some DVDs can be limited depending on the age of users. The "Parental Control" function allows you to set a playback limitation level.

1 Press MENU to display the menu on the TV screen before playing.

Select "INITIAL SETUP" using ↑/↓, then press →.
"INITIAL SETUP" is highlighted.

3 Select "PARENTAL CONTROL" using ↑ / ↓ , then press ENTER.
When you have not entered a password yet
The display for entering a password appears.

When you have already entered a password
The display for confirming the password appears. Skip Step 4.
| PAREN | TAL CON | TROL | |||||
|---|---|---|---|---|---|---|---|
| Ente | r passv | vord, t | hen p | ress | NTER], | ||
| - | |||||||
|
MITVL
Bet up |
· | ||||||
| ۰, | |||||||
Playing Discs in Various Modes
4 Enter a password in 4 figures using the number buttons, then press ENTER.
The display for confirming the password appears.
| PARENTAL CONTROL | |
|---|---|
| then press ENTER. | |
|
NITAL
Set up |
|
| • | |
5 To confirm your password, enter it using the number buttons, then press ENTER.The display for setting the playback limitation level and changing the password appears.
| PARENTAL CONTROL | |||
|---|---|---|---|
| LEVEL | :OFF | OFF | |
| STANDARD | :USA | 8 | |
| CHANGE PASSWORD | 7 . NC17 | ||
| 6.R | |||
| 5 | |||
| 4 . PG13 | |||
| NUM | 3 . PG | ||
| SETUP | 2 | ||
| 1.G | |||
| To set, press | ,thenENTER . | ||
| To quit, press |
6 Select "STANDARD" using ↑/↓, then press →.

Select a country as the standard for playback limitation level using ↑/↓, then press ENTER. A check mark (■) appears on the left of the selected country.
| PARENTAL CONT | ROL | ||
|---|---|---|---|
| STANDARD | : USA |
■USA
Canada Japan |
|
|
ETTE
NTAL Setup |
|||
|
To set, press
To quit, press |
HEFE, then ENTE
(MENU). |
A. |
8 Select "LEVEL" using ↑/↓, then press ENTER.

9 Select the level you want using ↑/↓, then press ENTER.
A check mark (■) appears on the left of the selected level.

The lower the number is, the more strict the limitation.
Playing Discs in Various Modes
To return to the normal screen Press MENU.
To turn off the Parental Control function and play the DVD after entering your password
Set "LEVEL" to "OFF" in Step 9, then press ▷.
To change the password
- In Step 5, select "CHANGE PASSWORD" using ↑/↓, then press → or ENTER. The display for changing the password appears.
- Follow Steps 4 and 5 to enter a new password.
Y If you have forgot your password
Enter "199703" in Step 4 to clear the current password. To enter a new password, follow the procedure from Step 1 again.
Notes
- When you play DVDs without the Parental Control function, playback cannot be limited on this player.
- When you do not set a password, you cannot change the settings for playback limitation.
- Depending on the DVD, you may be asked to change the parental control level while playing the disc. In this case, enter the password, then change the level. When you stop playing the DVD, the level returns to the original level.
Controlling the TV with the Supplied Remote
You can control Sony TVs with the B mark using the supplied remote.

| pressing | You can |
|---|---|
| POWER | Turn on or off the TV |
| / VIDEO | Select the input source for the TV |
| L | Adjust the volume of the TV |
| Change the channel of the TV | |
| Change the channel of th |
Settings and Adjustments
Using the Menu 🗊
Using the menu allows initial setup, selecting the play mode, adjusting the sound quality, setting the various outputs, etc. You can also set a language for the subtitles and menu display, playback limitation children. etc.
For details on each menu item, see pages 43 to 45.
In the menu, select the item or setting from left to right. Use to go to the right item or setting. Use to go back to the left item or setting.

Press MENU to display the menu on the TV screen

2 Select the main item you want using ↑/↓, and then press → or ENTER The selected main item is highlighted.

Select the item you want using † / ↓ , then press → or ENTER

4 Select the setting you want using † / ↓ , then press
A check mark ( ) appears on the left of the selected setting.

When - appears on the right of the setting
More settings to be selected are on the right. Press → to select.
To cancel using the menu on the way Press MENU.
Note
Some menu items require operations other than selecting the setting. For details on these items, see the relevant pages.
Settings for Playback (PLAY MODE)
"PLAY MODE" allows you to set various playback modes as described on pages 32 to 36. Default settings are underlined.
Notes
- Depending on the disc, you may not be able to set playback modes.
- You can set Shuffle, Program and Repeat Play only during stop for VIDEO CDs with PBC functions.

■REPEAT (page 32)
Selects the setting of Repeat Play.
- OFF: does not play repeatedly.
- DISC: repeats all the titles/all the chapters/all the tracks on a disc.
- TITLE (DVD only): repeats the current title.
- CHAPTER (DVD only): repeats the current chapter.
- TRACK (VIDEO CD/CD only): repeats the current track.
SHUFFLE (page 34)
Selects the setting of Shuffle Play.
- OFF: does not play a disc in random order.
- ON: has the player "shuffle" titles or tracks and play in a random order.
■PROGRAM (page 34)
Selects the setting of Program Play.
- OFF: The order of the titles, chapters or tracks on the disc cannot be arranged.
- SET: arranges the order of the titles, chapters or tracks on the disc.
- ON: plays the titles, chapters or tracks in the programmed order.
A-B REPEAT (page 33)
Selects the setting of A + B Repeat.
- OFF: does not play a specific portion of a title/chapter/ track repeatedly.
- SET: sets the A and B points.
- ON: plays a specific portion of a title/chapter/track repeatedly.
ALL OFF
Turns off all the settings in "PLAY MODE." Select this item in Continuous Play mode.
You can do Disc Repeat Play or Shuffle Play in the programmed order
When "PROGRAM" is set to "ON," set "REPEAT" to "DISC" or "SHUFFLE" to "ON."
"CUSTOM SETUP" allows you to set the display and sound according to the playback conditions. Default settings are underlined.
| AUTO PLAY | : OFF | |
| NOOE DIMMER | : BRIGHT | |
| AUDIÓ DRC | : OFF | |
| AUDIO ATT | OFF | |
| SETUP I / D / CTEDEA | ||
| L/N/SIEREU | STEREU | |
| 📾 L/R/STEREO | : STEREO | |
| NTW DOLBY DIGITAL M | ODE: 1 | |
| SETUP BACKCOOLIND | BUIC | |
| DAGAGHOUND | . DLUC | |
| To set press | ||
| To quit pres | ||
| io quit, prea | (mente), | |
AUTO PLAY
Selects the setting of Auto Play when you connect the AC power cord to the AC outlet.
- OFF: does not start playing a disc automatically.
- TIMER: starts playing a disc automatically when you connect the AC power cord to the AC outlet. By connecting a timer (not supplied), you can start playing at any time you want.
- DEMO1: starts playing the demonstration 1 automatically.
- DEMO2: starts playing the demonstration 2 automatically.
- Adjusts the lighting of the front panel display.
- BRIGHT: makes the front panel display bright.
- DARK: makes the front panel display dark.
- OFF: turns off the lighting of the front panel display.
AUDIO DRC (Dynamic Range Control)
Controls the audio dynamic range when you play a DVD. This functions only for the sound from the DIGITAL OUT connectors and from the LINE OUT (AUDIO 1, 2) connectors when "DVD DIGITAL OUT" is set to "PCM" (page 45).
- OFF: Normally select this position.
- ON: makes the sound clear with the volume turned down at night, etc.
Note
When you play DVDs without the AUDIO DRC function, there may be no effect on the sound.
AUDIO ATT (attenuation)
Selects the setting of the output from the LINE OUT (AUDIO 1, 2) connectors according to audio equipment to be expressed.
- OFF: turns off the audio attenuation
- ON: drops the audio output level so that no sound distortion occurs.
Note
The setting does not affect the output from the DIGITAL OUT connectors.
L/R/STEREO
Selects the setting of the sound of the VIDEO CD from the LINE OUT (AUDIO 1, 2) and DIGITAL OUT connectors or the sound of the CD from the LINE OUT (AUDIO 1, 2) connectors.
- STEREO: outputs the standard stereo sound.
- L: outputs the sound from the left channel.
- R: outputs the sound from the right channel.
Note
The sound is output in stereo from the DIGITAL OUT connectors when you play a CD.
DOLBY DIGITAL MODE
Gives the Dolby Digital (AC-3) format priority when you play
- a DVD on which multiple audio formats are recorded.
- 1: No priority given.
- 2: Priority given.
Notes
-
If "DOLBY DIGITAL MODE" is set to "2," the Dolby Digial (AC-3) format audio is played when:
- you open or close the disc tray
- you release Resume Play
Depending on the DVD, the sound may be switched to another channel or another language.
- If multiple audio channels are recorded in Dolby Digital (AC-3) format, the highest channel audio recorded in Dolby Digital (AC-3) format is played.
- Depending on the DVD, the audio with priority may be predetermined. In this case, you cannot give priority to the Dolby Digital (AC-3) format by selecting "2."
Selects the picture in pause mode.
- AUTO: A picture including subjects that move dynamically is output with no jitter. Normally select this position.
- FRAME: A picture including subjects do not move dynamically is output with high resolution.
Notes
- The setting does not affect the picture when the auto pause functions while playing the DVD.
- When "PAUSE MODE" is set to "FRAME," the picture may jitter in Slow-motion Play mode.
- Selects the background color of the TV screen in stop mode.
- BLUE: The background color is blue.
- BLACK: The background color is black.
Basic Settings (INITIAL SETUP)
"INITIAL SETUP" allows necessary setup when you install the player and connect external components to the player. The setups for advanced playback of DVDs or VIDEO CDs are also available in this main menu. Default settings are underlined.
| Ø | TV TYPE | :4:3 ` |
|---|---|---|
| NODE | VIDEO ASPECT RATIO | : LETTER BOX |
| DVD MENU LANGUAGE | : ENGLISH | |
| CUSTON | OSD LANGUAGE | : ENGLISH |
| £∏# | DOWNMIX | : SURROUND |
| • | DVD DIGITAL OUT | : PCM |
| NTW | VIDEO CD COLOR SYSTEM | : NTSC |
| SETUP | VIDEO CD DIGITAL OUT | : ON |
| PARENTAL CONTROL | ||
| To set, press .then | ENTER | |
| To quit, pressMENU. | ||
Selects the aspect ratio of the TV to be connected.
- 4:3: when you connect a normal TV to the player
- 16:9: when you connect a wide-screen TV to the player
VIDEO ASPECT RATIO
Selects the aspect ratio of the screen when you play a wide picture recorded on a DVD on the normal TV.
- LETTER BOX: displays the wide picture with bands displayed on the upper and lower portions of the screen.
- PAN SCAN : displays the wide picture on the whole screen with a portion automatically cut off.

PAN SCAN

Note
Depending on the DVD, the aspect ratio of the playback picture may be fixed.
44 EN
DVD MENU LANGUAGE
Switches the languages for the DVD menu which is recorded in multiple languages.
- ENGLISH
- FRENCH
- SPANISH
- JAPANES
- CHINESE
- ITALIAN
- GERMAN
- PORTUGUESE
- DUTCH
- OTHERS→
When you select "OTHERS," select and enter the language code from the list using the number buttons (page 53).
Note
When you select the language that is not recorded on the DVD, any one of the recorded languages is automatically selected.
■OSD (On-Screen Display) LANGUAGE
Switch the language for the on-screen display.
- ENGLISH
- FRENCH
DOWNMIX
Switches the mixing down methods when you play a DVD on which the sound in Dolby Digital (AC-3) format is recorded.
- SURROUND: when the player is connected to an audio component that conforms to Dolby surround, Dolby Pro Logic surround, etc.
- NORMAL : when the player is connected to a normal audio component.
- The setting affects the analog output from the LINE OUT (AUDIO 1, 2) connectors and digital output from the DIGITAL OUT OPTICAL and COAXIAL connectors when "DVD DIGITAL OUT" is set to "PCM."
DVD DIGITAL OUT
Switches the outputting methods of audio signals from the DIGITAL OUT OPTICAL and COAXIAL connectors on the rear panel of the player.
- PCM: when the player is connected to an audio component without a built-in Dolby Digital (AC-3) decoder
- AC-3 Digital: when the player is connected to audio component with a built-in Dolby Digital (AC-3) decoder
Note
Select thè setting correctly. Otherwise, no sound will come out from the speakers or strange sound will come out from the speakers, affecting your ears or causing the speakers to be damaged.
VIDEO CD COLOR SYSTEM
"NTSC" is selected when you play a VIDEO CD.
VIDEO CD DIGITAL OUT
Turns on and off the digital audio output when you play a VIDEO CD.
- ON: outputs the digital audio signals.
- OFF: does not output the digital audio signals.
PARENTAL CONTROL
Sets a password and playback limitation level when you play DVDs with playback limitation by children. For details, see page 39.
Precautions
On safety
- Caution The use of optical instruments with this product will increase eye hazard.
- Should any solid object or liquid fall into the cabinet, unplug the player and have it checked by qualified personnel before operating it any further.
On power sources
- The player is not disconnected from the AC power source (mains) as long as it is connected to the wall outlet, even if the player itself has been turned off.
- If you are not going to use the player for a long time, be sure to disconnect the player from the wall outlet. To disconnect the AC power cord (mains lead), grasp the plug itself; never pull the cord.
- Should the AC power cord (mains lead) need to be changed, have it done at a qualified service shop only.
On placement
- Place the player in a location with adequate ventilation to prevent heat build-up in the player.
- Do not place the player on a soft surface such as a rug that might block the ventilation holes on the bottom.
- Do not place the player in a location near heat sources, or in a place subject to direct sunlight, excessive dust or mechanical shock.
On operation
• If the player is brought directly from a cold to a warm location, or is placed in a very damp room, moisture may condense on the lenses inside the player. Should this occur, the player may not operate properly. In this case, remove the disc and leave the player turned on for about 30 minutes until the moisture evaporates.
On adjusting volume
• Do not turn up the volume while listening to a portion with very low level inputs or no audio signals. If you do, the speakers may be damaged when a peak level portion is played.
On cleaning
• Clean the cabinet, panel and controls with a soft cloth slightly moistened with a mild detergent solution. Do not use any type of abrasive pad, scouring powder or solvent such as alcohol or benzine.
If you have any questions or problems concerning your player, please consult your nearest Sony dealer.
IMPORTANT NOTICE
Caution: The enclosed DVD Player is capable of holding a still video image or Menu image on your television screen indefinitely. If you leave the still video image or Menu image displayed on your TV for an extended period of time you risk permanent damage to your television screen. Projection televisions are very susceptible.
Notes on Discs
On handling discs
- To keep the disc clean, handle the disc by its edge. Do not touch the surface.
- Do not stick paper or tape on the disc. If there is glue (or a similar substance) on the disc, remove the glue completely before using the disc.

- Do not expose the disc to direct sunlight or heat sources such as hot air ducts, or leave it in a car parked in direct sunlight as there can be considerable rise in temperature inside the car.
- After playing, store the disc in its case.
On cleaning
• Before playing, clean the disc with a cleaning cloth. Wipe the disc from the center out.

• Do not use solvents such as benzine, thinner, commercially available cleaners or anti-static spray intended for vinyl LPs.
Troubleshooting
If you experience any of the following difficulties while using the player, use this troubleshooting guide to help you remedy the problem. Should any problem persist, consult your nearest Sony dealer.
The power is not turned on.
If the ON/STANDBY indicator is not lit, check that the AC power cord is connected securely.
There is no picture.
- →Check that the player is connected securely.
- The video connecting cord has broken down. Replace it with a new one.
- Make sure you connect the player to the video input connector on the TV. (page 6)
- →Make sure you turn on the TV.
- Make sure you select the video input on the TV so that you can view the pictures from the player.
There is no sound.
- →Check that the player is connected securely.
- The audio connecting cord has broken down. Replace it with a new one.
- Make sure you connect the player to the audio input connectors on the amplifier. (page 6)
- Make sure you turn on the TV and the amplifier.
- Make sure you select the appropriate position on the amplifier so that you can listen to the sound from the player.
- ➡The player is in pause mode or in Slow-motion Play mode. Press ▷ to return to normal play mode.
- ➡Fast forward (FF1 or FF2) or fast reverse (FR1 or FR2) is performed. Press ▷ to return to normal play mode.
- ➡When you connect the player to an amplifier with a digital connector and play a DVD, set "DVD DIGITAL OUT" in "INITIAL SETUP" to "PCM" in the menu. When you play a VIDEO CD, set "VIDEO CD DIGITAL OUT" in "INITIAL SETUP" to "ON" in the menu.
- Select the appropriate setting of "DOWNMIX" in "INITIAL SETUP" for your amplifier.
The remote does not function
- ➡Remove any obstacles between the remote and the player.
- →Use the remote near the player.
- ➡Point the remote at the remote sensor
- Replace all the batteries in the remote with new ones if they are weak.
The picture noise appears
→Clean the disc.
- This player features the copy protection function developed by Macrovision. Copy protection signals are recorded on some DVDs. When you play these discs, the picture noise will appear on some TVs and projectors.
- The picture noise appears when the player is connected to the TV via the video deck. Do not connect the player to the video deck. Connect the player directly to the TV. (page 7)
The picture noise appears when you record and play the picture of the DVD on a video deck.
This player features the copy protection function developed by Macrovision. Copy protection signals are recorded on some DVDs. When you play and record the pictures of these discs on a video deck, the picture noise appears.
The sound noise comes out.
- ➡Clean the disc.
- →Connect the audio plug of the connecting cord firmly.
The disc does not play.
- There is no disc inside ("INSERT DISC" appears on the TV screen). Insert a disc.
- ➡Insert the disc with the playback side facing down on the disc tray correctly.
- ➡Place the disc on the disc tray correctly.
- ➡Clean the disc.
- ➡The player cannot play CD-ROMs, etc. (page 5) Insert a DVD, a VIDEO CD, or CD.
- →Check the region code of the DVD. (page 4)
- Moisture has condensed inside the player. Remove the disc and leave the player turned on for about 30 minutes. (page 46)
The player does not play from the beginning when playing a disc.
-
→Any menu items in "PLAY MODE" are set to "ON."
- Select "ALL OFF." (page 43)
- Resume Play is performed. Press
- →A title menu or a DVD menu automatically appears on the TV screen when you play your DVD, or a menu screen automatically appears on the TV screen when you play your VIDEO CD with PBC functions.
The DVD does not play when you select a title.
➡The Parental Control functions. (page 39)
The player starts playing the DVD automatically. → The DVD features the auto playback function.
Stopping playback, Search, Slow-motion Play, Repeat Play, Shuffle Play or Program Play, etc. cannot be performed.
Depending on the disc, you may not do some of the operations above.
Messages do not appear on the TV screen in the language you want.
➡In the menu, select the language for the onscreen display in "OSD LANGUAGE" in "INITIAL SETUP." (page 45)
The language for the sound cannot be changed when you play a DVD.
- Multilingual sound is not recorded on the DVD. Changing the language for the sound is
- prohibited on the DVD.
The language for the sub-titles cannot be changed when you play a DVD.
- →Multilingual sub-titles are not recorded on the DVD.
- Changing the language for the sub-titles is prohibited on the DVD.
The sub-titles cannot be turned off when you play a DVD.
Depending on the DVD, you may not be able to turn the sub-titles off.
The angles cannot be changed when you play a DVD.
- ➡Multi-angles are not recorded on the DVD.
- ➡ Change the angles when "ANGLE" appears on the front panel display. (page 38)
- →Changing the angles is prohibited on the DVD.
The aspect ratio of the screen cannot be changed though you set "VIDEO ASPECT RATIO" in "INITIAL SETUP" in the menu when you play a wide picture.
→The aspect ratio is fixed on your DVD
The menu screen does not appear when you play a VIDEO CD.
- →The VIDEO CD does not feature PBC functions.
- →Follow the correct operating procedure. (Also refer to the instructions supplied with the disc.)
The sound loses stereo effect when you play a VIDEO CD or a CD.
-
➡"1/L" or "2/R" appears on the front panel display.
- On the remote, press AUDIO CHANGE repeatedly until "1/L 2/R " appears. (page 37) In the menu, set "L/R/STEREO" in "CUSTOM
SETUP" to "STEREO." (page 44)
The player does not operate properly.
→Static electricity, etc. may affect the player's operation.
Disconnect the AC power cord once, then connect it again.
The picture jitters in Slow-motion Play mode.
➡In the menu, set "PAUSE MODE" in "CUSTOM SETUP" to "AUTO." (page 44)
The power is turned off automatically.
The Auto Power Off function is activated. (If you do not operate the player or the remote for more than 30 minutes when a disc is not being played, the power will be automatically turned off.)
Specifications
CD/DVD player
| aser | Semiconductor las |
|---|---|
| ignal format system | NTSC |
Audio characteristics
| Frequency response |
|
|---|---|
| CD: 2 Hz to 20 kHz (±0.5 dB) | |
| Signal-to-noise ratio | More than 107 dB |
| Harmonic distortion | Less than 0.0028 % |
| Dynamic range | More than 97 dB |
| Wow and flutter | Less than detected value |
| (±0.001% W PEAK) | |
Outputs and inputs
|
Jack
type |
Maximum
output level |
Load impedance | |
|---|---|---|---|
|
LINE OUT
(AUDIO 1, 2) |
Phono
jacks |
2 Vrms
(at 50 kilohms) |
Over 10 kilohms |
|
DIGITAL OUT
(OPTICAL) |
Optical
output connector |
–18 dBm | Wave length: 660 nm |
|
DIGITAL OUT
(COAXIAL) |
Phono
jacks |
0.5 Vp-p | 75 ohms terminated |
|
LINE OUT
(VIDEO) |
Phono
jack |
1.0 Vp-p |
75 ohms,
sync negative |
| S VIDEO OUT |
4-pin mini
DIN |
Y: 1.0 Vp-p
C: 0.286 Vp-p |
75 ohms,
sync negative 75 ohms terminated |
| S-LINK | Mini jack |
General
| Power requirements | 120 V AC, 60 Hz |
|---|---|
| Power consumption | 26 W |
| Dimensions (approx.) | 430 × 111 × 395 mm |
| (17 × 4 3 /8 × 15 5 /8 in.) (w/h/d) | |
| incl. projecting parts | |
| Mass (approx.) | 6.0 kg (13 lb 4 oz) |
| Operating temperature | 5 °C to 35 °C (41 °F to 95 °F) |
| Operating humidity | 5 % to 90 % |
Supplied accessories
See page 6.
Design and specifications are subject to change without notice
48EN
Glossary
Bit rate
Value indicating the amount of video data compressed in a DVD per second. The unit is Mbps (Mega bit per second). 1 Mbps indicates that the data per second is 1,000,000 bits. The higher the bit rate is, the larger the amount of data. However, this does not always mean that you can get higher quality pictures.
Chapter
Sections of a picture or a music piece on a DVD that are smaller than titles. A title is composed of several chapters. Each chapter is assigned a chapter number enabling you to locate the chapter you want.
Dolby Digital (AC-3)
Digital audio compression technology that the Dolby Laboratories Corporation developed. This technology conforms to 5.1-channel surround. When connecting a component with a built-in Dolby Digital decoder, you can enjoy more real audio presence.
DVD
A disc that contains up to 8 hours of moving pictures even though its diameter is the same as a CD. The data capacity of a single-layer and single-sided DVD, at 4.7 GB (Giga Byte), is 7 times that of a CD. Furthermore, the data capacity of a dual-layer and single-sided DVD is 8.5 GB, a single-layer and doublesided DVD 9.4 GB, and a dual-layer and double-sided DVD 17 GB.
The picture data uses the MPEG 2 format, one of the worldwide standards of digital compression technology. The picture data is compressed to about 1/40 of its original size. The DVD also uses the variable rate coding technology that changes the data to be allocated according to the status of the picture. The audio data is recorded in Dolby Digital (AC-3) as well as in PCM, allowing you to enjoy more real audio
presence. Furthermore, various advanced functions such as the
Furthermore, various advanced functions such as the multi-angle, multilingual, and Parental Control functions are provided with the DVD.
Multi-angle function
Various angles, or viewpoints of the video camera, for a scene are recorded on some DVDs.
Multilingual function
Several languages for the sound or sub-titles in a picture are recorded on some DVDs.
Parental Control
A function of the DVD for playback limitation of the disc by the age of the users according to the limitation level in each country. The limitation varies from disc to disc; when it is activated, playback is completely prohibited, violent scenes are skipped or replaced with other scenes and so on.
Playback Control (PBC)
Signals encoded on VIDEO CDs (Version 2.0) to control playback.
By using menu screens recorded on VIDEO CDs with PBC functions, you can enjoy playing simple interactive programs, programs with search functions, and so on.
Title
The longest sections of a picture or a music piece on a DVD; a movie, etc. for a picture piece on a video software or an album, etc. for a music piece on an audio software. Each title is assigned a title number enabling you to locate the title you want.
Track
Sections of a picture or a music piece on a CD or VIDEO CD. Each track is assigned a track number enabling you to locate the track you want.
VIDEO CD
A compact disc that contains moving pictures. The picture data uses the MPEG 1 format, one of the worldwide standards of digital compression technology. The picture data is compressed to about 1/140 of its original size. Consequently, a 12 cm VIDEO CD can contain up to 74 minutes of moving pictures.
VIDEO CDs also contain compact audio data. Sounds outside the range of human hearing are compressed while the sounds we can hear are not compressed. VIDEO CDs can hold 6 times the audio information of conventional audio CDs.
There are 2 versions of VIDEO CDs.
- Version 1.1: You can play only moving pictures and sounds.
- Version 2.0: You can play high-resolution still pictures and enjoy PBC functions.
This player conforms to both versions.
Index to Parts and Controls
Refer to the pages indicated in parentheses for details.
Front Panel

- 1 G (remote sensor) (6) Accepts the remote control signals.
- 2 POWER switch (10, 18, 26) Turns on and off the power of the player.
- 3 ON/STANDBY indicator (10, 18, 26) Lights in red in standby mode, changes to green when you turn on the power.
- ④ 合OPEN/CLOSE button (11, 19, 27) Opens or closes the disc tray.
- 5 PLAY button (10, 18, 26) Plays a disc.
- 6 IIPAUSE button (11, 19, 27) Pauses playing a disc.
- 7 STOP button (11, 19, 27, 36) Stops playing a disc.
- B I ← PREV button (12, 20, 28)Press to go back to the preceding chapter or track.
- 9 ►► NEXT button (12, 20, 28) Press to go to the next chapter or track.
- 10 ←/↑/↓/→ buttons Selects the items or settings.
- 11 ENTER button Executes the items or settings.
- 12 MENU button (42) Displays the menu on the TV screen to set or adjust the menu items.
- 13 Disc tray (10, 18, 26) Place a disc on the tray.
- 14 Front Panel Display (15, 22, 29) Indicates the playing time, etc.
- 15 DISPLAY button (15, 22, 29) Displays the current playing status on the TV screen.
- 16 TITLE button (13) Displays the title menu on the TV screen.
- 17 DVD MENU button (14) Displays the DVD menu on the TV screen.
- Image: The second sec
Rear Panel

1 LINE OUT (AUDIO 1, 2) connector (7)
Connects to the audio input connector on the TV or amplifier.
2 LINE OUT (VIDEO) connector (7)
Connects to the video input connector on the TV or monitor.
3 S VIDEO OUT connector (7)
Connects to the S video input connector on the TV or VCR.
4 S-LINK connector (9)
Connects to the S-link connector on an external component.
5 DIGITAL OUT (OPTICAL) connector (8)
Connects to an audio component using the optical cable.
6 DIGITAL OUT (COAXIAL) connector (8)
Connects to an audio component using the coaxial cable.

- ① ▲OPEN/CLOSE button (11, 19, 27) Opens or closes the disc tray.
- 2 Number buttons (12, 20, 28) Selects the items or settings.
- 3 CLEAR button (12, 20, 28) Cancels the number selected with the number buttons
- 4 >PLAY button (10, 18, 26) Plays a disc.
- 5 ► PREV/NEXT buttons (12, 20, 28) Press to go to the next chapter or track or to go back to the preceding chapter or track.
- (6) € / € SCAN buttons (12, 20, 28) Locates a point while monitoring the picture or sound.
- 7 ANGLE CHANGE button (38) Changes the angles when playing a DVD.
- 8 AUDIO CHANGE button (37) Changes the sound while playing a DVD or VIDEO CD or AUDIO CD.
- 9 DISPLAY button (15, 22, 29) Displays the current playing status on the TV screen.
- 10 TITLE button (13) Displays the title menu on the TV screen

11 & RETURN button (21)
Press to return to the preceding selection screen while playing a VIDEO CD with PBC functions.
12 TV POWER button (41)
Turns the TV power on and off.
13 POWER button (10, 18, 26) Turns on and off the power of the player.
14 ◄ I / I ► SLOW buttons (11, 19) Plays a disc in slow motion.
- 15 ◄II / II ► STEP buttons (11, 19) Plays a disc frame by frame.
- 16 SEARCH MODE button (12, 20, 28) Press to select the unit for search (track, index, etc.)
- TIME button (16, 24, 30) Displays the playing time of the disc, etc. on the front panel display.
- 18 ENTER button (13) Executes the items or settings
- 19 IIPAUSE button (11, 19, 27) Pauses playing a disc.
- 20 ■STOP button (11, 19, 27) Stops playing a disc.
- [21] </>→ buttons (11) Plays a disc at about twice the normal speed.
- 22 SUB-TITLE CHANGE button (38) Changes the sub-titles when playing a DVD.
- 23 SUB-TITLE ON/OFF button (38) Turns the sub-titles on and off when playing a DVD.
- MENU button (42)Displays the menu on the TV screen to set or adjust the menu items.
- 25 DVD MENU button (14) Displays the DVD menu on the TV screen.
- 26 ENTER button Executes the items or settings.
- 27 ←/↑/↓/→ buttons Selects the items or settings.
- 28 TV operation buttons (41) Controls Sony TVs.
Language Code List
For details, see page 45.
| Code | Language | Code | Language | Code | Language | Code | Language |
|---|---|---|---|---|---|---|---|
| 1027 | Afar | 1186 | Scots Gaelic | 1350 | Malayalam | 1513 | Siswati |
| 1028 | Abkhazian | 1194 | Galician | 1352 | Mongolian | 1514 | Sesotho |
| 1032 | Afrikaans | 1196 | Guarani | 1353 | Moldavian | 1515 | Sundanese |
| 1039 | Amharic | 1203 | Gujarati | 1356 | Marathi | 1516 | Swedish |
| 1044 | Arabic | 1209 | Hausa | 1357 | Malay | 1517 | Swahili |
| 1045 | Assamese | 1217 | Hindi | 1358 | Maltese | 1521 | Tamil |
| 1051 | Aymara | 1226 | Croatian | 1363 | Burmese | 1525 | Telugu |
| 1052 | Azerbaijani | 1229 | Hungarian | 1365 | Nauru | 1527 | Tajik |
| 1053 | Bashkir | 1233 | Armenian | 1369 | Nepali | 1528 | Thai |
| 1057 | Byelorussian | 1235 | Interlingua | 1376 | Dutch | 1529 | Tigrinya |
| 1059 | Bulgarian | 1239 | Interlingue | 1379 | Norwegian | 1531 | Turkmen |
| 1060 | Bihari | 1245 | Inupiak | 1393 | Occitan | 1532 | Tagalog |
| 1061 | Bislama | 1248 | Indonesian | 1403 | (Afan) Oromo | 1534 | Setswana |
| 1066 | Bengali; Bangla | 1253 | Icelandic | 1408 | Oriya | 1535 | Tonga |
| 1067 | Tibetan | 1254 | Italian | 1417 | Punjabi | 1538 | Turkish |
| 1070 | Breton | 1257 | Hebrew | 1428 | Polish | 1539 | Tsonga |
| 1079 | Catalan | 1261 | Japanese | 1435 | Pashto; Pushto | 1540 | Tatar |
| 1093 | Corsican | 1269 | Yiddish | 1436 | Portuguese | 1543 | Twi |
| 1097 | Czech | 1283 | Javanese | 1463 | Quechua | 1557 | Ukrainian |
| 1103 | Welsh | 1287 | Georgian | 1481 | Rhaeto-Romance | 1564 | Urdu |
| 1105 | Danish | 1297 | Kazakh | 1482 | Kirundi | 1572 | Uzbek |
| 1109 | German | 1298 | Greenlandic | 1483 | Romanian | 1581 | Vietnamese |
| 1130 | Bhutani | 1299 | Cambodian | 1489 | Russian | 1587 | Volapük |
| 1142 | Greek | 1300 | Kannada | 1491 | Kinyarwanda | 1613 | Wolof |
| 1144 | English | 1301 | Korean | 1495 | Sanskrit | 1632 | Xhosa |
| 1145 | Esperanto | 1305 | Kashmiri | 1498 | Sindhi | 4665 | Yoruba |
| 1149 | Spanish | 1307 | Kurdish | 1501 | Sangho | 1684 | Chinese |
| 1150 | Estonian | 1311 | Kirghiz | 1502 | Serbo-Croatian | 1697 | Zulu |
| 1151 | Basque | 1313 | Latin | 1503 | Singhalese | 1703 | Not specified |
| 1157 | Persian | 1326 | Lingala | 1505 | Slovak | ||
| 1165 | Finnish | 1327 | Laothian | 1506 | Slovenian | ||
| 1166 | Fiji | 1332 | Lithuanian | 1507 | Samoan | ||
| 1171 | Faroese | 1334 | Latvian; Lettish | 1508 | Shona | ||
| 1174 | French | 1345 | Malagasy | 1509 | Somali | ||
| 1181 | Frisian | 1347 | Maori | 1511 | Albanian | ||
| 1183 | Irish | 1349 | Macedonian | 1512 | Corbian |
Index
Index
Α
A↔B Repeat 33 Adjusting volume 10, 18, 26 Angle 38 AUDIO ATT 44 AUDIO DRC 43 AUTO PLAY 43 Auto pause 16, 24 Auto Power Off 10, 18, 26, 48
В
Batteries 6 Bit rate 16, 49
С
CD 26 Changing angles 38 sound 37 sub-titles 38 Chapter 5, 49 Connecting 6 Continuous play CD 26 DVD 10 VIDEO CD 18 CUSTOM SETUP 43
D, E
Display front panel display 16, 24, 30 on-screen display 15, 22, 29 Digital output 12, 45 Dolby Digital (AC-3) 8, 49 DOLBY DIGITAL MODE 44 DOWNMIX 45 DVD 10, 49 DVD menu 14 DVD menu 14 DVD menu language 45
F, G
Fast Forward 12, 20, 28 Fast Reverse 12, 20, 28 Front panel display CD 30 DVD 16 VIDEO CD 24
Η
Handling discs 46 Hi-speed search 12, 20, 28 Hooking up 6
I, J, K
INITIAL SETUP 44
L
LETTER BOX 44 Locating a specific point 12, 20, 28 by monitoring 12, 20, 28 by observing the TV screen 12, 20, 28
M, N
Menu CUSTOM SETUP 43 INITIAL SETUP 44 PLAY MODE 43 usage 42 Multi-angle 49 Multilingual 49
0
On-screen display CD 29 DVD 15 language 45 VIDEO CD 22
P, Q
PAN SCAN 44 Parental control 39, 49 PBC functions 21 PBC Playback 5, 21, 49 Playback Continuous Play 10, 18, 26 Program Play 34 Repeat Play 32 Shuffle Play 34 PLAY MODE 43 Program Play 34
R
Remote control 6, 41 Repeating a specific portion 33 current title, chapter or track 32 disc 32 Resume Play 36
5
Scene 5 Scene Search 20 Searching. See Locating. Shuffle Play 34 Slow-motion Play 11, 19 S video output 7 Sub-titles changing 38 turning on and off 37
Т
Title 5, 49 Title menu 13 Track 5, 49 Troubleshooting 47
U
Usable discs 4
V, W, X, Y, Z
VIDEO CD 18, 49
Downloaded from www.Manualslib.com manuals search engine
AVERTISSEMENT
Pour prévenir tout risque d'incendie ou d'électrocution, garder cet appareil à l'abri de la pluie et de l'humidité.
Pour prévenir tout risque d'électrocution, ne pas ouvrir le boîtier. Confier l'entretien de cet appareil exclusivement au personnel qualifié.
ATTENTION
L'utilisation d'instruments optiques avec cet appareil augmente les risques pour les yeux. Comme le faisceau laser utilisé par ce lecteur CD/DVD est dangereux pour les yeux, ne tentez pas de démonter le boîtier. Confiez l'entretien de cet appareil exclusivement au personnel qualifié.

Cette étiquette se trouve sur le boîtier de protection laser à l'intérieur de l'appareil.
ATTENTION
POUR PREVENIR LES CHOCS ELECTRIQUES, NE PAS UTILISER CETTE FICHE POLARISEE AVEC UN PROLONGATEUR, UNE PRISE DE COURANT OU UNE AUTRE SORTIE DE COURANT, SAUF SI LES LAMES PEUVENT ETRE INSEREES A FOND SANS EN LAISSER AUCUNE PARTIE A DECOUVERT.
Félicitations !
Nous vous remercions d'avoir fait l'acquisition de ce lecteur CD/DVD Sony. Avant de faire fonctionner cet appareil, nous vous recommandons de lire attentivement le présent mode d'emploi et de le conserver pour toute référence ultérieure.
TABLE DES MATIERES
| Ce lecteur peut reproduire les disques suivants | ||
|---|---|---|
| Préparation | ||
| Déballage | 6 | |
| Raccordement du système |
0
6 |
|
| Réglages indispensables avant l'utilisation | ||
| Opérations de base | ||
| 10 | ||
| Lecture d'un CD vidéo | ||
| Lecture d'un CD | ||
Lecture de disques dans différents modes
| Lecture de plages répétée (lecture répétée) | . 32 |
|---|---|
| Lecture dans un ordre quelconque (lecture aléatoire) | 34 |
| Création de programmes personnalisés (lecture programmée) | 34 |
| Reprise de la lecture là où vous avez stoppé un disque (reprise de lecture) | 36 |
| Changement des sons | 37 |
| Activation/désactivation des sous-titres | 37 |
| Changement des sous-titres | 38 |
| Changement des angles | 28 |
| Limitations de lecture par enfants (contrôle parental) | 20 |
| Commander le téléviseur avec la télécommande fournie | 41 |
Sélections et réglages
| Utilisation du menu | 42 |
|---|---|
| Sélections pour la lecture (MODE DE LECTURE) | 12 |
| Réglages de l'affichage et du son (REGLAGE PERSONNALISE) | 43 |
| Réglages initiaux (REGLAGES INITIAUX) | 44 |
Informations complémentaires
| Précautions | 46 |
|---|---|
| Remarques sur les disques | 40 |
| Dépannage |
40
17 |
| Spécifications | |
| Glossaire | 40 |
| Index des composants et des commandes | |
| Liste des codes de langues | |
Index.
A propos de ce mode d'emploi
Les instructions contenues dans le present mode d'emploi concernent le modèle DVP-S3000.
Conventions
• Les instructions fournies dans ce mode d'emploi portent sur les commandes du lecteur.
Vous pouvez également utiliser les touches de la télécommande si elles portent le même nom ou un nom similaire à celles du lecteur.
Les icônes à droite apparaissent dans ce mode d'emploi :
| lcôn | Signification |
|---|---|
|
Indique que vous pouvez uniquement
utiliser la télécommande pour effectuer l'opération. |
|
| ţ. |
Indique un conseil ou une astuce facilitant
l'opération envisagée. |
| DVD |
Indique les fonctions pour les DVD
VIDEO. |
| VIDEO | Indique les fonctions pour les CD vidéo. |
| CD | Indique les fonctions pour les CD audio. |
Ce lecteur peut reproduire les disques suivants
| DVD VIDEO | CD vidéo | CD audio | ||||
|---|---|---|---|---|---|---|
| Logo . | ||||||
| Contenu | Audio + vidéo | Audio | + vidéo | Au | dio | |
| Format de disque | 12 cm | 8 cm | 12 cm | 8 cm | 12 cm |
8 cm
(CD single) |
| Durée de lecture |
-Approx.
4 h (DVD simple face)/ approx. 8 h (DVD double face) |
Approx.
80 min. (DVD simple face)/approx. 160 min. (DVD double face) |
74 min. | 20 min. | 74 min. | 20 min. |
|
Pages de références
pour les opérations de base |
Pages 10 à 17 | Pages | 18 à 25 | Pages | 26 à 31 | |
Le logo "DVD VIDEO" est une marque déposée.
Ce lecteur satisfait aux spécifications du système couleur NTSC. Vous ne pouvez pas reproduire des disques enregistrés dans un autre système couleur tels que les systèmes PAL et SECAM.
Code régional des DVD pouvant être reproduits
Les indications de code régional tels que apparaissent sur l'étiquette de certains DVD pour indiquer le type de lecteur pouvant reproduire les disques. A moins que "1" ne soit repris dans les indications ou apparaisse sur l'étiquette du DVD, vous ne pouvez pas reproduire les disques sur ce lecteur. Si vous tentez de reproduire les DVD, le message "LECTURE DE CE DISQUE IMPOSSIBLE PAR LA LIMITE DE ZONE" apparaîtra sur l'écran du téléviseur. Suivant les DVD, aucune indication du code régional ne peut être étiquetée même si la lecture du DVD est interdite par la limite de zone.
Remarque sur les opérations de lecture des DVD et des CD vidéo
Certaines opérations de lecture des DVD et des CD vidéo peuvent être intentionnellement fixées par les producteurs de logiciel. Etant donné que ce lecteur reproduit les DVD et les CD vidéo en fonction du contenu du disque que les producteurs de logiciel ont conçu, certaines caractéristiques de lecture peuvent ne pas être disponibles.
4 F
Termes importants concernant les disques
• Titre
I es sections les plus longues d'une image ou d'une pièce musicale sur un DVD: un film, etc. pour une portion de film sur un support vidéo ou un album, etc. pour une pièce musicale sur un support audio. Chaque titre est doté d'un numéro de titre qui permet de le localiser.
• Chapitre
Section d'une image ou d'une pièce musicale d'un DVD, plus petite qu'un titre. Un titre est composé de plusieurs chapitres. Chaque chapitre est doté d'un numéro de chapitre qui permet de le localiser. Suivant les disques, aucun chapitre ne peut être enregistré.
• Plage
Section d'une image ou d'une pièce musicale d'un CD vidéo ou d'un CD: Chaque plage est dotée d'un numéro de plage qui permet de la localiser.

• Index
Un numéro qui divise une plage en certaines sections pour localiser le point désiré sur un CD vidéo ou un CD. Suivant les disques, aucun index ne peut être enregistré.
• Scène
Sur un CD vidéo avec fonctions PBC, les écrans de menu, les images animées et les images fixes sont divisées en sections appelées "scènes". Chaque scène reçoit un numéro de scène vous permettant de localiser la scène désirée.
Remarque sur la commande de lecture (PBC) (CD vidéo)
Ce lecteur satisfait aux normes CD vidéo Ver. 1.1 et Ver. 2.0. Vous pouvez activer deux modes de lecture en fonction du type de disque.
| Type de disque | Vous pouvez |
|---|---|
|
CD vidéo sans
fonctions PBC (disques Ver. 1.1) |
Visionner une source vidéo (images
animées) et écouter de la musique. |
|
CD vidéo avec
fonctions PBC (disques Ver. 2.0) |
Exploiter des logiciels interactifs à
l'aide des écrans de menu affichés sur l'écran du téléviseur (lecture PBC) en plus des fonctions de lecture vidéo des disques Ver. 1.1. Vous pouvez également visualiser des images fixes à haute résolution enregistrées sur un disque. |
Disques que le lecteur ne peut reproduire
Le lecteur ne peut pas reproduire des disques autres que ceux repris dans la liste du tableau de la page 4, tels que les CD-ROM, y compris les PHOTO CD, les sections de données dans les CD-EXTRA et les DVD-ROM.
Certains logiciels DVD incluent un encodage spécial pour déclencher le signal de protection contre la copie à partir de la sortie NTSC de ce lecteur. Si l'image reproduite d'un certain logiciel DVD apparaît parasitée, il est possible que ce phénomène soit dû à l'incompatibilité entre votre affichage et les signaux de protection contre la copie déclenchés par cet encodage dans le logiciel DVD.
Ce produit intègre une technologie de protection des droits d'auteur qui est protégée par des brevets américains et d'autres droits sur la propriété intellectuelle détenus par Macrovision Corporation et d'autres propriétaires de ces droits. L'utilisation de cette technologie de protection des droits d'auteur doit faire l'objet d'une autorisation par Macrovision Corporation et est exclusivement destinée à une utilisation dans le cercle familial et à d'autres systèmes de visualisation restreints, sauf autorisation contraire de Macrovision Corporation. Toute étude ingénieuriale inverse
Déballage
Vérifiez si vous avez les accessoires suivants :
- Cordon de connexion audio/vidéo/S-LINK (1)
- Câble S-VIDEO (1)
- Télécommande RMT-D100U (1)
- Piles Sony R6 (AA) (NS) (2)
Installation des piles dans la télécommande
Vous pouvez commander le lecteur au moyen de la télécommande fournie. Introduisez deux piles R6 (AA) en en faisant correspondre les pôles (+) et (–). Lorsque vous utilisez la télécommande, dirigez-la vers le capteur de télécommande 🖬 du lecteur.

Vous pouvez commander des téléviseurs Sony identifiés par le logo B à l'aide de la télécommande fournie. Voir page 42.
Quand faut-il remplacer les piles ?
Dans des conditions d'utilisation normales, les piles devraient durer environ six mois. Lorsque la télécommande n'agit plus sur le lecteur, remplacez simultanément les deux piles.
Remarques
- N'abandonnez pas la télécommande dans une source de chaleur importante ou dans un endroit humide.
- Ne laissez s'introduire aucun corps étranger dans le boîtier de la télécommande et en particulier lors du remplacement des piles.
- N'exposez pas le capteur de télécommande à la lumière directe du soleil ou d'un luminaire. Vous risquez sinon de provoquer un dysfonctionnement.
- Si vous n'avez pas l'intention d'utiliser la télécommande pendant une période prolongée, retirez les piles afin de prévenir tout risque de détérioration engendrée par une fuite des piles et la corrosion subséquente.
Raccordement du système
Présentation
Cette section décrit le raccordement du lecteur CD/ DVD à un téléviseur (doté de prises d'entrée audio/ vidéo) et/ou d'un amplificateur. Vous ne pouvez pas raccorder ce lecteur à un téléviseur sans le connecteur d'entrée vidéo. Avant de réaliser les connexions, n'oubliez pas de mettre hors tension tous les appareils concernés.
Pour écouter le son via les haut-parleurs du téléviseur

Pour écouter le son via des haut-parleurs raccordés à un amplificateur
Lecteur CD/DVD 000 Vers une prise Téléviseu OUT OUT 100-Vers l'entrée vidéo Vers l'entrée audio Vers une prise plificateur murale (secteur) 🗠 : Sens du signal Vers une prise murale (secteur)
Câbles de connexion indispensables


Raccordement
Lors du raccordement des câbles, assurez-vous que le code de couleur des fiches correspond à celui des prises appropriées sur les différents appareils raccordés : le jaune (vidéo) sur le jaune, le rouge (droit) sur le rouge et le blanc (gauche) sur le blanc. Assurezvous de la qualité des connexions afin de prévenir les bruits de souffle et les parasites.
■ Pour écouter le son via les haut-parleurs du téléviseur Raccordez le téléviseur à l'aide du cordon de connexion audio/vidéo/S-link (fourni).

Pour écouter le son via des haut-parleurs raccordés à un amplificateur
Raccordez le téléviseur à l'aide d'un cordon de connexion vidéo (non fourni) et l'amplificateur à
· · l'aide d'un câble de connexion audio (non fourni).

Procédez au même raccordement si votre amplificateur est de type "Pro Logic".
Remarques
Ne raccordez pas ce lecteur à une platine
vidéo. Si vous visualisez les images sur votre téléviseur après avoir réalisé les branchements illustrés à droite,

l'image apparaîtra parasitée. • En fonction du téléviseur ou de l'amplificateur, la distorsion
du son peut se produire en raison de l'importance du niveau de sortie audio. Dans ce cas, mettez "ATT. AUDIO" dans "REGLAGE PERSONNALISE" sur "OUI" dans le menu. Pour plus de détails, reportez-vous à la page 44.
Si votre téléviseur est doté d'un connecteur d'entrée S-VIDEO
Raccordez l'appareil via le connecteur S VIDEO OUT à l'aide du câble S-VIDEO (fourni) au lieu du cordon de connexion vidéo. Vous obtiendrez ainsi une image de meilleure qualité.

(suite page suivante)
Fabriqué sous licence de Dolby Laboratories Licensing Corporation. DOLBY, le symbole double-D DD, "AC-3" et PRO LOGIC sont des marques de Dolby Laboratories Licensing Corporation.
Préparation

Raccordez l'appareil via le connecteur DIGITAL OUT OPTICAL ou COAXIAL à l'aide d'un câble optique ou coaxial (non fourni).
Pendant la lecture d'un DVD, réglez "SORTIE NUMERIQUE DVD" dans "REGLAGES INITIAUX" sur "PCM" dans le menu (page 45).
Pendant la lecture d'un CD vidéo, réglez "SORTIE NUM CD VIDEO" dans "REGLAGES INITIAUX" sur "OUI" dans le menu (page 45).
Si vous utilisez un câble optique

Retirez le capuchon et branchez le câble optique.

Si vous utilisez un câble coaxial
Lecteur CD/DVD
Câble coaxial =____________________________________
Amplificateur doté d'un connecteur numérique, platine MD, platine DAT, etc.

Remarques
- Consultez les instructions fournies avec l'appareil à raccorder.
- Vous ne pouyez pas effectuer d'enregistrements audio numériques de disques enregistrés dans le format Dolby Digital (AC-3) à l'aide d'une platine MD ou d'une platine DAT.
Lors du raccordement ci-dessus, ne réglez pas "SORTIE NUMERIQUE DVD" dans "REGLAGES INITIAUX" sur "NUMER AC-3". Sinon, un son de forte amplitude sera brusquement diffusé par les haut-parleurs, risquant ainsi de provoquer des troubles de l'ouïe ou des dommages aux haut-parleurs.
Si vous disposez d'un appareil numérique doté d'un décodeur Dolby Digital intégré
Raccordez l'appareil via le connecteur DIGITAL OUT OPTICAL ou COAXIAL à l'aide du câble optique ou coaxial (non fourni). Si vous raccordez un appareil doté d'un décodeur Dolby Digital intégré, le lecteur peut reproduire des DVD enregistrés suivant le format Dolby Digital (AC-3) et restituer une atmosphère qui vous donne l'impression de vous trouver dans une salle de cinéma ou de concert.
Dans le menu, réglez "SORTIE NUMERIQUE DVD" dans "REGLAGES INITIAUX" sur "NUMER AC-3" (page 45).
Si vous utilisez un câble optique

Retirez le capuchon et branchez le câble optique.

Si vous utilisez un câble coaxial

Appareil doté d'un décodeur Dolby

Remarque
Consultez les instructions fournies avec l'appareil à raccorder.
8 ₽
Ś Si votre téléviseur est doté d'un connecteur S-LINK
Vous pouvez commander le lecteur CD/DVD au départ du téléviseur connecté. Raccordez le téléviseur via le connecteur S-LINK à l'aide du câble S-LINK (fourni). Consultez les instructions fournies avec le téléviseur à raccorder.


Réglages indispensables avant l'utilisation
Certains réglages sont nécessaires pour que le lecteur puisse fonctionner correctement avec le téléviseur ou tout autre appareil auquel il est raccordé.
Pour plus de détails sur l'utilisation du menu, voir page 42.
Pour plus de détails sur chaque option de menu, voir pages 43 à 45.
■ Si vous raccordez le lecteur à un téléviseur à écran large Dans le menu, réglez "TYPE DE TELE" dans
"REGLAGES INITIAUX" sur "16:9".
Si vous raccordez le lecteur à un téléviseur conventionnel
Dans le menu, réglez "TYPE DE TELE" dans "REGLAGES INITIAUX" sur "4:3".
Pour écouter le son stéréo diffusé par des haut-parleurs raccordés à un amplificateur normal ou via les hautparleurs du téléviseur
Dans le menu, réglez "MIXAGE" dans "REGLAGES INITIAUX" sur "NORMAL".
Pour écouter le son stéréo diffusé par des haut-parleurs raccordés à un amplificateur (ou un téléviseur) doté d'une fonction Dolby Pro Logic Surround
Dans le menu, réglez "MIXAGE" dans "REGLAGES INITIAUX" sur "SPATIAL".
Pour écouter le son diffusé par des haut-parleurs raccordés à un amplificateur doté d'un connecteur numérique ou pour sortir le son à un appareil numérique comme une platine DAT ou MD
Pendant la lecture d'un DVD, réglez "SORTIE NUMERIQUE DVD" dans "REGLAGES INITIAUX" sur "PCM" dans le menu.
Pendant la lecture d'un CD vidéo, réglez "SORTIE NUM CD VIDEO" dans "REGLAGES INITIAUX" sur "OUI" dans le menu.
■ Si vous raccordez le lecteur à un appareil numérique doté d'un décodeur Dolby Digital intégré
Dans le menu, réglez "SORTIE NUMERIQUE DVD" dans "REGLAGES INITIAUX" sur "NUMER AC-3".
"REGLAGES INITIAUX" comprend également d'autres options telles que "FORMAT D'IMAGE VIDEO" et "LANGUE ECRANS". Pour plus de détails, voir page 45.
Opérations de base
Lecture d'un DVD

CD vidéo ou d'un CD est différente de celle d'un DVD. Pour plus détails sur la lecture d'un CD vidéo, voir les pages 18 à 25. Pour plus détails sur la lecture d'un CD, voir les pages 26 à 31.
le lecteur ni la télécommande pendant plus de 30 minutes et qu'aucune lecture n'est en cours, l'appareil se mettra automatiquement hors tension (arrêt automatique).
Consultez les instructions fournies avec le disque
Šý Si "RESUME" apparaît dans la fenêtre d'affichage du panneau frontal
Vous pouvez reprendre la lecture à l'endroit où vous avez stoppé le DVD. Pour activer la lecture au début du disque, voir page 36.
Remarque
Suivant les DVD, il se peut que vous ne puissiez pas activer la fonction de reprise de lecture.
- Si vous voulez changer la vitesse de lecture durant une lecture au ralenti Vous avez le choix entre deux vitesses : RALENTI 1 (approx. 1/15e de la vitesse
- normale) et RALENTI 2 (approx. 1/30e). Chaque fois que vous appuyez sur ◄ ou ▶ , l'indication change selon la séquence suivante : RALENTI 1 ↔ RALENTI 2
Remarques
- Suivant les DVD, il se peut que vous ne puissiez pas exécuter certaines opérations décrites à droite.
- Lorsque vous reproduisez un DVD à une vitesse double de la normale dans un sens ou dans l'autre, le son de l'image est sorti via les connecteurs LINE OUT (AUDIO 1, 2). Le son est plus bas que celui à la vitesse normale. Dans ce cas, aucun son n'est transmis via les connecteurs DIGITAL OUT OPTICAL et COAXIAL.
Pour arrêter la lecture
Appuyez sur ■ .


Au cours de lecture
| Pour | Appuyez sur | |
|---|---|---|
| Activer une pause | II | |
| Reprendre la lecture après une pause | ∎ ou ⊳ | |
| Lecture image par image | ∢II ou II ► | |
| Lecture au ralenti | <[ 0u ]► | |
| Lecture à une vitesse double de la normale |
|
|
| Arrêter la lecture et retirer le disque |
Pour revenir au mode de lecture continue
Appuyez sur ⊳.

Localisation d'un titre, d'un chapitre ou d'un passage déterminé
Que sont un titre et un chapitre ? Voir page 5.
Si vous voulez changer la vitesse de recherche Vous awez le choix entre
Vous awez le choix entre deux vitesses: AV RAP1 ou REMB1 (approx. 10 fois la vitesse normale) et AV RAP2 ou REMB2 (approx. 30 fois). Chaque fois que vous appuyez sur ⊕ ou ⊕, l'indication change selon la séquence suivante: AV RAP1 (REMB1) ↔ AV RAP2 (REMB2)
R
``Ç` Si vous avez commis une erreur
Appuyez sur CLEAR, puis sur la touche numérique correcte.
Chaque fois que vous appuyez sur SEARCH MQDE "RECHERCHE TITRE", "RECHERCHE CHAPITRE"
et "RECHERCHE DUREE" apparaissent sur l'écran du téléviseur.
Remarque
Suivant les DVD, il se peut que vous ne puissiez pas exécuter certaines opérations décrites à droite.
| our | Appuyez sur |
|---|---|
|
asser au chapitre suivant en
node de lecture continue |
▶▶ |
|
evenir au chapitre précédent
n mode de lecture continue |
- |
| électionner un chapitre | Les touches numériques pour sélectionner le numéro du chapitre et puis sur ENTER ou D. |
| électionner un titre |
|
|
ocaliser un passage à l'aide du
ode temporel |
|
|
ocaliser un passage tout en
ontrôlant l'image (recherche) |
|
12⊬
Remarques
- Suivant les DVD, il se peut que vous ne puissiez pas sélectionner le titre.
- Suivant les DVD, un "menu de titres" peut s'appeler simplement un "menu" ou un "titre" dans les instructions fournies avec le disque. "Appuyez sur ENTER." à
- l'étape 3 peut également apparaître sous la forme
- "Appuyez sur SELECT."
Utilisation du menu de titres
Un DVD est divisé en longues sections d'images ou musicales appelées "titres". Lorsque vous reproduisez un DVD contenant plusieurs titres, vous pouvez sélectionner le titre de votre choix via le menu de titres.

Appuyez sur TITLE.
Le menu de titres apparaît sur l'écran du téléviseur. Le contenu du menu varie d'un disque à un autre.
| 1 | TITRE 1 | |
|---|---|---|
| 2 | TITRE 2 | |
| 3 | TITRE 3 | |
| 4 | TITRE 4 | |
Appuyez sur ←/↑/↓/→ pour sélectionner le titre que vous voulez reproduire.
Suivant les disques, vous pouvez utiliser les touches numériques pour sélectionner le titre.
Appuyez sur ENTER.
2
3
Le lecteur démarre la lecture du titre sélectionné.

Vous voulez sélectionner la langue pour le menu DVD Changez les réglages des paramètres via "REGLAGES INITIAUX" dans le menu normal (voir page 45).
Remarque
Suivant les DVD, un "menu DVD" peut s'appeler simplement un "menu" dans les instructions fournies avec le disque. "Appuyez sur ENTER." à l'étape 4 peut également apparaître sous la forme "Appuyez sur SELECT."
Utilisation du menu DVD
Certains DVD vous permettent de sélectionner le contenu du disque à l'aide du menu. Lorsque vous reproduisez ces DVD, vous pouvez sélectionner une langue pour les sous-titres, une langue pour le son, etc., au moyen du menu DVD.

Appuyez sur DVD MENU.
Le menu DVD apparaît sur l'écran du téléviseur. Le contenu du menu varie d'un disque à un autre.
| • | PARAMETRE 1 |
|---|
- · PARAMETRE 2
- · PARAMETRE 3
- · PARAMETRE 4
2 Appuyez sur ←/↑/↓/→ pour sélectionner le paramètre que vous voulez modifier.
Suivant les disques, vous pouvez utiliser les touches numériques pour sélectionner le paramètre.

Pour changer d'autres paramètres, répétez l'étape 2.
Appuyez sur ENTER.
14F
Utilisation de l'affichage sur écran du téléviseur
Vous pouvez vérifier le statut de fonctionnement du lecteur et les informations relatives au disque au moyen de l'affichage sur l'écran du téléviseur.


Appuyez sur DISPLAY.
Chaque fois que vous appuyez sur la touche, l'écran d'affichage change selon la séquence suivante :

Informations affichées en mode d'affichage sur écran 1
Pendant la lecture d'un disque, le numéro du titre en cours, le numéro du chapitre en cours et la durée de lecture sont toujours affichés.

■ Informations affichées en mode d'affichage sur écran 2


``Qu'est-ce qu'un angle ? Voir page 38.
Que sont un titre et un chapitre ? Voir page 5.
Qu'est-ce qu'une langue pour le son ? Voir page 37.
Qu'est-ce qu'une langue pour les sous-titres ? Voir page 37.
Remarque
Suivant les DVD, il est possible que certaines informations n'apparaissent pas sur l'écran du téléviseur.
* Chaque fois que vous appuyez sur TIME, les informations. changent comme indiqué cidessous.
Durée de lecture du chapitre en cours
Durée restante du chapitre en cours
Durée de lecture du titre en cours
Durée restante du – titre en cours
Opérations de base

Qu'est-ce qu'un débit binaire? Le débit binaire fait référence à la quantité de données vidéö par seconde sur un disque. Plus le débit binaire est élevé, plus la quantité de données est importante. Toutefois, cela ne signifie pas toujours que vous obtenez des images de meilleure qualité.
■ Informations affichées en mode d'affichage sur écran 3
Pendant la lecture d'un disque, le débit binaire approximatif de l'image de lecture est toujours affiché.
| DEBIT BIN |
0
IAIRE ennemi |
10Mbps |
|---|---|---|
Débit binaire de l'image de lecture
■ Informations affichées en mode d'affichage sur écran désactivé
Aucune information n'est affichée. (Les messages, etc., seront affichés.)
Utilisation de la fenêtre d'affichage du panneau frontal
Vous pouvez vérifier les informations relatives au disque telles que le nombre total de titres ou la durée restante en utilisant la fenêtre d'affichage du panneau frontal.

■ Informations affichées pendant la lecture d'un disque

Vérification de la durée restante
Chaque fois que vous appuyez sur TIME pendant la lecture d'un disque, l'affichage change comme indiqué dans le tableau ci-dessous. Les informations de temps dans le mode d'affichage sur écran 1 ou 2 changent chaque fois que vous appuyez sur TIME.
Remarque
Suivant les DVD, le numéro du chapitre ou le temps peuvent ne pas apparaître.
|
Durée de lecture et numéro
du chapitre en cours |
|
|---|---|
|
Durée restante du
chapitre en cours |
|
|
Durée de lecture et numéro
du titre en cours |
Appuyez sur TIME |
|
Durée restante du
titre en cours |
Appuyez sur TIME |
| L | Appuyez sur TIME |
Opérations de base

Lecture d'un CD vidéo

La procédure d'utilisation d'un DVD ou d'un CD est différente de celle d'un CD vidéo. Pour plus détails sur la lecture d'un DVD, voir les pages 10 à 17. Pour plus détails sur la lecture d'un CD, voir les pages 26 à 31.
Vous pouvez mettre le lecteur sous tension au moyen de la télécommande
Appuyez sur POWER quand l'indicateur ON/STANDBY du panneau frontal est allumé en rouge.
Après avoir exécuté l'étape 4 Suivant les CD vidéo, il se peut que l'écran de menu apparaisse sur l'écran du téléviseur. Vous pouvez reproduire le disque en mode interactif en suivant les instructions de l'écran de menu. (L'ecture PBC, voir page 21.)
Remarque
Si vous ne faites pas fonctionner le lecteur ni la télécommande pendant plus de 30 minutes et qu'aucune lecture n'est en cours, l'appareil se mettra automatiquement hors tension (arrêt automatique).
Consultez les instructions fournies avec le disque.
Effectuez les réglages sur votre téléviseur.
Mettez le téléviseur sous tension et sélectionnez l'entrée vidéo de façon à pouvoir visionner les images de ce lecteur.
Si vous utilisez un amplificateur
Mettez l'amplificateur sous tension et sélectionnez la position appropriée de façon à pouvoir écouter le son de ce lecteur.
Appuyez sur POWER pour mettre le lecteur sous tension.
L'indicateur ON/STANDBY (rouge) se change en vert et la fenêtre d'affichage du panneau frontal s'illumine.

Appuyez sur ≙ et placez le disque sur le plateau de lecture.

Avec la face imprimée vers le haut
Δ
Appuyez sur ⊳.
Le plateau de lecture se referme et le lecteur lance la lecture (lecture continue). Réglez le volume sur le téléviseur ou sur l'amplificateur.
18
Ši "RESUME" apparaît dans la fenêtre d'affichage du panneau frontal
Vous pouvez reprendre la lecture à l'endroit où vous avez stoppé le CD vidéo. Pour activer la lecture au début du disque, voir page 36.
ö
Si vous voulez changer la
lecture au ralenti Vous avez le choix entre deux vitesses : RALENTI 1 et .RALENTI 2. Chaque fois que vous appuyez sur ▶► , l'indication change selon la séquence suivante :
vitesse de lecture durant une
RALENTI 1 ↔ RALENTI 2
Pour arrêter la lecture
Appuyez sur 🔳.


Au cours de lecture
| Pour . | Appuyez sur | • • |
|---|---|---|
| Activer une pause | l I | |
| Reprendre la lecture après une pause | 🖬 ou 🗁 | |
| Lecture image par image | II ► | |
| Lecture au ralenti | ► | |
| Arrêter la lecture et retirer le disque |
Pour revenir au mode de lecture continue
Appuyez sur ⊳.
Downloaded from www.Manualslib.com manuals search engine
Opérations de base


Sélectionner un index en mode
démarrer la lecture d'un CD VIDEO doté de fonctions PBC
et pendant la lecture PBC
(recherche de scène)
Qu'est-ce qu'une plage ? Voir page 5.
Ou'est-ce gu'un index? Voir page 5.
Qu'est-ce qu'une scène? Voir page 5.
Si vous voulez changer la vitesse de recherche Vous avez le choix entre deux vitesses: AV RAP1 ou REMB1 et AV RAP2 ou REMB2. Chaque fois que vous appuyez sur 🖲 ou 🖻, l'indication change selon la séquence suivante: AV RAP1 (REMB1) ↔ AV RAP2 (REMB2)
Si vous avez commis une
sur la touche numérique
Chaque fois que vous appuvez "RECHERCHE PLAGE". "RECHERCHE SCENE" et "RECHERCHE INDEX VIDEO" apparaissent sur l'écran du téléviseur.
Remarque
Certains disques ne vous permettent pas de démarrer la lecture à partir d'une scène déterminée. Dans ce cas, si vous effectuez l'opération avant de démarrer la lecture, le lecteur démarre la lecture à partir de la scène 1. Si vous effectuez l'opération pendant la lecture d'un disque, le lecteur démarre la lecture à partir de la scène en cours
Localiser un passage tout en contrôlant l'image (recherche) Lorsque vous avez trouvé le passage voulu. appuyez sur ▷ pour revenir à la vitesse normale.
sur l'écran du téléviseur
l'écran du téléviseur
1 SEARCH MODE plusieurs fois de suite jusqu'à
ce que "RECHERCHE INDEX VIDEO" apparaisse
1 SEARCH MODE plusieurs fois de suite jusqu'à ce que "RECHERCHE SCENE" apparaisse sur
2 Les touches numériques pour sélectionner le
numéro de la scène et puis sur ENTER ou >.
(Pour vérifier le numéro de la scène en cours.
appuvez sur DISPLAY. Le numéro de la scène
apparaît dans l'angle supérieur gauche de l'écran
2 Les touches numériques pour sélectionner le numéro de l'index et puis sur ENTER ou ▷.
20⊬
Lecture d'un CD vidéo doté de fonctions PBC La lecture PBC démarre
automatiquement.
Pour annuler la lecture PBC d'un CD vidéo doté de fonctions PBC et reproduire le disque en mode de lecture continue
Il existe deux possibilités. lecture, sélectionnez la plage que vous désirez à l'aide de ide ou be , puis appuyez sur ENTER ou > •Avant de commencer la lecture, sélectionnez le numéro de plage à l'aide des touches numériques de la télécommande, puis appuvez sur ENTER ou "LECTURE SANS PBC" apparaît sur l'écran du téléviseur et le lecteur commence la lecture continue. Vous ne pouvez pas reproduire d'images fixes telles qu'un écran de menu.
Lecture d'un CD vidéo doté de fonctions PBC (lecture PBC)
Lorsque vous reproduisez un CD vidéo doté de fonctions PBC (disques Ver. 2.0), vous pouvez exploiter des opérations interactives simples, des opérations à l'aide de fonctions de recherche, etc. La lecture PBC vous permet de reproduire des CD vidéo en mode interactif en suivant les écrans de menu sur l'écran du téléviseur. Sur ce lecteur, vous pouvez utiliser les touches numériques, ENTER, I←4, I→1, ↑/↓ et ♂ (RETURN) en mode de lecture PBC.

Démarrez la lecture d'un CD vidéo doté de fonctions PBC en appliquant les étapes 1 à 4 de la procédure de "Lecture d'un CD vidéo" à la page 18.
(suite page suivante)
Opérations de base
Remarque
Suivant les CD vidéo, "Appuyez sur ENTER." à l'étape 3 peut s'exprimer sous la forme de "Appuyez SELECT." dans les instructions fournies avec le disque.
Sélectionnez le numéro du paramètre de votre choix.
Sur le lecteur
2
Appuyez sur ▲/▼ pour sélectionner le numéro du paramètre.
Sur la télécommande
Appuyez sur la touche numérique correspondant au paramètre voulu.
2 Appuyez sur ENTER.
Appliquez les instructions de l'écran de menu pour les opérations interactives.
Consultez les instructions fournies avec le disque étant donné que la procédure d'exploitation peut différer suivant les CD vidéo.
| Pour | Procédez comme suit |
|---|---|
| Sélectionner le paramètre. | Sur le lecteur, appuyez sur ▲/▼ pour sélectionner le numéro de paramètre et appuyez ensuite sur ENTER. |
| Sur la télécommande, appuyez sur la touche numérique du paramètre voulu et appuyez ensuite sur ENTER. | |
| Revenir à l'écran de menu. | Appuyez sur ♂ (RETURN), I ou ►►. |
Utilisation de l'affichage sur écran du téléviseur
Vous pouvez vérifier le statut de fonctionnement du lecteur et les informations relatives au disque au moyen de l'affichage sur l'écran du téléviseur.


pérations de base
Opérations de base
Qu'est-ce qu'un mode de lecture ? Voir page 43.
Chaque fois que vous appuyez sur TIME, les informations changent comme illustré cidessous.
Durée de lecture de la plage en cours
Durée restante de la plage en cours
Durée de lecture du disque
Durée restante du disque
Lorsque vous exécutez la lecture aléatoire ou programmée, la durée de lecture du disque et la durée restante du disque ne sont pas affichées.
• En mode de lecture continue

■ Informations affichées en mode d'affichage sur écran désactivé Aucune information n'est affichée. (Les messages, etc., seront affichés.)
Utilisation de la fenêtre d'affichage du panneau frontal
Vous pouvez vérifier les informations relatives au disque telles que le nombre total de plages ou la durée restante en utilisant la fenêtre d'affichage du panneau frontal.

Informations affichées pendant la lecture d'un disque

Pendant la lecture PBC
Le numéro de la scène en cours apparaît en lieu et place des numéros de plage et d'index. L'affichage ne change pas même si vous appuyez sur la touche TIME.
Remarque
Lorsque vous exécutez la lecture aléatoire ou programmée, la durée de lecture du disque et la durée restante du disque ne sont pas affichées.
Vérification de la durée restante (en mode de lecture continue)
Chaque fois que vous appuyez sur TIME pendant la lecture d'un disque, l'affichage change comme indiqué dans le tableau ci-dessous. Les informations de temps dans le mode d'affichage sur écran 1 ou 2 changent chaque fois que vous appuyez sur TIME.


Lecture d'un CD

Remarque
Si vous ne faites pas fonctionner le lecteur ni la télécommande pendant plus de 30 minutes et qu'aucune lecture n'est en cours, l'appareil se mettra automatiquement hors tension (arrêt automatique).
26F
Si "RESUME" apparaît dans la fenêtre d'affichage du panneau frontal
Vous pouvez reprendre la lecture à l'endroit où vous avez stoppé le CD. Pour activer la lecture au début du disque, voir page 36.
Pour arrêter la lecture
Appuyez sur ■ .


Au cours de lecture
| Pour | Appuyez sur | |
|---|---|---|
| Activer une pause | 11 | |
| Reprendre la lecture après une pause | II ou 🗁 | |
| Arrêter la lecture et retirer le disque |
Opérations de l

Localisation d'une plage ou d'un passage déterminé
Qu'est-ce qu'un plage ? Voir page 5.
Qu'est-ce qu'un index? Voir page 5.
Si vous voulez changer la vitesse de recherche
Vous avez le choix entre deux vitesses: AV RAP1 ou REMB1 et AV RAP2 ou REMB2. Chaque fois que vous appuyez sur ⊕ ou ⊕, l'indication change selon la séquence suivante: AV RAP1 (REMB1) ↔ AV RAP2 (REMB2)
Si vous avez commis une erreur
Appuyez sur CLEAR, puis sur la touche numérique correcte.
| Pour | Appuyez sur |
|---|---|
| Passer à la plage suivante en mode de lecture continue | |
|
Revenir à la plage précédente
en mode de lecture continue |
H 44 |
| Sélectionner une plage |
Les touches numériques pour sélectionner le
numéro de la plage et puis sur ENTER ou ⊳. |
|
Sélectionner un index en mode
de lecture continue |
|
|
Localiser un passage tout en
contrôlant le son (recherche) |
⊕/€. Lorsque vous avez trouvé le passage
voulu, appuyez sur ▷ pour revenir à la vitesse normale. |
Utilisation de l'affichage sur écran du téléviseur
Vous pouvez vérifier le statut de fonctionnement du lecteur et les informations relatives au disque au moyen de l'affichage sur l'écran du téléviseur.

Appuyez sur DISPLAY.
Chaque fois que vous appuyez sur la touche, l'écran d'affichage change selon la séquence suivante :

■ Informations affichées en mode d'affichage sur écran 1
Pendant la lecture d'un disque, le numéro de la plage en cours, la durée de lecture et le numéro d'index sont toujours affichés.

Informations affichées en mode d'affichage sur écran 2

■ Informations affichées en mode d'affichage sur écran désactivé
Aucune information n'est affichée. (Les messages, etc., seront affichés.)
* Chaque fois que vous appuyez sur TIME, les informations changent comme illustré cidessous.

Lorsque vous executez la lecture aléatoire ou programmée, la durée de lecture du disque et la durée restante du disque ne sont pas affichées.
pérations
Utilisation de la fenêtre d'affichage du panneau frontal
Vous pouvez vérifier les informations relatives au disque telles que le nombre total de plages, le nombre de plages restantes ou la durée restante en utilisant la fenêtre d'affichage du panneau frontal.

Informations affichées pendant la lecture d'un disque

Remarque
Lorsque vous exécutez la lecture aléatoire ou programmée, la durée de lecture du disque et la durée restante du disque ne sont pas affichées.
Vérification de la durée restante
Chaque fois que vous appuyez sur TIME pendant la lecture d'un disque, l'affichage change comme indiqué dans le tableau ci-dessous. Les informations de temps dans le mode d'affichage sur écran 1 ou 2 changent chaque fois que vous appuyez sur TIME.
| EX CD |
1/L 2/R
HOUR MIN SEC |
|
|---|---|---|
| 2 | > 0.02.25 | |
|
Durée restante de
la plage en cours |
• | Appuyez sur TIME |
| EX CD |
1/L 2/R
HOUR MIN SEC |
|
| 2 | > -0.0.50 | |
|
Durée de lecture
du disque |
4 | Appuyez sur TIME |
|
Durée de lecture
du disque |
Appuyez sur TIME | |
|
Durée de lecture
du disque |
●
@ |
|
|
Durée de lecture
du disque Durée restante du disque |
Appuyez sur TIME | |
|
Durée de lecture
du disque Durée restante du disque |
Appuyez sur TIME | |
|
Durée de lecture
du disque Durée restante du disque |
Appuyez sur TIME 1/L 2/R HOUR Appuyez sur TIME IL 2/R HOUR HOUR SEC HOUR MIN SEC IL 2/R HOUR |
Lecture de plages répétée (lecture répétée) 👔
Vous pouvez reproduire de manière répétée tous les titres ou toutes les plages d'un disque, un seul titre/ chapitre/plage ou encore un passage déterminé. Pour activer la fonction de lecture répétée, passez par le menu.
Pour plus de détails sur l'utilisation du menu, voir page 43.

Répétition de tous les titres ou toutes les plages d'un disque OVD CD
En mode de lecture aléatoire ou programmée, le lecteur répète la lecture des titres ou plages dans les modes aléatoire et programmé.
Vous ne pouvez pas activer la fonction de lecture répétée pendant la lecture PBC ou d'un CD vidéo (page 21). Suivant les DVD, il se peut que vous ne puissiez pas activer la fonction de lecture répétée.
Appuyez sur MENU pour afficher le menu sur l'écran du téléviseur. Réglez ensuite "REPETITION" dans "MODE DE LECTURE" sur "DISQUE".

"REPEAT" apparaît dans la fenêtre d'affichage du panneau frontal. Le lecteur répète la lecture des titres/ chapitres/plages de la façon suivante :
| Si le disque est reproduit en | Le lecteur répète |
|---|---|
|
Lecture continue (page 10, 18
ou 26) |
Toutes les titres/toutes les
plages |
| Lecture aléatoire (page 34) |
Tous les titres ou plages
dans un ordre aléatoire |
| Lecture programmée (page 34) |
Titres/chapitres/plages
programmés |
Pour désactiver la lecture répétée de tous les titres ou toutes les plages d'un disque
Appuyez sur MENU de façon à afficher le menu sur l'écran du téléviseur. Réglez ensuite "REPETITION" dans "MODE DE LECTURE" sur "NON" (page 43).
Répétition du titre ou du chapitre en cours
Vous pouvez activer la lecture répétée du titre ou du chapitre en cours uniquement en mode de lecture continue. Suivant les DVD, il se peut que vous ne puissiez pas activer la fonction de lecture répétée.
Répétition du titre en cours
Pendant la lecture du titre voulu, appuyez sur MENU de façon à afficher le menu sur l'écran du téléviseur. Réglez ensuite "REPETITION" dans "MODE DE LECTURE" sur "TITRE".
L'indication "REPEAT 1" apparaît dans la fenêtre d'affichage du panneau frontal et le lecteur répète la lecture du titre en cours.

■Répétition du chapitre en cours
Pendant la lecture du chapitre voulu, appuyez sur MENU de façon à afficher le menu sur l'écran du téléviseur. Réglez ensuite "REP" dans "MODE DE LECTURE" sur "CHAPITRE".
L'indication "REPEAT 1" apparaît dans la fenêtre d'affichage du panneau frontal et le lecteur répète la lecture du chapitre en cours.
Pour désactiver la répétition du titre ou du chapitre en cours
Appuyez sur MENU de façon à afficher le menu sur l'écran du téléviseur. Réglez ensuite "REPETITION" dans "MODE DE LECTURE" sur "NON" (page 43).
Répétition de la plage en cours
Vous pouvez répéter la lecture de la plage en cours uniquement en mode de lecture continue.
Pendant la lecture de la plage voulue, appuvez sur MENU de facon à afficher le menu sur l'écran du téléviseur. Réglez ensuite "REPETITION" dans "MODE DE LECTURE" sur "PLAGE".

L'indication "REPEAT 1" apparaît dans la fenêtre d'affichage du panneau frontal et le lecteur répète la lecture de la plage en cours.
Pour annuler la répétition de la plage en cours
Appuvez sur MENU de facon à afficher le menu sur l'écran du téléviseur. Réglez ensuite "REPETITION" dans "MODE DE LECTURE" sur "NON" (page 43).
Répétition d'un passage déterminé (répétition A ↔ B) DVD VIDEO
Vous pouvez reproduire de manière répétée un passage déterminé d'un titre/chapitre/plage. Cette fonction s'avére pratique pour mémoriser les paroles d'un chant
En cours de lecture PBC ou d'un CD vidéo (page 21), cette fonction ne peut être activée que pendant la lecture d'images animées
Suivant les DVD, il se peut que vous ne puissiez pas activer la fonction de lecture répétée.
1 Pendant la lecture d'un disque, appuyez sur MENU de facon à afficher le menu sur l'écran du téléviseur. Sélectionnez ensuite "REPETITION A-B" dans "MODE DE LECTURE."
L'indication "REPETITION A-B" est mise en évidence

2 Sélectionnez "REGLE" à l'aide des touches ↑/↓ et appuyez ensuite sur ENTER
L'écran d'affichage pour la localisation du point A apparaît, indiquant le numéro du chapitre ou de la plage en cours ainsi que la durée de lecture.

3 Lorsque vous avez localisé le point de début (point A) du passage à reproduire de manière répétée, appuvez sur ENTER.
L'écran de réglage pour le point B apparaît. L'indication "REPEAT A –" apparaît également dans la fenêtre d'affichage du panneau frontal.

4 Lorsque vous arrivez au point de fin (point B), appuvez sur ENTER.
L'indication "REPEAT A-B" apparaît dans la fenêtre d'affichage du panneau frontal. Le lecteur entame la lecture répétée de ce passage spécifique.
Pour annuler la répétition A
Appuyez sur MENU de façon à afficher le menu sur l'écran du téléviseur. Réglez ensuite "REPETITION A-B" dans "MODE DE LECTURE" sur "NON" (page 43).
Pour annuler le réglage en cours
Appuyez sur MENU
Ÿ Le réglage de répétition A ↔ B est conservé même après son annulation
Si vous sélectionnez "OUI" à l'aide des touches ↑/↓ à l'étape 2 et si vous appuyez sur ENTER, vous pouvez reproduire à nouveau le même passage.
- Le réglage de répétition A ↔ B est désactivé si vous ouvrez le plateau de lecture.
- Le réglage de répétition A ↔ B est désactivé si vous mettez le lecteur hors tension
- Lorsque vous activez la fonction de répétition A ↔ B, les réglages pour la lecture aléatoire et la lecture programmée
- Certaines scènes du DVD ou du CD vidéo ne permettent pas la répétition A ↔ B.
8 Appuyez sur ▷ pour démarrer la lecture programmée.
Pour annuler la lecture programmée
Appuyez sur MENU de façon à afficher le menu sur l'écran du téléviseur. Réglez ensuite "PROGRAMME" dans "MODE DE LECTURE" sur "NON".
Pour annuler la programmation
Appuyez sur MENU.
Pour modifier un programme
- A l'étape 5, sélectionnez le numéro de programmation du titre, du chapitre ou de la plage que vous voulez modifier à l'aide des touches ↑/↓.
- 2 Exécutez l'étape 6 pour reprogrammer
Pour annuler la séquence de programmation
Pour annuler tous les titres, chapitres ou plages de la séquence de programmation, sélectionnez "TOUT EFFACER" à l'étape 5.
Pour annuler le titre, le chapitre ou la plage programmé, sélectionnez le titre, le chapitre ou la plage à effacer à l'étape 5, et puis sélectionnez "EFFACER" à l'étape 6.
Y Le programme est conservé même à la fin de la lecture programmée
Vous pouvez réactiver la lecture du programme en appuyant sur [>.
Vous pouvez activer une lecture répétée ou une lecture aléatoire dans l'ordre programmé
Après la programmation, réglez "REPETITION" sur "DISQUE" ou "ALEATOIRE" sur "OUI" dans le menu
Remarques
- Les numéros de titres, de chapitres ou de plages affichés sont ceux des titres, des chapitres ou des plages enregistrés sur un disque.
-
Le programme est annulé si vous:
- ouvrez ou fermez le plateau de lecture;
- mettez le lecture hors tension
- Suivant les DVD, il se peut que vous ne puissiez par activer la fonction de lecture programmée.
Reprise de la lecture là où vous avez stoppé un disque (reprise de lecture) OVD
Le lecteur mémorise l'endroit où vous avez arrêté un disque si l'indication "RESUME" est activée dans la fenêtre d'affichage du panneau frontal. Dans ce cas, vous pouvez reprendre la lecture à partir de cet endroit.
Tant que vous ne retirez pas le disque du lecteur, la fonction de reprise de lecture reste accessible même si vous mettez le lecteur hors tension.

Pendant la lecture d'un disque, appuyez sur ■ pour arrêter la lecture.
L'indication "RESUME" apparaît dans la fenêtre d'affichage du panneau frontal et "POUR LA LECTURE SUIVANTE, LE DISQUE REPREND A L'ENDROIT DE L'INTERRUPTION." apparaît sur l'écran du téléviseur.
Si l'indication "RESUME" ne s'affiche pas, cela signifie que la fonction de reprise de lecture n'est pas accessible.
2 Appuyez sur ⊳.
Le lecteur démarre la lecture à l'endroit où vous aviez arrêté le disque à l'étape 1.
🏹 Pour activer la lecture au début du disque
Si l'indication "RESUME" apparaît dans la fenêtre d'affichage du panneau frontal avant que vous lanciez la lecture, appuyez sur ■ pour désactiver l'indication "RESUME" et appuyez ensuite sur ▷.
- Suivant les DVD, il se peut que vous ne puissiez pas activer la fonction de reprise de lecture.
- La fonction de reprise de lecture n'est pas accessible dans les modes de lecture aléatoire et programmée.
- Suivant l'endroit où vous avez arrêté le disque, il se peut que le lecteur reprenne la lecture à un autre endroit.
-
L'endroit où vous avez arrêté le disque est annulé si vous :
ouvrez ou fermez le plateau de lecture;
- débranchez le cordon d'alimentation;
- changez le mode de lecture;
- démarrez la lecture après avoir sélectionné un titre, un chapitre ou une plage.
- changez le réglage de "FORMAT D'IMAGE VIDEO," "LANGUE MENUS DVD" ou "CONTROLE PARENTAL" dans "REGLAGES INITIAUX' dans le menu.
Changement des sons 👔
Avec un DVD sur lequel des sons multilingues sont enregistrés, vous pouvez sélectionner la langue de votre choix pendant la lecture du DVD.
Avec un CD vidéo multiplex, vous pouvez sélectionner le son du canal gauche ou du canal droit et écouter le son du canal sélectionné via les haut-parleurs gauche et droit en même temps. Dans ce cas, le son est diffusé sans effet stéréo.

Appuyez sur AUDIO CHANGE pendant la lecture d'un disque
Chaque fois que vous appuyez sur la touche, l'indication et la langue ou le son des haut-parleurs change selon la séquence suivante :
Pendant la lecture d'un DVD

Pendant la lecture d'un CD vidéo ou d'un CD
| Appuyez | Indication | Vous entendez | ||
|---|---|---|---|---|
| Une fois | 1/L | Le son du canal gauche | ||
| Deux fois | 2/R | Le son du canal droit | ||
| Trois fois | 1/L 2/R | Le son stéréo standard | ||
Vous pouvez également utiliser le menu pour commuter le son pour le CD vidéo ou le CD
Appuvez sur MENU de facon à afficher le menu Sélectionnez ensuite "G/D/STEREO" dans "REGLAGE PERSONNALISE" pour changer le son (page 44).
Remarques
- Suivant les DVD, il se peut que vous ne puissiez pas changer les langues même si des sons multilingues ont été enregistrés sur le DVD.
- Si "DOLBY DIGITAL MODE" est réglé sur "2" (page 44), le format audio Dolby Digital (AC-3) est reproduit lorsque : - vous ouvrez ou refermez le plateau de lecture:
- vous relâchez Resume Play
Activation/désactivation des sous-titres 👔 💵
Avec un DVD sur lequel des sous-titres sont enregistrés, vous pouvez activer ou désactiver l'affichage des sous-titres quand vous le voulez pendant la lecture du DVD.

Appuyez sur SUB-TITLE ON/OFF pendant la lecture d'un DVD
Des sous-titres s'affichent sur l'écran du téléviseur.
Pour désactiver les sous-titres
Appuyez à nouveau sur SUB-TITLE ON/OFF.
- Pendant la lecture d'un DVD sur leguel des sous-titres n'ont pas été enregistrés, aucun sous-titre ne s'affiche lorsque vous appuyez sur SUB-TITLE ON/OFF.
- Suivant les DVD, il se peut que vous ne puissiez pas activer les sous-titres mêmes si des sous-titres ont été enregistrés
- Suivant les DVD, il se peut que vous ne puissiez pas désactiver les sous-titres.
Changement des sous-titres
Avec les DVD sur lesquels des sous-titres multilingues sont enregistrés, vous pouvez changer les sous-titres quand vous le voulez pendant la lecture du DVD. Si les sous-titres sont désactivés, appuyez sur SUB-TITLE ON/OFF pour les activer.

Pendant la lecture d'un DVD, appuyez plusieurs fois de suite sur SUB-TITLE CHANGE jusqu'à ce que les sous-titres voulus apparaissent sur l'écran du téléviseur.

* Si vous sélectionnez "SUIVRE AUDIO", la langue d'affichage des sous-titres se change automatiquement sur la langue sélectionnée pour le son.
Remarques
- Le type et le nombre de langues d'affichage des sous-titres varient d'un disque à un autre.
- Suivant les DVD, il se peut que vous ne puissiez pas changer les sous-titres même si des sous-titres multilingues sont enregistrés sur le DVD.
- Suivant les DVD, il se peut que vous ne puissiez pas activer la fonction de concordance automatique, même si l'indication "SUIVRE AUDIO" est affichée.
Changement des angles Î
Avec les DVD sur lesquels plusieurs angles sont enregistrés pour une scène, vous pouvez commuter les angles quand vous le voulez pendant la lecture du DVD.

Lorsque l'indication "ANGLE" apparaît dans la fenêtre d'affichage du panneau frontal pendant la lecture d'un DVD, appuyez plusieurs fois de suite sur ANGLE CHANGE jusqu'à ce que vous obteniez l'angle de votre choix.

Vous pouvez spécifier l'angle au préalable
- Spécifiez l'angle si l'indication "ANGLE" n'est pas activée dans la fenêtre d'affichage du panneau frontal. Lorsque vient une scène pour laquelle plusieurs angles
- sont enregistrés, l'angle est sélectionné automatiquement.
- Le nombre d'angles varie d'un disque à un autre ou encore d'une scène à une autre. Le nombre d'angles pouvant être commutés pour une scène correspond au nombre d'angles enregistrés pour cette scène.
- Suivant les DVD, il se peut que vous ne puissiez pas commuter les angles, même si plusieurs angles sont enregistrés sur le DVD.
Limitations de lecture par enfants (contrôle parental)
La lecture de certains DVD peut être limitée en fonction de l'âge des utilisateurs. La fonction de "contrôle parental" vous permet de programmer un niveau de limitation de lecture.

. 1 Appuyez sur MENU de façon à afficher le menu sur l'écran du téléviseur avant la lecture.

2 Sélectionnez "REGLAGES INITIAUX" à l'aide des touches ↑/↓ et appuyez ensuite sur →. L'indication "REGLAGES INITIAUX" est mise en évidence.
| TYPE DE TELE | :4:3 | ■4:3 | |
| FORMAT D'IMAGE VIDEO | : PAN SCAN | 16:9 | |
| Langue menus dvd | : FRANCAIS | ||
| LANGUE ECRANS | : FRANCAIS | ||
| MIXAGE | : SPATIAL | ||
| Ð | Sortie Numerique DVD | : PCM | |
| EGLAGES | SYS COULEUR CD VIDEO | : NTSC | |
| NTWA | Sor Numer CD Video | : NON | |
| CONTROLE PARENTAL | |||
| • | Pour régler, pressez | He, puis ENTER | |
| Pour quitter, pressez | w. | ||
-
3 Sélectionnez "CONTROLE PARENTAL" à l'aide des touches ↑/↓ et appuyez ensuite sur ENTER.
- Si vous n'avez pas encore introduit de mot de passe
L'écran de saisie du mot de passe apparaît.

Si vous avez déjà introduit un mot de passe
L'écran de confirmation du mot de passe apparaît. Sautez l'étape 4.
| CONTROL | e paren | TAL | |||
|---|---|---|---|---|---|
| Entrez | le mot | de p | asse, pu | is pressez | ENTER |
| CARLANS AND | - |
Lecture de disques dans différents modes
4 Introduisez un mot de passe à quatre chiffres à l'aide des touches numériques et appuyez ensuite sur ENTER.
L'écran de confirmation du mot de passe apparaît.
| CONTROLE PARENTAL | ||
|---|---|---|
|
Pour confirmer, entrez à nouveau
le mot de passe, puis pressez ENTER |
||
|
REGLAGES
INTIACX |
0. | |
5 Pour confirmer votre mot de passe, introduisez-le à l'aide des touches numériques et appuyez ensuite sur ENTER.
L'écran de réglage du niveau de limitation de lecture et de modification du mot de passe apparaît.

6 Sélectionnez "STANDARD" à l'aide des touches ↑/↓ et appuyez ensuite sur →.
| CONTROLE PAR | ENTAL | |
|---|---|---|
| SUSA |
=[USA
CANADA JAPON |
|
|
Pour réqler, p
Pour quitter, p |
pressez Hole, p
Dressez MENU. |
Duis ENTER . |
7 Sélectionnez un pays comme présélection de niveau de limitation de lecture à l'aide des touches ↑/↓ et appuyez ensuite sur →.
Un repère de contrôle (■) apparaît à gauche du pays sélectionné.
| CONTROLE PAR | ENTAL | ||
|---|---|---|---|
| REGLACES | STANDARD | : USA |
■USA
CANADA JAPON |
| ME MUX |
Pour régler, p
Pour quitter, p |
pressez 🕶 E, puis
pressez 🕬. |
ENTER). |
8 Sélectionnez "NIVEAU" à l'aide des touches ↑/↓ et appuyez ensuite sur ENTER.

9 Sélectionnez le niveau voulu à l'aide des touches ↑/↓ et appuyez ensuite sur ENTER.
Un repère de contrôle (■) apparaît à gauche du niveau sélectionné.

Plus le nombre est bas, plus la limitation est stricte.
Pour revenir à l'écran normal Appuyez sur MENU.
Pour désactiver la fonction de contrôle parental et reproduire un DVD après avoir introduit votre mot de passe
Réglez "NIVEAU" sur "NON" à l'étape 9 et appuyez ensuite sur ▷.
Pour changer le mot de passe
A l'étape 5, sélectionnez "CHANGER LE MOT DE PASSE" à l'aide des touches ↑/↓ et appuyez ensuité sur → ou ENTER.
L'écran de modification du mot de passe apparaît.
2 Exécutez les étapes 4 et 5 pour introduire un nouveau mot de passe.
🍟 Si vous avez oublié votre mot de passe
Introduisez "199703" à l'étape 4 pour supprimer le mot de passe en cours. Pour introduire un nouveau mot de passe, recommencez la procédure à partir de l'étape 1.
Remarques
- La lecture d'un DVD sans la fonction de contrôle parental ne peut pas être limitée sur ce lecteur.
- Si vous ne programmez pas de mot de passe, vous ne pouvez pas changer les réglages pour la limitation de lecture.
- Suivant les DVD, il se peut que vous soyez invité à changer le niveau de contrôle parental pendant la lecture du disque. Dans ce cas, introduisez le mot de passe et changez ensuite le niveau.
Lorsque vous arrêtez la lecture du DVD, le niveau est ramené à sa valeur originale.
Commander le téléviseur avec la télécommande fournie
Vous pouvez commander des téléviseurs Sony identifiés par le logo B au moyen de la télécommande fournie.

| Appuyez sur | Pour |
|---|---|
| TV POWER | Mettre le téléviseur sous ou hors tension |
| TV/VIDEO | Sélectionner la source d'entrée du téléviseur |
| VOL | Régler le volume du téléviseur |
| СН | Changer la chaîne du téléviseur |
élection et réglages
Utilisation du menu 👔
Le menu vous permet de réaliser la configuration initiale, de sélectionner le mode de lecture, de régler la aualité du son, de sélectionner les différentes sorties, etc. Vous pouvez également spécifier une langue d'affichage des sous-titres et des écrans de menu, la limitation de lecture par enfants, etc.
Pour plus de détails sur les différents paramètres de menu, voir pages 43 à 45.
Dans le menu, sélectionnez le paramètre ou le réglage en allant de la gauche vers la droite. Utilisez la touche ➡ pour passer au paramètre ou au réglage de droite. Utilisez + pour revenir au paramètre ou au réglage de gauche.

Appuyez sur MENU de façon à afficher le menu sur l'écran du téléviseur.

2 Sélectionnez le paramètre principal voulu à l'aide des touches † / ↓ et appuyez ensuite sur → ou ENTER.
Le paramètre principal sélectionné est mis en évidence.

Sélectionnez le paramètre voulu à l'aide des touches † / ↓ et appuvez ensuite sur → ou

Sélectionnez le réglage voulu à l'aide des touches ↑/↓ et appuyez ensuite sur ENTER. Un repère de contrôle ( II ) apparaît à gauche du réglage sélectionné.
|
REPETITION : NON
ALEATOIRE : OUI NON PROGRAMME : NON = OUI REPETITION A-B : NON TOUS DESACTIVES |
|---|
|
Pour régler, pressez Heren, puis (KTER).
Pour quitter, pressez (KEN). |
Lorsque - apparaît à droite du réglage
D'autres réglages à sélectionner se trouvent à droite. Appuve sur → pour sélectionner.
Pour désactiver le menu en cours d'utilisation Appuyez sur MENU.
Remarque
Certains paramètres de menu nécessitent des opérations autres que la sélection d'un réglage. Pour plus de détails sur ces paramètres, reportez-vous aux pages correspondantes.
Sélections pour la lecture (MODE DE LECTURE)
Le menu "MODE DE LECTURE" vous permet de sélectionner les différents modes de lecture décrits dans les pages 32 à 36.
Les réglages par défaut sont soulignés.
Remarques
- Suivant les disques, il se peut que vous ne puissiez pas régler les modes de lecture.
- Vous ne pouvez activer les fonctions Aléatoire, Programme et Répétition qu'à l'arrêt dans le cas des CD vidéo dotés de fonctions PBC.

■ REPETITION (page 32)
Sélection des options de lecture répétée
- NON : lecture répétée désactivée
- DISQUE : lecture répétée de tous les titres/tous les chapitres/toutes les plages d'un disque
- TITRE (DVD uniquement) : lecture répétée du titre en cours
- CHAPITRE (DVD uniquement) : lecture répétée du chapitre en cours
- PLAGE (CD vidéo/CD uniquement) : lecture répétée de la plage en cours
■ALEATOIRE (page 34)
Sélection des options de lecture aléatoire.
- NON : lecture aléatoire désactivée
- OUI : le lecteur "mélange" les titres ou les plages et les reproduit dans un ordre quelconque
PROGRAMME (page 34)
Sélection des options de lecture programmée
- NON: l'ordre des titres, des chapitres ou des plages du disque reste inchangé.
- REGLE : modification de l'ordre des titres, des chapitres ou des plages du disque.
- OUI : reproduit les titres, les chapitres ou les plages dans l'ordre programmé.
■REPETITION A-B (page 33)
Sélection des options de lecture répétée A
- NON : lecture répétée d'un passage de titre/chapitre/plage désactivée
- REGLE : localisation des points A et B
- OUI : lecture répétée d'un passage de titre/chapitre/plage activée
TOUS DESACTIVES
Désactivation de tous les réglages de "MODE DE LECTURE". Sélectionnez ce paramètre en mode de lecture continue.
-
Vous pouvez activer une lecture répétée d'un disque ou une lecture aléatoire dans l'ordre programmé "PROGRAMME" étant réglé sur "OUI", réglez
- "REPETITION" sur "DISQUE" ou "ALEATOIRE" sur "OI 1"
Réglages de l'affichage et du son (REGLAGE PERSONNALISE)
Le menu "REGLAGE PERSONNALISE" vous permet de régler l'affichage et le son en fonction des conditions de lecture.
Les réglages par défaut sont soulignés.
|
LECTURE AUTO : NON
REALE AFFICHEUR : CLAIR DRC AUDIO : NON LIVE ATT. AUDIO : NON G / D / STEREO : STEREO MODE DOLBY DIGITAL : 1 |
|---|
| CALAIN |
|
ATT. AUDIO :NON
Mare ATT. AUDIO :NON MG/D/STEREO :STEREO MODE DOLBY DIGITAL :1 |
| G / D / STEREO :STEREO |
| MODE DOLBY DIGITAL : 1 |
| AGES MODE PAUSE : AUTO |
| COULEUR FOND :BLEU |
| Pour régler, pressez - , puis MER. |
| Pour quitter, pressez (MENU). |
LECTURE AUTO
Sélection des réglages de lecture automatique lorsque vous branchez le cordon d'alimentation sur une prise murale (secteur).
- NON : désactivation du démarrage automatique de la lecture d'un disque.
- MINUTEUR : activation du démarrage automatique de la lecture d'un disque lors du branchement du cordon d'alimentation sur une prise murale (secteur). En raccordant un programmateur (non fourni), vous pouvez faire démarrer la lecture à l'heure de votre choix.
- DEMO1 : démarre automatiquement la démonstration 1.
- DEMO2 : démarre automatiquement la démonstration 2.
Réglage de l'éclairage de la fenêtre d'affichage du panneau frontal
- CLAIR : rend la fenêtre d'affichage du panneau frontal plus lumineuse.
- FONCE : rend la fenêtre d'affichage du panneau frontal plus sombre.
- NON : désactive l'éclairage de la fenêtre d'affichage du panneau frontal.
DRC AUDIO (commande de plage dynamique)
Commande la plage dynamique audio lorsque vous reproduisez un DVD.
Cette fonction n'est opérationnelle que pour le son des connecteurs DIGITAL OUT et des connecteurs LINE OUT (AUDIO 1, 2) lorsque "SORTIE NUMERIQUE DVD" est réglé sur "PCM" (page 45).
- NON : En principe, réglez-le sur cette position.
- OUI : rend le son plus clair à faible volume le soir, etc.
Remarque
Suivant les DVD, il se peut qu'il n'y ait pas d'effet de réglage de "DRC AUDIO".
ATT. AUDIO (atténuation)
Sélection du réglage des connecteurs de sortie LINE OUT (AUDIO 1, 2) en fonction de l'appareil audio à raccorder
- NON : désactivation de l'atténuation audio
- OUI: réglage du niveau de sortie audio de facon à
Remarque
Il se peut que le réglage n'affecte pas le signal de sortie des connecteurs DIGITAL OUT
■ G/D/STEREO
Sélection du réglage du son d'un CD vidéo sorti via les connecteurs LINE OUT (AUDIO 1, 2) et DIGITAL OUT ou du son d'un CD sorti via les connecteurs LINE OUT (AUDIO 1-2)
- STEREO : sortie du son stéréo standard
- G : sortie du son du canal gauche
- D : sortie du son du canal droit
Remarque
Les connecteurs DIGITAL OUT donnent un son stéréo lorsque vous reproduisez un CD.
MODE DOLBY DIGITAL
Donne la priorité au format de Dolby Digital (AC-3) lorsque vous reproduisez un DVD comportant plusieurs formats audio
1: pas de priorité 2: priorité
Remarques
• Si "DOLBY DIGITAL MODE" est réglé sur "2", le format audio Dolby Digital (AC-3) est reproduit lorsque :
- vous ouvrez ou refermez le plateau de lecture;
- vous relâchez Resume Play.
Selon les DVD, il se peut que le son soit commuté sur un autre canal ou une autre langue.
- Si plusieurs canaux audio sont enregistrés au format Dolby Digital (AC-3), c'est le canal audio enregistré au format Dolby Digital (AC-3) le plus élevé qui est reproduit
- Selon les DVD, il se peut qu'un signal audio prioritaire ait été prédéterminé. Dans ce cas, vous ne pouvez pas donner la priorité au format Dolby Digital (AC-3) en sélectionnant
MODE PAUSE
Sélection du mode de pause de l'image
- AUTO : Une image contenant des sujets qui se déplacent de manière dynamique sort sans être floue. En principe, sélectionnez cette position.
- IMAGE : Une image contenant des sujets qui ne se déplacent pas dynamiquement sort avec une haute définition
Remarques
- Le réglage n'affecte pas l'image lorsque la pause automatique est activée pendant la lecture d'un DVD.
- Lorsque "MODE PAUSE" est réglé sur "IMAGE", il se peut que l'image sautille en mode de lecture ralentie.
COULEUR FOND
Sélection de la couleur de fond de l'écran du téléviseur en
- NOIR : le fond est noir
- 44
Réglages initiaux (REGLAGES INITIAUX)
Le menu "REGLAGES INITIAUX" vous permet de procéder à la configuration indispensable lorsque vous installez le lecteur et raccordez des appareils externes au lecteur. Les réglages de lecture avancée d'un DVD ou d'un CD vidéo peuvent également être exécutés via ce menu principal.
Les réglages par défaut sont soulignés.
| TYPE DE TELE | :4:3 |
|---|---|
| ECTURE FORMAT D'IMAGE VIDEO | BTE LETTRE |
| HANGUE MENUS DVD | FRANCAIS |
| ATTACK LANGUE ECRANS | FRANCAIS |
| RENIME MIXAGE | SPATIAL |
| SORTIE NUMERIQUE DVD | : PCM |
| REGIRES SYS COULEUR CD VIDEO | INTSC |
| SORT NUMER CD VIDEO | :001 |
| CONTROLE PARENTAL | |
| Pour régler, pressez 🗗 | 🖭, puis enter . |
| Pour quitter, pressez ME | NU). |
TYPE DE TELE
Sélection du format du téléviseur à raccorder
- 4:3 : si vous raccordez un téléviseur conventionnel au lecteur.
- 16:9 : si vous raccordez un téléviseur 16:9e au lecteur.
FORMAT D'IMAGE VIDEO
Sélection du format de l'écran lorsque vous reproduisez une image 16:9e enregistrée sur un DVD sur un téléviseur normal
- BTE LETTRE : affiche l'image 16:9e, des bandes étant alors affichées dans le haut et dans le bas de l'écran.
- PAN SCAN : affiche l'image 16:9e sur la totalité de l'écran, une partie étant automatiquement coupée.

Remarque
Suivant les DVD, le rapport hauteur/largeur de l'image reproduite peut être fixé.
LANGUE MENUS DVD
Permute entre les langues du menu DVD qui est enregistré dans plusieurs langues.
- ANGLAIS
- FRANCAIS
- ESPAGNOL
- JAPONAIS
- CHINOIS
- ITALIEN
- ALLEMANE
- PORTUGAIS
- NEERLANDAIS
- AUTRES
Si vous sélectionnez "AUTRES", choisissez et introduisez le code de langue dans la liste à l'aide des touches numériques (page 53).
Remarque
Lorsque vous sélectionnez une langue qui n'est pas enregistrée sur le DVD, l'une des langues enregistrées est sélectionnée automatiquement.
LANGUE ECRANS
Commutation de la langue d'affichage à l'écran
- ANGLAIS
- FRANCAIS
Commutation des méthodes de mixage lorsque vous reproduisez un DVD sur lequel le son est enregistré en format Dolby Digital (AC-3).
- SPATIAL : si le lecteur est raccordé à un appareil audio doté de la fonction Dolby Surround, Dolby Pro Logic, etc.
- NORMAL : si le lecteur est raccordé à un appareil audio normal.
Connecteurs LINE OUT (AUDIO 1, 2) et la sortie numérique des connecteurs DIGITAL OUT OPTICAL et COAXIAL lorsque "SORTIE NUMERIQUE DVD" est réglé sur "PCM".
SORTIE NUMERIQUE DVD
Commutation des méthodes de sortie des signaux audio via les connecteurs DIGITAL OUT OPTICAL et COAXIAL situés sur le panneau arrière du lecteur
- PCM : si le lecteur est raccordé à un appareil audio doté d'un décodeur Dolby Digital (AC-3) intégré.
- NUMER AC-3 : si le lecteur est raccordé à un appareil audio doté d'un décodeur Dolby Digital (AC-3) intégré.
Remarque
Sélectionnez correctement le réglage. Sinon, aucun son ne sera diffusé par les haut-parleurs ou alors les hautparleurs diffuseront des sons étranges susceptibles d'affecter l'ouïe ou d'endommager les haut-parleurs.
SYS COULEUR CD VIDEO
"NTSC" est sélectionné lorsque vous reproduisez un CD vidéo.
SORTIE NUM CD VIDEO
Activation et désactivation de la sortie audio numérique lors de la reproduction d'un CD vidéo
- OUI : sortie des signaux audio numériques activée
- NON : sortie des signaux audio numériques désactivée
CONTROLE PARENTAL
Programmation d'un code de passe et d'un niveau de limitation de lecture en vue de la reproduction d'un DVD doté de la fonction de limitation de lecture par enfants. Pour plus de détails, voir page 39.
Informations complémentaires
Précautions
Sécurité
- Attention L'utilisation d'instruments optiques avec cet appareil augmente le risque de blessures aux yeux.
- Si des liquides ou des solides venaient à tomber dans le châssis, débranchez le lecteur et faites-le vérifier par le personnel qualifié avant de le remettre en service.
Alimentation
- Le lecteur n'est pas déconnecté de la source d'alimentation (secteur) aussi longtemps qu'il reste branché sur la prise murale, même si le lecteur proprement dit a été mis hors tension.
- Débranchez le lecteur de la prise murale si vous prévoyez de ne pas l'utiliser pendant une période prolongée. Pour débrancher le cordon d'alimentation (secteur), saisissez-le par la fiche. Ne tirez jamais sur le cordon proprement dit.
- Le cordon d'alimentation (secteur) ne peut être remplacé que dans un centre de service après-vente agréé uniquement.
Installation
- Installez le lecteur dans un endroit suffisamment ventilé de manière à éviter toute surchauffe interne.
- N'installez pas le lecteur sur des surfaces molles comme une nappe qui risquerait d'obstruer les orifices de ventilation du dessous.
- N'installez pas l'appareil à proximité de sources de chaleur ou dans un endroit soumis au rayonnement direct du soleil, à de la poussière en excès ou à des vibrations mécaniques.
Fonctionnement
• Si le lecteur est transporté directement d'un endroit froid dans un endroit chaud, ou est placé dans un local très humide, de l'humidité risque de se condenser sur les objectifs à l'intérieur du lecteur. Si cela se produit, le lecteur risque de ne pas fonctionner correctement. Dans ce cas, retirez le disque et laissez le lecteur sous tension pendant environ 30 minutes jusqu'à ce que toute l'humidité se soit évaporée.
Réglage du volume
N'augmentez pas le volume lorsque vous écoutez un passage avec de très faibles niveaux d'entrée ou sans signal audio. Vous risquez sinon d'endommager les haut-parleurs au moment de la reproduction d'un passage caractérisé par un niveau de crête.
Entretien
Nettoyez le châssis, le panneau et les commandes à l'aide d'un chiffon doux légèrement imprégné d'une solution détergente neutre. N'utilisez pas de tampons abrasifs, de poudre à récurer ni de solvants puissants tels que de l'alcool ou du benzène.
Si vous avez des questions ou des problèmes concernant votre lecteur, consultez votre revendeur Sony.
REMARQUE IMPORTANTE
Attention: Le lecteur DVD inclus est capable d'afficher indéfiniment un arrêt sur image vidéo ou une image de menu. Si vous laissez l'image vidéo fixe ou l'image de menu affichée sur l'écran de votre téléviseur pendant une période de temps prolongée, vous risquez d'endommagei votre téléviseur de façon permanente. Les télévisions de projection sont très sensibles.
Remarques sur les disques
Manipulation des disques
- Pour que les disques restent propres, manipulez-les avec soin. N'en touchez jamais la surface.
- Ne collez pas de papier ni de bande adhésive sur les disques.
S'il y a de la colle (ou toute autre substance similaire) sur disque, éliminez-la complètement avant d'utiliser le disq

- N'exposez pas les disques au rayonnement direct du solou à des sources de chaleurs telles que des conduits d'ain chaud. De même, ne les laissez pas dans une voiture parquée en plein soleil où la température à l'intérieur de l'habitacle risque d'augmenter dans des proportions considérables.
- Après avoir reproduit un disque, rangez-le dans son boî
Entretien des disques
Avant d'écouter un disque, nettoyez-le à l'aide d'un chif de nettoyage. Essuyez les disques en allant du centre ver l'extérieur.

N'utilisez pas de solvants tels que du benzène, du diluai des nettoyants disponibles dans le commerce ou des sprantistatiques destinés aux disques analogiques en vinyle
Dépannage
Si vous rencontrez l'une des difficultés suivantes lors de l'utilisation du lecteur, consultez ce guide de dépannage pour tenter de remédier au problème survenu. Si le problème persiste, consultez votre revendeur Sony.
L'alimentation n'est pas coupée.
Si l'indicateur ON/STANDBY n'est pas allumé, vérifiez que le cordon d'alimentation est branché correctement.
Il n'y a pas d'image.
- Vérifiez que le lecteur est raccordé correctement.
- →Le cordon de connexion vidéo est défectueux. Remplacez-le par un neuf.
- Assurez-vous que vous raccordez le lecteur au connecteur d'entrée vidéo sur le téléviseur. (page 6)
- ➡Assurez-vous que le téléviseur est allumé.
- Sélectionnez l'entrée vidéo du téléviseur de sorte que vous puissiez visualiser les images du lecteur.
Il n'y a pas de son.
- Vérifiez que le lecteur est raccordé correctement.
- Le cordon de connexion audio est défectueux. Remplacez-le par un neuf.
- →Veillez à raccorder le lecteur aux connecteurs d'entrée audio de l'amplificateur. (page 6)
- Vérifiez que le téléviseur et l'amplificateur sont allumés.
- Veillez à sélectionner la position appropriée sur l'amplificateur de sorte que vous puissiez écouter le son du lecteur.
- →Le lecteur est en mode de pause ou en mode de ralenti. Appuyez sur ▷> pour revenir en mode de lecture normale.
- →L'appareil effectue une avance rapide (AV RAP1 ou AV RAP2) ou un rembobinage (REMB1 ou REMB2). Appuyez sur ▷ pour revenir en mode de lecture normale.
- →Lorsque vous raccordez le lecteur à un amplificateur doté d'un connecteur numérique et reproduisez un DVD, mettez "SORTIE NUMERIQUE DVD" dans "REGLAGES INITIAUX" sur "PCM" dans le menu. Lorsque vous reproduisez un CD vidéo, mettez "SORTIE NUM CD VIDEO" dans "REGLAGES INITIAUX" sur "OUI" dans le menu.
- Sélectionnez le réglage approprié de "MIXAGE" dans "REGLAGES INITIAUX" en fonction de votre amplificateur.
La télécommande ne fonctionne pas.
- Retirez les obstacles éventuels entre la télécommande et le lecteur.
- Utilisez la télécommande à proximité du lecteur.
- ➡Orientez la télécommande vers le capteur infrarouge
- Remplacez toutes les piles de la télécommande par des neuves si elles sont faibles.
L'image apparaît parasitée.
➡Nettoyez le disque.
- Ce lecteur se caractérise par une fonction de protection contre la copie, développée par Macrovision. Les signaux de protection contre la copie sont enregistrés sur certains DVD. Lors de la lecture de ces disques, l'image apparaîtra parasitée sur certains téléviseurs et projecteurs.
- L'image apparaît parasitée lorsque le lecteur est raccordé au téléviseur via la platine vidéo. Ne raccordez pas le lecteur à la platine vidéo. Raccordez le lecteur directement au téléviseur. (page 7)
L'image apparaît parasitée lorsque vous enregistrez et reproduisez l'image d'un DVD sur une platine vidéo.
→Ce lecteur se caractérise par une fonction de protection contre la copie, développée par Macrovision. Les signaux de protection contre la copie sont enregistrés sur certains DVD. Lors de la lecture ou de l'enregistrement d'images de ces disques sur une platine vidéo, l'image apparaîtra parasitée.
Le son est parasité.
➡Nettoyez le disque.
Enfoncez à fond la fiche audio du cordon de connexion.
La lecture du disque ne s'effectue pas.
Il n'y a pas de disque à l'intérieur ("INTRODUISEZ UN DISQUE" apparaît sur l'écran du téléviseur).
Introduisez un disque.
- Placez le disque correctement sur le plateau de lecture en veillant à orienter la face de lecture vers le bas.
- Placez le disque correctement sur le plateau de lecture.
- ➡Nettoyez le disque.
- →Le lecteur ne peut pas reproduire de CD-ROM, etc. (page 5)
Introduisez un DVD, un CD vidéo ou un CD.
- →Vérifiez le code régional du DVD. (page 4)
- L'humidité s'est condensée à l'intérieur de l'appareil. Retirez le disque et laissez le lecteur sous tension pendant environ 30 minutes. (page 46)
Le lecteur ne commence pas au début lors de la lecture d'un disque.
- →Les paramètres du menu dans "MODE DE LECTURE" sont réglés sur "OUI".
- Sélectionnez "TOUŠ DESACTIVES". (page 43) →La reprise de lecture a lieu.
- Appuyez sur sur le panneau frontal ou sur la télécommande avant d'entamer la lecture. (page 36)
- →Un menu de titres ou un menu DVD apparaît automatiquement sur l'écran du téléviseur lorsque vous reproduisez votre DVD, ou un écran de menu apparaît automatiquement sur l'écran du téléviseur lors de la lecture de votre CD vidéo doté de fonctions PBC.
La lecture du DVD n'a pas lieu lorsque vous sélectionnez un titre.
→Le contrôle parental fonctionne. (page 39)
Le lecteur entame la lecture du DVD automatiquement. →Le DVD se caractérise par la fonction de lecture automatique.
L'arrêt de lecture, la recherche, la lecture au ralenti, la lecture répétée, la lecture mélangée ou programmée, etc. ne peuvent être exécutés.
En fonction du disque, il se peut que vous ne puissiez pas effectuer certaines opérations cidessus.
Les messages n'apparaissent pas sur l'écran du téléviseur dans la langue désirée.
Dans le menu, sélectionnez la langue pour l'affichage sur écran dans "LANGUE ECRANS" de "REGLAGES INITIAUX". (page 45)
La langue du son ne peut pas être modifiée lors de la lecture d'un DVD.
- Le son multilingue n'est pas enregistré sur le DVD.
- Le changement de la langue du son est interdit sur le DVD.
La langue des sous-titres ne peut pas être modifiée lorsque vous reproduisez un DVD.
- Les sous-titres multilingues ne sont pas enregistrés sur le DVD.
- →Le changement de la langue des sous-titres est interdit sur le DVD.
Les sous-titres ne peuvent pas être désactivés lorsque vous reproduisez un DVD.
Suivant les DVD, il se peut que vous ne puissiez pas désactiver les sous-titres.
Les angles ne peuvent pas être modifiés pendant la lecture d'un DVD.
- Les angles multiples ne sont pas enregistrés sur le DVD.
- Modifiez les angles lorsque "ANGLE" apparaît sur la fenêtre d'affichage du panneau frontal. (page 38)
- Le changement des angles est interdit sur le DVD.
Le rapport hauteur/largeur de l'écran ne peut pas être modifié même si vous réglez "FORMAT D'IMAGE VIDEO" dans "REGLAGES INITIAUX" dans le menu lorsque vous reproduisez une image 16:9e.
→Le rapport largeur/hauteur est fixé sur votre DVD.
L'écran de menu n'apparaît pas lorsque vous reproduisez un CD vidéo.
Le CD vidéo ne comprend pas les fonctions PBC. Suivez la procédure de fonctionnement correcte. (Reportez-vous également aux instructions fournies avec le disque.)
Le son perd l'effet stéréo lorsque vous reproduisez un CD vidéo ou un CD.
-
"1/L" ou "2/R" apparaît sur la fenêtre d'affichage du panneau frontal. Sur la télécommande, appuyez plusieurs fois
- sur AUDIO CHANGE jusqu'à ce que "1/L 2/R" apparaisse. (page 37) Dans le menu, réglez "G/D/STEREO" dans "REGLAGE PERSONNALISE" sur "STEREO".
- (page 44)
Le lecteur ne fonctionne pas convenablement
De l'électricité statique, etc. peut nuire au fonctionnement du lecteur. Débranchez le cordon d'alimentation et puis rebranchez-le.
L'image sautille en mode de lecture ralentie
Dans le menu, réglez "MODE PAUSE" sur "AUTO". (page 44)
L'alimentation est coupée automatiquement.
→La fonction d'arrêt automatique est activée. (Si vous ne faites pas fonctionner le lecteur ni la télécommande pendant plus de 30 minutes et qu'aucune lecture n'est en cours, l'appareil se mettra automatiquement hors tension )
Spécifications
Lecteur CD/DVD
| Laser | Semi-conducteur à laser |
|---|---|
| Format du signal | NTSC |
Caractéristiques audio
| Réponse en fréquence |
|
|---|---|
| CD : 2 Hz à 20 kHz (±0,5 dB) | |
| Rapport signal/bruit | Plus de 107 dB |
| Distorsion harmonique | Moins de 0,0028 % |
| Plage dynamique | Plus de 97 dB |
| Pleurage et scintillement | Moins que la valeur détectée |
| (+0.001 % W PEAK) |
Sorties et entrées
| Type de prise |
Niveau de
sortie maximum |
Impédance | |
|---|---|---|---|
|
LINE OUT
(AUDIO 1, 2) |
Prises phono |
2 Vrms (à 50
kilohms) |
Plus de 10
kilohms |
|
DIGITAL OUT
(OPTICAL) |
Connecteur de sortie optique | 18 dBm |
Longueur
d'onde : 660 nr |
|
DIGITAL OUT
(COAXIAL) |
Prises phono | 0,5 Vp-p |
75 ohms
termination |
|
LINE OUT
(VIDEO) |
Prise phono | 1,0 Vp-p |
75 ohms, sync
négative |
| S VIDEO OUT |
Miniconnecteur
DIN à 4 broches |
Y : 1,0 Vp-p |
75 ohms, sync
négative |
| С : 0,286 Vp-p |
75 ohms
termination |
||
| S-LINK | Miniprise |
Caractéristiques générales
| Puissance de raccordement | 120V CA, 60Hz |
|---|---|
| Consommation électrique | 26 W |
| Dimensions (approx.) | 430 × 111 × 395 mm |
| (17 × 4 3 /8 × 15 5 /8 pouces) (l/h/p), | |
| parties saillantes comprises | |
| Poids (approx.) | 6,0 kg (13 lb 4 oz) |
| Température de fonctionnem | ient |
| 5°C à 35°C (41°F à 95°F) |
Humidité de fonctionnement 5 % à 90
Accessoires fournis
Voir page 6.
La conception et les spécifications sont sujettes à modifications sans préavis.
48

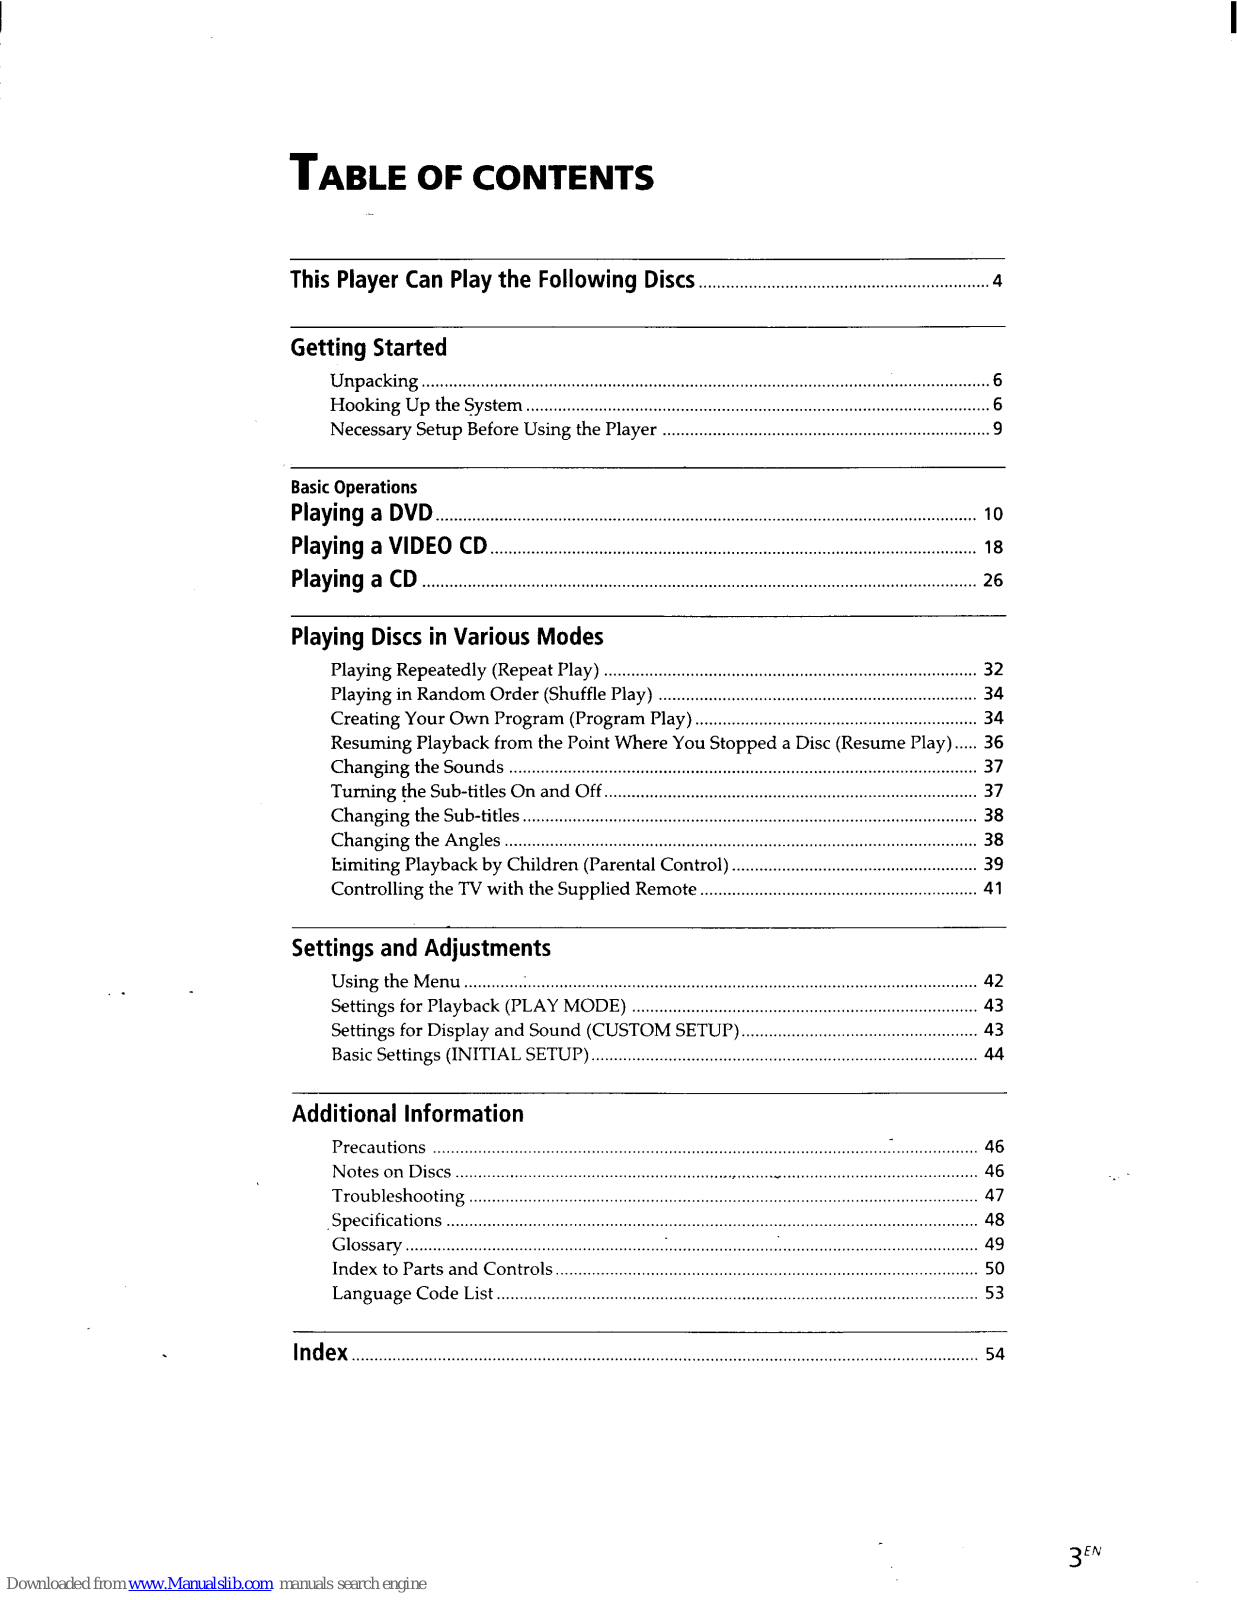
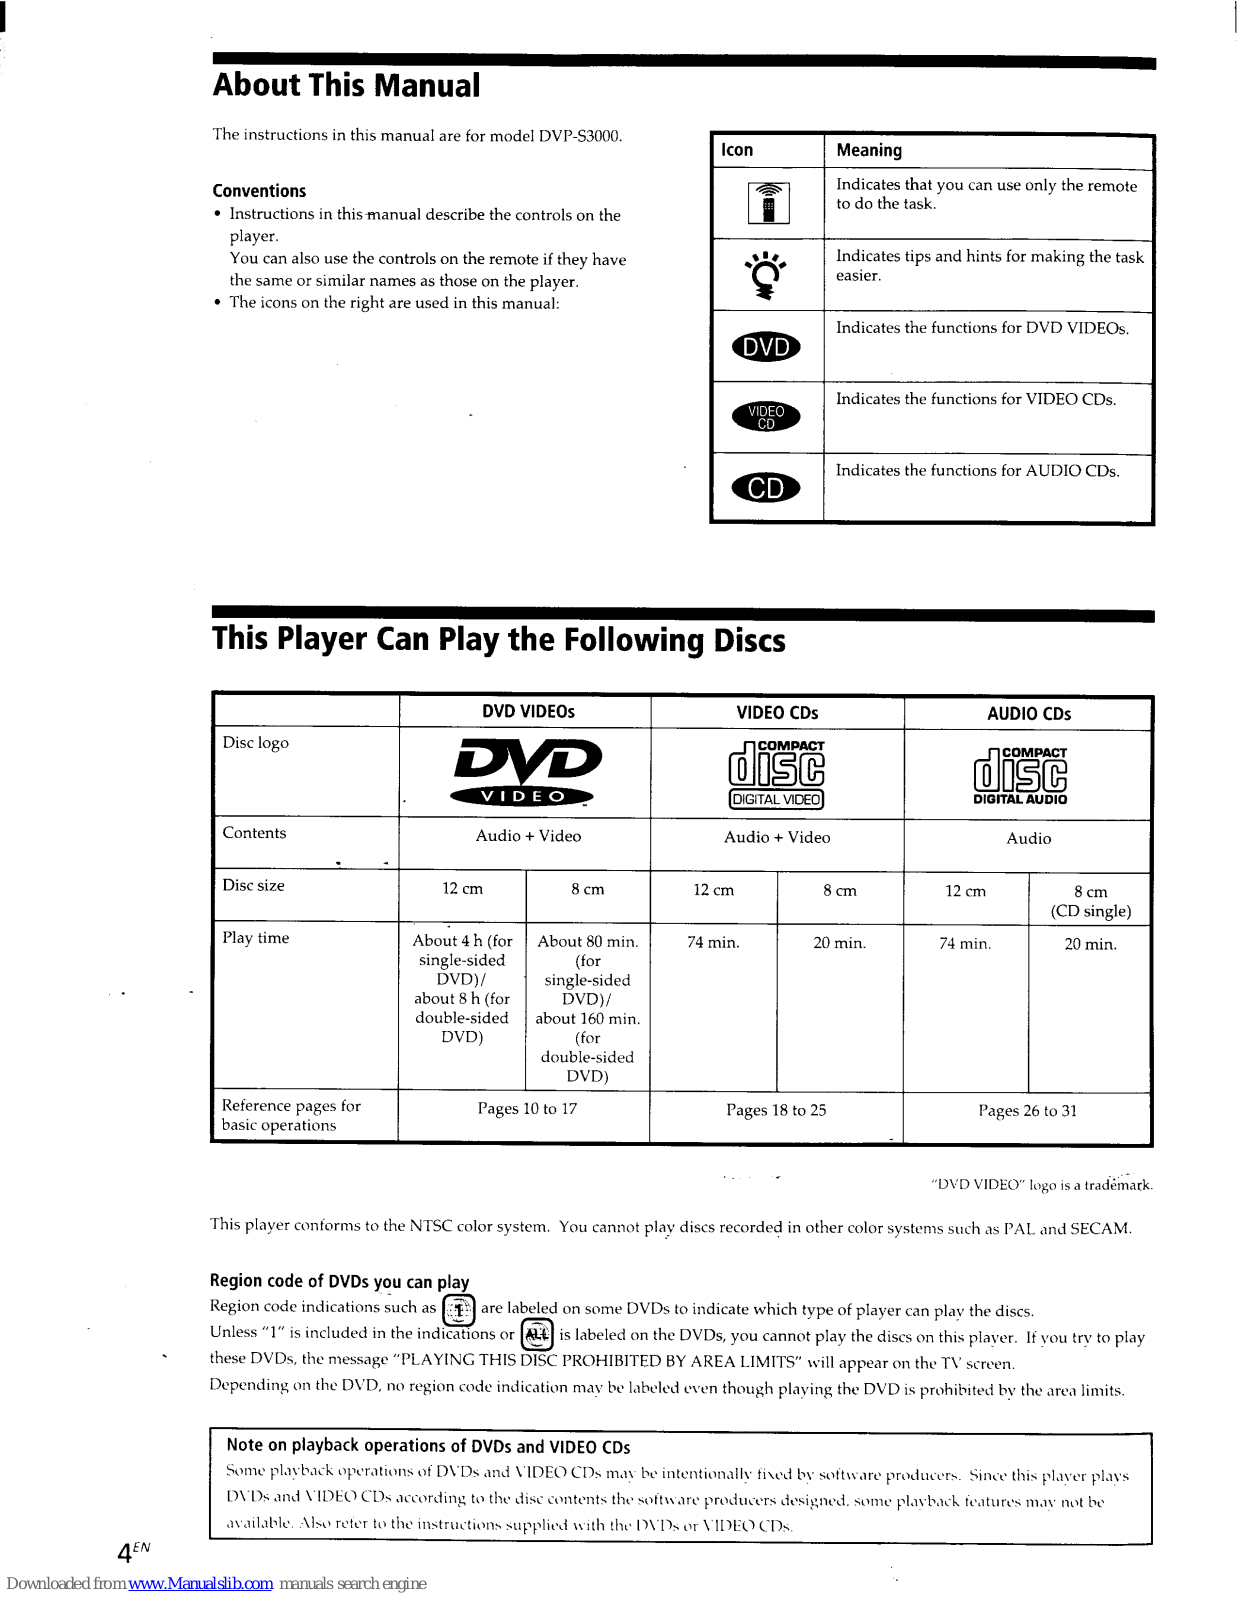
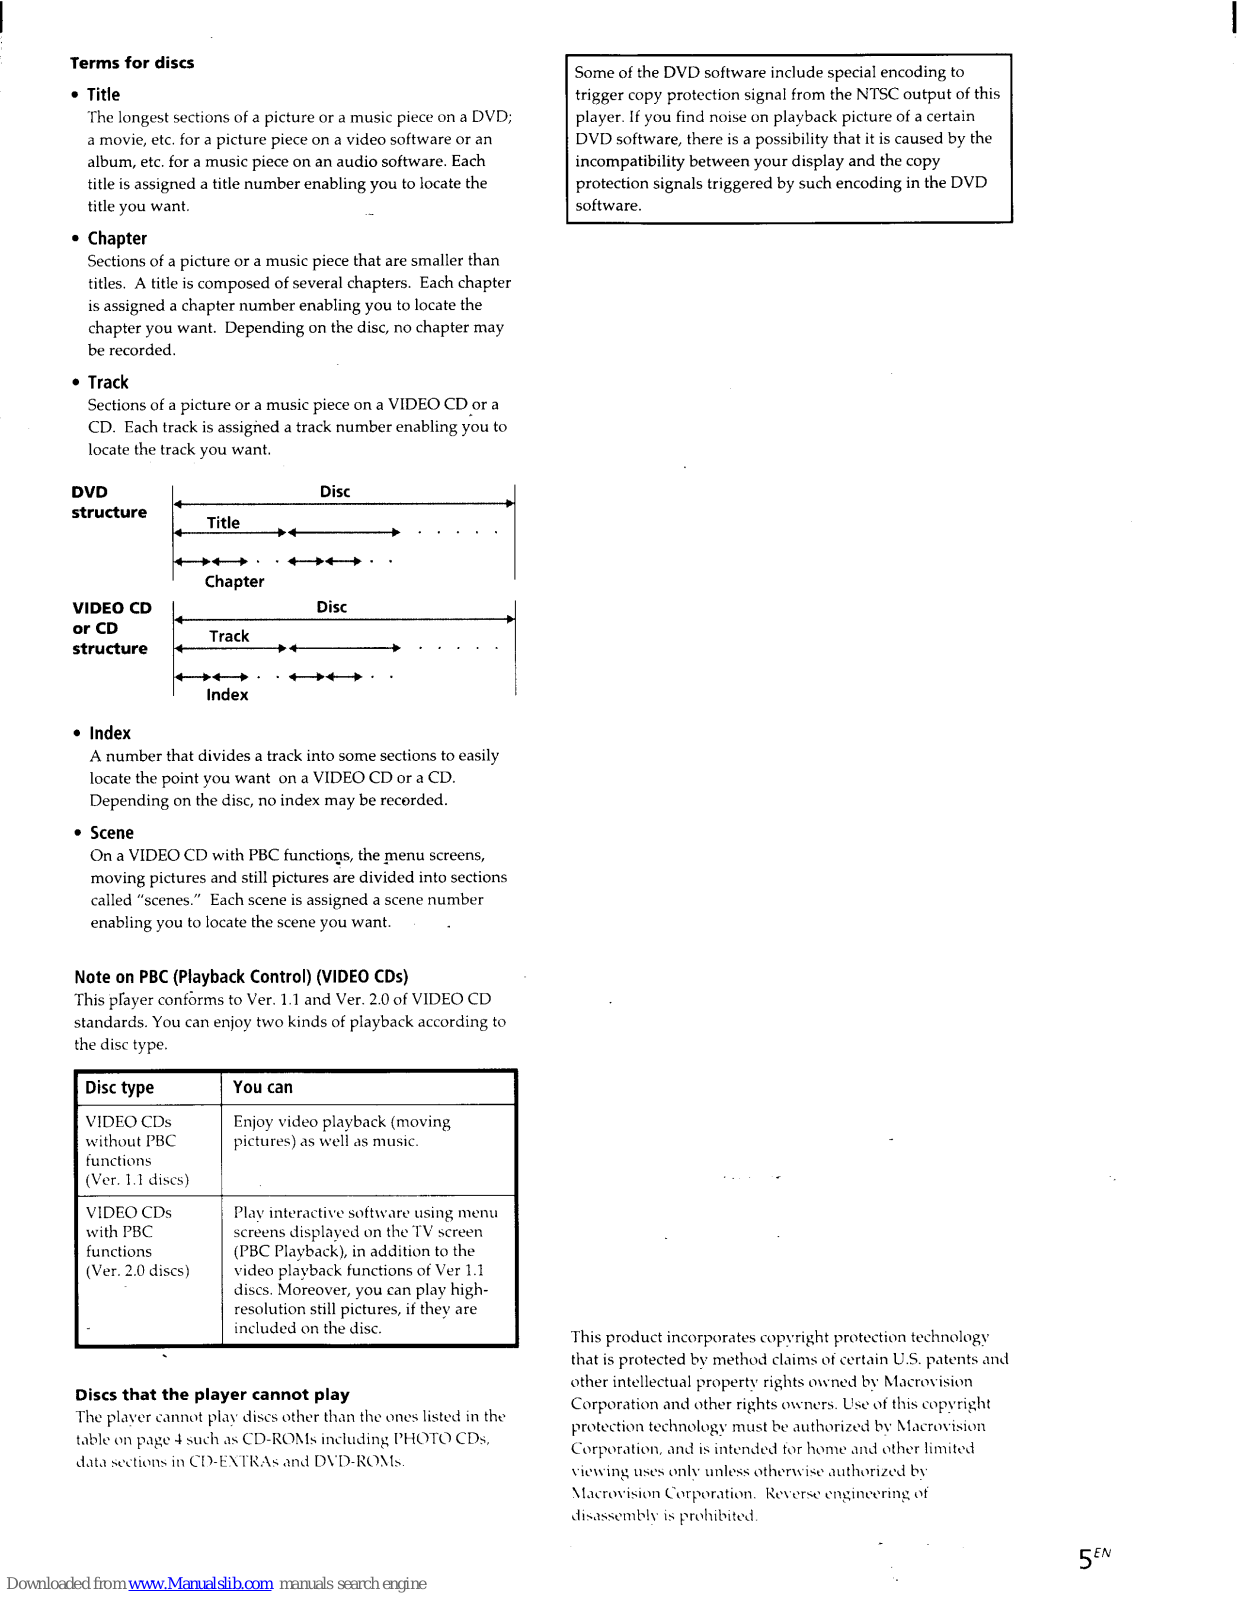
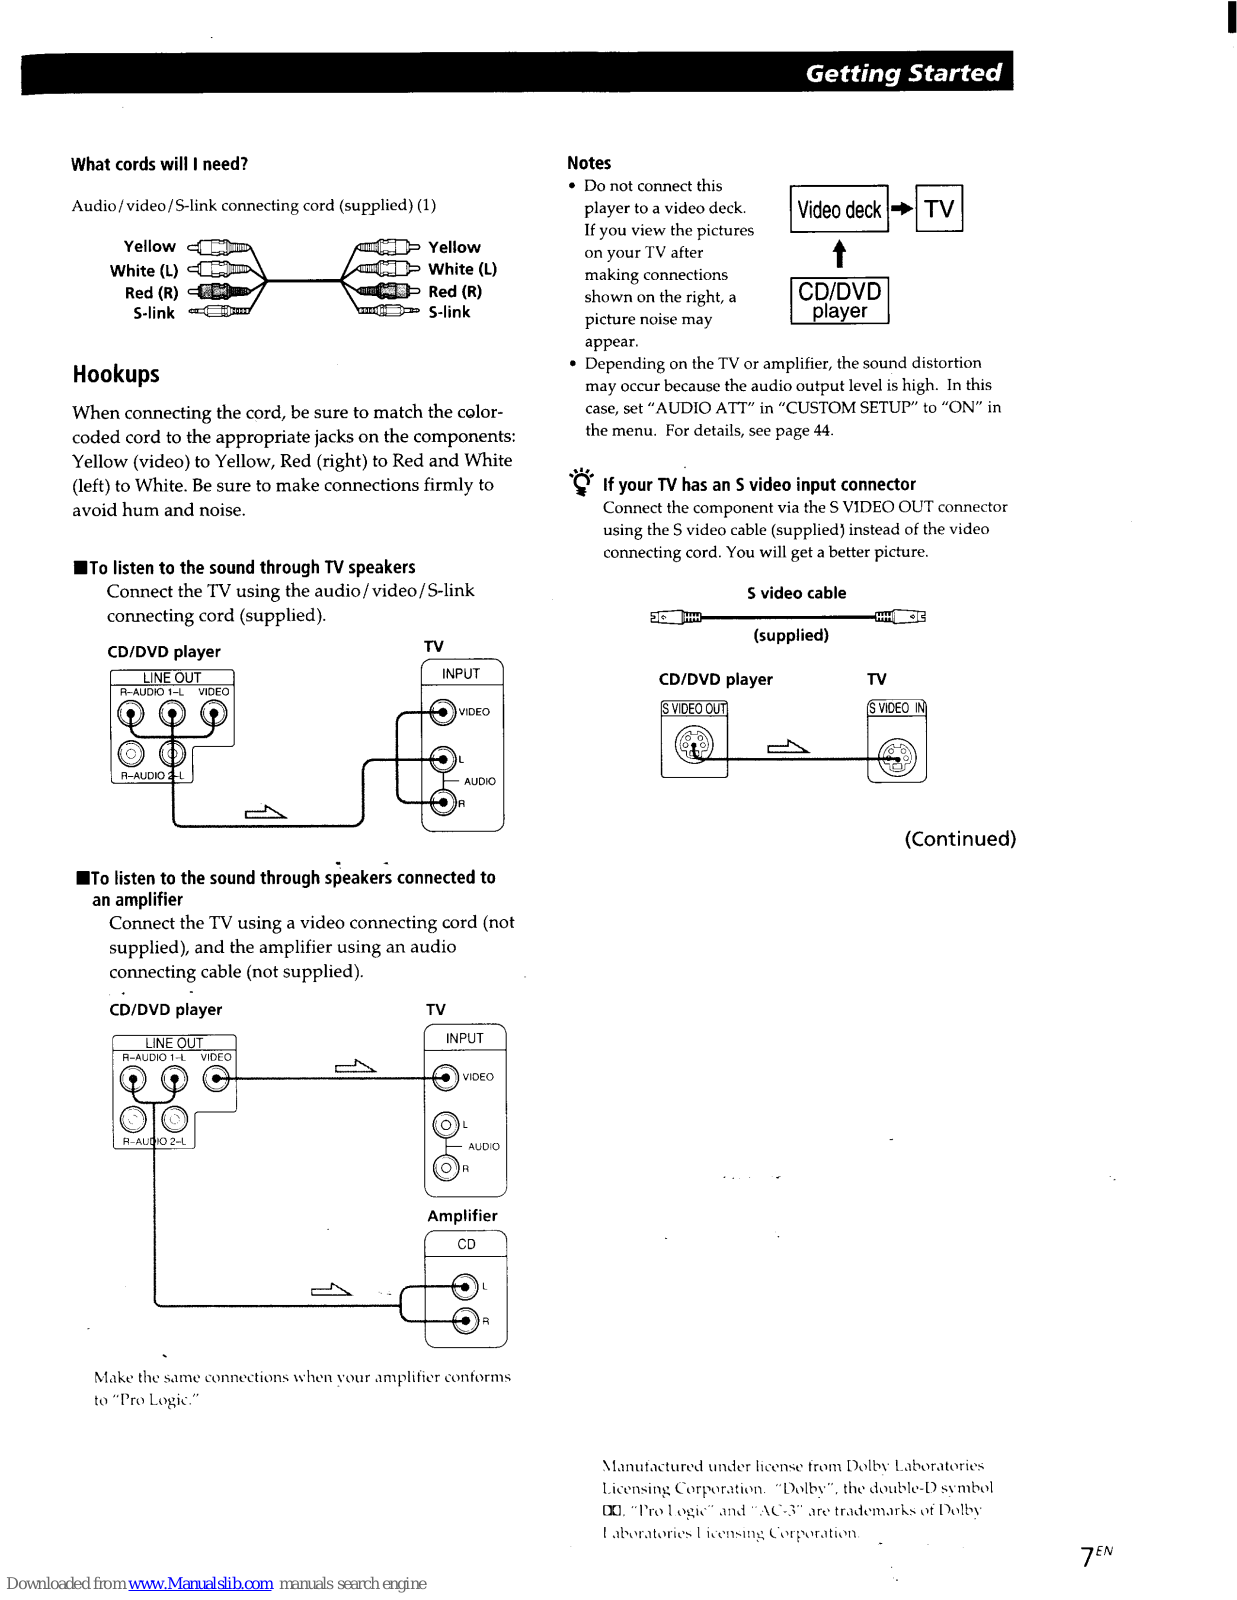
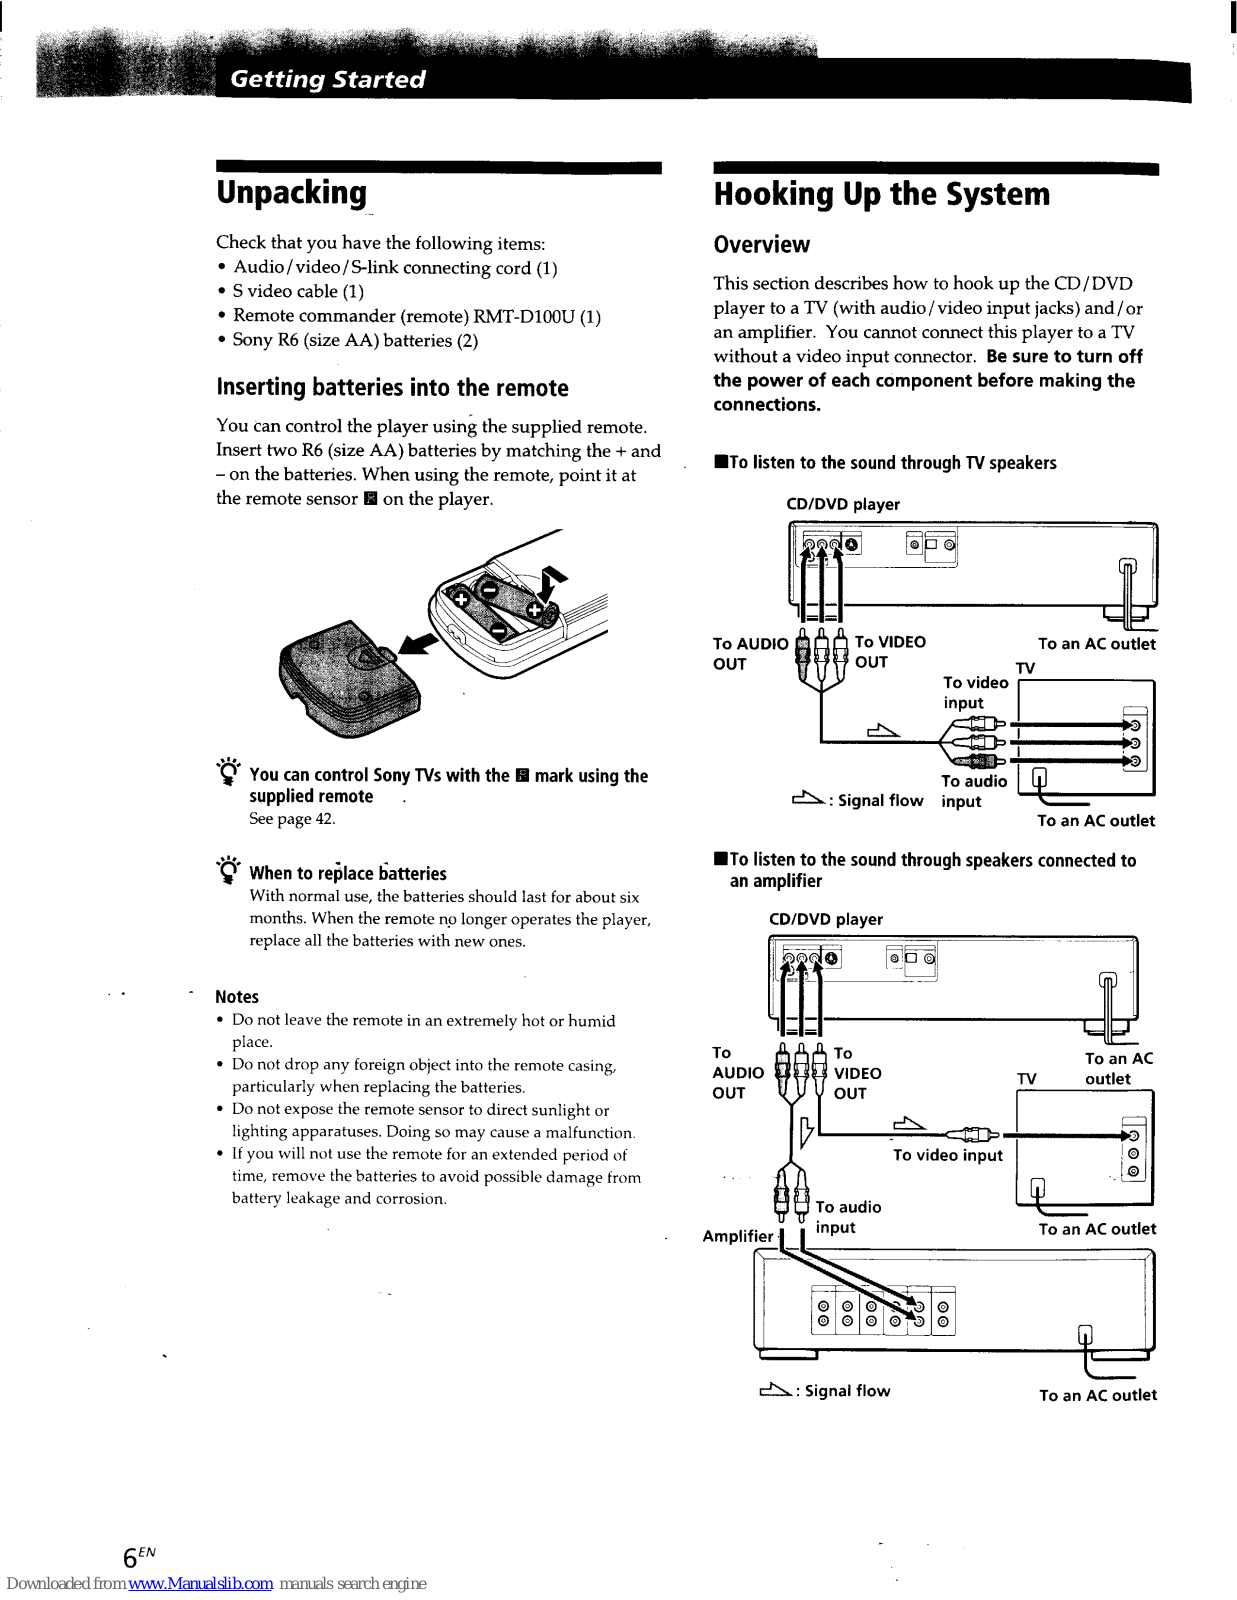
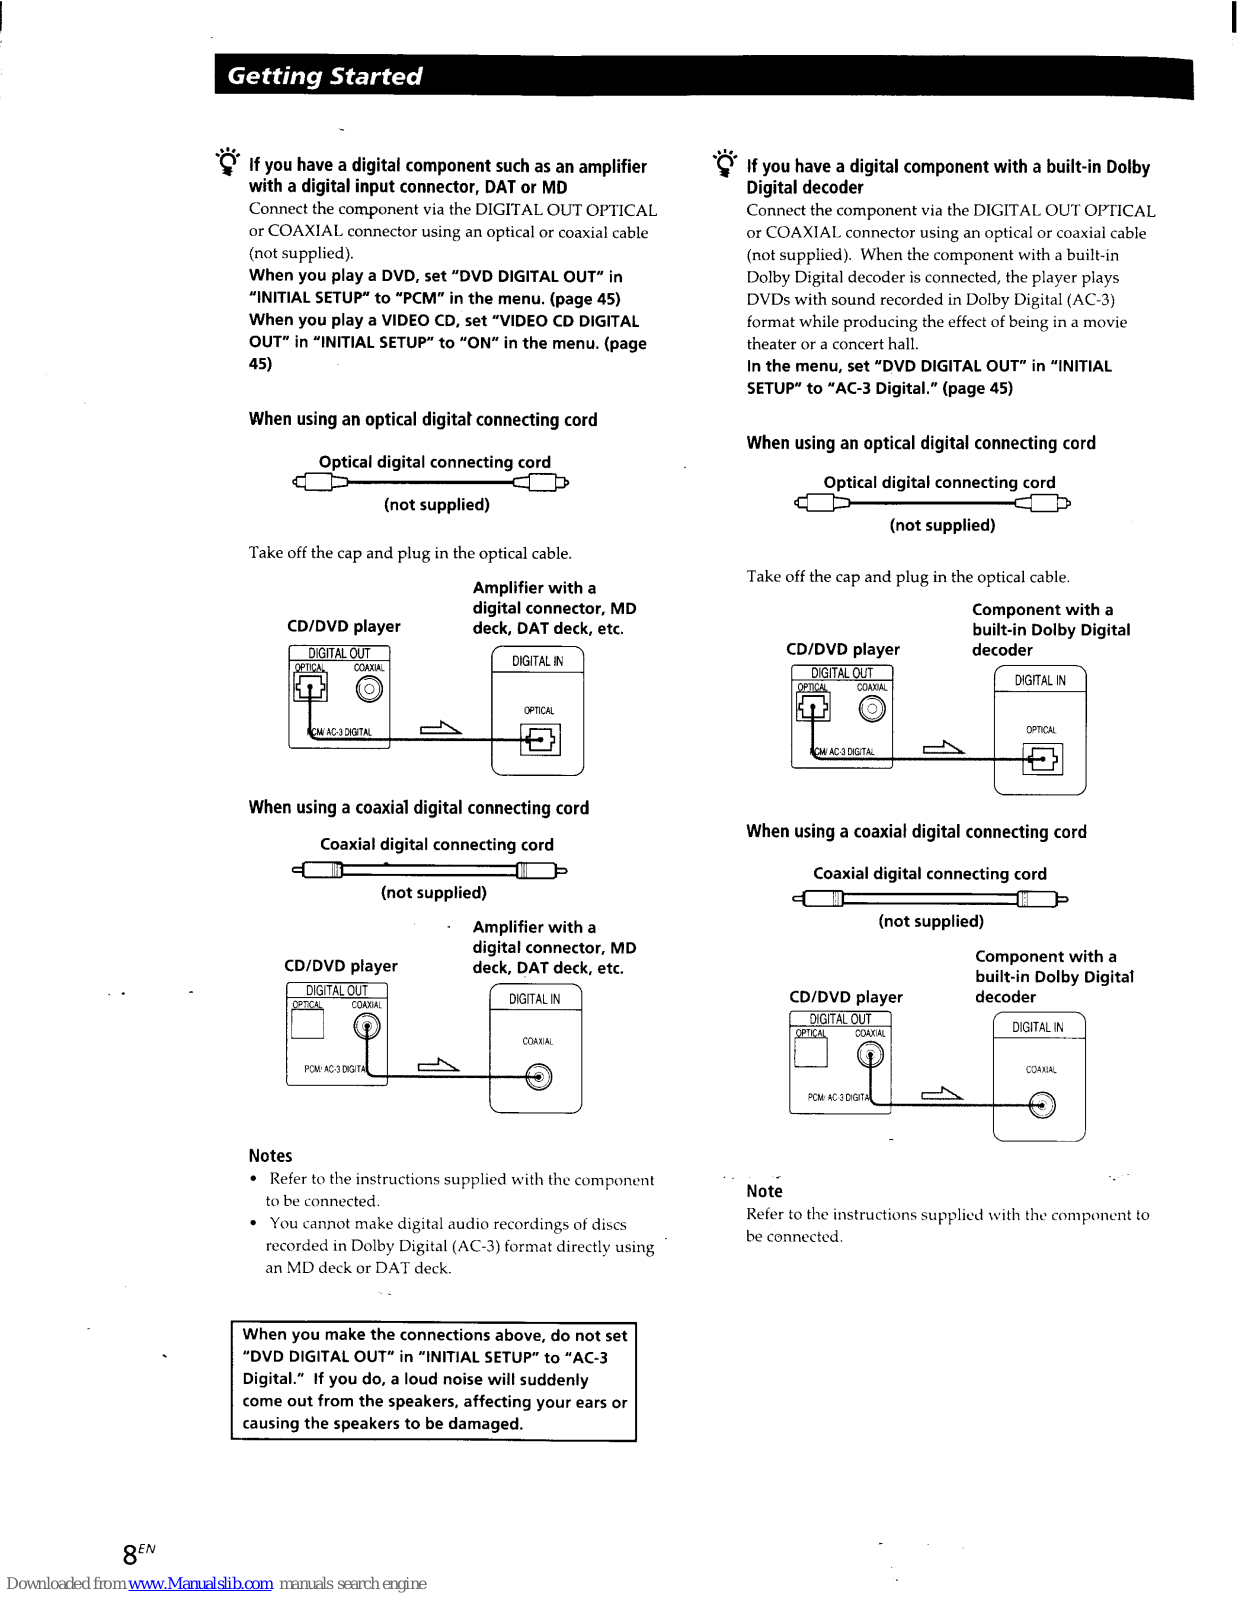

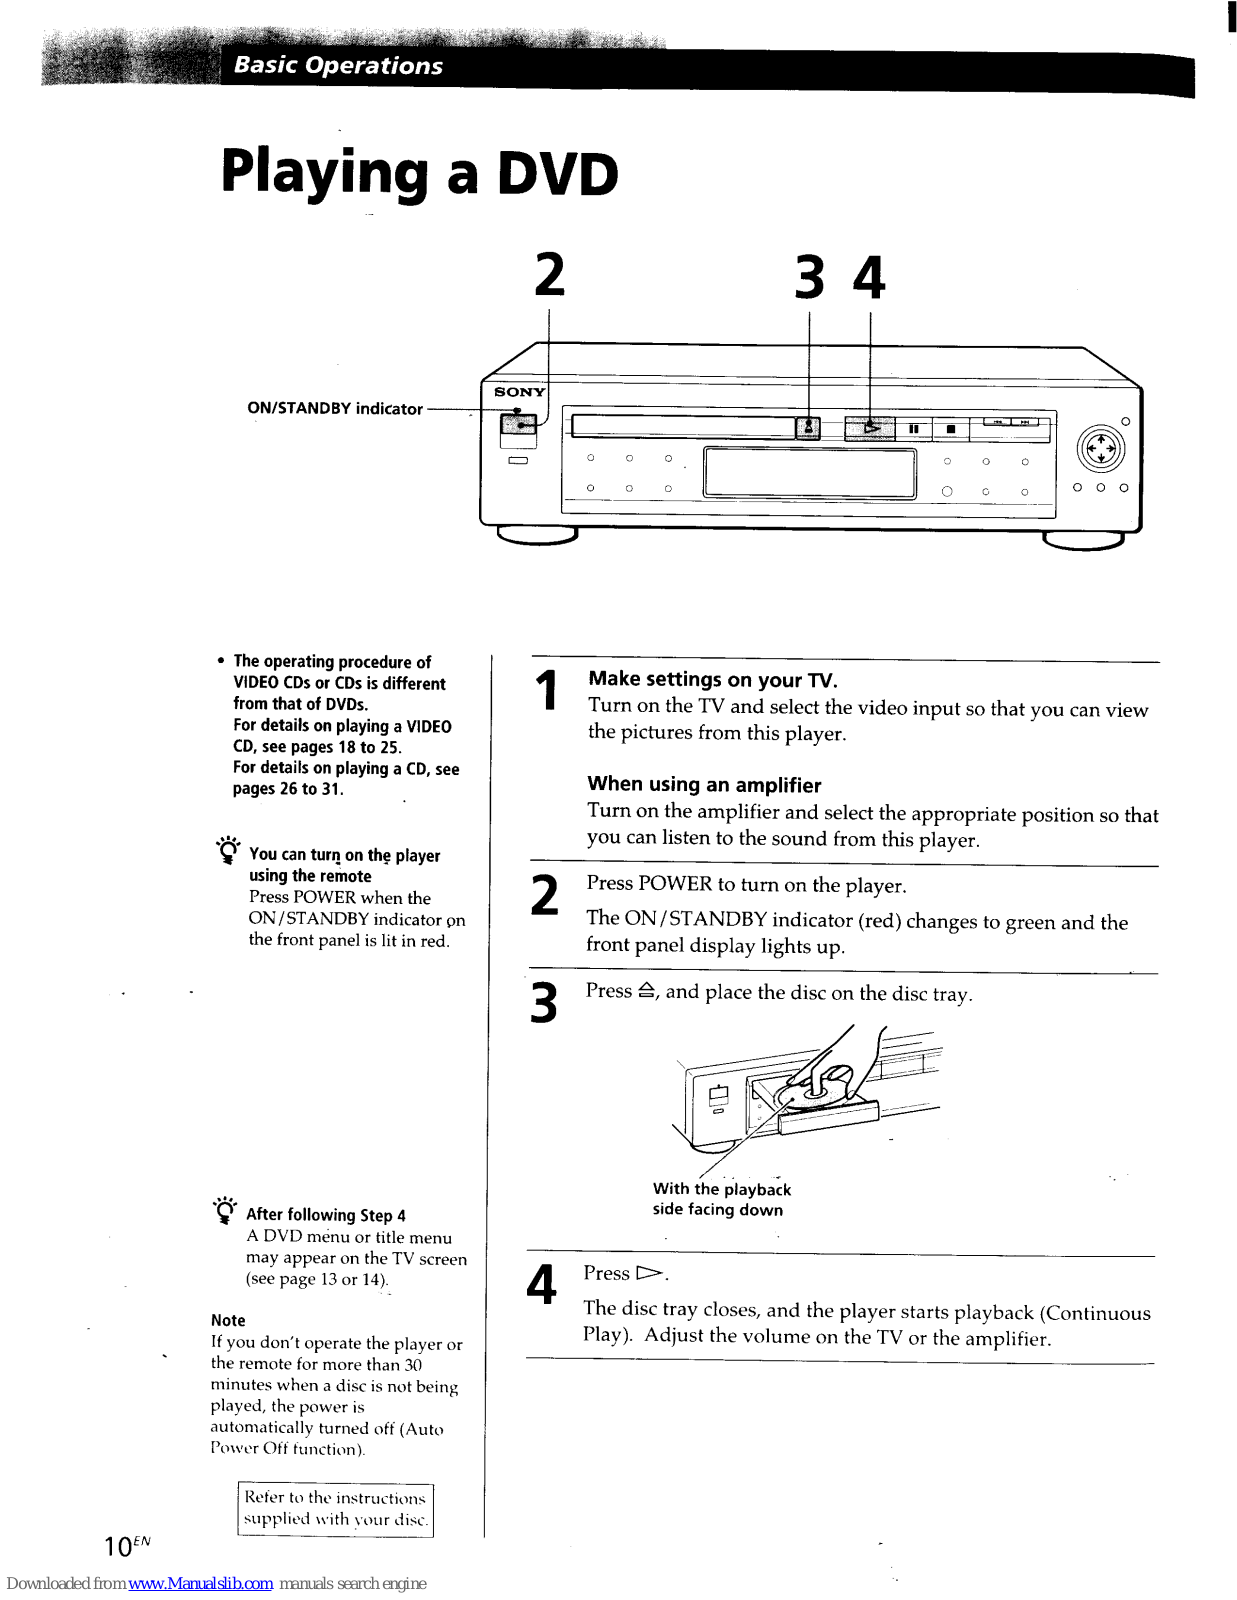
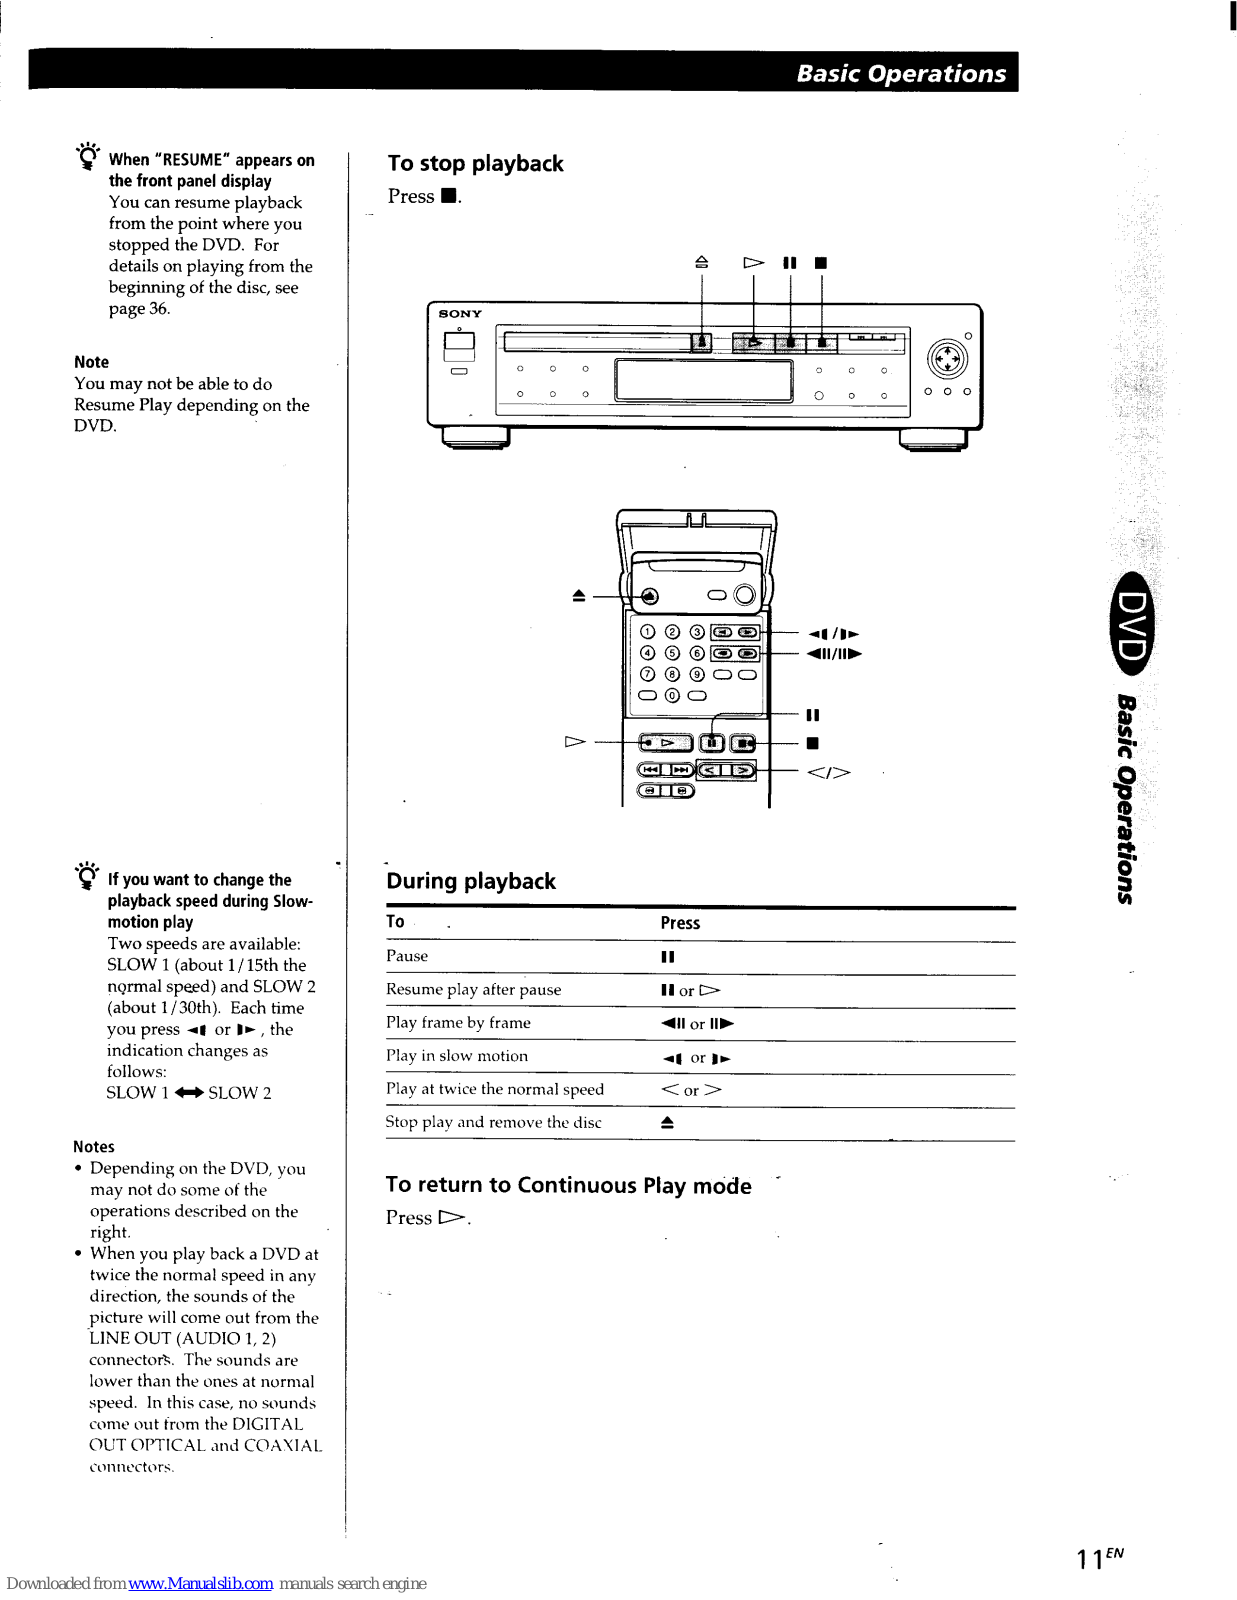
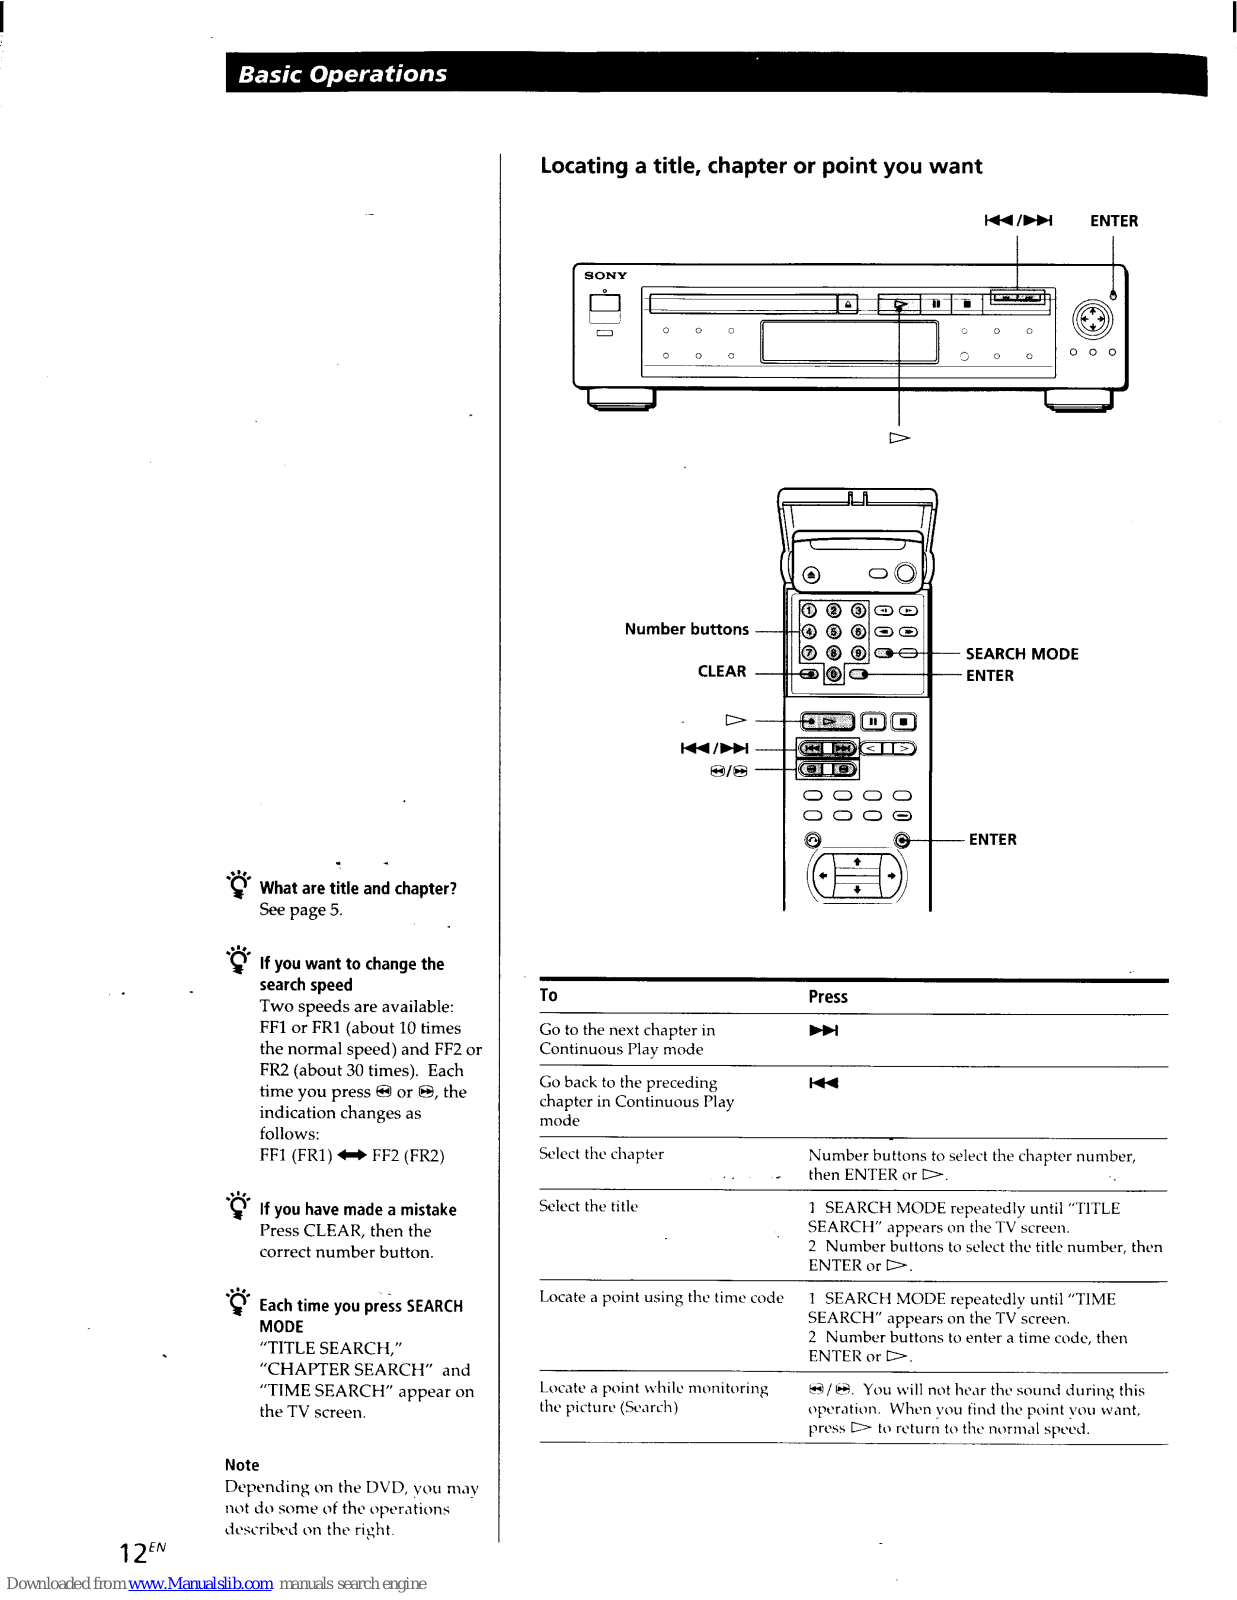
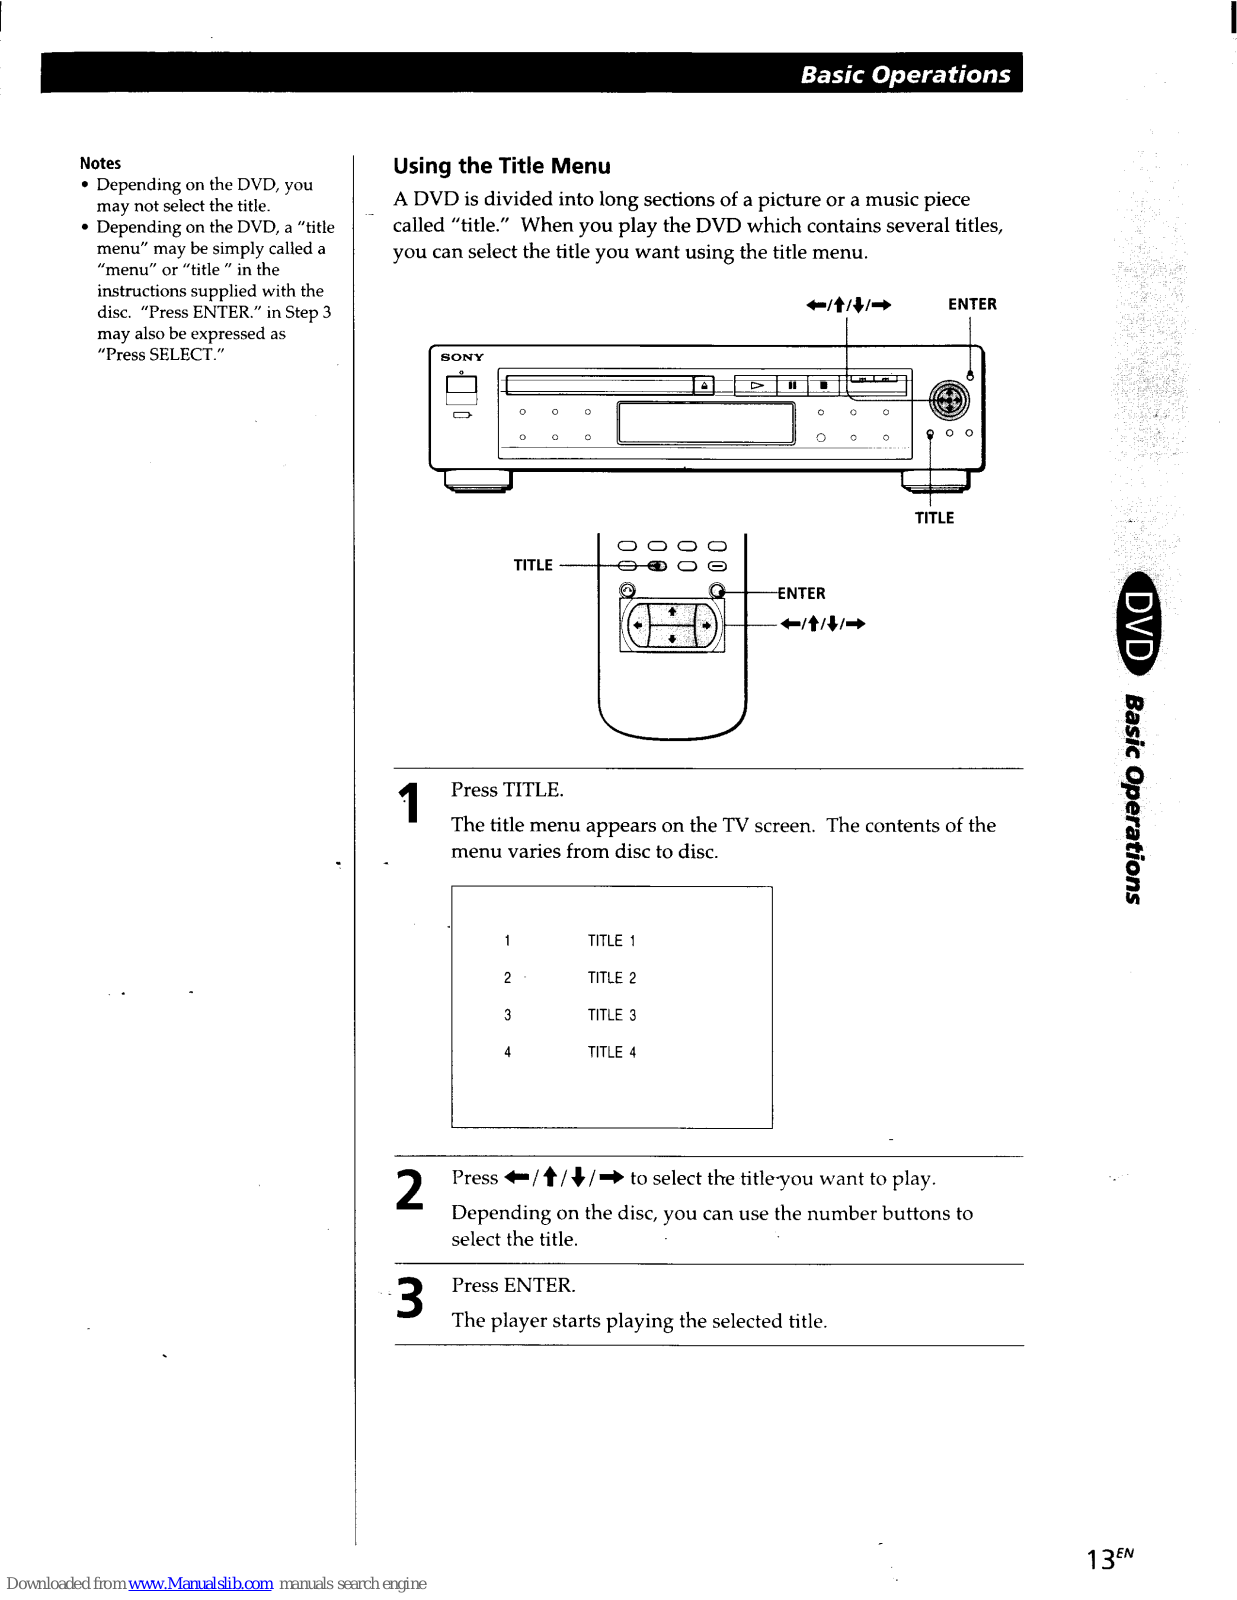
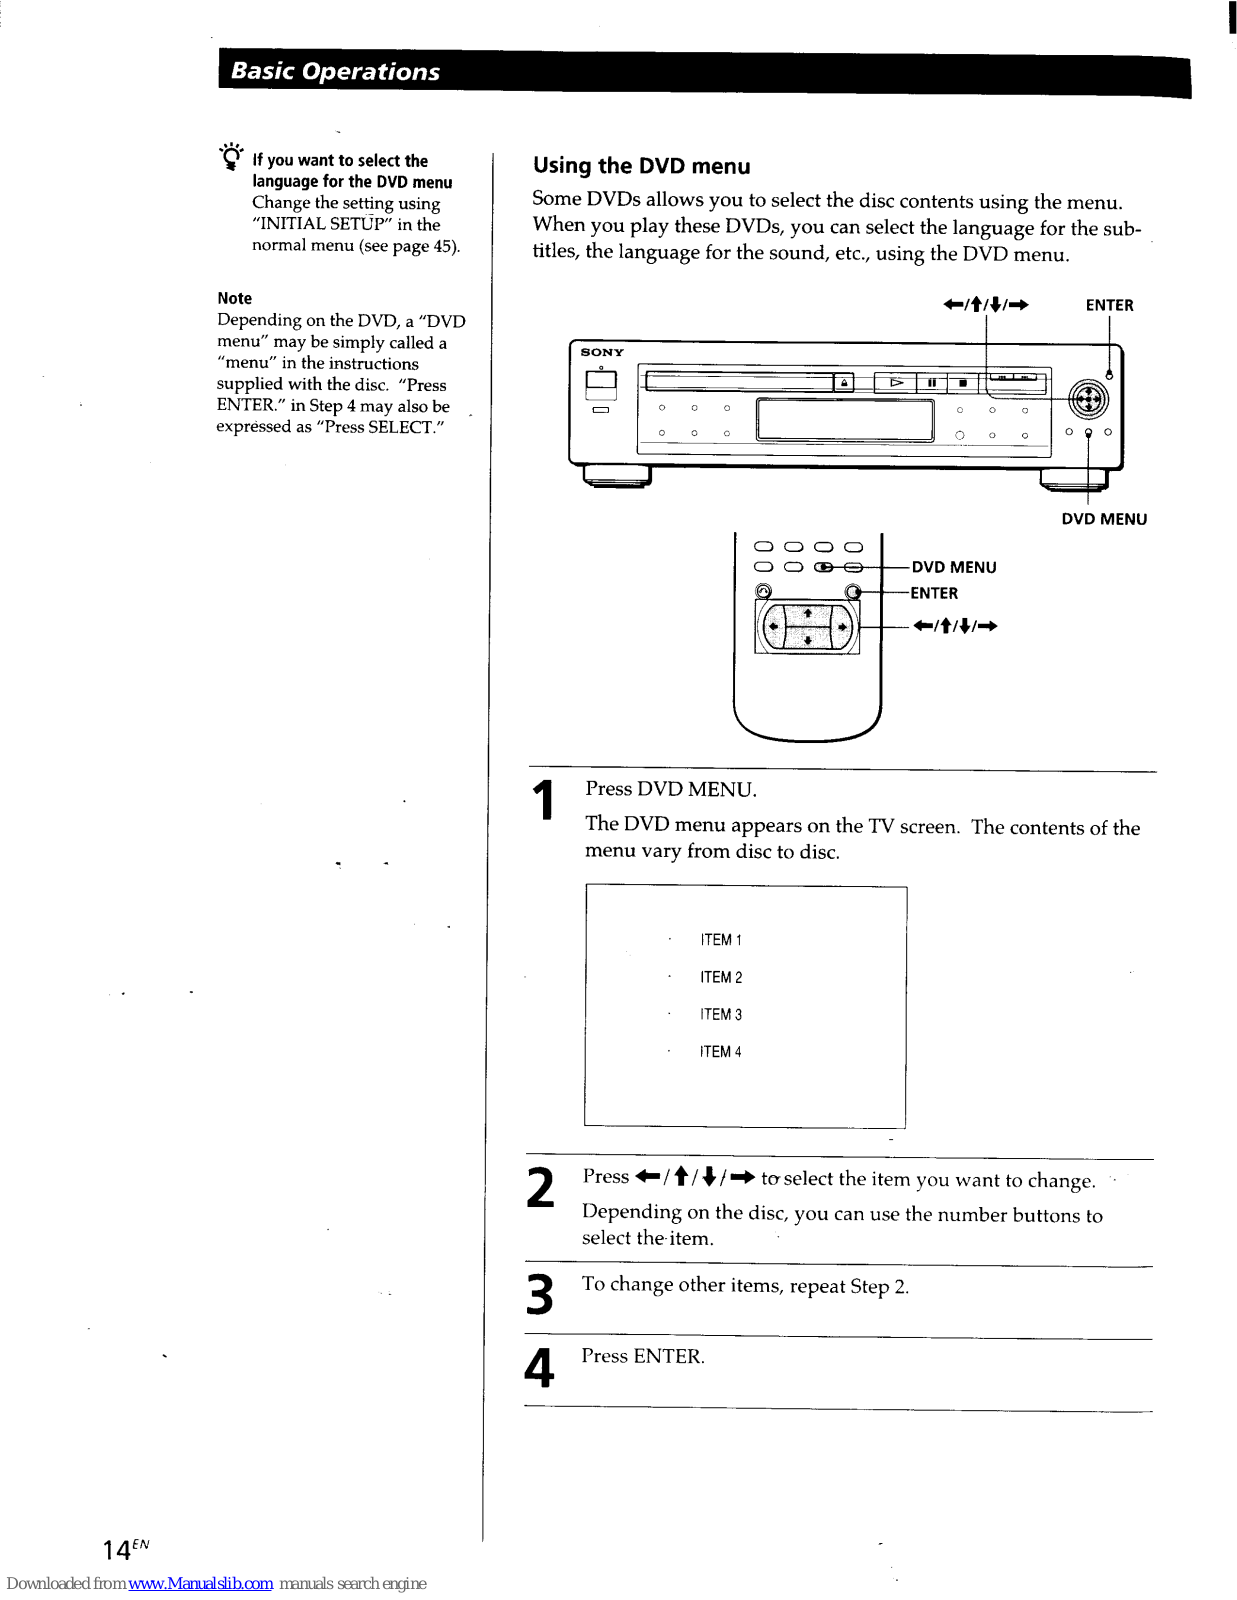
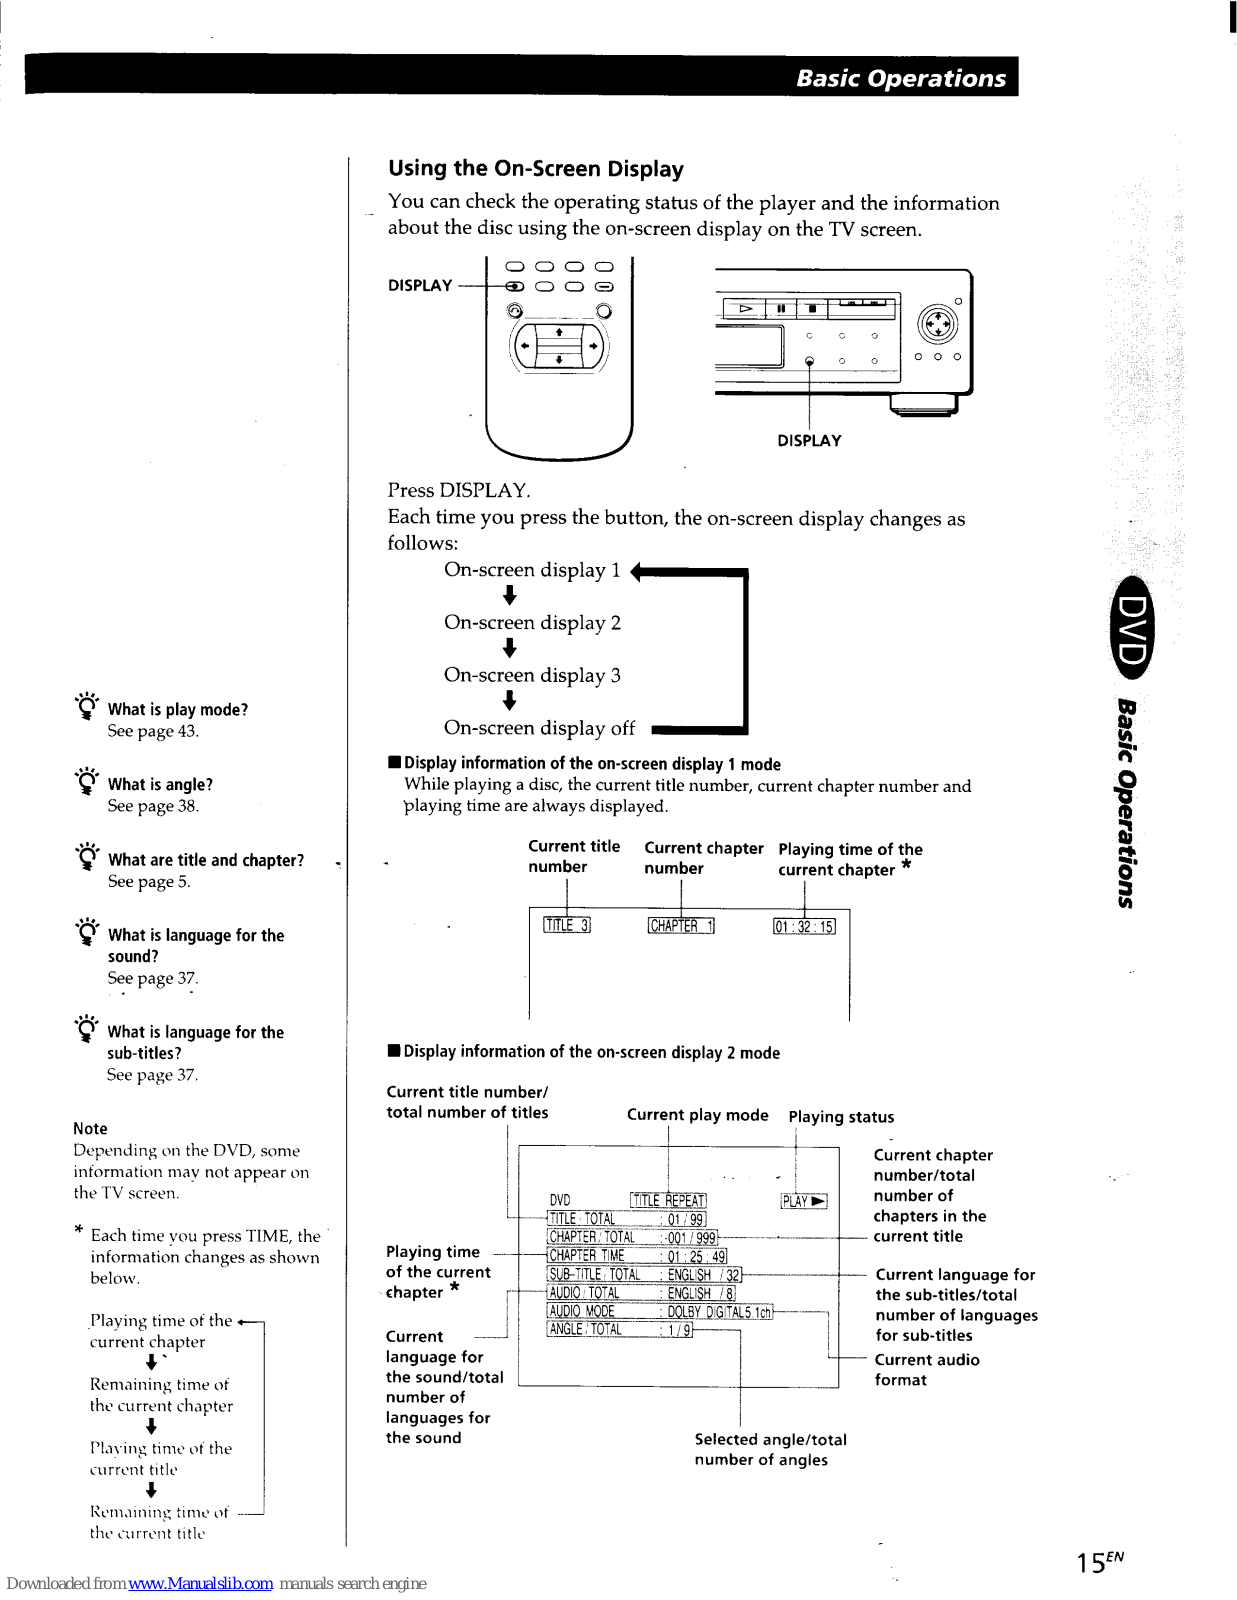
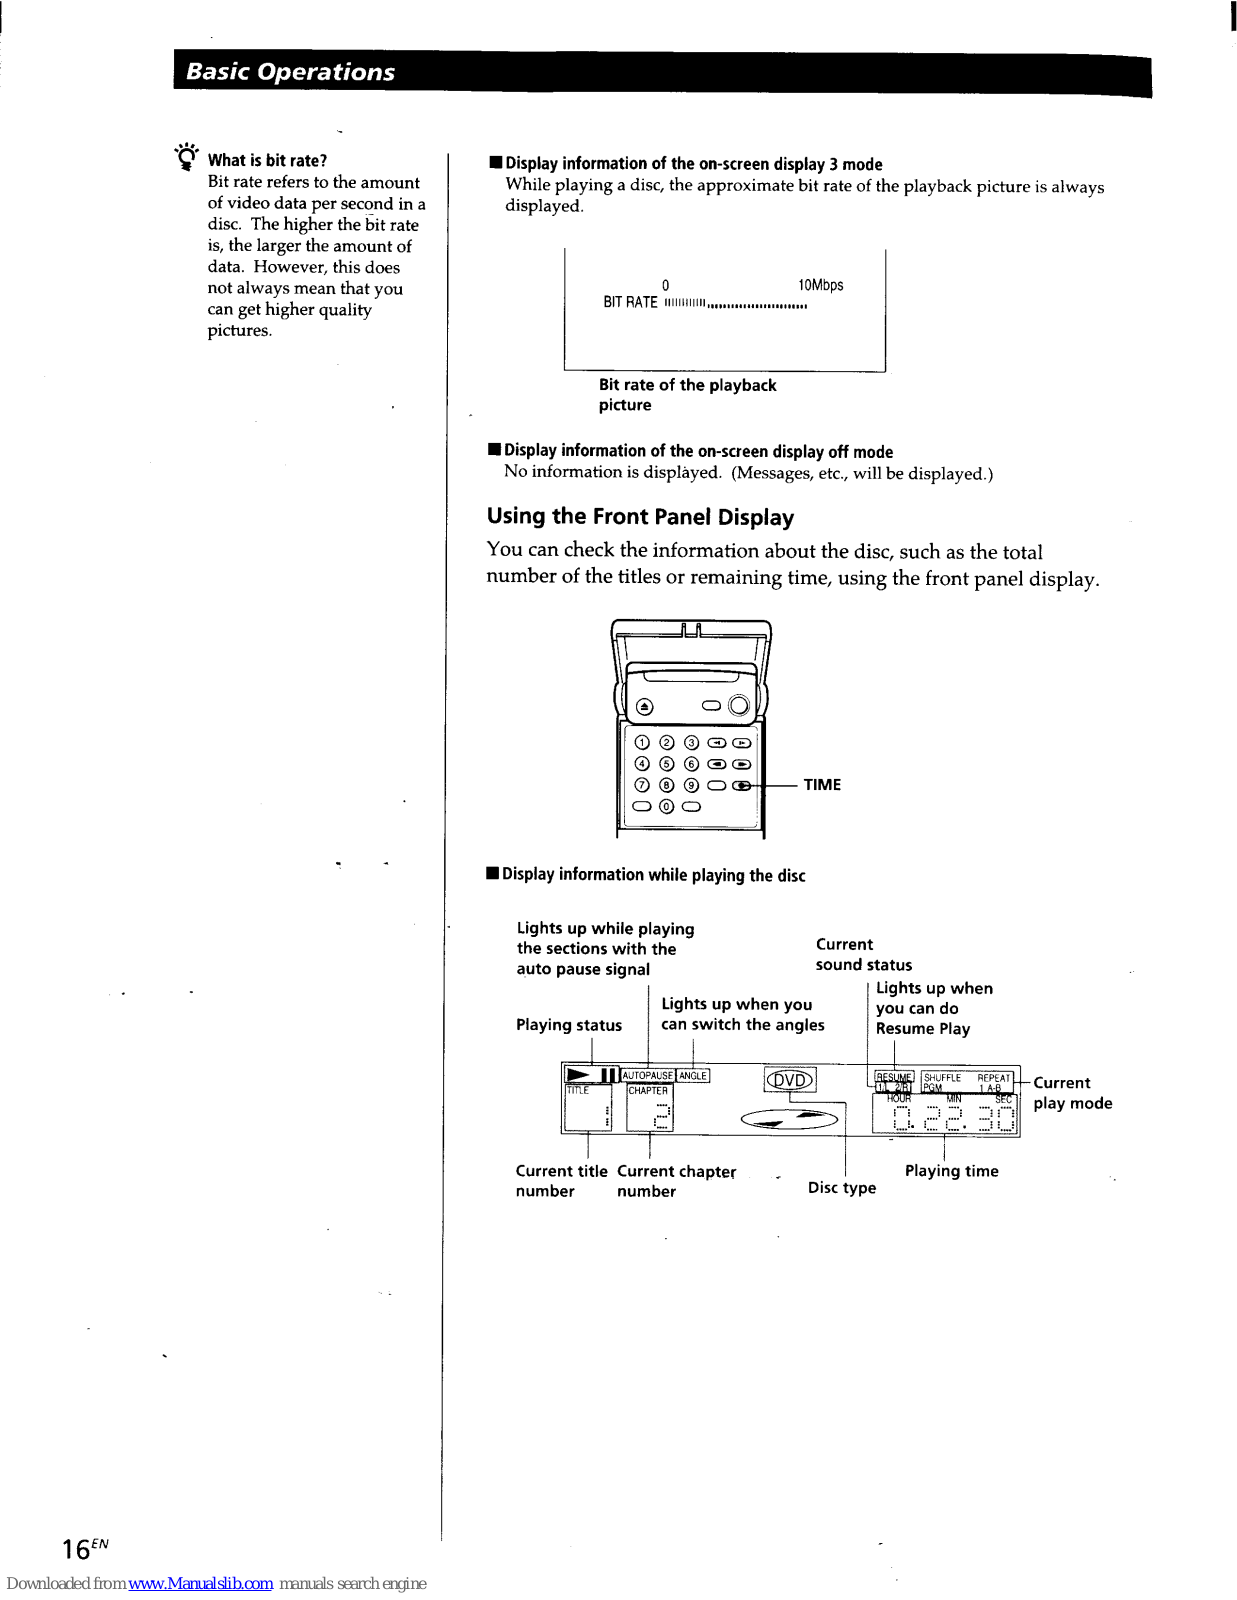
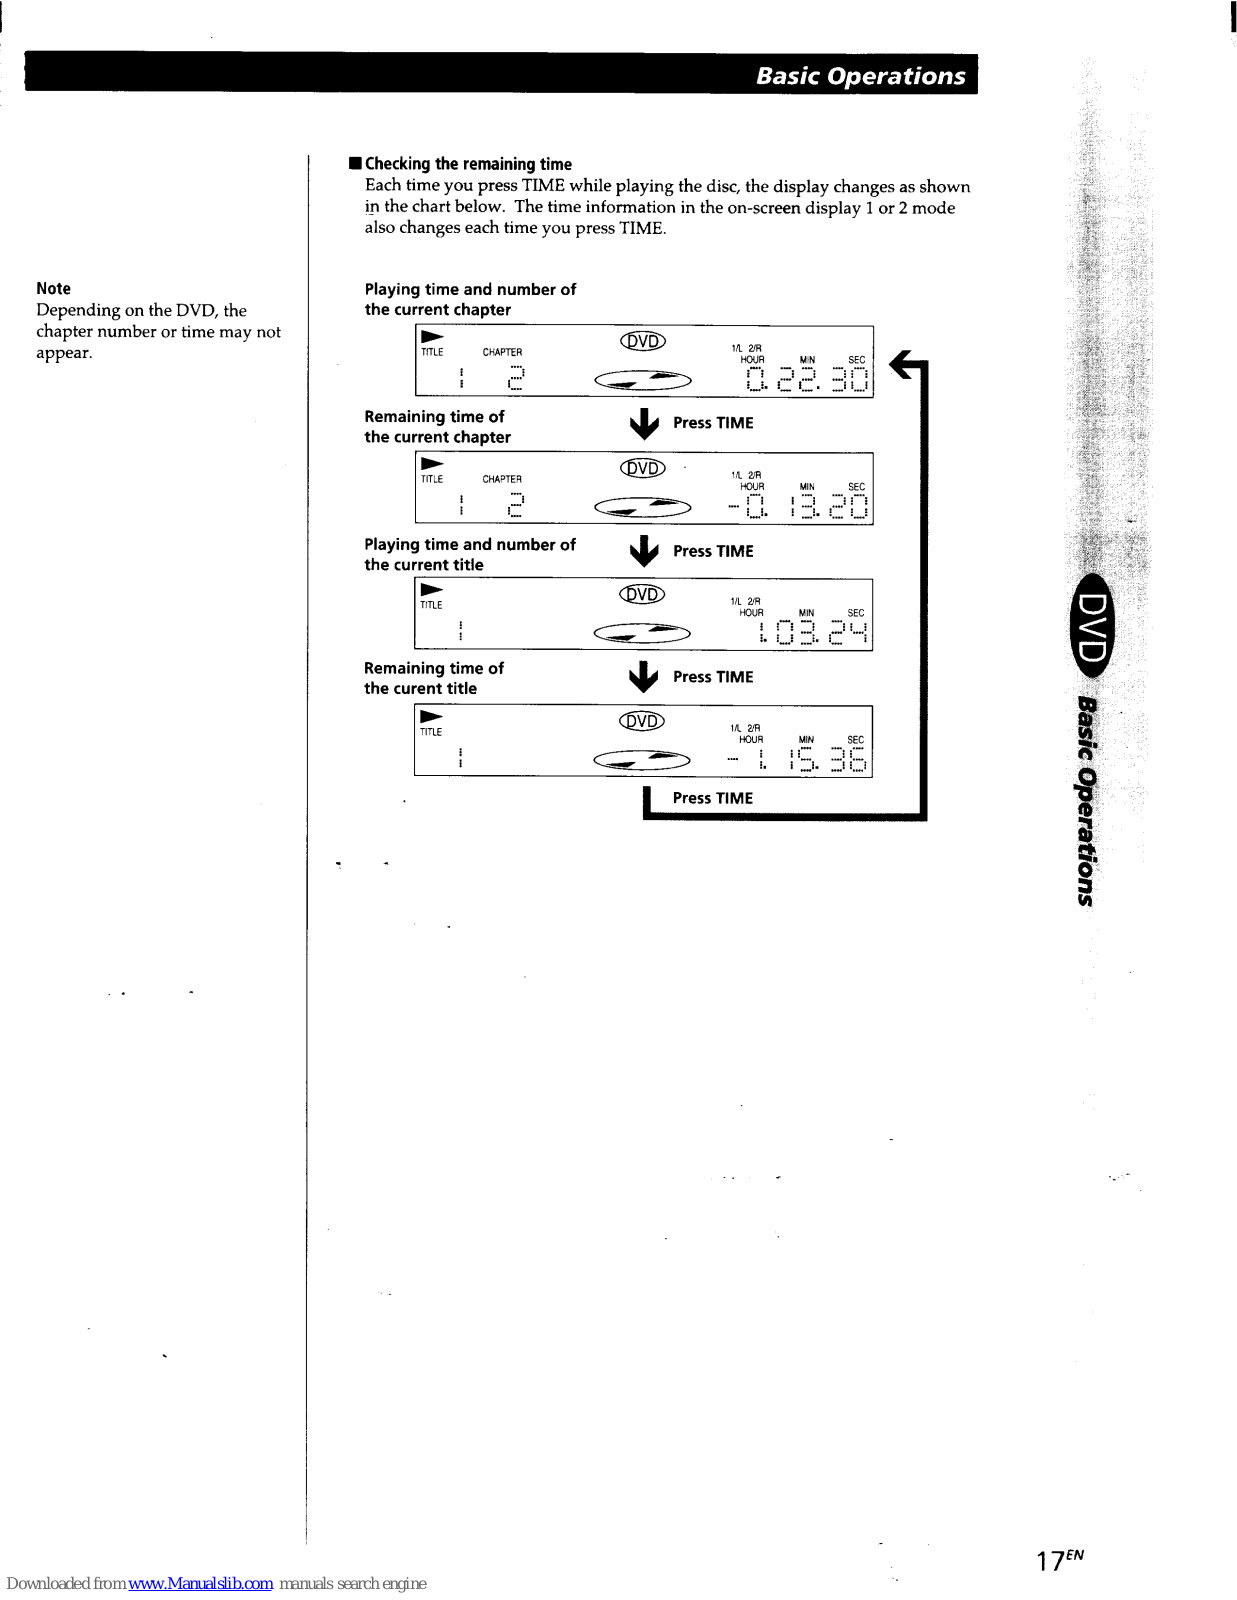
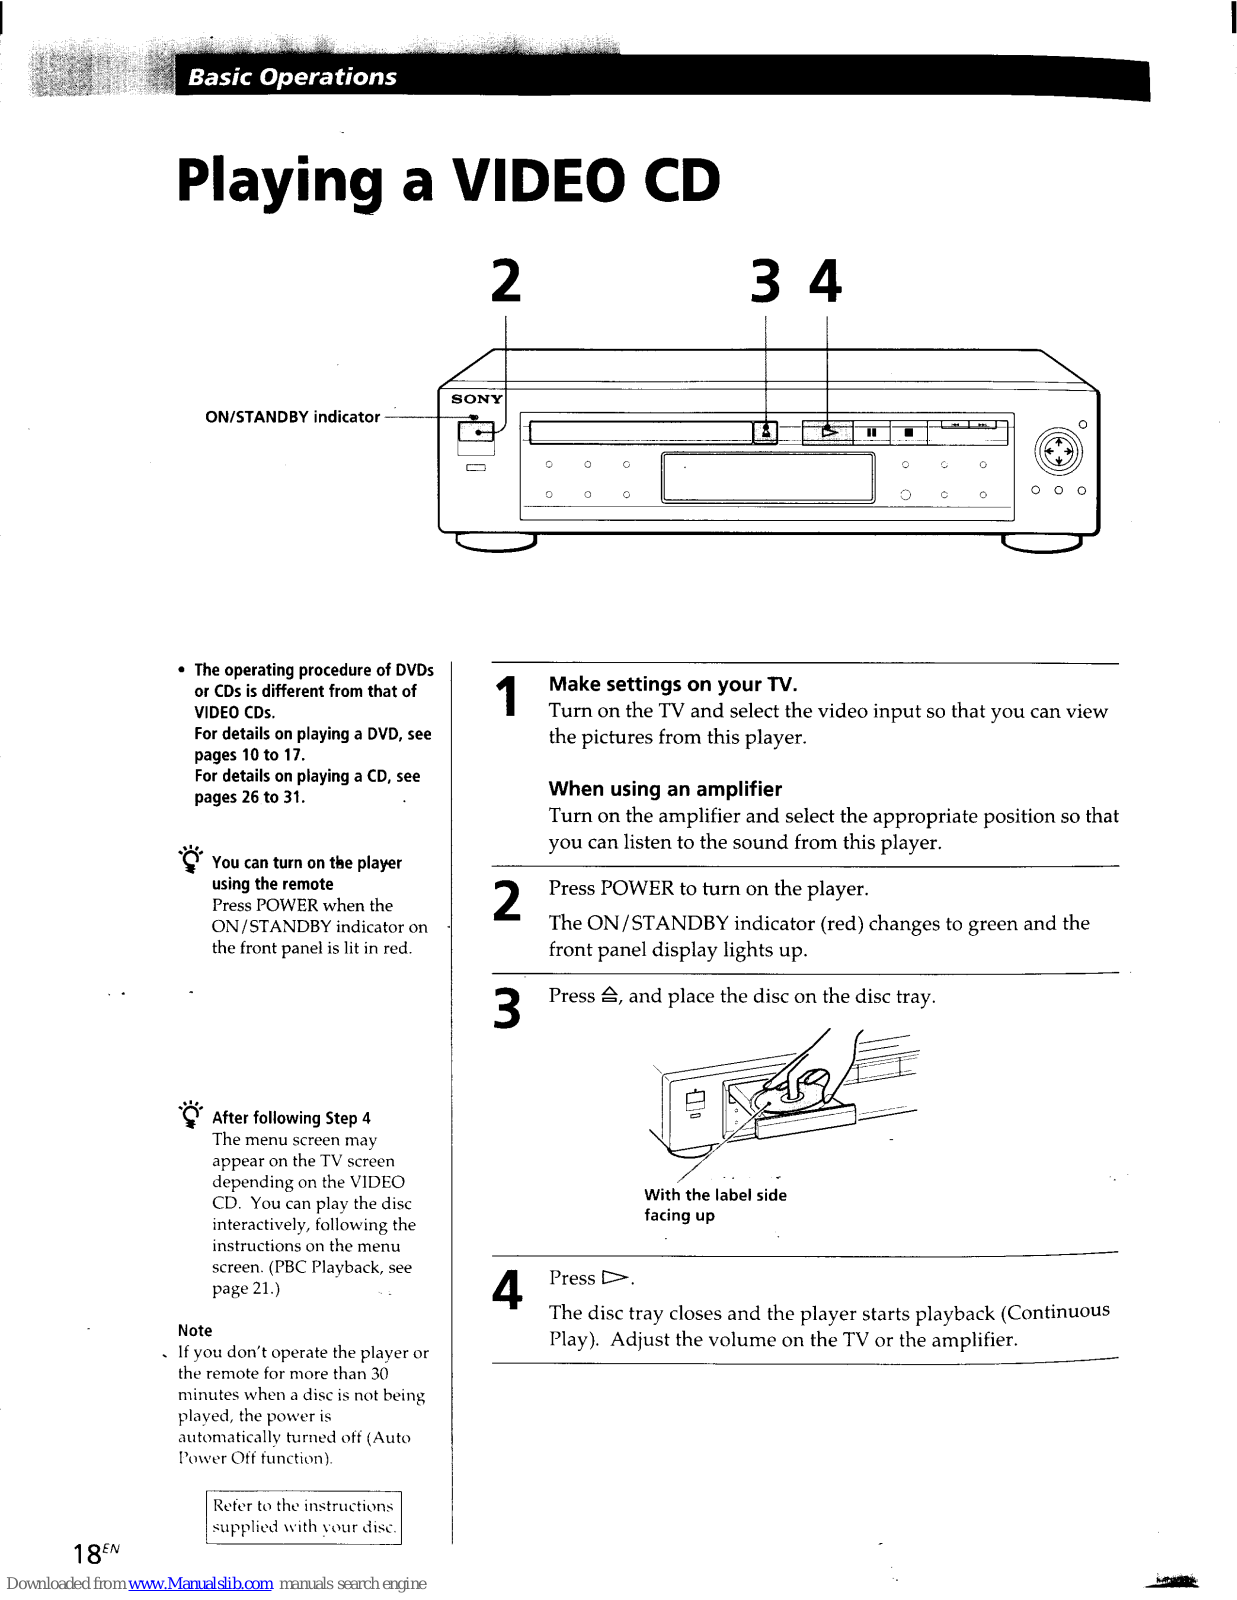
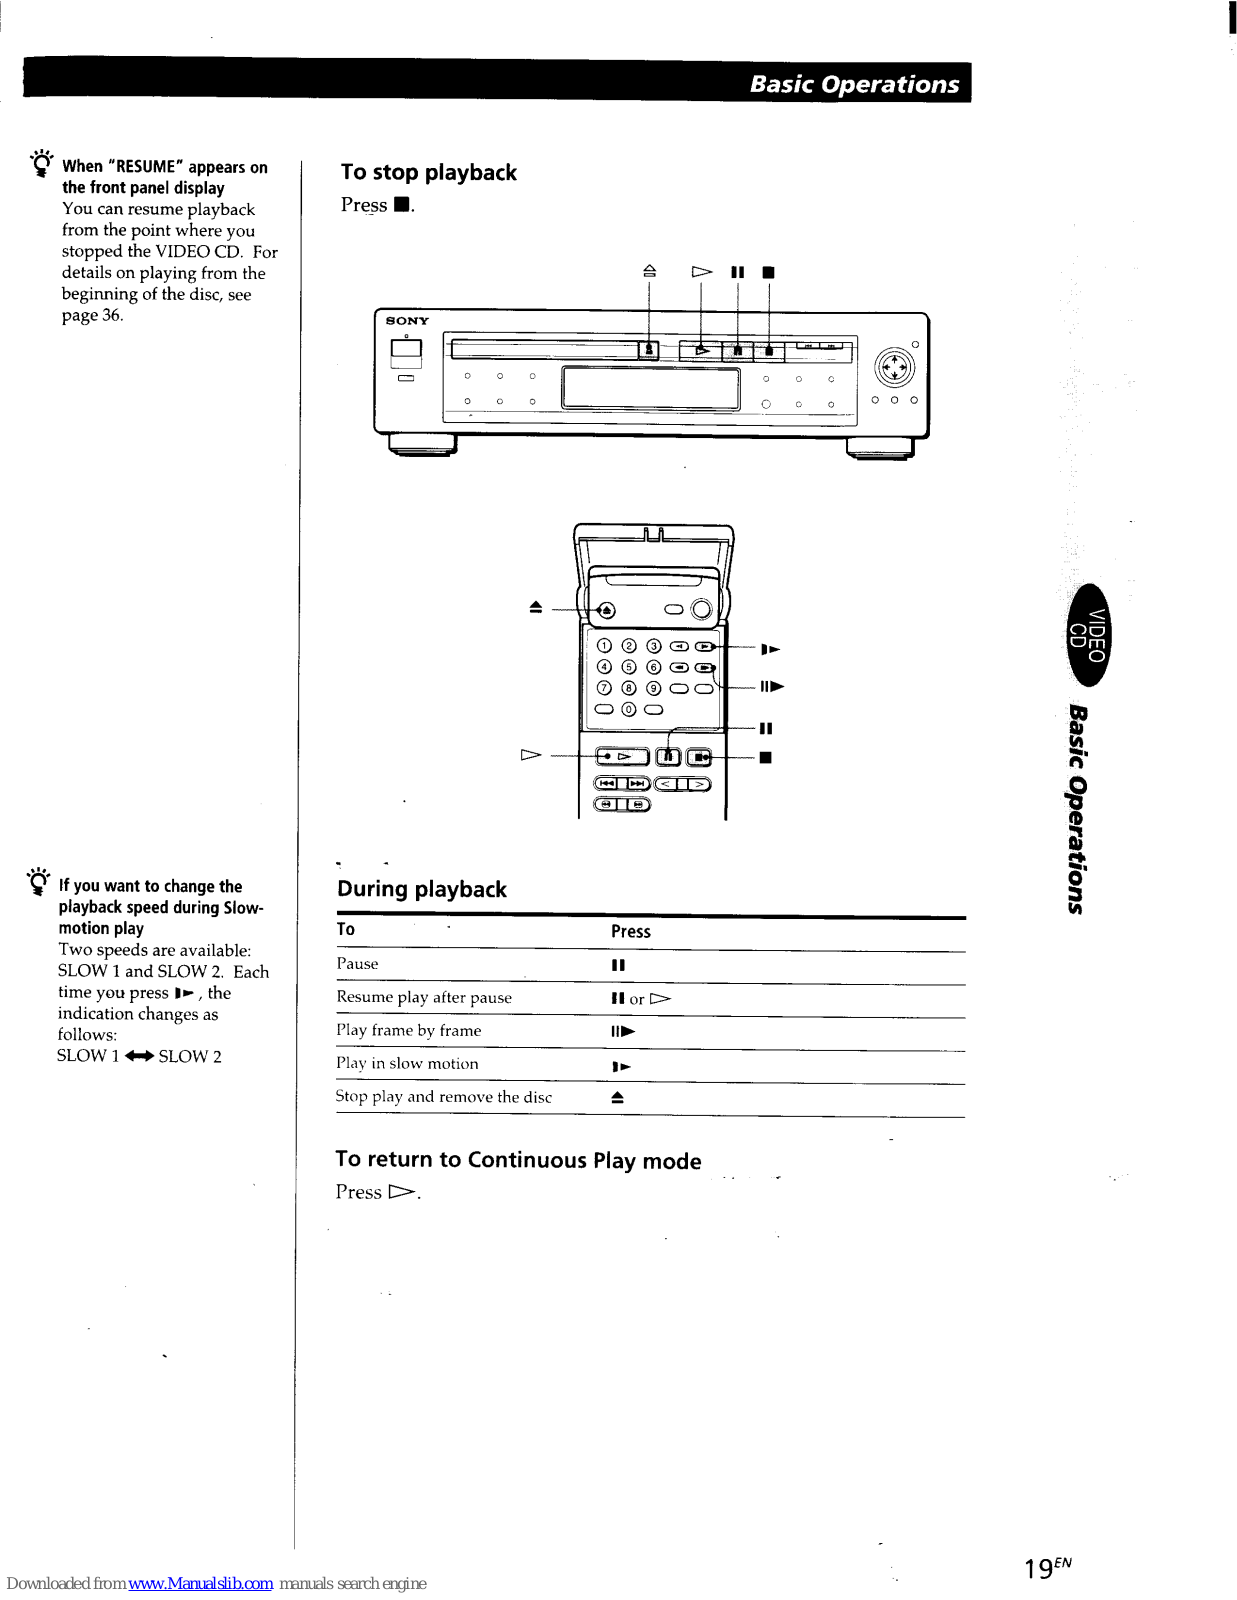

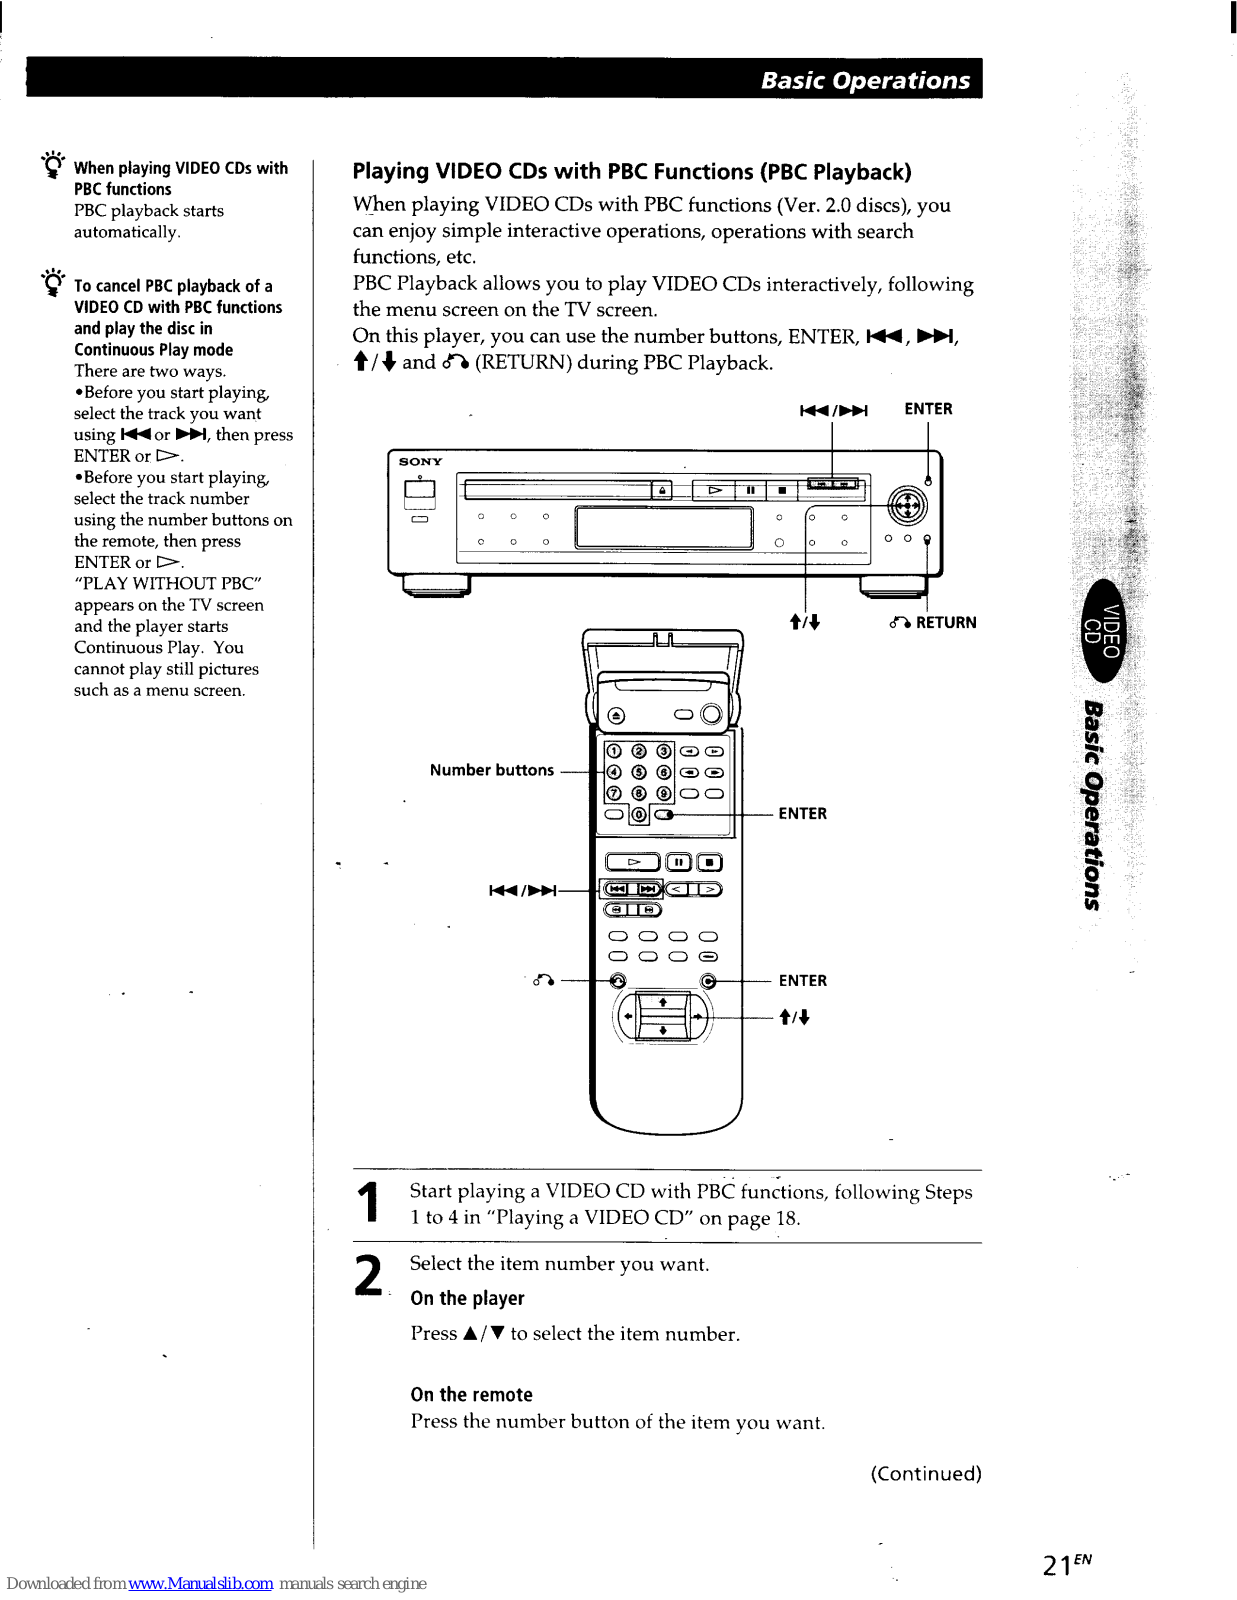
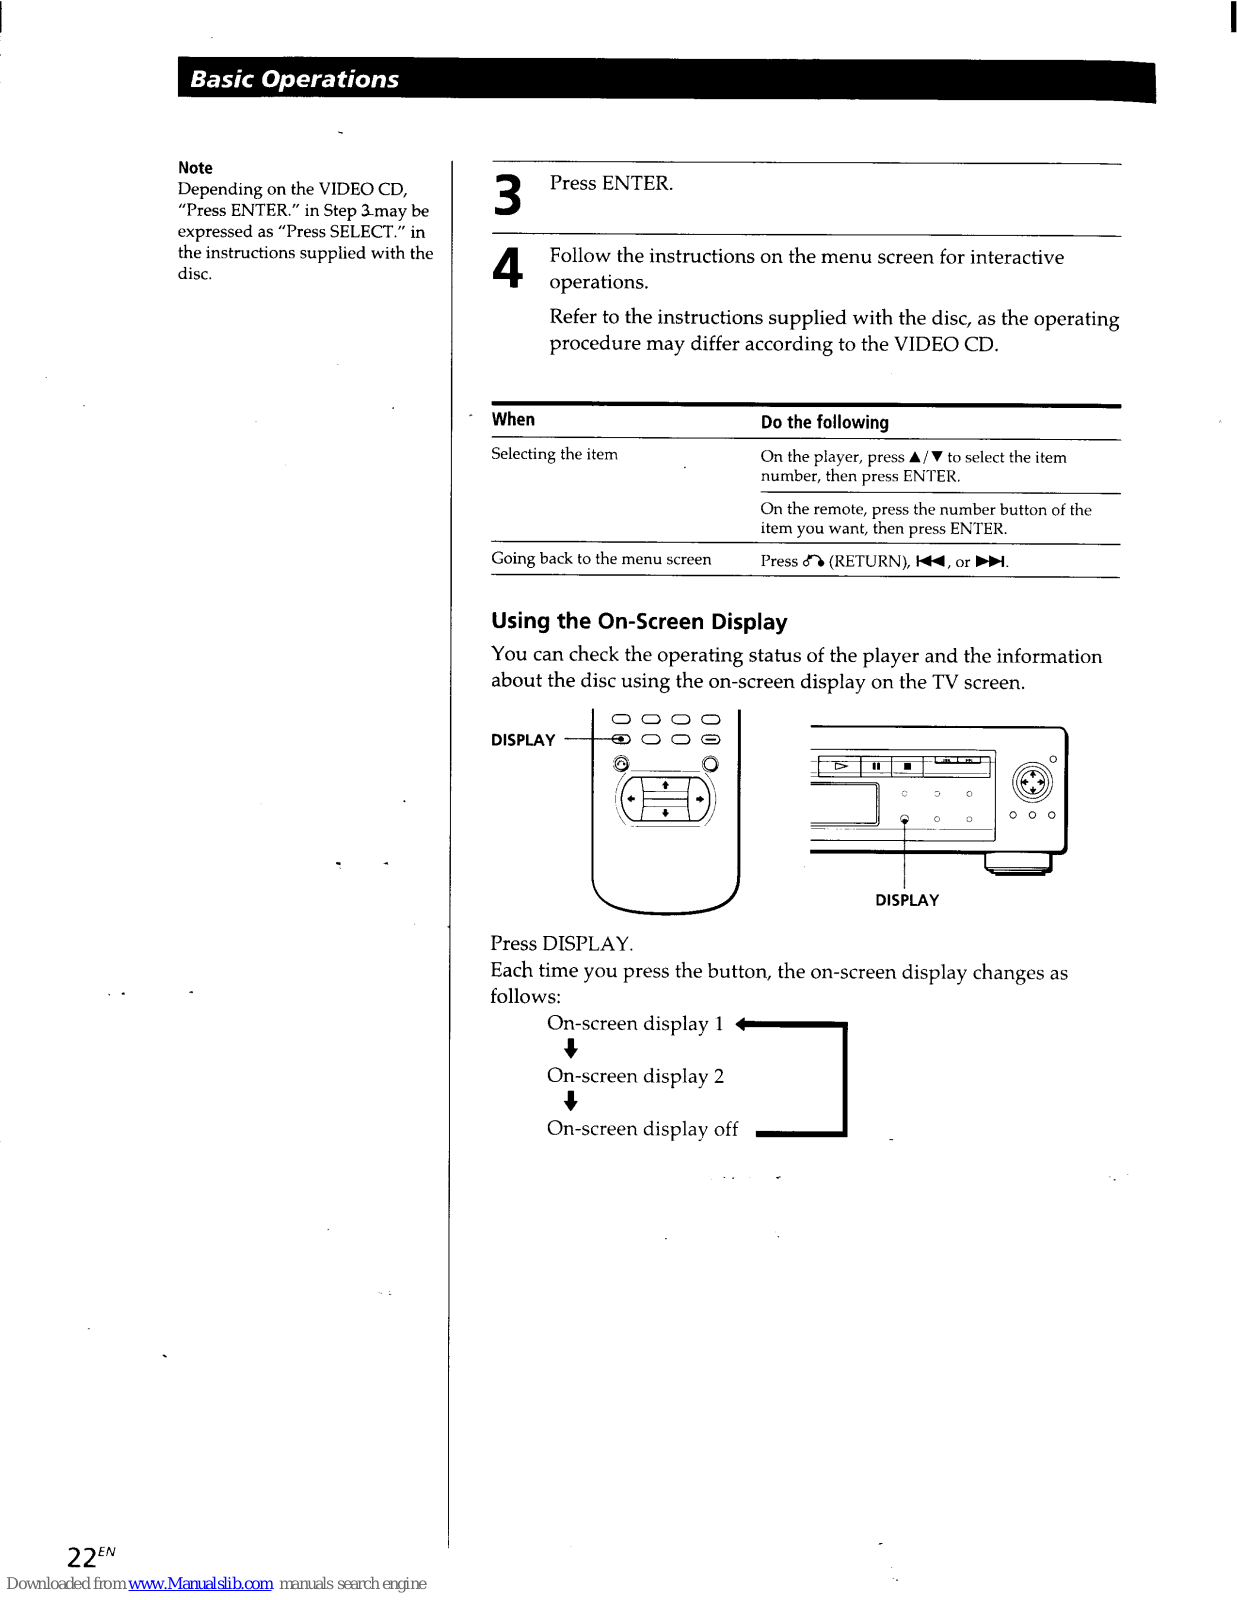

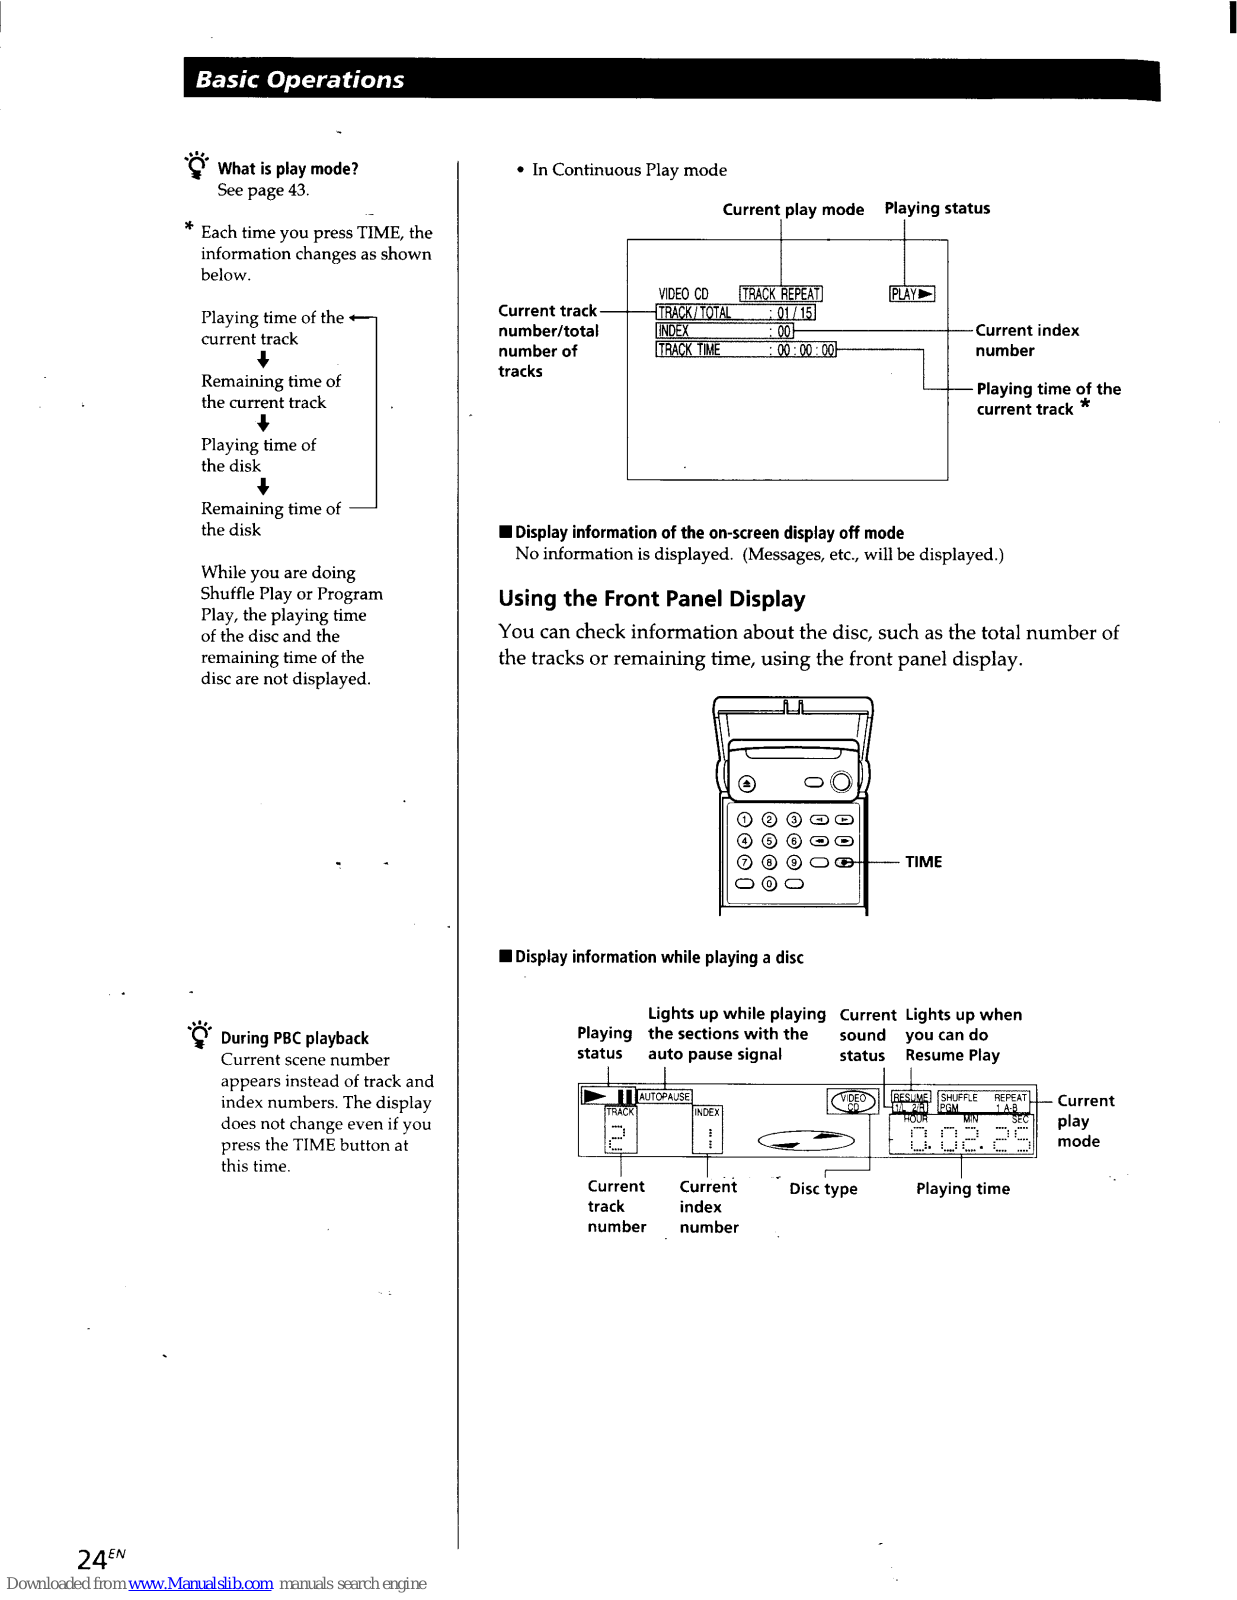
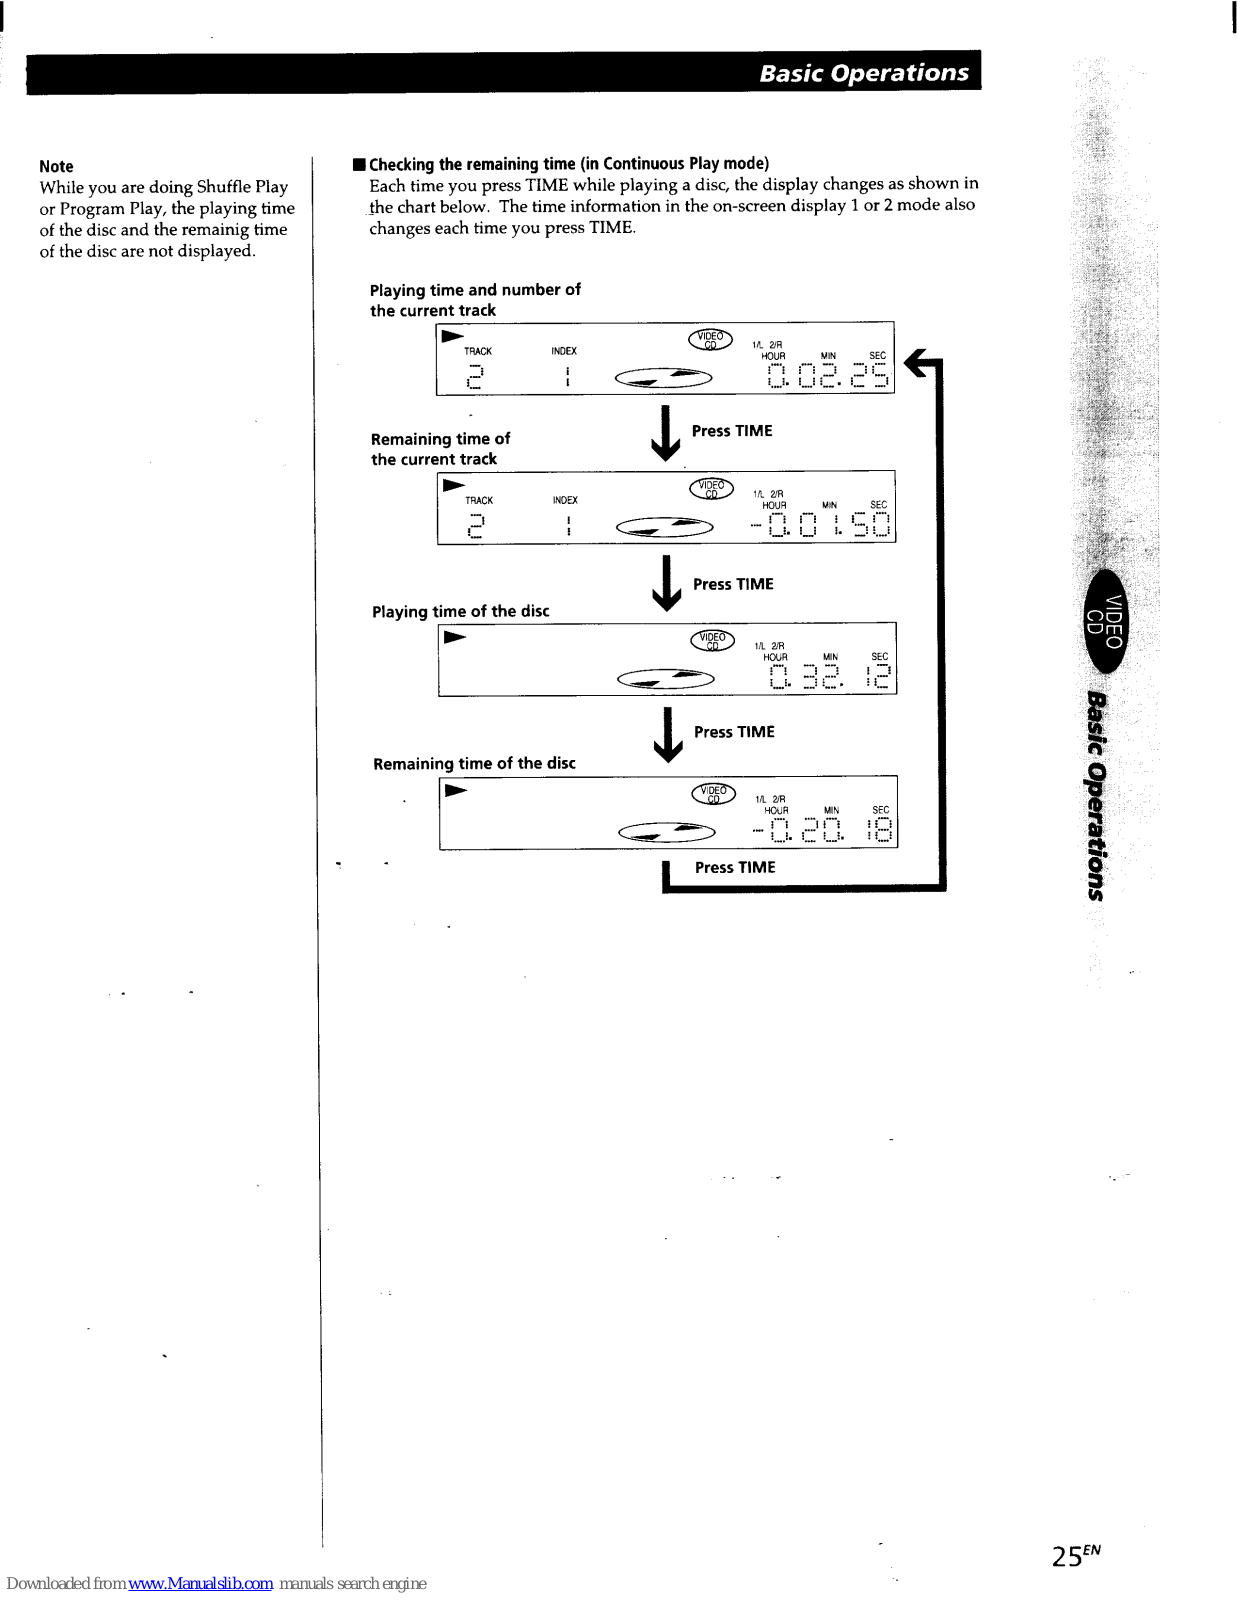
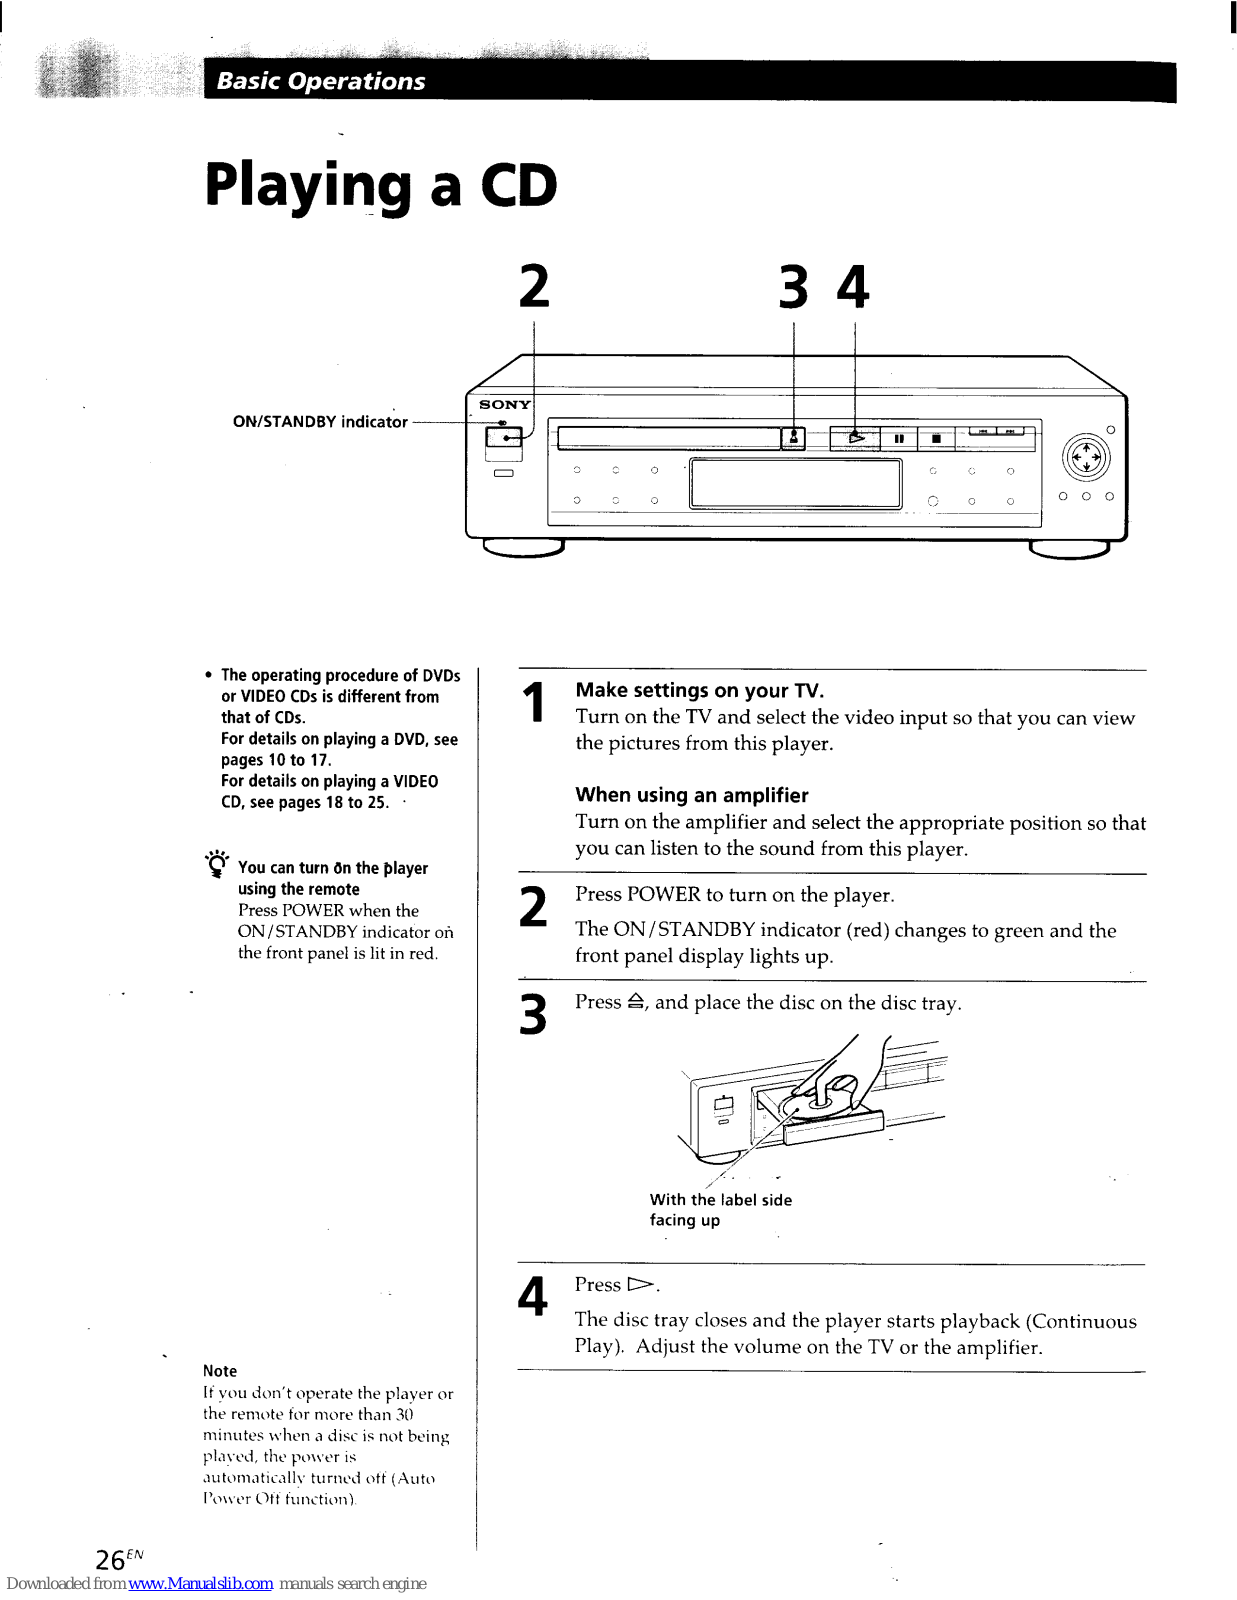
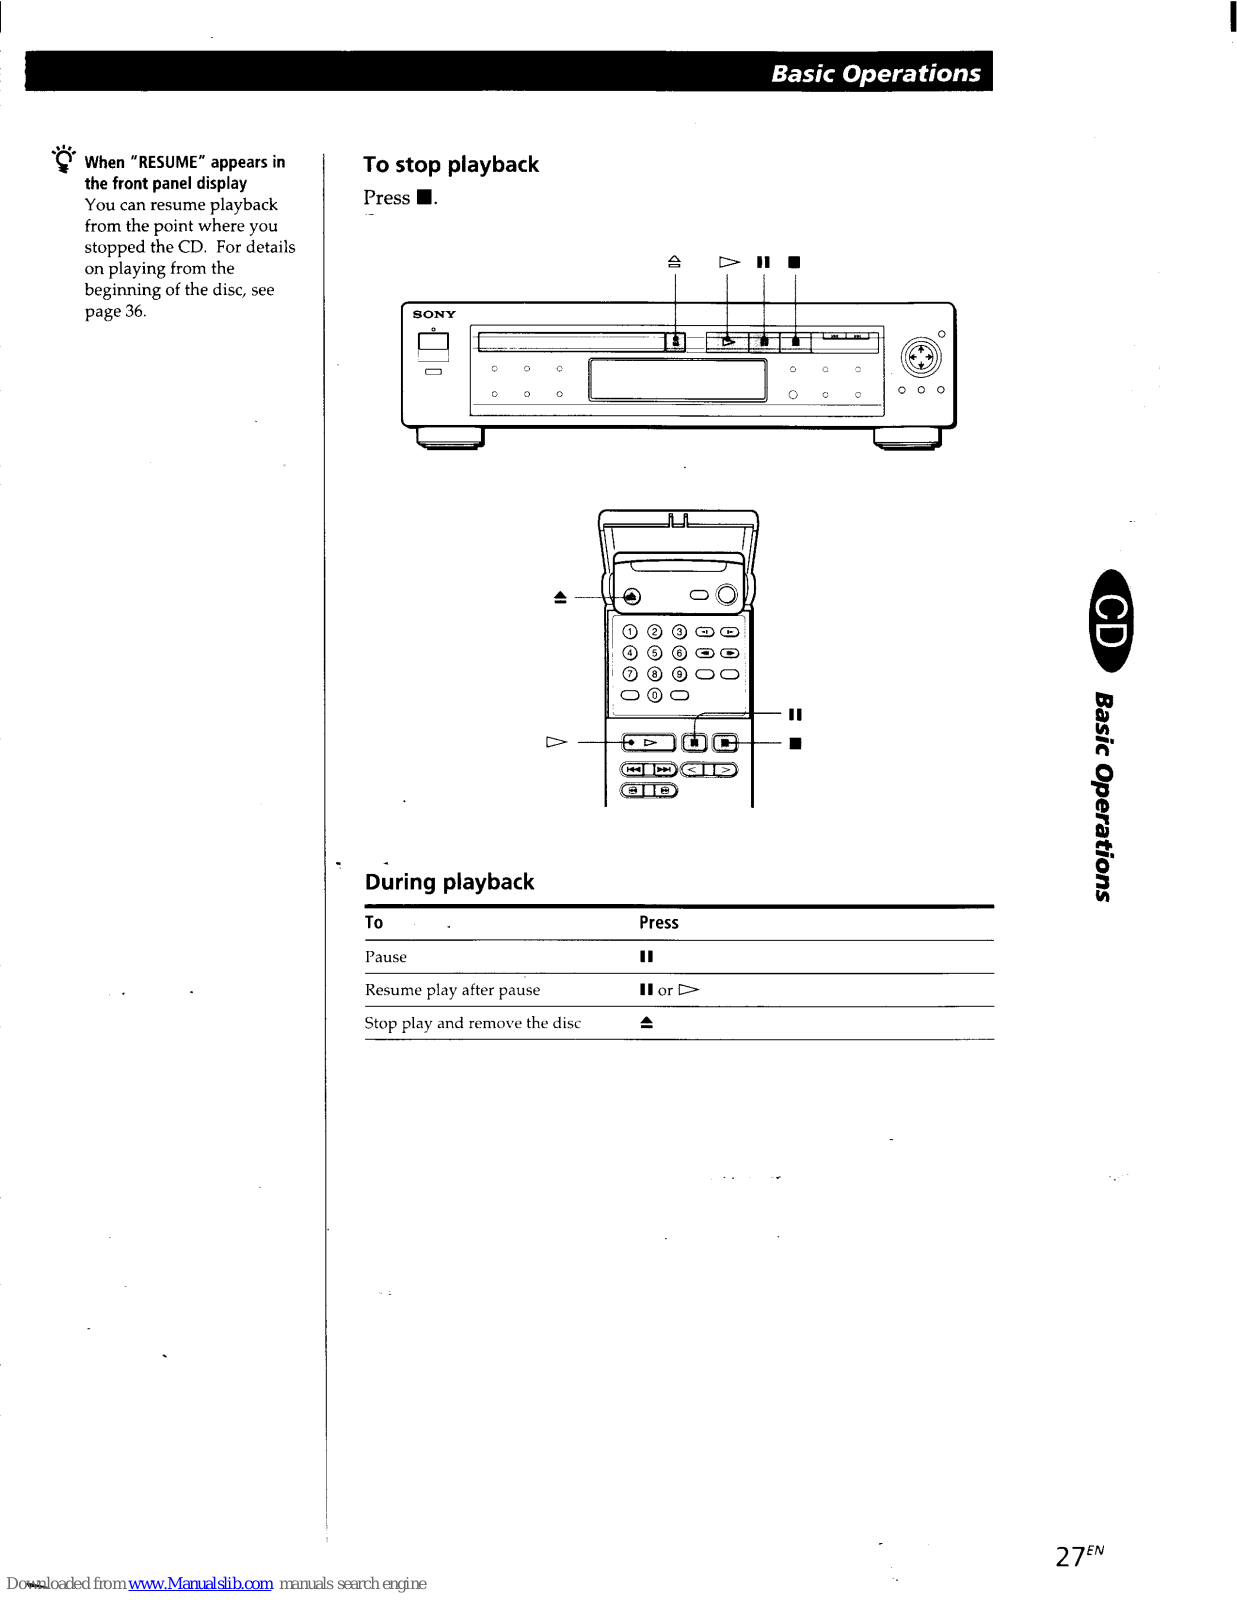
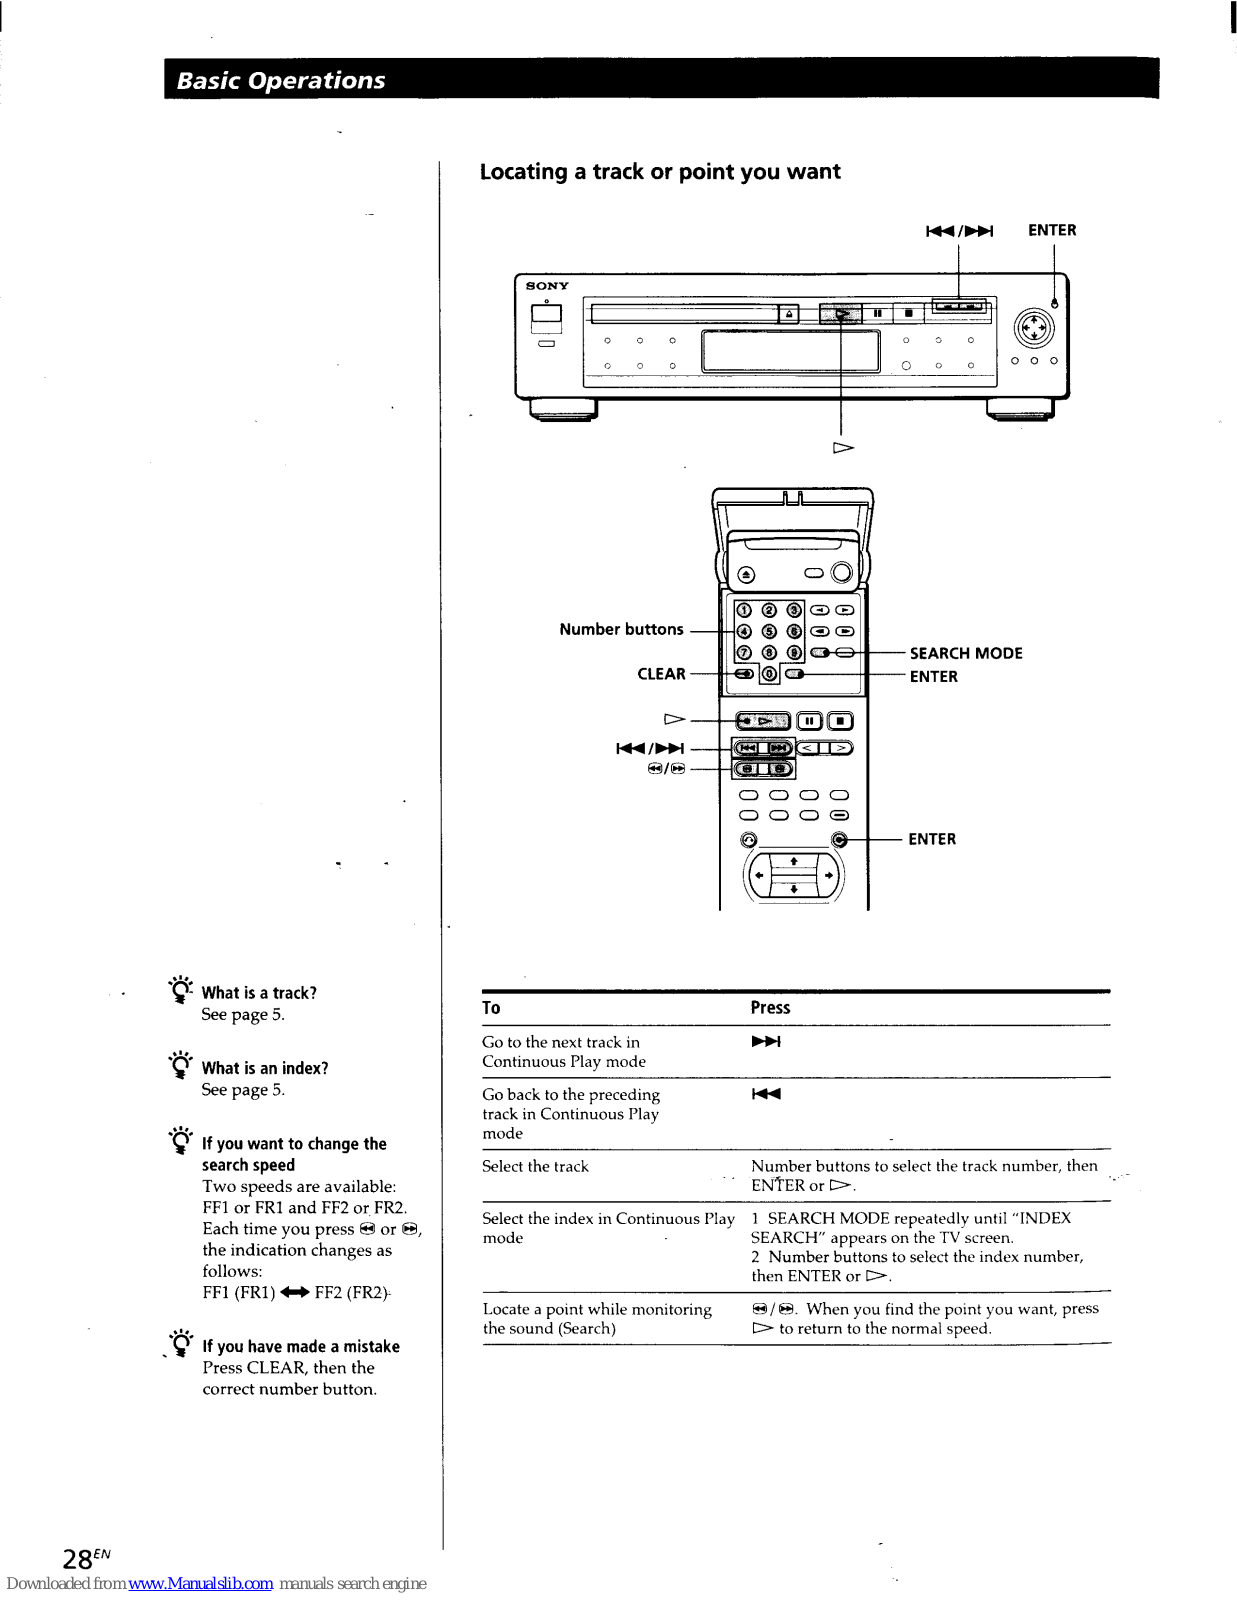
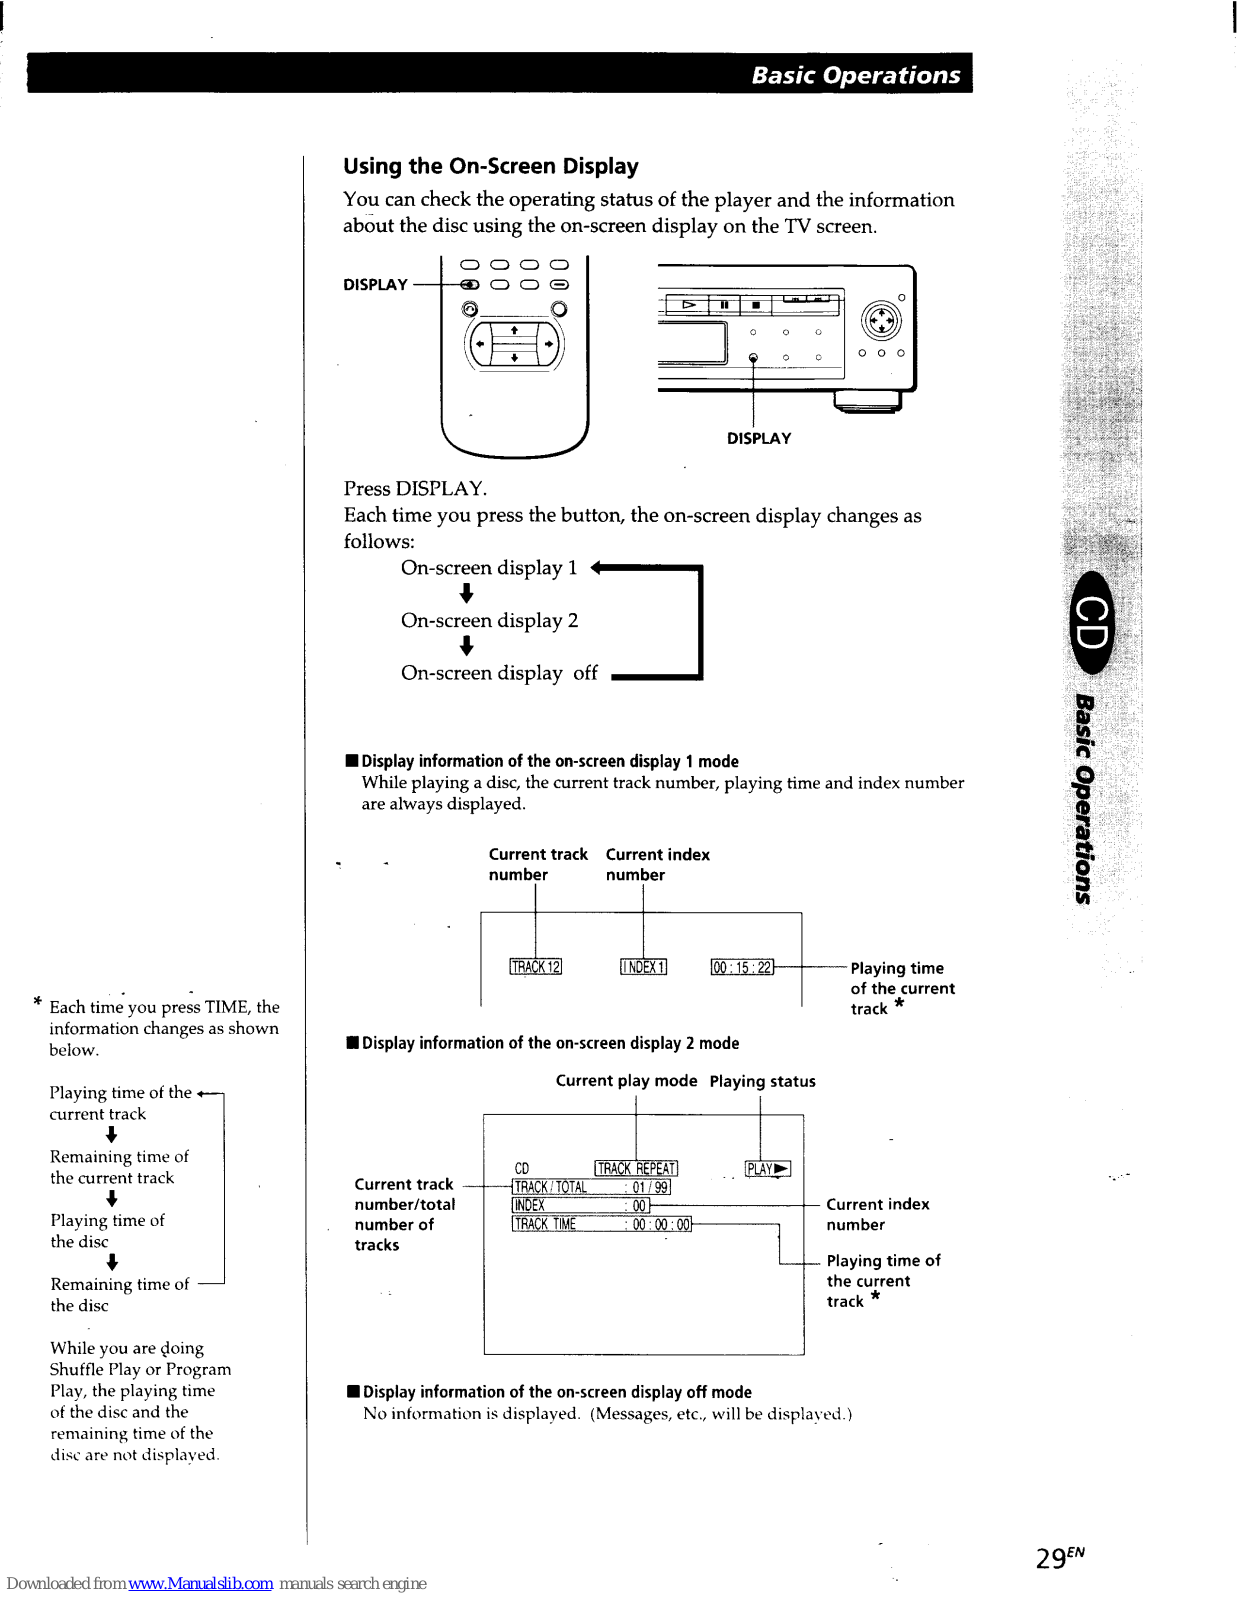
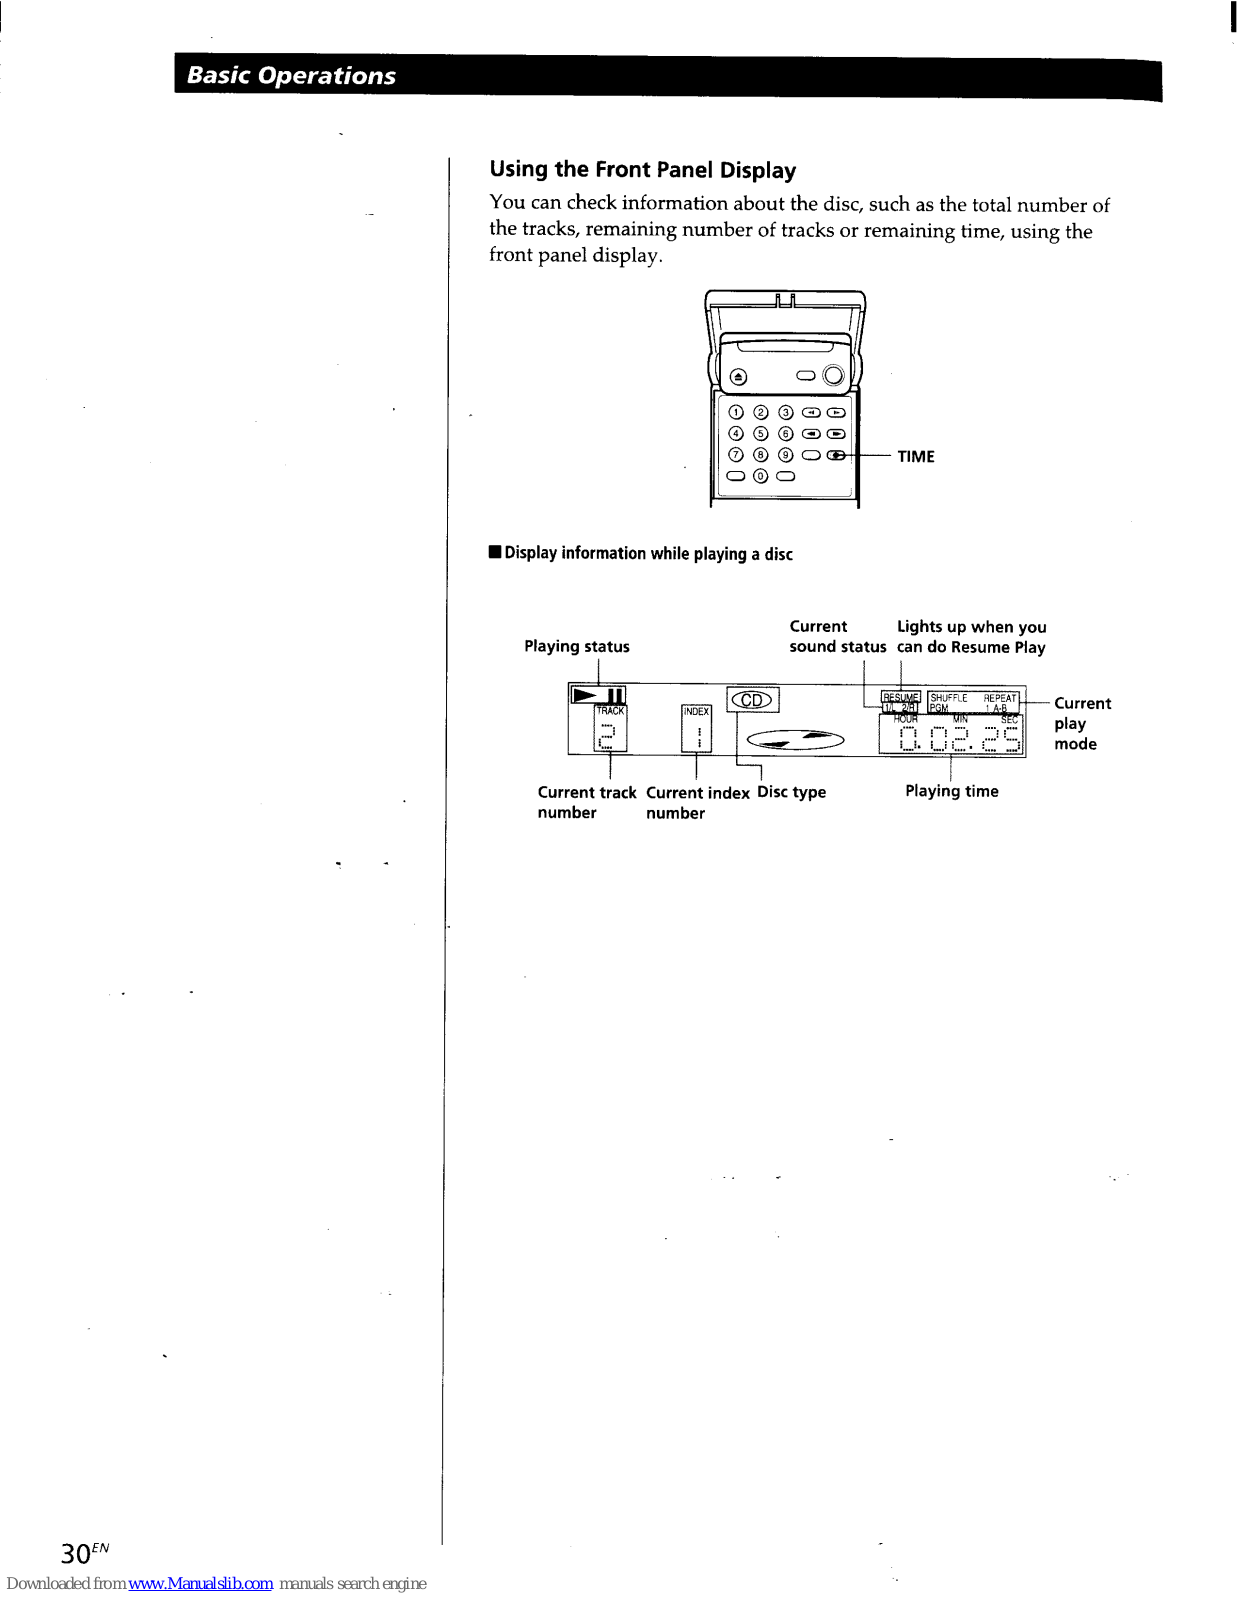


 Loading...