

Page 1

2-593-899-11(2)
Utility for In-Wall
Unit
CDP-NW10/DVP-NW50
User’s Manual
2005 Sony Corporation
Page 2

Notice for users
• Copyright laws prohibit reproducing the software or the manual accompanying it in whole or in part, or renting
the software without the permission of the copyright holder.
• In no event will SONY be liable for any financial damage, or loss of profits, including claims made by third
parties, arising out of the use of the software supplied with this Unit.
• In the event a problem occurs with this software as a result of defective manufacturing, SONY will replace it.
However, SONY bears no other responsibility.
• The software provided with this Unit cannot be used with equipment other than that which is so designated.
• Please note that, due to continued efforts to improve quality, the software specifications may be changed
without notice.
• Operation of this Unit with software other than that provided is not covered by the warranty.
Program © 2005 Sony Corporation
Documentation © 2005 Sony Corporation
2
Page 3

TABLE OF CONTENTS
Notice for users 2
Chapter 1 Getting Started
Overview 4
System network 5
Setup 1: Installing the Utility for In-Wall Unit Software to Your Computer 6
System requirements 6
Installing Utility for In-Wall Unit 7
Setup 2: Connecting the Computer to the Unit 7
Setup 3: Setting up the Utility for In-Wall Unit Software 8
Setting up Gracenote CDDBR8
Setting up all Units 9
The “Utility for In-Wall Unit Setup Menu” window for all Units 10
Setting up each Unit individually 11
The “Utility for In-Wall Unit Setup Menu” window for each unit 12
Storing FM/AM radio stations (Preset memory) 13
Setup 4: Setting up “Server Setup, powered by DiXiM” 14
Settings for “Windows Firewall” for Windows XP SP2 14
Settings for “Internet Connection Firewall” for Windows XP SP1 17
Starting “Server Setup, powered by DiXiM” 21
Starting the Media Server 22
Naming the Media Server 22
Prohibiting a Unit from accessing contents 23
Setting up a shared folder from “Server Setup, powered by DiXiM” 24
Chapter 2 Main Features
Starting and Quitting the Utility for In-Wall Unit Software 25
Watching Playlists (Import) 26
Creating a Playlist Using Utility for In-Wall Unit 27
Operating the Unit from a Computer 29
Other Features 32
Using right-click 32
Chapter 3 Additional Information
Troubleshooting 34
Error Messages 36
Trademarks and Copyrights 38
3
Page 4

Chapter 1
Overview
Getting Started
This chapter describes the features of the
Utility for In-Wall Unit software, how to
set up the Utility for In-Wall Unit and set
up the “Server Setup, powered by
DiXiM.”
Important features of the the Utility for InWall Unit software include the following:
• Using a computer to set up each installed Unit individually or all
Units simultaneously (page 9)
• Sharing music between your computer and each Unit (page 26)
• Creating original playlists (page 27)
• Using a computer to operate each installed Unit individually or
all installed Units simultaneously (page 29)
• Getting CD information from the Gracenote CDDBR* (page 8)
* CD DataBase
Note
Depending upon the configuration of your computer, visual details
of the Utility for In-Wall Unit software (such as window design, the
size, or location of images) may differ from the pictures in this
manual. The features of the software, however, operate as
described.
Continue to the next page
Chapter 1 Getting Started 4
l
Page 5

Overview (continued)
System network
The diagram below illustrates an entire system network made up of multiple Units.
Contact your nearest installer for details on making the required connections for the system network.
Note
The configuration shown below is for illustrative purposes only. It may differ from an actual system network.
INTERNET
LIVING ROOM
CDP-NW10
Front Speaker
Router
BEDROOM
CDP-NW10
Hub
DVP-NW50
GUEST ROOMKITCHEN
CDP-NW10
Computer
Front Speaker
Rear
Speaker
TV/Projector CD Changer
Center
Speaker
Sub Woofer
Example of a DVP-NW50 system network
Rear
Speaker
Chapter 1 Getting Started 5
Page 6

Setup 1: Installing the Utility for In-Wall Unit Software to Your Computer
Use the supplied CD-ROM to install the Utility for In-Wall Unit software.
A PDF version of this user’s manual is installed along with the software.
System requirements
The Utility for In-Wall Unit software requires the following system environment.
Computer IBM PC/AT or Compatible
• CPU: Celeron
(Pentium III 1 GHz or higher is recommended.)
• Memory: 256 MB or more
Operating System Factory installed:
Windows
WindowsR XP Professional with Service Pack 1 (or later)
Network 100BASE-T Ethernet
Display High Color (16 bit) or higher, 800 x 600 dots or better
The following environments are not supported:
• Operating systems other those indicated above
• Personally constructed PCs or personally installed operating systems
• An environment that is an upgrade of the original manufacturer-installed operating system
• A multi-boot environment
• A multi-monitor environment
• A Macintosh environment
R
1GHz or PentiumR III or higher, compatible
R
XP Home Edition with Service Pack 1 (or later)
Continue to the next page
Chapter 1 Getting Started 6
l
Page 7

Setup 1: Installing the Utility for In-Wall Unit
Software to Your Computer (continued)
Setup 2: Connecting the Computer to the Unit
Installing Utility for In-Wall Unit
Before installing Utility for In-Wall Unit
software
When the Utility for In-Wall Unit software is installed, the
“Server Setup, powered by DiXiM” software is installed at
the same time.
Disable any virus protection software before installing the
Utility for In-Wall Unit software.
1 Turn on your computer, and start up Windows.
2 Insert the supplied CD-ROM into your computer’s CD
or DVD drive.
The setup program starts automatically, and then the
installation window appears.
3 Follow the on-screen instructions.
Read the instructions carefully.
If any trouble occurs during the installation, see
“Troubleshooting” (page 34).
To uninstall the Utility for In-Wall Unit or the
“Server Setup, powered by DiXiM”
To uninstall the Utility for In-Wall Unit or the “Server
Setup, powered by DiXiM,” follow the steps below. To
uninstall both software programs, perform the procedure
twice, selecting a different program each time.
1 Click “Start” on the Windows taskbar to select
“Control Panel.”
2 Double-click “Add or Remove Programs.”
3 Click “Utility for In-Wall Unit” or “Utility for In-Wall
Unit-Server Setup, powered by DiXiM” in the
“Currently installed programs” list.
4
Click “Change/Remove.”
Follow the on-screen instructions to uninstall the
software.
For your computer to be able to communicate with your
installed Units, the computer and the Units must be on a
single 100BASE-TX network. Typically, this requires
100BASE-TX Ethernet cabling and a 100BASE-TX router,
hub, or switch. For details on setting up such a network,
refer to the instruction manual supplied with your router,
hub, or switch, and consult with the local installer of your
Units.
If other network devices are connected to the same
network as your Units and your computer, these devices
may be able to “see” your Units on the network or may
be “seen” by your Units or computer. This does not
mean, however, that these other products will be able to
use the network features of the Units and the Utility for
In-Wall Units software, such as music streaming.
Chapter 1 Getting Started 7
Page 8
Setup 3: Setting up the Utility for In-Wall Unit Software
You can set up Units connected to your network from your
computer.
Before your computer can operate your Units, the Units
must be configured with such settings as IP addresses and
tuner presets.
Using the Setup menu in the Utility for In-Wall Unit
software, you can configure these settings either for all
Units at once or for each Unit individually.
When the Music Menu appears, click “Setup Menu” on the
upper right of the window to display the Setup Menu.
Setting up Gracenote CDDB
R
Gracenote CDDBR is an online music recognition service to
identify CDs and digital music files. You must have the
Internet access in order to use Gracenote CDDB
R
.
You can access Gracenote CDDBR to download and
Gracenote provides this service free to end-users.
Using Gracenote CDDB
R
, artist name, album and track titles,
etc., are displayed on the wondow in the Utiltity for In-Wall
Unit software and on the front panel display of your Units.
Use the following steps to configure access to the Gracenote
R
CDDB
.
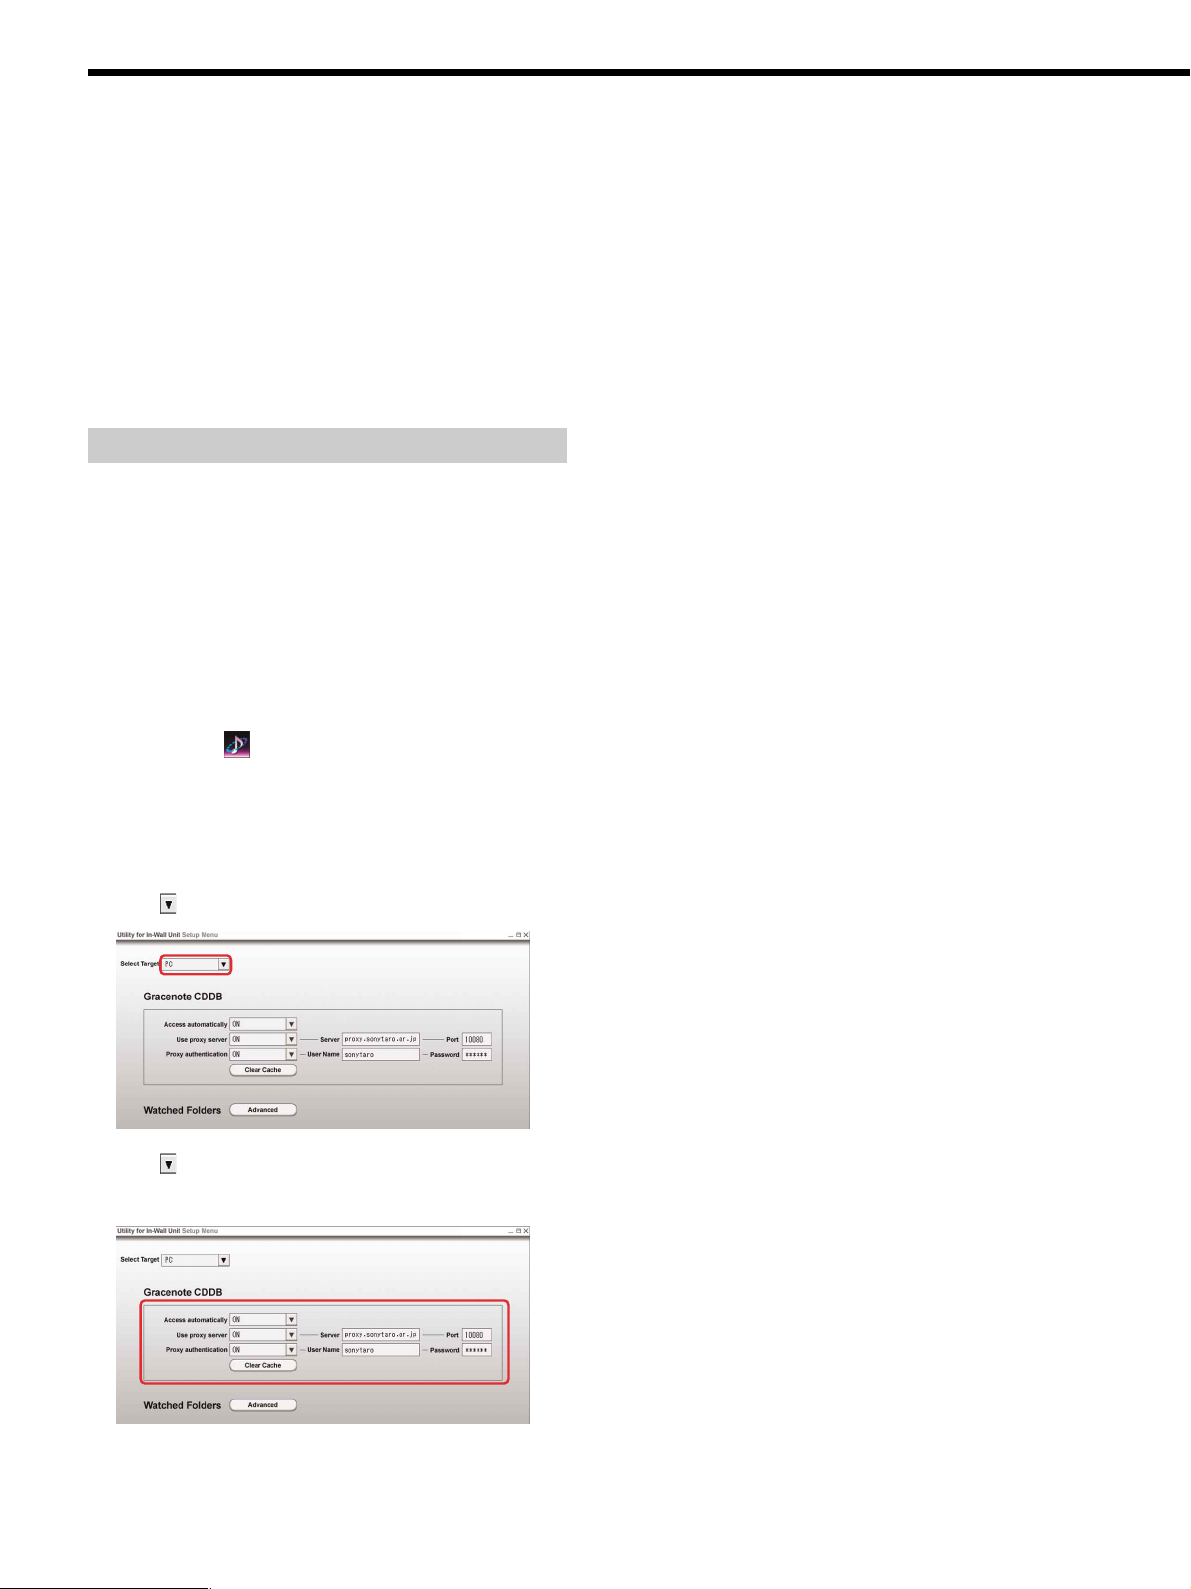
1 Double-click (“Utility for In-Wall Unit” icon) in the
task tray.
The main window appears.
You can also click “Start” on the Windows taskbar, then
point to “All Programs”—“Utility for In-Wall Unit,” then
click “Utility for In-Wall Unit.”
2 Click to select “PC.”
Access automatically:
ON: When a CD is inserted into the Unit, information
about the disc is automatically retrieved from the
Gracenote CDDB
OFF: When a CD is inserted into the Unit, the Utility for In-
Wall Unit software does not access the Gracenote
R
CDDB
.
Use proxy server:
R
.
Same as IE:
These proxy server settings are the same as
that of in the LAN Settings window on the
Connections panel of Internet Options in Windows
Control Panel.
ON: Your computer accesses the Internet through a
proxy server.
Enter the appropriate proxy server IP address and
port number.
OFF: Your computer accesses the Internet directly,
rather than through a proxy server.
Proxy authentication:
ON: Select if a log-in window appears when your
computer attempts to access the Internet through
your proxy server.
Enter a user name and password for the the Utility
for In-Wall Unit software to automatically enter
into the log-in window.
OFF: Select if no log-in window appears when your
computer attempts to access the Internet through
your proxy server.
When “Use proxy server” is set to OFF, this feature
is not used.
4 Click “OK” or “Apply.”
The setting goes into effect for all Units.
When you click “OK” or “Cancel,” the Music Menu
Window appears.
3 Click to select the item you want to set up.
See the table below for details on each item.
To clear the internal cache for Gracenote
R
CDDB
Click “Clear Cache.”
To display the “Server Setup, powered by
DiXiM” window
Click “Advanced.”
Continue to the next page
Chapter 1 Getting Started 8
l
Page 9
Setup 3: Setting up the Utility for In-Wall Unit Software (continued)
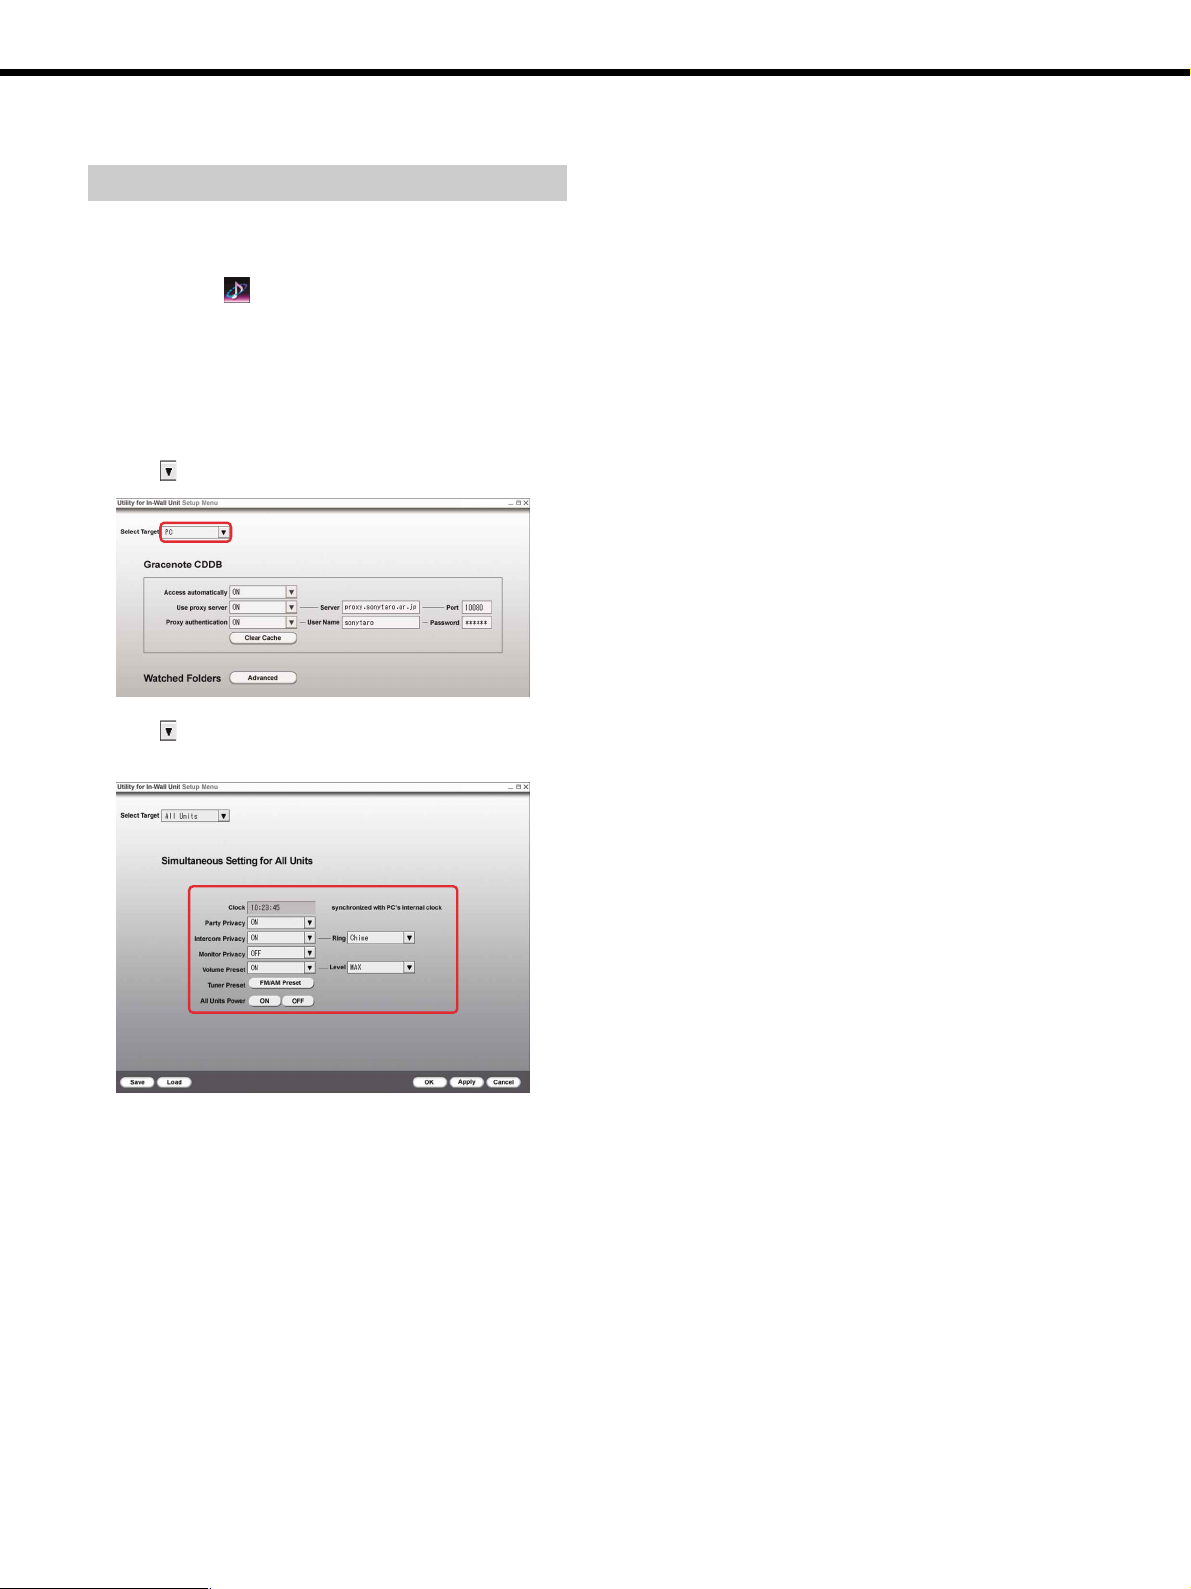
Setting up all Units
You can configure settings such as clock, volume, privacy,
and intercom, and so on for all Units simultaneously.
1 Double-click (“Utility for In-Wall Unit” icon) in the
task tray.
The main window appears.
You can also click “Start” on the Windows taskbar, then
point to “All Programs”—“Utility for In-Wall Unit,” then
click “Utility for In-Wall Unit.”
2 Click to select “All Units.”
3 Click
For details on each item, see the next page.
to select the item you want to adjust or set up.
4 Click “OK” or “Apply.”
The setting goes into effect for all units.
When you click “OK” or “Cancel,” the Music Menu
Window appears.
Continue to the next page
Chapter 1 Getting Started 9
l
Page 10

Setup 3: Setting up the Utility for In-Wall Unit software (continued)
The “Utility for In-Wall Unit Setup Menu” window for all Units
1 Clock
The time appeared is the same as that of the computer.
You cannot change the time in this window.
2 Party Privacy
ON: Units do not join Party Mode.
OFF: Units join Party Mode automatically.
3 Intercom Privacy
ON: Units ignore the Intercom signal.
OFF: Units receive the Intercom signal.
Click
4 Monitor Privacy
ON: Units cannot be monitored by other Units.
OFF: Units can be monitored by other Units.
5 Volume Preset
ON: The Units play sound at the selected volume level.
OFF: The preset volume level is disabled.
The Units play sound at whatever volume level
was set when the individual Unit was last turned
off.
to select the ring tone.
6 Tuner Preset
Click “FM/AM Preset” to configure all Units with up to
20 FM or AM radio stations. For details on how to
storing FM/AM radio stations, see page 13.
7 All Units Power
All Units turn “ON”/“OFF” simultaneously.
Continue to the next page
Chapter 1 Getting Started 10
l
Page 11

Setup 3: Setting up the Utility for In-Wall Unit software (continued)
Setting up each Unit individually
You can configure settings such as clock, volume, privacy,
and intercom for each Unit individually.
1 Double-click (“Utility for In-Wall Unit” icon) in the
task tray.
The main window appears.
You can also click “Start” on the Windows taskbar, then
point to “All Programs”—“Utility for In-Wall Unit,” then
click “Utility for In-Wall Unit.”
2 Click to select any Units.
To save the setting data
1 Click “Save.”
2 Click
to be saved.
3 Click “OK.”
to select the folder in which the setting data is
To load the setting data
1 Click “Load.”
2 Click
file.
3 Select the setting file you want to load.
4 Click “OK.”
to select the folder that contains the setting
3 Click to select the item you want to adjust or set
up.
For details on each item, see the next page.
4 Click “OK” or “Apply.”
The setting takes effective.
When you click “OK” or “Cancel,” the Music Menu
Window appears.
Continue to the next page
Chapter 1 Getting Started 11
l
Page 12
Setup 3: Setting up the Utility for In-Wall Unit software (continued)
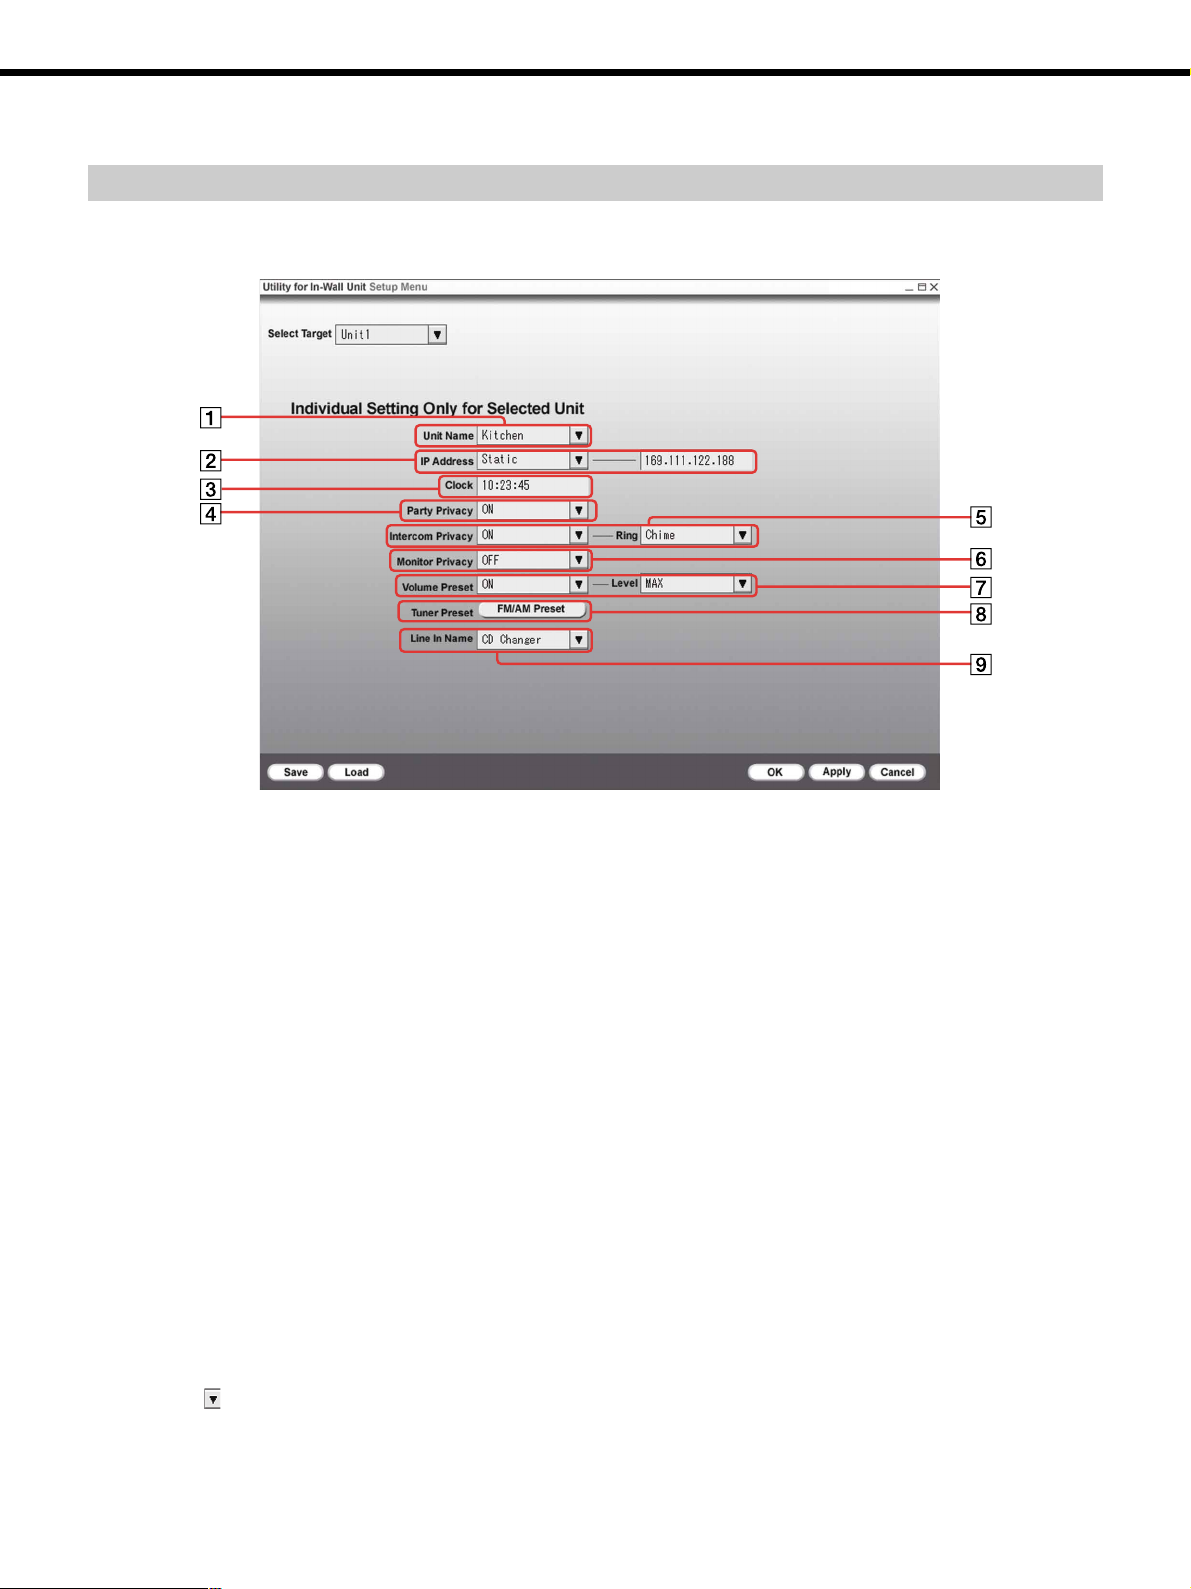
The “Utility for In-Wall Unit Setup Menu” window for each unit
1 Unit Name
You can enter a name of up to eight characters for each
Unit.
2 IP Address
Static: You must enter an IP address manually.
Auto: An IP address is acquired automatically.
Tip
To use “Auto” to automatically acquire an IP address, a DHCP
server must be available on the network. Most broadband
routers can act as DHCP servers. Refer to the manual that
supplied with your router for more information.
3 Clock
You can adjust the time of the selected Unit by entering
a new time.
4 Party Privacy
ON: The selected Unit does not join Party Mode.
OFF: The selected Unit joins Party Mode automatically.
5 Intercom Privacy
ON: The selected Unit ignore the Intercom signal.
OFF: The selected Unit can receive the Intercom
signal.
Click
to select the ring tone.
6 Monitor Privacy
ON: The selected Unit cannot be monitored by other
Units.
OFF: The selected Unit can be monitored by other
Units.
7 Volume Preset
ON: The selected Unit plays sound at the selected
volume level.
OFF: The preset volume level is disabled.
The selected Unit plays sound at whatever volume
level was set when the Unit was last turned off.
8 Tuner Preset
Click “FM/AM Preset” to configure the selected Unit
with up to 20 FM or AM radio stations. For details on
how to storing FM/AM radio stations, see page 13.
9 Line in Name
You can enter a name for an audio component
connected to the LINE IN of the selected Unit.
Continue to the next page
Chapter 1 Getting Started 12
l
Page 13

Setup 3: Setting up the Utility for In-Wall Unit software (continued)
Storing FM/AM radio stations (Preset memory)
You can preset up 20 FM or AM radio stations on all Units
simultaneously or on each Unit individually.
1 Double-click (“Utility for In-Wall Unit” icon) in the
task tray.
The main window appears.
You can also click “Start” on the Windows taskbar, then
point to “All Programs”—“Utility for In-Wall Unit,” then
click “Utility for In-Wall Unit.”
2 Click to select “All Units” or any Units.
4 Click to select “FM” or “AM.”
“Band”
5 Click to select the frequency.
You can also enter the frequency using the numeric
keys.
“Frequency”
3 Click “FM/AM Preset.”
Continue to the next page
Chapter 1 Getting Started 13
l
Page 14

Setup 3: Setting up the Utility for In-Wall Unit
software (continued)
6 Enter a name for the station.
You can enter a station name of up to eight characters. If
you have previously preset the station name in one of
the Units, you can enter the station name by clicking
to select the station name from the list.
“Station Name”
7 Click “OK” or “Apply.”
The setting takes effect.
When you click “OK” or “Cancel” in this window, you
return to the Setup Menu window shown in step 3.
Setup 4: Setting up “Server Setup, powered by DiXiM”
The“Server Setup, powered by DiXiM” makes it possible
for you to share audio files between your computer and
your Units.
You must set up the “Server Setup, powered by DiXiM” to
be able to share MP3-format audio files and M3U-format
playlists between the Utility for In-Wall Unit software and
your installed Units.
The “Server Setup, powered by DiXiM” is a program that
manages permission levels for contents.
Before using the “Server Setup, powered by DiXiM,” you
must configure your computer’s networking environment
as described in the following sections.
Settings for “Windows Firewall” for Windows XP SP2
Windows XP SP2 (Service Pack 2) contains the “Windows
Firewall” features that improve security when you connect
your computer to a network, and to the Internet. This
feature also affects the DiXiM home network.
You can enjoy home network contents safety by setting the
“Windows Firewall” feature appropriately.
To connect and enjoy DiXiM home network contents safety,
make sure that you set the firewall settings correctly.
The following procedures are necessary only if you did not
choose to change your Windows Firewall settings when you
installed the “Server Setup, powered by DiXiM.” If you
choose to change your Windows Firewall settings when you
installed the “Server Setup, powered by DiXiM,” Windows
Firewall has already been configured for you.
1 Click “Start” on the Windows taskbar to select
“Control Panel.”
2 Click the “Security Center” in the “Pick a category”
window.
If you have changed the “Control Panel” to classic view,
double-click “Windows Firewall,” and go to step 4.
The “Windows Security center” window appears.
Continue to the next page
l
Chapter 1 Getting Started 14
Page 15

Setup 4: Setting up “Server Setup, powered by DiXiM” (continued)
3 Click “Windows Firewall.”
The “Windows Firewall” window appears.
4 Click the “General” tab.
Confirm that the “On” radio button is selected and the
“Don’t allow exceptions” check box is cleared, as shown
below.
5 Click the “Exceptions” tab, and click
“Add Program….”
The “Add a Program” window appears.
6 Click “Browse….”
The “Browse” window appears.
Continue to the next page
Chapter 1 Getting Started 15
l
Page 16

Setup 4: Setting up “Server Setup, powered by DiXiM” (continued)
7 Click to select the folder in which “Server Setup,
powered by DiXiM” is to be installed from “Look in.”
Navigate to the folder in which you installed “Server
Setup, powered by DiXiM.”
If you did not change the default location when you
installed “Server Setup, powered by DiXiM,” click “My
Computer,” click “Local Disk (c:),” click “Program
Files,” click “DigiOn,” and click “Media Server for InWall Unit.”
8 Select “dmsiwu” (or “dmsiwu.exe”), and click
“Open.”
9 Confirm that “dmsiwu” (or “dmsiwu.exe”) has been
added to the list, and click “OK.”
The “Windows Firewall” window appears again.
10
Confirm that “dmsiwu” (or “dmsiwu.exe”) has been
added to the “Programs and Services” list, and click
“OK.”
The “Add a Program” window appears again.
The Windows Firewall settings for the DiMiX Media
Server are complete.
Continue to the next page
Chapter 1 Getting Started 16
l
Page 17

Setup 4: Setting up “Server Setup, powered by DiXiM” (continued)
(Reference) Networking ports used by
“Server Setup, powered by DiXiM”
The “Server Setup, powered by DiXiM” uses following
ports for communication. The configuration of Windows
Firewall described on pages 14 to 16 allows DiXiM
communications to use these ports.
If you are using a firewall program other than Windows
Firewall, configure your firewall software to allow the use
of the ports described in the following table.
Program Feature file name Port Protocol
number
dmsiwu.exe*1DiXiM SSDP Discovery 1900 UDP
DiXiM Media Server 30000 TCP
Device
DiXiM Media Server 30001 TCP
HTTP
1
*
If you did not change the destination folder when you installed
the software, “Server Setup, powered by DiXiM,” it is installed
in:
C:\Program Files\DigiOn\Media Server for In-Wall Unit\
Settings for “Internet Connection Firewall” for Windows XP SP1
Windows XP SP1 (Service Pack 1) includes a network
firewall feature called “Internet Connection Firewall” that
improves security when you connect your computer to a
network. These new features also affect the DiXiM home
network.
To be able to connect devices across your network to share
contents, while maintaining an appropriate level of network
security, make sure that Internet Connection Firewall is
configured as described in the following procedure.
3 Click “Network Connections.”
4 Double-click “Local Area Connection.”
If you use a connection method other than “Local Area
Connection,” open the connection icon you are actually
use, and match the following explanation to connection
method you use.
The “Local Area Connection Status” window appears.
5 Click the “General” tab, and click “Properties.”
1 Click “Start” on the Windows taskbar to select
“Control Panel.”
2 Click the “Network and Internet Connection” in the
“Pick a category” window.
If you have changed “Control Panel” to classic view,
double-click the “Network Connection,” and go to step
4.
The “Network and Internet Connections” window
appears.
The “Local Area Connection Properties” window
appears.
Continue to the next page
Chapter 1 Getting Started 17
l
Page 18

Setup 4: Setting up “Server Setup, powered by DiXiM” (continued)
6 Click the “Advanced” tab.
Make sure that the “Protect my computer and network
by limiting or preventing access to this computer from
the Internet” check box is selected.
When the check box is cleared, the “Internet
Connection Firewall” feature of Windows is disabled.
With the “Internet Connection Firewall” feature
disabled, the “Server Setup, powered by DiXiM” will
work without the following steps being performed, but
the network protection offered by this feature will not be
provided. To enable the “Internet Connection Firewall”
feature, select this check box, and continue with step 7.
7 Click “Settings….”
8 Click the “Services” tab, and click “Add….”
The “Service Settings” window appears.
The “Advanced Settings” window appears.
Continue to the next page
Chapter 1 Getting Started 18
l
Page 19

Setup 4: Setting up “Server Setup, powered by DiXiM” (continued)
9 Enter the information indicated into the boxes in the
“Service Settings” window.
DiXiM Media Server Device
Description of service: DiXiM Media Server Device
Name or IP address (for example 192.168.0.12) of the
computer hosting this service on your network:
Enter the name or IP address of your computer.
External Port number for this service:
Enter “30000,” and then select the TCP radio button.
Internal Port number for this service: 30000
11
Confirm that the the DiXiM Media Server Device
added in step 9 appears in the “Services” list in the
“Advanced Settings” window and that the check box
beside it is selected.
If the service added in step 9 does not appear, click
“Add…,” and complete steps 9 and 10 again.
If there is no check mark in the check box beside the
service, click the check box so that a check mark
appears.
To determine the name of your computer, click “Start”
on the Windows taskbar, right-click “My Computer,”
select “Properties,” and click the “Computer Name” tab.
The name of your computer is shown in the “Computer
description” box.
10
Click “OK.”
The “Service Settings” window closes.
Continue to the next page
Chapter 1 Getting Started 19
l
Page 20

Setup 4: Setting up “Server Setup, powered by DiXiM” (continued)
12
Repeat the process shown in steps 9 to 11 for the
four following services, entering the indicated
information for each.
DiXiM SSDP Discovery Response
Description of service: DiXiM SSDP Discovery Response
Name or IP address (for example 192.168.0.12) of the
computer hosting this service on your network:
Enter the name or IP address of your computer as
described in step 9.
External Port number for this service:
Enter “59000,” and then select the UDP radio button.
Internal Port number for this service: 59000
DiXiM SSDP Discovery
Description of service: DiXiM SSDP Discovery
Name or IP address (for example 192.168.0.12) of the
computer hosting this service on your network:
Enter the name or IP address of your computer as
described in step 9.
External Port number for this service:
Enter “1900,” and then select the UDP radio button.
Internal Port number for this service: 1900
DiXiM Media Server HTTP
DiXiM GENA Callback
Description of service: DiXiM GENA Callback
Name or IP address (for example 192.168.0.12) of the
computer hosting this service on your network:
Enter the name or IP address of your computer as
described in step 9.
External Port number for this service:
Enter “59000,” and then select the TCP radio button.
Internal Port number for this service: 59000
Description of service: DiXiM Media Server HTTP
Name or IP address (for example 192.168.0.12) of the
computer hosting this service on your network:
Enter the name or IP address of your computer as
described in step 9.
External Port number for this service:
Enter “30001,” and then select the TCP radio button.
Internal Port number for this service: 30001
Continue to the next page
Chapter 1 Getting Started 20
l
Page 21

Setup 4: Setting up “Server Setup, powered by DiXiM” (continued)
13
Confirm that the check boxes for the five DiXiM
services you have added are selected, and then click
“OK.”
16
Confirm the “Internet Connection Firewall” feature
is on.
When the “Internet Connection Firewall” feature is on, a
small icon of a lock appears on the right upper part of
the “Local Area Connection” icon in the “Network
Connection” window in the Control Panel. This lock
icon indicates that the network protection of the
“Internet Connection Firewall” feature is active.
Local Area Connection
Connected, Firewalled
Intel(R) PRO/100 VE Network ...
The “Advanced Settings” window closes.
14
Click “OK” in the “Local Area Connection Properties”
window.
“Local Area Connection Properties” window closes.
Depending on your computer, when you activate the
“Internet Connections Firewall” feature, it might take
several seconds for the window to close after you click
“OK.”
15
Click “Close” in the “Local Area Connection Status”
window.
The “Local Area Connection Status” window closes.
The “Internet Connection Firewall” settings are finished.
Starting “Server Setup, powered by DiXiM”
There are three ways to start “Server Setup, powered by
DiXiM”:
• By clicking “Advanced” in the “Setup Menu-PC”
window.
• By right-clicking
the task tray, and selecting “Advanced setting” from the
shortcut menu.
• By clicking “Start” on the Windows taskbar, and point to
“All programs,” – “DigOn,”- “Utility for In-Wall Unit-
Server Setup,” then click “Utility for In-Wall Unit-Server
Setup.”
(“Utility for In-Wall Unit” icon) in
Continue to the next page
Chapter 1 Getting Started 21
l
Page 22

Setup 4: Setting up “Server Setup, powered by DiXiM” (continued)
Basic Operations for the “Server Setup,
powered by DiXiM” window.
To activate settings changes
Click “OK” or “Apply.”
If you click “OK,” the setting changes take effect, and the
“Server Setup, powered by DiXiM” quits.
If you click “Apply,” the setting changes take effect
immediately, but the “Server Setup, powered by DiXiM”
remains open, enabling you to make additional setting
changes.
However, the setting will be activated immediately when
you add or delete the shared folder as the “Shared Folder”
tab is selected.
To cancel the settings
Click “Cancel.”
The setting that you are entering will be deleted and the
previous settings retained. The “Server Setup, powered by
DiXiM” will shut down at the same time.
However, the setting will be activated immediately when
you add or delete the shared folder as the “Shared Folder”
tab is selected.
2 Click “Start Media server.”
“Starting Media Server” appears.
When the Media Server starts up, “Media Server is
running” appears.
To stop the Media Server
Click “Stop the server.”
“Stopping Media Server” appears.
When the Media Server stops, “Media Server is being
stopped” appears.
Starting the Media Server
1 Click the “Start/Stop Server” tab on the “Server
Setup, powered by DiXiM” window.
The Media Server operating status appears on the right
side of the window.
Media server is not operating whenever “Start Media
server” is displayed on the “Server Setup, powered by
DiXiM” window.
The Media server is operating whenever “Stop Media
Server” is displayed on the “Server Setup, powered by
DiXiM” window.
Tip
The Media Server starts automatically when the “Server
Setup, powered by DiXiM” is started.
Naming the Media Server
1 Click the “Media Server Name” tab on the “Server
Setup, powered by DiXiM” window.
Continue to the next page
Chapter 1 Getting Started 22
l
Page 23

Setup 4: Setting up “Server Setup, powered by DiXiM” (continued)
2 Enter a name of the Media Server in the “Media
Server Name” text box.
The name of the Media Server is automatically
displayed in the “Media Server Name” text box if you
set a name for the Media Server when you installed the
“Server Setup, powered by DiXiM.”
If you do not provide a name for the Media Server, the
default name is “Media Server for In-Wall Unit.”
3 Click “OK” or “Apply.”
4 Restart your computer.
2 Select the Unit that you want to prohibit from
accessing content from the “Permitted List.”
“Permitted list”
3 Click “
Deny.”
P
Prohibiting a Unit from accessing contents
1 Click the “Security” tab on the “Server Setup,
powered by DiXiM” window.
Whether a Unit can access contents stored on the
computer is determined by which list the Unit is on.
Only Units on the “Permitted List” can access contents
on the computer.
Units on the ”Denied List” cannot access contents on the
computer.
The selected Unit moves to the “Denied List.”
4 Click “OK” or “Apply” to prohibit the selected Unit
from accessing content stored on the computer.
To setting up access privileges for contents
1 Select the Unit that you want to access content from
the “Denied List.”
2 Click “Permit
The “About Security” window appears.
3 Click “Yes” to confirm that you want to grant access
privileges to the selected Unit.
The selected Unit moves to the “Permitted List.”
4 Click “OK” or “Apply” to allow the selected Unit to
access content stored on the computer.
.”
p
Continue to the next page
Chapter 1 Getting Started 23
l
Page 24

Setup 4: Setting up “Server Setup, powered by DiXiM” (continued)
To delete a Unit from the “Permitted List” or
“Denied List”
1 Select the Unit you want to delete from the
“Permitted List” or the “Denied List.”
2 Click “Delete” at the center of the window.
The name of the selected Unit disappears from the
“Permitted List” or the “Denied List.”
3 Click “OK” or “Apply.”
The selected Unit is deleted from the list.
If an access request received from the deleted Unit, it is
added to the “Denied List” automatically.
Note
For security reasons, it is strongly recommended that your network
be protected by a router or firewall device if it is connected to the
Internet.
If your network is connected to the Internet and is not protected by
such a device, it is strongly recommended that the default setting
that causes new devices to be automatically placed on the “Denied
List” be maintained. If you change the “Server Setup, powered by
DiXiM” settings so that new devices are automatically placed on
the “Permitted List,” unauthorized users on the Internet may be
able to access shared content on your “Server Setup, powered by
DiXiM” computer.
3 Click “Rebuild Database.”
A confirmation window appears.
4 Click “Yes.”
The server database is rebuilt.
Notes
• Files and folders whose “Hidden files” property check box is
selected cannot be accessed.
• The time required to rebuild the database varies with the number
of files included in the shared folder. Depending on the situation,
it might take a considerable amount of time to rebuild.
• A “Shared folder” (page 26) and a “Watched folder” (this page)
are the same thing.
Setting up a shared folder from “Server Setup, powered by DiXiM”
You can add a shared folder or stop sharing a folder from
within either the Utility for In-Wall Unit software or “Server
Setup, powered by DiXiM.”
For details about adding a shared folder and stopping a
folder from being shared, see page 26.
To rebuild the Media Server database
Ordinarily, the “Server Setup, powered by DiXiM”
automatically keeps track of changes to the files in shared
folders.
In rare situations, however, the Media Server may be unable
to recognize changes to shared files. For example, if another
program modifies a shared audio file, but does not update
the file’s modification time stamp, the Media Server may be
unaware of the change and therefore not update its
database of shared file information.
In this situation, you can manually force the Media Server
to rebuild its database so it contains the latest shared file
information.
1 Click the “Shared Folder” tab on the “Server Setup,
powered by DiXiM” window.
2 Click the path of the folder whose database
information you want to rebuild from the ”Published
Folder List.”
Chapter 1 Getting Started 24
Page 25

Chapter 2
Starting and Quitting the
Utility for In-Wall Unit
Main Features
This chapter describes how to watch and
create playlists, and operate the Unit from
your computer using Utility for In-Wall
Unit.
Software
To start the Utility for In-Wall Unit software
Double-click (“Utility for In-Wall Unit” icon) in the
task tray.
The main window appears.
You can also click “Start” on the Windows taskbar, then
point to “All Programs”—“Utility for In-Wall Unit,” then
click “Utility for In-Wall Unit.”
If the Setup Menu window appears when the software
starts, you can move on to the main window by clicking
“OK” or “Cancel.”
To quit the Utility for In-Wall Unit software
Right-click (“Utility for In-Wall Unit” icon) in the task
tray, and click “Exit” from the shortcut menu.
Chapter 2 Main Features 25
Page 26

Watching Playlists (Import)
The default settings watch the contents of the following
folder with Units on the network:
C:\Documents and Settings\All Users\Documents\My
Music\
The last folder listed above shows the folder for “Shared
music” in the “Shared documents” folder.
You can also select additional folders of content to watch
with the network, as described in the following procedure.
1 Double-click (“Utility for In-Wall Unit” icon) in the
task tray.
The main window appears.
You can also click “Start” on the Windows taskbar, then
point to “All Programs”—“Utility for In-Wall Unit,”
then click “Utility for In-Wall Unit.”
If the Setup Menu window appears when the software
starts, you can move on to the main window by clicking
“OK” or “Cancel.”
2 Click the “Manage” tab.
3 Click the “Import” tab.
5 Select the folder you want to watch, and click “OK.”
The path of the selected folder is added to the “Watched
Folders,” and audio files in the folder can be accessed by
Units on the network.
To stop watching a folder
1 Click the path of the folder that you want to stop
sharing from the ”Watched Folders” in the window
shown in step 3.
2 Click “Remove Folder.”
A confirmation window appears.
3 Click “Yes.”
The selected watched folder is removed from the
“Watched Folders,” and audio files in the folder are no
longer accessible by Units on the network.
4 Click “Add Folder….”
The “Browse for Folder” window appears.
To verify a watched folder
Click “Rescan”
The “Watched Folders” is updated to show the current list
of watched folders.
Note
A “Watched folder” and a “Shared folder” are the same thing.
Chapter 2 Main Features 26
Page 27

Creating a Playlist Using Utility for In-Wall Unit
You can create original playlists in the Utility for In-Wall
Units software by selecting MP3-format music files stored
on your computer.
Using this feature, you can also group music tracks by
albums, artists, and genres.
1 Double-click (“Utility for In-Wall Unit” icon) in the
task tray.
The main window appears.
You can also click “Start” on the Windows taskbar, then
point to “All Programs”—“Utility for In-Wall Unit,”
then click “Utility for In-Wall Unit.”
If the Setup Menu window appears when the software
starts, you can move on to the main window by clicking
“OK” or “Cancel.”
2 Click the “Manage” tab.
5 Click “Search.”
The Utility for In-Wall Units software starts searching
for MP3-format files. The found tracks are displayed in
the “Search Result” list.
6 Select the tracks you want to add to the new
playlist.
3 Click the “Playlist” tab.
4 Search for MP3-format music files on your computer.
Enter the text you want to search for the names of MP3format files into the search text box.
“Tracks”
7 Click the playlist to move the selected music track.
“playlists”
Continue to the next page
Chapter 2 Main Features 27
l
Page 28

Creating a Playlist using Utility for In-Wall Unit (continued)
8 Click .
You can also add tracks to a playlist by dragging them
from the “Search Result” list to the name of the playlist
on the “Playlist” list.
The selected music tracks are added to the selected
playlist.
To create other new playlists
1 Click “New.”
2 Enter a name for the new playlist.
A new playlist appears.
To delete a track or a playlist
1 Select the track or the playlist you want to delete.
2 Click “Delete.”
The selected track or playlist is deleted.
Chapter 2 Main Features 28
Page 29

Operating the Unit from a Computer
You can use many of the basic features of a Unit over the
network from your computer.
When the Party mode is set to “ON,” you can play selected
content from “Playlists,” “Disc,” “Tuner,” and “LINE IN”
on multiple Units simultaneously.
When the Party mode is set to “OFF,” you can play selected
content from “Playlists,” “Disc,” “Tuner,” and “LINE IN”
on a selected Unit.
1 Double-click (“Utility for In-Wall Unit” icon) in the
task tray.
The main window appears.
You can also click “Start” on the Windows taskbar, then
point to “All Programs”—“Utility for In-Wall Unit,”
then click “Utility for In-Wall Unit.”
If the Setup Menu window appears when the software
starts, you can move on to the main window by clicking
“OK” or “Cancel.”
2 Click the “Play” tab.
4 Click the beside “Network.”
5 Click the beside “My PC.”
6 Click the beside “All Playlists.”
3 Click “ON” or “OFF” to select the Party mode setting.
• ON: The selected music plays from all Units that have
Party mode enabled.
• OFF: The selected music plays from only the selected
Unit. When selecting “OFF,” click
on which you want to play music.
to select the Unit
7 Click the Playlist you want to play in the Party mode.
Continue to the next page
Chapter 2 Main Features 29
l
Page 30

Operating the Unit from a Computer (continued)
8 Click to start playing the entire playlist, or
double-click an individual track to start playing that
track.
“Tracks”
To select “Disc,” “Tuner,” or “LINE IN” from
the Unit
1 Follow steps 1 to 4 (page 29).
2 Click the
3 Click the
4 Click “Disc,” “Tuner,” or “LINE IN.”
When you click “Disc”
Click to start playing the entire CD, or doubleclick an individual track to start playing that track.
When you click “Tuner”
Double-click a preset station, or click a preset station,
and click
When you click “LINE IN”
Click .
To select tracks by genre, artist, or album
1 Follow steps 1 to 3 (page 29).
2 Click the
3 Click the
4 Click the name of your desired genre, artist, or album.
5 Click
list, or double-click an individual track to start playing
that track.
beside “All Unit.”
beside Unit.
.
beside “My Music.”
beside “Genre,” “Artist,” “Album.”
to start playing the first track in the track
Continuous play/shuffle play
Click under “Play Mode” to select either “Continue” or
“Shuffle.”
If you select Plays
“Continue” All tracks on the selected “disc”
“Shuffle” All tracks on the selected “disc” or
or “playlist” in order.
“playlist” in random order.
Repeat Play
Click under “Repeat Mode” to select a repeat mode.
If you select Plays
“Repeat 1” A single track repeatedly.
“Repeat All” All tracks on the selected
“OFF” All tracks on the selected
“disc” or “playlist” repeatedly.
“disc” or “playlist” only once.
Additional operations on playing music
To Click
Stop x
Pause X
Resume play from pause X or N
Go to the next track >
Go back to the preceding track . twice
Go back to the beginning of .
the current track
during playback
To stop a radio and an audio component
connected to LINE IN
Click .
Continue to the next page
Chapter 2 Main Features 30
l
Page 31

Operating the Unit from a Computer (continued)
To search for a track by entering a keyword
1 Enter the text you want to find in a track name or an
artist name into the search text box.
2 Press “Search.”
The track search starts automatically.
Tracks including your search text appear in the music
list.
Search text box
To switch to the Setup Menu window
Click “Setup Menu” at the top of the window.
The Setup Menu window appears.
To display the entire system status
Click “All View” at the top of the window.
A new window appears, displaying the current music
source for each Unit.
Notes
•“Play Mode” and “Repeat Mode” are not available when “Tuner”
or “LINE IN” is selected.
• Text Searching is not available when “Tuner” or “LINE IN” is
selected as music source.
• When the room selected at the upper left of the window in step 3
(page 29) and the Unit selected on the left side of the window are
different, you cannot use “TUNER” or “LINE IN” as music
source.
Tips
• You can group music tracks by album, artist, and genre, and
search for tracks by name and artist.
• If the selected room is already playing content from “Disc,”
“Tuner,” or “LINE IN” when you select a room in step 3 (page
29,) the status of the currently playing content is displayed below
the rooms selection box.
Chapter 2 Main Features 31
Page 32

Other Features
Using right-click
Right-clicking in the Utility for In-Wall Unit software displays a menu of additional options. The options available change
depending on where in the program you right-click.
The “Utility for In-Wall Unit Setup Menu” Window
“Title Bar”
If you right-click Items Function
On the title bar Restore The window returns to its former position.
Move The window can be moved in various directions.
Size The size of the window can be changed.
Minimize The window is minimized to the taskbar.
Maximize The window expands to full screen.
Close The window closes.
The “Utility for In-Wall Unit Music Menu” Window
“My PC”
“All Playlists”
“Playlist”
“All Units”
“Disc”
“Unit”
“Title Bar”
If you right-click Items Function
On the title bar Restore The window returns to its former position.
Move The window can be moved in various directions.
Size The size of the window can be changed.
Minimize The window is minimized to the taskbar.
Maximize The window expands to full screen.
Close The window closes.
On “My PC,” or Setup The “Utility for In-Wall Unit Setup Menu” window for your computer appears.
“All Playlists”
On “Playlist” Properties The path to the playlist file appears.
Setup The “Utility for In-Wall Unit Setup Menu” window for your computer appears.
On “All Units” Setup The “Utility for In-Wall Unit Setup Menu” window for all Units appears.
On “Disc” CDDB Dialogs The dialogs for CDDB appear.
On “Unit” Properties The original unit number and Privacy setting status appear.
Setup The “Utility for In-Wall Unit Setup Menu” window for the selected Unit appears.
Continue to the next page
Chapter 2 Main Features 32
l
Page 33

Other Features (continued)
Taskbar
If you right-click Items Function
“Utility for In-Wall Unit”
On “Utility for In-Wall Unit” Restore The window returns to its former position.
Move The window can be moved in various directions.
Size The size of the window can be changed.
Minimize The window is minimized to the taskbar.
Maximize The window expands to full screen.
Close The window closes.
Task Tray
“Utility for In-Wall Unit” icon
If you right-click Items Function
On “Utility for In-Wall Unit” Setup Menu The “Utility for In-Wall Unit Setup Menu” window appears.
icon Music Menu The “Utility for In-Wall Unit Music Menu” window appears.
Support website The Sony product support Web site (http://productregistration.sony.com) appears.
Gracenote website The Gracenote CDDB
Version Information The version information window appears.
Advanced Settings The “Server Setup, powered by DiXiM” window appears.
Exit The application closes.
R
Web site (http://www.gracenote.com) appears.
Chapter 2 Main Features 33
Page 34

Chapter 3
Troubleshooting
Additional
Information
This chapter provides you with
additional information that will help you
understand and maintain your system.
If you have problems while using the Utility for In-Wall
Unit software, check the items below.
If the problem persists, contact your nearest Sony dealer or
a customer support center.
Display
The window does not respond or the
responses are wrong.
, Turn off the Unit by pressing X/1 (POWER) on the
Unit and the AC power unit, turn the Unit and AC
power unit back on, and then quit and restart the
Utility for In-Wall Unit software.
, Start another software program that you use
frequently, and confirm that the computer is
functioning normally.
, Uninstall Utility for In-Wall Unit software and then
re-install it again.
A Unit is not displayed on the “Music Source”
list in the “Utility for In-Wall Unit Music
Menu” window.
, Make sure that the Unit is properly connected. Refer
to the Installer’s manual.
Check network settings on your computer.
, Turn off the Unit by pressing X/1 (POWER) on the
Unit and the AC power unit, turn the Unit and AC
power unit back on, and then quit and restart the
Utility for In-Wall Unit software.
An MP3 file is not displayed in a track list.
, The MP3 track does not have the extension “.MP3”
(or “.mp3”).
, The MP3 track does not reside in a watched folder
specified in the “Import” tab window.
, Click “Rebuild Database” for the shared folder that
includes the MP3-format file in the “Server Setup,
powered by DiXiM” window.
, Media server is not running. Start Media Server
(page 22).
Continue to the next page
l
Chapter 3 Additional Information 34
Page 35

Troubleshooting (continued)
A playlist is not displayed on the “Music
Source” list in the “Utility for In-Wall Unit
Music Menu” window.
, The playlist does not have the extension “.M3U” (or
“.m3u”).
, The playlist is not in M3U-format.
, The playlist does not reside in a watched folder
specified in the “Import” tab window.
, Rebuild the database for the shared folder that
includes the playlist in the “Server Setup, powered
by DiXiM” window (page 24).
, Media server is not running. Start Media Server
(page 22).
Sound
There is no sound from a Unit.
, Make sure that the Unit is properly connected. Refer
to the Installer’s manual.
Check network settings on your computer.
, Turn off the Unit by pressing X/1 (POWER) on the
Unit and the AC power unit, turn the Unit and AC
power unit back on, and then quit and restart the
Utility for In-Wall Unit software.
Operation
An MP3 track track cannot be played.
, The MP3-format file does not have the extension
”.M3U” (or “.m3u”).
, The file does not contain MP3 audio data, even
though its file extension is “.MP3” or (“.mp3”).
Cannot uninstall Utility for In-Wall Unit
software.
, Stop the service.
Right-click
the shortcut menu.
in the task tray, and select “Exit” from
Network
MP3 files or playlists cannot be browsed from
a Unit.
, The Unit has not been given access privileges for
content on your computer in the “Server Setup,
powered by DiXiM” window (page 23).
, Make sure that “Windows Firewall” (Windows XP
SP2, page 14) or “Internet Connection Firewall”
(Windows XP SP1, page 17) is set up properly.
The message “Can’t access CDDB” appears.
, Make sure that your computer’s Internet connection
is properly configured and working.
, If your computer accesses the Internet through a
proxy server, make sure your computer is properly
configured to use the proxy server.
Cannot obtain album or track information
from Gracenote CDDBR.
, The Gracenote CDDBR does not have information
for the tracks.
, Make sure that your computer’s Internet connection
is properly configured and working.
, If your computer accesses the Internet through a
proxy server, make sure your computer is properly
configured to use the proxy server.
Chapter 3 Additional Information 35
Page 36

Error Messages
If any of the messages below appear on your computer, check the following table to solve the problem. If any problem persists,
consult your nearest Sony dealer.
Setting up Utility for Unit
Message Cause Corrective action
This application has already started by Another computer connected to Only one computer at a time on a particular
another PC in the LAN your network has already network can run the Utility for In-Wall Unit software.
The same name is already being used The Unit name you entered All device names on the network must be unique.
The same IP address is already being Another Unit on the network is The IP addresses of devices on the network
used already using the IP address you must be unique. Enter a different IP address.
All units’ set up will be overwritten. This message appears when “OK” Click “OK” to continue with overwriting the setup
OK ? or “Apply” is clicked in the “Utility data for all Units. Click “Cancel” to cancel overwriting
started the Utility for In-Wall
Unit software.
is already in use by another Enter a different name.
Unit on the network.
entered.
for In-Wall Unit Setup Menu” of the setup data for all Units.
window for all Units.
Selecting the Playlist from your computer
Message Cause Corrective action
No Playlist found The search did not find any playlists
Application found a playlist incompatible This message is displayed when Convert the playlist into M3U-format.
with M3U. Please convert the playlist into a playlist is found that is not
M3U format. in M3U-format.
The selected playlist/track will be deleted. This message is displayed when Press “OK,” and a playlist or a track will be deleted.
Are you sure? you try to delete a playlist or a
matching the criteria you entered.
track.
Selecting “Disc” from your computer
Message Cause Corrective action
Can’t access the specified unit The computer cannot access the Contact your nearest installer to check your network
No Disc This message is displayed if you Insert a disc appropriate to the drive in the Unit or
Door is open For safety reasons, closing a Unit’s Go to the unit whose door is open, and close it.
specified unit for some reason. and electrical connections.
select CD/DVD as the input source computer.
when there is no disc mounted in the
drive of the selected Unit or computer.
door remotely is not supported.
Continue to the next page
Chapter 3 Additional Information 36
l
Page 37

Error Messages (continued)
Using the Party mode function
Message Cause Corrective action
Party mode cannot be started The Party Privacy setting for all Change the Party Privacy setting for the Units you
Units is set to ON. want to participate in Party mode to OFF.
Not using the Party mode function
Message Cause Corrective action
The selected rooms’ unit is occupied This message appears when the Click “OK” to stop the music being played by the Unit.
now. Do you want to change the selected unit is already occupied. Click “Cancel” to leave the Unit’s music source
music source? unchanged.
Getting CD Information from Gracenote CDDB
R
Message Cause Corrective action
Can’t access CDDB The computer cannot access the Confirm that your computer’s Internet connection is
Gracenote CDDBR for some reason. properly configured and working.
Chapter 3 Additional Information 37
Page 38

Trademarks and Copyrights
• Microsoft, Windows and Windows NT are trademarks or registered trademarks of Microsoft Corporation in the United States and/or other
countries.
• TM and R marks are omitted in this manual.
• Macintosh is the registered trademark of Apple Computer, Inc. in the United States and/or other countries.
• IBM and PC/AT are registered trademarks of International Business Machines Corporation.
• Pentium and Celeron are trademarks or registered trademarks of Intel Corporation.
• All other trademarks and registered trademarks are trademarks or registered trademarks of their respective holders.
DigiOn/DiXiM
• DigiOn and DiXiM are registered trademarks of DigiOn, Inc.
• DigiOn and DiXiM are registered trademarks of DigiOn Ltd.
• Microsoft and Windows are the registered trademarks or trademarks in the United States and other countries of Microsoft Corporation.
• Intel, Celeron, and Pentium are registered trademarks of Intel Corporation.
• Other company names and product names, etc., that have been described are the registered trademarks or trademarks of each company.
• “DiXiM” is a multimedia home network solution developed by DigiOn Ltd.
For details, refer to the DigiOn Web site (http://www.digion.com/).
• DigiOn Ltd. develops and sells application software such as the multi-track sound editing software, “DigiOnSound,” the music DVD creation
software “DigiOnAudio,” the video editing software series, “DigiOnVideo,” the DVD authoring software series, “DigiOnAuthor for DVD”
and the CD/DVD writing software series “Drag’n Drop CD plus DVD Edition.” DigiOn Ltd. is a software manufacturer with strengths in
digital storage, audio visual, and CD/DVD technology. DigiOn developed the multimedia home network solution, “DiXiM,” based on its
own the technology. DigiOn also developed the middleware product, “DiXiM,” for multimedia home network use and the accompanying
PC application software in-house.
• It is prohibited to reproduce all or any part of this manual without the permission of DigiOn Ltd.
• The contents of this manual may change at any time without prior notification.
Even if loss or damage is caused by use of information provided in this manual, it doesn’t assume the responsibility though the attention of
thorough is paid and help is produced.
• The images, illustration, and music, etc., are protected as the property of the author by Copyright law.
Copyright law prohibit any persons from duplicating (copying) or recording DVD, CD, TV broadcast, or radio contents, etc., offered for
commercial use or rental, except for private viewing.
Please note that it is necessary to obtain permission from the author if the user is not the author of material used in a homepage, etc., when
such use exceeds the definition of private use, or when distribution involves sale or transfer of rights.
• DiXiM Media Server is based in part on the work of the Independent JPEG Group.
• DiXiM Media Client and DiXiM Media Server are based in part on expat.
• Copyright © 1998, 1999, 2000 Thai Open Source Software Center Ltd and Clark Cooper Copyright © 2001, 2002, 2003 Expat maintainers.
Permission is hereby granted, free of charge, to any person obtaining a copy of this software and associated documentation files (the
“Software”), to deal in the Software without restriction, including without limitation the rights to use, copy, modify, merge, publish,
distribute, sublicense, and/or sell copies of the Software, and to permit persons to whom the Software is furnished to do so, subject to the
following conditions:
The above copyright notice and this permission notice shall be included in all copies or substantial portions of the Software.
THE SOFTWARE IS PROVIDED “AS IS”, WITHOUT WARRANTY OF ANY KIND, EXPRESS OR IMPLIED, INCLUDING BUT NOT
LIMITED TO THE WARRANTIES OF MERCHANTABILITY, FITNESS FOR A PARTICULAR PURPOSE AND NONINFRINGEMENT. IN
NO EVENT SHALL THE AUTHORS OR COPYRIGHT HOLDERS BE LIABLE FOR ANY CLAIM, DAMAGES OR OTHER LIABILITY,
WHETHER IN AN ACTION OF CONTRACT, TORT OR OTHERWISE, ARISING FROM, OUT OF OR IN CONNECTION WITH THE
SOFTWARE OR THE USE OR OTHER DEALINGS IN THE SOFTWARE.
Continue to the next page
Chapter 3 Additional Information 38
l
Page 39

Trademarks and Copyrights (continued)
Gracenote/CDDB
Corporate description
Music recognition technology and related data are provided by GracenoteR. Gracenote is the industry standard in music recognition
technology and related content delivery. For more information visit www.gracenote.com.
Proprietary legends
CD and music-related data from Gracenote, Inc., copyright © 2000-2005 Gracenote. Gracenote CDDBR Client Software,
copyright 2000-2005 Gracenote. This product and service may practice one or more of the following U.S. Patents: #5,987,525; #6,061,680;
#6,154,773, #6,161,132, #6,230,192, #6,230,207, #6,240,459, #6,330,593, and other patents issued or pending. Services supplied and/or device
manufactured under license for following Open Globe, Inc. United States Patent 6,304,523.
Gracenote and CDDB are registered trademarks of Gracenote. The Gracenote logo and logotype, and the “Powered by Gracenote” logo are
trademarks of Gracenote.
Chapter 3 Additional Information 39
Page 40

Sony Corporation
 Loading...