

Page 1

CD/DVD
Player
Operating Instructions
3-073-381-11(2)
DVP-NS305
DVP-NS415
© 2002 Sony Corporation
Page 2

WARNING
Welcome!
To prevent fire or shock
hazard, do not expose the
unit to rain or moisture.
To avoid electrical shock, do
not open the cabinet. Refer
servicing to qualified
personnel only.
Mains lead must only be
changed at a qualified
service shop.
CAUTION
The use of optical instruments with
this product will increase eye
hazard. As the laser beam used in
this CD/DVD player is harmful to
eyes, do not attempt to disassemble
the cabinet.
Refer servicing to qualified
personnel only.
Precautions
Safety
• The power requirements and
power consumption of this unit
are indicated on the back of the
unit. Check that the unit’s
operating voltage is identical
with your local power supply.
Power
requirements
and power
consumption
m
X
DVP–XXXX
00V 00Hz
NO.
00W
• To prevent fire or shock hazard,
do not place objects filled with
liquids, such as vases, on the
apparatus.
Installing
• Do not install the unit in an
inclined position. It is designed
to be operated in a horizontal
position only.
• Keep the unit and discs away
from equipment with strong
magnets, such as microwave
ovens, or large loudspeakers.
• Do not place heavy objects on
the unit.
For the model su pplied with
the AC plug adaptor
If the AC plug of your unit does not
fit into the wall outlet, attach the
supplied AC plug adaptor.
0-000-000-00
Thank you for purchasing this
Sony CD/DVD Player. Before
operating this player, please read
this manual thoroughly and retain
it for future reference.
2
Page 3

Precautions
On safety
• Caution – The use of optical instruments
with this p roduct will increa se eye haza rd.
• Should any sol i d object or liq uid fall into
the cabinet, unplu g the player and have it
checked by quali f ie d personnel before
operating it any further.
On power sources
• The player is no t disc onnected from the A C
power source (mains) as long as it is
connected to the wall outlet, even if the
player itself has been turned off.
• If you are not going to use the player for a
long time, be sure to disconnect the player
from the wall outlet. To disconnect the AC
power cord (mai ns lead), grasp the plug
itself; never pull the cord.
On placement
• Place the pl ayer i n a l ocat io n wit h a dequ at e
ventilation to prevent heat build-up in the
player.
• Do not place the pl ayer on a soft surface
such as a rug that might block the
ventilation holes on the bottom.
• Do not place the pl ayer in a location nea r
heat sources, or in a place subject to di rect
sunlight, excessive dust, or mechanical
shock.
On adjusting volume
Do not turn up the volume while listening to
a section with very low level inputs or no
audio signals. If you do, the speakers may be
damaged when a pe ak l eve l se cti on is pl ay ed.
On cleaning
Clean the cabinet, panel, and controls with a
soft cloth slightly moistened with a mild
detergent solution. Do not use any type of
abrasive pad, scouring powder or solvent
such as alcohol or benzine.
If you have any questi ons or problems
concerning your player, please co nsult your
nearest Sony dealer.
On cleaning discs
Do not use a commercially available cleaning
disc. It may cause a malfunction.
IMPORTANT NOTICE
Caution: This player is capable of holding a
still video image or on-screen display image
on your television screen indefinitely. If
you leave the still video image or on-screen
display ima ge displayed on your TV for an
extended period of time you risk permanent
damage to your television scre en.
Projection telev is i ons are especially
susceptible to this.
On operation
• If the player is brought directly from a cold
to a warm location, or is p laced in a very
damp room, moisture may condense on the
lenses inside the player. S hould this occur,
the player may not oper at e pr ope rl y. In thi s
case, remove the disc and leave the player
turned on for about hal f an hour until the
moisture evaporates.
• When you move the player, take out any
discs. If you don’t, the di sc may be
damaged.
3
Page 4

Table of Contents
WARNING . . . . . . . . . . . . . . . . . . . . . . . . . . . . . . . . . . . . . . . . . . . . . . . . . . . . 2
Welcome! . . . . . . . . . . . . . . . . . . . . . . . . . . . . . . . . . . . . . . . . . . . . . . . . . . . . 2
Precautions . . . . . . . . . . . . . . . . . . . . . . . . . . . . . . . . . . . . . . . . . . . . . . . . . . . 3
About this Manual . . . . . . . . . . . . . . . . . . . . . . . . . . . . . . . . . . . . . . . . . . . . . . 6
This Player Can Play the Following Discs . . . . . . . . . . . . . . . . . . . . . . . . . . . 6
Notes about the Discs . . . . . . . . . . . . . . . . . . . . . . . . . . . . . . . . . . . . . . . . . . . 7
Index to Parts and Controls . . . . . . . . . . . . . . . . . . . . . . . . . . . . . . . . . . . . . . 8
Guide to On-Screen Displays (Control Bar) . . . . . . . . . . . . . . . . . . . . . . . . . 13
Simple Star t Guide . . . . . . . . . . . . . . . . . . . . . . . . . . . . . . . . . . 15
Quick Overview . . . . . . . . . . . . . . . . . . . . . . . . . . . . . . . . . . . . . . . . . . . . . . . 15
Step 1: Unpacking . . . . . . . . . . . . . . . . . . . . . . . . . . . . . . . . . . . . . . . . . . . . . 15
Step 2: Inserting Batteries into the Remote . . . . . . . . . . . . . . . . . . . . . . . . . 15
Step 3: TV Hookups . . . . . . . . . . . . . . . . . . . . . . . . . . . . . . . . . . . . . . . . . . . 16
Step 4: Playing a Disc . . . . . . . . . . . . . . . . . . . . . . . . . . . . . . . . . . . . . . . . . . 17
Hookups . . . . . . . . . . . . . . . . . . . . . . . . . . . . . . . . . . . . . . . . . 18
Hooking Up the Player . . . . . . . . . . . . . . . . . . . . . . . . . . . . . . . . . . . . . . . . . 18
Step 1: Connecting the Video Cords . . . . . . . . . . . . . . . . . . . . . . . . . . . . . . . 18
Step 2: Connecting the Audio Cords . . . . . . . . . . . . . . . . . . . . . . . . . . . . . . . 20
Step 3: Connecting the Power Cord . . . . . . . . . . . . . . . . . . . . . . . . . . . . . . . 25
Step 4: Quick Setup . . . . . . . . . . . . . . . . . . . . . . . . . . . . . . . . . . . . . . . . . . . 25
Playing Discs . . . . . . . . . . . . . . . . . . . . . . . . . . . . . . . . . . . . . . 28
Playing Discs . . . . . . . . . . . . . . . . . . . . . . . . . . . . . . . . . . . . . . . . . . . . . . . . 28
Searching for a Particular Poin t on a D isc (S can, Slow-motion Play, Searc h,
Freeze Frame) . . . . . . . . . . . . . . . . . . . . . . . . . . . . . . . . . . . . . . . . . . . . 30
Resuming Pl ayback from the P oint Wher e You Stop ped the Disc (Res ume Play/
Multi-disc Resume) . . . . . . . . . . . . . . . . . . . . . . . . . . . . . . . . . . . . . . . . . 32
Using the DVD’s Menu . . . . . . . . . . . . . . . . . . . . . . . . . . . . . . . . . . . . . . . . . 33
Playing VIDEO CDs with PBC Functions (PBC Playback) . . . . . . . . . . . . . . 33
Playing an MP3 Audio Track . . . . . . . . . . . . . . . . . . . . . . . . . . . . . . . . . . . . . 34
Various Play Mode Functions (Programme Play, Shuf fle Pla y, R epeat Play,
A-B Repeat Play) . . . . . . . . . . . . . . . . . . . . . . . . . . . . . . . . . . . . . . . . . . 36
Searching for a Scene . . . . . . . . . . . . . . . . . . . . . . . . . . . . . . . . 41
Searching for a Title/Chap t er/Tr ac k/ I ndex/Scene (Search mode) . . . . . . . . 41
Viewing Information About the Disc . . . . . . . . . . . . . . . . . . . . . . . 42
Checking the Playing Time and Remaining Time . . . . . . . . . . . . . . . . . . . . . 42
Sound Adjustments . . . . . . . . . . . . . . . . . . . . . . . . . . . . . . . . . . 44
Changing the Sound . . . . . . . . . . . . . . . . . . . . . . . . . . . . . . . . . . . . . . . . . . . 44
TV Virtual Surround Settings (TVS) . . . . . . . . . . . . . . . . . . . . . . . . . . . . . . . 45
4
Page 5

Enjoying Mo vies . . . . . . . . . . . . . . . . . . . . . . . . . . . . . . . . . . . . 48
Changing the Angles . . . . . . . . . . . . . . . . . . . . . . . . . . . . . . . . . . . . . . . . . . . 48
Displaying the Subtitles . . . . . . . . . . . . . . . . . . . . . . . . . . . . . . . . . . . . . . . . . 48
Adjusting the Picture Quality (BNR) . . . . . . . . . . . . . . . . . . . . . . . . . . . . . . . 49
Adjusting the Playback Picture (CUSTOM PICTURE MODE) . . . . . . . . . . . 50
Enhancing the Playback Picture (DIGITAL VIDEO ENHANCER)
(DVP-NS415 only) . . . . . . . . . . . . . . . . . . . . . . . . . . . . . . . . . . . . . . . . . 51
Using Various Additional Functions . . . . . . . . . . . . . . . . . . . . . . . 52
Locking Discs (CUSTOM PARENTAL CONTROL, PARENTAL
CONTROL) . . . . . . . . . . . . . . . . . . . . . . . . . . . . . . . . . . . . . . . . . . . . . . . 52
Controlling Your TV with the Supplied Remote . . . . . . . . . . . . . . . . . . . . . . . 56
Settings and Adjustments . . . . . . . . . . . . . . . . . . . . . . . . . . . . . . 58
Using the Setup Display . . . . . . . . . . . . . . . . . . . . . . . . . . . . . . . . . . . . . . . . 58
Setting the Display or Sound Tra ck Language (LANGUAG E SETUP) . . . . . 59
Settings for the Display (SCREEN SETUP) . . . . . . . . . . . . . . . . . . . . . . . . . 60
Custom Settings (CUSTOM SETUP) . . . . . . . . . . . . . . . . . . . . . . . . . . . . . . 61
Settings for the Sound (AUDIO SETUP) . . . . . . . . . . . . . . . . . . . . . . . . . . . . 62
Additional Information . . . . . . . . . . . . . . . . . . . . . . . . . . . . . . . . 65
Troubleshooting . . . . . . . . . . . . . . . . . . . . . . . . . . . . . . . . . . . . . . . . . . . . . . 65
Self-diagnosis Functio n (W hen letters/numbers ap pear in the display) . . . . 67
Glossary . . . . . . . . . . . . . . . . . . . . . . . . . . . . . . . . . . . . . . . . . . . . . . . . . . . . 68
Specifications . . . . . . . . . . . . . . . . . . . . . . . . . . . . . . . . . . . . . . . . . . . . . . . . 69
Language Code List . . . . . . . . . . . . . . . . . . . . . . . . . . . . . . . . . . . . . . . . . . . 70
Index . . . . . . . . . . . . . . . . . . . . . . . . . . . . . . . . . . . . . . . . . . . . . . . . . . . . . . . 71
5
Page 6

About this Manua l
Format of discs
Music CD
Check your model name
The instructions in this manual are for the 2
models: DVP-NS305 and DVP-NS415.
Check your model name by looking at the
front panel of the player. DVP-NS415 is the
model used for illustration purposes. Any
difference in operation is clearly indicated
in the text, for ex am ple, “DVP-NS4 15
only.”
• Instructions in this manual describe the
controls on the remote. You can also use the
controls on the player if they hav e the same
or similar names as those on the remote.
• Displays on the screen are slightly different
depending upon where the model is sold.
• The meaning of the icons used in this
manual is described below:
Icon Meaning
Functions available for DVD
VIDEOs or DVD-Rs/DVDRWs in Video mode
Functions available for VIDEO
CDs or CD-Rs/CD-RWs in
video CD for mat
Functions available for DATA
CDs (CD-ROMs/CD-Rs/CDRWs containing MP3* audio
tracks)
Functions available for music
CDs or CD-Rs/CD-RWs in
music CD format
* MP3 (MPEG1 Audio Layer 3) is a standard
format defined by ISO/MPEG which compresses
audio data.
This Player Can Play the Following Disc s
Format of discs
DVD VIDEO
VIDEO CD
The “DVD VIDEO” logo is a trademark.
Region code
Your player has a region code printed on the
back of the unit and only will play DVD
VIDEO discs (p la yback only) labelle d w ith
identical region codes. This system is used to
protect copyrights.
DVDs labelled will also play on this
ALL
player.
If you try to play any other DVD, the message
“Playback prohibited by area limitations.”
will appear on the TV screen. Depending on
the DVD, no region code indication may be
labelled even though playing the DVD is
prohibited by area restrictions.
X
DVP–XXXX
00V 00Hz
NO.
00W
Region code
0-000-000-00
Example of discs that the player
cannot play
The player cann ot p l ay t he following disc s:
• All CD-ROMs (including PHOTO CDs)/
CD-Rs/CD-RWs other than those recorded
in the follo wing formats:
–music CD format
–video CD format
–MP3 format that conf or ms to ISO9660*
Level 1/Level 2, or its extended format,
Joliet
• Data part of CD-E xt ras
• DVD-RWs in VR mode
• DVD-ROMs
• DVD Audio discs
• HD layer on Super Au di o CD s
* A logical format of files and folders on CD-
ROMs, defined by ISO (International Standard
Organization).
Also, the player cann ot play the following
discs:
• A DVD with a different region code.
6
Page 7

• A disc that has a non-standard shape (e.g.,
card, heart).
• A disc with paper or stickers on it.
• A disc that has the adhesive of cellop hane
tape or a sticker still left on it.
Note
Some CD-Rs, CD-RWs, DVD-Rs, or DVD-RWs
(in video mode) cannot be played on this player due
to the recording quality or physical condition of the
disc, or the characteristics of the recording device.
Furthermore, the disc will not play if it has not been
correctly finalized. For more inform at io n, se e th e
operating instructions for the recordi ng de vice.
Note that discs created in the Packet Write format
cannot be played.
Note on playback operations of
DVDs and VIDEO CDs
Some playback operations of DVDs and
VIDEO CDs may be intent i onally set by
software producers. Since this player plays
DVDs and VIDEO CDs according to the disc
contents the software produ cer s designed,
some playback features may not be available.
Also, refer to the instructions supplied with
the DVDs or VIDEO CDs.
Copyrights
This product i nc orporates copyright
protection technology that is protected by
method claims of certain U.S. patents, other
intellectual property rights owned by
Macrovisio n Corporation, and other rights
owners. Use of this copyright protection
technology must be authorized by
Macrovision Corpora tion, and i s int ended for
home and other lim it ed viewing uses onl y
unless otherwise aut horized by Macro vi si on
Corporati on . Reverse engineering or
disassembly is pr ohibited.
Notes about the D i scs
• To keep the disc clean, handle the disc by its
edge. Do not touch t he surface.
• Do not expose the disc to direct sunlight or
heat sources such as hot air ducts, or leave it
in a car parked in direct sunlight as the
temperature may rise considerably inside
the car.
• After playing, store the dis c i n it s case.
• Clean the disc wi th a cleaning cloth.
Wipe the disc fr om the centre out.
• Do not use solvents such as benz i ne,
thinner, commercially available cleaners , or
anti-static spra y in te nded for vinyl LPs.
7
Page 8

Index to Parts an d Controls
For more information, refer to the pages indicated in parentheses.
Front panel
DVP-NS305
DVP-NS415
A [/1 (on/standby) button/indicator (28)
Lights up in green wh en t he power is on
and lights up in red when the p la yer is in
standby mode.
B Disc tray (28)
C A (open/close) butt on ( 28)
D Fr ont panel display (9)
E (remote sensor) (15)
8
F Playback Dial (DVP-NS305) (29) (31)
Multi-mode Playback Dial (DVPNS415) (29) (31)
G MODE CHANGE button (DVP-
NS415 only) (31)
H x (stop) button (29)
I X (pause) button (29)
J SURROUND b utton (45)
K PICTURE MODE button (50)
Page 9

Front panel display
When playing back a D VD
Disc type
Lights up during
Repeat Play (38)
Playing status
Current audio signal (44)
Lights up when you can change the angle (48)
Current title/chapter or playing
time (43)
When playing back a VIDEO CD with Playback Control (PBC) (33)
Disc type
Playing status
Lights up during A-B Repeat Play (39)
Current scene or playing ti me (43)
When playing ba ck a CD, DATA CD (MP3 audio), or VIDEO CD (without PBC)
Playing status
Lights up dur i ng
Repeat Play (38)
Current track (43)
Disc type
Lights up when playing MP3 audio tracks (34)
Playing time (43)
,continued
9
Page 10

Rear panel
DVP-NS305
DIGITAL OUT LINE OUT
PCM/DTS/MPEG/
DOLBY DIGITAL
COAXIAL
R-AUDIO-L VIDEO
COMPONENT
VIDEO OUT
S VIDEO
OUT
Y
C
B
C
R
DVP-NS415
DIGITAL OUT LINE OUT
PCM/DTS/MPEG/
DOLBY DIGITAL
COAXIAL
OPTICAL
R-AUDIO-L VIDEO
COMPONENT
VIDEO OUT
S VIDEO
OUT
Y
C
B
C
R
A DIGITAL OUT (COAXIAL) jack (22)
(23) (24)
B DIGITAL OUT (OPTICAL) jack
(DVP-NS415 only) (22) (23) (24)
C LINE OUT L/R (AUDIO) jacks (21)
(22) (23)
D LINE OUT (VIDEO) jack (18)
E S VIDEO OUT jack (18)
F COMPONENT VIDEO OUT jacks
(18)
10
Page 11

Remote
DVP-NS305
Z OPEN/CLOSE button (29)
A
B SUR (surround) button (45)
C SUBTITLE button (48)
D AUDIO button (44)
E ANGLE button (48)
F CLEAR button (36)
G ./> PREV (previous)/NEXT
buttons (29)
H m/M SCAN/SLOW
buttons (30)
I X PAUSE button (29)
J H PLAY button (28)
The H button has a tactile dot.*
K C/X/x/c buttons (33)
L DISPLAY button (13)
M TOP MENU button (33)
N TV [/1 (on/standby) button (56)
O [/1 (o n/standby) button (28)
P PICTURE MODE button (50)
Q VOL +/– buttons (56)
The + button has a tactile dot.*
R TV/VIDEO button (56)
S SEARCH MODE button (41)
T REPLAY button (29)
U x STOP button (29)
V ENTER button (25)
W O RETURN button (33)
X MENU button (33) (34)
* Use the tactile dot as a reference when operating
the player.
,continued
11
Page 12

DVP-NS415
A TV [/1 (on/standby) button (56)
Z OPEN/CLOSE button (29)
B
C Number buttons (33)
The number 5 butt on has a tactile dot.*
D CLEAR button (36)
E SUBTITLE button (48)
F AUDIO button (44)
G ./> PREV (previous)/NEXT
buttons (29)
H m/M SCAN/SLOW
buttons (30)
I X PAUSE button (29)
J H PLAY button (28)
The H button has a t actile dot.*
K C/X/x/c buttons (33)
L DISPLAY button (13)
M TOP MENU button (33)
N [/1 (on/standby) button (28)
O VOL +/– buttons (56)
The + button has a t actile dot.*
P TV/VIDEO button (56)
Q ENTER button (performs the same
function as Z)
R PICTURE MODE button (50)
S ANGLE button (48)
T SUR (surround) button (45)
U TIME/TEXT button (42)
V REPEAT button (38)
W REPLAY button (29)
X SEARCH MODE button (41)
Y x STOP button (29)
Z ENTER button (25)
wj O RETURN button (33)
wk MENU button (33) (34)
12
* Use the tactile dot as a reference when operatin g
the player.
Page 13

Guide to On-Screen
Displays
The following expl ai ns the Control Bar. The
Control Bar is used for making adjustments to
the settings or displaying information during
playback.
The displayed contents differ according to the
type of disc being played.
The numbers in pare nt heses indicate
reference pages.
Displaying the Control Bar during
playback
The following displays appear when the
DISPLAY butto n i s pressed repeatedly
during playback. You can select the setting
that suits the current playback item and view
the related information.
◆Display 1
The following play modes A~D can be set.
The indicator light s up in bl ue when
activated.
Example: When Repeat Play is selected. (The
display will differ wh en A - B Repeat Play is
set.)
(Control Bar)
◆Display 2
The following functions G~J can be set.
The indicator lights up in blue when
activated.
Example: When “TVS” is set.
G TVS (45)
H BNR (49)
I CUSTOM PICTURE MODE (50)
J DIGITAL VIDEO ENHANCER (51)
(DVP-NS415 only)
m
◆Display 3
The following playback information is
displayed.
Example: When playing a DVD.
T41 – 8 T 1:01:57
CHAPTER
A Repeat Play (38)
B Shuffle Play (38)
C Program Play (36)
D A-B Repeat Play (39)
E Unit being repeated in this example.
F Playback status (NPlayback,
XPause, xStop, etc.)
m
K TIME/TEXT icon
L Title number of the DVD (41)
M Chapter number of the DVD (41)
N Playing time or remaining time (42)
m
◆Display 4 (DVD playback only)
DOLBY DIGITAL
O Format of the current audio signal (44)
3 / 2 .1
m
◆No display
m
◆Return to Display 1
,continued
13
Page 14

Displaying the Control Bar in
stop mode
The following dis pl ays appear when the
DISPLAY button is repeatedly pressed
during stop mode . You can make basic
adjustments an d customize the p la yer to suit
your viewing preferences.
◆Display 1
The following set ti ngs can be made.
QUICK
◆Display 3
Shows the same information as Display 2
during playback .
m
◆Display 4
Shows the same information as Display 3
during playback .
T41 – 8 T 1:01:57
A SETUP (58)
• Select QUICK to make the minimum
number of basic a dj ustments for using th e
player.
• Select CUSTOM to make a full r ange of
adjustments.
• Select RESET to return the SETUP
adjustments to the default settings.
B PARENTAL CONTROL (52)
• Set this to limit the playback of selected
discs on this player.
m
◆Display 2
Shows the same inf o r m at ion as Display 1
during playback.
CHAPTER
m
m
◆No display
m
◆Return to Display 1
14
Page 15

Simple Start Guide
Quick Overvie w
Step 2: Inserting Batteries into the Remote
Simple Start Guide
A quick overview presented in this guide will
give you enough information to start using the
player for your enjoy m ent. To use the
surround sound f eatures of this player, refer
to “Hookups” on pag e 18.
Notes
• You cannot connect this player to a TV that does
not have a video input jack.
• Be sure to disconnect the power cord (mains lead)
of each component befo re connecting.
Step 1: Unpacking
Check that you have the following items:
• Audio/video cord (pinplug × 3 y pinplug
× 3) (1)
• Remote comm ander (remote) (1)
• R6 (size AA) batteries (2)
• A plug adaptor is included with some
models.
You can control the player using the supplied
remote. Insert two R6 (size AA) batteries by
matching the 3 an d # ends on the batterie s
to the markings inside the co mpartment.
When using the remote, poin t it at the r emote
sensor on the player.
Notes
• D o n ot leave the remote in an extremely hot or
humid place.
• D o not dr op a ny fo reign object into the remote
casing, particular ly when rep lacing the batteries.
• D o not expose the remote sensor to direc t light
from the sun or a lighting appara tus. Doing so
may cause a malfunction.
• If you do not use the re mot e for an exte nded
period of time, remove the batteries to avoid
possible damage from batter y le ak age a nd
corrosion.
15
Page 16
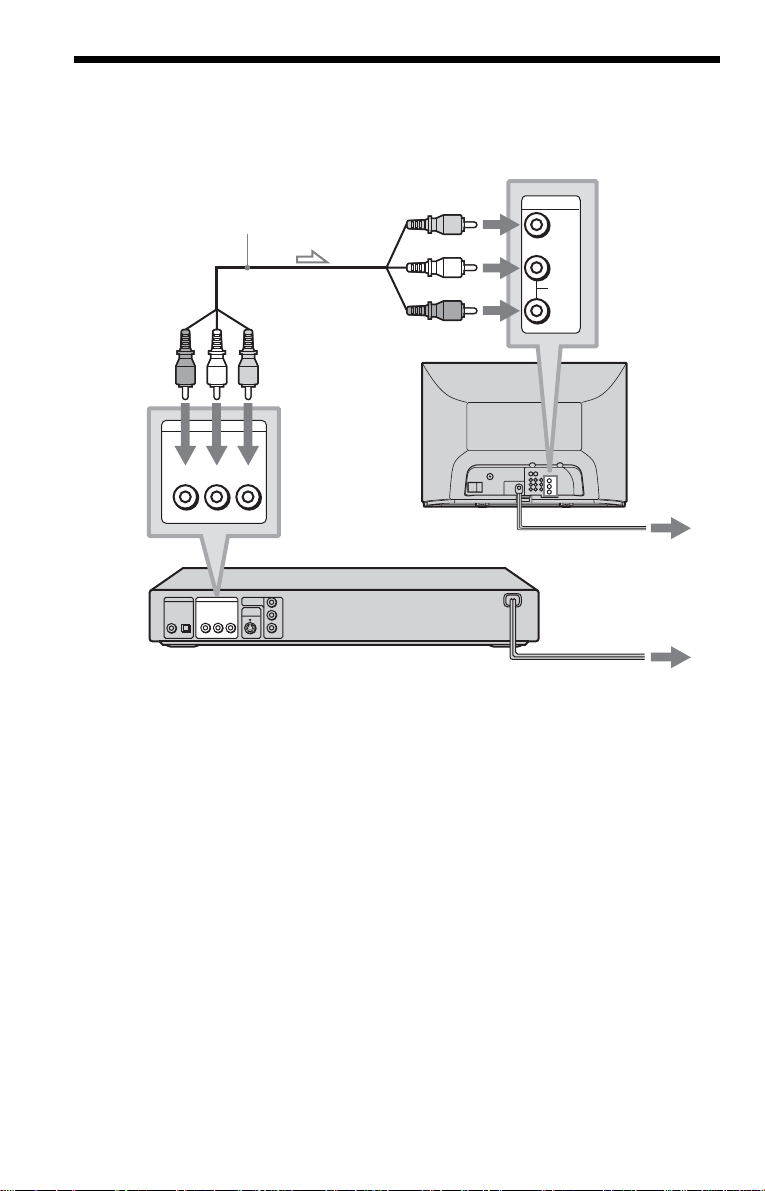
Step 3: TV Hookups
Connect the supplied audio/video cord and power cord (mains lead) in the order (1~3) shown
below. Be sure to connect the power cord (mains lead) last.
1 Audio/video cord
(supplied)
to LINE OUT
L/R (AUDIO)
LINE OUT
R-AUDIO-L VIDEO
to LINE OUT
(VIDEO)
CD/DVD Player
R-AUDIO-L VIDEO
COMPONENT
VIDEO OUT
S VIDEO
OUT
Y
C
B
C
R
DIGITAL OUT LINE OUT
PCM/DTS/MPEG/
DOLBY DIGITAL
COAXIAL
OPTICAL
l: Signal flow
When connecting to a standard 4:3 screen
TV
Depending on the disc, the image may not fit
your TV screen.
If you want to ch an ge th e a spec t ra ti o, pl ea se
refer to page 60.
to video input
INPUT
VIDEO
AUDIO
(yellow)
(white)
L
(red)
R
to audio input
TV
2 Power source
3 Power source
while pressin g X on the player. The power
indicator lights up in green and changes to
red. Then release X.
When connecting to a monaural T V
Use a stereo-mono conversion cor d (not
supplied). Connect the LINE OUT (VIDEO)
jack on the player to the TV’s video input
jack, and connect the LINE OUT L/R
(AUDIO) jack s t o t he TV’s audio input jack.
To change the colour system
The colour system of th e pl ayer is set to
NTSC or PAL. If the on-screen display of the
player do es n o t appe ar on th e TV, ch an ge the
colour system of the player (PAL or N TSC)
so that a picture appears on your TV. To
change the colour system, hold [/1 down
16
Page 17

Step 4: Playing a Disc
With the playback side facing down
Simple Start Guide
A Turn on the TV.
B Press [/1 on the player.
C Switch the input selector on your
TV so that the signal from the
player appears on the TV screen.
D Press A on the player to o pen t h e
disc tray.
E Place the disc on the tray with the
playback side facing do wn.
F Press H.
The disc tray closes and the player begins
playing the disc.
After Step 6
Depending on the di sc, a menu may be
displayed on the TV screen. If so, select the
item you want from the menu and play the
DVD (page 33) or VIDEO CD disc (page 33).
To stop playin g
Press x.
To remove the disc
Press A.
To turn off the player
Press [/1. The player enters standby mode
and the power indicator lights up in red.
17
Page 18

Hookups
Hooking Up the Player
Follow Steps 1 t o 4 to hook up and adjust the settings of t he player.
Before you start, disconnect the power cords (mains leads), check that you hav e al l of the
supplied acces sories, and inse rt the batteries in to the remote (pa g e 15).
Notes
• Plug cords securely to prevent unwanted noise.
• Refer to the instructions supplied with the components to be connected.
Step 1: Connecting the Video Cords
Connect thi s player to your TV monit or, pr ojector, or AV am plifier (receive r) using a video cord.
Select one of the patter ns A through C, according to the input jack on your TV monitor,
projector, or AV am plifier (receiver).
A
INPUT
VIDEO
L
AUDIO
R
TV, projector, or AV
amplifier (receiver)
to LINE OUT (VIDEO)
l : Signal flow
(yellow)
(yellow)
DIGITAL OUT LINE OUT
PCM/DTS/MPEG/
DOLBY DIGITAL
COAXIAL
OPTICAL
R-AUDIO-L VIDEO
Audio/video cord
(supplied)
COMPONENT
Y
VIDEO OUT
S VIDEO
OUT
C
B
C
R
CD/DVD playerto S VIDEO OUT
S VIDEO cord
(not supplied)
Component
video cord
(not supplied)
(green)
(blue)
COMPONENT
VIDEO IN
Y
C
B
C
R
TV, projector, or AV
amplifier (receiver)
(red)
to COMPONENT
VIDEO OUT
INPUT
S VIDEO
TV, projector, or AV
amplifier (receiver)
C
(green)
(blue)
(red)
B
18
Page 19
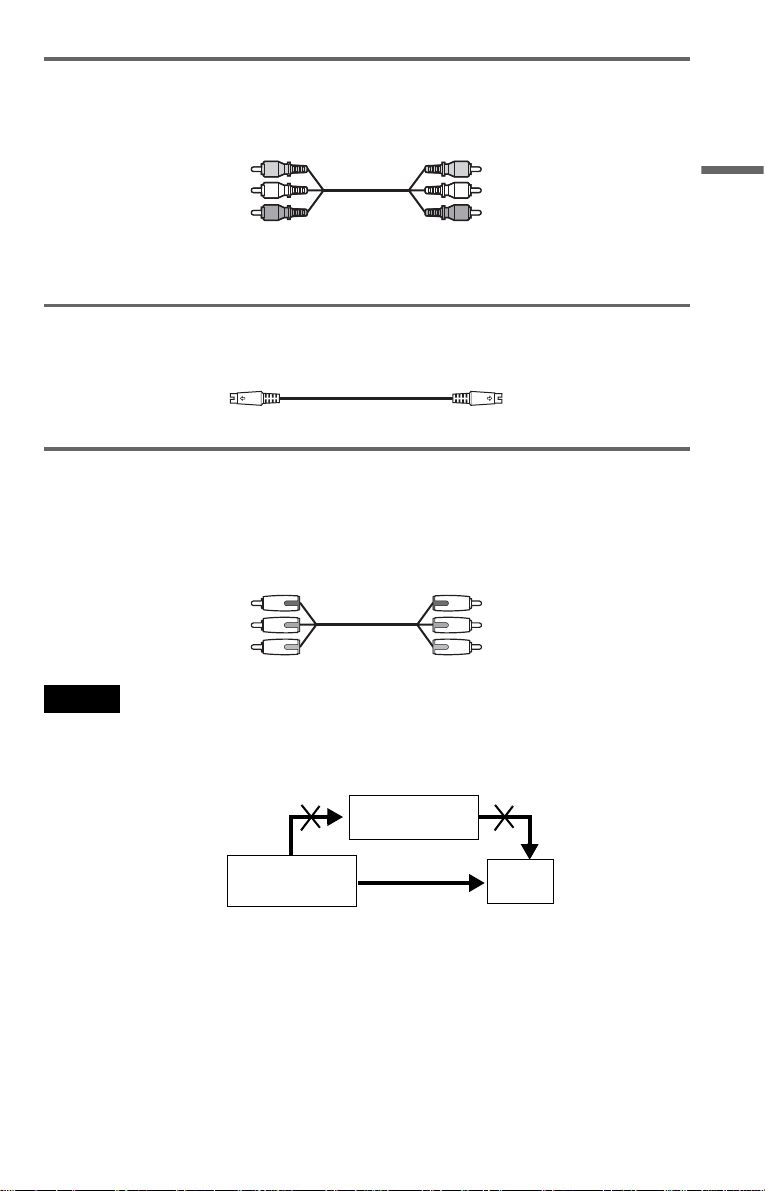
A If you are connecting to a video input jack
Connect the yellow plug of the audio/video cord (supplied) to the yellow (video) jacks. You will
enjoy standard quality images.
Yellow (Video)
White (L)
Red (R)
Yellow (Video)
White (L)
Red (R)
Use the red and white plugs to connect to the audio input jacks (page 21). (Do this if you are
connecting to a TV only.)
B If you are connecting to an S VIDEO input jack
Connect the S VIDEO cord (not supplied). You will enjoy high quality images.
C If you are connecting to a monitor, projector, or AV amplifier (receiver)
having component video input jacks (Y, C
Connect the component via the COMPONENT VIDEO OUT jacks using a component video
cord (not supplied) or three video cords (not supplied) of the same kind and length. You will
enjoy accurate colour reproduction and high quality images.
Green
Blue
Red
Notes
• You can switch the player’s colour system to match the colour system of the connected TV (page 16).
• Do not connect the player to a VCR. If you pa ss the player si gnals via the VCR, you may no t receive a clea r
image on the TV screen. If your TV only has one audio/video input jack, connect the player to this jack.
B, CR)
Green
Blue
Red
Hookups
CD/DVD player
VCR
Connect
directly
TV
19
Page 20

Step 2: Connecting the Audio Cords
Refer to the chart below to se lect the c onnection that best sui ts your syst em. Be sure to also read
the instructions for the components you wish to connect.
Select a connection
Select one of the foll owing connection s, through .
Components to be connected Connection
TV (page 21)
Stereo amplifier (receiver)
(having L and R audio input jacks only, or having a digital input jack)
•2 speakers
(front L and R)
MD deck/DAT deck (page 22)
AV amplifier (receiver) with a Dolby* Surround (Pro Logic)
decoder
(having L and R audio input jacks only, or having a digital input jack)
•3 speakers
(front L and R, and rear (monaural))
or
•6 speakers
(front L and R, centre, rea r L and R, subwoofer)
AV amplifier (receiver) having a Dolby Digital, MPEG audio, or
DTS** decoder and a digital input jack
•6 speakers
(front L and R, centre, rea r L and R, subwoofer)
* Manufactured under license from Dolby
Laboratories. “Dolb y,” “Pro Logic,” and the
double-D symbol are trademarks of Dolb y
Laboratories.
** “DTS” and “DTS Digital Out” are trademarks
of Digital Theater Systems, Inc.
A D
A
B
B
C
D
(page 22)
(page 23)
(page 24)
20
Page 21

A
Connecting to your TV
This connection will use your TV speakers for sound.
CD/DVD player
R-AUDIO-L VIDEO
COMPONENT
VIDEO OUT
S VIDEO
OUT
Y
C
B
C
R
DIGITAL OUT LINE OUT
PCM/DTS/MPEG/
DOLBY DIGITAL
COAXIAL
OPTICAL
A
LINE OUT
R-AUDIO-L VIDEO
(yellow)*
(white)
(yellow)
(white)
Hookups
TV
(red)
to LINE OUT L/R
Audio/video
cord (supplied)
(AUDIO)
l : Signal flow
* The yellow plug is used for vide o signals (page
18).
◆Recommende d surround sound effects for
this connection
• TVS DYNAMIC (page 46)
• TVS WIDE (page 46)
z Hint
When connecting to a monaural TV, use a stereomono conversion cord (not supp li ed). Connect the
LINE OUT L/R (AUDIO) jacks to the TV’s audio
input jack.
(red)
to audio input
,continued
21
Page 22

B
Connecting to a stereo amplifier (receiver) and 2 speakers/Connecting to
an MD deck or DAT deck
If the stereo amplifier (receiver) has audio input jacks L and R only, use . If the amplifier
(receiver) has a digital input jack, or when connecting to an MD deck or DAT deck, use .
In this case, you can also connect the player directly to the MD deck or DAT deck without using
your stereo amplifier (receiver).
CD/DVD player
R-AUDIO-L VIDEO
COMPONENT
VIDEO OUT
S VIDEO
OUT
Y
C
B
C
R
DIGITAL OUT LINE OUT
PCM/DTS/MPEG/
DOLBY DIGITAL
COAXIAL
OPTICAL
B-1
B-2
B-2
DIGITAL OUT
PCM/DTS/MPEG/
DOLBY DIGITAL
OPTICAL
COAXIAL
Coaxial digital
cord (not supplied)
or
or
to DIGITAL OUT
(COAXIAL or OPTICAL)
Optical digital cord
(not supplied)
Remove jack cap
before connecting
(DVP-NS415 only)
to coaxial or optical digital
input
[Speakers]
Stereo amplifier (receiver)
Front (L)
Front (R)
l: Signal flow
◆Recommended surround sound effects for
B-1
the connection only
• TVS STANDARD (page 46)
Stereo audio cord
(not supplied)
(red)(white)
to audio input
MD deck/DAT deck
B-1
LINE OUT
(white)
R-AUDIO-L VIDEO
(red)
to LINE OUT L/R (AUDIO)
z Hint
In connection , you can use the supplied
B-1
audio/video cord instead of using a separate audio
cord.
22
Page 23
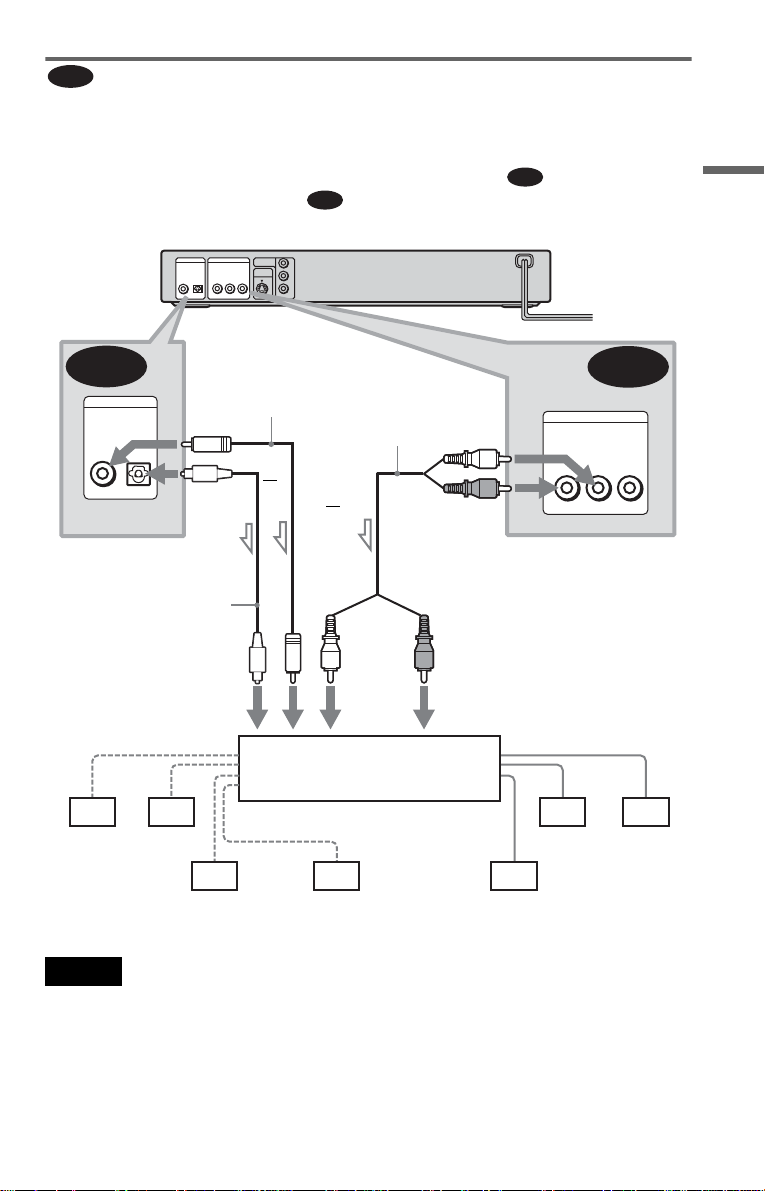
C
Connecting to an AV amplifier (receiver) having a Dolby Surround (Pro
Logic) decoder and 3 to 6 speakers
You can enjoy the Dolby Surround effects only when playing Dolby Surround audio or multichannel audio (D ol by D igital) discs.
If your amplifier (receiver) has L and R audio input jacks o nl y, use . If your am pl i fi er
(receiver) has a di gital input jack, use .
CD/DVD player
DIGITAL OUT LINE OUT
PCM/DTS/MPEG/
DOLBY DIGITAL
COAXIAL
OPTICAL
R-AUDIO-L VIDEO
COMPONENT
VIDEO OUT
S VIDEO
OUT
C-2
Y
C
B
C
R
C-1
Hookups
C-2
DIGITAL OUT
PCM/DTS/MPEG/
DOLBY DIGITAL
COAXIAL
OPTICAL
Coaxial digital cord
(not supplied)
to DIGITAL OUT
(COAXIAL or OPTICAL)
Optical digital cord
(not suppli e d)
Remove jack cap
before connecting
(DVP-NS415 only)
to coaxial or optical digital
input
[Speakers]
Rear (L)
Rear (R)
Subwoofer
l: Signal flow
Stereo
audio cord (not
supplied)
or
or
(red)(white)
Amplifier (receiver) with Dolby
Surround decoder
Centre
(white)
(red)
to LINE OUT L/R (AUDIO)
to audio input
[Speakers]
Front (L)
Rear (mono)
C-1
LINE OUT
R-AUDIO-L VIDEO
Front (R)
Note
When connecting 6 speak ers, replace the monaural
rear speaker with a centre speaker, 2 rear speakers
and a subwoofer.
,continued
23
Page 24

Connecting to an AV ampl ifier (rece iver) with a digita l inp ut jack ha ving
D
a Dolby Digital, MPEG audio or DTS decoder and 6 speakers
This connection will allow you to use the Dolby Digital, MPEG audio, or DTS decoder function
of your AV amplifier (receiver). You are not able to enjo y the surround sound effects of this
player.
CD/DVD player
R-AUDIO-L VIDEO
COMPONENT
VIDEO OUT
S VIDEO
OUT
Y
C
B
C
R
DIGITAL OUT LINE OUT
PCM/DTS/MPEG/
DOLBY DIGITAL
COAXIAL
OPTICAL
D
DIGITAL OUT
PCM/DTS/MPEG/
DOLBY DIGITAL
COAXIAL
OPTICAL
to DIGITAL OUT
(COAXIAL or OPTICAL)
Coaxial digital cord
(not supplied)
to coaxial digital input
[Speakers]
AV amplifier (receiver) having
a decoder
Rear (L)
Subwoofer
Rear (R)
l: Signal flow
Note
After you have completed the connection, be sure to
set “DOLBY DIGITAL” to “DOLBY DIGITAL”
and “DTS” to “ON” in Quick Setup (page 25). If
your AV amplifier (receiver) has an MPEG audio
decoder function, set “MPEG” to “MPEG” (p age
63). Otherwise, no sound or a loud noise will come
from the speakers.
or
to optical digital input
Optical digital cord
(not supplied)
Remove jack cap
before connecting
(DVP-NS415 only)
[Speakers]
Front (L)
Centre
Front (R)
24
Page 25
Step 3: Connecting the Power Cord
Plug the player and TV power cord (mains lead) into an AC outlet (mains).
Step 4: Quick Setu p
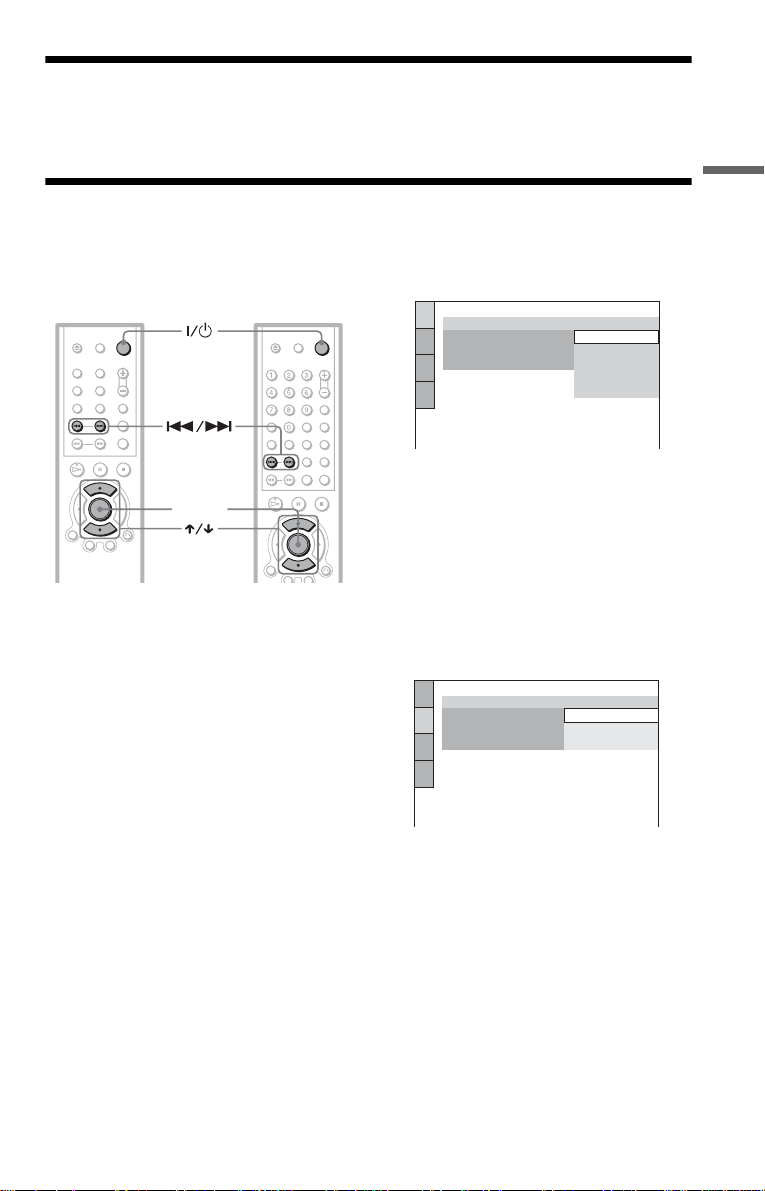
Follow the steps below to make the minimum number o f basi c adjust ments for using the play er.
To skip an adjustment, press >. To return to the previous adjustment, press ..
DVP-NS305 DVP-NS415
LANGUAGE SETUP
OSD:
MENU:
AUDIO:
SUBTITLE:
ENGLISH
ENGLISH
FRANÇAIS
DEUTSCH
ITALIANO
NEDERLANDS
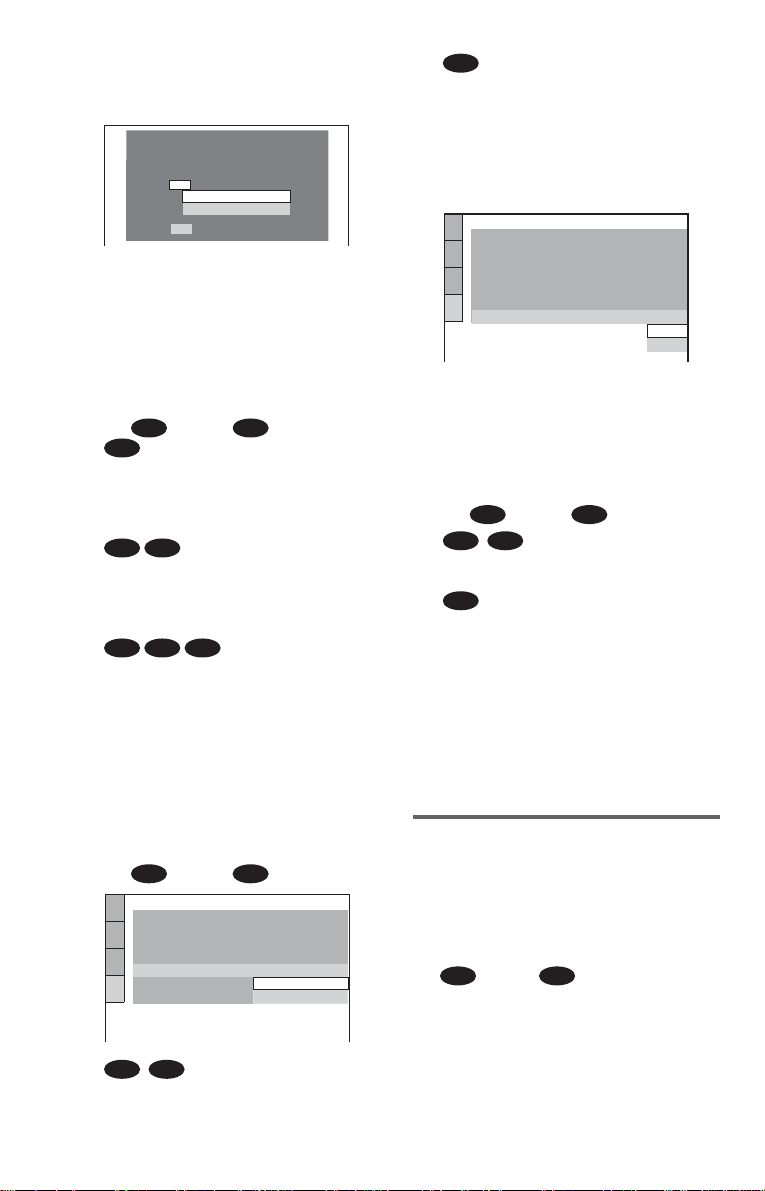
5 Press X/x to select a language.
ENTER
The player uses th e l anguage selected
here to display the menu and subtitles as
well.
6 Press ENTER.
1 Turn on the TV.
2 Press [/1.
3 Switch the input selector on your
TV so that the signal from the
player appears on the TV screen.
“Press [ENTER] to run QUICK SETUP”
appears at the bottom of the screen. If this
message does not appear, select
“QUICK” under “SETUP” in the Control
Bar to run Quick Set up (page 59).
4 Press ENTER without inserting a
disc.
The Setup Display fo r selecting the
language used in th e on-screen display
appears.
The available languages differ depending
upon the player model.
The Setup Display for selecting the
aspect ratio of the TV to be connected
appears.
SCREEN SETUP
TV TYPE:
COLOR SYSTEM:
SCREEN SAVER:
BACKGROUND:
4:3 LETTER BOX
16:9
16:9
4:3 PAN SCAN
7 Press X/x to select the setting that
matches your TV type.
◆ If you have a wide-screen TV or a 4:3
standard TV with a wid e- scr een mode
• 16:9 (page 60)
◆ If you have a 4: 3 st andard TV
• 4:3 LETTER BOX or 4:3 PAN SCAN
(page 60)
8 Press ENTER.
Hookups
,continued
25
Page 26
The Setup Display f or sel ec ti ng the type
of jack used to conne ct your amplifier
(receiver) appe ars.
Is this player connected to an amplifier
(receiver) ? Select the type of jack you
are using.
YES
LINE OUTPUT L/R (AUDIO)
DIGITAL OUTPUT
NO
9 Press X/x to select the type of jack
(if any) you are using to connect to
an amplifier (receiver), then pre ss
ENTER.
Choose the item that matches the audio
connection you selected on pages 21 to
24 ( through ).
A D
A
• If you connect just a TV and nothing
else, select “NO. ” Quick Setup is
finished and connections are complete.
B-1 C-1
• Select “LINE O U TPUT L/R
(AUDIO).” Quick Setup is finished and
connections are complete.
B-2 C-2 D
• Select “DIGI TA L OUTPUT.” The
Setup Display for “DOLBY DIGITAL”
appears.
10Press X/x to select the type of
Dolby Digital signal you wish to
send to your amplifier (receiver).
Choose the signal that matches the audio
connection you selected on pages 22 to
24 ( through ).
B D
AUDIO SETUP
AUDIO ATT:
AUDIO DRC:
DOWNMIX:
DIGITAL OUT:
DOLBY DIGITAL:
MPEG:
DTS:
B-2 C-2
• D-PCM (page 63)
DOLBY SURROUND
DOLBY DIGITAL
OFF
STANDARD
ON
D-PCM
D-PCM
D
• DOLBY DIGITAL (only if the
amplifier (recei ver) has a Dol by Digi tal
decoder) (page 63)
11Press ENTER.
“DTS” is selecte d .
AUDIO SETUP
AUDIO ATT:
AUDIO DRC:
DOWNMIX:
DIGITAL OUT:
DOLBY DIGITAL:
MPEG:
DTS:
DOLBY SURROUND
OFF
STANDARD
ON
D-PCM
PCM
OFF
OFF
ON
12Press X/x to select whether or
not you wish to send a DTS signal
to your amplifier (receiver).
Choose the item that matches the audio
connection you selected on pages 22 to
24 ( throug h ).
B D
B-2 C-2
• OFF (page 64)
D
• ON (only if the amplifier (r eceiver) has
a DTS decoder) (p age 64)
13Press ENTER.
Quick Setup is finished. All connections
and setup operations are complete.
If your AV amplifier (receiver) has an
MPEG audio decoder, set “MPEG” to
“MPEG” (page 63).
Enjoying the surround sound
effects
To enjoy the sur round sound effect s of this
player or your am pl ifier (receiver) , set the
following items as described below for the
audio connec tion y ou se lect ed on pa ges 2 2 to
24 ( through ). Each of these is the
B D
default setting and does not need to be
adjusted when you f ir s t connect the player.
Refer to page 58 for usi ng the Setup Display.
26
Page 27

Audio Connection (pages 21 to 24)
A
• No addition al settings are needed.
C-1
B-1
• Set “DOWNMIX” to “DOLBY
SURROUND” (page 63)
• If the sound distorts even when th e volume
is turned down, set “AUDIO ATT” to “ON”
(page 62)
B-2 C-2 D
• Set “DOWNMIX” to “DOLBY
SURROUND” (page 63)
• Set “DIGITA L OUT” to “ON” (page 63)
Hookups
27
Page 28
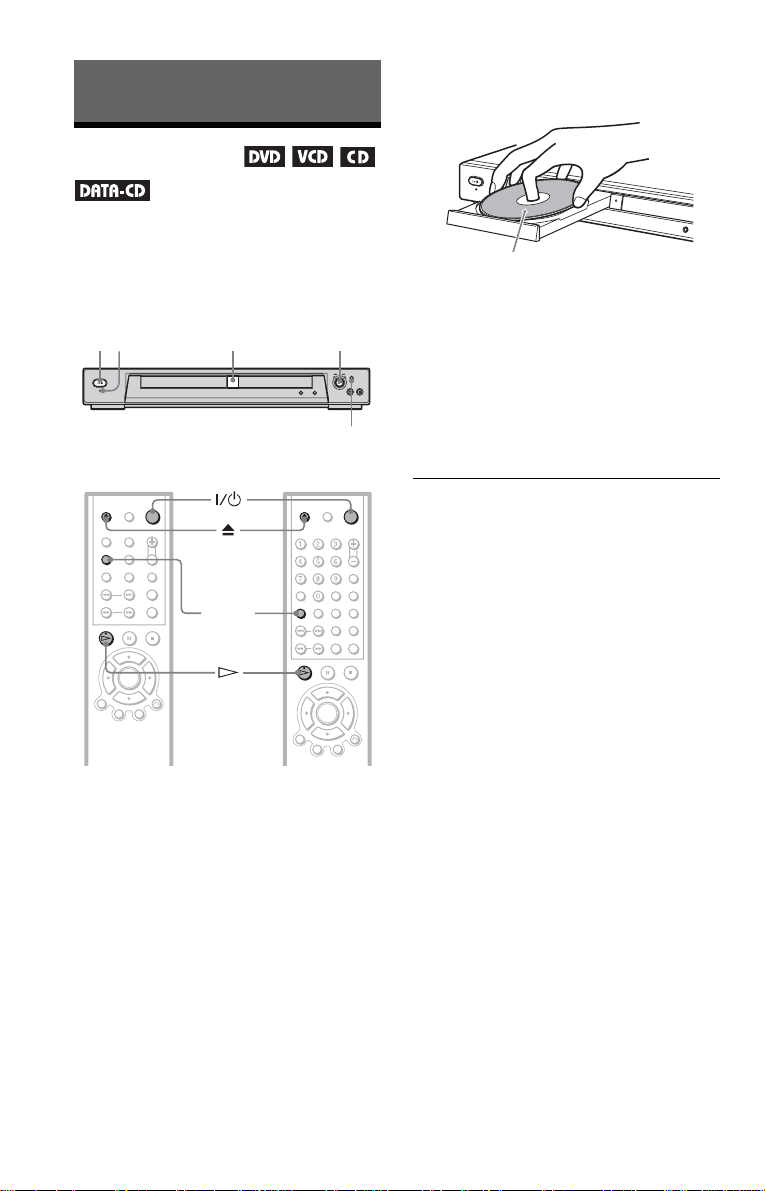
Playing Discs
Playing Discs
Depending on the DVD or VIDEO CD, some
operations may be di fferent or restricted.
Refer to the operating instructions supplied
with your disc.
Power
[/1 A
indicator
DVP-NS305 DVP-NS415
H/Playback Dial
MODE CHANGE
(DVP-NS415 only)
AUDIO
4 Press A on the player, and place a
disc on the disc tray.
With the playback side facing down
5 Press H.
The disc tray closes, and the player starts
playback (continuous play). Adjust the
volume on the TV or the amplifier
(receiver).
Depending on the disc, a menu may
appear on the TV screen. For DVDs, see
page 33. For VIDE O CDs, see page 33.
To turn off the player
Press [/1. The player enters standby mode.
z Hint
You can have the player turn off automatically
whenever you leave it in stop mode for more th an
30 minutes. To turn on this function, set “AUTO
POWER OFF” in “CUSTOM SETUP” to “ON”
(page 61).
1 Turn on your TV.
2 Press [/1.
The player turns on and the power
indicator lights up in gr een.
3 Switch the input selector on your
TV so that the signal from the
player appears on the TV screen.
◆ When us ing an amplifier (r eceiver)
Turn on the amplifier (receiver) and
select the appropriate channel so that you
can hear sound fr om t h e player.
28
Notes on playing DTS sound tracks on a CD
• When playing DTS-encoded CDs,
excessive noise wi ll be heard from the
analog stereo jacks. To avoid possible
damage to the audi o system, the consumer
should take proper pre cautions when the
analog stereo jacks of the player are
connected to an amplification syst em. To
enjoy DTS Digital Surround™ playback, an
external 5.1-channel decoder system must
be connected to the digital jack of the
player.
• Set the sound to “STEREO” using the
AUDIO button when you play DTS sound
tracks on a CD (page 44).
• Do not play DTS sound tracks without first
connecting the player to an audio
component having a built-in DTS decoder .
The player outputs the DTS signal via the
DIGITAL OUT (COAXIAL or OPTICAL)
jack even if “DTS” in “AUDIO SETUP” is
set to “OFF” in the Setup Dis play (page 64),
Page 29
and may affect your ears or cause your
speakers to be damaged.
Notes on playing DVDs with a DTS sound
track
• DTS audio signals are output only through
the DIGITAL OUT (COAXIAL or
OPTICAL) jack.
• When you play a DVD with DTS sound
tracks, set “DTS” to “ON” in “AUDIO
SETUP” (page 64).
• If you connect th e pl ayer to audio
equipment without a D T S decoder, do not
set “DTS” to “ON” in “AUDIO SETUP”
(page 64). A loud noise may come out f rom
the speakers, affe ct in g you r ears o r ca us ing
the speakers to be damaged.
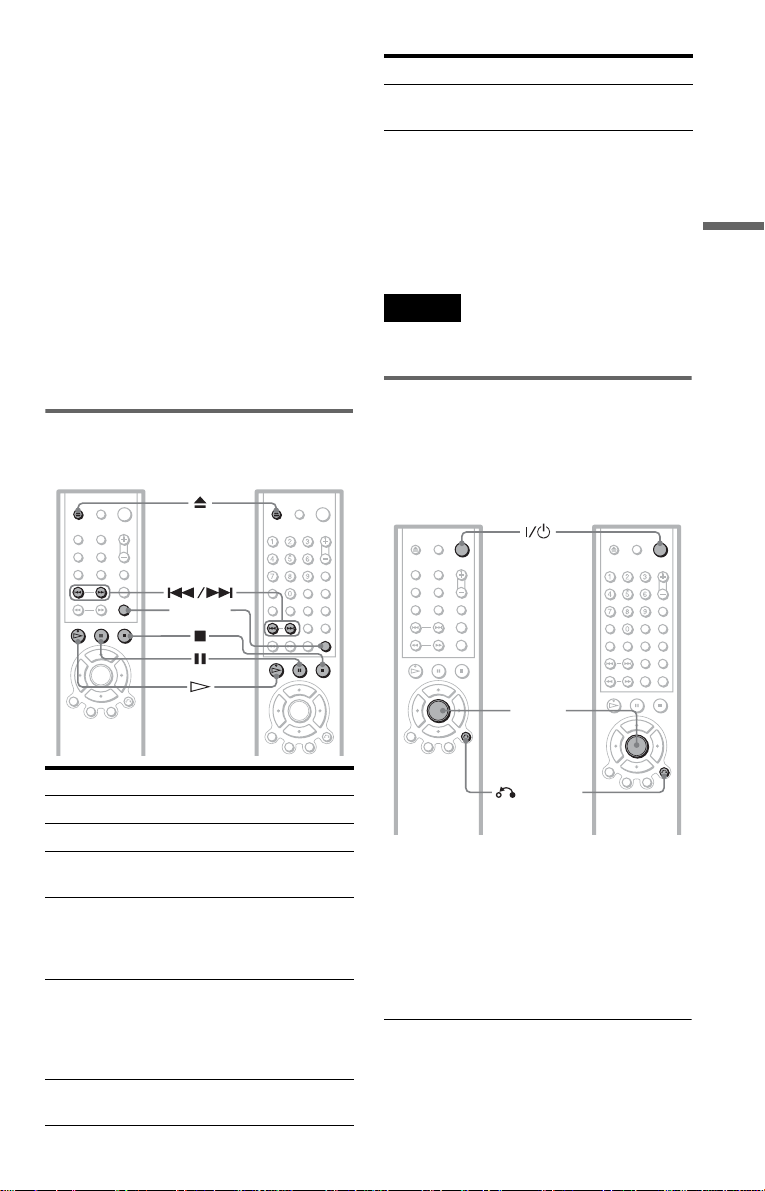
Additional operations
DVP-NS305 DVP-NS415
REPLAY
To Operation
Replay the previous
scene (DVD only)
* Operable when the MODE CHANGE indicator
lights up in green or turns off. For more details
about the Multi-mode Playback Dial, see page 31.
(DVP-NS415 only)
z Hint
The Replay function is useful when you want to
review a scene or dialog that you missed.
Press REPLAY
Note
You may not be able to use the Replay function with
some scenes.
Locking the disc tray (Child
Lock)
You can lock the disc tray to prevent children
from opening it.
DVP-NS305 DVP-NS415
Playing Discs
To Operation
Stop Press x
Pause Press X
Resume play after
pause
Go to the next chapter,
track, or scene in
continuous play mode
Go back to the
previous chapter,
track, or scene in
continuous play mode
Stop play and remove
the disc
Press X or H
Press > on the
remote, or briefly turn
the Playback Dial* on
the player clockwise
Press . on the
remote, or briefly turn
the Playback Dial* on
the player
counterclockwise
Press Z
ENTER
RETURN
When the player is in standby mode, press
O RETURN, ENTER, and then [/1 on the
remote.
The player turns on and “LOCKED” appears
on the front panel display. The Z button on
the player or the remote does not work while
the Child Lock is set.
To unlock the disc tr ay
When the player is in standby mode, press
O RETURN, ENTER, and then [/1 again.
,continued
29
Page 30
Note
Even if you select “RESET” u nder “SETUP” i n the
Control Bar (page 59), the disc tray remains locked.
Searching for a
Particular Point on a
Disc
(Scan, Slow-motion Play,
Search, Freeze Fram e)
You can quickly locate a particular point on a
disc by moni toring the picture o r playing back
slowly.
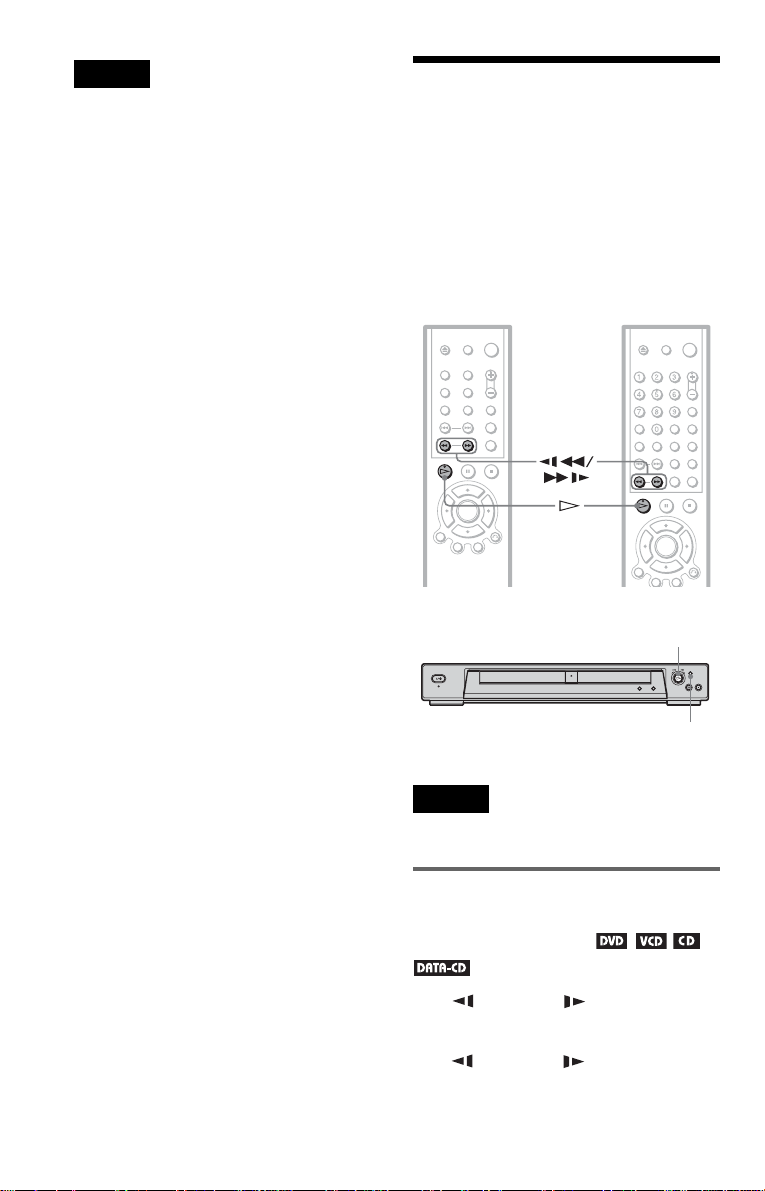
DVP-NS305 DVP-NS415
30
Multi-mode Playback Dial (DVP-NS415)
Note
Depending on the DVD/VIDEO CD, you may not
be able to do some of the operations describ ed.
Playback Dial (DVP-NS305)
MODE CHANGE
(DVP-NS415 only)
Locating a point quickly by
playing a disc in fast forward or
fast reverse (Scan)
Press m or M while playing a
disc. When you find the poi nt you want, press
H to return to normal speed. Each time you
press m or M during scan, the
playback spee d changes. Three speeds are
available. Wit h each press the indica t ion
changes as follows:
Page 31
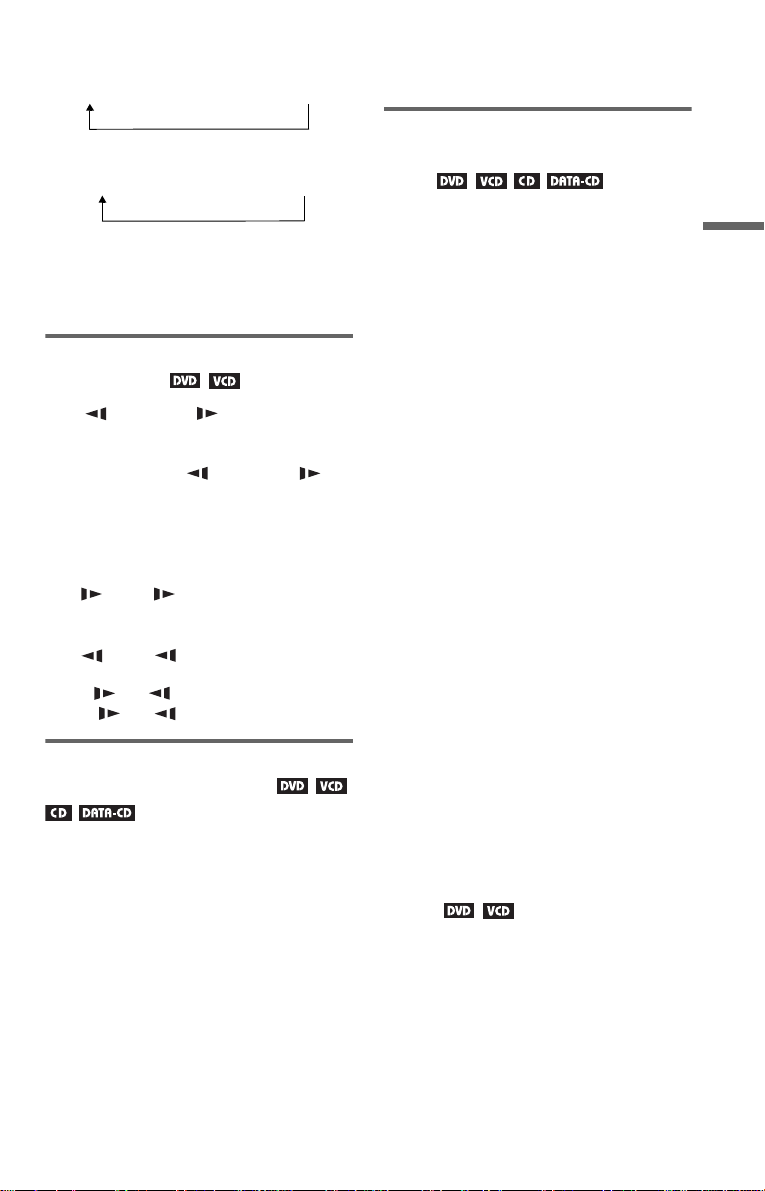
Playback direction
×2B (DVD/CD only) t 1M t 2M
Opposite direction
×2b (DVD only) t 1m t 2m
×2B”/“×2b” playback speed is about
The “
twice the normal speed. The “2M”/“2m”
playback speed is faster than “1M”/
“1m.”
Watching frame by frame (Slowmotion Play)
Press m or M when the play er is
in pause mode. To return to the normal speed,
press H.
Each time you press m or M
during Slow-motion play, the playback speed
changes. Two speeds are available. With each
press the indication changes as follows:
Playback direction
2 y 1
Opposite direction (DVD only)
2 y 1
you find the point you want, release the dial to
return to normal playback speed.
Using the Multi-mode Playback
Dial on the player (DVP-NS415
only)
You can search fo r a particul ar point on a disc
in various ways using the MODE CHANGE
button.
To go to the next chapter/track/scene
During playbac k and with the MODE
CHANGE indicator turned off, briefly turn
the Multi-mode Pl ayback Dial clockwi se to
skip to the next chapter/track/scene, or
counterclockwise to skip to the previous
ones. (The same operation can be made when
the MODE CHANGE indicator lights up in
green.)
To locate a point quickly (Search)
During playbac k and with the MODE
CHANGE indicator turned off, turn and h old
the Multi-mode Pl ayback Dial clockwi se to
locate a point in the playback direction, or
counterclockwise to locate a point in the
opposite direction. When you find the point
you want, release the dial to return to normal
playback speed.
Playing Discs
The “2 ”/“2 ” playback speed is slower
than “1 ”/“1
.”
Using the Playback Dial on the
player (DVP-NS305 only)
You can search for a particular point on a disc
in various ways usi ng the Playback Dial .
To go to the nex t chapter/track/scene
During playback, briefly turn the Play back
Dial clockwise to skip to the next chapter/
track/scene, or counterclockwise to skip to
the previous ones.
To locate a point quickly (Search)
During play back, turn and hold the P l ayback
Dial clockwise to locate a point in the
playback direction, or counterclockwise to
locate a point in the opposite direc tion. When
To locate a specific title/chapter/track
1 Press MODE CHANGE repeatedly so
that the indicator lights u p in green.
2 During playback, turn and hold the
Multi-mode Playback Dial clockwise to
locate succeeding titles/chapters/tracks,
or counterclockwise to locate preceding
ones.
To play one frame at a time (Freeze
Frame)
1 Press MODE CHANGE repeatedly so
that the indicator lights up in amber.
2 During playback, turn the Mult i- m ode
Playback Di al cl ockwise to go to the next
frame, or counterclockwise to go to the
previous frame. If you turn and hold the
dial, you can view the frames in
succession.
31
Page 32
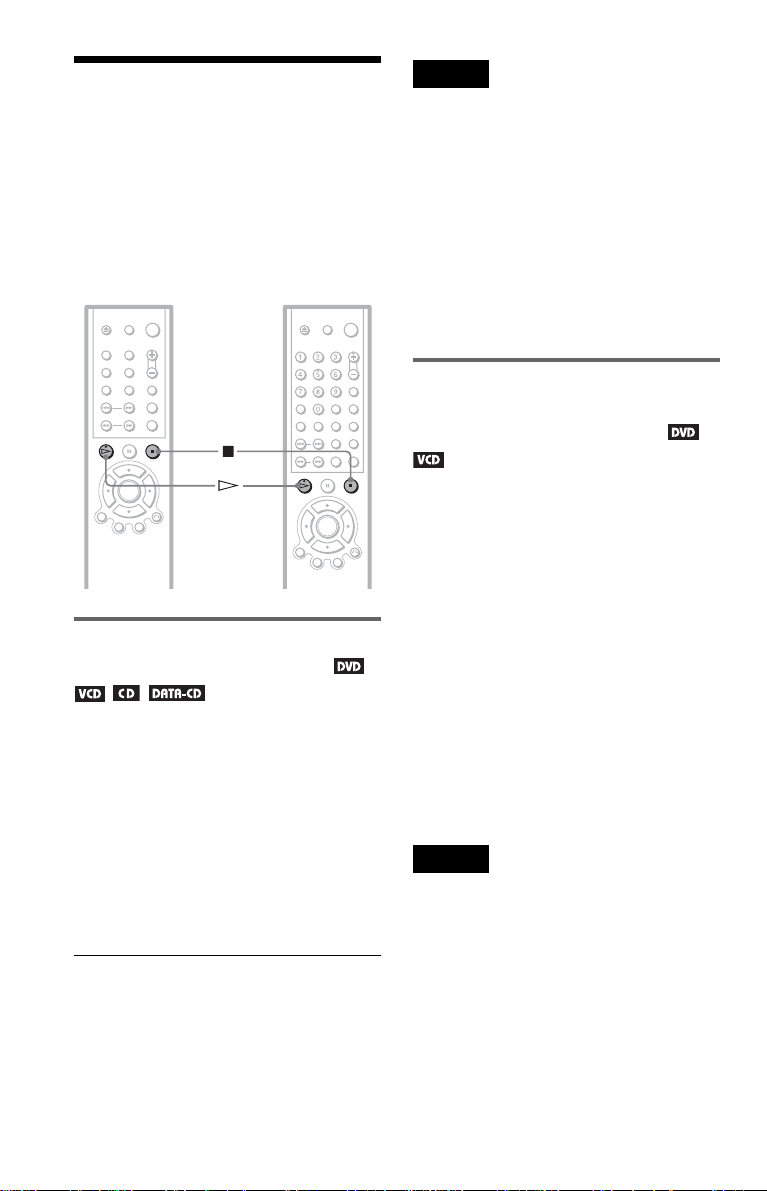
Resuming Playback from
the Point Where You
Stopped the Disc
Play/Multi-disc Resume)
The player remembers the point where you
stopped the disc.
DVP-NS305 DVP-NS415
Resuming playback for the
current disc (Resume Play)
The player remembers the point where you
stopped the disc ev en if the player enter s
standby mode by pressing [/1.
(Resume
1 While playing a disc, press x to stop
playback.
“RESUME” appe ars on the front panel
display.
2 Press H.
The player starts playback from the point
where you stoppe d th e disc in Step 1.
z Hint
To play from the beginning of the disc, press x
twice, then press H.
Notes
• The point where you stopped playing is cleared
when:
– you change the play mode.
– you change the settings on the Setup Display.
– you open the disc tray ( DVP-NS305 only).
– you disconnect the power cord (ma ins lead).
• When playing a CD, the point where you stopped
is cleared when the disc tray is opened or the
power cord (mains lead) is disconnected.
• When playing a DATA CD, the point where you
stopped is cleared when the player enters standby
mode, the disc tray is opened, or the power cord
(mains lead) is disconnected.
• This function may not work with some discs.
Storing the point where you
stopped the disc (Multi-disc
Resume) (DVP-NS415 only)
The player stores the point where you stopped
the disc and resumes playback from the same
point the next time you insert the same disc.
Resume playback points for up to 6 different
DVD/VIDEO CD discs remain in memory
even if you disconnect the power cord (mains
lead). When you s tore a resume playback
point for the seventh disc, the resume
playback point for the first disc is deleted.
z Hints
• To play from the beg inning of the disc, press x
twice, then press H.
• To turn off the Multi-disc Resu me function, set
“MULTI-DISC RESUME” in “CUSTOM
SETUP” to “OFF” (page 62). Pl ayback res tarts at
the resume point only for the current disc in the
player.
Notes
• The point where you stopped playing is cleared
when:
– you change the play mode.
– you change the settings on the Setup Display.
• This function may not work with some discs.
32
Page 33
Using the DVD’s Men u
Playing VIDEO CDs with
A DVD is divided into long sections of a
picture or a music f eat ure called “titles. ”
When you play a DVD which contains
several titles, you can sele ct the title you want
using the TOP MENU bu tton.
When you play DVDs that allow you to sele ct
items such as the language for the subtitles
and the language for the sound, select th ese
items using the ME N U but ton.
DVP-NS305 DVP-NS415
Number
buttons
ENTER
MENU
TOP MENU
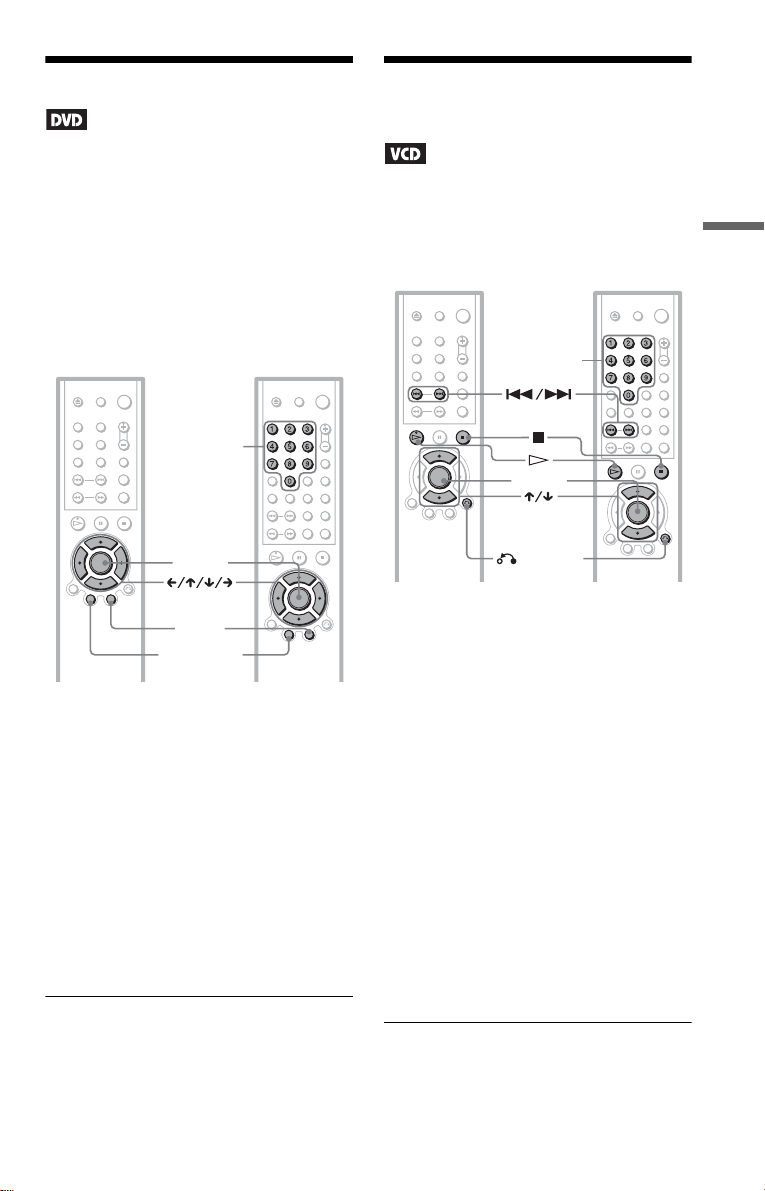
PBC Functions
PBC (Playback Contr ol ) al lo w s y ou t o pl ay
VIDEO CDs interactively by following the
menu on the TV screen.
DVP-NS305 DVP-NS415
(PBC Playback)
Number
buttons
ENTER
RETURN
1 Start playing a VIDEO CD with PBC
functions.
The menu for your selection appears.
Playing Discs
1 Press TOP MENU or MENU.
The disc’s menu ap pears on the TV
screen.
The contents of the menu vary from disc
to disc.
2 Press C/X/x/c to select the item
you want to play or change.
You can also use the number buttons t o
select the item (DVP-NS415 only).
3 Press ENTER.
2 Select the item number you want
by pressing X/x.
You can also use the number buttons to
select the item number and track (DVPNS415 only).
3 Press ENTER.
4 Follow the instructions in the
menu for interactive operations.
Refer to the instructions supplied with the
disc, as the operat i ng procedure may
differ depending on the VIDEO CD.
,continued
33
Page 34

To return to the menu
Press O RETURN.
z Hint
To play without using PBC, press ./> while
the player is stopped to select a track, then press H
or ENTER.
“Play without PBC” appears on the TV screen and
the player starts continuous play. You cannot play
still pictures such as a menu.
To return to PBC playback, press x twice then
press H.
Notes
• Depending on the VIDEO CD, “Press ENTER” in
Step 3 may appear as “Press SELECT” in the
instructions supplied with the disc. In this case,
press H.
• The PBC function s of Supe r VCDs do not wor k
with this player. Super VCDs are played in
continuous play mode only.
Playing an MP3 Audio Track
You can play back DATA CDs (CD-ROMs/
CD-Rs/CD-RWs) record ed in MP3 (M PEG 1
Audio Layer 3) format.
DVP-NS305 DVP-NS415
ENTER
RETURN
MENU
1 Press Z and place a DATA CD on
the disc tray.
34
2 Press H.
The disc tray closes, and the player starts
to play the first MP3 audio track in the
first album on the disc.
Notes
• This player can play MP3 audio t racks recorded in
the following sampling frequencies: 32kHz,
44.1kHz, 48kHz.
• The playback order ma y be dif fer e nt fro m the
edited order. See “The playback orde r of MP3
audio tracks” below for details.
Selecting an album and track
1 Press MENU.
The list of MP3 albu m s r ecorded on the
DATA CD appear s.
Page 35

(
3 0
)
1
ROCK BEST HIT
KARAOKE
JAZZ
R&B
MY FAVORITE SONGS
CLASSICAL
SALSA OF CUBA
BOSSANOVA
2 Select an album using X/x and press
ENTER.
The list of tracks cont ai ned in the album
appears.
JAZZ
1 ( 9 0
01SHE IS SPECIAL
02ALL YOU NEED IS ...
03SPICY LIFE
04HAPPY HOUR
05RIVER SIDE
06
5
07TAKE TIME,TAKE TIME
)
3 Select a track using X/x and press
ENTER.
The selecte d tra ck st arts play ing. When a
track or album is bein g pla ye d , its title is
shaded.
To go to the next or previous page
Press c or C.
See the instructions of the CD-R/RW device
or recording software (not supplied) fo r
details on the recording format.
To play a Multi Session CD
This player can play Multi Session CDs when
an MP3 au dio track is locate d in the firs t
session. Any subs equent MP3 audio track,
recorded in l at er sessions, can also be played
back.
When audio tracks and images in music CD
format or video CD format are recorded in the
first session, only the first session will be
played back.
Notes
• If you put the extension “.MP3” to data not in
MP3 format, the p layer can not re cogni ze th e d ata
properly and will generate a loud noise which
could damage your speaker syste m.
• T he play er c ann ot pla y a udio tracks in MP3PRO
format.
The playback order of MP 3 au dio tracks
The playback order of alb um s and tracks
recorded on a DATA CD is as follows.
◆Structure of disc contents
Tree 1 Tree 2 Tree 3 Tree 4 Tree 5
ROOT
Playing Discs
To return to the previous displ ay
Press O RETURN.
To turn off the display
Press MENU.
Notes
• Only the letter s in the al pha be t a nd num be rs can
be used for album or track names. Anything else
is displayed as an aste ris k .
• ID3 tags cannot be displayed.
About MP3 audio tracks
You can play MP3 audio tracks on CDROMs, CD-Rs, or CD-RWs. However, the
discs must be recorded according to ISO9660
level 1, level 2, or Joliet format for the player
to recognize the tracks.
You can also play discs recorded in Multi
Session.
album
track
,continued
35
Page 36
When you insert a DATA CD and press H,
the numbered tracks are played sequentially,
from
1 through 7. Any sub-albums/trac ks
contained withi n a currently select ed album
take priority over the next alb u m in the same
tree. (Example: C contains D so
before
5.)
When you press ME N U and the list of MP3
albums appears (page 34), the albums are
arranged in the following order: A t B t
C t D t F t G. Albums that do not
contain tracks (suc h as album E) do not
appear in the list.
z Hints
• If you add numbers (01, 02, 03, etc.) to the front
of the track file names, the tracks will be played in
that order.
• Since a disc with many trees takes longer to start
playback, place your albums within the first two
trees.
4 is played
Notes
• Depending on the software you use to create the
DATA CD, the playback order may differ from
the illustration above.
• The playb ack or de r above may not be applicable
if there are more than a total of 200 a lbums and
tracks in the DATA CD.
• The player can rec ognize up to 100 albums (the
player will count just albums, includi ng al bums
that do not contain MP3 audio tracks). The player
will not play any albums beyond the first 100
albums. Of the first 100 albums, the play er will
play no more than a combined total of 200 albums
and tracks.
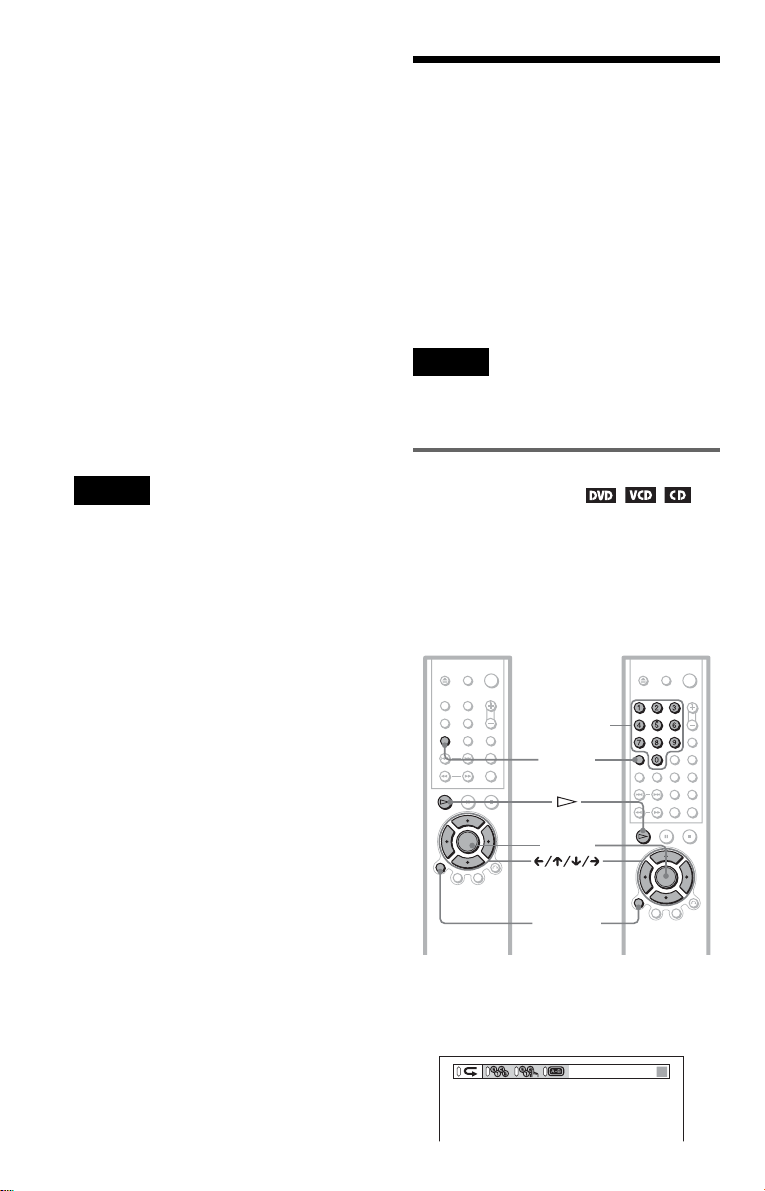
Various Play Mode
Functions
Shuffle Play, Repe at Play, A-B Repea t
Play)
You can set the fo llowing play modes:
• Programme Play (page 36)
• Shuffle Pla y (p age 38)
• Repeat Play (page 38)
• A-B Repeat Play (page 39)
Note
The play mode is cancelled when:
– you open the disc tray.
– the player enters sta ndby mode by pressing [/1.
Creating your own programme
(Programme Play)
You can play the co nt ents of a disc in the
order you want by ar ranging the order of the
titles, chapters, or tracks on the disc to create
your own programme. You can program m e
up to 99 titles, chapters, and tracks.
DVP-NS305 DVP-NS415
(Programm e Play,
Number
buttons
CLEAR
36
ENTER
DISPLAY
1 Press DISPLAY twice while the player
is in stop mode.
The following Control Bar appe ars.
Page 37
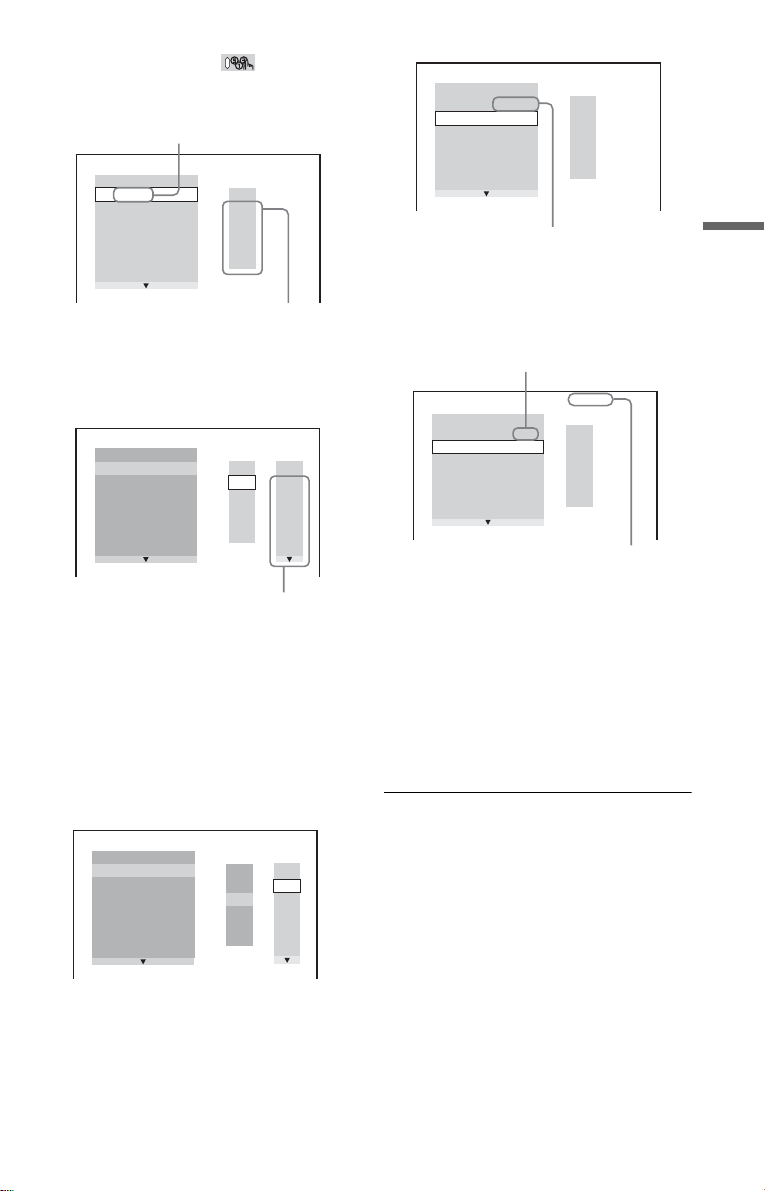
2 Press C/c to sele ct
(PROGRAM), then press ENTER.
“TRACK” is displayed when you play
a VIDEO CD or CD.
PROGRAM
ALL CLEAR
1. TITLE
2. TITLE
3. TITLE
4. TITLE
5. TITLE
6. TITLE
7. TITLE
– –
– –
– –
– –
– –
– –
T
– –
01
02
03
04
05
Titles or tracks
recorded on a disc
3 Press c.
The cursor moves to the title or track row
“T” (in this case, “0 1”).
PROGRAM
ALL CLEAR
1. TITLE
2. TITLE
3. TITLE
4. TITLE
5. TITLE
6. TITLE
7. TITLE
– –
– –
– –
– –
– –
– –
– –
– –
T
ALL
01
02
03
04
05
PROGRAM
ALL CLEAR
1. TITLE 0 2
2. TITLE
3. TITLE
4. TITLE
5. TITLE
6. TITLE
7. TITLE
– –
– –
– –
– –
– –
– –
–
Selected title and chap ter
0 3
– –
T
01
02
03
04
05
Playing Discs
◆ When playing a VIDEO CD or CD
For example, se le ct tr ack “02.”
Press X/x to select “02” under “T,” then
press ENTER.
Selected track
– –
– –
– –
– –
– –
– –
0:15:30
T
– –
01
02
03
04
05
PROGRAM
ALL CLEAR
1. TRACK 0 2
C
01
02
03
04
05
06
2. TRACK
3. TRACK
4. TRACK
5. TRACK
6. TRACK
7. TRACK
Total time of the programmed tracks
Chapters recorded on a disc
4 Select the title, chapter, or track you
want to programme.
◆ When play ing a DVD
For example, se l ect chapter “03” of title
“02.”
Press X/x to select “02” under “T,” then
press ENTER. Yo u can also use the
number buttons to select the number
(DVP-NS415 only).
PROGRAM
ALL CLEAR
– –
1. TITLE
– –
2. TITLE
– –
3. TITLE
– –
4. TITLE
– –
5. TITLE
– –
6. TITLE
– –
7. TITLE
Next, pres s X/x to select “03” under “C,”
then press ENTER. You can also use the
number buttons to select the number
(DVP-NS415 only).
– –
C
T
ALL
01
01
02
02
03
03
04
04
05
05
06
5 To programme other titles, chapters,
or tracks, repeat Steps 3 to 4.
The programmed titles, ch apters, and
tracks are displayed in the selected order.
6 Press H to start Pr ogramme Play.
Programme Play begins.
When the program me ends, you can
restart the same pr ogramme again by
pressing H.
To stop Programme Play
Press CLEAR.
To turn off the display
Press DISPLAY repeatedly until the display
is turned off.
To change or cancel a programme
1 Follow Steps 1 a nd 2 of “Creating your
own programm e (Programme Play).”
2 Select the programme number o f the title,
chapter, or track you w ant to change or
cancel using X/x, and press c. You can
also use the number buttons to select the
number (DVP-NS415 only).
,continued
37
Page 38
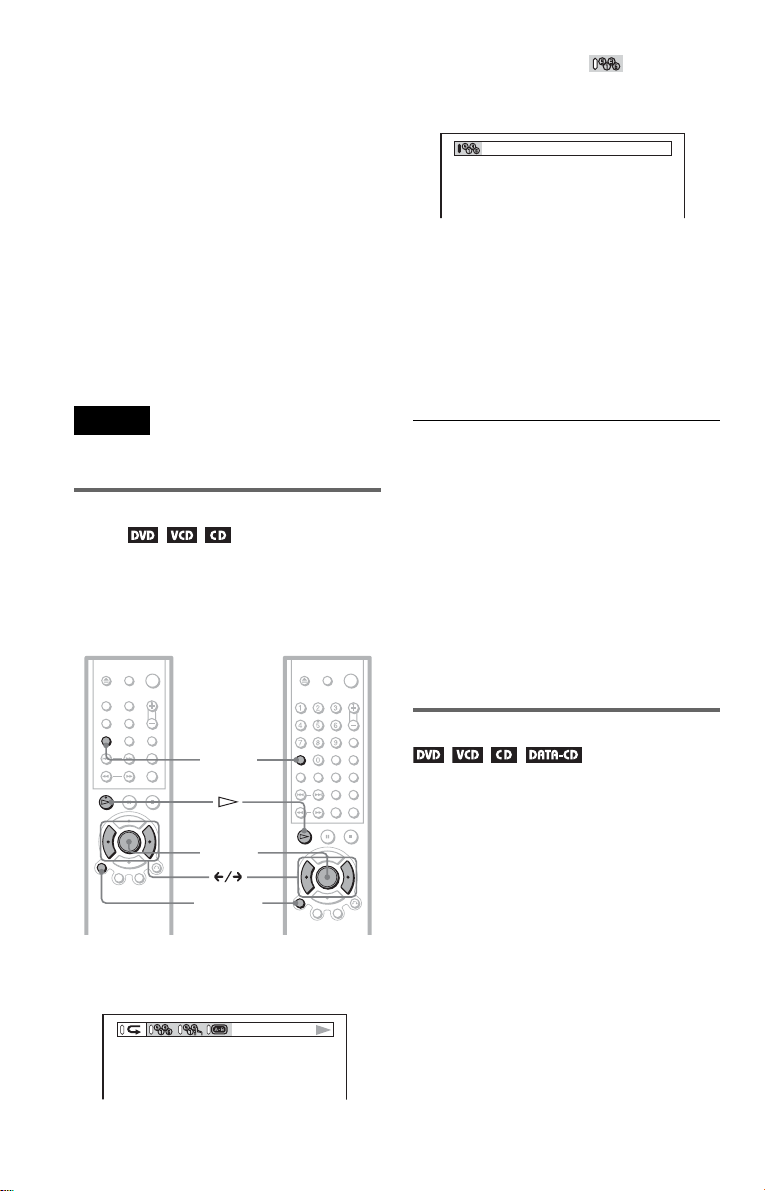
3
TITLE
Follow Step 4 for new programming. To
cancel a progra m m e, select “--” und er
“T,” then press ENTER.
To cancel all the titles, chapters, or tracks
in the programmed order
1 Follow Steps 1 and 2 of “Creating your
own programme (Programme Pl ay).”
2 Press X and select “ALL CLEAR.”
3 Press ENTER.
z Hint
You can do Repeat Play or Shuffle Play of the
programmed titles, chapters, or tracks. During
Programme Play, f oll ow th e s tep s of “Repea t Play ”
(page 38) or “Shuffle Play” (page 38).
Note
When playing Super V CDs, the total time of the
programmed tracks does not appe ar on the screen.
Playing in random order (Shuffle
Play)
You can have the player “shuffle” titles,
chapters, or tracks. Subsequent “shuffling”
may produce a different playing order.
DVP-NS305 DVP-NS415
2 Press C/c to select (SHUFFLE),
then press ENT ER repe atedly to sele ct
the item to be shuffled.
◆ When playing a DVD
• TITLE
• CHAPTER
◆ When playing a VIDEO CD or CD
• TRACK
◆ When Programme Play is activated
• ON: shuffles titles, chapters, or tracks
selected in Progr am m e Play.
To return to normal play
Press CLEAR, or select “OFF” in Step 2.
To turn off the Control Bar
Press DISPLAY repeatedly until the C ontrol
Bar is turned off.
z Hints
• You can set Shuffle Play while the player is
stopped. After selecting the “SHUFFLE” option,
press H. Shuffle Play starts.
• Up to 200 chapter s in a disc can be pl ay ed in
random order when “CHAPT ER” is selected.
CLEAR
ENTER
DISPLAY
1 Press DISPLAY during playback.
The following Cont rol Bar appears.
38
Playing repeatedly (Repeat Play)
You can play all of the titles or tracks on a
disc or a single title, chapter, or track
repeatedly.
You can use a comb in ation of Shuffle or
Programme Play modes.
Page 39
DVP-NS305 DVP-NS415
CHAPTER
CLEAR
REPEAT
ENTER
To return to normal play
Press CLEAR, or select “OFF” in Step 2.
To turn off the Control Bar
Press DISPLAY repeatedly until th e Co ntrol
Bar is turned off.
z Hints
• You can set Repeat Play while the player is
stopped. After selecting the “REPEAT” option,
press H. Repeat Play starts.
• Y ou can se le c t “REPEAT” dir e ct ly by pre ssing
REPEAT (DVP-NS415 only).
Playing Discs
DISPLAY
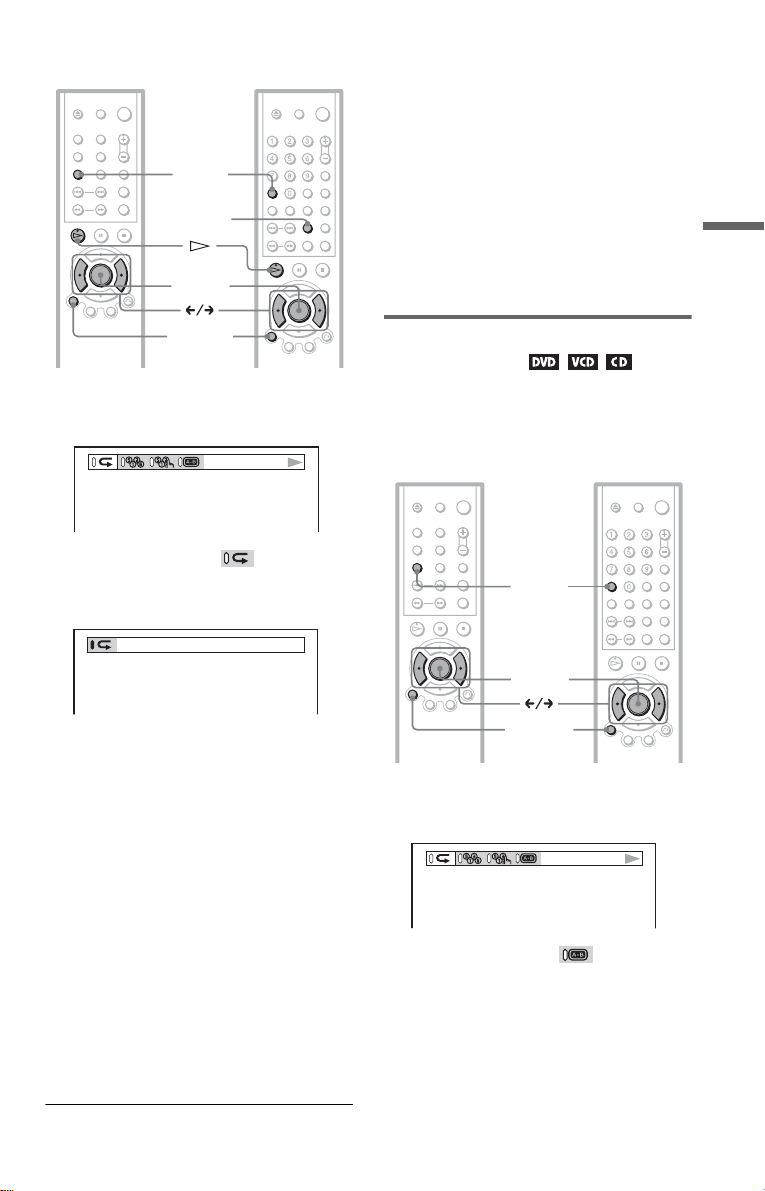
1 Press DISPLAY during playback.
The following Cont rol Bar appears.
2 Press C/c to sele ct
then press ENTER repeatedly to select
the item to be repeated.
◆ When play ing a DVD
• DISC: repeats all of the titles.
• TITLE: repeats the current title on a
disc.
• CHAPTER: repeats the current
chapter.
◆ When playin g a VI DEO CD or CD
• DISC: repeats all of the tracks.
• TRACK: repeats the current track.
◆ When playing a DATA CD (MP3 audio)
• DISC: repeats all of the albums.
• ALBUM: repeats the current album.
• TRACK: repeats the current track.
◆ When Programme Play o r Shuffle Pl ay
is activated
• ON: repeats Pr ogramme Play or
Shuffle Play.
(
REPEAT),
Repeating a specific portion (AB Repeat Play)
You can play a specific portion of a title,
chapter or track repeatedly. (This function is
useful when you want t o memorize lyrics, et c.)
DVP-NS305 DVP-NS415
CLEAR
ENTER
DISPLAY
1 Press DISPLAY during playback.
The following Control Bar appears.
2 Press C/c to select (A-B
REPEAT).
3 During playback, when you find the
starting point (poin t A) of the portion to
be played repeat edly, press ENTER .
The starting point (point A) is set.
,continued
39
Page 40

4 When y ou reach the ending point
A13 – 0:27:34 B
(point B), press EN TER again.
The set points are displayed and the
player starts repeating this specific
portion.
To return to normal play
Press CLEAR.
To turn off the Control Bar
Press DISPLAY repeatedly until the Control
Bar is turned off.
Note
When you set A-B Repeat Play, the sett ings for
Shuffle Play, Repeat Play, and Prog ramme Play are
cancelled.
40
Page 41
Searching for a Scene
– –
(10)
Searching for a Title/
Chapter/Track/Index/
Scene
You can search a DVD by title or chapte r, and
you can search a VID EO CD/CD by track ,
index, or scene. As ti tles and tracks are
assigned unique numbers on the disc, you can
select the de sire d one by e nteri ng its number .
Or, you can search for a scene using the time
code.
DVP-NS305 DVP-NS415
(Search mode)
Number
buttons
CLEAR
SEARCH
MODE
ENTER
(TITLE), (CHAPTER),
(TIME/TEXT), or (NUMBER
INPUT)
Select “TIME/TEXT” to search for a
starting point by inputting the time code.
◆ When playing a VIDEO CD
(TRACK) or (INDEX)
◆ When playing a VIDEO CD with PBC
Playback
(SCENE)
◆ When playing a CD
(TRACK) or (INDEX)
◆ When playing a DATA CD (MP3 audio)
(ALBUM) o r (TRACK)
3 Select the number of the title,
track, scene, time code, etc. you
want by pressing X/x to select the
digit, followed by C/c to move the
cursor.
For example, to find the scene at 2 hours,
10 minutes, and 20 seconds after the
beginning, select “TIME/TEXT ” in Step
2 and enter “2:10:20.” You can also use
the number buttons to select the num ber
(DVP-NS415 onl y).
If you make a mistake
Cancel the numbe r by pressing CLEAR,
then select another number.
Searching for a Scene
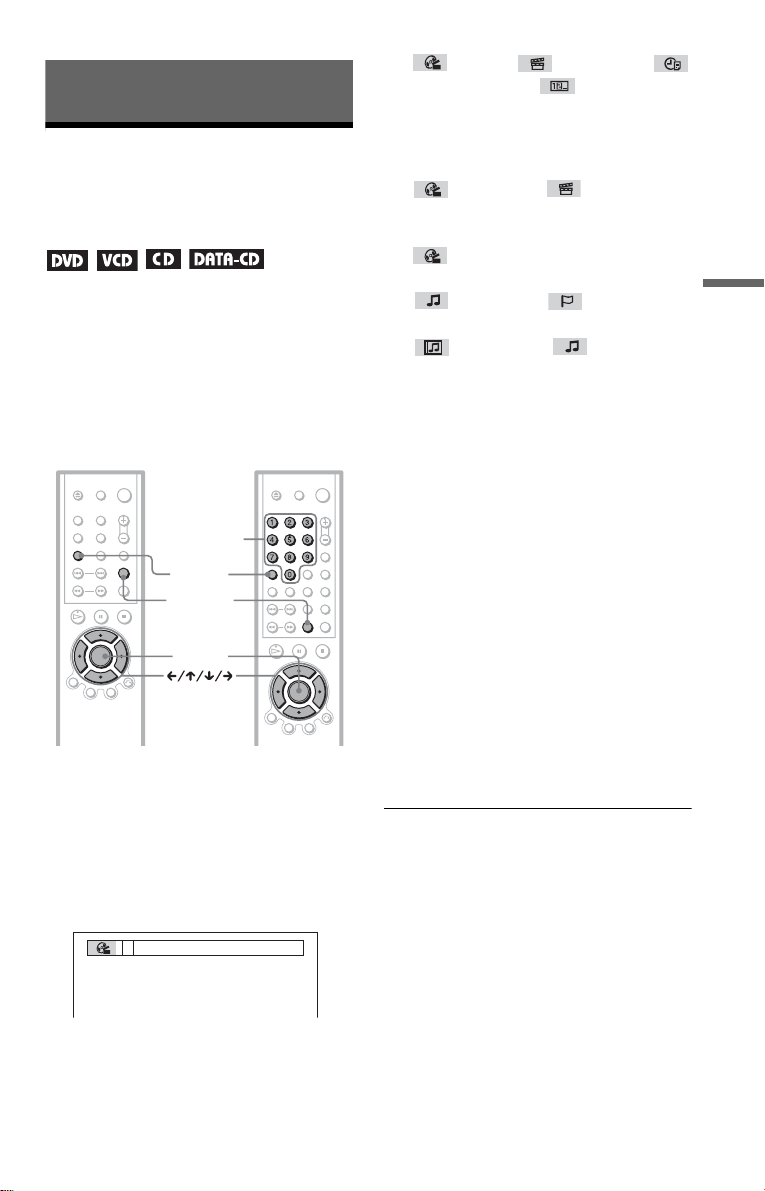
1 Press SEARCH M OD E.
The following dis pl ay a ppears.
“--
)” appears next to the icon (**
(**
refers to a nu m b er).
The number in parent heses indicates the
total number of titles, tracks, indexes,
scenes, etc. of t he disc.
2 Press SEARCH MODE repeatedly
to select the search method.
◆ When play ing a DVD
4 Press ENTER.
The player starts playback from the
selected number.
z Hints
• If you a re pla ying a disc and it is necessary to
enter a number, select “NUMBER INPUT” in
Step 2.
• When the display is turned off, you can search for
a chapter (DVD) or track (CD) by pressing the
number buttons and ENTER (DVP-NS415 only).
41
Page 42
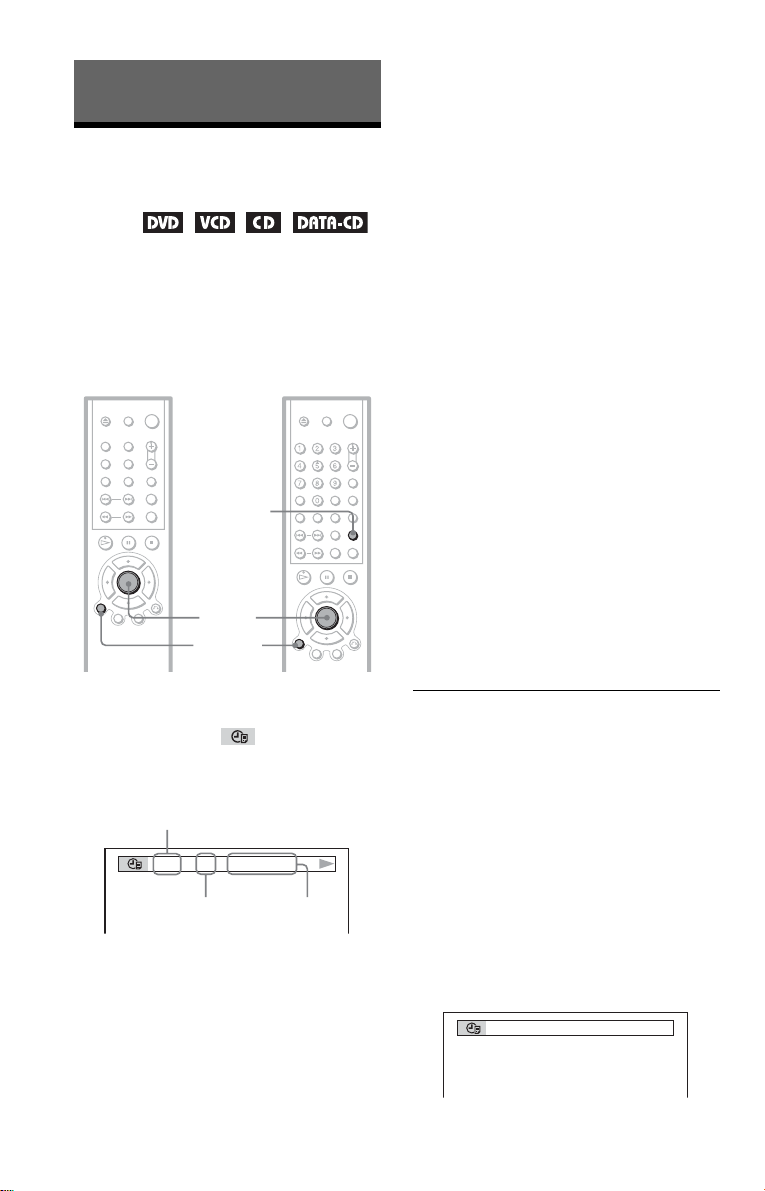
Viewing Information About the
T41 – 8 T 1:01:57
BRAHMS SYMPHONY
Disc
Checking the Playing Time and Remaining Time
You can check the pl aying time and
remaining time of the curr ent title, c hapter, or
track. Also, you can check the DVD/CD text
or track name (MP3 audio) recorded on the
disc.
DVP-NS305 DVP-NS415
TIME/TEXT
ENTER
DISPLAY
◆ When playing a DVD
•T
**:**:**
Playing time of the current title
•T–
**:**:**
Remaining time of the current title
•C
**:**:**
Playing time of the current chapter
•C–
**:**:**
Remaining time of the curren t chapte r
◆ When playing a VIDEO CD ( with PBC
functions)
•
**:**
Playing time of the current scene
◆ When playing a VIDEO CD ( without
PBC functions) or CD
•T
**:**
Playing time of the current track
•T–
**:**
Remaining time of the current track
•D
**:**
Playing time of the current disc
•D–
**:**
Remaining time of the current disc
◆ When playing a Super VCD
The remaining time cannot be displayed.
•T
**:**
Playing time of the current track
◆ When playing a DATA CD (MP3 audio)
•
****:**
Playing time of the current track
1 Press DISPLAY repeatedly during
playback until (TIME/TEXT)
appears.
Title, track (CD/VIDEO CD), scene,
or album number
Chapter, index, or
track (DATA CD)
Time
information
2 Press ENTER repeatedly to change
the time information.
The display and the kinds of time that you
can change depend on t he disc you are
playing.
42
To turn off the Control Bar
Press DISPLAY repeatedly until the C ontrol
Bar is turned off.
To check the DVD/CD text or track name
(MP3 audio)
Press ENTER repeatedly in Step 2 to display
text recorded on the DVD/CD/DATA CD.
The DVD/CD text appears only when text is
recorded in the dis c. Y ou cannot change the
text. If the disc does not contain text, “NO
TEXT” appears.
For DATA CDs, only the track name of the
MP3 audio track a ppears.
Page 43
Checking the information on the
Playi
front panel display
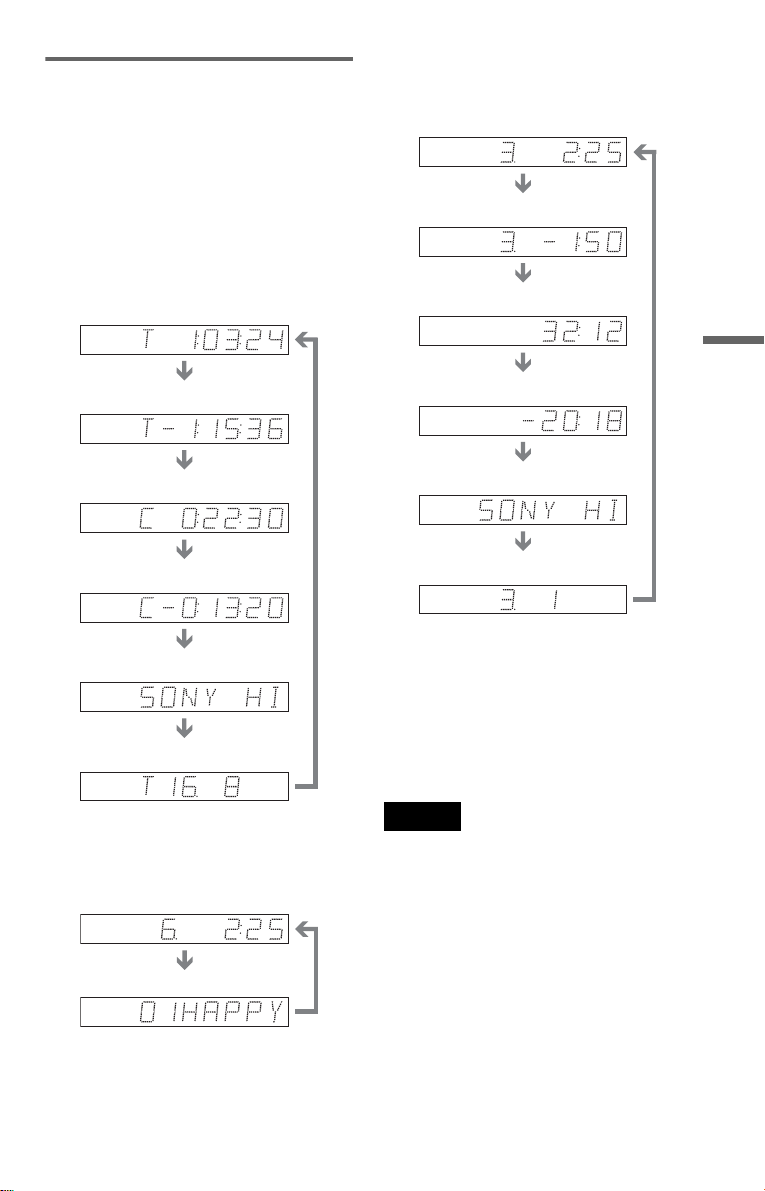
You can view the t ime informatio n and text
displayed on the TV screen also on the f ront
panel display. The in formation on the front
panel display cha nges as follows whe n you
change the time information on your TV
screen.
When playing a DVD
Playing time of the current title
When playing a VIDEO CD (without PBC
functions) or CD
Playing time and number of the
current track
Remaining time of the current
track
Playing time of the disc
Viewing Information About the Disc
Remaining time of the current title
Playing time of the current cha pter
Remaining time of the current
chapter
Text
Current title and chapter number
(returns to top automatically)
When playing a DATA CD (MP3 audio)
ng time and number of the
current track
Remaining time of the disc
Text
Current track and index number
(returns to top automatically)
z Hints
• When playing VIDEO CDs with PBC functions, the
scene number or the playing time are displayed.
• Long text that does not fit in a single line will
scroll across th e f r ont panel display.
• You can also check the time information and tex t
by pressing TIME/TEXT repeatedly (DVPNS415 only).
Notes
• D epending on the type of disc being played , th e
DVD/CD text or track name may not be
displayed.
• T he play er c an onl y display the first level of the
DVD/CD text, such as the disc name or title.
• Playing time of MP3 audio tracks may not be
displayed correctly.
Track name
43
Page 44

Sound Adjustments
1(4
):
Changing the Sound
When playing a DVD recorded in m ultiple
audio formats (PCM, Dolby Digital, MPEG
audio, or DTS), you c an change the audio
format. If the DVD is recorded with
multilingual tracks, you can also chan ge the
language.
With CDs, DATA CDs, or VIDEO CDs, you
can select the soun d from the right or left
channel and listen to the sound of the selected
channel through both the right and lef t
speakers. For ex ample, when playing a disc
containing a song with the vocals on the right
channel and the ins tr uments on the left
channel, you can hear the instruments from
both speakers by selecting the left channel.
DVP-NS305 DVP-NS415
AUDIO
2 Press AUDIO repeatedly to select
the desired audio signal.
◆ When playing a DVD
Depending on the DVD, the choice of
language varies.
When 4 digits ar e di splayed, they
indicate a language code. Refer to
“Language Cod e Li st ” on page 70 to see
which language the code represents.
When the same language is displayed two
or more times, the DVD is recorded in
multiple audio formats.
◆ When playing a VIDEO CD, CD , or
DATA CD (MP3 audio)
The default setting is underlined.
•STEREO
• 1/L: The sound of the left channel
(monaural)
• 2/R: The sound of the right channel
(monaural)
◆ When playing a Super VCD
The default setting is underlined.
• 1: STEREO
audio track 1
• 1: 1/L: The sound of the left channel of
the audio track 1 (monaural)
• 1: 2/R: The sound of the r ig ht channel
of the audio track 1 (m onaural)
• 2: STEREO: The stereo sound of the
audio track 2
• 2: 1/L: The sound of the left channel of
the audio track 2 (monaural)
• 2: 2/R: The sound of the r ig ht channel
of the audio track 2 (m onaural)
: The standard stereo sound
: The stereo sound o f th e
DISPLAY
1 Press AUDIO during playback.
The following display appears.
The number in parentheses indicat es the
total number of ava ilable audio signals.
ENGLISH
44
Note
While playing a Super VCD on which the audio
track is not recorded, no sound will come out when
you select “2:STEREO,” “2:1/L,” or “2:2/R.”
Checking the audio signal
format
If you press DISPLA Y repeatedly during
playback, the format of the current audio
signal (Dolby Digita l, M PEG audio, DTS,
PCM, etc.) ap pears as shown bel ow.
Page 45
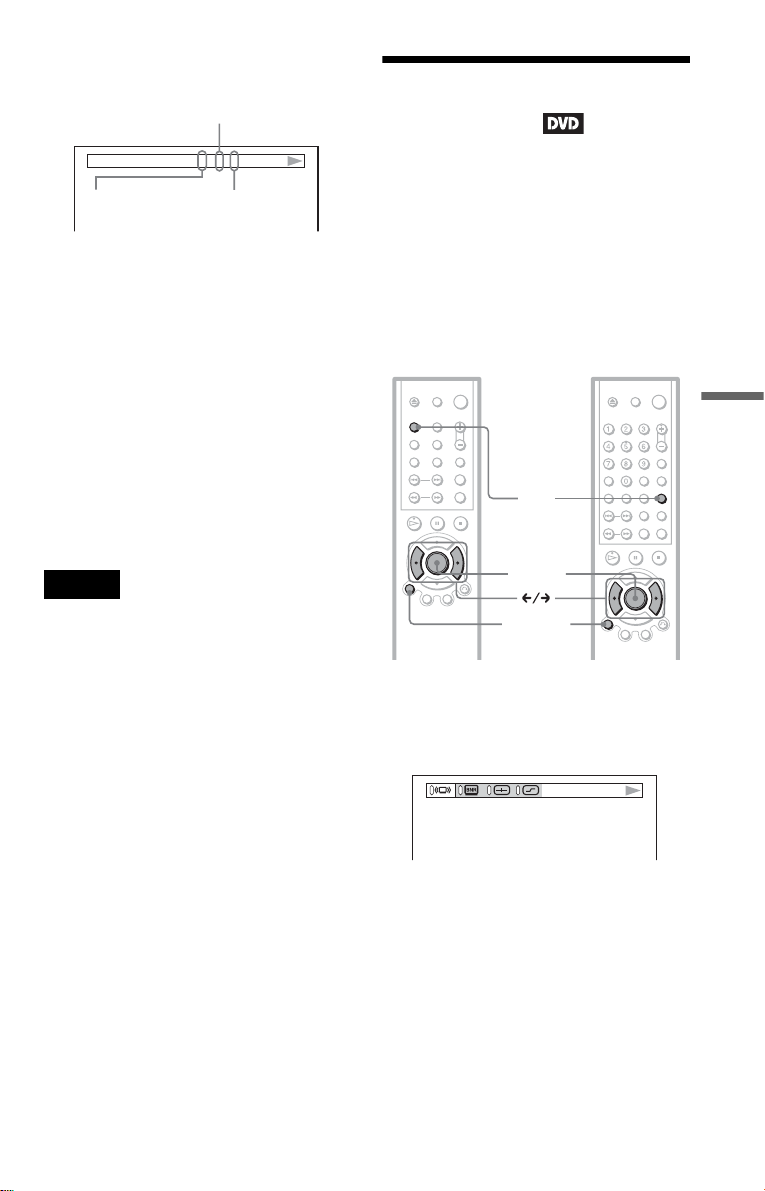
Example:
3 / 2 .1
Dolby Digital 5.1 ch
Rear (L/R)
TV Virtual Surround Settings (TVS)
DOLBY DIGITAL
Front (L/R)
+ Centre
LFE (Low Frequency
Effect)
About audio signals
Audio signals recorded in a disc contain the
sound elements (channels) shown below.
Each channel is output from a separate
speaker.
• Front (L)
• Front (R)
•Centre
•Rear (L)
•Rear (R)
• Rear (Monaural): This signal can be either
the Dolby Surround Sound processed
signals or the Dolby Digital sound’s
monaural rear audio signals.
• LFE (Low Frequency Effect) signal
Note
If “DTS” is set to “OFF” in “AUDIO SETUP,” the
DTS track selection option will not appear on the
screen even if the disc contains DTS tracks (page
64).
When you connect a stereo TV or 2 front
speakers, TVS (TV Virtual Surround) lets
you enjoy surround sound effects by using
sound imaging to create virtual rear speakers
from the sound of the front speakers (L: left,
R: right) without using actual rear speakers.
TVS was developed by Sony to produce
surround sound for home use using just a
stereo TV.
DVP-NS305 DVP-NS415
Sound Adjustments
SUR
ENTER
DISPLAY
1 Press DISPLAY twice during
playback.
The following Control Bar appears.
,continued
45
Page 46

2 Press C/c to select
TVS DYNAMIC
(SURROUND), then press ENTER
repeatedly to select o ne of the TVS
sounds.
Refer to the following explanations given
for each item.
• TVS DYNAMIC
•TVS WIDE
• TVS NIGHT
• TVS STANDARD
To cancel the setti ng
Select “OFF” in Step 2.
To turn off the Control Bar
Press DISPLAY repeatedly until the Control
Bar is turned off.
◆TVS DYNAMIC
Creates virtual rear speakers from the sound
of the front speakers (L, R) without using
actual rear speakers (shown b el ow ).
This mode is effect iv e w hen the distance
between the front L and R speakers is shor t,
such as with built-in speakers on a stereo TV.
TV
◆TVS NIGHT
Large sounds, suc h as explosions, are
suppressed, but the quieter sounds are
unaffected. This feature is useful when you
want to hear the dial og and enjoy the
surround sound effects of “TV S WIDE” at
low volume.
◆TVS STANDARD
Creates virtual rear speakers fr om the sound
of the front speakers (L, R) without using
actual rear speakers. The virtual speakers are
reproduced as shown in the illustration
below. Use this setting when you want to use
TVS with 2 separate speakers.
L R
TV
◆TVS WIDE
Creates virtual rear speakers from the sound
of the front speakers (L, R) without using
actual rear speakers. The virtual speakers are
reproduced as shown in the illustration
below.
This mode is effect iv e w hen the distance
between the front L and R speakers is shor t,
such as with built-in speakers on a stereo TV.
46
L: Front speaker (left)
R: Front speaker (right)
: Virtual speaker
z Hint
You can also change the setting by pres si n g SUR
(or SURROUND on the player) repeatedly.
Notes
• When the playing signal does not contain a signal
for the rear speakers, the surround effects will be
difficult to hear.
• When you select one of the TVS mode s, turn of f
the surround setting of the connected TV or
amplifier (receiver).
• Make sure that your listening position is between
and at an equal distance from your speakers, and
that the speakers are located in similar
surroundings.
Page 47

• “TVS NIGHT” only works with Dolby Digital
discs. However, not all discs will respond to the
“TVS NIGHT” function in the same way.
• When you use the DIGITAL OUT (OPTICAL or
COAXIAL) jack to listen to MPE G audio signals
and set “MPEG” to “MPEG” in “AUDIO
SETUP,” no sound will come from your speakers
if you select one of the TVS modes.
Sound Adjustments
47
Page 48
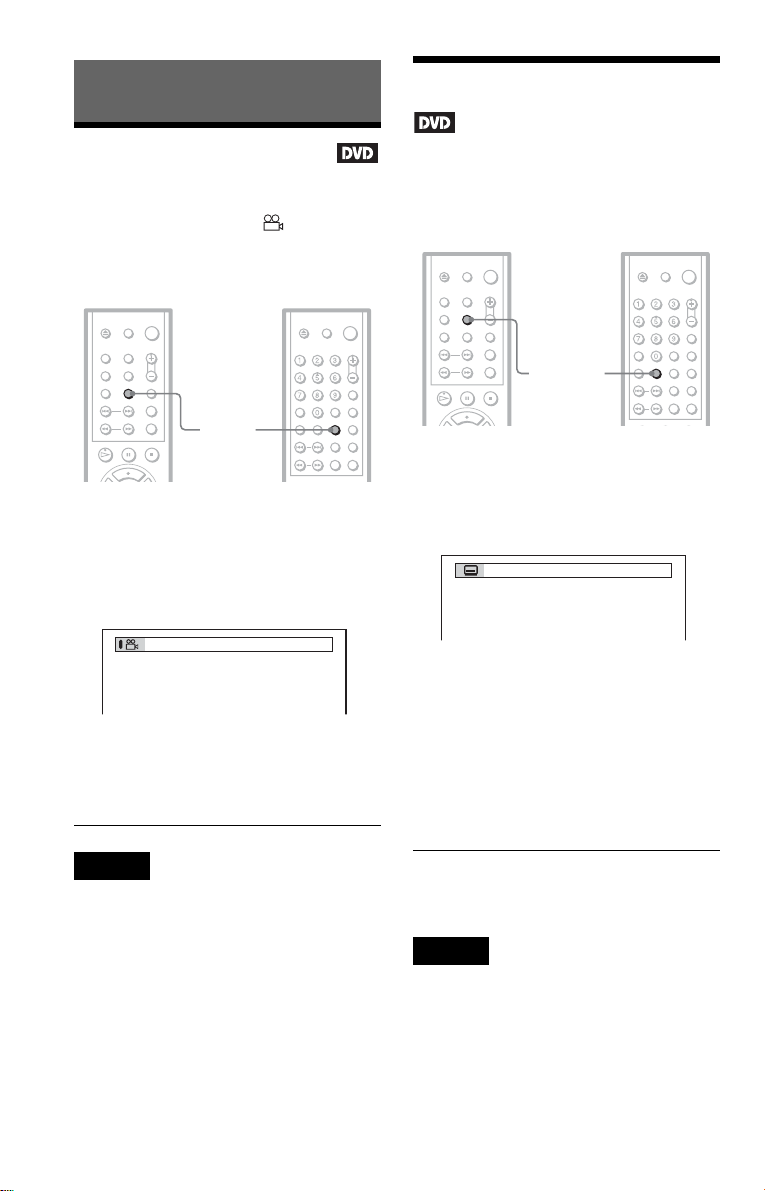
Enjoying Movies
2(7
)
1(8):ENGLISH
Displaying the Subtitles
Changing the Angles
If various angl es (multi-ang le s) for a scene
are recorded on the DVD, “ ” appears in
the front panel display. This means that you
can change the view i ng angle.
DVP-NS305 DVP-NS415
ANGLE
1 Press ANGLE during playback.
The number of the an gl e appears on the
display.
The number in parentheses indicat es the
total number of angle s.
2 Press ANGLE repeatedly to select
the angle number.
The scene changes to the selected angle.
If subtitles ar e r ecor de d on th e di sc s, y ou c an
change the subti tl es or turn them on and off
whenever you want while playing a DVD.
DVP-NS305 DVP-NS415
SUBTITLE
1 Press SUBTITLE during playback.
The following display appears.
The number in pare ntheses indicates the
total number of available subtitles.
2 Press SUBTITLE repeatedly to
select the language.
Depending on the DVD, the choice of
language varies.
When 4 digits ar e di splayed, they
indicate a language code. Refer to
“Language Cod e Li st ” on page 70 to see
which language the code represents.
Note
Depending on the DVD, you may not be able to
change the angles even if mult i-angles are recorded
on the DVD.
48
To turn off the subtitles
Select “OFF” in Step 2.
Note
Depending on the DVD, you may not be able to
change the subtitles eve n if multilingual subtitles
are recorded on it. You a lso ma y not be abl e to tu rn
them off.
Page 49

Adjusting the Picture
1
Quality
The Block Noise Reduction (BNR) function
adjusts the pict ur e quality by reduci ng the
“block noise” or mosaic like patterns that
appear on your TV scr een.
DVP-NS305 DVP-NS415
(BNR)
To cancel the “BNR” setting
Select “OFF” in Step 2.
To turn off the Control Bar
Press DISPLAY repeatedly until th e Co ntrol
Bar is turned off.
Notes
• If the outlines of the images on your screen should
become blurred, set “BNR” to “OFF.”
• Depending on the disc or the scene being played,
the “BNR” effect may be hard to discern.
ENTER
DISPLAY
1 Press DISPLAY twice during
playback.
The following Cont rol Bar appears.
2 Press C/c to select (BNR),
then press ENTER repeatedly to
select a level.
• 1: reduces the “block noise.”
• 2: reduces the “block noise” more than
1.
• 3: reduces the “block noise” more than
2.
Enjoying Movies
49
Page 50
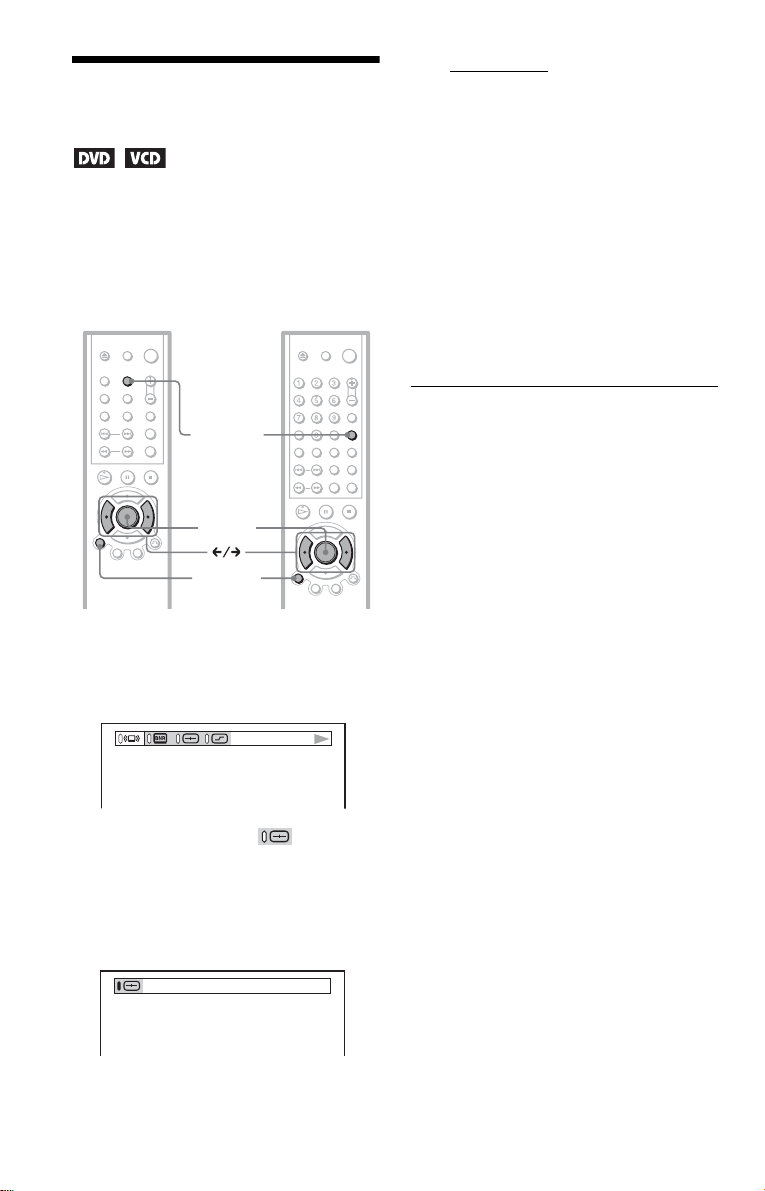
Adjusting the Playback
DYNAMIC 1
Picture (CUSTOM PICTURE MODE)
You can adjust the video signal of the DVD or
VIDEO CD from the player to obtain the
picture quality you want. Choose the setting
that best suits the programme you are
watching.
DVP-NS305 DVP-NS415
• STANDARD:
picture.
• DYNAMIC 1: produces a bold
dynamic picture by increasing the
picture contrast and the colour
intensity.
• DYNAMIC 2: produces a more
dynamic picture than DYNAMIC 1 by
further increasing the picture contrast
and the colour intensity.
• CINEMA 1: enhances details in dark
areas by increasing the black level.
• CINEMA 2: White colours become
brighter and black colours become
richer, and the colour contrast is
increased.
displays a standard
PICTURE
MODE
ENTER
DISPLAY
1 Press DISPLAY twice during
playback.
The following Control Bar appears.
2 Press C/c to select (CUSTOM
PICTURE MODE), then press
ENTER repeatedly to select the
setting you want.
The default setting is underlined.
To turn off the Control Bar
Press DISPLAY repeatedly until the Control
Bar is turned off.
z Hints
• When you watch a movie, “CINEMA 1” or
“CINEMA 2” is recommended.
• You can also select the “CUSTOM PICTURE
MODE” setting by pressing PICTURE MODE
repeatedly.
50
Page 51
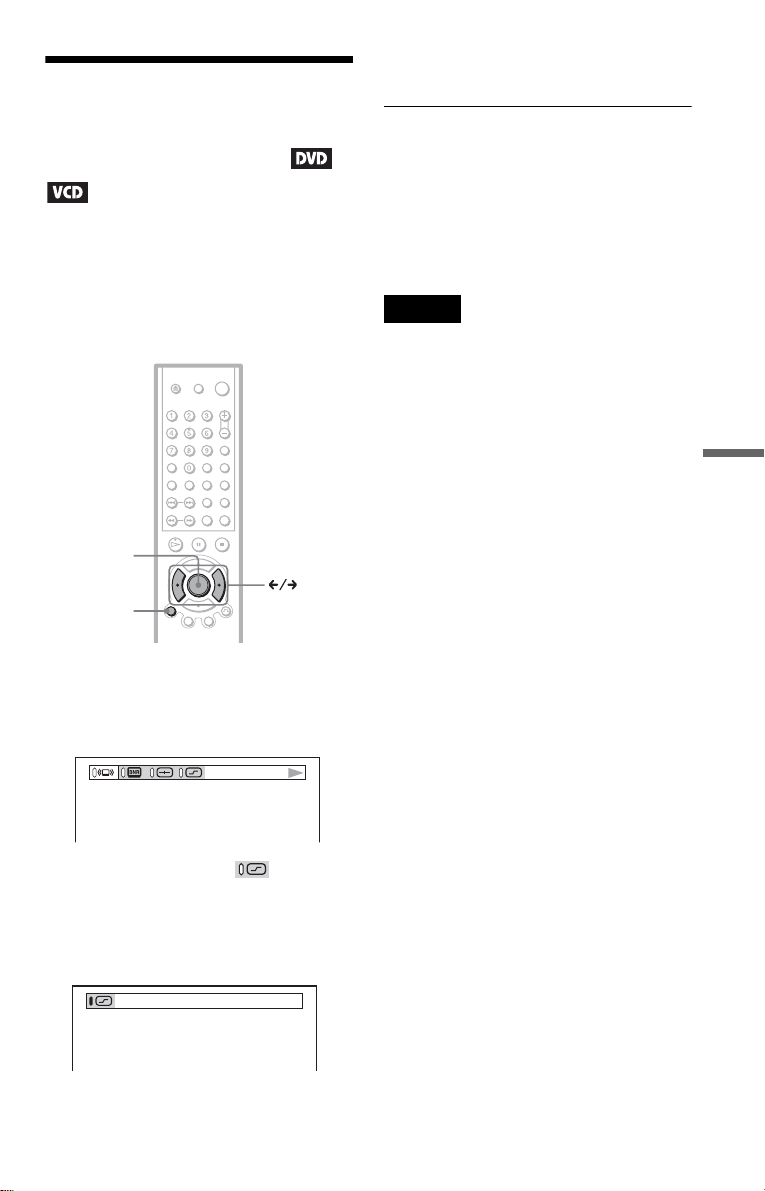
Enhancing the Pl ay back
1
• 3: enhances the ou tl i ne more than 2.
• SOFT: softens the im age (DVD only).
Picture
(DIGITAL VIDEO
ENHANCER) (DVP-NS415 only)
The Digital Video Enhancer (DVE) function
makes the picture appear clear and cr i sp by
enhancing the outlines of images on your TV
screen. Also, this function can soften the
images on the screen.
DVP-NS415
ENTER
DISPLAY
1 Press DISPLAY twice during
playback.
The following Cont rol Bar appears.
To cancel the “DIGITAL VIDEO
ENHANCER” setting
Select “OFF” in Step 2.
To turn off the Control Bar
Press DISPLAY repeatedly until th e Co ntrol
Bar is turned off.
Note
Depending on the disc or the scene being play ed ,
noise found in the disc may become more apparent.
If this happens, it is recommended that you use the
BNR function (page 49) with the DVE function. If
the condition still does not imp ro ve, r edu ce the
Digital Video Enhancer level, or select “SOFT”
(DVD only) in Step 2 above.
Enjoying Movies
2 Press C/c to select (DIGITAL
VIDEO ENHANCER), then press
ENTER repeatedly to select a
level.
• 1: enhances the outline.
• 2: enhances the outline more than 1.
51
Page 52
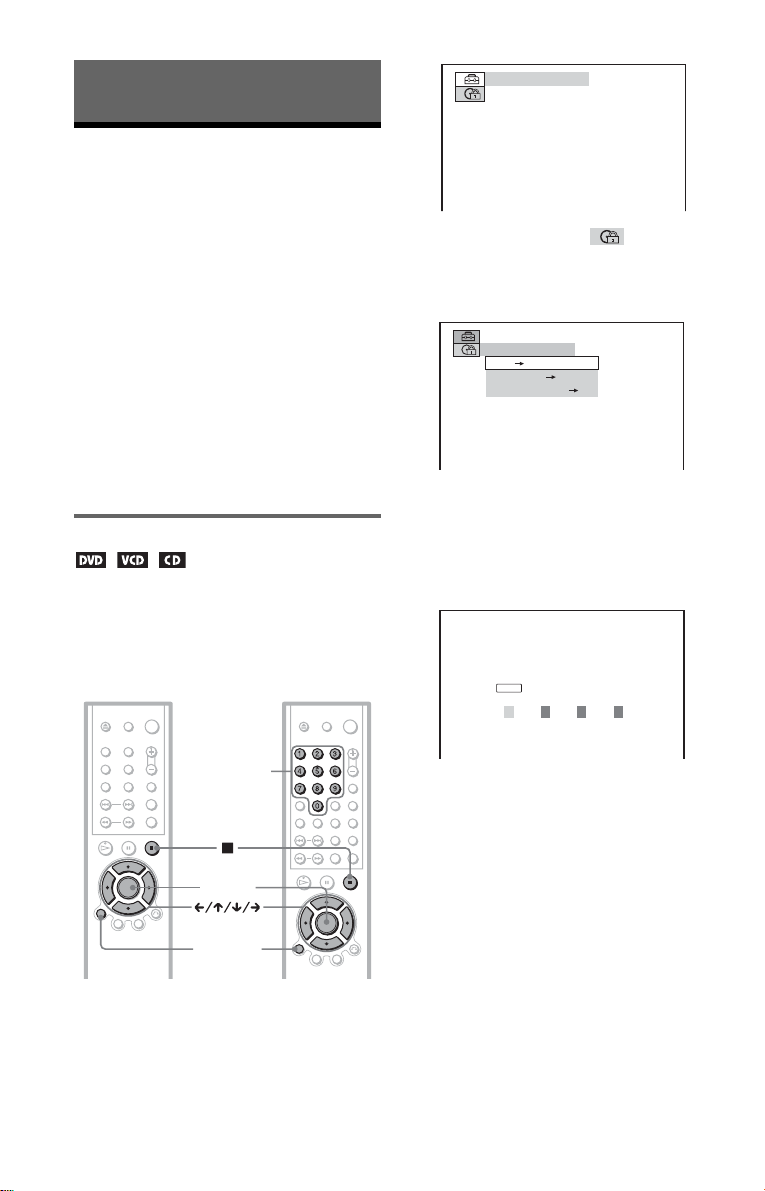
Using Various Additional Functions
Locking Discs (CUSTOM
PARENTAL CONTROL, PARENTAL
QUICK
CONTROL)
You can set two kinds of playback restrictions
for the desired disc.
• Custom Parental Control
You can set playback restrictions so that the
player will not play in appropriate discs.
• Parental Contro l
Playback of some DVDs can be limited
according to a predetermined leve l such as
the age of the users. Scenes may be blocked
or replaced wit h di fferent scenes.
The same passwor d is used for both Parental
Control and Custom Parental Control.
Custom Parental Control
You can set the sam e Custom Parent al
Control passwo rd for up to 40 discs. When
you set the 4 1 st-disc, the first disc is
cancelled.
DVP-NS305 DVP-NS415
Number
buttons
ENTER
DISPLAY
1 Insert the disc you want to lock.
If the disc is playing, press x to stop
playback.
2 Press DISPLAY while the player is in
stop mode.
The Control Ba r appears.
52
3 Press X/x to select (PARENTAL
CONTROL), then press ENTER.
The options for “PARENTAL
CONTROL” appear.
OFF
ON
PLAYER
PASSWORD
4 Press X/x to select “ON t,” then
press ENTER.
◆ If you hav e not entered a password
The display for registering a new
password appears.
PARENTAL CONTROL
Enter a new 4-digit password, then
ENTER
press
.
Enter a 4-digit password by pressing X/x
to select the digit, followed by C/c to
move the cursor, then press ENTER. You
can also use the number buttons to enter
your password ( D V P-NS415 only).
The display for confirming the passwor d
appears.
◆ When you have already registered a
password
The display for entering the password
appears.
Page 53
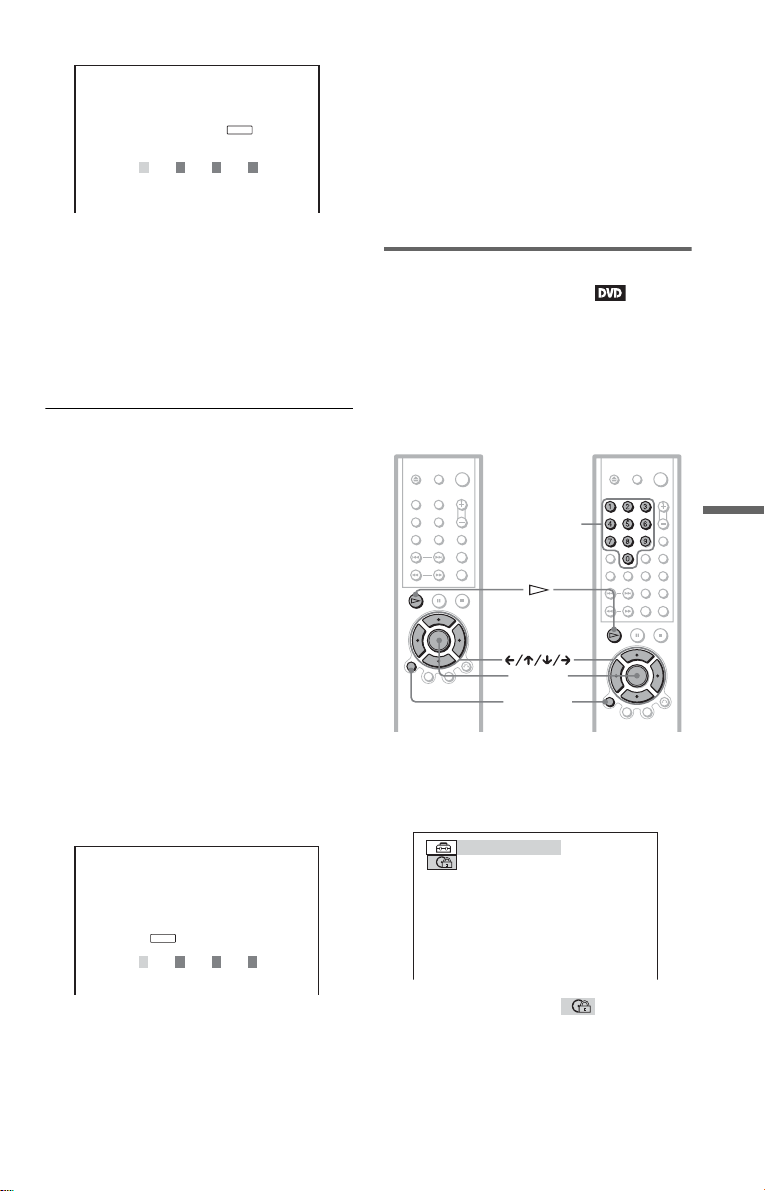
PARENTAL CONTROL
Enter password, then press
ENTER
.
5 Enter or re-enter your 4-digit password
by pressing X/x to select the digit,
followed by C/c to move the cursor,
then press ENTER.
You can also use the number buttons t o
enter your password (DVP-NS415 only).
“Custom parental control is set.” appears
when you enter your password.
To turn off the Custom Parental Control
function
1 Follow Steps 1 throug h 3 of “Custom
Parental Control.”
2 Press X/x to select “OFF t,” then press
ENTER.
3 Enter your 4-digit password using X/x to
select the digit, followed by C/c to move
the cursor, then press E N TER. You can
also use the number buttons to enter your
password (DVP-NS415 only).
To play a disc for which Custom Parental
Control is set
1 Insert the disc for which Custom Parental
Control is set.
The “CUSTOM PAREN TAL
CONTROL” display appears.
CUSTOM PARENTAL CONTROL
Custom parental control is already
set. To play, enter your password
ENTER
and press
.
z Hint
If you forget your password, enter the 6-digit
number “199703” using X/x to selec t the digit,
followed by C/c to move the cursor when the
“CUSTOM PARENTAL CONTROL” display asks
you for your password, then press ENTER. (Press c
after the 4th digit to allow the entire 6-digit number
to be entered.) The display wil l ask yo u to en ter a
new 4-digit password. You can also use the number
buttons to enter the digits (DVP-NS415 only).
Parental Control (limiting
playback by children)
Playback of some DVDs can be limited
according to a predeter mined level such as the
age of the users. The “PARENTAL
CONTROL” function allows you to set a
playback limitation level.
DVP-NS305 DVP-NS415
Number
buttons
ENTER
DISPLAY
1 Press DISPLAY while the player is in
stop mode.
The Control Bar appears.
QUICK
Using Various Additiona l Fun ctions
2 Enter your 4-digit password using X/x to
select the digit, followed by C/c to move
the cursor, then press E N TER. You can
also use the number buttons to enter your
password (DVP-NS415 only).
The player is ready for playback.
2 Press X/x to select (PARENTAL
CONTROL), then press ENTER.
The options for “PARENTAL
CONTROL” ap pear.
,continued
53
Page 54
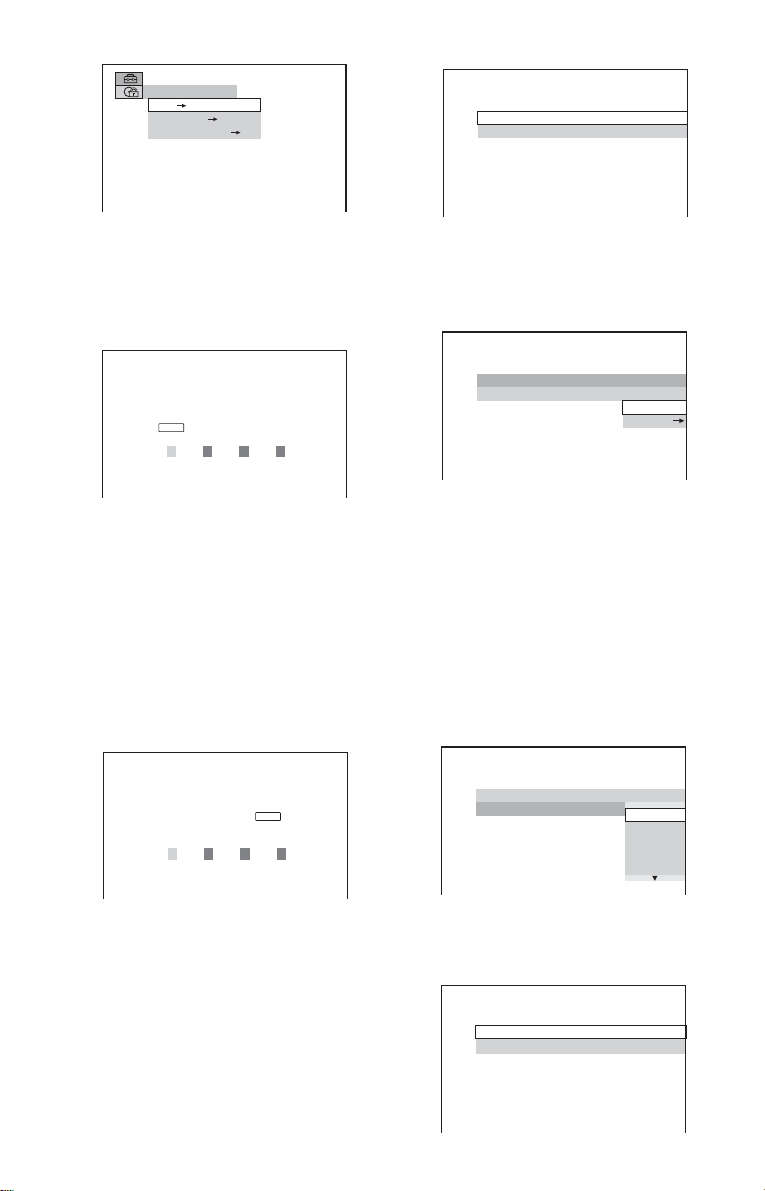
OFF
ON
PLAYER
PASSWORD
PARENTAL CONTROL
LEVEL: OFF
STANDARD:
USA
3 Press X/x to select “PLAYER t,”
then press ENTER.
◆ If you have not entered a password
The display for registering a new
password appear s.
PARENTAL CONTROL
Enter a new 4-digit password, then
ENTER
press
.
Enter a 4-digit password using X/x to
select the digit, followed by C/c to move
the cursor, then press ENTER. You can
also use the number buttons to enter your
password (DVP-NS415 only).
The display for confirming the passwo rd
appears.
◆ When you have already regist er ed a
password
The display for enter i ng the password
appears.
PARENTAL CONTROL
Enter password, then press
ENTER
.
5 Press X/x to select “STANDARD,”
then press ENTER.
The selection items for “STANDARD”
are displayed.
PARENTAL CONTROL
LEVEL: OFF
STANDARD:
USA
USA
OTHERS
6 Press X/x to select a geographic area
as the playback limitation level, then
press ENTER.
The area is selected.
When you select “OT H E RS t,” select
and enter a standard code in the table on
page 55
.
7 Press X/x to select “LEVEL,” then
press ENTER.
The selection items for “LEVEL” are
displayed.
PARENTAL CONTROL
LEVEL: OFF
STANDARD:
OFF
8:
NC17
7:
R
6:
5:
4 Enter or re-enter your 4-digit password
by pressing X/x to select the digit,
followed by C/c to move the cursor,
then press ENTER.
You can also use th e number buttons to
enter your password (DVP-NS415 only).
The display for setti ng t he playback
limitation level appears.
54
8 Select the level you want using X/x,
then press ENTER.
Parental Control setting is complete.
PARENTAL CONTROL
LEVEL:
STANDARD: USA
4: PG13
Page 55
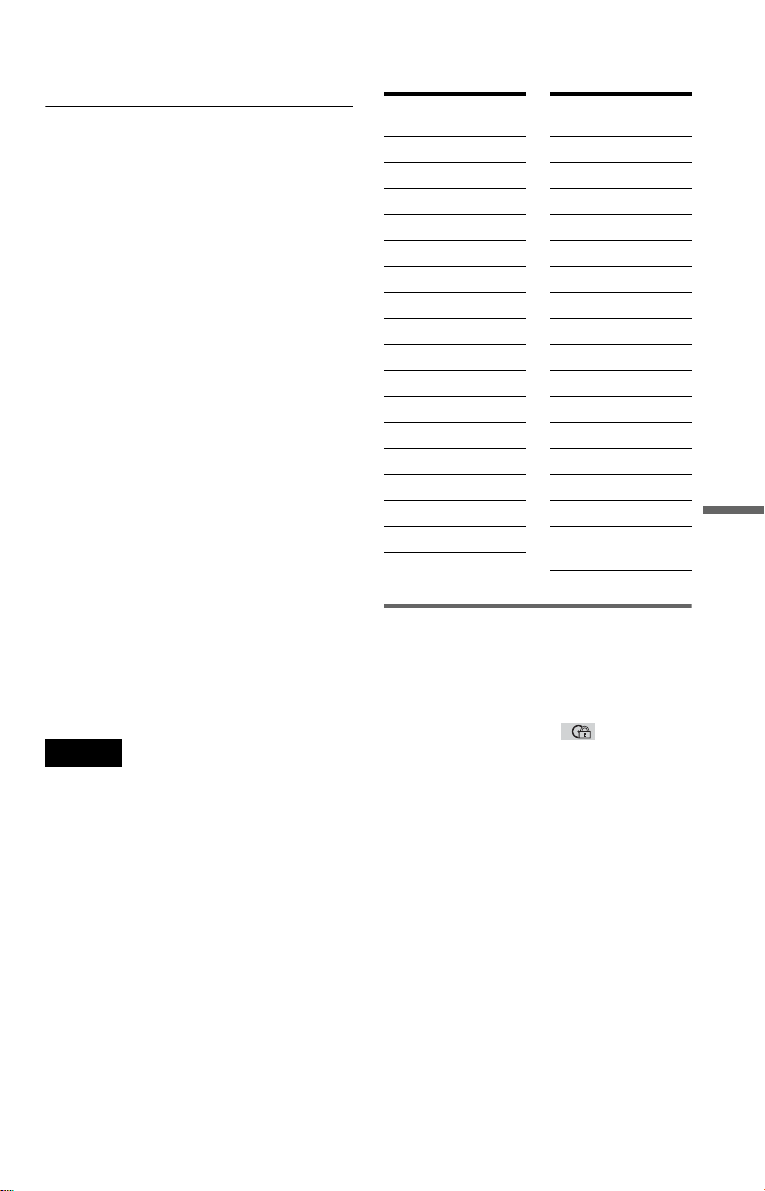
The lower the value, the stricter the
limitation.
To turn off the Parental Control function
Set “LEVEL” to “OFF” i n St ep 8.
To play a disc for which Parental Control is
set
1 Insert the disc an d pr ess H.
The display for enter i ng your password
appears.
2 Enter your 4-digit password using X/x to
select the digit, followed by C/c to move
the cursor, then press E N TER. You can
also use the number buttons to enter your
password (DVP-NS415 only).
The player starts playback.
z Hint
If you forget your password, remove the disc and
repeat Steps 1 to 3 of “Parental Cont ro l (limiting
playback by children).” When you ar e aske d to
enter your password, enter “199703” using X/x to
select the digit, followed by C/c to move the cursor,
then press ENTER. (Press c after the 4th digit to
allow the entire 6-digit number to be entere d.) T he
display will ask you to enter a new 4-digit
password. After you enter a new 4-digit password in
Step 4, replace th e disc in the player and press H.
When the display for entering your password
appears, enter your new password. You can also use
the number buttons to enter the digits (DVP-NS415
only).
Note
When you play DVDs which do not have the
Parental Control function, playback cannot be
limited on this player.
Area Code
Standard Code
number
Argentina 2044
Australia 2047
Austria 2046
Belgium 2057
Brazil 2070
Canada 2079
Chile 2090
China 2092
Denmark 2115
Finland 2165
France 2174
Germany 2109
India 2248
Indonesia 2238
Italy 2254
Japan 2276
Standard Code
Korea 2304
Malaysia 2363
Mexico 2362
Netherlands 2376
New Zealand 2390
Norway 2379
Pakistan 2427
Philippines 2424
Portugal 2436
Russia 2489
Singapore 2501
Spain 2149
Sweden 2499
Switzerland 2086
Thailand 2528
United
Kingdom
number
2184
Changing the password
1 Press DISPLAY while the player is in
stop mode.
The Control Bar appears.
2 Press X/x to select (PARENTAL
CONTROL), then press ENTER.
The options for “PARENTAL
CONTROL” ap pear.
3 Press X/x to select “PASSWORD
t,” then press ENTER.
The display for entering the pa ssword
appears.
4 Enter your 4-digit passwo rd using X/x
to select the digit, followed by C/c to
move the cursor, then press ENTER.
You can also use the number buttons to
enter your p assword (DVP-NS415 on ly).
Using Various Additiona l Fun ctions
,continued
55
Page 56
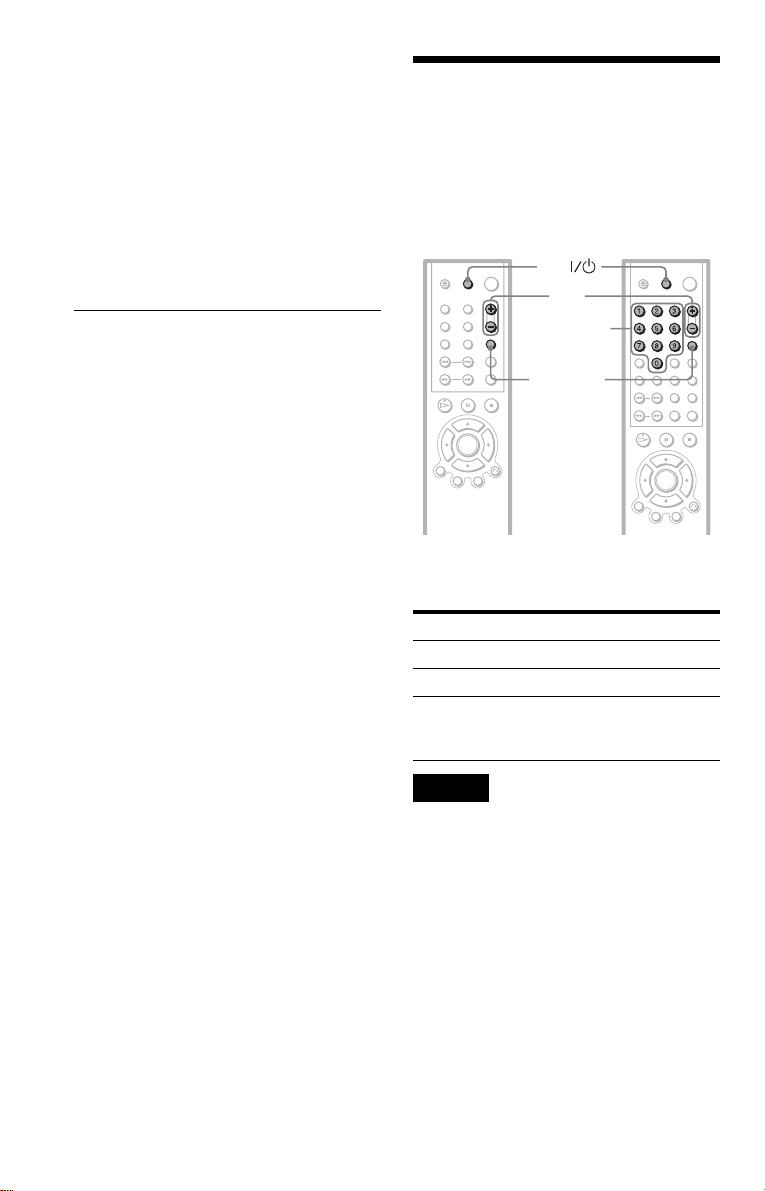
5 Enter a new 4-digit password using X/
x to select the digit, followe d by C/c
to move the cursor, then press ENTER.
You can also use th e number buttons to
enter your password (DVP-NS415 only).
6 To confirm your password, re-enter it
using X/x to select the digit, followed
by C/c to move the cursor, then press
ENTER.
You can also use th e number buttons to
enter your password (DVP-NS415 only).
If you make a mistake enter i ng your
password
Press C befor e you press ENTER and input
the correct number.
If you make a mistake
Press O RETURN.
To turn off the display
Press DISPLAY repeatedly until the display
is turned off.
Controlling Your TV wi th the Supplied Remote
You can control the sound level, input source,
and power switch of your Sony TV wi t h the
supplied remote.
DVP-NS305 DVP-NS415
TV
VOL
Number
buttons
TV/VIDEO
You can control your TV using the buttons
below.
By pressing You can
TV [/1 Turn the TV on or off
VOL +/– Adjust the volume of the TV
TV/VIDEO Switch the TV’s input source
between the TV and other
input sources.
56
Note
Depending on the unit being connected, you ma y
not be able to control your TV using some of the
buttons.
Page 57
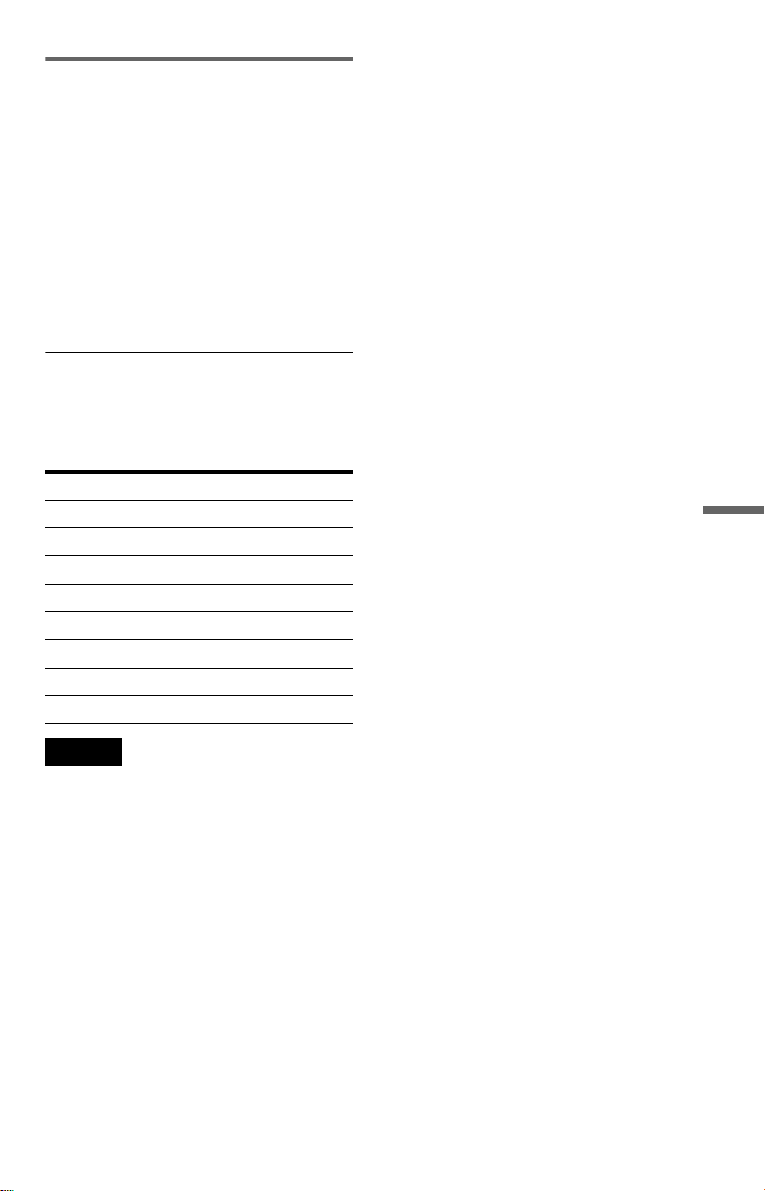
Controlling other TVs with the
remote (DVP-NS415 only)
You can control the sound level, input source,
and power switch of no n- Sony TVs as well.
If your TV is listed in the ta ble b elow, se t the
appropriate manuf acturer’s code.
1 While holding down TV [/1, press the
number buttons to select your TV’s
manufacturer’s code (see the table
below).
2 Release TV [/1.
Code number s of co ntrollable TVs
If more than one code number is listed, try
entering them one at a time until yo u find the
one that works with your TV .
Manufacturer Code number
Sony (default) 01
JVC 33
LG 06
Panasonic 17, 49
Philips 06, 08
Samsung 23
Sharp 29
Toshiba 38
Using Various Additiona l Fun ctions
Notes
• If you enter a new code number, the code number
previously entered will be erased.
• When you replace the batteries of the remote, the
code number you have set may be rese t to the
default setting. Set the appropr iate code number
again.
57
Page 58
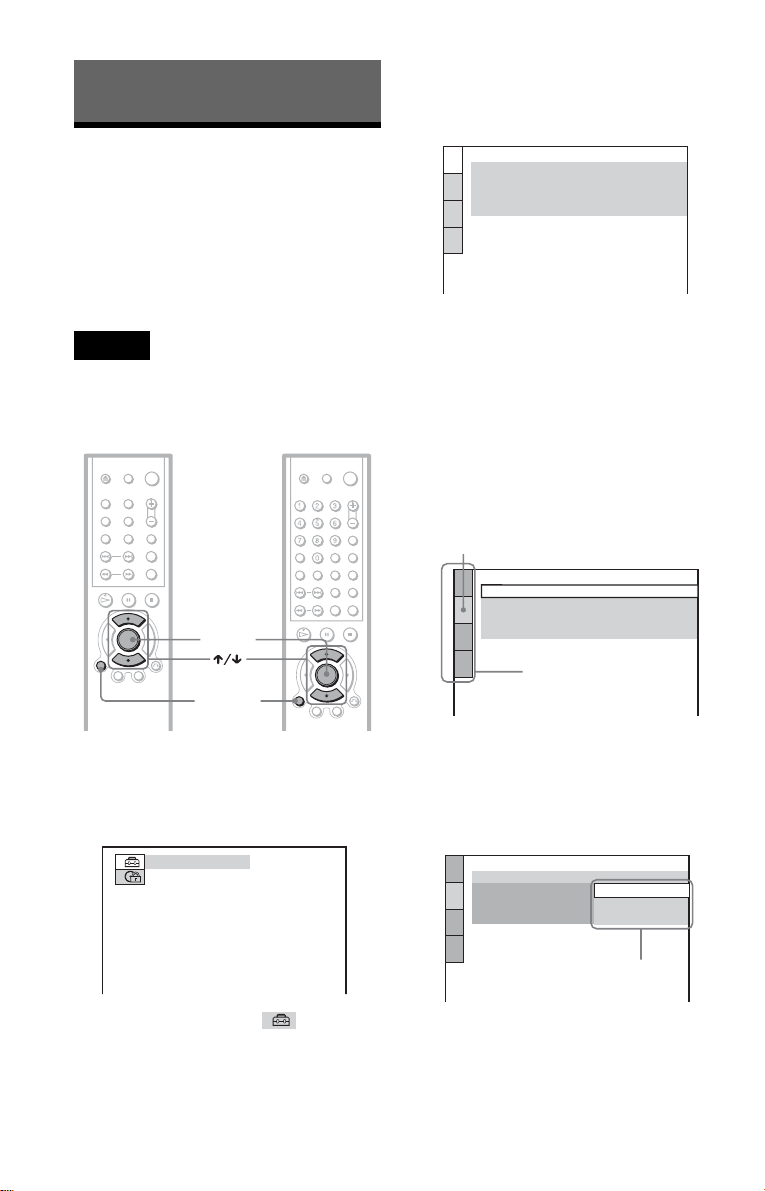
Settings and Adjustments
3 Press X/x to select “CUSTOM,”
then press ENTER.
The Setup Displ ay appears.
Using the Setup Di sp l ay
By using the Se t up Display, you can make
various adjustments to items such as picture
and sound. You can also set a language for the
subtitles and the Setup Display, among other
things. For details on each Setup Display
item, see pages from 59 to 64.
Note
Playback settings sto re d in the disc take priority
over the Setup Display settings and not all the
functions described may work.
DVP-NS305 DVP-NS415
ENTER
DISPLAY
LANGUAGE SETUP
OSD:
MENU:
AUDIO:
SUBTITLE:
ENGLISH
ENGLISH
ORIGINAL
ENGLISH
4 Press X/x to select the setup item
from the displayed list:
“LANGUAGE SETUP,” “SCREEN
SETUP,” “CUSTOM SETUP,” or
“AUDIO SETUP.” Then press
ENTER.
The Setup item is selected.
Example: “SCREEN SETUP”
Selected item
SCREEN SETUP
TV TYPE:
COLOR SYSTEM:
SCREEN SAVER:
BACKGROUND: JACKET PICTURE
Setup items
16:9
AUTO
ON
1 Press DISPLAY when t he p layer is
in stop mode.
The following Cont rol Bar appears.
QUICK
2 Press X/x to select (SETUP),
then press ENTER.
58
5 Select an item using X/x, then
press ENTER.
The options for the selected item appear.
Example: “TV TYPE”
SCREEN SETUP
TV TYPE:
COLOR SYSTEM:
SCREEN SAVER:
BACKGROUND:
4:3 LETTER BOX
16:9
16:9
4:3 PAN SCAN
Options
Page 59
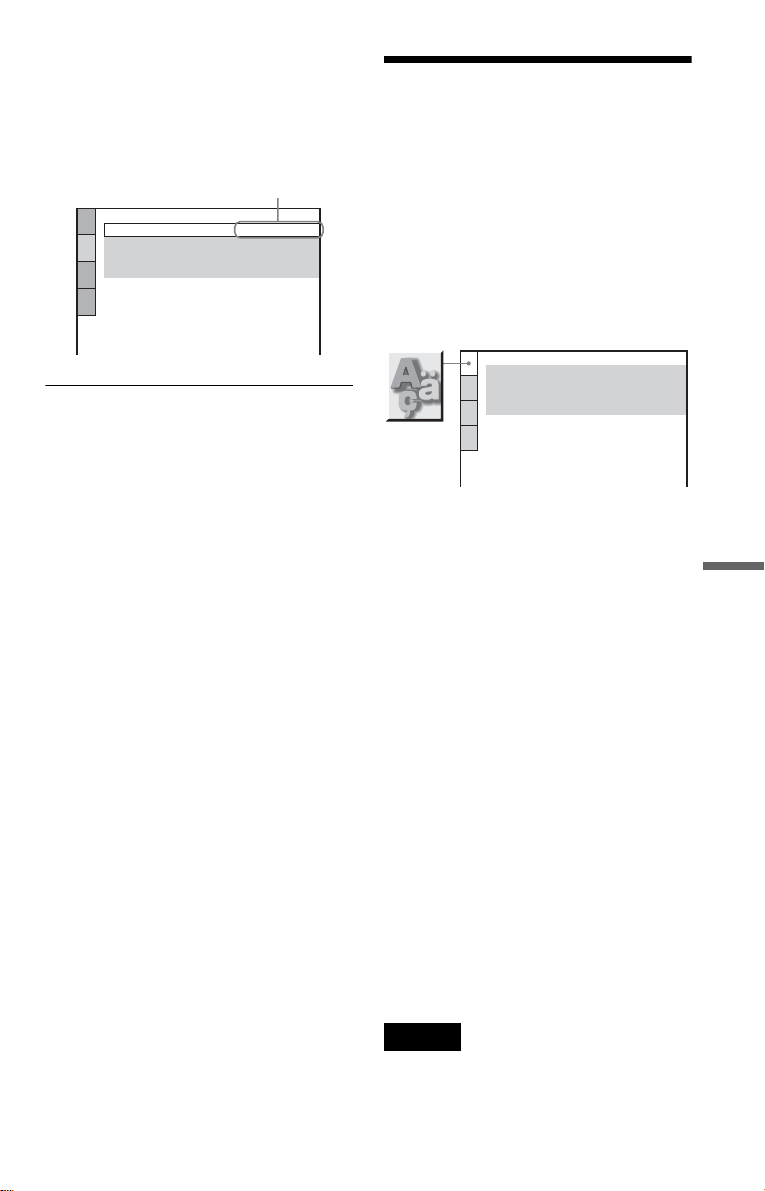
6 Select a setting using X/x, then
press ENTER .
The setting is selected and setup is
complete.
Example: “4:3 PAN SCAN”
Selected setting
SCREEN SETUP
TV TYPE:
COLOR SYSTEM:
SCREEN SAVER:
BACKGROUND: JACKET PICTURE
To turn off the display
Press DISPLAY repeatedly until the display
is turned o ff.
4:3 PAN SCAN
AUTO
ON
Setting the Display or
Sound Track Language
(LANGUAGE SETUP)
“LANGUAGE SETUP” allows you to set
various languages for the on-screen display or
sound track.
Select “LANGUAGE SETUP” in the Setup
Display. To use the display, see “Using the
Setup Display” (page 58).
LANGUAGE SETUP
OSD:
MENU:
AUDIO:
SUBTITLE:
ENGLISH
ENGLISH
ORIGINAL
ENGLISH
To enter the Quick Setup mode
Select “QUICK” in Step 3. Follow from Step
5 of the Quick Setup ex pl anation to make
basic adjustment (page 25).
To reset all of the “SETUP” settings
If you select “RESET” in Step 3, you can
reset all of the “SETUP” settings on pages 59
to 64 to the default settings. After you select
“RESET” and pres s EN TER, select “YE S”
and press ENTER to reset the settings (it
takes a few seconds to complete), or select
“NO” and press ENTER to return to the
Control Bar. Do not press [/1 when resetting
the player.
◆OSD (On-Screen Display)
Switches the display language on the screen.
◆MENU (DVD only)
You can select t he desired languag e for the
disc’s menu.
◆AUDIO (DVD only)
Switches the lang uage of the sound track.
When you select “ORIGINAL,” the language
given priority in the disc is selected.
◆SUBTITLE (DVD only)
Switches the language of the subtitle reco rded
on the DVD.
When you select “AUDIO FOLLOW,” the
language for the subtitles changes according to
the language you selected for the sound track.
z Hint
If you select “OTHERS t” in “MENU,”
“SUBTITLE,” and “AUDIO,” select and enter a
language code from “Language Code List ” on
page 70 using X/x to select the digit, followed by
C/c to move the cursor. You can also use the
number buttons to enter the digits ( DVP -NS 415
only).
Note
When you select a language in “MENU,”
“SUBTITLE,” or “AUDIO” that is not recorded on
the DVD, one of the recorded languages will be
automatically selected.
Settings and Adjustments
59
Page 60
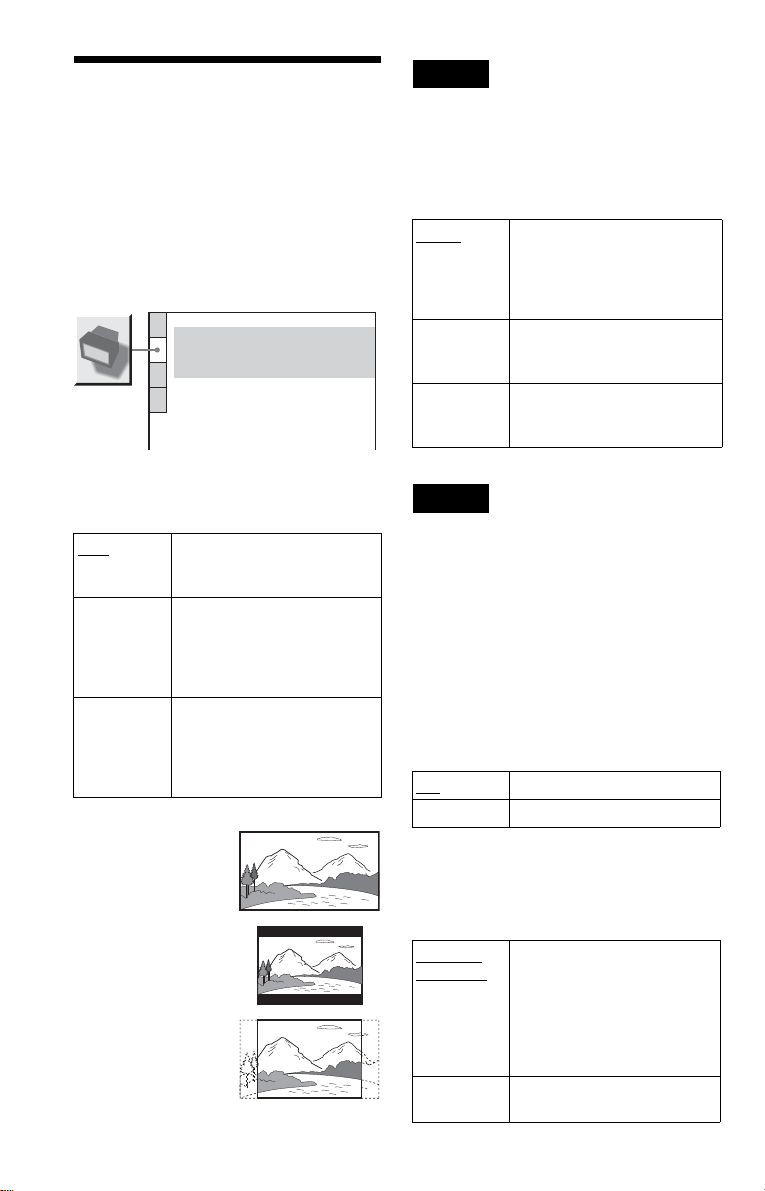
Settings for the Display
(SCREEN SETUP)
Choose settings according to the TV to be
connected.
Select “SCREEN SETUP” in the Setup
Display. To use the disp l ay, see “Using the
Setup Display” (page 58).
The default settings are underlined.
SCREEN SETUP
TV TYPE:
COLOR SYSTEM:
SCREEN SAVER:
BACKGROUND:
JACKET PICTURE
◆TV TYPE
Selects the aspect rati o of the connected TV
(4:3 standard or wide).
16:9 Select this when you connect a
4:3
LETTER
BOX
4:3
PAN SCAN
16:9
4:3 LETTER BOX
4:3 PAN SCAN
wide-screen TV or a TV with a
wide mode function.
Select this when you connect a
4:3 screen TV. Displays a wide
picture with bands on the upper
and lower portions of the
screen.
Select this when you connect a
4:3 screen TV. Automatically
displays the wide picture on the
entire screen and cuts off the
portions that do not fit.
16:9
AUTO
ON
Note
Depending on the DVD, “4:3 LETTER BOX” may
be selected automatically instead of “4:3 PAN
SCAN” or vice versa.
◆COLOR SYSTEM (VIDEO CD only)
Select the colour system when you play a
VIDEO CD.
AUTO Outputs th e video signal in the
PAL Changes the vide o signal of an
NTSC Changes the video signal of a
system of the VIDEO CD,
either PAL or NTSC. If your
TV is the DUAL system, select
AUTO.
NTSC VIDEO CD and outputs
it in the PAL system.
PAL VIDEO CD and outputs it
in the NTSC system.
Notes
• You cannot change the colour system for DVDs.
• You can change the colour system of this player
according to the connected TV. See page 16.
◆SCREEN SAVER
The screen saver image appear s w h en you
leave the player in pause or st op mode for 15
minutes, or when yo u pl ay back a CD or
DATA CD (MP3 audio) for more tha n 15
minutes. The screen saver will help prevent
your display device from becoming damaged
(ghosting). Press H to turn off the screen
saver.
ON
OFF Turns off the screen sa ver.
Turns on the screen saver.
◆BACKGROUND
Selects the background colour or picture on the
TV screen in stop mode or while playing a CD
or DATA CD (MP3 audio).
JACKET
PICTURE
GRAPHICS
The jacket picture (still picture)
appears, but only when the
jacket pict ure is already
recorded on the disc (CDEXTRA, etc.). If the di sc does
not contain a jacket picture, the
“GRAPHICS” pict ure appears.
A preset picture stored in the
player appears.
60
Page 61
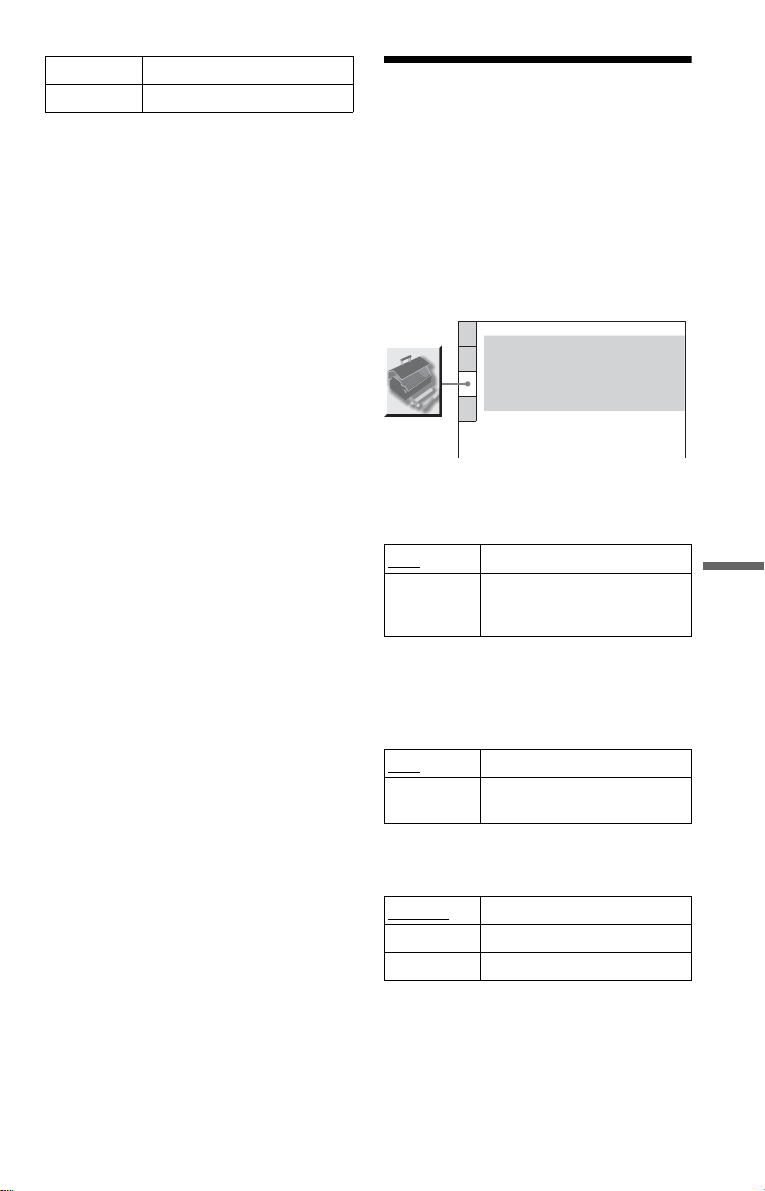
BLUE T he bac kground colour is blue.
BLACK The background colour is black.
Custom Settings (CUSTOM
SETUP)
Use this to set up playback related and other
settings.
Select “CUSTOM SETUP” in the Setup
Display. To use the display, see “Using the
Setup Display” (page 58).
The default settings are underlined.
CUSTOM SETUP
AUTO POWER OFF:
AUTO PLAY:
DIMMER:
PAUSE MODE:
TRACK SELECTION:
MULTI-DISC RESUME:
OFF
OFF
BRIGHT
AUTO
OFF
ON
◆AUTO POWER OFF
Switches the Auto Power Off setting on or
off.
OFF Switches this f un ction off.
ON The player enters standby mode
when left in stop mode for more
than 30 minutes.
◆AUTO PLAY
Switches the Auto Play setting on or off. Th is
function is useful when the player is
connected to a tim er (not supplied).
OFF
Switches this function off.
ON Automatically starts pla y ba ck
when the player is turned on.
◆DIMMER
Adjusts the lighting of the front panel display.
BRIGHT
Makes the lighting bright.
DARK Makes the lighti ng da rk.
OFF Turns off the lighting.
Settings and Adjustments
,continued
61
Page 62
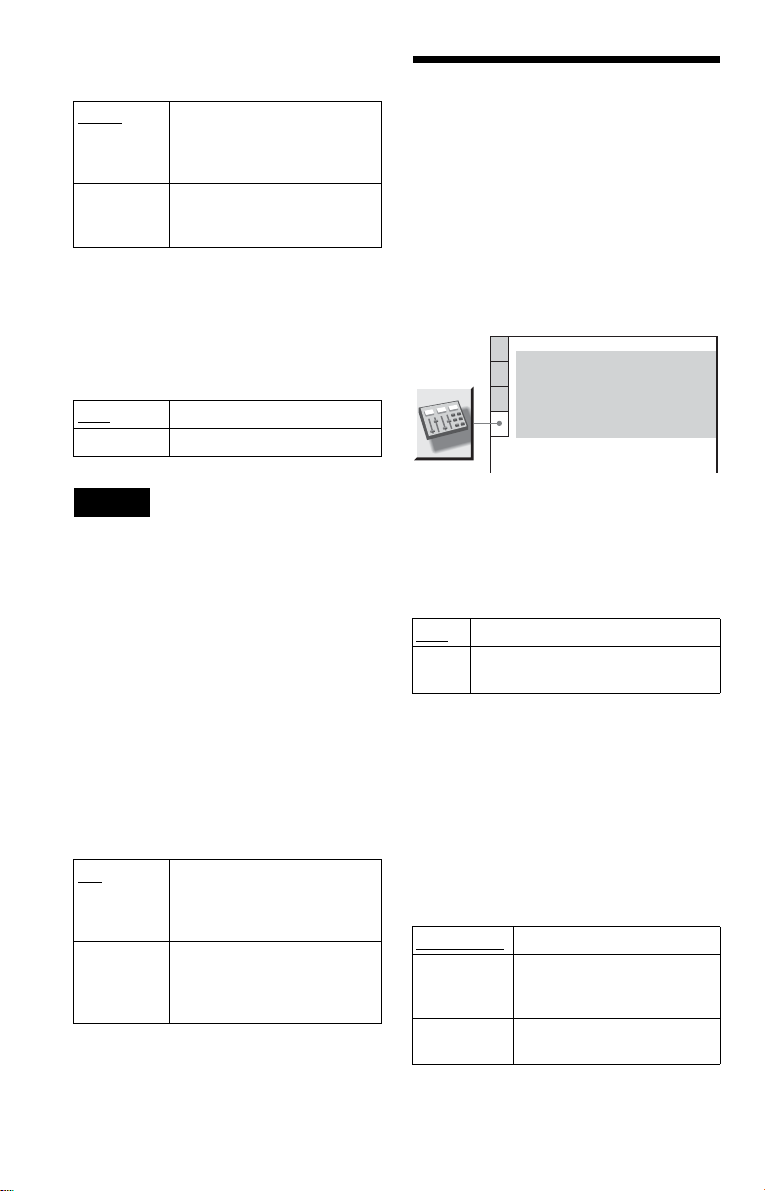
◆PAUSE MODE (DVD only)
Selects the picture i n pause mode.
AUTO The picture, in cluding subjects
that move dynamically, is
output with no jitter. Normally
select this position.
FRAME The pic ture, including subjects
that do not move dynamicall y,
is output in high resolution.
◆TRACK SELECTION (DVD only)
Gives the sound tra ck which contains the
highest numb er of channels pri ority when you
play a DVD on which multiple audio formats
(PCM, MPEG audio, D T S, or Dolby Digital
format) are re corded.
OFF
No priority given.
AUTO Priority given.
Settings for the Sound
(AUDIO SETUP)
“AUDIO SETUP” allows you to set t he sound
according to the playback and connection
conditions.
Select “AUDIO SETUP” in the Setup
Display. To use th e di splay, see “Using th e
Setup Display” (page 58).
The default sett i ngs are underlined.
AUDIO SETUP
AUDIO ATT:
AUDIO DRC:
DOWNMIX:
DIGITAL OUT:
DOLBY DIGITAL:
MPEG:
DTS:
DOLBY SURROUND
OFF
STANDARD
ON
D-PCM
PCM
OFF
Notes
• When you set th e it em to “AUT O,” the la ngua ge
may change. The “TRACK SELECTION” setting
has higher priority than the “AUDIO” settings in
“LANGUAGE SETUP” (page 59).
• If you set “DTS” to “OFF” (page 64), the DTS
sound track is not played even if you set “TRACK
SELECTION” to “AUTO.”
• If PCM, DTS, MP EG au dio, and Dolby Digital
sound tracks have the same number of cha nne ls,
the player selects PCM, DTS, Dolby Digital, and
MPEG audio sound tracks in this order.
◆MULTI-DISC RESUME (DVP-NS415
only) (DVD/VIDEO CD only)
Switches the Multi-disc Resume setting o n or
off. Resume play ba ck can be stored in
memory for up to 6 different DVD/VIDEO
CD discs (page 32).
ON
Stores the resume setting in
memory for up to six discs. (The
settings remain in memory even
if you select OFF.)
OFF Does not store the resum e
setting in memory. Playback
restarts at the resume poin t only
for the curren t disc i n the pl ayer.
◆AUDIO ATT (attenuation)
If the playback sound is distorted, s et this
item to “ON.” The player reduces the audio
output level.
This function affects the output of the LINE
OUT L/R (AUDIO) jacks
OFF Normally, select this position .
ON Select this when the playback sound
from the speakers is distorted.
◆AUDIO DRC (Dynamic Range Control)
(DVD only)
Makes the sound cl ear when the volu m e i s
turned down when playing a DVD that
conforms to “AUDIO DRC.” This affects t he
output from the following jacks:
–LINE OUT L/R (AUDIO) ja cks
–DIGITAL OUT (OPTICAL or COAXIAL)
jack only when “DOLBY DIGITAL” is set
to “D-PCM” (page 63).
STANDARD
Normally se lect this position.
TV MODE Makes the low sounds clear
even if you turn the volum e
down.
WIDE
RANGE
Gives you the feeling of being
at a live performance.
62
Page 63
◆DOWNMIX (DVD only)
Switches the method for mixing down to 2
channels when you play a DVD which has
rear sound elements (channels) or is recorded
in Dolby Digital format. For details on the
rear signal comp onents, see “Checking the
audio signal format” (page 44). This function
affects the output of the following jacks:
–LINE OUT L/R (AUDIO) jacks
–DIGITAL OUT (OPTICAL or COAXIAL)
jack when “DOLBY DIGITAL” is set to
“D-PCM” (page 63).
DOLBY
SURROUND
Select this w h en the player is
connected to an audio
componen t that conforms to
Dolby Surround (Pro Lo gic).
NORMAL Select th is when the play er is
connected to an audio
component that does not
conform to Dolby Surround (Pro
Logic).
If you connect a com ponent that does not
conform to the sel ected audio signal, a loud
noise (or no sound) w i ll come out from the
speakers, affe ct in g your ears or causing t he
speakers to be damaged.
◆DOLBY DIGITAL (DVD only )
Selects the type of Do lb y D i gi t al si gnal.
D-PCM Select this whe n the pl ayer is
connected to an audi o
component lacking a built-in
Dolby Digital decoder. You can
select whether the signals
conform to Dolby Surround
(Pro Logic) or not by making
adjustments to the
“DOWNMIX” item in
“AUDIO SETUP” (page 62).
DOLBY
DIGITAL
Select this when the player is
connected to an audi o
componen t w ith a built-in
Dolby Digital decoder.
◆DIGITAL OUT
Selects if audio signals are output via the
DIGITAL OUT (OPTICAL or COAXIAL)
jack.
Normally select this position. Whe n
ON
you select “ON,” see “Setting the
digital output signal” for further
settings.
OFF The influence of the digital circuit
upon the analog circuit is min imal.
Setting the digital output signal
Switches the method of outputting audio
signals when you connect a component such
as an amplifier (receiver) o r MD deck with a
digital input jack.
For connection details, se e page 20.
Select “DOLBY DIGITAL,” “MPEG,” an d
“DTS” after setting “DIGITAL OUT” to
“ON.”
AUDIO SETUP
AUDIO ATT:
AUDIO DRC:
DOWNMIX:
DIGITAL OUT:
DOLBY DIGITAL:
MPEG:
DTS:
DOLBY SURROUND
OFF
STANDARD
ON
D-PCM
PCM
OFF
◆MPEG (DVD only)
Selects the type of MP EG audio signal.
PCM
Select this when the player is
connected to an audi o
component lacking a built-in
MPEG decoder. If you play
MPEG audio sound tracks, the
player outputs stereo signals
via the DIGITAL OUT
(OPTICAL or COAXIAL)
jack.
MPEG Select this when the player is
connected to an audi o
componen t w ith a built-in
MPEG decoder.
Settings and Adjustments
,continued
63
Page 64

◆DTS (DVD only)
Selects whether or not to output DTS signals.
OFF Select this when the player is
ON Select this whe n the player is
connected to an audio
component lacking a built-in
DTS decoder.
connected to an audio
component with a built-in DTS
decoder.
Note
When you use the DIGITAL OUT (OPTICAL or
COAXIAL) jack to listen to MPEG audio signals
and set “MPEG” to “MPEG” in “AUDIO SETUP,”
no sound will come from your speakers if you select
one of the TVS modes.
64
Page 65

Additional Information
Troubleshooting
If you experience any of the following
difficulties while using the player, use this
troubleshooting guide to help remed y the
problem before requesting repairs. Should
any problem persis t, consult your neares t
Sony dealer.
Power
The power is not turned on.
, Ch eck that the power cord is connected
securely.
Picture
There is no picture/picture noise appears.
, Re-connect the connecti ng c o rd se curely.
, The connecting cords are damaged.
, Check the connection t o your T V (pag e 18 )
and switch the input selector on your TV so
that the signal from the pla yer appears on
the TV screen .
, The disc is dirty or flawed.
, If the pi cture output from your player goe s
through your VCR to get to your TV or if
you are connected to a combin ation TV/
VIDEO player, the copy-protection signal
applied to some DVD programmes could
affect picture quality. If you still experience
problems even when yo u connect your
player directly to you r TV , please try
connecting your player to your T V ’s S
VIDEO input (page 18).
, If the colour system of your player does not
match with that of your TV, change the
colour system of the player. For details, see
page 16. (You cannot change the colour
system of the DVD disc itself.)
Even though you set the aspect ratio in “TV
TYPE” of “SCREEN SETUP,” the picture
does not fill the screen.
, The aspect ratio of the disc is fixed on your
DVD.
Sound
There is no sound.
, Re-connect the connecting cord securely.
, The connecting co rd is damaged.
, The player is connecte d to t he wr ong input
jack on the amplifier (receiver) (page 22,
23, 24).
, The amplif ier (receiver ) input is not
correctly set.
, The player is in pause mode or in Slow -
motion Play mode.
, The player is in fast forward or fast reverse
mode.
, If the audio signal does not come through
the DIGITAL OUT (OPTICAL or
COAXIAL) jack, check the audio settings
(page 63).
, While playing a Super V CD on which the
audio track 2 is not recorded, no sound will
come out when you select “2:STEREO,”
“2:1/L,” or “2:2/R.”
Sound is noisy.
, When playing a CD with DTS sound tracks,
noise will come from the LINE OUT L/R
(AUDIO) jacks or DIGITAL OUT
(OPTICAL or COAXIAL) jack (page 28).
Additional Information
Sound distortion occ ur s.
, Set “AUDIO ATT” in “AUDIO SETUP” to
“ON” (page 62).
The sound volume is low.
, The sound volume is low on some DVDs.
The sound volume may improve i f you se t
“AUDIO DRC” to “TV MODE” (page 62).
, Set “AUDIO ATT” in “AUDIO SETUP” to
“OFF” (page 62).
Operation
The remote does not func tio n.
, There are obstacles between th e remot e an d
the player.
, The distance between the remote and the
player is too far.
, The remote is not pointe d at the remote
sensor on the player.
, The batteries in the remote are weak.
,continued
65
Page 66

The disc does not play.
, The disc is turned over.
Insert the disc w ith the play back side f acing
down on the disc tray.
, The disc is skewed.
The player cann ot p la y cer tain dis cs (p age 6 ).
,
, The region code on the DVD does not match
the player.
, Moistu re has co nde nse d inside the pla ye r
, The player cannot play CD-Rs, CD-RWs,
.
(page 3)
DVD-Rs, or DVD-RWs (video mode) that
are not finalized
(page 6)
.
Playback stops automatically .
, While playing discs with an a ut o pause
signal, the player stops playback at the auto
pause signal.
You cannot perform some functions such
as Stop, Search, Slow-motion Play,
Repeat Play, Shuffle Play, or Programme
Play.
, Depending on the disc, you may not be able
to do some of the operations above. See the
operating manual that comes with the disc.
The MP3 audio track cannot be played
(page 34).
, The DATA CD is not recorded in the MP3
format that conforms to ISO 9660 Level 1/
Level 2 or Joli et.
, The MP 3 aud io tra ck do es not have the
extension “.MP3.”
, The data is not formatted in MP3 even
though it has the extension “.MP3. ”
, The data is not MPEG1 Audio Layer 3 data.
, The p layer cannot play audio tracks in
MP3PRO format.
The title of the MP3 audio album or track
is not correctly displayed.
,
The player can only display numbers and
alphabet. Other characters are displayed as
asterisks.
The disc does not start playing from the
beginning.
, Programme Play, Shuffle Play, Repeat Play,
or A-B Repeat Play h as bee n sele cted (p age
36).
, Resume play has taken effe ct (page 32).
The player starts playing the disc
automatically.
, The disc features an auto playback function.
, “AUTO PLAY” in “CUSTOM SETUP” is
set to “ON” (page 61).
The language for the sound track cannot
be changed.
, Try using the DVD’s menu instead of the
direct selection button on the remote (page
33).
, M u l ti li ngual tracks are not recorded on the
DVD being played.
, The DVD prohibits the changing of the
language for the sound track.
The subtitle language cannot be changed
or turned off.
, Try using the DVD’s menu instead of the
direct selection button on the remote (page
33).
, M ultilingual subtitles are no t re corded on
the DVD being played.
, The DVD prohibits the changing of the
subtitles.
The angles cannot be changed.
, Try using the DVD’s menu instead of the
direct selection button on the remote (page
33).
, Multi-angles are not recorded on the DVD
being played.
, The angle can only be changed when the
“ ” indicator lights up on the front panel
display (page 9).
, The DVD prohibits changing of the angles.
The player does not op era t e properly.
, W hen static el ectricity, etc., causes th e
player to operat e abnormally, unplug the
player.
66
Page 67
Nothing is displayed on the front panel
display.
, “DIMMER” in “CUSTOM SETUP” is set
to “OFF.” Set “DIMMER” to “BRIGHT” or
“DARK” (page 61).
Self-diagnosis Function
(When letters/numbers appear in the
display)
5 numbers or letters are displayed on the
screen and on the front pan e l dis pla y.
, The se lf- diagnosis function was activated.
(See the table on page 67.)
The disc tray does not open and “LOCKED”
appears on the front panel display.
, Ch ild Lock is set (page 29).
The disc tray does not open and “TRAY
LOCKED” appears on the front p anel
display.
, Co ntact your Sony dealer or local
authorized Sony se rvice facility.
“Data error” ap pears on the TV screen
when playing a DATA CD.
, The MP3 audio track you want to pla y is
broken.
, The data is not MPEG1 Audio Layer 3 data.
When the self-diagnosis fun ction i s ac tivat ed
to prevent the player from malfunctioning, a
five-charact er service number (e.g., C 13 50)
with a combination of a letter and four digits
appears on the screen and the front panel
display. In this case, check the following
table.
C:13:50
First three
characters of
the service
number
C 13 The disc is dirty.
C 31 The disc is not inserted
E XX
(xx is a number)
Cause and/or corrective
action
, Clean the disc with a soft
cloth (page 7) .
correctly.
, Re-insert the disc
correctly.
To prevent a malf unction, the
player has performed th e
self-diagnosis function.
, Contact your nearest
Sony dealer or local
authorized Sony service
facility and give the 5character ser vice number.
Example: E 61 10
Additional Information
67
Page 68

Glossary
Chapter (page 9)
Sections of a pictur e or a m usic feature that
are smaller than titles. A tit le i s comp osed of
several chapters. Depending on th e di sc, no
chapters may be recorded.
Dolby Digital (page 24, 63)
Digital audio compression technology
developed by Dolb y Laboratories. Thi s
technology conforms to 5.1-channel surround
sound. The rea r cha nne l i s st ereo an d ther e is
a discrete subwoofer channel in this format.
Dolby Digital provides the same 5.1 discrete
channels of high quality digital audio found in
Dolby Digital cinema audio systems. Good
channel separa ti on is realized because all of
the channel dat a ar e recorded disc retely and
little deterioration is realized because all
channel data proce ss i ng i s digital.
Dolby Surround (Pro Logic) (page 23)
Audio signal processing technolog y that
Dolby Laboratories developed for surround
sound. When the input signal contai ns a
surround component, the Pro Logic pr ocess
outputs the front, centre and rear signals. The
rear channel is m onaural.
DTS (page 24, 64)
Digital audio compression technology that
Digital Theater Systems, Inc. developed. This
technology conforms to 5.1-channel surround
sound. The rea r cha nne l i s st ereo an d ther e is
a discrete subwoofer channel in this format.
DTS provides the same 5.1 discrete channels
of high quality digital audio.
Good channel se paration is realized because
all of the channel data is recorded discretely
and little deterioration is re ali ze d becau se al l
channel data proce ss i ng i s digital.
DVD (page 6)
A disc that contains up to 8 hours of moving
pictures even though its diameter is the same
as a CD.
The data capacity of a single-layer and singlesided DVD is 4.7 GB (Giga Byte), which is 7
times that of a CD. The data capacity of a
double-layer and single-sided DVD is 8.5
68
GB, a single-layer and double-sided DVD is
9.4 GB, and double-layer and double-sided
DVD is 17GB.
The picture data uses the MPEG 2 format, one
of the worldwide standards of digital
compression technology. The picture data is
compressed to about 1/40 (average) of its
original size. The DVD also uses a variable
rate coding technology that change s t he data
to be allocated according to the status of the
picture. Audio information is recorded in a
multi-channel format, such as Dolb y Digital,
allowing you to en jo y a m ore real audio
presence.
Furthermore, various advanced functions
such as the multi-angle, multilingual, and
Parental Cont rol functions are provide d with
the DVD.
Index (CD)/Video Index (VIDEO CD) (page
9)
A number that divides a track into sections to
easily locate the point you want on a CD or
VIDEO CD. Depending on the disc, no index
may be recorded .
MPEG audio (page 24, 63)
International standard coding system used to
compress aud i o di gi t al signals authorized by
ISO/IEC. MPEG 1 conforms to up to 2channel stereo. MPEG 2, used on DVDs,
conforms to up t o 7. 1-channel surround.
Scene (page 9)
On a VIDEO CD with PBC (playback
control) functions, t he menu scre ens, moving
pictures and st ill pictures are divide d i nto
sections called “scenes.”
Title (page 9)
The longest sect io n of a picture or music
feature on a DVD, movie, etc., in video
software, or the entire album in audio
software.
Track (page 9)
Sections of a picture or a music feature on a
CD or VIDEO CD (the length of a song).
Page 69

Specifications
System
Laser: Semiconductor laser
Signal format system: NTSC/PAL (See
page 16 to switch)
Audio characteristics
Frequency response: DVD VIDEO (PCM
96 kHz): 2 Hz to 44 kHz (±1.0 dB)/DVD
VIDEO (PCM 48 kHz): 2 Hz to 22 kHz
(±0.5 dB)/CD: 2 Hz to 20 kHz (±0.5 dB)
Signal-to-noise ratio (S/N ratio): 115 dB
(LINE OUT L/R (AUDIO) jacks only)
Harmonic distortion: 0.003 %
Dynamic range: DVD VIDEO: 103 dB/CD:
99 dB
Wow and flutter: Less than detected value
(±0.001% W PEAK)
The signals from LINE OUT L/R (AUDIO)
jacks are measured. When you play PCM
sound tracks with a 96 kHz sampling
frequency, the output signals from the
DIGITAL OUT (OPTICAL or COAXIAL)
jack are converted to 48 kHz sampling
frequency.
Outputs
(Jack name: Jack type/Output level/Load
impedance)
LINE OUT (AUDIO): Phono jack/2 Vrms/
10 kilohms
DIGITAL OUT (OPTICAL)*: Optical
output jack/–18 dBm (wave length
660 nm)
DIGITAL OUT (COAXIAL): Phono jack/
0.5 Vp-p/75 ohms
LINE OUT (VIDEO): Phono jack/1.0 Vp-p/
75 ohms
S VIDEO OUT: 4-pin mini DIN/Y:
1.0 Vp-p, C: 0.3 Vp-p (PAL), 0.286 Vp-p
(NTSC)/75 ohms
COMPONENT VIDEO OUT (Y, C
Phono jacks/Y : 1.0 Vp-p, C
0.7 Vp-p/75 ohms
* DVP-NS415 only
B, CR):
B, CR :
General
Power requirements:
220 – 240 V AC, 50/60 Hz
220 V AC, 60 Hz
110 V AC, 60 Hz
See page 2 for further information.
Power consumption: 12 W/13 W
See page 2 for further information.
Dimensions (approx.): 430 × 62 × 255 mm
(w/h/d) incl. projecting part s
Mass (approx.): 2.3 kg
Operating temperature: 5 °C to 35 °C
Operating humidity: 25 % to 80 %
Supplied accessories
See page 15.
Specifications and design are subject to
change without notice.
ENERGY STAR
As an
ENERGY STAR
Corporation has determined that this product
meets the
energy efficiency.
R
is a U.S. registered mark.
R
ENERGY STAR
Partner, Sony
R
guidelines for
Additional Information
69
Page 70

Language Code List
For details, see pages 44, 48, 59.
The language spelli ngs conform to the ISO 639: 1988 (E/F) standard.
Code Language Code Language Code Language Code Language
1027 Afar
1028 Abkhazian
1032 Afrikaans
1039 Amharic
1044 Arabic
1045 Assamese
1051 Aymara
1052 Azerbaijani
1053 Bashkir
1057 Byelorussian
1059 Bulgarian
1060 Bihari
1061 Bislama
1066 Bengali;
Bangla
1067 Tibetan
1070 Breton
1079 Catalan
1093 Corsican
1097 Czech
1103 Welsh
1105 Danish
1109 German
1130 Bhutani
1142 Greek
1144 English
1145 Esperanto
1149 Spanish
1150 Estonian
1151 Basque
1157 Persian
1165 Finnish
1166 Fiji
1171 Faroese
1174 French
1181 Frisian
1183 Irish
1186 Scots Gaelic
1194 Galician
1196 Guarani
1203 Gujarati
1209 Hausa
1217 Hindi
1226 Croatian
1229 Hungarian
1233 Armenian
1235 Interlingua
1239 Interlingue
1245 Inupiak
1248 Indonesian
1253 Icelandic
1254 Italian
1257 Hebrew
1261 Japanese
1269 Yiddish
1283 Javanese
1287 Georgian
1297 Kazakh
1298 Greenlandic
1299 Cambodian
1300 Kannada
1301 Korean
1305 Kashmiri
1307 Kurdish
1311 Kirghiz
1313 Latin
1326 Lingala
1327 Laothian
1332 Lithuanian
1334 Latvian;
Lettish
1345 Malagasy
1347 Maori
1349 Macedonian
1350 Malayalam
1352 Mongolian
1353 Moldavian
1356 Marathi
1357 Malay
1358 Maltese
1363 Burmese
1365 Nauru
1369 Nepali
1376 Dutch
1379 Norwegian
1393 Occitan
1403 (Afan)Orom o
1408 Oriya
1417 Punjabi
1428 Polish
1435 Pashto;
Pushto
1436 Portuguese
1463 Quechua
1481 Rhaeto-
Romance
1482 Kirundi
1483 Romanian
1489 Russian
1491 Kinyarwanda
1495 Sanskrit
1498 Sindhi
1501 Sangho
1502 Serbo-
Croatian
1503 Singhalese
1505 Slovak
1506 Slovenian
1507 Samoan
1508 Shona
1509 Somali
1511 Albanian
1512 Serbian
1513 Siswati
1514 Sesotho
1515 Sundanese
1516 Swedish
1517 Swahili
1521 Tamil
1525 Telugu
1527 Tajik
1528 Thai
1529 Tigrinya
1531 Turkmen
1532 Tagalog
1534 Setswana
1535 Tonga
1538 Turkish
1539 Tsong a
1540 Tatar
1543 Twi
1557 Ukrainian
1564 Urdu
1572 Uzbek
1581 Vietnamese
1587 Volapük
1613 Wolof
1632 Xhosa
1665 Yoruba
1684 Chinese
1697 Zulu
1703 Not specified
70
Page 71

Index
Numerics
16:9 60
4:3 LETTER BOX
4:3 PAN SCAN
5.1 Channel Surround
60
60
44
A
A-B REPEAT 39
34
Album
48
ANGLE
44, 59
AUDIO
AUDIO ATT
AUDIO DRC
AUDIO SETUP
AUTO PLAY
AUTO POWER OFF
62
62
62
61
61
B
BACKGROUND 60
15
Batteries
49
BNR
C
CD 28
CHAPTER
Chapter
Child Lock
COLOR SYSTEM
Connecting
Continuous play
Control Bar
CUSTOM
CUSTOM PARENTAL
CUSTOM PICTURE MODE
CUSTOM SETUP
41
9, 68
29
adjusting for VIDEO CD
60
changing the output sign al
16
18
CD/VIDEO CD
28
DVD
28
13
58
CONTROL
50
52
61
D
DATA CD 6, 34
DIGITAL OUT
Digital output
DIGITAL VIDEO
ENHANCER
DIMMER
Display
Control Bar display
Front panel display
Setup Display
63
63
51
61
13
9
58
DOLBY DIGITAL
44, 63, 68
DOWNMIX
24, 44, 64, 68
DTS
6, 28, 68
DVD
DVD VIDEO
F
Fast forward 30
Fast reverse
Front panel display
H
Handlin g discs 7
Hooking up
I
INDEX 41
Index
68
L
LANGUAGE SETUP 59
Locating
a specific point by watching
the TV screen
M
MENU 59
Menu
DVD’s menu
top menu
MODE CHANGE
6, 34
MP3
24, 44, 63, 68
MPEG
MULTI-DISC RESUME
62
Multi-mode Playback Dial
N
NUMBER INPUT 41
O
On-screen display
Control Bar display
Setup Display
59
OSD
P
PARENTAL CONTROL 52
PAUSE MODE
PBC Playback
Playback Dial
PRO LOGIC
PROGRAM
Programme Play
23, 24,
63
6
30
9
18
30
33
33
31
58
62
33
31
23, 63, 68
36
36
13
32,
31
Q
QUICK 59
Quick Setup
25, 59
R
Remote 15, 56
REPEAT
Repeat Play
REPLAY
RESET
Resume Play
38
38
29
59
32
S
S VIDEO output 18
41
SCENE
9, 68
Scene
SCREEN SAVER
SCREEN SETUP
Searching
58
SETUP
Setup Display
SHUFFLE
Shuffle Play
Slow-moti on Play
Speakers
Hooking up
SUBTITLE
SURROUND
60
60
30
58
38
38
31
20
48, 59
21, 22, 45
T
TIME/TEXT 41, 42
41
TITLE
9, 68
Title
TOP MENU
TRACK
Track
TRACK SELECTION
Troubleshooting
TV TYPE
TVS (TV Virtual Surround)
45
33
41
9, 68
62
65
60
U
Usable discs 6
V
VIDEO CD 6, 28
71
Page 72

Sony Corporation Printed in Malaysia
 Loading...