

Sony DVP-NS300B, DVP-NS300BX, DVP-NS300S Operating Instruction

3-069-729-11(1)
CD/DVD Player
Operating Instructions
DVP-NS300
© 2001 Sony Corporation

WARNING
Welcome!
To prevent f ire or shoc k hazard,
do not expose th e unit to rain or
moisture.
To avoid elec trical shock, do
not open the cabinet. Ref er
servicing to qualified pers onnel
only.
Mains lead must only be
changed at a qualified serv ice
shop.
This appliance is classified as a
CLASS 1 LASER product. The
CLASS 1 LASER PRODUCT
MARKING is located on the rear
exterior.
CAUTION
The use of optical instruments with
this product will increase eye hazard.
As the laser beam used in this CD/
DVD player is harmful to eyes, do
not attempt to disassemble the
cabinet.
Refer servicing to qualified personnel
only.
Notice for customers in the
United Kingdom and Republic
of Ireland
A moulded plug complying with
BS1363 is fitted to this equipment for
your safety and convenience.
Should the fuse in the plug supplied
need to be replaced, a 5 AMP fuse
approved by ASTA or BSI to
BS1362, (i.e., marked with or
mark) must be used.
If the plug supplied with this
equipment has a detachable fuse
cover, be sure to attach the fuse cover
after you change the fuse. Never use
the plug without the fuse cover. If
you should lose the fuse cover, please
contact your nearest Sony service
station.
Precautions
Safety
• This unit operates on 220 – 240 V
AC, 50/60 Hz. Check that the unit's
operating voltage is identical with
your local power supply.
• If anything falls into the cabinet,
unplug the unit and have it checked
by qualified personnel before
operating it any further.
• The unit is not disconnected from
the mains as long as it is connected
to the mains outlet, even if the unit
itself has been turned off.
• Unplug the unit from the wall outlet
if you do not intend to use it for an
extended period of time. To
disconnect the cord, pull it out by
the plug, never by the cord.
Installing
• Allow adequate air circulation to
prevent internal heat buildup.
• Do not place the unit on surfaces
(rugs, blankets, etc.) or near
materials (curtains, draperie s) that
may block the ventilation slots.
• Do not install the unit near heat
sources such as radiators, or air
ducts, or in a place subject to direct
sunlight, excessive dust,
mechanical vibration, or shock.
• Do not install the unit in an inclined
position. It is designed to be
operated in a horizontal position
only.
• Keep the unit and discs away from
equipment with strong magnets,
such as microwave ovens, or large
loudspeakers.
• Do not place heavy objects on the
unit.
• If the unit is brought directly from a
cold to a warm location, moisture
may condense inside the CD/DVD
player and cause damage to the
lenses. When you first install the
unit, or when you move it from a
cold to a warm location, wait for
about 30 minutes before operating
the unit.
Thank you for purchasing this Sony
CD/DVD Player. Before operating
this player, please read this manual
thoroughly and retain it for future
reference.
2

Precautions
On safety
• Caution – The use of optical instruments with
this product wil l increase eye hazard.
• Should any solid object or liqu id fall into the
cabinet, unplug the player and have it checked by
qualified personnel befo re operating it any
further.
On power sources
• The player is not d isconnected from the A C
power source (mains) as long as it is connected to
the wall outlet, even if the player itself has been
turned off.
• If you are not going to use the player for a long
time, be sure to disconnect the pl ayer from the
wall outlet. To disconnect the AC power cord
(mains lead), grasp the plug itself; never pull the
cord.
• Should the AC power cord (m ai ns le ad) need to
be changed, have it done a t a qualified service
shop only.
On placement
• Place the play er in a location with adequate
ventilation to prevent heat build-up in the player.
• Do not place the player on a soft surface such as
a rug that mi ght bloc k the ve ntilatio n holes on the
bottom.
• Do not place the pl ayer in a location near heat
sources, or in a place subject to di re ct sunlight,
excessive dust, or mechanical shock.
On adjusting volume
Do not turn up the volume while listening to a
section with very low level inputs or no audio
signals. If you do, the speakers may be damaged
when a peak level section is played.
On cleaning
Clean the cabinet, panel, and controls with a soft
cloth slightly moistened with a mild detergent
solution. Do not use any type of abrasive pad,
scouring powder or solvent such as alcohol or
benzine.
If you have any questions or problems concerning
your player, please co nsul t your nearest Sony
dealer.
On cleaning discs
Do not use a commercially available CD/DVD
cleaning disc. It may cause a malfunction.
IMPORTANT NOTICE
Caution: The enclosed DVD player is capable
of holding a still video image or on- screen
display image on your television scree n
indefinitely. If you leave the still video i ma ge
or on-screen display image displa ye d on your
TV for an extended period of time yo u risk
permanent damage to your telev ision screen.
Projection televisions are esp ecially
susceptible to this.
On operation
• If the player is brought directly from a cold to a
warm locat ion, or i s p lace d in a ve ry da mp r oom,
moisture may condense on the lenses inside the
player. Should this occur, the play e r m ay not
operate properly. In this case, remove the disc
and leave the player turned on for about half an
hour until the moisture evaporates.
• When you move the player, take out any discs. If
you don’t, the disc may be damage d.
3

Table of Contents
WARNING . . . . . . . . . . . . . . . . . . . . . . . . . . . . . . . . . . . . . . . . . . . . . . . . . . . . .2
Welcome! . . . . . . . . . . . . . . . . . . . . . . . . . . . . . . . . . . . . . . . . . . . . . . . . . . . . . .2
Precautions . . . . . . . . . . . . . . . . . . . . . . . . . . . . . . . . . . . . . . . . . . . . . . . . . . . .3
About this Manual . . . . . . . . . . . . . . . . . . . . . . . . . . . . . . . . . . . . . . . . . . . . . . .6
This Player Can Play the Following Discs . . . . . . . . . . . . . . . . . . . . . . . . . . . . .6
Notes about the Discs . . . . . . . . . . . . . . . . . . . . . . . . . . . . . . . . . . . . . . . . . . . .7
Index to Parts and Controls . . . . . . . . . . . . . . . . . . . . . . . . . . . . . . . . . . . . . . . .8
Guide to On-Screen Displays (Status Bar, Control Bar, Control Menu) . . . . . .12
Getting Started . . . . . . . . . . . . . . . . . . . . . . . . . . . . . . . . . . . .14
Quick Overview . . . . . . . . . . . . . . . . . . . . . . . . . . . . . . . . . . . . . . . . . . . . . . . .14
Step 1: Unpacking . . . . . . . . . . . . . . . . . . . . . . . . . . . . . . . . . . . . . . . . . . . . . .14
Step 2: Inserting Batteries into the Remote . . . . . . . . . . . . . . . . . . . . . . . . . . .14
Step 3: TV Hookups . . . . . . . . . . . . . . . . . . . . . . . . . . . . . . . . . . . . . . . . . . . . . 15
Step 4: Playing a Disc . . . . . . . . . . . . . . . . . . . . . . . . . . . . . . . . . . . . . . . . . . .16
Hookups . . . . . . . . . . . . . . . . . . . . . . . . . . . . . . . . . . . . . . . . .17
Hooking Up the Player . . . . . . . . . . . . . . . . . . . . . . . . . . . . . . . . . . . . . . . . . . .17
Step 1: Connecting the Video Cords . . . . . . . . . . . . . . . . . . . . . . . . . . . . . . . .17
Step 2: Connecting the Audio Cords . . . . . . . . . . . . . . . . . . . . . . . . . . . . . . . .19
Step 3: Connecting the Mains Lead . . . . . . . . . . . . . . . . . . . . . . . . . . . . . . . . .26
Step 4: Quick Setup . . . . . . . . . . . . . . . . . . . . . . . . . . . . . . . . . . . . . . . . . . . . .26
Playing Discs . . . . . . . . . . . . . . . . . . . . . . . . . . . . . . . . . . . . . .30
Playing Discs . . . . . . . . . . . . . . . . . . . . . . . . . . . . . . . . . . . . . . . . . . . . . . . . . .30
Resuming Playback from the Point Where You Stopped the Disc (Resume
Play) . . . . . . . . . . . . . . . . . . . . . . . . . . . . . . . . . . . . . . . . . . . . . . . . . . . . .32
Using the DVD’s Menu . . . . . . . . . . . . . . . . . . . . . . . . . . . . . . . . . . . . . . . . . .33
Playing VIDEO CDs with PBC Functions (PBC Playback) . . . . . . . . . . . . . . .34
Various Play Mode Function s (P rogra mm e Play , Shu ffle Pla y, Re pea t Pl ay, A-B
Repeat Play) . . . . . . . . . . . . . . . . . . . . . . . . . . . . . . . . . . . . . . . . . . . . . . . 35
Searching for a Scene . . . . . . . . . . . . . . . . . . . . . . . . . . . . . . . .39
Searching for a Particular Point on a Disc (Scan, Slow-motion play) . . . . . . .39
Searching for a Title/Chapter/Track/Index/Scene (Search mode) . . . . . . . . .40
Viewing Information About the Disc . . . . . . . . . . . . . . . . . . . . . .41
Checking the Playing Time and Remaining Time on the Front Panel Display .41
Checking the Playing Time and Remaining Time . . . . . . . . . . . . . . . . . . . . . .42
4

Sound Adjustments . . . . . . . . . . . . . . . . . . . . . . . . . . . . . . . . . 44
Changing the Sound . . . . . . . . . . . . . . . . . . . . . . . . . . . . . . . . . . . . . . . . . . . 44
TV Virtual Surround Sound Settings (TVS) . . . . . . . . . . . . . . . . . . . . . . . . . . 45
Enjoying Movies . . . . . . . . . . . . . . . . . . . . . . . . . . . . . . . . . . . 47
Changing the Angles . . . . . . . . . . . . . . . . . . . . . . . . . . . . . . . . . . . . . . . . . . . 47
Displaying the Subtitles . . . . . . . . . . . . . . . . . . . . . . . . . . . . . . . . . . . . . . . . . 47
Adjusting the Picture Quality (BNR) . . . . . . . . . . . . . . . . . . . . . . . . . . . . . . . . 48
Using Various Additional Functions . . . . . . . . . . . . . . . . . . . . . . 49
Locking Discs (Custom Parental Control, Parental Control) . . . . . . . . . . . . . . 49
Operation Sound Effects (Sound Feedback) . . . . . . . . . . . . . . . . . . . . . . . . . 54
Controlling Your TV with the Supplied Remote . . . . . . . . . . . . . . . . . . . . . . . 55
Settings and Adjustments . . . . . . . . . . . . . . . . . . . . . . . . . . . . . 56
Using the Setup Display . . . . . . . . . . . . . . . . . . . . . . . . . . . . . . . . . . . . . . . . 56
Setting the Display or Sound Track Language (LANGUAGE SETUP) . . . . . 57
Settings for the Display (SCREEN SETUP) . . . . . . . . . . . . . . . . . . . . . . . . . 58
Custom Settings (CUSTOM SETUP) . . . . . . . . . . . . . . . . . . . . . . . . . . . . . . 59
Settings for the Sound (AUDIO SETUP) . . . . . . . . . . . . . . . . . . . . . . . . . . . . 61
Additional Information . . . . . . . . . . . . . . . . . . . . . . . . . . . . . . . 64
Troubleshooting . . . . . . . . . . . . . . . . . . . . . . . . . . . . . . . . . . . . . . . . . . . . . . . 64
Self-diagnosis Function (When lett ers /num be rs app ear in the dis pl ay) . . . . . 66
Glossary . . . . . . . . . . . . . . . . . . . . . . . . . . . . . . . . . . . . . . . . . . . . . . . . . . . . . 67
Specifications . . . . . . . . . . . . . . . . . . . . . . . . . . . . . . . . . . . . . . . . . . . . . . . . . 69
Language Code List . . . . . . . . . . . . . . . . . . . . . . . . . . . . . . . . . . . . . . . . . . . . 70
List of Setup Display Items . . . . . . . . . . . . . . . . . . . . . . . . . . . . . . . . . . . . . . . 71
Index . . . . . . . . . . . . . . . . . . . . . . . . . . . . . . . . . . . . . . . . . . . . . . . . . . . . . . . . 73
5

About this Manual
•Instructions in this manual describe the
controls on the remote. You can also use the
controls on the player if they have the same
or similar name s as tho s e on the remote.
•The icon s used in this manual are describe d
below:
Icon Meaning Icon Meaning
z
Functions
available in
music CD
mode
More
convenient
features
Functions
available in
DVD video
mode
Functions
available in
VIDEO CD
mode
This Player Can Play the Following Discs
Format of discs
DVD VIDEO
Region code
Your DVD player has a region code printed
on the back of the unit and will only play
DVDs labelled with identical region codes.
DVDs labelled will also play on this
ALL
player.
If you try to play any other DVD, the
message “Playback prohibited by area
limitations.” will appear on the TV screen.
Depending on the DVD, no regi on code
indication may be labeled even though
playing the DVD is prohibited by area
restrictions.
X
Region code
0-000-000-00
CD/DVD PLAYER
AC 00V 00Hz
NO.
00W
SONY CORPORATION
MODEL NO.
MADE IN JAPAN
DVP–XXXX
Example of discs that the player cannot play
The player cannot play the follo win g di scs:
•CD-ROMs (PHOTO CDs included)
•CD-Rs
•Data part of CD-Extras
•DVD-ROMs
•DVD Audio discs
•HD layer on SACDs
VIDEO CD
Music CD
The “DVD VIDEO” logo is a trademark.
6
Also, the player cannot play the following
discs:
•A DVD with a different region code (page
67).
•A disc that has a non-standard shape (e.g.,
card, heart).
•A disc with paper or stickers on it.
•A disc that has the adhesive of cellophane
tape or a sticker still left on it.

Note on playback operations of DVDs and VIDEO CDs.
Notes about the Discs
Some playback operations of DVDs and
VIDEO CDs may be intentionally set by
software producers. Since this player pl ays
DVDs and VIDEO CDs according to the disc
contents the software producers designed,
some playback features may not be available.
Also, ref er to the instructions supplied with
the DVDs or VIDEO CDs.
Copyrights
This product incorporates copyright
protection tech nology that is prot ected by
method claims of cert ain U.S. patents, other
intellectual property rights owned by
Macrovision Corporation, and other rights
owners. Use of this copyright protection
technology must be authorized by
Macrovision Corporation, and is intended for
home and other limited viewin g us e s only ,
unless otherwise authorized by Macrovision
Corporation. Reverse engineering or
disassembly is prohibited.
On handling discs
•To keep the disc clean, handle the disc by its
edge. Do not touch the surface.
•Do not expose the disc to direct sunlight or
heat sources such as hot air duc ts, or leave
it in a car parked in direct sunlight as the
temperature may rise considerably inside
the car.
•After playing, store the disc in its case.
On cleaning
•Before playing, clean the disc with a
cleaning cloth.
Wipe the disc from the center out.
•Do not use solvents such as benzine,
thinner, commercially available cl eaners, or
anti-static spray intended for vinyl LPs.
continued
7

Index to Parts and Controls
For more information, refer to the pages indicated in parentheses.
Front panel
1 POWER switch/indicator (30)
2 BNR (Block Noise Reduction) button/
indicator (48)
3 SURROUND button/indicator (45)
4 Disc tray (30)
5 A (open/close) butto n ( 30 )
6 ./> (previous/next ) buttons (31)
7 C/X/x/c/ ENTER buttons (26)
8 TITLE button (33)
9 DVD MENU button (33)
q; O RETURN button (34)
qa DISPLAY button (12)
qs x (stop) button (30)
qd X (pause) button (31, 54)
qf H (play) button (30)
qg Front panel display (9)
qh (remote sensor) (14)
8

Front Panel Display
When playing back a DVD
Playing
Disc type
status
Lights up when the player outputs the signal in NTSC format
Current chapter (41)
DVD
DTS ANGLE REPEAT1
Current audio
signal (44)
NTSC
PGMMPEG SHUFFLE
Digital
A-B
Current play
mode (35)
TITLE CHAP HOUR MIN
Current title (41)
Lights up when you can change
the angle (47)
When playing back a VIDEO CD (PBC)
Disc type
VIDEO CD
CD
Current play mode
(35)
Playing
status
Lights up when the player outputs the signal in NTSC format
NTSC
PBC
A-B
Current scene (41)
Lights up when playing back a VIDEO CD with PBC (34)
When playing back a CD or VIDEO CD (without PBC)
Playing
status
VIDEO CD
CD
Lights up when the player outputs the signal in NTSC format
NTSC
PGM SHUFFLE
REPEAT1
A-B
TRACK INDEX MIN
Playing time (41)
MIN
Playing time (41)
SEC
SEC
SEC
Disc type
Current play mode
(35)
Current track and
index (41)
Playing time (41)
9
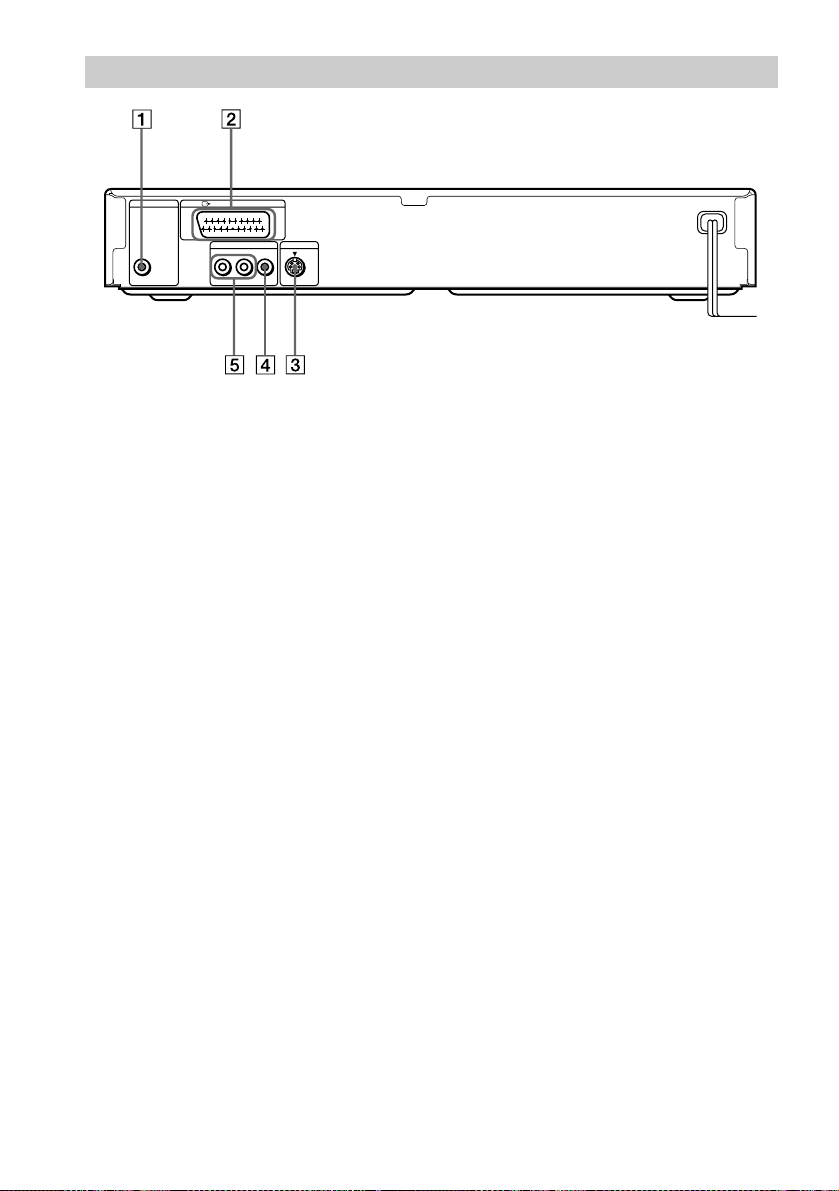
Rear Panel
DIGITAL OUT
PCM/DTS/MPEG/
DOLBY DIGITAL
COAXIAL
LINE (RGB)-TV
LINE OUT
R-AUDIO-L VIDEO
S VIDEO OUT
1 DIGITAL OUT (COAXIAL) jack (21,
22, 24)
2 LINE (RGB)-TV connector (15, 17)
3 S VIDEO OUT jack (17)
4 LINE OUT (VIDEO) jack (17)
5 LINE OUT L/R (AUDIO) jacks (20, 21,
22)
10
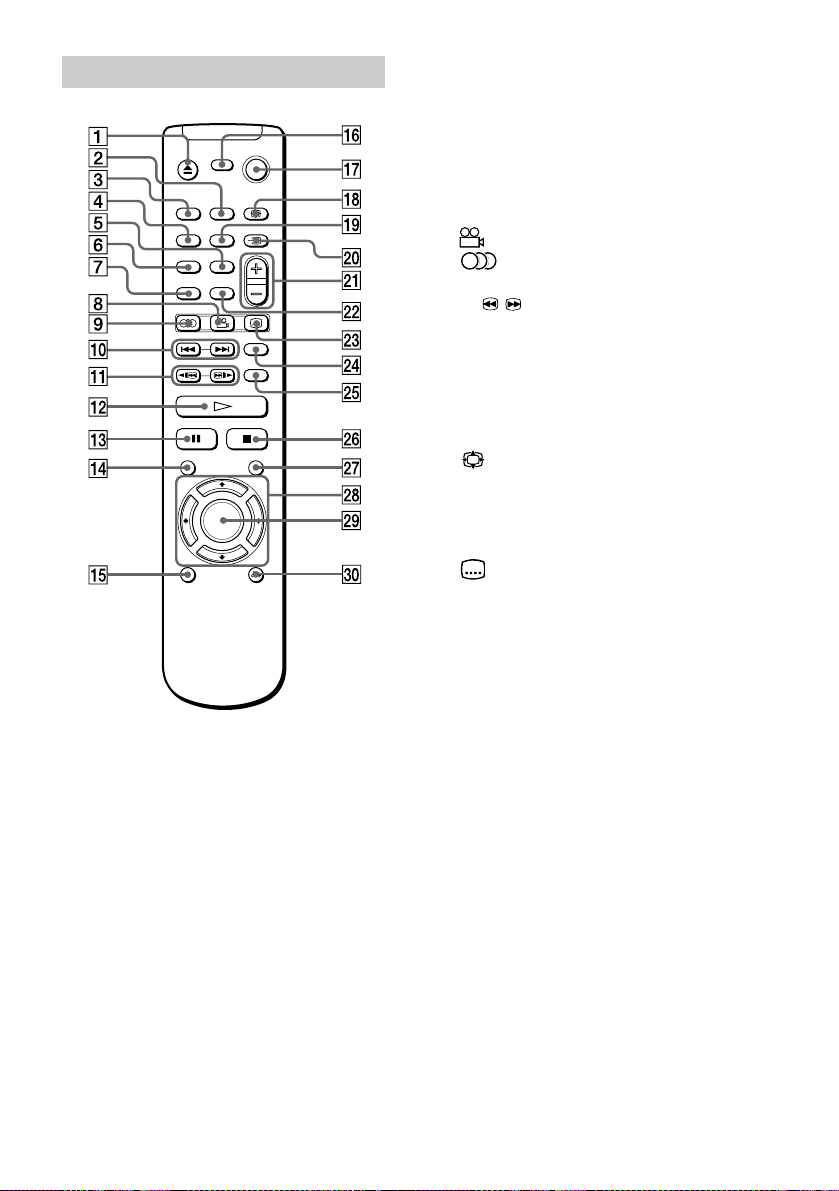
Remote
y
1 Z (open/close) button (31)
2 BNR (Block Noise Reduction) button
(48)
3 SURROUND button (45)
4 TIME/TEXT button (41)
5 REPEAT button (37)
6 SHUFFLE button (37 )
7 PROGRAM button (35)
8 (angle) button (47)
9 (audio) button (44)
q; ./> (previous/next) buttons (31)
qa / y (scan/slow) buttons (39)
qs H (play) button (30)
qd X (pause) button (31)
qf TITLE button (33)
qg DISPLAY button (56)
qh TV [/1 (on/standby) button (55)
qj [/1 (on/standby) button (54)
qk (wide mode) button (55)
ql A - B button (38)
w; t (TV/VIDEO) button (55)
wa 2 (volume) +/– buttons (55)
ws CLEAR button (35)
wd (subtitle) button (47)
wf SEARCH MODE button (40)
wg TV/DVD button (55)
wh x (stop) button (30)
wj DVD MENU button (33)
wk C/X/x/c buttons (26)
wl ENTER button (26)
e; O RETURN button (34)
11

Guide to On-Screen Displays (Status Bar, Control Bar, Control Menu)
DVD T41 – 8 T 0:08:41
3/2.1
The following explains the three type s of on- s creen displays used w ith this player:
Status Bar, Contr ol Bar, and Control Menu.
Status Bar
Displays the current playing status.
This display appears when the DISPLAY butto n i s pressed repeatedly duri ng playback.
The numbers in parentheses indicate reference pages.
Chapter number of
the DVD or the index
Type of disc being
played back.
number of the VIDEO
CD or CD (67).
Playback status
(BPlayback, XPause,
xStop, etc.).
Title number of
the DVD or the
track number of
the VIDEO CD
or CD (67).
(DVD playback only)
DOLBY DIGITAL
Format of the current audio
signal (44).
Lights up in green during Shuffle Play (35).
Lights up in
green during
Programme
Play (35).
Lights up in green during
Repeat Play (37).
Playing time or
remaining time
(41).
Unit being repeated.
CHAPTER
Example of when
Repeat Play is
selected. The display
will differ when A-B
Repeat Play is set.
12

Control Bar
2(7
)
The Control Bar appears when a playback function is selected by pressing the function’s butto n
on the remote.
Playback function icon.
Lights up in green
when a playback
function is selected.
Selected item or unit.
Example of when
(angle) is pressed
on the remote.
Control Menu
The Control Menu appears when the DISPLAY button is pressed when the player is in stop mode.
The number in parenthesis indicate reference pages.
SETUP (56)
• Select QUICK to make the minimum number of basic
adjustments to use the p layer.
• Select CUSTOM to make a full range of adjustments.
• Select RESET to return the adjustments to the default settings.
QUICK
Lights up in green during
Programme Play.
PROGRAM (35)
• Allows you to play titles, chapters or
tracks in any order you want.
CUSTOM
PARENTAL CONTROL
(49)
• Set this to limit the
playback of selected
discs.
13
Getting Started
Quick Overview
A quick overview presented in this chapter will give you enough information to start using the
player for your enjoyment. To use the surround sound features of this player, refer to “Hookups”
on page 17.
Note
You cannot connect this player to a TV that does not ha ve eit her a SCART (E UR O AV ) or video input jack.
Be sure to turn off the power of ea c h component before connecting.
Step 1: Unpacking
Check that you have the following items:
•Audio/video cord (pinplug × 3 y pinplug × 3) (1)
•Remote commander (remote) RMT-D126P (1)
•R6 (size AA) batteries (2)
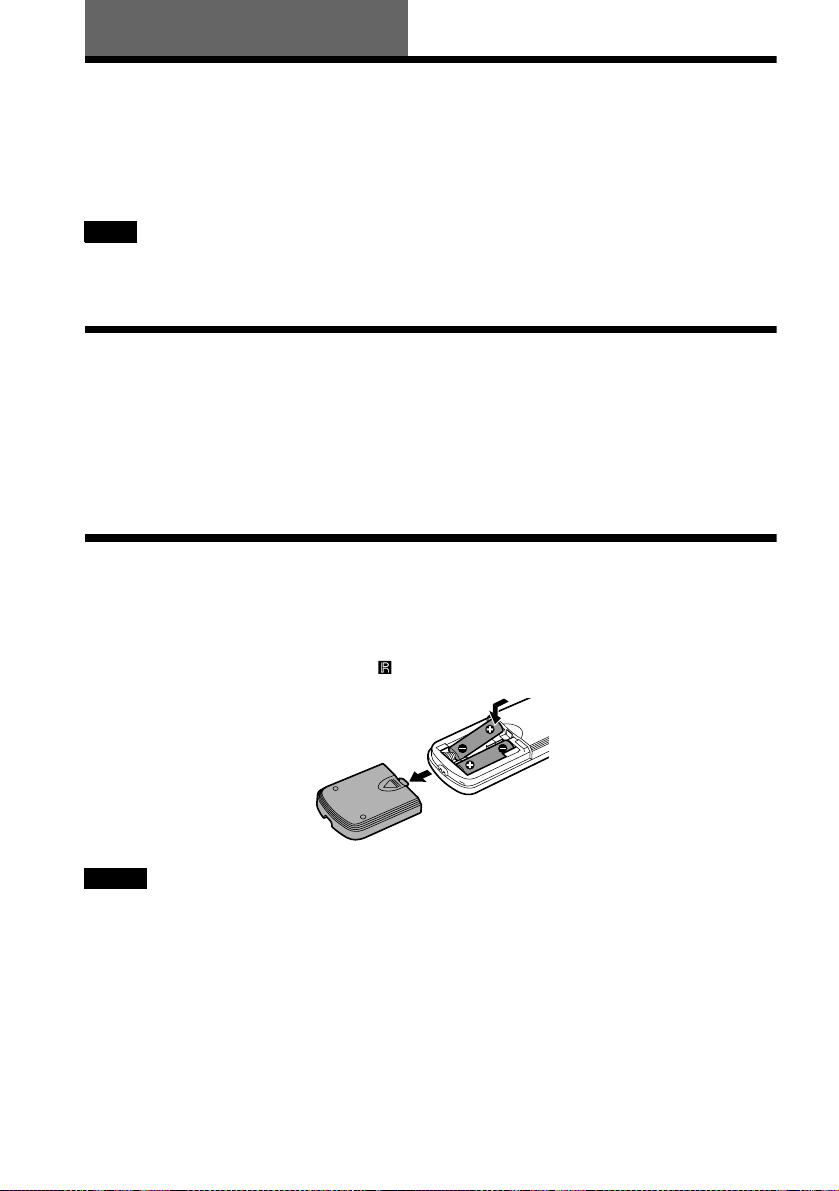
Step 2: Inserting Batteries into the Remote
You can control the player using the supplied remote. Insert two R6 (size AA) batteries by
matching the 3 and # ends on the batteri es to the markings i nside the comp artment. When using
the remote, point it at the remote sensor on the player.
Notes
• Do not leave the remote in an extremely hot or humid place.
• Do not drop any foreign object into the remote casing, particularly when replacing the batteries.
• Do not expose the rem ote se nsor to dir e c t light from the sun or lighting apparatus. Doing so may cause a
malfunction.
• If you do not use the remote for an ex te nde d pe r iod of time, remove the batteries to avoid possible damage from
battery leakage and corros ion .
14

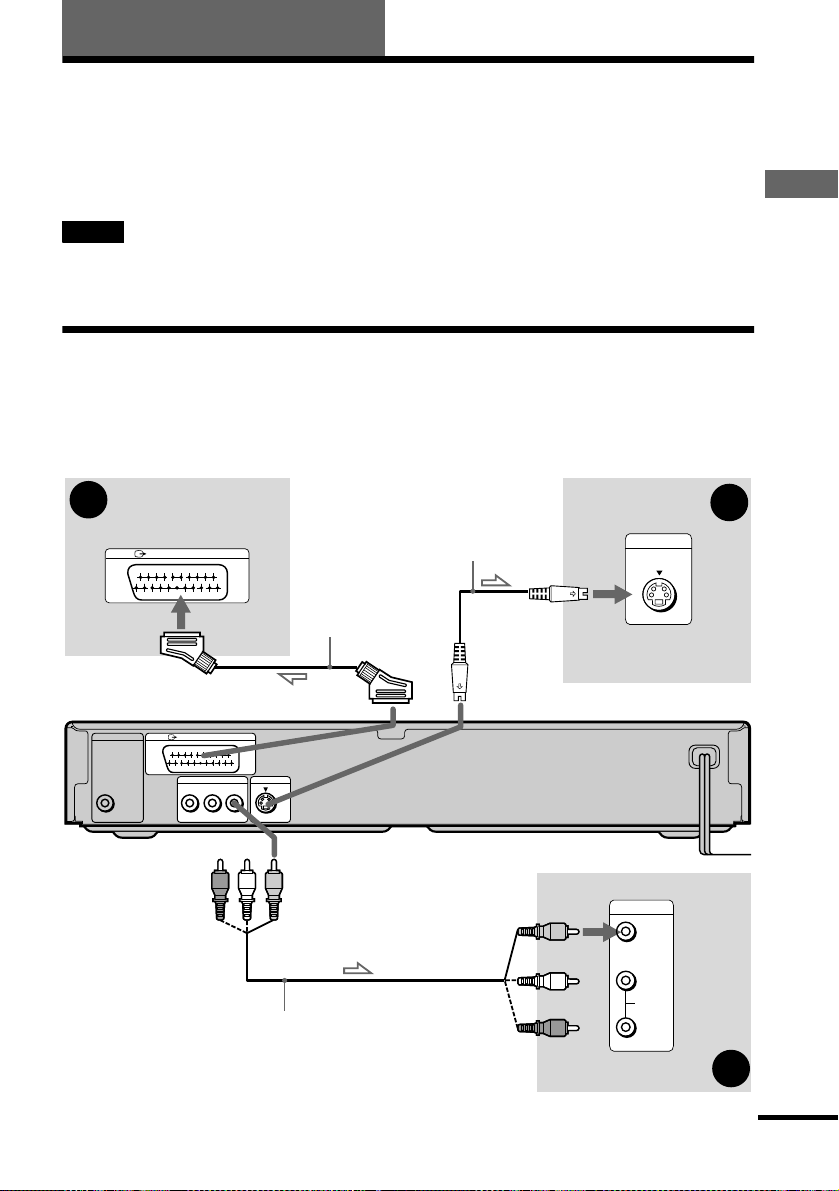
Step 3: TV Hookups
Connect a SCART (EURO AV) cord (not supplied) and the mains lead in the order (1~3)
shown below. Be sure to connect the mains lead last.
to SCART
(EURO AV) input
1 SCART (EURO AV)
LINE (RGB)-TV
LINE (RGB)-TV
DIGITAL OUT
PCM/DTS/MPEG/
DOLBY DIGITAL
COAXIAL
LINE OUT
R-AUDIO-L VIDEO
l: Signal flow
cord (not supplied)
to T LINE (RGB)-TV
CD/DVD Player
S VIDEO OUT
TV
3 Power source
When connecting to a standard 4:3 screen TV
Depending on the di sc, the image may not f it your TV screen.
If you want to change the aspect ratio, please refer to page 58.
Getting Started
2 Power source
If your TV does not have a SCART (EURO AV) connection
Refer to B in “Step 1: Connecting the Video Cords” (page 17).
15
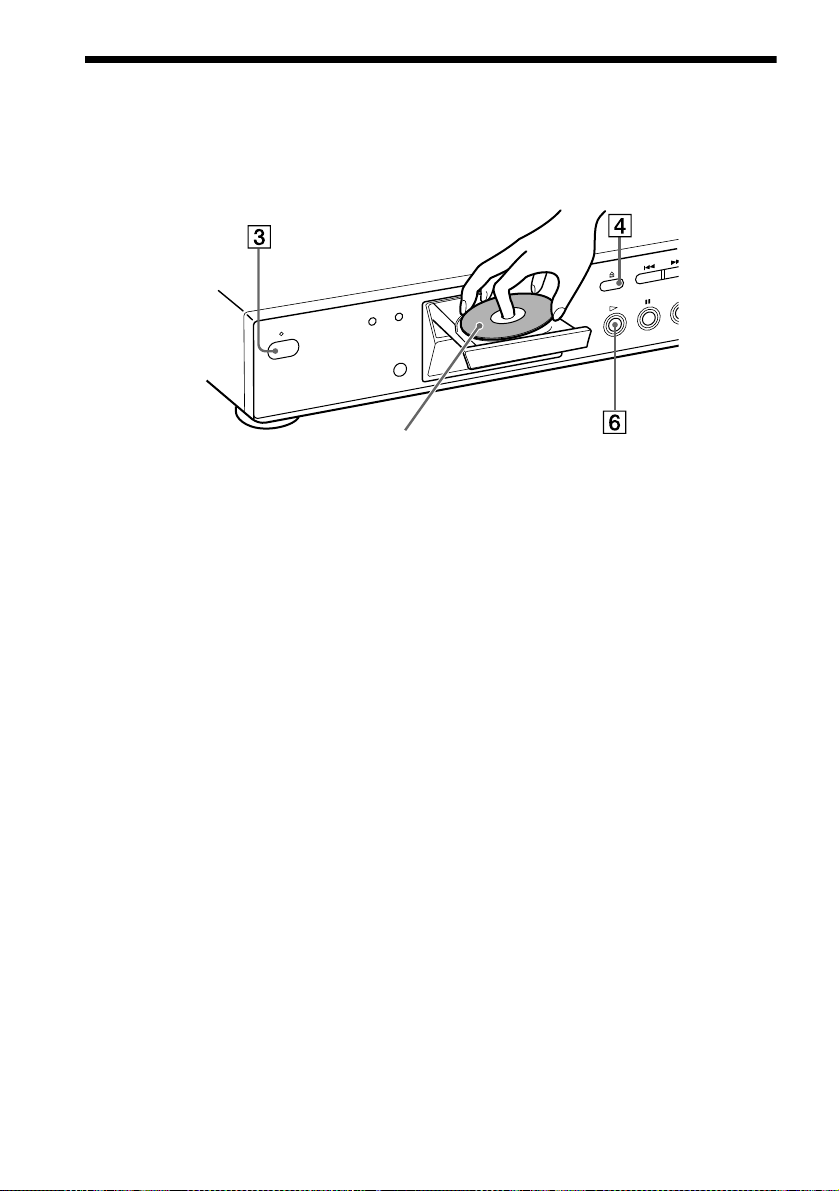
Step 4: Playing a Disc
1 Turn on the TV.
2 Switch the input selector on the TV to the player.
With the playback side facing down
3 Press POWER on t he player.
4 Press A on the player to open the disc tray.
5 Place the disc on the tray with the playback side facing down.
6 Press H.
The disc tray closes and the player begins playing t he disc.
After Step 6
Depending on the disc, a m enu may b e displaye d on the TV screen . If so, sele ct the i tem you wa nt
from the menu and play the DVD (page 33) or VIDEO CD disc (page 34).
To stop playing
Press x.
To take out the disc
Press A.
To turn off the player
Press ^/1 on the remote. The player is set to standby mode and the power indicator lights up in
red. Press POWER on the player to turn off completely.
16
Hookups
Hooking Up the Play er
Follow Steps 1 to 4 to hook up and adjust the settings of the player.
Before you start, turn off the power, check that you have all of the supplied accessories, and insert
the batteries into the remote (pag e 14).
Notes
• Plug cords securely to prevent unwanted noise.
• Refer to the instructions supplied with the components to be connected.
Step 1: Connecting the Video Cords
Connect your CD/DVD player to your TV monitor, projector, or AV amplifier (receiver) using a
video cord. Select o ne of the patterns A through C, according to the input jack on your TV
monitor, projector, or AV amplifier (receiver).
Hookups
A
TV
DIGITAL OUT
PCM/DTS/MPEG/
DOLBY DIGITAL
COAXIAL
LINE (RGB)-TV
LINE (RGB)-TV
LINE OUT
R-AUDIO-L VIDEO
SCART (EURO AV)
cord (not supplied)
S VIDEO OUT
(yellow)
Audio/vi deo cord (supplied)
S VIDEO cord
(not supplied)
INPUT
S VIDEO
TV, projec tor, o r AV
amplifier (receiver)
CD/DVD player
INPUT
VIDEO
(yellow)
L
AUDIO
R
TV, projector, or AV
amplifier (receiver)
C
B
l : Signal flow
continued
17

A If you are connecting to a SCART (EURO AV) input jack
)
Connect the SCART (EURO AV) cord (not supplied). Be sure to make the connections firmly to
avoid hum and noise. When you connect using the SCART (EURO AV) cord, check that the TV
conforms to S video or RGB signa ls. Refe r to the o pera tin g instru c tio ns supp lie d wit h th e TV to
be connected.
Also, when you set “LINE” to “S VIDEO” or “RGB” under “CUSTOM SETUP” in the Setup
Display (page 59), use a SCART (EURO AV) cord that conforms to each signal.
B If you are connecting to a video input jack
Connect the yellow plugs of the aud io/video cord (sup plied) to the yell ow (video) jacks. You will
enjoy standard quality images.
Yellow (Video)
White (L)
Red (R)
Yellow (Video
White (L)
Red (R)
Use the red and white plugs to co nnect to the audio input jacks (page 19).
C If you are co nnecting to an S VIDEO input jac k
Connect the S VIDEO cord (not supplied). You will enjoy high quality images.
Notes
• Do not connect your player to a VCR. You may not receive a clear image on the TV screen if you pass the player
signals via the V CR.
VCR
CD/DVD player
Connect directly
• When you connect the player to your TV via the SC AR T (EURO AV) jacks , the TV’s input source is set to the
player automatically when you start playback or press any button except for POWER on the player or [/1 on the
remote. If you wish to watch TV, press TV/DVD on the remote to return the input to the TV.
When you play a disc recorded in the NTSC colour system, the player outputs the video signal or the setup
display, etc., in the NTSC colour system and the picture may not appear on PAL colour system televisions.
In this case, open the tray and remove the disc.
TV
18

Step 2: Connecting the Audio Cords
Refer to the chart below to select the co nnection th at best suits y our system. The surround ef fects
you will enjoy depend on the connections and components you use.
Select a connection
Hookups
Select one of the following connecti on s, through .
Connection Components to be connected
(page 20)
A
(page 21)
B
(page 21)
B
(page 22)
C
(page 24)
D
* Manufactured under license from Dolby Laboratories. “Dolby,” “Pro Logic,” and the double-D symbol are
trademarks of Dolby Laboratories. Confidential unpublished works. © 1992-1997 Dolby Laboratories. All rights
reserved.
** “DTS” is a registered trademark of Digital Theater Systems, Inc.
• TV (stereo)
• Stereo amplif ie r (receiver)
(having L and R audio input jacks on ly, or having a digital input jack )
• 2 speakers
(front L and R)
• MD deck/DAT deck
• AV amplifier (receiver) with a Dolby* Surround (Pro Logic) decoder
(having L and R audio input jacks on ly, or having a digital input jack )
• 3 speakers
(front L and R, and rear (monaural))
• 6 speakers
(front L and R, centre, rear L and R, and subwoofer)
• AV amplifier (receiver) having a Dolby Digital, MPEG audio, or DTS**
decoder, and a digital inpu t jack
• 6 speakers
(front L and R, rear L and R, ce nt re, and subwoofer)
A D
continued
19

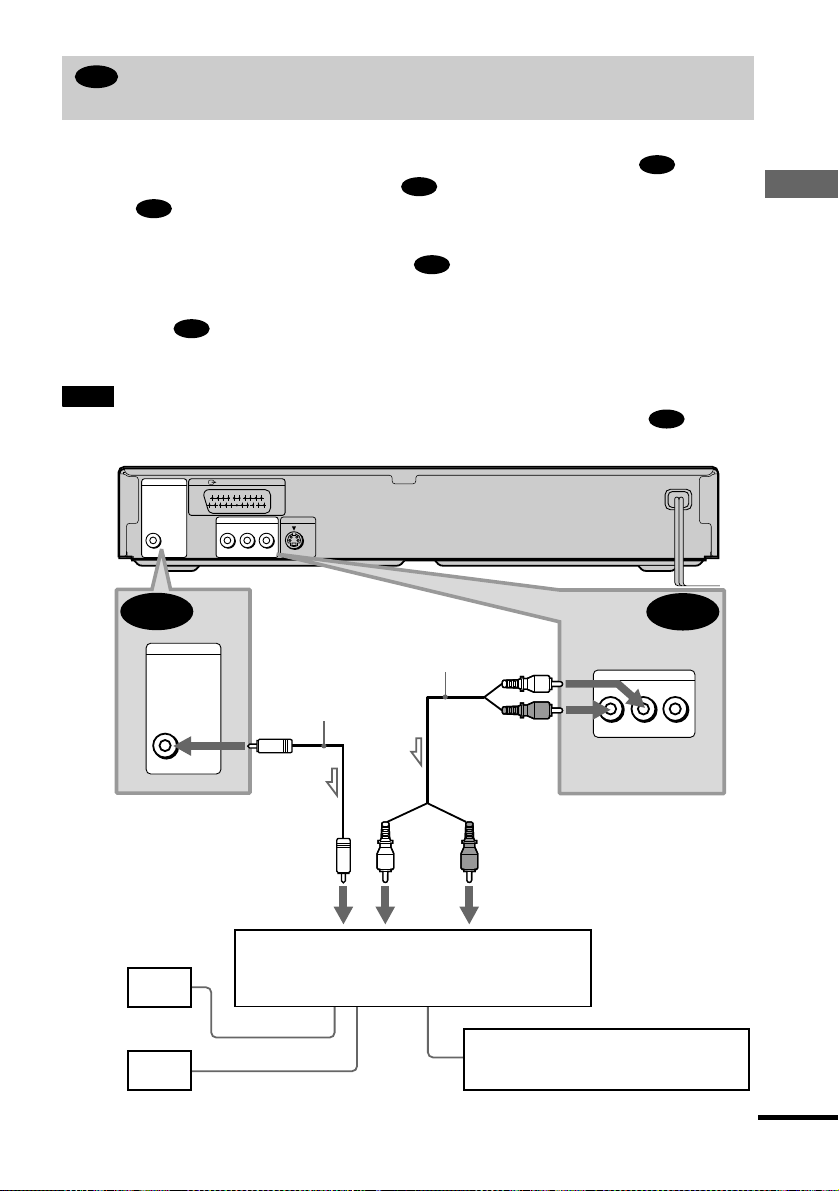
A
Connecting to your TV
This connection will use your TV speakers for sound. If you use the SCART (EURO AV) cord
in A of “Step 1: Connecting the Video Cords” (page 17), you do not have to conn ect audio co rds
to your TV.
xReco mmended surround sound effects for this connection
•TVS DYNAMIC (page 45)
•TVS WIDE (page 45)
CD/DVD player
DIGITAL OUT
PCM/DTS/MPEG/
DOLBY DIGITAL
COAXIAL
LINE (RGB)-TV
LINE OUT
R-AUDIO-L VIDEO
S VIDEO OUT
A
LINE OUT
(yellow)
(white)
R-AUDIO-L VIDEO
(red)
Audio/vide o c o rd
(supplied)
l : Signal flow
The yellow plug is used for vid e o sig n als (page 17).
(yellow)
TV
(white)
(red)
to audio input
20
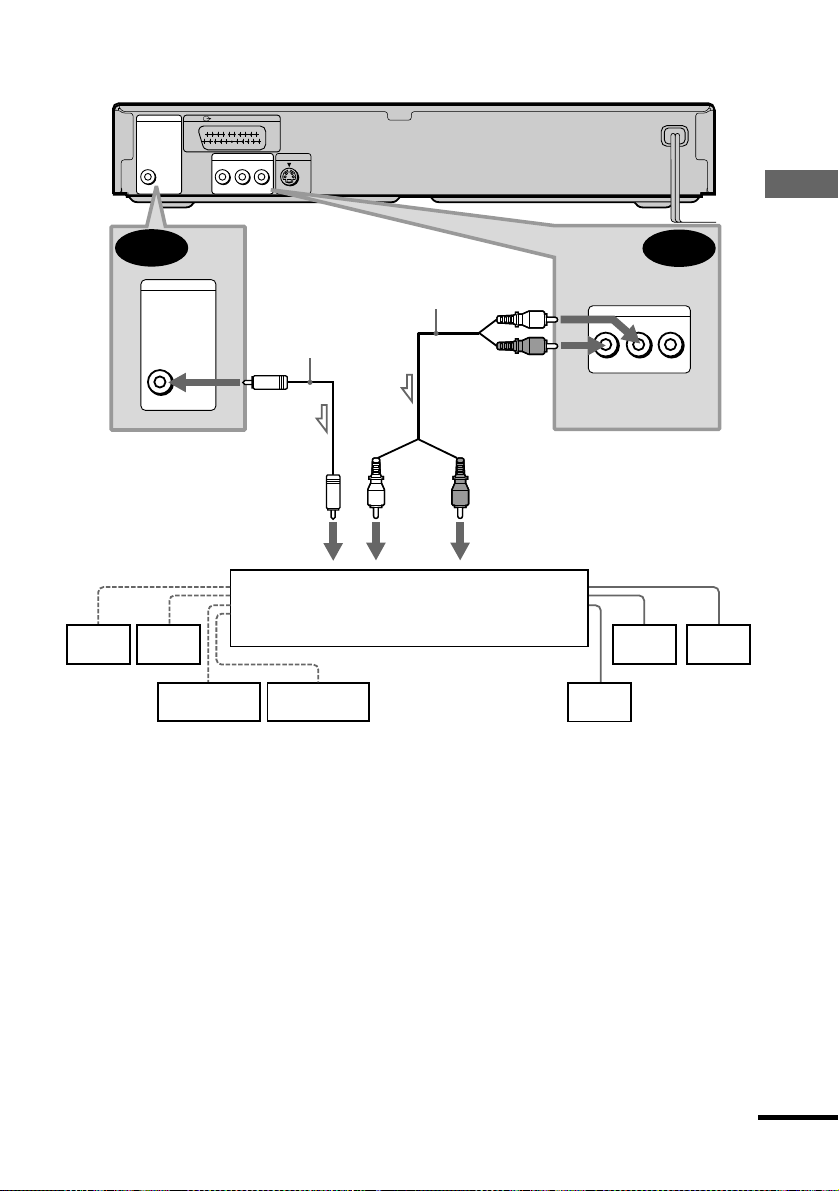
B
Connecting to a stereo amplifier (receiver) and 2 speakers/Connecting to
an MD deck or DAT deck
This connection will use your 2 front speak ers connected to your stereo amplifier (receiver) for
sound. If the stereo amplifier (receiver) has audio i nput jacks L and R only, use . If the
amplifier (receiver) has a digital input jack, use . When connecting to an MD deck or a DAT
deck, use . In this case, connect th e player directly to the MD deck or DAT deck with out
B-2
B-2
using your stereo amplifier (receiver).
xRecommended surround sound effects for the connection only
B-1
•TVS STANDARD (page 45)
B-1
Hookups
z
In connection , you can use the supplied audio/video cord instead of usi ng a separ a te audi o co rd .
B-1
z To realize better surround sound effects, make sure that your listening position is in between your spe aker s.
Note
If you select one of the TVS effects while playing a disc, no sound will come from your speakers with the connection.
CD/DVD player
DIGITAL OUT
PCM/DTS/MPEG/
DOLBY DIGITAL
COAXIAL
LINE (RGB)-TV
LINE OUT
R-AUDIO-L VIDEO
S VIDEO OUT
B-2
DIGITAL OUT
PCM/DTS/MPEG/
DOLBY DIGITAL
COAXIAL
to coaxial digital input
Coaxial digital cord
(not supplied)
Stereo audio cord
(not supplied)
or
(white)
(white)
(red)
(red)
to audio input
B-2
B-1
LINE OUT
R-AUDIO-L VIDEO
[Speakers]
Front
(L)
Front
(R)
l: Signal flow
Stereo amplifier (receiver)
MD deck/DAT deck
continued
21

C
Connecting to a Dolby Sur round ( Pro Logic) d ecoder a mplifier (receiver) and
3 to 6 speakers
This connection will allow you to enjoy the surround effects of the Pro Logic decoder on your
amplifier (receiver). If you have an AV amplifier (receiver) equipped with a Dolby Digital,
MPEG audio, or DTS decoder, refer to page 24.
You can enjoy the Dolby Surround effects only when playing Dolby Surround audio or multichannel audio (Dolby Digital) discs.
Pro Logic uses a minimum of 3 speakers (front L and R, and rear (monaural)). The surround
effects are enhanced if 6 speakers (front L and R, centre, rear L and R, and subwoofer) are used.
If your amplifier (receiver) has R and L audio input jacks only, use . If your amplifier
(receiver) has a digital input jack, use .
C-2
xReco mmended surround sound effects using this connection with your amplifier (receiver)
•Dolby Surround (Pro Logic) (page 67)
For correct speaker setting location, please refer to the operating instructions of the amplifier (receiver).
z
C-1
22
CD/DVD player
DIGITAL OUT
PCM/DTS/MPEG/
DOLBY DIGITAL
COAXIAL
LINE (RGB)-TV
LINE OUT
R-AUDIO-L VIDEO
S VIDEO OUT
Hookups
C-2
DIGITAL OUT
PCM/DTS/MPEG/
DOLBY DIGITAL
COAXIAL
Coaxial digital cord
(not supplied)
Stereo audi o co r d
(not supplied)
(white)
(red)
C-1
LINE OUT
R-AUDIO-L VIDEO
or
(white)
to coaxial digital input
[Speakers]
(red)
to audio input
[Speakers]
Dolby Surround amplifier (receiver)
Rear*
(mono)
Front
(L)
Rear
(L)
Rear
(R)
Subwoofer
Centre
l: Signal flow
∗ When connecting 6 speakers, replace the monaural rear speaker with a centre speaker, 2 rear speakers and a
subwoofer.
Front
(R)
continued
23
 Loading...