

Sony DVP-NC80V Operating Instructions (DVPNC80V),DVP-NC80V/B,DVP-NC80V/S Operating Instructions Manual
CD/DVD
Player
Operating Instructions
2-591-934-11(1)
DVP-NC80V
© 2005 Sony Corporation
WARNING
Notes About the
To prevent fire or s hock
hazard, do not expose the
unit to rain or moisture.
To avoid electrical shock, do
not open the cabinet. Refer
servicing to qualified
personnel only.
The AC power cord must be
changed only at a qualified
service shop.
CAUTION
The use of optical instruments with
this product will increase eye
hazard. As the laser beam used in
this CD/DVD player is harmful to
eyes, do not attempt to disassemble
the cabinet.
Refer servicing to qualified
personnel only.
This symbol is
intended to alert the
user to the presence
of uninsulated
“dangerous voltage”
within the product’s enclosure that
may be of sufficient magnitude to
constitute a risk of electric shock to
persons.
This symbol is
intended to alert the
user to the presence
of important
operating and
maintenance (servicing)
instructions in the literature
accompanying the appliance.
CAUTION
You are cautioned that any
changes or modifications not
expressly approved in this manual
could void your authority to
operate this equipment.
For customers in the U.S.A
Owner’s Record
The model and serial numbers are
located at the rear of the unit.
Record the serial number in the
space provided below. Refer to
them whenever you call upon your
Sony dealer regarding this product.
Model No. DVP-NC80V
Serial No.______________
Note
This equipment has been tested
and found to comply with the
limits for a Class B digital device,
pursuant to Part 15 of the FCC
Rules. These limits are designed to
provide reasonable protection
against harmful interference in a
residential installation. This
equipment generates, uses, and can
radiate radio frequency energy
and, if not installed and used in
accordance with the instructions,
may cause harmful interference to
radio communications. However,
there is no guarantee that
interference will not occur in a
particular installation. If this
equipment does cause harmful
interference to radio or television
reception, which can be
determined by turning the
equipment off and on, the user is
encouraged to try to correct the
interference by one or more of the
following measures:
– Reorient or relocate the
receiving ante nna.
– Increase the sepa rat ion
between the equipment and
receiver.
– Connect the equipment into an
outlet on a circuit different
from that to which the receiver
is connected.
– Consult the dealer or an
experienced radio/TV
technician for help.
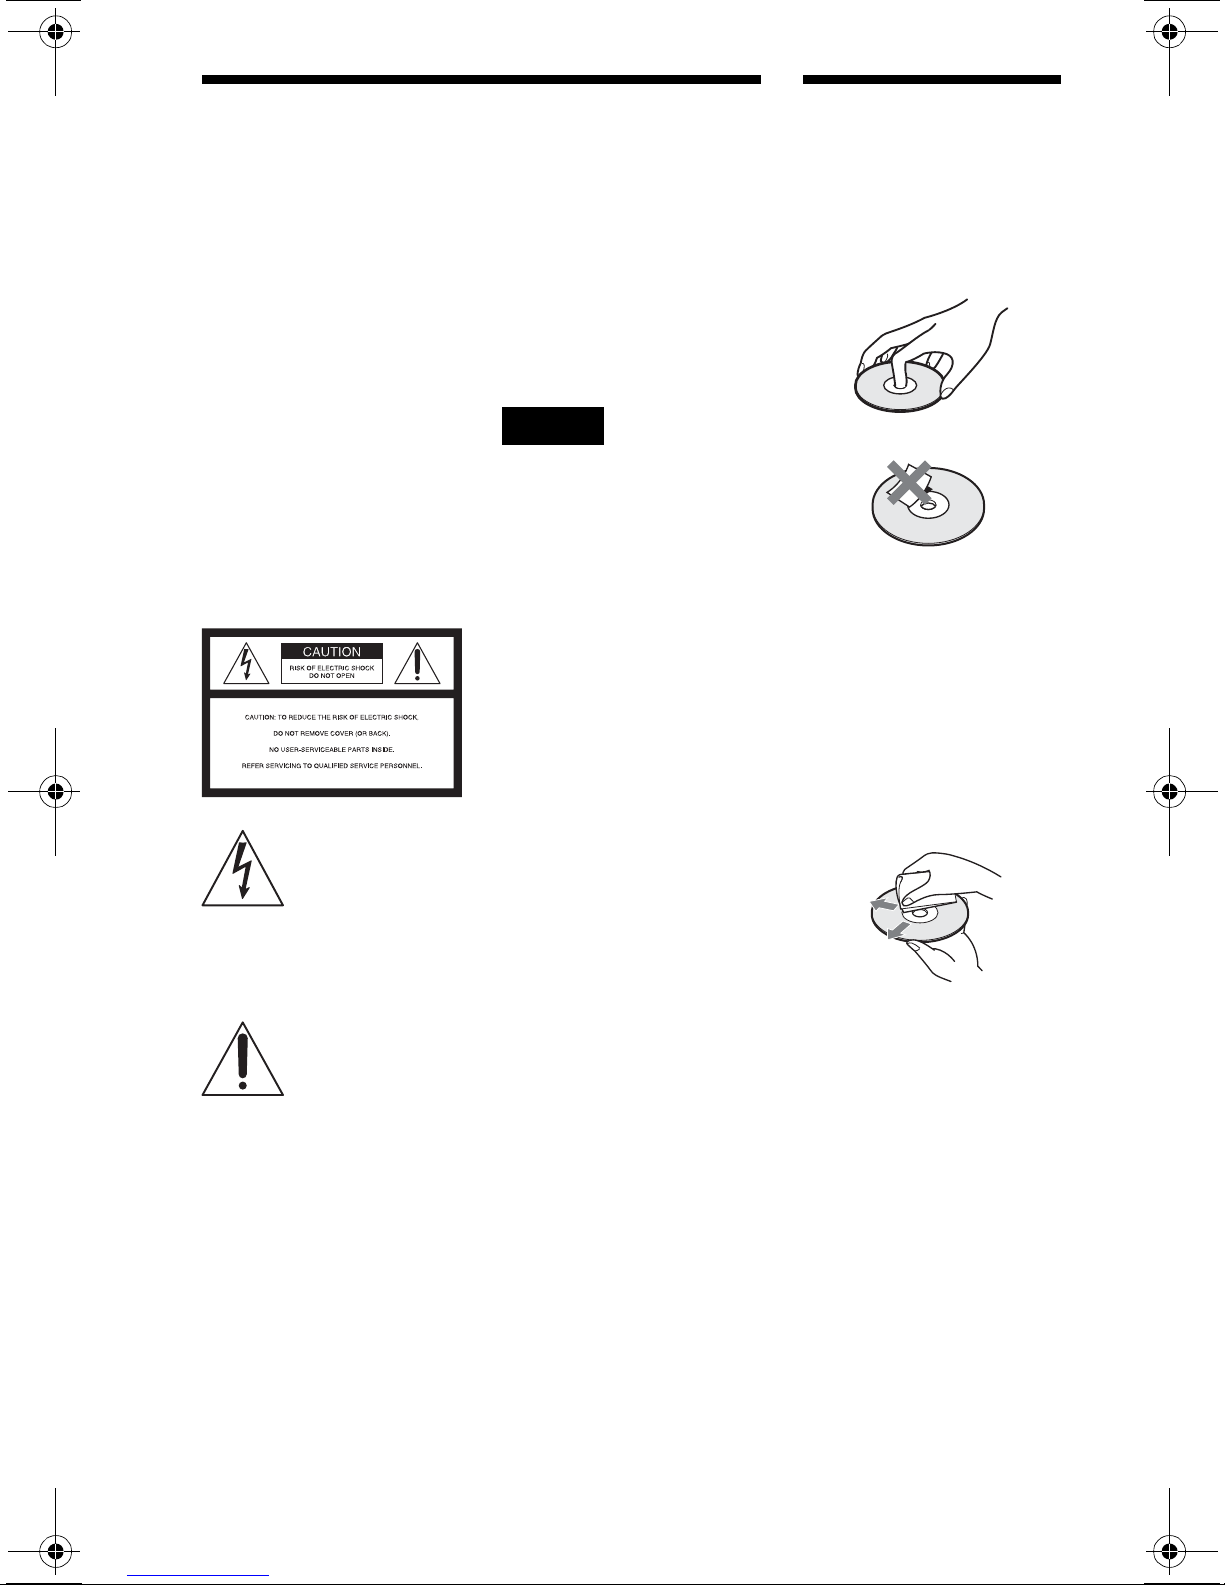
Discs
• To keep the disc clean, handle
the disc by its edge. Do not touch
the surface.
• Do not expose the disc to direct
sunlight or heat sources such as
hot air ducts, or leave it in a car
parked in direct sunlight as the
temperature may rise
considerably inside the car.
• After playing, store the disc in its
case.
• Clean the disc with a cleaning
cloth.
Wipe the disc from the center
out.
• Do not use solvents such as
benzine, thinner, commercially
available cleaners, or anti-static
spray intended for vinyl LPs.
• If you have printed the disc’s
label, dry the label before
playing.
2
Important
Safeguards
Attachments
Do not use attachments not
recommended by the manufacturer, as
they may cause hazards.
For your protection, please read these safety
instructions completely before operating the appliance,
and keep this manual for future reference.
Carefully observe all warnings, precautions and
instructions on the appliance, or the one described in
the operating instructions and adhere to them.
Use
Power sources
This set should be operated only
from the type of power source
indicated on the marking label. If
you are not sure of the type of
electrical power supplied to your
home, consult your dealer or local power company .
For those sets designed to operate from battery power,
or other sources, refer to the operating instructions.
Groundin g or Polarization
This set is equipped with a polarized ac power cord
plug (a plug having one blade wider than the other), or
with a three-wire grounding type plug (a plug having a
third pin for grounding). Follow the instructions
below:
For the set with a polarized AC power
cord plug:
This plug will fit into the power
outlet only one way. This is a
safety feature. If you are unable to
insert the plug fully into the outlet, try reversing the
plug. If the plug should still fail to fit, contact your
electrician to have a suitable outlet installed. Do not
defeat the safety purpose of the polarized plug by
forcin g it in.
For the set with a three-wire grounding
type AC plug:
This plug will only fit into a
grounding-type power outlet. This
is a safety feature. If you are
unable to insert the plug into the
outlet, contact your electrician to have a suitable outlet
installed. Do not defeat the safety purpose of the
grounding plug.
Overloading
Do not overload wall outlets,
extension cords or convenience
receptacles beyond their capacity,
since this can result in fire or
electric shock.
Object and Liquid Entry
Never push objects of any kind into
the set through openings as they
may touch dangerous voltage points
or short out parts that could result in
a fire or electric shock. Never spill
liquid of any kind on the set.
Cleaning
Unplug the set from the wall outlet
before cleaning or polishing it. Do
not use liquid cleaners or aerosol
cleaners. Use a cloth lightly
dampened with water for cleaning
the exterior of the set.
Installation
Water and Moisture
Do not use power-line operated sets
near water - for example, near a
bathtub, washbowl, kitchen sink, or
laundry tub, in a wet basement, or
near a swimming pool, etc.
Power-Cord Protection
Route the power cord so that it is
not likely to be walked on or
pinched by items placed upon or
against them, paying particular
attention to the plugs, receptacles, and the point where
the cord exits from the appliance.
Accessories
Do not place the set on an
unstable cart, stand, tripod,
bracket, or table. The set may
fall, causing serious injury to a
child or an adult, and serious damage to the set. Use
only a cart stand tripod, bracket, or table recommended
by the manufacturer.
An appliance and cart combination
should be moved with care. Quick
stops, excessive force, and uneven
surfaces may cause the appliance
and cart combination to overturn.
S3125A
Ventilation
The slots and openings in the cabinet are provided for
necessary ve ntilation. To ensure reliable operation of
the set, and to pr ote c t it from overh ea ting, these slots
and openings must never be blocked or covered.
• Never cover the slots and
openings with a cloth or
other materials.
• Never block the slots and
opening s by placing the set
on a bed, sofa, rug or other
similar surface.
,continued
3

• Never place the set in a
confined space, such as a
bookcase, or built-in
cabinet, unless proper
ventilation is provided.
• Do not place the set near or
over a radiator or heat
register, or where it is
exposed to direct sunlight.
Antennas
Outdoor antenna grounding
If an outdoor antenna or cable system is installed,
follow the precautions below.
An outdoor antenna system should not be located in the
vicinity of overhead power lines or other electric light
or power circuits, or where it can come in contact with
such power lines or circuits.
WHEN INSTALLING AN OUTDOOR ANTENNA
SYSTEM, EXTREME CARE SHOULD BE TAKEN
TO KEEP FROM CONTACTING SUCH POWER
LINES OR CIRCUITS AS CONTACT WITH THEM
IS ALMOST INVARIABLY FATAL.
Be sure the antenna system is grounded so as to provide
some protection a g a inst voltage surges and bu ilt-up s tatic
charges. Section 810 of the N ational E lectrical Code
provides information w ith respect to proper groun ding of
the mast and sup porting structure, groundin g of the lead -in
wire to an antenna dischar ge unit, size of ground in g
conductors, location of antenna-dischar ge unit, con nection
to grounding elec trode s, a nd requirements for the
grounding electrode.
Antenna Grounding According to the
National Electrical Code
Antenna Lead in Wire
Ground Clamp
Electric Service
Equipment
NEC-NATIONAL ELECTRICAL CODE
Lightning
For added protection for this set during a lightning
storm, or when it is left unattended and unused for long
periods of time, unplug it from the wall outlet and
disconnect the antenna or cable system. This will
prevent damage to the set due to lightning and powerline surges.
Antenna Discharge unit
(NEC Section 810-20)
Grounding Conductors
(NEC Section 810-21)
Ground Clamps
Power Service Grounding
Electrode System
(NEC Art 250 Part H)
Service
Damage Requiring Service
Unplug the set from the wall outlet and refer servicing
to qualified service personnel under the following
conditions:
• When the power cord or plug is
damaged or fra yed.
• If liquid has been spilled or
objects have fallen into the
set.
• If the set has been exposed
to rain or water.
• If the set has been
subject to excessive
shock by being
dropped, or the cabinet
has been dama ged.
• If the set does not operate
normally when following
the operating instructions.
Adjust only those controls
that are specified in the
operating instructions. Improper adjustment
of other con trols may result in damage and
will often require extensive work by a
qualified technician to restore the set to normal
operation.
• When the set exhibits a distinct change in
performance - this indicates a need for service.
Servicing
Do not attempt to service the set
yourself as opening or removing
covers may expose you to
dangerous voltage or other
hazards.
Refer all servicing to qualified service personnel.
Replacement parts
When replacement parts are required, be sure the
service technician has used replacement parts specifi ed
by the manufacturer that have the same characteristics
as the original parts.
Unauthorized substituti ons may res ult in fire, electr ic
shock, or other hazards.
Safety Check
Upon completion of any service or
repairs to the set, ask the service
technician to perform routine
safety checks (as specified by the
manufacturer) to determine tha t
the set is in safe operating
condition.
4
Precautions
On safety
• To prevent fire or shock hazard, do not
place objects filled with liquids, such as
vases, on the apparatus.
• Should any solid objec t or l i quid fall into
the cabinet, unpl ug the player an d have it
checked by q ualified personnel before
operating it any further.
On adjusting volume
Do not turn up the volume while listening to
a section with very low level inputs or no
audio si gnals. If you do, the spea ke r s may be
damaged whe n a pe ak le ve l se cti on is pl ayed .
On cleaning
Clean the cabinet, panel, and controls with a
soft cloth slightly moistened with a mild
detergent sol ution. Do not use any type of
abrasive pad, scouring powder or solvent
such as alcohol or benzine.
On power sources
• The player is not di sconnect ed from the AC
power source as long as it is connected to
the wall outlet, even if the player itself has
been turned off.
• If you are not going to use the player for a
long time, be sure to disconnect the player
from the wall outlet. To disconnect the AC
power cord, grasp the plug itself; never pull
the cord.
On placement
• Place th e pl ay er i n a l oc at io n wi th a dequ at e
ventilation to prevent heat build-up in the
player.
• Do not place the player on a sof t sur face
such as a rug.
• Do not place the player in a location near
heat source s, or in a place subject to direct
sunlight, excessive dust, or mechanical
shock.
• Do not install the player in an inclined
position. It is des igned to be operated in a
horizonta l po si t ion only.
• Keep the player and the discs away from
equipment w ith strong ma gnets, such as
microwave ovens, or large loudspea kers.
• Do not plac e heavy object s on the playe r .
On cleaning discs
Do not use a commercially available cleaning
disc. It may cause a malfunction.
IMPORTANT NOTICE
Caution: This player is capable of holding a
still video image or on-screen disp lay image
on your televi sion screen ind efinitely. If
you leave the still video image or on-screen
display i mage displ ayed on your T V for an
extended period of time you risk permanent
damage to yo ur television screen. Plasm a
display panel televisions and projection
televisions are susceptible to this.
On transpor ting the player
Before transportin g th e player, foll ow t h e
procedure below to return the internal
mechanisms to their original positions.
1 Remove all the discs from the disc tray.
2 Press A to close the disc tray.
Make sure that “NO DISC ” appears on
the front panel display.
3 Press ?/1 to turn off the p layer.
The playe r enters standby mode.
4 Disconnect the AC power cord.
On operati on
• If the player is brought directly from a cold
to a warm location, or is placed in a very
damp room, moisture may cond ense on the
lenses inside the player. Should this occur,
the playe r may not oper at e pr ope rly . In thi s
case, remove the disc and leave the player
turned on for abo ut hal f an hour until the
moisture evaporates.
• When you m ove the player, take out any
discs. If you don’t, the disc may be
damaged.
If you have any questions or problems
concerning your player, pl ease consult your
nearest Sony dealer.
5

Table of Contents
WARNING . . . . . . . . . . . . . . . . . . . . . . . . . . . . . . . . . . . . . . . . . . . . . . . . . . . . 2
Notes About the Discs. . . . . . . . . . . . . . . . . . . . . . . . . . . . . . . . . . . . . . . . . . . 2
Important Safeguards . . . . . . . . . . . . . . . . . . . . . . . . . . . . . . . . . . . . . . . . . . . 3
Precautions . . . . . . . . . . . . . . . . . . . . . . . . . . . . . . . . . . . . . . . . . . . . . . . . . . . 5
About This Manual. . . . . . . . . . . . . . . . . . . . . . . . . . . . . . . . . . . . . . . . . . . . . . 7
This Player Can Play the Following Discs. . . . . . . . . . . . . . . . . . . . . . . . . . . . 8
Index to Parts and Controls. . . . . . . . . . . . . . . . . . . . . . . . . . . . . . . . . . . . . . 10
Guide to the Control Menu Display . . . . . . . . . . . . . . . . . . . . . . . . . . . . . . . . 13
Hookups. . . . . . . . . . . . . . . . . . . . . . . . . . . . . . . . . . . . . . . . . . 16
Hooking Up the Player. . . . . . . . . . . . . . . . . . . . . . . . . . . . . . . . . . . . . . . . . . 16
Step 1: Unpacking . . . . . . . . . . . . . . . . . . . . . . . . . . . . . . . . . . . . . . . . . . . . . 16
Step 2: Inserting Batteries Into the Remote. . . . . . . . . . . . . . . . . . . . . . . . . . 16
Step 3: Connecting the Video Cords . . . . . . . . . . . . . . . . . . . . . . . . . . . . . . . 17
Step 4: Connecting the Audio Cords . . . . . . . . . . . . . . . . . . . . . . . . . . . . . . . 20
Step 5: Connecting the Power Cord . . . . . . . . . . . . . . . . . . . . . . . . . . . . . . . 23
Step 6: Quick Setup. . . . . . . . . . . . . . . . . . . . . . . . . . . . . . . . . . . . . . . . . . . . 23
Playing Discs . . . . . . . . . . . . . . . . . . . . . . . . . . . . . . . . . . . . . . 26
Playing Discs. . . . . . . . . . . . . . . . . . . . . . . . . . . . . . . . . . . . . . . . . . . . . . . . . 26
Resuming Playb ack From the Point Where Yo u St opped the Disc (Multi-disc
Resume) . . . . . . . . . . . . . . . . . . . . . . . . . . . . . . . . . . . . . . . . . . . . . . . . . 29
Using the DVD’s Menu. . . . . . . . . . . . . . . . . . . . . . . . . . . . . . . . . . . . . . . . . . 30
Selecting “ORIGINAL” or “PLAY LIST” on a DVD-RW/DVD-R . . . . . . . . . . . 30
Selecting a Playback Area for a Super Audio CD . . . . . . . . . . . . . . . . . . . . . 31
Playing VIDEO CDs With PBC Functions (PBC Playback) . . . . . . . . . . . . . 32
Various Play Mode Fu nc tions (Program Play, Sh uf fle Play , Repeat Play,
A-B Repeat Play). . . . . . . . . . . . . . . . . . . . . . . . . . . . . . . . . . . . . . . . . . . 33
Searching for a Scene . . . . . . . . . . . . . . . . . . . . . . . . . . . . . . . . 37
Searching for a Particular Point on a Disc (Search , Scan , Slow-motion Play,
Freeze Frame). . . . . . . . . . . . . . . . . . . . . . . . . . . . . . . . . . . . . . . . . . . . . 37
Searching for a Title/ Chapter/Track/Scene, etc. (Search mode ) . . . . . . . . . . 38
Searching by Scene (PICTURE NAVIGATION) . . . . . . . . . . . . . . . . . . . . . . 40
Viewing Information About the Disc . . . . . . . . . . . . . . . . . . . . . . . 41
Checking the Playing Time and Remaining Time . . . . . . . . . . . . . . . . . . . . . 41
Sound Adjustments . . . . . . . . . . . . . . . . . . . . . . . . . . . . . . . . . . 44
Changing the Sound . . . . . . . . . . . . . . . . . . . . . . . . . . . . . . . . . . . . . . . . . . . 44
Surround Mode Settings . . . . . . . . . . . . . . . . . . . . . . . . . . . . . . . . . . . . . . . . 45
Enjoyin g M ovies . . . . . . . . . . . . . . . . . . . . . . . . . . . . . . . . . . . . 49
Changing the Angles . . . . . . . . . . . . . . . . . . . . . . . . . . . . . . . . . . . . . . . . . . . 49
Displaying the Subtitles . . . . . . . . . . . . . . . . . . . . . . . . . . . . . . . . . . . . . . . . . 49
Adjusting the Playback Picture (CUSTOM PICTURE MODE). . . . . . . . . . . . 50
Sharpening the Pictures (SHARPNESS). . . . . . . . . . . . . . . . . . . . . . . . . . . . 51
Adjusting the Delay Between the Picture and Sound (AV SYNC). . . . . . . . . 52
6
Enjoying MP3 Audio and JPEG Images . . . . . . . . . . . . . . . . . . . . . 53
About MP3 Audio Tracks and JPEG Image Files . . . . . . . . . . . . . . . . . . . . . 53
Playing MP3 Audio Tracks or JPEG Image Files. . . . . . . . . . . . . . . . . . . . . . 54
Enjoying JPEG Images as a Slide Show. . . . . . . . . . . . . . . . . . . . . . . . . . . . 57
Using Various Additional Functions . . . . . . . . . . . . . . . . . . . . . . . 59
Locking Discs (CUSTOM PARENTAL CONTROL,
PARENTAL CONTROL) . . . . . . . . . . . . . . . . . . . . . . . . . . . . . . . . . . . . . 59
Controlling Your TV or AV Amplifier (Receiver)
With the Supplied Remote. . . . . . . . . . . . . . . . . . . . . . . . . . . . . . . . . . . . 62
Settings and Adjustments . . . . . . . . . . . . . . . . . . . . . . . . . . . . . . 65
Using the Setup Display. . . . . . . . . . . . . . . . . . . . . . . . . . . . . . . . . . . . . . . . . 65
Setting the Display or Sou nd Track Language (LANGU AGE SETUP) . . . . . 66
Settings for the Display (SCREEN SETUP). . . . . . . . . . . . . . . . . . . . . . . . . . 67
Custom Settings (CUSTOM SETUP). . . . . . . . . . . . . . . . . . . . . . . . . . . . . . . 68
Settings for the Sound (AUDIO SETUP) . . . . . . . . . . . . . . . . . . . . . . . . . . . . 69
Settings for the Speakers (SPEAKER SETUP) . . . . . . . . . . . . . . . . . . . . . . . 71
Additional Information . . . . . . . . . . . . . . . . . . . . . . . . . . . . . . . . 74
Troubleshooting. . . . . . . . . . . . . . . . . . . . . . . . . . . . . . . . . . . . . . . . . . . . . . . 74
Self-diagnosis Function (When letters/numbers appear in t he display). . . . . 77
Glossary. . . . . . . . . . . . . . . . . . . . . . . . . . . . . . . . . . . . . . . . . . . . . . . . . . . . . 77
Specifications. . . . . . . . . . . . . . . . . . . . . . . . . . . . . . . . . . . . . . . . . . . . . . . . . 80
Language Code List. . . . . . . . . . . . . . . . . . . . . . . . . . . . . . . . . . . . . . . . . . . . 81
Index . . . . . . . . . . . . . . . . . . . . . . . . . . . . . . . . . . . . . . . . . . . . . . . . . . . . . . . 82
About This Manual
• Instructions in this manual describe the controls on the remote. You can also use the
controls on the player if they have the same or similar names as those on the remote.
• “DVD” may be used as a general term for DVD VIDEOs, DVD+RWs/DVD+Rs and
DVD-RWs/DVD-Rs.
• The meaning of the icons used in this manual is described below:
Icons Meanings
Functions available for DVD VIDEOs and DVD+RWs/DVD+Rs in +VR
mode or DVD-RWs/DVD-Rs in video mode
Functions available for DVD-RWs/DVD-Rs in VR (Video Recording) mode
Functions available for VIDEO CDs (including Super VCDs or CD-Rs/CDRWs in video CD format or Super VCD form at)
Functions available for Super Audio CDs
Functions available for music CDs or CD-Rs/CD- RW s in music CD format
Functions available for DATA CDs (CD-ROMs/CD-Rs/CD-RWs)
containing MP3* audio tracks, and JPEG i ma ge files
Functions available for DATA DVDs (DVD-ROMs/DVD+RWs/DVD+Rs/
DVD-RWs/DVD-Rs) containing MP3* audio tracks, and JPEG image files.
* MP3 (MPEG-1 A udio L ayer III) is a standard forma t defined by ISO (International Org an ization for
Standardization)/IEC (International Electrotechnical Co m m ission) M PEG which compress es a udio d ata.
7
This Player Can Play the
Following Discs
Format of discs
DVD VIDEO
DVD-RW/-R
DVD+RW/+R
Super Audio CD
VIDEO CD/
Music CD
Example of discs that the player
cannot play
The player cannot play the fol l ow ing discs:
• CD-ROMs/CD-Rs/CD-RWs other than
those recorded in the formats listed on this
page.
• CD-ROMs record ed in PHOTO CD fo rmat.
• Data part of CD-Extras.
• DVD Audios.
Also, the player cannot pla y th e f ollowing
discs:
• A DVD VIDEO with a different region
code.
• A disc r ecorded in a colo r system o ther th an
NTSC, suc h as PAL or SE CAM (this pla yer
conforms to the NTSC color system ).
• A disc that has a non-standard shape (e. g . ,
card, heart).
• A disc with pa per or stickers on it.
• A disc that has the adhesive of cellophane
tape or a sticker still left on it.
Region code
CD-RW/-R
“DVD+RW,” “DVD-RW,” “DVD+R,”
“DVD-R,” “DVD VIDEO,” and “CD” logos
are trademar ks.
Note about CDs/DVDs
The player can play CD-ROMs/CD-Rs/CDRWs recorded in the following formats:
–music CD format
–video CD format
–MP3 aud i o tracks and JPEG image files of
format conforming to ISO 9660* Level 1/
Level 2, or its extended format, Joliet
–KODAK Picture CD format
* A logical format of files and folders on CD-
ROMs, defined by ISO (Inter na tional
Organization for Standardiza ti on) .
The player can play DVD-ROMs/
DVD+RWs/DVD-RWs/DVD+Rs/DVD-Rs
recorded in the following format:
–MP3 aud i o tracks and JPEG image files of
format conforming to UDF (Universal Disk
Format).
Your player has a region code printed on the
back of the unit and only will play DVD
VIDEOs (playback only) labeled with
identical region codes. This syste m is used to
protect copyrights.
DVD VIDEOs labeled will also play on
ALL
this player.
If you try to play a ny other DVD VIDEO, t he
message “P layback prohibited by area
limitations.” will appear on the TV screen.
Depending on the DVD VIDEO, there may
be no region code indication, even though
playing the DVD VIDEO is prohibited by
area restrictions.
DVP–XXXX
X
NO.
00V 00Hz
00W
0-000-000-00
Region code
8

Notes
• Notes about DVD+RWs/DVD+Rs, DVD-RWs/
DVD-Rs or CD-Rs/CD-RWs
Some DVD+RWs/DVD+Rs, DVD-RWs/DVDRs, or CD-Rs/CD-RWs cannot be played on this
player due to the recording quality or physical
condition of the disc, or the cha r acte r istics of the
recording device and authoring software.
The disc will not play if it has not been c or rec tly
finalized. For more information, refer to the
operating instruct ions for the recording device .
Note that some playback functions may not work
with some DVD+RWs/DVD+Rs, even if they
have been correctly fin alized. In this case, v iew
the disc by normal playback. Also som e DATA
CDs/DATA DVDs created in Packet Wr it e
format cannot be played.
• Music discs encoded with co pyright p rotection
technologies
This product is designed to pl ayb ack discs that
conform to the Compact Disc (CD) standard.
Recently, various music discs encoded with
copyright protection te ch nologies are marketed
by some record companies. Please be aware that
among those discs, there are some tha t do not
conform to the CD standard and may not be
playable by this product.
• Note on DualDiscs
A DualDisc is a two sided disc product whi ch
mates DVD recorded material on one side with
digital audio mater ia l on the other side.
However, since the audio mate rial side doe s not
conform to the Co mpact Disc (CD) standard,
playback on this produ ct is not gua r a nte e d .
Copyrights
This product i ncorporates co pyright
protection technology that is protected by
U.S. patents and other intellectual property
rights. Use of this copyright pr ot ection
technology must be authorized by
Macrovisio n, and is intended for hom e and
other limited viewing uses only unless
otherwise authorized by Macrovision.
Reverse engineering or disas sembly is
prohibited.
Note on playback operations of
DVDs and VIDEO CDs
Some playback operations of DVDs and
VIDEO CDs may be in te nt i ona l ly set by
software producers. Since this player plays
DVDs and VIDEO CDs according to the disc
contents th e software producers designed,
some playback features may not be available.
Also, refer to the instructions supplied with
the DVDs or VIDEO CDs.
9
Index to Parts and Controls
For more information, see the pages indicated in parentheses.
Front panel
A [/1 (on/standb y) bu tton (26)
B SUPER AUDIO CD indicator (31, 78)
Lights up when:
–playing an H D (High Density ) la yer of
Super Audio CD s.
–no disc is inserted.
C MULTI CHANNEL indicator (31, 78)
Lights up when:
–playing a disc that contains multiple
audio signal channels.
– no disc is inser t ed.
D DISC 1 – 5 buttons (27)
E H (play) butt on (26)
F X (pause) butt on (27)
Rear panel
COAXIAL
OPTICAL
PCM/DTS/
DOLBY
DIGITAL
DIGITAL
OUT
FRONT
5.1CH OUTPUT
CENTER
L
R
WOOFER
REAR
R
AUDIO
LINE OUT
L
VIDEO
S VIDEO
OUT
Y
COMPONENT
VIDEO OUT
PRPB
G x ( stop) button (27)
H ./> (previous/next) buttons (37)
I A (open/close) button (26)
J DISC SKIP button (26)
K PROGRESSIVE button/indicator (19)
Lights up when the player outputs
progressive signals.
L (remote sensor) (16)
M EXCHANGE button (28)
N Disc tray (26)
O Front panel display (11)
A DIGITAL OUT (OPTICAL) jack (20)
B DIGITAL OUT (COAXIAL) jack (20)
C 5.1CH OUTPUT jacks (20)
D LINE OUT L/R (AUDIO) jacks (20)
10
E LINE OUT (VIDEO) jack (17)
F S VIDEO O UT jack (17)
G COM PONENT VIDEO OUT (Y, P
R) jacks (17)
P
B,
Front panel display
When playing back a DVD VIDEO or DVD-VR mode disc
Disc type
Current disc
Disc numbers (27)
All Discs
Repeat mode
(35)
Current audio signal (44)
Playing
status
Lights up when you can
change the angle (49)
Lights up during Repeat Play (35)
Playing time of the
current title (42)
When playing back a VIDEO CD with Playback Control (PBC) (32)
Disc numbers (27)
Disc type
Current playing time (42)
Current disc
Playing
status
Lights up during A-B Repeat Play (36)
When playing b ack a Super Au dio CD, CD , DATA CD/DA TA DVD (MP3 au dio) or VID EO CD
(without PBC)
Disc numbers (27)
Disc type*
Current
disc
* When playing the HD layer of Super Audio CDs, the disc type is not displaye d.
z Hint
You can adjust the lighting of the front panel
display by setting “DIMMER” in “CUSTOM
SETUP.” (page 68)
All Discs Repeat
mode (35)
Lights up when play ing
MP3 audio tracks (55)
Playing
status
Current track (42)
Current playing time (42)
Lights up during Repeat Play (35)
Note
The front pane l display will turn off a utomatically
when the d isc tray is opened.
,continued
11
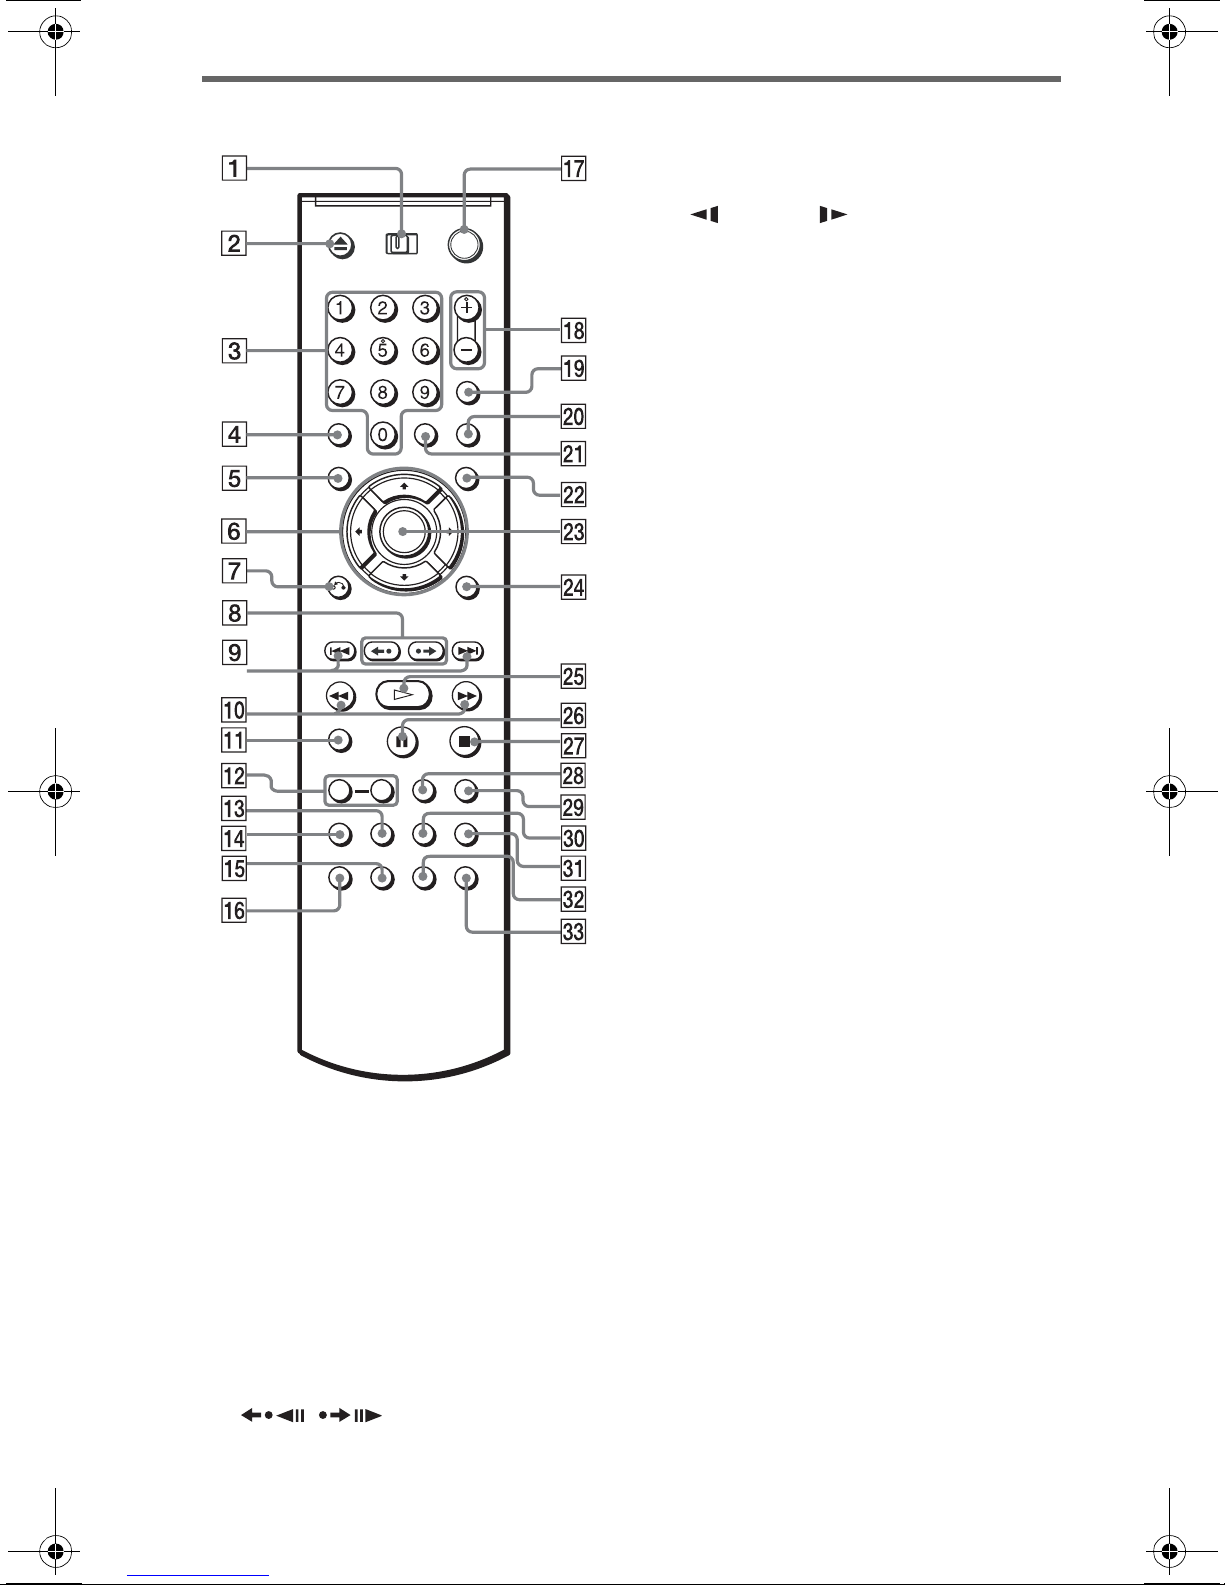
Remote
I ./> PREV/NEXT (previous/
next) buttons (27)
J m/M SCAN/SLOW
buttons (38)
K ZOOM button (27, 56)
L S L OW PLAY/FAST PLAY bu ttons
(27)
M SA-CD/CD button (31)
N SA-CD MULTI/2CH button (3 1)
O SUBTITLE button (49)
P AUDIO button (44)
Q [/1 (on/standby) bu tton (26)
R VOL (volume) +/– buttons (62)
The + butto n has a tactile dot.*
S TV/VIDEO/TIME/TEXT button (41)
T P I CTURE NAVI (picture na vigation)
button (40, 56)
A TV/DVD switch (41)
Z OPEN/CLOSE button (27)
B
C Number buttons (30)
The number 5 bu t to n has a tactile dot.*
D CLEAR button (33)
E TOP MENU button (30)
F C/X/x/c buttons (30)
U ENTER button (23, 62)
V MENU button (30)
W ENTER button (23)
X DISPLAY button (13)
Y H PLAY button (26)
The H butto n has a tactile dot.*
Z X PAUSE button (27)
wj x STOP button (27)
wk SHUFFLE button (34)
wl REPEAT button (35)
e; SUR button (45)
ea SEARCH MODE bu tton (38)
es ANGLE button (49)
ed DISC SKIP button (28)
* Use the tactile dot as a reference when operating
the player.
G O RETURN button (28)
H REPLAY/STEP/
/
ADVANCE/STEP buttons (27, 38)
12
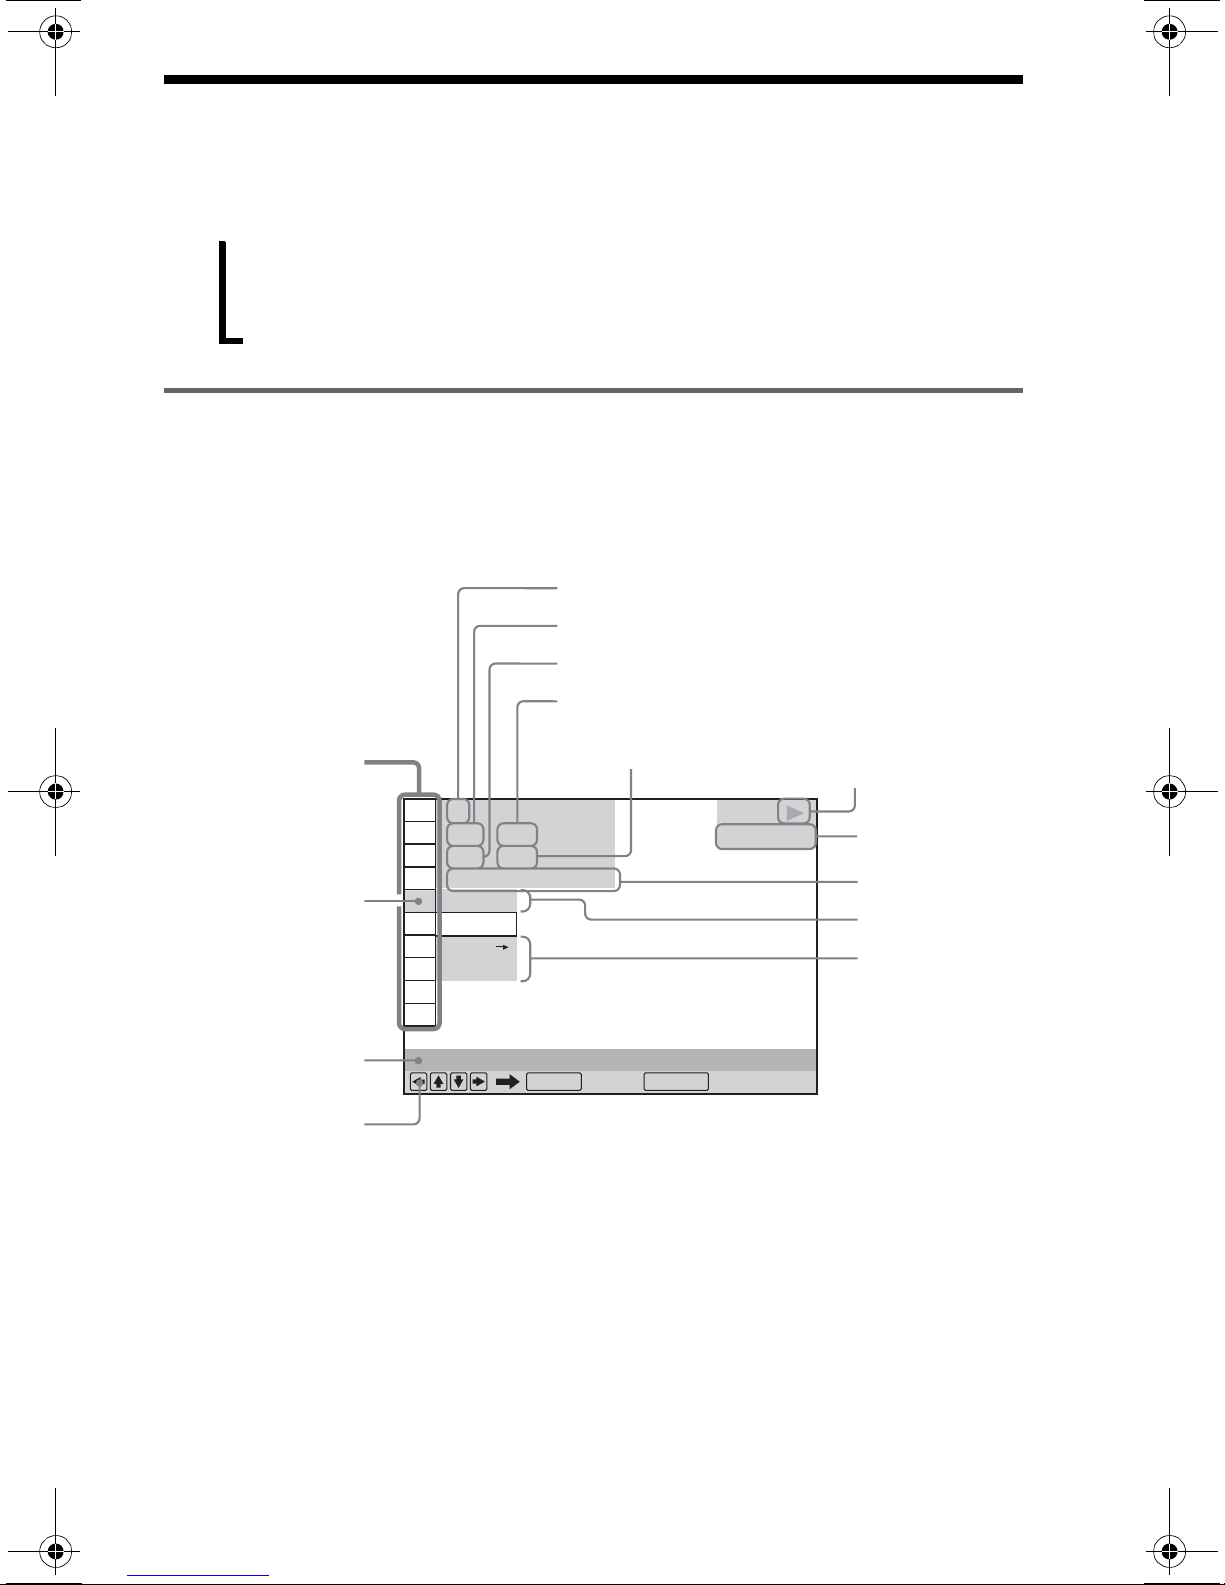
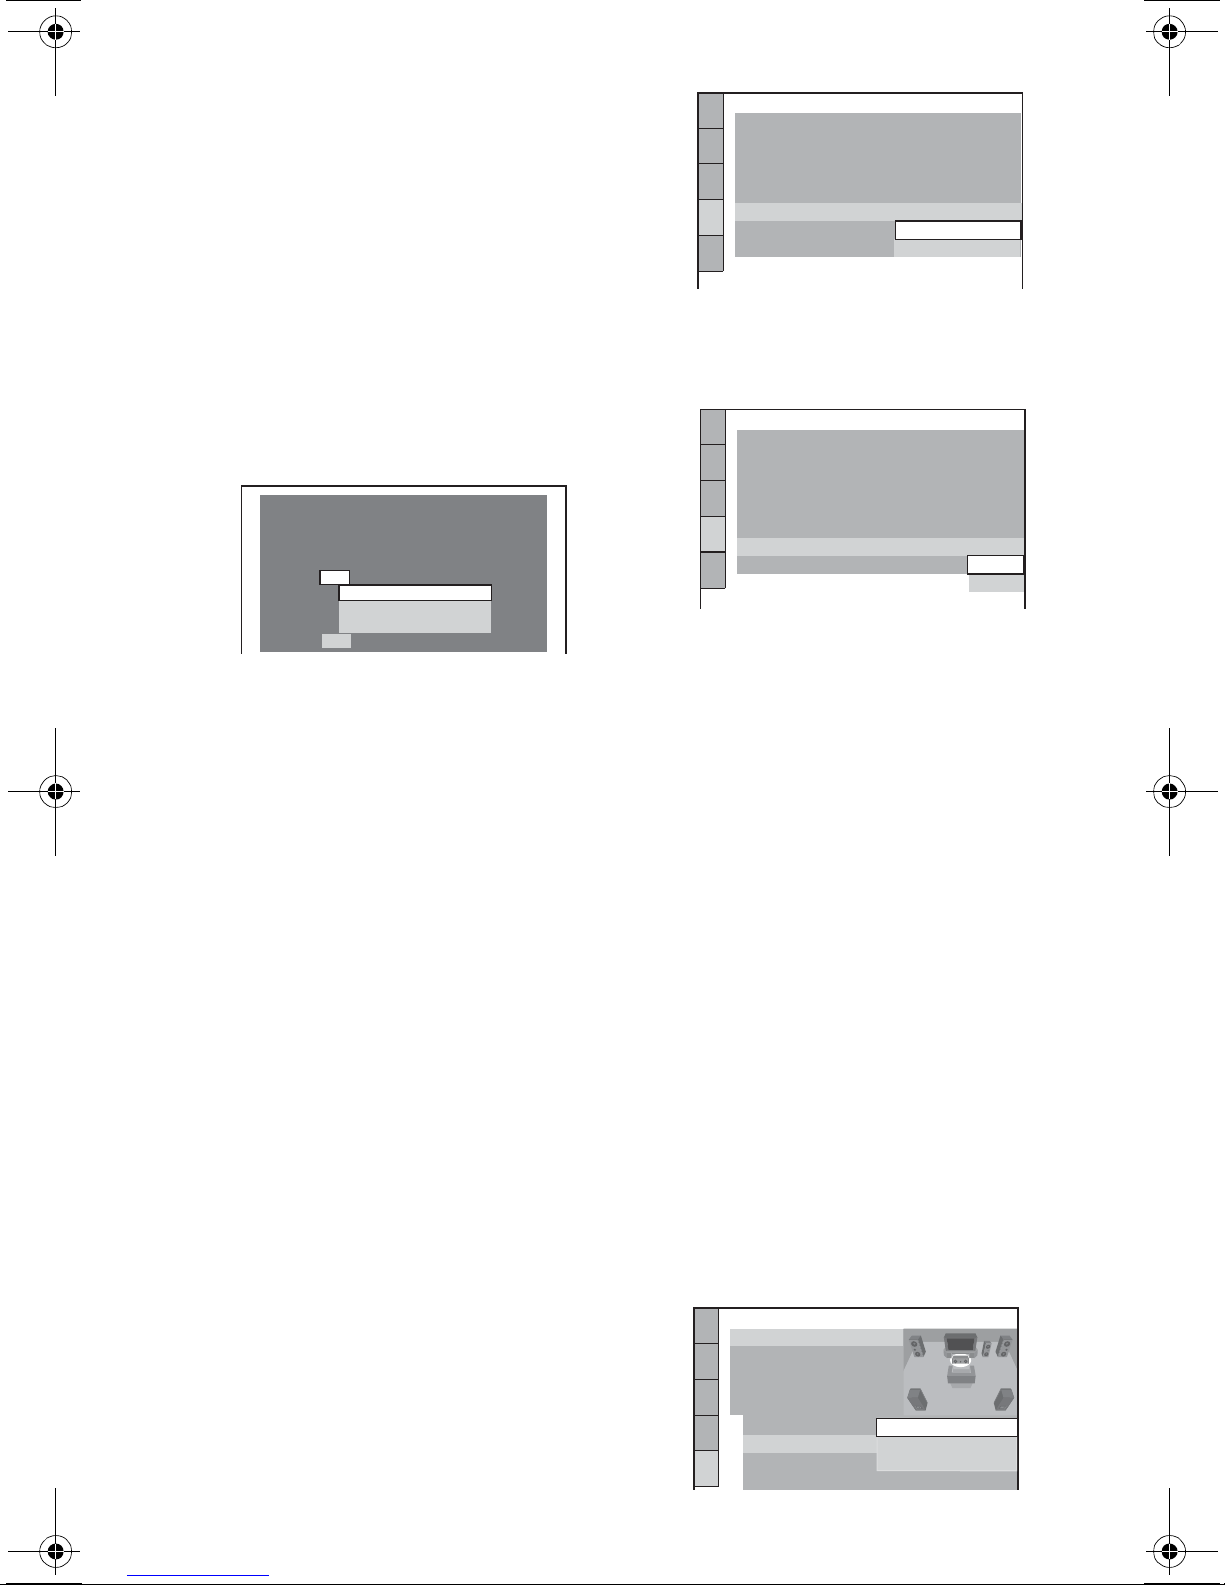
Guide to the Control Menu Display
Use the Control Menu to select a function and to view related information. Press DISPLAY
repeatedly to turn on or change th e Control Menu di s p l ay as follows:
Control Menu displa y 1
,
m
Control Menu displa y 2 (appears for certain discs only)
m
Control Menu displa y off
Control Menu display
The Control Menu display 1 and 2 will show diff erent items depending on the di sc type. For
details about each item , see the pages in pa rentheses.
Example: Control Menu display 1 when playing a DVD VIDEO.
Currently playing disc number
1
2
Playback status
(N Playback,
2
X Pause,
x Stop, etc.)
Control Menu items
Currently playing title number*
Currently playing chapter number*
Total number of titles*
Total number of chapte rs *
1
1
1 2 ( 2 7
1 8 ( 3 4
T
Selected item
1 : 3 2 : 5 5
OFF
OFF
SET
ON
Function name of
selected Control
Menu item
Operation message
*1 Displays the scene number for VIDEO CDs
(PBC is on), track number for VIDEO CDs/
Super Audio CDs/CDs, album number for
DATA CDs/DATA DVDs.
*2 Displays the index number for VIDEO CDs/
Super Audio CDs, MP3 audio track number or
JPEG image file number for DATA CDs/DATA
DVDs.
*3 Displays Super VCD as “SVCD.”
*4 Displays the date for JP EG files.
PROGRAM
ENTER DISPLAY
)
DVD VIDEO
)
Type of disc
being played*
Playing time*
Current setting
Options
3
4
Quit:
To turn off the display
Press DISPL A Y repeatedly.
,continued
13
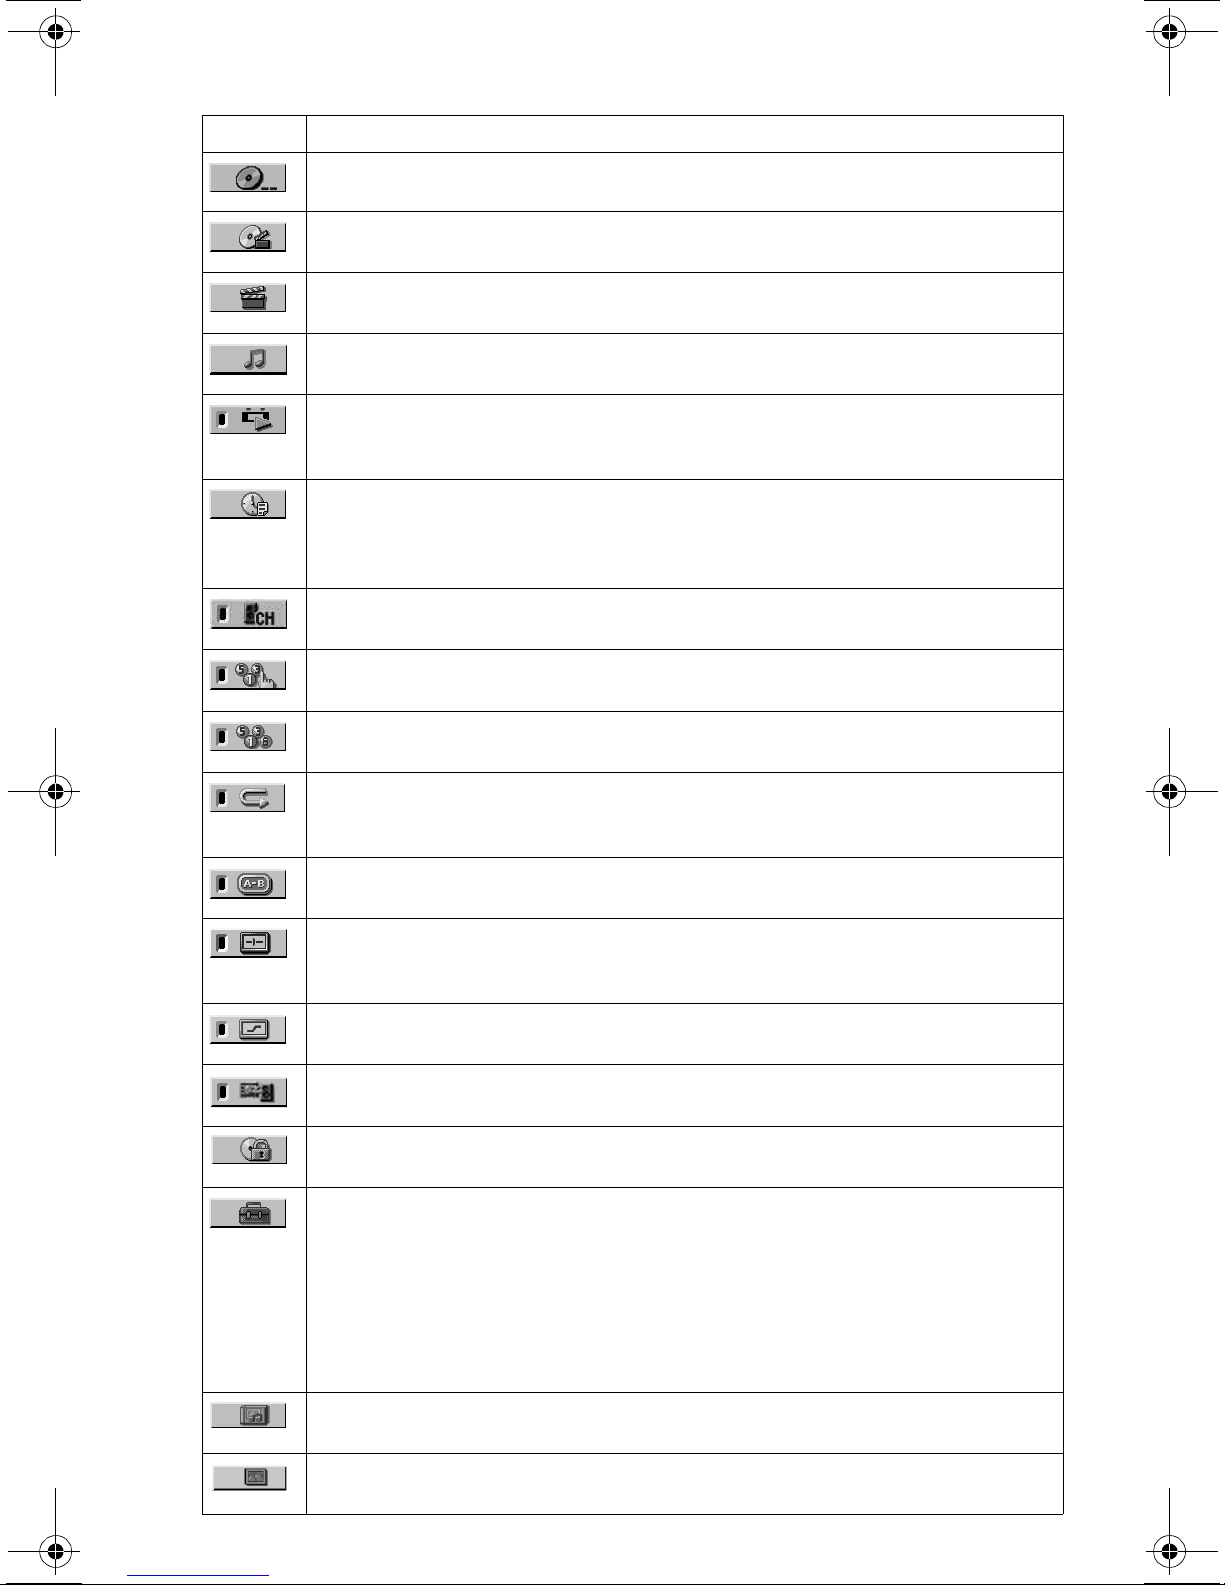
List of Control Menu items
Item Item Name, Function
DISC
Selects the disc to be played.
TITLE (page 38)/SCENE (page 38)/TRACK (page 38)
Selects the title, scene or track to be played.
CHAPTER (page 38)/INDEX (page 38)
Selects the chapter or index to be played.
TRACK (page 38)
Selects the track to be played.
ORIGINAL/PLAY LIST (page 30)
Selects the type of titles (DVD-RW/DVD-R) to be played, the ORIGINAL one or an
edited PLAY LIST.
TIME/TEXT (page 39)
Checks the elapsed time and the remaining playback time.
Input the time code for picture and music searching.
Displays the DVD/CD text or the DATA CD/DATA DVD track/file name.
MULTI/2CH (page 31)
Selects the playback area on Super Audio CDs when available.
PROGRAM (page 33)
Selects th e title, cha p ter or track to play in the order you want.
SHUFFLE (page 34)
Plays the title, chapter or track in random order.
REPEAT (page 35)
Plays the entire disc (all titles/all tracks/all albums) repeatedly or one title/chapter/track/
album repeatedly.
A-B REPEAT (page 36)
Specifies the parts you w a nt t o pla y re peatedly.
CUSTOM PICTURE MODE (page 50)
Adjusts the video signal from the player. You can select the picture quality that best suits
the program you are watching.
SHARPNESS (page 51)
Exaggerates the outline of the image to produce a sharper picture.
AV SYNC (page 52)
Adjust the delay betw een the picture and soun d.
PARENTAL CONTROL (page 59)
Set to prohibit playback on this player.
SETUP (page 65)
QUICK Setup (p age 23)
Use Quick Setup to choose the desired language of the on-screen display, the aspect ratio
of the TV, the audio output signal and the size of the speaker you are using.
CUSTOM Setup
In addition to the Quick Setup sett in g, you can adj u st vari o us other settings.
RESET
Returns the settings in “SETUP” to the default setting.
ALBUM (page 53)
Selects the album to be pl ayed.
FILE (page 39)
Selects the JPEG image file to be played.
14
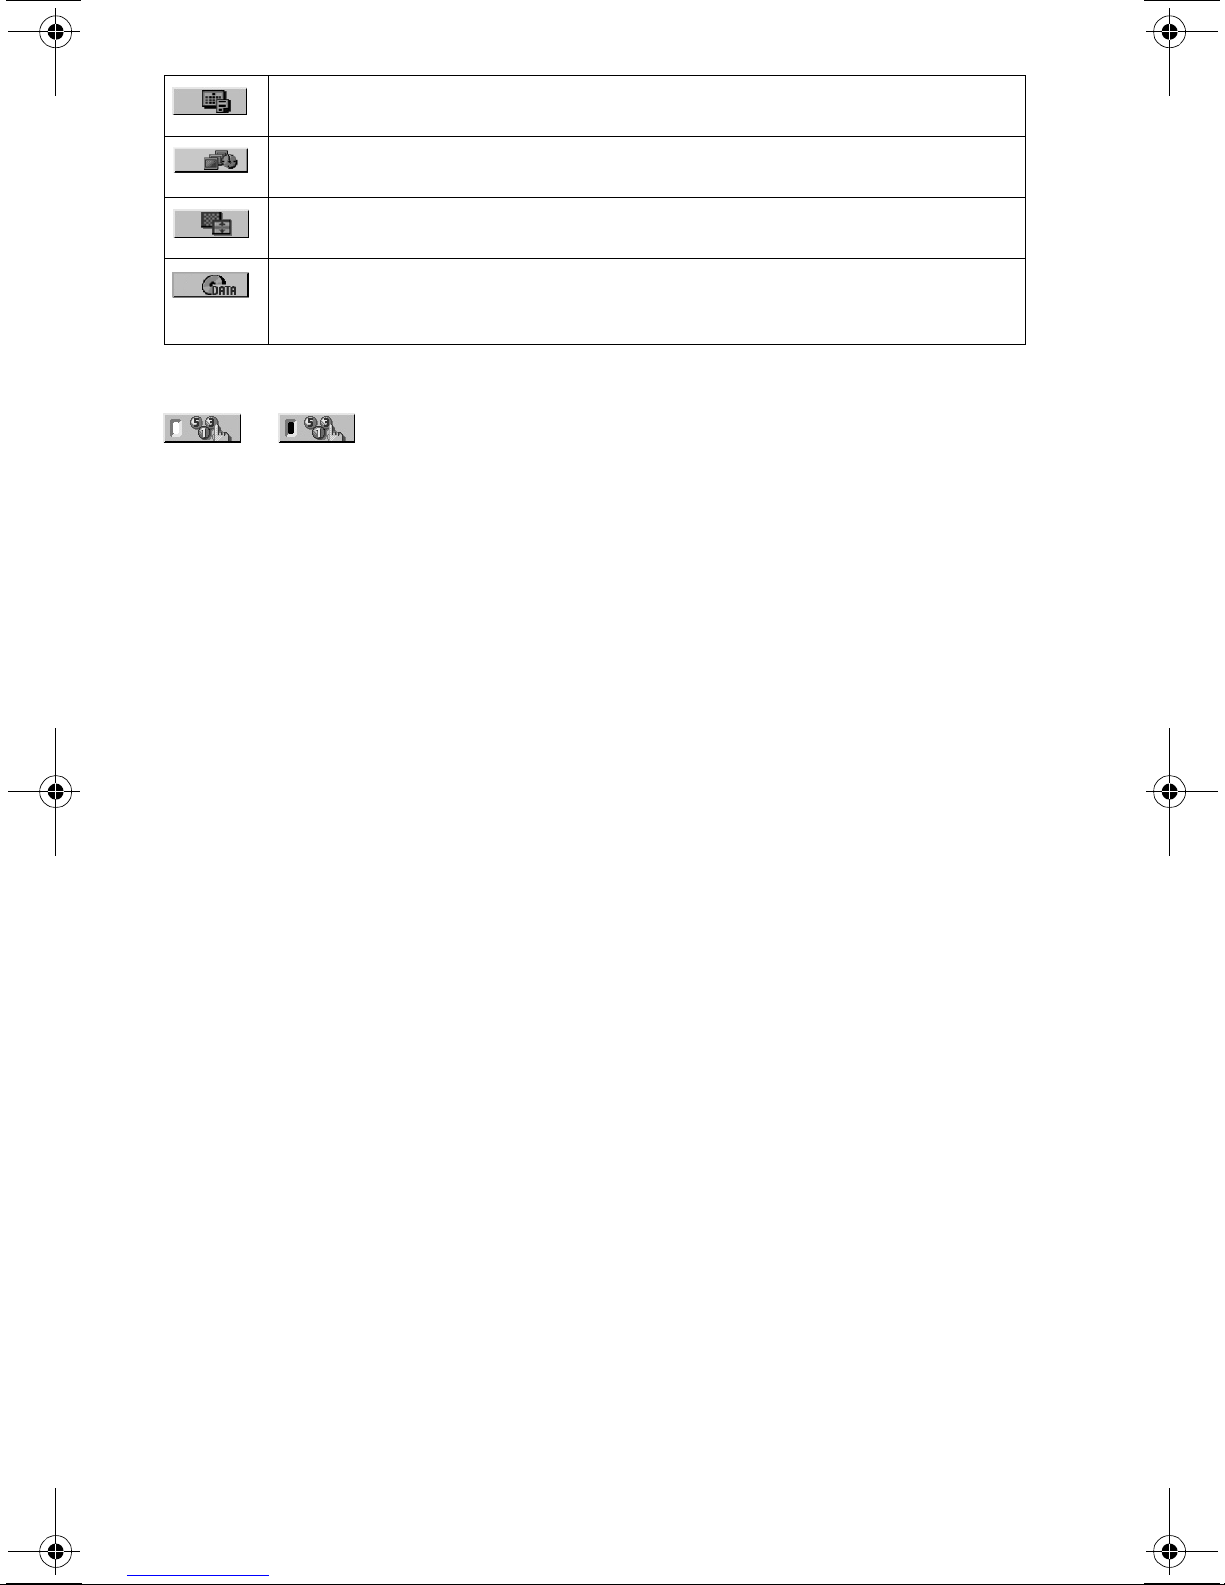
DATE (page 56)
Displays the date the pict ure was taken by a digital camera.
INTERVAL (page 58)
Specifies the duration for which the slides are displayed on the screen.
EFFECT (page 58)
Selects the effects to be used for changing slides during a slide show.
MODE (MP3, JPEG) (page 57)
Selects the data type; MP3 audio track (AUDIO), JPEG image file (IMAGE) or both
(AUTO) to be played when playing a DATA CD or DATA DVD.
z Hint
The Control Menu icon indicator lights up in green
t
except “OFF” (“PROGRAM,” “SHUFFLE,”
“REPEAT,” “A-B REPEAT,” “CUSTOM
PICTURE MODE,” “SHARPNESS” only). The
“ORIGINAL/PLAY LIST” indicator lights up in
green when you select “PLAY LIST” (default
setting). The “MULTI/2CH” indicator lights up in
green when you select the multi-channel playback
area on a Super Audio CD. The “AV SYNC”
indicator lights up in green when set to more than 0
ms.
when you select any item
15
Hookups
Hooking Up the Player
Follow steps 1 to 6 to hook up and adjust the settings of the player.
Notes
• Plug cords securely to prevent unwanted noise.
• Refer to the instructions supplied with the components to be connected.
• You cannot connect this player to a TV that does not ha ve a video input jack.
• Be sure to dis connect the power cord of each component before connecting.
Step 1: Unpacking
Check that you have the following items:
• Audio/Video cord (phono plug × 3 y phono plug × 3) (1)
• Remote commander (remote) (1)
• Size AA (R6) batteries (2)
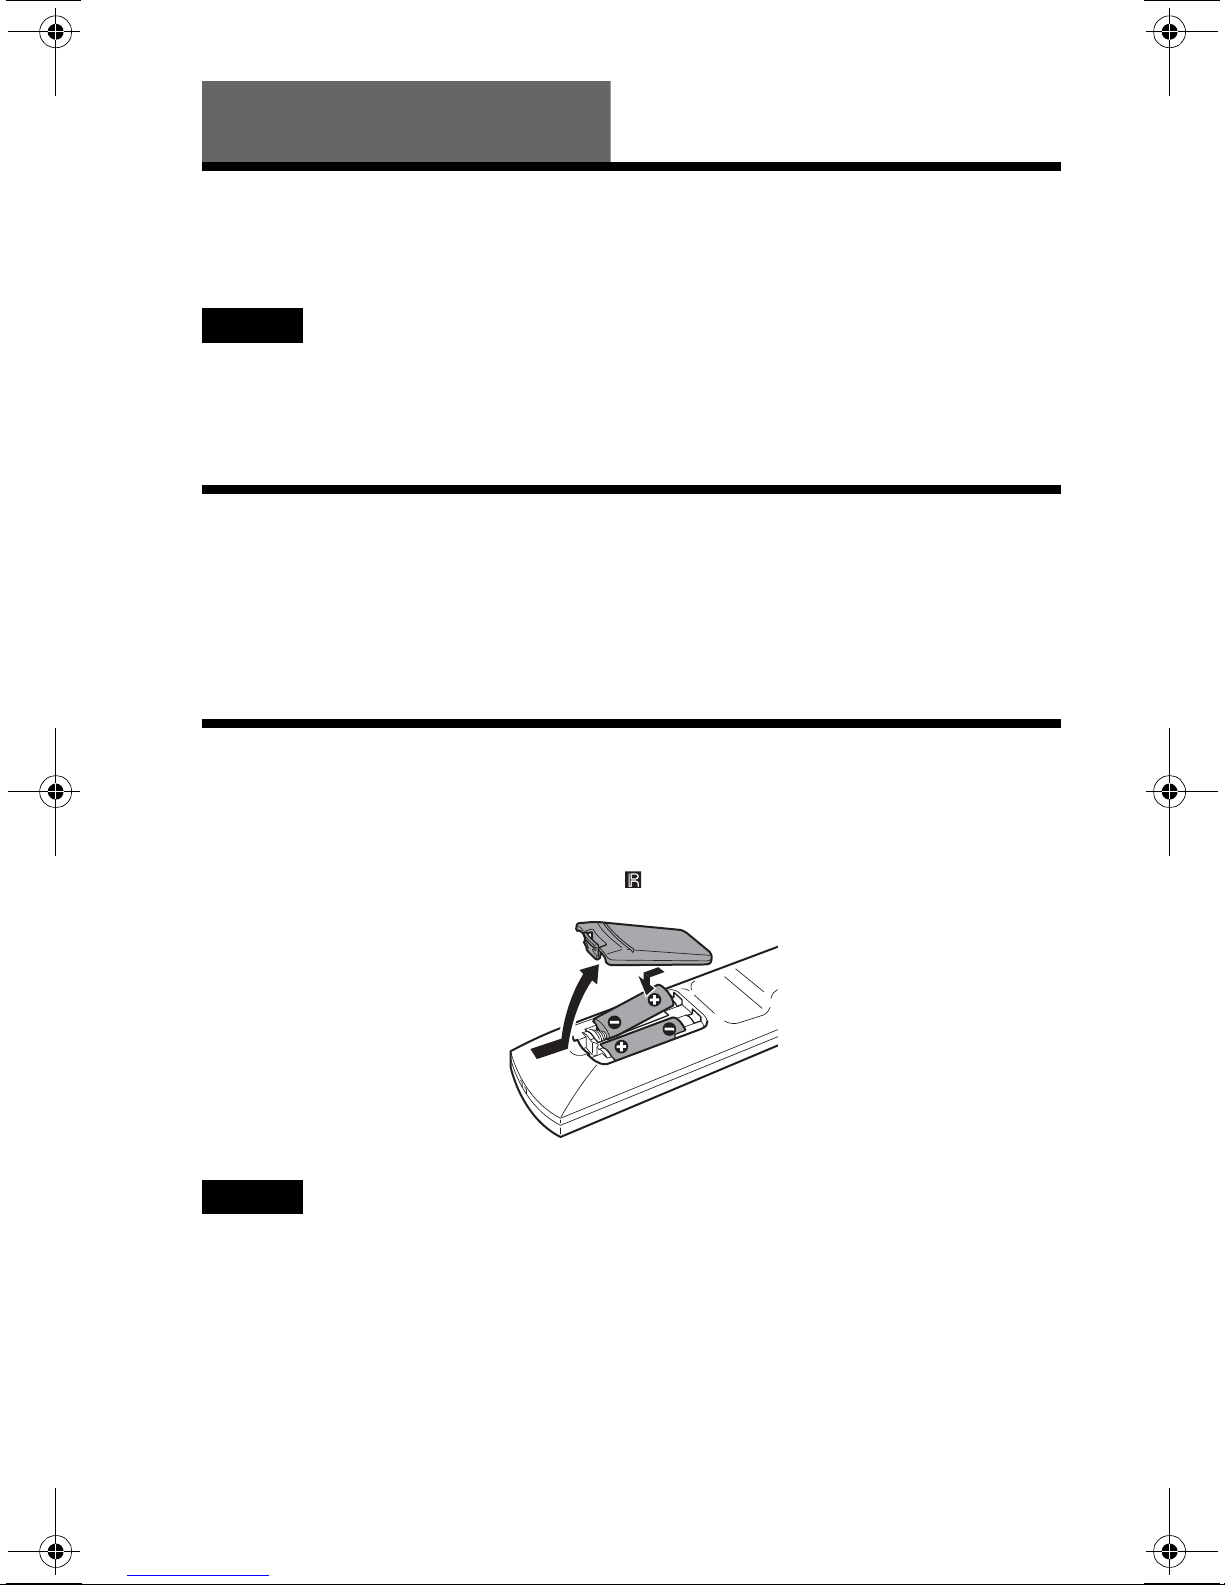
Step 2: Ins erting Batteries Into the Remote
You can control the player using the supplied remote. Insert two Size AA (R6) batteries by
matching the 3 and # ends on the batteries to the markings inside the compartment. When
using the remote, point it at the remote sensor on the player.
Notes
• Do not leave the remote in an extremely hot or humid place.
• Do not drop any foreign object into the remote casing, particularly when replacing the batteries.
• Do not expose the remote sensor to direct light from the sun or a lighting apparatus. Doing so may cause a
malfunction.
• If you do not use the remote for an extended period of time, remove the batteries to avoid possible damage
from battery leakage and corrosion.
16
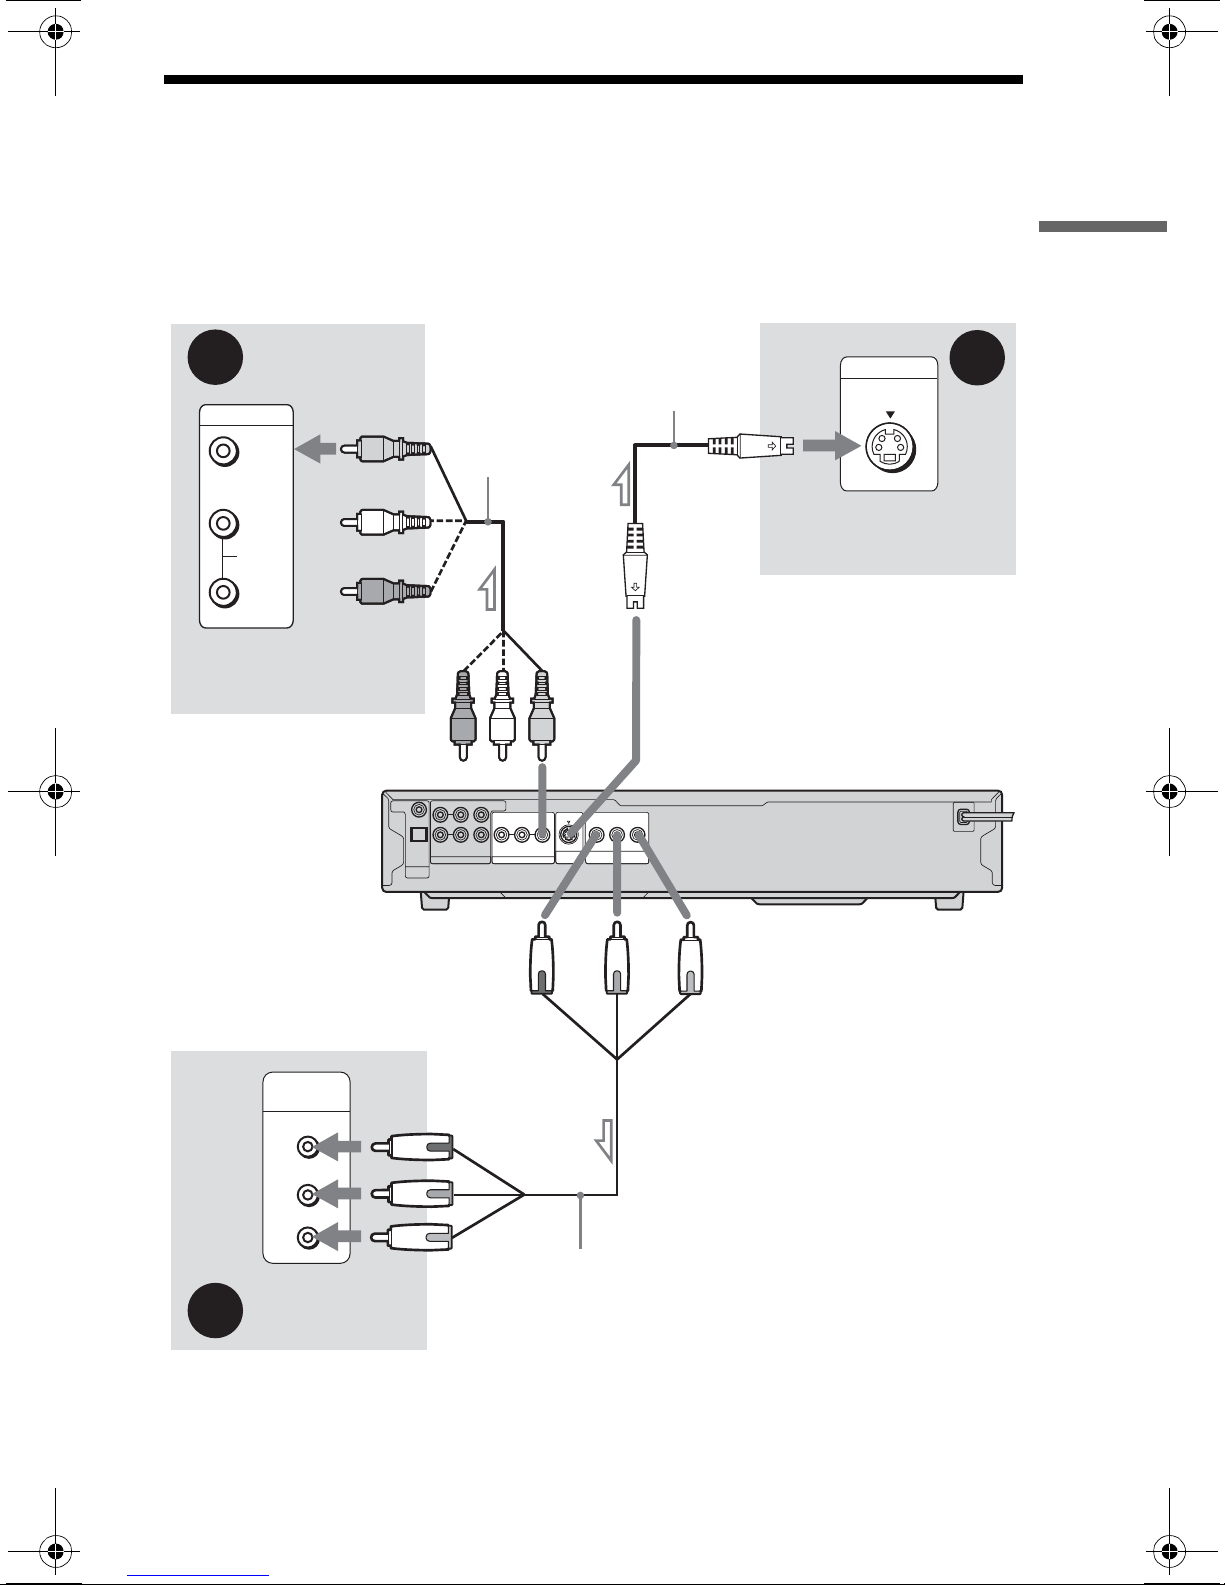
Step 3: Connecting the Video Cords
Connect this pl ayer to your TV mo nitor, projecto r, or AV a mplifi er (rece iver) usi ng a vid eo cord.
Select one of the pat t erns A through C, according to the inp ut jack o n your TV monitor,
projector, or AV amplifier (receiv er).
In order to vi ew pr ogres si ve sign al (4 80p) pict ures with a comp atib le TV , pr ojec tor, or mo nitor ,
you must use pattern A.
Hookups
B
INPUT
VIDEO
L
AUDIO
R
TV, projector, or AV
amplifier (receiver)
to LINE OUT (VIDEO)
to COMPONENT
VIDEO OUT
COAXIAL
Audio/video
cord (supplied)
L
R
OPTICAL
PCM/DTS/
DOLBY
DIGITAL
DIGITAL
OUT
FRONT
5.1CH OUTPUT
WOOFER
REAR
(green)
CENTER
R
AUDIO
L
LINE OUT
(yellow)
VIDEO
S VIDEO
OUT
(blue)
S VIDEO cord
(not supplied)
to S VIDEO OUT
Y
PRPB
COMPONENT
VIDEO OUT
(red)
INPUT
C
S VIDEO
TV, projector, or AV
amplifier (receiver)
CD/DVD player
COMPONENT
VIDEO IN
Y
(green)
P
B
(blue)
P
R
(red)
TV, projector, or AV
A
amplifier (receiver)
l : Signal flow
Component video
cord (not supplied)
,continued
17
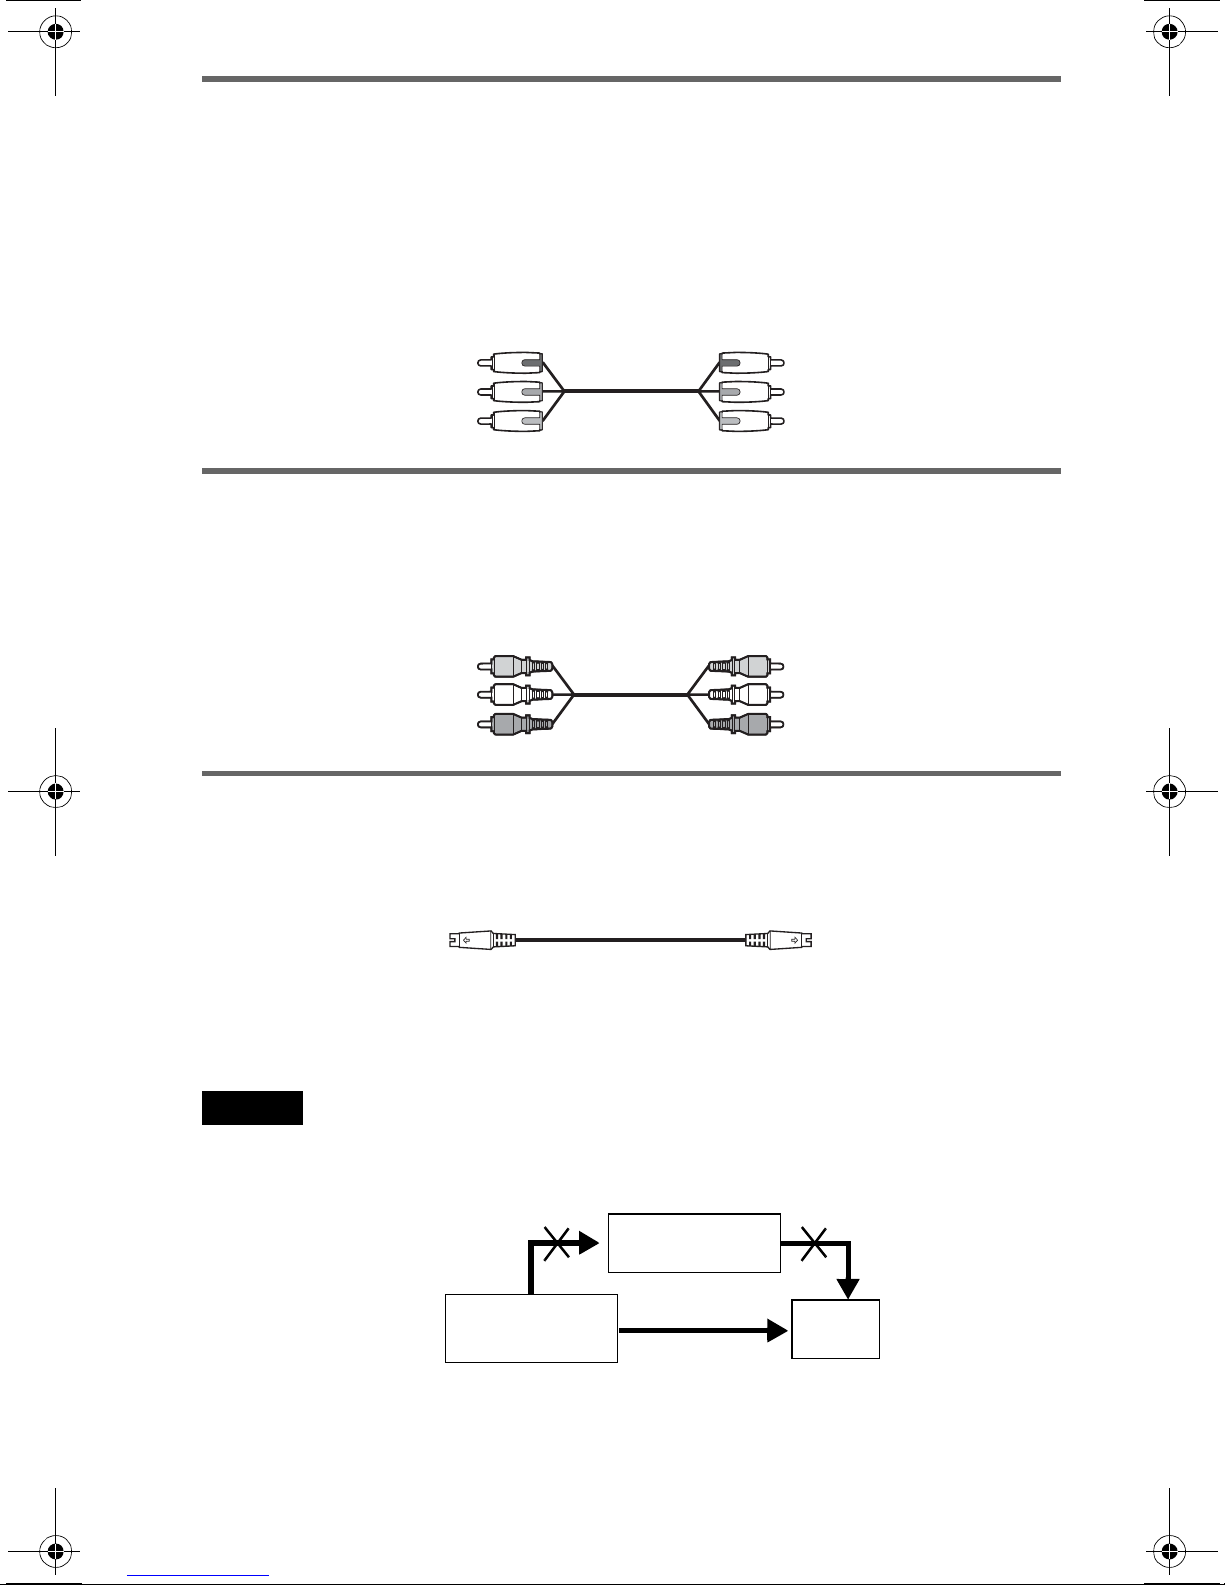
A If you are connecting to a monitor, projector, or AV amplifier
(receiver) having component video input jacks (Y, P
B, PR)
Connect the com ponent via the COMPONENT VID EO OUT jacks usin g a component video
cord (not supplied) or three video cord s (not supplied) of the same k in d and length. You will
enjoy accurate color repr oduction and hi gh quality images.
If your TV acc epts progressive 480p format signals, use thi s connection and press the
PROGRESSIVE button on the front panel to output progressive signals. For details, see “Using
the PROGRE SSI V E button” (page 19) .
Green
Blue
Red
Green
Blue
Red
B If you are connecting to a video input jack
Connect the yellow plug of an audio/video cord (supplied) to the yellow (video) jack. You will
enjoy standa rd quality images.
With this connection, select “NORMAL (INTERLACE)” (default) by pressing the
PROGRESSIVE bu tton on the front panel.
Yellow
White (L)
Red (R)
Yellow
White (L)
Red (R)
C If you are connecting to an S VIDEO input jack
Connect an S VIDEO cord (not supplied). You will enjoy high quality images.
With this connection, select “NORMAL (INTERLACE)” (default) by pressing the
PROGRESSIVE bu tton on the front panel.
When connecting to a wide screen TV
Depending on the disc, the image may not fit your TV screen. To change the aspect ratio, see
page 67.
Notes
• Do not connect a VCR, etc., between your TV and the play er. If you pass th e play er si g n al s via th e VCR,
you may not receive a clear image on the TV screen. If you r TV has only one audio/video input jack,
connect the player to this jack.
VCR
CD/DVD player
Connect
directly
TV
• Consumers should note that not all high definition television sets are fully compatible with this product and
may cause artifacts to be displayed in the picture. In case of 480 progressive scan picture problems, it is
recommended that the user switch the connection to the ‘standard definition’ output. If there are questions
regarding your TV set compatibility with this 480p DVD player model, please contact our customer service
center.
18

Using the PROGRESSIVE button
By using the PROGRESSIVE button on the front panel, you can select the signal format in
which the player outputs video signals (Progressive or Interlace), and the conversion method for
progressive signals. The PRO G R ESSIVE indicat or lights up when the player outputs
progressiv e signals.
Each time you pr ess PROGRES SI V E , th e display changes as follows:
PROGRESSIVE AUTO
m
PROGRESSIVE VIDEO
m
NORMAL ( I N TERLACE)
◆PROGRESSIVE A U TO
Select this sett ing when:
– your TV accepts progre ssive signals, a nd,
–the TV is connected to the COMPONENT VIDEO OUT jacks.
Normally select this under the abo ve condition. This automatically detects th e software type, and
selects the appropriate conversion met hod.
Note that the picture wil l not be clea r or no pictu re will a ppear if you se lect these setti ngs when
either of the above conditions is not met.
Hookups
◆PROGRESSIVE V IDEO
Select this sett ing when:
– your TV accepts progre ssive signals, a nd,
–the TV is connected to the COMPONENT VIDEO OUT jacks, and,
–you want to fix the conversion method to PROGRESSIVE VIDEO for video based software.
Select this if the imag e is not cle ar when you sel e ct PROGRESSIVE AUTO.
Note that the picture will not be clear or no picture will appear if you select these settings when
either of the above conditions is not met.
◆NORMAL (INTERLACE)
Select this sett ing when:
–your TV does not accept progressive signals, or,
–your TV is connected to jacks ot her than the COMPONENT VIDEO OUT jacks (LINE OUT
(VIDEO) or S VIDEO OUT).
About DVD software types and the conversion method
DVD software can be divided into two types: film-based software and video-based software.
Video-based software is deriv ed from TV, such as dramas and sit-co ms , and displays images at
30 frames/60 fields p er second. Film- based software is de rived from film and di splays images at
24 frames per second. Some DVD software contains both video and film.
In order fo r t hese images to appear natu ral on your screen when out put in progressive format,
the progressive signals need to be converted to match the type of DVD software that you are
watching.
Notes
• W he n you pl ay vi de o- ba se d sof twar e in prog ressive signal format, sections of some types of images ma y
appear unnatural due to the conversion proc e ss whe n output through the COMPONENT VID EO OU T
jacks. Images from the S VIDEO OUT and LINE OUT ( VID EO) jack s ar e unaffe ct ed as they a re outp ut in
the normal (interla ce ) fo rm a t.
• Whe n using LINE OUT (VIDEO) or S VIDEO OUT, the picture may appea r to flicker eac h tim e the
PROGRESSIVE button on the front panel is pressed (Interlace switches to Progressive or vice versa).
19

Step 4: Con necting the Audio Cords
Select o ne of the f ol l owi ng pa tt er ns A, or , according to the input jack on your TV
B-1 B-2
monitor, projector, or AV amplifier (rece iv er ). This will enabl e you to listen to sound.
(red)
(white)
(yellow)*
to LINE OUT
L/R (AUDIO)
to DIGITAL OUT
(COAXIAL or OPTICAL)
Audio/video
cord (supplied)
CD/DVD player
to 5.1CH
OUTPUT
(yellow)*
(white)
(red)
TV, projector, or
AV amplifier
(receiver)
B-1
Optical digital cord
(not supplied)
to coaxial or optical
digital input
[Speakers]
Rear (L)
Front (L)
Center
Coaxial digital cor d
(not supplied)
Stereo audio cor d
(not supplied)
or
or
AV amplifier (receiver)
having 5.1ch inputs or/
and a decoder
Monaural audio
cord (not supplied)
to audio input
[Speakers]
Rear (R)
Front (R)
Subwoofer
: Signal flow
* The yellow plug is used for vide o signals (page 17).
20
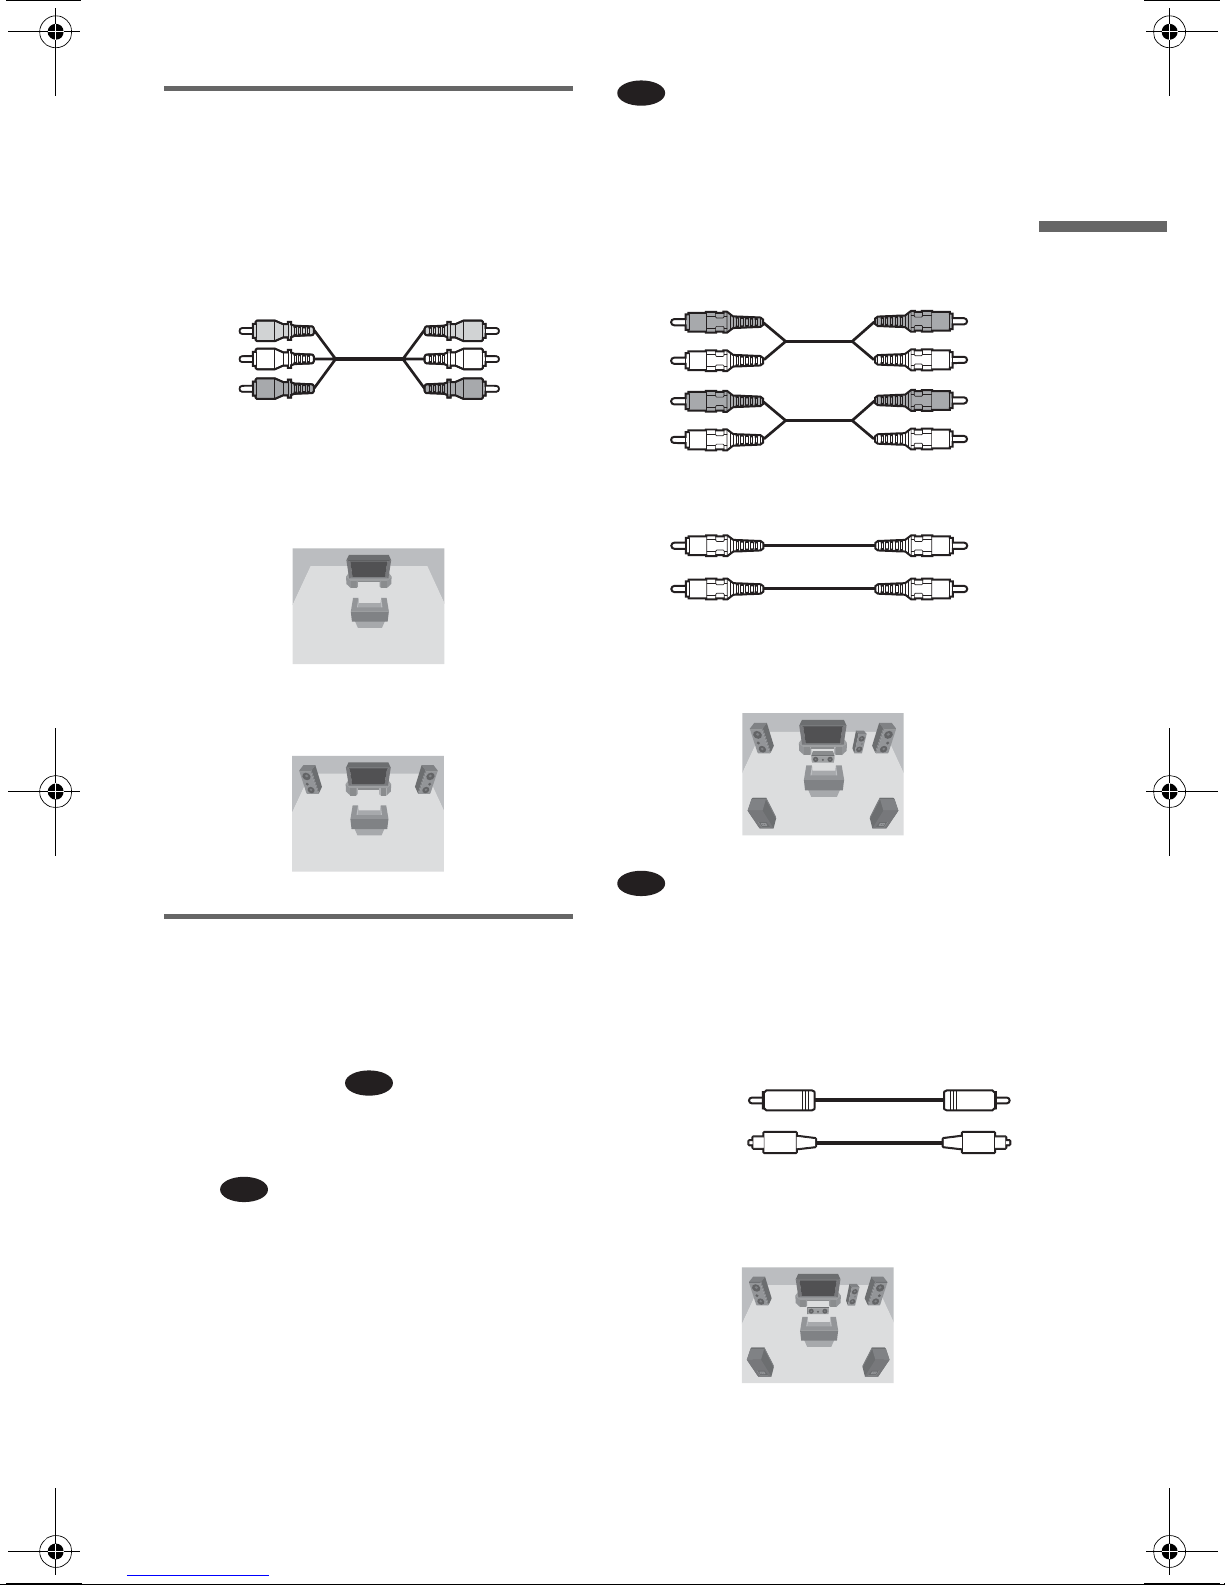
A Connecting to audio L/R input
jacks
This connection will use your TV’s o r stereo
amplifi er’s (receiver’s) two speakers for
sound. Connect using the aud i o/video cord
(supplied).
B-1
: Connecting to the 5.1 ch input jacks
You can enjo y 5. 1 ch surround sound using
the internal Dolby Digital, DTS or Super
Audio CD Mult i dec oder of this player .
Connect using the stereo audio cord or
monaural audio cord (not supplied).
Stereo audio cord
Hookups
Yellow
White (L)
Red (R)
Yellow
White (L)
Red (R)
• Surround effect (page 46)
TV: Dynamic Theater, Dynamic, Wide,
Night
Stereo amplifier (receiver): Standard, Night
B Connecting to an AV ampli fer
(receiver) with 5.1 ch i nput jacks
and/or a digital audio input jack
If your AV amplifier (receiver) has 5. 1
channel inpu ts , use .
If you want to use the Dolby Digital*
2
DTS*
decoder function on your A V
amplifi er (receive r), connect to its digital jack
using . With the following connec tions,
B-2
you can en joy a more re alisti c audio presen ce
in the comfort of your own home.
B-1
1
, or
White
Red
White
Red
White
Red
White
Red
Monaural au dio cord
White
White
White
White
• Surroun d ef fect
Dolby Digital (5.1ch), DTS (5.1ch)
B-2
: Connecting to a dig ital au dio in put
jack
If your AV amplifier (recei ver) has a Dolb y
Digital or DTS decoder and a digi t al in put
jack, use this connection.
Connect using a coaxial or optical digital cord
(not supplied).
Coaxial cord
Optical cord
• Surroun d ef fect
Dolby Digital (5.1ch), DTS (5.1ch)
,continued
21

*1
Manufactured under license from Dolby
Laboratories.
“Dolby,” “Pro Logic,” and the double-D symbol
are trademarks of Dolby Laborator ie s.
2
Manufactured under license from Digital Theater
*
Systems , I n c. U.S. Pat. N o ’s.
5,451,942; 5,956,674; 5,974,380; 5,978,762;
6,226,616; 6,487,535 and other U .S. and worldwide patents issued and pending. “DTS” and
“DTS Digital Surround” are registered
trademarks of Digital Theater Systems, Inc.
Copyright 1996, 2003 Digital Theater Systems,
Inc. All Rights Reserved.
z Hints
• For connection
B-2
For correct speaker l ocation, refer to the oper ating
instructions of the co nne ct e d com ponents.
• To enhance the sound performance:
– Use high-performance speakers.
– Use front, rear, and center speakers of the same
size an d p er formance.
– Place the subwoofer between the left and right
front speakers.
Notes
For connection
• After you have completed the connection, be sure
to set “DOLBY DIGITAL” to “DOLBY
DIGITAL” and “DTS” to “DTS” in Quick Setup
(page 23).
• When you connect an amplifier (receiver) that
conforms to the 96 kHz sampling frequency, set
“48kHz/96kHz PCM” in “AUDIO SETUP” to
“96kHz/24bit” (page 71).
• The surround sound effects of this player cannot
be used with this connection.
• Super Audio CD audio signals are not output from
the DIGITAL OUT jacks.
B-2
22

Step 5: Connecting the Power Cord
Plug the player and TV pow er cords into an AC outlet.
Step 6: Quick Se tup
Follow the steps below to make t he minimum number o f basic a djustmen ts for us ing the play er.
To skip an adjustment, press >. To return to the previous adjustment, press ..
ENTER
Hookups
1 Turn on the TV.
2 Press [/1.
3 Switch the input selector on your
TV so that the signal from the
player appears on the TV screen.
“Press [ENTER] to run QUICK SETUP”
(press en ter to run Quick Setu p) a ppears
at the bottom o f the scre en. If this
message doe s not appear, select
“QUICK” (quick) under “SETUP”
(setup) i n the Cont rol Me nu to r un Qui ck
Setup (page 66).
4 Press ENTER without inserting a
disc.
The Setup Disp lay for selecting the
language use d in the on-screen di splay
appears.
LANGUAGE SETUP
OSD:
MENU:
AUDIO:
SUBTITLE:
ENGLISH
ENGLISH
FRENCH
SPANISH
PORTUGUESE
5 Press X/x to select a language.
The player displays the menu and
subtitles in the selected language.
6 Press ENTER.
The Setup Display for selecting the
aspect ratio of the TV to be connected
appears.
SCREEN SETUP
TV TYPE:
SCREEN SAVER:
BACKGROUND:
BLACK LEVEL:
BLACK LEVEL
4:3 OUTPUT:
(COMPONENT OUT)
4:3 LETTER BOX
4:3 LETTER BOX
4:3 PAN SCAN
16:9
OFF
:
FULL
,continued
23
7 Press X/x to select the setting that
matches your TV type.
◆ If you have a 4: 3 st andard TV
• 4:3 LETTER BOX or 4:3 PA N SCAN
(page 67)
◆ If you have a wide-screen TV or a 4:3
standard TV wi t h a wi de-screen mode
• 16:9 (page 67)
8 Press ENTER.
The Setup Disp la y for selecting the t ype
of jack used to connect your ampl i fi er
(receiver) appears.
Is this player connected to an amplifier
(receiver)? Select the type of jack you
are using.
YES
LINE OUTPUT L/R(AUDIO)
DIGITAL OUTPUT
DIGITAL & 5.1CH OUTPUT
NO
AUDIO SETUP
AUDIO ATT:
AUDIO DRC:
AUDIO FILTER: SHARP
DOWNMIX:
DIGITAL OUT:
DOLBY DIGITAL:
DTS:
48kHz/96kHz PCM:
DOLBY SURROUND
DOLBY DIGITAL
OFF
STANDARD
ON
D-PCM
D-PCM
11Press ENTER.
“DTS” is sele ct ed.
AUDIO SETUP
AUDIO ATT:
AUDIO DRC:
AUDIO FILTER: SHARP
DOWNMIX:
DIGITAL OUT:
DOLBY DIGITAL:
DTS:
48kHz/96kHz PCM:
DOLBY SURROUND
OFF
STANDARD
ON
D-PCM
D-PCM
D-PCM
DTS
12Press X/x to select whether or
9 Press X/x to select the type of jack
(if any) you are using to connect to
an amplifier (receiver), then press
ENTER.
If you did not connect an AV amplifier
(receiver), select “NO.” Quick Setup is
finished and connections ar e complete.
If you connected an AV ampli fier
(receiver) using just an audio cord, select
“YES: LINE OUTPUT L/R (AUDIO).”
Quick Setup i s fini shed and conne ct ions
are complete.
If you connected an AV ampli fier
(receiver) using a digital coaxial or
optical cord, select “YES: DIGITAL
OUTPUT.” Setup Display for “DOLBY
DIGITAL” appears.
If you connected an AV ampli fier
(receiver) us i ng an audio cord , s el ect
“YES : DIGITAL & 5.1CH OUTPUT.”
The Setup Display for “DOLBY
DIGITAL” appears.
10Press X/x to select the type of
Dolby Digital signal you wish to
send to your amplifier (receiver).
If your AV am pl i fi er (receiver) has a
Dolby Digita l decoder, select “D OLBY
DIGITAL.” Otherwise, select “D-PCM.”
24
not you wish to send a DTS signal
to your amplifier (receiver).
• If your AV amplifier (receiver) has a DT S
decoder, select “DTS.” Ot herwise,
select “D-PC M.”
13Press ENTER.
◆ When “DIGITAL OUTPUT” is selected
in step 9
• Quick Setup is finished and
connections are complete.
◆ When “DIGITAL & 5.1CH OUTPUT” is
selected in st ep 9
• The Setup Displ ay for “SPEAK ER
SETUP” appears.
14Press X/x to select the size of the
center speaker.
If no center speaker is con nected, select
“NONE” (page 71).
SPEAKER SETUP
SIZE:
DISTANCE:
LEVEL(FRONT):
LEVEL(REAR):
TEST TONE:
FRONT:
CENTER:
REAR:
SUBWOOFER:
OFF
LARGE
LARGE
SMALL
LARGE
NONE
LARGE
YES
15Press ENTER.
“REAR” is selected.
SPEAKER SETUP
SIZE:
DISTANCE:
LEVEL(FRONT)
LEVEL(REAR)
TEST TONE:
FRONT:
CENTER:
REAR:
SUBWOOFER:
:
:
OFF
LARGE
LARGE
LARGE(REAR)
LARGE(SIDE)
LARGE(REAR)
YES
16Press X/x to select the size of the
rear speakers.
If no rear spea ker is connec te d, select
“NONE.”
17Press ENTER.
“SUBWOOFER” is selected.
SPEAKER SETUP
SIZE:
DISTANCE:
LEVEL(FRONT):
LEVEL(REAR):
TEST TONE:
FRONT:
CENTER:
REAR:
SUBWOOFER:
OFF
LARGE(REAR)
LARGE
LARGE
YES
NONE
YES
Hookups
18Press X/x to select whether or
not you have connected a
subwoofer.
19Press ENTER.
Quick Setup is finished. All connections
and setup oper at ions are compl ete.
25
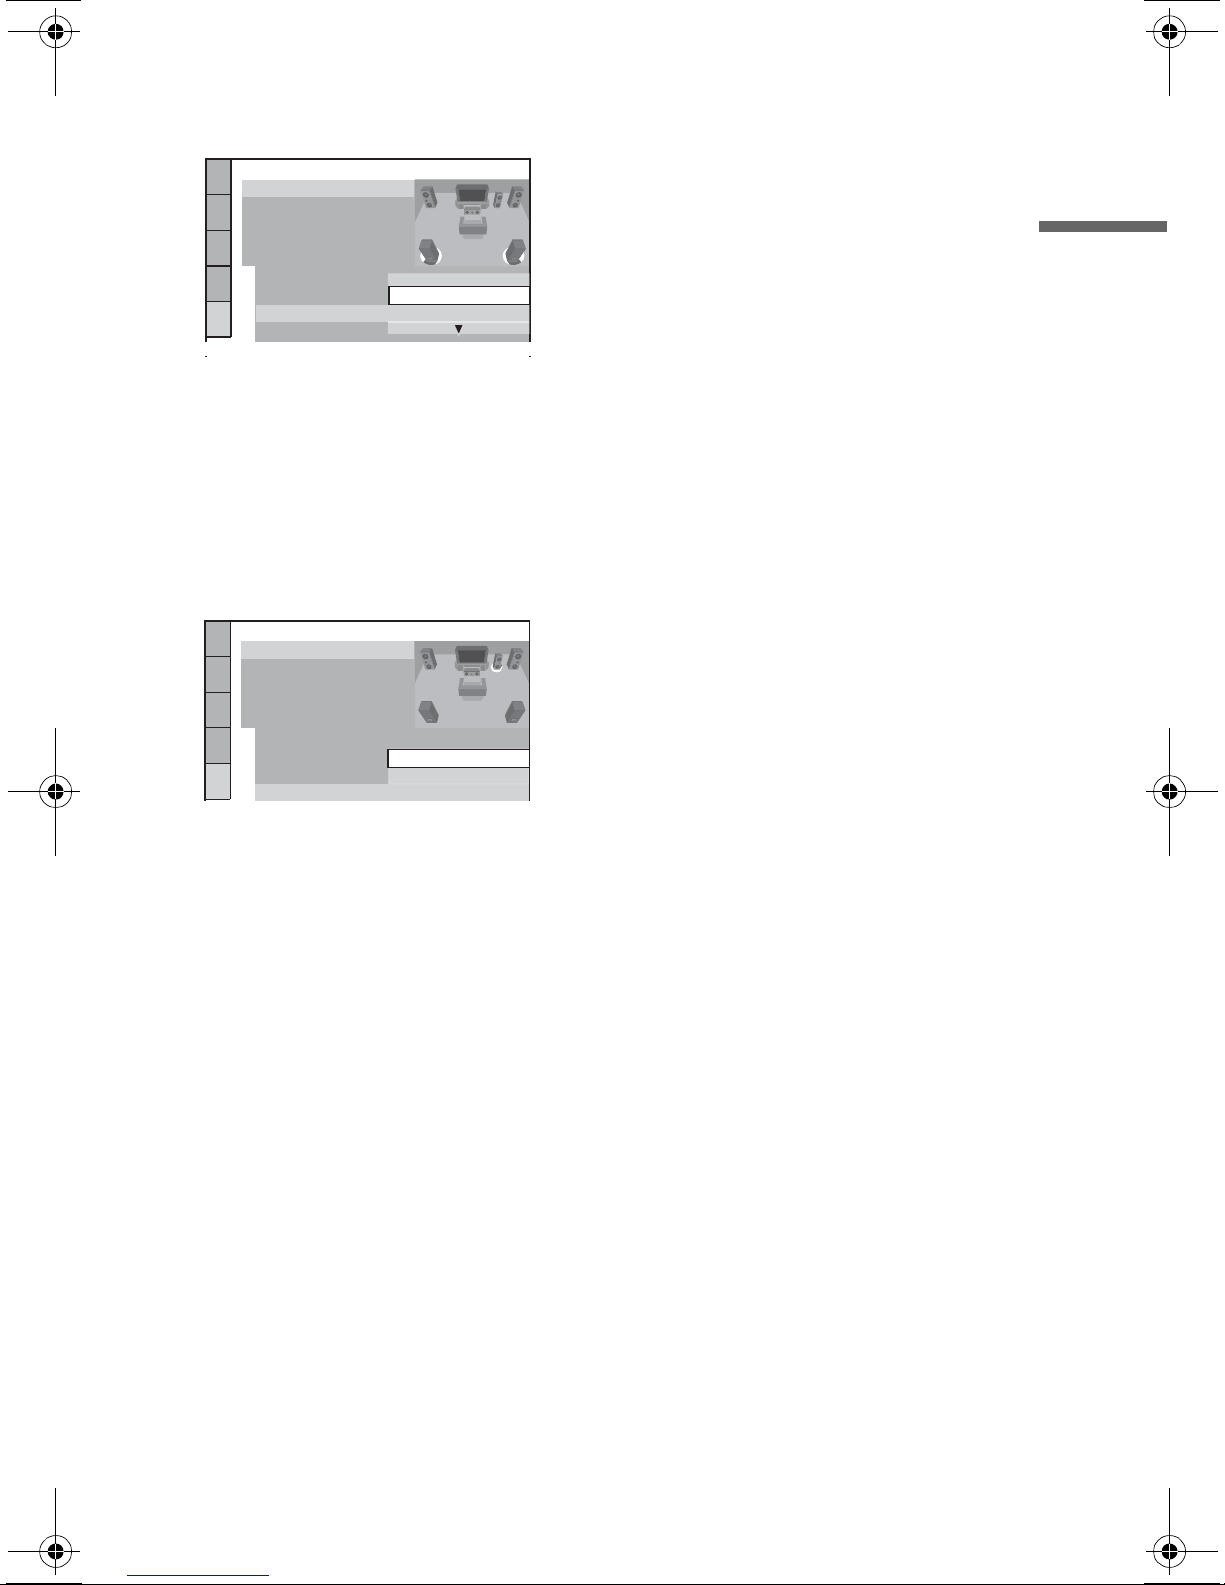
4 Press A on the player, and place a
Playing Discs
Playing Di scs
Depending on the DVD or VIDEO CD, some
operations m ay be different or r es tr i ct ed.
Refer to the operating instructions supplied
with your disc.
DISC SKIP
ENTER
disc on the disc tray.
To place oth er dis cs on the tray, pres s
DISC SKIP and place the discs in the
order you want to play them.
Each time you press DISC SKIP, the disc
tray turns so yo u can place the discs on
the empty compartments. The player
plays from the last disc pla ced on the tray.
Disc
With the playback
side facing down
compartment
number
5 Press H.
The disc tray closes. The player st arts
playback (continuous play). Adju st th e
volume on the TV or the amplifier
(receiver).
Depending on the disc, a menu may
appear on the TV screen. For DVD
VIDEOs, see page 30. For VIDEO CDs,
see page 32.
1 Turn on your TV.
2 Press [/1.
The player tu rns on.
3 Switch the input selector on your
TV so that the signal from the
player appears on the TV screen.
◆ When usin g an amplifier (r eceiver)
Turn on the amplifier (receiver) and
select the appropriate channel so that you
can hear sound from the pla yer.
26
DISC SKIP
To turn off the player
Press [/1. The player enters standby mode.
z Hint
You can have the player turn off automatically
whenever you leave it in sto p mode fo r mor e th an
30 minutes. To turn this function on or off, set
“AUTO POWER OFF” in “CUSTOM SETUP” to
“ON” or “OFF” (page 68).
Notes
• Super Audio CD audio signals are not output from
the DIGITAL OUT jacks.
• Discs created on DVD recorders must be correctly
finalized before they can be played. For more
information about finalizing, refer to the
operating instructions supplied with the DVD
recorder.
 Loading...