

Sony DVP-NC675P Owner’s Manual
3-091-202-12(1 )
CD/DVD
Player
Operating Instructions
For customers in the U.S.A,
Owner's Record
The model and serial numbers are located at the rear ol tile unit.
Record the _rial number in lhe space pwvided below. Reli:r to lhem
whenever you call upon your Sony dealer regarding lhis product.
Model No. DVP-NC675P
Serial NO.
For Customers in Canada
11this product is not working properly, please call 1-877-602-2008 for
Peace of Mind Warranty Replacement service.
For other prodtlct related que tions please conhtcI o/ir Customer
Information Service Centre al 1-877-899-7669 or wrile to IlSat:
Customer Inlormatkm Service 115 Gordon Baker Road, Toronto,
Ontario, M2H 3R6
J -_\
VIDEO
DVP-NC675P
© 2004 Sony Corporation
WARNING Welcome!
To prevent fire or shock
hazard, do not expose the
unit to rain or moisture.
To avoid electrical shock, do
not open the cabinet. Refer
servicing to qualified
personnel only.
CAUTION
The use ol optic_d insu uments with
this product will increase eye
hazard. As the laser beam u_d ill
this CD/DVD player is harmlul to
eyes, do not altelnpt IOdisassenlble
the cabinet.
Relcr servicing to qualified
personnel only.
This symbol is
inlended 1oalert the
user 1othe pre_nce
of uninsulated
within the product's enclosure that
may be of sul/icient magnilude to
constitute a risk ofeleclric shock to
persons.
mainlenance (servicing)
instructions in the lileralurc
accompanying lhe appliance.
"dangerous vollage"
This synlbol is
inlended 1oalert the
user 1othe pre_nce
of importanl
operating and
CAUTION :
This equipmen( has been tested
and lound to comply with the
limits lot a Class B digital device.
pursuant (o Part 15 of (l_eFCC
Rules. The_ limits are designed (o
provide reasonable protectkm
against harmlul in(erllrrcnce in a
residential installation. This
equipment genera(es, uses, and call
radialc radkt h'equency energy
and. if not installed and used in
accordance wilh the instructions,
may cause harmlul intcrlbrence to
radio colnlllunicalions. However,
there is no guaranlee lhal
interlbrence will not occur in a
parlicular inslallalion. If this
equipment does cause harmlul
interllrrence to radio or television
receptkm, width can be
determined by turning the
equipment oil and on, lhe user is
encouraged to try to correct the
interli:rence by one or lnore of the
Iollowing measures:
Reorient or relocate the
receiving mtenna.
Increase the separation
between the equipment and
receiver.
Connect the equipment into an
outlet on a circuit different
from that to which the receiver
is connected.
Consult the dealer or an
experienced radiofFV
technician %r help.
Thank you lor purchasing this
Sony CD/DVD Player. Belom
operating this player, please mad
this manual thoroughly and retain
it lor Iuture relcrence.
TO PREVENT ELECTRIC
SHOCK. MATCH WIDE BLADE
OF PLUG TO WIDE SLOT.
FULLY INSERT.
CAUTION
You are cautk)ned lhat rely change
or modifications not expressly
appro_ ed in this mamlal could void
yo/Ir a/llhority to operate lhis
equipmenl.
Important
Safeguards
For your protection, please read these sallrty
instructions complelcly belore operating the appliance,
and keep this manual lor luture reference,
Carelully ob_lwe all warnings, prccaulions and
insm/ctions on file appliance, or file one described in
lhe operating instructions and adhere to thenl,
Use
Power sources
This set shouM be operated only
fi'on_ the type el power source
indicaled on tile marking label. If
you arc not sure of lhe type el
electrical power supplied to your
honle, consult your dealer (51local power company.
For those sets designed to operate h'onl bilttery power,
(51:other sources, rclcr to tile operaling instrucliolls.
Grounding or Polarization
Tbis set is equipped with a polarized ac power cord
plug (a plug having one blade wider than the other), or
wilh a three-wire grounding lype phlg (a phlg having a
third pill lor grounding). Follow the insmlctions
below:
For the set with a polarized ac power
cord plug:
This phlg will fit into tile power
oullet only Olle way. This is a
sali_ty lcature, lfyou are unable to
insell lhe plug flllly inlo lhe outlet, IiT reversing tile
plug. If the phlg should still lzdl 1o ill, contacl your
electrician 1o have a suitable outlel inslalled. Do nol
delhal lhe salPly purpose of tile polarized phlg by
Iorcing it in.
For the set with a three-wire grounding
type ac plug:
This phlg will only fit into a
grounding-lype power outlet. This
is a sal)ty l_ature. If you are
tillable to insert the plug into the
oullet, contact your electrician to have a suitable oullet
inslalled. Do not delcal the salcly purpo_ of the
gwunding plug.
Overloading
Do not overload wall outlets,
extensioll cords or conveniellCe I _aa::aa_aa===,_
receptacles beyond their capacity,
since Ibis can result in tire or
electric shock.
Object and Liquid Entry
Never push objects_ el any kind inlo _/_ _
tile set through openings as they '_',,_
may touch dangerous voltage points
(517shorl oul paris lhal could restt]l ill
a filx_ or electric shock. Never spill
lktuid of any kind on tile _t.
Attachments
Do nol use altacbnlents llOl
reconltllended by tile UlZlllUl;iclur_2r, Jig
they nlay cause hazards.
Cleaning
Unphlg the set lronl lhe wall outlet
belore cleaning or polishing il. Do
not use liquid cleaners (51 aerosol
cleaners. Use a clolh lightly
danlpened with water lot cleaning
the exterior of tile set,
Installation
Water and Moisture
DO not use power-lhle operated sets ,+,,-_ _
near waler - lor example, near a
bathtub, washbowl, kitchen sink, or
hlundry tub, ill a wet baselllelll, or
llear a swillllning [)(5(51,elc.
Power-Cord Protection
Ro/lle tile power cord so lhat it is
not likely to be walked on or
pinched by items placed upon or
against them, paying particular
altention to tile plugs, receptacles, all(] llle poinl where
the cord exits fl'om lhe appliance.
Accessories
UllSlable cart, slalld_ lripod,
Do noI ph/ce tile set on _111
bracket, or table. Tile set may
tall, causing serious iJ_itn T to a
child or an adult, and serious damage to the set. Use
only a carl stand tripod, bracket, or table recomnlended
by tile manul,_cturer.
All appliance and cart combination
should be moved with calv. Quick
slops, excessive l]srce, and uneven
surli_ces may cause the appliance
and carl conlbJnalion 1(5overturn.
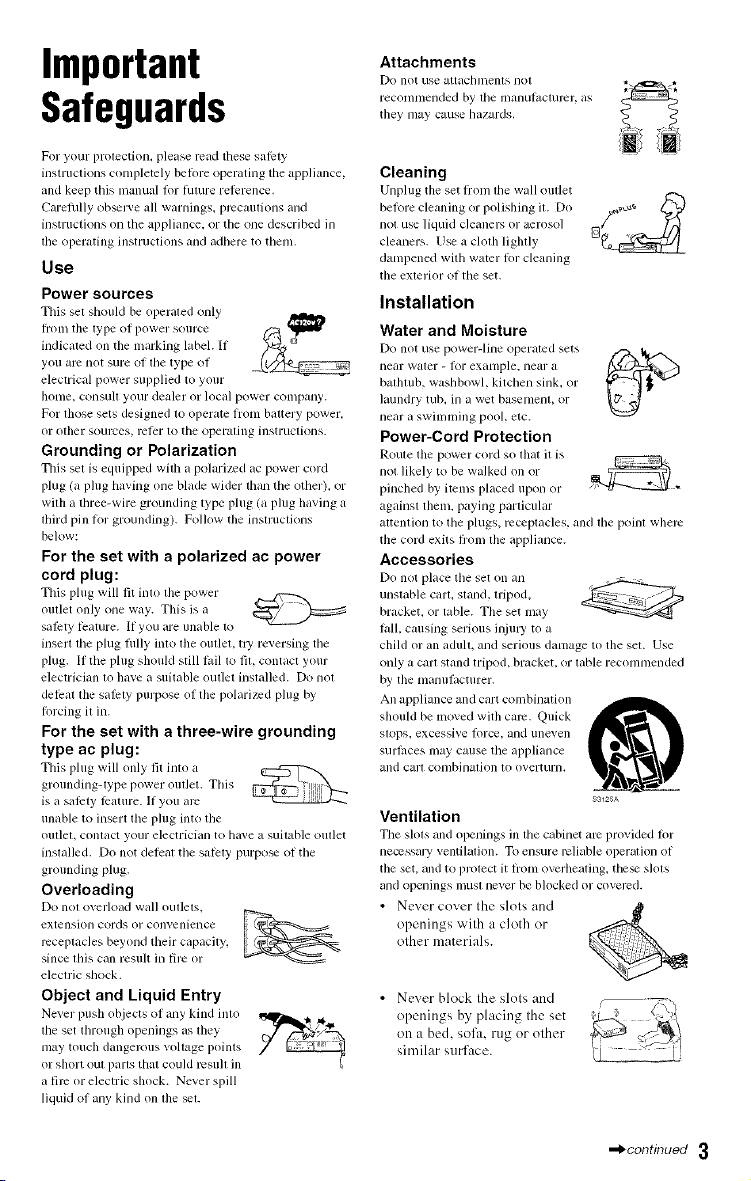
Ventilation
Tile slol and openings ill tile cannel are provided lor
necessaly ventilalion. To ensure lvlinble operation of
tile set, ;ind to prelect it lronl o_.erhe;llillg, the_ slots
and openings must never be blocked or covered.
• Never cover the slots and
openings with a cloth or
other materials.
• Never block the slots and
openings by placing the set
on a bed, sola, rug or other
similar surlace.
sa12s,_
,=i_continued 3
• Never place the set in a
confined space, such as a
bookcase, or builtqn
cabinet, unless proper
ventilation is provided.
• Do not place the set near or
over a radiator or heat
rcgistel: or where it is
2
exposed to direct sunlight.
Antennas
Outdoor antenna grounding
If an outdoor antenna or cable system is inshdled.
Iollow the prcclmtions below.
All Otltdoor _llltt_nna system should not be located ill tile
vicinity of overhead power lines or otller electric light
or power circtlils, or where it can colne ill contact wilh
such power lines or circuits.
WHEN INSTALLING AN OUTDOOR ANTENNA
SYSTEM. EXTREME CARE SHOULD BE TAKEN
TO KEEP FROM CONTACTING SUCH POWER
LINES OR CIRCUITS AS CONTACT WITH THEM
IS ALMOST INVARIABLY FATAL.
Be vIll'C2 tile antcllna _,}mtc21n is groundc2d so as 1_>provide
sonic protection ;igilinsl _)ltagc2 _/ll'gc2sHndbuilt-up slatic
cfim'gc2s.Section 810 of the Nalkmal Electrical Code
provMcs inlormalkm wilh resfvcl to proper grounding of
the nlaq and supporting Sll/iclurc, grounding ol lhe lead-in
wire to ;uaanlenna discfiargc2 unil, size of grounding
condllclors, location of alllenna-discharge unit. conneclion
to grounding electrodes, and mquircmcnls lot lfie
grounding electrode.
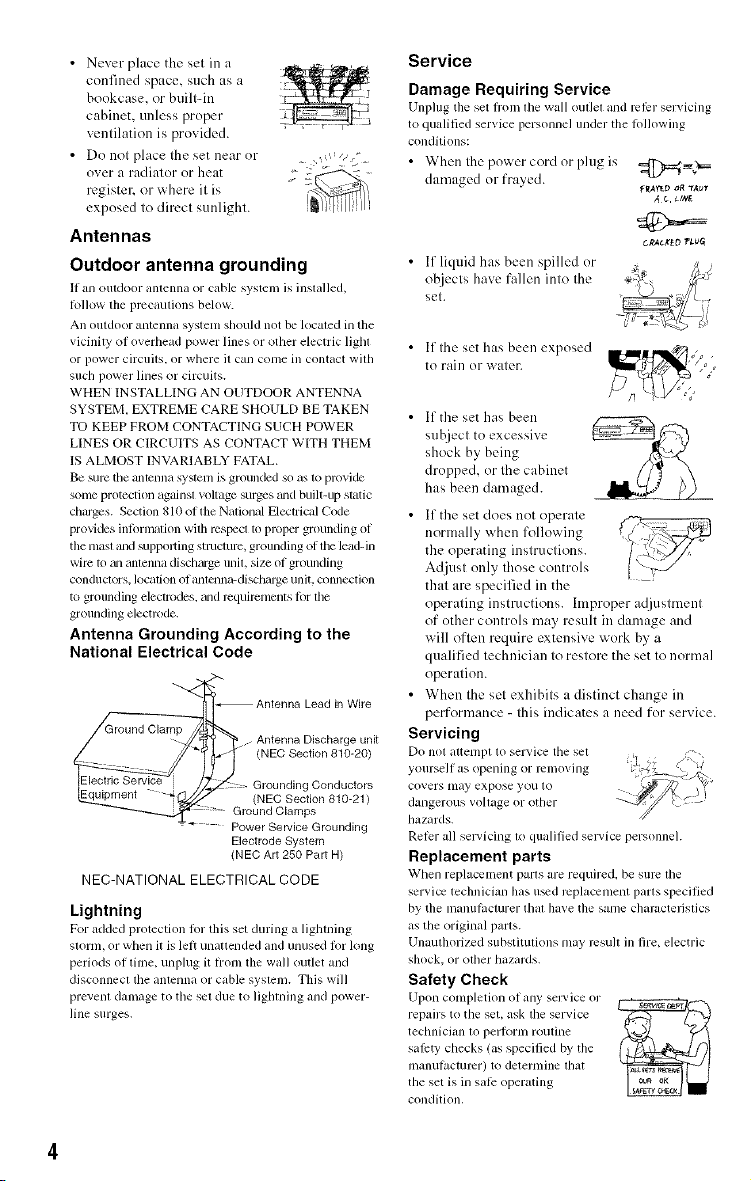
Antenna Grounding According to the
National Electrical Code
_ Antenna Lead in Wire
_'_ _t_t.... _[_ (NED Section 810-21)
NEC-NATIONAL ELECTRICAL CODE
Lightning
For added protection tot this set during a lightning
slornl, or when il is left unattended and unused tot long
periods ot time, unplug it h'onl the wall outlet and
disconnect the antenna or cable system. This will
prevenl damage to tile sel due to lighming mid power-
lille surges.
j. Antenna Discharge unit
(NED Section 810-20)
::=- Grounding Conductors
- GroundClamps
..... PowerService Grounding
ElectrodeSystem
(NED Art 250 PartH)
Service
Damage Requiring Service
Unphlg tile set fi'om tile wall outlet mid rcli:r servicing
to qualified service personnel under tile fi)llowing
conditions:
• When the power cord or plug is
damaged or frayed.
• If liquid has been spilled or
obiects have fallen into the
set.
• If the set has been exposed
to rain or water.
• If the set has been _ _
su[!iect to excessive
shock by being
dropped, or lhe cabinet
has been damaged.
• If the set does not operate
normally when l\dlowing
the operating instructions.
Adjust only those controls
that arc specified in the
operating instructions, hnproper adjustment
of other controls may result in damage and
will often require extensive work by a
qualified technician to restore the set to normal
operation.
• When the set exhibits a distinct change in
performance - this indicates a need for service.
Servicing
Do nol at_elnpl to sel'_,ic*t tile sel
yourself as opening or rclnoxing
covers may expose you to
dangerous vofiage or other
ha/nrds.
Relcr all sel_'icing 1o qualified selxice personnel.
Replacement parts
When replacement parls are required, be sure lfie
sel_ ice techniciml has u_ed replacement parts specified
by tile manulaclurer thai ]lave the salne c]laracterislics
as tile original paris.
Unauthorized substitutions may rcsull ill fire, electric
shock, or odler hazards.
Safety Check
Upon completion of any selvice or
repairs to tile set. ask tile service
tecfinickm lo perlornl routine
safety checks (as specified by tile
manulaclurcr) to deternline lfiat
the set is in sate operating
condition.
gllartt_ oR Tau_
d t_ _/N_
6RAnChO 1'LUG
Precautions
On safety
• Camion -The use of optical instrmnents
with this product will increase eye hazard.
• To prcvent fire or shock hazard, do not
place objects filled with liquids, such as
vases, on the apparatus.
• Should ally snlid object or liquid t_.,11into
the cabinet, unplug tile player and have it
checked by qualified personnel befk_re
operating it ally further.
Onpowersources
• The player is not disconnected from the AC
power source as king as it is connected to
the wall outlet, even if"the player itself has
been turned rift.
• If you are not going to use the player lk*ra
long time, be sure to disconnect the player
t>om the wall outlet. To disconnect the AC
power cord, grasp the plug itself: never pull
the cord.
Onplacement
• Place tile player ill a location with adequate
ventilation to prevent heat build-up ill the
player.
• Do nnt place tile player on a sol1 surface
such as a rug that might block the
ventilation holes.
• Do not place tile player ill a location near
heal sources, or ill a place subject to direct
sunlight, excessive dust, or mechanical
shock.
• Do not install tile player in all inclined
position. It is designed to be operated in a
horizontal position only.
• Do not place heavy objects on the player.
Onadjustingvolume
Do uot turn up the volume while listening to
a sectkm with very low level inputs or no
audio signals. If you do, the speakers may be
damaged when a peak level section is played.
Oncleaning
Clean the cabinet, panel, and controls with a
soft cloth slightly mnistcned with a mild
detergent sohltion. Do not use ally type of
abrasive pad, scouring powder or solvent
such as alcohol or benzine.
Oncleaningdiscs
Do not use a comnlercially availahle cleaning
disc. It may cause a malhmction.
IMPORTANTNOTICE
Caution: This player is capable of holding a
still video inulge or on-screen display image
on your television screen indefinitely. If
you leave Ihe still video irnage or on=screen
display image displayed on ynur TV for all
extended period of time you risk permanem
damage to your television screen. Plasma
Display Panel television and projection
televisions are especially susceptible to this.
Ontransportingtheplayer
Before transporting the player, follow the
procedure below to return the internal
mechanisms to their original positions.
1 Remove all Ihe discs from the disc tray.
2 Press _ to close the disc Iray.
Make sure that "NO DISC" appears on
tile front panel display.
3 Press I/(J) 1o turn off Ihe player.
The player enters standby mode.
4 Disconnect the AC power cord.
Onoperation
• If the player is brought directly fronl a cold
to a warm location, or is placed ill a very
damp Foonl, nloisttlre may condeuse Oil the
lenses inside the player. Should this occur,
the player may not operate properly. In this
case, remove the disc and leave the player
turned on lk)rabout half all hour until the
moisture evaporates.
• When you move tile player, take out ally
discs, lfyou don't, tile disc may be
damaged.
If you have ally questions or problems
concerning your player, please consult your
nearest Sony dealer.
Table of Contents
WARNING .................................................... 2
Welcome! ..................................................... 2
Important Safeguards ........................................... 3
Precautions ................................................... 5
About this Manual .............................................. 8
This Player Can Play the Following Discs ............................ 8
Notes about the Discs ........................................... 9
Index to Parts and Controls ...................................... 10
Guide to the Control Menu Display ................................ 14
Hookups .......................................... 17
Hooking Up the Player .......................................... 17
Step 1: Unpacking ............................................. 17
Step 2: Inserting Batteries into the Remote .......................... 17
Step 3: Connecting the Video Cords ............................... 18
Step 4: Connecting the Audio Cords ............................... 20
Step 5: Connecting the Power Cord ............................... 25
Step 6: Quick Setup ............................................ 25
Playing Discs ...................................... 28
Playing Discs ................................................. 28
Resuming Playback from the Point Where You Stopped the Disc (Multi-disc
Resume) ................................................. 31
Using the DVD's Menu .......................................... 32
Selecting "ORIGINAL" or "PLAY LIST" on a DVD-RW Disc ............. 32
Playing VIDEO CDs with PBC Functions (PBC Playback) .............. 33
Various Play Mode Functions (Program Play, Shuffle Play, Repeat Play, A-B
Repeat Play) .............................................. 34
Searchingfor a Scene ................................ 39
Searching for a Particular Point on a Disc (Search, Scan, Slow-motion Play,
Freeze Frame) ............................................. 39
Searching for a Title/Chapter/Track/Scene, etc ....................... 40
Searching by Scene (PICTURE NAVIGATION) ...................... 42
Viewing Information About the Disc ....................... 43
Checking the Playing Time and Remaining Time ..................... 43
Sound Adjustments .................................. 46
Changing the Sound ........................................... 46
TV Virtual Surround Settings (TVS) ................................ 47
Enjoying Movies .................................... 49
Changing the Angles ........................................... 49
Displaying the Subtitles ......................................... 49
Adjusting the Playback Picture (CUSTOM PICTURE MODE) ............ 50
Sharpening the Outline of an Image (SHARPNESS) ................... 51
Playing a DATA CD ................................... 52
About MP3 Audio Tracks and JPEG Image Files ..................... 52
Playing DATA CDs with MP3 Audio Track and JPEG Image Files ........ 53
Specifying the slideshow duration ................................. 57
Selecting an effect for image files in the slideshow .................... 58
UsingVariousAdditionalFunctions....................... 59
Locking Discs (CUSTOM PARENTAL CONTROL,
PARENTAL CONTROL) ..................................... 59
Controlling Your TV with the Supplied Remote ....................... 63
Settings and Adjustments .............................. 64
Using the Setup Display ......................................... 64
Setting the Display or Sound Track Language (LANGUAGE SETUP) ..... 65
Settings for the Display (SCREEN SETUP) .......................... 66
Custom Settings (CUSTOM SETUP) ............................... 67
Settings for the Sound (AUDIO SETUP) ............................ 68
Additional Information ................................ 70
Troubleshooting ............................................... 70
Self-diagnosis Function (When letters/numbers appear in the display) ..... 72
Glossary ..................................................... 73
Specifications ................................................. 7,5
Language Code List ............................................ 76
Index ....................................................... 77
Aboutthis Manual
ThisPlayerCanPlaythe
• Instructions ill this manual describe tile
controls nn the renlote. You can alsn use tile
controls on the player if they have the same
nr shnilar names as those on the remote.
• "DVD" may be used as a general term Rtr
DVD VIDEOs, DVD+RWs/DVD+Rs and
DVD-RWs/DVD-Rs.
• The meaning of the icons used iu this
manual is described belnw:
Icon Meaning
Functious available for DVD
VIDEOs and DVD+RWs/
DVD+Rs or DVD-RWs/DVD-
Rs ill vide() mode
Functions available for DVD-
RWs ill VR (Video Recording)
mode
Functiuns available fur VIDEO
CDs. Super VCDs or CD-Rs/
CD-RWs ill video CD lk_rmat
or Super VCD lk_rmat
Functiuns available for DATA
CDs (CD-ROMs/CD-Rs/CD-
RWs cuulaining MP3: audio
tracks :rod JPEG image files)
Functions av:dlable for music
CDs ur CD-Rs/CD-RWs in
music CD format
* MP3 (MPEG 1 Audio Layer 3) is a staMard
format defined by ISO (International
Organization for StaMardization)/MPEG which
compresses audio data.
FollowingDiscs
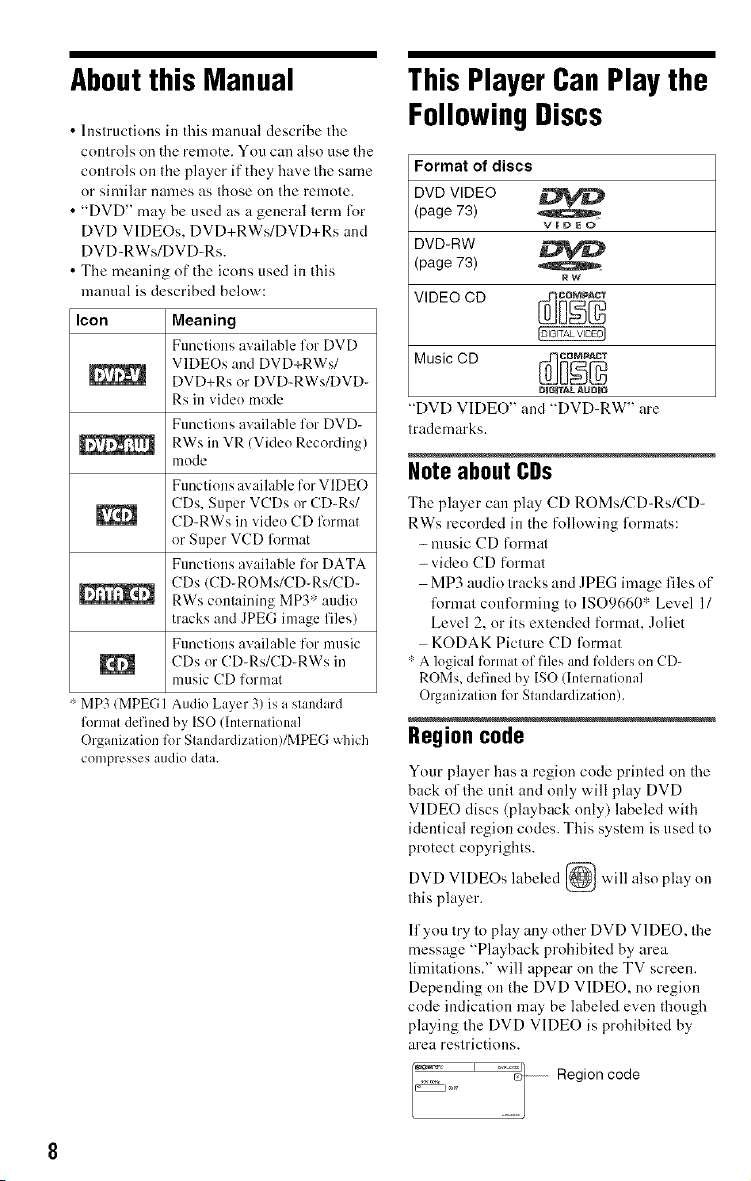
Format of discs
DVD VIDEO
(page 73)
DVD-RW
(page 73)
VBDEO
R!A"
V,DEODD
Music CD {_
"DVD VIDEO" and "DVD-RW ' are
trademarks.
Noteabout CDs
Tile player can play CD ROMs/CD-Rs/CD-
RWs recorded ill the fnllowiug l\)rmats:
- music CD li)rn]al
- vide() CD formal
MP3 audio tracks and JPEG image files of
format conforming to 1SO9660" Level 11
Level 2, or its extended formal Jnliet
KODAK Picture CD format
* A logical format of files and folders on CD-
ROMs, defined by ISO (International
Organization R)r Standardization).
Region code
Yore ÷player has a region cnde printed on the
back nfthe unit and only will play DVD
VIDEO discs (playback nnly) labeled with
identical reginu codes. This system is used to
protect copyrights.
DVD VIDEOs labeled ___ will also play nu
this player.
lfynu try to play any other DVD VIDEO, tile
message "Playback prnhibited by area
limitations." will appear nn the TV screen.
Depending nu the DVD VIDEO. nn reginn
code indicatinn may be labeled even though
playing tile DVD VIDEO is prohibited by
area restrictions.
DBGBT/_LAUDBO
Region code
Exampleof discsthat the player
cannot play
Note on playback operations of
DVDsand VIDEOCDs
The player cannot play the tk)llowing discs:
• CD-ROMs/CD-Rs/CD-RWs other than
those recorded in the lormats listed on the
previous page.
• CD-ROMs recorded in PHOTO CD format
• Data part of CD-Exlras
• DVD-ROMs
• DVD Audio discs
• HD layer oi1 Super Audio CDs
:"A logical format of files and folders on CD-
ROMs defined by ISO(International Standard
Organization).
Also, the player cannot play the following
discs:
• A DVD VIDEO with a different region
code.
• A disc recorded in a color system other than
NTSC, such as PAL or SECAM (this player
conl\)rms to the NTSC color system).
• A disc that has a non-standard shape (e.g.,
card, heart).
• A disc with paper or stickers on it.
• A disc that has the adhesive of cellophane
tape or a sticker still lel: on it.
• Notes about DVD+RWs/DVD+Rs, DVD-RWs/
DVD-Rs or CD-Rs/CD-RWs
Some DVD+RWs/DVD+Rs, DVD-RWs/DVD-
Rs or CD-Rs/CD-RWs cannot be played on this
player due to the recording quality or physical
condition of the disc, or the characteristics of the
recording device and authoring software.
The disc will not play if it has not been correctly
finalized. For more information, see the operating
instructions lk)r the recording device. Note that
some playback filnctions may not work with some
DVD+RWs/DVD+Rs, even if they have been
correctly finalized. In this case, view the disc by
normal playback. Also some DATA CDs created
in Packet Write format cannot be played.
• Music discs encoded with copyright protection
technologies
This product is designed to playback discs that
conform to the Compact Disc (CD) standard.
Recently, various music discs encoded with
copyright protection technologies are marketed
by some record companies. Please be ax_ire that
among those discs, there are some that do not
conform to the CD standard and may not be
playable by this product.
Some playback operations of DVDs and
VIDEO CDs may be intentionally set by
sol,1ware producers. Since this player plays
DVDs and VIDEO CDs according to the disc
contents the soflware producers designed,
some playback fcatures may not be available.
Also, refi:r to the instructions supplied with
the DVDs or VIDEO CDs.
Copyrights
This product incorporates copyright
protection technology that is protected by
U.S. patents and other intellectual property
rights. Use of this copyright protection
technology must be authorized by
Macrovisiom and is intended l\_r home and
other limited viewing uses only unless
otherwise authorized by Macrovision.
Reverse engineering or disassembly is
prohibited.
Notesabout the Discs
• To keep the disc clean, handle the disc by its
edge. Do not touch the surface.
• Do not expose the disc to direct sunlight or
heat sources such as hot air ducts, or leave it
in a car parked in direct sunlight as the
temperature may rise considerably inside
the car.
• Alier playing, store the disc in its case.
• Clean the disc with a cleaning cloth.
Wipe the disc l?'om the center out.
• Do not use solvents such as benzine,
thinner, commercially available cleaners, or
anti-static spray intended for vinyl LPs.
Index to Parts and Controls
For more hflk_rnmtion,reler Io the pages indicaled in parentheses.
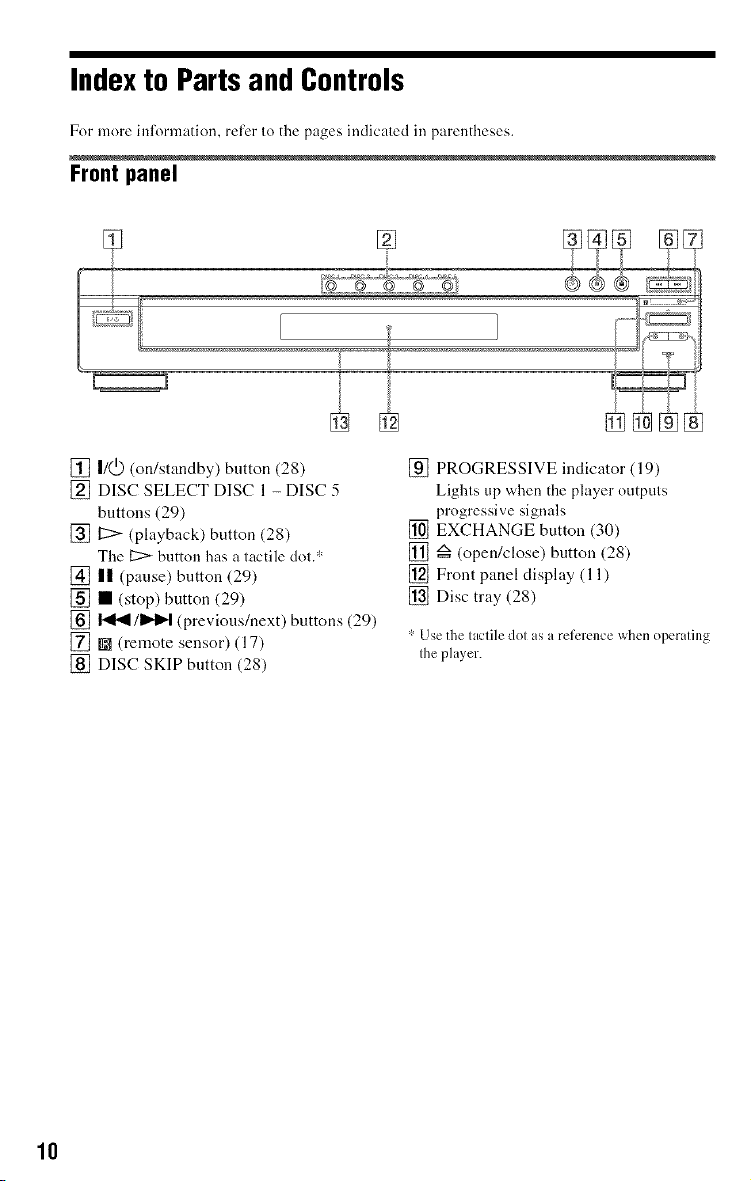
Front panel
[] I/(.D(on/standby) button (28)
[] DISC SELECT DISC 1 - DISC 5
buttons (29)
[] _ (playback) button (28)
The 17::>button has a tactile dot.':'
[] || (pause) button (29)
[] • (stop) button (29)
[] I'_[_ 11_1_1(previous/next) buttons (29)
[] m (remote sensor) (17)
[] DISC SKIP button (28)
[] PROGRESSIVE indicator (19)
Lights up when the player outputs
progressive signals
[] EXCHANGE button (30)
[] z_=(open/close) button (28)
[] Front panel display (11)
[] Disc tray (28)
' Use the laclile dol as a reference when operaling
Ihe player.
10
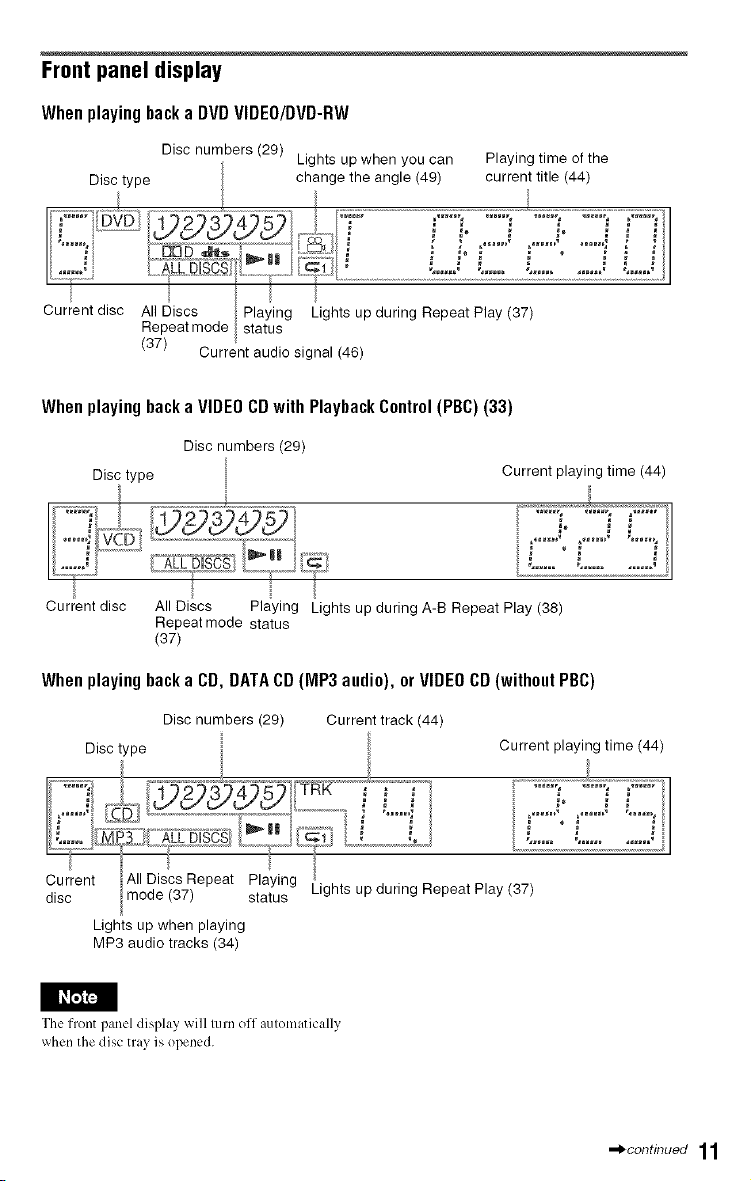
Frontpanel display
Whenplayingbacka DVDVIDEO/DVD-RW
Disc numbers (29)
Disc type change the angle (49) current title (44)
Lights up when you can Playing time of the
/
. /i_]i]_'_';_ii[lZ_:,'o_@ _ : ;, .'...... :......o .....'; : :1
...... , _LL D SCS _ ,,,,,,, ,... ,...... , ,.. ,
Current disc All Discs Playing Lights up during Repeat Play (37)
Whenplayingbacka VIDEOCDwithPlaybackControl(PBC)(33)
........?................................................................ ...........................................................................................................................................................................................I
Repeat mode status
(37) Current audio signal (46)
Disc numbers (29)
Disc type
Current playing time (44)
"o J...... "°"i. •
• ........................ :/'c" :.......,
Current disc All Discs Playing Lights up during A-B Repeat Play (38)
Whenplayingbacka CD,DATACD(IVIP3audio),orVIDEOCD(withoutPBC)
Disc type
L,,5£_[_] _,.........................L,%_ ,,-,.,: ;,............
1
/
Repeat mode status
(37)
Disc numbers (29)
Current track (44)
Current playing time (44)
t i
Current mode
disc
The front panel display will lurn off aulom_ttically
when the disc tray is opened.
All Discs Repeat
(37)
Ii
Lights up when playing
MP3 audio tracks (34)
i t
Playing
status Lights up during Repeat Play (37)
.-i_continued 11
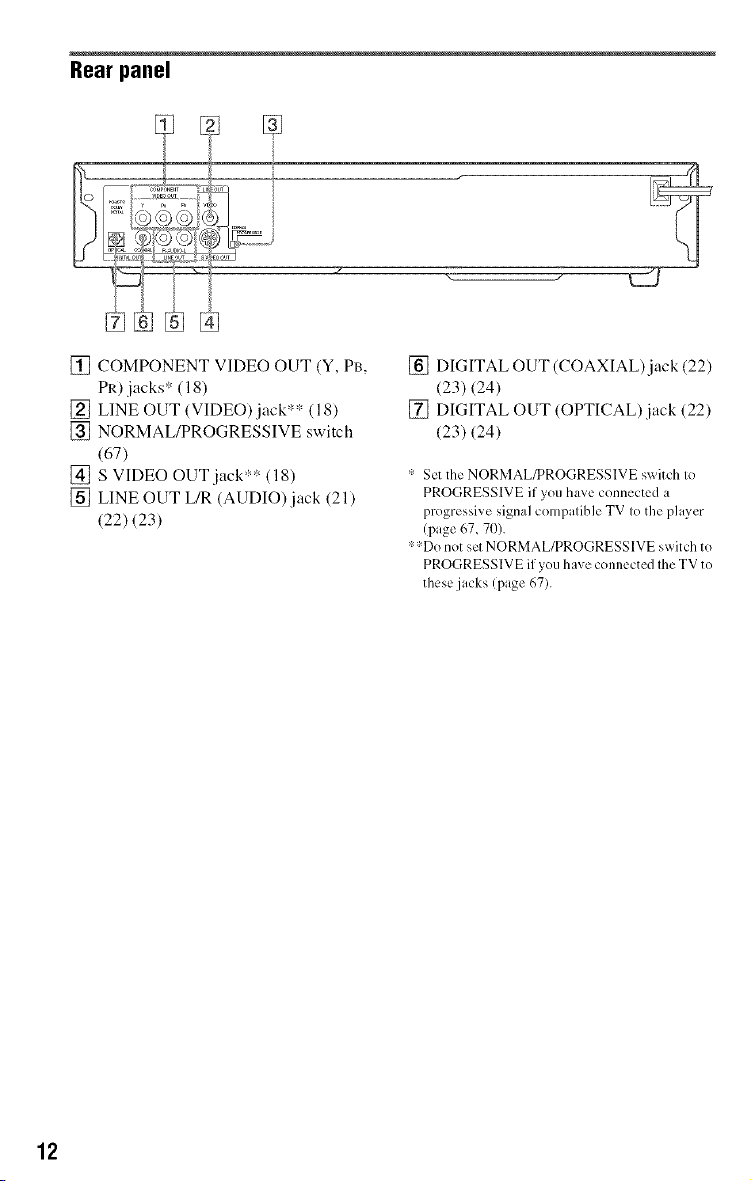
Rearpanel
[] COMPONENT VIDEO OUT (Y, PB,
PR) jacks* (18)
[] LINE OUT (VIDEO)jack** (18)
[] NORMAL/PROGRESSIVE switch
(67)
[] S VIDEO OUT jack** (18)
[] LINE OUT L/R (AUDIO) jack (21)
(22) (23)
[] DIGITALOUT(COAXIAL)jack(22)
(23)(24)
[] DIGITAL OUT (OPTICAL)jack (22)
(23)(24)
* Set the NORMAL/PROGRESSIVE switch to
PROGRESSIVE if you have connected a
progressive signal compatible TV to the player
(page 67, 70).
':':_Donot set NORMAL/PROGRESSIVE switch to
PROGRESSIVE if you have connected the TV to
these jacks (page 67).
12
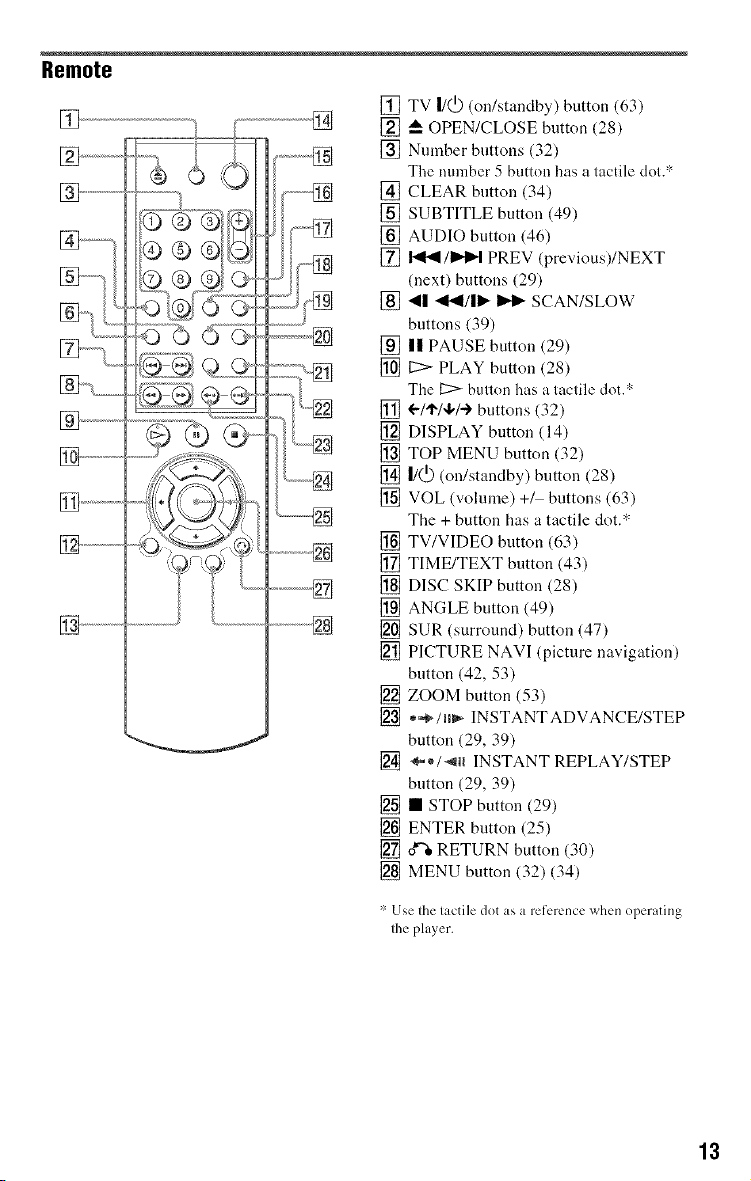
Remote
®®
[] TV I/(.D (on/standby) button (63)
[] A OPEN/CLOSE button (28)
[] Number buttons (32)
The mnnber 5 button has a tactile dot.*
[] CLEAR button (34)
[] SUBTITLE button (49)
[] AUDIO button (46)
[] _ 11_1_1 PREV (previous)/NEXT
(next) buttons (29)
[] _II -_,tl/ll_ _ SCAN/SLOW
buttons (39)
[] II PAUSE button (29)
[] 12> PLAY button (28)
The I2:> button has a tactile dot.*
[] <--/I"/4,/+ buttons (32)
[] DISPLAY button (14)
[] TOP MENU button (32)
[] I/Q) (on/standby) button (28)
[] VOL (vohnne) +_ buttons (63)
The + button has a tactile dot.*
[] TV/VIDEO button (63)
[] TIME/TEXT button (43)
[] DISC SKIP button (28)
[] ANGLE button (49)
[] SUR (surround) button (47)
[] PICTURE NAVI (picture navigation)
button (42, 53)
[] ZOOM button (53)
[] *_/tl_ INSTANTADVANCE/STEP
button (29, 39)
[] _*/-_H INSTANT REPLAY/STEP
button (29, 39)
[] • STOP button (29)
[] ENTER button (25)
[] ox_ RETURN button (30)
[] MENU button (32) (34)
' Use Ihe lactile dot as a reference when operating
Ihe player.
13
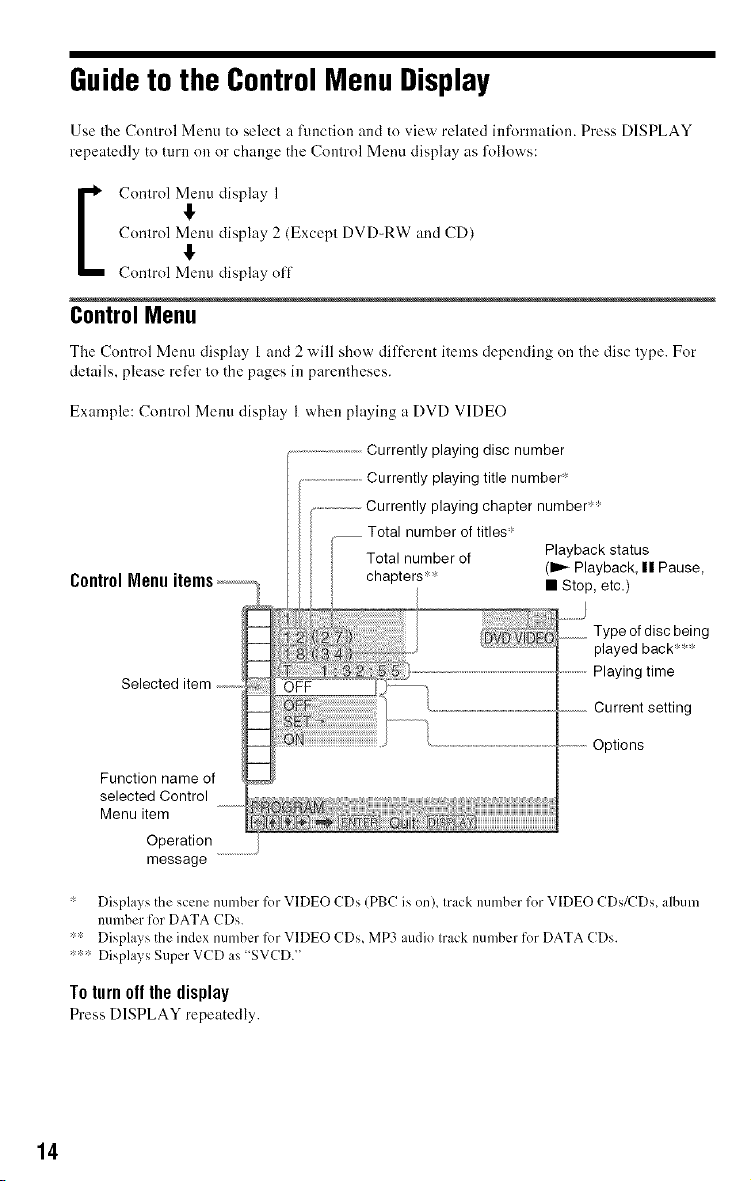
Guideto the ControlMenuDisplay
Use tile Conlrol Menu to select a ltmction mM to view related informalion. Press DISPLAY
repeatedly to turn on or change the Control Menu display as lk_llows:
!,
Control Menrl display 2 (Except DVD-RW and CD)
Control Menu display 1
Control Menu display oil
ControlMenu
The Control Menu display 1 and 2 will show different items depending on the disc type. For
delails, please refer Io the pages in parentheses.
Exarnple: Control Menu display I when playing a DVD VIDEO
!,
Currently playing disc number
Currently playing title number'
....................Currently playing chapter number *'_
Total number of titles ;L
Total number of Playback status
chapters* (1__Playback, || Pause,
selected Control
Menu item
Operation
message
* Displays the scene number for VIDEO CDs (PBC ison), track number for VIDEO CDs/CDs, album
number for DATA CDs.
** Displays the index number R)r VIDEO CDs, MP3 audio track number for DATA CDs.
*** Displays Super VCD as "SVCD."
To turn offthe display
Press DISPLAY repeatedly.
14
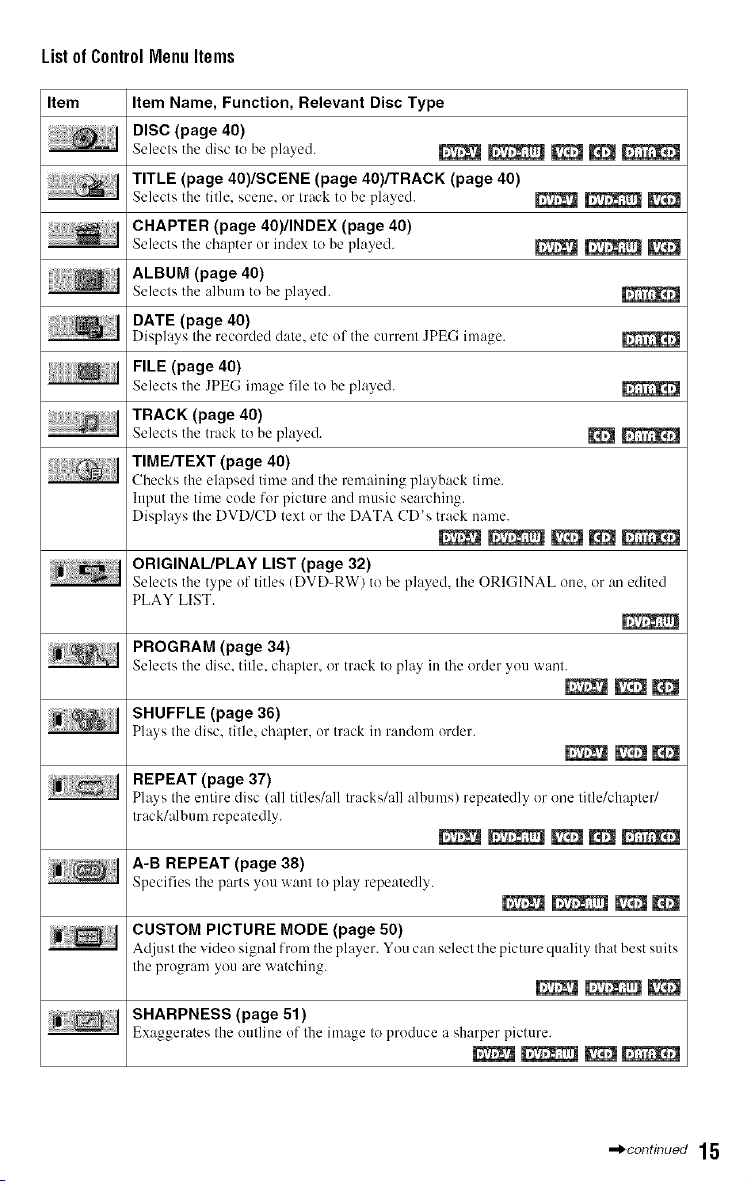
List of ControlMenu Items
Item
Item Name, Function, Relevant Disc Type
DISC (page 40)
Selectsthe_lisctot,e pl_ye_l. _ _ _ r¢_
TITLE (page 40)/SCENE (page 40)/TRACK (page 40)
Selects the title, scene, or track to be played. _ _ _rff4_
CHAPTER (page 40)/INDEX (page 40)
Selects the chapter or index to be played. _ _
ALBUM (page 40)
Selects the albtnn to be played.
DATE (page 40)
Displays tile recorded date. etc of the c/lrrent JPEG image.
FILE (page 40)
Selects the JPEG image file Io be played.
TRACK (page 40)
Selects the track to be played. _
TIMEfFEXT (page 40)
Checks the elapsed time nnd tile remaining playback time.
Input Ihe lime code for picture and music searching.
Displays Ihe DVD/CD lexl or Ihe DATA CD's track name.
ORIGINAL/PLAY LIST (page 32)
Selects the type of titles (DVD-RW) to be played, tlle ORICINAL one, or an edited
PLAY LIST.
PROGRAM (page 34)
Selects the disc. title, chapter, or track to play in the order you want.
SHUFFLE (page 36)
Plays tl]e disc. title, chapter, or track in random order.
REPEAT (page 37)
Plays the entire disc/all titles/all tracks/all albums) repeatedly or one title/chapter/
track/album repeatedly.
A-B REPEAT (page 38)
Specifies the parts you want to play repeatedly.
CUSTOM PICTURE MODE (page 50)
Adi/lst the qde( sir, nal lrom the player. You can select the picture quality that best suits
tile program you are watching.
SHARPNESS (page 51)
Exaggerates the outline of the image to produce ;1sharper picture.
,_continuod 15
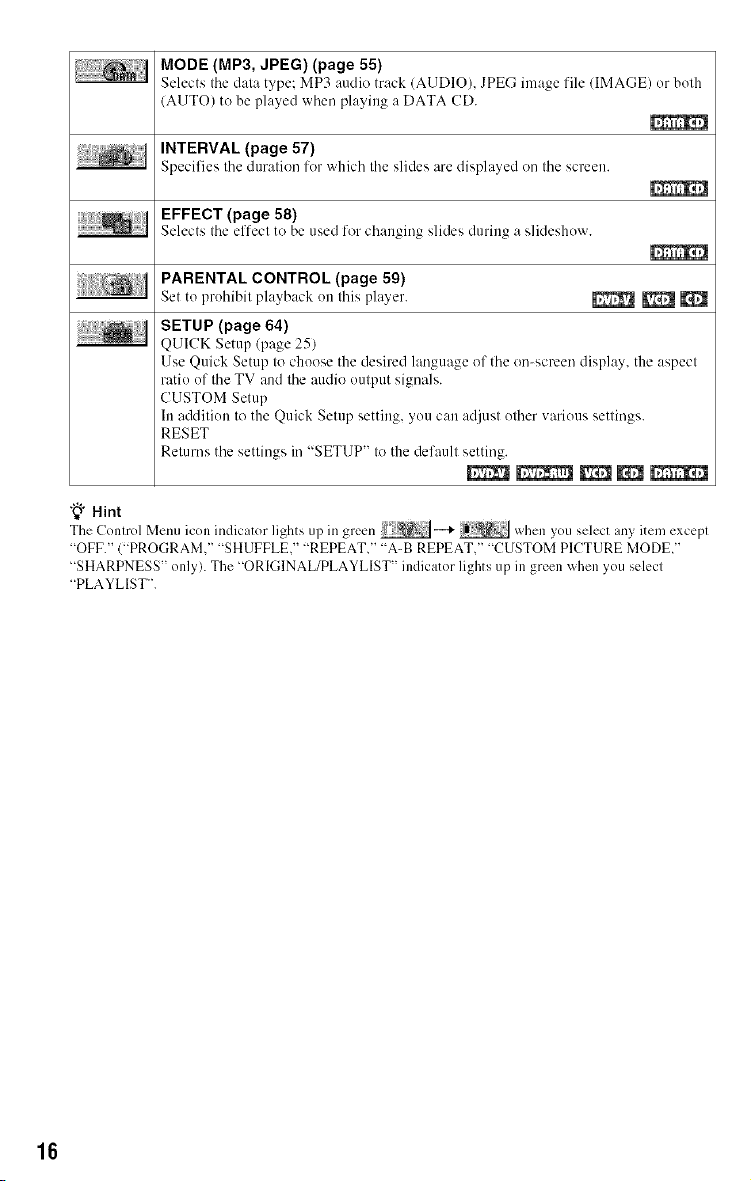
MODE (MP3, JPEG) (page 55)
Selects Ihe dal0. type; MP3 audio track (AUDIOh JPE(-; image file/IMAGE) or both
/AUTO) to be played when playing a DATA (!D.
INTERVAL (page 57)
Specifies tile duration lor which tile slides are displayed on tile screen.
EFFECT (page 58)
Selects the effect to be used for changing slides duriug a slideshow.
PARENTAL CONTROL (page 59)
Set to prohibit playback on this player. _ _
SETUP (page 64)
QUICK Setup/page 251
Use Quick Setup to choose the desired language of the on-screen display, the aspect
ratio of the TV and the audio output signals.
CUSTOM Setup
In addition to the Quick Setup setting, you can ad.just other various settings.
RESET
Returns the settings in ';SETUP" to the default setting.
"_" Hint
The Control Menu icon indicator lights up in green ""+ when you select any item excepl
"OFF." ("PROGRAM," "SHUFFLE," "REPEATs" "A-B REPEAT," "CUSTOM PICTURE MODE"
"SHARPNESS" only). The "ORIGINAL/PLAYLIST" indicator lights up in green ,,_hen you select
"PLAYLIST'.
16
HookingUpthe Player
Follow Sleps 1 to 6 to hook tip and adiust the settings of the player.
• Plug cords securely to prevent unwanted noise.
• Refer to the instructions supplied with the components to be connected.
• You cannot connect this player to a TV that does not have a video input jack.
• Be sure to disconnect the power of each component before connecting.
Step 1: Unpacking
Check that you ha,_e the l\41owing items:
• Audio/video cord (pinplug × 3 _-+ pinplug × 3) (1)
• Remote commander (remote) (1)
• Size AA (R6) batteries (2)
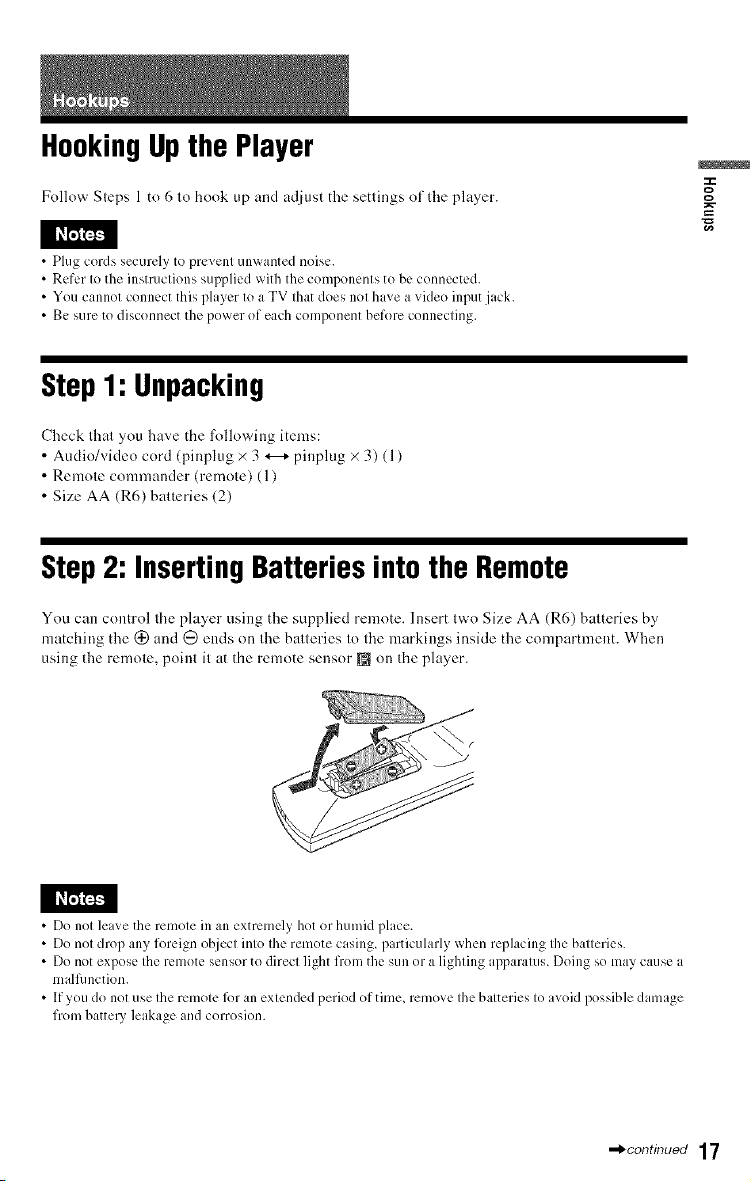
Step 2: Inserting Batteries into the Remote
You can control Ihe player using the supplied remote. Insert Iwo Size AA (R6) batteries by
matching the (_ and @ ends on Ihe batteries to the markings inside the compartment. When
using the remote, point it at the remote sensor m on the player.
g
"g
• Do not leave the remote in an extrcmdy hot or humid place.
• Do not drop any foreign object into the remote casing, p ,rticularly when replacing the batteries.
• Do not expose the remote sensor to direct light from the sun or a lighting apparatus. Doing so may cause a
malfimction.
• If you do not use the remote R)ran extended period of time. remove the batteries to avoid possible damage
from batte U leakage and corrosion.
,_continuod 17
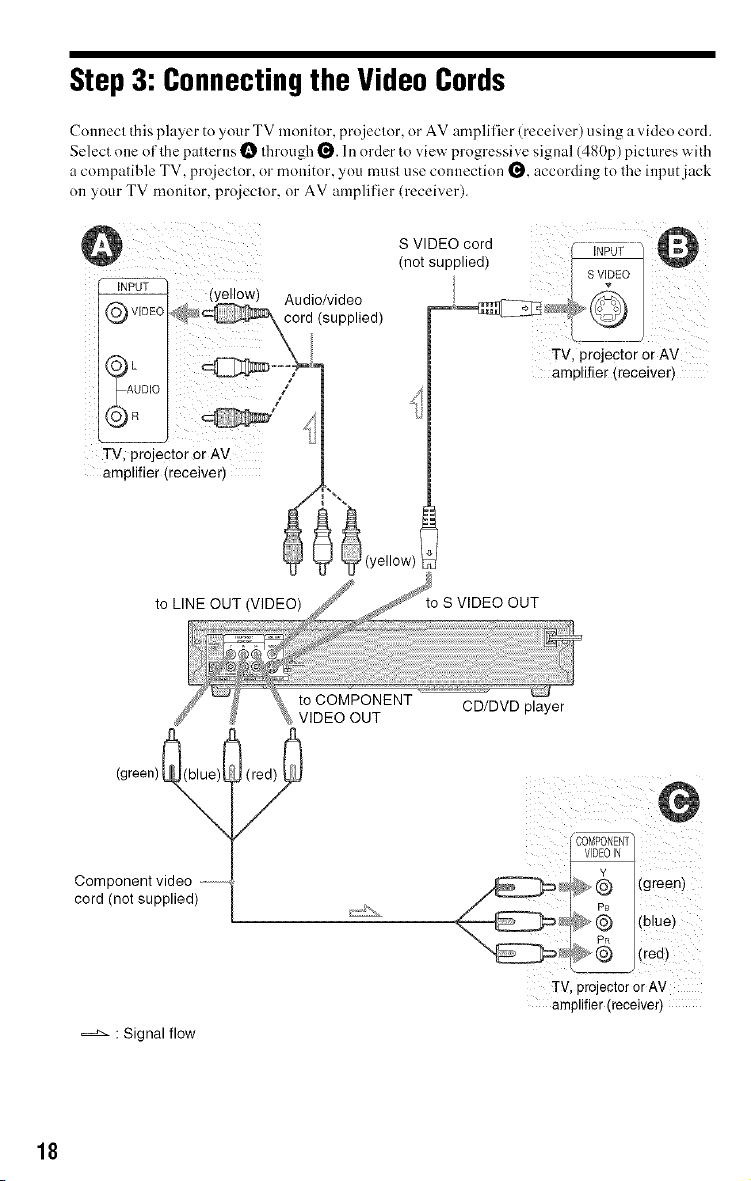
Step3: ConnectingtheVideoCords
Conned this player to your TV monitor, projet(or, or AV amplit]er (receiver) using a video cord.
Select one ol'lhe palterns O/hrough _. In order to view progressive sigeal (4g()p)pictures with
acompatible TV. projet/or, or moeitor, you musl use coenection _. according to/he inpurjack
on your TV moni)or, projeclor, or AV amplifier (receiver).
S VIDEO cord
(not supplied)
QvlDEo
TV, projector or AV
UDIO
TV) projector er AV
amplifier (receiver)
amplifier (receiver)
Component video
cord (not supplied)
18
to LINE OUT (VIDEO)
(green)
:Signal flow
to COMPONENT
VIDEO OUT
S VIDEO OUT
CD/DVD player
TV,projectoror AV
amplifier(receiver)
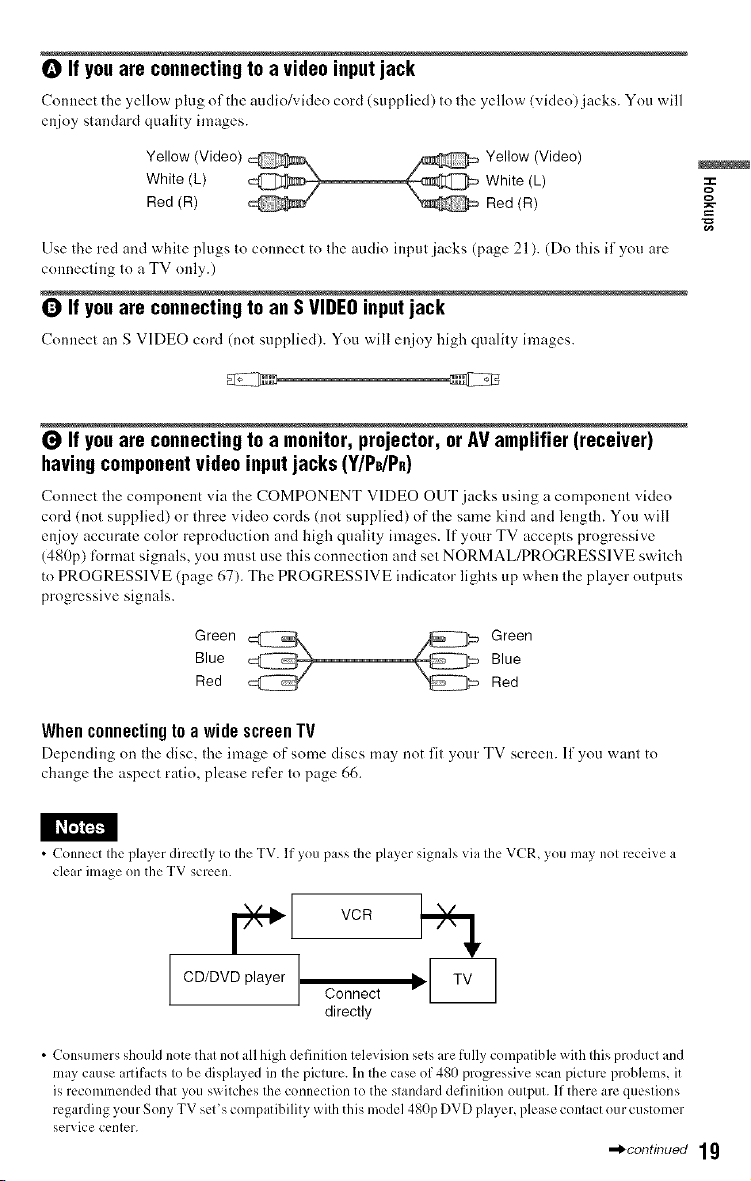
0 If youare connectingto a video inputjack
Connect the yellow plug of the audio/video cord (supplied) Io llae yellow (video)jacks. You will
enjoy standard quality images.
Yellow (Video) _ _ Yellow (Video)
White (L) _ _ White (L)
Red (R) Red (R)
Use the red arid while plugs Io connect to Ihe audio inpul jacks (page 21 ). (Do lhis if you are
colmecling loa TV only.)
0 If youare connectingto an SVIDEOinputjack
Connect an S VIDE() cord (not supplied). You will enjoy high qualily images.
• If youare connectingto a monitor,projector, or AVamplifier (receiver)
havingcomponentvideo inputjacks (Y/PdPR)
Connect the component _ia the COMPONENT VIDEO OUT jacks using a component video
cord (not supplied) or three video cords (not supplied) of the same kind and length. You will
enjoy accurate color reproduction and high quality images. If your TV accepts progressive
(480p) lormat signals, you must use this connection and set NORMAL/PROGRESSIVE switch
to PROGRESSIVE (page 67). The PROGRESSIVE indicator lights tip when the player outputs
progressive signals.
g
,g
Blue
Green
Red
Blue
Green
Red
When connectingto a wide screen TV
Depending on Ihe disc, Ilaeimage (It"some discs may not fil your TV screen. If you warn to
change lhe aspect ratio, please ret'er lo page 66.
• Connect Ihe player directly Io Ihe TV. If you pass the player signals via Ihe VCR, you may nol receive a
clear image on the TV screen.
CD/DVD player /
directly
• Consumers should note that not all high definition television sets arefidly compatible with this product and
may cause artifacts to be displayed in the picture. In the case of 480 progressive scan picture problems, it
is recommended that you switches the connection to the standard definition output. Ifthere are questions
regarding your Sony TV set's compatibility with this model 480p DVD player, please contact our customer
service center.
,_continued 19
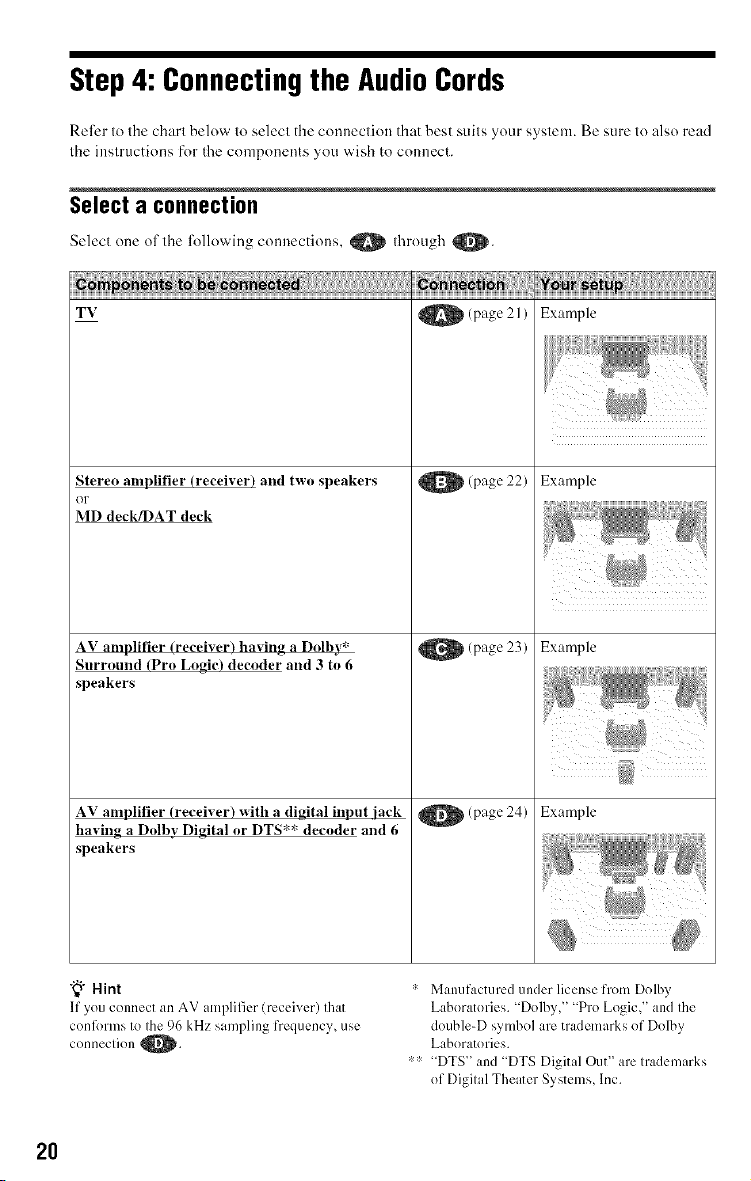
Step4: Connectingthe AudioCords
Refer Io dae chart below Io selecl the connection that best suils your system. Be sure to also read
the instructions for the components you wish to comlect.
Select a connection
Select one of the following connections. O Ihrough O.
T'_' _ (page 21) Example
Stereo amplifier (reeeiver) and two speakers Example
or
MD deck/DAT deck
AV amplilier (receiver) having a Dolby* Example
Surround (Pro Logie) deeoder and 3 to 6
speakers
AV amplifier (receiver) with a digital input iack _ (page 24) Example
havin_ a Dolbv Digital or DTS** decoder and 6
speakers
"_° Hint
If you connect an AV amplifier (receiver) that
conl_)rms to the 96 kHz sampling frequency, use
connection 1_.
* Manufactured under license from Dolby
Laboratories. "Dolby," "Pro Logic 2' and the
double-D symbol are trademarks of Dolby
Laboratories.
*:_ "DTS" and "DTS Digital Out" are trademarks
of Digital Theater Systems, Inc.
20
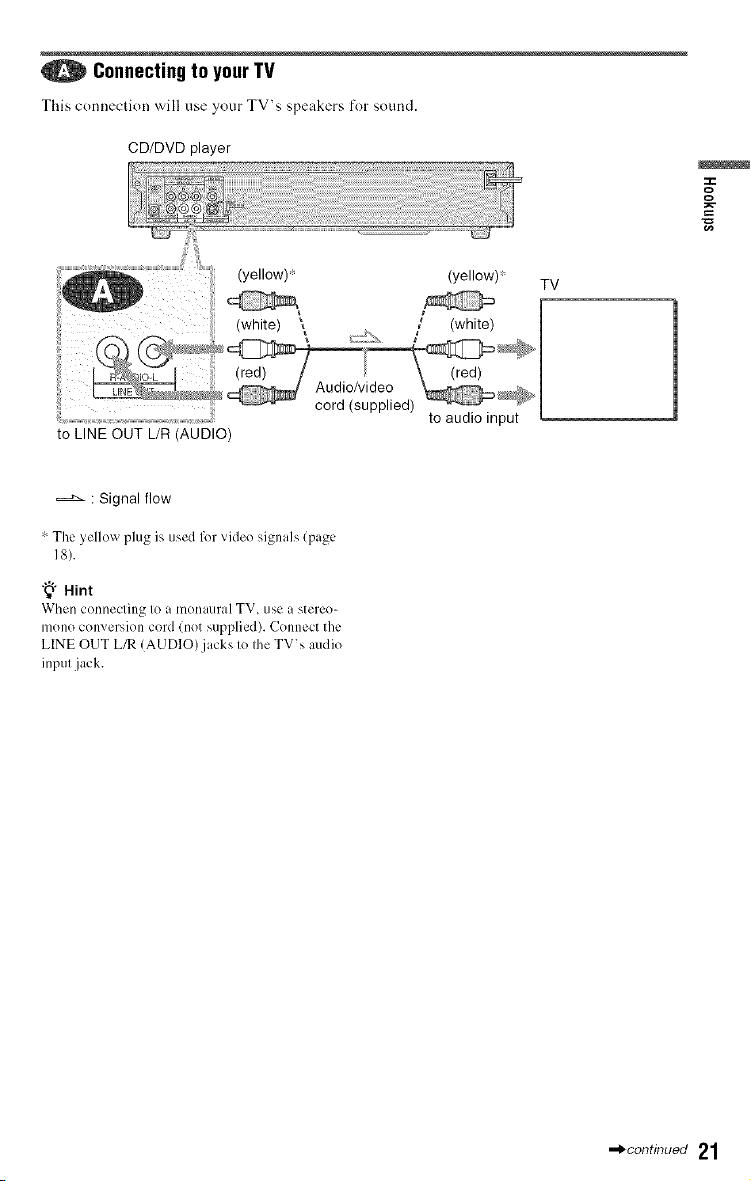
0 Connectingto your TV
This cormccdon will use your TV's speakers t'or sound.
CD/DVD player
_=
g
(yellow)* (yellow)*
(white) \
(red)
iii ii
to LINE OUT L/R (AUDIO)
: Signal flow
:"The yellow plug is used l_)r video signals (page
18).
"_° Hint
When connecting to a monaural TV. use a sterco-
mono conversion cord (not supplied). Connect the
LINE OUT L_ (AUDIO)jacks to the TV's audio
input jack.
i
Audio/video
cord (supplied)
TV
to audio input
,_continued 21
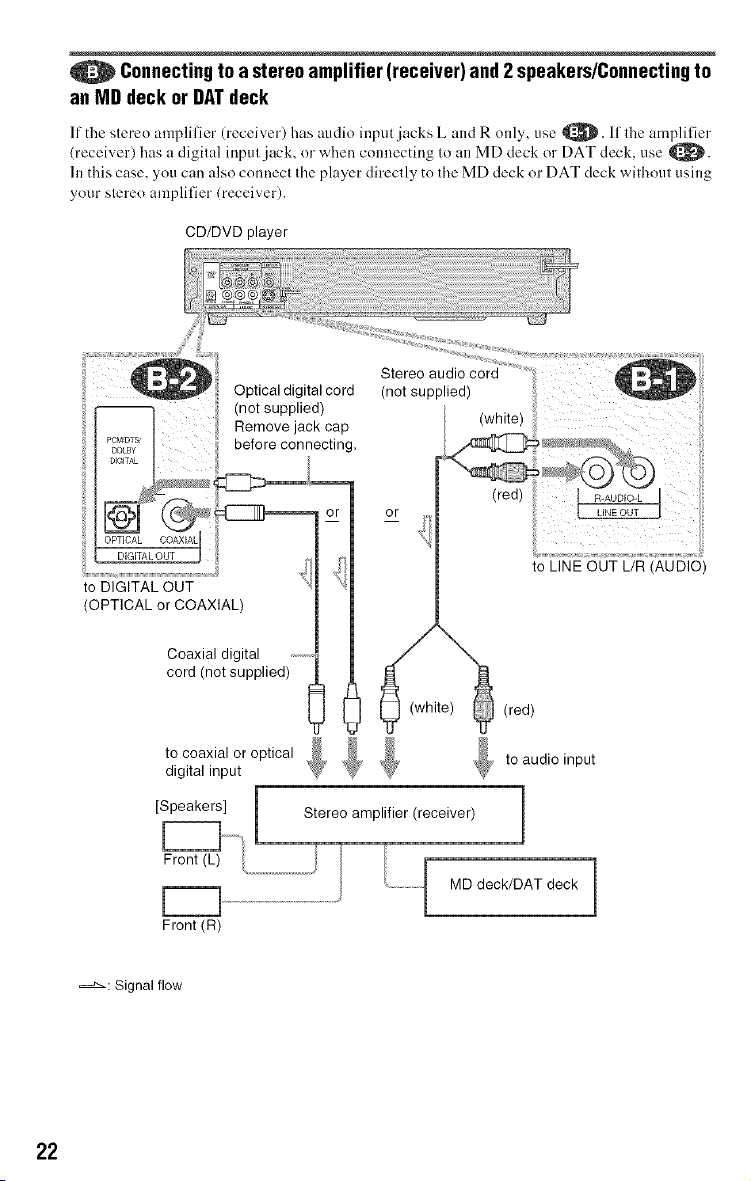
0 Connectingto a stereoamplifier(receiver)and2 speakers/Connectingto
anMD deck or DATdeck
If the stere<} amplifier (receiver) has audio input jacks L and R only, use _. If the amplifier
(receiver) has a digital input j_lck, or when connecting to all MD deck or DAT deck, use _.
In this case, you can also connect the player directly to tile MD deck or DAT deck without using
your stereo amplifier (receiver).
CD/DVD player
OPTICAL
DiGiTALOUT
to DIGITAL OUT
(OPTICAL or COAXIAL)
Coaxial digital
cord (not supplied)
tocoaxialoroptical _ _ @_/
digital input
[Speakers]
Front (R)
Optical digital cord
(not supplied)
Remove jack cap
before connecting.
Stereo amplifier (receiver)
Stereo audio cord
(not supplied)
(white)
or
(white)
MD deck/DAT deck
(red)
i
to LINE OUT L/R (AUDIO)
(red)
to audio input
22
==z_: Signal flow
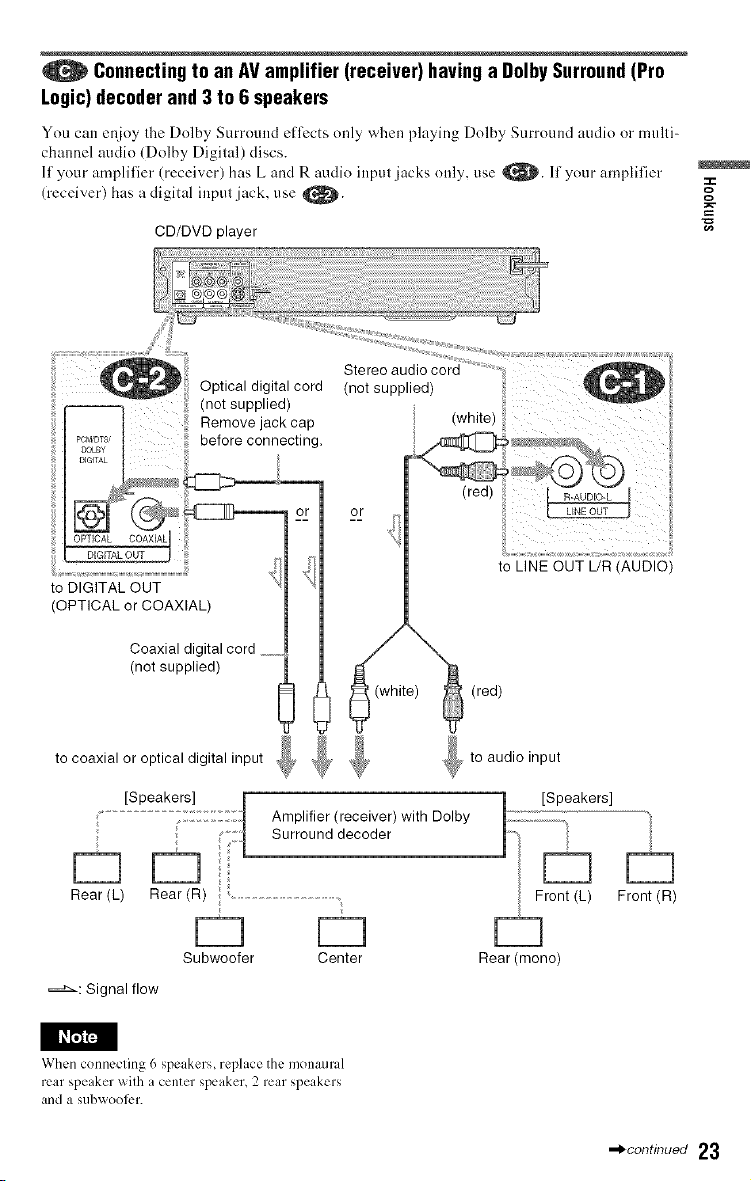
0 Connectingto anAVamplifier (receiver)havinga DolbySurround(Pro
Logic)decoderand 3 to 6 speakers
You can er_ioy the Dolby Surround effects only when playing Dolby Surround audio or multi-
channel audio (Dolby Digital) discs.
If your amplifier (receiver) has L and R audio input jacks only, use _. If your amplifier
(receiver) has a digital input jack, use _.
CD/DVD player
g
Optical digital cord
(not supplied)
Stereo audio cord
(not supplied)
(white)
(red)
DIGITAL OUT,_,_
to DIGITAL OUT
(OPTICAL or COAXIAL)
Coaxial digital cord ...........
(not supplied)
to coaxial or optical digital input , to audio input
Amplifier (receiver) with Dolby
Surround decoder
Rear (L) Rear (R) ...................................
4 }
to LINE OUT L/R (AUDIO)
/
j(white) (red)
i
[Speakers]
Front (R)
Subwoofer
_: Signal flow
When connecling 6 spe ikers, replace the monaural
rear speaker wilh a center speaker, 2 rear speakers
and a sub_ooli:r.
Center
Rear (mono)
,-)continued 23
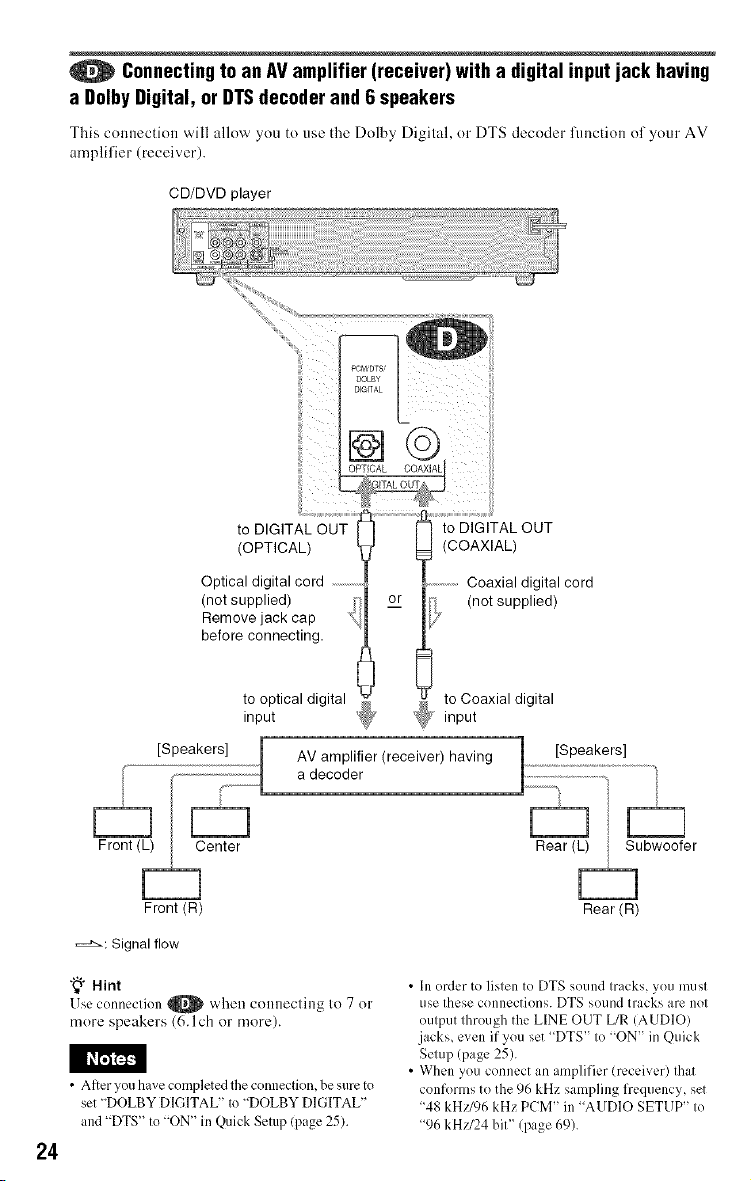
0 Connectingtoan AVamplifier (receiver)with a digital input ack having
a DolbyDigital, or DTSdecoderand6 speakers
This comlection will allow you to use the Dolby Digital, or DTS decoder flmction of your AV
amplifier (receiver).
CD/DVD player
%
OPTICAL
i []
to DIGITAL OUT
(OPTICAL)
Optical digital cord
(not supplied)
Remove jack cap
before connecting.
to optical digital
input
Front (L) Center Rear (L) Subwoofer
Front (R)
==z_: Signal flow
"_" Hint
Wsc COlllK'ction O w'hel_ COlllleclillg {o 7 or
more speakers (6.1ch or more).
• After you have completed the connection, be sure m
set "DOLBY DIGITAL" to"'DOLBY DIGITAL"
and "DTS" to "ON" in Quick Setup (page 25).
24
to DIGITAL OUT
(COAXIAL)
...............Coaxial digital cord
to Coaxial digital
_y input
AV amplifier (receiver) having
a decoder
• In order to listen to DTS sound tracks, you must
use these connections. DTS sound tracks are not
output through the LINE OUT L/R IAUDIO)
.jacks,even if you set "DTS" to "ON" in Quick
Setup (page 25).
• When you connect an amplifier (receiver) that
conforms to the 96 kHz sampling frequency, set
"48 kH//96 kHz PCM" in "AUDIO SETUP" to
"96 kH//24 bit" (page 69).
(not supplied)
Rear (R)
 Loading...