

Sony DVP-FX811, DVP-FX811K User Manual

Portable
CD/DVD
Player
3-294-108-31(1)
Operating Instructions
Manual de instrucciones
US
ES
DVP-FX811K/FX811
©2008 Sony Corporation

WARNING
To reduce the risk of fire or
electric shock, do not expose
this apparatus to rain or
moisture.
To avoid electrical shock, do
not open the cabinet. Refer
servicing to qualified
personnel only.
The AC power cord must be
changed only at a qualified
service shop.
Batteries or batteries
installed apparatus shall not
be exposed to excessive heat
such as sunshine, fire or the
like.
CAUTION
The use of optical instruments with
this product will increase eye
hazard. As the laser beam used in
this CD/DVD player is harmful to
eyes, do not attempt to disassemble
the cabinet.
Refer servicing to qualified
personnel only.
This label is located on the bottom
of the unit.
This symbol is
intended to alert the
user to the presence
of uninsulated
within the product’s enclosure that
may be of sufficient magnitude to
constitute a risk of electric shock to
persons.
maintenance (servicing)
instructions in the literature
accompanying the appliance.
“dangerous voltage”
This symbol is
intended to alert the
user to the presence
of important
operating and
Precautions
• Install this system so that the AC
power cord can be unplugged
from the wall socket
immediately in the event of
trouble.
• The player is not disconnected
from the AC power source as
long as it is connected to the wall
outlet, even if the player itself
has been turned off.
• To prevent fire or shock hazard,
do not place objects filled with
liquids, such as vases, on the
apparatus.
For customers in the U.S.A
Owner’s Record
The model and serial numbers are
located at the bottom of the unit.
Record the serial number in the space
provided below. Refer to them
whenever you call upon your Sony
dealer regarding this product.
Model No. DVP-FX811K/FX811
Serial No.______________
CAUTION
You are cautioned that any change
or modifications not expressly
approved in this manual could void
your authority to operate this
equipment.
Note
This equipment has been tested
and found to comply with the
limits for a Class B digital device,
pursuant to Part 15 of the FCC
Rules. These limits are designed to
provide reasonable protection
against harmful interference in a
residential installation. This
equipment generates, uses, and can
radiate radio frequency energy
and, if not installed and used in
accordance with the instructions,
may cause harmful interference to
radio communications. However,
there is no guarantee that
interference will not occur in a
particular installation. If this
equipment does cause harmful
interference to radio or television
reception, which can be
determined by turning the
equipment off and on, the user is
encouraged to try to correct the
interference by one or more of the
following measures:
– Reorient or relocate the
receiving antenna.
– Increase the separation between
the equipment and receiver.
– Connect the equipment into an
outlet on a circuit different from
that to which the receiver is
connected.
– Consult the dealer or an
experienced radio/TV technician
for help.
IMPORTANT SAFETY
INSTRUCTIONS
1) Read these instructions.
2) Keep these instructions.
3) Heed all warnings.
4) Follow all instructions.
5) Do not use this apparatus
near water.
6) Clean only with dry cloth.
7) Do not block any ventilation
openings. Install in
accordance with the
manufacturer’s instructions.
8) Do not install near any heat
sources such as radiators,
heat registers, stoves, or
other apparatus (including
amplifiers) that produce
heat.
9) Do not defeat the safety
purpose of the polarized or
grounding-type plug. A
polarized plug has two
blades with one wider than
the other. A grounding type
plug has two blades and a
third grounding prong. The
wide blade or the third prong
are provided for your safety.
If the provided plug does not
fit into your outlet, consult
an electrician for
replacement of the obsolete
outlet.
10) Protect the power cord from
being walked on or pinched
particularly at plugs,
convenience receptacles,
and the point where they exit
from the apparatus.
11) Only use attachments/
accessories specified by the
manufacturer.
2
12) Use only with the cart, stand,
tripod, bracket, or table
specified by the
manufacturer, or sold with
the apparatus. When a cart is
used, use caution when
moving the cart/apparatus
combination to avoid injury
from tip-over.
13) Unplug this apparatus during
lightning storms or when
unused for long periods of
time.
14) Refer all servicing to
qualified service personnel.
Servicing is required when
the apparatus has been
damaged in any way, such as
power-supply cord or plug is
damaged, liquid has been
spilled or objects have fallen
into the apparatus, the
apparatus has been exposed
to rain or moisture, does not
operate normally, or has
been dropped.
RECYCLING LITHIUMION BATTERIES
Lithium-Ion
batteries are
recyclable.
You can help
preserve our
environment by
returning your used rechargeable
batteries to the collection and
recycling location nearest you.
For more information regarding
recycling of rechargeable batteries,
call toll free
1-800-822-8837, or visit
http://www.rbrc.org/
Caution: Do not handle damaged
or leaking Lithium-Ion batteries.
For the State of California,
USA only
Perchlorate Material – special
handling may apply, See
www.dtsc.ca.gov/hazardouswaste/
perchlorate
Perchlorate Material: Lithium
battery contains perchlorate.
Precautions
Road safety
Do not use the monitor unit and
headphones while driving, cycling,
or operating any motorized
vehicle. Doing so may create a
traffic hazard and is illegal in some
areas. It can also be potentially
dangerous to play your headsets at
high volume while walking,
especially at pedestrian crossings.
You should exercise extreme
caution or discontinue use in
potentially hazardous situations.
On safety
Should any solid object or liquid
fall into the cabinet, unplug the
player and have it checked by
qualified personnel before
operating it any further.
On power sources
• The power requirements of this
unit are indicated on the AC
adaptor. Check that the unit’s
operating voltage is identical
with your local power supply.
• If you are not going to use the
player for a long time, be sure to
disconnect the player from the
wall outlet. To disconnect the
AC power cord, grasp the plug
itself; never pull the cord.
• Do not touch the AC power cord
or the AC adaptor with wet
hands. Doing so may cause
shock hazard.
• Use a commercially available
AC plug adaptor, if necessary,
depending on the design of the
wall outlet.
Wall
outlet
AC plug adaptor
(not supplied)
On temperature increases
Heat may build up inside the player
during charging or if it is being
used for a long time. This is not a
malfunction.
AC power cord
(supplied)
On placement
• Place the player in a location
with adequate ventilation to
prevent heat build-up in the
player.
• Do not place the player in a
confined space such as a
bookshelf or similar unit.
• Do not cover the ventilation of
the player with newspapers,
tablecloths, curtains, etc. And do
not place the player on a soft
surface, such as a rug.
• Do not place the player in a
location near heat sources, or in a
place subject to direct sunlight,
excessive dust, sand, moisture,
rain, or mechanical shock, or in a
car with its windows closed.
• Do not place the player in an
inclined position. It is designed
to be operated in a horizontal
position only.
• Keep the player and discs away
from equipment with strong
magnet, such as microwave
ovens, or large loudspeakers.
• Do not place heavy objects on
the player.
On operation
• If the player is brought directly
from a cold to a warm location,
or is placed in a very damp room,
moisture may condense on the
lenses inside the player. Should
this occur, the player may not
operate properly. In this case,
remove the disc and leave the
player turned on for about half an
hour until the moisture
evaporates.
• Keep the lens on the player clean
and do not touch it. Touching the
lens may damage the lens and
cause the player to malfunction.
Leave the disc lid closed except
when you insert or remove discs.
On Liquid Crystal Display
• Although manufactured with
high precision technology, the
LCD may occasionally display
dots of various colors. That is not
a malfunction.
• Do not wipe the LCD surface
with wet cloth. If water enters, a
malfunction may result.
• Do not place or drop any object
onto the LCD surface. Also, do
not apply pressure from hands or
elbows.
• Do not damage the LCD surface
with a sharp edged tool.
• Do not close the LCD panel with
a pen, etc., on the disc lid.
,continued
3
• If the player is brought directly
A
from a cold to a warm location,
moisture may condense over the
LCD surface. In which case,
wipe out the moisture with tissue
paper, etc., before use.
However, moisture condensation
will continue if the LCD surface
is cold. Wait until the surface
warms to room temperature.
On AC adaptor
• Use the supplied AC adaptor for
this player, as other adaptors
may cause a malfunction.
• Do not disassemble or reverseengineer.
• Do not drop or apply shock.
• Do not confine the AC adaptor in
a closed place such as a
bookshelf or an AV cabinet.
• Do not connect the AC adaptor
to a traveler’s electric
transformer, which may generate
heat and cause a malfunction.
On battery pack
• Certain countries may regulate
disposal of the battery used to
power this product. Please
consult with your local authority.
• Because of the battery’s limited
life, its capacity gradually
deteriorates over time and
repeated use. Purchase a new one
when the battery holds about
only half the normal period.
• The battery may not be charged
to its fullest capacity when
charged for the first time, or
when it has not been used for a
long time. The capacity recovers
after being charged and
discharged several times.
• Do not leave the battery pack in
a car or direct sunlight, where
temperature goes up above
60 ºC (140°F).
• Do not expose to water.
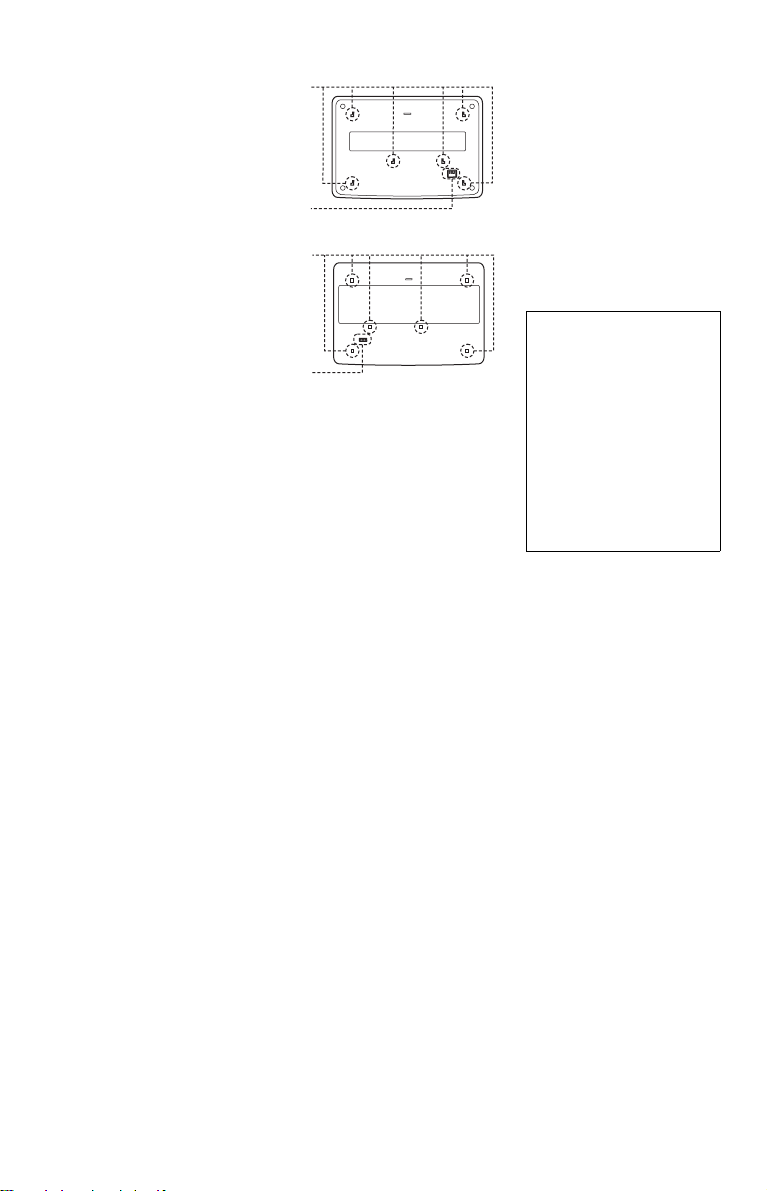
• Avoid short-circuiting the
battery connecting jacks (A)
located on the bottom of the
player and the connecting jacks
(C) on the battery pack with
metal objects such as a necklace.
• Make sure dust or sand does not
enter the battery connecting
jacks (A) and the guide holes (B)
located on the bottom of the
player, and the connecting jacks
(C) and the guide holes (D) on
the battery pack.
Bottom of the player
B
Battery pack
D
C
On car adaptor
• Use the supplied car adaptor for
this player, as other adaptors
may cause a malfunction.
• Do not dissemble or reverseengineer.
• Do not drop or apply shock.
• Do not touch the metal parts, as
it may cause a short and damage
the car adaptor, especially if
touched by other metal objects.
• Do not place the car adaptor in a
location near heat sources, or in a
place subject to direct sunlight or
mechanical shock, or in a car
with its windows closed.
On adjusting volume
Do not turn up the volume while
listening to a section with very low
level inputs or no audio signals. If
you do, the speakers may be
damaged when a peak level section
is played.
On headphones
• Preventing hearing damage
Avoid using headphones at high
volumes. Hearing experts advice
against continuous, loud, and
extended play. If you experience a
ringing in your ears, reduce the
volume or discontinue use.
• Showing consideration for
others
Keep the volume at a moderate
level. This will allow you to hear
outside sounds and still be
considerate to the people around
you.
On cleaning
Clean the cabinet, panel, and
controls with a soft cloth slightly
moistened with a mild detergent
solution. Do not use any type of
abrasive pad, scouring powder or
solvent such as alcohol or benzine.
On cleaning discs, disc/
lens cleaners
Do not use cleaning discs or disc/
lens cleaners (including wet or
spray types). These may cause
the apparatus to malfunction.
IMPORTANT NOTICE
Caution: This player is capable
of holding a still video image or
on-screen display image on your
television screen indefinitely. If
you leave the still video image or
on-screen display image
displayed on your TV for an
extended period of time you risk
permanent damage to your
television screen. Plasma
display panel televisions and
projection televisions are
susceptible to this.
If you have any questions or
problems concerning your player,
please consult your nearest Sony
dealer.
4

Table of Contents
WARNING . . . . . . . . . . . . . . . . . . . . . . . . . . . . . . . . . . . . . . . . . . . . . . . . . . . . 2
Precautions . . . . . . . . . . . . . . . . . . . . . . . . . . . . . . . . . . . . . . . . . . . . . . . . . . . 3
About This Manual. . . . . . . . . . . . . . . . . . . . . . . . . . . . . . . . . . . . . . . . . . . . . . 6
This Player Can Play the Following Discs . . . . . . . . . . . . . . . . . . . . . . . . . . . . 7
Preparations . . . . . . . . . . . . . . . . . . . . . . . . . . . . . . . . . . . . . . . . 9
Checking the Accessories . . . . . . . . . . . . . . . . . . . . . . . . . . . . . . . . . . . . . . . . 9
Using the Remote . . . . . . . . . . . . . . . . . . . . . . . . . . . . . . . . . . . . . . . . . . . . . . 9
Using the LCD Panel . . . . . . . . . . . . . . . . . . . . . . . . . . . . . . . . . . . . . . . . . . 10
Connecting the AC Adaptor . . . . . . . . . . . . . . . . . . . . . . . . . . . . . . . . . . . . . 11
Using with the Battery Pack . . . . . . . . . . . . . . . . . . . . . . . . . . . . . . . . . . . . . 12
Using with the Car Battery Adaptor . . . . . . . . . . . . . . . . . . . . . . . . . . . . . . . . 14
Playing Discs . . . . . . . . . . . . . . . . . . . . . . . . . . . . . . . . . . . . . . 15
Playing Discs . . . . . . . . . . . . . . . . . . . . . . . . . . . . . . . . . . . . . . . . . . . . . . . . 15
Using the Playback Settings Display . . . . . . . . . . . . . . . . . . . . . . . . . . . . . . 20
Searching for a Particular Point on a Disc (Search, Scan, Slow Play, Repeat
Play, Random Play) . . . . . . . . . . . . . . . . . . . . . . . . . . . . . . . . . . . . . . . . . 22
Playing MP3 Audio Tracks or JPEG Image Files . . . . . . . . . . . . . . . . . . . . . 24
Adjusting the Picture Size and Quality . . . . . . . . . . . . . . . . . . . . . . . . . . . . . 27
Settings and Adjustments . . . . . . . . . . . . . . . . . . . . . . . . . . . . . . 28
Using the Setup Display. . . . . . . . . . . . . . . . . . . . . . . . . . . . . . . . . . . . . . . . . 28
Settings for the Display (General Setup) . . . . . . . . . . . . . . . . . . . . . . . . . . . . 29
Settings for the Sound (Audio Setup) . . . . . . . . . . . . . . . . . . . . . . . . . . . . . . 30
Setting the Display or Sound Track Language (Language Setup). . . . . . . . . 31
Parental Control Settings (Parental Control) . . . . . . . . . . . . . . . . . . . . . . . . . 32
Hookups . . . . . . . . . . . . . . . . . . . . . . . . . . . . . . . . . . . . . . . . . . 34
Connecting to another device . . . . . . . . . . . . . . . . . . . . . . . . . . . . . . . . . . . . 34
Additional Information . . . . . . . . . . . . . . . . . . . . . . . . . . . . . . . . 37
Troubleshooting . . . . . . . . . . . . . . . . . . . . . . . . . . . . . . . . . . . . . . . . . . . . . . . 37
About MP3 Audio Tracks and JPEG Image Files . . . . . . . . . . . . . . . . . . . . . 39
Notes About the Discs . . . . . . . . . . . . . . . . . . . . . . . . . . . . . . . . . . . . . . . . . . 40
Specifications . . . . . . . . . . . . . . . . . . . . . . . . . . . . . . . . . . . . . . . . . . . . . . . . 41
Index to Parts and Controls . . . . . . . . . . . . . . . . . . . . . . . . . . . . . . . . . . . . . 42
Index . . . . . . . . . . . . . . . . . . . . . . . . . . . . . . . . . . . . . . . . . . . . . . . . . . . . . . . 45
5
About This Manual
• Instructions in this manual describe the controls on the remote. You can also use the
controls on the player if they have the same or similar names as those on the remote.
• “DVD” may be used as a general term for DVD VIDEOs, DVD+RWs/DVD+Rs (+VR
mode) and DVD-RWs/DVD-Rs (video mode).
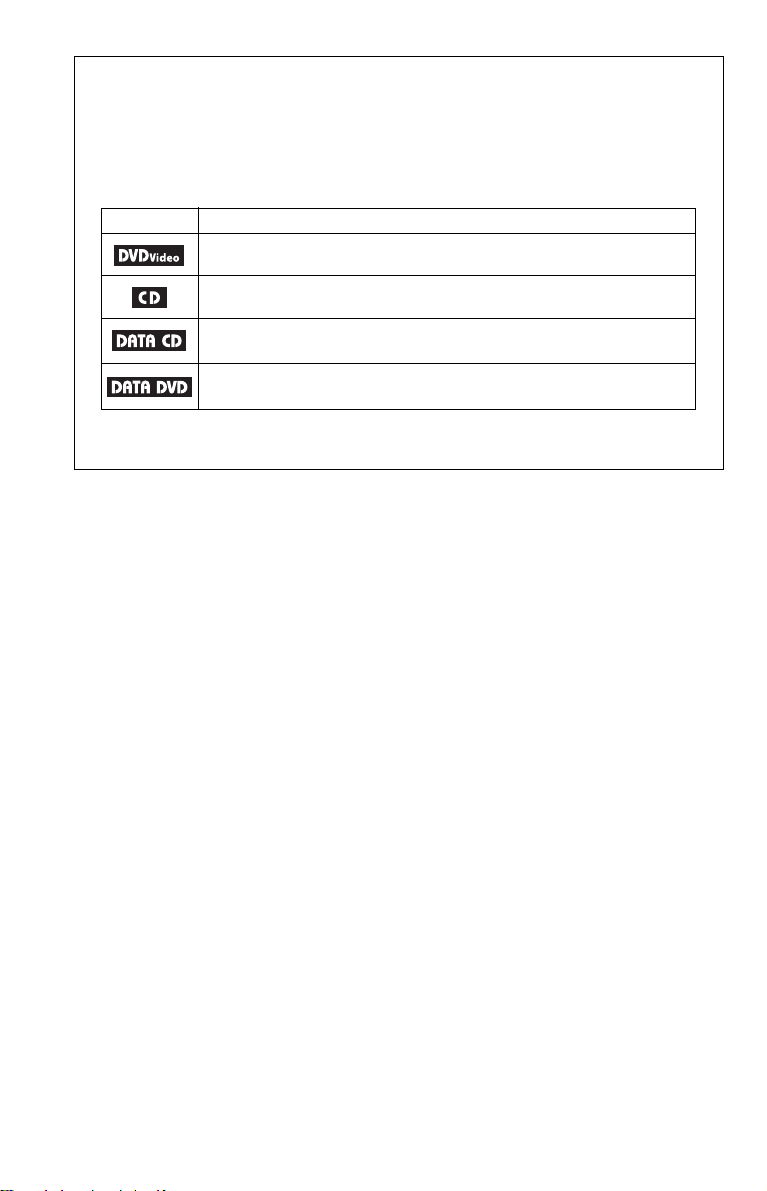
• The meaning of the icons used in this manual is described below:
Icons Meaning
Functions available for DVD VIDEOs and DVD+RWs/DVD+Rs in +VR
mode or DVD-RWs/DVD-Rs in video mode
Functions available for music CDs or CD-Rs/CD-RWs in music CD format
Functions available for DATA CDs (CD-ROMs/CD-Rs/CD-RWs
containing MP3
Functions available for DATA DVDs (DVD-ROMs/DVD+RWs/DVD+Rs/
DVD-RWs/DVD-Rs containing MP3
* MP3 (MPEG-1 Audio Layer III) is a standard format defined by ISO (International Organization for
Standardization)/IEC (International Electrotechnical Commission) MPEG which compresses audio
data.
*
audio tracks, and JPEG image files)
*
audio tracks,
and JPEG image files
)
6

This Player Can Play the
Following Discs
Format of discs
DVD VIDEO
DVD-RW/-R
(finalized disc)
DVD+RW/+R
(finalized disc)
Music CD
CD-RW/-R
“DVD+RW,” “DVD-RW,” “DVD+R,”
“DVD-R,” “DVD VIDEO,” and “CD” logos
are trademarks.
Note about CDs/DVDs
The player can play CD-ROMs/CD-Rs/CDRWs recorded in the following formats:
– music CD format
– MP3 audio tracks and JPEG image files of
format conforming to ISO 9660* Level 1,
or its extended format, Joliet
– KODAK Picture CD format
* A logical format of files and folders on CD-
ROMs, defined by ISO (International
Organization for Standardization).
The player can play DVD-ROMs/
DVD+RWs/DVD-RWs/DVD+Rs/DVD-Rs
recorded in the following format:
– MP3 audio tracks and JPEG image files of
format conforming to UDF (Universal Disk
Format).
Example of discs that the player
cannot play
The player cannot play the following discs:
• Blu-ray discs.
• Discs recorded in AVCHD format.
• HD DVDs.
•DVD-RAMs.
• CD-ROMs/CD-Rs/CD-RWs other than
those recorded in the formats listed on this
page.
• CD-ROMs recorded in PHOTO CD format.
• Data part of CD-Extras.
• DVD Audio discs.
• DATA DVDs that do not contain MP3
audio tracks or JPEG image files.
• HD layer on Super Audio CDs.
Also, the player cannot play the following
discs:
• A DVD VIDEO with a different region
code.
• A disc recorded in a color system other than
NTSC, such as PAL or SECAM.
• A disc that has a non-standard shape (e.g.,
card, heart).
• A disc with paper or stickers on it.
• A disc that has the adhesive of cellophane
tape or a sticker still left on it.
Notes
• Notes about DVD+RWs/DVD+Rs, DVD-RWs/
DVD-Rs or CD-Rs/CD-RWs
Some DVD+RWs/DVD+Rs, DVD-RWs/DVDRs, or CD-Rs/CD-RWs cannot be played on this
player due to the recording quality or physical
condition of the disc, or the characteristics of the
recording device and authoring software.
The disc will not play if it has not been
correctly finalized. For more information, refer
to the operating instructions for the recording
device. Note that some playback functions may
not work with some DVD+RWs/DVD+Rs, even
if they have been correctly finalized. In this case,
view the disc by normal playback. Also some
DATA CDs/DATA DVDs created in Packet
Write format or multiple sessions cannot be
played.
• Notes about DVD+R DLs/DVD-R DLs
Playback of DVD+R DLs/-R DLs (double
layered) on this player is not guaranteed.
,continued
7

• Music discs encoded with copyright protection
technologies
This product is designed to playback discs that
conform to the Compact Disc (CD) standard.
Recently, various music discs encoded with
copyright protection technologies are marketed
by some record companies. Please be aware that
among those discs, there are some that do not
conform to the CD standard and may not be
playable by this product.
• Note on DualDiscs
A DualDisc is a two sided disc product which
mates DVD recorded material on one side with
digital audio material on the other side.
However, since the audio material side does not
conform to the Compact Disc (CD) standard,
playback on this product is not guaranteed.
Region code
It is the system that is used to protect
copyrights. The region code is shown on the
DVD VIDEO packages according to the
region of sale. DVD VIDEOs labeled “ALL”
or “1” will play on this player.
ALL
Note on playback operations of
DVDs
Some playback operations of DVDs may be
intentionally set by software producers. Since
this player plays DVDs according to the disc
contents the software producers designed,
some playback features may not be available.
Also, refer to the instructions supplied with
the DVDs.
Trademarks
• Manufactured under license from Dolby
Laboratories.
Dolby and the double-D symbol are
trademarks of Dolby Laboratories.
• Manufactured under license under U.S.
Patent #: 5,451,942 & other U.S. and
worldwide patents issued & pending. DTS
and DTS Digital Out are registered
trademarks and the DTS logos and Symbol
are trademarks of DTS, Inc. ©1996-2007
DTS, Inc. All Rights Reserved.
Copyrights
This product incorporates copyright
protection technology that is protected by
U.S. patents and other intellectual property
rights. Use of this copyright protection
technology must be authorized by
Macrovision, and is intended for home and
other limited viewing uses only unless
otherwise authorized by Macrovision.
Reverse engineering or disassembly is
prohibited.
8
Preparations
Checking the Accessories
Check that you have the following items:
• Audio/video cord (mini plug × 2 y phono
plug × 3) (1)
• AC power cord (1)
• AC adaptor (1)
• Car battery adaptor (1)
• Battery pack (NP-FX110) (1)
• Remote (with battery) (1)
• Carrying case (1) (supplied with DVPFX811K only)
• Headphones (1) (supplied with DVPFX811K only)
Using the Remote
When operating, point it at the remote sensor on the player.
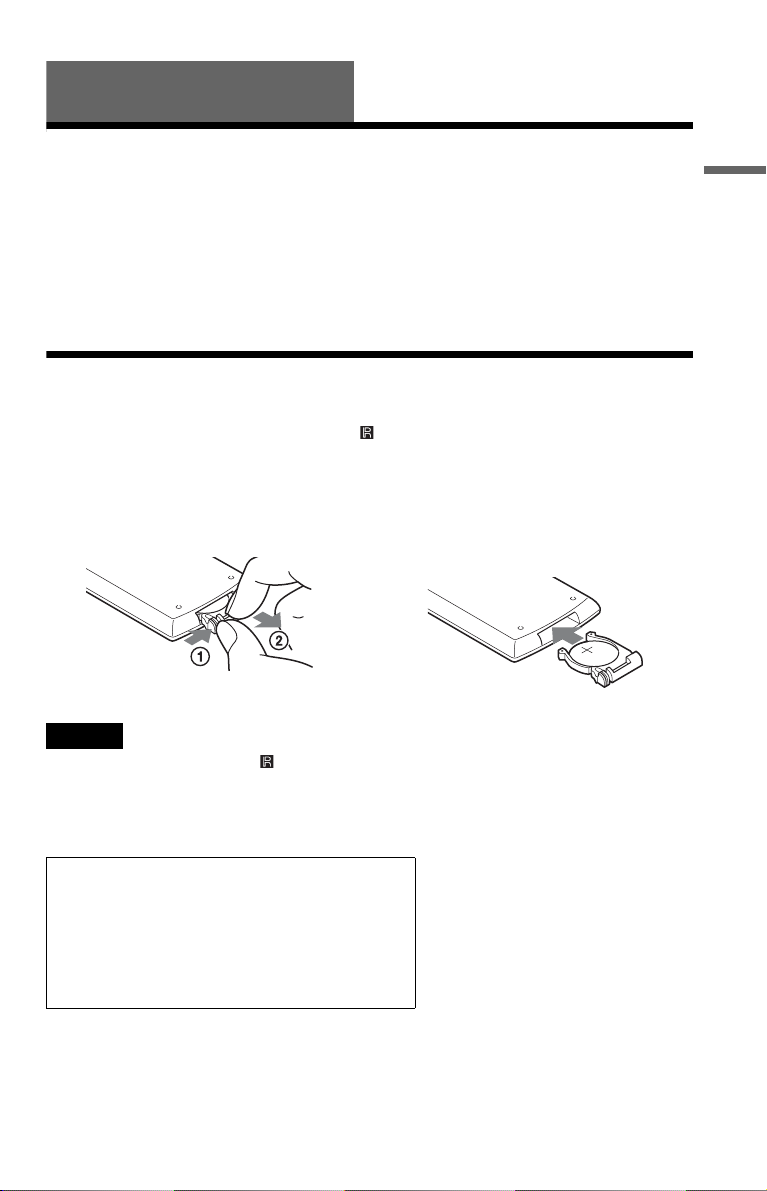
To replace the remote control battery
Insert a lithium battery CR2025 matching the 3 and # ends of the battery.
1 Pull out the battery holder (2) while
pressing the lock lever (1).
2 Remove the old battery.
Notes
• Do not expose the remote sensor to direct sunlight or a lighting apparatus. Doing so may cause a
malfunction.
• No button operation can be made, when the battery drains. If the remote does not work at all, change the
battery and check the status.
3 Insert the new battery in the battery
holder with the 3 side up and then push
the holder fully.
Preparations
WARNING
Battery may explode if mistreated.
Do not recharge, disassemble or dispose of in fire.
CAUTION
Danger of explosion if battery is incorrectly replaced.
Replace only with the same or equivalent type.
9

Using the LCD Panel
The LCD panel of the player can rotate a maximum of 180 degrees clockwise and still be used.
After rotation of the LCD panel, it can be folded down on the main body of the player and still
function.
Rotating the LCD panel
1 Place the player on a table or other flat stable surface.
2 Push the LCD panel up with your thumbs until it is open to the vertical position.
3 Slowly rotate the LCD panel 180 degrees in the direction indicated by the arrow
(clockwise).
Rotating and folding down the LCD panel
After rotating the LCD panel 180 degrees clockwise push the LCD panel down onto the main
body of the player. In this position the panel is facing up.
To return the LCD panel to its original position
Open the LCD panel to the vertical position and rotate the LCD panel counter-clockwise slowly.
Notes
• Do not rotate the LCD panel over 180 degrees. In addition, do not rotate in the opposite direction. Doing
so will break the LCD panel.
• If the LCD panel does not fully open, do not further rotate it. The LCD panel may become damaged.
• Return the LCD panel to its original positions after use. The LCD screen can be damaged by sudden shocks
or similar treatment.
10

Connecting the AC Adaptor
Connect the AC adaptor (supplied) in the order of 1 to 3 below.
To disconnect, follow the steps in reverse order.
Preparations
PHONES
AB
AUDIO VIDEO
OPTICAL
OUT
LINE SELECT
DC plug
IN OUT
DC IN
9.5V
To DC IN 9.5 V jack
2
AC Adaptor
(supplied)
AC power cord (supplied)
1
To a wall outlet
3
Note
Stop playback before disconnecting the AC power cord. Failure to do so may cause a malfunction.
11

Using with the Battery Pack
When an AC power connection is not available, the player can be enjoyed with the battery pack
(supplied) installed.
Please charge the battery pack before using it.
Installing the battery pack
1 Aligning the battery pack with the lines on the player’s bottom, engage the hooks of
the battery pack in the holes on the bottom of the player.
2 Slide the battery pack in the direction of the arrow until it clicks into place.
Battery pack
Bottom of the player
To remove the battery pack
Push the release knob and slide the battery pack in the direction of the arrow.
Release knob
Notes
• Turn the player off before installing the battery pack.
• Do not remove the battery pack during playback.
• Do not touch the connecting points of the player and the battery pack. Doing so may cause a malfunction.
• Be careful not to drop the battery pack when installing and removing it.
12

Charging the battery pack
POWER CHARGE
1 Attach the battery pack to the player (page 12).
2 Connect the AC adaptor to the player, and then connect the AC power cord into a wall
outlet (page 11).
CHARGE indicator
DC IN 9.5 V jack
Preparations
HOLD
Player Battery pack
PHONES
AB
AUDIO VIDEO
OPTICAL
OUT
LINE SELECT
IN OUT
DC IN
9.5V
When charging begins, the CHARGE indicator turns on.
When charging ends, the CHARGE indicator turns off.
3 After charging is finished, disconnect the AC power cord from the wall outlet and
remove the AC adaptor.
To check the battery level
When the player is stopped, a battery indicator is displayed on the screen. Recharge the battery,
when is displayed or the CHARGE indicator flashes.
Full Exhausted
The battery indicator is not displayed when a DVD or JPEG file are being played. Stop the player
and check the battery level.
Charging time and maximum playing time
Charging time (with the player turned off) Playing time (with the display turned on)
Approx.
6 hours
* This is the indication of the longest continuous playback on the following conditions.
– normal temperature (20°C (68°F))
– Headphone Use
– Set Backlight Adjustment to the Minimum
– Set “Digital Output” to “Off” in “Audio Setup.”
Battery condition may reduce operating time.
Approx.
6 hours*
Notes
• The battery indicator does not appear on the screen when the AC adaptor is used or when inputting from
external sources.
• Charging times may differ from that indicated above due to conditions of use, environment, and other
factors. The recommended charge up surrounding temperature is in the 10-30°C (50-86°F) range.
13
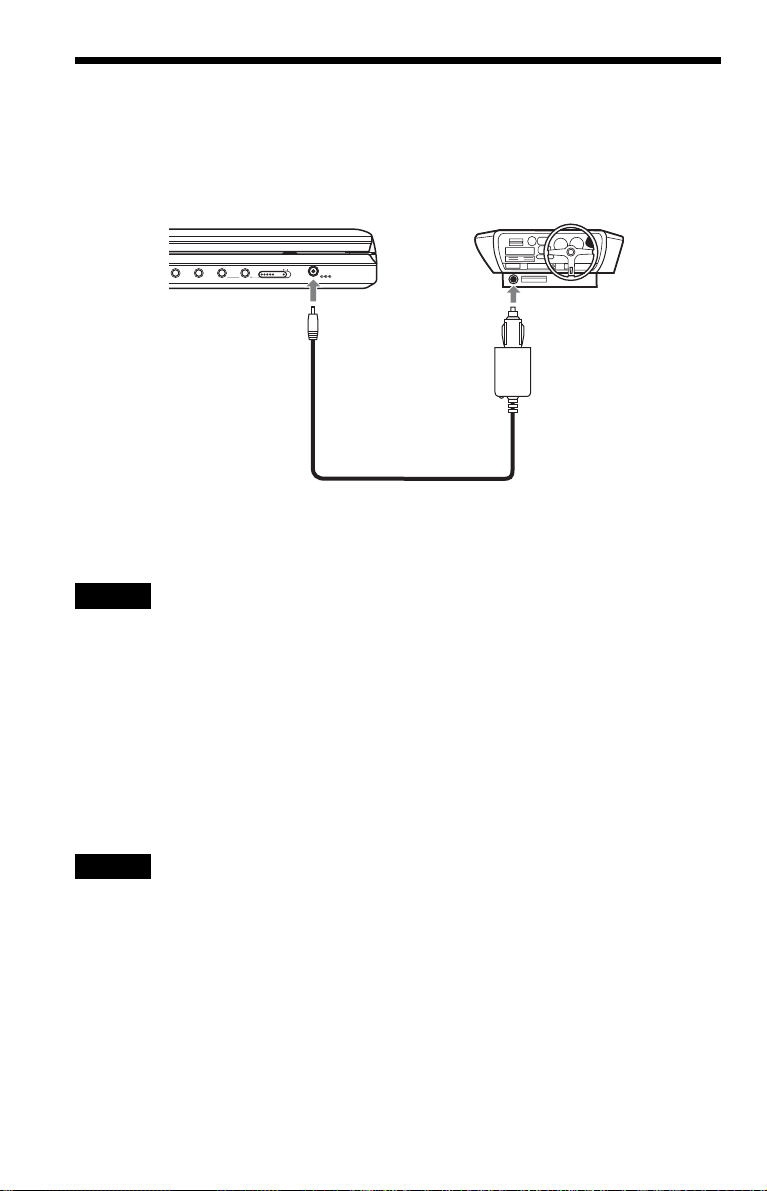
Using with the Car Battery Adaptor
Use the car battery adaptor (supplied) to supply power from the cigarette lighter socket to the
player. The adaptor is for a 12V car battery. Do not use it with a 24V car battery. The adaptor is
also for use with negatively grounded cars. Do not use it with cars grounded positively.
AUDIO VIDEO
PHONES
AB
OPTICAL
OUT
LINE SELECT
To DC IN 9.5V jack
IN OUT
DC IN
9.5V
To cigarette lighter socket
Car battery adaptor (supplied)
z Hint
If the car adaptor interferes with car operation, use a commercial cigarette lighter extension cord.
Notes
• Do not use the car adaptor if it has been dropped or damaged.
• Arrange the cord so as not to interfere with the driver. Also, do not place the LCD panel where the driver
can watch.
• If the picture is not clear, keep the player away from the car battery adaptor.
• Use the car battery adaptor with the car engine running. If it is used with the car engine off, the car battery
may become unusable.
• If the cigarette lighter socket is dirty with ash, etc, a bad connection may cause the plug to heat up. Always
clean well before use.
• The car battery adaptor may heat up while charging or after a long period of use. That is not a malfunction.
After using the car battery adaptor
After turning the player off, disconnect the car battery adaptor from the cigarette lighter socket.
Notes
• Do not turn off the car engine while the player is turned on. Doing so stops the power supply and may cause
damage to the player.
• Disconnect the car battery adaptor after use. Since some cars supply power to the cigarette lighter socket
even when the engine is turned off, the car battery may discharge over time.
• When disconnecting the car battery adaptor, hold the plug to pull it out.
• When listening to the car radio, disconnect the car battery adaptor from the cigarette lighter socket to avoid
noise.
14

Playing Discs
H
O
L
D
O
P
EN
CHARGE
POWER
Playing Discs
Depending on the DVD, some operations
may be different or restricted.
Refer to the operating instructions supplied
with the disc.
Connect the AC adaptor or install the battery
pack.
x
2 Press [/1 on the remote or slide
the [/1/HOLD switch of the player
to “[/1.”
The player turns on and the power
indicator lights up in green.
3 Press OPEN to open the disc lid.
Playing Discs
4 Insert the disc to be played.
Push with the playback side down until it
clicks.
H
VOL
123
456
7809
1 Open the player’s LCD panel.
Set the LINE SELECT switch on the
player’s right side to “OUT.”
DISPLAY MENU RETURN OPTIONS
CHARGEPOWER
OPEN \/1/HOLD
\/1
H
x
Playback side facing down
5 Push the PUSH CLOSE on the
player to shut the disc lid.
6 Press H.
Playback starts.
• Some discs may start playing
automatically after the disc lid is shut.
• Depending on the disc, a menu may
appear on the screen. See page 17 for
details.
• After all titles have been played, the
player will stop itself and the display
will return to the menu screen.
Notes
• If the disc is inserted with playback side up, a “No
Disc” or “Cannot play this disc.” message
appears.
• Discs created on DVD recorders must be correctly
finalized to play on this player. For more
information about finalizing, refer to the
operating instructions supplied with the DVD
recorder.
• The disc may be still spinning when the disc lid is
opened. Wait until the spinning stops before
removing the disc.
,continued
15
• Durin g operation, “ ” may appear on the screen.
This symbol indicates that a function explained in
this operating instruction is not available on the
current DVD VIDEO.
Additional playback operations
To stop playback
Press x.
Pressing H again will start playback from
the point you stopped (Resume Play). See
page 17 for details.
To play from the beginning, press x twice,
then press H.
To turn off the power
Press the remote’s \/1 button or slide the
player’s \/1/HOLD switch to “\/1.”
To avoid accidental button operation on
the player
Set the player’s \/1/HOLD switch to
“HOLD.” All the buttons on the player are
locked, while the button on the remote
remains operable.
To play DTS sound tracks on a DVD VIDEO
• The player’s speaker does not output DTS
sound. When you play DTS sound tracks on
a DVD VIDEO, connect the player to an
AV amplifier (receiver) (page 35) and set
up “DTS” in “Audio Setup” (page 31).
• If you connect the player to audio
equipment such as an AV amplifier
(receiver) without a DTS decoder, do not set
“DTS” to “On” in “Audio Setup” (page 31).
A loud noise may come out from the
speakers, which may affect your ears or
cause speaker damage.
123
456
7809
.
X
>
x
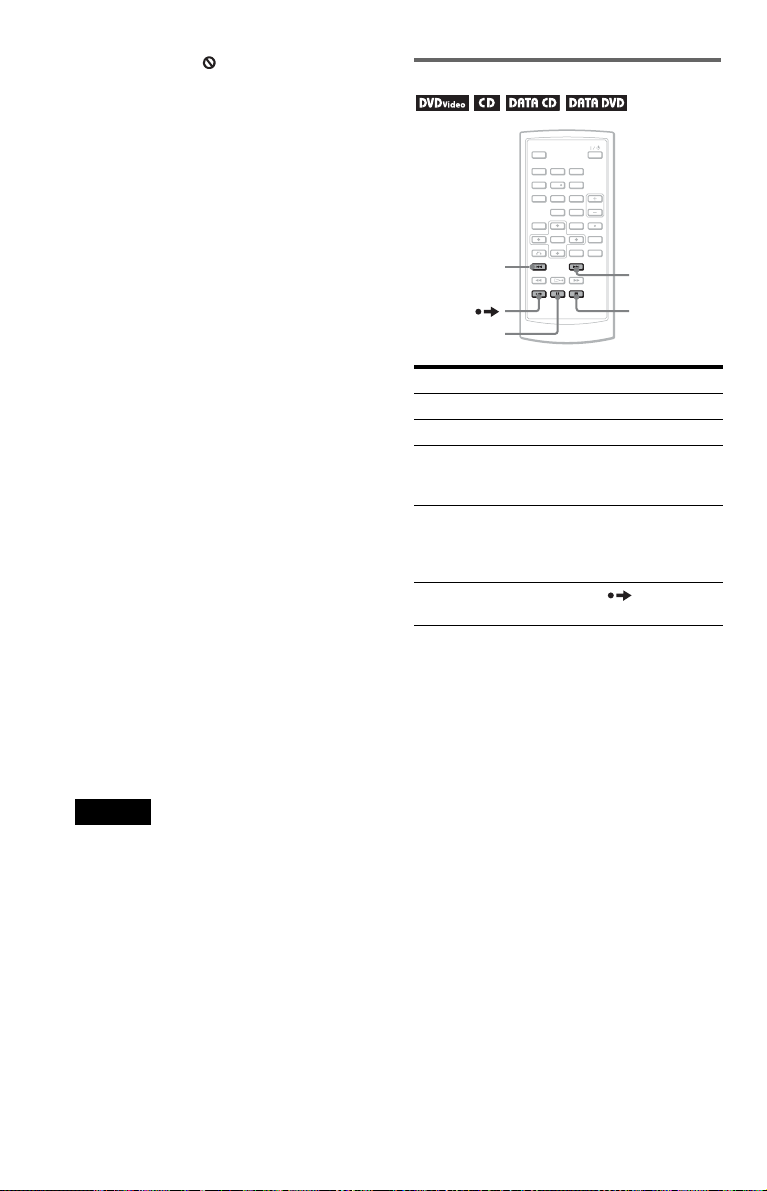
To Operation
Stop Press x
Pause Press X
Go to the next chapter,
Press >
track, or scene in
continuous play mode
Go back to the
Press .
previous chapter,
track, or scene in
continuous play mode
Briefly fast forward
the current scene*
* DVD VIDEOs only.
The above functions may not be used for some
scenes.
Press during
playback.
Notes
• A screen saver image appears when you leave the
player in pause or stop without operation for more
than 15 minutes. The image disappears when you
press H. See page 30 for details.
• The player turns off, 15 minutes after starting the
screen saver function (Auto Power Off).
16
Resuming playback from the
point where you stopped the disc
(Resume Play)
When you stop playback, the player
remembers the stop point and displays a
message on the screen. You can resume from
the same point by pressing H again. Resume
Play works even after the player is turned off,
as long as the disc lid is kept closed.
Using the DVD’s menu
A DVD is divided into long sections of a
picture or a music feature called “titles.”
When you play a DVD containing several
titles, you can select the title you want using
the TOP MENU button.
When you play DVDs that allow you to select
items such as language for the sound and
subtitles, select these items using the MENU
button.
Playing Discs
123
456
7809
H
x
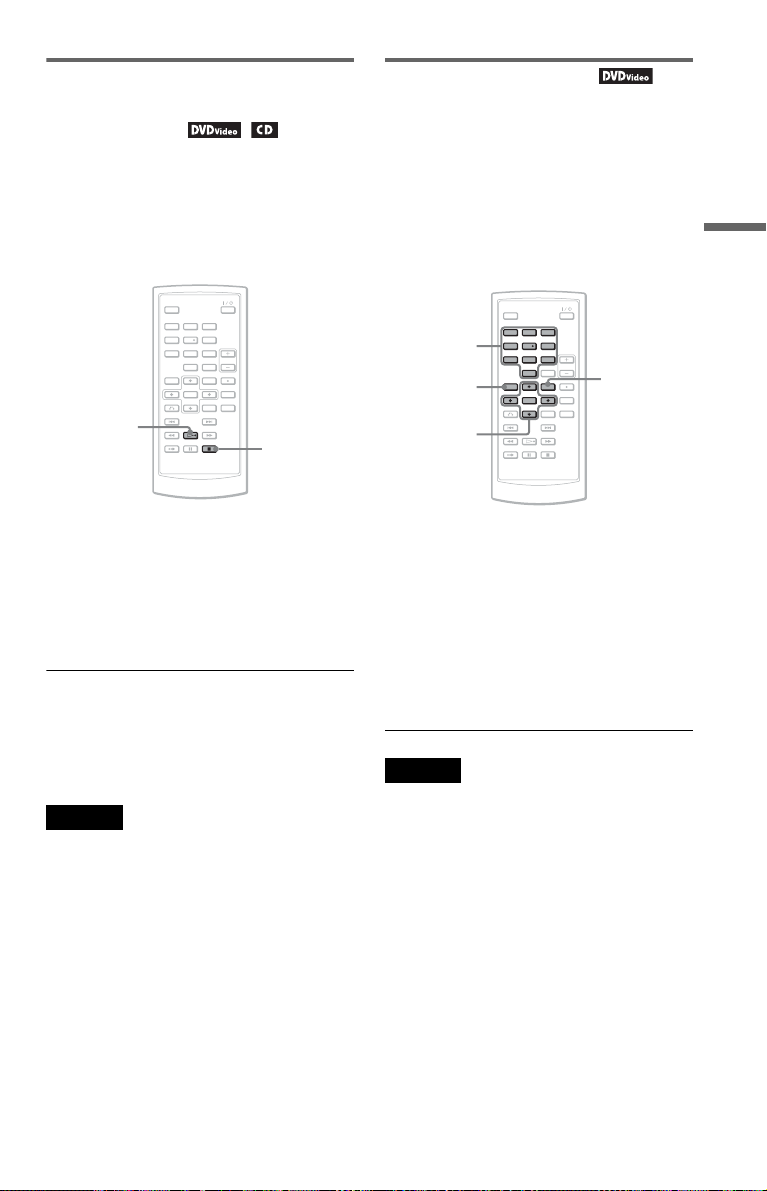
1 While playing a disc, press x to stop
playback.
A message appears.
2 Press H.
The player starts playback from the point
you stopped in step 1.
z Hints
• To play from the beginning of the disc, press x
twice, then press H.
• When turning power on again after power off,
resume play starts automatically.
Notes
• Depending on the stop point, Resume play may
not start from exactly the same point.
• The point where you stopped playing is cleared
when:
– you open the disc lid.
– you disconnect the battery pack and the AC
adaptor.
– you change the LINE SELECT switch setting.
123
Number
buttons
TOP MENU
C/X/x/c
ENTER
456
7809
MENU
1 Press TOP MENU or MENU.
The disc’s menu appears on the screen.
The contents of the menu vary from disc
to disc.
2 Press C/X/x/c or the number buttons
to select the item you want to play or
change.
3 Press ENTER.
Note
Depending on the disc, you may not be able to use
C/c of the player for the disc menu. In this case, use
C/c on the remote.
,continued
17
Changing the sound
When playing a DVD VIDEO recorded in
multiple audio formats (PCM, Dolby Digital,
or DTS), you can change the audio format. If
the DVD VIDEO is recorded with
multilingual tracks, you can also change the
language.
With CDs, you can select the sound from
either the right or left channel and listen to the
sound of the selected channel through both
the right and left speakers. For example, when
playing a disc containing a song with the
vocals on the right channel and the
instruments on the left channel, you can hear
the instruments from both speakers by
selecting the left channel.
123
456
7809
AUDIO
Notes
• Depending on the disc, you may not be able to
change the audio format, even if it is recorded in
multiple audio formats.
• If “DTS” in “Audio Setup” is set to “Off”
(page 31), the DTS track selection option will not
appear on the screen even if the disc contains DTS
tracks.
• When playing DTS sound tracks on a CD, you
cannot change the sound.
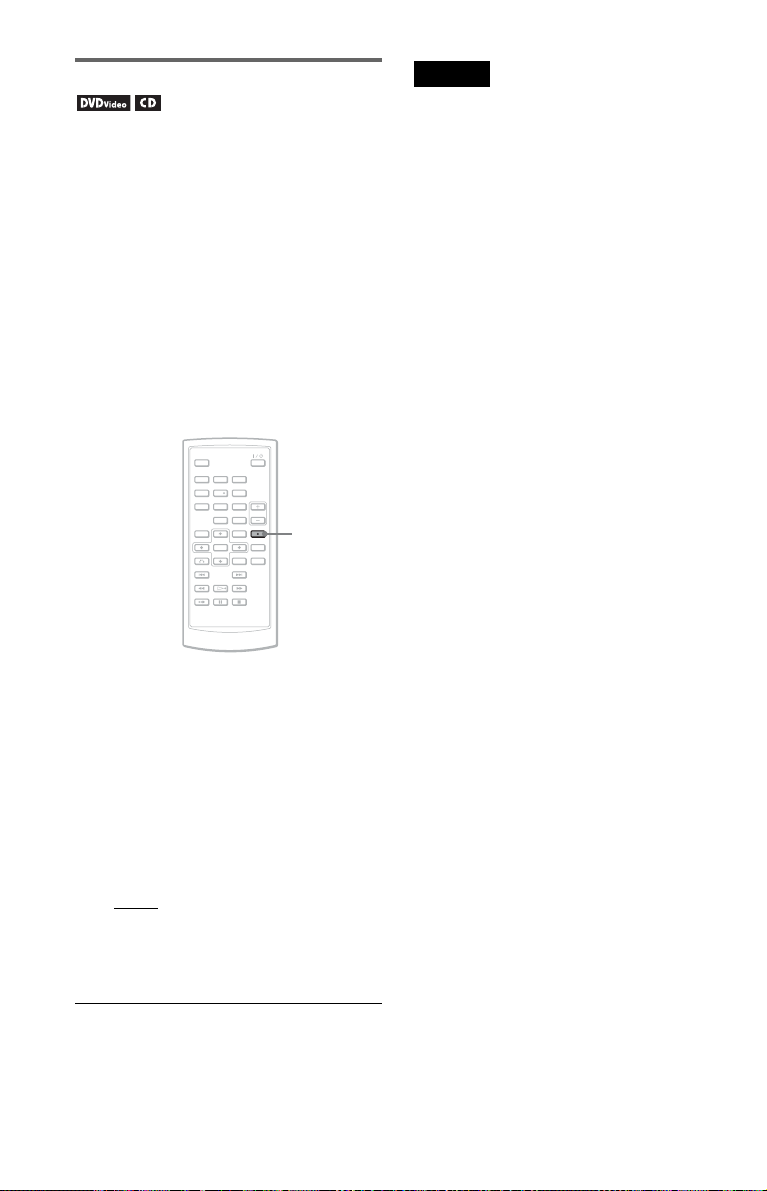
1 Press AUDIO repeatedly to select the
desired audio signal.
The default setting is underlined.
◆ When playing a DVD VIDEO
Depending on the DVD VIDEO, the
choice of language varies.
When the same language is displayed two
or more times, the DVD VIDEO is
recorded in multiple audio formats.
◆ When playing a CD
•Stereo
: the standard stereo sound
• Left: the sound of the left channel
(monaural)
• Right: the sound of the right channel
(monaural)
z Hints
• You can check of the current audio format (Dolby
Digital, DTS, PCM, etc.) by pressing AUDIO
repeatedly while playing a DVD VIDEO.
• You ca n switch the sound in the Playback Settings
Display while playing a DVD (page 20).
18
 Loading...