

Sony DVP-FX770 Operating manual
4-284-253-11(1)
Portable
CD/DVD Player
Operating Instructions
z
To find out useful hints, tips and information about Sony
products and services please visit:
www.sony-europe.com/myproduct/
DVP-FX770
© 2011 Sony Corporation

WARNING
To reduce the risk of fire or
electric shock, do not
expose this apparatus to
rain or moisture.
To avoid electrical shock,
do not open the cabinet.
Refer servicing to qualified
personnel only.
The mains lead must be
changed only at a qualified
service shop.
Batteries or batteries
installed apparatus shall
not be exposed to
excessive heat such as
sunshine, fire or the like.
This label is located on the
bottom of the unit.
This appliance is classified as a
CLASS 1 LASER product. The
CLASS 1 LASER PRODUCT
MARKING is located on the
bottom of the unit.
CAUTION
The use of optical instruments
with this product will increase
eye hazard. As the laser beam
used in this CD/DVD player is
harmful to eyes, do not attempt to
disassemble the cabinet.
Refer servicing to qualified
personnel only.
Disposal of Old Electrical &
Electronic Equipment
(Applicable in the European
Union and other European
countries with separate collection
systems)
This symbol on the product or on
its packaging indicates that this
product shall not be treated as
household waste. Instead it shall
be handed over to the applicable
collection point for the recycling
of electrical and electronic
equipment. By ensuring this
product is disposed of correctly,
you will help prevent potential
negative consequences for the
environment and human health,
which could otherwise be caused
by inappropriate waste handling
of this product. The recycling of
materials will help to conserve
natural resources. For more
detailed information about
recycling of this product, please
contact your local Civic Office,
your household waste disposal
service or the shop where you
purchased the product.
Disposal of waste batteries
(applicable in the European
Union and other European
countries with separate collection
systems)
This symbol on the battery or on
the packaging indicates that the
battery provided with this
product shall not be treated as
household waste.
On certain batteries this symbol
might be used in combination
with a chemical symbol. The
chemical symbols for mercury
(Hg) or lead (Pb) are added if the
battery contains more than
0.0005% mercury or 0.004%
lead.
By ensuring these batteries are
disposed of correctly, you will
help prevent potentially negative
consequences for the
environment and human health
which could otherwise be caused
by inappropriate waste handling
of the battery. The recycling of
the materials will help to
conserve natural resources.
In case of products that for
safety, performance or data
integrity reasons require a
permanent connection with an
incorporated battery, this battery
should be replaced by qualified
service staff only.
To ensure that the battery will be
treated properly, hand over the
product at end-of-life to the
applicable collection point for the
recycling of electrical and
electronic equipment.
For all other batteries, please
view the section on how to
remove the battery from the
product safely. Hand the battery
over to the applicable collection
point for the recycling of waste
batteries.
For more detailed information
about recycling of this product or
battery, please contact your local
Civic Office, your household
waste disposal service or the
shop where you purchased the
product.
Do not take apart or remodel the
player. Doing so can result in
electric shock. Consult your
nearest Sony dealer or Sony
Service Center for exchange of
rechargeable batteries, internal
checks or repair.
2
Precautions
• Install this system so that the
mains lead can be unplugged
from the wall socket
immediately in the event of
trouble.
• The player is not disconnected
from the AC power source
(mains) as long as it is
connected to the wall outlet,
even if the player itself has
been turned off.
• To prevent fire or shock
hazard, do not place objects
filled with liquids, such as
vases, on the apparatus.
• Excessive sound pressure from
earphones and headphones can
cause hearing loss.
The manufacturer of this product
is Sony Corporation, 1-7-1
Konan Minato-ku Tokyo, 1080075 Japan. The Authorized
Representative for EMC and
product safety is Sony
Deutschland GmbH, Hedelfinger
Strasse 61, 70327 Stuttgart,
Germany. For any service or
guarantee matters please refer to
the addresses given in separate
service or guarantee documents.
IMPORTANT NOTICE
Caution: This player is capable
of holding a still video image
or on-screen display image on
your television screen
indefinitely. If you leave the
still video image or on-screen
display image displayed on
your TV for an extended period
of time you risk permanent
damage to your television
screen. Plasma display panel
televisions and projection
televisions are susceptible to
this.
If you have any questions or
problems concerning your
player, please consult your
nearest Sony dealer.
Copyrights, trademarks
and software licence
information
• Manufactured under licence
from Dolby Laboratories.
Dolby and the double-D
symbol are trademarks of
Dolby Laboratories.
• “DVD+RW,” “DVD-RW,”
“DVD+R,” “DVD+R DL,”
“DVD-R,” “DVD VIDEO,”
and “CD” logos are
trademarks.
• MPEG Layer-3 audio coding
technology and patents
licensed from Fraunhofer IIS
and Thomson.
• All other trademarks are
trademarks of their respective
owners.
• THIS PRODUCT IS
LICENSED UNDER THE
MPEG-4 VISUAL PATENT
PORTFOLIO LICENSE FOR
THE PERSONAL AND NONCOMMERCIAL USE OF A
CONSUMER FOR
DECODING VIDEO IN
COMPLIANCE WITH THE
MPEG-4 VISUAL
STANDARD (“MPEG-4
VIDEO”) THAT WAS
ENCODED BY A
CONSUMER ENGAGED IN
A PERSONAL AND NONCOMMERCIAL ACTIVITY
AND/OR WAS OBTAINED
FROM A VIDEO PROVIDER
LICENSED BY MPEG LA TO
PROVIDE MPEG-4 VIDEO.
NO LICENSE IS GRANTED
OR SHALL BE IMPLIED
FOR ANY OTHER USE.
ADDITIONAL
INFORMATION
INCLUDING THAT
RELATING TO
PROMOTIONAL,
INTERNAL AND
COMMERCIAL USES AND
LICENSING MAY BE
OBTAINED FROM MPEG
LA, LLC. SEE HTTP://
WWW.MPEGLA.COM
About this manual
• In this manual, “disc” is used as
a general reference for the
DVDs or CDs unless otherwise
specified by the text or
illustrations.
• Icons, such as , listed at
the top of each explanation
indicate what kind of media
can be used with the function
being explained.
For details, see “Playable
Media” (page 24).
• NEED-to-know information
(to prevent incorrect operation)
is listed under the
NICE-to-know information
(tips and other useful
information) is listed under the
z icon.
b icon.
3

Table of Contents
WARNING . . . . . . . . . . . . . . . . . . . . . . . . . . . . . . . . . . . . . . . . . . . . . . 2
Guide to Parts and Controls . . . . . . . . . . . . . . . . . . . . . . . . . . . . . . . . . 5
Preparations . . . . . . . . . . . . . . . . . . . . . . . . . . . . . . . . . . . . 8
Checking the Accessories . . . . . . . . . . . . . . . . . . . . . . . . . . . . . . . . . . 8
Charging the Battery . . . . . . . . . . . . . . . . . . . . . . . . . . . . . . . . . . . . . . 8
Using the Car Battery Adaptor . . . . . . . . . . . . . . . . . . . . . . . . . . . . . . . 9
Connecting to a TV . . . . . . . . . . . . . . . . . . . . . . . . . . . . . . . . . . . . . . 10
Playback . . . . . . . . . . . . . . . . . . . . . . . . . . . . . . . . . . . . . 11
Playing Discs . . . . . . . . . . . . . . . . . . . . . . . . . . . . . . . . . . . . . . . . . . . 11
Playing MP3, JPEG, and Video Files . . . . . . . . . . . . . . . . . . . . . . . . . 13
Adjusting the Picture Size and Quality . . . . . . . . . . . . . . . . . . . . . . . . 15
Settings and Adjustments . . . . . . . . . . . . . . . . . . . . . . . . . . 16
Using the Setup Display . . . . . . . . . . . . . . . . . . . . . . . . . . . . . . . . . . . 16
Additional Information . . . . . . . . . . . . . . . . . . . . . . . . . . . . 20
Troubleshooting . . . . . . . . . . . . . . . . . . . . . . . . . . . . . . . . . . . . . . . . . 20
Precautions . . . . . . . . . . . . . . . . . . . . . . . . . . . . . . . . . . . . . . . . . . . . 22
Playable Media . . . . . . . . . . . . . . . . . . . . . . . . . . . . . . . . . . . . . . . . . . 24
Specifications . . . . . . . . . . . . . . . . . . . . . . . . . . . . . . . . . . . . . . . . . . . 26
Index . . . . . . . . . . . . . . . . . . . . . . . . . . . . . . . . . . . . . . . . . . . . . . . . . 27
4
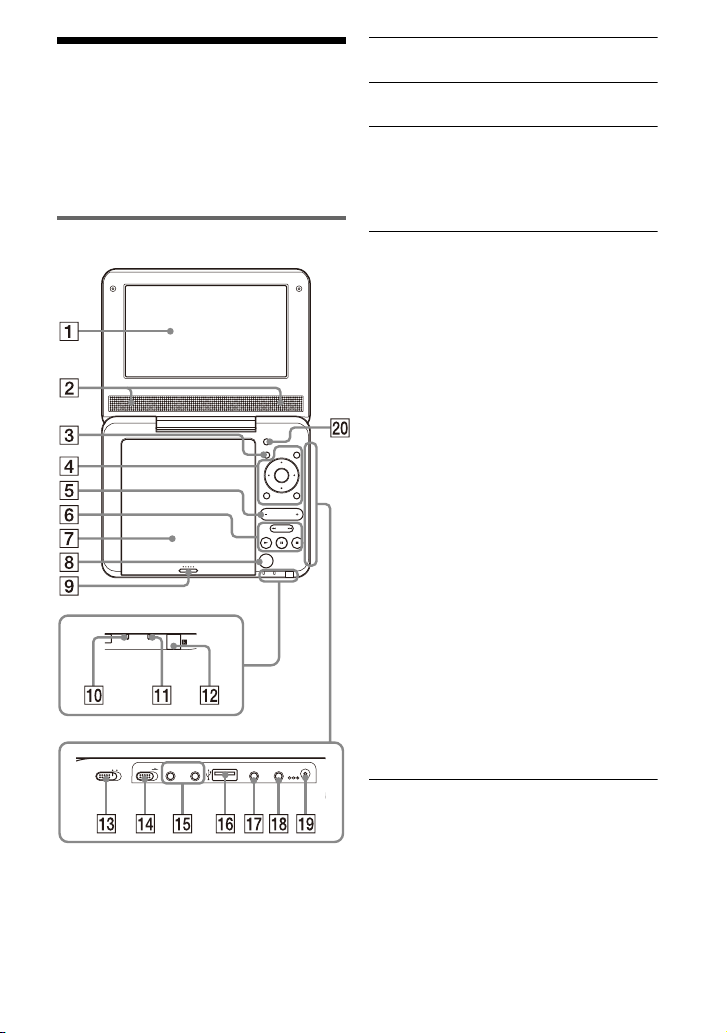
Guide to Parts and
OPERATE
ONOFF
HOLD
PHONES
AB
AUDIO
OUT
VIDEO
OUT
DC IN
9.5V
Controls
A LCD panel (page 11)
B Speaker
The available functions of the player and
remote differ depending on the disc or the
situation.
Player
INPUT SELECT
DISPLAY MENU
ENTER
RETURN
OPTIONS
VOLUME
PUSH CLOSE
POWER CHARGE
OPEN
C DISPLAY button
Displays the playback information.
• When playing a DVD, changes the
playback mode (page 12).
D MENU button
Displays the DVD VIDEO’s menu.
• When playing a CD or VIDEO CD
(PBC function is off), switches to
Repeat Play (page 12) or Shuffle
Play.
• When playing a JPEG file, plays a
slideshow (page 14).
C/X/x/c button
Moves the highlight to select a
displayed item.
• C/c on the player works the same as
m/M on the remote.
ENTER (centre) button
Enters the selected item.
• ENTER on the player works the
same as N.
RETURN button
Returns to the previous display.
OPTIONS button
Displays the menu for adjusting the
LCD screen (page 15) and using the
setup display (page 16).
The VOLUME+ and N (play) buttons
have a tactile dot. Use the tactile dot as a
reference when operating the player.
E VOLUME (sound volume) +/–
button
Adjusts the volume.
,continued
5
F N (play) button (page 11)
Starts or re-starts playback.
X (pause) button (page 11)
Pauses or re-starts playback.
x (stop) button (page 11)
Stops playback.
./> (previous/next)
button
Skips to the previous/next chapter,
track or file.
G Disc Lid (page 11)
H OPEN button (page 11)
Opens the disc lid.
I PUSH CLOSE (page 11)
Closes the disc lid.
J POWER indicator (page 11)
K CHARGE indicator (page 8)
L (remote sensor)
Q AUDIO OUT jack (page 10)
R VIDEO OUT jack (page 10)
S DC IN 9.5V jack (page 8, 9)
Connect the AC adaptor or car battery
adaptor.
T INPUT SELECT button (page 14)
Each time you press the button, the
LCD screen image switches as
follows:
• Disc (default)
•USB (page14)
M OPERATE switch (page 11)
Turns the player on or off.
N HOLD switch
To avoid accidental button operation
of the player, set the HOLD switch to
the direction of the arrow.
All the buttons on the player are
locked, while the buttons on the
remote remain operable.
O PHONES (headphone) jack A, B
P USB jack (type A) (page 14)
Connect a USB device to this jack.
6
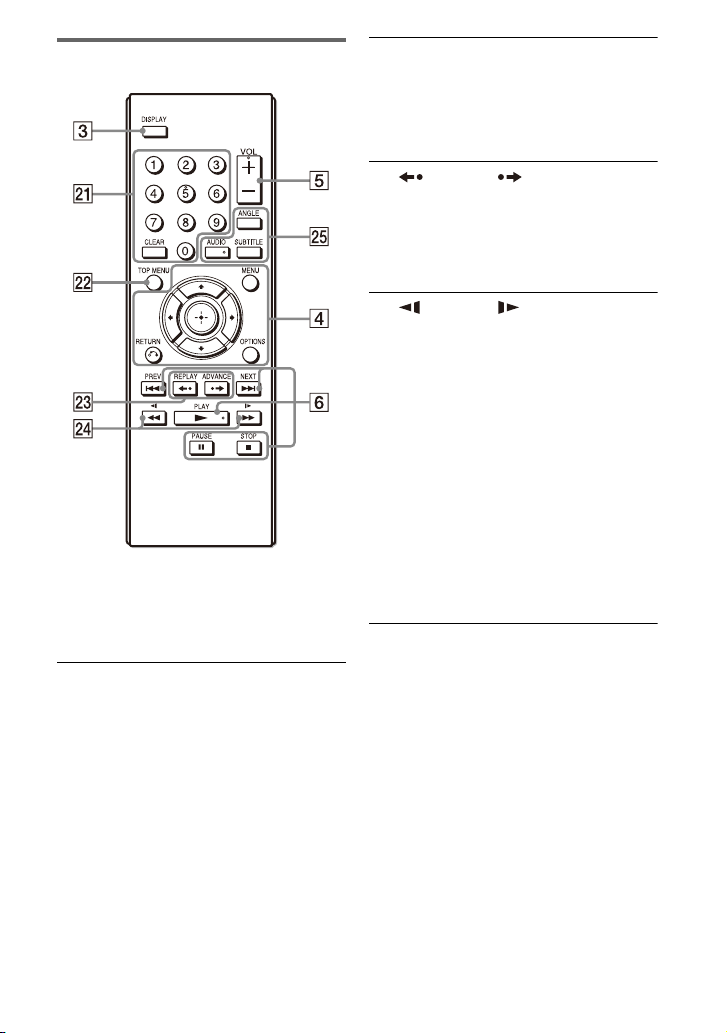
Remote
The VOL +, number 5, N and AUDIO
buttons have a tactile dot. Use the tactile
dot as a reference when operating the
player.
U Number buttons
Enters the title/chapter numbers, etc.
CLEAR button
Clears the entry field.
V TOP MENU button
Displays the DVD VIDEO’s top
menu.
• When playing a DVD VR, switches
between “Original” and “Play List.”
W REPLAY/ ADVANCE
buttons
Replays the scene/briefly fast
forwards the current scene (DVD
only).
X m/M (scan/slow)
buttons
• Fast reverses/fast forwards when
pressed during playback. Press
repeatedly to change the speed.
• Slow reverses/slow forwards when
pressed during pause. Press
repeatedly to change the speed.
(Slow reverse play is available for
DVD only. Slow forward play is
available for DVD, VIDEO CD and
video files.) Depending on the disc,
reverse slow playback may not be
possible, or images may not appear
smooth.
Y ANGLE button
Changes the angles recorded on a
DVD VIDEO.
AUDIO button
Changes the audio signal each time
pressed.
• When playing a DVD VIDEO,
switches the recorded language.
• When playing a CD or VIDEO CD,
switches between stereo and
monaural.
SUBTITLE button
Changes the subtitles recorded on a
DVD VIDEO each time pressed.
7
Preparations
Checking the Accessories
Check that you have the following items:
•AC adaptor (1)
• Car battery adaptor (1)
• Audio/video cable (mini plug × 2 y
phono plug × 3) (1)
•Remote (1)
• R6 (size AA) batteries (2)
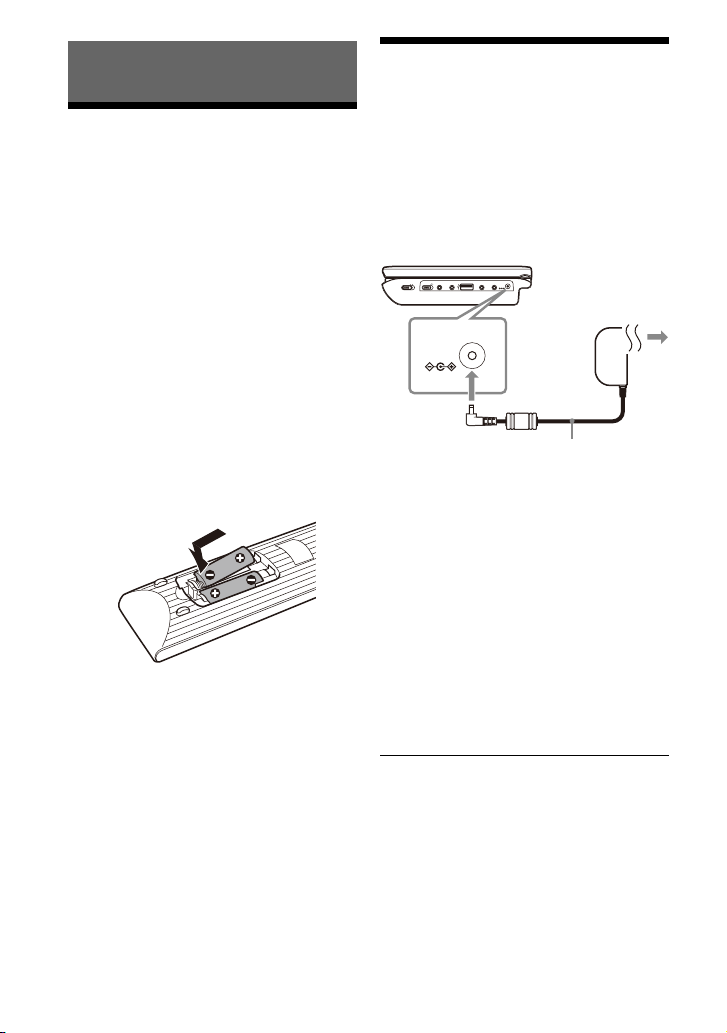
Preparing the remote
Insert two R6 (size AA) batteries by
matching the 3 and # ends on the
batteries to the markings inside the
compartment.
Charging the Battery
Charge the rechargeable battery before
using the player for the first time, or when
the battery is depleted.
1 Connect the AC adaptor.
When charging begins, the CHARGE
indicator lights up in orange.
OPERATE
ONOFF
HOLD
PHONES
AUDIO
VIDEO
DC IN
OUT
OUT
9.5V
AB
To a wall outlet
DC IN
9.5V
AC Adaptor (supplied)
When charging ends, the CHARGE
indicator lights off.
Disconnect the AC adaptor.
z
If the POWER indicator lights up instead of the
CHARGE indica tor, the OPERATE switch is se t
to “ON.” Set the OPERATE switch to “OFF,”
and make sure that the CHARGE indicator lights
up.
b
Charge the battery in an ambient temperature of
between 5 °C to 35 °C.
8

Charging time and playing time
Charging time: approx. 3 hours
Playing time: approx. 4 hours
Times indicated are under the following
conditions:
– Moderate temperature (20 °C)
– Headphone use
– Backlight set to minimum
Depending on the ambient temperature or
rechargeable battery condition, charging time
may be longer, or playing time may be reduced.
To check the battery level
When the player is stopped, the battery
indicator is displayed. When the battery is
empty, is displayed or the CHARGE
indicator flashes. Set the OPERATE
switch to “OFF,” connect the AC adaptor,
and recharge the battery.
Full Empty
Using the Car Battery Adaptor
The car battery adaptor (supplied) is for a
12 V car battery, negative earth (do not use
it with a 24 V car battery, positive earth).
1 Connect the car battery adaptor.
OPERATE
ONOFF
HOLD
PHONES
AUDIO
VIDEO
DC IN
OUT
OUT
9.5V
AB
DC IN
9.5V
To cigarette
lighter socket
Car battery adaptor (supplied)
After using the player in a car
Disconnect the car battery adaptor from a
cigarette lighter socket.
b
• The driver should not connect or disconnect
the car battery adaptor while driving.
• Arrange the cable so as not to interfere with the
driver. Also, do not place the LCD panel where
the driver can watch.
• Clean the cigarette lighter socket. If it is dirty,
it may cause contact failure or malfunction.
• Use the car battery adaptor with the car engine
running. If it is used with the car engine off, the
car battery may become depleted.
• Do not leave the player or accessories in the
car.
Preparations
9
 Loading...