

Sony DVP-FX74 User Manual

4-169-962-31(1)
Portable
CD/DVD Player
Operating Instructions
Manual de instrucciones
DVP-FX74
© 2010 Sony Corporation
US
ES

WARNING
To reduce the risk of fire or
electric shock, do not
expose this apparatus to
rain or moisture.
To avoid electrical shock,
do not open the cabinet.
Refer servicing to qualified
personnel only.
The AC power cord must be
changed only at a qualified
service shop.
Batteries or batteries
installed apparatus shall
not be exposed to
excessive heat such as
sunshine, fire or the like.
CAUTION
The use of optical instruments
with this product will increase
eye hazard. As the laser beam
used in this CD/DVD player is
harmful to eyes, do not attempt to
disassemble the cabinet.
Refer servicing to qualified
personnel only.
This label is located on the
bottom of the unit.
This symbol is
intended to alert the
user to the presence
of uninsulated
voltage” within the product’s
enclosure that may be of
sufficient magnitude to constitute
a risk of electric shock to
persons.
“dangerous
This symbol is
intended to alert the
user to the presence
of important
maintenance (servicing)
instructions in the literature
accompanying the appliance.
Precautions
• Install this system so that the
AC power cord can be
unplugged from the wall socket
immediately in the event of
trouble.
• The player is not disconnected
from the AC power source as
long as it is connected to the
wall outlet, even if the player
itself has been turned off.
• To prevent fire or shock
hazard, do not place objects
filled with liquids, such as
vases, on the apparatus.
For customers in the U.S.A
Owner’s Record
The model and serial numbers are
located at the bottom of the unit.
Record the serial number in the
space provided below. Refer to
them whenever you call upon your
Sony dealer regarding this product.
Model No. DVP-FX74
Serial No.______________
operating and
CAUTION
You are cautioned that any
changes or modifications not
expressly approved in this
manual could void your authority
to operate this equipment.
b
This equipment has been tested
and found to comply with the
limits for a Class B digital
device, pursuant to Part 15 of the
FCC Rules. These limits are
designed to provide reasonable
protection against harmful
interference in a residential
installation. This equipment
generates, uses, and can radiate
radio frequency energy and, if
not installed and used in
accordance with the instructions,
may cause harmful interference
to radio communications.
However, there is no guarantee
that interference will not occur in
a particular installation. If this
equipment does cause harmful
interference to radio or television
reception, which can be
determined by turning the
equipment off and on, the user is
encouraged to try to correct the
interference by one or more of
the following measures:
– Reorient or relocate the
receiving antenna.
– Increase the separation
between the equipment and
receiver.
– Connect the equipment into an
outlet on a circuit different
from that to which the receiver
is connected.
– Consult the dealer or an
experienced radio/TV
technician for help.
IMPORTANT SAFETY
INSTRUCTIONS
1) Read these instructions.
2) Keep these instructions.
3) Heed all warnings.
4) Follow all instructions.
5) Do not use this apparatus
near water.
6) Clean only with dry cloth.
7) Do not block any
ventilation openings.
Install in accordance with
the manufacturer’s
instructions.
8) Do not install near any heat
sources such as radiators,
heat registers, stoves, or
other apparatus (including
amplifiers) that produce
heat.
9) Do not defeat the safety
purpose of the polarized or
grounding-type plug. A
polarized plug has two
blades with one wider than
the other. A grounding type
plug has two blades and a
third grounding prong. The
wide blade or the third
prong are provided for
your safety. If the provided
plug does not fit into your
2

outlet, consult an
electrician for replacement
of the obsolete outlet.
10) Protect the power cord
from being walked on or
pinched particularly at
plugs, convenience
receptacles, and the point
where they exit from the
apparatus.
11) Only use attachments/
accessories specified by
the manufacturer.
12) Use only with the cart,
stand, tripod, bracket, or
table specified by the
manufacturer, or sold with
the apparatus. When a cart
is used, use caution when
moving the cart/apparatus
combination to avoid
injury from tip-over.
13) Unplug this apparatus
during lightning storms or
when unused for long
periods of time.
14) Refer all servicing to
qualified service
personnel. Servicing is
required when the
apparatus has been
damaged in any way, such
as power-supply cord or
plug is damaged, liquid has
been spilled or objects
have fallen into the
apparatus, the apparatus
has been exposed to rain or
moisture, does not operate
normally, or has been
dropped.
Do not take apart or remodel the
player. Doing so can result in
electric shock. Consult your
nearest Sony dealer or Sony
Service Center for exchange of
rechargeable batteries, internal
checks or repair.
IMPORTANT NOTICE
Caution: This player is capable
of holding a still video image
or on-screen display image on
your television screen
indefinitely. If you leave the
still video image or on-screen
display image displayed on
your TV for an extended period
of time you risk permanent
damage to your television
screen. Plasma display panel
televisions and projection
televisions are susceptible to
this.
If you have any questions or
problems concerning your
player, please consult your
nearest Sony dealer.
Copyrights and
trademarks
• This product incorporates
copyright protection
technology that is protected by
U.S. patents and other
intellectual property rights.
Use of this copyright
protection technology must be
authorized by Macrovision,
and is intended for home and
other limited viewing uses only
unless otherwise authorized by
Macrovision. Reverse
engineering or disassembly is
prohibited.
• Manufactured under license
from Dolby Laboratories.
Dolby and the double-D
symbol are trademarks of
Dolby Laboratories.
• “DVD+RW,” “DVD-RW,”
“DVD+R,” “DVD-R,” “DVD
VIDEO,” and “CD” logos are
trademarks.
• MPEG Layer-3 audio coding
technology and patents
licensed from Fraunhofer IIS
and Thomson.
About this manual
• In this manual, “disc” is used as
a general reference for the
DVDs or CDs unless otherwise
specified by the text or
illustrations.
• Icons, such as , listed at
the top of each explanation
indicate what kind of media
can be used with the function
being explained.
For details, see “Playable
Media” (page 25).
• NEED-to-know information
(to prevent incorrect operation)
is listed under the
NICE-to-know information
(tips and other useful
information) is listed under the
z icon.
b icon.
3

Table of Contents
WARNING . . . . . . . . . . . . . . . . . . . . . . . . . . . . . . . . . . . . . . . . . . . . . . 2
Guide to Parts and Controls . . . . . . . . . . . . . . . . . . . . . . . . . . . . . . . . . 5
Preparations . . . . . . . . . . . . . . . . . . . . . . . . . . . . . . . . . . . . 8
Checking the Accessories . . . . . . . . . . . . . . . . . . . . . . . . . . . . . . . . . . 8
Charging the Rechargeable Battery . . . . . . . . . . . . . . . . . . . . . . . . . . . 8
Using the Car Battery Adaptor . . . . . . . . . . . . . . . . . . . . . . . . . . . . . . . 9
Connecting to a TV . . . . . . . . . . . . . . . . . . . . . . . . . . . . . . . . . . . . . . . 10
Playback . . . . . . . . . . . . . . . . . . . . . . . . . . . . . . . . . . . . . .11
Playing Discs . . . . . . . . . . . . . . . . . . . . . . . . . . . . . . . . . . . . . . . . . . . 11
Playing MP3 and JPEG Files . . . . . . . . . . . . . . . . . . . . . . . . . . . . . . . 14
Adjusting the Picture Size and Quality . . . . . . . . . . . . . . . . . . . . . . . . 15
Settings and Adjustments . . . . . . . . . . . . . . . . . . . . . . . . . . .17
Using the Setup Display . . . . . . . . . . . . . . . . . . . . . . . . . . . . . . . . . . . 17
Additional Information . . . . . . . . . . . . . . . . . . . . . . . . . . . . .20
Troubleshooting . . . . . . . . . . . . . . . . . . . . . . . . . . . . . . . . . . . . . . . . . 20
Precautions . . . . . . . . . . . . . . . . . . . . . . . . . . . . . . . . . . . . . . . . . . . . . 22
Playable Media . . . . . . . . . . . . . . . . . . . . . . . . . . . . . . . . . . . . . . . . . . 25
Specifications . . . . . . . . . . . . . . . . . . . . . . . . . . . . . . . . . . . . . . . . . . . 27
Index . . . . . . . . . . . . . . . . . . . . . . . . . . . . . . . . . . . . . . . . . . . . . . . . . . 28
4

Guide to Parts and
POWER
ONOFF
HOLD
PHONES
AB
AUDIO
OUT
VIDEO
OUT
DC IN
9.5V
Controls
A LCD panel (page 11)
B Speaker
For more information, see the pages
indicated in parentheses.
Player
TOP MENU
DISPLAY MENU
ENTER
RETURN
OPTIONS
VOLUME
PUSH CLOSE
POWER CHARGE
The VOLUME+ and N (play) buttons
have a tactile dot. Use the tactile dot as a
reference when operating the player.
OPEN
C TOP MENU button
When playing a DVD VIDEO:
Displays the top menu.
D DISPLAY button
Displays the playback information.
• When playing a DVD:Displays the
playback information and changes
the playback mode. See page 13.
• When playing a CD:Each time you
press the button, switches between
track playback time and disc
playback time.
MENU button
• When playing a DVD:Displays the
menu.
• When playing a CD:Each time you
press the button, switches Repeat
Play, Shuffle Play, and Play.
• When playing a JPEG file:Displays
the list of thumbnails and plays a
slideshow. See page 14.
C/X/x/c button
Moves the highlight to select a
displayed item.
• When playing a DVD:C/c on the
player works as the same as m/
M on the remote.
Center button (ENTER)
Enters the selected item.
• When playing a DVD or CD:ENTER
on the player works as the same as
N.
,continued
5

RETURN button
Returns to the previous display.
OPTIONS button
Displays the menu for adjusting the
LCD screen (page 15) and using the
setup display (page 17).
L (remote sensor)
When operating by the remote, point it
at the remote sensor .
M POWER switch (page 11)
Turns the player on or off.
E VOLUME (sound volume) +/–
button
Adjusts the volume.
F N (play) button (page 11)
Starts or re-starts playback.
X (pause) button (page 11)
Pauses or re-starts playback.
x (stop) button (page 11)
Stops playback.
. (previous)/> (next)
button
Skips to the beginning of the current
chapter/track/scene.
To go to the beginning of the previous
chapter/track/scene, press twice.
Skips to the next chapter/track/scene.
G Disc Lid (page 11)
H OPEN button (page 11)
Opens the disc lid.
I PUSH CLOSE (page 11)
Closes the disc lid.
N HOLD switch
To avoid accidental button operation
of the player, set the HOLD switch to
the direction of the arrow.
All the buttons on the player are
locked, while the buttons on the
remote remain operable.
O PHONES (headphone) jack A, B
P AUDIO OUT jack (page 10)
Q VIDEO OUT jack (page 10)
R DC IN 9.5V jack (page 8, 9)
Connect the AC power adaptor or car
battery adaptor.
J POWER indicator (page 11)
K CHARGE indicator (page 8)
6
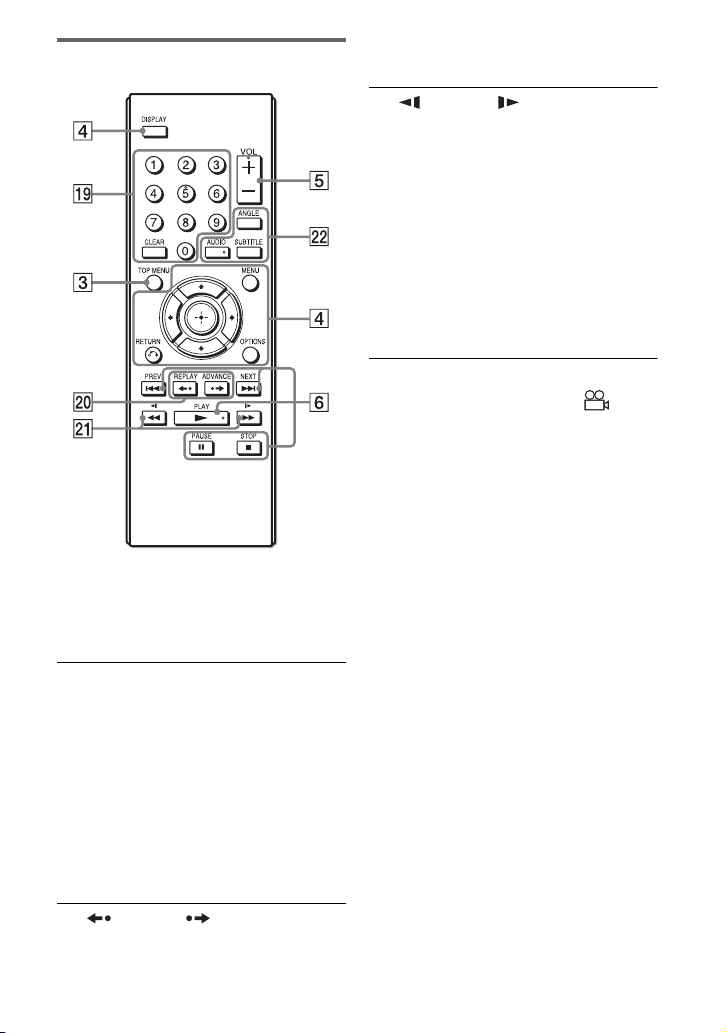
Remote
The VOL +, number 5, N and AUDIO
buttons have a tactile dot. Use the tactile
dot as a reference when operating the
player.
S Number buttons
Enters the title/chapter numbers, etc.
• When playing a DVD VIDEO or
CD:Search directly by entering the
title/chapter/track number using the
number buttons, and press ENTER.
To switch a title or chapter, press C/
c.
CLEAR button
Clears the entry field.
Replays the scene/briefly fast forward
the current scene (DVD only).
U m/M (scan/slow)
buttons
Fast reverses/ fast forwards when
pressed during playback. Press
repeatedly to change the speed.
• When playing a DVD:Slow reverses/
slow forwards when pressed during
pause. Press repeatedly to change the
speed.
Depending on the disc, reverse slow
playback may not be possible, or
images may not appear smooth.
V ANGLE button
Changes the angle. When “ ”
(Angle Mark) appears, you can change
angles. Depending on the disc, you
may not be able to change the angle.
(DVD VIDEO only)
AUDIO button
Changes the audio signal.
• When playing a DVD VIDEO:Each
time you press the button, the
language of the sound track
switches. Depending on the disc, the
choice of language varies.
• When playing a CD:Each time you
press the button, the mode switches
between stereo and monaural (left/
right).
SUBTITLE button
Changes the subtitle. Each time you
press the button, the subtitle switches.
Depending on the disc, the choice of
language varies. (DVD only)
T REPLAY/ ADVANCE
buttons
7

Preparations
Checking the
Accessories
Check that you have the following items:
• AC power adaptor (1)
• Car battery adaptor (1)
• Audio/video cord (mini plug × 2 y
phono plug × 3) (1)
• Remote (1)
• Size AA (R6) batteries (2)
Charging the
Rechargeable Battery
Charge the rechargeable battery before
using the player for the first time, or when
the battery is depleted.
1 Connect the AC power adaptor.
When charging begins, the CHARGE
indicator lights up in orange.
POWER
ONOFF
HOLD
PHONES
AUDIO
VIDEO
DC IN
OUT
OUT
9.5V
AB
Preparing the remote
Insert two Size AA (R6) batteries by
matching the 3 and # ends on the
batteries to the markings inside the
compartment.
DC IN
9.5V
To a wall outlet
AC power Adaptor (supplied)
When charging ends, the CHARGE
indicator lights off.
Disconnect the AC power adaptor.
z
If the POWER indicator lights up instead of the
CHARGE indicator, the POWER switch is set to
“ON.” Set the POWER switch to “OFF,” and
make sure that the CHARGE indicator lights up.
b
Charge the battery in an ambient temperature of
between 5°C (41°F) to 35°C (95°F).
8

Charging time and playing time
Charging time: approx. 3 hours
Playing time: approx. 3 hours
Times indicated are under the following
conditions:
– Moderate temperature (20°C (68°F))
– Headphone use
– Backlight set to minimum
Depending on the ambient temperature or
rechargeable battery condition, charging time
may be longer, or playing time may be reduced.
To check the battery level
When the player is stopped, the battery
indicator is displayed. When the battery is
empty, is displayed or the CHARGE
indicator flashes. Set the POWER switch
to “OFF,” connect the AC power adaptor,
and recharge the battery.
Using the Car Battery
Adaptor
The car battery adaptor (supplied) is for a
12V car battery, negative earth (do not use
it with a 24V car battery, positive earth).
1 Start the engine.
2 Connect the car battery adaptor.
POWER
ONOFF
HOLD
PHONES
AUDIO
VIDEO
DC IN
OUT
OUT
9.5V
AB
DC IN
9.5V
Preparations
Full Empty
To cigarette
Car battery
lighter socket
adaptor
(supplied)
3 Turn on the player.
b
• The driver should not connect or disconnect
the car battery adaptor while driving.
• Arrange the cord so as not to interfere with the
driver. Also, do not place the LCD panel where
the driver can watch.
• Clean the cigarette lighter socket. If it is dirty,
it may cause contact failure or malfunction.
• Use the car battery adaptor with the car engine
running. If it is used with the car engine off, the
car battery may become depleted.
,continued
9
After using the player in a car
1 Turn off the player.
2 Disconnect the car battery adaptor.
3 Turn off the engine.
b
• Do not disconnect the car battery adaptor or
turn off the car engine before you turn off the
player. Doing so may damage the player.
• Disconnect the car battery adaptor after use. If
it is left connected, the car battery may become
depleted.
• Do not leave the player or accessories in the
car.
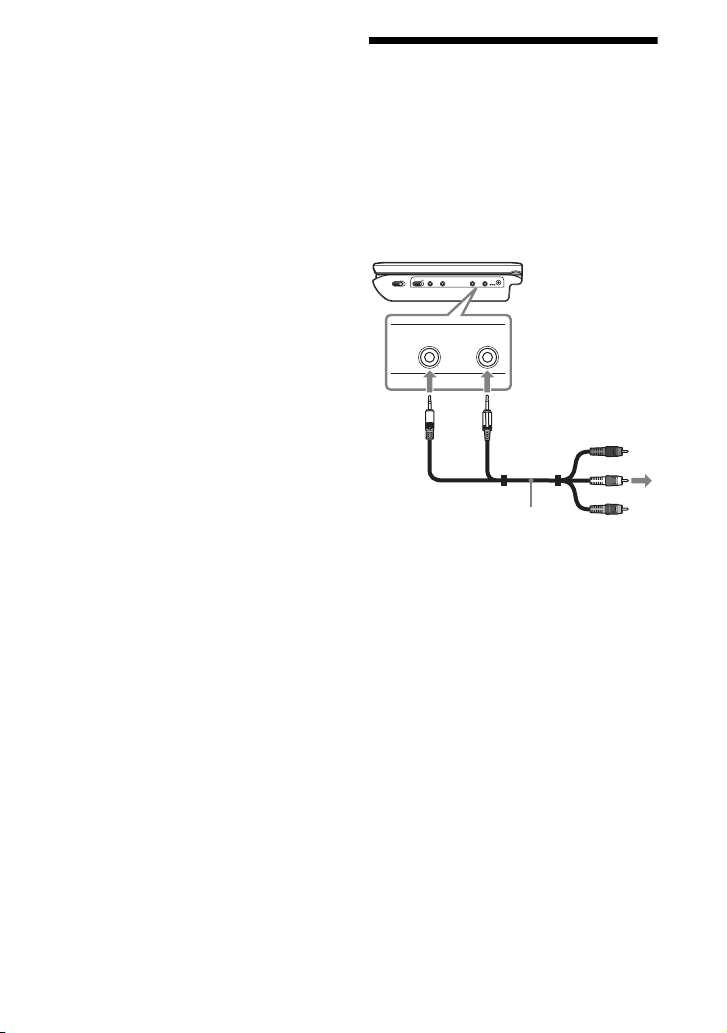
Connecting to a TV
By connecting the player to your TV or
monitor, you can enjoy images.
1 Connect the player to your TV or
monitor using the audio/video
cord (supplied).
POWER
ONOFF
HOLD
PHONES
AUDIO
VIDEO
DC IN
OUT
OUT
9.5V
AB
AUDI O
VIDEO
OUT
OUT
To AUDIO/
VIDEO input
jacks of a TV or
monitor
Audio/video cord
(supplied)
z
The player can connect to an AV amplifier in the
same way as a TV. Although connecting is the
same as a TV, the yellow plug of the audio/video
cord is not used.
10
b
• No picture is displayed on the LCD screen
while connected to a TV using the audio/video
cord.
• Refer to the instructions supplied with the
equipment to be connected.
• Before connecting, turn off the player and the
equipment to be connected, then unplug from
their wall sockets.

Playback
POWER
ONOFF
HOLD
Playing Discs
Depending on the disc, some operations
may be different or restricted. Refer to the
operating instructions supplied with the
disc.
Connect the AC power adaptor.
N
X
ENTER
OPTIONS
x
VOLUME
OPEN
OPEN
PUSH
CLOSE
TOP MENU
DISPLAY MENU
RETURN
PUSH CLOSE
4 Insert the disc to be played.
Place with the playback side down and
push gently until it clicks.
Playback
Playback side facing down
5 Push the PUSH CLOSE on the
disc lid to shut the disc lid.
6 Press N.
The player starts playback.
Depending on the disc, a menu may
appear. Press C/X/x/c to select the
item, and press ENTER.
POWER
1 Open the LCD panel.
2 Slide the POWER switch to
“ON.”
The player turns on and the POWER
indicator lights up in green.
3 Press OPEN to open the disc lid.
To stop playback
Press x.
To pause playback
Press X.
b
• Discs created on DVD recorders must be
correctly finalized to play on the player. For
more information about finalizing, refer to the
operating instructions supplied with the DVD
recorder.
• The disc may be stil l spinning when the disc lid
is opened. Wait until the spinning stops before
removing the disc.
,continued
11
 Loading...