

Page 1
3-072-475-11(2)
CD/DVD Player
Operating Instructions
DVP-F41MS
2002 Sony Corporation
Page 2
WARNING
Welcome!
To prevent fire or shock
hazard, do not expose
the unit to rain or
moisture.
To avoid electrical
shock, do not open the
cabinet. Refer servicing
to qualified personnel
only.
CAUTION
The use of optical instruments with
this product will increase eye hazard.
As the laser beam used in this CD/
DVD player is harmful to eyes, do
not attempt to disassemble the
cabinet.
Refer servicing to qualified
personnel only.
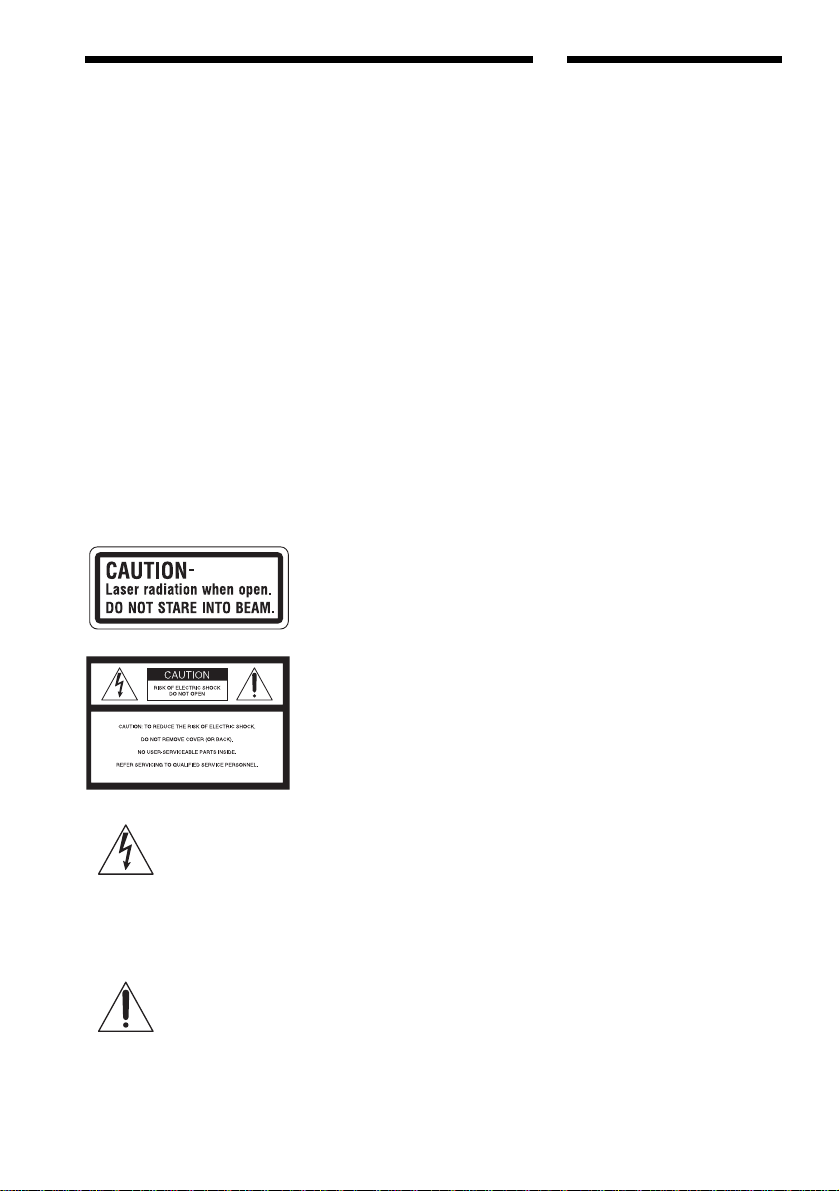
The following caution label is
located on the laser protective
housing inside the enclosure.
This symbol is
intended to alert the
user to the presence
of uninsulated
voltage” within the product’s
enclosure that may be of sufficient
magnitude to constitute a risk of
electric shock to persons.
maintenance (servicing) instructions
in the literature accompanying the
appliance.
“dangerous
This symbol is
intended to alert the
user to the presence
of important
operating and
CAUTION
TO PREVENT ELECTRIC SHOCK
MATCH WIDE BLADE OF PLUG
TO WIDE SLOT, FULLY INSERT.
For customers in the U.S.A.
Owner’s Record
The model and serial numbers are
located at the bottom of the unit.
Record the serial number in the space
provided below. Refer to them
whenever you call upon your Sony
dealer regarding this product.
Model No. DVP-F41MS
Serial No.______________
CAUTION
You are cautioned that any change or
modifications not expressly
approved in this manual could void
your authority to operate this
equipment.
This equipment has been tested and
found to comply with the limits for a
Class B digital device, pursuant to
Part 15 of the FCC Rules. These
limits are designed to provide
reasonable protection against
harmful interference in a residential
installation. This equipment
generates, uses, and can radiate radio
frequency energy and, if not installed
and used in accordance with the
instructions, may cause harmful
interference to radio
communications. However, there is
no guarantee that interference will
not occur in a particular installation.
If this equipment does cause harmful
interference to radio or television
reception, which can be determined
by turning the equipment off and on,
the user is encouraged to try to
correct the interference by one or
more of the following measures:
– Reorient or relocate the receiving
antenna.
– Increase the separation between the
equipment and receiver.
– Connect the equipment into an out-
let on a circuit different from that to
which the receiver is connected.
– Consult the dealer or an experi-
enced radio/TV technician for
help.
Thank you for purchasing this Sony
CD/DVD Player. Before operating this
player, please read this manual
thoroughly and retain it for future
reference.
2
Page 3
Precautions
Wall outlet
AC-F21
On safety
• Caution – The use of optical instruments
with this product will increase eye hazard.
• Should any solid object or liquid fall into
the cabinet, unplug the player and hav e it
checked by qualified personn el before
operating it any further.
• Do not put any foreign objects in the DC IN
10.5 V (external power input) jack.
On power sources
• Use only the supplied AC power adaptor.
Do not use any other AC power adaptor. It
may cause a malfunction.
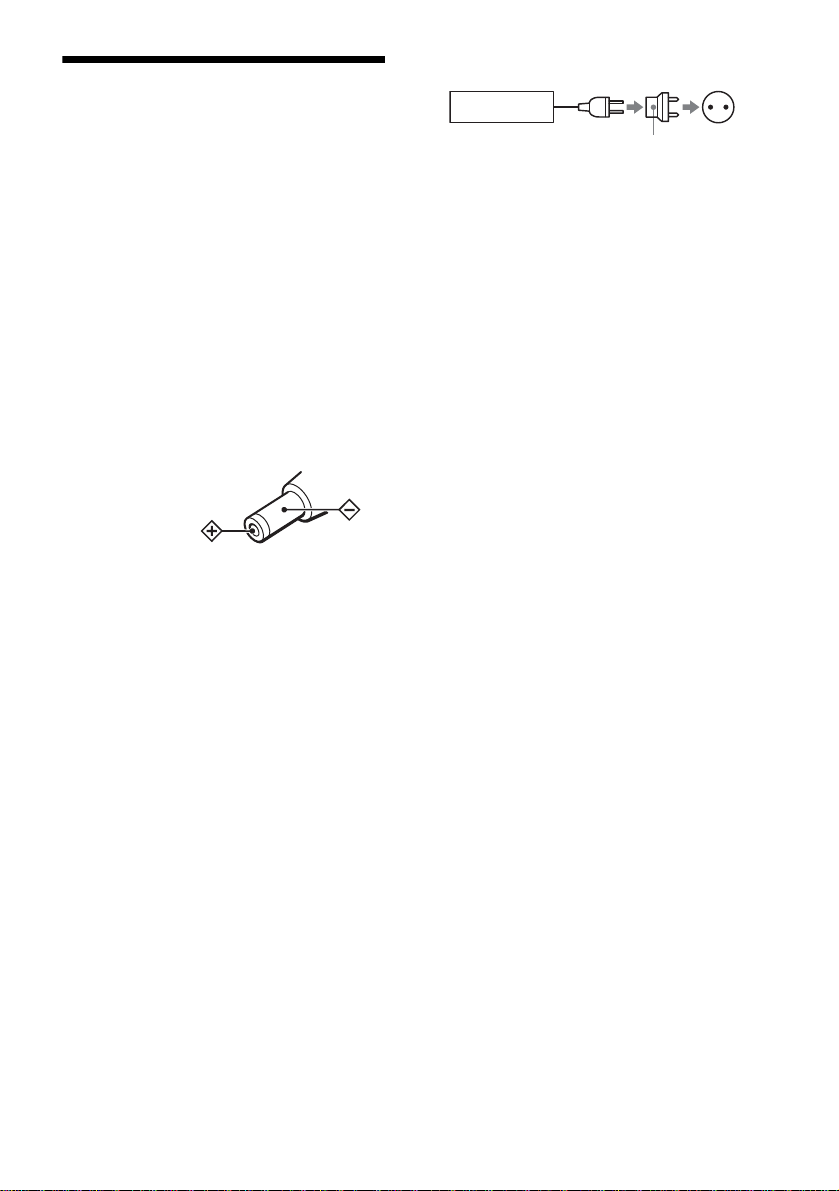
Polarity of the plug
• If the AC power adaptor causes interference
to the radio or television rece ption , move it
away from the radio or television.
• Do not touch the AC power adaptor with
wet hands.
• The player is not disconnected from the AC
power source as long as it is connected to
the wall outlet, even if the player itself has
been turned off.
• If you are not going to use the player for a
long time, be sure to disconnect the player
from the wall outlet. To disconnect the AC
power cord, grasp the plug itself; never pull
the cord.
• Should the AC power cord need to be
changed, have it done at a qualified service
shop only.
• Use a commerc ially available AC plug
adaptor, if necessary, depending on the
design of the wall outlet.
AC plug adaptor
On placement
• Place the player in a location with adequate
ventilation to prevent heat build -up in the
player.
• Do not place the player and the AC power
adaptor on a s of t s u rf ace such as a rug.
• Do not place the player and the AC power
adaptor in a location near heat sources, or in
a place subject to direct sunlight, excessive
dust, or mechanical shock.
• Do not put any object on top of the player.
The player may be dam aged.
On operation
• If the player is brought directly from a col d
to a warm location, or is placed in a very
damp room, moisture may condense on the
lenses inside the player. Should this occur,
the player may not operate properly. In this
case, remove the disc and leave the player
turned on for about half an hour until the
moisture evaporates.
• Do not insert a disc with non-standard
shape (e.g., card, heart) into the player. The
disc may not be ejected and cause a
malfunction.
• When you move the player, take out any
discs. If you don’t, the disc may be
damaged.
On adjusting volume
Do not turn up the volume while listening to
a section with very low level inputs or no
audio signals. If you do, the speakers may be
damaged when a pe ak level s ection is playe d.
On “Memory Stick”
• Do not i nsert any foreign obj ect such as
metal into the “Memory Stick ” slot. It may
cause a malfunction.
continued
,
3
Page 4

• When you remove the “Memory Stick,” do
not pull it forcibly. Remove the “Memory
Stick” as described on page 72.
On cleaning
Clean the cabinet, panel, and controls with a
soft cloth slightly moistened with a mild
detergent solution. Do not use any type of
abrasive pad, scouring powder or solvent
such as alcohol or benzine.
On cleaning discs
Do not use a commercially available cleaning
disc. It may ca use a malfunct ion
If you have any questions or problems
concerning your pl ayer, please consult your
nearest Sony dealer.
IMPORTANT NOTICE
Caution: This player is capable of holding a
still video image or on-screen display
image on your television screen
indefinitely. If you leave the still video
image or on-screen display image displayed
on your TV for an extended period of time
you risk permanent damage to your
television screen. Projection televisions are
especially susceptible to this.
4
Page 5

Table of Contents
WARNING . . . . . . . . . . . . . . . . . . . . . . . . . . . . . . . . . . . . . . . . . . . . . . . . . . . . 2
Welcome! . . . . . . . . . . . . . . . . . . . . . . . . . . . . . . . . . . . . . . . . . . . . . . . . . . . . . 2
Precautions . . . . . . . . . . . . . . . . . . . . . . . . . . . . . . . . . . . . . . . . . . . . . . . . . . . . 3
About this Manual . . . . . . . . . . . . . . . . . . . . . . . . . . . . . . . . . . . . . . . . . . . . . . . 7
This Player Can Play the Following Discs . . . . . . . . . . . . . . . . . . . . . . . . . . . . 7
Notes about the Discs . . . . . . . . . . . . . . . . . . . . . . . . . . . . . . . . . . . . . . . . . . . 9
Index to Parts and Controls . . . . . . . . . . . . . . . . . . . . . . . . . . . . . . . . . . . . . . 10
Guide to the Control Menu Display . . . . . . . . . . . . . . . . . . . . . . . . . . . . . . . . . 14
Getting Started . . . . . . . . . . . . . . . . . . . . . . . . . . . . . . . . . . . . 17
Quick Overview . . . . . . . . . . . . . . . . . . . . . . . . . . . . . . . . . . . . . . . . . . . . . . . . 17
Step 1: Unpacking . . . . . . . . . . . . . . . . . . . . . . . . . . . . . . . . . . . . . . . . . . . . . 17
Step 2: Inserting Batteries into the Remote . . . . . . . . . . . . . . . . . . . . . . . . . . 17
Step 3: TV Hookups . . . . . . . . . . . . . . . . . . . . . . . . . . . . . . . . . . . . . . . . . . . . 19
Step 4: Playing a Disc . . . . . . . . . . . . . . . . . . . . . . . . . . . . . . . . . . . . . . . . . . 20
Hookups . . . . . . . . . . . . . . . . . . . . . . . . . . . . . . . . . . . . . . . . . 21
Hooking Up the Player. . . . . . . . . . . . . . . . . . . . . . . . . . . . . . . . . . . . . . . . . . . 21
Step 1: Connecting the Video Cords . . . . . . . . . . . . . . . . . . . . . . . . . . . . . . . 22
Step 2: Connecting the Audio Cords . . . . . . . . . . . . . . . . . . . . . . . . . . . . . . . 24
Step 3: Attaching the Jack Cover . . . . . . . . . . . . . . . . . . . . . . . . . . . . . . . . . . 32
Step 4: Connecting the Power Cord . . . . . . . . . . . . . . . . . . . . . . . . . . . . . . . . 33
Step 5: Quick Setup . . . . . . . . . . . . . . . . . . . . . . . . . . . . . . . . . . . . . . . . . . . . 34
Playing Discs . . . . . . . . . . . . . . . . . . . . . . . . . . . . . . . . . . . . . 38
Playing Discs . . . . . . . . . . . . . . . . . . . . . . . . . . . . . . . . . . . . . . . . . . . . . . . . . 38
Resuming Playback from the Point Where You Stopped the Disc
(Resume Play) . . . . . . . . . . . . . . . . . . . . . . . . . . . . . . . . . . . . . . . . . . . . . . . . 40
Using the DVD’s Menu . . . . . . . . . . . . . . . . . . . . . . . . . . . . . . . . . . . . . . . . . 41
Selecting “ORIGINAL” or “PLAY LIST” on a DVD-RW Disc . . . . . . . . . . . . . 41
Playing VIDEO CDs with PBC Functions (PBC Playback) . . . . . . . . . . . . . . 42
Various Play Mode Functions (Program Play, Shuffle Play, Repeat Play,
A-B Repeat Play) . . . . . . . . . . . . . . . . . . . . . . . . . . . . . . . . . . . . . . . . . . . . . . 43
Searching for a Scene . . . . . . . . . . . . . . . . . . . . . . . . . . . . . . . 49
Searching for a Particular Point on a Disc or a “MG Memory Stick”
(Scan, Slow-motion Play) . . . . . . . . . . . . . . . . . . . . . . . . . . . . . . . . . . . . . . . . 49
Searching for a Title/Chapter/Track/Index/Scene, etc. (Search mode) . . . . . 50
Viewing Information About the Disc . . . . . . . . . . . . . . . . . . . . . . 52
Viewing the Playing Time and Remaining Time on the Front Panel Display . 52
5
Page 6

Checking the Playing Time and Remaining Time . . . . . . . . . . . . . . . . . . . . . .54
Checking the Play Information . . . . . . . . . . . . . . . . . . . . . . . . . . . . . . . . . . . . .55
Sound Adjustments . . . . . . . . . . . . . . . . . . . . . . . . . . . . . . . . . .57
Changing the Sound . . . . . . . . . . . . . . . . . . . . . . . . . . . . . . . . . . . . . . . . . . . .57
TV Virtual Surround Settings (TVS) . . . . . . . . . . . . . . . . . . . . . . . . . . . . . . . .59
Enjoying Movies . . . . . . . . . . . . . . . . . . . . . . . . . . . . . . . . . . . .62
Changing the Angles . . . . . . . . . . . . . . . . . . . . . . . . . . . . . . . . . . . . . . . . . . . .62
Displaying the Subtitles . . . . . . . . . . . . . . . . . . . . . . . . . . . . . . . . . . . . . . . . . .63
Adjusting the Picture Quality (BNR) . . . . . . . . . . . . . . . . . . . . . . . . . . . . . . . .64
Playing a DATA-CD . . . . . . . . . . . . . . . . . . . . . . . . . . . . . . . . . .65
About MP3 Audio Tracks and JPEG Image Files. . . . . . . . . . . . . . . . . . . . . . .65
Playing an MP3 Audio Track . . . . . . . . . . . . . . . . . . . . . . . . . . . . . . . . . . . . . .67
Viewing a JPEG Image File . . . . . . . . . . . . . . . . . . . . . . . . . . . . . . . . . . . . . .68
Playing a “Memory Stick” . . . . . . . . . . . . . . . . . . . . . . . . . . . . .71
About the “Memory Stick” . . . . . . . . . . . . . . . . . . . . . . . . . . . . . . . . . . . . . . . . .71
Playing an ATRAC3 Audio Track . . . . . . . . . . . . . . . . . . . . . . . . . . . . . . . . . .73
Viewing a JPEG Image File . . . . . . . . . . . . . . . . . . . . . . . . . . . . . . . . . . . . . .75
Using Various Additional Functions . . . . . . . . . . . . . . . . . . . . . .78
Locking Discs (Custom Parental Control, Parental Control). . . . . . . . . . . . . . .78
Operation Sound Effects (Sound Feedback) . . . . . . . . . . . . . . . . . . . . . . . . . .82
Controlling Your TV, etc. with the Supplied Remote . . . . . . . . . . . . . . . . . . . .83
Settings and Adjustments . . . . . . . . . . . . . . . . . . . . . . . . . . . . .85
Using the Setup Display . . . . . . . . . . . . . . . . . . . . . . . . . . . . . . . . . . . . . . . . . .85
Setting the Display or Sound Track Language (LANGUAGE SETUP) . . . . . .86
Settings for the Display (SCREEN SETUP) . . . . . . . . . . . . . . . . . . . . . . . . . . .87
Custom Settings (CUSTOM SETUP) . . . . . . . . . . . . . . . . . . . . . . . . . . . . . . . .89
Settings for the Sound (AUDIO SETUP) . . . . . . . . . . . . . . . . . . . . . . . . . . . . .90
Additional Information . . . . . . . . . . . . . . . . . . . . . . . . . . . . . . .93
Troubleshooting . . . . . . . . . . . . . . . . . . . . . . . . . . . . . . . . . . . . . . . . . . . . . . . .93
Self-diagnosis Function (When letters/numbers appear in the display) . . . . . .96
Glossary . . . . . . . . . . . . . . . . . . . . . . . . . . . . . . . . . . . . . . . . . . . . . . . . . . . . . .97
Specifications . . . . . . . . . . . . . . . . . . . . . . . . . . . . . . . . . . . . . . . . . . . . . . . . . .99
Language Code List . . . . . . . . . . . . . . . . . . . . . . . . . . . . . . . . . . . . . . . . . . . .101
List of Setup Display Items . . . . . . . . . . . . . . . . . . . . . . . . . . . . . . . . . . . . . . .102
Index . . . . . . . . . . . . . . . . . . . . . . . . . . . . . . . . . . . . . . . . . . . . . . . . . . . . . . .104
6
Page 7
About this Manual
• Instructions in this manual describe the
controls on the remote. You can also use the
controls on the player if the y have the same
or similar names as those on the remote.
• The icons used in this manual are described
below:
This Player Can Play the Following Discs
Format of discs
DVD VIDEO
Icon Meaning
Functions available for DVD
VIDEOs or DVD-Rs/DVDRWs in Video mode
Functions available for DVDRWs in VR (Video Recording)
mode
Functions available for VIDEO
CDs or CD-Rs/CD-RWs
Functions available for music
CDs or CD-Rs/CD-RWs
Functions available for MP3*
audio track s or JP EG i mage
files on CD-ROMs/CD-Rs/
CD-RWs
Functions available for JPEG
image files on a “Memory
Stick”
Functions available for
ATRAC3** audio tracks or
JPEG image file on a
“MagicGate (MG) Memory
Stick”
z More convenient features
The following terms will be used to explain com mon
features in similar media.
– “DVD” for DVD VIDEOs, DVD-Rs and DVD-
RWs (Video mode/VR mode)
– “Memory Stick” for both “Memory Stick” and
“MG Memory Stick”
DVD-RW
VIDEO CD
Music CD
“DVD VIDEO” and “DVD-RW” are trademarks.
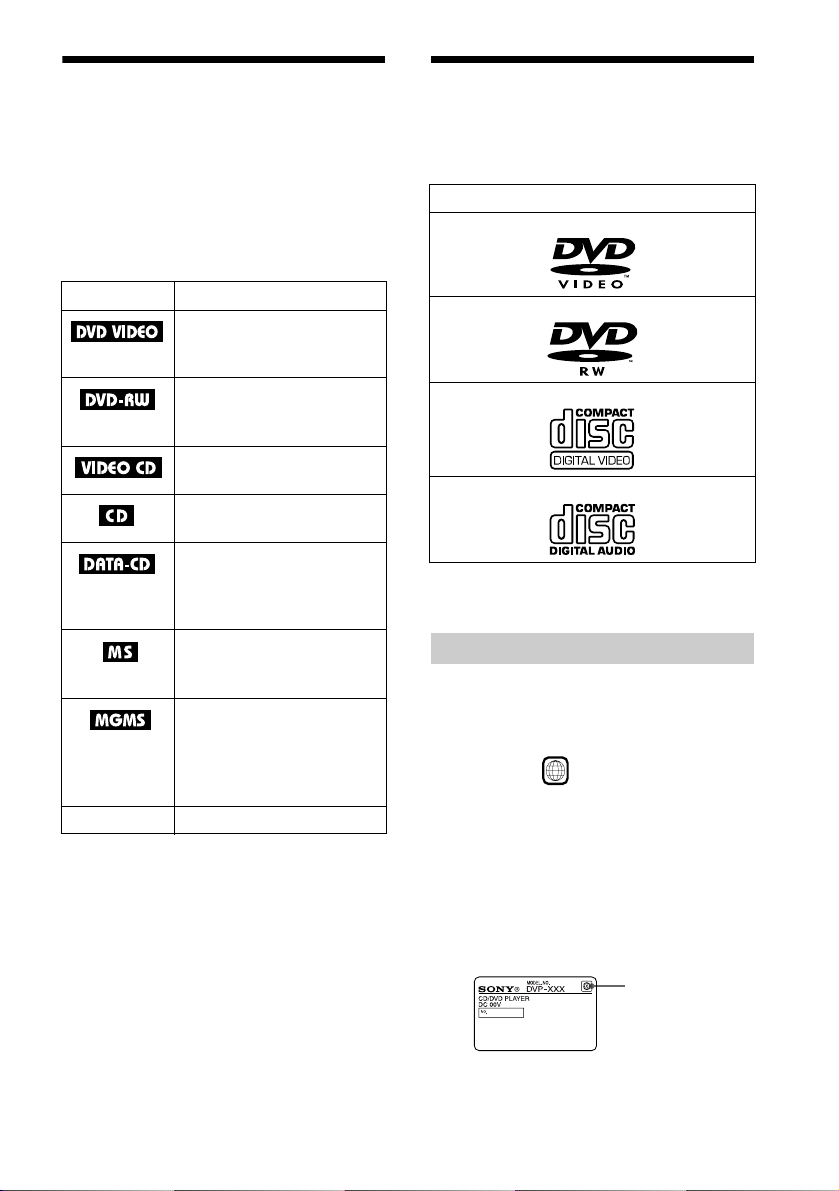
Region code
Your player has a region code printed on the
back of the unit and will only play DVDs
labeled with identical region codes.
DVDs labeled will also play on this
player.
If you try to play any other DVD, the
message “Playback prohibited by ar ea
limitations.” will appear on the TV screen.
Depending on the DVD, no region code
indication may be labeled even though
playing the DVD is prohibited by area
restrictions.
ALL
* Audio compression standard defined by ISO
(International Organiza tion for Standardization)/
MPEG
**Adaptive Transform Acoustic Coding 3: Audio
compression technology
US and foreign patents licensed from Dolby
Laboratories.
Region Code
continued
,
7
Page 8

Example of discs that the player
cannot play
The player cannot play the following discs:
• CD-ROMs/CD-Rs/RWs (except the discs
recorded in the following formats:
–Music CD format
–VIDEO CD format
–MP3 audio tracks and JPEG image files
which conform to ISO9660* level 1/
level 2/Joliet)
• Data part of CD-Extras
• DVD-ROMs
• DVD Audio discs
• HD layer on SACDs
* A logical format of files and folders on CD-ROMs,
defined by ISO (International Organ iz ation f or
Standardization).
Also, the player cannot play the following
discs:
• A DVD VIDEO with a different region
code (page 98).
• A disc recorded in a color system other than
NTSC, such as PAL or SECAM. (This
player conforms to the NTSC color
system.)
• A disc that has a non-standard shape (e.g.,
card, heart).
• A disc with paper or stickers on it.
• A disc that has the adhesive of cellophane
tape or a sticker still left on it.
Note on playback oper ations of DVDs
and VIDEO CDs
Some playback operations of DVDs and
VIDEO CDs may be intentionally set by
software producers. Since this player pl ays
DVDs and VIDEO CDs according to the disc
contents the software producers designed,
some playback features may not be available.
Also, ref er to the ins tructions supplied with
the DVDs or VIDEO CDs.
Copyrights
This product incorporates copyright
protection technology that is protected by
method claims of cert ain U.S. patents, ot her
intellectual property rights owned by
Macrovision Corporation, and other rights
owners. Use of this copyright protecti on
technology must be authorized by
Macrovision Corporation, and is intended for
home and other limited viewin g us e s only ,
unless otherwise authorized by Macrovision
Corporation. Reverse engineering or
disassembly is prohibited.
Note
On playing DVD-R/DVD-RW/CD-R/CD-RW
Some DVD-Rs, DVD-RWs, CD-Rs or CD-RWs
cannot be played on this player due to the reco rd ing
quality or physical condition of the disc, or the
characteristics of the recording device. The disc will
not play if it has not been correctly f ina li ze d.
Discs containing one-generation copy co ntr ol le d
contents recorded with CPRM (Cont ent Protecti on for
Recordable Media) protection cannot be played on this
player.
For more information, see the operating instructions
for the recording device.
Note that discs c reated i n the P acket Wr ite fo rmat also
cannot be played.
8
Page 9
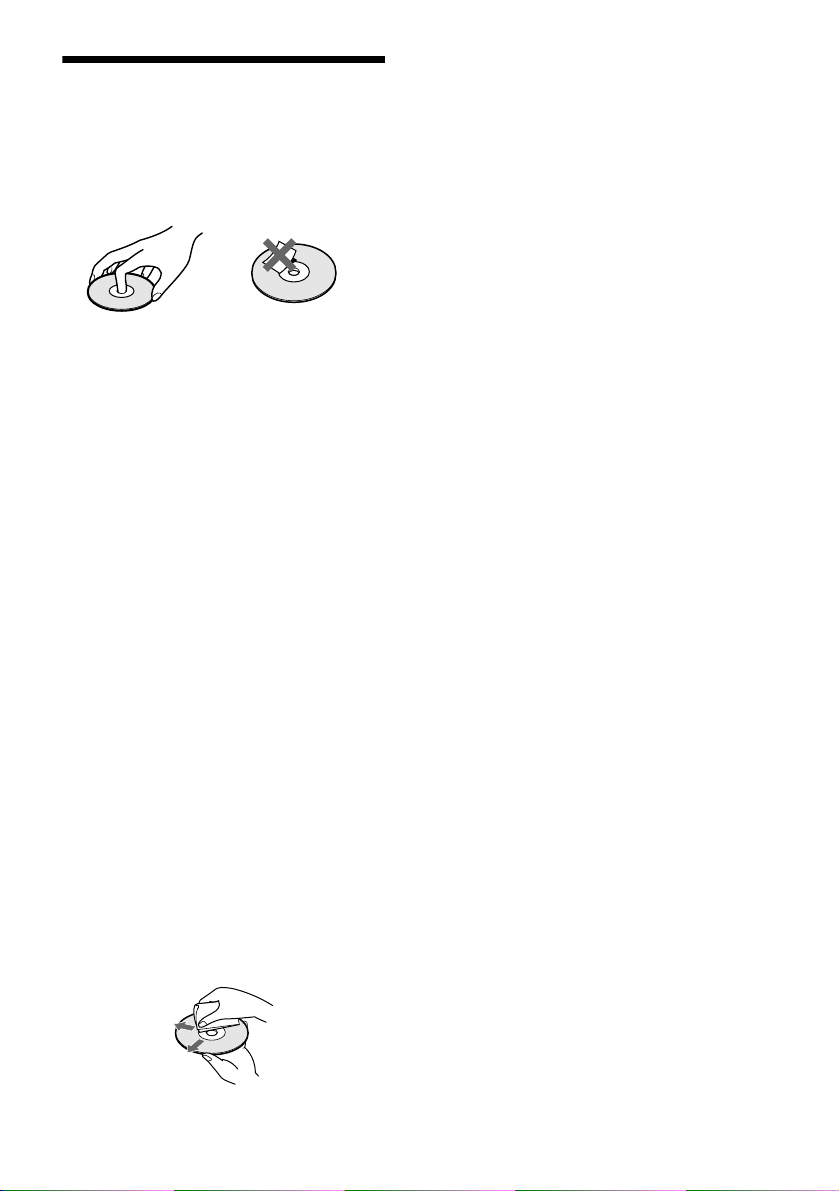
Notes about the Discs
On handling discs
• To keep the disc clean , handle the disc by its
edge. Do not touch the surface.
• Do not expose the disc to direct sun lig ht or
heat sources such as hot air ducts, or leave
it in a car parked in direct sunlight as the
temperature may rise considerabl y inside
the car.
• After pressing A on the pl ayer to eject the
disc, do no leave the disc as it is. Rem ove it
completely from the player.
• After playing, store the disc in its case.
• If glue i s present on the outer edge of the
disc, wipe the e dge of th e disc w ith the si de
of a pen or pencil so that the glue is spread
evenly along the edge before inserting th e
disc into the player. Be sure not to touch th e
playback side of the disc when wiping the
edge.
• If burrs remain on the outer edge of the
disc, remove them by rub bing with the sid e
of a pen or pencil. If burrs are not removed,
discs may not load properly into the pl ayer,
or fragments of plastic adhering to the
playback side of the disc may cause
skipping in the sound.
• Do not use solvents such as benzine,
thinner, commercially available cl eaners, or
anti-static spray intended for vinyl LPs.
On cleaning
• Before playing, clean the disc with a
cleaning cloth. Wipe the disc from the
center out.
9
Page 10
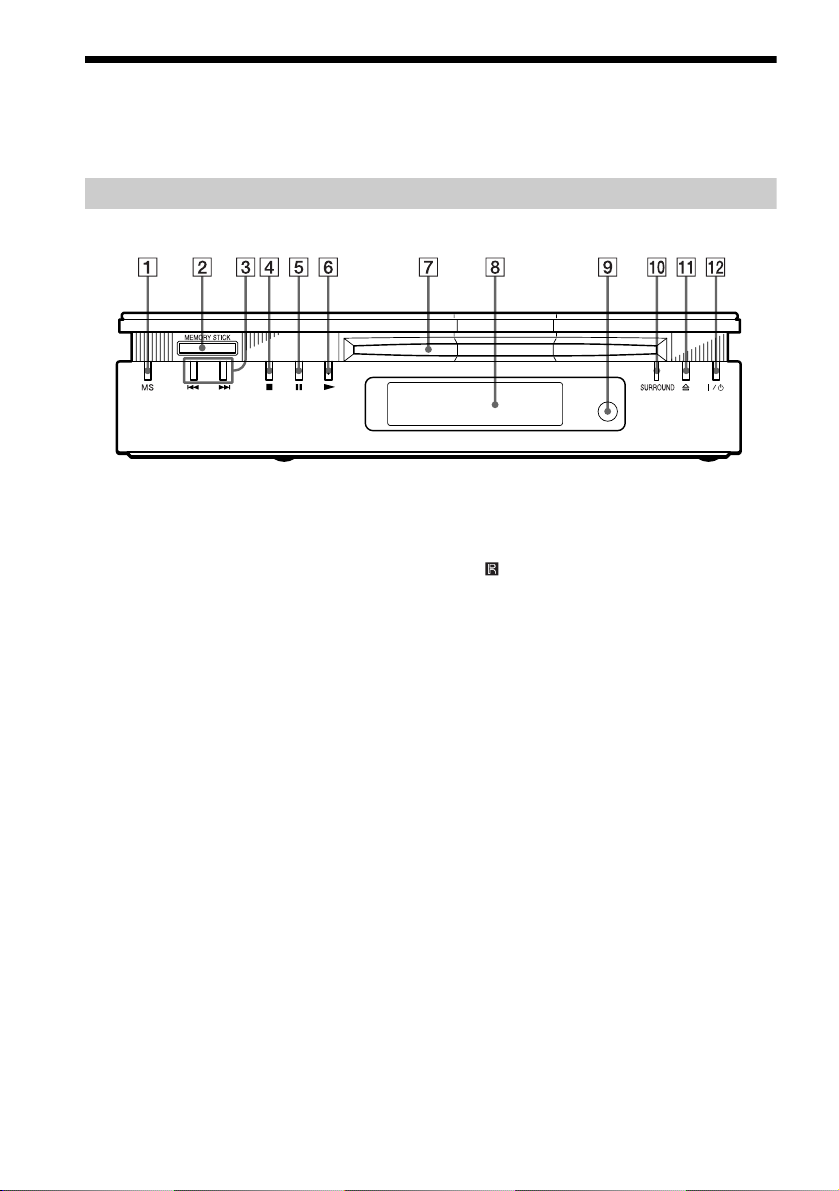
Index to Parts and Controls
For more information, refer to the pages indicated in parentheses.
Front Panel
A MS (“Memory Stick”) button/indicator
(73)
Lights up in:
• orange in MS mode (“Memory Stick”
playback mode)
• yellow while reading the data in the
“Memory Stic k”
It goes out in disc (playback) mode.
B MEMORY STICK (“Memory Stick”)
slot (72)
C ./> (previous/next) buttons (39)
D x (stop) button (38)
E X (pause) button (39, 82)
F N (play) button (38)
G Disc slot (38)
H Front panel display (11)
I (remote sensor) (17)
J SURROUND indicator (59)
K A (eject) button (39)
L ?/1 (power) button/indicator (3 8)
10
Page 11
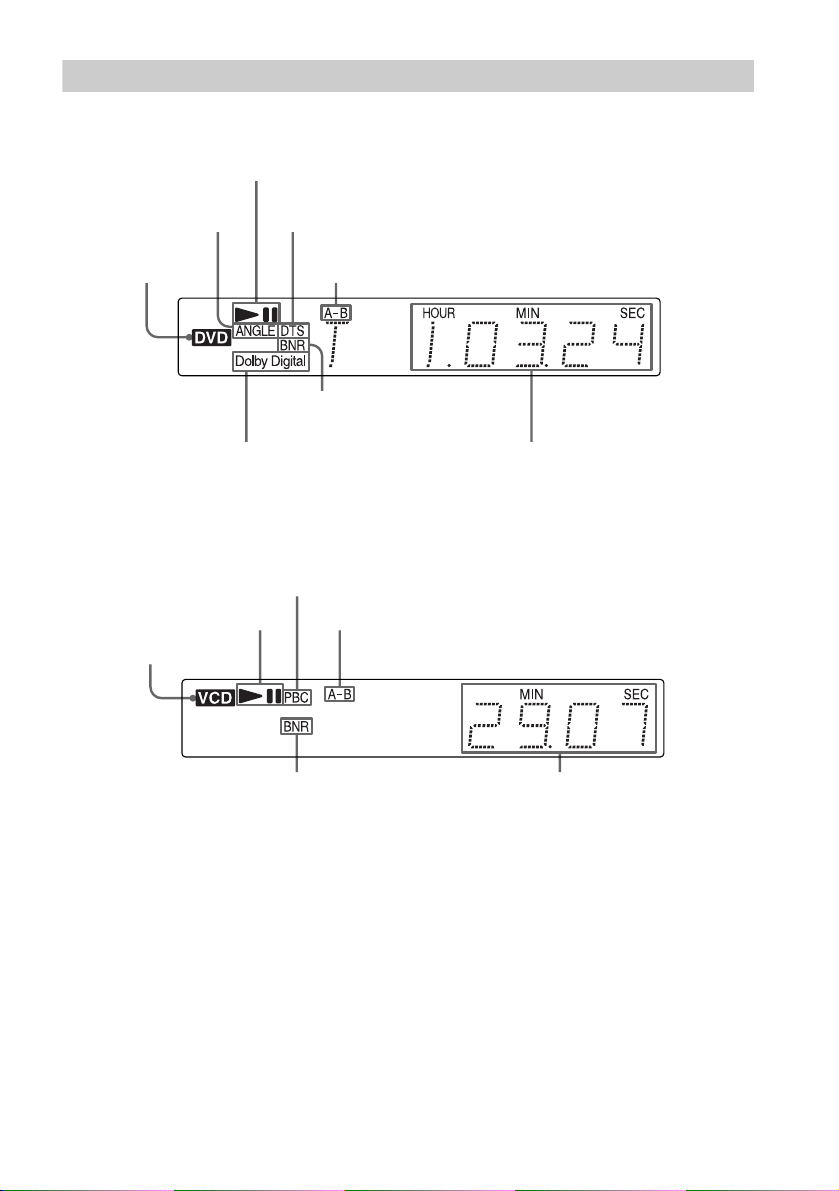
Front Panel Display
When playing back a DVD VIDEO/DVD-RW
Playing status
Lights up when you
can change the angle
Disc type
Current audio signal (Dolby Digital signal) (57)
When playing back a VIDEO CD (PBC)
Lights up when playing back a
VIDEO CD with PBC (42)
Playing status
Disc type
Current audio signal
(DTS format signal) (57)
Current play mode (A-B
Repeat Play) (47)
Lights up when BNR is
on (64)
Current play mode (A-B Repeat Play) (47)
Current title and chapter
number, playing time, etc. (52)
Lights up when BNR is on (64)
Current scene number or playing
time (52)
continued
,
11
Page 12
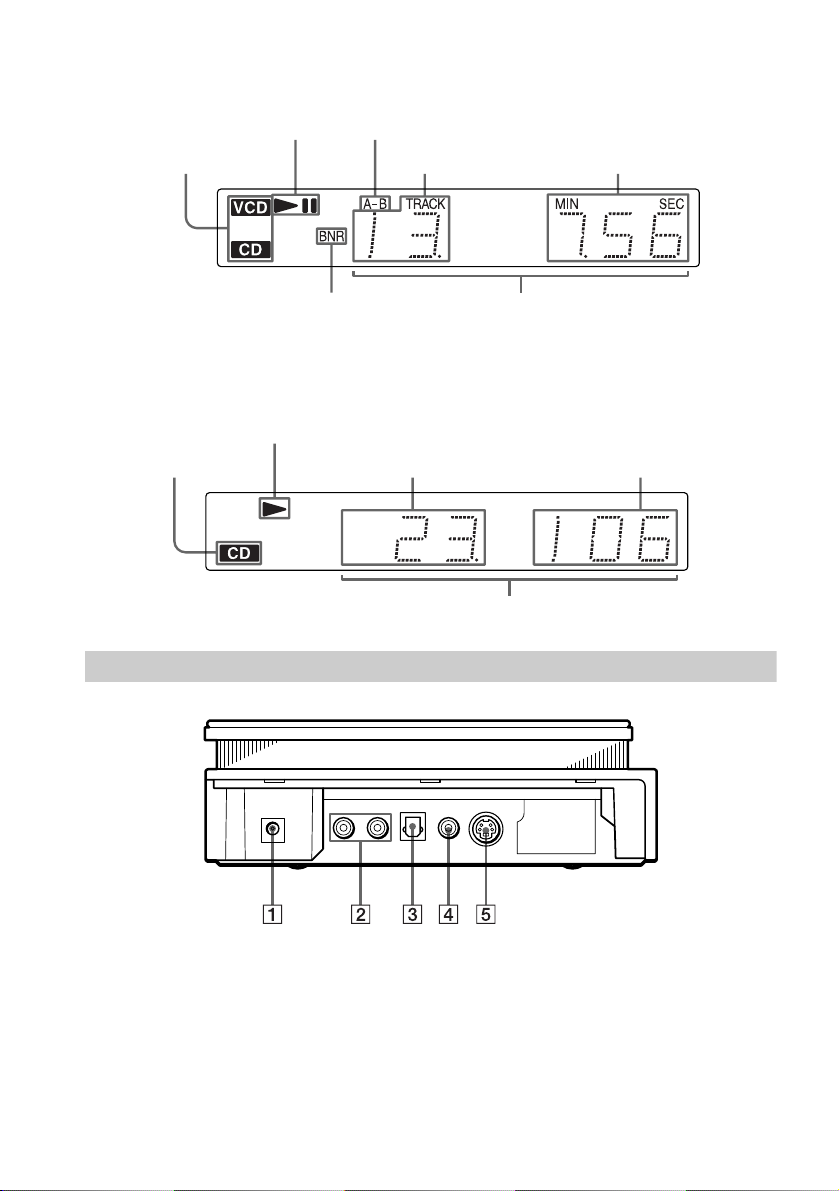
When playing back a CD/DATA-CD (MP3 audio track)/VIDEO CD (without PBC)/
“MG Memory Stick” (ATRAC3 audio track)
Disc type
(does not appear
for “Memory
Stick”)
Playing status
Lights up when BNR is on
(64)
Current play mode (A-B Repeat Play) (47)
Playing timeCurrent track
Current track and index
number, playing time , etc. (52)
When viewing a JPEG image on a DATA-CD/ “Memory Stick”
Disc type
(does not appear
for “Memory
Stick”)
Playing status
Current file numberCurrent album number
Current album and file number, file name, etc. (52)
Side Panel
A DC IN 10.5 V jack (19)
B AUDIO OUT L/R jacks (19, 25, 26, 28)
C DIGITAL OUT (OPTICAL) jack (26,
28, 30)
D VIDEO OUT jack (19, 22)
E S-VIDEO OUT jack (22)
12
Page 13
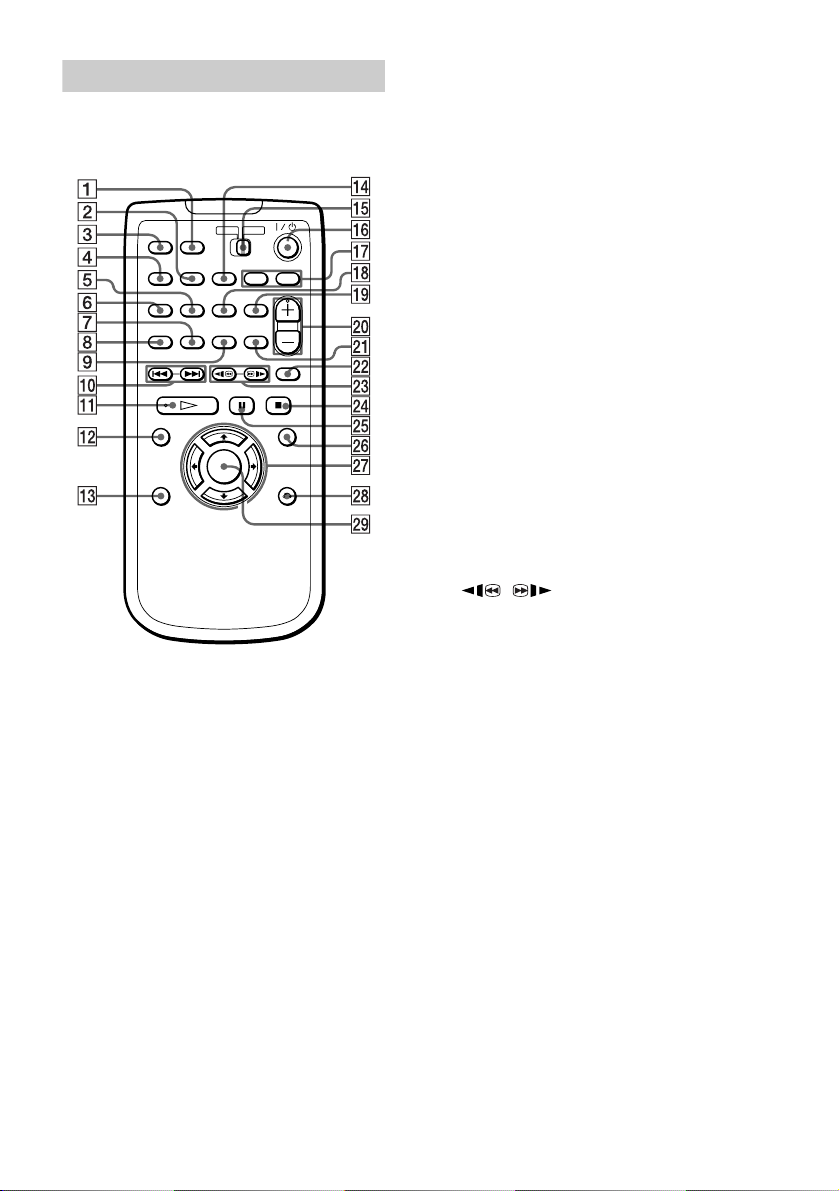
Remote
A MS (“Memory Stick”) button (73, 75)
B BNR (Block Noise Reduction) button
(64)
C TIME/TEXT button (52)
D SURROUND button (59)
E ANGLE button (62)
F AUDIO button (57)
G PROGRAM button (44)
H SHUFFLE button (46)
I REPEAT button (46)
J ./> PREV (previous) /NEXT
buttons (39)
K H PL AY bu tto n* (3 8)
L TOP MENU button (41)
M DISPLAY button (14, 85)
N SEARCH MODE button (50)
O TV/DVD switch (83)
P ?/1 (power) button (38)
Q TV operation buttons (83)
R SUBTITLE button (63)
S CLEAR button (44, 46, 47)
T VOL (volume) +/– buttons* (83)
U A-B button (47)
V REPLAY button (39)
W / SCAN/SLOW butto ns (49)
X x STOP button (39)
Y X PAUSE button (39)
Z MENU button (41)(67)(73)
wj C/X/x/c buttons (34)
wk ORETURN button (42)
wl ENTER button (34 )
* Use the tactile dot as a reference when oper ating the
player.
13
Page 14
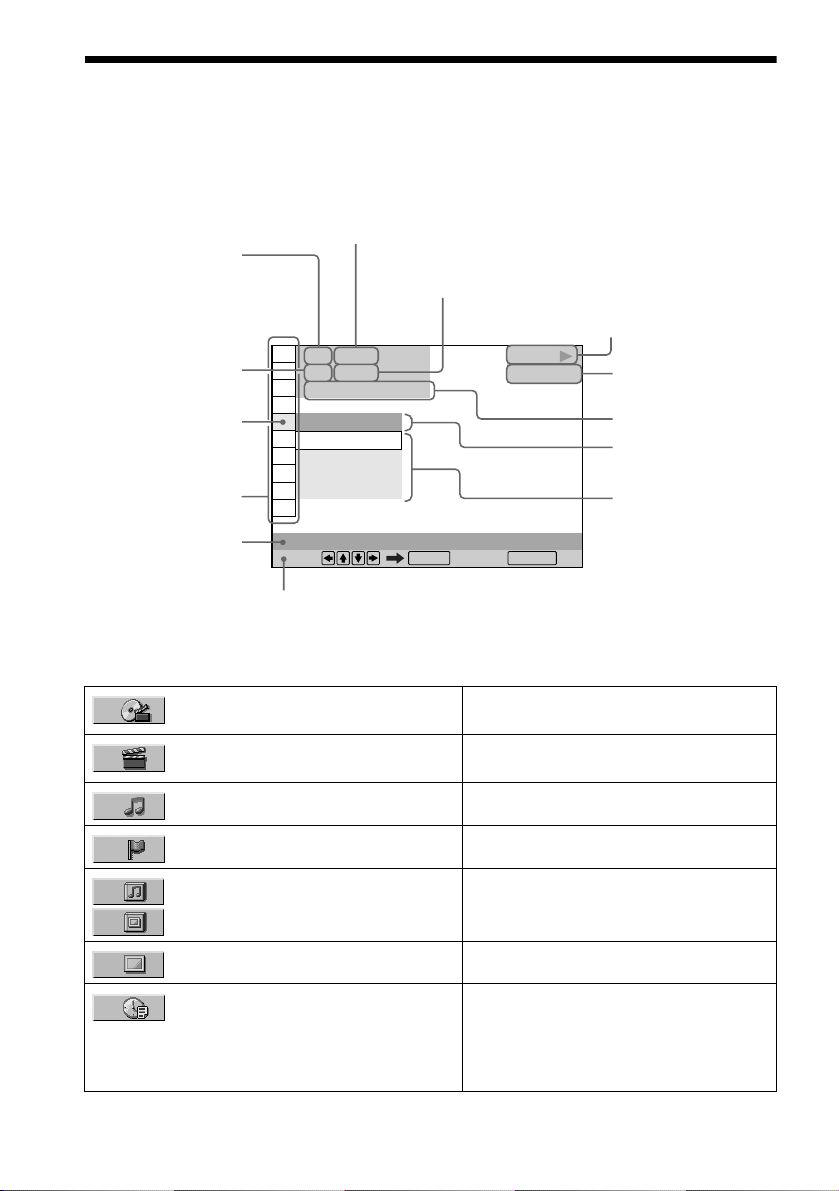
Guide to the Cont rol Menu Display
Use the Control Menu to select a function that you would like to use. The Control Menu appears
when the DISPLAY button is pressed. For details, please refer to the page in parentheses.
Currently playing title
(DVD), scene (VIDEO
CD), track (VIDEO CD/
CD), album (DATACD/ “Memory Stick”)
Currently playing
chapter (DVD), index
(VIDEO CD/CD), track/
file (DATA-CD/
“Memory Stick”)
Icon of selected
Control Menu
item
Control Menu
items
Function name of
selected Control
Menu item
Operation message
List of Control Menu Items
Total number of titles, scene s, tracks or albums recorded
Total number of chapters,
indexes, tracks or files recorded
1 2 ( 2 7
1 8 ( 3 4
T
1 : 3 2 : 5 5
)
)
PLAY
DVD VIDEO
OFF
OFF
1: ENGLISH
2: FRENCH
3: SPANISH
SUBTITLE
Select: Cancel:
ENTER RETURN
Playback status
N Playback, X
(
x Stop, etc.)
Pause,
Type of disc being
played back (“MS” for
“Memory Stick”)
Playing time
Current
setting
Options
14
TITLE (page 50)/SCENE (page 50)/
TRACK (page 50)
CHAPTER (page 50)/INDEX (page
50)
TRACK (page 50, 67, 73) Selects the track to be played.
INDEX (page 50) Selects the index to be played.
ALBUM (audio) (page 67)
ALBUM (image) (page 69, 76)
FILE (page 69, 76) Selects the JPEG image file to be played.
TIME/TEXT (page 50) Checks the elapsed time and the remaining
Selects the title, scene, or track to be played.
Selects the chapter or index to be pl ayed.
Selects the album to be played.
playback time.
Input the time code for picture and music
searching.
Displays the DVD or CD text.
Page 15
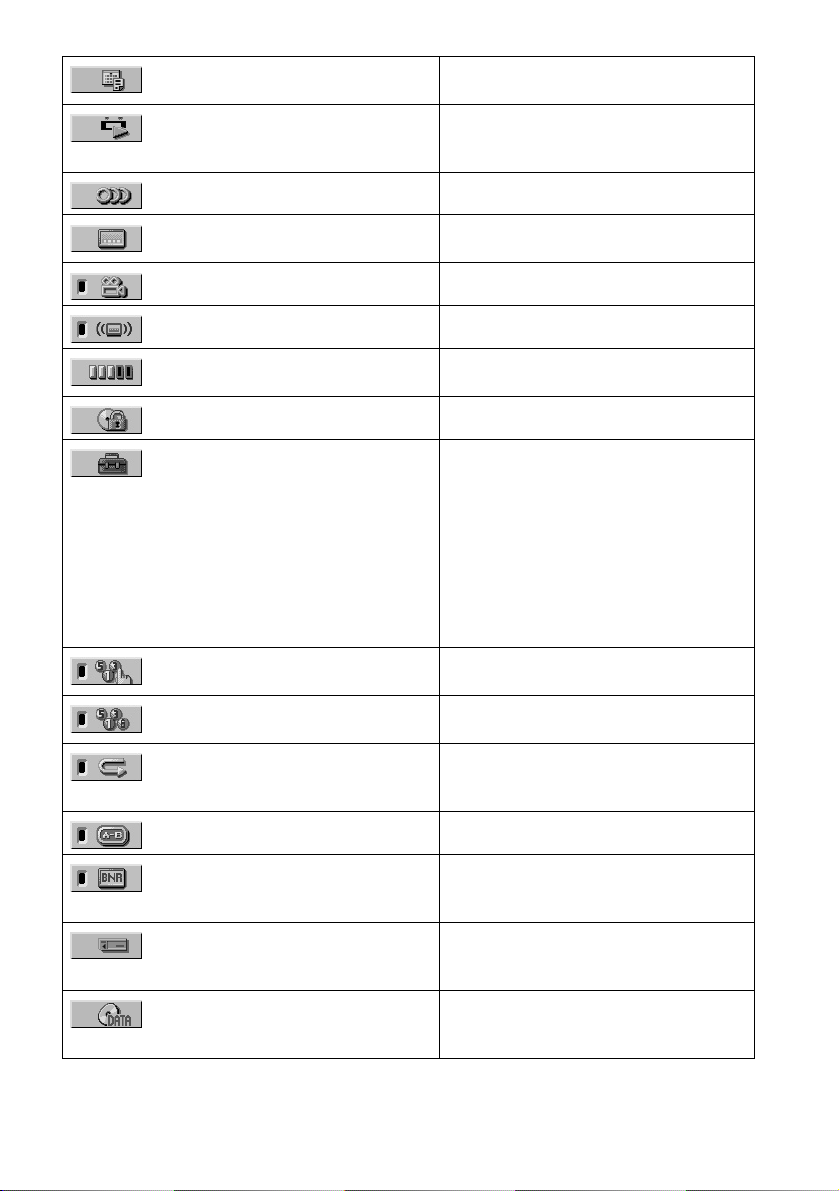
DATE Displays the recorded date, etc. of the current
ORIGINAL/PLAY LIST (page 41) Selects the type of titles (ORIGINAL or PLAY
AUDIO (page 57) Changes the audio setting.
JPEG image.
LIST) to be played when play ing DVD-RW
(VR mode).
SUBTITLE (page 63) Displays the subtitles.
ANGLE (page 62) Changes the angl e.
TVS (TV Virtual Surround) (page 59) Selects the surround functions.
ADVANCED (page 55) Checks the information (bit rate or layer) on
PARENTAL CONTROL (page 78) Set to prohibit playback on this player.
SETUP (page 85) QUICK Setup (page 34)
PROGRAM (page 44) Selects the title, chapte r, or tra ck to play in the
SHUFFLE (page 46) Plays the title, chapter, or track in a random
REPEAT (page 46) Plays the entire disc or “MG Memory Stick”
A-B REPEAT (page 47) Specifies the parts you want to play repeat edly.
Changes the subtitle language.
the disc during playback.
Use Quick Setup to choose the desire d
language for the on-scre en display, the aspect
ratio of the TV and the audio outp uts.
CUSTOM Setup (page 85)
In addition to the Quick Setup setting, you can
adjust other various settings.
RESET
Returns the settings in “SETUP” to the default
setting.
order you want.
order.
(all titles/ all tracks), or on e title/chap ter/album/
track repeated ly.
BNR (page 64) Adjusts the picture quality by reducing the
“block noise” or mosaic like pat terns that
appear on your TV scre en.
MEMORY STICK (page 73, 75) Selects the data type (ATRAC3 audio track or
JPEG image file) to be played when playing a
“Memory Stick.”
DATA-CD (page 67, 68) Selects the data type (MP3 audio track or JPEG
image file) to be played when playing a DATACD.
continued
,
15
Page 16

z Each time you press DISPLAY, the Con tr ol Me nu display changes as follows:
Control Menu display 1
,
Only Control Menu display 1 appears dur ing C D or “Me mory Stick” playback. The Control Menu it em s diff e r
depending on the type of the disc or “Memor y St ic k. ”
z The Control Menu icon indicator lights up in green when you select any item except
“OFF” (“TVS,” “PROGRAM,” “SHUFFLE,” “REPEAT,” “A-B REPEAT,” “BNR” only). The “ANGLE” indicator
lights up in green only when the angles can be changed.
m
Control Menu display 2
m
ADVANCED display (Appears if you select any setting other than “OFF.” See page 55.)
m
Control Menu display off
t
16
Page 17
Getting Started
Quick Overview
A quick overview presented in this chapter will give you enough information to start using the
player for your enjoyment. To use the surround sound features of this player, refer to “Hookups”
on page 21.
Notes
• You cannot connect this player to a TV that does not have a video input jack.
• Be sure to turn off the power of each component before co nnecting.
Step 1: Unpacking
Check that you have the following items:
• Audio/video cord (pinplug x 3 y pin plug x 3) (1)
• Remote com mander (1)
• Size AA (R6) batteries (2)
• AC power adaptor AC-F21 (1)
• AC power cord (1)
• Jack cover for vertical installation (1)
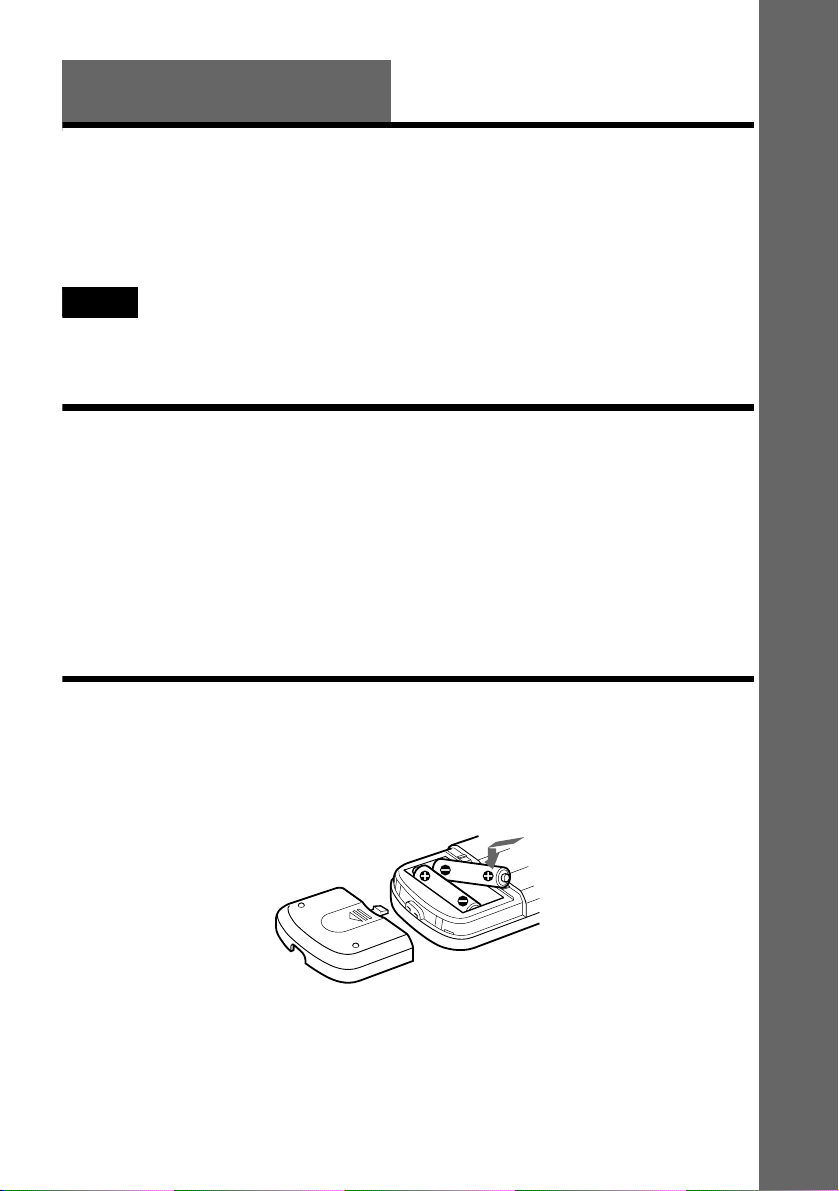
Step 2: Inserting Batteries into the Remote
You can control the player using the supplied remote. Insert two size AA (R6) bat teries by
matching the 3 and # en ds on the batte ries to the mark ings inside the c ompartment. Whe n using
the remote, point it at the remote sensor on the player.
Getting Started
continued
,
17
17
Page 18

If you cannot operate the player with the remote
The player has 2 remote sensors, one at the top and one on the front (page 20). If one of the remote
sensor is exposed to direct sunlight or lighting apparatus, the remote may not operate correctly.
If this happens, select a remote sensor in the following way until you find one that works. (If the
MS indicator on the player is lit, turn it off by pressing MS.)
When the power is on an d no disc is inserted in the player, press . for more than 2 seconds
while pressing x.
The selected remot e sensor is displayed on the front panel disp lay as follows:
BOTH* (The player
receives the remote
signal at both remote
sensors.)
* The default setting
TOP (The player
receives the remote
t
signal at the top
remote sensor.)
FRONT (The player
receives the remote
t
signal at the front
remote sensor.)
Notes
• Do not leave the remote in an extremely hot or humid place .
• Do not drop any foreign object into the remote casing, particularly when replacing the batteries.
• Do not expose the remote sensor to direct light from the sun or lighting apparatus. Doing so may cau se a
malfunction.
• If you do not use the remote for an extended period of time, remove the batte r ies to a void possible damage from
battery leakage and corros ion .
18
Page 19
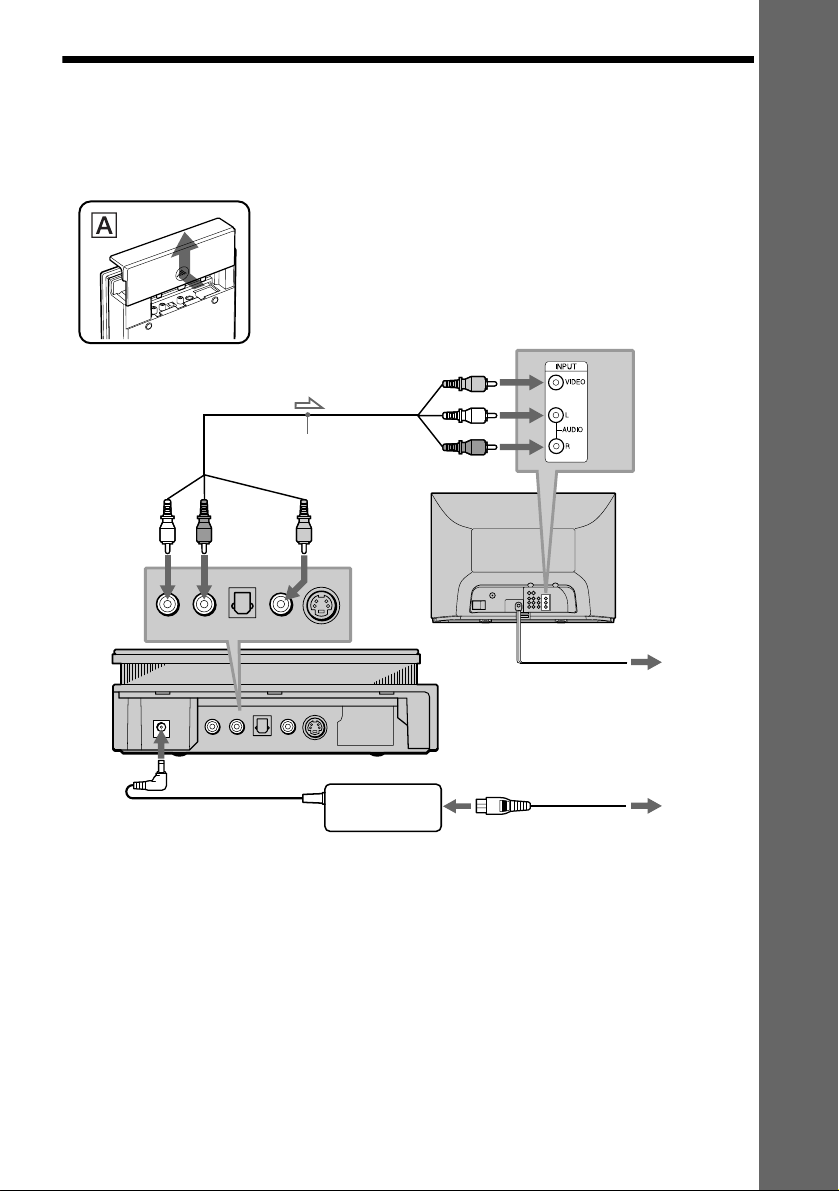
Step 3: TV Hookups
Remove the jack cover from the player (see fig. A). Connect the supplied audio/video cord and
power cord in the order (1~3) shown below. Be sur e to co nn e ct the power cord last.
Getting Started
(yellow)
(white)
to AUDIO
OUT L
(white)
l: Signal flow
(red)
1 Audio/video cord
(supplied)
(red)
to
AUDIO
OUT R
(yellow)
to video input
(yellow)
to VIDEO
OUT
CD/DVD Player
AC power adaptor
(AC-F21, supplied)
(white)
(red)
to audio input
When connecting to a wide screen TV
Depending on the di sc, the image may not fit your TV screen.
If you want to change the aspect ratio, please refer to page 87.
(yellow)
(white)
(red)
TV
2 Power source
AC power cord
(supplied)
3 Power source
19
19
Page 20
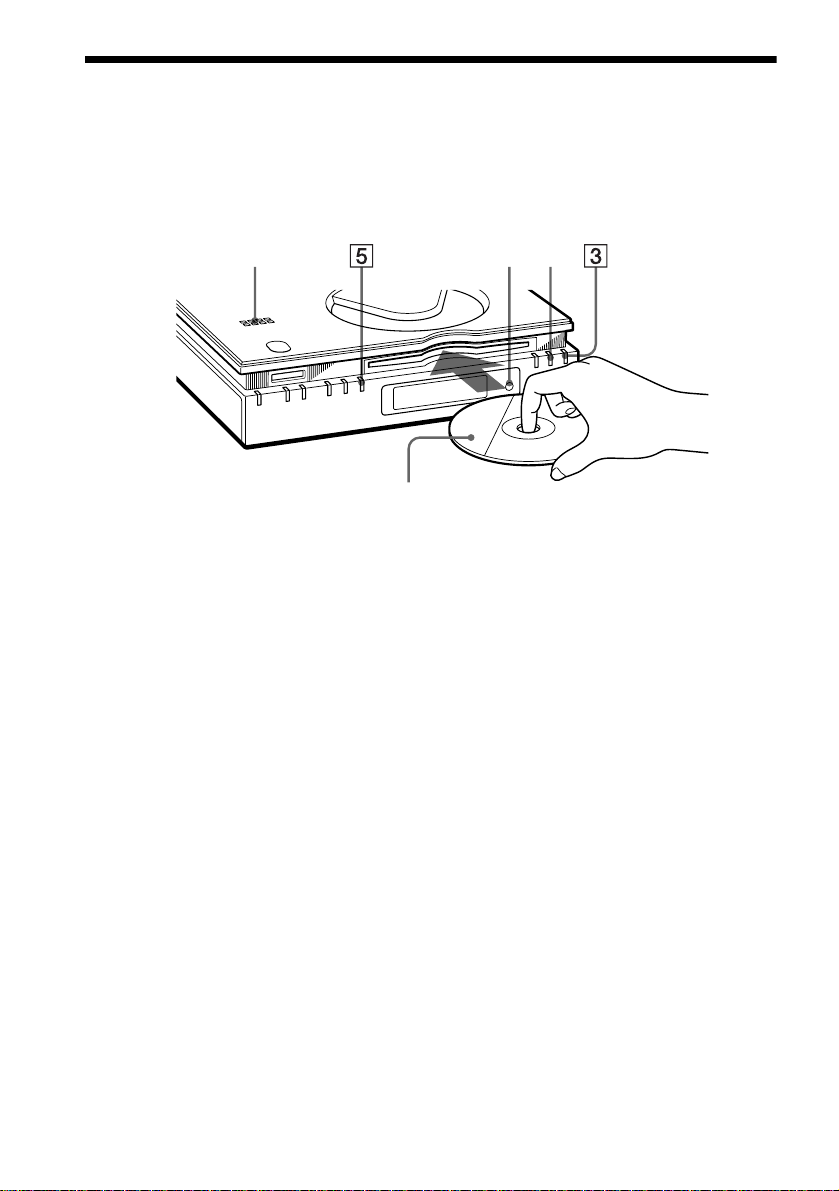
Step 4: Playing a Disc
A Turn on the TV.
B Switch the input selector on the TV to the player.
Remote
sensor
A
C Press
Remote
sensor
With the playback side faci ng do w n
?/1 on the player.
D Insert the disc into the disc slot with the playback side facing down .
E Press
After Step 5
Depending on the disc, a m enu may b e displaye d on the TV screen . If so, sele ct the i tem you wa nt
from the menu and play the DVD VIDEO (page 41) or VIDEO CD disc (page 42).
To stop playing
Press x.
N.
The player begins pla ying the disc.
To take out the disc
Press A on the player, then remove the disc.
To turn off the player
Press ?/1. The player is set to standby mode and the ?/1 indicator lights up in red.
To play a DATA-CD, see page 67. You can play also a “Memory Stick” on this player, see page 73.
z
20
Page 21

Hookups
Hooking Up the Play er
Follow Steps 1 to 5 to hook up and adjust the settings of the player.
Before you start, turn off the power, check that you have all of the supplied accessories, and insert
the batteries into the remote (page 17). Remove the jack cover (page 19).
Notes
• Plug cords securely to prevent unwanted noise.
• Refer to the instructions supplied with the components to be connected.
Hookups
21
Page 22
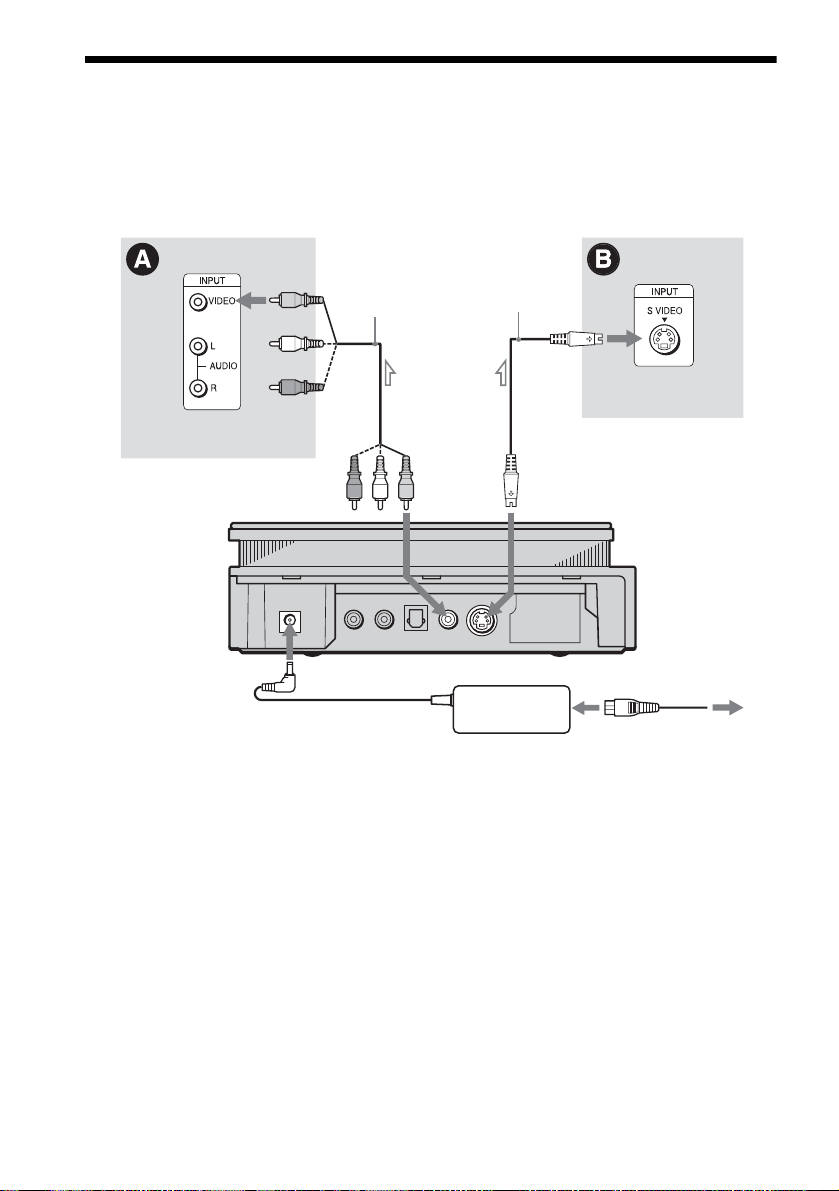
Step 1: Connecting the Video Cords
Connect this player to your TV monitor, projector, or AV amplifier (receiver) using a video cord.
Select one of the patterns A or B, according to the input jack on your TV monitor, projector, or
AV amplifier (receiver).
(yellow)
TV, projector, AV
amplifier (receiver)
CD/DVD player
l: Signal flow
(yellow)
Audio/video cord
(supplied)
(yellow)
to VIDEO
OUT
S video cord
(not supplied)
to S-VIDEO
OUT
AC power adaptor
(AC-F21, supplied)
TV, projecto r, AV
amplifier (receiver)
AC power cord
(supplied)
22
Page 23
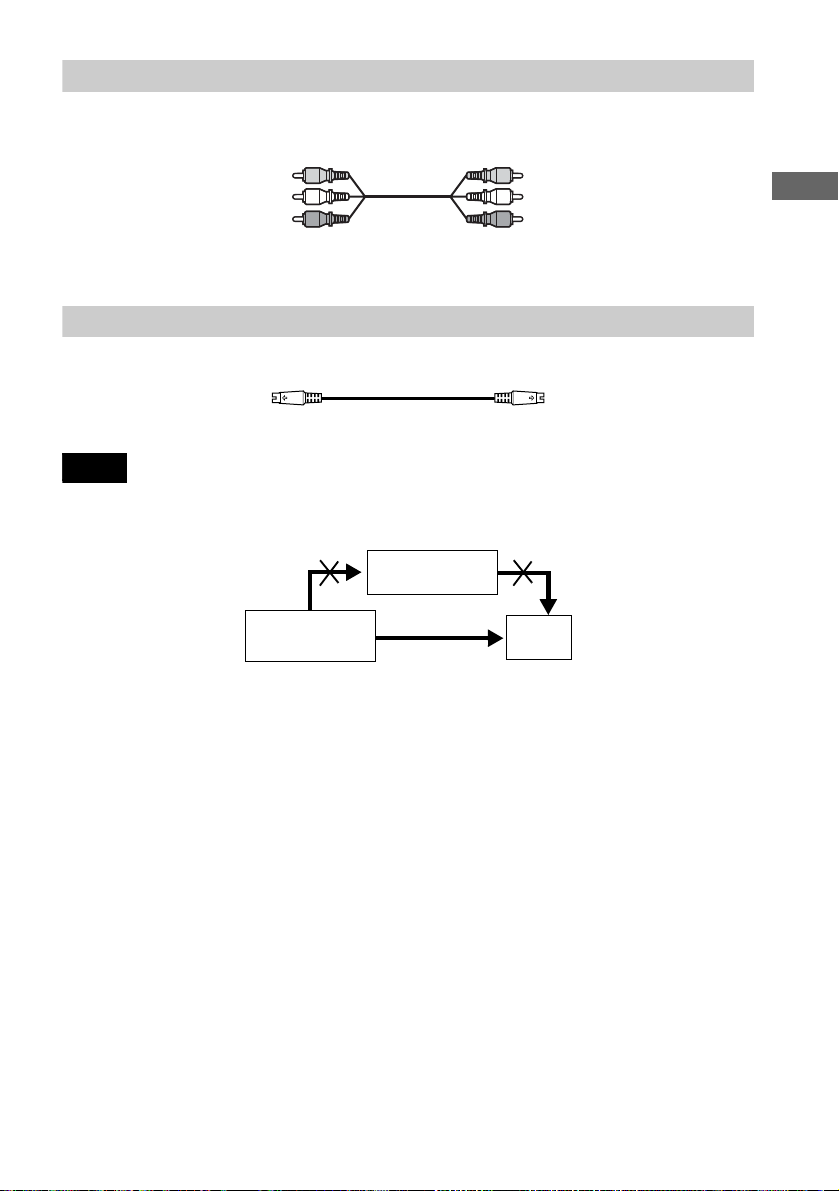
A If you are connecting to a video input jack
Connect the yellow plugs of the audio/video cord (supplied) to the yellow (video) jacks. You will
enjoy standard quality images.
Yellow (Video)
White (L)
Red (R)
Yellow (Video)
White (L)
Red (R)
Use the red and white plugs to connect to the audio input jacks (page 25).
B If you are connecting to an S VIDEO input jack
Connect the S VIDEO cord (not supplied). You will enjoy high quality images.
Note
Do not connect your player to a VCR. You may not receive a clear image on the TV screen if you pass the player
signals via the VCR.
VCR
CD/DVD player
Connect directly.
TV
Hookups
23
Page 24
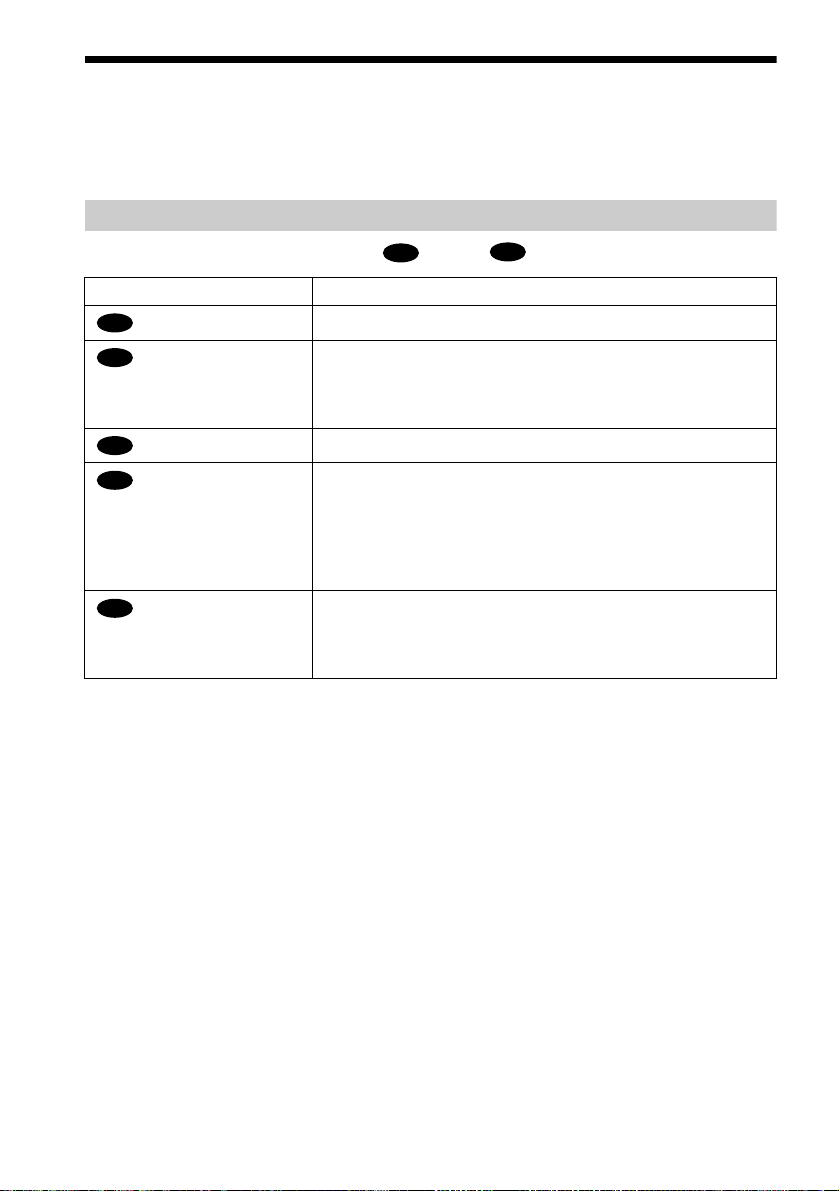
Step 2: Connecting the Audio Cords
Refer to the chart below to select the connection that best suits your system. The surround effects
you will enjoy depend on the connections and components you use.
Select a connection
Select one of the fo llowing connecti ons, through .
Connection Components to be connected
(page 25)
A
(page 26)
B
(page 26)
B
(page 28)
C
(page 30)
D
* Manufactured under license from Dolby Laboratories. “Dolby,” “Pro Logic,” and the do uble - D sym bol a r e
trademarks of Dolby Laboratories. Confidential unpublished works. © 1992-1997 Dolby Laboratories. All rights
reserved.
**“DTS” and “DTS Digital Out” are trademarks of Digital Theater Systems, Inc.
TV (stereo)
Stereo amplifier (re ceiver)
(having L and R audio input jacks onl y, or having a digital input jack )
•2 speakers
MD deck/DAT deck
AV ampli fier (rece iver) with a Dolby* Surro und (Pro Logic) decoder
(having L and R audio input jacks onl y, or having a digital input jack )
•3 speakers
•6 speakers
AV amplifier (receiver) having a Dolby Digital or DTS** decoder, and
a digital input jack
•6 speakers
A
(front L and R)
(front L and R, and rear (monaural))
(front L and R, center, rear L and R, subwoofer)
(front L and R, center, rear L and R, subwoofer)
D
24
Page 25
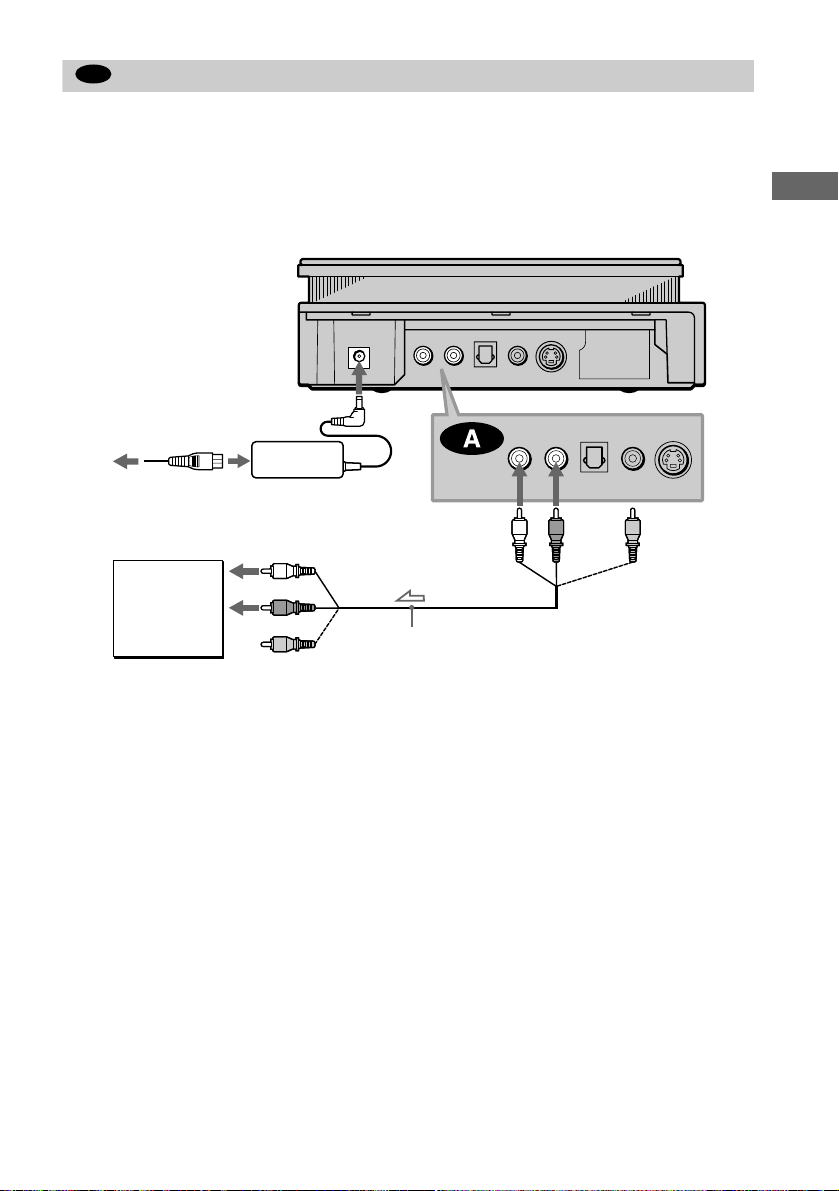
A
Connecting to your TV
This connection will use your TV speakers for sound.
xRecommended surround sound effects for this connection.
• TVS DYNAMIC (page 59)
• TVS WIDE (page 59)
CD/DVD player
AC power cord
(supplied)
AC power adaptor
TV
(AC-F21, supplied)
to audio input
(white)
to AUDIO
OUT L
(white)
(white)
(red)
to
AUDIO
OUT R
(red)
Hookups
(yellow)
(red)
(yellow)
l: Signal flow
Audio/video cord
(supplied)
The yellow plug is used f or video signals (page 22 ) .
continued
,
25
Page 26

B
Connecting to a st ere o ampl ifier (r ece iver) an d 2 speake rs/Conn ectin g to a n
MD deck or DAT deck
This connection will use your 2 front speakers connected to your stereo amplifier (receiver) for
sound. If the stereo amplifier (receiver) has audio input jacks L and R only, use . If the
amplifier (receiver) has a digita l input jack, us e . When connecting to an MD deck o r a DAT
deck, use . In this case, you can also connect the player directly to the MD deck or DAT
B-2
B-2
deck without using your stereo amplif i er (receiver).
B-1
xReco mmended surround sound effects for the connection only.
B-1
• TVS STANDARD (page 59)
In connection , you can use the supplied audio/ vide o c or d inst ead of using a separate audio cord.
z
B-1
z To realize better surro und sound effects, make sure that your listening position is in between your speake rs .
Notes
• If you select one of the TVS effects while playing a disc, no sound will come from your speakers with the
connection.
• MP3 audio and ATRAC3 audio tracks will not be output from the DIGITAL OUT (OPTICAL) jack.
B-2
26
Page 27
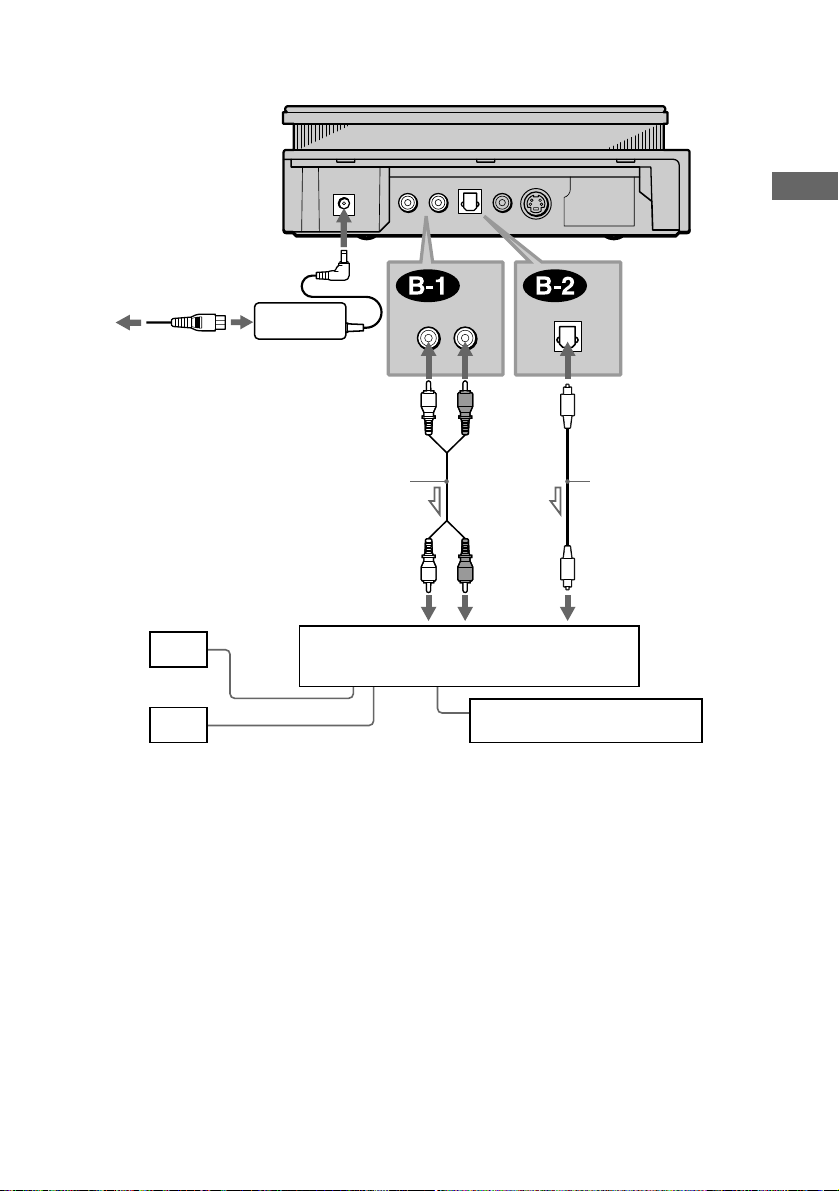
CD/DVD player
AC power cord
(supplied)
AC power adaptor
(AC-F21, supplied)
(white)
to AUDIO
OUT L
(white)
(red)
to AUDIO
OUT R
(red)
to DIGITAL OUT
(OPTICAL)
Hookups
[Speakers]
Front (L)
Front (R)
l: Signal flow
Stereo audio cord
(not supplied)
(white) (red)
to audio input
Stereo amplifier (receiver)
or
MD deck/DAT deck
Optical digital cord
(not supplied)
to optical digital
input
continued
,
27
Page 28

C
Connecting to a Dol by Surro und ( Pro Lo gic) d ecoder amp lifie r (re ceiver) and
3 to 6 speakers
This connection will allow you to enjoy the surround effects of the Dolby Surround (Pro Logic)
decoder on your amplifier (receiver). If you have an AV amplifier (receiver) equipped with a
Dolby Digital or DTS decoder, refer to page 30.
You can enjoy the Dolby Surround effects only when playing Dolby Surround audio or
multichannel audio (Dolby Digital) discs.
Pro Logic uses a minimum of 3 speakers (front L and R, and rear (monaural)). The surround
effects are enhanced if 6 speakers (front L and R, center, rear L and R, and subwoofer) are used.
If your amplifier (receiver) has R and L audio input jacks only, use . If your amplif ier
(receiver) has a digital input jack, use .
C-2
xReco mmended surround sound effects usin g this connection with your amplif ier (receiver).
• Dolby Surround (Pro Logi c) (page 91)
For correct speaker setting location, please refer to the operating instructions of the amplifier (receiver).
z
Note
MP3 audio and ATRAC3 audio tracks will not be outpu t from the DIGITAL OUT (OPTICAL) jack.
C-1
28
Page 29
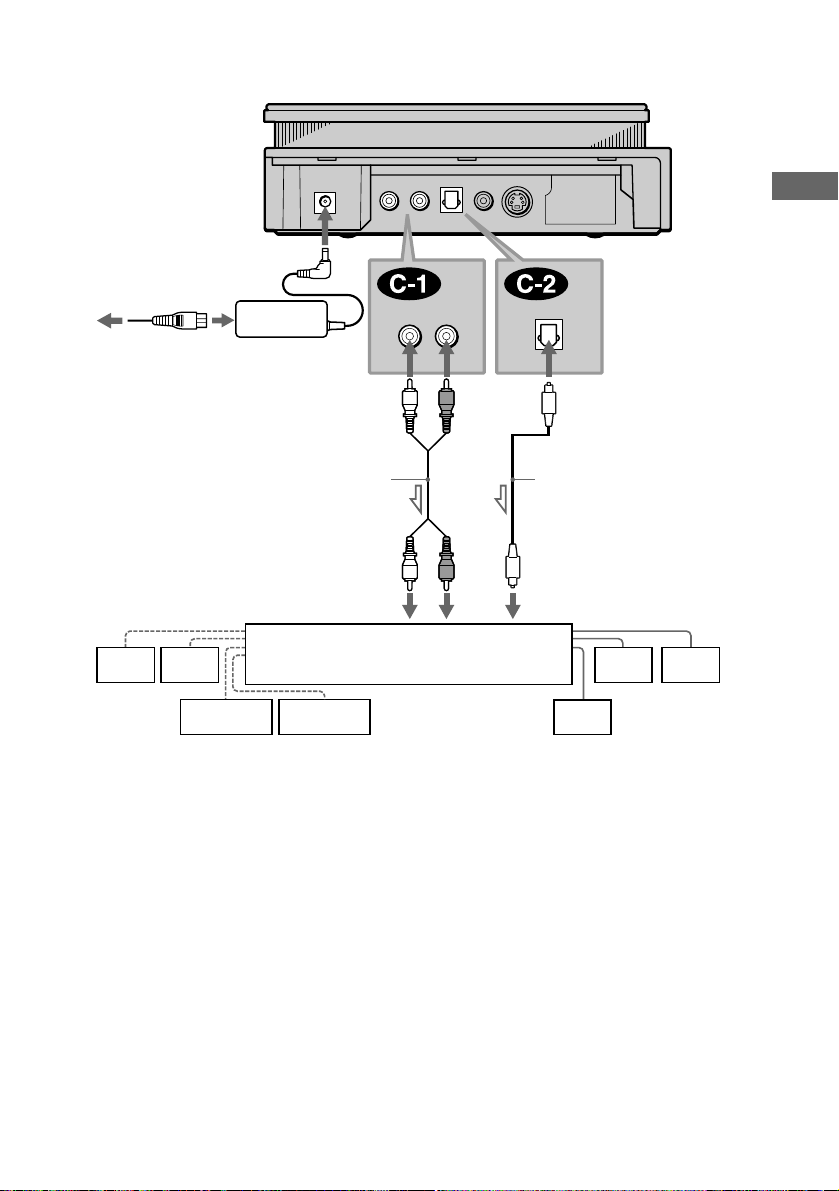
CD/DVD player
AC power cord
(supplied)
AC power adaptor
(AC-F21, supplied)
(white)
to AUDIO
OUT L
(white)
(red)
to AUDIO
OUT R
(red)
to DIGITAL OUT
(OPTICAL)
Hookups
Stereo audio cord
(not supplied)
(white)
or
(red)
Optical digital cord
(not supplied)
to optical digital
[Speakers]
to audio input
input
[Speakers]
Amplifier (receiver) with
Rear (L)
Rear (R)
Subwoofer
Dolby Surround decoder
Center
Rear*
(mono)
Front (L)
Front (R)
l: Signal flow
* When connecting 6 speakers, replace the monaural rear speaker with a center speaker, 2 rear speakers and a
subwoofer.
continued
,
29
Page 30

D
Connecting to an AV amplifier (receiver) with a digital input jack having a
Dolby Digital or DTS decoder, and 6 speakers
This connection will allow you to use the Dolby Digital or DTS decoder function of your AV
amplifier (receiver). You are not ab l e to enjoy the TVS sound effects of the player.
xReco mmended surround sound effects usin g this connection with your amplif ier (receiver).
• Dolby Digital (5.1ch) (page 91)
• DTS (5.1ch) (page 91)
z
To enhance the surround sound effec ts, ref e r to the op era ting instructions of the amplif ie r (re c ei ve r) f or corr ect
speaker setting location.
Notes
• After you have completed the connection, be sure to set “DOLBY DIGITAL” in “AUDIO SETUP” to “DOLBY
DIGITAL” (page 34). If your AV amplifier (receiver) has a DTS decoder, set “DTS” i n “AUDIO SETUP” to “ON”
(page 34). Otherwise, no sound or a loud noise will come from the speakers.
• MP3 audio and ATRAC3 audio tracks will not be output from the DIGITAL OUT (OPTICAL) jack.
30
Page 31
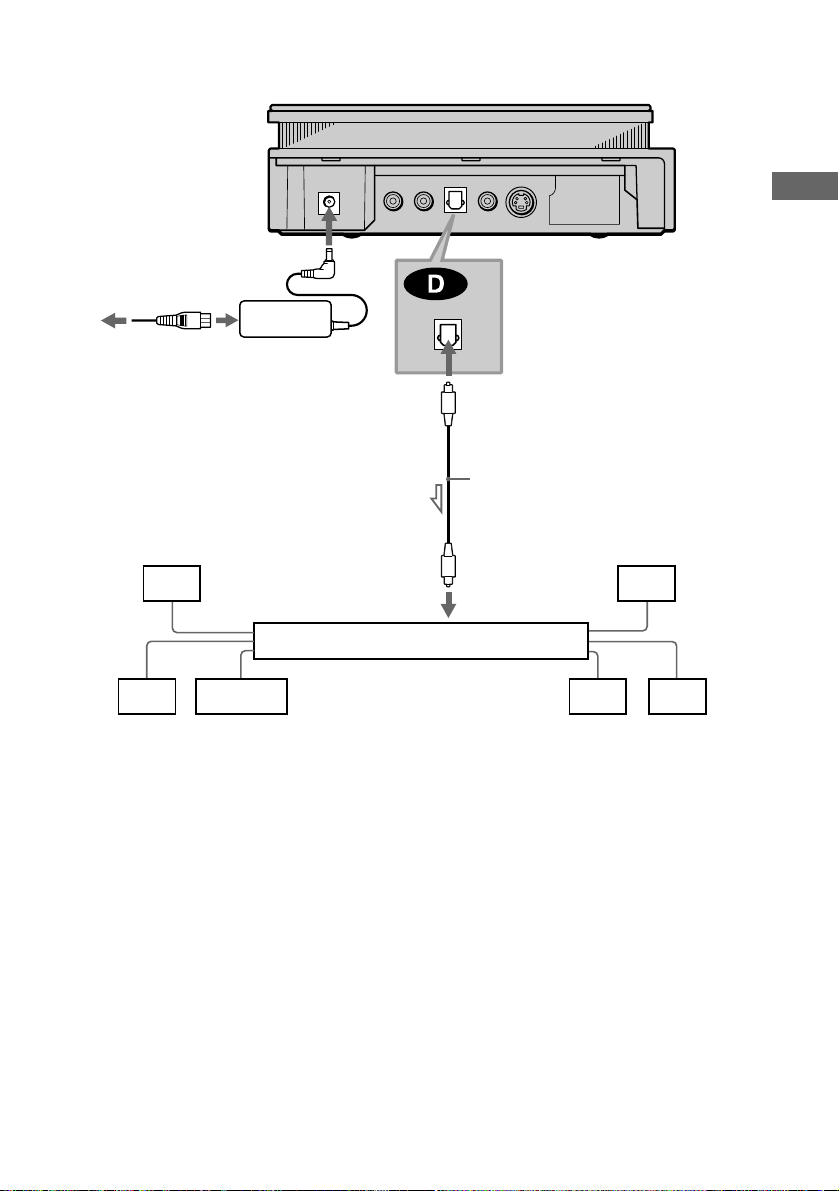
CD/DVD player
AC power cord
(supplied)
Hookups
AC power adaptor
(AC-F21, supplied)
to DIGITAL OUT
(OPTICAL)
Optical digital cord (not
supplied)
[Speakers]
Rear (R)
Rear (L)
l: Signal flow
Subwoofer
to optical digital input
AV amplifier (receiver) with a decoder
[Speakers]
Front (R)
Front (L) Center
31
Page 32
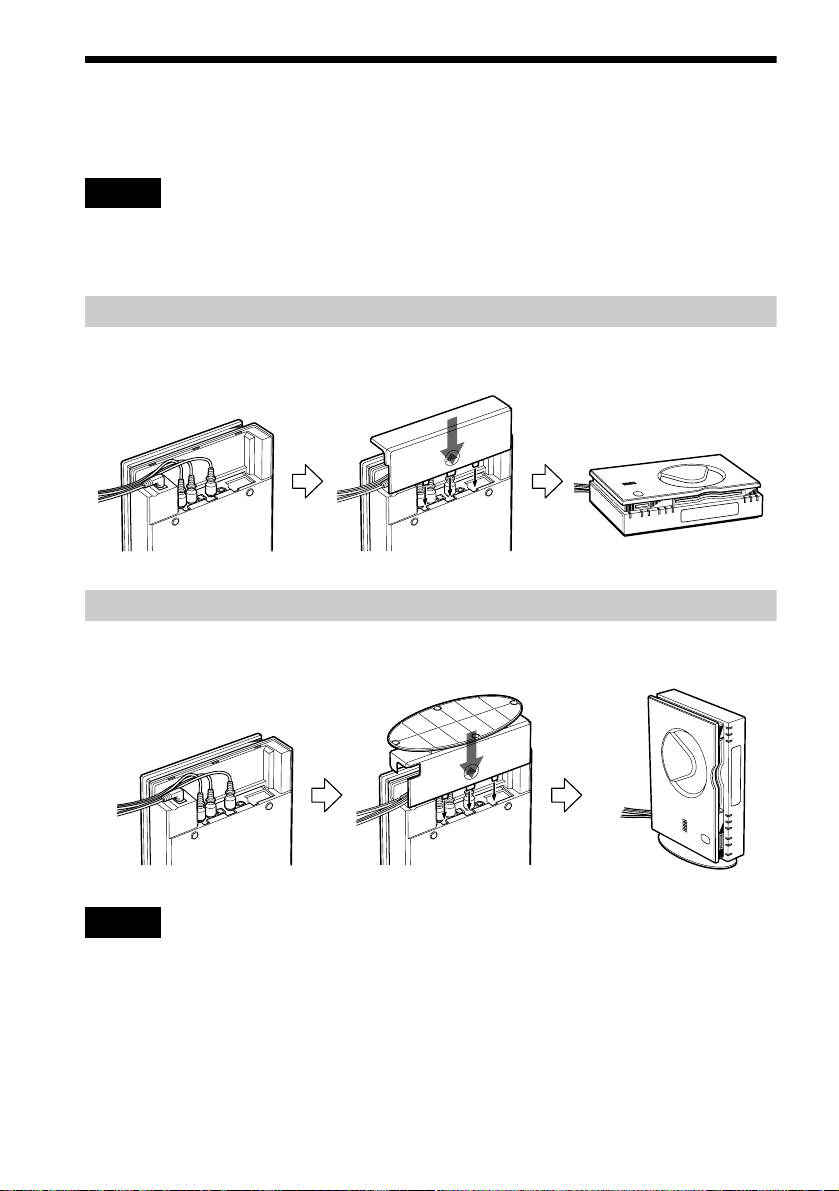
Step 3: Attaching the Jack Cover
You can install the player horizontally, vertically or on the wall.
Notes
• Make s ure that the connecting cords are not trapped by th e jack cover.
• If you use commercially available cords, make sure that those cords are similar to the supplied cords in size. If the
cords are too thick or hard, or the plug is too large, you may not be able to attach the jack c ove r secur e ly.
When you install the player horizontally
First, gather all the connectin g cords together and let them pass through the side of the player.
Then attach the jack cover carefull y not to trap the cords.
When you install the pl ayer vertic ally
First, gather all the connectin g cords together and let them pass through the side of the player.
Then attach the jack cover for vertical installation (supplied) carefully not to tr ap the cords.
Notes
• When you place the player in a horizontal position, remove the jack cover for vertical installation.
• To move the player, hold the player itself. If you hold the flat part of the jack cover for vertical installation, it may
break.
• Do not place the player in a vertical position without attaching the jack cover for vertical installation. If you do not
attach it, the player will be uns ta ble and may fall over.
32
Page 33
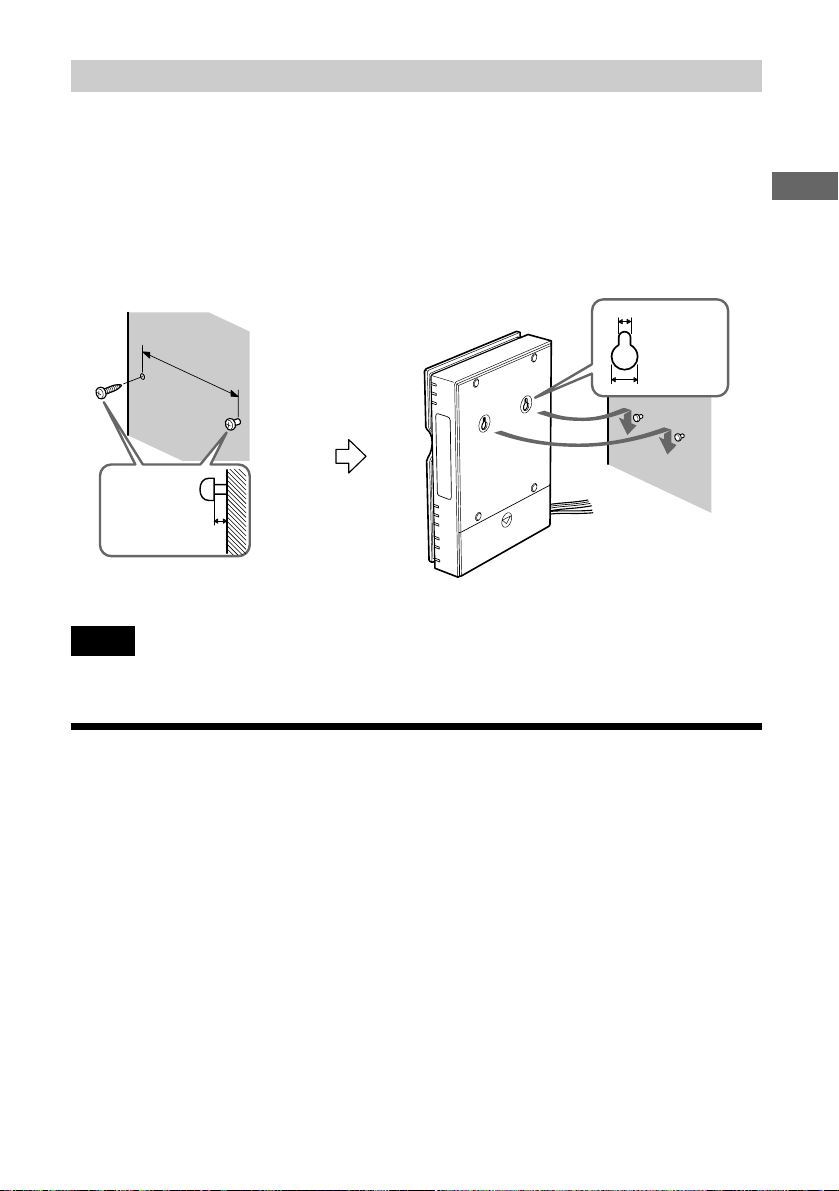
When you install the player on the wall
Attach the jack cover as in the same way for the horizontal installation.
Fastening screws are not supplied. You need to determine the appropriate hanging screws and/or
other necessary hardware needed to securely and safely fasten the unit to the wall. Placement of
the screws should be at the same height and should be 3 1/4 in. (80 mm) apart. The screws or other
fasteners should protrude by 3/16 to 7/32 in. (4 to 5 mm).
Please be sure you have selected fasteners or screws that will fit in the hanging holes on the
bottom of the unit. Remove the seals covering the hanging holes. Hang the player on the screws.
Push the player tightly against the wall.
3/16 in.
Hookups
3 1/4 in.
3/16 - 7/32 in.
3/8 in.
Note
WHEN YOU DISCONNECT OR CONNECT THE CORDS, TAKE THE PLAYER DOWN FROM THE WALL.
Step 4: Connecting the Power Cord
Plug the player and TV power cords into an AC outlet.
Do not connect the power cord of your player to the “switched” power socket of an amplifier
(receiver). Otherwise, when you turn off the power of your amplifier (receiver), the settings for
the player may be lost.
33
Page 34
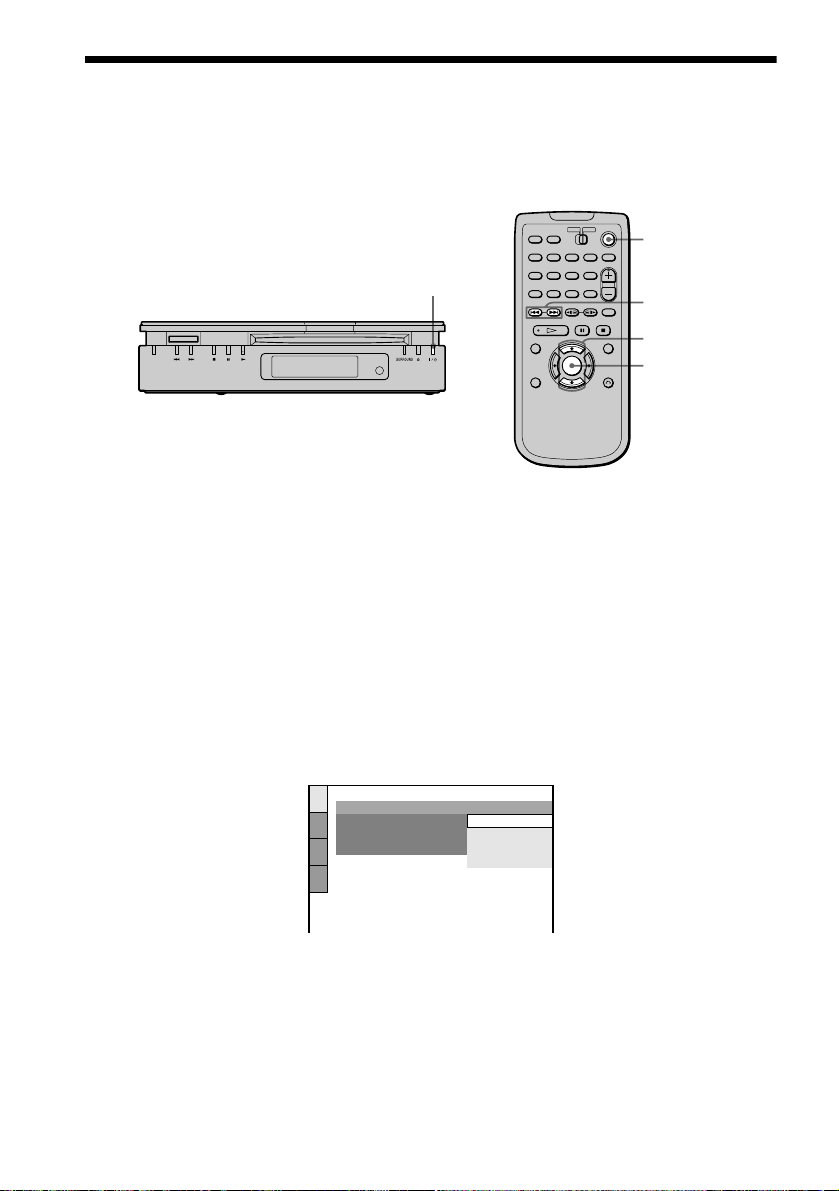
Step 5: Quick Setup
Follow the steps below to mak e th e mi nimu m nu mbe r o f b asic ad ju stmen ts to use the p layer . To
skip an adjustment press >, to return to the previous adjustment, press ..
?/1
?/1
./>
/x
X
ENTER
A Turn on the TV.
B Switch the input selector on the TV to the player.
C Press
?/1 on the player or the remote.
“Press [ENTER] to run QUICK SETUP.” appears at the bottom of the screen. If this message
does not appear, select “QUICK” (“QUICK”) under “SETUP” (“S ETUP”) in the Control
Menu (page 85) to run Quick Setup.
D Press ENTER without inserting a disc.
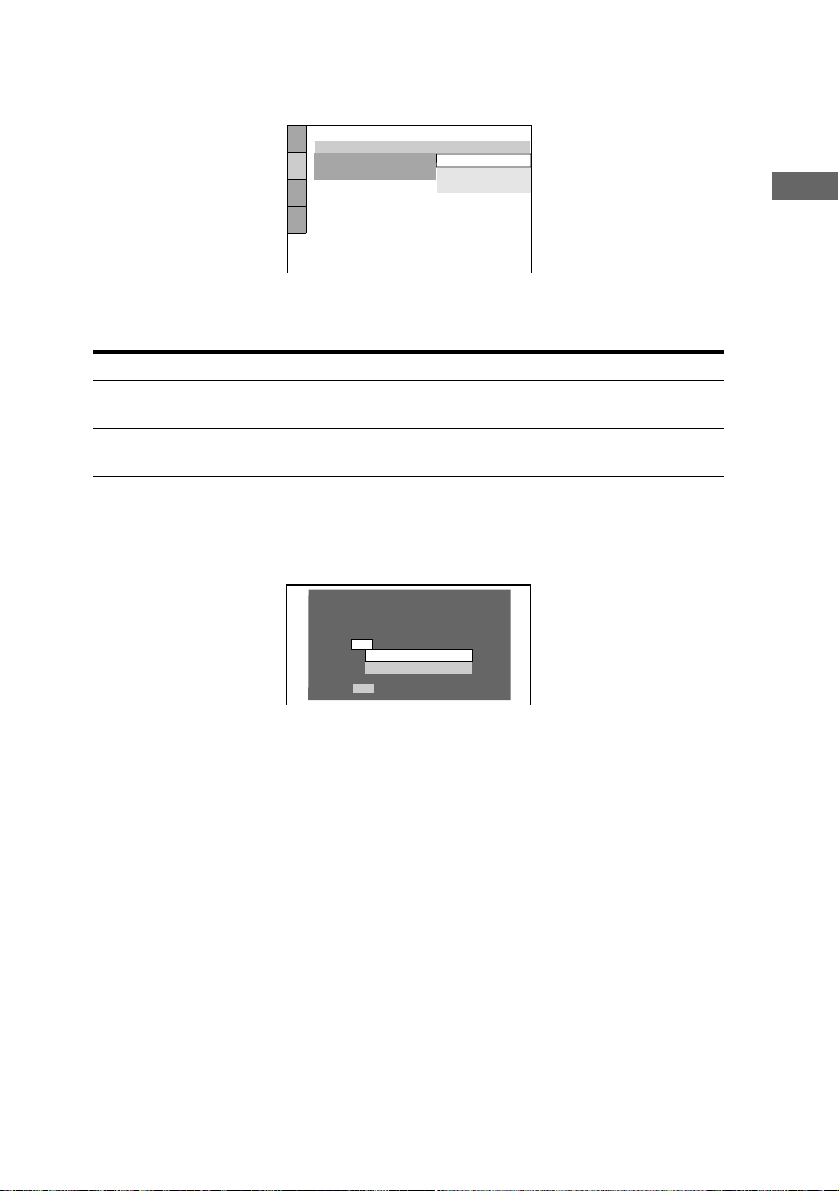
The Setup Display for selecting the language used in the on-screen display appears.
LANGUAGE SETUP
OSD:
MENU:
AUDIO:
SUBTITLE:
ENGLISH
ENGLISH
FRENCH
SPANISH
PORTUGUESE
E Press X/x to select a language.
The player uses the language selected here to display the menu and subtitle s as well.
34
Page 35
F Press ENTER.
The Setup Display for selecting the aspect ratio of the TV to be connected appears.
SCREEN SETUP
TV TYPE:
SCREEN SAVER:
BACKGROUND:
4:3 LETTER BOX
4:3 LETTER BOX
4:3 PAN SCAN
16:9
G Press X/x to select the item .
TV Type You select Page
4:3 standard TV 4:3 LETTER BOX or 4:3
87
PAN SCAN
A wide-screen TV or 4:3 standard TV with the
16:9 87
wide-screen mode
H Press ENTER.
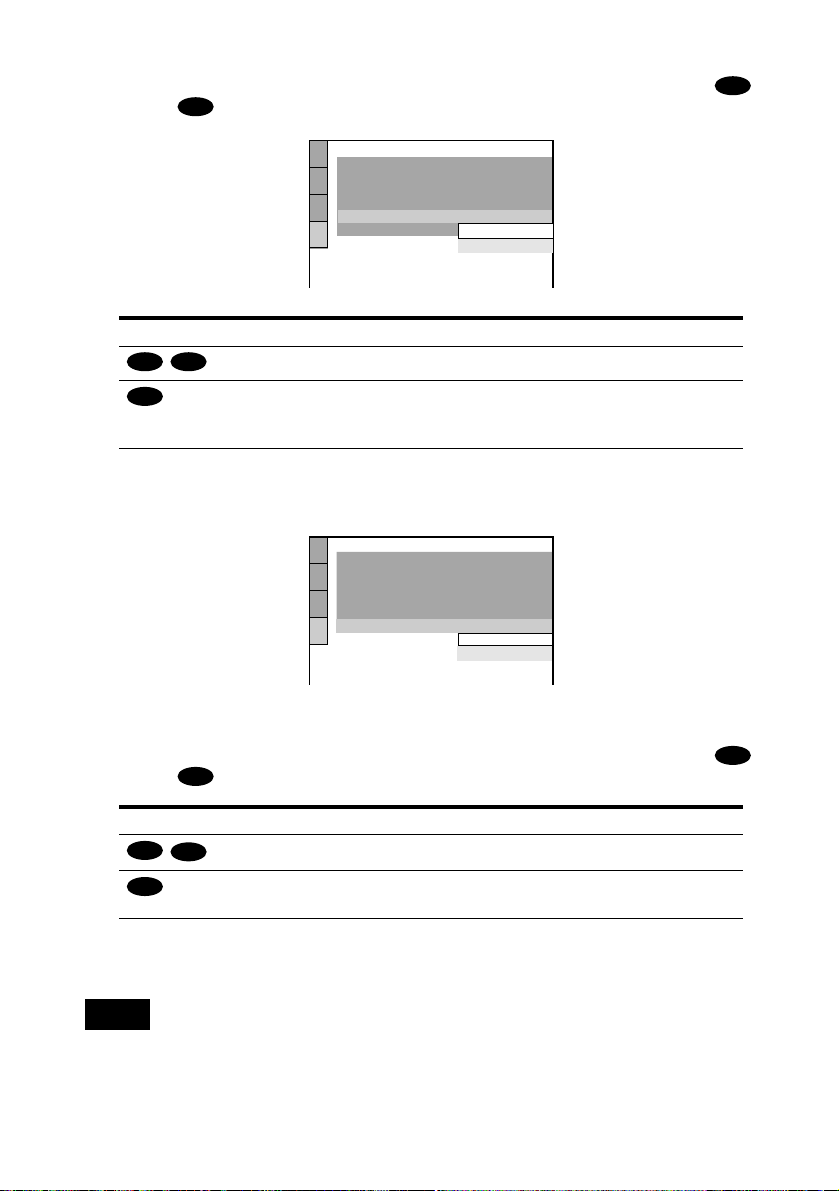
The Setup Display for selecting the type of jack used to connect your amplifier (receiver)
appears.
Is this player connected to an amplifier
(receiver) ? Select the type of jack you
are using.
YES
AUDIO OUTPUT L/R
DIGITAL OUTPUT
NO
Hookups
I Press X/x to select the item, then press ENTER.
• When “NO” or “AUDIO OUTPUT L/R” is selected, Quick Setup is finished and connections
are complete.
• When “DIGITAL OUTPUT” is selected, the Setup Display for “DOLBY DIGITAL”
appears. Proceed to Step 0.
continued
,
35
Page 36
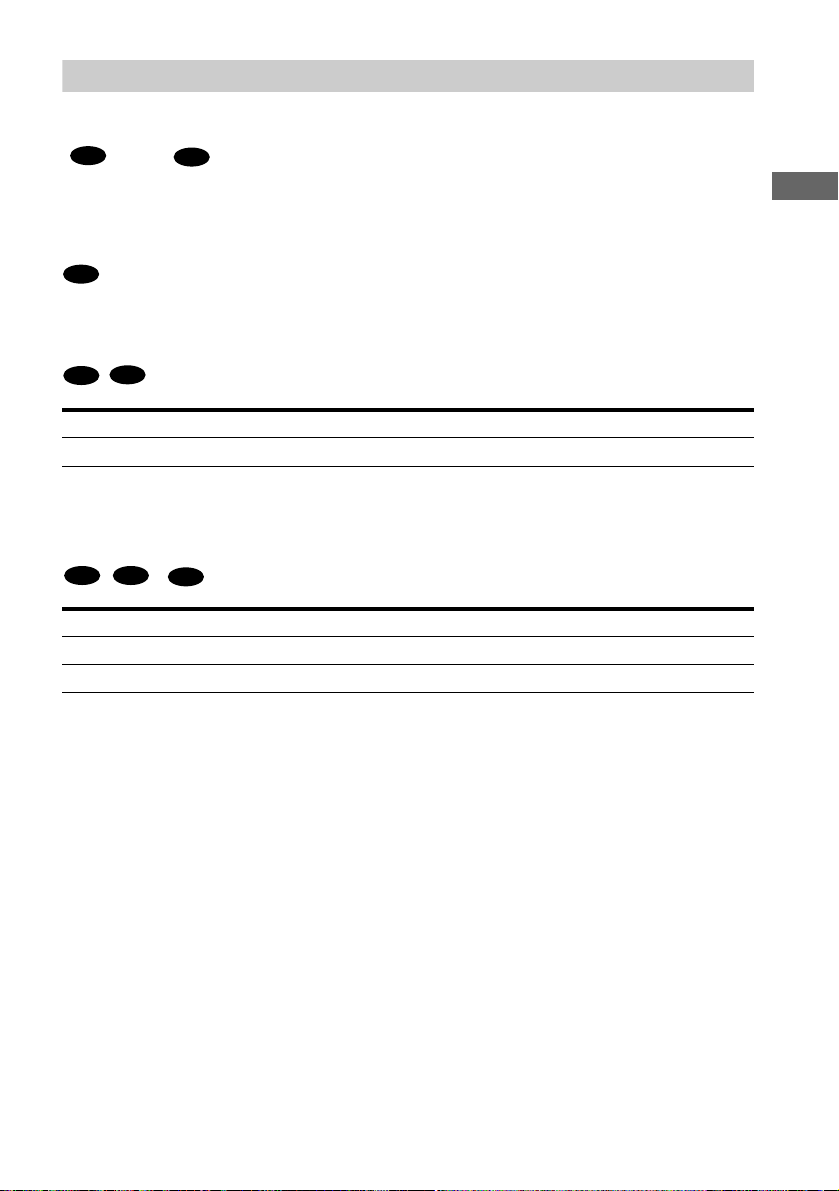
J Press X/x to select the item.
Choose the item that matches the audio connection you selected in pages 26 to 30 (
through ).
Audio Cord Connection Type You select Page
B-2 C-2
D
D
AUDIO SETUP
AUDIO ATT:
AUDIO DRC:
DOWNMIX:
DIGITAL OUT:
DOLBY DIGITAL:
DTS:
DOLBY SURROUND
DOLBY DIGITAL
OFF
STANDARD
ON
D-PCM
D-PCM
D-PCM 91
DOLBY DIGITAL (only if the
91
amplifi er/ rece iv er has a Do lb y Digi tal
decoder)
K Press ENTER.
“DTS” is selected.
AUDIO SETUP
AUDIO ATT:
AUDIO DRC:
DOWNMIX:
DIGITAL OUT:
DOLBY DIGITAL:
DTS:
DOLBY SURROUND
OFF
STANDARD
ON
D-PCM
OFF
OFF
ON
B
L Press X/x to select the item.
Choose the item that matches the audio connection you selected in pages 26 to 30 (
B-2
D
D
C-2
OFF 91
ON (only if the amplifier/receiver has
a DTS decoder)
through ).
Audio Cord Connection Type You select Page
M Press ENTER.
Quick Setup is finished. All connections and setup operations are complete.
Note
You can directly start Quick Setup only whe n you r un it f or the first tim e.
To run Quick Setup a second time, select “QUICK” under “ SET UP” in the Co ntr ol Men u (page 85) .
36
B
91
Page 37
Enjoying the surround sound effects
To enjoy the surround sound effects of this player or your amplifier (receiver), the following
items must be set as described below for the audio connection you selected in pages 26 to 30
B
( through ). Each of these are the default settings and do not need to be adjusted when
you first connect the player. Refer to page 85 for using the Setup Display.
Audio Connection (pages 25 to 30)
A
No additional settings are ne eded.
C-1
B-1
Item You select Page
DOWNMIX DOLBY SURROUND 91
• If the sound distorts even when the volume is turned down, set “AUDIO ATT” to “ON” (page
90).
D
Hookups
B-2 C-2
Item You select Page
DOWNMIX DOLBY SURROUND 91
DIGIT AL OUT ON 91
D
37
Page 38
Playing Discs
Playing Discs
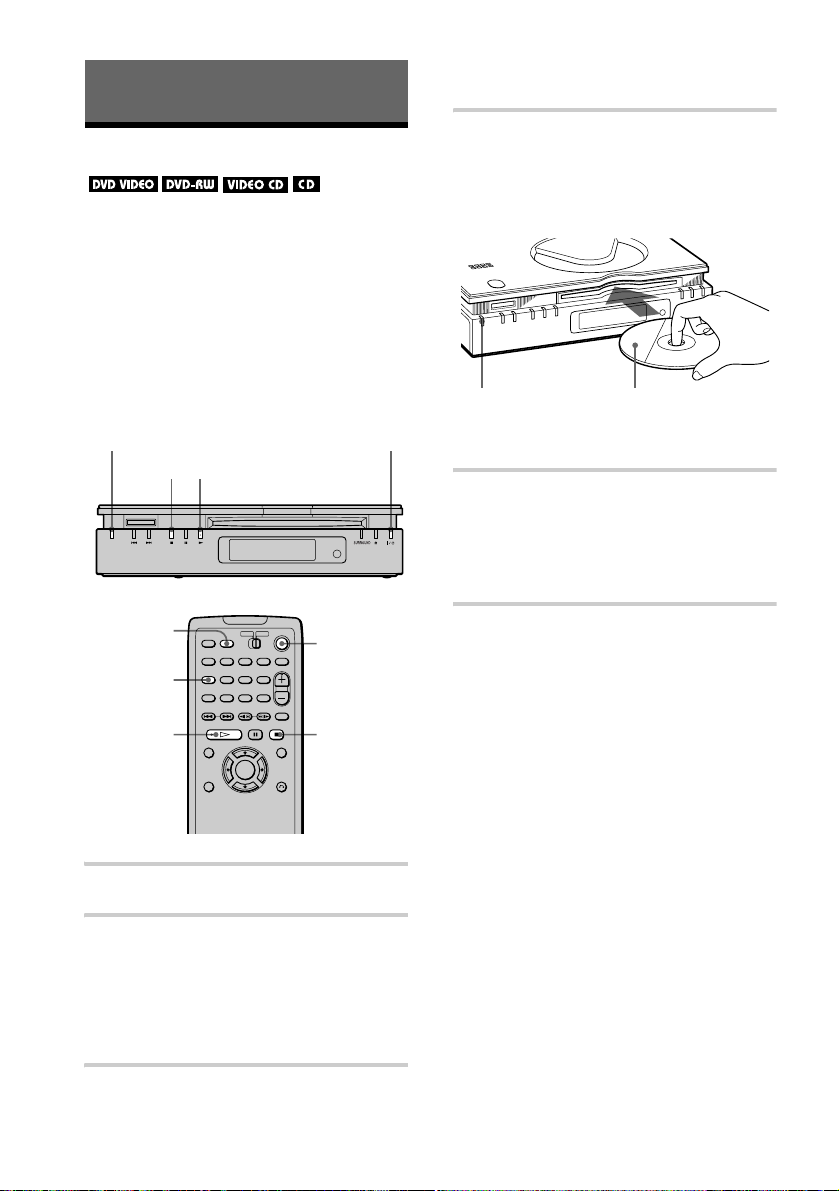
When playing a disc, make sure th at the MS
indicator is turned off (Disc mode).
To play a DATA-CD, see page 67.
Depending on the DVD or VIDEO CD, some
operations may be differ ent or restricted.
Refer to the operating instructions supplied
with your disc.
MS button/indicator
x
N
?/1 button /indicator
The ?/1 indicator (red) changes to green
and the front panel display lights up.
4 Insert a disc in the player .
If the MS indicator on the player is lit,
press MS to turn it off in stop mode. (Disc
mode)
MS button/
indicator
With the playback side
facing down
5 Press N on the player or H on the
remote.
The player starts playback (continuous
play). Adjust the volume on the TV or the
amplifier (receiver).
MS
AUDIO
H
1 Turn on your TV.
2 Switch the input selector on the TV
to the player.
When using an amplifier (receiver)
Turn on the amplifier (receiver) and
select the appropriate channel.
3 Press ?/1.
38
?/1
x
After following Step 5
Depending on the disc, a menu may appear
on the TV screen. You can play the disc
interactively by following th e instructions on
the menu. DVD (page 41), VIDEO CD (page
42).
To turn off the player
Press ?/1. The player enters standby mode
and the ?/1 indicator lights up in red. T o turn
off the player completely, disconnect the AC
power cord. While playing a disc, do not
disconnect the AC power cord. Doing so may
cancel the menu settings. When you turn off
the player, first press x to stop playback and
then press ?/1.
Notes on playing DTS sound tr acks on
a CD
• When playing DTS-encoded CDs,
excessive noise will be heard from the
Page 39
analog stereo jacks. To avoid possible
damage to the audio system, the consumer
should take proper precautions when the
analog stereo jacks of the player are
connected to an amplifi cation system. To
enjoy DTS Digital Surround™ playback, an
external 5.1-channel decoder system must
be connected to the digital jack of the
player.
• Set the sound to “STEREO” using the
AUDIO button when you play DTS sound
tracks on a CD (page 57).
• Do not play DTS sound tracks withou t first
connecting the player to an audio
component having a built-in DTS decoder.
The player outputs the DTS signal via the
DIGITAL OUT (OPTICAL) jack even if
“DTS” in “AUDIO SETUP” is set to “OFF”
in the Setup Display (page 92), and may
affect your ears or cause your speakers to be
damaged.
Notes on playing DVDs with a DTS
sound track
• DTS audio signals are output only through
the DIGITAL OUT (OPTICAL) jack.
• If you connect the player to au dio
equipment without a DTS decoder, do not
set “DTS” to “ON” in “AUDIO SETUP”
(page 92). A loud noise may come out from
the speakers, affecting your ears or causing
the speakers to be damaged.
• When you play a DVD with DTS soun d
tracks, set “DTS” to “ON” in “AUDIO
SETUP” (page 92).
Notes
• When you insert an 8-cm (3-inch) disc, insert the
disc slowly at the center of the disc slot. If you
cannot eject the disc, consult your nearest Sony
dealer.
• No adapter is required in order to play 8-cm (3-inch)
discs on this player. If an adapter is used, damage to
the player may resu lt; therefore, never use an ad apter
when playing 8-cm (3-inch) discs.
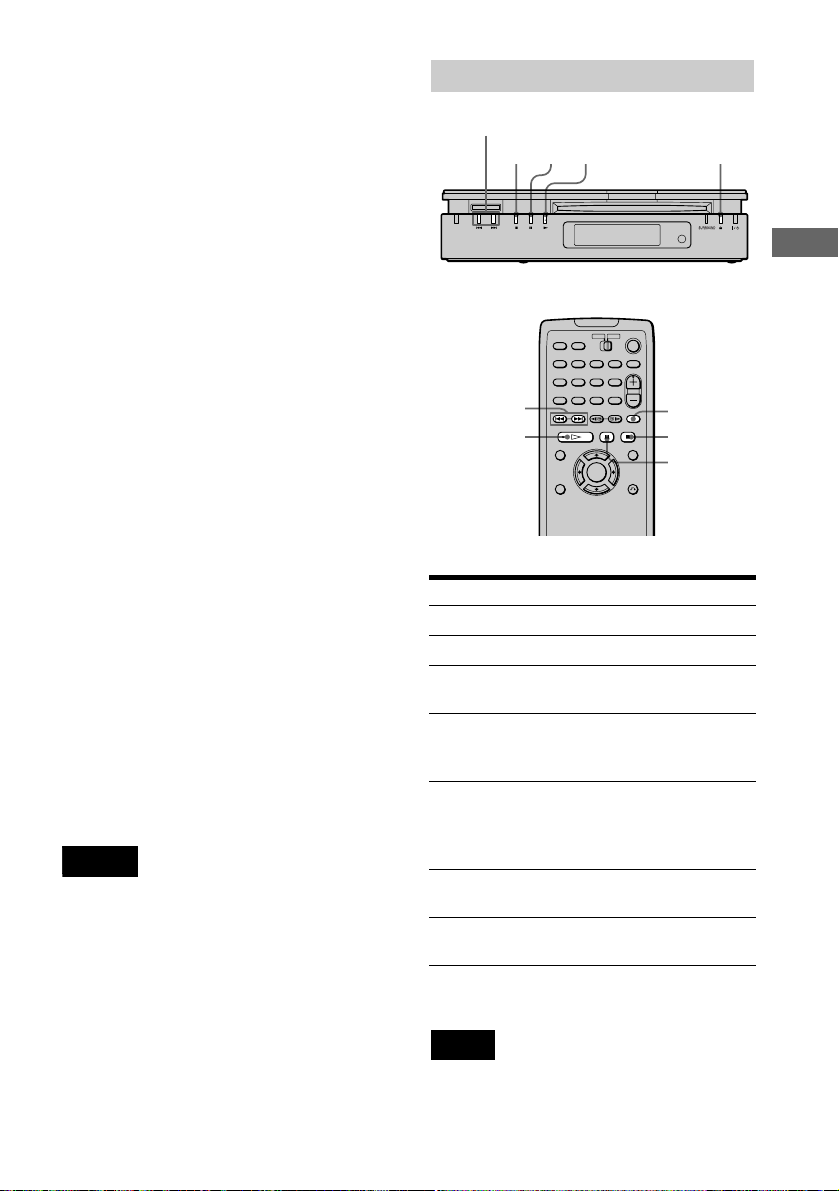
Additional operations
./>
XN
x
./>
H
To Operation
Stop
Pause
Resume play after
pause
Go to the next chapter,
track, or scene in
continuous play mode
Go back to the
preceding cha pter,
track, or scene in
continuous play mode
Stop play and remove
the disc
Replay a previous
scene (DVD only)
x
Press
Press
X
Press
X or H or N
Press
>
.
Press
Press
A
Press REPLAY
z The Replay function is use f ul whe n you wa nt to
review a scene or dialog that you miss ed.
Note
You may not be able to use the Replay function with
some scenes.
A
REPLAY
x
X
Playing Discs
39
Page 40
Resuming Playb ack from
the Point Where You
Stopped the Disc (Resume
Play)
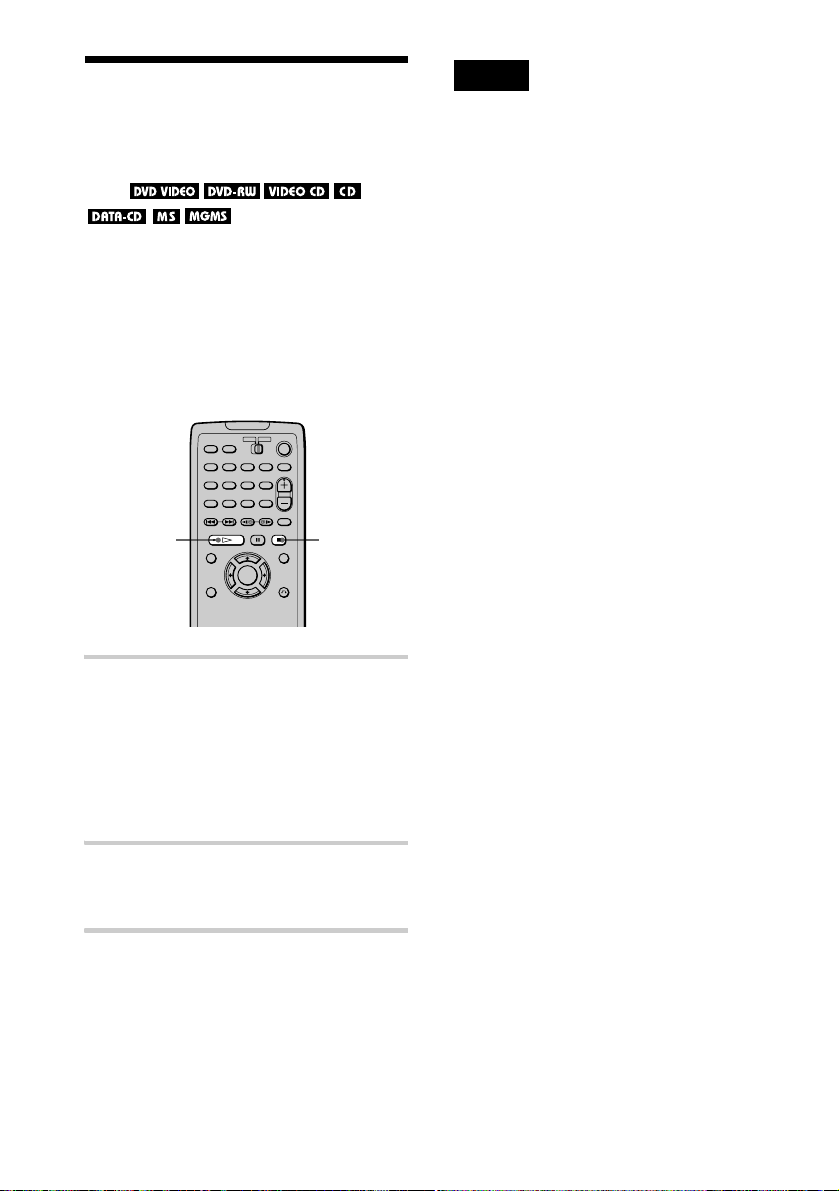
When you stop the disc, the player
remembers the point where you presse d x
and “RESUME” appears on t he front panel
display. As long as you do not remove the
disc, Resume Play works even if the pl ayer
enters standby mode by pressing ?/1.
Hx
Notes
• Depending on where you stopped the disc, the player
may not resume playback from exactly the same
point.
• The point where you stopped playing is cleared
when:
– you disc onnect the AC power cord.
– yo u change the play mode.
– yo u change the settings on the Setup Display.
– you switch to MS mode.
– the play er ente rs standby mode (DATA-CD,
“Memory Stick” and “MG Memory Stick” only)
1 While playing a disc, press x to stop
playback.
“RESUME” appears on the front panel
display and you ca n rest art the disc from
the point where you st opped the disc.
If “RESUME” does not appear, Resume
Play is not available.
2 Press H.
The player starts playback from the point
where you stopped the disc in Step 1.
z To play from the beginn ing of the disc , press x
twice, then pres s
40
H.
Page 41
Using the DVD’s Menu
T
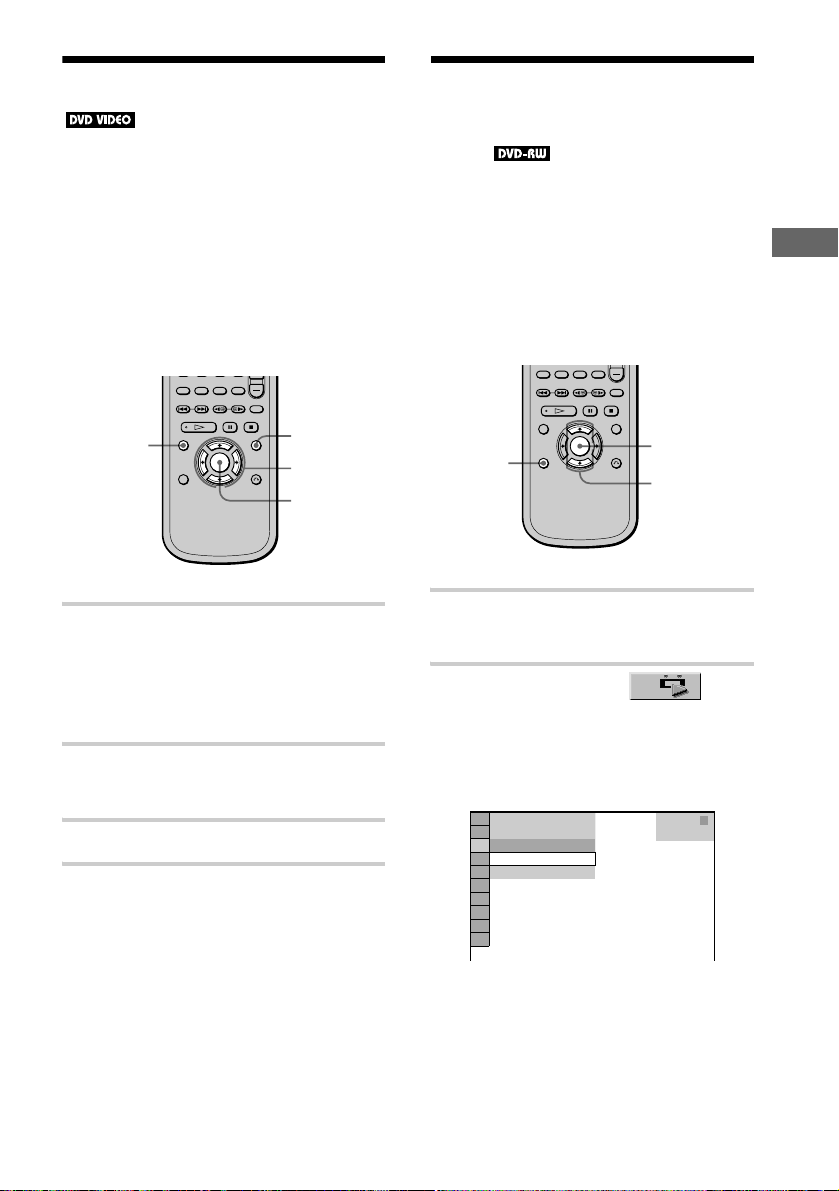
A DVD VIDEO is divided into long sections
of a picture or a music feature called “titles.”
When you play a DVD VIDEO which
contains several titles, y ou can selec t the title
you want using the TO P MENU button.
When you play DVD VIDEOs that allow you
to select items such as the language for the
subtitles and the language for the sound,
select these items using the MENU button.
Selecting “ORIG I NAL” or “PLAY LIST” on a DVD- RW Disc
Some DVD-RW discs in VR (Video
Recording) mode have two ty pes of title s for
playback: originally recorded titles
(ORIGINAL) and titles that can be created on
recordable DVD players for editing (PLAY
LIST). You can select the type of titles to be
played.
Playing Discs
OP MENU
MENU
C/X/x/c
ENTER
1 Press TOP MENU or MENU.
The disc’s menu appears on the TV
screen.
The contents of the menu vary from disc
to disc.
2 Press C/X/x/c to select the item
you want to play or change.
3 Press ENTER.
DISPLAY
ENTER
X/x
1 Press D ISPLAY in stop mode.
The Control Menu appears.
2 Press X/x to select
(ORIGINAL/PLAY LIST), then press
ENTER.
The options for “ORIGINAL/PLAY
LIST” appear.
)
1 2 ( 2 7
1 8 ( 3 4
PLAY LIST
PLAY LIST
ORIGINAL
)
STOP
DVD-RW
continued
,
41
Page 42
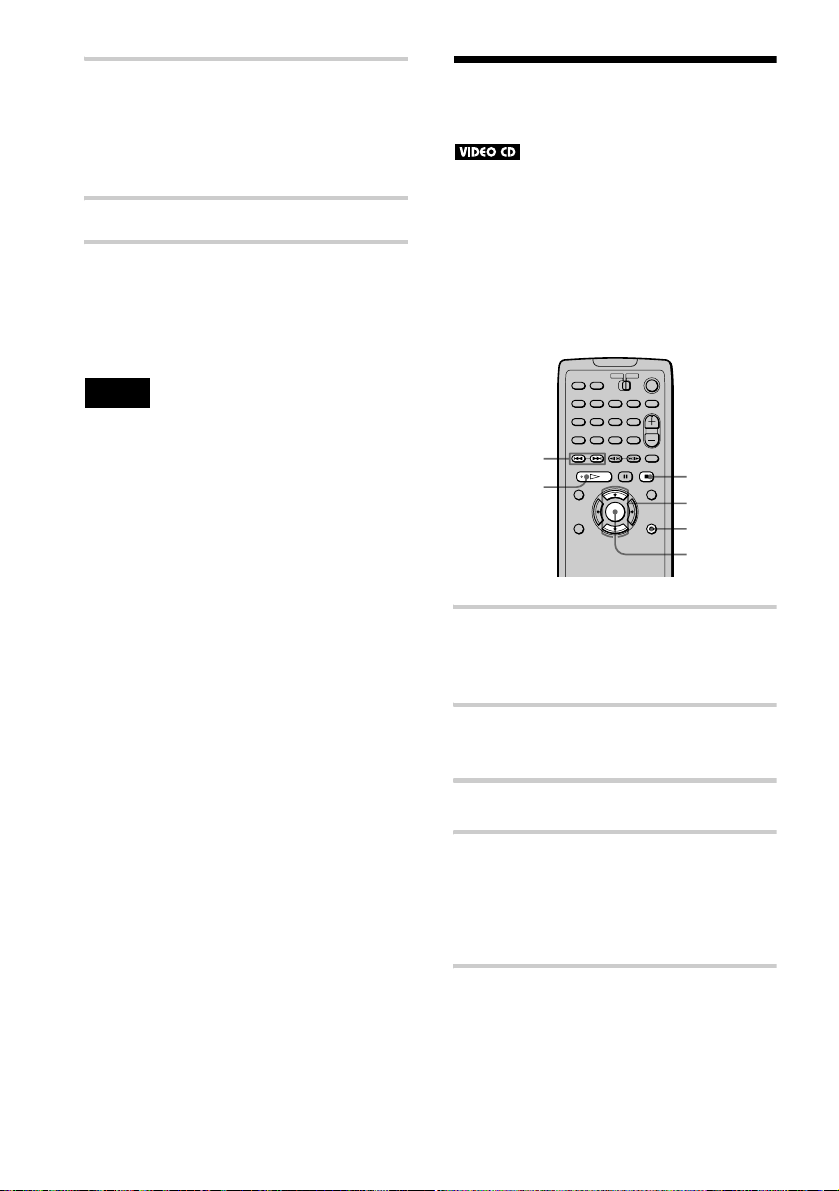
3 Press X/x to select the setting.
• PLAY LIST: plays the titles created
from “ORIGINAL” for editing.
• ORIGINAL: plays the titles originally
recorded.
Playing VIDEO CDs with PBC Functions (PBC Playback)
4 Press ENTER.
To turn off the Control Menu
Press DISPLAY repeatedly until the Control
Menu is turned off.
Note
This setting is canc ele d when you swit ch t he pl ayer to
MS mode.
With PBC (Pla yback Control ) functi ons, you
can enjoy simple interactive operations,
search functions, and other operations.
PBC playback allows you to play VIDEO
CDs interactively by following the menu on
the TV screen.
./>
H
x
X/x
O
RETURN
ENTER
1 Start playing a VIDEO CD with PBC
functions.
The menu for your selection appears.
2 Select the item number you want by
pressing X/x.
42
3 Press ENTER.
4 Follow the instructions in the menu
for interactive operations.
Refer to the instructions supplied with
the disc, as the operating procedure may
differ according to the VIDEO C D.
To go back to the menu
Press ORETURN.
z
To play without using PBC, press ./>
while the player is stopped to select a track, then press
H or ENTER.
Page 43

“Play without PBC.” appears on the TV screen and the
player starts continuous play. You cannot play still
pictures such as a menu.
To return to PBC playback, press
x twice then press
H.
Note
Depending on the VIDEO CD, “Press ENTER” in
Step 3 may appear as “Press SELECT” in the
instructions supplied with the disc. In this case, press
H.
Various Play Mode
Functions (Program Play, Shuffle
Play, Repeat Play, A-B Repeat Play)
You can set the following play modes:
• Program Play (page 44)
• Shuffle Play (page 46)
• Repea t Play (page 46)
• A-B Repeat Play (page 47)
Note
The play mode is canceled when:
– you eject the disc.
– the pla ye r enter s sta ndby mode by pressing
– you pr e ss MS .
?/1.
Playing Discs
continued
,
43
Page 44
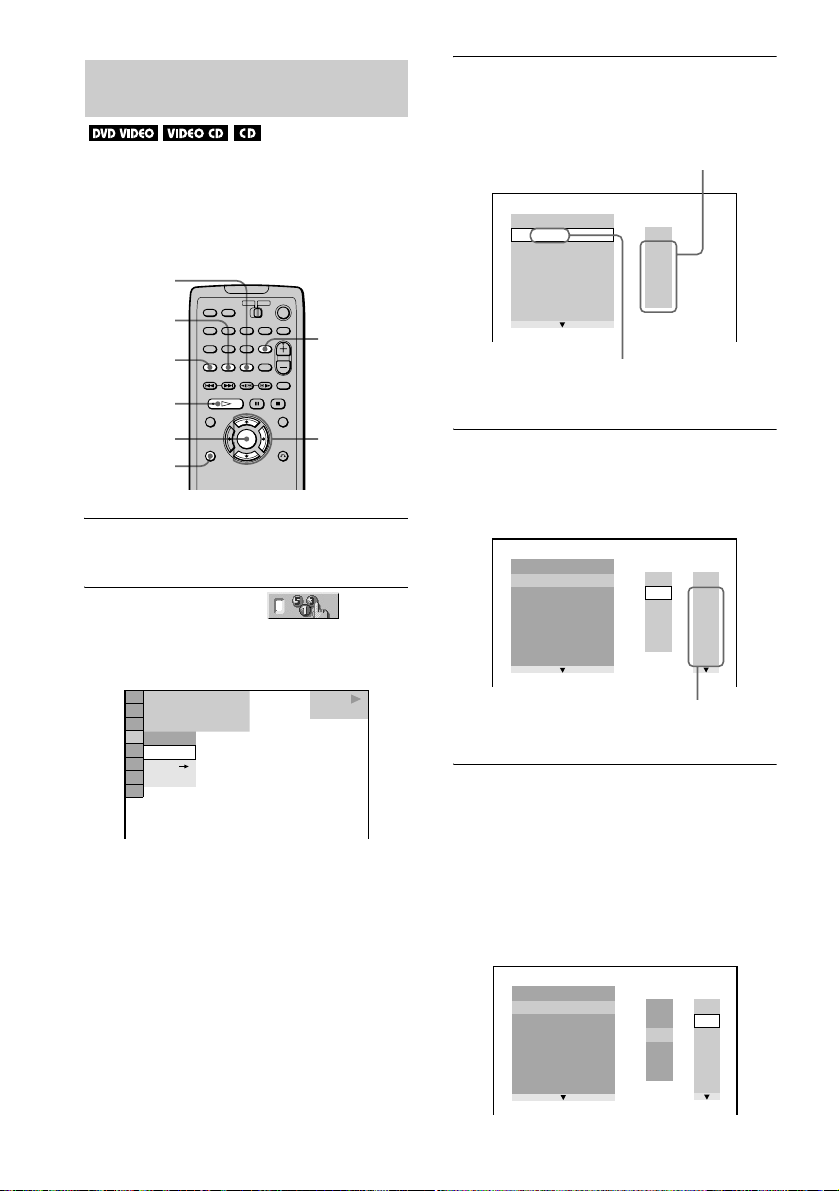
Creating your own prog ram (Program
Play)
You can play the contents of the discs in the
order you want by arranging the order of the
titles, chapters, or tracks to create your own
program. You can program up to 99 titles,
chapters, and tracks.
REPEAT
PROGRAM
CLEAR
SHUFFLE
H
3 Press X/x to select “SETt,” then
press ENTER.
The display for programming appears.
Tracks or titles recorded on a dis c
PROGRAM
ALL CLEAR
1. TITLE
– –
2. TITLE
– –
3. TITLE
– –
4. TITLE
– –
5. TITLE
– –
6. TITLE
– –
7. TITLE
“TRACK” is displayed when you
play a VIDEO CD or a CD
– –
T
01
02
03
04
05
ENTER X/x/c
DISPLAY
1 Press DISPLAY twice (once for CD).
The Control Menu is displayed.
2 Press X/x to select
(PROGRAM), then press ENTER.
The options for “PROGRAM” appear.
)
1 2 ( 2 7
1 8 ( 3 4
T
1 : 3 2 : 5 5
OFF
OFF
SET
ON
)
PLAY
DVD VIDEO
4 Press c.
The cursor moves to the title or track (in
this case, “01”).
PROGRAM
ALL CLEAR
– –
1. TITLE
– –
2. TITLE
– –
3. TITLE
– –
4. TITLE
– –
5. TITLE
– –
6. TITLE
– –
7. TITLE
Chapters recorded on a disc
– –
T
C
ALL
01
01
02
02
03
03
04
04
05
05
06
5 Select the title, chapter, or track you
want to program.
x When playing a DVD VIDEO
For example, select chapter “03” of title
“02.”
Press X/x to select “02” under “T,” then
press ENTER.
PROGRAM
ALL CLEAR
1. TITLE
2. TITLE
3. TITLE
4. TITLE
5. TITLE
6. TITLE
7. TITLE
– –
– –
– –
– –
– –
– –
– –
– –
T
C
ALL
01
01
02
02
03
03
04
04
05
05
06
44
Page 45
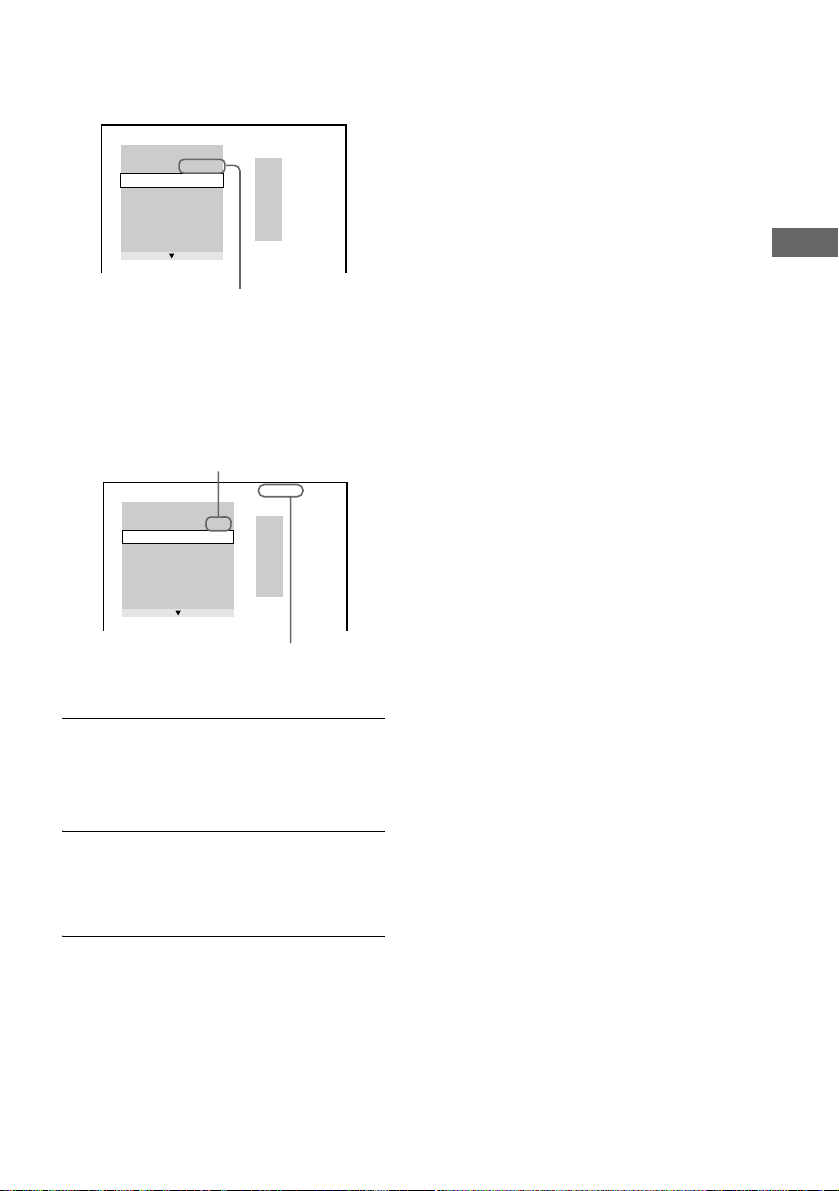
Next, press X/x to select “03” under
“C,” then press ENTER.
PROGRAM
ALL CLEAR
1. TITLE 0 2
2. TITLE
3. TITLE
4. TITLE
5. TITLE
6. TITLE
7. TITLE
–
– –
– –
– –
– –
– –
– –
Selected title and chapter
0 3
– –
T
01
02
03
04
05
x When playing a VIDEO CD or CD
For example, select track “02.”
Press X/x to select “02” under “T,” then
press ENTER.
Selected track
– –
– –
– –
– –
– –
– –
0:15:30
T
– –
01
02
03
04
05
PROGRAM
ALL CLEAR
1. TRACK 0 2
2. TRACK
3. TRACK
4. TRACK
5. TRACK
6. TRACK
7. TRACK
Total time of the programmed
tracks
6 To program other titles, chapters, or
tracks, repeat Steps 4 to 5.
The programmed titles, chapters, and
tracks are displayed in the select ed order.
To turn off the Control Menu
Press DISPLAY repeatedly until the Control
Menu is turned off.
To change or cancel a program
1 Follow Steps 1 through 3 of “Cre a ting
your own program (Program Play).”
2 In Step 4, select the program number of
the title, chapter, or track you want to
change or cancel using X/x, and press c.
3 Follow Step 5 for new programming. To
cancel a program, select “--” un der “T,”
then press ENTER.
To cancel all the titles, chapters, or
tracks in the programmed order
1 Follow Steps 1 through 3 of “Cre a ting
your own program (Program Play).”
2 Press X and select “ALL CLEAR.”
3 Press ENTER.
You can do Repeat Play or Shuffle Play of the
z
programmed titles, chapt ers, or trac ks by pr e ssi ng
REPEAT or SHUFFLE during Program Play. Or
activate “REPEAT” or “SHUFFLE” on the Control
Menu during Program Play.
z You can select “PROGRAM” directly by pressing
PROGRAM.
Playing Discs
7 Press H to start Program Play.
Program Play begins.
When the program ends, you can re start
the same program again by pr essing H.
To return to normal play
Press CLEAR, or select “OFF” in Step 3.
To play the same program again, select “ON”
in Step 3 and press H.
continued
,
45
Page 46
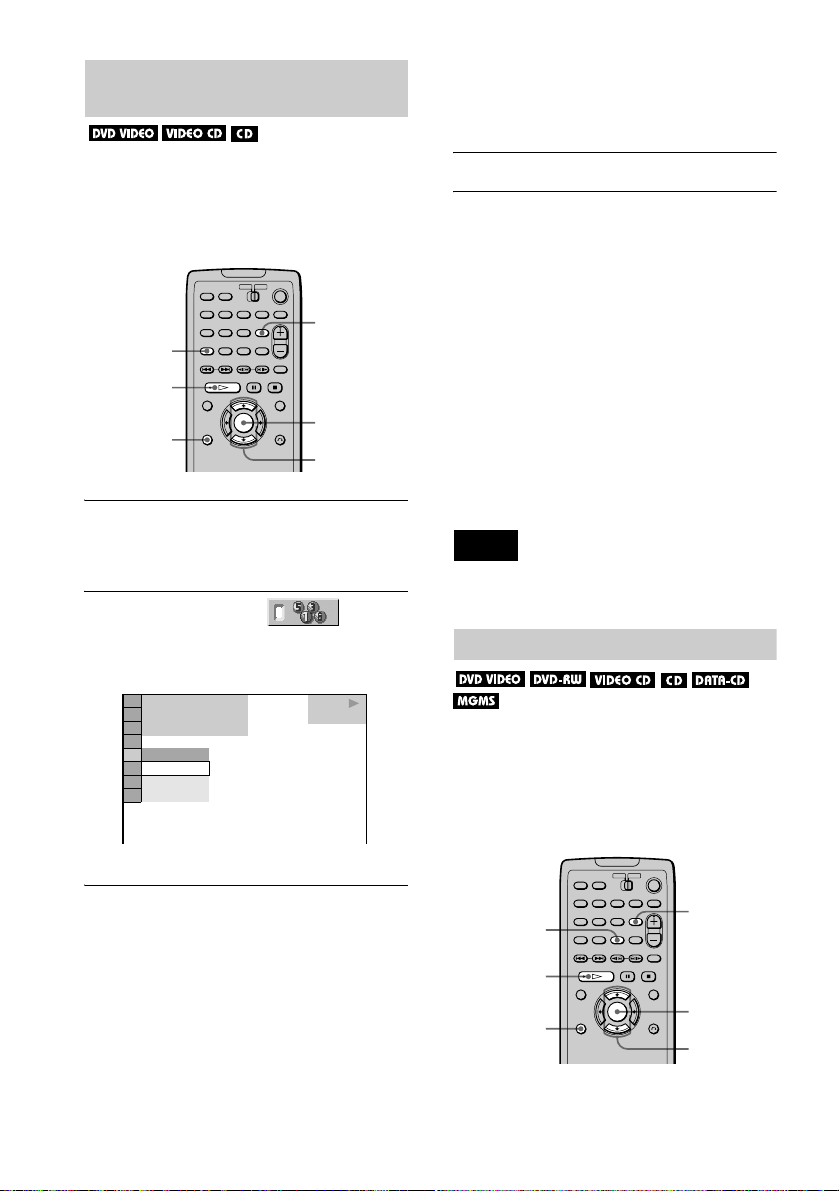
Playing in random order (Shuffle
Play)
x During Program Play
• ON: Shuffles titles or tracks selected
in Program Play and plays them in
random order.
You can have the player “shuffle” title s,
chapters, or tracks and play them in a random
order. Subsequent “shuffling” may produce a
different playing order.
CLEAR
SHUFFLE
H
DISPLAY
ENTER
X/x
1 Press DISPLAY twice (once for CD)
during playba ck .
The Control Menu is displayed.
2 Press X/x to select
(SHUFFLE), then press ENTER.
The options for “SHUFFLE” appear.
)
1 2 ( 2 7
1 8 ( 3 4
T
1 : 3 2 : 5 5
OFF
OFF
TITLE
CHAPTER
)
PLAY
DVD VIDEO
4 Press ENTER.
To return to normal play
Press CLEAR or select “OFF” in Step 3.
To turn off the Control Menu
Press DISPLAY repeatedly until the Control
Menu is turned off.
You can set the player to “s huffle” in sto p mode as
z
well. After pressing SHUFFLE to select the item you
want to set, press
z You can select “SHUFFLE” directly by pressing
SHUFFLE. Each time you press the button the ite m
changes.
Note
Up to 200 chapters in a disc can be played in random
order when “CHAPTER” is selected.
Playing repeatedly (Repeat Play)
You can play all of the titles or tracks on a
disc or “MG Memory Stick,” or a singl e title,
chapter, album, or track repeatedly.
You can use a combination of Shuffle or
Program Play modes.
H. Shuffle Play starts.
3 Press X/x to select the item .
x When playing a DVD VIDEO
• TITLE: Shuffles titles and plays
them in random order.
• CHAPTER: Shuffles chapters and
plays them in random orde r .
x When playing a VIDEO CD or CD
• TRACK: Shuffles tracks and plays
them in random order.
46
CLEAR
REPEAT
H
ENTER
DISPLAY
X/x
Page 47
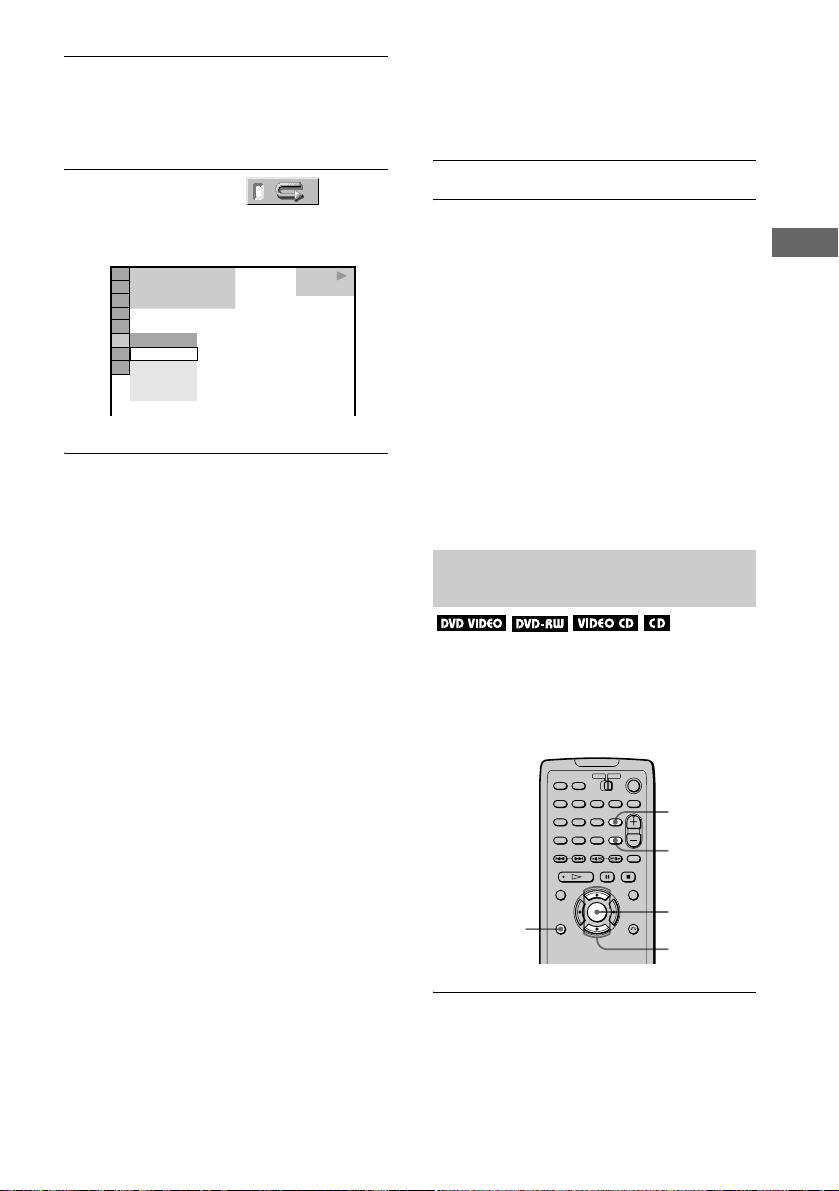
1 Press DISPLAY twic e (once for CD/DATA -
CD/ “MG Memory Stick”) during
playback.
The Control Menu is displayed.
• TRACK: Repeats the current track.
x During Program Play or Shuffle Play
• ON: Repeats Program Play or
Shuffle Play.
2 Press X/x to select
(REPEAT), then press ENTER.
The options for “REPEAT” appear.
1 2 ( 2 7
1 8 ( 3 4
T
1 : 3 2 : 5 5
OFF
OFF
DISC
TITLE
CHAPTER
)
)
PLAY
DVD VIDEO
3 Press X/x to select the item.
x When playing a DVD VIDEO
• DISC: Repeats all of the titles.
• TITLE: Repeats the current title on a
disc.
• CHAPTER: Repeats the current
chapter.
x When playing a DVD-RW
• DISC: Repeats all of the titles in the
selected type of titles (ORIGINAL/
PLAY LIST). (page 41)
• TITLE: Repeats the current title on a
disc.
• CHAPTER: Repeats the current
chapter.
x When playing a VIDEO CD or CD
• DISC: Repeats all of the tracks on a
disc.
• TRACK: Repeats the current track.
x When playing MP3 audio on a DATACD
• DISC: Repeats all of the albums on
a disc.
• ALBUM: Repeats the current album.
• TRACK: Repeats the current track.
x When playing ATRAC3 audio tracks
on an “MG Memory Stick”
• ALL: Repeats all of the tracks.
4 Press ENTER.
To return to normal play
Press CLEAR, or select “OFF” in Step 3.
To turn off the Control Menu
Press DISPLAY repeatedly until the Control
Menu is turned off.
z
You can set the player to “repeat” in stop mode as
well. After pressing REPEAT to select the item you
want to set, press
H. Repeat Play starts.
z You can select “REPEAT” direc tly by pr e ssing
REPEAT.
z You cannot repeat JPEG im ag e file s.
Repeating a specific portion (A-B
Repeat Play)
You can play a specific portion of a ti tle,
chapter, or track repeatedly. (This function is
useful when you want to memorize lyrics,
etc.)
)
CLEAR
A-B
DISPLAY
ENTER
X/x
1 Press DISPLAY twice (once for CD).
The Control Menu is displayed.
continued
,
Playing Discs
47
Page 48
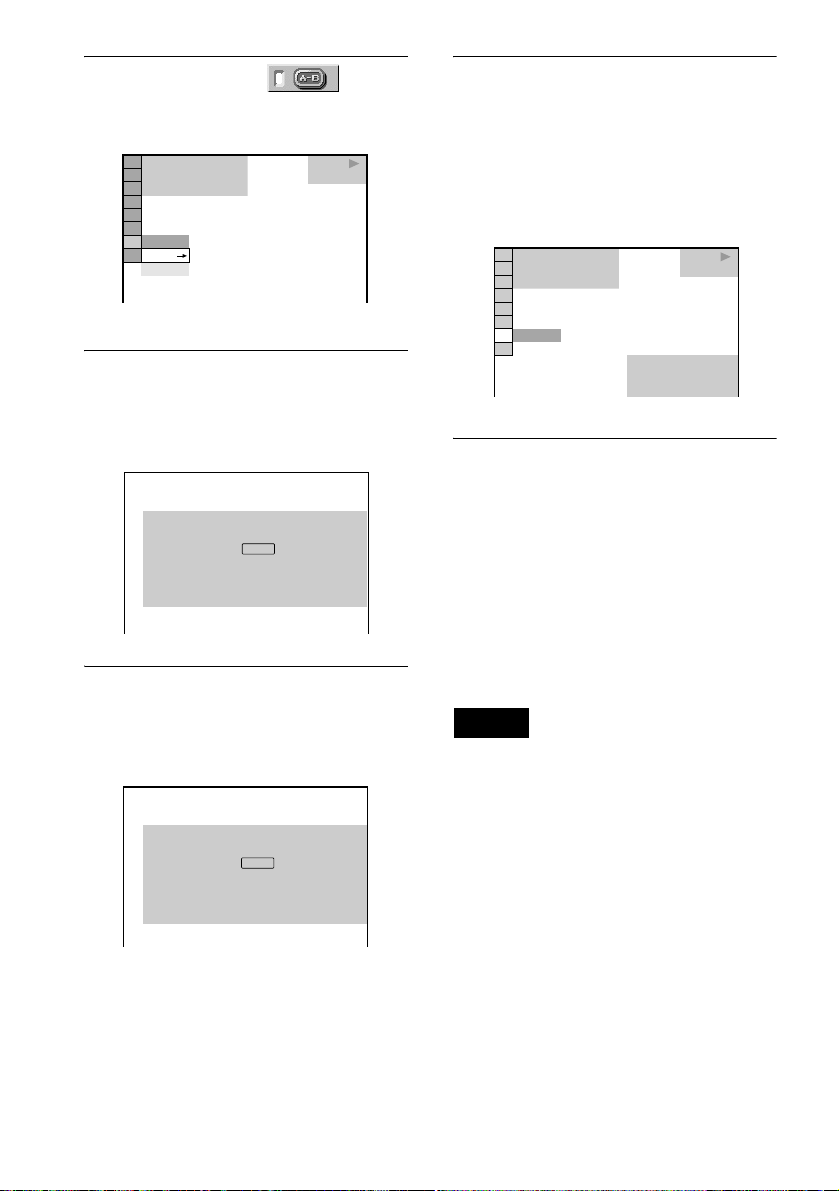
2 Press X/x to select (A-B
REPEAT), then press ENTER.
The options for “A-B REPEAT” appear.
1 2 ( 2 7
1 8 ( 3 4
T
1 : 3 2 : 5 5
OFF
SET
OFF
)
)
PLAY
DVD VIDEO
3 Press X/x to select “SET t,” then
press ENTER.
The “A-B REP EAT” setti ng display
appears.
A-B REPEAT
Set point A with
ENTER
.
4 During playback, when you find the
starting point (point A) of the portion to
be played repeatedly, press ENTE R.
The starting point (point A) is set.
A-B REPEAT
Set point B with .
ENTER
CHAPTER
TIME
A: 18 – 1 : 32 : 55
5 When you reach the ending point (point
B), press ENTER ag ain.
The set points are displayed and the
player starts repeating this specific
portion.
“A-B” appears on the front panel display
during A-B Repeat Play.
)
1 2 ( 2 7
)
1 8 ( 3 4
T
1 : 3 4 : 3 0
ON
To return to normal play
Press CLEAR, or select “OFF” in Step 3.
To turn off the Control Menu
Press DISPLAY repeatedly until the Control
Menu is turned off.
z
You can select “A-B REPEAT” directly by
pressing A-B. Press the button once to set the point A,
and press it again to set the point B.
Notes
• Yo u can set A-B Rep eat Play for only one specific
section.
• When you set A-B Repeat Play, the settings for
Shuffle Play, Repeat Play , and Pro g ram Play are
canceled.
• A-B Repeat Play does not work for titles containing
still pictures on a DVD-RW in VR mode.
• A-B Repeat Play does not work crossing different
titles (“ORIGINAL” or “PLAY LIST”) on a DVDRW in VR mode.
PLAY
DVD VIDEO
CHAPTER
TIME
A: 18 – 1 : 32 : 55
B: 18 – 1 : 34 : 30
48
Page 49
Searching for a Scene
yyy
y
Searching for a Particular
Point on a Disc or a “MG
Memory Stick” (Scan, Slow-
motion Play)
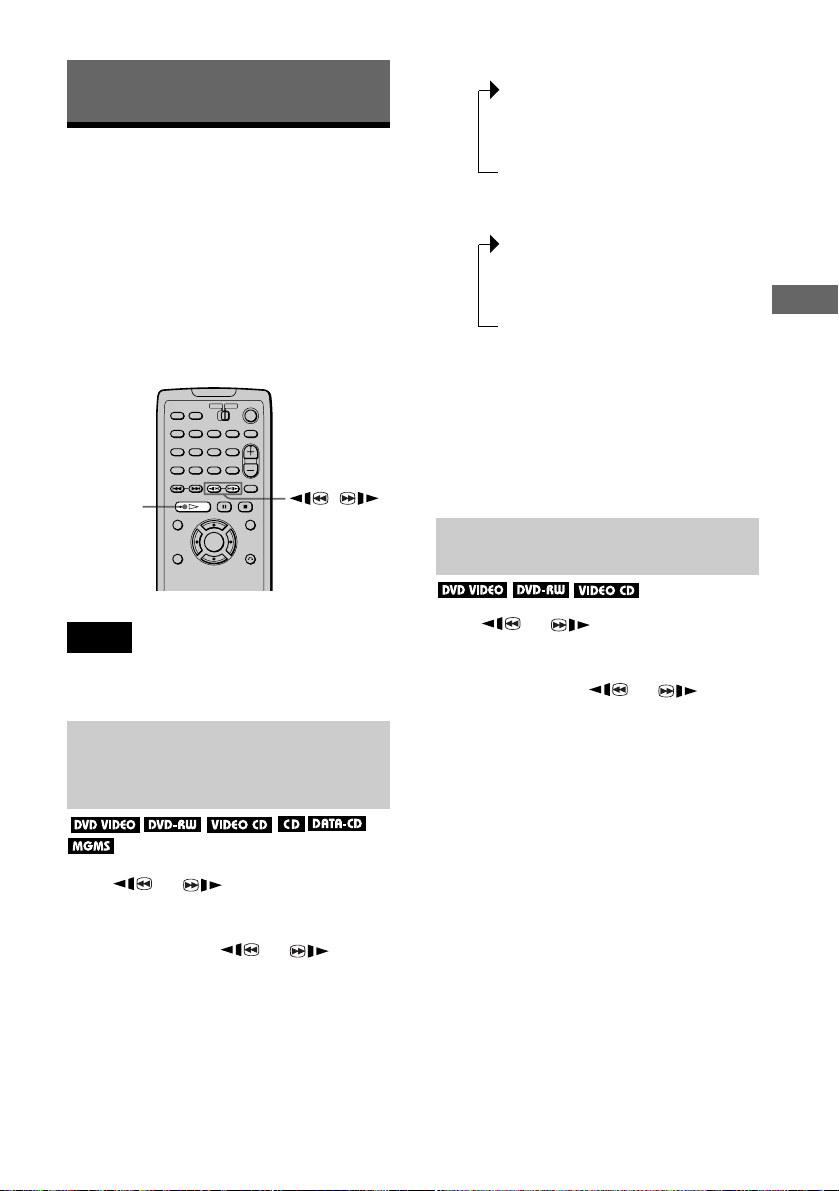
You can locate a particular point on a disc
quickly by monitoring the picture or playing
back slowly.
H
/
Playback direction
x2B (DVD VIDEO/CD only)
r
FF1M
r
FF2M
Opposite direction
x2b (DVD VIDEO only)
r
FR1m
r
FR2m
The “x2B”/ “x2b” playback speed is about
twice the normal speed.
The “FF2M”/ “FR2 m” playback speed is
faster than “FF1M”/ “FR1m.”
You cannot view JPEG image files in fast forward
z
or fast reverse.
Watching frame by frame (Slowmotion Play)
Searching for a Scene
Note
Depending on the DVD/VIDEO CD, you may not be
able to do some of the operations described.
Locating a point qu ickly by playing a
disc in fast forward or fast reverse
(Scan)
Press or while playing a disc.
When you find the point you want, press H
to return to normal speed.
Each time you press
scan, the playback speed changes. Three
speeds are available. With each press the
indication changes as follow s :
or during
Press or when the player is in
pause mode. To return to the normal speed,
press H.
Each time you press
Slow-motion Play, the playback speed
changes. Two speeds are avail able. With
each press the indication changes as follows:
Playback direction
SLOW2y y SLOW1y
Opposite direction (DVD VIDEO only)
SLOW2 y SLOW1
The “SLOW2 y”/ “SLOW2 ” playback
speed is slower than “SLOW1y”/
“SLOW1 .”
or during
49
Page 50
Searching for a T i tle/
Chapter/Track/Index/
x When playing a VIDEO CD with PBC
Playback
(SCENE)
Scene, etc. (Search mode)
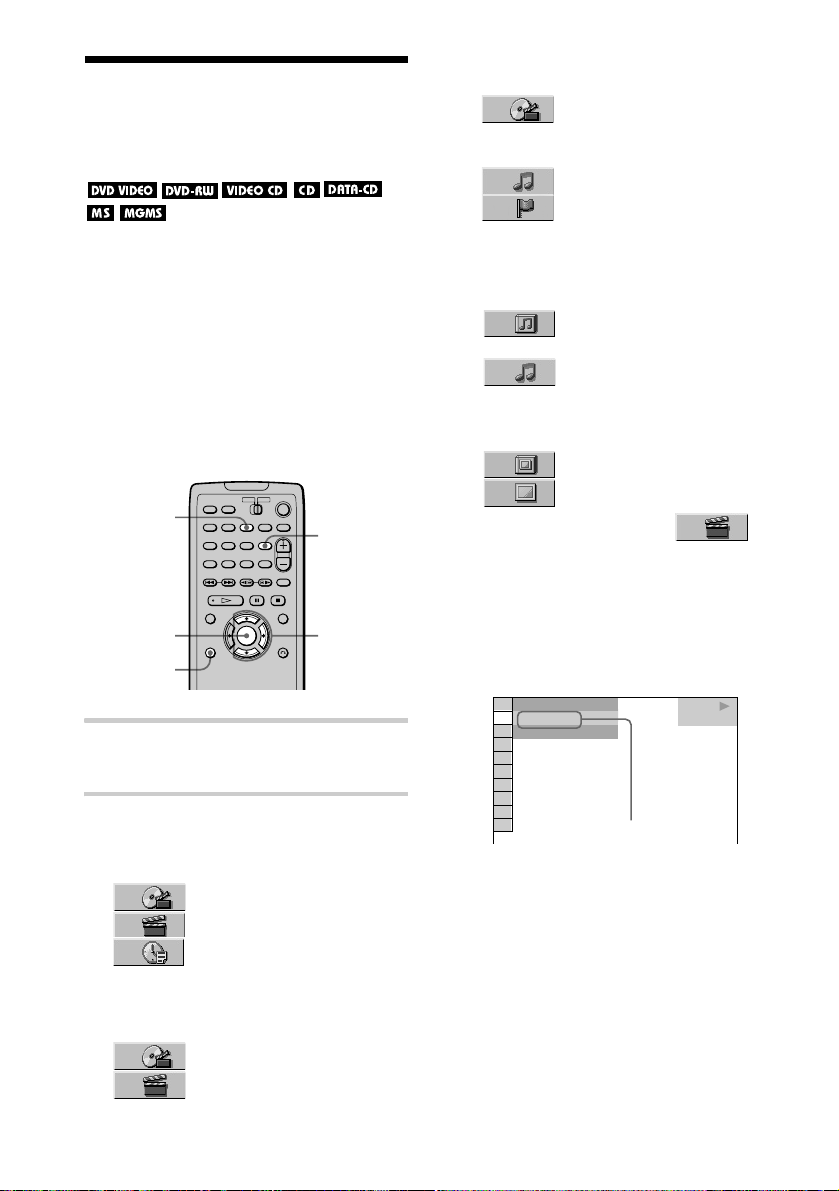
You can search a DVD disc by title or
chapter, and you can search a VIDEO CD or
CD by track, index, or scene. You can search
an audio track or image on a DATA-CD or
“Memory Stick” by al bum, track, or file.
As title and tracks are assigned unique
numbers on the di sc or “Memo ry Stick,” you
can select the desired one by entering its
number. Or, yo u can s ear ch for a scene using
the time code.
SEARCH
MODE
ENTER
DISPLAY
CLEAR
X/x/c
1 Press D ISPLAY.
The Control Menu appears.
x When playing a CD
(TRACK) or
(INDEX)
x When playing an audio on a DATA-CD
(MP3 audio track) or “MG Memory
Stick” (ATRAC3 audi o track)
(ALBUM) (DATA-CD only)
or
(TRACK)
x When viewing a JPEG image file on a
DATA-CD or “Memo ry Sti ck”
(ALBUM) or
(FILE)
Example: when you select
(CHAPTER)
)” is selected (** refers to a
“
** (**
number).
The number in parentheses indica tes the
total number of titles, chapters, tracks,
indexes, scenes, albums or f iles.
)
1 2 ( 2 7
1 8 ( 3 4
T
1 : 3 2 : 5 5
)
PLAY
DVD VIDEO
2 Press X/x to select the search
method.
x When playing a DVD VIDEO/DVD-RW
(TITLE),
(CHAPTER), or
(TIME/TEXT)
Select “TIME/TEXT” for “Time search”
(see below).
x When playing a VIDEO CD
(TRACK) or
(INDEX)
50
Selected item
Page 51
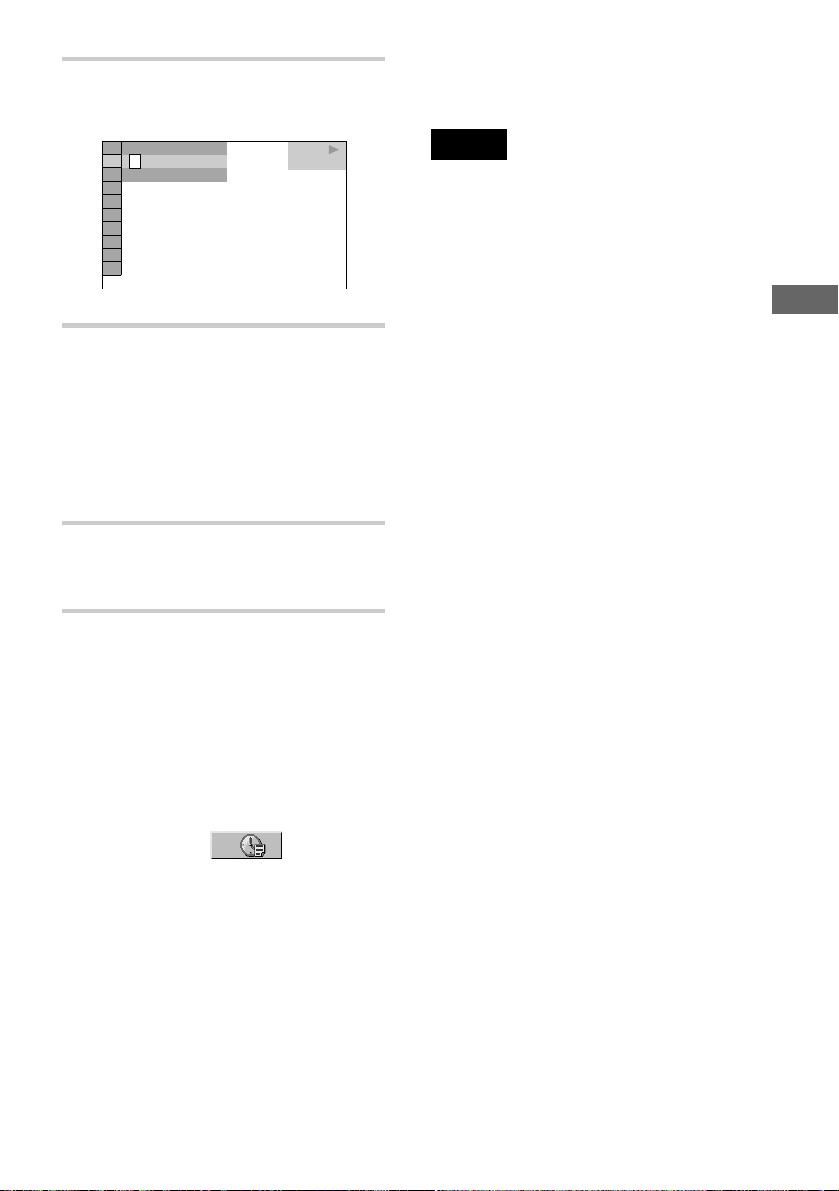
3 Press ENTER.
“** (**)” changes to “-- (**).”
When the Control Menu display is turned off, you
z
can search for a chapter, or track, etc. by pressing
SEARCH MODE followed by X/x/c and ENTER.
)
1 2 ( 2 7
(
3 4
– –
T
1 : 3 2 : 5 5
)
PLAY
DVD VIDEO
4 Select the number of the title, track,
scene, etc., you want by pressing
X/x to select the digit, following by
c to move the cursor.
If you make a mistake
Cancel the number by pressing CLEAR,
then select another number.
5 Press ENTER.
The player starts playback from the
selected number.
To turn off the Control Menu
Press DISPLAY repeatedly until the Control
Menu is turned off.
Notes
• When you search a DATA-CD or “Memory Stick,”
the number you should input is dif fer e nt f ro m the
numbers included in the album, track or file name.
Input the album, track or file num be r indic a ting the
recording order on the DATA-CD or “Memory
Stick.”
• You cannot search for a still image on a DVD-RW
in VR mode.
Searching for a Scene
To search for a scene using the time
code (Time search) (DVD VIDEO/DVDRW only)
1 In Step 2, select (TIME/
TEXT).
“T **:**:**” (playing time of the current
title) is selected.
2 Press ENTER.
“T
**:**:**
” changes to “T --:--:--.”
3 Input the time code using X/x/c, then
press ENTER.
For example, to find the scene at 2 hours,
10 minutes, and 20 seconds after the
beginning, just enter “2:10:20.”
51
Page 52
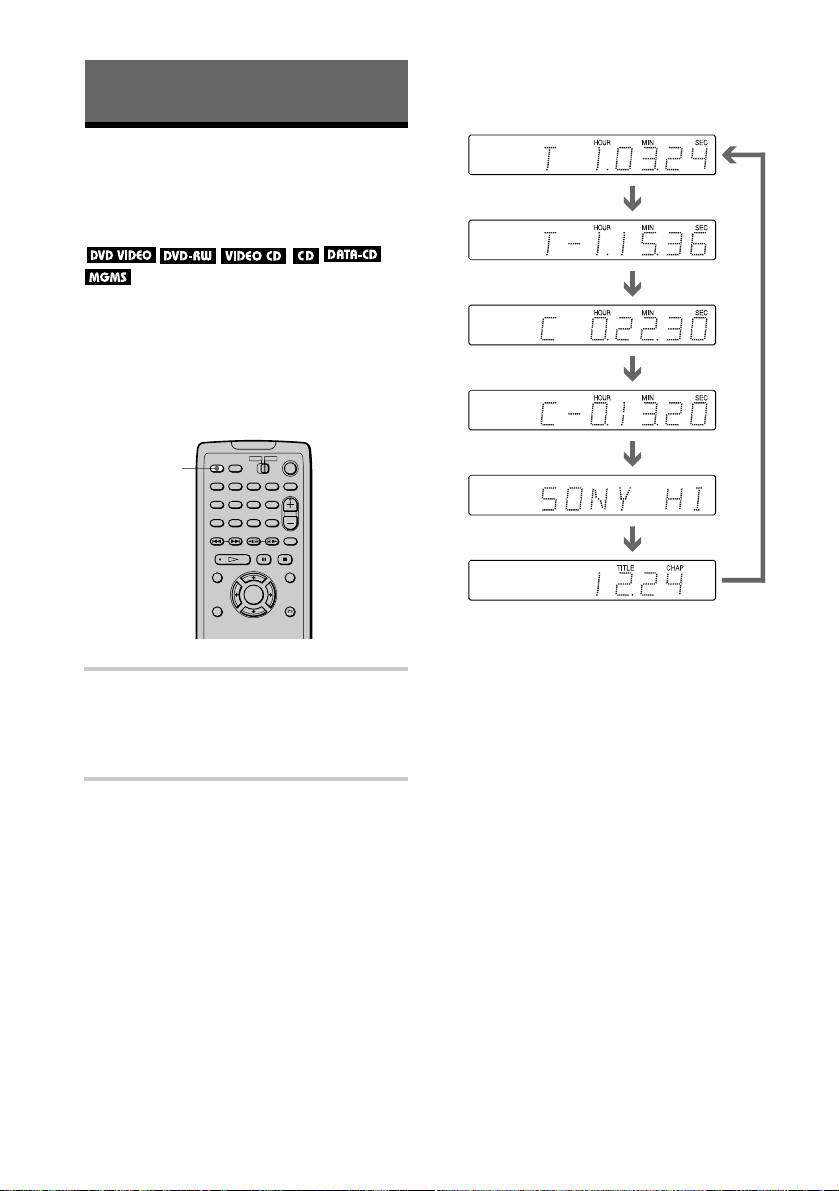
When playing a DVD VIDEO/DVD-RW
Viewing Information About the Disc
Viewing the Playing Time and Remaining Ti me on the Front Panel Display
You can check information about the disc,
such as the remaining time, current number
of title of a DVD VIDEO/DVD-RW, or track
of a CD or VIDEO CD, using the front panel
display (page 11).
TIME/TEXT
Playing time of the current title
Remaining time of the
current title
Playing time of the
current chapter
Remaining time of the
current chapter
Text
Current title and
chapter number
Automatically
Press TIME/TEXT.
Each time you press TIME/TEXT while
playing the disc, the display changes as
shown in the following charts.
52
Page 53
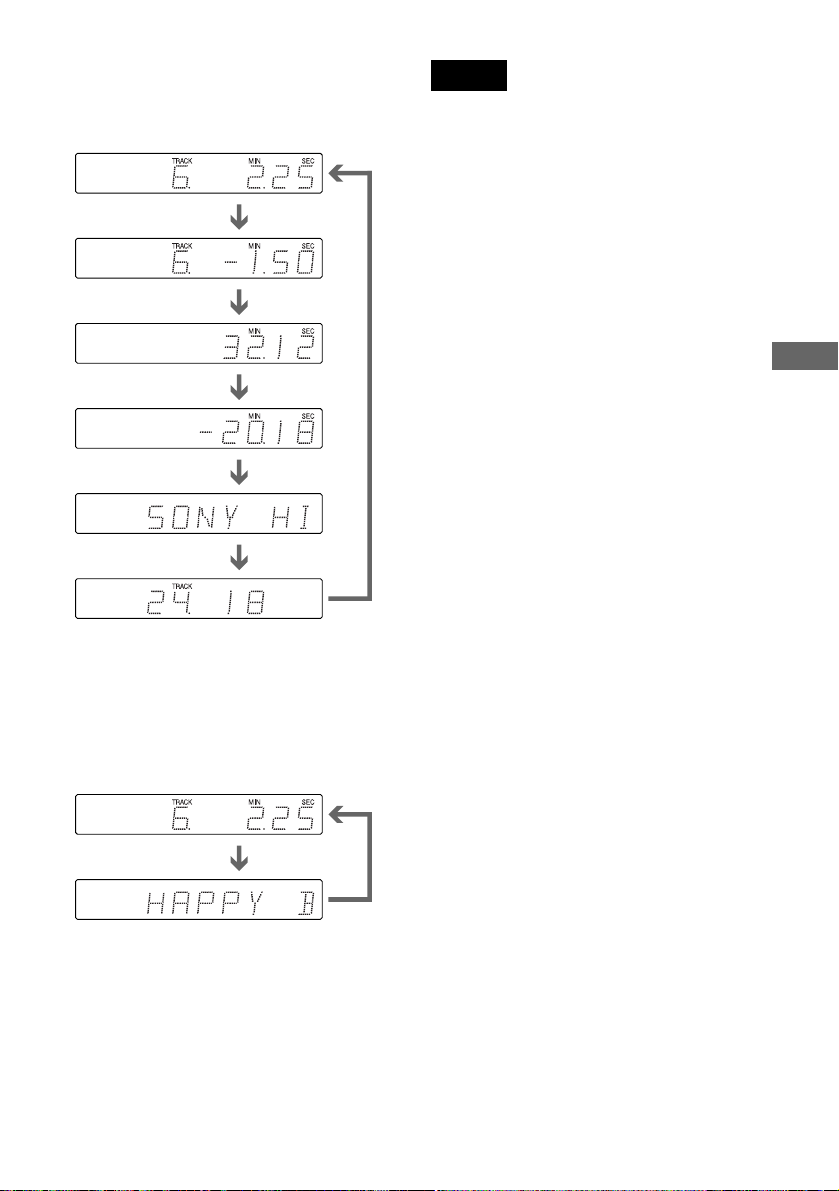
When playing a VIDEO CD (without
PBC functions) or CD
Track playing time and the current track
number
Remaining time of the
current track
Playing time of the
disc
Notes
• Depending on the type of disc being played and the
playing mode, the above mentioned disc information
may not be displayed.
• Playing time of MP3 audio track may not be
displaye d c orrectly.
Remaining time of
the disc
Text
Current track and
index number
Automatically
When playing a DATA-CD (MP3 audio
track) or “MG Memory Stick”
(ATRAC3 audio track)
Current track number and playing time
Name of the current
track
Viewing Information About the Disc
z When playing VIDEO CDs with PBC functions,
the scene number or the playing time is displayed.
z The playing time and remaining time of the current
chapter, title, tr a ck, scene, or disc will also appear on
your TV screen. See the following section “Checking
the Playing Time and Remaining Time ” for
instructions on how to read this inf or mation.
53
Page 54
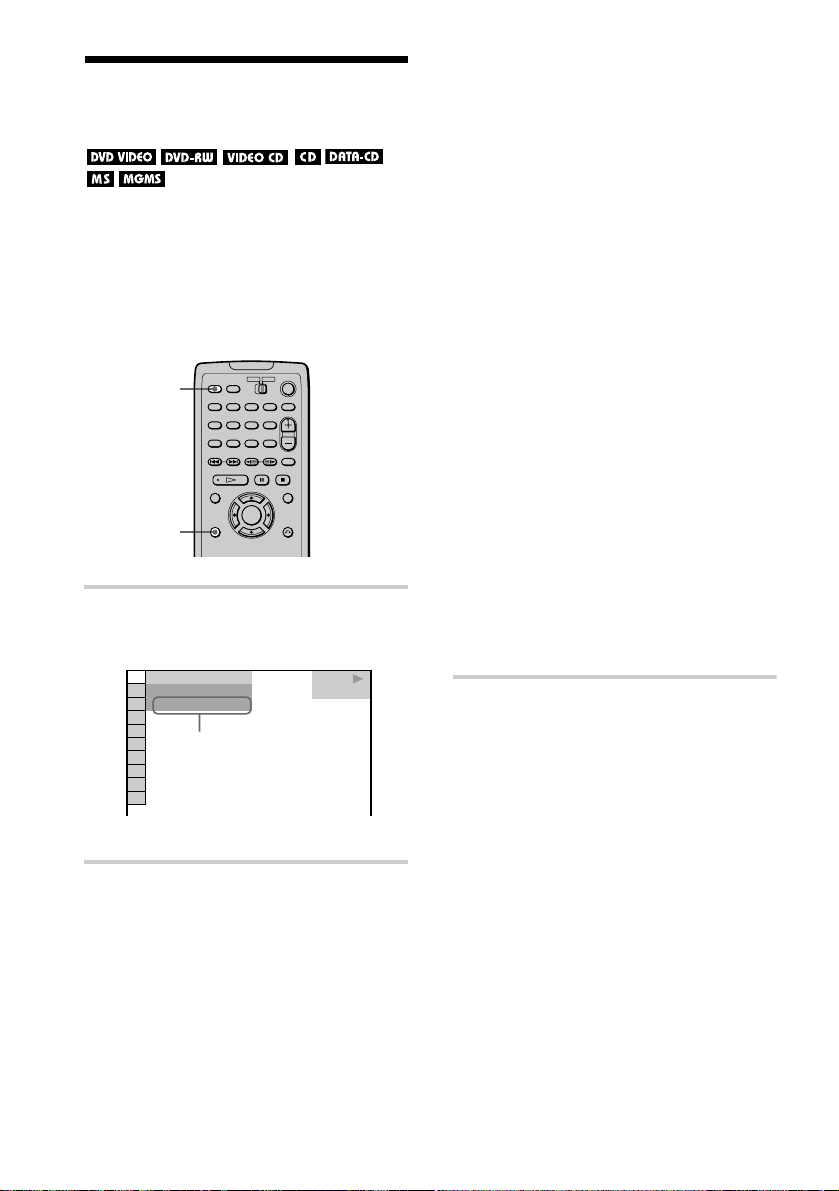
Checking the Playing Time and Remain ing Time
You can check the playing time and
remaining time of the current title , chapter, or
track, and the playing time or remaining time
of the disc, etc. Also, you can check the title
of music or image recorded on a disc or
“Memory Stick” such as DVD/CD texts.
TIME/
TEXT
DISPLAY
1 Press DISPLAY during playback.
The Control Menu is displayed.
)
1 2 ( 2 7
)
1 8 ( 3 4
T
1 : 3 2 : 5 5
Playing time of title or
track, etc.
PLAY
DVD VIDEO
•C
**:**:**
Playing time of the current chapter
•C–
**:**:**
Remaining time of the current
chapter
x When playing a VIDEO CD (with PBC
functions)
•
**:**
Playing time of the current scene
(minute:second)
x When playing a VIDEO CD (without
PBC functions) or CD
•T
**:**
Playing time of the current track
(minute:second)
•T–**:
**
Remaining time of the current track
•D
**:**
Playing time of the current disc
•D–
**:**
Remaining time of the current disc
x When playing a DATA-CD (MP3
audio) or “MG Memor y Stick” (ATRAC3
audio track)
•
****:**
Playing time of the current track
(minute:second)
To turn off the Control Menu
Press DISPLAY repeatedly until the Control
Menu is turned off.
z
When viewing a JPEG image file on a DATA-CD
or “Memory Stick,” recorded date will be dis played.
2 Press TIME/TEXT repeatedly to
change the time information.
The display and the ki nds of time that you
can change depend on the disc you are
playing.
x When playing a DVD VIDEO/DVD-RW
•T
**:**:**
Playing time of the current title
(hour:minute:second)
•T–**:**:
Remaining time of the current title
54
**
Checking the DVD/CD text
Press TIME/TEXT repeatedly in Step 2. If a
text (title of music or image on a disc or
“Memory Stick”) is recorded, the text
appears on the front panel display or TV
screen. If no text is recorded, “NO TEXT”
appears.
Page 55
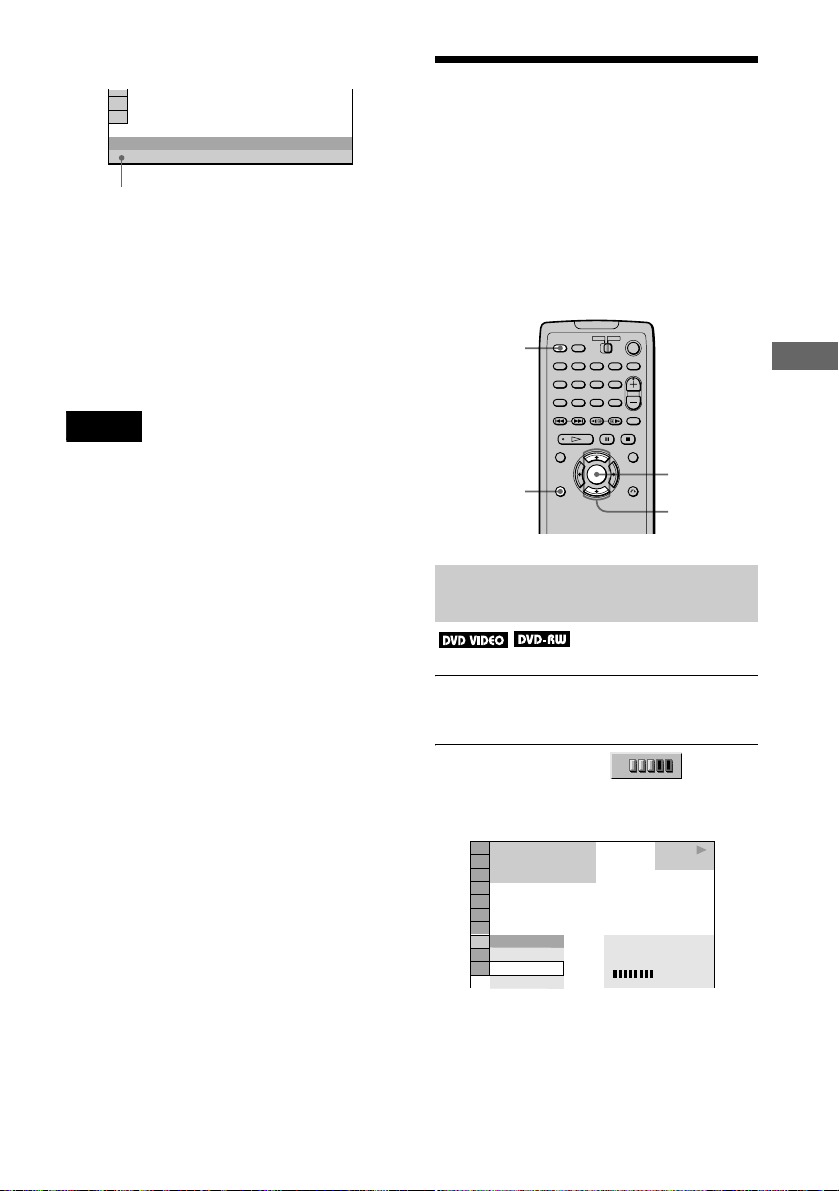
Checking the Play
TIME/TEXT
BRAHMS SYMPHONY NO – 4
Text (The track or file name is dis play ed
when playing a DATA-CD or “Memory
Stick.”)
z If the text does not fit on a single line, you can see
the entire text by watching it scroll across the fron t
panel display.
z You can select the time and text directly by
pressing TIME/TEXT.
Notes
• Only letters of the alphabet can be displayed.
• This player can only display the first level of text,
such as the title .
Information
You can check information suc h as t he bit
rate or the DVD layer that is being played.
While playing a disc, an approximate bit rate
of the playback picture is always displayed as
Mbps (Mega bit per second) and the audio as
kbps (kilo bit per second).
TIME/TEXT
Viewing Information About the Disc
ENTER
DISPLAY
X/x
Checking the play information of
DVD (ADVANCED)
1 Press DISPLAY dur ing playback.
The Control Menu is displayed.
2 Press X/x to select
(ADVANCED), then press ENTER.
The options for “ADVANCED” appear.
)
1 2 ( 2 7
1 8 ( 3 4
T
1 : 3 2 : 5 5
BIT RATE
OFF
BIT RATE
LAYER
)
PLAY
DVD VIDEO
BIT RATE
05
continued
384
10
kbps
Mbps
,
55
Page 56
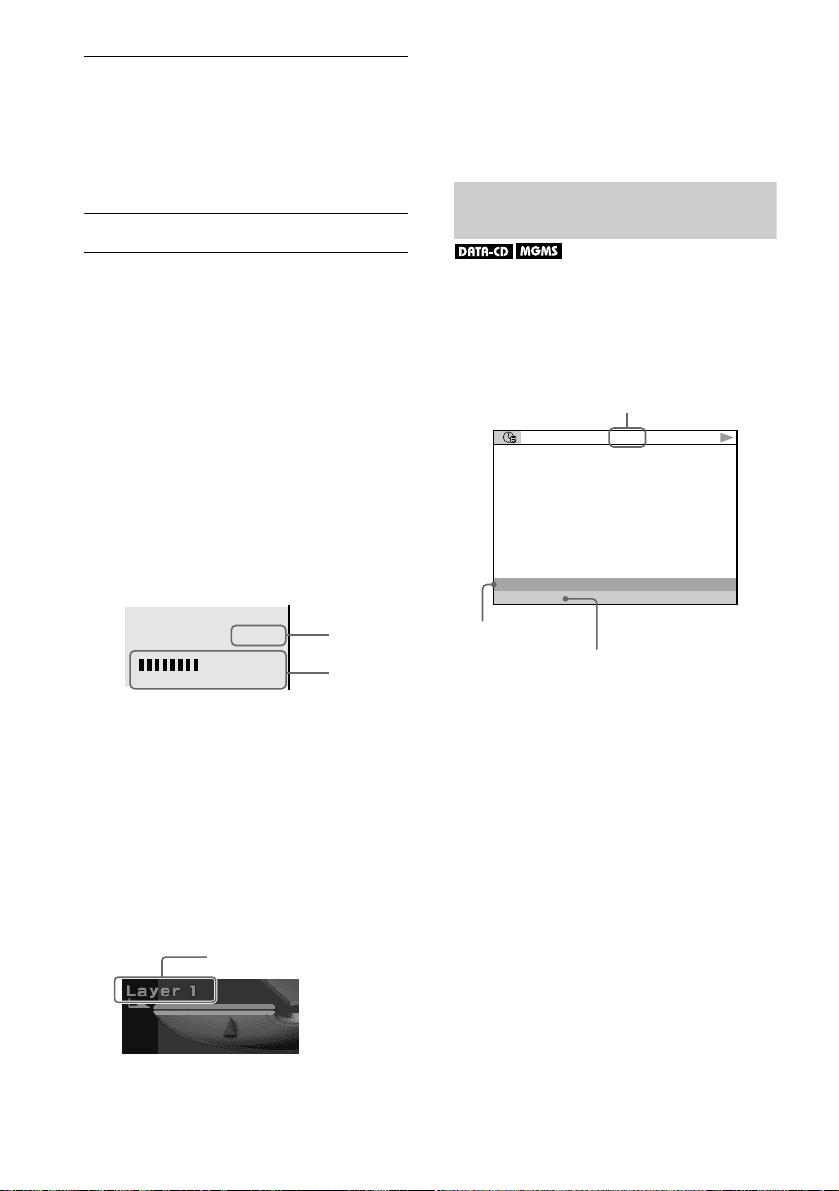
3 Press X/x to select items.
For each item, please refer to “Displays
of each item.”
• BIT RATE: displays the bit rate.
• LAYER: displays the layer and the
pick-up point.
4 Press ENTER.
To close the ADVANCED window
Select “OFF” in Step 3.
To turn off the Control Menu
Press DISPLAY repeatedly until the Control
Menu is turned off.
Display of each item
By pressing DISPLAY repeatedly, you can
display either “BIT RATE” or “LAYER,”
whichever was selected in “ADVANCED.”
If it is a dual-layer DVD, the player indicates
which layer is being read (“ La ye r 0” or
“Layer 1”).
For details on the layers, see page 97 (DVD
VIDEO).
Checking the play information of
DATA-CD or “MG Memory S tick”
By pressing TIME/TEXT while playing MP3
audio track on a DATA-CD or ATRAC3
audio track on an “MG Me mory Stick” you
can display the audio bit rate (the amount of
data per second of the current audio).
Bit rate
T 17:30 128k PLAY
BIT RATE
BIT RATE
05
384
10
kbps
Mbps
Bit rate refers to the amount of vid e o/audio
data per second in a disc. The higher the bit
rate, the larger the amount of data. When the
bit rate level is high, there is a large amount
of data. However, this do es not always mean
that you can get higher quality pictures or
sounds.
LAYER
Appears when the DVD
has dual layers
Indicates the approximate point where the
disc is playing.
56
Audio
Video
KARAOKE
RIVER SIDE
Album name
Track/file name
Page 57
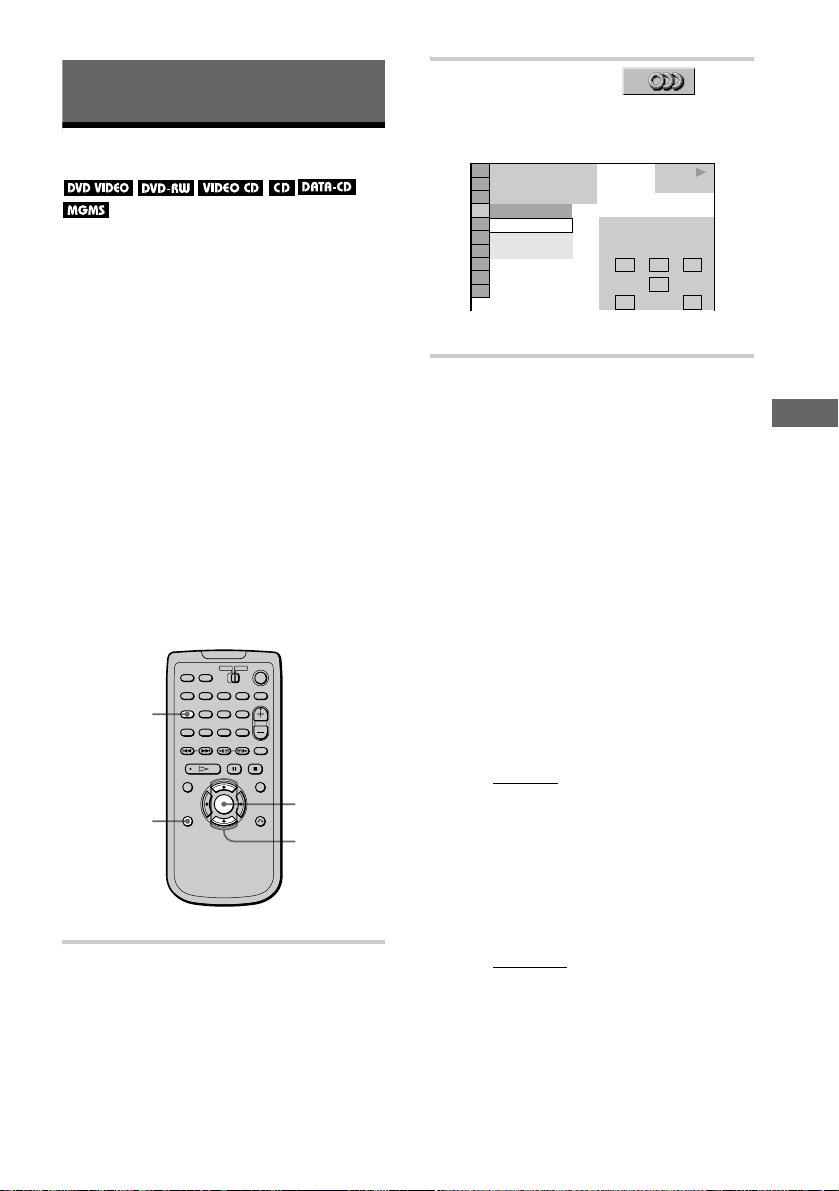
Sound Adjustments
Changing the Sound
If the DVD VIDEO is recorded with
multilingual tracks, you can select the
language you want while playing the di sc.
If the DVD VIDEO is recorded in multiple
audio formats (PCM, Dolby Digital, or DTS),
you can select the audio format you want
while playing the disc.
With stereo CDs, DATA-CDs, VIDEO CDs
or “MG Memory Stick,” you can sel ect the
sound from the right or left channel and listen
to the sound of the selected channel through
both the right and left speakers. (In this case,
the sound loses its stereo effect.) For
example, when playing a disc containing a
song with the voca ls on the rig ht c hannel and
the instruments on the left channel, yo u can
select the left channel and hear the
instruments from both speakers.
AUDIO
ENTER
DISPLAY
X/x
1 Press DISPLAY during playback.
The Control Menu is displayed.
2 Press X/x to select
(AUDIO), then press ENTER.
The options for “AUDIO” appear.
)
1 2 ( 2 7
)
1 8 ( 3 4
T
1 : 3 2 : 5 5
1: ENGLISH
1: ENGLISH
2: ENGLISH
FRENCH
3:
PROGRAM FORMAT
DOLBY DIGITAL 3/2.1
LRC
LS RS
PLAY
DVD VIDEO
LFE
3 Press X/x to select the desired
audio signal.
x When playing a DVD VIDEO
Depending on the DVD VIDEO, the
choice of language varies.
When 4 digits are displayed, they
represent the language code. Refer to the
language code list on page 101 to see
which language the code represents.
When the same language is displayed two
or more times, the disc is recorded in
multiple audio formats .
x When playing a DVD-RW
The types of sound tracks recorded on a
disc are displayed. The default setting is
underlined.
Example:
• 1: MAIN
• 1: SUB (sub sound)
• 1: MAIN+SUB (main and sub
sound)
x When playing a VIDEO CD, CD, DATACD (MP3 audio) or “MG Memory Stick”
(ATRAC3 audio trac k)
The default setting is underlined.
• STEREO
sound
• 1/L: The sound of the left channel
(monaural)
• 2/R: The sound of the right c h an ne l
(monaural)
(main sound)
: The standard stereo
Sound Adjustments
continued
,
57
Page 58
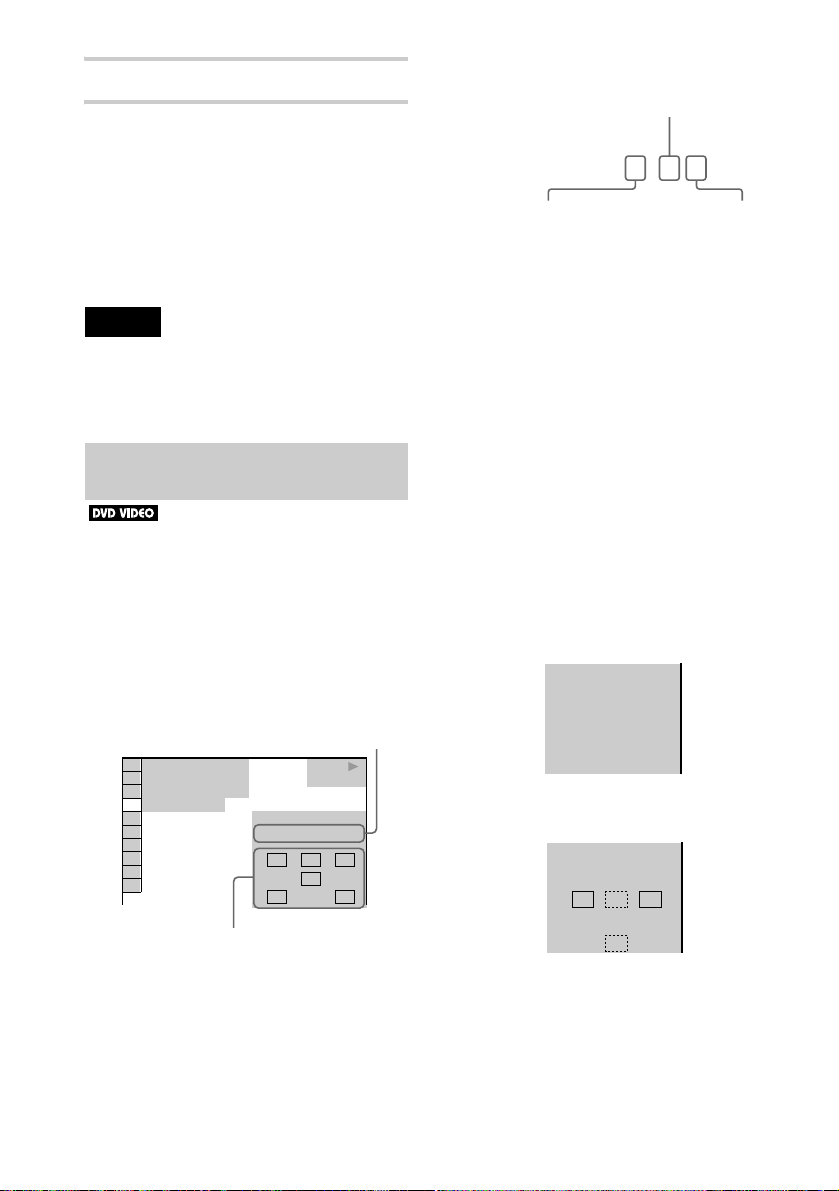
4 Press ENTER.
For Dolby Digital 5. 1c h :
Rear component 2
To turn off the Control Menu
Press DISPLAY repeatedly until the Control
Menu is turned off.
z You can select “AUDIO” directly by pressing
AUDIO. Each time you press the button, the item
changes.
Notes
• For discs not in multiple audio format, you cannot
change the sound.
• While playing a DVD, the sound may change
automatically.
Displaying the audio informat ion of
the disc
When you select “AUDIO,” the channels
being played are displayed on the screen.
For example, in Dolby Digital format,
multiple signals ranging from monaural to
5.1 channel signals can be recorded on a
DVD VIDEO. Depending on the DVD
VIDEO, the number of the recorded channels
may differ.
Current audio format*
)
1 2 ( 2 7
)
1 8 ( 3 4
T
1 : 3 2 : 5 5
1: ENGLISH
Currently playing program format**
PROGRAM FORMAT
DOLBY DIGITAL 3/2.1
LRC
LS RS
PLAY
DVD VIDEO
LFE
DOLBY DIGITAL
Front component 2 +
Center component 1
3 / 2 . 1
LFE (Low Frequency
Effect) component 1
**The letters in the program format display
mean the following sound component.
L: Front (left)
R: Front (right)
C: Center
LS: R ear (left)
RS: Rear (right)
S: Rear (monaural): The rear
component of the Dolby Surround
processed signal and the Dolby
Digital signal
LFE: Low Frequency Effect signal
The display examples are as follows:
• PCM (stereo)
PROGRAM FORMAT
PCM 48kHz 24bit
• Dolby Surround
PROGRAM FORMAT
DOLBY DIGITAL 2/0
DOLBY SURROUND
L RC
S
*“PCM,” “DTS,” or “DOLBY DIGITAL” is
displayed.
In the case of “DOLBY DIGITAL,” the
channels in the playing track are displayed
by numbers as follows:
58
Page 59
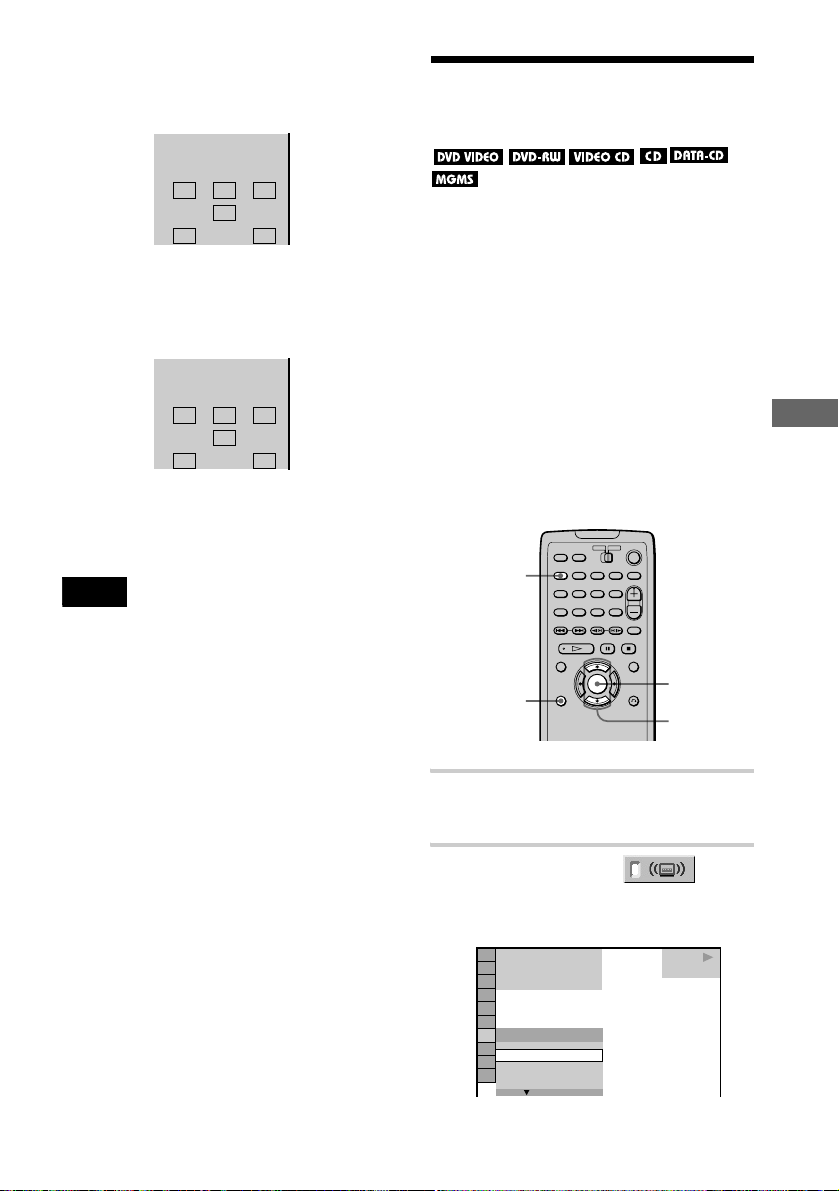
• Dolby Digital 5.1ch
“LFE” is enclosed in a solid line even if an
LFE signal component is not output.
PROGRAM FORMAT
DOLBY DIGITAL 3/2.1
LRC
LFE
LS RS
•DTS
“LFE” is enclosed in a solid line even if an
LFE signal component is not output.
PROGRAM FORMAT
DTS 3/2.1
LRC
LFE
LS RS
z When the signal contains rear signal components
such as “LS,” “RS” or “S,” the Surround effect is
enhanced (page 59).
Note
If “DTS” is set to “OFF” in “AUDIO SETUP,” the
DTS track selection option will not appear on the
screen even if the disc contains DTS tracks (page 92).
TV Virtual Surrou nd Settings (TVS )
When you connect a stereo TV or 2 front
speakers, TV V irtual Surro und lets yo u enjoy
surround sound effect s by using sound
imaging to create virtual rear speakers from
the sound of the front speakers (L: left, R:
right) without using actual rear speakers.
This function is designed to work with the
AUDIO OUT L/R jacks. Note that if you
select one of the TVS settings while playing
a DVD, the player does not output the Dolby
Digital signals from the DIGITAL OUT
(OPTICAL) jack (w he n yo u se t “D O LBY
DIGITAL” in “AUDIO SETUP” to “DPCM”) (page 92).
SURROUND
DISPLAY
ENTER
X/x
Sound Adjustments
1 Press DISPLAY during playback.
The Control Menu appears.
2 Press X/x to select (TVS),
then press ENTER.
The options for “TVS” appear.
)
1 2 ( 2 7
)
1 8 ( 3 4
T
1 : 3 2 : 5 5
OFF
OFF
TVS DYNAMIC
TVS WIDE
PLAY
DVD VIDEO
continued
,
59
Page 60
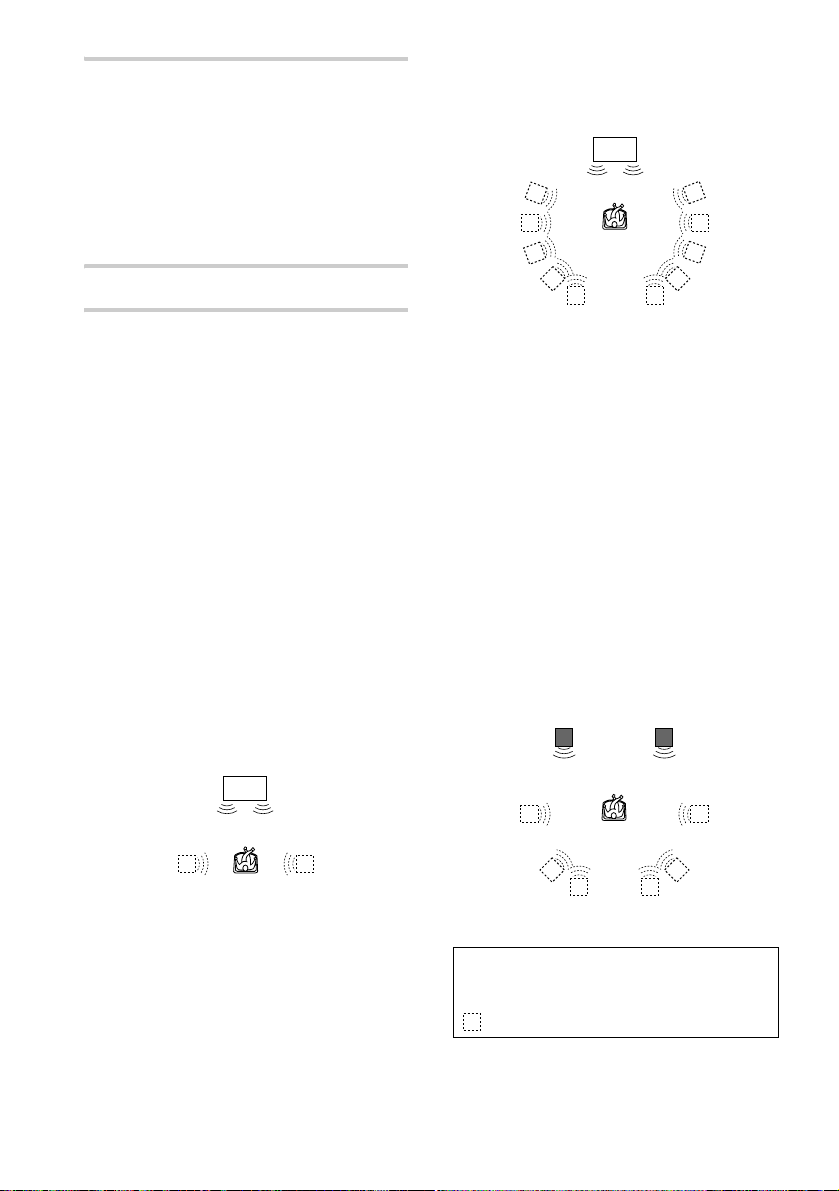
3 Press X/x to select one of the TVS
(TV Virtual Surround) sounds.
Refer to the explanations given for each
item.
• TVS DYNAMIC
• TVS WIDE
• TVS NIGHT
• TVS STANDARD
4 Press ENTER.
This mode is effective when the distance
between the front L and R speakers is sho r t,
such as with built-in speakers on a stereo TV.
TV
To reset the TVS setting
In Step 3, select “OFF.”
To turn off the Control Menu
Press DISPLAY repeatedly until the Control
Menu is turned off.
TVS DYNAMIC
Uses sound imaging to create virtual rear
speakers from the sound of the front speakers
(L, R) without using actual re ar speakers. The
virtual speakers are reproduced as sho wn in
the illustration below. The sound imaging
effect is distinct and clearly reproduces each
aural element of the audio tr ack.
This mode is effective when the dist ance
between the front L and R speakers is short,
such as with built-in speakers on a stereo TV.
TV
TVS WIDE
Uses sound imaging to create virtual rear
speakers from the sound of the front speakers
(L, R) without using actual re ar speakers. The
virtual speakers are reproduced as sho wn in
the illustration below. This gives the sound
an expanded effect that fills the area
surrounding the listener.
TVS NIGHT
The large sounds, such as explosions, are
suppressed, but the quieter sounds are
unaffected. This feature is useful wh en you
do not want to disturb other people but still
want to hear the dialog and enjoy the
surround sound effects of “TVS WIDE.”
TVS STANDARD
Uses sound imaging to create virtual rear
speakers from the sound of the front speakers
(L, R) without using actual rear speakers. The
virtual speakers are reproduced as shown in
the illustration below. Use this setting when
you want to use TVS with 2 separate speakers
and retain the sound quality .
LR
L: Left front speaker
R: Right front speaker
: Virtual speakers
60
Page 61

z You can select “TVS” directly by pressing
SURROUND. Each time you press the button, the
item changes. If you select any setting other than
“OFF,” the SURROUND indicator on the player li ghts
up.
Notes
• When you select an effect, the sound cuts off for a
moment.
• When the playing signal does not contain a signal for
the rear speakers (page 58), the surround effects may
be difficult to hear.
• When you select one of the TVS modes, turn off the
surround setting of the connected TV or amplifi er
(receiver).
• Make sure that your listening position is between
and at an equal distance from your speakers, and that
the speakers are located in similar surroundings.
Otherwise, the TVS effect may be hard to discern.
• “TVS NIGHT” works only with Dolby Digital
audio. However, not all discs will respond to th e
“TVS NIGHT” function in the same way.
• If you set “DOLBY DIGITAL” to “DOLBY
DIGITAL,” or “DTS” to “ON” (page 91), so und will
come from the DIGITAL OUT (OPTICAL) jack but
it will not have the TVS effec t.
Sound Adjustments
61
Page 62
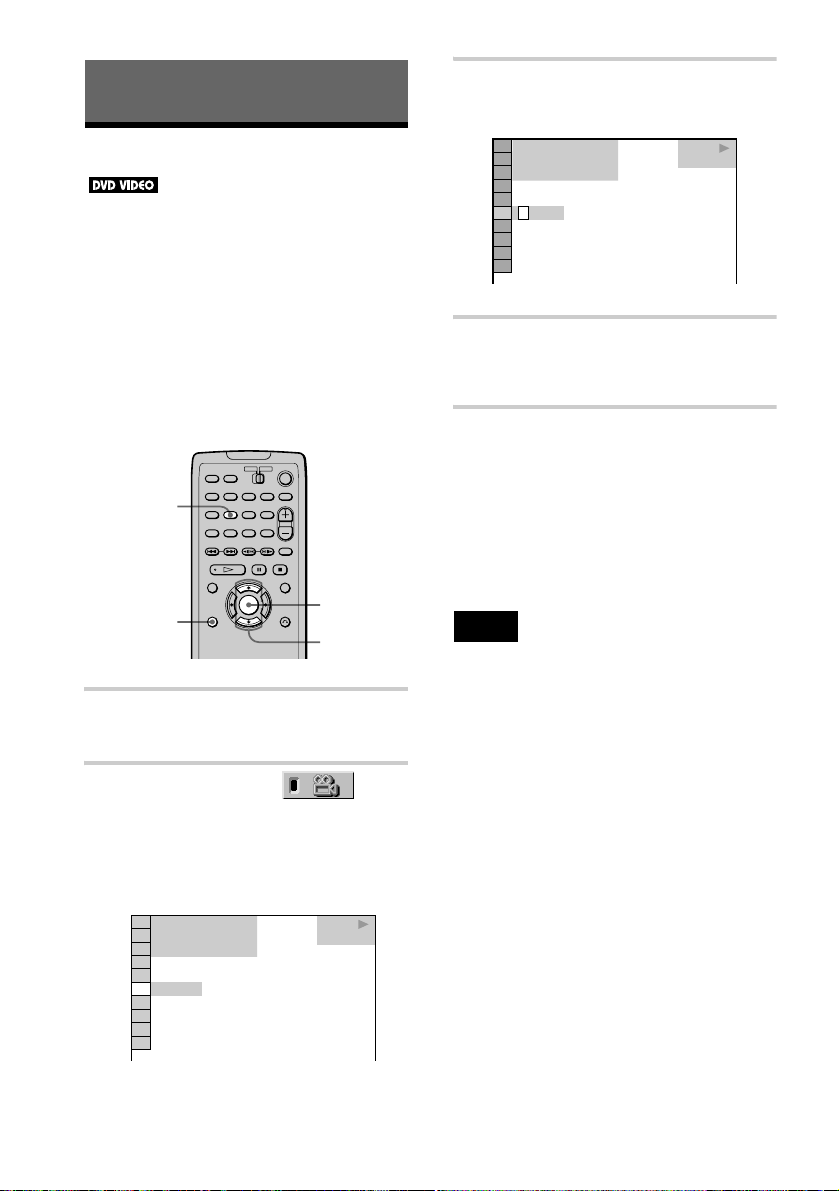
Enjoying Movies
Changing the Angles
If various angles (multi-angles) for a scene
are recorded on the DVD VIDEO, “ANGLE”
appears on the front panel display. This
means that you can change the viewing angle.
For example, while playing a scene of a train
in motion, you can di splay the view from
either the front of the train, the left window of
the train, or from the right window without
having the train’s movement interrupted.
ANGLE
ENTER
DISPLAY
X/x
1 Press DISPLAY during playback.
The Control Menu appears.
3 Press c or ENTER.
The number of the angle changes t o “-. ”
1 2 ( 2 7
1 8 ( 3 4
T
1 : 3 2 : 5 5
)
–
( 9
)
)
PLAY
DVD VIDEO
4 Select the angle number using X/x,
then press ENTER.
The scene changes to the selected angle.
To turn off the Control Menu
Press DISPLAY repeatedly until the Control
Menu is turned off.
z You can select the angle directly by pr es si n g
ANGLE. Each time you press the button, the angle
changes.
Note
Depending on the disc, you may not be able to change
the angles even if multi-angles are recorded on the
disc.
2 Press X/x to select
(ANGLE).
The number of the angle appear s .
The number in parentheses indicat es the
total number of angles.
)
1 2 ( 2 7
)
1 8 ( 3 4
T
1 : 3 2 : 5 5
)
1
( 9
62
PLAY
DVD VIDEO
Page 63
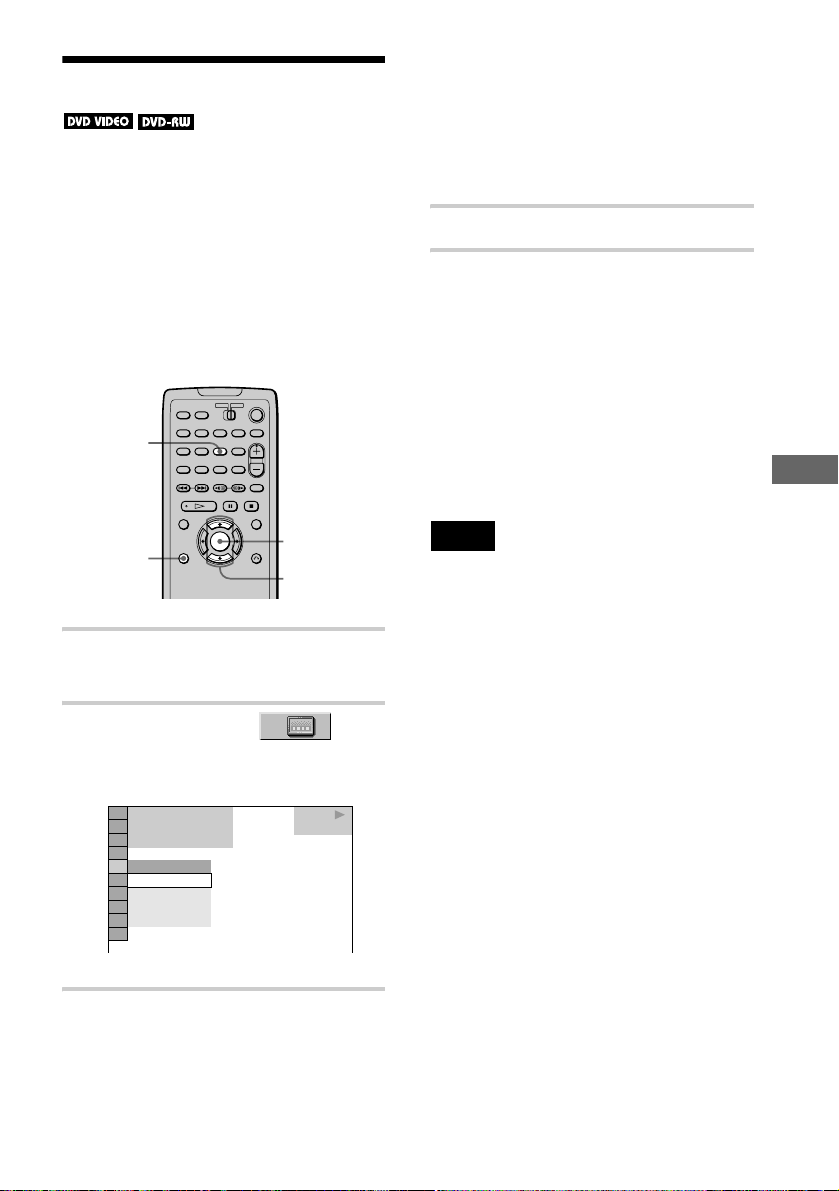
Displaying the Subtitles
If subtitles are recorded on the disc, you can
turn the subtitles on and off whenever you
want while playing. If multilingual subtitles
are recorded on the disc, you can change t he
subtitle language wh ile playing, and tur n it on
or off whenever you want. For example, you
can select the language you want to practice
and turn the subtitles on for better
understanding.
SUBTITLE
When 4 digits are displayed, they
indicate the language code. Refer to the
language code list on page 101 to see
which language the code represents.
x When playing a DVD-RW
Select “ON.”
4 Press ENTER.
To cancel the SUBTITLE setting
Select “OFF” in Step 3.
To turn off the Control Menu
Press DISPLAY repeatedly until the Control
Menu is turned off.
You can select “SUBTITLE” directly by pressing
z
SUBTITLE. Each time you press the button, the item
changes.
Enjoying Movies
DISPLAY
ENTER
X/x
1 Press DISPLAY during playback.
The Control Menu appears.
2 Press X/x to select
(SUBTITLE), then press ENTER.
The options for “SUBTITLE” appear.
)
1 2 ( 2 7
)
1 8 ( 3 4
T
1 : 3 2 : 5 5
OFF
OFF
1: ENGLISH
2:
FRENCH
3: SPANISH
PLAY
DVD VIDEO
3 Press X/x to select the setting.
x When playing a DVD VIDEO
Select the language.
Depending on the DVD VIDEO, the
choice of language varies.
Note
Depending on the disc, you may not be able to change
the subtitles even if multilingual subtitles are recorded
on it.
63
Page 64
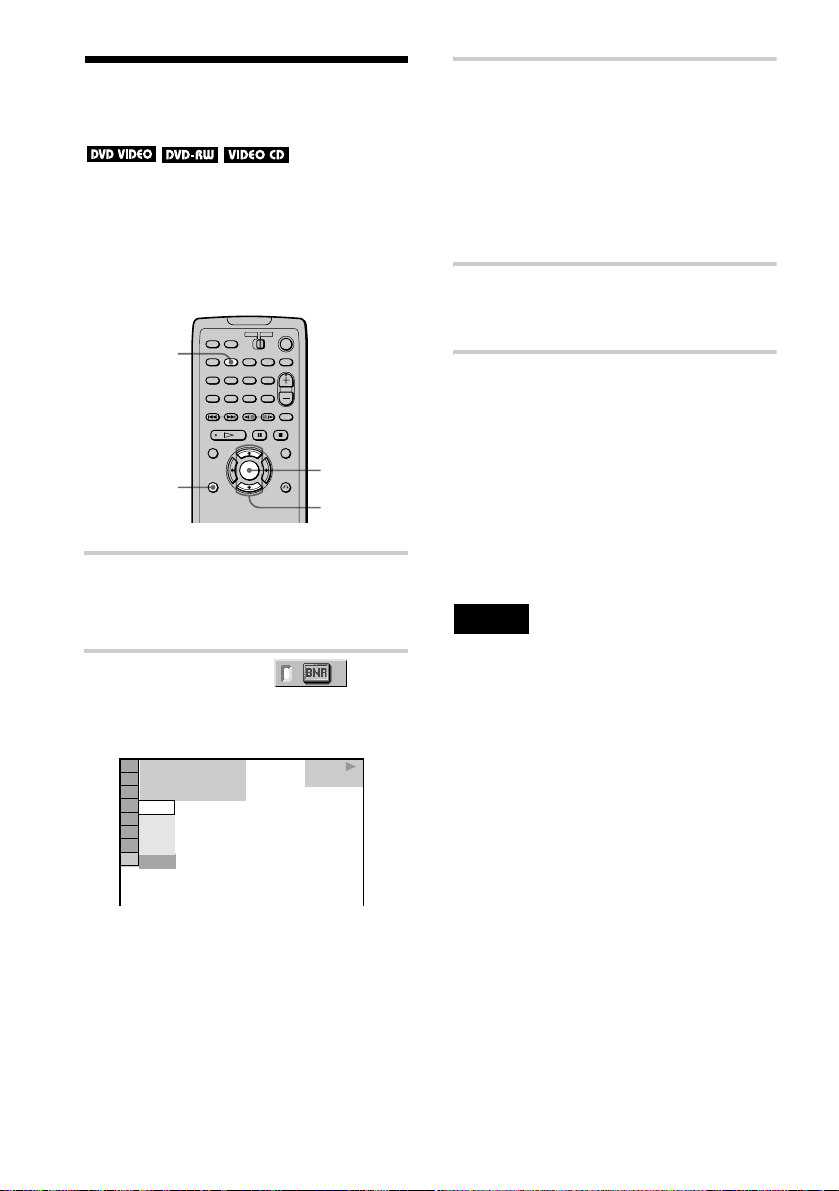
Adjusting the Picture Quality (BNR)
The Block Noise Reduction (BNR) func tion
adjusts the picture quality by reducing the
“block noise” or mosaic like patterns that
appear on your TV screen.
BNR
3 Press X/x to select a level.
As the value increases, the mosaic like
patterns on your TV screen will d ecrease.
• 1: reduces the “block noise”.
• 2: reduces the “block noise” more than
1.
• 3: reduces the “block noise” more than
2.
4 Press ENTER.
The disc plays with the setting you
selected.
To cancel the BNR setting
Select “OFF” in Step 3.
DISPLAY
ENTER
X/x
1 Press DISPLAY twice during
playback.
The Control Menu appears.
2 Press X/x to select (BNR),
then press ENTER.
The options for “BNR” appear.
1 2 ( 2 7
1 8 ( 3 4
T
1 : 3 2 : 5 5
OFF
1
2
3
OFF
)
)
PLAY
DVD VIDEO
To turn off the Control Menu
Press DISPLAY repeatedly until the Control
Menu is turned off.
You can select “BNR” directly by pressing BN R.
z
Each time you press the button, the level changes.
Notes
• If the outlines of the images on your screen should
become blurred, set “BNR” to “OFF.”
• Depending on the disc or the scene being played, the
“BNR” effect may be hard to discern.
64
Page 65

Playing a DATA-CD
About MP3 Audio Tracks and JPEG Image Files
What is MP3/JPEG?
MP3 is audio compression technolog y that
satisfies the ISO/MPEG regulations.
JPEG is image compression technology.
MP3 audio track or JPEG image file
that the player can play
The player can play the MP3 audio tracks or
JPEG image files:
• which have extension “.MP3” (MP3 audio
track) or “.JPG” (JPEG image file)
• which conform to the DCF* image file
format
* “Design rule for Camera File system”: Image
standards for digital came r as regula ted by Japan
Electronic Industries Development Association
(JEIDA)
Discs that the player can play
You can play MP3 audio tracks or JPEG
image files on CD-ROMs, CD-Rs or CDRWs (DATA-CD). However, the discs must
be recorded according to ISO9660 level 1,
level 2 or Joliet format for the player to
recognize the tracks (or files).
You can also play discs recorded in Multi
Session.
See the instructions supplied with the CD-R/
CD-RW drives and the recording software
(not supplied) for details on the recording
format.
Note on the multi-session disc
If MP3 audio tracks or JPEG image files are recorded
in the first session, the player will play MP3 audio
tracks or JPEG image files also in other s es s ions.
If audio tracks and images in Music CD format or
Video CD format are recorded in the first session, only
the first session will be played back.
Note
Since the player cannot play the discs created in the
Packet Write format, you cannot view the JPEG
images recorded using the foll owing Sony products
(as of February, 2002):
– Digital Photo Printer DPP-SV88
– Di gita l Still Camera MVC-CD1000, MVC -
CD200, MVC-CD300
Notes
• The player will play any data with the extension
“.MP3” or “.JPG,” even if they are not in MP3 or
JPEG format. Playing this data may generate a loud
noise which could damage your speake r syst em .
• The player does not conform to audio in MP3PRO
format.
Playing a DATA-CD
continued
,
65
Page 66
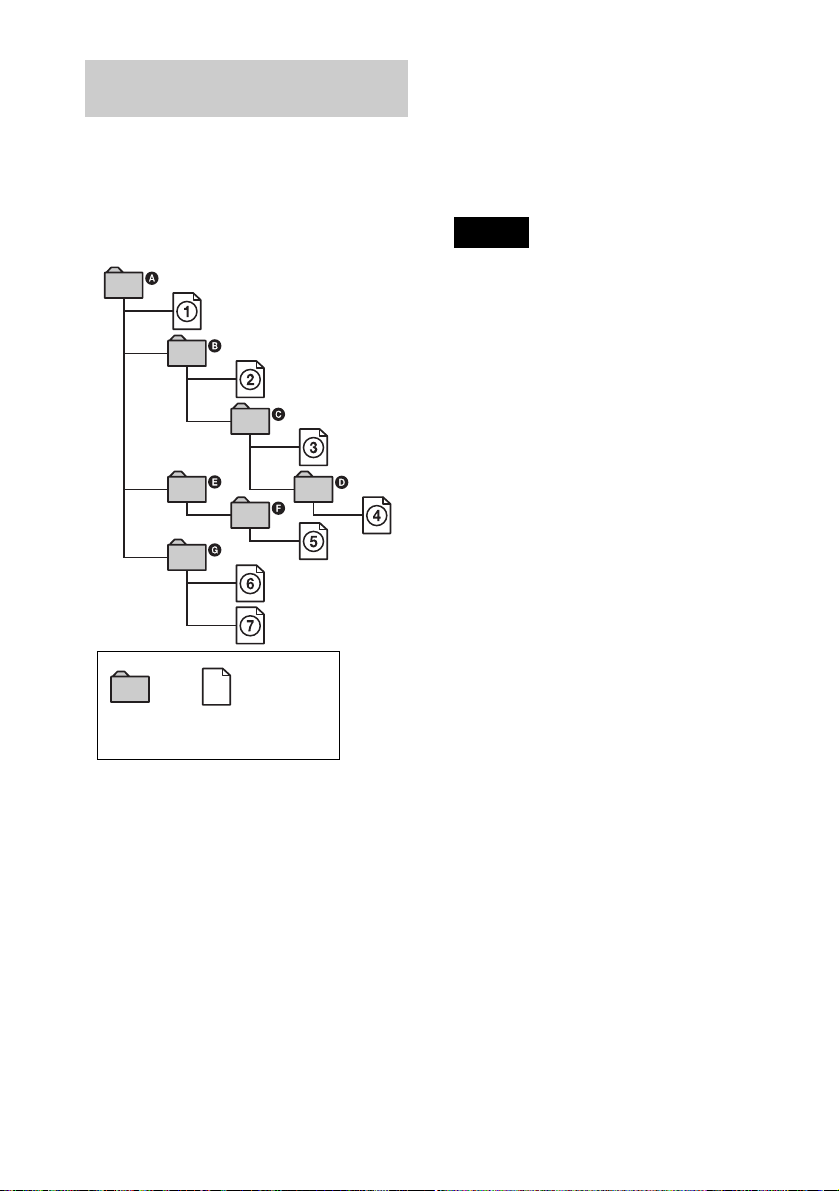
Playback order of MP3 audio tracks
or JPEG image files
The albums, MP3 audio tracks, or JPEG
image files recorded in a DATA-CD will be
played as fol lows:
If you add numbers (01, 02, 03, etc.) to the front of
z
the track/file names when you store the tracks (or files)
in a disc, the tracks and fil es will be played in that
order.
z Since a disc with many tre e s tak es longe r to sta r t
playback, place your albums within the first two trees
when you store the tracks (or fi les) in a disc.
Structure of disc contents
Tree 1 Tree 2 Tree 3 Tree 4 Tree 5
ROOT
Album
Track (MP3 audio) or
File (JPEG image)
Notes
• Dep en d ing on the software you use to create the
DATA-CD, the playback order may differ from the
above illustration.
• The playback order above may not be applicable if
there are more than 999 albums and tracks (or files)
in the DATA-CD.
• The player can recognize up to 499th album (the
player will count just albums, including albums that
do not contain MP3 audio tracks and JPEG image
files). The player will not play any al bums beyond
the first 499 album. Of th e first 499 albums, the
player will play no more than a com bi n ed to tal of
999 albums and tracks (or files).
When you insert a DATA-CD and press H,
the numbered tracks (or files) are played
sequentially, from 1 through 7. Any subalbums/tracks (or files) contained within a
currently selected album take priority over
the next album in the same tree. (Example: C
contains D so 4 is played before 5.)
When you press MENU and the list of album
names appears (page 67), the album names
are arranged in the follo wing order: A t B
t C t D t F t G. Albums that do
not contain tracks (or files) (such as album
E) do not appear in the l ist.
66
Page 67
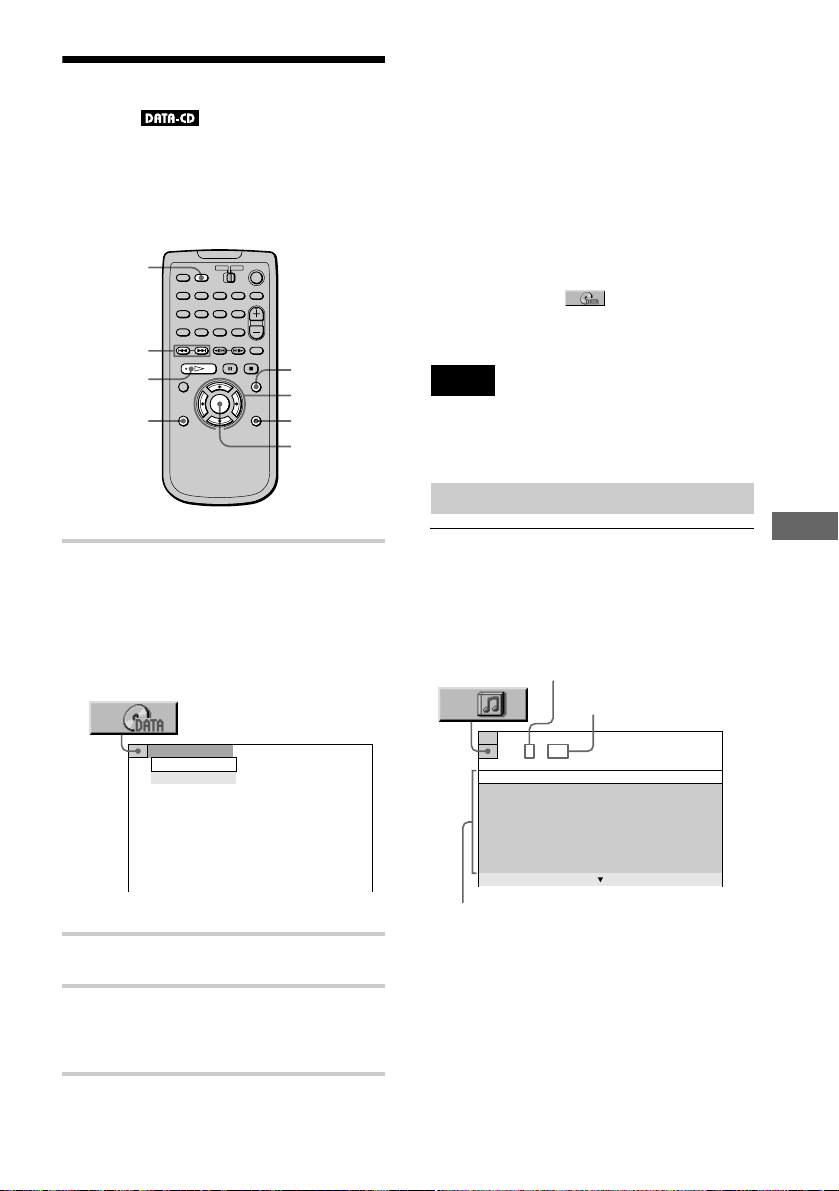
Playing an MP3 Audio Track
MP3 audio tracks recorded on DATA-CDs
(CD-ROM, CD-R, CD-RW) can be played
on this player.
MS
./>
H
DISPLAY
MENU
C/X/x/c
O
RETURN
ENTER
To play the next or previous track
Press > or ..
z
You can view the disc information (p age 52) or
scan (page 49) while playing MP3 audio tracks . You
can also activate Repeat Play (page 4 6) , “AUDIO”
(page 57), and “TVS” (page 59).
z You can also use > or . on the player to
select “AUDIO” in Step 2.
z If you want to view JPEG image files after playing
MP3 audio tracks, press DISPLAY to display the
Control Menu. Select using X/x, then pres s
ENTER. Follow from Step 2 of “Viewing a JPEG
Image File” on page 68.
Note
The ID3 tag, which is the memory area partiti one d in
MP3 audio for inputting music titles, etc., cannot be
displayed.
Selecting an album and track
1 Insert a DATA-CD into the d isc slot.
(If the MS indicator on the player is lit,
press MS to turn it off in stop mode.)
The Control Menu appears if an MP 3
audio tracks or JPEG image file is
recorded on the DATA-CD.
AUDIO
AUDIO
IMAGE
2 Press X/x to select “AUDIO.”
3 Press H or ENTER.
The first MP3 audio track recorded on the
DATA-CD is played back.
1 After Step 3 i n “Playing an MP3 Audio
Track,” press MENU.
The albums recorded on the DATA-CD
appear. When an album is being played,
its title is shaded.
Highlighted album number
Total albums in the disc
AUDIO
(
3 0
)
continued
1
ROCK BEST HIT
KARAOKE
JAZZ
R&B
MY FAVORITE SONGS
CLASSICAL
SALSA OF CUBA
BOSSANOVA
List of album names
Playing a DATA-CD
,
67
Page 68
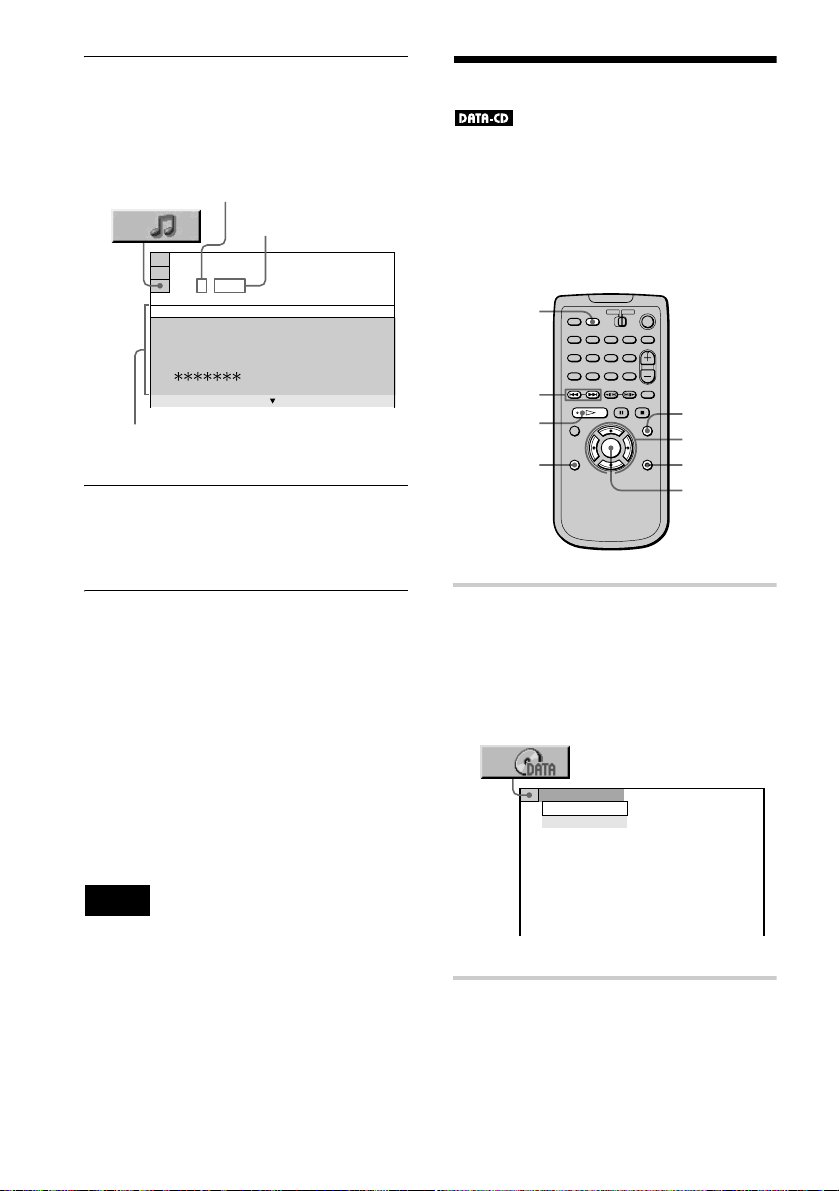
2 Press X/x to select the album you want
to play, then press ENTER.
Tracks in the album appear. When a track
is being played, its title is shaded.
Viewing a JPEG Image File
Highlighted track number
Total tracks in the
album
AUDIO
JAZZ
1 ( 2 5 6
01 SHE IS SPECIAL
02 ALL YOU NEED IS TO...
03 SPICY LIFE
04 HAPPY HOUR
05 RIVER SIDE
06 5
07 TAKE TIME, TAKE TIME
List of track names
)
3 Press X/x to select the track, th en press
ENTER.
The player starts playing the selected
track.
To go to the next or previous page
Press c or C.
To return to the previous display
Press ORETURN.
JPEG image files recorded on DATA-CDs
(CD-ROM, CD-R, CD-RW) can be viewed
on this player. Note, however, that you can
view only the JPEG image files which
conform to the DCF image file format.
MS
./>
H
MENU
C/X/x/c
O
DISPLAY
RETURN
ENTER
1 Insert a DATA-CD into the d isc slot.
(If the MS indicator on the player is lit,
press MS to turn it off in stop mode.)
The Control Menu appears if an MP 3
audio tracks or JPEG image file is
recorded on the DATA-CD.
To turn off the display
Press MENU.
By pressing MENU, you can display the album list
z
when the player is stopped.
Note
Only the letters in alphabet and numbers in the album/
track names can be displayed. Other characters appear
as an “*” (asterisk).
68
AUDIO
AUDIO
IMAGE
2 Press X/x to select “IMAGE.”
Page 69
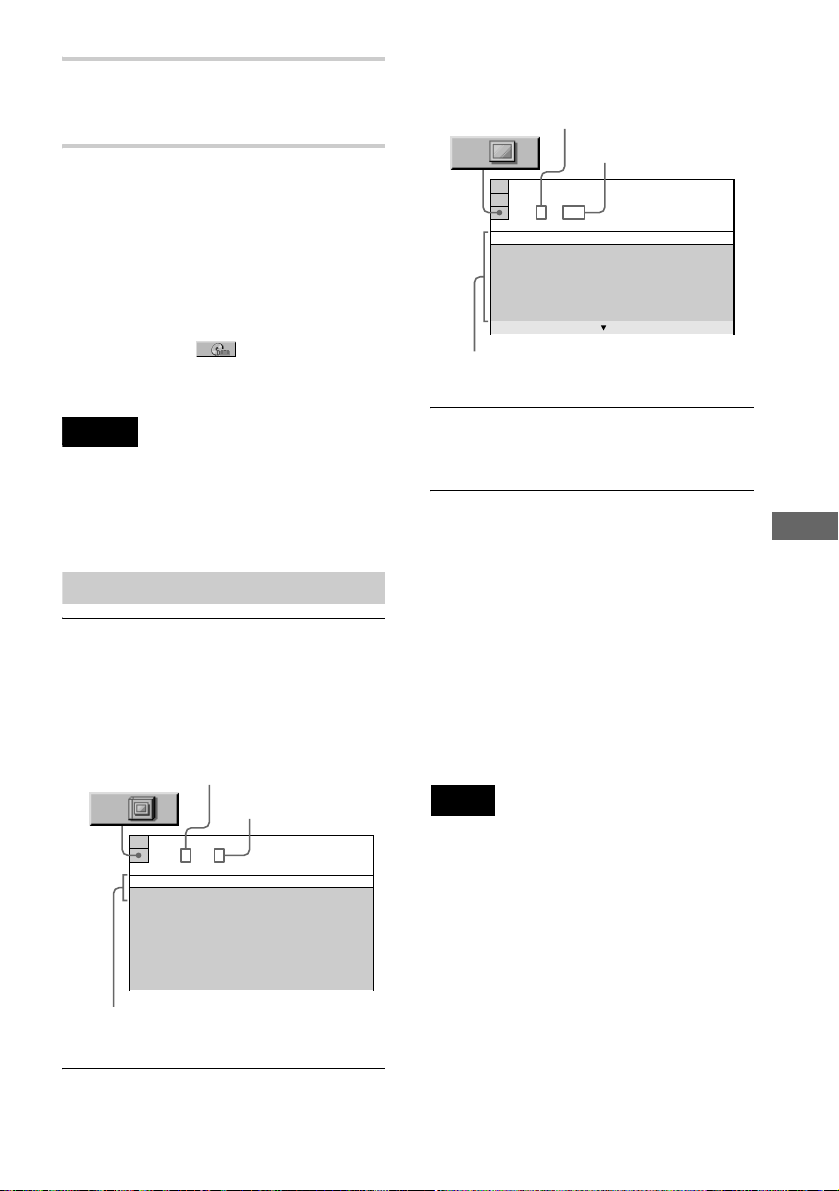
3 Press H or ENTER.
The first JPEG image file recorded on the
DATA-CD is played back.
To play the next or previous file
Press > or ..
z
You can also use > or . on the player to
select “IMAGE” in Step 2.
z If you want to play MP3 audio tracks after viewing
JPEG image files, press DISPLAY to display the
Control Menu. Select using X/x, then press
ENTER. Follow from Step 2 of “Playing an MP3
Audio Track” on page 67.
Files in the album appear. When a file is
being played, its title is shaded.
Highlighted file number
Total files in the album
IMAGE
BIRTHDAY PARTY
1( 2 8
SCENE01
SCENE02
SCENE03
SCENE04
SCENE05
SCENE06
SCENE07
List of file name s
)
Notes
• J PEG image file s which are set to display large r than
4720 dots vertically or horizonta ll y ma y not be
displayed.
• JPEG image files which do not fit the screen will be
reduced so they can be displayed properly.
Selecting an album and file
1 After Step 3 in “Viewing a JPEG Image
File,” press MENU.
The albums recorded on the DATA-CD
appear. When an album is being played,
its title is shaded.
Highlighted album number
Total albums in the
disc
IMAGE
1 ( 2
BIRTHDAY PARTY
WINTER FESTIVAL
)
3 Press X/x to select the file, then press
ENTER.
The player starts playing the selected file.
To go to the next or previous page
Press c or C.
To return to the previous display
Press ORETURN.
To turn off the display
Press MENU.
z
By pressing MENU, you can display the album list
when the player is stopped.
Note
Only the letters in alphabet and numbers in the album/
file names can be displayed. O the r char acte r s a ppe ar
as an “*” (asterisk).
Playing a DATA-CD
List of album names
2 Press X/x to select the album you want
to play, then press ENTER.
continued
,
69
Page 70
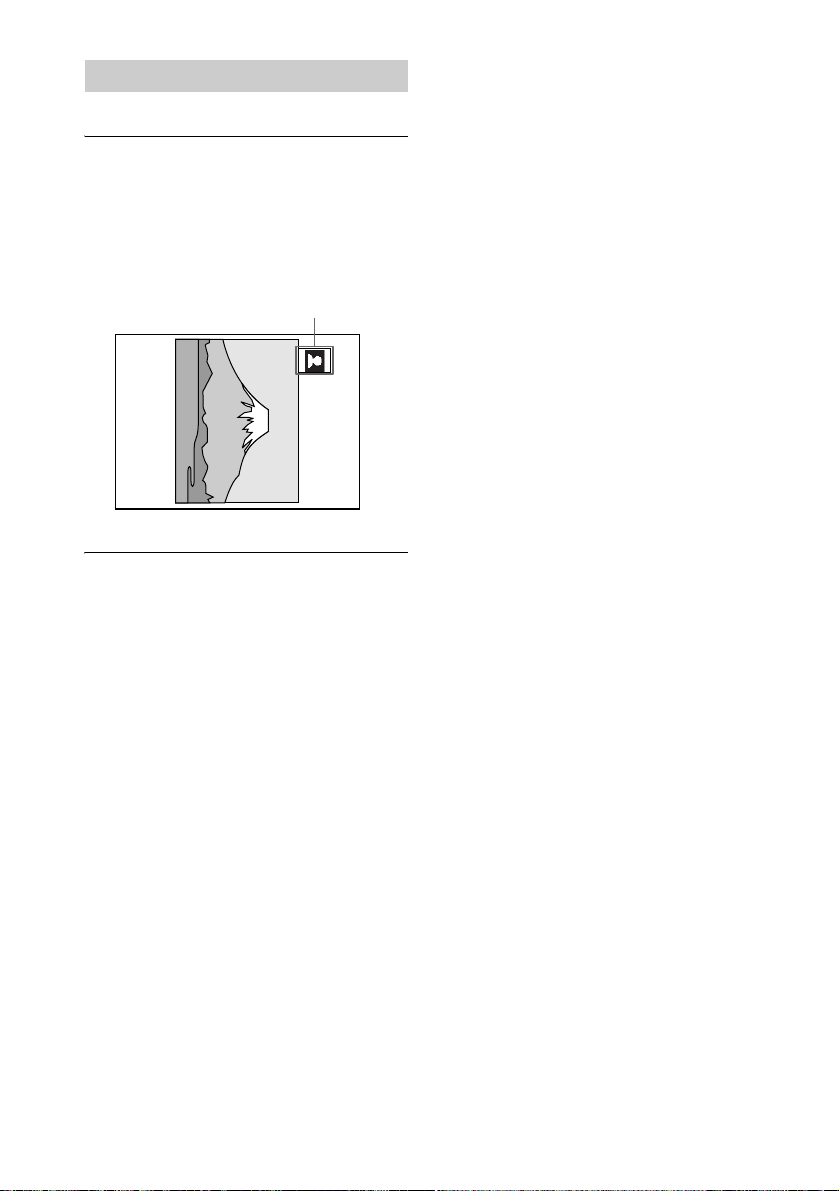
Rotating a JPEG image
You can rotate an image by 90 degrees.
Press C/c while viewing an ima ge .
Each time you press c, the image rotates
clockwise by 90 degrees.
Each time you press C, the image rotates
counterclockwise by 90 degrees.
Example of when you press c on ce:
Rotating direction
70
Page 71
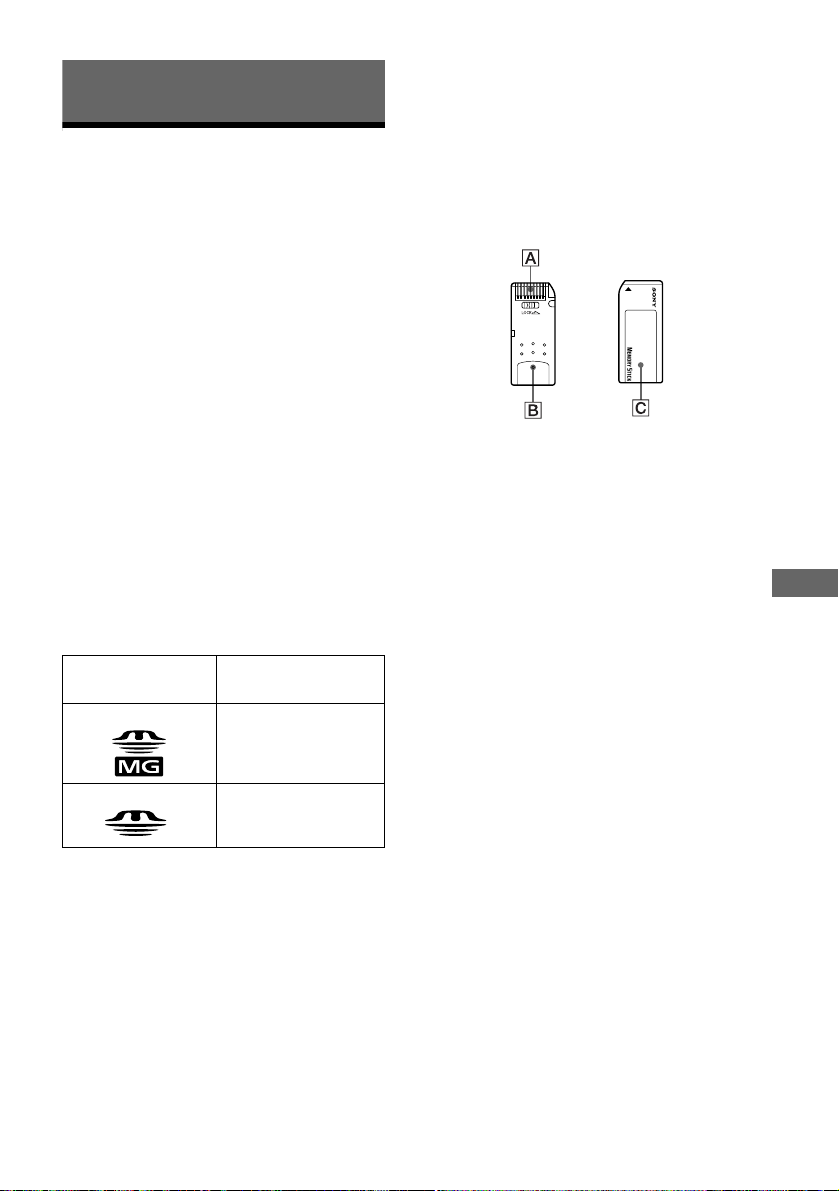
Playing a “Memory Stick”
About the “Memory Stick”
Note on use
To avoid damaging data, do not
- remove the “Memory Stick” or disconnect
the power cord while playing it.
- use the “Memory Stick” in a location
subject to static electricity or elect ri c noise.
“Memory Stick” is a compact, portable and
versatile Integrated Circuit recording
medium with a data capacity th at exceeds a
floppy disk. “Memory Stick” is specially
designed for exchanging and sharing digital
data among “Memory Stick” compatible
products. Beca use it is removable, the
“Memory Stick” can also be used for external
data storage.
Types of “Memory Stick”
There are two types of “Memory Stick; ”
–“MagicGate (MG) Memory Stick”* that is
equipped with “MagicGate” copyright
protection techno lo gy .
–“Memory Stick”** that is not equipped
with “MagicGate” copyright protection
technology.
You can use both types of “Memory
Stick” with this player.
Type of “Memor y
Stick”
“MG Memory Stick” Audio data + Still image
“Memory Stick” Still image + General
What is “MagicGate***”?
“MagicGate” is a copyright protection
technology**** for the “MG Memory Stick”
and compliant products. Authentication
ensures that protected content is transferred
only between co mp lia nt devices and a “MG
Memory Stick,” and th at protected content is
recorded and transferred in an encrypted
format to prevent unauthorized copying or
playback.
Recordable data
+ General data
data
On handling the “Memory Stick”
• The tactile protrusion on the rear surface of
a “MG Memory Stick” distinguishes it from
an ordinary “Memory Stick.” (B)
• To prolong the life of the “Memory Stick,”
use the storage case supplied with the
“Memory Stick.”
• Do not touch the “Memory Stick”
connector with your f ing e r or met al lic
objects. (A)
• Do not bend, drop or a pp ly s trong shock to
the “Memory Stick.”
• Do not disassemble or modify the “Memory
Stick.”
• Do not allow the “Memory Stick” to get
wet.
• Do not use or store the “Mem ory Stick” i n a
location that is subject to:
- Extremely high tem perature such as in a
car parked in the sun
- Direct sunlight
- High humidity or places with corrosive
substances
• Do not attach any other material than the
label supplied with the “Memory Stic k” on
the label space. (C)
• Attach the label so that it does not stick out
from the proper attachment location .
• Do not stick one label on top of another.
• If the label is turned up at the corners or
loose, replace it with a new one.
continued
,
Playing a “Memory Stick”
71
Page 72
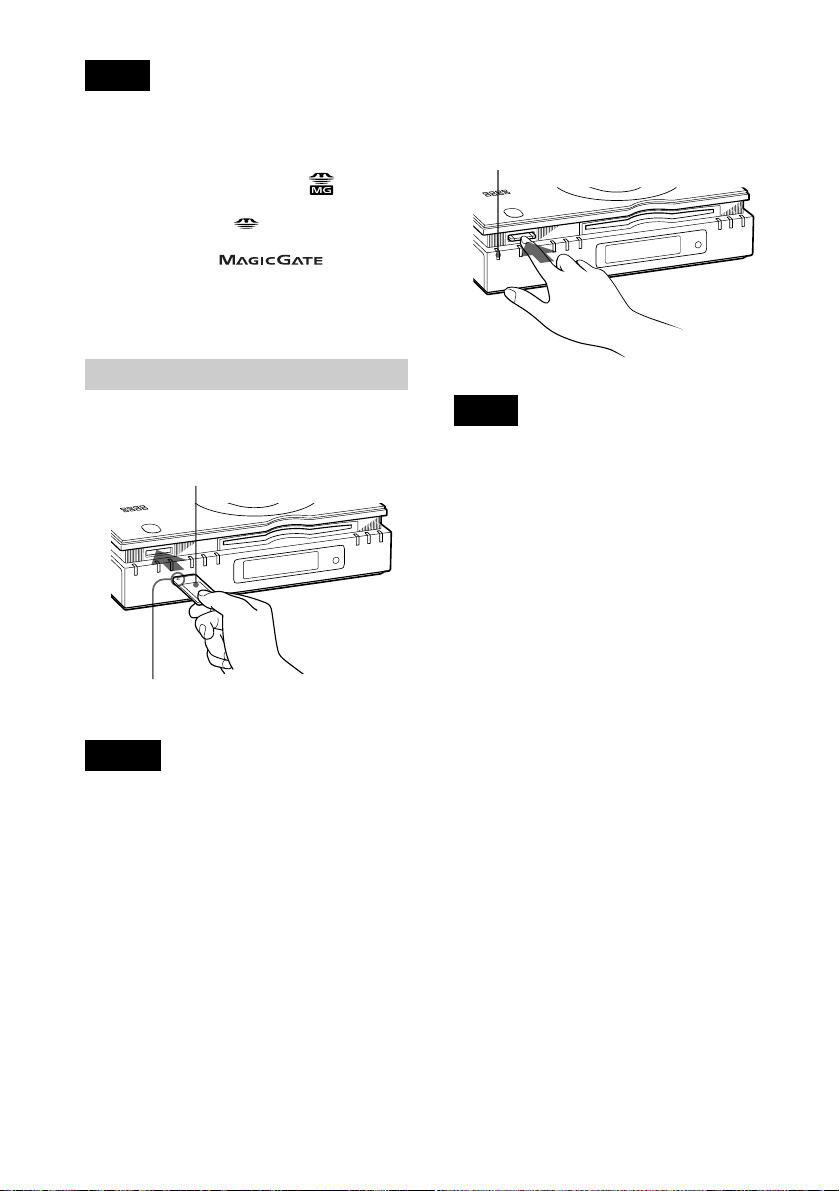
Note
Attach the label correctly on the “M em or y S tic k” or
you may not be able to remove the “Memory Stick”
from the player.
* “MagicGate Memory Stick,” and are
trademarks of Sony Corporation.
**“Memory Stick” and are trademarks of Sony
Corporation.
***“MagicGate” and are
trademarks of Sony Corporation.
****The copyright protection technology of this
player conforms to th e SDMI (Secure Digital Mus ic
Initiative) stan dard.
Inserting a “Memory Stick”
To take out the “Memory Stick”
While the player is stopped, push and release
the “Memory Stick.”
MS indicator
Insert the “Memory Stick” securely into the
MEMORY STICK slot.
“Memory Stick”
Insert until it
clicks.
In the direction of the
v
Notes
• Observe the side and dir e c tion carefully when
inserting a “Memory Stick.” Insert the “Memory
Stick” with the
direction of the
damaged.
• Do not insert any objects other than a “Memory
Stick” into the slot. Doing so may cause a
malfunction.
v mark facing up , a nd in the
v. Otherwise, the slot may be
Note
When you take out the “Memory Stick,” make sure
that the MS indicator is not lit in yellow. If you turn off
the power or disc onn ect the power cord while th e MS
indicator is lit in yellow , the “Memory Stick” ma y be
damaged.
72
Page 73
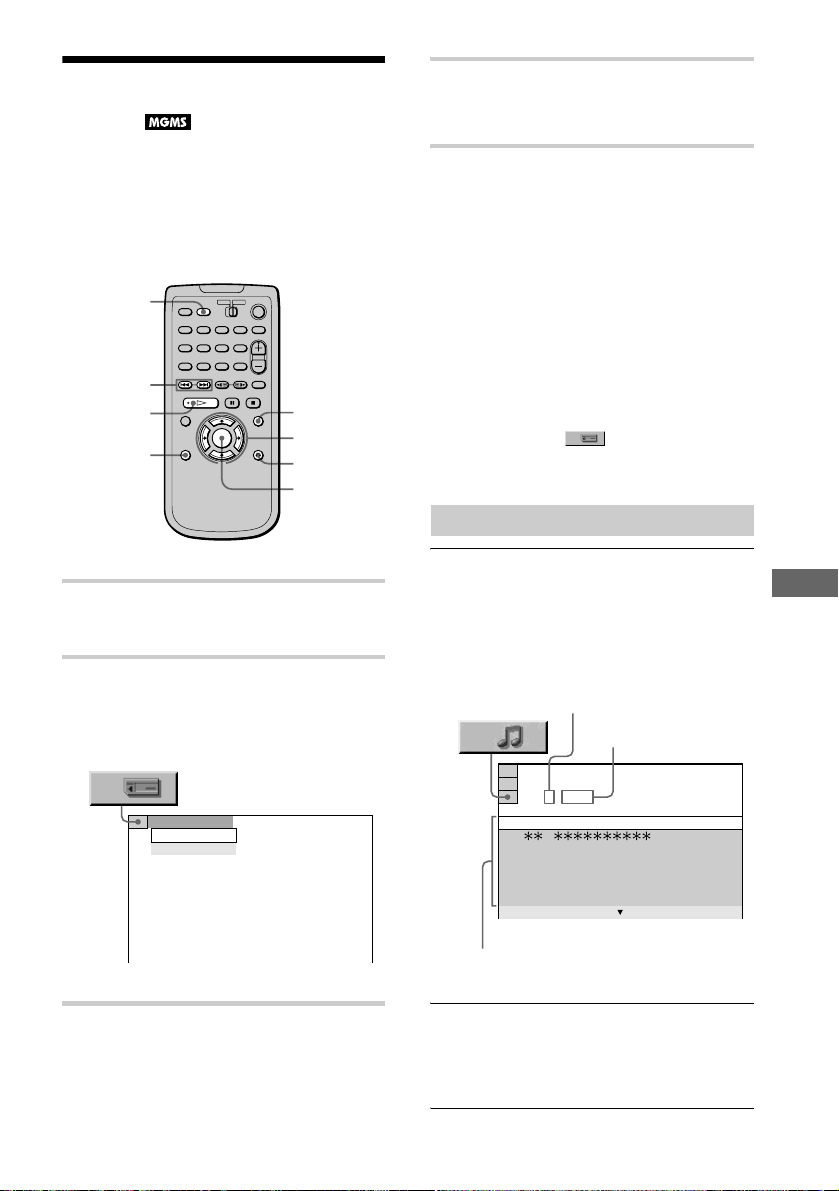
Playing an ATRA C3 Audio Track
You can play ATRAC3 audio tracks recorded
on an “MG Memory Stick.”
Make sure the MS indic ator is li t (MS mode)
when you play an “MG Memor y Stick.”
MS
./>
H
DISPLAY
MENU
C/X/x/c
ORETURN
ENTER
1 Insert a “MG Memory Stick” into the
MEMORY STICK slot (page 72).
2 Press MS.
The MS indicat o r on the player lights up
(MS mode).
The Control Menu is displayed.
AUDIO
AUDIO
IMAGE
4 Press H or ENTER.
The first track recorded on the “MG
Memory Stick” is play ed back.
To play the next or previous track
Press > or ..
z
You can view the disc information (p age 52) or
scan (page 49) while playing ATRAC3 aud io tra cks.
You can also activate Repeat Play (page 46),
“AUDIO” (page 57), and “TVS” (page 59).
z You can also use > or . on the player to
select “AUDIO” in Step 3.
z If you want to view JPEG image files after playing
ATRAC3 audio tracks, press DISPLAY to display the
Control Menu. Select using X/x, then pres s
ENTER. Follow from Step 3 of “Viewing a JPEG
Image File” on page 75.
Selecting a track
1 After Step 4 in “Playing an ATRAC3
Audio Track,” press MENU.
The audio tracks recorded on the “MG
Memory Stick” appear. When a track is
being played, its title is shaded.
Highlighted track number
Total tracks in the
album
AUDIO
MY FAVORITE SONGS
1 ( 1 0 8
01 GREEN LEAVES
02 P
03 CONDOR
04 SOMEDAY, SOMEWHERE
05 BORN FREE
06 TOMORROW WILL COME
07 VERY IMPRESSIVE
)
Playing a “Memory Stick”
3 Press X/x to select “AUDIO.”
List of track names
2 Press X/x to select the track, th en press
ENTER.
The player starts playing the selected
track.
continued
,
73
Page 74
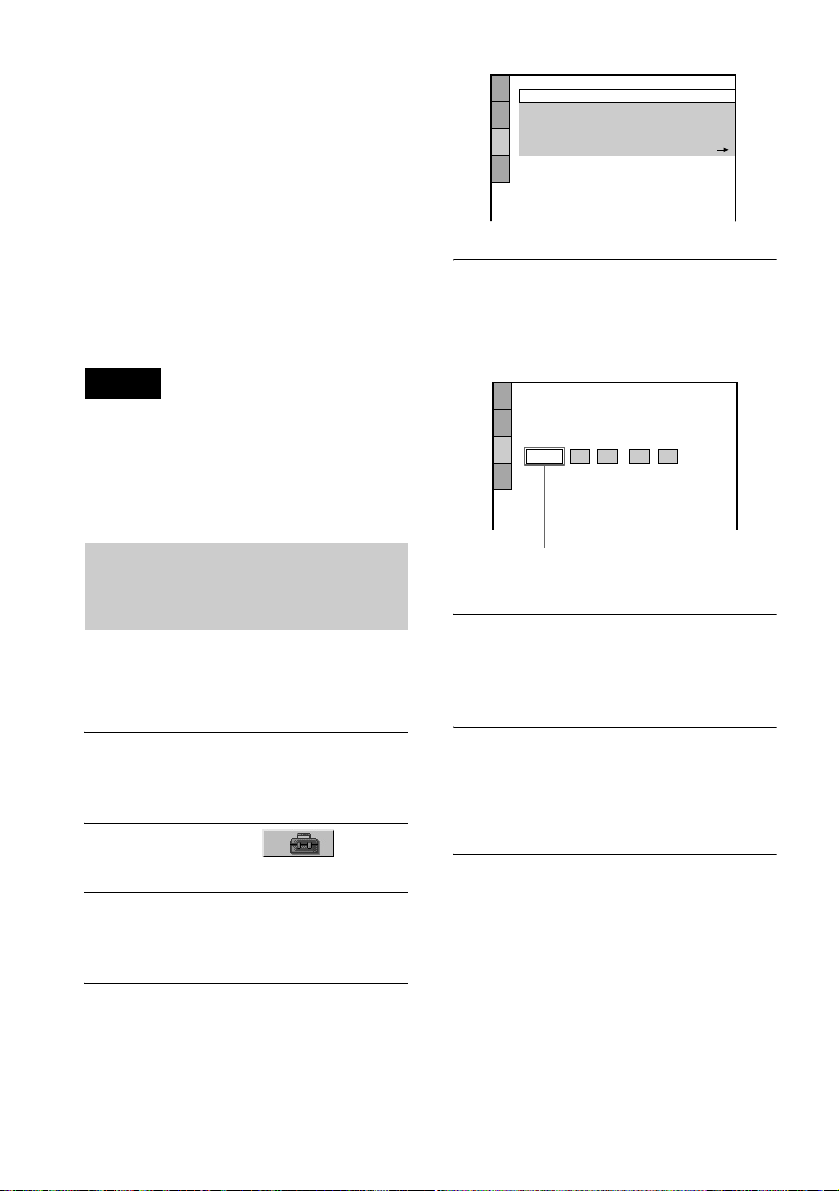
To go to the next or previous page
CUSTOM SETUP
DIMMER:
PAUSE MODE:
BRIGHT
AUTO
OFF
TRACK SELECTION:
DATE/TIME SETUP
OFF
Press c or C.
To return to the previous display
Press ORETURN.
To turn off the display
Press MENU.
To switch to disc mode
Press MS. The MS indi cator goes out.
z
By pressing MENU, you can display the track list
when the player is stopped.
AUTO PLAY:
5 Press X/x to select “DATE/TIME SETUP
t,” then press ENTER.
The “DATE/TIME SETUP” display
appears.
Notes
• Only the letters in alphabet and numbers in the
album/track names can be displayed. Other
characters appear as an “*” (asterisk).
• MS mode will be released when:
– the player enters standby mode
– the power cord is disconnected
Playing a track with a playback
period restriction (DATE/TIME
SETUP)
Set the current date and time so that you can
play an audio track with a playback period
restriction recorded on an “MG Memory
Stick.”
1 Press DISPLAY when the pla y er is in
stop mode.
The Control Menu appears.
2 Press X/x to select (SETUP),
then press ENTER.
3 Press X/x to select “CUSTOM, ” t he n
press ENTER.
The Setup Display appears.
4 Press X/x to selec t “CUSTOM SE TUP,”
then press ENTER.
74
The “CUSTOM SETUP” display
appears.
CUSTOM SETUP
DATE/TIME SETUP
YDMMH
2002 33 8 08
Start with the year.
:AM//
6 Press X/x to select a figure, then press
c.
The “Y (year)” is set, and the next item
“M (month)” will be highlighted.
7 Repeat Step 6 to set “M (month),” “D
(day),” “H (hour),” and “M (minute),”
then press ENTER.
When you press ENTER after setting “M
(minute),” the clock starts operating.
If you make a mistake
Press C repeatedly until the item you want to
correct is highlighted, then input the correct
number.
To turn off the Setup Display
Press DISPLAY repeatedly until the Setup
Display is turned off.
Page 75
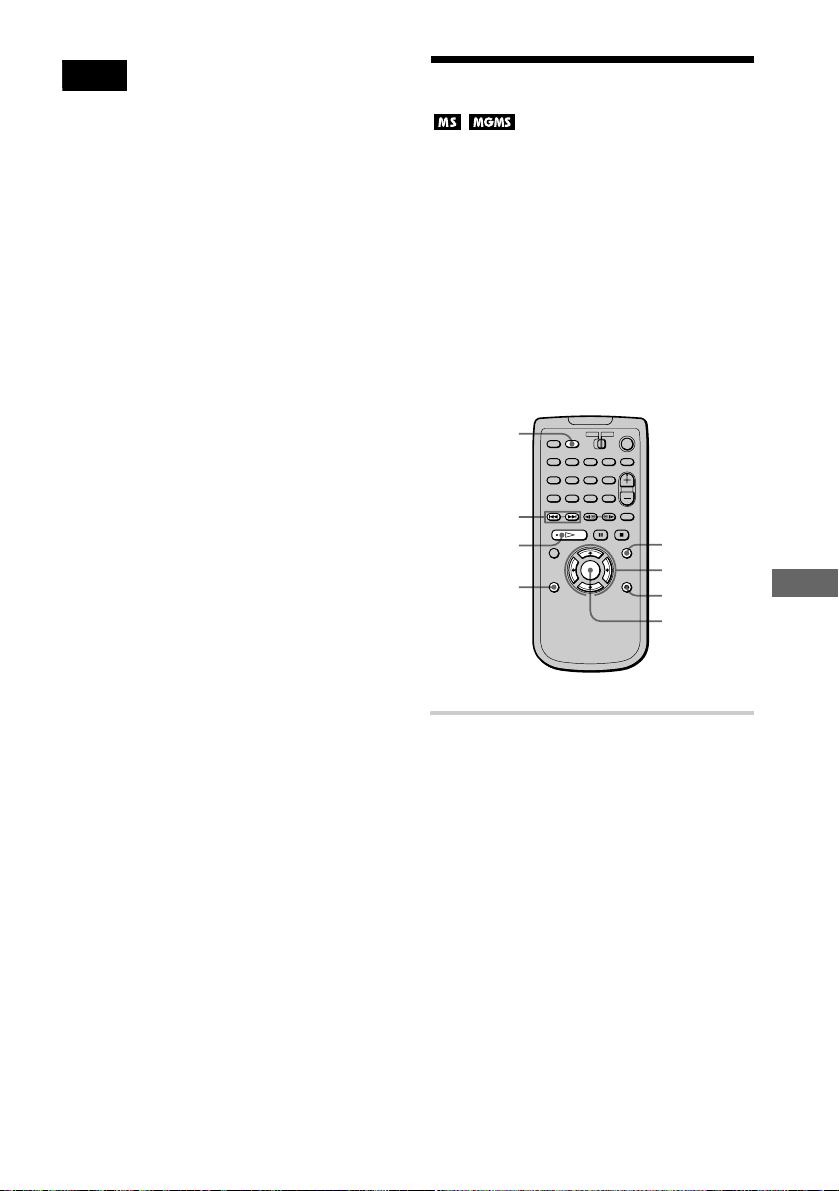
Note
When you disconnect the power cord, the date/time
setting will return to the factory settings.
Viewing a JPEG Image File
You can view JPEG image files recorded on
an “MG Memory Stick” or a “Memor y
Stick.” Note, however, that the player can
display JPEG image files recorded using a
digital camera only if the image file format
and the directory structure are DCF
compliant.
Make sure the MS indicator is lit (MS mode)
when you play an “MG Memory Stick” or
“Memory Stick.”
MS
./>
H
DISPLAY
MENU
C/X/x/c
ORETURN
ENTER
Playing a “Memory Stick”
1 Insert a “Memory Stick” into the
MEMORY STICK slot (page 72).
continued
,
75
Page 76
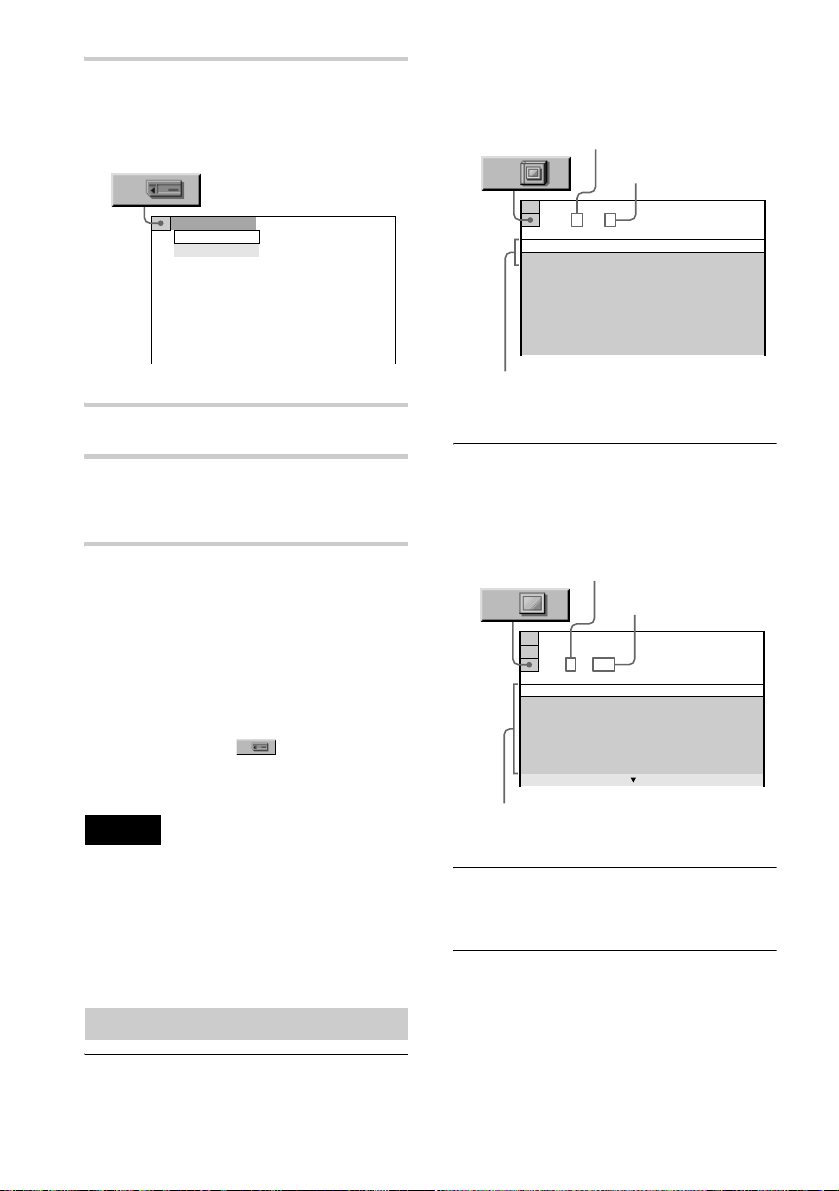
2 Press MS.
The MS indicator on the player lights up
(MS mode).
The Control Menu is displayed.
AUDIO
AUDIO
IMAGE
3 Press X/x to select “IMAGE.”
A list of the albums saved on the
“Memory Stick” appears. When an
album is being played, its title is shaded.
Highlighted album number
IMAGE
1 ( 2
100MSDCF
101MSDCF
List of album names
Total albums in the
“Memory Stick”
)
4 Press H or ENTER.
The first image recorded on the “Memory
Stick” is played back.
To play the next or previous file
Press > or ..
You can also use > or . on the player to
z
select “IMAGE” in Step 3.
z If you want to play ATRAC3 audio tr a c ks a fter
viewing JPEG image files, press DISPLAY to display
the Control Menu. Select using X/x, then press
ENTER. Follow from Step 3 of “Playing an ATRAC3
Audio Track” on page 73.
Notes
• JPEG image file s whic h ha ve been ed ite d or
renamed on computers may not be displayed.
• JPEG image files which are set t o display larger than
4720 dots vertically or horizont ally may not be
displayed.
• JPEG image files which do not fit the screen will be
reduced so they can be displayed pr ope r ly.
Selecting an album and file
2 Press X/x to select an album, then press
ENTER.
The files in the album appe ar. When a file
is being played, its title is shaded.
Highlighted file number
IMAGE
10 0 MSDCF
1( 2 8
DSC00001
DSC00002
DSC00003
DSC00004
DSC00005
DSC00006
DSC00007
List of file names
Total files in the
“Memory Stick”
)
3 Press X/x to select the file, then press
ENTER.
The player starts playing the selected file.
To go to the next or previous page
Press c or C.
1 After Step 4 i n “Viewing a JPEG Image
File,” press MENU.
76
To return to the previous display
Press ORETURN.
Page 77
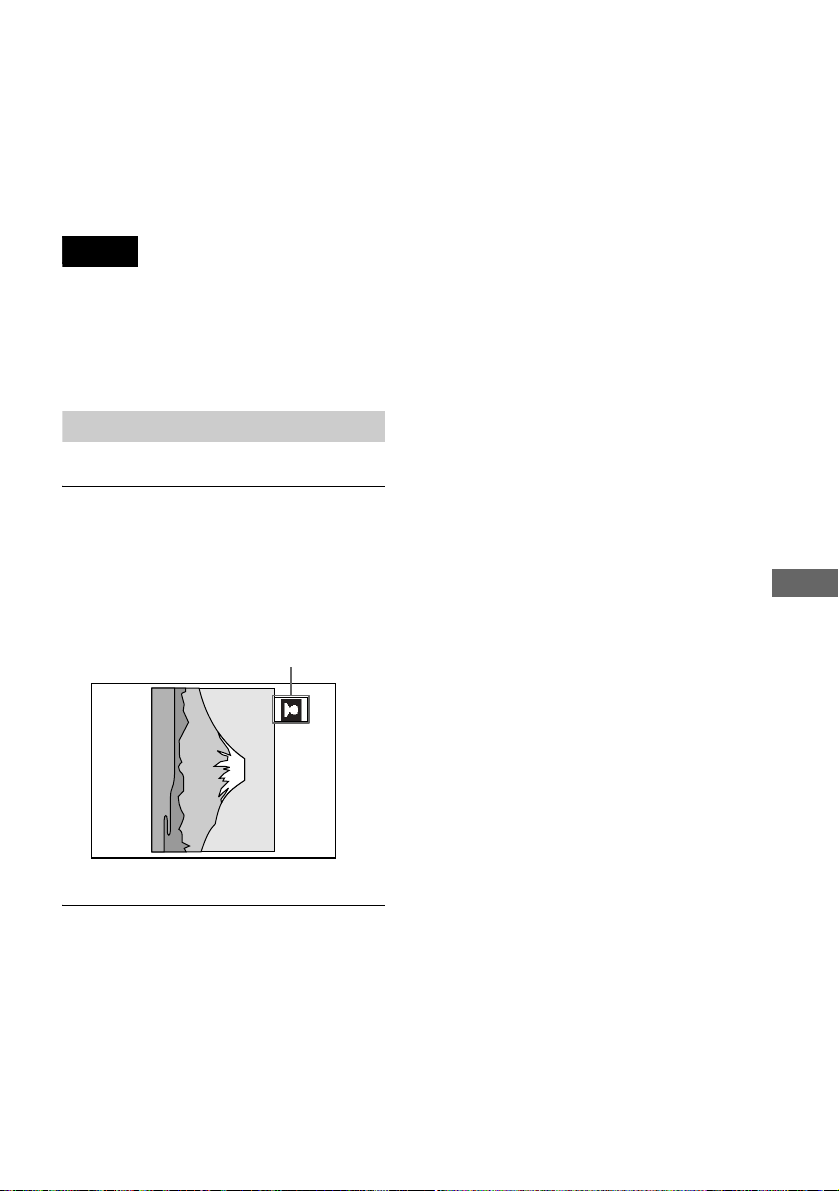
To turn off the display
Press MENU.
To switch to disc mode
Press MS. The MS indicator goes out.
z
By pressing MENU, you can display the album list
when the player is stopped.
Notes
• Only the letters in alphabet and numbers in the
album/file names can be displayed. Other characters
appear as an “*” (asterisk).
• MS mode will be released when:
– the pl ay er en te rs sta ndby mode
– the power cord is disconnected
Rotating a JPEG image
You can rotate an image by 90 degrees.
Press C/c while viewing an image.
Each time you press c, the image rotates
clockwise by 90 degrees.
Each time you press C, the image rotates
counterclockwise by 90 degrees.
Example of when you press c once:
Playing a “Memory Stick”
Rotating direction
77
Page 78
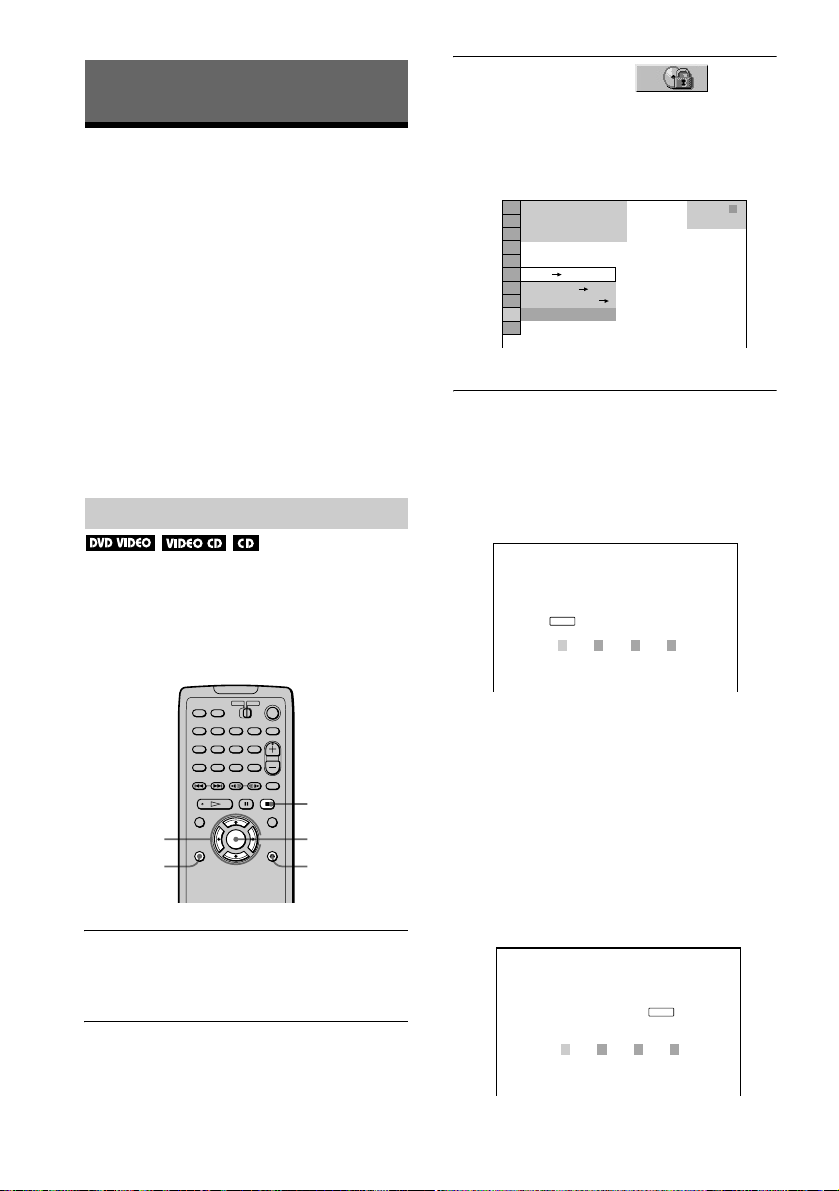
Using Various Additional Functions
Locking Discs ( Custom Parental
Control, Parental Control)
You can set two kinds of playback
restrictions for the desired disc.
• Custom Parental Control
You can set the playback restrictions so that
the player will not play inappropriate discs.
• Parental Control
Playback of some DVD VIDEOs can be
limited according to a predetermin ed lev e l
such as the age of the users.
The same password is used for both Parental
Control and Custom Parental Control.
Custom Parental Control
3 Press X/x to select
(PARENTAL CONTROL), then press
ENTER.
The options for “PARENTAL
CONTROL” appear.
)
1 2 ( 2 7
)
1 8 ( 3 4
T
1 : 3 2 : 5 5
ON
PLAYER
PASSWORD
OFF
STOP
DVD VIDEO
4 Press X/x to select “ON t,” then
press ENTER.
x If you have not entered a password
The display for registering a new
password appears.
You can set the same Custom Parental
Control password for up to 50 discs. When
you set the fifty-first disc, the first disc is
canceled.
C/X/x/c
DISPLAY
1 Insert the disc you want to lock.
If the disc is playing, press x to stop
playback.
2 Press DISPLAY while the player is in
stop mode.
The Control Menu is displayed.
78
x
ENTER
ORETURN
PARENTAL CONTROL
Enter a new 4-digit password, then
ENTER
press
.
Enter a 4-digit password by pressing X/
x to select the digit, followed by c to
move the cursor. Then press ENTER.
The display f or co nf irmi ng th e pa ssw ord
appears.
x When you have alre ady registered a
password
The display for entering the password
appears.
PARENTAL CONTROL
Enter password, then press
ENTER
.
Page 79
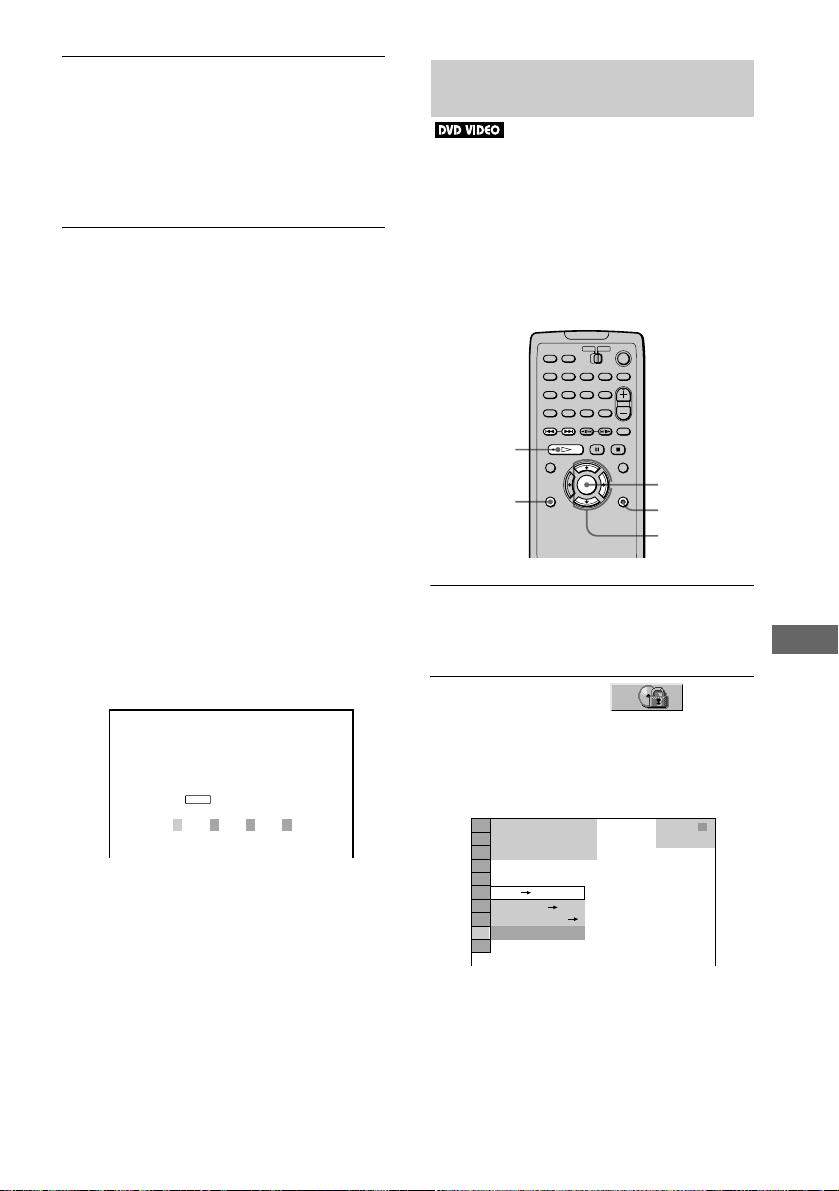
5 Enter or re-enter your 4-digit password
by pressing X/x to select the digit,
followed by c to move the cursor. Then
press ENTER.
“Custom parental control is set.” appears
and then the screen returns to the Contro l
Menu display.
To turn off the Custom Parental
Control function
1 Follow Steps 1 through 3 of “Custom
Parental Control.”
2 Press X/x to select “OFF t,” then press
ENTER.
3 Enter your 4-digit password using X/x
to select the digit, followed by c to move
the cursor. Then press ENTER.
To play the disc for which Custom
Parental Control is set
Parental Control (limiting playback
by children)
Playback of some DVD VIDEOs can be
limited according to a predetermined level
such as the age of the users. The
“PARENTAL CONTROL” function allows
you to set a playback limitation level.
A scene that is limited is not played, or it is
replaced by a different scene.
.
H
DISPLAY
ENTER
ORETURN
X/x/c
1 Insert the disc for which Custom Parental
Control is set.
The “CUSTOM PARENTAL
CONTROL” displa y appears.
CUSTOM PARENTAL CONTROL
Custom parental control is already
set. To play, enter your password
ENTER
and press
.
2 Enter your 4-digit password using X/x
to select the digit, followed by c to move
the cursor. Then press ENTER.
The player is ready for playback.
z If you forget your password, enter the 6-digit
number “199703” when the “CUSTOM PARENTAL
CONTROL” display asks you for your password, then
press ENTER. (Press c after the 4th digit to allow the
entire 6-digit number to be entered. ) T he di spla y wil l
ask you to enter a new 4-digit password.
1 Press DISPLAY while the player is in
stop mode.
The Control Menu appears.
2 Press X/x to select
(PARENTAL CONTROL), then press
ENTER.
The options for “PARENTAL
CONTROL” appear.
)
1 2 ( 2 7
)
1 8 ( 3 4
T
1 : 3 2 : 5 5
ON
PLAYER
PASSWORD
OFF
STOP
DVD VIDEO
continued
Using Various Additional Functions
,
79
Page 80
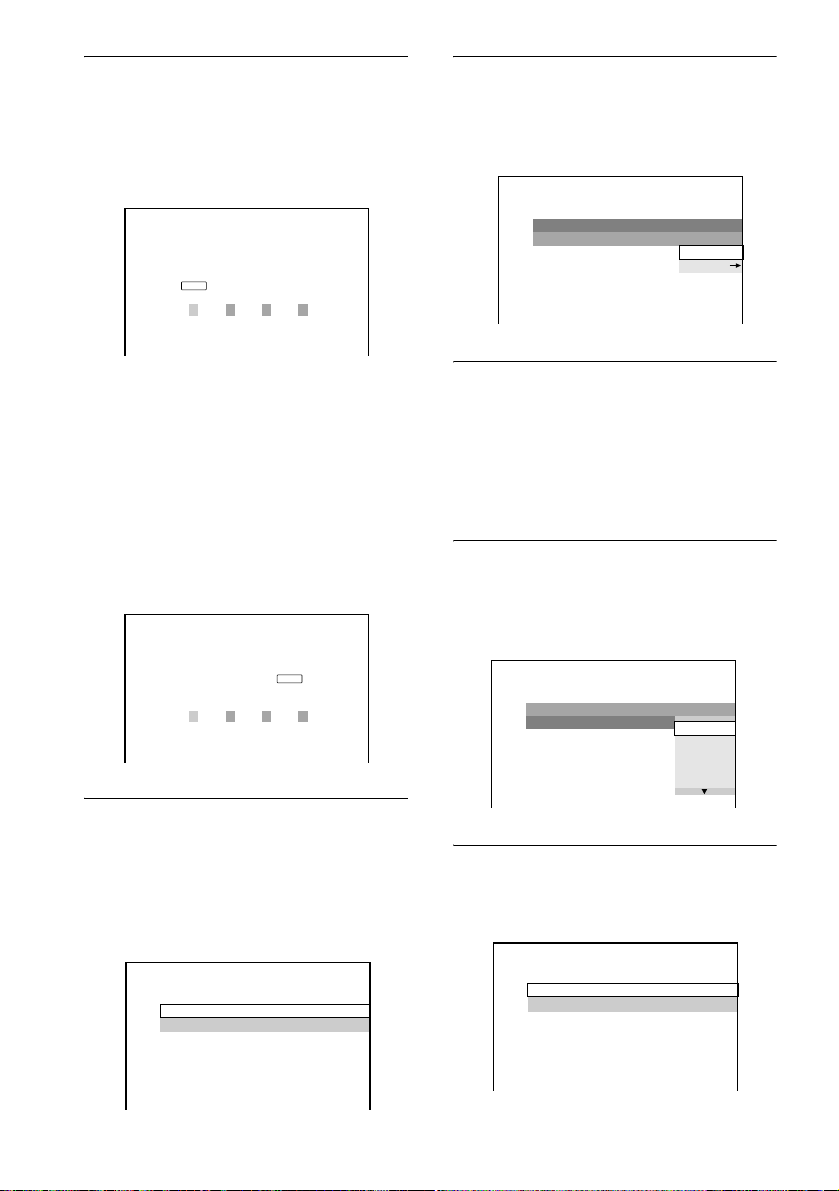
3 Press X/x to select “PLAYER t,” then
press ENTER.
x If you have not enter ed a password
The display for registering a new
password appears.
PARENTAL CONTROL
Enter a new 4-digit password, then
ENTER
press
.
5 Press X/x to select “STANDARD,” then
press ENTER.
The selection items for “STANDARD”
are displayed.
PARENTAL CONTROL
LEVEL:
STANDARD:
OFF
USA
USA
OTHERS
Enter a 4-digit password by pressing X/
x to select the digit, followed by c to
move the cursor. Then press ENTER.
The display for confirming the password
appears.
x When you have already r egistered a
password
The display for entering the password
appears.
PARENTAL CONTROL
Enter password, then press
ENTER
.
4 Enter or re-enter your 4-digit pa ssword
by pressing X/x to select the digit,
followed by c to move the cursor. Then
press ENTER.
The display for setting the playback
limitation level appears.
6 Press X/x to select a geog raphic area
as the playback limitation level, then
press ENTER.
The area is selected.
When you select “OTHERS t,” select
and enter the standard code in the table on
page 81 using X/x.
7 Press X/x to select “LEVEL,” then
press ENTER.
The selection items for “LEVEL” are
displayed.
PARENTAL CONTROL
LEVEL: OFF
STANDARD:
OFF
8:
NC17
7:
R
6:
5:
8 Select the level you want using X/x,
then press ENTER.
Parental Control setting is complete.
80
PARENTAL CONTROL
LEVEL: OFF
STANDARD:
USA
PARENTAL CONTROL
LEVEL:
STANDARD: USA
4: PG13
Page 81
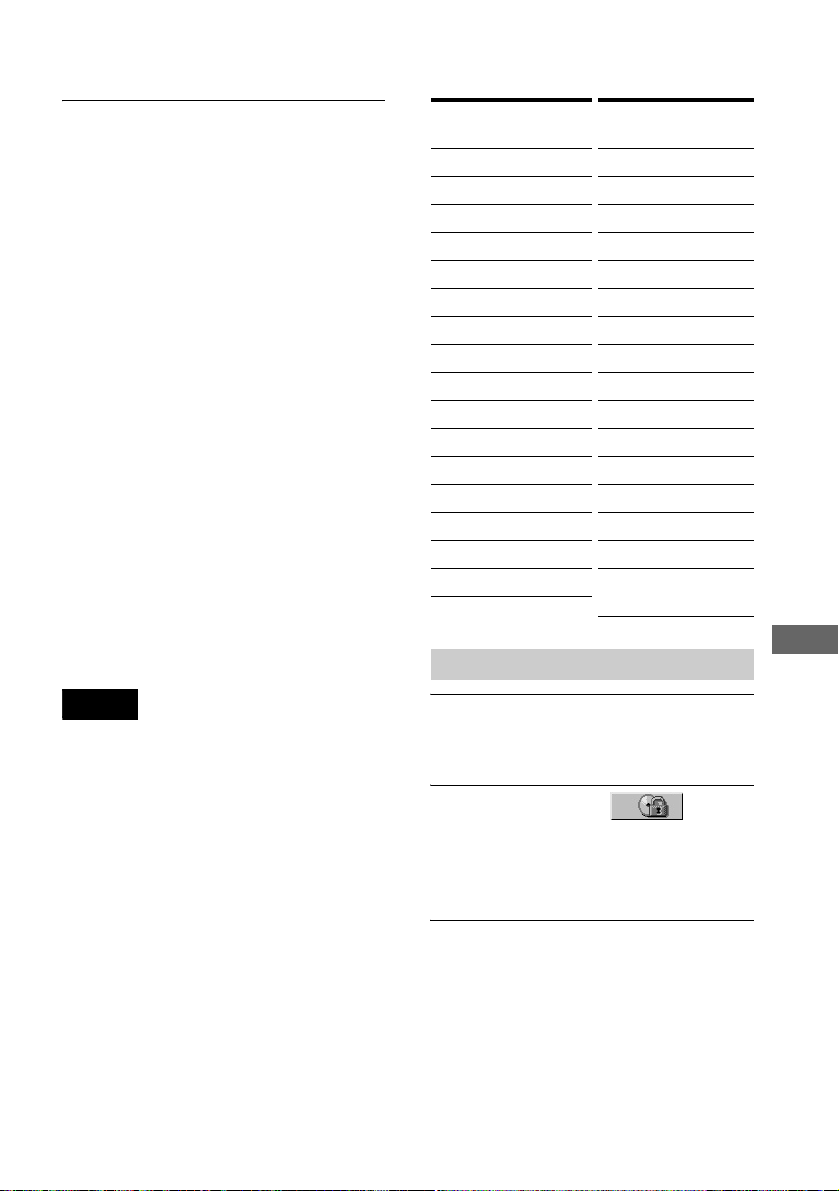
The lower the value, the more strict the
limitation.
To turn off the Parental Control
function
Set “LEVEL” to “OFF” in Step 8.
To play a disc for which Parental
Control is set
1 Insert the disc and press H.
The “PARENTAL CONTROL” display
appears.
2 Enter your 4-digit password using X/x
to select the digit, followed by c to move
the cursor. Then press ENTER.
The player starts playback.
z If you forget your password, remove the disc and
repeat Steps 1 to 3 of “Parental Contr ol (limiting
playback by children).” When you a re a ske d to en te r
your password, enter “199703,” then press ENTE R.
(Press c after the 4th digit to allow the entire 6 digit
number to be entered.) The display will a sk you to
enter a new 4-digit password. After you enter a new 4digit password, rep lace the disc i n the player and press
H. When the “PARENTAL CONTROL” display
appears, enter your new password.
Area Code
Standard Code
number
Argentina 2044
Australia 2047
Austria 2046
Belgium 2057
Brazil 2070
Canada 2079
Chile 2090
China 2092
Denmark 2115
Finland 2165
France 2174
Germany 2109
India 2248
Indonesia 2238
Italy 2254
Japan 2276
Changing the password
Standard Code
Korea 2304
Malaysia 2363
Mexico 2362
Netherlands 2376
New Zealand 2390
Norway 2379
Pakistan 2427
Philippines 2424
Portugal 2436
Russia 2489
Singapore 2501
Spain 2149
Sweden 2499
Switzerland 2086
Thailand 2528
United
Kingdom
number
2184
Using Various Additional Functions
Notes
• When you play DVD VIDEOs which do not have the
Parental Control function, playback cannot be
limited on this player.
• Depending on the DVD VIDEO, you may be asked
to change the parental control level while playing the
disc. In this case, enter your pas sword , th en ch an ge
the level. If the Resume Play mode is can cel ed , the
level returns to the original level.
1 Press DISPLAY while the player is in
stop mode.
The Control Menu appears.
2 Press X/x to select
(PARENTAL CONTROL), then press
ENTER.
The options for “PARENTAL
CONTROL” appear.
3 Press X/x to select “PASSWORD t,”
then press ENTER.
The display for entering the password
appears.
continued
,
81
Page 82

4 Enter your 4-digit password using X/x to
select the digit, followed by c to move
the cursor. Then press ENTER.
Operation Sound Effects
(Sound Feedback)
5 Enter a new 4-d igit password usin g X/x
to select the digit, foll owed by c to move
the cursor. Then press ENTER.
6 To confirm your passwo r d, r e-e n t er it
using X/x to select the digit, followed by
c to move the cursor. Then press
ENTER.
If you make a mistake entering your
password
Press C before you pre ss ENTER and input
the correct number.
If you make a mistake
Press ORETURN.
To turn off the Control Menu
Press DISPLAY repeatedly until the Control
Menu is turned off.
The player beeps when the following
operations are performed.
The default setting of the Sound Feedback
function is set to off.
Operation Operation sound
Power is turned on One beep
Power is turned off Two be eps
H is pressed
X is pressed
Playback is stopped One long beep
Operation is not possible Three beeps
One beep
Two beeps
82
Page 83
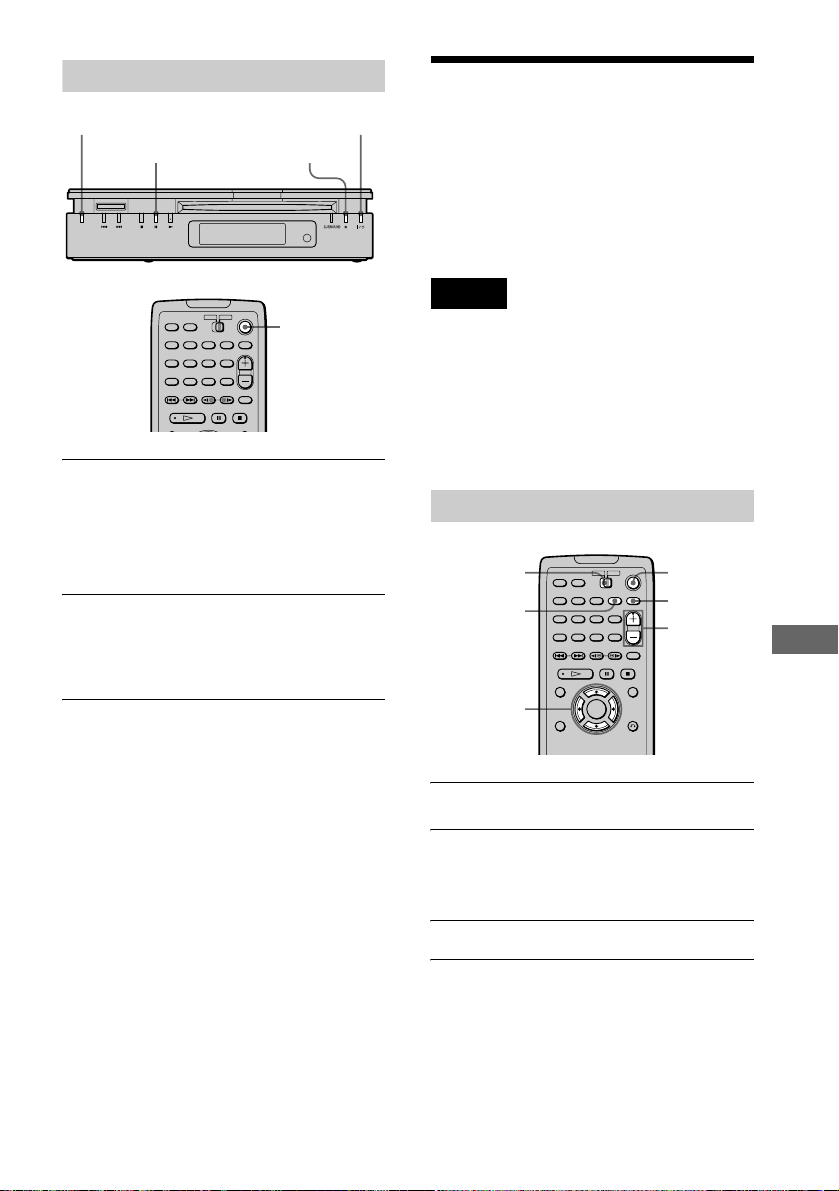
To set Sound Feedback
MS indicator
X
?/1 button/indicator
A
?/1
1 Press ?/1 on the player or the remote.
The ?/1 indicator lights up in green.
Make sure that the MS indicator is turned
off. If there is a disc in the player, press
A and remove the disc.
2 Press and hold X on the player for more
than two seconds.
You will hear one beep and the Sound
Feedback function is turned on.
Controlling Your TV, etc. with the Supplie d Remote
By adjusting the remote signal, you can
control your TV or Sony Active Speaker
System SA-F21 (not supplied) with the
supplied remote.
Notes
• Depending on the uni ts be ing connected, you may
not be able to cont rol your TV or Sony AV amp lifie r
(receiver) using some of the buttons below.
• If you enter a new TV code, the code pr evi ous ly
entered will be erased.
• When you replace the batteries of the remote, the TV
code may be reset to the default setting. Reset th e
appropriate code.
Controlling TVs with the remote
TV/DVD
WIDE MODE
C/X/x/c
?/1
TV/VIDEO
VOL
Using Various Additional Functions
To turn off the Sound Feedback
function
When there is no disc in the player and the
MS indicator is tu r ne d off , pr e s s an d hold X
on the player for more than two seconds. You
will hear two beeps and the Sound Feedback
function is turned off.
1 Slide the TV/DVD switch to “TV.”
2 Hold down ?/1, and enter your TV’s
manufacturer’s code (see the table)
using C/X/x/c.
3 Release ?/1.
continued
,
83
Page 84

Manufacturer’s codes of controllable
TVs
Manufacturer Press C/X/x/c to input code
Sony (default) XX
Fisher Xx
General Electric XC
JVC xX
Magnavox Xc
Panasonic cc
Philips Xc
Quasar cx
RCA XC
Samsung xc
Sanyo Xx
Sears cC or XC or Xx
Sharp cx
Teknika Xc
Toshiba cC
Zenith cX
Controlling the TV
When you set the TV/DVD switch to “TV,”
you can control yo ur TV using the buttons
below.
Controlling Active Speaker System
SA-F21
When you set the TV/DVD switch to
“DVD,” you can adjust the volume using
VOL +/–.
There are some Sony audio products you can
z
adjust the volume with the supplied remote.
By pressing You can
?/1
VOL (volume) +/– Adjust the volume of the
TV/VIDEO Switch the TV’s input
WIDE MODE Switch to or from the wide
Turn the TV on or off
TV
source between th e TV an d
other input sources
mode of a Sony wide TV
84
Page 85
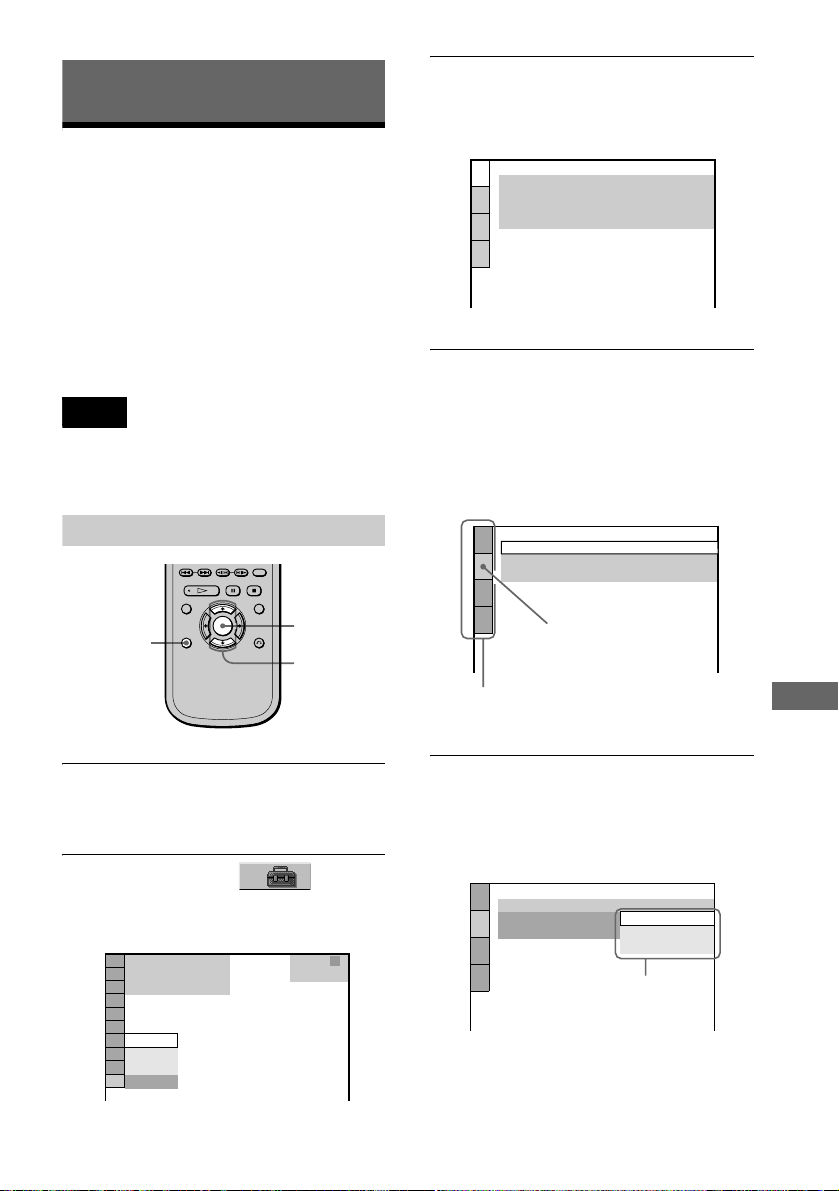
Settings and Adjustments
Using the Setup Display
By using the Setup Display, you can make
various adjustments to items such as picture
and sound. You can also set a language for
the subtitles and the Setup Display, among
other things. For details on each Setup
Display item see pag e 86 t hro ug h 92. For an
overall list of Setup Display items, see page
102.
Note
Playback settings stored in the disc take priority over
the Setup Display settings and not all the functions
described may work.
3 Press X/x to select “CUSTOM,” then
press ENTER.
The Setup Display appears.
LANGUAGE SETUP
OSD:
MENU:
AUDIO:
SUBTITLE:
ENGLISH
ENGLISH
ORIGINAL
ENGLISH
4 Press X/x to select the setup item from
the displayed list: “LANG UAGE SETUP, ”
“SCREEN SETUP,” “CUSTOM SETUP,”
or “AUDIO SETUP.” Then pr es s ENTER.
The selected setup item appears.
Example: “SCREEN SETUP”
How to use the Setup Display
DISPLAY
ENTER
X/x
1 Press DISPLAY on the remo te whe n the
player is in stop mode.
The Control Menu appears.
2 Press X/x to select (SETUP),
then press ENTER.
The options for “SETUP” appear.
)
( 47
: :
QUICK
CUSTOM
RESET
QUICK
STOP
DVD VIDEO
SCREEN SETUP
TV TYPE:
SCREEN SAVER:
BACKGROUND:
Setup items
Selected item
4:3 LETTER BOX
JACKET PICTURE
ON
5 Select an item using X/x, then press
ENTER.
The options for the selected item appear.
Example: “TV TYPE”
SCREEN SETUP
TV TYPE:
SCREEN SAVER:
BACKGROUND:
4:3 LETTER BOX
4:3 LETTER BOX
4:3 PAN SCAN
Options
16:9
Settings and Adjustments
continued
,
85
Page 86
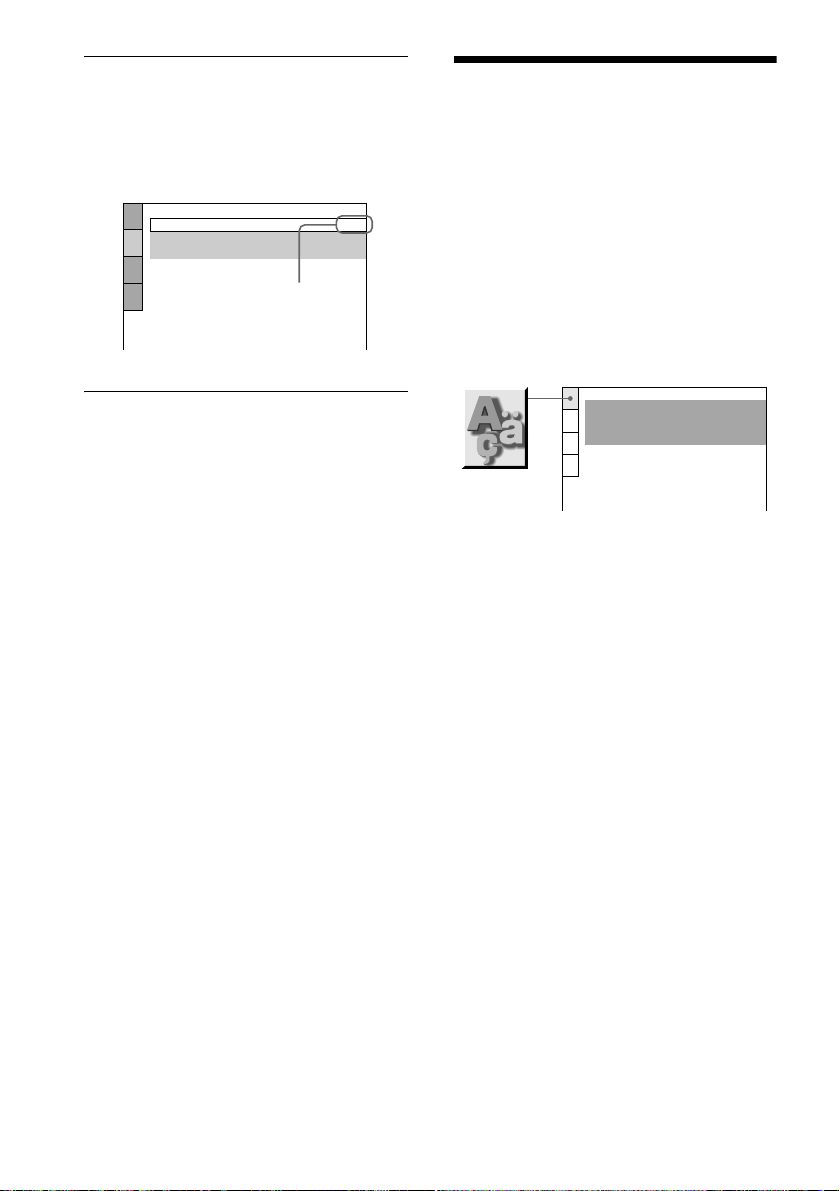
6 Select a setting using X/x, then press
ENTER.
The setting is selected and setup is
complete.
Example: “16:9”
Setting the Display or
Sound Track Language
(LANGUAGE SETUP)
SCREEN SETUP
TV TYPE:
SCREEN SAVER:
BACKGROUND:
JACKET PICTURE
Selected setting
16:9
ON
To turn off the Setup Display
Press DISPLAY repeatedly until the Setup
Display is turned off.
z
If you select “QUICK” in Step 3, you will enter the
Quick Setup mode (page 34).
Follow from Step 5 of the Quick Setup explanation to
make basic adjustments.
z If you select “RESET” in Step 3, you can reset all
of the “SETUP” settings on pages 102 to 103 to the
default settings (exce pt f or “DA TE /TIME SETUP”).
After you select “RESET” and press ENTER, select
“YES” and press ENTER to reset the settings (it takes
a few seconds to complete), or select “NO” and press
ENTER to return to the Control Menu. Do not turn off
the player during resetting.
“LANGUAGE SETUP” allows you to set
various languages for the on-screen display
or sound track.
Select “LANGUAGE SETUP” in the Setup
Display. For details on us ing the display, see
“Using the Setup Disp lay” (page 85).
LANGUAGE SETUP
OSD:
MENU:
AUDIO:
SUBTITLE:
ENGLISH
ENGLISH
ORIGINAL
ENGLISH
xOSD (On-Screen Display)
Switches the display language on the screen.
Selects the language from the displayed list.
xMENU (DVD VIDEO only)
You can select the desired language for the
menu. Selects the language from the
displayed list.
xAUDIO (DVD VIDEO only)
Switches the language of the sound track.
Selects the language from the displayed list.
When you select “ORIGINAL,” the language
given priority in the disc is selected.
86
xSUBTITLE (DVD VIDEO only)
Switches the language of the subtitles
recorded on the DVD VIDEO.
Select the language from the displayed list.
When you select “AUDIO FOLLOW,” the
language for the subtitles changes acco rdin g
to the language you selected for the sound
track.
Page 87
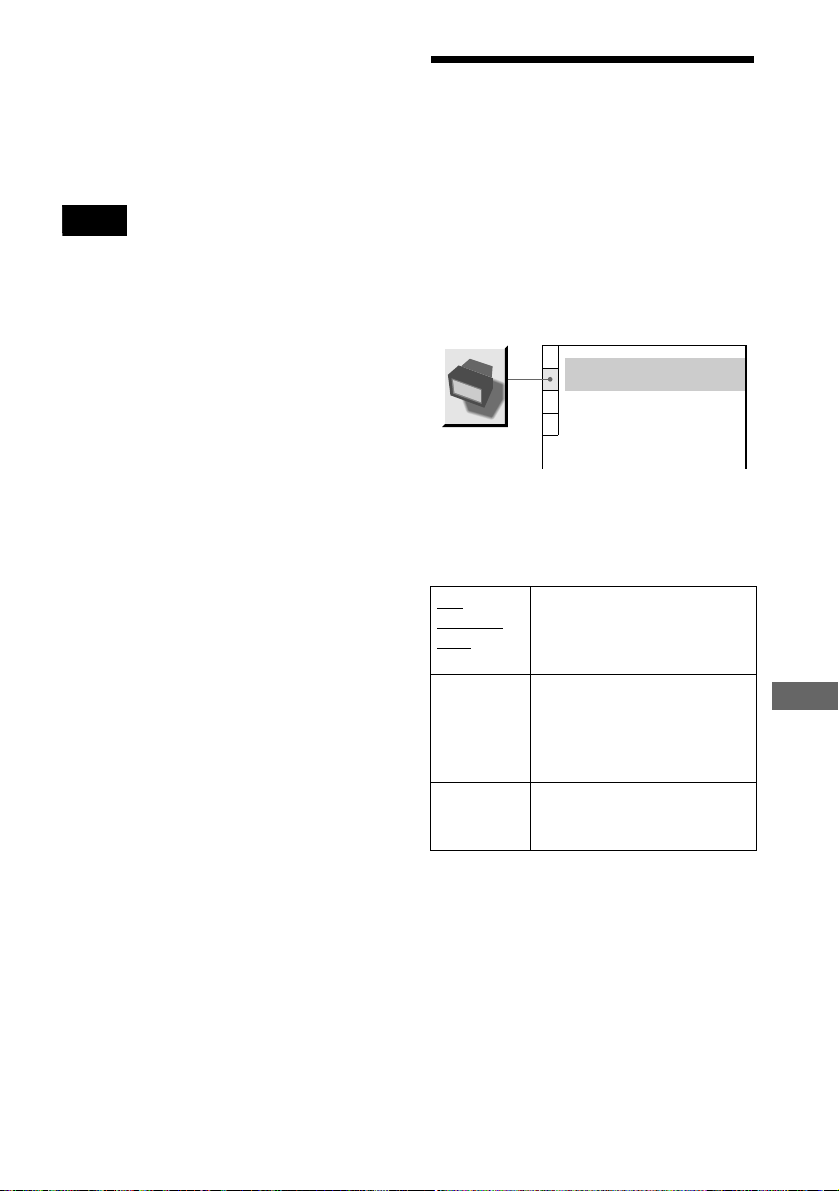
z If you select “OTHERS t” in “MENU,”
“SUBTITLE,” and “AUDIO,” select and enter the
language code from the list using X/x to select the
digit, followed by c to move the cursor (page 101).
After you have made a selection, the language code (4
digits) is displayed the next time you select
“OTHERS t.”
Note
When you select a lang uage that is no t record ed on the
disc, one of the recorded languages wil l be
automatically selected (except for the “OSD”).
Settings for the Display
(SCREEN SETUP)
Choose settings according to the TV to be
connected.
Select “SCREEN SETUP” in the Setup
Display. For details on using the display, see
“Using the Setup Display” (page 85).
The default settings are underlined.
SCREEN SETUP
TV TYPE:
SCREEN SAVER:
BACKGROUND:
4:3 LETTER BOX
JACKET PICTURE
ON
xTV TYPE
Selects the aspect ratio of th e connected TV
(4:3 standard or wide).
4:3
LETTER
BOX
4:3 PAN
SCAN
16:9 Select this when you connect a
Select this when you connect a
4:3 screen TV. Displays a wide
picture with bands on the upper
and lower portions of the scr een.
Select this when you connect a
4:3 screen TV. Automatically
displays the wide picture on th e
entire screen and cuts off the
portions th at do not fit.
wide-screen TV or a T V w it h a
wide mode function.
Settings and Adjustments
continued
,
87
Page 88
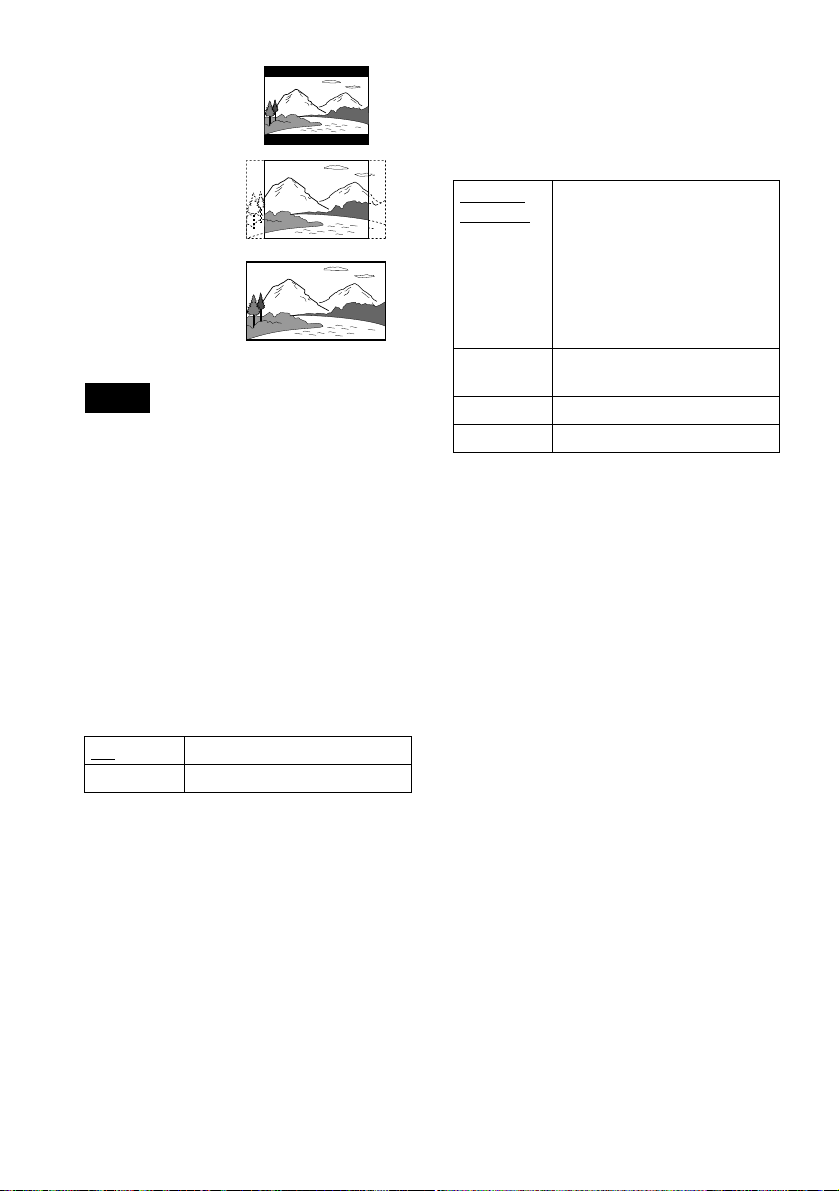
4:3 LETTER BOX
4:3 PAN SCAN
16:9
Note
Depending on the DVD, “4:3 LETTER BOX” may be
selected automati cally instea d of “4:3 PAN SCAN” or
vice versa.
xSCREEN SAVER
Turns on and off the screen saver so that the
screen saver image appears when you leave
the player in pause or stop mode for 15
minutes, or when you play back an audio or
JPEG image on a CD/DATA-CD/ “Memory
Stick” for more than 15 minutes. The screen
saver will help prevent your display device
from becoming damaged (ghosting). Press
H to turn off the screen saver.
xBACKGROUND
Selects the background color or picture on the
TV screen in stop mode or while playing a
CD/DATA-CD (MP3 audio track)/”MG
Memory Stick” (ATRAC3 audio track).
JACKET
PICTURE
GRAPHICS A preset picture stored in the
BLUE The background color is blue.
BLACK The background color is black.
The jacket pict ur e (still picture)
appears in the background, but
only when the jacket picture is
already recorde d on the disc
(CD-EXTRA, etc.). If the disc
does not contain a jacket pi ct ure,
the “GRAPHICS” picture
appears.
player appears in the background.
ON Turns on the screen saver.
OFF Turns off the screen saver.
88
Page 89
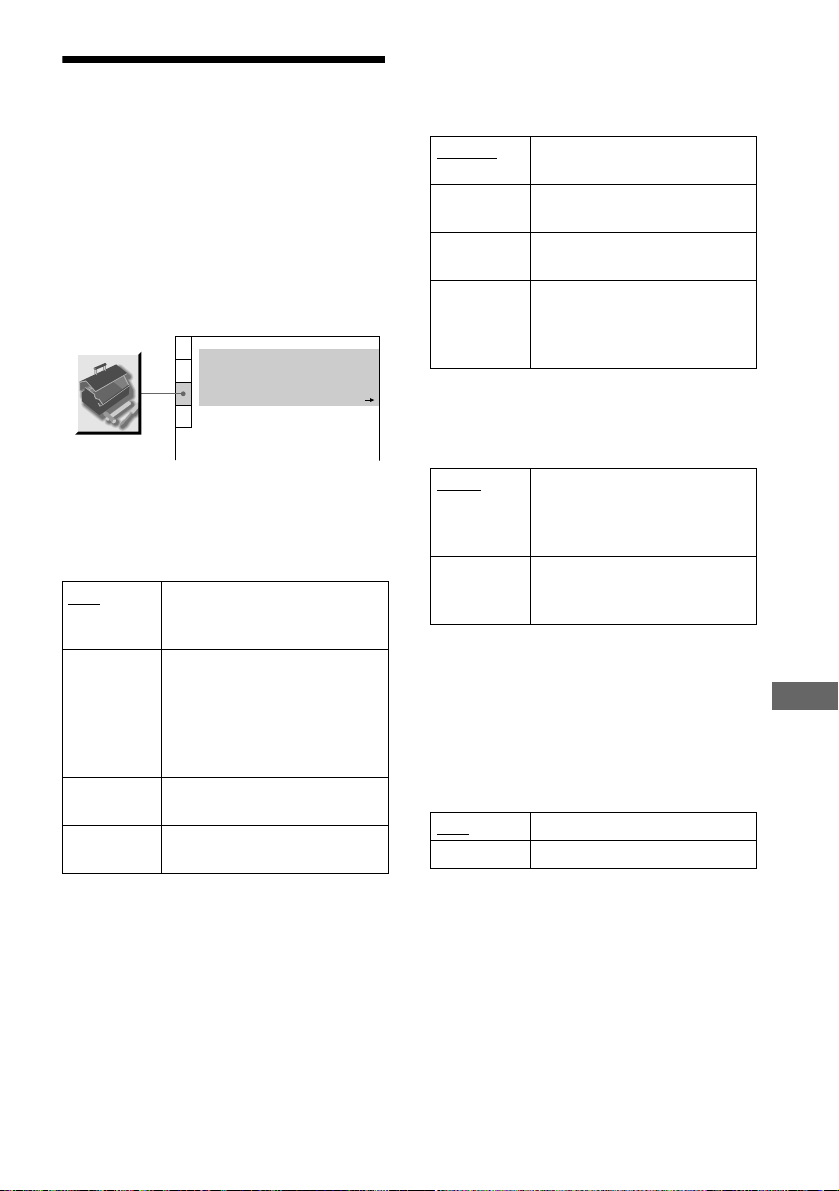
Custom Settings (C UST OM
CUSTOM SETUP
DIMMER:
PAUSE MODE:
BRIGHT
AUTO
OFF
TRACK SELECTION:
DATE/TIME SETUP
OFF
SETUP)
Use this to set up playback related and other
settings.
Select “CUSTOM SETUP” in the Setup
Display. For details on using the disp lay, see
“Using the Setup Display” (page 85).
The default settings are underlined.
AUTO PLAY:
xDIMMER
Adjusts the lighting of the front panel
display.
BRIGHT Makes the front panel display
bright.
DARK Makes the front panel display
dark.
OFF Turns off the lighting of the front
panel display.
AUTO Turn on the front panel display
for a few seconds when a button
on the player or remote is
pressed.
xPAUSE MODE (DVD VIDEO/DVD-RW
only)
Selects the picture in pause mode.
xAUTO PLAY
Selects the Auto Play setting when you turn
on the player .
OFF Does not use “TIMER,”
“DEMO1,” or “DEMO2” to start
playback.
TIMER Starts playing when the player is
turned on.
A CD, DVD VIDEO or VIDEO
CD can be played at any time
when the player is conn ec ted to a
timer (not supplied).
DEMO1 Starts playing the first
demonstration automatically.
DEMO2 Starts playi ng t h e s e cond
demonstration automatically.
AUTO
FRAME T he picture, includin g su bjects
The picture, including subjects
that move dynamically, is output
with no jitter. Normally, select
this position.
that do not move dynamic ally, is
output in high resolution.
xTRACK SELECTION (DVD VIDEO
only)
Gives the sound track which contains the
highest number of channels priority when
you play a DVD VIDEO on which multiple
audio formats (PCM, DTS or Dolby Digital
format) are recorded.
OFF
AUTO Priority given.
No priority given.
Settings and Adjustments
continued
,
89
Page 90
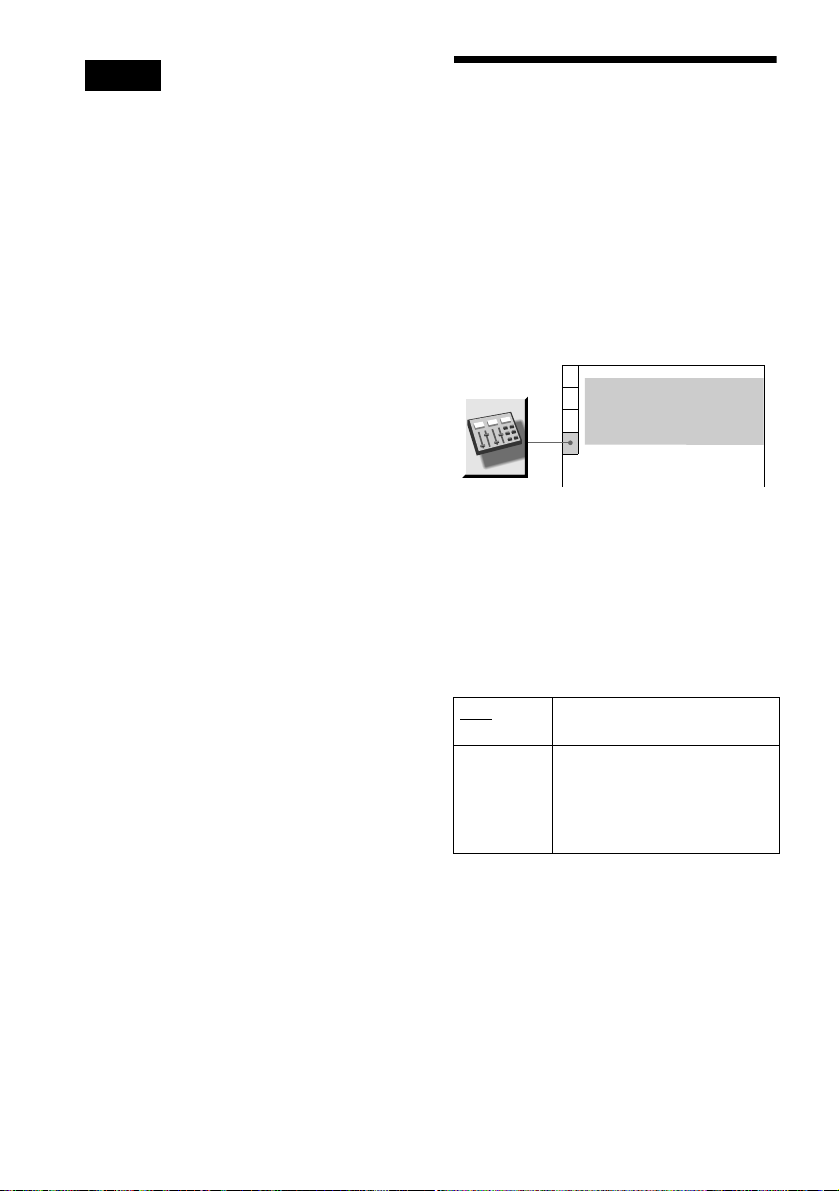
Notes
• When you set the item to “AUTO,” the language
may change. The “TRACK SELECTION” setting
has higher priority than the “AUDIO” settings in
“LANGUAGE SETUP” (page 86).
• If you set “DTS” to “OFF” (page 92), the DTS sound
track is not played even if you set “ TRACK
SELECTION” to “AUTO.”
• If PCM, DTS and Dolby Digital sound tracks have
the same number of channels, th e pl ay er se lects
PCM, DTS and Dolby Digital sound tracks in this
order.
• Depending on the DVD VIDEO, the audio channel
with priority may be predetermined. In this case, you
cannot give priority to the DTS or Dolby Digita l
format by selecting “AUTO.”
xDATE/TIME SETUP t
Set the current date and time. See “Playing a
track with a playback period restri ction
(DATE/TIME SETUP)” in”Playing an
ATRAC3 Audio Track” on page 74.
Settings for th e Sound
(AUDIO SETUP)
“AUDIO SETUP” allows you to set the
sound according to the playback and
connection condition s .
Select “AUDIO SETUP” in the Setup
Display. For details on us ing the display, see
“Using the Setup Disp lay” (page 85).
The default settings are underlined.
AUDIO SETUP
AUDIO ATT:
AUDIO DRC:
DOWNMIX:
DIGITAL OUT:
DOLBY DIGITAL:
DTS:
DOLBY SURROUND
xAUDIO ATT (attenuation)
If the playback sound is distorted, set this
item to “ON.” The player reduces the aud io
output level.
This function affects the output of the
following jacks:
–AUDIO OUT L/R jacks
OFF
STANDARD
ON
D-PCM
OFF
90
OFF Turns off the audio attenuation .
Normally, select th is p o s ition.
ON Reduces the audio output level so
that no sound distortion occurs.
Select this when the playba ck
sound from the speakers is
distorted.
Page 91
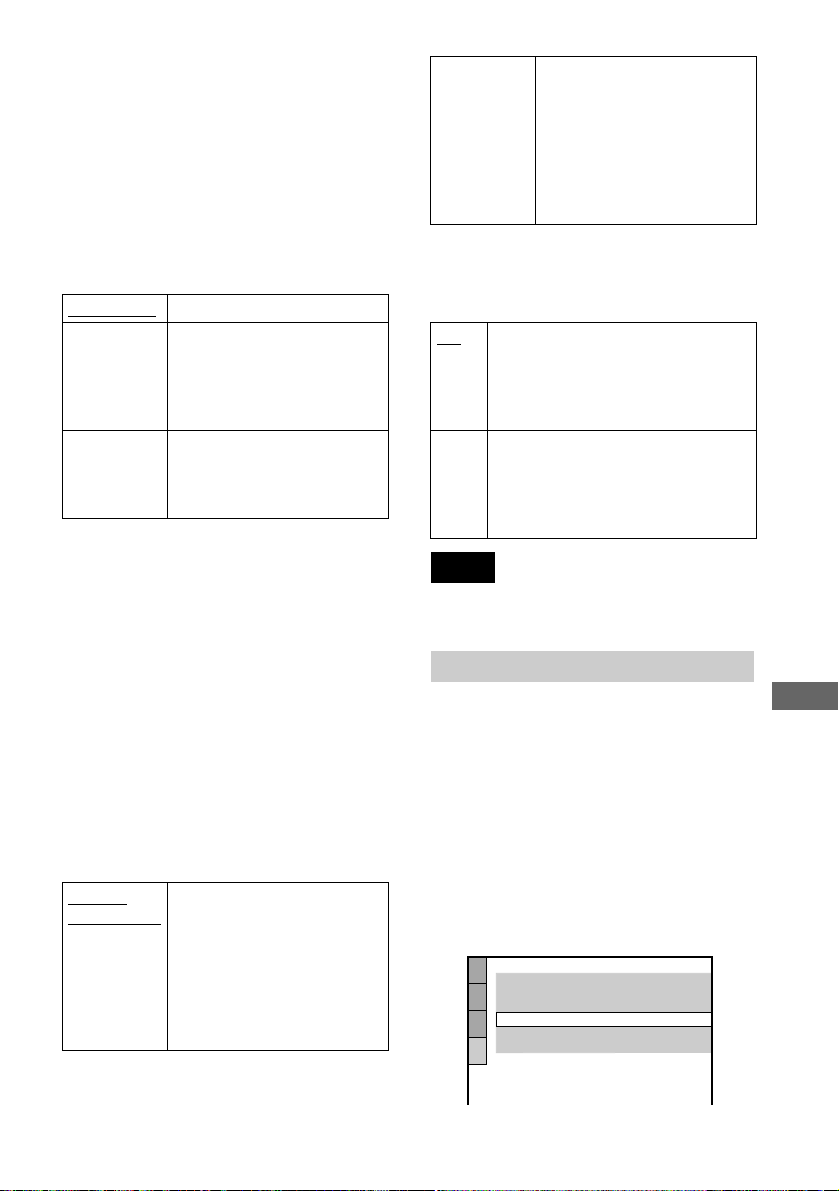
xAUDIO DRC (Dynamic Range
Control) (DVD VIDEO/DVD-RW only)
Makes the sound clear when the volume is
turned down when playing a DVD that has
the “AUDIO DRC” function. This affects the
output from the following jacks:
–AUDIO OUT L/R jacks
–DIGITAL OUT (OPTICAL) jack only
when “DOLBY DIGITAL” is set to “DPCM” in “DIGITAL OUT” (page 92).
STANDARD Normally, select this position.
TV MODE Makes the low sounds clear even
if you turn the volume down. It
is especially recommended
when you listen to the sound
using the speakers of the TV.
WIDE
RANGE
Gives you the feeling of being at
a live performance. When you
use high quality speakers, it is
even more effective.
xDOWNMIX (DVD VIDEO/DVD-RW
only)
Switches the mixing down methods when
you play a DVD on which rear signal
components such as “Rear (left),” “Rear
(right),” or “Rear (monaural)” are recorded in
Dolby Digital format. For details on the rear
signal components, see “Displaying the audio
information of the disc” (page 58). This
function affects the output of the following
jacks:
–AUDIO OUT L/R jacks
–DIGITAL OUT (OPTICAL) jack when
“DOLBY DIGITAL” is set to “D-PCM” in
“DIGITAL OUT” (page 92).
DOLBY
SURROUND
Select this when the player is
connected to an audio
component that conforms to
Dolby Surround (Pro Logic).
The output signals which
reproduce the Dolby Surround
effect are downmixed to 2
channels.
NORMAL Select this when the player is
connected to an audio
component that does not
conform to Dolby Surround (Pro
Logic). All of the output signals
are downmixed to 2 channels
without the Dolby Surround
(Pro Logic) effect.
xDIGITAL OUT
Selects if audio signals are output via the
DIGITAL OUT (OPTICAL) jack.
Normally, select this position. When
ON
you select “ON , ” s et “DOLBY
DIGITAL” and “DTS.” For details on
setting these items, see “Setting the
digital output signal.”
OFF T he pla ye r doe s not out put the audio
signals via the DIGITAL OUT
(OPTICAL) jack . Th e infl uence of the
digital circuit upon the analog circuit is
minimal.
Note
MP3 audio and ATRAC3 audio tracks will not be
output from the DIGITAL OUT (OPTICAL) jack.
Setting the digital output signal
Switches the method of outputting audio
signals when you connect th e following
component using an optical digital cord vi a
the DIGITAL OUT (OPTICAL) jack.
–Amplifier (receiver) with digital input jack
–AV amplifier (receiver) with a built-in DTS
or DOLBY DIGITAL decoder
–MD or DAT deck
For connection details, see page 26.
Select “DOLBY DIGITAL” and “DTS” after
setting “DIGITAL OUT” to “ON.”
AUDIO SETUP
AUDIO ATT:
AUDIO DRC:
DOWNMIX:
DIGITAL OUT:
DOLBY DIGITAL:
DTS:
DOLBY SURROUND
OFF
STANDARD
ON
D-PCM
OFF
Settings and Adjustments
continued
,
91
Page 92
xDOLBY DIGITAL (DVD VIDEO/DVDRW only)
Selects the Dolby Digital signals output via
the DIGITAL OUT (OPTICAL) jack.
D-PCM Select this wh en the player is
DOLBY
DIGITAL
connected to an audio component
lacking a buil t- in Dolby Digital
decoder. You can select whether
the signals conform to Dolby
Surround (Pro Logic) or not by
making adjustments to the
“DOWNMIX” item in “AUDIO
SETUP” (page 91).
Select this w h en the player is
connected to an audio component
with a built-in Dolby Digital
decoder. If the player is connected
to an audio com ponent lacking a
built-in Dolby Digital decode r, do
not set this. Otherwise, whe n you
play the Dolby Digital sound track,
a loud noise (or no sound) will
come out from the speakers,
affecting your ears or causing the
speakers to be damaged.
xDTS (DVD VIDEO only)
Selects if DTS signals are output via the
DIGITAL OUT (OPTICAL) jack.
Note
If you select one of the TVS settings while playin g a
DVD, the player does not output the Dolby Digital
signals from the DIGITAL OUT (OPTICAL) jack
(when you set “DOLBY DIGITAL” in “AUDIO
SETUP” to “D-PCM”).
OFF
ON Select this whe n the player is
Select this w h en the player i s
connected to an audio component
lacking a buil t-in DTS decoder. Note
that the DTS st er eo signals are output
in this setting.
connected to an audio component
having a built-in DTS decoder.
If the player is connected to an audio
component lacking a built-in DTS
decoder, do not s et this. Otherwise,
when you play the DTS sound track, a
loud noise (or no sound) will come
out from the speakers, affecting your
ears or causing the sp eakers to be
damaged.
92
Page 93

Additional Information
Troubleshooting
Even though you set the aspect ratio
in “TV TYPE” of “SCREEN SETUP,”
the picture does not fill the screen.
, The aspect rat io of the disc is fixed on your
DVD.
If you experien c e an y of the fo llo w in g
difficulties while using the player, use this
troubleshooting guide to help remedy the
problem before requesting repairs. Should
any problem persist, consult your nearest
Sony dealer.
Power
The power is not turned on.
, Check that the AC power adaptor and AC
power cord are connec te d securely.
Picture
There is no picture.
, The connec ti ng cords are not connected
securely.
, The connec ti ng cords are damaged.
, The player is not connected to the correct TV
input jack (page 22).
, The video input on the TV is not set so that you
can view pictures on the player.
Picture noise appears.
, The disc is dirty or fla w ed.
, If the picture output from your player goes
through your VCR to get to your TV, the copyprotection signal applied to some DVD
programs could affect pi c ture quality. If you
still experience problems even when you
connect your player dir ec tl y to your TV,
please try connecting your player to your TV’s
S video input (page 22).
Sound
There is no sound.
, The connecting cord is not co nnected secu rely.
, The connecting cord is damaged.
, The player is connected to the wrong input
jack on the amplifier (receiver) (page 26 , 28 ,
30).
, The amplifie r (receiver) input is not changed
so that you can listen to the player.
, The player is in pause mode or in Slow-motion
Play mode.
, The player is in fast forward or fa st reverse
mode.
, If the audio signal do es not com e through the
DIGITAL OUT (OPTICAL) jack, check the
audio settings (page 90).
, MP3 audio and ATRAC3 audio tracks will not
be output from the DIGITAL OUT
(OPTICAL) jack.
Sound is noisy.
, The disc is dirty or flawed.
, When playin g a CD w i th DTS sound tracks,
noise will come from the AUDIO OUT L/R
jacks (page 38).
Additional Information
Sound distortion occurs.
, Set “AUDIO ATT” in “AUDIO SETUP” to
“ON” (page 90).
Operation
The remote does not function.
, There are obstacles between the remote and
the player.
, The distance between the remote and the
player is too far .
, The remote is not pointed at the remote sensor
on the player.
continued
,
93
Page 94

, The remote sensor of the player is exposed to
strong light. Select a remote sensor that is not
exposed to strong light (page 18).
, The remote sensor you are trying to use is not
activated. Select t he remote sensor you want to
use (page 18).
, The batteries in the remote are weak.
The disc does not play.
, There is no disc inside.
, The disc is upside down. Insert the disc with
the playback side facing down in the disc slot.
, The disc is skewed.
, The player cannot play CD-ROMs, etc. (page
8).
, The region code on the DVD VIDEO does not
match the play er.
, Moisture has condense d in side th e pl ayer.
Remove the disc and leave the player turned
on for about half an hour . T urn on the power
again before playing the disc (page 3).
, The player cannot play DVD-Rs, DVD-RWs,
CD-Rs, or CD-RWs that are not finalized.
, You are trying to play the wrong medium (disc
or “Memory Stick”) in the wrong mode (disc
mode or MS mode).
Press MS to select the correct mode. (The MS
indicator is lit in MS mode, and is off in disc
mode.)
One of the following messages
appears when you insert a “Memory
Stick” into the player.
“Memory Stick type error”
, The “Memory Stick” is not compatible with
the player (for instance, the “Memory Stick” is
larger than 128MB, etc.).
“Format error”
, The “Mem ory Stick” was form atted in a way
that does not con form to the pl ayer (Window s
Explorer, etc.).
The following message appears when
you play the DATA-CD.
“Data error”
, The MP3 audio track/JPEG image file you
want to play is broken
, You are trying to vie w the following data:
– the JPEG image file format does not
comform to DCF (page 68)
– has the extension “. JPG ” bu t no t in JPEG
format
You cannot play MP3 audio tracks.
, You are trying to pla y the following data:
– recorded on an “Memory Stick” (The player
can play MP3 audio tracks recorded on
DATA-CDs only)
– does not conform to ISO9660 level 1, level 2
or Joliet
– recorded in MP3PRO
– has an extension othe r tha n “ .M P 3”
– has the extension “. MP3” but not in MP3
format
“Memory Stick error”/ “Insert a
Memory Stick.”
, The playe r cannot recognize the “Memory
Stick.”
Eject the “Mem ory Stick” and insert it again.
“Data error”
, The ATRAC3 audio track/JPEG image file
you want to play is broken.
, You are trying to vi ew the following data:
– JPEG image recorded by a digital camera
that image fi le format a nd dire ctory str ucture
are not DCF compliant (page 75)
– JPEG image edited by a computer
– has the e xtension “.JPG” but not in JPEG
format
94
You cannot view JPEG image files
correctly.
, You are trying to vie w the following data:
– does not conform to ISO9660 level 1, level 2
or Joliet
– has an extension other than “.JPG”
– larger than 4720 dots vertically or
horizontally
– does not fit the screen (those images are
reduced)
Page 95
The album/track/file names are n ot
displayed correctly.
, The album/track/ file name appe ars as asteris ks
(
).
*
The player ca n display only l etters of the
alphabet and number s. O th er characters
appear as asterisks.
You cannot play ATRAC3 audio
tracks.
In the case of music data with
playback date restriction:
, The current date is not set, or was reset
because the power cord was di sconnected.
Set the date and time (page 74).
, The date s etting has exp ir ed. “Time limit
expired” appears on the displ a y.
In the case of music data for which the
number of playback times is
restricted:
, The “MG Memory Stick” erasure prevention
switch is locked. “Copyright lock” appears on
the display.
Unlock the erasure prevention switch.
, The data has bee n pla ye d as m an y times as is
allowed. “Playback limit exceeded” appears
on the display.
The disc does not start playing from
the beginning.
, Program Play, Shuffle Play, Repeat Play or A-
B Repeat Play has been selected (page 43).
Press CLEAR to ca ncel these functio ns before
playing a disc.
, Resume Pl ay has been select ed.
During stop, press
remote and then st ar t playback (page 40).
, The disc automatically displays the menu.
x on the player or the
The player starts playing the disc
automatically.
, The disc features an auto playback fun ct ion.
, “AUTO PLAY” in “CUSTOM SETUP” is set
to “TIMER” (page 89) .
Playback stops automatically.
, Some discs may contain an auto pause signal.
While playing su ch a disc, the player stops
playback at the auto pau se signal.
You cannot perform some functions
such as stop, Scan, Slow-motion Play,
Repeat Play, Shuffle Play, or Program
Play.
, Depending on the disc, you may not be able to
do some of the operations above. See the
operating ma nual that comes with the disc.
Messages do not appear on the
screen in the language you want.
, In the Setup Displa y, sel ec t the desired
language for the on-screen disp la y in “OSD ”
under “LANGUAGE SETUP” (page 86).
The language for the sound track
cannot be changed.
, Multilingual trac ks are not recorded on the
DVD VIDEO being pl ayed.
, The DVD VIDEO prohibits the changing of
the language for the sound trac k.
The subtitle language cannot be
changed.
, Multilingual subtitles are not r ecorded on th e
DVD VIDEO being pl ayed.
, The DVD VIDEO prohibits the changing of
the subtitles.
The subtitle cannot be turned off.
, The DVD VIDEO prohibits the subtitles being
turned off.
The angles cannot be changed.
, Multi-angles are not recorded on the DVD
VIDEO being played.
, The angle can be changed only when the
“ANGLE” indicator lig hts up on the front
panel disp l ay (page 11).
, The DVD VIDEO prohibits changing of the
angles.
continued
,
Additional Information
95
Page 96
The player does not operate properly.
, When static electricity, etc., cause s th e player
to operate abnormally, disc onnect the AC
power cord once, then connect it again.
Self-diagnosis Function
(When letters/numbers appear in the
display)
Nothing is displayed on the front
panel display.
, “DIMMER” in “CUSTOM SETUP” is set to
“OFF.” Set “DIMMER” to “BRIG H T” or
“DARK” (page 89). I f you set to “AUTO, ” the
display turns on only when you op e rat e the
player.
5 numbers or letters are displayed on
the screen and on the front panel
display.
, The self-diagnosis function was activated.
(See the table on page 96 .)
The disc cannot be removed and
“LOCKED” appears on the fron t panel
display.
, Contact your Sony dealer or local author iz ed
Sony service facility.
When the self-diagnosis func tion is activated
to prevent the player from malfunctioning, a
five-character service number (e.g., C 13 00)
with a combination of a letter and digits
appears on the screen and the front panel
display. In this case, check the following
table.
C:13:00
First three
characters
of the
service
number
C 13 The disc is dirty .
C 31 The disc is not inserted correctly.
E XX
number)
Cause and/or corrective
action
, Clean the disc wi th a soft clo th
(page 9).
, Re-insert the disc cor r ectly.
(xx is a
To prevent a malfunction, the
player has performed the selfdiagnosis function.
, Contact your ne arest Sony
dealer or local authorized
Sony service facility and giv e
the 5-character se r vi c e
number.
Example: E 61 10
96
Page 97

Glossary
Album (page 67, 69, 76)
A unit in which to store JPEG image files or
MP3/ATRAC3 audio tracks on a DATACDs or “Memory Stic k.” (“Album” is an
exclusive definition for this player.)
ATRAC3 (page 73)
ATRAC3 (Adaptive Transform Acoustic
Coding 3), is audio compression technology
that satisfies the demand for high sound
quality and high compression rates. The
ATRAC3 compression rate is approximately
10 times higher than that of the audio CD
format, resulting in increased data capacity.
Chapter (page 11)
Sections of a picture or a music feature th at
are smaller than titles. A title is composed of
several chapters. Depending on the disc, no
chapters may be recorded.
Dolby Digital (page 24, 92)
Digital audio compression technology
developed by Dolby Laboratories. This
technology conforms to 5.1-channel
surround sound. The rear channel is st ereo
and there is a discrete subwoofer channel in
this format. Dolby Digital provid es the same
5.1 discrete channels of high quality digital
audio found in Dolby Digital cinema audio
systems. Good channel separation is re alized
because all of the channel dat a are recorded
discretely and little deterioration is realized
because all channel data processing is digital.
Dolby Surround (Pro Logi c ) (page 91)
Audio signal proc es si n g te ch no lo gy that
Dolby Laboratories developed for surround
sound. When the input signal contains a
surround componen t, the Pro Logic process
outputs the front, center, and rear signals. The
rear channel is monaural.
DTS (page 24, 92)
Digital audio compression technology that
Digital Theater Systems, Inc. developed.
This technology conforms to 5.1-channel
surround sound. The r ear channel is stereo
and there is a discrete subwoofer channel in
this format. DTS provides the same 5.1
discrete channels of high quality digital
audio.
Good channel separation is realized because
all of the channel data is recorded discretely
and little deterioration is realized be cause all
channel data processing is digital.
DVD-RW (page 41)
A DVD-RW is a recordable and rewritable
disc with the same size as the DVD VIDEO.
The DVD-RW can be recorded in two
different modes: VR mode an d V ideo mode.
VR (Video Recording) mode enables various
programming and editing functions, some of
which are limited in the c ase of Video mode.
Video mode complies with DVD VIDEO
format and is compatible with DVD players
while a DVD-RW recorded in VR mode can
only be played on DVD-RW compliant
players. The “DVD-RW” appears in this
manual, or the on-screen display refers to
DVD-RWs in VR mode.
DVD VIDEO (page 7)
A disc that contains up to 8 hours of mo ving
pictures even though its diameter is the same
as a CD.
The data capacity of a single-layer and
single-sided DVD is 4.7 GB (Giga Byte),
which is 7 times that of a C D . The data
capacity of a double-layer and sin gle-sided
DVD is 8.5 GB, a single-layer and doublesided DVD is 9.4 GB, and double-layer and
double-sided DVD is 17 GB.
The picture data uses the MPEG 2 format,
one of the worldwide standards of digital
compression technology. The picture data is
compressed to about 1/40 (average) of its
original size.
Additional Information
continued
,
97
Page 98
The DVD VIDEO also uses a variable rate
coding technology that changes the data to be
allocated according to the status of the
picture. Audio information is recorded in
Dolby Digital as well as in PCM, allowing
you to enjoy a more real audio p resence.
Furthermore, var io us advanced functions
such as the multi-angle, multilingual, and
Parental Control function s are prov ided with
the DVD VIDEO.
File (page 69, 76)
A JPEG image recorded on a DATA-CD or
“Memory Stick.” (“File” is an exclusive
definition for this player.) A single file
consists of a single image.
Index (CD)/Video Index (VIDEO CD) (page
50)
A number that divides a track in to sections to
easily locate the point you want on a VIDEO
CD or CD. Dependin g on the disc, no index
may be recorded.
Parental Control (page 78)
A function of the DVD VIDEO used to limit
playback of the disc accord in g t o t he age of
the user and the limitation level in each
country. The limitation varies from disc to
disc; when it is activate d, or playback is
completely prohibited, violent scenes are
skipped or replaced with other scenes, etc.
Region Code (page 7)
This system is used to protect copyrights. A
region number is allocated on each DVD
player or DVD disc according to the sales
region. Each region code is shown on the
player as well as on the disc packaging. The
player can play the discs that matc h its region
code. The player can also play discs with the
mark. Even when the region code is not
ALL
shown on the DVD, the region limit may still
be activated.
companies in the fields of recorded au di o
content, computers, an d consumer
electronics, de dicated to developing an
integrated method of copyright protection
technology that can be used worldwide.
SDMI is working to create a framework for
preventing improper usage of audio files and
to promote legal musi c distribution services.
Scene (page 11)
On a VIDEO CD with PBC (playback
control) functio ns, the menu scre ens, moving
pictures and still pictures are divid ed into
sections called “scenes.”
Title (page 11)
The longest section of a picture or music
feature on a DVD, movie, etc., in video
software, or the entire album in audio
software.
Track (page 11)
Sections of a picture or a music feature on a
VIDEO CD, CD, DATA-CD or “MG
Memory Stick” (the length of a song).
(“Track” in DATA-CD or “MG Memory
Stick” is an exclusive definition for thi s
player.)
TV Virtual Surr ound (TVS) (page 59)
Technology fro m Sony developed to pr oduce
surround sound for home use using just a
stereo TV. Designed to work with the sound
characteristics of your TV, this technology
brings the excitement of surround sound to
your home using nothing more than yo ur
stereo TV’s internal speakers. Furthermore,
various TVS modes are av a il a bl e . For
example, “TVS WIDE” uses just two
speakers to create a virt ual sound
environmen t that makes you feel li ke you are
surrounded by multiple speakers.
SDMI
SDMI which stands for Secure Digital Music
Initiative, is a forum that c onsists of over 13 0
98
Page 99
Specifications
System
Laser Semiconductor laser
Signal format system NTSC
Audio characteristics (DVD/CD)
Frequency response DVD VIDEO (PCM 96 kHz): 2 Hz to 44 kHz (±1.0 dB)
DVD VIDEO (PCM 48 kHz): 2 Hz to 22 kHz (±0.5 dB)
Signal-to-noise ratio (S/N ratio) 115 dB (AUDIO OUT L/R jacks only)
Harmonic distortion 0.003%
Dynamic range DVD VIDEO: 103 dB
Wow and flutter Less than detected value (±0.001% W PEAK)
The signals from AUDIO OUT L/R jacks are measured. When you play PCM s ound tracks with a 96 kHz sampling
frequency, the output signal from the DIGITAL OUT (OPTICAL) jack is converted to 48 kHz sampling frequency.
Outputs
CD/“MG Memory Stick” (ATRAC 3): 2 H z to 20 kH z (±0.5 dB)
CD/“MG Memory Stick” (ATRAC3): 99 dB
Jack name Jack type Maximum output
DIGIT AL OUT
(OPTICAL)
AUDIO OUT L/R Phono jack 2 Vrms (50 kilohms) Over 10 kilohms
VIDEO OUT Phono jack 1.0 Vp-p 75 ohms, sync negative
S-VIDEO OUT 4-pin mini DIN Luminance signal:
Optical output jack -18 dBm Wave length 660 nm
level
1.0 Vp-p
Color signal:
0.286 Vp-p
Load impedance
75 ohms, sync negative
75 ohms terminated
General
Power requirements DC 10.5 V
Power consumption 12 W
Dimensions (approx.) 252 × 60 × 183 mm (10 × 2 3/8 × 7 1/4 in.) (width/height/depth)
Mass (approx.) 1.5 kg (3 lb. 5 oz.)
Operating temperature 5°C to 35°C (41°F to 95°F)
Operating humidity 25% to 80%
See page 3 for further information.
including projecting parts
Additional Information
continued
,
99
Page 100

AC power adaptor
Model name AC-F21
Power requirements 100 – 240 V AC, 50/60 Hz
Output voltage DC 10.5 V, 1.3 A in operating mode
Operating temperatur e 5°C to 35°C (41°F to 95°F)
Storage temperature –20° C t o 60° C (–4°F to 140°F)
Supplied accessories
See page 17.
Optional accessory
Active Speaker System SA-F21
Specifications and design are subject to change wi th out notice.
ENERGY STAR is a U.S. registered mark. As an ENERGY STAR Partner, Sony Corporation has determined
that this product meets the
ENERGY STAR guidelines for energy efficiency.
100
 Loading...