

Page 1
3-042-645-25 (1)
Portable
VIDEO CD Player
Operating Instructions
D-VJ85
2000 Sony Corporation
Page 2
WARNING
To prevent fire or shock
hazard, do not expose the unit
to rain or moisture.
To avoid electrical shock, do
not open the cabinet. Refer
servicing to qualified
personnel only.
Welcome!
Thank you for purchasing the Sony Portable
VIDEO CD Player. Before operating your
player, please read this manual and retain it
for future reference.
This player can play the following
discs:
• VIDEO CD
Disc logo
Contents Audio & video signals
• Audio CD
Disc logo
Contents Audio signals only
There are 2 types of CDs in size — 12 cm and 8 cm.
Their longest play time is 74 and 20 minutes
respectively. The actual play time, however, varies
among the CDs.
Note on VIDEO CDs
This player conforms to Version 1.1 and 2.0 of VIDEO
CD standards. You can enjoy two kinds of playback
according to the CD type.
Disc type
VIDEO CDs
without PBC
functions
You can
Enjoy video playback
(moving pictures) as well
as music.
(Version 1.1)
VIDEO CDs
with PBC
functions
(Version. 2.0)
Play interactive software
using menus displayed on
the TV screen, in addition
to the video playback
function. Also play highresolutive still pictures.
About CD-Rs
This CD player can play CD-Rs recorded in
the CD-DA* and Video CD format, but
playback capability is depending on the
quality of the media and the condition of the
recording device.
* CD-DA is the abbreviation for Compact Disc Digital
Audio. It is a recording standard used for the Audio
2
CDs.
Page 3

Table of Contents
Getting started
Locating the Controls .................................. 4
Playing a VIDEO CD
1. Connect your VIDEO CD player............. 7
2. Set the NTSC/PAL switch to the color
system of your TV. .................................. 7
3. Insert a VIDEO CD. ................................ 8
4. Play a VIDEO CD. .................................. 8
Playing an audio CD
1. Connect your CD player........................ 10
2. Insert an audio CD. ............................... 10
3. Play an audio CD. ................................. 10
Playing VIDEO CDs in Various Modes
Playing VIDEO CDs using the wireless
remote control ...................................... 12
Playing VIDEO CDs in slow-motion
(Slow-motion Play) .............................. 14
Playing VIDEO CDs with PBC functions
(PBC Play) ........................................... 15
Playing VIDEO CDs repeatedly
(Repeat Play) ........................................ 16
Using other functions ............................... 17
Locating a track in VIDEO CDs
Locating a specific track by observing the
TV screen (Search)............................... 18
Locating a specific point directly ............. 18
Playing audio CDs in various modes
Playing tracks repeatedly (Repeat Play)... 21
Playing tracks in random order
(Shuffle Play) ....................................... 22
Playing tracks in your favorite order
(PGM Play) .......................................... 22
Using other functions ............................... 23
Turning off the operation beep sound....... 25
Connecting your VIDEO CD player
Connecting a stereo system ...................... 26
Using your VIDEO CD player in a car..... 27
Connecting a power source
Using the rechargeable batteries............... 28
Using dry batteries.................................... 30
Notes on the power source ....................... 30
Additional information
Precautions ............................................... 31
Maintenance ............................................. 31
Troubleshooting........................................ 32
Specifications ........................................... 34
Accessories (supplied/optional) ............... 35
Glossary ...................................... Back cover
3
Page 4
Getting started
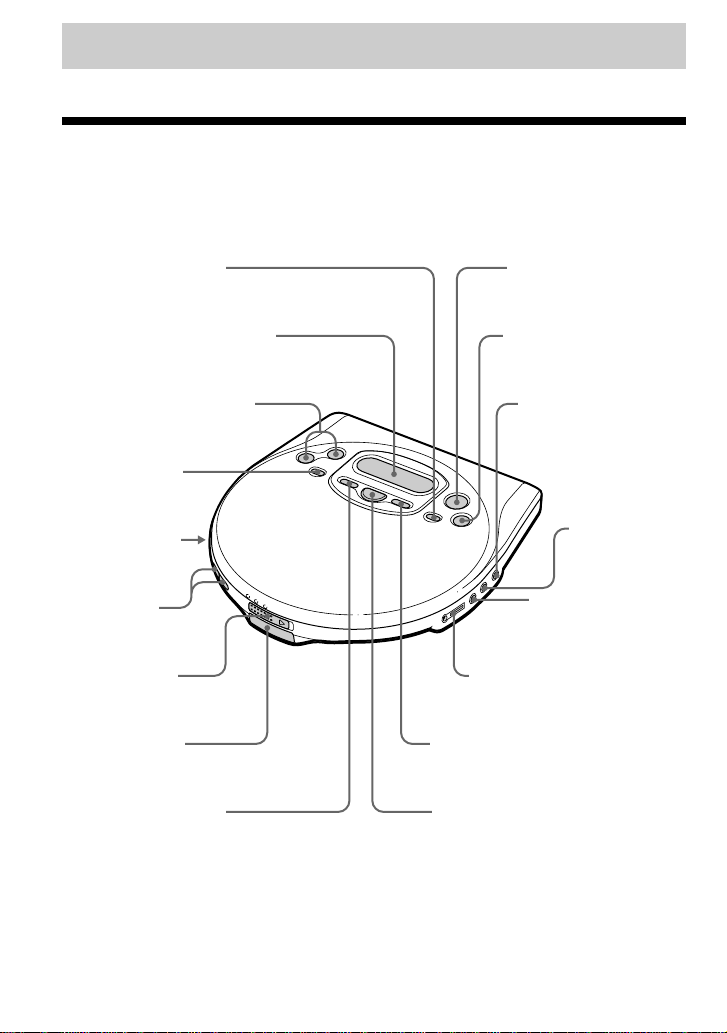
Locating the Controls
For details, see pages in parentheses.
CD player (front)
1 RETURN O button
(page 15)
2 Display (pages 9, 11, 21–25)
3 ./>• PREV/NEXT
(AMS/search) buttons
(pages 9, 11, 16, 18, 22)
4 MENU button
(page 15)
5 HOLD switch
(page 24)
6 VOLUME
+/– buttons
(page 8, 10)
7 OPEN switch
(pages 8, 10)
8 Remote sensor
(pages 12)
9 PLAY MODE button
(pages 20 - 23)
q; u (play/pause) button
(page 8 - 11, 15, 23)
qax (stop) /CHG (charge)
button (pages 8 - 11, 25,
28)
qs DC IN 4.5V (external
power input) jack
(pages 7, 10, 28)
qd VIDEO OUT
jack (pages 7,
17)
qf AUDIO OUT
(OPTICAL) jack
(pages 7, 17, 26)
qg i/REMOTE jack (page 10)
qh SOUND button (page 23)
qj REPEAT/ENTER/SELECT button
(page 11, 16, 20 - 23)
4
Page 5
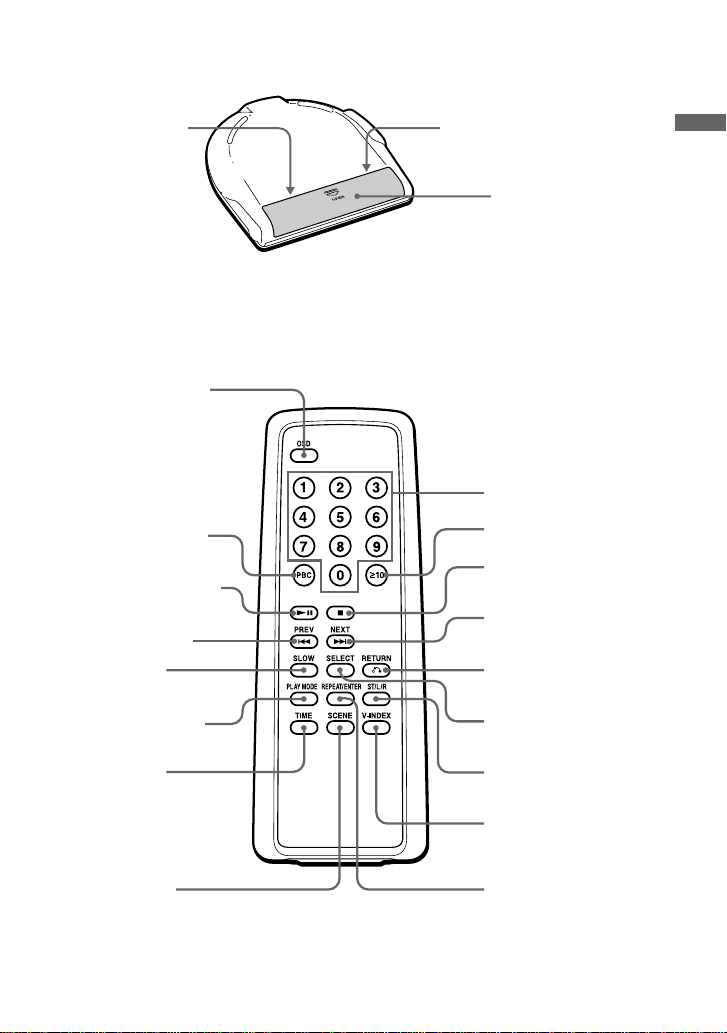
CD player (rear)
qk NTSC/PAL switch
(pages 7)
Wireless remote control
wa OSD button (page12)
ws PBC button (page 15)
wd u (play/pause) button
(pages 8, 9, 11, 12, 15, 23)
wf PREV . button
(pages 9, 11, 16, 18, 22)
wg SLOW button
(page 14)
wh PLAY MODE button
(pages 20 - 23)
wj TIME button
(page 19)
ql AVLS switch (pages 24)
w; Battery compartment
(pages 28)
wk Number buttons (pages
9, 11, 15, 18 - 20, 22)
wl ≥10 button (pages
15, 18, 19, 22)
e; x (stop) button
(pages 8 - 11)
ea NEXT > button
(pages 9, 11, 16, 18, 22)
es RETURN O
button (page 15)
ed SELECT button
(pages 20)
ef ST/L/R button
(page 14)
eg V-INDEX button
(page 18)
Getting started
This button does not
function on this
model.
eh REPEAT/ENTER
button (pages 11, 16,
21- 23)
(Continued)
5
Page 6
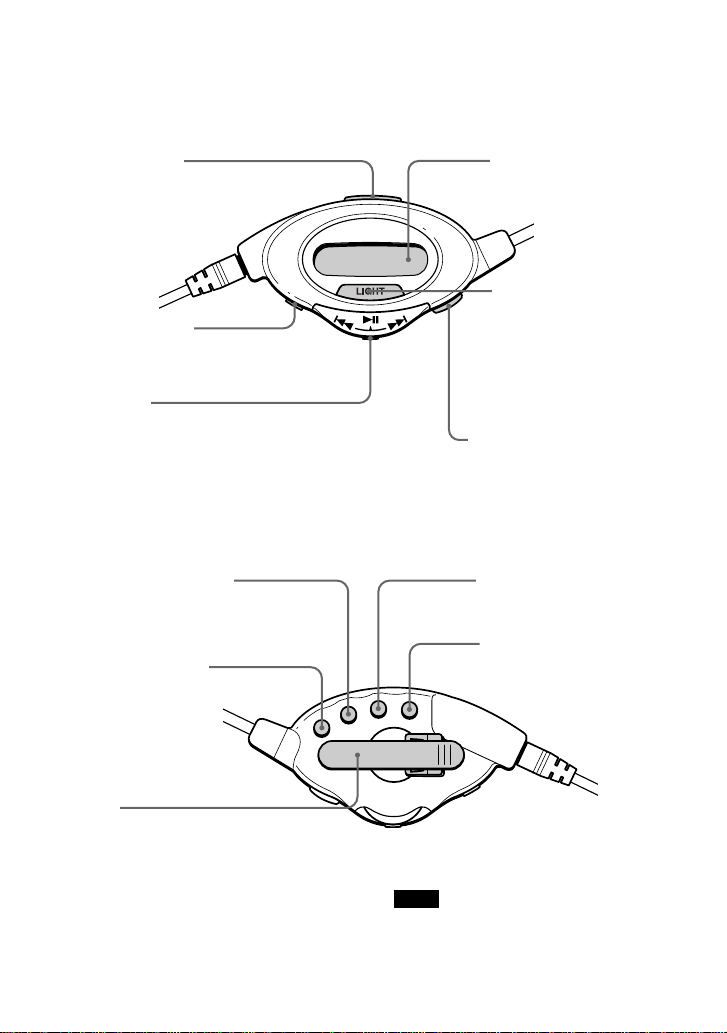
Remote control
(Front)
ej HOLD switch
(page 24)
ek x (stop) button
(pages 9 - 11, 25)
el Jog lever
u: play/pause (pages 8 - 11, 23)
./>: AMS/search
(pages 9, 11, 16, 18, 22)
(Rear)
r; Display
(pages 9, 11, 21 - 25)
ra LIGHT button
Press to illuminate the
display on the remote
control for about 5
seconds when using the
player on the rechargeable
batteries or alkaline
batteries.
rs VOLUME +/– tab (page 10)
rdP (play) MODE button
(pages 21 - 23)
rf RPT (repeat)/ENT
(enter) button
(pages 11, 16, 21 - 23)
rg Clip
You can turn and
change the angle of the
clip.
6
rh SOUND button
(page 23)
rj DISPLAY button (page 25)
Press to check the remaining
time on the CD and the
number of the tracks left.
Note
Use only the supplied remote control. You cannot
operate this VIDEO CD player with the remote
control supplied with other VIDEO CD players.
Page 7
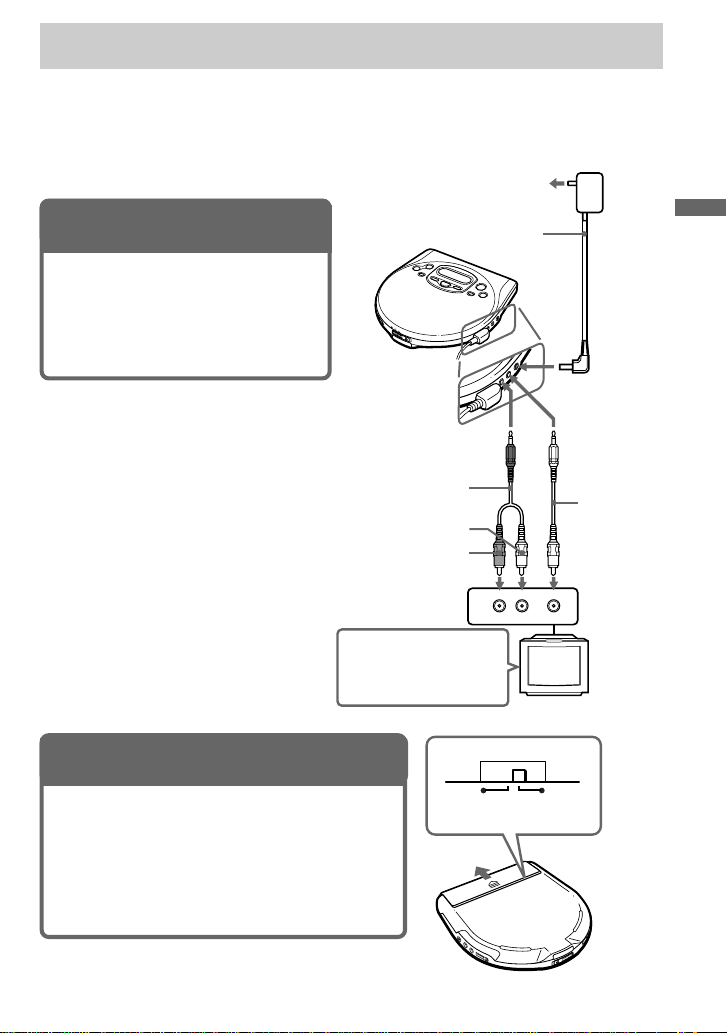
Playing a VIDEO CD
You can play back a VIDEO CD, using the supplied AC power adaptor. You can also use
rechargeable batteries and alkaline batteries. (See “Connecting a power source” on pages 28 –
30.)
To produce color pictures normally, you need to set the color system properly according to the
connected TV.
to an AC outlet
1. Connect your VIDEO CD player.
1 Connect the AC power adaptor.
2 Connect the video and audio cables.
3 Turn on the power of the TV and set
the input mode selector to the proper
position.
Turn on the power and
set the input mode
selector to the proper
position.
2. Set the NTSC/PAL switch to the color system of your TV.
1 Open the battery compartment lid.
2 Switch to “PAL” or “NTSC” using a pointed
material.
PAL system countries:
China, India, Indonesia, Singapore, Malaysia, etc.
NTSC system countries:
Japan, Korea, Taiwan, U.S.A., etc.
to AUDIO OUT
(OPTICAL)
Audio cable
White
Red
AC power
adaptor
AUDIO
INPUT
RL
Playing a VIDEO CD
to DC IN 4.5V
to VIDEO OUT
Video cable
Yellow
VIDEO
TV
PALNTSC
(Continued)
7
Page 8
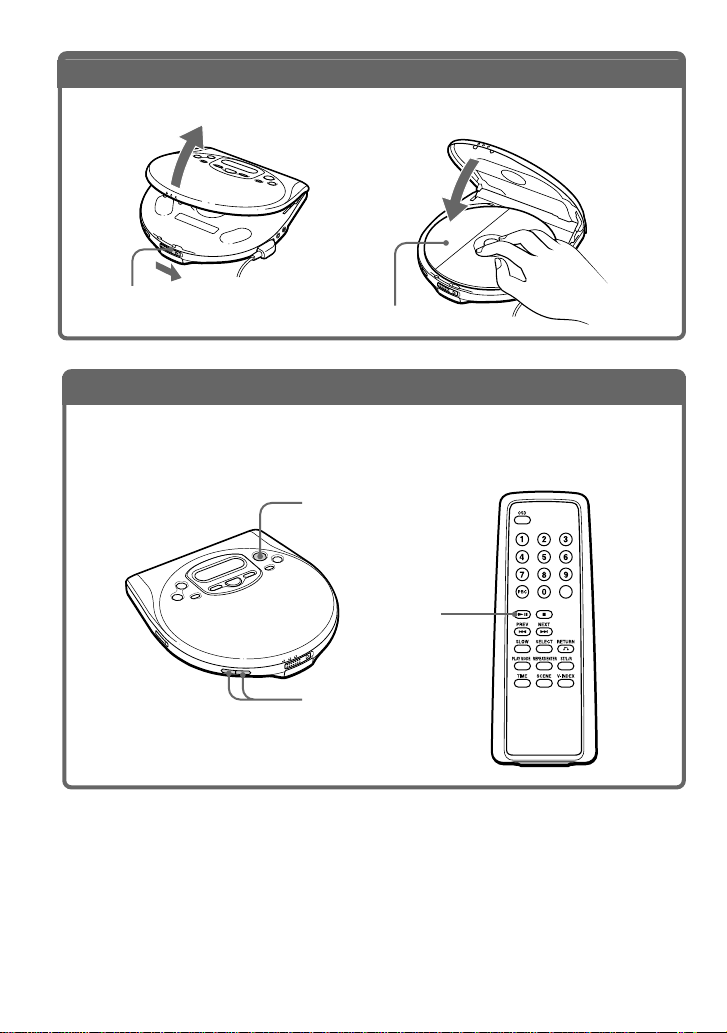
3
. Insert a VIDEO CD.
1 Slide OPEN to open the lid. 2 Fit the VIDEO CD to the pivot and
close the lid.
OPEN switch
4
. Play a VIDEO CD.
1 Press u on the main unit or the wireless remote control.
2 Adjust the volume on the equipment connected to this player. (You cannot adjust the
volume on this player except for the signals output from the i/REMOTE jack).
To stop playing, press x.
The player also turn off.
Label side up
u
u
VOLUME +/–
8
Page 9
To
Pause
Stop
Resume play after pause
Locate the next or succeeding tracks
Locate the current or preceding tracks
Locate a specific track directly
Locate a point in the track while monitoring
the picture*
* To return to normal playback, press u.
Do this
Press u.
Press x/CHG (x).
Press u
Press > repeatedly until you find the scene or track.
Press . repeatedly unitl you find the scene or track.
Press the number button of the track (wireless remote
control only).
Press . or > and hold it down until m or M
appears on the TV screen.
The above operations can also be done with the buttons on the supplied earphones with remote
control or wireless remote control.
About the display
• No indication appears on the display while you operate the unit with the wired remote control.
• During play, the track number and the elapsed playing time of the current track appear.
• During pause, the elapsed playing time flashes.
If the volume level does not increase (when listening with the
headphones/earphone)
Is AVLS set to “LIMIT”? Set AVLS to “NORM.” For details, see “To protect your hearing
(AVLS)” on page 24.
If a cable is connected to the AUDIO OUT jack, you cannot adjust the volume. In such a case,
disconnect the cable.
Playing a VIDEO CD
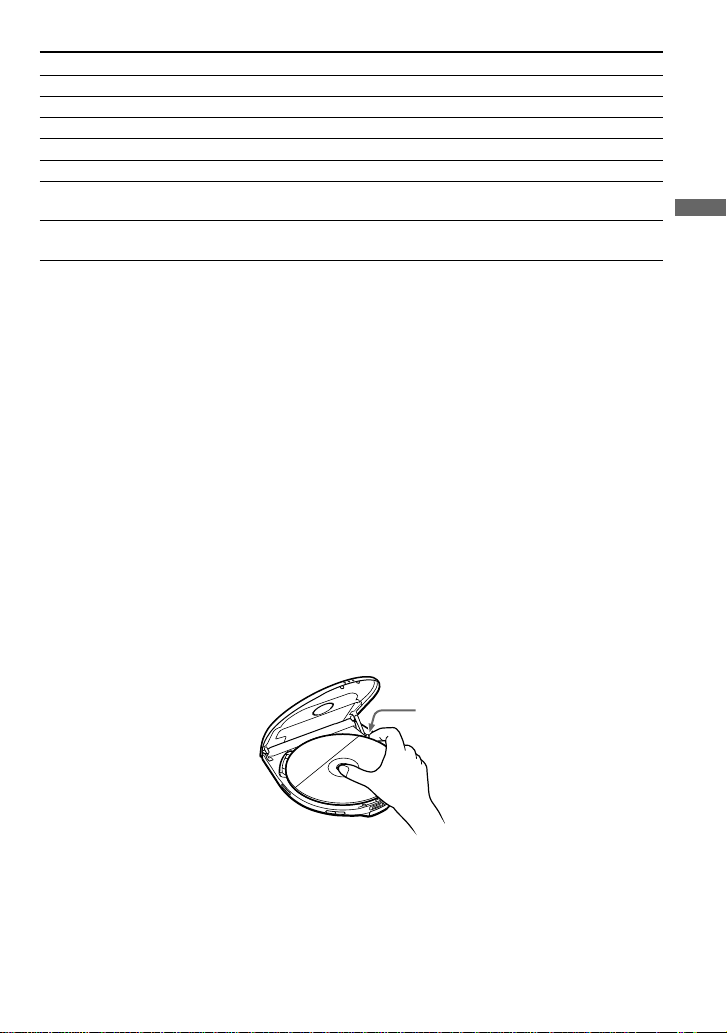
Removing the VIDEO CD
Remove the VIDEO CD as illustrated.
Dent
9
Page 10
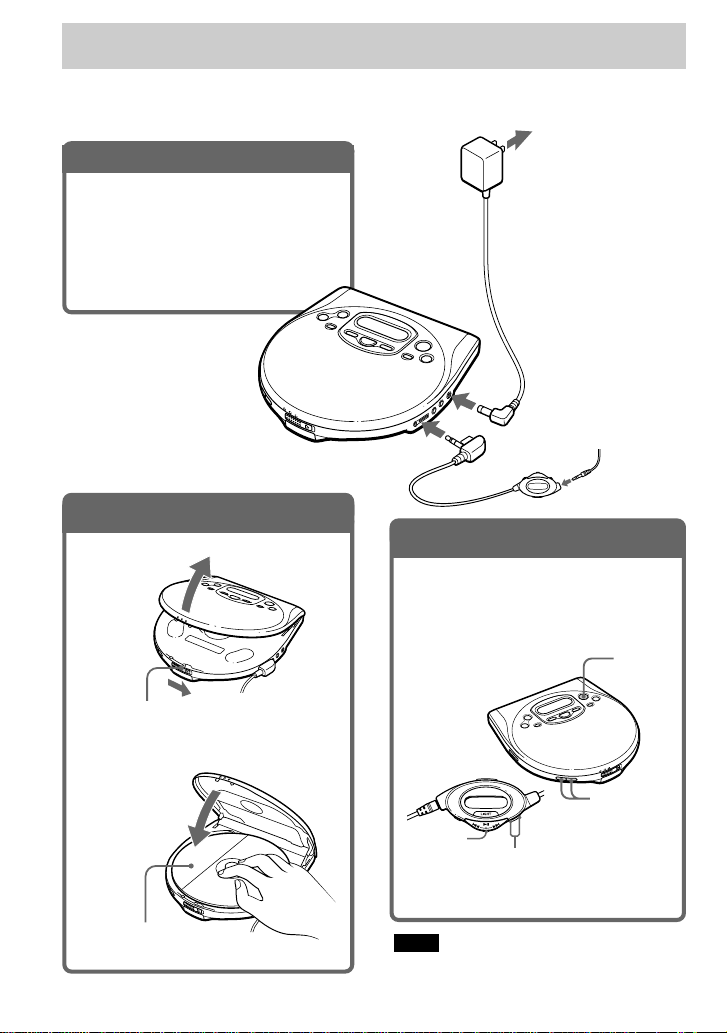
Playing an audio CD
You can also use rechargeable batteries, alkaline batteries and a car battery. (See “Connecting a
power source” on pages 28 - 30.)
1
. Connect your CD player.
1 Connect the AC power adaptor.
2 Connect the earphones with remote
control.
Connect the earphones firmly. A
loose connection may cause noise
during playback.
2
. Insert an audio CD.
1 Slide OPEN to open the lid.
to i/REMOTE
3
. Play an audio CD.
1 Press u on the main unit or press
the jog lever on the remote control
toward u.
2 Adjust the volume by pressing
VOLUME + or –.
to an AC outlet
AC power
adaptor
to DC IN
4.5V
Earphones with
remote control
(supplied)
u
OPEN switch
2 Fit the audio CD to the pivot and
close the lid.
Label side up
10
VOLUME +/–
Jog lever
To stop playing, press x.
The player is also turned off.
Note
When playing back an audio CD using the AC
power adaptor, it takes a while until the sound is
heard.
VOLUME
Page 11
To
Pause
Stop
Resume play after pause
Find the beginning of the current track (AMS*)
Find the beginning of previous tracks (AMS)
Find the beginning of the next track (AMS)
Find the beginning of succeeding tracks (AMS)
Locate a specific track directly
Go forward quickly
Go backwards quickly
* Automatic Music Sensor
** These operations are possible during both play and pause.
Press
u
x/CHG (x)
u
. once**
. repeatedly**
> once**
> repeatedly**
Number buttons of the track (wireless remote
control only)**
Hold down >**
Hold down .**
The above operations can also be done with the buttons on the supplied earphones with remote
control or wireless remote control.
If you press REPEAT/ENTER (RPT/ENT) to display “REPEAT”, you can locate the tracks continuously in the
following order:
• When using >: next track t next track ...... last track t first track t second track ......
• When using .: previous track t previous track ...... first track t last track ......
About the display
• When playing an audio CD using the AC power adaptor, indications on the remote control
display window go off until the sound is heard.
• When you press u, the total number of tracks in the audio CD and total playing time appear
for about two seconds.
• During play, the track number and the elapsed playing time of the current track appear.
• Between tracks, the time to the beginning of the next track appears with the “-” indication.
• During pause, the elapsed playing time flashes.
Playing an audio CD
If the volume level does not increase
Is AVLS set to “LIMIT”? Set AVLS to “NORM.” For details, see “To protect your hearing
(AVLS)” on page 24.
If a cable is connected to the AUDIO OUT jack, you cannot adjust the volume. In such a case,
disconnect the cable.
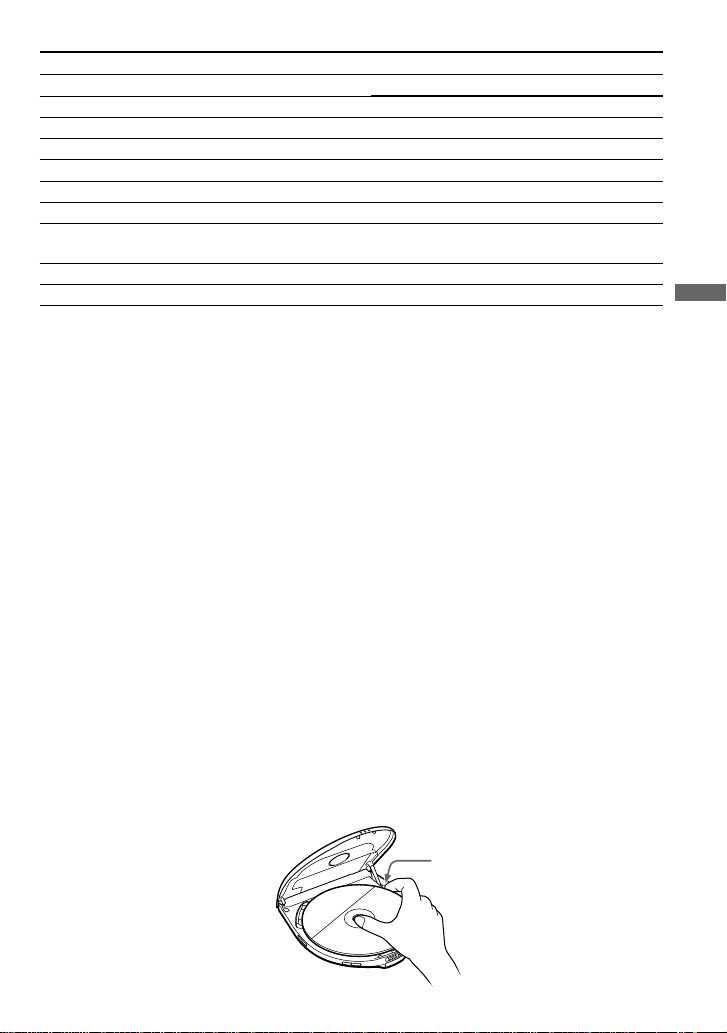
Removing the audio CD
Remove the audio CD as illustrated.
Dent
11
Page 12
B
Playing VIDEO CDs in Various Modes
Playing VIDEO CDs using the wireless remote control
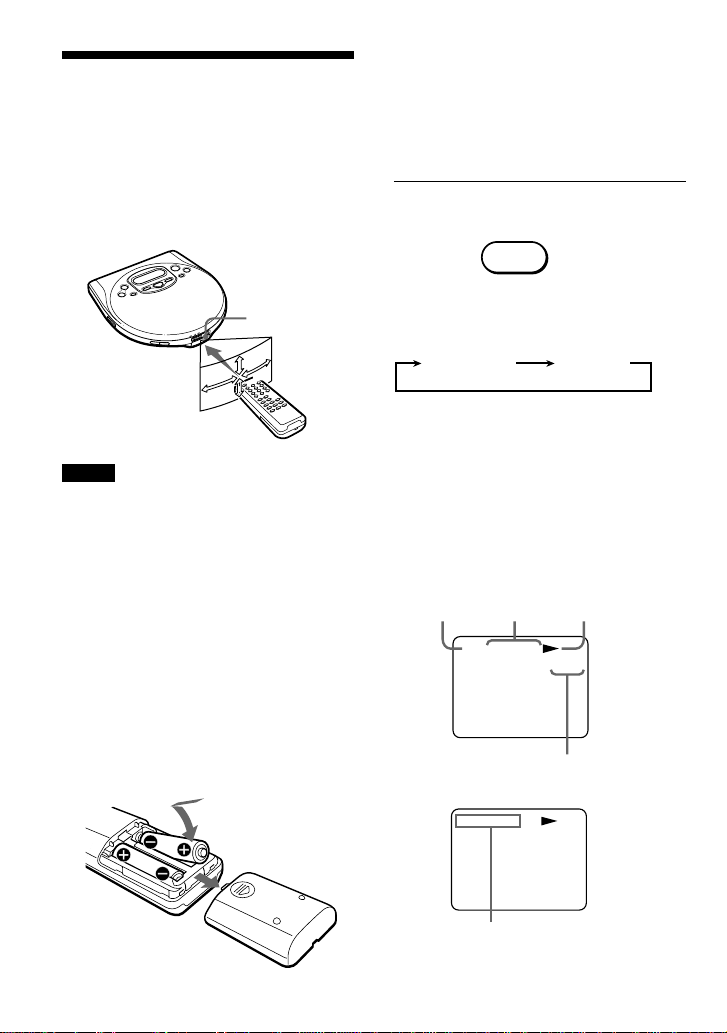
Use the supplied wireless remote control to
Displaying the operating
status on the TV screen
You can check the operating status of the
player and the information about the VIDEO
CD on the TV screen.
play VIDEO CDs.
You can also play, stop playback, search
forward or backward using the buttons on the
Press OSD.
main unit.
OSD
Remote sensor
Point the wireless
remote control
towards the remote
sensor of the player.
Notes
• When using the player on alkaline batteries, you
can turn on the player by pressing u on the
wireless remote control within about 5 minutes
after you turn it off. If 5 minutes have already
passed, press u on the player to turn it on. (You
cannot turn on the player using the wireless
remote control.)
• Do not expose the remote sensor to direct
sunlight or lighting apparatuses.
• Remove any obstacles between the remote sensor
on the player and the wireless remote control.
30°
60°
60°
30°
To insert batteries into the wireless
remote control
Insert two R6 (size AA) batteries by
matching the 3 and # on the batteries.
Each time you press the button, the OSD
(On-Screen Display) mode changes as
follows:
OSD AUTO OSD ON
When “OSD AUTO” is selected, the
operating status appears for a few seconds on
the TV screen when you press a button or
when the operating status is changed. When
“OSD ON” is selected, the operating status,
time display, etc. are always displayed.
While playing a VIDEO CD without PBC
functions/while playing back with PBC OFF
Track number
Playing time
02ST00:00
While playing a VIDEO CD with PBC functions
Operating status
∗
MONO/STEREO indication
∗
STPBC
12
V-index
* Setting of the ST/L/R, etc. are displayed for about
a few seconds when you change the OSD modes.
Page 13
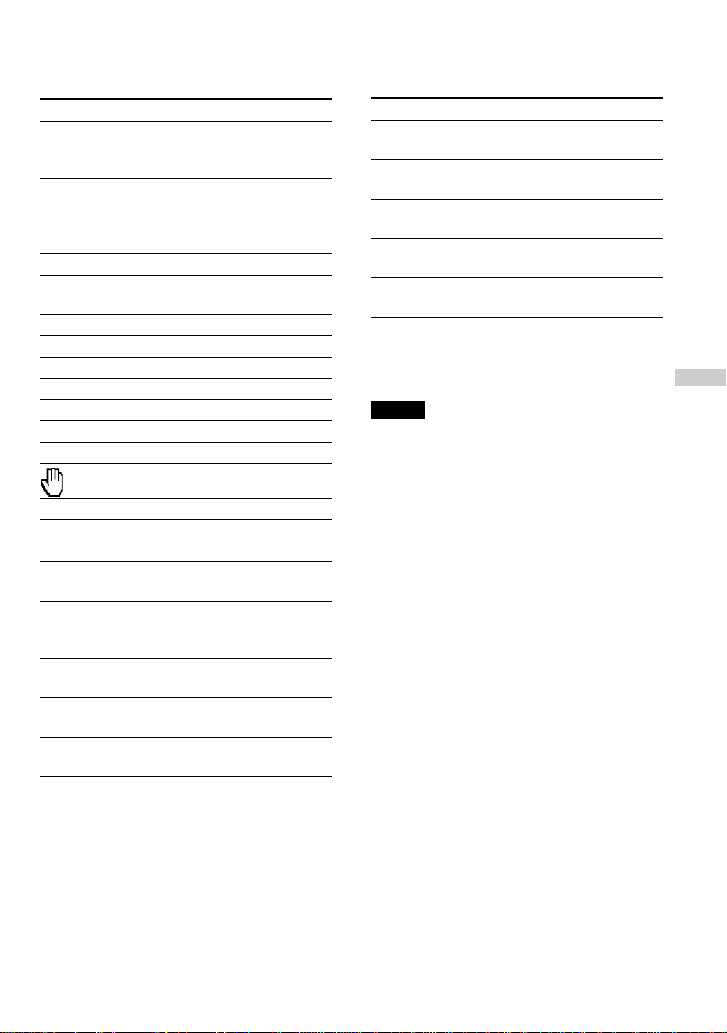
Various indications displayed on the
TV screen
Indication
PBC
SELECT
V INDEX
DIGEST
NEXT
PREV
N
X
T
M
m
ST
L
R
OSD AUTO
OSD ON
PBC OFF
PBC ON
What it means (page)
Playing a VIDEO CD with
PBC functions with PBC ON
(15)
Waiting for you to select
something (For instance,
at the time of menu display)
(15)
Video index search (18)
In the Track Digest mode
(20)
Next track number
Previous track number
Playing (8)
Pausing (9)
Slow-motion playing (14)
Searching forward (9, 18)
Searching backwards (9, 18)
The player cannot accept the
operation
Hearing stereo sound (14)
Hearing left channel sound
(14)
Hearing right channel sound
(14)
OSD mode has been
switched to “OSD AUTO.”
(12)
OSD mode has been
switched to “OSD ON.” (12)
PBC mode has been switched
to OFF. (15)
PBC mode has been switched
to ON. (15)
Indication
NTSC
PAL
REP OFF
REP ALL *
REP 1 *
* Repeat play is not available during PBC
playback.
Notes
• While playing an audio CD, the OSD mode
cannot be displayed on the TV screen.
• When you record the playback picture of this
player on another VCR, etc., be sure to select
“OSD OFF”. Otherwise, the display information
will also be recorded on the VCR.
What it means (page)
The NTSC/PAL switch is set
to “NTSC”. (7)
The NTSC/PAL switch is set
to “PAL”. (7)
The repeat mode has been set
to OFF. (21)
Playing a whole VIDEO CD
repeatedly (21)
Playing the current track
repeatedly (21)
(Continued)
Playing VIDEO CDs in various modes
13
Page 14
Playing VIDEO CDs using the
wireless remote control
Playing multiplex VIDEO CDs
On multiplex VIDEO CDs, different sounds
are recorded for the left and right channels.
You can select either the left or the right
channel and hear the sound of the selected
channel. In this case, the stereo effect will be
lost.
Press ST/L/R while playing a multiplex
VIDEO CD.
Each time you press the button, the
indication and sound you hear change as
follows:
Press Indication
Once L
You will hear
Left channel sound
Playing VIDEO CDs in
slow-motion
(Slow-motion Play)
You can make the play speed slower.
Press SLOW while playing a VIDEO
CD.
SLOW
To cancel slow-motion play
Press u.
When playback of the current track is
finished, slow-motion play will be cancelled
automatically and return to normal play.
Twice R
Three ST
times
The initial setting is “ST”.
14
Right channel sound
Stereo sound
Page 15
Playing VIDEO CDs with
PBC functions
(PBC Play)
Using the PBC functions , you can play a
VIDEO CD with PBC functions (Version
2.0) (simple interactive software, software
with search functions, etc.).
Refer also to the instructions supplied with
the VIDEO CD, as the operating procedure
may differ depending on the VIDEO CD.
Insert a VIDEO CD with PBC
1
functions (see page 8).
Press u .
2
Repeat the above procedure,
4
following the instructions shown
on the menu.
When
You want to select
an item number
You want to go back
to the previous menus
Press
Number button of the
item you want on the
wireless remote control.
On the player: MENU
until the desired item
number is displayed,
then SELECT.
RETURNO. (The
actual operation varies
among the VIDEO CDs.
Refer to the instructions
supplied with the
VIDEO CDs.)
Playing VIDEO CDs in various modes
PBC playback starts, and the menu
appears on the TV screen.
Press the number buttons to
3
select item number of the menu
you want to play.
For instance, to select item number 5,
press 5.
To select an item number 10 or more,
press ≥10 first, then the corresponding
number buttons.
Examples:
For 12: ≥10, then 1 and 2
For 24: ≥10, then 2 and 4
For 135: ≥10, ≥10, then 1 and 3
and 5
On the player
Press MENU to select the item number, then press
SELECT.
Note
When playing some VIDEO CDs, N SELECT (or
N) appears on the TV screen, instead of SELECT.
In that case, press SELECT on the remote control.
If you press u, the player pauses.
To play the VIDEO CD in normal play
mode and cancel play using PBC
functions
Press PBC on the wireless remote control so
that “PBC OFF” appears on the TV screen.
“PBC” disappears from the display, and
normal play starts (in the sequence of the
track numbers). In this case, you cannot play
still pictures such as menu screens.
When you change the PBC mode
When you change the PBC mode (“PBC
ON” or “PBC OFF) and start play, the player
plays the VIDEO CD from the beginning.
15
Page 16
Playing VIDEO CDs
repeatedly
(Repeat Play)
To repeat another track, press . or >
to select the track you want to repeat. While
the track is playing, press REPEAT/ENTER.
You can play a whole VIDEO CD or a single
track repeatedly.
To repeat all the tracks on a
VIDEO CD
Set the PBC mode to “PBC OFF”.
1
(See “Playing VIDEO CDs with
PBC functions” on page 15).
While playing a VIDEO CD, press
2
REPEAT/ENTER repeatedly until
“REP ALL” appears on the TV
screen.
To cancel repeat play
Press REPEAT/ENTER until “REPEAT
OFF” appears on the TV screen.
To repeat a single track
Set the PBC mode to “PBC OFF”.
1
(See “Playing VIDEO CDs with
PBC functions” on page 15).
To cancel repeat play
Press REPEAT/ENTER until “REPEAT
OFF” appears on the TV screen.
Note
This function is not available during PBC playback.
While the track you want to repeat
2
is playing, press REPEAT/ENTER
until “REP 1” appears on the TV
screen.
16
Page 17
Using other functions
Shock protection function
By using a memory buffer that can store
approximately 12 seconds of video data, the
shock protection function prevents the
pictures from skipping when you make a jolt
or bump to your VIDEO CD player.
Note
Noise may appear on the screen if
– the VIDEO CD player receives stronger
continuous shock than expected or
– a dirty or scratched VIDEO CD is played.
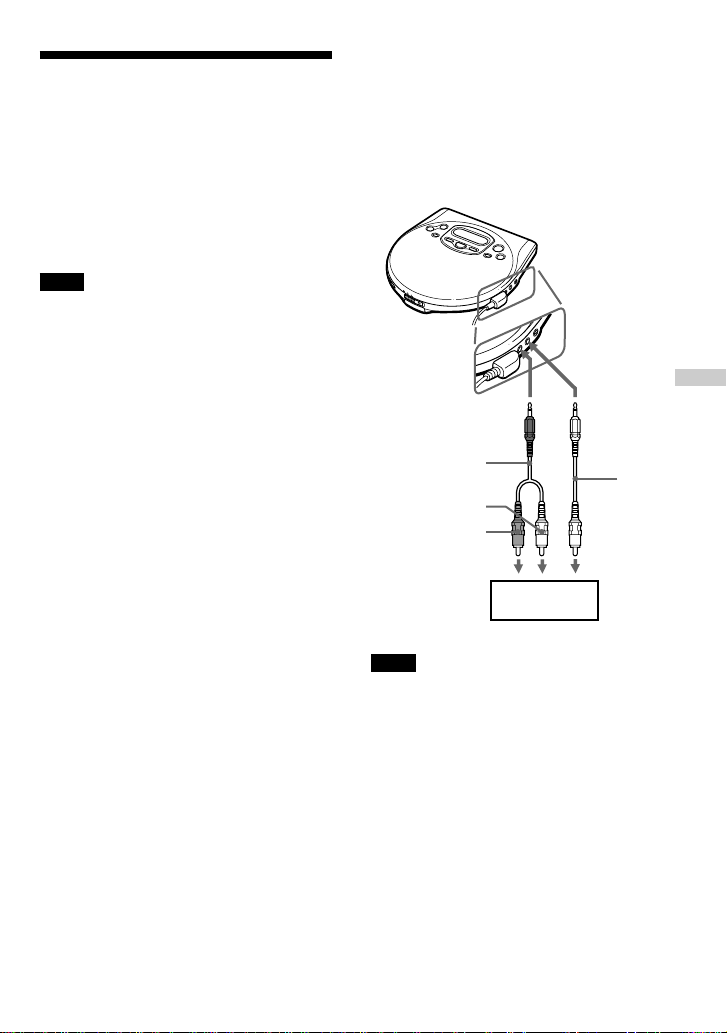
Connecting to other video
equipment
You can record a VIDEO CD on a video
tape. Refer to the instruction manual
supplied with other equipment for details.
Before making connections, turn off each
equipment.
To VIDEO OUT
Playing VIDEO CDs in various modes
To AUDIO OUT
(OPTICAL)
Audio
cable
White
Red
To LINE IN or
REC IN
VCR, etc.
Note
Before you play a disc, turn down the volume of the
connected equipment so as not to damage the
speakers.
Video
cable
Yellow
17
Page 18
B
Locating a track in VIDEO CDs
Locating a specific
track by observing the
TV screen
While playing a
quickly locate any track or a specific point
in a track by observing the TV screen.
To
Locate the next or
succeeding tracks
Locate the current
or preceding tracks
Locate a specific
track directly
Locate a point in
the track while
monitoring the
picture
To directly locate a track number 10
or more
To select an item number 10 or more, press
≥10 first, then the corresponding number
buttons.
Examples:
For 12: ≥10, then 1 and 2
For 24: ≥10, then 2 and 4
For 135: ≥10, ≥10, then 1 and 3 and 5
(Search)
VIDEO
CD, you can
Do this
Press > repeatedly
until you find the track.
Press . repeatedly
until you find the track.
Press the number button
of the track (wireless
remote control only).
Press . or > and
hold it down until m
or M appears on the
TV screen.
Locating a specific point directly
You can locate a specific point directly using
the video index, scene numbers and the time
of the point.
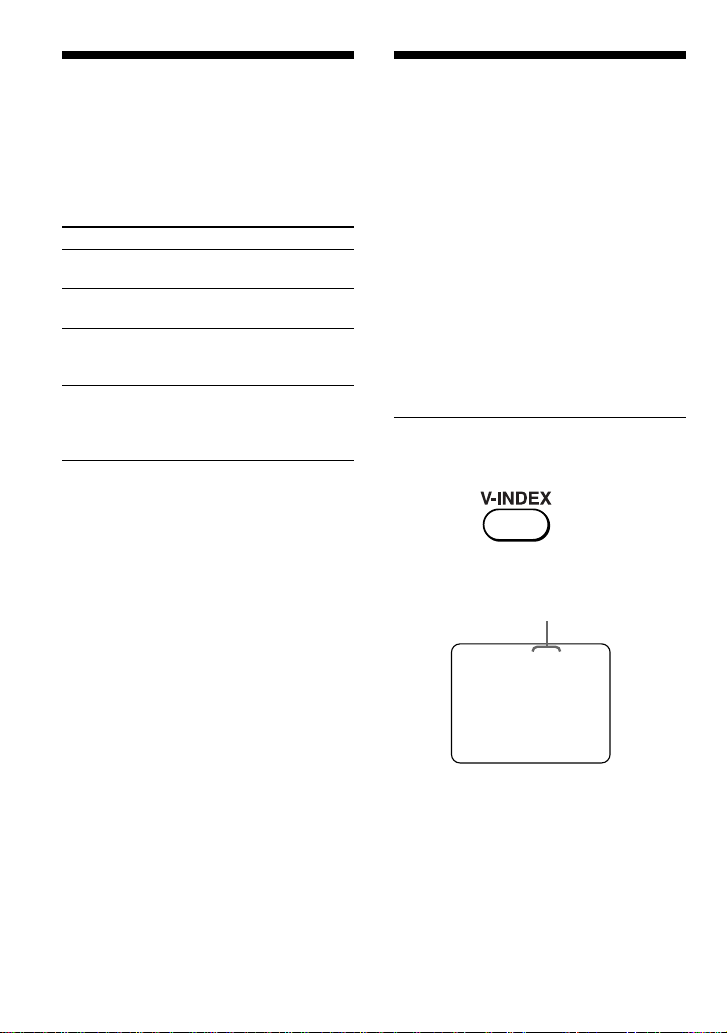
To locate a specific point using the
video index numbers (Video Index
Search)
Some VIDEO CDs with PBC functions have
the video index numbers or the scene
numbers. Some VIDEO CDs have both.
Check the current video index number by
displaying it on the TV screen during
playback. (See pages 12 and 13.)
Press V-INDEX while playing a
1
VIDEO CD.
“V INDEX” appears on the TV screen.
The current video index number
V10INDEX
18
Page 19
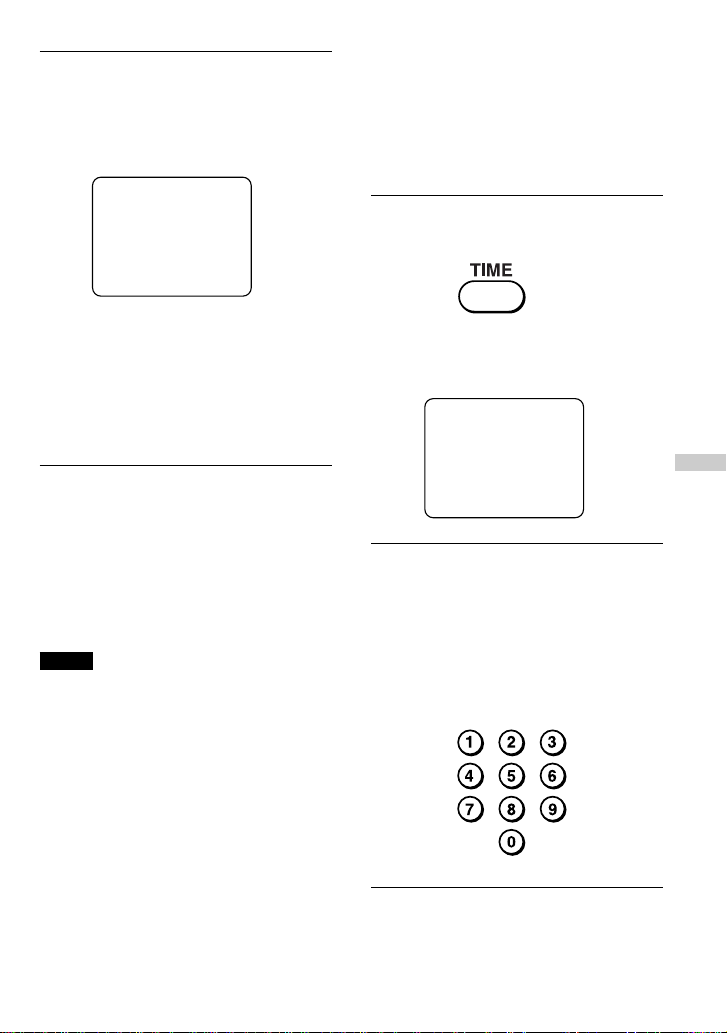
Press the number buttons to
TIME
– – :– –
2
select the video index number you
want.
The selected video index number
appears on the TV screen.
V I NDEX
To select a number 10 or more, press
≥10 first, then the corresponding number
buttons.
Examples:
For 12: ≥10, then 1 and 2
For 24: ≥10, then 2 and 4
For 135: ≥10, ≥10 then 1 and 3 and 5
If you have made a mistake
Repeat the same procedure from Step 1
again.
To cancel the video index search
Press V-INDEX again.
Notes
• You cannot use Video Index Search with tracks or
VIDEO CDs which do not have video index
numbers recorded.
• You cannot search for video index numbers in
different tracks.
24
To locate a specific point by inputting
the time of the point (Time Jump
Search)
You can locate a specific point directly by
inputting the time of the point you want to
find.
Press TIME while playing a VIDEO
1
CD.
“TIME” and “– – : – –” appear on the
TV screen.
Press the number buttons to input
2
the time of the point you want to
find.
The picture of the selected time appears
on the TV screen.
e.g. To select one minute and 50
seconds, press -, 1, 5 and -.
Locating a scene or track in VIDEO CDs
(Continued)
19
Page 20
Locating a specific point directly
To locate a specific point by
observing nine scenes in the current
track at one time (Track Digest
Search)
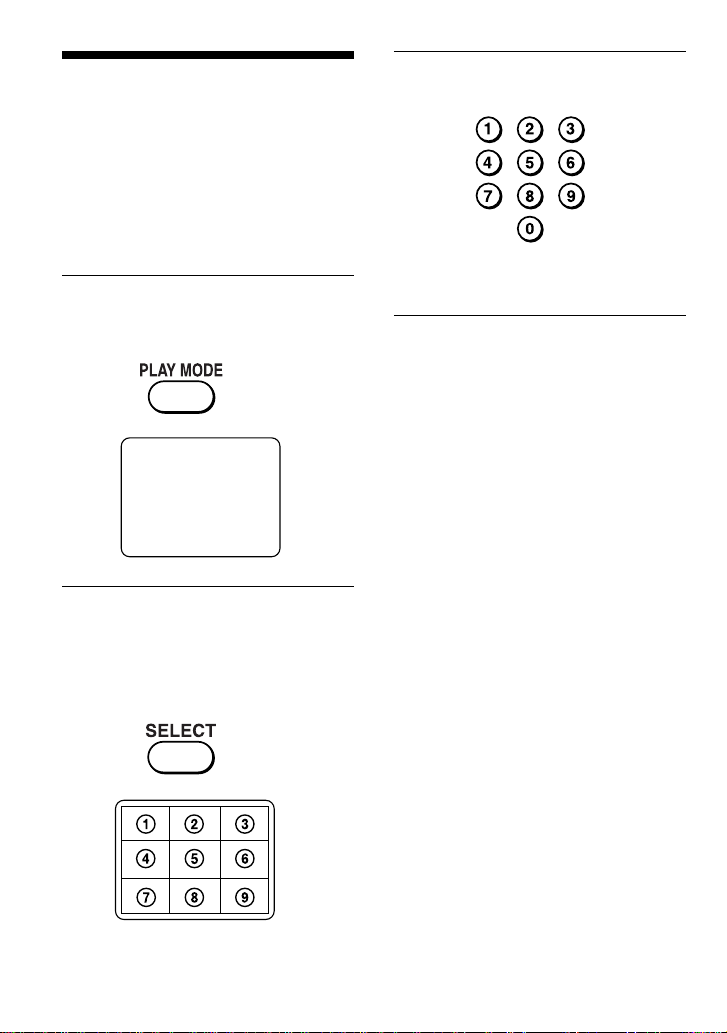
You can locate a specific point directly by
observing nine scenes in the current track at
one time.
While playing a VIDEO CD, press
1
PLAY MODE until “DIGEST”
appears on the TV screen.
DIGEST
Press SELECT.
2
The player separates the current track
into nine parts automatically, and
displays the first picture of each part on
the TV screen.
Press the number button of the
3
picture you want to see.
The player starts playing from the part
you selected.
20
Page 21
B
Playing audio CDs in various modes
Playing tracks
repeatedly
You can play tracks repeatedly in normal,
PGM or shuffle play modes.
Repeat all the tracks or only one track.
The following operations can be done with
the buttons on the main unit, the supplied
earphones with remote control, or the
supplied wireless remote control.
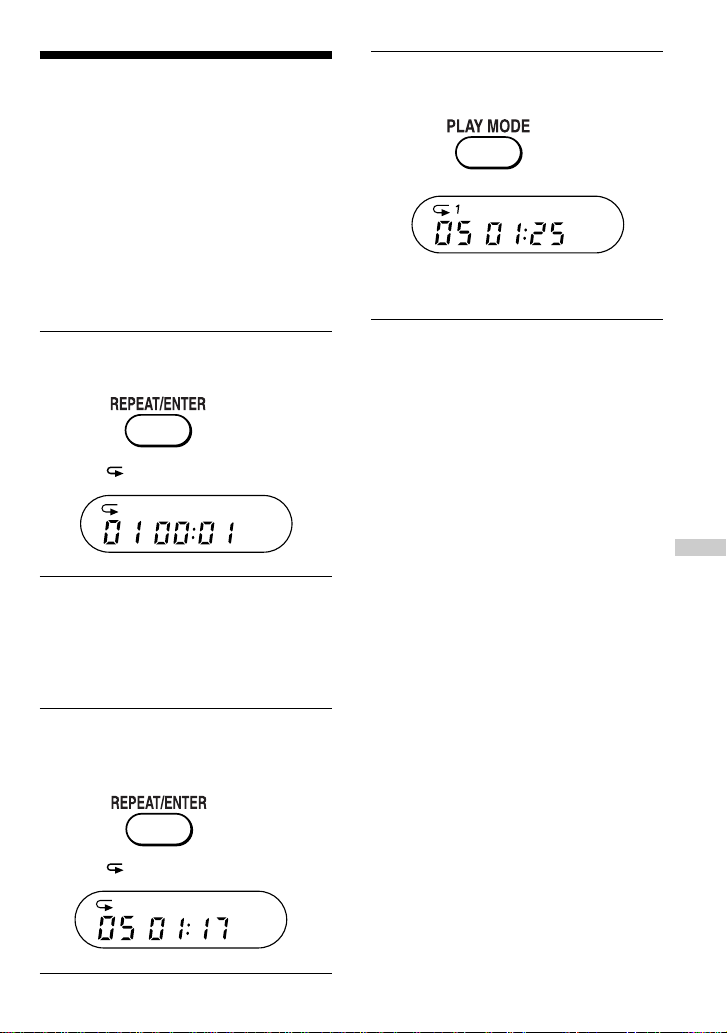
To repeat all the tracks
Press REPEAT/ENTER (RPT/ENT)
during play.
The “ ” indicator appears.
To cancel repeat play
Press REPEAT/ENTER (RPT/ENT) again.
(Repeat Play)
Press PLAY MODE (P MODE)
2
repeatedly until “1” appears.
To repeat another track, press . or > .
To cancel repeat play
Press REPEAT/ENTER (RPT/ENT) again.
Playing audio CDs in various modes
To repeat a single track
Press REPEAT/ENTER (RPT/ENT)
1
while the track you want to repeat
is playing.
The “ ” indication appears.
21
Page 22
Playing tracks in
random order
Play)
You can play the tracks in an audio CD in
random order.
The following operations can be done with
the buttons on the main unit, the supplied
earphones with remote control, or the
supplied wireless remote control.
(Shuffle
Playing tracks in your
favorite order
You can program the player to play up to 64
tracks in your favorite order.
The following operations can be done with
the buttons on the main unit, the supplied
earphones with remote control, or the
supplied wireless remote control.
(PGM Play)
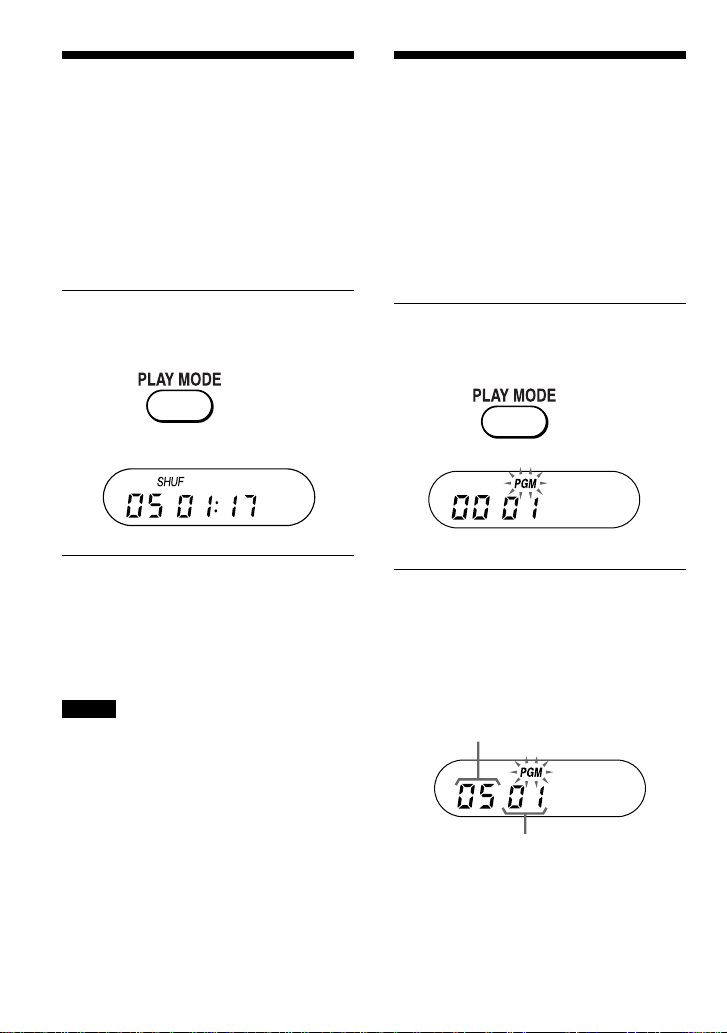
During play, press PLAY MODE
(P MODE) repeatedly until “SHUF”
appears.
The tracks play in random order.
To cancel shuffle play
Press PLAY MODE (P MODE) repeatedly
until the play mode indication disappears
from the display.
Notes
• During shuffle play, you cannot return to previous
tracks by pressing ..
• If you locate a specific track using the number
button on the wireless remote control, shuffle
play is cancelled.
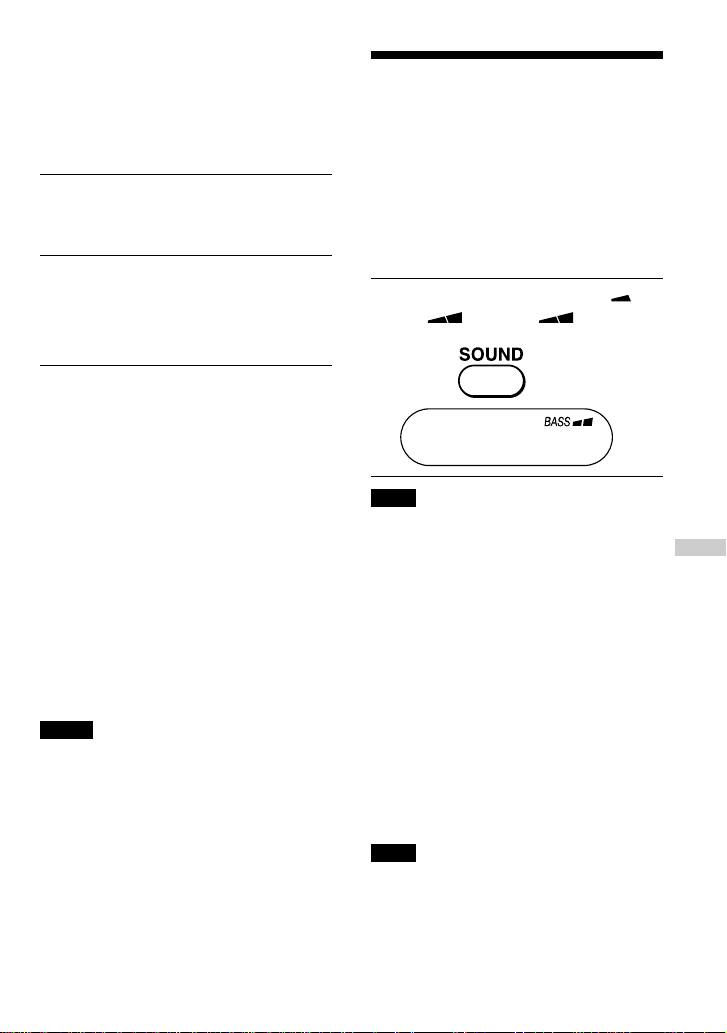
During playback, press PLAY
1
MODE (P MODE) repeatedly until
“PGM*” appears.
Press the number buttons
2
(wireless remote control only), or
. or > and REPEAT/ENTER
(RPT/ENT) to choose a track.
The track number and the playing order
appear.
Track number
Flashing
Playing order
22
Page 23
To select an item number 10 or more using
the wireless remote control, press ≥10 first,
then the corresponding number buttons.
Examples:
For 12: ≥10, then 1 and 2
For 24: ≥10, then 2 and 4
Repeat step 2 to program the
3
remaining tracks.
Press u .
4
“PGM” stops flashing and the tracks you
have chosen play in the order you
specified.
To cancel PGM play
Press PLAY MODE (P MODE) until “PGM”
disappears.
Using other functions
To enjoy more powerful bass
sound (MEGA BASS Function)
You can enjoy a powerful bass-boosted
sound.
The following operations can be done with
the buttons on the main unit or the supplied
earphones with remote control.
Press SOUND to select “BASS ” or
“BASS .” “BASS ” is more
effective.
To check the program
During programming:
Press REPEAT/ENTER (RPT/ENT) before
step 4.
During PGM play:
Press PLAY MODE (P MODE) repeatedly
until “PGM” flashes, then press REPEAT/
ENTER (RPT/ENT).
Each time you press REPEAT/ENTER (RPT/
ENT), the track number and the playing
order appear in the order you specified.
Notes
• When you finish entering the 64th track in step 2,
the first selected track appears in the display.
• If you select more than 64 tracks, the first
selected tracks are erased.
Note
• If the sound is distorted when emphasizing bass,
turn down the volume.
G-PROTECTION function
The G-PROTECTION function has been
developed to provide excellent protection
against sound skipping while jogging. This
function provides a higher level of shock
protection than the traditional one.
While jogging, be sure to hold your VIDEO
CD player with the OPEN switch facing
upward.
There is no ON/OFF switch of the
G-PROTECTION function on this VIDEO
CD player and its remote control. You can
always enjoy high quality CD sound using
the G-PROTECTION function.
Note
Sound may skip:
– if the VIDEO CD player receives stronger
continuous shock than expected,
– if a dirty or scratched CD is played or
– when using poor-quality CD-Rs or
if there is a problem with the recording device
or application software.
(Continued)
Playing audio CDs in various modes
23
Page 24
Using other functions
To protect your hearing
(AVLS)
The AVLS (Automatic Volume Limiter
System) function keeps down the maximum
volume to protect your hearing.
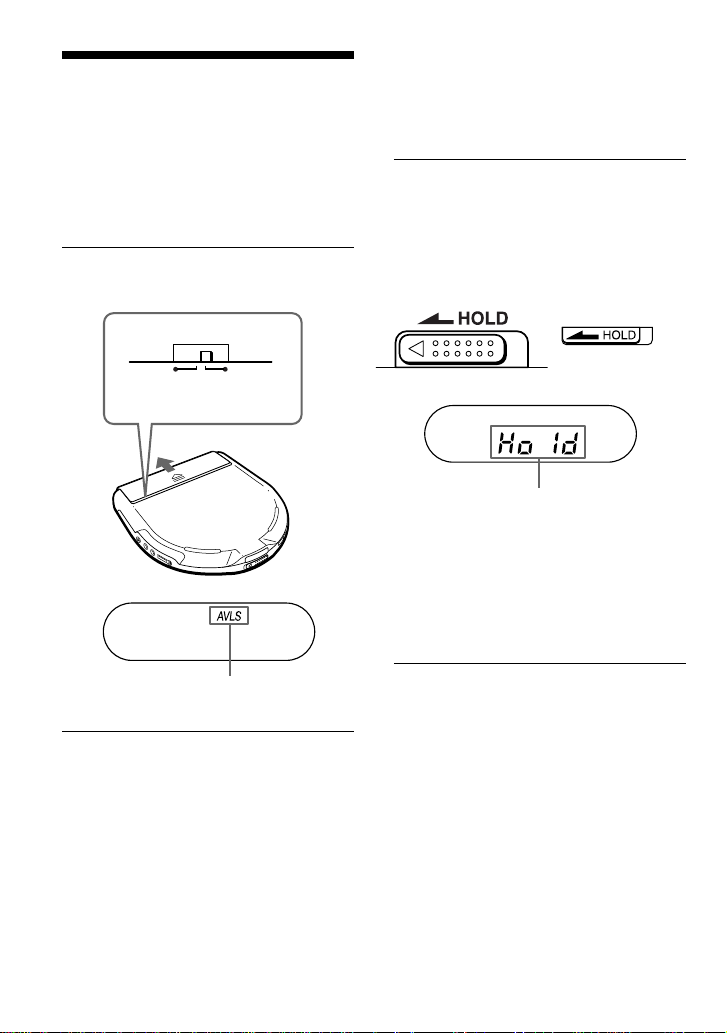
Open the battery compartment and
set AVLS to “LIMIT”.
NORM LIMIT
AVLS
To lock the buttons (HOLD)
You can lock the controls on your VIDEO
CD player to prevent accidental button
presses.
Slide HOLD in the direction of the
arrow.
When you press any button, “Hold”
appears in the display and you cannot
operate the player.
VIDEO CD player Remote control
Displayed when the HOLD function is working.
You can use the HOLD function with both
the VIDEO CD player and remote control.
You can still operate your VIDEO CD player
using the remote control when HOLD on the
remote control is set to off.
Flashes when the volume is turned up
beyond a certain level.
To turn off the AVLS function
Set AVLS to “NORM”.
24
To unlock the controls
Slide HOLD in the opposite direction of the
arrow.
Page 25
Checking the remaining time
on the CD and the number of
tracks left
You can check the remaining time on the CD
and the number of tracks left using
DISPLAY.
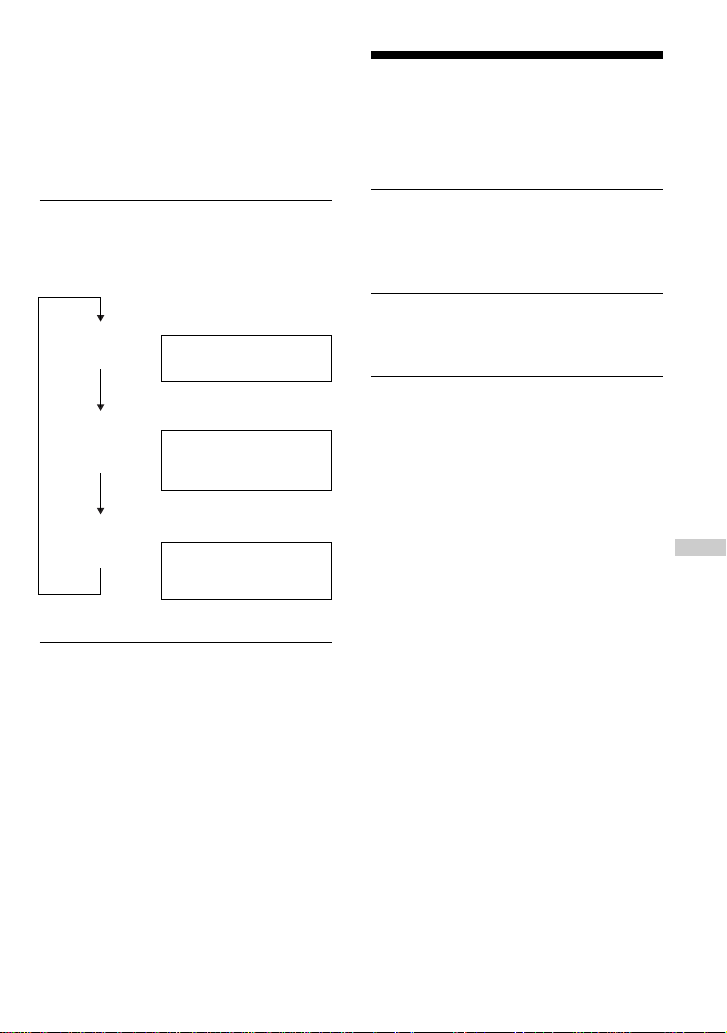
Press DISPLAY.
Each time you press the button, the display
changes as follows.
Display
Normal play
Press DISPLAY
once.
Track number and elapsed
playing time
Track number and
remaining time on the
current track
Turning off the operation beep sound
You can turn off the beep sound that is heard
from your headphones/earphones when you
operate your CD player.
Remove the power source (AC
1
power adaptor, rechargeable
batteries or dry batteries) from the
CD player.
Connect the power source while
2
pressing x/CHG on the CD player
or x on the remote control.
To turn on the beep sound
Remove the power source and then connect
the power source without pressing x/CHG
or x.
Press DISPLAY
twice.
* Not displayed during Single play, Shuffle play or
PGM play.
The number of tracks left*
and remaining time on the
CD*
Playing audio CDs in various modes
25
Page 26
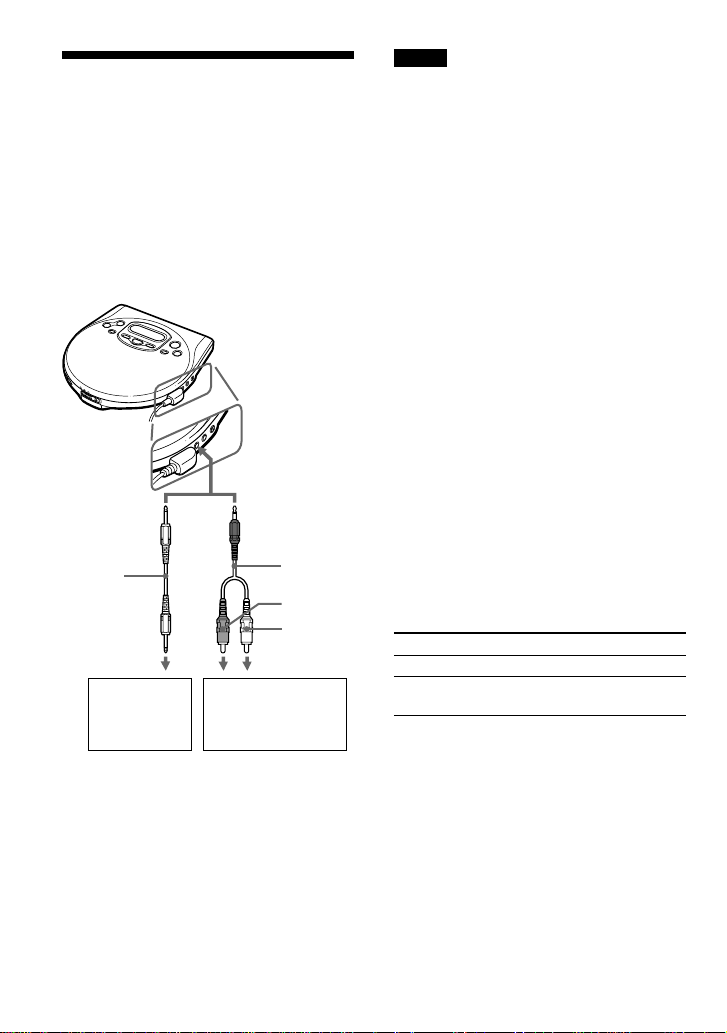
B
Connecting your VIDEO CD player
Connecting a stereo system
You can listen to CDs through a stereo
system or record CDs on a cassette tape and
a MiniDisc. For details, see the instruction
manual that comes with the connected
device.
Be sure to turn off all connected devices
before making connections.
to AUDIO OUT
(OPTICAL)
Optical
digital
connecting
cord
MiniDisc
recorder, DAT
deck, etc.
Stereo system,
cassette recorder,
radio cassette
recorder, etc.
Connecting
cord
Right (red)
Left (white)
Notes
• Before you play a CD, turn down the volume of
the connected device to avoid damaging the
connected speakers.
• Use the AC power adaptor for recording. If you
use the rechargeable batteries or dry batteries as a
power source, batteries may become completely
depleted during recording.
• Adjust the volume properly on the connected
device so that the sound will not be distorted.
When using the connecting cord
• You cannot adjust the volume of the
headphones/earphones on the VIDEO CD
player or the remote control.
• If the sound is distorted, connect the device
to the i/REMOTE jack.
When using the optical digital
connecting cord
To record the CD sound on a MiniDisc, DAT,
etc., make sure that the VIDEO CD player is
in pause before operating the recording
procedures.
About the G-PROTECTION and
SOUND functions when using the
connecting cord or optical digital
connecting cord
See the following table for valid functions
according to the types of connecting cord:
G-PROTECTION
Connecting cord
Optical digital
connecting cord
* Functions only on the output sound from the
i/REMOTE jack; does not function on the
output sound from the AUDIO OUT (OPTICAL)
jack.
No
No
SOUND
No
Yes*
26
Page 27

Using your VIDEO CD player in a car
You can listen to a CD in a car by connecting
your CD player to the car cassette deck.
You cannot use the car mount plate for this
VIDEO CD player.
When you use your VIDEO CD player in a
car, install it securely in a location that does
not interfere with your driving.
Optional car accessory needed
To connect your VIDEO CD player to a car
cassette deck, you need the following car
accessories in “Accessories (supplied/
optional)”:
• Car battery cord, and
• Car connecting pack*
For details, see the instruction manuals that
come with the optional accessories.
* Noise may be heard if you use an optional
connecting cord. It is recommended that you use
a Sony car connecting pack to reduce noise.
Switched ignition function (when
using the car battery cord)
With this feature, your VIDEO CD player
stops automatically when you turn off the car
engine (turn off the ignition key) even if the
batteries are inserted in the VIDEO CD
player. This function is invalid depending on
the car models.
Notes
• Use only the car battery cord listed in
“Accessories (supplied/optional).” If you use any
other car battery cord, a heat, smoke or
malfunction may occur.
• Do not operate the system in a way that might
divert your attention from driving safely. As a
driver, you alone are responsible for safely
operating your vehicle in accordance with traffic
safety laws at all times.
• Do not install the system where it may obstruct
your view through the windshield or your view of
your vehicle’s indicator displays.
• Do not install the system where it may hinder the
function of safety devices such as an air-bag.
Doing so may prevent the air-bag from
functioning properly in the event of an accident.
Connecting your VIDEO CD player
27
Page 28
B
Connecting a power source
You can use the following power sources:
• Rechargeable batteries
•AC power adaptor (see “Playing a VIDEO
CD” on page 7)
• LR6 (size AA) alkaline batteries (battery
case)
For the battery life and charging time of the
rechargeable batteries, see “Specifications.”
Using the rechargeable batteries
Charge the rechargeable batteries before
using them for the first time. You can use
only the following rechargeable batteries for
your VIDEO CD player.
• NH-7WMAA
• NH-WM2AA
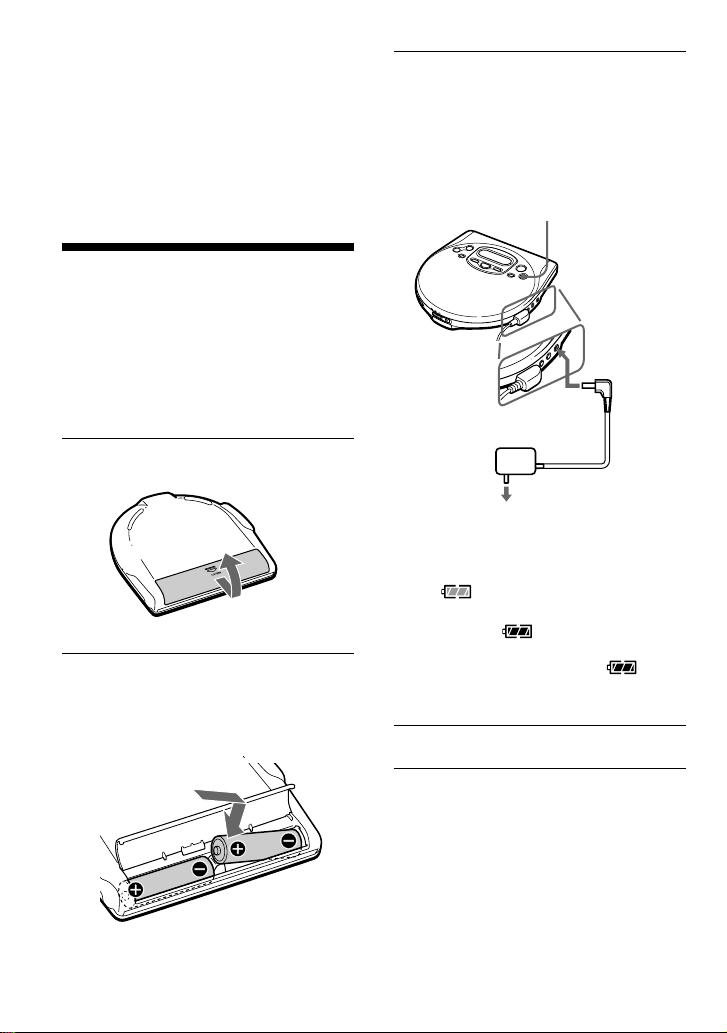
Open the battery compartment lid.
1
(rear)
Insert two rechargeable batteries
2
by matching 3 to the diagram
inside the battery compartment
and close the lid.
Connect the AC power adaptor to
3
the DC IN 4.5 V jack of your VIDEO
CD player and an AC outlet, then
press x/CHG to start charging.
If the AC power adaptor does not fit the
AC outlet, use the AC plug adaptor.
x/CHG button
to DC IN 4.5 V
to an AC outlet
The VIDEO CD player charges the
batteries. The “CHG” indicator turns on
in the display, and the indicator sections
of light up in succession. When
the batteries are completely charged, the
“CHG” and indicators turn off.
If you press x/CHG after the charge has
already been completed, the
indicator flashes and “Full” appears in
the display.
Disconnect the AC power adaptor.
4
AC power adaptor
28
Page 29
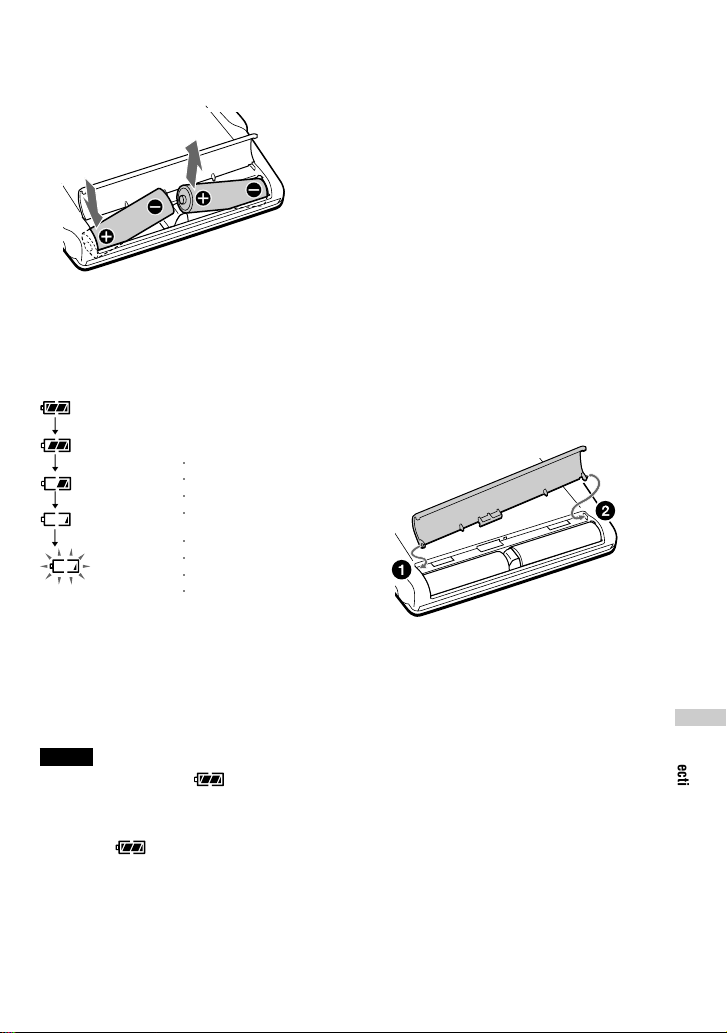
To remove the rechargeable batteries
Remove the batteries as illustrated below.
When to charge the rechargeable
batteries
You can check the remaining power of the
batteries in the display.
Battery power is full.
r
r
○○○○
Battery power is getting low.
r
rechargeable batteries.
Note on the rechargeable batteries
If the battery is new or has not been used for
a long time, it may not be charged
completely until you charge and discharge it
several times.
Note on carrying the rechargeable
batteries
Use the supplied battery carrying case to
prevent unexpected heat. If the rechargeable
batteries and the metallic objects are
contacted, heat or fire may occur due to a
short circuit.
To attach the battery compartment lid
If the battery compartment lid is detached by
an accidental drop, excessive force, etc.,
attach it as illustrated below.
r
○○○○
Battery power is low.
r
Lo batt* Batteries are depleted.
* Beep sounds.
To keep the original battery capacity for a
long time, charge the batteries only when
they are completely depleted.
Notes
• The indicator sections of roughly show the
remaining battery power. One section does not
always indicate one-fourth of the battery power.
• Depending on operating conditions, the indicator
sections of
may increase or decrease.
When to replace the rechargeable
batteries
If the battery life becomes shorter by about
half, replace the batteries with new
Connecting a power source
29
Page 30
Using dry batteries
Use only the following dry battery type for
your VIDEO CD player:
• LR6 (size AA) alkaline batteries
Note
Be sure to remove the AC power adaptor when
using the dry batteries.
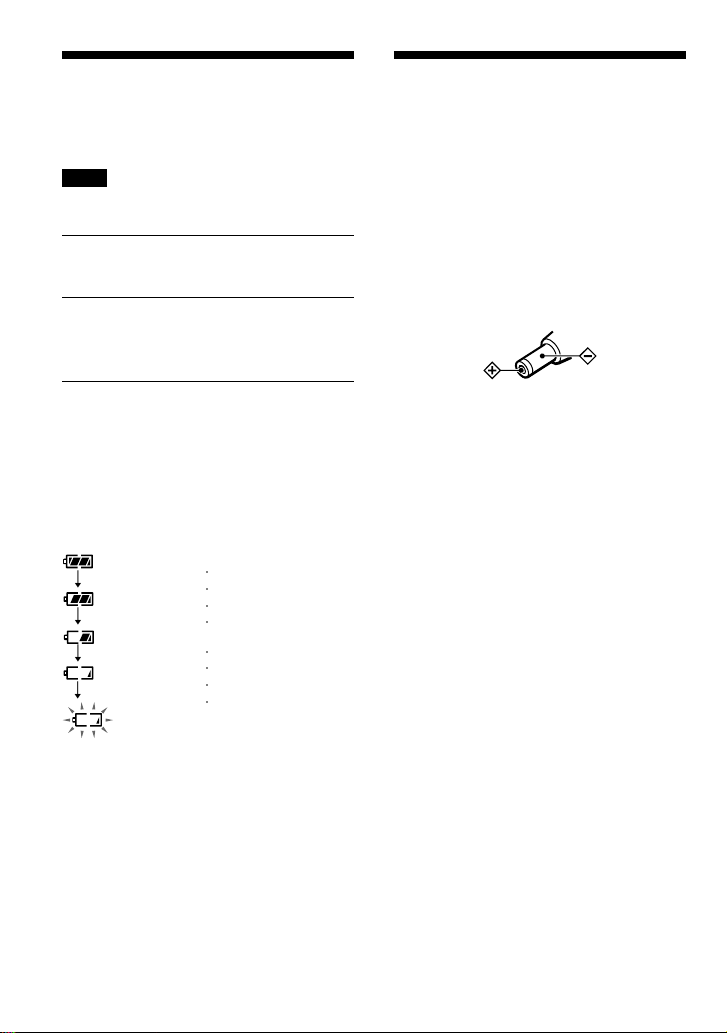
Open the battery compartment lid.
1
Notes on the power source
Disconnect all power sources when the
VIDEO CD player is not used.
On AC power adaptor
• Use only the AC power adaptor supplied or
recommended in “Accessories (supplied/
optional).” Do not use any other AC power
adaptor. It may cause a malfunction.
Insert two LR6 (size AA) batteries
2
by matching 3 to the diagram in
the battery compartment.
To remove the batteries
Remove the batteries in the same way as
rechargeable batteries.
When to replace the batteries
You can check the remaining power of the
batteries in the display.
r
Battery power is full.
r
Battery power is getting low.
r
r
Battery power is low.
r
Lo batt* Batteries are depleted.
* Beep sounds.
When the batteries are depleted, replace both
batteries with new ones.
○○○○
○○○○
Polarity of the plug
• When disconnecting the AC power adaptor
from the AC outlet, grasp the adaptor
itself. Do not pull it by the cord.
• Do not touch the AC power adaptor with
wet hands.
On rechargeable batteries
and dry batteries
• Do not charge the dry batteries.
• Do not throw the batteries into fire.
• Do not carry the batteries with coins or
other metallic objects. It can generate heat
if the positive and negative terminals of the
battery are accidentally contacted by a
metallic object.
• Do not mix rechargeable batteries with dry
batteries.
• Do not mix new batteries with old ones.
• Do not use different types of batteries
together.
• When the batteries are not to be used for a
long time, remove them.
• If battery leakage occurs, wipe off any
deposit in the battery compartment, and
install new batteries. In case the deposit
adheres to you, wash it off thoroughly.
30
Page 31
B
Additional information
Precautions
On safety
• Should any solid objects or liquid fall into
the VIDEO CD player, unplug it and have
it checked by qualified personnel before
operating it any further.
• Do not put any foreign objects in the DC
IN 4.5 V (external power input) jack.
On the VIDEO CD player
• Keep the lens on the VIDEO CD player
clean and do not touch it. If you do so, the
lens may be damaged and the VIDEO CD
player will not operate properly.
• Do not put any heavy object on top of the
VIDEO CD player. The VIDEO CD player
and the CD may be damaged.
• Do not leave the VIDEO CD player in a
location near heat sources, or in a place
subject to direct sunlight, excessive dust or
sand, moisture, rain, mechanical shock,
unleveled surface, or in a car with its
windows closed.
• If the VIDEO CD player causes
interference to the radio or television
reception, turn off the VIDEO CD player
or move it away from the radio or
television.
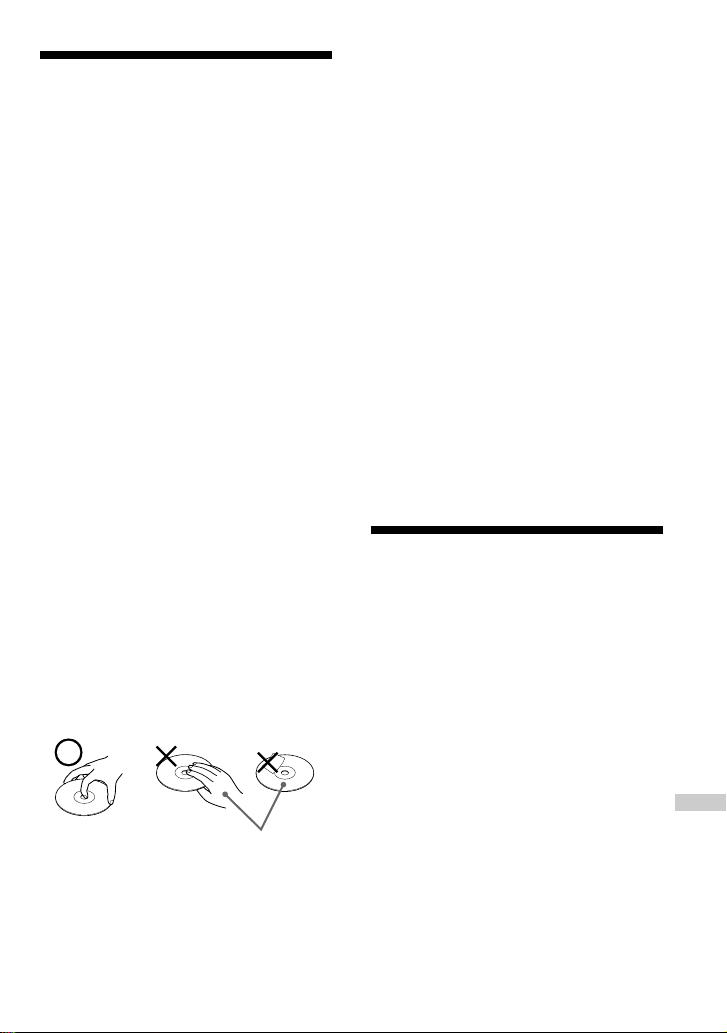
On handling CDs
• To keep the CD clean, handle it by its
edge. Do not touch the surface.
• Do not stick paper or tape onto the CD.
On headphones/earphones
Road safety
Do not use headphones/earphones while
driving, cycling, or operating any motorized
vehicle. It may create a traffic hazard and is
illegal in some areas. It can also be
potentially dangerous to play your headsets
at high volume while walking, especially at
pedestrian crossings. You should exercise
extreme caution or discontinue use in
potentially hazardous situations.
Preventing hearing damage
Avoid using headphones/earphones at high
volume. Hearing experts advise against
continuous, loud and extended play. If you
experience a ringing in your ears, reduce
volume or discontinue use.
Consideration for others
Keep the volume at a moderate level. This
will allow you to hear outside sounds and to
be considerate to the people around you.
Maintenance
To clean the casing
Use a soft cloth slightly moistened in water
or a mild detergent solution. Do not use
alcohol, benzine or thinner.
Not these ways
• Do not expose the CD to direct sunlight or
heat sources such as hot air ducts. Do not
leave the CD in a car parked under direct
sunlight.
• Do not use the CD soiled with dust.
Malfunction may occur.
Additional information
31
Page 32
Troubleshooting
Should any problem persist after you have checked these symptoms, consult your nearest Sony
dealer.
Symptom
CD playback does not start.
The disc does not play or
“no dISC” appears in the
display when a CD is placed
in the player.
No sound, or noise is heard.
The volume does not increase
even if you press the VOLUME
+ button repeatedly.
Sound seems to lose the
stereo effect and becomes
monaural.
The playing time is too short
when powered with the dry
batteries.
The playing time is too short
when powered with the
rechargeable batteries.
When you press u, “Lo
batt” or “00” appears in the
display. The CD does not
play.
“Lo batt” or “HI dc In”
appears in the display and
the player does not operate.
“HOLD”appears on the
display when you press a
button.
Cause and/or corrective actions
c The unit is being operated on AC power. When playing back an
audio CD using the AC power adaptor, it takes a while until the
sound is heard.
c The CD is dirty or defective. (page 31)
c Check that the CD is inserted with the label side up. (page 8, 10)
c Moisture condensation has occurred.
Leave the CD player aside for several hours until the moisture
evaporates.
c The lens is dirty. Clean the lens. (page 31)
c Close the lid of the player and battery compartment firmly.
(pages 8, 28)
c Make sure the batteries are inserted correctly. (pages 28, 30)
c Connect the AC power adaptor to an AC outlet securely. (page 7)
c The CD-R was not finalized. Finalize the CD-R with the recording
device.
c There is a problem with the quality of the CD-R, recording device,
or application software.
c Connect the plugs firmly. (page 7)
c Plugs are dirty. Clean the plugs with a dry soft cloth periodically.
c Set the AVLS switch to “NORM.” (page 24)
c The headphones/earphones are connected to the AUDIO OUT
(OPTICAL) jack. Connect them to the i/REMOTE jack.
(page 10)
c Press ST/L/R on the wireless remote control repeatedly until “ST”
appears on the TV screen. (Only when playing a VIDEO CD)
c Check that you are using alkaline batteries and not manganese
batteries. (page 30)
c Replace the batteries with new LR6 (size AA) alkaline batteries.
(page 30)
c Charge and discharge the rechargeable batteries several times.
(pages 28)
c The rechargeable batteries are used up completely. Charge the
batteries. (page 28)
c Replace the batteries with new LR6 (size AA) alkaline batteries.
(page 30)
c Use only the AC power adaptor in “Accessories (supplied/
optional).” (page 35)
c Remove all power sources, then insert the batteries or connect the
AC power adaptor again. (pages 7, 28)
c The buttons are locked. Slide the HOLD switch back. (page 24)
32
Page 33
Symptom
Cannot adjust the volume
with the VOLUME +/– buttons
on the player.
No picture appears on the TV
screen.
Picture is distorted.
Picture is blurred or becomes
monochrome.
Picture is distorted, noise is
heard or playback stops.
The wireless remote control
does not function.
The CD player does not start
charging.
Cause and/or corrective actions
c
The player is connected to an audio device. Adjust the volume
using the volume control on the connected device.
c Make sure the TV is turned on.
c Make sure you select the correct video input on the TV.
c Connect the video connecting cord correctly.
c An audio CD is being played.
c Close the lid of the player and the battery compartment firmly.
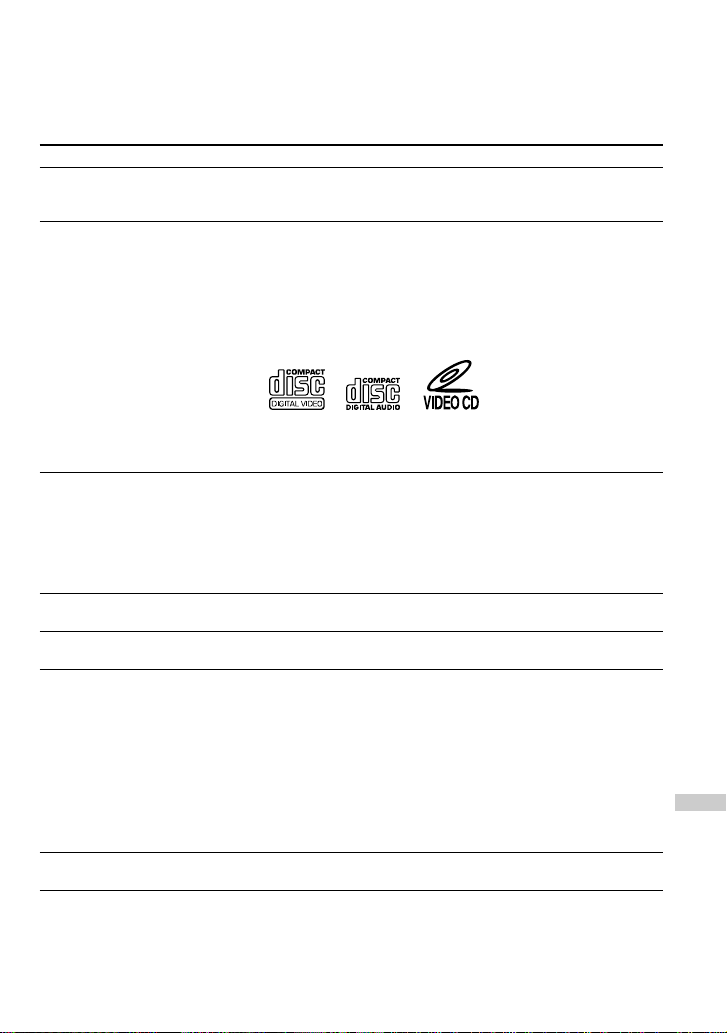
c Make sure the following mark is on the VIDEO CD.
c You may not play back some illegally duplicated VIDEO CDs
even though they have the above mark printed. In this case, consult
the shops where you bought the VIDEO CDs
c When you pause or use search, picture is distorted. This is not a
malfunction.
c The VIDEO CD is defective. Replace the VIDEO CD.
c The VIDEO CD is dirty. Clean the VIDEO CD.
c The color system you have selected for this player is not the same
as the one the VIDEO CD is recorded with. (page 7)
c Check the setting of the NTSC/PAL switch. (page 7)
c Move a portable telephone, transciever, etc. away from the player.
c If 5 minutes have already passed after you turned off the player by
pressing x, you cannot turn on the power using the wireless
remote control. In this case, press u on the player to turn on the
power. Once the player is turned on, you can operate the player
with the wireless remote control. (Only when using the player on
alkaline batteries)
c Remove any obstacles between the wireless remote control and the
remote sensor. (page 12)
c Replace all the batteries in the wireless remote control with new
ones if they are weak.
c
During stop, press x/CHG. (page 28)
(page 8, 10)
Additional information
33
Page 34

Specifications
System
Compact disc digital audio/video system
Laser diode properties
Material: GaAlAs
Wavelength: λ = 780 nm
Emission duration: Continuous
Laser output: Less than 44.6 µW
(This output is the value measured at a distance
of 200 mm from the objective lens surface on
the optical pick-up block with 7 mm aperture.)
Error correction
Sony Super Strategy Cross Interleave Reed
Solomon Code
D-A conversion
1-bit quartz time-axis control
Channel number
2 channels
Frequency response
20 - 20,000 Hz
307)
+1–2
dB (measured by EIAJ CP-
Output (at 4.5 V input level)
Audio output (stereo minijack)
Output level 0.7 V rms at 47 kilohms
Recommended load impedance over 10
kilohms
Video output (minijack)
Output level 1Vp-p at 75 ohms
Recommended load impedance 75 ohms
Headphones (stereo minijack)
Approx. 5 mW + Approx. 5 mW at 16 ohms
Power requirements
For the area code of the model you purchased,
check the upper left side of the bar code on the
package.
•Two LR6 (size AA) batteries: 3 V DC
•AC power adaptor (DC IN 4.5 V jack):
220 V, 50/60 Hz (HK2)
220 V - 230 V, 50/60 Hz (E13)
220V, 50 Hz (CN2)
•Two Sony NH-WM2AA rechargeable
batteries: 2.4 V DC
•Two Son y NH-7WMAA rechargeable
batteries: 2.4 V DC
• Sony DCC-E245 car battery cord for use on
car battery: 4.5 V DC
34
Battery life* (approx. hours)
(When you use the VIDEO CD player on a flat and
stable surface.)
Playing time varies depending on how the CD
player is used.
VIDEO CD Audio CD
Two NH-7WMAA 1 10
(charged for
about 4 hours**)
NH-WM2AA 3 20
(charged for
about 4 hours**)
Two Sony alkaline 3 35
batteries LR6SG
* Measured value by the standard of EIAJ
(Electronic Industries Association of Japan).
** Charging time varies depending on how the
rechargeable battery is used.
Operating temperature
5°C - 35°C (41°F - 95°F)
Dimensions (w/h/d) (excluding
projecting parts and controls)
Approx. 131.5× 25 × 141.4 mm
(5 1⁄8 × 3⁄4 × 5 1⁄8 in.)
Mass
Approx. 239 g (8.4 oz)(excluding rechargeable
batteries)
Approx. 298g (10.5 oz)(including rechargeable
batteries and a CD)
Design and specifications are subject to change
without notice.
Page 35
Accessories (supplied/optional)
Supplied accessories
AC power adaptor (1)
Audio cable (1)
Video cable (1)
Wireless remote control (1)
Earphones with remote control (1)
Rechargeable batteries (2)
Battery carrying case (1)
Carrying case (1)
Optional accessories
Active speaker system SRS-Z1
SRS-Z1000
Car battery cord DCC-E245
Car battery cord with car connecting pack
DCC-E26CP
Car connecting pack CPA-9
Connecting cord RK-G129HG
RK-G136HG
Optical digital connecting cord
POC-5B
POC-10B
POC-15B
POC-5AB
POC-10AB
POC-15AB
Rechargeable battery NH-WM2AA
Earphones MDR-E848LP
MDR-EX70LP
MDR-A44L
MDR-A110LP
GLASSTRON PLM-A55
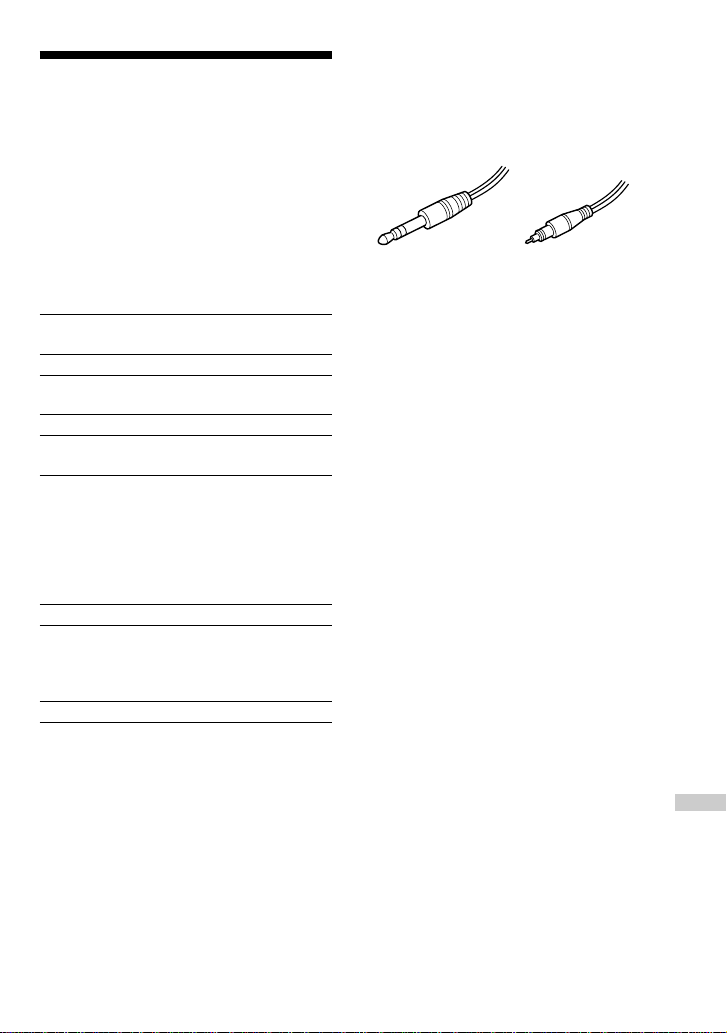
When connecting optional
headphones/earphones to the
supplied remote control
Use only headphones with stereo mini plugs.
You cannot use headphones with micro
plugs.
Stereo miniplug Micro plug
Your dealer may not handle some of the
above listed accessories. Please ask the
dealer for detailed information about the
accessories in your country.
Additional information
35
Page 36
Glossary
Index
Markings assigned for particular points to
divide a track or a whole disc. By using
indexes you can easily find particular points
you want. There are two types of index—one
is for audio CDs and the other is for VIDEO
CDs. This player only conforms to the latter
type of index, called “Video Index.”
PBC Playback
Playback using the menus recorded on
VIDEO CDs with PBC functions. You can
enjoy simple interactive operations using the
PBC Playback.
Playback Control (PBC)
Signals encoded on VIDEO CDs (Version
2.0) to control playback.
By using menus recorded on VIDEO CDs
with PBC functions, you can enjoy playing
simple interactive software, software with
search functions, and so on. When you insert
a VIDEO CD with PBC functions on this
player, “PBC” appears on the display.
Track
Markings differentiating pictures or songs
recorded on VIDEO CDs or audio CDs. Each
track is assigned with a number, called
“Track Number.”
VIDEO CD
A compact disc containing moving pictures.
Picture data is compressed to 1/120th of the
original data in the MPEG 1 format (one of
the worldwide standards of digital
compression technologies) and recorded on a
disc.
A 12 cm VIDEO CD can reproduce up to 74
minute’s length of moving pictures. Audio
data is also compressed so that a VIDEO CD
can contain 6 times as much audio data as an
audio CD.
There are 2 versions of VIDEO CDs.
• Version 1.1: You can play only moving
pictures and sounds.
• Version 2.0: You can play still pictures and
enjoy PBC functions.
Sony Corporation
36
 Loading...