

Page 1
U
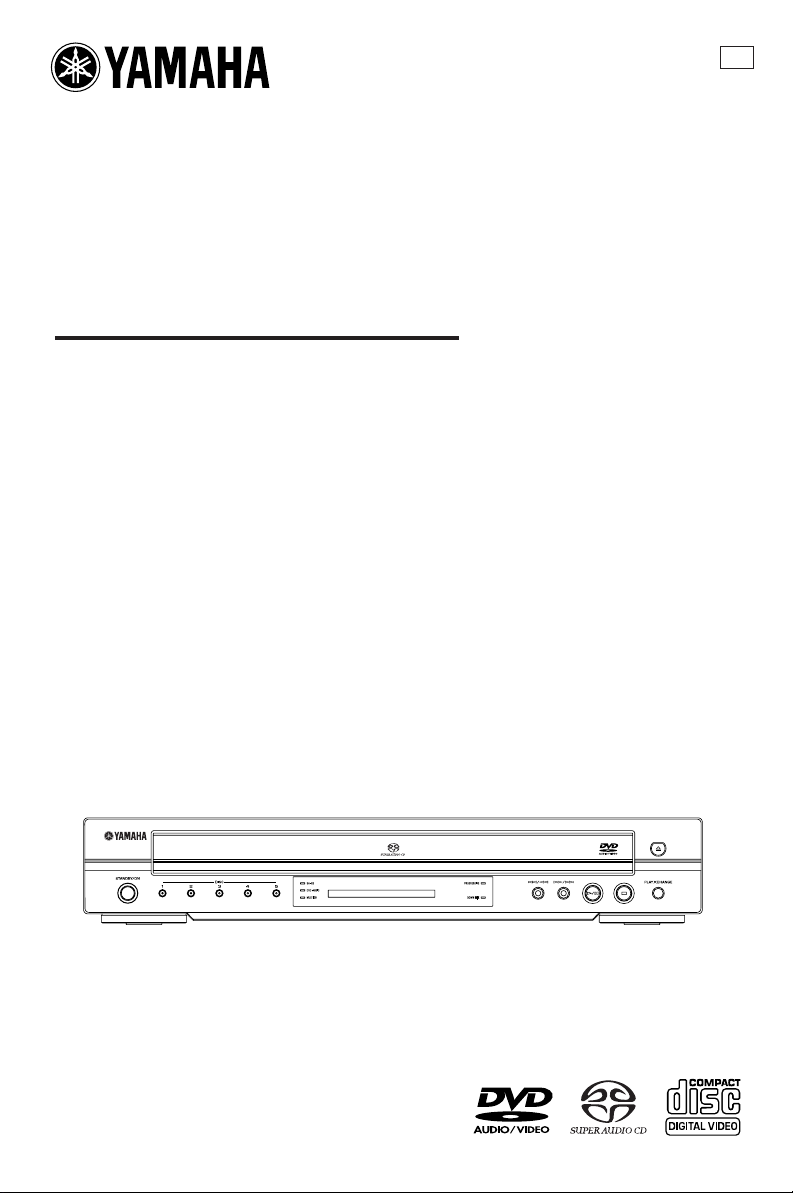
DVD AUDIO / VIDEO SA-CD CHANGER
LECTEUR DE DVD AUDIO / VIDEO SA-CD CHANGEUR
DV-C6770
OWNER’S MANUAL
MODE D’EMPLOI
0
Page 2
IMPORTANT SAFETY INSTRUCTIONS
12
Grounding or Polarization — This product may be equipped
CAUTION
RISK OF ELECTRIC SHOCK
CAUTION: TO REDUCE THE RISK OF
ELECTRIC SHOCK, DO NOT REMOVE
COVER (OR BACK). NO USER-SERVICEABLE
PARTS INSIDE. REFER SERVICING TO
• Explanation of Graphical Symbols
1
Read Instructions — All the safety and operating
instructions should be read before the product is operated.
2
Retain Instructions — The safety and operating instructions
should be retained for future reference.
3
Heed Warnings — All warnings on the product and in the
operating instructions should be adhered to.
4
Follow Instructions — All operating and use instructions
should be followed.
5
Cleaning — Unplug this product from the wall outlet before
cleaning. Do not use liquid cleaners or aerosol cleaners. Use
a damp cloth for cleaning.
6
Attachments — Do not use attachments not recommended
by the product manufacturer as they may cause hazards.
7
Water and Moisture — Do not use this product near water
— for example, near a bath tub, wash bowl, kitchen sink, or
laundry tub; in a wet basement; or near a swimming pool;
and the like.
8
Accessories — Do not place this product on an unstable
cart, stand, tripod, bracket, or table. The product may fall,
causing serious injury to a child or adult, and serious damage to the product. Use only with a cart, stand, tripod, bracket, or table recommended by the manufacturer, or sold with
the product.
Any mounting of the product should follow the manufacturer’s instructions, and should use a mounting accessory recommended by the manufacturer.
9
A product and cart combination should be
moved with care. Quick stops, excessive
force, and uneven surfaces may cause the
product and cart combination to overturn.
10
Ventilation — Slots and openings in the cabinet are provided for ventilation and to ensure reliable operation of the product and to protect it from overheating, and
these openings must not be blocked or covered. The openings should never be blocked by placing the product on a
bed, sofa, rug, or other similar surface.
This product should not be placed in a built-in installation
such as a bookcase or rack unless proper ventilation is provided or the manufacturer’s instructions have been adhered to.
11
Power Sources — This product should be operated only
from the type of power source indicated on the marking label. If you are not sure of the type of power supply to your
home, consult your product dealer or local power company.
For products intended to operate from battery power, or other sources, refer to the operating instructions.
i
DO NOT OPEN
QUALIFIED SERVICE PERSONNEL.
The lightning flash with arrowhead symbol,
within an equilateral triangle, is intended to alert
you to the presence of uninsulated “dangerous
voltage” within the product’s enclosure that
may be of sufficient magnitude to constitute a
risk of electric shock to persons.
The exclamation point within an equilateral triangle is intended to alert you to the presence of
important operating and maintenance (servicing) instructions in the literature accompanying
the appliance.
with a polarized alternating current line plug (a plug having
one blade wider than the other). This plug will fit into the
power outlet only one way. This is a safety feature. If you
are unable to insert the plug fully into the outlet, try reversing the plug. If the plug should still fail to fit, contact your
electrician to replace your obsolete outlet. Do not defeat the
safety purpose of the polarized plug.
13
Power-Cord Protection — Power-supply cords should be
routed so that they are not likely to be walked on or pinched
by items placed upon or against them, paying particular attention to cords at plugs, convenience receptacles, and the
point where they exit from the product.
14
Lightning — For added protection for this product during a
lightning storm, or when it is left unattended and unused for
long periods of time, unplug it from the wall outlet and disconnect the antenna or cable system. This will prevent damage to the product due to lightning and power-line surges.
15
Power Lines — An outside antenna system should not be located in the vicinity of overhead power lines or other electric
light or power circuits, or where it can fall into such power
lines or circuits. When installing an outside antenna system,
extreme care should be taken to keep from touching such
power lines or circuits as contact with them might be fatal.
16
Overloading — Do not overload wall outlets, extension
cords, or integral convenience receptacles as this can result
in a risk of fire or electric shock.
17
Object and Liquid Entry — Never push objects of any kind
into this product through openings as they may touch dangerous voltage points or short-out parts that could result in
a fire or electric shock. Never spill liquid of any kind on the
product.
18
Servicing — Do not attempt to service this product yourself
as opening or removing covers may expose you to dangerous voltage or other hazards. Refer all servicing to qualified
service personnel.
19
Damage Requiring Service — Unplug this product from the
wall outlet and refer servicing to qualified service personnel
under the following conditions:
a) When the power-supply cord or plug is damaged,
b) If liquid has been spilled, or objects have fallen into the
product,
c) If the product has been exposed to rain or water,
d)
If the product does not operate normally by following
the operating instructions. Adjust only those controls
that are covered by the operating instructions as an im-
proper adjustment of other controls may result in dam-
age and will often require extensive work by a qualified
technician to restore the product to its normal operation,
e) If the product has been dropped or damaged in any
way, and
f) When the product exhibits a distinct change in perfor-
mance - this indicates a need for service.
20
Replacement Parts — When replacement parts are required,
be sure the service technician has used replacement parts
specified by the manufacturer or have the same characteristics as the original part. Unauthorized substitutions may result in fire, electric shock, or other hazards.
21
Safety Check — Upon completion of any service or repairs
to this product, ask the service technician to perform safety
checks to determine that the product is in proper operating
condition.
22
Wall or Ceiling Mounting — The unit should be mounted to
a wall or ceiling only as recommended by the manufacturer.
23
Heat — The product should be situated away from heat
sources such as radiators, heat registers, stoves, or other
products (including amplifiers) that produce heat.
Page 3
1. IMPORTANT NOTICE: DO NOT MODIFY THIS UNIT!
This product, when installed as indicated in the instructions contained in this manual, meets FCC requirements. Modifications
not expressly approved by Yamaha may void your authority, granted by the FCC, to use the product.
2. IMPORTANT: When connecting this product to accessories and/or another product use only high quality shielded cables.
Cable/s supplied with this product MUST be used. Follow all installation instructions. Failure to follow instructions could void
your FCC authorization to use this product in the USA.
3. NOTE: This product has been tested and found to comply with the requirements listed in FCC Regulations, Part 15 for Class
“B” digital devices.
Compliance with these requirements provides a reasonable level of assurance that your use of this product in a residential
environment will not result in harmful interference with other electronic devices. This equipment generates/uses radio
frequencies and, if not installed and used according to the instructions found in the users manual, may cause interference
harmful to the operation of other electronic devices. Compliance with FCC regulations does not guarantee that interference
will not occur in all installations. If this product is found to be the source of interference, which can be determined by turning
the product “OFF” and “ON”, please try to eliminate the problem by using one of the following measures:
Relocate either this product or the device that is being affected by the interference.
Utilize power outlets that are on different branch (circuit breaker or fuse) circuits or install AC line filter/s.
In the case of radio or TV interference, relocate/reorient the antenna. If the antenna lead-in is 300 ohm ribbon lead, change
the lead-in to coaxial type cable.
If these corrective measures do not produce satisfactory results, please contact the local retailer authorized to distribute this
type of product. If you can not locate the appropriate retailer, please contact Yamaha Electronics Corp., 6660 Orangethorpe
Ave. Buena Park, CA90622.
The above statements apply ONLY to those products distributed by Yamaha Corporation of America or its subsidiaries.
We Want You Listening For A Lifetime
YAMAHA and the Electronic Industries Association's Consumer Electronics Group want you to get the most out of
your equipment by playing it at a safe level. One that lets the sound come through loud and clear without annoying
blaring or distortion - and, most importantly, without affecting your sensitive hearing.
Since hearing damage from loud sounds is often undetectable until it is too late, YAMAHA and the Electronic
Industries Association's Consumer Electronics Group recommend you to avoid prolonged exposure from excessive
volume levels.
FCC INFORMATION (for US customers)
CAUTION
VISIBLE AND INVISIBLE LASER RADIATION WHEN
OPEN. AVOID EXPOSURE TO BEAM
ADVARSEL
SYNLIG OG USYNLIG LASERSTRÅLING VED ÅBNING
UNDGÅ UDSÆTTELSE FOR STRÅLING
ADVARSEL
SYNLIG OG USYNLIG LASERSTRÅLING NÅR DEKSEL
ÅPNES UNNGÅ EKSPONERING FOR STRÅLEN
VARNING
SYNLIG OCH OSYNLIG LASERSTRÅLNING NÄR
DENNA DEL ÄR ÖPPNAD BETRAKTA EJ STRÅLEN
VAR O !
AVATTAESSA OLET ALTTIINA NÄKYVÄLLE JA
NÄKYMÄTTÖMÄLLE LASER SÄTEILYLLE, ÄLÄ KATSO SÄTEESEEN
VORSICHT
SICHTBARE UND UNSICHTBARE LASERSTRAHLUNG
WENN ABDECKUNG GEÖFFNET NICHT DEM STRAHL AUSSETSEN
DANGER
VISIBLE AND INVISIBLE LASER RADIATION WHEN
OPEN AVOID DIRECT EXPOSURE TO BEAM
ATTENTION
CAS D'OUVERTURE EXPOSITION DANGEREUSE AU FAISCEAU
RAYONNEMENT LASER VISIBLE ET INVISIBLE EN
T
C
U
T
D
K
O
U
R
P
D
O
R
R
E
P
S
E
A
1
T
L
I
E
T
A
1
S
A
L
1
S
S
R
R
E
A
S
E
A
L
S
A
S
P
S
K
L
A
P
A
C
L
A
R
L
E
1
C
R
S
E
E
N
A
S
L
D
A
A
K
L
R
O
E
1
U
S
L
S
A
L
S
A
T
I
L
U
K
D
O
R
P
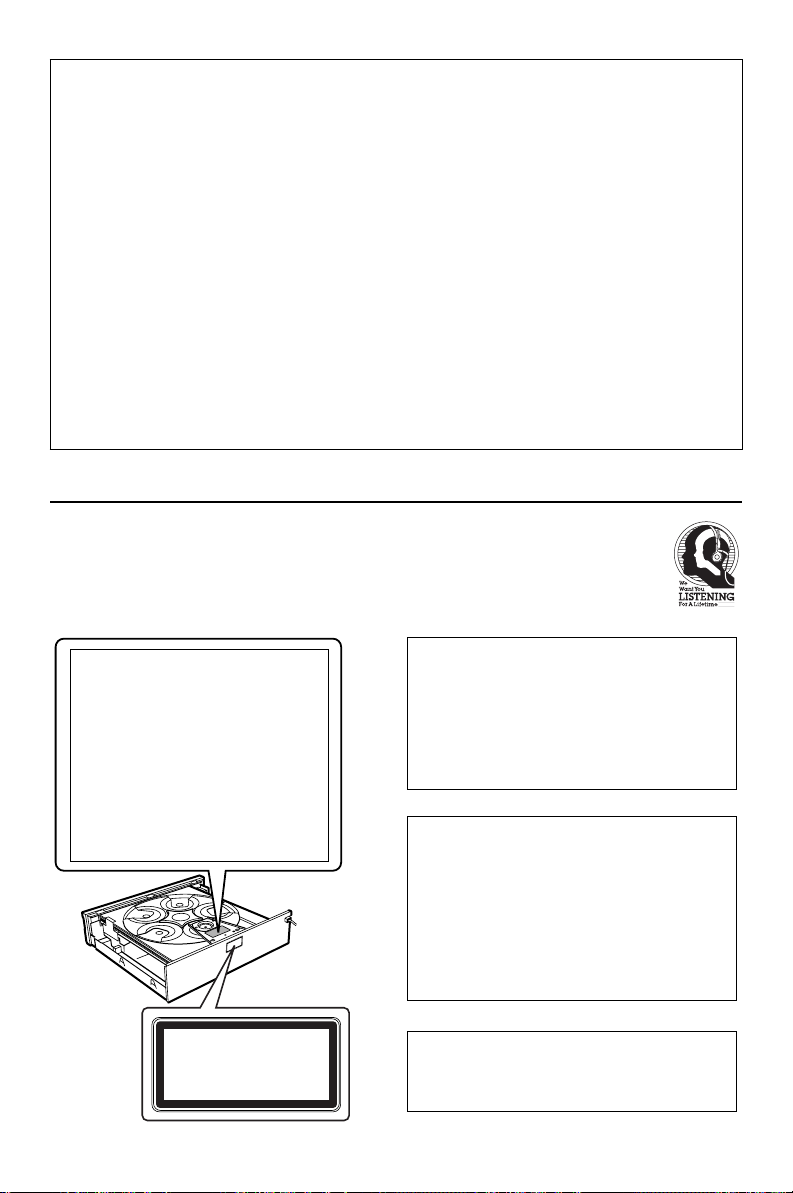
CLASS 1 LASER PRODUCT
LASER KLASSE 1 PRODUKT
LUOKAN 1 LASERLAITE
KLASS 1 LASER APPARAT
PRODUIT LASER DE CLASSE 1
For Customer Use:
Read carefully the information located at the rear panel of
the player and enter below the Serial No. Retain this
information for future reference.
Model No.
Serial No. __________________________
FOR CANADIAN CUSTOMERS
To prevent electric shock, match wide blade of plug to wide
slot and fully insert.
This Class B digital apparatus complies with Canadian
ICES-003.
This digital apparatus does not exceed the Class B limits for
radio noise emissions from digital apparatus as set out in the
Radio Interference Regulations of the Canadian Department
of Communications.
CAUTION
Use of controls or adjustments or performance of
procedures other than those specified herein may result in
hazardous radiation exposure.
ii
Page 4

CAUTION: READ THIS BEFORE OPERATING YOUR UNIT.
1
To assure the finest performance, please read this
manual carefully. Keep it in a safe place for future
reference.
2
Install this sound system in a well ventilated, cool,
dry, clean place — away from direct sunlight, heat
sources, vibration, dust, moisture, or cold. In a
cabinet, allow about 2.5cm (1 inch) of free space
all around this unit for adequate ventilation.
3
Locate this unit away from other electrical
appliances, motors, or transformers to avoid
humming sounds.
4
Do not expose this unit to sudden temperature
changes from cold to hot, nor locate this unit in
an environment with high humidity (i.e., a room
with a humidifier) to prevent condensation inside
this unit, which may cause an electrical shock, fire,
damage to this unit, and/or personal injury.
5
Avoid installing this unit in a location where
foreign objects may fall onto this unit or where
this unit may be exposed to liquid dripping or
splashing. On the top of this unit, do not place:
– Other components, as they may cause damage
and/or discoloration on the surface of this unit.
– Burning objects (i.e., candles), as they may
cause fire, damage to this unit, and/or personal
injury.
– Containers with liquid in them, as they may fall,
spilling the liquid and causing an electrical
shock to the user and/or damage to this unit.
6
Do not cover this unit with a newspaper,
tablecloth, curtain, etc. in order not to obstruct
heat radiation. If the temperature inside this unit
rises, it may cause fire, damage to this unit, and/or
personal injury.
7
Do not plug in this unit to a wall outlet until all
connections are complete.
8
Do not operate this unit upside-down. It may
overheat, possibly causing damage.
9
Do not use excessive force on switches, knobs
and/or cords.
10
When disconnecting the power cord from the
wall outlet, grasp the plug; do not pull the cord.
11
Do not clean this unit with chemical solvents; this
might damage the finish. Use a clean, dry cloth.
12
Use only the voltage specified on this unit. Using
this unit with a higher voltage than specified is
dangerous and may cause fire, damage to this
unit, and/or personal injury. YAMAHA will not be
held responsible for any damage resulting from
use of this unit with a voltage other than as
specified.
13
To prevent damage by lightning, disconnect the
power cord from the wall outlet during an
electrical storm.
14
Do not attempt to modify or fix this unit. Contact
qualified YAMAHA service personnel when any
service is needed. The cabinet should never be
opened for any reason.
15
When not planning to use this unit for long
periods of time (i.e., vacation), disconnect the AC
power plug from the wall outlet.
16
Be sure to read the “TROUBLESHOOTING”
section on common operating errors before
concluding that this unit is faulty.
17
Before moving this unit, press STANDBY/ON to
set the unit in standby mode, then disconnect the
AC power plug from the wall outlet.
WARNING
TO REDUCE THE RISK OF FIRE OR ELECTRIC
SHOCK, DO NOT EXPOSE THIS UNIT TO
RAIN OR MOISTURE.
When playing DTS encoded CDs, excessive noise will
be heard from the analog stereo outputs. To avoid
possible damage to the audio system, the consumer
should take proper precautions when the analog
stereo outputs of the player are connected to an
amplification system. To enjoy DTS Digital
Surround™ playback, an external 5.1-channel DTS
Digital Surround™ decoder system must be
connected to the digital output of the player.
LASER SAFETY
This unit employs a laser. Due to possible eye injury,
only a qualified service person should remove the
cover or attempt to service this device.
DANGER
This unit emits visible laser radiation when open.
Avoid direct eye exposure to beam.
When this unit is plugged into a wall outlet, do not
place your eyes close to the opening of the disc tray
and other openings or look inside.
Be sure to place this unit on a level surface.
If not so, this unit will fail to work normlly at the
PLAYXCHANGE operation and cause damage to the
disc(s) and this unit itself.
LASER
Type Semiconductor laser GaAlAs
Wave length 650 nm (DVD)
Output Power 7 mW (DVD/VCD/CD)
Beam divergence 60 degree
780 nm (VCD/CD)
iii
Page 5
Contents
Introduction
Region Codes ..........................................................................2
Supplied accessories...............................................................2
Notes about discs................................................................... 2
Cleaning discs ..........................................................................2
Patent information.................................................................. 2
Functional Overview
Front Panel............................................................................... 3
Rear Panel ................................................................................4
Remote Control ..................................................................... 5
Preparation
General Notes on connections........................................... 6
Digital Connections ...............................................................6
Analog Connections............................................................... 6
6CH DISCRETE jacks........................................................................6
MIXED 2CH jacks...............................................................................7
Video Connections.................................................................7
S-Video terminal <A>...................................................................... 7
Composite Video terminal <B>................................................. 7
Component Video terminal <C>..............................................7
Getting Started
Inserting batteries into the Remote Control................... 8
Using the remote control ...............................................................8
Turning on the power...........................................................8
Selecting the color system that corresponds
to your TV ...............................................................................8
Setting language preference .................................................9
Setting the OSD Language.............................................................9
Setting the Audio, Subtitle and Disc menu language...10
Setting the speaker’s channels...........................................10
Disc Operations
Basic Playback........................................................................ 12
General Operation...............................................................12
Pausing playback................................................................................12
Selecting track/chapter................................................................... 12
Searching backward/forward...................................................... 12
Stopping playback............................................................................. 12
Selecting various repeat/shuffle functions.......................13
Repeat.....................................................................................................13
Repeating a section within a chapter/track........................13
Shuffle (not for DVD/VCD/SVCD)........................................14
Operations for video playback (DVD/VCD/SVCD).....14
Using the Disc Menu ......................................................................14
Zooming in...........................................................................................14
Resuming playback from the last stopped point.............14
On-Screen Display (OSD)..........................................................15
Special DVD Features..........................................................16
Playing a Title ......................................................................................16
Camera Angle..................................................................................... 16
Audio.......................................................................................................16
Subtitles..................................................................................................16
Special VCD & SVCD Features.........................................16
Playback Control (PBC)................................................................ 16
Preview Function...............................................................................16
DVD-Audio features ........................................................... 17
Changing pages..................................................................................17
Playing bonus groups......................................................................17
DVD-Video Mode ...........................................................................17
SA-CD (Super Audio CD) ................................................. 18
Playing a disc........................................................................................ 18
Changing SA-CD playback area and layer ......................... 18
Audio CD............................................................................... 19
Playing a disc........................................................................................ 19
Playing MP3/DivX/JPEG/Kodak Picture CD................... 19
General Operation ..........................................................................19
Selecting a folder and track/file................................................. 19
Special picture disc features ..............................................20
Preview Function (JPEG)..............................................................20
Zoom picture...................................................................................... 20
Playback with multi-angles...........................................................20
Scan Effect............................................................................................. 20
Playing MP3 music and JPEG picture simultaneously...20
Setup Menu
General Setup menu............................................................ 21
Selecting DVD-Audio/Video mode .......................................21
Locking/Unlocking the disc for viewing................................ 21
Programming disc tracks and discs .........................................21
OSD Language................................................................................... 23
Screen Saver........................................................................................ 23
Sleep Timer.......................................................................................... 23
®
VOD registration code................................................. 23
DivX
Audio Setup Menu ............................................................... 24
Setting the analog output............................................................. 24
Setting the Digital output............................................................. 24
Speaker Setup..................................................................................... 25
CD Upsampling.................................................................................25
Night Mode.......................................................................................... 25
Video Setup Menu................................................................ 25
TV Type.................................................................................................25
Setting the TV Display...................................................................26
Progressive............................................................................................ 26
Picture Setting..................................................................................... 27
Selecting the black level (U.S.A. model only)...................27
Closed Caption (U.S.A. model only)..................................... 27
Preference Setup Menu ...................................................... 28
Audio, Subtitle, Disc Menu.......................................................... 28
Restricting playback by Parental Control............................28
PBC (Playback Control)................................................................ 29
MP3/JPEG Menu................................................................................ 29
Changing the Password................................................................. 29
Restoring to original settings......................................................29
Language Code .......................... 30
Troubleshooting ........................ 32
Glossary ...................................... 34
Specifications ............................. 35
English
1
Page 6

Introduction
Thank you for purchasing this unit. This
Owner’s Manual explains the basic
operation of this unit.
Region Codes
DVD discs must be labeled for
ALL regions, Region 1 (U.S.A
model) or Region 4 (Australia
model) in order to play on this
Player. You cannot play Discs that
are labeled for other regions.
ALL
1
4
Supplied accessories
– Remote control
– Batteries (two AA size) for remote
control
– Audio/Video cable
– Owner’s Manual
Notes about discs
– This unit is designed for use with Super
Audio CD (SA-CD), DVD-Video, DVD-Audio,
Video CD, Super Video CD, Audio CD, CD-
R, CD-RW, DVD+RW, DVD+R, DVD-R
and DVD-RW.
This unit can play:
– MP3, picture (Kodak, JPEG) files on CD-
R(W).
– JPEG/ISO 9660 format
– Maximum 30 characters display.
®
– DivX
– CD-R and CD-RW cannot be played unless
– Some discs cannot be played depending on
– Be sure to use only CD-R and CD-RW discs
– Do not use any non standard shaped discs
– Do not use disc with tape, scals, or paste on
disc on CD-R[W]/DVD+R[W]/
DVD-R[W] (3.11, 4.x and 5.x)
finalized.
the recording conditions such as PC
environment and application software. The
characteristics and condition of the discs;
materials, scratches, curvature, and etc.,
may result in failure.
made by reliable manufacturers.
(heart, etc.)
it, damage to the unit may result.
– Do not use a disc printed on its surface by
a commercially available label printer.
Cleaning discs
• When a disc becomes dirty, clean it
with a cleaning cloth. Wipe the disc
from the centre out. Do not wipe in a
circular motion.
• Do not use solvents such as benzine,
thinner, commercially available cleaners,
or antistatic spray intended for analog
records.
Patent information
Manufactured under license from
Dolby Laboratories. “Dolby”,
“Pro Logic” and the double-D
symbol are trademarks of Dolby
Laboratories.
DTS” and “DTS Digital
“
Surround” are registered
trademarks of Digital Theater
Systems, Inc.
DivX, DivX Certified, and
associated logos are trademarks
of DivXNetworks, Inc and are
used under license.
This product incorporates copyright protection
technology that is protected by method claims of
certain U.S. patents and other intellectual property
rights owned by Macrovision Corporation and
other rights owners. Use of this copyright
protection technology must be authorized by
Macrovision Corporation, and is intended for home
and other limited viewing uses only unless
otherwise authorized by Macrovision Corporation.
Reverse engineering or disassembly is prohibited.
2
Page 7
Functional Overview
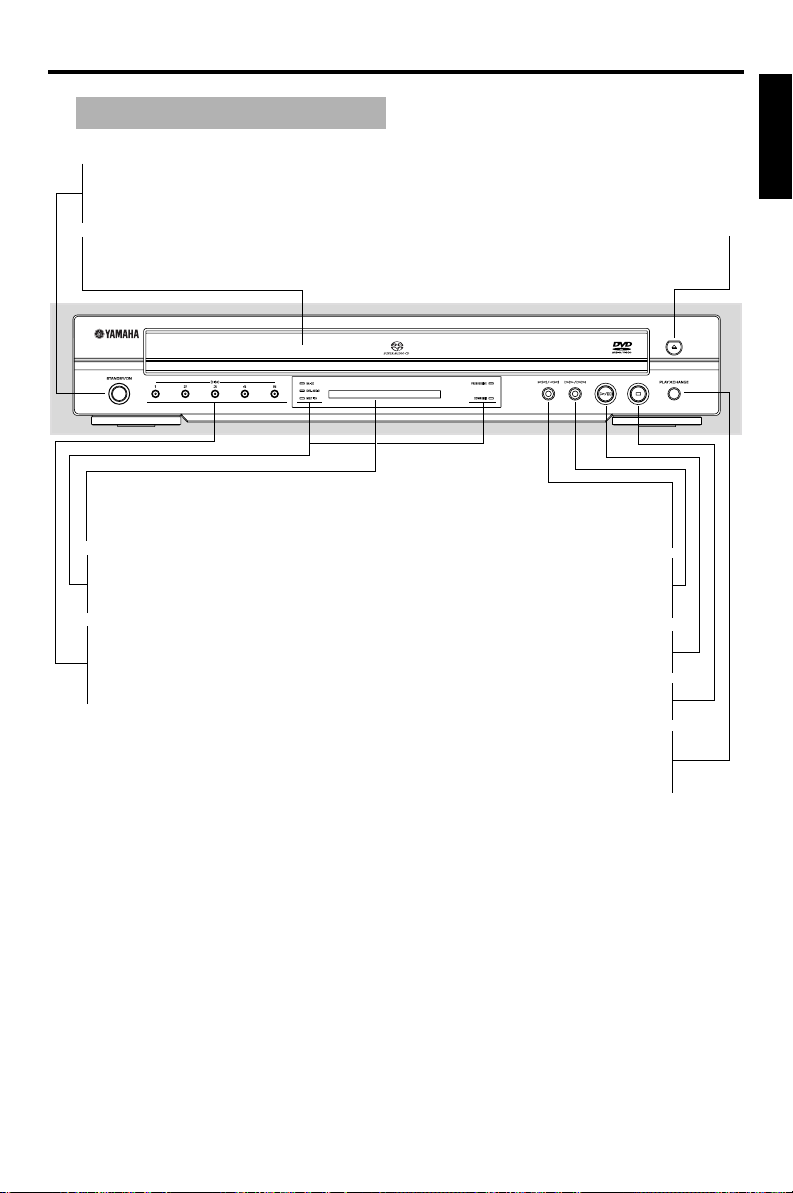
Front Panel
STANDBY/ON
– turns on this unit or sets it to the
standby mode
Disc tray
– load up to 5 discs on the disc tray
DISPLAY
– shows the current status of the
player
LEDs
– LED lights up when the
corresponding feature is set to ON
DISC (1, 2, 3, 4, 5)/LEDs
– to select and directly playback the
preferred disc / each LED flashes
green when button is selected
English
/ OPEN/CLOSE
– to open/close the disc tray
S/Q
– search backward* / go to a
previous chapter or track
R/T
– search forward* / go to the next
chapter or track
B/; PLAY/PAUSE
– to start or interrupt playback
9 STOP
– to stop playback
PLAYXCHANGE
– to change another disc(s) during
playback
* Press button for about two seconds.
3
Page 8

Functional Overview
Rear Panel
COMPONENT video outputs
– connect to an AV receiver with Y PB/
CB PR/CR inputs
AUDIO OUT - 6CH DISCRETE
– connect to 6CH INPUT inputs of your
AV receiver
AUDIO OUT - MIXED 2CH
– connect to AUDIO inputs of your AV
receiver or stereo system
VIDEO OUT - VIDEO
– connect to VIDEO (composite) input of
your AV receiver
VIDEO OUT - S VIDEO
– connect to S VIDEO input of your AV
receiver
– connect to a standard AC outlet
AC Power Cord
DIGITAL OUT - OPTICAL
– connect to OPTICAL input of your
AV receiver
DIGITAL OUT - COAXIAL
– connect to COAXIAL input of
your AV receiver
Caution: Do not touch the inner pins of the jacks on the rear panel.
Electrostatic discharge may cause permanent damage to the unit.
4
Page 9
Functional Overview
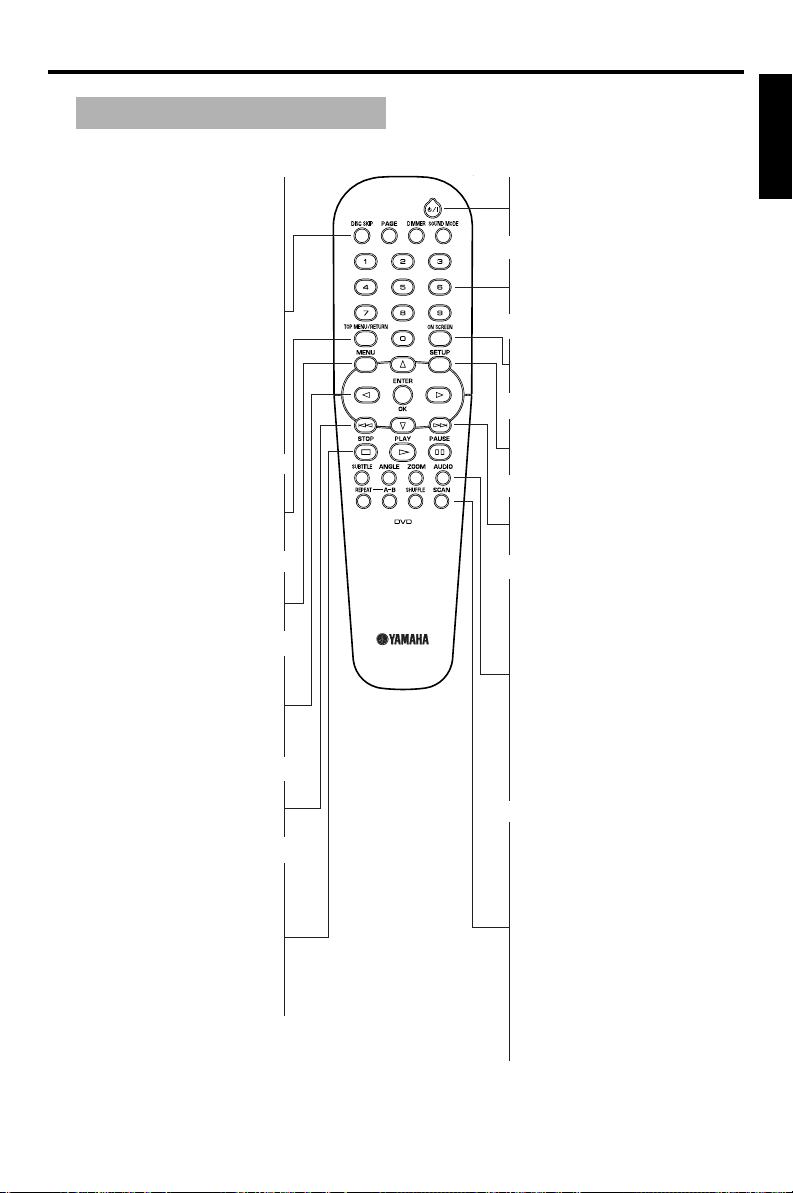
Remote Control
DISC SKIP
– select another disc
PAGE
– turns pages of the DVD-
Audio still pictures
DIMMER
– select 3 different
brightnesses for the display
SOUND MODE
– selects the required sound
mode: Stereo, Virtual Surround
or Multi-channel / change
SA-CD playback area
TOP MENU/RETURN
– display the top-level disc
menu (DVD) / go back to
previous menu (VCD)
MENU
– access menu of a disc (DVD)
/ switch PBC on/off (VCD)
1 2 3 4
– (left/right/up/down) select an
item in the menu
ENTER/OK
– acknowledge menu selection
S
– search backward* / go to a
previous chapter or track
STOP ( 9 )
– stop playback
PLAY ( B )
– start playback
PAUSE ( ; )
– pause playback temporarily /
frame-by-frame playback
|
B/
– turn this unit ON or go to
standby-on mode
0-9 numeric keypad
– select numbered items in a
menu
ON SCREEN
– access or remove player’s
On Screen Display menu
SETUP
– access or remove player’s
setup menu
T
– search forward* / next
chapter or track
SUBTITLE
– subtitle language selector
ANGLE
– select DVD camera angle
ZOOM
– enlarge video image
AUDIO
– audio language and format
selector / change Hybrid SACD playback layer
REPEAT
– repeat chapter, track, title,
disc,all discs
A-B
– repeat a specific segment
SHUFFLE
– play tracks in random order
SCAN
– play the first 6 seconds or
less of each track / chapter
within a disc
English
* Press and hold button for about two seconds.
5
Page 10
Preparation
General Notes on connections
Never make or change connections with
the power switched on.
• Depending on the equipment you wish
to connect, there are various ways you
could connect this unit. Possible
connections are shown in the following
drawings.
• Please refer to the manuals of other
equipment as necessary to make the
best connections.
• Do not connect this unit via your VCR.
The video quality could be distorted by
the copy protection system.
• Do not connect this unit’s audio out
jack to the phono in jack of your audio
system.
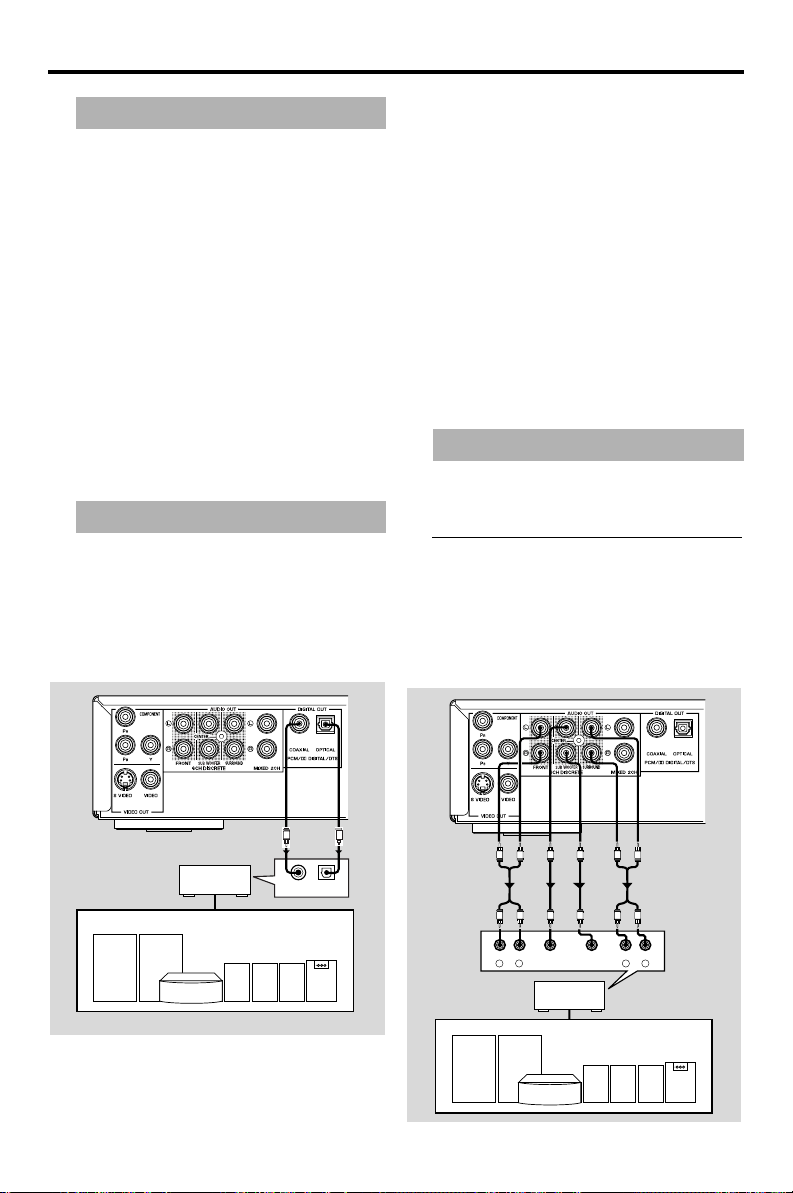
Digital Connections
This unit has COAXIAL and OPTICAL
digital out jacks. Connect one or both of
them to your AV receiver equipped with
Dolby Digital, DTS, or MPEG decoder
using each specific cable (separate
purchase).
Notes:
– If the audio format of the digital output
does not match the capabilities of your
receiver, the receiver will produce a strong,
distorted sound or no sound at all. Make
sure to select the appropriate audio format
at menu screen included on the disc.
Pressing AUDIO once or more may change
not only audio languages but also audio
formats, and the selected format appears
for several seconds on the status window.
– SA-CD audio signal is not output from
DIGITAL OUT jacks.
– If you wish to enjoy Dolby Digital, DTS, and
MPEG you must connect this unit to the AV
receiver that support those.
Analog Connections
This player has two types of analog output
jacks.
6CH DISCRETE jacks
To reproduce multi-channel Super audio
CD and DVD-Audio, connect these jacks
to your AV receiver’s multi channel input
jacks using commercially available audio
pin cables.
C
AV receiver
COAXIALINOPTICAL
Speakers
You will need to set this unit’s digital
output to ALL (see page 24
“DIGITAL OUTPUT”).
6
O
IN
FRONT
R L
AV receiver
CENTER
SUBWOOFER
Speakers
SURROUND
RL
Page 11
Preparation
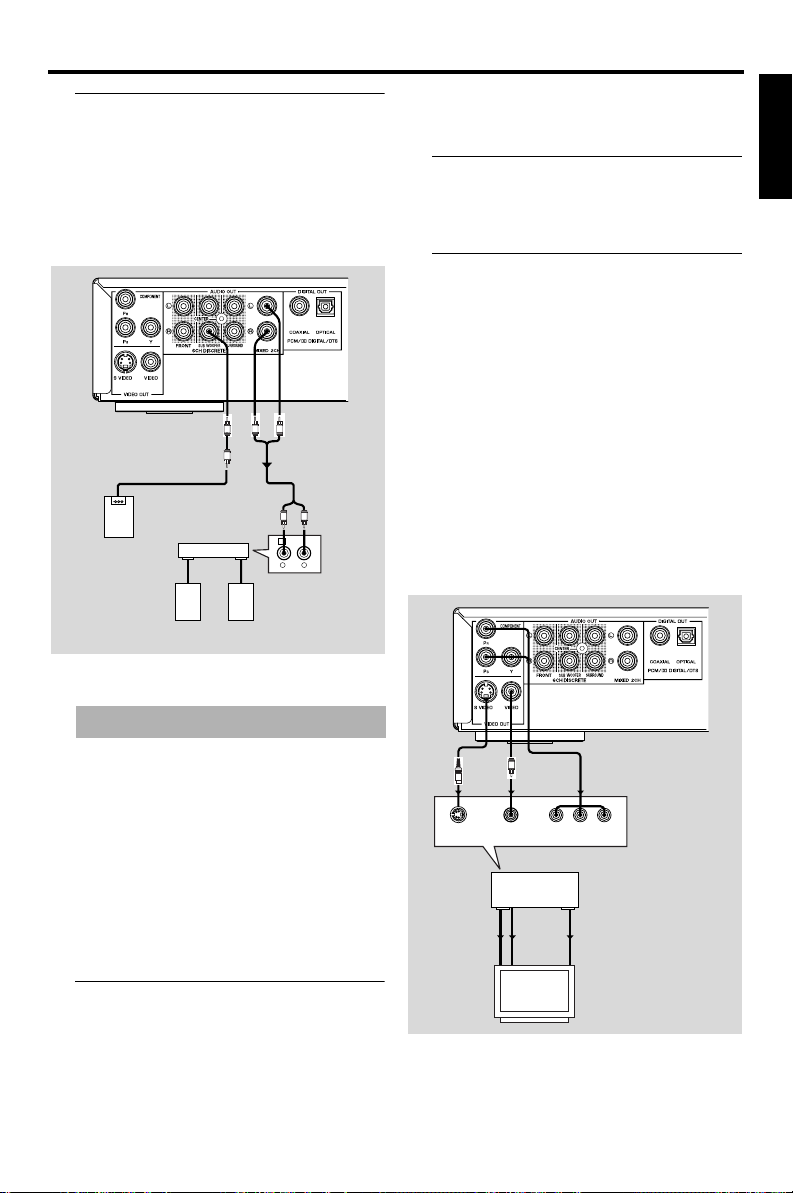
MIXED 2CH jacks
Use audio/video cable supplied with this
player to connect the L (left) and R (right)
jacks to corresponding input jacks of your
audio equipment such as Stereo amplifier.
You can connect a subwoofer to the
SUBWOOFER jack.
L
R
L
Right
speaker
R
1 CD/DVD
RL
Subwoofer
Left
speaker
Stereo
amplifier
Receiver (and TV) with S-video input is
required.
Composite Video terminal <B>
Use audio/video cable supplied with this
unit when connecting the player to a TV.
Component Video terminal <C>
Component video connection achieves
high fidelity in reproducing colors (better
performance than S-video connection),
separating video signal into luminance (Y,
terminal color-coded as green), and color
difference (Pb, blue/Pr, red). Use
commercially available coaxial cables.
Receiver (and TV) with component input is
required. Observe the color of each jack
when connecting. If your receiver does not
have component output jacks, connecting
the player’s component output directly to
your TV’s component input can reproduce
better video image.
English
Video Connections
If your AV receiver has video output jacks,
connect your receiver (and then to your
TV) so that you can use one TV for several
different video sources (LD, VCR etc.) by
simply switching the input source selector
of your receiver.
The player has three types of video output
jacks. Use one of them in accordance with
the input jacks of the equipment to be
connected.
S-Video terminal <A>
S (separate) video connection achieves a
clearer picture than composite video
connection by separating color and
luminance when transmitting signals. Use
commercially available S-video cable.
S
S VIDEO VIDEO
S VIDEO
OUT
S VIDEO
IN
V
<B><A> <C>
COMPONENT
VIDEO
AV receiver
COMPONENT
VIDEO OUT
COMPONENT
VIDEO IN
VIDEO
OUT
VIDEO
IN
YPB/CBPR/CR
7
Page 12

Getting Started
Step1: Inserting batteries into the Remote Control
3
1
2
2
1 Open the battery compartment.
2 Insert two batteries type R06 or AA,
following the indications (+ –) inside the
compartment.
3 Close the cover.
Using the remote control
Remote control
sensor
Point the remote control
at the sensor, within
approximately 6 m
(20 feet) of the unit.
30°
30°
Step2: Turning on the power
1 Connect the AC power cord to the power
outlet.
2 Turn on the TV and your AV receiver.
3 Select the appropriate input source at the
AV receiver that was used to connect to
this unit. Refer to the equipment owner’s
manual for detail.
4 Turn this unit on.
5 Set the TV to the correct Video IN
channel. (e.g. EXT1, EXT2, AV1, AV2,
AUDIO/VIDEO, etc. Refer to your TV
owner’s manual for detail)
➜ The front display lights up and the
default screen appears on the TV.
Step3: Selecting the color system that corresponds to your TV
This DVD Player is compatible with both
NTSC and PAL. Select the color system
that matches your TV.
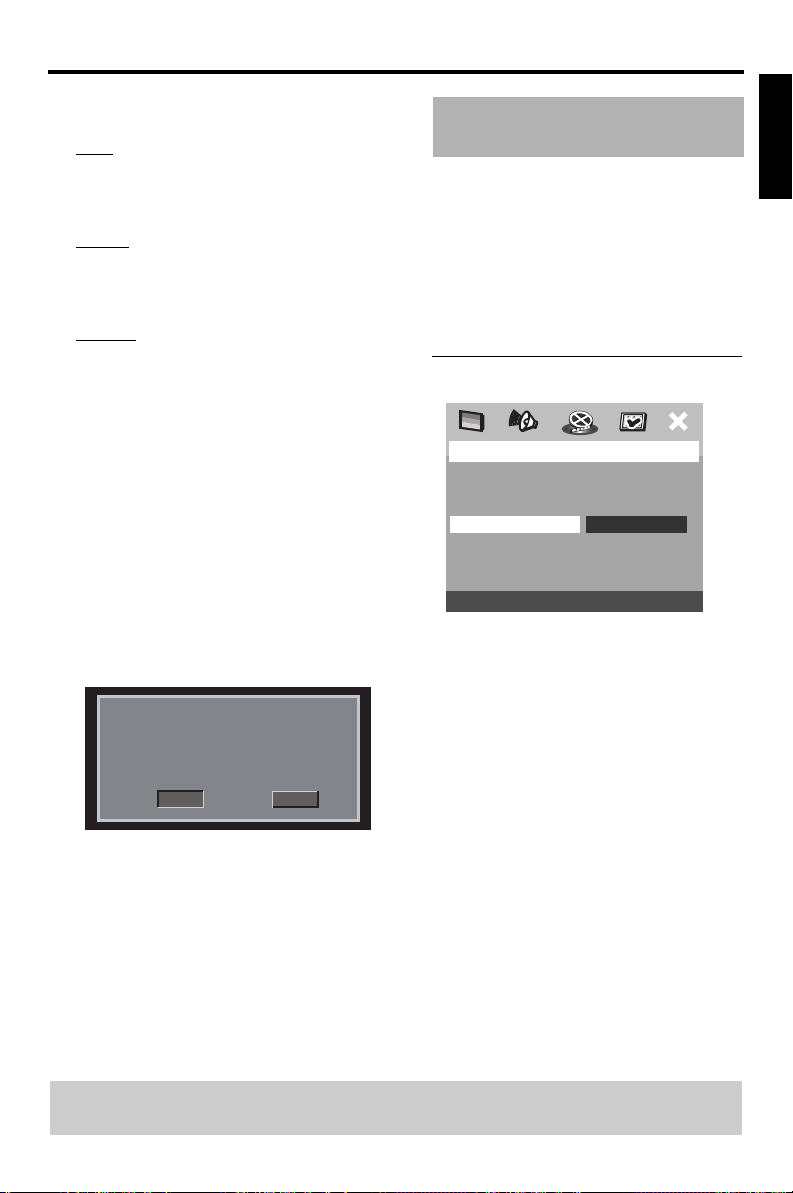
VIDEO SETUP PAGE
TV TYPE PAL
TV DISPLAY NTSC
PROGRESSIVE MULTI
PICTURE SETTING
BLACK LEVEL
CLOSED CAPTION
Handling the remote control
• Do not spill water or other liquids on
the remote control.
• Do not drop the remote control.
• Do not leave or store the remote
control in the following types of
conditions:
– high humidity such as near a bath
– high temperature such as near a heater
or stove
– extremely low temperature
– dusty places
8
1 Press SETUP.
2 Press 2 repeatedly to select {VIDEO
SETUP PAGE}.
3 Press 34 to highlight {TV TYPE}, then
press 2.
Page 13
Getting Started
4 Press 34 to highlight one of the options
below:
PAL
Select this if the connected TV is PAL
system. It will change the video signal of a
NTSC disc and output in PAL format.
NTSC
Select this if the connected TV is NTSC
system. It will change the video signal of a
PAL disc and output in NTSC format.
MULTI
Select this if the connected TV is
compatible with both NTSC and PAL
(multi-system). The output format will be
in accordance with the video signal of the
disc.
5 Select an item and press ENTER/OK.
Helpful Hint:
– Before changing the current TV
Standard setting, ensure that your TV
supports the ‘selected TV Type’
system.
– If there is not proper picture on your
TV, wait for 15 seconds for auto
recover.
CHANGING PAL TO NTSC
1. ENSURE THAT YOUR TV SYSTEM SUPPORTS
NTSC STANDARD.
2. IF THERE IS A DISTORTED PICTURE
DISPLAYED ON THE TV, WAIT 15 SECONDS
FOR AUTO RECOVER.
CANCELOK
Step4: Setting language preference
You can select your own preferred
language settings.This DVD Player will
automatically switch to the language for
you whenever you load a disc. If the
language selected is not available on the
disc, the disc’s default language will be used
instead. The OSD language in the system
menu, will remain once selected.
Setting the OSD Language
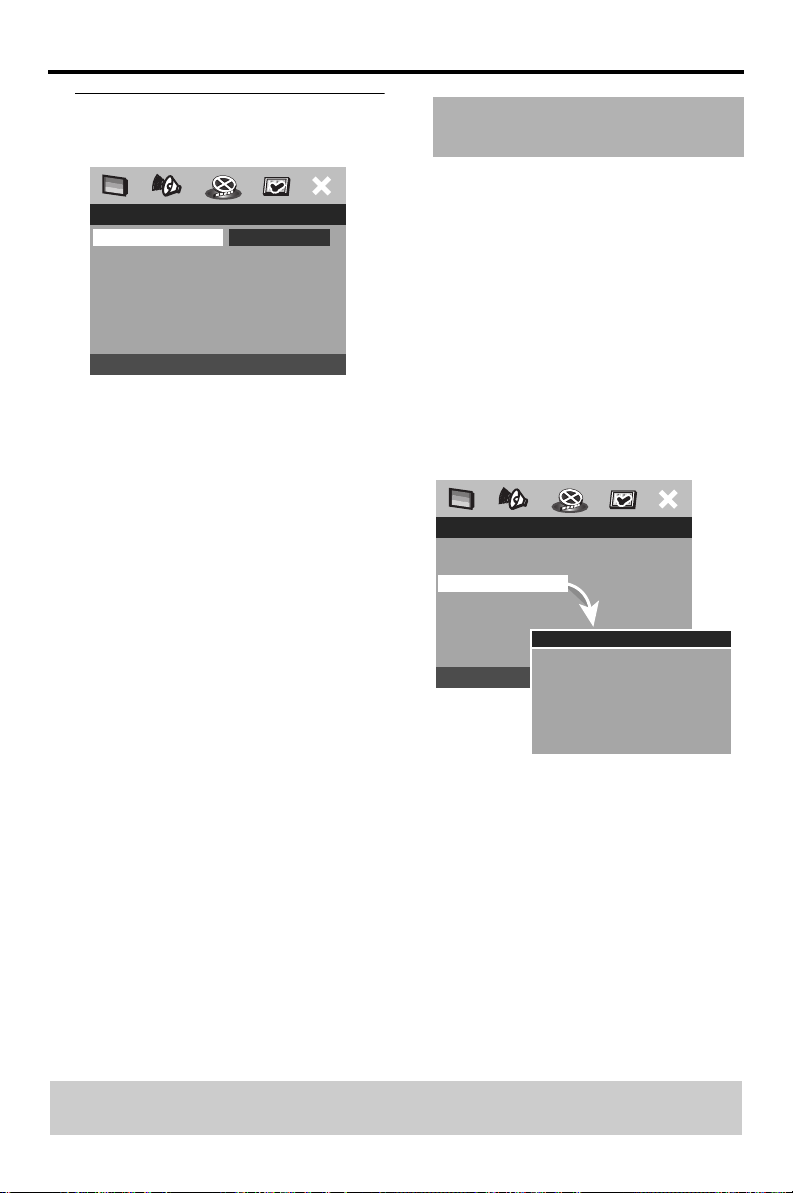
GENERAL SETUP PAGE
DVD-AUDIO
DISC LOCK
PROGRAM
OSD LANGUAGE ENGLISH
SCREEN SAVER FRANÇAIS
SLEEP ESPAÑOL
DIVX(R) VOD CODE
(U.S.A. model)
1 Press SETUP.
2 Press 1 2 to select {GENERAL SETUP
PAGE}.
3 Press 34 to highlight {OSD LANGUAGE},
then press 2.
4 Press 34 to select a language and press
ENTER/OK.
English
TIPS: To return to the previous menu, press 1.
To remove the menu, press SETUP.
9
Page 14
Getting Started
Setting the Audio, Subtitle and Disc menu language
PREFERENCE PAGE
AUDIO ENGLISH
SUBTITLE CHINESE(SIMP)
DISC MENU FRENCH
PARENTAL SPANISH
PBC PORTUGUESE
MP3/JPEG NAV POLISH
PASSWORD ITALIAN
DEFAULT TURKISH
1 Press STOP 9 twice, then press SETUP.
2 Press 2 repeatedly to select
{PREFERENCE PAGE}.
3 Press 34 to highlight one of the options
below at a time, then press 2.
– ‘AUDIO’ (disc’s soundtrack)
– ‘SUBTITLE’ (disc’s subtitles)
– ‘DISC MENU’ (disc’s menu)
4 Press 34 to select a language and press
ENTER/OK.
If the language you want is not in the
list, then select {OTHERS},
then use the numeric keypad (0-9) on
the remote to enter the 4-digit language
code (see page 30 “Language Code”) and
press ENTER/OK.
5 Repeat steps 3–4 for other language
settings.
Step5: Setting the speaker’s channels
You can adjust the delay times (center and
surround only) and volume level for
individual speakers. These adjustments let
you optimize the sound according to your
surroundings and setup.
IMPORTANT!
The speaker settings only available
on Multi-channel audio outputs.
1 Press SETUP.
2 Press 2 repeatedly to select {AUDIO
SETUP PAGE}.
3 Press 34 to highlight {SPEAKER SETUP},
then press 2.
AUDIO SETUP PAGE
ANALOG OUTPUT
DIGITAL AUDIO
SPEAKER SETUP
CD UPSAMPLING
NIGHT MODE
SPEAKER SETUP
FRONT SPEAKER
CENTER SPEAKER
SURROUND SP
SUBWOOFER
SPEAKERS VOLUME
SPEAKERS DELAY
4 Enter its submenu by pressing 2.
5 Press 34 to highlight one of the options
below at a time, then press 2.
TIPS: To return to the previous menu, press 1.
To remove the menu, press SETUP.
10
Page 15
Getting Started
{FRONT SPEAKER, CENTER
SPEAKER, SURROUND SP}
OFF
(only for CENTER and
SURROUND)
When no speaker is connected.
LARGE
When connected speakers can produce
low frequency signals below 120 Hz.
SMALL
When connected speakers cannot
produce low frequency signals below
120 Hz.
{SUBWOOFER}
ON
When a subwoofer is connected.
OFF
When no subwoofer is connected.
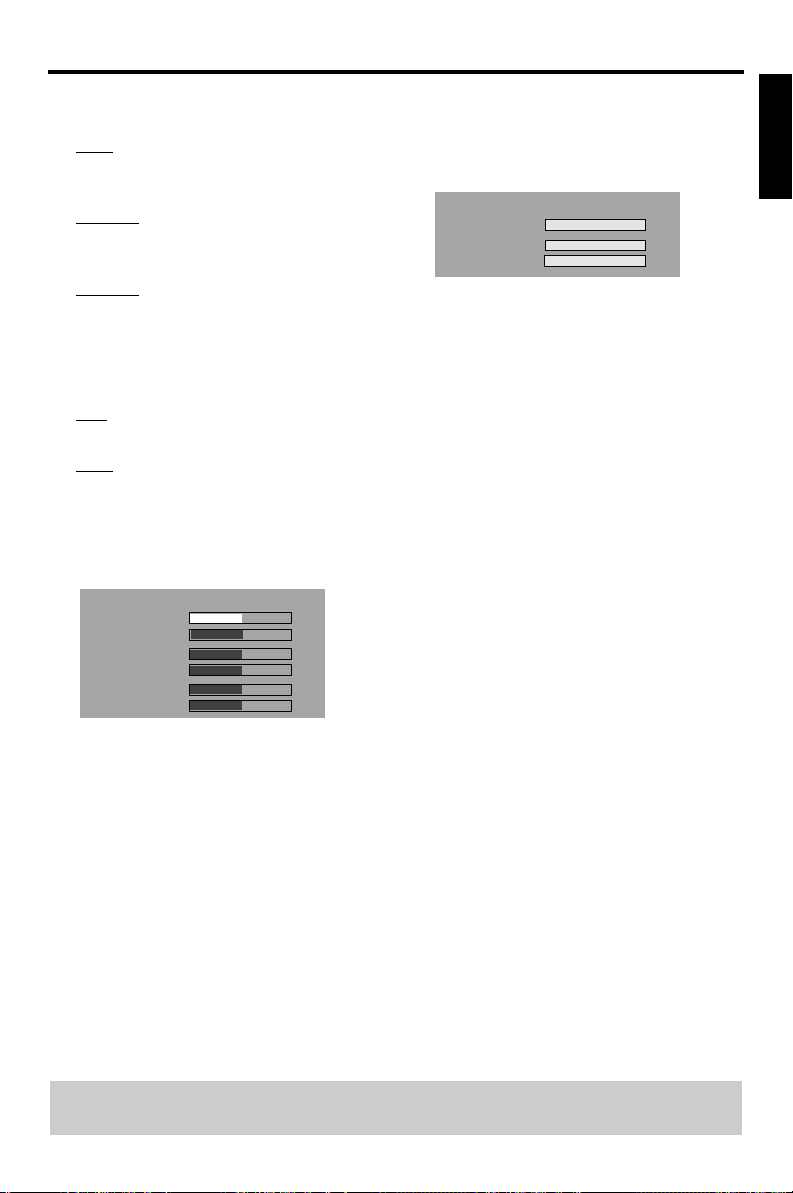
{SPEAKERS VOLUME}
Volume level setting for individual
speakers (–6 dB ~ +6 dB).
SPEAKERS VOLUME SETUP
FRONT LEFT
FRONT RIGHT
CENTER
SUBWOOFER
SURROUND L
SURROUND R
0dB
0dB
0dB
0dB
0dB
0dB
{SPEAKERS DELAY}
Delay times setting in relation to the
listening position/distance for center and
surround speakers (0 MS~15 MS).
SPEAKERS DELAY SETUP
CENTER
SURROUND L
SURROUND R
0 MS
0 MS
0 MS
6 Press 1 2 to adjust the setting that best
suit your surround sound needs.
7 Press ENTER/OK to confirm.
Helpful Hints:
– Use the longer delay time settings when the
surround speakers are closer to the listener
than the front speakers.
– The test tone will be automatically
generated to help you judge the sound level
of each speaker.
English
TIPS: To return to the previous menu, press 1.
To remove the menu, press SETUP.
11
Page 16
Disc Operations
IMPORTANT!
– If the inhibit icon ( or X) appears
on the TV screen when a button is
pressed, it means the function is
not available on the current disc or
at the current time.
– Depending on the DVD or VIDEO
CD, some operations may be
different or restricted.
– Do not push on the disc tray or put
any objects other than disc on the
disc tray. Doing so may cause the
disc player malfunction.
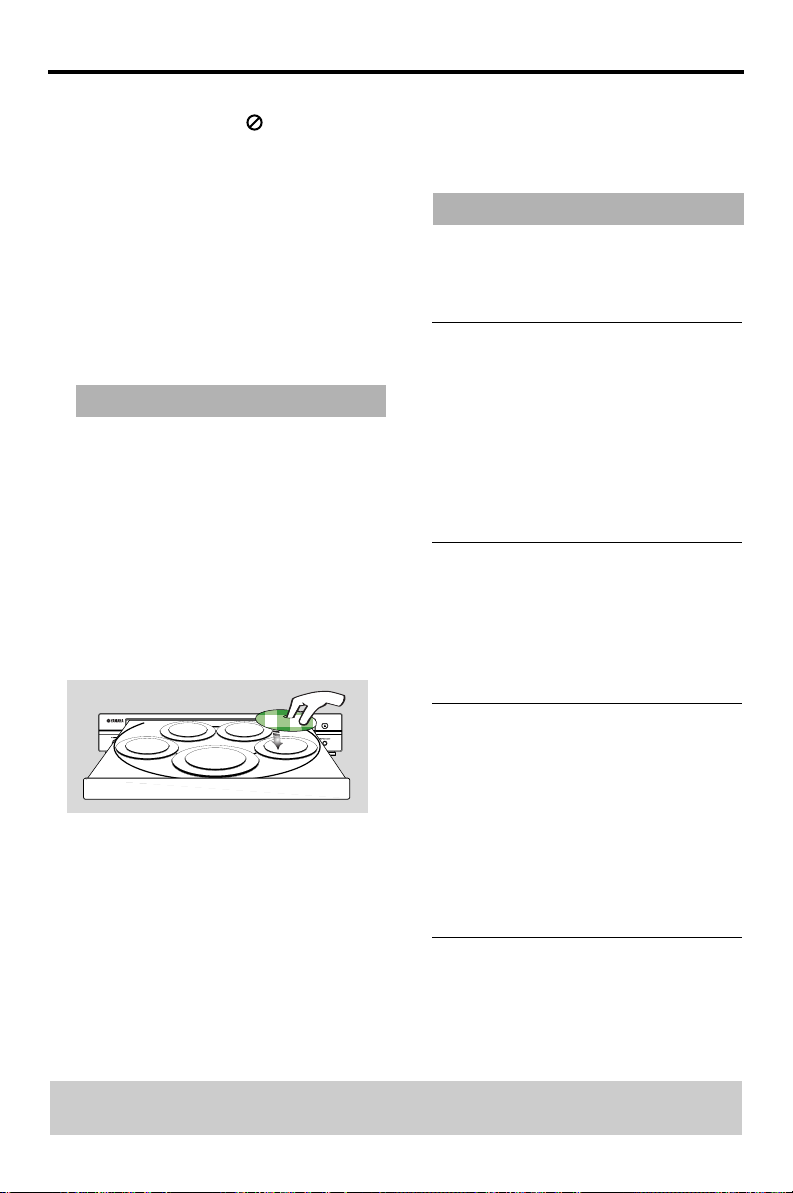
Basic Playback
1 Press STANDBY/ON on the front panel.
2 Press OPEN/CLOSE / on the front
panel to open disc loading tray.
3 Place the chosen discs in the tray, with the
label facing up.
4 Press PLAY B.
➜ The disc tray closes and playback starts
automatically with all the loaded discs
on the tray in sequence.
5 To stop playback, press STOP 9.
• When the disc tray is open, pressing
PLAY B, OPEN/CLOSE /,
PLAYXCHANGE, DISC (1, 2, 3, 4,
5) will close the disc tray automatically.
General Operation
Unless otherwise stated, all operations
described are based on Remote Control
use.
Pausing playback
1 During playback, press PAUSE ;.
➜ Playback will pause and sound will be
muted.
2 Press PAUSE ; again to select the next
picture frame.
3 To resume normal playback, press
PLAY B.
Selecting track/chapter
• Press S / T or use the numeric
keypad (0-9) to key in a track/chapter
number.
➜ If repeat mode is active, pressing S /
T will replay the same track/chapter.
Searching backward/forward
• Press and hold S / T, then press
PLAY B to resume normal playback.
➜ While searching, pressing S / T
again will increase the search speed.
• To playback a specific disc directly,
press DISC SKIP repeatedly on the
remote control or one of the DISC (1,
2, 3, 4, 5) on the front panel.
• Press PLAYXCHANGE on the front
panel to open the disc tray and reload
or unload any discs without interrupting
current disc playback.
• Playback will stop after all discs have
been played.
TIPS: The operating features described here might not be possible for certain discs. Always refer to
the instructions supplied with the discs.
12
Note:
– For MP3, WMA, DivX
function allows you to search within the
currently playing track.
®
, the search
Stopping playback
• Press STOP 9.
Page 17
Disc Operations
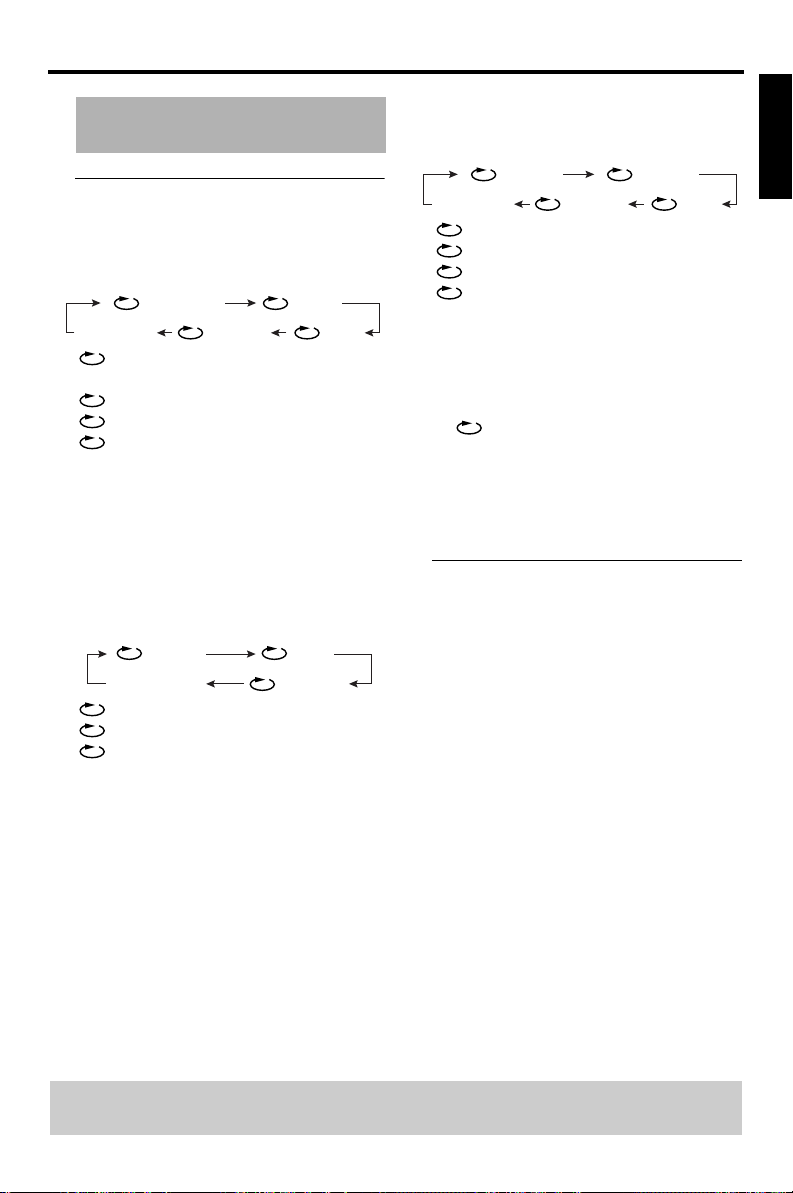
Selecting various repeat/shuffle functions
Repeat
Repeat chapter/title/disc (DVD-V)
Each time you press REPEAT, the front
display changes as follows;
CHAPTER TITLE
DISC ALL DISCREPEAT OFF
CHAPTER*: repeat the current
chapter
TITLE: repeat the current title
DISC*: repeat the entire disc
ALL DISC: repeat all discs loaded on
the tray
REPEAT OFF: exit repeat mode
* This feature may not be available with some
discs.
Repeat track/disc (except DVD-V/
DVD-A)
Each time you press REPEAT, the front
display changes as follows;
TRACK DISC
REPEAT OFF ALL DISC
TRACK: repeat the current track
DISC: repeat the entire disc
ALL DISC: repeat all discs loaded on
the tray
REPEAT OFF: exit repeat mode
Repeat track/group/disc (DVD-A)
Each time you press REPEAT, the front
display changes as follows;
TRACK GROUP
DISC ALL DISCREPEAT OFF
TRACK: repeat the current track
GROUP: repeat the current group
DISC: repeat the entire disc
ALL DISC: repeat all discs loaded on
the tray
REPEAT OFF: exit repeat mode
Note:
– When only one disc is available on the disc
tray, continuous playback will apply when
ALL DISC is selected.
Helpful Hint:
– For VCD, repeat playback is not possible if
the PBC mode is switched on.
Repeating a section within a chapter/track
1 While playing a disc, press A-B at your
chosen starting point.
2 Press A-B again at your chosen end point.
➜ The section A and B can be set only
within the same chapter/track.
➜ The section will now repeat
continuously.
3 To exit the sequence, press A-B.
English
TIPS: The operating features described here might not be possible for certain discs. Always refer to
the instructions supplied with the discs.
13
Page 18

Disc Operations
Shuffle (not for DVD/VCD/ SVCD)
With the Shuffle function, you can play
tracks in random order.
1 During playback, press SHUFFLE
repeatedly to select SHUFFLE DISC,
SHUFFLE ALL DISC, or SHUFFLE OFF.
➜ The selected mode appears on the
display for several seconds.
• In SHUFFLE DISC mode, all tracks on
the disc currently playing are played in
random order. For Hybrid SA-CDs,
tracks on the SA-CD layer are played by
default (see page 18).
• In SHUFFLE ALL DISC, tracks from all
discs are played in random order:
– If the disc currently playing is a CD, only
tracks from CDs and the CD layer of
SA-CDs will be played.
– If the disc currently playing is in SA-CD
(SA-CD layer), MP3, WMA, DivX
tracks on the disc currently playing are
played in random order. When all the
tracks on that disc have been played,
shuffle playback continues with the next
disc.
Operations for video playback (DVD/VCD/SVCD)
Using the Disc Menu
Depending on the disc, a menu may appear
on the TV screen once you load in the disc.
To select a playback feature or item
• Use 1 234 or numeric keypad
(0-9) on the remote, then press
ENTER/OK to start playback.
To access or remove the menu
• Press MENU on the remote.
Zooming in
This function allows you to enlarge the
picture on the TV screen and to pan
through the enlarged picture.
®
1 During playback, press ZOOM repeatedly
,
to display the picture with different scales.
➜ Use 1 234 to pan through the
enlarged picture.
➜ Playback will continue.
2 Press ZOOM repeatedly to return to the
original size.
Resuming playback from the last stopped point
Resume playback of the last 10 discs is
possible, even if the disc was ejected or the
power switched off.
• Load one of the last 10 discs.
➜ “LOADING” appears.
• Press PLAY B and the disc will be
played back from the last point.
To cancel resume mode
• In stop mode, press STOP 9 again.
TIPS: The operating features described here might not be possible for certain discs. Always refer to
the instructions supplied with the discs.
14
Page 19
Disc Operations
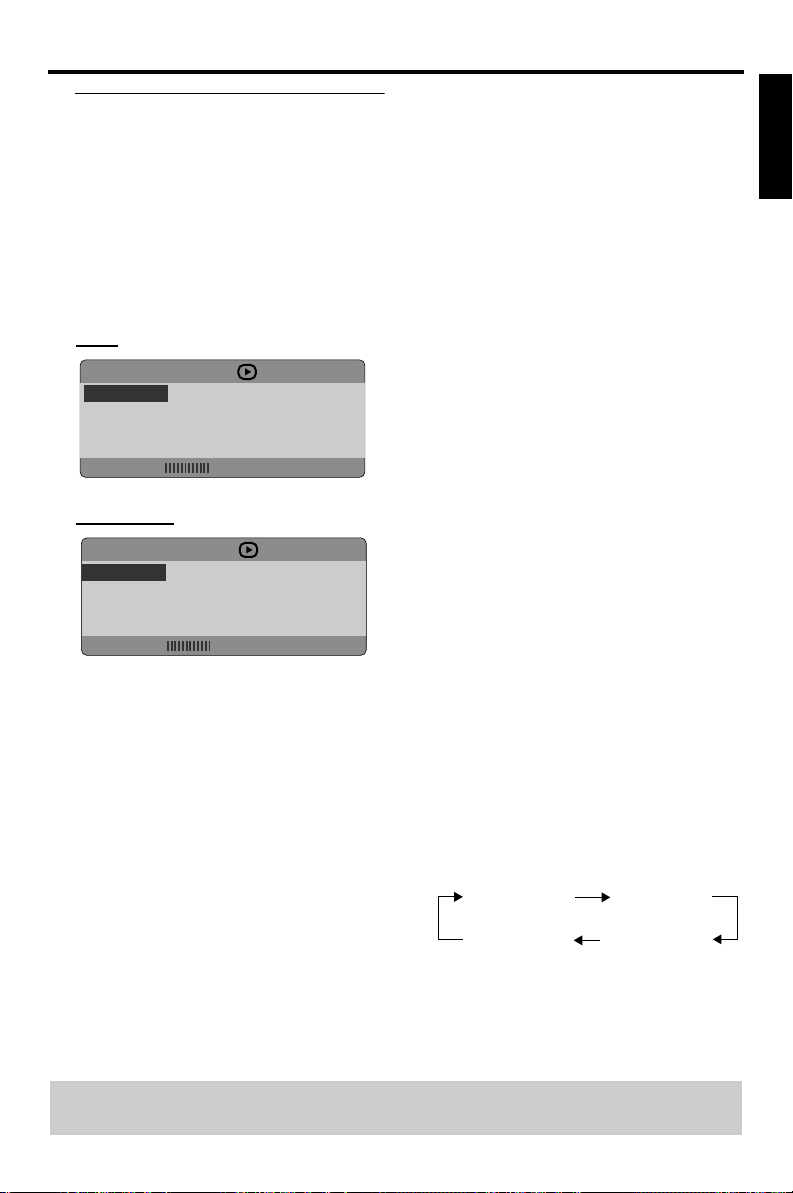
On-Screen Display (OSD)
OSD menu shows the disc playback
information (for example, title or chapter
number, elapsed playing time, audio/
subtitle language), a number of operations
can be done without interrupting disc
playback.
1 During playback, press ON SCREEN.
➜ A list of available disc information
appears on the TV screen.
DVD
MENU
TITLE 02/14
CHAPTER 02/14
AUDIO 5.1CH
SUBTITLE ENG
BITRATE
VCD/SVCD
MENU
TRACK 02/14
DISC TIME 0:49:17
TRACK TIME 0:03:43
REPEAT OFF
BITRATE
2 Press 34 to view the information and
press ENTER/OK to access.
3 Use the numeric keypad (0-9) to input
the number/time or press
selection, then press ENTER/OK to
confirm.
➜ Playback will change to the chosen time
or to the selected title/chapter/track.
Title/Chapter/Track selection (DVD/
VCD)
1 Press 34 to select {TITLE} or
{CHAPTER} (DVD) or {TRACK} (VCD).
2 Press ENTER/OK.
3 Select a title, chapter or track number
using the numeric buttons.
34 to make the
Time Search (DVD/VCD)
1 Press 34 to select {TT TIME} or {CH
TIME} (DVD) or {TRACK TIME} or {DISC
TIME} (VCD).
➜ {TT TIME} refers to the total time of the
current title, and the {CH TIME} refers
to the total time of the current chapter.
2 Press ENTER/OK.
3 Enter hours, minutes and seconds from left
to right using the numeric buttons. (e.g.
0:34:27)
Audio/Subtitle/Angle (DVD)
You can change {AUDIO}, {SUBTITLE} or
{ANGLE} if available on the disc you are
playing.
1 Press 34 to select {AUDIO}, {SUBTITLE}
or {ANGLE}.
2 Press ENTER/OK.
3 For Audio and Subtitle,
Press 34 to highlight your selection and
press ENTER/OK.
or
For Angle,
Select an angle using the numeric buttons.
Repeat/Time Display (DVD/VCD)
1 Press 34 to select {REPEAT} or {TIME
DISP.}.
2 Press ENTER/OK.
3 Press 34 to highlight your selection and
press ENTER/OK.
Time display (CD)
Each time you press ON SCREEN, the
time display changes as follows;
TOTAL ELAPSED TOTAL REMAIN
SINGLE REMAIN SINGLE ELAPSED
English
TIPS: The operating features described here might not be possible for certain discs. Always refer to
the instructions supplied with the discs.
15
Page 20
Disc Operations
Special DVD Features
Playing a Title
1 Press MENU.
➜ The disc title menu appears on the TV
screen.
2 Use 1 234 or numeric keypad (0-9)
to select a play option.
3 Press ENTER/OK to confirm.
Camera Angle
• Press ANGLE repeatedly to select
different desired angle.
Audio
Changing the Audio Language and/or
format
• Press AUDIO repeatedly to select
different audio languages.
Subtitles
• Press SUBTITLE repeatedly to select
different subtitle languages.
Special VCD & SVCD Features
Playback Control (PBC)
For VCD with Playback Control
(PBC) feature (version 2.0 only)
• Press MENU to toggle between ‘PBC
ON’ and ‘PBC OFF’.
➜ If you select ‘PBC ON’, the disc menu (if
available) will appear on the TV.
➜ Use the S / T or the numeric
keypad (0-9) to select a play option.
• During playback, pressing TOP
MENU/RETURN will return to the
menu screen (if PBC is on).
If you want to skip the index menu
and playback directly from the
beginning,
• Press MENU on the remote control to
switch to PBC off.
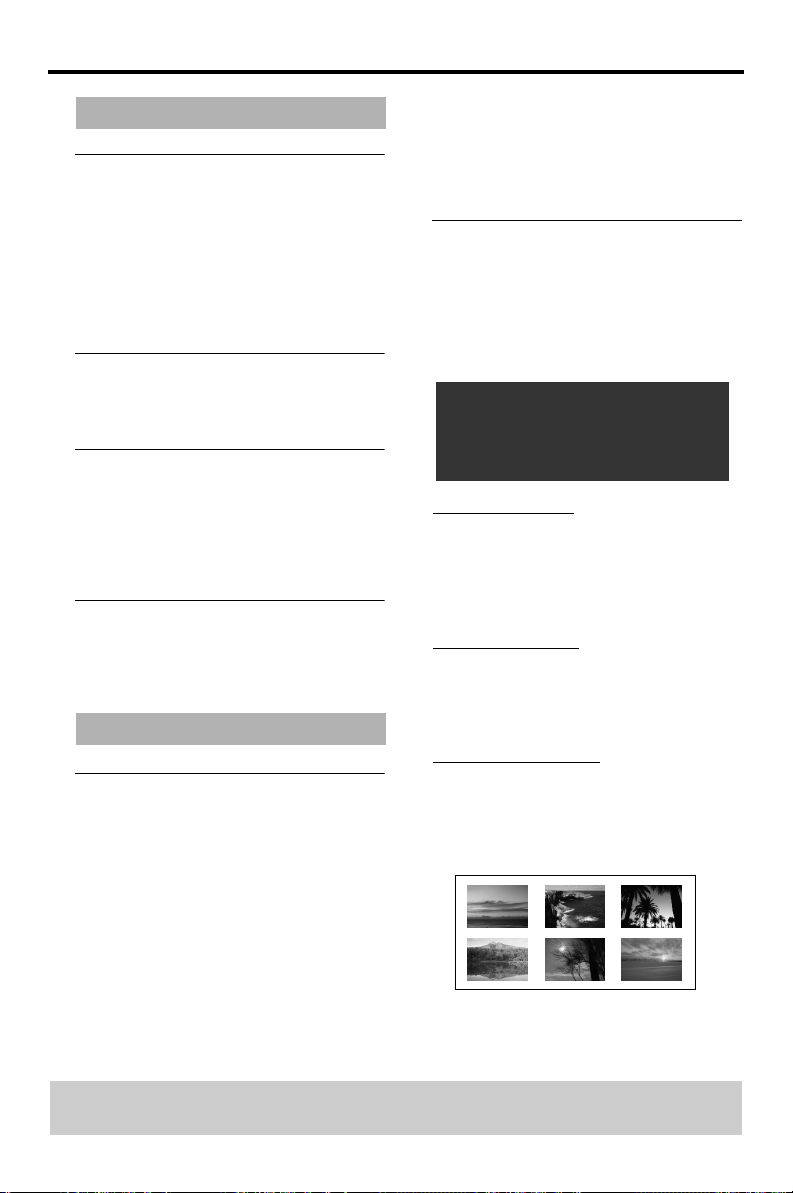
Preview Function
1 Press SCAN.
2 Press 34 to highlight {TRACK DIGEST},
{DISC INTERVAL} or {TRACK
INTERVAL}.
3 Press ENTER/OK to open one option.
SELECT DIGEST TYPE:
TRACK DIGEST
DISC INTERVAL
TRACK INTERVAL
TRACK DIGEST
This function will minimize the picture of
every track in order to display every six of
these tracks on the screen to help you
know the content of every track on the
disc.
DISC INTERVAL
This function is used to divide a disc into
six parts by regular intervals and display
them on one page to preview the whole
disc.
TRACK INTERVAL
This function is used to divide a single track
into six parts by regular intervals and
display them on one page to help you
preview the selected track.
(example for 6 thumbnail pictures display)
TIPS: The operating features described here might not be possible for certain discs. Always refer to
the instructions supplied with the discs.
16
Page 21

Disc Operations
4 Use 1 234 to select a track or use
numeric keypad (0-9) to input the
selected track number next to {SELECT}.
5 Press S / T to open the previous or
next page.
6 Press ENTER/OK to confirm.
To quit preview function
• Use 1 234 to highlight {EXIT} and
press ENTER/OK to confirm.
To return to preview menu
• Use 1 234 to highlight {MENU} and
press ENTER/OK to confirm.
For CD
• At stop mode, press SCAN on the
remote control.
➜ Each track will be played for a few
seconds.
DVD-Audio features
The DVD-Audio is developed for the sole
purpose of creating high quality pure
sound with Linear PCM and Packed PCM
(Lossless coding) in up to six audiochannels. The sampling frequency of
192 kHz/24 bits are supported.
Moreover, many DVD-Audio discs offer
slide show and page turn capabilities.
• When you play a down mix prohibited
disc, NO DOWN MIX lights on the
front panel display, and DOWN MIX
indicator turns off.
Playing bonus groups
Some discs contain bonus groups that
require a four-digit password to gain
access. In this case, consult the disc jacket
and other packaging for information.
1 While playback is stopped, press ON
SCREEN twice.
➜ The group and track list is displayed on
the TV screen.
2 Press 34 to select a bonus group, then
press ENTER/OK.
3 Enter a four-digit password using the
numeric keypad (0-9), then press
ENTER/OK.
4 Press 34 to select a track, then press
ENTER/OK.
DVD-Video Mode
Some DVD-Audio discs include DVDVideo contents that can be played on
conventional DVD-Video players (see
page 21 “Selecting DVD-Audio/Video
mode”).
English
Changing pages
Some DVD-Audio discs contain
information pages that can include photo
galleries, artist biographies, lyrics, etc.
Every time you press the PAGE button on
the remote control, the page is turned to
the next.
TIPS: The operating features described here might not be possible for certain discs. Always refer to
the instructions supplied with the discs.
17
Page 22
Disc Operations
SA-CD (Super Audio CD)
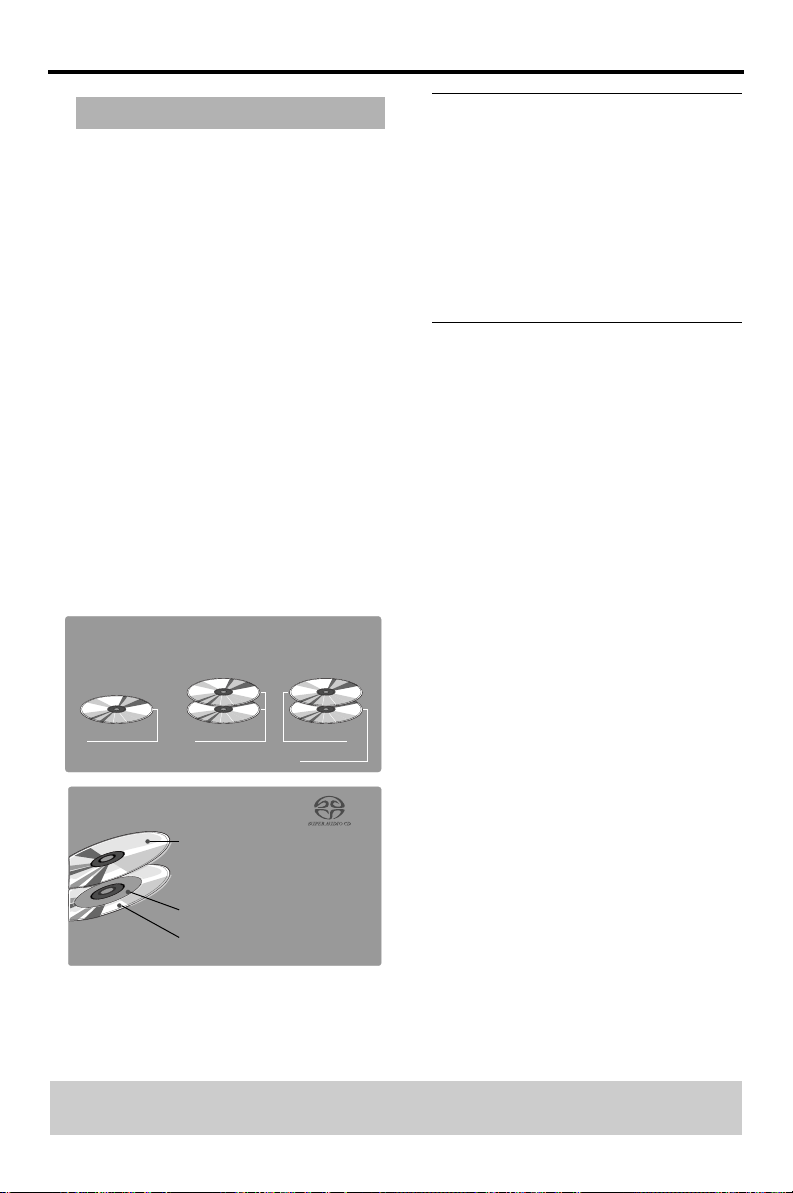
The SA-CD standard is based on Direct
Stream Digital (DSD) technology. This
new direct-stream digital format
comprises a 1-bit system that has a digital
sampling frequency that is 64 times higher
than that of conventional audio CD.
There are three types of SA-CD discs:
single-layer, dual-layer and hybrid discs.
Each type may contain two areas of
recorded information: a High Quality
Stereo area and a High Quality Multichannel area.
–A single layer disc can contain both
information areas.
–A dual layer disc can contain both
information areas. Double the
information can be stored on the disc,
thanks to the second layer.
–A hybrid disc can contain both
information areas, and also a second,
standard CD layer, making it playable on
standard CD players.
SA-CD Disc Types
Single layer disc
HD layer
Dual layer disc
Hybrid SA-CD-Disc
1
CD layer that plays on any CD
player
High Density layer containing:
2
- High Quality DSD Stereo
- High Quality DSD Multi-
3
channel
HD layer
Hybrid layer
disc
CD layer
HD layer
Playing a disc
1 Load a disc.
Playback starts automatically.
➜ The TV screen will display the current
playing status and current playing track
list in the area.
2 Playback will stop at the end of the disc.
3 To stop playback, press STOP 9.
Changing SA-CD playback area and layer
You can change the SA-CD playback area
by pressing the SOUND MODE button,
and change the playback layer by pressing
the AUDIO button.
• On hybrid discs (with SA-CD and CD
layers), the player will always start
playing the SA-CD layer (multi channel
area).
• You can change between SA-CD multi
channel and SA-CD stereo area by
pressing SOUND MODE (depending
on availability of the mode on the disc).
or
1 Press 1 and select the folder using
34, then Press ENTER/OK.
2 Press 34 to select a track.
3 Press ENTER/OK to confirm.
• To switch between the SA-CD layer
and the CD layer, press the AUDIO
button while playback is stopped.
• The SA-CD indicator lights only when
the SA-CD layer is selected.
Notes:
– SA-CD Text is not supported.
– You can not change the Analog output
setting during SA-CD playback (see
page 24 “Audio Setup Menu”).
TIPS: The operating features described here might not be possible for certain discs. Always refer to
the instructions supplied with the discs.
18
Page 23
Disc Operations
Audio CD
Playing a disc
1 Load a disc.
➜ Playback starts automatically.
➜ The TV screen will display the number
of tracks for selection and current
playing status.
2 Playback will stop at the end of the disc.
3 To stop playback, press STOP 9.
Playing MP3/DivX/JPEG/Kodak Picture CD
General Operation
1 Load a disc.
➜ The disc reading time may exceed 30
seconds due to the complexity of the
directory/file configuration.
➜ The data disc menu appears on the TV
screen.
2 Playback will start automatically. If not
press PLAY B.
During playback, you can;
• Press S / T to select another
track/file in the current folder.
• Press PAUSE ; to pause playback.
Helpful Hint:
– It may not be possible to play certain MP3/
JPEG/DivX disc due to the configuration
and characteristics of the disc or condition
of the recording.
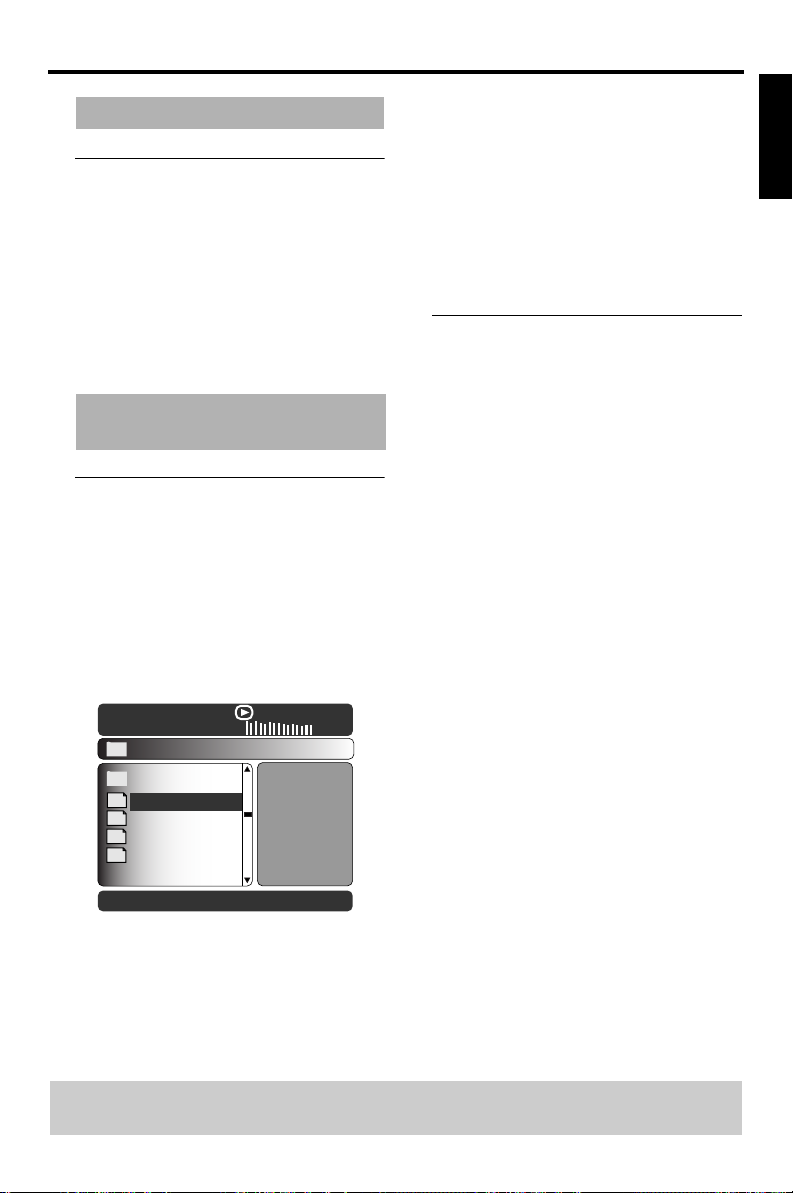
Selecting a folder and track/file
1 Press 34 to select the folder and press
ENTER/OK to open the folder.
2 Press 34 to select a track/file.
3 Press ENTER/OK to confirm.
➜ Playback will start from the selected file
to the end of the folder.
English
00:00 00:00
001/020
Favorite
MP3
Piano
Cello
MP3
MP3
Jazz
MP3
Live
TIPS: The operating features described here might not be possible for certain discs. Always refer to
the instructions supplied with the discs.
19
Page 24
Disc Operations
Special picture disc features
1 Load a Picture disc (Kodak Picture CD,
JPEG).
➜ For Kodak disc, the slide show will
begin.
➜ For JPEG disc, the picture menu appears
on the TV screen.
2 Press PLAY B to start the slide-show
playback.
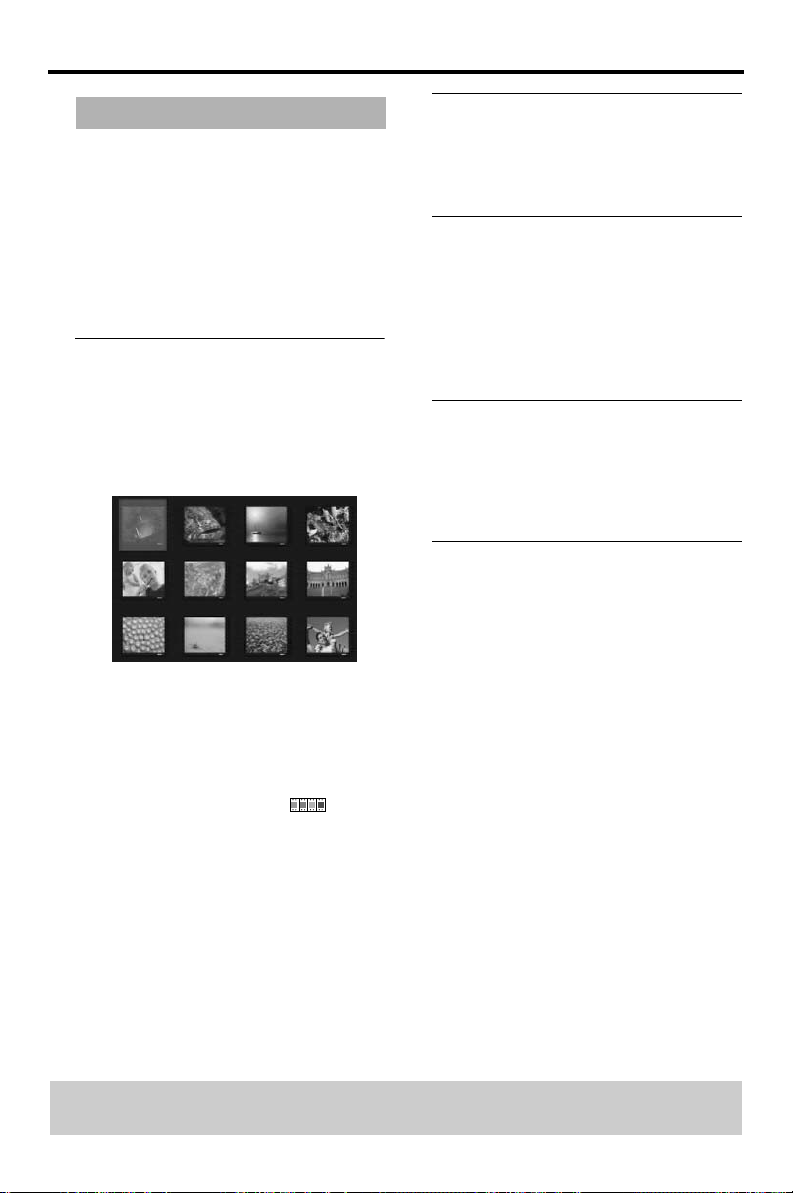
Preview Function (JPEG)
This function shows the content of the
current folder or the whole disc.
1 Press STOP 9 during playback.
➜ 12 thumbnail pictures will appear on the
TV screen.
2 Press S / T to display the other
pictures on the previous/next page.
3 Use 1 234 to highlight one of the picture
and press ENTER/OK to start playback
OR
Move the cursor to highlight on the
bottom of the page to start playback from
the first picture on the current page.
4 Press MENU to return to Picture CD
menu.
Zoom picture
1 During playback, press ZOOM repeatedly
to display the picture with different scales.
2 Use 1 234 to view the zoomed picture.
Playback with multi-angles
• During playback, press 1 234 to
rotate the picture on the TV screen.
1: rotate the picture anti-clockwise
2: rotate the picture clockwise
3: flip the picture vertically
4: flip the picture horizontally
Scan Effect
• Press ANGLE repeatedly to choose
different scan effect.
➜ Various of scan effect appears on the
top left hand corner on the TV screen.
Playing MP3 music and JPEG picture simultaneously
1 Load a disc that contains music and
picture.
➜ The disc menu appears on the TV
screen.
2 Select an MP3 track.
3 During MP3 music playback, select a
picture from the TV screen and press
PLAY B.
➜ The picture files will be played back one
after another until end of the folder.
4 To quit simultaneous playback, press
MENU followed by STOP 9.
Helpful Hint:
– Some files on Kodak or JPEG disc may be
distorted during playback due to the
configuration and characteristics of the disc.
TIPS: The operating features described here might not be possible for certain discs. Always refer to
the instructions supplied with the discs.
20
Page 25
Setup Menu
The setup is carried out via the TV,
enabling you to customize the DVD Player
to suit your particular requirements.
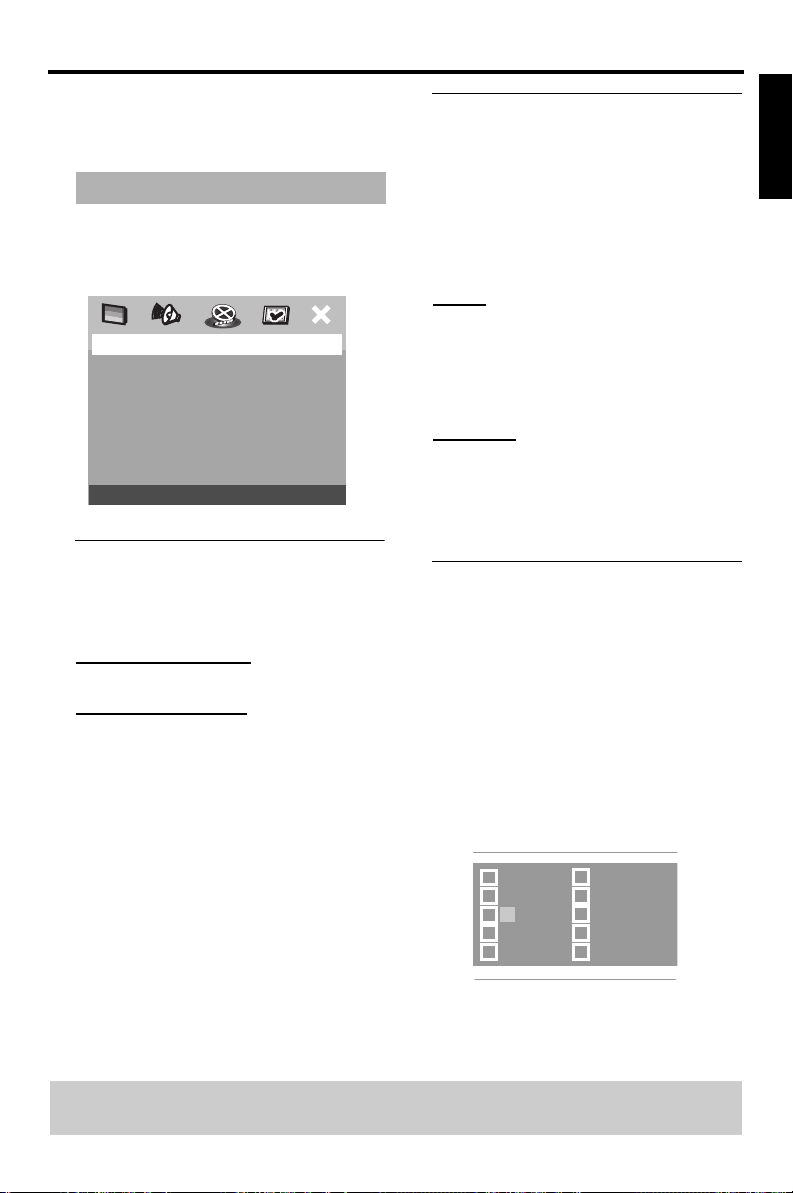
General Setup menu
1 Press SETUP.
2 Press 1 2 to select ‘General Setup’ icon.
3 Press ENTER/OK to confirm.
GENERAL SETUP PAGE
DVD-AUDIO
DISC LOCK
PROGRAM
OSD LANGUAGE
SCREEN SAVER
SLEEP
DIVX(R) VOD CODE
Selecting DVD-Audio/Video mode
1 In ‘GENERAL SETUP PAGE’, press 34 to
highlight {DVD-AUDIO}, then press 2.
DVD-AUDIO MODE
Select this for normal playback.
DVD-VIDEO MODE
Select this to playback the DVD-Video
contents.
2 Press 34 to select a setting, then press
ENTER/OK to confirm your selection.
Notes:
– The DVD-AUDIO indicator lights up when a
DVD-Audio disc is playing.
– When you select DVD-VIDEO MODE, the
DVD-AUDIO indicator turns off.
Locking/Unlocking the disc for viewing
Not all discs are rated or coded by the disc
maker. You can prevent a specific disc
from playing by locking the disc. Up to 40
discs can be locked.
1 In ‘GENERAL SETUP PAGE’, press 34 to
highlight {DISC LOCK}, then press 2.
LOCK
Select this to block the playback of the
current disc. Subsequent access to a
locked disc requires six-digit password.
The default password is ‘000 000’ (see
page 29 “Changing the Password”).
UNLOCK
Select this to unlock the disc and allow
future playback.
2 Press 34 to select a setting, then press
ENTER/OK to confirm your selection.
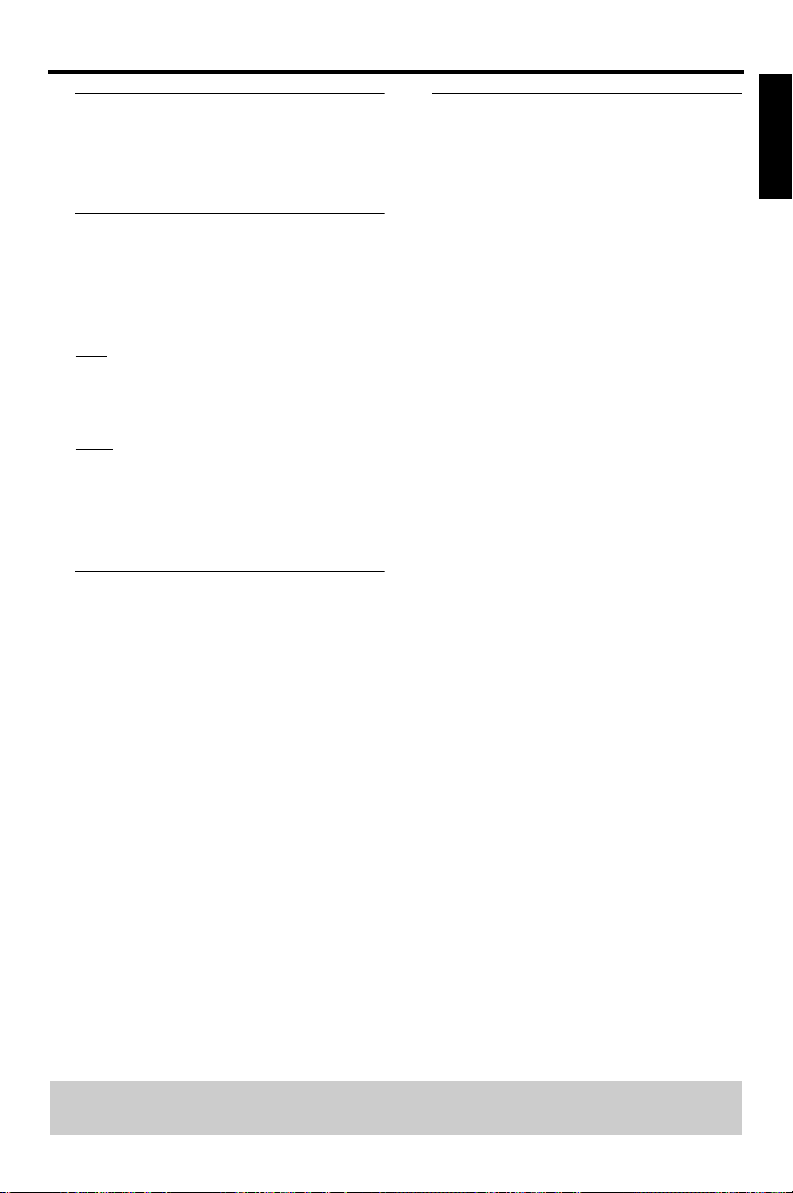
Programming disc tracks and discs
Program: Track (not for Picture
CD/MP3/SA-CD/WMA/DivX®)
You can play the contents of the disc in the
order you want by programming the tracks
to be played. Up to 20 tracks can be
stored.
1 In ‘GENERAL SETUP PAGE’, press 34 to
highlight {PROGRAM}, then press 2 to
select {FTS}.
2 Press ENTER/OK to confirm.
1 04
2 10
3 11
4 __
5 __
6 __
7 __
8 __
9 __
10 __
English
TIPS: To return to the previous menu, press 1.
To remove the menu, press SETUP.
21
Page 26

Setup Menu
To input your favorite tracks/chapter
3 Use the numeric keypad (0-9) to enter
a valid track/chapter number.
4 Use 1 234 to move the cursor to the
next position.
➜ If the track number is more than ten,
press T to open the next page and
proceed with programming or,
➜ Use 1 234 to highlight {NEXT} on the
program menu, then press ENTER/
OK.
5 Repeat steps 3–4
to input another track/
chapter number.
If you want to remove a track
6 Use 1 234 to move the cursor to the
track you want to remove.
7 Press ENTER/OK to remove this track
from the program menu.
Note:
– On SA-CD discs, you can program tracks on
the CD layer.
Program: Disc
You can play the disc in the order you
want by programming the discs to be
played. Up to 5 discs can be stored.
1 In ‘GENERAL SETUP PAGE’, press 34 to
highlight {PROGRAM}, then press 2 to
select {FDS}.
2 Press ENTER/OK to confirm.
To input your favorite discs
3 Use the numeric keypad (0-9) to enter
a valid disc number.
4 Use 1 234 to move the cursor to the
next position.
5 Repeat steps 3–4
to input another disc
number.
If you want to remove a disc
6 Use 1 234 to move the cursor to the
disc you want to remove.
7 Use the numeric keypad (0-9), press 0
to remove this disc from the program
menu.
To start program playback
• Use 1 234 to highlight {START} on
the program menu, then press ENTER/
OK.
➜ Playback will start with the selected
tracks or discs under the programmed
sequence.
To exit program playback
• Use 1 234 to highlight {EXIT} on the
program menu, then press ENTER/
OK.
(1) Disc : _
(2) Disc : _
(3) Disc : _
(4) Disc : _
(5) Disc : _
TIPS: To return to the previous menu, press 1.
To remove the menu, press SETUP.
22
Page 27
Setup Menu
OSD Language
This menu contains various language
options for display language on the screen.
For details, see page 9.
Screen Saver
This function is used to turn the screen
saver on or off.
1 In ‘GENERAL SETUP PAGE’, press 34 to
highlight {SCREEN SAVER}, then press 2.
ON
Select this if you wish to turn off the TV
screen when disc playback is stopped or
paused for more than 15 minutes.
OFF
Select this to disable the screen saver
function.
2 Press 34 to select a setting, then press
ENTER/OK to confirm your selection.
Sleep Timer
This feature automatically sets the DVD
player in standby mode after the amount of
time you have set.
1 In ‘GENERAL SETUP PAGE’, press 34 to
highlight {SLEEP}, then press 2.
2 Press 34 to select a setting.
➜ You can select from 15, 30, 45 and 60
minutes. Select {OFF} to cancel the
sleep timer function.
3 Press ENTER/OK to confirm your
selection.
DivX® VOD registration code
Yamaha provide you with the DivX® VOD
(Video On Demand) registration code that
allows you to rent and purchase videos
using the DivX
For more information, visit at
www.divx.com/vod.
1 In ‘GENERAL SETUP PAGE’, press 34 to
highlight {DIVX(R) VOD CODE}, then
press 2.
➜ The registration code will appear.
2 Press ENTER/OK to exit.
3 Use the registration code to purchase or
rent the videos from DivX
at www.divx.com/vod. Follow the
instructions and download the video onto
a CD-R for playback on this DVD player.
Helpful Hints:
– All the downloaded videos from DivX
VOD can only be played back on this DVD
player.
– Time search feature is not available during
DivX movie playback.
®
VOD service.
®
VOD service
®
English
TIPS: To return to the previous menu, press 1.
To remove the menu, press SETUP.
23
Page 28
Setup Menu
Audio Setup Menu
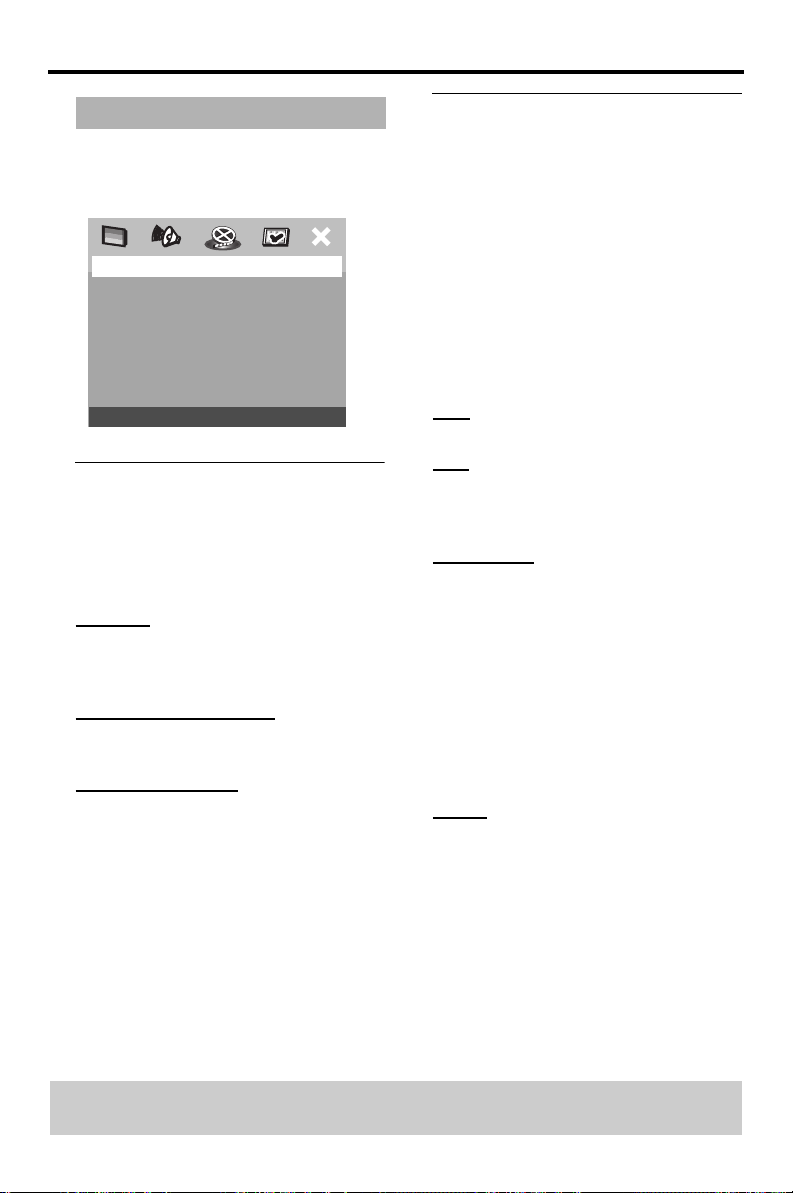
1 Press SETUP.
2 Press 1 2 to select ‘Audio Setup’ icon.
3 Press ENTER/OK to confirm.
AUDIO SETUP PAGE
ANALOG OUTPUT
DIGITAL AUDIO
SPEAKER SETUP
CD UPSAMPLING
NIGHT MODE
Setting the analog output
Set Analog Output to match your DVD
Player’s playback capability.
1 In ‘AUDIO SETUP PAGE’, press 34 to
highlight {ANALOG OUTPUT}, then press
2.
STEREO
Select this to change channel output to
stereo which delivers sound from only the
two front speakers and subwoofer.
VIRTUAL SURROUND
Select this to reproduce the surround
channels virtually.
MULTI-CHANNEL
Select this setting when using a multichannel audio/(video) receiver with 6
channel inputs. In this mode, the player will
perform DTS decoding or Dolby Digital
5.1-channel decoding when applicable, and
Dolby Pro Logic decoding on DVD-Video
and Video-CD discs with 2-channel sound
tracks. No Dolby Pro Logic decoding is
done with (Super) Audio CD discs.
2 Press 34 to select a setting, then press
ENTER/OK to confirm your selection.
Setting the Digital output
The options included in Digital Audio are:
‘Digital Output’ and ‘LPCM Output’.
1 In ‘AUDIO SETUP PAGE’, press 34 to
highlight {DIGITAL AUDIO}, then press 2.
2 Press the 34 to highlight an option.
3 Enter its submenu by pressing 2.
4 Move the cursor by pressing the 34 to
highlight the selected item.
DIGITAL OUTPUT
Set the Digital output according to your
optional audio equipment connection.
OFF
Turn off the digital output.
ALL
If you have connected your DIGITAL
AUDIO OUT to a multi-channel decoder/
receiver.
PCM ONLY
Only if your receiver is not capable of
decoding multi-channel audio.
LPCM OUTPUT
If you connect the DVD Player to a PCM
compatible receiver via the digital
terminals, such as coaxial or optical etc.,
you may need to adjust ‘LPCM Output’.
Discs are recorded at a certain sampling
rate. The higher the sampling rate, the
better the sound quality.
48kHz
Playback a disc recorded at the sampling
rate of 48kHz. 96kHz (if available on disc)
PCM data stream will be converted to
48kHz.
TIPS: To return to the previous menu, press 1.
To remove the menu, press SETUP.
24
Page 29
Setup Menu
96kHz
Playback a disc recorded at the sampling
rate of 96kHz. If the 96kHz disc is copy
protected, the digital output will be muted
to comply with the standards.
Speaker Setup
This menu contains setup options for your
audio output which makes the speaker
setup system reproduce high quality
surround sound. For details, see page 10.
CD Upsampling
This feature allows you to convert your
music CD to a higher sampling rate using
sophisticated digital signal processing for
better sound quality. If you have activated
the upsampling, the player will
automatically switch to stereo mode.
1 In ‘AUDIO SETUP PAGE’, press 34 to
highlight {CD UPSAMPLING}, then press
2.
OFF
Select this to disable CD-upsampling.
88.2 kHz (X2)
Select this to convert the sampling rate of
the CDs twice higher than the original.
176.4 kHz (X4)
Select this to convert the sampling rate of
the CDs four times higher than the
original.
2 Press 34 to select a setting, then press
ENTER/OK to confirm your selection.
Note:
– This setting is only applicable for the signals
output from the analog jacks.
Night Mode
In this mode, the high volume outputs are
softened and low volume outputs are
brought upward to an audible level. It is
useful for watching your favorite action
movie without disturbing others at night.
1 In ‘AUDIO SETUP PAGE’, press 34 to
highlight {NIGHT MODE}, then press 2.
ON
Select this to level out the volume. This
feature is only available for movies with
Dolby Digital mode.
OFF
Select this when you want to enjoy the
surround sound with its full dynamic range.
2 Press 34 to select a setting, then press
ENTER/OK to confirm your selection.
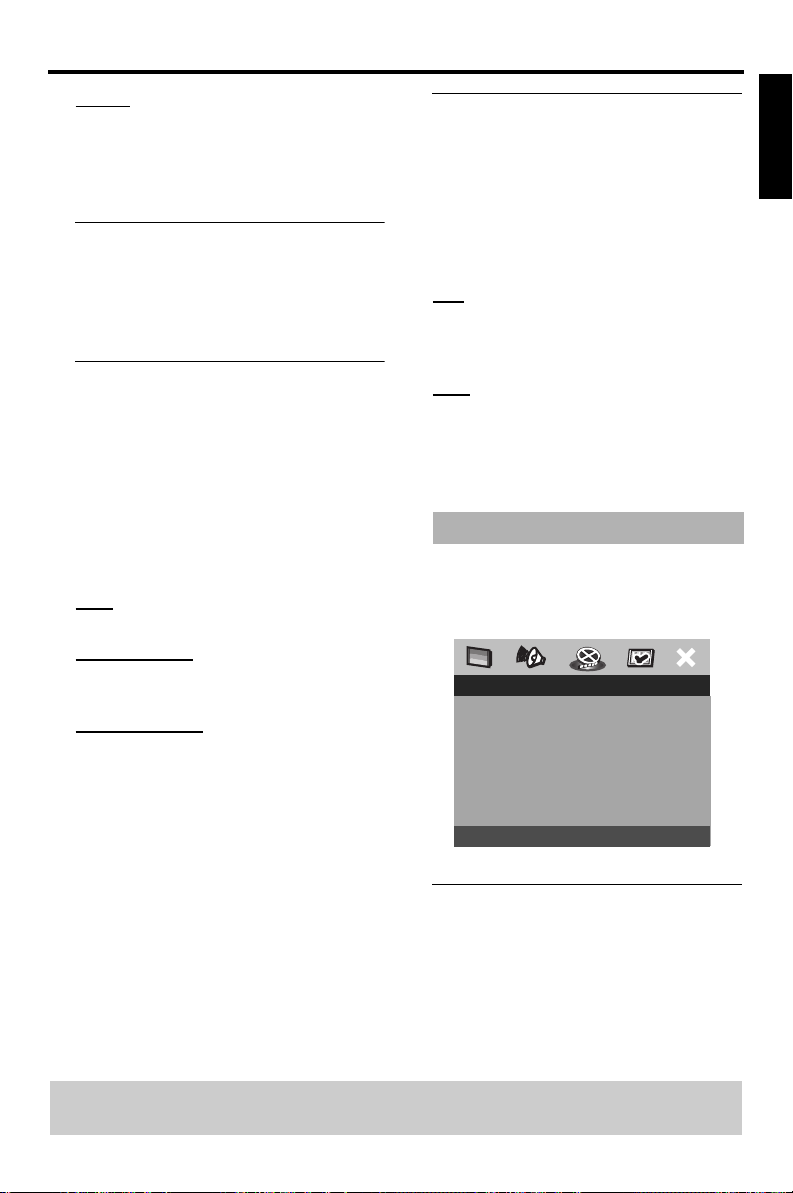
Video Setup Menu
1 Press SETUP.
2 Press 1 2 to select ‘Video Setup’ icon.
3 Press ENTER/OK to confirm.
VIDEO SETUP PAGE
TV TYPE
TV DISPLAY
PROGRESSIVE
PICTURE SETTING
BLACK LEVEL
CLOSED CAPTION
TV Type
This menu contains the options for
selecting the color system that matches
the connected TV. For details, see page 8.
English
TIPS: To return to the previous menu, press 1.
To remove the menu, press SETUP.
25
Page 30
Setup Menu
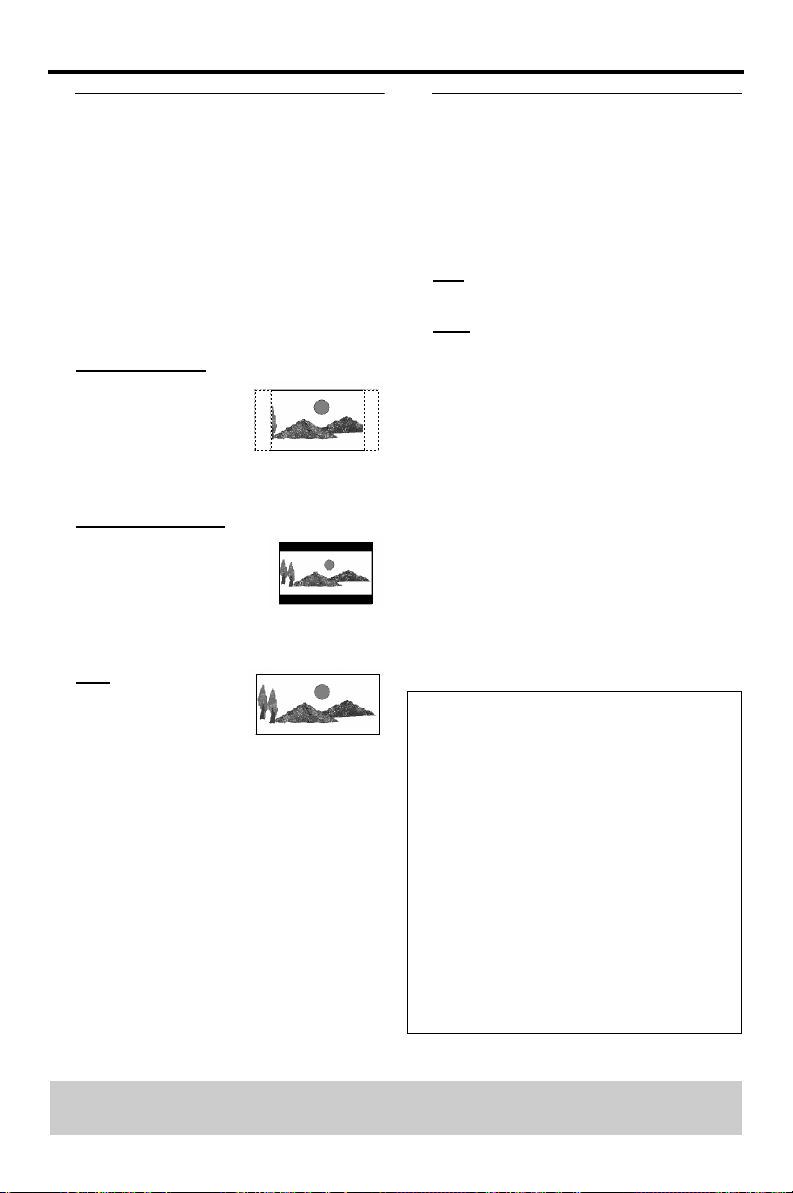
Setting the TV Display
Set the aspect ratio of the DVD Player
according to the TV you have connected.
The format you select must be available on
the disc. If it is not, the setting for TV
display will not affect the picture during
playback.
1 In ‘VIDEO SETUP PAGE’, press 34 to
highlight {TV DISPLAY}, then press 2.
2 Press 34 to highlight one of the options
below:
4:3 PAN SCAN
Select this if you have
a normal TV and want
both sides of the
picture to be trimmed
or formatted to fit
your TV screen.
4:3 LETTER BOX
Select this if you have a
normal TV. In this case, a
wide picture with black
bands on the upper and
lower portions of the TV screen will be
displayed.
16:9
Select this if you have
a widescreen TV.
3 Select an item and press ENTER/OK.
Progressive
This feature is only applicable if you have
connected this DVD Player to a
Progressive Scan TV through the Y Pb Pr
jacks (see page 7).
1 In ‘VIDEO SETUP PAGE’, press 34 to
highlight {PROGRESSIVE}, then press 2.
ON
To enable Progressive Scan function.
OFF
To disable Progressive Scan function.
2 Press 34 to select a setting, then press
ENTER/OK to confirm your selection.
Notes on activating Progressive:
– Ensure that your TV has progressive
scan.
– Connect with YPbPr video cable.
– If there is no picture, wait 15 seconds
for auto recover or deactivate
Progressive manually.
1 Open the disc tray by pressing OPEN/
CLOSE / on the front panel.
2 Press 1.
3 Press ANGLE.
CONSUMERS SHOULD NOTE THAT NOT ALL
HIGH DEFINITION TELEVISION SETS ARE
FULLY COMPATIBLE WITH THIS PRODUCT
AND MAY CAUSE ARTIFACTS TO BE
DISPLAYED IN THE PICTURE. IN CASE OF 525
OR 625 PROGRESSIVE SCAN PICTURE
PROBLEMS, IT IS RECOMMENDED THAT THE
USER SWITCH THE CONNECTION TO THE
“STANDARD DEFINITION” OUTPUT. IF THERE
ARE QUESTIONS REGARDING OUR VIDEO
MONITOR COMPATIBILITY WITH THIS
MODEL 525P AND 625P DVD PLAYER, PLEASE
CONTACT OUR CUSTOMER SERVICE
CENTER.
This unit is compatible with the complete line of
YAMAHA products, including the projectors DPX1100, LPX-510 and the plasma monitor PDM-
4210.
TIPS: To return to the previous menu, press 1.
To remove the menu, press SETUP.
26
Page 31
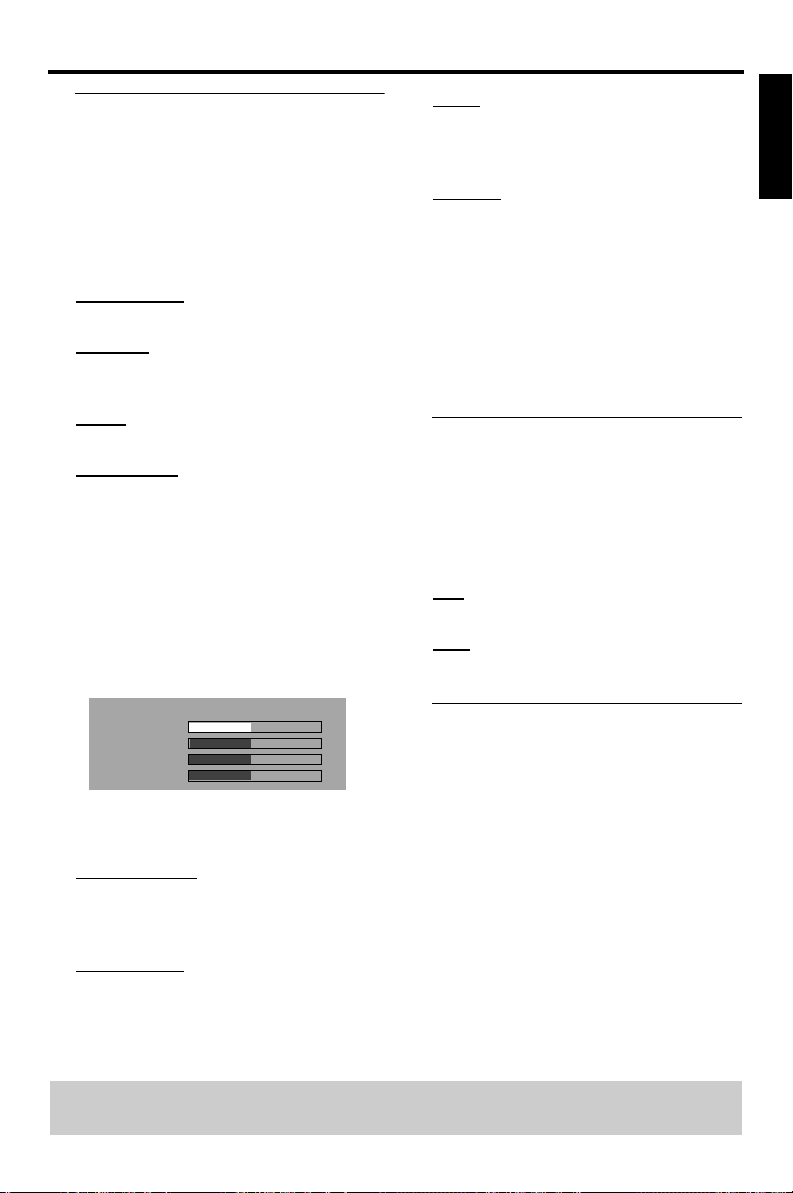
Setup Menu
Picture Setting
This DVD Player provides three
predefined sets of picture color settings
and one personal setting which you can
define yourself.
1 In ‘VIDEO SETUP PAGE’, press 34 to
highlight {PICTURE SETTING}, then press
2.
STANDARD
Select this for standard picture setting.
BRIGHT
Select this will make the TV picture
brighter.
SOFT
Select this will make the TV picture softer.
PERSONAL
Select this to personalize your picture
color by adjusting the brightness, contrast,
tint and color (saturation).
2 Press 34 to select a setting, then press
ENTER/OK to confirm your selection.
3 If you select {PERSONAL}, then proceed
to steps 4–7.
➜ The ‘PERSONAL PICTURE SETUP’
menu appears.
PERSONAL PICTURE SETUP
BRIGHTNESS
CONTRAST
TINT
COLOR
4 Press 34 to highlight one of the following
options.
BRIGHTNESS
Increase the value will brighten the picture
or vice versa. Choose zero (0) for average
setting.
CONTRAST
Increase the value will sharpen the picture
or vice versa. Choose zero (0) to balance
the contrast.
0
0
0
0
TINT
Increase the value will darken the picture
or vice versa. Choose zero (0) for average
setting.
COLOR
Increase the value will enhance the color in
your picture or vice versa. Choose zero
(0) to balance the color.
5 Press 1 2 to adjust the setting that best
suit your personal preference.
6 Repeat steps 4–5
for adjusting other color
features.
7 Press ENTER/OK to confirm.
Selecting the black level (U.S.A.
model only)
If you set the TV type to NTSC, set Black
level shift to ON. This will improve the
color contrast during playback. The black
level setting has no effect if the TV type is
set to PAL.
ON
Select this for enhanced black level.
OFF
Select this for standard black level.
Closed Caption (U.S.A. model
only)
Closed Captions are data that are hidden
in the video signal on specific discs,
invisible without a special decoder. The
difference between subtitles and captions
is that subtitles are intended for hearing
persons and captions are for the hearing
impaired. Subtitles rarely show all of the
audio. For example, captions show sound
effects (e.g., “phone ringing” and
“footsteps”), while subtitles don’t.
Before you select this function, please
ensure that the disc contains closed
captions information and your TV set also
has this function.
English
TIPS: To return to the previous menu, press 1.
To remove the menu, press SETUP.
27
Page 32
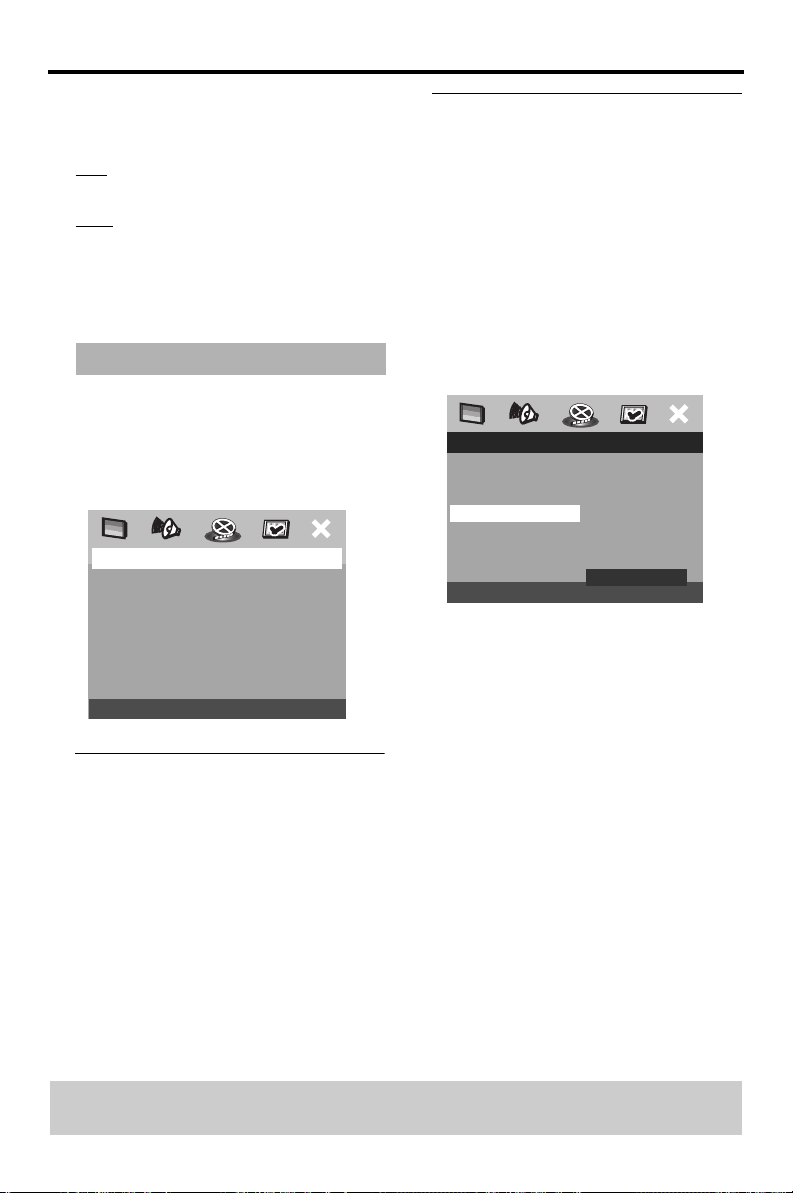
Setup Menu
1 In ‘VIDEO SETUP PAGE’, press 34 to
highlight {CLOSED CAPTION}, then press
2.
ON
To enable Closed Caption function.
OFF
To disable Closed Caption function.
2 Press 34 to select a setting, then press
ENTER/OK to confirm your selection.
Preference Setup Menu
1 Press STOP 9 twice to stop playback (if
any), then press SETUP.
2 Press 1 2 to select the ‘Preference Setup’
icon.
3 Press ENTER/OK to confirm.
PREFERENCE PAGE
AUDIO
SUBTITLE
DISC MENU
PARENTAL
PBC
MP3/JPEG NAV
PASSWORD
DEFAULT
Audio, Subtitle, Disc Menu
These menus contain various language
options for audio, subtitle and disc menu
which may be recorded on the DVD. For
details, see page 10.
Restricting playback by Parental
Control
Some DVDs may have a parental level
assigned to the complete disc or to certain
scenes on the disc. This feature lets you set
a playback limitation level.
The rating levels are from 1 to 8 and are
country dependent. You can prohibit the
playing of certain discs that are not suitable
for your children or have certain discs
played with alternative scenes.
1 In ‘PREFERENCE PAGE’, press 34 to
highlight {PARENTAL}, then press 2.
PREFERENCE PAGE
AUDIO 1 KID SAFE
SUBTITLE 2 G
DISC MENU 3 PG
PARENTAL 4 PG 13
PBC 5 PGR
MP3/JPEG NAV 6 R
PASSWORD 7 NC 17
DEFAULT 8 ADULT
2 Press 34 to highlight a rating level for the
disc inserted and press ENTER/OK.
➜ To disable Parental controls and have all
Discs play, select {8 ADULT}.
3 Use the numeric keypad (0-9) to enter
the six-digit password (see page 29
“Changing the Password”).
➜ DVDs that are rated above the level you
selected will not play unless you enter
your six-digit password.
Helpful Hints:
– VCD, SVCD, CD, SA-CD have no level
indication, so parental control function has
no effect on these type of discs. This applies
to most illegal DVD discs.
– Some DVDs are not encoded with a rating
though the movie rating may be printed on
the Disc cover. The rating level feature does
not work for such Discs.
TIPS: To return to the previous menu, press 1.
To remove the menu, press SETUP.
28
Page 33
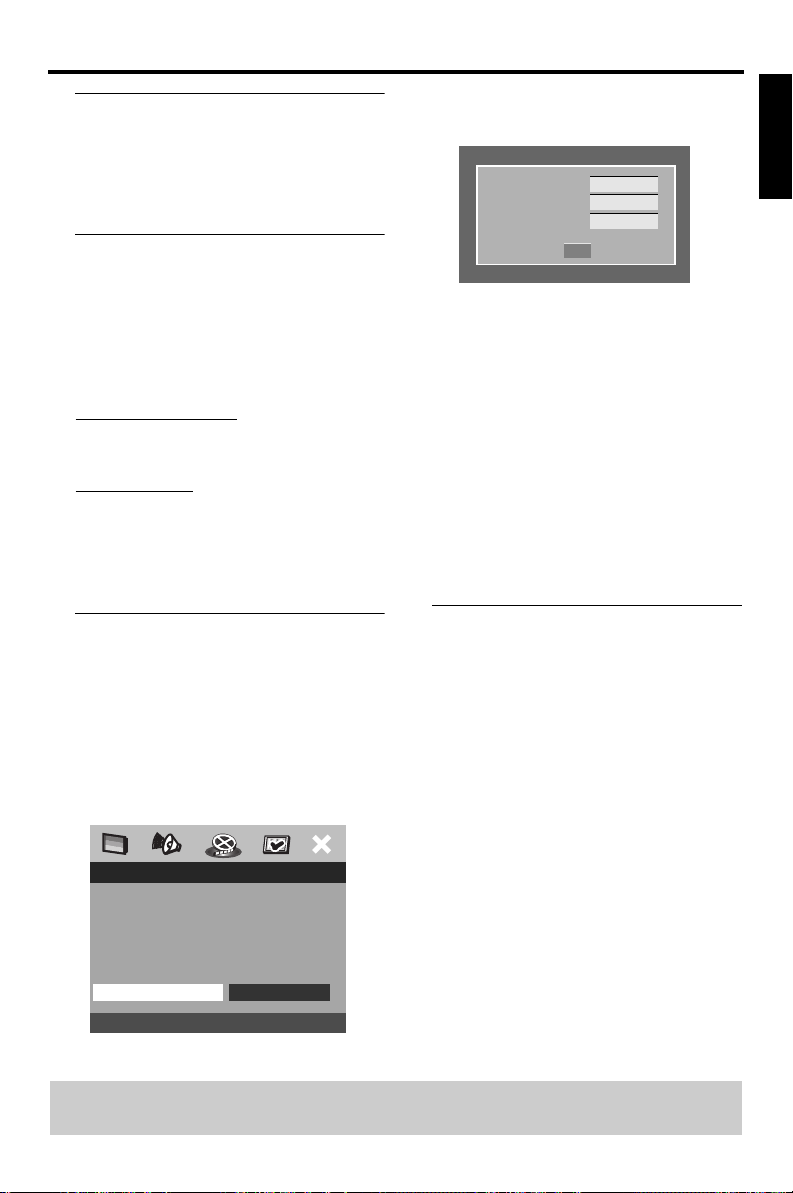
Setup Menu
PBC (Playback Control)
You can set the PBC to ON or OFF. This
feature is available only on Video CD 2.0
with playback control (PBC) feature. For
details, see page 16.
MP3/JPEG Menu
MP3/JPEG Navigator can be set only if the
disc is recorded with menu. It allows you
to select different display menus for easy
navigation.
1 In ‘PREFERENCE PAGE’, press 34 to
highlight {MP3/JPEG NAV}, then press 2.
WITHOUT MENU
Select this to display all the files contained
in the MP3/Picture CD.
WITH MENU
Select this to display only the folder menu
of the MP3/Picture CD.
2 Press 34 to select a setting, then press
ENTER/OK to confirm your selection.
Changing the Password
The same password is used for both
Parental Control and Disc Lock. Enter
your six-digit password when prompted
on the screen. The default password is 000
000.
1 In ‘PREFERENCE PAGE’, press 34 to
highlight {PASSWORD}, then press 2 to
select {CHANGE}.
PREFERENCE PAGE
AUDIO
SUBTITLE
DISC MENU
PARENTAL
PBC
MP3/JPEG NAV
PASSWORD CHANGE
DEFAULT
2 Press ENTER/OK to enter the ‘Password
Change Page’.
OLD PASSWORD
NEW PASSWORD
CONFIRM PWD
OK
3 Use the numeric keypad (0-9) to enter
your old six-digit password.
➜ When doing this for the first time, key
in ‘000 000’.
➜ If you forget your old six-digit
password, key in ‘000 000’.
4 Enter the new six-digit password.
5 Enter the new six-digit password a second
time to confirm.
➜ The new six-digit password will now
take effect.
6 Press ENTER/OK to confirm.
Restoring to original settings
Setting the DEFAULT function will reset all
options and your personal settings to the
factory defaults, except your password for
Parental Control and Disc Lock.
1 In ‘PREFERENCE PAGE’, press 34 to
highlight {DEFAULT}, then press 2 to
select {RESET}.
2 Press ENTER/OK to confirm.
➜ All settings will now reset to factory
defaults.
English
TIPS: To return to the previous menu, press 1.
To remove the menu, press SETUP.
29
Page 34
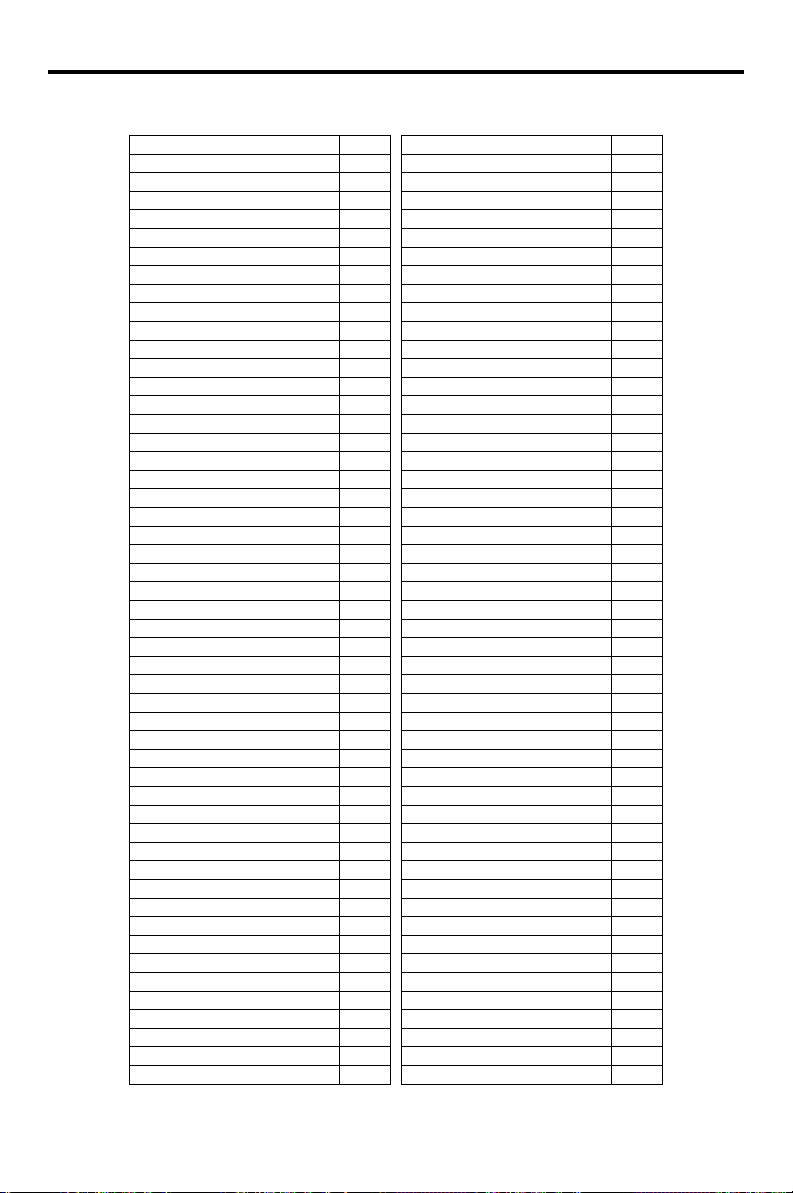
Language Code
These pages can be used to select other languages.This does not affect the
options in “AUDIO”, “SUBTITLE” or “DISC MENU”.
Abkhazian 6566 German 6869
Afar 6565 Gikuyu; Kikuyu 7573
Afrikaans 6570 Greek, 6976
Albanian 8381 Guarani 7178
Amharic 6577 Gujarati 7185
Arabic 6582 Hausa 7265
Armenian 7289 Hebrew 7269
Assamese 6583 Herero 7290
Avestan 6569 Hindi 7273
Aymara 6589 Hiri Motu 7279
Azerbaijani 6590 Hungarian 7285
Bashkir 6665 Icelandic 7383
Basque 6985 Ido 7379
Belarusian 6669 Indonesian 7368
Bengali 6678 Interlingua (International) 7365
Bihari 6672 Interlingue 7369
Bislama 6673 Inuktitut 7385
Bokmål, Norwegian 7866 Inupiaq 7375
Bosnian 6683 Irish 7165
Breton 6682 Italian 7384
Bulgarian 6671 Japanese 7465
Burmese 7789 Javanese 7486
Castilian, Spanish 6983 Kalaallisut 7576
Catalan 6765 Kannada 7578
Chamorro 6772 Kashmiri 7583
Chechen 6769 Kazakh 7575
Chewa; Chichewa; Nyanja 7889 Khmer 7577
Chichewa; Chewa; Nyanja 7889 Kikuyu; Gikuyu 7573
Chinese 9072 Kinyarwanda 8287
Chuang; Zhuang 9065 Kirghiz 7589
Church Slavic; Slavonic; 6785 Komi 7586
Church Slavonic; Church 6785 Korean 7579
Chuvash 6786 Kuanyama; Kwanyama 7574
Cornish 7587 Kurdish 7585
Corsican 6779 Kwanyama; Kuanyama 7574
Croatian 7282 Lao 7679
Czech 6783 Latin 7665
Danish 6865 Latvian 7686
Dutch 7876 Letzeburgesch; 7666
Dzongkha 6890 Limburgan; Limburger; 7673
English 6978 Limburger; Limburgan; 7673
Esperanto 6979 Limburgish; Limburger; 7673
Estonian 6984 Lingala 7678
Faroese 7079 Lithuanian 7684
Fijian 7074 Luxembourgish; 7666
Finnish 7073 Macedonian 7775
French 7082 Malagasy 7771
Frisian 7089 Malay 7783
Gaelic; Scottish Gaelic 7168 Malayalam 7776
Gallegan 7176 Maltese 7784
Georgian 7565 Manx 7186
30
Page 35
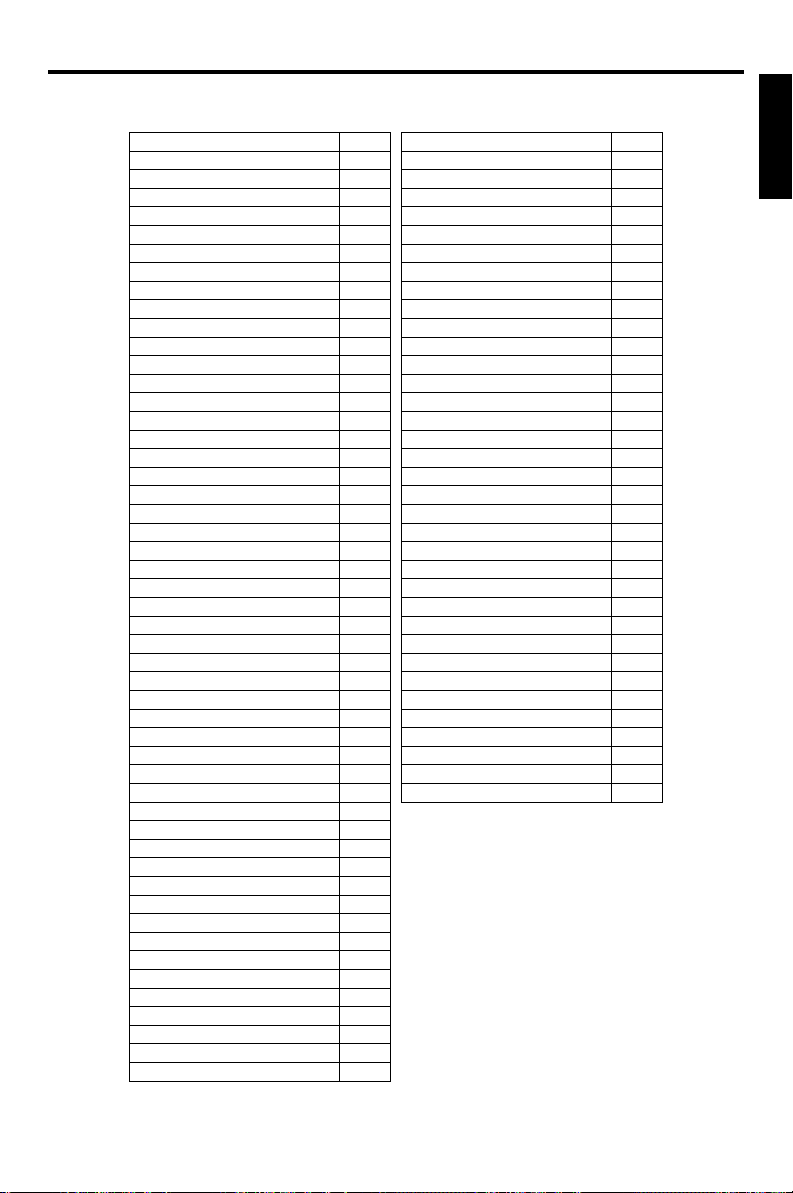
Language Code
These pages can be used to select other languages.This does not affect the options in
“AUDIO”, “SUBTITLE” or “DISC MENU”.
Maori 7773 Sotho, Southem 8384
Marathi 7782 South Ndebele 7882
Marshallese 7772 Spanish; Castilian 6983
Moldavian 7779 Sundanese 8385
Mongolian 7778 Swahili 8387
Nauru 7865 Swati 8383
Navaho, Navajo 7886 Swedish 8386
Navajo; Navaho 7886 Tagalog 8476
Ndebele, North 7868 Tahitian 8489
Ndebele, South 7882 Tajik 8471
Ndonga 7871 Tamil 8465
Nepali 7869 Tatar 8484
Northern Sami 8369 Telugu 8469
North Ndebele 7868 Thai 8472
Norwegian 7879 Tibetan 6679
Norwegian Bokmål; Bokmål, 7866 Tigrinya 8473
Norwegian Nynorsk; 7878 Tonga (Tonga Islands) 8479
Nyanja; Chichewa; Chewa 7889 Tsonga 8483
Nynorsk, Norwegian; 7878 Tswana 8478
Occitan (post 1500); Proven 7967 Turkish 8482
Old Bulgarian; Old Slavonic; 6785 Turkmen 8475
Old Church Slavonic; Old 6785 Twi 8487
Old Slavonic; Church 6785 Uighur 8571
Oriya 7982 Ukrainian 8575
Oromo 7977 Urdu 8582
Ossetian; Ossetic 7983 Uzbek 8590
Ossetic; Ossetian 7983 Vietnamese 8673
Pali 8073 Volapük 8679
Panjabi 8065 Walloon 8765
Persian 7065 Welsh 6789
Polish 8076 Wolof 8779
Portuguese 8084 Xhosa 8872
Provençal; Occitan (post) 7967 Yiddish 8973
Pushto 8083 Yoruba 8979
Quechua 8185 Zhuang; Chuang 9065
Raeto-Romance 8277 Zulu 9085
Romanian 8279
Rundi 8278
Russian 8285
Samoan 8377
Sango 8371
Sanskrit 8365
Sardinian 8367
Scottish Gaelic; Gaelic 7168
Serbian 8382
Shona 8378
Sindhi 8368
Sinhalese 8373
Slovak 8375
Slovenian 8376
Somali 8379
English
31
Page 36

Troubleshooting
Refer to the chart below when this unit does not function properly. If the
problem you are experiencing is not listed below or if the instruction below does
not help, set this unit to the standby mode, disconnect the power cord, and
contact the nearest authorized YAMAHA dealer or service center.
Problem Solution
No power – Check if the AC power cord is properly connected.
No picture – Refer to your TV’s manual for correct Video In channel
Distorted picture
Completely distorted picture
or black/white picture with
DVD
No sound or distorted sound – Adjust the volume.
No audio at digital output – Check the digital connections.
No output from subwoofer
during stereo
Disc can’t be played – The DVD+R/RW, DVD-R/RW, CD-R/RW must be
Picture freezes momentarily
during playback
– Press the STANDBY/ON on the front of the DVD system
to turn on the power.
selection. Change the TV channel until you see the DVD
screen.
– Check if the TV is switched on.
– If you did not use Progressive Scan connections (using the Y
PB PR jacks on the DVD Player) and you do not have a
picture at the TV, please follow the steps below to turn off
Progressive Scan;
1. Press / (OPEN/CLOSE) to open the disc tray.
2. Press 1.
3. Then press ANGLE to deactivate the Progressive. The
DVD Player will reset itself to Component/Interlaced
video.
– Sometimes a small amount of picture distortion may appear
depending on the disc being played back. This is not a
malfunction.
– Make sure the disc is compatible with the DVD Player.
– Ensure that the DVD Player’s TV Type is set to match that
of the Disc and your TV.
– Check that the speakers are connected correctly.
– Check if your receiver can decode MPEG-2 or DTS and if
not, please make sure the digital output is set to PCM
ONLY.
– Check if the audio format of the selected audio language
matches your receiver capabilities.
– Check that all speaker settings in the setup menu have been
changed to small instead of large.
finalized.
– Ensure the disc label is facing up.
– Check if the disc is defective by trying another disc.
– If you have recorded a Picture CD or MP3 CD yourself,
ensure that your disc contains at least 10 pictures or 5 MP3
tracks.
– Region code incorrect.
– Check the disc for fingerprints/scratches and clean with a
soft cloth wiping from centre to edge.
32
Page 37

Troubleshooting
Problem Solution
The player does not respond to
the Remote Control
Buttons do not work – To completely reset the player, unplug the AC cord from
Player does not respond to
some operating commands
during playback.
DVD Player cannot read CDs/
DVDs
Menu items cannot be selected – Press STOP twice before selecting Setup Menu.
Unable to play DivX movies
No sound during DivX movies
playback
– Aim the Remote Control directly at the sensor on the front
of the player.
– Reduce the distance to the player.
– Replace the batteries in the Remote Control.
– Re-insert the batteries with their polarities (+/– signs) as
indicated.
the AC outlet for 5-10 seconds.
– Operations may not be permitted by the disc. Refer to the
instructions of the disc jacket.
– Use a commonly available cleaning CD/DVD to clean the
lens before sending the DVD Player for repair.
– Depending on the disc availability, some menu items cannot
be selected.
– Check that the DivX file is encoded in ‘Home Theater’
mode with DivX 5.x encoder.
– The audio code may not be supported by the DVD player.
English
33
Page 38
Glossary
Analog: Sound that has not been turned into num-
bers. Analog sound varies, while digital sound has specific numerical values. These jacks send audio through
two channels, the left and right.
Aspect ratio: The ratio of vertical and horizontal
sizes of a displayed image. The horizontal vs. vertical
ratio of conventional TVs. is 4:3, and that of widescreens
is 16:9.
AUDIO OUT Jacks: Jacks on the back of the DVD
System that send audio to another system (TV, Stereo,
etc.).
Bit Rate: The amount of data used to hold a given
length of music; measured in kilobits per seconds, or
kbps. Or, the speed at which you record. Generally, the
higher the bit rate, or the higher the recording speed,
the better the sound quality. However, higher bit rates
use more space on a Disc.
Chapter: Sections of a picture or a music piece on a
DVD that are smaller than titles. A title is composed of
several chapters. Each chapter is assigned a chapter
number enabling you to locate the chapter you want.
Component Video Out Jacks: Jacks on the back
of the DVD System that send high-quality video to a TV
that has Component Video In jacks (R/G/B, Y/Pb/Pr,
etc.).
Disc menu: A screen display prepared for allowing
selection of images, sounds, subtitles, multi-angles, etc.
recorded on a DVD.
Digital: Sound that has been converted into numerical
values. Digital sound is available when you use the DIGITAL AUDIO OUT COAXIAL or OPTICAL jacks. These
jacks send audio through multiple channels, instead of
just two channels as analog does.
DivX 3.11/4x/5x: The DivX code is a patent pending,
MPEG-4 based video compression technology, developed by DivXNetworks, Inc., that can shrink digital
video to sizes small enough to be transported over the
internet, while maintaining high visual quality.
Dolby Digital: A surround sound system developed
by Dolby Laboratories containing up to six channels of
digital audio (front left and right, surround left and right,
center and subwoofer).
DTS: Digital Theatre Systems. This is a surround sound
system, but it is different from Dolby Digital. The formats were developed by different companies.
JPEG: A very common digital still picture format. A
still-picture data compression system proposed by the
Joint Photographic Expert Group, which features small
decrease in image quality in spite of its high compression ratio.
MP3: A file format with a sound data compression sys-
tem. “MP3” is the abbreviation of Motion Picture
Experts Group 1 (or MPEG-1) Audio Layer 3. By using
MP3 format, one CD-R or CD-RW can contain about
10 times as much data volume as a regular CD can.
34
Multichannel DVD is specified to have each sound
track constitute one sound field. Multichannel refers to
a structure of sound tracks having three or more channels.
Parental Control: A function of the DVD to limit
playback of the disc by the age of the users according to
the limitation level in each country. The limitation varies
from disc to disc; when it is activated, playback will be
prohibited if the software’s level is higher than the userset level.
PCM (Pulse Code Modulation): A system for
converting analog sound signal to digital signal for later
processing, with no data compression used in conversion.
Playback control (PBC): Refers to the signal
recorded on video CDs or SVCDs for controlling
reproduction. By using menu screens recorded on a
Video CD or SVCD that supports PBC, you can enjoy
interactive-type software as well as software having a
search function.
Progressive Scan: It displays all the horizontal lines
of a picture at one time, as a signal frame. This system
can convert the interlaced video from DVD into progressive format for connection to a progressive display.
It dramatically increases the vertical resolution.
Region code: A system for allowing discs to be played
back only in the region designated beforehand. This unit
will only play discs that have compatible region codes.
You can find the region code of your unit by looking on
the product label. Some discs are compatible with more
than one region (or ALL regions).
S-Video: Produces a clear picture by sending separate
signals for the luminance and the color. You can use SVideo only if your TV has S- video In jack.
Super Audio CD (SA-CD): This audio format is
based upon the current CD standards but includes a
greater amount of information that provides higher
quality sound. There are three types of discs: single layer,
double layer and hybrid discs. The hybrid disc contains
both standard audio CD and Super Audio CD information.
Surround: A system for creating realistic three dimen-
sional sound fields full of realism by arranging multiple
speakers around the listener.
Title: The longest section of a picture or music feature
on DVD, music, etc., in video software, or the entire
album in audio software. Each title is assigned a title
number enabling you to locate the title you want.
VIDEO OUT jack: Jack on the back of the DVD Sys-
tem that sends video to a TV.
Page 39

Specifications
PLAYBACK SYSTEM
DVD-Video
DVD-Audio
SA-CD multichannel and SA-CD stereo
Video CD & SVCD
CD
PICTURE CD
CD-R, CD-RW
DVD+R, DVD+RW
DVD-R, DVD-RW
VIDEO PERFORMANCE
Video (CVBS) Output 1 Vpp into 75 ohm
S-Video output Y: 1 Vpp into 75 ohm
C: 0.3 Vpp into 75 ohm
Component video output Y: 1 Vpp into 75 ohm
Pb/Cb Pr/Cr: 0.7 Vpp into
75 ohm
Black Level Shift On/Off
AUDIO FORMAT
Digital Mpeg/ Dolby Digital/ Compressed Digital
DTS
PCM 16, 20, 24 bits
fs, 44.1, 48, 96 kHz
MP3(ISO 9660) 24, 32, 56, 64, 96, 128,
256 kbps
fs, 16, 22.05, 24, 32,
44.1, 48 kHz
WMA 32–192 kbps, mono, stereo
Full decoding of Dolby Digital and DTS multi-channel sound
Analog Sound Stereo
Dolby Surround compatible downmix from Dolby Digital
multi-channel sound
Dolby Pro Logic II
3D sound for virtual 5.1 channel sound on 2 speakers
AUDIO PERFORMANCE
DA Converter 24bit, 192kHz
Signal-Noise (1 kHz) 105dB
Dynamic range (1 kHz) 95dB
DVD fs 96 kHz 2Hz- 44kHz
fs 48 kHz 2Hz- 22kHz
SVCD fs 48 kHz 2Hz- 22kHz
fs 44.1kHz 2Hz- 20kHz
CD/VCD fs 44.1kHz 2Hz- 20kHz
Distortion and Noise (1 kHz) 0.0035%
TV STANDARD (PAL/50Hz) (NTSC/60Hz)
Number of lines 625 525
Playback Multistandard (PAL/NTSC)
CONNECTIONS
Y Output Cinch (green)
Pb/Cb Output Cinch (blue)
Pr/Cr Output Cinch (red)
S-Video Output Mini DIN, 4 pins
Video Output Cinch
Audio Output (L+R) Cinch
Digital Output 1 coaxial, 1 optical
IEC60958 for CDDA / LPCM
IEC61937 for MPEG 1/2, Dolby
Digital and DTS
6 channel analog output
Audio Front L/R Cinch (white/red)
Audio Surround L/R Cinch (white/red)
Audio Center Cinch (blue)
Audio Subwoofer Cinch (black)
CABINET
Dimensions (w x d x h) 435 x 425 x 75 mm
Weight Approx. 5.5 Kg
POWER SUPPLY
Power inlet U.S.A model 120V, 60Hz
Australia model 240V, 50Hz
Power usage Approx. 15W
Power usage standby < 1W
English
Specifications subject to change without prior
notice
35
Page 40
YAMAHA ELECTRONICS CORPORATION, USA
YAMAHA CANADA MUSIC LTD.
YAMAHA ELECTRONIK EUROPA G.m.b.H.
YAMAHA ELECTRONIQUE FRANCE S.A.
YAMAHA ELECTRONICS (UK) LTD.
YAMAHA SCANDINAVIA A.B.
YAMAHA MUSIC AUSTRALIA PTY, LTD.
135 MILNER AVE., SCARBOROUGH, ONTARIO M1S 3R1, CANADA
SIEMENSSTR. 22-34, 25462 RELLINGEN BEI HAMBURG, F.R. OF GERMANY
RUE AMBROISE CROIZAT BP70 CROISSY-BEAUBOURG 77312 MARNE-LA-VALLEE CEDEX02, FRANCE
YAMAHA HOUSE, 200 RICKMANSWORTH ROAD WATFORD, HERTS WD18 7GQ, ENGLA ND
J A WETTERGRENS GATA 1, BOX 30053, 400 43 VÄSTRA FRÖLUNDA, SWEDEN
17-33 MARKET ST., SOUTH MELBOURNE, 3205 VIC., AUSTRALIA
6660 ORANGETHORPE AVE., BUENA PARK, CALIF. 90620, U.S.A.
©2004 All rights reserved.
Printed in China
IP
3139 246 13903
 Loading...