

Page 1
4-417-596-23(1)
Digital Still Camera / Instruction Manual GB
Cámara fotografía digital / Manual de instrucciones ES
DSC-TX66
Page 2
English
Learning more about the camera (“Cyber-shot User Guide”)
“Cyber-shot User Guide” is an on-line manual. Refer to it for
in-depth instructions on the many functions of the camera.
1 Access the Sony support page.
http://www.sony.net/SonyInfo/Support/
2 Select your country or region.
3 Search for the model name of your camera within the
support page.
• Check the model name on the bottom of your camera.
Checking the supplied items
The number in parentheses indicates the number of pieces.
• Camera (1)
• Rechargeable battery pack NP-BN (1)
(This rechargeable battery pack cannot be used with Cyber-shot that are
supplied with the NP-BN1 battery pack.)
• Multi-use terminal USB cable (1)
• AC Adaptor AC-UB10/UB10B/UB10C/UB10D (1)
• Power cord (mains lead) (not supplied in the USA and Canada) (1)
• Paint pen (1)
• Wrist strap (1)
• Tripod adaptor (1)
• Instruction Manual (this manual) (1)
GB
2
Page 3

Owner’s Record
The model and serial numbers are located on the bottom. Record the serial number in the
space provided below. Refer to these numbers whenever you call your Sony dealer
regarding this product.
Model No. DSC-TX66
Serial No. _____________________________
Model No. AC-UB10/AC-UB10B/AC-UB10C/AC-UB10D
Serial No. _____________________________
WARNING
To reduce fire or shock hazard, do not expose the unit to rain or
moisture.
IMPORTANT SAFETY INSTRUCTIONS
-SAVE THESE INSTRUCTIONS
DANGER
TO REDUCE THE RISK OF FIRE OR ELECTRIC
SHOCK, CAREFULLY FOLLOW THESE
INSTRUCTIONS
If the shape of the plug does not fit the power outlet, use an attachment plug adaptor of the
proper configuration for the power outlet.
CAUTION
[ Battery pack
If the battery pack is mishandled, the battery pack can burst, cause a fire or even chemical
burns. Observe the following cautions.
• Do not disassemble.
• Do not crush and do not expose the battery pack to any shock or force such as
hammering, dropping or stepping on it.
• Do not short circuit and do not allow metal objects to come into contact with the battery
terminals.
• Do not expose to high temperature above 60°C (140°F) such as in direct sunlight or in a
car parked in the sun.
• Do not incinerate or dispose of in fire.
• Do not handle damaged or leaking lithium ion batteries.
GB
GB
3
Page 4

• Be sure to charge the battery pack using a genuine Sony battery charger or a device that
can charge the battery pack.
• Keep the battery pack out of the reach of small children.
• Keep the battery pack dry.
• Replace only with the same or equivalent type recommended by Sony.
• Dispose of used battery packs promptly as described in the instructions.
[ AC Adaptor
Connect the AC Adaptor to the nearest wall outlet (wall socket).
If some trouble occurs while using the AC Adaptor, immediately shut off the power by
disconnecting the plug from the wall outlet (wall socket).
The power cord (mains lead), if supplied, is designed specifically for use with this camera
only, and should not be used with other electrical equipment.
For Customers in the U.S.A. and Canada
[ RECYCLING LITHIUM-ION BATTERIES
Lithium-Ion batteries are recyclable.
You can help preserve our environment by returning your used
rechargeable batteries to the collection and recycling location nearest
you.
For more information regarding recycling of rechargeable batteries,
call toll free
1-800-822-8837, or visit http://www.rbrc.org/
Caution: Do not handle damaged or leaking Lithium-Ion batteries.
[ Battery pack
This device complies with Part 15 of the FCC Rules. Operation is subject to the following
two conditions:
(1) This device may not cause harmful interference, and (2) this device must accept any
interference received, including interference that may cause undesired operation.
This Class B digital apparatus complies with Canadian ICES-003.
GB
4
Page 5

For Customers in the U.S.A.
UL is an internationally recognized safety organization.
The UL Mark on the product means it has been UL Listed.
If you have any questions about this product, you may call:
Sony Customer Information Center
1-800-222-SONY (7669).
The number below is for the FCC related matters only.
[ Regulatory Information
Declaration of Conformity
Trade Name: SONY
Model No.: DSC-TX66
Responsible Party: Sony Electronics Inc.
Address: 16530 Via Esprillo,
Telephone No.: 858-942-2230
This device complies with Part15 of the FCC Rules. Operation is subject to the
following two conditions: (1) This device may not cause harmful interference, and (2)
this device must accept any interference received, including interference that may cause
undesired operation.
[ CAUTION
You are cautioned that any changes or modifications not expressly approved in this manual
could void your authority to operate this equipment.
[ Note:
This equipment has been tested and found to comply with the limits for a Class B digital
device, pursuant to Part 15 of the FCC Rules.
These limits are designed to provide reasonable protection against harmful interference in
a residential installation. This equipment generates, uses, and can radiate radio frequency
energy and, if not installed and used in accordance with the instructions, may cause
harmful interference to radio communications. However, there is no guarantee that
interference will not occur in a particular installation. If this equipment does cause harmful
interference to radio or television reception, which can be determined by turning the
equipment off and on, the user is encouraged to try to correct the interference by one or
more of the following measures:
– Reorient or relocate the receiving antenna.
– Increase the separation between the equipment and receiver.
– Connect the equipment into an outlet on a circuit different from that to which the
receiver is connected.
– Consult the dealer or an experienced radio/TV technician for help.
The supplied interface cable must be used with the equipment in order to comply with the
limits for a digital device pursuant to Subpart B of Part 15 of FCC Rules.
San Diego, CA 92127 U.S.A.
GB
GB
5
Page 6
For Customers in Europe
[ Notice for the customers in the countries applying EU Directives
The manufacturer of this product is Sony Corporation, 1-7-1 Konan Minato-ku Tokyo,
108-0075 Japan. The Authorized Representative for EMC and product safety is Sony
Deutschland GmbH, Hedelfinger Strasse 61, 70327 Stuttgart, Germany. For any service or
guarantee matters please refer to the addresses given in separate service or guarantee
documents.
This product has been tested and found compliant with the limits set out in the EMC
Directive for using connection cables shorter than 3 meters (9.8 feet).
[ Attention
The electromagnetic fields at the specific frequencies may influence the picture and sound
of this unit.
[ Notice
If static electricity or electromagnetism causes data transfer to discontinue midway (fail),
restart the application or disconnect and connect the communication cable (USB, etc.)
again.
[ Disposal of Old Electrical & Electronic Equipment (Applicable in
the European Union and other European countries with separate
collection systems)
please contact your local Civic Office, your household waste disposal service or the shop
where you purchased the product.
This symbol on the product or on its packaging indicates that this product
shall not be treated as household waste. Instead it shall be handed over to
the applicable collection point for the recycling of electrical and electronic
equipment. By ensuring this product is disposed of correctly, you will help
prevent potential negative consequences for the environment and human
health, which could otherwise be caused by inappropriate waste handling
of this product. The recycling of materials will help to conserve natural
resources. For more detailed information about recycling of this product,
GB
6
Page 7

[ Disposal of waste batteries (applicable in the European Union
and other European countries with separate collection systems)
This symbol on the battery or on the packaging indicates that the battery
provided with this product shall not be treated as household waste.
On certain batteries this symbol might be used in combination with a
chemical symbol. The chemical symbols for mercury (Hg) or lead (Pb) are
added if the battery contains more than 0.0005% mercury or 0.004% lead.
potentially negative consequences for the environment and human health which could
otherwise be caused by inappropriate waste handling of the battery. The recycling of the
materials will help to conserve natural resources.
In case of products that for safety, performance or data integrity reasons require a
permanent connection with an incorporated battery, this battery should be replaced by
qualified service staff only. To ensure that the battery will be treated properly, hand over
the product at end-of-life to the applicable collection point for the recycling of electrical
and electronic equipment.
For all other batteries, please view the section on how to remove the battery from the
product safely.
Hand the battery over to the applicable collection point for the recycling of waste batteries.
For more detailed information about recycling of this product or battery, please contact
your local Civic Office, your household waste disposal service or the shop where you
purchased the product.
By ensuring these batteries are disposed of correctly, you will help prevent
Notice for customers in the United Kingdom
A moulded plug complying with BS 1363 is fitted to this equipment for your safety and
convenience.
Should the fuse in the plug supplied need to be replaced, a fuse of the same rating as the
supplied one and approved by ASTA or BSI to BS 1362, (i.e., marked with an or
mark) must be used.
If the plug supplied with this equipment has a detachable fuse cover, be sure to attach the
fuse cover after you change the fuse. Never use the plug without the fuse cover. If you
should lose the fuse cover, please contact your nearest Sony service station.
GB
GB
7
Page 8
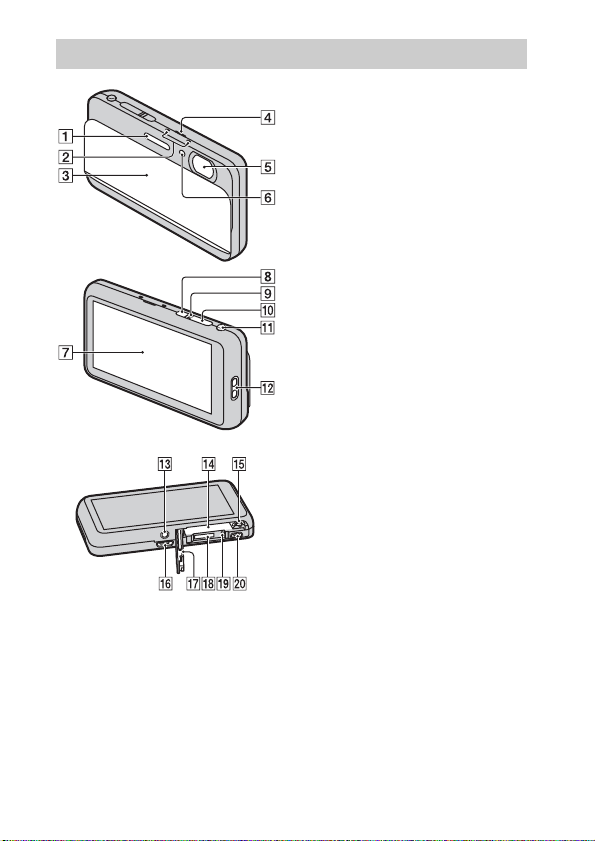
Identifying parts
A Flash
B Microphone
C Lens cover
D Speaker
E Lens
F Self-timer lamp/Smile Shutter
lamp/AF illuminator
G OLED screen/Touch panel
H ON/OFF (Power) button
I Power/Charge lamp
J Shutter button
K W/T (zoom) lever
L Hook for wrist strap
M Thread groove
N Battery insertion slot
O Battery eject lever
P Multi connector (Type3b)
Q Battery/Memory card cover
R Memory card slot
S Access lamp
T HDMI micro jack
GB
8
Page 9
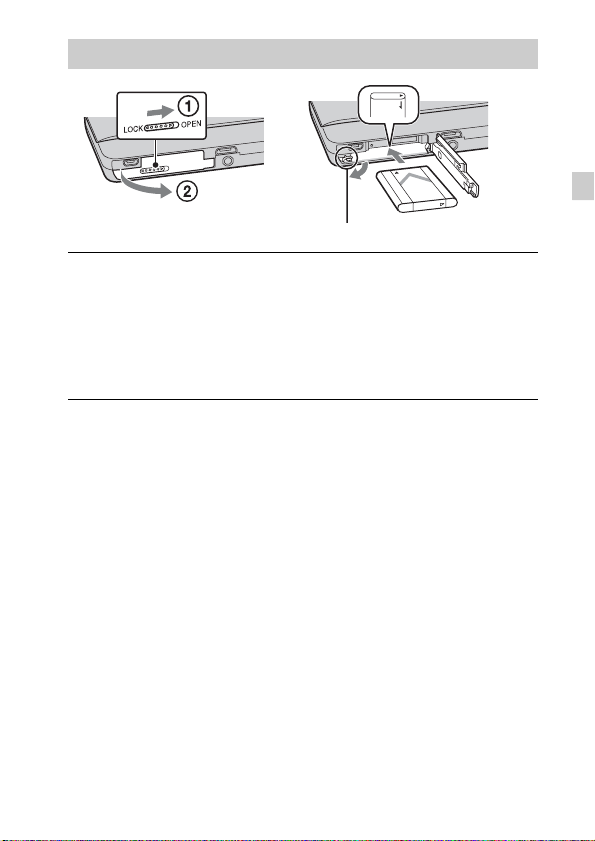
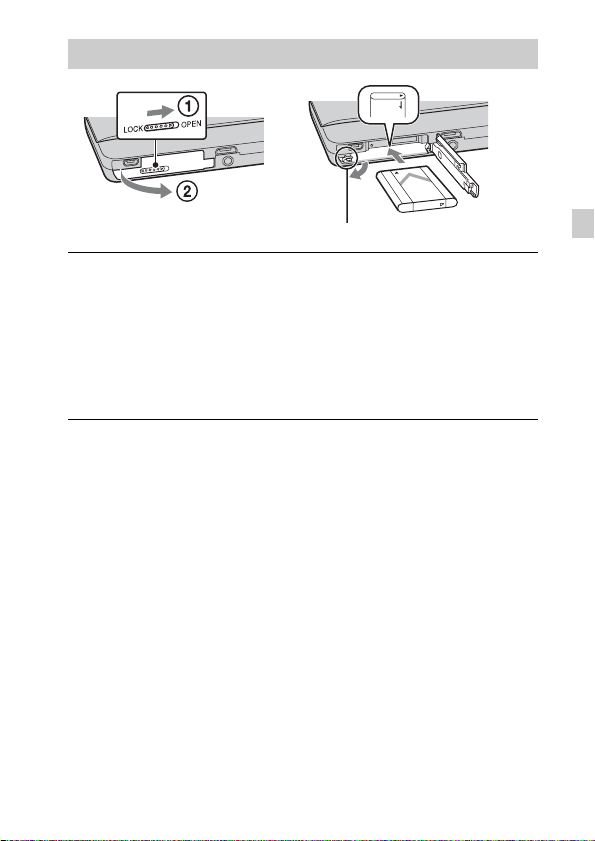
Inserting the battery pack
Battery eject lever
Open the cover.
1
Insert the battery pack.
2
• While sliding the battery eject lever, insert the battery pack as
illustrated. Make sure that the battery eject lever locks after insertion.
• Closing the cover with the battery inserted incorrectly may damage the
camera.
GB
GB
9
Page 10
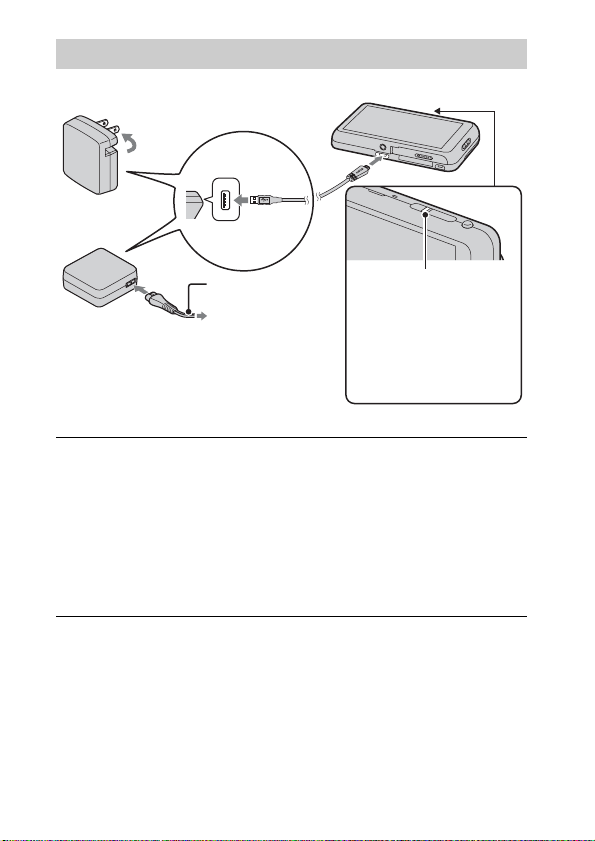
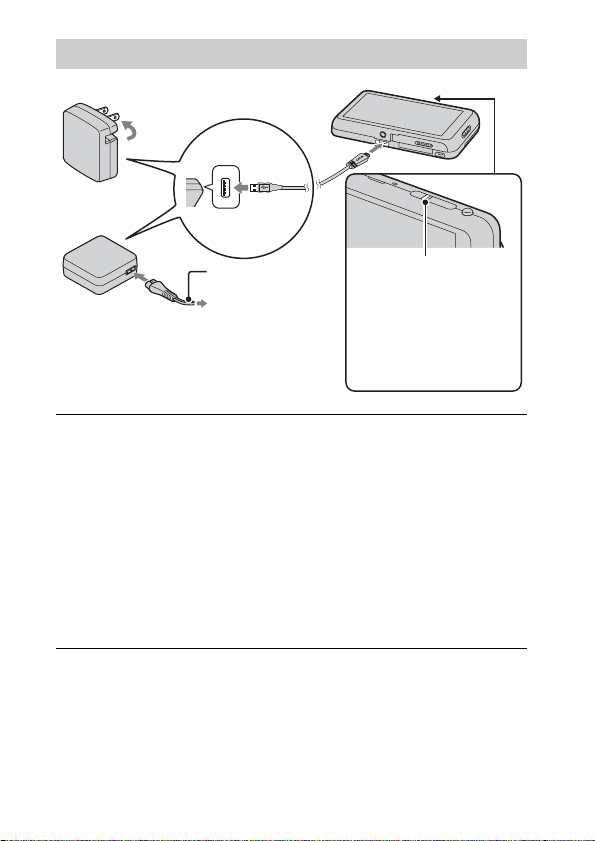
Charging the battery pack
For customers in the USA,
Canada
Power cord
(Mains lead)
For customers in countries/regions
other than the USA and Canada
Connect the camera to the AC Adaptor (supplied),
1
using the multi-use terminal USB cable (supplied).
Connect the AC Adaptor to the wall outlet (wall socket).
2
The Power/Charge lamp lights orange, and charging starts.
• Turn off the camera while charging the battery.
• You can charge the battery pack even when it is partially charged.
• When the Power/Charge lamp flashes and charging is not finished,
remove and re-insert the battery pack.
GB
Power/Charge lamp
Lit: Charging
Off: Charging finished
Flashing:
Charging error
Charging paused due to
overheating
10
Page 11

Notes
• If the Power/Charge lamp on the camera flashes when the AC Adaptor is
connected to the wall outlet (wall socket), this indicates that charging is
temporarily stopped because the temperature is outside the recommended range.
When the temperature gets back within the appropriate range, the charging
resumes. We recommend charging the battery pack in an ambient temperature of
between 10°C to 30°C (50ºF to 86ºF).
• The battery pack may not be effectively charged if the terminal section of the
battery is dirty. In this case, wipe any dust off lightly using a soft cloth or a cotton
swab to clean the terminal section of the battery.
• Connect the AC Adaptor (supplied) to the nearest wall outlet (wall socket). If
malfunctions occur while using the AC Adaptor, disconnect the plug from the wall
outlet (wall socket) immediately to disconnect from the power source.
• When charging is finished, disconnect the AC Adaptor from the wall outlet (wall
socket).
• Be sure to use only genuine Sony brand battery packs, multi-use terminal USB
cable (supplied) and AC Adaptor (supplied).
• BC-TRN2 battery charger (sold separately) is able to quick-charge the NP-BN
rechargeable battery pack supplied with this model. BC-TRN battery charger (sold
separately) is not able to quick-charge the NP-BN rechargeable battery pack
supplied with this model.
x
Charging time (Full charge)
The charging time is approximately 115 min. using the AC Adaptor
(supplied).
Note
• The above charging time applies when charging a fully depleted battery pack at a
temperature of 25°C (77°F). Charging may take longer depending on conditions of
use and circumstances.
GB
GB
11
Page 12

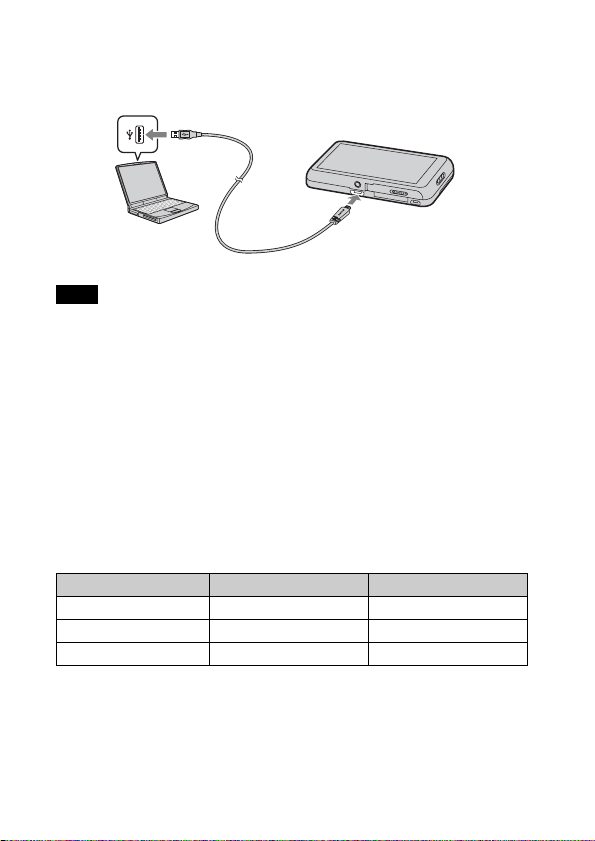
x
Charging by connecting to a computer
The battery pack can be charged by connecting the camera to a computer using
a multi-use terminal USB cable.
Note
• Note the following points when charging via a computer:
– If the camera is connected to a laptop computer that is not connected to a power
source, the laptop battery level decreases. Do not charge for an extended period
of time.
– Do not turn on/off or restart the computer, or wake the computer to resume from
sleep mode when a USB connection has been established between the computer
and the camera. The camera may cause a malfunction. Before turning on/off, or
restarting the computer or waking the computer from sleep mode, disconnect the
camera and the computer.
– No guarantees are made for charging using a custom-built computer or a
modified computer.
12
GB
Page 13
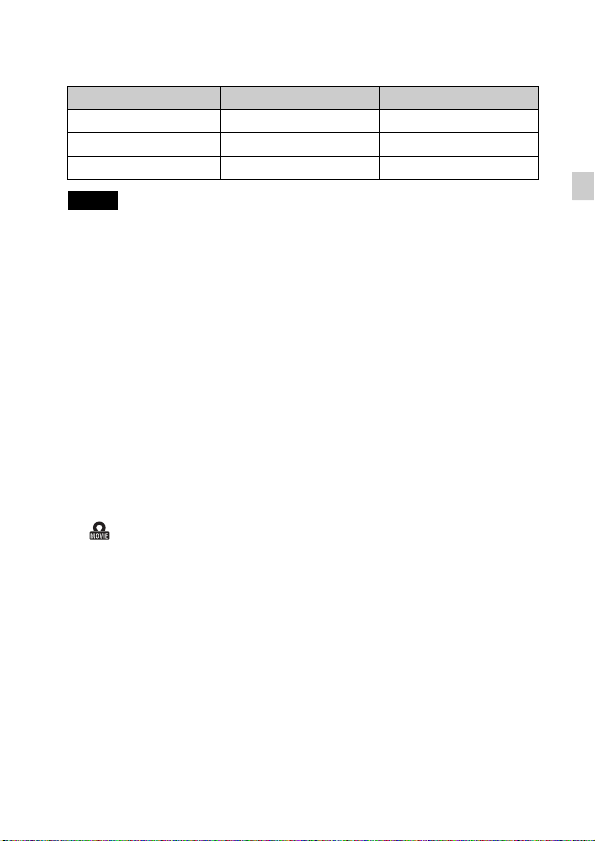
x
Battery life and number of images that can be
recorded and played back
Battery life Number of images
Shooting (still images) Approx. 125 min. Approx. 250 images
Viewing (still images) Approx. 180 min. Approx. 3600 images
Shooting (movies) Approx. 60 min. —
Notes
• The above number of images applies when the battery pack is fully charged. The
number of images may decrease depending on the conditions of use.
• The number of images that can be recorded is for shooting under the following
conditions:
– Using Sony microSD memory card (Class 4 or faster) (sold separately)
– The battery pack is used at an ambient temperature of 25°C (77°F).
– [Disp. Resolution] is set to [Standard].
• The number for “Shooting (still images)” is based on the CIPA standard, and is for
shooting under the following conditions:
(CIPA: Camera & Imaging Products Association)
– [Panel Brightness] is set to [3(Normal)].
– Shooting once every 30 seconds.
– The zoom is switched alternately between the W and T ends.
– The flash strobes once every two times.
– The power turns on and off once every ten times.
• The battery life for movies applies shooting under the following conditions:
– Movie quality: AVC HD HQ
– When continuous shooting ends because of set limits (page 24), touch
(Movie button) again and continue shooting. Shooting functions such as the
zoom do not operate.
x
Supplying power
The camera can be supplied with power from the wall outlet (wall socket) by
connecting to the AC Adaptor, using the multi-use terminal USB cable
(supplied).
You can import images to a computer without worrying about draining the
battery pack by connecting the camera to a computer using the multi-use
terminal USB cable.
In addition, you can use the AC Adaptor AC-UD10 (sold separately) for
shooting to supply power when shooting.
GB
GB
13
Page 14
Notes
• Power cannot be supplied when the battery pack is not inserted in the camera.
• When the camera is connected directly to a computer or to a power outlet using the
supplied AC Adaptor, power supply is available only in playback mode. If the
camera is in shooting mode or while you are changing the settings of the camera,
power is not supplied even if you make a USB connection using the multi-use
terminal USB cable.
• If you connect the camera and a computer using the multi-use terminal USB cable
while the camera is in playback mode, the display on the camera will change from
the playback screen to the USB connection screen. Touch (Playback) to
switch to the playback screen.
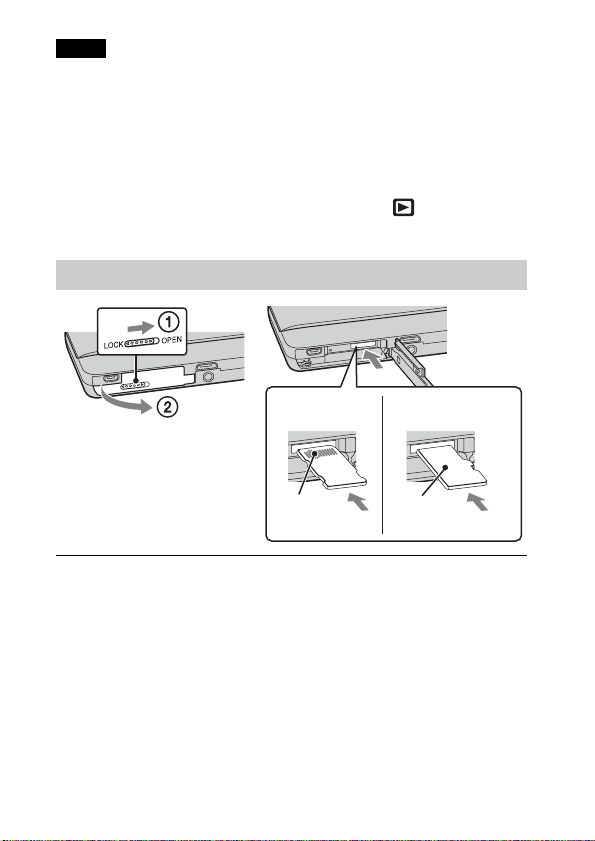
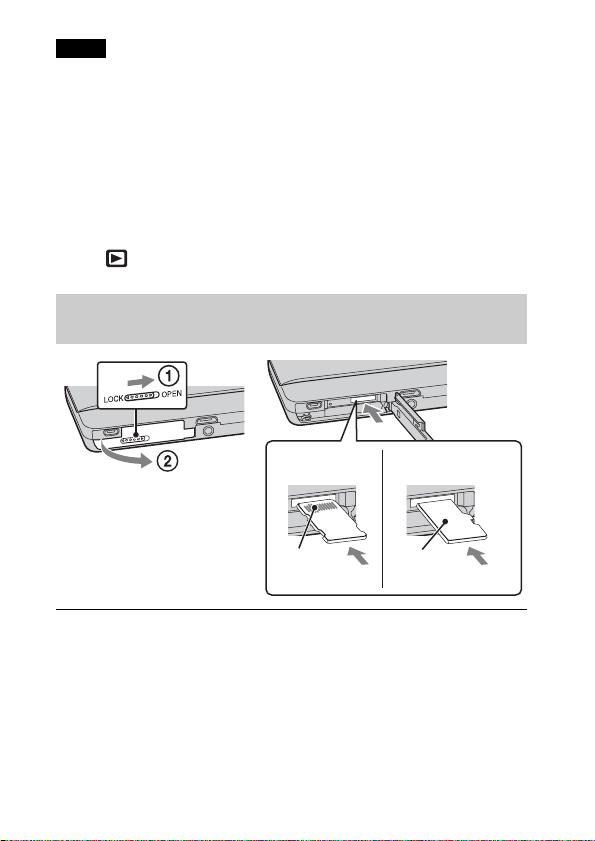
Inserting a memory card (sold separately)
“Memory Stick
Micro” media (M2)
Make sure that the correct
side is facing up.
Open the cover.
1
Insert the memory card (sold separately).
2
• With the camera lens facing upward, as illustrated, insert the memory
card straight in until it clicks into place.
• Pushing down on the microSD memory card (in the direction of the
battery insertion slot) while inserting it may damage the camera.
• Be careful when removing the microSD memory card, as it may pop out
quickly.
Close the cover.
3
GB
Terminal Printing
microSD memory
card
surface
14
Page 15
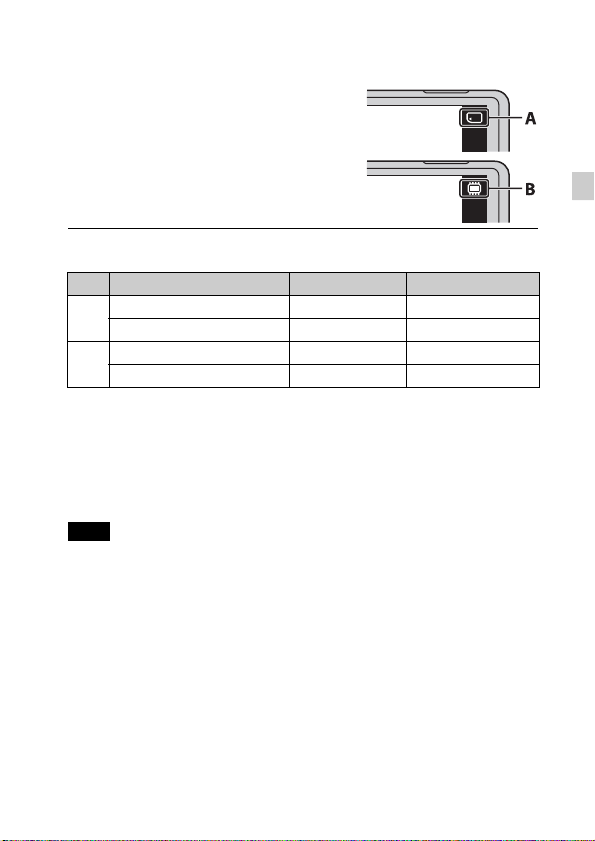
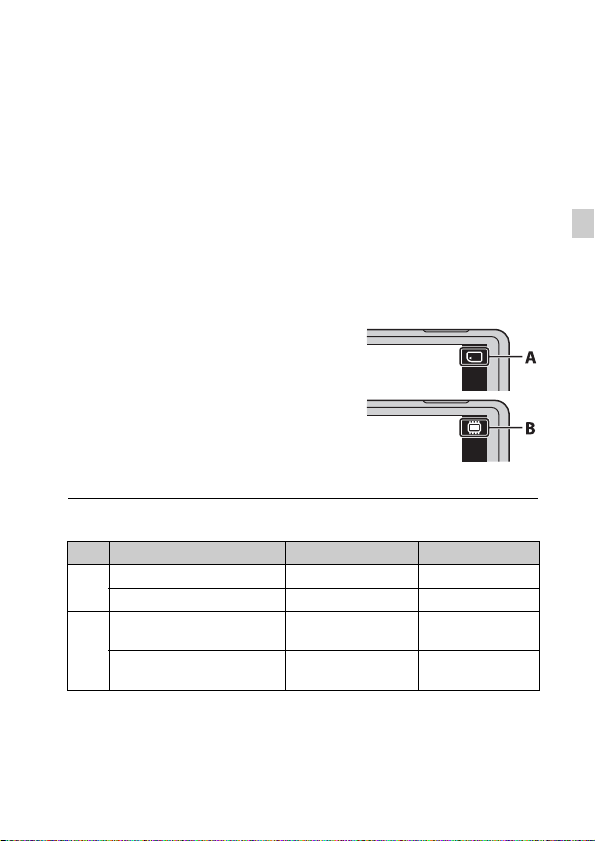
Check the icon displayed on the upper right screen and
4
make sure the memory card is inserted correctly.
• A: The memory card is inserted
correctly.
• B: The memory card is not inserted
correctly. Confirm the direction of the
memory card and reinsert it straight into
the camera.
• Only one memory card can be inserted.
x
Memory cards that can be used
Memory card For still images For movies
Memory Stick Micro a —
A
Memory Stick Micro (Mark2) aa
microSD memory card aa (Class 4 or faster)
B
microSDHC memory card aa (Class 4 or faster)
• In this manual, products in A are collectively referred to as “Memory Stick Micro”
media, and products in B are collectively referred to as microSD memory card.
x
To remove the memory card/battery pack
Memory card: Push the memory card in once to eject the memory card.
Battery pack: Slide the battery eject lever. Be sure not to drop the battery pack.
Note
• Never remove the memory card/battery pack when the access lamp (page 8) is lit.
This may cause damage to data in the memory card/internal memory.
GB
GB
15
Page 16
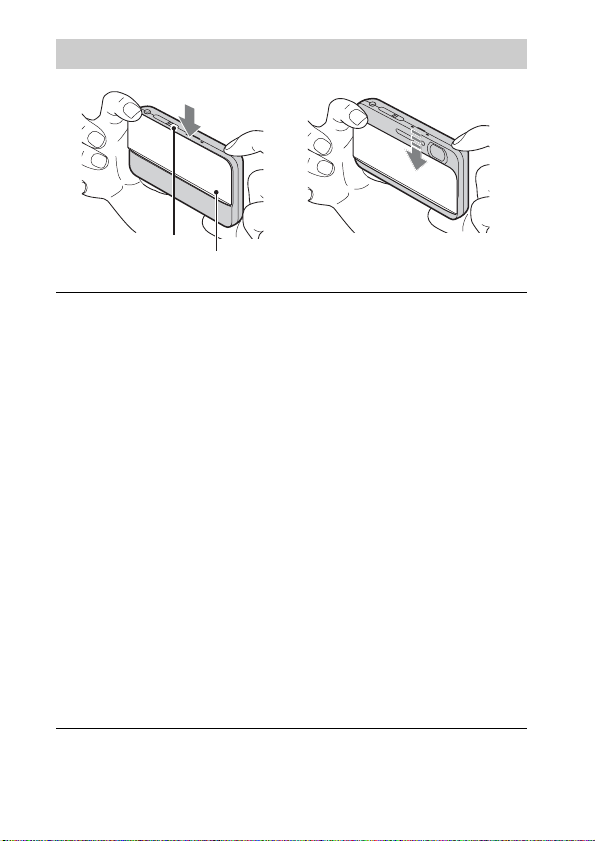
Setting the clock
ON/OFF (Power)
Lower the lens cover.
1
The camera is turned on. The power lamp lights up green only when the
camera starts up.
Date & Time setting is displayed when you turn on the camera for the first
time.
• You can also turn on the camera by pressing the ON/OFF (Power)
• It may take time for the power to turn on and allow operation.
Select a desired language.
2
Select a desired geographic location by following the
3
on-screen instructions, then touch [Next].
Set [Daylight Savings] or [Summer Time], [Date & Time
4
Format] and [Date & Time], then touch [Next].
• Midnight is indicated as 12:00 AM, and noon as 12:00 PM.
Touch [OK].
5
Follow the instructions on the screen.
6
• If you set [Disp. Resolution] to [High], the battery charge may be
GB
button
button.
depleted faster.
Lens cover
16
Page 17
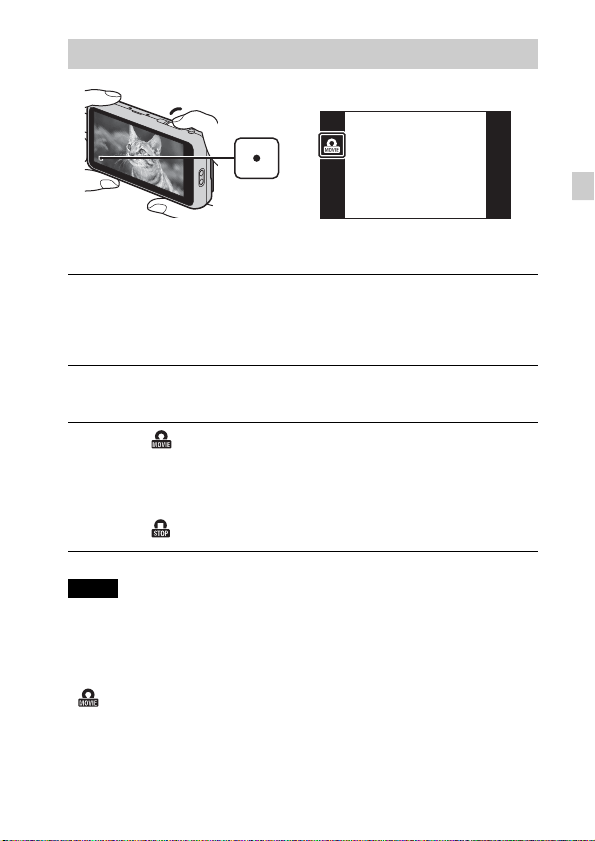
Shooting still images/movies
Shutter button
Shooting still images
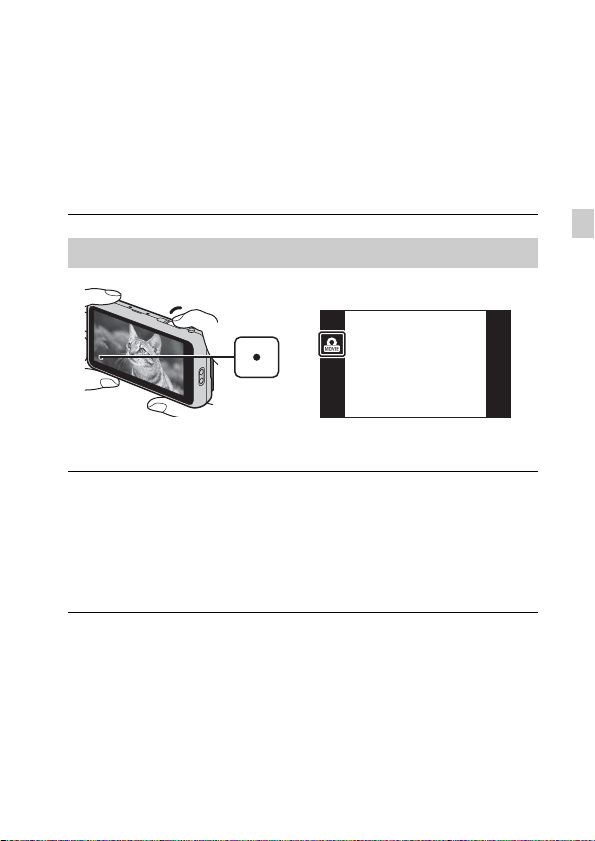
Press the shutter button halfway down to focus.
1
When the image is in focus, a beep sounds and the z indicator lights.
Press the shutter button fully down to shoot an image.
2
Shooting movies
Touch (Movie button) to start recording.
1
• Use the W/T (zoom) lever to change the zoom scale.
• Press the shutter button to shoot still images while continuing to record
the movie.
Touch (Movie button) to stop recording.
2
Notes
• The sound of the lever operating will be recorded when the zoom function
operates while shooting a movie.
• Continuous shooting is possible for approximately 29 minutes at one time at the
camera’s default settings and when the temperature is approximately 25°C (77°F).
When movie recording is finished, you can restart recording by touching
(Movie button) again. Recording may stop to protect the camera depending
on the ambient temperature.
GB
GB
17
Page 18
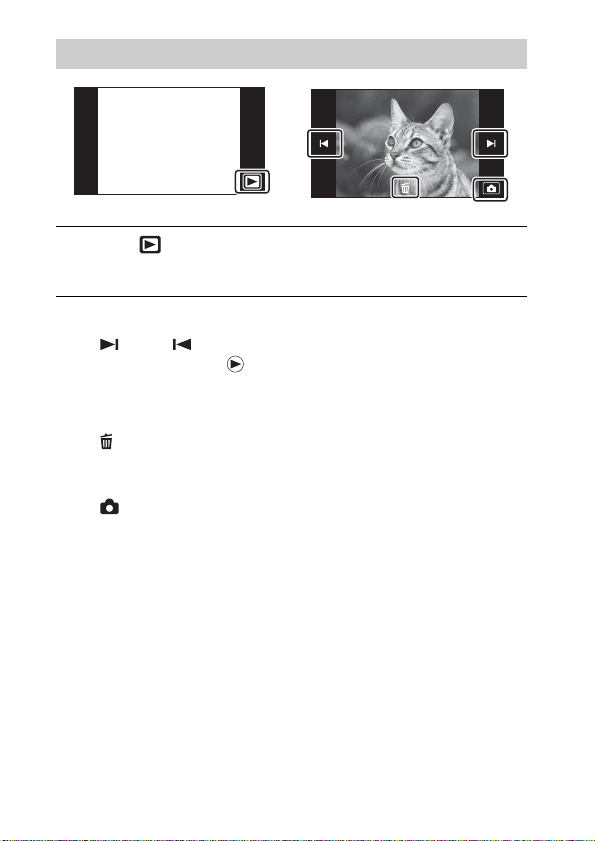
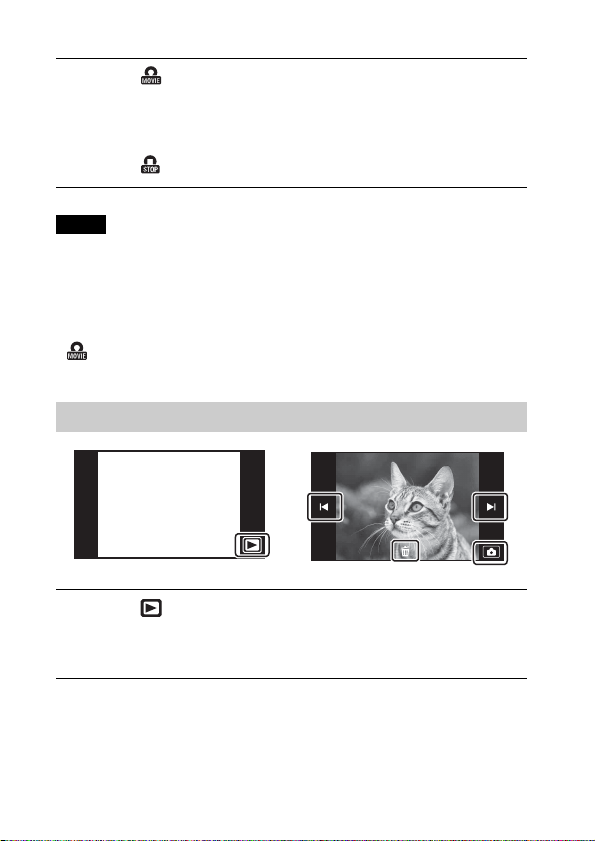
Viewing images
Touch (Playback).
1
• When images on a memory card recorded with other cameras are played
back on this camera, the registration screen for the data file appears.
x
Selecting next/previous image
Touch (Next)/ (Previous) on the screen.
• To play back movies, touch (Playback) in the center of the screen.
• To zoom in, move the W/T (zoom) lever to the T side.
x
Deleting an image
Touch (Delete) t [This Image].
x
Returning to shooting images
Touch on the screen.
• You can also return to shooting mode by pressing the shutter button halfway
down.
18
GB
Page 19
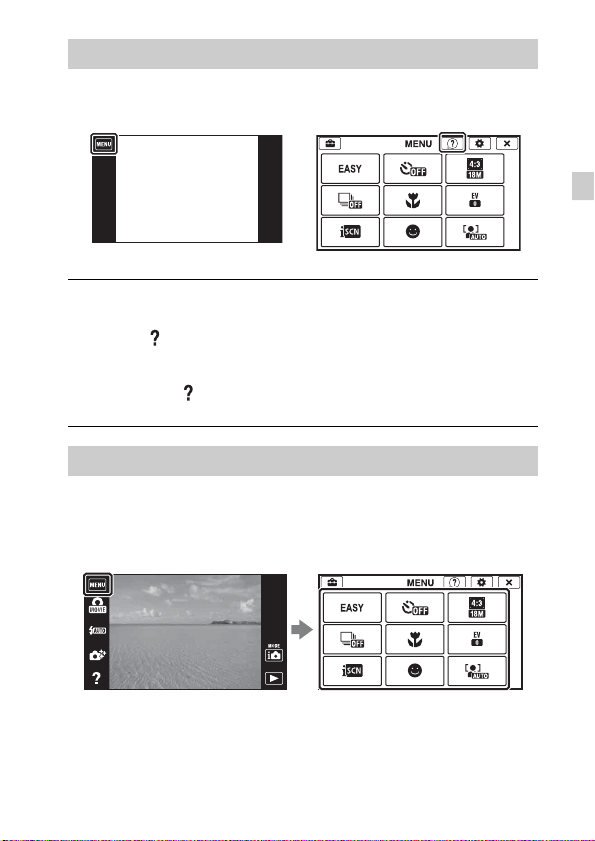
In-Camera Guide
This camera is equipped with built-in instruction guide. This allows you to
search the camera’s functions according to your needs.
Touch MENU.
1
Touch (In-Camera Guide), then select the desired
2
MENU item.
The operation guide for the selected item is displayed.
• If you touch (In-Camera Guide) when the MENU screen is not
displayed, you can search the guide using keywords or icons.
Introduction of other functions
Other functions used when shooting or playing back can be operated touching
the MENU on the screen. This camera is equipped with a Function Guide that
allows you to easily select from the functions. While displaying the guide, you
can use various functions.
GB
GB
19
Page 20
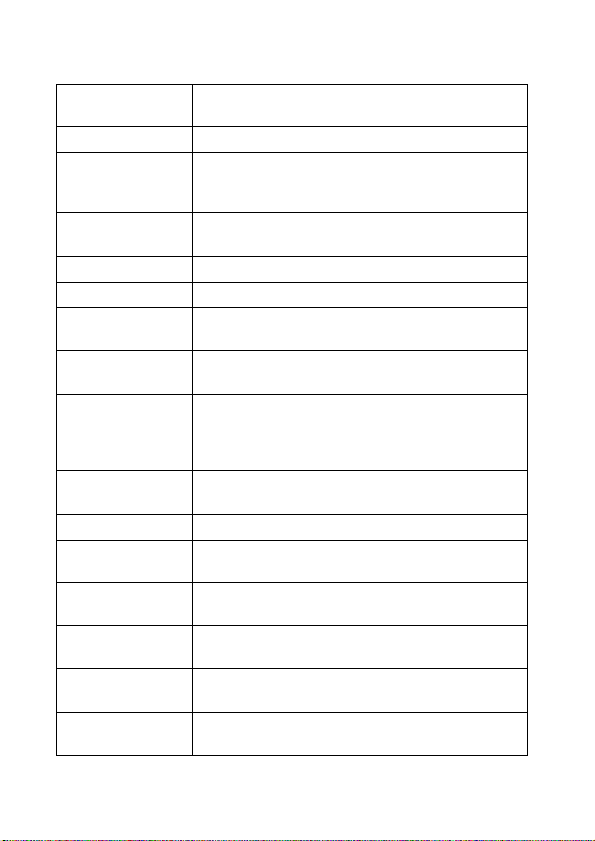
x
Menu Items
Shooting
Movie shooting
scene
Easy Mode Shoot still images using minimal functions.
Photo Creativity
Movie button
Flash Sets the flash settings.
Self-Timer Sets the self-timer settings.
Defocus Effect
Still Image
Size(Dual Rec)
Still Image Size/
Panorama Image
Size/Movie Size/
Movie Quality
Cont. Shooting
Settings
Macro Shoots beautiful close-up images of small subjects.
HDR Painting
effect
Area of emphasis
Color hue
Extracted Color
Watercolor Effect
GB
Select movie recording mode.
Change settings easily and shoot images when the
shooting mode is set to [Intelligent Auto] or [Superior
Auto].
Shoot movies quickly from a shooting mode other than
[Movie Mode].
Set the level of background defocus effect when
shooting in Background Defocus mode.
Sets the still image size shot while recording a movie.
Select the image size and the quality for still images,
panoramic images or movie files.
Sets the burst shooting settings.
When [HDR Painting] is selected in Picture Effect, sets
the effect level.
When [Miniature] is selected in Picture Effect, sets the
part to focus on.
When [Toy camera] is selected in Picture Effect, sets the
color hue.
When [Partial Color] is selected in Picture Effect, selects
the color to extract.
When [Watercolor] is selected in Picture Effect, sets the
effect level.
20
Page 21
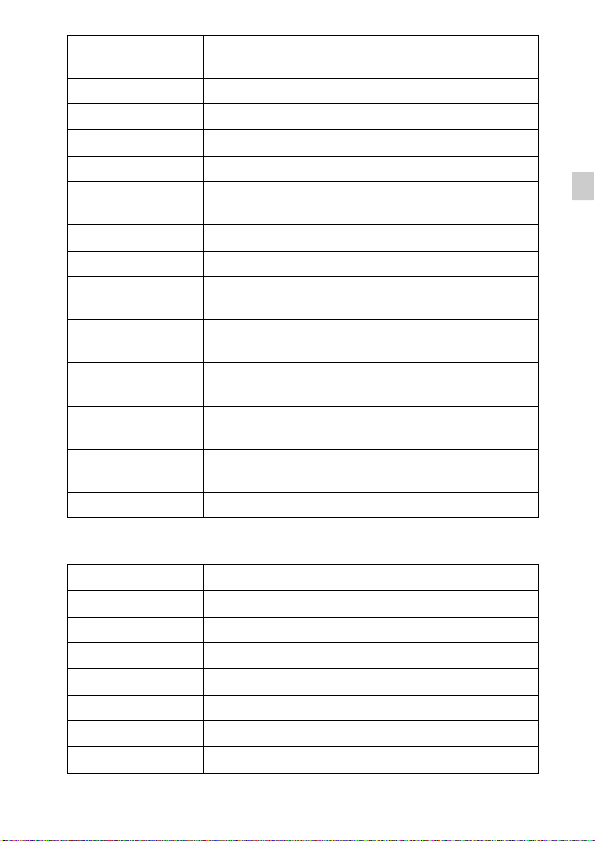
Illustration Effect
EV Adjust the exposure manually.
ISO Adjust the luminous sensitivity.
White Balance Adjust color tones of an image.
Focus Select the focus method.
Metering Mode
Scene Recognition Set to automatically detect shooting conditions.
Soft Skin Effect Set the Soft Skin Effect and the effect level.
Smile Shutter
Smile Detection
Sensitivity
Face Detection
Anti Blink
Movie SteadyShot
In-Camera Guide Search the camera’s functions according to your needs.
When [Illustration] is selected in Picture Effect, sets the
effect level.
Select the metering mode that sets which part of the
subject to measure to determine the exposure.
Set to automatically release the shutter when a smile is
detected.
Set the Smile Shutter function sensitivity for detecting
smiles.
Select to detect faces and adjust various settings
automatically.
Set to automatically shoot two images and select image
in which the eyes are not blinking.
Sets the strength of SteadyShot in movie mode. If you
change this setting, the angle of view will change.
Viewing
Easy Mode Increase the text size on the screen for ease of use.
Date Select Selects the desired image to view by date.
Calendar Selects the date to be played back on Calendar.
Image Index Displays multiple images at the same time.
Slideshow Select a method of continuous playback.
Delete Delete an image.
Retouch Retouch an image using various effects.
Picture Effect Add various texture on images.
GB
GB
21
Page 22
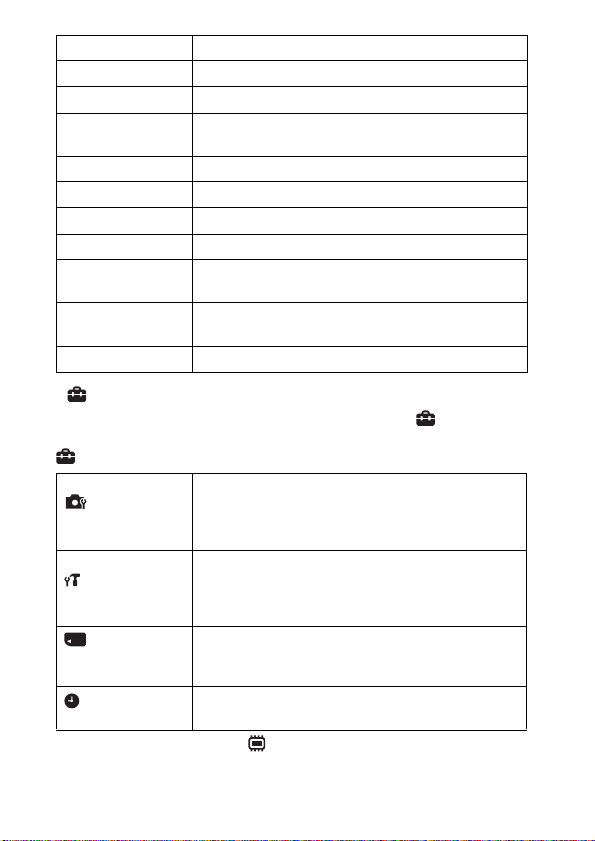
Paint Paints on a still image and saves it as a new file.
3D Viewing Set to play back images shot in 3D mode on a 3D TV.
View Mode Select the display format for images.
Display Cont.
Shooting Group
Protect Protect the images.
Print (DPOF) Add a print order mark to a still image.
Rotate Rotate a still image to the left or right.
Volume Adjusts the volume.
Exposure data
Number of images
in index
In-Camera Guide Search the camera’s functions according to your needs.
x
Setting items
Select to display burst images in groups or display all
images during playback.
Sets whether or not to display the shooting data (Exif
data) of the currently displayed file on the screen.
Sets the number of images displayed in the index screen.
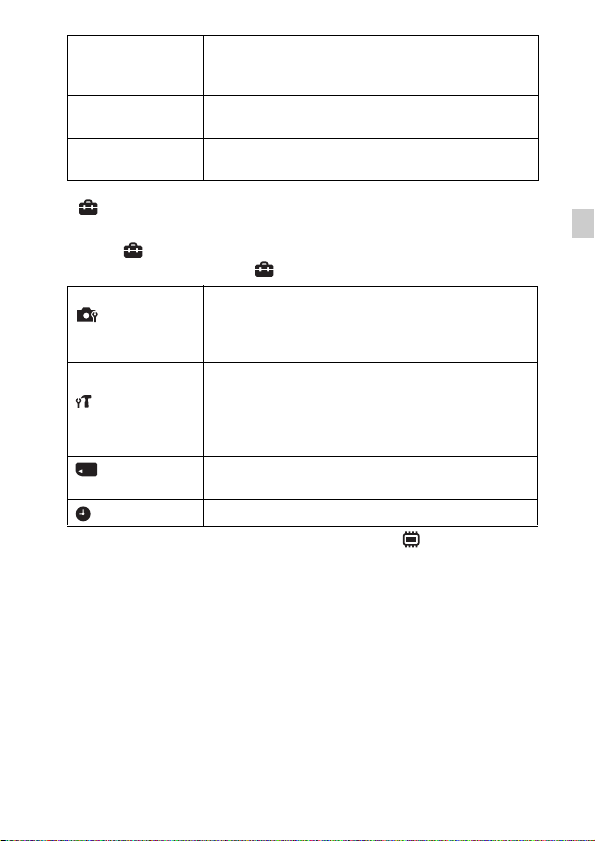
If you touch the MENU while shooting or during playback, (Settings) is
provided as a final selection. You can change the default settings on the
(Settings) screen.
Movie format/AF Illuminator/Grid Line/Clear Image
Shooting Settings
Main Settings
Memory Card
*
Tool
Clock Settings
* If a memory card is not inserted, (Internal Memory Tool) will be displayed and
only [Format] can be selected.
GB
Zoom/Digital Zoom/Wind Noise Reduct./Scene Recog.
Guide/Red Eye Reduction/Blink Alert/Write Date/Disp.
Resolution
Beep/Panel Brightness/Language Setting/Display color/
Demo Mode/Initialize/CTRL FOR HDMI/Eco Mode/
USB Connect Setting/USB Power Supply/LUN Setting/
Download Music/Empty Music/Version
Format/Create REC.Folder/Change REC.Folder/Delete
REC.Folder/Copy/File Number
Area Setting/Date & Time Setting
22
Page 23

Install PC application (Windows)
The built-in software “PlayMemories Home” allows you to import still images
and movies to your computer and use them.
You can shoot or play back images on this camera even if you do not install
“PlayMemories Home”, however, “PlayMemories Home” is required to
import AVCHD movies to your computer.
Connect the camera to a computer.
1
Windows 7: [Computer] t camera icon t media icon
2
t Double-click [PMHOME.EXE]
Windows XP/Vista: [Computer] (in Windows XP, [My
Computer]) t [PMHOME] t Double-click
[PMHOME.EXE]
Follow the instructions on the screen to complete the
3
installation.
Note
• “PlayMemories Home” is not compatible to Mac OS. If you play back images on a
Mac, use the applications that are installed on your Mac.
For details, see http://www.sony.co.jp/imsoft/Mac/
x
Features of “PlayMemories Home”
Below are examples of the functions available when you use “PlayMemories
Home”. To take advantage of the various “PlayMemories Home” functions,
connect to the Internet and install the “Expanded Feature”.
• You can import images shot with the camera to a computer for display.
• You can display images stored on a computer by shooting date in a calendar
display.
• You can correct (Red Eye Correction, etc.) still images, print the images,
send images by e-mail, and change the shooting date and time.
• You can save and print images with the date.
• You can create a disc from AVCHD movies imported to a computer.
(Expanded Feature)
GB
GB
23
Page 24
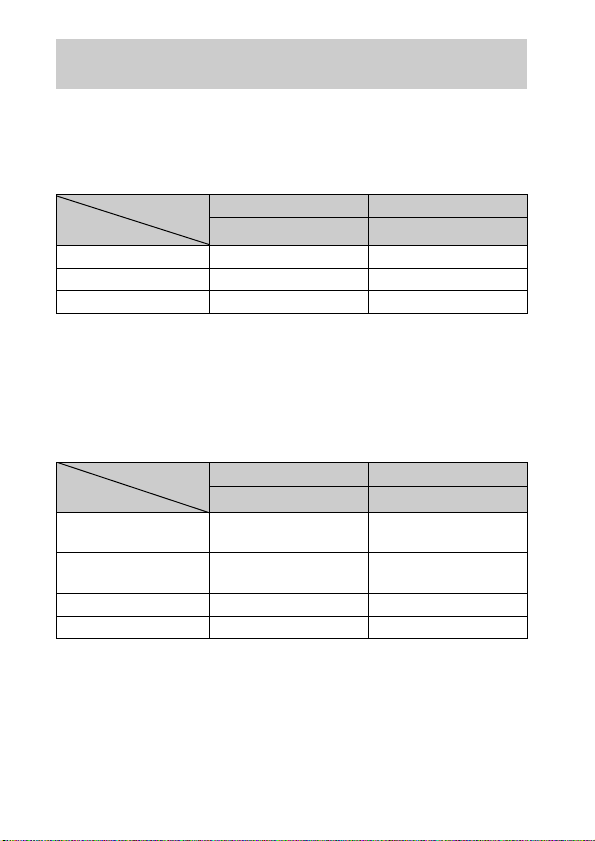
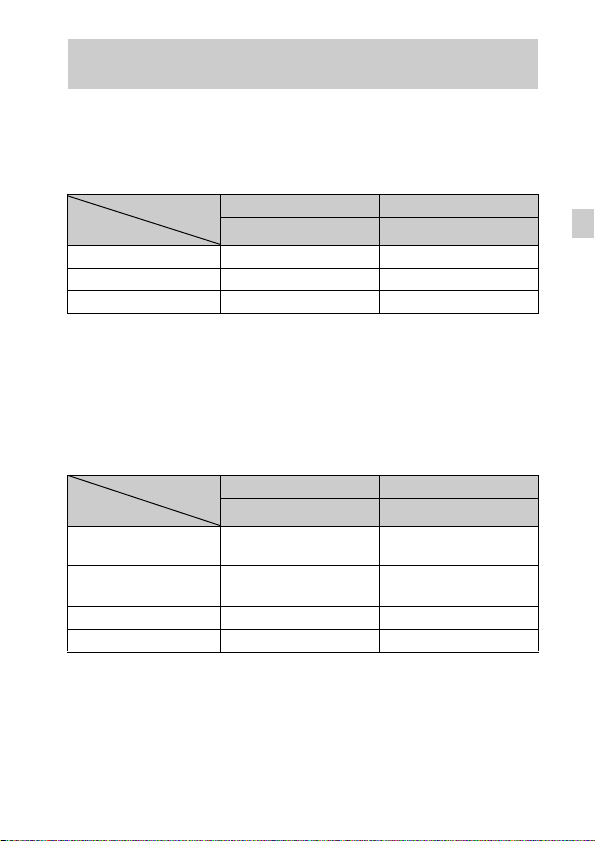
Number of still images and recordable time of movies
The number of still images and recordable time may vary depending on the
shooting conditions and the memory card.
x
Still images
(Units: Images)
Capacity
Size
18M 3 295
VGA 65 6400
16:9(13M) 3 330
x
Movies
Internal memory Memory card
Approx. 19 MB 2 GB
The table below shows the approximate maximum recording times. These are
the total times for all movie files. Continuous shooting is possible for
approximately 29 minutes. The maximum size of an MP4-format movie file is
up to approximately 2 GB.
(h (hour), m (minute))
Capacity
Size
AVC HD 24M (FX) — 10 m
AVC HD 9M (HQ) — 20 m
MP4 12M — 15 m
MP4 3M — 1 h 5 m
The number in ( ) is the minimum recordable time.
• The recordable time of movies varies because the camera is equipped with VBR
(Variable Bit Rate), which automatically adjusts image quality depending on the
shooting scene. When you record a fast-moving subject, the image is clearer but
the recordable time is shorter because more memory is required for recording.
The recordable time also varies depending on the shooting conditions, the subject
or the image quality/size settings.
GB
Internal memory Memory card
Approx. 19 MB 2 GB
(10 m)
(15 m)
24
Page 25

Notes on using the camera
Functions built into this camera
• This manual describes each of the functions of 1080 60i-compatible devices and
1080 50i-compatible devices.
To check whether your camera is a 1080 60i-compatible device or a 1080 50icompatible device, check for the following marks on the bottom of the camera.
1080 60i-compatible device: 60i
1080 50i-compatible device: 50i
• Do not watch 3D images shot with this camera for extended periods of time on
3D-compliant monitors.
• When you view 3D images shot with this camera on a 3D-compliant monitors, you
may experience discomfort in the form of eye strain, fatigue, or nausea. To prevent
these symptoms, we recommend that you take regular breaks. However, you need
to determine for yourself the length and frequency of breaks you require, as they
vary according to the individual. If you experience any type of discomfort, stop
viewing the 3D images until you feel better, and consult a physician as necessary.
Also refer to the operating instructions supplied with the device or software you
have connected or are using with this camera. Note that a child’s eyesight is still at
the development stage (particularly children below the age of 6).
Consult a pediatrician or ophthalmologist before letting your child view 3D
images, and make sure he/she observes the above precautions when viewing such
images.
On use and care
Avoid rough handling, disassembling, modifying, physical shock, or impact such as
hammering, dropping, or stepping on the product. Be particularly careful of the lens.
Notes on recording/playback
• Before you start recording, make a trial recording to make sure that the camera is
working correctly.
• The camera is neither dust-proof, nor splash-proof, nor water-proof.
• Avoid exposing the camera to water. If water enters inside the camera, a
malfunction may occur. In some cases, the camera cannot be repaired.
• Do not aim the camera at the sun or other bright light. It may cause the
malfunction of the camera.
• If moisture condensation occurs, remove it before using the camera.
• Do not shake or strike the camera. It may cause a malfunction and you may not be
able to record images. Furthermore, the recording media may become unusable or
image data may be damaged.
GB
GB
25
Page 26

Do not use/store the camera in the following places
• In an extremely hot, cold or humid place
In places such as in a car parked in the sun, the camera body may become
deformed and this may cause a malfunction.
• Under direct sunlight or near a heater
The camera body may become discolored or deformed, and this may cause a
malfunction.
• In a location subject to rocking vibration
• Near a location that generates strong radio waves, emits radiation or is strongly
magnetic place. Otherwise, the camera may not properly record or play back
images.
• In sandy or dusty places
Be careful not to let sand or dust get into the camera. This may cause the camera to
malfunction, and in some cases this malfunction cannot be repaired.
On carrying
Do not sit down in a chair or other place with the camera in the back pocket of your
trousers or skirt, as this may cause malfunction or damage the camera.
Carl Zeiss lens
The camera is equipped with a Carl Zeiss lens which is capable of reproducing sharp
images with excellent contrast. The lens for the camera has been produced under a
quality assurance system certified by Carl Zeiss in accordance with the quality
standards of Carl Zeiss in Germany.
Note on the screen
The screen is manufactured using extremely high-precision technology so over
99.99% of the pixels are operational for effective use. However, some tiny black
and/or bright dots (white, red, blue or green) may appear on the screen. These dots
are a normal result of the manufacturing process, and do not affect the recording.
On camera’s temperature
Your camera and battery may get hot due to continuous use, but it is not a
malfunction.
On the overheat protection
Depending on the camera and battery temperature, you may be unable to record
movies or the power may turn off automatically to protect the camera.
A message will be displayed on the screen before the power turns off or you can no
longer record movies. In this case, leave the power off and wait until the camera and
battery temperature goes down. If you turn on the power without letting the camera
and battery cool enough, the power may turn off again or you may be unable to
record movies.
26
GB
Page 27

On charging the battery
If you charge a battery that has not been used for a long time, you may be unable to
charge it to the proper capacity.
This is due to the battery characteristics, and is not a malfunction. Charge the battery
again.
Warning on copyright
Television programs, films, videotapes, and other materials may be copyrighted.
Unauthorized recording of such materials may be contrary to the provisions of the
copyright laws.
No compensation for damaged content or recording failure
Sony cannot compensate for failure to record or loss or damage of recorded content
due to a malfunction of the camera or recording media, etc.
Cleaning the camera surface
Clean the camera surface with a soft cloth slightly moistened with water, then wipe
the surface with a dry cloth. To prevent damage to the finish or casing:
– Do not expose the camera to chemical products such as thinner, benzine, alcohol,
disposable cloths, insect repellent, sunscreen or insecticide.
GB
GB
27
Page 28

Specifications
Camera
[System]
Image device: 7.76 mm (1/2.3 type)
Exmor R CMOS sensor
Total pixel number of camera:
Approx. 18.9 Megapixels
Effective pixel number of camera:
Approx. 18.2 Megapixels
Lens: Carl Zeiss Vario-Tessar 5× zoom
lens
f = 4.7 mm – 23.5 mm (26 mm –
130 mm (35 mm film equivalent))
F3.5 (W) – F4.8 (T)
While shooting movies (16:9):
28 mm – 140 mm*
While shooting movies (4:3):
35 mm – 175 mm*
* When [Movie SteadyShot] is set
to [Standard]
SteadyShot: Optical
Exposure control: Automatic exposure,
Scene Selection (15 modes)
White balance: Automatic, Daylight,
Cloudy, Fluorescent 1/2/3,
Incandescent, Flash, One Push
Signal format:
For 1080 50i: PAL color, CCIR
standards HDTV 1080/50i
specification
For 1080 60i: NTSC color, EIA
standards HDTV 1080/60i
specification
File format:
Still images: JPEG (DCF, Exif,
MPF Baseline) compliant, DPOF
compatible
3D still images: MPO (MPF
Extended (Disparity Image))
compliant
Movies (AVCHD format):
AVCHD format Ver. 2.0
compatible
Video: MPEG-4 AVC/H.264
Audio: Dolby Digital 2ch,
equipped with Dolby Digital Stereo
Creator
• Manufactured under license from
Dolby Laboratories.
Movies (MP4 format):
Video: MPEG-4 AVC/H.264
Audio: MPEG-4 AAC-LC 2ch
Recording media: Internal Memory
(Approx. 19 MB), “Memory Stick
Micro” media, microSD memory
cards
Flash: Flash range (ISO sensitivity
(Recommended Exposure Index)
set to Auto):
Approx. 0.08 m to 3.7 m
(3 1/4 inches to 12 ft 1 3/4 inches)
(W)
Approx. 0.6 m to 2.6 m
(1 ft 11 5/8 inches to 8 ft
6 3/8 inches) (T)
28
GB
Page 29

[Input and Output connectors]
HDMI connector: HDMI micro jack
Multi connector: Type3b
(AV-out/USB/DC-in)
Video output
Audio output
USB communication
USB communication: Hi-Speed USB
(USB 2.0)
[Screen]
OLED screen:
Wide (16:9), 8.3 cm (3.3 type)
Total number of dots:
1 229 760 dots equivalent
[Power, general]
Power: Rechargeable battery pack
NP-BN, 3.6 V
AC Adaptor AC-UB10/UB10B/
UB10C/UB10D, 5 V
Power consumption (during shooting):
1.0 W
Operating temperature: 0 °C to 40 °C
(32 °F to 104 °F)
Storage temperature: –20 °C to +60 °C
(–4 °F to +140 °F)
Dimensions (CIPA compliant):
92.9 mm × 54.4 mm × 13.4 mm
(3 3/4 inches × 2 1/4 inches ×
17/32 inches) (W/H/D)
Mass (CIPA compliant) (including
NP-BN battery pack, “Memory
Stick Micro” media):
Approx. 109 g (3.8 oz)
Microphone: Stereo
Speaker: Monaural
Exif Print: Compatible
PRINT Image Matching III:
Compatible
AC Adaptor AC-UB10/UB10B/
UB10C/UB10D
Power requirements: AC 100 V to
240 V, 50 Hz/60 Hz, 70 mA
Output voltage: DC 5 V, 0.5 A
Operating temperature: 0 °C to 40 °C
(32°F to 104°F)
Storage temperature: –20 °C to +60 °C
(–4 °F to +140 °F)
Dimensions:
Approx. 50 mm × 22 mm × 54 mm
(2 inches × 7/8 inches ×
2 1/4 inches) (W/H/D)
Mass:
For the USA and Canada:
Approx. 48 g (1.7 oz)
For countries or regions other than
the USA and Canada:
Approx. 43 g (1.5 oz)
Rechargeable battery pack
NP-BN
Used battery: Lithium-ion battery
Maximum voltage: DC 4.2 V
Nominal voltage: DC 3.6 V
Maximum charge voltage: DC 4.2 V
Maximum charge current: 0.9 A
Capacity:
typical: 2.3 Wh (630 mAh)
minimum: 2.2 Wh (600 mAh)
Design and specifications are subject to
change without notice.
GB
GB
29
Page 30
Trademarks
• The following marks are trademarks
of Sony Corporation.
, “Cyber-shot,”
“Memory Stick Micro”
• “AVCHD” and “AVCHD” logotype
are trademarks of Panasonic
Corporation and Sony Corporation.
• Windows is registered trademark of
Microsoft Corporation in the United
States and/or other countries.
• Mac is registered trademark of Apple
Inc.
• microSDHC logo is a trademark of
SD-3C, LLC.
• “ ” and “PlayStation” are
registered trademarks of Sony
Computer Entertainment Inc.
• In addition, system and product
names used in this manual are, in
general, trademarks or registered
trademarks of their respective
developers or manufacturers.
However, the ™ or ® marks are not
used in all cases in this manual.
• Add further enjoyment with your
PlayStation 3 by downloading the
application for PlayStation 3 from
PlayStation Store (where available.)
• The application for PlayStation 3
requires PlayStation Network
account and application download.
Accessible in areas where the
PlayStation Store is available.
Additional information on this
product and answers to frequently
asked questions can be found at
our Customer Support Website.
Printed on 70% or more recycled paper
using VOC (Volatile Organic
Compound)-free vegetable oil based
ink.
30
GB
Page 31

GB
GB
31
Page 32
Español
Para saber más sobre la cámara (“Guía del usuario de Cyber-shot”)
La “Guía del usuario de Cyber-shot” es un manual on-line.
Consúltela para ver instrucciones exhaustivas sobre las
muchas funciones de la cámara.
1 Acceda a la página de atención al cliente de Sony.
http://www.sony.net/SonyInfo/Support/
2 Seleccione su país o región.
3 Busque el nombre del modelo de su cámara en la página
de atención al cliente.
• Compruebe el nombre del modelo en la parte inferior de
su cámara.
Comprobación de los artículos suministrados
El número entre paréntesis indica el número de piezas.
• Cámara (1)
• Batería recargable NP-BN (1)
(Esta batería recargable no se puede utilizar con las Cyber-shot que se
suministran con la batería NP-BN1.)
• Cable USB para terminal de usos múltiples (1)
• Adaptador de alimentación de ca (FUENTE DE ALIMENTACIÓN)
AC-UB10/UB10B/UB10C/UB10D (1)
• Cable de alimentación (no suministrado en EE.UU. y Canadá) (1)
• Lápiz de pintar (1)
• Correa para muñeca (1)
• Adaptador de trípode (1)
• Manual de instrucciones (este manual) (1)
ES
2
Page 33

Nombre del producto: Cámara Digital
Modelo: DSC-TX66
POR FAVOR LEA DETALLADAMENTE ESTE MANUAL DE INSTRUCCIONES
ANTES DE CONECTAR Y OPERAR ESTE EQUIPO.
RECUERDE QUE UN MAL USO DE SU APARATO PODRÍA ANULAR LA
GARANTÍA.
AVISO
Para reducir el riesgo de incendio o descarga eléctrica, no
exponga la unidad a la lluvia ni a la humedad.
INSTRUCCIONES DE SEGURIDAD IMPORTANTES
-GUARDE ESTAS INSTRUCCIONES
PELIGRO
PARA REDUCIR EL RIESGO DE INCENDIO O DESCARGA
ELÉCTRICA, SIGA ATENTAMENTE ESTAS INSTRUCCIONES
PRECAUCIÓN
[ Batería
Si la batería se manipula indebidamente, puede explotar y causar un incendio o provocarle
quemaduras químicas. Tenga en cuenta las siguientes precauciones.
• No desmonte el producto.
• No aplaste ni exponga la batería a impactos tales como golpes o caídas, ni la deje caer o
la pise.
• No provoque un cortocircuito en la batería ni permita que objetos metálicos entren en
contacto con sus terminales.
• No exponga la batería a temperaturas superiores a 60 °C como a la luz solar directa, o en
el interior de un automóvil estacionado al sol.
• No la incinere ni la arroje al fuego.
• No manipule baterías de iones de litio dañadas o con fugas.
• Asegúrese de cargar la batería con un cargador de baterías original de Sony o con un
dispositivo que pueda cargarla.
• Mantenga la batería fuera del alcance de niños pequeños.
• Mantenga la batería seca.
• Sustitúyala únicamente por otra del mismo tipo o equivalente recomendada por Sony.
• Deshágase de la baterías usada lo antes posible según el procedimiento que se describe
en las instrucciones.
ES
ES
3
Page 34

[ Adaptador de alimentación de ca (FUENTE DE ALIMENTACIÓN)
Conecte el adaptador de ca a la toma de corriente de la pared más cercana.
Si ocurriera algún problema mientras utiliza el adaptador de ca, corte inmediatamente la
corriente desenchufando el cable de alimentación de la toma de corriente de la pared.
El cable de alimentación, si se ha suministrado, está diseñado de manera específica para
utilizarse únicamente con esta cámara y no debería utilizarse con ningún otro equipo
eléctrico.
Atención para los clientes en Europa
[ Aviso para los clientes de países en los que se aplican las
directivas de la UE
El fabricante de este producto es Sony Corporation, 1-7-1 Konan Minato-ku Tokyo,
108-0075, Japón. El representante autorizado en lo referente al cumplimiento de la
directiva EMC y a la seguridad de los productos es Sony Deutschland GmbH, Hedelfinger
Strasse 61, 70327 Stuttgart, Alemania. Para resolver cualquier asunto relacionado con el
soporte técnico o la garantía, consulte las direcciones que se indican en los documentos de
soporte técnico y garantía suministrados por separado.
Este producto se ha probado y cumple con la normativa que establece la Directiva EMC si
se utiliza un cable de conexión de menos de 3 metros de longitud.
[ Atención
Los campos electromagnéticos a frecuencias específicas podrán influir en la imagen y el
sonido de esta unidad.
[ Aviso
Si la electricidad estática o el electromagnetismo interrumpen la transmisión de datos
(fallo), reinicie la aplicación o desconecte el cable de comunicación (USB, etc.) y vuelva a
conectarlo.
[ Tratamiento de los equipos eléctricos y electrónicos al final de
su vida útil (aplicable en la Unión Europea y en países europeos
con sistemas de tratamiento selectivo de residuos)
Este símbolo en el equipo o en su embalaje indica que el presente
producto no puede ser tratado como residuos doméstico normal. Debe
entregarse en el correspondiente punto de recogida de equipos eléctricos y
electrónicos. Al asegurarse de que este producto se desecha
correctamente, usted ayuda a prevenir las consecuencias potencialmente
negativas para el medio ambiente y la salud humana que podrían derivarse
de la incorrecta manipulación en el momento de deshacerse de este
naturales. Para recibir información detallada sobre el reciclaje de este producto, póngase en
contacto con el ayuntamiento, el punto de recogida más cercano o el establecimiento donde
ha adquirido el producto.
ES
producto. El reciclaje de materiales ayuda a conservar los recursos
4
Page 35

[ Tratamiento de las baterías al final de su vida útil (aplicable en la
Unión Europea y en países europeos con sistemas de
tratamiento selectivo de residuos)
Este símbolo en la batería o en el embalaje indica que la batería
proporcionada con este producto no puede ser tratada como un residuo
doméstico normal.
En algunas baterías este símbolo puede utilizarse en combinación con un
símbolo químico. El símbolo químico del mercurio (Hg) o del plomo (Pb)
0,004% de plomo.
Al asegurarse de que estas baterías se desechan correctamente, usted ayuda a prevenir las
consecuencias potencialmente negativas para el medio ambiente y la salud humana que
podrían derivarse de la incorrecta manipulación en el momento de deshacerse de la
batería. El reciclaje de materiales ayuda a conservar los recursos naturales.
En el caso de productos que por razones de seguridad, rendimiento o mantenimiento de
datos sea necesaria una conexión permanente con la batería incorporada, esta batería solo
deberá ser reemplazada por personal técnico cualificado para ello.
Para asegurarse de que la batería será tratada correctamente, entregue el producto al final
de su vida útil en un punto de recogida para el reciclado de aparatos eléctricos y
electrónicos.
Para las demás baterías, consulte la sección donde se indica cómo extraer la batería del
producto de forma segura. Deposite la batería en el correspondiente punto de recogida para
el reciclado de baterías.
Para recibir información detallada sobre el reciclaje de este producto o de la batería,
póngase en contacto con el ayuntamiento, el punto de recogida más cercano o el
establecimiento donde ha adquirido el producto.
se añadirá si la batería contiene más del 0,0005% de mercurio o del
ES
ES
5
Page 36
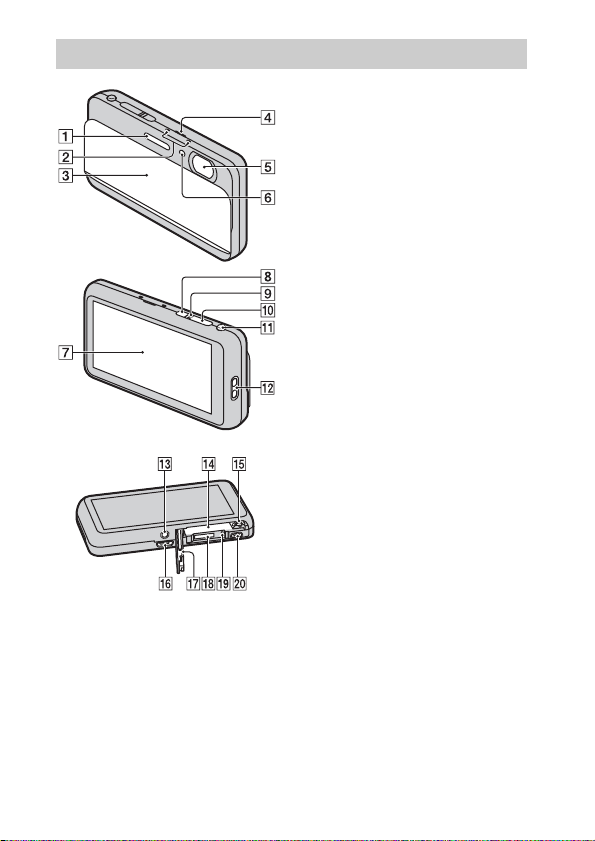
Identificación de las partes
A Flash
B Micrófono
C Tapa del objetivo
D Altavoz
E Objetivo
F Lámpara del autodisparador/
Lámpara del captador de
sonrisas/Iluminador AF
G Pantalla OLED/Panel táctil
H Botón ON/OFF (Alimentación)
I Lámpara de alimentación/carga
J Botón del disparador
K Palanca W/T (zoom)
L Gancho para correa de muñeca
M Rosca para trípode
N Ranura de inserción de la batería
O Palanca de expulsión de la
batería
P Conector múltiple (Type3b)
Q Tapa de la batería/tarjeta de
memoria
R Ranura de tarjeta de memoria
S Lámpara de acceso
T Microtoma HDMI
ES
6
Page 37
Inserción de la batería
Palanca de expulsión de la batería
Abra la tapa.
1
Inserte la batería.
2
• Mientras desliza la palanca de expulsión de la batería, inserte la batería
como se muestra en la ilustración. Asegúrese de que la palanca de
expulsión de la batería se bloquea después de insertarla.
• El cerrar la tapa con la batería insertada incorrectamente podrá dañar la
cámara.
ES
ES
7
Page 38
Carga de la batería
Para clientes en EE.UU., Canadá
Cable de
alimentación
Para clientes en países/regiones
distintos de EE.UU. y Canadá
Conecte la cámara al adaptador de alimentación de ca
1
(suministrado), utilizando el cable USB para terminal de
Lámpara de alimentación/carga
Iluminada: Cargando
Apagada: La carga ha terminado
Parpadea:
Error de carga
Se ha hecho una pausa en la
carga debido al
recalentamiento
usos múltiples (suministrado).
Conecte el adaptador de alimentación de ca a la toma
2
de corriente de la pared.
Se ilumina en naranja la lámpara de alimentación/carga, y comienza la
carga.
• Apague la cámara mientras carga la batería.
• Puede cargar la batería incluso cuando esté parcialmente cargada.
• Cuando la lámpara de alimentación/carga parpadee y la carga no haya
finalizado, extraiga la batería y vuelva a insertarla.
ES
8
Page 39

Notas
• Si la lámpara de alimentación/carga de la cámara parpadea cuando el adaptador de
alimentación de ca está conectado a la toma de corriente de la pared, indica que la
carga se ha detenido temporalmente porque la temperatura está fuera del rango
recomendado. Cuando la temperatura vuelve dentro del rango apropiado, se
reanuda la carga. Le recomendamos cargar la batería a una temperatura ambiente
de entre 10 °C a 30 °C
• Es posible que la batería no se cargue eficazmente si la sección del terminal de la
batería está sucia. En este caso, quite el polvo ligeramente utilizando un paño
suave o un bastoncillo de algodón para limpiar la sección del terminal de la
batería.
• Conecte el adaptador de alimentación de ca (suministrado) a la toma de corriente
de la pared más cercana. Si se produce algún malfuncionamiento mientras se
utiliza el adaptador de alimentación de ca, desenchufe la clavija de la toma de
corriente de la pared inmediatamente para desconectarlo de la fuente de
alimentación.
• Cuando termine la carga, desconecte el adaptador de alimentación de ca de la toma
de corriente de la pared.
• Asegúrese de utilizar solamente baterías, cable USB para terminal de usos
múltiples (suministrado) y adaptador de alimentación de ca (suministrado) de la
marca Sony genuinos.
• Con el cargador de baterías BC-TRN2 (se vende por separado) se puede cargar
rápidamente la batería recargable NP-BN suministrada con este modelo. Con el
cargador de baterías BC-TRN (se vende por separado) no se puede cargar
rápidamente la batería recargable NP-BN suministrada con este modelo.
x
Tiempo de carga (Carga completa)
El tiempo de carga es de aproximadamente 115 min (minuto) utilizando el
adaptador de alimentación de ca (suministrado).
Nota
• El tiempo de carga de arriba se aplica cuando se carga una batería completamente
agotada a una temperatura de 25 °C
La carga podrá llevar más tiempo dependiendo de las condiciones de utilización y
las circunstancias.
ES
ES
9
Page 40
x
Carga conectando a un ordenador
La batería se puede cargar conectando la cámara a un ordenador utilizando el
cable USB para terminal de usos múltiples.
Nota
• Tenga en cuenta los puntos siguientes cuando cargue a través de un ordenador:
– Si conecta la cámara a un ordenador portátil que no está conectado a la fuente de
corriente, el nivel de la batería del portátil disminuirá. No cargue durante un
periodo de tiempo prolongado.
– No encienda/apague o reinicie el ordenador, ni lo reanude desde el modo de
ahorro de energía cuando se encuentre establecida una conexión USB entre el
ordenador y la cámara. La cámara podría causar un mal functionamiento. Antes
de encender/apagar, o reiniciar el ordenador o reanudarlo desde el modo de
ahorro de energía, desconecte la cámara y el ordenador.
– No existen garantías para la carga utilizando un ordenador de diseño particular o
un ordenador modificado.
x
Duración de la batería y número de imágenes que se
pueden grabar y ver
Duración de la batería Número de imágenes
Tomar (imágenes fijas) Aprox. 125 min (minuto) Aprox. 250 imágenes
Ver (imágenes fijas) Aprox. 180 min (minuto) Aprox. 3 600 imágenes
Tomar (películas) Aprox. 60 min (minuto) —
10
ES
Page 41

Notas
• El número de arriba de imágenes se aplica cuando la batería está completamente
cargada. El número de imágenes podrá disminuir dependiendo de las condiciones
de uso.
• El número de imágenes que se puede grabar es cuando las tomas se hacen en las
condiciones siguientes:
– Utilizando tarjeta de memoria microSD de Sony (Clase 4 o más rápida) (se
vende por separado)
– La batería se utiliza a una temperatura ambiente de 25 °C
– [Resolución visualiz.] está ajustada a [Estándar].
• El número para “Tomar (imágenes fijas)” está basado en el estándar CIPA, y es
tomando imágenes en las condiciones siguientes:
(CIPA: Camera & Imaging Products Association)
– [Luminosidad panel] está ajustada a [3(Normal)].
– Tomando una imagen cada 30 s (segundo)
– Se cambia el zoom alternativamente entre los extremos W y T.
– El flash destella una de cada dos veces.
– La alimentación se activa y desactiva una vez cada diez veces.
• La duración de la batería para películas se aplica tomando en las condiciones
siguientes:
– Calidad película: AVC HD HQ
– Cuando finalice la toma continua debido a los límites establecidos (página 23),
toque (Botón película) otra vez y continúe tomando. Las funciones de toma
tal como el zoom no responderán.
x
Suministro de alimentación
A la cámara se le puede suministrar alimentación desde la toma de corriente de
la pared conectando el adaptador de alimentación de ca, utilizando el cable
USB para terminal de usos múltiples (suministrado).
Puede importar imágenes a un ordenador sin preocuparse de si se agota la
batería conectando la cámara a un ordenador utilizando el cable USB para
terminal de usos múltiples.
Además, puede utilizar el adaptador de alimentación de ca AC-UD10 (se
vende por separado) para hacer la toma y así suministrar alimentación cuando
toma imágenes.
ES
ES
11
Page 42
Notas
• La alimentación no se puede suministrar cuando la batería no está insertada en la
cámara.
• Cuando la cámara esté conectada directamente a un ordenador o a una toma de
corriente utilizando el adaptador de alimentación de ca suministrado, el suministro
de alimentación estará disponible solamente en modo de reproducción. Si la
cámara está en modo de toma de imagen o mientras usted está cambiando los
ajustes de la cámara, no se suministrará alimentación aunque haga una conexión
USB utilizando el cable USB para terminal de usos múltiples.
• Si conecta la cámara y un ordenador utilizando el cable USB para terminal de usos
múltiples mientras la cámara está en modo de reproducción, la visualización en la
cámara cambiará de la pantalla de reproducción a la pantalla de conexión USB.
Toque (Reproducir) para cambiar a la pantalla de reproducción.
Inserción de una tarjeta de memoria (se vende por separado)
Asegúrese de que el lado
correcto está orientado
hacia arriba.
Abra la tapa.
1
ES
12
“Memory Stick
Micro” (M2)
Terminal Superficie
Tarjeta de memoria
microSD
de impresión
Page 43
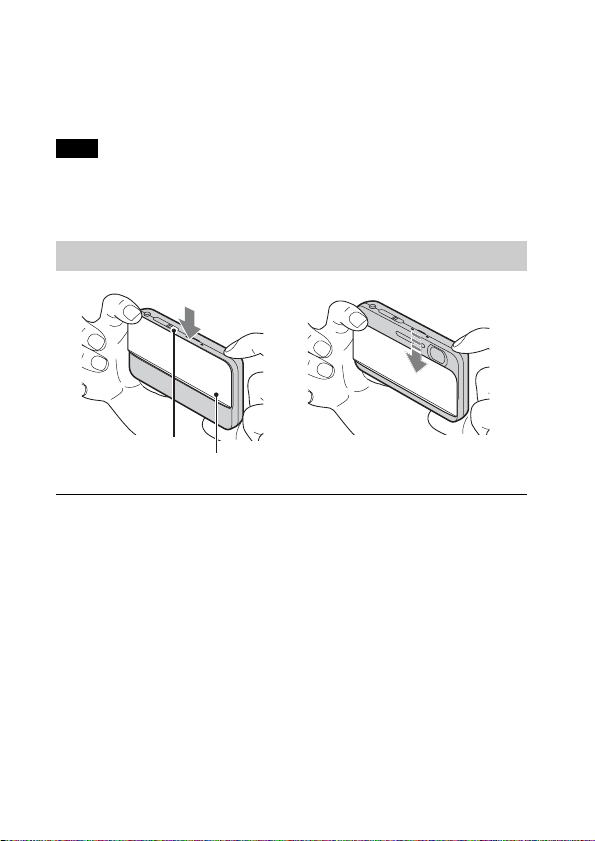
Inserte la tarjeta de memoria (se vende por separado).
2
• Con el objetivo de la cámara orientado hacia arriba, como se muestra en
la ilustración, inserte la tarjeta de memoria en línea recta hasta encaje en
su sitio con un chasquido.
• Si empuja hacia abajo la tarjeta de memoria microSD (en la dirección de
la ranura de inserción de la batería) mientras la inserta podrá dañar la
cámara.
• Tenga cuidado cuando extraiga la tarjeta de memoria microSD, porque
podrá salir de pronto rápidamente.
Cierre la tapa.
3
Compruebe el icono visualizado en la parte superior
4
derecha de la pantalla y asegúrese de que la tarjeta de
memoria está insertada correctamente.
• A: La tarjeta de memoria está insertada
correctamente.
• B: La tarjeta de memoria no está
insertada correctamente. Confirme la
dirección de la tarjeta de memoria y
vuelva a insertarla en línea recta en la
cámara.
• Solamente se puede insertar una tarjeta
de memoria.
x
Tarjetas de memoria que se pueden utilizar
Tarjeta de memoria Para imágenes fijas Para películas
Memory Stick Micro a —
A
Memory Stick Micro (Mark2) aa
Tarjeta de memoria microSD aa (Clase 4 o más
B
Tarjeta de memoria
microSDHC
• En este manual, los productos en A se conocen colectivamente como “Memory
Stick Micro”, y los productos en B se conocen colectivamente como tarjeta de
memoria microSD.
aa (Clase 4 o más
rápida)
rápida)
ES
ES
13
Page 44
x
Para extraer la tarjeta de memoria/batería
Tarjeta de memoria: Empuje la tarjeta de memoria hacia dentro una vez para
expulsar la tarjeta de memoria.
Batería: Deslice la palanca de expulsión de la batería. Asegúrese de no dejar
caer la batería.
Nota
• No extraiga nunca la tarjeta de memoria/batería cuando la lámpara de acceso
(página 6) esté encendida. Esto podría ocasionar daño a los datos en la tarjeta de
memoria/memoria interna.
Ajuste del reloj
Botón ON/OFF
(Alimentación)
Baje la tapa del objetivo.
1
La cámara se enciende. La lámpara de alimentación se ilumina en verde
solamente al encenderse la cámara.
Cuando encienda la cámara por primera vez se visualizará el ajuste de
Fecha y Hora.
• También puede encender la cámara pulsando el botón ON/OFF
(Alimentación).
• Es posible que lleve algún tiempo en conectarse la alimentación y
permitir realizar operaciones.
Seleccione un idioma deseado.
2
Seleccione un lugar geográfico deseado siguiendo las
3
instrucciones en pantalla, después toque [Sig.].
ES
Tapa del objetivo
14
Page 45
Ajuste [Hora verano], [Format fecha y hora] y [Fecha y
4
hora], después toque [Sig.].
• Medianoche se indica como 12:00 AM, y mediodía como 12:00 PM.
Toque [OK].
5
Siga las instrucciones de la pantalla.
6
• Si ajusta [Resolución visualiz.] a [Alta], es posible que la carga de la
batería se agote más rápidamente.
Toma de imágenes fijas/películas
Botón del disparador
Toma de imágenes fijas
Pulse el botón del disparador hasta la mitad para
1
enfocar.
Cuando la imagen está enfocada, suena un pitido y se ilumina el indicador
z.
Pulse el botón del disparador a fondo para tomar una
2
imagen.
ES
ES
15
Page 46
Toma de películas
Toque (Botón película) para comenzar a grabar.
1
• Utilice la palanca W/T (zoom) para cambiar la escala del zoom.
• Pulse el botón del disparador para tomar imágenes fijas mientras
continúa grabando la película.
Toque (Botón película) para detener la grabación.
2
Notas
• El sonido de la palanca funcionando se grabará cuando se accione la función de
zoom mientras se toma una película.
• Se puede filmar continuamente durante 29 min (minuto) aproximadamente de una
vez con los ajustes predeterminados de la cámara y cuando la temperatura es de
aproximadamente 25 °C
Cuando termine la grabación de película, puede volver a grabar tocando
(Botón película) otra vez. Es posible que la grabación se detenga para
proteger la cámara dependiendo de la temperatura ambiente.
Visualización de imágenes
Toque (Reproducción).
1
• Cuando se reproduzcan en esta cámara imágenes de una tarjeta de
memoria grabadas con otras cámaras, aparecerá la pantalla de registro
para el archivo de datos.
16
ES
Page 47
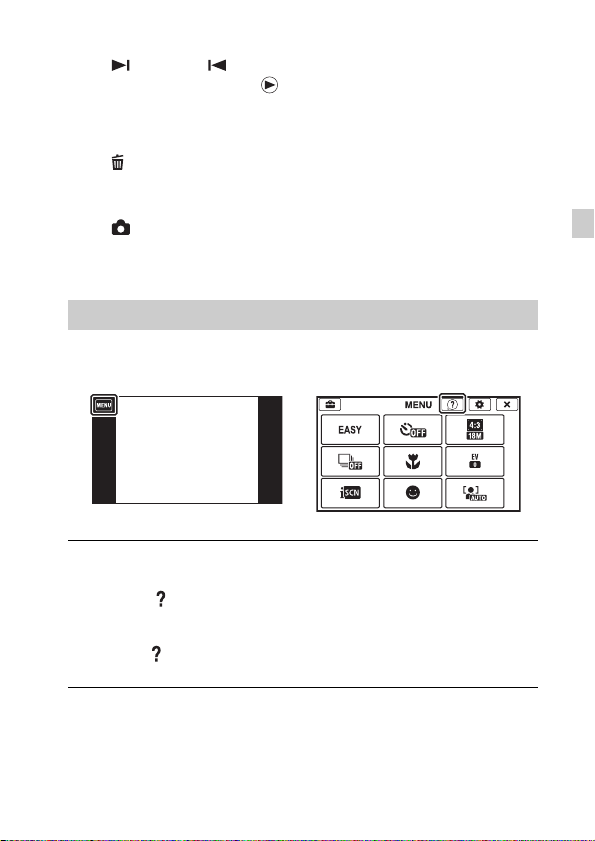
x
Selección de la imagen siguiente/anterior
Toque (Siguiente)/ (Anterior) en la pantalla.
• Para reproducir películas, toque (Reproducir) en el centro de la pantalla.
• Para acercar con zoom, mueva la palanca W/T (zoom) hacia el lado T.
x
Eliminación de una imagen
Toque (Borrar) t [Esta ima].
x
Para volver a la toma de imágenes
Toque en la pantalla.
• Puede también volver al modo de toma de imagen pulsando el botón del
disparador hasta la mitad.
Guía en la cámara
Esta cámara está equipada con una guía de instrucciones incorporada. Esto le
permite buscar las funciones de la cámara de acuerdo con sus necesidades.
Toque MENU.
1
Toque (Guía en la cámara), después seleccione el
2
elemento de MENU deseado.
Se visualiza la guía de operación para el elemento seleccionado.
• Si toca (Guía en la cámara) cuando no está visualizada la pantalla de
MENU, puede buscar en la guía utilizando palabras claves o iconos.
ES
ES
17
Page 48
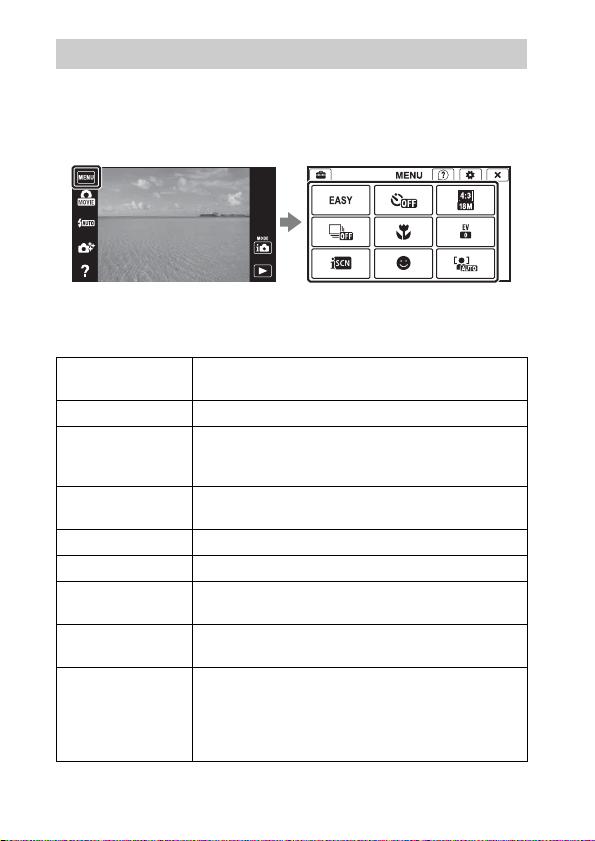
Presentación de otras funciones
Tocando el MENU en la pantalla se pueden emplear otras funciones usadas
cuando se toma imagen o se reproduce. Esta cámara está equipada con una
guía de funciones que le permite seleccionar fácilmente entre las funciones.
Mientras se muestra la guía, puede utilizar varias funciones.
x
Elementos del menú
Toma de imagen
Escena toma
película
Modo fácil Toma imágenes fijas utilizando el mínimo de funciones.
Creatividad fotogr.
Botón película
Flash Establece los ajustes del flash.
Contador automát. Establece los ajustes del autodisparador.
Efecto de
desenfoque
Tamaño img
fija(Dual Rec)
Tamaño img fija/
Tamaño imagen
panorámica/
Tamaño película/
Calidad de película
ES
Selecciona el modo de grabación de película.
Cambia ajustes fácilmente y toma imágenes cuando el
modo de toma de imagen está ajustado a [Inteligente
Auto] o [Automático superior].
Toma películas rápidamente en un modo de toma
distinto de [Modo película].
Ajusta el nivel del efecto de desenfoque de fondo cuando
se toma en modo Desenfoque de fondo.
Establece el tamaño de la imagen fija tomada mientras se
graba una película.
Selecciona el tamaño de imagen y la calidad para
imágenes fijas, imágenes panorámicas o archivos de
película.
18
Page 49
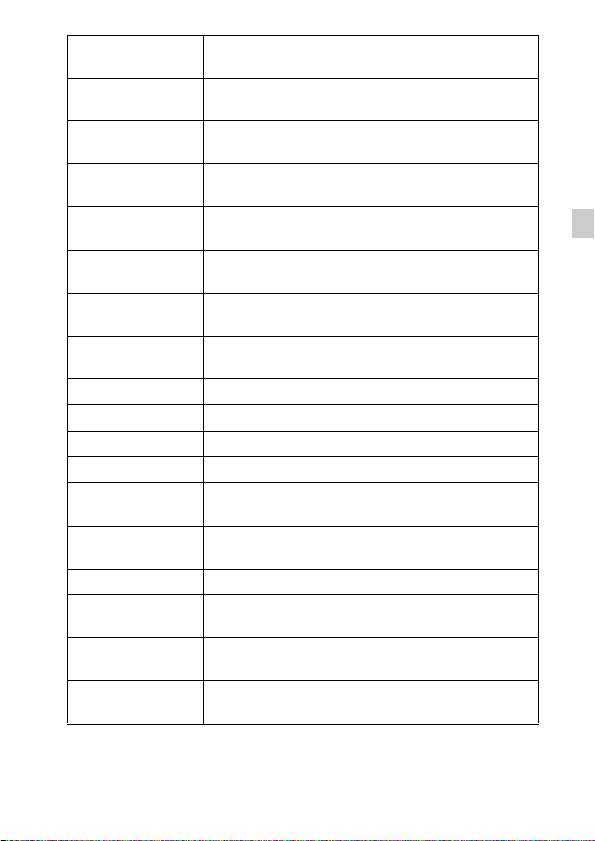
Ajustes de captura
continua
Macro
Efecto pintura HDR
Área de énfasis
Tono de color
Color Extraído
Efecto de acuarela
Efecto de
ilustración
EV Ajusta la exposición manualmente.
ISO Ajusta la sensibilidad luminosa.
Balance Blanco Ajusta los tonos de color de una imagen.
Enfoque Selecciona el método de enfoque.
Modo medición
Reconocimiento de
escena
Efecto piel suave Ajusta el Efecto piel suave y el nivel del efecto.
Captador de
sonrisas
Sensibilidad de
sonrisa
Detección de cara
Establece los ajustes de toma con ráfaga.
Toma bellas imágenes en primeros planos de objetos
pequeños.
Cuando está seleccionado [Pintura HDR] en Efecto de
foto, establece el nivel de efecto.
Cuando está seleccionado [Miniatura] en Efecto de foto,
establece la parte a enfocar.
Cuando está seleccionado [Cámara juguete] en Efecto de
foto, establece el tono de color.
Cuando está seleccionado [Color parcial] en Efecto de
foto, selecciona el color a extraer.
Cuando está seleccionado [Acuarela] en Efecto de foto,
establece el nivel de efecto.
Cuando está seleccionado [Ilustración] en Efecto de foto,
establece el nivel de efecto.
Selecciona el modo de medición que establece qué parte
del motivo se mide para determinar la exposición.
Ajusta para detectar automáticamente las condiciones de
la toma.
Ajusta para que la cámara accione automáticamente el
obturador cuando se detecta una sonrisa.
Ajusta la sensibilidad de la función Captador de sonrisas
para detectar sonrisas.
Selecciona la detección de caras y hace varios ajustes
automáticamente.
ES
ES
19
Page 50
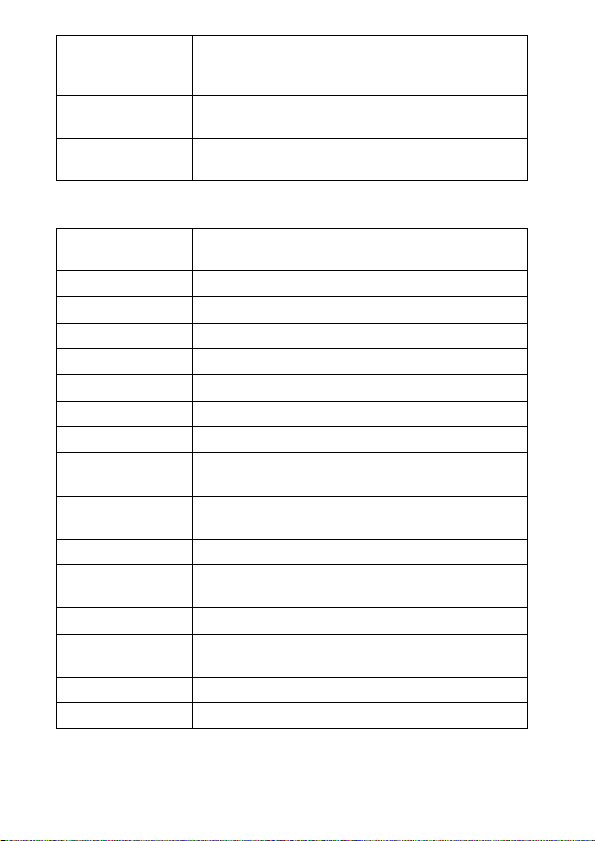
Reducc ojos
cerrados
SteadyShot
película
Guía en la cámara
Ajusta para tomar automáticamente dos imágenes y
selecciona la imagen en la que los ojos no están
parpadeando.
Ajusta la intensidad de SteadyShot en Modo película. Si
cambia este ajuste, cambiará el ángulo de visión.
Busca funciones de la cámara de acuerdo con sus
necesidades.
Visionado
Modo fácil
Seleccionar fecha Selecciona la imagen deseada para ver mediante fecha.
Calendario Selecciona la fecha que se va a reproducir en Calendario.
Índice imágenes Visualiza múltiples imágenes al mismo tiempo.
Diapositivas Selecciona un método de reproducción continua.
Borrar Elimina una imagen.
Retocar Retoca una imagen utilizando varios efectos.
Efecto de foto Añade varias texturas a las imágenes.
Pintar
Visionado 3D
Modo visualización Selecciona el formato de visualización para imágenes.
Visualiza grupo de
capt. cont.
Proteger Protege las imágenes.
Impresión (DPOF)
Rotar Gira una imagen fija hacia la izquierda o derecha.
Volumen Ajusta el volumen.
Aumenta el tamaño de texto en la pantalla para facilitar
el uso.
Pinta sobre una imagen fija y la guarda como archivo
nuevo.
Ajusta para reproducir imágenes tomadas en modo 3D
en un televisor 3D.
Selecciona para visualizar imágenes de ráfaga en grupos
o visualizar todas las imágenes durante la reproducción.
Añade una marca de orden de impresión a una imagen
fija.
20
ES
Page 51
Datos de
exposición
Número de imágs
en índice
Guía en la cámara
x
Elementos de ajuste
Establece si se visualizan o no los datos de toma de
imagen (datos Exif) del archivo visualizado actualmente
en la pantalla.
Establece el número de imágenes visualizadas en la
pantalla de índice.
Busca funciones de la cámara de acuerdo con sus
necesidades.
Si toca MENU mientras toma una imagen o durante la reproducción, se
proveerá (Ajustes) como selección final. Puede cambiar los ajustes
predeterminados en la pantalla (Ajustes).
Ajustes de
Toma
Ajustes
Principales
Herramienta
Tarjeta Memoria
Ajustes de Reloj Configuración área/Config.fecha y hora
* Si no hay insertada una tarjeta de memoria, se visualizará (Herramienta
Memoria Interna) y solamente se podrá seleccionar [Formatear].
Formato de película/Iluminador AF/Cuadrícula/Zoom
Imag. Clara/Zoom digital/Reducc. ruido viento/Guía
Recono.escena/Reduc. ojos rojos/Aviso ojos cerrados/
Inscribir fecha/Resolución visualiz.
Pitido/Luminosidad panel/Language Setting/Color
visualización/Modo demostración/Inicializar/CTRL.
POR HDMI/Modo eco/Ajuste conexión USB/
Alimentación USB/Ajuste LUN/Desc música/Vaciar
música/Versión
Formatear/Crear Carpeta Grab/Camb. Carp. Grab/
*
ElimCarpGrabación/Copiar/Número Archivo
ES
ES
21
Page 52

Instalación de aplicación de PC (Windows)
El software incorporado “PlayMemories Home” le permite importar imágenes
fijas y películas a su ordenador y utilizarlas.
Puede tomar o reproducir imágenes en esta cámara aunque no instale
“PlayMemories Home”, sin embargo, necesitará “PlayMemories Home” para
importar películas AVCHD a su ordenador.
Conecte la cámara a un ordenador.
1
Windows 7: [Equipo] t icono de cámara t icono de
2
soporte t Haga doble clic en [PMHOME.EXE]
Windows XP/Vista: [Equipo] (en Windows XP, [Mi PC])
t [PMHOME]t Haga doble clic en [PMHOME.EXE]
Siga las instrucciones de la pantalla para completar la
3
instalación.
Nota
• “PlayMemories Home” no es compatible con Mac OS. Si reproduce imágenes en
un ordenador Mac, utilice las aplicaciones que hay instaladas en su ordenador
Mac.
Para más detalles, consulte http://www.sony.co.jp/imsoft/Mac/
x
Características de “PlayMemories Home”
Lo de abajo son ejemplos de las funciones disponibles cuando usted utiliza
“PlayMemories Home”. Para sacar provecho a las distintas funciones de
“PlayMemories Home”, conéctese a Internet e instale la “Función adicional”.
• Puede importar imágenes tomadas con la cámara a un ordenador para
visualizarlas.
• Puede visualizar imágenes almacenadas en un ordenador por fecha de toma
en una visualización de calendario.
• Puede corregir imágenes fijas (Corrección ojos rojos, etc.), imprimir las
imágenes, enviar imágenes por correo electrónico, y cambiar la fecha y hora
de toma.
• Puede guardar e imprimir imágenes con la fecha.
• Puede crear un disco de películas AVCHD importadas a un ordenador.
ES
(Función adicional)
22
Page 53
Número de imágenes fijas y tiempo grabable de películas
El número de imágenes fijas y el tiempo que se puede grabar podrán variar
dependiendo de las condiciones de la toma y de la tarjeta de memoria.
x
Imágenes fijas
(Unidades: Imágenes)
Capacidad
Tamaño
18M 3 295
VGA 65 6 400
16:9(13M) 3 330
x
Películas
La tabla de abajo muestra los tiempos de grabación máximos aproximados.
Estos son los tiempos totales para todos los archivos de película. Se puede
filmar continuamente durante 29 min (minuto) aproximadamente. El tamaño
máximo de un archivo de película de formato MP4 es de hasta
aproximadamente 2 GB
Capacidad
Tamaño
AVC HD 24M (FX) — 10 min
AVC HD 9M (HQ) — 20 min
MP4 12M — 15 min
MP4 3M — 1 h 5 min
El número dentro de ( ) es el tiempo grabable mínimo.
• El tiempo grabable de películas varía porque la cámara está equipada con VBR
(Velocidad de bits variable), que ajusta automáticamente la calidad de imagen
dependiendo de la escena que se está tomando. Cuando grabe un motivo que se
mueve rápidamente, la imagen será más clara pero el tiempo grabable será más
corto porque se requiere más memoria para grabar.
El tiempo grabable también varía dependiendo de las condiciones de la toma, el
motivo o los ajustes de calidad/tamaño de imagen.
Memoria interna Tarjeta de memoria
Aprox. 19 MB 2GB
(h (hora), min (minuto))
Memoria interna Tarjeta de memoria
Aprox. 19 MB 2GB
(10 min)
(15 min)
ES
ES
23
Page 54

Notas sobre la utilización de la cámara
Funciones incorporadas en esta cámara
• Este manual describe cada una de las funciones de los dispositivos compatibles
con 1080 60i y dispositivos compatibles con 1080 50i.
Para comprobar si su cámara es un dispositivo compatible con 1080 60i o un
dispositivo compatible con 1080 50i, compruebe si hay las marcas siguientes en la
parte inferior de la cámara.
Dispositivo compatible con 1080 60i: 60i
Dispositivo compatible con 1080 50i: 50i
• No vea imágenes 3D tomadas con esta cámara durante periodos de tiempo
prolongados en monitores compatibles con 3D.
• Cuando vea imágenes 3D tomadas con esta cámara en monitores compatibles con
3D, es posible que note molestias en forma de cansancio de la vista, fatiga, o
náuseas. Para evitar estos síntomas, recomendamos que haga descansos regulares.
Sin embargo, necesitará determinar por sí mismo la duración y la frecuencia de los
descansos que requiere, porque éstos varían de una persona a otra. Si nota
cualquier tipo de molestia, detenga el visionado de imágenes 3D hasta que se
sienta mejor, y consulte con un médico si lo cree necesario. Además, consulte los
manuales de instrucciones suministrados con el dispositivo o software que ha
conectado o está utilizando con esta cámara. Tenga en cuenta que la vista de un
niño aún está en estado de desarrollo (particularmente los niños de menos de 6
años).
Consulte con un pediatra u oculista antes de permitir que su niño vea imágenes
3D, y asegúrese de que él/ella observa las precauciones de arriba cuando vea tales
imágenes.
Uso y cuidados
Evite un manejo brusco, desmontaje, modificación, golpes físicos, o impactos tales
como golpear, dejar caer, o pisar el producto. Sea especialmente cuidadoso con el
objetivo.
Notas sobre la grabación/reproducción
• Antes de comenzar a grabar, haga una grabación a modo de prueba para
asegurarse de que la cámara está funcionando correctamente.
• La cámara no está hecha a prueba de polvo, ni a prueba de salpicaduras, ni a
prueba de agua.
• Evite exponer la cámara al agua. Si entra agua dentro de la cámara, podrá ocurrir
un mal funcionamiento. En algunos casos, la cámara no podrá ser reparada.
• No dirija la cámara hacia el sol ni hacia otras luces intensas. Podrá ocasionar un
mal funcionamiento de la cámara.
• Si se produce condensación de humedad, elimínela antes de utilizar la cámara.
• No agite ni golpee la cámara. Podría ocasionar un mal funcionamiento y no poder
ES
grabar imágenes. Además, el soporte de grabación podría quedar inutilizable o
dañarse los datos de imagen.
24
Page 55

No utilice o almacene la cámara en los siguientes lugares
• En un lugar muy caluroso, frío o húmedo
En lugares tales como en un automóvil aparcado al sol, es posible que el cuerpo de
la cámara se deforme y esto podrá ocasionar un mal funcionamiento.
• Bajo la luz solar directa o cerca de una estufa
El cuerpo de la cámara podrá decolorarse o deformarse, y esto podrá ocasionar un
mal funcionamiento.
• En un lugar expuesto a vibración basculante
• Cerca de un lugar que genera ondas de radio intensas, emite radiación o tiene
magnetismo fuerte. De lo contrario, es posible que la cámara no pueda grabar o
reproducir imágenes correctamente.
• En lugares arenosos o polvorientos
Tenga cuidado de no dejar entrar dentro de la cámara arena o polvo. Esto podrá
ocasionar un mal funcionamiento en la cámara, y en algunos casos este mal
funcionamiento no podrá repararse.
Acerca del transporte
No se siente en una silla u otro lugar con la cámara en el bolsillo trasero de sus
pantalones o falda, porque podrá ocasionar un mal funcionamiento de la cámara o
dañarla.
Objetivo Carl Zeiss
La cámara está equipada con un objetivo Carl Zeiss que puede reproducir imágenes
nítidas con excelente contraste. El objetivo de la cámara ha sido fabricado bajo el
sistema de garantía de calidad certificado por Carl Zeiss de acuerdo con las normas
de calidad de Carl Zeiss en Alemania.
Nota sobre la pantalla
La pantalla está fabricada utilizando tecnología de muy alta precisión por lo que más
del 99,99 % de los píxeles son operativos para uso efectivo. Sin embargo, es posible
que aparezcan algunos puntos diminutos negros y/o brillantes (de color blanco, rojo,
azul o verde) en la pantalla. Estos puntos son un resultado normal del proceso de
fabricación, y no afectan a la grabación.
Acerca de la temperatura de la cámara
Es posible que la cámara y la batería se sobrecalienten debido al uso continuo, pero
no se trata de un fallo de funcionamiento.
Acerca de la protección contra el recalentamiento
Dependiendo de la temperatura de la cámara y de la batería, es posible que no pueda
grabar películas o que la alimentación se desconecte automáticamente para proteger
la cámara.
Se visualizará un mensaje en la pantalla antes de que se desconecte la alimentación o
ya no podrá grabar películas. En este caso, deje desconectada la alimentación y
espere hasta que la temperatura de la cámara y la batería descienda. Si conecta la
alimentación sin dejar que la cámara y la batería se enfríen suficientemente, es
posible que la alimentación se desconecte otra vez o que no pueda grabar películas.
ES
ES
25
Page 56

Acerca de la carga de la batería
Si carga una batería que no ha sido utilizada durante largo tiempo, es posible que no
pueda cargarla hasta la capacidad apropiada.
Esto se debe a las características de la batería, y no es un malfuncionamiento.
Cargue la batería otra vez.
Aviso sobre los derechos de autor
Los programas de televisión, películas, cintas de vídeo y demás materiales pueden
estar protegidos por copyright. La grabación no autorizada de tales materiales puede
ir en contra de los artículos de las leyes de copyright.
No hay compensación por daño del contenido o fallo de grabación
Sony no compensará por no poder grabar o por la pérdida o daño del contenido
grabado debido a un mal funcionamiento de la cámara o el soporte de grabación, etc.
Limpieza de la superficie de la cámara
Limpie la superficie de la cámara con un paño suave ligeramente humedecido con
agua, después limpie la superficie con un paño seco. Para evitar dañar el acabado o
la envoltura:
– No exponga la cámara a productos químicos tales como diluyente, bencina,
alcohol, paños desechables, repelente de insectos, bronceador o insecticida.
26
ES
Page 57

Especificaciones
Cámara
[Sistema]
Dispositivo de imagen: Sensor de
7,76 mm (tipo 1/2,3) Exmor R
CMOS
Número total de píxeles de la cámara:
Aprox. 18,9 Megapíxeles
Número efectivo de píxeles de la
cámara:
Aprox. 18,2 Megapíxeles
Objetivo: Objetivo zoom 5× Carl Zeiss
Vario-Tessar
f = 4,7 mm – 23,5 mm
(26 mm – 130 mm (equivalente a
película de 35 mm))
F3,5 (W) – F4,8 (T)
Mientras se toman películas (16:9):
28 mm – 140 mm*
Mientras se toman películas (4:3):
35 mm – 175 mm*
* Cuando [SteadyShot película]
está ajustado a [Estándar]
SteadyShot: Óptico
Control de exposición: Exposición
automática, Selección de escena
(15 modos)
Balance del blanco: Automático,
Luz diurna, Nublado, Fluorescente
1/2/3, Incandescente, Flash, Una
pulsación
Formato de señal:
Para 1080 50i: Color PAL, normas
CCIR, especificación HDTV
1080/50i
Para 1080 60i: Color NTSC,
normas EIA, especificación HDTV
1080/60i
Formato de archivo:
Imágenes fijas: Cumple con JPEG
(DCF, Exif, MPF Baseline),
compatible con DPOF
Imágenes fijas 3D: Compatible con
MPO (MPF Extendido (Imagen
con disparidad))
Películas (Formato AVCHD):
Compatible con formato AVCHD
versión 2,0
Vídeo: MPEG-4 AVC/H.264
Audio: Dolby Digital 2 canales,
equipado con Dolby Digital Stereo
Creator
• Fabricado bajo licencia de Dolby
Laboratories.
Películas (Formato MP4):
Vídeo: MPEG-4 AVC/H.264
Audio: MPEG-4 AAC-LC 2
canales
Soporte de grabación: Memoria interna
(Aprox. 19 MB) “Memory Stick
Micro”, tarjetas de memoria
microSD
Flash: Alcance del flash (sensibilidad
ISO (Índice de exposición
recomendado) ajustado a Auto):
Aprox. 0,08 m a 3,7 m (W)
Aprox. 0,6 m a 2,6 m (T)
[Conectores de entrada y salida]
Conector HDMI: Microtoma HDMI
Conector múltiple: Type3b
(salida de AV/USB/entrada de cc)
Salida de vídeo
Salida de audio
Comunicación USB
Comunicación USB: Hi-Speed USB
(USB 2.0)
ES
ES
27
Page 58

[Pantalla]
Pantalla OLED:
Panorámico (16:9), 8,3 cm
(tipo 3,3)
Número total de puntos:
Equivalente a 1 229 760 puntos
[Alimentación, general]
Alimentación: Batería recargable
NP-BN, cc 3,6 V
Adaptador de alimentación de ca
(FUENTE DE ALIMENTACIÓN)
AC-UB10/UB10B/UB10C/
UB10D, cc 5 V
Consumo (durante la toma de imagen):
1,0 W
Temperatura de funcionamiento:
0°C a 40°C
Temperatura de almacenamiento:
–20 °C a +60 °C
Dimensiones (cumple con CIPA):
92,9 mm × 54,4 mm × 13,4 mm
(An/Al/Pr)
Peso (cumple con CIPA) (incluyendo
la batería NP-BN, “Memory Stick
Micro”):
Aprox. 109 g
Micrófono: Estéreo
Altavoz: Monoaural
Exif Print: Compatible
PRINT Image Matching III:
Compatible
Adaptador de alimentación de
ca (FUENTE DE
ALIMENTACIÓN) AC-UB10/
UB10B/UB10C/UB10D
Requisitos de alimentación: ca 100 V
a 240 V 50 Hz/60 Hz 70 mA
Tensión de salida: cc 5 V 0,5 A
Temperatura de funcionamiento:
0°C a 40°C
Temperatura de almacenamiento:
–20 °C a +60 °C
Dimensiones:
Aprox. 50 mm × 22 mm × 54 mm
(An/Al/Pr)
Peso:
Para EE.UU. y Canadá:
Aprox. 48 g
Para países o regiones distintos de
EE.UU. y Canadá:
Aprox. 43 g
Batería recargable NP-BN
Batería utilizada: Batería de litio-ión
Tensión máxima: cc 4,2 V
Tensión nominal: cc 3,6 V
Tensión de carga máxima: cc 4,2 V
Corriente de carga máxima: 0,9 A
Capacidad:
típica: 2,3 Wh (630 mAh)
mínima: 2,2 Wh (600 mAh)
El diseño y las especificaciones están
sujetos a cambios sin previo aviso.
28
ES
Page 59
Marcas comerciales
• Las marcas siguientes son marcas
comerciales de Sony Corporation.
, “Cyber-shot”,
“Memory Stick Micro”
• “AVCHD” y el logotipo de
“AVCHD” son marcas comerciales
de Panasonic Corporation y Sony
Corporation.
• Windows es una marca comercial
registrada de Microsoft Corporation
en los Estados Unidos y/u otros
países.
• Mac es una marca comercial
registrada de Apple Inc.
• El logotipo de microSDHC es una
marca comercial de SD-3C, LLC.
• “ ” y “PlayStation” son marcas
comerciales registradas de Sony
Computer Entertainment Inc.
• Además, los nombres de sistemas y
productos utilizados en este manual
son, en general, marcas comerciales o
marcas comerciales registradas de sus
respectivos desarrolladores o
fabricantes. Sin embargo, las marcas
™ o ® no se utilizan en todos los
casos en este manual.
• Disfrute aún más de su PlayStation 3
descargando la aplicación para
PlayStation 3 en PlayStation Store
(donde esté disponible.)
• La aplicación en la PlayStation 3
requiere una cuenta PlayStation
Network y la descarga de la
aplicación. Podrá acceder a ella en las
zonas donde la PlayStation Store esté
disponible.
En la página Web de atención al
cliente puede encontrar
información adicional sobre este
producto y respuesta a las
preguntas hechas con más
frecuencia.
Impreso en papel reciclado en un 70%
o más utilizando tinta hecha con aceite
vegetal exento de compuesto orgánico
volátil (COV).
ES
ES
29
Page 60

30
ES
Page 61

ES
ES
31
Page 62

32
ES
Page 63

ES
ES
33
Page 64

©2012 Sony Corporation Printed in China
 Loading...