

Page 1

Digital Still Camera
Instruction Manual
DSC-TX1
4-148-681-12(1)
Getting started
Shooting/viewing
images
Using shooting
functions
Using viewing
functions
Deleting images
Connecting to other
devices
Changing camera
settings
© 2009 Sony Corporation
GB
Page 2

Owner’s Record
The model and serial numbers are located
on the bottom. Record the serial number in
the space provided below. Refer to these
numbers whenever you call upon your Sony
dealer regarding this product.
Model No. DSC-TX1
Serial No. ___________________________
WARNING
To reduce fire or shock hazard, do
not expose the unit to rain or
moisture.
If the shape of the plug does not fit the
power outlet, use an attachment plug
adaptor of the proper configuration for the
power outlet.
CAUTION
[ Battery pack
If the battery pack is mishandled, the battery pack
can burst, cause a fire or even chemical burns.
Observe the following cautions.
• Do not disassemble.
• Do not crush and do not expose the battery pack
to any shock or force such as hammering,
dropping or stepping on it.
• Do not short circuit and do not allow metal
objects to come into contact with the battery
terminals.
• Do not expose to high temperature above 60°C
(140°F) such as in direct sunlight or in a car
parked in the sun.
• Do not incinerate or dispose of in fire.
• Do not handle damaged or leaking lithium ion
batteries.
• Be sure to charge the battery pack using a
genuine Sony battery charger or a device that
can charge the battery pack.
• Keep the battery pack out of the reach of small
children.
• Keep the battery pack dry.
• Replace only with the same or equivalent type
GB
2
recommended by Sony.
Page 3

• Dispose of used battery packs promptly as
described in the instructions.
[ Battery charger
Even if the CHARGE lamp is not lit, the battery
charger is not disconnected from the AC power
source (mains) as long as it is connected to the
wall outlet (wall socket). If some trouble occurs
while using the battery charger, immediately shut
off the power by disconnecting the plug from the
wall outlet (wall socket).
For Customers in the U.S.A. and
Canada
[ RECYCLING LITHIUM-ION
BATTERIES
Lithium-Ion batteries are
recyclable.
You can help preserve our
environment by returning your
used rechargeable batteries to
the collection and recycling
location nearest you.
For more information regarding recycling of
rechargeable batteries, call toll free
1-800-822-8837, or visit http://www.rbrc.org/
Caution: Do not handle damaged or leaking
Lithium-Ion batteries.
[ Battery pack
This device complies with Part 15 of the FCC
Rules. Operation is subject to the following two
conditions: (1) This device may not cause harmful
interference, and (2) this device must accept any
interference received, including interference that
may cause undesired operation.
For Customers in the U.S.A.
UL is an internationally recognized safety
organization.
The UL Mark on the product means it has been
UL Listed.
If you have any questions about this product, you
may call:
Sony Customer Information Center
1-800-222-SONY (7669)
The number below is for the FCC related matters
only.
[ Regulatory Information
Declaration of Conformity
Trade Name: SONY
Model No.: DSC-TX1
Responsible Party: Sony Electronics Inc.
Address:16530 Via Esprillo,
San Diego, CA 92127 U.S.A.
Telephone No.: 858-942-2230
This device complies with Part15 of the FCC
Rules. Operation is subject to the following
two conditions: (1) This device may not cause
harmful interference, and (2) this device must
accept any interference received, including
interference that may cause undesired
operation.
[ CAUTION
You are cautioned that any changes or
modifications not expressly approved in this
manual could void your authority to operate this
equipment.
This Class B digital apparatus complies with
Canadian ICES-003.
GB
3
Page 4

[ Note:
This equipment has been tested and found to
comply with the limits for a Class B digital
device, pursuant to Part 15 of the FCC Rules.
These limits are designed to provide reasonable
protection against harmful interference in a
residential installation. This equipment generates,
uses, and can radiate radio frequency energy and,
if not installed and used in accordance with the
instructions, may cause harmful interference to
radio communications. However, there is no
guarantee that interference will not occur in a
particular installation. If this equipment does
cause harmful interference to radio or television
reception, which can be determined by turning the
equipment off and on, the user is encouraged to
try to correct the interference by one or more of
the following measures:
– Reorient or relocate the receiving antenna.
– Increase the separation between the equipment
and receiver.
– Connect the equipment into an outlet on a
circuit different from that to which the receiver
is connected.
– Consult the dealer or an experienced radio/TV
technician for help.
The supplied interface cable must be used w ith the
equipment in order to comply with the limits for a
digital device pursuant to Subpart B of Part 15 of
FCC Rules.
For Customers in Europe
[ Notice
If static electricity or electromagnetism causes
data transfer to discontinue midway (fail), restart
the application or disconnect and connect the
communication cable (USB, etc.) again.
[ Disposal of Old Electrical &
Electronic Equipment (Applicable
in the European Union and other
European countries with separate
collection systems)
This symbol on the product or on its packaging
indicates that this product shall not be treated as
household waste. Instead it shall be handed over
to the applicable collection point for the recycling
of electrical and electronic equipment. By
ensuring this product is disposed of correctly, you
will help prevent potential negative consequences
for the environment and human health, which
could otherwise be caused by inappropriate waste
handling of this product. The recycling of
materials will help to conserve natural resources.
For more detailed information about recycling of
this product, please contact your local Civic
Office, your household waste disposal service or
the shop where you purchased the product.
[ Notice for the customers in the
countries applying EU Directives
The manufacturer of this product is Sony
Corporation, 1-7-1 Konan Minato-ku Tokyo, 1080075 Japan. The Authorized Representative for
EMC and product safety is Sony Deutschland
GmbH, Hedelfinger Strasse 61, 70327 Stuttgart,
Germany. For any service or guarantee matters
please refer to the addresses given in separate
service or guarantee documents.
This product has been tested and found compliant
with the limits set out in the EMC Directive for
using connection cables shorter than 3 meters
(9.8 feet).
[ Attention
The electromagnetic fields at the specific
frequencies may influence the picture and sound
of this unit.
GB
4
Page 5

Disposal of waste batteries
(applicable in the European Union
and other European countries with
separate collection systems)
This symbol on the battery or on the packaging
indicates that the battery provided with this
product shall not be treated as household waste.
On certain batteries this symbol might be used in
combination with a chemical symbol. The
chemical symbols for mercury (Hg) or lead (Pb)
are added if the battery contains more than
0.0005% mercury or 0.004% lead.
By ensuring these batteries are disposed of
correctly, you will help prevent potentially
negative consequences for the environment and
human health which could otherwise be caused by
inappropriate waste handling of the battery. The
recycling of the materials will help to conserve
natural resources.
In case of products that for safety, performance or
data integrity reasons require a permanent
connection with an incorporated battery, this
battery should be replaced by qualified service
staff only. To ensure that the battery will be
treated properly, hand over the product at end-oflife to the applicable collection point for the
recycling of electrical and electronic equipment.
For all other batteries, please view the section on
how to remove the battery from the product
safely.
Hand the battery over to the applicable collection
point for the recycling of waste batteries.
For more detailed information about recycling of
this product or battery, please contact your local
Civic Office, your household waste disposal
service or the shop where you purchased the
product.
Notice for customers in the
United Kingdom
A moulded plug complying with BS 1363 is fitted
to this equipment for your safety and
convenience.
Should the fuse in the plug supplied need to be
replaced, a fuse of the same rating as the supplied
one and approved by ASTA or BSI to BS 1362,
(i.e., marked with an or mark) must be
used.
If the plug supplied with this equipment has a
detachable fuse cover, be sure to attach the fuse
cover after you change the fuse. Never use the
plug without the fuse cover. If you should lose the
fuse cover, please contact your nearest Sony
service station.
GB
5
Page 6

Table of contents
Notes on using the camera........................................................................8
Getting started ................................................................... 10
Checking the accessories supplied ........................................................ 10
Identifying parts .......................................................................................11
Charging the battery pack....................................................................... 12
Inserting the battery pack/a “Memory Stick Duo” media
(sold separately) ......................................................................................14
Setting the clock ......................................................................................16
Shooting/viewing images ...................................... 18
Shooting images ......................................................................................18
Viewing images........................................................................................19
Using shooting functions ........................................................ 20
Displaying minimum indicators (Easy Mode) ..........................................20
Detecting the shooting conditions automatically (Scene Recognition)... 21
Shooting panoramic images (Sweep Panorama) ....................................23
Shooting with reduced blur (Anti Motion Blur) (Hand-held Twilight) ....... 25
Shooting continuously (Burst).................................................................. 25
Focusing on the face of the subject (Face Detection).............................26
Detecting smiles and shooting automatically (Smile Shutter) .................27
Focusing on a specific point of the frame ............................................... 28
Selecting the image size to match the usage..........................................29
Selecting a flash mode ............................................................................30
Using the self-timer..................................................................................31
Shooting close-ups (Macro) .................................................................... 31
Using the Shooting mode that matches the scene (Scene Selection) ....32
Shooting movies ......................................................................................33
Using viewing functions .......................................................... 35
Using the touch panel..............................................................................35
Viewing an enlarged image (Playback Zoom)......................................... 36
Displaying images full-screen (Wide Zoom)............................................36
Rotating a vertical orientation image (Temporarily rotated display)........ 37
Searching for an image (Image Index)....................................................37
GB
6
Viewing still images with music (Slideshow)............................................38
Page 7

Deleting images .............................................................................39
Deleting images ...................................................................................... 39
Deleting all images (Format) ................................................................... 39
Connecting to other devices ................................................. 40
Viewing images on a TV.......................................................................... 40
Printing still images ................................................................................. 40
Using the camera with a computer ......................................................... 42
Changing camera settings ...................................................... 46
Changing the operation sounds .............................................................. 46
Using the MENU items ............................................................................ 47
Using the (Settings) items................................................................. 50
Others ..................................................................................................52
List of icons displayed on the screen...................................................... 52
Learning more about the camera (“Cyber-shot Handbook”) .................. 54
Troubleshooting....................................................................................... 55
Precautions.............................................................................................. 57
Specifications.......................................................................................... 58
GB
7
Page 8

Notes on using the camera
Changing the language setting
The screen language can be changed if
necessary.
To change the language setting, touch ,
then select (Settings) t (Main
Settings) t [Language Setting].
Internal memory and “Memory
Stick Duo” media back up
Do not turn off the camera, remove the battery
pack, or remove the “Memory Stick Duo”
media while the access lamp is lit. Otherwise,
the internal memory data or “Memory Stick
Duo” media may be damaged. Be sure to make
a backup copy to protect your data.
On database files
When you insert a “Memory Stick Duo” media
without a database file into the camera and
turn on the power, part of the “Memory Stick
Duo” media capacity is used to automatically
create a database file. It may take some time
until you can perform the next operation.
Notes on recording/playback
• Before you start recording, make a trial
recording to make sure that the camera is
working correctly.
• The camera is neither dust-proof, nor splash-
proof, nor water-proof. Read “Precautions”
(page 57) before operating the camera.
• Avoid exposing the camera to water. If water
enters inside the camera, a malfunction may
occur. In some cases, the camera cannot be
repaired.
• Do not aim the camera at the sun or other
bright light. It may cause the malfunction of
the camera.
• Do not use the camera near a location that
generates strong radio waves or emits
radiation. Otherwise, the camera may not
properly record or play back images.
• Using the camera in sandy or dusty locations
may cause malfunctions.
• If moisture condensation occurs, remove it
before using the camera (page 57).
GB
8
• Do not shake or strike the camera. It may
cause a malfunction and you may not be able
to record images. Furthermore, the recording
media may become unusable or image data
may be damaged.
• Clean the flash surface before use. The heat
of flash emission may cause dirt on the flash
surface to become discolored or to stick to
the flash surface, resulting in insufficient
light emission.
Notes on the LCD screen
• The LCD screen is manufactured using
extremely high-precision technology so over
99.99% of the pixels are operational for
effective use. However, some tiny black and/
or bright dots (white, red, blue or green) may
appear on the LCD screen. These dots are a
normal result of the manufacturing process,
and do not affect the recording.
• If water droplets or other liquids splash on
the LCD screen and make it wet,
immediately wipe off the screen with a soft
cloth. Leaving liquids on the LCD screen
surface can harm the quality and cause a
malfunction.
• Do not press against the LCD screen. The
screen may be discolored and that may cause
a malfunction.
Please use Sony genuine
accessories
If you use accessories manufactured by
companies other than Sony, this could cause a
camera trouble.
• Using other manufacturers’ camera cases
with magnets could cause a power supply
trouble.
On camera’s temperature
Your camera and battery may get warm due to
continuous use, but it is not a malfunction.
On the overheat protection
Depending on the camera and battery
temperature, you may be unable to record
movies or the power may turn off
automatically to protect the camera.
A message will be displayed on the LCD
screen before the power turns off or you can
no longer record movies.
Page 9

On image data compatibility
• The camera conforms with DCF (Design rule
for Camera File system) universal stand ard
established by JEITA (Japan Electronics and
Information Technology Industries
Association).
• Sony does not guarantee that the camera will
play back images recorded or edited with
other equipment, or that other equipment will
play back images recorded with the camera.
Warning on copyright
Television programs, films, videotapes, and
other materials may be copyrighted.
Unauthorized recording of such materials may
be contrary to the provisions of the copyright
laws.
No compensation for damaged
content or recording failure
Sony cannot compensate for failure to record
or loss or damage of recorded content due to a
malfunction of the camera or recording media,
etc.
GB
9
Page 10

Getting started
Checking the accessories supplied
• Battery charger BC-CSD (1)
• Power cord (mains lead) (1)
(not supplied in the USA and Canada)
Getting started
• Rechargeable battery pack NP-BD1 (1)/
Battery case (1)
• Paint pen (1)
• USB, A/V Cable for multi-use terminal (1)
x
Using the wrist strap
The wrist strap is already attached to the
camera at the factory.
Place your hand through the loop to prevent
the camera from damage by being dropped.
Hook
x
Using the paint pen
The paint pen is used when operating the
touch panel. It attaches to the wrist strap.
Note
• Do not carry the camera by holding the
paint pen. The camera may fall off.
GB
10
• Wrist strap (1)
• CD-ROM (1)
– Cyber-shot application software
– “Cyber-shot Handbook”
– “Cyber-shot Step-up Guide”
• Instruction Manual (this manual) (1)
Page 11

Identifying parts
Bottom
A Zoom (W/T) lever
B Shutter button
C Microphone
D ON/OFF (Power) button
E Flash
F Self-timer lamp/Smile Shutter lamp/
AF illuminator
G Lens
H Lens cover
I LCD screen/Touch panel
J (Playback) button
K Hook for wrist strap/Grip
L Speaker
M Battery/“Memory Stick Duo” media
cover
N Tripod receptacle
• Use a tripod with a screw less than 5.5 mm
(7/32 inches) long. Otherwise, you cannot
firmly secure the camera, and damage to the
camera may occur.
O Battery eject lever
P Access lamp
Q “Memory Stick Duo” media slot
R Battery insertion slot
S Multi connector
Getting started
11
GB
Page 12

Charging the battery pack
Insert the battery pack into
1
the battery charger.
• You can charge the battery even when
it is partially charged.
Getting started
Battery pack
Connect the battery
2
charger to the wall
For customers in the USA and Canada
Plug
outlet (wall socket).
If you continue charging the
battery pack for about one more
hour after the CHARGE lamp
turns off, the charge will last
slightly longer (full charge).
CHARGE lamp
Lit: Charging
Off: Charging finished (normal
charge)
CHARGE lamp
For customers in countries/regions other
than the USA and Canada
Power cord
(mains lead)
CHARGE lamp
When charging is finished, disconnect the battery
3
charger.
12
GB
Page 13

x
Charging time
Full charge time Normal charge time
Approx. 220 min. Approx. 160 min.
Notes
• The table above shows the time required to charge a fully depleted battery pack at a temperature of
25°C (77°F). Charging may take longer depending on conditions of use and circumstances.
• Connect the battery charger to the nearest wall outlet (wall socket).
• When charging is finished, disconnect the power cord (mains lead) from the wall outlet (wall
socket), and remove the battery pack from the battery charger.
• Be sure to use the battery pack or the battery charger of the genuine Sony brand.
x
Battery life and number of images you can record/view
Battery life (min.) No. of Images
Shooting still images Approx. 125 Approx. 250
Viewing still images Approx. 240 Approx. 4800
Note
• The number of still images that can be recorded is based on the CIPA standard, and is for shooting
under the following conditions.
(CIPA: Camera & Imaging Products Association)
SteadyShot] is set to [Shooting].
–[
– [LCD Brightness] is set to [Normal].
– Shooting once every 30 seconds.
– The zoom is switched alternately between the W and T ends.
– The flash strobes once every two times.
– The power turns on and off once every ten times.
– A fully charged battery pack (supplied) is used at an ambient temperature of 25°C (77°F).
– Using Sony “Memory Stick PRO Duo” media (sold separately).
Getting started
zUsing the camera abroad
You can use the camera and the battery charger (supplied) in any country or region where the
power supply is within 100 V to 240 V AC, 50/60 Hz.
Do not use an electronic transformer (travel converter). This may cause a malfunction.
13
GB
Page 14

Inserting the battery pack/a “Memory Stick Duo” media (sold separately)
Open the cover.
1
Getting started
Insert the “Memory Stick
2
Duo” media (sold separately).
With the terminal side facing the lens, insert
the “Memory Stick Duo” media until it
clicks into place.
14
Insert the battery pack.
3
Check the direction of the battery, make
sure the polarity marks are facing the LCD
screen, and insert the battery until the
battery eject lever is locked.
Battery eject lever
Close the cover.
4
• Closing the cover with the battery inserted
incorrectly may damage the camera.
GB
Polarity
marks
Page 15

x
“Memory Stick” media that
you can use
“Memory Stick Duo” media
You can also use a “Memory Stick PRO Duo”
media or “Memory Stick PRO-HG Duo”
media with the camera.
For details on the number of images/time that
can be recorded, see pages 24, 30, 34. Other
types of “Memory Stick” media or memory
card are not compatible with the camera.
“Memory Stick” media
You cannot use a “Memory Stick” media with
the camera.
x
To remove the “Memory
Stick Duo” media
Access lamp
Make sure that the access
lamp is not lit, then push the
“Memory Stick Duo” media in
once.
Note
• Never remove the “Memory Stick Duo”
media/battery pack when the access lamp is
lit. This may cause damage to data in the
“Memory Stick Duo” media/internal
memory.
x
When there is no “Memory
Stick Duo” media inserted
Images are stored in the camera’s internal
memory (approximately 11 MB).
To copy images from the internal
memory to a “Memory Stick Duo”
media, insert the “Memory Stick Duo”
media in the camera, touch t
(Settings) t ("Memory Stick"
Tool) t [Copy].
x
To remove the battery pack
Battery eject
lever
Slide the battery eject lever.
Be sure not to drop the
battery pack.
x
Checking the remaining
battery charge
A remaining charge indicator appears on
the LCD screen.
High
Notes
• It takes about one minute until the correct
remaining charge indicator appears.
• The remaining charge indicator may not be
correct under certain circumstances.
• If the NP-FD1 battery pack (sold separately)
is used, the minute display is also shown
after the remaining charge indicator.
• If the camera is running on and you do not
operate the camera for about one minute, the
LCD screen becomes dark.
• If the camera is running on and you do not
operate the camera for about two minutes,
the camera turns off automatically (Auto
power-off function).
Low
Getting started
15
GB
Page 16

Setting the clock
Lower the lens cover.
1
The camera is turned on.
• You can also turn on the camera by
pressing the ON/OFF (Power) button.
• It may take time for the power to turn
Getting started
on and allow operation.
Select the desired date
2
display format, then
touch .
Select Daylight Savings
3
[On]/[Off] then touch .
ON/OFF (Power) button
Lens cover
16
Select the item to be set,
4
then set the value with
v/V and touch .
• Midnight is indicated as 12:00 AM,
and noon as 12:00 PM.
GB
Page 17

Select your desired area
5
with b/B, then touch .
Touch [OK].
6
Note
• The camera does not have a feature for superimposing dates on images. By using “PMB” in the
CD-ROM (supplied), you can print or save images with the date.
x
Setting the date and time again
Touch t (Settings) t (Clock Settings) (page 50).
Getting started
17
GB
Page 18

Shooting/viewing imag
es
Shooting images
Lower the lens cover.
1
The camera is turned on.
• To shoot movies, set (REC
Mode) to (Movie Mode)
(page 33).
Shooting/viewing images
Hold the camera
2
steady as illustrated.
• Slide the zoom (W/T) lever to
the T side to zoom.
Slide to the W side to return.
Lens cover
Zoom (W/T) lever
GB
18
Press the shutter
3
button halfway down
to focus.
is displayed to indicate that
SteadyShot is working. When the
image is in focus, a beep sounds
and the z indicator lights.
• The shortest shooting distance
is approximately 1 cm (13/32
inches) (W)/50 cm (19 3/4
inches) (T) (from the lens).
Press the shutter
4
button fully down.
The image is shot.
Shutter button
SteadyShot
mark
AE/AF lock
Page 19
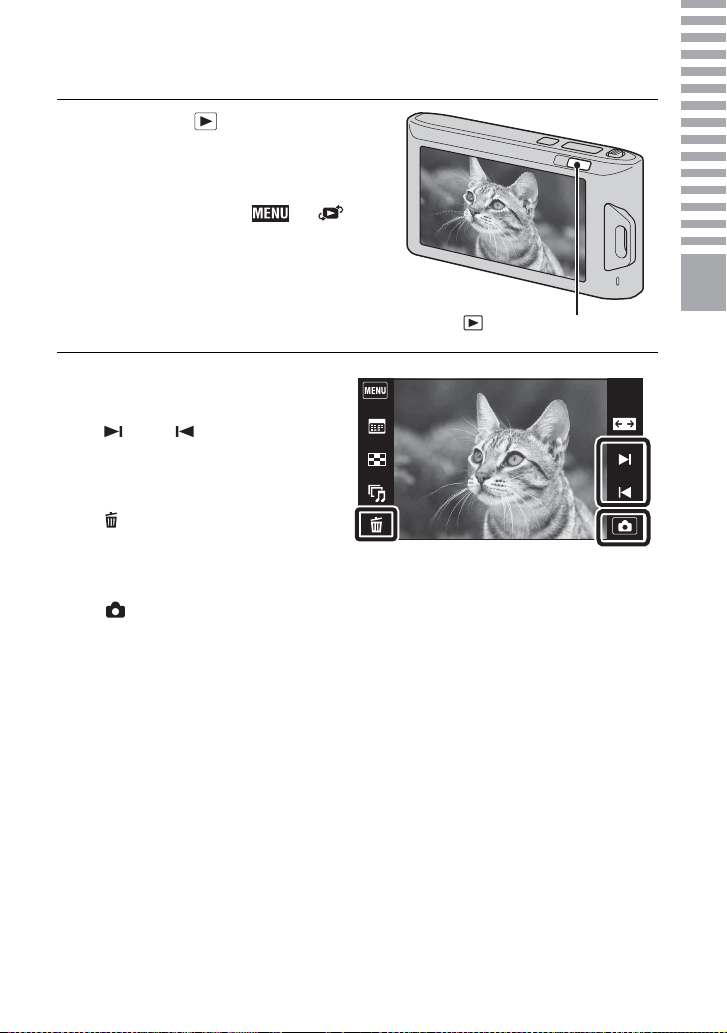
Viewing images
Press the (Playback)
1
button.
• When images on a “Memory Stick Duo”
media recorded with other cameras cannot
be played back, touch t (View
Mode) t [Folder View] to view the
images.
(Playback) button
x
Selecting next/previous
image
Touch (Next)/ (Previous) on the
screen.
x
Deleting an image
Touch (Delete) t [This Image].
x
Returning to shooting
images
Touch .
• You can also return to shooting mode
by pressing the shutter button halfway
down.
x
Turning off the camera
Close the lens cover.
• You can also turn off the camera by pressing the ON/OFF (Power) button.
Shooting/viewing images
19
GB
Page 20
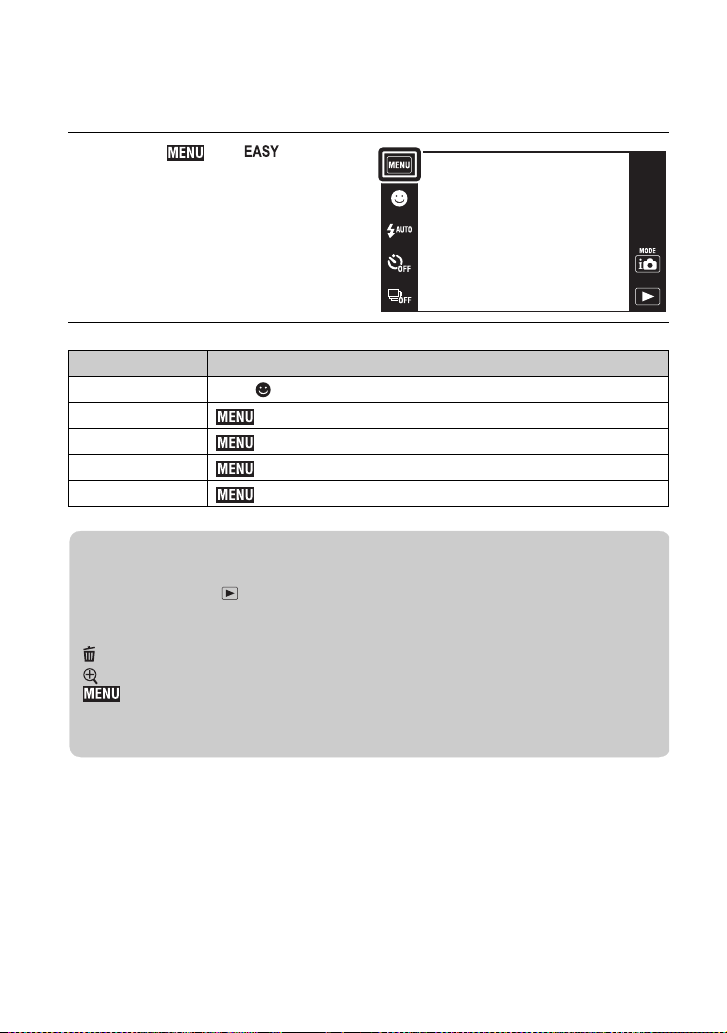
Using shooting f
unctions
Displaying minimum indicators (Easy Mode)
This mode allows you to shoot still images using the minimum necessary functions. The
text size increases and indicators become easier to see.
Touch t (Easy
1
Mode) t [OK].
Action Operation method
Smile Shutter Touch (Smile)
Image Size t [Image Size] t Select [Large] or [Small]
Flash t [Flash] t Select [Auto ] or [Off]
Self-Timer t [Self-Timer] t Select [On] or [Off]
Exit Easy Mode t [Exit Easy Mode] t Touch [OK]
zViewing still images in Easy Mode
When you press the (Playback) button in Easy Mode, the playback screen text
becomes larger, indicators become easier to see. In addition, the functions that can
be used are limited.
(Delete): Deletes the currently displayed image.
(Zoom): Enlarges the displayed image.
: Touch [Delete Single Image] to delete the currently displayed image.
: Touch [Delete All Images] to delete all images in that folder.
: Touch [Exit Easy Mode] to exit Easy Mode.
GB
20
Page 21
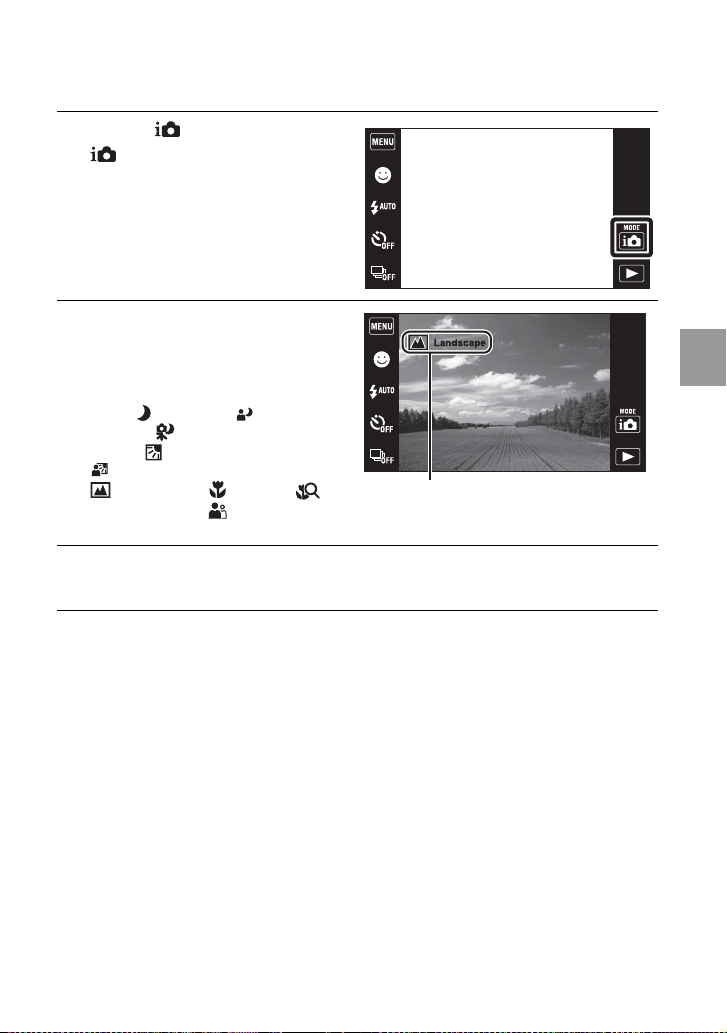
Detecting the shooting conditions automatically (Scene Recognition)
Touch (REC Mode) t
1
(Intelligent Auto
Adjustment).
Point the camera at the
2
subject.
When the camera recognizes a
scene, a Scene Recognition icon and
guide, (Twilight), (Twilight
Portrait), (Twilight using a
tripod), (Backlight),
(Backlight Portrait),
(Landscape), (Macro),
(Close Focus) or (Portrait) is
displayed on the LCD screen.
Press the shutter button halfway down to focus and then
3
press the shutter button fully down to shoot the image.
Scene Recognition icon (Guide)
Using shooting functions
21
GB
Page 22
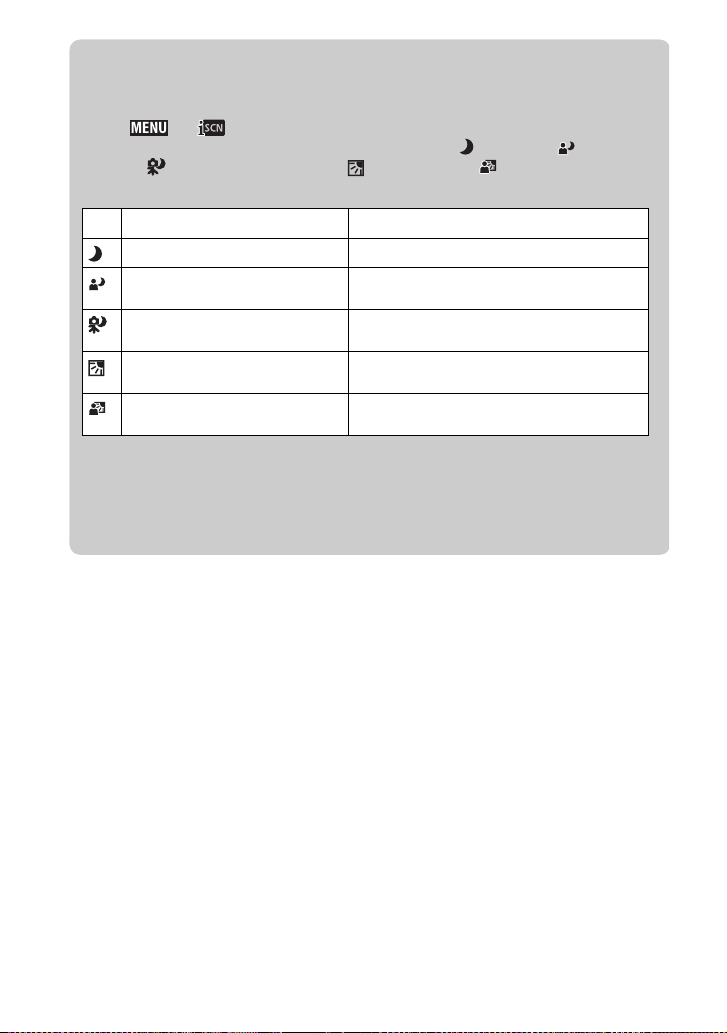
zShooting two images with different settings and selecting the
one you like
Touch t (Scene Recognition) t [Advanced].
When the camera recognizes a difficult-to-shoot scene ( (Twilight), (Twilight
Portrait), (Twilight using a tripod), (Backlight) and (Backlight Portrait)),
it changes the settings as follows and shoots two images with different effects.
First Image Second Image
Shoot in Slow Synchro Shoots with sensitivity increased and shake reduced
Shoot in Slow Synchro with the face
which the flash strobes on as guide
Shoot in Slow Synchro Shoots with even slower shutter speed without
Shoots with the flash Shoots with the brightness and contrast of the
Shoots with the face which the flash
strobes on as guide
When [Anti Blink] is displayed prior to shooting while shooting with Scene
Recognition set to [Advanced], the camera automatically shoots two images
consecutively, and selects the image with the eyes open to be recorded
automatically.
Shoots with sensitivity increased with the face as
guide and shake reduced
increasing sensitivity
background adjusted (DRO plus)
Shoots with the brightness and contrast of the face
and the background adjusted (DRO plus)
22
GB
Page 23
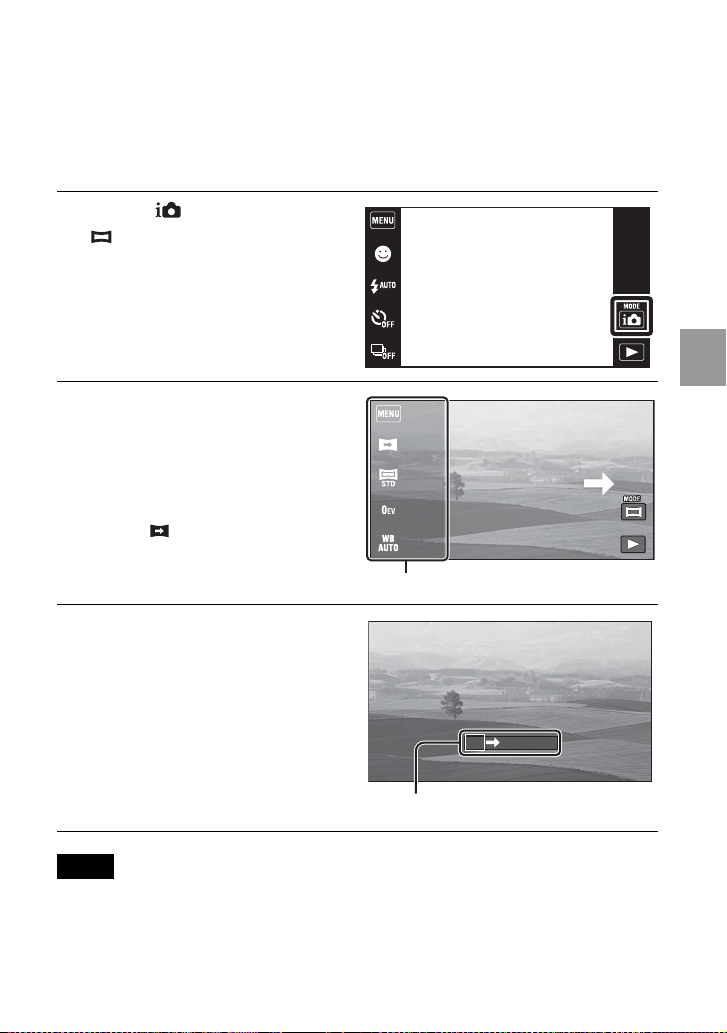
Shooting panoramic images (Sweep Panorama)
Shoots multiple images and allows you to create a panoramic image from composed
images while you pan the camera. Panoramic images can also be played back using the
supplied software “PMB”.
Touch (REC Mode) t
1
(Sweep Panorama).
Hold the camera at the
2
position where you can see
the LCD screen clearly,
then press the shutter
button fully down.
• Touch to change the shooting
direction.
This part will not be taken.
Pan the camera to the end,
3
following the guidance on
the LCD screen.
Guidance bar
Notes
• Sweep Panorama is not suitable for moving objects.
• Shooting may stop or the image may not be recorded correctly in some cases.
• Since several images are stitched together, the stitched part will not be recorded smoothly.
Using shooting functions
23
GB
Page 24
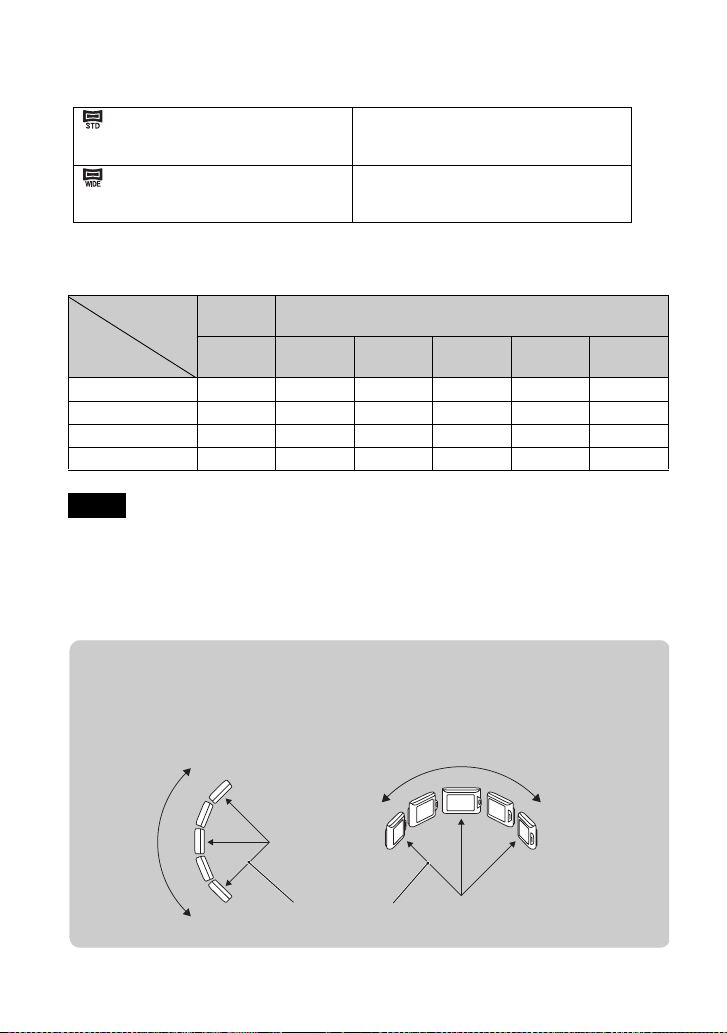
x
Image Size
The image size determines the size of the image file that is recorded when you take a
image.
(Standard)
(Vertical direction: 3424×1920)
(Horizontal direction: 4912×1080)
(Wide)
(Vertical direction: 4912×1920)
(Horizontal direction: 7152×1080)
x
Number of still images that can be recorded
Capacity
Size
Standard (horizontal) 3 315 640 1262 2548 5180
Wide (horizontal) 3 259 527 1040 2101 4271
Standard (vertical) 2 222 452 892 1801 3661
Wide (vertical) 2 213 432 853 1723 3503
Internal
memory
Approx.
11 MB
1GB 2GB 4GB 8GB 16 GB
Shoot images using standard size.
Shoot images using wide size.
(Units: Images)
“Memory Stick Duo” media formatted with this camera
Notes
• The number of still images may vary depending on the shooting conditions and the recording
media.
• When the number of remaining shootable images is greater than 9,999, the “>9999” indicator
appears.
• When an image shot with other cameras is played back on this camera, the image may not appear
in the actual image size.
24
zTips for shooting a panoramic image
Pan the camera in an arc with a constant velocity and in the same direction as the
indication on the LCD screen.
Vertical direction Horizontal direction
Radius as short as
possible
GB
Page 25
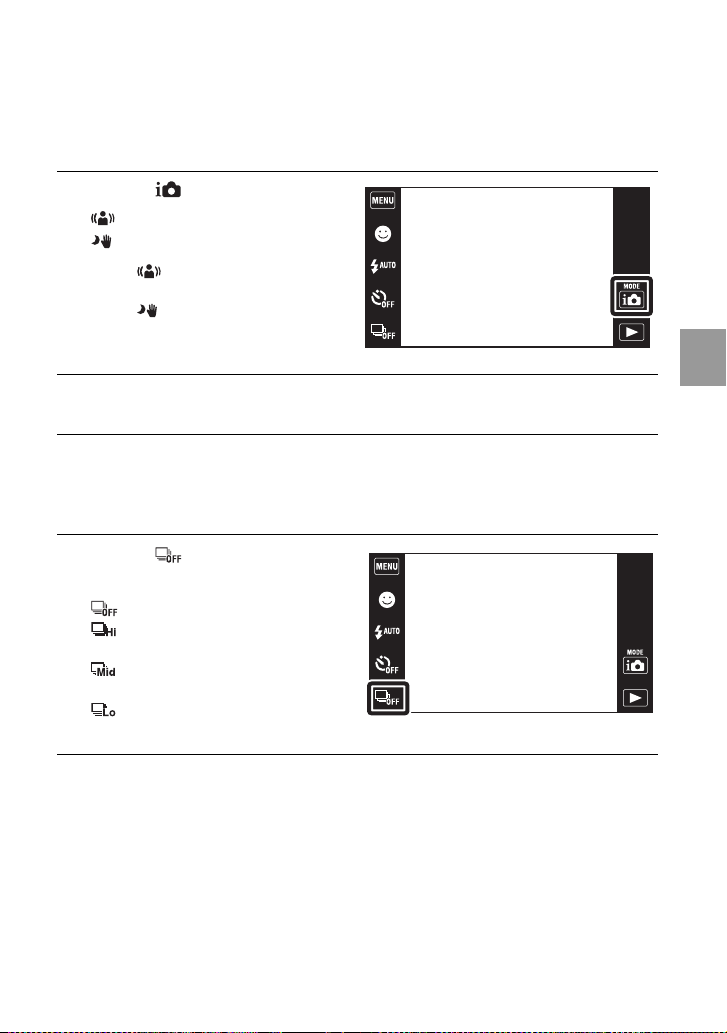
Shooting with reduced blur (Anti Motion Blur) (Hand-held Twilight)
A series of burst shots are taken, and image processing is applied to reduce camera
shake, subject blur and noise.
Touch (REC Mode) t
1
(Anti Motion Blur) or
(Hand-held Twilight).
Select (Anti Motion Blur) when
you shoot in a room.
Select (Hand-held Twilight) when
you shoot night scene without a
tripod.
Press the shutter button fully down.
2
Shooting continuously (Burst)
Touch (Burst) t
1
desired mode.
(Off): Shoots a single image.
(High): Shoots up to 10 images
per second in succession.
(Mid): Shoots up to 5 images per
second in succession.
(Low): Shoots up to 2 images per
second in succession.
Using shooting functions
25
GB
Page 26
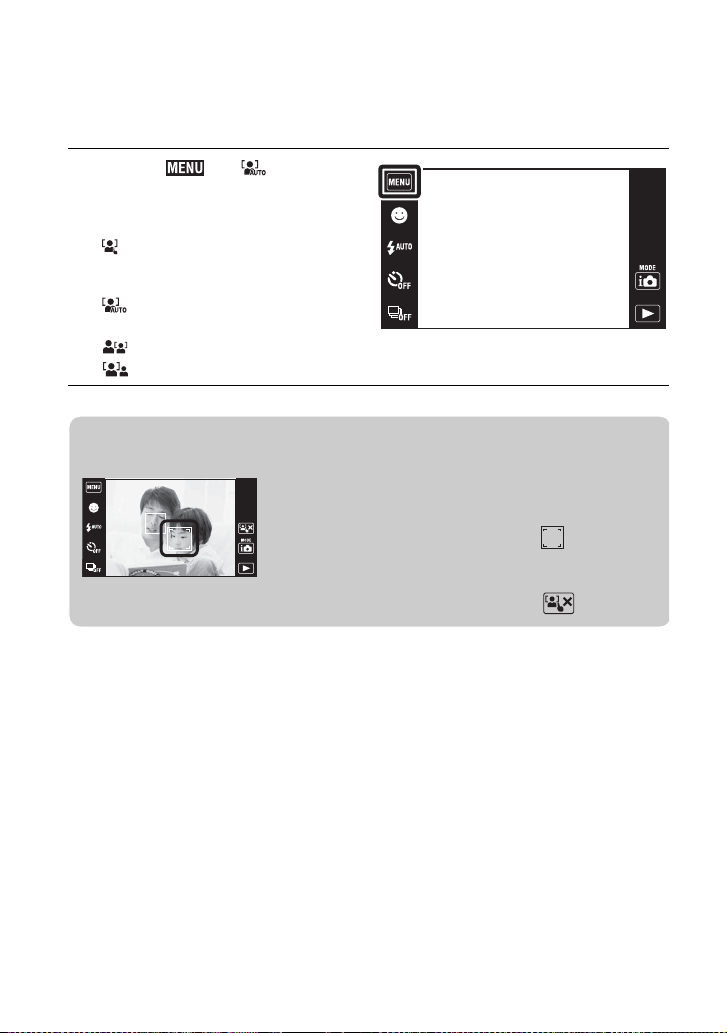
Focusing on the face of the subject (Face Detection)
The camera detects the face of the subject and focuses on it.
Touch t (Face
1
Detection) t desired
mode.
(When touched): Detects the
face when an area with a face is
touched on the screen.
(Auto): Selects the face the
camera is to automatically focus on.
(Child Priority): Detects and shoots with priority on a child’s face.
(Adult Priority): Detects and shoots with priority on an adult’s face.
zRegistering the priority face (Selected-face Memory)
1 Touch a face you want to register as the priority face
during Face Detection.
The touch face is registered as the priority face, and the
frame changes to an orange-colored .
2 Each time you touch a different face, that face is
registered as the priority face.
3 To cancel the face registration, touch .
26
GB
Page 27
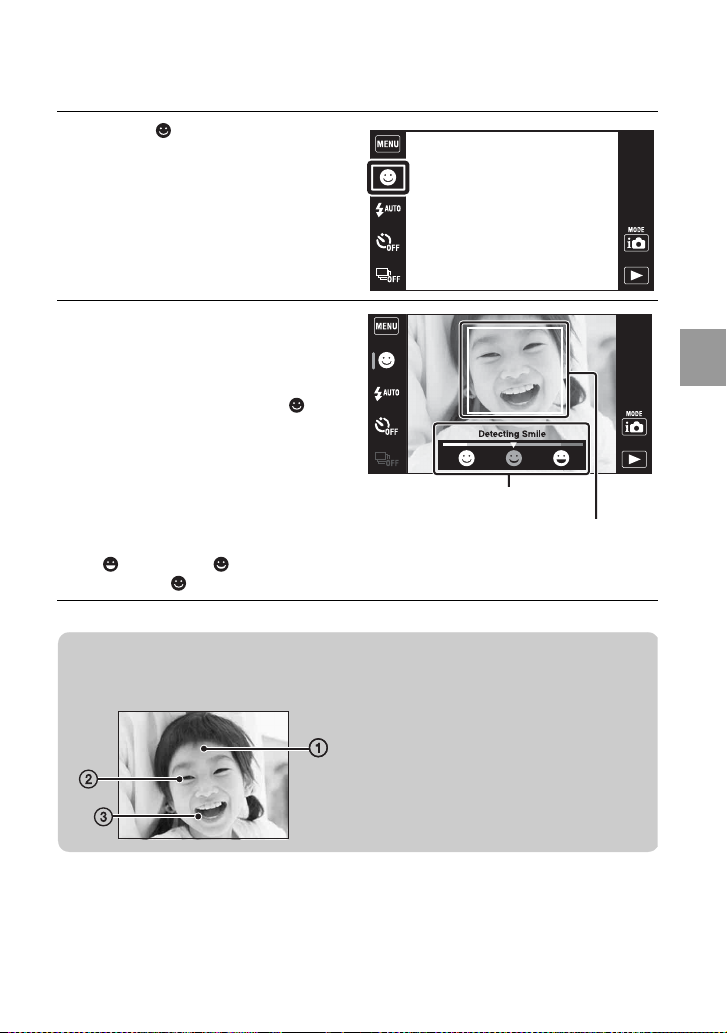
Detecting smiles and shooting automatically (Smile Shutter)
Touch (Smile).
1
Wait detecting a smile.
2
When the smile level exceeds the V
point on the indicator, the camera
records images automatically. To
end the Smile Shutter, touch
(Smile) again.
• If you press the shutter button
during Smile Shutter, the camera
shoots the image then returns to
Smile Shutter mode.
• You can set the sensitivity for
detecting smiles by touching
(Big Smile), (Normal
Smile) or (Slight Smile).
Smile Detection Sensitivity
indicator
Face Detection frame
Using shooting functions
zHints for better capturing of smiles
1 Do not cover the eyes with the bangs.
2 Try to orient the face in front of the
camera and be as level as possible.
Keep the eyes narrowed.
3 Give a clear smile with an open mouth.
The smile is easier to detect when the
teeth are shown.
27
GB
Page 28
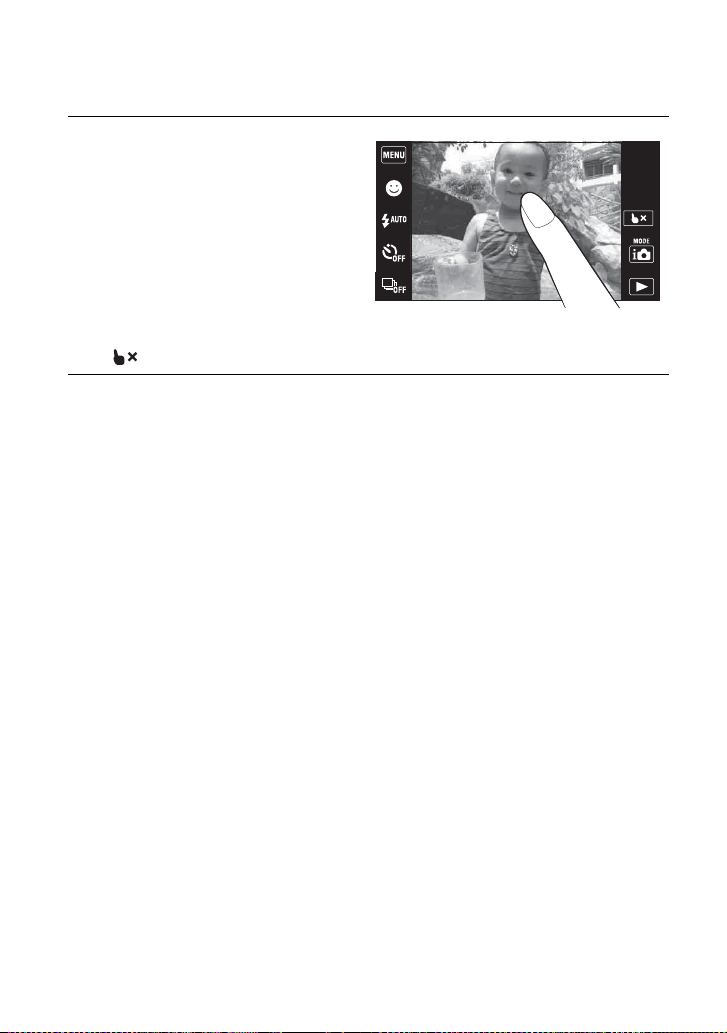
Focusing on a specific point of the frame
Simply touch the point of the frame you wish to focus on to change the focus position.
Point the camera at the
1
subject, then touch the point
of the frame you want to
focus on.
• You can change the focus point as
many times as you wish before
pressing the shutter button halfway
down.
• If you want the camera to choose a
focus point automatically, touch
.
28
GB
Page 29
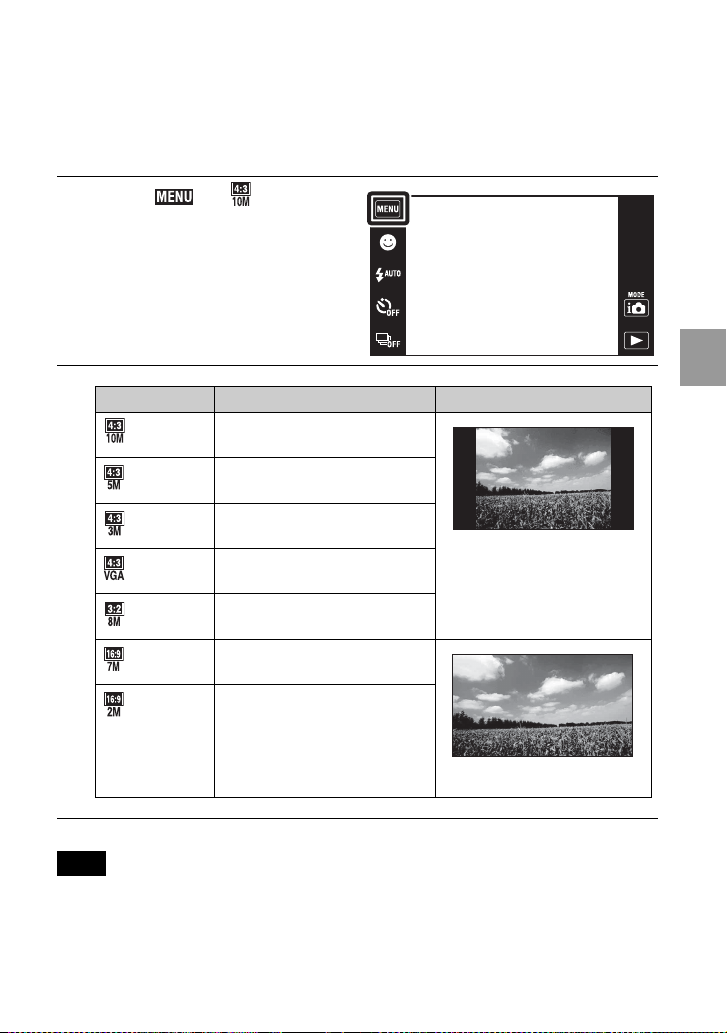
Selecting the image size to match the usage
The image size determines the size of the image file that is recorded when you take a
image.
The larger the image size, the more detail will be reproduced when the image is printed
on large-format paper. The smaller the image size, the more images can be recorded.
Touch t (Image
1
Size) t desired size.
Image size Usage guidelines LCD screen
(3648×2736) For prints up to A3+ size
(2592×1944) For prints up to A4 size
(2048×1536) For prints up to L/2L size
(640×480) For e-mail attachments
(3648×2432) 3:2 aspect ratio as in photo prints
and postcards
(3648×2056) For viewing on a high-definition TV
and printing up to A4 size
(1920×1080) For viewing on a high-definition TV
Note
• When you print images shot with 16:9 aspect ratio, both edges may be cut off.
Images are displayed in 4:3 or 3:2
aspect ratio.
Images will fill the entire screen.
Using shooting functions
29
GB
Page 30
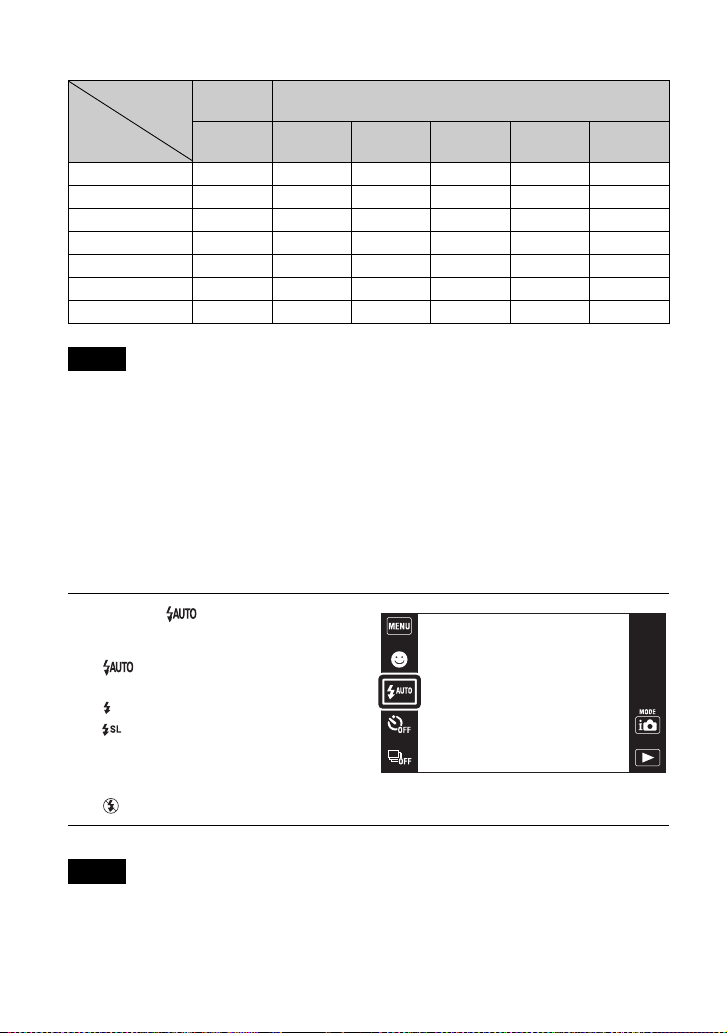
x
Number of still images that can be recorded
(Units: Images)
Capacity
Size
10M 2 202 412 812 1640 3335
5M 3 293 595 1174 2372 4821
3M 7 617 1253 2472 4991 10140
VGA 70 5924 12030 23730 47910 97390
3:2(8M) 2 200 406 801 1618 3290
16:9(7M) 2 201 409 807 1629 3312
16:9(2M) 11 987 2005 3955 7986 16230
Notes
• The number of still images may vary depending on the shooting conditions and the recording
media.
• When the number of remaining shootable images is greater than 9,999, the “>9999” indicator
appears.
• When an image shot with other cameras is played back on this camera, the image may not appear
in the actual image size.
Internal
memory
Approx.
11 MB
“Memory Stick Duo” media formatted with this camera
1GB 2GB 4GB 8GB 16 GB
Selecting a flash mode
Touch (Flash) t
1
desired mode.
(Auto): Flashes when shooting
in low light or backlight conditions.
(On): Flash always operates.
(Slow Synchro): Flash always
operates. The shutter speed is slow in
a dark place to clearly shoot the
background that is out of flash light.
(Off): Flash does not operate.
Notes
• [On] or [Slow Synchro] are not available when the camera is in Intelligent Auto Adjustment mode.
• You cannot use the flash during burst shooting.
GB
30
Page 31
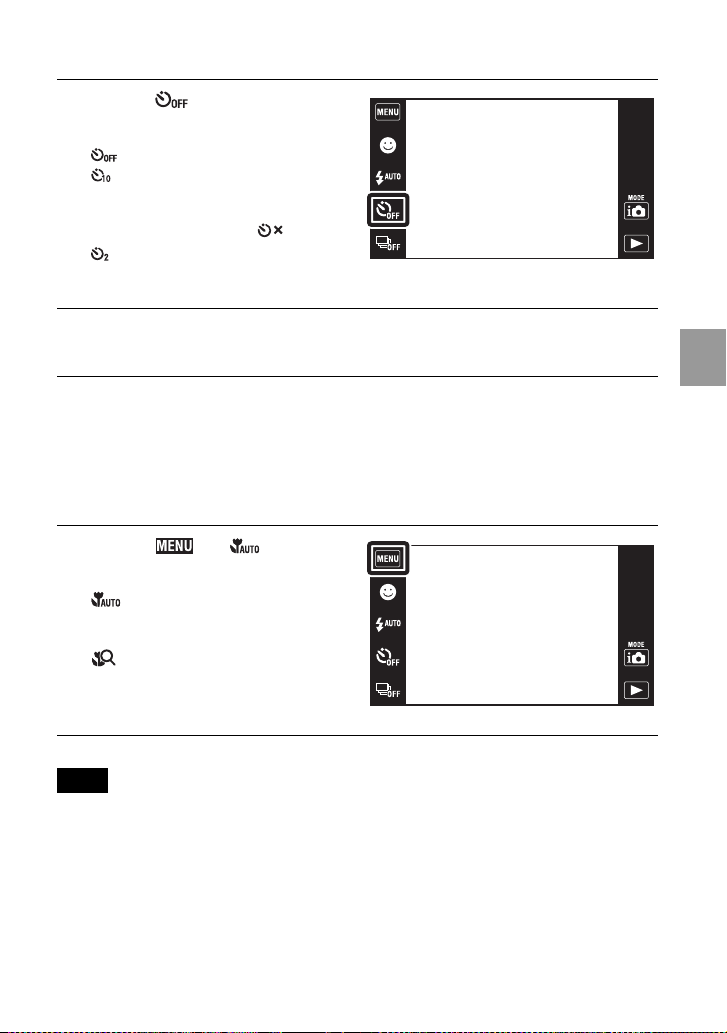
Using the self-timer
Touch (Self-Timer) t
1
desired mode.
(Off): Not using the self-timer.
(10sec): Shooting starts after a
10-second delay. Use this setting if
you want to include yourself in the
image. To cancel, touch .
(2sec): Shooting starts after a
two-second delay. This is to prevent
blurring due to unsteadiness when the shutter button is pressed.
Press the shutter button.
2
The self-timer lamp flashes and a beep sounds until the shutter operates.
Shooting close-ups (Macro)
You can shoot beautiful close-up images of small subjects such as insects or flowers.
Touch t (Macro)
1
t desired mode.
(Auto): The camera adjusts the
focus automatically from distant
subjects to close-up.
(Close Focus On): Use this
mode to shoot at close distances.
Locked to the W side: Approximately
1 to 20 cm (13/32 to 7 7/8 inches)
Using shooting functions
Note
• Macro mode is fixed to [Auto] in Sweep Panorama, Movie mode, Anti Motion Blur, Hand-held
Twilight, Smile Shutter or Easy Mode.
31
GB
Page 32
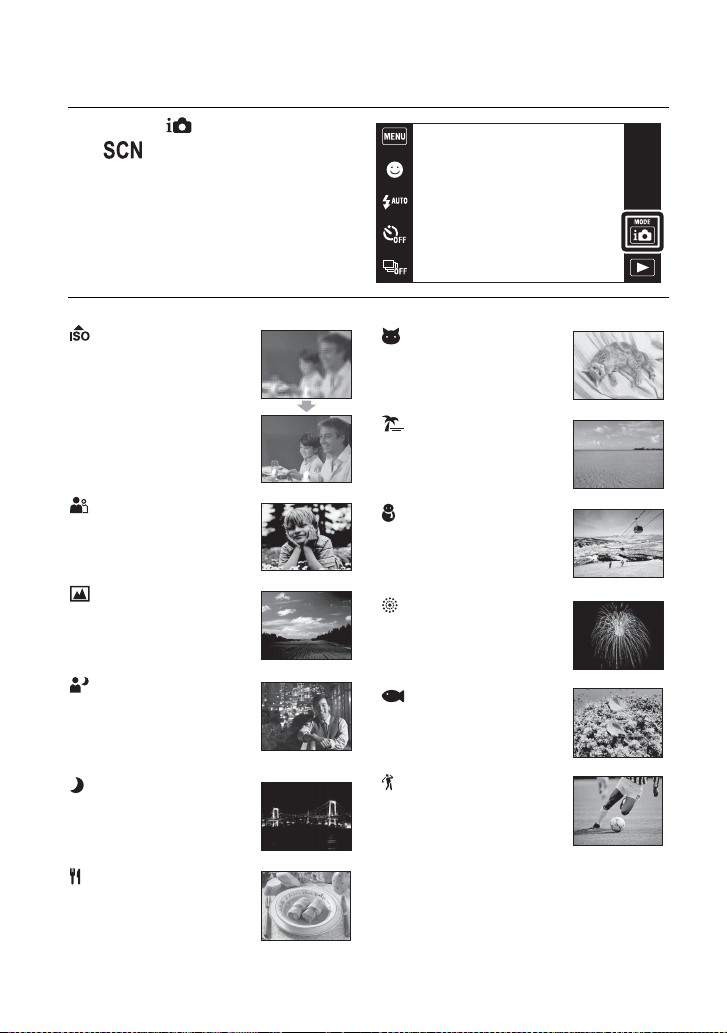
Using the Shooting mode that matches the scene (Scene Selection)
Touch (REC Mode) t
1
(Scene Selection) t
desired mode.
(High Sensitivity):
Shoots images without a
flash even in low lighting.
(Soft Snap): Shoots
images with a softer
atmosphere for portraits of
people, flowers, etc.
(Landscape): Shoots
with the focus on a distant
subject.
(Twilight Portrait):
Shoots sharp images of
people in a dark place
without losing the nighttime
atmosphere.
(Twilight): Shoots night
scenes without losing the
nighttime atmosphere.
(Gourmet): Shoots food
arrangements in delicious
color.
(Pet): Shoots images of
your pet with the best
settings.
(Beach): Shoots
seaside or lakeside scenes
with the blueness of the
water captured more vividly.
(Snow): Shoots snow
scenes in white more clearly.
(Fireworks): Shoots
fireworks in all their
splendor.
(Underwater): Shoots
underwater in natural colors
in housing (such as Marine
Pack).
(Hi-Speed Shutter):
Shoots moving subjects in
bright places.
32
GB
Page 33
Note
• The flash does not operate in some modes.
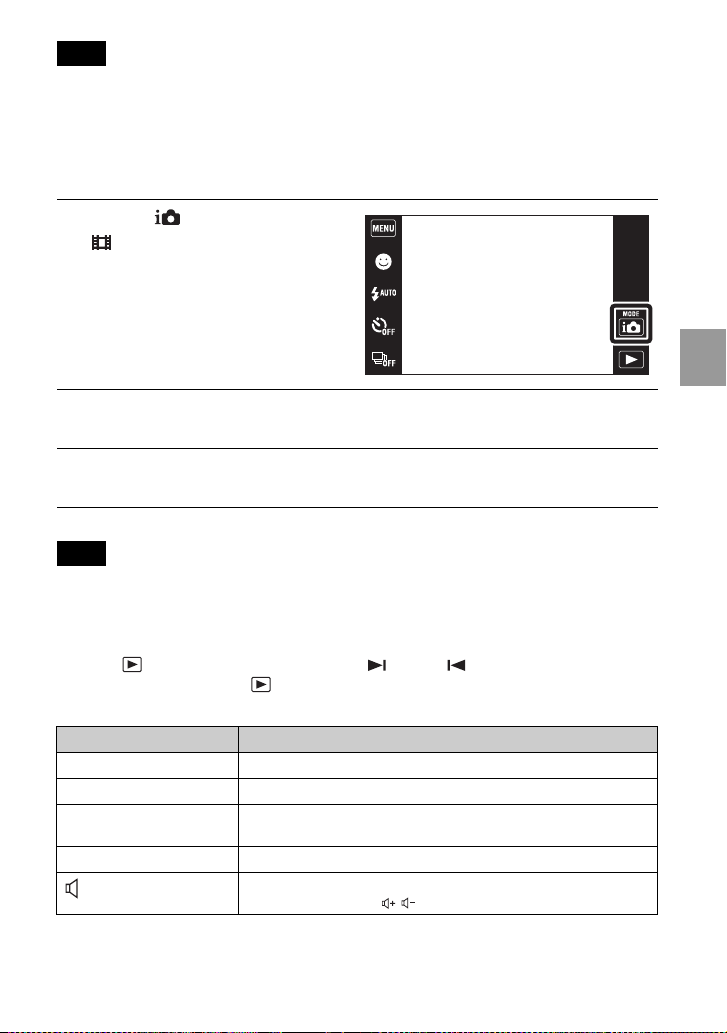
Shooting movies
Touch (REC Mode) t
1
(Movie Mode).
Press the shutter button fully down to start recording.
2
Press the shutter button fully down again to stop recording.
3
Note
• Depending on the surrounding temperature, the screen brightness while recording a movie
decreases automatically.
x
Viewing movies
Press the (Playback) button and touch the (Next) / (Previous) buttons to select
a movie to view, then touch on the LCD screen. When you touch the LCD screen
during playback, operation buttons are displayed.
Button/Operation method Available functions
. Jump to the start of the movie
m Fast rewind
Touch u or the LCD
screen
M Fast forward
Normal playback/pause
Volume control
Adjust the volume with / .
Using shooting functions
33
GB
Page 34
x
Image size
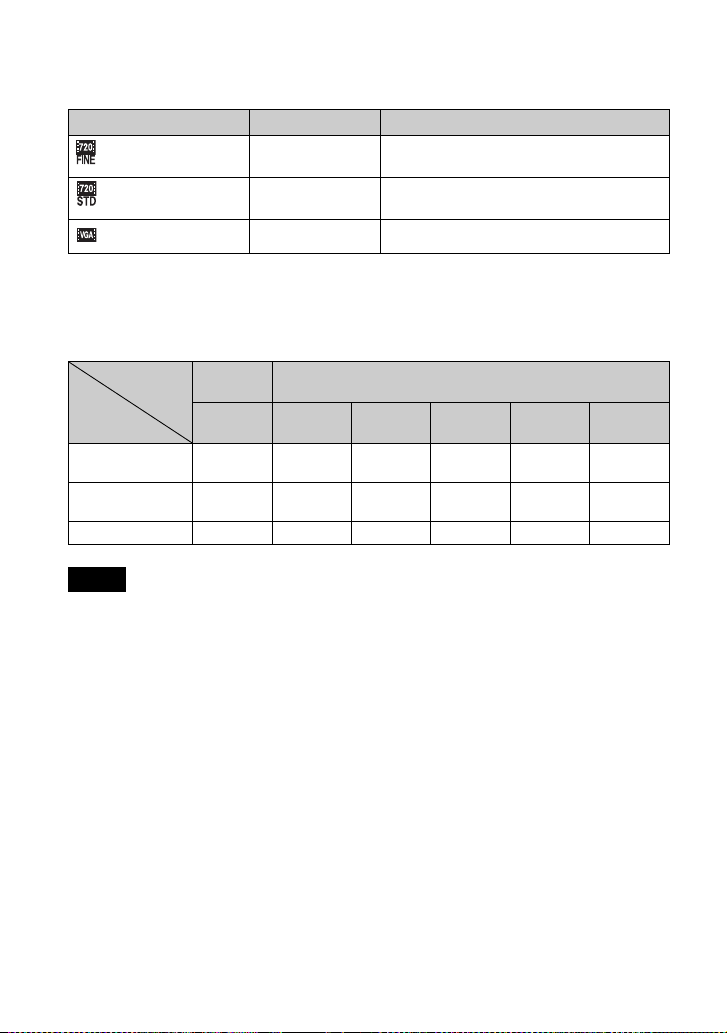
The larger the image size, the higher the image quality. The higher the amount of data
used per second (average bit rate), the smoother the playback image.
Movie image size Average bit rate Usage guidelines
1280×720(Fine) 9 Mbps Shoot highest quality movies for display on High
1280×720(Standard) 6 Mbps Shoot standard quality movies for display on
VGA 3 Mbps Shoot at an image size suitable for WEB upload.
x
Maximum recording time
Definition TV.
High Definition TV.
The table below shows the approximate maximum recording times. These are the total
times for all movie files. Continuous shooting is possible for approximately 29 minutes.
(Units: hour: minute: second)
Capacity
Size
1280×720
(Fine)
1280×720
(Standard)
VGA 0:00:10 0:40:50 1:23:20 2:44:30 5:32:30 11:16:10
Internal
memory
Approx.
11 MB
– 0:13:50 0:28:30 0:56:20 1:53:50 3:51:40
– 0:20:20 0:41:30 1:22:10 2:46:10 5:38:00
“Memory Stick Duo” media formatted with this camera
1GB 2GB 4GB 8GB 16 GB
Notes
• The recording time may vary depending on the shooting conditions and the recording media.
• The continuous shooting time differs according to the shooting circumstances (temperature, etc.).
The numbers in the table above are when [LCD Brightness] is set to [Normal].
• Movies with the size set to [1280×720] can only be recorded on a “Memory Stick PRO Duo”
media.
34
GB
Page 35
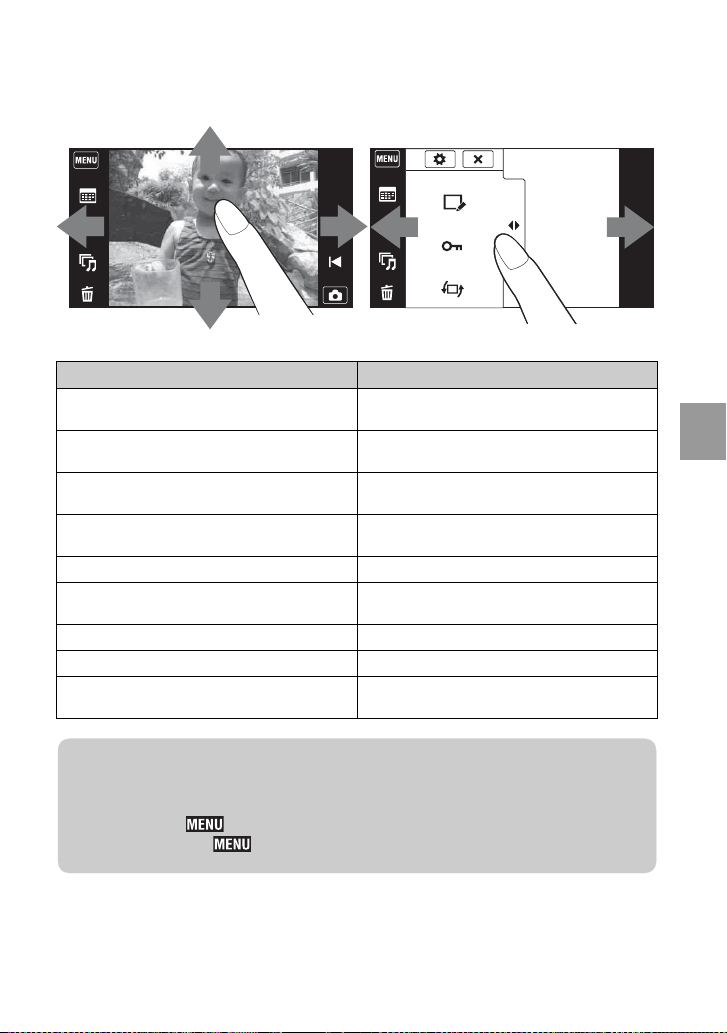
Using viewing f
unctions
Using the touch panel
The camera allows you to perform various operations by dragging on the LCD screen
with your finger.
Displays/hides the MENU screen
Adjustability Operation method
Displays the MENU screen Touch the left side of the LCD screen and drag to
Hides the MENU screen Touch the right side of the LCD screen and drag to
Hides the operation buttons Touch the left side of the LCD screen and drag to
Displays the operation buttons Touch the left side of the LCD screen and drag to
Displays the next/previous image Drag to the right or left
Continuously changes the image (next/previous
image)
Displays the image index screen Drag up
Displays the next/previous page in index mode Drag down or up
Displays the calendar during playback in Date
View mode
the right
the left
the left
the right
Drag to the right or left, and continue pressing
Drag down
Using viewing functions
zOperation button display settings
Sets whether to display the operation buttons on the LCD screen.
When shooting: t [Shooting Display Settings] t [On] or [Off]
When playing back: t [Playback Display Settings] t [On] or [Off]
35
GB
Page 36
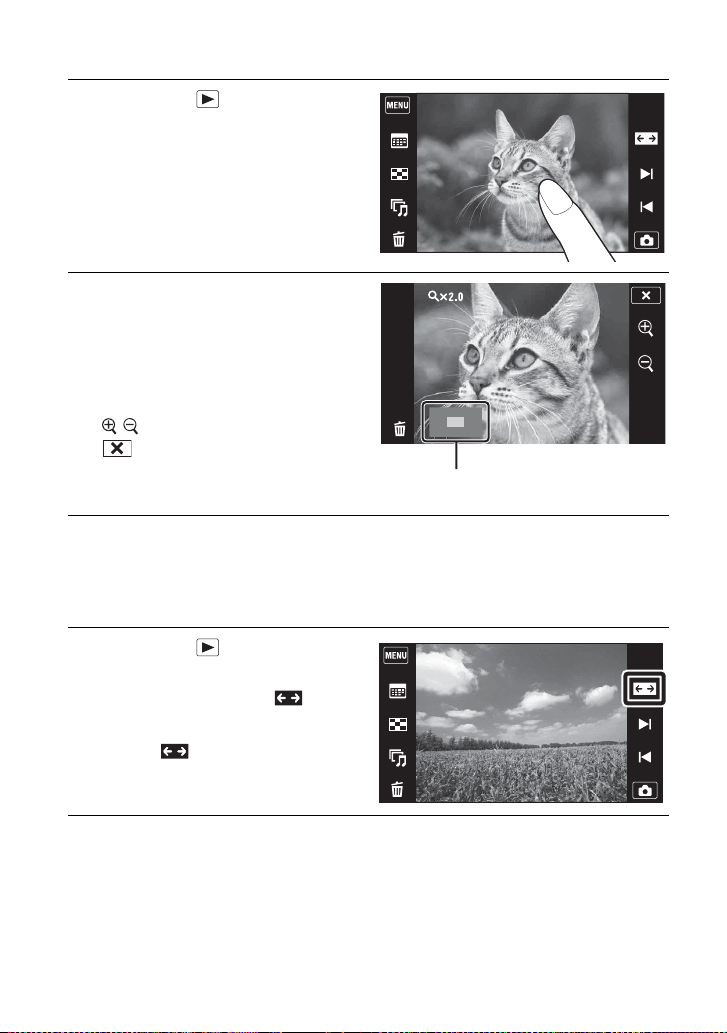
Viewing an enlarged image (Playback Zoom)
Press the (Playback)
1
button to display an image,
then touch the area you want
to enlarge.
The image is enlarged at twice the size,
with the area you touched at the center.
Adjust the zoom scale and
2
position.
The zoom scale increases each time you
touch the screen.
Drag up/down/right/left: Changes the
zoom position.
: Changes the zoom scale.
: Cancels playback zoom.
Shows the displayed area of the whole
image
Displaying images full-screen (Wide Zoom)
36
Press the (Playback)
1
button to display the still
image, then touch (Wide
Zoom).
• Touch again to end the wide
zoom.
GB
Page 37
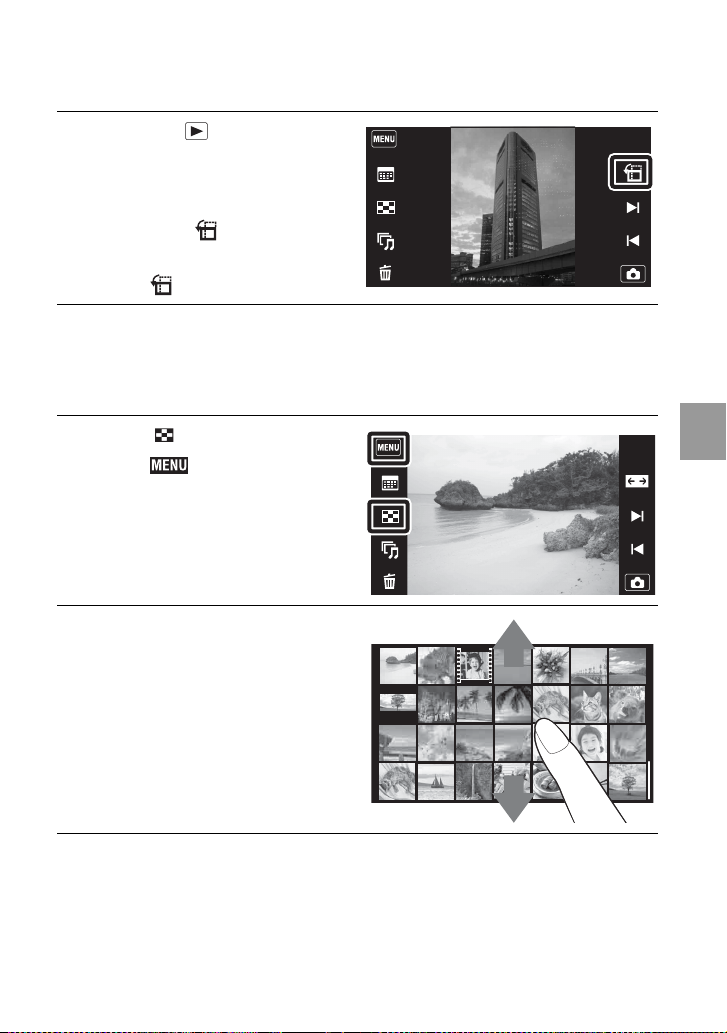
Rotating a vertical orientation image (Temporarily rotated display)
Press the (Playback)
1
button to display the still
image, then select the
vertical orientation images,
then touch (Temporarily
rotated display).
• Touch again to end the display.
Searching for an image (Image Index)
Touch (Image Index).
1
• Touch t [Image index
settings] to set the number of
displayed images to 12 or 28 images.
Using viewing functions
Touch the screen and drag
2
up or down to change the
page.
• Touch an image on the index screen to
return to the single image screen for
that image.
37
GB
Page 38
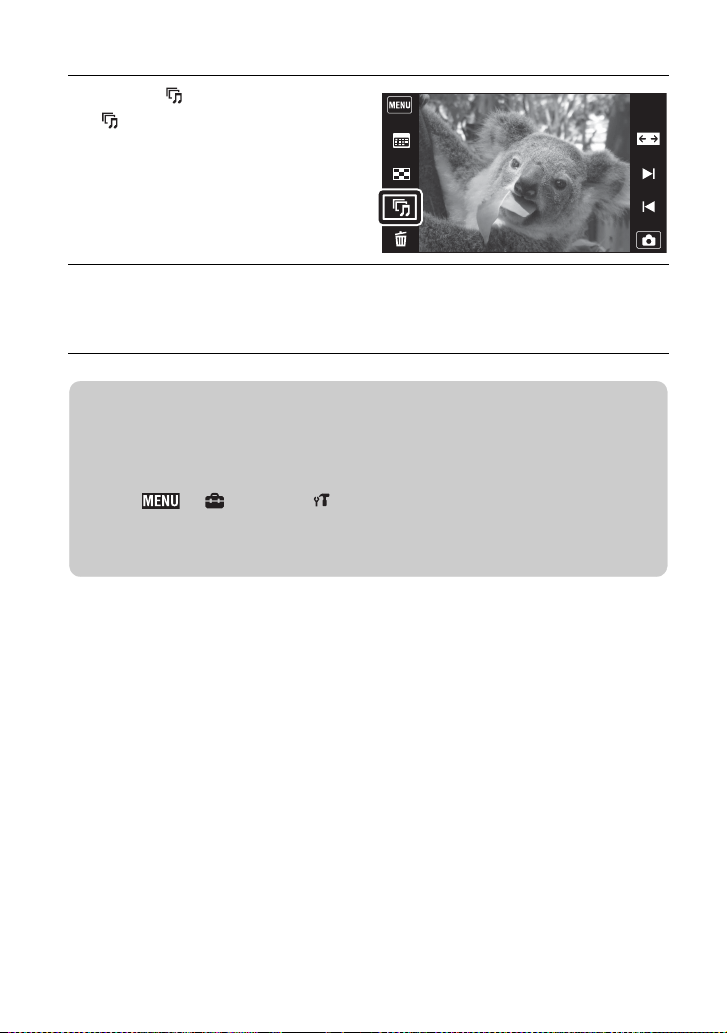
Viewing still images with music (Slideshow)
Touch (Slideshow) t
1
(Slideshow with music)
Select the desired setting item, then touch [Start].
2
The slideshow starts.
• To end the slideshow, touch the screen, and then touch [Exit Slideshow].
zSelecting background music
You can transfer a desired music file from your CDs or MP3 files to the camera to play back
during slideshow. To transfer music files, install the “Music Transfer” software (supplied) to
your computer (page 43), then follow the steps below.
1 Touch t (Settings) t (Main Settings) t [Download Music].
2 Make a USB connection between the camera and your computer.
3 Start and operate “Music Transfer”.
For details on “Music Transfer”, see the “Music Transfer” help.
38
GB
Page 39
Deleting imag
es
Deleting images
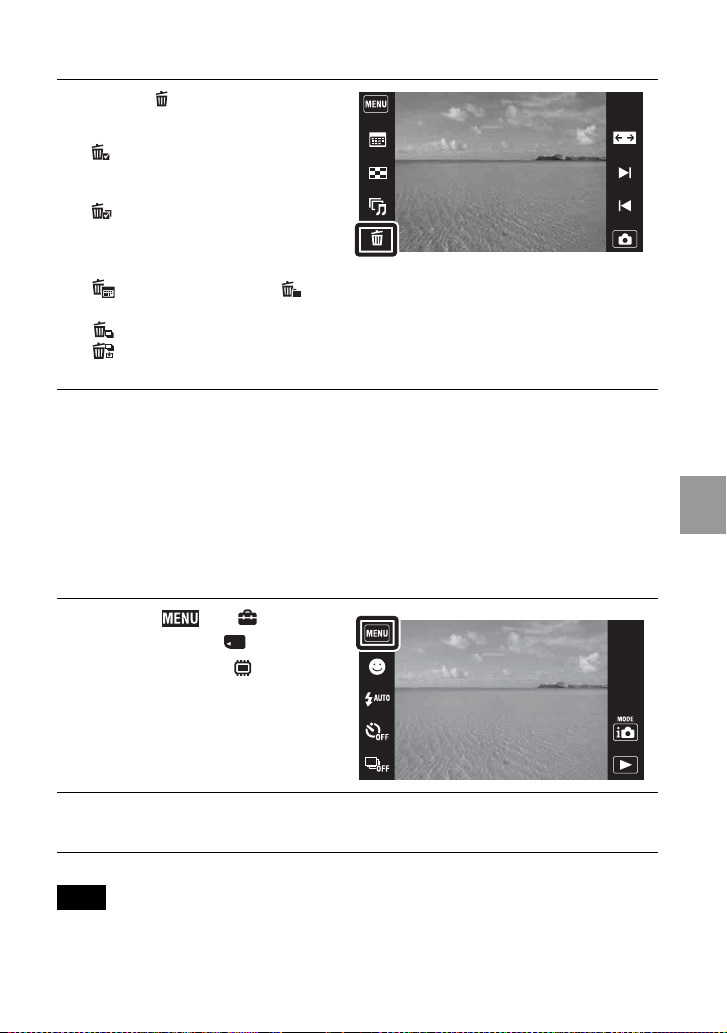
Touch (Delete) t
1
desired mode.
(This Image): Deletes the
currently displayed image in single
image mode.
(Multiple Images): Allows you
to select and delete multiple images.
Touch the image you want to delete,
then touch [OK] t [OK].
(All in Date Range)/ (All in This Folder): Deletes all images in Date
Range or the selected folder at once.
(All In This Group): Deletes all images in Burst Group at once.
(All but this image): Deletes Burst Group images other than the selected
image in Display Burst Group mode.
Deleting all images (Format)
You can delete all data stored on “Memory Stick Duo” media or the internal memory. If
a “Memory Stick Duo” media is inserted, all data stored on the “Memory Stick Duo”
media are deleted. If no “Memory Stick Duo” media is inserted, all data stored in the
internal memory are deleted.
Deleting images
Touch t
1
(Settings) t ("Memory
Stick" Tool) or (Internal
Memory Tool) t [Format].
Touch [OK].
2
Note
• Formatting permanently deletes all data, including protected images, and the data cannot be
recovered.
39
GB
Page 40
C
onnecting to other devices
Viewing images on a TV
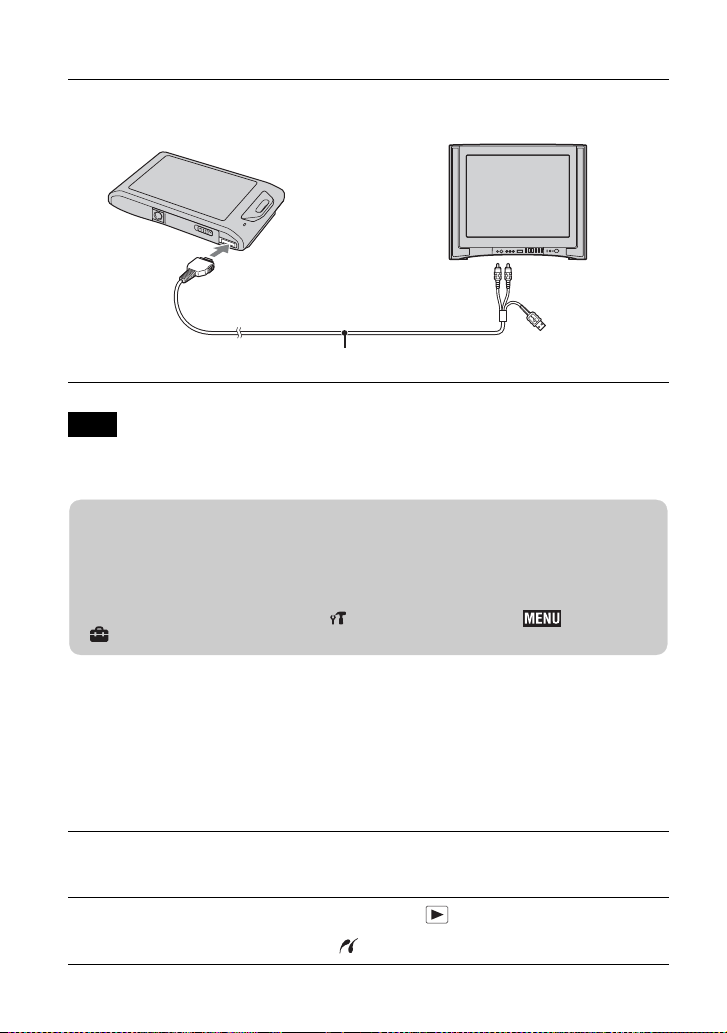
1
Connect the camera to the TV with the cable for multi-use
terminal (supplied).
To the multi connector
Cable for multi-use terminal
Note
• The [Video Out] setting is set to [NTSC] mode at the factory to let you enjoy optimum movie
image quality. When images do not appear or jitter on your TV, you may be using a PAL-only TV.
Try switching the [Video Out] setting to [PAL] (page 50).
To audio/video input
jacks
zViewing images on a HD (High Definition) TV
• You can view images recorded on the camera by connecting the camera to an HD (High
Definition) TV with the HD Output Adaptor Cable (sold separately). Use a Type1a-compliant
HD Output Adaptor Cable.
• Set [COMPONENT] to [HD(1080i)] in (Main Settings) by touching t
(Settings).
Printing still images
If you have a PictBridge-compliant printer, you can print images by the following
procedure.
Connect the camera to the printer with the cable for multi-
1
use terminal (supplied).
Turn on the printer, and press the (Playback) button.
2
After the connection is made, the indicator appears.
GB
40
Page 41
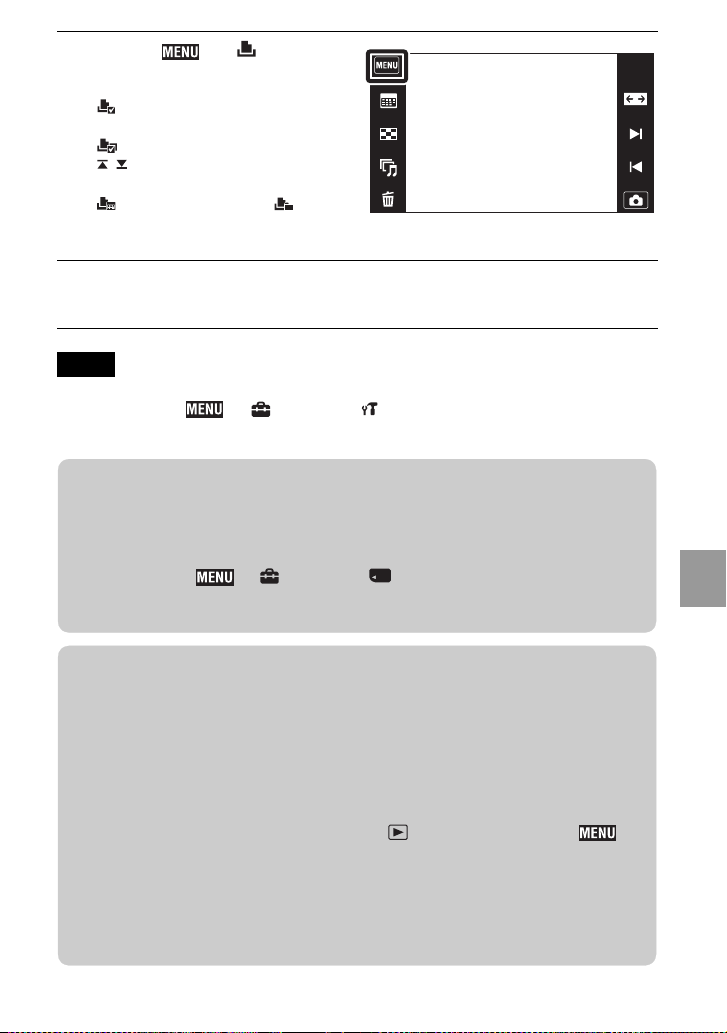
Touch t (Print)
3
t desired item.
(This Image): Prints the
currently displayed image.
(Multiple Images): Touch
/ to display the image, then touch
the image you want to print.
(All in Date Range)/ (All in
This Folder): Prints all images in
Date Range or the selected folder at once.
Touch the desired setting item, then [Start].
4
The image is printed.
Notes
• If the connection between the camera and printer is not established, disconnect the cable for multi-
use terminal, touch t
[PictBridge], and start over the procedure from step 1.
• Panoramic images may not be printed depending on the printer.
(Settings) t (Main Settings) t [USB Connect] t
zPrinting at a shop
You cannot print images stored in the internal memory at a print shop directly from the camera.
Copy the images to a “Memory Stick Duo” media, then take the “Memory Stick Duo” media to
the print shop.
How to copy: Touch t (Settings) t ("Memory Stick" Tool) t [Copy] t
[OK].
For details, consult your photo printing service shop.
Connecting to other devices
zSuperimposing dates on images
This camera does not include a function for superimposing a date on an image. The reason for
this is to prevent the date from being duplicated during printing.
Printing at a shop:
You can ask that images be printed with a date superimposed. For details, consult with a photo
printing service shop.
Printing at home:
Connect to a PictBridge-compliant printer, and press (Playback) button, then set t
[Print] t [Date] to [Date] or [Day&Time].
Superimposing dates on images using PMB:
With the supplied “PMB” software installed on a PC (page 43), you can directly superimpose the
date on an image. However, note that when images with a superimposed date are printed, the
date may be duplicated depending on print settings. For details on “PMB”, see the “PMB Guide”
(page 44).
41
GB
Page 42
Using the camera with a computer
x
Using “PMB (Picture Motion Browser)”
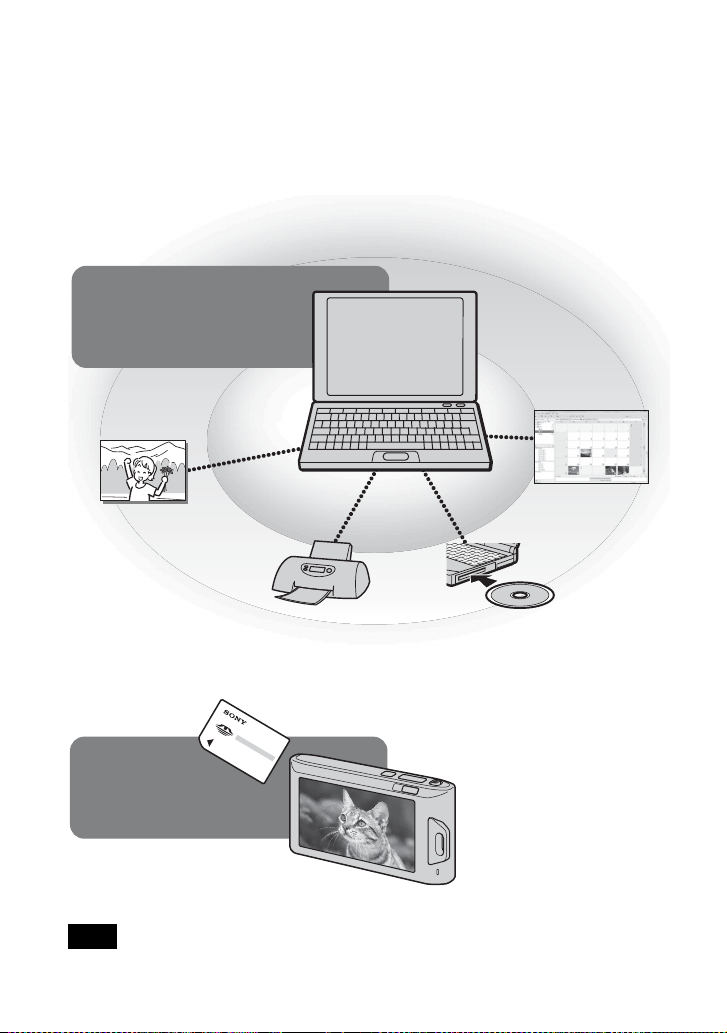
You can enjoy the recorded images more than ever by taking advantage of the software,
and “PMB” is included on a CD-ROM (supplied).
There are more functions, in addition to those listed below, for enjoying your images.
For details, see the “PMB Guide” (page 44).
Import to
computer
Calendar
Viewing images in a
calendar.
Media service
Uploading the image to
the media service.
Print
Printing images with
date stamps.
Export to
camera
Exporting images to a “Memory
Stick Duo” media and viewing
them.
Note
• “PMB” is not compatible with Macintosh computers.
GB
42
CD/DVD
Creating a data disc using a CD
burner drive or DVD burner
drive.
Page 43
x
Stage 1: Installing the “PMB” (supplied)
You can install the software (supplied) using the following procedure. When you install
“PMB,” “Music Transfer” is also installed.
• Log on as Administrator.
Check your computer environment.
1
Recommended environment for using “PMB” and “Music Transfer”,
and when importing images
OS (pre-installed): Microsoft Windows XP
Intel Pentium III 800 MHz or faster (For playing/editing the High Definition
CPU:
movies: Intel Pentium 4 2.8 GHz or faster/Intel Pentium D 2.8 GHz or faster/Intel
Core Duo 1.66 GHz or faster/Intel Core 2 Duo 1.20 GHz or faster)
Memory:
or more)
Hard Disk (Disk space required for installation): Approximately 500 MB
Display: Screen resolution: 1,024 × 768 dots or more
*1
*2
Turn on your computer, and insert the CD-ROM (supplied)
2
into the CD-ROM drive.
The installation menu screen appears.
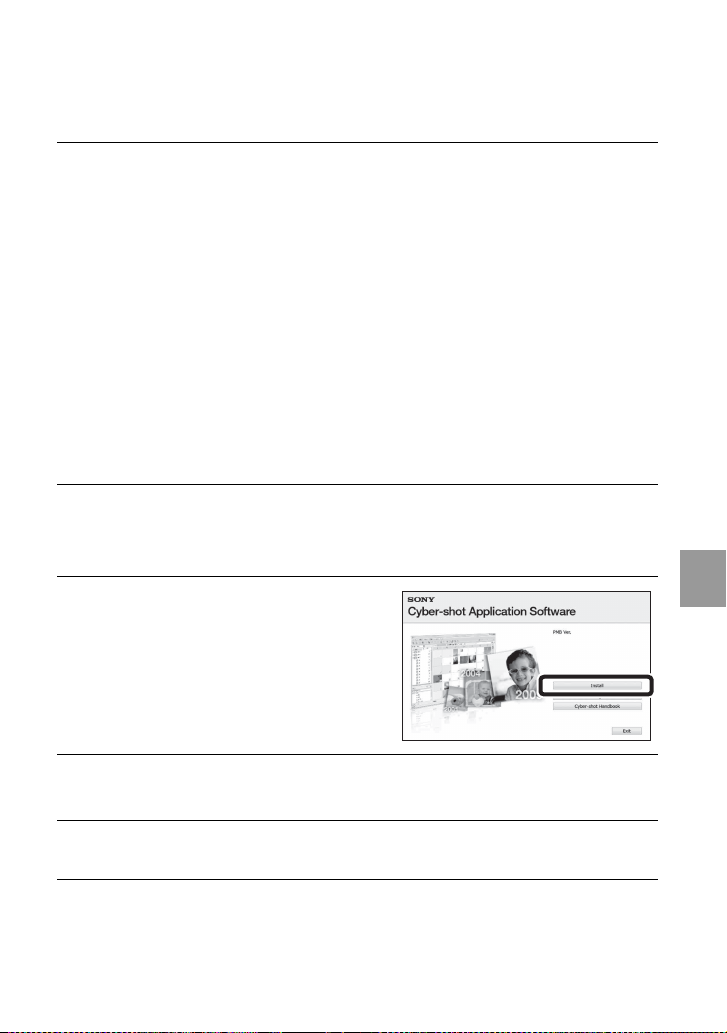
Click [Install].
3
The “Choose Setup Language” screen
appears.
512 MB or more (For playing/editing the High Definition movies: 1 GB
64-bit editions and Starter (Edition) are not supported.
Windows Image Mastering API (IMAPI) Ver.2.0 or later is required to use the function for
creating discs.
Starter (Edition) is not supported.
*1
SP3/Windows Vista*2 SP2
Connecting to other devices
Follow the instructions on the screen to complete the
4
installation.
Remove the CD-ROM after the installation is complete.
5
43
GB
Page 44
x
Stage 2: Importing images to your computer using “PMB”
Insert a fully charged battery pack to the camera, then press
1
the (Playback) button.
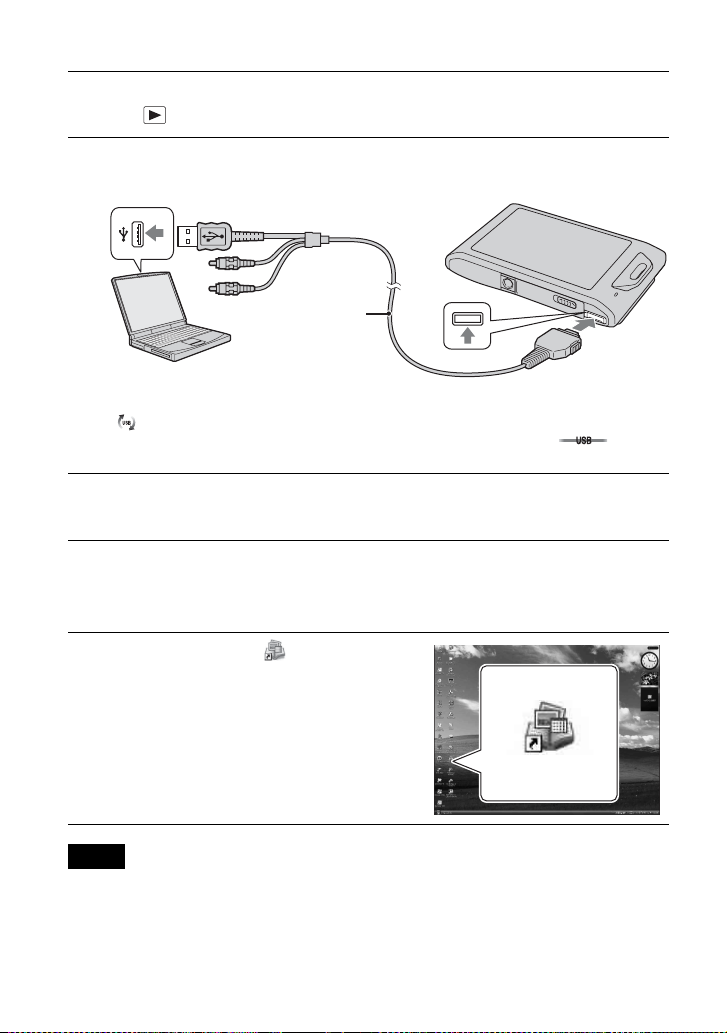
Connect the camera to your computer.
2
“Connecting…” appears on the screen of the camera.
1 To a USB jack
Cable for multi-use
terminal
2 To the multi
connector
• is displayed on the screen during the communication session. Do not operate the
computer while the indicator is displayed. When the indicator changes to , you can
start using the computer again.
Click the [Import] button.
3
For details, see the “PMB Guide”.
x
Stage 3: Viewing “PMB Guide”
Double-click the (PMB Guide)
1
icon on the desktop.
• To access the “PMB Guide” from the start
menu: Click [Start]
[Sony Picture Utility]
Guide].
Notes
• Do not disconnect the cable for multi-use terminal from the camera while the camera is operating
or while “Accessing…” appears on the screen of the camera. Doing so may corrupt the data.
• When using a battery with little remaining charge, you may not be able to transfer the data or the
data may be corrupted. Using the AC-LS5K/AC-LS5 AC Adaptor (sold separately) and the USB/
AV/DC IN Cable for multi-use terminal (sold separately) is recommended.
GB
44
t [All Programs] t
t [Help] t [PMB
Page 45

x
Using the camera with your Macintosh computer
You can copy images to your Macintosh computer. However, “PMB” is not compatible.
When images are exported to the “Memory Stick Duo” media, view them in [Folder
View].
You can install “Music Transfer” on your Macintosh computer.
Recommended computer environment
The following environment is recommended for a computer connected to the camera.
Recommended environment for using “Music Transfer” and for importing
images
OS (pre-installed): Mac OS X (v10.3 to v10.5)
Memory: 64 MB or more (128 MB or more is recommended)
Hard Disk (Disk space required for installation): Approximately 50 MB
Connecting to other devices
45
GB
Page 46
Changing
camera se
tting
s
Changing the operation sounds
Selects or turns off the sound produced when you operate the camera.
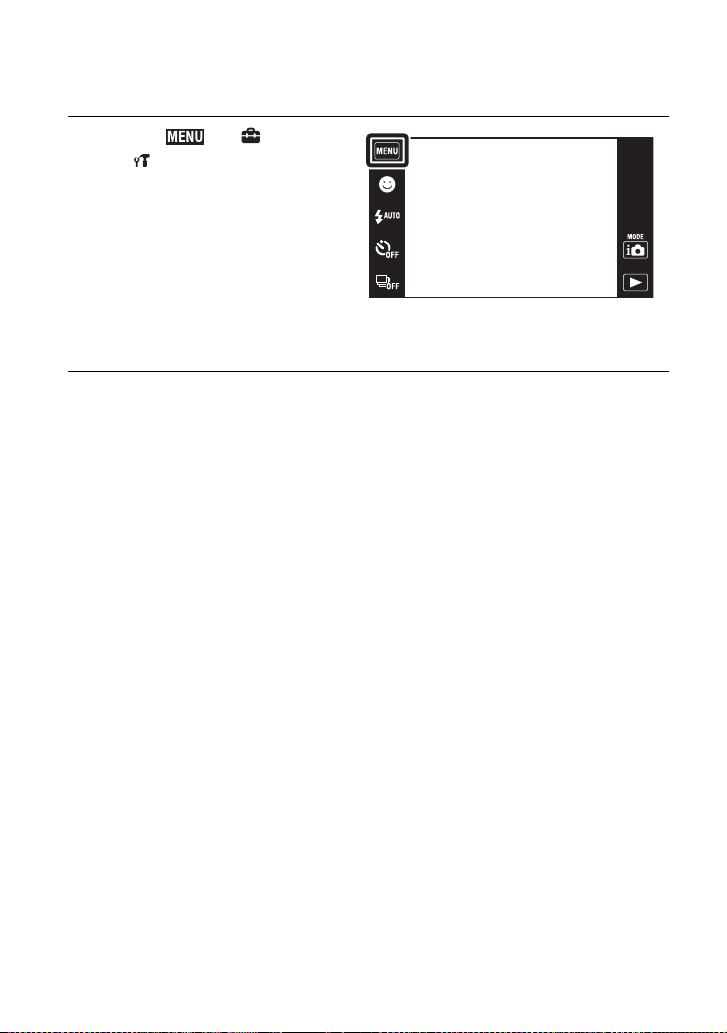
Touch t (Settings)
1
t (Main Settings) t
[Beep] t desired mode.
Shutter: Turns on the shutter sound
when you press the shutter button.
High/Low: Turns on the beep/shutter
sound when you operate the touch
panel/press the shutter button. If you
want to lower the volume, select
[Low].
Off: Turns off the beep/shutter sound.
46
GB
Page 47
Using the MENU items
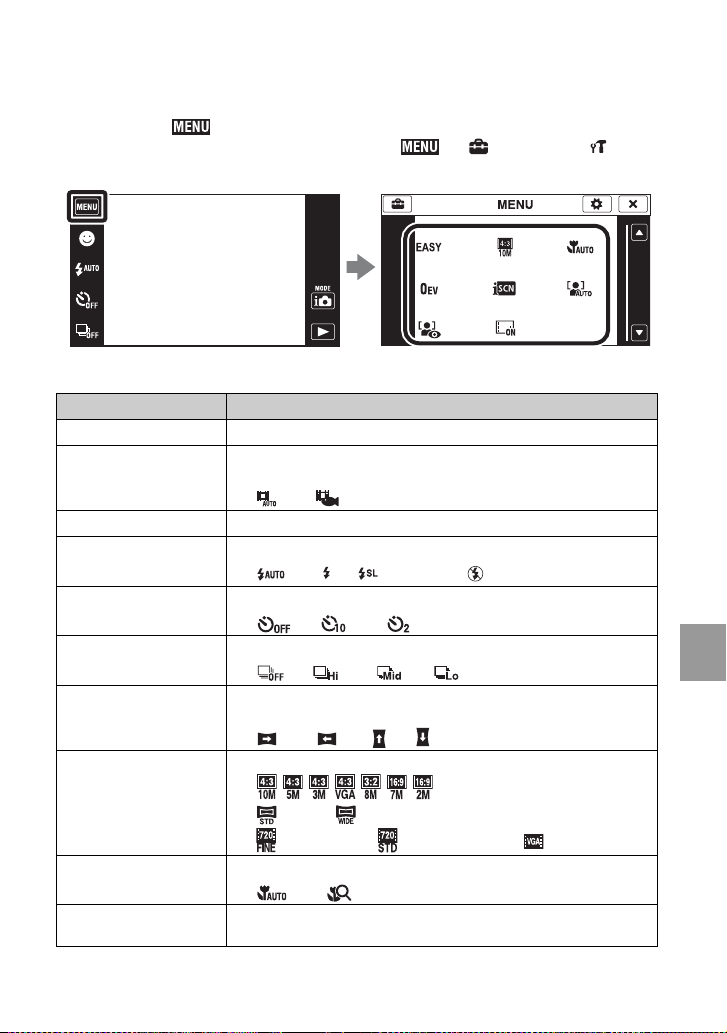
Displays available functions for easy setting when the camera is in shooting or playback
mode. Only the available items are displayed on the screen. The four menu items
displayed below do not appear in the MENU screen.
To restore the camera to its default settings, touch t (Settings) t (Main
Settings) t [Initialize].
x
MENU in shooting mode
Item Description
Easy Mode Allows you to shoot still images using the minimum necessary functions.
Movie shooting mode Allows you to shoot with preset settings according to the scene when the
Smile Shutter Detecting smiles and shooting automatically.
Flash Sets the flash settings.
Self-Timer Sets the self-timer settings.
Burst Sets the burst shooting settings.
Shooting Direction Set the direction to pan the camera when you shoot a Sweep Panorama
Image Size Sets the image size.
Macro Shoots beautiful close-up images of small subjects.
EV Adjusts exposure manually.
camera is in Movie Mode.
( Auto/ Underwater)
( Auto/ On/ Slow Synchro/ Off)
( Off/ 10sec/ 2sec)
( Off/ High/ Mid/ Low)
images.
( Right/ Left/ Up/ Down)
(//////)
( Standard/ Wide)
( 1280×720(Fine)/ 1280×720(Standard)/ VGA)
( Auto/ Close Focus On)
(–2.0EV to +2.0EV)
Changing camera settings
47
GB
Page 48
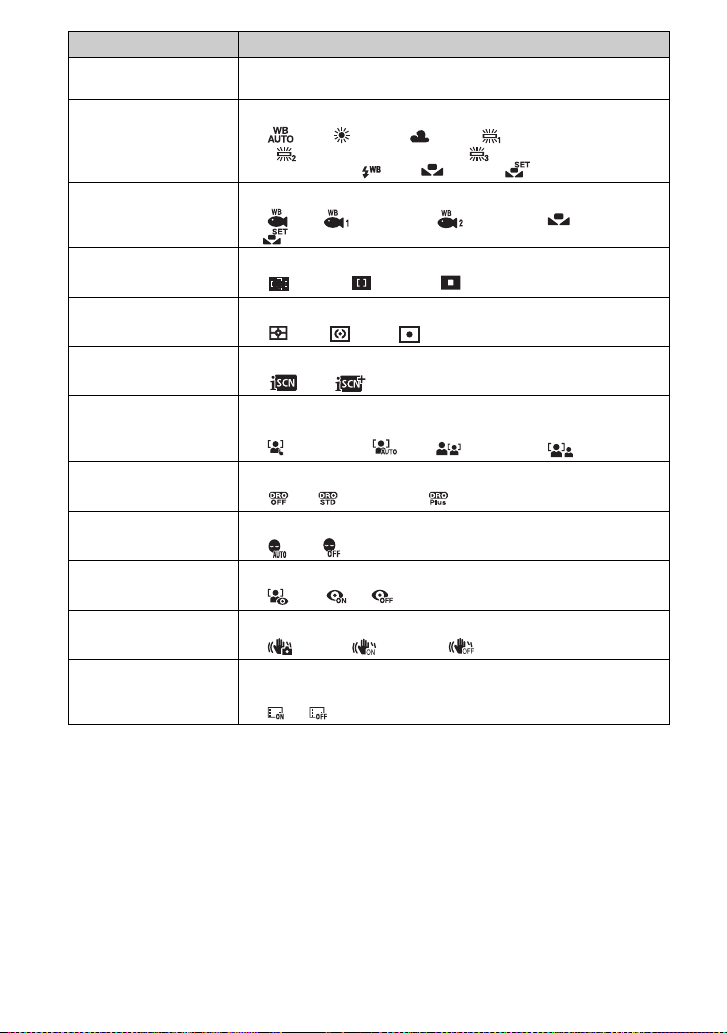
Item Description
ISO Selects a luminous sensitivity.
White Balance Adjusts color tones according to the surrounding light conditions.
Underwater White Balance Adjusts the colors when shooting underwater.
Focus Changes the focus method.
Metering Mode Sets which part of the subject to measure to determine the exposure.
Scene Recognition Automatically detects the shooting conditions and then takes the shot.
Face Detection Selects the priority subject for adjusting the focus when using Face
DRO Optimizes the brightness and contrast.
Anti Blink Sets Anti Blink function.
Red Eye Reduction Sets to reduce the red-eye phenomenon.
SteadyShot Selects the anti-blur mode.
Shooting Display Settings Sets whether to display the operation buttons on the LCD screen in
(ISO AUTO/ISO125 to ISO3200)
( Auto/ Daylight/ Cloudy/ Fluorescent White Balance
1, Fluorescent White Balance 2, Fluorescent White Balance 3/
n Incandescent/ Flash/ One Push/ One Push Set)
( Auto/ Underwater 1, Underwater 2/ One Push/
One Push Set)
( Multi AF/ Center AF/ Spot AF)
( Multi/ Center/ Spot)
( Auto/ Advanced)
Detection.
( When touched/ Auto/ Child Priority/ Adult Priority)
( Off/ DRO standard/ DRO plus)
( Auto/ Off)
( Auto/ On/ Off)
( Shooting/ Continuous/ Off)
shooting mode.
( On/ Off)
48
GB
Page 49
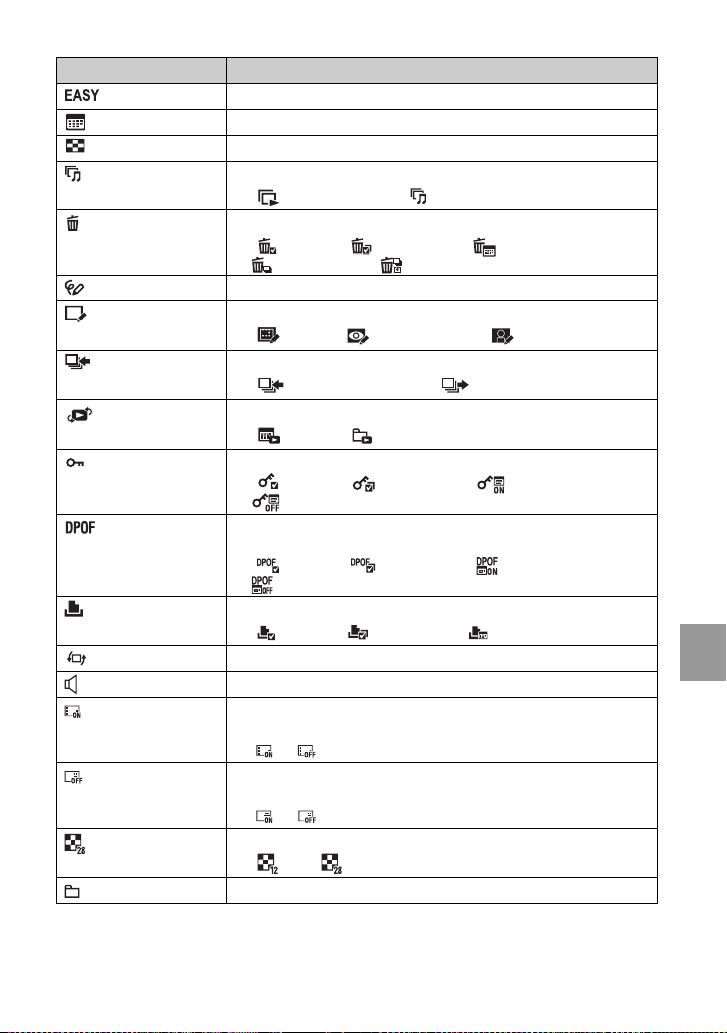
x
MENU in viewing mode
Item Description
(Easy Mode) Allows you view images easily.
(Calendar) Selects the date to be played back on Calendar.
(Image Index) Displays multiple images at the same time.
(Slideshow) Plays back images in succession.
( Continuous Playback/ Slideshow with music)
(Delete) Deletes images.
( This Image/ Multiple Images/ All in Date Range*/
All In This Group/ All but this image)
(Paint) Paints on a still image and saves as a new image.
(Retouch) Retouches still images.
( Trimming/ Red Eye Correction/ Unsharp masking)
(Display Burst Group) Select how to display the burst images on the screen.
( Display Main Image Only/ Display All)
(View Mode) Switches the View Modes.
( Date View/ Folder View)
(Protect) Prevents accidental erasure.
( This Image/ Multiple Images/ Set All in Date Range*/
Remove All in Date Range*)
Adds a Print order mark to the image you want to print in a “Memory
Stick Duo” media.
( This Image/ Multiple Images/ Set All in Date Range*/
Remove All in Date Range*)
(Print) Prints images using a PictBridge-compliant printer.
( This Image/ Multiple Images/ All in Date Range*)
(Rotate) Rotates a still image.
(Volume Settings) Adjusts the volume.
(Playback Display
Settings)
(Exposure data) Sets whether or not to display the shooting data (Exif data) of the currently
(Image index settings) Sets the number of images displayed in the index screen.
(Select Folder) Selects the folder for viewing images.
Sets whether to display the operation buttons on the LCD screen in
viewing mode.
( On/ Off)
displayed file on the LCD screen.
( On/ Off)
( 12-up/ 28-up)
Changing camera settings
* The displayed item differs according to each View Mode.
49
GB
Page 50
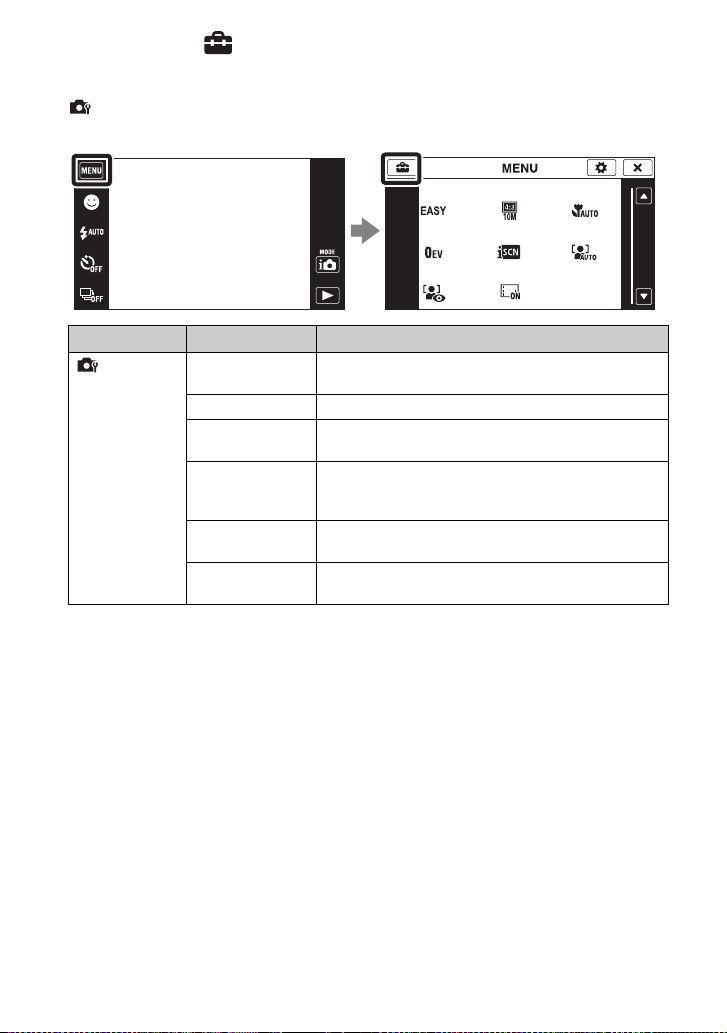
Using the (Settings) items
You can change the default settings of the camera.
(Shooting Settings) are displayed only when settings have been entered from
shooting mode.
Category Item Description
Shooting
Settings
AF Illuminator The AF illuminator supplies fill light to focus more easily
on a subject in dark surroundings.
Grid Line Sets whether or not to display the grid lines on the screen.
Digital Zoom Sets the zoom method for magnifications higher than the
optical zoom.
Auto Orientation When the camera is rotated to shoot a portrait (vertical)
image, the camera records its position change and displays
the image in the portrait position.
Scene Recog. Guide Selects whether or not the guide is displayed next to the
Scene Recognition icon.
Blink Alert When an image with the subject’s eyes closed is recorded,
the message is displayed.
50
GB
Page 51
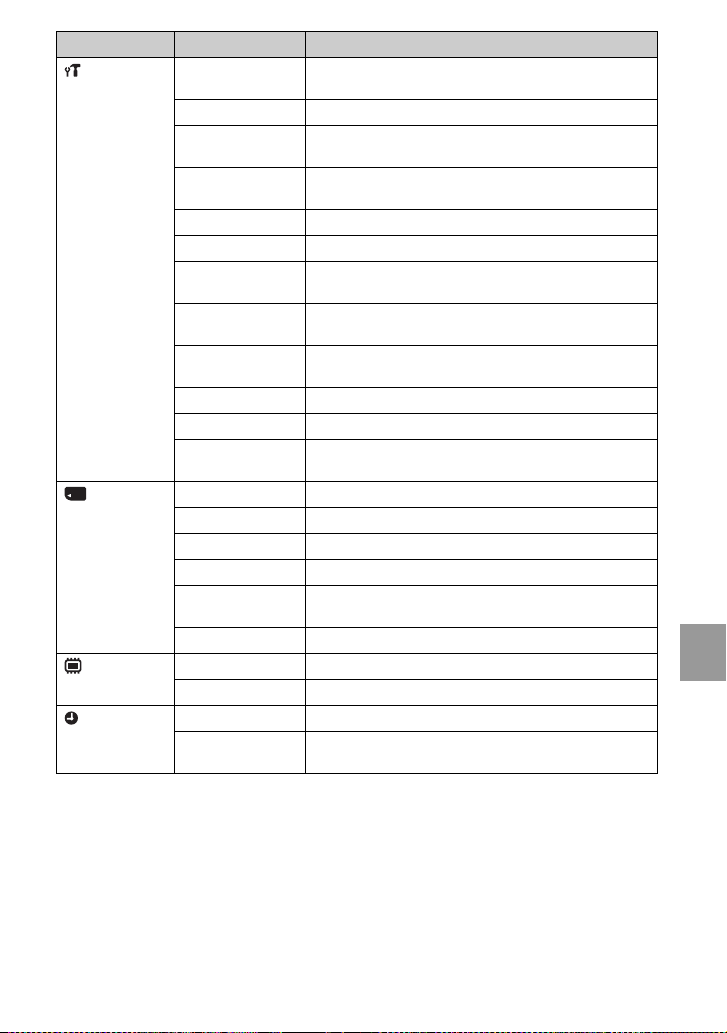
Category Item Description
Main Settings Beep Selects or turns off the sound produced when you operate
LCD Brightness Sets the brightness of the LCD screen.
Language Setting Selects the language to be used in the MENU items,
Demo Mode Demonstrates the Smile Shutter and Scene Recognition
Initialize Restores the camera to its default settings.
COMPONENT Sets the video signal according to a connected TV terminal.
Video Out Sets the mode according to the video output system to be
Housing Changes the button operations when the camera is in the
USB Connect Sets the mode used when connecting the camera to a
Download Music Changes the slideshow music.
Format Music Deletes all slideshow music.
Calibration Corrects misalignment of the response positions of the
"Memory
Stick" Tool
Internal
Memory Tool
Clock Settings Area Setting Adjusts the time to the local time of the selected area.
Format Formats a “Memory Stick Duo” media.
Create REC.Folder Creates a new folder on a “Memory Stick Duo” media.
Change REC.Folder Changes the folder used for recording images.
Delete REC.Folder Deletes a folder in a “Memory Stick Duo” media.
Copy Copies all images recorded in the internal memory to a
File Number Selects the method used to assign file number to images.
Format Formats the internal memory.
File Number Selects the method used to assign file number to images.
Date & Time
Setting
the camera.
warnings and messages.
function.
connected.
housing (Marine Pack).
computer or a printer.
buttons on the touch panel.
“Memory Stick Duo” media.
Sets the date and time.
Changing camera settings
51
GB
Page 52
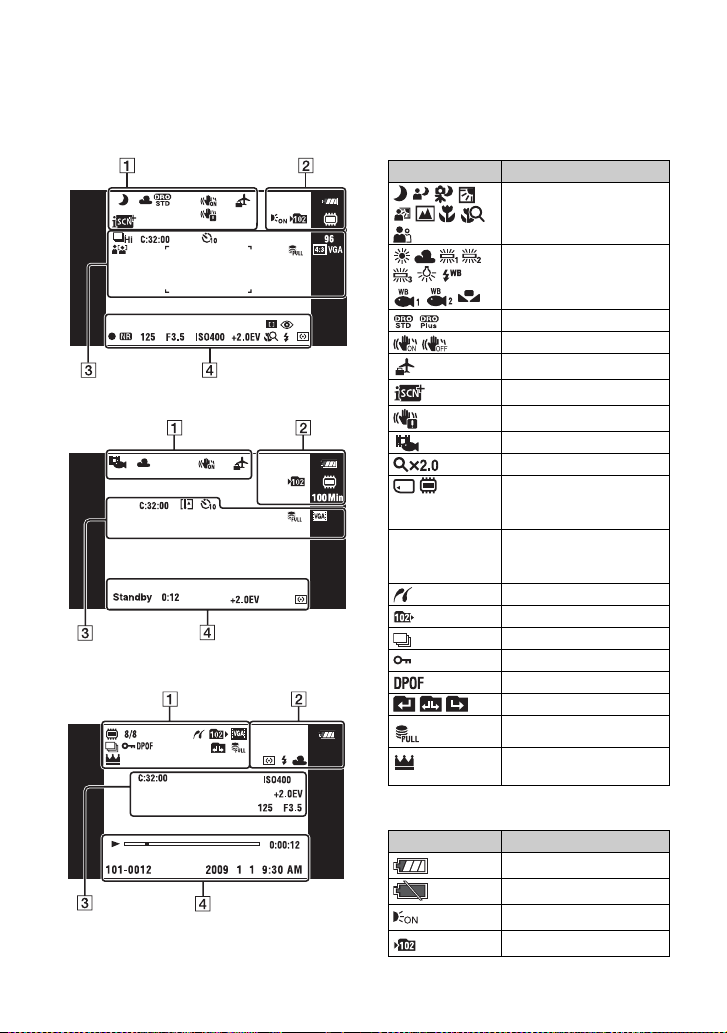
Oth
ers
List of icons displayed on the screen
Icons are displayed on the screen to indicate the camera status.
The displayed icon positions may differ according to the shooting mode.
When shooting still images
When shooting movies
When playing back
A
Display Indication
DRO
SteadyShot
Recording/Playback Media
8/8
Changing folder
Scene Recognition icon
White balance
Destination
Scene Recognition
Vibration warning
Movie shooting mode
Playback zoom
(“Memory Stick Duo”
media, internal memory)
Image number/Number of
images recorded in selected
folder
PictBridge connecting
Playback folder
Burst shooting images
Protect
Print order (DPOF) mark
Database file full
Main image in the burst
group
B
Display Indication
Battery remaining
Low battery warning
AF illuminator
Recording folder
GB
52
Page 53
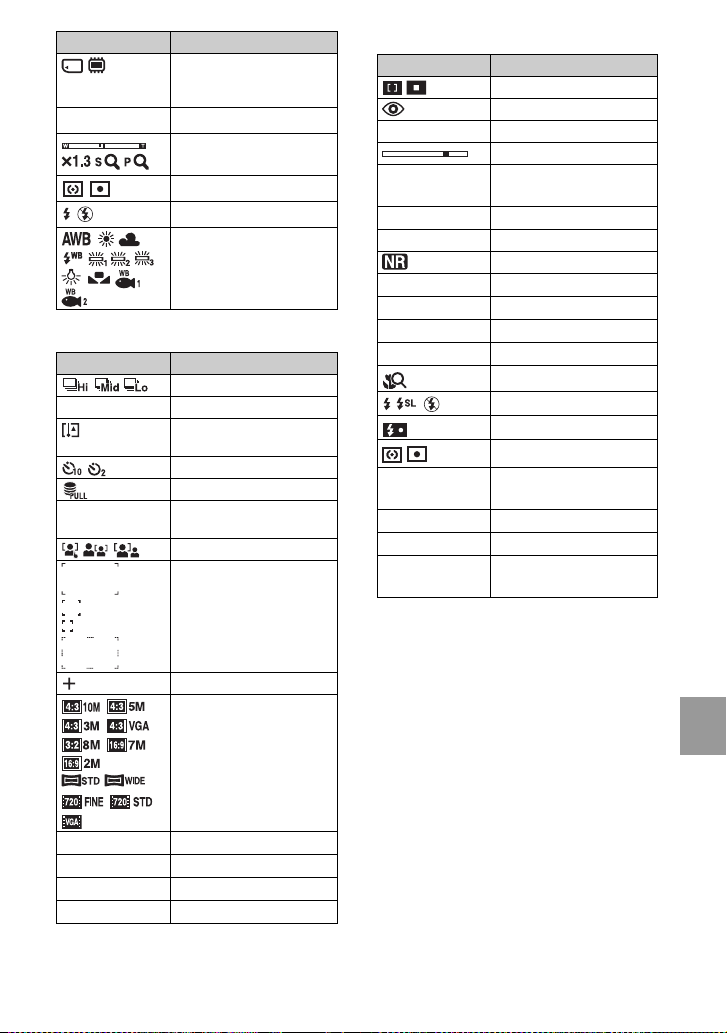
Display Indication
100 Min
Recording/Playback Media
(“Memory Stick Duo”
media, internal memory)
Recordable time
Zoom scaling
Metering Mode
Flash
White balance
C
Display Indication
Burst mode
C:32:00 Self-diagnosis display
Temperature increase
warning
Self-timer
Database file full
96
Face Detection
Number of recordable
images
AF range finder frame
D
Display Indication
Focus
Red-eye reduction
N Playback
Playback bar
35° 37' 32" N
139° 44' 31" E
0:00:12
z AE/AF lock
125
F3.5
ISO400
+2.0EV
REC
Standby
0:12
101-0012
2009 1 1
9:30 AM
Latitude and Longitude
display
Counter
NR slow shutter
Shutter speed
Aperture value
ISO number
Exposure Value
Close focus
Flash mode
Flash charging
Metering mode
Recording a movie/Standby
a movie
Recording time (m:s)
Folder-file number
Recorded date/time of the
playback image
ISO400
+2.0EV
125
F3.5
Spot metering cross hair
Image size
ISO number
Exposure Value
Shutter speed
Aperture value
53
Others
GB
Page 54
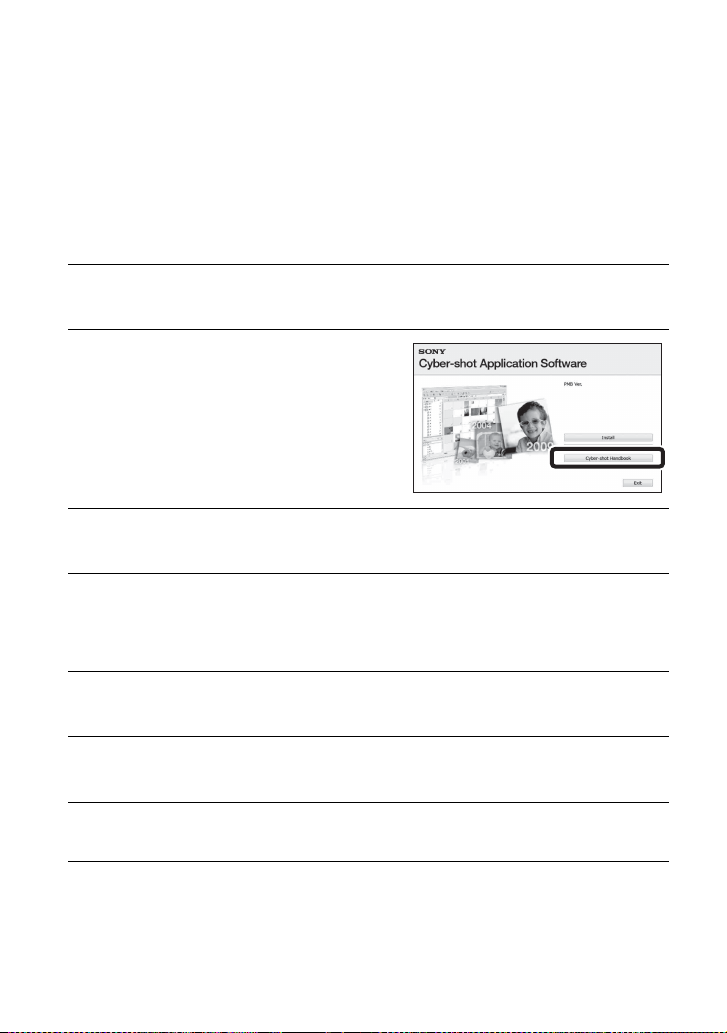
Learning more about the camera (“Cybershot Handbook”)
“Cyber-shot Handbook”, which explains how to use the camera in detail, is included on
the CD-ROM (supplied). Refer to it for in-depth instructions on the many functions of
the camera.
• You need Adobe Reader to read “Cyber-shot Handbook”. If it is not installed on your computer,
you can download it from web page: http://www.adobe.com/
x
For Windows users
Turn on your computer, and insert the CD-ROM (supplied)
1
into the CD-ROM drive.
Click [Cyber-shot Handbook].
2
“Cyber-shot Step-up Guide”, which contains
information on accessories for the camera, is
installed at the same time.
Start “Cyber-shot Handbook” from the shortcut on the
3
desktop.
54
x
For Macintosh users
Turn on your computer, and insert the CD-ROM (supplied)
1
into the CD-ROM drive.
Select the [Handbook] folder and copy “Handbook.pdf”
2
stored in the [GB] folder to your computer.
After copying is complete, double-click “Handbook.pdf”.
3
GB
Page 55
Troubleshooting
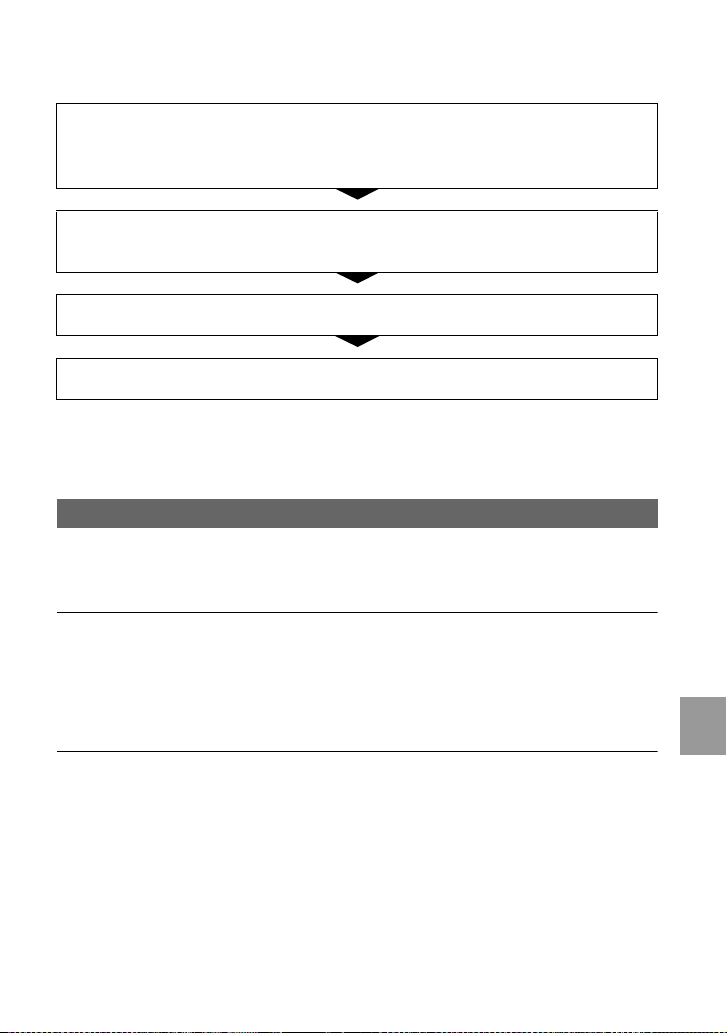
If you experience trouble with the camera, try the following solutions.
1 Check the items below, and refer to “Cyber-shot Handbook” (PDF).
If a code such as “C/E:ss:ss” appears on the screen, refer to “Cyber-shot
Handbook.”
2 Remove the battery pack, wait for about one minute, re-insert the battery
pack, then turn on the power.
3 Initialize the settings (page 50).
4 Consult your Sony dealer or local authorized Sony service facility.
On repairing cameras with internal memory or Music files function included, data in the
camera may be checked on minimum necessity to verify and improve the malfunction
symptoms. Sony will not copy or save any of those data.
Battery pack and power
Cannot insert the battery pack.
• Make sure the direction of the battery is correct, and insert it until the battery eject lever is
locked (page 14).
Cannot turn on the camera.
• After inserting the battery pack into the camera, it may take a few moments for the camera to
power up.
• Insert the battery pack correctly (page 14).
• The battery pack is discharged. Insert a charged battery pack (page 12).
• Use a recommended battery pack.
The power turns off suddenly.
• Depending on the camera and battery temperature, the power may turn off automatically to
protect the camera. In this case, a message is displayed on the LCD screen before the power
turns off.
• If you do not operate the camera for about two minutes while the power is on, the camera
turns off automatically to prevent wearing down the battery pack. Turn on the camera again.
55
Others
GB
Page 56

The remaining charge indicator is incorrect.
• This is caused when you use the camera in an extremely hot or cold location.
• A discrepancy arose between the remaining charge indicator and the actual remaining battery
charge. Fully discharge the battery pack once, then charge it to correct the indication.
• Battery capacity decreases over time and through repeated use. When the operating time per
charge decreases markedly, the battery pack needs to be replaced. Purchase a new battery
pack.
Cannot charge the battery pack while it is inside the camera.
• You cannot charge the battery pack using the AC Adaptor (sold separately). Use the battery
charger to charge the battery.
The CHARGE lamp flashes while charging the battery.
• Remove and reinsert the battery pack, making sure it is installed correctly.
• The temperature may be inappropriate for charging. Try charging the battery pack again
within the proper charging temperature range (10°C to 30°C (50°F to 86°F)).
Shooting still images/movies
Cannot record images.
• Check the free capacity of the internal memory or “Memory Stick Duo” media (pages 24, 30,
34). If it is full, do one of the following:
– Delete unnecessary images (page 39).
– Change the “Memory Stick Duo” media.
• You cannot record images while charging the flash.
• Movies with the size set to [1280×720] can only be recorded on a “Memory Stick PRO Duo”
media. When using recording media other than “Memory Stick PRO Duo” media, set the
movie image size to [VGA].
• Set [Demo Mode] to [Off].
Viewing images
Cannot play back images.
• The folder/file name has been changed on your computer.
• No guarantees are made for playing back, on this camera, files containing images which were
processed on a computer or images which were shot using other cameras.
• The camera is in USB mode. Delete the USB connection.
• You may not be able to play back some images stored on the “Memory Stick Duo” media shot
using other cameras. Play such images in Folder View (page 49).
• This is caused by copying images on your computer to the “Memory Stick Duo” media
without using the “PMB”. Play such images in Folder View (page 49).
GB
56
Page 57

Precautions
Do not use/store the camera in the
following places
• In an extremely hot, cold or humid place
In places such as in a car parked in the sun,
the camera body may become deformed and
this may cause a malfunction.
• Under direct sunlight or near a heater
The camera body may become discolored or
deformed, and this may cause a malfunction.
• In a location subject to rocking vibration
• Near strong magnetic place
• In sandy or dusty places
Be careful not to let sand or dust get into the
camera. This may cause the camera to
malfunction, and in some cases this
malfunction cannot be repaired.
On carrying
Do not sit down in a chair or other place with
the camera in the back pocket of your trousers
or skirt, as this may cause malfunction or
damage the camera.
On cleaning
Cleaning the LCD screen
Wipe the screen surface with an LCD cleaning
kit (sold separately) to remove fingerprints,
dust, etc.
Cleaning the lens
Wipe the lens with a soft cloth to remove
fingerprints, dust, etc.
Cleaning the camera surface
Clean the camera surface with a soft cloth
slightly moistened with water, then wipe the
surface with a dry cloth. To prevent damage to
the finish or casing:
– Do not expose the camera to chemical
products such as thinner, benzine, alcohol,
disposable cloths, insect repellent, sunscreen
or insecticide.
– Do not touch the camera with any of the
above on your hand.
– Do not leave the camera in contact with
rubber or vinyl for a long time.
On operating temperatures
Your camera is designed for use under the
temperatures between 0°C and 40°C (32°F and
104°F). Shooting in extremely cold or hot
places that exceed this range is not
recommended.
On moisture condensation
If the camera is brought directly from a cold to
a warm location, moisture may condense
inside or outside the camera. This moisture
condensation may cause a malfunction of the
camera.
If moisture condensation occurs
Turn off the camera and wait about an hour for
the moisture to evaporate. Note that if you
attempt to shoot with moisture remaining
inside the lens, you will be unable to record
clear images.
On the internal rechargeable
backup battery
This camera has an internal rechargeable
battery for maintaining the date and time and
other settings regardless of whether the power
is on or off.
This rechargeable battery is continually
charged as long as you are using the camera.
However, if you use the camera for only short
periods, it discharges gradually, and if you do
not use the camera at all for about one month it
becomes completely discharged. In this case,
be sure to charge this rechargeable battery
before using the camera.
However, even if this rechargeable battery is
not charged, you can still use the camera, but
the date and time will not be indicated.
Charging method of the internal
rechargeable backup battery
Insert charged battery pack in the camera, and
then leave the camera for 24 hours or more
with the power off.
Others
57
GB
Page 58

Specifications
Camera
[System]
Image device: 7.59 mm (1/2.4 type) Exmor R
CMOS sensor
Total pixel number of camera: Approx. 10.6
Megapixels
Effective pixel number of camera: Approx. 10.2
Megapixels
Lens: Carl Zeiss Vario-Tessar 4× zoom lens
f = 6.18 – 24.7 mm (35 – 140 mm (35 mm
film equivalent))
F3.5 (W) – F4.6 (T)
When shooting movies (16:9): 38 – 152 mm
When shooting movies (4:3): 46 – 184 mm
Exposure control: Automatic exposure, Scene
Selection (12 modes)
White balance: Automatic, Daylight, Cloudy,
Fluorescent 1/2/3, Incandescent, Flash, One
push
Underwater White Balance: Auto, Underwater
1/2, One push
Recording system:
Still images: JPEG (DCF Ver. 2.0, Exif Ver.
2.21, MPF Baseline) compliant, DPOF
compatible
Movies: MPEG-4 Visual
Recording media: Internal Memory
(approx. 11 MB), “Memory Stick Duo” media
Flash: Flash range (ISO sensitivity
(Recommended exposure Index) set to Auto):
Approx. 0.08 to 3.0 m (3 1/4 inches to
9ft101/8inches) (W)/
approx. 0.5 to 2.4 m (1 ft 7 3/4 inches to 7 ft
10 1/2 inches) (T)
[Input and Output connectors]
Multi connector Type1a (AV-out (SD/HD
Component)/USB/DC-in):
Video output
Audio output (Monaural)
USB communication
USB communication: Hi-Speed USB (USB 2.0
compliant)
[LCD screen]
LCD panel: Wide (16:9), 7.5 cm (3.0 type) TFT
drive
Total number of dots: 230 400 (960 × 240) dots
[Power, general]
Power: Rechargeable battery pack NP-BD1, 3.6 V
NP-FD1 (sold separately), 3.6 V
Power consumption (during shooting): 1.0 W
Operating temperature: 0 to 40°C (32 to 104°F)
Storage temperature: –20 to +60°C (–4 to +140°F)
Dimensions: 93.8 × 58.2 × 16.5 mm (3 3/4 × 2 3/8
× 21/32 inches) (W/H/D, excluding
protrusions)
Mass (including NP-BD1 battery pack and a
“Memory Stick Duo” media): Approx. 142 g
(5.0 oz)
Microphone: Monaural
Speaker: Monaural
Exif Print: Compatible
PRINT Image Matching III: Compatible
PictBridge: Compatible
BC-CSD battery charger
Power requirements: AC 100 V to 240 V,
50/60Hz, 2.2W
Output voltage: DC 4.2 V, 0.33 A
Operating temperature: 0 to 40°C (32 to 104°F)
Storage temperature: –20 to +60°C (–4 to +140°F)
Dimensions: Approx. 62 × 24 × 91 mm (2 1/2 ×
31/32 × 3 5/8 inches) (W/H/D)
Mass: Approx. 75 g (2.7 oz)
Rechargeable battery pack
NP-BD1
Used battery: Lithium-ion battery
Maximum voltage: DC 4.2 V
Nominal voltage: DC 3.6 V
Maximum charge current: 1.24 A
Maximum charge voltage: DC 4.2 V
Capacity:
typical: 2.4 Wh (680 mAh)
minimum: 2.3 Wh (620 mAh)
Design and specifications are subject to
change without notice.
58
GB
Page 59

Trademarks
• The following marks are trademarks of Sony
Corporation.
Stick,” , “Memory Stick PRO,”
Duo,” , “Memory
Stick PRO-HG Duo,”
Micro,” “MagicGate,” ,
“PhotoTV HD,” “Info LITHIUM”
• Microsoft, Windows, DirectX and Windows
Vista are either registered trademarks or
trademarks of Microsoft Corporation in the
United States and/or other countries.
• Macintosh and Mac OS are trademarks or
registered trademarks of Apple Inc.
• Intel, MMX, and Pentium are trademarks or
registered trademarks of Intel Corporation.
• Adobe and Reader are either trademarks or
registered trademarks of Adobe Systems
Incorporated in the United States and/or
other countries.
• In addition, system and product names used
in this manual are, in general, trademarks or
registered trademarks of their respective
developers or manufacturers. However, the
™ or ® marks are not used in all cases in this
manual.
, “Cyber-shot,” “Memory
, “Memory Stick Duo,”
, “Memory Stick PRO
, “Memory Stick
59
Others
GB
Page 60

Additional information on this product and answers
to frequently asked questions can be found at our
Customer Support Website.
Printed on 70% or more recycled paper using VOC (Volatile
Organic Compound)-free vegetable oil based ink.
Printed in Japan
 Loading...