

Page 1
4-465-973-62(1)
4-465-973-62(1)
AR
PR
http://www.sony.net/SonyInfo/Support/
DSC-RX100M2
Digital Still Camera / Instruction Manual GB
CT
CS
http://www.sony.net/SonyInfo/Support/
©2013 Sony Corporation
Printed in China
DSC-RX100M2
DSC-RX100M2
Page 2
AR
2
ﺮﻋ
(«Cyber-shot اﻣﺎﻜﻠﻟ مﺪﺨﺘﺴﳌا ﻞﻴﻟد») اﻣﺎﻜﻟا ﻦﻋ ﺪﻳﺰﳌا ﺔﻓﺮﻌﻣ
ﲆﻋ لﻮﺼﺤﻠﻟ ﻪﻴﻟإ ﻊﺟرا .ﺖﻧﱰﻧﻹا ﱪﻋ ﻞﻴﻟد ﻦﻋ ةرﺎﺒﻋ «Cyber-shot اﻣﺎﻜﻠﻟ مﺪﺨﺘﺴﳌا ﻞﻴﻟد»
.اﻣﺎﻜﻟا ﻒﺋﺎﻇو ﻦﻣ ﺪﻳﺪﻌﻟا ﻦﻋ ﺔﻴﻠﻴﺼﻔﺗ تﻴﻠﻌﺗ
.Sony ﻢﻋد ﺔﺤﻔﺻ ﱃإ ﻞﺧدا
ʓ
http://www.sony.net/SonyInfo/Support/
.ﻚﺘﻘﻄﻨﻣ وأ كﺪﻠﺑ ﱰﺧا
ʔ
.ﻢﻋﺪﻟا ﺔﺤﻔﺻ ﻞﺧاد اﻣﺎﻜﻟا ﻞﻳدﻮﻣ ﻢﺳا ﻦﻋ ﺚﺤﺑا ʕ
.اﻣﺎﻜﻟا ﻦﻣ ﲇﻔﺴﻟا ءﺰﺠﻟا ﰲ ﻞﻳدﻮﳌا ﻢﺳا ﻦﻣ ﻖﻘﺤﺗ ˎ
ﻞﻴﻟﺪﻟا ضﺮﻋ
.ﲇﺧاد تادﺎﺷرإ ﻞﻴﻟﺪﺑ ةﺰﻬﺠﻣ اﻣﺎﻜﻟا هﺬﻫ
(اﻣﺎﻜﻟا ﻞﻴﺻﺎﻔﺗ ﻞﻴﻟد) /
MENU
اﻣﺎﻜﻟا ﻞﻴﺻﺎﻔﺗ ﻞﻴﻟد
.ﻂﺒﻀﻟا ﻢﻴﻗو MENU دﻮﻨﺑ ﻞﻴﺻﺎﻔﺗ اﻣﺎﻜﻟا ضﺮﻌﺗ
.MENU رﺰﻟا ﲆﻋ ﻂﻐﺿا ʓ
.(اﻣﺎﻜﻟا ﻞﻴﺻﺎﻔﺗ ﻞﻴﻟد) / رﺰﻟا ﻂﻐﺿا ﻢﺛ ،بﻮﻏﺮﳌا MENU ﺪﻨﺑ ﱰﺧا ʔ
ﺮﻳﻮﺼﺘﻟا ﻪﻴﺟﻮﺗ
.رﺎﺘﺨﳌا ﺮﻳﻮﺼﺘﻟا ﻊﺿﻮﻟ ﺮﻳﻮﺼﺘﻟا تﺎﻬﻴﺟﻮﺗ اﻣﺎﻜﻟا ضﺮﻌﺗ
.ﺮﻳﻮﺼﺘﻟا ﻊﺿو ﰲ (اﻣﺎﻜﻟا ﻞﻴﺻﺎﻔﺗ ﻞﻴﻟد)
/ رﺰﻟا ﻂﻐﺿا ʓ
.ﻢﻜﺤﺘﻟا ﺔﻠﺠﻋ ﲆﻋ Ć ﻂﻐﺿا ﻢﺛ ،بﻮﻏﺮﳌا ﺮﻳﻮﺼﺘﻟا ﻪﻴﺟﻮﺗ ﱰﺧا ʔ
.ﺮﻳﻮﺼﺘﻟا ﻪﻴﺟﻮﺗ ضﺮﻌﻳ
.
î/Ô ماﺪﺨﺘﺳﺎﺑ ﺮﻳﻮﺼﺘﻟا تﺎﻬﻴﺟﻮﺗ ﻴﻐﺗو Ă/è ماﺪﺨﺘﺳﺎﺑ ﺔﺷﺎﺸﻟا ﺮﻳﺮ ﻚﻨﻜ ˎ
GB
2
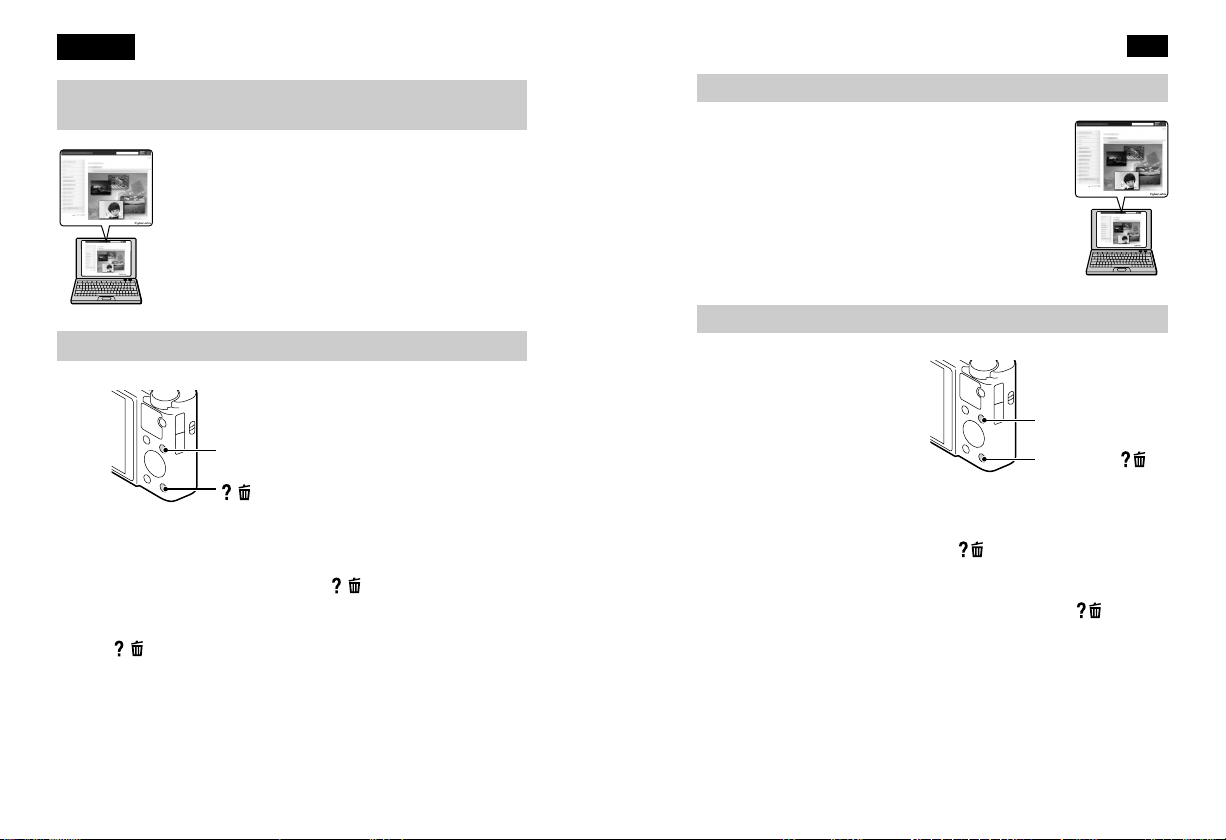
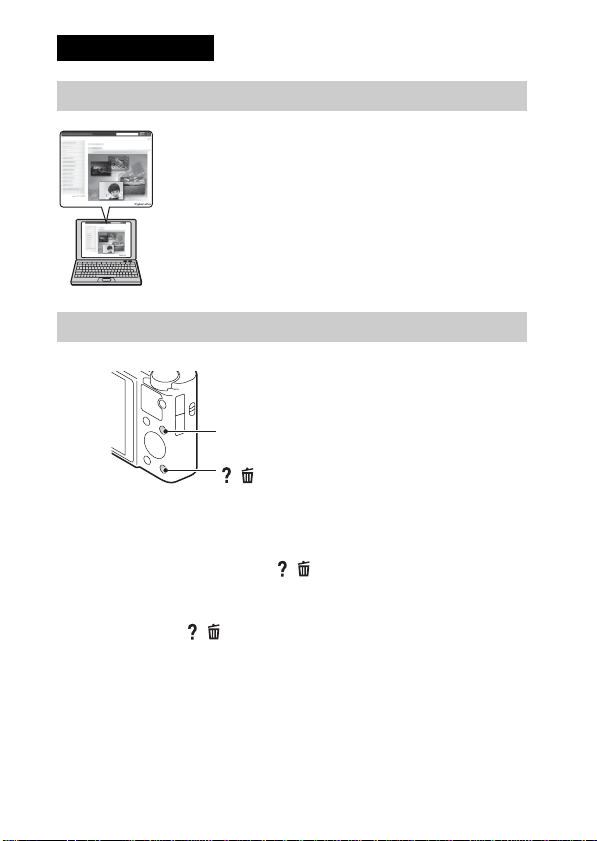
This camera is equipped with a built-in instruction guide.
In-Camera Guide
The camera displays explanations for MENU items and the setting values.
1 Press the MENU button.
2 Select the desired MENU item, then press / (In-Camera Guide) button.
Shooting Tip
The camera displays shooting tips for the shooting mode selected.
1 Press / (In-Camera Guide) button in shooting mode.
2 Select the desired shooting tip, then press
z on the control wheel.
The shooting tip is displayed.
• You can scroll the screen using v/V and change shooting tips using
b/B.
English
Learning more about the camera (“Cyber-shot
User Guide”)
“Cyber-shot User Guide” is an on-line manual. Refer to it for
in-depth instructions on the many functions of the camera.
1 Access the Sony support page.
http://www.sony.net/SonyInfo/Support/
2 Select your country or region.
3 Search for the model name of your camera within the
support page.
• Check the model name on the bottom of your camera.
Viewing the Guide
/ (In-Camera Guide)
MENU
Page 3

Owner’s Record
The model and serial numbers are located on the bottom. Record the serial number in the
space provided below. Refer to these numbers whenever you call your Sony dealer
regarding this product.
Model No. DSC-RX100M2
Serial No. _____________________________
Model No. AC-UB10/AC-UB10B/AC-UB10C/AC-UB10D
Serial No. _____________________________
WARNING
To reduce fire or shock hazard, do not expose the unit to rain or
moisture.
IMPORTANT SAFETY INSTRUCTIONS
-SAVE THESE INSTRUCTIONS
DANGER
TO REDUCE THE RISK OF FIRE OR ELECTRIC
SHOCK, CAREFULLY FOLLOW THESE
INSTRUCTIONS
If the shape of the plug does not fit the power outlet, use an attachment plug adaptor of the
proper configuration for the power outlet.
CAUTION
[ Battery pack
If the battery pack is mishandled, the battery pack can burst, cause a fire or even chemical
burns. Observe the following cautions.
• Do not disassemble.
• Do not crush and do not expose the battery pack to any shock or force such as
hammering, dropping or stepping on it.
• Do not short circuit and do not allow metal objects to come into contact with t he battery
terminals.
• Do not expose to high temperature above 60°C (140°F) such as in direct sunlight or in a
car parked in the sun.
• Do not incinerate or dispose of in fire.
• Do not handle damaged or leaking lithium ion batteries.
GB
GB
3
Page 4

• Be sure to charge the battery pack using a genuine Sony battery charger or a device that
can charge the battery pack.
• Keep the battery pack out of the reach of small children.
• Keep the battery pack dry.
• Replace only with the same or equivalent type recommended by Sony.
• Dispose of used battery packs promptly as described in the instructions.
[ AC Adaptor
Use the nearby wall outlet (wall socket) when using the AC Adaptor. Disconnect the AC
Adaptor from the wall outlet (wall socket) immediately if any malfunction occurs while
using the apparatus.
For Customers in the U.S.A. and Canada
[ RECYCLING LITHIUM-ION BATTERIES
Lithium-Ion batteries are recyclable.
You can help preserve our environment by returning your used
rechargeable batteries to the collection and recycling location nearest
you.
For more information regarding recycling of rechargeable batteries,
call toll free
1-800-822-8837, or visit http://www.rbrc.org/
Caution: Do not handle damaged or leaking Lithium-Ion batteries.
[ Battery pack
This device complies with Part 15 of the FCC Rules. Operatio n is subject to the following
two conditions:
(1) This device may not cause harmful interference, and (2) this device must accept any
interference received, including interference that may cause undesired operation.
CAN ICES-3 B/NMB-3 B
This equipment complies with FCC/IC radiation exposure limits set forth for an
uncontrolled environment and meets the FCC radio frequency (RF) Exposure Guidelines
in Supplement C to OET65 and RSS-102 of the IC radio frequency (RF) Exposure rules.
This equipment has very low levels of RF energy that are deemed to comply without
testing of specific absorption ratio (SAR).
GB
4
Page 5

For Customers in the U.S.A.
UL is an internationally recognized safety organization.
The UL Mark on the product means it has been UL Listed.
If you have any questions about this product, you may call:
Sony Customer Information Center
1-800-222-SONY (7669).
The number below is for the FCC related matters only.
[ Regulatory Information
Declaration of Conformity
Trade Name: SONY
Model No.: DSC-RX100M2
Responsible Party: Sony Electronics Inc.
Address: 16530 Via Esprillo,
Telephone No.: 858-942-2230
This device complies with Part15 of the FCC Rules. Operation is subject to the
following two conditions: (1) This device may not cause harmful interference, and (2)
this device must accept any interference received, including interference that may cause
undesired operation.
This equipment must not be co-located or operated in conjunction with any other antenna
or transmitter.
[ CAUTION
You are cautioned that any changes or modifications not expressly approved in this manual
could void your authority to operate this equipment.
[ Note:
This equipment has been tested and found to comply with the limits for a Class B digital
device, pursuant to Part 15 of the FCC Rules.
These limits are designed to provide reasonable protection against harmful interference in
a residential installation. This equipment generates, uses, and can radiate radio frequency
energy and, if not installed and used in accordance with the instructions, may cause
harmful interference to radio communications. However, there is no guarantee that
interference will not occur in a particular installation. If this equipment does cause harmful
interference to radio or television reception, which can be determined by turning the
equipment off and on, the user is encouraged to try to correct the interference by one or
more of the following measures:
– Reorient or relocate the receiving antenna.
– Increase the separation between the equipment and receiver.
– Connect the equipment into an outlet on a circuit different from that to which the
receiver is connected.
– Consult the dealer or an experienced radio/TV technician for help.
San Diego, CA 92127 U.S.A.
GB
GB
5
Page 6
The supplied interface cable must be used with the equipment in order to comply with the
limits for a digital device pursuant to Subpart B of Part 15 of FCC Rules.
For Customers in Canada
This device complies with Industry Canada licence-exempt RSS standard(s).
Operation is subject to the following two conditions: (1) this device may not cause
interference, and (2) this device must accept any interference, including interference that
may cause undesired operation of the device.
For Customers in Europe
[ Notice for the customers in the countries applying EU Directives
This product has been manufactured by or on behalf of Sony Corporation, 1-7-1 Konan
Minato-ku Tokyo, 108-0075 Japan. Inquiries related to product compliance based on
European Union legislation shall be addressed to the authorized representative, Sony
Deutschland GmbH, Hedelfinger Strasse 61, 70327 Stuttgart, Germany. For any service or
guarantee matters, please refer to the addresses provided in the separate service or
guarantee documents.
Hereby, Sony Corporation, declares that this DSC-RX100M2 Digital Still Camera is in
compliance with the essential requirements and other relevant provisions of the Directive
1999/5/EC. For details, please access the following URL:
http://www.compliance.sony.de/
This product has been tested and found compliant with the limits set out in the EMC
regulation for using connection cables shorter than 3 meters (9.8 feet).
[ Attention
The electromagnetic fields at the specific frequencies may influence the picture and sound
of this unit.
[ Notice
If static electricity or electromagnetism causes data transfer to discontinue midway (fail),
restart the application or disconnect and connect the communication cable (USB, etc.)
again.
GB
6
Page 7
[ Disposal of Old Electrical & Electronic Equipment (Applicable in
the European Union and other European countries with separate
collection systems)
This symbol on the product or on its packaging indicates that this product
shall not be treated as household waste. Instead it shall be handed over to
the applicable collection point for the recycling of electrical and electronic
equipment. By ensuring this product is disposed of correctly, you will help
prevent potential negative consequences for the environment and human
health, which could otherwise be caused by inappropriate waste handling
of this product. The recycling of materials will help to conserve natural
please contact your local Civic Office, your household waste disposal service or the shop
where you purchased the product.
resources. For more detailed information about recycling of this product,
[ Disposal of waste batteries (applicable in the European Union
and other European countries with separate collection systems)
This symbol on the battery or on the packaging indicates that the battery
provided with this product shall not be treated as household waste.
On certain batteries this symbol might be used in combination with a
chemical symbol. The chemical symbols for mercury (Hg) or lead (Pb) are
added if the battery contains more than 0.0005% mercury or 0.004% lead.
potentially negative consequences for the environment and human health which could
otherwise be caused by inappropriate waste handling of the battery. The recycling of the
materials will help to conserve natural resources.
In case of products that for safety, performance or data integrity reasons require a
permanent connection with an incorporated battery, this battery should be replaced by
qualified service staff only. To ensure that the battery will be treated properly, hand over
the product at end-of-life to the applicable collection point for the recycling of electrical
and electronic equipment.
For all other batteries, please view the section on how t o remove the battery from the
product safely.
Hand the battery over to the applicable collection point for the recycling of waste batteries.
For more detailed information about recycling of this product or battery, please contact
your local Civic Office, your household waste disposal service or the shop where you
purchased the product.
By ensuring these batteries are disposed of correctly, you will help prevent
GB
Notice for customers in the United Kingdom
A moulded plug complying with BS 1363 is fitted to this equipment for your safety and
convenience.
Should the fuse in the plug supplied need to be replaced, a fuse of the same rating as the
supplied one and approved by ASTA or BSI to BS 1362, (i.e., marked with an or
mark) must be used.
GB
7
Page 8
If the plug supplied with this equipment has a detachable fuse cover, be sure to attach the
fuse cover after you change the fuse. Never use the plug without the fuse cover. If you
should lose the fuse cover, please contact your nearest Sony service station.
For Customers in Singapore
Checking the supplied items
The number in parentheses indicates the number of pieces.
• Camera (1)
• Rechargeable battery pack NP-BX1 (1)
• Micro USB cable (1)
• AC Adaptor AC-UB10/UB10B/UB10C/UB10D (1)
• Power cord (mains lead) (not supplied in the USA and Canada) (1)
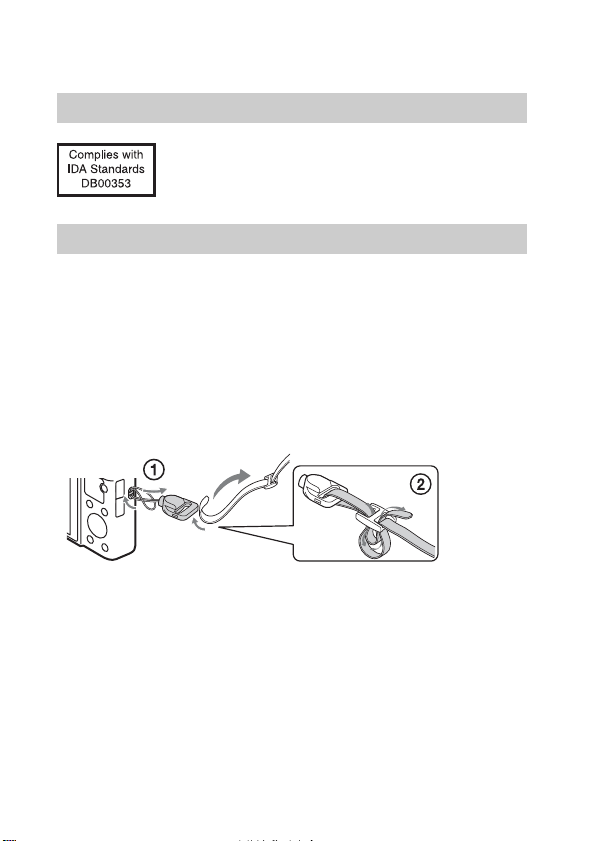
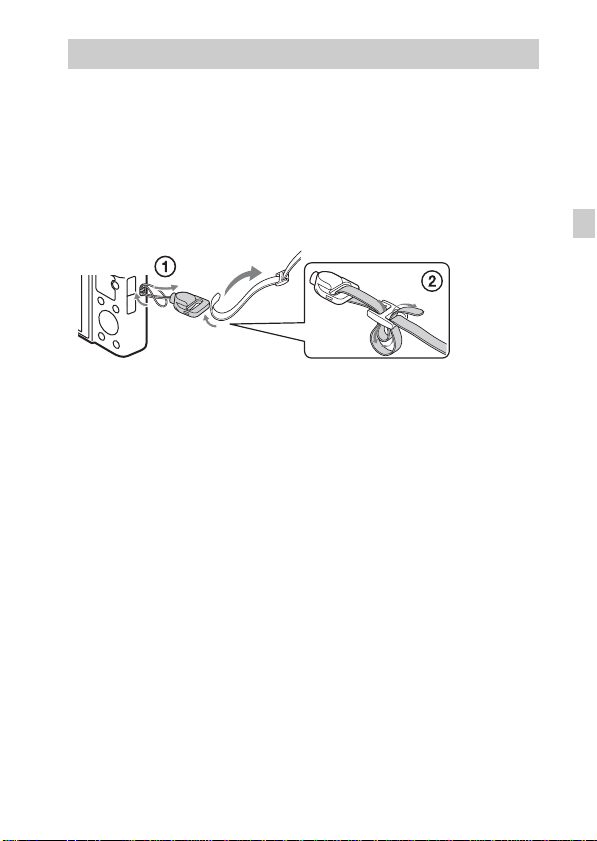
• Wrist strap (1)
• Strap adapter (2)
(Strap adapters are used to attach the shoulder strap (sold separately), as
illustrated.)
• Instruction Manual (this manual) (1)
GB
8
Page 9
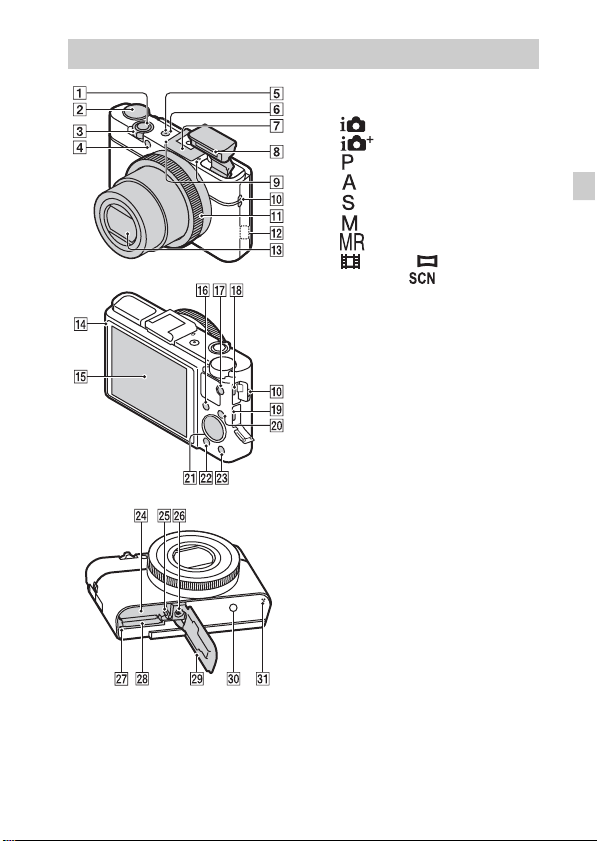
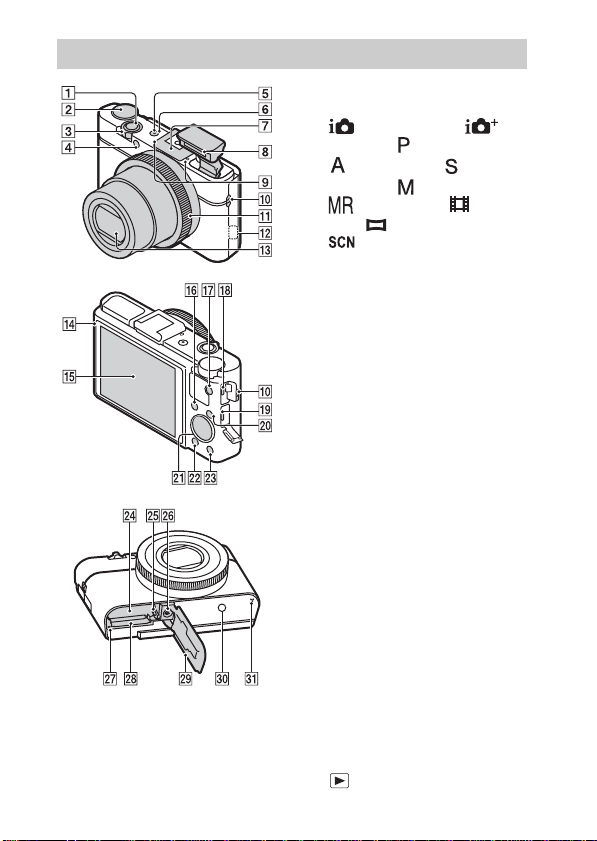
Identifying parts
A Shutter button
B Mode dial
(Intelligent Auto)/
(Superior Auto)/
(Program Auto)/
(Aperture Priority)/
(Shutter Priority)/
(Manual Exposure)/
(Memory recall)/
(Movie)/ (Sweep
Panorama)/ (Scene
Selection)
C For shooting: W/T (zoom) lever
For viewing: Index/Playback
zoom lever
D Self-timer lamp/Smile Shutter
lamp/AF illuminator
E Power/Charge lamp
F ON/OFF (Power) button
G Multi interface shoe*
H Flash
• Do not cover the flash with your
fingers.
• When using the flash, the flash
pops up automatically. If not
using the flash, press it down
manually.
I Microphone
J Hook for strap
K Control Ring
L Wi-Fi sensor (built-in)
M Lens
N Light sensor
O LCD screen
P Fn (Function) button
Q MOVIE (Movie) button
GB
GB
9
Page 10

R Multi Terminal
• Supports Micro USB compatible
device.
S HDMI micro jack
T MENU button
U Control wheel
V (Playback) button
W / (In-Camera Guide/Delete)
button
X Battery insertion slot
Y Battery eject lever
Z Tripod socket hole
• Use a tripod with a screw less
than 5.5 mm (7/32 inches) long.
Otherwise, you cannot firmly
secure the camera, and damage to
the camera may occur.
wj Access lamp
wk Memory card slot
wl Battery/Memory card cover
e; (N Mark)
• Touch the mark when you
connect the camera to a
smartphone equipped with the
NFC function.
• NFC (Near Field
Communication) is an
international standard of the
short-range wireless
communication technology.
ea Speaker
* For details on compatible accessories
for the multi interface shoe, visit the
Sony web site, or consult your Sony
dealer or local authorized Sony
service facility. You can also use
accessories that are compatible with
the accessory shoe. Operations with
other manufacturers’ accessories are
not guaranteed.
10
GB
Page 11
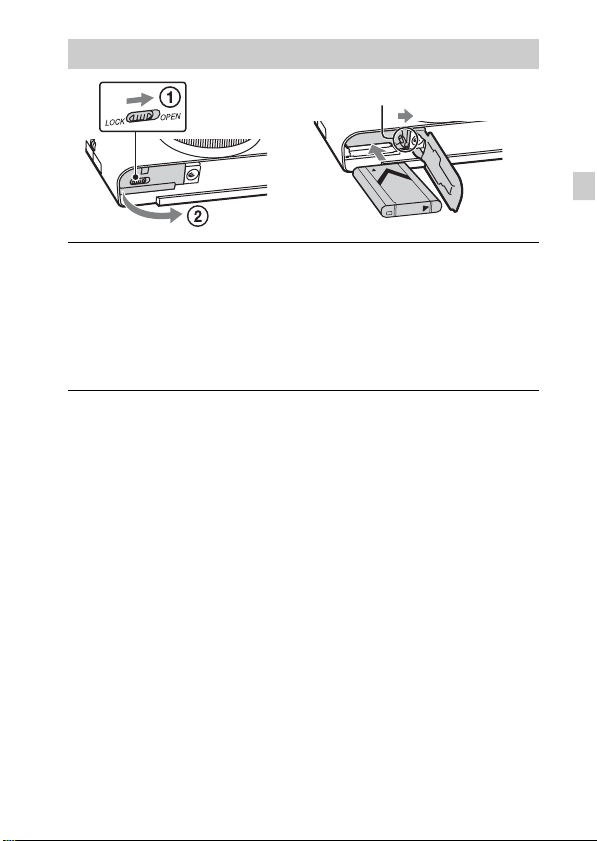
Inserting the battery pack
Battery eject lever
Open the cover.
1
Insert the battery pack.
2
• While pressing the battery eject lever, insert the battery pack as
illustrated. Make sure that the battery eject lever locks after insertion.
• Closing the cover with the battery inserted incorrectly may damage the
camera.
GB
GB
11
Page 12
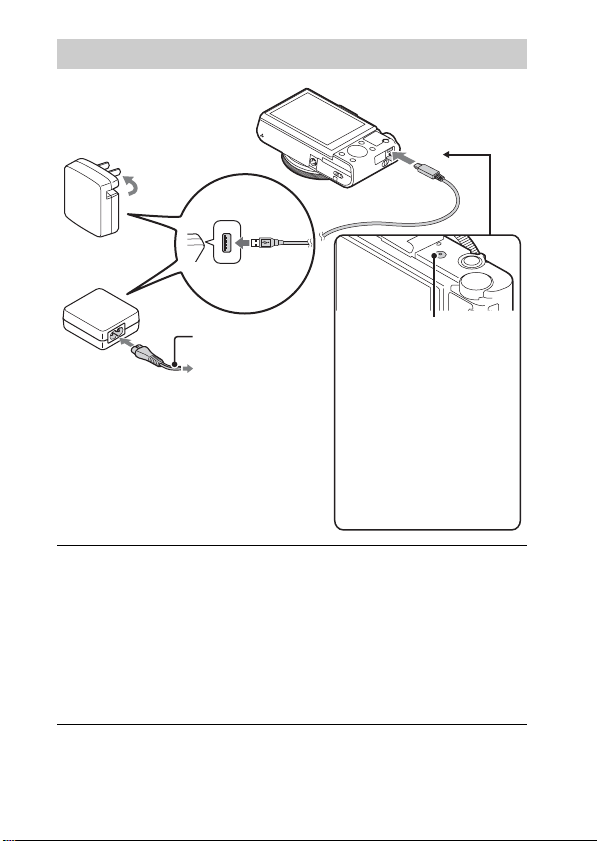
Charging the battery pack
For customers in the USA
and Canada
Power cord
(Mains lead)
For customers in countries/regions
other than the USA and Canada
Connect the camera to the AC Adaptor (supplied),
1
using the micro USB cable (supplied).
Connect the AC Adaptor to the wall outlet (wall socket).
2
The Power/Charge lamp lights orange, and charging starts.
• Turn off the camera while charging the battery.
• You can charge the battery pack even when it is partially charged.
• When the Power/Charge lamp flashes and charging is not finished,
remove and re-insert the battery pack.
GB
Power/Charge lamp
Lit: Charging
Off: Charging finished
Flashing:
Charging error or
charging paused
temporarily because the
camera is not within the
proper temperature range
12
Page 13

Notes
• If the Power/Charge lamp on the camera flashes when the AC Adaptor is
connected to the wall outlet (wall socket), this indicates that charging is
temporarily stopped because the temperature is outside the recommended range.
When the temperature gets back within the appropriate range, the charging
resumes. We recommend charging the battery pack in an ambient temperature of
between 10°C to 30°C (50ºF to 86ºF).
• The battery pack may not be effectively charged if the terminal section of the
battery is dirty. In this case, wipe any dust off lightly using a soft cloth or a cotton
swab to clean the terminal section of the battery.
• Connect the AC Adaptor (supplied) to the nearest wall outlet (wall socket). If
malfunctions occur while using the AC Adaptor, disconnect the plug from the wall
outlet (wall socket) immediately to disconnect from the power source.
• When charging is finished, disconnect the AC Adaptor from the wall outlet (wall
socket).
• Be sure to use only genuine Sony brand battery packs, micro USB cable (supplied)
and AC Adaptor (supplied).
• Power is not supplied during shooting/playback if the camera is connected to a
wall outlet with the supplied AC adaptor. To supply power to the camera during
shooting/playback, use the AC-UD10 (sold separately) or AC-UD11 (sold
separately) AC adaptor.
• The AC Adaptor AC-UD11 (sold separately) may not be available in some
countries/regions.
x
Charging time (Full charge)
The charging time is approximately 230 min. using the AC Adaptor
(supplied).
Notes
• The above charging time applies when charging a fully depleted battery pack at a
temperature of 25°C (77°F). Charging may take longer depending on conditions of
use and circumstances.
GB
GB
13
Page 14
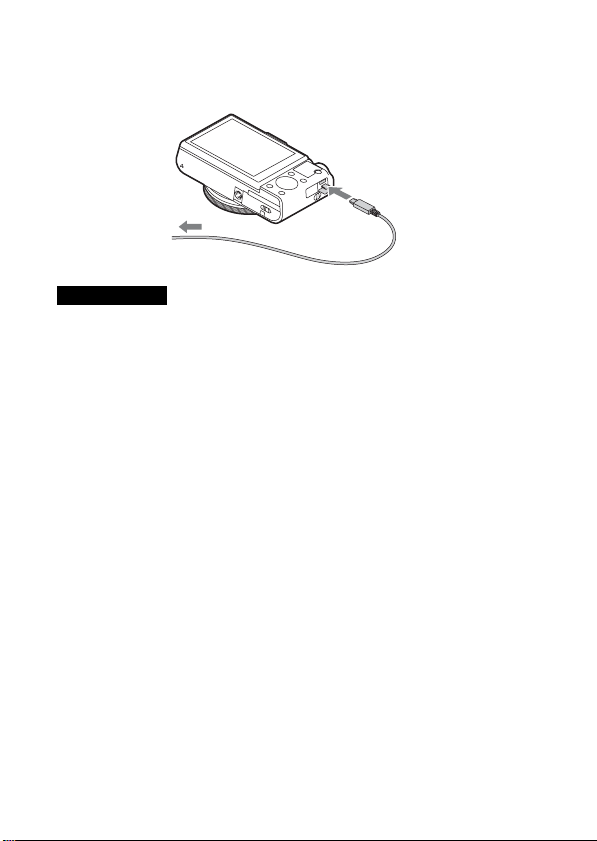
x
Charging by connecting to a computer
The battery pack can be charged by connecting the camera to a computer using
a micro USB cable.
To a USB jack
Notes
• Note the following points when charging via a computer:
– If the camera is connected to a laptop computer that is not connected to a power
source, the laptop battery level decreases. Do not charge for an extended period
of time.
– Do not turn on/off or restart the computer, or wake the computer to resume from
sleep mode when a USB connection has been established between the computer
and the camera. The camera may cause a malfunction. Before turning on/off, or
restarting the computer or waking the computer from sleep mode, disconnect the
camera and the computer.
– No guarantees are made for charging using a custom-built computer or a
modified computer.
14
GB
Page 15

x
Battery life and number of images that can be
recorded and played back
Battery life Number of images
Shooting (still images) Approx. 175 min. Approx. 350 images
Typical movie shooting Approx. 45 min. —
Continuous movie shooting Approx. 80 min. —
Viewing (still images) Approx. 250 min. Approx. 5000 images
Notes
• The above number of images applies when the battery pack is fully charged. The
number of images may decrease depending on the conditions of use.
• The number of images that can be recorded is for shooting under the following
conditions:
– Using Sony “Memory Stick PRO Duo” (Mark2) media (sold separately)
– The battery pack is used at an ambient temperature of 25°C (77°F).
• The number for “Shooting (still images)” is based on the CIPA standard, and is for
shooting under the following conditions:
(CIPA: Camera & Imaging Products Association)
– DISP is set to [Display All Info.].
– Shooting once every 30 seconds.
– The zoom is switched alternately between the W and T ends.
– The flash strobes once every two times.
– The power turns on and off once every ten times.
• The numbers of minutes for movie shooting are based on the CIPA standard, and
are for shooting under the following conditions:
– Record Setting: 60i 17M(FH)/50i 17M(FH)
– Typical movie shooting: Battery life based on repeatedly starting/stopping
shooting, zooming, turning on/off, etc.
– Continuous movie shooting: Battery life based on non-stop shooting until the
limit (29 minutes) has been reached, and then continued by pressing the MOVIE
button again. Other functions, such as zooming, are not operated.
GB
GB
15
Page 16
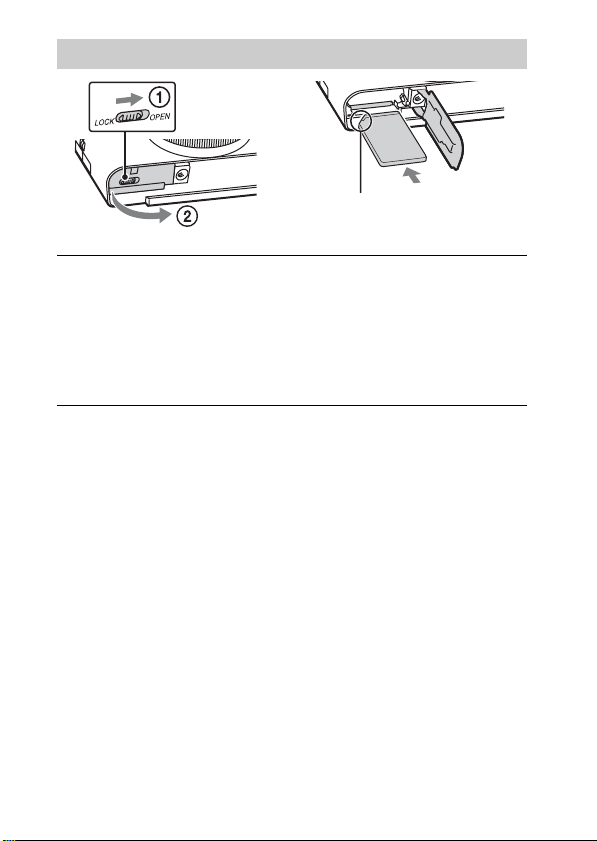
Inserting a memory card (sold separately)
Ensure the notched corner
faces correctly.
Open the cover.
1
Insert the memory card (sold separately).
2
• With the notched corner facing as illustrated, insert the memory card
until it clicks into place.
Close the cover.
3
16
GB
Page 17
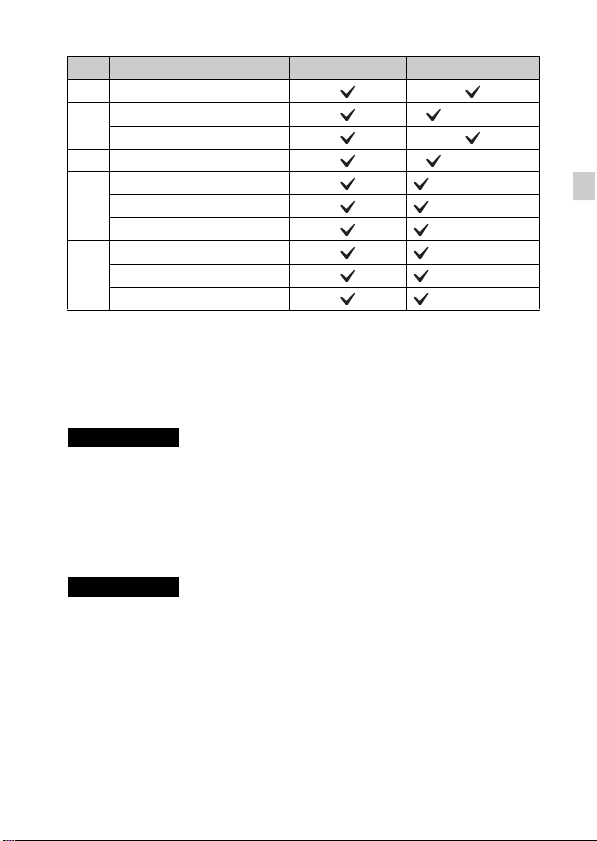
x
Memory cards that can be used
Memory card For still images For movies
A Memory Stick XC-HG Duo
Memory Stick PRO Duo (Mark2 only)
B
Memory Stick PRO-HG Duo
C Memory Stick Micro (M2) (Mark2 only)
SD memory card (Class 4 or faster)
D
SDHC memory card (Class 4 or faster)
SDXC memory card (Class 4 or faster)
microSD memory card (Class 4 or faster)
E
microSDHC memory card (Class 4 or faster)
microSDXC memory card (Class 4 or faster)
• In this manual, the products in the table are collectively referred to as follows:
A: “Memory Stick XC Duo” media
B: “Memory Stick PRO Duo” media
C: “Memory Stick Micro” media
D: SD card
E: microSD memory card
Notes
• When using “Memory Stick Micro” media or microSD memory cards with this
camera, make sure to use with the appropriate adaptor.
x
To remove the memory card/battery pack
Memory card: Push the memory card in once to eject the memory card.
Battery pack: Slide the battery eject lever. Be sure not to drop the battery pack.
Notes
• Never remove the memory card/battery pack wh en the access lamp (page 9) is lit.
This may cause damage to data in the memory card.
GB
GB
17
Page 18
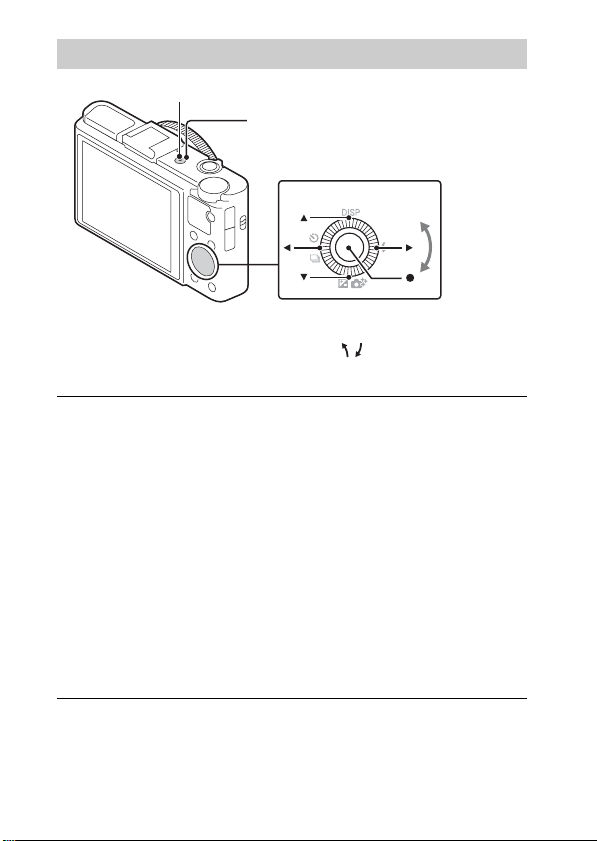
Setting the clock
ON/OFF (Power)
Power/Charge lamp (green)
Control wheel
Select items: b/B
Set the numeric value of date and
time:
v/V//
z
Set:
Press the ON/OFF (Power) button.
1
Date & Time setting is displayed when you turn on the camera for the first
time.
• It may take time for the power to turn on and allow operation.
Check that [Enter] is selected on the screen, then press
2
z on the control wheel.
Select a desired geographic location by following the
3
on-screen instructions, then press z.
Set [Daylight Svg.:], date and [Date Format:], then
4
press z.
• Midnight is indicated as 12:00 AM, and noon as 12:00 PM.
Check that [Enter] is selected, then press z.
5
18
GB
Page 19
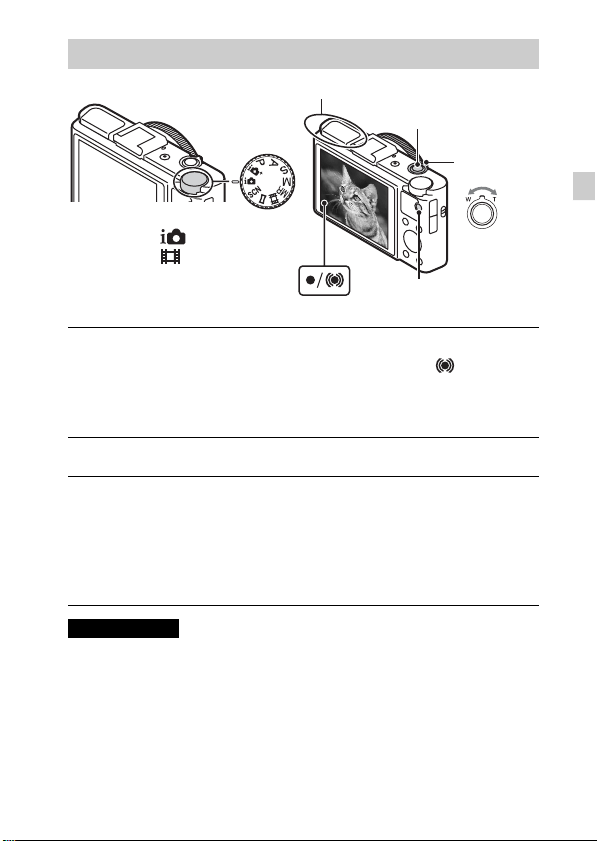
Shooting still images/movies
Do not cover the flash.
Shutter button
W/T (zoom)
lever
Mode dial
: Intelligent Auto
: Movie
MOVIE
Shooting still images
Press the shutter button halfway down to focus.
1
When the image is in focus, a beep sounds and the z or indicator
lights.
Press the shutter button fully down to shoot an image.
2
Shooting movies
Press the MOVIE (Movie) button to start recording.
1
• Use the W/T (zoom) lever to change the zoom scale.
• Press the shutter button to shoot still images while continuing to record
the movie.
Press the MOVIE button again to stop recording.
2
Notes
• Do not pull up the flash manually. This may cause a malfunction.
• When using the zoom function while shooting a movie, the sound of the camera
operating will be recorded. The sound of the MOVIE button operating may also be
recorded when movie recording is finished.
• Continuous shooting is possible for approximately 29 minutes at one time at the
camera’s default settings and when the temperature is approximately 25°C (77°F).
When movie recording is finished, you can restart recording by pressing the
MOVIE button again. Recording may stop to protect the camera depending on the
ambient temperature.
W: zoom out
T: zoom in
GB
GB
19
Page 20
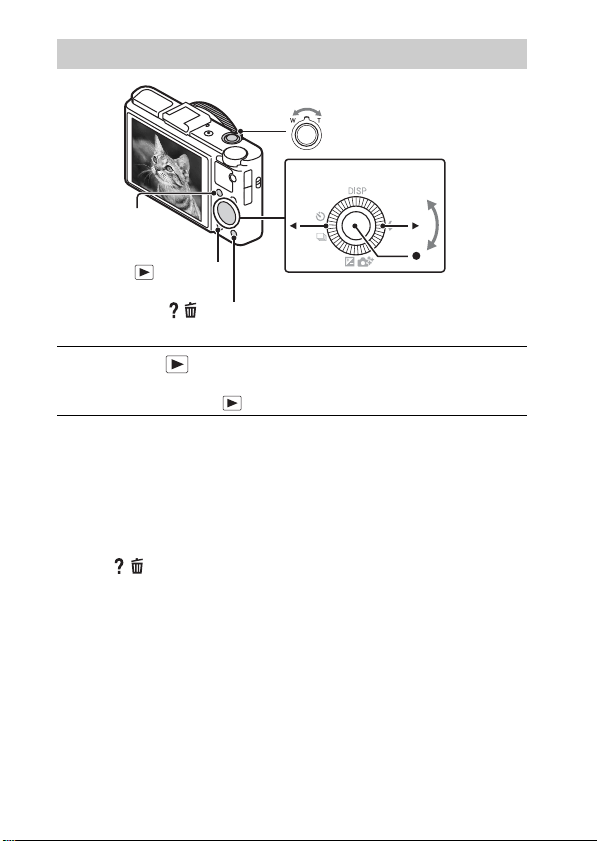
Viewing images
Fn (Function)
W: zoom out
T: zoom in
Control wheel
(Playback)
/ (Delete)
Press the (Playback) button.
1
• You can switch the display mode between still images and movies by
selecting MENU t 1 t [Still/Movie Select].
x
Selecting next/previous image
Select an image by pressing B (next)/b (previous) on the control wheel or by
turning the control wheel. Press z in the center of the control wheel to view
movies.
x
Deleting an image
1 Press / (Delete) button.
2 Select [D elete] with v on the control wheel, then press z.
x
Rotating an image
Press the Fn (Function) button.
x
Returning to shooting images
Press the shutter button halfway down.
GB
Select images: B (next)/b (previous) or
turn the control wheel
Set: z
20
Page 21
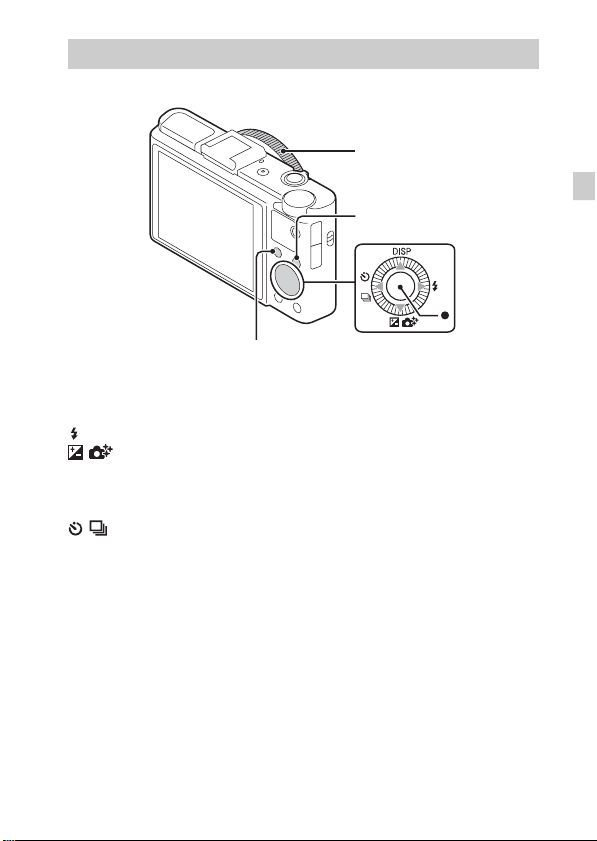
Introduction of other functions
Other functions can be operated using the control wheel, MENU button, etc.
Control Ring
MENU
GB
Fn (Function)
x
Control wheel
DISP (Display Contents): Allows you to change the screen display.
(Flash Mode): Allows you to select a flash mode for still images.
/ (Exposure Comp./Photo Creativity): Allows you to adjust image
brightness. Allows you to change [Bkground Defocus], [Brightness], [Color],
[Vividness] and [Picture Effect] when shooting mode is set to [Intelligent
Auto] or [Superior Auto].
/ (Drive Mode): Allows you to use the self-timer and burst shooting
mode.
z (Tracking focus): The camera tracks the subject and adjusts focus
automatically even when the subject is moving.
Control wheel
GB
21
Page 22
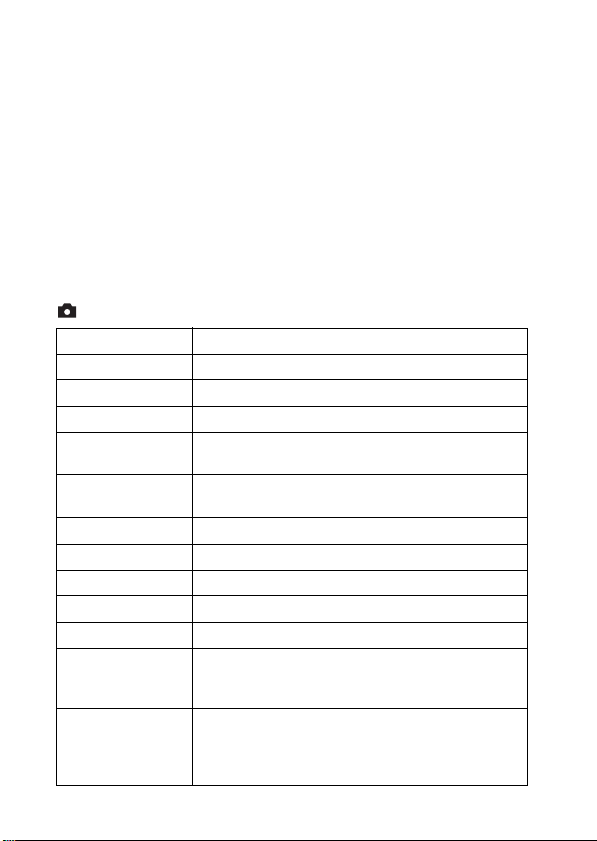
x
Fn (Function) button
Allows you to register seven functions and recall those functions when
shooting.
1 Press the Fn (Function) button.
2 Select the desired function by pressing the Fn (Function) button
repeatedly, or using b/B on the control wheel.
3 Select the setting value by turning the control wheel or Control Ring.
x
Control Ring
Your favorite functions can be assigned to the Control Ring; when shooting,
established settings can be changed just by turning the Control Ring.
x
Menu Items
Still shooting menu
Image size Selects the size of still images.
Aspect Ratio Selects the aspect ratio for still images.
Quality Sets the image quality for still images.
Panorama: Size Selects the size of panoramic images.
Panorama:
Direction
Ctrl with
Smartphone
Drive Mode Sets the drive mode, such as for continuous shooting.
Flash Mode Sets the flash settings.
Focus Mode Selects the focus method.
Autofocus Area Selects the area of focus.
Soft Skin Effect Sets the Soft Skin Effect and the effect level.
Smile/Face Detect.
Auto Object
Framing
GB
22
Sets the shooting direction for panoramic images.
Shoots still images and movies by controlling the camera
remotely by a smartphone.
Selects to detect faces and adjust various settings
automatically. Sets to automatically release the shutter
when a smile is detected.
Analyzes the scene when capturing faces, close-ups, or
subjects tracked by Tracking Focus function, and
automatically trims and saves another copy of the image
with a more impressive composition.
Page 23
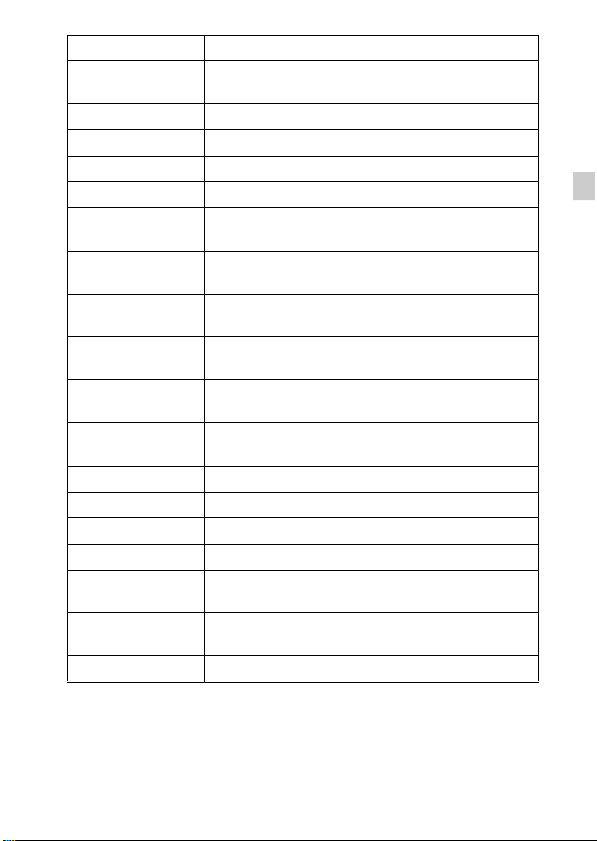
ISO Adjusts the luminous sensitivity.
Metering Mode
Flash Comp. Adjusts the intensity of flash output.
White Balance Adjusts color tones of an image.
DRO/Auto HDR Compensates automatically for brightness and contrast.
Creative Style Selects the desired image processing.
Picture Effect
Clear Image Zoom
Digital Zoom
Long Exposure NR
High ISO NR
AF Illuminator
SteadyShot Sets SteadyShot.
Color Space Changes the range of reproducible colors.
Shooting Tip List Accesses all shooting tips.
Write Date Sets whether to record a shooting date on the still image.
Scene Selection
Memory recall
Memory Registers the desired modes or camera settings.
Selects the metering mode that sets which part of the
subject to measure to determine the exposure.
Selects the desired effect filter to achieve a more
impressive and artistic expression.
Provides a higher-quality zoomed image than with
Digital Zoom.
Provides zoomed images at higher magnification than
with Clear Image Zoom.
Sets noise reduction processing for shots with a shutter
speed of 1/3 second or longer.
Sets noise reduction processing for high-sensitivity
shooting.
Sets the AF illuminator, which provides light for a dark
scene to aid focusing.
Selects pre-set settings to match various scene
conditions.
Selects settings you want to recall when the mode dial is
set to [Memory recall].
GB
GB
23
Page 24
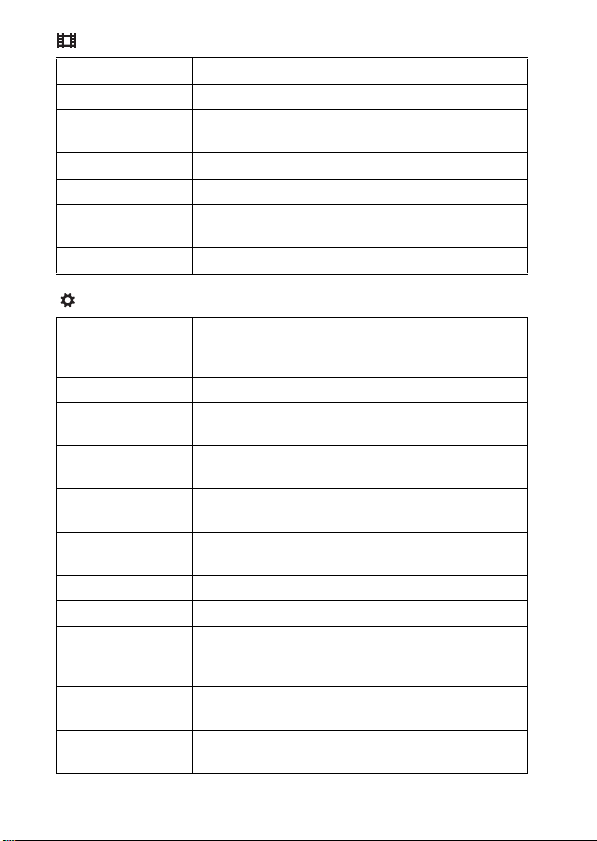
Movie shooting menu
File Format Selects the movie file format.
Record Setting Selects the size of the recorded movie frame.
Image Size(Dual
Rec)
SteadyShot Sets SteadyShot.
Audio Recording Sets whether to record audio when shooting a movie.
Wind Noise
Reduct.
Movie Selects the exposure mode to suit your subject or effect.
Sets the still image size shot when recording a movie.
Reduces wind noise during movie recording.
Custom menu
FINDER/LCD
Setting
Red Eye Reduction Reduces the red-eye phenomenon when using flash.
Grid Line
Auto Review
DISP Button
Peaking Level
Peaking Color Sets the color used for the peaking function.
Control Ring Assigns the desired functions to the Control Ring.
Zoom Func. on
Ring
Control Ring
Display
Function Button
GB
When using a electronic viewfinder (sold separately),
sets the method for switching between the electronic
viewfinder and screen.
Sets a grid line display to enable alignment to a structural
outline.
Sets auto review to display the captured image after
shooting.
Sets the screen display modes that can be selected by
pressing DISP on the control wheel.
Enhances the outline of in-focus ranges with a specific
color when focusing manually.
Sets the zooming function of the control ring.
When you select [Step], you can move a zoom position
to a fixed step of the focal length.
Sets whether to display animation when operating the
Control Ring.
Customizes the functions displayed when the Fn
(Function) button is pressed.
24
Page 25
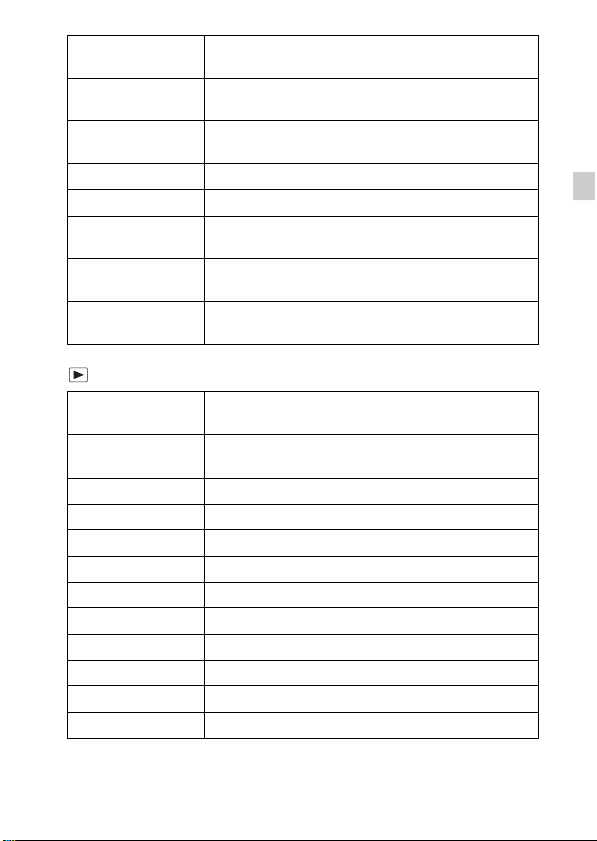
Func. of Center
Button
Func. of Left
Button
Func. of Right
Button
MOVIE Button Sets whether to always activate the MOVIE button.
MF Assist Displays an enlarged image when focusing manually.
Focus Magnif.
Time
Face Priority
Tracking
Face Registration
Assigns the desired functions to the center button.
Assigns the desired functions to the left button.
Assigns the desired functions to the right button.
Sets the length of time the image will be shown in an
enlarged form.
Sets whether to track faces as a priority when tracking.
Registers or changes the person to be given priority in
the focus.
Playback menu
Send to
Smartphone
Send to Computer
View on TV
Still/Movie Select Switches between still image/movie displays.
Delete Deletes an image.
Slide Show Shows a slide show.
Image Index Displays multiple images at the same time.
Protect Protects the images.
Specify Printing Adds a print order mark to a still image.
Picture Effect Adds various textures to images.
Volume Settings Adjusts the volume.
Playback Display Sets how to play back an image recorded in portrait.
Transfers images to display on a smartphone.
Backs up images by transferring them to a computer
connected to a network.
You can view images on a network-enabled TV.
GB
GB
25
Page 26
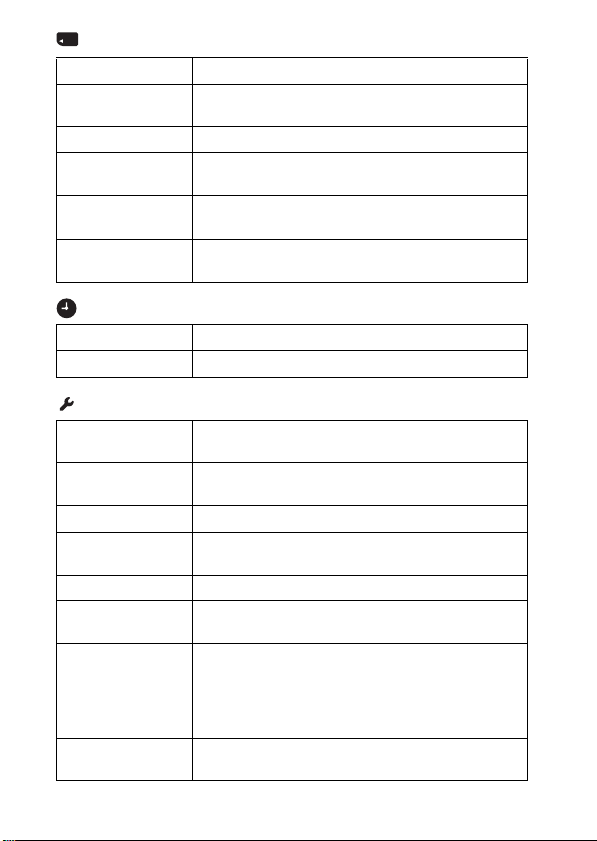
Memory Card Tool menu
Format Formats the memory card.
File Number
Select REC Folder Changes the selected folder for storing images.
New Folder
Recover Image DB
Display Card
Space
Sets the method used to assign file numbers to still
images and movies.
Creates a new folder for storing still images and movies
(MP4).
Recovers the image database file and enables recording
and playback.
Displays the remaining recording time of movies and the
recordable number of still images on the memory card.
Clock setup menu
Date/Time Setup Sets date and time, and daylight savings.
Area Setting Sets the location of use.
Setup menu
Menu start
Mode Dial Guide
LCD Brightness Sets the screen brightness.
Viewfinder Bright.
Power Save Sets the level of the power saving feature.
Power Saving Start
Time
PAL/NTSC
Selector
(only for 1080 50i
compatible
models)
Upload Settings
GB
Sets the default position of the cursor on the menu to the
top item or the last-selected item.
Turns the mode dial guide (the explanation of each
shooting mode) on or off.
When using an electronic viewfinder (sold separately),
sets the brightness of the electronic viewfinder.
Sets the length of time until the camera turns off
automatically.
By changing the TV format of the device, shooting in a
different movie format is possible.
Sets the upload function of the camera when using an
1
*
Eye-Fi card.
26
Page 27
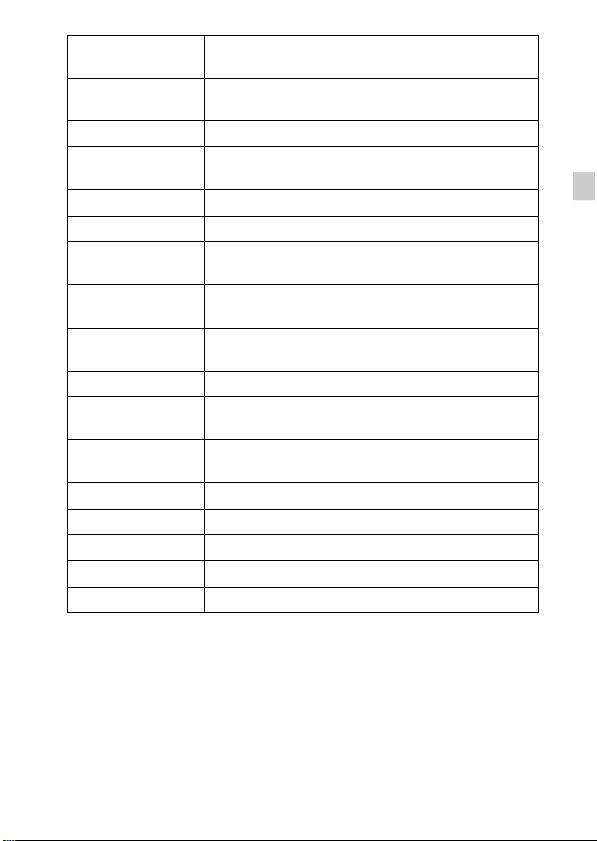
HDMI Resolution
CTRL FOR HDMI
USB Connection Sets the USB connection method.
USB LUN Setting
USB Power Supply Sets whether to supply power using a USB connection.
Audio signals Sets the operating sound of the camera.
WPS Push
Access Point
Settings
Edit Device Name
Disp MAC Address Displays the MAC address of the camera.
SSID/PW Reset
Airplane Mode
Version Displays the camera software version.
Language Selects the language.
Drop Sensor Sets the [Drop Sensor] function.
Demo Mode Sets demonstration playback of a movie to on or off.
Initialize Restores settings to their defaults.
*1
Appears when an Eye-Fi card (sold separately) is inserted into the camera.
Sets the resolution when the camera is connected to an
HDMI TV.
Operates the camera from a TV that supports
“BRAVIA” Sync.
Enhances compatibility by limiting the functions of USB
connection.
You can register the access point to the camera easily by
pushing the WPS button.
You can register your access point manually.
You can change the device name under Wi-Fi Direct,
etc.
Resets the SSID and password of smartphone
connection.
You can set this device to not perform wireless
communications.
GB
GB
27
Page 28
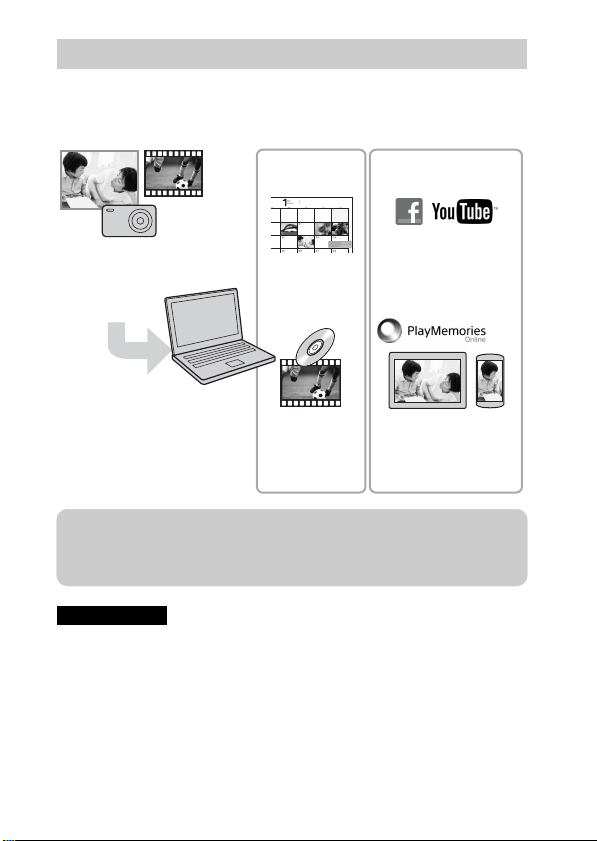
Features of “PlayMemories Home”
The software “PlayMemories Home” allows you to import still images and
movies to your computer and use them. “PlayMemories Home” is required for
importing AVCHD movies to your computer.
Sharing images
Uploading images to
network services
Sharing images on
“PlayMemories
Online”
Importing images from
your camera
Organizing
Viewing images
on Calendar
Creating movie
discs
z Downloading “PlayMemories Home” (for Windows only)
You can download “PlayMemories Home” from the following URL:
www.sony.net/pm
Notes
• An Internet connection is required to install “PlayMemories Home”.
• An Internet connection is required to use “PlayMemories Online” or other network
services. “PlayMemories Online” or other network services may not be available
in some countries or regions.
• “PlayMemories Home” is not compatible with Macs. Use the applications that are
installed on your Mac. For details, visit the following URL:
http://www.sony.co.jp/imsoft/Mac/
GB
28
Page 29
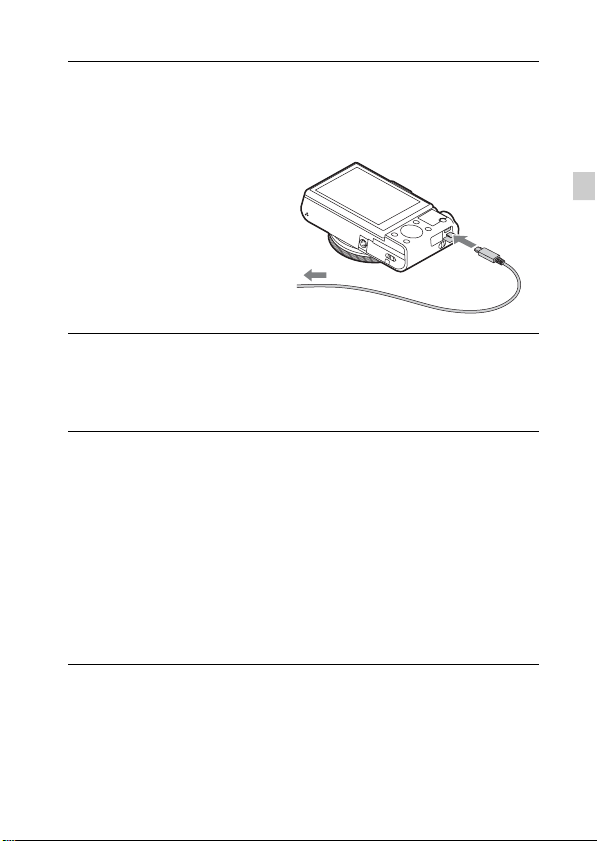
x
Installing “PlayMemories Home” on a computer
Using the Internet browser on your computer, go to the
1
following URL, then click [Install] t [Run].
www.sony.net/pm
Follow the instructions
2
on the screen to
complete the
installation.
• When the message to connect
the camera to a computer is
displayed, connect the camera
and computer using the micro
USB cable (supplied).
x
Viewing “PlayMemories Home Help Guide”
For details on how to use “PlayMemories Home”, refer to the “PlayMemories
Home Help Guide”.
Double-click the [PlayMemories Home Help Guide] icon
1
on the desktop.
• To access the “PlayMemories Home Help Guide” from the start menu:
Click [Start] t [All Programs] t [PlayMemories Home] t
[PlayMemories Home Help Guide].
• For Windows 8, select the [PlayMemories Home] icon from the Start
screen to start [PlayMemories Home], then select [PlayMemories Home
Help Guide] from [Help] menu.
• For details on “PlayMemories Home”, you can also see the “Cyber-shot User
Guide” (page 2) or the following PlayMemories Home support page (English
only):
http://www.sony.co.jp/pmh-se/
To a USB jack
To the Multi
Terminal
GB
GB
29
Page 30

Features of “Image Data Converter”
Below are examples of the functions available when you use “Image Data
Converter”.
• You can edit RAW images using multiple correction functions, such as tone
curve or sharpness.
• You can adjust images using white balance, aperture and Creative Style, etc.
• You can save displayed and edited still images to your computer.
There are two ways to save RAW images: save and leave as RAW data or
save in a general-purpose file format.
• You can display and compare the RAW images/JPEG images that are shot
with this camera.
• You can rank images in five levels.
• You can set the color label.
x
Installing “Image Data Converter”
Download the software from the following URL and
1
install it on your computer.
Windows: http://www.sony.co.jp/imsoft/Win/
Mac: http://www.sony.co.jp/imsoft/Mac/
x
Viewing “Image Data Converter Guide”
For details on how to use “Image Data Converter,” refer to the “Image Data
Converter Guide.”
For Windows:
1
Click [Start] t [All Programs] t [Image Data Converter]
t [Help]t [Image Data Converter Ver.4].
For Mac:
Start Finder t [Applications] t [Image Data Converter]
t [Image Data Converter Ver.4] t In the menu bar,
choose “Help” t “Image Data Converter Guide.”
• For Windows 8, start “Image Data Converter Ver.4” t In the menu
bar, choose “Help” t “Image Data Converter Guide.”
• For details on “Image Data Converter,” you can also see the
“Cyber-shot User Guide” (page 2) or the following “Image Data
Converter” support page (English only):
GB
30
http://www.sony.co.jp/ids-se/
Page 31
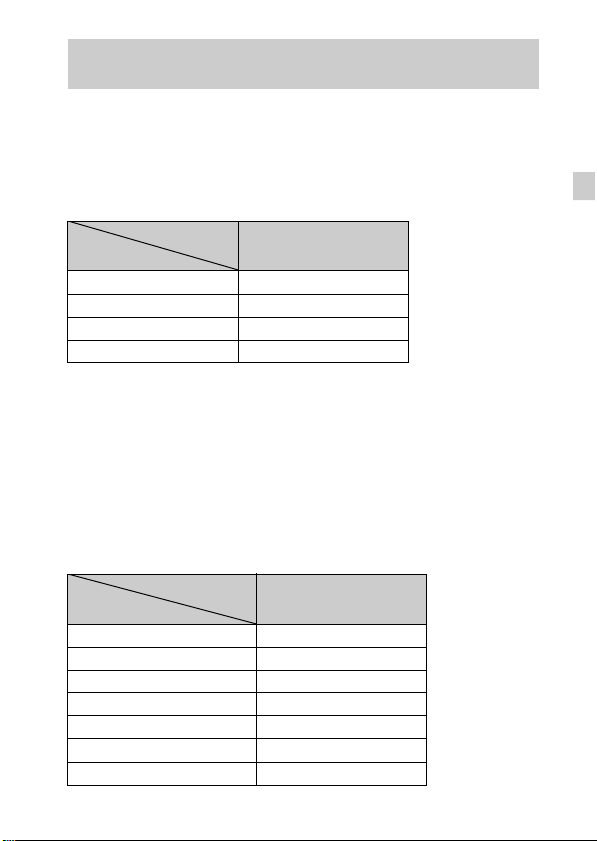
Number of still images and recordable time of
movies
The number of still images and recordable time may vary depending on the
shooting conditions and the memory card.
x
Still images
Image size: L: 20M
When [Aspect Ratio] is set to [3:2]*
Capacity
Quality
Standard 295 images
Fine 170 images
RAW & JPEG 58 images
RAW 88 images
* When the [Aspect Ratio] is set to other than [3:2], you can record more pictures
than shown above. (Except when [Quality] is set to [RAW].)
x
Movies
The table below shows the approximate maximum recording times. These are
the total times for all movie files. Continuous shooting is possible for
approximately 29 minutes (a product specification limit). The maximum
continuous recording time of an MP4 (12M) format movie is about 15 minutes
(limited by the 2 GB file size restriction).
(h (hour), m (minute))
Capacity
Record Setting
60i 24M(FX)/50i 24M(FX) 10 m
60i 17M(FH)/50i 17M(FH) 10 m
60p 28M(PS)/50p 28M(PS) 9 m
24p 24M(FX)/25p 24M(FX) 10 m
24p 17M(FH)/25p 17M(FH) 10 m
1440×1080 12M 15 m
VGA 3M 1 h 10 m
2 GB
2 GB
GB
GB
31
Page 32

• The recordable time of movies varies because the camera is equipped with VBR
(Variable Bit-Rate), which automatically adjusts image quality depending on the
shooting scene. When you record a fast-moving subject, the image is clearer but
the recordable time is shorter because more memory is required for recording.
The recordable time also varies depending on the shooting conditions, the subject
or the image quality/size settings.
Notes on using the camera
Functions built into this camera
• This manual describes 1080 60i-compatible devices and 1080 50i-compatible
devices.
To check whether your camera is a 1080 60i-compatible device or 1080 50icompatible device, check for the following marks on the bottom of the camera.
1080 60i-compatible device: 60i
1080 50i-compatible device: 50i
• This camera is compatible with 1080 60p or 50p-format movies. Unlike standard
recording modes up to now, which record in an interlacing method, this camera
records using a progressive method. This increases the resolution, and provides a
smoother, more realistic image.
On use and care
Avoid rough handling, disassembling, modifying, physical shock, or impact such as
hammering, dropping, or stepping on the product. Be particularly careful of the lens.
Notes on recording/playback
• Before you start recording, make a trial recording to make sure that the camera is
working correctly.
• The camera is neither dust-proof, nor splash-proof, nor water-proof.
• Avoid exposing the camera to water. If water enters inside the camera, a
malfunction may occur. In some cases, the camera cannot be repaired.
• Do not aim the camera at the sun or other bright light. It may cause the
malfunction of the camera.
• If moisture condensation occurs, remove it before using the camera.
• Do not shake or strike the camera. It may cause a malfunction and you may not be
able to record images. Furthermore, the recording media may become unusable or
image data may be damaged.
Do not use/store the camera in the following places
• In an extremely hot, cold or humid place
In places such as in a car parked in the sun, the camera body may become
deformed and this may cause a malfunction.
• Storing under direct sunlight or near a heater
The camera body may become discolored or deformed, and this may cause a
GB
malfunction.
32
Page 33

• In a location subject to rocking vibration
• Near a location that generates strong radio waves, emits radiation or is strongly
magnetic place. Otherwise, the camera may not properly record or play back
images.
• In sandy or dusty places
Be careful not to let sand or dust get into the camera. This may cause the camera to
malfunction, and in some cases this malfunction cannot be repaired.
On carrying
Do not sit down in a chair or other place with the camera in the back pocket of your
trousers or skirt, as this may cause malfunction or damage the camera.
Carl Zeiss lens
The camera is equipped with a Carl Zeiss lens which is capable of reproducing sharp
images with excellent contrast. The lens for the camera has been produced under a
quality assurance system certified by Carl Zeiss in accordance with the quality
standards of Carl Zeiss in Germany.
Notes on the screen
The screen is manufactured using extremely high-precision technology so over
99.99% of the pixels are operational for effective use. However, some tiny black
and/or bright dots (white, red, blue or green) may appear on the screen. These dots
are a normal result of the manufacturing process, and do not affect the recording.
Notes on the flash
• Do not carry the camera by the flash unit, or use excessive strength on it.
• If water, dust or sand get into the open flash unit, it may cause a malfunction.
On camera’s temperature
Your camera and battery may get hot due to continuous use, but it is not a
malfunction.
On the overheat protection
Depending on the camera and battery temperature, you may be unable to record
movies or the power may turn off automatically to protect the camera.
A message will be displayed on the screen before the power turns off or you can no
longer record movies. In this case, leave the power off and wait until the camera and
battery temperature goes down. If you turn on the power without letting the camera
and battery cool enough, the power may turn off again or you may be unable to
record movies.
On charging the battery
If you charge a battery that has not been used for a long time, you may be unable to
charge it to the proper capacity.
This is due to the battery characteristics, and is not a malfunction. Charge the battery
again.
GB
GB
33
Page 34

Warning on copyright
Television programs, films, videotapes, and other materials may be copyrighted.
Unauthorized recording of such materials may be contrary to the provisions of the
copyright laws.
No compensation for damaged content or recording failure
Sony cannot compensate for failure to record or loss or damage of recorded content
due to a malfunction of the camera or recording media, etc.
Cleaning the camera surface
Clean the camera surface with a soft cloth slightly moistened with water, then wipe
the surface with a dry cloth. To prevent damage to the finish or casing:
– Do not expose the camera to chemical products such as thinner, benzine, alcohol,
disposable cloths, insect repellent, sunscreen or insecticide.
Maintaining the screen
• Hand cream or moisturizer left on the screen may dissolve its coating. If you get
any on the screen, wipe it off immediately.
• Wiping forcefully with tissue paper or other materials can damage the coating.
• If fingerprints or debris are stuck to the screen, we recommend that you gently
remove any debris and then wipe the screen clean with a soft cloth.
Note on wireless LAN
We assume no responsibility whatsoever for any damage caused by unauthorized
access to, or unauthorized use of, destinations loaded on the camera, resulting from
loss or theft.
Note on disposal/transfer of the camera
To protect personal data, perform the following when disposing of or transferring
the camera.
• Reset all camera settings by performing [Initialize] (page 27).
• Delete all registered people’s faces from [Face Registration] (page 25).
34
GB
Page 35

Specifications
Camera
[System]
Image device: 13.2 mm × 8.8 mm
(1.0 type) Exmor R CMOS sensor
Total pixel number of camera:
Approx. 20.9 Megapixels
Effective pixel number of camera:
Approx. 20.2 Megapixels
Lens: Carl Zeiss Vario-Sonnar T
zoom lens
f = 10.4 mm – 37.1 mm (28 mm –
100 mm (35 mm film equivalent))
F1.8 (W) – F4.9 (T)
While shooting movies (16:9):
29 mm – 105 mm
While shooting movies (4:3):
36 mm – 128 mm
*1
When [SteadyShot] is set to
[Standard]
SteadyShot: Optical
Exposure control: Automatic exposure,
Aperture priority, Shutter priority,
Manual exposure, Scene Selection
White balance: Automatic, Daylight,
Shade, Cloudy, Incandescent,
Fluorescent (Warm White/
Cool White/Day White/Daylight),
Flash, Color temperature/Color
filter, Custom
File format:
Still images: JPEG (DCF, Exif,
MPF Baseline) compliant, RAW
(Sony ARW 2.3 Format), DPOF
compatible
Movies (AVCHD format):
AVCHD format Ver. 2.0
compatible
Video: MPEG-4 AVC/H.264
*1
*1
*
3.6×
Audio: Dolby Digital 2ch,
equipped with Dolby Digital Stereo
Creator
• Manufactured under license from
Dolby Laboratories.
Movies (MP4 format):
Video: MPEG-4 AVC/H.264
Audio: MPEG-4 AAC-LC 2ch
Recording media: “Memory Stick XC
Duo” media, “Memory Stick PRO
Duo” media, “Memory Stick
Micro” media, SD cards, microSD
memory cards
Flash: Flash range (ISO sensitivity
(Recommended Exposure Index)
set to Auto):
Approx. 0.3 m to 15.0 m
(0.98 ft. to 49.21 ft.) (W)
Approx. 0.55 m to 5.7 m
(1.80 ft. to 18.70 ft.) (T)
[Input and Output connectors]
HDMI connector: HDMI micro jack
Multi Terminal*:
USB communication
USB communication: Hi-Speed USB
(USB 2.0)
* Supports Micro USB compatible
device.
[Screen]
LCD screen:
7.5 cm (3.0 type) TFT drive
Total number of dots:
1 228 800 dots
GB
GB
35
Page 36

[Power, general]
Power: Rechargeable battery pack
NP-BX1, 3.6 V
AC Adaptor AC-UB10/UB10B/
UB10C/UB10D, 5 V
Power consumption (during shooting):
Approx. 1.5 W
Operating temperature: 0 °C to 40 °C
(32 °F to 104 °F)
Storage temperature: –20 °C to +60 °C
(–4 °F to +140 °F)
Dimensions (CIPA compliant):
101.6 mm × 58.1 mm × 38.3 mm
(4 inches × 2 3/8 inches ×
1 9/16 inches) (W/H/D)
Mass (CIPA compliant) (including NP-
BX1 battery pack, “Memory Stick
Duo” media):
Approx. 281 g (9.9 oz)
Microphone: Stereo
Speaker: Monaural
Exif Print: Compatible
PRINT Image Matching III:
Compatible
[Wireless LAN]
Supported standard: IEEE 802.11 b/g/n
Frequency: 2.4GHz
Supported security protocols: WEP/
WPA-PSK/WPA2-PSK
Configuration method: WPS (Wi-Fi
Protected Setup) / manual
Access method: Infrastructure Mode
NFC: NFC Forum Type 3 Tag
compliant
AC Adaptor AC-UB10/UB10B/
UB10C/UB10D
Power requirements: AC 100 V to
240 V, 50 Hz/60 Hz, 70 mA
Output voltage: DC 5 V, 0.5 A
Operating temperature: 0 °C to 40 °C
(32 °F to 104 °F)
Storage temperature: –20 °C to +60 °C
(–4 °F to +140 °F)
Dimensions:
Approx. 50 mm × 22 mm × 54 mm
(2 inches × 7/8 inches ×
2 1/4 inches) (W/H/D)
Mass:
For the USA and Canada: Approx.
48 g (1.7 oz)
For countries or regions other than
the USA and Canada: Approx. 43 g
(1.5 oz)
Rechargeable battery pack
NP-BX1
Used battery: Lithium-ion battery
Maximum voltage: DC 4.2 V
Nominal voltage: DC 3.6 V
Maximum charge voltage: DC 4.2 V
Maximum charge current: 1.89 A
Capacity: 4.5 Wh (1 240 mAh)
Design and specifications are subject to
change without notice.
36
GB
Page 37
Trademarks
• The following marks are trademarks
of Sony Corporation.
, “Cyber-shot,”
“Memory Stick XC-HG Duo,”
“Memory Stick PRO Duo,”
“Memory Stick PRO-HG Duo,”
“Memory Stick Duo,” “Memory
Stick Micro”
• “AVCHD Progressive” and
“AVCHD Progressive” logotype are
trademarks of Panasonic Corporation
and Sony Corporation.
• Dolby and the double-D symbol are
trademarks of Dolby Laboratories.
• The terms HDMI and HDMI HighDefinition Multimedia Interface, and
the HDMI Logo are trademarks or
registered trademarks of HDMI
Licensing LLC in the United States
and other countries.
• Windows is registered trademark of
Microsoft Corporation in the United
States and/or other countries.
• Mac, App Store are registered
trademarks of Apple Inc.
• iOS is a registered trademark or
trademark of Cisco Systems, Inc.
and/or its affiliates in the United
States and certain other countries.
• SDXC logo is a trademark of SD-3C,
LLC.
• Android, Google Play are trademarks
of Google Inc.
• Wi-Fi, the Wi-Fi logo, Wi-Fi
PROTECTED SET-UP are registered
trademarks of the Wi-Fi Alliance.
• The N Mark is a trademark or
registered trademark of NFC Forum,
Inc. in the United States and in other
countries.
• DLNA and DLNA CERTIFIED are
trademarks of Digital Living
Network Alliance.
• “ ” and “PlayStation” are
registered trademarks of Sony
Computer Entertainment Inc.
• Facebook and the “f” logo are
trademarks or registered trademarks
of Facebook, Inc.
• YouTube and the YouTube logo are
trademarks or registered trademarks
of Google Inc.
• Eye-Fi is a trademark of Eye-Fi, Inc.
• In addition, system and product
names used in this manual are, in
general, trademarks or registered
trademarks of their respective
developers or manufacturers.
However, the ™ or ® marks are not
used in all cases in this manual.
• Add further enjoyment with your
PlayStation 3 by downloading the
application for PlayStation 3 from
PlayStation Store (where available.)
• The application for PlayStation 3
requires PlayStation Network
account and application download.
Accessible in areas where the
PlayStation Store is available.
Additional information on this
product and answers to frequently
asked questions can be found at
our Customer Support Website.
GB
GB
37
Page 38
中文 (繁體字)
關於相機的詳細資訊(“Cyber-shot 使用者指南”)
“Cyber-shot 使用者指南”是線上使用說明書。關於相
機各種功能的深入使用說明,請參考此書。
1 進入Sony服務網頁。
http://www.sony.net/SonyInfo/Support/
2 選擇您的國家與地區。
3 搜尋服務網頁內您相機的型號名稱。
• 查看您相機底部的型號名稱。
檢視指南
本相機配備有內建的使用指南。
MENU
/ (相機指南)
相機指南
相機顯示MENU項目和設定值的說明。
1 按MENU按鈕。
2 選擇您要的MENU項目,然後按 / (相機指南)按鈕。
拍攝秘訣
相機顯示所選拍攝模式的拍攝秘訣。
1 在拍攝模式中按 / (相機指南)按鈕。
2 選擇要使用的拍攝秘訣,然後按控制輪上的
拍攝秘訣便會顯示出來。
• 您可以使用 v/V 捲動螢幕並使用 b/B 變更拍攝秘訣。
z。
CT
2
Page 39

警告
為減少發生火災或電擊的危險,請勿讓本機暴露於雨中或受潮。
重要的安全指示
-請保存這些指示危險
為了降低火災或電擊的危險,請小心遵守
這些指示
注意
[ 電池組
如果電池組處理不當,電池組可能會爆炸,造成火災,甚至化學灼傷。請遵
循以下注意事項。
• 切勿拆解。
• 切勿擠壓,撞擊電池組或對電池組用力過度,如敲擊,跌落或踩踏在電池
組上。
• 切勿短路或讓金屬物品接觸到電池端子。
• 切勿暴露在超過 60 ℃的高溫下,例如直射陽光下,或停在太陽下的汽車
內。
• 切勿焚化或丟棄在火中。
• 切勿處理損壞或洩漏的鋰離子電池。
• 務必使用 Sony 原廠的充電器或可對電池組充電的裝置來為電池組充電。
• 電池組應放在幼兒不易觸及的地方。
• 使電池組保持乾燥。
• 請僅使用與 Sony 建議的相同或相等的電池類型進行更換。
• 請依照說明書中的說明正確丟棄舊電池組。
[ 電源供應器 / 電源適配器
使用電源供應器 / 電源適配器時,請使用附近牆上的電源插座。如果在使用
設備時發生任何故障,請立即將電源供應器 / 電源適配器從牆上的電源插座
拔掉。
CT
CT
3
Page 40

注意
本產品已經過測試並確定符合 EMC 規定中所提出的使用連接電纜不得超過
3 公尺的限制。
[ 注意
特定頻率的電磁場可能會影響此機的畫面和聲音。
[ 通知
如果靜電或電磁導致資料傳送中斷 (失敗),請重新啟動應用程式或斷開連
接,並重新連接通信電纜 (USB 等)。
經型式認證合格之低功率射頻電機,非經許可,公司、商號或使用者均不得擅自變
更頻率、加大功率或變更原設計之特性及功能。
低功率射頻電機之使用不得影響飛航安全及干擾合法通信;經發現有干擾現象時,
應立即停用,並改善至無干擾時方得繼續使用。前項合法通信,指依電信法規定作
業之無線電通信。低功率射頻電機須忍受合法通信或工業、科學及醫療用電波輻射
性電機設備之干擾。
僅適用於台灣
廢電池請回收
附屬電纜上附有鐵芯時的注意事項:USB 電纜或 A/V 連接電纜或電源適配器
之 DC 輸出線上的一個鐵芯係抑制電磁波干擾用,請勿任意拆卸。
CT
4
Page 41
檢查附件
括號中的數字代表的是件數。
• 相機 (1)
• 充電電池NP-BX1 (1)
• 微型USB電纜 (1)
• 電源供應器/電源適配器AC-UB10/UB10B/UB10C/UB10D (1)
• 電源線 (在美國與加拿大非附件)(1)
• 腕帶 (1)
• 掛帶轉接環 (2)
(如圖所示,掛帶轉接環用來安裝肩帶 (另售)。)
• 使用說明書 (本說明書)(1)
CT
CT
5
Page 42
認識各部件
CT
6
A 快門按鈕
B 模式轉盤
(智慧式自動)/ (高
級自動)/ (程式自動)/
(光圈優先)/ (快門速
度優先)/ (手動曝光)/
(記憶回復)/ (動態影
像)/ (全景攝影)/
(場景選擇)
C 用來拍攝:W/T (變焦)桿
用來觀看:索引/播放變焦桿
D 自拍定時器指示燈/微笑快門
指示燈/AF照明器
E 電源/充電指示燈
F ON/OFF (電源)按鈕
G 多介面接座*
H 閃光燈
• 請不要以您的手指蓋住閃光
燈。
• 使用閃光燈時,閃光燈會自動
彈出。當您不想要使用閃光燈
時,以手動方式壓下閃光燈。
I 麥克風
J 掛繩勾
K 控制環
L Wi-Fi感應器 (內建)
M 鏡頭
N 光感應器
O LCD螢屏
P Fn (功能)按鈕
Q MOVIE (動態影像)按鈕
R 多功能端子
• 支援微型USB相容裝置。
S HDMI微型插孔
T MENU按鈕
U 控制輪
V (播放)按鈕
Page 43
W / (相機指南/刪除)按鈕
X 電池插槽
Y 電池退出桿
Z 三腳架鎖孔
• 請使用螺絲長度在5.5公釐以
下的三腳架。否則無法將相機
牢靠地固定住,而且可能會對
相機造成損壞。
wj 存取指示燈
wk 記憶卡插槽
wl 電池/記憶卡蓋子
e; (N標記)
• 將相機連接到具有NFC功能的
智慧型手機時觸碰此標記。
• NFC (Near Field
Communication)是一種短範
圍無線通訊技術的國際標準。
ea 揚聲器
* 關於多介面接座相容附件的詳情,
請造訪Sony網站,或是洽詢Sony經
銷商或當地授權的Sony服務機構。
您也可以使用與配件接腳相容的附
件。不保證能搭配其他製造商附件
操作。
CT
CT
7
Page 44
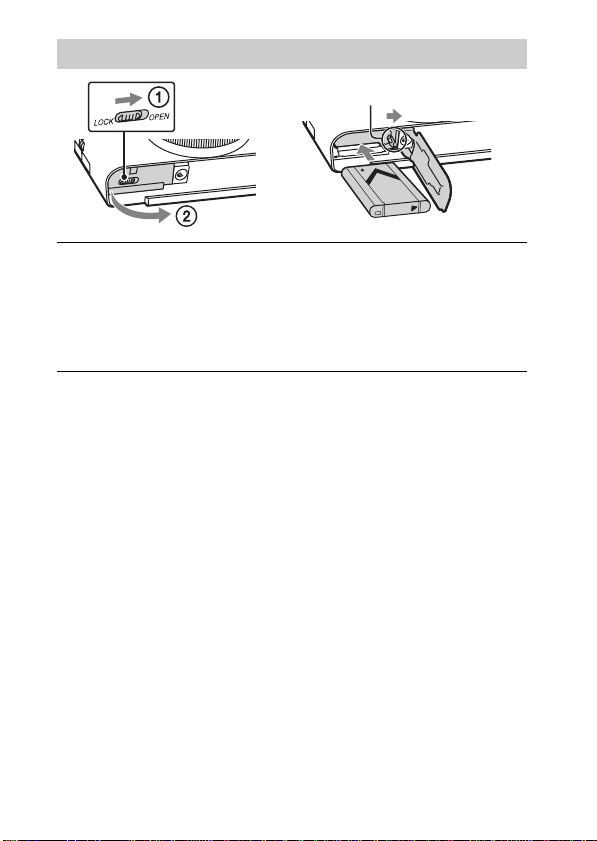
插入電池
電池退出桿
打開蓋子。
1
插入電池。
2
• 如圖所示,在按住電池退出桿的同時將電池插入。確認電池退出
桿在插入後有鎖定。
• 電池插入不正確時關上電池蓋可能會損壞相機。
CT
8
Page 45
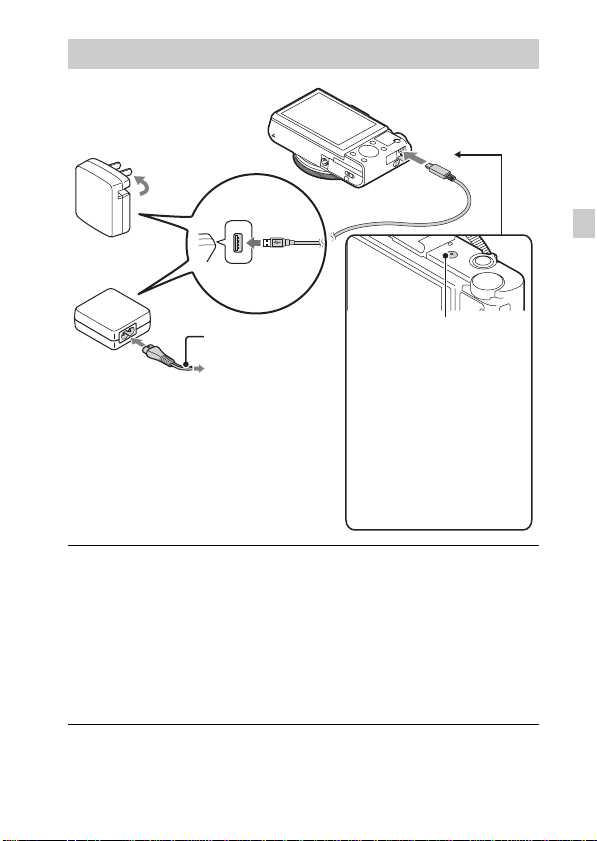
為電池充電
美國與加拿大的用戶
CT
電源線
美加以外的國家/地區的用戶
用微型USB電纜 (附件)將相機連接到電源供應器/電源
1
電源/充電指示燈
點亮:充電
熄滅:充電完成
閃爍:
因為相機溫度不在適當範
圍內而充電錯誤或暫停充
電
適配器 (附件)。
將電源供應器/電源適配器連接到牆上的電源插座。
2
電源/充電指示燈亮橘燈,充電開始。
• 為電池充電時關閉相機。
• 即使電力沒有完全放光,也可以為電池充電。
• 電源/充電指示燈閃爍而且充電未完成時,取出電池之後再插回
去。
CT
9
Page 46

附註
• 電源供應器/電源適配器連接到牆上的電源插座時,如果相機上的電源/充
電指示燈閃爍,表示因為溫度超出建議範圍外而暫停充電。溫度回到適當
的範圍內時,會恢復充電。建議您在10℃至30℃的環境溫度下對電池充電。
• 電池的端子部分如果髒了,可能無法有效地充電。遇到這種情況時,請用
軟布或棉花棒輕輕地將所有髒東西擦掉,以清潔電池的端子部分。
• 將電源供應器/電源適配器 (附件)連接到最近的牆上電源插座。如果使用
電源供應器/電源適配器時發生故障,請立即將插頭從牆上的電源插座拔掉
以中斷電源。
• 充電完成時,將電源供應器/電源適配器從牆上的電源插座拔掉。
• 務必只使用原廠的Sony電池、微型USB電纜 (附件)以及電源供應器/電源
適配器 (附件)。
• 如果相機透過附件電源供應器/電源適配器連接到牆上的電源插座,拍攝/
播放時無法供電。若要在拍攝/播放時為相機供電,使用AC-UD10 (另售)
或AC-UD11 (另售)電源供應器/電源適配器。
• 某些國家/地區可能買不到電源供應器/電源適配器AC-UD11 (另售)。
x
充電時間 (完全充電)
使用電源供應器/電源適配器 (附件)時的充電時間大約230分鐘。
附註
• 上述充電時間適用於在溫度為25℃時對用盡的電池充電的情況。充電可能
因為使用情況或環境而需要長一點的時間。
10
CT
Page 47
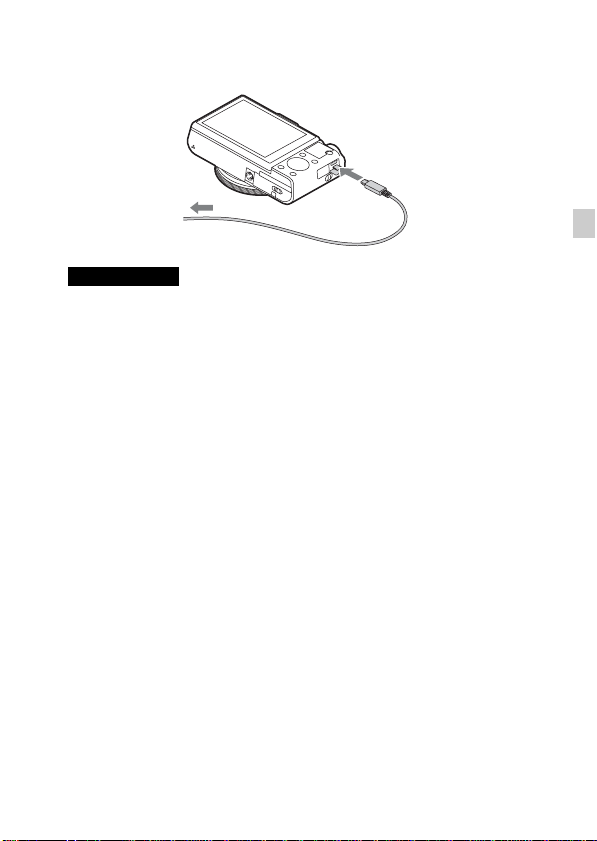
x
連接到電腦上充電
用微型USB電纜將相機連接到電腦,便可以為電池充電。
至USB插孔
附註
• 經由電腦充電時,請注意下列幾點:
– 如果相機是連接在沒有連接電源的膝上型電腦,電腦的電池電量會降低。
請不要長時間充電。
– 在相機與電腦之間建立USB連接時,不要開/關或重新啟動電腦,或者是將
電腦從休眠模式中喚醒。相機可能會造成故障。開/關電腦或重新啟動電
腦,或者喚醒休眠模式中的電腦之前,要中斷相機與電腦的連接。
– 對於自行組裝的電腦或修改過的電腦,不保證能夠充電。
CT
CT
11
Page 48

x
電池使用時間以及可以記錄與播放的影像數目
電池使用時間 影像數目
拍攝 (靜態影像) 約175分鐘 約350個影像
一般動態影像拍攝 約45分鐘 —
連續動態影像拍攝 約80分鐘 —
檢視 (靜態影像) 約250分鐘 約5000個影像
附註
• 上述影像數目適用於電池充滿電的情況。視使用情況而定,影像的數目可
能會減少。
• 可以記錄的影像數目是在下列情況下拍攝的:
– 使用Sony “Memory Stick PRO Duo” (Mark2) (另售)
– 在環境溫度為25℃時使用電池。
• “拍攝 (靜態影像)”的數目以CIPA標準為根據,在下列情況下進行拍攝:
(CIPA: Camera & Imaging Products Association)
– DISP設定為[顯示所有資訊]。
– 每30秒鐘拍一張。
– 變焦在W和T端交替轉換。
– 每拍攝兩次閃光燈閃光一次。
– 每拍攝十次打開和關閉電源一次。
• 動態影像拍攝分鐘數以CIPA標準為根據,在下列情況下進行拍攝:
– 錄製設定: 60i 17M(FH)/50i 17M(FH)
– 一般動態影像拍攝:反覆開始/停止拍攝、變焦、開/關電源等條件下的電
池使用時間
– 連續動態影像拍攝:以不中斷拍攝直到達到上限 (29分鐘)後再度按下
MOVIE按鈕繼續拍攝為根據的電池使用時間。不操作其他功能,如縮放。
12
CT
Page 49
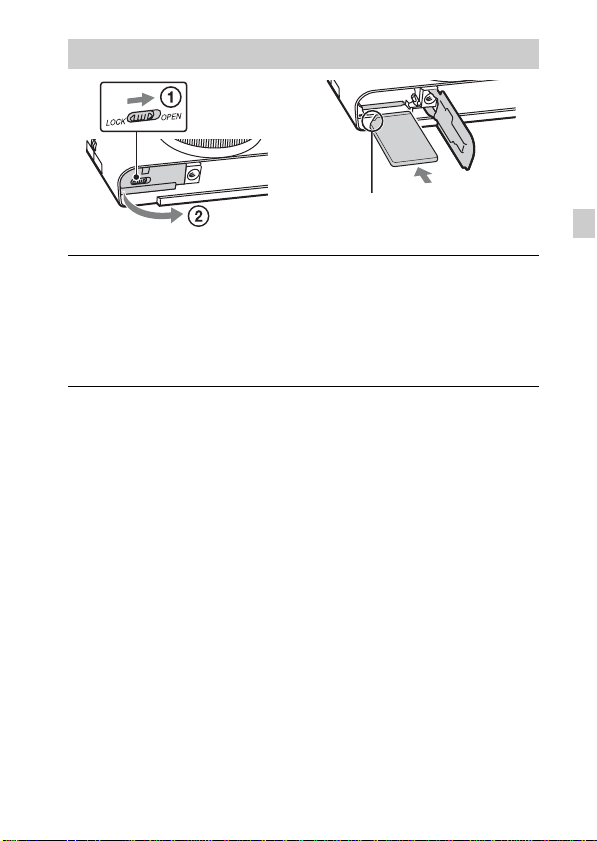
插入記憶卡 (另售)
確認缺角那頭朝向正確的方
向。
打開蓋子。
1
插入記憶卡 (另售)。
2
• 缺角那頭朝向圖示方向,將記憶卡插入到卡入定位為止。
關上蓋子。
3
CT
CT
13
Page 50
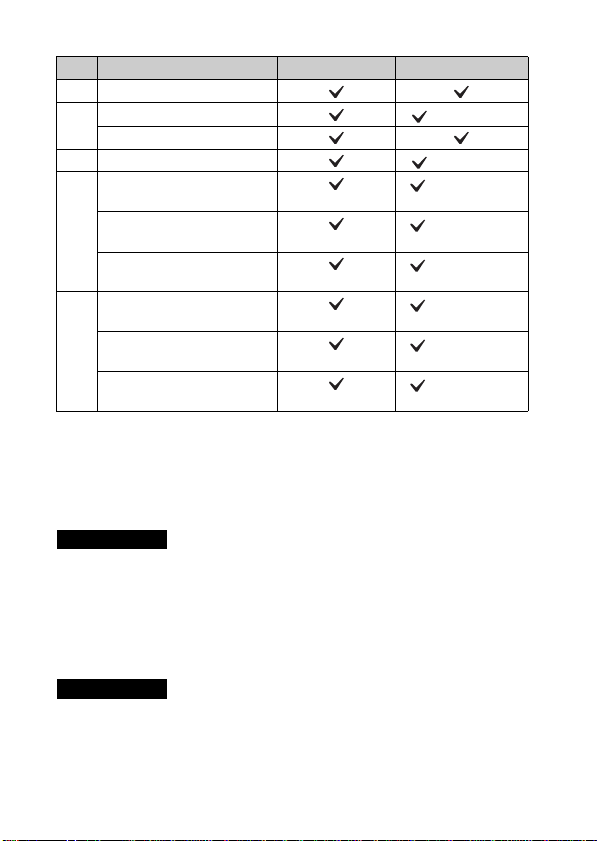
x
可以使用的記憶卡
記憶卡 適用於靜態影像 適用於動態影像
A Memory Stick XC-HG Duo
Memory Stick PRO Duo (僅限Mark2)
B
Memory Stick PRO-HG Duo
C Memory Stick Micro (M2) (僅限Mark2)
SD記憶卡 (等級4或者更
SDHC記憶卡 (等級4或者更
D
SDXC記憶卡 (等級4或者更
microSD記憶卡 (等級4或者更
microSDHC記憶卡 (等級4或者更
E
microSDXC記憶卡 (等級4或者更
• 在本說明書中,表中的產品統稱如下:
A:“Memory Stick XC Duo”
B:“Memory Stick PRO Duo”
C:“Memory Stick Micro”
D:SD卡
E:microSD記憶卡
附註
• 以本相機使用 “Memory Stick Micro”或microSD記憶卡時,務必要使用適
當的轉接卡。
x
若要取出記憶卡/電池
快)
快)
快)
快)
快)
快)
記憶卡:將記憶卡往裡壓一下以退出記憶卡。
電池:推動電池退出桿。小心不要讓電池掉落地上。
附註
• 存取指示燈 (第6頁)點亮時切勿取出記憶卡/電池。這樣可能會對記憶卡
中的資料造成損壞。
14
CT
Page 51
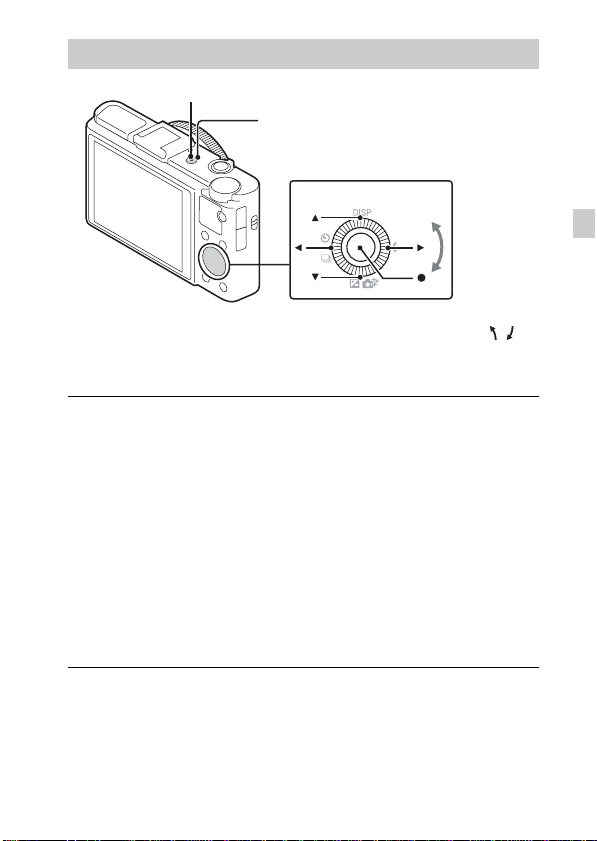
設定時鐘
ON/OFF (電源)
電源/充電指示燈 (綠色)
控制輪
選擇項目:b/B
設定日期與時間的數值:v/V//
z
設定:
按ON/OFF (電源)按鈕。
1
日期與時間設定會在您首次開機時顯示出來。
• 可能需要一點時間才能開啟電源並進行操作。
確認已在畫面上選擇[進入],然後按控制輪上的 z。
2
按照螢幕上的指示選擇一個您要的地理位置,然後
3
按 z。
設定[日光節約時間:]、日期和[日期格式:],然後
4
按 z。
• 午夜會顯示為12:00 AM,而正午則是12:00 PM。
確認已選擇[進入],然後按 z。
5
CT
CT
15
Page 52
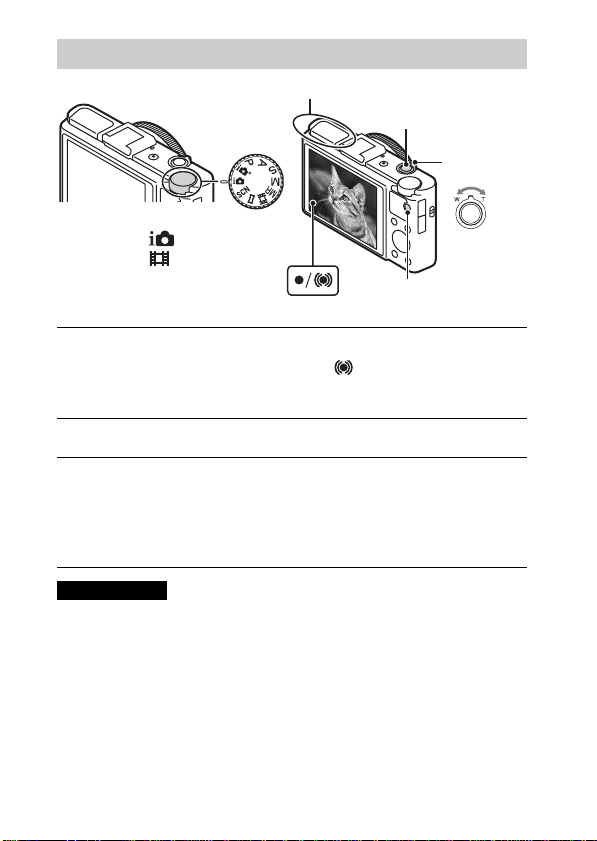
拍攝靜態影像/動態影像
請不要蓋住閃光燈。
快門按鈕
W/T (變
焦)桿
模式轉盤
: 智慧式自動
: 動態影像
拍攝靜態影像
將快門按鈕按下一半以便對焦。
1
影像合焦時,會發出嗶聲,而且 z 或 指示會點亮。
將快門按鈕完全按下去以拍攝影像。
2
拍攝動態影像
按下MOVIE (動態影像)按鈕開始記錄。
1
• 用W/T (變焦)桿變更變焦比率。
• 繼續記錄動態影像的同時按快門按鈕拍攝靜態影像。
再度按下MOVIE按鈕停止記錄。
2
附註
• 請勿以手動方式拉起閃光燈。這樣可能會導致故障。
• 拍攝動態影像時,相機的運作聲音會在使用變焦功能時被記錄下來。動態
影像記錄完成時,MOVIE按鈕的運作聲音也可能會被記錄下來。
• 在25℃左右的溫度下,以相機的預設設定拍攝時,一次可以連續拍攝大約
29分鐘。動態影像記錄完成時,可以再按一下MOVIE按鈕以重新開始記錄。
視環境溫度而定,記錄可能會停止以保護相機。
W:縮小
T:放大
MOVIE
16
CT
Page 53
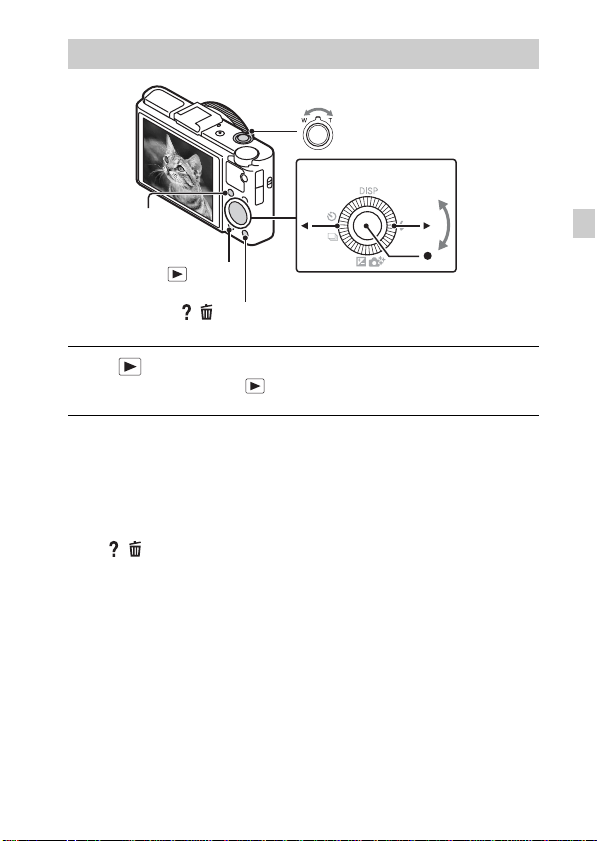
觀看影像
W:縮小
T:放大
控制輪
Fn (功能)
(播放)
/ (刪除)
按 (播放)按鈕。
1
• 您可以選擇 MENU t 1 t [靜態 / 動態影像選擇] 以在靜態影
像和動態影像之間切換顯示模式。
x
選擇下一個/上一個影像
按控制輪上的 B (下一個)/b (上一個)或者轉動控制輪,以選擇一
個影像。按控制輪中央的 z 以檢視動態影像。
x
刪除影像
1 按 / (刪除)按鈕。
2 用控制輪上的 v 選擇[刪除],然後按 z。
x
旋轉影像
按Fn (功能)按鈕。
x
恢復拍攝影像
將快門按鈕按下一半。
選擇影像:B (下一個)/b (上一
個)或者轉動控制輪
設定:z
CT
CT
17
Page 54
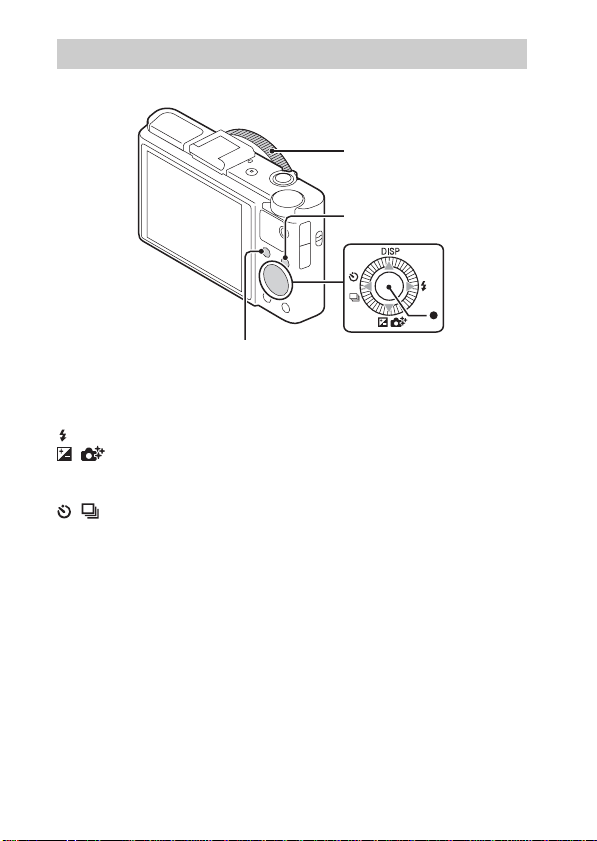
其他功能簡介
其他功能可以用控制輪、MENU按鈕等操作。
控制環
MENU
Fn (功能)
x
控制輪
DISP (顯示內容):讓您變更螢幕顯示。
(閃光燈模式):讓您選擇靜態影像的閃光燈模式。
/ (曝光補償/相片創造):讓您調整影像亮度。讓您在拍攝模式
設定為[智慧式自動]或[高級自動]時,變更[背景離焦]、[亮度]、[色
彩]、[鮮明]以及[相片效果]。
/ (過片模式):讓您使用自拍定時器和連拍模式。
z (追蹤對焦):相機會追蹤被攝體,即使被攝體移動,也會自動調整
焦距。
CT
控制輪
18
Page 55
x
Fn (功能)按鈕
讓您註冊七個功能並可在拍攝時調用該些功能。
1 按Fn (功能)按鈕。
2 反覆按下Fn (功能)按鈕或用控制輪上的 b/B 選擇您要的功能。
3 轉動控制輪或控制環以選擇設定值。
x
控制環
喜好的功能可以指定至控制環;拍攝時,只要轉動控制輪就能變更已建
立的設定。
x
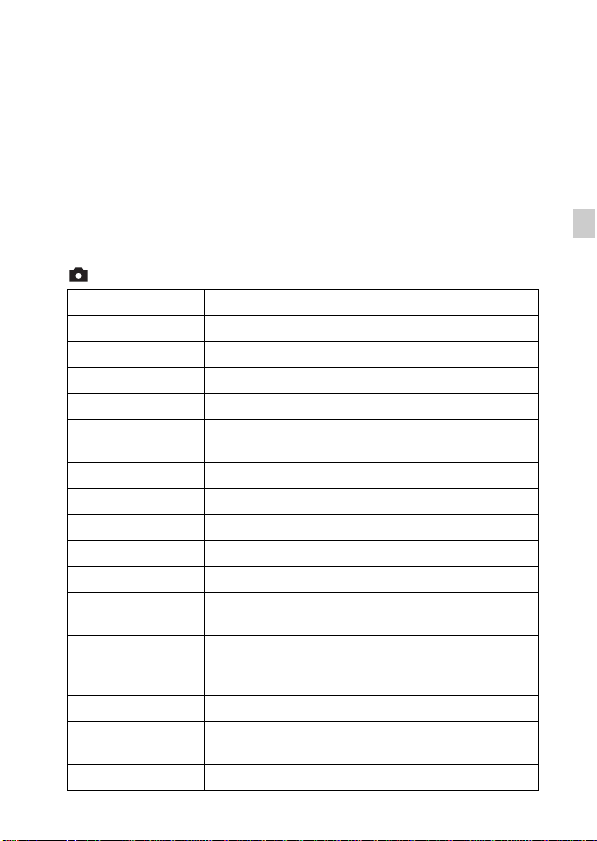
功能表項目
靜態影像拍攝功能表
影像尺寸 選擇靜態影像的尺寸。
長寬比 選擇靜態影像的長寬比。
影像品質 設定靜態影像的畫質。
全景: 影像尺寸 選擇全景影像的尺寸。
全景: 方向 設定全景影像的拍攝方向。
使用智慧型手機控制透過智慧型手機控制相機拍攝靜態影像和動態影
過片模式 設定用於連拍等的過片模式。
閃光燈模式 設定閃光燈設定值。
對焦模式 選擇對焦方法。
自動對焦區域 選擇對焦區域。
柔膚效果 設定美膚效果與效果的等級。
微笑/面孔偵測
自動取景
ISO 調整感光度。
測光模式
閃光補償 調整閃光燈的光線量。
像。
選擇自動偵測面孔並調整各種設定。設定在偵測到
微笑時自動釋放快門。
在拍攝臉部、特寫或使用追蹤對焦功能追蹤的被攝
體時分析場景,然後以更令人印象深刻的構圖自動
裁剪並儲存為影像的另一個拷貝。
選擇測光模式,設定要測量被攝體的哪個部分以決
定曝光值。
CT
CT
19
Page 56
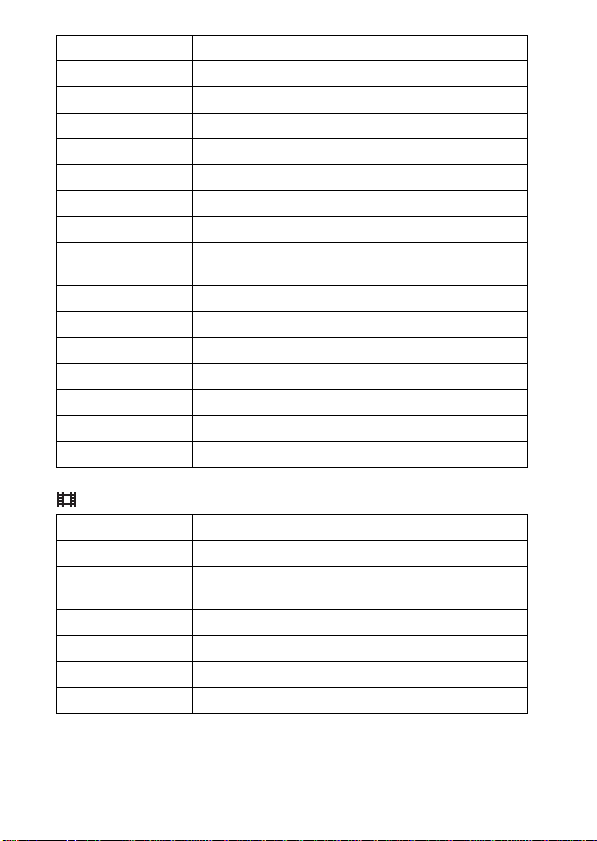
白平衡 調整影像的色調。
DRO/自動 HDR 自動補正亮度和對比度。
風格設定 選擇所需的影像處理方法。
相片效果 選擇想要的效果濾鏡,以呈現更深刻的藝術效果。
清晰影像縮放 提供比數位變焦更高品質的變焦影像。
數位變焦 提供比清晰影像縮放更高放大率的變焦影像。
消除長曝雜訊 設定快門速度為1/3秒或更久時的雜訊消除處理。
高 ISO 雜訊消除 設定高感光度拍攝的雜訊消除處理。
AF 輔助照明
SteadyShot 設定SteadyShot。
色彩空間 變更可再生色彩的範圍。
拍攝祕訣清單 存取所有的拍攝秘訣。
寫入日期 設定是否將拍攝日期記錄在靜態影像上。
場景選擇 選擇預設的設定以便與各種場景條件配合。
記憶回復 選擇模式轉盤設為[記憶回復]時要調用的設定。
記憶 註冊要使用的模式或相機設定。
設定AF照明器,可在黑暗環境中提供光線幫助對焦
物體。
動態影像拍攝功能表
檔案格式 選擇動態影像檔案格式。
錄製設定 選擇記錄動態影像幀的尺寸。
影像尺寸(Dual
Rec)
SteadyShot 設定SteadyShot。
音訊錄製 設定在拍攝動態影像時是否錄音。
減少風噪音 在記錄動態影像時減少風噪音。
動態影像 根據被攝體或效果選擇曝光模式。
設定記錄動態影像時靜態影像的拍攝尺寸。
20
CT
Page 57
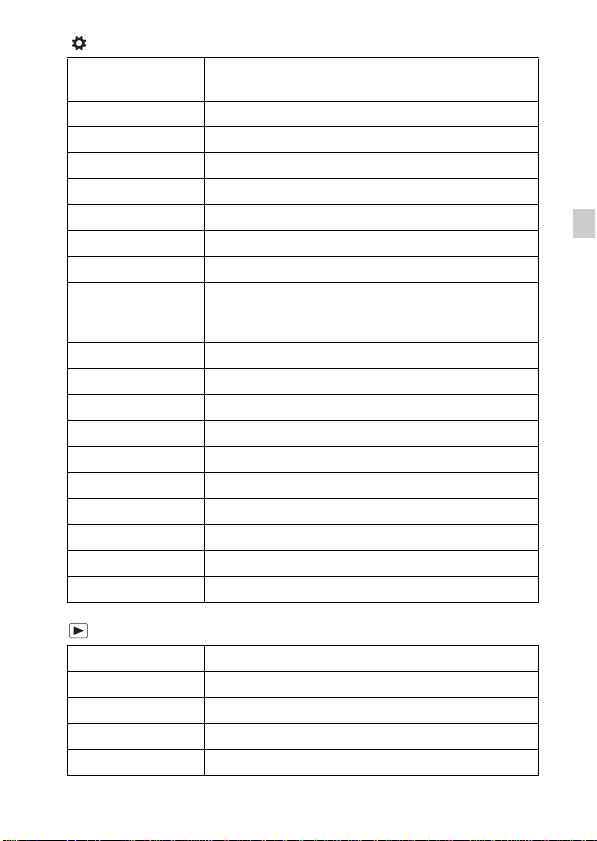
自訂功能表
FINDER/LCD設定
紅眼減弱 減弱使用閃光燈時的紅眼現象。
格線 設定格線顯示,以便對齊結構輪廓。
自動檢視 設定自動檢視以在拍攝後顯示拍攝影像。
DISP按鈕 設定透過按控制輪上的DISP可選擇的螢幕顯示模式。
峰值等級 在手動對焦時用特定顏色強調對焦範圍的輪廓。
峰值顏色 設定用於峰值功能的顏色。
控制環 指定所需的功能到控制環。
控制環的變焦功能
控制環顯示 設定操作控制環時是否顯示動畫。
功能按鈕 自訂按下Fn (功能)按鈕時顯示的功能。
中央按鈕功能 指定所需的功能到中央按鈕。
左側按鈕功能 指定所需的功能到左側按鈕。
右側按鈕功能 指定所需的功能到右側按鈕。
MOVIE按鈕 設定是否永遠啟動MOVIE按鈕。
MF輔助 在手動對焦時顯示放大的影像。
對焦放大時間 設定以放大形式顯示影像的時間長度。
面孔優先追蹤 設定追蹤時是否優先追蹤某個面孔。
面孔登錄 註冊或變更要優先對焦的人臉。
使用電子觀景窗 (另售)時,設定在電子觀景窗與
螢幕之間切換的方法。
設定控制環的變焦功能。
選擇[級數]時,您可以將變焦位置移到固定級數的
焦距。
CT
播放功能表
傳送至智慧型手機
傳送至電腦
在TV上觀看
靜態/動態影像選擇 在靜態影像/動態影像顯示之間切換。
刪除 刪除一個影像。
傳送影像至智慧型手機以便顯示。
請將影像傳送到連接在網路的電腦上備份。
您可以在有網路功能的電視機上觀看影像。
CT
21
Page 58
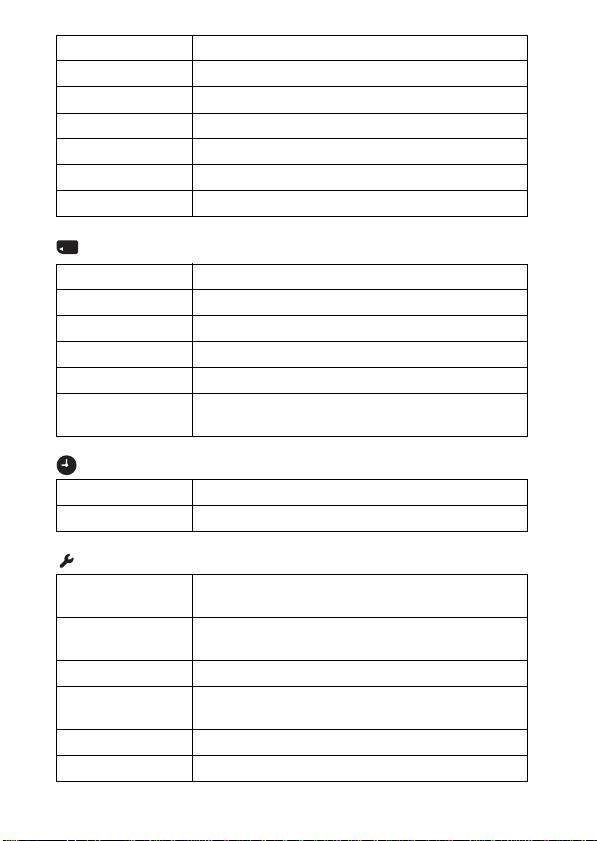
循環播放 顯示循環播放。
影像索引 同時顯示多個影像。
保護 保護影像。
指定列印 為一個靜態影像添加列印預訂標記。
相片效果 在影像上添加各種紋理。
音量設定 調整音量。
播放顯示 設定如何播放縱向拍攝的影像。
記憶卡工具功能表
格式化 格式化記憶卡。
檔案編號 為靜態影像與動態影像設定指定檔案號碼的方法。
選擇REC資料夾 改變儲存影像的所選資料夾。
新資料夾 建立新資料夾以儲存靜態影像與動態影像 (MP4)。
還原影像資料庫 還原影像資料庫檔案,並啟動錄製與播放。
顯示記憶卡空間
顯示記憶卡中可以記錄的動態影像時間和靜態影像
的數目。
時鐘設定功能表
日期/時間設定 設定日期與時間以及日光節約。
區域設定 設定使用位置。
設定功能表
選單開始位置
模式轉盤指南
LCD亮度 設定螢幕亮度。
觀景窗亮度
省電 設定省電功能的等級。
CT
省電開始時間 設定相機自動關閉之前的等待時間長度。
將功能表的游標預設位置設定為最頂部的項目或上
次選擇的項目。
開啟或關閉模式轉盤指南 (各個拍攝模式的說
明)。
使用電子觀景窗 (另售)時,設定電子觀景窗的亮
度。
22
Page 59

PAL/NTSC選擇器
(僅限1080 50i相
藉由變更裝置的電視格式,即可以不同的動態影像
格式來拍攝。
容機型)
1
上傳的設定
*
設定使用Eye-Fi卡時相機的上傳功能。
HDMI解析度 設定相機連接至HDMI電視機時的解析度。
HDMI控制 從支援 “BRAVIA”Sync的電視機操作相機。
USB連線 設定USB連線方法。
USB LUN設定 透過限制USB連線功能來改善相容性。
USB電源供給 設定是否透過USB連線供電。
音頻訊號 設定相機的運作聲音。
WPS按鍵 按一下WPS按鈕即可輕鬆在相機上註冊存取點。
存取點手動設定 您可以手動註冊存取點。
編輯裝置名稱 您可以變更Wi-Fi Direct等底下的裝置名稱。
顯示MAC地址 顯示相機的MAC位址。
SSID/密碼重設 重設智慧型手機連線的SSID和密碼。
飛航模式 您可以將此裝置設定為不進行無線通訊。
版本 顯示相機軟體版本。
語言 選擇語言。
跌落傳感器 設定[跌落傳感器]功能。
示範模式 設定開啟或關閉動態影像播放示範。
初始化 將設定還原成其預設值。
*1
在相機中插入Eye-Fi卡 (另售)時出現。
CT
CT
23
Page 60
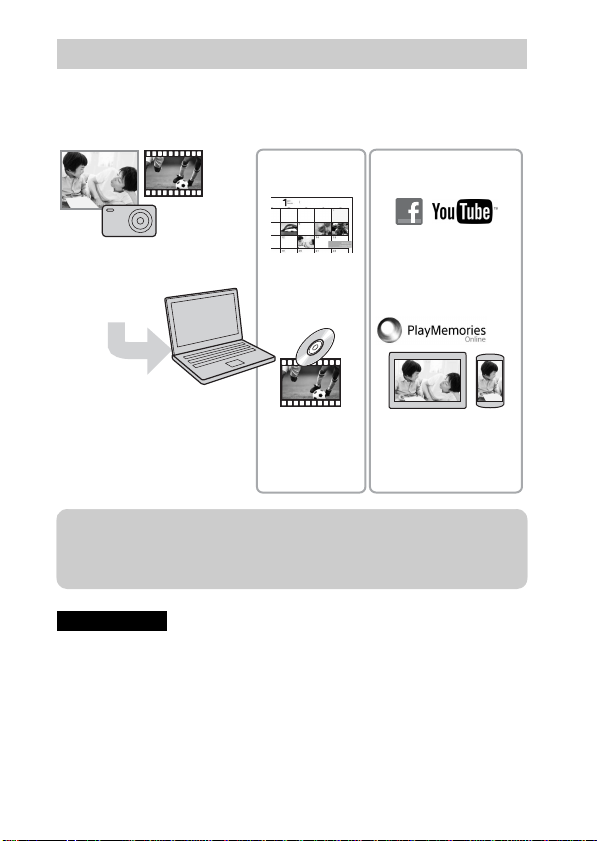
“PlayMemories Home”的功能
“PlayMemories Home”軟體可以讓您將靜態影像與動態影像匯入電腦並
加以使用。必須要有 “PlayMemories Home”才能將AVCHD動態影像匯入
電腦。
分享影像
將影像上載至網路服
務
在 “PlayMemories
Online”分享影像
從相機匯入影像
組織
在日曆上觀看影
像
創建動態影像光
碟
z 下載 “PlayMemories Home”(僅限Windows)
您可以從以下URL下載 “PlayMemories Home”:
www.sony.net/pm
附註
• 必須連線至網際網路才能安裝 “PlayMemories Home”。
• 必須連線至網際網路才能使用 “PlayMemories Online”或其他網路服務。
有些國家或地區可能沒有提供 “PlayMemories Online”或其他網路服務。
• “PlayMemories Home”與Mac不相容。請使用Mac上安裝的應用程式。詳情
請造訪以下URL:http://www.sony.co.jp/imsoft/Mac/
24
CT
Page 61
x
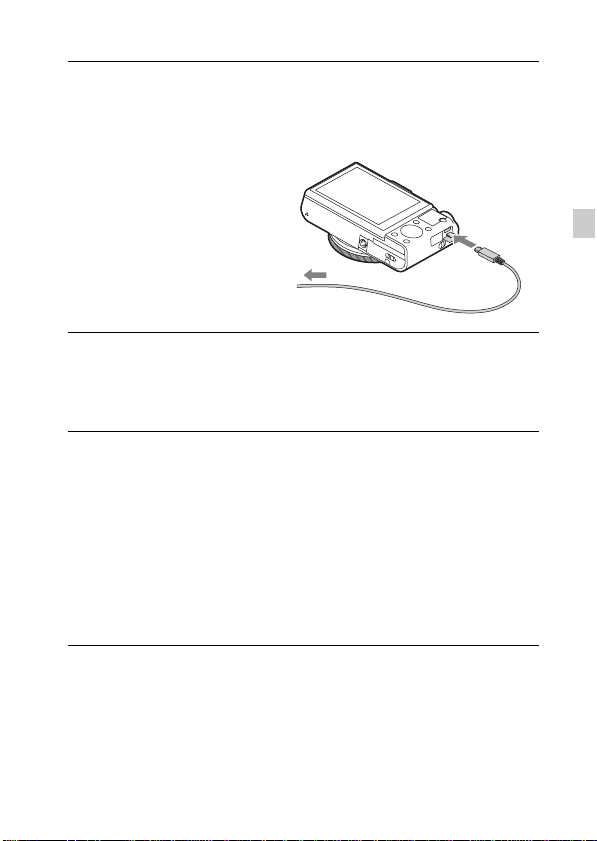
在電腦上安裝 “PlayMemories Home”
使用電腦的網際網路瀏覽器,進入以下URL,然後按一下
1
[安裝] t [執行]。
www.sony.net/pm
按照畫面上的指示完成
2
安裝。
• 顯示將相機連接到電腦的訊
息時,用微型USB電纜 (附
件)連接相機與電腦。
至USB插孔
x
觀看 “PlayMemories Home 說明指南”
關於如何使用 “PlayMemories Home”的詳情,請參閱 “PlayMemories
Home 說明指南”。
按兩下桌面上的[PlayMemories Home 說明指南]圖示。
1
• 若要從開始功能表存取 “PlayMemories Home 說明指南”:按一
下[開始] t [所有程式] t [PlayMemories Home] t
[PlayMemories Home 說明指南]。
• 如果使用Windows 8,在開始畫面上選擇[PlayMemories Home]圖
示以啟動[PlayMemories Home],然後從[說明]功能表選擇
[PlayMemories Home 說明指南]。
• 關於 “PlayMemories Home”的詳情,您也可以參閱 “Cyber-shot 使
用者指南”(第2頁)或以下PlayMemories Home支援網頁 (只有英
文):
http://www.sony.co.jp/pmh-se/
至多功能端
子
CT
CT
25
Page 62

“Image Data Converter”的功能
以下是使用 “Image Data Converter”時的可用功能範例。
• 您可以用色調曲線或銳利度等多種校正功能編輯RAW影像。
• 您可以用白平衡、光圈和風格設定等調整影像。
• 您可以將顯示和編輯的靜態影像儲存到電腦上。
有兩種儲存RAW影像的方式:保持RAW格式儲存影像資料,或儲存為一
般檔案格式。
• 您可以顯示和對比本相機拍攝的RAW影像/JPEG影像。
• 您可以使用五種等級來分級影像。
• 您可以設定色彩標籤。
x
安裝 “Image Data Converter”
從下列URL下載軟體並將其安裝在電腦上。
1
Windows: http://www.sony.co.jp/imsoft/Win/
Mac: http://www.sony.co.jp/imsoft/Mac/
x
觀看 “Image Data Converter指南”
關於如何使用“Image Data Converter”的詳情,請參閱“Image Data
Converter指南”。
如果使用Windows:
1
按一下[開始] t [所有程式] t [Image Data
Converter] t [說明] t [Image Data Converter
Ver.4]。
如果使用Mac:
啟動Finder t [應用程式] t [Image Data Converter]
t [Image Data Converter Ver.4] t 在功能表列中選擇
“說明” t “Image Data Converter指南”。
• 如果使用Windows 8,啟動 “Image Data Converter Ver.4” t
在功能表列中選擇 “說明” t “Image Data Converter指南”。
• 關於 “Image Data Converter”的詳情,您也可以參閱 “Cyber-
shot 使用者指南”(第2頁)或以下 “Image Data Converter”
支援網頁 (只有英文):
http://www.sony.co.jp/ids-se/
26
CT
Page 63
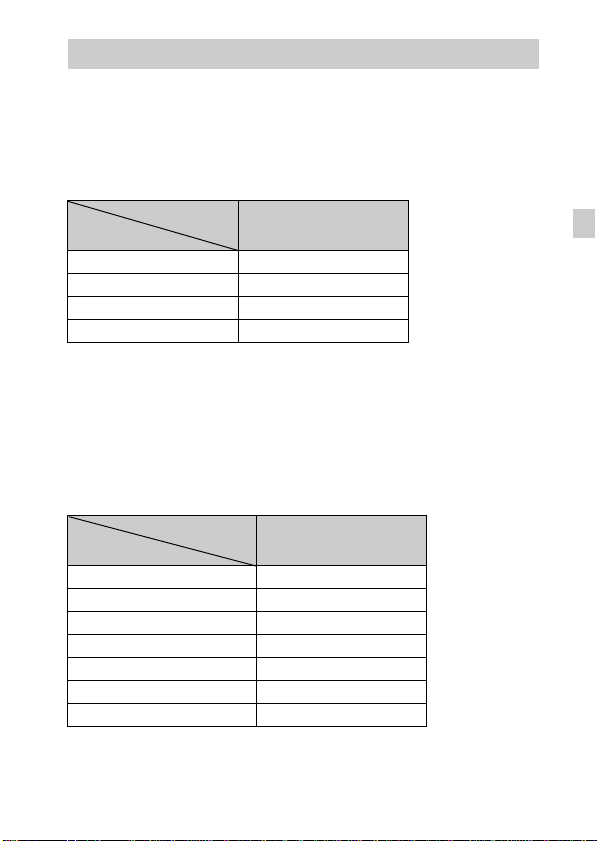
靜態影像的數目和可以記錄的動態影像時間
靜態影像的數目和可以記錄的動態影像時間可能會因為拍攝條件和記憶
卡而異。
x
靜態影像
影像尺寸:L: 20M
當[長寬比]設為[3:2]時*
容量
影像品質
標準 295個影像
精細 170個影像
RAW與JPEG 58個影像
RAW 88個影像
* [長寬比]未設定為[3:2]時,可以記錄比上列更多的影像。(當[影像品質]
設為[RAW]時除外。)
x
動態影像
下表顯示的是大略的最長記錄時間。這些是所有動態影像檔案的總時
間。可以持續拍攝約29分鐘 (產品規格限制)。MP4 (12M)格式動態影
像的最長連續記錄時間約15分鐘 (受到2 GB檔案大小限制)。
(h (時),m (分))
容量
錄製設定
60i 24M(FX)/50i 24M(FX) 10 m
60i 17M(FH)/50i 17M(FH) 10 m
60p 28M(PS)/50p 28M(PS) 9 m
24p 24M(FX)/25p 24M(FX) 10 m
24p 17M(FH)/25p 17M(FH) 10 m
1440×1080 12M 15 m
VGA 3M 1 h 10 m
2 GB
2 GB
CT
CT
27
Page 64

• 動態影像可以記錄的時間會因為相機配備有可以根據拍攝場景而自動調整
畫質的VBR (Variable Bit-Rate)而有所不同。記錄快速移動的被攝體
時,影像會比較清晰,但是可以記錄的時間會比較短,因為需要更多記憶
體來記錄。
可以記錄的時間也會因為拍攝條件、被攝體或者畫質/尺寸的設定而有所不
同。
使用相機的注意事項
本相機內建的功能
• 本說明書描述1080 60i相容裝置與1080 50i相容裝置。
若要查看您的相機是否是1080 60i相容裝置或1080 50i相容裝置,請查看
相機底部的下列標誌。
1080 60i相容裝置:60i
1080 50i相容裝置:50i
• 本相機與1080 60p或50p格式動態影像相容。與到目前為止都是以隔行掃描
法記錄的標準記錄模式不同的是,本相機是以逐行掃描法記錄。這樣可以
增加解析度,提供更順暢、更真實的影像。
關於使用和維護
對於產品要避免粗暴的使用、拆解、修改、實體衝擊或者敲打、跌落或踐踏
之類的撞擊。對於鏡頭要特別小心。
關於記錄/播放的注意事項
• 開始拍攝之前,要進行試拍,以確定相機能正確的運作。
• 本相機不防塵、不防潑濺、也不防水。
• 避免讓相機接觸到水。如果有水進入相機內,可能會發生故障。在某些情
況下,相機無法修復。
• 請勿用相機朝向太陽或其它強光。那樣可能會令您的相機故障。
• 如果有濕氣凝結,要在使用相機之前將其清除。
• 請勿搖晃或撞擊本相機。那樣可能會造成故障,您可能無法記錄影像。而
且,記錄媒體可能變成無法使用,或者影像資料可能受損。
請勿在下列地方使用/存放相機
• 在非常炎熱、寒冷或潮濕的地方
例如,在停在太陽底下的車廂中,相機機身可能變形而造成故障。
• 存放在陽光直射或者靠近發熱器的地方
相機機身可能褪色或變形,而這可能會造成故障。
• 在會受到搖擺振動的地方
• 靠近會產生強烈無線電波、發出輻射或者強烈磁性的地方。否則相機可能
無法正確地記錄或播放影像。
• 在多沙或多灰塵的地方
小心不要讓沙子或灰塵進入相機中。否則可能會造成相機故障,有時候這
種故障是無法修理的。
CT
28
Page 65

攜帶時
不要在相機放置於褲子或裙子的後面口袋中時坐在椅子或其他地方,因為這
樣可能會造成故障或者損害相機。
Carl Zeiss鏡頭
本相機配備有Carl Zeiss鏡頭,能以優越的對比再生清晰的影像。本相機的
鏡頭是根據德國Carl Zeiss的品質標準,在經過Carl Zeiss認證的品質保證
系統底下生產的。
關於螢幕的注意事項
螢幕利用極高精確度技術製造,所以99.99%以上的像素都可以有效的使用。
不過,您可能會發現細小的黑點和/或亮點 (白色、紅色、藍色或綠色)出
現在螢幕上。這些點是生產過程中的正常結果,不會影響記錄。
關於閃光燈的注意事項
• 請不要以抓住閃光燈的方式拿相機,或者是對閃光燈施加太大的力量。
• 如果水、灰塵或沙子進入開啟的閃光燈,可能會造成故障。
關於相機的溫度
您的相機和電池可能因為持續使用而變熱,但是這並不是故障。
關於過熱保護
您可能無法記錄動態影像,或者電源可能會自動關閉以保護相機,這點要視
相機和電池溫度而定。
螢幕上會出現一個訊息,然後電源會關閉,或者您無法再記錄動態影像。遇
到這種情況時,將電源關閉,等到相機與電池溫度下降為止。如果不讓相機
與電池溫度降得夠低就開啟電源,電源可能會再度關閉或者可能會無法記錄
動態影像。
關於為電池充電
如果為很久沒用的電池充電,可能無法將其充到適當的容量。
這是因為電池特性的緣故,並不是故障。請再為電池充電。
版權警告
電視節目、影片、錄影帶及其它資料可能具有版權。未經許可錄製這些資料
將會觸犯版權法。
對於損壞的內容或記錄失敗不補償
對於因為相機或記錄媒體等的故障而造成的記錄失敗或記錄內容遺失或損
壞,Sony不能補償。
清潔相機表面
用沾了一點水的軟布清潔相機表面,然後以乾布擦拭表面。若要防止傷害表
面塗層或外殼:
– 請不要讓相機接觸化學產品如稀釋劑、揮發油、酒精、用過即丟的清潔布、
驅蟲劑、遮光劑或殺蟲劑。
CT
CT
29
Page 66

保養螢幕
• 如果護手霜或保濕霜殘留在螢幕上,塗層可能會分解。如果沾染到螢幕,
請立即擦掉。
• 用面紙或其他物品大力擦拭可能損壞塗層。
• 如果指印或碎屑黏在螢幕上,建議您輕輕去除碎屑,然後用軟布將螢幕擦
拭乾淨。
關於無線LAN的注意事項
對於因為遺失或竊盜導致未經授權存取或未經授權使用相機載入的目的地而
造成的任何損害,我們不承擔任何責任。
關於丟棄/轉讓相機的注意事項
為了保護個人資料,丟棄或轉讓相機時請執行以下操作。
• 執行[初始化] (第23頁)以重設所有相機設定。
• 刪除[面孔登錄] (第21頁)中所有已註冊的人臉。
30
CT
Page 67

規格
相機
[系統]
影像裝置:13.2公釐×8.8公釐
(1.0型)Exmor R CMOS感應器
相機的總像素數:
約2090萬像素
相機的有效像素數:
約2020萬像素
鏡頭:Carl Zeiss Vario-Sonnar
*
T
3.6倍變焦鏡頭
f = 10.4公釐-37.1公釐 (28公
釐-100公釐 (35公釐的底片
機))
F1.8 (W)-F4.9 (T)
拍攝動態影像 (16:9)時:
29公釐-105公釐
拍攝動態影像 (4:3)時:
36公釐-128公釐
*1
當[SteadyShot]設為[標準]時
SteadyShot:光學
曝光控制:自動曝光、光圈優先、
快門速度優先、手動曝光、場景
選擇
白平衡:自動、日光、陰影、陰天、
白熾燈、螢光燈 (暖白色/冷白
色/白天白光/日光)、閃光燈、
色溫/彩色濾鏡、自訂
檔案格式:
靜態影像:符合JPEG (DCF、
Exif、MPF Baseline)標準、
RAW (Sony ARW 2.3格式)、相
容於DPOF
動態影像 (AVCHD格式):
相容於AVCHD格式Ver. 2.0
視訊:MPEG-4 AVC/H.264
音訊:Dolby Digital 2聲道,
配備Dolby Digital Stereo
Creator
• 由Dolby Laboratories授權製
造。
*1
*1
動態影像 (MP4格式):
視訊:MPEG-4 AVC/H.264
音訊:MPEG-4 AAC-LC 2聲道
記錄媒體:“Memory Stick XC
Duo”、“Memory Stick PRO
Duo”、“Memory Stick
Micro”、SD卡、microSD記憶卡
閃光燈:閃光範圍 (ISO感光度
(建議的曝光指數)設定為自
動):
約0.3公尺至15.0公尺 (W)
約0.55公尺至5.7公尺 (T)
[輸入和輸出接頭]
HDMI接頭:HDMI微型插孔
多功能端子*:USB通訊
USB通訊:Hi-Speed USB
(USB 2.0)
* 支援微型USB相容裝置。
[螢幕]
LCD螢幕:
7.5公分 (3.0型)TFT驅動
總點數:1 228 800點
[電源,一般]
電源:充電電池NP-BX1,3.6 V
電源供應器/電源適配器
AC-UB10/UB10B/UB10C/UB10D,
5V
電池消耗量 (進行拍攝時):
約1.5 W
操作溫度:0℃至40℃
存放溫度:-20℃至+60℃
尺寸 (符合CIPA標準):
101.6公釐×58.1公釐×38.3公
釐 (寬/高/長)
質量 (符合CIPA標準)
(包含NP-BX1電池、“Memory
Stick Duo”):約281公克
麥克風:立體聲
CT
CT
31
Page 68

揚聲器:單聲
Exif Print:相容
PRINT Image Matching III:相容
[無線LAN]
支援的標準:IEEE 802.11 b/g/n
頻率:2.4 GHz
支援的安全性通訊協定:
WEP/WPA-PSK/WPA2-PSK
設定方式:WPS (Wi-Fi Protected
Setup)/手動
存取方式:基礎架構模式
NFC:符合NFC Forum Type 3 Tag標
準
電源供應器/電源適配器AC-UB10/
UB10B/UB10C/UB10D
電源要求:AC 100 V至240 V,
50 Hz/60 Hz,70 mA
輸出電壓:DC 5 V,0.5 A
操作溫度:0℃至40℃
存放溫度:-20℃至+60℃
尺寸:
約50公釐×22公釐×54公釐
(寬/高/長)
質量:
美國與加拿大:約48公克
美國與加拿大以外的國家與地
區:約43公克
充電電池NP-BX1
使用的電池:鋰離子電池
最大電壓:DC 4.2 V
額定電壓:DC 3.6 V
最大充電電壓:DC 4.2 V
最大充電電流:1.89 A
容量:4.5 Wh (1 240 mAh)
設計及規格如有變更,恕不另行通
知。
CT
32
商標
• 下列標記是Sony Corporation的商
標。
、“Cyber-shot”、
“Memory Stick XC-HG Duo”、
“Memory Stick PRO Duo”、
“Memory Stick PRO-HG Duo”、
“Memory Stick Duo”、“Memory
Stick Micro”
• “AVCHD Progressive”和“AVCHD
Progressive”標誌是Panasonic
Corporation和Sony Corporation
的商標。
• Dolby和雙D符號是Dolby
Laboratories的商標。
• HDMI名稱、HDMI High-Definition
Multimedia Interface名稱和HDMI
標誌是HDMI Licensing LLC在美國
和其他國家的商標或註冊商標。
• Windows是Microsoft Corporation
在美國和/或其他國家的註冊商
標。
• Mac、App Store是Apple Inc.的註
冊商標。
• iOS是Cisco Systems, Inc.和/或
其子公司在美國和其他國家的註冊
商標或商標。
• SDXC標誌是SD-3C, LLC的商標。
• Android、Google Play是Google
Inc.的商標。
• Wi-Fi、Wi-Fi標誌和Wi-Fi
PROTECTED SET-UP是Wi-Fi
Alliance的註冊商標。
• N字標示為NFC Forum, Inc.在美國
和其他國家的商標或註冊商標。
• DLNA和DLNA CERTIFIED是Digital
Living Network Alliance的商
標。
• “ ”和 “PlayStation”是
Sony Computer Entertainment
Inc.的註冊商標。
• Facebook和 “f”標誌是
Facebook, Inc.的商標或註冊商
標。
Page 69
• YouTube和YouTube標誌是Google
Inc.的商標或註冊商標。
• Eye-Fi是Eye-Fi, Inc.的商標。
• 此外,在本說明書中所使用的系統
和產品的名稱通常是他們各自的開
發商或製造商的商標或註冊商標。
但是在本說明書中並未在所有場合
使用™或®標誌。
• 從PlayStation Store (在有這些
店的地方)下載PlayStation 3的
應用程式,可以用您的
PlayStation 3增添更多樂趣。
• 若要使用PlayStation 3專用的應
用程式,必須先下載PlayStation
Network應用程式並且擁有帳號。
在有PlayStation Store的地區可
以取得。
在我們的客戶支援網站可以查
到本產品新增的資訊和常見問
題的答案。
CT
CT
33
Page 70
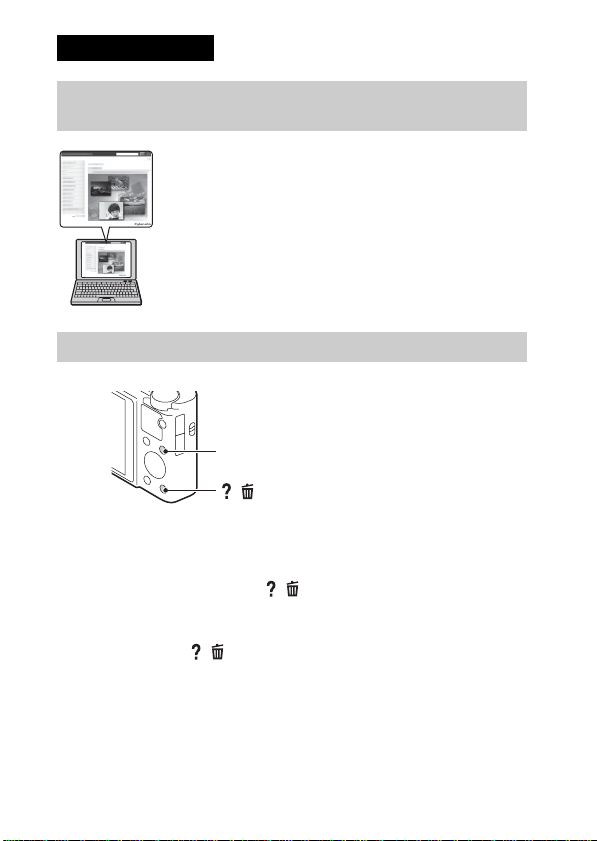
中文 (简体字)
学习更多有关相机的内容 (“Cyber-shot 用户手
册”)
“Cyber-shot 用户手册”是在线手册。有关本相机的多
种功能的更详尽说明,请参阅该手册。
1 访问Sony支持网页。
http://www.sony.net/SonyInfo/Support/
2 选择您的国家或地区。
3 在支持网页内搜索相机的机型名称。
• 查看相机底部的机型名称。
查看功能介绍
本相机具备内置使用介绍。
MENU
/ (相机内功能介绍)
相机内功能介绍
相机会显示MENU项目和设置值的说明。
1 按MENU按钮。
2 选择所需MENU项目,然后按 / (相机内功能介绍)按钮。
拍摄提示
相机会显示所选拍摄模式的拍摄提示。
1 在拍摄模式中按 / (相机内功能介绍)按钮。
2 选择所需的拍摄提示,然后按控制盘上的
即会显示拍摄提示。
• 可以使用 v/V 滚动画面,并使用 b/B 改变拍摄提示。
z。
CS
2
Page 71

警告
为减少发生火灾或触电的危险,请勿让本装置淋雨或受潮。
重要安全说明
-请保存这些危险说明
为减少火灾或电击的危险,请仔细遵照这
些说明操作
小心
[ 电池组
如果电池组使用不当,电池组可能会爆炸,引起火灾,甚至化学灼伤。请遵
守下列注意事项。
• 切勿拆卸。
• 切勿压坏电池组,切勿让电池组受到敲打,跌落或遭到踩踏等外力或震
动。
• 切勿让电池组短路,切勿让金属物与电池端子接触。
• 切勿放在温度超过 60 ℃的高温处,如直射阳光下或停在太阳下的车内。
• 切勿焚烧或丢弃在火中。
• 切勿使用损坏或漏液的锂离子电池。
• 务必用原装的 Sony 充电器或可以给电池组充电的设备给电池组充电。
• 请将电池组放在儿童取不到的地方。
• 请保持电池组干燥。
• 只能用 Sony 建议的相同或同等类型进行更换。
• 请按照指示中的说明立即丢弃用过的电池组。
[ 电源适配器
使用电源适配器时请将它连接到就近的墙壁插座。如果使用设备时发生任何
问题,请立即从墙壁插座上拔下电源适配器。
CS
CS
3
Page 72
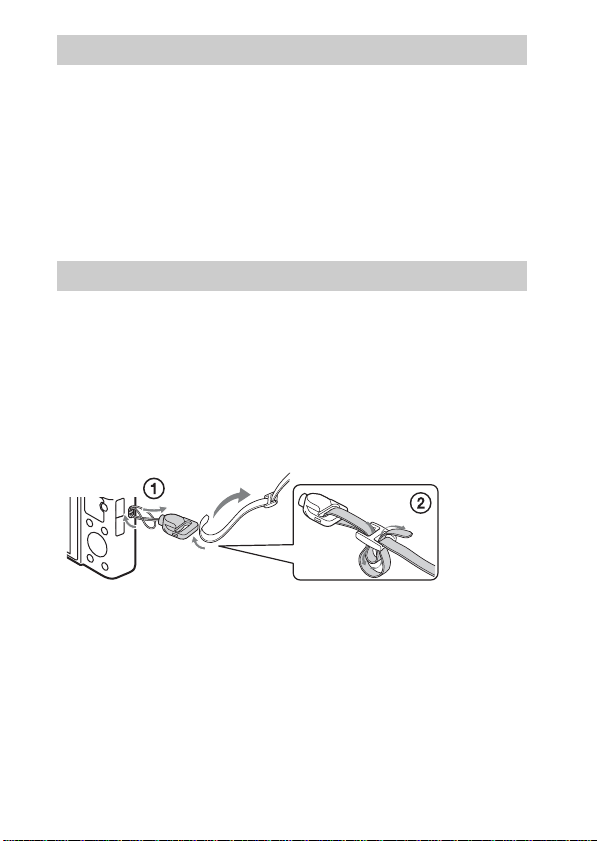
注意
本产品已经过测定并确定符合 EMC 规范中所提出的使用不超过 3 米的连接电
缆的限制。
[ 注意
特定频率的电磁场可能会影响此设备的图像和声音。
[ 通知
如果静电或电磁导致数据传送中断 (失败),请重新启动应用程序或断开连
接,并重新连接通信电缆 (USB 等)。
检查附属品
括号中的数字表示件数。
• 相机 (1)
• 可重复充电电池NP-BX1 (1)
• 微型USB连接线 (1)
• 电源适配器AC-UB10/UB10B/UB10C/UB10D (1)
• 电源线 (美国和加拿大机型未附带本品)(1)
• 腕带 (1)
• 挂件适配器 (2)
(如图所示,挂件适配器可用于安装肩带 (另售)。)
• 使用说明书 (本说明书)(1)
CS
4
Page 73
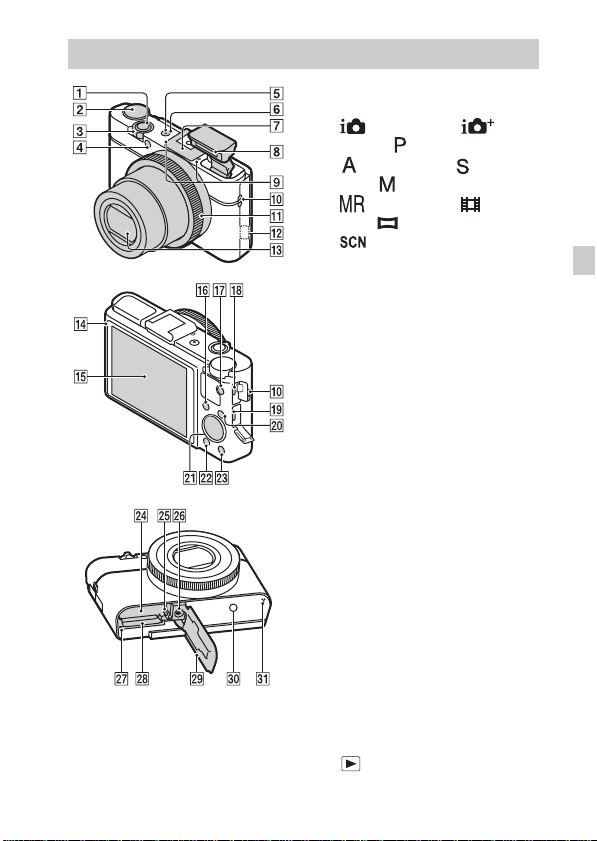
产品检视
A 快门按钮
B 模式转盘
(智能自动)/ (增强
自动)/ (程序自动)/
(光圈优先)/ (快门优
先)/ (手动曝光)/
(调出存储)/ (动态影
像)/ (扫描全景)/
(场景选择)
C 用于拍摄:W/T (变焦)杆
用于观看:索引/播放变焦杆
D 自拍指示灯/笑脸快门指示灯/
AF照明器
E 电源/充电指示灯
F ON/OFF (电源)按钮
G 多接口热靴*
H 闪光灯
• 请勿让手指遮住闪关灯。
• 使用闪光灯时,闪光灯会自动
弹出。如果不使用闪光灯,请
手动将其按下。
I 麦克风
J 挂绳钩
K 控制环
L Wi-Fi感应器 (内置)
M 镜头
N 光线感应器
O LCD液晶屏
P Fn (功能)按钮
Q MOVIE (动态影像)按钮
R 多功能端子
• 支持微型USB兼容设备。
S HDMI微型插孔
T MENU按钮
U 控制盘
V (播放)按钮
CS
CS
5
Page 74

W / (相机内功能介绍/删除)
按钮
X 电池插入槽
Y 电池退出杆
Z 三脚架插孔
• 请使用螺丝长度小于5.5 mm的
三脚架。否则,您无法牢固地
固定相机,并可能会损坏相
机。
wj 存取指示灯
wk 存储卡插槽
wl 电池/存储卡盖
e; (N标记)
• 将相机连接至配备NFC功能的
智能手机时触碰此标记。
• NFC (Near Field
Communication)是一种短距
离无线通信技术的国际标准。
ea 扬声器
* 有关与多接口热靴相兼容配件的详
细说明,请访问Sony网站,或咨询
您的Sony经销商或当地Sony授权服
务机构。您也可以使用与附件插座
兼容的附件。不保证能配合其他制
造商的附件进行操作。
CS
6
Page 75
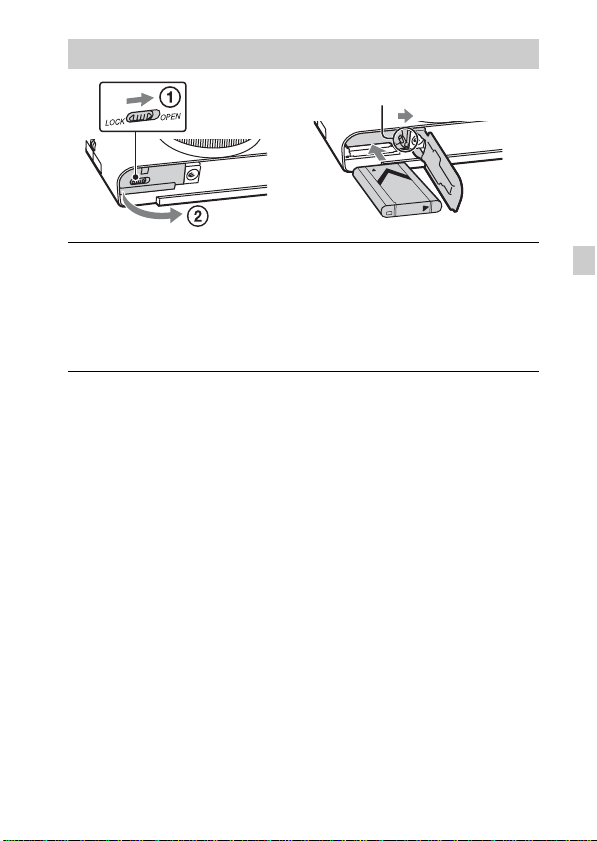
插入电池
电池退出杆
打开盖子。
1
插入电池。
2
• 如图所示,一边按电池退出杆,一边插入电池。插入后确保电池
退出杆锁定到位。
• 如果在未正确插入电池的状态下关闭盖子,可能会损坏相机。
CS
CS
7
Page 76
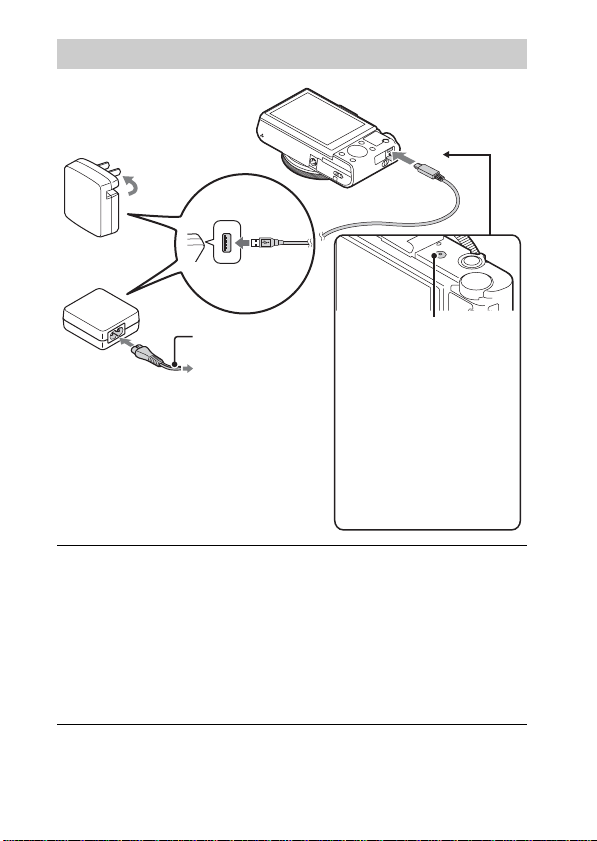
为电池充电
面向美国和加拿大的客户
电源线
面向美国和加拿大以外国家/地区的客
户
用微型USB连接线 (附送)将相机连接到电源适配器
1
电源/充电指示灯
点亮:充电中
熄灭:充电完成
闪烁:
由于相机温度未在合适范
围内,充电错误或暂停
(附送)。
将电源适配器连接到墙壁插座。
2
电源/充电指示灯以橙色点亮,充电开始。
• 在给电池充电时关闭相机电源。
• 即使电池仍然有部分电量,也可以给电池充电。
• 当电源/充电指示灯闪烁并且充电未完成时,取出并重新插入电
池。
CS
8
Page 77

注意
• 如果在电源适配器与墙壁插座连接时相机上的电源/充电指示灯闪烁,表示
由于温度超出推荐范围而充电暂停。当温度回到适于充电的范围时,会恢
复充电。建议您在10℃至30℃的环境温度下给电池充电。
• 如果电池的端子部分肮脏,电池可能无法有效充电。这种情况下,请用软
布或棉棒轻轻擦掉所有灰尘以清洁电池的端子部分。
• 将电源适配器 (附送)连接到最近的墙壁插座。使用电源适配器期间如果
发生故障,请立即从墙壁插座上拔下插头切断电源。
• 充电结束后,从墙壁插座上拔下电源适配器。
• 请务必只使用纯正Sony品牌电池、微型USB连接线 (附送)和电源适配器
(附送)。
• 如果相机通过附送的电源适配器连接到墙壁插座,则拍摄/播放期间无法供
电。若要在拍摄/播放期间对相机供电,请使用AC-UD10 (另售)或AC-UD11
(另售)电源适配器。
• 电源适配器AC-UD11 (另售)在某些国家/地区可能不提供。
x
充电时间 (完全充电)
使用电源适配器 (附送)的充电时间约为230分钟。
注意
• 上述充电时间适用于在25℃下为电量完全耗尽的电池充电。根据使用和环
境条件的不同,充电可能需要更长时间。
CS
CS
9
Page 78
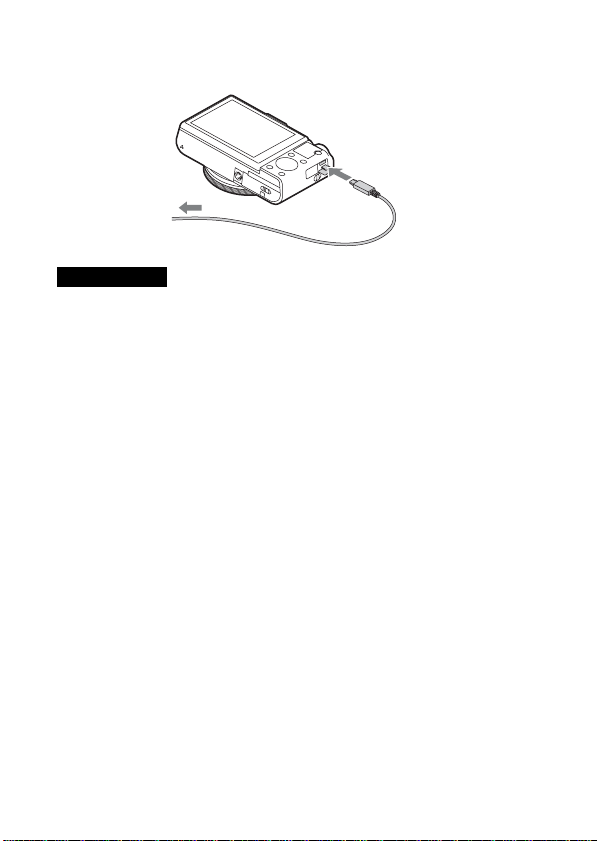
x
通过连接到电脑进行充电
通过使用微型USB连接线将相机连接到电脑,可以给电池充电。
到USB插孔
注意
• 通过电脑充电时,请注意下列各项:
– 如果相机连接到未连接电源的笔记本电脑,笔记本电脑的电池电量会降
低。请不要长时间充电。
– 当电脑和相机之间已经建立了USB连接时,请不要打开/关闭或重新启动电
脑,或从睡眠模式恢复电脑操作。相机可能会发生故障。打开/关闭或重
新启动电脑,或从睡眠模式恢复电脑操作之前,请断开相机和电脑的连
接。
– 对使用自己组装的电脑或经过改造的电脑充电不提供任何保障。
10
CS
Page 79

x
电池使用时间以及可记录和播放的影像数
电池使用时间 影像数
拍摄 (静止影像) 约175分钟 约350个影像
标准动态影像拍摄 约45分钟 —
连续动态影像拍摄 约80分钟 —
观看 (静止影像) 约250分钟 约5000个影像
注意
• 上述影像数是电池充足电时的数值。取决于使用条件,影像数可能会减少。
• 能够记录的影像数是在下列条件下拍摄时的数值:
– 使用Sony “Memory Stick PRO Duo” (Mark2) (另售)
– 在25℃的环境温度下使用电池。
• “拍摄 (静止影像)”数基于CIPA标准,是在下列条件下拍摄时的数值:
(CIPA: Camera & Imaging Products Association)
– DISP设定为[显示全部信息]。
– 每隔30秒拍一张。
– 变焦在W端和T端之间交替转换。
– 每拍摄两次闪光灯闪光一次。
– 每拍摄十次打开和关闭电源一次。
• 动态影像拍摄的分钟数基于CIPA标准,适用于在下列条件下拍摄:
– 记录设置:60i 17M(FH)/50i 17M(FH)
– 标准动态影像拍摄:电池使用时间取决于反复开始/停止拍摄、变焦、打
开/关闭电源等情况。
– 连续动态影像拍摄:电池使用时间取决于不间断拍摄直至上限 (29分钟)
后再按MOVIE按钮继续拍摄的情况。未运行其它功能,如变焦。
CS
CS
11
Page 80
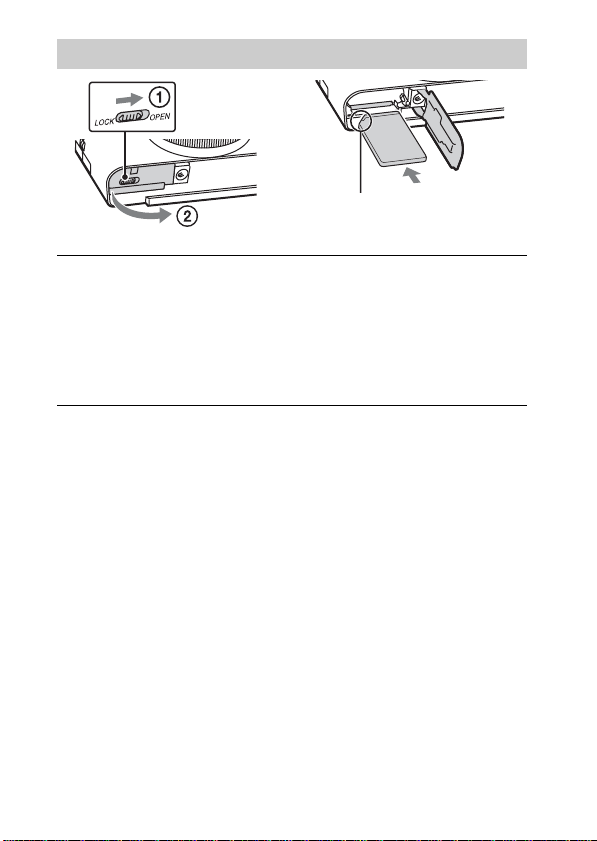
插入存储卡 (另售)
确保让缺口角朝向正确的方
向。
打开盖子。
1
插入存储卡 (另售)。
2
• 令有缺口的一侧朝向图示方向,将存储卡插入到位直到发出咔嚓
声。
关闭盖子。
3
12
CS
Page 81
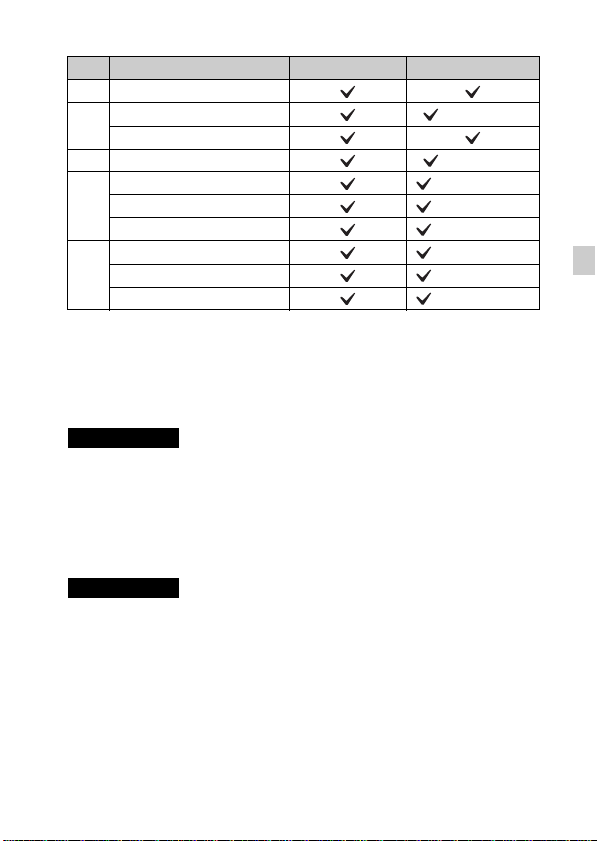
x
能够使用的存储卡
存储卡 对于静止影像 对于动态影像
A Memory Stick XC-HG Duo
Memory Stick PRO Duo (仅限Mark2)
B
Memory Stick PRO-HG Duo
C Memory Stick Micro (M2) (仅限Mark2)
SD存储卡 (级别4或更快)
D
SDHC存储卡 (级别4或更快)
SDXC存储卡 (级别4或更快)
microSD存储卡 (级别4或更快)
E
microSDHC存储卡 (级别4或更快)
microSDXC存储卡 (级别4或更快)
• 在本手册中,表中的产品统称如下:
A:“Memory Stick XC Duo”
B:“Memory Stick PRO Duo”
C:“Memory Stick Micro”
D:SD卡
E:microSD存储卡
注意
• 在相机中使用 “Memory Stick Micro”或microSD存储卡时,请务必使用合
适的适配器。
x
要取出存储卡/电池时
存储卡:向里按一次存储卡以退出存储卡。
电池:滑动电池退出杆。请小心不要让电池掉落。
注意
• 当存取指示灯 (第5页)点亮时,切勿取出存储卡/电池。这可能会导致存
储卡上的数据损坏。
CS
CS
13
Page 82
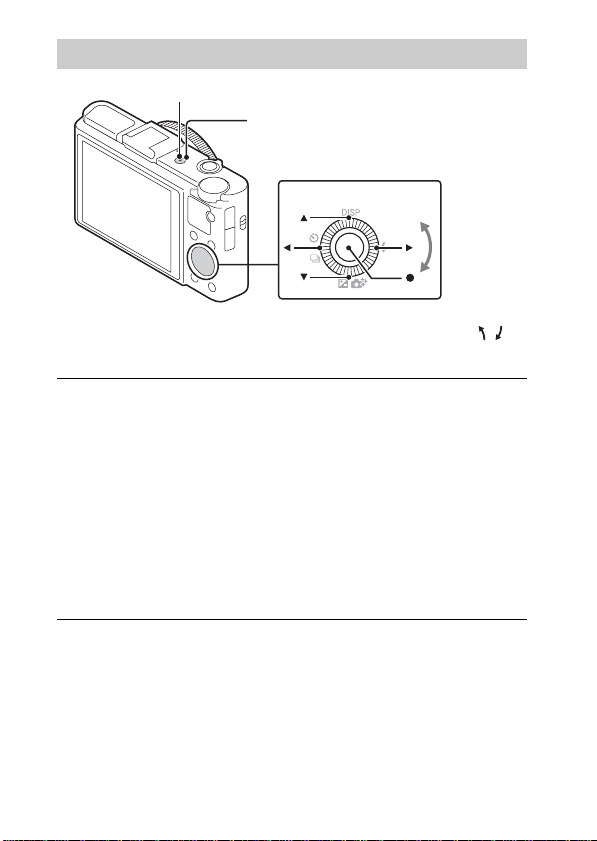
设置时钟
ON/OFF (电源)
电源/充电指示灯 (绿色)
控制盘
选择项目:b/B
设定日期和时间的数值:v/V//
z
设定:
按ON/OFF (电源)按钮。
1
第一次接通相机电源时,会显示日期和时间设置。
• 开启电源并进入可正常操作状态的过程需要消耗一些时间。
确认在屏幕上已选择[确定],然后按控制盘上的 z。
2
按照屏幕上的指示选择所需地理位置,然后按 z。
3
设定[夏时制:]、日期和[日期格式:],然后按 z。
4
• 午夜会显示为12:00 AM,而中午则显示为12:00 PM。
确认已选择[确定],然后按 z。
5
14
CS
Page 83
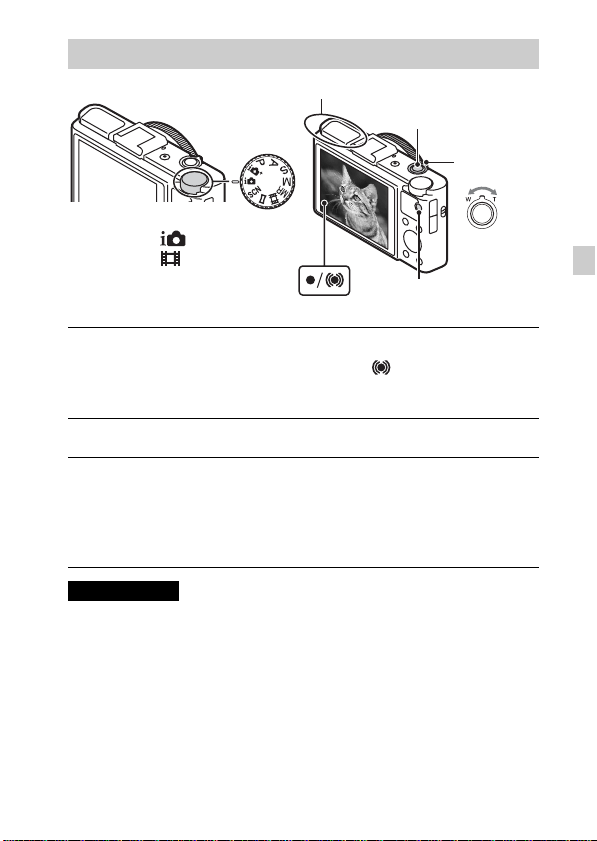
拍摄静止影像/动态影像
请勿遮住闪光灯。
快门按钮
W/T (变
焦)杆
模式转盘
:智能自动
:动态影像
拍摄静止影像
半按下快门按钮以对焦。
1
当影像对焦时,会发出哔音,并且 z 或 指示点亮。
完全按下快门按钮拍摄影像。
2
拍摄动态影像
按MOVIE (动态影像)按钮开始录制。
1
• 使用W/T (变焦)杆改变变焦倍数。
• 在连续录制动态影像期间按快门按钮拍摄静止影像。
再次按MOVIE按钮停止录制。
2
注意
• 请勿手动拉出闪光灯。否则可能会造成故障。
• 如果在拍摄动态影像时使用变焦功能,相机的操作声音将被记录。当动态
影像录制结束时,MOVIE按钮的操作声音可能也被记录。
• 当相机设定为默认设置并且温度约为25℃时,可以一次连续拍摄约29分钟。
当动态影像录制结束时,可以通过再次按MOVIE按钮重新开始录制。根据周
围温度,录制可能会停止以保护相机。
W:缩小
T:放大
MOVIE
CS
CS
15
Page 84
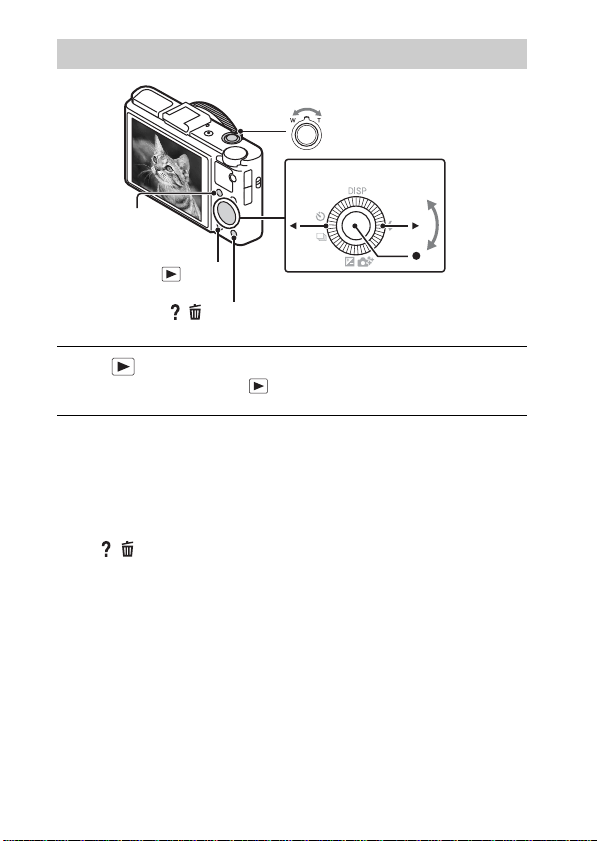
观看影像
Fn (功能)
W:缩小
T:放大
控制盘
(播放)
/ (删除)
按 (播放)按钮。
1
• 可以通过选择MENU t 1 t [静态/动态影像选择],在静止
影像和动态影像之间切换显示模式。
x
选择下一个/上一个影像
通过按控制盘上的 B (下一个)/b (上一个)或通过转动控制盘选择
影像。按控制盘中央的 z 观看动态影像。
x
删除影像
1 按 / (删除)按钮。
2 用控制盘上的 v 选择[删除],然后按 z。
x
旋转影像
按Fn (功能)按钮。
x
返回拍摄影像
半按下快门按钮。
CS
选择影像:B (下一个)/b (上一
个)或转动控制盘
设定:z
16
Page 85
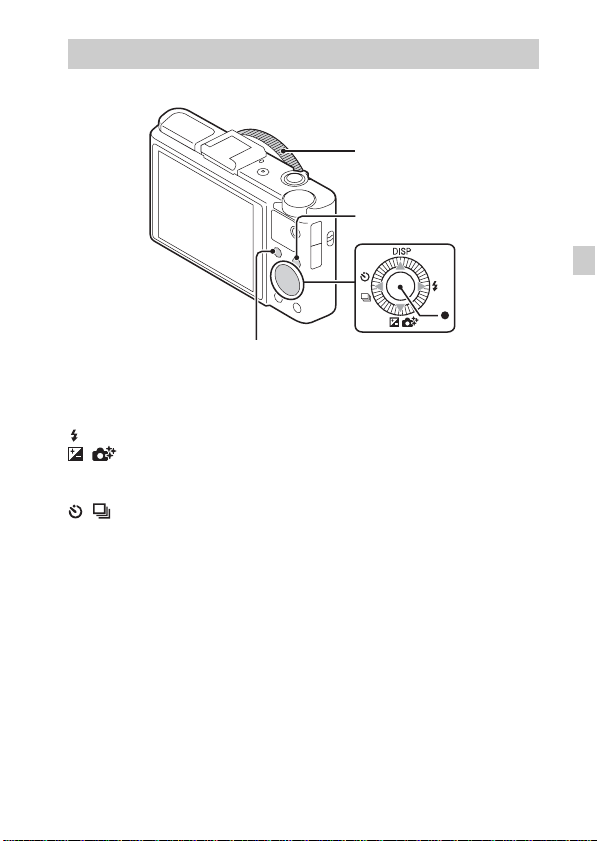
其他功能的介绍
可以使用控制盘、MENU按钮等操作其他功能。
控制环
MENU
CS
Fn (功能)
x
控制盘
DISP (显示内容):可以改变屏幕显示。
(闪光模式):可以选择静止影像用闪光模式。
/ (曝光补偿/照片创作):可以调整影像亮度。当拍摄模式设定为
[智能自动]或[增强自动]时,可以改变[背景散焦]、[亮度]、[色彩]、
[生动]和[照片效果]。
/ (拍摄模式):可以使用自拍和连拍模式。
z (跟踪对焦):即使被摄体正在移动,相机也会跟踪被摄体并自动调
节对焦。
控制盘
CS
17
Page 86
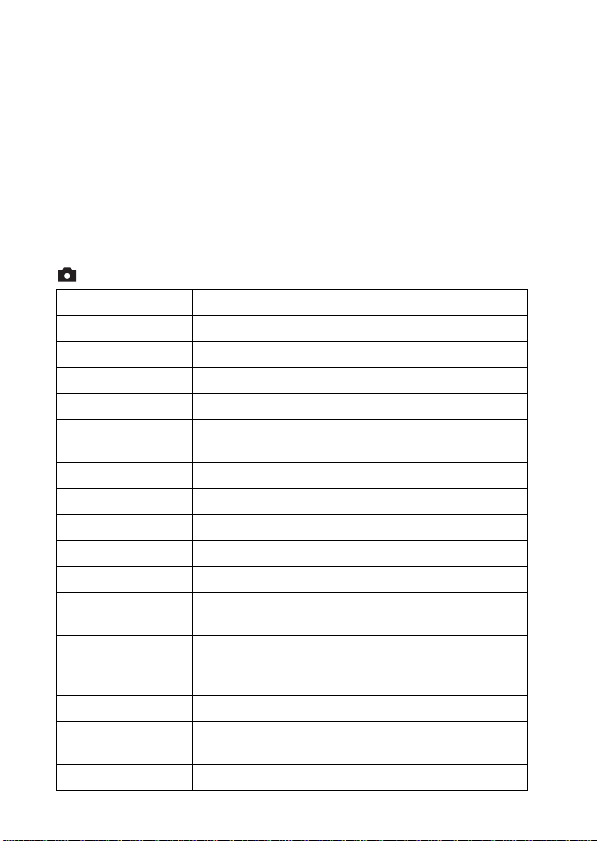
x
Fn (功能)按钮
可以注册七个功能并在拍摄时调用这些功能。
1 按Fn (功能)按钮。
2 反复按Fn (功能)按钮或使用控制盘上的 b/B,选择所需功能。
3 转动控制盘或控制环选择设置值。
x
控制环
喜爱的功能可以指定到控制环;拍摄时,只要转动控制环就可改变建立
的设置。
x
菜单项目
静止影像拍摄菜单
影像尺寸 选择静止影像的尺寸。
纵横比 选择静止影像的纵横比。
影像质量 设定静止影像的画质。
全景: 影像尺寸 选择全景影像的尺寸。
全景: 方向 设定全景影像的拍摄方向。
使用智能手机控制
拍摄模式 设定拍摄模式,例如进行连拍。
闪光模式 设定闪光灯设置。
对焦模式 选择对焦方式。
自动对焦区域 选择对焦区域。
美肤效果 设定美肤效果和效果等级。
笑脸/人脸检测
自动构图
ISO 调整光照感光度。
测光模式
CS
闪光补偿 调整闪光灯输出的强度。
18
通过智能手机远程控制相机,拍摄静止影像和动态
影像。
选择以自动检测人脸并调整各种设置。设定为检测
到笑脸时自动释放快门。
在拍摄人脸、特写或用跟踪对焦功能跟踪到的被摄
体时分析场景,然后以更令人印象深刻的构图自动
修剪并保存为另一个影像副本。
选择设定要测量被摄体的哪个部分决定曝光的测光
模式。
Page 87
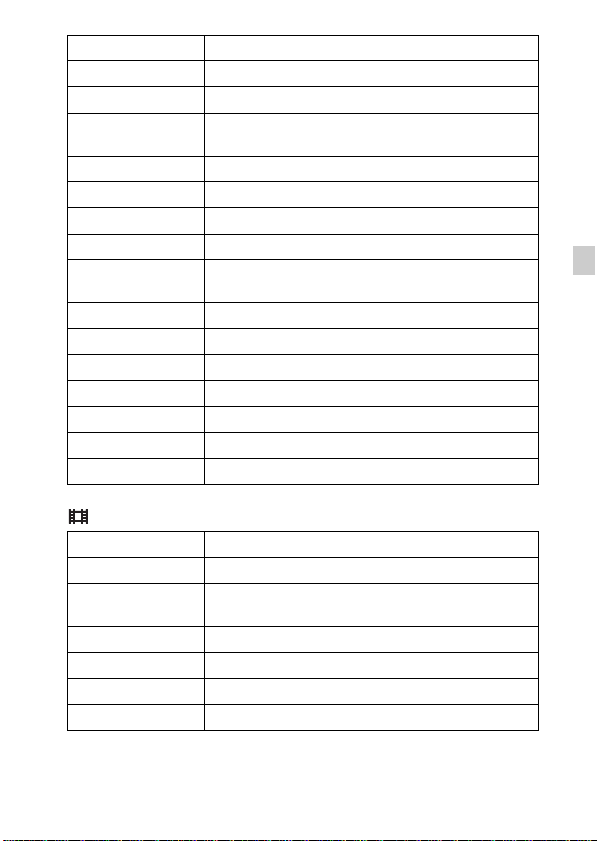
白平衡模式 调整影像的色调。
DRO/自动HDR 自动补偿亮度和对比度。
创意风格 选择所需的影像处理。
照片效果
清晰影像缩放 提供比使用数字变焦画质更高的变焦影像。
数字变焦 提供比使用清晰影像缩放倍率更高的变焦影像。
长时曝光降噪 设定快门速度为1/3秒或更久时的降低噪点处理。
高ISO降噪 设定高感光度拍摄时的降低噪点处理。
AF辅助照明
SteadyShot 设定SteadyShot。
色彩空间 改变可再现色彩的范围。
拍摄技巧列表 查看所有拍摄提示。
写入日期 设定是否在静止影像上记录拍摄日期。
场景选择 选择预设设置以匹配各种场景条件。
调出存储 选择当模式转盘设定为[调出存储]时要调用的设置。
存储 注册所需模式或相机设置。
选择所需的效果滤镜以获取更令人印象深刻的艺术
效果。
设定用于在黑暗场景中提供光线帮助对焦的AF照明
器。
动态影像拍摄菜单
文件格式 选择动态影像文件格式。
记录设置 选择录制的动态影像画面的尺寸。
影像尺寸(Dual
Rec)
SteadyShot 设定SteadyShot。
录音 设定是否在拍摄动态影像时录制声音。
减少风噪声 降低拍摄动态影像期间的风噪。
动态影像 选择适合被摄体或效果的曝光模式。
设定录制动态影像时的静止影像拍摄尺寸。
CS
CS
19
Page 88
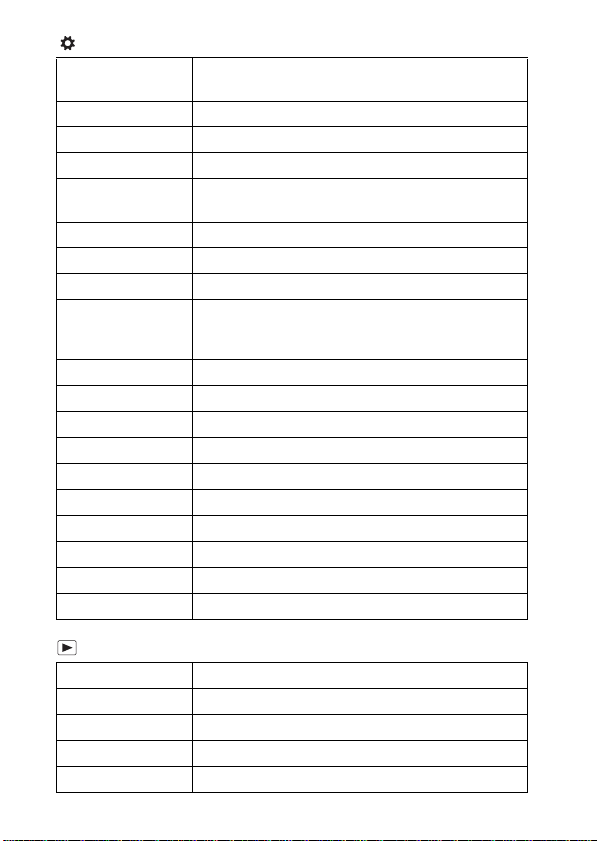
自定义菜单
FINDER/LCD选择设置使用电子取景器 (另售)时,设定在电子取景器和
减轻红眼闪光 减少使用闪光灯时的红眼现象。
网格线 设定格线显示以便对齐结构轮廓。
自动检视 设定自动检视以在拍摄后显示拍摄影像。
DISP按钮
峰值水平 在手动对焦时以特定颜色加强对焦范围的轮廓。
峰值色彩 设定用于峰值功能的颜色。
控制环 将所需功能指定到控制环。
控制环变焦功能
控制环显示 设定在操作控制环时是否显示动画。
功能按钮 自定义按下Fn (功能)按钮时显示的功能。
中央按钮功能 将所需功能指定到中央按钮。
左按钮功能 将所需功能指定到左按钮。
右按钮功能 将所需功能指定到右按钮。
MOVIE按钮 设定是否始终启用MOVIE按钮。
MF帮助 在手动对焦时显示放大的影像。
对焦放大时间 设定影像放大显示的时间长度。
人脸优先跟踪 设定在跟踪时是否优先跟踪人脸。
人脸登记 注册或改变要优先对焦的人物。
屏幕之间的切换方式。
设定可以通过按控制盘上的DISP进行选择的屏幕显
示模式。
设定控制环的变焦功能。
选择[步级]时,可以将变焦位置移动到固定档的焦
距。
播放菜单
发送至智能手机
发送至电脑
在电视上观看
静态/动态影像选择 在静止影像/动态影像显示之间切换。
CS
删除 删除影像。
20
将影像传送到智能手机上进行显示。
通过将影像传输到与网络连接的电脑进行备份。
可以在连接网络的电视机上观看影像。
Page 89
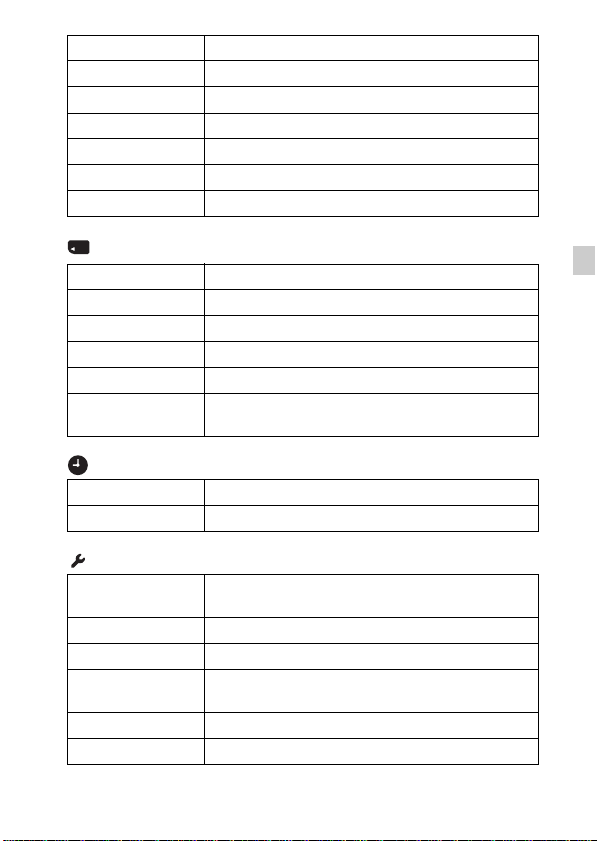
幻灯片播放 显示幻灯片。
影像索引 同时显示多个影像。
保护 保护影像。
指定打印 为静止影像添加打印命令标记。
照片效果 在影像上添加各种质感。
音量设置 调整音量。
回放显示 设定如何播放纵向录制的影像。
存储卡工具菜单
格式化 格式化存储卡。
文件序号 设定为静止影像和动态影像指定文件编号的方式。
选择REC文件夹 改变存储影像的所选文件夹。
新文件夹 创建存储静止影像和动态影像 (MP4)的新文件夹。
修复影像数据库 修复影像数据库文件并启用录制和播放。
显示存储卡剩余空间显示存储卡上动态影像的剩余记录时间和静止影像
的可记录数。
时钟设置菜单
日期时间设置 设定日期和时间以及夏令时。
区域设置 设定使用地区。
设置菜单
菜单调出位置
模式转盘指南 打开或关闭模式转盘指南 (各拍摄模式的说明)。
液晶屏亮度 设定屏幕亮度。
取景器亮度
节电 设定节电功能的等级。
自动关机开始时间 设定相机自动关闭前的等待时间长度。
将菜单上的光标默认位置设定为顶部项目或上次选
择的项目。
使用电子取景器 (另售)时,设定电子取景器的亮
度。
CS
CS
21
Page 90

PAL/NTSC选择器
(仅限1080 50i兼
通过改变设备的电视格式,就能以不同的动态影像
格式进行拍摄。
容机型)
上传设置
设定使用Eye-Fi卡时相机的上传功能。
1
*
HDMI分辨率 设定相机与HDMI电视机连接时的分辨率。
HDMI控制 通过支持 “BRAVIA” Sync的电视机操作相机。
USB连接 设定USB连接方式。
USB LUN设定 通过限制USB连接的功能以增加兼容性。
USB电源供给 设定是否使用USB连接进行供电。
音频信号 设定相机的操作声音。
WPS按压 按下WPS按钮即可将存取点轻松注册到相机。
访问点手动设置 可以手动注册存取点。
编辑装置名称 可以改变Wi-Fi Direct等下的设备名称。
显示MAC地址 显示相机的MAC地址。
SSID/密码复位 重设与智能手机连接的SSID和密码。
飞行模式 可以设定本设备不进行无线通信。
版本 显示相机软件版本。
语言 选择语言。
跌落传感器 设定[跌落传感器]功能。
演示模式 设定打开或关闭动态影像的演示播放。
初始化 将设置恢复为默认值。
*1
相机中插有Eye-Fi卡 (另售)时出现。
22
CS
Page 91
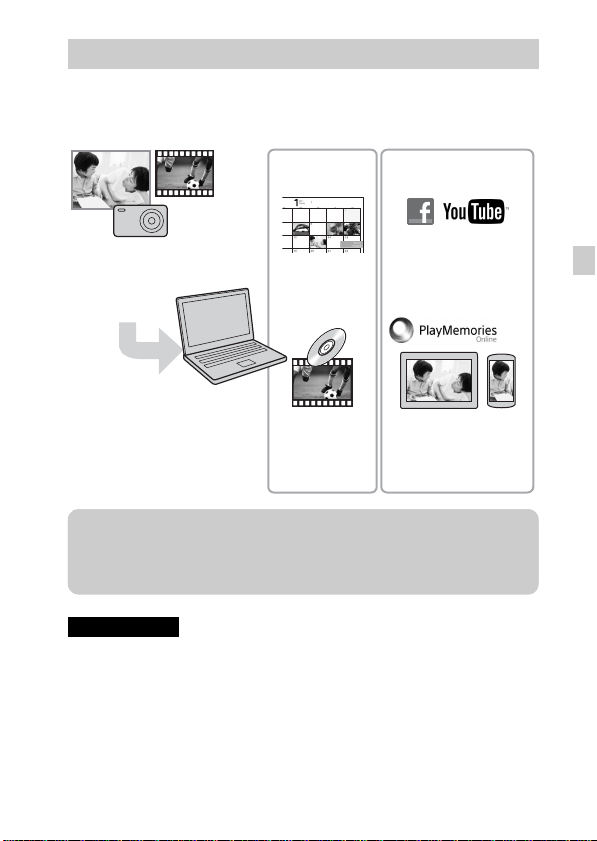
“PlayMemories Home”的功能
通过使用软件 “PlayMemories Home”,可以将静止影像和动态影像导
入电脑并进行使用。将AVCHD动态影像导入电脑需要使用
“PlayMemories Home”。
分享影像
上传影像到网络服务
器
在 “PlayMemories
Online”上共享影像
从相机导入影像
组织
在日历上观看影
像
创建动态影像光
盘
z 下载 “PlayMemories Home”(仅限Windows)
可从以下URL下载 “PlayMemories Home”:
www.sony.net/pm
注意
• 安装 “PlayMemories Home”需要互联网连接。
• 使用 “PlayMemories Online”或其它网络服务需要互联网连接。
“PlayMemories Online”或其它网络服务可能在某些国家或地区不可用。
• “PlayMemories Home”与Mac不兼容。请使用安装在Mac上的应用程序。有
关详细说明,请访问以下URL:http://www.sony.co.jp/imsoft/Mac/
CS
CS
23
Page 92
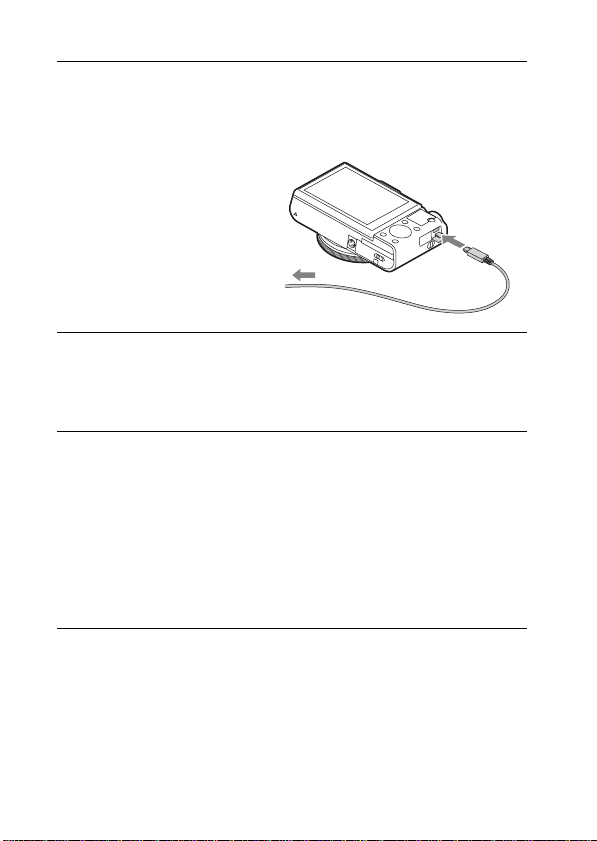
x
在电脑上安装 “PlayMemories Home”
在电脑上使用Internet浏览器,访问以下URL,然后单击
1
[安装] t [运行]。
www.sony.net/pm
按照画面上的指示完成
2
安装。
• 当显示将相机连接到电脑的
信息时,请使用微型USB连
接线 (附送)连接相机和电
脑。
到USB插孔
x
观看 “PlayMemories Home 帮助指南”
有关如何使用 “PlayMemories Home”的详细说明,请参阅
“PlayMemories Home 帮助指南”。
双击桌面上的[PlayMemories Home 帮助指南]图标。
1
• 从开始菜单访问 “PlayMemories Home 帮助指南”:单击[开始]
t [所有程序] t [PlayMemories Home] t [PlayMemories
Home 帮助指南]。
• 使用Windows 8时,从开始画面选择[PlayMemories Home]图标启
动[PlayMemories Home],然后从[帮助]菜单选择[PlayMemories
Home 帮助指南]。
• 有关 “PlayMemories Home”的详细说明,您也可以参阅 “Cybershot 用户手册”(第2页)或以下PlayMemories Home支持页面 (仅英
文):http://www.sony.co.jp/pmh-se/
到多功能端子
24
CS
Page 93

“Image Data Converter”的功能
以下是使用 “Image Data Converter”时的可用功能示例。
• 可以使用色调曲线或锐度等多个修正功能编辑RAW影像。
• 可以使用白平衡、光圈和创意风格等调整影像。
• 可以将显示和编辑的静止影像保存到电脑。
有两种保存RAW影像的方法:保存为RAW数据,或保存为一般文件格
式。
• 可以显示和比较用本相机拍摄的RAW影像/JPEG影像。
• 可以将影像评分为五个等级。
• 可以设定颜色标签。
x
安装 “Image Data Converter”
从以下URL下载软件并安装到电脑上。
1
Windows: http://www.sony.co.jp/imsoft/Win/
Mac: http://www.sony.co.jp/imsoft/Mac/
x
观看 “Image Data Converter指南”
有关如何使用 “Image Data Converter”的详细说明,请参阅 “Image
Data Converter指南”。
对于Windows:
1
单击[开始] t [所有程序] t [Image Data Converter]
t [帮助] t [Image Data Converter Ver.4]。
对于Mac:
启动Finder t [应用程序] t [Image Data Converter]
t [Image Data Converter Ver.4] t在菜单条中,选择
“帮助” t “Image Data Converter指南”。
• 对于 Windows 8,启动 “Image Data Converter Ver.4” t 在菜
单条中,选择 “帮助” t “Image Data Converter 指南”。
• 有关 “Image Data Converter”的详细说明,您也可以参阅
“Cyber-shot 用户手册”(第2页)或以下 “Image Data
Converter”支持页面 (仅英文):
http://www.sony.co.jp/ids-se/
CS
CS
25
Page 94
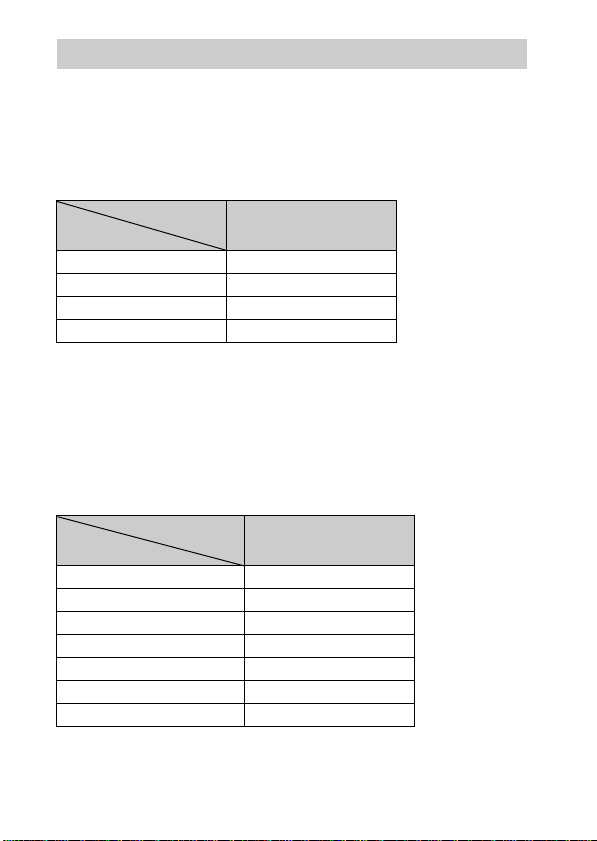
静止影像数和动态影像的可记录时间
根据拍摄条件和存储卡的不同,静止影像数目和可记录时间可能会有所
不同。
x
静止影像
影像尺寸:L: 20M
当[纵横比]设定为[3:2]时*
容量
影像质量
标准 295个影像
精细 170个影像
RAW&JPEG 58个影像
RAW 88个影像
*
当[纵横比]未设定为[3:2]时,可以录制比上述更多的影像。(当[影像质量]
设定为[RAW]时除外。)
x
动态影像
下表显示近似的最长记录时间。这些为所有动态影像文件的总时间。可
连续拍摄约29分钟 (产品规格限制)。MP4 (12M)格式动态影像的最长
连续记录时间约15分钟 (受2 GB文件大小限制)。
(h (小时)、m (分))
容量
记录设置
60i 24M(FX)/50i 24M(FX) 10 m
60i 17M(FH)/50i 17M(FH) 10 m
60p 28M(PS)/50p 28M(PS) 9 m
24p 24M(FX)/25p 24M(FX) 10 m
24p 17M(FH)/25p 17M(FH) 10 m
1440×1080 12M 15 m
VGA 3M 1 h 10 m
2 GB
2 GB
26
CS
Page 95

• 由于本相机具备根据拍摄场景自动调节影像画质的VBR (可变比特率)功
能,因此动态影像的可记录时间会有所不同。当录制快速移动的被摄体时,
影像更加清晰,但由于需要更多存储空间进行录制,因此可记录时间较短。
取决于拍摄条件、被摄体或影像画质/尺寸设置,可记录时间也会有所不
同。
有关使用本相机的注意事项
本相机的内置功能
• 本手册介绍1080 60i兼容设备和1080 50i兼容设备。
要查看相机是否是1080 60i兼容设备还是1080 50i兼容设备,请查看相机
底部的下列标记。
1080 60i兼容设备:60i
1080 50i兼容设备:50i
• 本相机兼容1080 60p或50p格式动态影像。与目前为止以隔行方式的标准录
制模式不同,本相机使用逐行方式进行录制。这样可以提高分辨率,并呈
现更流畅真实的影像。
关于使用和保养
请避免粗暴地使用、分解、改造、物理性撞击本产品,或由于捶打、掉落或
踩踏而使本产品受到冲击。请格外小心使用镜头。
有关拍摄/播放的注意事项
• 开始拍摄前,请先进行试拍以确保相机正常工作。
• 本相机不防尘、不防溅水、不防水。
• 请不要使相机受潮。如果水分进入相机内,可能会引发故障。在某些情况
下,相机无法修复。
• 请勿把相机朝向太阳或其它强光。这可能导致相机故障。
• 如果发生湿气凝聚,在使用相机前请除去湿气。
• 请勿摇晃或撞击本相机。这可能会引起故障并且可能无法拍摄影像。此外,
有可能使记录媒体无法使用或造成影像数据的损坏。
请勿在下列地方使用/存放相机
• 极热、极冷或潮湿的地方
诸如停放在阳光下的车中等场所,相机机身可能会变形,而且可能会造成
故障。
• 存放在阳光直射或者靠近加热器的地方
相机机身可能会褪色或变形,而且可能会造成故障。
• 有摇摆振动的地方
• 产生强烈无线电波、放射辐射线或具有强磁场的场所附近。否则,相机可
能无法正常拍摄或播放影像。
• 有沙或灰尘的地方
小心不要让沙或灰尘进入相机内。这可能会造成相机故障,有时候这种故
障是无法修理的。
CS
CS
27
Page 96

关于携带
把相机放在裤子或裙子的后衣兜里时,请勿坐在椅子上或其它地方,因为这
可能会造成相机故障或损坏相机。
Carl Zeiss镜头
本相机配备有Carl Zeiss镜头,能以卓越的对比效果再现清晰的影像。本相
机的镜头根据德国的Carl Zeiss质量标准在经过Carl Zeiss认证的质量保证
系统下生产。
有关画面的注意事项
屏幕采用超高精密技术制造,其有效像素为99.99%以上。但是,屏幕上可能
会出现一些小黑点和/或亮点 (白、红、蓝或绿色)。出现这些点是制造过程
中产生的正常现象,并不会对录制造成任何影响。
有关闪光灯的注意事项
• 请勿以握住闪光灯的方式拿持相机,或是对闪光灯过度用力。
• 如果有水、灰尘或沙子进入开启的闪光灯,可能会造成故障。
关于相机的温度
照相机和电池因连续使用可能变热,这是正常现象。
关于过热保护
根据相机和电池的温度,您可能无法录制动态影像或电源可能会自动关闭以
保护相机。
在电源关闭或无法继续录制动态影像之前,屏幕上会显示信息。这种情况
下,让相机处于电源关闭状态,等到相机和电池温度降低为止。如果在相机
和电池没有充分冷却的状态下打开电源,电源可能会再次关闭或可能无法录
制动态影像。
关于给电池充电
如果给长时间未使用的电池充电,可能无法将其充到正确的电量。
这是电池特性的原因,不是故障。重新给电池充电。
有关版权的警告事项
电视节目、影片、录影带及其它资料可能具有版权。未经许可录制这些资料
可能会触犯版权法。
对内容损坏或拍摄失败不予赔偿
Sony对由于相机或记录媒体等的故障而导致的拍摄失败、拍摄内容丢失或损
坏不予赔偿。
清洁相机表面
用蘸少许水的软布清洁相机表面,然后用干布擦拭表面。为防止损坏涂层或
外壳:
– 请不要让相机沾上化学产品,如稀释剂、汽油、酒精、一次性擦布、驱虫
剂、防晒霜或杀虫剂等。
28
CS
Page 97

保养屏幕
• 残留在屏幕上的护手霜或保湿霜可能会侵蚀涂层。如果沾上屏幕,请立即
擦掉。
• 强行用纸巾或其它材料擦拭会损坏涂层。
• 如果屏幕上粘有指印或碎屑,建议轻轻用软布拭去碎屑再擦拭干净。
有关无线局域网的注意事项
对因遗失或失窃而导致非法访问或非法使用相机上加载的目标网络而造成的
任何损害,我们不承担任何责任。
有关丢弃/转让相机的注意事项
为保护个人数据,请在丢弃或转让相机时执行以下操作。
• 通过执行[初始化] (第22页)重设所有相机设置。
• 删除所有[人脸登记] (第20页)中注册的人脸。
CS
CS
29
Page 98

规格
相机
[系统]
影像装置:13.2 mm × 8.8 mm
(1.0型)Exmor R CMOS传感器
相机总像素数:
约2090万像素
相机有效像素数:
约2020万像素
镜头:Carl Zeiss Vario-Sonnar
T
3.6倍变焦镜头
*
f = 10.4 mm – 37.1 mm(28 mm
– 100 mm (35 mm胶片等效))
F1.8 (W) – F4.9 (T)
拍摄动态影像 (16:9)时:
29 mm – 105 mm
拍摄动态影像 (4:3)时:
36 mm – 128 mm
*1
当[SteadyShot]设定为[标准]
时
SteadyShot:光学
曝光控制:自动曝光、光圈优先、
快门优先、手动曝光、场景选择
白平衡:自动、日光、阴天、多云、
荧光灯、白炽灯 (暖白/冷白/
日光白/日光)、闪光灯、色温/
滤色镜、自定义
文件格式:
静止影像:符合JPEG (DCF、
Exif、MPF Baseline)标准、
RAW (Sony ARW 2.3格式)、兼
容DPOF
动态影像 (AVCHD格式):
AVCHD格式版本2.0兼容
视频:MPEG-4 AVC/H.264
音频:Dolby Digital 2声道、
配备Dolby Digital Stereo
Creator
*1
*1
• 由Dolby Laboratories授权制
造。
CS
30
动态影像 (MP4格式):
视频:MPEG-4 AVC/H.264
音频:MPEG-4 AAC-LC 2声道
记录媒体:“Memory Stick XC
Duo”、“Memory Stick PRO
Duo”、“Memory Stick
Micro”、SD卡、microSD存储卡
闪光灯:闪光范围 (ISO感光度
(推荐曝光指数)设定为自
动):
约0.3 m至15.0 m (W)
约0.55 m至5.7 m (T)
[输入和输出连接器]
HDMI接口:HDMI微型插孔
多功能端子*:USB通信
USB通信:Hi-Speed USB
(USB 2.0)
* 支持微型USB兼容设备。
[屏幕]
LCD屏幕:
7.5 cm (3.0型)TFT驱动
总点数:1 228 800点
[电源,常规]
电源:可重复充电电池NP-BX1、
3.6 V
电源适配器AC-UB10/UB10B/
UB10C/UB10D、5 V
耗电量 (拍摄时):约1.5 W
操作温度:0℃至40℃
存储温度:–20℃至+60℃
尺寸 (符合CIPA标准):
101.6 mm × 58.1 mm ×
38.3 mm (长/高/宽)
质量 (符合CIPA标准)(包括
NP-BX1电池、“Memory Stick
Duo”):约281 g
麦克风:立体声
扬声器:单声道
Page 99

Exif Print:兼容
PRINT Image Matching III:兼容
[无线局域网]
支持标准:IEEE 802.11 b/g/n
频率:2.4 GHz
支持的安全协议:WEP/WPA-PSK/
WPA2-PSK
配置方式:WPS (Wi-Fi Protected
Setup)/手动
存取方式:基础结构模式
NFC:符合NFC Forum Type 3 Tag标
准
电源适配器AC-UB10/UB10B/
UB10C/UB10D
电源要求:交流100 V至240 V、
50 Hz/60 Hz、70 mA
输出电压:直流5 V、0.5 A
操作温度:0℃至40℃
存储温度:–20℃至+60℃
尺寸:
约50 mm × 22 mm × 54 mm
(长/高/宽)
质量:
面向美国和加拿大:约48 g
面向美国和加拿大以外的国家或
地区:约43 g
可重复充电电池NP-BX1
使用的电池:锂离子电池
最大电压:直流4.2 V
额定电压:直流3.6 V
最大充电电压:直流4.2 V
最大充电电流:1.89 A
容量:4.5 Wh (1 240 mAh)
设计及规格如有变更,恕不另行通
知。
商标
• 下列标识是Sony Corporation的商
标。
、“Cyber-shot”、
“Memory Stick XC-HG Duo”、
“Memory Stick PRO Duo”、
“Memory Stick PRO-HG Duo”、
“Memory Stick Duo”、“Memory
Stick Micro”
• “AVCHD Progressive”和“AVCHD
Progressive”标识是Panasonic
Corporation和Sony Corporation
的商标。
• Dolby和双D符号是Dolby
Laboratories的商标。
• 术语HDMI和HDMI High-Definition
Multimedia Interface以及HDMI标
识是HDMI Licensing LLC在美国和
其他国家的商标或注册商标。
• Windows是Microsoft Corporation
在美国和/或其他国家的注册商
标。
• Mac、App Store是Apple Inc.的注
册商标。
• iOS是Cisco Systems, Inc.和/或
其子公司在美国和某些其他国家的
注册商标或商标。
• SDXC标识是SD-3C,LLC的商标。
• Android、Google Play是Google
Inc.的商标。
• Wi-Fi、Wi-Fi标识、Wi-Fi
PROTECTED SET-UP是Wi-Fi
Alliance的注册商标。
• N标记是NFC Forum, Inc.在美国和
其他国家/地区的商标或注册商
标。
• DLNA和DLNA CERTIFIED是Digital
Living Network Alliance的商
标。
• “ ”和 “PlayStation”是
Sony Computer Entertainment
Inc.的注册商标。
CS
CS
31
Page 100
• Facebook和 “f”标识是
Facebook, Inc.的商标或注册商
标。
• YouTube和YouTube标识是Google
Inc.的商标或注册商标。
• Eye-Fi是Eye-Fi, Inc.的商标。
• 此外,在本说明书中所使用的系统
和产品的名称通常是各自的开发商
或制造商的商标或注册商标。但是
在本手册中并未在所有场合使用™
或®标识。
• 通过从PlayStation Store (可利
用时)下载PlayStation 3用应用
程序,可以更加尽情地享用
PlayStation 3。
• PlayStation 3的应用程序需要
PlayStation Network帐户和应用
程序下载。在PlayStation Store
可用地区可访问。
在我们的客户支持网站可以查
询到本产品新增的信息和日常
问题的答案。
32
CS
 Loading...