

Sony DSCG1 Cyber-shot User Manual

Digital Still Camera
Cyber-shot Handbook
DSC-G1
Before operating the unit, please read this
Handbook and “Instruction Manual”
thoroughly, and retain them for future
reference.
VCLICK!
Table of contents
Basic Operations
Using the shooting
functions
Using the playback
functions
Changing the settings
Viewing images on a
TV screen
Using your computer
Using a network
Printing still images
Listening to music
Troubleshooting
Others
Index
© 2007 Sony Corporation 2-898-081-12(1)
GB
Notes on using your camera
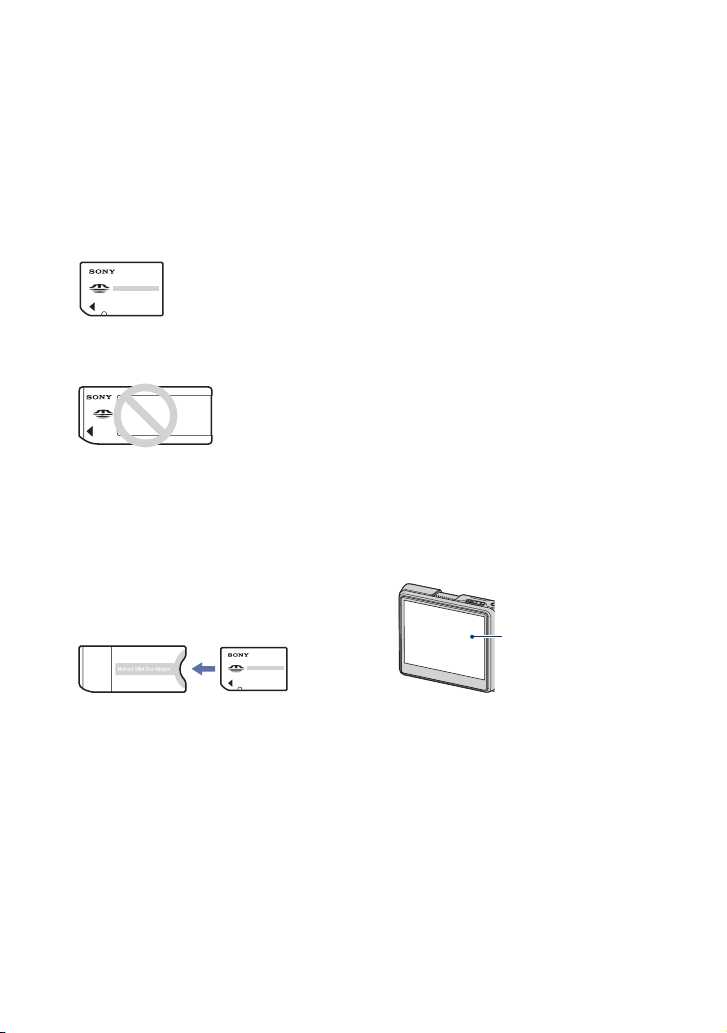
Types of “Memory Stick” that can be
used (not supplied)
The IC recording medium used by this
camera is a “Memory Stick Duo”. There are
two types of “Memory Stick”.
“Memory Stick Duo”: you can use a
“Memory Stick Duo” with your camera.
“Memory Stick”: you cannot use a
“Memory Stick” with your camera.
Other memory cards cannot be used.
• For details on “Memory Stick Duo”, see
page 120.
When using a “Memory Stick Duo” with
“Memory Stick” compatible equipment
You can use the “Memory Stick Duo” by
inserting it into the Memory Stick Duo
Adaptor (not supplied).
• If you do not intend to use the battery pack for a
long time, use up the existing charge and
remove it from your camera, then store it in a
cool, dry place. This is to maintain the battery
pack functions.
• For details on the usable battery pack, see
page 122.
Carl Zeiss lens
This camera is equipped with a Carl Zeiss
lens which is capable of reproducing sharp
images with excellent contrast.
The lens for this camera has been produced
under a quality assurance system certified
by Carl Zeiss in accordance with the quality
standards of Carl Zeiss in Germany.
Notes on the LCD screen and lens
• The LCD screen is manufactured using
extremely high-precision technology so over
99.99% of the pixels are operational for
effective use. However, there may be some tiny
black points and/or bright points (white, red,
blue or green in color) that constantly appear on
the LCD screen. These points are normal in the
manufacturing process and do not affect the
recording in any way.
Black, white, red, blue
or green points
Memory Stick Duo Adaptor
Notes on the “InfoLITHIUM” battery
pack
• Charge the battery pack (supplied) before using
the camera for the first time.
• The battery pack can be charged even if it is not
completely discharged. Also, even if the battery
pack is not fully charged, you can use the
partially charged capacity of the battery pack as
is.
2
• Exposing the LCD screen or the lens to direct
sunlight for long periods may cause
malfunctions. Be careful when placing the
camera near a window or outdoors.
• Do not press against the LCD screen. The screen
may be discolored and that may cause a
malfunction.
• Images may trail across on the LCD screen in a
cold location. This is not a malfunction.
• Be careful not to bump the lens, and be careful
not to apply force to it.
The pictures used in this Handbook
The photographs used as examples of pictures in
this Handbook are reproduced images, and are not
actual images shot using this camera.

Table of contents
Notes on using your camera .....................................................................2
Basic information.......................................................................................7
Identifying parts.......................................................................................10
Indicators on the screen..........................................................................12
Changing the screen display ...................................................................16
Basic Operations
Shooting images easily (Auto adjustment mode)....................................18
Viewing/deleting images..........................................................................23
How to operate – home/menu .................................................................26
Menu items..............................................................................................30
Using the shooting functions
Changing the recording mode.................................................................31
Shooting still images (Scene selection)...................................................32
Shooting menu ........................................................................................34
Camera: Selecting the still image camera mode
Scene: Selecting the Scene Selection mode
EV: Adjusting the exposure
Focus: Changing the focus method
Metering Mode: Selecting the metering mode
White Bal: Adjusting the color tones
ISO: Selecting a luminous sensitivity
REC Mode: Selecting the continuous shooting method
Flash Level: Adjusting the amount of flash light
Camera Set.: Changing setup items for shooting
3

Table of contents
Using the playback functions
Playing back images from the home screen ...........................................41
Viewing menu .........................................................................................45
Album/ Folder: Go To Album/Go To Folder, Combine Album, Split Album
Manage Images: Delete, Protect
Edit Image: Rotate, Resize
Label: Add Label, No Label
Find: Keyword, Similar Images
Print
Slide Show
/ Import/ Export
Details
Changing the settings
How to change the settings..................................................................... 54
Media Tools ...................................................................................... 56
General............................................................................................56
Media Space
File Number
Memory Stick...................................................................................57
Format
Create REC. Folder
Internal Memory ............................................................................... 59
Scan Images
Format
Settings ............................................................................................ 61
Main – Sound .............................................................................61
Beep AVLS
Default Media
Check Album
Change REC. Folder
Fully Format
Main – Screen ........................................................................... 62
Language
HOME Design
Function Guide
LCD Brightness
Main – Preferences ...................................................................63
Initialize
USB Connect
Video Out
4

Table of contents
Clock Set...........................................................................................65
Clock Set
Camera.............................................................................................66
Image Size(Photos)
Image Size(Movies)
AF Mode
Digital Zoom
Red Eye Reduction
AF Illuminator
SteadyShot
Auto Orientation
Music................................................................................................69
Repeat
MEGA BASS
LCD Auto Off
Network ............................................................................................70
Access Point
Network Power Save
Nickname
Img exchg password
Viewing images on a TV screen
Viewing images on a TV screen..............................................................73
Using your computer
Enjoying your Windows computer ...........................................................75
Installing the software (supplied).............................................................77
Using the “Album Editor” (supplied) ........................................................78
Using the “Picture Motion Browser” (supplied)........................................82
Connecting the camera and your computer with Mass Storage..............86
Using a network
What you can do with a network connection ...........................................88
Assigning a nickname to the camera ......................................................90
Collaboration Shot...................................................................................91
Picture Gift...............................................................................................93
Viewing images via a Wireless LAN........................................................95
5

Table of contents
Printing still images
How to print still images..........................................................................97
Printing images directly using a PictBridge compliant printer ................. 98
Listening to music
Listening to music .................................................................................101
Troubleshooting
Troubleshooting.....................................................................................104
Warning indicators and messages........................................................115
Others
To use your camera abroad — Power sources .....................................118
On the “Memory Stick” .......................................................................... 120
On the “InfoLITHIUM” battery pack....................................................... 122
Index
Index ..................................................................................................... 123
6
Basic information
Shooting
images
The camera is equipped with an internal memory of approximately 2 GB, which enables a
large number of images to be stored in the camera.
The images can also be stored in a “Memory Stick Duo” (not supplied).
Store the images in the
internal memory
The Original Image at the image
size set up for the camera and a
small size Album Image (VGA)
are stored in the internal
memory.
Internal memory
Original image Album image
• Album images are very small, so you can store a lot of images in the camera. This is convenient to view
Images later. Album Images are always recorded.
• For movies, the first cut of a movie is recorded on an album as an Album Image.
Album image Original image
Store the images in a
“Memory Stick Duo”
The Original Image at the image
size set up for the camera is
stored in the “Memory Stick
Duo”, and a small size Album
Image (VGA) is stored in the
internal memory.
Internal
memory
“Memory
Stick Duo”
7

Basic information
Automatic image
management
This camera automatically classifies images into albums depending on the shooting intervals
and frequency.
You can search the images by albums for your convenience.
The automatically created albums can be divided or combined manually.
<Example>
1st album 2nd album 3rd album1st album
Number of
images
Time (Date)
To name an album
t Use the “Album Editor”
(supplied)
To put these two together
t Combine albums
To divide one here into two
t Divide an album
Number of
images
The album has a new
name
The two albums are
combined
2nd album 3rd album1st album
Time (Date)
The album is divided
at the specified spot
8
Basic information
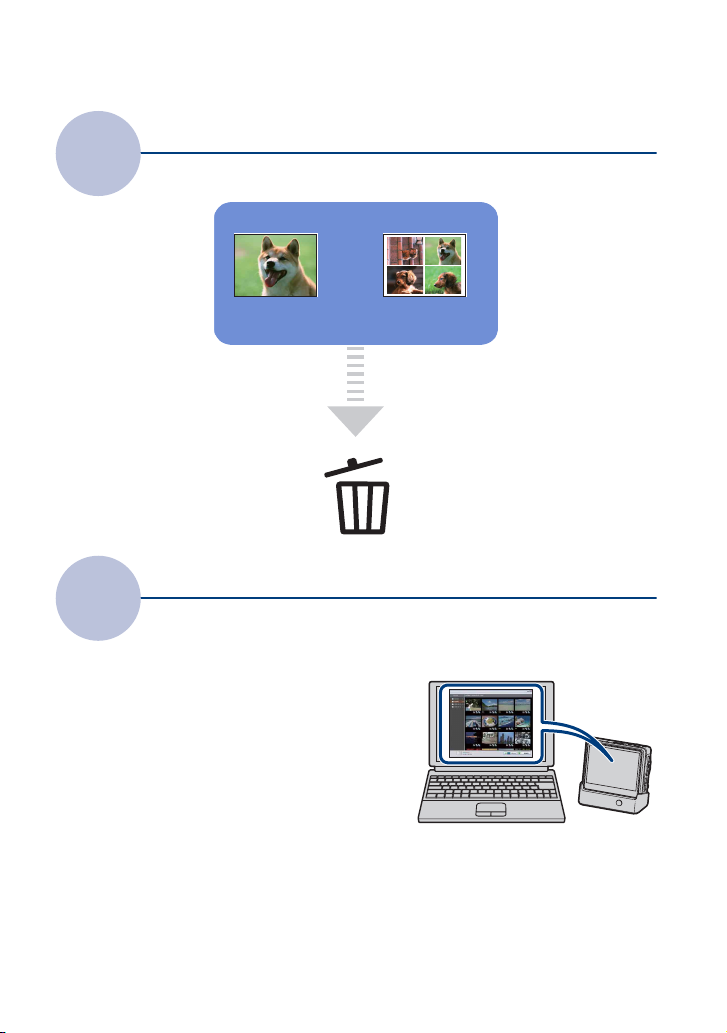
Delete
Original image Album image
When deleting an image, you
can choose to delete just the
Original Image, or delete the
Original and Album Images at
the same time.
Use with a
Computer
This camera is equipped with various search functions. With the software on the supplied CDROM, you can use more advanced search functions.
With the “Album Editor”, you can:
• Edit labels or comments
• Copy images stored on a computer to the camera
• Import MPEG4 movie files to the camera
• Restore the data of the camera from a backup of a
computer (Restore)
You can enjoy a lot more images with ease !
9
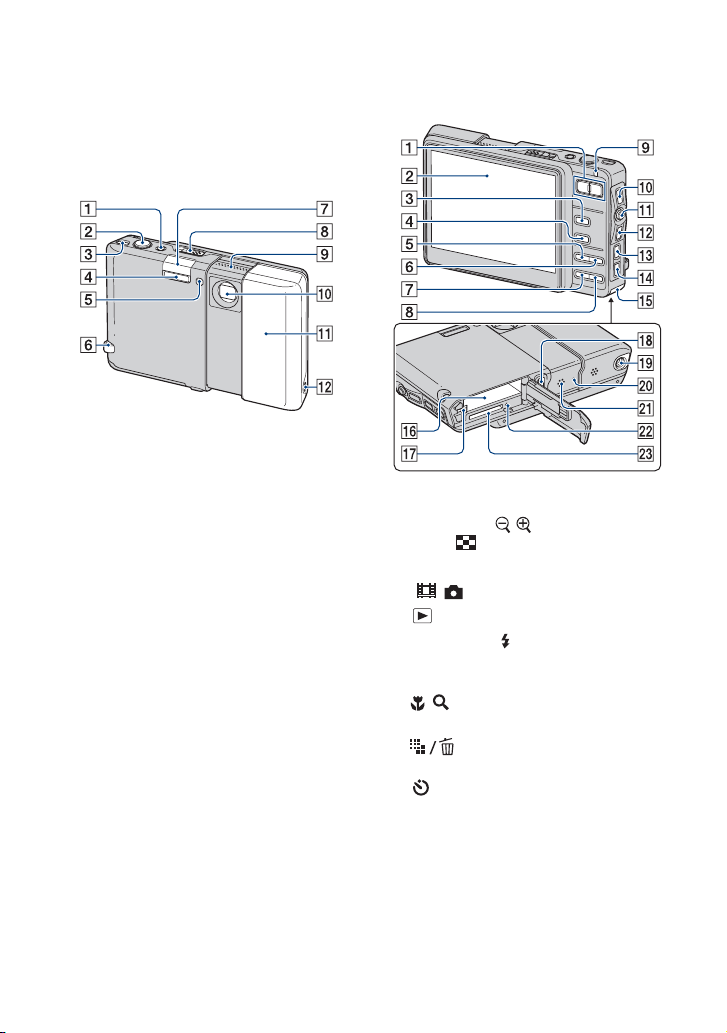
Identifying parts
See the pages in parentheses for details of
operation.
Camera
A POWER lamp/POWER button
B Shutter button (19)
C WLAN (Wireless network) button (91)
D Flash (20)
E Self-timer lamp (21)/AF illuminator
(67)
F Hook for wrist strap
G WLAN antenna (internal)
H OPEN (CAMERA) lever (18)
I Microphone
J Lens
K Lens cover
L i (Headphones) jack (103)
A For shooting: Zoom (W/T) button
(19)
For viewing: / (Playback zoom)
button/ (Index) button (23, 24)
B LCD screen (16)
C / (Movie/Photo) button (18)
D (Playback) button (23)
E For shooting: (Flash) button (20)
For playing back music: Hold button
(102)
F / (Macro/Magnifying Glass)
button (20)
G (Image Size/Delete) button
(22, 23)
H (Self-timer) button (21)
I Flash charging (20)/CHG (charge) lamp
J DISP (Screen display switch) button
(16)
K Control button
L BACK button
• Returns to the previous screen.
M MENU button (29)
10
Identifying parts
N HOME button (26)
O Battery/“Memory Stick Duo” cover
P Battery insertion slot
Q Battery eject lever
R Multi connector
S Tripod receptacle
• Use a tripod with a screw length of less than
5.5 mm (7/32 inch). You will be unable to
firmly secure the camera to tripods having
screws longer than 5.5 mm (7/32 inch), and
may damage the camera.
T RESET button (104)
U Speaker
V Access lamp
W “Memory Stick Duo” slot
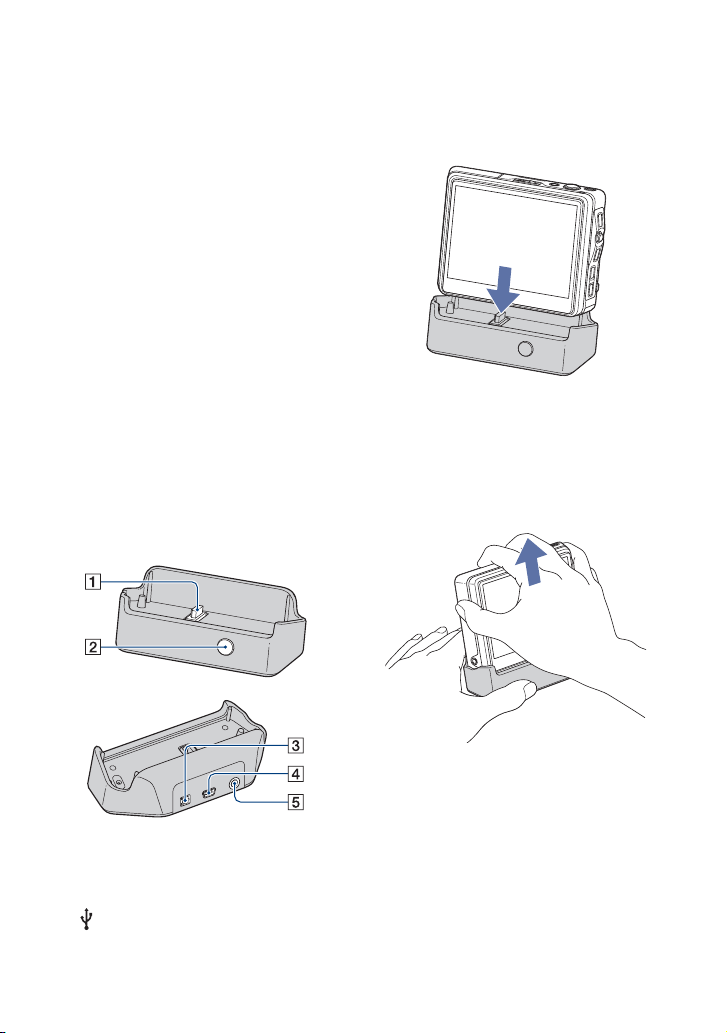
Cyber-shot Station
This is used when charging the battery pack
or connecting the camera to a TV or a
computer, etc.
How to connect
Connect the camera as illustrated.
• Make sure to install the camera all the way in
firml y.
How to disconnect
Grasp the camera and the Cyber-shot
Station as illustrated and disconnect the
camera.
A Camera connector
B CONNECT button (86)
C DC IN jack
D (USB) jack
E A/V OUT (STEREO) jack
• Be sure to turn off the camera before you
connect the camera to the Cyber-shot Station or
disconnect the camera from the Cyber-shot
Station.
11

Indicators on the screen
Each time you press the DISP (Screen
display switch) button, the screen status
changes.
See the pages in parentheses for details of
operation.
When shooting still images
When shooting movies
A
Display Indication
60Min Battery remaining
• Only is indicated,
depending on a mode.
Recording media
Recording folder
• This does not appear when
using the internal memory.
SteadyShot (68)
Radio field strength with a
network
3:2 3M
2M VGA 16:9
[400] Remaining number of
[00:00:00] Maximum recording time
Image size
recordable images
(57)
(22)
B
Display Indication
The setting that has been
selected by the menu
Zoom scaling (19, 67)
(16)
12
Indicators on the screen
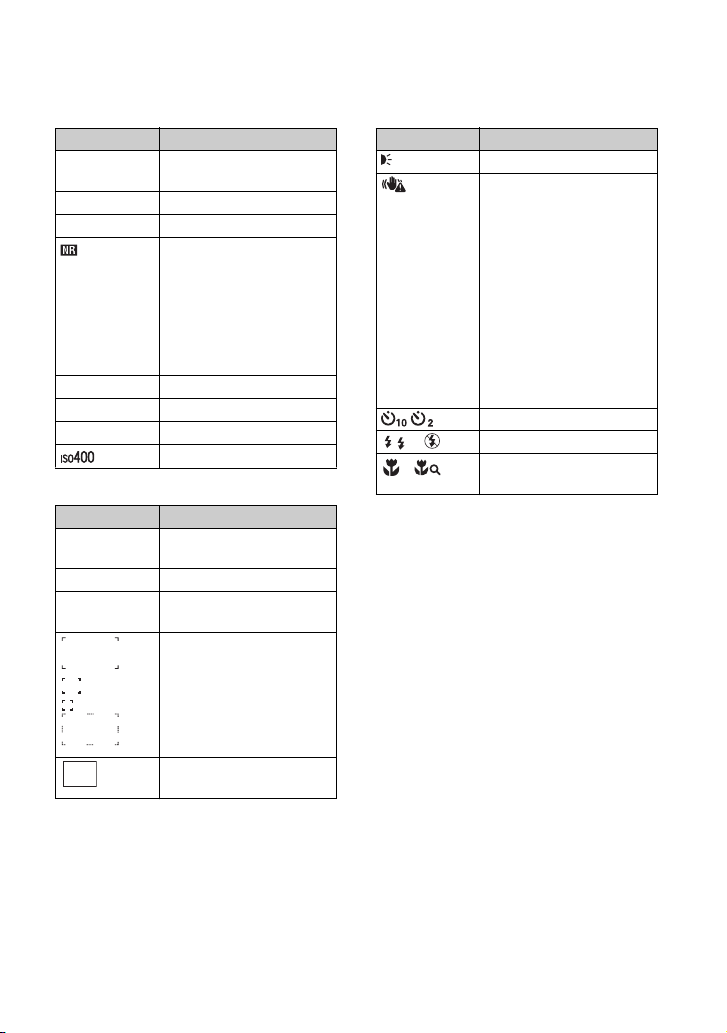
C
Display Indication
z (Green)
z (Red)
AE/AF lock (19)
Recording a movie
Standby Standby a movie
00:00:00 Recording time
NR slow shutter
• When the shutter speed
drops below a certain speed
in low light conditions, the
NR (Noise Reduction) slow
shutter function activates
automatically to reduce the
picture noise.
125 Shutter speed
F3.5 Aperture value
+2.0EV Exposure Value
(34)
ISO number (38)
D
Display Indication
C:32:00 Self-diagnosis display
(115)
E Low battery warning (115)
+ Spot metering cross hair
(37)
AF range finder frame (35)
E
Display Indication
ON
AF illuminator (67)
Vibration warning
• Indicates vibration may
prevent you from shooting
clear images due to
insufficient lighting. Even if
the vibration warning
appears, you can still shoot
images. However, we
recommend that you turn on
the anti-blur function, using
the flash for better lighting
or using a tripod or other
means to stabilize the
camera (page 116).
Self-timer (21)
SL
Flash mode (20)
Macro/Magnifying Glass
(20)
Latest recording history
(16)
13

Indicators on the screen
When playing back
A
Display Indication
60Min Battery remaining
• Only is indicated,
depending on a mode.
The destination medium of
Original Images
Playback folder
• This does not appear when
using the internal memory.
PictBridge connecting
(57)
(100)
Search keyword
Index mode
12/12 Image number/Number of
images recorded in selected
folder
B
Display Indication
Vo l u m e (23)
AV L S
1.3
C:32:00 Self-diagnosis display
Zoom scaling
(23)
(115)
00:00:12 Counter
Playback bar
NXM
my
Playback
(23)
N Playback
X Pause
M Fast-forward
m Rewind
y Frame-by-frame
(advance)
Frame-by-frame
(reverse)
Movie operation guide
>/M Skip/Fastforward
./m Skip/Rewind
y Frame-by-frame
(advance)
Frame-by-frame
(reverse)
PictBridge connecting
(100)
• Do not disconnect the USB
cable while the icon is
displayed.
2007/01/01
----
Information area
14
Indicators on the screen
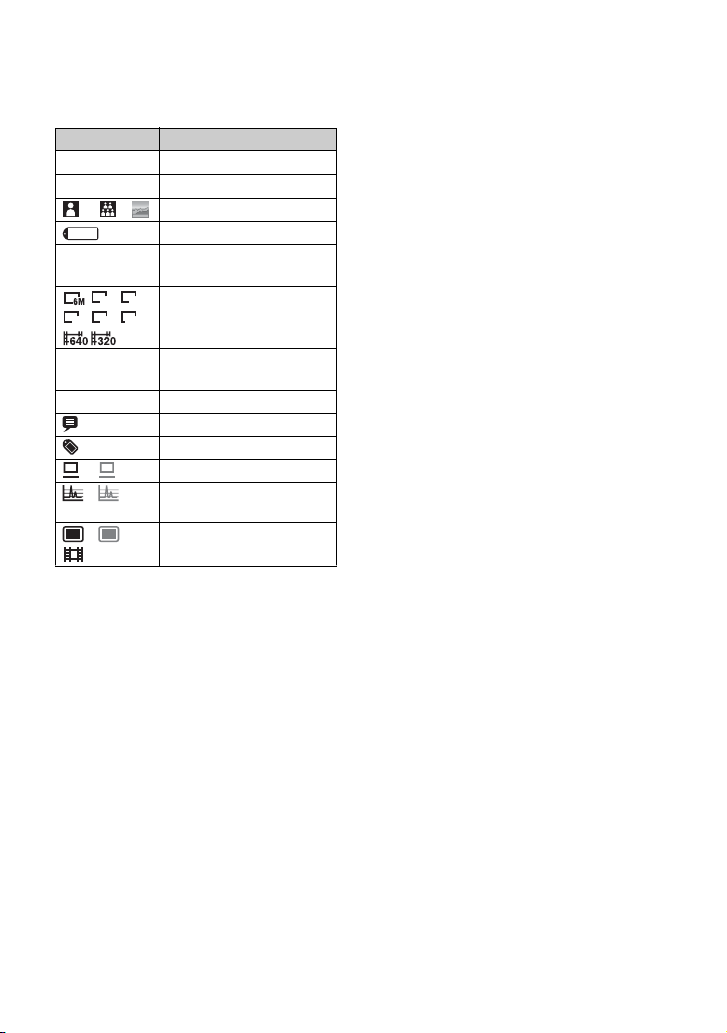
C
Display Indication
DSC00012
s
2007/01/01
9:30AM
3:2 3M
2M VGA 16:9
File number (56)
Color Detection
Face Detection
Label
Recorded date/time of the
playback image
Image size
(22)
-30fps
Frame number per second
(22)
- Protect (47)
Comment
Label
(49)
PC backup (done/undone)
Image analysis (done/
undone)
Original Image (stored/not
stored)
15

Changing the screen display
Each time you press the DISP (Screen display switch) button, the display changes as follows.
DISP (Screen display
switch) button
• By pressing DISP (Screen display switch) button longer, you can increase the LCD backlight (only when
the camera is used with the battery pack).
During shooting
Indicator off Setting display on
Latest recording history
• When shooting a movie, the indicators disappear from the screen. After the shooting, the screen returns to
the previous status.
During playback (single screen)
16
Indicator off Indicators on
Information area
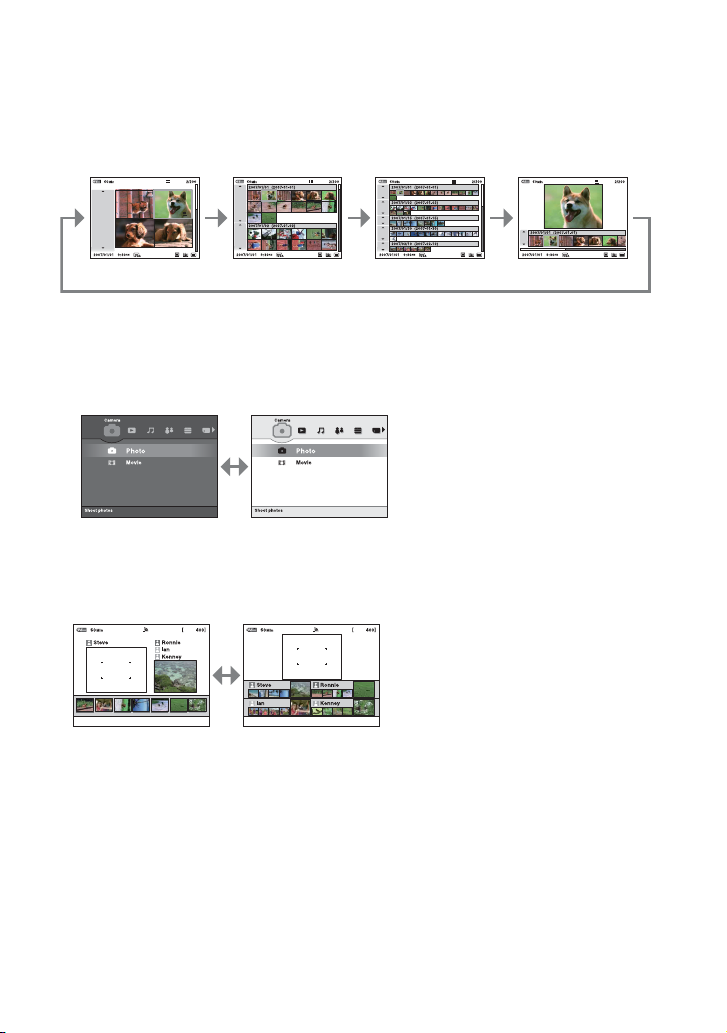
Changing the screen display
During playback (Index screen)
4-image index
• For details on an index screen, see page 24.
30-image index 100-image index
Home screen
The background is
black
The background is
white
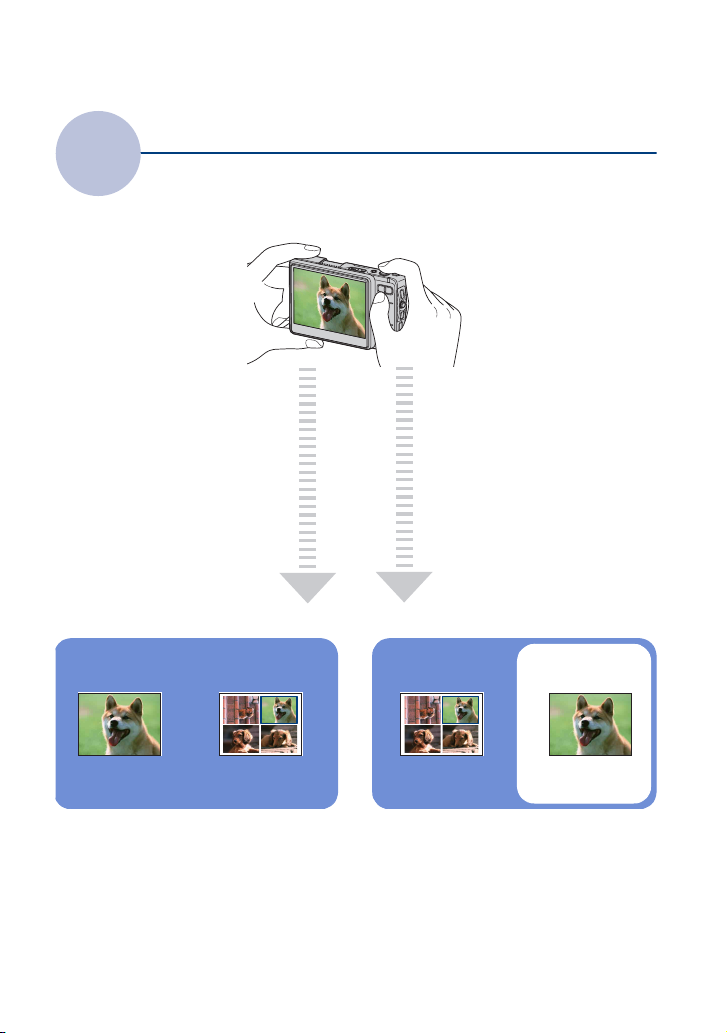
During Collaboration Shot
Normal Multi angles
Single image +
6-image index
Displays your images
and those of all other
connected users in
order of recording
time
• For details on the Collaboration Shot t page 91
Displays the images of
each connected user
separately
17
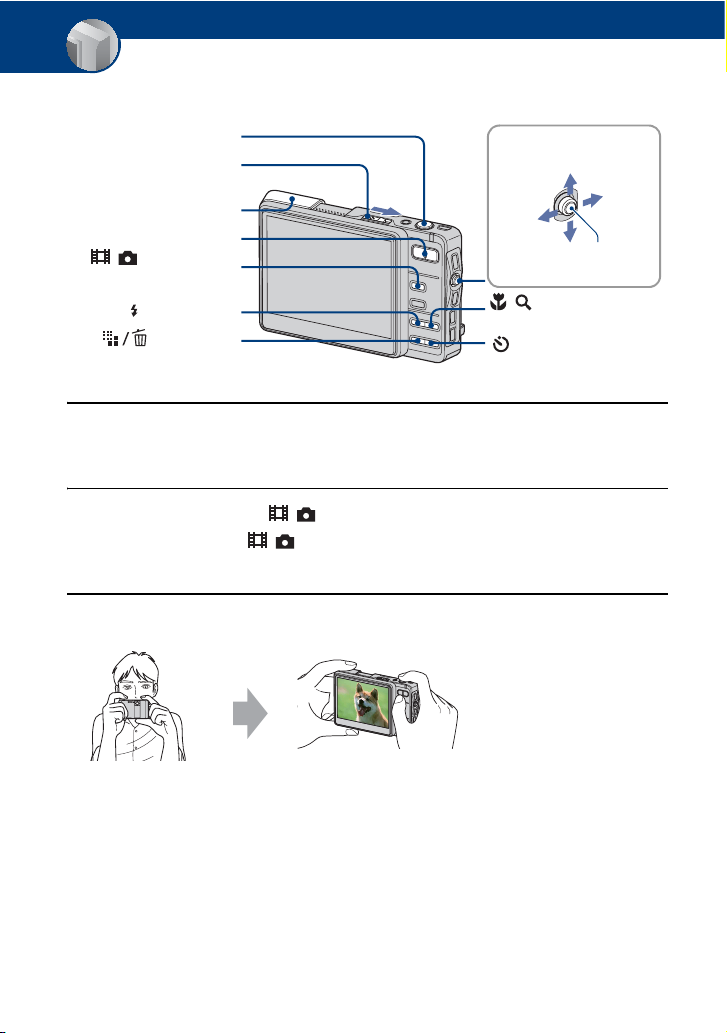
Basic Operations
Shooting images easily (Auto adjustment mode)
Shutter button
OPEN (CAMERA) lever
Lens cover
Zoom button
/ (Movie/Photo)
button
(Flash) button
(Image Size)
button
Control button
Up
Left
Press z
Down
/ (Macro/Magnifying
Glass) button
(Self-timer) button
1 Open the lens cover by sliding the OPEN (CAMERA) lever.
Open until it clicks.
2 Select a mode with the / (Movie/Photo) button.
Each time you press the / (Movie/Photo) button, the mode changes between Movie
and Photo.
3 Hold the camera steady, keeping your arms at your side.
Position the subject
in the center of the
LCD screen.
Right
18

Shooting images easily (Auto adjustment mode)
4 Shoot with the shutter button.
Aside from an Original Image, a small size Album Image is recorded in the internal memory (page 7).
Still image:
1Press and hold the shutter button halfway down to focus.
The z (AE/AF lock) indicator (green) flashes, a beep sounds, the indicator stops flashing and
remains lit.
2Press the shutter button fully down.
The shutter sounds.
AE/AF lock indicator
Movie:
Press the shutter button fully down.
To stop recording, press the shutter button fully down again.
If you shoot a still image of a subject that is difficult to focus on
• The shortest shooting distance is approx. 50 cm (19 3/4 inches). Shoot in the close-up (Macro) mode or
Magnifying Glass mode (page 20) when you shoot a subject closer than the shooting distance.
• When the camera cannot focus on the subject automatically, the AE/AF lock indicator changes to flashing
slowly and the beep does not sound. The AF range finder frame disappears from the LCD screen.
Recompose the shot and focus again.
Subjects difficult to focus on are:
– Distant from the camera and dark
– The contrast between the subject and its background is poor.
– Seen through glass
–Moving fast
– Reflective light or with a lustrous finish
–Flashing
– Backlit
Using the zoom
Press the zoom button.
• When the zoom scale exceeds 3×, the camera uses the Digital Zoom function.
For details on the [Digital Zoom] settings and the image quality, see page 67.
Basic Operations
19

Shooting images easily (Auto adjustment mode)
Flash (Selecting a flash mode for still images)
Press repeatedly until the desired mode is selected.
: Flash Auto
Strobes when there is insufficient light or backlight (default setting)
• No indicator appears on the lower part of the screen even if you select this setting.
: Flash forced on
: Slow synchro (Flash forced on)
SL
The shutter speed is slow in a dark place to clearly shoot the background that is out of flash light.
: Flash forced off
• The flash strobes twice. The first time is to adjust the light quantity.
• The CHG lamp flashes while charging the flash.
Macro/Magnifying Glass (Shooting close-up)
Press / repeatedly until the desired mode is selected.
: Macro Off (Default setting)
• No indicator appears on the lower part of the screen even if you select this setting.
: Macro On (W side: Approx. 8 cm or farther (3 1/4 inches or farther), T side: Approx. 25 cm or farther
(9 7/8 inches or farther))
:Magnifying Glass On (Locked to the W side: Approx. 1 to 20 cm (13/32 to 7 7/8 inches))
Macro
• Setting the zoom all the way to the W side is recommended.
• The in-focus range becomes narrow, and the complete subject may not entirely be in focus.
• The Auto Focus speed drops.
Magnifying Glass
• Use this mode to shoot at even closer distances than (Macro) recording.
• Burst and Exposure Bracket cannot be used (page 39).
• The optical zoom is locked to the W side and cannot be used.
• When you press the zoom button, the image is enlarged using the digital zoom.
20
Shooting images easily (Auto adjustment mode)
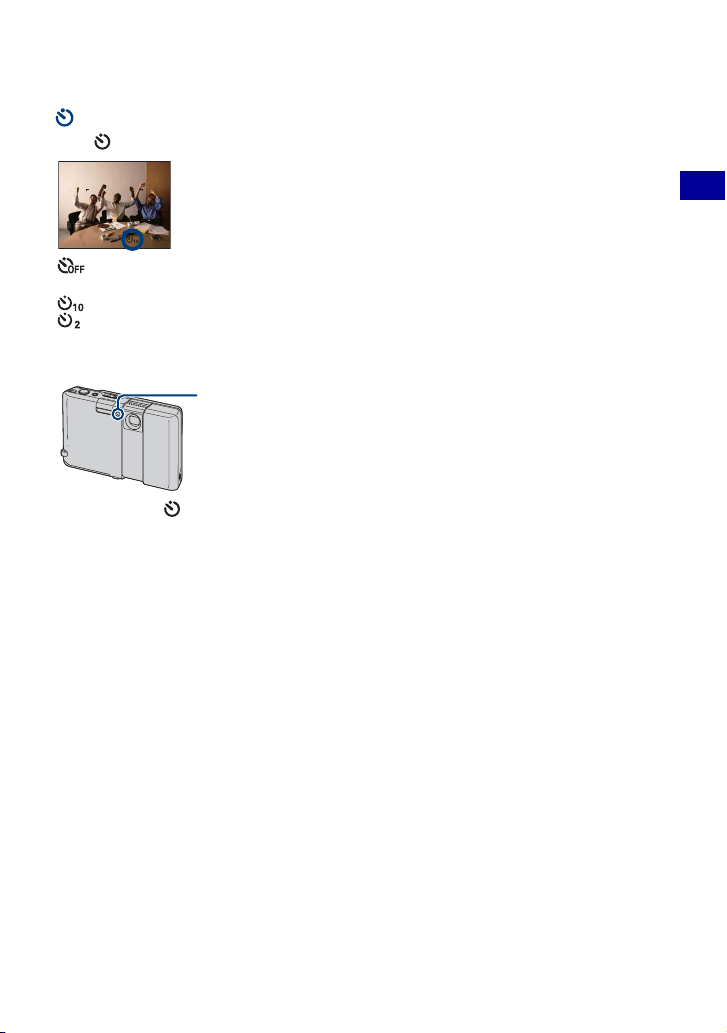
Using the self-timer
Press repeatedly until the desired mode is selected.
: Not using the self-timer
• No indicator appears on the lower part of the screen even if you select this setting.
: Setting the 10-second delay self-timer
: Setting the 2-second delay self-timer
Press the shutter button, the self-timer lamp flashes, and a beep sounds until the shutter
operates.
Self-timer lamp
To cancel, press again.
Basic Operations
21

Shooting images easily (Auto adjustment mode)
To change the image size
Press (Image Size), and then move the control button to select the size.
The default settings are marked with .
Image size Usage guidelines No. of images Printing
6M (2816×2112) For prints up to A4(8×10") Less
1)
3:2
(2816×1872) Shoot with 3:2 aspect ratio
Fine
3M (2048×1536) For prints up to 13×18 cm(5×7")
2M (1632×1224) For prints up to 9×13 cm(3.5×5")
VGA (640×480) For emailing (640×480)
More
2)
(1920×1080)
16:9
1) Images are recorded in 3:2 aspect ratio, same as photograph printing paper or postcards, etc.
2) Both edges of the image may be cut off when printing (page 112).
3) By using a Memory Stick slot, USB connection, or via a network (page 95), you can enjoy images in
higher quality.
Movie image size Frame/Second Usage guidelines
Display On 16:9 HDTV
3)
Rough
640×480 Approx. 30 Display on TV
320×240 Approx. 30 For emailing (320×240)
• The larger the image size, the higher the image quality.
22
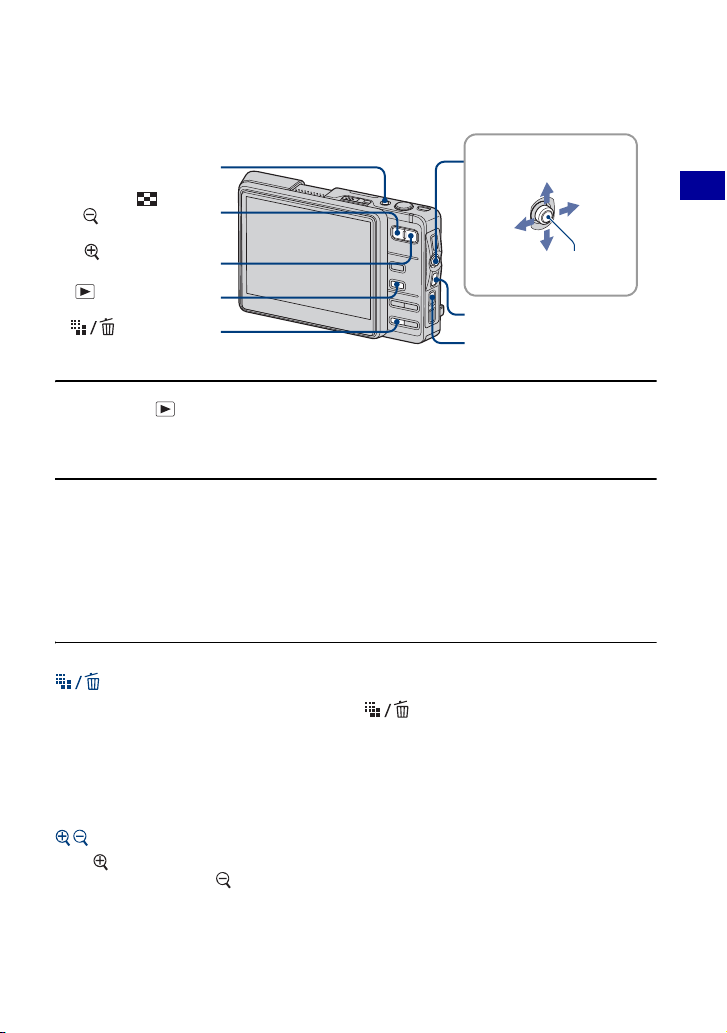
Viewing/deleting images
POWER button
(Index)/
(Playback zoom)
button
(Playback zoom)
butto n
(Playback) button
(Delete) button
Control button
Up
Left
Down
BACK button
MENU button
Right
Press z
1 Press the (Playback) button.
When the lens cover is closed, pressing the POWER button turns on the camera with the playback
mode.
2 Select an image by moving the control button to C/c.
Moving it to C displays the previous image, and moving it to c displays the next image.
Movie:
Press
z to play back a movie. (Press z again to stop playback.)
Holding the control button to C to rewind and to c to fast forward.
Moving the control button to X/x to adjust the volume.
To delete images
1 Display the image you want to delete and press (Delete).
2 Select [Original Image Only] or [Original & Album Images] with the control button, then press
z.
To cancel the deletion
Select [Exit], then press z.
To view an enlarged image (playback zoom)
Press while displaying a still image.
To undo the zoom, press .
Adjust the portion: Moving the control button to X/x/C/c.
Cancel playback zoom: Press BACK.
• If you operate the playback zoom function, the screen indicators are turned off except for the zoom scaling
indicator.
Basic Operations
23

Viewing/deleting images
Viewing an index screen
Press (Index) to switch to the index screen. Each time you press DISP (Screen display
switch) or (Index), the screen changes as follows.
DISP (Screen display switch) button
DISP (Screen display switch) or (Index) button
Select an image with the control button.
To return to the single-image screen, press z.
To delete images in index mode
1 Press (Delete) while the index screen is displayed.
2 Select the images (below).
3 Select [Original Image Only] or [Original & Album Images] with the control button, then press
z.
Selecting multiple images
After you select multiple images, you can perform the following functions on all the selected
images collectively.
Delete/Print/Picture Gift/Share Images/Import/Export/Slide Show/Label/Protect
1 Select the image selection mode in each function.
The browse screen appears.
24

Viewing/deleting images
2 Select the image with the control button, then press z.
The mark is checked in the box of the image.
To select all the images in an album (or a folder)
Keep the control button to C until the frame of an album (or a folder) is selected, then press z.
The mark is checked in the box of all the images in the album (or folder).
3 Press MENU.
4 Select [OK], then press z.
Each function is executed.
To cancel the selection
In Step 2, select the image that the mark is checked, then press z. The mark is took off
from the box of the image.
Basic Operations
25

How to operate – home/menu
Using the home screen
The home screen is the basic screen used for accessing the various functions. You can access
the home screen regardless of the shooting/viewing mode.
Control button
Up
Right
Left
Press z
Down
HOME button
1 Press HOME to display the home screen.
Category
Item
Guide
2 Move the control button to C/c to select a category.
3 Move the control button to X/x to select an item.
4 Press z to set.
• The home screen cannot be displayed during a PictBridge/USB connection.
26

How to operate – home/menu
The home list
Pressing the HOME button displays the following items.
Details on the items are displayed on the screen using the guide.
Category Items
Camera
Viewer
Music
Communication
Toolbox
Media Tools
Photo (page 31)
Movie (page 31)
Album (page 41)
Memory Stick (page 41)
Last Image (page 41)
Last Viewed (page 41)
Slide Show (page 42)
Audio Player (page 102)
Collaboration Shot (page 91)
Picture Gift (page 93)
Print (page 98)
Share Images (page 95)
General (page 56)
Media Space File Number
Default Media Check Album
Memory Stick (page 57)
Format Create REC. Folder
Change REC. Folder
Internal Memory (page 59)
Scan Images Format
Fully Format
Basic Operations
27

How to operate – home/menu
Category Items
Settings
Main
Clock Set (page 65)
Camera (page 66)
Music (page 69)
Network (page 70)
Sound (page 61)
Beep AVLS
Screen (page 62)
Language HOME Design
Function Guide LCD Brightness
Preferences (page 63)
Initialize USB Connect
Video Out
Clock Set
Image Size(Photos) Image Size(Movies)
AF Mode Digital Zoom
Red Eye Reduction AF Illuminator
SteadyShot Auto Orientation
Repeat MEGA BASS
LCD Auto Off
Access Point Network Power Save
Nickname Img exchg password
28
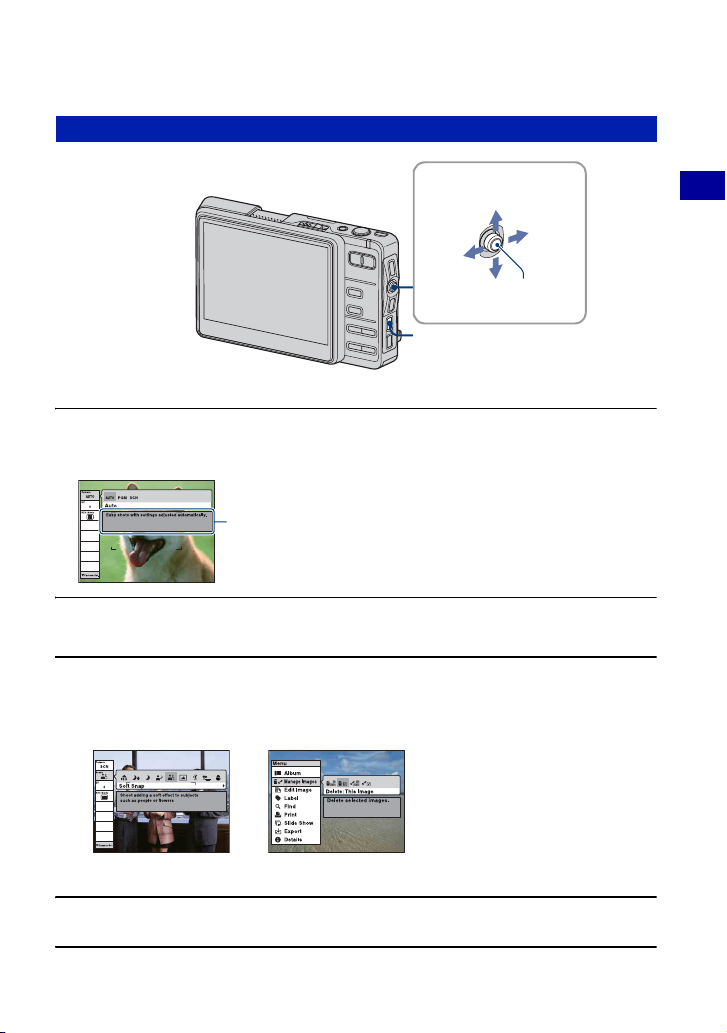
How to operate – home/menu
Using menu items
1 Press MENU to display the menu.
• Different items are available depending on the mode.
Function guide
Setting [Function Guide] to [Off] turns off the function guide
(page 62).
Control button
Up
Left
Down
MENU button
Basic Operations
Right
Press z
2 Move the control button to X/x to select the menu item.
3 Move the control button to C/c to select a setting.
• To display an item that is not displayed, move the control button to C/c until the item is displayed.
Shooting mode Playback mode
• Press z after selecting an item in playback mode.
4 Press MENU to turn off the menu.
29
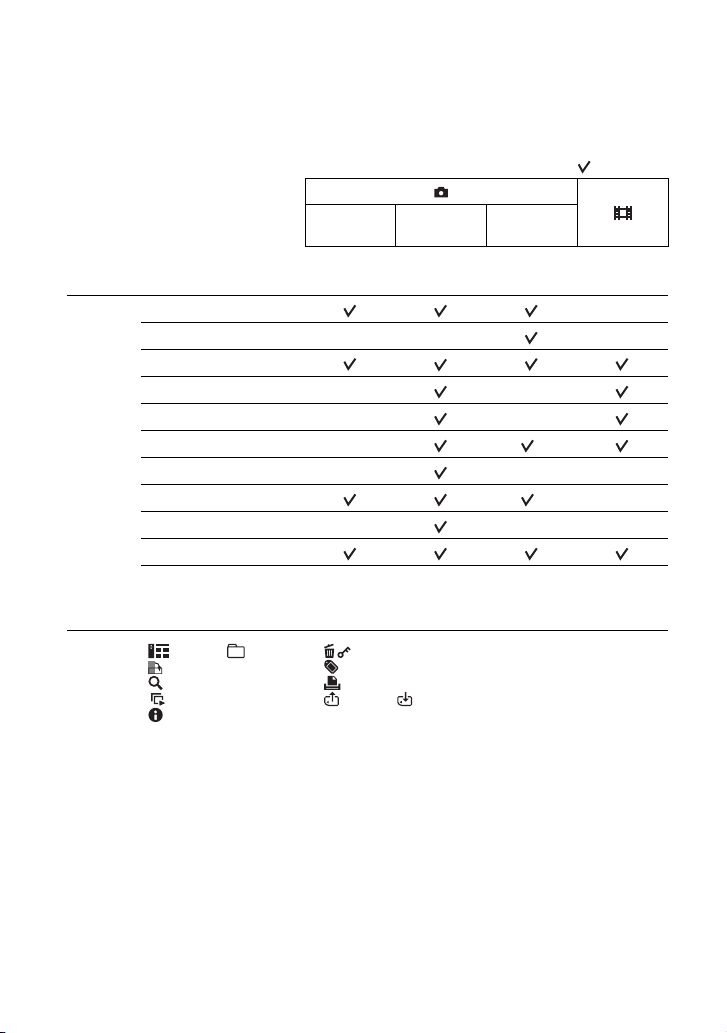
Menu items
The available menu items vary depending on the mode position. Only the available items are
displayed on the screen.
( : available)
Menu for shooting (page 34)
Camera
Scene
EV
Focus —
Metering Mode —
White Bal —
ISO — — —
REC Mode
Flash Level —
Camera Set.
*The operation is limited according to the Scene Selection mode (page 33).
Menu for viewing (page 45)
Album ( Folder) Manage Images
Edit Image Label
Find Print
Slide Show Import ( Export)
Details
Auto Program
—— —
Scene
Selection
—
—
—
*
* —
——
30
 Loading...