

Page 1
3-060-523-12(1)
DSC-S50
Digital Still
Camera
Operating Instructions
Before operati ng t h e unit, please read thi s ma nual thoroughly, and retain
it for futur e reference.
Owner’s Record
The model and serial numbers are located on the bottom. Record the
serial number in th e space provided below. Refer to these numbers
whenever you call upon you r Sony dealer regarding this product.
Model No.________________________
Serial No. ________________________
DSC-S30/S50
©2000 Sony Corporation
Page 2

W ARNING
To prevent fire or shock hazard, do
not expose the unit to rain or
moisture.
For the Customers in the
U.S.A.
This symbol is intended to
alert the user to the presence
of uninsulated “dangerous
voltage” within the
product’s enclosure that
may be of sufficient
magnitude to constitute a
risk of elec tr ic shock to
persons.
This symbol is intended to
alert the user to the presence
of important operating and
maintenance (servicing)
instructions in the lite rature
accompanyin g the
appliance.
Never expose the battery pack to
temperature above 140°F (60°C), such as in
a car parked in the sun or under direct
sunlight.
If you have any questions about this product,
you may call:
Sony Customer Information Center
1-800-222-SONY (7669)
or write to:
Sony Customer Information Center
1 Sony Drive, Mail Drop #T1-11, Park
Ridge, NJ 07656
CAUTION
You are cautioned that any changes or
modifications not expressly approved in this
manual could void your authority to operate
this equipment.
Declaration of Conformity
Trade Name: SONY
Model No.: DSC-S30
Responsible Party:Sony Electronics Inc.
Address: 1 Sony Drive, Park
Ridge, NJ 07656
USA
Telephone No.: 201-930-6972
This device complies with Part 15 of the
FCC Rules. Operation is subject to the
following two conditions: (1) This
device may not cause harmful
interference, and (2) this device must
accept any interference received,
including interference that may cause
undesired operation.
Declaration of Conformity
Trade Name: SONY
Model No.: DSC-S50
Responsible Party:Sony Electronics Inc.
Address: 1 Sony Drive, Park
Ridge, NJ 07656
USA
Telephone No.: 201-930-6972
This device complies with Part 15 of the
FCC Rules. Operation is subject to the
following two conditions: (1) This
device may not cause harmful
interference, and (2) this device must
accept any interference received,
including interference that may cause
undesired operation.
2
Page 3

Note:
This equipment has been tested and found to
comply with the limits for a Class B digital
device, pursuant to Part 15 of the FCC
Rules. These limits are de s ig n ed to provide
reasonable protection agains t ha rmf ul
interference in a residential installation. This
equipment generates, uses, and can radiate
radio frequency energy and, if not installed
and used in accordance with the
instructions, may cau se harmful interf erence
to radio communications. However, there is
no guarantee that in terfere nce wi ll n ot occu r
in a particular installation. If this equipment
does cause harmful interference to radio or
television reception, which can be
determined by turning the equipment off and
on, the user is encouraged to try to correct
the interference by one or more of the
following measures:
— Reorient or relocate the receiving
antenna.
— Increase the separation between the
equipment and receiver.
— Connect the equipment into an outlet
on a circuit different from that to which
the receiver is connected.
— Consult the dealer or an experience d
radio/TV technician for help.
The shielded interface cable recommended
in this manual must be used with this
equipment in order to comply with the limits
for a digital device pursuant to Subpart B of
Part 15 of FCC Rules.
DISPOSAL OF LITHIUM ION
BA TTERY .
LITHIUM ION BATTERY.
DISPOSE OF PROPERLY.
You can return your unwanted lithium ion
batteries to your nearest Sony Service
Center or F actory Service Center.
Note:
In some areas the di sposal of lithium ion
batteries in household or business trash may
be prohibited.
For the Sony Servi ce Center near est yo u call
1-800-222-SONY (United States only)
For the Sony Fact ory Servic e Cent er neare st
you call 416-499-SONY (Canada only)
Caution:
Do not handle damaged or leak ing li thium
ion battery.
For the Customers in Canada
CAUTION
TO PREVENT ELECTRIC SHOCK, DO
NOT USE THIS POLARIZED AC PLUG
WITH AN EXTENSION CORD,
RECEPTACLE OR OTHER OUTLET
UNLESS THE BLADES CAN BE FULLY
INSERTED TO PREVENT BLADE
EXPOSURE.
NOTICE FOR THE
CUSTOMERS IN THE UNITED
KINGDOM
A moulded plug complying with BS 1363 is
fitted to this equipment for your safety a nd
convenience.
Should the fuse in the plug supplied need to
be replaced, a 5 AMP fuse approved by
ASTA or BSI to BS 1362, (i.e. marked with
or mark) must be used.
If the plug supplied with this equipment has
a detachable fuse cov er, be sure to attach t he
fuse cover after you change the fuse. Never
use the plug without the fuse cover. If you
should lose the fuse cover, please contact
your nearest Sony service station.
For the Customers in
Germany
Directive: EMC Directive 89/336/EE C.9 2 /
31/EEC
This equipment complies with the EMC
regulations when used under the following
circumstances:
•
Residential area
•
Business district
•
Light-i ndustry district
(This equipment complies with the EMC
standard regulations EN55022 Clas s B. )
3
Page 4

Attention
The electromagnetic f i elds at the specific
frequencies may influence the picture and
sound of this camera.
“Memory Stick”
N50
For the Customers in CANAD A
This Class B digital apparatus complies with
Canadian ICES-003.
For the Customers in the
U.S.A.
This device complies with Part 15 of the
FCC Rules. Operation is subject to the
following two conditions: (1) This device
may not cause harmful interf e renc e , a nd
(2) this device must accept any interference
received, including interference that may
cause undesired operation.
Be sure to read the following
before using your camera
• This Owner's Manual is for the two
models of the DSC-S30 and the
DSC-S50. Check to make sure which
model you have purchased bef ore
you use yo ur camera.
• The illustrations in this manual
show the DSC-S 50.
Trial recording
Before you record one-time events, you may
want to make a trial recordin g to ma ke sur e
that the camera is working correctly.
No compensation for contents of
the recording
Contents of the recordin g cannot be
compensated for if recording or pla yba c k is
not possible due to a malfuncti on of your
camera, etc.
Notes on image data compatibility
•
This camera conforms w i th the Design
Rules for Camera File Systems universal
standard established by the JEIDA (Japan
Electronic Industries Development
Association). You cannot play back on
your camera still images recorded on other
equipment (DCR-TRV890E/TRV900/
TRV900E, DSC-D700, DSC-D770) that
does not conform with this universal
standard. (These models are not sold in
some areas.)
•
Playback of images recorded with your
camera on other equipment and playback
of images recorded or edited with other
equipment on your camera are not
guaranteed.
Precaution on copyright
Tele vision programs, films, video tapes, and
other materials may be copyrighted.
Unauthorized recording of such materials
may be contrary to the provision of the
copyright laws.
Do not shake or strike the camera
In addition to malfunctions and inability to
record images, this may render the
“Memory Stick” unusable or ima ge data
breakdown, damage or loss may occur.
LCD screen and lens
•
The LCD screen is manufactured using
high-precision technology. Ho wever, there
may be some tiny black points and/or
bright points (red, blue or green in colo r)
that consta n tly appear on the LCD screen .
These points are normal in the
manufacturing process and do not affect
the recording in any way. Over 99.99% of
the pixels are operational for effective use.
•
Be careful when placing the camera near a
window or outdoors. Exposing the LCD
screen or the lens to direc t sunlight for
long periods may cause malfunctions.
Do not get the camera wet
When taking pictures outdoors in the rain or
under similar conditions, be car eful not to
get the camera wet. If moisture
condensation occurs, refer to page 54 and
follow the instructions on how to remove it
before using the camera.
Back up recommendation
To avoid the potential risk of data loss,
always copy (back up) data to a disk.
4
Page 5

Table of contents
Getting started
Identifying the parts ..............................6
Preparing the power supply ..................8
Setting the date and time .....................13
Inserting the “Memory Stick” .............15
Basic operations
Recording
B
Recording still images ........................16
Recording moving images
(DSC-S50 only) ...........................20
Playback
B
Playing back still images ....................21
Playing back moving images .............. 22
Viewing images using a personal
computer ...................................... 24
Image file storage destinations a nd
image files ....................................28
Advanced operations
Before performing advanced operations
How to use the MODE selector ..........29
How to use the control button .............29
How to change the menu settings ....... 31
Menu settings ................ ......................32
Various recording
B
Rotating the LCD screen
— Face-to-Face recording ...........37
Setting th e image size
(IMAGE SIZE) ............................ 37
Recording still images for e-mail
(E-MAIL) ..................................... 38
Adding audio files to still images
(VOICE) (DSC-S50 only) ..........39
Recording text documents (TEXT) ..... 39
Recording un compressed image s
(TIFF) ............... ............................ 40
Recording images in macro ................41
Setting the distance to the subject .......41
Using the PROGRAM AE function .... 42
Adjusting the exposure
(EXPOSURE) .............................. 43
Adjusting the whit e ba la nce
(WHITE BALANCE) ..................43
Recordin g the date and tim e on the still
image (DATE/TIME) ..................44
Enjoying picture effects (P. E F F E C T ) . 44
Various playback
B
Playing back six images at once
(INDEX) ...................................... 45
Enlarging a part of the still image
(Zoom and trimming) ..................46
Rotating a still image (ROTATE) .......47
Playing back the images in order
(SLIDE SHOW) ....................... .... 47
Viewing images on a TV screen .........48
Editing
B
Preventing ac c idental erasure
(PROTECT) ................................. 49
Deleting images (DELETE) ................50
Changing the recorded still image size
(RESIZE) ..................................... 51
Copying images (COPY) ....................51
Selecting still images to print
(PRINT MARK) ..........................53
Additional information
Precautions .......................................... 54
On “Memory Sticks” .......................... 55
Using your camera abroad ..................56
Troubleshooting .................................. 57
Warning and notice messages .............61
Self-diagnosis display .........................62
Specifications ...................................... 63
LCD screen indicators ........................64
Index ...................................................66
5
Page 6

Getting started
Identifying the parts
See the pages in parentheses for de ta i ls of operation.
1
2
3
4
A Flash (19)
B MODE selector (29)
C Shutter button (16) (20)
D Lens cap
E Photocell window for flash
Do not block while recording.
F Self-timer/recording lamp
G Built-in microphone (DSC-S50
only)
Do not touch while recording.
H Speaker (DSC-S50 only)
5
6
7
8
9
0qsqa
I Lens
J A/V OUT jack (DSC-S50 only)
(48)
Audio output is monaural.
VIDEO OUT jack (DSC-S30
only) (48)
K USB jack (25) (26)
L Tripod receptacle (bottom
surface)
Use a tripod with a screw length of
less than 9/32 inch (6.5 mm). You
will be unable to firmly secure the
camera to tripods having longer
screws, and may damage the
camera.
6
Page 7

Attaching the strap
Getting started
1
2
9
3
4
5
6
7
8
0
qf
qg
qh
qj
qa
qs
qd
A Flash button
B FOCUS button (41)
C LCD BACKLIGHT BRIGHT/
NORMAL switch
Usually set to NORMAL. When
you use the camera outdoors or in
other br ight places, setting this to
BRIGHT makes the LCD screen
bright and easy to s ee, but also
uses up the batte ry fast er.
D Control butt on
E PROGRAM AE +/– button
VOLUME +/– button
F PROGRAM AE button (42)
G DISPLAY button
H LCD screen
I Hook for lens cap/strap
J Zoom button
K Access lamp (15)
L Battery/“Memory Stick” cover
M Battery eject lever (8)
N OPEN switch
O POWER switch
P DC IN jack (9) (12)
Q POWER lamp/BATT CHARGE
lamp (9) (13)
7
Page 8
Preparing the power supply
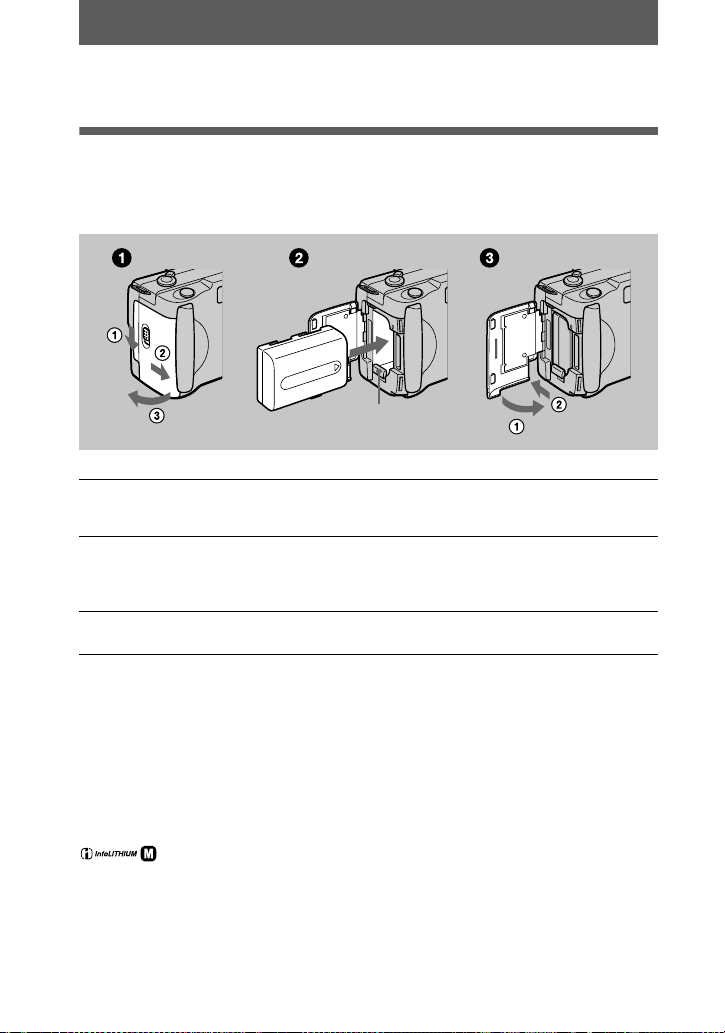
Installing the battery pack
Your camera operates only with the “InfoLITHIUM” NP-FM50 battery pack* (M
series). You cannot use any other battery pack.
Battery eject lever
Open the battery/“Memory Stick” cover.
1
Open the cover while sliding the OPEN switch in the direction of the arrow.
Install the battery pack.
2
Insert the batter y pack with the B mark facing toward the battery compartment
as illustrated.
Close the battery/“Memory Stick” cover.
3
To remove the battery pack
Open the battery/“Memory Stick” cover. Slide the battery eject lever
downward, and remove the battery pack.
Be careful not to drop the battery pack when removing it.
* What is “InfoLITHIUM”?
“InfoLITHIUM” is a lithium ion battery pack which can exchange information such as battery
consumption with compatible video equipment. This unit is compatible with the
“InfoLITHIUM” battery pack (M series). “Inf oLITHIUM” M series battery packs have the
mark. “InfoLITHIUM” is a trademark of Sony Corporation.
8
Page 9
Charging the battery pack
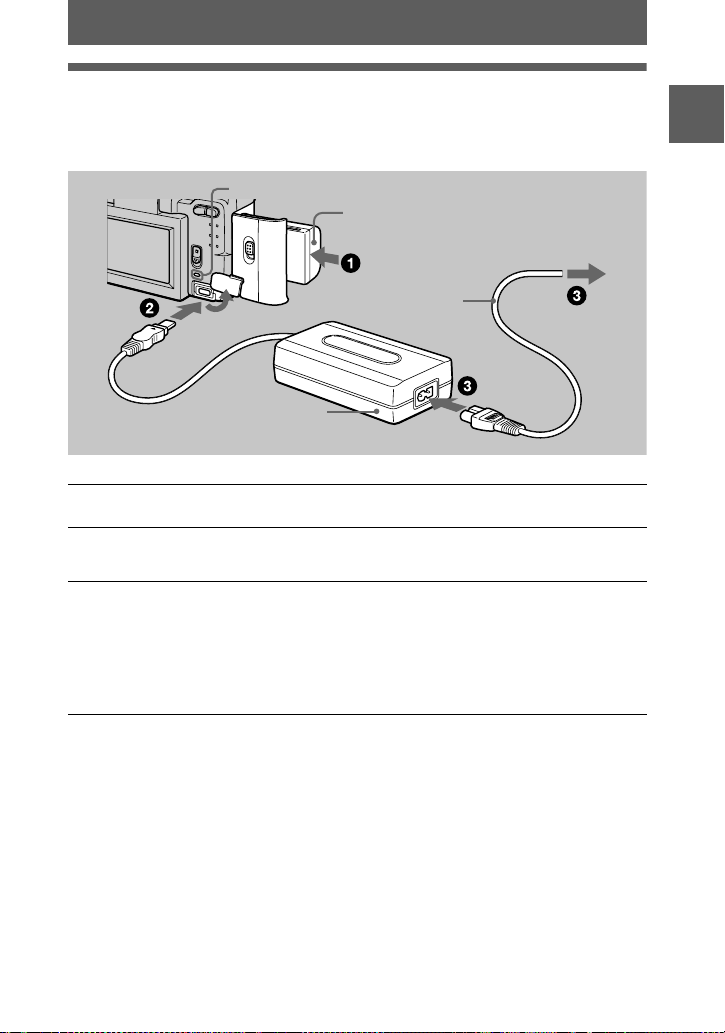
You cannot charge the bat te ry pack while your camera is turned on. Be s ure to turn
off your camera before charging.
BATT CHARGE lamp
Battery pack (M series)
To the wall outlet (mains)
Power cord
DC IN jack cover
(mains lead)
Getting started
AC power adaptor
Inser t the batter y pack into your c amera.
1
Open the DC IN jack cover and connect the DC connecting cable to
2
the DC IN jack of your camera with the v mark facing up.
Connect the power cord (mains lead) to the AC power adaptor and
3
then to a wall outlet (mains).
The BATT CH A R G E lamp lights orange w hen charging begins. When the
BATT CHARGE lamp goes off,
charge
, which allows you to use the battery longer than usual, leave the
battery pack inse rt ed for about one hour aft er normal charge is compl eted.
Battery remaining indicator
The LCD screen on the camera shows the remaining time for which you can still
record or play back images.
This indication may not be entirely accurat e depending on the condi t io ns of use and
the operating environment.
Auto power-off function
If you do not operate the came ra for abou t three mi nutes durin g recordi ng, the camer a
turns off automaticall y to prevent wearing down the batte ry. To use the camera again,
slide down the POWER switch to turn on the camera again.
AC-L10
normal ch arge
is completed. For
full
9
Page 10

Charging time
Battery pack Full charge (min.) Normal charge (min.)
NP-FM50 (supplied) 150 90
Approximate time to charge a completely discharged battery pack using the AC-L10
AC power adaptor.
Battery life and number of images that can be recorded/played back
STILL mode recording*
DSC-S50
LCD BACKLIGHT Battery life (min.) Number of images
BRIGHT 140 (130) 2300 (2100)
NORMAL 150 (140) 2500 (2300)
DSC-S30
LCD BACKLIGHT Battery life (min.) Number of images
BRIGHT 140 (130) 2800 (2600)
NORMAL 150 (140) 3000 (2800)
STILL mode playback** (DSC-S50/S30)
LCD BACKLIGHT Battery life (min.) Number of images
BRIGHT 170 (160) 3400 (3200)
NORMAL 220 (210) 4400 (4200)
Approximate battery life and number of images that can be recorded/played back
with a fully charged batte ry pack at a temperature of 77°F (25°C), 640×480 i m age
size and in NORMAL recording mode. Numbers in parentheses indicate the time
when you use a normally charged battery p ack.
Recording at about 5-second intervals
∗
Playing back single images in orde r at ab out 3- se c ond intervals
∗∗
MOVIE mode recording (DSC- S50 only)
LCD BACKLIGHT Battery life (min.)
BRIGHT 140 (130)
NORMAL 150 (140)
Approximate time that can be recorded with a fully charged battery pack at a
temperature of 77°F (25 °C) and 160×112 image size. Numbers in parentheses
indicate the time when you use a normally charged battery pack.
10
Page 11

Notes
•
The battery life and number of images will be decreased if you use your camera at low
temperatures, use the flas h , rep eatedly turn the power on/off or use the zoom.
•
The capacity of the “Memory Stick” is limited. The above figures are a guide when you
continuously record/play back while replacing the “Memory Stick.”
•
If sufficient battery remaining time is indicated but the power runs out soon, fully charge the
battery so that the correc t ba ttery remaining time appea r s.
•
Do not short the DC plug of the AC power adaptor with a metallic object, as this may cause
malfunction.
•
Do not expose the battery pack to water.
Getting started
11
Page 12
Using the AC power adaptor
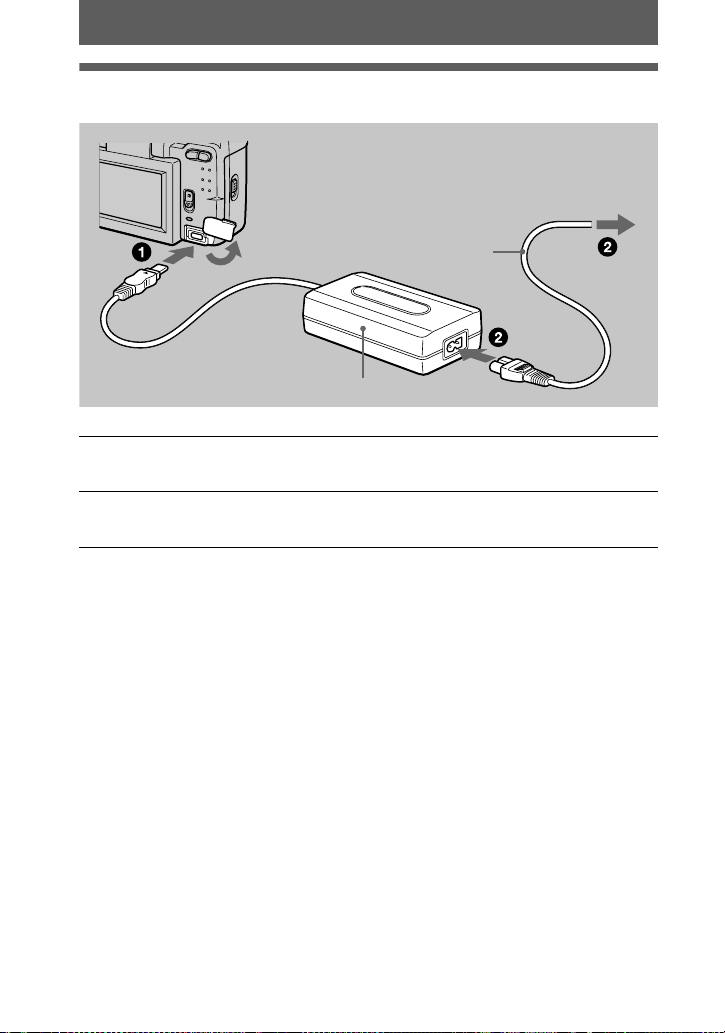
To the wall outlet (mains)
DC IN jack cover
AC-L10 AC power adaptor
Open the DC IN jack cover and connect the DC connecting cable to
1
the DC IN jack of your camera with the v mark facing up.
Connect the power cord (mains lea d) to th e AC power adaptor and
2
then to a wall outlet (mains).
Using a car battery
Use Sony DC adaptor/charger.
Power cord
(mains lead)
12
Page 13

Setting the date and time
When you first use your camera, set the date and time. If these are not set, the
CLOCK SET screen appears whenever you turn on your camera for recording.
Control button
POWER
lamp
Slide down the POWER switch to turn on the power.
1
The POWER lamp lights up.
Press v on the control button.
2
The menu bar appears on the LCD screen .
Select [SETUP] with B on the control button,
3
then press t h e center z.
Getting started
Select [CLOCK SET] with v/V on the control button, then press the
4
center z.
13
Page 14

Select the desired date display format with
5
6
7
8
To cancel the date and time setting
Select [CANCEL] with v/V/b/B on the control button, then press the center z.
on the control button, then press the
v/V
center z.
Select from [Y/M/D] (year/month/day), [M/D/Y]
(month/day/y ear ) or [D/M/Y] (day/ m onth/year).
Select the year, month, day, ho ur or m inute
item you want to set with b/B on the control
button.
The item to be set is indicated with v/V.
Set the numeric value with v/V on the control button, then press
the center z to enter it .
After ent e ring the nu mber, v/V moves to the next item.
If you selected [D/M/Y] in st ep 5, set the time on a 24- hour cycle.
Select [ENTER] with B on the control button,
then press the center z at the desired
moment to begin clock movement.
The date and time are entered.
14
Page 15
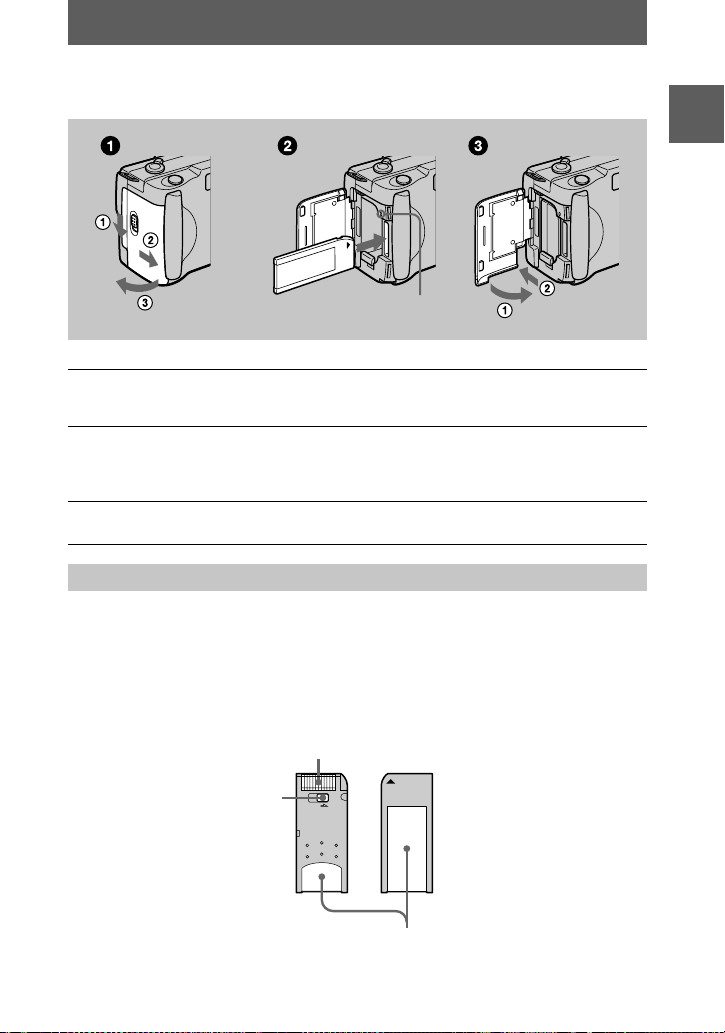
Inserting the “Memory Stick”
Access lamp
Open the battery/“Memory Stick” cover.
1
Open the cover while sliding the OPEN switch in the direction of the arrow.
Insert the “Memory Stick.”
2
Insert the “Memory Stick” with the B mark facing toward the battery
compartment as illustrated until it clicks.
Close the battery/“Memory Stick” cover.
3
Removing the “Memory Stick”
Open the battery/“Memory Stick” cover, then press the “Memory Stick” once ligh tly.
Notes
•
Insert the “Memory Stick” firmly until it clicks, otherwise a message such as “MEMORY
STICK ERROR” will be displayed.
•
Never remove the “Memory Stick” or turn off the power while the access lamp is lit up.
•
You cannot record or edit images on a “Memory Stick” if the erasure prevention switch is set to
the LOCK position.
Connector
Getting started
Erasure prevention switch
OC
Label space
15
Page 16
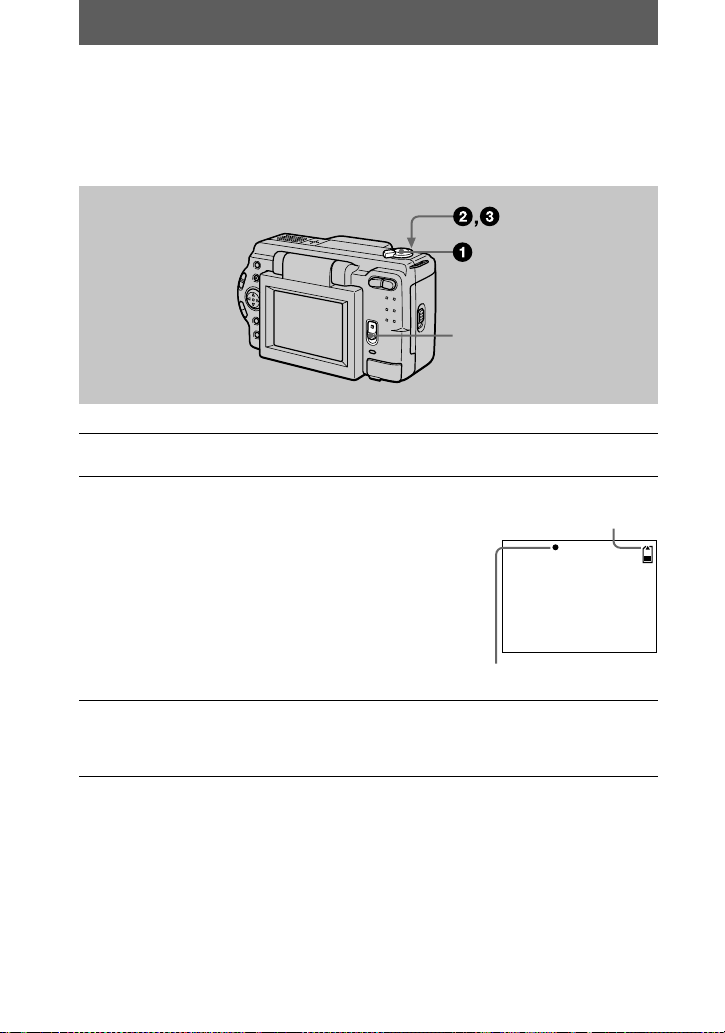
Basic operations
AE lock indicator
Remaining memory
capacity indicator
Recording
B
Recording still images
Still images ar e recorded in JPEG for m at .
To record still images, slide the POWER switch down to turn on the po we r and insert
a “Memory Stick.”
POWER switch
Set the MODE selector to STILL.
1
Press and hold the shutter button halfway
2
down and check the image.
While the AE lock indicator z (green) is flashin g,
the image freezes momentarily, but is not yet
recorded. When the camera finishes the automatic
adjustments*, the AE lock indicator z lights up
and the camera is ready for rec o rding.
T o cancel the recording, release the shutter button.
3
Exposure and focus are automatically adjusted.
∗
The number of images you can record on a “Memory Stick”
See pages 37 to 40.
Notes
•
While the image is being recorded on the “Memory Stick,” do not shake or strike the camera.
Also, do not turn the power off, or remove the battery pack or “Memory Stick.”
•
When recording a bright subje ct, t he LCD sc reen col or may ch ange a fte r AE lock , b ut this does
not affect the recorded image.
16
Press the shutter button fully down.
The shutter sounds and the image is re corded on the “Memory Stick.”
When “REC” disappears, you can record the next image.
Page 17

Checking the last recorded image (Quick Review)
The T side of the bar shows the
digital zooming zone.
You can check the last recorded image by clearing the menu bar from the screen
(page 31) and pres si ng b on the control button . To return to the norm al recording
mode, press lightly on the shutter button or select [RETURN] with b/B on the
control button and then press the center z. You can also delete the im age first by
selecting [DELETE] on the Quick Review screen with b/B on the cont rol button and
pressing the center z, and then selecting [OK] with v/V on the control button and
pressing the center z.
Using the zoom feature
Zoom button
W side: for wide-angle (subject appears
farther away)
T side: for telephoto (subject appears
closer)
Minimum focal distance to the subject
W side: About 9 7/8 inches (25 cm) or more
T side: About 23 5/8 inches (60cm) or more
To record even closer subjects, see page41.
Digital zoom function
This camera has a digital zoom function.
Digital zoom enlarges the image by digital processing and it starts to function when
zoom exceeds 3×.
BB
B
B
Recording
Using digital zoom
•
The maximum zoom magnification is 6×.
•
Digital zooming deteriorates the pi ct ure quality. When digital zoom is not
necessary, set [DIGITAL ZOOM] to [OFF] in the menu settings (page 34).
Note
Digital zoom does not work for moving images.
17
Page 18
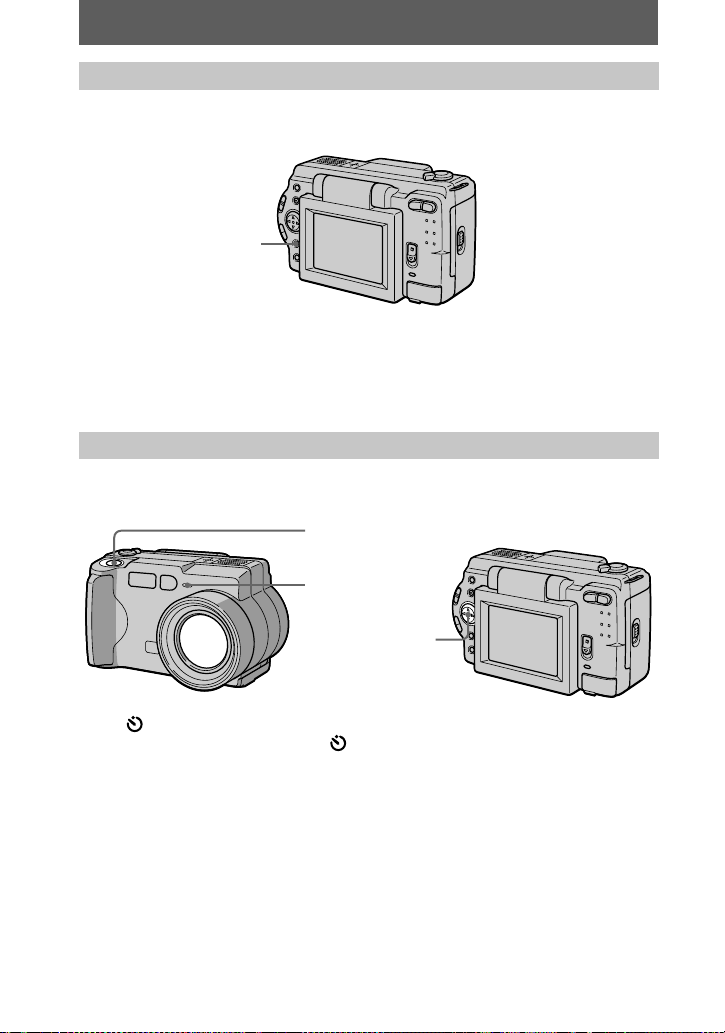
LCD screen indicators during recording
Press DISPLAY to turn on/off the indicators on the LCD screen.
See page 64 for a detailed description of the indicated items.
DISPLAY
Notes
•
You cannot turn off the self-timer indicators and some of the indicators used in advanced
operations.
•
The indicators on the LCD screen are not recorded.
Using the self-timer
When you use the self-timer function, the subject is recorded about 10 seconds after
you press the shutter button.
Shutter button
Self-timer lamp
Control button
Select (self-timer) indicator on the L CD screen with v/V/b/B on the control
button, then press the center z. The (self-timer) indicator a ppears on the LCD
screen, and about 10 seconds after yo u pr ess the shutter button, th e subject is
recorded. The self-timer lamp flashes after you press the shutter button until the
shutter is released.
18
Page 19

Recording images with the flash
The initial setting is auto (n o indicator). In this mode, the flash automatic al ly s trobes
when the surr oundings become dark. When you change the flash mode, press the
(flash) repeatedly so that the flash mode indicator appears on the LCD screen.
(
flash)
Each time you press the (flash), the indicator changes as follows.
(No indicator) t t t t (No indicator)
Auto red-eye reduction: The flash strobes before recording to reduce the
red-eye phenomenon .
Forced flash: The flash strobes regardless of the surrou nding
brightness.
No flash: The flash does not strobe.
You can change the brig ht ness of the flash (FLAS H LEV EL) in the menu settin gs
(page 34).
Notes
•
The recommended shooting distance using the built-in flash is 31/32 feet to 8 1/3 feet (0.3 m to
2.5 m).
•
Attaching a conversion lens (not supplied) may block the light from the flash or cause the lens
shadow to appear.
•
Auto red-eye reduction may not produce the desired red-eye reduction effects depending on
individual differences, the distance to the subje ct, if the subj ec t doe s not see the pre-strobe, or
other conditions. In addition, red-eye reduc tion effects are also difficult to obtain if you set the
shutter to a slow speed in the PROGRAM AE shutter priority mode.
•
The flash effect is not obtained easily when you use forced flash in a bright locat ion.
BB
B
B
Recording
19
Page 20
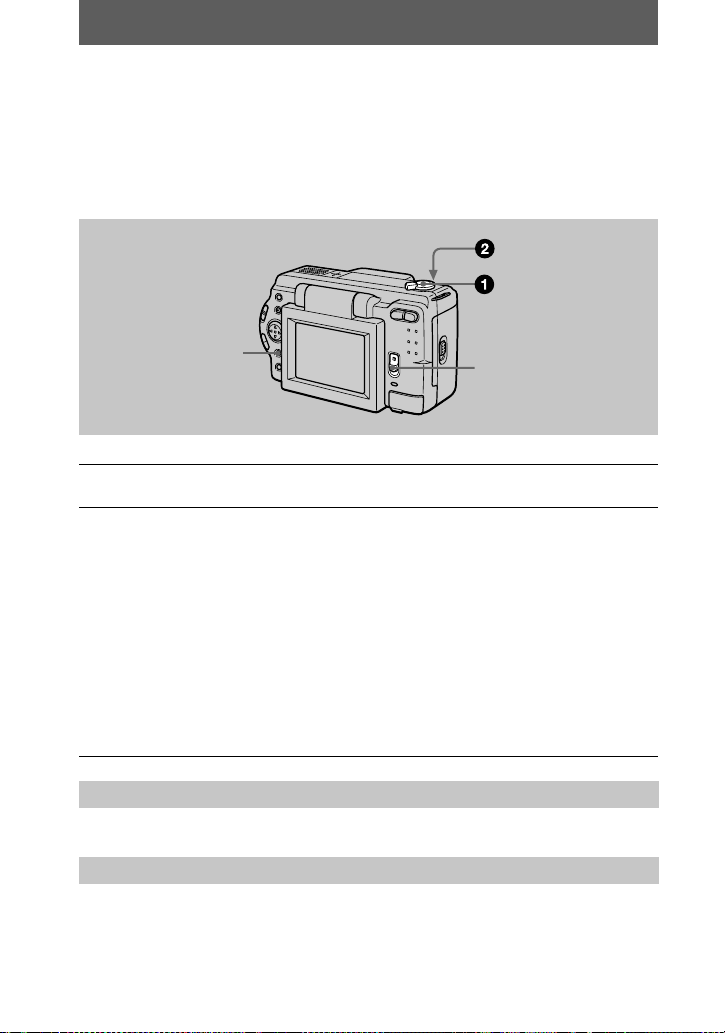
Recording moving images (DSCS50 only)
Moving images with audio are recorded in MPEG format.
To record mov i ng i m ages, slide the POWER swit ch down to turn on the power and
insert a “Mem ory Stick.”
DISPLAY
Set the MODE selector to MOVIE.
1
Press the shutter button fully down.
2
“REC” appears on th e LCD screen, and the i m age and sound are recorded on
the “Memory Stick . ”
If you press the shutter button momentarily
The image and sound are recorded for five seconds. You can change the
recording time to 10 or 15 seconds with [REC TIME SET] in the menu settings
(page 33).
If you hold the shutter button down
The image and sound are recorded while the shutter button is held down for up
to 60 seconds. However, when [IMAGE SIZE] in the menu setting is set to
[320×240], the maximum recording time is 15 seconds (page 33).
Zooming or using the self-timer, etc.
See pages 17 and 18.
LCD screen indicators during recording
Press DISPLAY to turn on/off the indicators on the LCD screen.
These indicators are not recorded. See page 64 for a detailed description of the
indicators.
POWER switch
20
Page 21
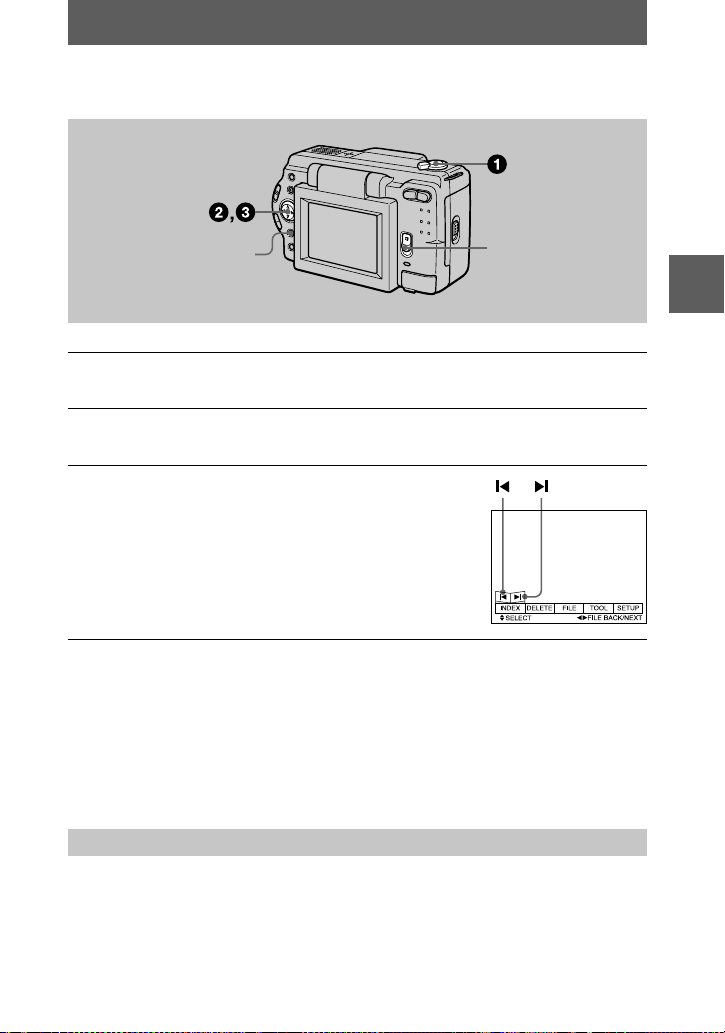
Playing back still images
Playback
B
DISPLAY
Set the MODE selector to PLAY.
1
The last recorded image (still or moving) appears on the LCD screen.
Press v on the control button to display the menu bar on the LCD
2
screen.
Select the desired still image with the
3
control button.
Press v/V/b/B on the control button to select "b/B"
on the LCD screen, then press b/B on the control
button.
: To display the preceding image.
"b
: To display the next image.
B"
When the menu bar is not displayed
You can directly select and play bac k the image with b/B on the control button .
Notes
•
You might not be able to correctl y play bac k im ag es reco rd ed with th i s cam era o n oth er
equipment.
•
You cannot play back on this camera ima ge s la rge r th an the maximum image size that c an b e
recorded with this camera.
POWER switch
BB
B
B
Playback
LCD screen indicators during still image playback
Press DISPLAY to turn on/off the indicators on the LCD screen.
See page 64 for a det ailed description of th e i ndicators.
21
Page 22
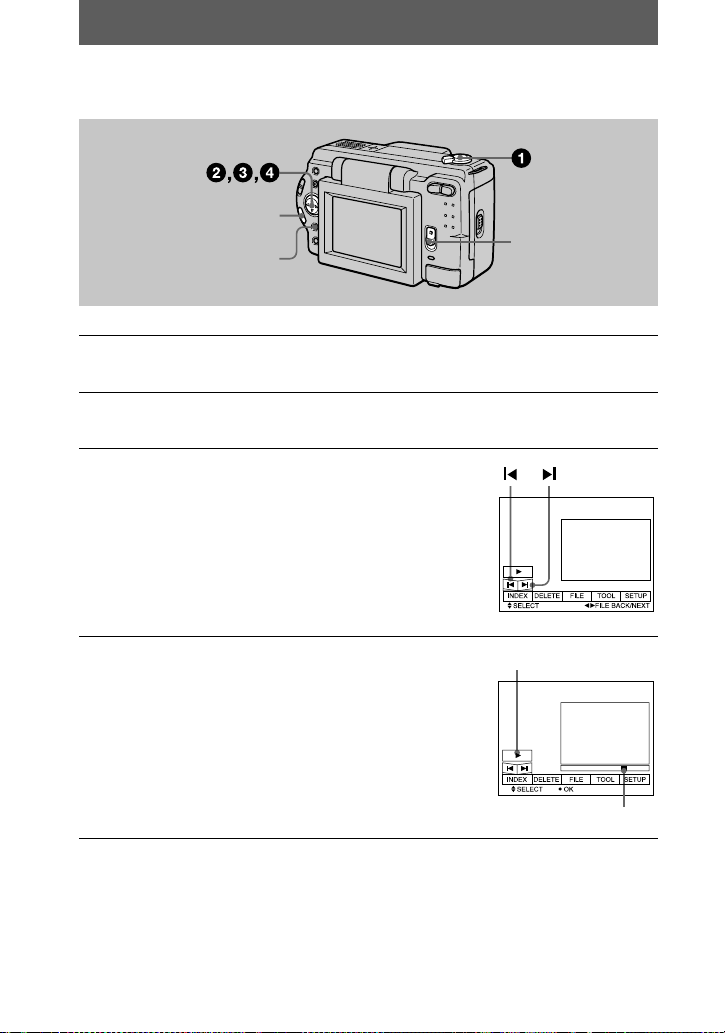
Playing back moving images
B
(playback)/X (pause)
Playback bar
VOLUME +/–
DISPLAY
Set the MODE selector to PLAY.
1
The last recorded image (still or moving ) appears on the LCD s cr een.
Press v on the control button to display the menu bar on the LCD
2
screen.
Select the desired moving imag e w i th the
3
control button.
Moving images are displayed one-size smaller than
still images.
Press v/V/b/B on the control button to select "b/B"
on the LCD screen, then press b/B on the control
button.
: To display the preceding image.
"b
: To display the next image.
B"
POWER switch
4
To pause playback
Select X (pause) on the LCD screen with v/V/b/B on the control button, th en pr es s
the center z.
22
Select
v/V/b/B
center z.
The moving image and sound* are played back.
During playback , B (playback) changes to X
(pause).
You can play back sound in DSC-S50 only.
∗
(playback) on the LCD screen with
B
on the control button, then press the
Page 23

When the menu bar is not displayed
You can directly select the image with b/B on the control button, and play back the
image and sound ( D SC- S50 only) by pressing the center z. When you press the
center z during playback, playback is paused.
Adjusting the volume (DSC-S50 only)
Press VOLUME +/– to adjust the volume.
LCD screen indicators during moving image playback
Press DISPLAY to turn on/off the indicators on the LCD screen.
See page 64 for a det ailed description of th e i ndicators.
BB
B
B
Playback
23
Page 24

Viewing images using a personal
computer
You can view data recorded with your camera on a personal computer and attach it to
e-mail. This section describes the method for installing the USB driver and viewing
images on a pers onal computer. Be sure to also see the op eration manuals for yo ur
personal compu t er and application s oftware.
Note
Data recorded with your cam era is stored in the following formats. Make sure that ap pli ca ti ons
that support these file formats are installed on your personal computer.
•
Still images (other than TEXT and uncom pr e sse d modes): JPEG format
•
Moving images/audio: MPEG format
•
Uncompressed mode still images: TIFF format
•
TEXT mode: GIF format
Recommended computer environment
Recommended Windows environment
OS: Microsoft Windows98, Windows 98SE
Standard installation is required.
Operation is not assured in an environment upgra de d f ro m:
Windows3.1, Windows 95 to Windows98 or
Windows98 to Windows98SE.
CPU: MMX Pentium 200 MHz or faster
The USB connector must be provided as standard.
ActiveMovie Player (DirectShow) must be installed (to play back moving pictures).
Recommended Macintosh environment
Macintosh computer with the Mac OS 8.5.1/8. 6 /9. 0 standard installat ion
However, note that the update to Mac OS 9.0 should be used for the following models.
•
iMac with the Mac OS 8.6 standard installati on an d a slo t loa ding type CD-ROM drive
•
iBook or G4 with the Mac OS 8.6 standard installation
The USB connector must be provided as standard.
QuickTime 3.2 or newer must be installed (to play back moving pic ture s) .
Notes
•
Operations are not guaranteed for either the Windows or Macintosh environment if you connect
two or more USB equipment to a single personal computer at the same time (excep t for the
USB keyboard and mouse which are provided as standard), or when using a hub.
•
Depending on the type of USB equipment that is used simultaneously, some equipment may
not operate.
•
Operations are not guaranteed for all the recommended computer environments mentioned
above.
24
Page 25
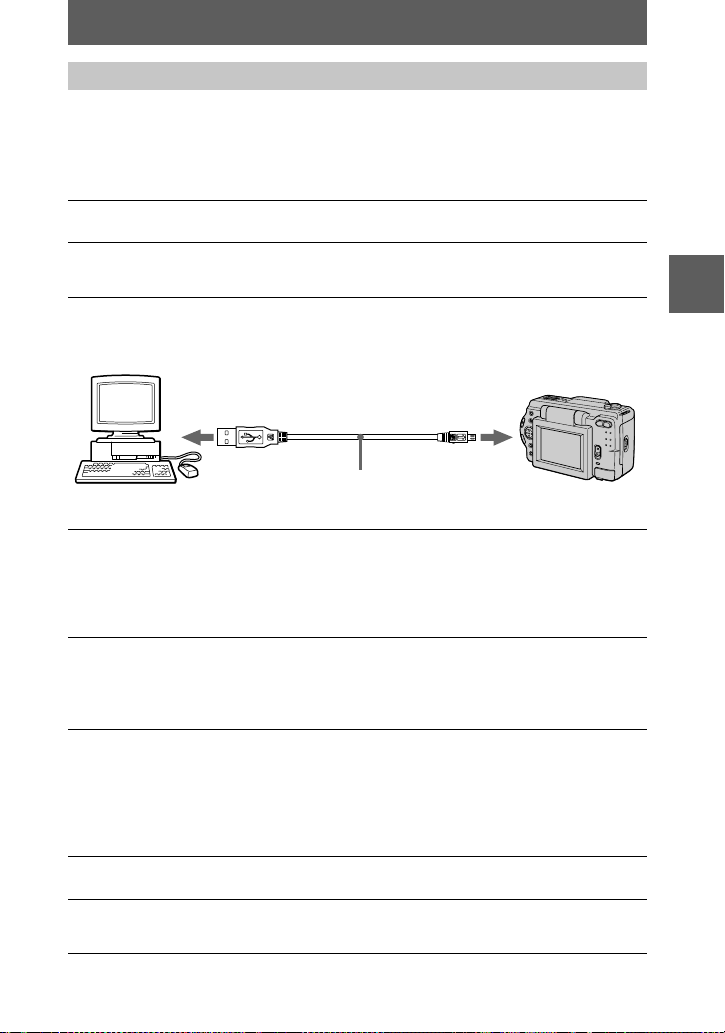
Installing the USB driver
Before connecting your camera to your personal computer, install the USB driver to
the computer. The USB driver is contained together with application software for
viewing images on a CD-ROM whic h i s supplied with your ca m er a.
For Windows 98 users
Turn on your personal computer and allow Windows 98 to load.
1
Insert the supplied CD-ROM in the CD-ROM drive of your personal
2
computer.
Connect the USB jack on your camera with the USB connector on
3
your personal computer using the supplied USB cable.
BB
B
B
Playback
to the USB connector
Personal computer
Insert a “Memor y Stick” into your camera, connect the AC power
4
adaptor and turn on your camera.
“PC MODE” appe ar s on the LCD screen of your camera and the camera is set
to communicatio n st andby mode. Your person al computer recogniz es the
camera, and the Windows 98 Ad d H ardware Wizard starts.
Follow the on-screen messages to specify the CD-ROM drive and
5
install the USB driver.
The Add Hardware Wizard sta rt s tw i ce because two different US B drivers are
installed. Be sure to allow the installation to complete without interrupting it.
Note
Be sure to insert a “Memory Stick” into your camera before installing the USB driver.
Otherwise, you will be unable to install the USB driver.
For Macintosh users
Turn on your personal computer and allow the Mac OS to load.
1
Insert the supplied CD-ROM in the CD-ROM drive of your personal
2
computer.
USB cable
to the USB jack
Push in until the
connector clicks
into place
25
Page 26
Double-clic k the CD-ROM drive icon to open the window.
3
Double-click the icon of the hard disk containing the OS to open
4
the window.
Move the following two files from the window opened in step 3 to
5
the “System Folder” icon in the window opened in step 4 (drag
and dro p).
•
Sony USB Driver
•
Sony USB Shim
When “Put these items into the Extensions folder?” appears, click
6
“OK.”
Restart your personal computer.
7
Viewing images
For Windows 98 users
Turn on the power of your personal computer and allow
1
Windows 98 to load.
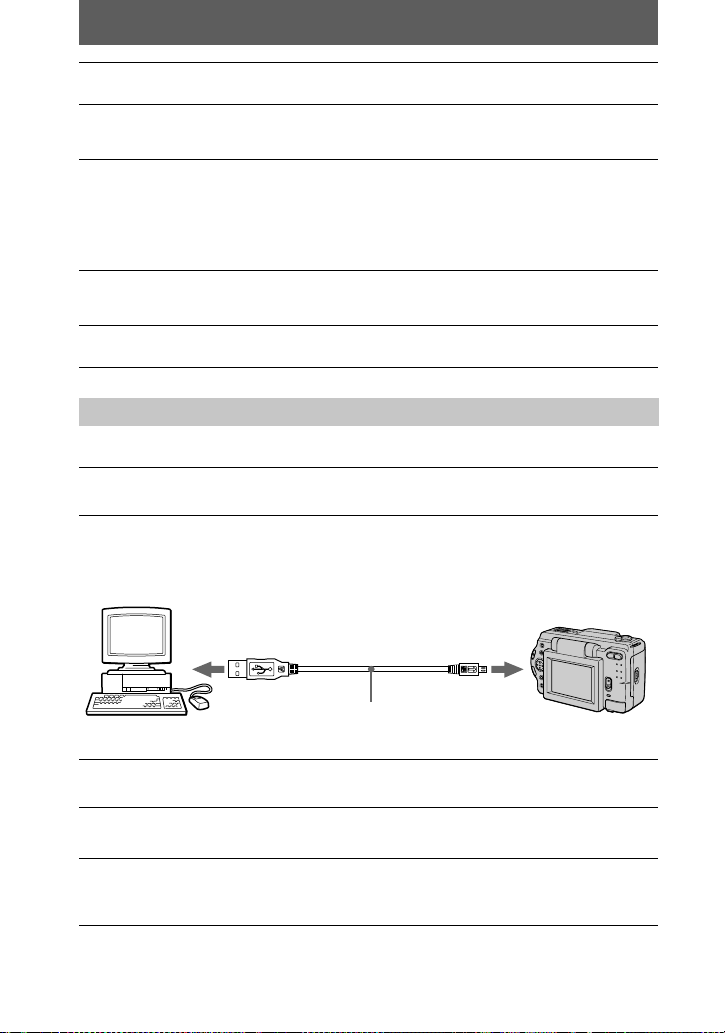
Connect one end of the USB cable to the USB jack on the camera
2
and the other end to the USB connector on your personal
computer.
to the USB connector
Personal computer
Insert a “Memory Stick” into your camera, and connect the AC
3
power adaptor to your camera and then to a wall outlet (mains).
Turn on the power of your camera.
4
“PC MODE” appears on the LCD screen of the camera.
Open “My Computer” on Windows 98 and double click the newly
5
recognized drive. (Example: “Removable Disk (D:)”)
The folders inside the “Memory Stick” are displayed.
USB cable
to the USB jack
Push in until the
connector clicks
into place
26
Page 27
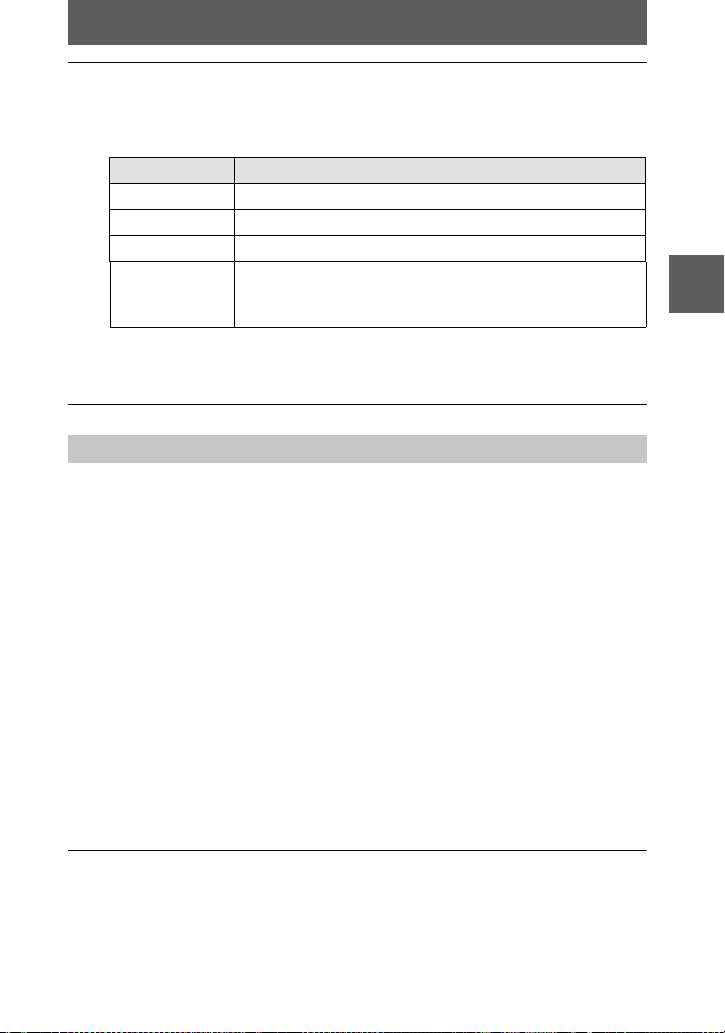
Select and double-click the desired image/sound file from the
6
folder.
For the detailed folder and file name, see “Image file storage destinations and
image files” (page 28).
Desired file type Double-click in this order
Still ima g e “Dcim” folder t “100msdcf” folder t Image file
Moving image* “M s sony” folder t “Moml0001” folder t Image file*
Audio* “Mssony” folder t “Momlv100” folder t Audio file*
E-mail image
“Mssony” folder t “Imcif100” folder t Image file
TIFF image
(uncompressed)
Copying a file to the hard disk of your personal computer before viewing it is
∗
recommended. If you play back the file directly from the “Memory Stick”, the image
and sound may break off.
Notes on using your personal computer
“Memory Stick”
•
“Memory Stick” operations on your camera cannot be assured if the “Memory Stick” has been
formatted on your personal computer.
•
Do not optimize the “Memory Stick” on a Windows machine. This will shorte n the “M em or y
Stick” life.
•
Do not compress the data on the “Memo ry Stick .” Com pr e sse d files cannot be played back on
your camera.
Software
•
Depending on your application software, the file size may increase when you open a still image
file.
•
When you load an image modified using the su pplied retouch software from your personal
computer to the camera or when you dir e c tly modify the image on the camera, the ima ge
format will differ so the “FILE ERROR” message may appear and you may be unable to open
the file.
BB
B
B
Playback
Communications with your personal computer
Communications between your came r a and your personal computer may not recover after
recovering from Suspend, Resume, or Sleep.
•
Windows and ActiveMovie, DirectShow are either registered trademarks or trademarks of
Microsoft Corporation in the Uni te d St at es and/or othe r cou n tries.
•
Macintosh and Mac OS, QuickTime are trademarks of Apple Com put er, Inc.
•
All other product names mentioned he rein may be the trademarks or registered tradem arks of
their respective companies. Furthermore, “™” an d “®” a re not me ntioned in each case in this
manual.
27
Page 28
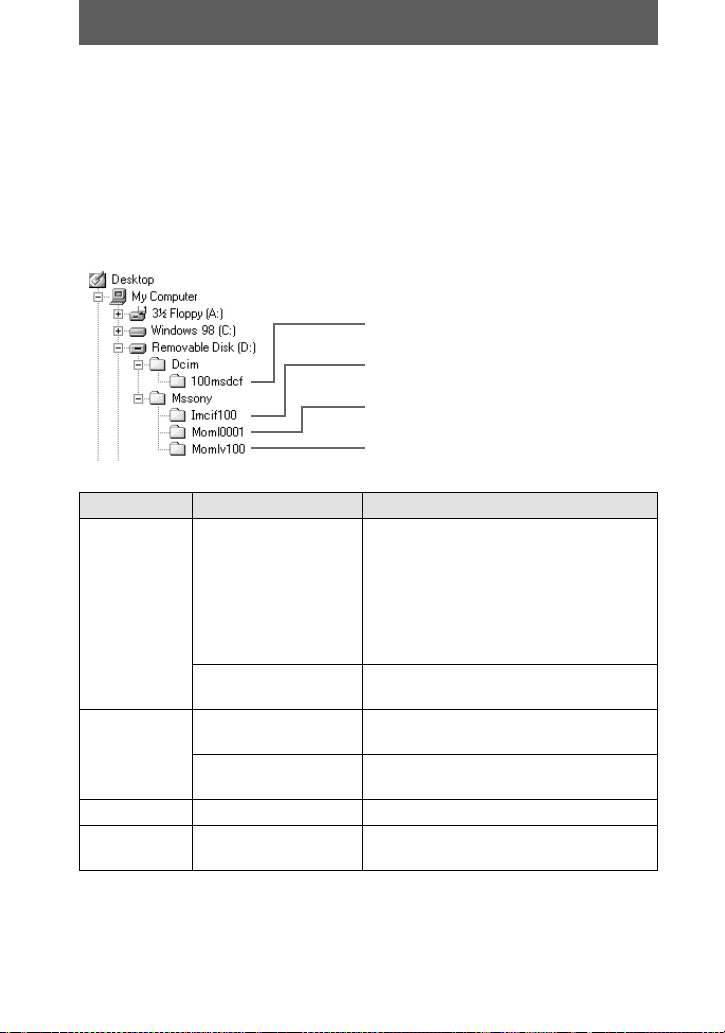
Image file storage destinations
and image files
Image files recorded with your camera are grouped in folders by recording mode.
The meanings of the file names are as follows.
within the range from 0001 to 9999.
For Windows 98 users (The drive recognizing the camera is
“D.”)
Folder File Meaning
100msdcf DSC0
Imcif100 DSC0
Moml0001 MOV0
Momlv100 DSC0
The numerical portions of the following files are the same.
— A small-size image file reco rd ed in E-M A I L mode an d its c or r es ponding image file
— An uncompressed im ag e file recor de d in TIFF mode and its corresponding image file
— An audio file recorded in VOICE mode and its corr es ponding image file
TXT0
DSC0
ssss
ssss
ssss
ssss
ssss
.JPG
.GIF
.JPG
.TIF
ssss
.MPG•Moving image file recorded normally
.MPG•Audio file recorded in VOICE mode
ssss
Folder containing still image data
Folder containing E-MAIL mode and TIFF
mode image data
Folder containing moving image data
Folder containing VOICE mode audio data
•
Still image file recorded normally
•
Still image file recorded in E-MAIL
mode (page 38)
•
Still image file recorded in TIFF mode
(page 40)
•
Still image file recorded in VOICE
mode (page 39)
•
Still image file reco rded in TEXT mode
(page 39)
•
Small-size image file recorded in EMAIL mode (page 38)
•
Uncompressed image file recorded in
TIFF mode (page 40)
(page 39)
stands for any number
28
Page 29
Advanced operations
Before performing advanced
operations
This section describes the basic control methods that are frequently used for
“Advanced operations”.
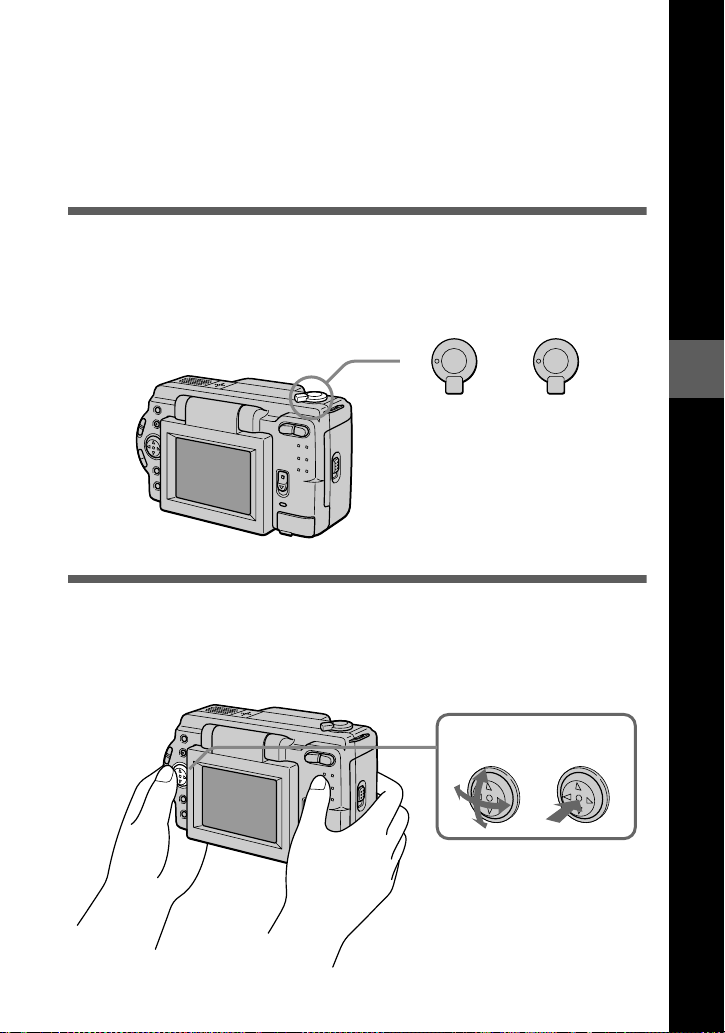
How to use the MODE selector
The MODE selec t or selects whether yo u can use your camera to record or to play
back and edit ima ges. Set the selector as follows before starting to operate your
camera.
PLAY
STILL
MOVIE
DSC-S50 DSC-S30
PLAY: To play back or edit
STILL: To record still images
MOVIE: To record moving
PLAY
STILL
images
and voice memos
images
(DSC-S50 only)
How to use the control button
The control button is used to select the indicators, images and menus appearing on
the LCD screen of your camera. The operation methods that are frequently used for
“Advanced operations” are describ ed below.
Select Enter (OK)
Before performing advanced operations
29
Page 30
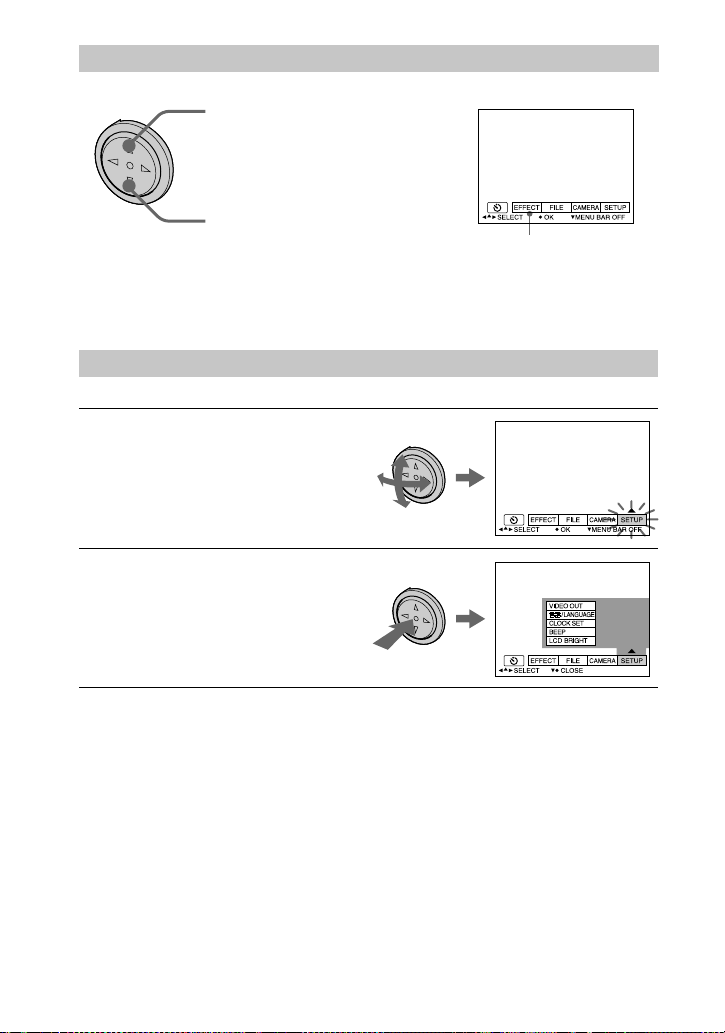
Turning on/off the operation buttons (menu bar) on the LCD screen
Press v to display the menu bar
on the LCD screen.
Press V to clear the menu bar
from the LCD screen.
Note
You cannot clear the menu bar during INDEX screen display (page 45).
Menu bar
Selecting items and image s on the LCD screen
Press v/V/b/B on the
1
control button to select the
item you want to set or the
image you want to display.
The color of the sel ect ed item or
the border of the se le cted image
changes from blue to yellow.
Press the center z to enter
2
the item.
Repeat steps 1 and 2 to execute
each function.
The “Advanced operations” section of this manual refers to selecting and
entering items by the above procedure as “Select [(item name)].”
30
Page 31
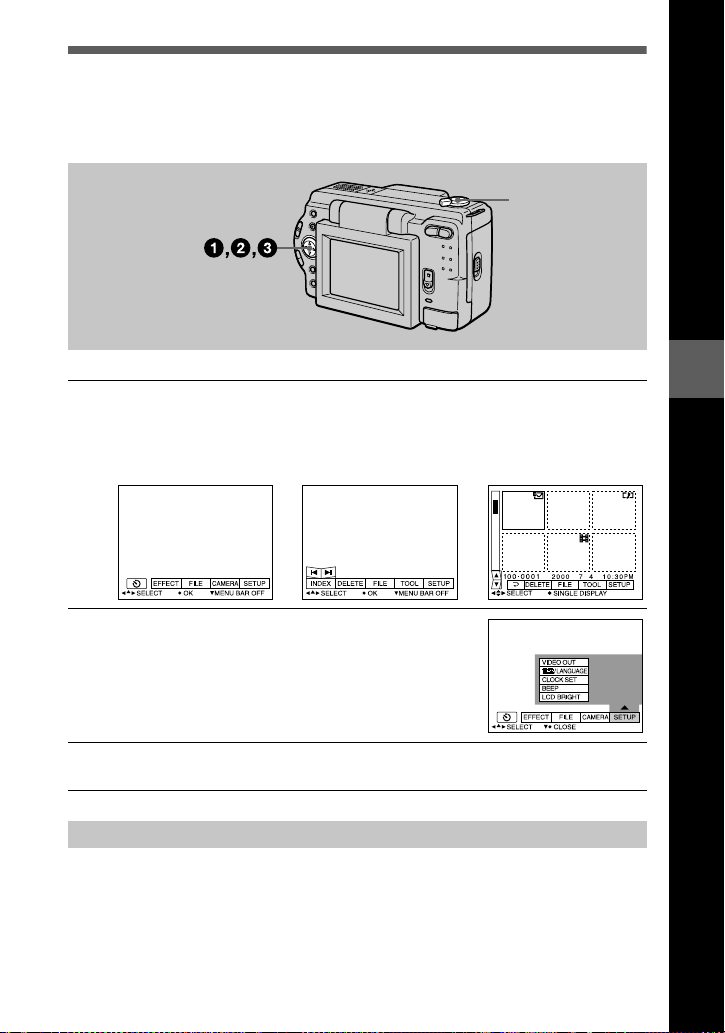
How to change the menu settings
Some of the advanced operations for your camera are executed by selecting menu
items displayed on the LCD screen with the control button.
MODE selector
Press v on the control button to display the menu bar.
1
The menu bar appears as follows according to the setting of the MODE
selector.
MOVIE/STILL PLAY (single mode) PLAY (INDEX mode)
Select the desired item with v/V/b/B on the
2
control button, then press the center z.
The color of the selected item changes f rom blue to
yello w, and when you press the center z, the modes
that can be set for t hat item are displayed.
Before performing advanced operations
Select the desired mode with v/V/b/B on the control button, then
3
press the center z.
To clear the menu
Press V on the control bu tto n until the LCD screen returns to the menu bar display in
step 1. To clear the menu bar, press V again.
31
Page 32
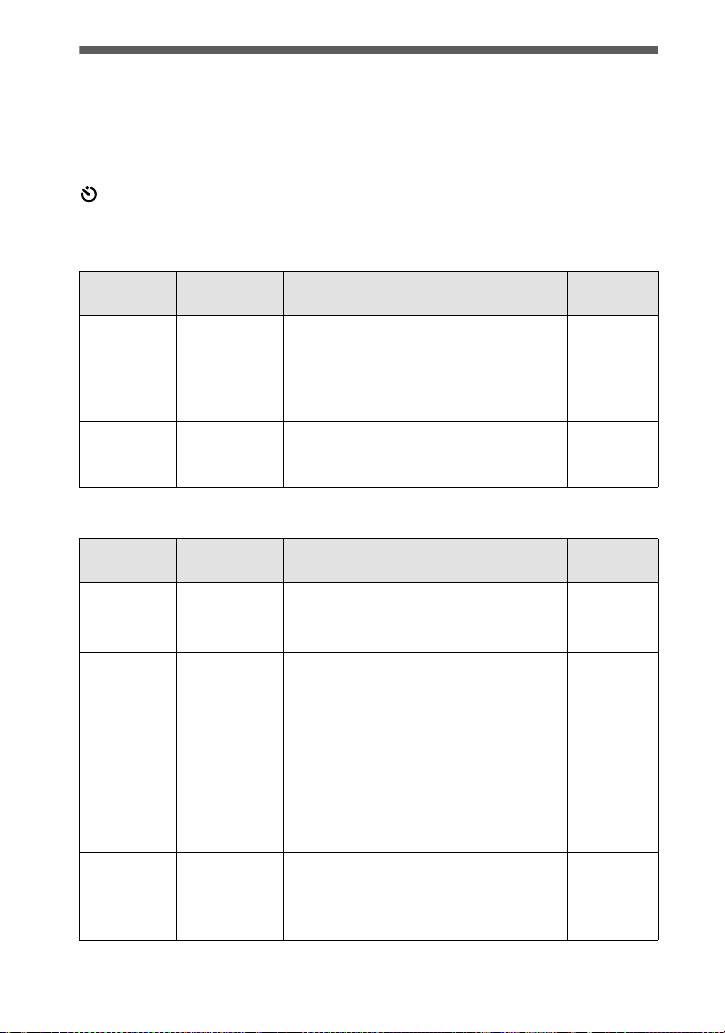
Menu settings
Menu items that can be modified differ depending on the setting of the MODE
selector. The LCD screen sho ws onl y t he it ems you c an oper at e at th e mo men t. In iti al
settings are indicated with x.
(SELF TIMER)
Records with the self-timer (page 18).
EFFECT
Item Setting Description MODE
P.EFFECT SOLARIZE
B&W
SEPIA
NEG.ART
OFF
x
DA TE/
TIME
FILE
Item Setting Description MODE
FORMAT OK Formats a “Mem ory Stick.” MOVIE
POS.
SENSOR
FILE
NUMBER
DAY&TIME
DA TE
OFF
x
CANCEL Cancels formatting of a “Memory
ON Plays back images recorded with the
OFF When this camera may be subject to
x
SERIES Assigns numbers to files in s equence
NORMAL Resets the file numbering each time the
x
Sets the image special effects (page 44). MOVIE
Sets whether to insert the date and time
into the image (page 44).
Stick.”
camera on its side (vertical images) as
horizontal images. This function does
not work for images recorded in TEXT
mode.
vibration such as when you record
images from insi d e a moving car, set
this to OFF to prevent improper
horizontal/vert ical judgement.
even if the “Memory Stick” is changed.
“Memory Stick” is changed.
selector
STILL
STILL
selector
STILL
PLAY
STILL
MOVIE
STILL
32
Page 33
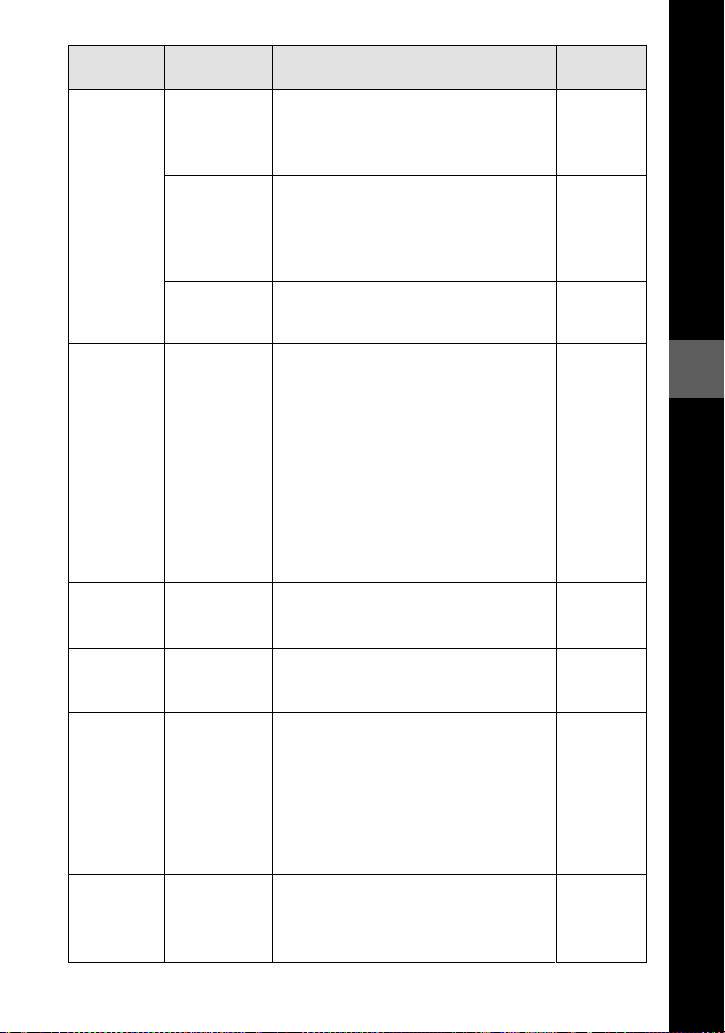
Item Setting Description MODE
IMAGE
SIZE
REC MODE TIFF Records a TIF F (uncompressed) file in
REC TIME
SET
ROTATE
(in single
mode only)
SLIDE
SHOW
(in single
mode only)
PRINT
MARK
1600×1200
x
1600 (3:2)
1024×768
640×480
1472×1104
1280×960
x
1280 (3:2)
1024×768
640×480
320×240
160×112
x
TEXT Records a GIF file in black-and-white.
VOICE Records an audio file (with still image)
E-MAIL Records a small-size (320×240) JPEG
NORMAL Records a JPEG file in the selected
x
15 sec
10 sec
5 sec
x
—
INTERVAL
REPEAT Repeats the slide show.
START Starts the slide show.
CANCEL Cancels the slide show settings and
ON Marks the still images to be printed
OFF Unmarks the print mark of the still
x
Selects the im a ge size when recording
still images (DS C -S50 only).
Selects the im a ge size when recording
still images (DS C -S30 only).
Selects the MPEG image size when
recording moving images (DSC-S50
only).
addition to the JPEG file.
in addition to the JPEG file (DSC-S50
only).
file in addi tion to the selected im age
size.
image size.
Adjusts the recording time for moving
images (DSC- S50 only).
Rotates the still image. PLAY
Sets the slide show interval.
3 sec/5 sec/10 sec/30 sec/1 min
x
ON/OFF
x
execution.
(page 53).
images.
selector
STILL
STILL
MOVIE
STILL
Before performing advanced operations
MOVIE
PLAY
PLAY
33
Page 34
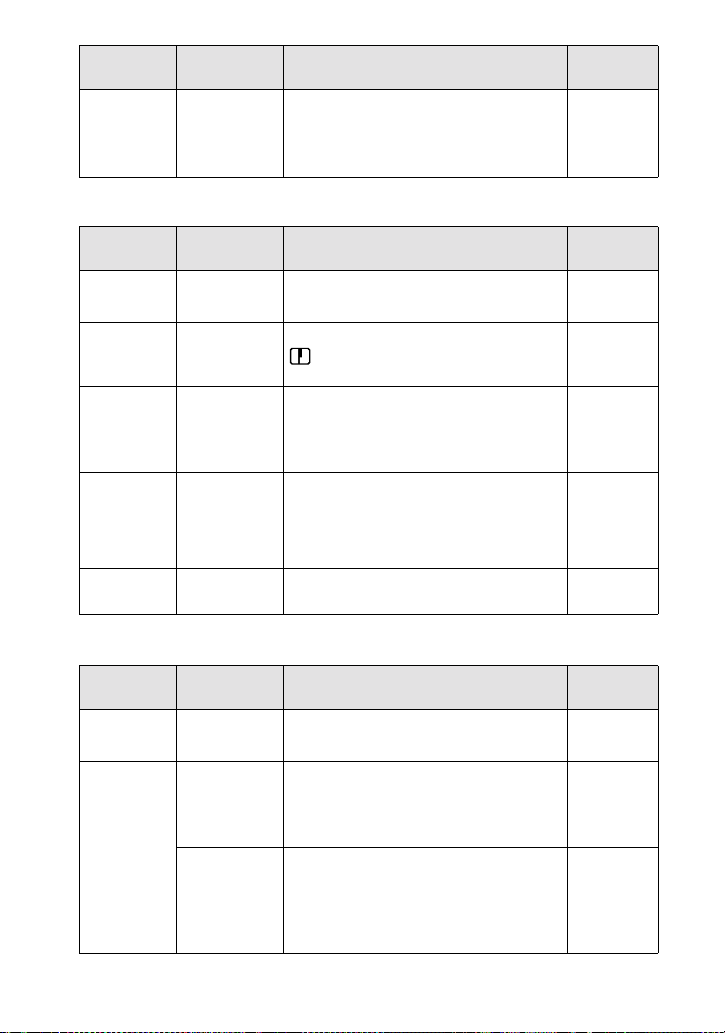
Item Setting Description MODE
PROTECT ON Protects images against ac ci dental
OFF Releases protection of images against
x
CAMERA
Item Setting Description MODE
DIGITAL
ZOOM
SHARPNESS
WHITE
BALANCE
FLASH
LEVEL
EXPOSURE +2.0 EV to
ON Uses digital zoom. STILL
x
OFF Does not use digital zoom.
+2 to –2 Adjusts th e sharpness of the image.
IN DOOR
OUT DOOR
HOLD
AUTO
x
HIGH Makes the flash level higher than
NORMAL Normal setting.
x
LOW Makes the flash level lower than normal.
–2.0 EV
erasure (page 49 ).
accidental erasure.
appears on the LCD screen except
when set to 0.
Sets the white balance (page 43). MOVIE
normal.
Adjusts the exposure. MOVIE
selector
PLAY
selector
STILL
STILL
STILL
STILL
TOOL
Item Setting Description MODE
COPY OK Copies an image (page 51). PLAY
CANCEL Cancels copying of the image.
RESIZE
(in single
mode only)
1600×1200
1024×768
640×480
CANCEL
x
1472×1104
1280×960
1024×768
640×480
CANCEL
x
Changes the recorded still image size
(page 51) (DSC- S50 only).
Changes the recorded still image size
(page 51) (DSC- S30 only).
selector
PLAY
PLAY
34
Page 35
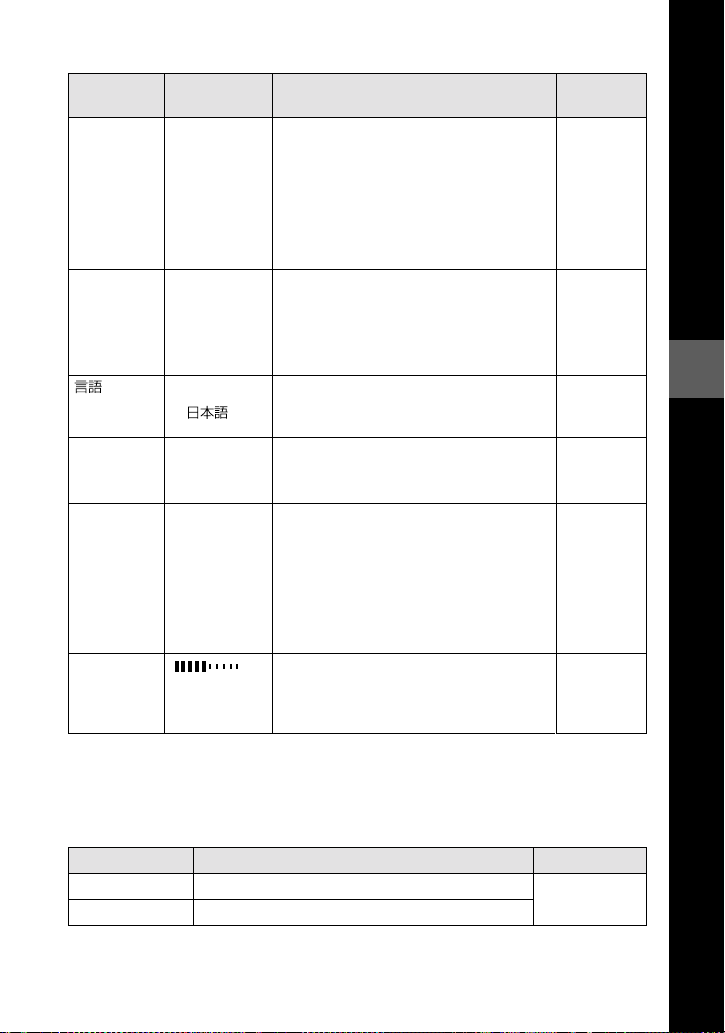
SETUP
Item Setting Description MODE
DEMO
VIDEO
OUT
/
LANGUAGE
CLOCK
SET
BEEP SHUTTER Turns off the beep only. (The shutter
LCD
BRIGHT
ON/STBY
x
OFF
NTSC Sets the video output signal to NTSC
PAL Sets the video output signal to PAL
ENGLISH Displays the menu items in English. MOVIE
x
—
ON Turns on the beep/shutte r sound (when
x
OFF Turns off the beep/shutter sound.
Displayed only when you use the AC
power adaptor in MOVIE or STILL
mode. When ON is selected, a
demonstration will start if you do not
operate your camera for about
10 minutes. To stop the demonstration,
turn off your camer a. Select ON to make
the demonstration appear again.
mode (North American countries, Japan,
etc.).
mode (European c ountries, etc.).
/JPN Displays the menu items in Japanese.
Sets the date and time (page 13). MOVIE
sound is heard whe n yo u press the
shutter button.)
you press the control button/
button).
Adjusts the LCD scr ee n brightness
using the +/– buttons on the LCD
screen. This has no effect on the
recorded images.
shutter
selector
MOVIE
STILL
MOVIE
STILL
PLAY
STILL
PLAY
STILL
PLAY
MOVIE
STILL
PLAY
MOVIE
STILL
PLAY
Before performing advanced operations
INDEX*
Displays six images at a time (PLAY (INDEX) mode) (page 45).
DELETE
Setting Description MODE selector
OK Deletes the displayed image. PLAY
CANCEL Cancels deleting of the image.
35
Page 36

(RETURN)**
3
Returns to PLAY (single) mode.
Displayed only in PLAY (single) mode.
∗
Displayed only in PLAY (INDEX) mode.
∗∗
36
Page 37
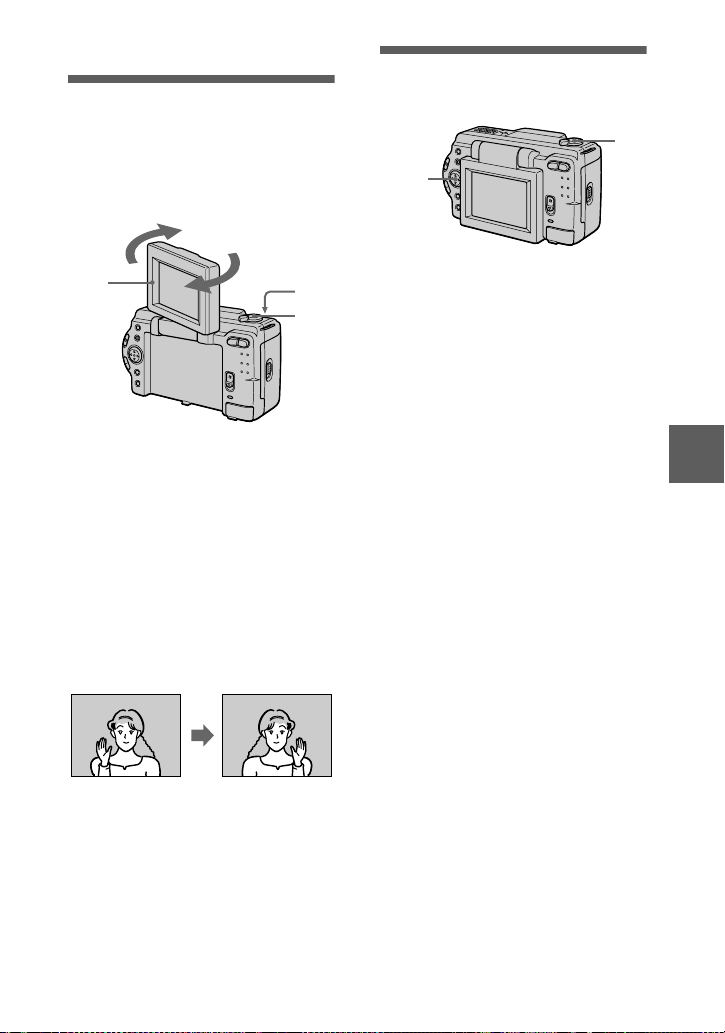
Various recording
2,3
1
B
Rotating the LCD
screen — Face-toFace recording
You can record images with the lens
facing you.
Setting the image size
(IMAGE SIZE)
2
1
Set the MODE selector to
MOVIE or STILL.
2
Adjust the angle of the LCD
screen.
Rotate the LCD screen by 180° fo r
Face-to-Face recording.
3
Record the image.
The image appears on the LCD
screen as a mirror image, but the
recorded image is the same as the
actual subject.
Image appearing
on the LCD screen
Recorded image
1
3
1
Set the MODE selector to
MOVIE or STILL.
(MOVIE is for DSC-S50 only)
2
Select [FILE] and then
[IMAGE SIZE] from the menu.
3
Select the desired image
size.
DSC-S50:
Still image sizes
1600×1200, 1600 (3:2)*,
1024×768, 640×480
The image is recorded in 3:2 size to
∗
match the printing pape r siz e ratio of
3:2.
Moving image sizes
320×240, 16 0× 112
DSC-S30:
Still image sizes
1472×1104, 1280×960,
1280 (3:2)*, 1024×768, 640×480
The image is recorded in 3:2 size to
∗
match the printing pape r siz e ratio of
3:2.
BB
B
B
Various recording
37
Page 38
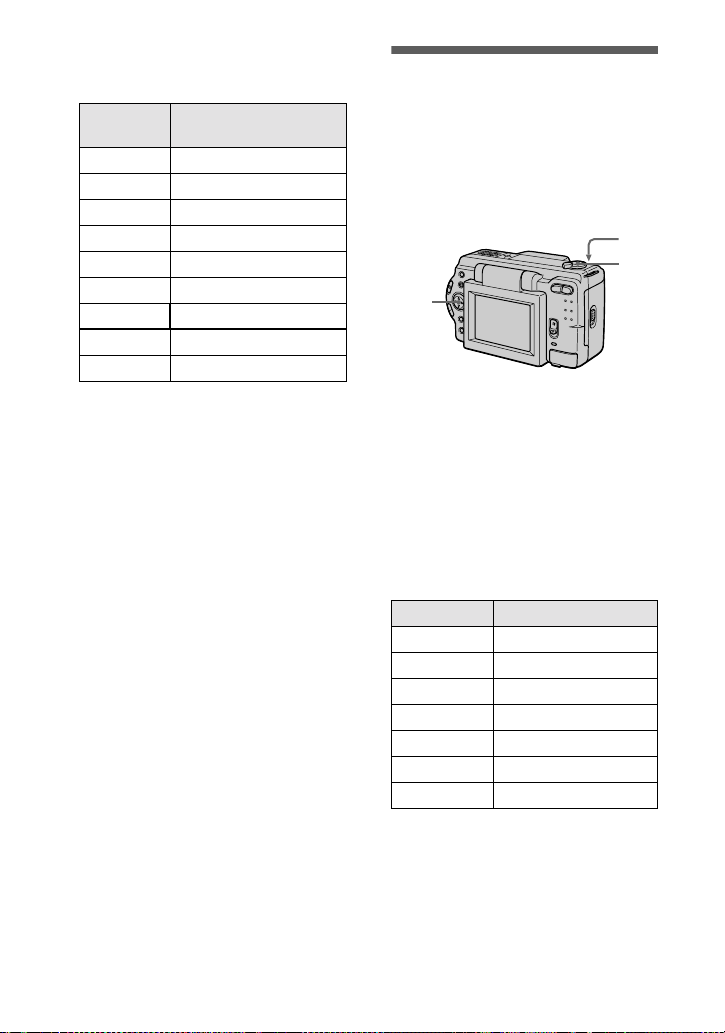
The number of images or the time
2
1
3
that you can record on a “Memory
Stick” (4 MB):
Image size Number of images or
1600×1200 Approx. 4
1600 (3:2) Approx. 4
1472×1104 Approx. 5
1280×960 Approx. 6
1280 (3:2) Approx. 6
1024×768 Approx. 10
640×480 Approx. 57
320×240 Approx. 42 (15**) sec.
160×112 Approx. 169 (60**) sec.
When [REC MODE] is set to
∗
[NORMAL].
Numbers in parentheses indicate the
∗∗
maximum recording time during
continuous recording.
time*
Recording still
images for e-mail (EMAIL)
E-MAIL mode records a small-size
(320×240) im age at the same time as a
still image. Small-size images are
convenient for e-mail transmission, etc.
1
Set the MODE selector t o
STILL.
2
Select [FILE], [REC MODE],
and then [E-MAIL] from the
menu.
3
Record the image.
The number of images that you can
record on a “Memory Stick” (4 MB)
in E-MAIL mode.
Image size Number of images
1600×1200 Approx. 3
1600 (3:2) Approx. 3
1472×1104 Approx. 4
1280×960 Approx. 5
1280 (3:2) Approx. 5
1024×768 Approx. 9
640×480 Approx. 46
To return to normal
recording mode
Select [NORMAL] in step 2.
38
Page 39
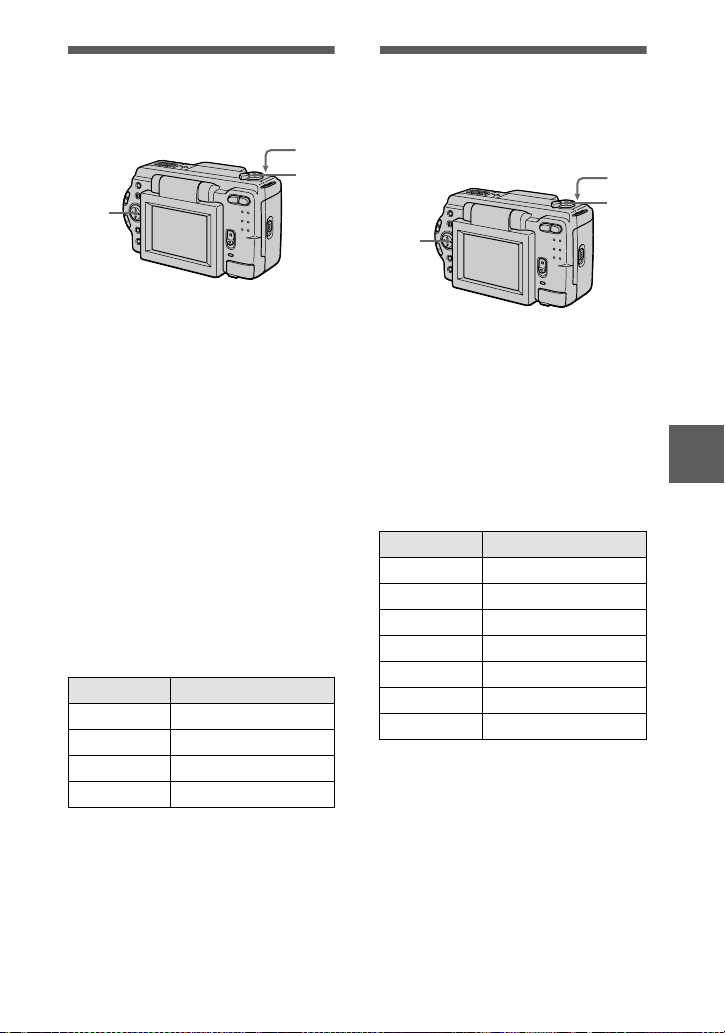
Adding audio files to
2
1
3
still images (VOICE)
(DSC-S50 only)
3
Recording text
documents (TEXT)
Text is recorded in black and white
GIF format to pr ovide a clearer imag e.
1
2
1
Set the MODE selector to
STILL.
2
Select [FILE], [REC MODE],
and then [VOICE] from the
menu.
3
Record the image.
If you press and releas e the sh ut ter
button, sound is rec o r ded for
5 seconds.
If you hold down the shutter
button, soun d is reco rded unt il yo u
release the shutter button for up to
40 seconds.
The number of images that you can
record on a “Memory S t i c k ” (4 MB)
in VOICE mode ( whe n re c ording
sound for five seconds):
Image size Number of images
1600×1200 Approx. 3
1600 (3:2) Approx. 3
1024×768 Appr ox. 8
640×480 Approx. 28
To return to normal
recording mode
Select [NORMAL] in step 2.
When using the DSC-S30
The DSC-S30 does not have a VOICE
function. When you edit (delete, protect, or
copy files, etc.) files recorded in VOICE
mode on a different camera, the still image
file is edited but the audio file is not.
1
Set the MODE selector to
STILL.
2
Select [FILE], [REC MODE],
and then [TEXT] from the
menu.
3
Record the image.
The number of images that you can
record on a “Memory Stick” (4 MB)
in TEXT mode:
Image size Number of images
1600×1200 Approx. 12 to 87
1600 (3:2) Approx. 14 to 97
1472×1104 Approx. 14 to 97
1280×960 Approx. 20 to 114
1280 (3:2) Approx. 22 to 137
1024×768 Approx. 30 to 160
640×480 Approx. 80 t o 363
To return to normal
recording mode
Select [NORMAL] in step 2.
Notes
•
If the subject is not evenly illuminated, you
may be unable to record a clear image.
•
Writing and readin g data takes more time
than in normal recording.
•
The flash does not strobe in TEXT mode
regardless of the surrounding brightness.
39
BB
B
B
Various recording
Page 40
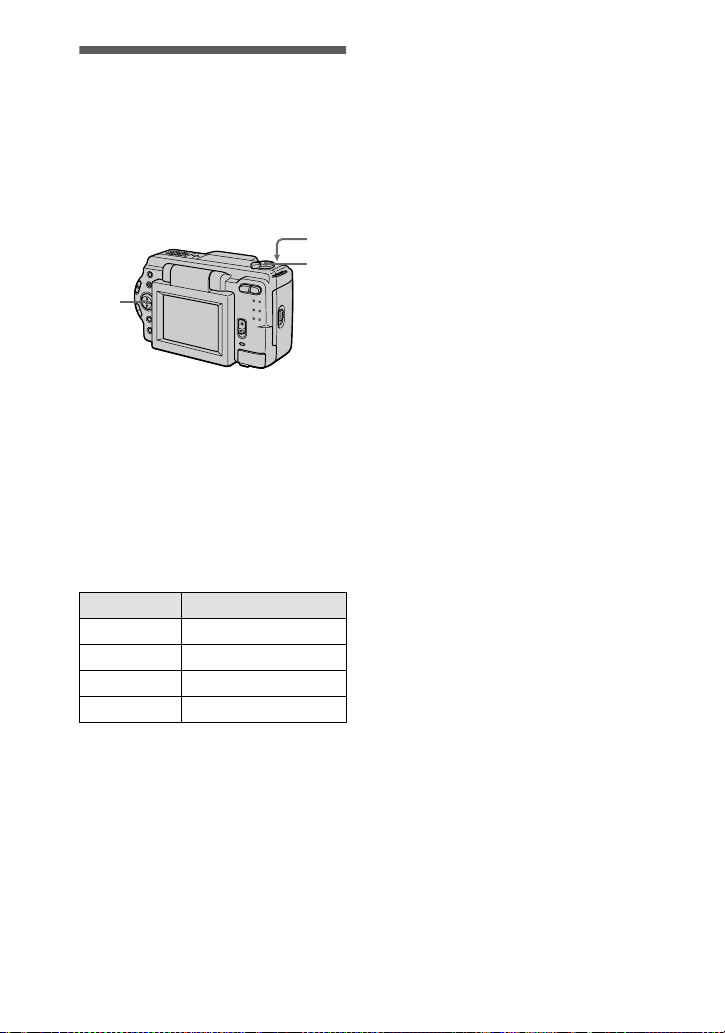
Recording
uncompressed
images (TIFF)
This mode simultaneously rec or ds still
images in both TIFF format
(uncompressed) and JPEG format
(compressed).
3
1
2
1
Set the MODE selector to
STILL.
2
Select [FILE], [REC MODE],
and then [TIFF] from the
menu.
3
Record the image.
The number of images that you can
record on a “Memory Stick”
(16 MB ) in TIFF mode:
Image size Number of images
1600×1200 Approx. 2
1600 (3:2) Approx. 2
1280×960 Approx. 3
1280 (3:2) Approx. 3
Notes
•
JPEG images are recorded in the image
size selected by the [IMAGE SIZE] menu.
TIFF images are recorded in [1600×1200]
size in DSC-S50, and [1280×960] size in
DSC-S30 other than when [1600 (3:2)] or
[1280 (3:2)] is selected.
•
Writing data takes more time than in
normal recording.
•
The supplied “Memory Stick” (4 MB )
does not have sufficient capacity to record
uncompressed images.
To return to normal
recording mode
Select [NORMAL] in step 2.
40
Page 41
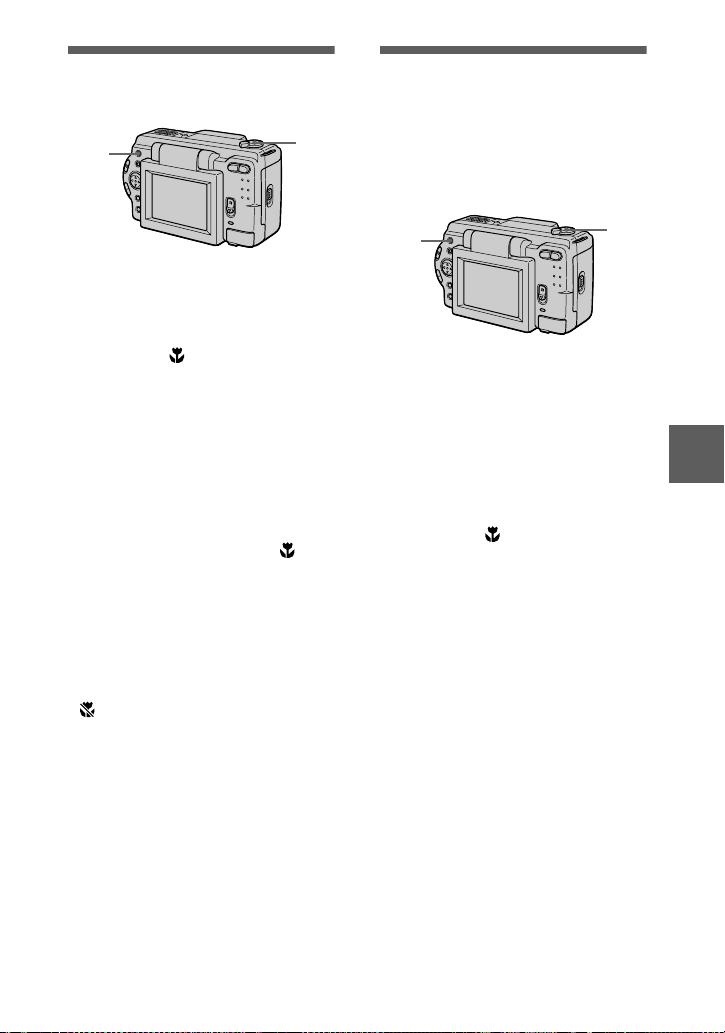
Recording images in
2
1
macro
2
1
Set the MODE selector to
MOVIE or STILL.
2
Press FOCUS repeatedly
until the (auto macro)
indicator appears on the LCD
screen.
You can record a subject as close
as about 1 3/16 inches (3 cm) from
the lens surface wi th the zoom set
all the way to the W side.
To return to normal
recording mode
Press FOCUS repeatedly until
disappears from the LCD screen.
Notes
•
You cannot record images in macro with
the following PROGRAM AE modes.
— Landscape mode
—Panfocus mode
•
You cannot record images in macro when
appears on the LCD screen .
1
Setting the distance
to the subject
Normally the focus is automatically
adjusted. This function is useful when
the auto focus does not work well such
as in dark places.
1
Set the MODE selector to
MOVIE or STILL.
2
Press FOCUS repeatedly to
achieve a sharp focus.
The 9 (manua l f ocus) indicator
appears on the LCD screen.
You can select from t h e following
7 focus settings: auto (no
indicator), (auto macro),
1 3/4 feet (0.5m), 3 1/4 feet
(1.0m), 9 3/4 feet (3.0m), 23 feet
(7.0m), ∞ (infinite)
To reactivate auto focusing
Press FOCUS repeatedly until the
indicator dis appears in step 2.
Note
These setting distances are approxim ate, and
should be used as a reference.
BB
B
B
Various recording
41
Page 42
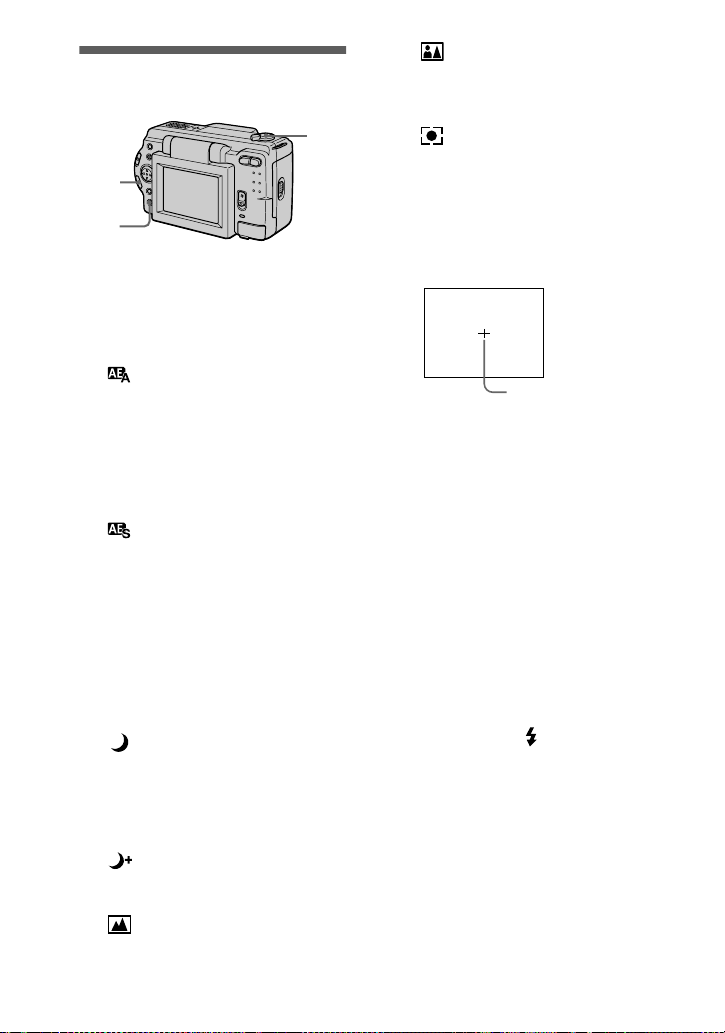
Using the PROGRAM
AE function
1
+/–
2
1
Set the MODE selector to
MOVIE or STILL.
2
Press PROGRAM AE
repeatedly to select th e
desired PROGRAM AE mode.
Aperture priority mode
Makes the subject sta nd out
against an unclear background or
makes both the subject and the
background stand out clearly.
Press +/– repeatedly to select an
aperture v a lu e i n 9 st eps fro m F2. 8
to F11.
Shutter speed priority
mode
Records a sharp pict ur e of a fastmoving subject or the fl ow of
motion of a moving subject.
Press +/– repeatedly to select a
shutter speed in 18 steps from 8”
to 1/725 when recording a still
image and in 12 steps from 1/8 to
1/725 when reco rding a moving
image.
Twilight mode
Suppresses the washed-out color
of a bright subject in a dark place
so that you can recor d th e subject
without losing th e dark
atmosphere of th e surroundings.
Twilight plus mode
Increases the effec tiveness of t h e
twilight mode function.
Landscape mode
Focuses only on a dis tant subject
to record landsc apes, etc.
42
Panfocus mode
Changes the focu s quickly and
simply from a close subject to a
distant subject .
Spot light-metering mode
Select this mode wh en there is
backlight or when there is strong
contrast betwe en the subject and
the background, et c. Position the
point you want to record on the
spot light-mete ri ng cross hair.
LCD screen
Spot light-metering
cross hair
To cancel PROGRAM AE
Press PROGRAM AE repe at edly until
the indicator on the LCD screen goes
out.
Notes
•
You cannot select F2. 8 in a perture priority
mode, and the indication may differ from
the actual apertu re value when the zoom is
set to the T side.
•
You can focus only on distant subjects in
Landscape mode.
•
In Panfocus mode, the zoom position and
focus are fixed.
•
When you record in the Twilight plus
mode, we recommend that you use a tripod
to prevent shaking.
•
Set the forced flash whe n you use the
flash in the following modes:
–
Twilight mode
–
Twilight plus mode
–
Landscape mode
•
You cannot use the PROGRAM AE
function when [REC MODE] is se t to
[TEXT].
•
If the setting is not appropriate in aperture
priority mode and shutter prior it y mode,
the setting value indicator on the LCD
screen flashes when you press the shutter
button. In this case, reset the value.
•
If you set a slow shutter speed in twilight
plus mode and shutter speed priority mode,
the noise may increase.
Page 43
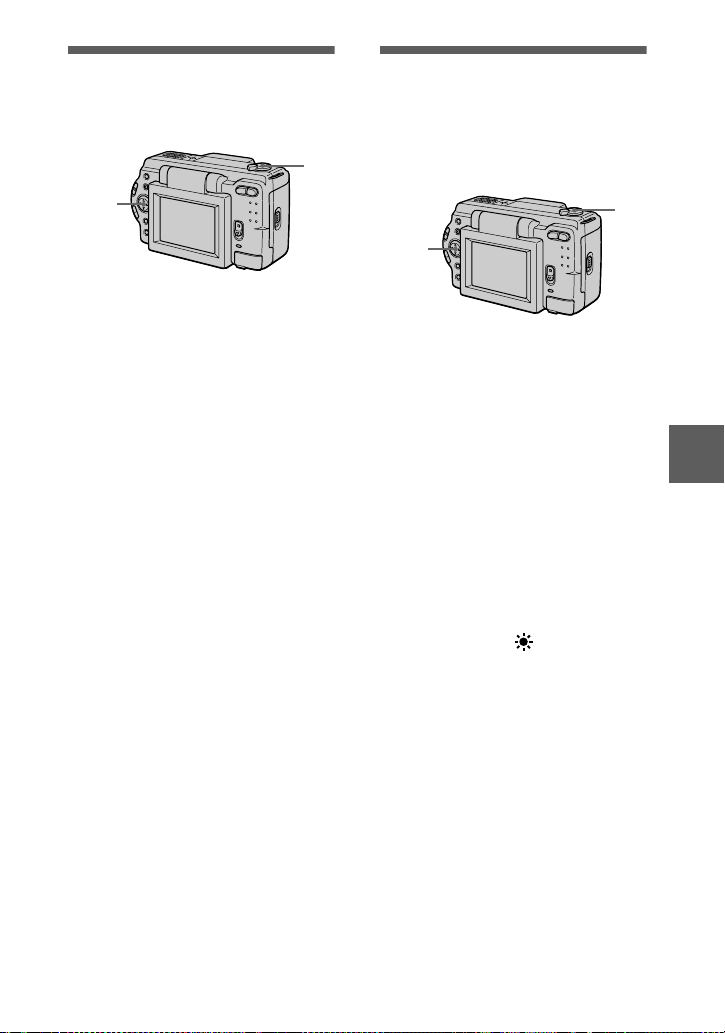
Adjusting the
2,3
1
exposure
(EXPOSURE)
1
2,3
1
Set the MODE selector to
MOVIE or STILL.
2
Select [CAMERA] and then
[EXPOSU RE] from the me n u .
3
Select the desired exposure
value.
Adjust the exposure value while
checking the brightness of the
background. You can select values
ranging from +2.0 EV to –2.0 EV
in steps of 1/3 EV.
Note
The exposure may not be adjusted properly
when the subject is extremely bright or dark,
or when using the flash.
Adjusting the white
balance (WHITE
BALANCE)
Normally the white balance is
automatically adjusted.
1
Set the MODE selector to
MOVIE or STILL.
2
Select [CAMERA] and then
[WHITE BALANCE] from the
menu.
3
Select the desired white
balance setting.
IN DOOR (n)
•
Places where the lighting
condition change s quickly
•
Under bright lighting such as
photography studi os
•
Under sodium or m ercury lamps
OUT DOOR ( )
Recording a sun rise/sunset, night
scene, neon signs, or fireworks
HOLD
Recording a si ngl e-col ored subj ect
or background
AUTO (No indicator)
Adjusts the whit e balance
automatically
BB
B
B
Various recording
To reactivate auto
adjustment
Select [AUTO] in step 3.
Note
Select [AUTO] when recording under
fluorescent lightin g.
43
Page 44
Recording the date
2,3
1
and time on the still
image (DATE/TIME)
2,3
1
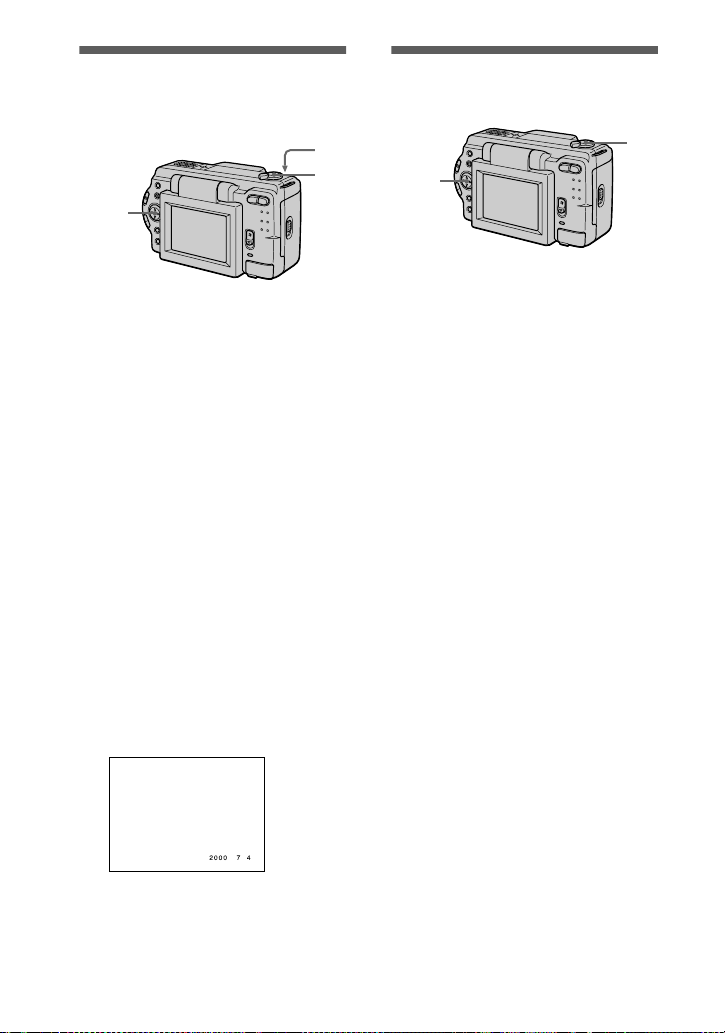
Set the MODE selector to
STILL.
2
Select [EFFECT] and then
[DATE/TIME] f rom th e menu.
3
Select the date and time
setting.
DAY&TIME
The date, hour and minutes are
imposed onto the image.
DATE
The year, month and day are
imposed onto the image.
OFF
The date and time are not imposed
onto the image.
4
Record the image.
The date and time are not
displayed during recording.
The date and time are displayed
when playing back images.
Enjoying picture
effects (P.EFFECT)
4
1
1
Set the MODE selector t o
MOVIE or STILL.
2
Select [EFFECT] and then
[P.EFFECT] from the menu.
3
Select the desired mode.
SOLARIZE
The light contrast is clearer and the
picture looks like an illustrati on.
B&W
The picture is monochrome (black
and white).
SEPIA
The picture is colored l i ke an ol d
picture.
NEG.ART
The color and bright ness of the
picture are reversed.
To cancel picture effect
Select [OFF] in step 3.
44
Page 45
Various playback
B
Playing back six
images at once
(INDEX)
2
1
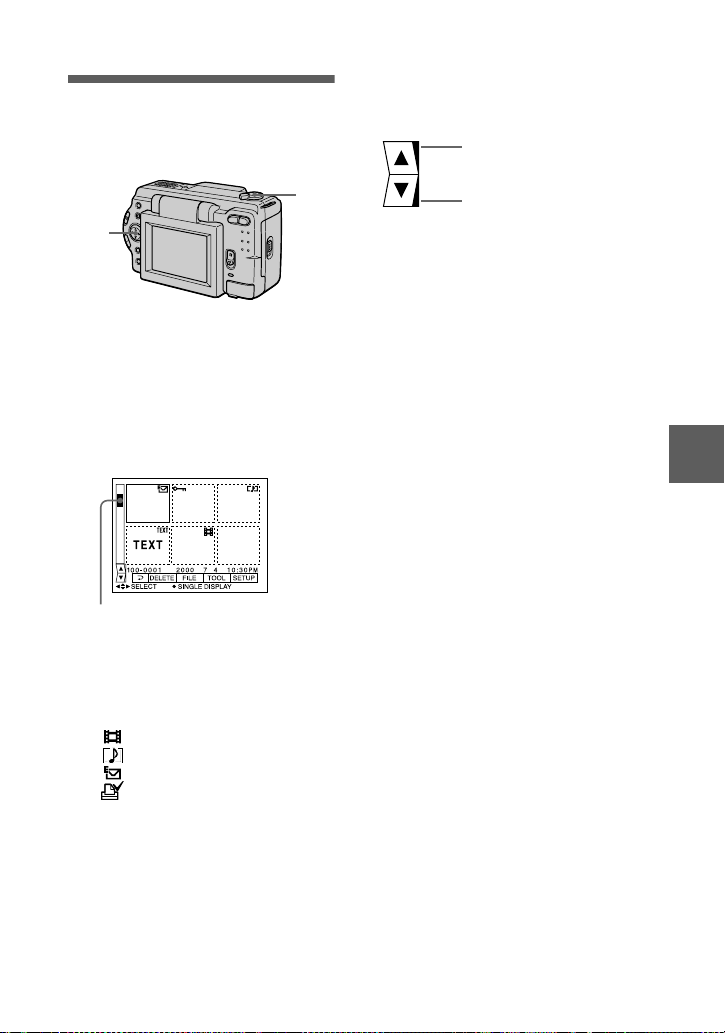
Set the MODE selector to
PLAY.
2
Select [INDEX] on the LCD
screen.
Six images are displayed at once
(index screen).
This shows the position of the
currently displayed images relative
to all the recorded images.
To display the next
(previous) index screen
Select v/V at the lower left of the LCD
screen.
Displays the previous
index screen
1
To return to normal playback
(single image)
•
Select th e d esired image with th e
control button.
•
Select [3] (RETURN).
Note
You cannot display images recorded in
TEXT mode on the INDEX screen.
Displays the next index
screen
BB
B
B
Various playback
The following marks are displayed
on each image according to the
image type and settings.
: Moving image file
: Voice memo file
: E-mail file
: Print mark
-
: Protect mark
TEXT: Text mark
TIFF: TIFF mark
(No mark): Normal recordi ng (no
settings)
45
Page 46

Enlarging a part of
the still image (Zoom
and trimming)
1
2,4
1
Set the MODE selector to
PLAY.
2
Display the image to be
enlarged.
3
Zoom in/out the image with
the zoom button.
The zoom scaling indicator
appears on the LCD screen.
4
Press the control button
repeatedly to select th e
desired part of the image.
: The image moves downward
v
: The image moves upward
V
: The image moves rightward
b
: The image moves leftward
B
3
Notes
•
Y ou cannot trim images recorded in TEXT
mode or uncompressed image s.
•
The maximum zo om magnification is 5
the original image, regardle ss of the image
size.
•
The picture quality of trimmed images
may deteri orate.
•
The original picture remains even after
trimming.
•
The trimmed image is recorded as the
newest file.
×
To return to the normal size
Zoom in with t he zo om b utt on un ti l the
zoom scaling indicator ( ×1.1)
disappears from the screen, or simply
press z.
To record an enlarged image
(trimming)
1Enlarge the image.
2Press the shutter button. The image
is recorded at 64 0× 480 size, then the
display returns to the image display
before enlargement.
46
Page 47
Rotating a still image
2,3
1
(ROTATE)
1
2,3,4
1
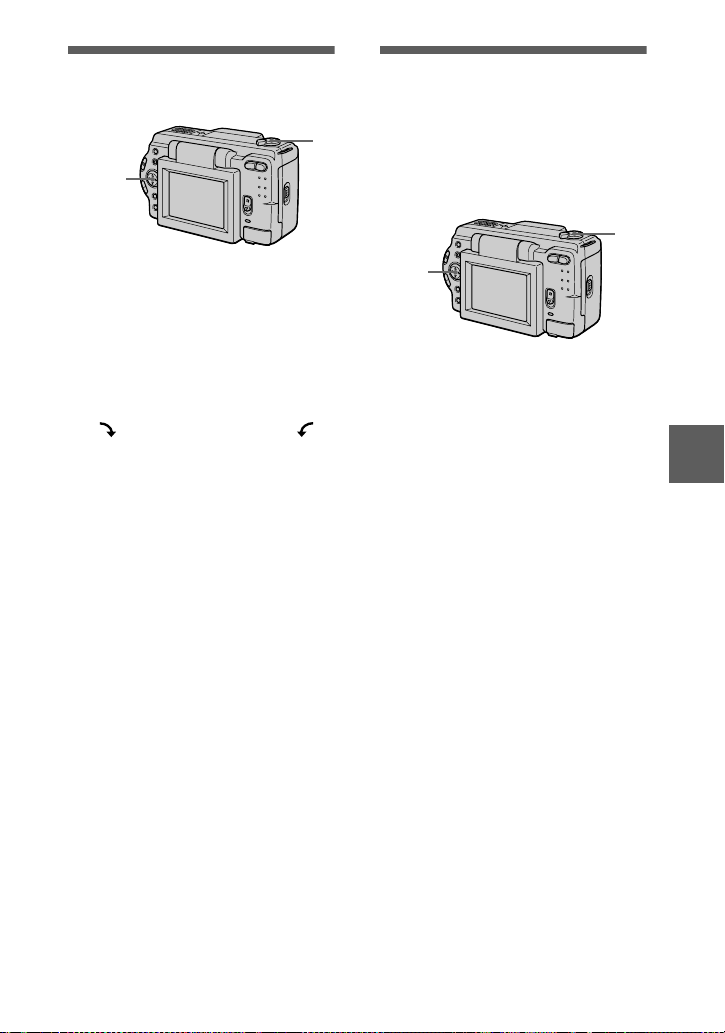
Set the MODE selector to
PLAY.
2
Display the image to rotate.
3
Select [FILE] and then
[ROTATE] from the menu.
4
Rotate the image clockwise
or countercloc kwise ,
then select [RETURN].
Notes
•
You may not be able to rotate protec te d
images or images recorded with other
equipment.
•
Also, when viewing images on a personal
computer, the image rotation information
may not be reflected depending on the
application software.
•
You cannot rotate protected or
uncompressed images, or i mag es reco rd ed
in TEXT mode.
Playing back the
images in order
(SLIDE SHOW)
This function is useful for checking the
recorded images or for presentations,
etc.
1
Set the MODE selector to
PLAY.
2
Select [FILE] and then [SLIDE
SHOW] from the menu.
Set the following items.
INTERV AL
1 min (one minute), 30 sec
(30 seconds), 10 sec (10 seconds),
5 sec (5 seconds), 3 sec
(3 seconds)
REPEAT
ON: Plays back image s i n a
continuous loop until
[RETURN] is selected.
OFF: After all ima ges have been
played back, the slide show
ends.
3
Select [START] with the
control button.
The slide show begins.
BB
B
B
Various playback
To cancel the slide show
Select [CANCEL] in step 2 or 3.
To skip to the next/previous
image during slide show
playback
Select
"b/B"
LCD screen.
at the lower left of the
47
Page 48
Note
The [INTERVAL] setting time is
approximate, and may vary depending on
the played back image size or other factors.
48
Viewing images on a
TV screen
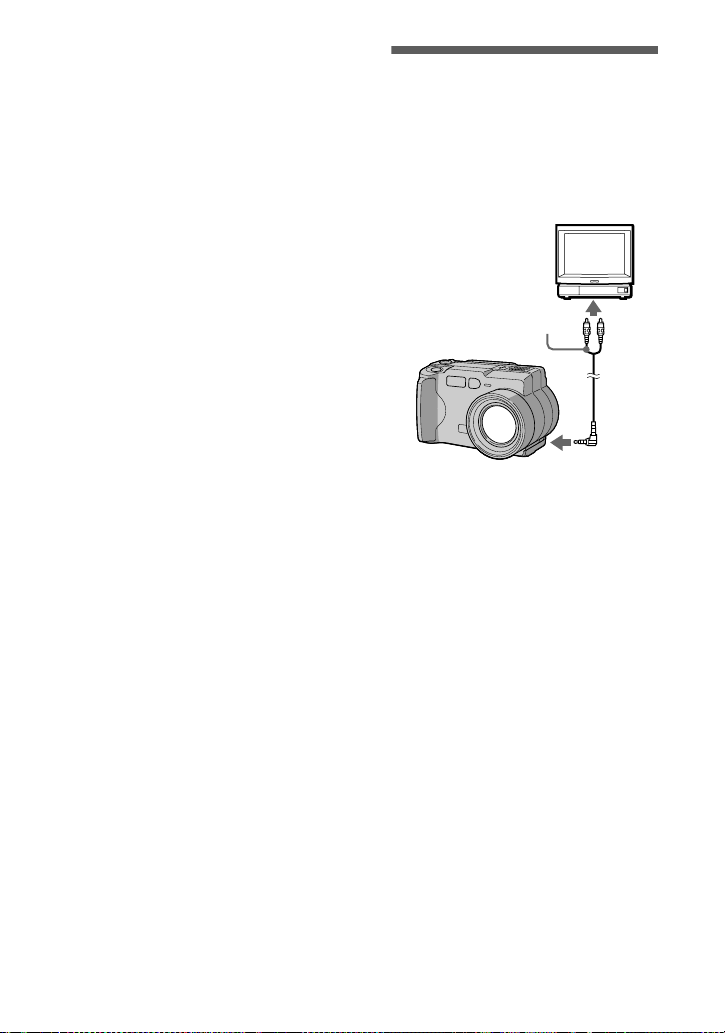
Before connectin g your camera, be
sure to turn off the TV. After
connecting A/V connecting cable
(DSC-S50) or VIDEO connecting
cable (DSC-S30), turn on the TV.
Set the TV/VIDEO
switch to VIDEO.
A/V connecting cable or
VIDEO connecting cable
(supplied)
to A/V OUT jack or
VIDEO OUT jack
1
Connect your camera and the
TV.
DSC-S50
Connect the A/V connecting cable
to the A/V OUT jack of your
camera and to the audi o/ video
input jacks of the TV.
If your TV has stereo type audio
input jacks, connect the audio plug
of the A/V connecting cable to the
Lch jack.
DSC-S30
Connect the video cabl e t o t he
VIDEO OUT jack of your camera
and to the video input jac k of the
TV.
2
Turn on the TV, then start
playback on your camera.
The playback imag e appears on
the TV screen.
Note
You cannot use a TV that has an antenna
(aerial) connect or only.
Page 49
Editing
B
Preventing accidental
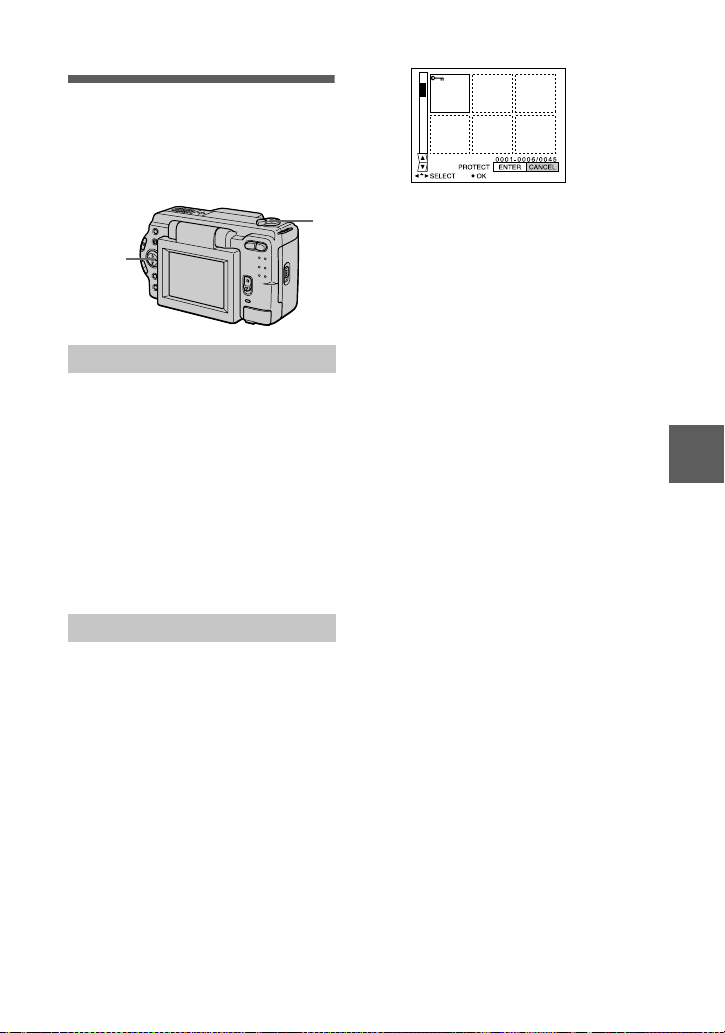
erasure (PROTECT)
The - (protect) indicator appears on
protected i m ages.
The selected images are protected.
1,2,3
In single mode
1
Set the MODE selector to
PLAY, then display the image
to protect.
2
Select [FILE], [PROTECT],
and then [ON] from the menu.
The displayed image is protected
and - appears.
To release protection
Select [OFF] in step 2.
In INDEX mode
1
Set the MODE selector to
PLAY, th en di splay the INDEX
screen.
2
Select [FILE], [PROTECT],
and then [ALL] or [SELECT]
from the menu.
3
When you select [ALL]
Select [ON].
All the images recorded in
“Memory Stick ” are protected.
When you select [SELECT]
Select all the images to protect
with the control button, then select
[ENTER].
1
To release protection
If you selected [ALL] in step 2, select
[OFF]. If you selected [SELECT] in
step 2, select the images to unprotect
with the control button, then select
[ENTER].
BB
B
B
Editing
49
Page 50
Deleting images
(DELETE)
You cannot delete pr ot ected files.
1,2,3
In single mode
1
Set the MODE selector to
PLAY , then display the image
to delete.
2
Select [DELETE] and then
[OK] from the menu.
The image is deleted.
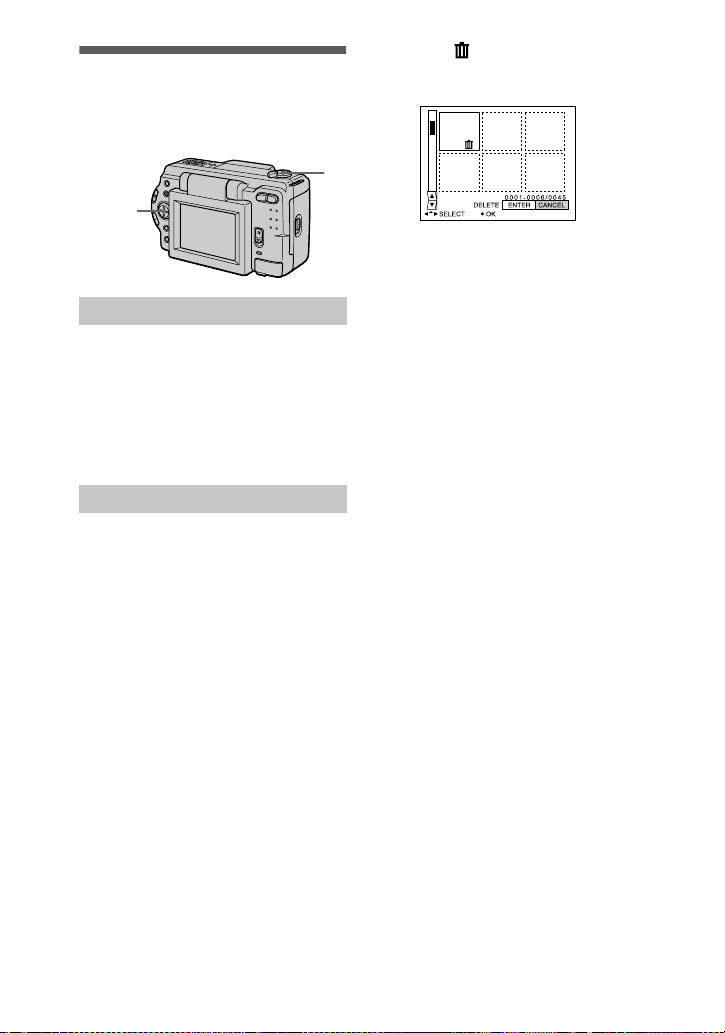
In INDEX mode
1
Set the MODE selector to
PLAY, then display the INDEX
screen.
2
Select [DELETE] and then
[ALL] or [SELECT] from the
menu.
3
When you select [ALL]
Select [ENTER].
All unprotected images are
deleted.
When you select [SELECT]
Select all the images to d elete with
the control button, then select
[ENTER].
The (delete) indicator appears
on the selected images and these
images are deleted.
1
To cancel deleting
Select [CANCEL] in step 2 or 3.
Note
If there are files on the “Memory Stick” with
names having the same last 4 digits as the
file name of the image to be dele ted, these
files are also deleted at the same time.
50
Page 51
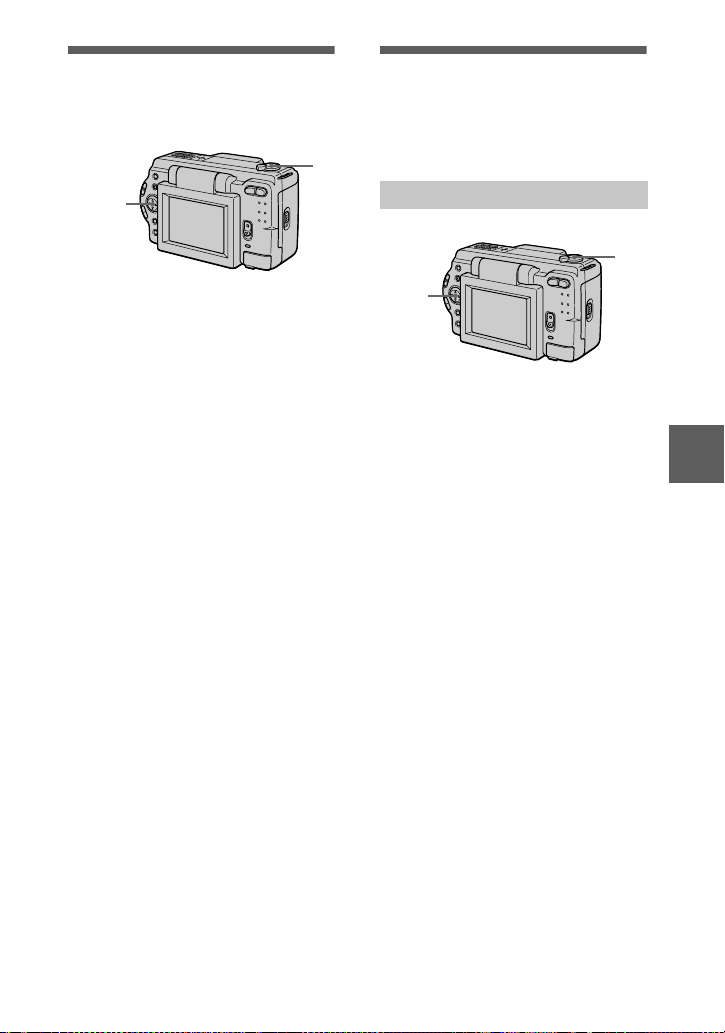
Changing the
1,2
1
recorded still image
size (RESIZE)
1,2,3
1
Set the MODE selector to
PLAY and display the image
to resize.
2
Select [TOOL] a nd then
[RESIZE] from the menu.
3
Select the desired image
size.
DSC-S50
1600×1200, 1024×768, 640×480
DSC-S30
1472×1104, 1280×960, 1024×768,
640×480
The changed im a ge is recorded,
then the display returns to the
image display before resizing.
To return to the original size
Select [CANCEL] in step 3.
Notes
•
You cannot change the size of images
recorded in TEXT mode or uncompressed
images.
•
When you change from a small size to a
large size, the picture quality deterior a te s.
•
The original image is retained even after
resizing.
•
The resized image is recorded as the
newest file.
Copying images
(COPY)
You can copy images to another
“Memory Stick.”
1
In single mode
1
Set the MODE selector to
PLAY , then display the image
to copy.
2
Select [TOOL], [COPY], and
then [OK] from the menu.
“FILE ACCESS” appears.
3
When “CHANGE MEMORY
STICK” appears, eject the
“Memory Stick.”
“INSERT MEMORY STICK”
appears.
4
Insert the “Memory Stick” on
which to copy the image.
“RECORDING” appears. When
copying is completed,
“COMPLETE” appe ar s.
To end copying, select [EXIT].
To copy the image to
another “Memory Stick”
Select [CONTINUE] and repeat steps
3
and 4.
BB
B
B
Editing
51
Page 52
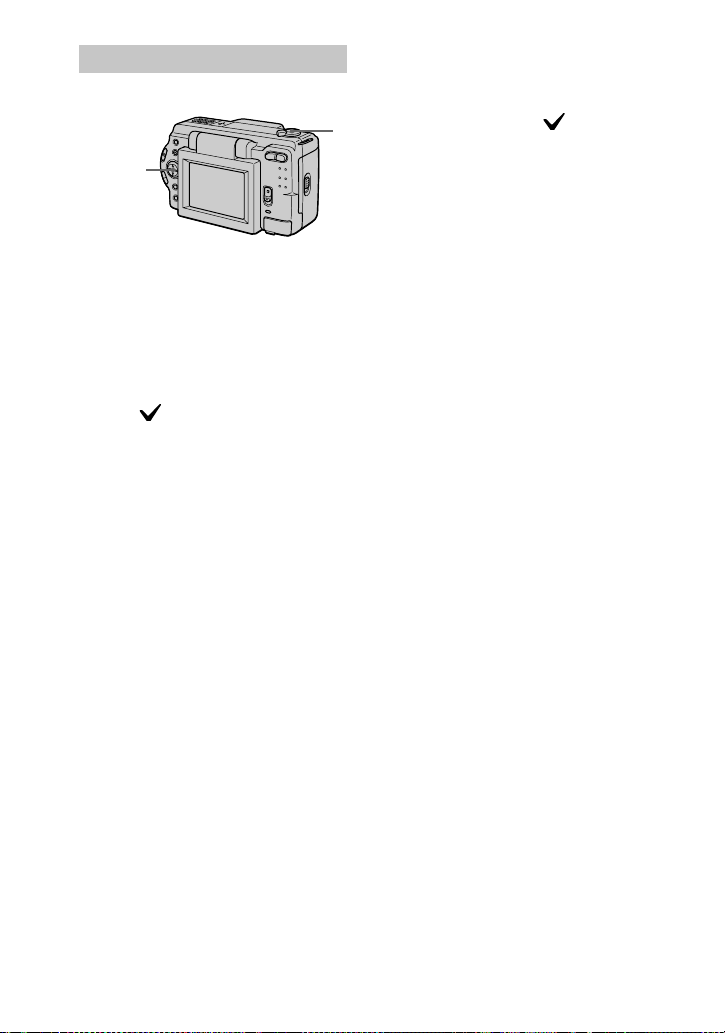
In INDEX mode
,2,3,4
1
Set the MODE selector to
PLAY, then display the INDEX
screen.
2
Select [TOOL], [COPY], and
then [SELE CT] from the
menu.
3
Select the image to copy.
The (select) indicator ap pears
on the image.
4
Select [ENTER].
“MEMORY STICK A CCESS”
appears.
5
When “CHANGE MEMORY
STICK” is displayed, eject the
“Memory Stick.”
“INSERT MEMORY STICK”
appears.
6
Insert another “Memory
Stick.”
“RECORDING” appears. When
copying is completed ,
“COMPLETE” appe ar s.
To end copying, select [EXIT].
Notes
•
You cannot copy uncompressed images.
•
You cannot copy images that are bigg er
than 1.4 MB at once. If “NOT ENOUGH
1
MEMORY” appears or flashes on the
INDEX screen, cancel some images to
copy and try again.
•
After “COMPLETE” appears, if you
exchange the “Memory Stick” without
selecting “EXIT,” the same image is
copied again.
To copy the image to
another “Memory Stick”
Select [CONTINUE] and repeat steps
5
and 6.
To cancel copying part-way
Change the MODE s el ector setting or
turn off the power.
52
Page 53
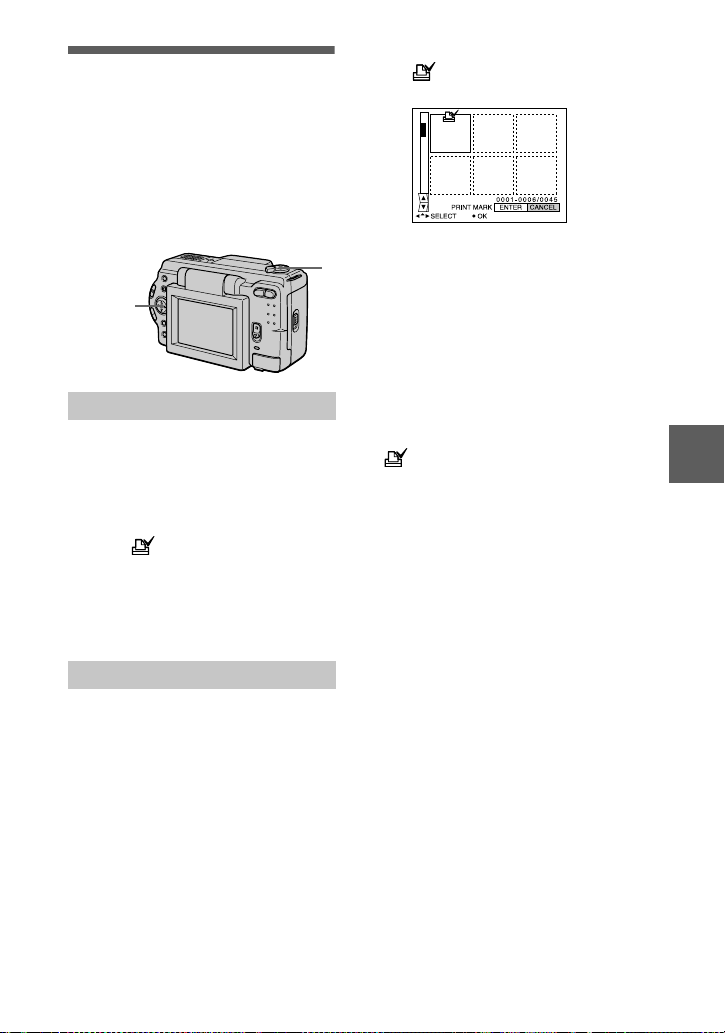
Selecting still images
to print (PRINT MARK)
You can mark a print mark on still
images recorded with your camera.
This mark is convenient when you
have images printed at a shop that
conforms with the DPOF (Digital Print
Order Format ) st andard.
,2,3,4
In single mode
1
Set the MODE selector to
PLAY and display the image
you want to print.
2
Select [FILE], [PRINT MARK],
and then [ON] from the menu.
The (print) mark is displayed
on the image.
To unmark the print mark
Select [OFF] in step 2.
4
Select [ENTER].
of the selected images change
from green to whit e.
To unmark selected print
1
marks
Select the images to unmark in step 3
with the control button, then select
[ENTER].
To unmark all the print
marks
Select [FILE], [PRINT MARK],
[ALL] and then [OFF] from the menu.
of all images are unmarked.
Notes
•
Y ou cannot mark moving images or images
recorded in TEXT mode.
•
If you mark an image recorded in TIFF
mode with a print mark, only the
uncompressed image is printe d, and th e
JPEG image recorded at the same time is
not printed.
BB
B
B
Editing
In INDEX mode
1
Set the MODE selector to
PLAY, th en di splay the INDEX
screen.
2
Select [FILE], [PRINT MARK],
and then [SELECT] from the
menu.
3
Select the images to m ar k
with the control button.
53
Page 54

Additional information
Precautions
On cleaning
Cleaning the LCD screen
Wipe the screen surface with a cleaning
cloth (not supplied) or a LCD cleaning kit
(not supplied) to remove fingerprints, dust ,
etc.
Cleaning the camera surface
Clean the camera surface with a soft cloth
slightly moi sten e d wi th w ate r, then wipe th e
surface dry. Do not use any type of solvent
such as thin ner, alco hol or benzene as this
may damage the finish or the casing.
After using your camera at the
seashore or other dusty locations
Clean your camera carefu lly. Otherwi se , the
salty air may corrod e the metal fittings or
dust may enter the inside of your camera,
causing a malfunction.
Note on operating
temperature
Y ou r camera is de signed f or use between the
temperatures of 32°F and 104°F (0°C and
40°C). Recording in extre mely cold or ho t
places that exceed thi s rang e is not
recommended.
On moisture condensation
If the camera is brought directly from a cold
to a warm location, or is placed in a very
damp room, moisture may conde nse inside
or outside the camera. Should this occur, the
camera will not operate properly.
Moisture condensation occurs
easily when:
•
The camera is brought from a cold location
such as a ski slope into a warmly heated
room.
•
The camera is taken from an airconditioned room or car interior to the hot
outdoors, etc.
How to prevent moisture
condensation
When bringing the camera from a cold place
to a warm place, seal the camera in a plastic
bag and allow it to adapt to conditions at the
new location over a period of time (about an
hour).
If moisture condensation occurs
Turn off the camera and wait about an hour
for the moisture to evaporate. Note that if
you attempt to record with moisture
remaining inside the lens, you will be unable
to record clear images.
On AC power adaptor
•
Unplug the unit from the wall outlet
(mains) when you are not using the unit for
a long time.
•
To disconnect the power cord (mains lead),
pull it out by the plug. Never pull the
power cord (mains lead) itself.
•
Do not operate the unit w ith a damaged
cord or if the unit has been dropped or
damaged.
•
Do not bend the power cord (mains lead)
forcibly, or place a hea v y o b ject on it. This
will damage the cord and may cause fire or
electrical shock.
•
Prevent metallic objects fr om coming into
contact with the metal pa r ts of the
connecting section. If this happens, a short
may occur and the unit may be damaged.
•
Always keep metal contacts clean.
•
Do not disassemble the unit.
•
Do not apply mechanical shock or drop the
unit.
•
While the unit is in use, part icula rly during
charging, keep it away from AM receivers
and video equipment. AM reception and
video operation are disturbed.
•
The unit becomes warm during use. This is
not a malfunction .
•
Do not place the unit in loca tions that are:
—Extremely hot or cold
—Dusty or dirty
—Very humid
—Vibrating
54
Page 55

On battery pack
•
Use only the specified charger with the
charging function.
•
T o prev ent accident from a short circuit, do
not allow metal objects to come into
contact with the battery terminals.
•
Keep the batter y pack away from fire.
•
Never expose the battery pack to
temperatures above 140°F (60°C), such as
in a car parked in the sun or under direct
sunlight.
•
Keep the batter y pack dry.
•
Do not expose the battery pack to any
mechanical shock.
•
Do not disassemble nor modify the battery
pack.
•
Install the battery pack to the camera
securely.
•
Charging w hi l e some capacity remains
does not affect the original battery
capacity.
If any problem occurs, unplug your camer a
and contact your nearest Sony dealer.
On internal rechargeable
button battery
This camera has an internal rechargeable
button bat tery for maintaining th e date and
time and other settings regardless of whether
the power is on or off. This rechargeable
button battery is constantly charged as long
as you are using the camera. However, if
you use the camera for only short periods it
discharges gradually, and if you do not use
the camera at all for about half a year it
becomes completely discharge d. In this
case, be sure to charge this rechargeable
button battery before using the camera.
However, even if this rechargeable button
battery is not charged, you can still use the
camera as long as you do not record the date
and time.
Charging method
Connect the came ra to a wall outlet (mains)
with the AC power adaptor, or install a
charged battery pack, an d leave the camera
for 24 hours or more with the POWER
switch set to OFF.
On “Memory Sticks”
“Memory Stick” is a new compact, portable
and versatile IC recordin g medi u m with a
data capacity that exceeds a floppy disk.
“Memory Stick” is specially designed for
exchanging and sharing digital data amon g
“Memory Stick” compati ble products.
Because it is removable, “Memory Stick”
can also be used for external data storage.
There are two types of “Memory Sticks”:
general “Memory Sticks” and “MagicGate
Memory Sticks” that are equipped with the
MagicGate* copyright prot ecti on
technology.
You can use both types of “Memory Stick”
with your camera. However, because your
camera does not support the MagicGate
standards, data recorded with your camera is
not subject to MagicGate copyright
protection.
MagicGate is copyright protection
∗
technology that uses encryption
technology.
Notes
•
Do not remove the “Memory Stick” while
reading or writing data.
•
Data may be damaged if:
—you remove the “Memory Stick” or turn
off your camera while reading or
writing data.
—you use the “Memo ry Stick ” in a
location subject to the effects of static
electricity or noise.
•
Do not attach any other material than the
supplied label on the labeling position.
•
Attach the label so that it does not stick out
from the proper attachment location.
•
When you carry or store the “Memory
Stick,” put it in its supplied case.
•
Do not touch the terminals of a “Memory
Stick” with your hand or a metal object.
•
Do not strike, bend or drop the “Memory
Stick.”
•
Do not disassemble or modify the
“Memory Stick.”
•
Do not allow the “Memory Stick” to get
wet.
Additional information
55
Page 56
“Memory Stick”, , “MagicGate
Memory Stick” and are trademarks o f
Sony Corporation.
“MagicGa te” and are
trademarks of Sony Corporation.
Using your camera
abroad
Power sources
You can use your camera in any
country or area with the supplied
battery charger within 100 V to 240 V
AC, 50/60 Hz. Use a commercially
available AC plug adaptor
necessary, depending on the design of
the wall outlet (mains)
AC- L10
Watching the playback picture on
TV
If you want to view the playback
picture on a TV , you need a TV having
a video input jack an d a video
connecting cable.
The color sy st em of the TV must be
the same as that of your digital still
camera. TV color systems differ fr om
country to country. Check the
following list:
NTSC system countries
Bahama Islands, Bolivia, Canada,
Central America, Chile, Columbia,
Ecuador, Jamaica, Japan, Korea,
Mexico, Peru, Surinam, Taiwan, the
Philippines, the U.S.A., Venezuela, etc.
[b]
.
[a]
, if
PAL system countries
Australia, Austria, Belgium, China,
Denmark, Finland, G er many, Great
Britain, Holland, Hong Kong, Italy,
Kuwait, Malaysia, New Zealand,
Norway, Portugal, Singapore, Spain,
Sweden, Swit zerland, Thailand , et c.
PAL-M system country
Brazil
PAL-N system countries
Argentina, Paraguay, Uruguay
SECAM system countries
Bulgaria, Czech Republic, France,
Guiana, Hungary, Iran, Iraq, Monaco,
Poland, Russia, Slovak Republic,
Ukraine, etc.
56
Page 57

Troubleshooting
If you experience trouble with your camera, first check the following items. Should
your camera still not operate properly after you have made these checks, consult your
Sony dealer or local authorized Sony service facility. If code displays (C:ss:ss)
appear on the LC D screen, the self-diagnosis displa y f unction is working (p age 62).
Symptom Cause and/or Solution
•
Your camera does not
work.
Your camera cannot
record images.
The picture is out of focus. •Your camera is not in macro recording mode when
The resizing function does
not work.
You cannot display a print
mark.
The picture is noisy.
You are not using an “InfoLITHIUM” batter y pack.
t Use an “InfoLITHIUM” battery pack (page 8) .
•
The battery level is low (the E indicator appears
on the LCD screen).
t Ch arge the battery pack (page 9).
•
The AC power adaptor is not connected securely.
t Connect it firmly to the DC IN jack of your
camera and a wall outlet (mains) (page 12).
•
The built-in microcomputer is not working
properly.
t Disconnect and then rec onnect all power
sources after one minute. Then turn the power
on by sliding the POWER switch down and
check that the camera works properly.
•
The MODE selector is set to PLAY.
t Set it to MOVIE or STILL (pages 16, 20).
•
No “Memory Stick” has been inserted into your
camera.
t Insert a “Memory Stick” (page 15).
•
The write-protect tab on the “Memory Stick” is set
to LOCK.
t Set it to the recording position.
you shoot a subject that is about 1 3/16 to
9 7/8 inches (3 to 25 cm) away from the lens.
t Set the macro recording mode (page 41).
t Press the zoom button to set to the W side.
•
You cannot resize moving images and text images.
•
You cannot display pr in t m arks on moving images
and text images.
•
Your camera is placed near a TV or other
equipment that uses strong magnets.
t Move your c am era away from the TV, etc.
Additional information
57
Page 58
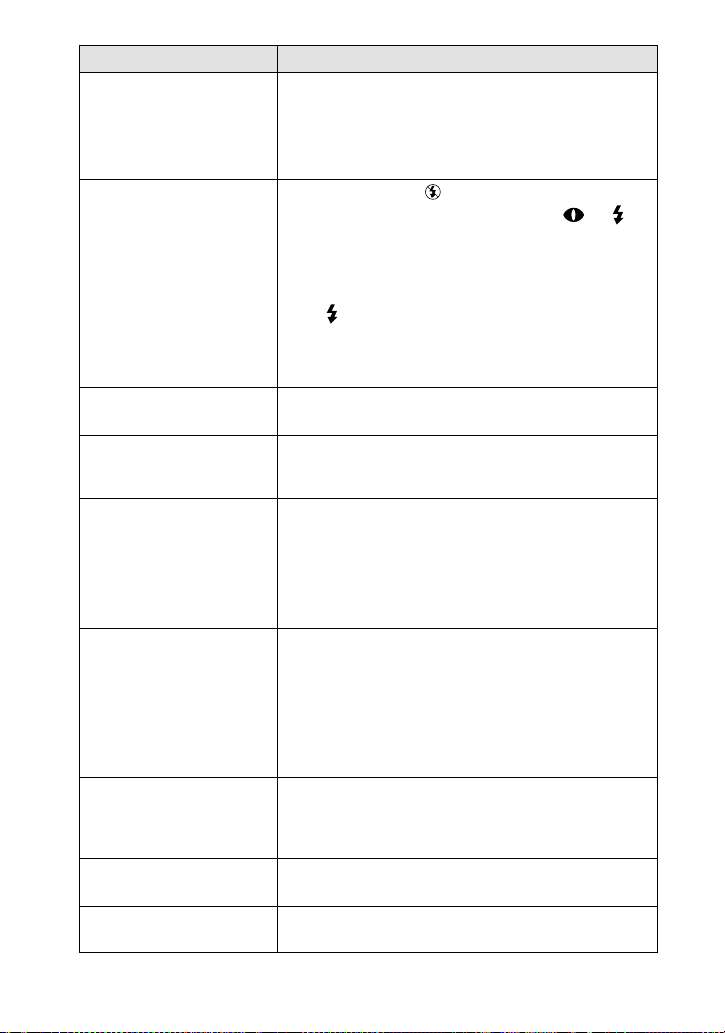
Symptom Cause and/or Solution
The picture is too dark.
The flash does no t work. •The flash is set to .
The date and time are
recorded incorrectly.
Vertical streaks appear
when you are shoot ing a
very brig ht subject.
The battery life is short.
The battery remaini ng
indicator is incorrect.
Sufficien t battery
remaining indicator is
displayed but the power
runs out soon.
The zoom does not work. •PROGRAM AE is set to the Panfocus mode.
Digital zoom does not
function.
•
You are shooting a subject with a light source
behind the subject.
t A djust the exposure (p age 43).
t Adjust the brightness of the LCD screen (page
35).
t Set the flash to auto (no indicator), or
(page 19).
•
PROGRAM AE is set to the Twilight, Twilight
plus, or Panfocus mode.
t Cancel the mode (page 42) or set the flash to
.
•
The MODE selector is set to MOVIE (DSC-S50
only).
t S e t it to STIL L .
•
The date and time are not set correctly.
t Set the correct date and time (page 13).
•
The smear phenom enon is happening.
t This is not a malfunction.
•
You are recording/playing back images under
extremely cold temperatures.
•
The battery pack is not charged enough.
t Charge the battery pack fully.
•
The battery pack is dea d.
t Replace the battery pack with a new one.
•
Yo u have used the camera for a long time in an
extremely hot or an extrem el y cold location.
•
The battery pack is dea d.
t R eplace the battery pack with a new one (page
8).
•
The battery pack is di scharged.
t Install a charged battery pack (pages 8, 9).
t Fully charge the battery pack (page 9).
t Cancel the Panfocus mode (page 42).
•
You cannot use digital zoom to record moving
pictures.
58
Page 59
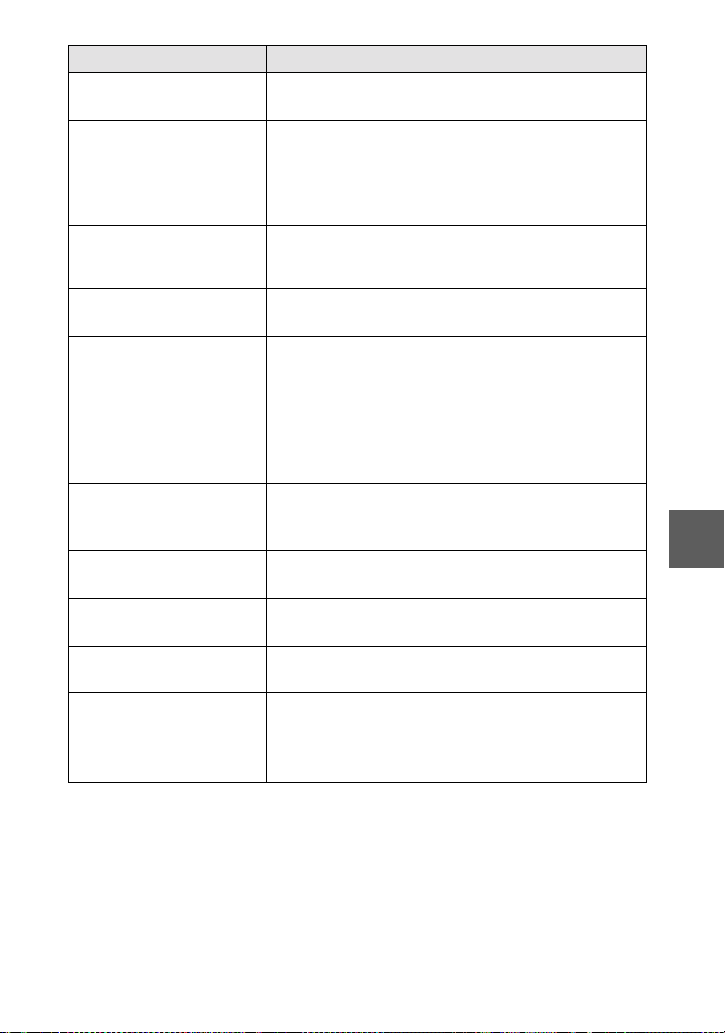
Symptom Cause and/or Solution
•
Your camera cannot play
back images.
The image and sound are
interfered by noise when
you play back an image on
a personal comput er.
The image cannot be
played back on a personal
computer.
Your camera cannot delete
an image.
The power turns off
suddenly.
The image does not
appear on the TV scree n.
A file error occurs when
you play back a file.
The PROGRAM AE
function does not w or k.
The LCD screen freezes
momentarily.
The picture is
monochrome (black and
white).
The MODE selector is set to STILL o r MOVIE.
t Set it to PLAY (page 21).
•
You are playing back th e file directly from the
“Memory Stick.”
t Copy th e file to the har d di s k of the personal
computer and then play back the file from the
hard disk (page 27).
t Consult the personal computer or software
manufacturer.
•
The image is protected.
t Ca ncel the protection (page 49).
•
With the MODE selector set to STILL or MOVIE,
if you do not operate the camera for about three
minutes while the power is on , th e came ra turns off
automatically to prevent wearing down the b attery.
t Turn on the camera.
•
The battery is discharged.
t Replace it with a charged bat t er y.
•
The video output signal setting of your camera is
incorrect.
t Change the setting (page 4 8) .
•
The image size is larger than 1600×1200.
t Use an image size of 1600 × 1200 or smaller.
•
The camera is set to TEX T m ode.
t Cancel TEXT mode (page 42).
•
This is a characteristic of the system and is not a
malfunction.
•
The camera is set to TEX T m ode.
t Cancel TEXT mode (page 39).
•
P.EFFECT is set to B&W mode.
t Canc el B& W mode (page 44).
Additional information
59
Page 60

Symptom Cause and/or Solution
•
Your personal computer
does not recognize your
camera.
The camera is turned off.
t Turn on the camera.
•
The battery level is low.
t Use the AC power ada ptor (page 12).
•
The USB cable is not connected firmly.
t Disconnect the USB cable, and connect it again
firmly . Make sur e that “PC MODE” is displaye d
on the LCD screen (p ag e 26).
•
The USB connect ors on yo ur pers onal co mputer ar e
connected to other equipment besides the keyboard,
the mouse, and your camera.
t D is connect the USB cables except for the o nes
connected to the keyboard, the mouse, and your
camera (page 24).
60
Page 61
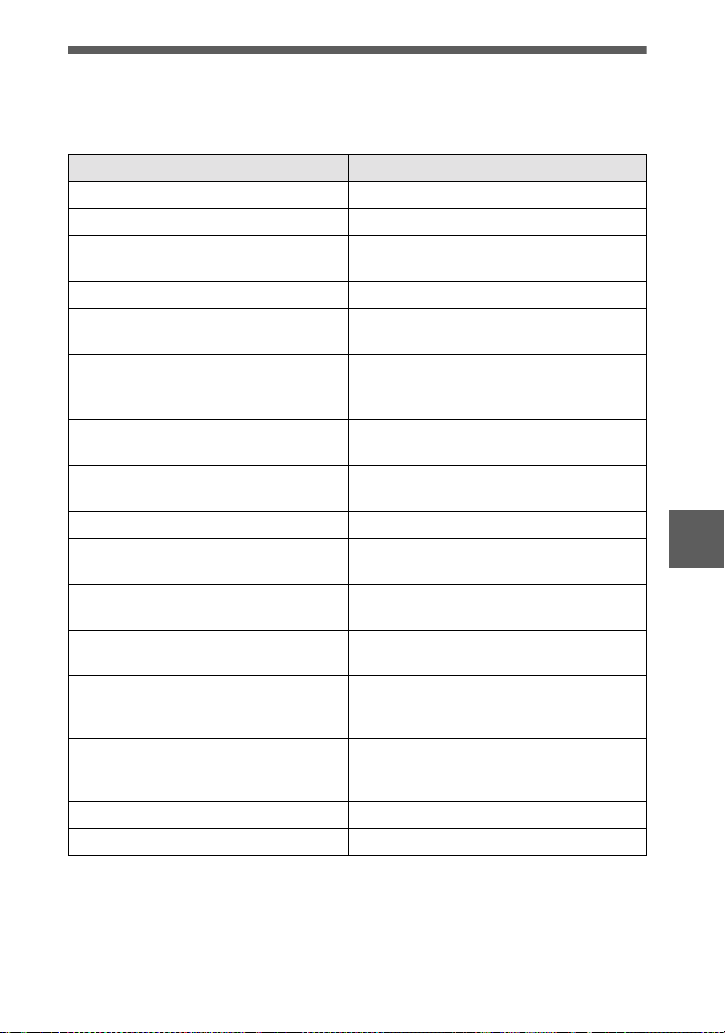
Warning and notice messages
Various messages appear on the LCD screen. Check the corresponding des cr i pt io ns
in the following list.
Message Meaning
NO MEMORY STICK No “Memory Stick” has been inserted.
SYSTEM ERROR Turn the power off and on again.
MEMORY STICK ERROR The inserted “Mem ory Stick” cannot be
FORMAT ERROR Failed to format the “Memory Stick.”
MEMORY STICK LOCKED The write-protect tab on the “Memory
NO MEMORY SPACE Th e ca pacity of the “Memor y St ic k” is
NO FILE No image has been recorded on the
FILE ERROR An error occurred while playing back the
FILE PROTECT The image is protecte d aga in st er asure.
for “InfoLITH IUM” battery only The battery is not th e “InfoLITHIUM”
NOT ENOUGH MEMORY The images you want to copy are too big
DIRECTORY ERROR A directory with the same name already
IMAGE SIZE OVER You are playing back an image of a size
INVALID OPERATION You are playing back a file that was
E
-
used with your cam er a, or is dam aged.
Stick” is set to the LOCK position.
full, and you cannot record or copy
images.
“Memory Stick.”
image.
type.
to copy with your camera.
exists.
that cannot be played back with your
camera.
created on equipment other than your
camera.
The battery level is low or zero.
The image is protecte d.
Additional information
61
Page 62
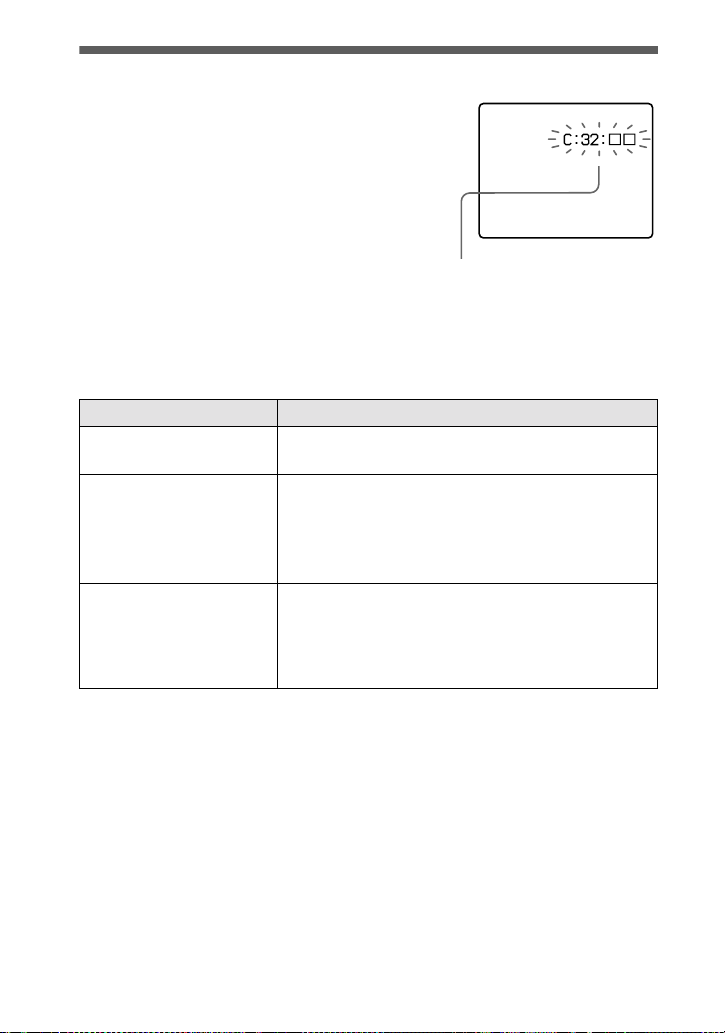
Self-diagnosis display
Self-diagnosis display
•
C:ss:
ss
You can reverse the camera
malfunction yourself.
•
E:ss:
ss
Contact your Sony dealer or local
authorized Sony service facility.
Your camera has a self-diagnosis display. This
function displays the camera condition on the
LCD screen with a combination of a letter and
four digits of numbers. If this occurs, check the
following code chart. The code informs you of the
camera’s current condition. The la st two di gi t s
(indicated by ss) will differ depending on the
state of the camer a.
First three digits Cause and/or Corrective Action
•
C:32:
ss
C:13:
ss
E:61:
ss
E:91:
ss
If you are unable to solve the problem even after trying the corrective
actions a few times, contact your Sony dealer or local authorized Sony
service facility.
There is trouble wit h your camera’s hardware.
t Turn the power off and on agai n.
•
An unformatted “Memory Stick” is inserted.
t Form at th e “Memory Stick” (p age 32).
•
The inserted “Me mory Stick” cannot be used with
your camera, or is damaged.
t Insert a new “Memory Stick” (page 15).
•
A camera malfunct ion that you cannot reverse has
occurred.
t Co ntact your Sony dealer or lo cal authorized
Sony service facility and inform them of the 5digit service code. (example: E:61:10)
62
Page 63

Specifications
System
Image device
1/2.7 type color CCD
Lens
3× zoom lens
f = 6.1 – 18.3 mm
(39 – 117 mm when converted
into a 35 mm still camera)
F = 2.8 – 2.9
Exposure control
Automatic exposure
White balance
Automatic, Indoor, Outdoor,
Hold
Data system
Still: JPEG, GIF (in TEXT
mode), TIFF
Movie (DSC-S50 only):
MPEG1
Audio with still image
(DSC-S50 only):
MPEG1 (Monaural)
Recording medium
“Memory Stick”
Flash
Recommended recording
distance:
11 7/8 inches to 8 1/4feet
(0.3 m to 2.5 m)
Output connector
A/V OUT (Monaural)
(DSC-S50 only)
Minijack
Video: 1 Vp-p, 75Ω,
unbalanced, sync negative
Audio: 327 mV (at a 47 kΩ
load)
Output impedance: 2.2 k
VIDEO OUT
(DSC-S30 only)
Minijack
Digital I/O (USB)
Special mi n ijack
LCD screen
Used LCD panel
2 type TFT (Thin Film
Transistor active matrix) drive
Ω
Total number of dots
123 200 (560×220) dots
General
Used battery pack
NP-FM50
Power requirements
8.4 V
Powe r consumption
(during recording )
2.9 W
Operation temperature
32°F to 104°F
(0°C to 40°C)
Storage temperature
–4°F to +140°F
(–20°C to +60°C)
Maximum dimensions
41/2×23/4×23/4inches
(113×68×69 mm) (w/h/d)
Mass
Approx. 13 oz (370 g)
(including battery pack NPFM50, “Memory Stick”, wrist
strap and lens cap etc.)
Built-in microphone
(DSC-S50 only)
Electret condenser microphone
Built-in speaker
(DSC-S50 only)
Dynamic speaker
AC-L10 AC power
adaptor
Power requirements
100 to 240 V AC, 50/60 Hz
Rated output voltage
DC 8.4 V, 1.5 A in operating
mode
Operation temperature
32°F to 104°F (0°C to 40°C)
Storage temperature
–4°F to +140°F
(–20°C to +60°C)
Maximum dimensions
5×1 9/16×2 1/2inches
(125×39×62 mm) (w/h/d)
Mass
Approx. 10 oz (280 g)
NP-FM50 battery pack
Used battery
Lithium ion battery
Maximum voltage
DC 8.4 V
Nominal voltage
DC 7.2 V
Capacity
8.5 Wh (1 180mAh)
Accessories
A/V connecting cable
(DSC-S50 only) (1)
VIDEO connecting cable
(DSC-S30 only) (1)
NP-FM50 battery pack (1)
AC-L10 AC power adaptor (1)
Power cor d (1 )
USB cable (1)
Lens cap (1)
Lens cap strap (1)
Wrist strap (1)
“Memory Stick” (4 MB) (1)
CD-ROM (1 )
Operating Instructions (1)
Design and specifications are
subject to change without
notice.
Additional information
63
Page 64
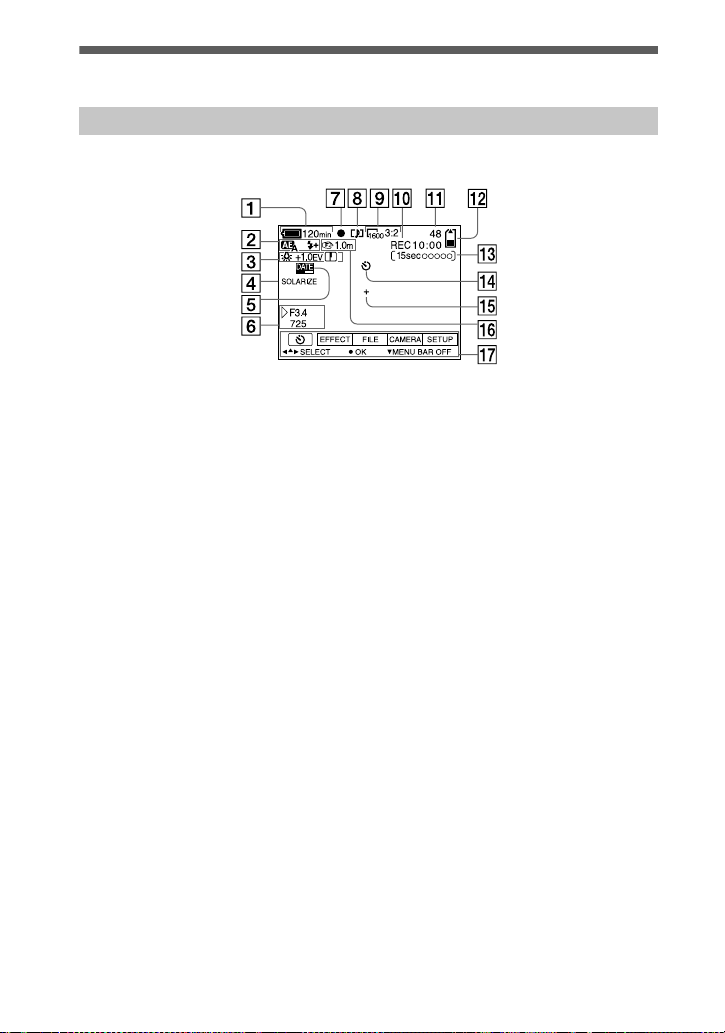
LCD screen indicators
The indicators during recording
A Battery remaining indicator
B PROGRAM AE/flash level/flash
mode indicator
C White balance/EV level/
sharpness indicator
D Picture effect indicator
E Date/time indicator
F Aperture/shutter speed
indicator
G AE lock/focus lock indicator
H Recording mode indicator
I Image size indicator
J Self-diagnosis function/
recording time indicator
K Number of recorded images
L Remaining memory capacity
indicator
M Moving image/VOICE recording
time indicator (DSC-S50 only)
N Self-timer indicator
O Spot light-meteri ng indicator
P Focus/macro mode indicator
Q Menu bar and gu i de m e nu
They appear by pressing
v
on the
control b u t t on and disappear by
pressing V of it.
64
Page 65
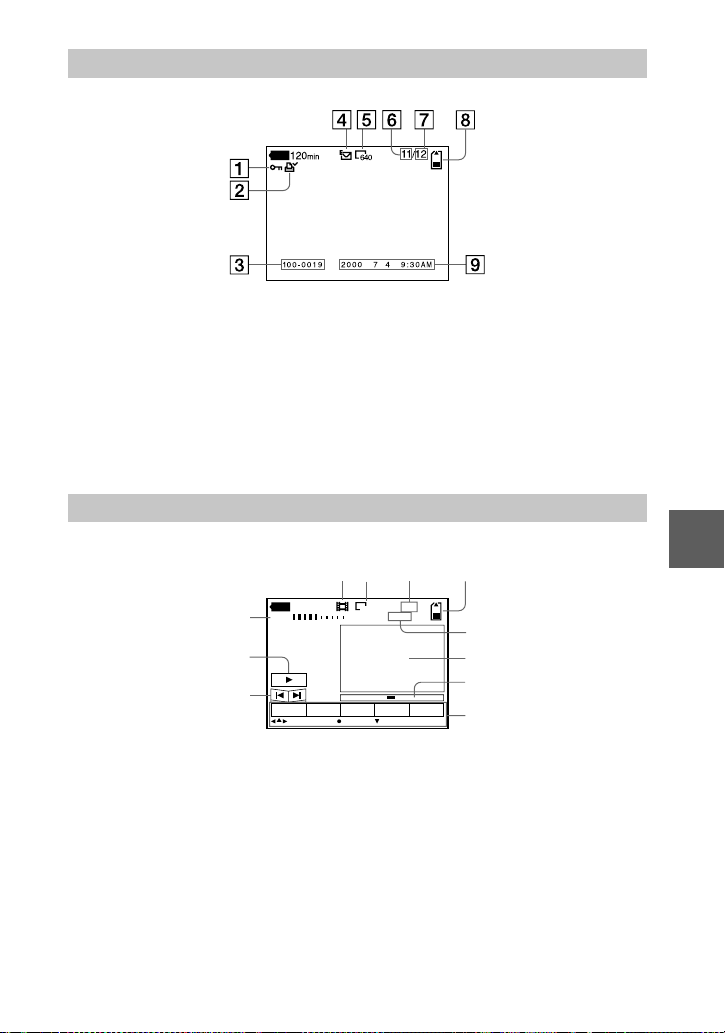
When playing back still images
A Protect indicator
B Print mark indicator
C File name
D Recording mode indicator
E Image size indicator
F Image number
When playing back moving images
45 6
120
in
O
1
2
3
SC O
A VOL. (Volume) indicator
(DSC-S50 only)
B Playback/pause buttons
: during pause
B
: during playba ck
X
C Fast-forward/rewind buttons
D Recording mode indicator
E Image size indicator
G Number of stored images in
“Memory Stick”
H Remaining memory capacity
indicator
I Recording date of the pla ybac k
image/menu bar and guide
menu
7
6
320
012
8
9
0
SOODIDI
R O
F Image number / number of
G Remaining memory capacity
H Counter
I Play back image
J Play bar
K Menu bar and gu ide menu
qa
stored images in “Memory
Stick”
indicator
Additional information
65
Page 66

Index
A
A/V OUT.........................48
Adjusting the exposure ....43
AE (Auto Exposure) ........16
Aperture priori ty mode ....42
Auto power-off function ....9
Auto red-eye reduction....19
B
Battery pack
battery life...................10
charging......................... 9
installing........................8
remaining battery
indicator.......................64
BEEP................................35
C
Charging the battery pack..9
Cleaning...........................54
Control button..................29
COPY...............................51
D
DELETE ..........................50
Digital zoom....................17
Display window
indicators.....................64
E
Editing
COPY..........................51
DELETE......................50
preventing accidental
erasure.........................49
E-MAIL ...........................38
Enlarging a part of the
still image....................46
F
Face-to-face recording..... 37
File name ...................... ...28
FLASH LEVEL ...............19
Focus................................41
Focusing manually...........41
FORMAT.........................32
Full charge.........................9
I
IMAGE SIZE...................37
INDEX mode................ ...45
“InfoLITHIUM” battery
pack...............................8
J
JPEG................................16
L
LCD screen......................64
LCD screen indicators.....64
M
“Memory Stick”
copying images........ ....51
formatting....................32
inserting.......................15
number of images that
you can record.............38
Menu................................32
MODE selector................29
Moisture condensation.....54
Moving images
playing back................22
recording .....................20
MPEG..............................20
N
Normal charge ... ................9
NTSC system...................56
Number of images that you
can record
by image size...............38
in E-MAIL mode.........38
in VOICE mode........... 39
P
P.EFFECT........................44
PAL system......................56
Playing back
moving images............22
still images ..................21
Playing back multiple
images at once.............45
Power supply
AC power adaptor.......12
battery pack...................9
Preventing accidental
erasure.........................49
PRINT MARK.................53
PROGRAM AE...............53
PROTECT........................49
Q
Quick Review..................17
R
REC MODE.....................33
Recording
images in macro..........41
moving images............20
still images ..................16
still images for
e-mail...........................38
with the flash...............19
RESIZE............................51
S
SECAM system ...... .........56
Self-diagnosis display......62
Setting date and time .. .. . ..13
SHARPNESS...................34
Shutter speed prior ity
mode ............................42
Single mode.....................31
SLIDE SHOW.................47
Still images
playback......................21
recording .....................16
T
TEXT...............................39
TIFF.................................40
TV color system...............56
U
USB..................................25
Using the self-timer.........18
Using your camera
abroad..........................56
V
Viewing images
on a TV screen............48
using a personal
computer......................24
VOICE............................. 39
W
Warning and notice
messages......................61
WHITE BALANCE.........43
Z
Zoom................................17
66
Page 67

Page 68

Sony Corporation Printed in Japan
 Loading...