

Sony DRN-XM01C2, DRN-XM01CK2, DRN-XM01HK2, DRN-XM01R2, DRN-XM01H2 User Manual
3-245-381-11(1)
Digital Audio Receiver
For customers in the USA
Please register this product on line at
productregistration.
Proper registration will enable us to send you periodic mailings about
new products, services, and other important announcements.
Registering your product will also allow us to contact you in the
unlikely event that the product needs adjustment or modification.
Thank you.
Accessory Kit
For DRN-XM01H2/XM01HK2 Customers
Installation Guide
OWNER’S RECORD
The model number is located on the bottom and serial number
also on the bottom. Record the serial number in the space
provide below. Refer to these numbers whenever you call upon
your Sony dealer regarding this product.
Model No.
Serial No.
DRN-XM01C2/DRN-XM01R2/
DRN-XM01H2/
DRN-XM01CK2/
DRN-XM01HK2
Sony Corporation ©2002 Printed in Japan
LIMITED WARRANTY
(Portable Audio)
Printed on 100%
recycled paper using
VOC (Volatile Organic
Compound)-free
vegetable oil based ink.
WARNING
To prevent fire or shock hazard, do not expose
the unit to rain or moisture.
You are cautioned that any changes or modifications not expressly
approved in this manual could void your authority to operate this
equipment.
INFORMATION
This equipment has been tested and found to comply with the limits for a
Class B digital device, pursuant to Part 15 of the FCC Rules. These limits
are designed to provide reasonable protection against harmful interference in a residential installation. This equipment generates, uses, and can
radiate radio frequency energy and, if not installed and used in accordance with the instructions, may cause harmful interference to radio
communications. However, there is no guarantee that interference will
not occur in a particular installation. If this equipment does cause harmful
interference to radio or television reception, which can be determined by
turning the equipment off and on, the user is encouraged to try to correct
the interference by one or more of the following measures:
– Reorient or relocate the receiving antenna.
– Increase the separation between the equipment and receiver.
– Connect the equipment into an outlet on a circuit different from that to
which the receiver is connected.
– Consult the dealer or an experienced radio/TV technician for help.
This device complies with Part 15 of the FCC Rules. Operation is subject
to the following two conditions: (1) This device may not cause harmful
interference, and (2) This device must accept any interference received,
including interference that may cause undesired operation.
For All Models
Caution
• Do not operate the unit in a way that might divert your attention from
driving safely. As a driver, you alone are responsible for safely
operating your vehicle in accordance with traffic safety laws at all times.
• Do not install the unit where it may obstruct your view through the
windshield or your view of your vehicle’s indicator displays.
• Do not install the unit where it may hinder the function of safety
devices such as an air-bag. Doing so may prevent the air-bag from
functioning properly in the event of an accident.
• The installation and use suggestions contained in this manual are
subject to any restrictions or limitations that may be imposed by
applicable law— purchaser should check applicable law for any
restrictions or limitations before installing and/or operating this
product.
• Failure to follow these safety instructions and warnings may result in a
serious accident.
http://www.sony.com/
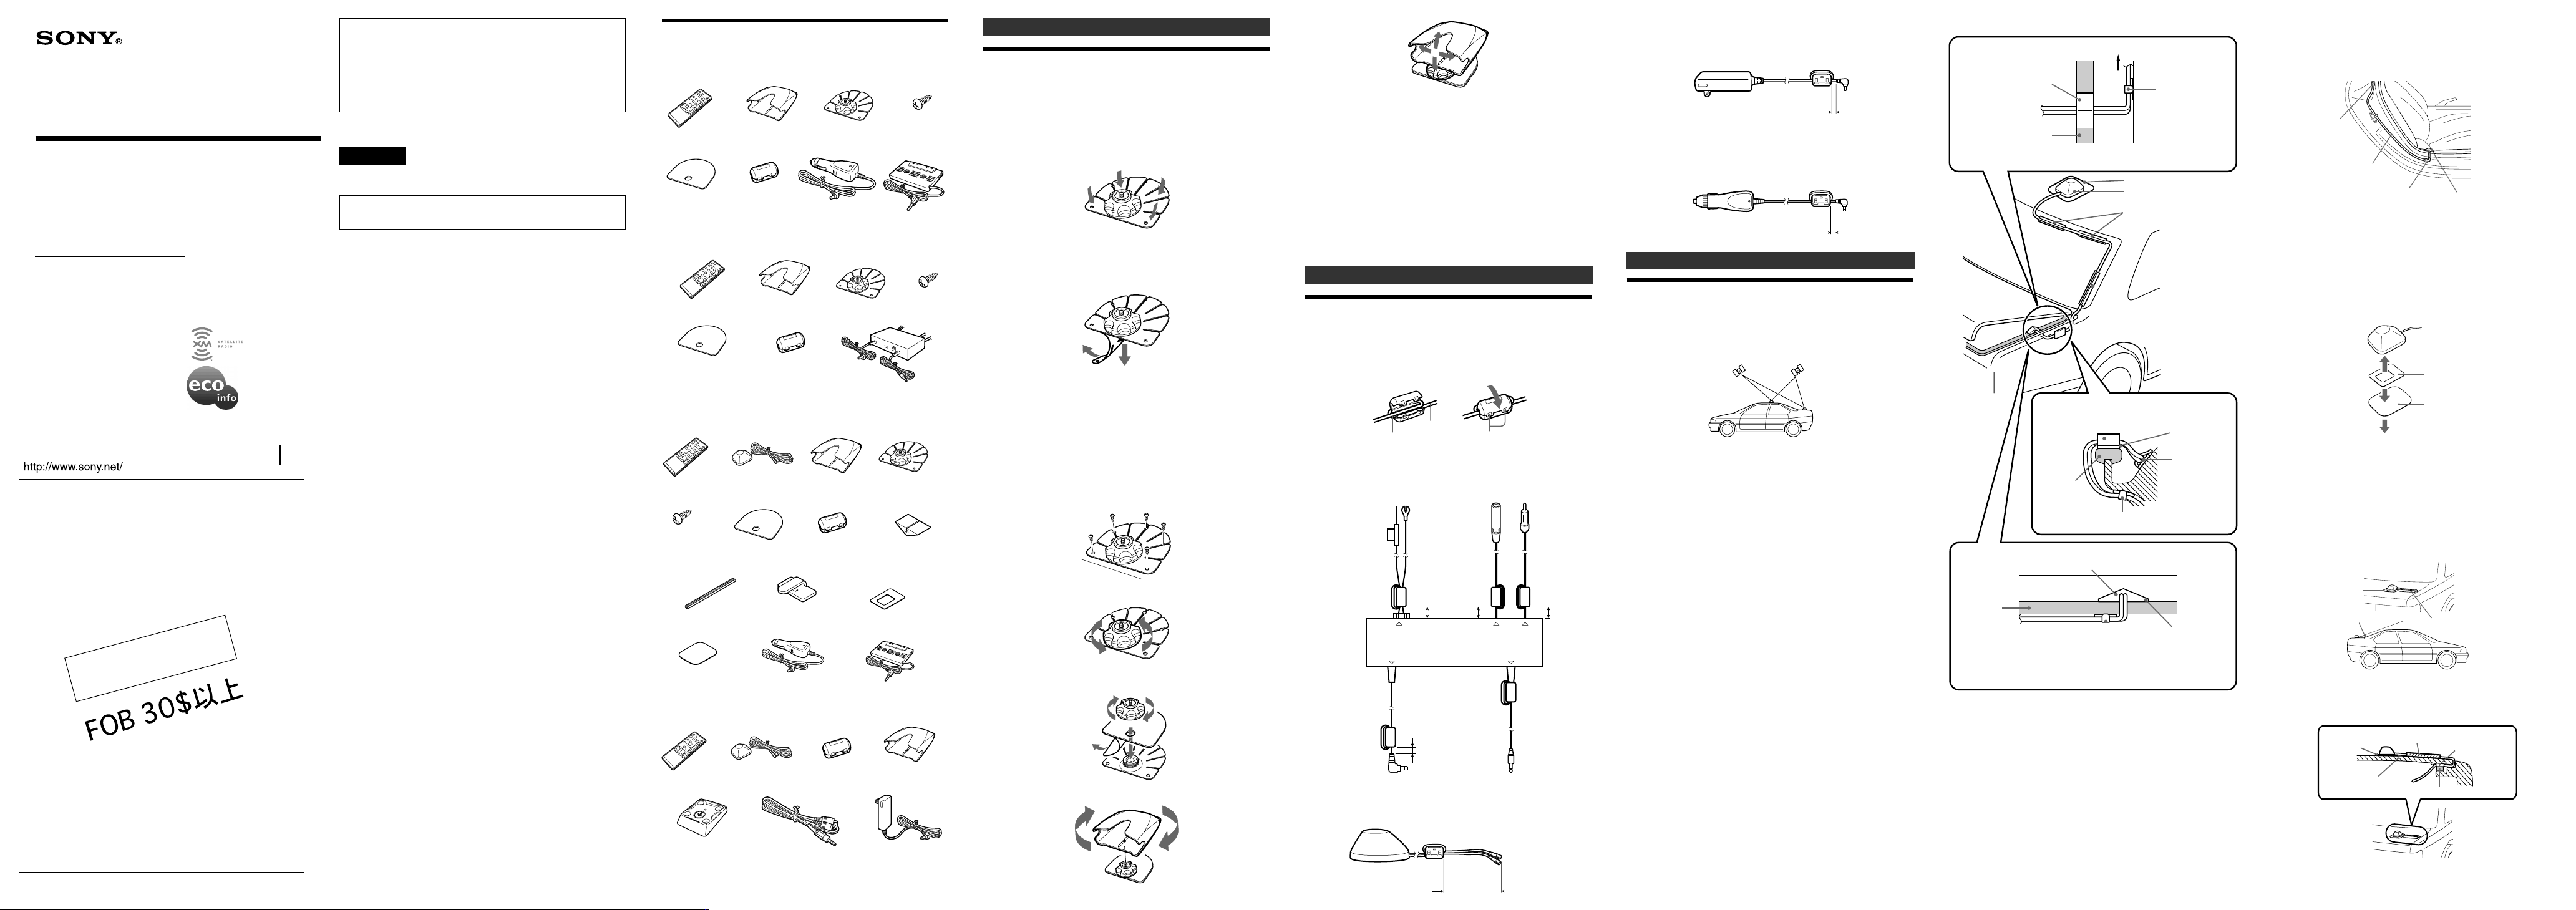
Parts for Installation and Connection
for DRN-XM01C2
Remote
commander (1)
Cover (1)
Car cradle (1)
Ferrite core (2)
Car battery
cord (1)
for DRN-XM01R2
Remote commander (1)
Cover (1)
Car cradle (1)
Ferrite core (6)
for DRN-XM01CK2
Remote
commander (1)
Screw (5)
Cable guide (3)
XM antenna (1)
Cover (1)
Cord clamp (4) Cushion with the
Car battery cord (1) Car connecting pack (1)Seal (1)
Car cradle (1)
Ferrite core (2)
for DRN-XM01H2/XM01HK2
Remote
commander (1)
Home stand (1)
XM antenna (1)
Ferrite core (2) Home cradle (1)
Car stand (1)
Car stand (1)
RF modulator (1)
double-sided
adhesive tape (1)
AC power adaptor (1)Audio cord (1)
Screw (5)
Car connecting
pack (1)
Screw (5)
Car stand (1)
Water proof
cushion (1)
For DRN-XM01C2/XM01CK2/XM01R2
Installing the Cradle in your
Car
Install the cradle with the supplied car stand.
1 Choose the mounting position, then shape the base of the
stand to match the mounting surface.
Note
Bend the base gently so there are no gaps between the base and the
mounting surface.
2 Clean the mounting surface well.
3 Peel off the protective film from the base of the stand and
attach the base to the mounting surface.
Make sure the base attaches to the mounting surface completely.
Notes
• The double-sided tape will not stick firmly if the mounting surface
temperature is lower than 20°C (68°F). Use a hairdryer, etc. to warm
up the mounting surface before mounting.
• Consider the mounting position carefully beforehand. If you change
the position after mounting the double-sided tape will weaken.
• When removing the stand, preheat the mounting surface with a
hairdryer then slowly pull up to remove, or use a commercially
available solvent to remove the seal.
4 Fix the stand with the supplied screws.
Note
Before drilling holes in the mounting surface, make sure there is
nothing behind the mounting surface.
5 Remove the knob.
6 Attach the supplied cover over the base of the stand as
shown below.
3
2
1
7 Attach the cradle to the stand.
To the stand receptacle
at the bottom of the
cradle
8 Adjust the angle.
You can also adjust the angle after installing the main unit into the
cradle.
Notes
• Do not install the unit in a location where it may be subjected to
extremely high or low temperatures as the cabinet may become
deformed or damaged. After parking your car, the temperature inside
the car may raise considerably. Therefore, cover the cradle and the main
unit with a white cloth or remove it from the cradle to avoid the direct
sunlight.
• Do not install the cradle, the main unit and RF modulator in the
following places:
– Underneath the driver’s seat: There may be a danger of the unit
getting lodged under the brake pedal.
– On the door or ceiling: There may be a danger of the unit falling down
or obscuring the driver’s view while driving.
For All Models
Affixing the ferrite cores
You must affix the cores (supplied with the model you purchased) in
order to comply with Part 15 of the FCC Rules.
Wind the cord around the ferrite core once or twice, and then fasten the
catch. Make sure that each ferrite core should be attached to the
appropriate position as shown in the diagram below.
Wind once or twice.
Affixing the ferrite core to the RF modulator
Wind the black
and red cords
around the RFC8 ferrite core
twice, then
fasten the catch.
POWER ANT
DC OUT AUDIO
Wind the cord
around the
RFC-8 ferrite
core twice,
then fasten the
catch.
Affixing the ferrite core to the XM antenna
Cord
Approx.
10 mm
(13/32
inches)
RFC-8
Wind the cord
around the RFC-8
ferrite core twice,
then fasten the
catch.
RFC-8
Approx. 5 mm
(7/32 inches)
Wind the cord around the RFC8 ferrite core once, then fasten
the catch.
Fasten the catch.
Wind the cord around the RFC-8 ferrite
core once, then fasten the catch.
Approx.
10 mm
(13/32
inches)
RFC-8
RFC-8
RFC-8
Approx. 135 mm
(5 3/8 inches)
Approx.
10 mm
(13/32
inches)
Affixing the ferrite core to the AC power
adaptor (AC-E60A)
Wind the cord around the
RFC-8 ferrite core twice,
then fasten the catch.
Approx. 5 mm
(7/32 inches)
Affixing the ferrite core to the car battery cord
(DCC-E260)
For DRN-XM01CK2
Wind the cord around the
RFC-8 ferrite core twice,
then fasten the catch.
Approx. 5 mm
(7/32 inches)
Installing the XM Antenna to
your Car
The bottom surface of the XM antenna is made of a magnet. Install the
antenna horizontally in a location where the radio wave from the satellite
is not interrupted by the body of the car (E.g., roof or trunk lid).
Notes on installing the antenna to your car
Place the antenna on a flat surface as far away as possible from the edges
of the trunk lid or the rear window.
• Before mounting the antenna, be sure to attach the supplied seal to the
body of the car where the antenna will be mounted, then mount the
antenna gently so that it does not damage the body of the car.
• Do not leave the cord slackened outside of the car.
• Use the cord clamp when fixing the cord, if required.
• When removing the antenna, do not pull it by the cord. This may cause
the cord to come off the antenna due to the powerful magnet.
• The antenna cord is charged with the XM signal and the power supply
to the antenna. When wiring the antenna, be careful not to pinch the
cord in the moving parts of the car. The damaged cable may cause a
malfunction of the antenna and the main unit.
• When washing the car in an automatic car wash, remove the antenna.
Otherwise, it may damage the body of the car.
Installing the antenna to an aluminum or plastic
body
The antenna cannot be installed on an aluminum or plastic body with the
magnet. In this case, use the supplied seal.
Painting the antenna
The antenna can be painted according to the body color of the car,
however, do not use paint that contains metal powder. This may cause
deterioration or inability of reception.
Do not disassemble the antenna when painting.
Placement of the car antenna
Place the antenna on a flat and even surface on your car roof. The angle
from the ground to the satellite should be about 20 - 60 degrees. If you
place the antenna on the trunk lid, make sure your car roof does not block
the satellite signal. Depending on where you live, you may be able to
receive radio waves that are retransmitted by ground repeaters.
Installing the Antenna on the Roof (recommended)
Figure of the top
Water proof cushion
Inside of the trunk
Rubber packing
Put the water proof cushion parallel on the rubber packing
using the double-sided adhesive tape.
Figure of the back
Water proof cushion
Rubber
packing
Cord clamp**
Figure of the side
Rubber
packing
Put the water proof cushion on the rubber packing with the flat
surface downward using the double-sided adhesive tape.
* Be sure to install the antenna firmly on a flat surface. Do not install
on the corner of the roof.
** • Be sure to install the cord clamp in a lower position where the water
proof cushion is mounted. Otherwise, it will cause a water leak into
the trunk.
• Clean the mounting surface before installing the cord clamp.
• Leave the installed cord clamp for 24 hours before installing the
cord. Otherwise, the cord clamp may come off due to weak
attachment.
• To install the cord, insert it into the cord clamp, then press the top
of the cord clamp downward so that the cord is securely installed
inside the cord clamp.
***• Cut the cable guide, if required.
• It is difficult to attach the cable guide to a body or window which
has fluorine resin coating.
Water proof cushion
Cord clamp**
Cord clamp**
Seal
XM antenna*
Cable guide***
Cable guide***
Double-sided
adhesive tape
Cord
clamp**
Double-sided
adhesive tape
Leading the antenna cord into the car through
the space between the door and body
When installing the antenna on the roof, you can also lead the antenna
cord into the car through the space between door and body.
Cord clamp*
Antenna cord
Cord clamp*
* • Clean the mounting surface before installing the cord clamp.
• Leave the installed cord clamp for 24 hours before installing the cord.
Otherwise, the cord clamp may come off due to weak attachment.
• To install the cord, insert it into the cord clamp, then press the top of
the cord clamp downward so that the cord is securely installed inside
the cord clamp.
Water proof cushion
Mounting the Antenna with the Supplied Seal and
Cushion with the Double-sided Adhesive Tape
Attach to the antenna.
2
Cushion with the
3
double-sided
adhesive tape
Seal
1
Attach to the trunk lid.
Note
When removing the seal, preheat the mounting surface with a hairdryer
then pull up slowly to remove, or use a commercially available solvent to
remove the seal.
Installing the Antenna on the Trunk Lid
1 Mount the antenna on the trunk lid.
Clean the mounting surface before mounting.
Seal
20° or less
Cable guide
2 Mount the water proof cushion on the right or left side of the
trunk lid.
To prevent rain water leakage inside the car along the cord, mount the
water proof cushion above the rubber packing when the trunk lid is closed.
Water proof
cushion
Trunk lid
Cable guide*
Rubber packing
Seal
* • Cut the cable guide, if required.
• It is difficult to attach the cable guide to a body or window which
has fluorine resin coating.
For DRN-XM01C2/XM01CK2
For DRN-XM01R2
For the DRN-XM01CK2
For DRN-XM01H2/XM01HK2
For All Models
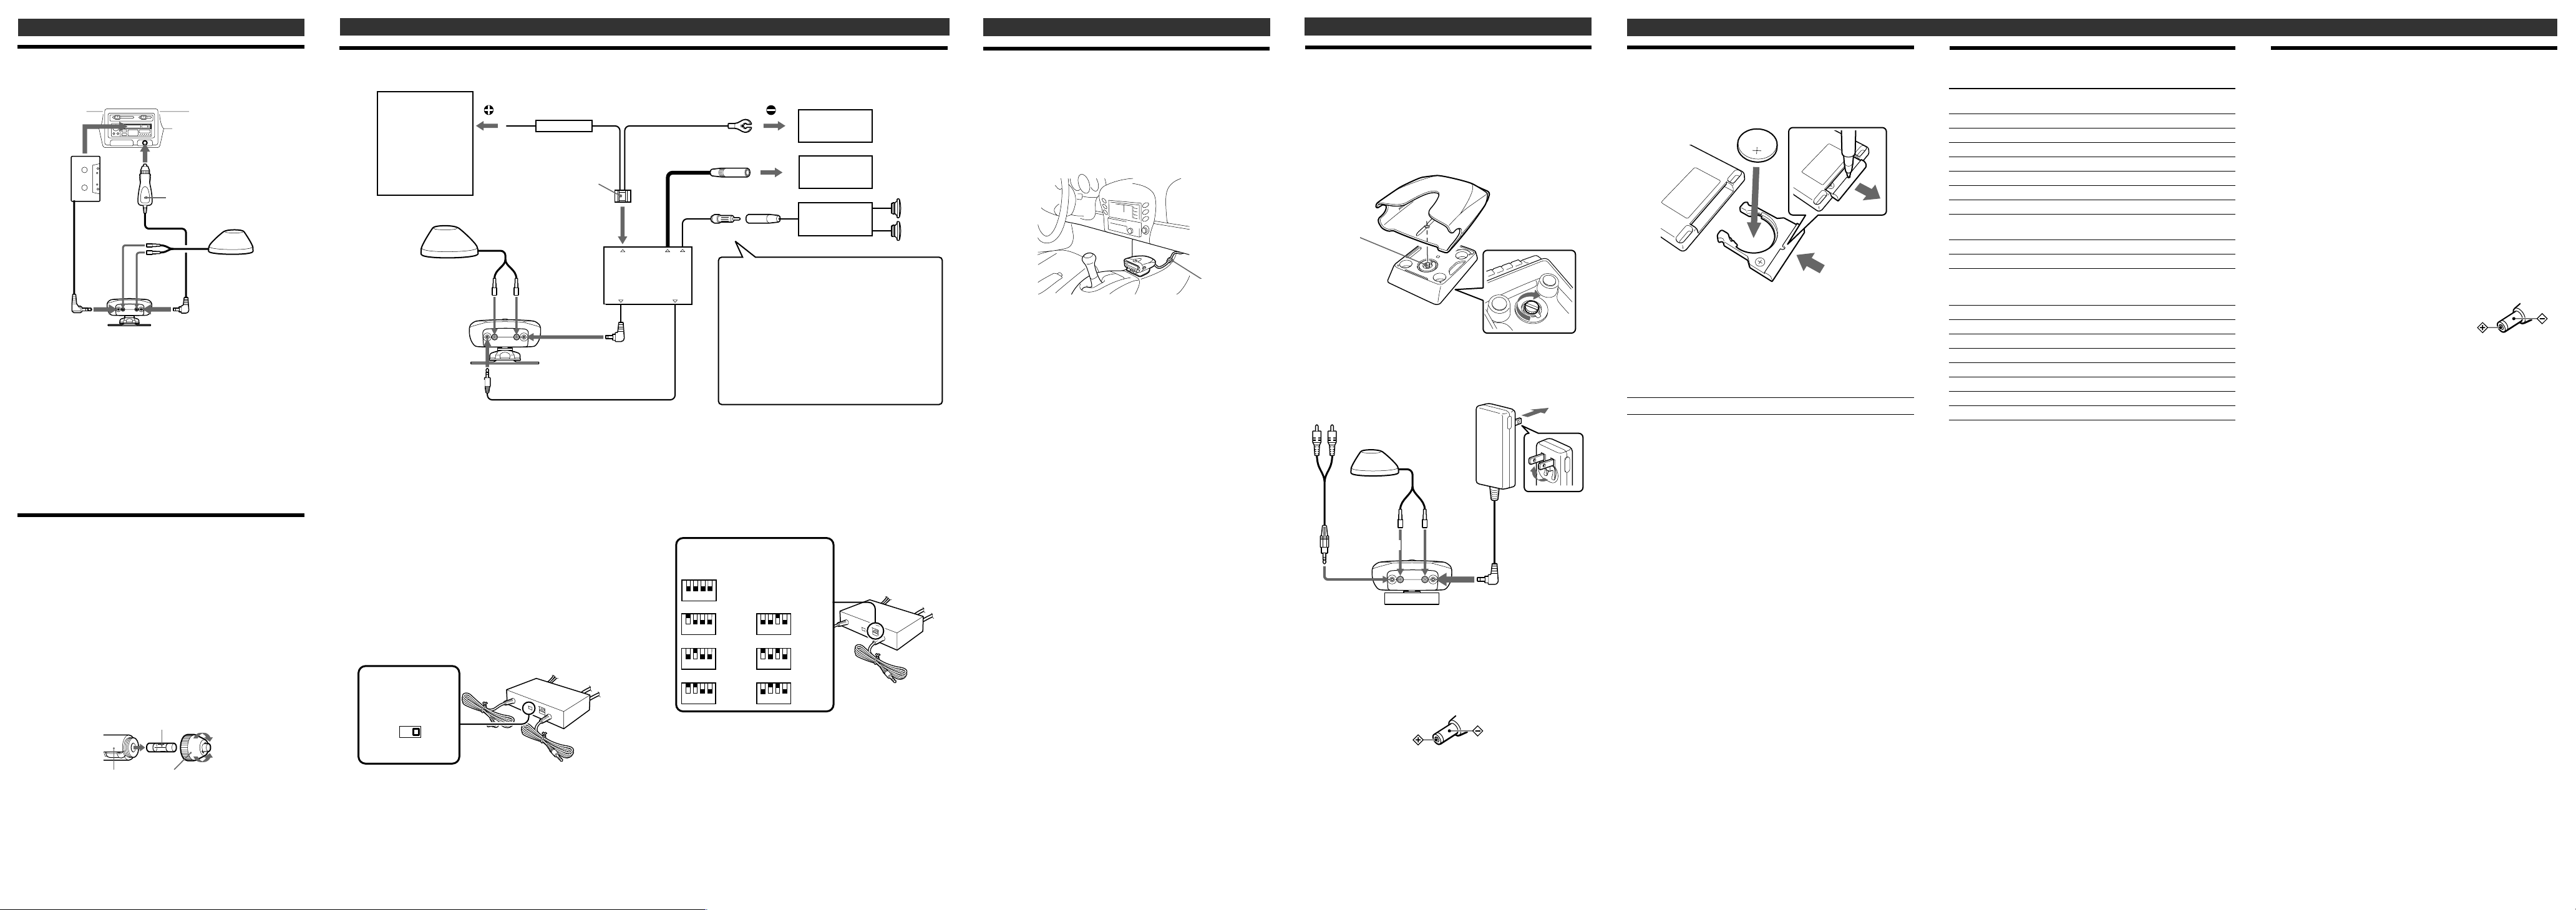
Connecting the Unit to the
Cigarette Lighter Socket
Car cassette deck
to a cassette
insertion slot
to a cigarette lighter
Car
connecting
pack
to the
ANT SAT
to the
LINE OUT
jack
When the electric power is supplied to the car battery cord, the power
lamp lights up.
Notes
• Route the cords so that they will not interfere with your driving.
• Take care not to accidentally insert a portion of the car connecting pack
cord into the cassette insertion slot. This may cause the cord to break or
damage the car cassette deck.
• To disconnect the cord from your audio equipment, pull it out by
grasping the plug. Never pull it by the cord.
• If the inside of the cigarette lighter socket is dirty with cigarette ash, the
cigarette lighter plug may be heated due to abnormal contact. Be sure to
clean the inside of the cigarette lighter socket before inserting the plug.
• After using the receiver, eject the car connecting pack from the car
cassette deck and disconnect the car battery cord from the receiver and
the cigarette lighter socket.
• Do not use the receiver when the car’s engine is not running.
jack
Cradle
socket
Power lamp
Car battery cord
SAT
to the
ANT TER
jack
XM antenna
(sold separately
for DRN-XM01C2)
to the DC IN 6V
jack
Using the Car Connecting Pack
1 Turn down the volume of the car cassette deck.
2 Set the tape selector to the normal (TYPE I) position, and the
DOLBY NR, REPEAT, or BLANK SKIP switch to the OFF
position if such are equipped.
3 Insert the car connecting pack into the cassette insertion slot.
4 Start playback on the car cassette deck.
5 Adjust the volume.
If no sound is heard or the car connecting pack is removed, change the
playback direction on the car cassette deck.
To Remove the Car Connecting Pack
Press the Z (eject) button of the car cassette deck.
Note
You cannot use this car connecting pack with certain car cassette decks.
Fuse Replacement
Cigarette lighter plug
1 Pull the cigarette lighter plug out of the cigarette lighter socket.
2 Detach the end of the plug by turning it counterclockwise.
3 Replace the fuse with a new one.
4 Reattach the end of the plug by turning it clockwise firmly.
Notes
• When replacing the fuse, be sure to use one with the correct amperage,
as stated on the fuse case. (1 A, 125 V, 20 mm)
• Do not use a piece of wire instead of a fuse.
• If the replaced fuse blows again, consult your dealer.
Fuse (1 A)
End of the plug
to tighten
to remove
Connecting the Unit to your Car with a RF Modulator
To the +12 V power
terminal which is
powered when the
ignition key switch
is in the accessory
position.
Be sure to connect
the black earth lead
to it first.
XM antenna
(sold separately)
to the ANT SAT jack
Cradle
to the LINE OUT jack
Red
SAT
Fuse (1 A)
Power connecting cord
(Supplied)
to the ANT TER jack
to the DC IN 6V jack
POWER ANT
DC OUT AUDIO
Fuse Replacement
If the fuse blows, check the power connection and replace the fuse. If the
fuse blows again after replacement, there may be an internal malfunction.
Warning
Use a fuse with the specified amperage rating. Use of a higher amperage
fuse may cause serious damage.
Setting the POWER SELECT Switch
This RF modulator supplies power to the receiver and detects the on/off
state by monitoring the load of the power. When the receiver is turned on,
the RF modulator automatically cuts off the antenna line and directly
outputs the sound of the receiver to the car audio with the selected FM
frequency. This prevents the sound from disturbing the FM broadcast
signal. When the receiver is turned off, the antenna line is connected to
the car audio. Besides, you can set the RF modulator to always cut off the
antenna line and output the XM radio sound to the car audio, in this case,
you cannot hear the normal FM broadcast.
POWER SEL (select)
switch
POWER
SEL
ON 2 1
1 : Normal use (detecting more than 100 mA load)
2 : Not used (detecting more than 50 mA load)
ON : Not used (cutting off the antenna line)
RF Modulator
Changing the Transmitting Frequency
This unit changes the signal of the XM satellite radio broadcast into an
FM frequency and outputs the sound through an FM tuner. There may be
interference noise while playing the receiver, when the frequency selected
for the receiver is used for transmitting the actual FM broadcast. In such a
case, change the transmitting frequency on the unit. The factory-set is 87.9
MHz.
Note
When you change the frequency on the unit, be sure to tune your FM
tuner to the newly selected one.
Black
Antenna connecter
Connect it as follows when a diversity antenna is
used for the car audio.
TOYOTA
Connect to the bigger antenna connector.
NISSAN
The optional antenna converter cord XA-82 is
required. The shape of the antenna terminal is
different depending on the model of the car.
Others
The optional antenna converter cord may be
required. Check with the retailer.
Frequency select switch
F.SEL
1234
87.7 MHz
(Default)
1234
87.9 MHz
1234
88.1 MHz
1234
88.3 MHz
1234
1234
1234
to a metal point
on the car
88.5 MHz
88.7 MHz
88.9 MHz
to the car
antenna
Car audio
Speaker
system
When the Installation and
Connections Have Been Made
Securing the Cord
After installing and connecting the unit, run cord so as not to interfere
with the operation of the vehicle.
Run and fix the cord on the passenger side of the center console with the
supplied cord clamp.
Cord clamp*
* • Clean the mounting surface before installing the cord clamp.
• Leave the installed cord clamp for 24 hours before installing the
cord. Otherwise, the cord clamp may come off because of weak
attachment.
Note
Make sure the cord does not get caught in the sliding rails under the front
seats or the front doorsills as this may cause the cord to be severed.
Using the Unit on House Current
Use the AC power adaptor and the audio cord supplied with
DRN-XM01H2/XM01HK2.
Note
• To disconnect the cord from your audio equipment, pull it out by
grasping the plug. Never pull it by the cord.
Attaching the Home Stand
Tighten the screw at the
To the stand
receptacle at
the bottom of
the cradle
Connecting the Unit
to the input jacks
of the audio
equipment
XM antenna
Audio cord
SAT
to the ANT
SAT jack
to the LINE
OUT jack
Note on the DC plug of the AC power adaptor
This AC power adaptor uses a unified polarity type plug (JEITA
standard). Damage will occur if it is connected to a DC power input jack
without the ! polarity symbol or with another symbol. If the jack of
your audio equipment does not match the AC power adaptor, consult
your dealer.
Symbol of unified polarity type jack
to the ANT
TER jack
Placement of the Home Antenna
The satellite is located in the south sky. Place the antenna as follows for
proper reception:
– Outside the house
– Place the antenna in an area where there are no obstacles within 20 - 60
degrees facing the southern sky.
– On a flat surface so that it is parallel to the ground.
When you place it indoors, or if there is a building or tree in the direction
of the satellite, the antenna may not be able to receive the radio wave.
Depending on where you live, you may be able to receive radio waves
that are retransmitted by ground repeaters.
bottom of the home stand
to secure the cradle.
to an AC outlet
AC power adaptor
to the DC IN 6V jack
Replacing the Lithium Battery
into the Remote Commander
Replace the battery when the buttons on the remote commander do not
work. Remove the old battery and insert a new one.
2
1
3
1 Insert a long and thin object into the hole, then pull out the
lithium battery holder.
2 Place the lithium battery with the positive (+) side facing up.
3 Insert the battery holder into the remote commander until it
clicks.
Battery life (Approx.)
Sony lithium battery CR2025 1 year
Notes on lithium battery
• Keep the lithium battery out of reach of children. Should the battery be
swallowed, immediately consult a doctor.
• Wipe the battery with a dry cloth to assure good contact.
• Be sure to install the battery in the correct polarity position.
• Do not hold the battery with metallic tweezers, as doing so may cause a
short-circuit.
• Do not break up the battery or throw it into a fire, which might cause it
to explode.
Carefully dispose of the used battery.
Note
When the unit is not to be used for a long period of time, remove the
battery to avoid damage from battery leakage and corrosion.
Specifications
Accessories supplied
DRN- DRN- DRN- DRN- DRN-
XM01C2 XM01R2 XM01H2 XM01CK2 XM01HK2
Remote commander
XM antenna — — (1) (1) (1)
Car cradle (1) (1) — (1) —
Car stand (1) (1) — (1) —
Screw (5) (5) — (5) —
Cover (1) (1) — (1) —
Ferrite core (2) (6) (2) (2) (2)
Water proof
cushion
Cable guide — — — (3) —
Cord clamp — — — (4) —
Cushion with
the double-sided — — — (1) —
adhesive tape
Seal — — — (1) —
Car battery cord (1) — — (1) —
Car connecting pack (1) — — (1) —
RF modulator — (1) — — —
Home cradle — — (1) — (1)
Home stand — — (1) — (1)
Audio cord — — (1) — (1)
AC power adaptor — — (1) — (1)
( ): supplied (The parenthesized numbers indicate the quantity of each
accessory.)
—: not supplied.
Optional accessories
AC power adaptor AC-E60A
Car battery cord DCC-E260
Car connecting pack CPA-7
Design and specifications are subject to change without notice.
(1) (1) (1) (1) (1)
——— (1)—
Precautions
• Do not install the unit where:
– the ambient temperature exceeds 55°C (131°F).
– it will be exposed to direct sunlight or hot air from a heater.
– it will be exposed to rain, water, or high humidity.
– it will be exposed to a lot of dust.
– it will be subject to excessive vibration.
– hinder normal driving activities.
– jeopardize the passengers.
• Be sure to turn off the power of each component before making the
connections.
For DRN-XM01C2/XM01CK2 Customers
Be sure to check that the voltage of the equipment connected to this unit
is correct. Incorrect voltage may cause the equipment to malfunction.
• This unit is designed for negative ground 12 or 24 V DC operation only.
• Avoid high temperatures, such as direct sunlight or hot air from the
heater.
• You cannot use this unit with some car cassette deck.
• Used with some car cassette decks, the car connecting pack may rattle.
This is not a malfunction of the car connecting pack.
Note on the DC plug of the car battery cord
This car battery cord uses a unified polarity type
plug (JEITA standard). Damage will occur if it is
connected to a DC power input jack without the
! polarity symbol or with another symbol.
For DRN-XM01R2 Customers
• This unit is designed for negative ground 12 V DC operation only.
• Before making connections, disconnect the earth terminal of the car
battery to avoid short circuits.
• Connect the red power input leads only after all other leads have been
connected.
• Be sure to connect the red power input lead to the positive 12 V
power terminal which is powered when the ignition switch is in the
accessory position.
• Run all earth wires to a common earth point.
For DRN-XM01H2/XM01HK2 Customers
On installing the AC power adaptor
Do not place the AC power adaptor in a location where it is subject to:
– extreme high temperature (E.g., in a car with its windows closed)
– direct sunlight or near a heat source
– mechanical vibration or shock
– a magnetic field (E.g., near a magnet, speaker, or TV)
– excessive dust.
On operating the AC power adaptor
• Make sure the current and voltage of the equipment matches that of the
outlet.
• For safety, if the input current is too high, the unit will automatically
shut down.
• Do not use the unit near a TV set. If you place equipment too close to
the unit while they are being used, you may experience some
interference.
• To prevent damage, be careful not to drop or otherwise cause a
mechanical shock to the unit.
• After using, disconnect the unit from the wall outlet and the equipment.
• Disconnect the unit from the AC outlet by pulling on the plug. Do not
pull on the cord.
• To avoid short-circuiting, do not allow the terminals of the unit or
connector to touch any metal object.
• Use only the recommended AC power adaptor.
For All Customers
On cleaning
• Clean the unit with a soft, dry cloth. If the unit is very dirty, wipe it off
with a soft cloth lightly moistened with a mild detergent solution, and
then wipe with a soft dry cloth.
• Do not use any type of solvent such as alcohol, thinner, or benzine as it
may damage the finish of the cabinet.
• If you use any chemical cleaner, observe the instructions provided with
the product.
• If the cabinet of the unit is splashed with any type of solvent such as
insecticide, or remains in contact for a long time with rubber or vinyl,
 Loading...